

Page 1

PaperCom
Quick Selector
User's Guide
(DOC No.: 250-0175-E Rev. A)
Avision Inc.
Page 2

Trademarks
Microsoft, Windows and Windows NT are registered trademarks of Microsoft Corporation in the United
States and/or other countries.
IBM, PC, AT, XT are registered trademarks of International Business Machines Corp.
Other brands and product names herein are trademarks or registered trademarks of their respective
holders.
Copyright
All rights reserved. No part of this publication may be reproduced, transmitted, transcribed, stored in a
retrieval system, or translated into any language or computer language, in any form or by any means,
electronic, mechanical, magnetic, optical, chemical, User's Guide, or otherwise, without the prior written
permission of Avision.
Material scanned by this product may be protected by governmental laws and other regulations, such as
copyright laws, the customer is solely responsible for complying with all such laws and regulations.
ii
Page 3

TTABLE OF ABLE OF CCONTENTSONTENTS
IINTRODUCING NTRODUCING QQUICK UICK SSELECTORELECTOR......................................................................................................................................................11
IINSTALLING THE NSTALLING THE SSOFTWAREOFTWARE ..................................................................................................................................................................33
CONFIGURING YOUR SYSTEM............................................................................................................................3
INSTALLING QUICK SELECTOR...........................................................................................................................4
UNINSTALLING QUICK SELECTOR......................................................................................................................5
QQUICK UICK TT OUR TO OUR TO QQUICK UICK SSELECTORELECTOR ................................................................ ................................................................ ..............66
STARTING QUICK SELECTOR.............................................................................................................................6
COMPONENTS OF QUICK SELECTOR MAIN WINDOW...........................................................................................7
HOW TO USE QUICK SELECTOR.........................................................................................................................8
EXAMPLE I : SCANNING TO IMAGE EDITOR(BASIC)..................................................................................8
EXAMPLE II : SCANNING TO IMAGE EDITOR (ADVANCED)......................................................................11
EXAMPLE III : SCANNING TO OCR........................................................................................................13
EXAMPLE IV : TURNING YOUR SCANNER TO A FAX MACHINE................................................................15
THREE WAYS TO USE QUICK SELECTOR FEATURES........................................................................................17
UU SING THE SING THE PPUSH BUTTONSUSH BUTTONS ................................................................................................................................................................1818
USING THE PREVIEW BUTTON..........................................................................................................................19
USING THE GO BUTTON...................................................................................................................................20
USING THE SELECT BUTTON............................................................................................................................21
CC USTOMIZING USTOMIZING QQUICK UICK SSELECTORELECTOR ................................................................ ................................................................ ..................2222
BRINGING UP THE SETUP DIALOG....................................................................................................................22
CUSTOMIZING QUICK SELECTOR.....................................................................................................................22
CUSTOMIZING YOUR APPLICATION SETTING..........................................................................................23
CUSTOMIZING YOUR SCANNER SETTING...............................................................................................23
iii
Page 4

UU SING SING QQUICK UICK SSELECTORELECTOR........................................................................................................................................................................2828
FINDING YOUR FILE.........................................................................................................................................28
FILING YOUR IMAGE TO DOCUMENT MANAGER................................................................................................30
EDITING YOUR SCANNED IMAGE......................................................................................................................32
E-MAILING YOUR SCANNED IMAGE...................................................................................................................34
PRINTING YOUR SCANNED IMAGE.....................................................................................................................36
FAXING YOUR SCANNED IMAGE.......................................................................................................................37
CONVERTING YOUR IMAGE TO TEXT ................................................................................................................38
PASTING YOUR IMAGE TO WWW .....................................................................................................................40
VIEWING THE ON-LINE HELP............................................................................................................................41
EXITING QUICK SELECTOR..............................................................................................................................42
IINDEXNDEX ................................................................................................................................................................................................ ..............................4343
iv
Page 5

Quick Selector Introducing Quick Selector
Introducing Quick Selector
Welcome to the Quick Selector. Quick Selector, as the name suggests, is an easy-to-use
application that makes light work of tasks. With a single click or one push of the button,
Quick Selector immediately scans your image or text document and send it to a variety of
scanning applications such as Copy, Fax, E-mail, OCR(Optical Character Recognition),
Image-editing application, or even the Internet Browser.
Above all, Quick Selector provides an impressive live preview function. With the live
preview, you can get a quick preview image and select an area you want to send to your
scanning application.
The following sections provides a comprehensive explanation on how to use the Quick
Selector effectively. The information covers:
• Installing the software - Describe the step in installing the software.
• Quick Tour to Quick Selector - Introduce the main components of Quick Selector
window and provide several examples to quickly learn and take advantage of Quick
Selector.
• Using the Push button of your scanner - Describe what you should know to use the
buttons.
• Customizing the Quick Selector - Describe how to setup your scanner for your
scanning application.
• Using Quick Selector - Presents how to use the Quick Selector efficiently.
1
Page 6

Page 7

Quick Selector Installing Quick Selector
Installing the Software
Configuring your System
To operate Quick Selector well, it is recommended that your system meets the following
minimum requirements:
• IBM compatible PC 486, Pentium or later
• Microsoft Windows 95
• One printer port available (enhanced parallel port recommended)
• 20 Megabytes of available hard disk space for installation
• 8 Megabytes of RAM (16 Megabytes or higher recommended)
• A video graphics array (VGA) monitor
• A Microsoft Windows-compatible pointing device (For example, mouse);
• A CD-ROM drive
3
Page 8
Installing the Software Quick Selector
Quick Selector Controller icon
Installing Quick Selector
Installing Quick Selector is extremely easy. Just follow the procedure described below:
1. Start your Windows 95.
2. Place the CD into your CD-ROM drive. An installation menu will automatically pop
up.
3. If the installation menu does not automatically pop up, go to the Start button and
choose Run. Type d:\setup.exe (d: your CD-ROM drive in use) and follow the
instruction on the screen to complete the installation.
4. In the final Installation screen, choose Finish and then restart your Windows 95.
5. If the installation program has been installed successfully, a Quick Selector Controller
appears in the lower-right corner of the taskbar.
6. Install Fax/E-mail software and modem if you wish to use Quick Selector Fax/E-mail
features.
Note:
Once you have completed the software installation, the Scanner Driver, MGI
PhotoSuite(the image-editing application), PaperCom Document Manager,(the document
management application), and PaperCom Quick Selector(the scanning assistant
application) appears in your Programs groups.
4
Page 9
Quick Selector Installing Quick Selector
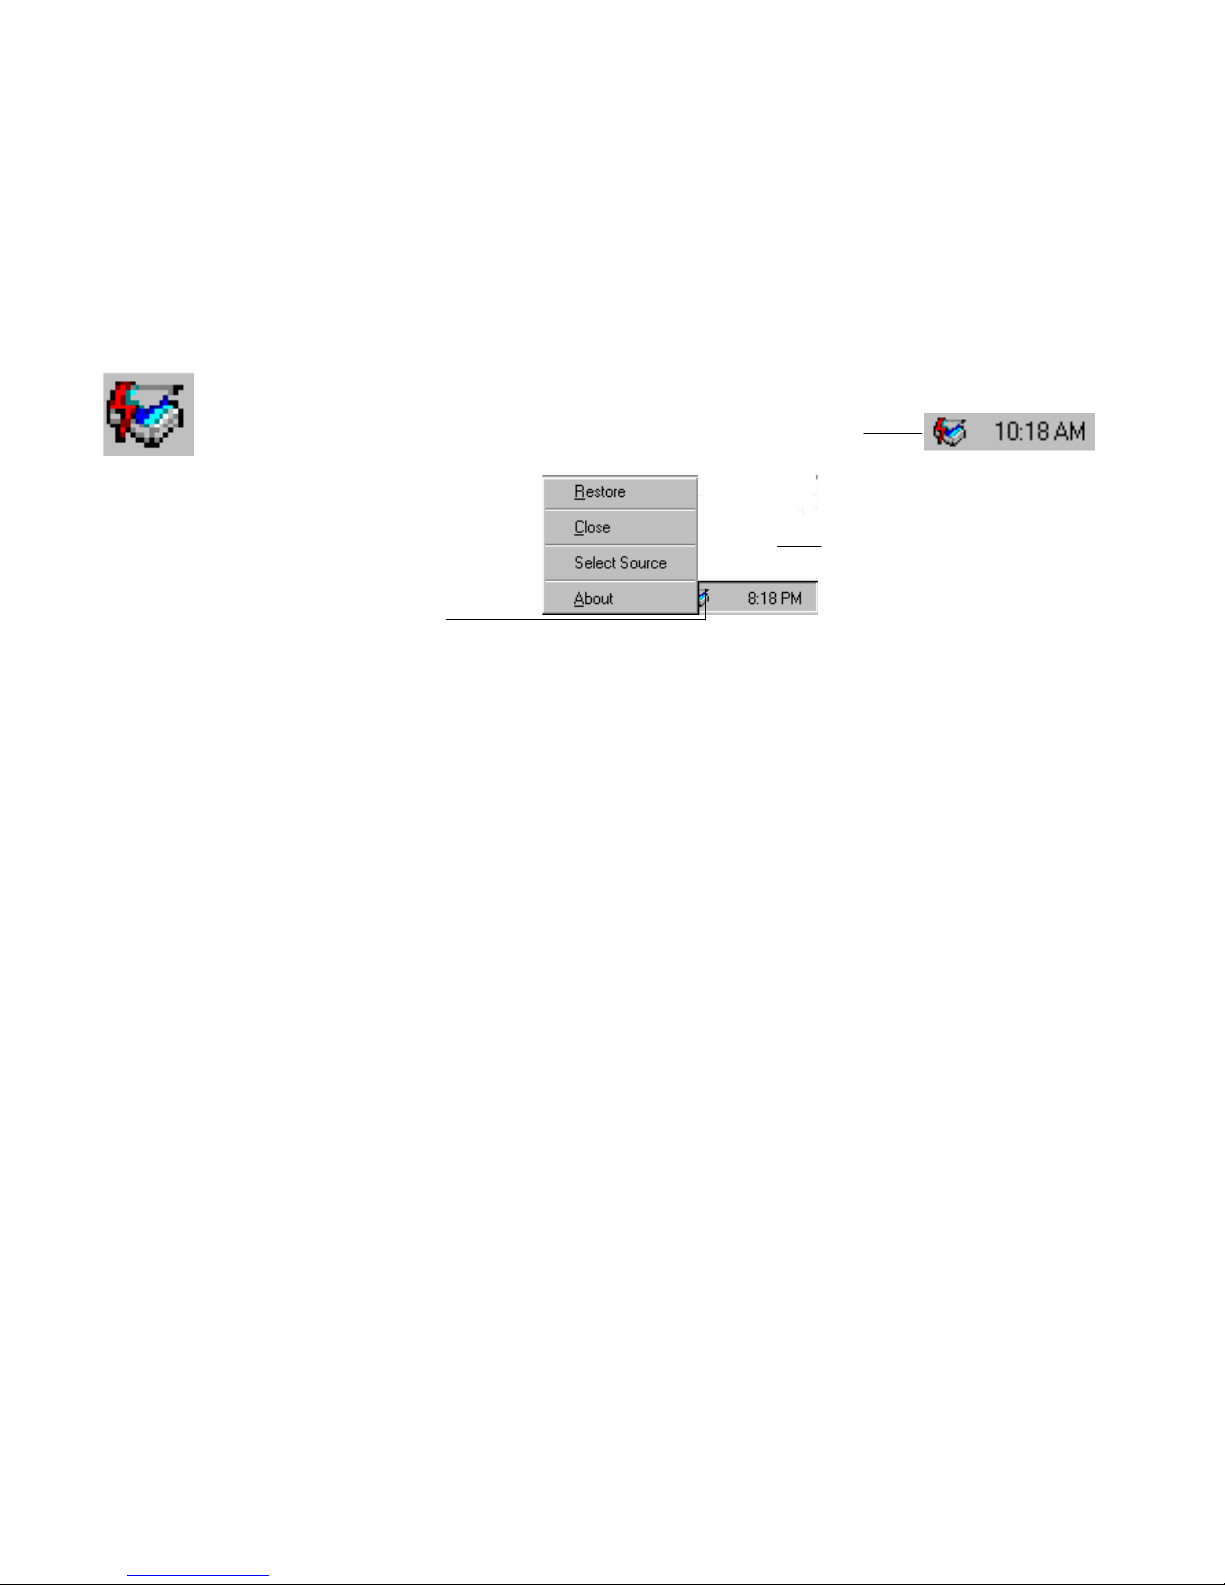
A pop-up menu
Uninstalling Quick Selector
To remove Quick Selector,
1. Click the Quick Selector Controller icon in the lower-right corner of the taskbar. A
pop-up menu is displayed.
Quick Selector
Controller icon
Quick Selector Controller icon
2. Choose Close. The Quick Selector Controller icon disappears.
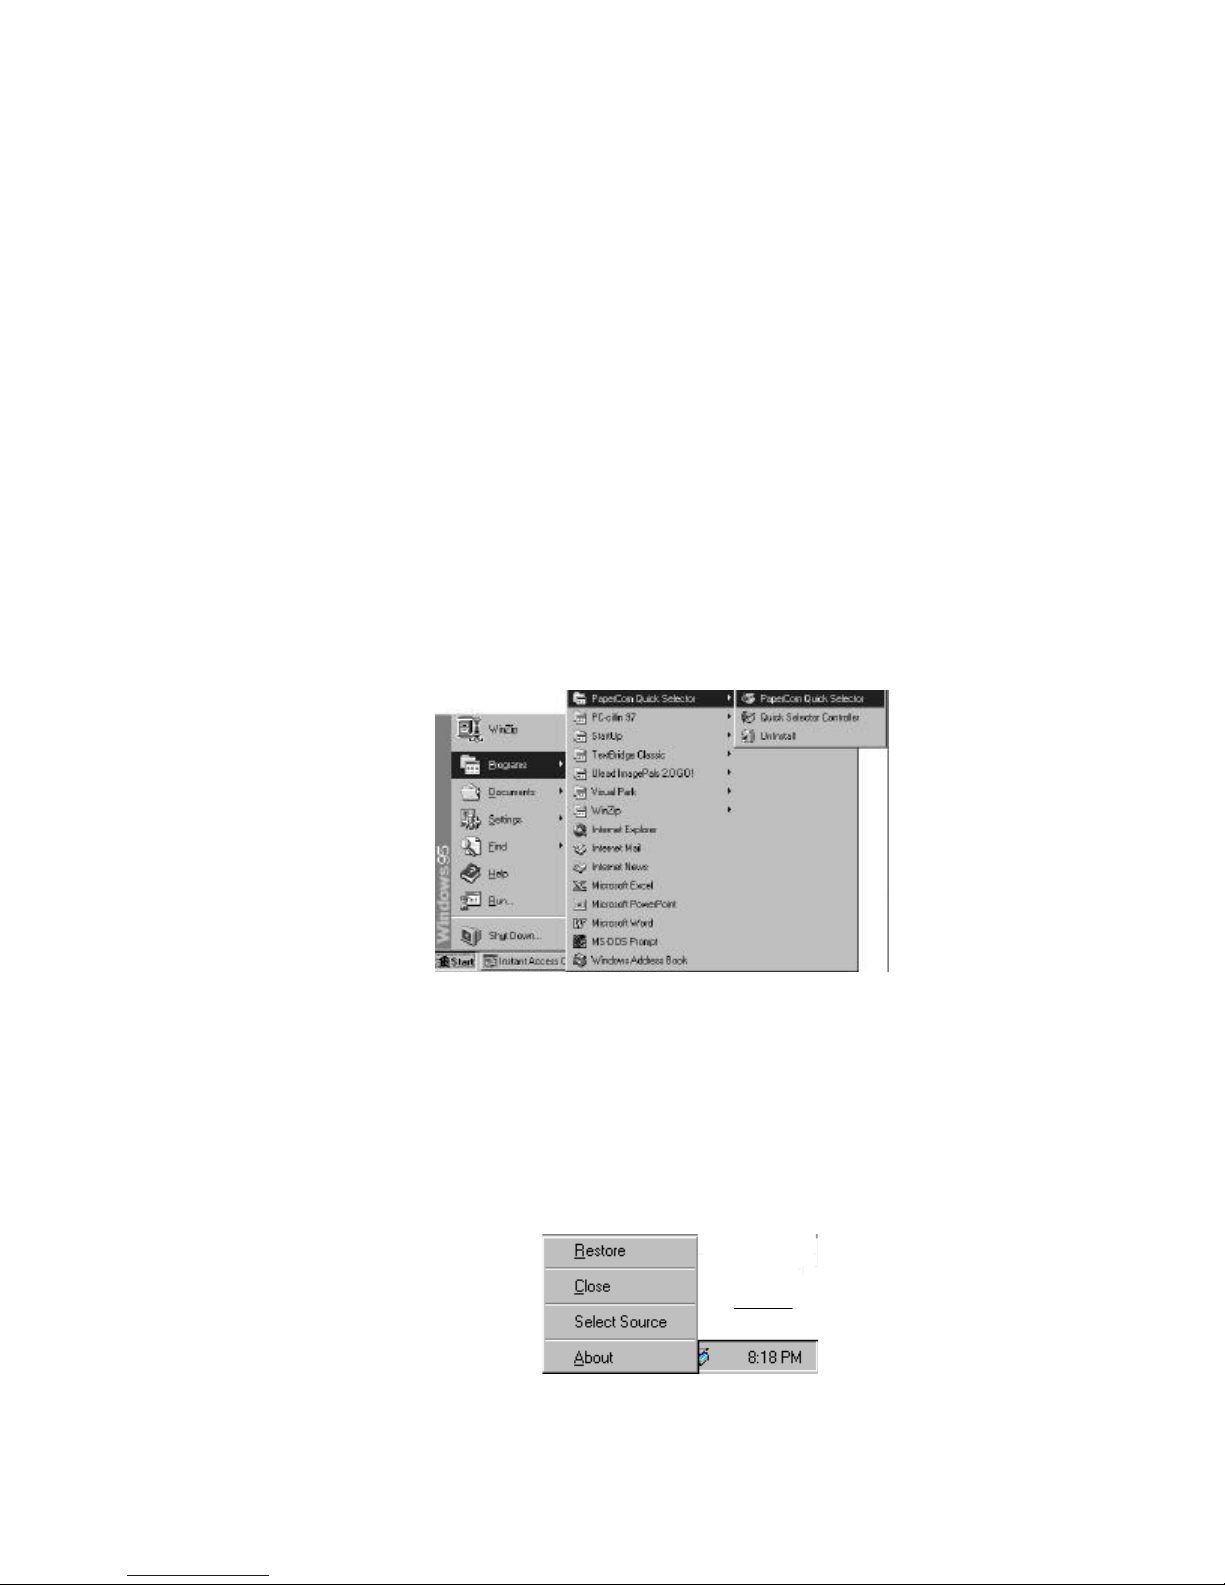
3. Go to the Start button. Choose Programs and Uninstall from the PaperCom Quick
Selector menu. The Quick Selector program is removed.
Note:
Quick Selector Controller responds to the signals from the Push button located at the
lower-right corner of your scanner. Whether you need to remove Quick Selector or start
Quick Selector, you need to first close or start Quick Selector Controller.
To close Quick Selector Controller,
1. Click Quick Selector Controller at the lower-right corner of the taskbar. A pop-up
menu appears.
2. Click Close on the pop-up menu. Quick Selector Controller disappears.
To start Quick Selector Controller,
1. Click the Start button. Choose Programs and PaperCom Quick Selector. Then
choose Quick Selector Controller.
2. The Quick Selector Controller appear in the lower-right corner of the task bar.
5
Page 10
Quick Tour to Quick Selector Quick Selector
Quick Tour to Quick Selector
If you are new to Quick Selector, this chapter helps you to learn the basic features of
Quick Selector in a short time. From several examples provided here, you can quickly
learn to use Quick Selector and have funs with it.
Starting Quick Selector
You can start Quick Selector by simply pressing any one button of the Push buttons at
the front of the scanner OR by choosing the Start button and Quick Selector from the
Programs menu OR by choosing Restore from the Quick Selector Controller pop-up
menu.
1. Press one of the three push button at the lower-right corner of the scanner or choose
Start>Programs>PaperCom Quick Selector>PaperCom Quick Selector.
2. The Quick Selector main window as shown in below appears on the screen.
OR
1. Click the Quick Selector Controller in the lower-right corner of the taskbar. A pop-up
menu appear.
2. Choose Restore from the pop-up menu to bring up the Quick Selector main window.
6
A pop-up menu
Page 11
Quick Selector Quick Tour to Quick Selector
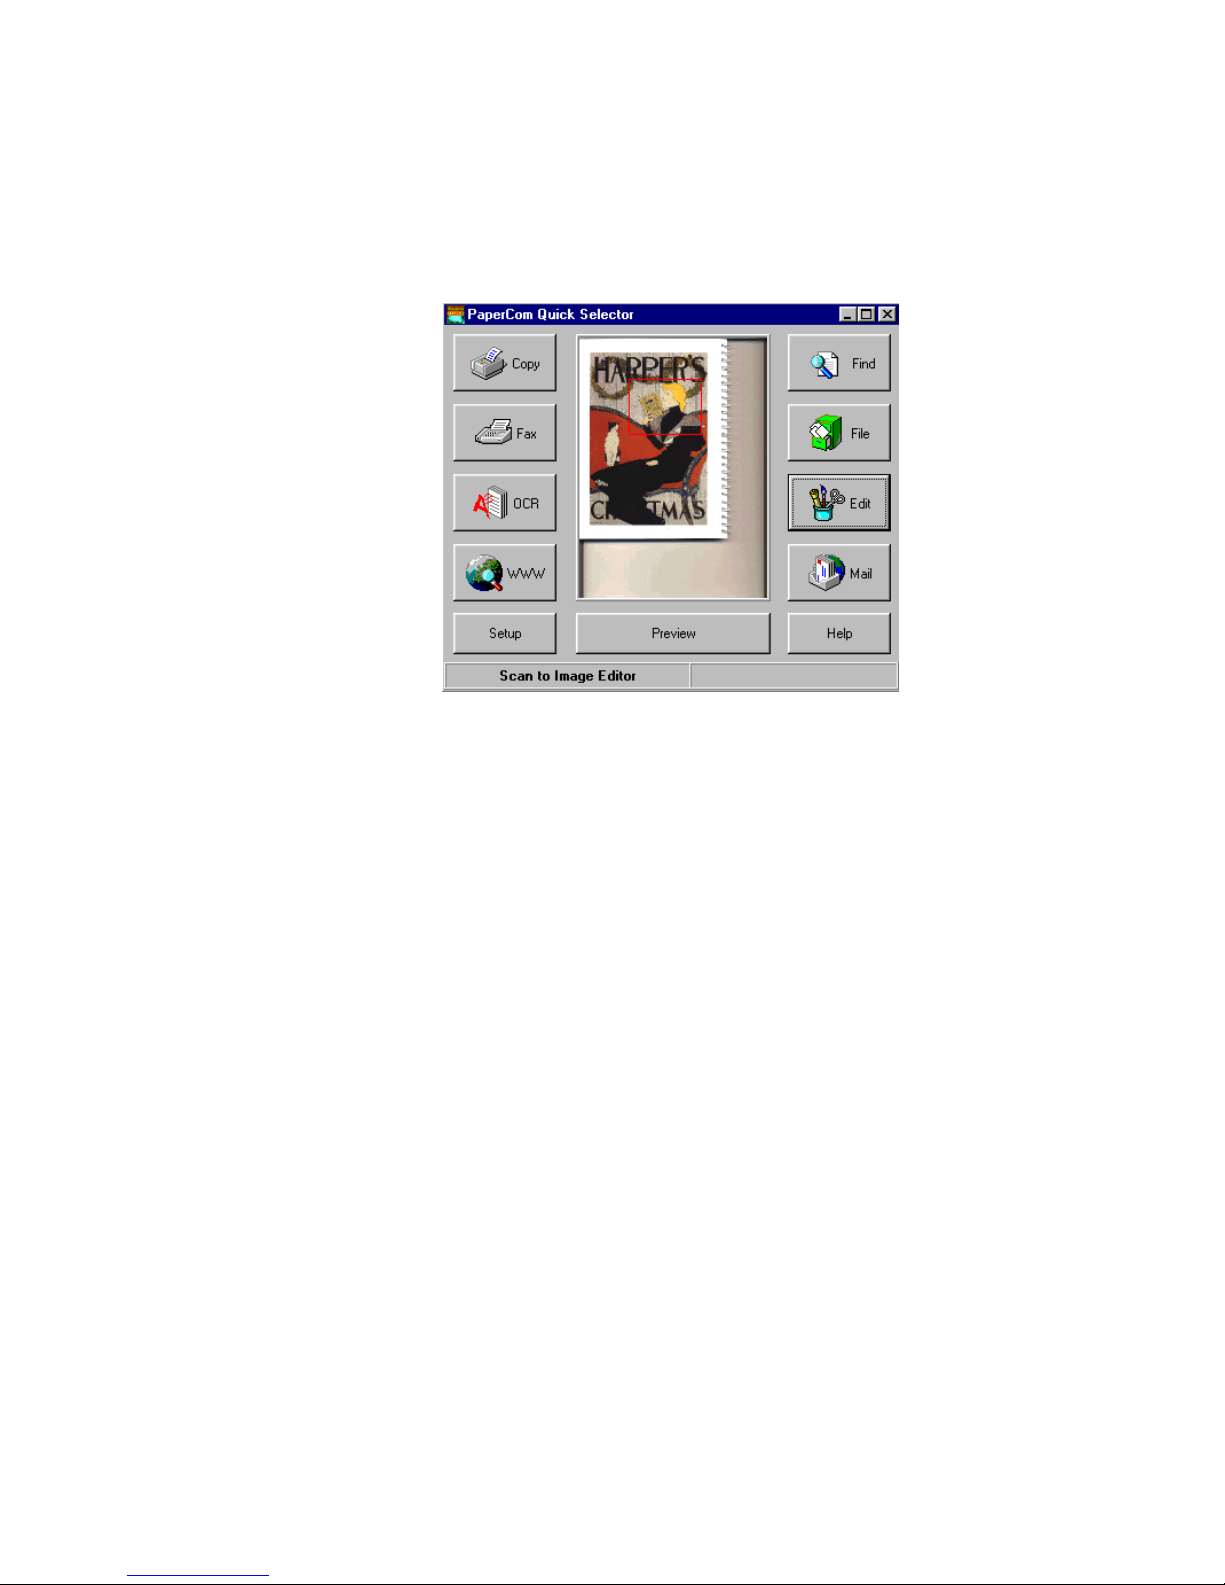
Components of Quick Selector main window
Quick Selector main window
Find: Search your file stored in Document Manager application.
File: Export your scanned image to Document Manager application.
Edit: Export your scanned image to Image Editor.
E-mail: Export your scanned image to E-mail.
Copy: Print your scanned image.
Fax: Export your scanned image to Fax.
OCR: Export your scanned image to OCR.
WWW: Export your scanned image to WWW.
7
Page 12

Quick Tour to Quick Selector Quick Selector
How to use Quick Selector
Quick Selector is easy to learn and use. The procedure to scan and export your image or
text document to various scanning applications is similar. The following examples show
you how to scan and export your image to one of the application (for example, MGI
PhotoSuite which came with the scanner.) You can also follow the same procedure if
you want to scan and export your image or document to other application(for example, if
you want to export to OCR, click OCR button in step 7.)
Example I : Scanning to Image Editor(Basic)
This example explains how to use the Quick Selector with the default setting.
1. Connect your scanner and PC correctly.(Refer to the user manual of the scanner)
2. Place your image on the document glass of your scanner.
3. Press one push button (either one of the three button located at the front of the
scanner.)
Or
Choose Start>Programs>PaperCom Quick Selector>PaperCom Quick Selector.
4. The Quick Selector main window appear.
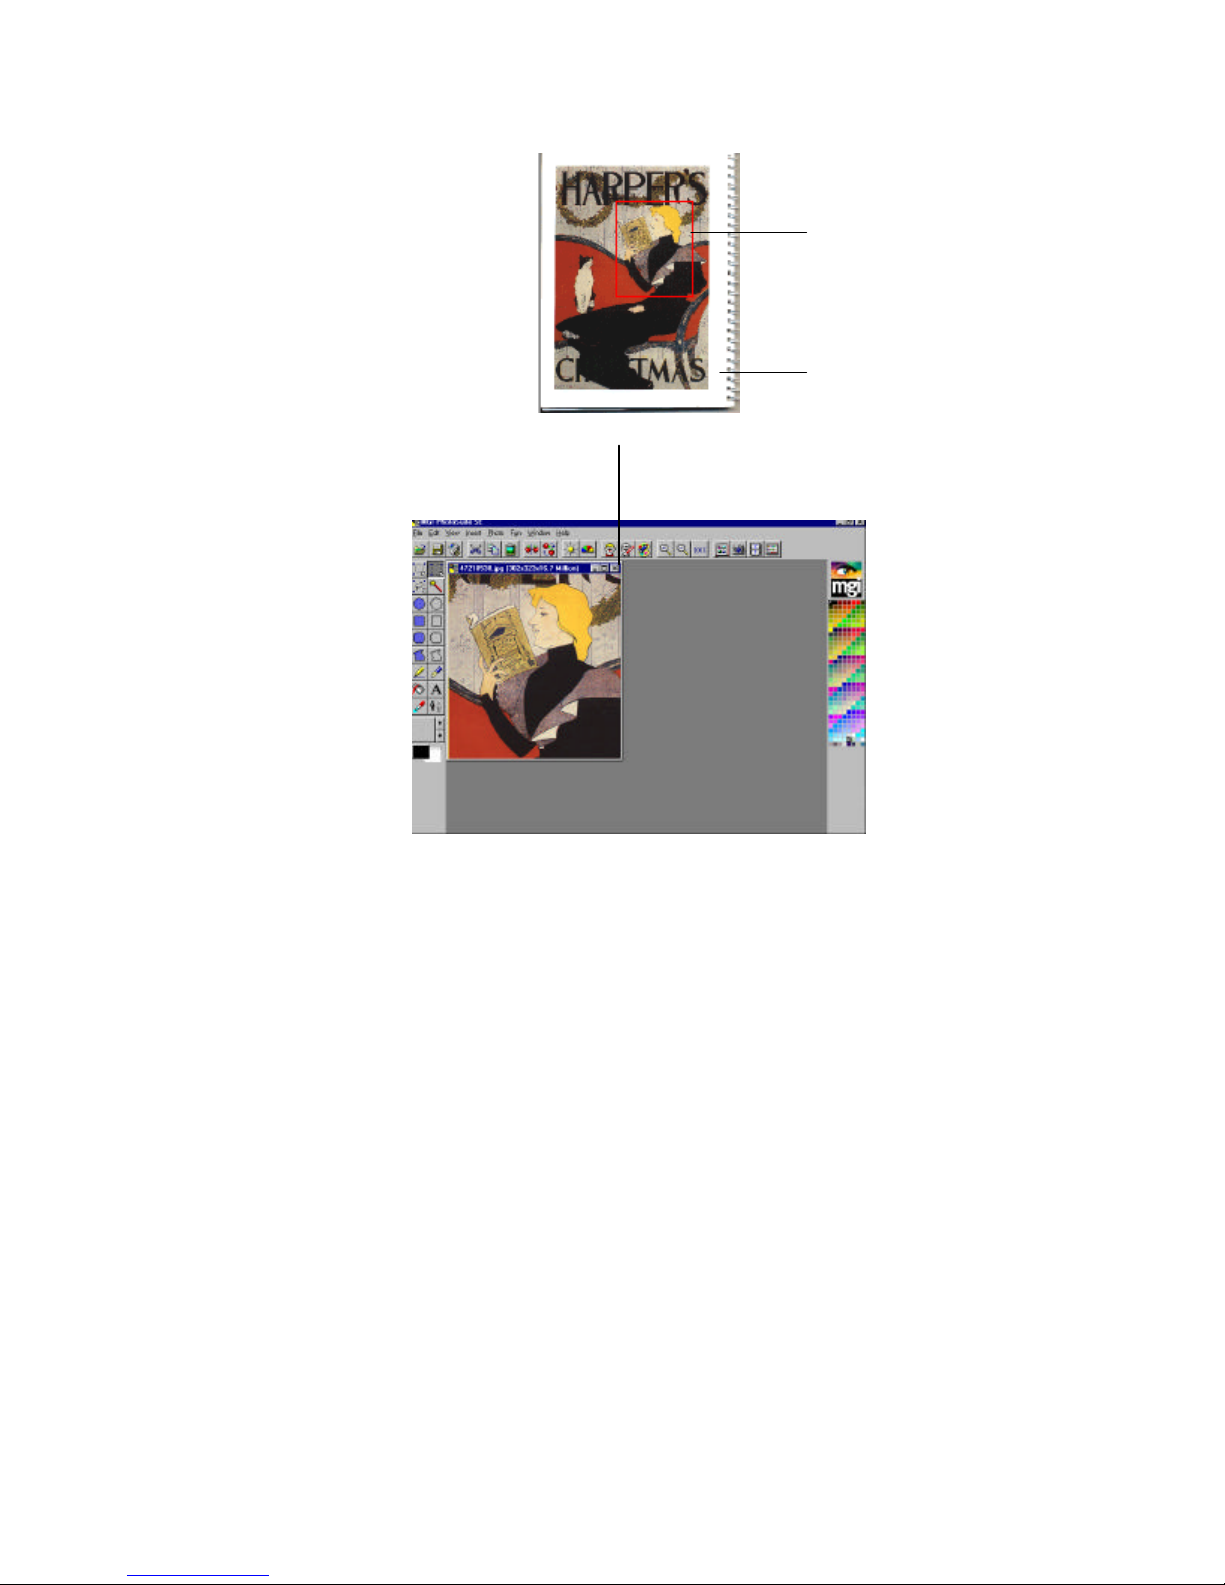
5. Click the Preview button. A quick preview image at a low resolution appears in
the center of the Quick Selector window.
6. Click anywhere on the preview image. Hold down your left mouse button and
drag diagonally. A red frame will drawn around the selected area.
7. Click Edit button.
8. The MGI PhotoSuite starts and the portion you selected in step 7 appears in
MGI PhotoSuite screen.
9. Enjoy editing with MGI PhotoSuite.
8
Page 13
Quick Selector Quick Tour to Quick Selector
The Preview Image
The Red Frame
The selected image area is displayed in
MGI PhotoSuite.
The MGI PhotoSuite window
Tip:
In Step 6, if you wish to cancel the selected area, just click anywhere outside the selected
area on the preview image again. The selected area (the red framed area) will disappear.
Then, repeat step 6 to create a new selected area.
9
Page 14
Quick Tour to Quick Selector Quick Selector
Note:
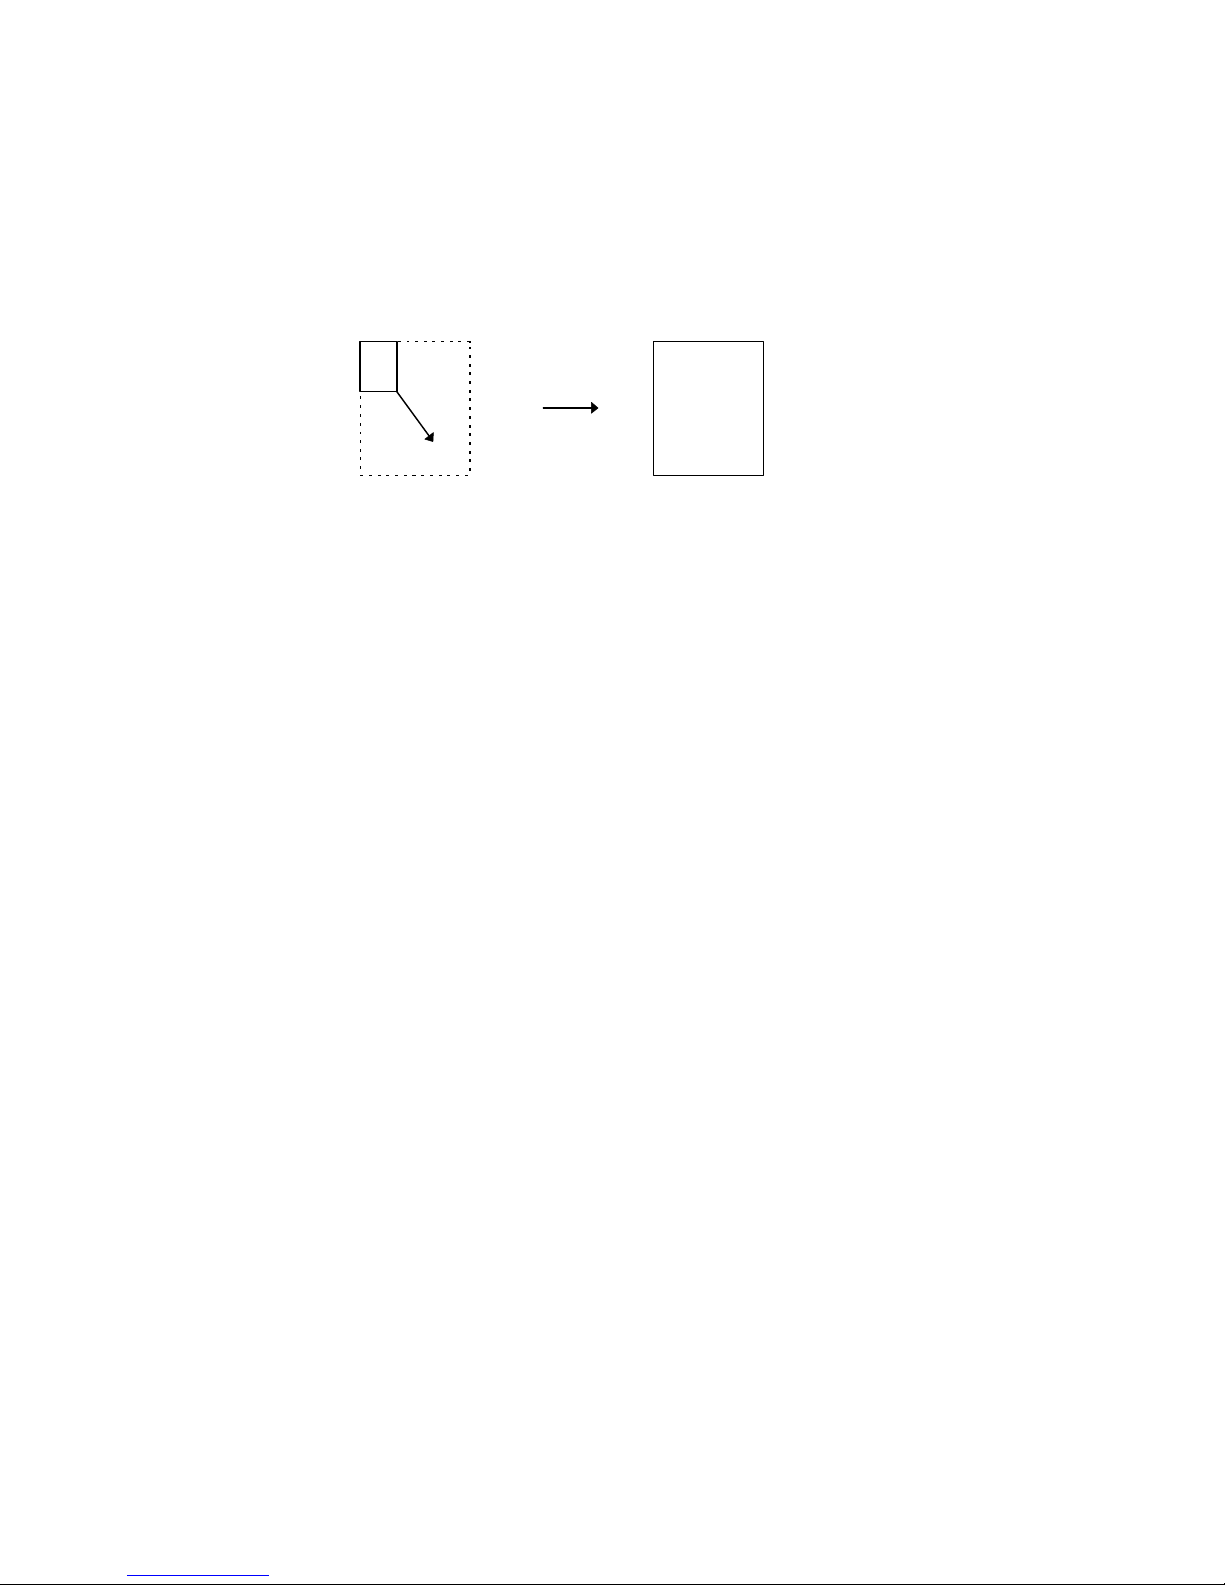
1. Refer to the following figure if you are not familiar with how to create a selection by
dragging your right mouse button:
2. The preceding procedure is a basic steps that follows the default setting of Quick
Selector. If you wish to change your scanner setting to achieve particular scanning
purpose(for example, when you want to change paper size, add another printer, or
another OCR application), please refer to the following Chapter - Customizing the
Quick Selector - to learn to change the scanner and application setting in the Setup
dialog box.
10
Page 15
Quick Selector Quick Tour to Quick Selector
Example II : Scanning to Image Editor (Advanced)
Unlike example I, the following example explains how to make your own scan by
customizing Quick Selector.
Let us take a color photo of 6 x 4 (inch). You want to edit the image with Quick
Selector image-editing application.
A. Choosing your Scanning Application
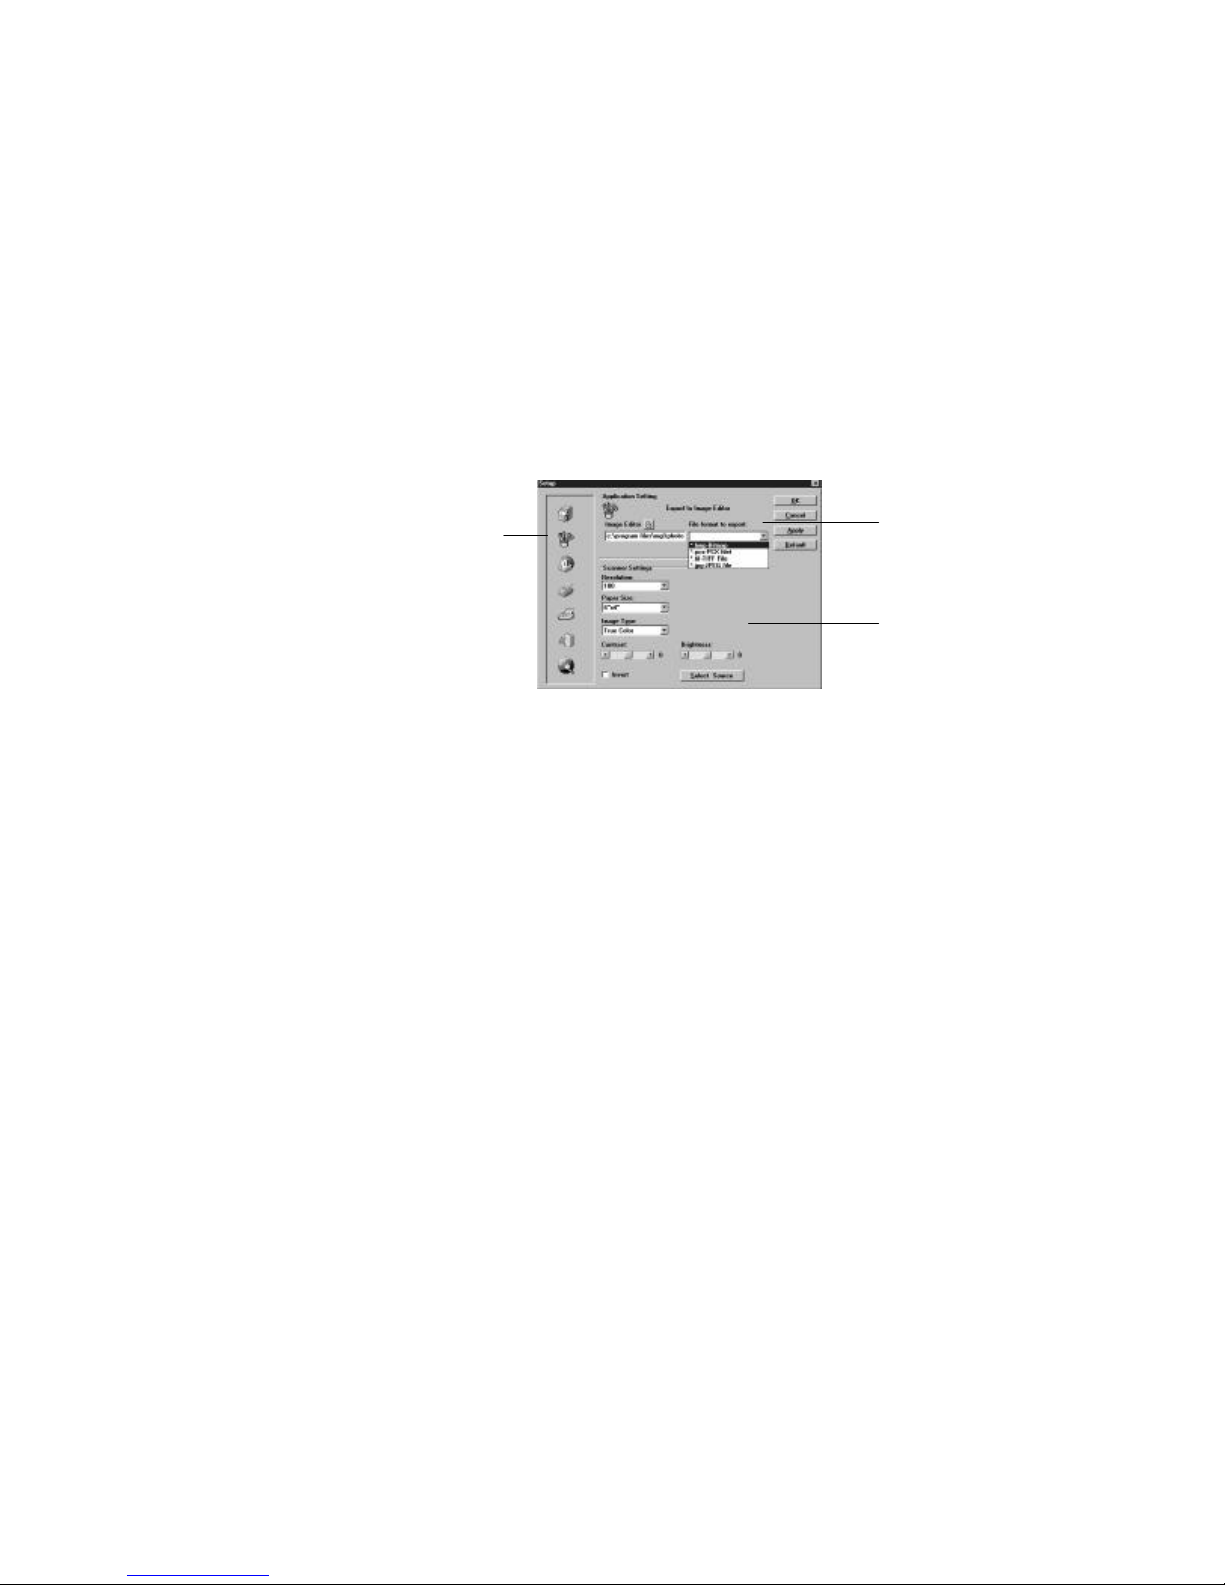
1. Click the Setup button to display the Setup dialog box.
Application Setting
Image Editor icon
Scanner Setting
2. Click Edit application button to display the image-editing application setting as well as
the scanner setting.
B. Choosing your Application Setting
3. Choose .pcx to be your file format.
C. Choosing your Scanner Setting
4. Choose 300 dpi from the Resolution drop-down list box.
5. Choose True Color from the Image Type drop-down list box.
6. Choose 6 x 4 (inch) from the Paper Size drop-down list box.
7. Choose OK to save the setting and return to Quick Selector main window.
D. Placing your Original
8. Place your photo down with the top right corner close to the Scanner Alignment
Mark.
11
Page 16

Quick Tour to Quick Selector Quick Selector
E. Enjoying Scan
10. Click the Edit application button.
Or
Use the Select button on the Scanner to select the Edit button and then press the Go
button.
Or
Select the Edit application button by pressing the Tab key and then pressing Enter.
11. The MGI PhotoSuite starts and your scanned image is displayed in MGI PhotoSuite
screen.
Tips:
Your recently selected application is saved when you leave Quick Selector main window
or turn off your computer. If you want to scan and link to the recently selected
application again, just press the Go button after turning on your computer and your
scanner. Quick Selector main window appears and for a while your image is scanned and
displayed in the recently selected application main window.
12
Page 17
Quick Selector Quick Tour to Quick Selector
Example III : Scanning to OCR
Follow these procedures to scan your text and perform an optical character recognition
(OCR) using Quick Selector.
Let us take a Portuguese text with an A5 size of paper as our example. We are using
Quick Selector OCR application. The recognized text will then be transferred to your
word processor for further editing.
A. Choosing your Scanning Application
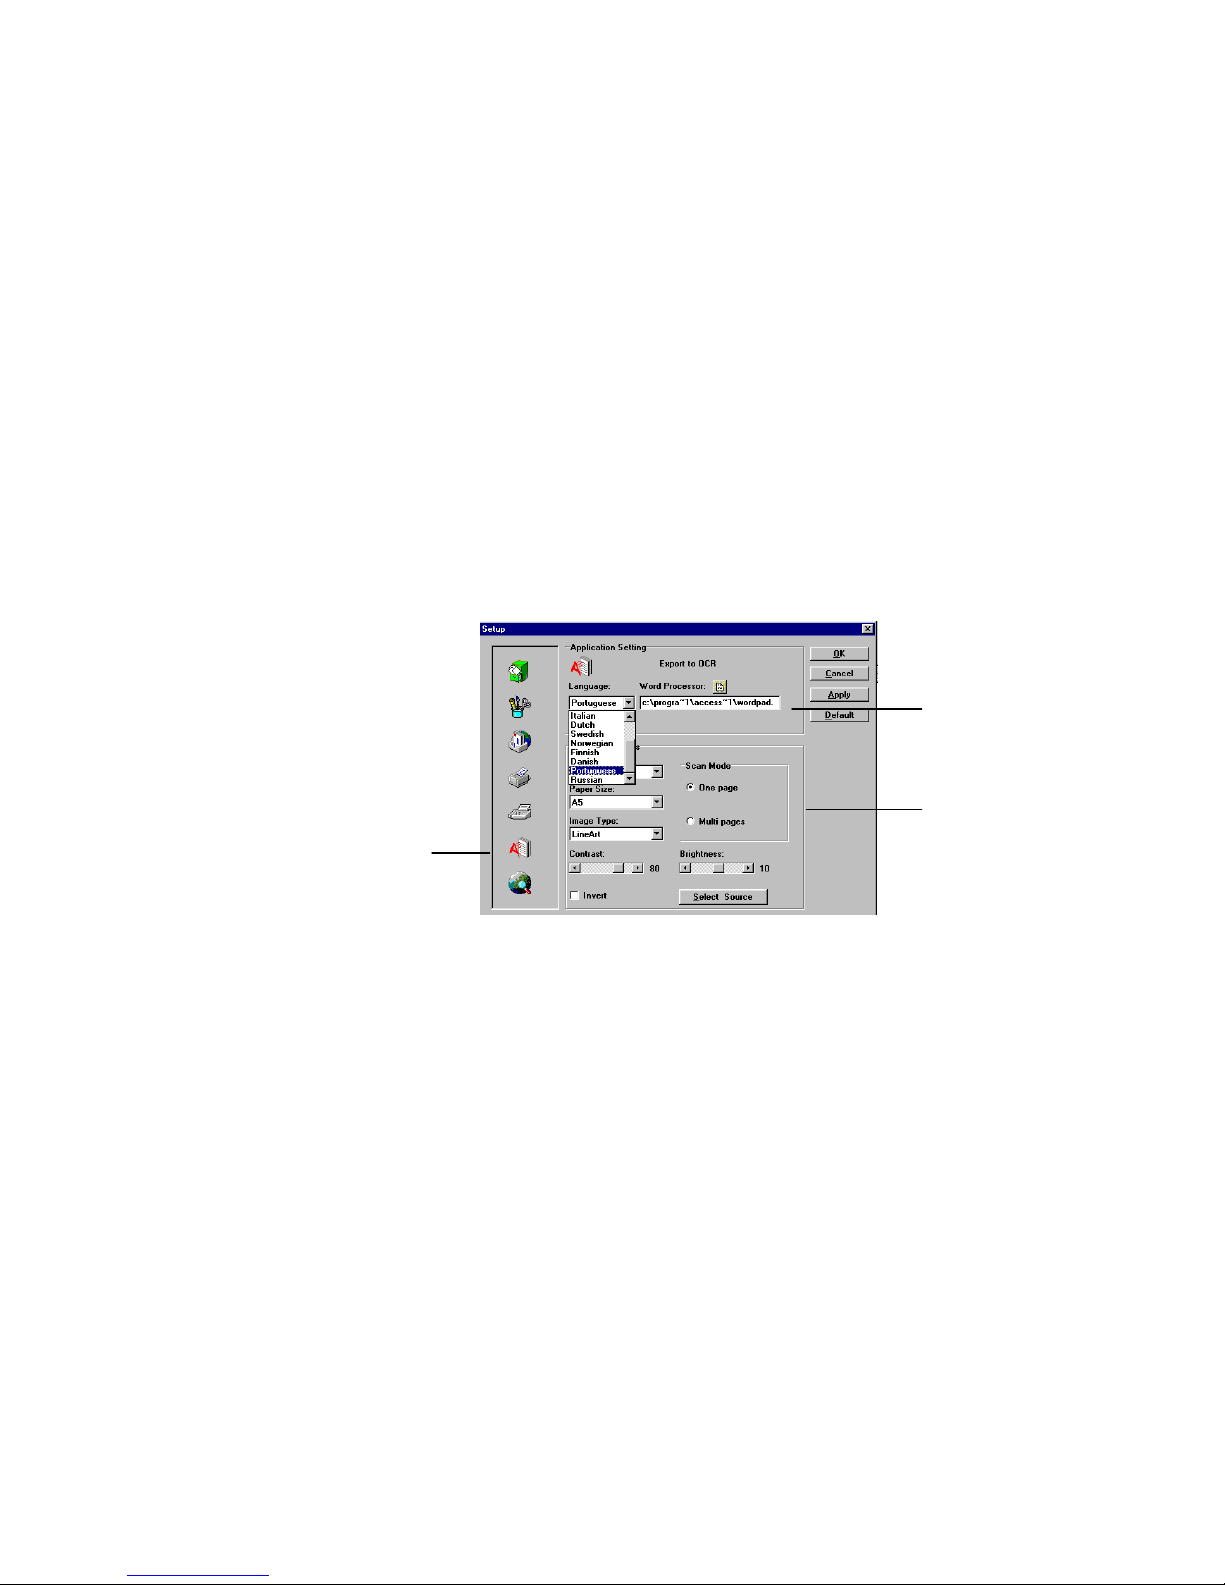
1. Click the Setup button to display the Setup dialog box.
Application Setting
Scanner Setting
The OCR button
2. Click OCR application button to display the OCR application setting as well as the
scanner setting.
B. Choosing your Application Setting
3. Choose Portuguese from the Language drop-down list box.
C. Choosing your Scanner Setting
4. Choose 300 dpi from the Resolution drop-down list box.
5. Choose Line Art from the Image Type drop-down list box.
6. Choose A5 from the Paper Size drop-down list box.
7. Choose Apply or OK to save the setting and return to Quick Selector main window.
13
Page 18

Quick Tour to Quick Selector Quick Selector
word processor.
D. Placing your Original
9. Place your text document down with the top right corner close to the Scanner
Alignment Mark.
E. Enjoying Scan
10. Click OCR application button
Or
Use the Select button on the scanner to select the OCR application button then press
the Go button.
Or
Select the OCR application button by pressing the Tab key and then pressing Enter.
11. Your text is scanned and displayed in a word processor.
The text shown in a
Note:
1. The OCR software supports 12 languages. These languages include English, German,
French, Spanish, Italian, Dutch, Swedish, Norwegian, Finnish, Danish, Portuguese,
and Russian.
2. Your recently selected application is saved when you leave Quick Selector main
window or turn off your computer. If you want to scan and link to the recently
selected application again, just press the Go button after turning on your computer and
your scanner. Quick Selector main window appears and for a while your image is
scanned and displayed in the recently selected application main window.
14
Page 19

Quick Selector Quick Tour to Quick Selector
Example IV : Turning your Scanner to a Fax Machine
If you already installed the fax software on your computer and connected a fax modem to
your computer, you can turn your scanner into a fax machine through Quick Selector.
Let us take a letter-sized document. You want to fax the document to one of your
business associate through Microsoft Fax in Quick Selector. Check if Microsoft Fax has
already been installed. If not, install Microsoft Fax before installing Quick Selector and
then proceed the following steps:
A. Choosing your Scanning Application
1. Click the Setup button to display the Setup dialog box.
Application Setting
The Fax button
Scanner Setting
2. Click Fax application button to display the Fax application setting and the default
scanner setting.
B. Choosing your Application Setting
3. Choose Microsoft Fax from the Fax Name drop-down list box.
C. Choosing your Scanner Setting
4. Use default scanner setting(Resolution:200 dpi, Paper Size: Letter, Image Type: Line
art) or you may change the scanner setting from the drop-down list box.
5. Choose OK to save the setting and return to Quick Selector main window.
D. Placing your Original
9. Place your typed document down with the top right corner close to the Scanner
Alignment Mark.
15
Page 20

Quick Tour to Quick Selector Quick Selector
E. Enjoying Scan
10. Click the Fax software button
Or
Use the Select button of the scanner to select the Fax software button and then press
the Go button.
Or
Select Fax software button by pressing the Tab key and then press Enter.
11. Your document is scanned and a Printer dialog box appears.
12. Verify your fax driver in the Printer dialog and choose OK.
13. Use Microsoft Fax as you usually do.
Tip:
Your recently selected application is saved when you leave Quick Selector main window
or turn off your computer. If you want to scan and link to the recently selected
application again, just press the Go button after turning on your computer and your
scanner. Quick Selector main window appears and for a while your image is scanned and
displayed in the recently selected application main window.
16
Page 21

Quick Selector Quick Tour to Quick Selector
Three Ways to Use Quick Selector Features
Quick Selector provides the following three options for you to access its features.
• • Using the Mouse button
1. Move your mouse pointer over the scanning application buttons.
2. Stop at one of the application buttons representing application where you wish to
send your image or text document and click your left mouse button.
3. The selected scanning application starts and your image or text document appears
in the screen of the application.
• • Using the Push button
How to use the Push button to access Quick Selector features is described in the
following section.
• • Using the Keyboard
To use the key board,
1. Press the Tab key to move through the scanning application buttons in a clockwise
direction. If you hold down the Control or Shift key and press the Tab key, you
move through the scanning applications in a counterclockwise direction.
2. Press the Enter key.
3. Your selected scanning application starts and your image appears in the screen of
the application.
17
Page 22

Using Push button Quick Selector
Using the Push buttons
The push buttons located at the front of the scanner are: the Select button on the right, the
Go button in the middle, and the Preview button on the left.
LED
Preview Go Select
Note:
1. When a button is pressed, the LED indicator on the left side of the Preview button
turns orange to indicate the working status.
2. When the button is released, the LED turns green to indicate the ready status.
18
Page 23

Quick Selector Customizing Quick Selector
Using the Preview button
Use the Preview button to get a test scanned image. Once the preview is displayed on
your screen, you can select the area to be scanned.
To use the Preview button,
1. Press the Preview button.
2. Within a few seconds, the Preview image appears in the Preview Area of Quick
Selector.
19
Page 24

Using Push button Quick Selector
Using the Go button
Use the Go button to activate the scanning applications or export your scanned image to
OCR, image-editing, or PaperCom Document Manager application.
To use the Go button,
1. Select your desired scanning application by pressing the Select button.
2. Press the Go button. The Wait cursor is displayed.
3. The selected scanning application is activated.
Note:
Depending on the scanning application you have selected, either one of the following
situation could be occurred after pressing the Go button,
• Select the Find software button and press the Go button: The document manager
application starts. You can find your file stored in the document manager application.
• Select the File, OCR, Edit application button and press the Go button: The
selected application(for example, the document manager, TextBrdige OCR engine or
Image-editing application) starts and your scanned image appears in the application
main window.
• Select the Copy, Fax software button and press the Go button: A dialog appears
to enter your information. Press OK to start scanning and your scanned image is
printed, or faxed.
• Select the E-mail software button and press the Go button: Your image is
scanned and a dialog appears to enter your information. Press OK to attach the
image to your e-mail message.
• Select WWW browser button and press the Go button: The scanned image
appears in your web browser screen. You can paste the scanned image to your home
page.
20
Page 25

Quick Selector Customizing Quick Selector
Using the Select button
Use the Select button to choose your desired scanning application in a clockwise direction.
To use the Select button,
1. Press the Select button and select your scanning application in a clockwise direction.
2. The selected scanning application button is highlighted.
21
Page 26
Using Push button Quick Selector
Customizing Quick Selector
Before accessing Quick Selector scanning applications, it is highly recommended to
customize Quick Selector to suit your need. For example, select which printer to be used
when you have more than one printer drivers installed on your computer, or browse to
locate your application path if the application is not displayed in the selection list box in
the Setup dialog, and change your scanner settings when you want to use different paper
size, resolution, image type and so on.
Bringing up the Setup dialog
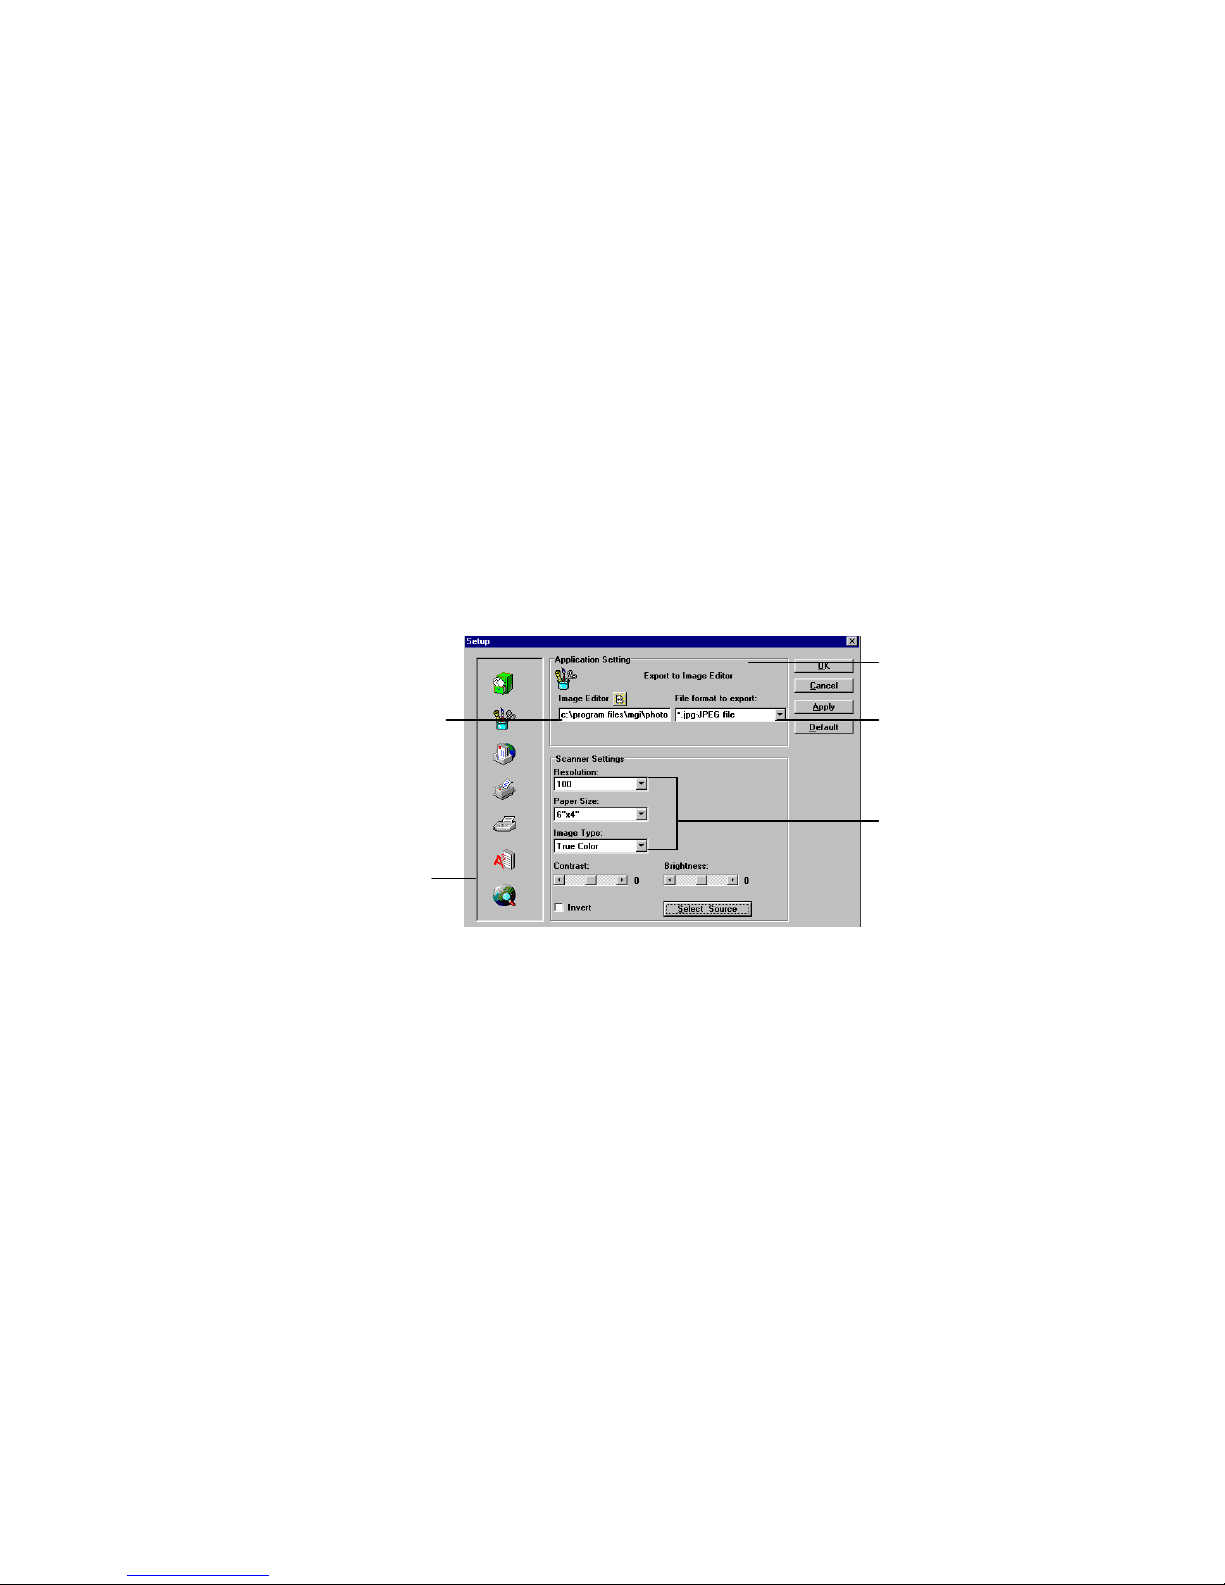
Click the Setup button to bring up the Setup dialog box to customize Quick Selector.
Application
Select location of
your application
Setting Area
Select your
file format
Scanner Setting
Area
Application
bar
The Setup dialog box
Customizing Quick Selector
The steps to customize your Quick Selector for each application are similar. Please refer
to the following procedure when setting up different applications.
22
Page 27

Quick Selector Customizing Quick Selector
Customizing your Application Setting
1. Click your desired application button. The application setting as well as the scanner
setting in the right side of the dialog box change simultaneously.
2. Click the Browser button or the Arrow button to designate your application path and
the appropriate file format.
3. Choose Apply or OK to save the application setting. Alternatively, choose Cancel to
abandon any settings just made and leave the Setup dialog.
Note:
Quick Selector supports the following popular file formats for convenient processing by
your image editing application.
1. .bmp- the bitmap file
2. .pcx - the PCX file
3. .tif - the TIFF file
4. .jpg - the JPEG file
Customizing your Scanner Settings
1. Click the desired application button. The appropriate settings for the chosen
application appears in the right of Setup dialog box.
2. Make the following choices with respect to the description below:
23
Page 28

Using Push button Quick Selector
3. Change the level of Brightness or Contrast by moving the slider to the left or right.
4. Choose Apply or OK to save the scanner setting. Alternatively, choose Cancel to
abandon any settings just made and leave the Setup dialog.
You can also refer to two examples in the preceding Quick Tour chapter on how to
customize Quick Selector.
24
Page 29

Quick Selector Customizing Quick Selector
Note:
Quick Selector also provides default scanner settings that serves as a quick solution for
each scanning application as shown in the following table:
Tips: How to Setup your Scanner Setting
Choosing the Best Resolution
Select proper resolution from a range of 100dpi to 300dpi for your scanned image. The
resolution is measured in dot per inch (dpi). The higher the resolution, the greater the
processing time needed and the memory needed to store the image. It is suggested to use
the following settings to get a good scanning result.
100 dpi (Color) to create a Web graphic or a photo (album)
200 dpi (B&W) to fax your document
300 dpi (B&W) to print or OCR your document
Choosing the Right Paper Size
Select the right paper size from Business Card to A4 Size to fit actual size of your original
document.
25
Page 30

Using Push button Quick Selector
Choosing the Best Image Type
Select a suitable image type for the document or photo you want to scan.
• Line art: Scan only black and white image without gray shades. The best choice if
you want to scan text, pen or ink drawing.
• Halftone: Also scan black and white image. Halftone creates the allusion of shades
of gray by using different size of dots. This is the best choice if you are going to
reproduce the black and white original or color photographs as a black and white
reprint.
• Error Diffusion: Diffusion provides excellent image detail and good image texture.
Diffusion minimizes interference patterns that can occur after scanning halftone image,
such as those found in magazines, books, and newspaper.
• Gray: Gray produces 256 levels of gray shades on the screen. The best choice if you
want to scan black and white photographs.
• True Color: True Color reproduces color images using 16.7 millions colors to give a
more true-to-life quality to the image. The best choice if you want to scan color
photos.
26
Page 31

Quick Selector Customizing Quick Selector
Adjusting Brightness
Increase or reduce the level of brightness by moving the slider bar to the right or left.
Adjusting Contrast
Increase or reduce the level of contrast by moving the slider bar to the right or left.
Using Invert
Check the Invert checkbox to reverse the brightness and darkness of the image.
27
Page 32

Using Quick Selector Quick Selector
28
Using Quick Selector
Using various application buttons in Quick Selector allows you to access various
scanning applications in just a few seconds.
Finding your File
Find your file stored in the Document Manager application by pressing the Find button.
The Find button allows you to search your file or folder within PaperCom Document
Manager using a folder title, page title, or the content in your annotation object.
To Find your file,
1. Select the Find button by either pressing the select button, pressing the Tab key or
moving your mouse pointer to the Find button.
2. Click the Find button or press the Go button. The PaperCom Document Manager
application starts and the Find dialog box appears.
3. Enter the characters you want to search for.
4. Choose Find Now button to search your folder or file.
The screen of PaperCom Document Manager
The Find dialog box
Enter your
text here
Page 33

Quick Selector Using Quick Selector
29
Tips:
1. You can select your desired scanning application in a counterclockwise direction
by holding the Shift or Ctrl key and then pressing the Tab .
2. Your recently selected application is saved when you leave Quick Selector main
window or turn off your computer. If you want to scan and link to the recently
selected application again, just press the Go button after turning on your computer
and your scanner. Quick Selector main window appears and for a while your
image is scanned and displayed in the recently selected application main window.
Page 34

Using Quick Selector Quick Selector
30
Filing your Image to Document
File your image to Document manager application by pressing the File button. The
File button allows you to link your scanned image to PaperCom Document Manager
application. The PaperCom Document Manager application is a document
management program helps to maintain your documents electronically. You can save
your scanned image to disk, link the scanned image to other applications(OCR, or
image-editing software), or even highlight your documents by using the annotation
feature.
Details in using PaperCom Document Manager, please refer to the PaperCom
Document Manager manual.
To File your Image to Document Manager Application,
1. Select the File button by either pressing the select button in a clockwise direction
or moving your mouse pointer to the File button.
2. Click the button or press the Go button. The PaperCom Document Manager
application starts and your scanned image appears in PaperCom Document
Manager main window.
The Screen of PaperCom Document Manager
Your scanned image is displayed in PaperCom
Document Manager.
Page 35

Quick Selector Using Quick Selector
31
Tips:
1. You can select your desired scanning application in a counterclockwise direction
by holding the Shift or Ctrl key and then pressing the Tab .
2. Your recently selected application is saved when you leave Quick Selector main
window or turn off your computer. If you need to scan and link to the recently
selected application again, just press the Go button after turning on your computer
and your scanner. Quick Selector main window appears and for a while your
image is scanned and displayed in the recently selected application main window.
Page 36
Using Quick Selector Quick Selector
32
Editing your Scanned Image
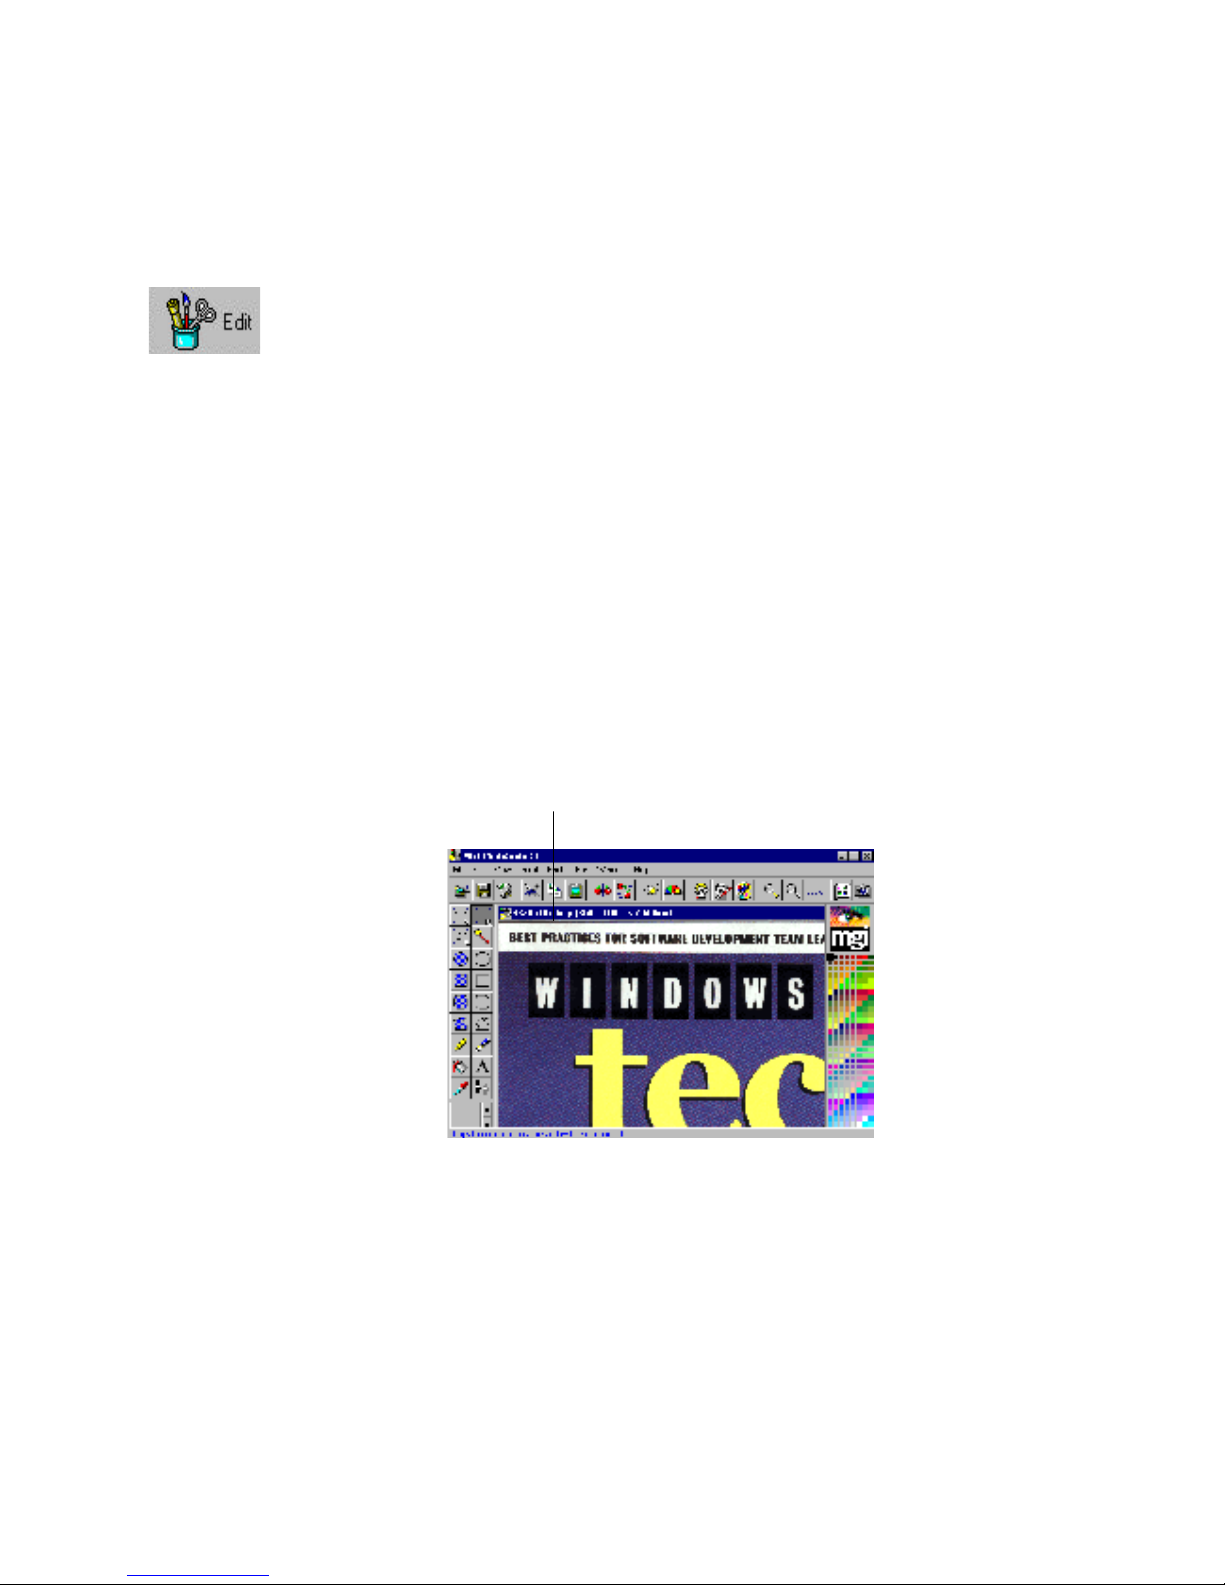
Edit your scanned image by pressing the Edit button. The Edit button allows you to
link your scanned image to the image-editing application (For example, MGI
PhotoSuite which came with the scanner). In this way, you can conveniently edit your
scanned image.
To Edit your scanned image in Image Editor,
1. Select the Edit button by either pressing the select button in a clockwise direction
or moving your mouse pointer to the Edit button.
2. Click the button or press the Go button. The image-editing application starts and
your scanned image appears in PhotoSuite main window.
Note:
Browse your image-editing application path in the Setup dialog box if you prefer other
image-editing application rather than our bundled application.
The Screen of MGI PhotoSute
Your scanned image is displayed in the
workspace of MGI PhotoSuite.
Page 37

Quick Selector Using Quick Selector
33
Tips:
1. You can select your desired scanning application in a counterclockwise direction
by holding the Shift or Ctrl key and then pressing the Tab key.
2. Your recently selected application is saved when you leave Quick Selector main
window or turn off your computer. If you need to scan and link to the recently
selected application again, just press the Go button after turning on your computer
and your scanner. Quick Selector main window appears and for a while your
image is scanned and displayed in the recently selected application main window.
Page 38

Using Quick Selector Quick Selector
34
E-mailing your Scanned Image
E-mail your scanned image by pressing the E-mail button. The E-mail button allows
you to send your scanned image to your e-mail software and attach to your
correspondent.
Quick Selector supports Microsoft Mail, Lotus cc:Mail, or Internet Mail. If you have
one of those programs on your computer, Quick Selector displays Microsoft Mail,
Lotus cc:Mail, or Internet Mail in Setup dialog.
To use the E-mail feature of Quick Selector, please install first your e-mail software
and modem on your computer.
To E-mail your scanned image,
1. Select the E-mail button by either pressing the select button in a clockwise
direction or moving your mouse pointer to the E-mail button.
2. Click the button or press the Go button. An E-mail dialog box is displayed to
allow you enter your e-mail address and write a memo to your correspondent.
3. Choose Send to send the e-mail.
The E-mail dialog box
Enter your e-mail
information here.
Page 39

Quick Selector Using Quick Selector
35
Tips:
1. You can select your desired scanning application in a counterclockwise direction
by holding the Shift or Ctrl key and then pressing the Tab key.
2. Your recently selected application is saved after leaving Quick Selector main
window or turning off your computer. If you need to scan and link to the recently
selected application again, just press the Go button after turning on your computer
and your scanner. Quick Selector main window appears and for a while your
image is scanned and displayed in the recently selected application main window.
Page 40

Using Quick Selector Quick Selector
36
Printing your scanned image
Print your scanned image by pressing the Copy button. The Copy button allows you
to send your scanned image to printer driver and print your scanned image if you have
connected a printer to your scanner.
Before using the Copy button, make sure your printer has been connected and your
printer driver has been installed on your computer and set up well in the Setup dialog
box.
To Print your scanned image,
1. Select the Copy button by either pressing the select button in a clockwise direction
or moving your mouse pointer to the Copy button.
2. Click the button or press the Go button. A printer dialog box is displayed to allow
you to enter your printer settings.
3. Choose OK to print.
The Printer dialog box
Tips:
1. You can select your desired scanning application in a counterclockwise direction
by holding the Shift or Ctrl key and then pressing the Tab key.
2. Your recently selected application is saved when you leave Quick Selector main
window or turn off your computer. If you want to scan and link to the recently
selected application again, just press the Go button after turning on your computer
and your scanner. Quick Selector main window appears and for a while your
image is scanned and displayed in the recently selected application main window.
Page 41

Quick Selector Using Quick Selector
37
Faxing your Scanned Image
Fax your scanned image by pressing the Fax button. The Fax button allows you to
send your scanned image to your fax driver and forward the image to your
correspondent.
Before using the Fax feature, make sure your modem has been connected and your fax
driver has been installed on your computer and set up well in the Setup dialog box.
To Fax your scanned image,
1. Select the Fax button by either pressing the select button in a clockwise direction
or moving your mouse pointer to the Fax button.
2. Click the button or press the Go button. A Print dialog box appears.
3. Use the fax software as you usually do.
The Print dialog box
Tips:
1. You can select your desired scanning application in a counterclockwise direction
by holding the Shift or Ctrl key and then pressing the Tab key.
2. Your recently selected application is saved after leaving Quick Selector main
window or turning off your computer. If you need to scan and link to the recently
selected application again, just press the Go button after turning on your computer
and your scanner. Quick Selector main window appears and for a while your
image is scanned and displayed in the recently selected application main window.
Page 42
Using Quick Selector Quick Selector
38
Converting your image to Text
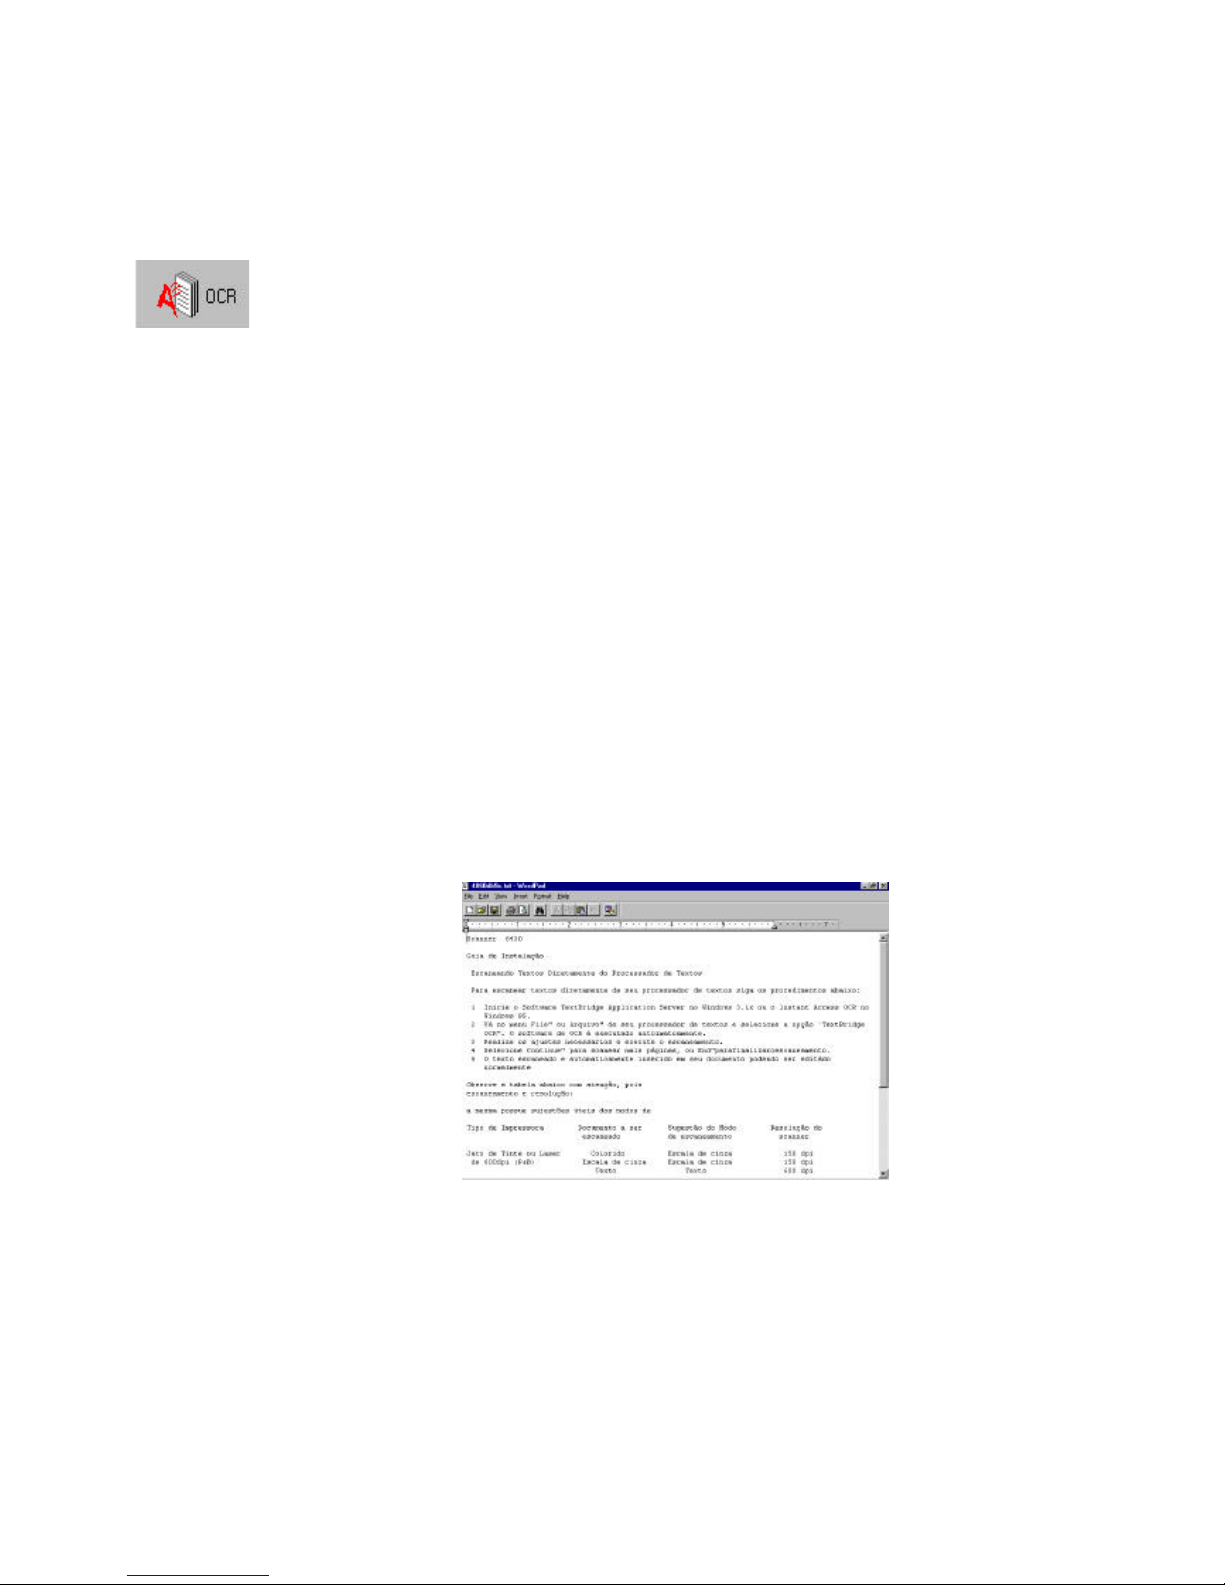
Convert your image to text by pressing the OCR button. The OCR button allows you
to link your scanned text to OCR application(For example, Xerox TextBridge which
came with the scanner) and convert the image text to editable text with a word
processor.
The OCR software supports 12 languages. Theses languages include English, German,
French, Spanish, Italian, Dutch, Swedish, Norwegian, Finnish, Danish, Portuguese, and
Russian. All the text in these languages can be read correctly in a satisfactory level by
our bundled OCR software.
To Convert your image to OCR application,
1. Select the OCR button by either pressing the select button in a clockwise direction
or moving your mouse pointer to the OCR button.
2. Click the OCR button or press Go button. The OCR software starts and your
scanned text is displayed and become editable with a word processor.
Note:
Before Using the OCR button, it is suggested to first designate your word processor
path and file format in the Application setting area in the Setup dialog box first.
The Microsoft WordPad window with the scanned text
Page 43

Quick Selector Using Quick Selector
39
Tips:
1. You can select your desired scanning application in a counterclockwise direction
by holding the Shift or Ctrl key and then pressing the Tab key.
2. Your recently selected application is saved when you leave Quick Selector main
window or turn off your computer. If you want to scan and link to the recently
selected application again, just press the Go button after turning on your computer
and your scanner. Quick Selector main window appears and for a while your
image is scanned and displayed in the recently selected application main window.
Page 44

Using Quick Selector Quick Selector
40
Pasting your image to WWW
Paste your image to your web browser by pressing the WWW button. The WWW
button allows you to place your scanned image to your Web Browser.
Quick Selector supports Netscape or Microsoft Internet Explorer. If you have
installed one of those web browser on your computer, Quick Selector displays
Netscape or Microsoft Internet Explorer in Setup dialog.
To Paste your image to web browser,
1. Select the WWW button by either pressing the select button in a clockwise
direction or moving your mouse pointer to the WWW button.
2. Click the button or press the Go button. The web browser is displayed.
Tips:
1. You can select your desired scanning application in a counterclockwise direction
by holding the Shift or Ctrl key and then pressing the Tab key.
2. Your recently selected application is saved after leaving Quick Selector main
window or turning off your computer. If you want to scan and link to the recently
selected application again, just press the Go button after turning on your
computer and your scanner. Quick Selector main window appears and for a while
your image is scanned and displayed in the recently selected application main
window.
Your scanned image
is displayed on your
web browser screen.
Page 45

Quick Selector Using Quick Selector
41
Viewing the on-line Help
The Help button allows you to review the on-line help on the screen.
To view the on-line Help,
1. Click the Help button.
2. The on-line help window is displayed.
Page 46

Using Quick Selector Quick Selector
42
Exiting Quick Selector
To exit Quick Selector,
1. Click the Close button in the upper-right corner of Quick Selector main window.
2. Quick Selector is closed.
Page 47

43
Index
A
Application Setting
Application path, File format, 23
B
Brightness, 27
C
Contrast, 27
Converting your image to Text, 38
Customizing Quick Selector
Application setting, Scanner settings, 22
D
Document Manager, 30
E
Editing your Scanned Image, 32
E-mailing your Scanned Image, 34
Error Diffusion, 26
Exiting Quick Selector, 42
F
Faxing your Scanned Image, 37
Filing your Image to Document, 30
Finding your File, 28
G
Go button
Find, File, Edit, E-mail, Copy, Fax, OCR, WWW, 20
Gray, 26
H
Halftone, 26
I
Image Type
Line art, Halftone, Error diffusion, Grays, True colors,
26
image-editing application, 32
Invert, 27
L
Line art, 26
O
on-line Help, 41
P
Paper Size, 25
Pasting your image to WWW, 40
Preview button, 19
Printing your scanned image, 36
Push Button
the Select button, the Scan button, the Preview button,
6
push buttons
Select button, Go button, Preview button, 18
R
Resolution, 25
S
Scanner Settings
Resolution, Paper size, Image type, Brightness,
Contrast, Invert, 23
Select button, 21
T
True Color, 26
 Loading...