

Page 1

Avira Update Manager
User Manual
Page 2

Table of contents
1. Product information . . . . . . . . . . . . . . . . . . . . . . . . . . . . . . . . . . . . . . . . . . . 4
1.1 Functionality . . . . . . . . . . . . . . . . . . . . . . . . . . . . . . . . . . . . . . . . . . . . . . . . . . . . . . . . . . . . . . . . 4
1.2 System requirements . . . . . . . . . . . . . . . . . . . . . . . . . . . . . . . . . . . . . . . . . . . . . . . . . . . . . . . . 4
2. Installation . . . . . . . . . . . . . . . . . . . . . . . . . . . . . . . . . . . . . . . . . . . . . . . . . . . 6
2.1 Installation on Windows . . . . . . . . . . . . . . . . . . . . . . . . . . . . . . . . . . . . . . . . . . . . . . . . . . . . . . 6
2.1.1 Install AUM . . . . . . . . . . . . . . . . . . . . . . . . . . . . . . . . . . . . . . . . . . . . . . . . . . . . . . . . . . . . . . . .6
2.1.2 Installing the AUM Server on other servers . . . . . . . . . . . . . . . . . . . . . . . . . . . . . . . . . . 10
2.1.3 Automatically configured installation . . . . . . . . . . . . . . . . . . . . . . . . . . . . . . . . . . . . . . . 11
2.1.4 Installing the AUM Frontend on other computers . . . . . . . . . . . . . . . . . . . . . . . . . . . . 12
2.1.5 User interface . . . . . . . . . . . . . . . . . . . . . . . . . . . . . . . . . . . . . . . . . . . . . . . . . . . . . . . . . . . . 13
Table of contents
2.2 Installation on Linux . . . . . . . . . . . . . . . . . . . . . . . . . . . . . . . . . . . . . . . . . . . . . . . . . . . . . . . . 14
2.2.1 Installation procedure . . . . . . . . . . . . . . . . . . . . . . . . . . . . . . . . . . . . . . . . . . . . . . . . . . . . . 15
2.3 Reinstall AUM (on Linux) . . . . . . . . . . . . . . . . . . . . . . . . . . . . . . . . . . . . . . . . . . . . . . . . . . . . 17
2.4 Deinstallation . . . . . . . . . . . . . . . . . . . . . . . . . . . . . . . . . . . . . . . . . . . . . . . . . . . . . . . . . . . . . . 17
2.4.1 Deinstallation with graphical user interface (Windows) . . . . . . . . . . . . . . . . . . . . . . . 17
2.4.2 Deinstallation on Linux (without graphical user interface) . . . . . . . . . . . . . . . . . . . . . 17
3. Configuration . . . . . . . . . . . . . . . . . . . . . . . . . . . . . . . . . . . . . . . . . . . . . . . . 19
3.1 Configuration with graphical interface (Windows) . . . . . . . . . . . . . . . . . . . . . . . . . . . . . 19
3.1.1 Starting the AUM Frontend for the first time . . . . . . . . . . . . . . . . . . . . . . . . . . . . . . . . 19
3.1.2 Server Settings . . . . . . . . . . . . . . . . . . . . . . . . . . . . . . . . . . . . . . . . . . . . . . . . . . . . . . . . . . . 20
3.1.3 Configuring Internet settings . . . . . . . . . . . . . . . . . . . . . . . . . . . . . . . . . . . . . . . . . . . . . . 20
3.1.4 Configure email notifications . . . . . . . . . . . . . . . . . . . . . . . . . . . . . . . . . . . . . . . . . . . . . . 22
3.1.5 Selecting the location where you wish to save updates . . . . . . . . . . . . . . . . . . . . . . . . 23
3.1.6 Changing the ports of the integrated HTTP server . . . . . . . . . . . . . . . . . . . . . . . . . . . . 24
3.1.7 Changing the preset download server . . . . . . . . . . . . . . . . . . . . . . . . . . . . . . . . . . . . . . . 26
3.1.8 Editing the list of AUM Servers . . . . . . . . . . . . . . . . . . . . . . . . . . . . . . . . . . . . . . . . . . . . . 26
3.1.9 Editing the products list . . . . . . . . . . . . . . . . . . . . . . . . . . . . . . . . . . . . . . . . . . . . . . . . . . . 27
3.1.10 Configuring the update scheduler . . . . . . . . . . . . . . . . . . . . . . . . . . . . . . . . . . . . . . . . . 28
3.2 Configuration without graphical user interface (Linux) . . . . . . . . . . . . . . . . . . . . . . . . . 29
3.2.1 Server settings . . . . . . . . . . . . . . . . . . . . . . . . . . . . . . . . . . . . . . . . . . . . . . . . . . . . . . . . . . . . 29
3.2.2 Setting up a proxy server . . . . . . . . . . . . . . . . . . . . . . . . . . . . . . . . . . . . . . . . . . . . . . . . . . 30
Avira Update Manager - User Manual (Status: 17 Nov 2011) 2
Page 3

Table of contents
3.2.3 Configuring email notifications . . . . . . . . . . . . . . . . . . . . . . . . . . . . . . . . . . . . . . . . . . . . . 31
3.2.4 Selecting the location for saving updates . . . . . . . . . . . . . . . . . . . . . . . . . . . . . . . . . . . . 32
3.2.5 Changing the ports of the integrated HTTP server . . . . . . . . . . . . . . . . . . . . . . . . . . . . 32
3.2.6 Changing the preset download server . . . . . . . . . . . . . . . . . . . . . . . . . . . . . . . . . . . . . . . 32
3.2.7 Editing the list of servers . . . . . . . . . . . . . . . . . . . . . . . . . . . . . . . . . . . . . . . . . . . . . . . . . . 33
3.2.8 Editing the product list . . . . . . . . . . . . . . . . . . . . . . . . . . . . . . . . . . . . . . . . . . . . . . . . . . . . 33
3.2.9 Configuring the repository update schedule . . . . . . . . . . . . . . . . . . . . . . . . . . . . . . . . . 33
3.3 Configuration with graphical interface (Linux AUM Server
via AUM Frontend on a Windows client) . . . . . . . . . . . . . . . . . . . . . . . . . . . . . . . . . . . . . . 35
4. Operation . . . . . . . . . . . . . . . . . . . . . . . . . . . . . . . . . . . . . . . . . . . . . . . . . . . . 38
4.1 Operation on Windows (with graphical interface) . . . . . . . . . . . . . . . . . . . . . . . . . . . . . . 38
4.1.1 Testing the updates . . . . . . . . . . . . . . . . . . . . . . . . . . . . . . . . . . . . . . . . . . . . . . . . . . . . . . . 38
4.1.2 Starting and stopping product updates manually . . . . . . . . . . . . . . . . . . . . . . . . . . . . . 40
4.1.3 Updating the AUM Server . . . . . . . . . . . . . . . . . . . . . . . . . . . . . . . . . . . . . . . . . . . . . . . . . 41
4.1.4 Updating the AUM Frontend . . . . . . . . . . . . . . . . . . . . . . . . . . . . . . . . . . . . . . . . . . . . . . . 42
4.1.5 Displaying the logfile . . . . . . . . . . . . . . . . . . . . . . . . . . . . . . . . . . . . . . . . . . . . . . . . . . . . . . 43
4.1.6 Displaying product update version information . . . . . . . . . . . . . . . . . . . . . . . . . . . . . . 44
4.2 Operation on Linux (without graphical interface) . . . . . . . . . . . . . . . . . . . . . . . . . . . . . . 44
4.2.1 Testing the updates . . . . . . . . . . . . . . . . . . . . . . . . . . . . . . . . . . . . . . . . . . . . . . . . . . . . . . . 45
4.2.2 Starting and stopping AUM manually . . . . . . . . . . . . . . . . . . . . . . . . . . . . . . . . . . . . . . . 46
4.2.3 Updating products . . . . . . . . . . . . . . . . . . . . . . . . . . . . . . . . . . . . . . . . . . . . . . . . . . . . . . . . 46
4.2.4 Canceling a download (prematurely) . . . . . . . . . . . . . . . . . . . . . . . . . . . . . . . . . . . . . . . . 47
4.2.5 Updating AUM automatically . . . . . . . . . . . . . . . . . . . . . . . . . . . . . . . . . . . . . . . . . . . . . . 47
4.2.6 Displaying the logfile . . . . . . . . . . . . . . . . . . . . . . . . . . . . . . . . . . . . . . . . . . . . . . . . . . . . . . 48
5. Frequently Asked Questions (FAQ) . . . . . . . . . . . . . . . . . . . . . . . . . . . . . . 50
5.1 Procedure for updating via Fileserver/Share . . . . . . . . . . . . . . . . . . . . . . . . . . . . . . . . . . . 50
5.2 Procedure for updating via Webserver (http) . . . . . . . . . . . . . . . . . . . . . . . . . . . . . . . . . . 50
5.3 Procedure for updating SAVAPI products . . . . . . . . . . . . . . . . . . . . . . . . . . . . . . . . . . . . . 51
5.4 Avira Support . . . . . . . . . . . . . . . . . . . . . . . . . . . . . . . . . . . . . . . . . . . . . . . . . . . . . . . . . . . . . . 51
Avira Update Manager - User Manual (Status: 17 Nov 2011) 3
Page 4

Product information
1. Product information
1.1 Functionality
Avira Update Manager lets you download updates for many of your Avira products
conveniently and automatically from the Internet.
Individual computers on your network can then update products via your intranet, rather
than having to download them themselves from the Internet.
Avira Update Manager comprises the following two components:
• Avira Update Manager Server (for both Microsoft Windows and UNIX)
• Avira Update Manager Frontend (for Microsoft Windows only)
The Avira Update Manager Server runs on one or more servers on your intranet and
controls the downloading of product updates on these servers.
AUM Frontend lets you configure and operate one or more AUM Servers from a central
point (Remote Control).
1.2 System requirements
For Avira Update Manager to work perfectly, the computer system must fulfill the following
requirements:
• Computer from Pentium class upwards, at least 1 GHz
• Operating system (Windows)
- Microsoft Server 2003 x86 or x64 (no IA-64 systems), newest SP
- Microsoft Server 2008 x86 or x64 (no IA-64 systems), newest SP
Note
You can also install the AUM user interface (the so-called Frontend) on Windows
XP from SP1, Windows Vista and Windows 7 x86 or Windows 7 x64 (except IA64 systems).
Note
The user interface can only be installed on Microsoft Windows systems.
Note
Please note that the Windows 2000 operating system is no longer supported.
Avira Update Manager - User Manual (Status: 17 Nov 2011) 4
Page 5

• Operating system (UNIX)
- Red Hat Enterprise Linux 6 Server
- Red Hat Enterprise Linux 5 Server (5.6)
- Red Hat Enterprise Linux 4 Server (4.8)
- Novell Open Enterprise Server 2 (SLES 10 SP2)
- Novell SUSE Linux Enterprise Server 11 (SP1)
- Novell SUSE Linux Enterprise Server 10 (SP2)
- Novell SUSE Linux Enterprise Server 9 (SLES 9)
- Debian GNU/Linux 6; 5; 4
- Ubuntu Server Edition 8.04
- Ubuntu Server Edition 10.10
Note
The libstdc++.so.6 library must also be available on the systems. This usually
has to be installed subsequently through proprietary distribution package
management.
Product information
Note
If you are using a 64-bit version (amd64/x86_64) of the above mentioned Linux
distributions, 32-bit compatible libraries must also be subsequently installed. The
proprietary distribution software management can usually be used for this.
• Internal memory
- At least 512 MB RAM
- At least 500 MB temporary memory on the hard disk (depending on the scope of the
product updates).
• Internet connection (modem or LAN)
• Administrator rights (for installing the Avira Update Manager)
Avira Update Manager - User Manual (Status: 17 Nov 2011) 5
Page 6

Installation
2. Installation
2.1 Installation on Windows
Install both components of the Avira Update Manager (Server and Frontend) on a central
server on your intranet.
Then, if required, install the AUM Server on all other servers on the intranet which you have
designated for supplying clients.
(see "Installing the AUM Server on other servers" - page 10)
Note
You can also install the AUM Frontend on other computers and use it to
conveniently control the servers with the installed AUM Server (see "Installing
the AUM Frontend on other computers" - page 12).
Prerequisites
For the Avira Update Manager to function perfectly on your server, ensure that the
following requirements are met:
• System requirements are fulfilled
• You have administrator rights
• During installation all programs running on your server have been terminated
• Where necessary, the ports required by Avira Update Manager are opened in the
firewall
• No other programs are occupying the AUM network port
Perform the installation using the following steps:
1. Install Avira Update Manager
2. Install the Avira Update Manager Server on other servers
3. Install the Avira Update Manager Frontend on other computers
2.1.1 Install AUM
1. Go to the website http://www.avira.com.
The Avira Update Manager is provided for download in the Support > Download
section.
Avira Update Manager - User Manual (Status: 17 Nov 2011) 6
Page 7

2. Save the file to your computer.
3. Double-click on the saved file.
The dialog box of the setup program appears.
4. Click Continue.
The setup program for Avira Update Manager starts. The dialog box Welcome...
appears.
5. Click Next.
The dialog box with the license agreement appears.
Installation
6. Confirm that you accept the terms of the license agreement and click
The dialog box
Select Features appears:
Next.
7. Select the required components and click Next.
If you have selected Avira Update Manager Server for installation, the Choose
Destination Location
dialog box appears.
8. Confirm the specified destination directory by clicking Next.
-OR-
Use the Change... button to select a different destination directory and confirm by
clicking Next.
Avira Update Manager - User Manual (Status: 17 Nov 2011) 7
Page 8

The dialog box AUM Network Configuration appears.
Installation
9. Confirm the default configuration by clicking Next.
-OR-
If necessary, change the predefined ports accordingly. The selected ports are opened
automatically during installation and remain open afterwards.
If required, use
adapter under
Change... to select a different Root Directory and choose a specific
Network Interface or leave the setting at All. You can also use a UNC
path as the root directory and enter the UNC authentication here. However, locally
connected networks cannot be used.
Confirm with Next.
The AUM Service Account dialog box appears.
10.Enter an Administrative account (e.g. Administrator) using the appropriate
Account password and click Next.
11. You will now be asked to define a password for the AUM. Enter the password twice and
click Next.
The dialog box Configure Scheduler appears.
Avira Update Manager - User Manual (Status: 17 Nov 2011) 8
Page 9

Installation
12.Confirm the specified configuration by clicking Next.
-OR-
Enable/ disable the option Enable scheduling, or change the time or interval for the
updates and click Next to confirm.
13.You will then be asked whether you want AUM Server to be dealt with as an exception
to the Microsoft Windows Firewall.
If you confirm by selecting
choose
No you have to configure the firewall manually at a later stage.
Yes the firewall will be configured automatically, if you
Click Next to confirm your choice.
The dialog box Ready to Install the Program appears.
14.In the next dialog box, click Install.
Avira Update Manager is installed. The message Installation finished appears.
15.Click Finish.
The setup program creates a new entry in the Windows Start menu Avira > Avira
Update Manager Frontend
.
The installation has been completed successfully.
Avira Update Manager - User Manual (Status: 17 Nov 2011) 9
Page 10

Installation
After installation, the AUM Server starts immediately and must be configured with the AUM
Frontend for the product update at a later time (see 3. Configuration - page 19).
2.1.2 Installing the AUM Server on other servers
Note
Installing the AUM Server on multiple servers is usually only necessary for large
networks (>2000 computers).
1. Follow the procedure for the initial installation of the AUM Server and AUM Frontend
(see "Install AUM" - page 6), until the dialog box Select Features appears.
2. Select only the component Avira Update Manager Server and click Next.
The dialog box Choose Destination Location appears.
3. Confirm the specified destination directory by clicking Next.
-OR-
Use the Change... button to select a different destination directory and confirm by
clicking Next.
The dialog box AUM Network Configuration appears.
4. Confirm the specified configuration by clicking Next.
-OR-
If necessary, change the predefined ports as required.
If required, use Change... to select a different destination directory for the updates,
specify a fixed IP address under Network Interface or save the setting All. Click Next to
confirm.
The AUM Service Account dialog box appears.
5. Enter an Administrative account (e.g. Administrator) using the appropriate
Account password and click Next.
The dialog box Configure Scheduler appears.
6. Confirm the specified configuration by clicking Next.
-OR-
Avira Update Manager - User Manual (Status: 17 Nov 2011) 10
Page 11

Installation
Enable/ disable the option Enable scheduling, or change the time or interval for the
updates. Click Next to confirm.
7. You will now be asked whether you want AUM Server to be dealt with as an exception in
the Microsoft Windows Firewall.
If you confirm by selecting Yes the firewall will be configured automatically, if you
choose No you have to configure the firewall manually at a later stage.
8. Click Next to confirm your choice. The dialog box Ready to Install the Program
appears.
9. Click
Install.
Avira Update Manager is installed. The message
Installation finished appears.
10.Click Finish.
Installation of the AUM Server on the server has been successfully completed.
11. Repeat this installation until the AUM Server is running on all designated servers.
After installation, the AUM Server starts immediately and must be configured with the AUM
Frontend for the product update at a later time (see 3. Configuration - page 19).
2.1.3 Automatically configured installation
Avira Update Manager Server can also be configured prior to installation, so that it is ready
for use immediately after start-up and is installed without user interaction.
To do this, unpack avira_update_manager_en.zip. Then copy the file
silent_install_ium_en.iss into a directory of your choice, open the file with a text editor and
edit the file according to your configuration requirements. The same parameters are
available for ium.conf.
Note
A precise description of the configuration options can be found in the
silent_install_ium_en.iss file.
Save and then start setup.exe or avira_update_manager_en.exe by entering the following
in the command line:
/s /f1"/path/to/silent_install_ium_en.iss"
Avira Update Manager - User Manual (Status: 17 Nov 2011) 11
Page 12

Installation
The outcome of the installation is saved in the file setup.log in the same directory as
silent_install_ium_en.iss.
Note
The Avira Update Manager, including the AUM Frontend can also be uninstalled
automatically (see 2.4 Deinstallation - page 17).
2.1.4 Installing the AUM Frontend on other computers
1. Follow the procedure for the initial installation of the Avira Update Manager Server and
Avira Update Manager Frontend (see 2.1.1 Install AUM - page 6), until the dialog box
Select Features appears.
2. Select only the component
Avira Update Manager Frontend and click Next.
The dialog box Choose Destination Location appears.
3. Confirm the specified destination directory by clicking Next.
-OR-
Use the Change... button to select a different destination directory and confirm by
clicking Next.
The dialog box Ready to Install the Program appears.
4. Click Install.
The Avira Update Manager Frontend is installed.
5. Click Finish when completed.
The setup program creates a new entry in the Windows Start menu Avira > Avira
Update Manager Frontend
.
The installation of the Avira Update Manager Frontend has been successfully completed.
Avira Update Manager - User Manual (Status: 17 Nov 2011) 12
Page 13
Installation
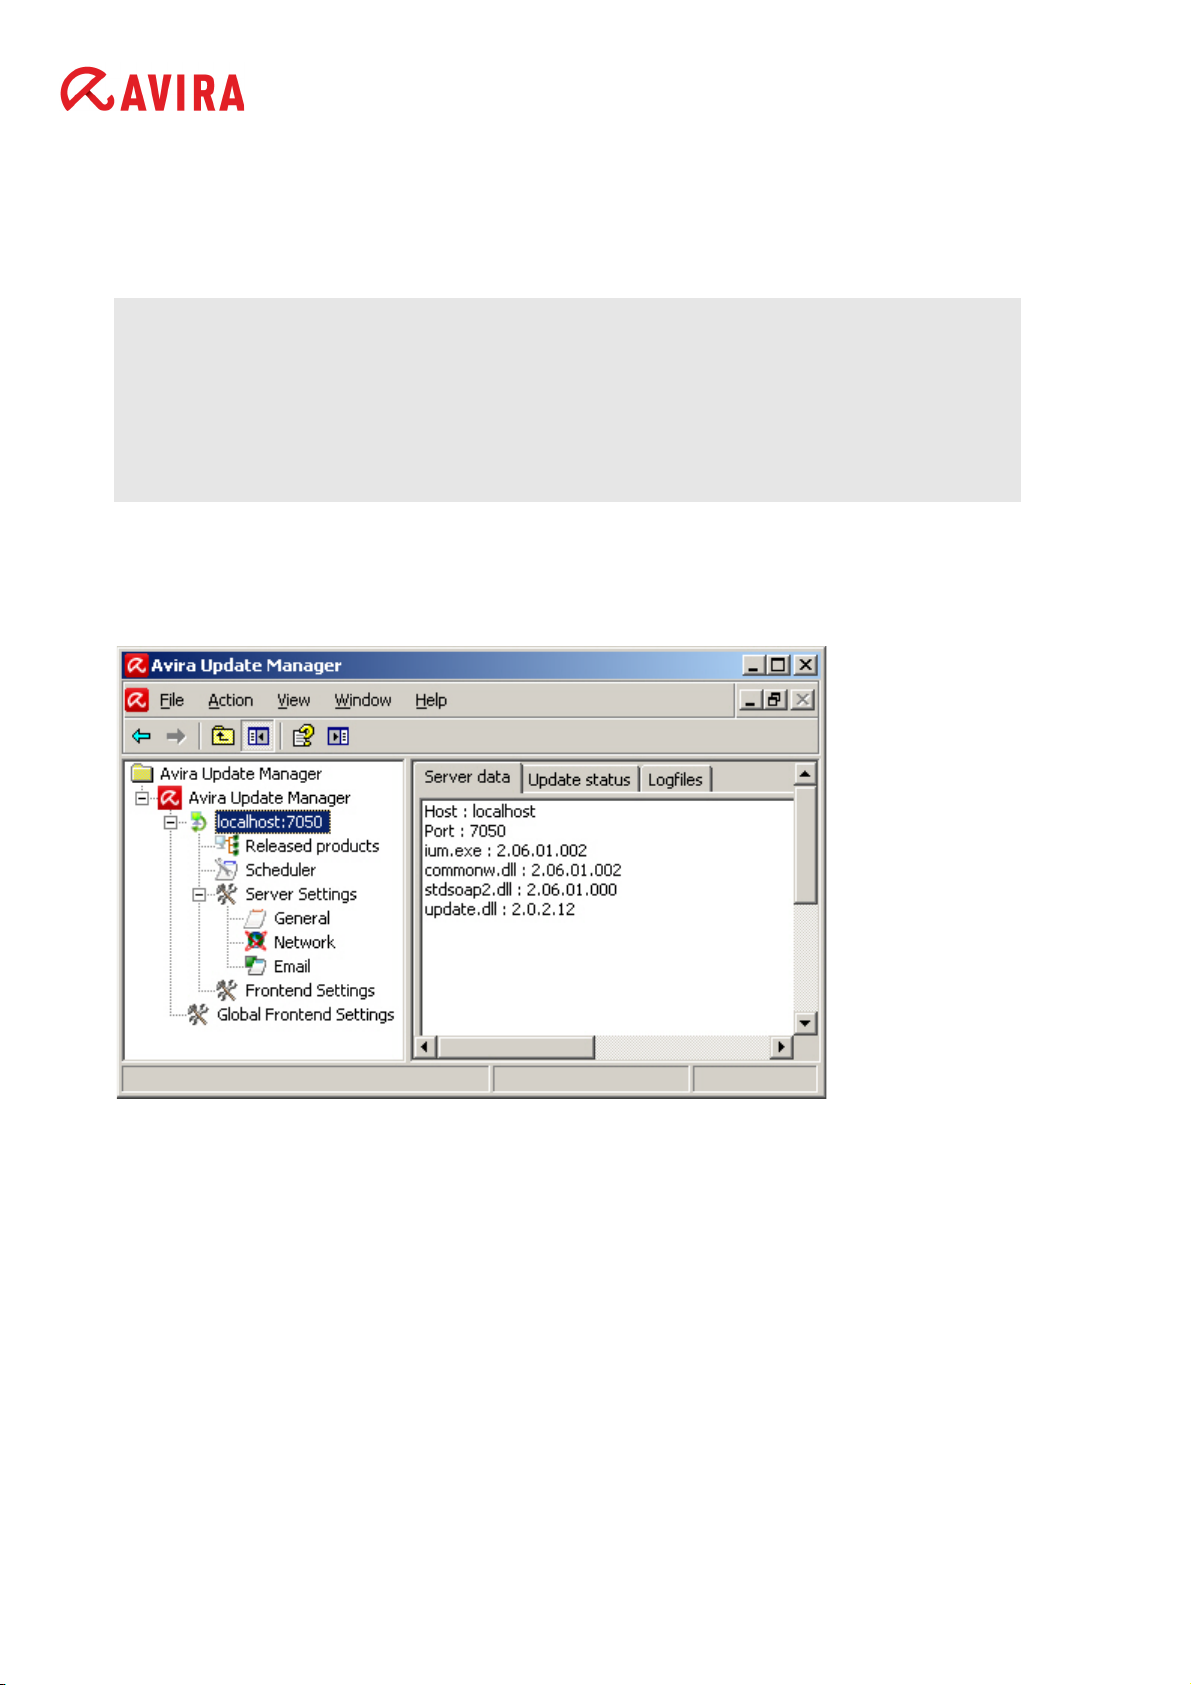
2.1.5 User interface
In Windows, the Avira Update Manager service is controlled by means of the graphical user
interface – the Avira Update Manager Frontend – which is created as a snap-in for the
Microsoft Management Console (MMC).
Note
The appearance, structure and menu structure of the MMC may vary depending
on the operating system. The chapter describes only the proprietary elements of
the Avira Update Manager Frontend. For further information on the MMC and on
manual integration of a snap-in, please refer to the user manual or the online
help of your operating system.
The AUM Frontend consists of a window divided into two areas. The left-hand window area
- the navigation area – displays the console structure. The right-hand window area contains
the detail window. Many types of information can be displayed in the detail window,
including tables and columns.
The entries in the expandable navigation structure are referred to as nodes, for example,
the Server Settings node.
The console tree of the Avira Update Manager contains the following nodes in the
navigation area:
• Avira Update Manager
This is the root node to which the managed AUM Servers are added. The detail window
shows the version of the AUM Frontend and the logfile for automatic slef-updates.
• Servername:Port [e.g. localhost:7050]
Displays the server name and the selected port used to connect the AUM Frontend to
the AUM Server.
Avira Update Manager - User Manual (Status: 17 Nov 2011) 13
Page 14
The following details are displayed in the detail window: Server data (version information of the currently installed AUM Server), Update status and Logfiles.
The following entries appear underneath the server node:
- Released products - products for product updating can be added here.
- Scheduler - configuration for the scheduling of product updates.
- Server Settings: General (general configuration options for the AUM); Network (con-
figuration options for the source of updates: HTTP server, proxy server); Email (configuration for the sending of email messages).
- Frontend Settings - SSL Server authentication.
Global Frontend Settings
•
Configuration options for Frontend automatic updates.
Status of a server:
Icon Status
Installation
Server connected
Server disconnected
AUM is attempting to make a connection to the server
An error has occurred.
2.2 Installation on Linux
Prerequisites
For the Avira Update Manager to function perfectly on your server, ensure that the
following requirements are satisfied:
• System requirements are fulfilled
• Administrator rights and root rights are granted for the installation
• AUM network ports are open in the firewall (default: 7100, 7050, 7051 and 7080)
• No other applications are installed that occupy the AUM network ports
Note
If any of the AUM network ports are already used by other applications, the AUM
daemon does not start and no error message is displayed at the command line.
Avira Update Manager - User Manual (Status: 17 Nov 2011) 14
Page 15

Installation
The installation of the Avira Update Manager is performed automatically with the aid of an
interactive installation script (bash command line).
The script performs the following steps:
• License retrieval (EULA)
• Checking the integrity of the installation files.
• Checking authorizations required for installation.
• Copying the application files and overwriting existing files that are no longer needed.
• Copying the configuration files
2.2.1 Installation procedure
1. Log in as 'root'. Otherwise you will not have the authorization to perform the installation
and the script will issue an error message.
2. Extract the current installation package, e.g. to /tmp:
cd /tmp; tar -xzvf avira_update_manager_unix_en.tar.gz
3. Change the directory to which you have extracted Avira Update Manager:
cd avira_update_manager_unix-<version>
4. Start the installer:
./install
5. Read the license agreement carefully. Pressing the space bar will take you to the next
page. Accept the license agreement. Then press the Q and Y keys and click Enter to
confirm.
The product is now installed. The destination directory is checked and if necessary
created. All the necessary files are copied to the destination directory:You will then be
asked if you wish to create an icon link to the AUM start script in your system directory:
Would you like to create a link in /usr/sbin for avium?[y]
6. Recommended: y(es). This is not absolutely necessary but simplifies the subsequent
retrieval of the AUM.
Please specify if boot scripts should be set up.
Set up boot scripts? [y]
Avira Update Manager - User Manual (Status: 17 Nov 2011) 15
Page 16
7. Recommended: y(es).
Automatic system start-up is configured:If you would prefer to start the Daemon Avira
Update Manager manually after system start-up, perform the following steps: Select N
and press Enter.
You will then be asked if weekly updates for AUM should be downloaded automatically.
3) Configuring updates
An internet updater is available with version...
In order to trigger an update you will need to run the
command:
/usr/lib/AntiVir/ium/avupdate-ium --product=AUM
Would you like to create a link in /usr/sbin for avupdateium ? [y]:
8. Recommended: y(es).
Installation
Would you like to check for AUM updates once a week ? [n]
Recommended: y(es).
Finally a report will be displayed confirming that the installation has been successfully
completed:
Installation of the following features complete:
Avira Update Manager
Avira Update Manager
*********************************************************
Configuration files:
/etc/avira/ium.conf (Avira AUM main config)
*********************************************************
Be sure to read the manual file for additional
information.
Thank you for your interest in Avira Update Manager
(UNIX).
Avira Update Manager - User Manual (Status: 17 Nov 2011) 16
Page 17

Installation
2.3 Reinstall AUM (on Linux)
You can repeat the installation script at any time. Other scenarios are possible:
• Installation of a new version (upgrade) of the AUM. The installation script then checks
the previous version and installs the requisite new components.
• Enabling or disabling automatic start-up of the AUM at system start-up.
2.4 Deinstallation
2.4.1 Deinstallation with graphical user interface (Windows)
To uninstall Avira Update Manager (e.g. in Windows Server 2003):
1. Open the
2. Double-click on Add or Remove Programs.
3. Select Avira Update Manager and click Remove.
You will be asked if you really wish to remove the program.
4. Click Yes to confirm.
All components of the program are removed.
You will also be asked if you wish to save user data, such as the HTTP root directory
and configuration.
5. Click on Finish to complete deinstallation.
Avira Update Manager has been uninstalled.
Automatic deinstallation (no interaction required)
Start setup.exe or avira_update_manager_en.exe by entering the following in the
command line:
Control Panel via the Windows Start menu.
/s /f1"/path/to/silent_uninstall_ium_en.iss"
The AUM is uninstalled without user interaction.
2.4.2 Deinstallation on Linux (without graphical user interface)
To uninstall the Avira Update Manager, log in as root and run the following command:
/usr/lib/AntiVir/ium/uninstall --product=AUM
Avira Update Manager - User Manual (Status: 17 Nov 2011) 17
Page 18

Installation
The Avira Update Manager is now completely uninstalled in accordance with the default
settings.
However, during deinstallation you will be asked whether you wish to create backups of the
logfiles and the configuration files. If you do not want this, press Enter. If you wish to create
backups, enter y and then press Enter.
The same applies to the HTTP root directory. If you wish to delete this directory, press
Enter, otherwise enter n and then press Enter.
Avira Update Manager - User Manual (Status: 17 Nov 2011) 18
Page 19

Configuration
3. Configuration
3.1 Configuration with graphical interface (Windows)
Avira Update Manager Frontend lets you configure and control all services on the intranet
on which the Avira Update Manager Server is active.
After installation, you have to configure the installed Avira Update Manager Servers to
access the intranet and the Internet, as well as the required product updates. To do this,
complete the following steps:
1. "Starting the AUM Frontend for the first time" - page 19
2. "Server Settings" - page 20
Note
If you quit the dialog after changing the configuration, the program will prompt
you to save the new configuration. You can either do this immediately at every
change or allow the program to remember the changes until you save all
changes at the same time, on completion of the configuration.
3. Basic settings for configuring the server
- "Configuring Internet settings" - page 20
- "Configure email notifications" - page 22
4. Advanced settings for configuring the server
- "Selecting the location where you wish to save updates" - page 23
- "Changing the ports of the integrated HTTP server" - page 24
- "Changing the preset download server" - page 26
- "Editing the list of AUM Servers" - page 26
5. Advanced settings for downloading the update
- "Displaying product update version information" - page 44
- "Configuring the update scheduler" - page 28
3.1.1 Starting the AUM Frontend for the first time
The Avira Update Manager Server service must be started on the relevant servers.
1. Click on the program icon in the Windows start menu under Start > Programs > Avira >
Avira Update Manager Frontend > Avira Update Manager Frontend
Avira Update Manager - User Manual (Status: 17 Nov 2011) 19
.
Page 20

Configuration
The MMC with the Avira Update Manager snap-in appears.
2. Log in on the server, with the Administrator password.
To learn how to add your servers and mirrored Avira products in the AUM, go to chapters
"Editing the list of AUM Servers" - page 26 and "Displaying product update version
information" - page 44.
3.1.2 Server Settings
1. After a change, click on a different navigation area or terminate the Avira Update
Manager Frontend.
The Commit settings dialog appears:
2. Click Yes to confirm the configuration change.
3.1.3 Configuring Internet settings
To configure the Avira Update Manager for updates via the Internet or the intranet:
1. In the navigation area, click on the node of the server being configured.
2. Click on the Server Settings node.
Avira Update Manager - User Manual (Status: 17 Nov 2011) 20
Page 21

3. Click on Network.
Configuration
4. Set up a Proxy server:
If the Internet is accessed via a proxy server, enable the Use server option in the proxy
server area.
Enter the Proxy server data (optional, if required by the proxy server):
• Address or name of server
URL or IP address of the proxy server. Examples: proxy.domain.com
92.168.1.100
• Port of server
Port number of the proxy server. Example: 8080 or 3128
• Login name
Activate the Use authentication option and insert the user name logging in to the proxy
server.
Avira Update Manager - User Manual (Status: 17 Nov 2011) 21
Page 22

• Login password
Password for logging in to the proxy server. The password is saved in encrypted form.
3.1.4 Configure email notifications
To define how Avira Update Manager sends email messages:
1. In the navigation area, click on the node of the server being configured.
2. Click on the Server Settings node.
3. Click on Email:
Configuration
4. In the Email messages area, enable the Activate email notification option.
•
SMTP Server
Name of mail server. The maximum length of the host name is 127 characters.
Examples:
255.255.255.255
mail.testcompany.com
• Sender
Sender's email address (optional). Example: sendername@testcompany.com
Avira Update Manager - User Manual (Status: 17 Nov 2011) 22
Page 23

Configuration
• Recipient(s)
Recipient’s email address. Separate individual addresses by commas. The maximum
length of all addresses is 259 characters. Example:
recipient.name@testcompany.com
5. If an authentication on the mail server is required, enable the Use authentication option
in the Authentication area and enter the mail server login data.
• User name
Name for logging in to the mail server.
Password
•
The password is saved in encrypted form.
6. In the Email notification for the following events area, specify when Avira Update
Manager should send emails:
Error, Warning or Information.
Please also note the information in the report file.
You can also Send a test email in the email configuration dialog.
Note
The Simple Message Transfer Protocol (SMTP) is used to send emails. ESMTP
(Extended SMTP) is not currently supported. An encrypted transfer via TLS
(Transport Layer Security) or SSL (Secure Sockets Layer) is not possible.
3.1.5 Selecting the location where you wish to save updates
To define the destination directory in which future updated files and program packages are
to be placed:
1. In the navigation area, click on the node of the server being configured.
2. Click on the Server Settings node.
Avira Update Manager - User Manual (Status: 17 Nov 2011) 23
Page 24

Configuration
3. Click General:
4. In the field Root directory for update files, enter the destination directory on the server.
The destination directory can also be on the network. Locally connected networks are
not supported.
Note
If the destination directory is on a computer on the intranet, you must specify the
path manually in the form of a UNC path. To do this, ensure that you have the
necessary rights on the host computer. The AUM Server should not be logged in
as a local system account, otherwise it is not possible to log in to the host
computer. Example:
\\server\share\updates\avira\
5. Enable the Use UNC authentication for root directory option if authentication is
required on the selected server. It will activate the fields for User and Password.
6. Enter the login name and the password. The password is saved in encrypted form.
3.1.6 Changing the ports of the integrated HTTP server
1. In the navigation area, click on the node of the server being configured.
2. Click on the Server Settings node.
3. Click on Network.
Avira Update Manager - User Manual (Status: 17 Nov 2011) 24
Page 25

Configuration
4. In the HTTP Server area, change the Port of server 7080, or the Port of test server
7100, if these are already occupied by an application on this computer.
Avira Update Manager - User Manual (Status: 17 Nov 2011) 25
Page 26

3.1.7 Changing the preset download server
1. In the navigation area, click on the node of the server being configured.
2. Click on the Server Settings node.
3. Click on Network:
Configuration
4. Enable the Use own server list option.
5. In the field Update server list, enter the download server (IP address or computer
name).
Note
You can also specify multiple proprietary download servers, separated by
comma.
3.1.8 Editing the list of AUM Servers
To add a new server:
1. Right-click on the
Avira Update Manager and select New > Add AUM server.
Avira Update Manager - User Manual (Status: 17 Nov 2011) 26
Page 27

The Add AUM server dialog box opens:
Configuration
2. Enter the name of the server or its IP address in the field
click the browse button
3. Enter the password for the server in the
4. Click
OK.
[...] to selected the required server.
AUM login password field.
IP address or hostname, and
The server appears in the navigation area of the user interface.
To delete a server
In the navigation area, right-click on the node for the server to be deleted and select
Remove server.
3.1.9 Editing the products list
To select a product to be updated by the Avira Update Manager:
1. In the navigation area, click on the node of the server being configured and log in.
2. Right-click on
Released products and select the menu item New > Add product.
The Product selection dialog box opens:
3. Select the product to be updated from the
Avira Update Manager - User Manual (Status: 17 Nov 2011) 27
Product drop-down list.
Page 28

4. In the Language drop-down list, select the required language.
The entry All indicates that the product is either only available in English or that all
available languages are contained in the program package.
Configuration
5. In the Operating System
drop-down list
, select the appropriate operating system, then
select the Processor type.
6. Click Add product.
The product is added to the list of released products.
To delete a product
1. In the navigation area, click on the node of the server being configured.
2. Click on Released products.
3. Right-click on the product to be deleted in the list of the products for update and select
Remove product.
3.1.10 Configuring the update scheduler
To configure the interval at which Avira Update Manager scans for available product
updates and downloads these updates to the server:
1. In the navigation area, click on the node of the server being configured.
2. Click Scheduler:
Avira Update Manager - User Manual (Status: 17 Nov 2011) 28
Page 29

Configuration
3. In the Scheduling area, activate the Enable scheduling function and then the required
update interval (Once, Hourly, Daily, Weekly, Monthly or Every x days/
hours/minutes).
4. If you have enabled Every x days/hours/minutes enter an update interval. The
minimum interval is 15 minutes.
5. Specify the start date and time for the first update in the Start time/ Start date fields.
The scheduler has been configured. When you exit the dialog box you will automatically
receive a prompt to save all changes. The service performs product updates at the
specified date and time and at the appropriate intervals.
Note
The selected interval must be at least 5 minutes longer than the interval set for
the automatic copying of files in test mode.
3.2 Configuration without graphical user interface (Linux)
The most important settings for your Avira Update Manager are contained in the
configuration file /etc/avira/ium.conf.
Note
To edit the configuration, open the file in an editor, make the required changes
and restart the AUM (see "Starting and stopping AUM manually" - page 46).
Note
Please note that any comments you write in the ium.conf file will be deleted each
time AUM is restarted.
Password encryption makes it necessary to configure certain functions via the
AUM Frontend.
Note
Currently the Avira Update Manager for UNIX-based operating systems is only
available in English. Therefore, do not edit the parameter
<language value="en" />.
3.2.1 Server settings
The default value 0.0.0.0 ensures that the Avira Update Manager is listening to all
available network interfaces.
Avira Update Manager - User Manual (Status: 17 Nov 2011) 29
Page 30

Configuration
The default setting
<ip value="0.0.0.0"/>
can also be changed as required. Replace 0.0.0.0 with the corresponding IP address or
host name.
3.2.2 Setting up a proxy server
Avira Update Manager may use a proxy server for updates. By default, this function is
disabled.
<use_proxy value="false" />
Enable it by making the following changes in the ium.conf file:
<use_proxy value="true"/>
Then insert the information required for the proxy server into the configuration file.
The address of the proxy server is defined with the IP address or server name using the
option
<proxy_host value="your_proxyserverip"/>
while the port used is defined by entering:
<proxy_port value="your_proxyserverport"/>
Proxy server authentication is disabled by default:
<proxy_use_auth value="false"/>
Activate this by setting the parameter to
<proxy_use_auth value="true"/>
You can enter your user name under
<proxy_username value=""/>
in the command line. The password is defined in
<proxy_password value=""/>
Note
Passwords entered via the AUM Frontend are encrypted. If the passwords are
entered by manually editing the configuration file, they will be stored in plain text.
It is therefore recommended to enter the passwords via AUM Frontend.
Avira Update Manager - User Manual (Status: 17 Nov 2011) 30
Page 31

Configuration
3.2.3 Configuring email notifications
The Avira Update Manager can send information about completed repository updates by
email. This is how you can configure it:
The SMTP server used for sending the emails:
<smtp_server value="smtp_server.tld"/>
The sender and the recipient of the notification email can be configured by editing the
following parameters:
<smtp_from value="AVIUM@your_domain.tld"/>
<smtp_to value="AUM_Admin@your_domain.tld"/>
By default, if enabled, the email notifications are sent only when errors occur:
<smtp_level value="error"/>
To receive email notifications for warnings and errors, modify the smtp_level value to
warning:
<smtp_level value="warning"/>
To receive email notifications after successful updates, for warnings and errors, modify the
smtp_level value to info:
<smtp_level value="info"/>
Authentication on the SMTP server is disabled as the default setting:
<smtp_login_required value="false"/>
Change the parameter to
<smtp_login_required value="true"/>
to enable it.
Note
SMTP authentication can only be fully configured via the AUM Frontend,
because the application encrypts the password, and plaintext cannot be used.
It is therefore recommended to set only the user name in the ium.conf file
<smtp_login value=""/>
leaving the parameter for the password unchanged
Avira Update Manager - User Manual (Status: 17 Nov 2011) 31
Page 32

Configuration
<smtp_password value=""/>
The password should be entered via the AUM Frontend.
3.2.4 Selecting the location for saving updates
The location where updates are to be saved can be chosen as required. You can specify it
by editing the following parameter in the ium.conf file:
<http_server_root value="/var/avira/ium/HttpRoot"/>
Note
The Avira Update Manager creates a specific folder structure in this directory.
The files it contains should not be changed manually.
3.2.5 Changing the ports of the integrated HTTP server
The default settings of the AUM HTTP server are as follows:
<http_server_enable value="true"/>
<http_server_ip value="0.0.0.0"/>
<http_server_port value="7080"/>
<http_server_port_test value="7100"/>
If the port for the production server (7080) or the port for the test server (7100) is already
used by another application, it should be changed into other unused port.
If you do not wish to use the integrated http server, change
<http_server_enable value="true"/>
from "true" to "false".
3.2.6 Changing the preset download server
The ium.conf file contains a default list of download servers:
<http_server_list_orig value="http://dl1.pro.antivir.de,http://
dl2.pro.antivir.de,http://dl3.pro.antivir.de,http://
dl4.pro.antivir.de,http://dl1.antivir.net,http://
dl2.antivir.net,http://dl3.antivir.net" />
Note
Please do not edit this list.
If you would prefer to use a proprietary server for the update instead of the official servers,
change the following parameter from "false" to "true":
Avira Update Manager - User Manual (Status: 17 Nov 2011) 32
Page 33

Configuration
<override_server_list value="true"/>
3.2.7 Editing the list of servers
If you have specified that you wish to use your own download servers, you can specify
several custom download servers, separated by commas:
<http_server_list_user value="ip_address:port" />
3.2.8 Editing the product list
New products can be added as follows:
/usr/lib/AntiVir/ium/ium --add_products
You can use interactive queries to add or remove a product from the repository. After
running this command the configuration is saved in /etc/avira/mirrorconfig.xml.
Note
In order to run --add_products it is essential that the Avira Update Manager
daemon is not running, otherwise the command will fail.
3.2.9 Configuring the repository update schedule
By default the scheduler for the Avira Update Manager is deactivated. An update schedule
has to be created manually be editing the ium.conf file.
First, set
<enable value="false"/>
to "true".
Then you can configure the interval at which Avira Update Manager scans for available
product updates and downloads them. This requires adding certain options to the
configuration file. For example:
<scheduler>
<enable value="true"/>
<periodicity value="1"/>
<userdefinedInterval value="0"/>
<userdefinedIntervalSeconds value="0"/>
<start value="1293015226"/>
<weekdays value="127"/>
</scheduler>
Avira Update Manager - User Manual (Status: 17 Nov 2011) 33
Page 34

Frequency of the updates:
The frequency of the updates is set with the parameter:
<periodicity value=""/>
Available values:
- 0 = once
- 1 = hourly
- 2 = daily
- 3 = weekly
- 4 = monthly
- 5 = user-defined
If you select 5, you must also set a user-defined interval. This is done with
Configuration
<userdefinedInterval value=""/>
The specification is made in hours, i.e. 1 = one hour, 2 = two hours, etc.
You can use
<userdefinedIntervalSeconds value=""/>
to set the seconds.
The interval (in seconds) is then yielded from the sum of the two specified values:
userdefinedInterval * 3600 + userdefinedIntervalSeconds.
Note
The selected interval must be at least 5 minutes longer than the interval set for
the automatic copying of files in test mode.
In order to set the scheduler for certain days of the week, use:
<weekdays value=""/>
Available values:
- 0 = once
- 1 = Sunday
- 2 = Monday
- 4 = Tuesday
- 8 = Wednesday
- 16 = Thursday
Avira Update Manager - User Manual (Status: 17 Nov 2011) 34
Page 35

Configuration
- 32 = Friday
- 64 = Saturday
- 127 = every day
Start time:
To specify the start time, you must calculate the seconds since 1970. The date command
can be used to calculate the current time in seconds
date +%s
Accordingly, a specific time can be converted to this format with the command
date -d "Year-Month-Day Time" +%s,
e.g.
date -d "2010-08-24 9:07" +%s
Enter the result as the start time, e.g.
<start value="1277483495"/>
Each subsequent update takes this data as the starting point.
After enabling the Scheduler, the AUM Server adds the following parameters to the
configuration file, which you should not change:
<state value="3"/>
<lastRun value="0"/>
<clienttimezoneoffset value="-60"/>
• state returns the status of the update task: 0 (task completed successfully), 1 (task
failed), 2 (task in progress), 3 (task not run yet)
• lastRun shows the time (in seconds, like the start parameter) when the task has
lastly been run
• clienttimezoneoffset is used by the server to compensate any time zone
differences
3.3 Configuration with graphical interface (Linux AUM Server
via AUM Frontend on a Windows client)
If you have enabled Avira Update Manager in daemon mode, you can also manage Avira
Update Manager via a graphical user interface (GUI).
Avira Update Manager - User Manual (Status: 17 Nov 2011) 35
Page 36

Configuration
For this you need a Windows client (e.g. Windows XP) on your network to install the AUM
Frontend.
After installing Avira Update Manager on your Linux system, you must ensure that it is
started and can be selected. For this you can use the default basic configuration provided.
You can conveniently define all Avira Update Manager settings at a later time via the AUM
Frontend.
Prerequisites
Requirements for remote management of Avira Update Manager on your Linux
system:
• Avira Update Manager has been correctly installed and started
• The relevant ports have been opened in the firewall
• A Windows client is available and Avira Update Manager can be accessed from
this client
• The AUM Frontend is installed on the Windows client
• The following incoming and outgoing ports must be enabled on your Windows
client for remote management: 7100, 7050, 7051, 7080
1. Enter the following command in the console. For this you require root rights.
avium start
or:
/usr/lib/AntiVir/ium/avium start
The Avira Update Manager is then started and runs in daemon mode.
avium start
Starting Avira Update Manager...
Starting: ium
2. If you wish, you can check whether the daemon Avira Update Manager is “listening” on
its network ports as follows:
# netstat -anp|grep ium
tcp 0 0 0.0.0.0:7080 0.0.0.0:* LISTEN 3722/ium
tcp 0 0 0.0.0.0:7050 0.0.0.0:* LISTEN 3722/ium
tcp 0 0 0.0.0.0:7051 0.0.0.0:* LISTEN 3722/ium
tcp 0 0 0.0.0.0:7100 0.0.0.0:* LISTEN 3722/ium
Avira Update Manager - User Manual (Status: 17 Nov 2011) 36
Page 37

3. You can then install the AUM Frontend on the Windows client.
The AUM Frontend is a component of the Avira Update Manager for Windows.
-
Go to
www.avira.com
under
Support > Download
and download Avira Update Man-
ager (Windows).
- Start installing the Avira Update Manager.
During installation, you can choose which components to install:
Configuration
- Please select only the first option,
Avira Update Manager Frontend, and continue.
- After installation you can access the AUM Frontend under Start > Programs > Avira >
Avira Update Manager Frontend > Avira Update Manager Frontend
.
4. Configure AUM via the AUM Frontend, as described in 3.1 Configuration with graphical
interface (Windows) - page 19.
Note
If you wish to define a new password for the connection between the AUM
Frontend and Avira Update Manager service, this can also be carried out under
Linux. In the command line enter
./ium --password=
followed by the required password.
Avira Update Manager - User Manual (Status: 17 Nov 2011) 37
Page 38

4. Operation
4.1 Operation on Windows (with graphical interface)
The following requirements must be met:
• The Avira Update Manager service is running on the server(s)
• The Avira Update Manager Frontend has been started
This chapter deals with the following topics:
• "Testing the updates" - page 38
• "Starting and stopping product updates manually" - page 40
• "Updating the AUM Server" - page 41
• "Updating the AUM Frontend" - page 42
• "Displaying the logfile" - page 43
Operation
• "Displaying product update version information" - page 44
Note
Using the AUM Frontend on Windows, you can also configure the following
issues for the Linux AUM Server:
"Testing the updates" - page 38,
"Starting and stopping product updates manually" - page 40,
"Displaying the logfile" - page 43
"Displaying product update version information" - page 44
4.1.1 Testing the updates
Avira Update Manager provides updates via a special test port in test mode. Selected test
computers can thus test the downloaded files. If these files are found not to contain errors,
they can be approved for the regular port by the user manually or by means of an automatic
procedure. The update is available to all clients.
To operate Avira Update Manager in test mode, the following settings must be configured:
1. In the navigation area, double-click on the node of the server being configured.
2. Double-click on the
Avira Update Manager - User Manual (Status: 17 Nov 2011) 38
Server Settings node.
Page 39

3. Click General:
Operation
4. Enable the Activate test mode option in the Updates area. The test files can be
transferred either manually or automatically. Enable the Commit test files automatically
option and enter the required time (in minutes).
Note
If the server is restarted after an update, the automatic commit for the last update
is discarded.
Note
The selected interval must be at least 5 minutes less than the interval set for
updating the products.
The files will be copied after this period of time has elapsed.
Avira Update Manager - User Manual (Status: 17 Nov 2011) 39
Page 40

Operation
5. Click Yes to confirm the change. The AUM Servers are first reinitialized (Status: ).
If problems occur during the test, the copying of the test files can be terminated. Rightclick on the Test products node and select Drop upcoming commit.
Alternately, you can enter
--drop_automatic_commit
in the command line. This means that the automatic product commit remains activated
but that queued files are deleted. New files are not saved in the queue until the next
update.
Manual commit, which allows files to be enabled individually at any time, is still available
via the context menu of the
Test products node.
4.1.2 Starting and stopping product updates manually
You can manually start the product updates download for each server separately or stop a
running download at any time.
The Scheduler provides a further download control option (see "Displaying product update
version information" - page 44).
To start a product update manually:
1. In the navigation area, right-click on the node for the required product and select
mirrored products
Avira Update Manager - User Manual (Status: 17 Nov 2011) 40
.
Update
Page 41

Operation
The icon in front of the selected server changes. The Avira Update Manager Server
starts downloading the latest product update.
- If errors occur or the download is incomplete, the update is terminated. All temporary
files are deleted and the destination directory is not changed. The following icon
appears next to the selected server:
- After a successful product update download, the following icon reappears in front of
the server(s):
To restart the update after an unsuccessful download:
1. Check your Internet connection and the connection to the servers in the intranet and
check the logfile to find the source of the error.
2. Restart the update.
To stop the current product update download manually:
In the navigation area, right-click on the node for the required product and select Cancel
update
.
Note
You can restart the terminated download by clicking Update mirrored products
again.
4.1.3 Updating the AUM Server
To configure the Avira Update Manager Server automatic update:
1. In the navigation area, double-click on the node of the server being configured.
2. Double-click on the Server Settings node.
3. Click General.
4. In the Configure Avira Update Manager updates area, enable the Install AUM service
updates automatically
if you wish to install the Avira Update Manager update directly
after a successful download.
To update the AUM Server manually:
In the navigation area, right-click on the node for the required server and select Start AUM
server service
Avira Update Manager - User Manual (Status: 17 Nov 2011) 41
self update.
Page 42

Operation
4.1.4 Updating the AUM Frontend
To configure the AUM Frontend update:
1. In the navigation area, click on Avira Update Manager > Global Frontend Settings:
2. If you want the AUM Frontend to update automatically, enable the Search and install
updates automatically
option.
3. To use your own server list for AUM Frontend updates, enable the Use own server list
option and enter the servers in the list (separated by commas). You can also use a proxy
server, by enabling the
Authentication.
Use proxy server option and entering the Address, Port and
4. If you then click in the navigation area again, the following message appears: “Do you
want to accept the AUM Frontend settings?” Click OK.
Note
The status of the automatic update can be checked in the logfile of the AUM
Frontend.
To update the AUM Frontend manually:
In the navigation area, right-click on the Avira Update Manager node and select Update
frontend manually now
.
Avira Update Manager - User Manual (Status: 17 Nov 2011) 42
Page 43

Operation
4.1.5 Displaying the logfile
The logfile records the activities of the Avira Update Manager Server. Error messages and
status reports can be easily viewed and checked.
To display a server report:
1. In the navigation area, click on the node of the required server.
There are three tabs in the detail window in the right-hand part of the MMC window:
- Server data: Information on Avira Update Manager
Update status: Information on current product updates
-
- Logfiles: Detailed AUM logfiles
2. Click
Logfiles.
The report file is displayed on the screen:
3. In the Choose logfile area, select a logfile from the list:
- Avira Update Manager Frontend Update logfile
- Avira Update Manager logfile
- Avira Update Manager automatic update logfile
4. Choose a filter, if you wish to filter the AUM logfile:
- Select Errors and only ERROR messages are listed.
- Select Warnings and only ERROR and WARNING messages are listed.
Avira Update Manager - User Manual (Status: 17 Nov 2011) 43
Page 44

Operation
5. Press Save if you wish to save the logfile in .txt format.
4.1.6 Displaying product update version information
The files for each update product on a server contain version information, which you can
choose to display.
To check which versions are on your server:
1. In the navigation area, click on the node of the required server.
2. Click on one of the products added to Released products.
Information on the product, virus definition file and additional required update files
appears in the detail window.
4.2 Operation on Linux (without graphical interface)
Note
To change the configuration, stop the Avira Update Manager, open the
configuration file in an editor, make the required changes and restart the AUM
(see "Starting and stopping AUM manually" - page 46).
Note
Currently, the Avira Update Manager is available only in English, for UNIX-based
systems. Please do not change the parameter <language value="en" />.
Avira Update Manager - User Manual (Status: 17 Nov 2011) 44
Page 45

Operation
4.2.1 Testing the updates
This function provides a separate optional update structure which enables you to first scan
new versions and updates before releasing the files for all your productive systems.
Technically this means starting a further HTTP service which is by default provided via the
HTTP port 7100.
Ideally, you can provide a small test environment for these test releases and scan the
updates before using them on your productive systems.
The test mode is disabled by default:
<testmode value="false"/>
To enable it, change the parameter in the ium.conf file to:
<testmode value="true"/>
If the test files have been downloaded, you can start an application to check that your
systems are still fully functional with the updated files.
Enter the path to the application that is to be tested, in the parameter:
<start_after_update value="" />
This application must be certified by Avira, in order to prevent the misuse of this option by
unauthorized persons. Please contact the support beforehand.
The test files can then be copied to the release folder automatically. To do this, change the
parameter
<auto_commit_enable value="false" />
to
<auto_commit_enable value="true" />
You can also define an interval for copying the test files to the release folder. The time unit
is one minute. According to the default setting
<auto_commit_interval value="60" />
the test files will hence be copied automatically after 60 minutes.
Note
The selected interval must be at least 5 minutes less than the interval set for
updating the products.
Avira Update Manager - User Manual (Status: 17 Nov 2011) 45
Page 46

Operation
If problems occur while testing the updates with the test repository, the automatic copying
process of the test files can be terminated, with the command:
/usr/lib/AntiVir/ium/ium --drop_automatic_commit
This means that automatic product commit remains enabled but the currently queued
commit is dropped. The next commit will not be queued until the next update download
(after running /usr/lib/AntiVir/ium/ium --get_updates).
4.2.2 Starting and stopping AUM manually
If you wish to start the Avira Update Manager daemon, use the command:
/usr/lib/AntiVir/ium/avium start
The Avira Update Manager daemon can be stopped with the following command:
/usr/lib/AntiVir/ium/avium stop
To restart the daemon enter the command:
/usr/lib/AntiVir/ium/avium restart
To check whether the Avira Update Manager is running, you can use the command:
/usr/lib/AntiVir/ium/avium status
4.2.3 Updating products
Products are updated manually with the command
/usr/lib/AntiVir/ium/ium –-get_updates
The Avira Update Manager checks if there are any new updates for the products in the
repository and then downloads these immediately.
Note
If the Avira Update Manager daemon is started, after issuing --get_updates, it
will be in charge of getting the updates for the repository.
Note
When the Avira Update Manager daemon has been started, the output of
--get_updates is written in the logfile. If no daemon is running, the output will
be displayed directly in the terminal.
Avira Update Manager - User Manual (Status: 17 Nov 2011) 46
Page 47

Operation
4.2.4 Canceling a download (prematurely)
If you wish to cancel a download prematurely, terminate Avira Update Manager using the
Crtl+C shortcut only, or with
/usr/lib/AntiVir/ium/avium stop
if the AUM is running in the background.
Note
Using kill -9 can lead to problems with the program requiring a computer
reboot.
By sending SIGKILL to the ium process semaphores are created, which prevent
further execution of the service. These can be removed via the following
command:ipcrm -sipcrm -s _semaphore-id_This means that for
example the command ipcrm -s _918270815_ deletes the semaphore with
the ID 918270815.
Please follow the same procedure with other semaphores.
4.2.5 Updating AUM automatically
You can set AUM to carry out a self-update, after it updates the products' repository, by
changing the parameter:
<automatic_selfupdate value="false"/>
into
<automatic_selfupdate value="true"/>
If you use AUM via AMC (Avira Update Manager), you can notify the attached AMC Server
about available updates, using the parameter:
<automatic_mode value="true"/>
If you answered yes during the installation (see "Installation procedure" - page 15), when
asked to set automatic updates of AUM, the update command (/usr/lib/AntiVir/
ium/avupdate-ium --product=AUM) is run automatically once a week.
To set custom automatic updates of AUM on Linux, you can insert a cron job similar to the
one optionally created at the installation. For example:
# cat /etc/cron.d/avira_updater
16 12 * * Tue root /usr/lib/AntiVir/ium/avupdate-ium --product=AUM
> /dev/null
Avira Update Manager - User Manual (Status: 17 Nov 2011) 47
Page 48

Available update files are downloaded and automatically installed.
Note
If you are running Avira Update Manager in daemon mode, it must be restarted
after changing the configuration, for the new settings to be accepted:
avium restart
or:
/usr/lib/AntiVir/ium/avium restart
Stopping Avira Update Manager...
Stopping: ium
Starting Avira Update Manager...
Starting: ium
4.2.6 Displaying the logfile
The logfile records the activities of the Avira Update Manager Server.
Operation
The logfiles for Avira Update Manager can be accessed in the directory: /var/log/ium.
Log level
You can define which kind of messages are logged by editing the parameter:
<log_level value="info" />
•info
The default is info. It means that errors, warnings and some status messages will be
logged. You can decide on the extent of the log file by choosing how much detail is to be
logged. From error to debug the log file becomes more and more detailed, the default
info being the medium setting.
•error
In error-mode only errors are logged.
• warning
In warning-mode errors as well as warning are logged.
• trace
In addition trace superficially traces the service and saves it to the log.
• debug
Debug is the setting which delivers the greatest detail. When <log_level
value="debug" /> is chosen, the service is reproduced line after line in the log file, in
order to monitor at which passage in the code the service has encountered a problem.
Avira Update Manager - User Manual (Status: 17 Nov 2011) 48
Page 49

Operation
Log file backup
By default the Avira Update Manager creates only one single logfile. If you would like to
start a new logfile after every restart, set
<log_append value ="true" />
to false.
This also gives you the option of setting a maximum file size in kB by using the parameter:
<log_max_size value="1024" />
If this file size is reached, the current logfile is backed up and a new logfile is created.
The number of backups can also be limited via the following parameter
<log_backup_count value="10" />
The earliest backup will be deleted at the creation of a new one.
Avira Update Manager - User Manual (Status: 17 Nov 2011) 49
Page 50

Frequently Asked Questions (FAQ)
5. Frequently Asked Questions (FAQ)
What must I look out for when configuring the Avira Professional Security 2012 for
Windows?
Avira Update Manager generates the required update structure automatically! It is
important when updating via Fileserver/Share to enable the destination directory on the
server, so that the update can by carried out by the Avira Professional Security 2012 for
Windows.
5.1 Procedure for updating via Fileserver/Share
1. Under Configuration > General > Update, enable the via Fileserver/Share option.
2. Go to the
3. In the Download area, enter the path to the update folder in the destination directory
specified in Avira Update Manager.
Example:
file://192.168.1.1/AUM_share_name/update
4. Where necessary, enter the server login data in the Server Login area.
Configuration > General > Update > Fileserver tab.
5.2 Procedure for updating via Webserver (http)
1. Under Configuration > General > Update, enable the via Webserver option.
2. Go to the Configuration > General > Update > Webserver tab.
3. In the
to be downloaded.
Download area, enter the address of the webserver from which the updates are
Examples:
http://192.168.1.1:7080/update
http://server:7080/update
4. Where necessary, adjust the proxy server settings in the
Update > Webserver > Proxy
Avira Update Manager - User Manual (Status: 17 Nov 2011) 50
area.
Configuration > General >
Page 51

Frequently Asked Questions (FAQ)
5.3 Procedure for updating SAVAPI products
To update SAVAPI products supported by AUM (Avira AntiVir WebGate, Avira AntiVir
MailGate, Avira Server Security 2012 for UNIX, Avira Professional Security 2012 for UNIX),
you have to configure /etc/avupdate.conf by commenting out the internet-srvs line
and inserting three new lines:
--------------------------
#internet-srvs
intranet-srvs=http://iumserver:7080
product-root=/update
intranet
--------------------------
5.4 Avira Support
You can find more questions and answers in our Knowledgebase.
Avira Update Manager - User Manual (Status: 17 Nov 2011) 51
Page 52

This manual was created with great care. However, errors in design and contents
cannot be excluded. The reproduction of this publication or parts thereof in any form
is prohibited without previous written consent from Avira Operations GmbH & Co. KG.
Issued Q4-2011
Brand and product names are trademarks or registered trademarks of their
respective owners. Protected trademarks are not marked as such in this manual.
However, this does not mean that they may be used freely.
© 2011 Avira Operations GmbH & Co. KG.
All rights reserved. E&OE.
Avira Operations GmbH & Co. KG
Kaplaneiweg 1 | 88069 Tettnang
Germany
Telephone: +49 7542-500 0
Facsimile: +49 7542-500 3000
www.avira.com
 Loading...