

AVIRA SECURITY MANAGEMENT CENTER 2.5 - SUPPORT 03-2010, SECURITY MANAGEMENT CENTER 2.5 User Manual
Page 1
Avira Security Management Center | HowTo
Status: March 2010 1
Avira Security Management Center 2.5
Support
März 2010
www.avira.com
Errors in design and contents cannot be excluded
© Avira GmbH
Page 2

Contents
1. Installation of the SMC Server ........................................................................................ 3
2. Installation of the SMC Frontend .................................................................................... 6
3. Starting the SMC and Logon .......................................................................................... 6
4. Licensing of the SMC ...................................................................................................... 6
5. Installing the Software Repositories .............................................................................. 6
6. How to Install the Security Environment ....................................................................... 9
7. Configuration Settings of the SMC ...............................................................................10
8. Installation of the SMC Agents via the SMC Frontend .................................................10
9. Pull / Push Mode of the SMC Agent ..............................................................................13
10. Filtering groups ............................................................................................................15
11. Windows Installation ....................................................................................................18
11.1. “Unattended“ Installation of the SMC Agents .....................................................18
11.2. Installation of the Avira AntiVir Professional ......................................................18
11.3. Configuration of the Avira AntiVir Professional ..................................................20
11.4. Planning and Executing of Updates and Scans ..................................................24
11.5. Installation of the Avira AntiVir Server .................................................................25
11.6. Configuration of Avira AntiVir Server ..................................................................25
11.7. Planning and Executing of Updates and Scans ..................................................28
11.8 To reset or to transfer the Configuration ..............................................................29
11.9 Migration of the SMC 2.4 to 2.5 and AV8 to AV10 .................................................30
12. Automatic Product Installation ....................................................................................32
13. Automatic Synchronization with ADS/LDAP ..............................................................33
14. Administration of several IUMs via the SMC Frontend ..............................................33
17. UNIX ..............................................................................................................................36
17.1. Manual Installation of the SMC Agents for UNIX .................................................36
17.2. Installation and configuration of the Avira AntiVir UNIX Professional/Server ..36
17.3 Installation and Configuration of the Avira AntiVir UNIX Updater (for SMC) ......37
17.4. Installation and Configuration of Avira AntiVir UNIX WebGate ..........................38
17.5. Installation and Configuration of Avira AntiVir UNIX MailGate ..........................38
Page 3
Avira Security Management Center | HowTo
Status: March 2010 3
All installation files which are necessary for the installation and the manuals in
pdf format can be found on our website for being downloaded.
http://www.avira.
com
(http://www.avira.com/en/download/index.html).
1. Installation of the SMC Server
After having downloaded the installation file of the SMC and unpacked it on your
windows server, please, start the installation of the AntiVir Security Management
Center Server: AntiVir_Security_Management_Center_Server_en.exe.
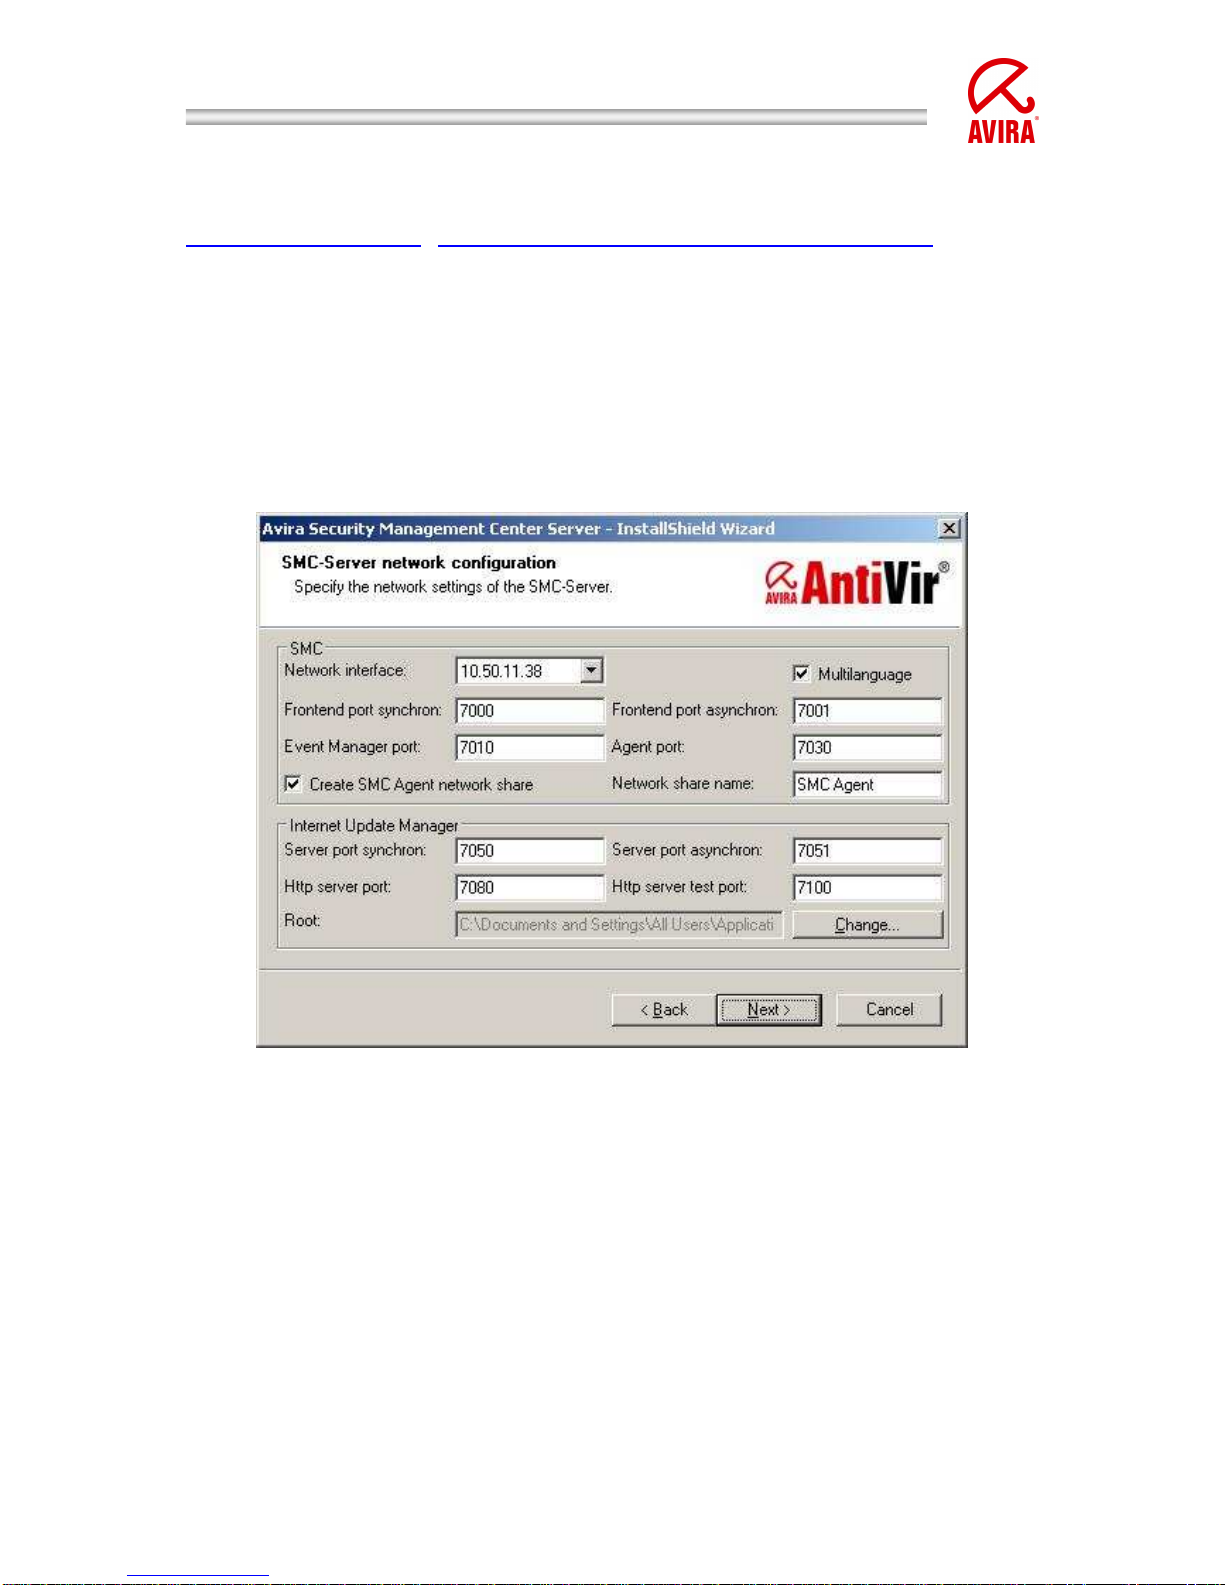
During the installation routine the following window will appear. Here you can
change the network configuration of the AntiVir Security Management Center
Server, if necessary.
Illustration 1 SMC – Installation Network settings
Make sure that the network ports „7000“, „7001“, „7010“, „7030“, “7050”,
7051”, “7080” and „7100“ are not yet used by any other application installed on
the server.
You can check this by means of the order „netstat –an“ which can be entered via
the command prompt.
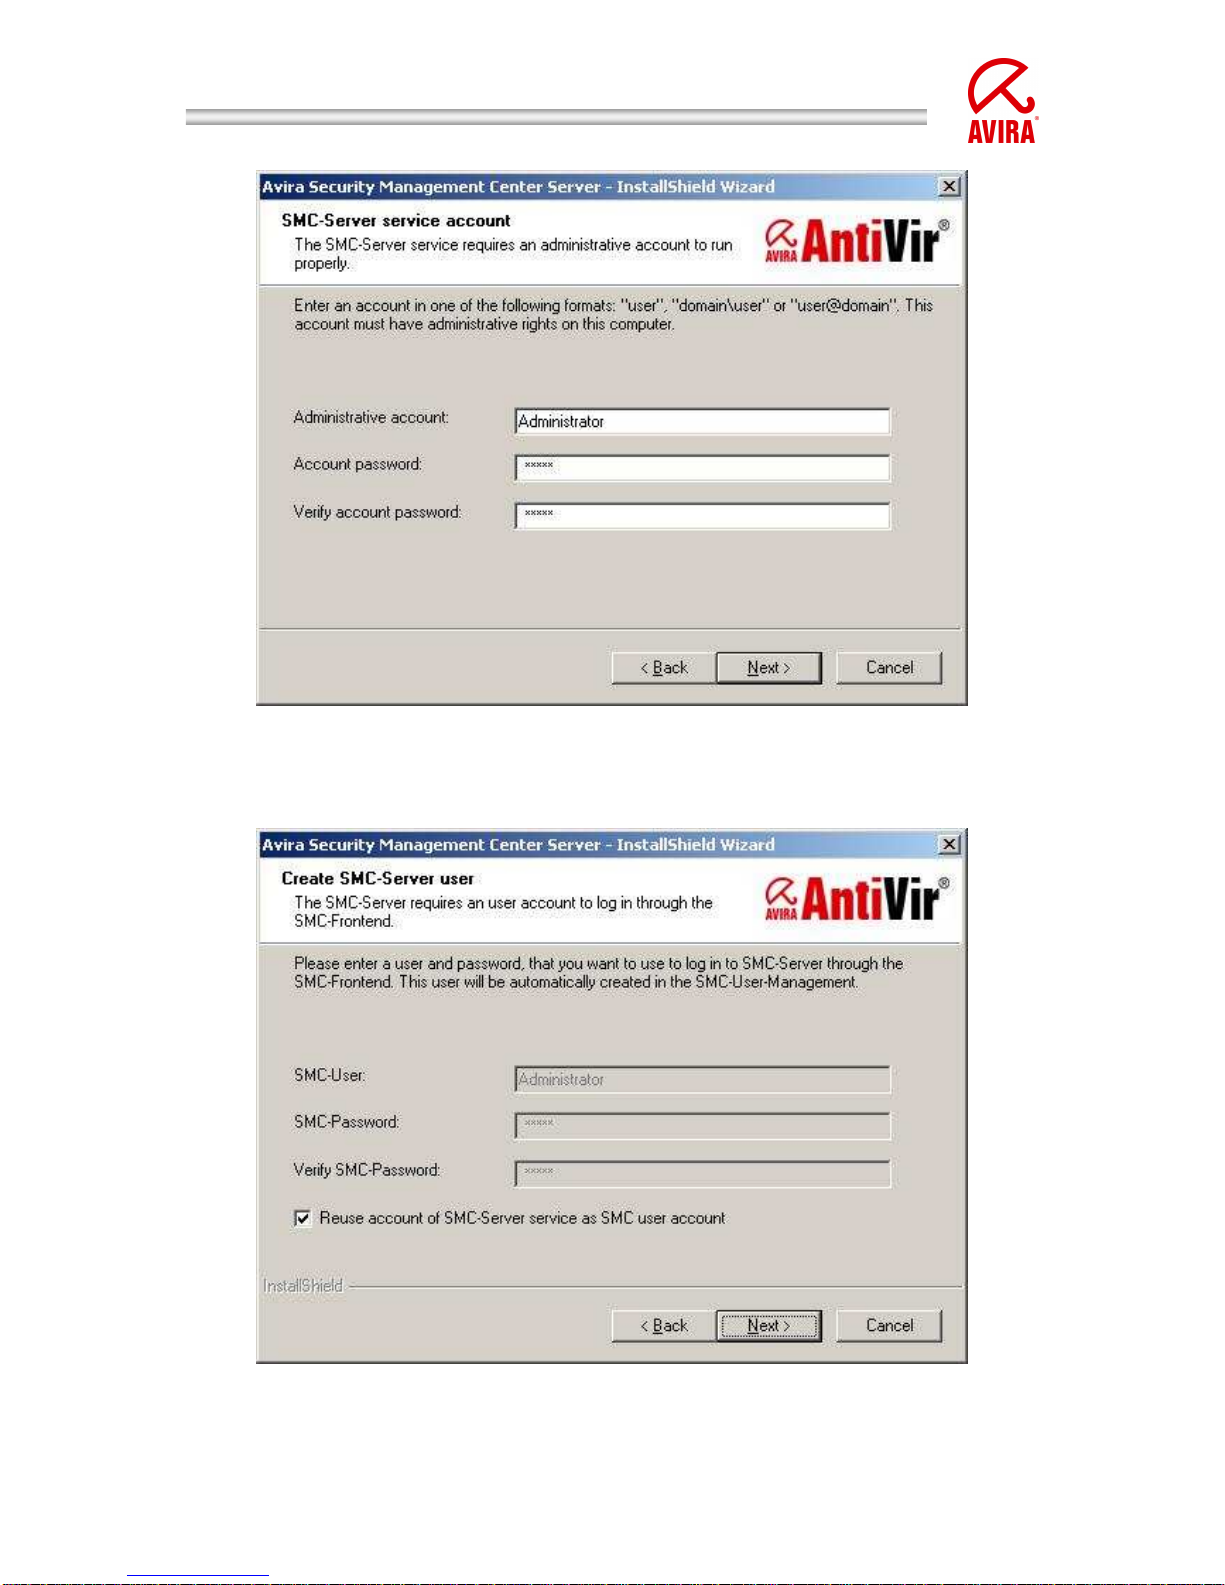
During the installation the following window will appear. In order to install the
necessary services you have to enter an administrator account (as the case may
by the domain administrator account) with the corresponding password:
Page 4
Avira Security Management Center | HowTo
Status: March 2010 4
Illustration 2 SMC – Installation
After you have clicked on “Next“, the following window appears:
Illustration 3 SMC – Installation user account
Page 5
Avira Security Management Center | HowTo
Status: March 2010 5
The activated Option “Reuse account of SMC-Server service as SMC user
account” means that you can login to the SMC with this user as “administrator”
(same Login data as the formerly entered windows administrator.)
By deactivating the option you can also enter a special SMC user who will be
used for the login to the SMC.
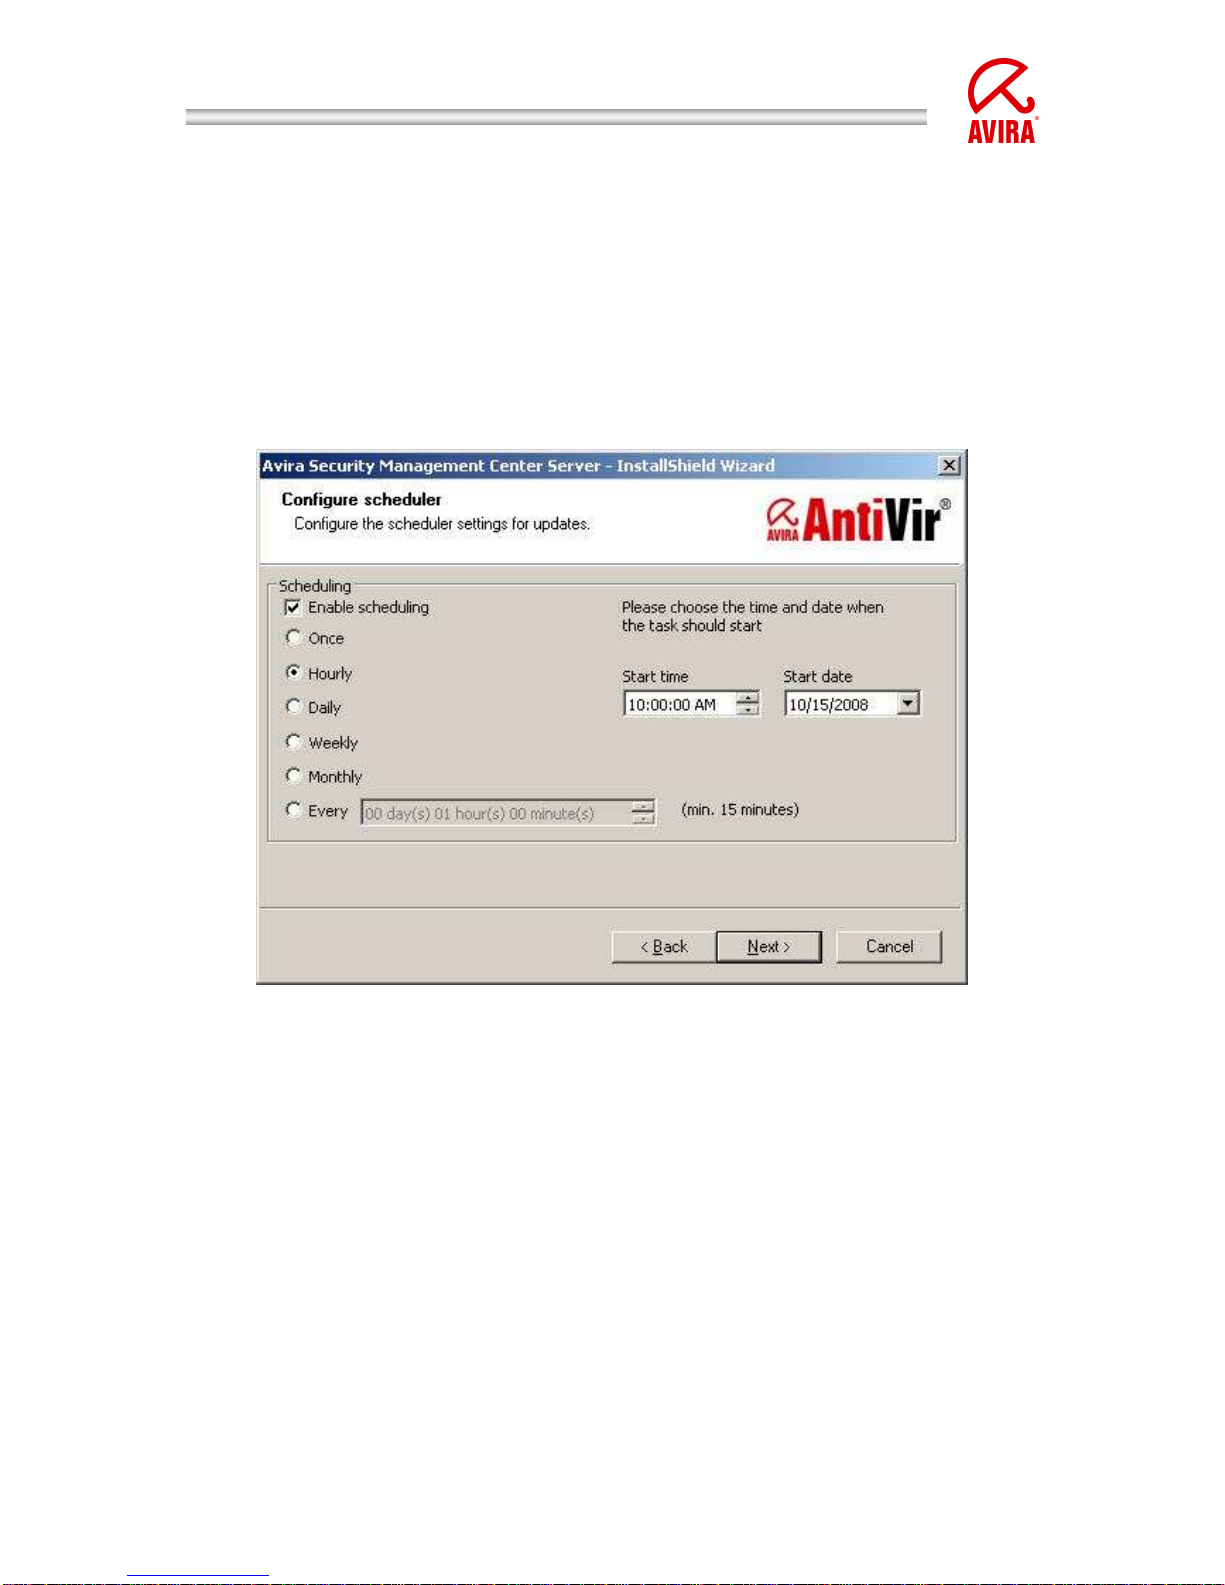
After that, a window will appear which allows you to configure the scheduler of
the Internet Update Manager. According to the settings, it will load the product
updates, the virus definition file and engine updates.
Illustration 4 Configuration Scheduler
Page 6

Avira Security Management Center | HowTo
Status: March 2010 6
2. Installation of the SMC Frontend
The SMC Frontend (Graphical User Interface) is necessary in order to configure
the SMC and has to be installed separately.
This can be done on the windows server or/and on the administrator’s
workstation PC.
Execute the file „AntiVir_Security_Management_Center_Frontend_en.exe“ for the
installation of the AntiVir Security Management Center Frontend and confirm the
appearing window by “accept”. Finish the installation via the installation
assistant.
3. Starting the SMC and Logon
The SMC is started via the start menu „Start“ „Programs“ „AVIRA“ „AntiVir
Security Management Center“ „Management Center“
In order to log on to the AVIRA Security Management Center Console, click on
„AVIRA Security Management Center Frontend“.
Please, enter the user (default: administrator) and the password you have used
during the installation. After that, click on “ok” in order to logon to the SMC.
Please, take care to change the mark from local computer to computer in the
network in case the SMC Frontend should not be installed on the SMC Server. In
such a case enter the IP address/hostname of the server on which the SMC
Server is installed. Alternatively you can choose it via “Browse”.
4. Licensing of the SMC
In case you should already have a valid license file „hbedv.key“ for the SMC, you
can implement it after the logon as follows:
Click on “AntiVir Security Management Center Frontend“ with the right mouse
button and then on “License”.
Via the now appearing window you have the possibility to import the SMC license
file.
5. Installing the Software Repositories
In order to be able to work with the SMC, the AVIRA products have to be
integrated into the SMC.
First download the necessary installation file(s) from our website.
www.avira.com (http://www.avira.com/en/download/index.html).
In order to add the installation file(s) as software to the SMC, click on “Software”
in the SMC Frontend with the right mouse button and then chose “New”
„Software“.
Page 7

Avira Security Management Center | HowTo
Status: March 2010 7
Via the now appearing window you can directly select the already downloaded
installation files in the self unpacking “exe” format
The formats „zip“ or for linux software packages „gz“ and „tgz“ are also possible.
After the software has been inserted, it will appear with a faded icon as a point in
the menu of the SMC software.
After the license file has been integrated into the corresponding software (this is
possible in the right half of the window) the icon for the software will appear in
solid colours.
Illustration 5 Software Packages
Confusing the license or saving an invalid license for the software package is not
possible with the new SMC version. Before saving the license will be checked for
validity.
The license which is integrated into the software package is only used for the
first installation of the software on the clients.
In case this license has expired, it has to be renewed for the corresponding
software for possible new installations of the AVIRA products on the clients.
Page 8

Avira Security Management Center | HowTo
Status: March 2010 8
The license on the already installed clients will not be renewed. This has
to be done separately via the copy function in the security environment
and the point “Installation” “AntiVir Professional” “Copy Files”
The installation files which were added via the software packages will be
automatically added to the Internet Update Manager which has been integrated
into the SMC.
The Internet Update Manager downloads the necessary updates for the software
packages and makes them available for the clients via http and the port which
was defined in the configuration of the Internet Update Manager (by default: port
7080). In order to proceed the updates automatically you should configure the
“planer” which is integrated in the Internet Update Manager (please, click with
the right mouse button on “Internet Update Manager” and choose “Plan
Update”).
The planer has to be activated first. The activation can be done via a right mouse
click on “Internet Update Manager” choose “planer” “Activate planer”.
Please, make sure that the Internet Update Manager has already proceeded the
first update before you update the clients. You can do that by a click with the
right mouse button on “Internet Update Manager” “Update now”.
If the function “Update automatically” is activated in the configuration of the
Internet Update Manager, the updates which are downloaded by the Internet
Update Manager will be loaded automatically via a command which is sent to the
clients. The corresponding update source (f. ex. http://10.50.11.91:7080/upd/)
will be included automatically.
The clients can also be updated independently of the “automatic updates” of the
Internet Update Manager. Please, note the chapter 11.4 in which the planning
and proceeding of updates and scans is described.
For further information about the “automatic updates” of the Internet Update
Manager, please, read the corresponding chapter in the SMC manual.
Page 9
Avira Security Management Center | HowTo
Status: March 2010 9
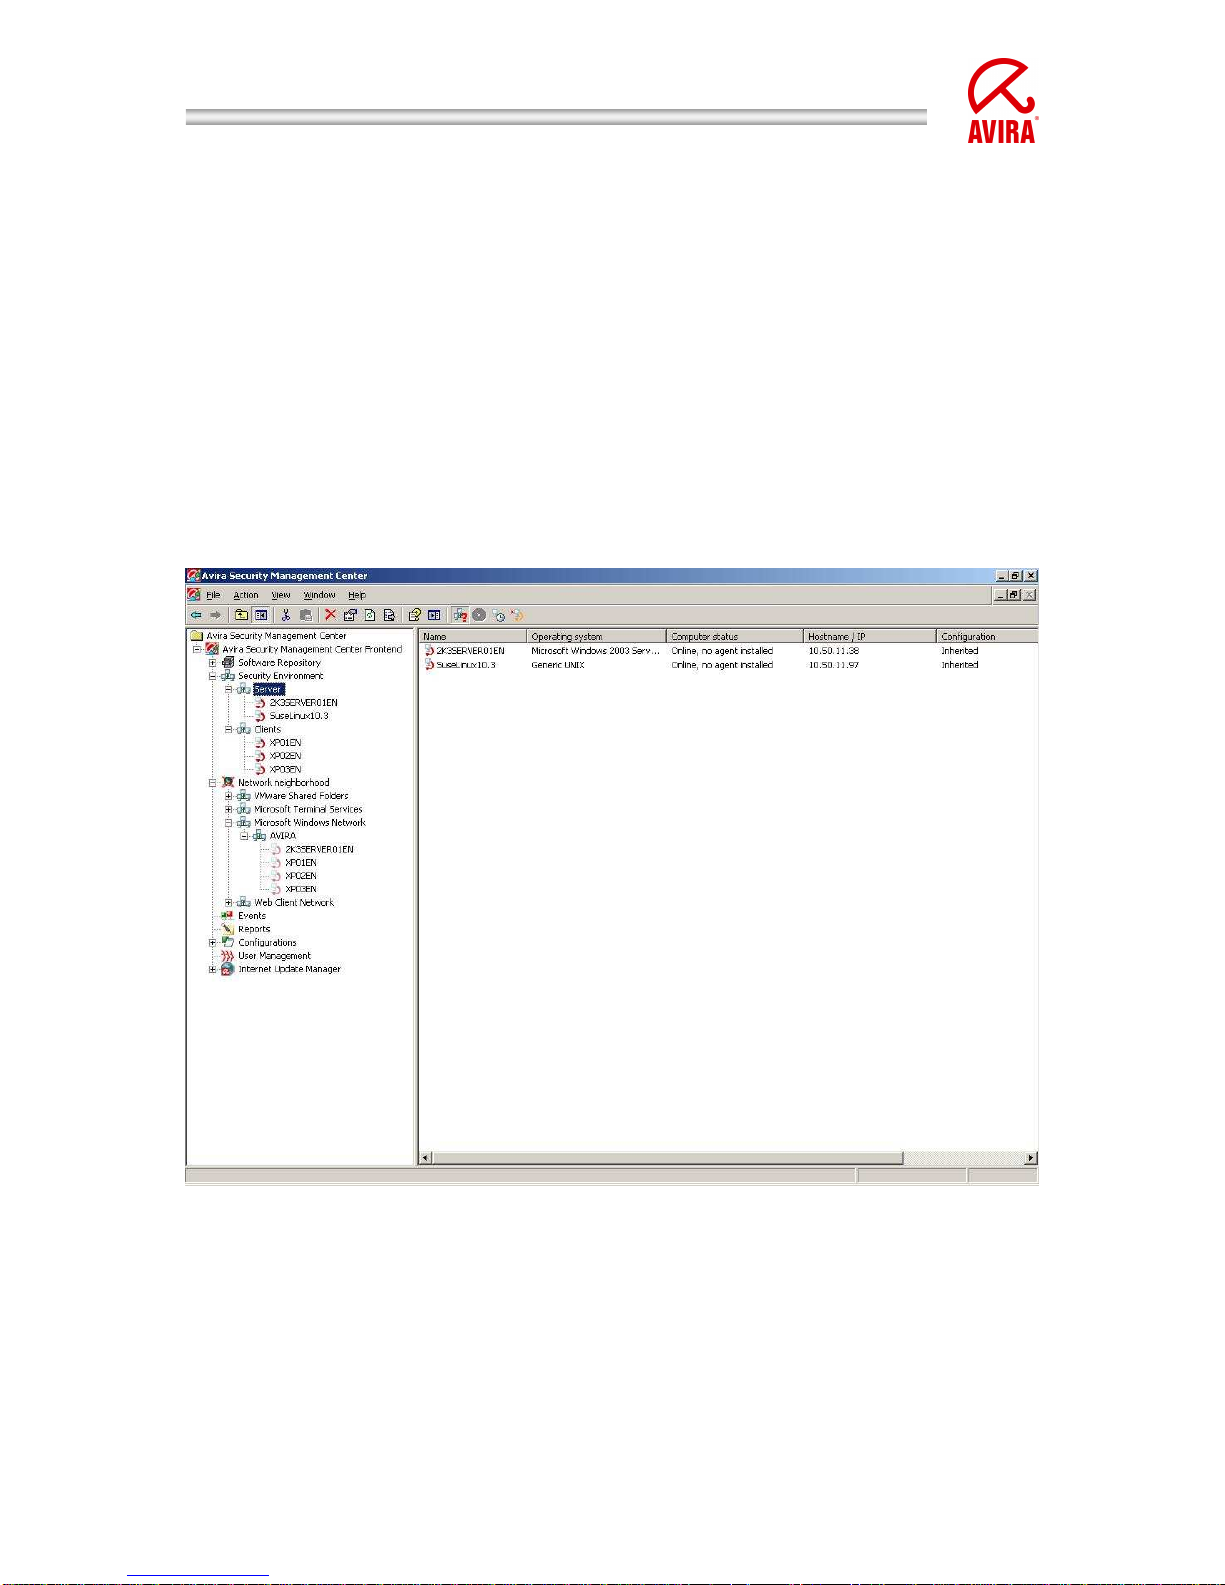
6. How to Install the Security Environment
The security environment consists of clients which shall be managed via the SMC
and can be organized in groups and subgroups.
A new group can be a subgroup of the security environment or of an already
existing group.
A group can be created by clicking on the designated place in the security
environment with the right mouse button and choosing “New” “Group“.
This example shows how the group “Server” and “Clients” are created.
You can drag the computers which are located in your network from the network
environment which is shown underneath the security environment into the
security environment or to created groups:
Illustration 6 Security Environment
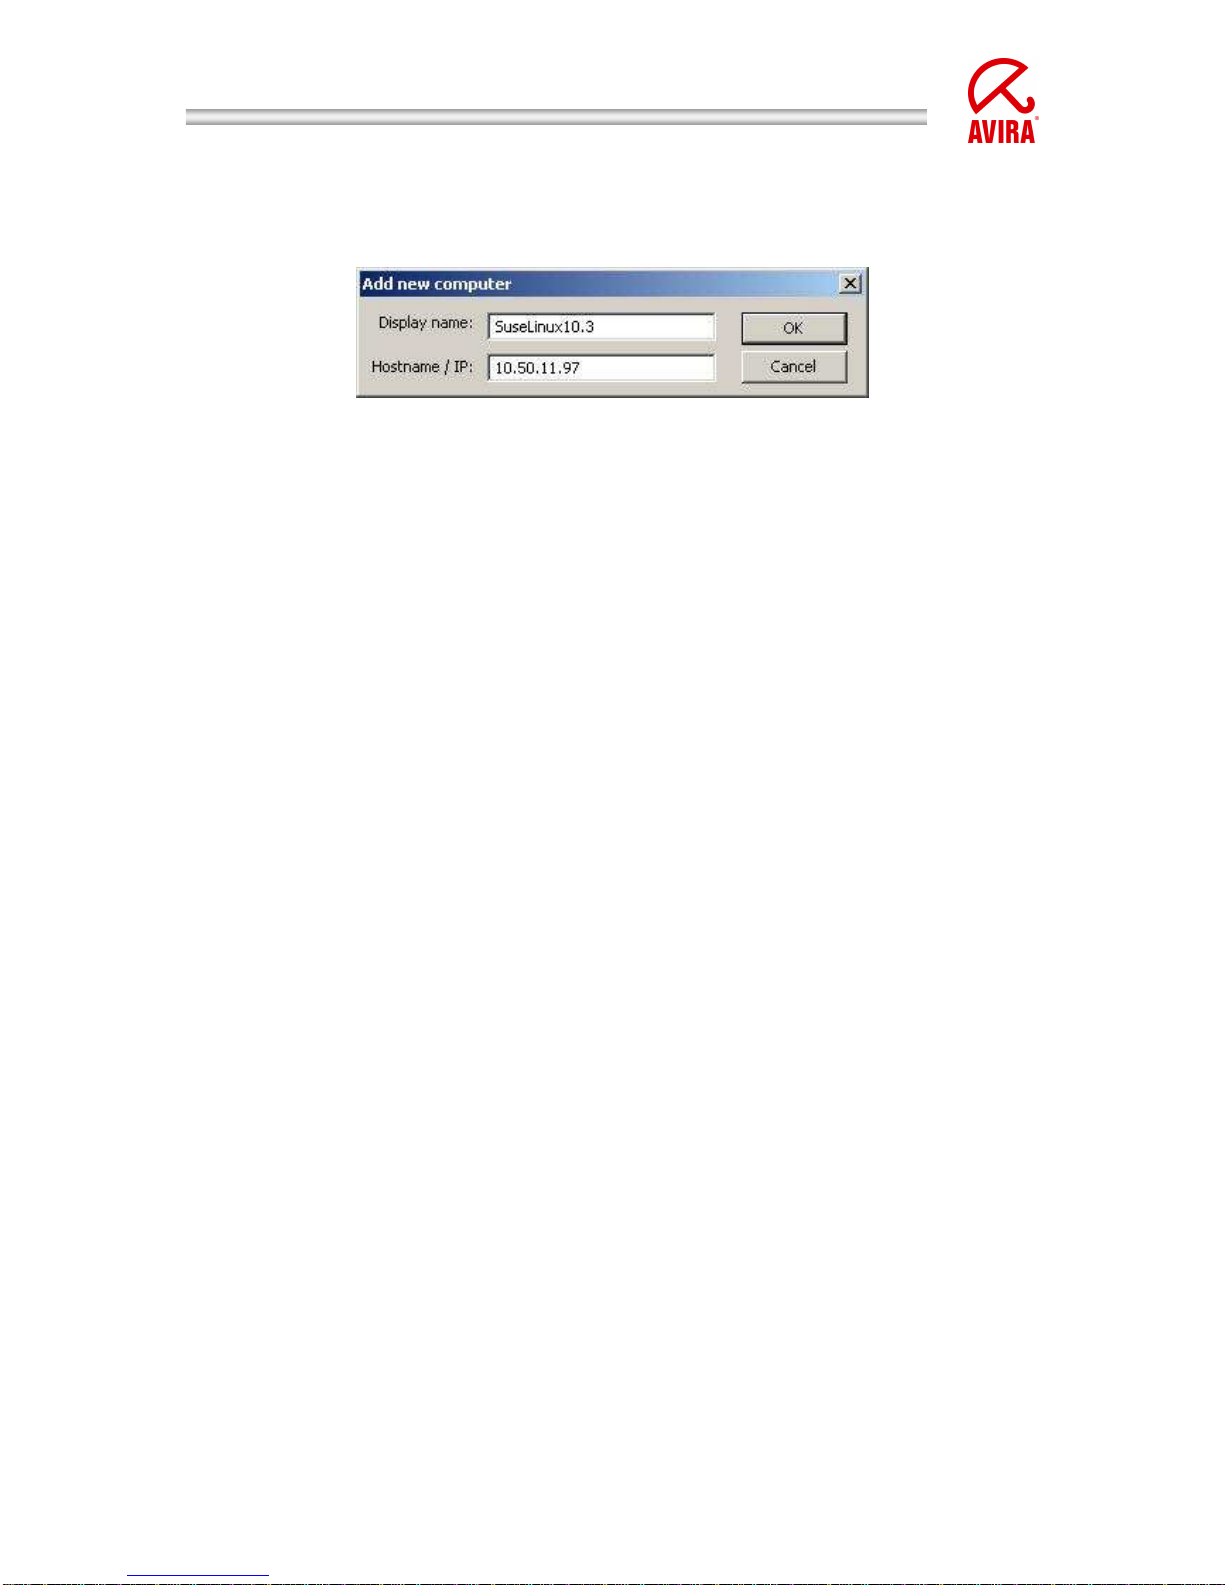
Computers which are not shown in the network, f. ex. linux clients, can be
manually added to a group
For this purpose click on the designated group with the right mouse button and
choose “New” “Computer”.
Then the following window appears which allows to name the computer via the
host name or the IP address.
Page 10
Avira Security Management Center | HowTo
Status: March 2010 10
Moreover a differing name can be given with which the computer will be shown
in the SMC:
Illustration 7 Security Environment
7. Configuration Settings of the SMC
The configuration of the SMC is divided into the following sections:
• General
• Server
• Internet Update Manager
• Alert Manager
The configuration allows defining general settings of the SMC. If you should use a
proxy server it can be entered beneath “configuration settings” “Internet
Update Manager” –> “Communication settings”. Further configuration settings
like f. ex. the configuration of the “Alert Manager” are explained in the SMC
manual.
8. Installation of the SMC Agents via the SMC Frontend
The SMC agent is responsible for the communication between the SMC Server
and the clients that have to be managed.
The agent has to be installed on the client in addition to the necessary virus
protection. This can be done directly via the SMC, manually or by means of a
script.
In order to enable the SMC Agent to communicate with the SMC Server the
following conditions have to be fulfilled:
−
Firewall: If a firewall is used on the client, the following network ports (TCP)
have to be opened:
Out (TCP): 7000, 7001, 7010, 7020, 7021, 7030, 7050, 7051, 7080, 7100.
In (TCP): 7030
Moreover ICMP requests, PING (incoming echo demands) have to be enabled.
−
Guest account: The user account “Guest“ has to be deactivated
−
The simple Filesharing (“Explorer” “Extras“ “Archive Options” “View”
“Use simple filesharing” (recommended)) should be deactivated.
Page 11
Avira Security Management Center | HowTo
Status: March 2010 11
−
The access from the SMC Server to the hidden filesharing “C$“ of the clients
has to be possible (\\<IP address Client\c$\).
−
For a smooth installation via the SMC a network wide, standardised user
account is indispensable.
The installation of the SMC Agents via the SMC is done by clicking in the security
environment on the corresponding client/group with the right mouse button and
choosing “Installation” “AntiVir SMC Agent“ “Install”.
The computers on which the SMC Agent is installed have to be powered on and
Windows has to be activated!
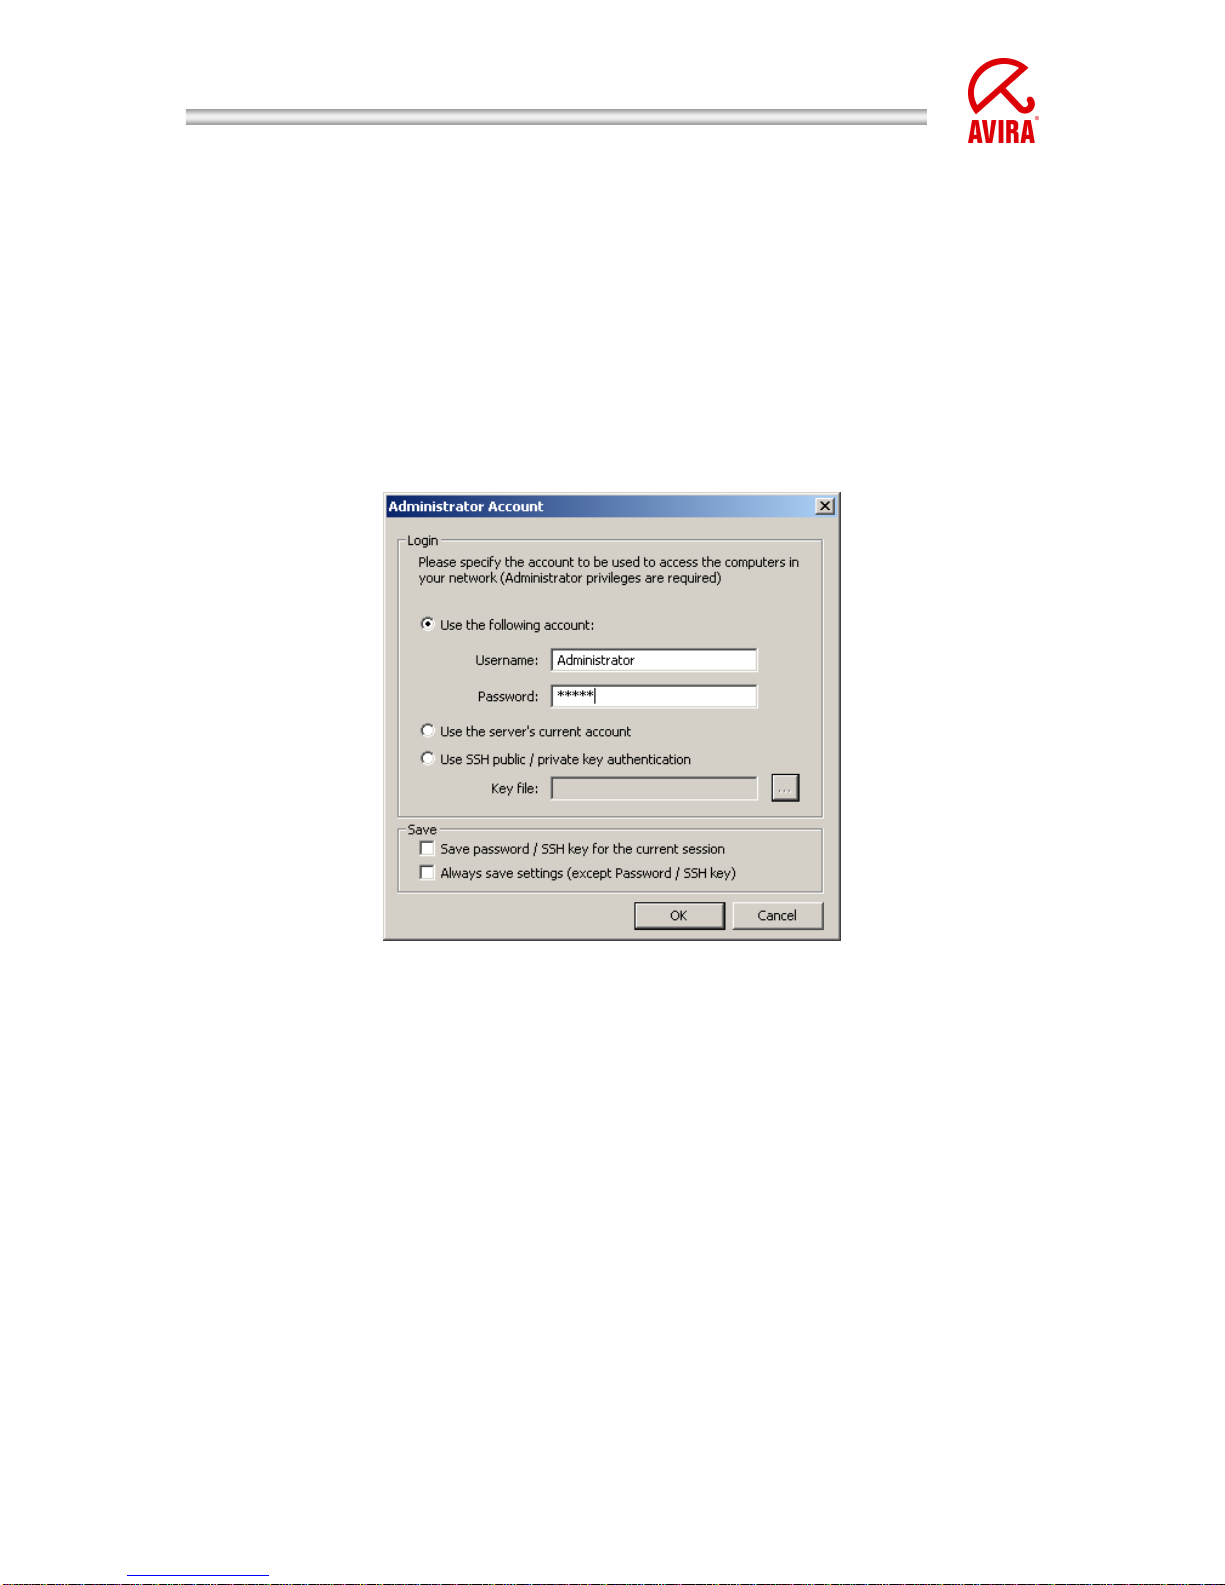
The following authentication window appears:
Illustration 8: SMC Agent Installation
Enter an existing user with administrative rights on the client into the field “user
name” and a corresponding “password”. For linux clients f. ex. the user “root”.
In case the account of the SMC server service also exists on the clients
(standardised local administrator login, domain administrator, …) you can also
choose the option “Use the current account of the server”.
For the installation via SSH (linux clients) you can additionally use SSH key for
the authentication. For this purpose choose the option “Use SSH public/private
key authentication” and enter the corresponding key.
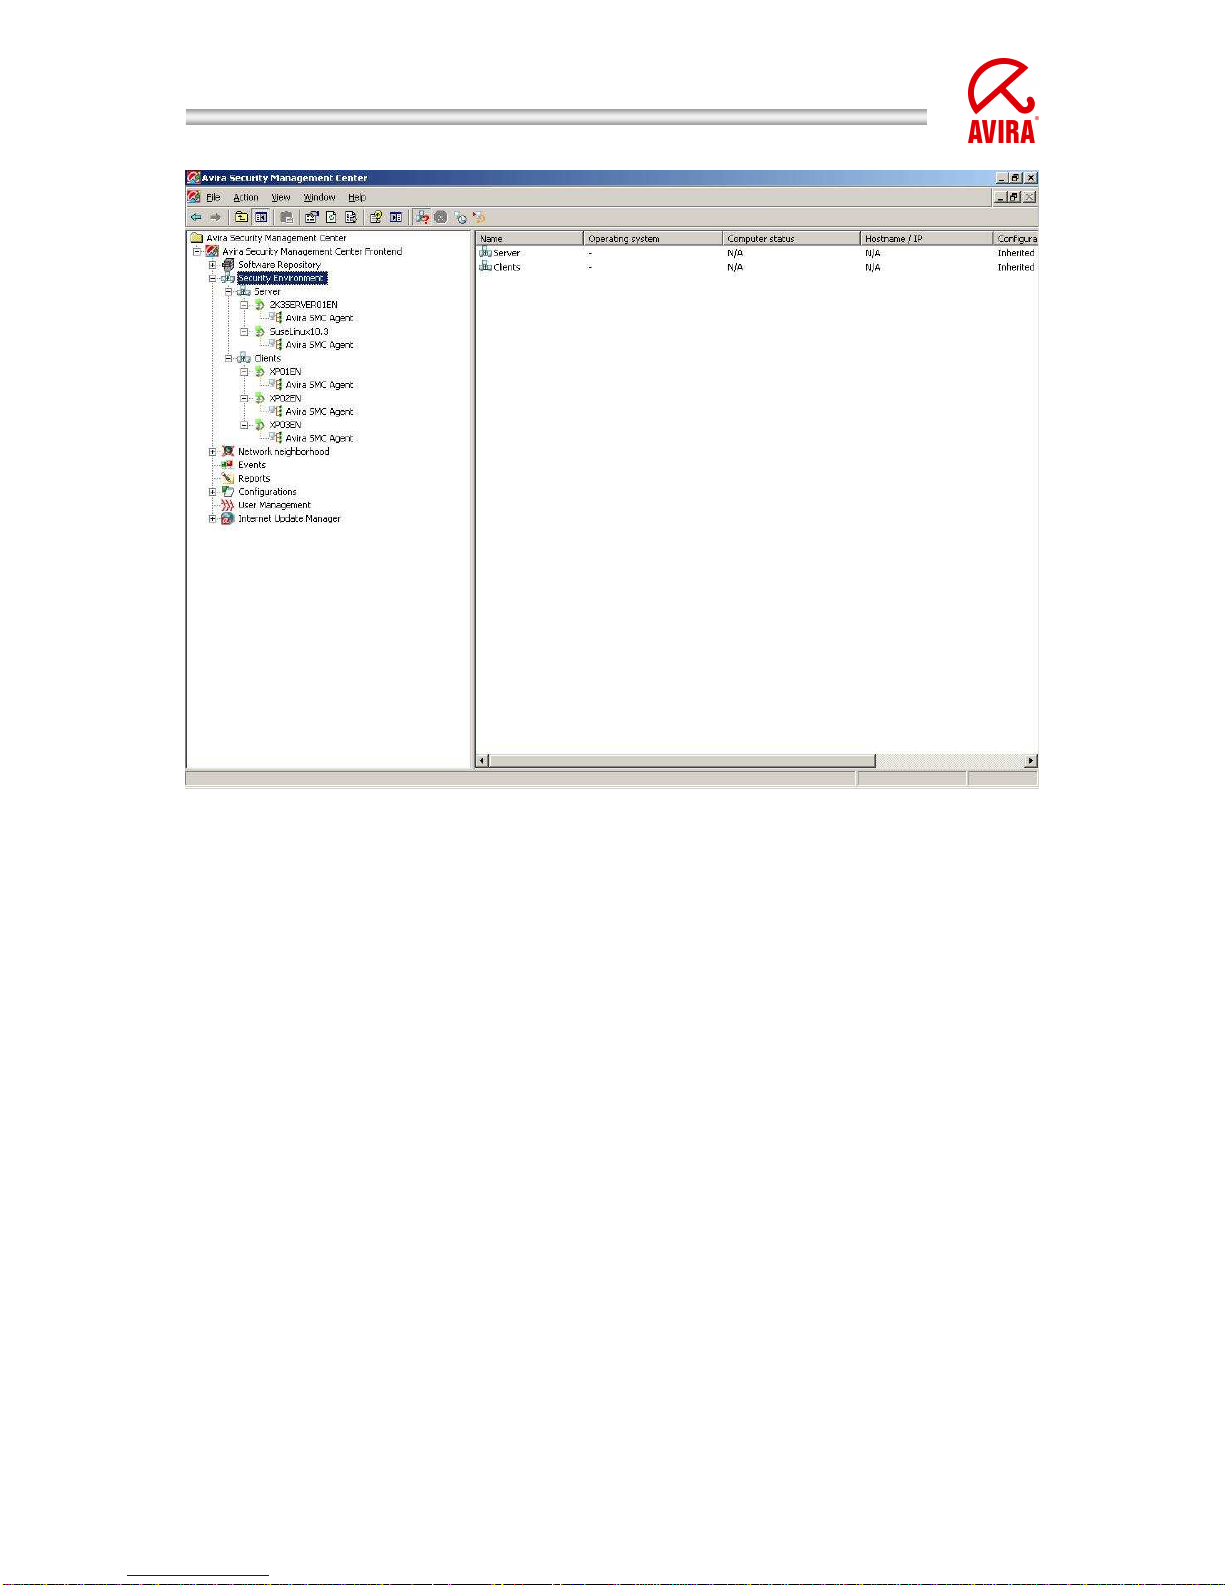
After the successful installation of the SMC Agent the client will be shown with a
green icon in the security environment (communication is working):
Page 12
Avira Security Management Center | HowTo
Status: March 2010 12
Illustration 9 Security Environment; installed agent
In order to uninstall click with the right mouse button on the designated
client/group and the choice of “Installation” “AntiVir SMC Agent” “Uninstall”.
The appearing pop-up window has to be confirmed with “Yes”.
Page 13

Avira Security Management Center | HowTo
Status: March 2010 13
9. Pull / Push Mode of the SMC Agent
After the installation the SMC works in the “push mode” by default. That means,
the SMC Server sends planned commands like updates or scans or f. ex. changes
in the configuration to the SMC Agent, which proceeds them on the
corresponding client.
For PC’s which are not reachable for the SMC Server at that moment an
“outstanding action” will be generated which will be executed as soon as the
installed agent connects to the SMC Server.
In the “push mode” the SMC Server tries to reach all computers. This causes a
heavy system load for a short time.
For an update command with an interval of one hour the data is sent f. ex. to
500 computers and an update of 2 MB is loaded by the Internet Update Manager.
This will happen at the same time on 500 clients and cause a system load of
(500x2MB) 1 TB in the network.
In order to reduce this network load, the SMC can be switched to “pull mode”. So
the SMC Agent will check if there are new “tasks” for it and proceed them. As
never all clients are started at the same time the planned update intervals will
not take place at the same time. Using the pull mode the same amount of data is
copied for an update but the system load is dispersed over a longer period.
A further advantage of the pull mode in comparison to the push mode is that the
SMC Agent checks for changes according to the configured interval. If it shouldn’t
find changes or if it shouldn’t reach the SMC Server the previous configurations
or tasks are retained. Configured update tasks are proceeded independently of
the SMC Server.
The change from the push mode to the pull mode is done in the configuration of
the SMC Agent via the SMC Frontend. It is possible to choose pull or push mode
separately for individual pc’s or groups.
In order to set the whole security environment on the pull mode, please, click
with the right mouse button on the “security environment” and on
“configuration” “Avira SMC Agent” “configure”.
In the configuration of the SMC Agent you will find the push mode in the field
“Data retrieval from server”. You can change that to “Pull”. The corresponding
minute interval for the connection of the SMC Agent to the SMC Server (by
default 60 minutes) can be defined via “Pull interval”.
Page 14

Avira Security Management Center | HowTo
Status: March 2010 14
Illustration 10: Configuration Agent 2.4
The configuration change of the SMC Agent is sent to the clients via the button
“Send now”.
The following functions can be proceeded via the pull mode:
• Product installation
• Product configuration
• Product commands
• Task management
• Progress bar of the clients
For technical reasons further functions like recalling the log files of the clients are
based on the push mode.
Page 15

Avira Security Management Center | HowTo
Status: March 2010 15
10. Filtering groups
The filtering groups offer a better overview in large networks. You can choose
certain computers to be displayed in one or several virtual group.
The following filters can be chosen for virtual groups:
• Computers which report an error status
• Computers which reports product error status like an module out of date
or a general module error
• Computers on which a special product is not installed
all products which are integrated beneath “software packages” can be
chosen
A filtering group shows a special overview of all clients which correspond to the
chosen filter criteria. Tha means the shown computers are not switched into the
virtual group but remain in their previous group. All actions which are proceeded
on the clients in the virtual group will be proceeded directly on the real
computers
Example:
In order to create a “filtering group” which filters clients that have not install an
AntiVir Professional you click with the right mouse button on “Security
environment”. The following window appears where you can enter a name for the
new “filtering group”:
Illustration 11: Creation of filtering groups – step 1
After you’ve clicked on “Next” the following window appears where you can
choose one of the offered “filtering groups” (f. ex. “filter computers which have a
specific product not installed”):
Page 16

Avira Security Management Center | HowTo
Status: March 2010 16
Illustration 12: Creation of filtering groups – step 2
After that you click on “Next” in order to get to the following options:
Illustration 13: Creation of filtering groups – step 3
Now you can choose one of the “Software packages”. In this example Avira
AntiVir Professional is chosen. After you have clicked on “Finish” a “filtering
group” named “missing virus protection” is created in the “Security
environment”.
In this group every computer is shown which has not installed the product AntiVir
Professional:
Page 17

Avira Security Management Center | HowTo
Status: March 2010 17
Illustration 14: Security Environment – Display Filtering Groups
Now you can install AntiVir Professional on the “filtered” clients.
For further details about the “Filtering groups” reading the SMC manual is
recommended.
Page 18

Avira Security Management Center | HowTo
Status: March 2010 18
11. Windows Installation
11.1. “Unattended“ Installation of the SMC Agents
Alternatively the agent can be installed manually with the setup file or
unattended (f. ex. integrated into the logon scripts).
On the SMC Server the following registry has been generated:
“C:\Documents and Settings\All Users\Application data\Avira\Avira Security
Management Center Server\Agent”
Please, enable this registry via the Windows enabling with writing access.
In case of an unattended installation it is not enough to start the file
“insallagent.bat” via the registry enabling. (\\<IP-address-SMCserver>\<Enabling(agent)>\installagent.bat).
The “insallagent.bat” starts the installation (setup.exe) of the SMC Agent and
uses the SMC Server information which is saved in the file “installsmcagent.iss”.
By generating a corresponding batch file (f. ex. uninstallagent.bat) for the
uninstallation of the SMC Agent the “uninstallsmcagent.iss” can be used.
Clients which were not integrated into the security environment before the
unattended SMC Agent installation will be listed in the new group “new
computers” and can be moved afterwards via drag & drop.
You have also the possibility to add new computers to existing groups by means
of the IP address. Therefore you can define an IP address or IP address sectors
as a property of a group. As soon as an SMC Agent is logging on to the SMC
Server for the first time the SMC will integrate it into the corresponding group
according to its IP address.
11.2. Installation of the Avira AntiVir Professional
All AntiVir products that are integrated into the software repository can be
installed via the SMC.
This can be done via a click with the right mouse button
on the designated group and then via “Installation” “Avira AntiVir
Professional” “Install”.
This applies to an installation of the Avira AntiVir Professional Version 10. In the
Version 8 the path to the installation is called “Avira AntiVir Workstation”.
Afterward the window “Setup Configuration” opens and you can choose the
components which shall be installed and the target path:
Page 19

Avira Security Management Center | HowTo
Status: March 2010 19
Illustration 15: Installation of AntiVir Professional 10
Here you can define an installation configuration for the whole security
environment or for special computer groups which is passed on to all computers
in that group via the check box. If you uncheck that box you can add or remove
individual components which differ from the standard configuration.
If clients which have already an installed agent are turned off an outstanding
action is generated. That means this action will be repeated as soon as the SMC
Agent logs on to the SMC Server.
Outstanding actions are shown with a red triangle on the left side of the client:
If clients are shown with a red exclamation mark (!) ( / / ), something is
wrong with the status of the installed product.
If clients are related to groups which are not shown with the possibility to
enlarge them the respectively shown red ! will not be recognized. In such a case
the red group icon will give a hint:
The error status (the cause of the red !) can be found out by clicking on the
client with the right mouse button and choosing “View” „Product Status”.
In such a case you can see that the update status is out of date.
An error status (red !) can also be caused by a not activated “AntiVir Guard”
(real time protection), “AntiVir Mailguard” (POP3/SMTP-Scanner), the “AntiVir
Planer” or “AntiVir WebGuard”:
Page 20

Avira Security Management Center | HowTo
Status: March 2010 20
Illustration 16: Modules
The reset of the status message that is shown by the red “!” can only be carried
out by removing the cause of the error message.
In our case it would be automatically reset after an update on the concerned
clients (a short waiting time up to a minute is possible).
“Module status” – “Not available” means that the update process has not a
module. So “Not available” is correct and not an error.
Deciding is the “Module error status”. Here you should have “ok” in the ideal
case.
In case of an error, f. ex. during the installation of the AntiVir SMC Agent or of
any other Avira products a red stop sign appears.
This error message can be seen via a click with the right mouse button on the
client and then via “Views“ “Error Messages”.
Just consider with which colour the stop icon is shown!
= Error Message
= Warning/Hint
Stop messages are not automatically reset. They remain even if the cause of the
stop message has already been removed. They have to be reset by a mouse click
with the right mouse button “Reset Error Status”
11.3. Configuration of the Avira AntiVir Professional
Via the SMC all functions are available that can be adjusted locally at the client.
In order to get to the configuration of the Avira AntiVir Professional click on the
group that has to be configured with the right mouse button and choose
“Configuration” „AVIRA AntiVir Professional “Configure”.
The configuration of the Avira AntiVir Professional opens. Here you can make
changes similar to the local configuration of the client.
Page 21

Avira Security Management Center | HowTo
Status: March 2010 21
If you administer clients of Avira AntiVir Professional Version 8 the path to the
configuration is “AntiVir Workstation configure”.
In case of AntiVir Professional 8 XML templates are used for the configuration:
Illustration 17: XML template of the AntiVir Professional 8
In the Avira AntiVir Professional Version 10 gui plugins were installed by which
the layout of the configuration gui is nearly identical to the gui of the clients.
That is why you see in the Avira Professional 10 the same menu as you would
find them on the local client:
Page 22

Avira Security Management Center | HowTo
Status: March 2010 22
Illustration 18: Configuration of the AntiVir Professional 10
The Update configuration can be found in each configuration of the clients
underneath the point “General” and “Update”.
Change the configuration in order to proceed f. ex. central updates.
Choose the update procedure “via internet“ or “via fileserver/share.
In case of the update “via webserver” you have to consider that the clients will
not inevitably download the updates via the internet.
On the contrary the use of the http protocol is meant here. The update is done
via a webserver which also can be located in a local network (not in the
internet). The SMC 2.0 offers you an already included Internet Update Manager
which also works as a webserver on port 7080. Please, note the detailed
information given in the SMC manual.
The advantages of using http for the updates are:
- Several update servers can be entered; in case the first one cannot be
reached the following registered one will be used
In case of the configuration of a laptop the internal webserver can be
named as the first update server and the internet update server of AVIRA
can be defined as the second update server. If the laptop is used far from
the enterprise network the updates will be done via the second update
server, the AVIRA server.
- It is not necessary to care about the authentication of the share which is
important for the use of “via filesharing”.
Page 23

Avira Security Management Center | HowTo
Status: March 2010 23
The configuration of the update „via webserver“ can look as follows using the
Avira AntiVir Professional 10:
Illustration 19: Configuration of the AntiVir Professional 10
The configuration of the updates „via filesharing“ in the AV10 can look as follows:
Illustration 20: Configuration AntiVir Professional 10 – Update via file server
Page 24

Avira Security Management Center | HowTo
Status: March 2010 24
Using the update option “via filesharing“ you should not forget to enable the
destination directory “httproot” (root directory for the updated files) of the
Internet Update Manager via the file system (read access is sufficient).
This directory is normally located in:
“C:\Documents and settings\All Users\Application data\Avira\Avira Internet
Update Manager\HttpRoot\”
Also the „Server Login Name“ and the „Server Login Password“ should be
configured, so that the updater can load the updates even if the user login on the
client has not yet taken place.
After you have chosen and configured an update possibility, it can be sent via a
click on “Send Now” to the clients.
For clients that are deactivated when the configurations are transmitted an
outstanding action will be generated.
The “outstanding action” will be carried out as soon as the client will be activated
and the SMC Agent will have registered to the SMC Server.
11.4. Planning and Executing of Updates and Scans
An update or scan order can be executed by clicking with the right mouse button
on the designated group in the SMC and after that click on “Command”
“AVIRA AntiVir Workstation” “Start Update / Scan”.
Via the window which opens now you can choose “Schedule this command”. This
command executes updates or scans automatically at particular times and after
specified periods.
If the button “Schedule this command” is not activated, an update or scan is
executed at once (depending on the command).
The execution of commands “Update” or “Scan” are nearly the same. The only
difference consists in the different possibilities of execution. This is why a
detailed description of the command “Scan” is left out. Further details can be
found in the manual.
Page 25

Avira Security Management Center | HowTo
Status: March 2010 25
11.5. Installation of the Avira AntiVir Server
The Avira AntiVir Server has to be integrated into the “software packages” just
like the Avira AntiVir Professional in order to be installed and configured via the
SMC.
The installation procedure is similar to the Avira AntiVir Professional and
therefore is not described here. For further information of the AntiVir Server
installation, please, read the manual.
11.6. Configuration of Avira AntiVir Server
Via the SMC all functions and configurations are available which can be adjusted
locally at the Avira AntiVir Server.
You get to the configuration of the Avira AntiVir Server via the SMC with a right
mouse click on the group you want to configure. Choose “Configuration”
“AntiVir Server” “Configure“.
The configuration of Avira AntiVir Server opens. Here you can make changes
similar to the local configuration at the Avira AntiVir Server.
The update configuration is located in the menu of the register „Updates“.
Change the configuration here in order to be able to execute f. ex. central
updates.
You can choose here the update procedure “via a webserver (intranet)” or “via
fileserver / share”.
Depending on the kind of update you have chosen, the update path has to be
configured.
Illustration 21 Update scheduler AntiVir Server 10
Page 26

Avira Security Management Center | HowTo
Status: March 2010 26
If the update shall be loaded via “Fileserver/Share” the target folder of the
Internet Update Manager “HttpRoot” has to be enabled via the file system
(reading rights are enough). The configuration of the update can be seen in the
screenshot above.
The “Server Login Name” and the “Server Login Password” are important to be
configured, so that the Updater can load updates even if the user login to the
Windows Server has not yet taken place or if the user who is signed in has no
access rights to the update registry.
Illustration 22 Configuration AntiVir Server 10 – Update via file server
Page 27

Avira Security Management Center | HowTo
Status: March 2010 27
An update via the webserver which is offered by the Internet Update Manager is
also possible. The internet update will be changed, so that “dl.antivir.de/update“
isn’t used as the update source but the webserver of the internet updater is
called. The example for the configuration “ via webserver (intranet) is shown in
the following screenshot.
Illustration 23: Configuration AntiVir Server 10 download server
Page 28

Avira Security Management Center | HowTo
Status: March 2010 28
11.7. Planning and Executing of Updates and Scans
In order to execute an update or a scan command via the SMC you have to click
with the right mouse button on the designated group and then on “Commands”
“AntiVir Server” “Start Update/Scan”:
Illustration 24: Start update / scan task
As the planning of the updates or scans is similar to the procedure regarding the
Avira AntiVir Professional it will not be described here. Further information can be
found in the manual.
Page 29

Avira Security Management Center | HowTo
Status: March 2010 29
11.8 To reset or to transfer the Configuration
If a configuration about the “security environment” is modified for one product it
will be transferred to all pc’s in the “security environment” respectively in the
subgroups.
Exception:
In case a subgroup/pc has been separately configured in a special way by
deactivating the option “Transfer configuration” this group/pc will keep its
configuration and will not accept the superior configuration.
In order to make sure that the special configured subgroup/pc accepts the
superior configuration the special configuration of the subgroup/pc has to be
reset (“configuration” “Avira AntiVir Professional” “Reset all”).
Example:
The function “Transfer configuration” has been deactivated for the subgroup
“clients” and it has been configured in a way that the expert mode is not shown.
Via the superior group “security environment” a configuration has been chosen
which shows the expert mode.
The group “clients” will not accept this configuration as a special configuration
has been made here. If the configuration of the “security environment” shall be
accepted the configuration of the group “clients” has to be reset. Click with the
right mouse button on the group “clients” and choose “Configuration” “Avira
AntiVir Professional” “Reset all”.
In order to see which groups or pc’s have a transferred or a special configuration
click on the corresponding superior group (f. ex. “security environment”)
In the right half of the Security Management Center Frontend you can see if the
configuration is “special” or “transferred”.
Illustration 25: Security Environment transferred or specific configuration
Page 30

Avira Security Management Center | HowTo
Status: March 2010 30
11.9 Migration of the SMC 2.4 to 2.5 and AV8 to AV10
In order to be able to use the new version of AntiVir Professional in you network,
it is necessary to update the Security Management Center and the Agent first. In
the Version 2.5 of the SMC an agent is integrated which allows the allocation and
the administration of the AntiVir Professional Version 8, the AntiVir Server 8 and
the Version 10.
So you can update only a view computers or groups to AV10 in order to test it in
the network. Afterwards you can update you network group by group.
There are the following possibilities for an update to the version 2.5:
Update
Right mouse click on the Avira Security Management Center Frontend
Chose start update: start server – update
Choose start update: Frontend
Right mouse click on group or client: start Avira SMC Agent update
Hint: During the update of the SMC Server and the Frontend the connection of
the frontend is interrupted. You have to log on again after the update.
Please, check afterwards if the update of all SMC components server, frontend
and agent has worked properly. The SMC server and frontend versions can be
found in the menu bar beneath “? – Info about Avira Security Management
Center Frontend”, the version of the agent can be found in each client in the
menu product versions via the report “Administered computers”.
Installation
Download the latest version of the SMC from our homepage and unpack
the setup files for the server and the frontend. Both have to be updated.
Then start the setup file for the SMC server. The program will tell you to
uninstall the version 2.4. Please, confirm that and enter in the following
window that you don’t want to delete your user data.
After that execute the setup of the SMC server and frontend as usual and
update the agent of the client to the version 2.5 like described before
Administration AV8 and AV10
After having updated the SMC server and the frontend you can allocate the AV10
via the SMC by inserting the corresponding software package.
In order to install AntiVir Professional 10 on an already existing PC in the security
environment you have to install the new agent on it. This update is automatically
proceeded by the SMC server by default.
Page 31

Avira Security Management Center | HowTo
Status: March 2010 31
After the uninstallation has been finished on all PCs, please, install the new agent
which is included in the SMC:
During the allocation of the AV10, please, note that the version 8 has to be
uninstalled before the installation of the AV10.
Attention: After the uninstallation of the version 8 a restart of the client is
necessary before the installation of the AV10. Without a restart of the client the
installation is broken off with an error message.
If the setup file of the AntiVir Professional 10 shall be executed locally on the
client after the update of the SMC agent, the setup file uninstalls automatically
the version 8 and installs the new version after a restart.
Page 32

Avira Security Management Center | HowTo
Status: March 2010 32
12. Automatic Product Installation
The SMC Version 2.5 offers the possibility to define an automatic product
installation. This function installs the defined product automatically on all
computers which are moved into a certain groups.
Click with the right mouse button on a group, “Installation” “Products”. After
that you can select the software packages.
Illustration 26: Automatic product installation
Page 33

Avira Security Management Center | HowTo
Status: March 2010 33
13. Automatic Synchronization with ADS/LDAP
The already given possibility to synchronize the SMC Security Environment
with ADS or LDAP has been extended. Now you can proceed that via the
scheduler.
Click with the right mouse button on security environment and select
“Plan synchronization”. You can select how to proceed the synchronization
as usual. Finally you insert a task which automatically proceeds the
synchronization in the future.
14. Administration of several IUMs via the SMC Frontend
In case of several standalone IUMS (e.g. for several subsidiaries), you had to
administer them via separate IUM frontends. The SMC 2.5 allows you to
administer several IUM servers via the SMC frontend.
You can add a new IUM as follows:
Right mouse button on “Avira Internet Update Manager” “New” “Add IUM
Server”. After the IUM Server or several IUM servers have been added into the
SMC-Frontend, a product synchronization is proceeded automatically.
Illustration 27: Administration of several IUMs via the SMC Frontend
Page 34

Avira Security Management Center | HowTo
Status: March 2010 34
15. General Hints / Information
INFO Bubbles:
When you slide over the configuration icons in the SMC with the mouse curser, yellow
information windows will appear which give you helpful hints.
ICONS of the SMC:
There are several icons which can appear in the SMC. They are described in the following:
= Error message
= Warning / Hint
= The client is activated; the Agent is installed and the
communication works
/ / / = Check product status
= The Client is deactivated/cannot be reached; Agent is not
installed
= The Client is deactivated/cannot be reached; Agent is
installed
= The Client is deactivated/cannot be reached; Agent is
installed; outstanding action
= Client is activated, Agent is not installed
= PC is activated; Agent is installed but cannot be reached
= Sandglass, the client is connecting to the SMC Server or is
occupied with the commands of the SMC
= Symbol of the agent which is installed on the client
/ = Valid software package without integrated license file
„hbedv.key“
/ = Valid software package with integrated license file
„hbedv.key
/ = Software package is installed on the client
Page 35

Avira Security Management Center | HowTo
Status: March 2010 35
ID of the Software Packages:
In case you should get the message “Missing software package with ID XX” the
software package is not integrated or it is integrated with an old and defective
version:
Software ID = Software package
33 = SMC-Agent
30 = AntiVir Server 7 DE
31 = AntiVir Server 7 EN
51 = UNIX Server
71 = UNIX Workstation/Professional
91 = UNIX MailGate
111 = UNIX WebGate
121 = UNIX Updater
200 = AntiVir Professional 8 German
201 = AntiVir Professional 8 English
202 = AntiVir Professional 8 Russian
203 = AntiVir Professional 8 Spanish
204 = AntiVir Professional 8 Italian
205 = AntiVir Professional 8 French
250 = AntiVir Server 8 German
251 = AntiVir Server 8 English
252 = AntiVir Server 8 Russian
253 = AntiVir Server 8 Spanish
254 = AntiVir Server 8 Italian
255 = AntiVir Server 8 French
500 = AntiVir Professional 10 German
501 = AntiVir Professional 10 English
502 = AntiVir Professional 10 Russian
503 = AntiVir Professional 10 Spanish
504 = AntiVir Professional 10 Italian
505 = AntiVir Professional 10 French
600 = AntiVir Server 10 German
601 = AntiVir Server 10 English
602 = AntiVir Server 10 Russian
603 = AntiVir Server 10 Spanish
604 = AntiVir Server 10 Italian
605 = AntiVir Server 10 French
Page 36

Avira Security Management Center | HowTo
Status: March 2010 36
17. UNIX
17.1. Manual Installation of the SMC Agents for UNIX
You can install the SMC agent also in a manual way.
The needed product package is called:
AntiVir_Security_Management_Center_UNIX_Agent.tgz and can be downloaded
from the internet.
The package is called AntiVir_Security_Management_Center_en.zip and the file
AntiVir_Security_Management_Center_UNIX_Agent.tgz can be extracted with the
command unzip AntiVir_Security_Management_Center_en.zip
AntiVir_Security_Management.tgz in an unix environment.
Save the file in a directory of your choice on you computer on which the SMC
Agent shall work, f. ex. in \tmp.
Unpack the package:
tar xzvf AntiVir_Security_Management_Center_UNIX_Agent.tgz
Change to the installation directory:
cd AntiVir_Security_Management_Center_UNIX_Agent
Install the SMC Agent:
./install --server=HOST[:PORT] --display-name=<SMC display name>
The IP address of the server and the SMC display name have to be given. The
name of the server port can be given optionally. This is only necessary if the
SMC Server does not use the default ports for the communication with the SMC
Agent.
17.2. Installation and configuration of the Avira AntiVir UNIX
Professional/Server
The AV Guard can only be used via the SMC if the dazuko module can be loaded
automatically by means of the command modprobe or has already been loaded.
Details about the translation and installation of dazuko can be found in the
HowTo on the website http://www.dazuko.org.
Before you can start with the installation the product package for Avira AntiVir
UNIX Professional and Avira AntiVir UNIX server has to be added to the product
packages of the SMC and a license has to be entered.
The package is called antivir-workstation-prof-<version>.tar.gz or antivir-serverprof-<version>.tar.gz. The packages can also be downloaded from the website
http://www.avira.com.
In order to start the installation of Avira AntiVir UNIX Professional/Server click on
the knot security environment and as the case may be on the group or the
computer where the AntiVir Unix Professional/Server shall be installed.
Click with the right mouse button on the group/the computer and choose
Installation/Avira AntiVir Professional/Server (UNIX)/Install. The dialogue window
Installation appears and has to be confirmed with OK.
Page 37

Avira Security Management Center | HowTo
Status: March 2010 37
The AV Guard is started automatically during the booting but it is not started
after the installation. This is shown in the SMC with the icons “Check product
status”. In order to start the AV Guard click with the right mouse button on the
group/the computer and choose “Avira AntiVir Professional” “Server (UNIX)”
“Start”.
If the Guard cannot be started and the error status remains it is possible that
dazuko (file access control) is missing on the server or has not yet been loaded.
All directories are supervised by the guard during an installation via the SMC.
Which directories shall be controlled can be changed in the registry “Basic
Settings” of the configuration. Click with the right mouse button on the
group/the computer and choose “Configuration” “Avira AntiVir Professional”
“Server (UNIX)” “configure”. We recommend to supervise only a few
important directories (f. ex. enable share).
Details about the configuration of Avira AntiVir UNIX Professional/Server can be
found in the manual for Avira AntiVir UNIX Server (chapter 4 configuration).
For the configuration of the updater via the SMC a different software package,
the Avira AntiVir UNIX Updater (for SMC) is needed. The installation and
configuration is described in a chapter of this document. This concerns only Avira
AntiVir MailGate 2, Avira AntiVir WebGate 1 and Professional 2+ Server 2.
17.3 Installation and Configuration of the Avira AntiVir UNIX
Updater (for SMC)
The Avira AntiVir UNIX Updater (for SMC) allows to proceed all configurations
about the update and to start and to stop the automatic Internet Updater. It can
be used with all Avira AntiVir products for UNIX. Avira AntiVir MailGate 3 /
WebGate 2 use a new updater
The necessary software package is antivir-updateplugin-prof-<version>.tar.gz. It
has to be added to the software packages of the SMC just like the other product
packages.
The package can be downloaded from the website http://www.avira.com.´
In order to start the installation of the Avira AntiVir UNIX updater (for SMC) click
on the knot security environment and as the case may be on the group/computer
where the AntiVir UNIX (for SMC) updater shall be installed.
Click with the right mouse button on the group/computer and choose
“Installation” “Avira Updater” “(UNIX)” “Install”. The dialogue windows
installation appears and has to be confirmed by OK.
The automatic Internet Updater carries out an update every two hours and is
started automatically during the booting. But it will not be started after the
installation. This is shown here: “Views” “Product Status”.
In order to start the automatic Internet Updater click with the right mouse
button on the group/computer and choose “commands” “Avira Updater
(UNIX)” “Start”.
In order to change the configuration click with the right mouse button on the
group/computer and choose “Configuration” “Avira Updater ( UNIX)”
“configure”.
Page 38

Avira Security Management Center | HowTo
Status: March 2010 38
A different download server (f. ex. http://www.mydownload.com or
http://10.40.0.5) for the update can be entered in the registry “. General
Settings” in the option “Auto Update Server”. Further details about the
configuration of the updater can be found in the manual for Avira AntiiIr UNIX
Server (chapter 4 configuration).
17.4. Installation and Configuration of Avira AntiVir UNIX
WebGate
Before you can start with the Installation, the product package for Avira AntiVir
UNIX WebGate has to be added to the software packages of the SMC and a
license has to be entered. The package is called antivir-webgate-prof<version>.tar.gz. The package can be downloaded from the website
http://www.avira.com.
In order to start the installation of Avira AntiVir UNIX WebGate, click on the knot
security environment and as the case may be on the group / the computer where
Avira AntiVir WebGate shall be installed. Click with the right mouse button on the
group/the computer and choose “Installation” “Avira AntiVir WebGate
(UNIX)” “Install”. The dialogue window installation appears and has to be
confirmed by OK.
WebGate is started automatically after the booting but it will not be started after
the installation. This is shown here: “Views” “Product Status”. In order to
start WebGate click with the right mouse button on the group/the computer and
choose “commands” “Avira AntiVir WebGate (UNIX)” “Start”.
In order to make changes about the configuration, click with the right mouse
button on the group/the computer and choose “Configuration” “Avira AntiVir
WebGate (UNIX)” “configure”. You will find all the details about the
configuration in the manual Avira AntiVir UNIX WebGate (Chapter 4
Configuration).
For the configuration of the updater via the SMC a separate software package is
needed the Avira AntiVir UNIX Updater (for SMC). The installation and
configuration of the Avira AntiVir UNIX Updater (for SMC) can be found in a
chapter of this description.
17.5. Installation and Configuration of Avira AntiVir UNIX
MailGate
Before the installation the product package for Avira AntiVir UNIX MailGate has to
be added to the software packages of the SMC and a license has to be entered.
The package is called antivir-mailgate-prof-<version>.tar.gz. The package can
be downloaded from the website http//:www.avira.com.
In case of an installation via the SMC only the configuration of MailGate can be
done. The configuration of the MTA (f. ex. postfix) cannot be proceeded via the
SMC.
Page 39

Avira Security Management Center | HowTo
Status: March 2010 39
In order to start the Installation of Avira AntiVir UNIX MailGate, click on the knot
security environment and as the case may be on the group/the computer where
Avira AntiVir UNIX MailGate shall be installed. Click with the right mouse button
on the group/the computer and choose “Installation” “Avira AntiVir MailGate
(UNIX)” “Install”. The dialogue window Installation appears and has to be
confirmed by OK.
MailGate and the used MTA have to be configured now. Please, note the
necessary configuration settings in the manual Avira AntiVir MailGate UNIX
(chapter 4.4 Further installation passes dependent on the MTA).
In order to make the described changes in the configuration, click with the right
mouse button on the group/the computer and choose “Configuration” “Avira
AntiVir Mailate (UNIX)” “configure”. Further Details about the configuration
can be found in the manual for Avira AntiVir UNIX MailGate (chapter 6
configuration).
MailGate is started automatically after the booting but is not started after the
installation. In order to start MailGate, click with the right mouse button on the
group/the computer and choose “commands” “AntiVir WebGate (UNIX)”
“Start”.
For the configuration of the updater via the SMC a separate software package is
needed the Avira AntiVir UNIX Updater (for SMC). The installation and
configuration of the Avira AntiVir UNIX Updater (for SMC) can be found in a
chapter in this description.
 Loading...