

AVIRA PREMIUM SECURITY SUITE - FIREWALL 07-2009, FIREWALL PREMIUM SECURITY SUITE User Manual
Page 1

HowTo
Firewall Avira Premium Security Suite
Avira Support
July 2009
Page 2

Contents
1. BASIC KNOWLEDGE ABOUT THE FIREWALL.......................................................................................3
2. EXPLANATION OF THE TERMS..................................................................................................................3
3. CONFIGURATION POSSIBILITIES..............................................................................................................5
3.1 SECURITY LEVEL................................................................................................................................................5
3.1.1 Block all..................................................................................................................................................7
3.1.2 Custom....................................................................................................................................................7
3.1.3 High........................................................................................................................................................8
3.1.4 Medium...................................................................................................................................................8
3.1.5 Low.........................................................................................................................................................9
3.2 CONFIGURATION...............................................................................................................................................10
3.2.1Adapter rules.........................................................................................................................................11
3.2.1.1 Incoming Rules............................................................................................................................................11
3.2.1.2 Outgoing rules..............................................................................................................................................12
3.2.2 Application rules..................................................................................................................................14
3.2.2.1 Add application............................................................................................................................................14
3.2.2.2 Application settings .....................................................................................................................................15
3.2.3 Trusted vendors....................................................................................................................................16
3.2.3.1 Trusted vendors for user...............................................................................................................................16
3.2.3.2 Automatically allow applications created by trusted vendor.........................................................................17
3.2.3.3 Vendors........................................................................................................................................................18
3.2.3.4 Remove........................................................................................................................................................19
3.2.3.5 Reload..........................................................................................................................................................20
3.2.4 Settings.................................................................................................................................................21
3.2.4.1 Automatic rule timeout ................................................................................................................................21
3.2.4.2 Advanced options.........................................................................................................................................21
3.2.4.3 Notifications.................................................................................................................................................22
3.2.4.4 Application rules..........................................................................................................................................24
3.2.5 Pop-up settings.....................................................................................................................................25
3.2.5.1 Pop-up settings.............................................................................................................................................25
3.2.5.2 Remember action for this application...........................................................................................................26
3.2.5.3 Show details ................................................................................................................................................27
3.2.5.4 Allow privileged ..........................................................................................................................................28
4. GENERAL INFORMATION ABOUT PARENTAL CONTROL...............................................................30
4.1 ACTIVATION OF THE PARENTAL CONTROL .............................................................................................................31
4.2 USER SELECTION...............................................................................................................................................31
4.3 ROLES.............................................................................................................................................................32
4.3.1 Properties of the role............................................................................................................................32
5. CHANGING THE UPDATE INTERVALS...................................................................................................34
5.1 CHANGING OF AN UPDATE JOB ............................................................................................................................35
- 2 -
Page 3

1. Basic Knowledge about the Firewall
A firewall works with network protocols like e.g. TCP, UDP, IT, etc.
A simple example for the building up of a connection is also called handshake
procedure. This example shows how a communication between two computers in the
Internet is build up.
• Computer A sends a package with the information that it wants to build up a
connection to computer B
• Computer B answers that it is ready
• Computer A confirms the answer of Computer B
• The connection between Computer A and B is now build up and the data
interchange can begin.
2. Explanation of the terms
TCP:
The Transmission Control Protocol (TCP) is an agreement (protocol) about the way
in which computers interchange data.
UDP:
The User Datagram Protocol (UDP) is a minimal connectionless network protocol. In
order to send the data with UDP to the right program on the target computer, socalled ports are used. Therefore the port number of the service which contains the
data is also sent. Additionally UPD offers an integrity check by sending a check sum.
Thereby an incomplete transmission can be detected.
Flooding:
Flooding is a kind of overflow in a network caused by packages. Flooding can
paralyze the data transmission in a network (or of a single computer) as the
computer or the network is overflowed by a mass of requests and cannot react
anymore. You can compare that to a traffic jam on a freeway.
Ports:
A port can be compared to a house number. The difference is that a house, here a
computer can have several numbers. A port is a part of an address which assigns the
arriving package to an application.
Example:
Port 110 is responsible for the service POP3 and guarantees the access to the email
server. Special applications use port numbers which are assigned firmly by IANA and
are generally known. Usually the ports are numbered from 0 to 1023 and are called
Well Known Ports. Producers of applications can register ports for their own
- 3 -
Page 4

protocols if necessary, similar to domain names. The registration of the ports offers
the advantage that an application can be identified according to the port number, but
only if the application uses the IANA registered port. The rest of the ports from port
number 49152 to 65535 are so called Dynamic and/or Private Ports. You find further
information on the following website:
http://www.iana.org/assignments/port-numbers
Port scan:
Port scans are executed in order to spy out free ports on the computer.
If a computer provides a server service to others, it opens a TCP/IP or UDP port or
both or several ports. A web server has to open the port 80. A port scan finds out
which ports are opened on the computer. In order to see which ports are actually
opened on your computer you can execute a test on the following website:
http://www.port-scan.de/index2.php
IP:
In order to get connected to a computer the Internet Protocol (IP) identifies it with a
definite IP address. In case you send a letter to a friend you have to write the street
and the city on it. The IP address has the same function.
Host File:
Sometimes the host file is used to block known web servers by entering the local
host (127.0.0.1), so that all requests are sent to the own system. The specialty of this
method is that the blockage is valid in the whole system and is not limited to the
browser as web filters are. Furthermore you can use these filters against some
malware programs if they are trying to get commands from already known servers.
URL:
Uniform Resource Locators (URL) are a kind of Uniform Resource Identifiers (URLs).
URLs identify and locate a resource via the used network protocol (e.g. HTTP or
FTP) and the location of the resource in the computer networks.
As URLs are the first and most frequent kind of URLs the terms are often used as
synonyms.
In colloquial language URL is frequently used as a synonym for Internet addresses
like e.g. www.avira.com.
Slide-Up:
A slide-up is a small window which appears slowly top right or down right on your
screen and disappears after an interaction or after some time.
- 4 -
Page 5
3. Configuration Possibilities
3.1 Security Level
First you have to decide which security level you want to use. A security level which
is too high might cause a dysfunction of some system functions. Using a security
level which is to low you run the risk that not all accesses to your computer are
blocked.
In general, we can say: In case the PC is not connected to a local network and no
network-compatible device (e.g. network printer) is located near the PC, the security
level can be “High”. That means the computer is invisible in the network. Furthermore
connections form outside are blocked and flooding and port scan are prevented.
This is the default setting after the installation of the Avira Premium Security Suite.
In case the PC is located in a network environment or the PC should access to
network devices like e.g. network printer, the security level should be set on
“Medium”. “High” might block the network printer or not recognize it as the firewall
does not know that a printer is available.
Please, proceed as follows:
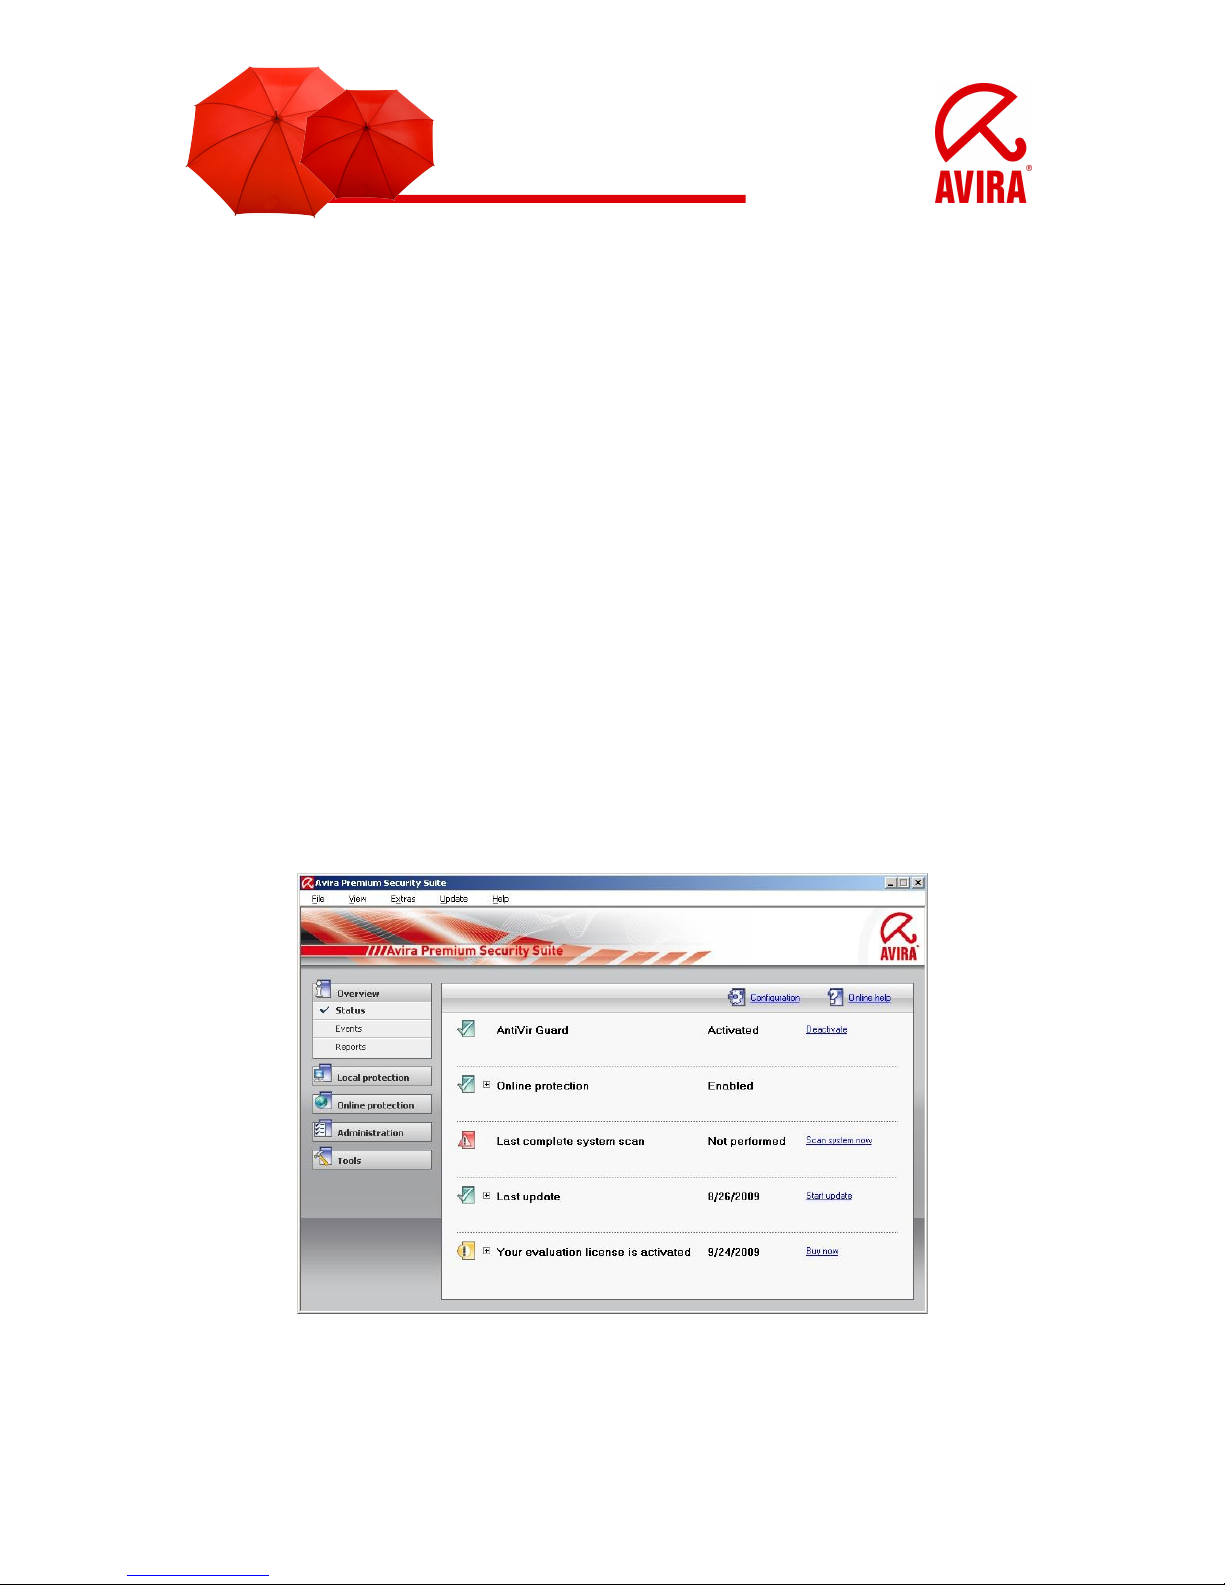
• Start the Avira AntiVir Control Center
You can start it by a left double click on the umbrella symbol. The tray icon is located
in the task bar, down right next to the system time.
- 5 -
Page 6
• Open the register "Online protection"
The register is opened by a left mouse click on the register “Online protection”. The
register “Online protection” is located on the left side of the Control Center.
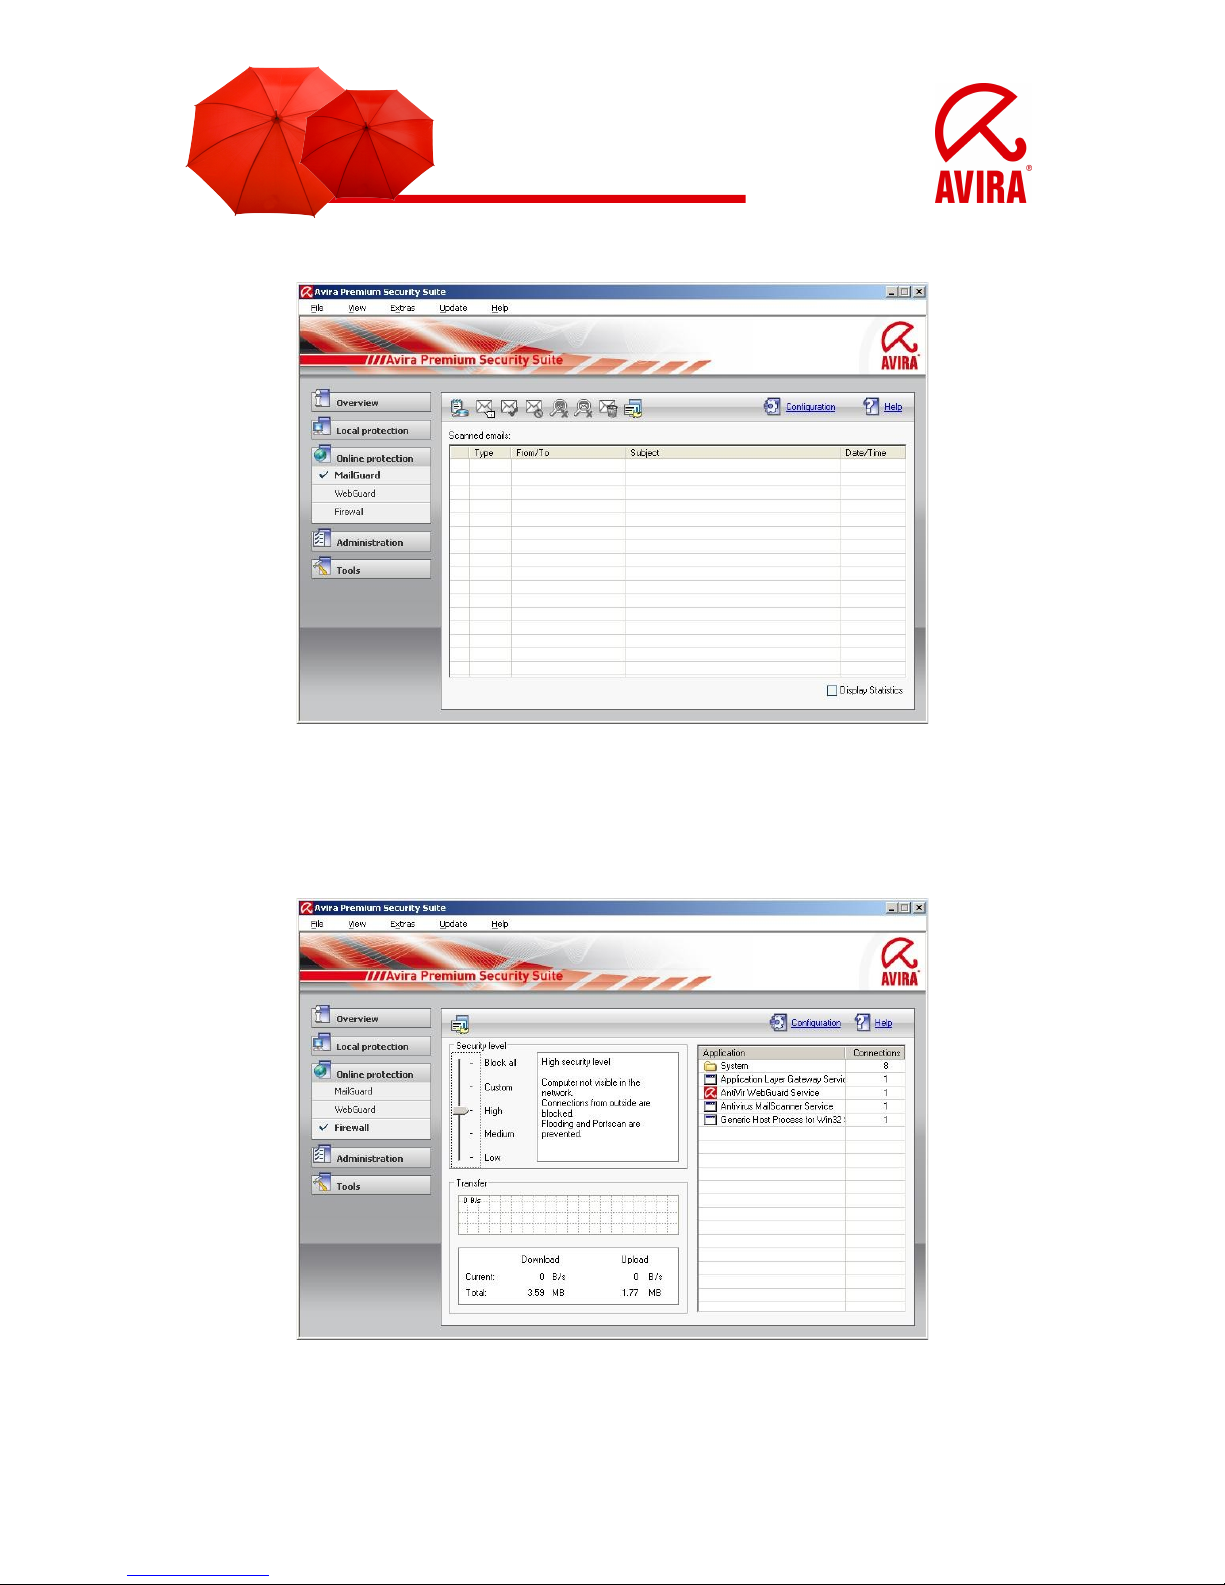
• Open firewall settings
A click on “Firewall” on the submenu of “Online protection” opens the configuration of
the Avira Firewall. This menu appears on the right side in the main window of the
Control Center.
- 6 -
Page 7
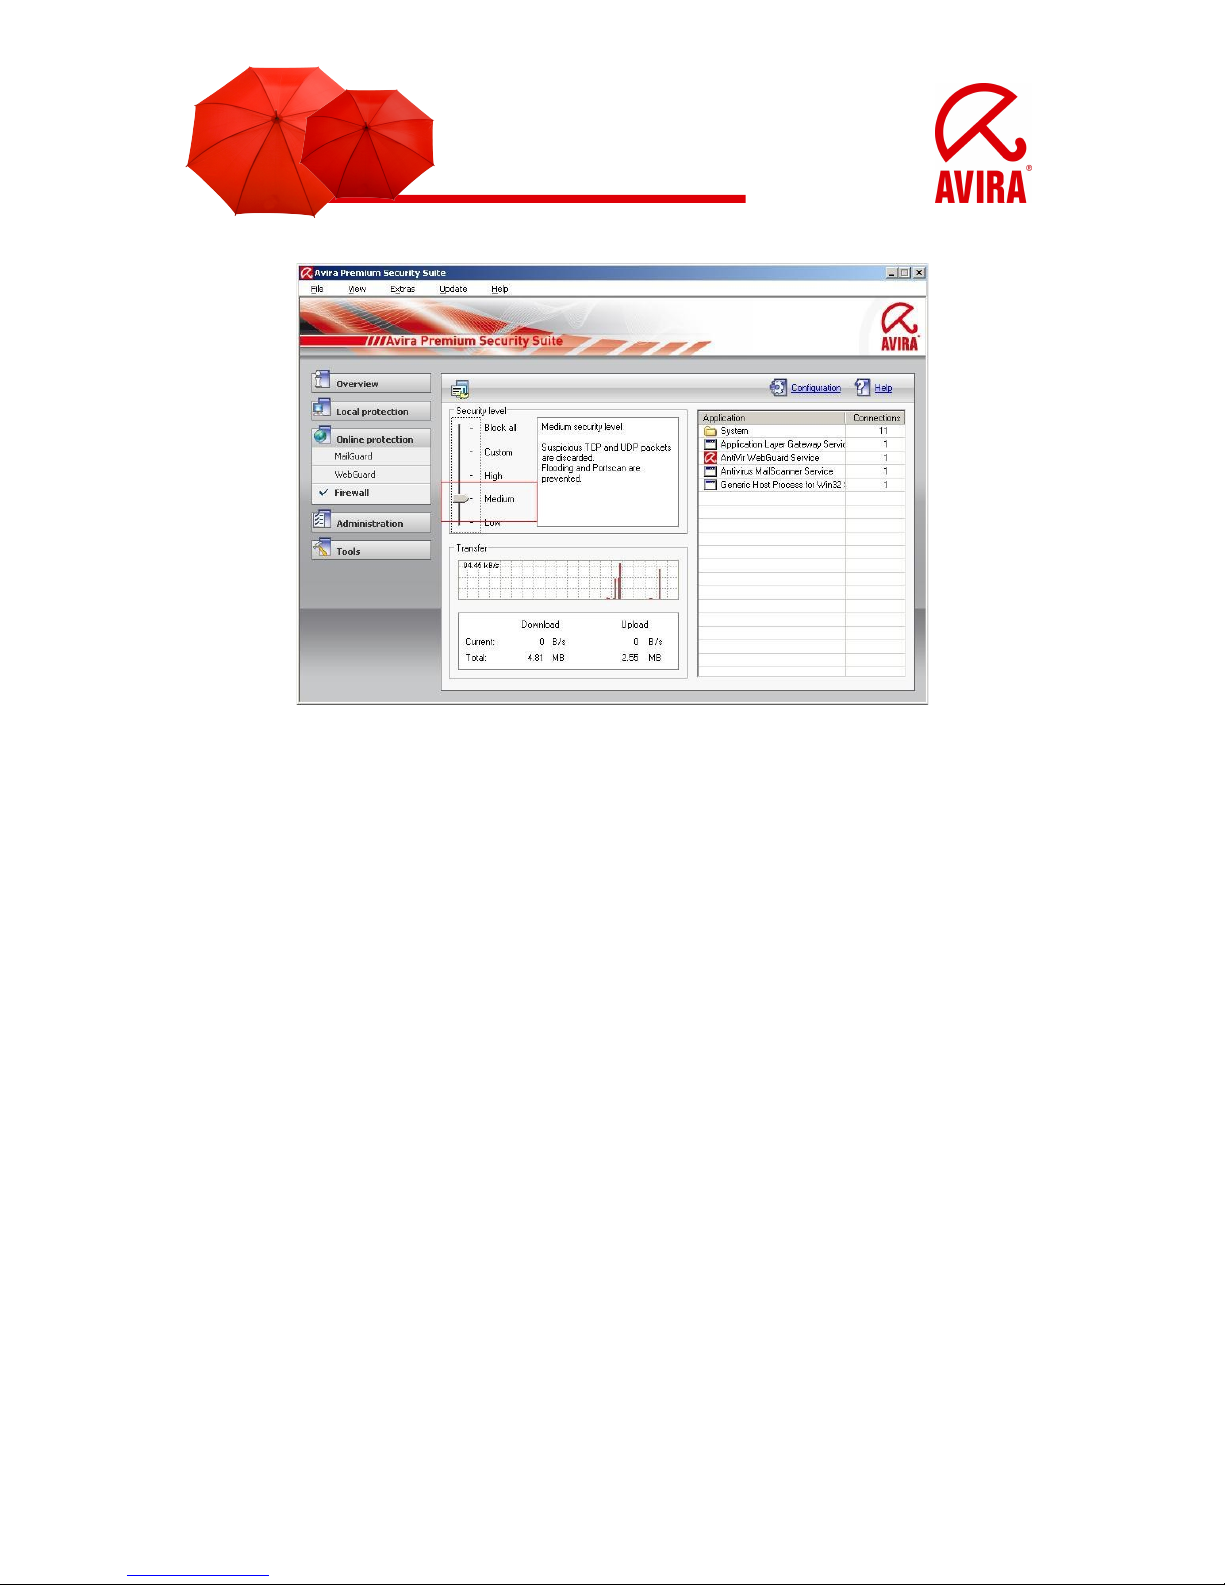
• Adaption of the Security Level of the Firewall
By clicking and keeping hold of the security level controller you can adapt the
security level. The possible levels are “Low”, “Medium”, “High”, “Custom” and “Block
all”.
You can find a description of the levels directly on the right side of the controller.
Please, choose the level “Medium”, in case any problems with network printers,
removable hard disk or similar network connections should occur.
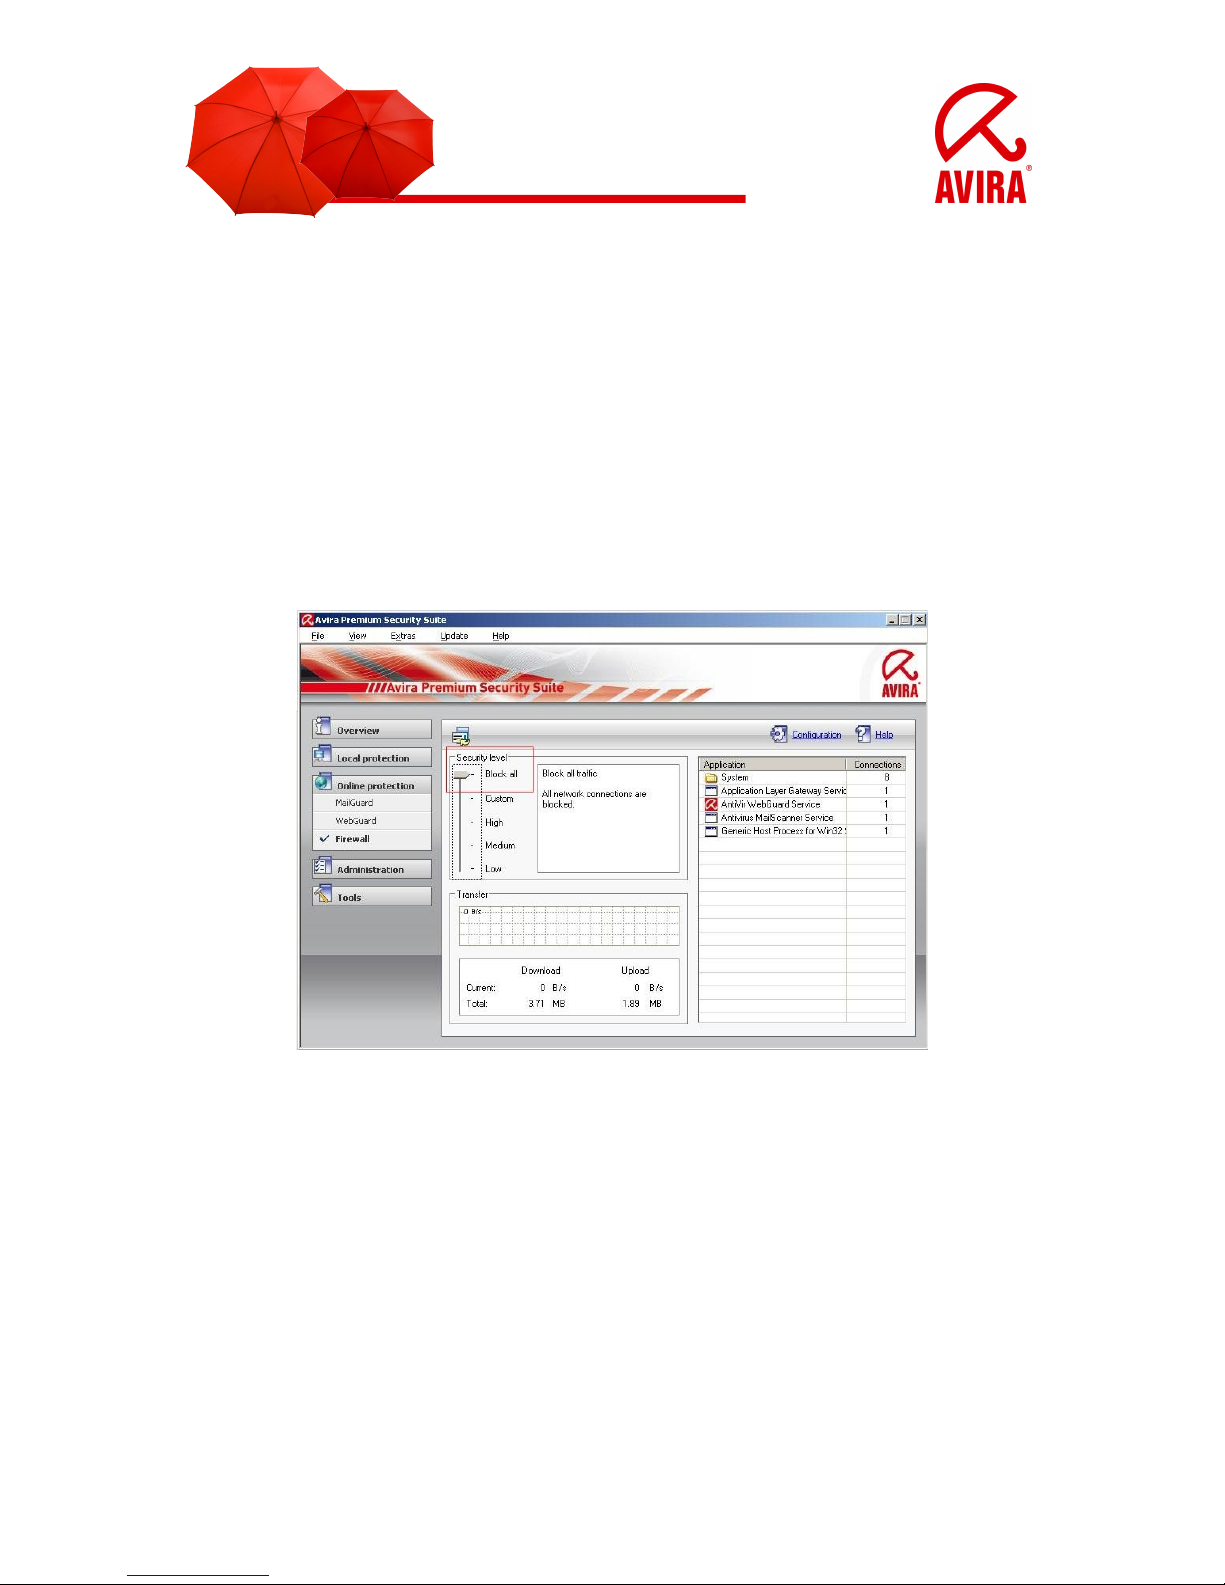
3.1.1 Block all
All network connections are blocked.
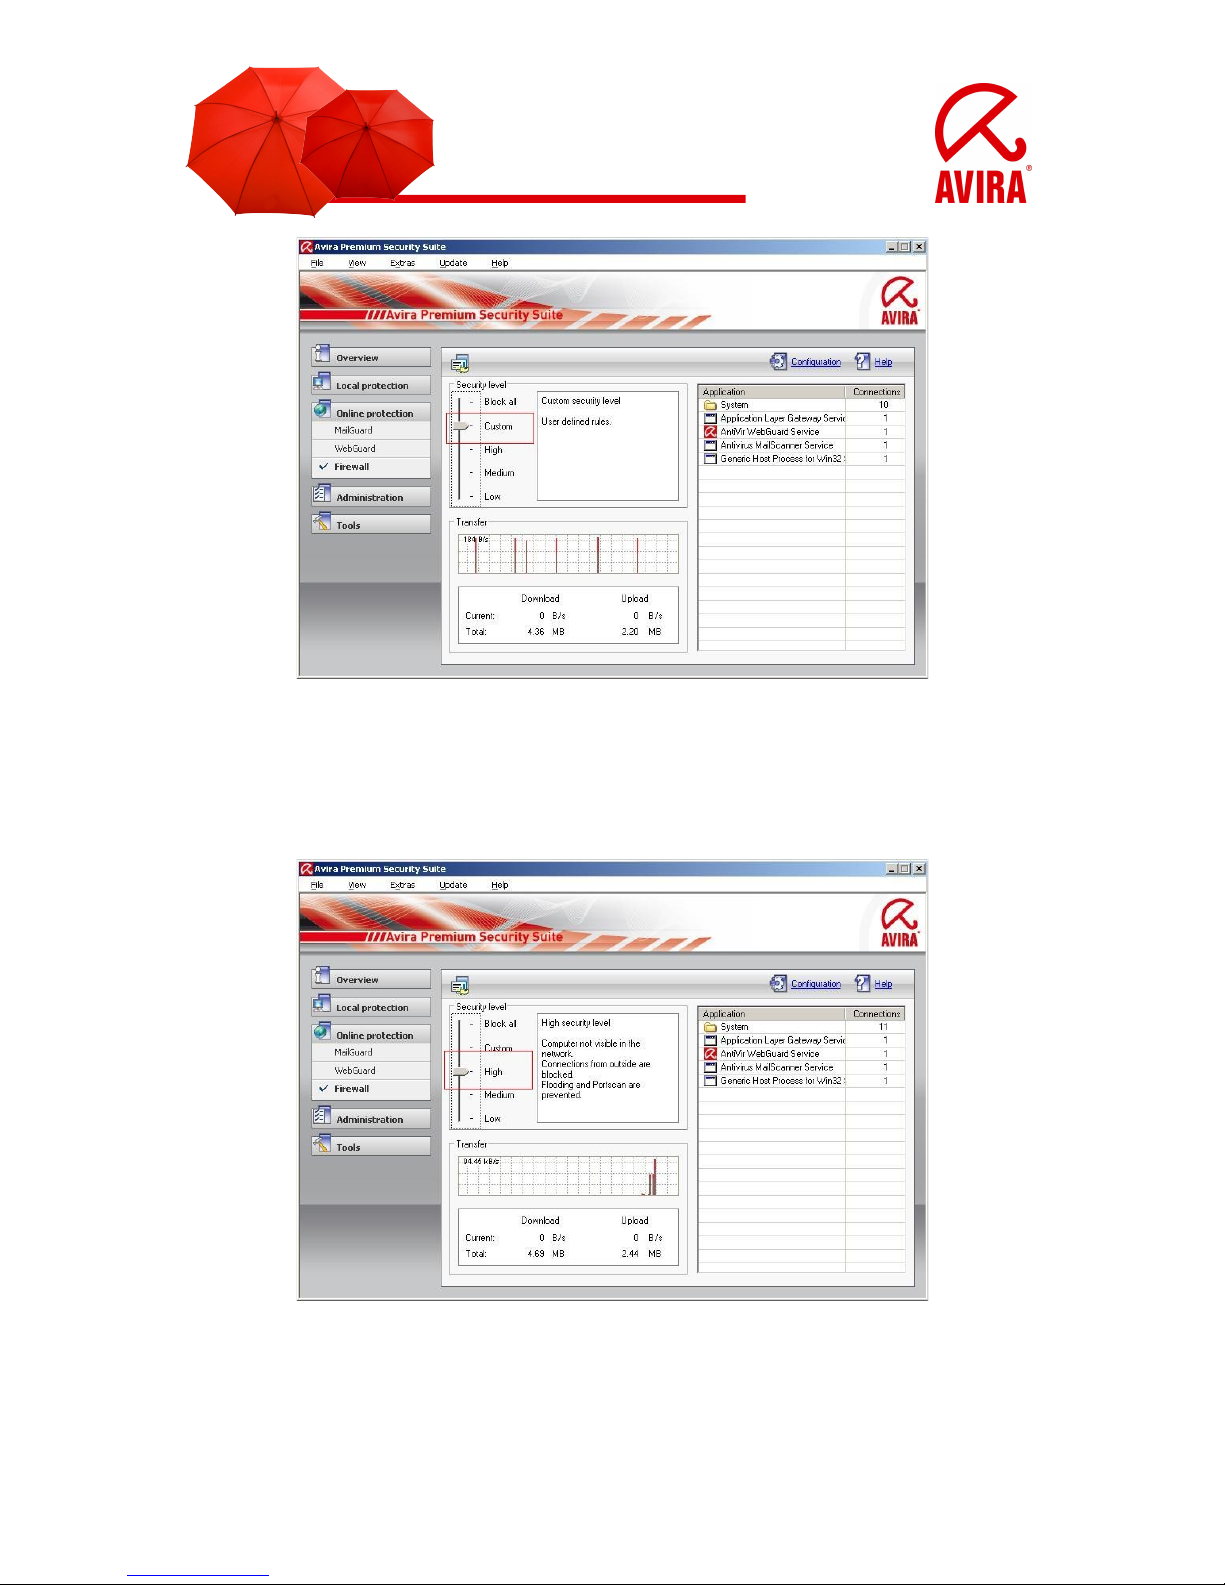
3.1.2 Custom
You can choose user defined rules in the configuration (view chapter 3.2
Configuration).
- 7 -
Page 8
3.1.3 High
The computer is invisible in the network and the connection coming from outside are
blocked. Flooding and port scan are prevented.
3.1.4 Medium
In comparison to the firewall setting “High”, the computer is visible in the network and
receives TCP and UDP requests. These requests are refused. TCP and UDP
packages which are received unexpectedly are not attended and accepted. Flooding
and port scan are prevented.
- 8 -
Page 9
Also using the level “Medium”, problems with the network can occur. In this case you
should change the level to “Low”.
The preset level is more distinctive in the security level “Medium”. That means with
“Medium” some TCP and UDP package requests are recognized and forwarded
automatically. Others are refused.
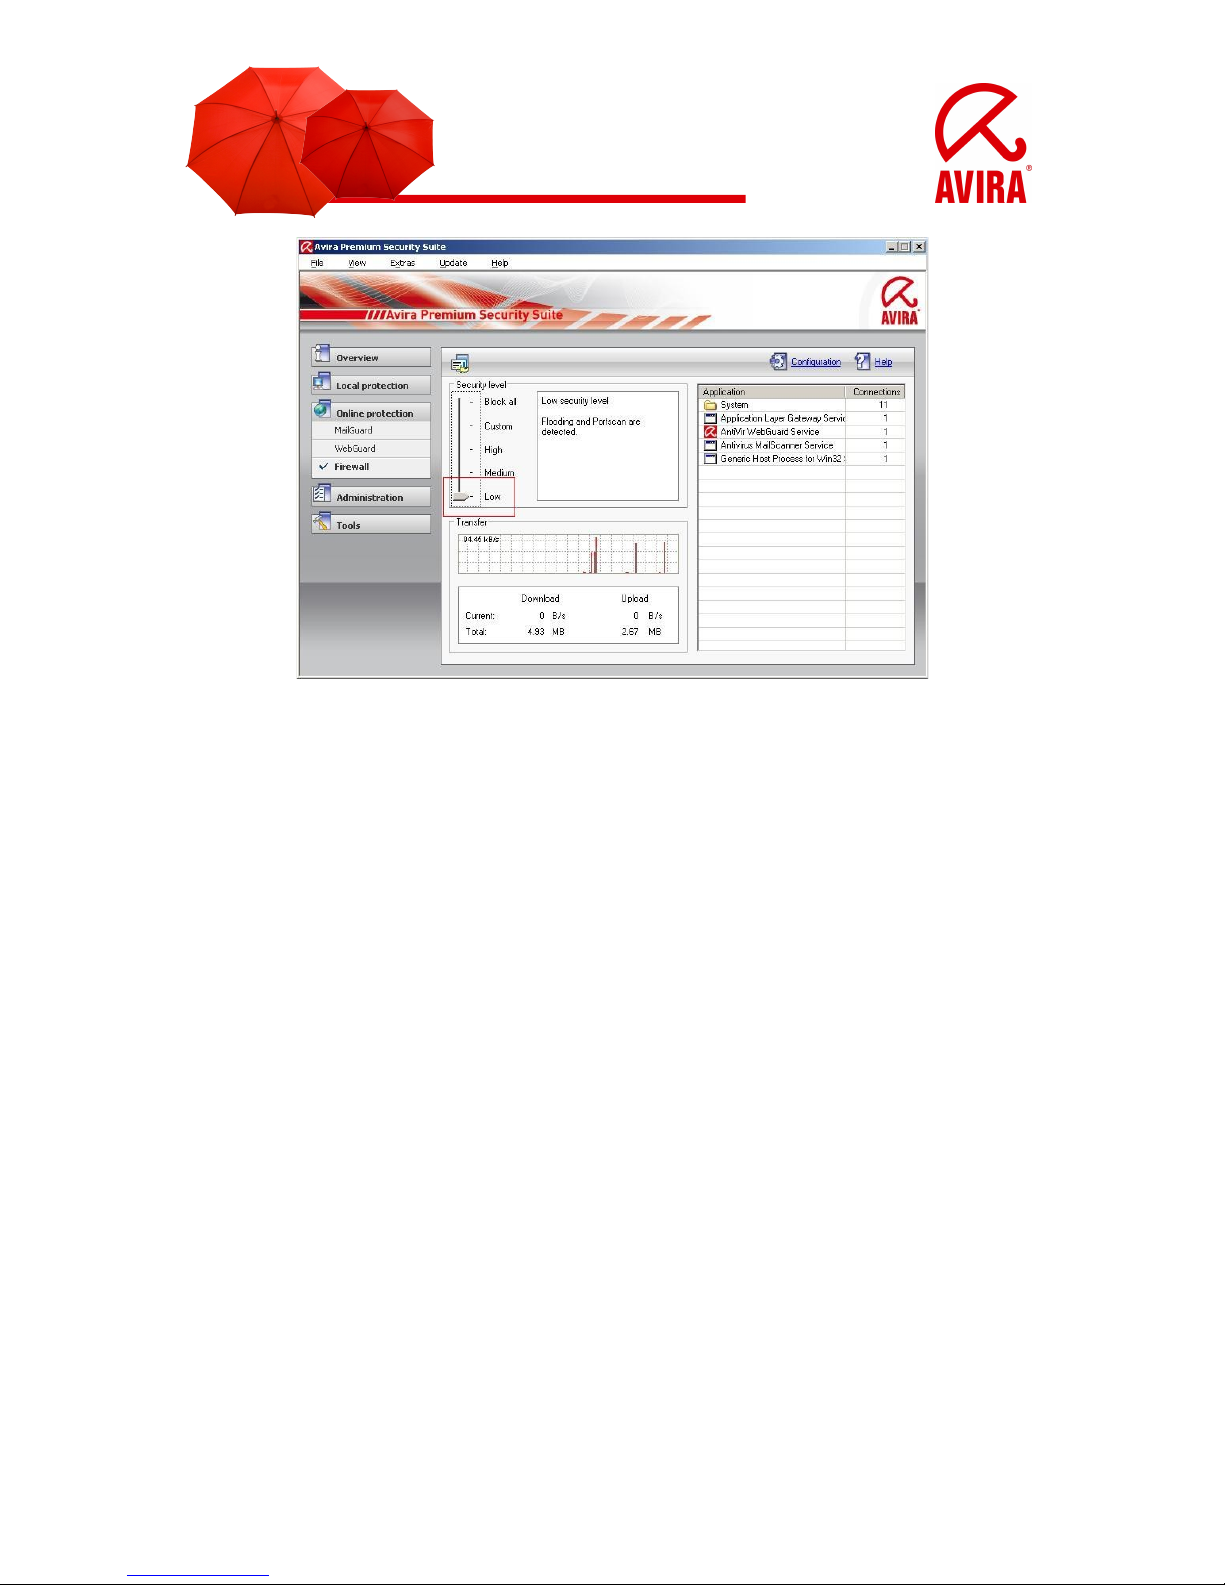
3.1.5 Low
Also the level “Low” offers you the protection of the Avira Firewall. Flooding and port
scan are not prevented, only detected. These are the most frequent methods for
finding vulnerabilities on your computer.
- 9 -
Page 10
In case these settings are not enough for you or you have to activate different ports
for an application, you can find more configurations in chapter 3.2 Configuration.
3.2 Configuration
Click with the right mouse button on the tray icon in the task bar and choose the point
“Configure AntiVir”. You also have the possibility to start the configuration via the
Avira Control Center by opening the Control Center and by clicking on
“Configuration” top right or by pressing F8, or via Extras –> Configuration.
In the configuration you can find the button “Firewall” on the left side. Activate the
expert mode in order to have access to all possible settings. Here you can configure
the adapter rules, the application rules, trusted vendors, general settings and popup
settings.
- 10 -
Page 11
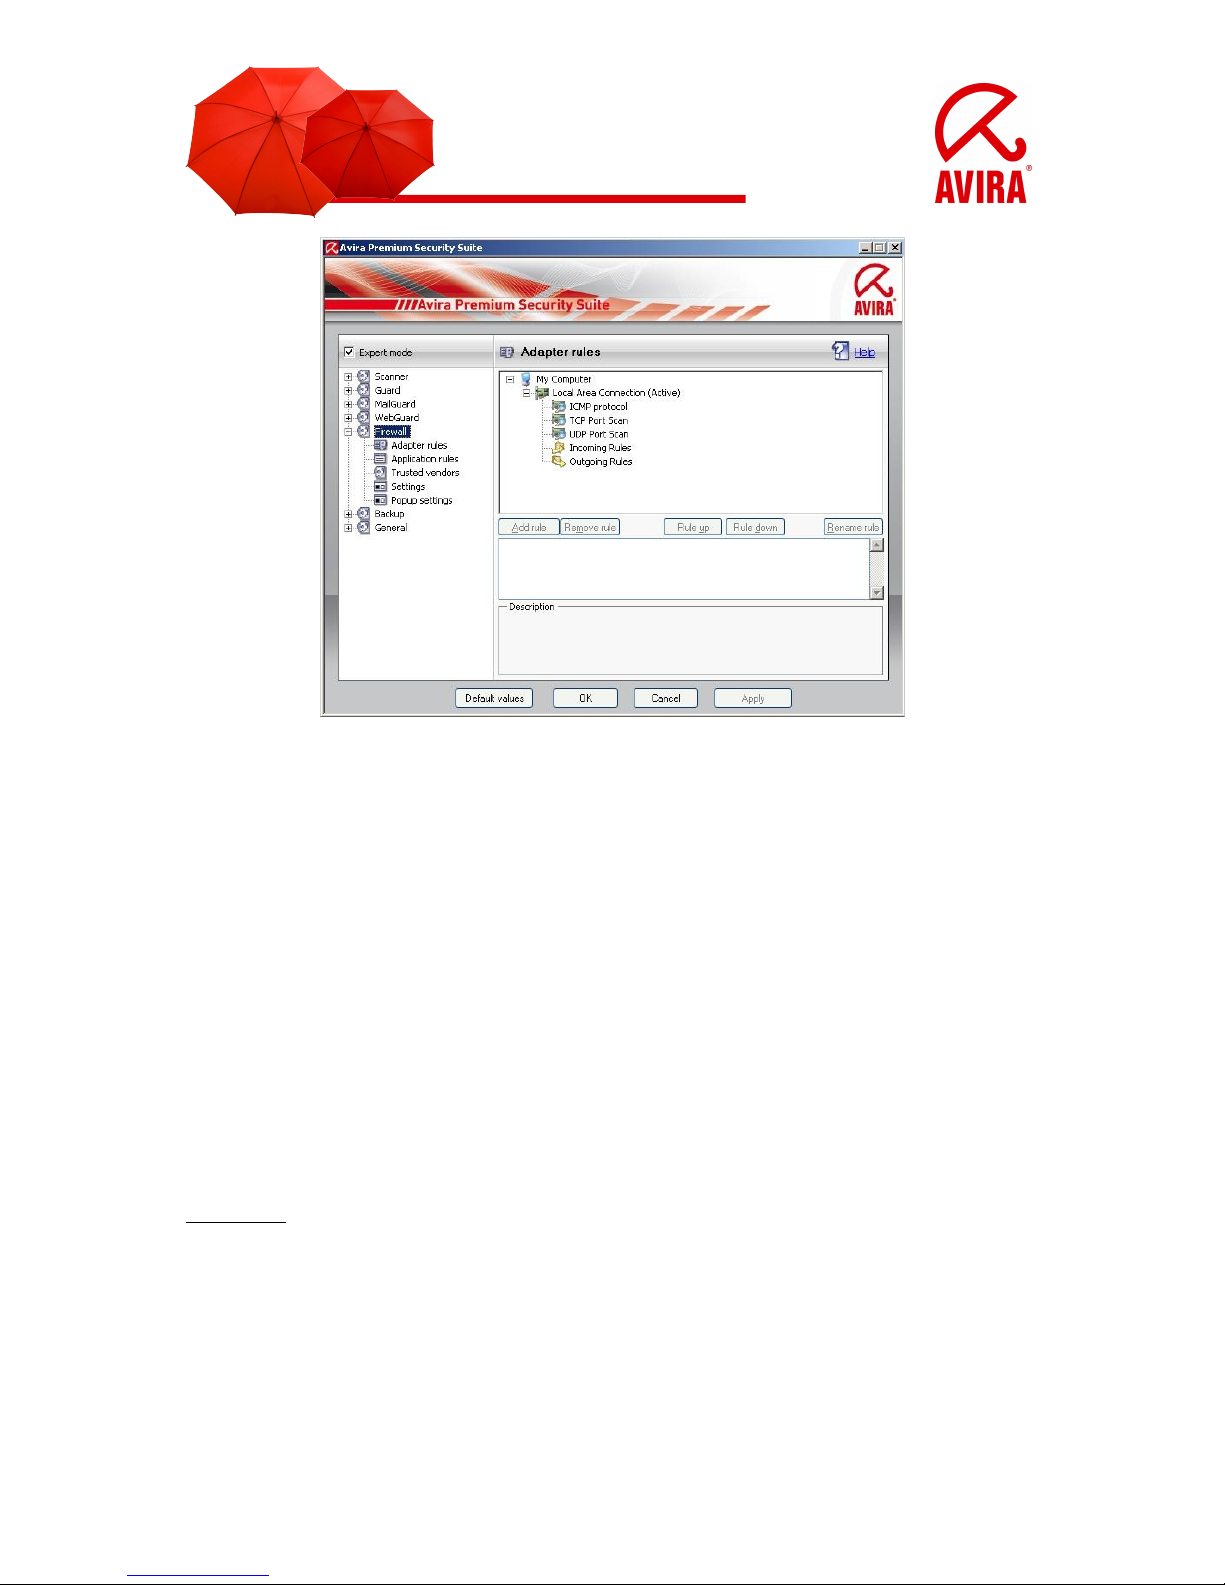
3.2.1 Adapter rules
Each hardware entity which is simulated by software or each hardware entity (e.g. a
network interface card) is seen as an adapter (e.g. Miniport, Bridge Connection, etc.)
The Avira Firewall shows the adapter rules for all adapters which exist on your
computer and for which a driver is installed.
A predefined adapter rule is dependent on the security level. You can change the security level via the Avira Control Center like it is described in chapter 3.1 or change
the adapter rules as you want. After you have changed the adapter rules the controller of the firewall is placed on the security level “Custom”.
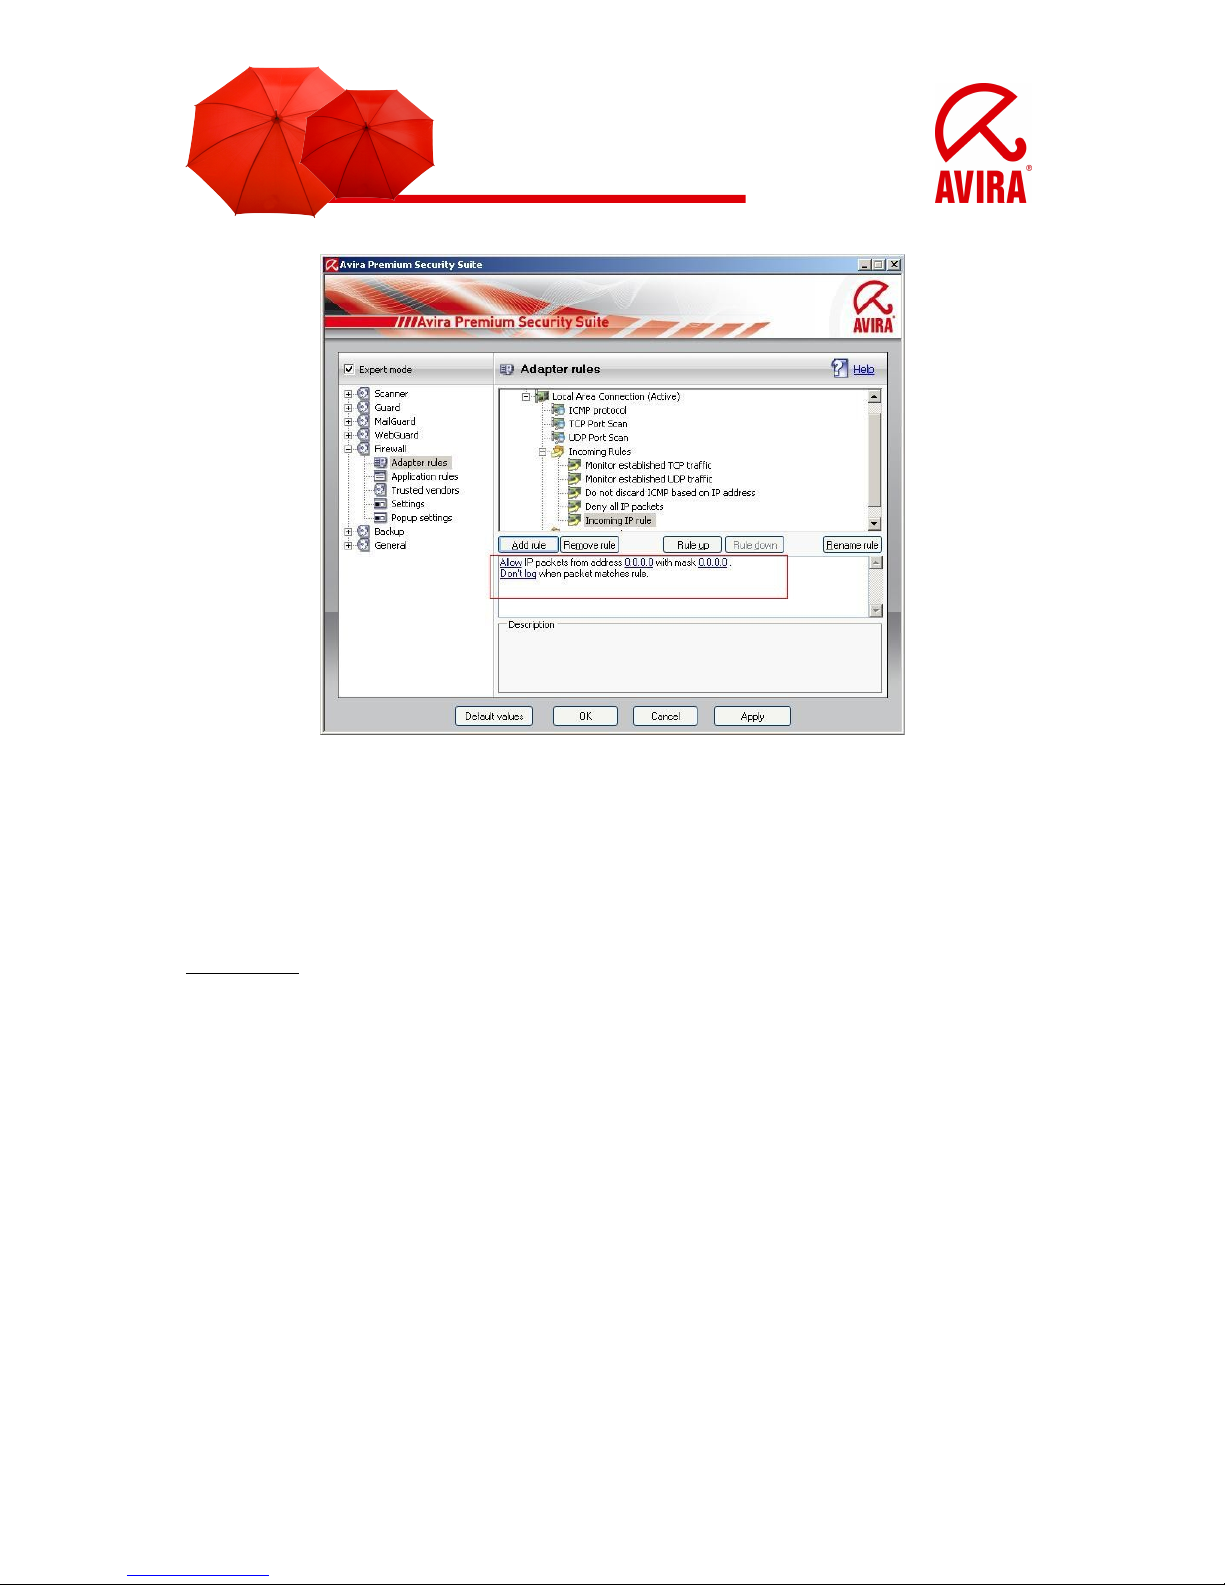
3.2.1.1 Incoming Rules
Incoming rules help to control the incoming data traffic with the Avira Firewall.
Example:
You want to add the IP address 10.40.30.20.
If you click on “Add rule”, a window opens with different predefined rules. There you
choose “IP” and confirm with “OK”.
In your “Incoming rules” you can find the point “Incoming IP rule”. Choose this point.
You can also rename it. You can now enter the IP and its mask into the marked box
below and enable or block it. You can also decide if the package should be written
into the log file or not.
- 11 -
Page 12
3.2.1.2 Outgoing rules
Outgoing rules help to control the outgoing data transfer by means of the Avira
Firewall. You can define an outgoing rule for the following protocols: IP, ICMP, UDP
and TCP. In order to enter settings for the “Outgoing rules” you can proceed in the
same way as for the settings of the “Incoming rules”.
Examples:
• Peer to Peer
In case you should use e.g. interchange systems, file systems or file sharing
systems, you can use the default templates. You only have to enable the needed
TCP and UDP ports.
- 12 -
Page 13

• VMware
In case the Internet access should not be possible out of your VMware, you have to
enable it via the following template.
- 13 -
Page 14

3.2.2 Application rules
This list contains all users in the system. If you are logged on as administrator, you
can choose a user and set a rule for him. If you don’t have administrative rights the
list only shows you the currently logged on users.
Example:
Thereby an administrator can make sure that a web browser doesn’t receive Internet
access or that a chat program is not executed.
3.2.2.1 Add application
If you click on the button “Add application”, a new window opens with the programs
that are installed on your computer.
- 14 -
Page 15

By a simple click the application is marked and can be added to the list via the button
“Add”.
3.2.2.2 Application settings
Here you can change the mode from “Filtered” to “Privileged”. In the mode “Filtered”
the adapter rules and the application rules are checked. In the mode “Privileged” only
the application rules are checked.
Furthermore the action can be changed from “Allow” to “Deny” or “Ask”. If you
choose the action “Ask”, you are always asked before executing a program if you
really want to start the program. In case of the action “Deny” the program is blocked
by the Avira Firewall.
- 15 -
Page 16

3.2.3 Trusted vendors
In the menu “Trusted vendors” a list of reliable software producers is shown. You can
add or remove producers to or from the list by using the option “Always trust this
vendor” in the popup window of the network event. You can allow the network access
of application which are signed by the listed vendors by default. Therefore you
activate the option “Automatically allow applications created by trusted vendors”.
3.2.3.1 Trusted vendors for user
This list contains all users in your system. If you are logged in as administrator, you
can choose a user and see and modify his list of trusted vendors. If you aren’t a user
with privileged rights, the list only shows you the logged in user.
- 16 -
Page 17

3.2.3.2 Automatically allow applications created by trusted vendor
If this option is activated, applications with a signature of known and trusted vendors
get automatically an access to the network. This option is activated by default.
- 17 -
Page 18

We recommend you to keep this option activated, as we have the contact data of
these vendors. The vendors are licensed software enterprises. Therefore the vendors
are categorized as trusted vendors.
3.2.3.3 Vendors
The list shows all vendors who are categorized as trustworthy.
- 18 -
Page 19

3.2.3.4 Remove
The marked entry is removed from the list of trusted vendors. In order to remove the
marked vendor definitely from the list, press “OK” or “Apply” in the configuration window.
- 19 -
Page 20

3.2.3.5 Reload
The changes are cancelled. The last saved list is loaded.
Tip:
If you remove a vendor from the list and click on “Apply” the vendor is removed for
good. You can’t reload it. But you have the possibility to add the vendor again to the
list of trusted vendors via the option “Always trust this vendor” in the popup window of
the network event.
The firewall prioritizes application rules: If you create an application rule and the
vendor of the application is part of the list of trusted vendors, the application rule is
applied.
- 20 -
Page 21

3.2.4 Settings
3.2.4.1 Automatic rule timeout
• Block forever
A rule which has been created for a portscan is kept automatically.
• Remove rule after n seconds
A rule which has been automatically created, e.g. for a portscan, is removed after the
given time. This option is activated by default.
3.2.4.2 Advanced options
• Windows Host file is NOT LOCKED
If this option is on LOCKED, the windows host file is write protected. A manipulation
of the file is no longer possible. For example malware is not able to redirect you to
undesired websites. This option is set on NOT LOCKED by default.
We recommend you to set the Windows host file on LOCKED. If you should use applications which access to the host file, like e.g. Spybot Search & Destroy, set the option on NOT LOCKED.
- 21 -
Page 22

• Stop Windows Firewall on startup
This option deactivates the Windows Firewall on startup. This option is activated by
default as the use of two firewalls at the same time might cause problems. Two
desktop firewalls interfere with each other.
3.2.4.3 Notifications
Here you can choose in case of which events you want to receive a notification from
the firewall.
- 22 -
Page 23

• Portscan
If you activate this option you receive a desktop notification in case a portscan has
been detected by the firewall.
Portscan are not always malicious, but can be a sign of a possible attack on your
system.
• Flooding
If you activate this option you receive a desktop notification in case a flooding attack
has been detected by the firewall. Flooding attacks can overflow your network with
mounds of data and paralyze your network.
• Applications blocked
In case an application should try to build up an external connection which you have
not allowed in the firewall or which is not privileged, the connection is blocked by the
Avira firewall and you receive a desktop notification. This notification informs you
about the application and why it has been blocked.
• IP blocked
If this options is activated you receive a desktop notification in case the firewall has
refused the data traffic from a certain IP address. We recommend you to deactivate
this option as there are a lot of undesired IP address requests in the Internet. Therefore you would receive lots of desktop notifications.
- 23 -
Page 24

3.2.4.4 Application rules
With these options you set the configurations for the application of the firewall.
• Advanced settings
If you activate this option, you have the possibility to administer different network accesses of an application individually. That means you create a special application
rule for an application. You can administer the traffic of an application individually or
you only monitor the application.
• Basic settings
If you activate this option, you can only set one action for different network accesses.
Usually this is enough to allow or to block applications.
- 24 -
Page 25

3.2.5 Pop-up settings
3.2.5.1 Pop-up settings
• Inspect process launch stack
If this option is enabled, the process stack inspection allows a more accurate control.
The firewall assumes that each process in the stack which is trustworthy is the one
whose child process enables the access to the network. Therefore, a popup window
is opened for each process in the stack which is untrustworthy. These options are deactivated by default. We recommend you to keep the default settings as you would
receive a flow of pop-ups otherwise.
• Allow multiple pop-ups per process
If this option is activated, a pop-up window is opened each time an application tries to
build up a network connection. Alternatively you are informed only on the first connection attempt. This option is deactivated by default. We recommend you to keep
the default settings. So you receive only one pop-up window per process.
• Automatically suppress pop-up notification while Game Mode
If this option is activated, the Avira Firewall automatically changes to the game mode
in case an application is executed in full screen mode on your system.
In the game mode, all defined adapter and application rules are applied. The network
access is temporarily allowed to applications for which no rules with actions (allow or
refuse) are defined. So no pop-up windows with questions about the network event
are opened. We recommend you to activate this option if you play games (online
games) on your computer, so that you are not disturbed by irritating pop-ups during
the game.
- 25 -
Page 26

3.2.5.2 Remember action for this application
• Always enabled
The option “Save action for this application” in the dialogue windows “Network event”
is activated by default. The option “Always enabled” is activated by default.
• Always disabled
The option “Save action for this application” in the dialogue windows “Network event”
is disabled by default.
• Enabled for signed applications
The option “Save action for this application” in the dialogue box “Network event” is
automatically activated for the network access by signed applications of certain
vendors. The vendors are: Microsoft, Mozilla, Opera, Yahoo, Google, Hewlet Packard, Sun, Skype, Adobe, Lexmark, Creative Labs, ATI, nVidia.
• Remember last used state
The option “Save action for this application” in the dialogue box “Network event” is
enabled in the same way as for the last network event.
In case the option “Save action for this application” has been activated for the last
network event, the option will also be active for the following network event. In case
- 26 -
Page 27

the option “Save action for this application” has been deactivated for the last network
event, the option won’t be active for the following network event.
We recommend you to keep this option, so that all actions about the connections of
the applications are automatically saved.
3.2.5.3 Show details
Here you can configure which detailed information in the box network event is important to you.
• Show details on demand
The details are only shown on request in the box network event. That means the details are shown after a click on the button “Show details” in the box network event.
• Always show details
The details are always shown in the box network event.
• Remember last used state
The display of detailed information is administered in the same way as for the previous network event. In case detailed information has been shown, the same information will be displayed for the following network event. If the detailed information hasn’t
- 27 -
Page 28

been displayed, the detailed information will also be blanked for the following network
event.
3.2.5.4 Allow privileged
Here you can configure the settings for the option privileged.
• Always enabled
The option “Allow privileged” is activated by default in the box network event.
• Always disabled
The option “Allow privileged” is deactivated by default in the box network event.
• Remember last used state
The option “Allow privileged” is used as it has been before in the box network event:
If the option “Allow privileged” was activated for the last network event, it will also be
activated by default for the next network event.
If the option “Allow privileged” was deactivated for the last network event, it will also
be deactivated by default for the next network event.
- 28 -
Page 29

- 29 -
Page 30

4. General information about parental control
Avira Premium Security Suite offers a parental control function to filter undesired or illegal Internet offers. You can assign different roles to different users. A user role is
configurable and contains forbidden or allowed URLs (Internet addresses) and forbidden content categories. Powerful URL filter lists are used to block Internet contents
according to certain categories. In these URL filter lists URLs are categorized depending on the content of the websites into content groups.
The URL filer lists are updated every day, adjusted and extended. They support
European languages (English, German, French, Italian, Russian …). The roles child,
young person, adult are preconfigured with the corresponding forbidden categories.
In order to configure the parental control, you have to activate it first. If this option is
enabled, all the web pages requested by the user while navigating the Internet are
scanned on the basis of the role assigned to the registered user in the parental control function. In case of a forbidden website the website is blocked and a note appears in the browser.
Example:
If a blocked page is requested, the following browser window appears.
- 30 -
Page 31

4.1 Activation of the parental control
In order to activate the parental control, go to the configuration of AntiVir and activate
the expert mode. Choose the WebGuard on the left side. You can open the windows
by clicking on the plus in front of WebGuard. The parental control is the third point.
Choose it and activate it on the right side.
4.2 User selection
You find all users of the system in the top down box. Choose a user and click on
“Add”.
The user appears on the right side with the default setting “Child”. You can change
the role by a simple click.
- 31 -
Page 32

4.3 Roles
You can add a new role or you can change the given roles.
In order to add new roles, enter the role name in the free box. 30 sign are given for a
name.
Example:
The role “child under 16” should be added.
Click on “Add”. The new role appears in the right box. In order to configure the role
“Child under 16”, choose the role and click on “change”.
4.3.1 Properties of the role
Here you can add URLs and block the access to URLs which belong to certain
categories.
- 32 -
Page 33

Example:
www.google.com and URLs of the category Pornography, Erotica/Sex and Sects
should be blocked.
The categories are provided by a huge data base of the enterprise Cobion.
Furthermore, the web filter accesses to a data base of the consumer protection
central Hamburg. If you should find a website which belongs to a category, you can
categorize it via the following link and have it checked:
http://filterdb.iss.net/urlcheck/url-report.asp.
- 33 -
Page 34

5. Changing the update intervals
The update of the virus definitions are predefined in the scheduler with an interval of
two hours. You can change this setting in case a different time or a more frequent
update should be necessary.
• Start the Avira AntiVir Control Center (view page 5)
• Start the AntiVir Scheduler
Click on the button “Administration” on the left side of the AntiVir Control Center.
Click on the button “Scheduler”. In the main menu of the Control Center appears now
the scheduler menu, where all update and scan jobs are shown. The daily update
and the daily complete system scan are preconfigured. The complete system scan is
deactivated by default.
- 34 -
Page 35

5.1 Changing of an update job
Click with the right mouse button on “Two hourly update” and choose “Edit selected
job” in the context menu.
Now the assistant for creating and changing jobs appears. You see the name and the
description of the job. Here you can change the description as you like.
By a
click
on the
button
“Next”
the
window for the selection of the type of job appears. Here the correct type “Update
job” is already entered. Simply click on “Next” in order to configure the time of the job.
- 35 -
Page 36

By a click on the first box you can change the configuration from “Interval” to “Daily”.
In next box you can choose the desired update time. By activating the box
underneath you can choose if the update should be started while connecting to the
Internet. If the update should be repeated because the computer was not online at
the desired time, please, activate the second box.
- 36 -
Page 37

Click on “Next”, in order to get to the selection of the display mode.
Click on the selection box and you can choose one of the following display mode:
- 37 -
Page 38

• Invisible: The update is executed without any notification
• Minimized: The update is executed in the background and confirmed by a
slide-up.
• Maximized: The update is displayed in a large window
Choose the desired mode and finish the configuration with a click on “Finish”.
The procedure for a scan job is similar. Here you only have to choose “Scan job”
instead of “Update job”.
You find further information:
• In the online help of the program (Taste F1)
• In the manual:
http://www.avira.de/documents/products/pdf/en/man_avira_premium_secrity_%20suite_en.pdf
• In our knowledge base:
http://www.avira.de/en/support/kbsearch.php
• In the FAQ (frequently asked questions)
http://www.avira.de/en/support/faq.html
- 38 -
 Loading...