

Page 1

User Manual
Avira AntiVir WebGate
Avira WebGate Suite
www.avira.com
Page 2

Contents
Chapter 1. About this Manual ........................................................................... 3
1.1 Introduction ............................................................................................................................................... 3
1.2 The Structure of the Manual ..................................................................................................................... 4
1.3 Signs and Symbols...................................................................................................................................... 4
1.4 Abbreviations ............................................................................................................................................. 5
Chapter 2. Product Information ....................................................................... 7
2.1 Features ...................................................................................................................................................... 8
2.2 Licensing Concept ...................................................................................................................................... 8
2.3 Modules and Operating Mode of AntiVir WebGate................................................................................. 9
2.4 System Requirements .............................................................................................................................. 10
Chapter 3. Installation ................................................................................... 11
3.1 Choosing the WebGate Computer........................................................................................................... 11
3.2 Getting the Installation Files................................................................................................................... 11
3.3 Licensing................................................................................................................................................... 12
3.4 Installing AntiVir WebGate ..................................................................................................................... 13
3.5 Reinstalling AntiVir WebGate ................................................................................................................. 17
3.6 Installing AntiVir WebGate Using the Graphical User Interface........................................................... 18
Chapter 4. Configuration ................................................................................ 25
4.1 Overview................................................................................................................................................... 26
4.2 Monitoring HTTP Traffic......................................................................................................................... 26
4.3 Monitoring FTP Traffic............................................................................................................................ 30
4.4 Integration over ICAP Interface .............................................................................................................. 32
4.5 Configuration Files .................................................................................................................................. 34
4.5.1Configuration File avwebgate.conf 34
4.5.2Configuration File avupdater.conf 41
4.5.3Configuration File avwebgate.acl 42
4.6 Configuration Script ................................................................................................................................ 43
4.7 Regular Updates Configuration............................................................................................................... 44
4.7.1Configuring Automatic Updates through Internet Updater 46
4.7.2Performing Cron Updates 48
4.8 Verifying Updates Authenticity with GnuPG ......................................................................................... 49
4.9 Templates Configuration......................................................................................................................... 50
4.10 Testing AntiVir WebGate...................................................................................................................... 51
Chapter 5. Operating ...................................................................................... 53
5.1 Starting and Stopping AntiVir WebGate manually................................................................................ 53
5.2 Procedures when Detecting Viruses or Unwanted Programs................................................................ 54
Chapter 6. Graphical User Interface (GUI) ....................................................... 55
6.1 Overview................................................................................................................................................... 55
6.2 Operating AntiVir WebGate Using the GUI ........................................................................................... 56
6.3 Configuring AntiVir WebGate Using the GUI ........................................................................................ 62
6.4 Updating WebGate Using the GUI .......................................................................................................... 71
6.5 Configuring AntiVir Updater Using the GUI .......................................................................................... 73
Chapter 7. Service .......................................................................................... 77
7.1 Support ..................................................................................................................................................... 77
7.2 Online Shop.............................................................................................................................................. 77
7.3 Contact...................................................................................................................................................... 78
Avira GmbH AntiVir WebGate 1
Page 3

Chapter 8. Appendix ....................................................................................... 79
8.1 Glossary .................................................................................................................................................... 79
8.2 Further Information ................................................................................................................................ 80
8.3 Golden Rules for Protection Against Viruses ......................................................................................... 81
2 AntiVir WebGate Avira GmbH
Page 4

About this Manual
1About this Manual
In this Chapter you can find an overview of the structure and contents of this
manual.
After a short introduction, you can read information about the following issues:
z The Structure of the Manual – Page 4
z Signs and Symbols – Page 4
1.1 Introduction
We have enclosed in this manual all the information you need about AntiVir
WebGate and it will guide you step by step through installation, configuration and
operation of the software.
The appendix contains a Glossary, which explains the basic terms.
The RELEASE_NOTES file included in the product kit presents additional current
information about AntiVir WebGate.
For further information and assistance, please refer to our Website, to the Hotline
of our Technical Support and to our regular Newsletter (see Service – Page 77).
Your Avira Team
Avira GmbH AntiVir WebGate 3
Page 5
1.2 The Structure of the Manual
The manual of your AntiVir software consists in a number of Chapters, bringing
you the following information:
Chapter Contents
1 About this Manual The structure of the manual, signs and symbols
2 Product Information General information about AntiVir WebGate
3 Installation Instructions to install AntiVir WebGate on your
4 Configuration Directions for optimal settings of AntiVir
5 Operating Working with AntiVir WebGate; Reactions
About this Manual
software, its modules, features, system
requirements and licensing
system
WebGate on your system
when detecting viruses and unwanted programs
6 Graphical User Interface
(GUI)
7 Service Avira GmbH Support and Service
8 Appendix Glossary of technical terms and abbreviations
1.3 Signs and Symbols
The manual uses the following signs and symbols:
Symbol Meaning
3
... shown before a step you have to perform
General information about GUI; Operation and
configuration of AntiVir WebGate using the
GUI
Golden Rules for Protection against Viruses
... shown before a condition that must be met, prior to
performing an action
... shown before the result that directly follows the preceding
action
... shown before a warning in case there is a danger of critical
data loss or hardware damage
... shown before a note containing particularly important
information, e.g. on the steps to be followed
... shown before a tip that makes it easier to understand and
use AntiVir WebGate
4 AntiVir WebGate Avira GmbH
Page 6
About this Manual
For improved legibility and clear marking, the following types of emphasis will also
be used in the text:
Emphasis in text Explanation
Ctrl+Alt Key or key combination
/usr/lib/AntiVir/antivir
ls /usr/lib/AntiVir
Choose component
Select all
http://www.avira.com URLs
Signs and Symbols – Page 4 Cross-reference within the document
1.4 Abbreviations
The manual uses the following abbreviations:
Abbreviation Meaning
ACL Access Control List
FTP File Transfer Protocol
GUI Graphical User Interface
HTTP Hypertext Transfer Protocol
Path and filename
User entries
Elements of the software interface such
as menu items, window titles and
buttons in dialog windows
HTTPS Hypertext Transfer Protocol Secure
ICAP Internet Content Adaptation Protocol
PMS Possible Malicious Software
SMTP Simple Mail Transfer Protocol
SNEWS Secure NEWs Server
SSL Secure Sockets Layer
VDF Virus Definition File
Avira GmbH AntiVir WebGate 5
Page 7

About this Manual
6 AntiVir WebGate Avira GmbH
Page 8
Product Information
2Product Information
Internet connection is an underestimated invasion doorway for malware on your
computer. If you transfer unfiltered data from the Internet on your system, you
can spread all types of malware throughout the entire network.
AntiVir WebGate is a reliable protection for your computer, by scanning, filtering
and if necessary blocking access to all files from the Internet.
Furthermore, AntiVir WebGate also scans the entire outgoing traffic.
Usually company computers access the Internet indirectly, via a proxy server.
AVIRA WebGate co-operates with the proxy server and completes it in an ideal
way.
Right from the beginning, two really important hints:
Losing valuable files usually has dramatic consequences. Not even the best antivirus
software can fully protect you against file loss.
Ensure regular backups for your files.
An antivirus program can be reliable and effective only if kept up-to-date.
Ensure that you maintain your AntiVir WebGate up-to-date, using Automatic
Updates. You will learn how to do it in this user guide.
Avira GmbH AntiVir WebGate 7
Page 9

2.1 Features
AntiVir WebGate supports a variety of configuration settings for controlling
Internet data transfer. The essential features are:
• NEW: Extended access control, for setting rules to allow tunneling for certain
• NEW: URL filtering, using the categories in Avira Web Access and Content
• Real-time scanning for viruses/unwanted programs
• Heuristic detection of macroviruses
• Scanning all downloaded files (HTTP and FTP)
• Scanning all outgoing files (e. g. PUT and POST)
• Simple installation and configuration: supported by intuitive scripts and
• Recognition of all common archive types
• Automatic Internet Update for the scan engine and VDF
• Configurable notification functions for the administrator (protocol, warnings,
• Self-Integrity Program Check, which ensures the antivirus system is operating
• Optional: user-friendly graphic interface (GUI) for operating and configuring
• Access control to WebGate using IP addresses
• ICAP support (enables connection through ICAP interface)
Product Information
types of requests and responses.
Control library (available in Avira AntiVir WebGate Suite)
graphical user interface (GUI)
reports); sending email warnings (SMTP)
correctly
AntiVir WebGate
2.2 Licensing Concept
You must have a license to use AntiVir WebGate. You are required to accept the
license terms
(see http://www.avira.com/documents/general/pdf/en/avira_eula_en.pdf).
There are different license models for using the various functions of AntiVir
WebGate:
z Demo version
z Full version
z Comfort pack
The license depends upon the number of users in the network, which are to be
protected by AntiVir WebGate.
The license is given in a license file named hbedv.key . You will receive it by email
from Avira GmbH. It contains certain data, such as the programs you will use and
the time interval of your license. The same license file may refer to more Avira
products.
8 AntiVir WebGate Avira GmbH
Page 10

Product Information
Demo Version
Evaluation
Ver sion
Full Version
Comfort Pack
The Demo Version detects and reports only the EICAR test-virus. There is no
possibility to block the access to infected files.
Details about the Evaluation Version can be found on our Website:
http://www.avira.com.
The range of Full Version features includes:
z Provision of AntiVir WebGate Versions by Internet download
z License file by email, for activating the Demo Version to a Full Version
z Complete installation instructions (digital)
z PDF manuals available for Internet download
z Four weeks Installation Support, starting from acquisition date
z Newsletter Service (per email)
z Internet Update Service for program files and VDF
In addition to the Full Version license, the Comfort Pack includes:
z Every three months: free delivery of a boot-CD-ROM with the AntiVir Rescue
System and all updated AntiVir products
z Complete installation manual (printed) on first delivery
z License file on a floppy with the first delivery
z Newsletter Service (printed, regular mail delivery)
2.3 Modules and Operating Mode of AntiVir WebGate
AntiVir WebGate security software consists in the following modules:
z AntiVir Search Engine
z Internet Updater
z WebGate Main Program
z Graphical User Interface (GUI) for AntiVir WebGate
z Avira Web Access and Content Control library
AntiVir Search Engine
AntiVir Search Engine essentially represents the scanning and repairing modules
of Avira software. These are also used by the other AntiVir products.
Internet Updater
The Internet Updater searches over the Internet and automatically updates your
AntiVir product, if necessary. This ensures that your programs are always kept upto-date.
Avira GmbH AntiVir WebGate 9
Page 11

WebGate Main Program
The Main Program is the actual WebGate function, supervising the HTTP and FTP
network access over the Internet. It detects viruses and unwanted programs using
the AntiVir Search Engine.
GUI for AntiVir WebGate
The graphical user interface (GUI) assists you in operating and configuring AntiVir
WebGate and graphically displays the monitoring process. However, AntiVir
WebGate is fully configurable and functioning even without a GUI.
You need Java 1.4.0 or later, in order to use the GUI.
Avira Web Access and Content Control library
WebGate allows clients to filter outgoing requests based on URL categories, such
as Violence, Gambling, Erotic etc. To determine the categories for a certain URL, the
Web Access and Content Control library is used. (This module is only activated
with the license for Avira AntiVir WebGate Suite.)
Product Information
To find out more details about the Web Access and Content Control library, please
refer to the Manual file within the WebGate installation directory.
2.4 System Requirements
AntiVir WebGate asks for the following minimum system requirements:
z Computer i386
z HD: 100 MB (1 GB or more recommended)
z RAM: 256 MB (1280 MB for Solaris)
z Linux; FreeBSD (Intel); OpenBSD (Intel) or Sun Solaris
Running AntiVir software on FreeBSD 6.x requires installing the compat5x
distribution.
If you want to use the GUI:
z Java 1.4.0 or newer
10 AntiVir WebGate Avira GmbH
Page 12

Installation
3 Installation
You can find the current version of AntiVir WebGate on our website.
AntiVir WebGate is supplied as packed archive. This archive contains the AntiVir
Search Engine, the Internet Updater, the WebGate Main Program and the
graphical user interface (GUI) for WebGate.
The graphical installation is also possible when using the Installation CD-ROM.
You are guided through the installation process, step-by-step. This Chapter is
composed of the following Sections:
z Choosing the WebGate Computer – Page 11
z Getting the Installation Files – Page 11
z Licensing – Page 12
z Installing AntiVir WebGate – Page 13
z Reinstalling AntiVir WebGate – Page 17
z Installing AntiVir WebGate Using the Graphical User Interface – Page 18
3.1 Choosing the WebGate Computer
Depending on network and hardware configuration, there are more possibilities
for choosing an AntiVir WebGate computer, as a “guard” between the user’s client
and the Internet.
A connection to the proxy server is especially needed, for ensuring a controlled
Internet access.
AntiVir WebGate is adjusted first in terms of network configuration (see
Configuration – Page 25). At the time of the installation, it must be decided on
which computer WebGate will be installed.
3.2 Getting the Installation Files
Downloading the Installation Files from the Internet
Download the current version file from our Website
http://www.avira.com/en/downloads/avira_antivir_unix_webgate.html
on your local computer. The file name is
antivir-webgate-prof-<version>.tar.gz.
Save the file in a /tmp folder on the computer, on which you want to run
WebGate.
Avira GmbH AntiVir WebGate 11
Page 13

Getting the Installation Files from CD-ROM
On the CD-ROM, open
/EN/PRODUCTS/UNIX/WEBGATE/ or
/EN/PRODUCTS/UNIX/GUI_INSTALLERS/.
Copy the file
antivir-webgate-prof-<version>.tar.gz in a directory, for example in
/tmp.
Unpacking Program Files
Go to the temporary directory
cd /tmp
Unpack the
tar -xzvf antivir-webgate-prof-<version>.tar.gz
AntiVir archive:
in the temporary directory will then appear antivir-webgate-prof-<version> .
:
Installation
3.3 Licensing
You must have a license for AntiVir WebGate, in order to use the program (see
Licensing Concept – Page 8). The license comes in a file named hbedv.key.
This license file contains information regarding the range and period of the license.
Without the license file, AntiVir WebGate runs only as Demo Version, with
restricted features.
Purchasing the License
You may contact us by telephone or by email
license file for AntiVir WebGate.
You will receive the license file by email.
You can easily acquire AntiVir WebGate using our Online Shop (for details, visit
http://www.avira.com).
Copying the License File
Copy the license file hbedv.key in the installation directory on your system:
/tmp/antivir-webgate-prof-<version>.
(info@avira.com), for acquiring a
You can also perform the installation without having a license key from the beginning.
AntiVir WebGate will then run as Demo Version.
You can copy the license file anytime in the AntiVir program directory
/usr/lib/AntiVir .
12 AntiVir WebGate Avira GmbH
Page 14

Installation
3.4 Installing AntiVir WebGate
AntiVir WebGate installation is performed automatically using an installation
script. This script performs the following tasks:
z Checks integrity of the installation files
z Checks for the required permissions for installation
z Checks for existing installed versions of AntiVir products on the computer
z Copies the program files and overwrites the existing obsolete files
z Copies the configuration files. Existing AntiVir configuration files are kept
z Optionally: installs Internet Updater
z Optionally: installs WebGate GUI
z Optionally: configures the automatic start of AntiVir WebGate or of the
Internet Updater
For the first installation, you must follow these steps:
z Preparing Installation – Page 13
z Installing AntiVir WebGate – Page 13
Preparing Installation
Login as root. Otherwise you don’t have the required authorization for the
installation and the script returns an error message.
Go to the directory where you have unpacked AntiVir WebGate:
cd /tmp/antivir-webgate-prof-<version>
Installing AntiVir WebGate
Depending on the AntiVir products you have already installed on your computer, the
installation procedure may vary.
Engine
Type:
./install
Confirm the License Agreement.
Avira GmbH AntiVir WebGate 13
Page 15

Installation
The installation script starts. First, the AntiVir Search Engine is copied:
1) installing AntiVir Engine
copying bin/antivir to /usr/lib/AntiVir/ ... done
copying vdf/antivir0.vdf to /usr/lib/AntiVir/ ... done
copying vdf/antivir1.vdf to /usr/lib/AntiVir/ ... done
copying vdf/antivir2.vdf to /usr/lib/AntiVir/ ... done
copying vdf/antivir3.vdf to /usr/lib/AntiVir/ ... done
installation of AntiVir Engine complete
Then you are asked if you want to install the Internet update daemon:
2) installing internet update daemon
...
Would you like to install the internet update daemon? [n]
You do not need the Internet update daemon for performing updates. You can use the
command antivir --update anytime, for manual updates over the Internet.
Installation
with update
daemon
However, for the first installation it is recommended that you install the daemon. You
can deactivate it later in the configuration.
If you want to install the Internet update daemon (recommended):
Type Y.
The daemon is installed. Then you are asked if you want to create a link to
avupdater and if the Updater should be automatically activated at system
start:
copying script/avupdater to /usr/lib/AntiVir/ ... done
checking for existing /etc/avupdater.conf ... not found
copying etc/avupdater.conf to /etc/ ... done
Would you like to create a link in /usr/sbin for avupdater ? [y]
linking /usr/sbin/avupdater to /usr/lib/AntiVir/avupdater ... done
Would you like the internet update daemon to start automatically? [y]
Confirm with Enter. You can change these settings later.
The automatic system start is configured:
setting up startup script ... done
installation of the internet update daemon complete
Installation
without update
daemon
If you want to install the Internet update daemon later or never at all:
Type N or press Enter.
14 AntiVir WebGate Avira GmbH
Page 16
Installation
WebGate Main
Program
The files for WebGate main program are copied. You will be asked if you want to
create a link in /usr/sbin
3) installing main program
copying doc/avwebgate_en.pdf to /usr/lib/AntiVir/ ... done
copying bin/avwebgate.bin to /usr/lib/AntiVir/ ... done
copying script/avwebgate to /usr/lib/AntiVir/ ... done
creating /usr/lib/AntiVir/templates ... done
creating /usr/lib/AntiVir/templates/examples ... done
creating /usr/lib/AntiVir/templates/examples/en ... done
creating /usr/lib/AntiVir/templates/examples/de ... done
installing example templates to /usr/lib/AntiVir/templates ... de en
copying doc/MANUAL to /usr/lib/AntiVir/MANUAL.avwebgate ... done
Would you like to create a link in /usr/sbin for avwebgate ? [y]
If you do not want to create a link:
Type N or press Enter.
GUI
installation
Then you are asked if you want WebGate to start automatically:
Would you like AvWebGate to start automatically? [y]
Confirm with Enter. You can later modify this setting.
The automatic system start is configured:
setting up startup script ... done
installation of main program complete
Then you are asked if you want to install WebGate with the optional graphic user
interface (GUI).
4) installing GUI (+ SMC support)
Note: The AntiVir Security Management Center (SMC) requires this
feature, even if you do not intend to use the GUI.
This product comes with a GUI that allows you to monitor realtime
activity, view logs, and configure the product. This tool is optional
(not required) for the product to run.
The GUI requires Java 1.4.x or higher.
Would you like to install the GUI (+ SMC support)? [y]
AntiVir WebGate is completely functioning and fully configurable, even without the
graphic user interface.
Avira GmbH AntiVir WebGate 15
Page 17

If you wish to install the GUI:
3 You must have Java 1.4.x or higher installed on the computer.
Type Y or confirm with Enter.
The GUI program files are copied:
checking for existing /etc/avwebgate.conf ... not found
copying etc/avwebgate.conf-gui to /etc/avwebgate.conf ... done
copying common gui files to /usr/lib/AntiVir/gui ... done
copying platform dependant gui files to /usr/lib/AntiVir/gui ... done
copying script/antivir-gui to /usr/lib/AntiVir/ ... done
linking /usr/bin/antivir-gui to /usr/lib/AntiVir/antivir-gui ... done
copying smcpkg/libuxwgt.so.linux_glibc22 to /usr/lib/AntiVir/agent/libuxwgt.so ... done
installation of GUI complete
Installation
Updater
configuration
The following question is about AntiVir Updater configuration:
5) configuring AntiVir Updater
Your connection to the internet might require special configuration
settings (such as HTTP proxy settings). You may also want the
updater to log to specific files or send email notification. You
now have the opportunity to set these options.
Would you like to configure the AntiVir updater now? [y]
If you answer Y, the configuration script starts. You can also do this later – using the
script or the GUI. It is recommended that you first get acquainted with the configuration
possibilities and then perform it (see Configuration – Page 25).
Answer N.
In the end you will see a report, confirming that the installation was
completed successfully:
Installation of the following features complete:
AntiVir Engine
AntiVir Internet Update Daemon
AntiVir WebGate
AntiVir GUI
16 AntiVir WebGate Avira GmbH
Page 18

Installation
3.5 Reinstalling AntiVir WebGate
You can launch the installation script anytime. There are more situations possible:
z Installing a new version (Upgrade). The installation script checks the prior ver-
sion and installs the necessary new components. The configuration file settings
already made are not overwritten, but inherited (see Configuration – Page 25).
z Later installation of some components, e. g. Internet Updater or GUI.
z Activating or deactivating the automatic start of AntiVir WebGate or Internet
Updater.
AntiVir WebGate reinstallation
The procedure is the same in all listed cases:
Go to the temporary directory where you have unpacked AntiVir WebGate:
cd /tmp/antivir-webgate-prof-<version>
Type:
./install
The installation script runs as described above (see Installing AntiVir
WebGate – Page 13).
Make the necessary changes during installation.
AntiVir WebGate is installed, with the desired settings.
Avira GmbH AntiVir WebGate 17
Page 19
Installation
3.6 Installing AntiVir WebGate Using the Graphical User Interface
If you are using an installation CD, you can comfortably install AntiVir WebGate
using a graphical installation routine. The file name is
antivir-webgate-<version>-gui_installer.tar.gz
in /EN/PRODUCTS/UNIX/GUI_INSTALLERS on the CD-ROM.
The graphical installation routine serves only for installation. It is not related to the GUI,
which enables the operation and configuration of AntiVir WebGate.
The graphical installation routine for AntiVir WebGate runs only on Linux. It requires
Java 1.4.0 or higher.
3 The program file is unpacked and saved in the directory:
/tmp/antivir-webgate-<version>-gui_installer.
Open the directory and type:
./install
A welcome text with a short description of the program appears:
Click Next.
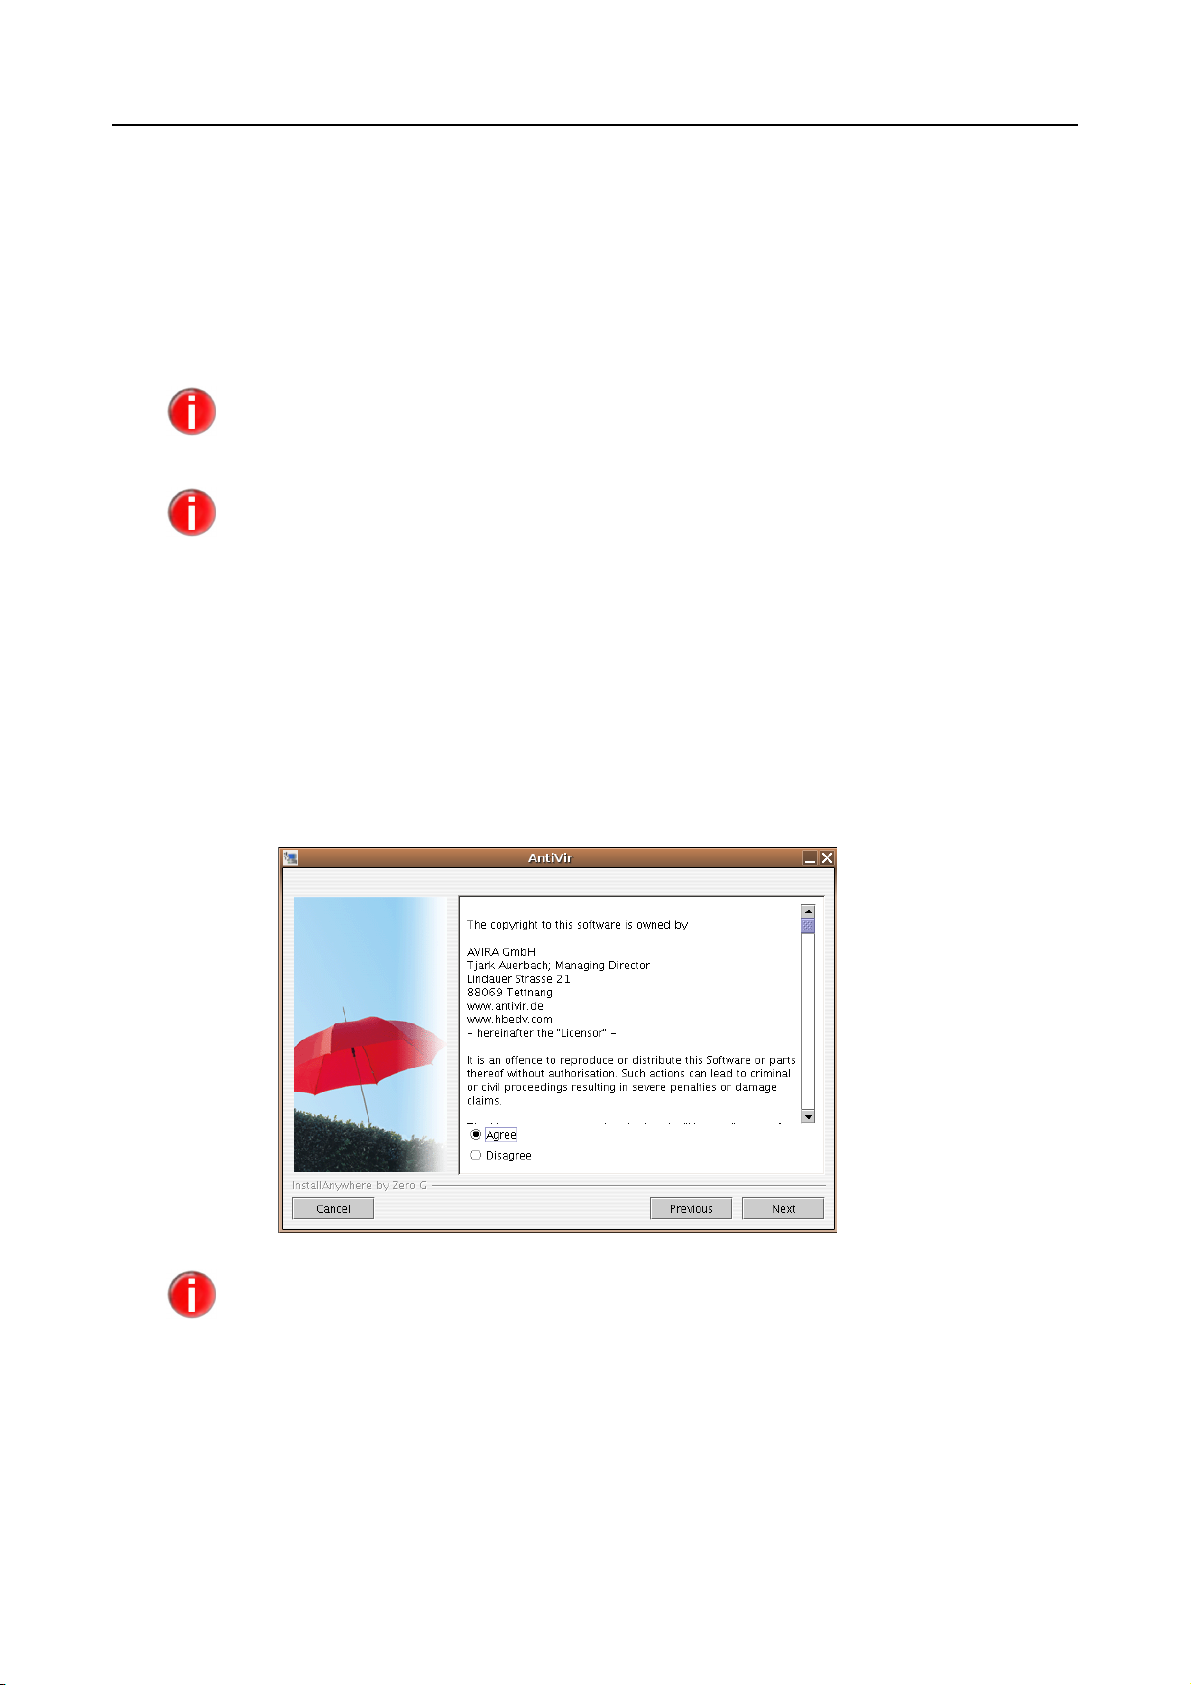
You will see the license terms window:
In order to continue the installation, you have to accept the License Agreement. If
Disagree is active, the installation can not continue.
Select Agree and click Next.
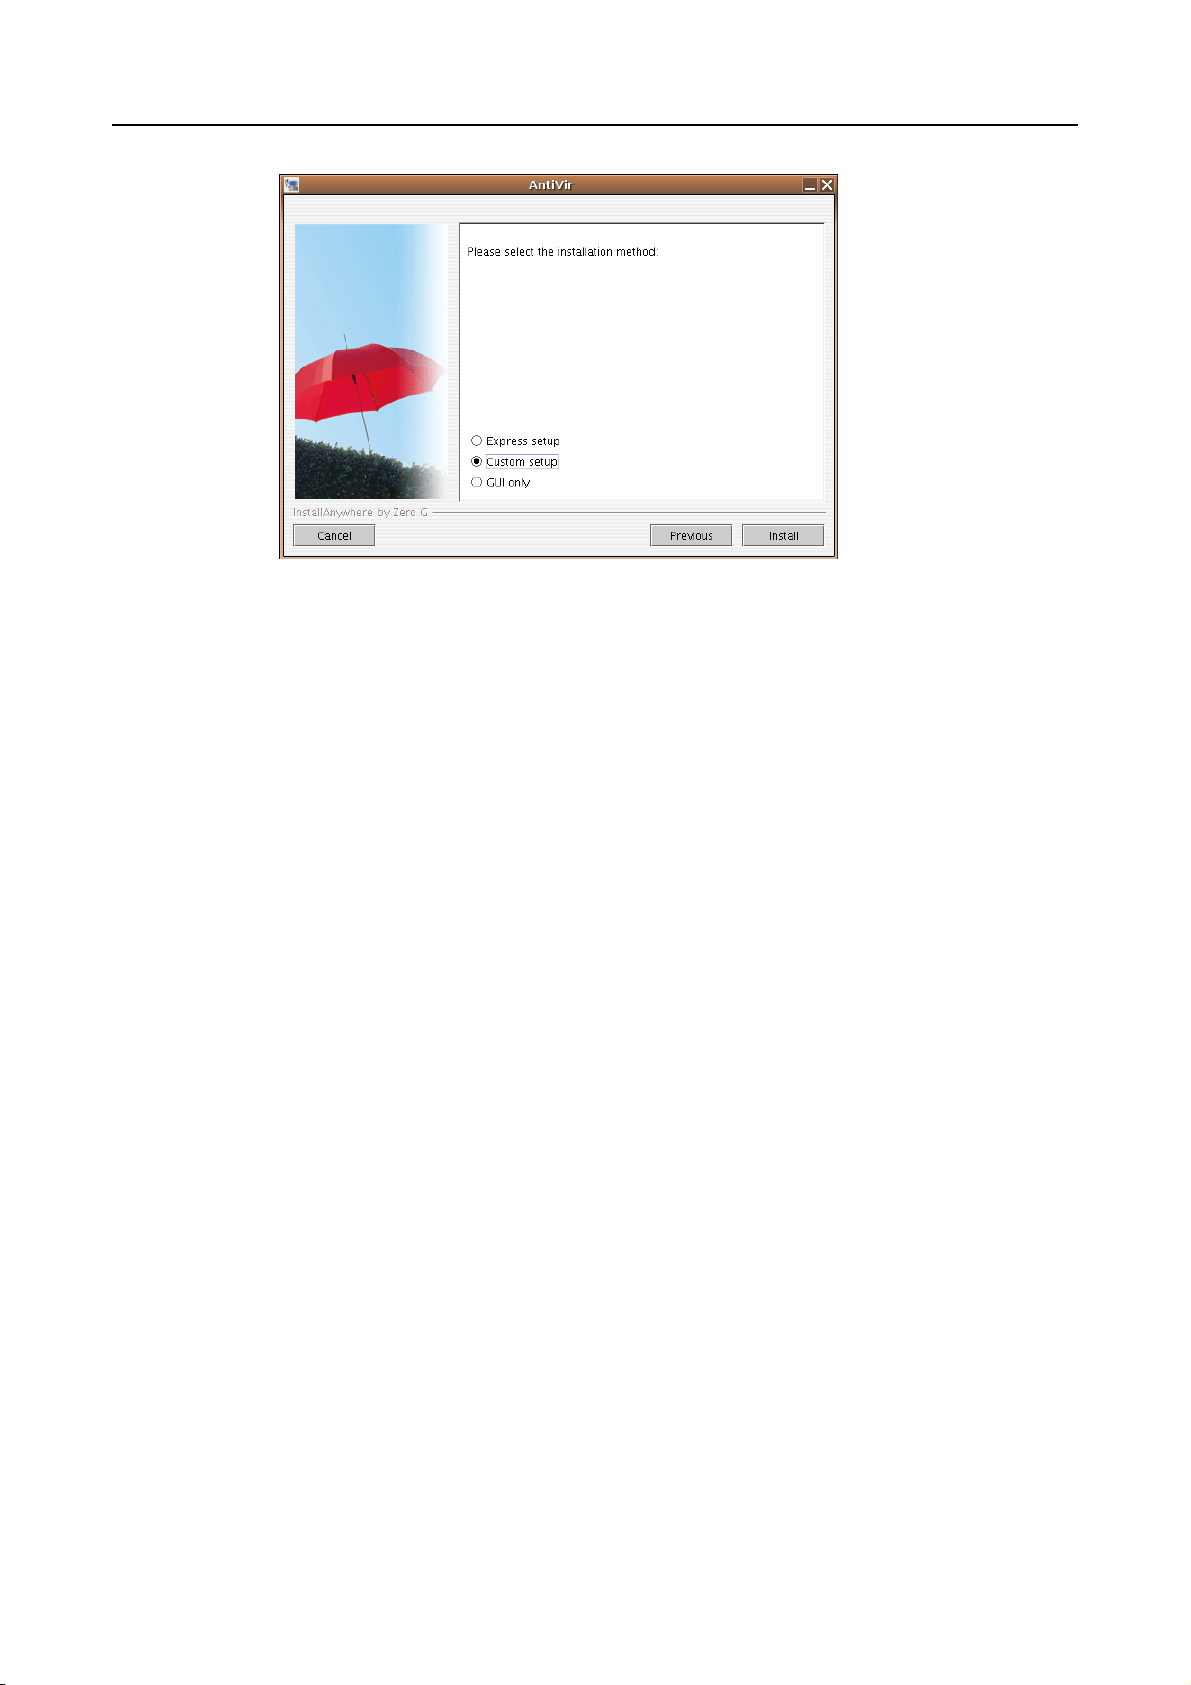
The following window is displayed:
18 AntiVir WebGate Avira GmbH
Page 20
Installation
You have three possibilities to install WebGate:
z Express setup: The program is installed with basic settings.
z Custom setup: The program is installed according to the user’s options.
Express setup
z GUI only: Only the GUI is installed in /usr/lib/AntiVir .
The program is installed with the following basic settings:
z "WebGate" (Main Program) and "AntiVir" (AntiVir Search Engine) are installed
in the directory:
/usr/lib/AntiVir
z The automatic Internet Updater is not installed.
z GUI support is activated.
z WebGate will start automatically when booting.
z The license file is not copied, meaning that AntiVir WebGate runs as demo
version.
Select Express setup and click Next.
All settings and further instructions appear in a window.
Click Install.
The program is installed.
Custom setup
You can install the program with user-defined settings.
Select Custom setup and click Next.
Avira GmbH AntiVir WebGate 19
Page 21
Installation
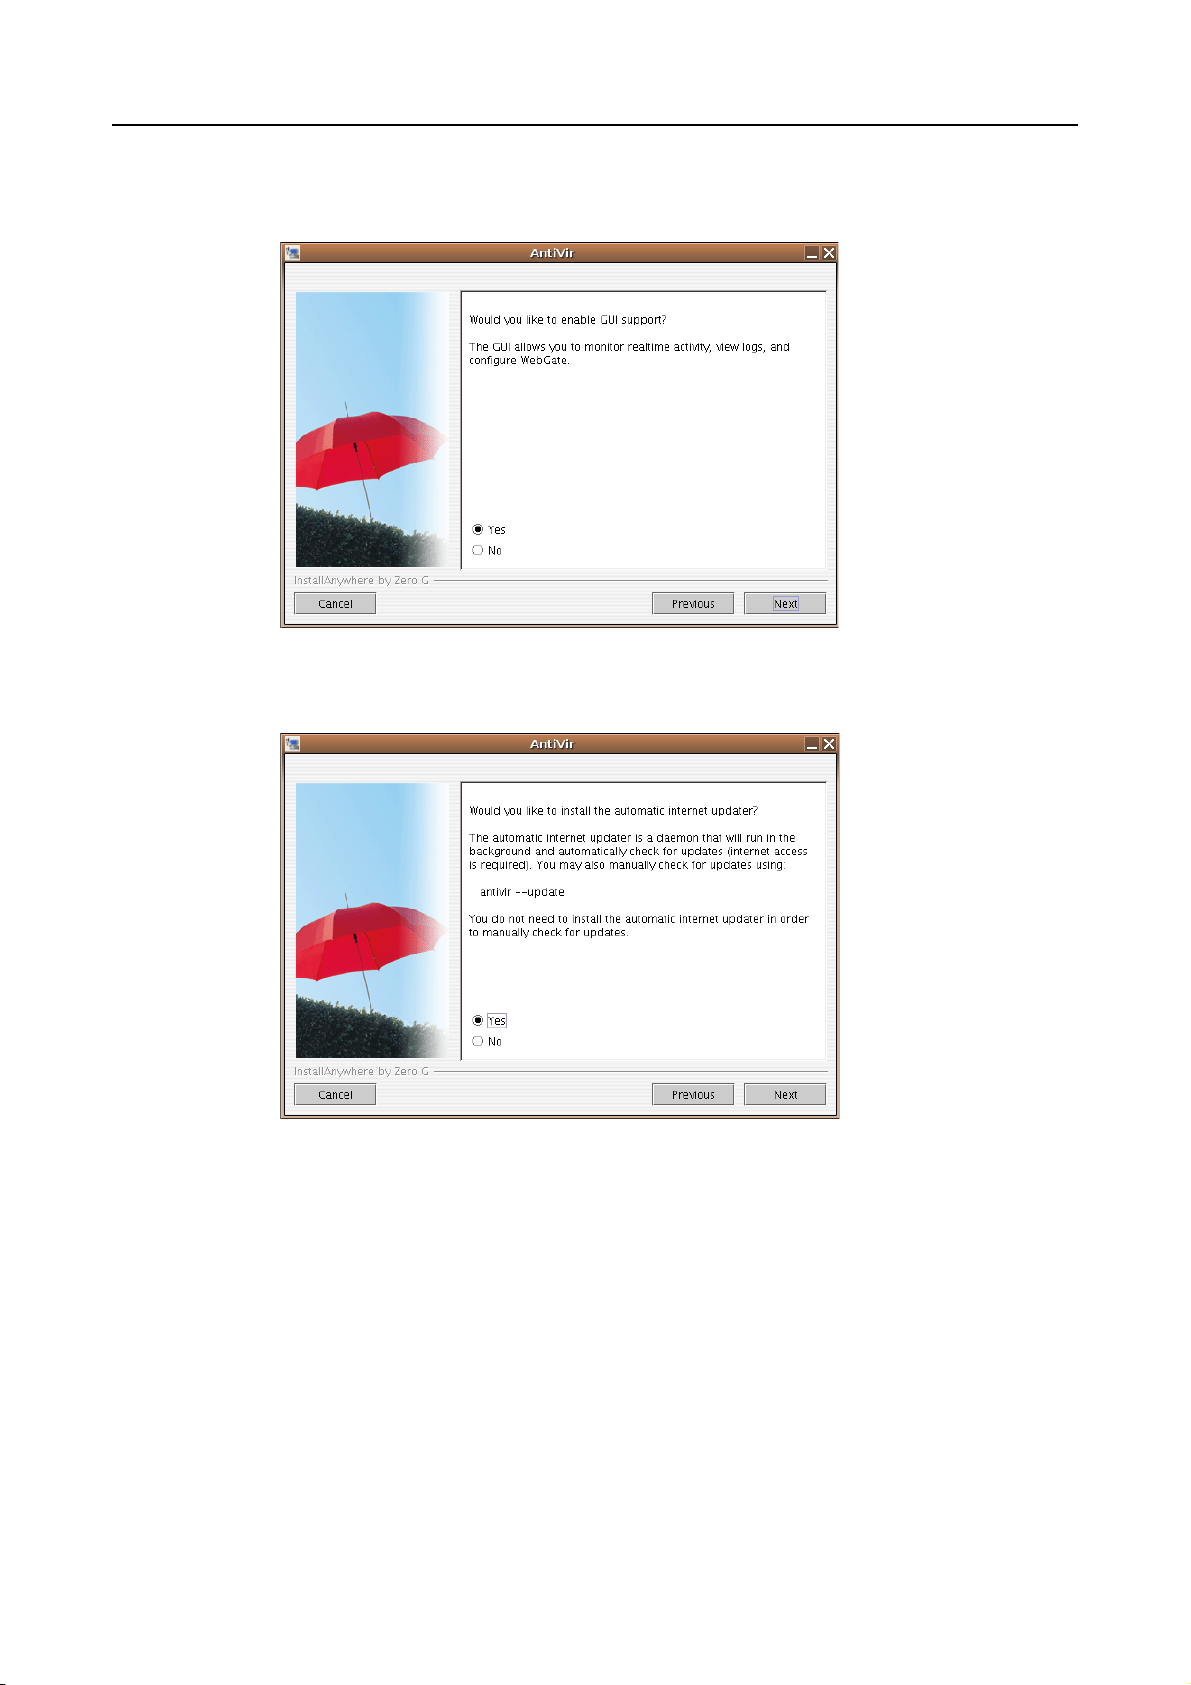
The following window asks if you want to activate the GUI (entry in the file
avwebgate.conf):
Select Yes or No and click Next.
Then you must specify if you want to install the automatic Internet Updater:
If you wish to install the Internet Updater:
Select Yes and click Next (in this case, you are asked if you want the Internet
Updater to start automatically by computer boot).
The next window asks if the license file is to be copied:
20 AntiVir WebGate Avira GmbH
Page 22

Installation
Select the license file with Choose and click Next.
The next window asks if WebGate should start automatically by computer
boot:
Select Yes or No and click Next.
An optional question asks if the Internet Updater should start automatically:
Avira GmbH AntiVir WebGate 21
Page 23
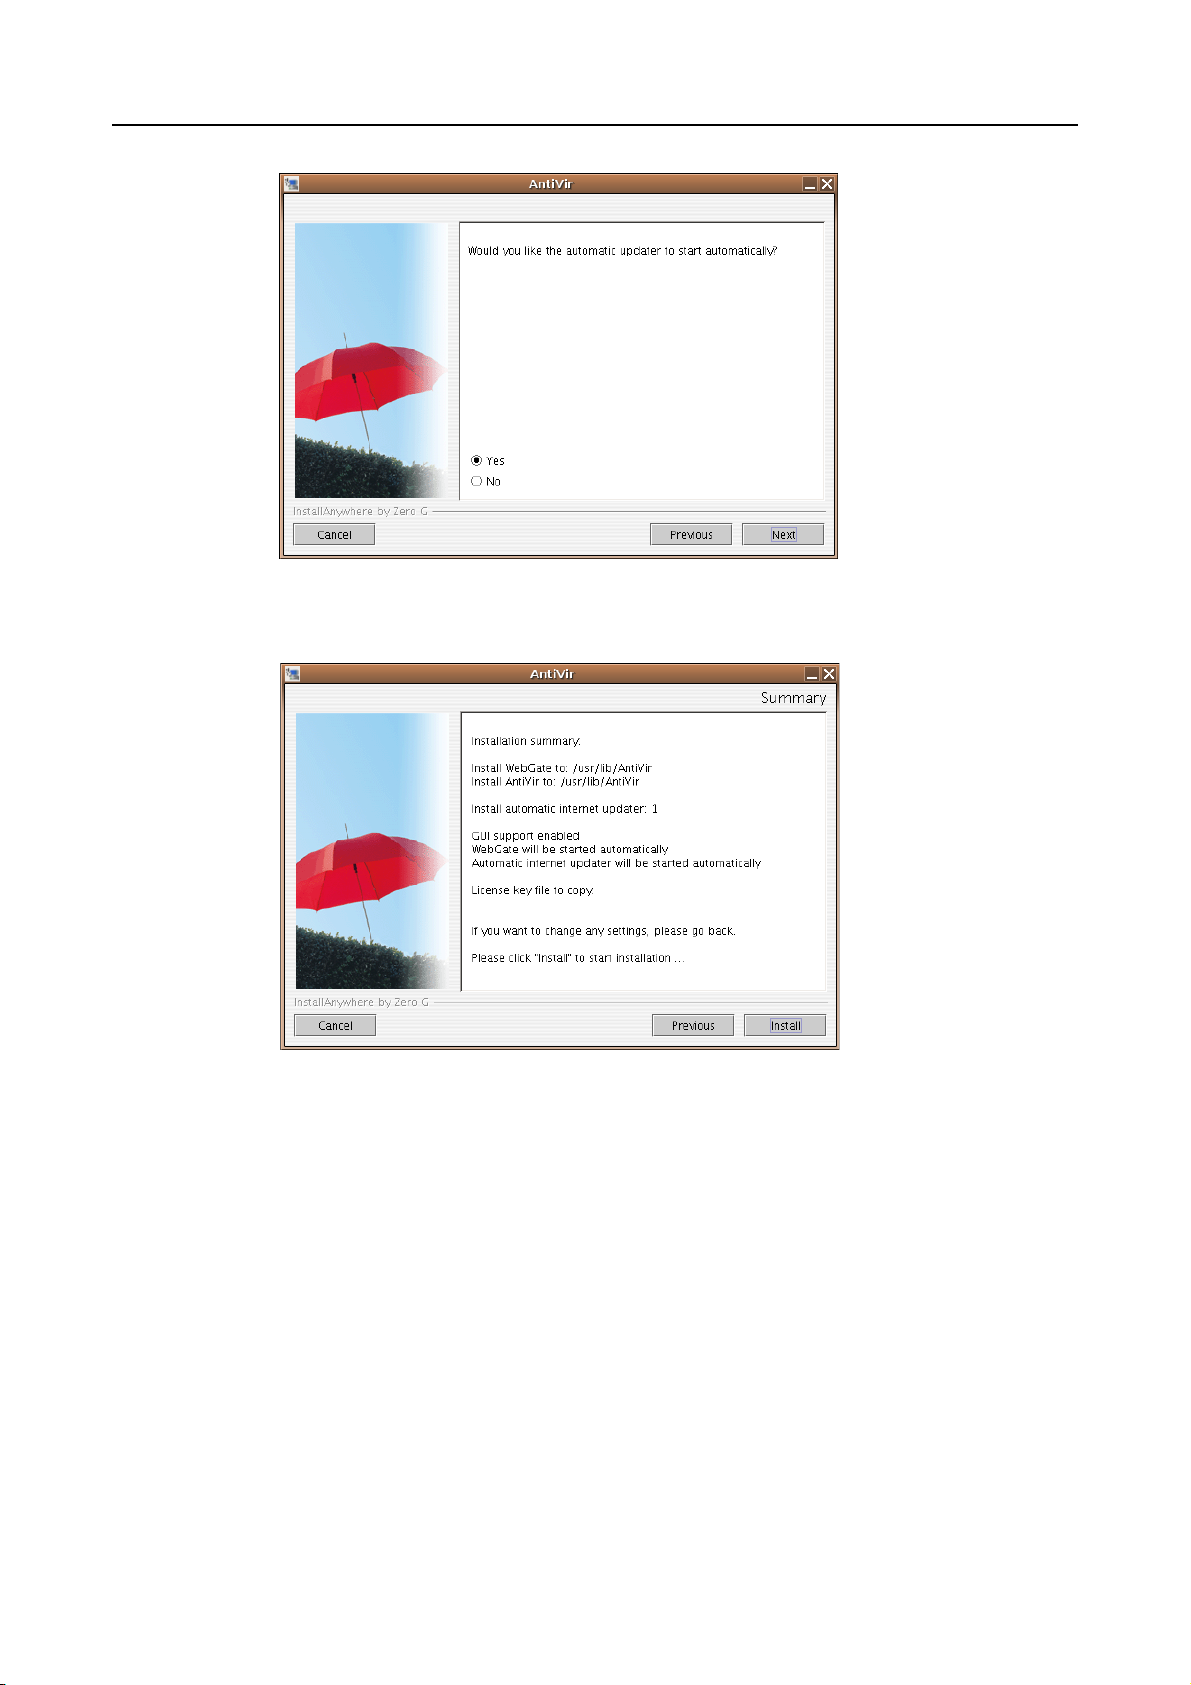
Select Yes or No and click Next.
A window will display the settings and further instructions:
Installation
Click Install.
The program will be installed.
GUI only
Choose this option, if you wish to install only the GUI.
Select GUI only and click Next.
The GUI is installed in the following directory:
/usr/lib/AntiVir
All settings and further instructions appear in a window.
Click Install.
GUI is installed.
22 AntiVir WebGate Avira GmbH
Page 24
Installation
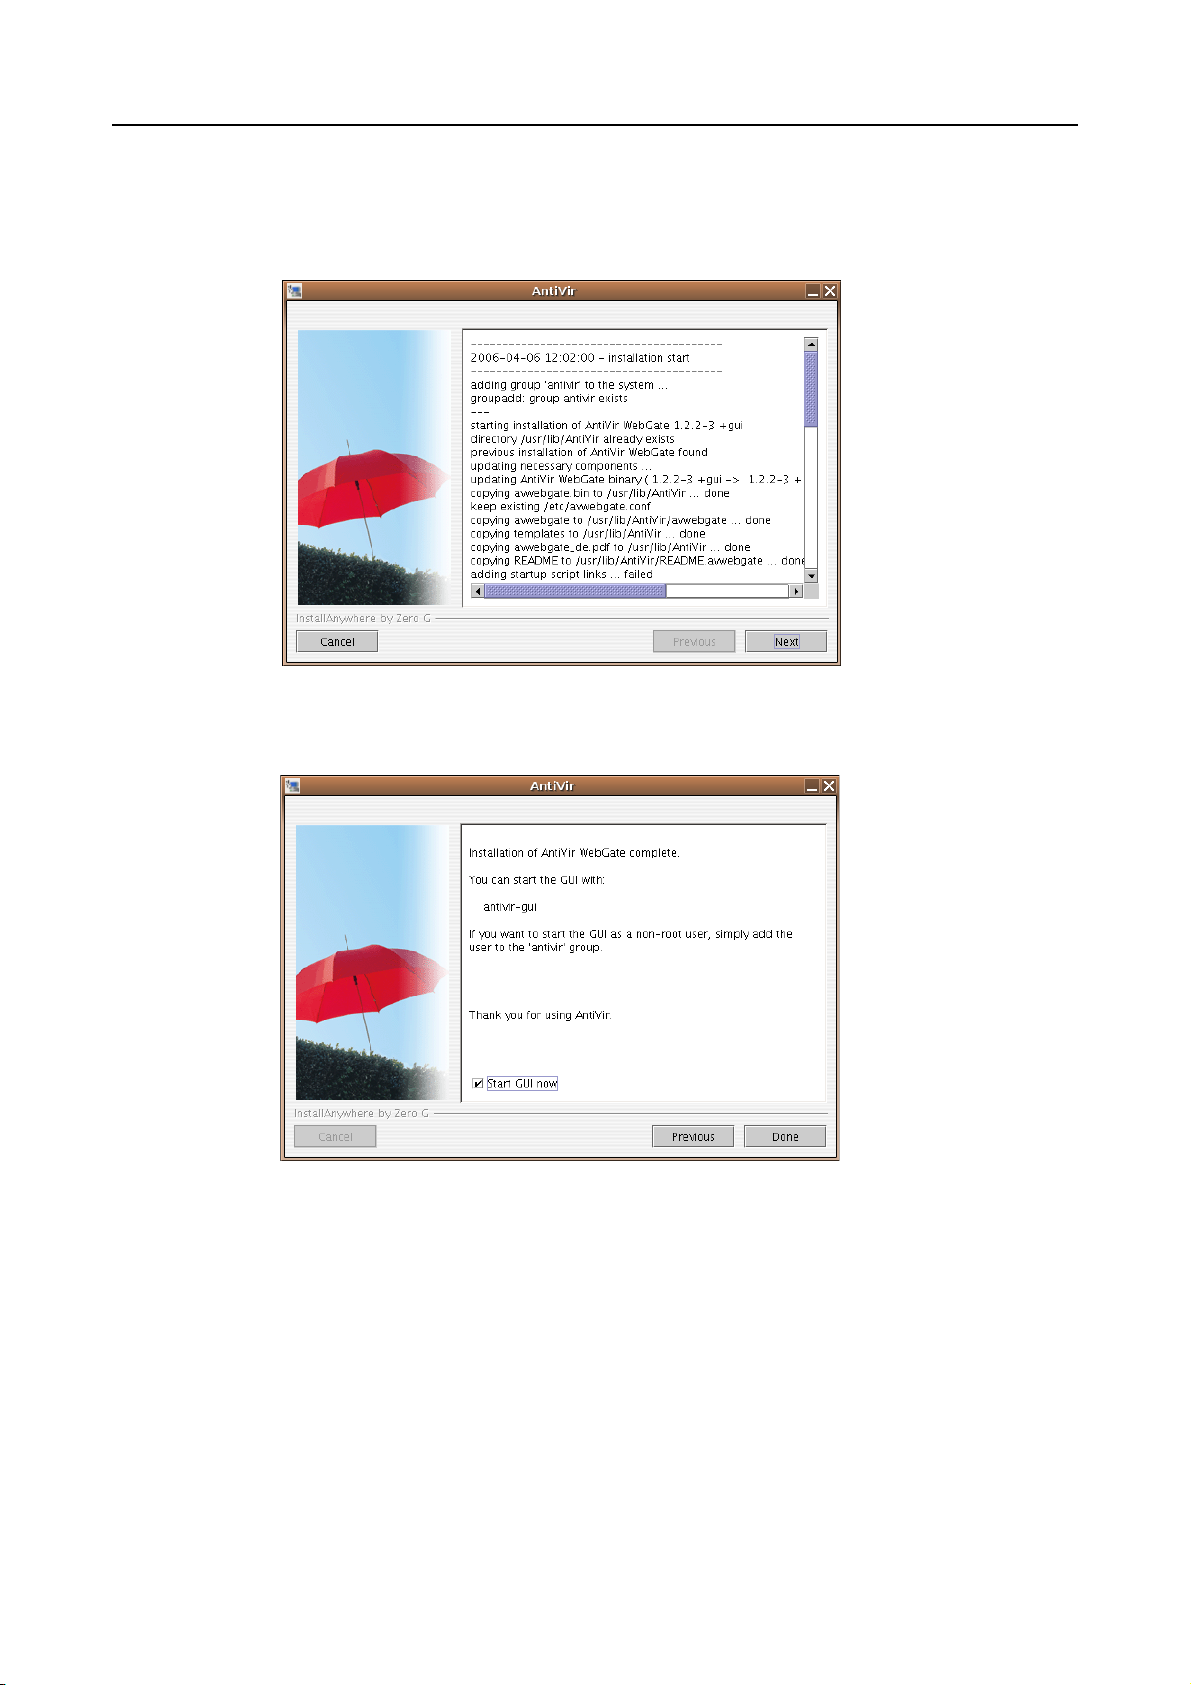
Completing the Installation
Following any installation type you selected, a window will list the performed
installation steps:
Click Next.
You will see the following window:
If you want to start the GUI directly:
Activate the option Start GUI now and click Done.
The installation is completed.
Avira GmbH AntiVir WebGate 23
Page 25

Installation
24 AntiVir WebGate Avira GmbH
Page 26

Configuration
4 Configuration
You can tune AntiVir WebGate for optimal performance. Right after installation,
you have the possibility to make the most important adjustments. The most
common settings are suggested.
You can modify these settings anytime, to adjust WebGate to your requirements.
After a short overview, you will be guided step by step through the configuration
process:
z In Monitoring HTTP Traffic – Page 26 you can read about the different
possibilities for WebGate’s network setting.
z In Monitoring FTP Traffic – Page 30 is a description of integrating WebGate as
FTP proxy.
z Integration over ICAP Interface – Page 32 presents the integration of WebGate
over ICAP interface.
z In Configuration Files – Page 34 we shortly describe the entries in the
configuration files. Advanced Unix users can completely configure WebGate by
editing these settings directly in the files.
z In Configuration Script – Page 43 you can read how to define general settings
using the included script.
z In Regular Updates Configuration – Page 44 you learn how to keep WebGate up-
to-date.
z Testing AntiVir WebGate – Page 51 describes how you can test the performance
of WebGate, after completing the configuration.
Avira GmbH AntiVir WebGate 25
Page 27

4.1 Overview
Configuration
Configuration
files
Configuration
script
GUI
The configuration is defined in two files:
z avupdater.conf is used by all AntiVir programs. This file defines basic settings for
automatic updates and for generating reports in logfiles or by emails. The file is
located in /etc .
z avwebgate.conf defines WebGate specific procedures, network configuration,
proxy server integration and the program’s reactions when detecting viruses or
unwanted programs. The file is located in /etc.
The settings can be made directly in the configuration files. This is not so difficult (see
Configuration Files – Page 34 for their contents), but a comfortable way is using the
script settings or the graphical user interface (GUI), included in the program. These
intercept the eventual errors and restart the necessary processes.
avupdater.conf can be set using the configuration script /usr/lib/AntiVir/
configantivir
avwebgate.conf can be easily configured using the Configuration options in the
(see Configuration Script – Page 43).
graphical user interface- GUI (see Configuring AntiVir WebGate Using the GUI –
Page 62).
4.2 Monitoring HTTP Traffic
WebGate can scan the entire incoming and outgoing HTTP traffic for viruses and
unwanted programs. It can even scan the web-based FTP transfers (FTP over
HTTP). WebGate works with the existing proxy servers and supplements them, but
it can also be set as stand-alone HTTP proxy.
Depending on the network and configuration, there are more possibilities for
setting AntiVir WebGate as "guard" between the Client computer and the Internet.
In all these cases, the user does not have direct connection to the Internet, but
through WebGate.
There are three different configurations:
z WebGate without Proxy Server (Network Configuration 0) – Page 27
z WebGate between Client and Proxy Server (Network Configuration 1) – Page 28
z WebGate between Proxy Server and Internet (Network Configuration 2) –
Page 29
If you set ports under 1024 during configuration, WebGate has to reboot as root.
26 AntiVir WebGate Avira GmbH
Page 28
Configuration
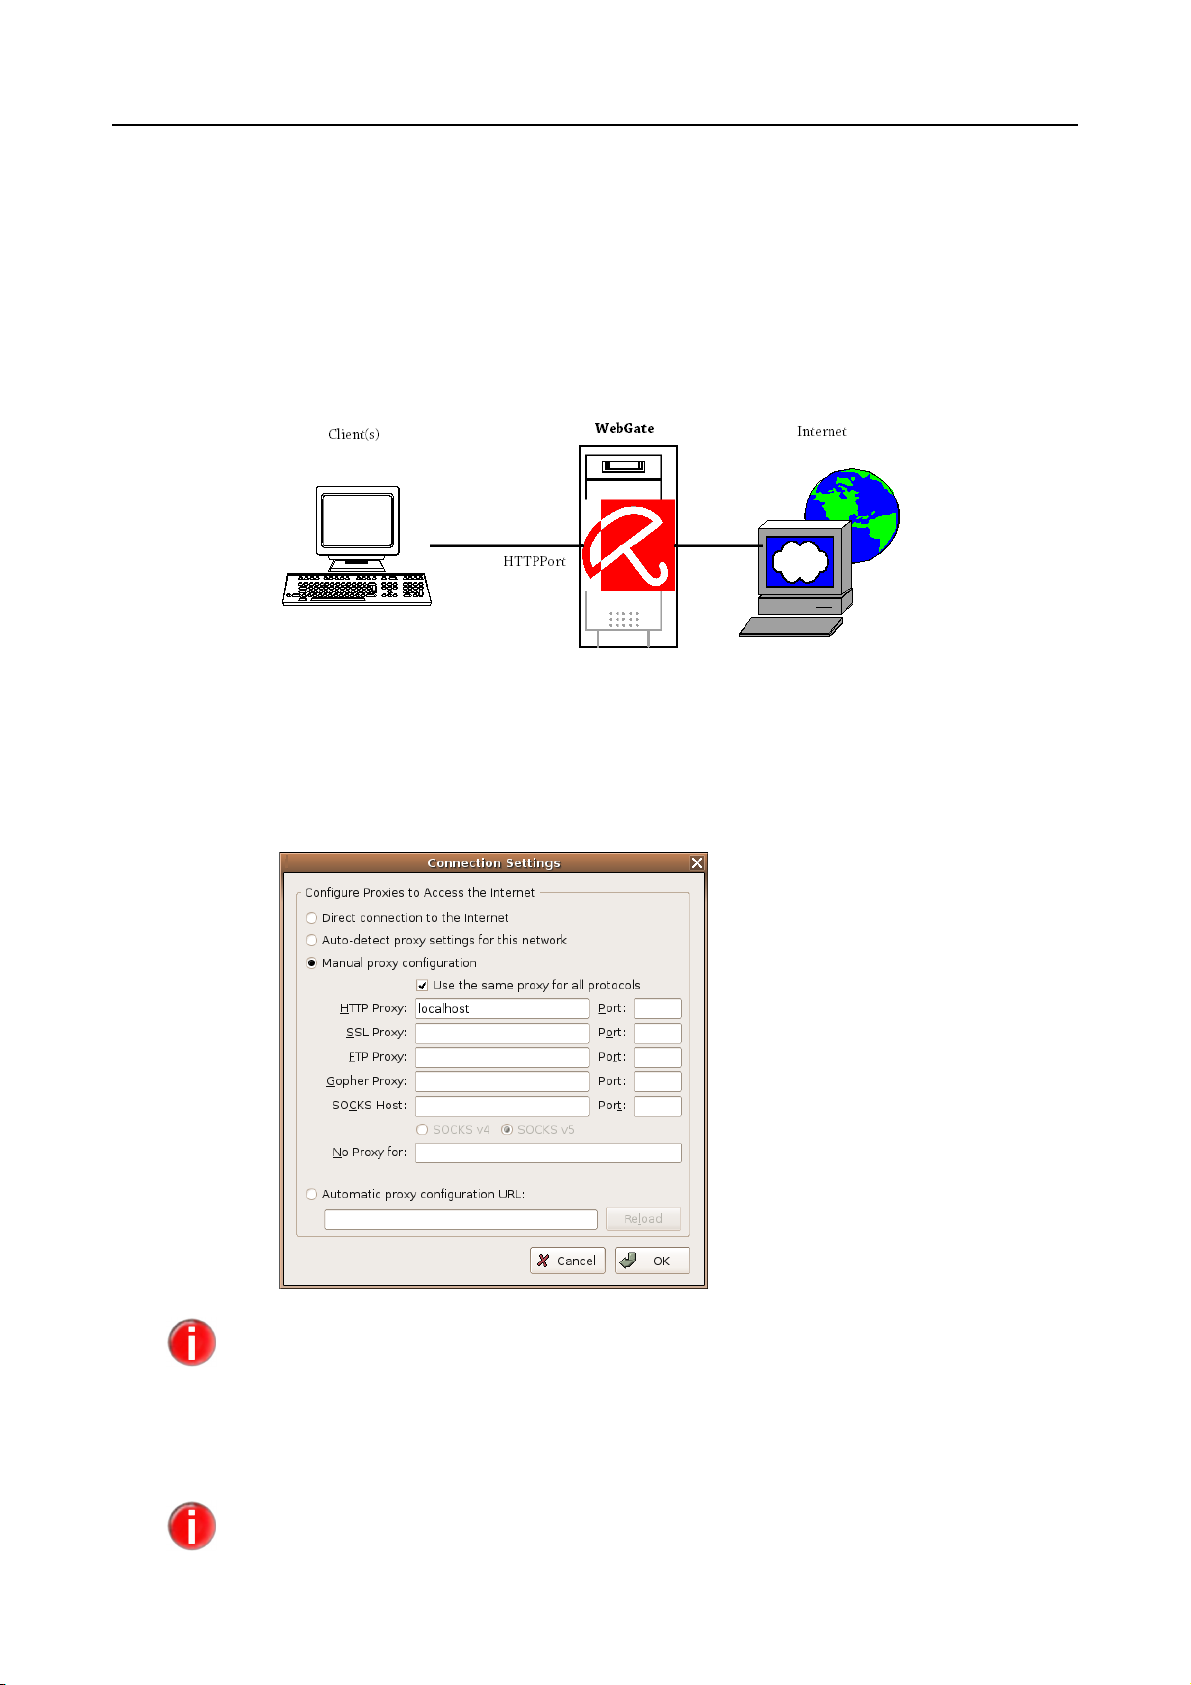
WebGate without Proxy Server (Network Configuration 0)
If there is no proxy server, WebGate stands between Clients and the Internet. It
can be installed directly on Clients or on another computer.
WebGate directs the Clients’ enquiries to the Internet and scans the answer from
the Internet. The access to infected files from a Website is blocked and only not
infected files are forwarded to the Client. From the Client’s point of view, WebGate
is functioning as a proxy server.
Make the following settings in avwebgate.conf (example):
HTTPPort 8080
Configure the browser according to the Clients. For "Proxy Server Address" you
need to enter the IP address of the WebGate computer.
If WebGate is installed on the actual Client, we recommend the following settings in
avwebgate.conf:
HTTPPort 127.0.0.1:8080.
For Proxy server address enter the IP address 127.0.0.1 or localhost .
The real settings can differ from those given in the example, but for a correct
configuration, the settings in avwebgate.conf must be compatible with the Client’s
browser configuration.
Avira GmbH AntiVir WebGate 27
Page 29

Configuration
WebGate between Client and Proxy Server (Network Configuration 1)
In this configuration, the other proxy server can be attacked by malicious software. If you
want complete protection for your proxy server (normally), network configuration 2 is
recommended. See WebGate between Proxy Server and Internet (Network
Configuration 2) – Page 29.
This configuration is suitable when the proxy is connected to other servers and the
Clients need to be protected from infection. WebGate can be installed directly on
the proxy server or on another computer.
WebGate directs the Client’s inquiries through the proxy server to the Internet and
scans the answers from the Internet, which are received through the proxy server.
The access to infected files from a Website is blocked and only not infected files are
directed to the Clients.
This example assumes the following proxy server configuration:
host proxy.mycompany.com
serverport 3128
So, the proxy server communicates with the Clients over port 3128.
Install WebGate on the machine proxy.mycompany.com.
Make the following settings in avwebgate.conf (example):
HTTPPort 3128
Now, the Clients will communicate through WebGate for HTTP and FTP
inquiries, not directly through the original proxy server. The browser settings
on the Client computers must not be changed.
Enter the following values in avwebgate.conf (example):
HTTPProxyServer 127.0.0.1
HTTPProxyPort 8080
28 AntiVir WebGate Avira GmbH
Page 30

Configuration
WebGate forwards the HTTP and FTP inquiries to localhost port 8080.
Change the port of the original proxy server according to the value of
HTTPProxyPort (in avwebgate.conf), so that it can contact WebGate. For
example:
serverport 8080
If WebGate is installed on the actual proxy server:
Make sure that WebGate does not respond on the same server port, as is the
case in the example above.
If WebGate and the proxy server are installed on the same computer:
It is usually easier to adapt the settings of the proxy server and to inherit the initial
settings of the WebGate. In this way, you do not need to make any changes on the Clients.
It is also possible to install WebGate on a computer, other than the proxy server. The
settings must be done accordingly.
In this network configuration, a Client could also be a proxy server (for example, by
installing WebGate between two proxies).
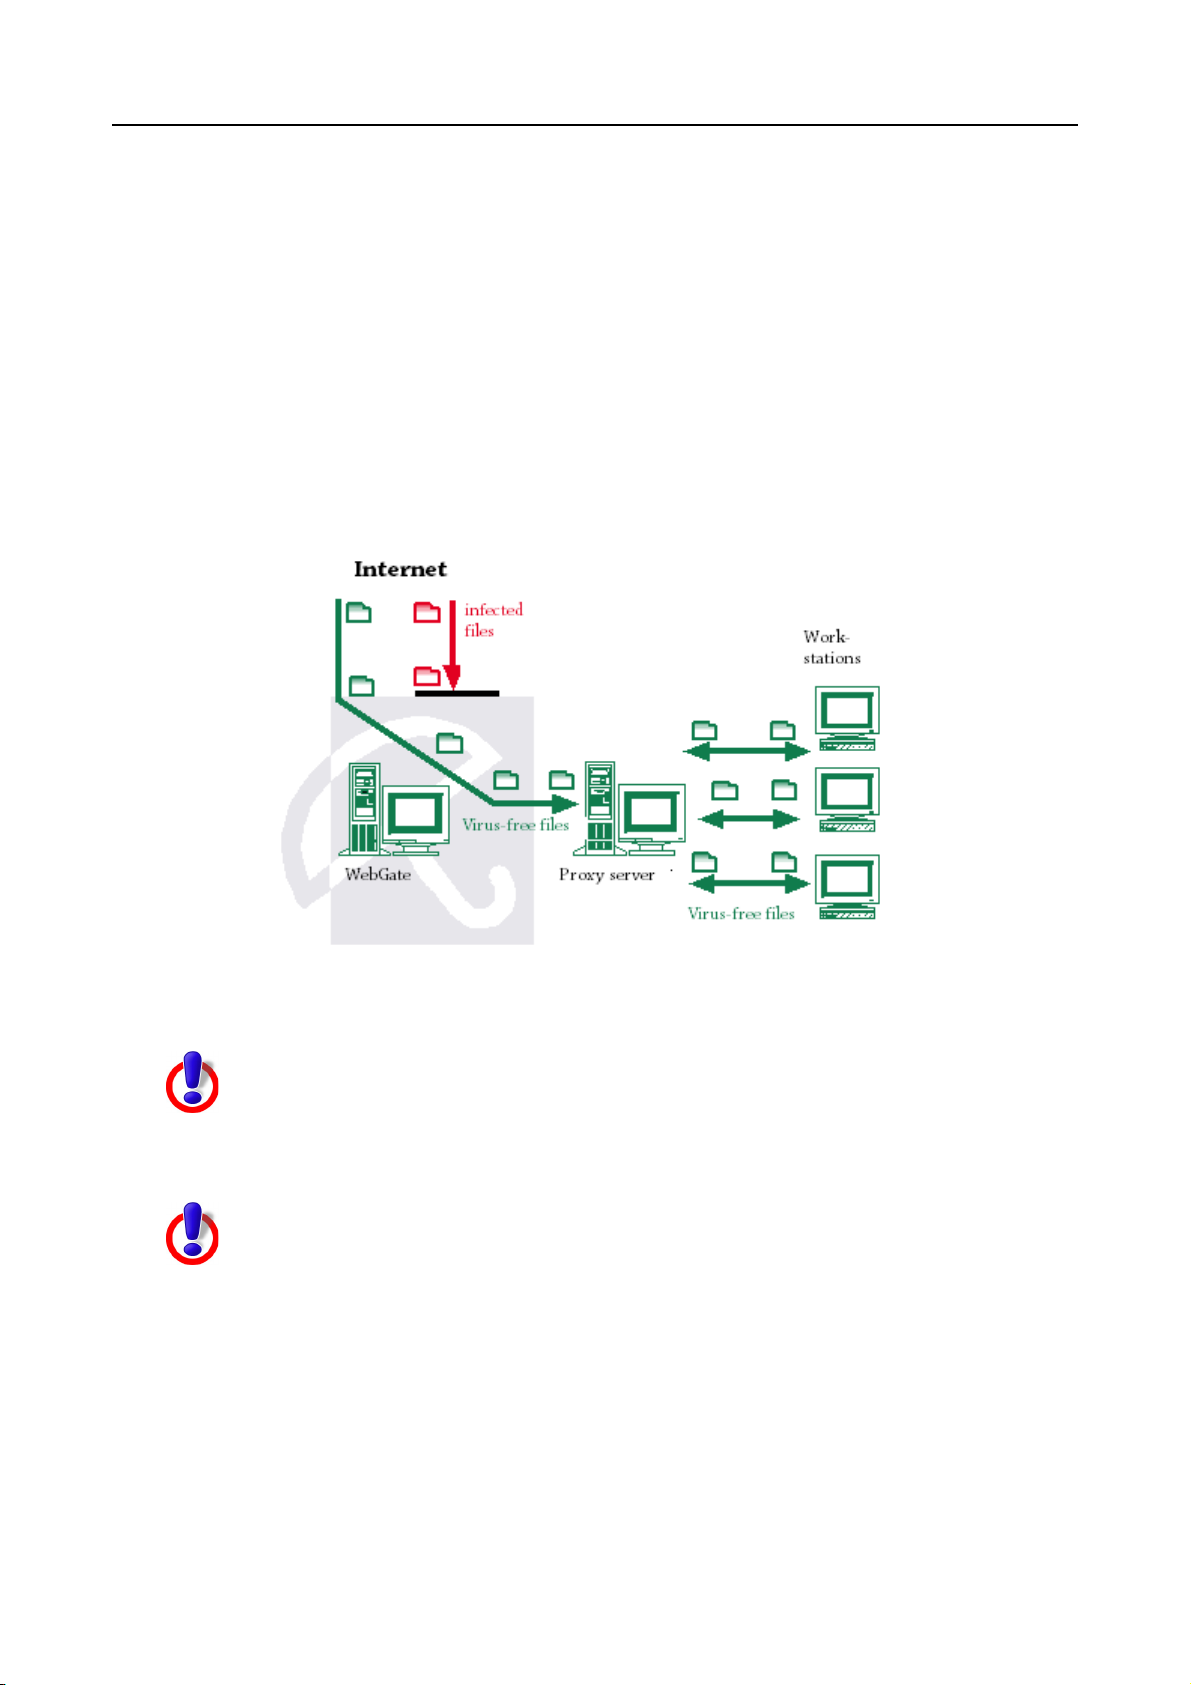
WebGate between Proxy Server and Internet
(Network Configuration 2)
If you already use a proxy server, it is better to install WebGate between the proxy
and the Internet. In this way malicious software is intercepted by the proxy server.
WebGate can be installed directly on the proxy server machine or on another one.
WebGate directs the Clients’ inquiries through the proxy towards the Internet and
scans the answers from the Internet. The access to infected files from a Website is
blocked and only uninfected ones are forwarded to the Clients, through the proxy
server.
Avira GmbH AntiVir WebGate 29
Page 31

Configuration
The example assumes the following configuration of the proxy server:
host proxy.mycompany.com
serverport 3128
So the proxy server responds on port 3128.
Make the following settings in avwebgate.conf (example):
HTTPPort 8080
Configure the other proxy server, so that it does not directly serve inquiries to
the Internet, but directs them to WebGate (e. g. port 8080). This port must
correspond to the value of HTTPPort in avwebgate.conf .
– Example for a Squid proxy server:
In this configuration, you must first start WebGate and then the proxy server.
Squid proxy has to direct all inquiries to WebGate (parent proxy), so you have
to configure the Squid configuration file squid.conf as follows:
cache_peer proxy.mycompany.com parent 8080 0 no-query
no-digest default
acl all src 0.0.0.0/0.0.0.0
never_direct allow all
If WebGate is installed on the proxy server machine:
Make sure that WebGate and the proxy server do not respond on the same
server ports, such as is the case in the above example.
When a Client asks for data, which can be found on the proxy server’s cache, it will receive
its data directly from there. These data will not be scanned, until the cache is emptied. It
bears a risk, because a new virus might "penetrate" and it could be forwarded to Clients,
even if they have updated VDFs.
If you modify the proxy server’s port, you have to adapt the settings of the Clients’
browsers, which access the proxy.
It is usually easier to keep the proxy settings and to adapt the WebGate settings, just like
in the above example.
4.3 Monitoring FTP Traffic
WebGate can also be set as real FTP proxy, so that it can scan the files transferred
through an FTP Client and even block them. It scans both downloads and uploads.
In avwebgate.conf set the port for the WebGate to communicate with the FTP
Clients:
FTPPort 2121
Now, the FTP Clients can communicate to FTP servers, through WebGate, which
30 AntiVir WebGate Avira GmbH
Page 32

Configuration
means that the Clients have no direct connection to the FTP servers, but to
WebGate. In order for WebGate to make a substitute connection to FTP servers,
you need to specify the address and the name of the FTP servers. WebGate must
receive this information from FTP Clients at login with the USER command:
USER <username>@<host>[:<port>]
Compared to making a direct connection to FTP server, the connection through
WebGate also needs, apart from the user name at login, the host name – separated
with the @ character from the user name – or the IP address (optionally with port)
of the FTP server.
Example
This example illustrates the login procedure, when using a standard Unix FTP
Client:
Assumption: WebGate runs on a machine with the IP address 192.168.0.1 and
receives inquiries from FTP Clients on port 2121. You should establish a
connection to a remote FTP server with the IP address 10.0.0.1, the user name
"foo" and the password "bar".
$ ftp 192.168.0.1 2121
Connected to 192.168.0.1.
220 AntiVir WebGate FTP proxy. Login with <username>@<host>[:<port>]
Name (192.168.0.1:user): foo@10.0.0.1
331 Password required for foo.
Password: bar
230 User foo logged in.
Remote system type is UNIX.
Using binary mode to transfer files.
ftp>
On login, the FTP Client should be used just as before, i. e. when it was not using
WebGate. WebGate acts as proxy between FTP Client and FTP server and scans the
transferred data.
Many FTP Clients allow FTP proxy configuration. This enables a certain transparency of
WebGate towards the user, i. e. the user senses no difference at login, when using the FTP
Client with or without proxy.
Optionally, WebGate allows a parent FTP proxy. For example, it can be set in
avwebgate.conf as follows:
FTPProxyServer 127.0.0.1
FTPProxyPort 2121
In this case, WebGate does not communicate directly to the FTP server, but with
the indicated parent FTP proxy. Thus, more FTP servers can operate consecutively.
In order to avoid Client timeouts during the transfer of larger files, WebGate sends
Keepalive messages to the Client. The time interval is the value of
Avira GmbH AntiVir WebGate 31
Page 33

RefreshInterval or – if this is 0 – the value of KeepaliveInterval.
Furthermore, WebGate sends "NOOP" commands to the server within the
established KeepaliveInterval, so that it also maintains the connection to
the server during sending and receiving larger files to or from the Client.
4.4 Integration over ICAP Interface
If there is a caching server with ICAP support in the network, WebGate can be
integrated with the ICAP interface. WebGate can still scan and block incoming
(RESPMOD) and outgoing (REQMOD) files.
In avwebgate.conf you must set the port, through which WebGate will
communicate with the ICAP Client:
ICAPPort 1344
Configuration
Scanning Incoming Data Traffic (Response Modification)
The ICAP Client sends an HTTP response for WebGate to scan (ICAP server). If the
data is not infected, it is returned to the ICAP Client and from there forwarded to
the Client. If the answer is blocked (e. g. in case of a virus detection), WebGate
generates an HTML page, based on the corresponding HTML template, and sends
this to the ICAP Client. The page is then forwarded to the Client instead of the
original answer from the server.
32 AntiVir WebGate Avira GmbH
Page 34

Configuration
Scanning Outgoing Data Traffic (Request Modification)
The ICAP Client sends an HTTP request to WebGate (ICAP-Server) for scanning. If
the data is not infected, it is returned to the ICAP Client and from there it is sent
to the destination server. If the request is blocked (i. e. in case of a virus detection),
WebGate generates an HTML page, based on the corresponding HTML template,
and sends this to the ICAP Client. In this case, the original request is not sent to
the server anymore.
You can find further details about ICAP server integration in the ICAP Client
documentation.
Avira GmbH AntiVir WebGate 33
Page 35

4.5 Configuration Files
This part describes the structure of AntiVir WebGate configuration files. WebGate
reads these files by program start. It ignores empty lines and commented lines,
beginning with #.
The program is provided with default values, which are important for many procedures.
Some options can be deactivated with a # at the beginning of the line (commented) or can
be set with default values. These can be activated by removing the # character or by
changing the values.
4.5.1 Configuration File avwebgate.conf
This section provides a short description of the entries in avwebgate.conf . The
settings affect only AntiVir WebGate’s behavior and no other AntiVir programs.
They partly depend on the basic configuration, on which WebGate has to run (see
Monitoring HTTP Traffic – Page 26). You can also learn how to make these settings
using a graphical user interface, in Configuring AntiVir WebGate Using the GUI –
Page 62.
Configuration
HTTPPort
FTPPort
Port for scanning HTTP connections:
This sets the port on which WebGate responds to HTTP requests from Client or
proxy computers. There are various setups needed, according to the configuration
(see Monitoring HTTP Traffic – Page 26).
The default is:
HTTPPort [host_ip_or_name:]8080
We recommend not to allow access to WebGate from outside your network. WebGate
should be therefore connected only to the internal network interface. If you have
installed WebGate as parent proxy on the same computer as your existing proxy server,
we recommend for example, the following settings:
HTTPPort 127.0.0.1:8080.
If neither hostname nor IP address are specified, the port is linked to all interfaces.
Port for scanning FTP connections:
WebGate can also monitor real FTP connections. Unlike "FTP over HTTP",
WebGate communicates with the Client over FTP. This entry sets the port on
which WebGate responds to Client computers or to the FTP proxy server for FTP
connections.
FTPPort [hostname_or_ip:]2121
ICAPPort
Port for ICAP support:
WebGate can be integrated with the ICAP interface (as ICAP server). This entry
sets the communication port between WebGate and the ICAP Clients.
ICAPPort [hostname_or_ip:]1344
User
Group
Switching to users and groups:
After starting, WebGate can switch to other user and group, for running its
process. WebGate should not run as root. Enter the user and group IDs, which
34 AntiVir WebGate Avira GmbH
Page 36

Configuration
WebGate should assume after start (and thus turning in the root permissions).
User 65534
Group 65534
WebGate must first start as root. If you do not want this, you must specify the values for
User and Group in the file /etc/avwebgate.conf .
AllowHTTPS
Tunnel
AllowedHTTP
ConnectPorts
Max
Connections
Allow HTTPS tunnel:
WebGate allows tunneling for SSL connections (HTTPS). As the data is encrypted,
it is not scanned. WebGate does not interfere with the transaction, it just forwards
the data. Due to this fact, it can not verify if the protocol being spoken is really
HTTP on top of SSL. For this reason, it allows only connections to ports 443
(HTTPS) and 563 (SNEWS). Default:
AllowHTTPSTunnel 0
The data transferred through the HTTPS tunnel will not be scanned by WebGate.
Tunneling SSL-encrypted connections:
If you want to allow HTTPS connections to non-standard ports, you can do so by
adding the desired ports to this list. Each port will be separated by a comma or a
whitespace.
AllowedHTTPConnectPorts 443, 563
Maximum number of connections allowed:
The maximum number of simultaneous connections allowed to run through
WebGate. A thread is created for every connection. The value sets the limit for the
number of connections or threads allowed simultaneously. Default:
MaxConnections 1024
Refresh/
Redirect/
Keepalive
Interval
Avoiding Client-timeouts by large downloads:
Some browsers and proxies send an error message, if no data is received after a
certain interval (timeout). WebGate may come to such timeout messages, because
of delays during large downloads and scanning.
In order to avoid timeouts, WebGate offers three possibilities. The entries are
given in seconds.
z If the Client is a browser, WebGate sends an HTML progress page, which is
updated at regular intervals. Default:
RefreshInterval 0
z If the option RefreshInterval is deactivated or the Client is not a browser,
(temporary) HTTP redirects are sent to the Client. Thus, the Client is cyclically
redirected to a dynamic-generated URL, intercepted by WebGate in order to
avoid the timeout. Default:
RedirectInterval 0
Avira GmbH AntiVir WebGate 35
Page 37

Configuration
This method does not work for all Clients. When encountering problems:
Use the KeepaliveInterval option.
z If none of the above mentioned methods is used, WebGate can send messages
to the Client at certain intervals. The value must be smaller than the one set in
the Client or proxy server. Default:
KeepaliveInterval 30
HTTPProxy...
FTPProxy...
Settings for HTTP proxy server:
These settings work only for Network Configuration 1. For the installation before
a proxy server, WebGate needs the following information:
z HTTPProxyServer: Name or IP address of the proxy server
z HTTPProxyPort: The port for the proxy server
z HTTPProxyUsername, HTTPProxyPassword: Login and password for
proxy server, if needed
Example:
HTTPProxyServer your.proxy
HTTPProxyPort 8080
HTTPProxyUsername username
HTTPProxyPassword password
Settings for FTP proxy server:
If WebGate serves as FTP proxy (see FTPPort option), you can set a parent proxy
for FTP connections. Example:
FTPProxyServer your.proxy
FTPProxyPort 2121
Tempora ry
Temporary directory:
Dir
You can change the name of the temporary directory. The standard is
/tmp. This
directory contains for example, the files during scanning.
TemporaryDir /tmp (/var/tmp for Solaris binaries)
ArchiveScan
Scanning archives:
By default, all files in archives are unpacked on access and scanned, according to
the settings for ArchiveMaxSize, ArchiveMaxRecursion and
ArchiveMaxRatio.
It is recommended not to deactivate these options.
ArchiveScan 1
ArchiveMax
Size
Maximum size of archived files:
This option limits the scanning process to the files with unpacked size smaller than
ArchiveMaxSize (in Bytes). The null value means no limit. Default is 1 GB:
ArchiveMaxSize 1GB
36 AntiVir WebGate Avira GmbH
Page 38

Configuration
ArchiveMax
Recursion
ArchiveMax
Ratio
Block
Suspicious
Archive
Maximum recursion level:
When scanning recursive archives, the level of the recursion can be limited. The
null value means all archives are completely unpacked, regardless of their recursion
level. Default:
ArchiveMaxRecursion 20
Maximum compression rate for archives:
This option limits the scanning to files which do not exceed a certain compression
level. It ensures protection against so-called "Mail bombs", which occupy
unexpectedly large amount of memory when decompressed. The null value means
all archives are completely decompressed, regardless of their compression rate.
Default:
ArchiveMaxRatio 150
Blocking suspicious archives:
When activated, this option blocks archives which exceed one of the limits set for
ArchiveMaxSize, ArchiveMaxRecursion and ArchiveMaxRatio.
If this option is deactivated, all archives are forwarded, regardless of the settings
for ArchiveMaxSize, ArchiveMaxRecursion and ArchiveMaxRatio.
BlockSuspiciousArchive 0
Block
Encrypted
Archive
BlockPartial
Archive
Block
Extensions
Move
Concerning
FilesTo
LogFile
Blocking password-protected archives:
If this option is activated, WebGate blocks password-protected archives.
BlockEncryptedArchive 0
If enabled, multi-volume archives will be blocked.
BlockPartialArchive 0
Blocking certain file extensions:
WebGate can block files that have certain extensions. It will also apply for file
names in archives.
BlockExtensions exe scr pif
Quarantine directory:
By default, blocked files are deleted. But you can specify a quarantine directory to
store them. For example,
MoveConcerningFilesTo /home/quarantine
Path and name of the logfile:
All important WebGate operations are logged through a syslog daemon. You could
specify an additional logfile, by entering the full path. For example,
LogFile /var/log/avwebgate.log
LogLevel
Level for log notes:
This option defines the logging level for WebGate notifications (possible values: 0
to 7). The higher the level, the more information is logged. The values correspond
to Unix standard levels used in syslog:
Avira GmbH AntiVir WebGate 37
Page 39

Configuration
z 0: EMERGENCY
z 1: ALERT
z 2: CRITICAL
z 3: ERROR
z 4: WARNING
z 5: NOTICE
z 6: INFO
z 7: DEBUG
For example, LogLevel 4 means that the logfile contains all EMERGENCY, ALERT,
CRITICAL, ERROR and WARNING notifications. NOTICE-, INFO- and DEBUGmessages will not be recorded.
LogLevel 4
Syslog
Facility
EmailTo
AddX
ForwardedFor
Header
Syslog facility:
WebGate sends notifications to syslog daemon for all important operations. You
can specify the facility for these messages. Default:
SyslogFacility user
The detail level of these messages depends on the settings for LogLevel.
Email messages:
AntiVir WebGate is able to send emails with additional information (for example
about the relevant file), if it detects a virus or unwanted program. There is no
default value. In order to send emails, you must enter a recipient address. For
example,
EmailTo root@localhost
Header analysis:
In case of a proxy chain network, a downstream proxy server can make no analysis
based on the Client’s IP address, because it sees all requests as coming from the
same address: from the proxy upstream. So the proxy knows only the address of its
direct communication partners’ and not the address of the computer issuing the
request.
If the AddXForwardedForHeader option is active, WebGate adds a header field
(X-Forwarded-For) to the HTTP request or adds the IP address of the Client it
received the request from. In this way WebGate can forward the Client IP address
to the downstream proxy servers. These are then able to analyze the header field
and to use the included indirect data for example, for access control mechanisms
or for logging purposes.
This option could also enable the use of ACLs for a Squid proxy, which is configured
by WebGate as parent proxy. The parent proxy must certainly hold the necessary
functionality for header analysis.
AddXForwardedForHeader 0
38 AntiVir WebGate Avira GmbH
Page 40

Configuration
Allow
Client
Addresses
Forbidden
Agents
Allow
Destination
Ports
Allowing connections for certain Clients/ networks:
WebGate can activate certain Clients or networks using this option. Single Clients
are set using their IP address. A network is set typing a ’/’ and its netmask (for
example, 192.168.1.0/24).
AllowClientAddresses 127.0.0.1 192.168.0.0/16
If you do not specify any IP address, the access is not restricted.
If you specify at least one IP address, the access is permitted only to the entered IPs.
Anyone else has no access.
Denying access to specific user agents:
You can specify one or more user agent strings that will be denied access. The main
purpose is to avoid unnecessary traffic generated by clients issuing range requests
(such as Microsoft's BITS "Background Intelligent Transfer Service") or streaming
services (such as Apple's iTunes). Range requests and data streaming are only
permitted if specified in AclConfigFile (see below).
ForbiddenUserAgents BITS iTunes
Allowing connections for certain ports:
WebGate can limit the connections to certain destination ports, using this option.
You may specify domains with a hyphen.
AclConfigFile
WSLicense
Ticket
WSKeyFile
WSBlock
Categories
AllowDestinationPorts 21 80 1025-65535
If you do not specify any ports, the access is not restricted.
If you specify at least one port, the access is permitted only on the entered ports. Any
other port has no access.
Access control scheme:
WebGate can also support more complex rules by implementing a Squid-like access
control scheme. To use the access control scheme you must create a new
configuration file containing the rules describing the desired behavior and have
AclConfigFile contain the path to it. The syntax supported by the access control
scheme is described in the Manual.
AclConfigFile /etc/avwebgate.acl
License for the Avira Web Access and Content Control library. This is used for
library authentication. This option and both WSKeyFile and WSBlockCategories
must be set in order to use the URL filtering capabilities of WebGate.
WSLicenseTicket NNNN-NNNN-NNNN-NNNN
Key file used by Avira Web Access and Content Control library to encrypt traffic.
This option and both WSLicenseTicket and WSBlockCategories must be set in
order to use the URL filtering capabilities of WebGate.
WSKeyFile /usr/lib/AntiVir/wskeyfile
URL filtering:
This option and both WSKeyFile and WSLicenseTicket must be set in order to use
the URL filtering capabilities of WebGate.
Note: For a list of all categories please consult the Manual.
WSBlockCategories 0-2 12 14 61
Avira GmbH AntiVir WebGate 39
Page 41

Configuration
Detect...
Heuristics
Macro
Detection of other types of unwanted programs:
Besides viruses, there are some other types of harmful or unwanted software. You
can activate their detection using the following options:
DetectADSPY yes
DetectAPPL yes
DetectBDC yes
DetectDIAL yes
DetectGAME no
DetectHEUR-DBLEXT yes
DetectJOKE no
DetectPCK no
DetectPHISH yes
DetectSPR no
Macrovirus Heuristics:
Activates the heuristics for macroviruses in documents. This option is activated by
default:
Heuristics
Level
GUISupport
HeuristicsMacro yes
Win32-Heuristics:
Sets the detection level of Win32-Heuristics. available values are 0 (off), 1 (low), 2
(medium) and 3 (high). Default:
HeuristicsLevel 2
Support over graphical user interface (GUI):
This option must be activated, in order for WebGate to communicate with GUI.
You must enter the following parameters:
GuiSupport yes
GuiCAFile /usr/lib/AntiVir/gui/cert/cacert.pem
GuiCertFile /usr/lib/AntiVir/gui/cert/server.pem
GuiCertPass antivir_default
GuiRandFile /dev/urandom
In case of missing or invalid parameters, the GUI is not available.
The log file records eventual errors.
Please refer to the Manual file in WebGate’s installation directory, for more details
about advanced configuration options.
40 AntiVir WebGate Avira GmbH
Page 42

Configuration
4.5.2 Configuration File avupdater.conf
This section provides a short description of the settings in avupdater.conf. These
settings affect all AntiVir products you have installed on the computer. For this
reason we refer to "AntiVir" in general, instead of just "AntiVir WebGate".
You can learn how to edit this file easily, in Configuration Script – Page 43.
You must restart the Internet Updater, if you modify any values regarding the Internet
Updater manually in avupdater.conf, instead of using the configuration script. Only after
restart will the changes take effect.
Type:
/usr/lib/AntiVir/avupdater restart
EmailTo
LogTo
AutoUpdate...
Email messages:
AntiVir can send emails after performing updates. There is no default setting. You
must specify a recipient, in order to send emails:
EmailTo root@localhost
Logfile:
AntiVir logs all important operations over the syslog daemon. There is no default
setting. You must enter the full path to the logfile, in order to use this option:
LogTo /var/log/avupdater.log
Update scheduler:
The security software can check regularly for updates online using the Internet
Updater and, if necessary, it performs the update. By default, the possible options
are deactivated, for security reasons; so the program starts no automatic updates.
For updates at every 2 hours, you must activate the following option:
AutoUpdateEvery2Hours
For daily updates, activate the option below:
AutoUpdateDaily
In case of daily updates, you may also set the time for this action, in HH:MM
format:
AutoUpdateTime 04:23
HTTPProxy...
Proxy server:
If your computer is connected to the Internet via an HTTP proxy server, you must
specify this, so that the automatic Internet Updater functions properly.
These entries must not be confused with those from avwebgate.conf . The settings made
in avupdater.conf influence only the Internet connection for automatic updates, not
specific WebGate settings.
By default, the settings are deactivated; a direct connection to Internet is assumed.
You must specify:
Avira GmbH AntiVir WebGate 41
Page 43

Configuration
z HTTP proxy server
z Port
z Username and password for the HTTP proxy server if necessary.
Example:
HTTPProxyServer proxy.domain.com
HTTPProxyPort 8080
HTTPProxyUsername username
HTTPProxyPassword password
Syslog...
GnuPG...
Updater
Keeps
Backups
Syslog settings:
WebGate sends messages for all important operations to the syslog daemon. You
may specify the facility and priority for these messages. Default is:
SyslogFacility user
SyslogPriority notice
These values apply even if the option is not active.
GnuPG settings:
The Updater can check the updates for authenticity using GnuPG. For more
information, see Verifying Updates Authenticity with GnuPG – Page 49. You must
specify the path to GnuPG binary files. For example:
GnuPGBinary /usr/local/bin/gpg
You can also add other options using GnuPGOptions, depending on the specific
GnuPG installation. This is usually not necessary. For security reasons, both
settings are by default deactivated.
The Internet Updater replaces installed files with newer versions, when updates
are available. Even if the program is testing the new files, you might want to keep
backups of earlier versions.
When activating this option, your existent files will be moved in the newly created
subdirectories of /usr/lib/AntiVir, named
updater-backup-YYYYmmdd-HHMMSS.
If you activate the backup function of the Internet Updater, you should check this
directory regularly and manually delete old versions as the size increases.
UpdaterKeepsBackups
4.5.3 Configuration File avwebgate.acl
WebGate implements an access control scheme that is a subset of Squid’s. All the
supported features are described in the Manual file contained in the program’s
package.
Using this feature it is possible to set up rules to allow tunneling for certain types
of requests and responses. This is useful for supporting streaming Internet
content or user agents, that require using HTTP range requests.
42 AntiVir WebGate Avira GmbH
Page 44

Configuration
The access control scheme is saved in a separate file, specified with the parameter
AclConfigFile in /etc/avwebgate.conf
Several examples are included in /doc/avwebgate.acl.example.
4.6 Configuration Script
You can comfortably setup AntiVir using the configuration script configantivir. This
script edits the settings in avupdater.conf, intercepts possible invalid entries and
restarts the necessary processes.
The procedure using the script is really easy.
If you want a general configuration of AntiVir:
Type:
/usr/lib/AntiVir/configantivir
The script reads the current settings in avupdater.conf and systematically asks if
you want to enter new values. It displays the possible parameters, while the current
ones are shown as default.
If you want to keep one of the current settings:
Press Enter.
If you want to change a setting:
Type the new value and confirm with Enter.
In the end, a summary of the configuration settings is displayed. The following
output appears after running configantivir (example):
Here are the configuration settings you have specified. Look them over to
make sure they are correct.
email notification: root@localhost
specific logfile: no
update frequency: daily (if avupdater is running)
update time: random (if avupdater is running)
http proxy server: proxy.mycompany.com:8080
syslog output: user.notice
available options: y n
Save configuration settings? [y]
If you do not agree with all displayed options:
Type N, for restarting the configuration script and correcting the values
If all settings correspond to the configuration you desire:
Confirm with Y or Enter, for saving the configuration file with the new values.
Avira GmbH AntiVir WebGate 43
Page 45

The script reports saving the configuration file. It gives information on the
Internet Updater activity and asks if you want to restart the Updater:
Would you like to restart the update daemon using the new configuration? [y]
Confirm with Y or Enter.
The Internet Updater is restarted. Finally, the script displays the summary of
the configuration.
4.7 Regular Updates Configuration
The performance and effectiveness of antivirus software depend on updating. This
is why AntiVir offers the possibility to download current updates via HTTP from
the AntiVir webservers and even to schedule them automatically at regular
intervals.
These updates ensure that AntiVir components, which provide security against
viruses and unwanted programs, are always kept up-to-date.
Configuration
The command
antivir --update
enables the update of AntiVir software at any time.
There are two possible methods to configure automatic AntiVir updates:
1. You can use the Internet Updater, which was delivered together with your
AntiVir program and is easy to configure:
• manually in avupdater.conf, or
• using the configuration script configantivir.
2. You can use AntiVir and a
cron daemon. This is recommended if you are an
experienced Unix user. In this case you have to make the configuration yourself,
but you have a wider range of settings.
Configuring Internet Connection for Updates
3 Check if your Internet connection is functioning correctly. In most cases, the
connection is already configured. If not, refer to your Unix documentation for
the information you need.
Proxyserver
If your AntiVir WebGate computer is connected to the Internet via HTTP proxy
server (Network Configuration 1), you must make the necessary settings for
AntiVir:
Call configantivir:
/usr/lib/AntiVir/configantivir
44 AntiVir WebGate Avira GmbH
Page 46

Configuration
Confirm with Enter all settings, until you reach the proxy server option:
If this machine is sitting behind an HTTP proxy server, you will need to configure AntiVir with the appropriate proxy settings. Internet access is required in
order to make updates.
available options: y n
Does this machine use an HTTP proxy server? [n]
Type Y.
You are then asked for the name of the proxy server:
What is the HTTP proxy server name? []
Type its name (example):
proxy.domain.com
Then you are asked for the proxy server’s port:
Which port number does the HTTP proxy server use? []
Type the port:
8080
You are asked if you need a username and password for the proxy server:
Proxy servers may be configured to require a username and password. If the
HTTP proxy server for this machine requires a username and password AntiVir
needs to be appropriately configured.
available options: y n
Does the HTTP proxy server require a username/password? [n]
If this is the case:
Type Y.
Then you are asked for the username and password.
Enter the username and password.
Confirm with Enter all remaining settings.
The Internet connection is now configured.
Avira GmbH AntiVir WebGate 45
Page 47

Configuration
4.7.1 Configuring Automatic Updates through Internet Updater
The Internet Updater is a very simple daemon, which performs the following
commands at fixed intervals:
antivir --update
Automatic Start of Internet Updater
It is important that the Internet Updater starts automatically by every system
start. If you have performed the installation as described in Installing AntiVir
WebGate – Page 13, your system is correctly set.
If Internet Updater has not yet been automatically activated at system start:
Reinstall WebGate with the necessary settings (see Reinstalling AntiVir
WebGate – Page 17).
Starting and Stopping Internet Updater Manually
If you want to start Internet Updater manually:
Type:
/usr/lib/AntiVir/avupdater start
If you want to stop Internet Updater manually:
Type:
/usr/lib/AntiVir/avupdater stop
If you want to check the current status of the Internet Updater:
Type:
/usr/lib/AntiVir/avupdater status
Configuring Automatic Updates in avupdater.conf
UpdateAction The configuration file supports the following entry:
UpdateAction webgate <action>
The <action> may be any of "none" (the default), "check" or "fetch". These
settings instruct the updater how to keep your AV scan service up to date, and in
addition the updater will check for available updates or will even fetch an archive
with the new software to your local disk.
UpdateStore
Dir
Allows you to specify where the software archives should be stored, by default the
directory "
/usr/lib/AntiVir/updcomp/" is used. Available updates for the
webgate component will not be applied automatically to your local installation.
Updating from a Local Mirror
By default, the Internet Updater fetches new versions of the software from the
official Avira download servers. Optionally the Internet Updater can be redirected
46 AntiVir WebGate Avira GmbH
Page 48

Configuration
to use a local mirror to check for and fetch updates, which is important when the
mirror-script or Internet Update Manager is used.
HTTPUpdate
Server
The Internet Updater can be configured for a local mirror with the
HTTPUpdateServer directive in the /etc/avupdater.conf file. This
directive takes specifications in the following form:
HTTPUpdateServer http://mirror-host[:port]/[document-root/]
Configuring Automatic Updates Using configantivir
You can define the following settings:
z Update intervals. It is possible to:
– update every two hours
– update daily
z Time settings for updates (for daily updates). You can:
– set the time yourself
– choose a random time set. In this case, the script will chose a time, which will
remain set for every day. So it is important for the computer to be
permanently online.
Run configantivir:
/usr/lib/AntiVir/configantivir
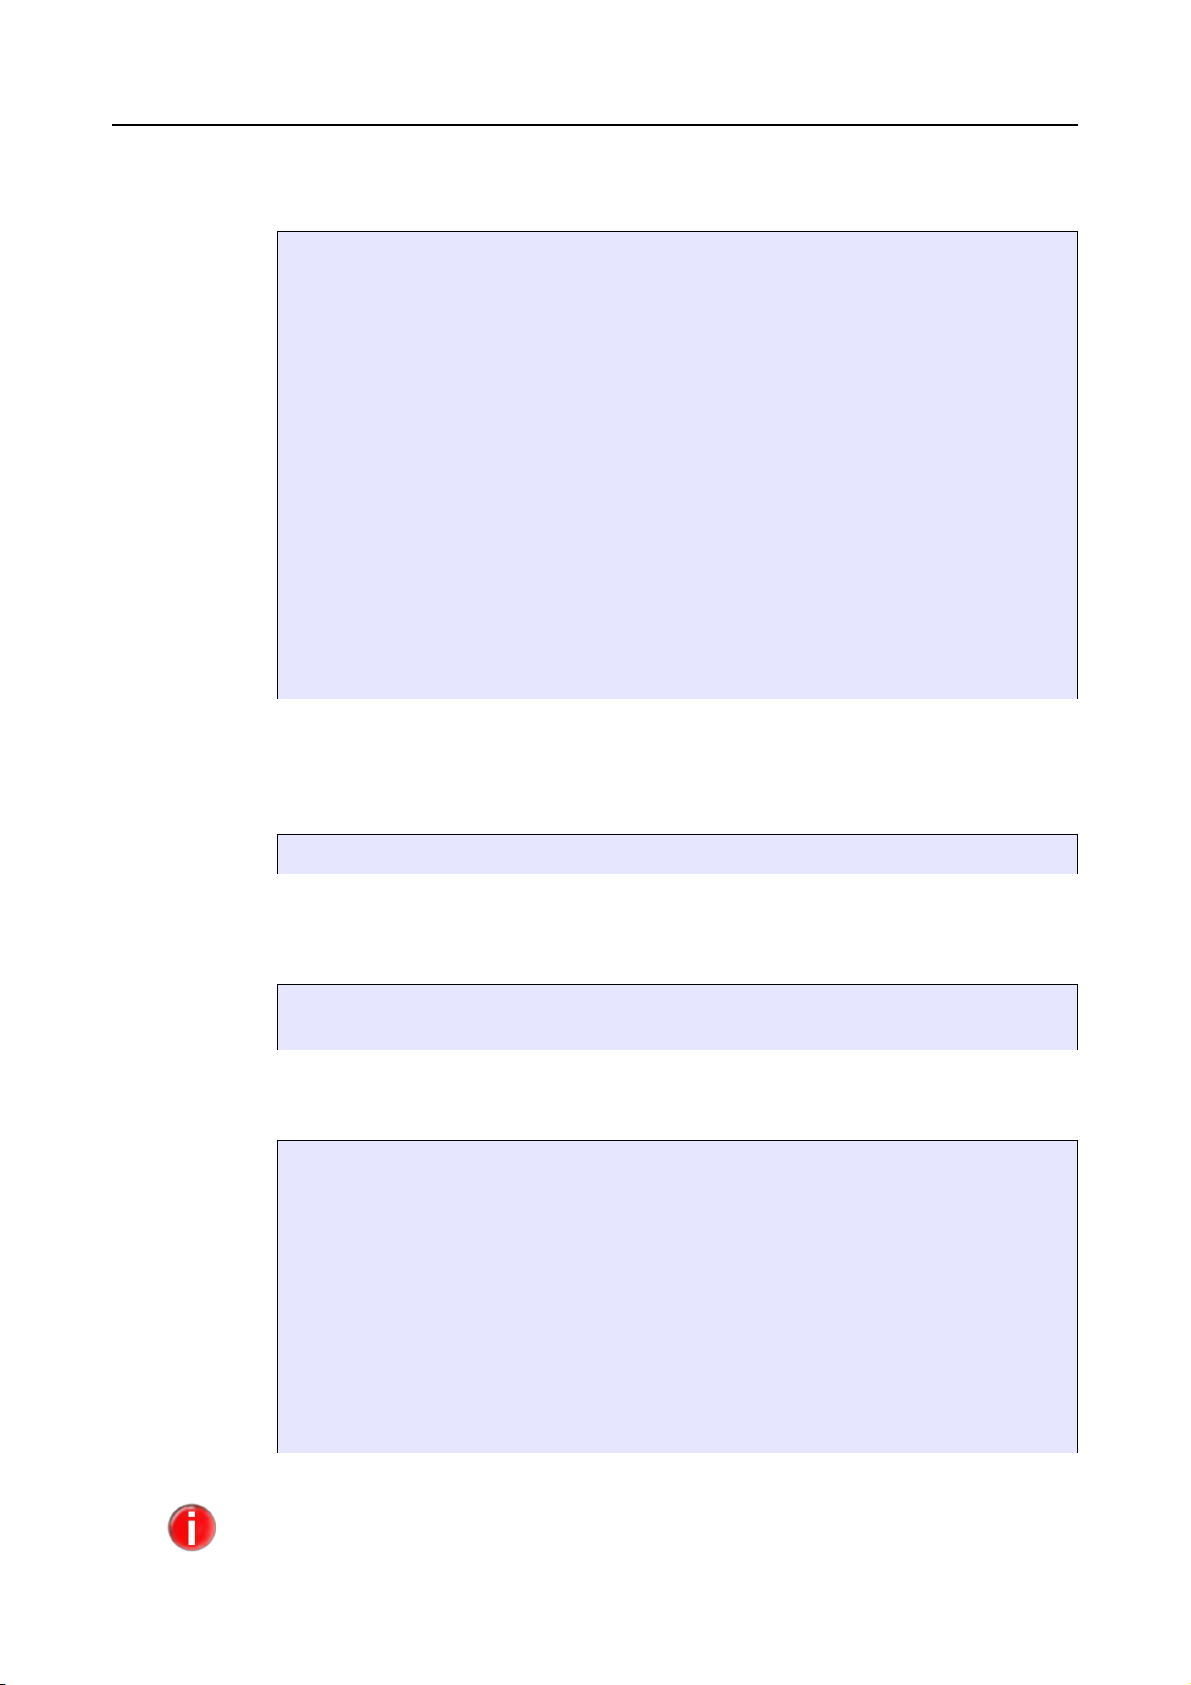
First, it asks you how often you need AntiVir to check for updates:
AntiVir is equipped with an Internet Update Daemon. At specified intervals,
AntiVir will connect to an update server to check for newer versions of the
AntiVir engine or the data files. If a newer version is available, AntiVir will
automatically download and install the updates without requiring any special
attention. This allows AntiVir to be kept current against attacks and problems.
AntiVir can be configured to check for updates every 2 hours (2) or once a day
(d). You can also choose to disable the Internet Update Daemon (n).
Note: Updates can also be done manually from the command line:
antivir --update
You may prefer to disable the Internet Update Daemon and instead perform
regular updates using a cron(8) job.
Using the startup script for the Internet Update Daemon when it is disabled
will result in an error.
available options: 2 d n
How often should AntiVir check for updates? [2]
Type:
– n, if you do not want automatic updates
Avira GmbH AntiVir WebGate 47
Page 49

Configuration
– 2 for updates every two hours
– d for daily updates
If you decide for daily updates, you must then set the time:
The AntiVir Updater can be set to always check for updates at a particular time
of day. This is specified in a HH:MM format (where HH is the hour and MM is
the minutes). If you do not have a permanent connection, you may set it to a
time when you are usually online. You may also let AntiVir choose a random
time (r).
If you have a permanent connection then a random time may be preferred
because it will help to disperse the times when other users are getting updates.
available options: HH:MM r
What time should updates be done? [RANDOM]
Type the time in HH:MM format.
– OR –
Type r for random time.
Confirm all remaining settings with Enter.
The automatic updates are now configured. The Internet Updater will start
automatically (if not yet performed) or it is restarted (if already active).
4.7.2 Performing Cron Updates
If you are an experienced Unix user, you can use cron daemon to perform
automatic AntiVir updates.
Cron daemon is used to run regular system processes. For more details, refer to
your Unix documentation.
Using cron for updates, you have more configuration possibilities, than with the
Internet Updater.
Example
Enter the following cron job in /etc/crontab:
45 */2 * * * root /usr/lib/AntiVir/antivir --update -q
This command activates updates every 2 hours, but performs them 15
minutes ahead of the set time: 0:45, 2:45, 4:45 and so on. The -q parameter
states that no report will be given.
48 AntiVir WebGate Avira GmbH
Page 50

Configuration
4.8 Verifying Updates Authenticity with GnuPG
GnuPG is a free alternative to the encryption program PGP (Pretty Good Privacy).
Using GnuPG you can verify the authenticity of the AntiVir Updates.
It is highly recommended to use GnuPG.
However, this procedure requires intensive knowledge of Unix and GnuPG. In case of
configuration errors, there is the danger to deactivate AntiVir updates.
You can find more details about GnuPG at http://www.gnupg.org
The following steps guide you to activate GnuPG support.
Download GnuPG from the Website http://www.gnupg.org. Here you can also
find the manual with further information about GnuPG and its features.
Generate your own PGP key pair, as described in the documentation.
Import the AntiVir public PGP key into your key-ring:
gpg --import antivir.gpg
Display the fingerprint of the key, to check if it really is the AntiVir PGP key:
gpg --fingerprint build@avira.com
The 40-character fingerprint is displayed.
Check if the fingerprint corresponds with the one on AntiVir Website (http://
www.avira.com).
Sign the AntiVir public key, in order to certify its validity:
gpg --sign-key build@avira.com
Change to /bin subdirectory of the AntiVir installation directory:
cd /tmp/antivir-webgate-prof-<version>/bin
Here you can find the files antivir and antivir.sig.
Check the signature with
gpg --verify antivir.asc antivir
If you do not get any error message, you can use GnuPG for AntiVir updates.
Activate GnuPG for AntiVir. In /etc/avupdater.conf enter the path to GnuPG
binaries, using the option GnuPGBinary:
GnuPGBinary /usr/local/bin/gpg
You can edit this option in avupdater.conf only manually. Setting in the configuration
script is not possible, in order to avoid the danger of configuration errors.
Avira GmbH AntiVir WebGate 49
Page 51

Restart Internet Updater, to activate the new settings in avupdater.conf:
/usr/lib/AntiVir/avupdater restart
From now on, GnuPG authenticates the Updates.
4.9 Templates Configuration
If you have a valid license file, you may customize various notification web pages
and emails generated by AvWebGate. WebGate will send these for example, in case
of detecting viruses or unwanted programs: alert, blocked, error or progress
template.
Configuration
These templates are usually created and saved in
may also set another directory, using the following entry in
You can use different keywords for editing template files (see manual file /usr/lib/
AntiVir/MANUAL.avwebgate
Following is a description of the available templates.
HTML Templates
Template Meaning
alert.html
blocked.html
error.html
progress_downloading.html
progress_scanning.html
progress_complete.html
progress_aborted.html
ws_blocked.html
/usr/lib/AntiVir/templates. You
avwebgate.conf:
TemplateDir /home/templates
).
Displayed when an alert is found by AvWebGate
Displayed when AvWebGate has blocked a suspicious
file (using various block-settings in avwebgate.conf)
Displayed if an error occurred while processing the
user's request
Displayed while a file is being downloaded (this
template is used only when the refresh method for
timeout prevention is used)
Displayed while a file is being scanned (this template
is used only when the refresh method for timeout
prevention is used)
Displayed after a file has been downloaded and
scanned (this template is used only when the refresh
method for timeout prevention is used)
Displayed if the user has aborted the download (this
template is used only when the refresh method for
timeout prevention is used)
Displayed if the page was part of a category blocked by
the user
50 AntiVir WebGate Avira GmbH
Page 52

Configuration
Email Templates
Template Meaning
alert.mail
blocked.mail
Used when an alert is found by AvWebGate
Used when AvWebGate has blocked a suspicious
file (using various block-settings in
avwebgate.conf)
4.10 Testing AntiVir WebGate
After completing the installation and configuration, you can test the functionality
of AntiVir WebGate using a test virus. This will not cause any damage, but it will
force the security program to react when the computer is scanned.
Testing AntiVir WebGate with a Test-Virus
Start WebGate:
/usr/lib/AntiVir/avwebgate start
Type the following URL in your Web browser http://www.eicar.org.
Read the information about the test virus eicar.com.
Download the test virus on your computer.
AntiVir WebGate will block the access to the file and issues a warning in the
browser:
Check the logfile for detailed notifications about the detection.
Avira GmbH AntiVir WebGate 51
Page 53

Configuration
52 AntiVir WebGate Avira GmbH
Page 54

Operating
5Operating
After concluding installation and configuration and AntiVir WebGate is running,
WebGate guarantees continuous monitoring of your system. During operation you
might have to make occasional changes in settings, as described in Configuration
– Page 25.
You can easily manage and configure AntiVir WebGate using the graphical user
interface integrated in the program.
This Chapter is divided in the following parts:
z Starting and Stopping AntiVir WebGate manually – Page 53, describing the
start and stop procedure of WebGate from the console.
z In Procedures when Detecting Viruses or Unwanted Programs – Page 54 you
can learn what you should do, in case of an infection in your network.
5.1 Starting and Stopping AntiVir WebGate manually
You must log in as root or you must have the required permissions, in order to start or
stop AntiVir WebGate.
If you have installed WebGate as described in Installing AntiVir WebGate – Page 13, it
will start automatically by system start.
Starting AntiVir WebGate
Type:
/usr/lib/AntiVir/avwebgate start
The program starts with the following message:
Starting AntiVir: avwebgate
Stopping AntiVir WebGate
Type:
/usr/lib/AntiVir/avwebgate stop
The program ends with the following message:
Stopping AntiVir: avwebgate
Avira GmbH AntiVir WebGate 53
Page 55

Operating
5.2 Procedures when Detecting Viruses or Unwanted Programs
If correctly configured, AntiVir is set to deal automatically with all the tasks on
your computer:
z The infected file is repaired or at least deleted.
z If it could not be repaired, the access to the file is blocked and, according to the
configuration, the file is renamed or moved. This eliminates the risk of
infection.
You should however follow these guidelines:
Try to detect the way the infection "sneaked" on your system.
Perform targeted scanning on the data storage that might be infected.
Inform your team, superiors or partners.
Inform your system administrator and security provider.
Submitting Infected Files to Avira GmbH
Please send us the malware or suspicious files that our product does not yet
recognize or remove. Send us the virus or file packed (gzip, WinZIP, PKZip, Arj)
in the attachment of an email to virus@antivir.de.
When packing, use the password virus. This way, the file will not be deleted by virus
scanners on email gateway.
54 AntiVir WebGate Avira GmbH
Page 56

Graphical User Interface (GUI)
6 Graphical User Interface (GUI)
6.1 Overview
The graphical user interface (GUI) assists you in operating, configuring and
updating AntiVir WebGate and it graphically displays the monitoring process.
AntiVir WebGate is fully functioning and configurable even without GUI. The
interface is an independent application, which can start and stop without
influencing AntiVir WebGate.
You need Java 1.4.0 or higher for using the GUI.
Permissions
Starting
You do not need root permissions for using the program with GUI as a normal
user.
However, you must belong to the "antivir" group, created during the installation.
Type (as root):
/usr/sbin/usermod -G group1,group2,group3,antivir
username
group1
username is the name of the user.
- group3 are the groups to which the user belongs,
To set the groups for a user:
Type:
/usr/bin/groups
Start the GUI:
antivir-gui
If this command does not detect the Java installation:
Create a soft link in /usr/bin (as root):
ln -s /PATH_TO_JAVA_INSTALLATION/bin/java /usr/bin
Communi-
cation
GUI communicates with AntiVir WebGate via SSL over the loopback network
interface. You must specify the following parameters in the configuration file
avwebgate.conf:
GuiSupport yes
GuiCAFile /usr/lib/AntiVir/gui/cert/cacert.pem
GuiCertFile /usr/lib/AntiVir/gui/cert/server.pem
GuiCertPass antivir_default
GuiRandFile /dev/urandom
If these parameters are missing or invalid, the GUI is not available.
Eventual errors are recorded in the logfile.
Avira GmbH AntiVir WebGate 55
Page 57

Graphical User Interface (GUI)
More Products
If more AntiVir products are installed on the computer, GUI sets them in tabs.
Thus you can easily monitor and configure every product. Depending on the tab
you click, the GUI displays its own menus and options.
Trouble-
shooting
Check the following requirements for using the GUI:
z AntiVir WebGate must be installed in /usr/lib/AntiVir.
z You must have a COMMERCIAL license for AntiVir WebGate
(antivir --version).
z The parameter GuiSupport must be set in avwebgate.conf.
z The user must belong to the "antivir" group.
If these requirements are not met, an error message appears:
AntiVir WebGate is not available on the computer.
6.2 Operating AntiVir WebGate Using the GUI
Starting GUI
3 The entry GuiSupport must be activated in avwebgate.conf in order for
WebGate to communicate with the GUI.
Start the GUI:
/usr/lib/AntiVir/antivir-gui
The GUI appears, displaying the Realtime view.
56 AntiVir WebGate Avira GmbH
Page 58

Graphical User Interface (GUI)
Status display
More WebGates
Symbols
Text in the status column:
z green text (e. g. running): WebGate is active
z blue question mark: WebGate status is unknown
z red text: WebGate is inactive
z yellow text: WebGate will be restarted
In case there are more WebGates in the network, different situations can be
displayed in the following format (example):
(1|2|1|1)
Meaning:
z 1 WebGate is running
z 2 WebGates are active
z 1 WebGate will be restarted
z there is 1 WebGate with unknown status
Click to display the Realtime view.
Click to switch to the Logfile window.
Click to open the Configuration window.
Avira GmbH AntiVir WebGate 57
Page 59

Menus
WebGate
Graphical User Interface (GUI)
System
z Network browser: to select another computer in the network, on which
WebGate GUI runs.
z Certificate management: to manage integrated certificates of the other
computers in the network.
z About...: displays Product information and Support information
z Exit: closes GUI. WebGate is not stopped.
GUI Options
z Realtime view: to display the graphical Realtime view
z Logfile: to switch to Logfile table window
z Configuration: to open the Configuration window
z Load configuration...: to load a preset configuration
z Save configuration...: to save the current configuration
z Start WebGate: to start WebGate. This menu option is active only when
WebGate is not running
z Stop WebGate: to stop WebGate. This menu option is active only when WebGate
is running
z Restart WebGate: to restart WebGate (WebGate will be stopped and restarted).
58 AntiVir WebGate Avira GmbH
Page 60

Graphical User Interface (GUI)
z Realtime view: to set the time interval of the graphic. It also has an option for
switching off the display (View on/ View off).
Realtime View Window
See the figure in Starting GUI – Page 56
Data
throughput
Displays the current memory load and its average value graphically and as text. To
expand or close the graphic display, you can slide the bar between the graphics and
the text area with the mouse pointer or you can use the red arrows.
Graphic view:
z Horizontal axis: time intervals (available between 30 seconds and 3 minutes)
z Vertical axis: 100% stands for the maximum number of connections multiplied
with KB pro connection, as set in configuration (see Basic WebGate Settings –
Page 63). The y axis changes automatically according to the current value levels.
Table with description:
The text description is divided in five columns:
z Computer: shows the name and the IP address of the currently scanned
computer. The text has the same color as the graphics.
z Status: shows the status for every computer.
z Connections: shows the current and the maximum allowed connections of the
computer.
z Speed: shows the current data throughput of WebGate in Bytes/s. The value is
automatically updated.
Current files
Last log entries
z Total: shows how many files have been loaded from the net since WebGate
started.
Shows the name of the computer, paths and names of the currently scanned files.
Displays the last three lines of the logfile. The entries are updated, every time
WebGate writes new lines in the logfile. The amount depends on the log level
settings.
Avira GmbH AntiVir WebGate 59
Page 61

Logfile Window
Graphical User Interface (GUI)
Click on the Logfile button.
– OR –
Select the menu option WebGate/Logfile.
The Logfile window appears:
Logfile
Settings
Rows
Displays the complete logfile, with full paths, the current size of the logfile in KB,
the displayed log levels and the log level used by WebGate.
Four buttons appear on the bottom of the window: Settings, Rows, Load new and
More.
Press Settings.
An additional area appears in the Logfile window:
z Choice of date to view: selecting the time interval for the logfile entries to be
displayed;
Default: complete logfile.
z Show the following log levels: selecting the log levels to be displayed;
Default:
All.
Number of displayed log lines
Load new
Reloading the logfile
60 AntiVir WebGate Avira GmbH
Page 62

Graphical User Interface (GUI)
More
The loaded logfile view is extended with the number of Lines given.
Configuration Window
see Configuring AntiVir WebGate Using the GUI – Page 62
Starting and Stopping WebGate
Start
Stop
Restart
Select the menu option WebGate/Start WebGate.
Select the menu option WebGate/Stop WebGate.
Select the menu option WebGate/Restart WebGate.
Changing the Time Intervals
Set the time interval in GUI Options/Realtime view/Time view. You can choose
from:
– 30 seconds
Closing GUI
– 1 minute
– 2 minutes
– 3 minutes
When you close GUI, it retains the current status of AntiVir WebGate.
Select System/Exit.
The GUI is closed.
Avira GmbH AntiVir WebGate 61
Page 63

Graphical User Interface (GUI)
6.3 Configuring AntiVir WebGate Using the GUI
You can use the GUI to set the configuration parameters in avwebgate.conf.
For a better understanding, we shall also mention the entry in avwebgate.conf for
every parameter. These parameters are fully described in Configuration Files –
Page 34.
AntiVir GUI also applies to other AntiVir products and, in case you have more products
installed on the same computer, it displays the options according to the selected product.
When working with WebGate, the Expertmode option has no influence on the
configuration settings.
Opening the Configuration Window
Click the symbol for configuration
– OR –
Select the menu option WebGate/Configuration.
The Configuration window appears, with the basic WebGate settings:
Click the symbol buttons and make the corresponding settings
62 AntiVir WebGate Avira GmbH
Page 64

Graphical User Interface (GUI)
Basic WebGate Settings
In this section (see the figure in Opening the Configuration Window – Page 62) you
can set the basic WebGate parameters.
Configuration
file
Tempora ry
Directory
HTTP Port
Allow HTTPS
tunnel
FTP Port
ICAP Port
Default is /etc/avwebgate.conf
You can change the name of the temporary directory. The default is /tmp. This
directory stores for example, the files during scanning.
This entry sets the port, on which WebGate communicates for HTTP connections
with the Client computer or the proxy server. It may need various settings,
depending on the configuration.
The corresponding parameter is HTTPPort in avwebgate.conf.
Here you can enable an HTTPS protocol. The data tunneled through this
connection is not scanned by Webgate.
These entries set the ports for FTP and ICAP protocol. The changes are saved in
avwebgate.conf.
Avira GmbH AntiVir WebGate 63
Page 65

Extended Configuration
The extended settings influence WebGate directly.
Graphical User Interface (GUI)
Maximum
connection
count
Refresh/
Redirect/
Keepalive
Interval
Maximum number of simultaneous connections on WebGate. A thread is created
for every connection. The value restricts the number of simultaneous connections
and threads allowed.
Some browsers and proxies send an error message, if no data is received after a
certain interval (timeout). WebGate may come to such timeout messages, because
of delays during large downloads and scanning.
In order to avoid timeouts, WebGate offers three possibilities. The entries are
given in seconds.
z If the Client is a browser, WebGate sends an HTML progress page, which is
updated at regular intervals. The time interval is set with Refresh Interval.
z If the option Refresh Interval is deactivated or the Client is not a browser,
(temporary) HTTP redirects are sent to the Client. Thus, the Client is cyclically
redirected to a dynamic-generated URL, intercepted by WebGate in order to
avoid the timeout. The time interval is set with Redirect Interval.
This method does not work for all Clients. When encountering problems:
Use Keepalive Interval.
z If none of the above mentioned methods is used, WebGate can send messages
to the Client at certain intervals. The interval is set using Keepalive Interval.
The value must be smaller than the one set in the Client or proxy server.
64 AntiVir WebGate Avira GmbH
Page 66

Graphical User Interface (GUI)
Block
extensions
Transmit the
client IP
Activate
Heuristics
Quarantine
Directory
Prefix Settings
If you enter certain file extensions in this filed, WebGate will block the files with
these extensions, when downloaded or opened.
This parameter sets AddXForwardedForHeader in avwebgate.conf. You can find
details in the Configuration Chapter: AddX ForwardedFor Header – Page 38.
If you activate heuristics, WebGate also traces unknown viruses. You can set the
detection level for Win32 Heuristics.
Enter the directory you want to store blocked files.
You can use these options to activate the detection of unwanted programs such as
Backdoor Clients, Double Extension Files, Dialers, Adware/ Spayware (default
values). WebGate detects even
Runtime Compression Tools
DetectGame, DetectJoke etc.
Jokes, Games, Security Privacy Risk or Unusual
. The configuration parameters in avwebgate.conf are:
Avira GmbH AntiVir WebGate 65
Page 67

Proxy Settings
Graphical User Interface (GUI)
HTTP Proxy
FTP Proxy
This area is active, only if you use Network Configuration 1. In this case you must
specify the proxy server connected to WebGate.
The settings are made separately for HTTP and FTP connections.
z Server: Proxy server’s hostname or IP. The parameters are HTTPProxyServer
and FTPProxyServer in avwebgate.conf.
z Port: Port for proxy server communication with WebGate. The parameters are
HTTPProxyPort and FTPProxyPort in avwebgate.conf.
z Username: username for access on proxy server, if necessary. The parameter is
HTTPProxyUsername in avwebgate.conf.
z Password: Password for proxy server access, if necessary. The parameter is
HTTPProxyPassword in avwebgate.conf.
66 AntiVir WebGate Avira GmbH
Page 68
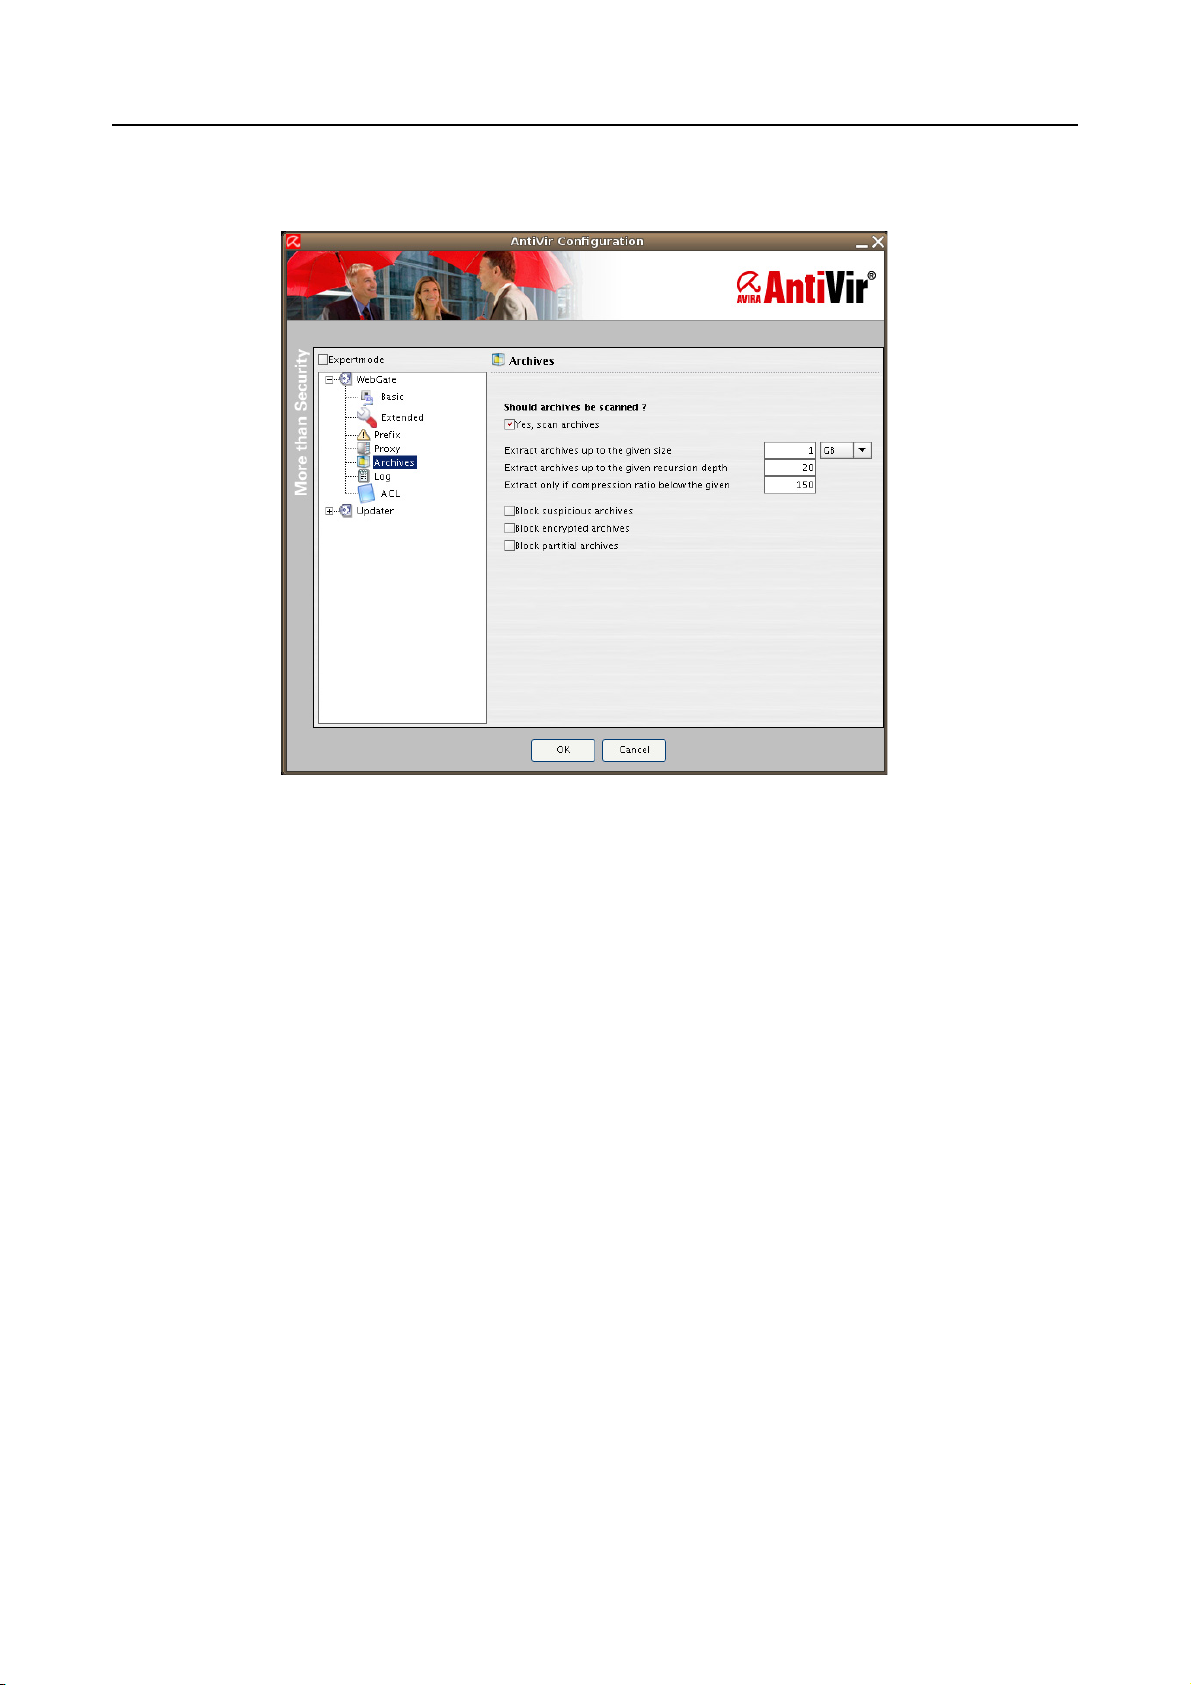
Graphical User Interface (GUI)
Archive Settings
Scan archives
Maximum
archive size
Maximum
recursion
This area contains options for scanning archives with WebGate. These settings are
made in avwebgate.conf.
By default, all files in archives are unpacked on access and scanned, according to
the settings for:
• Maximum archive size,
• Maximum recursion depth
• Maximum compression ratio.
It corresponds to
ArchiveScan in avwebgate.conf.
It is recommended not to deactivate these options.
This option limits the scanning process to the files with unpacked size smaller than
the maximum size (in Bytes). The null value means no limit. Default is 1 GB.
It corresponds to
ArchiveMaxSize in avwebgate.conf.
When scanning recursive archives, the level of the recursion can be limited. The
null value means all archives are completely unpacked, regardless of their recursion
level. The default is 20.
It corresponds to
ArchiveMaxRecursion in avwebgate.conf.
Maximum
compression
ratio
This option limits the scanning to files which do not exceed a certain compression
level. This action ensures protection against so-called "Mail bombs", which occupy
unexpectedly large amount of memory when decompressed. The null value means
all archives are completely decompressed, regardless of their compression rate.
Default is 150.
Avira GmbH AntiVir WebGate 67
Page 69

Graphical User Interface (GUI)
It corresponds to ArchiveMaxRatio in avwebgate.conf.
Block
suspicious
archives
When activated, this option blocks archives which exceed one of the limits set for
Archive maximum size, Archive maximum recursion depth and Maximum
compression ratio
If this option is deactivated, all archives are forwarded, regardless of the settings
for Archive maximum size, Archive maximum recursion depth and Maximum
compression ratio
It corresponds to BlockSuspiciousArchive in avwebgate.conf.
Block
encrypted
archives
Block
partial archives
If activated, this option blocks password-protected archives.
It corresponds to BlockEncryptedArchive in avwebgate.conf.
If activated, this option blocks multi-volume archives.
It corresponds to BlockPartialArchive in avwebgate.conf.
Logfile Settings
.
.
Here you can define what WebGate reports in a Logfile.
Syslog facility
Path of logfile
Select the facility for messages sent to syslog daemon. Default: user.
All important WebGate operations are logged through a syslog daemon. You could
specify an additional logfile, by entering the full path. For example:
/var/log/avwebgate.log.
It corresponds to
68 AntiVir WebGate Avira GmbH
LogFile in avwebgate.conf.
Page 70

Graphical User Interface (GUI)
Log level
Send
email
This option defines the logging level for WebGate notifications (possible values: 0
to 7). The higher the level, the more information is logged. The values correspond
to Unix standard levels used in syslog:
z 0: EMERGENCY
z 1: ALERT
z 2: CRITICAL
z 3: ERROR
z 4: WARNING
z 5: NOTICE
z 6: INFO
z 7: DEBUG
For example, LogLevel 4 means that the logfile contains all EMERGENCY, ALERT,
CRITICAL, ERROR and WARNING notifications. NOTICE-, INFO- and DEBUGmessages will not be recorded.
AntiVir WebGate is able to send emails with additional information (for example
about the relevant file), if it detects a virus or unwanted program. There is no
default value. In order to send emails, you must enter a recipient address. For
example, root@localhost.
ACL Settings
It corresponds to EmailTo in avwebgate.conf.
Avira GmbH AntiVir WebGate 69
Page 71

Graphical User Interface (GUI)
In this window you can set the access and connections to specific ports for certain
Clients or networks.
Allow
client
address
Enter the IP address of the Client you want to have access through WebGate and
press Add. If you want to enable a network, enter the IP address, followed by ’/’ and
the Bit number of the netmask. For example,
192.168.1.0 or 192.168.1.0/24
Allow
destination
port
Enter the ports, for which you want to allow the access through WebGate.
Configuring WebGate
Log in as root.
Start WebGate GUI:
/usr/lib/AntiVir/antivir-gui
Define the basic settings in Basic WebGate Settings – Page 63.
Define the extended settings. If you are not sure about possible values (for
example, the maximum number of connections allowed), keep the default
value. You can modify and tune these values during operation or when eventual
conflicts occur.
If you are using WebGate with a proxy, make the Proxy Settings – Page 66
accordingly. You can read about the basic configurations in Monitoring HTTP
Traffic – Page 26.
Set the parameters for scanning archives, if you want to activate this feature.
Select the malware types you want WebGate to detect.
Make the settings for the logfile and email messages in the area for Logfile
Settings – Page 68.
Press Save to keep the values you set.
The new settings are now activated.
70 AntiVir WebGate Avira GmbH
Page 72

Graphical User Interface (GUI)
6.4 Updating WebGate Using the GUI
3 The entry GuiSupport must be activated in avwebgate.conf in order for
WebGate to communicate with the GUI.
Start the GUI:
/usr/lib/AntiVir/antivir-gui
The GUI appears, displaying the Realtime view.
Updater Window
Switch to Updater window (click on Updater tab):
Symbols
The Updater main window displays information about the
the
Versions of the product, engine, PackLib and VDF. A scroll-text area describes
the current Updater activity.
You can perform an update at anytime, pressing the Update button. The process
steps and eventual errors are listed in the text area, while the details are registered
in the Updater logfile, according to the logfile settings (see below).
Click to view Updater main window.
Click to switch to Logfile view.
Click to access the Configuration window.
Operating System and
Avira GmbH AntiVir WebGate 71
Page 73

Menus
Graphical User Interface (GUI)
System
The System menu is the same as in the WebGate window (see Operating AntiVir
WebGate Using the GUI – Page 56).
Updater
The Updater menu has the following options:
• Status: to switch to Updater main window;
• Logfile: to switch to Logfile view;
• Configuration: to open the Configuration window;
• Start Update: to update WebGate.
Updater Logfile Window
Click on the Logfile button.
– OR –
Select the menu option Updater/Logfile.
The Logfile window appears:
Logfile
Displays the complete logfile, with full paths, the current size of the logfile in KB,
the displayed log levels and the log level used by Updater.
Four buttons appear on the bottom of the window: Settings, Rows, Load new and
More.
Settings
Press Settings.
An additional area appears in the Logfile window:
72 AntiVir WebGate Avira GmbH
Page 74

Graphical User Interface (GUI)
z Choice of date to view: selecting the time interval for the logfile entries to be
displayed;
Default: complete logfile.
z Show the following log levels: selecting the log levels to be displayed;
Default: All.
Rows
Load new
More
Number of displayed log lines
Reloading the logfile
The loaded logfile view is extended with the number of Lines given.
6.5 Configuring AntiVir Updater Using the GUI
You can make the configuration settings for AntiVir Updater directly in the GUI.
AntiVir GUI also applies to other AntiVir products and, in case you have more products
installed on the same computer, it displays the options according to the selected product.
When working with WebGate, the Expertmode option has no influence on the
configuration settings.
Click the symbol for configuration
– OR –
Select the menu option Updater/Configuration.
The Configuration window appears, with the Automatic updates settings:
Avira GmbH AntiVir WebGate 73
Page 75

Graphical User Interface (GUI)
Automatic
updates
When you activate this option (recommended), you may choose between:
• Automatic updates every 2 hours
• Automatic updates daily; here you may select the time for the daily updates.
The parameters in the configuration file avupdater.conf are:
AutoUpdateEvery2Hours, AutoUpdateDaily, AutoUpdateTime.
Updater Proxy Settings
HTTP Proxy
Here you must set the HTTP connection for updates.
z Server: update proxy server’s hostname or IP.
z Port: port for update proxy server communication with WebGate.
z Username: username for access on update proxy server, if necessary.
z Password: password for update proxy server access, if necessary.
The parameters avupdater.conf are:
HTTPProxyServer, HTTPProxyPort, HTTPProxyUsername,
HTTPProxyPassword
.
74 AntiVir WebGate Avira GmbH
Page 76

Graphical User Interface (GUI)
Updater Logfile Settings
Path of logfile
Email
Here you can define what WebGate reports in a Logfile.
All important Update operations are logged through a syslog daemon. You could
specify an additional logfile, by entering the full path. For example:
/var/log/avupdater.log.
It corresponds to
LogTo in avupdater.conf.
AntiVir Updater is able to send emails with additional information after
performing updates. There is no default value. In order to send emails, you must
enter a recipient address. For example, root@localhost.
It corresponds to
EmailTo in avupdater.conf.
Avira GmbH AntiVir WebGate 75
Page 77

Graphical User Interface (GUI)
76 AntiVir WebGate Avira GmbH
Page 78

Service
7Service
7.1 Support
Support Service
Forum
Our Webpage http://www.avira.com contains all the necessary information on our
extensive support service.
The competence and experience of our developers is at your disposal. The experts
from Avira answer your questions and help you with difficult technical problems.
During the first 30 days after you have purchased a license, you can use our
AntiVir Installation Support by phone, email or by online form.
In addition we recommend that you optionally purchase our AntiVir Classic
Support, with which you can contact and obtain advice from our experts during
the business hours, when encountering technical problems. The annual fee for this
service, which includes eliminating viruses and hoax support, is 20 % of the list
price of your purchased AntiVir program.
Another optional service is the AntiVir Premium Support which offers you,
additionally to the scope of the AntiVir Classic Supports, the possibility to reach
competent partners at any time - even after business hours, in case of emergency.
When virus alerts occur, you will receive an SMS on your mobile phone.
Before you contact our Hotline, we recommend that you visit our user forum at
http://forum.antivir.de.
Your questions may already have been answered for another user and posted on
the forum.
Email Support
Support via email can be obtained at http://www.avira.com.
7.2 Online Shop
Would you want to buy our products per mouse-click?
You can visit Avira Online Shop at http://www.avira.com and buy, upgrade or
extend AntiVir licenses fast and safely. The Online Shop guides you step-by-step
through the orders menu. A multi language Customer Care Center explains to
you the ordering process, the payment transaction and the delivery. Resellers can
order by invoice and use a reseller panel.
Avira GmbH AntiVir WebGate 77
Page 79

7.3 Contact
Service
Address
Internet
Avira GmbH
Lindauer Strasse 21
D-88069 Tettnang
Germany
You can find further information about us and our products by visiting
http://www.avira.com.
78 AntiVir WebGate Avira GmbH
Page 80

Appendix
8 Appendix
8.1 Glossary
Item Meaning
Backdoor (BDC) A backdoor is a program infiltrated in order to steal data from the
computer, without the user’s knowledge. This program is manipulated
by third-parties using a remote backdoor-control software, over the
Internet or network.
AntiVir detects backdoor-control programs.
cron (daemon) A daemon which starts other programs on specified times.
Daemon A background process for administration on Unix systems. On average,
there are about a dozen daemons running on a computer. These
processes usually start up and shut down with the computer.
Demo version Without a license file, AntiVir WebGate runs as demo version and it
only reports the test virus EICAR. It will not block the access to
infected files. The update function is not available.
Dialer Paid dialing program. When installed on your computer, this program
builds a Premium Rate Number Internet connection, charging you at
higher rates. This can lead to huge phone bills.
AntiVir detects Dialers.
Engine The scanning module of AntiVir software.
Heuristic The systematic process of solving a problem using general and specific
rules drawn from previous experience. The solution is however not
guaranteed.
AntiVir uses a heuristic process for detecting unknown macro viruses.
When typical virus-like functions are found, the respective macro is
classified as "suspicious".
Kernel The base component of a Unix operating system, which performs
elementary functions (e.g. memory and process administration)
Logfile also: Report file. A file containing reports generated by the program at
run-time, when a certain event occurs.
Malware Generic term for "foreign bodies" of any type. These can be
interferences such as viruses or other software, which the user
generally considers as unwanted (see also Unwanted Programs).
PMS (Possible
Malicious Software)
Avira GmbH AntiVir WebGate 79
Software that does not usually harm the computer. It is programmed
to harm other users.
For example, Mail bombs: with such a program, the victim can be
attacked by thousands of emails.
AntiVir detects PMS.
Page 81

Appendix
Item Meaning
Quarantine directory The directory where infected files are stored, to block the user’s access
to them.
root The user with unlimited access rights (such as system administrator on
Windows)
Signature A bytes-combination used for recognizing a virus or unwanted
program.
Script A text file containing commands to be executed by the system. (similar
to batch files in DOS)
SMP (Symmetric Multi
Processing)
SMTP Simple Mail Transfer Protocol: protocol for email transport on the
syslog daemon
Unwanted programs The name for programs that do not directly harm the computer, but
VDF (Virus Definition
File)
Unix SMP: Unix version for computers with parallel processors.
Internet.
A daemon used by programs for logging various information. These
reports are written in different logfiles. The syslog daemon
configuration is in /etc/syslog.conf.
are not desired by the user or administrator. These can be backdoors,
dialers, jokes and games. AntiVir detects various types of unwanted
programs.
A file with known signatures for viruses and unwanted programs. In
many cases it is enough for an Update to load the most recent version
of this file.
8.2 Further Information
You can find further information on viruses, worms, macro viruses and other
unwanted programs at http://www.avira.com .
80 AntiVir WebGate Avira GmbH
Page 82

Appendix
8.3 Golden Rules for Protection Against Viruses
Always keep boot floppy-disks, for your network server and for your
workstations.
Always remove floppy-disks from the drive after finishing the work. Even if
they have no executable programs, disks can contain program code in the boot
sector and these can serve to carry boot sector viruses.
Regularly backup your files.
Limit program exchange: particularly with other networks, mailboxes, Internet
and acquaintances.
Scan new programs before installation and the disk after this. If the program is
archived, you can detect a virus only after unpacking and during installation.
If there are other users connected to your computer, you should set the following
rules for protection against viruses:
Use a test computer for controlling downloads of new software, demo versions
or virus suspicious media (floppies, CD-R, CD-RW, removable drives).
Disconnect the test computer from the network!
Appoint a person responsible with virus infection operations and establish all
steps for virus elimination.
Organize an emergency plan as a precaution for avoiding damage due to
destruction, robbery, failure or loss/change due to incompatibility. You can
replace programs and storage devices, but not your vital business data.
Set up a plan for data protection and recovery.
Your network must be correctly configured and the access rights must be wisely
assigned. This is a good protection against viruses.
Avira GmbH AntiVir WebGate 81
Page 83

Avira GmbH
Lindauer Str. 21
88069 Tettnang
Germany
Telephone: +49 (0) 7542-500 0
Fax: +49 (0) 7542-525 10
Internet: http://www.avira.com
© Avira GmbH. All rights reserved.
This manual was created with great care. However, errors in design and contents cannot be excluded. The reproduction of this publication or parts thereof in any form is prohibited without previous
written consent from Avira GmbH.
Errors excepted. Content suject to change.
Issued Q4/2007
AntiVir® is a registered trademark of the Avira GmbH.
All other brand and product names are trademarks or registered trademarks of their respective
owners. Protected trademarks are not marked as such in this manual. However, this does not
mean that they may be used freely.
www.avira.com
 Loading...