

Page 1

www.avira.com
User Manual
UNIX Server
More Than Security
Page 2

Contents
1 About this Manual . . . . . . . . . . . . . . . . . . . . . . . . . . . . . . . . . . . . . . . . . . . . . . 3
1.1 Introduction . . . . . . . . . . . . . . . . . . . . . . . . . . . . . . . . . . . . . . . . . . . . . . . . . . . . . 3
1.2 The Structure of the Manual . . . . . . . . . . . . . . . . . . . . . . . . . . . . . . . . . . . . . . . 3
1.3 Signs and Symbols . . . . . . . . . . . . . . . . . . . . . . . . . . . . . . . . . . . . . . . . . . . . . . . . 4
1.4 Abbreviations . . . . . . . . . . . . . . . . . . . . . . . . . . . . . . . . . . . . . . . . . . . . . . . . . . . . 5
2 Product Information . . . . . . . . . . . . . . . . . . . . . . . . . . . . . . . . . . . . . . . . . . . . 7
2.1 Features . . . . . . . . . . . . . . . . . . . . . . . . . . . . . . . . . . . . . . . . . . . . . . . . . . . . . . . . . 8
2.2 Licensing Concept . . . . . . . . . . . . . . . . . . . . . . . . . . . . . . . . . . . . . . . . . . . . . . . . 8
2.3 Modules and Operating Mode of Avira AntiVir UNIX Server . . . . . . . . . . . . 9
2.4 System Requirements . . . . . . . . . . . . . . . . . . . . . . . . . . . . . . . . . . . . . . . . . . . . 10
2.5 Technical Information . . . . . . . . . . . . . . . . . . . . . . . . . . . . . . . . . . . . . . . . . . . . 10
3 Installation . . . . . . . . . . . . . . . . . . . . . . . . . . . . . . . . . . . . . . . . . . . . . . . . . . . 11
3.1 Getting the Installation Files . . . . . . . . . . . . . . . . . . . . . . . . . . . . . . . . . . . . . . 11
3.2 Licensing . . . . . . . . . . . . . . . . . . . . . . . . . . . . . . . . . . . . . . . . . . . . . . . . . . . . . . .12
3.3 Installing the Dazuko Kernel Module . . . . . . . . . . . . . . . . . . . . . . . . . . . . . . .12
3.4 Integration on Samba . . . . . . . . . . . . . . . . . . . . . . . . . . . . . . . . . . . . . . . . . . . .14
3.5 Installing AntiVir . . . . . . . . . . . . . . . . . . . . . . . . . . . . . . . . . . . . . . . . . . . . . . . . 16
3.6 Reinstalling AntiVir . . . . . . . . . . . . . . . . . . . . . . . . . . . . . . . . . . . . . . . . . . . . . . 22
3.7 Installing AntiVir UNIX Server Using the Graphical Installation Routine 23
3.8 Integrating Third-Party Products . . . . . . . . . . . . . . . . . . . . . . . . . . . . . . . . . . . 30
4 Configuration . . . . . . . . . . . . . . . . . . . . . . . . . . . . . . . . . . . . . . . . . . . . . . . . . 31
4.1 Overview . . . . . . . . . . . . . . . . . . . . . . . . . . . . . . . . . . . . . . . . . . . . . . . . . . . . . . .31
4.2 Configuration Files . . . . . . . . . . . . . . . . . . . . . . . . . . . . . . . . . . . . . . . . . . . . . . . 31
4.3 Configuration Script . . . . . . . . . . . . . . . . . . . . . . . . . . . . . . . . . . . . . . . . . . . . . 39
4.4 Configuring AntiVir Samba Scanner . . . . . . . . . . . . . . . . . . . . . . . . . . . . . . . . 40
4.5 Configuring Regular Updates . . . . . . . . . . . . . . . . . . . . . . . . . . . . . . . . . . . . . . 43
4.6 Testing AntiVir UNIX Server . . . . . . . . . . . . . . . . . . . . . . . . . . . . . . . . . . . . . . 48
5 Operation . . . . . . . . . . . . . . . . . . . . . . . . . . . . . . . . . . . . . . . . . . . . . . . . . . . . 49
5.1 Overview of AntiVir Command Line Scanner . . . . . . . . . . . . . . . . . . . . . . . . 49
5.2 Using AntiVir Command Line Scanner . . . . . . . . . . . . . . . . . . . . . . . . . . . . . .53
5.3 Reaction to Detecting Viruses/ Unwanted Programs . . . . . . . . . . . . . . . . . .56
6 Graphical User Interface (GUI) . . . . . . . . . . . . . . . . . . . . . . . . . . . . . . . . . . 57
6.1 Overview . . . . . . . . . . . . . . . . . . . . . . . . . . . . . . . . . . . . . . . . . . . . . . . . . . . . . . .57
6.2 AntiVir Scanner . . . . . . . . . . . . . . . . . . . . . . . . . . . . . . . . . . . . . . . . . . . . . . . . . 58
6.3 AntiVir Guard . . . . . . . . . . . . . . . . . . . . . . . . . . . . . . . . . . . . . . . . . . . . . . . . . . . 68
7 Service . . . . . . . . . . . . . . . . . . . . . . . . . . . . . . . . . . . . . . . . . . . . . . . . . . . . . . . 79
7.1 Support . . . . . . . . . . . . . . . . . . . . . . . . . . . . . . . . . . . . . . . . . . . . . . . . . . . . . . . . 79
7.2 Online Shop . . . . . . . . . . . . . . . . . . . . . . . . . . . . . . . . . . . . . . . . . . . . . . . . . . . . .80
7.3 Contact . . . . . . . . . . . . . . . . . . . . . . . . . . . . . . . . . . . . . . . . . . . . . . . . . . . . . . . . .80
8 Appendix . . . . . . . . . . . . . . . . . . . . . . . . . . . . . . . . . . . . . . . . . . . . . . . . . . . . . 81
8.1 Glossary . . . . . . . . . . . . . . . . . . . . . . . . . . . . . . . . . . . . . . . . . . . . . . . . . . . . . . . . 81
8.2 Further Information . . . . . . . . . . . . . . . . . . . . . . . . . . . . . . . . . . . . . . . . . . . . .82
8.3 Golden Rules for Protection Against Viruses . . . . . . . . . . . . . . . . . . . . . . . . .83
Avira GmbH Avira AntiVir UNIX Server 1
Page 3

2 Avira AntiVir UNIX Server Avira GmbH
Page 4

1About this Manual
In this Chapter you can find an overview of the structure and contents of this manual.
After a short introduction, you can read information about the following issues:
• The Structure of the Manual – Page 3
• Signs and Symbols – Page 4
1.1 Introduction
We have included in this manual all the information you need about AntiVir and it will
guide you step by step through installation, configuration and operation of the software.
The appendix contains a Glossary which explains the basic terms.
For further information and assistance, please refer to our website, to the Hotline of our
Technical Support and to our regular Newsletter (see Service – Page 79).
About this Manual
Your Avira Team
1.2 The Structure of the Manual
The manual of your AntiVir software consists of a number of Chapters, providing you
with the following information:
Chapter Contents
1 About this Manual The structure of the manual, signs and symbols
2 Product Information General information about AntiVir software, its
3 Installation Instructions to install AntiVir UNIX Server on your
4 Configuration Directions for optimum settings of AntiVir on your
5 Operation Working with AntiVir, after installation; targeted
6 Graphical User Interface (GUI) General information on GUI; operating and
7 Service
modules, features, system requirements and
licensing.
system – using both the installation script and the
graphical installation routine.
system.
scanning for viruses and unwanted programs;
reactions when viruses and unwanted programs are
detected.
configuring AntiVir UNIX Server using the GUI.
Avira GmbH Support and Service.
8 Appendix Glossary of technical terms and abbreviations,
Golden Rules for Protection against Viruses.
Avira GmbH Avira AntiVir UNIX Server
3
Page 5

About this Manual
1.3 Signs and Symbols
The manual uses the following signs and symbols:
Symbol Meaning
3 ... shown before a condition that must be met prior to
... shown before a step you have to perform.
... shown before the result that directly follows the preceding
performing an action.
action.
... shown before a warning if there is a danger of critical data loss
or hardware damage.
... shown before a note containing particularly important
information, e.g. on the steps to be followed.
... shown before a tip that makes it easier to understand and use
AntiVir UNIX Server.
For improved legibility and clear marking, the following types of emphasis are also used
in the text:
Emphasis in text Explanation
Ctrl+Alt Key or key combination
/usr/lib/AntiVir/antivir Path and filename
ls usr/lib/AntiVir User entries
Choose component
Select all
http://www.avira.com URLs
Signs and Symbols – Page 4 Cross-reference within the document
Elements of the software interface such as
menu items, window titles and buttons in
dialog windows
4 Avira AntiVir UNIX Server Avira GmbH
Page 6

1.4 Abbreviations
The manual uses the following abbreviations:
Abbreviation Meaning
FAQ Frequently Asked Question
FQDN Fully Qualified Domain Name
GPL General Public License
GUI Graphical User Interface
MIME Multipurpose Internet Mail Extensions
MTA Mail Transport Agent
PMS Possibly Malicious Software
RFC Request For Comment
SMTP Simple Mail Transfer Protocol
VDF Virus Definition File
About this Manual
Avira GmbH Avira AntiVir UNIX Server
5
Page 7

About this Manual
6 Avira AntiVir UNIX Server Avira GmbH
Page 8

2 Product Information
You are responsible for numerous workstations and servers in your network but you are
only human.
The servers are the heart of the network. So if viruses can freely penetrate and spread on
your servers, your network is only a step away from breakdown. This is where AntiVir
products for servers come in.
Product Information
UNIX computers are more often used as file servers or email gateway servers. Thus they
transfer and store files that have no connection to UNIX, e.g. Office documents and email
attachments. So, viruses can access a server through a Windows Client and freely cause
damage.
Avira AntiVir UNIX Server is a comprehensive and flexible tool for confronting viruses
and unwanted programs on your server and for reliable protection of your system.
Right from the beginning, two really important hints:
Losing valuable files usually has dramatic consequences. Not even the
best antivirus software can fully protect you against data loss.
Ensure that you make regular backups of your files.
An antivirus program can be reliable and effective only if kept up to
date.
Ensure that you keep your AntiVir programs up to date using
automatic updates as described in this user guide.
Avira GmbH Avira AntiVir UNIX Server
7
Page 9

Product Information
2.1 Features
Avira AntiVir UNIX Server offers you extensive configuration possibilities to keep control
of your network.
The current features of Avira AntiVir UNIX Server are:
• Easy installation, using the installation script or the graphical installer.
• Simple configuration: support for configuration using the configuration scripts, with
• Command line scanner (on demand):
• Resident guard (on access):
• Heuristic detection of macroviruses.
• Detection of all common archive types with certain recursion level in the case of
• Simple integration with automatic jobs, such as scanning at a set time.
• Automatic updates of AntiVir software via the Internet.
• Comprehensive functions for logging, warnings and messages for the administrator;
• Self-Integrity Program Check, which ensures the antivirus system is operating
• Optional user-friendly graphical user interface (GUI) for operating and configuring
help text.
Configurable search for all known malware types (viruses, Trojans, backdoor
programs, hoaxes, worms etc.)
Configurable reactions when detecting viruses or unwanted programs: repair, move,
rename programs or files; automatically remove viruses or unwanted programs.
nested archives.
sending email warnings (SMTP).
correctly at all times.
Avira AntiVir UNIX Server.
2.2 Licensing Concept
You must have a license to use Avira AntiVir UNIX Server and accept the license terms
(see http://www.avira.com/documents/general/pdf/en/avira_eula_en.pdf).
There are different license types for using the various functions of Avira AntiVir UNIX
Server:
•Demo version
•Full version
• Convenience Package
The license depends upon the number of users in the network who are to be protected by
AntiVir.
The license is given in a license file named hbedv.key . You will receive it by email from
Avira GmbH. It contains certain data, such as the programs you will use and the period of
your license. The same license file may refer to more AntiVir products.
Demo Version
Without a license file, the AntiVir software runs as a demo version. It cannot detect the
viruses and the other unwanted programs, which the licensed version detects. It only
detects test signatures. Therefore, the demo version can only be used to test the features
and operation of the software, as well as the integration with certain processes. It does
not provide any protection against malware. You cannot perform automatic updates, so
you always have to download the current virus definition files and the new versions of
AntiVir scan engine manually from our website.
8 Avira AntiVir UNIX Server Avira GmbH
Page 10

Product Information
It is not possible to block access to infected files, to repair or to move them with AntiVir.
Evaluation
Ver sion
Full Version
Convenience
Package
Details of the evaluation version can be found on our website:
http://www.avira.com.
The range of full version features includes:
• Provision of AntiVir versions by Internet download
• License file by email, for converting the demo version to a full version
• Complete installation instructions (digital)
• PDF manuals available for Internet download
• Four weeks installation support, starting from acquisition date
• Newsletter service (by email)
• Internet update service for program files and VDF
In addition to the full version license, the Convenience Package includes:
• Every three months: free delivery of a boot-CD-ROM with the AntiVir Rescue System
and all updated AntiVir products
• Complete installation manual (printed) on first delivery
• License file on a floppy disk with the first delivery
• Newsletter service (printed, regular mail delivery)
2.3 Modules and Operating Mode of Avira AntiVir UNIX Server
The Avira AntiVir UNIX Server security software consists of the following program
components:
• AntiVir Command line scanner
•AntiVir Guard
• AntiVir Samba Scanner
• Internet Updater
AntiVir Command line scanner
... can always be launched from the command prompt (on-demand). Infected files and
suspicious macros can be isolated, cleaned or deleted using a number of options. It can be
integrated and used within scripts.
AntiVir Guard
... runs as a daemon process. It permanently monitors all user access in the network (on
access) and it protects the files against viruses and unwanted programs. It immediately
blocks access to infected files which can be automatically renamed, repaired or moved.
AntiVir Samba Scanner
... runs as a daemon process. It constantly monitors the file traffic through Samba Service
(dedicated file and print server for Windows and UNIX workstations). It immediately
blocks access to infected files which can be automatically renamed, repaired or moved.
Apart from the administration log entries, it issues notifications for the remote users of
the files.
Avira GmbH Avira AntiVir UNIX Server
9
Page 11

Product Information
Internet Updater
... ensures that AntiVir is always kept up to date using your Internet connection. It checks
if there are any new files to download and automatically updates your software if
necessary.
2.4 System Requirements
Avira AntiVir UNIX Server asks for the following minimum system requirements on your
server:
• i386 (Linux, FreeBSD, OpenBSD, SunOS) or PowerPC (Linux) or Sparc (SunOS)
processor;
• 80-100 MB free hard disk space;
• 20 MB temporary disk space;
• 192 MB (512 MB on SunOS) free memory space;
• Linux with glibc; FreeBSD; OpenBSD or SunOS;
• to integrate the on access scanner: Linux kernel 2.2, 2.4 or 2.6, optionally with
RSBAC; FreeBSD 4, 5 or 6; SunOS 5.7, 5.8, 5.9 or 5.10 (Sparc) or 5.9 (i386);
• to use the AntiVir Samba Scanner: Samba version with support for VFS Mechanism
(version 2.2.0 or higher) and samba-vscan 0.3.5 or higher;
• to use the GUI: Sun Java 1.4.0 or higher.
2.5 Technical Information
AntiVir Guard is based on Dazuko (http://www.dazuko.org), an open source software
project. Dazuko is a kernel module which allows the AntiVir Guard daemon to access the
files.
AntiVir Samba Scanner is based on samba-vscan
(http://www.openantivirus.org/projects.php), an open source software project. sambavscan is a VFS plug-in for Samba and it has a so-called AntiVir Backend, which allows the
AntiVir Samba Scanner to access the files.
Please observe the license information in the installation directory /legal.
10 Avira AntiVir UNIX Server Avira GmbH
Page 12

3 Installation
You can find the current version of AntiVir UNIX Server on the Internet. If you have a
Convenience Package AntiVir CD-ROM, you may also install the product from it.
AntiVir is supplied as a packed archive. It contains AntiVir Guard, AntiVir Command line
scanner and the Internet Updater.
You will be guided step by step throughout the installation procedure. This Chapter is
divided into the following sections:
• Getting the Installation Files – Page 11
• Licensing – Page 12
• Installing the Dazuko Kernel Module – Page 12
• Integration on Samba – Page 14
• Installing AntiVir – Page 16
• Reinstalling AntiVir – Page 22
• Installing AntiVir UNIX Server Using the Graphical Installation Routine – Page 23
• Integrating Third-Party Products – Page 30
Installation
3.1 Getting the Installation Files
Downloading the Installation Files from the Internet
Download the current version file from our website http://www.avira.com
to your local computer. The file name is
antivir-server-prof-<version>.tar.gz (without graphical installer) or
antivir-server-linux-gui_installer.tar.gz (with graphical installation routine).
Save the file in a /tmp folder on the computer on which you want to run AntiVir
UNIX Server.
Getting the Installation Files from CD-ROM
On the AntiVir CD-ROM open
/EN/PRODUCTS/UNIX/SERVER or
/EN/PRODUCTS/UNIX/GUI_INSTALLERS/.
Copy the file antivir-server-prof-<version>.tar.gz or
antivir-server-linux-gui_installer.tar.gz in a directory, for example in
/tmp.
Unpacking Program Files
We will now describe the unpacking of the product kit without graphical installation
routine:
Go to the temporary directory:
cd /tmp
Unpack the archive containing the AntiVir kit:
tar xzvf antivir-server-prof-<version>.tar.gz
In the temporary directory will then appear antivir-server-prof-<version> .
Change to the following directory:
Avira GmbH Avira AntiVir UNIX Server
11
Page 13

Installation
cd /tmp/antivir-server-prof-<version>/contrib/dazuko
Unpack the archive containing the dazuko kernel module:
tar xzvf dazuko-<version>tar.gz
The dazuko-<version> directory is created.
3.2 Licensing
You must have an AntiVir license in order to use the full product (see Licensing Concept –
Page 8). The license comes in a file named hbedv.key.
This license file contains information regarding the scope and period of the license.
Without the license file, AntiVir UNIX Server runs only as a demo version with restricted
features.
Purchasing the License
You may contact us by telephone or by email (info@avira.com) to acquire a license file
for AntiVir UNIX Server.
You will receive the license file by email.
You can easily acquire AntiVir UNIX Server using our Online Shop (for details, visit
http://www.avira.com).
Copying the License File
Copy the license file hbedv.key to the installation directory on your system
./tmp/antivir-server-prof-<version>
You can also perform the installation without having a license key
from the beginning. AntiVir UNIX Server will then run as demo
version.
You can copy the license file at any time to the AntiVir program
directory /usr/lib/AntiVir .
3.3 Installing the Dazuko Kernel Module
Dazuko kernel module is required by all platforms to allow AntiVir Guard functionality.
Dazuko is necessary for installing the AntiVir Guard resident scanner.
AntiVir can be installed even without dazuko, but in this case it will
run without AntiVir Guard. See more details in Installing AntiVir
without AntiVir Guard – Page 16.
You must compile the module yourself because your UNIX kernel and Dazuko must be
based on the same source files. This is the only way you can ensure that Dazuko will have
access to the same system functions as your UNIX kernel.
12 Avira AntiVir UNIX Server Avira GmbH
Page 14

Installation
If your distribution supplier offers an exact matching module to your
kernel:
Skip the following step.
Check the name of the module on the system (you might use this
information for further installation of AntiVir Guard). Use the
following command:
find /lib/modules/‘uname -r‘ -name ’dazuko*’
The installation pack for SunOS (Sparc and i386) contains a binary
module and you do not have to install it on this platform yourself.
The procedure is described, so that you do not need expert knowledge to perform it.
Nevertheless, knowledge of UNIX kernel compilation is needed, especially when errors
are encountered. Further information on this can be found at:
http://www.tldp.org/HOWTO/Kernel-HOWTO.html
Compiling Dazuko
3 Make sure that the source code for UNIX kernel is in /usr/src/linux . If not, install it
there. Information on this subject can be found in your UNIX provider
documentation.
3 Check if you have on your computer the kernel compiling programs (for example gcc).
This also applies to UNIX standard installations. If not, install the required packages.
Information on this subject can be found in your UNIX provider documentation.
3 Your UNIX kernel must be based on the source code from /usr/src/linux, as in most
cases, especially in a UNIX reinstallation. You can only be absolutely certain by
recompiling the installed kernel using exactly these sources.
Go to the temporary directory where you unpacked Dazuko, for example:
cd /tmp/antivir-server-prof-<version>/contrib/dazuko/
dazuko-<version>
Check the configuration of your computer with the configure script. Based on this
information, it will provide appropriate guidance for further installation of the
software:
If you are not certain about your UNIX kernel status, you should
proceed with the installation. In the worst case, Dazuko will not be
integrated into your UNIX kernel and the AntiVir Guard will not
start. A message will be displayed and you can solve the situation
afterwards.
./configure
Compile Dazuko:
make
Optionally: verify if the newly installed module works with the computer's running
kernel:
make test
Avira GmbH Avira AntiVir UNIX Server
13
Page 15

Installation
Depending on your operating system, you will receive the file dazuko.o or dazuko.ko
in the temporary directory. AntiVir installation script will prompt for the path to
this file later.
Further information on Dazuko can be found on the website:
http://www.dazuko.org. You may find distribution-specific details already documented
in the FAQ section.
3.4 Integration on Samba
You need AntiVir Backend for samba-vscan on all platforms in order to use the full
features of AntiVir Samba Scanner.
You need AntiVir Backend for samba-vscan if you want transparent monitoring of the file
access via Samba Service.
You can initially install AntiVir without samba-vscan. In this case,
AntiVir runs without the Samba Scanner. You may still ensure
appropriate protection of the file release using AntiVir Guard. The
notifications to the remote users of the files are then implemented
with the option ExternalProgram in AntiVir Guard and with own
logic (for example, using UNIX scripts).
You have to create the AntiVir Backend for samba-vscan yourself (obtained through a
VFS Plug-in for Samba) because your Samba Service and the Backend must be based on
the same sources. Only this will ensure correct functionality of the VFS Plug-in and the
stability of your file server.
To proceed with this step, you will need knowledge of Samba compiling and samba-vscan.
Detailed information is found in the source pack documentation and on the websites of
these projects.
Preparing Samba
3 Check that your system contains the programs needed for compiling sources (gcc,
make etc.). This might be the case for standard UNIX installations. If necessary,
install the program packs. You can find more information in the documentation of
your UNIX distribution.
3 Make sure that you have the source text for samba-vscan in version 0.3.5 or newer on
your system. There is a patch for version 0.3.5 which implements AntiVir Backend.
Samba-vscan includes AntiVir Backend from version 0.3.6.
3 Make sure you have the exact version of Samba sources that you use for the file
server. You do not have to translate and install the entire Samba sources, only sambavscan pack. The installation of the translated Samba is of course the best way to
ensure that the Service and VFS plugin match one another.
If your distributor has included an AntiVir Backend suited for your
Samba Server:
Skip the next step.
Check the name of the Backend and of the corresponding
configuration file on the system. Use the following command:
find /usr -name ’vscan-antivir.so’
find /usr -name ’vscan-antivir.conf*’
14 Avira AntiVir UNIX Server Avira GmbH
Page 16

Installation
Change to the temporary directory where you have unpacked Samba. For example:
cd /tmp
gunzip < samba-<version>tar.gz | tar xf -
cd samba-<version>/source
Check the configuration of your system with the configure script and based on the
details it finds create the corresponding information regarding further translation of
the software:
./configure
Create the additional information needed by samba-vscan:
make proto
Go to the temporary directory where you unpacked samba-vscan. For example:
cd /tmp
bunzip2 < samba-vscan-0.3.5.tar.bz2 | tar xf -
cd samba-vscan-0.3.5
Unpack the archive with AntiVir Backend for samba-vscan. This contains AntiVir
sources as a patch, which applies to samba-vscan 0.3.5 and integrates AntiVir
Backend. Apply the patch (starting with samba-vscan version 0.3.6, this step is no
longer needed because AntiVir Backend is already included).
gunzip < /tmp/samba-vscan-antivir-0.3.5.tar.gz |
tar xf -
patch -p0 < patch-sambavscan-hookup.diff
Configure and translate samba-vscan. For this, you have to indicate the Samba
sources:
./configure --with-samba-source=/tmp/samba-<version>/
source
make
make install
You can use a configuration example for AntiVir samba-vscan Backend, which is
provided for some settings:
cp antivir/vscan-antivir.conf /usr/local/samba/lib
To integrate AntiVir Samba Scanner in smb.conf for monitoring of the released files, you
must activate the vscan-antivir.so plug-in (see Configuring AntiVir Samba Scanner –
Page 40). There is no need to start additional services apart from Samba, as the plug-in
vscan-antivir.so handles this aspect by itself.
Avira GmbH Avira AntiVir UNIX Server
15
Page 17

Installation
3.5 Installing AntiVir
AntiVir is automatically installed using a script. This script performs the following tasks:
• Checks integrity of the installation files.
• Checks for the required permissions for the installation.
• Checks for an existing version of AntiVir on the computer.
• Copies the program files. Overwrites existing obsolete files.
• Copies AntiVir configuration files. Existing AntiVir configuration files are inherited.
• Optionally it creates a link in /usr/bin, so that AntiVir can be called from any folder
without needing a given path.
• Optionally it installs the Update Daemon and the resident scanner AntiVir Guard.
• Optionally it configures an automatic start for AntiVir Updater and AntiVir Guard on
system start-up.
The following steps must be taken for the initial installation:
• Preparing Installation – Page 16
• If Dazuko has not been compiled: Installing AntiVir without AntiVir Guard – Page 16
• If Dazuko has been compiled: Installing AntiVir with AntiVir Guard – Page 19
Preparing Installation
Login as root. Otherwise you do not have the required authorization for installation
and the script returns an error message.
Go to the directory in which you unpacked AntiVir:
cd /tmp/antivir-server-prof-<version>
Installing AntiVir without AntiVir Guard
If you have not compiled the Dazuko kernel module, you can only install AntiVir without
AntiVir Guard. AntiVir Guard can be easily installed later.
Type the command:
./install
Please note the dot and slash in the command syntax. Typing the command without
this path specification, leads to another command, which is not related to AntiVir
installation process and this would result in error messages and unwanted actions.
Press q to close the license text view.
16 Avira AntiVir UNIX Server Avira GmbH
Page 18

Installation
The installation script starts. After you agree with the license terms, it will copy
the program files. Optionally, the Installer can read an existing license key:
Do you agree to the license terms? [n] y
creating /usr/lib/AntiVir ... done
1) installing command line scanner
copying bin/antivir to /usr/lib/AntiVir/ ... done
copying vdf/antivir0.vdf to /usr/lib/AntiVir/ ... done
copying vdf/antivir1.vdf to /usr/lib/AntiVir/ ... done
copying vdf/antivir2.vdf to /usr/lib/AntiVir/ ... done
copying vdf/antivir3.vdf to /usr/lib/AntiVir/ ... done
Enter the path to your key file: [hbedv.key]
copying hbedv.key to /usr/lib/AntiVir/hbedv.key ... done
copying script/configantivir to /usr/lib/AntiVir/ ... done
linking /usr/bin/antivir to /usr/lib/AntiVir/antivir ... done
installation of command line scanner complete
Then you are asked if you want to install the Internet Update Daemon:
2) installing automatic internet update daemon
An internet update daemon is available ...
...
Would you like to install the automatic internet update daemon? [n]
Installation
with Update
Daemon
You do not necessarily need Internet Update Daemon to keep AntiVir
up to date. You can perform this operation manually via the Internet.
See Updating AntiVir Manually – Page 55
However, for the initial installation, it is recommended to install the
Update Daemon. You can deactivate it in the configuration settings.
If you choose to install the Internet Update Daemon (recommended):
Type Y and confirm with Enter.
Then, you are asked if the Update Daemon should start automatically:
Would you like to install the internet update daemon? [n] y
copying script/rc.avupdater.SuSE8x to /usr/lib/AntiVir/avupdater ... done
checking for existing /etc/avupdater.conf ... not found
copying etc/avupdater.conf to /etc/ ... done
Would you like the internet update daemon to start automatically? [y]
Press Enter. You can change this setting later.
The automatic system start is configured:
setting up startup script ... done
installation of the internet update daemon complete
Installation
without Update
Daemon
If you choose not to install the Internet Update Daemon, or to do this later, manually:
Type N or press Enter.
Confirm with Enter.
Avira GmbH Avira AntiVir UNIX Server
17
Page 19

Installation
Skipping
AntiVir Guard
GUI
installation
You are asked if you want to install AntiVir Guard:
3) installing AvGuard
Version 2.1.8-30 of AntiVir for UNIX Server is capable of on-access,
real-time scanning of files. This provides
...
There are several ways in which you can install AvGuard.
module - Dazuko will be loaded by the avguard script
kernel - Dazuko is always loaded
(and should not be loaded by the avguard script)
no install - do not install AvGuard at this time
...
available options: m k n
How should AvGuard be installed? [k]
Type N and confirm with Enter.
The next step is for the installation of the optional user interface (GUI):
4) installing GUI (+ SMC support)
...
Would you like to install the GUI (+ SMC support)? [y]
Starting
Configuration
AntiVir UNIX Server is provided with a GUI, which enables
monitoring of realtime activity, the display of log entries and
configuration of the product. However, AntiVir is fully functional
even without the GUI.
If you want to install the GUI:
3 Java 1.4.0 or higher must be installed on your system
Answer Y when asked about GUI installation.
The GUI program files are copied.
Finally, you can configure the AntiVir Updater and start the AntiVir Guard immediately
(if already activated during the installation, AntiVir Guard starts automatically on startup):
5) configuring AntiVir Updater
...
Would you like to configure AntiVir updater now? [y] n
Would you like to start AvGuard now? [y] n
If you answer Y, AntiVir configuration script starts. You can carry out
configuration at any time later. We recommend that you first learn
about the configuration options and then carry out configuration.
End this procedure by answering N.
18 Avira AntiVir UNIX Server Avira GmbH
Page 20

You will see a report that indicates the completion of the installation:
Installation of the following features complete:
AntiVir command line scanner
AntiVir Internet Update Daemon
AntiVir GUI
Note: It is highly recommended that you perform an update now to
ensure up-to-date protection. This can be done by running:
antivir --update
Be sure to read the README file for additional information.
Thank you for your interest in AntiVir for UNIX Server.
Installing AntiVir with AntiVir Guard
3 Make sure that the Dazuko kernel module has been compiled (see Installing the
Dazuko Kernel Module – Page 12).
Type the command:
./install
Please note the dot and slash in the command syntax. Typing the command without
this path specification, leads to another command, which is not related to AntiVir
installation process and this would result in error messages and unwanted actions.
Press q to close the license text view.
The installation script starts. After you agree with the license terms, it will copy
the program files. Optionally, the Installer can read an existing license key:
Installation
Do you agree to the license terms? [n] y
creating /usr/lib/AntiVir ... done
1) installing command line scanner
copying bin/antivir to /usr/lib/AntiVir/ ... done
copying vdf/antivir0.vdf to /usr/lib/AntiVir/ ... done
copying vdf/antivir1.vdf to /usr/lib/AntiVir/ ... done
copying vdf/antivir2.vdf to /usr/lib/AntiVir/ ... done
copying vdf/antivir3.vdf to /usr/lib/AntiVir/ ... done
Enter the path to your key file: [hbedv.key]
copying hbedv.key to /usr/lib/AntiVir/hbedv.key ... done
copying script/configantivir to /usr/lib/AntiVir/ ... done
linking /usr/bin/antivir to /usr/lib/AntiVir/antivir ... done
installation of command line scanner complete
Then you are asked if you want to install the Internet Update Daemon:
2) installing automatic internet update daemon
An internet update daemon is available ...
...
Would you like to install the automatic internet update daemon? [n]
You do not necessarily need Internet Updater to keep AntiVir up to
date. You can perform this operation manually via the Internet. See
Updating AntiVir Manually – Page 55
However, for the initial installation, it is recommended to install the
Updater. You can later deactivate it in the configuration settings.
Avira GmbH Avira AntiVir UNIX Server
19
Page 21

Installation
Installation
with Update
Daemon
Installation
without Update
Daemon
Installing
AntiVir Guard
If you choose to install the Internet Update Daemon (recommended):
Type Y and confirm with Enter.
Then, you are asked if the Update Daemon should start automatically:
Would you like to install the internet update daemon? [n] y
copying script/rc.avupdater.SuSE8x to /usr/lib/AntiVir/avupdater ... done
checking for existing /etc/avupdater.conf ... not found
copying etc/avupdater.conf to /etc/ ... done
Would you like the internet update daemon to start automatically? [y]
Press Enter. You can change this setting later.
The automatic system start is configured:
setting up startup script ... done
installation of the internet update daemon complete
If you choose not to install the Internet Update Daemon, or to do this later, manually:
Type N or press Enter.
Confirm with Enter.
You are asked if you want to install AntiVir Guard:
3) installing AvGuard
Version 2.1.8-30 of AntiVir for UNIX Server is capable of on-access,
real-time scanning of files. This provides
...
There are several ways in which you
can install AvGuard.
module - Dazuko will be loaded by the avguard script
kernel - Dazuko is always loaded
(and should not be loaded by the avguard script)
no install - do not install AvGuard at this time
...
available options: m k n
How should AvGuard be installed? [k]
Type M and confirm with Enter.
You will be asked to enter the path to the compiled Dazuko module dazuko.ko (or
dazuko.o):
Enter the full path to dazuko.ko:
Enter the full path.
For example: If dazuko.ko is in /tmp/antivir-server-prof-<version>/contrib/dazuko/
dazuko-<version>/ you should type:
/tmp/antivir-server-prof-<version>/contrib/dazuko/dazuko<version>/dazuko.ko
20 Avira AntiVir UNIX Server Avira GmbH
Page 22

Installation
The installation script reads the existing kernel module and then copies the files
for AntiVir Guard.
detecting kernel version ... linux26-2.6.5-7.97-smp
creating /usr/lib/AntiVir/linux26-2.6.5-7.97-smp ... done
copying /tmp/antivir-server-prof-2.1.8-30/contrib/dazuko/dazuko-2.3.1/
dazuko.ko to /usr/lib/AntiVir/linux26-2.6.5-7.97-smp/dazuko.ko ... done
copying doc/avserver_de.pdf to /usr/lib/AntiVir/ ... done
copying script/rc.avguard.SuSE8x to /usr/lib/AntiVir/avguard ... done
copying doc/MANUAL to /usr/lib/AntiVir/MANUAL.avguard ... done
If the installation script reports any errors on Dazuko, you should probably recompile
your UNIX kernel. For more information, see http://www.dazuko.org
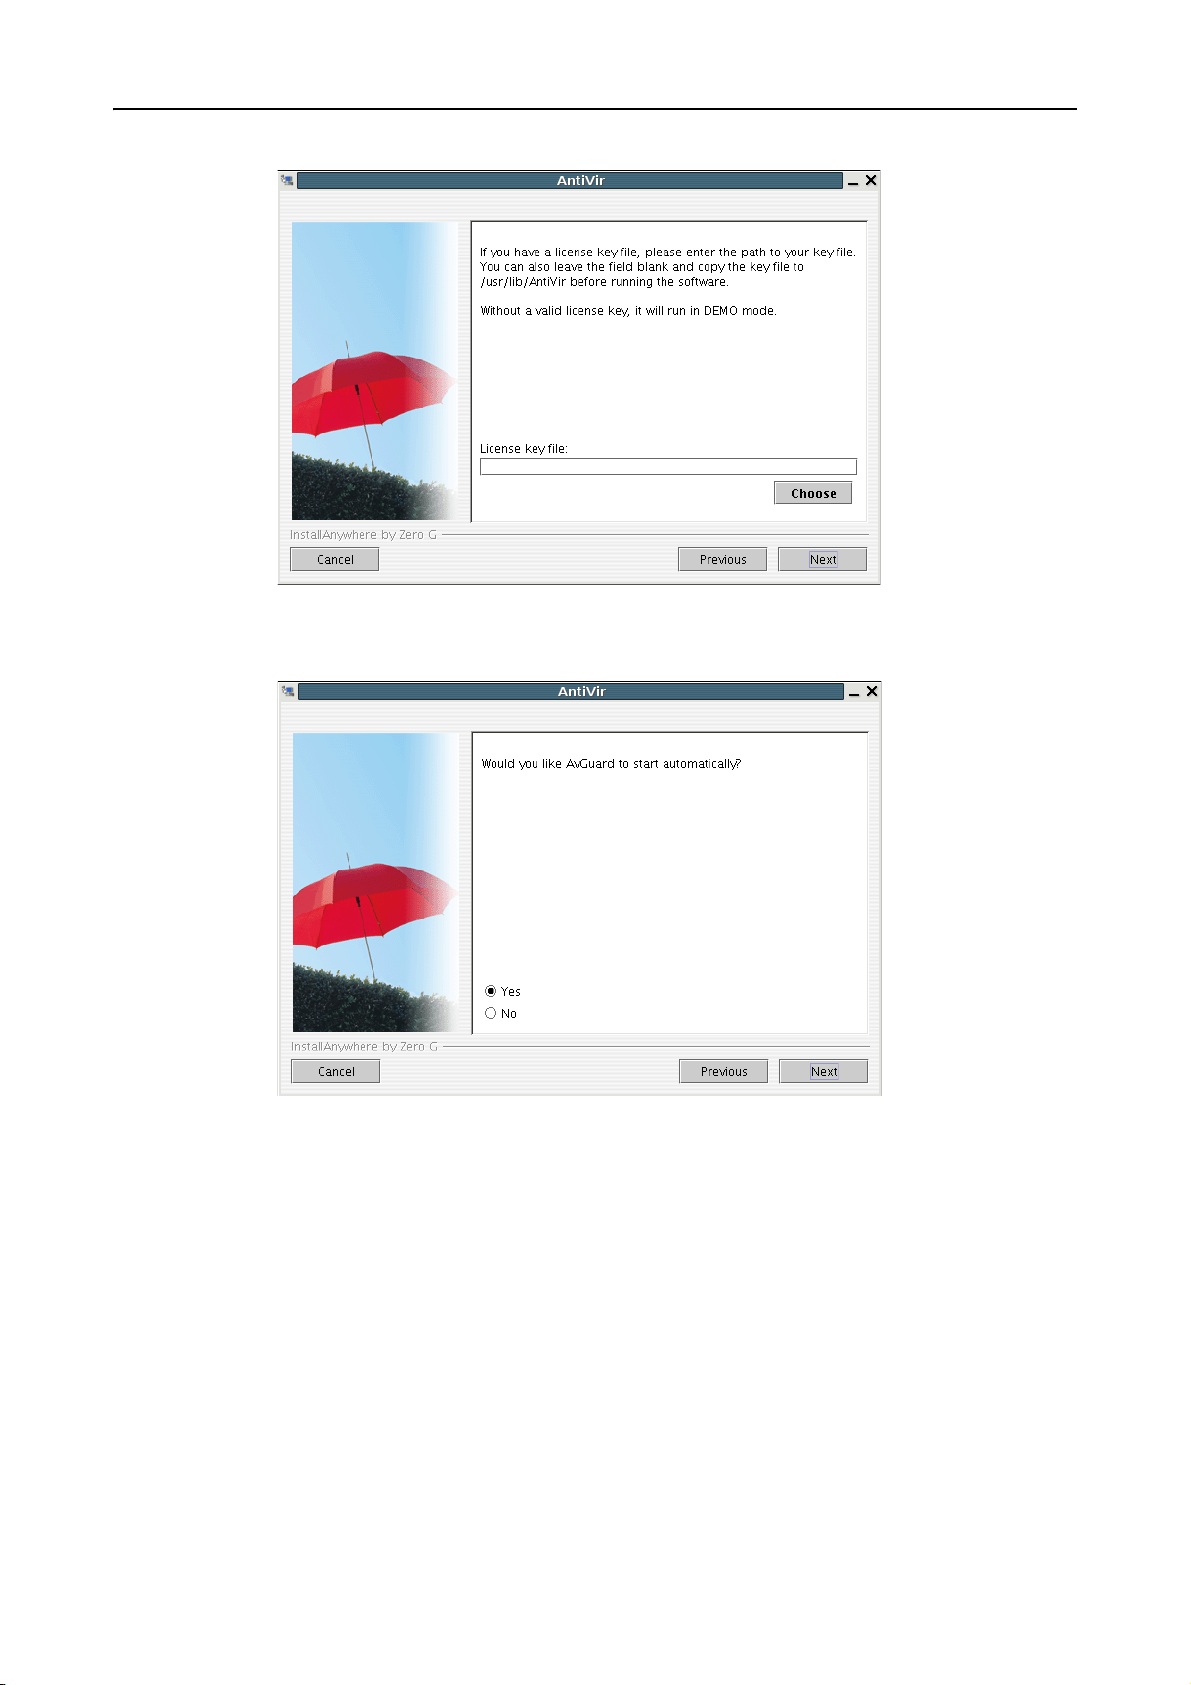
Then you are asked if the AntiVir Guard should be automatically run on system startup:
Would you like AvGuard to start automatically? [y]
Confirm with Enter.
Finally, the AntiVir Guard is linked to the startup script and the Guard’s
installation is completed:
GUI
installation
Starting
Configuration
setting up startup script ... done
installation of AvGuard complete
The next step is for the installation of the optional user interface (GUI):
4) installing GUI (+ SMC support)
...
Would you like to install the GUI (+ SMC support)? [y]
AntiVir UNIX Server is provided with a GUI, which enables
monitoring of realtime activity, the display of log entries and
configuration of the product. However, AntiVir is fully functional
even without the GUI.
If you want to install the GUI:
3 Java 1.4.0 or higher must be installed on your system
Answer Y when asked about GUI installation.
The GUI program files are copied.
Finally, you can configure the AntiVir Updater and start the AntiVir Guard immediately
(if already activated during the installation, AntiVir Guard starts automatically on startup):
5) configuring AntiVir Updater
...
Would you like to configure AntiVir updater now? [y] n
Would you like to start AvGuard now? [y] n
Avira GmbH Avira AntiVir UNIX Server
21
Page 23

Installation
If you answer Y, AntiVir configuration script starts. You can carry out
configuration at any time later. We recommend that you first learn
about the configuration options and then carry out configuration.
End this procedure by answering N.
You will see a report that indicates the completion of the installation:
Installation of the following features complete:
AntiVir command line scanner
AntiVir Internet Update Daemon
AntiVir Guard
AntiVir GUI
Note: It is highly recommended that you perform an update now to
ensure up-to-date protection. This can be done by running:
antivir --update
Be sure to read the README file for additional information.
Thank you for your interest in AntiVir for UNIX Server.
3.6 Reinstalling AntiVir
You can launch the installation script at any time. There are several possible situations:
• Installing a new version (upgrade). The installation script checks the prior version
and installs the necessary new components. The configuration file settings already
made are not overwritten (see Configuration – Page 31) but are inherited.
• Later installation of some components, e.g. AntiVir Guard or Internet Update
Daemon.
• Activating or deactivating the automatic start of Internet Update Daemon or AntiVir
Guard.
Reinstalling AntiVir
The procedure applies to all these cases:
3 First of all, you have to make sure that AntiVir Guard is stopped:
/usr/lib/AntiVir/avguard stop
Open the temporary directory where you unpacked AntiVir:
cd /tmp/antivir-server-prof-<version>
Type:
./install
The installation script performs as described in Installing AntiVir – Page 16).
Make the changes you need during installation procedure.
AntiVir is installed with the required features.
22 Avira AntiVir UNIX Server Avira GmbH
Page 24

Installation
3.7 Installing AntiVir UNIX Server Using the Graphical Installation Routine
You can also install AntiVir using a simple graphical installation routine. All you need to
do is download the corresponding file as described in Getting the Installation Files –
Page 11.
The graphical installation routine serves for installation only. It is in
no way related to the GUI for operating and configuring AntiVir UNIX
Server.
AntiVir UNIX Server with graphical installation only applies to Linux.
It needs Java 1.4.0 or higher.
3 Unpack the program into the following directory:
/tmp/antivir-server-linux-gui_installer.
Type:
./install
The welcome page appears with a program description:
Click Next.
Avira GmbH Avira AntiVir UNIX Server
23
Page 25

Installation
The License Agreement window is displayed:
You must agree with these conditions in order to continue with the
installation. If Disagree is active, you cannot proceed.
Select Agree and click Next.
You will see the following window:
There are three possibilities for installing AntiVir UNIX Server:
• Express setup: The program is installed with basic settings.
• Custom setup: The program is installed according to the user’s options.
• GUI only: Only the GUI is installed in usr/lib/AntiVir.
Express setup
The program is installed with the following basic settings:
• AntiVir UNIX Server is installed in the directory: /usr/lib/AntiVir
• AntiVir Guard (on-access scanner) is installed.
• The automatic Internet Update Daemon is not installed.
24 Avira AntiVir UNIX Server Avira GmbH
Page 26

• GUI support is activated.
• AntiVir Guard will start automatically when booting.
• The license file is not copied, meaning that AntiVir runs as a demo version.
Select Express setup and click Next.
All settings and further instructions appear in a window.
Click Install.
The program is installed.
Custom setup
You can install the program with user-defined settings.
Select Custom setup and click Next.
The following window asks if you want to install AntiVir Guard.
Installation
You can handle AntiVir Guard in one of the following ways:
• Auto install: Dazuko sources are compiled and the kernel module is integrated.
• Manual install: Dazuko kernel module is created manually (see Installing the
Dazuko Kernel Module – Page 12)
• No Install: AntiVir Guard is not installed.
Select Auto install in order to install Dazuko automatically and click Next.
Avira GmbH Avira AntiVir UNIX Server
25
Page 27

Installation
Then you are asked if you want to activate GUI support (entry in the file
avguard.conf):
Select Yes or No and click Next.
Then you can install the Internet Update Daemon:
If you want to install the Internet Update Daemon:
Select Yes and click Next (in this case, an additional question appears at the end of
the installation, regarding the automatic start of the Update Daemon).
The following step is to copy the license file:
26 Avira AntiVir UNIX Server Avira GmbH
Page 28
Installation
Follow the instructions and click Next.
The following question refers to the automatic start of AntiVir Guard on system
start-up:
Select Yes or No and click Next.
Avira GmbH Avira AntiVir UNIX Server
27
Page 29

Installation
An optional question follows regarding the automatic start of the Internet Update
Daemon on system start-up:
Select Yes or No and click Next.
Finally, a window with the summary of your settings and further information is
displayed:
Click Install.
The program is installed.
GUI only
Choose this option if you wish to install only the GUI.
Select GUI only and click Next.
The GUI is installed in the following directory: /usr/lib/AntiVir
All settings and further instructions appear in a window.
Click Install.
GUI is installed.
28 Avira AntiVir UNIX Server Avira GmbH
Page 30
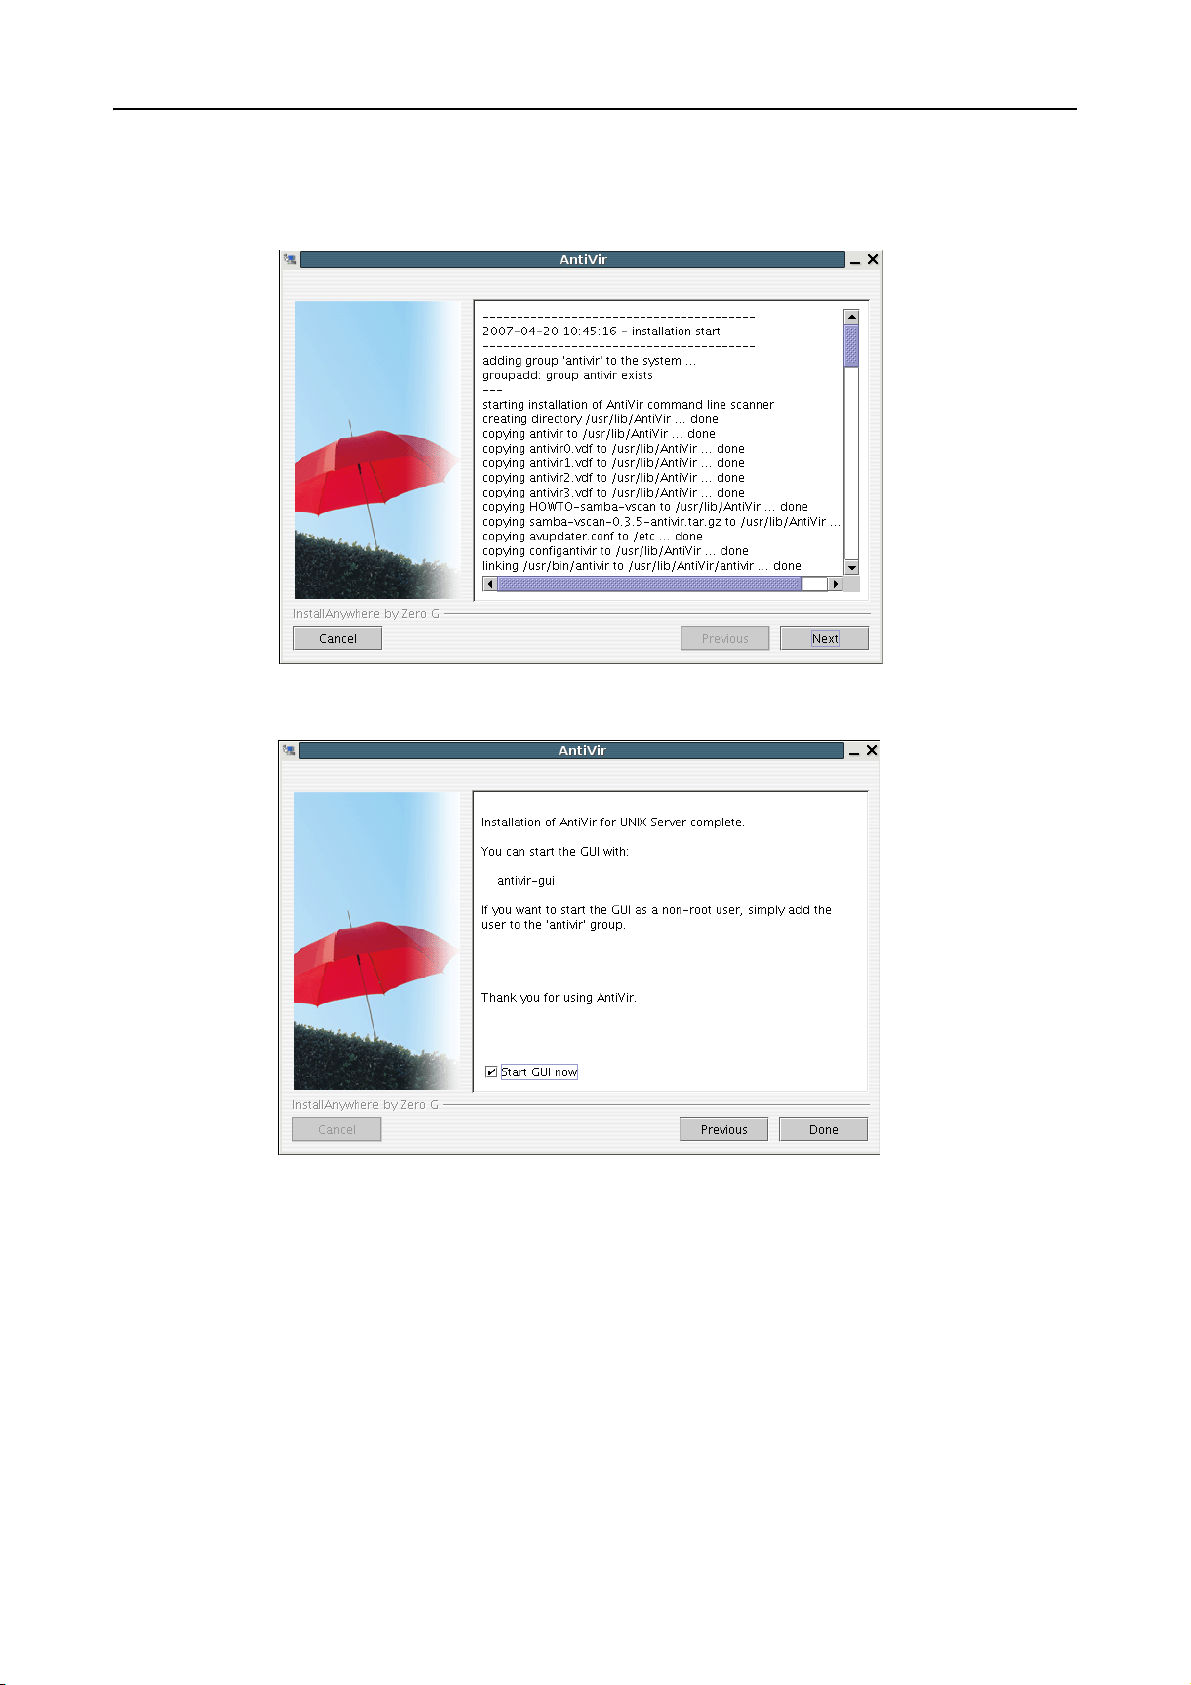
Completing the Installation
According to the installation type you selected, a window will list the performed
installation steps:
Installation
Click Next.
You will see the following window:
If you want to start the GUI directly:
Activate the option Start GUI now and click Done.
The installation is completed.
Avira GmbH Avira AntiVir UNIX Server
29
Page 31

Installation
3.8 Integrating Third-Party Products
Integration in AMaViS
"A Mail Virus Scanner (AMaViS)" project (http://www.amavis.org/) is already prepared
for integration with the AntiVir Scanner. You can either install AMaViS after installing
AntiVir, for automatic detection, or explicitly activate AntiVir support during AMaViS
installation using the option --enable-all or --enable-hbedv for the command
./configure.
Please note that AMaViS uses the Command line scanner and runs it
as a separate process for every message. Unfortunately, this method
is not as efficient as a dedicated email scanner. For an environment
with higher throughput requirements, you should consider
integrating AntiVir MailGate or SAVAPI-based products.
You need a license to integrate the Command line scanner with
AMaViS. This allows you to generate antivirus scan services for other
computers.
30 Avira AntiVir UNIX Server Avira GmbH
Page 32

4 Configuration
You can adjust AntiVir UNIX Server for optimum performance. You can make the main
adjustments immediately after installation. The most common settings are suggested.
You can modify these settings anytime, to adjust the product to your requirements.
After a short overview, you will be guided step by step through the configuration process:
• An overview of the Configuration Files – Page 31.
• The procedure for using the Configuration Script – Page 39
• Specific configurations for AntiVir:
- Configuring AntiVir Samba Scanner – Page 40
- Configuring Regular Updates – Page 43
• Finally Testing AntiVir UNIX Server – Page 48, after completing the configuration.
4.1 Overview
Configuration
Configuration
Files
Configuration
Script
The configuration is defined in four files:
• avguard.conf defines the behavior of the resident AntiVir Guard, as well as logfiles
when detecting viruses and unwanted programs.
• avupdater.conf defines the automatic updates and the logfiles of the software.
• vscan-antivir.conf and avsamba.conf define the behavior of AntiVir Samba Scanner.
The settings can be made directly in the configuration files. This is
not very difficult.
A more convenient way is to use the graphical interface or the script
included in the program kit. These intercept the eventual errors and
restart the necessary processes.
You can use the configuration script configantivir in /usr/lib/AntiVir to edit the settings of
the Internet Updater (They correspond to the settings in avupdater.conf).
4.2 Configuration Files
This part describes the structure of AntiVir UNIX Server configuration files. AntiVir reads
these files on program start-up. It ignores empty lines and commented lines beginning
with #.
The program is provided with default values, which are important for many procedures.
Some options can be deactivated with a # at the beginning of the line (commented) or can
be set with default values. These can be activated by removing the # character or by
changing the values.
Avira GmbH Avira AntiVir UNIX Server
31
Page 33

Configuration
Configuration File avguard.conf
You must restart the Internet Update Daemon and the AntiVir Guard
if you modify any values manually in the configuration files. The
changes only take effect after a restart.
Type:
/usr/lib/AntiVir/avupdater restart
/usr/lib/AntiVir/avguard restart
This section provides a short description of the entries in avguard.conf . The settings
affect only the behavior of AntiVir UNIX Server and no other AntiVir programs. You can
also learn how to make these settings using a graphical user interface in Configuring
AntiVir Guard Using the GUI – Page 72.
Num
Daemons
AccessMask
Number of daemons:
The number of simultaneous AntiVir Guard daemons can be set between 3 and 20. The
default is 3 and it is appropriate for smaller standard computers. For servers with high
traffic, a larger number would be necessary:
NumDaemons 3
If the value is 0, AntiVir Guard is deactivated.
Access mask:
This option sets the access type of AntiVir Guard, when scanning files for viruses or
unwanted programs:
• 1: Scanning a file when opened
• 2: Scanning a file when closed
• 4: Scanning a file when executed
For setting more access types at the same time, you have to add the above values. For
example, to scan files when opened and when closed, the value has to be 3. This is the
default value.
AccessMask 3
Please note that AntiVir Guard is able to react to these situations and
to scan files, only if the kernel module supports these events. Not
every operating system supports all events in every kernel version.
Moreover, some kernel modules offer the possibility to activate or
deactivate certain events. Independent from the use of the other
events, we recommend that you always keep the option Scanning
files when opened activated.
Repair
Concerning
Files
Repairing files:
AntiVir Guard is able to repair files immediately after access. If this fails, access is
blocked. The following option must be active:
RepairConcerningFiles yes
It is deactivated by default.
LogOnly,
Rename...
Move...
Action when detecting viruses or unwanted programs:
If RepairConcerningFiles is not set or repair is not possible, access to the file is
blocked and the action is logged. The following three options define further actions of
AntiVir Guard:
32 Avira AntiVir UNIX Server Avira GmbH
Page 34

Configuration
• LogOnly: no further action
• RenameConcerningFiles: renaming the file by adding the .XXX extension.
• MoveConcerningFilesTo: moving the file to another folder. This folder will be
automatically created if it does not already exist. For example:
MoveConcerningFilesTo /home/unwanted
You can select only one of these options. If more than one is activated, AntiVir applies the
last one selected in the configuration file.
IncludePath
ExcludePath
Scanned directories:
AntiVir Guard scans the files in the specified folders, including their subfolders. Usually,
the data for the different users is in /home. The default setting is:
IncludePath /home
You can specify only one folder in a command line. You can enter more folders by typing
the command for each one. Example:
IncludePath /home
IncludePath /var
If no folder is specified, AntiVir Guard will not scan any files!
Excluded directories:
AntiVir Guard can exclude certain folders when scanning. For example, a folder
containing temporary files of AntiVir components. There is no default setting.
You can specify only one folder in a command line. You can enter more folders by typing
the command for each one. Example:
ExcludePath /home/log
ExcludePath /home/tmp
If you have activated MoveConcerningFilesTo, that folder is
automatically excluded.
ArchiveScan
Scanned archives:
AntiVir Guard scans archives when opened, depending on the setting for
ArchiveMaxSize, ArchiveMaxRecursion and ArchiveMaxRatio. To do this,
you must activate the following option:
ArchiveScan yes
This is deactivated by default in order to maintain the highest possible performance of
AntiVir.
ArchiveMax
Size
Maximum archive size:
This option limits the scanning process to the files with unpacked size smaller than
ArchiveMaxSize (in Bytes). The zero value means no limit. The default setting is 1
Gigabyte (1073741824 Bytes):
ArchiveMaxSize 1073741824
Avira GmbH Avira AntiVir UNIX Server
33
Page 35

Configuration
ArchiveMax
Recursion
Archive
MaxRatio
Archive
MaxCount
Maximum recursion level:
When scanning recursive archives, the level of recursion can be limited. The zero value
means all archives are completely unpacked, regardless of their recursion level. Default:
ArchiveMaxRecursion 20
Maximum compression rate for archives:
This option limits the scanning to files which do not exceed a certain compression level. It
ensures protection against so-called "mail bombs", which occupy an unexpectedly large
amount of memory when decompressed. The zero value means all archives are completely
decompressed, regardless of their compression rate. Default:
ArchiveMaxRatio 150
In order to use the following program function, you need Dazuko
2.0.0 or higher on your system.
Number of files in an archive:
The archive scanning is limited to a given number of files within a recursion level. The
zero value means no limit is set. There is no default setting.
ArchiveMaxCount 0
Detect...
Heuristics
Macro
Heuristics
Level
Detection of other types of unwanted programs:
Besides viruses, there are other types of harmful or unwanted software. You can activate
their detection using the following options. The virus detection is not optional and you
can not deactivate it.
DetectAdspy yes
DetectBDC yes
DetectDial yes
DetectGame no
DetectJoke no
DetectPck no
DetectPhish yes
DetectSPR no
You can use the parameter DetectAllTypes, in order to activate all known categories
with a single entry.
Macrovirus Heuristics:
Activates the heuristics for macroviruses in documents. This option is activated by
default:
HeuristicsMacro yes
Win32-Heuristics:
Sets the detection level of Win32-Heuristics. Available values are 0 (off), 1 (low), 2
(medium) and 3 (high). Default:
HeuristicsLevel 0
ScanMode
Configuring files to be scanned:
This entry sets the procedure to determine whether a file is to be scanned or not. The
available methods are:
• extlist: scan only files with certain extensions;
34 Avira AntiVir UNIX Server Avira GmbH
Page 36

• smart: scan files based on both their name and file type;
• all: always scan files, of all types and names.
The default setting is to scan all files:
ScanMode all
In order to use the following program function, you need Dazuko
2.0.0 or higher.
Configuration
External
Program
Starting External Programs When Suspicious Files Are Found:
AntiVir Guard can start an external program when a virus or an unwanted program is
found. This can send a notification or perform an action using AntiVir Guard options.
It is possible to send an SMS, to call the appointed responsible person, to show a dialog
window on the local screen or on another computer, to save the data in another format or
another file.
You can use macros (preceded by %) to pass the results as arguments to the external
program. Thus the data can be treated differently and adjusted to the local conditions.
The following table shows the supported macros and their significance:
Option Function
%h Path to file (may contain special characters)
%f Filename only (may contain special characters)
%p Full path and filename (such as %h/%f), may contain special
characters
%U UID of file (owner identifier )
%G GID of file (UNIX group identifier)
%s File size
%m File access mode
%De Event type
%DF File system or partition (device) on which the file is located
%Dp PID of the process
%Du UID of the process
%Df Flag of file operation
%Dm Access mode of file operation
%Sn Name of the detected virus / unwanted program
%Sa Extra information (if available)
%St Type of detected virus or unwanted program
%SA Action performed by AntiVir Guard
%Su The user, who carried out the file operation
Avira GmbH Avira AntiVir UNIX Server
35
Page 37

Configuration
Some of these parameters are not checked by AntiVir but are taken
from the file properties and forwarded to the running process, so
they must be checked before further processing.
ExternalProgram /usr/bin/logger -- blocking access to %p (%Sn)
GUISupport
EmailTo
Suppress
Notification
Below
Support via graphical user interface (GUI):
This option must be activated in order for AntiVir to communicate with GUI. You must
enter the following parameters:
GuiSupport yes
GuiCAFile /usr/lib/AntiVir/gui/cert/cacert.pem
GuiCertFile /usr/lib/AntiVir/gui/cert/server.pem
GuiCertPass antivir_default
In the case of missing or invalid parameters, the GUI is not available.
The log file records possible errors.
Email messages:
AntiVir Guard can send emails, when it detects viruses or unwanted programs. There is
no default setting. You must specify a recipient in order to send emails:
EmailTo root@localhost
Filtering email notifications as required:
This option can exclude certain messages, when notifications are sent, according to their
priority level. The recipients will only receive notifications with the selected priority or
higher. The possible priority levels (in ascending order) are Notice, Information,
Warning, Error and Alert. By default, all notifications are sent.
SuppressNotificationBelow Scanner Notice
LogFile
Logfile:
AntiVir logs all important operations via the syslog daemon. It can also create an
additional logfile. There is no default setting. You must enter the full path to the logfile in
order to use this option:
LogFile /var/log/avguard.log
Syslog...
Configuration File avupdater.conf
Syslog settings:
AntiVir sends messages for all important operations to the syslog daemon. You may
specify the facility and priority for these messages. Default is:
SyslogFacility user
SyslogPriority notice
These values apply even if the option is not active.
This section provides a short description of the settings in avupdater.conf. These settings
affect the Internet Updater of the AntiVir software.
Instead of the manual settings, you can use the GUI (if installed) to conveniently edit this
configuration file.
36 Avira AntiVir UNIX Server Avira GmbH
Page 38

Configuration
You must restart the Internet Update Daemon if you modify any
values manually in avupdater.conf. The changes only take effect after a
restart.
Type:
/usr/lib/AntiVir/avupdater restart
EmailTo
Suppress
Notification
Below
LogFile
Syslog...
Email messages:
AntiVir Internet Updater can send emails after performing updates or when problems
occur. There is no default setting. You must specify a recipient in order to send emails:
EmailTo root@localhost
Filtering email notifications as required:
This option can exclude certain messages, when notifications are sent, according to their
priority level. The recipients will only receive notifications with the selected priority or
higher. The possible priority levels (in ascending order) are Notice, Information,
Warning, Error and Alert. By default, all notifications are sent.
SuppressNotificationBelow Updater Notice
Logfile:
AntiVir logs all important operations via the syslog daemon. It can also create an
additional logfile. There is no default setting. You must enter the full path to the logfile in
order to use this option:
LogTo /var/log/avupdater.log
Syslog settings:
AntiVir sends messages for all important operations to the syslog daemon. You may
specify the facility and priority for these messages. Default is:
SyslogFacility user
SyslogPriority notice
AutoUpdate...
HTTPProxy...
These values apply even if the option is not active.
Update scheduler:
The security software can check regularly for updates online using the Internet Update
Daemon and, if necessary, it performs the update. By default, the possible options are
deactivated; so the program does not start any automatic updates. Please activate one of
the update plans (after configuring your HTTP proxy, if necessary) and start the Update
Daemon or set an update job in cron daemon, in order to keep the AntiVir software up to
date.
For updates every 2 hours, you must activate the following option:
AutoUpdateEvery2Hours
For daily updates, activate the option below:
AutoUpdateDaily
In the case of daily updates, you may also set the time for this action, in HH:MM format:
AutoUpdateTime 04:23
Proxy server:
If your computer is connected to the Internet via an HTTP proxy server, you must specify
this so that the automatic Internet Updater functions properly. By default, the settings
are deactivated; a direct connection to the Internet is needed. You must specify:
Avira GmbH Avira AntiVir UNIX Server
37
Page 39

Configuration
•HTTP proxy server
•Port
• Username and password for the HTTP proxy server if necessary.
Example:
HTTPProxyServer proxy.domain.com
HTTPProxyPort 8080
HTTPProxyUsername username
HTTPProxyPassword password
Updater
Keeps
Backups
GnuPG...
UpdateAction
The Internet Updater replaces installed files with newer versions when updates are
available. Even if the program is testing the new files, you might want to keep backups of
earlier versions.
When activating this option, your existing files will be moved to the newly created
subdirectories of /usr/lib/AntiVir, named updater-backup-YYYYmmdd-HHMMSS.
If you activate the backup function of the Internet Updater, you
should check this directory regularly and manually delete old versions
as the size increases.
UpdaterKeepsBackups
GnuPG settings:
The Updater can check the updates for authenticity using GnuPG. For more information,
see Verifying Updates Authenticity with GnuPG – Page 47. If you use GnuPG, you have to
enter the path to GnuPG executable, for example:
GnuPGBinary /usr/local/bin/gpg
You can also add other options using GnuPGOptions, depending on the specific GnuPG
installation. This is usually not necessary. For security reasons, both settings are
deactivated by default.
Setting the type of update actions:
Using this option you can specify how you want to handle other software modules
(mailgate or webgate): disregard them completely, only search for updates or download a
new version, if available. Additional modules are not automatically replaced. In this way
you can always perform a local test of the network services before installing new versions.
For the scan engine and VDF database, the updates are always installed and you can not
deactivate them. The keywords for these actions are none, check or fetch. By default,
the program only performs scanner updates and it does not check for new versions of
other modules:
UpdateAction mailgate none
UpdateAction webgate none
UpdateStoreDir
Storage path for available module updates:
If an update is available for an additional software module and the UpdateAction is
set to fetch (to download the new version on the local storage), the corresponding file is
stored in the directory specified with UpdateStoreDir. The default path is a
subdirectory in the installation directory:
UpdateStoreDir /usr/lib/AntiVir/updcomp
38 Avira AntiVir UNIX Server Avira GmbH
Page 40

Configuration file avsamba.conf
If you have installed the AntiVir Samba Scanner on your file server, you can configure this
module, instead of the on access AntiVir Guard, in the avsamba.conf file. The settings
made in this file apply to all scanner processes connected to the Samba service via sambavscan.
The eventual (AntiVir-specific) settings made in the configuration file vscan-antivir.conf
override the specifications in avsamba.conf. It is however recommended to use the
configuration file vscan-antivir.conf only for Samba or samba-vscan specific settings, while
the settings for AntiVir should be edited in avsamba.conf.
The following keywords can be used in avsamba.conf. Please refer to the section about
Configuration File avguard.conf, for the description of these commands:
EmailTo, Suppress..., LogFile, Syslog..., Detect..., Heur...,
Archive..., Repair..., LogOnly/Rename.../Move..., ScanMode.
4.3 Configuration Script
You can conveniently set up AntiVir Internet Updater using the configuration script,
which is able to intercept possible invalid entries and restart the necessary processes.
The procedure for using the script is very easy. If you want to configure the Internet
Updater:
Type:
/usr/lib/AntiVir/configantivir
The script reads the current settings in avupdater.conf and systematically asks if you want
to enter new values. It displays the possible parameters, while the current ones are shown
as default.
If you want to keep one of the current settings:
Configuration
Press Enter.
If you want to change a setting:
Type the new value and confirm with Enter.
Finally, a summary of the configuration settings is displayed and you have to confirm the
configuration:
AntiVir Configuration
=====================
Here are the configuration settings you have specified. Look them over
to make sure they are correct.
email notification: no
specific logfile: /var/log/avupdater.log
update frequency: every 2 hours (if update daemon is running)
http proxy server: none
available options: y n
Save configuration settings? [y]
If you do not agree with all displayed options:
Type N to restart the configuration script and correct the values.
If all settings correspond to the configuration you require:
Confirm with Y or Enter to save the configuration file with the new values.
Avira GmbH Avira AntiVir UNIX Server
39
Page 41

Configuration
The script reports the saving of the configuration file. It displays information on
handling the Internet Updater:
* SUCCESS *
Configuration successfully saved to.
/etc/avupdater.conf
Press <ENTER> to continue.
Running Internet Update Daemon
==============================
In order for the Internet Update Daemon to be active
...
available options: y n
Would you like to apply the new configuration? [y]
Confirm with Y or Enter to start the Internet Update Daemon.
The Daemon starts. If already running, it will automatically restart in order to
apply the new settings. Then the configuration is complete
Starting AntiVir: avupdater
...
AntiVir Status: avupdater running [ running ]
Here are some commands that you should remember...
configure updater: /usr/lib/AntiVir/configantivir
start update daemon: /usr/lib/AntiVir/avupdater start
stop update daemon: /usr/lib/AntiVir/avupdater stop
update daemon status: /usr/lib/AntiVir/avupdater status
4.4 Configuring AntiVir Samba Scanner
AntiVir Samba Scanner consists of a VFS plug-in for Samba and a Scan Service. To use
AntiVir Samba Scanner, instead of the on access AntiVir Guard, you must install the VFS
plug-in (an AntiVir specific plug-in for samba-vscan software) as described in Integration
on Samba – Page 14.
You have to activate AntiVir VFS Plug-in for the monitored shares in the Samba Service
configuration file smb.conf. The specification of a configuration file is optional. The new
entries to be made are, for example:
[myshare]
...
vfs object = vscan-antivir
vscan-antivir: config-file =
/usr/local/samba/lib/vscan-antivir.conf
Your distributor may have already carried out this step or you could use a configuration
interface to do this.
You can activate the scanner for single shares or for the entire server by making the
specific entries in the [global] section of the smb.conf file.
40 Avira AntiVir UNIX Server Avira GmbH
Page 42

You may operate single shares using separate configuration files or you can use the same
configuration file for all scanners at once. If no configuration file is specified for the
scanner, it will be used in the default configuration.
Configuration file vscan-antivir.conf
The entries in vscan-antivir.conf are described in more detail in the order of their
appearance. They can be roughly divided into two categories:
• samba-vscan options, which can be similarly supported by all Backends;
• AntiVir-specific options, which operate specific functions of this Backend.
It is recommended to make only settings specific to samba-vscan in the configuration file
vscan-antivir.conf, while the settings for AntiVir should be made in avsamba.conf. Not all
relevant settings for the AntiVir Samba Scanner can be made in the configuration file
vscan-antivir.conf, as some key-words might not be integrated (yet).
Configuration
max file size
verbose file
logging
scan on open/
scan on close
deny access on
error/
deny access on
minor error
Maximum file size:
samba-vscan can skip files when scanning if they exceed a certain size. If the option is set
to 0 (default), all files are scanned.
max file size = 0
Logging file access:
samba-vscan can report every file access in a log (if this option is set to yes) or it can
report only the access to files in which it detects a virus or unwanted program (no). The
default is no.
verbose file logging = no
Scanning files when opened and/or closed:
samba-vscan scans files for various events when opened and/or closed (Default: both
cases).
scan on open = yes
scan on close = yes
Denying access to files:
samba-vscan can deny access not only when it finds a virus or unwanted program in a file,
but also when an error occurs during file processing. This option can be set for different
error levels:
If the Scanner itself is not available, this is considered an error.
If the Scanner, although available, cannot scan files, this is considered a minor error.
As this situation allows malware to infiltrate the system, access is blocked by default for
this case.
deny access on error = yes
deny access on minor error = yes
send warning
message
Notifying file access denial:
samba-vscan can notify remote users of a fileserver every time access is blocked, using
pop-ups (Default: yes).
send warning message = yes
concerning file
action (infected
file action)
File actions:
Apart from blocking the access to concerning files, samba-vscan is also able to perform
further actions:
Avira GmbH Avira AntiVir UNIX Server
41
Page 43

Configuration
• Delete the file
• Move the file to a quarantine directory
The values for this option are nothing (default), delete and quarantine.
Please note that the term "infected" is incorrect when used for other
unwanted software detected as viruses. Not all findings are infected
with a virus, but they may have a different cause. Therefore, for
compatibility reasons, the option infected file action has
been replaced in the newer versions with concerning file
action. You should also use this term in the notification texts for
affected users.
concerning file action = quarantine
quarantine
directory,
quarantine
prefix
max lru files
entries, lru file
entry lifetime
exclude file
types
Quarantine directory and prefix:
If you activate the option to move concerning files to quarantine, when a virus or
unwanted program is detected, you can now specify the directory for the quarantine and
the prefix to apply to file names. You have to adapt the settings to your system
requirements. If the moving reaction fails, the concerning files are deleted by the bulk
memory.
quarantine directory = /tmp
quarantine prefix = vir-
Recently scanned files:
samba-vscan creates a list with the recently scanned files to ensure a fast reaction to
successive file access and to save scan resources. With these settings you can configure
the memory for the last recently used (LRU) files. Default: 100 entries, for up to 5
seconds.
max lru files entries = 100
lru file entry lifetime = 5
Excluding files from scanning:
samba-vscan can exclude certain file types from scanning, classifying the files by the
MIME type. You should use this option with great care!
By default the list is empty, so there are no excluded file types.
exclude file types =
antivir program
name
Path for AntiVir program:
The VFS Plug-in serves as an interface between Samba and the Scan Service. The "antivir"
program has been integrated for the AntiVir Scanner. This option tells the plug-in where
to find the "antivir" program. Default:
antivir program name = /usr/lib/AntiVir/antivir
options for
archives
Checking archives:
AntiVir Samba Scanner is also able to scan within archives if the option antivir scan
in archive is set to yes. However, there are limits and archives are skipped when
they exceed these parameters (maximum compression ratio, maximum contents size,
42 Avira AntiVir UNIX Server Avira GmbH
Page 44

Configuration
maximum recursion level). If one of these values is 0, the limit does not apply, so it is
"infinite".
antivir scan in archive = no
antivir max ratio in archive = 150
antivir max archived file size = 1073741824
antivir max recursion level = 5
antivir detect ...
Detecting unwanted software:
AntiVir Samba Scanner always scans for viruses in assigned files. It can also detect other
types of unwanted software if you activate the appropriate option (set it to yes).
Please note that even if the access to a file is blocked by the option
concerning file action, it is not necessarily infected by a
virus. By default, the Scanner searches only for viruses.
antivir detect dialer = no
antivir detect game = no
antivir detect joke = no
antivir detect pms = no
antivir detect spy = no
It is also possible to activate all detection types with a single option:
antivir detect alltypes. If set to yes, all the above detect options are
considered activated.
4.5 Configuring Regular Updates
The performance and effectiveness of antivirus software depend on updating. This is why
AntiVir offers the possibility to download current updates via HTTP from the AntiVir
webservers and even to schedule them automatically at regular intervals.
These updates ensure that AntiVir components, which provide security against viruses
and unwanted programs, are always kept up to date.
All update processes use AntiVir Command line scanner. The command
antivir --update
enables the update of AntiVir software at any time (see Updating AntiVir Manually –
Page 55).
There are two methods to configure AntiVir updates:
• You can use the Internet Update Daemon provided with AntiVir, which is easy to
configure. This is recommended if you have little UNIX knowledge and if you only
want to make small adjustments.
• You may use AntiVir with cron daemon. This is recommended if you have extensive
UNIX knowledge. You have to carry out configuration yourself, but it gives you more
flexibility.
Avira GmbH Avira AntiVir UNIX Server
43
Page 45

Configuration
Configuring Internet Connection for Updates
3 Check that your Internet connection is functioning correctly. In most cases, the
connection is already configured. If not, refer to your UNIX documentation for the
information you need.
Proxyserver
If your AntiVir UNIX Server computer is connected to the Internet via HTTP proxy
server, you must make the necessary settings for AntiVir:
Run configantivir:
/usr/lib/AntiVir/configantivir
Confirm all settings with Enter until you reach the proxy server option:
HTTPProxyServer/HTTPProxyPort (4 of 4)
=============================
If this machine is sitting behind an HTTP proxy server, you will need to
configure AntiVir with the appropriate proxy settings. Internet access
is required in order to make updates.
available options: y n
Does this machine use an HTTP proxy server? [n]
Type Y.
You are then asked for the name and the port of the proxy server. Type the data:
What is the HTTP proxy server name? [] proxy.domain.tld
Which port number does the HTTP proxy server use? [] 3128
Then you are asked if you need a username and password for the proxy server:
HTTPProxyUsername/HTTPProxyPassword (4-2 of 4)
===================================
Proxy servers may be configured to require a username and password. If
the HTTP proxy server for this machine requires a username and password
AntiVir needs to be appropriately configured.
available options: y n
Does the HTTP proxy server require a username/password? [n]
If this is the case:
Type Y.
Then you are asked for the username and password.
Enter the username and password.
The configuration script displays the configuration summary and asks for
confirmation, to write the configuration file.
The Internet update connection is now configured.
44 Avira AntiVir UNIX Server Avira GmbH
Page 46

Configuring Automatic Updates through Internet Update Daemon
The Internet Update Daemon is a very simple service which performs the following
command at fixed intervals:
antivir --update
To enable the following settings, you must first install the Internet
Updater i.e. if you have installed AntiVir UNIX Server with Update
Daemon as described in Installing AntiVir – Page 16. Otherwise you
have to run the installation script again, see Reinstalling AntiVir –
Page 22.
You can define the following settings:
• Update intervals. It is possible to:
- update every two hours
- update daily
• Time settings for updates (for daily updates). You can:
- set the time yourself;
- choose a random time set. In this case, the script will chose a time, which will
remain set for every day. It is therefore important for the computer to be
permanently online.
Configuration
Run configantivir:
/usr/lib/AntiVir/configantivir
Confirm every setting with Enter, until you reach the question about update
frequency:
AutoUpdateEvery2Hours/AutoUpdateDaily (3 of 4)
=====================================
AntiVir is equipped with an Internet Update Daemon. At specified
intervals, AntiVir will connect to an update server to check for newer
versions of the AntiVir engine or the data files. If a newer
version is available, AntiVir will automatically download and install
the updates without requiring any special attention. This allows AntiVir
to be kept current against attacks and problems.
AntiVir can be configured to check for updates every 2 hours (2) or
once a day (d). You can also choose to disable the Internet Update
Daemon (n).
Note: Updates can also be done manually from the command line:
antivir --update
You may prefer to disable the Internet Update Daemon and
instead perform regular updates using a cron(8) job.
Using the startup script for the Internet Update Daemon when
it is disabled will result in an error.
available options: 2 d n
How often should AntiVir check for updates? [2]
Type:
- n if you do not want automatic updates
- 2 for updates every two hours
- d for daily updates
Avira GmbH Avira AntiVir UNIX Server
45
Page 47

Configuration
If you decide on daily updates, you must then set the time:
AutoUpdateTime (3-2 of 4)
==============
The AntiVir Updater can be set to always check for updates at a
particular time of day. This is specified in a HH:MM format
(where HH is the hour and MM is the minutes). If you do not have a
permanent connection, you may set it to a time when you are usually
online. You may also let AntiVir choose a random time (r).
If you have a permanent connection then a random time may be preferred
because it will help to disperse the times when other users are
getting updates.
available options: HH:MM r
What time should updates be done? [RANDOM]
Type the time in HH:MM format.
– OR –
Type r for random time.
Confirm all remaining settings with Enter.
The automatic updates are now configured. The Internet Updater will start
automatically (if not yet performed) or is restarted (if already active).
Starting and Stopping Internet Update Daemon Manually
If you want to start the Internet Update Daemon manually:
Type:
/usr/lib/AntiVir/avupdater start
If you want to stop the Internet Update Daemon manually:
Type:
/usr/lib/AntiVir/avupdater stop
If you want to check the current status of the Internet Update Daemon:
Type:
/usr/lib/AntiVir/avupdater status
Performing Cron Updates
Performing updates with cron is recommended!
If you are an experienced UNIX user, you can use cron daemon to perform automatic
AntiVir updates.
Cron daemon is used to run regular recurring system processes. For more details, refer to
your UNIX documentation.
Using cron for updates, you have more configuration possibilities than with the Internet
Update Daemon.
Example:
Enter the following cron job in /etc/crontab:
45 */2 * * * root /usr/lib/AntiVir/antivir --update -q
46 Avira AntiVir UNIX Server Avira GmbH
Page 48

This command activates updates every 2 hours, but performs them 15 minutes
ahead of the set time: 0:45, 2:45, 4:45 and so on. The -q parameter states that no
report will be given, see Options – Page 49
Starting Internet Update Daemon Automatically
It is important that the Internet Update Daemon starts automatically on every system
start-up. If you have performed the installation as described in Installing AntiVir –
Page 16, your system is correctly set.
If Internet Update Daemon has not yet been automatically activated on system start-up:
Reinstall AntiVir with the necessary settings (see Reinstalling AntiVir – Page 22).
Verifying Updates Authenticity with GnuPG
GnuPG is a free alternative to the encryption program PGP (Pretty Good Privacy). Using
GnuPG you can verify the authenticity of the AntiVir Updates.
It is highly recommended to use GnuPG.
However, this procedure requires intensive knowledge of UNIX and
GnuPG. In the event of configuration errors, there is a danger of
deactivating AntiVir updates.
These steps must be performed by a user who runs updates on the
computer. Usually it is the user with administrator rights.
You can find more information on GnuPG at http://www.gnupg.org
Configuration
The following steps guide you to activate GnuPG support.
Download GnuPG from the website http://www.gnupg.org. Here you can also find
the manual with further information on GnuPG and its features.
Generate your own PGP key pair, as described in the documentation.
Import the AntiVir public PGP key to your key-ring:
gpg --import antivir.gpg
– OR –
Import the AntiVir public key directly from the key server:
gpg --keyserver=wwwkeys.pgp.net --recv-keys 0F821C2E
Display the fingerprint of the key to check that it really is the AntiVir PGP key:
gpg --fingerprint build@avira.com
The 40-character fingerprint is displayed.
Check whether the fingerprint corresponds with the one on the AntiVir website
(http://www.avira.com).
Sign the AntiVir public key in order to certify its validity:
gpg --sign-key build@avira.com
Change to /bin subdirectory of the AntiVir installation directory (example):
cd /tmp/antivir-server-prof-<version>/bin
Here you can find the files antivir and antivir.asc.
Check the signature with
gpg --verify antivir.asc antivir
If you do not get any error message, you can use GnuPG for AntiVir updates.
Activate GnuPG for AntiVir. In /etc/avupdater.conf enter the path to GnuPG binaries,
using the option GnuPGBinary:
Avira GmbH Avira AntiVir UNIX Server
47
Page 49

Configuration
GnuPGBinary /usr/local/bin/gpg
You can only edit this option in avupdater.conf manually. Setting in
the configuration script is not possible, in order to avoid the danger
of configuration errors.
Restart Internet Update Daemon to activate the new settings in avupdater.conf:
/usr/lib/AntiVir/avupdater restart
From now on, GnuPG authenticates the updates.
4.6 Testing AntiVir UNIX Server
After completing the installation and configuration, you can test the functionality of
AntiVir UNIX Server using a test virus. This will not cause any damage, but it will force
the security program to react when the computer is scanned.
Testing AntiVir with a Test-Virus
Type the following URL in your Web browser http://www.eicar.org.
Read the information about the test virus eicar.com.
Download the test virus to your computer.
According to the AntiVir configuration and eicar version, AntiVir Guard will
immediately block the download and it will issue an alert message.
Try to access the file, for example by copying it:
cp eicar.com eicar.com.txt
According to the AntiVir configuration and eicar version, AntiVir Guard will
immediately block access and take any necessary action, such as rename or move
the file.
Scanning for Possible Errors
If you notice that AntiVir Guard does not display the expected messages or does not take
the relevant action, you have to check the configuration.
Check whether AntiVir Guard is running. Type:
/usr/lib/AntiVir/avguard status
Start AntiVir Guard if necessary.
Check whether the directory in which you are currently working is included in the
monitored list, in /etc/avguard.conf (see Configuration File avguard.conf – Page 32)
Check the value of AccessMask in /etc/avguard.conf. If the value is 0, then AntiVir
Guard is deactivated.
Check the messages in the logfile of AntiVir Guard or in syslog in order to isolate
errors.
48 Avira AntiVir UNIX Server Avira GmbH
Page 50

5Operation
After concluding installation and configuration, AntiVir guarantees continuous scanning
on your system. During operation, there may be the need for occasional changes in
Configuration – Page 31.
Nevertheless, a manual scan for viruses or unwanted programs might be needed. This is
where you can use AntiVir Command line scanner. This program enables scanning for
many specific targets.
AntiVir Command line scanner can be integrated into scripts and also regularly activated
by cron jobs. Users familiar with UNIX have various possibilities available to set optimum
monitoring of their systems.
This Chapter has the following structure:
• Overview of AntiVir Command Line Scanner – Page 49 summarizes all options for the
Command line scanner.
• Using AntiVir Command Line Scanner – Page 53 describes some examples of working
with the Command line scanner.
• Reaction to Detecting Viruses/ Unwanted Programs – Page 56 gives you some hints
on how to react when AntiVir has done its work.
Operation
5.1 Overview of AntiVir Command Line Scanner
Start
AntiVir Command line scanner starts with
/usr/lib/AntiVir/antivir [-option] [directory [...]]
If you have created a link in /usr/bin during installation, the following is sufficient:
antivir [-option] [directory [...]]
If you have not specified any directory, it scans only the current directory.
If you want to scan certain files in a directory, the syntax is:
antivir [-option] [directory][filename]
Options
You can use the following options for the command line scanner, in various
combinations:
Option Function
--allfiles Short for --scan-mode=all
Please use the option --scan-mode=
--alltypes Short for --with-alltypes
Please use the option --with-<type>
--archive-maxcount=N
--archive-max-
size=N
Avira GmbH Avira AntiVir UNIX Server
Excludes archived files from scanning, when they exceed the
limit of file numbers on recursion level.
Excludes archived files, if their unpacked size exceeds the
given value.
49
Page 51

Operation
Option Function
--archive-max-
ratio=N
--archive-max-
recursion=N
-C <filename> Name of the configuration file to be used for the Updater.
--check Used with --update: AntiVir checks for available updates.
-del When a virus/unwanted program is detected, infected files
-dmdas Deletes all macros in a document, if one is suspicious.
-dmdel Deletes documents with suspicious macros.
-dmse Sets the exit code to 101, when a macro is found.
-e Affected files are repaired (if possible). It can be used with:
Excludes archived files, if their compression ratio exceeds
the given value.
Excludes archived files, if their recursion level exceeds the
given value.
Default: /etc/avupdater.conf
In case of available updates, it issues a message, but it does
not perform the update.
are deleted.
-del, to delete the file,
-ren, to rename the file,
--moveto=, to move the file to Quarantine directory, if it
could not be repaired.
--exclude=<name> Does not scan the specified directory or file. It does not
support wildcards, but you can use it repeatedly.
--help Shows all possible options.
--heur-macro Activates Heuristics for macroviruses in documents.
--heur-nomacro Deactivates Heuristics for macroviruses in documents.
--heur-level=N Sets the detection level for Win32 files.
Level 0: off
Level 1: low
Level 2: medium
Level 3: high
--home-dir=<dir> AntiVir searches in <dir> for its own files (for example
avira.vdf).
--info AntiVir shows the list of all known viruses, Malware and
unwanted programs.
-lang:DE
-lang:EN
--log-email=
<addr>
AntiVir generates German or English messages. It usually
detects the language set on your system automatically.
Sends a scan report to the specified email address (in
addition to results displayed on the screen).
--moveto=<dir>
Moves affected files to the specified directory (the so-called
Quarantine).
50 Avira AntiVir UNIX Server Avira GmbH
Page 52

Operation
Option Function
-noboot The boot sector test is deactivated. This saves time in
targeted scan operations, but otherwise it is not
recommended.
-nobreak Deactivates Ctrl+C and Ctrl+Break. This avoids interruption
from a user.
-nolnk Ignores symbolic links.
-nombr Master boot sector test is deactivated. This saves time in
targeted scan operations, but it is not otherwise
recommended.
-once AntiVir scans once a day only: this option checks if AntiVir
already ran on that day. If it has been executed, the scanning
is aborted and a message is issued.
-onefs Ignores links to other file systems. This excludes folders (for
example NFS folders) from scanning.
-q "Quiet": AntiVir suppresses all messages.
-r1 Only viruses, unwanted programs and warnings are logged.
-r2 In addition to -r1, all scanned paths are logged.
-r3 All scanned files are logged.
-r4 Detailed messages are logged.
-ra The log messages are appended to an existing log file.
-ren Infected files are renamed when a virus/unwanted program
is detected.
-rf<filename> Creating the logfile with the given <filename>. In
<filename> you can use the following macros:
-%d: day
-%m: month
-%y: year
-ro Overwrites logfile.
-rs Messages about viruses or unwanted programs are output
individually.
-s Scans all subdirectories.
--scan-in-archive Also scans within packed archives.
--scan-in-mbox Also scans the mailbox directory.
--scan-mode=<mode>
--temp=<dir> AntiVir keeps its temporary files in <dir>.
Avira GmbH Avira AntiVir UNIX Server
Sets the procedure for scanning a file. <mode> can be all,
smart or extlist.
smart is the default for on demand scanner.
51
Page 53

Operation
Option Function
--update AntiVir performs an update, to keep the virus definition file
(VDF) and programs up to date.
-v Performs an intensive scanning on all files and even issues
error messages. This option should be used in exceptional
cases only, as for example after a virus detection/removal.
--version Shows AntiVir’s version.
Exit Codes
AntiVir command line scanner issues exit codes after operation. UNIX users can include
them in scripts.
--warnings-as-
alerts
--with-<type> Activates detection of unwanted programs, which are not
--without-<type> Deactivates the detection of certain types of malware (see
-z Corresponds to --scan-in-archive.
@<rspfile> AntiVir reads parameters from "response file"
Treats non-fatal situations as serious errors. Terminates the
program when getting warnings, with the same exit code as
the one issued for virus detection.
viruses. <type> can be adspy, bdc, dial, game,
heur-dblext, joke, pck, phish or spr. You can use
this option more than once. The option --alltypes
activates the detection of all types.
above).
Please use --scan-in-archive.
<rspfile>. In <rspfile> every option must be on a
separate line. This allows you to save a combination of
parameters as a file for later use.
Exit Code Meaning
0 Normal program termination: no virus/unwanted program, no
error.
1 Virus/ unwanted program detected in file or boot sector.
2Virus/ unwanted program detected in memory.
3 Virus/unwanted program detected in file or boot sector, using
heuristics.
100 AntiVir displays only the help text.
101 Macro detected in a file (when -dmse option is used).
102 AntiVir does not start, because the parameter -once was used
and the program has already run that day.
200 Program aborted; not enough memory.
201 The specified response file was not found.
52 Avira AntiVir UNIX Server Avira GmbH
Page 54

Operation
Exit Code Meaning
202 The specified response file contains another @<rsp> directive.
203 Invalid parameter.
204 Invalid directory.
205 The specified log file could not be created.
210 AntiVir could not find a required library.
211 Program stopped, because self check failed.
212 Could not read avira.vdf file.
213 Initialization error.
214 License key not found.
AntiVir command line scanner has other exit codes when used with --update:
Exit Code Meaning
0No update available.
1 AntiVir was successfully updated (when --check is activated,
it only reports that an update is available).
>=2 Update failure.
5.2 Using AntiVir Command Line Scanner
This paragraph shows examples of using the command line scanner.
When AntiVir Guard is active, using AntiVir Command line scanner causes double file
scanning:
• With AntiVir Guard, if the file is opened with AntiVir Command line scanner.
• With AntiVir Command line scanner itself.
In order to avoid disturbance, you should first deactivate AntiVir Guard:
/usr/lib/AntiVir/avguard stop
In addition, remember to restart it after scanning:
/usr/lib/AntiVir/avguard start
Performing Complete Scan
After installation, it is important to perform a complete scan of the system.
The following parameters should be used:
--scan-mode=all Scans all files.
--with-alltypes Detects all sorts of suspicious and unwanted files.
-s Scans all subfolders.
--scan-in-archive Scans packed files, too.
Avira GmbH Avira AntiVir UNIX Server
53
Page 55

Operation
The command is:
antivir --scan-mode=all --with-alltypes -s --scan-inarchive /
Performing Partial Scan
Usually, scanning the directories that contain incoming and outgoing data (mailbox,
Internet, text folders) may be sufficient. These files are usually in /var.
If you have any DOS partitions on your UNIX system, you also have to scan them.
You can use the following parameters:
--scan-mode=all Scans all files.
-s Scans all subfolders.
--scan-in-archive Scans packed files, too.
If your DOS partitions are in /mnt and the incoming and outgoing files are in /var:
Use the command:
antivir
--scan-mode=all -s --scan-in-archive /var /mnt
Deleting Infected Files
AntiVir can delete files which contain viruses or unwanted programs. Optionally, AntiVir
can first try to repair these files.
The program will first overwrite the files and then delete them; i.e. repairing tools will not
recover them.
You can use the following options:
--scan-mode=all Scans all files.
-del Deletes infected files.
-e -del Tries to repair the infected files and deletes the ones it could
Examples
If you want to delete all infected files from /home/myhome:
Type the command:
antivir --scan-mode=all -del /home/myhome
If you want to repair infected files from /home/myhome and to delete the files that could
not be repaired:
not repair.
In the following examples, files are transformed or deleted. Therefore
important data may be lost!
Type the command:
antivir --scan-mode=all -e -del /home/myhome
54 Avira AntiVir UNIX Server Avira GmbH
Page 56

Running AntiVir When Installed in Other Directory Than /usr/lib/AntiVir
AntiVir requires information on its installation directory for the self-test if not installed
in /usr/lib/AntiVir.
If AntiVir is installed, for example in /usr/local/AntiVir:
Type:
antivir --home-dir=/usr/local/AntiVir
Updating AntiVir Manually
You can update AntiVir manually at any time.
It is recommended to run AntiVir as root during updates.
Advantage: other running processes of AntiVir daemons (such as AntiVir Guard, SAVAPI
server processes, AntiVir MailGate) will be automatically updated with the new security
files without interrupting the scanning process. Thus it ensures that all files are scanned.
If AntiVir is not started as root during updating, it will not have the necessary
permissions for restarting AntiVir daemons. Consequently, you need to restart manually
as root.
If you want to update AntiVir:
Operation
Type:
/usr/lib/AntiVir/antivir --update
If you only want to check for a new AntiVir update without performing it:
Type:
/usr/lib/AntiVir/antivir --update --check
Updating AntiVir Using a Script
Advanced UNIX users can integrate the AntiVir Command line scanner in a script and use
the Exit Codes – Page 52.
Example
Write a script like the one below, to suppress AntiVir messages and to replace them
with your own:
------------------ BEGIN SCRIPT ------------------#!/bin/sh
/usr/lib/AntiVir/antivir --update -q
case $? in
0)
echo "AntiVir is up-to-date"
;;
1)
echo "AntiVir has been updated"
;;
*)
echo "An error occured during update"
;;
esac
------------------- END SCRIPT --------------------
Avira GmbH Avira AntiVir UNIX Server
55
Page 57

Operation
5.3 Reaction to Detecting Viruses/ Unwanted Programs
If correctly configured, AntiVir is set to deal automatically with all the tasks on your
computer:
• The infected file is repaired or at least deleted.
• If it could not be repaired, access to the file is blocked and, according to the
configuration, the file is renamed or moved. This eliminates all virus actions.
You should do the following:
Try to detect the way the virus / unwanted program infiltrated your system.
Perform targeted scanning on the data storage supports you used.
Inform your team, superiors or partners.
Inform your system administrator and security provider.
Submit Infected Files to Avira GmbH
Please send us the viruses, unwanted programs and suspicious files that our product
does not yet recognize or detect and also any suspicious files. Send us the virus or
unwanted program packed in a password-protected archive (PGP, gzip, WinZIP,
PKZip, Arj) attached to an email message to virus@avira.com.
When packing, use the password virus. This way the file will not be
deleted by virus scanners on the email gateway.
56 Avira AntiVir UNIX Server Avira GmbH
Page 58

6 Graphical User Interface (GUI)
6.1 Overview
The graphical user interface (GUI) assists you in operating and configuring AntiVir UNIX
Server and it graphically displays the monitoring process. AntiVir UNIX Server is fully
functional and configurable even without GUI. The interface is an independent
application which can start and stop without influencing the AntiVir UNIX Server.
You need Sun Java 1.4.0 or higher to use the GUI.
Graphical User Interface (GUI)
Permissions
Starting
Communi-
cation
You do not need root permissions to use the program with GUI as a normal user.
However, you must belong to the "antivir" group, created during the installation.
Type (as root):
/usr/sbin/usermod -G group1,group2,group3,antivir username
group1 - group3 are the groups to which the user belongs,
username is the name of the user.
To set the groups for a user:
Type:
/usr/bin/groups
Start the GUI:
antivir-gui
If this command does not detect the Java installation:
Create a soft link in /usr/bin (as root):
ln -s /PATH/TO/JAVA/INSTALLATION/bin/java /usr/bin
GUI communicates with AntiVir UNIX Server via SSL over the loopback network
interface. You must specify the following parameters in the configuration file
avguard.conf:
GuiSupport yes
GuiCAFile /usr/lib/AntiVir/gui/cert/cacert.pem
GuiCertFile /usr/lib/AntiVir/gui/cert/server.pem
GuiCertPass antivir_default
If these parameters are missing or invalid, the GUI is not available.
Any errors are recorded in the logfile.
More products
Problems
Avira GmbH Avira AntiVir UNIX Server
If more AntiVir products are installed on the computer, GUI displays them in separate
tabs. Thus you can easily monitor and configure every product. Depending on the tab you
click, the GUI displays its own menus and options.
Check the following requirements, if you encounter problems using the GUI:
• AntiVir UNIX Server must be installed in /usr/lib/AntiVir.
• You must have a valid license for the AntiVir UNIX Server
(antivir --version).
57
Page 59

Graphical User Interface (GUI)
• The parameter GuiSupport must be set in avguard.conf.
• The user must belong to the "antivir" group.
If these requirements are not met, an error message appears:
AntiVir UNIX Server is not available on the computer.
6.2 AntiVir Scanner
6.2.1 Operating AntiVir Scanner Using the GUI
You can conveniently configure and perform scanning processes using the AntiVir for
UNIX Framework.
Starting Scanner GUI
Start the GUI:
/usr/lib/AntiVir/antivir-gui
The GUI appears, displaying the Folders view.
Buttons
Click to start the Scanning process, with graphical display.
Click to view the Logfile of the scanning process.
Click to open the Configuration window.
58 Avira AntiVir UNIX Server Avira GmbH
Page 60
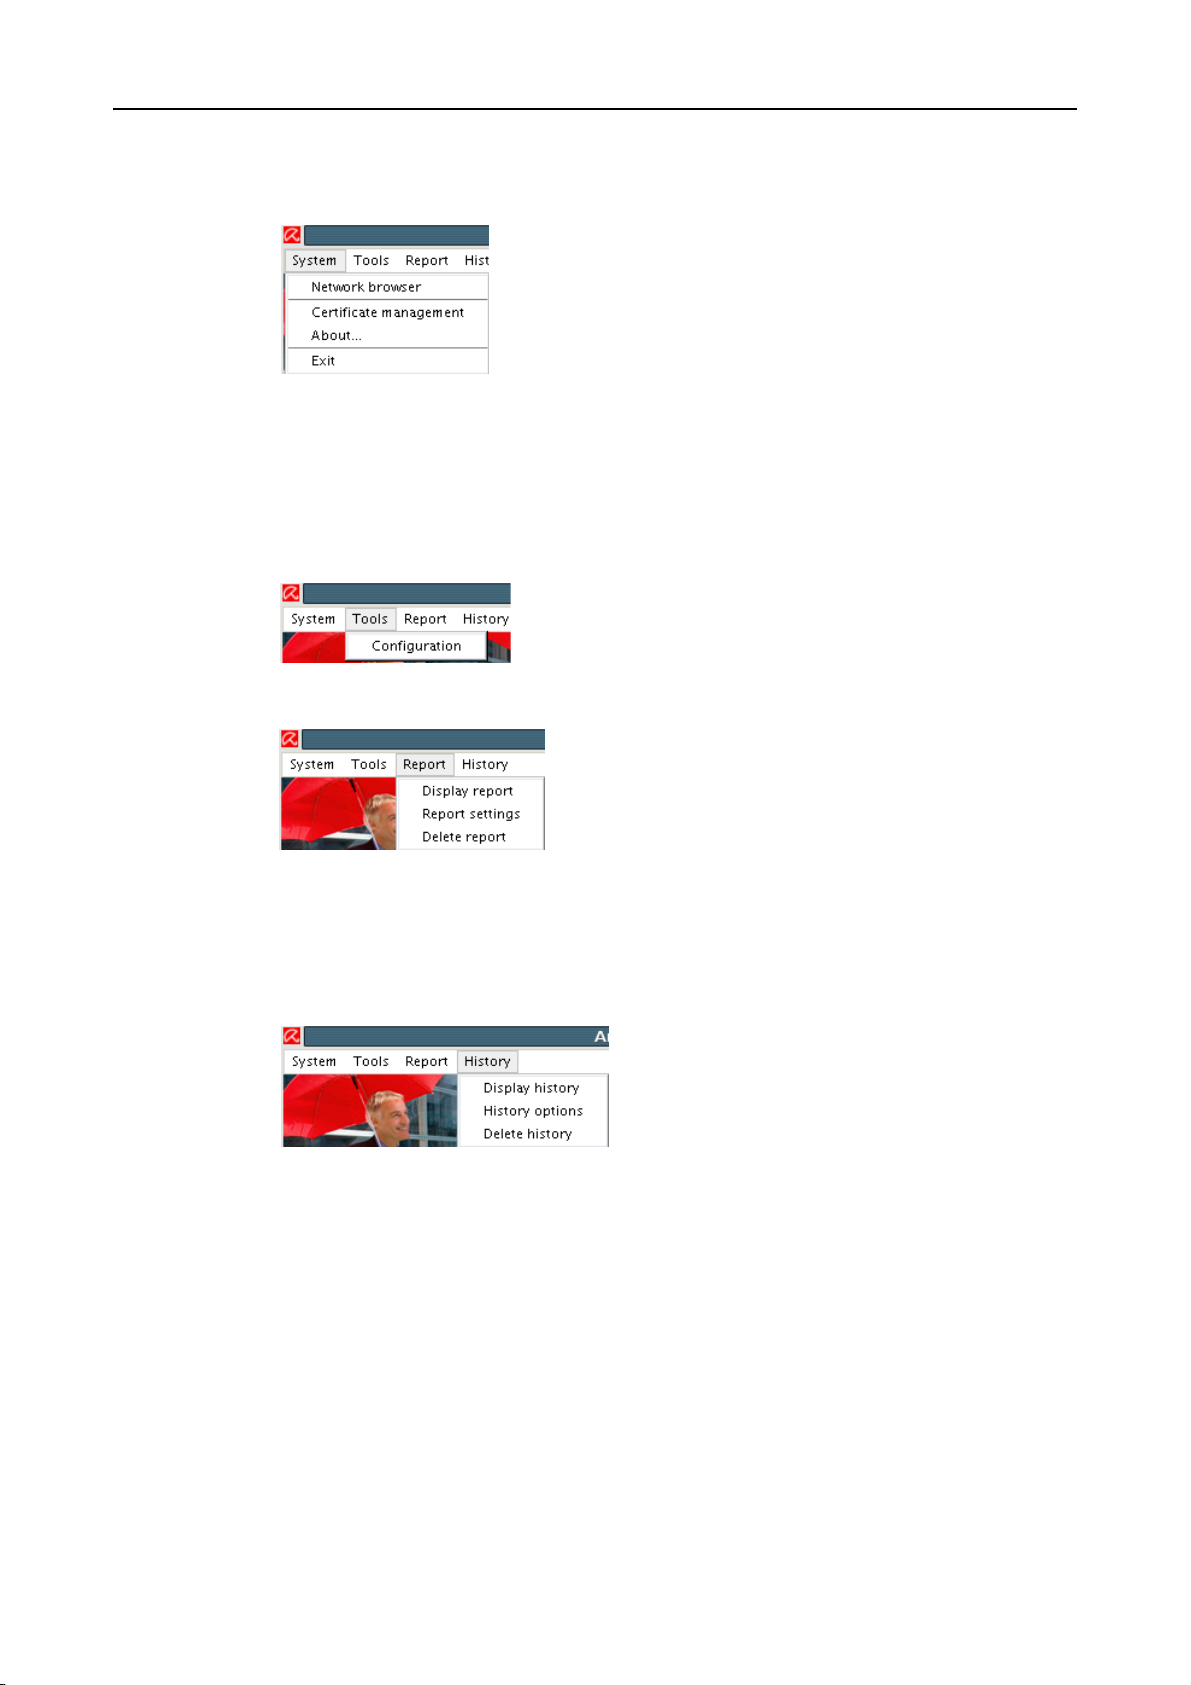
Menus
System
Tools
Graphical User Interface (GUI)
• Network browser: to select another computer in the network on which AntiVir GUI
runs.
• Certificate management: to manage integrated certificates of the other computers
in the network.
• About...: displays Product information and Support information
• Exit: closes GUI. It does not stop AntiVir UNIX Server.
Report
History
• Configuration: to open the configuration window.
• Display report: to display the report file in a window (avscanner.log).
• Report settings: to open the configuration window for the report settings.
• Delete report: to delete the report file (given in the Report settings configuration
window).
• Display history: to open the history window, with AntiVir actions reports.
• History options: to open the configuration window for the history settings.
• Delete history: to delete the Scanner actions reported in history.
Avira GmbH Avira AntiVir UNIX Server
59
Page 61
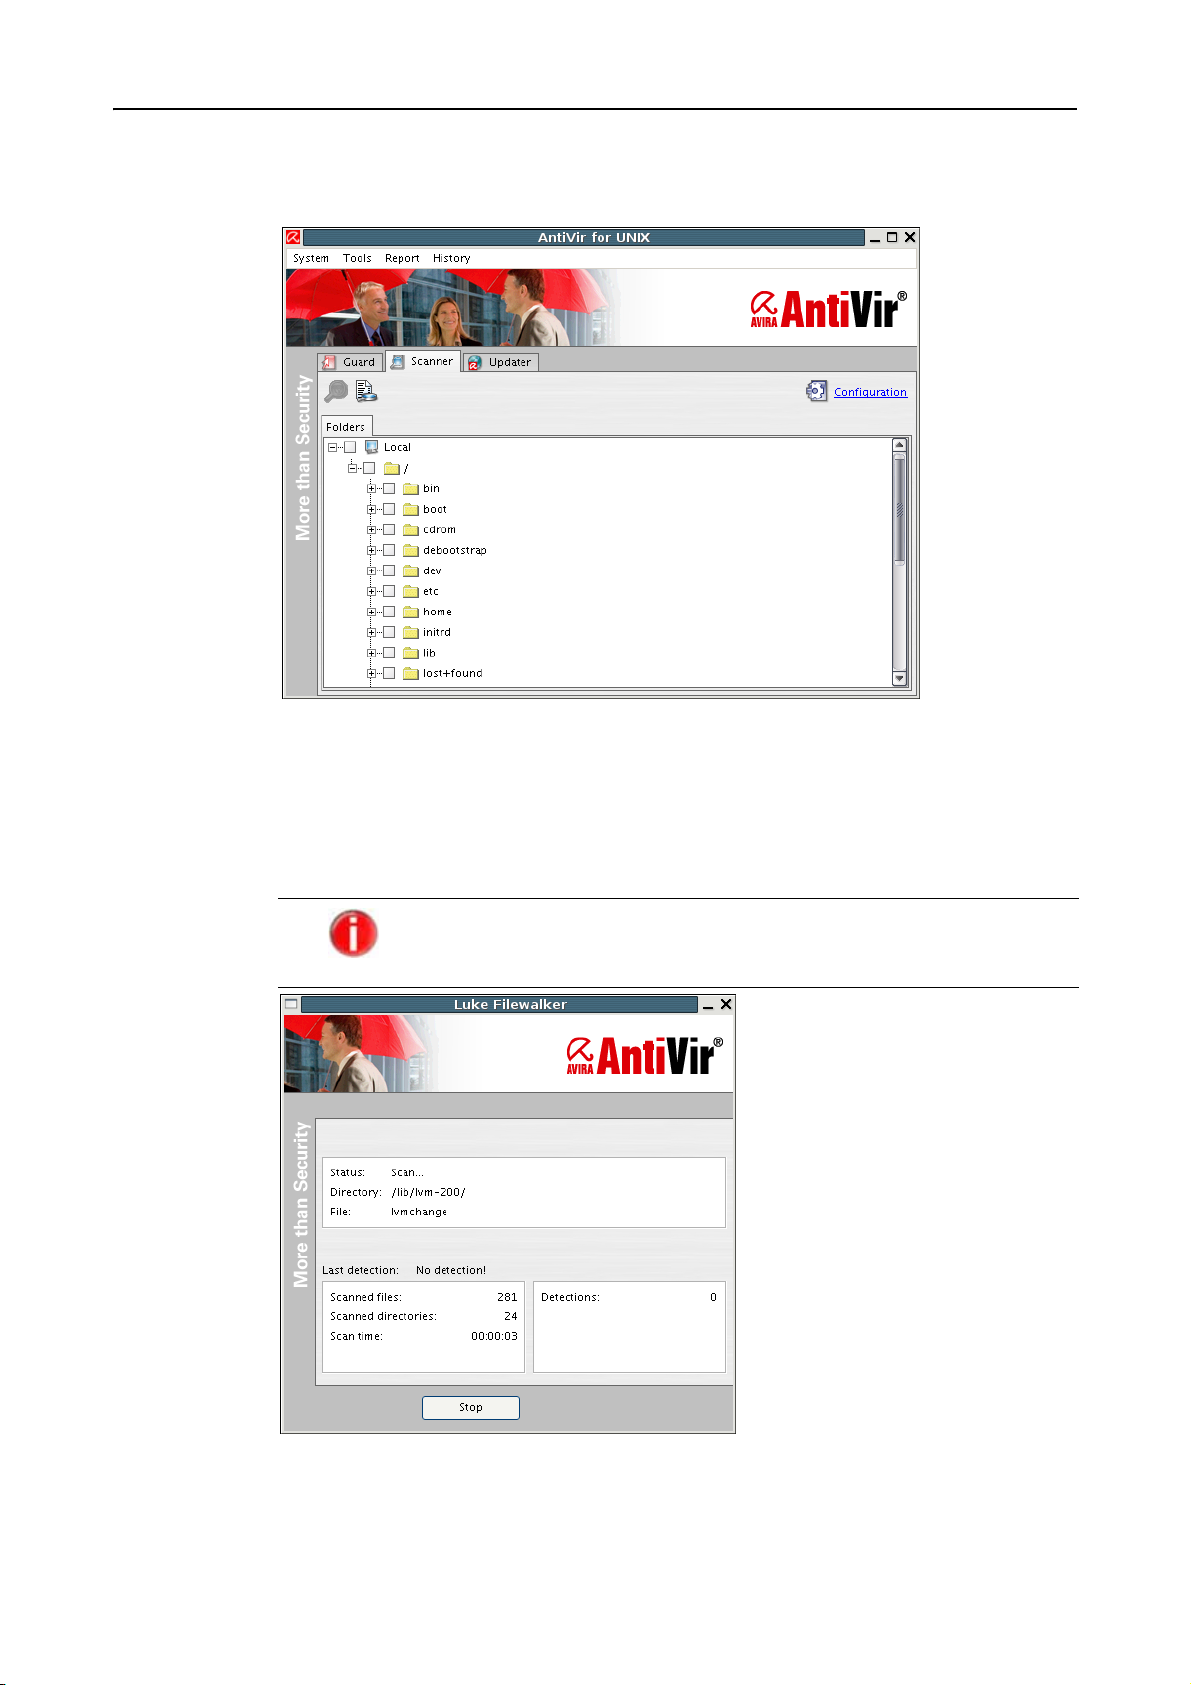
Graphical User Interface (GUI)
Starting the Scan Process
Select the required computers, directories and files to be scanned from the Folders
view by clicking the corresponding check-box.
Click the magnifying glass icon.
AntiVir starts scanning, displaying the scan process window. The Scanner searches
through the selected directories using the current configuration.
All computers must have the executable antivir in the directory
specified in the configuration.
Status
Folder
The Scanner status.
The currently scanned directory.
60 Avira AntiVir UNIX Server Avira GmbH
Page 62

File
Currently scanned file.
Graphical User Interface (GUI)
Last detection
Scanned files
Scanned
directories
Scan time
Detections
Stopping the Scan Process
Displaying Scanner History
The name of the last detected malware.
The number of files that have been scanned.
The number of directories that have been scanned.
The time taken by the current scanning process.
Number of detections during the current scanning process.
You can stop the scanning process by pressing the Stop button. This button is
deactivated if the option "Allow interruption" in Scanner Configuration/ Search is not
active.
Press the Stop button.
The scanning process ends.
Select the menu option History / Display history.
The History window appears:
There is a History entry for every scanning process.
Every node mentions the date and time and it has a blue check-mark (no detections) or a
red arrow (malware detected).
The node ends with one of the following symbols:
* Scan was cancelled by user
# Scan was cancelled by busy scanner
+ Scan was cancelled by offline computer
When you expand the node (click the plus sign), the following data is listed:
• Details of scan conducted on <Date> <Time>
• Note in the case of cancelled scanning
•Time taken for scan
• Number of scanned directories
•Number of scanned files
Avira GmbH Avira AntiVir UNIX Server
61
Page 63

Graphical User Interface (GUI)
•Number of warning messages
•Number of detections
•Name of last detection (e. g. Eicar-Test-Signature virus)
If you want to close the History window:
Press Close.
The window closes.
If you want to delete the history:
Press Delete.
All history entries are deleted.
6.2.2 Configuring AntiVir Scanner Using the GUI
Click the Configuration button in the Scanner main window
– OR –
Select the menu option Tools/Configuration.
The Configuration window appears:
The configuration settings are grouped in two categories: Basic and Expert settings. For
access to the second category, you have to activate the Expertmode option.
Click the desired tag in the left panel (Search, Archives, Report... ).
The configuration options are displayed in the right panel.
62 Avira AntiVir UNIX Server Avira GmbH
Page 64

Basic Mode - Scanner Search Settings
These are the basic options for the scanning process.
Graphical User Interface (GUI)
Files
According to the type of files you want to be scanned (All files, only Program and Macro
files, or using the Smart extensions list):
Activate the required option.
Mailbox
If you want to scan the contents of your mailbox:
Activate Scan mailboxes.
Path for
AntiVir
Scan process
This field contains the path to the AntiVir program. Usually the file is installed in:
/usr/lib/AntiVir/antivir
If you want to allow termination of the scan process:
Activate the check-box Allow interruption.
If you do not want to follow symbolic links during the scan process:
Activate the check-box Do not follow symbolic links.
Basic Mode - Scanner Archive Settings
Search archives
If you want the AntiVir Scanner to search within archives:
Activate the Search archives option.
Avira GmbH Avira AntiVir UNIX Server
63
Page 65

Graphical User Interface (GUI)
Basic Mode - Scanner Report Configuration
These settings influence the contents of the Scanner report file:
Mode
Data to be
logged
Output path
Shorten report
The report file records the messages issued by the Command Line Scanner. You have the
following options:
•No report
• Overwrite report
• Append new report
Activate the required option.
You can also choose the information type logged by the Scanner:
•Alerts
• Include all paths
• All scanned files
Activate the required option.
The second option includes the first one, and the third option includes the other two.
Type the path to the report file. This is usually:
/home/username/.AntiVir/avscanner.log
If you activate this option, you can select the maximum number of lines saved in the
report file (Cut off after...).
64 Avira AntiVir UNIX Server Avira GmbH
Page 66

Basic Mode - Scanner History Settings
AntiVir Scanner offers a useful history of scanning results. You may adjust this list in the
History settings:
Graphical User Interface (GUI)
Short report
Expert Mode - Scanner Settings for Action by Malware
If you want the Scanner to create short reports:
Activate the option Generate short report.
Type the path to the output file.
Set the number of entries.
Avira GmbH Avira AntiVir UNIX Server
65
Page 67

Graphical User Interface (GUI)
Unwanted
programs
Acoustic alarm
Expert Mode - Scanner Archive Settings
You may select one of the following actions in case of malware detection:
• Repair without prompt
• Delete without prompt
• Notify only
Activate the desired option.
Activate the Acoustic alarm check-box, browse for the desired Wave file and Test
the sound.
Recursion
depth
Archive size
In Expertmode you can also make settings for:
If you have activated the archive scanning but you want to scan only those nested
archives which do not exceed a certain recursion depth:
Activate the Restrict recursion depth option and type the desired number of levels
(Maximum recursion depth).
If you have activated the archive scanning but you want to scan only those archives which
do not exceed a certain size:
Activate the Restriction of archive size option and type the desired size in bytes
(Maximum size).
66 Avira AntiVir UNIX Server Avira GmbH
Page 68

Expert Mode - Scanner Heuristic Settings
Graphical User Interface (GUI)
Macrovirus-
heuristic
Heuristic
Select Macrovirusheuristic in order to activate heuristic methods when scanning
your documents for macro viruses.
Select Heuristic, in order to activate Win32-file heuristics, for detecting even
unknown file viruses, worms, trojans etc. You can set the intensity of this method:
• Detection level low
• Detection level medium
• Detection level high
Avira GmbH Avira AntiVir UNIX Server
67
Page 69

Graphical User Interface (GUI)
Expert Mode - Extended Threat Categories
Selection of
extended
threat
categories
You can configure AntiVir to scan for so-called Extended threat categories. Activate
the required categories.
The tooltip contains details about every category.
The list may change after updates.
6.3 AntiVir Guard
6.3.1 Operating AntiVir Guard Using the GUI
The AntiVir for UNIX Framework supports the resident guard and you can easily monitor
your server using this feature.
Starting GUI
3 The entry GuiSupport must be activated in avguard.conf in order for AntiVir UNIX
Server to communicate with the GUI.
Start the GUI:
/usr/lib/AntiVir/antivir-gui
The GUI appears, displaying the Folders view.
68 Avira AntiVir UNIX Server Avira GmbH
Page 70
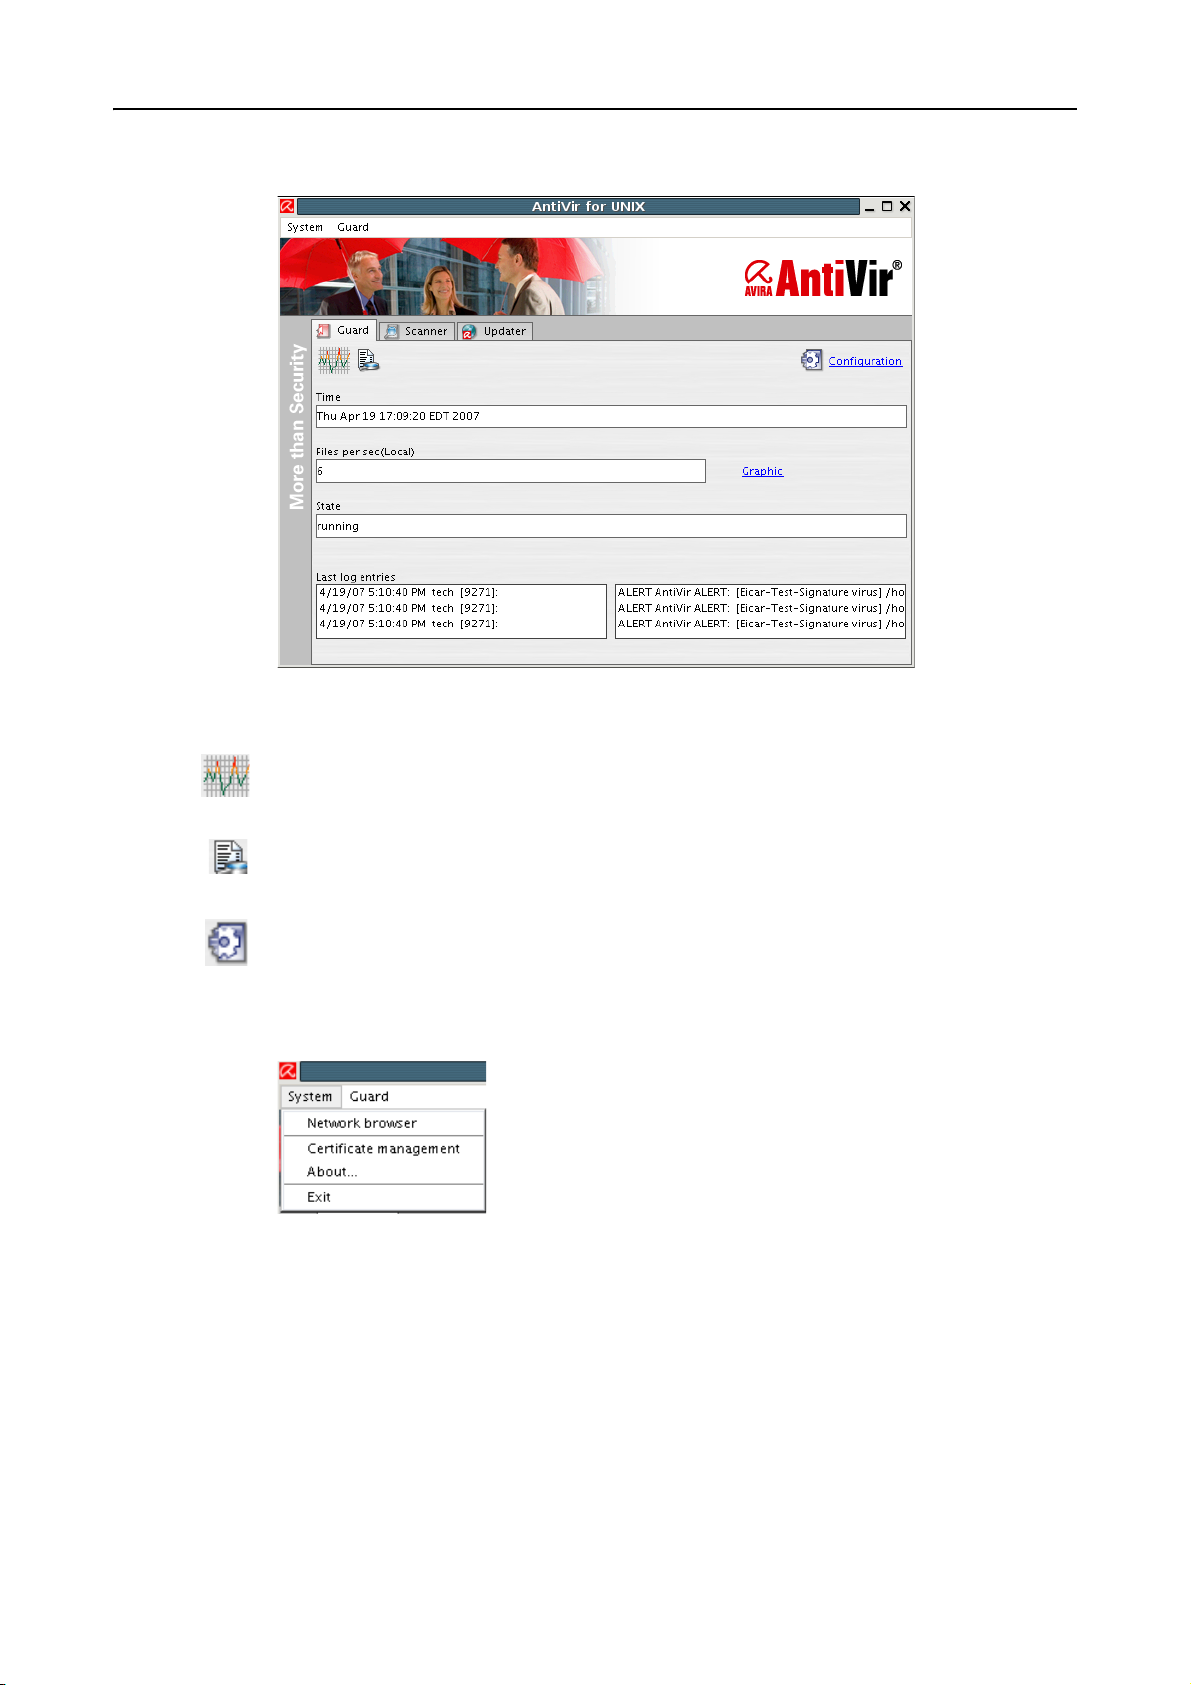
Graphical User Interface (GUI)
Press the Guard tab to open the Guard status window.
Buttons
Menus
System
Click to display the real-time Guard status.
Click to view the Guard Logfile.
Click to open the Configuration window.
• Network browser: to select another computer in the network on which AntiVir GUI
runs.
• Certificate management: to manage integrated certificates of the other computers
in the network.
• About...: displays Product information and Support information.
• Exit: closes GUI. It does not stop AntiVir UNIX Server.
Avira GmbH Avira AntiVir UNIX Server
69
Page 71

Graphical User Interface (GUI)
Guard
• Realtime: to display the realtime Guard status.
• Log: to view the logfile window.
• Configuration: to open the configuration window.
• Load Configuration: to load a preset configuration.
• Save Configuration: to save the current configuration.
• Start Guard: to start AntiVir Guard.
• Stop Guard: to stop AntiVir Guard.
Realtime Guard Status
See the figure in Starting GUI – Page 68
The Realtime Guard Status displays the current file access (e.g. 6 files/sec). It also shows
the current status of AntiVir Guard and the latest entries in the logfile.
State
AntiVir Guard’s current status: running or stopped.
Guard Logfile Window
Click on the Logfile button.
– OR –
Select the menu option Guard/Logfile.
The Logfile window appears:
70 Avira AntiVir UNIX Server Avira GmbH
Page 72

Graphical User Interface (GUI)
Logfile
Settings
Displays the complete logfile, with full paths, the current size of the logfile in KB, the
displayed log levels and the log level used by AntiVir Guard.
Four buttons appear at the bottom of the window: Settings, Rows, Load new and More.
Press Settings.
An additional area appears in the Logfile window:
• Choice of date to view: selecting the time interval for the logfile entries to be
displayed;
Default: complete logfile.
• Show the following log levels: selecting the log levels to be displayed;
Default: All.
Rows
Load new
More
Number of displayed log lines.
Reloading the logfile.
The loaded logfile view is extended with the number of Lines given.
Configuration Window
see Configuring AntiVir Guard Using the GUI – Page 72
Starting and Stopping AntiVir Guard
Start
Stop
Select the menu option Guard/Start Guard.
Select the menu option Guard/Stop Guard.
Closing GUI
Select System/Exit.
The GUI is closed.
Avira GmbH Avira AntiVir UNIX Server
71
Page 73

Graphical User Interface (GUI)
When you close GUI, it retains the current status of AntiVir Guard.
6.3.2 Configuring AntiVir Guard Using the GUI
You can use the GUI to set the configuration parameters in avguard.conf.
For better understanding, we shall also mention the entry in avguard.conf for every
parameter. These parameters are fully described in Configuration Files – Page 31.
Opening the Configuration Window
Press the configuration button.
– OR –
Select the menu option Guard/Configuration.
The Configuration window appears, with the basic Search settings:
The configuration settings are grouped in two categories: Basic and Expert settings. For
access to the second category, you have to activate the Expertmode option.
Click the desired tag in the left panel (Search, Archives, Report... ).
The configuration options are displayed in the right panel.
Basic Mode - Guard Search Settings
Include Paths
AntiVir Guard scans the files in the specified folders, including their subfolders. Usually
the data for the different users is in /home.
You can specify only one folder in a command line. You can enter more folders by typing
the command for each one. Example: /home and /media.
72 Avira AntiVir UNIX Server Avira GmbH
Page 74

Graphical User Interface (GUI)
If no folder is specified, AntiVir Guard will not scan any files!
This option sets the IncludePath parameter in avguard.conf.
Click Add.
The New path window appears.
Enter the path to the required directory, click Add and confirm with OK.
If you want to remove a directory from the list:
Select the desired directory and click Delete.
Exclude Paths
Scan mode
AntiVir Guard can exclude certain folders when scanning. For example, a folder
containing temporary files of AntiVir components. There is no default setting.
You can specify only one folder in a command line. You can enter more folders by typing
the command for every one. Example: /home/log and /home/tmp.
If you activated Move to directory in the Actions setting, that
quarantine folder is automatically excluded.
This option sets the ExcludePath parameter in avguard.conf.
Click Add.
The New path window appears.
Enter the path to the desired directory, click Add and confirm with OK.
If you want to remove a directory from the list:
Select the required directory and click Delete.
This option sets the access type of AntiVir Guard, when scanning files for viruses or
unwanted programs:
•Scan on file open
• Scan on file close
•Scan on file execute
This option sets the AccessMask parameter in avguard.conf.
Activate the required check-box(es).
Avira GmbH Avira AntiVir UNIX Server
73
Page 75

Graphical User Interface (GUI)
Basic Mode - Guard Action Settings
AntiVir Guard is able to take specific actions when viruses or unwanted programs are
detected:
Repair
concerning
files?
How to handle
concerning
files?
Email
AntiVir Guard is able to repair files immediately after access. If this fails, access is
blocked. This option is deactivated by default.
It corresponds to RepairConcerningFiles in avguard.conf.
Activate the Repair check-box.
If Repair is not activated or if repair is not possible, access to the files is blocked and the
action is logged. The following three options define further actions of AntiVir Guard:
• Log only: no further action
• Rename: rename the file by adding the .XXX extension.
• Move: move the file to another folder. This folder will be automatically created if it
does not already exist. For example, /home/unwanted
These options correspond to LogOnly, RenameConcerningFiles and
MoveConcerningFilesTo in avguard.conf.
Select the desired option.
If you activate Move:
Type in the path to the directory where concerning files will be stored.
If AntiVir Guard should send emails when a virus or unwanted program is detected:
Write the email address.
74 Avira AntiVir UNIX Server Avira GmbH
Page 76
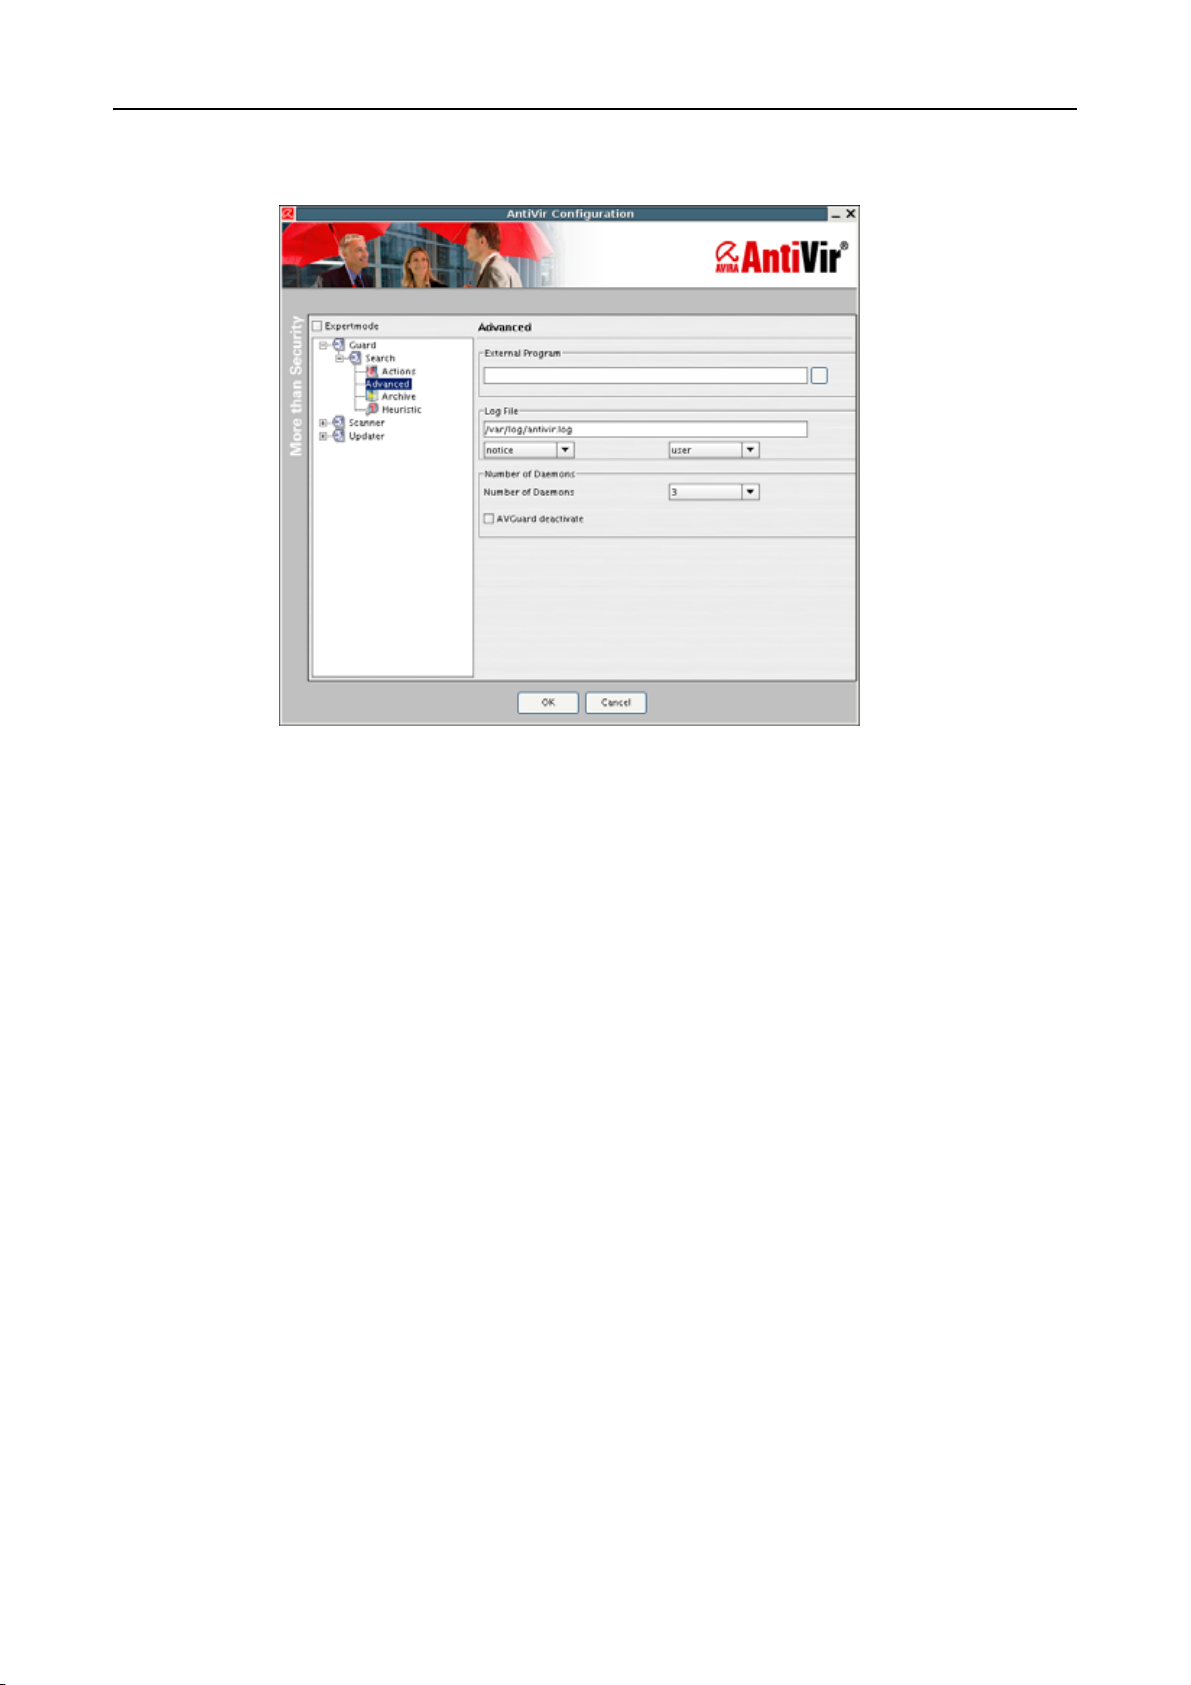
Basic Mode - Guard Advanced Settings
Graphical User Interface (GUI)
External
Program
Log File
Number of
Daemons
Starts an external program when suspicious files appear.
(See External Program – Page 35 for more details)
Full path and file name for the logfile of AntiVir Guard. For example:
/var/log/avguard.log.
All important AntiVir operations are logged via a syslog daemon.
Type the full path and file name.
The number of simultaneous AntiVir Guard daemons can be set between 0 and 20. The
default is 3 and it is appropriate for smaller standard computers. For servers with a high
level of traffic, a larger number would be necessary.
Here you may also deactivate AntiVir Guard.
These options correspond to NumDaemons in avguard.conf.
Select the required number of daemons.
Avira GmbH Avira AntiVir UNIX Server
75
Page 77

Graphical User Interface (GUI)
Basic Mode - Guard Archive Settings
Archive
If you want the Guard to scan in archives:
Activate the option Search archives.
Basic Mode - Guard Heuristic Settings
Macrovirus-
heuristic
Select Macrovirusheuristic in order to activate heuristic methods when scanning
your documents for macro viruses.
76 Avira AntiVir UNIX Server Avira GmbH
Page 78

Graphical User Interface (GUI)
Heuristic
Select Heuristic, in order to activate Win32-file heuristics, for detecting even
unknown file viruses, worms, trojans etc. You can set the intensity of this method:
• Detection level low
• Detection level medium
• Detection level high
Expert Mode - Guard Archive Settings
Recursion
depth
Archive size
The Expertmode enables the following configuration settings:
Activate the option Restrict recursion depth and select the desired value.
Activate the option Archive size and select the desired limit.
Avira GmbH Avira AntiVir UNIX Server
77
Page 79

Graphical User Interface (GUI)
Expert Mode - Extended threat categories
Selection of
extended
threat
categories
You can configure AntiVir Guard to scan for so-called Extended threat categories.
Activate the required categories.
The tooltip contains details about every category.
The list may change after updates.
78 Avira AntiVir UNIX Server Avira GmbH
Page 80

7Service
7.1 Support
Service
Support Service
Email Support
Our website http://www.avira.com contains all the necessary information on our
extensive support service.
The expertise and experience of our developers is available to you. The experts of Avira
answer your questions and help you with difficult technical problems.
During the first 30 days after you have purchased a license, you can use our AntiVir
Installation Support by phone, email or by online form.
In addition, we recommend that you also purchase our AntiVir Classic Support, with
which you can contact and obtain advice from our experts during business hours when
technical problems are encountered. The annual fee for this service, which includes
eliminating viruses and hoax support, is 20 % of the list price of your purchased AntiVir
program.
Another optional service is the AntiVir Premium Support which offers you, in addition to
the scope of the AntiVir Classic Support, the possibility of contacting expert partners at
any time - even after business hours in the event of an emergency. When virus alerts
occur, you will receive an SMS on your cellphone.
Support via email can be obtained at http://www.avira.com.
Avira GmbH Avira AntiVir UNIX Server
79
Page 81

Service
7.2 Online Shop
Would you like to buy our products with a mouse-click?
You can visit Avira Online Shop at http://www.avira.com and buy, upgrade or extend
AntiVir licenses quickly and safely. The Online Shop guides you step by step through the
order menu. A multi-lingual Customer Care Center explains the order process, payment
transactions and delivery. Resellers can order by invoice and use a reseller panel.
7.3 Contact
Address
Internet
Avira GmbH
Lindauer Strasse 21
D-88069 Tettnang
Germany
You can find further information on us and our products by visiting
http://www.avira.com.
80 Avira AntiVir UNIX Server Avira GmbH
Page 82

Appendix
8 Appendix
8.1 Glossary
Item Meaning
Backdoor (BDC) A backdoor is a program infiltrated in order to steal data or to control the
computer, without the user’s knowledge. This program is manipulated by
third parties using a backdoor client via the Internet or local network.
cron (daemon) A daemon which starts other programs at specified times.
Daemon A background process for administration on UNIX systems. On average,
there are about a dozen daemons running on a computer. These processes
usually start up and shut down with the computer.
Demo version Without a license file, AntiVir UNIX Server runs as a demo version and it
only reports the test virus EICAR. It will not block access to infected files.
The update function is not available.
Dialer Paid dialing program. When installed on your computer, this program sets
up a premium rate number Internet connection, charging you at high rates.
This can lead to huge phone bills.
AntiVir detects Dialers.
Engine The scanning module of AntiVir software.
Heuristic The systematic process of solving a problem using general and specific rules
drawn from previous experience. However, solution is not guaranteed.
AntiVir uses a heuristic process to detect unknown macro viruses. When
typical virus-like functions are found, the respective macro is classified as
"suspicious".
Kernel The basic component of a UNIX operating system which performs
elementary functions (e.g. memory and process administration).
Logfile also: Report file. A file containing reports generated by the program during
run-time when a certain event occurs.
Malware Generic term for "foreign bodies" of any type. These can be interferences
such as viruses or other software which the user generally considers as
unwanted (see also Unwanted Programs).
PMS (Possibly Malicious
Software)
Software that does not usually harm the computer. It is programmed to
harm other users.
For example, mail bombs: with such a program, the victim can be attacked by
thousands of emails.
AntiVir detects PMS.
Quarantine directory The directory where infected files are stored to block the user’s access to
them.
root The user with unlimited access rights (such as system administrator on
Windows)
Signature A Byte combination used to recognize a virus or unwanted program.
Avira GmbH Avira AntiVir UNIX Server
81
Page 83

Appendix
Item Meaning
Script A text file containing commands to be executed by the system (similar to
batch files in DOS)
SMP (Symmetric Multi
Processing)
SMTP Simple Mail Transfer Protocol: protocol for email transmission on the
syslog daemon A daemon used by programs for logging various information. These reports
Unwanted programs The name for programs that do not directly harm the computer but are not
VDF (Virus Definition
File)
VFS Virtual File System
UNIX SMP: UNIX version for computers with parallel processors.
Internet.
are written in different logfiles. The syslog daemon configuration is in
/etc/syslog.conf.
wanted by the user or administrator. These can be backdoors, dialers, jokes
and games. AntiVir detects various types of unwanted programs.
A file with known signatures for viruses and unwanted programs. In many
cases it is enough for an update to load the most recent version of this file.
8.2 Further Information
You can find further information on viruses, worms, macro viruses and other unwanted
programs at http://www.avira.com/en/threats/index.html .
82 Avira AntiVir UNIX Server Avira GmbH
Page 84

8.3 Golden Rules for Protection Against Viruses
Always keep boot floppy-disks for your network server and for your workstations.
Always remove floppy disks from the drive after finishing the work. Even if they have
no executable programs, disks can contain program code in the boot sector and these
can serve to carry boot sector viruses.
Regularly back up your files.
Limit program exchange: particularly with other networks, mailboxes, Internet and
acquaintances.
Scan new programs before installation and the disk after this. If the program is
archived, you can detect a virus only after unpacking and during installation.
If there are other users connected to your computer, you should set the following rules
for protection against viruses:
Use a test computer for controlling downloads of new software, demo versions or
virus suspicious media (floppies, CD-R, CD-RW, removable drives).
Disconnect the test computer from the network!
Appoint a person responsible for virus infection operations and define all steps for
virus elimination.
Organize an emergency plan as a precaution for avoiding damage due to destruction,
theft, failure or loss/change due to incompatibility. You can replace programs and
storage devices but not your vital business data.
Set up a plan for data protection and recovery.
Your network must be correctly configured and the access rights must be wisely
assigned. This is good protection against viruses.
Appendix
Avira GmbH Avira AntiVir UNIX Server
83
Page 85

www.avira.com
Avira GmbH
Lindauer Str. 21
88069 Tettnang
Germany
Telephone: +49 (0) 7542-500 0
Fax: +49 (0) 7542-525 10
Email: info@avira.com
Internet: http://www.avira.com
© Avira GmbH. All rights reserved.
This manual was created with great care. However, errors in design and contents cannot be excluded.
The reproduction of this publication or parts thereof in any form is prohibited without previous
written consent from Avira GmbH.
Errors and technical subject to change.
Issued May 2007
AntiVir® is a registered trademark of the Avira GmbH.
All other brand and product names are trademarks or registered trademarks of their respective owners.
More Than Security
Protected trademarks are not marked as such in this manual. However, this does not mean that they may be used freely.
 Loading...