

Page 1

Avira AntiVir Exchange
User Manual
Page 2

Contents
...................................................................................... 5
..................................................................................... 8
.................................................................... 14
......... 19
1 Quickstart
1.1 Installation on an Exchange server ........................................................................ 5
1.2 Starting the AntiVir Exchange Management Console ............................................. 5
1.3 Configuration in the AntiVir Exchange Management Console ................................ 6
1.3.1 Necessary steps in the basic configuration ................................................................. 6
1.3.2 Necessary steps in the policy configuration ................................................................ 6
1.3.3 Recommended steps in the basic configuration .......................................................... 7
1.3.4 Virus scan of the Exchange databases ........................................................................ 7
1.4 Observing data in AntiVir Monitor ........................................................................ 7
2 Installation
2.1 System requirements ............................................................................................ 8
2.2 Installation of Avira AntiVir Exchange on an Exchange server ................................ 8
2.3 Uninstalling Avira AntiVir Exchange ................................................................... 13
3 Technical description
3.1 The Avira AntiVir Exchange Server ...................................................................... 14
3.1.1 The transport agent ................................................................................................. 15
3.1.2 The Avira AntiVir Exchange Service = Enterprise Message Handler (EMH) ............... 15
3.1.3 The Avira AntiVir Exchange quarantine ................................................................... 15
3.1.4 The Active Directory/LDIF ....................................................................................... 16
3.1.5 Compressed files/archives: The Avira AntiVir Exchange unpacker ............................ 17
3.2 The Avira AntiVir Exchange configuration ........................................................... 17
4 Details on the Avira AntiVir Exchange Management Console
4.1 The toolbar ......................................................................................................... 19
4.2 Meaning of icons ................................................................................................ 20
4.3 Basic configuration ............................................................................................. 22
4.3.1 Overview with configuration reports ....................................................................... 22
4.3.2 Importing a configuration ....................................................................................... 23
4.3.3 AntiVir Server settings ............................................................................................ 23
4.3.4 Settings for an individual AntiVir Server .................................................................. 27
4.3.5 Address lists ............................................................................................................ 32
4.3.6 Report templates ..................................................................................................... 38
4.3.7 Creating a database connection to an SQL server ..................................................... 44
4.3.8 Folder settings ........................................................................................................ 49
4.3.9 Utility settings ........................................................................................................ 57
4.4 Policy configuration ............................................................................................ 58
4.4.1 Example of a company policy ................................................................................... 58
2
Page 3

4.4.2 Conditions .............................................................................................................. 58
....................................................................... 70
................................................................................ 105
4.4.3 Job types ................................................................................................................. 59
4.4.4 Actions .................................................................................................................... 60
4.4.5 Processing sequence of jobs ..................................................................................... 61
4.5 AntiVir Monitor ................................................................................................. 61
4.5.1 Quarantines ............................................................................................................ 61
4.5.2 Avira AntiVir Exchange reports ............................................................................... 69
5 AntiVir scan engine
5.1 Overview ............................................................................................................ 70
5.1.1 Job types ................................................................................................................. 70
5.2 AntiVir Scan ....................................................................................................... 70
5.3 Information store scan........................................................................................ 71
5.3.1 Status of the information store ................................................................................ 72
5.3.2 Virus scan in the information store - sample job ...................................................... 75
5.4 Configuring and enabling the AntiVir Scan Engine ............................................... 80
5.5 Activating virus scanning - sample job ................................................................. 83
5.5.1 General settings ...................................................................................................... 83
5.5.2 Job is mission critical .............................................................................................. 84
5.5.3 Setting address conditions ....................................................................................... 85
5.5.4 Setting content conditions ...................................................................................... 85
5.5.5 Defining actions ...................................................................................................... 85
5.5.6 Selecting servers ...................................................................................................... 89
5.5.7 Entering details for the job ...................................................................................... 89
5.5.8 Saving the configuration .......................................................................................... 89
5.6 Virus scan of password-protected archives ........................................................... 90
5.6.1 Sample job ............................................................................................................... 90
5.7 File restrictions for the attachment ..................................................................... 91
5.7.1 By type .................................................................................................................... 91
5.7.2 By email size ............................................................................................................ 92
5.7.3 By attachment type and/or size ............................................................................... 92
5.7.4 Configuring fingerprints .......................................................................................... 93
5.7.5 Blocking file attachments by type - Sample job ......................................................... 93
5.7.6 Restricting email size - sample job ........................................................................... 97
5.7.7 Blocking attachments types and sizes - sample job ................................................. 100
6 AntiVir Wall
6.1 Job types .......................................................................................................... 105
6.2 Address check ................................................................................................... 105
6.2.1 Blocking senders or recipients - sample job ............................................................ 106
6.3 Content check with dictionaries ........................................................................ 109
6.3.1 Setting up dictionaries ........................................................................................... 109
6.3.2 Checking and blocking text content - sample job .................................................... 112
3
Page 4

Avira AntiVir Exchange 9
................................................................................... 119
6.4 Limiting the number of recipients ..................................................................... 116
6.4.1 Restricting the number of recipients - sample job ................................................... 116
7 Anti-spam
7.1 Avira AntiSpam Engine ..................................................................................... 119
7.1.1 Configuring AntiSpam Engine ............................................................................... 119
7.2 Wall spam filtering jobs .................................................................................... 122
7.2.1 AntiSpam with Wall Spam Filtering jobs ................................................................ 122
7.2.2 Definite no-spam criteria ....................................................................................... 124
7.2.3 Definite spam criteria ............................................................................................ 125
7.2.4 Practical tips.......................................................................................................... 126
7.3 Anti-spam for experts ....................................................................................... 126
7.3.1 Combined criteria - example .................................................................................. 127
7.3.2 Combining the information on spam probability .................................................... 128
7.3.3 AntiSpam scanning - Sample job ............................................................................ 130
7.3.4 Configuring advanced spam filtering jobs .............................................................. 140
7.3.5 Manual AntiSpam configuration ............................................................................ 141
4
Page 5
Quickstart
1 Quickstart
The quick guide to Avira AntiVir Exchange:
• Installation on an Exchange server
• Starting the AntiVir Exchange Management Console
• Configuration in the AntiVir Exchange Management Console
• Observing data in AntiVir Monitor
1.1 Installation on an Exchange server
1. To install Avira AntiVir Exchange, double-click the installation file:
• For Microsoft Exchange 2003: avira_antivir_exchange_2k_32bit.exe
• For Microsoft Exchange 2007/2010 (64-bit):
avira_antivir_exchange_2k7_64bit.exe
2. Follow the rest of the instructions in the setup until the installation is completed.
If you do not specify another installation directory, Avira AntiVir Exchange is installed
in the following default directory:
C:\Programme\Avira\AntiVir Exchange\ (German)
C:\Program Files\Avira\AntiVir Exchange\ (English)
or
C:\Programme(x86)\Avira\AntiVir Exchange\ (German)
C:\Program Files(x86)\Avira\AntiVir Exchange\ (English)
for 64-bit versions
Warning: You must disable any real-time or on-access scan functions of the virus scanners used
for the directory ...\Avira\AntiVir Exchange\AntiVirData\
1.2 Starting the AntiVir Exchange Management Console
Avira AntiVir Exchange is a server product that is configured using the AntiVir Exchange
Management Console. For Avira AntiVir Exchange to work, the AntiVir for Exchange service
must be started. See also The Avira AntiVir Exchange Service = Enterprise Message Handler (EMH)
You start the console via Start - Programs - Avira - AntiVir Exchange - AntiVir Exchange
Management Console.
When you close the AntiVir Exchange Management Console, you will be asked if you want to
save changes.
Note: Open changes are indicated by (*) at the uppermost node. If you want to save your
changes to the configuration, click the Save button. The configuration is saved in the
ConfigData.xml file, which is stored in the Avira\AntiVir Exchange\Config\ directory.
5
Page 6

Avira AntiVir Exchange 9
1.3 Configuration in the AntiVir Exchange Management
Console
After the installation, make the settings described below in the AntiVir Exchange Management
Console.
1.3.1 Necessary steps in the basic configuration
In the Basic Configuration, you define the valid servers, email addresses, common templates
and utility settings.
Select Basic Configuration - General Settings - AntiVir Server settings on the Email
addresses tab to check the entries for the Administrators and the Internal domains. See
Server settings.
AntiVir
1.3.2 Necessary steps in the policy configuration
In the Policy Configuration, you define and enable the required jobs in accordance with your
company's policies. In other words, jobs are no more than rule-based measures or actions that
are applied to the mail traffic.
Carry out the following steps to create a new job:
1. Find the required template in Job templates.
2. Select the template and drag it into the Mail Transport Jobs folder. Configure the
name and the properties of this job and enable the job under Properties. (Active: Yes)
6
Page 7

Quickstart
3. Note the sequence in which the jobs are processed (see Processing sequence of jobs
4. Save your changes. See also Starting the AntiVir Exchange Management Console.
It is important to distinguish between two categories of jobs.
Jobs for the AntiVir Scan Engine that scan for viruses, malware or malicious scripts or that filter
emails according to size and/or type of file attachment and jobs for the AntiVir Wall that can be
used to filter emails according to a number of criteria (e.g. addresses, words, images).
).
1.3.3 Recommended steps in the basic configuration
It is recommended that you make individual settings for address lists, templates, etc. in the
basic configuration. These settings are, however, not mandatory for a test operation.
1. Configure the Address lists (for the selection in the job rules) under General
Settings.
2. If required, change the standard templates under General Settings.
3. In Utility Settings, configure the required accessories such as word lists, fingerprints
and virus scanners.
1.3.4 Virus scan of the Exchange databases
In Policy Configuration - Information Store Jobs, you can make the corresponding settings
for each AntiVir server individually.
You cannot create information store jobs yourself. When you add a new server, a corresponding
information store job is automatically available.
When you remove the server again, the information store job is also deleted.
For further information on information store jobs, see Information store scan
.
1.4 Observing data in AntiVir Monitor
After saving your settings, you can observe ongoing operations in Avira AntiVir Exchange with
AntiVir Monitor.
AntiVir Monitor allows you to observe the latest "live data" and manage the quarantines of
the configured servers, for example.
More information is available under AntiVir Monitor
7
Page 8

2 Installation
Overview:
• System requirements
• Installation of Avira AntiVir Exchange on an Exchange server
• Uninstalling Avira AntiVir Exchange
2.1 System requirements
The following are the system requirements for installing Avira AntiVir Exchange:
• CD-ROM drive or network access
• RAM: Exchange recommended + additional 64 MB
• Hard drive: At least 400 MB for the installation
• Microsoft .NET Framework 2.x
• Operating systems (both 32-bit and 64-bit):
• Windows Server 2003
• Windows Server 2008
• Exchange server:
• MS Exchange Server 2003
• MS Exchange Server 2007 SP1 Update Rollup 4
The following roles are supported:
- Hub Transport Server
- Mailbox Server
• MS Exchange Server 2010
Note: Please contact the support for information about the installation of clusters.
Warning: You must disable any real-time or on-access scan functions of the virus scanners used
for the directory ...\Avira\AntiVir Exchange\AntiVirData\
2.2 Installation of Avira AntiVir Exchange on an Exchange
server
1. To install Avira AntiVir Exchange, double-click the installation file, for example:
avira_antivir_exchange_2k_32bit.exe
8
Page 9
Installation
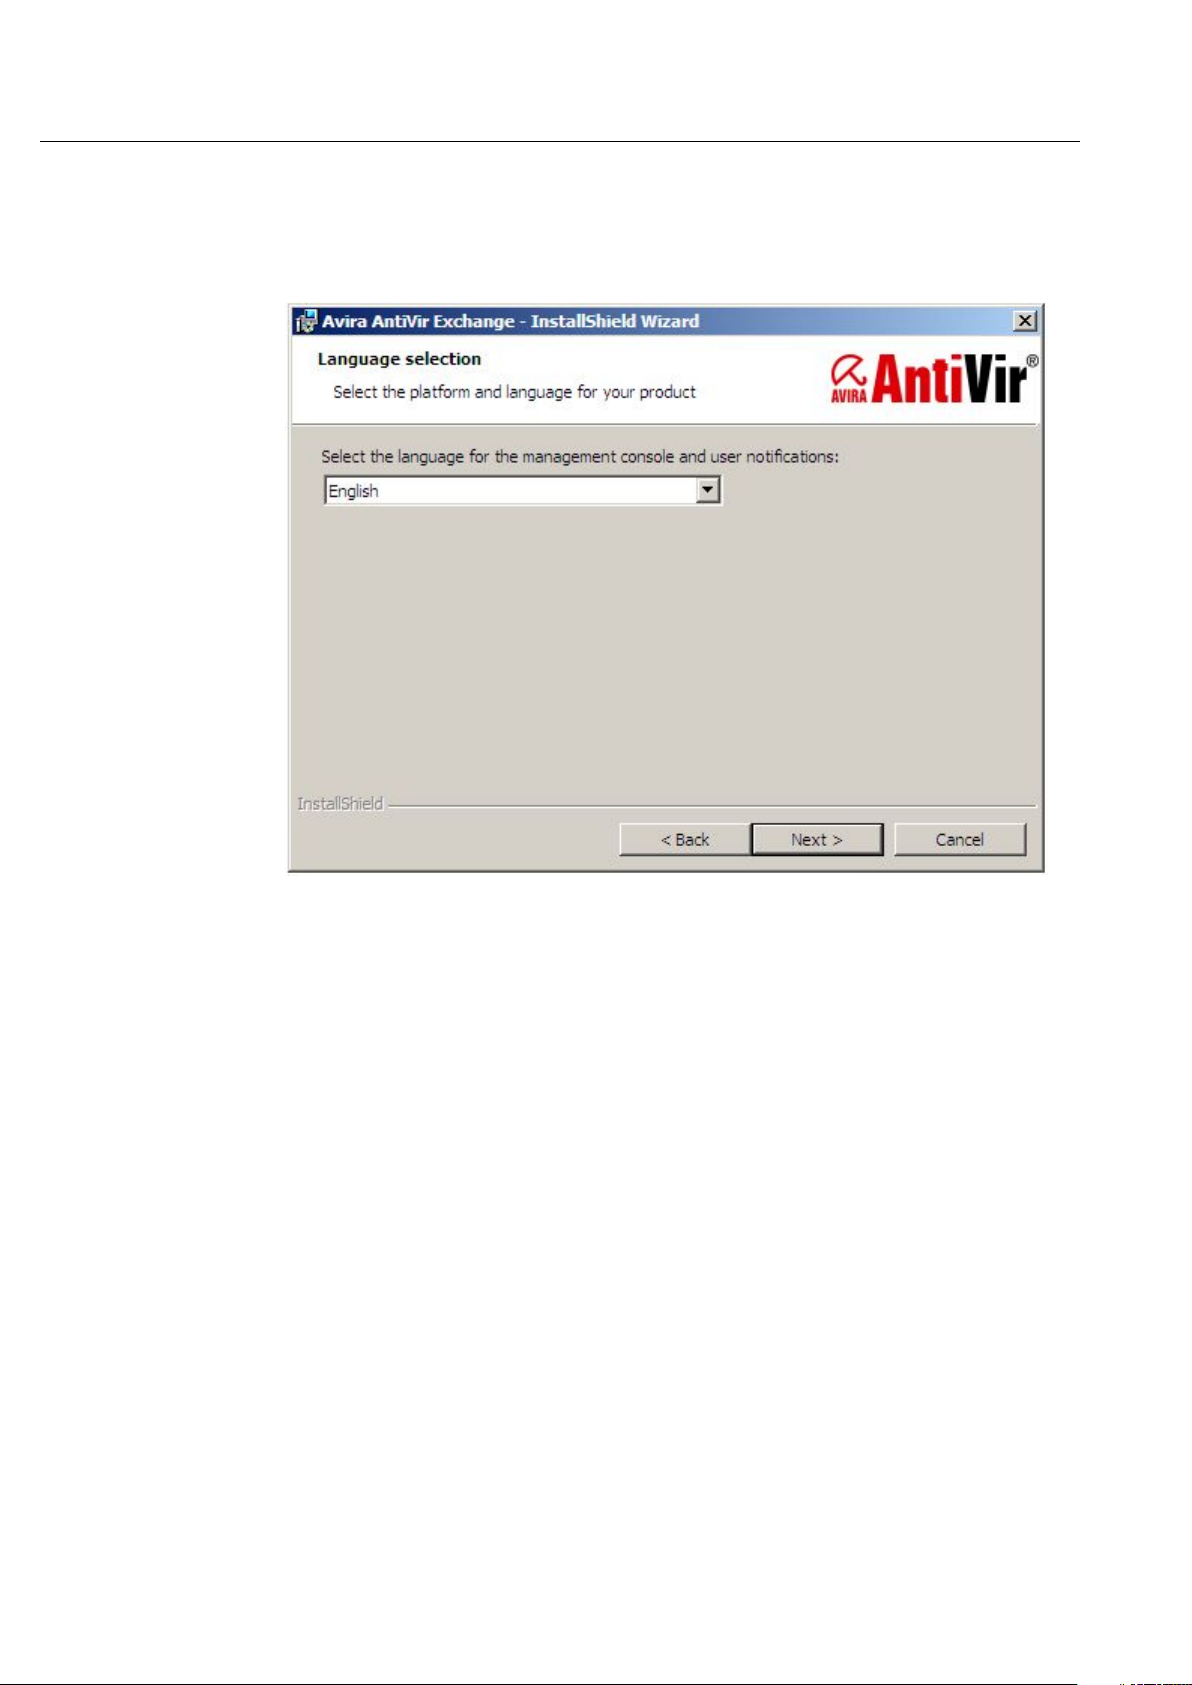
2. First select the setup language. Then select the platform and the language for the
product.
The selected product language applies for the product interface and for the user
notifications that are sent from Avira AntiVir Exchange to the users.
3. In the next dialog box, accept the license agreement to be able to continue and then click
Next.
9
Page 10
Avira AntiVir Exchange 9
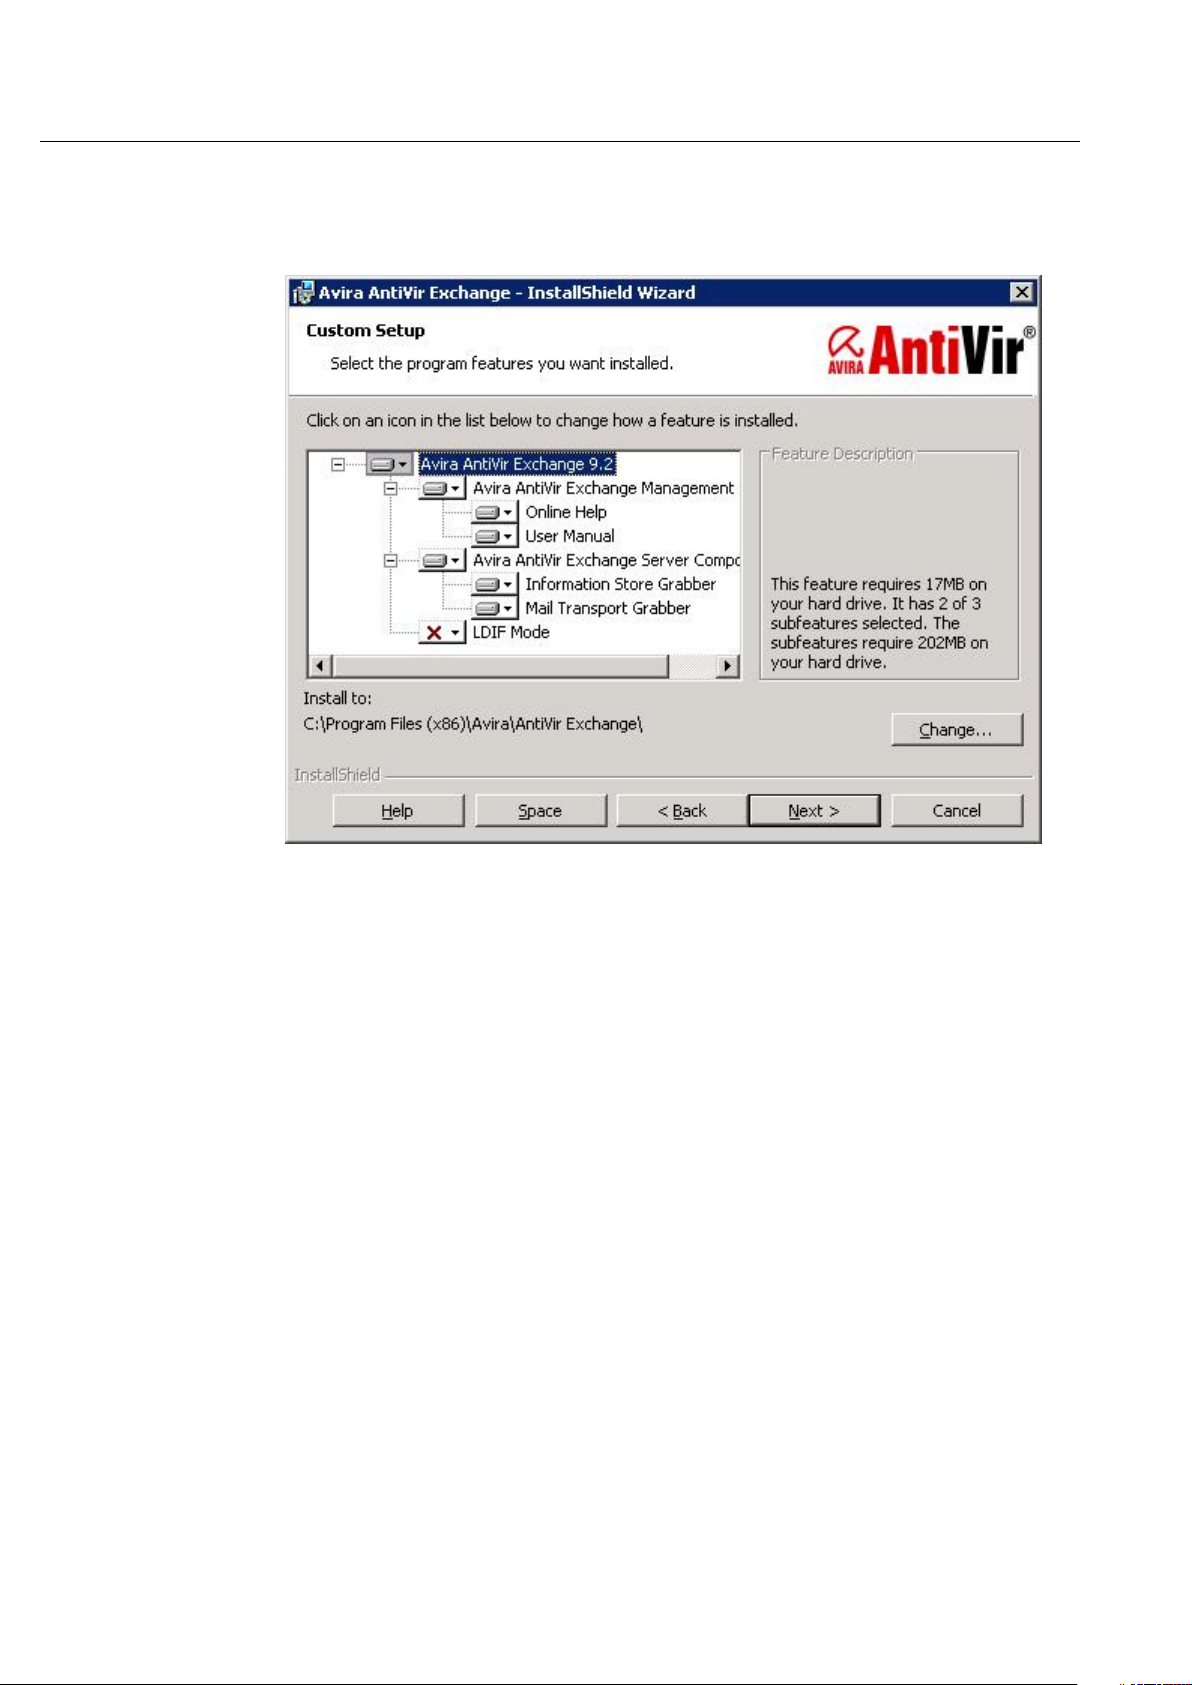
4. In the next dialog box, select the features that you want to install. When you make this
selection, all server components and the AntiVir Exchange Management Console are
installed.
If another active information store scan application apart from Avira AntiVir Exchange
is located on the server, the information store scan function is disabled. If you want to
use the information store scan, you first need to uninstall the other application.
5. Click Next.
10
Page 11
Installation
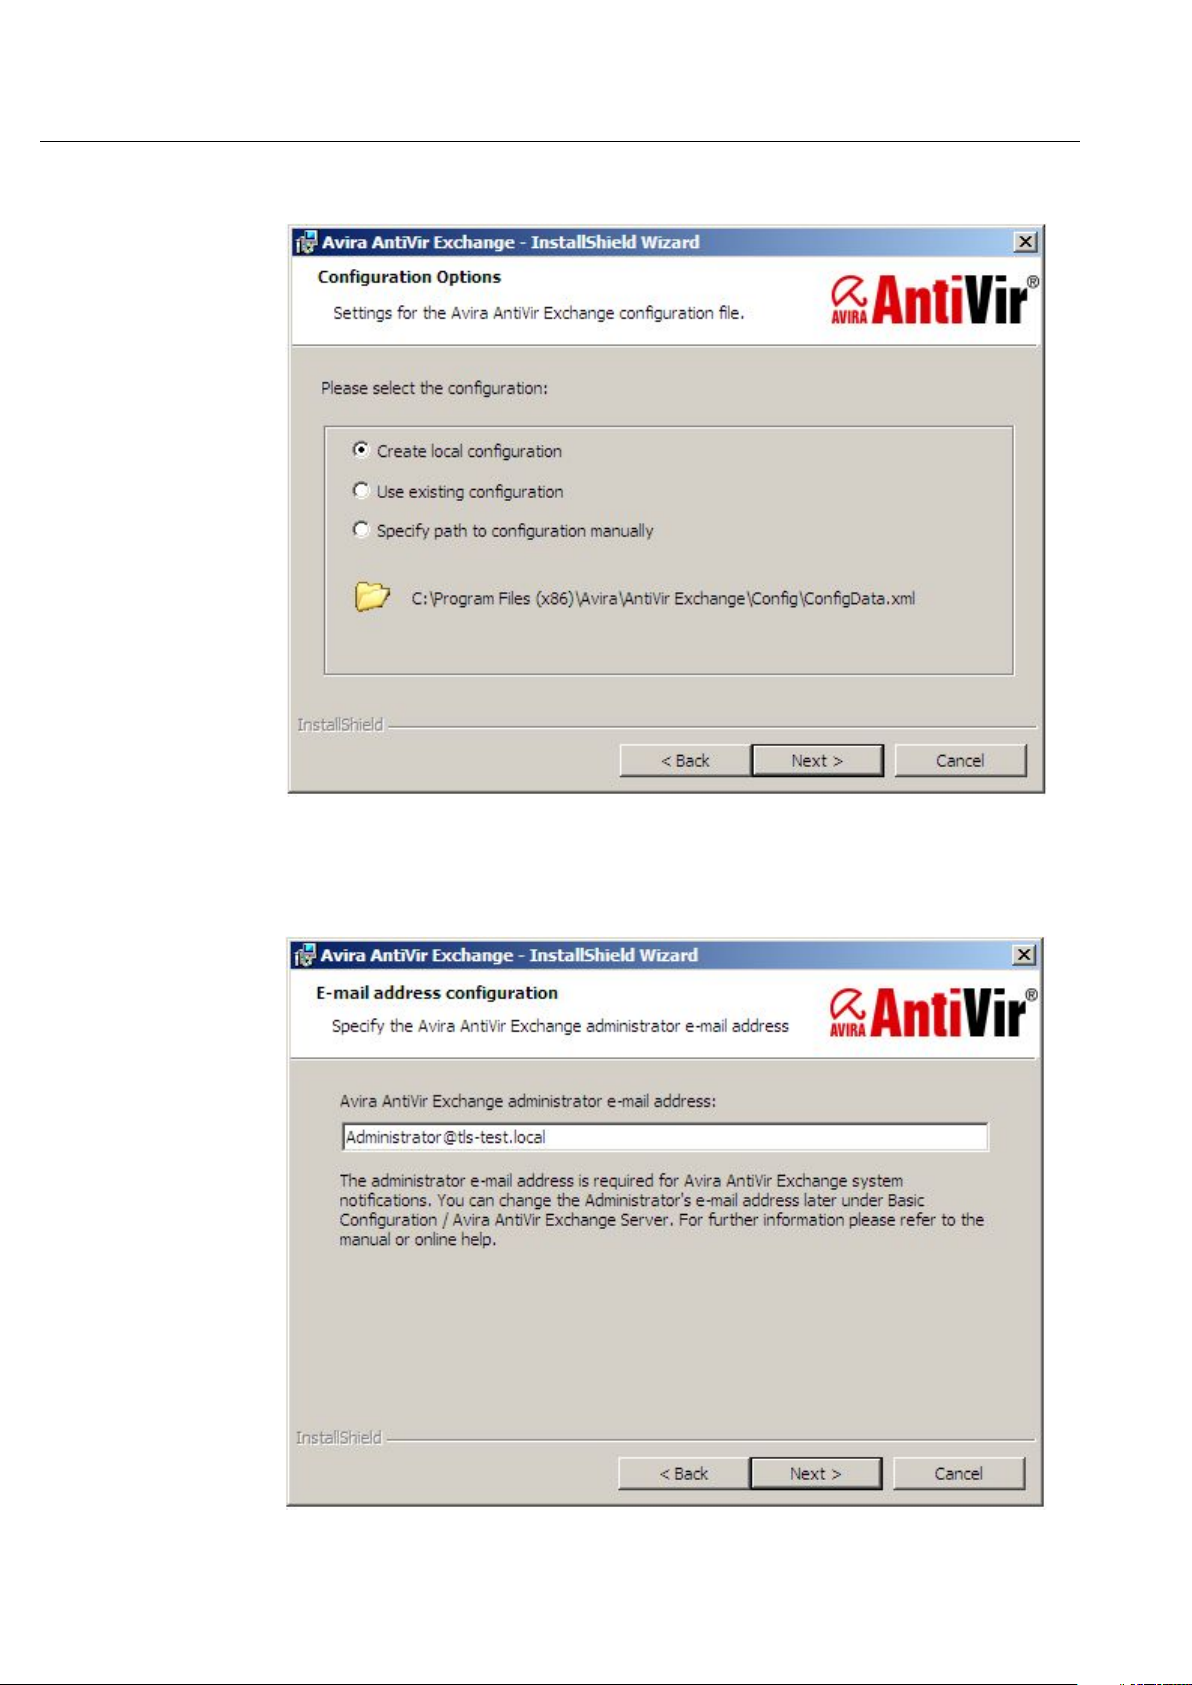
6. In the next dialog box, you are asked for the storage location of the configuration file.
If you are not operating Avira AntiVir Exchange on multiple servers and you want to
administer centrally with one configuration, confirm the default setting and click Next.
7. In the next dialog box, define the email address of the administrator.
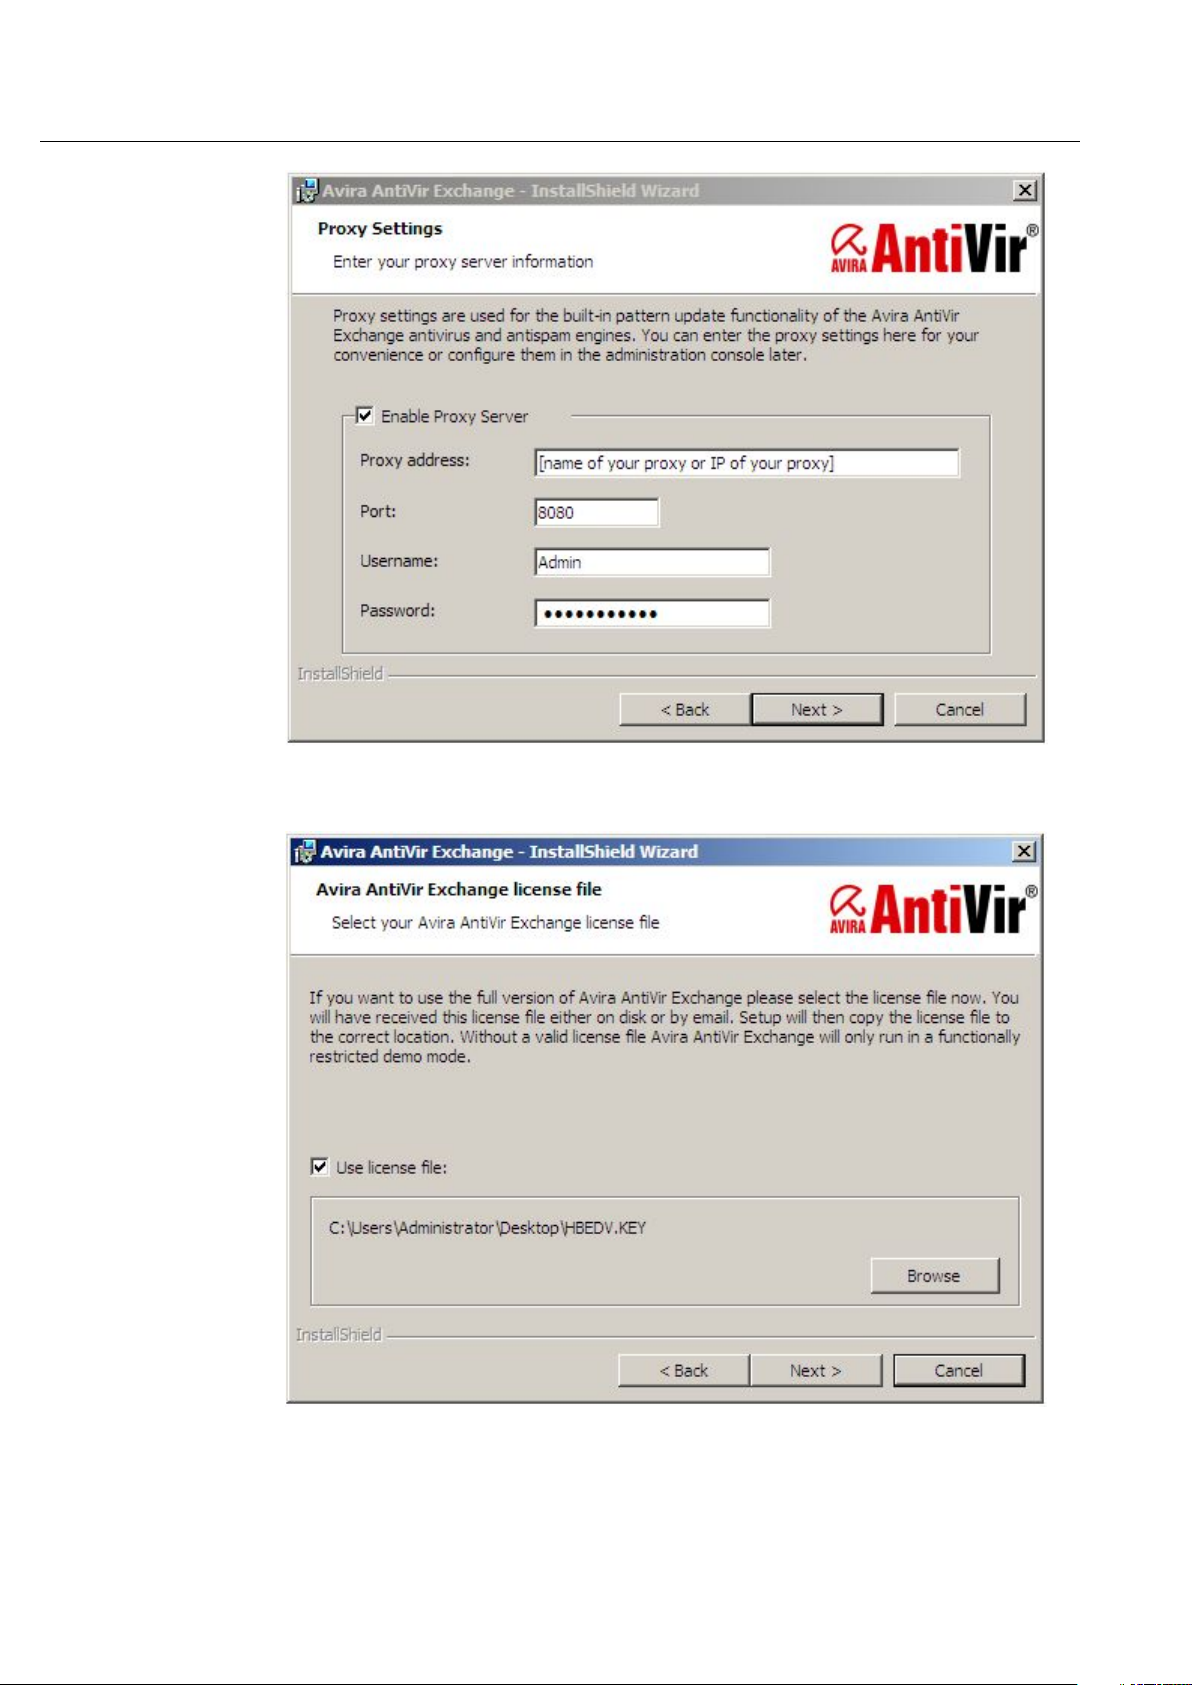
8. If you are using a proxy server for the AntiVir update, check the box and enter the proxy
settings for IP address, port, user and password. The password is stored in plain text.
11
Page 12
Avira AntiVir Exchange 9
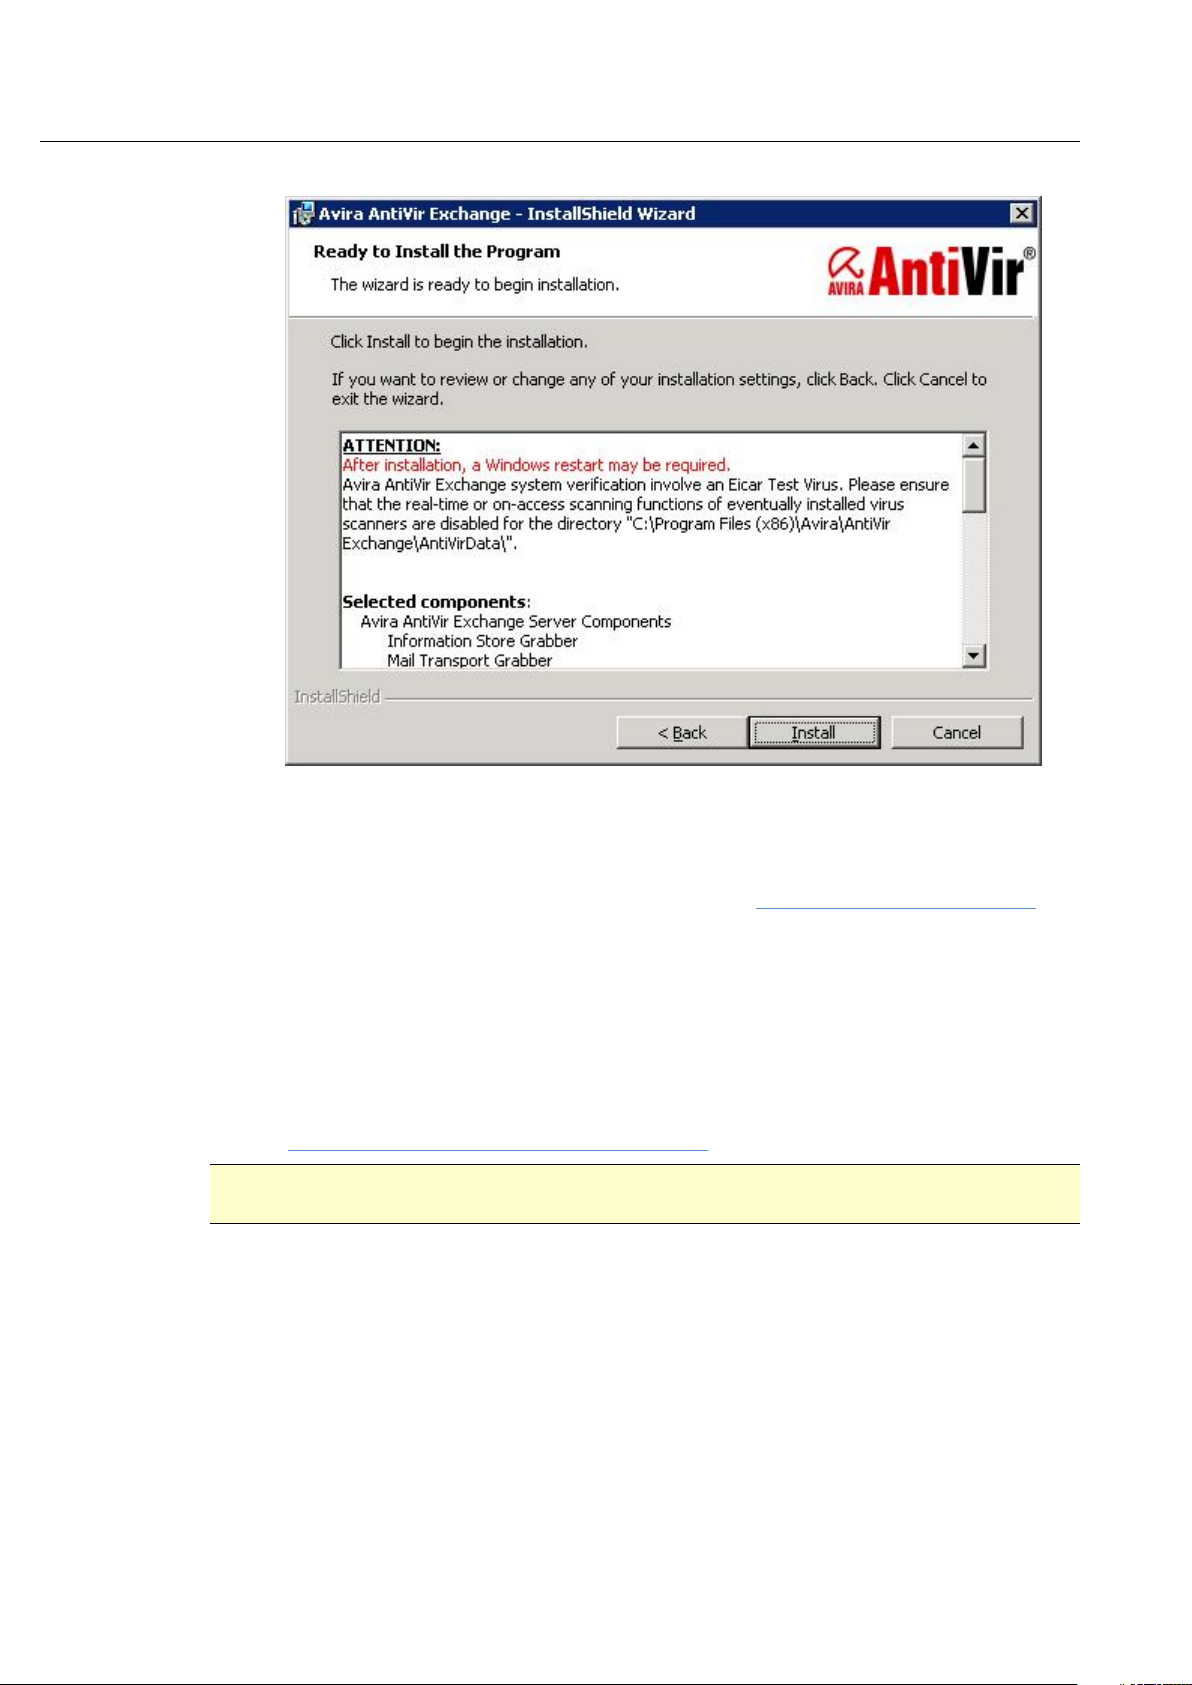
9. In the next dialog box, you are asked for the license file.
12
Enable the Use license file option and use Browse to select the path for the license
file.
Page 13
Installation
10. You then receive a summary of your settings.
11. Now disable the on-access scanner for the directory ...\AntiVirData if you have not
already done so.
12. Check your configuration settings.
These settings are accepted as the default settings in the configuration of the Avira
AntiVir Exchange Server. For more information, see AntiVir Exchange Server Settings
13. Follow the rest of the instructions and click Install.
Avira AntiVir Exchange is then installed in the following directory:
<Drive>:\<Default program directory>\Avira\AntiVir Exchange\
14. When you click Finish in the last dialog box, Avira AntiVir Exchange is successfully
installed.
The AntiVir virus scanner is completely configured and can be used straightaway. For this
purpose, we provide a job for the virus scan with AntiVir, which you can simply enable.
See also Configuring and enabling the AntiVir Scan Engine
Warning: You must disable any real-time or on-access scan functions of the virus scanners used
for the directory ...\Avira\AntiVir Exchange\AntiVirData\
.
.
2.3 Uninstalling Avira AntiVir Exchange
1. Click Start - Control Panel - Programs and Features
2. Select Avira AntiVir Exchange
3. Click Next. The setup will be launched and will uninstall Avira AntiVir Exchange.
13
Page 14

3 Technical description
Avira AntiVir Exchange is divided into three main components:
• The Avira AntiVir Exchange Console
• The Avira AntiVir Exchange Server
• The Avira AntiVir Exchange Configuration
The Avira AntiVir Exchange Console is the user interface for configuring and administering
Avira AntiVir Exchange. This is a so-called "snap-in" for the MMC.
The Avira AntiVir Exchange Console can be used to administer individual Exchange servers with
Avira AntiVir Exchange installed or entire "Avira AntiVir Exchange server farms". This makes
daily administration much easier, particularly in a multi-server environment.
The Avira AntiVir Exchange Console gives the administrator access to all the necessary
configuration information and to the AntiVir Monitor (which includes an overview of
quarantines) of the Avira AntiVir Exchange Servers. Two different access methods are used for
configuration purposes and to access the quarantines.
1. Standard Windows file access
Windows data access is required in order access the Avira AntiVir Exchange
configuration, for example to administer security settings. The Avira AntiVir Exchange
configuration may be available locally.
2. SOAP and SSL
The AntiVir Monitor
used for communication purposes.
is accessed via SOAP and SSL. A defined communication port is
The Avira AntiVir Exchange Console supports two modes:
1. Local administration
Here the Avira AntiVir Exchange Console is run directly on the Exchange server on
which all the Avira AntiVir Exchange components have been installed. This mode is
suitable for smaller environments and administration takes place on the local server.
2. Remote administration
In this case the Avira AntiVir Exchange Console is not run on the Exchange server, but
is installed on a client instead.
The Avira AntiVir Exchange Console runs on the following operating systems:
• Windows 2003
• Windows XP Professional
• Windows 2008
• Windows Vista
• Windows 7
The remote administration option is suitable for central administration in multi-server
environments. The Avira AntiVir Exchange Console uses one or more Exchange servers to
configure and administer Avira AntiVir Exchange.
3.1 The Avira AntiVir Exchange Server
Avira AntiVir Exchange Server is the term used to refer to the Avira AntiVir Exchange functions
and processes that run solely on the Exchange server.
14
Page 15

Technical description
The Avira AntiVir Exchange Server can be installed both in simple environments and in frontend/back-end environments.
The Avira AntiVir Exchange Server is in turn divided into a number of different areas.
3.1.1 The transport agent
The transport agent is a process that ensures that all emails, schedule queries, etc. sent, received
or routed by the Exchange server are "intercepted" (or grabbed).
The SMTP transport protocol is used for all transport involving emails, schedule requests, etc.
The "MS SMTP Transport Stack" is part of the SMTP transport protocol. This transport stack is
used to route all email traffic. It doesn’t matter whether these are emails that are sent between
mailboxes on the same mailbox or incoming and outgoing emails.
In every case, email must pass through the transport stack. The transport agent is "linked" to
this transport stack. As a registered event sink, the transport agent monitors the email traffic
and routes all relevant information to the Avira AntiVir Exchange Service – the second
component of the Avira AntiVir Exchange Server. The email remains active until all processing
by the Avira AntiVir Exchange Server is successfully completed.
Note: Exchange-internal information, such as replication messages, are recognized as such by
the transport agent and are left unchanged in the Exchange system.
3.1.2 The Avira AntiVir Exchange Service = Enterprise Message
Handler (EMH)
The Avira AntiVir Exchange Service is always started as a Windows service and accepts all
information from the transport agent. All further processing by Avira AntiVir Exchange will be
monitored and controlled by the Avira AntiVir Exchange Service from this point forward. If the
Avira AntiVir Exchange Service is stopped, the security functions of Avira AntiVir Exchange are
disabled.
The Avira AntiVir Exchange Service can access all the necessary information:
• The configured Avira AntiVir Exchange jobs
• The installed Avira AntiVir Exchange license
• The Active Directory
• The Avira AntiVir Exchange quarantine
All of this information is now used for many purposes, for example to check the emails for
viruses, identify spam emails and to place them in quarantine.
After processing, the Avira AntiVir Exchange Service returns the emails to the SMTP server.
3.1.3 The Avira AntiVir Exchange quarantine
One possible option is to stop infected emails or other undesirable emails on the server. This
prevents these emails from reaching the relevant recipients. These emails are placed in the Avira
AntiVir Exchange quarantine instead. A number of quarantines are available on each Avira
AntiVir Exchange Server after installation. Additional quarantines can be created by the
administrator.
An Avira AntiVir Exchange quarantine comprises
• A quarantine directory on the Exchange server
(...\AntiVirData\Quarantine\Default Quarantine)
• The emails copied to quarantine.
15
Page 16

Avira AntiVir Exchange 9
• A quarantine database (LocIdxDB.mdb).
Avira AntiVir Exchange automatically generates an entry in the quarantine database for every
email placed in quarantine. This database is a Microsoft Access file.
The following information is stored in this database:
• Email subject
• Date/Time
• Sender’s email
• Recipient’s email
• Sender’s email (SMTP)
• Recipient’s e-mail (SMTP)
• Short description of the restriction detected
• Email size
• Name of the Avira AntiVir Exchange job that placed this email in quarantine
• Name of the Exchange server
• Name of the email file
• Processing history
When an Avira AntiVir Exchange quarantine is displayed with the Avira AntiVir Exchange
Console, the information from the quarantine database is displayed first.
When a quarantine entry is opened, more information is loaded from the email file.
Communication with the Avira AntiVir Exchange quarantine uses SOAP (Simple Object Access
Protocol) + SSL (Secure Socket Layer). This applies both to direct "local" access to the server and
to access from a remote Windows workstation. Port 8008 is the default communication port.
This port can be changed in the Avira AntiVir Exchange Console (AntiVir Server node). If this
port is changed for the server, this change must also be adapted to all accessing Avira AntiVir
Exchange Consoles. All computers must use the same port. SSL is used to encrypt the SOAP
communication channel. All the necessary components are provided during installation.
3.1.4 The Active Directory/LDIF
Avira AntiVir Exchange does not make any changes or additions to the Active Directory (AD).
However, information from the Active Directory is read out at various points by Avira AntiVir
Exchange.
When starting, the Avira AntiVir Exchange Service determines which Global Catalog server is
available. This is used when determining addresses from distribution lists during email
processing, for example.
The Avira AntiVir Exchange Console uses the Active Directory when selecting sender/ recipient
conditions.
16
If there is no Active Directory available because, for example, the relevant ports are not open,
then it is possible to work with an LDIF file. This can be generated by means of an LDAP export
from an Active Directory, Exchange user directory or Notes Name and Addressbook (NAB).
Page 17

Technical description
3.1.5 Compressed files/archives: The Avira AntiVir Exchange
unpacker
Files are often compressed when sent by email. To ensure that the virus scan and all checks also
work for archives, Avira AntiVir Exchange uses an unpacker to be able to check files within the
archive. Avira AntiVir Exchange includes an unpacker which is automatically available after
installation.
The unpacker supports the following archive formats:
• ACE
• CAB
• ZIP
• Selfextracting ZIP
• ARJ
• Selfextracting ARJ
• TAR
• GZIP
• TGZ (Tape archive)
• UUE (Executable compressed ASCII archive)
• LZH (LH ARC)
• RAR
• Selfextracting RAR
• Java Archive (.jar)
• BZIP2
• 7-ZIP
Note: It is possible for an archive itself to contain archives. These archives (recursively packed
files) are unpacked to a depth of 5 as standard. All archives that exceed this limit are transferred
to the Bad Mail area.
The default upper limit for an email including unpacked files is 300 MB. A limit like this is
particularly important in so-called "ZIP of Death" attacks.
The unpacking depth and the size limit can be changed in the console under Basic
Configuration - AntiVir Server - Properties - General.
3.2 The Avira AntiVir Exchange configuration
All the information required to run Avira AntiVir Exchange is stored in the Avira AntiVir
Exchange configuration. The Avira AntiVir Exchange configuration is available in the form of an
XML file (ConfigData.xml).
The ConfigData.xml file is similar in structure to a database. There are different entries for each
configuration area. Because the configuration involves a single file, it is very easy to distribute
and back up the configuration. When help is required with configuration problems, the
ConfigData.xml can be sent to the Avira Support Team for analysis.
17
Page 18

Avira AntiVir Exchange 9
The configuration information required both by the Avira AntiVir Exchange Server and the
Avira AntiVir Exchange Console. Among other things, the Avira AntiVir Exchange Server derives
the data for the Avira AntiVir Exchange job to be run from this information. To be able to make
changes to the configuration with the Avira AntiVir Exchange Console, access is also required to
the ConfigData.xml file. The Avira AntiVir Exchange configuration information can be stored
both in a local directory and on a network share. An entry in the registry defined which Avira
AntiVir Exchange configuration is used by the Avira AntiVir Exchange Console or the Avira
AntiVir Exchange Server. The path to the Avira AntiVir Exchange configuration can be specified
in C:\..... format or as UNC path \\Servername\Share\ConfigData.xml. If the specified Avira
AntiVir Exchange configuration is unavailable, Avira AntiVir Exchange uses the so-called "LastKnown-Good" configuration. This is logged in the Windows event list.
The "Last-Known-Good" configuration is stored locally for each server and is always updated
when changes have been made to the Avira AntiVir Exchange configuration and it is possible to
access the "Last-Known-Good" configuration from the Avira AntiVir Exchange configuration.
Note: A parameter is available to allow a non-standard configuration to be opened with the
console. For example, you could start the Avira.msc file with parameter config and the required
configuration file as follows:
"C:\Programs\Avira\AntiVir Exchange\Avira.msc" config
"C:\OtherFolder\Directory\ConfigData.xml"
You can also specify a UNC path here.
18
Page 19
4 Details on the Avira AntiVir Exchange
Management Console
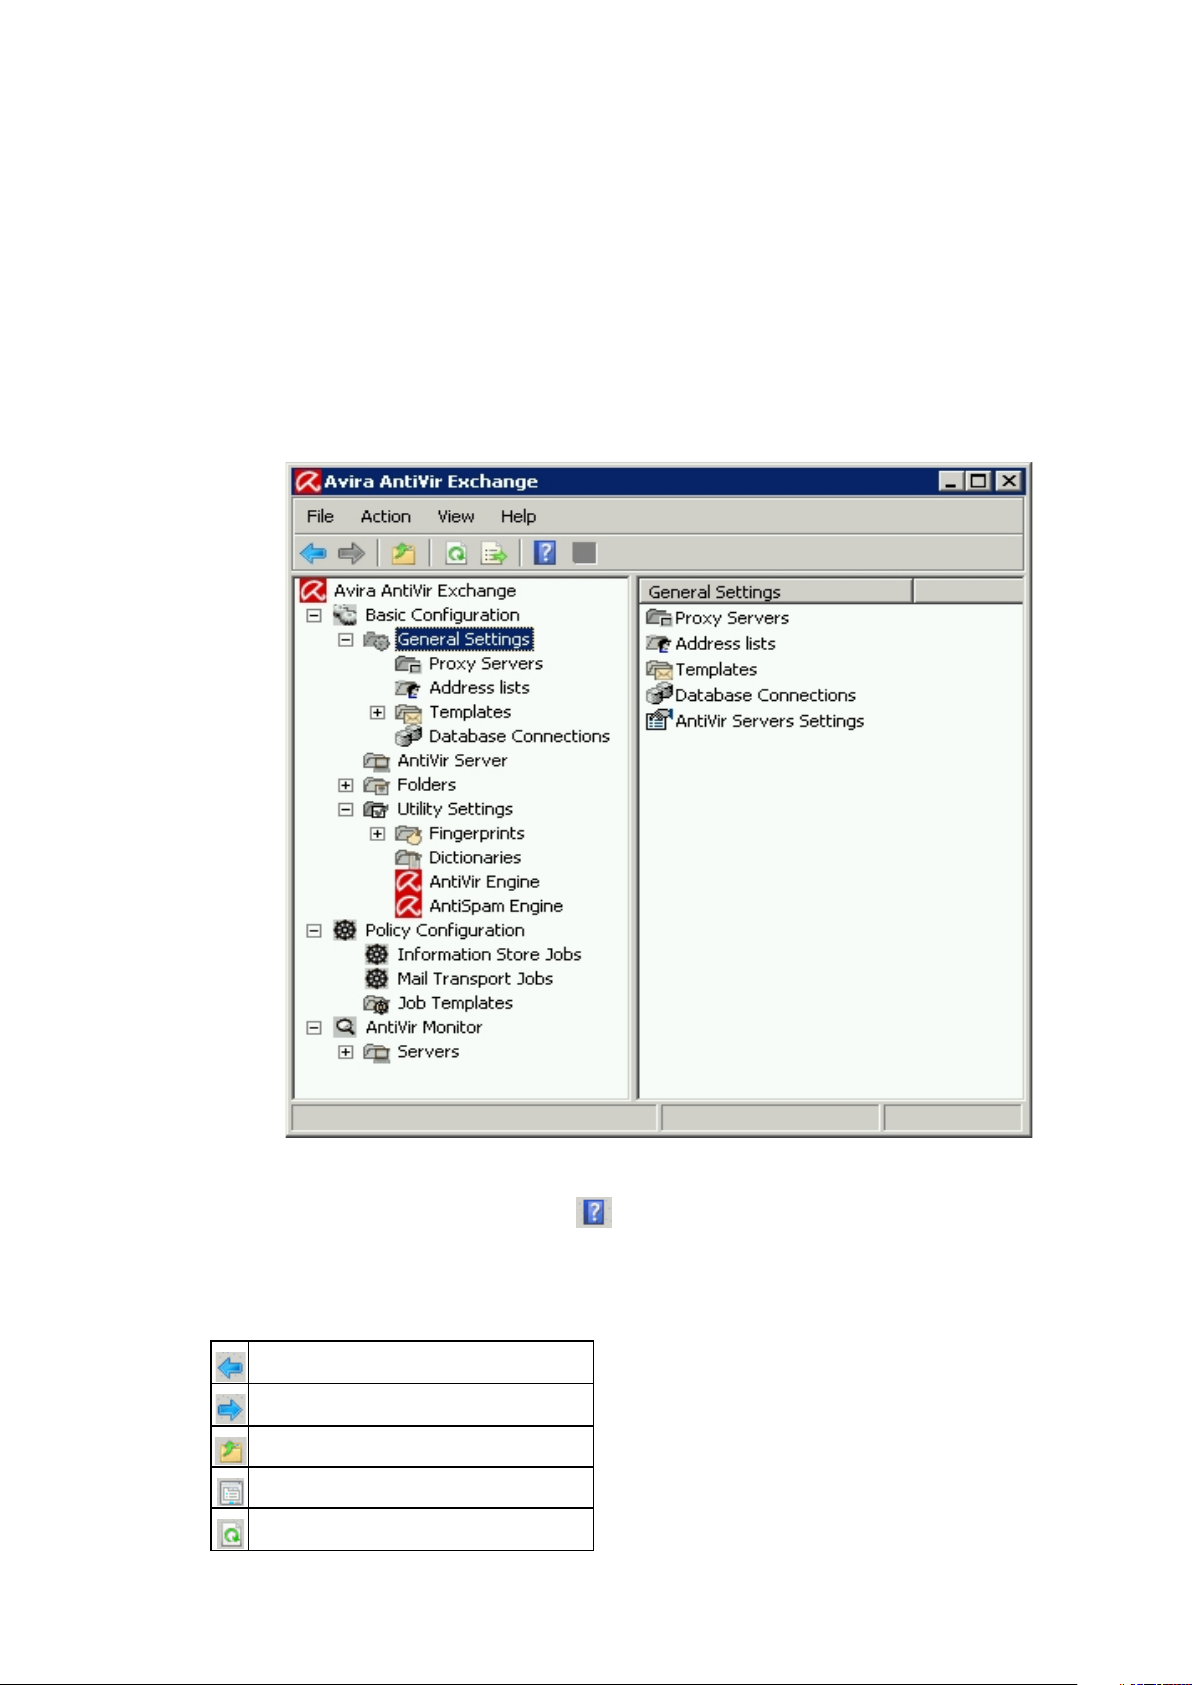
1. Open the AntiVir Exchange Management Console
2. In the left hand column select the Basic Configuration, Policy Configuration or
AntiVir Monitor.
The corresponding subfolders can be seen in the right hand window.
3. To launch Online Help click on
in the toolbar or on Show Help File in the menu.
4.1 The toolbar
Back
Forwards
Up one level
Properties of the selected object
Refresh
19
Page 20
Avira AntiVir Exchange 9
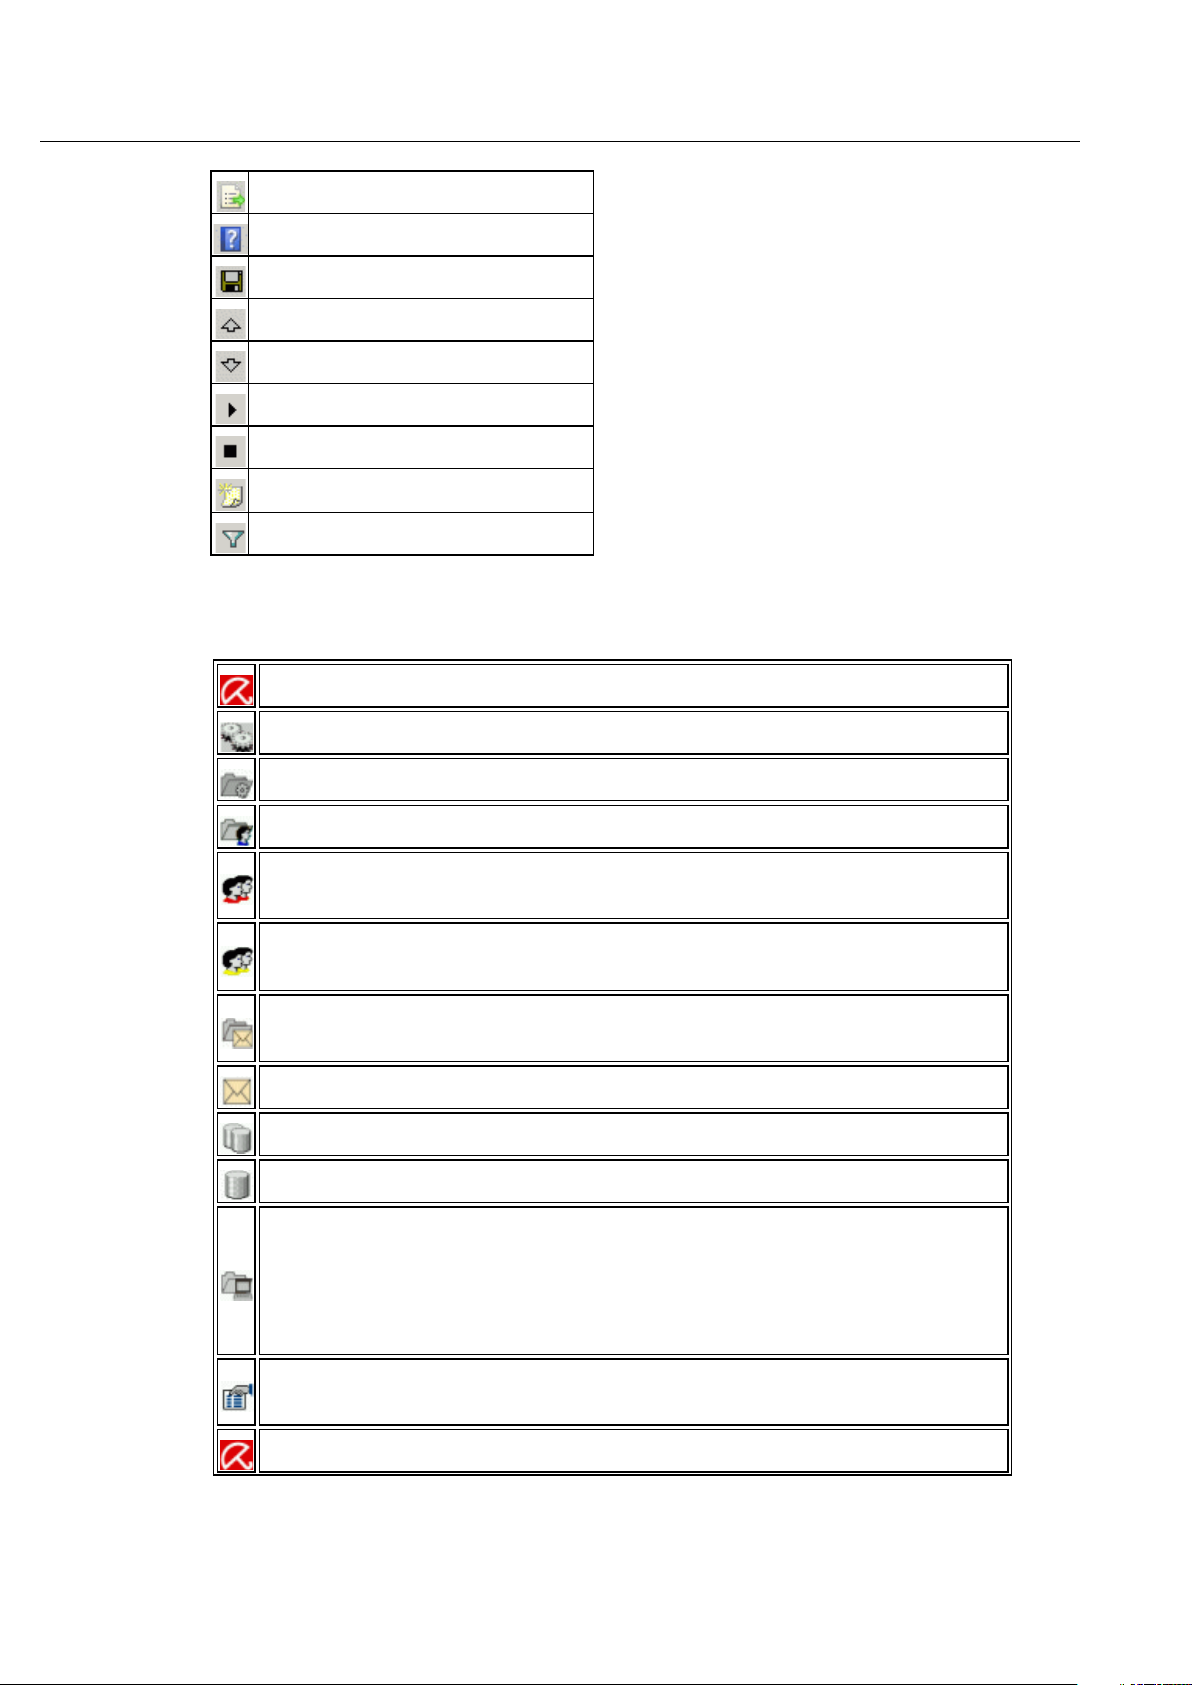
Export list
Help
Save
Increase position/order by one
Decrease position/order by one
Enable job
Disable job
New object
Set filter in quarantine / bad mail
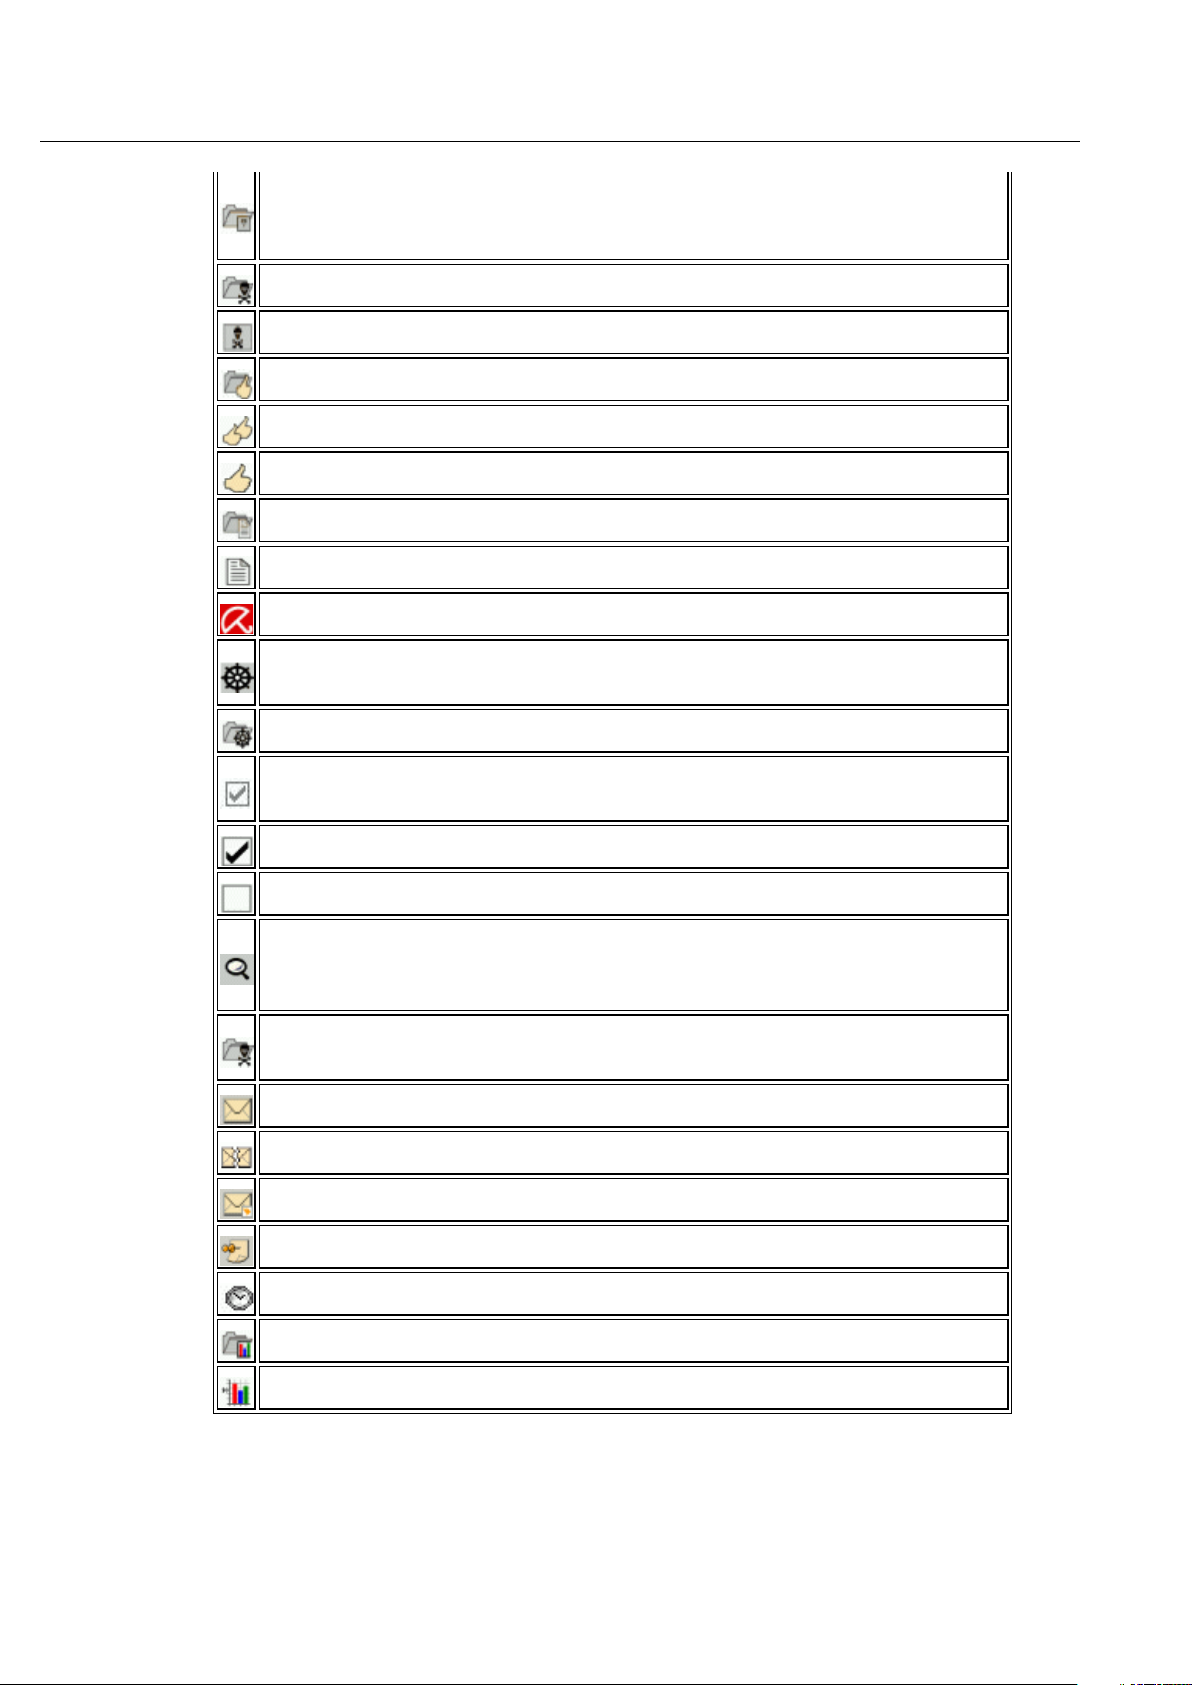
4.2 Meaning of icons
Avira AntiVir Exchange Console start and logo
Basic Configuration for the general settings of all modules.
Node for General Settings
The folder for the address lists
A single Avira AntiVir Exchange address list (red collar), supplied with Avira
AntiVir Exchange and cannot be changed.
A single user-defined address list (yellow collar), can be created by the user and
configured under Properties
The folder for Sample notifications, containing the various samples for every
job type and recipient.
A single sample notifications, configurable under Properties
The folder for the individual database connections.
The icon for a single database connection, configurable under Properties.
A list of all Avira AntiVir Exchange servers. Servers can be added, removed and
configured. The shared properties for all servers are configured under General
Settings - AntiVir Server Settings, or, alternatively, by right-clicking on
AntiVir Server - Properties. These include the standard email addresses and
internal domain(s)
20
General AntiVir Server Settings under the General Settings node in the righthand window.
A single server, configurable under Properties.
Page 21
Details on the Avira AntiVir Exchange Management Console
Folder Settings and Utility Settings. The quarantines are found under Folder
Settings and all additional items to be configured, such as virus scanner,
fingerprints and dictionaries, are found under Utility Settings.
The quarantine folder structure. This contains all quarantine folders.
A single quarantine folder, configurable under Properties.
The folder for fingerprint groups.
A logically related fingerprint group.
A single fingerprint, configurable under Properties.
The folder for the word lists used to filter content.
A single dictionary, configurable under Properties.
The AntiVir virus scanner, configurable under Properties.
Policy configuration for configuring individual jobs based on your company's
policies.
Folder for sample jobs, containing the jobs for individual job types.
An AntiVir job or AntiVir Wall job, which can have various job types, configurable
under Properties.
An active job, configurable under Properties.
An inactive job, configurable under Properties.
The AntiVir Monitor for viewing all quarantine folders on each available server.
The quarantine folders contain the copies of the original emails, including the
attachments.
The quarantine folders with original mails for inspection. Detailed information
can be retrieved for every email.
A single quarantine item
Invalid quarantine item
Resent quarantine item
Information store for quarantine item.
Time and day of quarantine update
Folder for different AntiVir reports delivered with Avira AntiVir Exchange.
Individual AntiVir report.
21
Page 22

Avira AntiVir Exchange 9
The view of the Avira AntiVir Exchange Console comprises three areas:
• Basic configuration
• Policy configuration
• AntiVir Exchange Monitor
4.3 Basic configuration
The basic configuration is where general settings and the most important basic settings are
made for the modules.
The basic configuration is used to manage:
• General settings, such as:
• All folders (e.g. quarantine folders)
• and the utilities:
• Proxy server
• Address lists
• Notification templates (templates)
• Database connections
• AntiVir servers
• Word lists for the content check
• Fingerprints for blocking attachments
• AntiVir engine
• AntiSpam engine
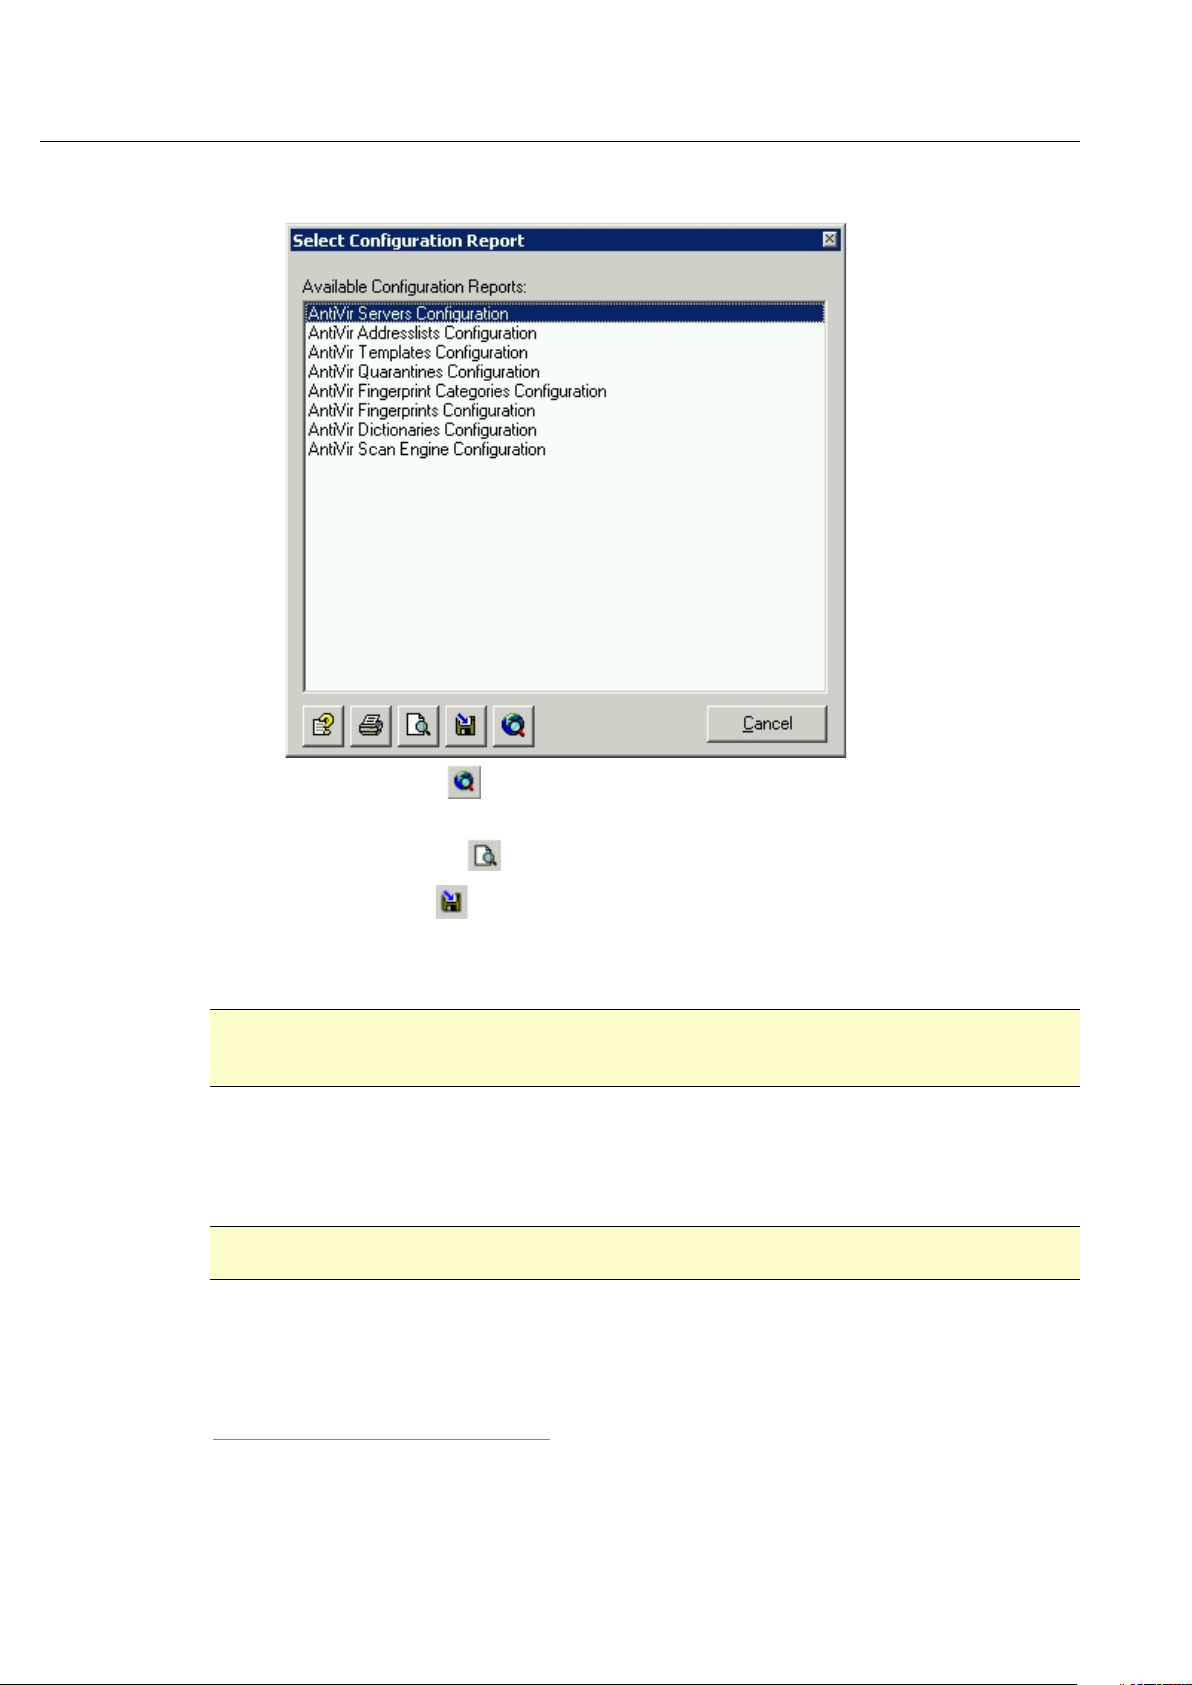
4.3.1 Overview with configuration reports
A configuration report provides an overview of the current configuration:
1. Right-click on Basic Configuration and select All Tasks - Show Configuration Reports.
22
Page 23
Details on the Avira AntiVir Exchange Management Console
2. Click the required report.
3. Click Show report.
The report is then opened as a HTML file in the browser.
4. Click Report preview
5. Click Save report
to display a print preview.
to save the selected report as a HTML file.
4.3.2 Importing a configuration
Warning: Before changing an object in the basic configuration, it is recommended that you create a copy
of the old object of the same name and rename it. The new version replaces the old one, which means that
your own changes to the object are then lost.
If a modified version is available:
1. Select Basic Configuration - All Tasks - Import Configuration to reinstall all
elements/objects such as word lists or fingerprints.
2. For this, select the corresponding XML file provided by Avira.
Warning: This function does not import the full configuration (ConfigData.xml) including the jobs, but
instead imports only individual basis objects.
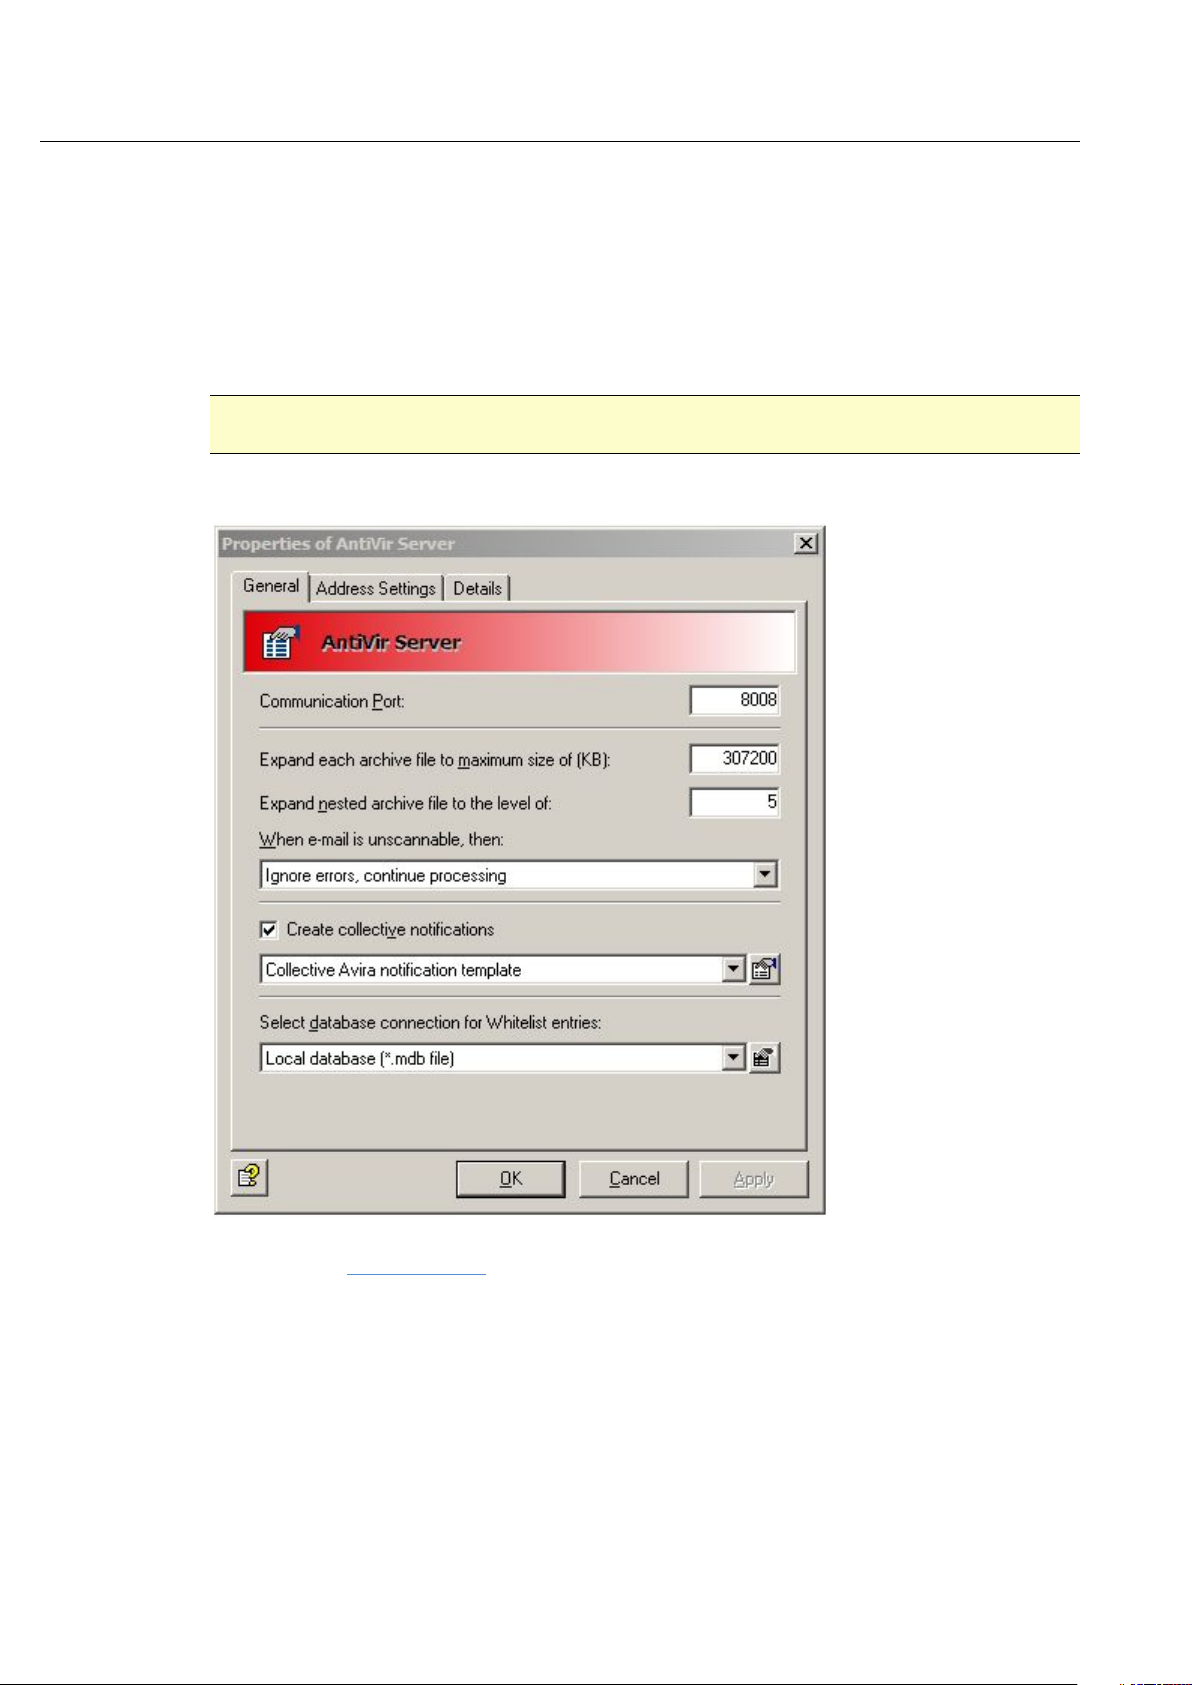
4.3.3 AntiVir Server settings
Under AntiVir Server Settings you can configure the default settings for all Avira AntiVir
Exchange servers. Each server can also be configured on an individual basis. For more details see
Settings for an individual AntiVir server
1. Select Basic Configuration - General Settings
2. Open Properties:
• In the right-hand window click on AntiVir Server Settings and right-click to select
Properties.
.
23
Page 24
Avira AntiVir Exchange 9
Packed files and AntiVir Monitor
The settings on the General tab define the maximum permissible size for unpacked files on the
hard disk and the maximum permissible unpacking depth for archives. Emails that exceed these
values are transferred to the Bad Mail area.
Warning: Make sure that your communication port is set correctly for the AntiVir Monitor.
Otherwise it will not be possible to communicate with the servers.
Port 8008 is used as the default during installation. The values entered here apply to all servers.
• Properties can also be opened by double-clicking on AntiVir Server Settings.
• Alternatively, you can access the properties in the left-hand window under Basic
Configuration by right-clicking AntiVir Server.
24
In this context you should also read the description of how to assign rights and make security
settings under AntiVir Monitor
.
Unscannable elements
Unscannable elements, for example emails including encrypted attachments, can be subject to
cross-server actions which are automatically performed when the program identifies an element
as unscannable.
You can choose between two options from the drop-down. Either the fact that the email is
unscannable can be ignored and the email is processed or the email is automatically moved to
the bad mail directory.
Page 25

Details on the Avira AntiVir Exchange Management Console
Combined notification
Each job can generally be configured so that, when a particular event occurs, the recipients,
senders and/or administrators are notified of this event (Actions tab in Job Properties).
If several of these events occur for a processed email, then the default setting for Avira AntiVir
Exchange emails is that they do not send a separate notification for every event, but rather that
all notifications are sent as a collective notification. This means that the recipients of this
collective notification only receive one email that lists all incoming events.
The recipients of this Collective Notification only receive one email that lists all incoming events.
Collective Notifications is used as the template in this case. You can modify this template or
create new templates (with Basic Configuration - General Settings - Templates -
Collective Notifications).
Note: If you suppress the sending of collective notifications and instead wish to send a separate
email notification for every event that occurs, you should disable the Create collective
notifications field under General Settings - AntiVir Server Settings - General Tab.
Central whitelist
In multi-email environments every participating server creates its own user whitelists. Without
email synchronization, each user therefore receives a separate whitelist for each server and each
whitelist has to be managed separately. To be able to manage these whitelists centrally, thus
simplifying administration, instead of the regular local database based on Microsoft Jet-Engine,
you can also set up a Microsoft SQL server to save the data for all participating Avira AntiVir
Exchange servers in a central SQL database.
To create central user whitelists, you must first configure a database connection between the
SQL server and the Avira AntiVir Exchange server (Basic Configuration - Database Connections).
As soon as this connection is in place, select the relevant configuration in the Database
Connection for Whitelist Entries field.
25
Page 26
Avira AntiVir Exchange 9
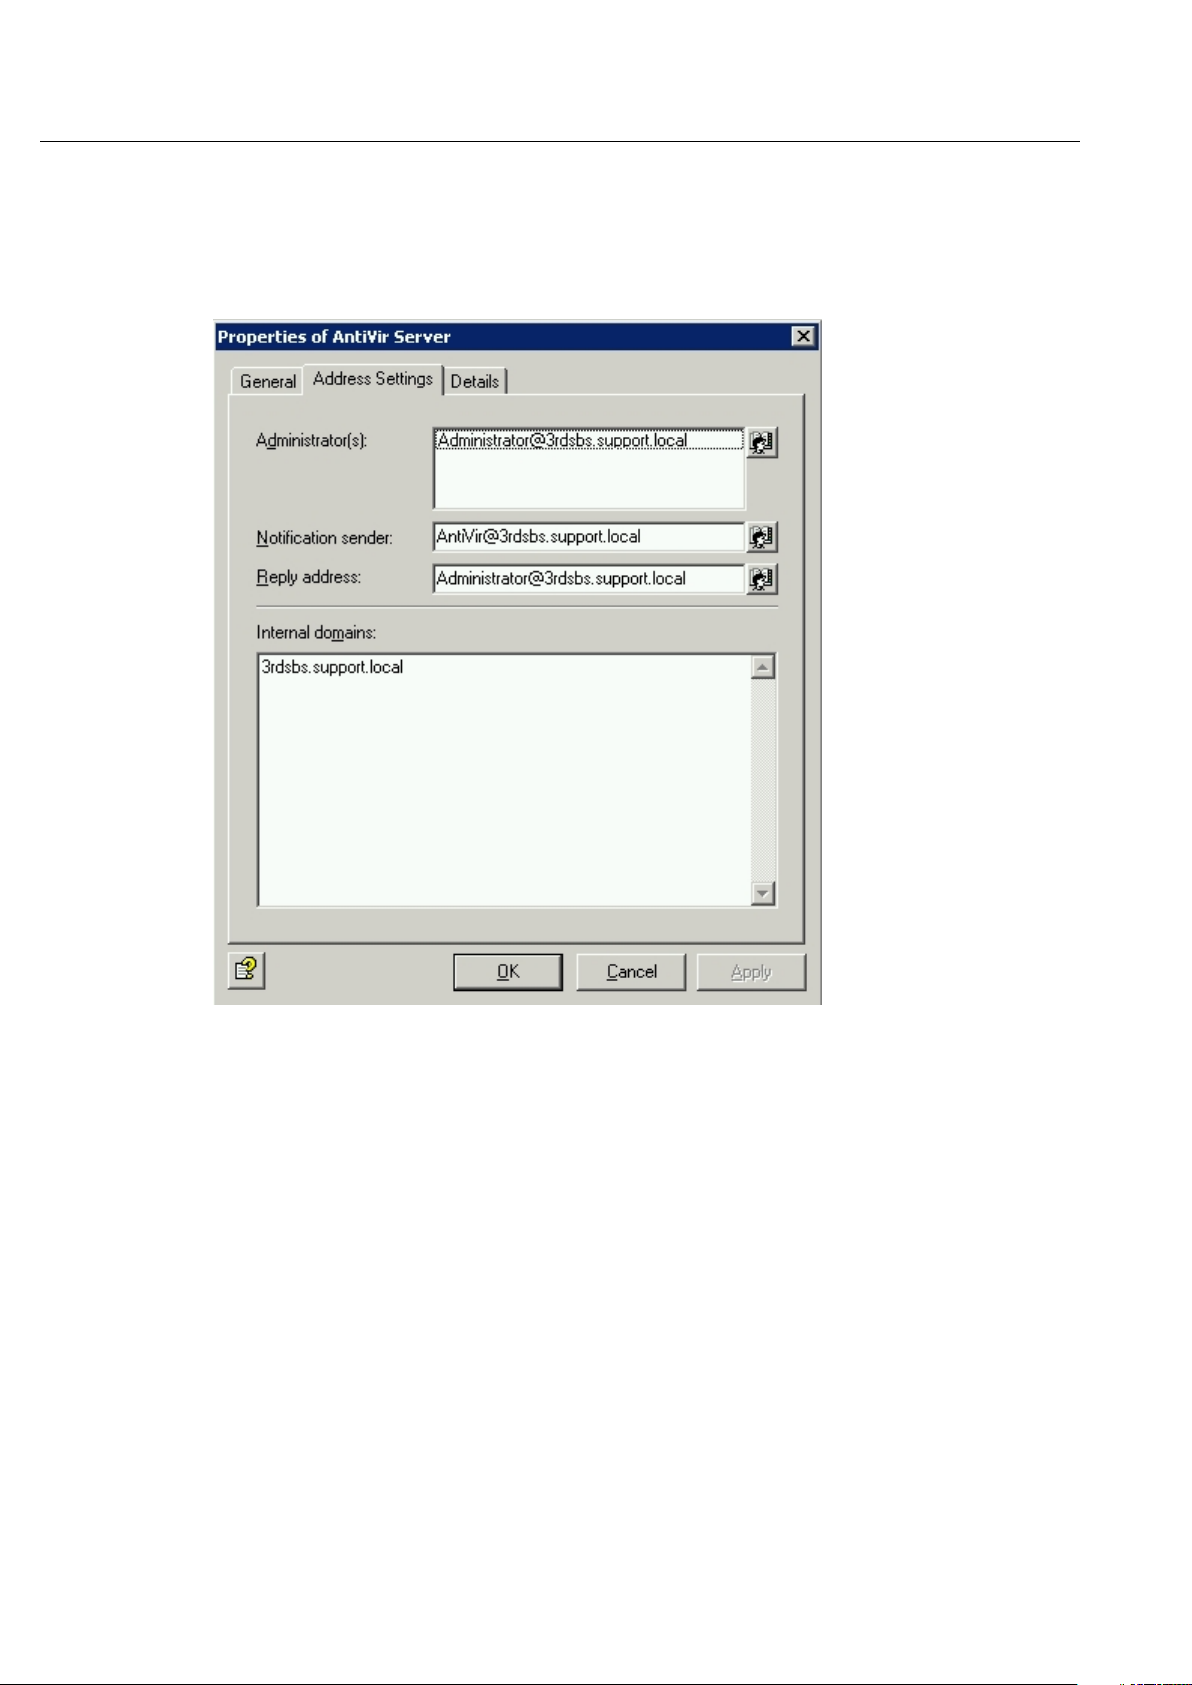
Defining email addresses and internal domains
Avira AntiVir Exchange requires a number of basic settings for the mail domain of the emails to
be processed. During installation, the email address of the specified Avira AntiVir Exchange
administrator is used to enter the following basic settings for Avira AntiVir Exchange:
• Administrator(s): The Avira AntiVir Exchange administrator addresses entered here
receive important status notifications from the Avira AntiVir Exchange installation and
the configured administrator notifications. The installation enters the queried
administrator address as the default.
• Notification sender: The sender displayed in Avira AntiVir Exchange notifications. The
installation enters Avira AntiVir Exchange with the mail domain of the queried
administrator address as the default.
• Reply address: The recipient of replies to these notifications in Avira AntiVir Exchange
notifications. The installation enters the queried administrator address as the default.
• Internal domains: The mail domains specified here are seen as internal mail domains,
while all others are considered external mail domains. This setting is used to
differentiate between incoming and outgoing emails in the Avira AntiVir Exchange rules
on the basis of the sender and recipient addresses of an email. For example, a spam
filter job will only deal with incoming emails, while AntiVir should not be applied to
outgoing emails.
Multiple domains are separated with Return. Subdomains are automatically included if
the main domain is preceded by the prefix "*."as a wildcard, e.g. *.domain.com. The
installation enters the mail domain of the queried administrator address as the default.
26
Page 27
Details on the Avira AntiVir Exchange Management Console
These entries apply to all Avira AntiVir Exchange servers. The settings can be changed here at
any time.
4.3.4 Settings for an individual AntiVir Server
Select Basic Configuration, click AntiVir Server in the left-hand window and select the
required server in the right-hand window with a double-click. To create a new server, right-click
on AntiVir Server - New - AntiVir Server. Right-click on Properties and configure the
settings for the new server.
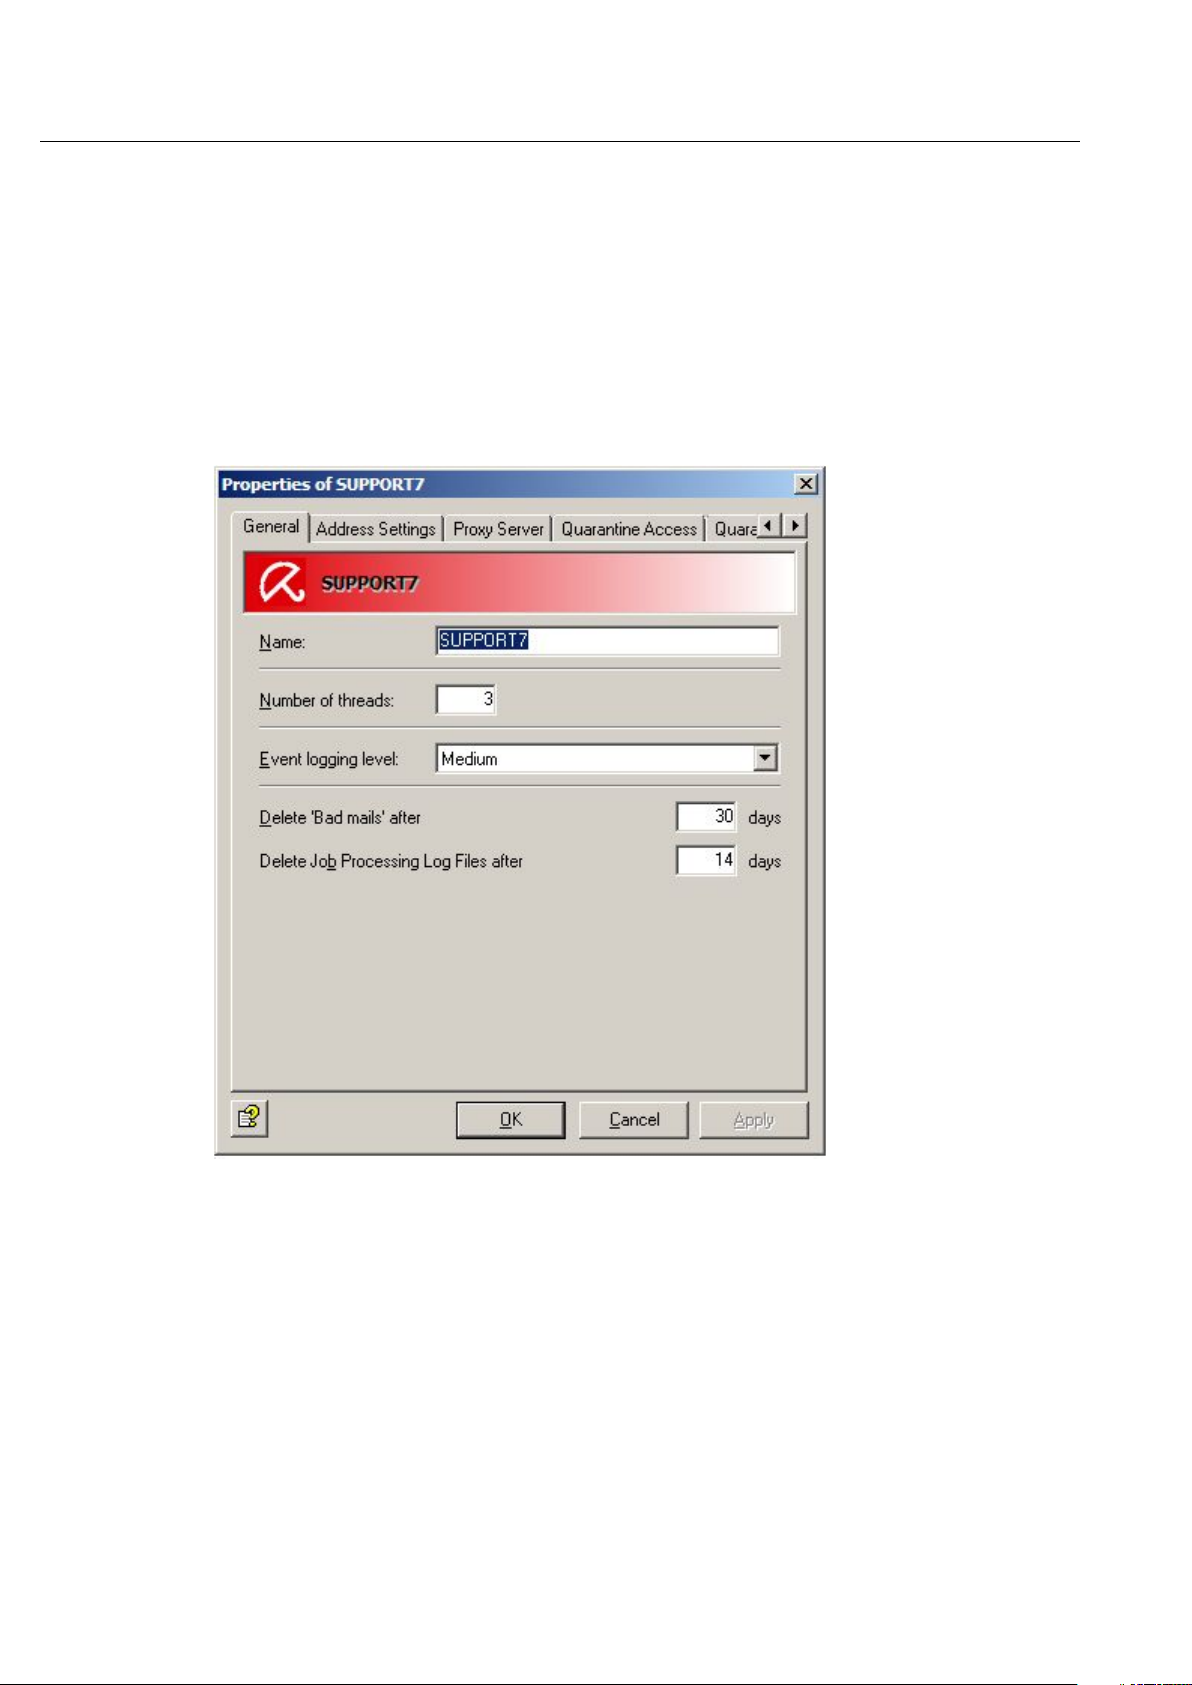
General server settings
1. Enter the name of the Exchange server.
The current Exchange server name is automatically entered during installation.
2. Define the maximum number of simultaneously processed emails in the Number of
Threads field.
The number of emails that can be reasonably processed by AntiVir depends on the
configuration and performance of your server.
3. Select the log level for the event log which can be viewed with the event viewer
(Windows Event Log).
Levels range from None to Maximum.
4. Decide on the number of days for which the emails are to remain in Bad Mail
quarantine.
The emails are automatically deleted after this number of days elapses.
27
Page 28
Avira AntiVir Exchange 9
5. Define the number of days after which a job processing log is to be deleted in the Log
Note: To be able to access a newly created server immediately in the AntiVir Monitor, update
the view in the monitor (right-click on AntiVir Monitor - Update, or use the icon in the
toolbar).
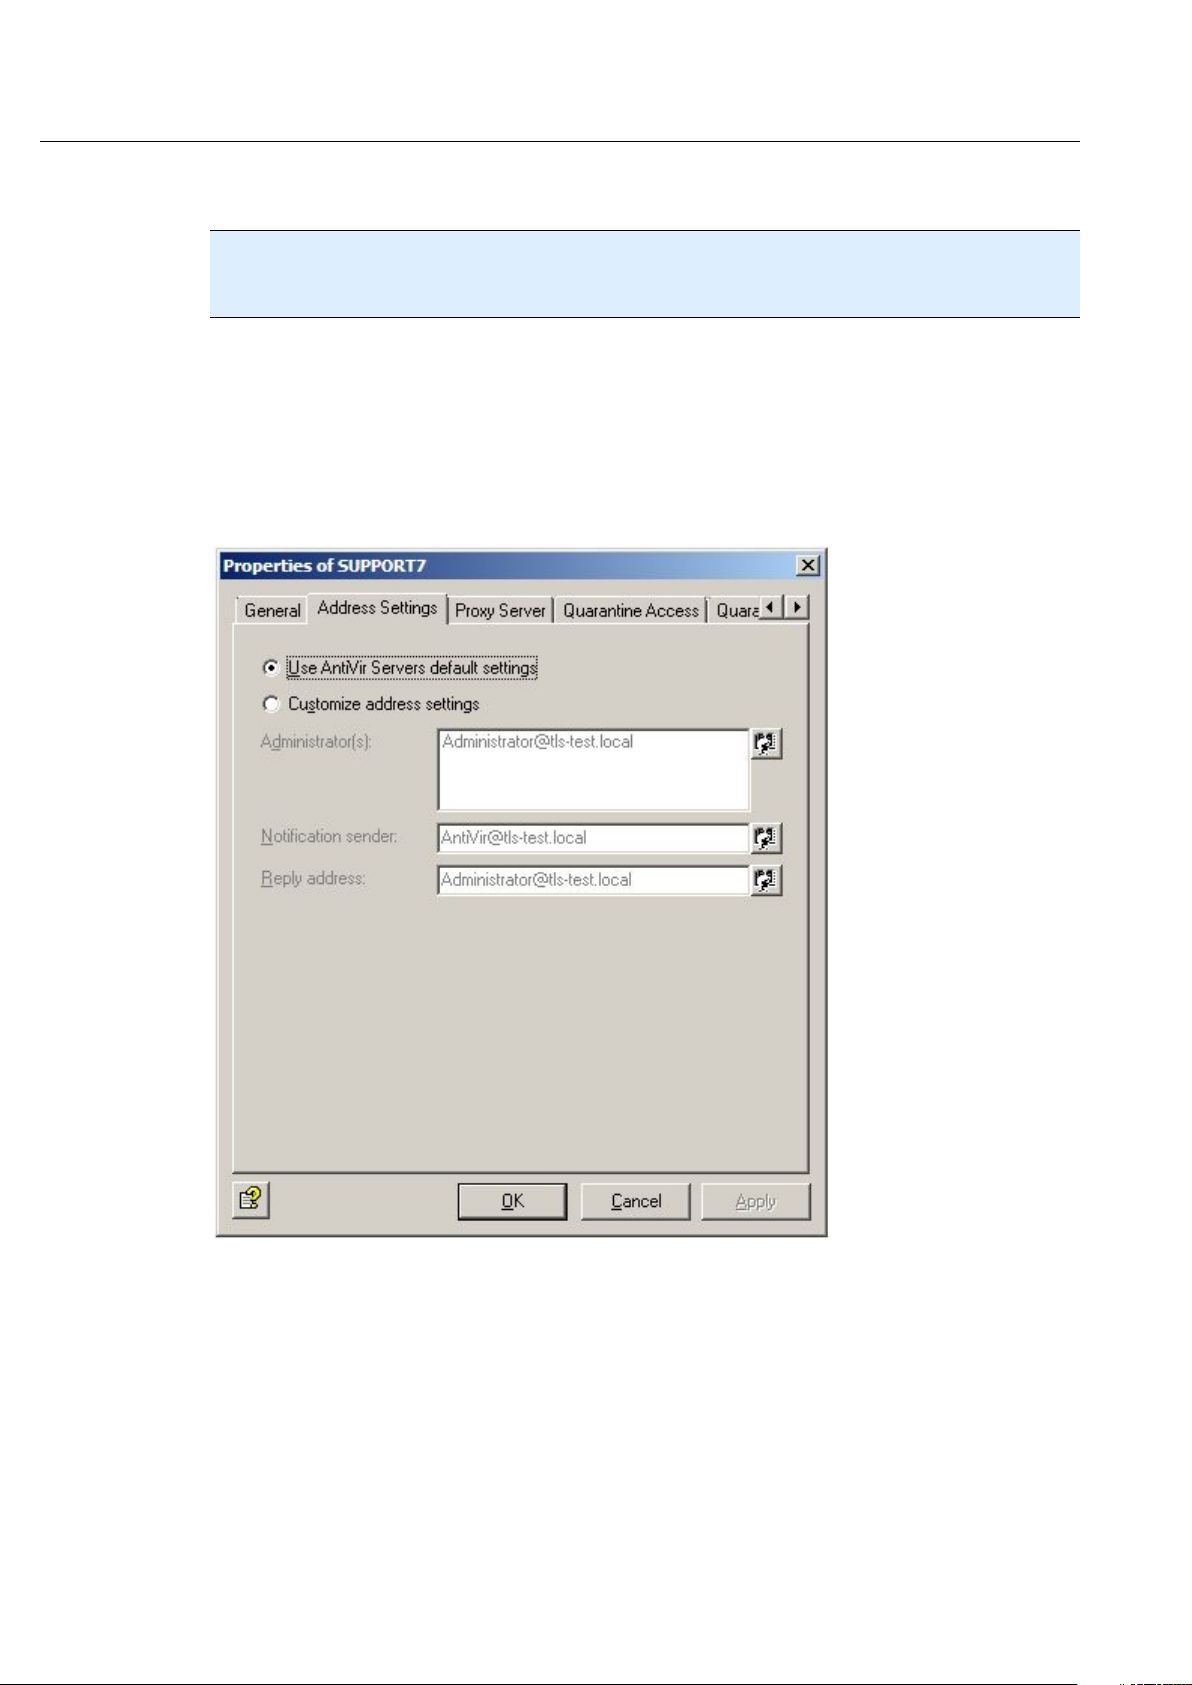
Individual email addresses for an AntiVir Server
The settings for each server are taken from the properties of all AntiVir Servers that are set
automatically during installation or that have been entered individually by you. These settings
are regarded as AntiVir Server default settings.
If you need individual settings for a server, enable the option Customize address settings and
enter the addresses in the relevant fields.
folder.
28
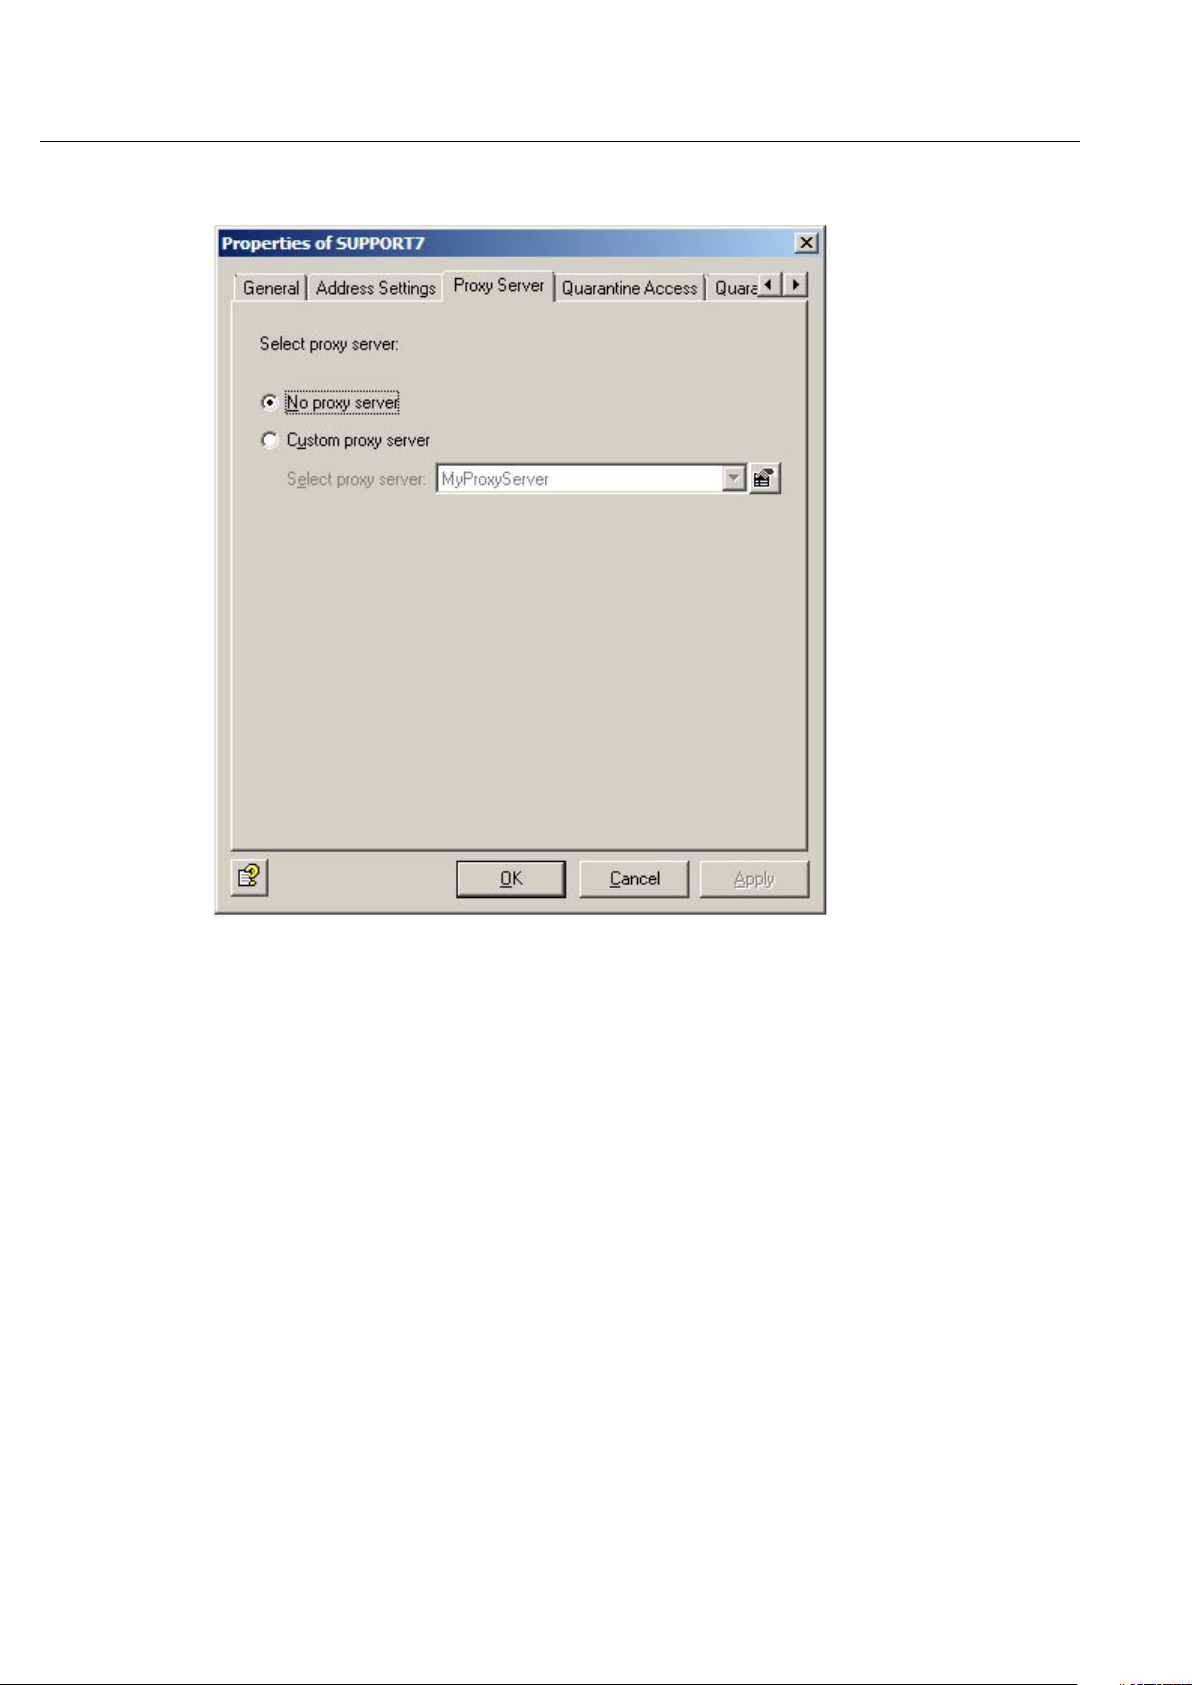
Using proxy servers
If a proxy server is required in your network environment for Internet connections, you can
select the appropriate proxy server for every AntiVir Server. For example for downloading
updates from the Internet.
Page 29
Details on the Avira AntiVir Exchange Management Console
Click the Proxy servers tab.
Proxy server settings
If you wish to connect your AntiVir Server to a proxy server, select your user-defined
appropriate proxy server from the list.
If you have already specified the connection data for the proxy server while installing Avira
AntiVir Exchange, you will see these proxy server settings under Basic Configuration -
General Settings - Proxy Servers.
Otherwise, you should enter the proxy server settings there:
• Name/IP Address: The full name or IP address of the proxy server.
Example 1: proxy.mydomain.de
Example 2: 127.0.0.1
• Port: Port number of the proxy server. The specified port is used to communicate with
the proxy server.
Example: 8000
• User and password (optional): Authentication data under which the update service
logs onto the proxy server.
Example: proxy_user
A proxy server is deleted by right-clicking and selecting Delete . Please note that you cannot
delete a proxy server that is already in use by an object.
29
Page 30
Avira AntiVir Exchange 9
If the actions of the virus scanner and AntiSpam engine are to be executed by means of a proxy
server, make the appropriate settings in the proxy server tab.
User-specific access to quarantine
Avira AntiVir Exchange allows users to access their own quarantine emails.
Which emails are available and which users have access can be configured individually for each
quarantine. This function is particularly interesting in relation to spam filtering, i.e. for spam
quarantines. In addition, the administrator has less work to do because users can deliver the
individual quarantine emails themselves.
They can define whether users are permitted to access their quarantine emails and which type
of emails they can access for each individual server. The user receives a quarantine summary
report containing information on quarantined emails and, by clicking on the appropriate action
for the relevant email, thereby creating a request.
Individually configured for each quarantine, these actions are Request (deliver to recipients of
the summary report), Approve (delivery to all recipients) and/or Remove (flag email for
deletion in the quarantine). User access is by means of an email request or a HTTP request.
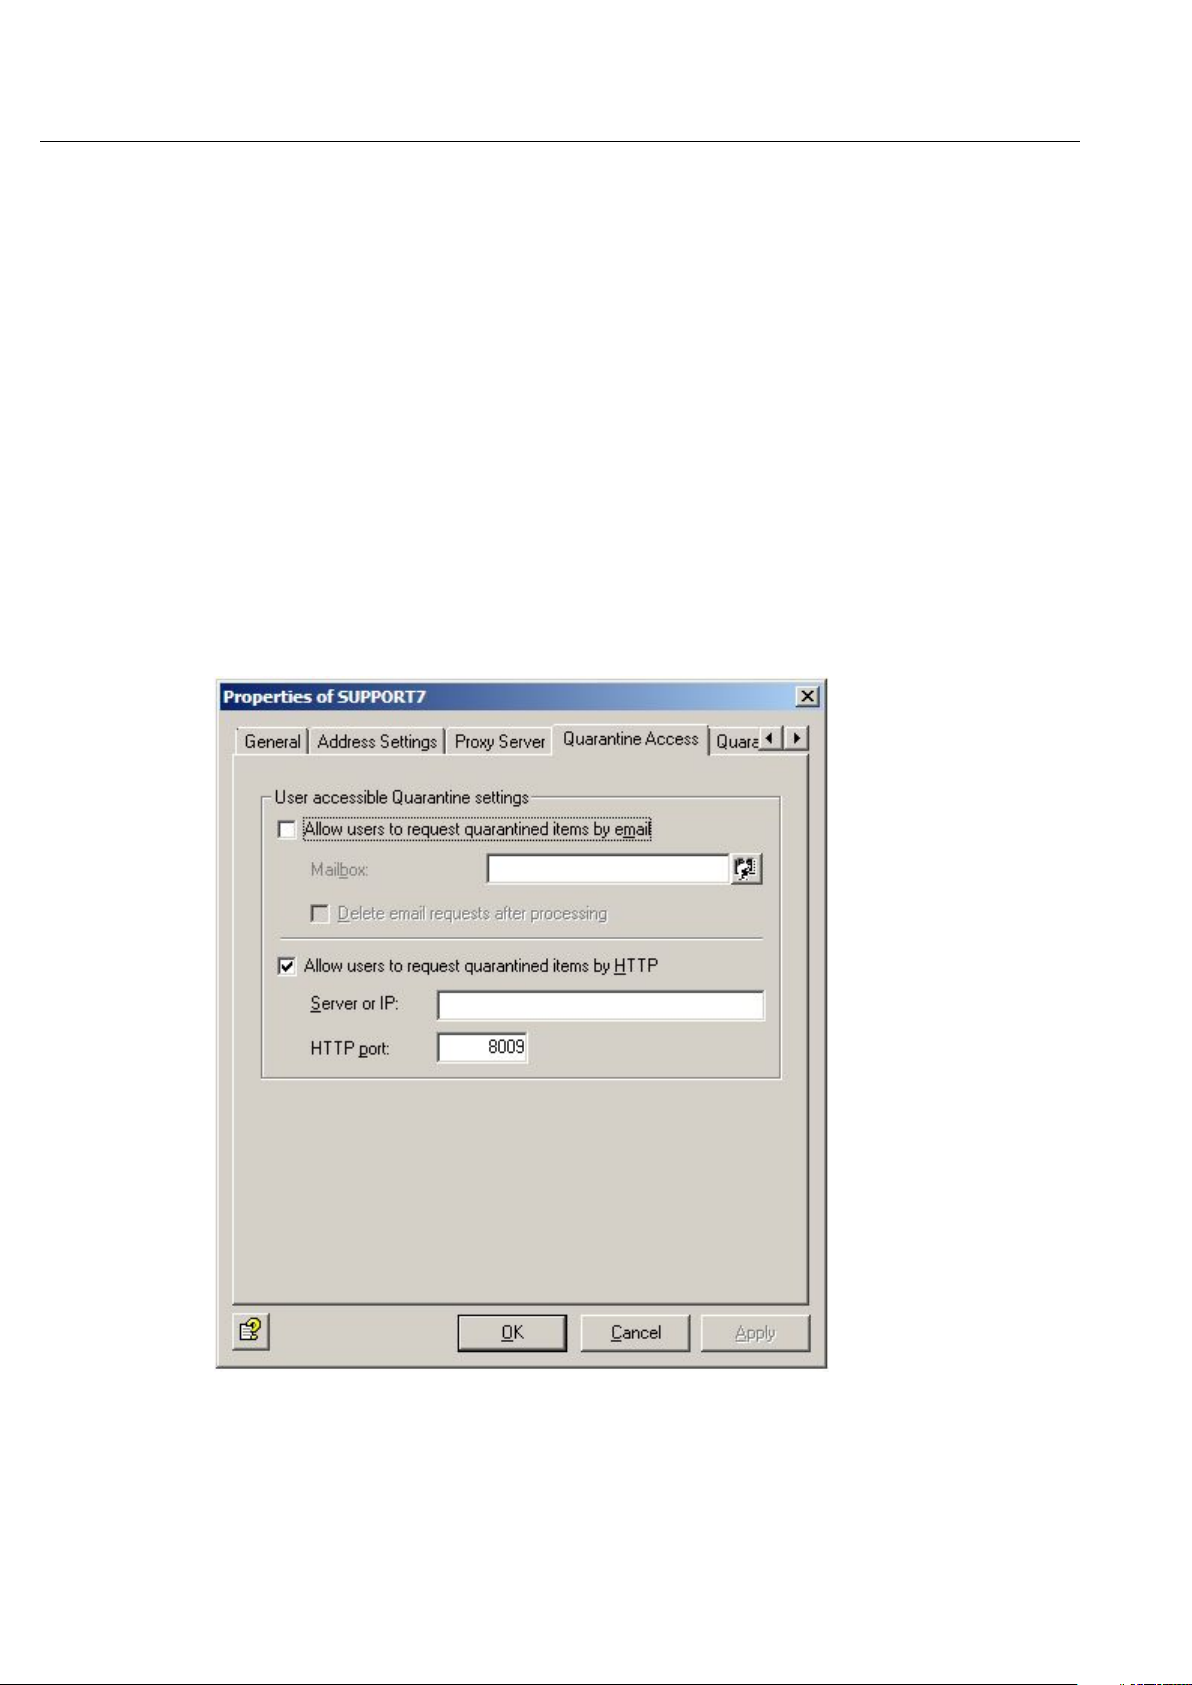
Click the Quarantine Access tab:.
30
Allow users to request quarantined items by email: The quarantine request is initiated by
means of an email request. If the user clicks on the action link for the required email in his
quarantine summary report, the email request is automatically generated and sent to the email
address you define in the Mailbox field on this tab.
This requires that the email address specified here should exist and that the email is sent via the
server on which Avira AntiVir Exchange, and the corresponding quarantines, are installed.
Page 31

Details on the Avira AntiVir Exchange Management Console
We recommend that you set up the mailbox on the relevant server. The content of the email is
read out, thereby performing the action required by the user. AntiVir recognizes request emails
from users by:
1. the email address (specified in the Mailbox field)
2. the keyword for a user request in the email (User Request)
Finally, the request mail is placed in the specified mailbox.
Enable the Delete email requests after processing option if the request emails are to be
deleted from the specified mailbox after processing.
Allow users to request quarantined items by HTTP: The quarantine request is initiated by
means of HTTP. The default browser opens as soon as the user has clicked the required action.
The user receives a message indicating that his request is being processed. This request requires
a free port. The standard entry is port 8009:
Warning: The response to users displayed by the browser is always the same
(OK_Response.html in directory AntiVir\App-Data). The user will not be notified if the requested
email no longer exists, because it has already been deleted in the quarantine for example.
Quarantine Maintenance
This tab is used to set the time at which the server quarantines are to be compressed. The
compression involves physically deleting all emails marked for deletion and releasing the
memory space again.
The default setting for compression is every Saturday at 3 a.m.. To change the time or
frequency, click Edit and set the required times.
31
Page 32

Avira AntiVir Exchange 9
Note: You can also compress a quarantine manually if necessary by right-clicking on the
relevant quarantine in AntiVir Monitor and selecting the All Tasks - Compress Quarantine
command .
Viewing a list of all jobs
The AntiVir Jobs tab contains a list of all the jobs defined on this server.
To process a job on the server, call the job properties directly.
4.3.5 Address lists
You can create your own address lists which can be selected in the job in the Basic
Configuration - General Settings under Address Lists. The available addresses can be found
in the Active Directory.
Creating, editing and deleting address lists
1. Open Basic Configuration - General Settings
2. Right-click Address Lists and select New - Address List.
3. Give the address list a mnemonic name.
4. Click on the Select Addresses icon:
5. In the window that then opens, select the required addresses under the various
headings with Add.
You can enter your own addresses in the input field and add these to the address list.
The * (asterisk) and ? (question mark) symbols can be used as wildcards. It is also
possible to enter formally invalid email addresses, such as info@domain. Separate the
various entries with a carriage return (Enter key).
If you have created an extensive list of your own addresses, you can run a text search in
this list by clicking:
To delete an entry from the list, mark it and click Remove.
. The text search function is also available in the dictionaries.
.
32
Page 33

Details on the Avira AntiVir Exchange Management Console
6. Click OK.
Your address list should look something like this:
7. Allow adding addresses from quarantine:
This is where you decide whether direct access to this address list is to be permitted
from a quarantined email. When you view a quarantined email in AntiVir Monitor
can use the Add button to add the sender address for the quarantined email to various
address lists. The following address lists are released for direct access in the delivery
default setting:
• Anti-Spam: Blacklist
• Anti-Spam: Newsletter Blacklist
• Anti-Spam: Newsletter Whitelist
• Anti-Spam: Whitelist
8. Click OK again.
9. To delete, mark the address list by right-clicking and select Delete from the context
menu.
Usage and handling in a job
In each job you can use the Addresses tab to choose the users to whom the job is to apply. You
can use the next tab to set the most common scenarios:
you
33
Page 34

Avira AntiVir Exchange 9
Scanning for viruses
Here you can choose whether the job applies to all users or is to be restricted to internal or
external users. You can make this choice for both senders and recipients.
Note: Both conditions in the Message from and Addressed to fields must apply if an action is
to be triggered (AND link).
Split up emails with multiple recipients: When an email is addressed to several recipients
and one or more of them is entered in a job in the address scan, this email is split into two
emails: one email for the defined recipients of the address check and one for the non-defined
recipients. The job then only processes the email with the recipients who are defined. Emails are
not split up if you have not defined address scanning for recipients. The splitting of emails will
impact on the performance of your server.
Company policy: All emails are to be scanned for viruses. In this case it is not enough only to
scan the emails from external senders. It is also necessary to ensure that no infected emails
leave the company. The defined actions (scan for viruses, clean file if necessary and copy to
quarantine) must be performed independently of the senders or recipients.
Implementation: Action will be taken at Message from: <All Senders/Recipients>
and at Addressed to: <All Senders/Recipients>. There are no exceptions. Every email
from every sender to every recipient is scanned for viruses.
34
This is how the address settings are displayed in the job:
Page 35

Details on the Avira AntiVir Exchange Management Console
The advanced scan can be used to implement more complex company policies with ease. Click
the Advanced button. Afterwards, click the Basic button to return to simple selection.
Here is an example of a job that blocks file attachments
Company policy: No emails containing video attachments are to be allowed to reach the
company via the Internet. However, an exception to this rule is to be defined for the marketing
department and for senior management.
• Run this job when a message arrives from checks the sender(s). The exception
Except where addressed from also applies.
• and where addressed to scans the recipient(s). The exception Except where
addressed to also applies.
Implementation: The address settings in the job should look like this: The defined action in the
job (in other words the blocking of attachments) will be executed under Run this job when a
message arrives from: <External Senders/Recipients> and under And where
addressed to is to be sent to <Internal Senders/Recipients>. Under Except where
addressed to you should define an exception for the marketing departments and senior
management that you have already entered as a group in the Active Directory (AD) or that you
can create in a separate address list. This means that all video attachments sent by external
senders to internal recipients will be intercepted unless the recipient is in the marketing
department team or a member of senior management. This is how the address settings are
displayed in the job:
35
Page 36

Avira AntiVir Exchange 9
Note: All specified conditions in the Run this job when a message arrives from and And
where addressed to fields must apply if an action is to be triggered (AND link). If several
addresses are entered within the same condition (e.g. And where addressed to), only one
needs to match for the action to be triggered. The exceptions (Except where ...) are of no
relevance for the basic triggering of the action. Emails to or from these exception addresses are
simply forwarded without the defined actions being executed.
Click Internal Senders/Recipients, No Address Selected or a corresponding entry in the
exceptions to call up the address selection window and to define the addresses for this specific
condition:
36
Page 37

Details on the Avira AntiVir Exchange Management Console
The AntiVir address lists are also available:
37
Page 38

Avira AntiVir Exchange 9
General
Avira AntiVir Exchange address lists are fixed lists from which settings for the higher Avira
AntiVir Exchange servers are generated that are requested and entered upon installation, or
that you have configured manually. See AntiVir Exchange Server Settings
Note: User defined address lists and AntiVir address lists are only displayed when an
address is selected for a job. User defined address lists can be changed anytime, AntiVir
address lists cannot be changed.
4.3.6 Report templates
In every job you can decide under Actions who is to receive a report when Avira AntiVir
Exchange detects a prohibited email.
When you create a new job, you can select the appropriate template for the job type. For more
detailed information about the various job types see Policy configuration
The report templates for the various jobs (content check, virus scan, etc.) are created in the
Basic Configuration.
Creating report templates
.
.
You will find preconfigured report templates for the various modules under Basic
Configuration - General Settings - Templates.
1. Click Templates and select the template type.
2. Right-click on the required template in the right-hand window and select Properties.
3. Enter the subject.
4. Click on the Notification text - Edit tab for the text of the notification. You can
change the layout of the text using the formatting menu bar; this information will then
be converted internally into HTML commands. If you retrieve the source text with the
button, you can also enter HTML commands directly.
5. The Jobs tab shows the jobs in which the notification template is used.
6. Click OK.
List of notification variables
The following variables, which can also be entered directly with the arrow next to the
button, can be used in the notification texts and in the subject lines of the notifications. Please
note that the tokens [VAR] and [/VAR] are case-sensitive and must always be written in
uppercase form.
38
Category, variable type Variable Description
General: Sender [VAR]Mailsender[/VAR]
General: Sender (SMTP) [VAR]From[/VAR]
General: Subject [VAR]Subject[/VAR]
Sender of the triggering
email.
Sender SMTP of the
triggering email.
Subject line of the
triggering email.
Page 39

Details on the Avira AntiVir Exchange Management Console
Date and time when the job
Results of the scans with all
AntiVir
Category of the prohibited file
General: Date and Time [VAR]Date[/VAR]
General: Date [VAR]DateOnly[/VAR]
General: Recipient(s) [VAR]Recipients[/VAR]
General: Job Name [VAR]Jobname[/VAR]
General: Invalid
Recipients
General: Quarantine
folder
General: ID of a
Quarantine email
General: Server [VAR]Server[/VAR]
[VAR]UnrestrictedRecipients[/VAR]
[VAR]Quarantine[/VAR]
[VAR]QuarantineDocRef[/VAR]
triggered the action.
Date when the job
triggered the action.
Recipients of the triggering
email.
Name of the job that
started an action.
Recipients of the triggering
email not defined in the
address (input) conditions.
The quarantine where an
email has been placed.
Unique identifier of the
email moved to quarantine
Server used to send the
relevant email; in this case
the name entered in the
configuration.
Server used to send the
General: Server (network
name)
General: Time [VAR]TimeOnly[/VAR]
General: Avira AntiVir
Exchange Report
General: Avira AntiVir
Exchange Report (details)
General: Applicable
recipients
Category, variable type Variable Description
AntiVir: Attachment size [VAR]AttachmentSize[/VAR]
[VAR]ServerFQDN[/VAR]
[VAR]ToolReport[/VAR]
[VAR]ToolReportDetails[/VAR]
[VAR]RestrictedRecipients[/VAR]
relevant email; in this case
the network name of the
server (fully qualified
domain name).
Time when the triggering
job ran.
Short summary of the scan
results.
details.
Recipients of the triggering
email defined in the
address (input) conditions.
Size of the
prohibited/affected
attachment
AntiVir: Attachment type [VAR]FingerprintName[/VAR]
AntiVir: Fingerprint
category
[VAR]Fingerprintcategory[/VAR]
Name of the prohibited file
type
type
39
Page 40

Avira AntiVir Exchange 9
Information store scan
AntiVir: Email size [VAR]MessageSize[/VAR] Size of the entire email
AntiVir: Attachment
name
AntiVir: Email size limit [VAR]SetSizeLimit[/VAR]
AntiVir: Virus name [VAR]Virusname[/VAR] Names of the viruses detected
AntiVir: Virus scanner [VAR]VirusScanner[/VAR]
Category, variable type Variable Description
IS-Scan: Database [VAR]VSAPI_Database[/VAR]
IS-Scan: Database URL [VAR]VSAPI_Url[/VAR]
IS-Scan: Error description [VAR]VSAPI_ErrorText[/VAR]
[VAR]AttachmentName[/VAR]
Name of the
prohibited/affected
attachments
Maximum email size defined
in the job
Names of the detecting virus
scanners
Name of the information store in
which the message was located at
the time of the virus scan
URL of the information store in
which the message was located at
the time of the virus scan
Further description in the event
of an error by the information
store job
IS-Scan: Submit time [VAR]VSAPI_SubmitTime[/VAR]
IS-Scan: MessageUrl URL [VAR]VSAPI_MessageUrl[/VAR]
IS-Scan: Folder [VAR]VSAPI_Folder[/VAR]
IS-Scan: Mailbox [VAR]VSAPI_Mailbox[/VAR]
IS-Scan: Server [VAR]VSAPI_Server[/VAR]
IS-Scan: Virus scanner [VAR]virusscanner[/VAR]
IS-Scan: Virus name [VAR]virusname[/VAR] Names of the viruses detected
Date and time the message was
sent.
URL of the information store of
the message at the time of the
virus scan
Name of the information store
folder in which the message was
located at the time of the virus
scan
Name of the owner of the
mailbox in which the message
was located at the time of the
virus scan
Name of the server on which the
virus scan by the information
store scan took place
Name of the detecting virus
scanner
40
IS-Scan: Delivery time [VAR]VSAPI_DeliveryTime[/VAR]
Date and time the message was
delivered.
Page 41

Details on the Avira AntiVir Exchange Management Console
AntiVir Wall
Anti-spam check
This value is compared with the
emails with three or more stars,
Address scan
Category, variable type Variable Description
Content scan
Wall: Content checking
details
Wall: Mail part [VAR]DeniedMailParts[/VAR]
Wall: Restricted
dictionaries
Wall: Restricted words [VAR]DeniedWord[/VAR]
Wall: Spam analysis
details
Wall: Spam probability [VAR]SpamValue[/VAR]
Wall: Spam level [VAR]SpamLevel[/VAR]
[VAR]DeniedContentTabHTML
[/VAR]
[VAR]DeniedWordlists[/VAR]
[VAR]SpamReportHTML[/VAR]
Detailed information about the
words/phrases found
Affected triggering
attachments/message texts
Triggering dictionary with
value/threshold attained
Triggering word with
value/threshold attained
Detailed information about the
individual spam criteria
Determined spam probability
in the form of a value (0 - 100).
individually set thresholds in
the Advanced Spam Filtering
job.
AntiVir Wall enters a spam
level in the email header of
every scanned email as a
number of stars in increments
of 10 (e.g. (X-SPAM-TAG: *
means the spam probability is
between 0 and 10, XSPAMTAG:*** means the
probability is between 20 and
30). You can search for this
string in the Outlook header
and formulate a rule that
assigns various actions to all
Wall: Number of
recipients
Wall: Max. number of
recipients
for example. You will find more
information about regulatory
options in Outlook in the
Outlook Help.
[VAR]NumberRecipient[/VAR]
[VAR]SetRecipientLimit[/VAR]
Number of addressed recipients
Restriction on the number of
recipients set in the job
41
Page 42

Avira AntiVir Exchange 9
Quarantine summary report
Collective notification: List
Wall: Restricted senders [VAR]DeniedSender[/VAR] Name of the triggering sender
Wall: Restricted recipients [VAR]DeniedRecipient[/VAR]
Category, variable type Variable Description
Summary: Sender [VAR]From[/VAR] Summary report sender
The address to which replies to the
Summary: Reply to [VAR]ReplyTo[/VAR]
Summary: Subject [VAR]Subject[/VAR] Summary report subject
Summary: Current
summary support date
Summary: Last summary
report date
Summary: Current
summary report date and
time
Summary: Last summary
report date and time
[VAR]Nowdate[/VAR]
[VAR]Lastdate[/VAR]
[VAR]Now[/VAR]
[VAR]Last[/VAR]
summary report are to be sent
(NotificationReplyTo)
Date when the current summary report
was generated
Date when the last summary report was
generated
Date and time when the current
summary report was generated
Date and time when the last summary
report was generated
Name of the triggering
recipients
Summary: Recipients [VAR]RcptTo[/VAR] Summary report recipients
Summary: Fully qualified
domain name
of Quarantine emails
Summary: HTTP port [VAR]HTTPPort[/VAR] HTTP server port
Summary: HTTP server [VAR]HTTPServer[/VAR]
Summary: Quarantine [VAR]Displayname[/VAR]
Summary: Server [VAR]Server[/VAR]
Summary: Current
summary report time
Summary: Last summary
report time
[VAR]FQDN[/VAR]
[VAR]HtmlList[/VAR]
[VAR]Nowtime[/VAR]
[VAR]Lasttime[/VAR]
Full network name of the server where
the quarantine is located for which the
summary reports are generated.
Complete list of all quarantine objects
for the relevant recipient with HTML
formatting (mandatory field in the
quarantine summary report).
HTTP server for sending a user query
via HTTP
Name of the quarantine from which the
list of emails was created
Short name of the server where the
quarantine is located for which the
summary reports are generated
Time when the current summary report
was generated
Time when the last summary report was
generated
42
Page 43

Details on the Avira AntiVir Exchange Management Console
Collective notifications
Whitelist
Category, variable type Variable Description
Numbered HTML list of all
notifications (Subject). Each
Collective notification:
Table of contents
[VAR]TOCList[/VAR]
list entry is linked with the
associated entry in the
notification list (variable
"NotificationList").
Collective notification:
Notification list
Category, variable
type
Userlist: Entries [VAR]HtmlList[/VAR]
Userlist: Fully
Qualified Domain
Name
Userlist: HTTP Port [VAR]HTTPPort[/VAR] HTTP server port
Userlist: HTTP
Server
[VAR]NotificationList[/VAR]
Variable Description
[VAR]FQDN[/VAR]
[VAR]HTTPServer[/VAR]
HTML list of all notifications
(body), each separated by a
vertical separating line.
Complete list of all entries
for the relevant recipient
with HTML formatting
(mandatory field in the
whitelist notification).
Full network name of the
server where the whitelist is
located for which the
summary reports are
generated.
HTTP server for sending a
user query via HTTP
Name of the whitelist from
Userlist: Name [VAR]Displayname[/VAR]
Userlist: Recipients [VAR]RcptTo[/VAR] Whitelist report recipients
Userlist: Reply
address
Userlist: Sender [VAR]From[/VAR]
Userlist: Server [VAR]Server[/VAR]
Userlist: Number of
entries
[VAR]ReplyTo[/VAR]
[VAR]CollectedSize[/VAR]
which the list of emails was
created
The address to which replies
to the whitelist notification
are to be sent
(NotificationReplyTo)
Whitelist notification
senders
Short name of the server
where the whitelist is located
for which the notifications
are generated
Overall size of whitelist
notification
43
Page 44

Avira AntiVir Exchange 9
Userlist: Subject [VAR]Subject[/VAR] Notification subject
Userlist: Number [VAR]SummaryPart[/VAR]
If more than 3,000 new
entries appear in a whitelist,
the user receives several
whitelist notifications. The
variable returns the current
number for the
notification(“1” for the first
3,000 entries, “2” for the
next 3,000, etc.).
Whitelist: Send
whitelist by web
Whitelist: Send
whitelist by mail
Whitelist: Clear
whitelist by web
Whitelist: Clear
whitelist by mail
Blacklist: Send
blacklist via HTTP
Blacklist: Send
blacklist by email
Blacklist: Delete
blacklist via HTTP
Blacklist: Delete
blacklist by email
[VAR]link::HTTP_SendWhitelist [/VAR]
[VAR]link::MAIL_SendWhitelist [/VAR]
[VAR]link::HTTP_ClearWhitelis [/VAR] Delete whitelist via HTTP
[VAR]link::MAIL_ClearWhitelist [/VAR] Delete whitelist via email
[VAR]link::HTTP_SendBlacklist[/VAR]
[VAR]link::MAIL_SendBlacklist[/VAR]
[VAR]link::HTTP_ClearBlacklist[/VAR] Blacklist deleted via HTTP
[VAR]link::MAIL_ClearBlacklist[/VAR] Blacklist deleted by email
Whitelist query and
notification via HTTP
Whitelist query and
notification via email
Blacklist request and
notification via HTTP
Blacklist request and
notification by email
44
4.3.7 Creating a database connection to an SQL server
Connection with SQL servers
You can use database connections to link external databases to Avira AntiVir Exchange. Instead
of the regular local database based on Microsoft Jet-Engine, it is also possible to use a Microsoft
SQL server that saves the Avira AntiVir Exchange data in an SQL database. At present, MS SQL
Server 2000 and MS SQL Server 2005 are supported, while MS SQL Server 2005 Express can
also be used when CPU and memory capacity are limited.
Options available with SQL servers
In multi-server environments without server synchronization you can use a Microsoft SQL
server to ensure that each user only receives a central whitelist for all participating servers.
In addition, the Microsoft SQL Server can also be used with quarantine databases.
If several SQL servers and multiple Avira AntiVir Exchange Servers are installed in a multiserver environment, these can be arranged in pairs. This means that there is a local SQL server
installed on every Avira AntiVir Exchange Server, so that only one database connection is
required.
Page 45

Details on the Avira AntiVir Exchange Management Console
Note: Bear in mind that Avira AntiVir Exchange is optimized for use as a local database based
on MS Jet Engine. In the case of complex server environments, extensive configurations are
required on Avira AntiVir Exchange and on the MS SQL server that cannot be explained here. If
you have specific questions, please contact our support team.
Configuring the database connection
The following sections describe the configuration of database connections between Avira
AntiVir Exchange and an Microsoft SQL server. During configuration, please note the
distinction between a central MS SQL server for central user whitelists and a local MS SQL
server for the quarantine.
SQL server and Avira AntiVir Exchange Server:
If the SQL server and the Avira AntiVir Exchange Server are installed on the same computer, the
following requirements must be met:
• Installations of SQL server and Avira AntiVir Exchange Server are complete.
• Database(s) are configured and the associated tables are created
• At least one user is created as a database user
• The database user has corresponding access rights to the database
• The ADO driver is installed on the Avira AntiVir Exchange Server
If the SQL server and the Avira AntiVir Exchange Server are installed on different systems, it is
also necessary to ensure that:
• the protocol set on the SQL server meets the requirements for external server
operations.
• The service has been restarted after the SQL server was configured.
The database connection between Avira AntiVir Exchange and the SQL server is established by
means of the ADO protocol.
1. For this purpose you should create a new database connection under Basic
Configuration - General Settings - Database Connections under Address Lists.
2. Assign a name for the connection configuration and define the details for the ADO
string in the Connection string field.
3. Enter the required values manually or use the stored Avira AntiVir Exchange variables
(server, database, etc.), which are then replaced by the relevant values during runtime.
45
Page 46

Avira AntiVir Exchange 9
The following example is one of many configuration options for the ADO string. You
will find detailed explanations of this and other options and configurations of the MS
SQL ADO string in the appropriate Microsoft documentation.
Sample connection string:
Provider=SQLOLEDB;User
ID=[ADOUser];Password=[ADOPwd];Trusted_Connection=No;Initial
Catalog=[DBCatalog];Data Source=LOCALHOST\SQLEXPRESS;
• Provider=SQLOLEDB; Obligatory parameter that specifies the provider.
Enter the value manually (no AntiVir variable available).
• User ID=[ADOUser];Password=[ADOPwd]; Obligatory parameter;
enter the parameters ’User ID=’ and ’Password=’ manually in the string
and set the AntiVir variables Database user and Password. The inserted
[ADOUser] and [ADOPwd] will be replaced by the contents of the field from
point 3 during evaluation. It is recommended that variables should be used as
this prevents the values in the ADO string from appearing in plain text.
However, in theory, the values can also be entered manually. In this case the
two fields at point 3 should be left empty.
• Trusted_Connection=No; Optional parameter for SQL authentication. To
enable the SQL server to recognize the Avira AntiVir Exchange Server as a
trusted server, enter ’Trusted_Connection=No;’ manually (no Avira
AntiVir Exchange variable available).
46
Page 47

Details on the Avira AntiVir Exchange Management Console
• Initial Catalog=[DBCatalog]; Obligatory parameter that specifies
the database to be used. Enter the parameter ’Initial Catalog=’ in the
string manually and set the Avira AntiVir Exchange variable Database. If you
use the SQL server for the quarantine, the variable [DBCatalog] is replaced
with the name of the database defined under Quarantine - Properties in the
Folder name field. If, on the other hand, you use the SQL server for a central
whitelist, the variable [DBCatalog] is replaced with the fixed name
’Whitelist’. The variable [DBCatalog] enables you to use a database
connection for several databases within an MS SQL server. Please note that the
databases must be created under precisely this name. Otherwise a connection
cannot be established.
• Data Source=LOCALHOST\SQLEXPRESS; Obligatory parameter for a
locally installed MS SQL Server 2005 Express. In this case, enter the parameter
’Data Source=’ manually and, if necessary, set the Avira AntiVir Exchange
variable Server. The [Server] variable is replaced by the NetBiosName of the
server at runtime. If you work in complex server environments with
subdomains, you can also use the Avira AntiVir Exchange Server (network)
variable. In this case, the [ServerFQDN] variable is set and the FQDN (Fully
Qualified Domain Name) of the server is read out. If the SQL server is used for
central whitelists, manually enter the name of the central SQL server here.
Exception: In the case of a central SQL server, e.g. when the SQL server is used for
central whitelists, the two Avira AntiVir Exchange variables Server and Server
(network) cannot be used in the ADO string. Instead you should enter the name of the
SQL server manually, i.e. Data-Source=Name_des_Servers;
4. Enter the name of the SQL user permitted to access the database in the Database user
field (shown in the graphic as User). Enter the associated Password in the next field.
The values entered here can be read out using the variables [ADOUser] and
[ADOPwd] in the ADO string.
5. The Command Timeout field is used to specify the waiting period in seconds before
the database connection is closed if the database does not return data. You are advised
to begin with a value of 60 seconds when using large databases.
Configuring central whitelists
If the email is handled in multi-server environments, every server creates its own user
whitelists. Without server synchronization, each user therefore receives a separate whitelist for
each participating server and each whitelist has to be maintained separately. To be able to
administer these whitelists centrally, thus simplifying administration, instead of the regular
local database based on Microsoft Jet-Engine, you can also set up a Microsoft SQL server to save
the data for all participating Avira AntiVir Exchange Servers in a central SQL database.
To configure central whitelists, you must first configure a database connection between the SQL
server and the Avira AntiVir Exchange Server. More settings are required within Avira AntiVir
Exchange after this, so that Avira AntiVir Exchange can use the entries from the whitelist
database.
The configuration of the database connection depends on the server environment
1. Proceed according to operating environment, as in the scenarios under
database connection.
2. Enter the central SQL server under Data Source=.
Note: Bear in mind that the [DBCatalog] variable for the whitelist database is
replaced with the fixed database name in the ADO string of the database connection.
Configuring the
47
Page 48

Avira AntiVir Exchange 9
3. Under AntiVir Servers Settings - Properties select the SQL server in the Database
4. Open the Wall job Advanced Spam Filtering - Actions - Definite Criteria and
Configuring a quarantine database
In addition to the option for using the Microsoft SQL server for whitelists, the server can also
be used locally with quarantine databases. The index for a quarantine is regularly listed in the
local database (Microsoft Jet engine). If the capacity of a Jet database is not sufficient, you can
also save these entries in a locally installed SQL server. You must have installed MS SQL on the
email server for this purpose.
The configuration of the database connection depends on the server environment
connection for whitelist entries field. This field contains all data sources entered
under database connections for selection.
enable the Emails from senders in user whitelist field
1. Proceed according to operating environment, as in the scenarios under
database connection.
2. Enter Source= under data on every LOCALHOST server, so as to be able to access the
locally installed SQL server.
Note: Bear in mind that the [DBCatalog] variable for the name of the quarantine database is
replaced with the folder name under Quarantine - Properties - Folder name in the ADO
string of the database connection. This means that one database connection can be used for
several quarantine databases.
In the case of SQL databases, it is also possible that the database service might fail or be
unavailable. Consequently, the quarantine name would also be unavailable during this
downtime, so that emails to be quarantined in this time would not be saved correctly. As with
the mission critical option in the job, the same option is also available for the quarantine
(enable Quarantine - Right click: Properties - Quarantine is mission critical) to control
the handling of emails in the event of a quarantine error.
If a quarantine is set to ‘mission critical’, any quarantine errors that occur are reported to the
job. The job is then canceled and the error routine of this job is started. The way in which the
email is dealt with, i.e. whether the job ignores the email or moves it to the bad mail directory,
depends on the ‘mission critical’ setting in the job itself.
Configuring the
Handling problems with SQL servers
There may be several different reasons why problems arise while installing or configuring SQL
servers. This is why we can only offer some advice on how to analyze errors:
• Make sure that the SQL server browser is enabled.
• Check the port (default: 1433) or adapt it to your server environment.
48
Path for Microsoft SQL Server 2005: Double-click Configuration Tools - SQL Server
Configuration Manager under SQL Native Client Configuration - Client
Protocols - TCP/IP.
Path for Microsoft SQL Server 2005: Configuration Tools - SQL Server
Configuration Manager - SQL Server 2005 Services - SQL Server Browser
(Status: Running).
If a central SQL server is installed that runs on a system other than the AntiVir Server, the
following requirements must also be met:
Page 49

Details on the Avira AntiVir Exchange Management Console
• If you use Microsoft SQL Server 2005, select Configuration Tools - SQL Server
Surface Area Configuration - Surface Area Configuration for Services and
Connections. For MSSQLSERVER - Database Engine - Remote Connections select
the option Using both TCP/IP and named paths to permit the connection to the SQL
server configured in the ADO string.
• The SQL server service must be restarted after configuration.
Note: You should also note the configuration options for quarantine (mission critical) if the
database service fails.
4.3.8 Folder settings
Configuring a quarantine
A quarantine is a folder in which all emails affected by the conditions are stored if you defined
this with the Copy to Quarantine action. When you install Avira AntiVir Exchange, a folder
called Quarantine is created in the data directory. This folder initially contains some default
quarantines and later all additional newly created quarantines.
1. You can configure existing quarantines and create new ones under Basic
Configuration - Folders - Quarantines. Click Quarantines.
All available quarantines are displayed in the right-hand window.
To create a new quarantine:
• Right-click Quarantines and select New - Quarantine.
• The Folder name from the description is then transferred. Only characters
from A-Z and 0-9 are transferred; all other characters are converted to
underscores.
• You can overwrite the suggested Folder name.
Note: Do not enter an absolute path here. You only need to enter the folder
name.
• When you save the configuration, EMH automatically creates the new
quarantine and it is then also displayed in the AntiVir Monitor (update the
view!).
Warning: The size of a quarantine is restricted to 1 GB.
49
Page 50

Avira AntiVir Exchange 9
2. Right-click on an existing quarantine in the right-hand window and select Properties.
3. You can give the quarantine a meaningful name under Name.
However, the Folder name of the quarantine remains unchanged. The entry in the
Folder name field is only available for some, newly created quarantines.
4. Define how many days an email that was placed in quarantine should be kept before it is
automatically deleted.
5. Use Size of body excerpts to determine whether and how much of the text from the
body of the email (message text) is to be written to the database.
When setting this value, make sure to take data protection aspects and the required
space in the database into account.
Warning: The size of a quarantine is restricted to 1 GB.
6. With Include processing logs, you can log the processing of the emails placed in this
quarantine.
This allows you, for example, to trace the reasons for an email being placed in
quarantine. In the AntiVir Monitor, you can access the respective email and view the
processing log including detailed information via the Processing Log tab.
7. Quarantine is mission critical:
If this field is enabled, any quarantine errors that occur are reported to the job. The job
is then canceled and the error routine of this job is started. The way in which the email
is dealt with, i.e. whether the job ignores the email or moves it to the bad mail directory,
depends on the ‘mission critical’ setting in the job itself. For information on ‘mission
critical’ in the job, see Job is mission critical
.
50
Page 51

Details on the Avira AntiVir Exchange Management Console
Example: A job that checks for viruses finds a virus in an incoming email. The job is
configured in such a way that the email is delivered to the default quarantine but not to
the recipient. The quarantine is not available due to a quarantine error. The email
therefore cannot be placed in quarantine. The following are possible settings for the
quarantine and the job:
• Quarantine + Job are both NOT ‘mission critical’:
Result: The quarantine error is ignored. The email cannot be copied to the
quarantine and is also not delivered.
• Quarantine is NOT ‘mission critical’ + Job IS ‘mission critical’:
Result: see above.
• Quarantine IS ‘mission critical’ + Job is NOT ‘mission critical’:
Result: The job processing is canceled and the virulent (!) email is transferred
unprocessed to the next job in the processing chain.
• Quarantine + Job are both ‘mission critical’:
Result: The email is moved to the Bad mail quarantine and is kept there. The
email is not delivered.
Warning: For as long as the quarantine error is not fixed, the error will be repeatedly
reported to the job if the ‘mission critical’ option (in the quarantine) is enabled.
If the job itself is not ‘mission critical’, it turns itself off after a certain time and does
not process any further emails.
If, however, the job is ‘mission critical’, every email is transferred to the bad mail area
and is not delivered until such time as the error is fixed.
Irrespective of the ‘mission critical’ setting, the Avira AntiVir Exchange administrators
are informed by email about errors that occur frequently in the quarantine or in the job.
8. In the Summary Reports, you can now configure a quarantine summary report for this
quarantine.
Note: If you want to allow the users access to the processing of whitelists, select Quarantine
Summary Report with Whitelist Support under Template.
Setting up quarantine summary reports
A Quarantine Summary Report provides information on emails that Avira AntiVir Exchange
placed in quarantine.
Summary reports can be sent to various recipients/recipient groups and can contain a list of
various quarantine emails. The emails in question, the actions that the recipient of the
summary report can start for these emails and the additional information that the summary
report contains are all configured separately in each summary report.
Each type of notification comprises two parts:
• The template in which the form of the summary report is defined.
The templates of the summary reports can be edited under Basic Configuration General Settings - Templates - Quarantine Summary Reports. The variables
available here are exclusively related to the summary reports and their form. Configure
the quarantine summary report template as described under
templates.
Creating notification
51
Page 52

Avira AntiVir Exchange 9
• A list of emails placed in quarantine (the actual content of the summary report), in
The Summary Report: Sender variable under Templates designates the sender of the
summary report (the same sender as for all Avira AntiVir Exchange notifications and is defined
under AntiVir Server Settings). The check box for the Sender in the Fields tab in a quarantine
designates the sender of the emails placed in quarantine that are listed in the list of emails.
Summary reports are particularly intended for spam quarantines and the recipients of these
spam mails. The standard case is for the users to receive a list of all new spam mails that were
addressed to them and that are in a specific spam quarantine. This standard case is configured
as follows:
1. Open Basic Configuration - Folders - Quarantines.
2. In the right-hand window, double-click the Anti-spam: Medium spam quarantine to
which fields are used to define which emails and email fields are to be listed in the
summary report created.
The content of the summary report is also defined using the Summary Report: List of
Quarantine Mails variable ([VAR]HTMLList[/VAR]), which is a mandatory entry
in each summary report. The entries that this list contains are defined under Basic
Settings - Folders - Quarantines - Properties of a Quarantine - Summary
Reports - Add - Fields.
open it.
52
3. Click the Summary Reports tab.
4. Click Add.
Page 53

Details on the Avira AntiVir Exchange Management Console
5. Assign a name for the summary report on the General tab.
6. In the Recipients field, select the All Recipients entry. Recipients of the summary
report are the original recipients of the quarantine emails. Select User-defined
recipients if, for example, you want to restrict the group of recipients for a summary
report. The selected recipients, senders, groups or other address patterns are then listed
in the lower text box.
7. As a template, you can select a summary report that you defined yourself under
General Settings - Templates - Quarantines - Summary Reports. The Avira
AntiVir Exchange standard delivery includes the Quarantine Summary Report
template, which already contains preconfigured settings. If you want to allow your users
to place a sender from the summary report on their user whitelist, use the Quarantine
Summary Report with Whitelist Support template.
8. For Summary data, select New mails only. In this way, the recipient of the summary
report only receives the emails that came in since the last summary report in the
quarantine.
9. Processing: do not process by AntiVir jobs means that the resent email that the
user requested or released is no longer checked by the active AntiVir jobs. Each
requested or released email is delivered unchecked to the recipient. See also the Fields
tab.
53
Page 54

Avira AntiVir Exchange 9
10. In the Fields tab, select which fields from the quarantine emails are to be written to the
list of quarantine emails of the summary report. If, for example, you select the Subject
check box here, the subject of the quarantine email is listed in the email list of the
summary report. The relevant check boxes for the standard case are already selected.
The recipient of the summary report can execute an action with the listed email by
clicking the links in the report. Here, select the action that the user is permitted to
execute:
Request: The email is delivered from the quarantine to the recipient of the summary
report.
Release: The email is delivered to all original recipients of the email.
Remove: The email is marked for deletion in the quarantine.
Add to user whitelist: The sender of the email is added to the user whitelist.
Add to user blacklist: The sender of the email is added to the user blacklist.
Note: If you select several check boxes, several links to an email will appear in the
summary report.
11. In the Whitelist Fields or Blacklist Fields tabs, select the fields from the quarantine
emails that you want to appear in the whitelist or blacklist report.
54
Page 55

Details on the Avira AntiVir Exchange Management Console
12. Click the Schedule tab and then Add. A Schedule Settings window in which you can
define the start of the summary report creation is displayed. In this case, a quarantine
summary report is generated and sent to the recipients of the spam mails every
workday at 12:00 a.m.
13. Click OK.
55
Page 56

Avira AntiVir Exchange 9
14. Your new quarantine summary report is now displayed in the Schedule tab. Clicking
Edit allows you to change the time or the day of the week while clicking Remove
deletes the summary report:
From now on, a summary report is sent to the recipients of spam mails of the Anti-
spam: Medium quarantine at 12:00 a.m.
Note: You can create several different summary reports with different content for a
quarantine. The emails for each summary report are "gathered" separately from the
quarantine, even if the schedule for these summary reports is identical.
Note: You will find a list of all quarantines under Basic Settings - Folders Quarantines. The Summary Report column allows you to see immediately the
quarantines for which a summary report is configured (yes/no).
Whitelist report
Select the Whitelist Support template for the quarantine summary report so that the recipient
of the quarantine summary report can manage the entries in his/her whitelist and can request a
whitelist report.
56
Page 57

Details on the Avira AntiVir Exchange Management Console
Fingerprints
Under Whitelist Fields, define the fields to be displayed.
Under Whitelist template, you can edit the existing whitelist template or create a new one.
Configure the whitelist template with the variables as described under List of template variables
4.3.9 Utility settings
AntiVir uses fingerprints for file type recognition. A comprehensive list of fingerprints is
supplied with Avira AntiVir Exchange and these are divided into categories. It is generally not
necessary to make changes initially. You will find more information about the configuration of
fingerprints in Configuring fingerprints
.
Dictionaries
Here you can create dictionaries that contain word strings that you want to block during
content and spam filtering with AntiVir Wall. We provide some dictionary categories, which you
can adapt to your own needs. You will find the exact configuration of the dictionaries in
up dictionaries.
AntiVir Scan Engine
For more information on configuring the virus scanner, see Configuring and enabling the AntiVir
Scan Engine.
.
Setting
57
Page 58

Avira AntiVir Exchange 9
4.4 Policy configuration
In the policy configuration, you define your AntiVir jobs based on your company's policies.
You can use various conditions (or also filters) to define which emails are affected, when specific
actions should be executed, and in which sequence the jobs are to be processed (priority). All
conditions can be configured within the job. The sum of the AntiVir jobs is the company policy.
4.4.1 Example of a company policy
Every incoming spam mail is to be detected, deleted or sent to quarantine.
The spam mails should not reach the recipient, but he should be informed that he has received
spam and the spam should be named so that he can decide for himself which of these emails he
wishes to receive.
This is to be achieved with a daily summary.
All of this can be set up in the Wall Spam Filtering jobs.
4.4.2 Conditions
In each job you can define the properties that emails must have to ensure that a job is executed.
You can define the conditional parameters yourself in accordance with your own requirements:
The processing of a job, e.g. scanning for viruses, is only initiated if all requirements for an
incoming or outgoing email are met.
58
Page 59

Details on the Avira AntiVir Exchange Management Console
Warning: In order for the job to be executed, the content conditions must match the defined
address conditions on the Addresses tab (AND connector).
Email processing can be controlled by means of the value of existing headers. External
applications that process the emails prior to processing by Avira AntiVir Exchange can add
certain X header fields with defined values to the emails, for example. The following AntiVir
jobs can be configured with the condition ... with following headers and values so that job
processing is initiated in accordance with the value of an X header field.
4.4.3 Job types
There are 9 different job types, which you can find under Policy Configuration - Mail
Transport Jobs - Right click - New:
Job type Meaning
AntiVir Scan Job scans the emails for viruses.
AntiVir Email Size Filtering
AntiVir Attachment Filtering
AntiVir Attachment/Size Filtering
AntiVir Protected Attachment Detection
AntiVir Wall Content Filtering
AntiVir Wall Email Address Filtering
AntiVir Wall Recipient Limit Filtering
Job checks the emails for a maximum
permitted size (specified per email).
Job scans the emails for prohibited file
attachments. The various file formats are
identified using fingerprints.
Job scans the emails for prohibited file
attachments. The maximum permitted size
for an attachment can be specified at the
same time.
The job reacts to emails with passwordprotected archives and executes the job
actions configured in the Actions tab.
Password-protected archives can thus be
handled in a rule-based way.
Job scans the emails and attachments for
prohibited text content.
Job checks the emails for address
restrictions.
Job checks the emails for a maximum
permitted number of recipients per email
(the recipients in the “To” field of an email
are counted).
AntiVir Wall Spam Filtering
You can define your own conditions for each job type. All conditions must match before a
defined action is executed. Address filters can be configured for all job types. For example, you
can configure that all emails sent from the domains *@gmx.net and *@hotmail.com, that are
larger than 500 KB, that contain the word "Look" and that belong to the Sound fingerprint
category are to be deleted (and therefore not delivered to the recipient!) and that a copy of the
email is to be placed in the quarantine. This case would be an AntiVir Attachment/Size
Filtering job.
Job uses various criteria to scan emails for
spam.
59
Page 60

Avira AntiVir Exchange 9
A series of standard jobs is provided with Avira AntiVir Exchange and you can modify these in
accordance with your needs. Of course, you can also create your own jobs. The preconfigured
jobs are available under Policy Configuration – Job Templates. Use the mouse to drag the
required job into Mail Transport Jobs. Any number of jobs can be created. For the sequence of
the processing, refer to Mail Transport Jobs from the order in the list of all jobs. Further
information is available under Processing sequence of jobs
A job may be enabled or disabled. A disabled job is in the configuration but is not executed. If
you want to disable jobs, you therefore do not need to permanently delete them from the
configuration.
In each job, you can use the Actions tab to set which actions are to be executed if an email falls
under the defined conditions or is infected with a virus.
4.4.4 Actions
In addition to the actions that belong to the function of a job, the following standard actions are
also available:
Copy to quarantine
.
Action Meaning
A copy of the email will be placed in the
quarantine folder you have specified and
can be viewed there at any time.
Delete email
Delete attachment
Subject extension
Send notifications to
Start external application
Add X header field
The infected/blocked original email is
permanently deleted from the server (the
copy remains in quarantine if this option is
set).
The infected attachments are permanently
deleted from the server.
A configurable extension is added to the
subject line. This enables the recipient to
see that this email has been scanned.
Notifications can be sent to the following
groups:
• Administrators
• Senders
• Recipients
• Others
An external, freely selected application is
run.
A field is added to the email header that
can be filled with a value from the
variables.
60
Redirect email
The email will be redirected to the specified
recipients. Option: Original recipients also
receive the email.
Page 61

Details on the Avira AntiVir Exchange Management Console
4.4.5 Processing sequence of jobs
The sequence in which a job is processed is displayed in the view of all jobs in Policy
Configuration - Mail Transport Jobs.
New jobs are added to the end of the list. You can use the
or right-click (All Tasks - Up/Down) to move the jobs to the required position.
and arrow keys in the toolbar
4.5 AntiVir Monitor
AntiVir Monitor allows you to view the quarantine areas on every available server and to obtain
detailed information about the emails contained there.
You can use AntiVir Monitor to observe all Avira AntiVir Exchange Servers, quarantines
and bad mails. You can also access the statistical evaluations.
AntiVir Monitor lists all the servers configured under Basic Configuration - AntiVir Server.
AntiVir Monitor uses SOAP/SSL encryption to access the server via the network.
To access a server, first enter it under Basic Configuration - AntiVir Server and refresh
AntiVir Monitor in this view.
The procedure for adding a server can be found in the description
AntiVir server. The configuration of the quarantine should also correspond in accordance with
the description in the Configure quarantine section.
You can display detailed information about the AntiVir version and the configuration for every
server. Right-click on the required server in AntiVir Monitor and select Properties.
To use AntiVir Monitor you must log on as an authorized user. If you are not logged on locally
on the server, a login dialog will appear for you to enter your user name and the password for
the relevant domain. The authorization for accessing AntiVir Monitor is entered in the
properties of the file access.acl in the ...\Avira\Avira AntiVir Exchange\AppData\ folder.
Settings for an individual
Click on the Security tab and assign the relevant user at least read-only rights.
Observing the data in AntiVir Monitor:
1. Click the required server.
2. Authenticate yourself with a user name and password that has authorizations for the
AntiVir data on the server’s file system.
3. Click on the area you want to view, for example on Default quarantine or Bad mail.
All existing emails will be displayed (limit 10,000 emails).
4. Filter the required emails with the Filter Options icon
5. Open an email with a double-click.
6. Send the email by clicking
a second time if necessary.
.
4.5.1 Quarantines
If you enabled the Copy to quarantine action in the job, then all affected emails are in a
quarantine and all available information on the individual emails can be found in the AntiVir
Monitor.
Click a quarantine. If you right-click an email, the following actions are available in the view:
61
Page 62

Avira AntiVir Exchange 9
You can also drag and drop to copy. Use your mouse to drag the selected email to another
quarantine.
Within a quarantine, it is possible to filter emails according to numerous criteria. Right-click
View – Filter options or on the
There are three ways of resetting the options:
icon. You will see the following dialog box:
62
1. Enable the No Filter option in Filter Options.
2. Right-click View - Show all objects.
3. Use the
A maximum of 10,000 emails (the most recent) are displayed at any one time in the AntiVir
Monitor. To obtain older emails that are no longer listed, restrict the view using a
corresponding filter option.
icon in the toolbar.
Example of an email in quarantine
You receive this information if you double-click or right-click the properties of the email in the
quarantine.
The most important information can be found at a glance on the Message tab.
Page 63

Details on the Avira AntiVir Exchange Management Console
The icons used on these tabs:
Send email from quarantine
Delete email in quarantine
Define, modify, delete the label for the email
Save email as
Open online help
Next email in the quarantine / bad mail
Previous email in the quarantine / bad mail
The Add to button allows you to add the SMTP sender of the email to the spam defense of a
specific address list. You define for each individual address list which address lists are displayed
under this button. See also Address lists
. Once the sender address has been added to the address
list, you receive a message:
63
Page 64

Avira AntiVir Exchange 9
The name of the job that placed the email in quarantine, the job type, the server, information as
to why the email fell under restrictions and was placed in quarantine, and further processing
details are available under Processing Log:
64
Information about the resending of the email from quarantine is available under Details.
Page 65

Details on the Avira AntiVir Exchange Management Console
Example of an email in the information store quarantine
You receive this information if you double-click or right-click the properties of the email in the
information store quarantine.
The most important information can be found at a glance on the Item tab.
65
Page 66

Avira AntiVir Exchange 9
The icons used on these tabs:
Delete item in quarantine
Define, modify, delete the label for the item
Save item in file system
Next item in the quarantine
Previous item in the quarantine
The Copy button allows you to copy the object to another quarantine on this server.
The next tab, Processing Log, shows the name of the job that placed the email in quarantine,
the job type, the server, information as to why the item fell under restrictions and was placed in
quarantine, and further processing details:
66
Page 67

Details on the Avira AntiVir Exchange Management Console
Sending emails from quarantine
If you want to have an email from quarantine delivered to its original or another recipient, you
can send this directly from the quarantine without it having to be checked again by an Avira
AntiVir Exchange job:
1. Open a list of emails of a quarantine in the AntiVir Monitor.
2. Right-click to select the required email and then select All Tasks - Send from
Quarantine.
Note: Alternatively, you can also send the email directly from the Properties window by
clicking the icon.
You will see the following dialog box:
67
Page 68

Avira AntiVir Exchange 9
The recipient sees the original sender in the "From" field of the email (i.e. not a
forwarded mail).
3. You can change the recipient by enabling the Change email recipients option and
then clicking the Select address icon:
.
Note: When selecting addresses for the resending of emails from quarantine, no
address lists are available. For more information on address lists, see Address lists.
4. If you no longer want the email to be processed by the jobs, enable the Deliver the
email bypassing any AntiVir jobs on this server option.
This will generally be the case if you want to have an email delivered from quarantine
because a user urgently needs this email despite, for example, prohibited words or
attachments.
Note: This is a universal setting. If you enabled jobs that are also to scan resent emails
from quarantine, then set this setting to Resubmit the email to all AntiVir jobs on
this server, as otherwise the Check before sending job setting will not take effect
and all emails will be sent on unprocessed.
Note: The Resubmit the email to all AntiVir jobs on this server instruction also
applies only for the jobs for which the Mails from quarantine: Check before
sending option was enabled. Even if you want to have the quarantine emails processed
again, all jobs for which the Ignore emails resent from quarantine option is enabled
are excluded.
68
Page 69

Details on the Avira AntiVir Exchange Management Console
Adding senders to an address list
If a sender’s email was placed in quarantine but this sender’s emails are in future to be
identified as wanted, you can place the sender on one of your address lists, e.g. Antispam:
Whitelist:
1. In the AntiVir Monitor, open the quarantine containing the required email.
2. Right-click to select the email and then select All Tasks - Add sender to address list.
3. Select the address list in which you want to include the sender.
If you want to ensure that all senders of a particular domain are to be identified as
wanted and are to reach the user’s mailbox, proceed according to the same principle but
select the Add mail domain to address list option instead. In this way, if there are
several email senders belonging to a mail domain, e.g. at a customer company, you do
not need to enter all sender addresses individually in the address list. The address is
added to the list in the form of *@samplecompany.com.
Note: In both cases, the Allow adding addresses from quarantine field must be enabled
within the address list. Otherwise, the required sender address cannot be added to the list.
Bad mails
Bad mails are all emails that could not be processed by the AntiVir jobs, e.g. emails with formats
that cannot be processed. Very little information exists about bad mails, as AntiVir could not
inspect these emails. These emails may also contain an undetected virus.
There is only one folder for bad mails on each server. Also, no additional folders can be created.
Apart from that, the same functions and options apply for bad mails as for quarantine mails.
4.5.2 Avira AntiVir Exchange reports
The report and statistics function in Avira AntiVir Exchange can be used to obtain detailed
information about email processing.
Seven predefined statistical reports and one advanced report are available.
The extended statistical report can be defined on an individual basis. The reports can be
accessed using AntiVir Monitor. The individual reports contain both the graphical presentation
of detected policy violations (e.g. viruses, unwanted file attachments) as well as table
information. A separate report exists that answers the most frequent questions. Data relating to
AntiVir quarantines is also shown.
The reports can be produced for freely defined periods. Extensive printing and export functions
allow the report data to be reused with ease.
The report data is cached during processing and is recorded in the evaluation database twice per
hour. Processed emails do not generally appear immediately in the reports.
Click AntiVir Reports and open the required report in the right-hand window with a double-
click. Enter the required period for the report in the new window that appears. Select
export the evaluation for importing into another application; you can choose from a number of
different formats.
to
69
Page 70

5 AntiVir scan engine
5.1 Overview
AntiVir is used for scanning emails for viruses, for type and size of attachment and for the total
email size.
5.1.1 Job types
• Virus scan of incoming and outgoing emails
Type: AntiVir Scan
• Virus scanning in MS Exchange databases (on access & proactive/background)
Type: Information store scan
• Blocking of specific file types in the attachment
Type: AntiVir Attachment Filtering
• Restriction of the email size
Type: AntiVir Email Size Filtering
• Restriction of type and/or size of attachments
Type: AntiVir Attachment/Size Filtering
Note: Create a separate job for every restriction type. The job types cannot be changed later.
For the exact procedure, please see the descriptions in Activating virus scanning - sample job.
5.2 AntiVir Scan
You can configure the virus scanner under Basic Configuration - Utility Settings - AntiVir
Engine - Avira AntiVir Scan Engine - Properties.
The AntiVir Scan job starts the virus scanner in accordance with the configured conditions.
The conditions determine the emails for which a job is executed.
The following example illustrates how a virus scanning job works: The job scans an email with
the result: Virus found. This triggers a virus alarm and a series of actions is started, which you
can define yourself under Actions in the job.
You can define the following, for example:
1. If a virus is found, the original mail should be cleaned and then delivered to the
recipient.
2. If the original mail cannot be cleaned, the affected email is copied to the folder selected
by you (quarantine), the original is deleted and not delivered.
3. In this case, messages are sent to the administrator, sender and recipient. These
messages contain the relevant information regarding the virus scanner and the AntiVir
job.
The following actions are possible:
• Scan for viruses
• Remove viruses
• Subject extension
70
Page 71

AntiVir scan engine
• Copy entire email to quarantine
• Remove affected attachments from the email
• Delete and do not deliver the affected email
• Run an external application
• Notify administrator, sender, and/or recipient
• Notify other freely selected persons
• Add X-header field
• Redirect email
5.3 Information store scan
In addition to the virus scan on transport level, Avira AntiVir Exchange can also scan data in the
public or private information store of MS Exchange. This scan does not refer to the incoming or
outgoing mail traffic, but instead to the mail files on the server or those that do not come into
contact or have not come into contact with the transport agent, e.g. drafts.
Three main areas are covered with the information store scan:
71
Page 72

Avira AntiVir Exchange 9
• On-demand scan
• Proactive scan
• Background scan
In addition to the scheduled scan, the background scan is also always executed when the
databases are being loaded (e.g. when the server is started).
The settings for the information store scan are server-wide. That is why there is always only one
information store scan job available for each server, and not any number like for AntiVir virus
scanning.
If a client attempts to open a message, a comparison is carried out to ensure that the
text body and the attachment were scanned by the current virus signature file. If the
content was not scanned using the current virus signature file, the corresponding
message component is sent to the virus scanner before being forwarded to the client.
The on-demand scan is the most frequently selected option in the information store
scan.
The proactive scan checks new incoming messages before access to a client via the ondemand scan takes place. The proactive scan is an addition to the on-demand scan that
can ensure faster client access.
With the background scan, a complete scan of all elements of the information store can
be started. This scan can be enabled separately for the public and private information
store. All elements that have not yet been scanned with the current virus scanner
signature file are included.
If a virus is found in a message, various actions that are specially tailored for the information
store scan can be carried out:
• Block object: Blocking prevents access to the entire message object. With current
Microsoft email clients, a corresponding error message is displayed when an attempt is
made to open such an e-mail message. With other/older email clients, there may be
different feedback. However, the blocked messages can always be deleted via the client.
• Replace with: Replacement replaces the infected element of the message (e.g. file
attachment) with a text comment. The infected element is deleted.
• Mark as not infected: In exceptional cases, it can be decided that the corresponding
element is not to be marked as infected when a virus is found. Subsequent virus checks
will again identify the element as infected. This action is only useful in test
environments, as the user is not protected.
Note: The virus scan of the MS Exchange information store takes place using Microsoft Virus
Scanning API 2.0/2.5. For further information, see http://support.microsoft.com/kb/285667/EN/
Warning: For messages that are blocked by the information store scan, there may be error
messages during data back-ups of the information store.
Warning: Exiting or uninstalling Avira AntiVir Exchange, as well as stopping the information
store scan jobs, not only disables the active virus protection of the information store but also
removes the blocking of infected content mentioned above.
72
5.3.1 Status of the information store
Click AntiVir Monitor - Server - Server Status. There you will find both the current status of
the information store scans and the option for a manual restart.
Page 73

AntiVir scan engine
If you click the General tab, you will see:
• whether the scanner DLL for the information store scan is loaded. As soon as the DLL
shows Loaded, the information store scan is activated.
• the version of the information store scan. Each restart increases this value.
• when the last version update occurred and the time and date of the last restart.
Click the Information store scan tab. There you have the option of restarting the background
scan.
73
Page 74

Avira AntiVir Exchange 9
Warning: When you restart the scan, all elements in the information store are scanned again.
This applies to all three scan modes. If you have enabled the background scan, this scan can be
very time and resource-intensive. It is therefore recommended that you restart at off-peak
times and depending on the virus scanner update.
74
Page 75

AntiVir scan engine
Defining a schedule
5.3.2 Virus scan in the information store - sample job
In the Information Store Jobs section under Policy Configuration, you will find an
Information Store Scan per server. Open this job with a double-click.
Warning: When you enable/disable the information store scan job, it can take up to two
minutes before the Exchange Store registers the change.
General settings
On the General tab, you can enable the on-demand scan for both the private and the public
information store.
In addition to the on-demand scan, you can also enable the proactive scan and the background
scan. For further information, see Information store scan
.
The mission critical option is explained in more detail in Job is mission critical.
You can create a schedule for restarting of the scan on the Schedule tab. When you restart the
scans, all elements in the information store are scanned again. This applies to all three scan
modes. If you have enabled the background scan, this scan can be very time and resourceintensive. It is therefore recommended that you restart at off-peak times and depending on the
virus scanner update.
75
Page 76

Avira AntiVir Exchange 9
Defining actions
Click Add to create an entry in the schedule. Then select the start time and the days on which
the restart is to be executed. The selection is added to the schedule when you click OK:
The Actions tab is used to define which actions are to be carried out when the job has found an
infected mail.
Extra archive scan with AntiVir unpacker: Enable this option if you are using the virus
scanner of another manufacturer and, unlike Avira products, this scanner does not have an
integrated unpacker. When this option is enabled, an internal unpacker firstly extracts the
packed files and then sends them individually to the virus scanner.
76
Page 77

AntiVir scan engine
Three different actions are possible:
77
Page 78

Avira AntiVir Exchange 9
A. Malware found/Removing not successful: Handles the case whereby a virus was
found and the file could not be successfully cleaned.
a. Firstly select whether a copy of the object is to be placed in a quarantine and
labeled. A special default quarantine is available for the information store scan.
b. The second option gives you the choice of blocking, replacing or ignoring/not
marking the object. See also Information store scan
c. Use the last default option to select whether a notification is to be sent to the
administrator(s).
d. You can use the Add button to select additional actions. In this way, it is
possible, for example, to send notifications to any recipients or to start an
external application.
.
78
Page 79

AntiVir scan engine
B. Removing successful: Handles the case whereby the file was successfully cleaned and
the virus was removed.
The following actions can be defined here:
a. With the first option, select whether a copy of the object is to be placed in a
quarantine and labeled. The copy is created before the object is cleaned, which
means that the object is in its original state in the quarantine.
b. In addition, you can choose whether a notification is to be sent to the
administrator(s).
79
Page 80

Avira AntiVir Exchange 9
Job details
C. Object unscannable: Handles the case whereby the files could not be scanned. This
allows you to influence the behavior of Avira AntiVir Exchange when encrypted objects
are found, which due to their nature cannot be viewed and therefore cannot be scanned
for viruses.
Two options are available to you here. The first concerns the action of the information
store scan:
a. Abort scanning: The object is scanned again during the next scan process.
Access to this option is blocked if previous scan processes handled the object as
virus-free.
b. Mark as not infected: The object is handled as if it were virus-free. It is only
scanned again the next time the virus scan is restarted.
c. Use default behaviour: The object is handled according to the settings for
When e-mail is unscannable, then... under Basic Configuration - AntiVir
Server - General.
The second option concerns the possibility of sending a notification to the
administrator as well as executing additional actions using Add.
You can describe the job in more detail on the last tab entitled Details.
5.4 Configuring and enabling the AntiVir Scan Engine
80
Avira AntiVir Exchange accesses the virus scanner by means of the so-called Avira AV
Interface - a DLL file.
Page 81

AntiVir scan engine
Warning: You must disable any real-time or on-access scan functions of the virus scanners used
for the directory ...\Avira\AntiVir Exchange\AntiVirData\
Test that your virus scanner is working correctly: Mark the required server name under AntiVir
Monitor and click Server Status in the right-hand window. Under the Search Engine Test
tab select Virus Scanner Test. If the test is successful you will get an OK and a message
indicating that an EICAR test virus has been found.
You can configure AntiVir under Basic Configuration - Utility Settings - AntiVir Engine -
Avira AntiVir Scan Engine - Properties.
• The name of the Avira Interface DLL must be entered in the Avira AV Interface field.
This DLL file is the connection between Avira AntiVir Exchange and the virus scanner.
This entry is preconfigured for every virus scanner and cannot be changed! In the next
field specify the parameter to be used by the virus scanner to scan for viruses.
• To set the virus scanner so that emails or attachments are cleaned when a virus is
found, enable the Different clean parameter field and specify the associated
parameter in the subsequent Clean parameter field.
Note: The corresponding clean parameters can be obtained by email or telephone from
the Support team.
81
Page 82

Avira AntiVir Exchange 9
• Timeout:
• Allow multiple concurrent calls:
The preconfigured return codes can be processed in the Return codes tab. The Details tab
indicates the meaning of the individual codes.
Update tab: The virus scanner has a mechanism that enables the latest patterns to be loaded
from the Internet.
Note: If you only want to use the virus scanner to scan for viruses, use the Scan with
AntiVir Engine job. The Remove Virus field must be disabled in the Actions tab. If
the virus scanner is also to be used to remove any viruses found, use the Scan and
Remove with AntiVir Engine job. In this case, the aforementioned field must be
enabled and the required actions in the event of a virus must be defined.
Specify the number of seconds after which an attempt to connect to the server is to be
canceled (if the connection has not been established by then). When specifying a time,
please consider the performance of your server. Minimum value: 60 seconds.
means that several emails can be processed by this virus scanner at the same time. The
number of calls is defined in AntiVir Server - Properties - General tab: Number of
threads. See also the settings for an individual Avira AntiVir Exchange Server.
82
Update pattern database: Enable this switch.
• Parameter: This field specifies the directory in which the updated virus patterns are
saved and contains a default setting (default: Update\Extract).
• Interval: Interval in minutes at which pattern update scanning takes place. Minimum
value: 15 minutes.
Page 83

AntiVir scan engine
• Timeout: The update procedure will be canceled after this time. Minimum value: 60
seconds.
You can use a proxy server to update the virus pattern. Select the required proxy server in the
Proxy Server tab. To create a new proxy server, see the "Using proxy servers" section under
Settings for an individual AntiVir server
The Jobs tab shows the jobs in which the virus scanner is incorporated.
Warning: To update Avira AntiVir Exchange please do not use this tab, but rather select the
Virus Scanner/Anti-spam Update option on the Search Engine Test tab and click Start.
After the update you will receive a detailed update report.
The Details tab contains a description of the default return values. If you make changes to the
Return Codes tab, we recommend documenting these changes on the Details tab.
.
5.5 Activating virus scanning - sample job
In Policy Configuration - Mail Transport Jobs, you will find the job Scan with AntiVir
Scan Engine. Open this job with a double-click.
5.5.1 General settings
You can assign a name of your own to the job on the General tab. Set the job to Active. The job
is enabled as soon as you save your settings with OK and close the job. The check mark in the
job icon immediately tells you the job is enabled.
83
Page 84

Avira AntiVir Exchange 9
The default for the Subject extension is AntiVir checked. This additional text is added to the
subject line of every email checked by the job.
This job also processes emails sent from quarantine once again. The Send option in Send from
Quarantine applies to all jobs and has priority. Accordingly, if you resend a mail with the
Quarantine Send option Deliver the email bypassing any AntiVir jobs on this server,
the mail will not be processed by any job. For this reason, when sending emails from quarantine,
you should set the Send option to Resubmit the email to all AntiVir jobs on this server.
For more information about resending emails from Quarantine see
Quarantine .
Sending emails from
5.5.2 Job is mission critical
A job is mission critical if the email is to be placed in the bad mail area in the event of a
processing error, e.g. if the virus scanner is not found. Select this option for mission-critical jobs
such as virus scans (place a checkmark in the box).
Warning: When this option is set, every email (incoming or outgoing) is transferred to the bad
mail area for as long as the processing error is not fixed.
A job is not mission critical if the result of the job is to be ignored for the email in question if
a processing error occurs. In this case, the email is transferred to the next job for processing.
Every processing error is entered in the Windows Event Log. If the processing error occurs fives
times successively, the job is disabled. The disabled job is restarted automatically after 15
minutes. Select this option for jobs that are not mission critical.
The default setting for nearly all jobs is not mission critical. Which jobs are to be considered
mission critical should be determined in the company policies.
Keeping a log of the processing
You use the processing log to observe the processing of the emails by the job. Activate this
function if an obligation to produce verification may occur or if you want to test a job.
When you set the checkmark for this option, information as to whether and how the job
processed the respective email is written to a text file for every email processed. This log text file
is stored in the Log folder in the Avira AntiVir Exchange installation directory. The log is
defined per job but the text file contains information on all jobs for which the Write
processing log option is enabled. An extra text file is created for each day.
Name of the text file: Audit_all_<Date of last change>.log, e.g. Audit_all_20050909.log
The individual items of information regarding the processed email are separated by semicolons
and can therefore be evaluated manually or automatically:
1. Date and time the email was processed.
2. Job ID
3. Job name
4. Message ID
5. SMTP sender
6. SMTP recipient
7. Result of the scan by Avira AntiVir Exchange
• Restricted - email matches the defined restrictions
• Restricted - email does not match the defined restrictions
Recipient groups are broken down. A separate line is written to the file for each recipient.
84
Page 85

AntiVir scan engine
5.5.3 Setting address conditions
You can use the Addresses tab to restrict the senders and recipients for whom this job is to
apply. Select all addresses from existing address lists or from lists you have created yourself. For
the best way to use address lists and for a precise description of the procedure see Address lists
.
5.5.4 Setting content conditions
You can use the Conditions tab to set the conditions for executing a job. For the best way to
use conditions, see Conditions
Warning: In order for the job to be executed, the content conditions must match the defined
address conditions on the Addresses tab (AND connector).
.
5.5.5 Defining actions
The Actions tab is used to define which actions are to be carried out when the job has found
a virulent email:
This job should scan the email for viruses but not attempt to clean the viruses from the email or
attachment. All virus scanners are generally able to clean viruses. However, as it rarely happens
in practice that known communication partners accidentally send viruses to one another (the
viruses mostly originate from spam that contains viruses), it is more effective to place
attachments with viruses into quarantine.
85
Page 86

Avira AntiVir Exchange 9
Note: As the job should only carry out one virus scan, you need to configure the AntiVir Scan
Engine accordingly. In Basic Configuration - Utility Settings - AntiVir Engine, select the
required engine and disable the Different clean parameter field. Enable this field if the job is
to clean the email or the attachment if a virus is found.
Once you have defined what exactly is to be scanned, define two different actions:
1. For the event that a virus was found and the file could not be successfully cleaned.
2. For the event that the file was successfully cleaned and the virus was removed (if you
The configuration of the actions is the same in both cases. The following example refers to the
first case:
selected this option).
86
A copy of the email is placed in quarantine and the relevant attachments are deleted. Here, the
email is only delivered to the recipient if the message text was virus-free and the attachment
could be deleted. A notification regarding the virus is sent to the administrator. This
notification is selected from the pull-down list of possible notifications; the list can be organized
individually with the HTML toolbar or directly with HTML format commands.
Note: Check whether virus mails sent to your company are frequently also spam. If this is the
case, it is best to immediately delete the entire email and not only the attachment. In this way,
there is no need to also check the remainder of the message texts for spam.
Note: If you enabled the Scan for viruses: Body option and a virus is actually found in the
text, the entire email, including the attachments, is deleted if the Delete attachment option
was set (an attachment is not delivered without the message text). The email section affected is
generally deleted individually. If only the attachment was virulent, then it is only the
attachment that is deleted.
Page 87

AntiVir scan engine
Click the Add button if you want to define further actions:
• Notification: Select the recipient of the notification from the address book.
• Start external program: A new program/application can be defined to have the
actions of this application executed. To start an external application, specify the path
and, if applicable, the necessary parameters.
• Add Avira tag and value: Mail header tags can be set during the Avira AntiVir
Exchange processing process so that special Avira AntiVir Exchange actions can be
executed. For example, additional details to be evaluated by a subsequent job can be
added to an email. When the email is sent to the original recipient, the mail header tags
are removed.
• Add header field and value: Define a new X-header field and select the variable to be
inserted in order, for example, to output the result of a spam analysis as a value. Unlike
the mail header tag, this information remains even when the email is sent to the
original recipient.
• Redirect mail: Select the recipient of the redirected email from the address book.
Redirect mail is not set by default but is simply proposed as an additional action.
Note: Special information with regard to Redirect mail: If you redirect a TNEF mail to an
external address, an empty email will be received, possibly with a winmail.dat attachment.
Exchange uses the TNEF format if an Outlook user (not Outlook Express!) sends an email
within an Exchange organization. This format is not used for communication via the Internet or
when using other email programs.
87
Page 88

Avira AntiVir Exchange 9
Click Next and make further configurations depending on the selected option. In the case of
Redirect mail, you have the following options:
Click the address book icon
If you also want to deliver the email to the original recipient or the original sender, select the
associated check box.
Click Finish when the recipient has been entered.
to select additional recipients or to define your own addresses.
88
Page 89

AntiVir scan engine
5.5.6 Selecting servers
On the Server tab, select the server(s) on which the job is to be active.
Click the Select button. A dialog box similar to the one for selecting virus scanners is displayed.
Note: The server must be configured correctly in order to appear in the selection list. For more
information on the configuration of Avira AntiVir Exchange Servers, see Settings for an
individual AntiVir Exchange server.
5.5.7 Entering details for the job
You can describe the job in more detail on the last tab entitled Details.
5.5.8 Saving the configuration
Save the configuration of the Avira AntiVir Exchange Console every time you make changes. To
do so, click the
in the Avira\AntiVir Exchange\Config\ directory. Open changes are indicated by (*) at the
uppermost node.
button. The configuration is saved in the ConfigData.xml file, which is stored
89
Page 90

Avira AntiVir Exchange 9
5.6 Virus scan of password-protected archives
In order for AntiVir jobs to be able to process emails, the emails must be fully unpacked.
Password-protected archives cannot be unpacked. Therefore, emails with such file attachments
are by default blocked as "unscannable" by the virus scan job and are placed in the AntiVir bad
mail quarantine.
To prevent this action, use the AntiVir Protected Attachment Detection job. This job reacts
to emails with password-protected archives and executes the job actions configured in the
Actions tab. Password-protected archives can thus be handled in a rule-based way. For example,
such emails can be blocked for certain individuals/groups but delivered to others.
As the emails would be delivered unscanned in the latter case, the emails need to be scanned by
a virus scan job before delivery. The AntiVir Scanner job therefore marks emails that contain
password-protected archives. Due to this marking, a subsequent virus scan job handles these
emails as "normal" emails and can ignore processing errors (DENIED) that occur without this
job.
Warning: The virus scanner does not check the files contained in archives for virus infection.
5.6.1 Sample job
1. Right-click Mail Transport Jobs, select New - AntiVir Protected Attachment
Detection.
90
Page 91

AntiVir scan engine
2. Enable the job. In the example, only the job-specific details are explained.
3. With the default setting for the job, an extension is inserted in the subject of the email
and a notification is delivered to the administrator. An email copy is stored in the
standard quarantine but the email is not blocked (the Delete email option is disabled).
Depending on the configuration, it is transferred to a subsequent virus scan job and
then delivered to the recipient.
4. If emails are blocked and are not to be delivered to the recipients, enable the Delete
email option. The email remains in the default quarantine until it is checked and
released by the administrator.
5.7 File restrictions for the attachment
Files can be restricted according to the type and size criteria. To begin with, certain types of files
cannot be permitted. You can also define the maximum size of an email and the maximum size
of email attachments. The attachment size and type can also be checked in a shared job.
5.7.1 By type
The file must be identified by AntiVir. For this, the fingerprint of the file is checked. The
fingerprint contains the binary file pattern, e.g. for *.exe files and/or the file extension, e.g. for
*.vbs files.
The result of this check is compared with the prohibited/permitted fingerprints under AntiVir
restrictions and is excluded or admitted accordingly. The actions from the job are then executed
for rejected files, e.g. in the case of an email with a prohibited attachment:
91
Page 92

Avira AntiVir Exchange 9
• The prohibited attachment is copied to quarantine.
• The message text is delivered to the recipient.
• Notifications are sent to the administrator and the sender.
The following actions are possible for an AntiVir Attachment Filtering job:
• Place entire email in quarantine
• Remove affected attachments from the email
• Delete and do not deliver the affected email
• Add sender or recipient to whitelist
• Subject extension
• Notify administrator
• Notify sender
• Notify recipient
• Notify other freely selected persons
• Run an external application
• Add Avira header field
• Add X-header field
• Redirect email
5.7.2 By email size
Emails can be analyzed and also rejected based on their total size. You can set limit per email in
the Email size tab.
The following actions are possible for an AntiVir Email Size Filtering job:
• Place entire email in quarantine
• Subject extension
• Delete and do not deliver the affected email
• Add sender or recipient to whitelist
• Notify administrator, sender, recipient
• Notify other freely selected persons
• Run an external application
• Add Avira header field
• Add X-header field
• Redirect email
5.7.3 By attachment type and/or size
Emails can be analyzed and also rejected based on the size of their attachments. You can set the
maximum size of an attachment per email in the Fingerprint/Size tab. In this job, you can also
restrict the type of attachment at the same time.
92
The action options for an AntiVir Attachment/Size Filtering job are the same as for an
Attachment Filtering job.
Page 93

AntiVir scan engine
5.7.4 Configuring fingerprints
A fingerprint comprises a name pattern and/or a binary pattern.
• Name pattern: This can be used to configure fingerprints using the file name and file
extension (*.exe, etc.).
• Binary pattern: This can be used to configure fingerprints using unique binary file
information.
With the name pattern, manipulations are of course possible, as (if the users are aware of it) the
extension can simply be changed. The binary pattern is a unique assignment to a format and
cannot be manipulated so easily in the file. Therefore, the secure way to identify a file format is
to enter a binary pattern.
However, with name patterns it is possible to react quickly to virus attacks:
As soon as the attachment name with which the virus is spread is known (example: Nimda virus
= readme.exe), the virus attacks can be prevented even before a virus pattern update is available
from the anti-virus manufacturer. The file name is simply created as a new fingerprint with the
name pattern.
It is also possible to block individual files:
If a company is using customized software that generates its own file format, a fingerprint can
also be created for this and it is therefore possible, for example, to prevent such files leaving the
company by email. You can organize fingerprints and group them in a logical category.
A series of predefined fingerprints for standard files is automatically provided with the
program. For help with creating individual fingerprints, please contact support.
5.7.5 Blocking file attachments by type - Sample job
You will find different jobs for blocking various file formats under Policy configuration Sample jobs.
• Block archives, except ZIP files
All compressed formats except ZIP files
• Block suspect attachments
Known harmful attachments, such as Nimda, etc.
• Block video files
Video formats
• Block sound files
Sound formats
• Block executable files
Executable files (exe, com, etc.
The following example is based on Block video files. Drag and drop this job to the Mail
Transport Jobs folder and open it there with a double-click.
General settings
1. You can assign a name of your own to the job on the General tab.
The check mark in the job icon immediately tells you the job is active.
2. Enable the job.
93
Page 94

Avira AntiVir Exchange 9
3. The job is enabled as soon as you save your settings with OK and close the job.
The default for the Subject extension is AntiVir checked. This extension is added to
the subject line of every email scanned by the job.
This job also processes emails sent from quarantine once again. The Send option in Send from
Quarantine applies to all jobs and has priority. Accordingly, if you resend a mail with the
Quarantine Send option Delivery without further AntiVir check on this server the mail
will not be processed by any job. For this reason, when sending emails from quarantine, you
should set the Send option to Recheck email with AntiVir jobs.
Setting address conditions
You can use the Addresses tab to restrict the senders and recipients for whom this job is to
apply.
Select all addresses from existing address lists or from lists you have created yourself.
Setting content conditions
You can use the Conditions tab to set the conditions for executing a job.
Warning: In order for the job to be executed, the content conditions must match the defined
address conditions on the Addresses tab (AND connector).
94
Page 95

AntiVir scan engine
Select fingerprints
1. Select the prohibited fingerprints from the Fingerprints tab:
Unpack compressed attachments means that the internal unpacker will open
archives and check the files they contain for the specified fingerprints. If this checkbox
is not enabled, only the archive will be checked as the highest file and will simply be
recognized as a packed format.
95
Page 96

Avira AntiVir Exchange 9
2. Fingerprint conditions: Click Video and no fingerprints selected to select a
fingerprint category or an individual fingerprint from a fingerprint list.
You will see the following view:
3. You can use the Add and Remove buttons to assign whole categories or individual
fingerprints to the list of blocked and/or permitted fingerprints. Open the category in
the left window by double-clicking or by clicking on the +.
Note: You can select a category, such as Video under Selected Fingerprints and enter one or
more fingerprints for this category under Exceptions. For a better overview, avoid having too
many categories checked by a single job.
96
Page 97

AntiVir scan engine
Defining actions
1. The Actions tab is used to define which actions are to be carried out when the job has
found a prohibited fingerprint as an attachment:
A copy of the email is placed in quarantine and the relevant attachments are deleted.
Consequently, the email is delivered to the recipient, but the prohibited attachments
are removed. A warning is sent to the administrator notifying him/her of the
fingerprint detected. This notification is selected from the pull-down list of possible
notifications; the list can be organized individually with the HTML toolbar or directly
with HTML format commands.
2. The Add button allows you to define more actions.
5.7.6 Restricting email size - sample job
Under Policy configuration - sample jobs you will find the Block emails greater than 100
MB job
Note: The email size restriction relates to the entire email, including the subject, message text,
header and attachment.
Drag and drop this job to the Mail Transport Jobs folder and open it there with a double-click.
97
Page 98

Avira AntiVir Exchange 9
General settings
You can assign a name of your own to the job on the General tab. Enable the job. The job is
enabled as soon as you save your settings with OK and close the job. The check mark in the job
icon immediately tells you the job is enabled.
The default for the Subject extension is AntiVir checked. This extension is added to the
subject line of every email scanned by the job.
This job also processes emails resent from quarantine. The Send option in Send from
quarantine applies to all jobs and has priority. Accordingly, if you resend a mail with the
Quarantine Send option Deliver the email bypassing any AntiVir jobs on this server,
the mail will not be processed by any job. For this reason, when sending emails from quarantine,
you should set the Send option to Recheck email with AntiVir jobs.
Setting address conditions
You can use the Addresses tab to restrict the senders and recipients for whom this job is to
apply. Select all addresses from existing address lists or from lists you have created yourself.
For the best way to use address lists and for a precise description of the procedure see
lists.
Setting content conditions
You can use the Conditions tab to set the conditions for executing a job.
For the best way to use conditions, see Conditions
.
Address
98
Page 99

AntiVir scan engine
Warning: In order for the job to be executed, the content conditions must match the defined
address conditions on the Addresses tab (AND connector).
Defining email size
The Email size tab is used to define the required maximum email size in Kilobytes:
Each incoming and outgoing email may therefore only be a maximum of 100,000 Kilobytes in
size.
Defining actions
The Actions tab is used to define which actions are to be carried out when the job has found an
email that is too large.
99
Page 100

Avira AntiVir Exchange 9
As the action, a copy of the email is placed in quarantine and the relevant email is deleted.
Consequently, the email is not delivered to the recipient. A warning is sent to the administrator
notifying him/her of the excessively large email. The notification is selected from the pull-down
list of possible notifications; the list can be organized individually with the HTML toolbar or
directly with HTML format commands.
The Add button allows you to define more actions.
The procedure is described under Defining actions
in "Enabling virus scanning - sample job"
Selecting servers
Servers are selected as described in Selecting servers.
Saving the configuration
Save the configuration of the AntiVir Exchange Management Console every time you make
changes. To do so, click the
file, which is stored in the Avira\AntiVir Exchange\Config\ directory. Open changes
are indicated by (*) at the uppermost node.
button. The configuration is saved in the ConfigData.xml
5.7.7 Blocking attachments types and sizes - sample job
You will find different jobs for blocking various file formats and corresponding sizes under
Policy Configuration - Job templates.
• Block Office Files > 10 MB
Microsoft Office files larger than 10 MB
• Block Sound Files > 5 MB
Sound files larger than 5 MB
100
 Loading...