

Page 1
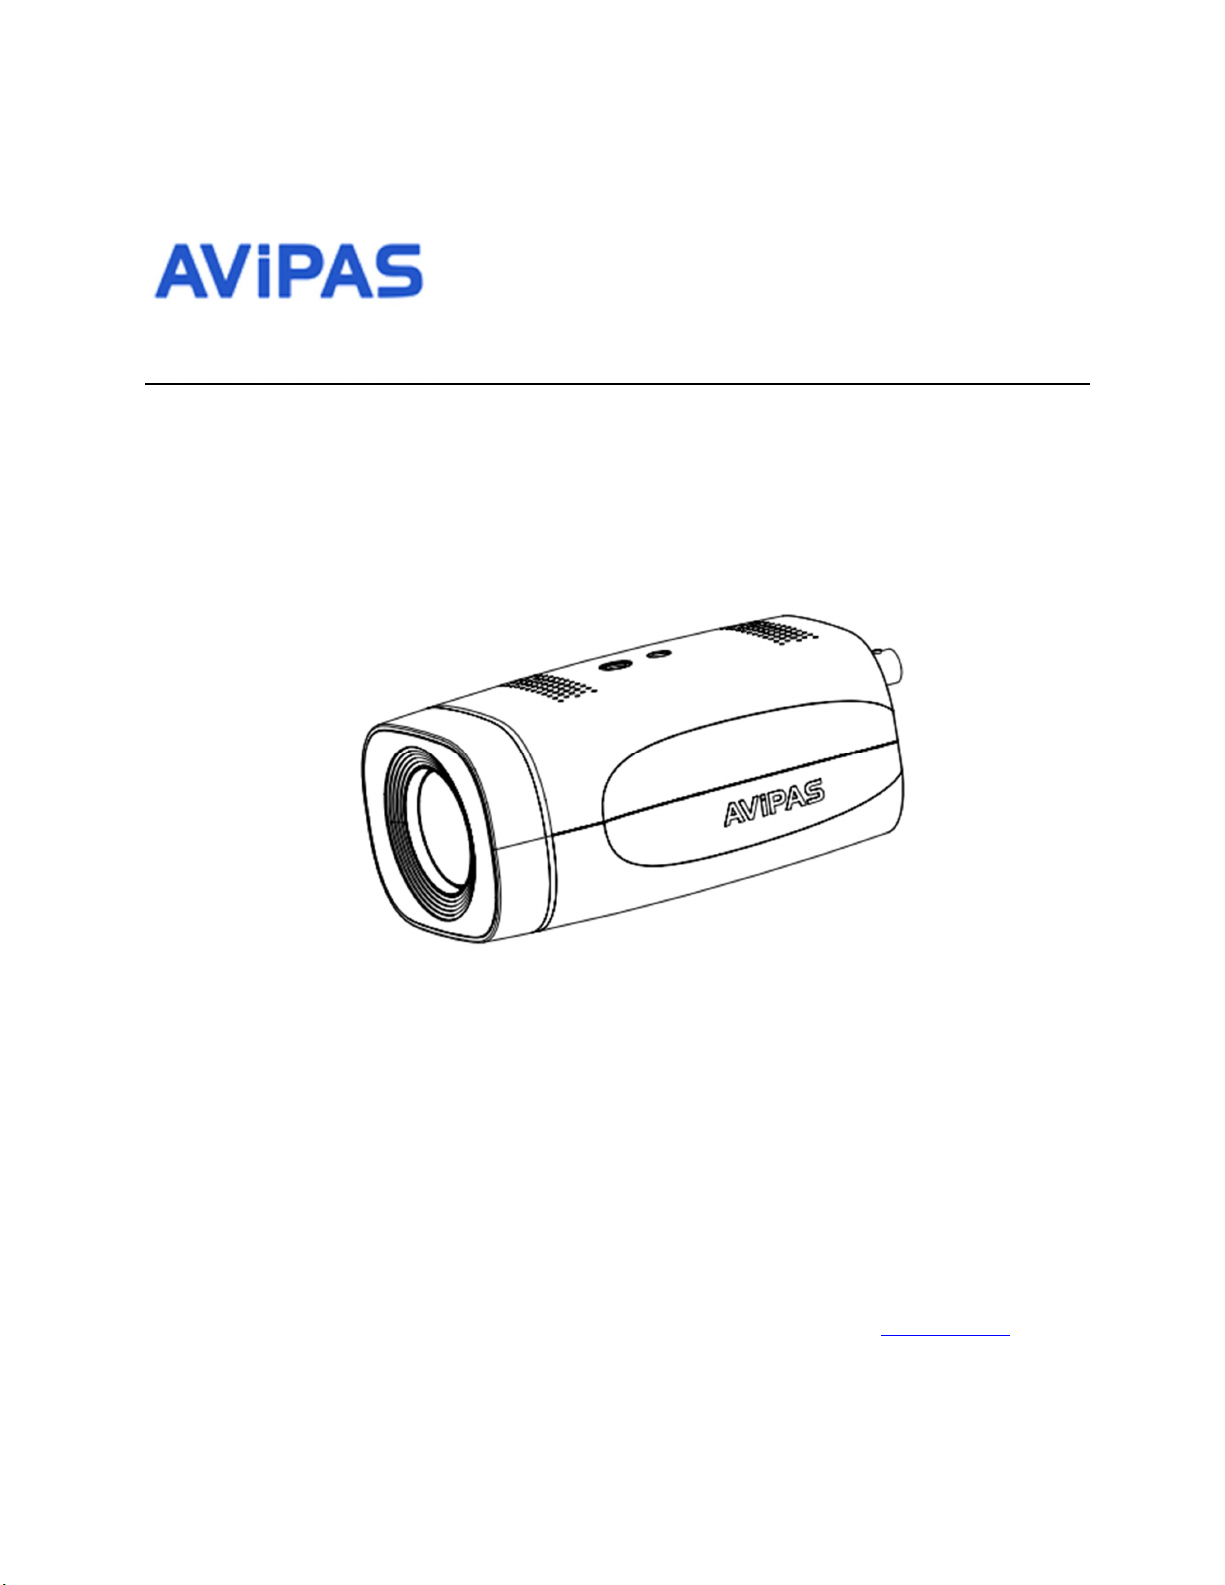
HD Video Conferencing Camera
Model: AV-1180
User Manual
V1.1
Please read this user manual
thoroughly before using.
www.avipas.com
i
Page 2

Preface
Thanks for using this HD Video Conferencing Camera.
This manual introduces the functions, installation process and operation of the HD camera. Prior to installation and
usage, please read the manual thoroughly.
Precautions
This product can only be used in the specified conditions in order to avoid any damage to the camera:
1. Do not subject the camera to rain or moisture.
2. Do not remove the cover. Otherwise, you may risk receiving an electric shock. In case of unintended equipment
operation, contact an authorized engineer.
3. Never operate under unspecified temperature, humidity or power supply.
4. Please use soft dry cloth to clean the camera. If the camera is very dirty, clean it with diluted neuter detergent;
do not use any type of solvents, which may damage the surface.
Note
This is a class A production. Electromagnetic radiation at certain frequencies may affect the image quality of TV in home
environment.
Page 3
Electrical Safety:
Electric Safety
Installation and operation must accord with electric safety standard.
Use caution to transport
Avoid stress, vibration or soakage in transport, storage and installation.
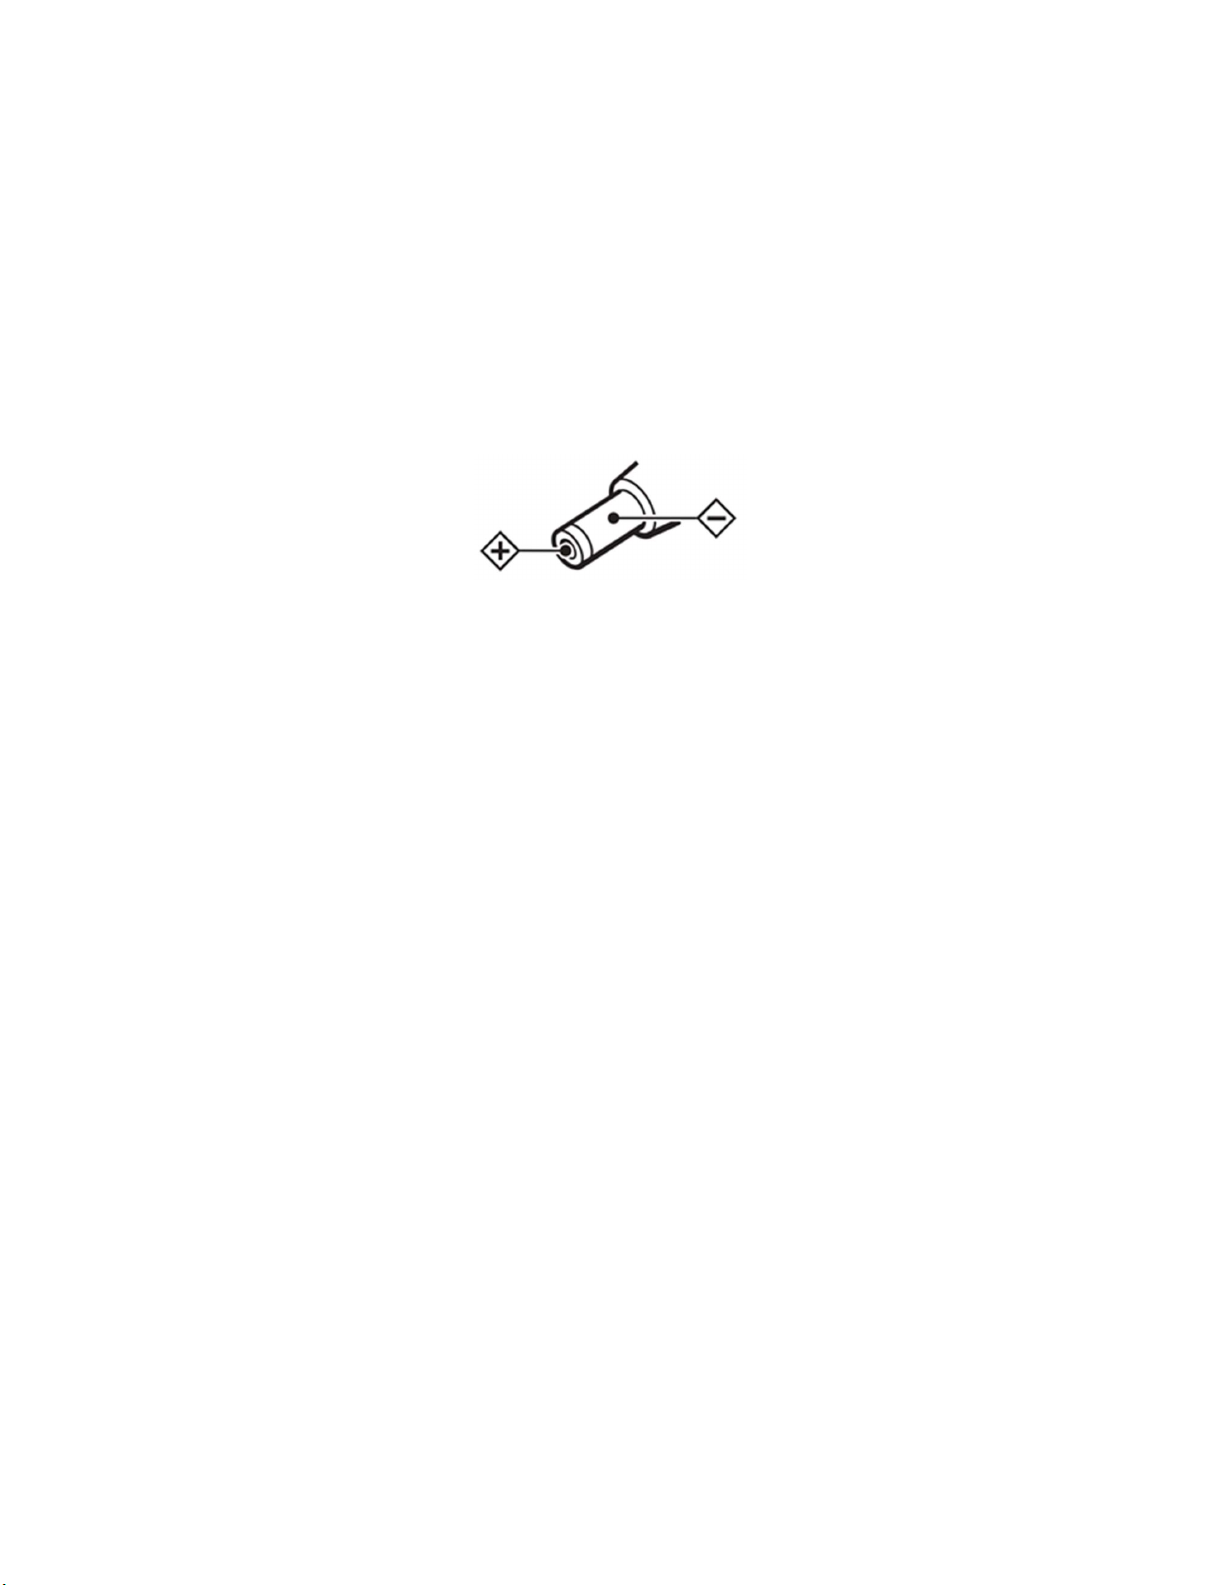
Polarity of power supply
The power supply of this product is +12V, the max electrical current is 2A. Polarity of the power supply plug is
shown in the drawing below.
Installation precautions
Do not grasp the camera lens when carrying it. Do not touch camera lens by hand. Mechanical damage may
result from doing so.
Do not use in corrosive liquid, gas or solid environment to avoid any cover (plastic material) damage.
Make sure there is no obstacle within rotation range.
Do not power on before installation is completed.
Do not dismantle the camera
We are not responsible for any unauthorized modification or dismantling.
CAUTION!
Certain frequencies of electromagnetic field may affect the image of the camera.
iii
Page 4

Content
Introduction .........................................................................................................................................................................................1
1.1 Product Schematic 1
1.2 Product Overview 2
1.3 Rear Panel Diagram 3
1.4 Bracket Installation 4
1.5 Accessory 4
1.6 Product Feature 5
1.7 Technical Specification 5
IR Remote Control................................................................................................................................................................................8
2.1 IR Remote Control Key 8
2.2 OSD Menu Setting 9
Network Connection ........................................................................................................................................................................133
3.1 Connection Method 13
3.2 Camera's Physical Address 13
3.3 Access Camera via IP 13
3.4 Web Interface 15
Serial Port Communication Control ...................................................................................................................................................23
4.1 Visca Protocol List 23
4.2 Pelco-D Protocol Command List 30
4.3 Pelco-P Protocol Command List 30
Maintenance and Troubleshooting ....................................................................................................................................................31
6.1 Camera Maintenance 31
6.2 Unqualified Application 31
6.3 Troubleshooting 31
iv
Page 5
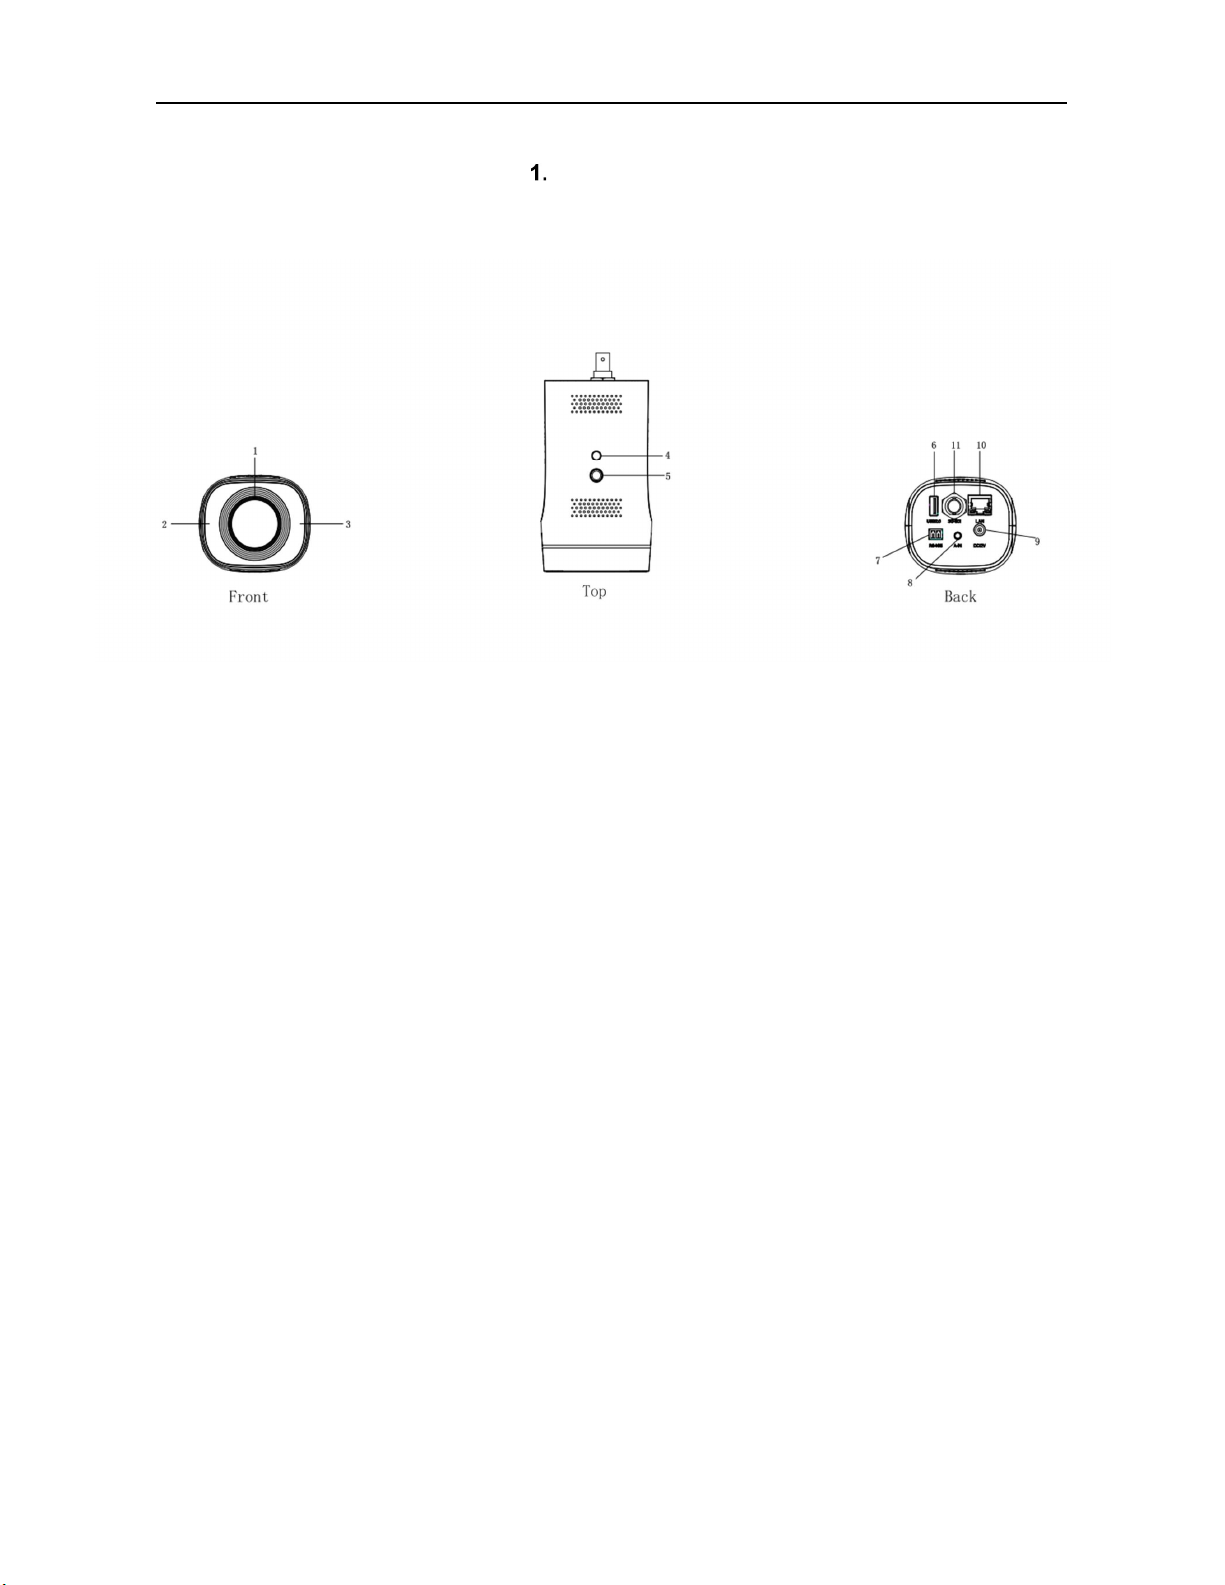
1.1 Product Schematic
Introduction
Fig 1.1 Product Schematic
Description:
1. Lens
2. Infrared Receiver
3. Indicator Light
4. Installati on Hole 8. 3.5 mm Audio Line-in Port
5. ¼ -20 female thread Screw 9. DC12V Power Input Socket
6. USB2.0 Type-A Port
7. RS485 Phoenix Connector
half-duplex
10. RJ45 Network Connection Port
11. SDI Port
1
Page 6
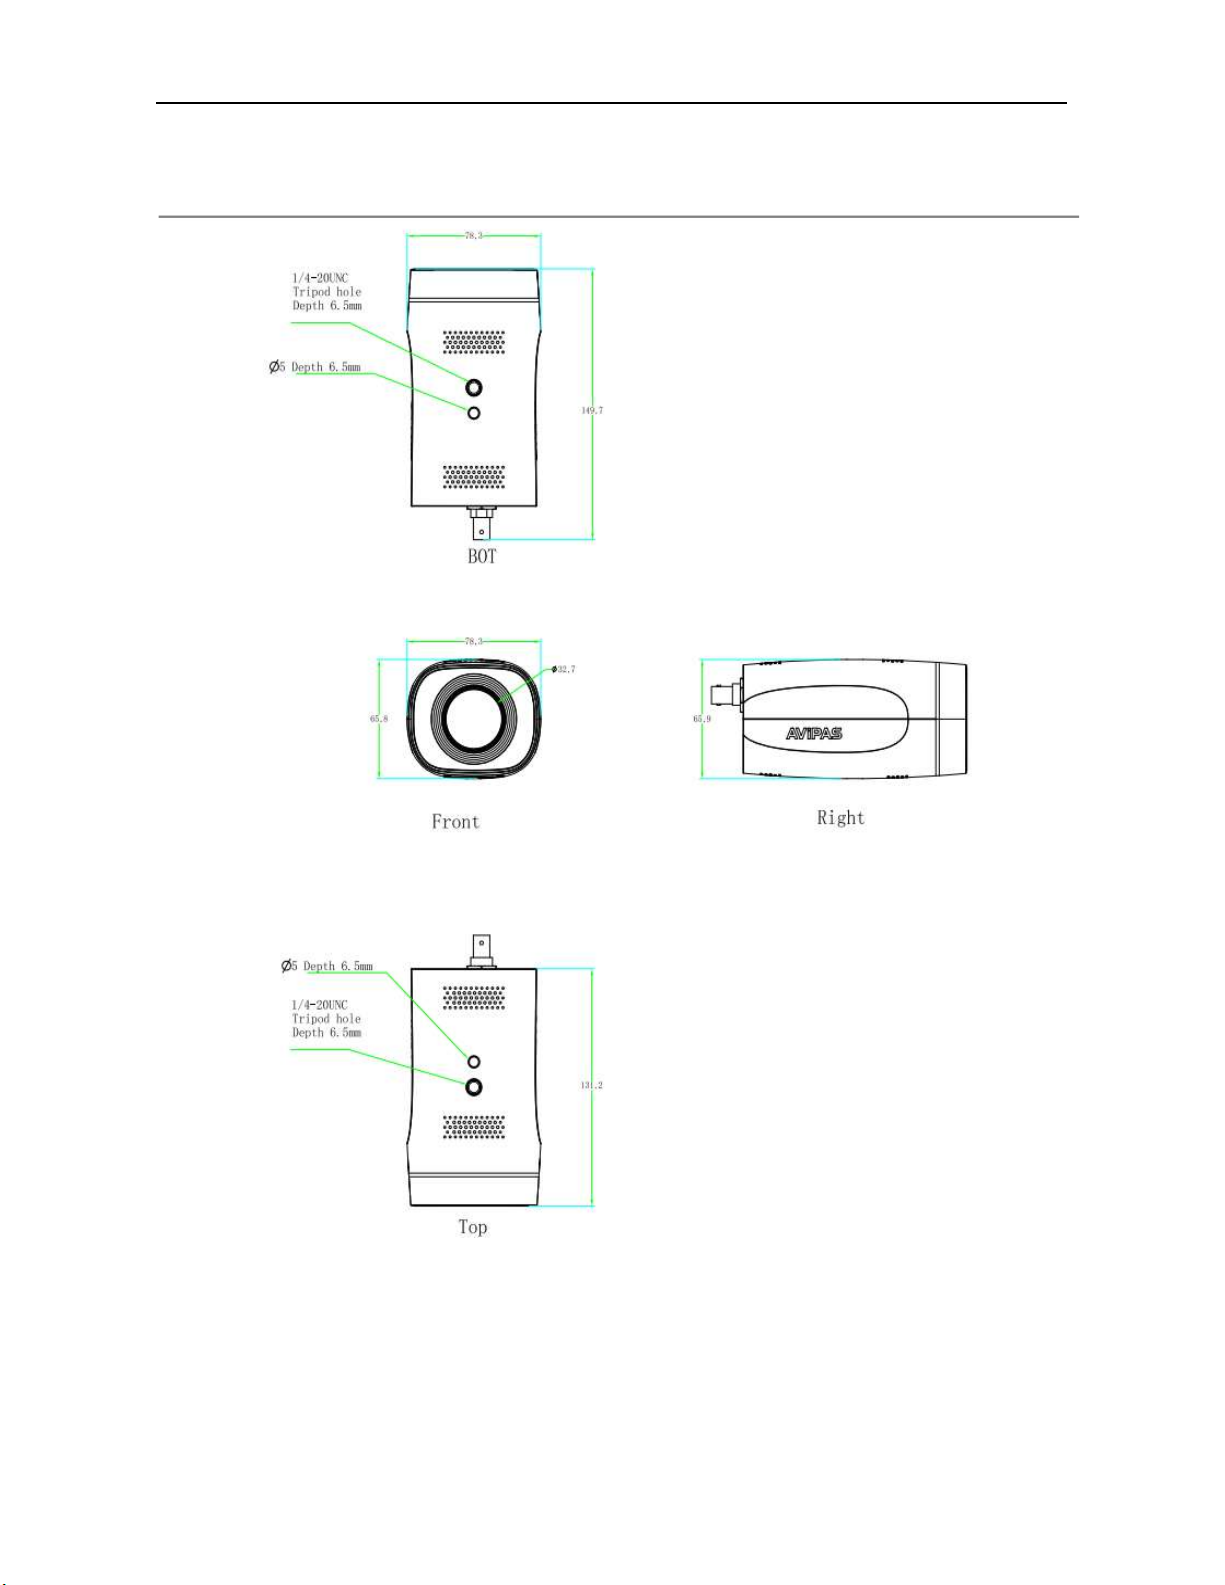
1.2 Product Overview
2
Page 7
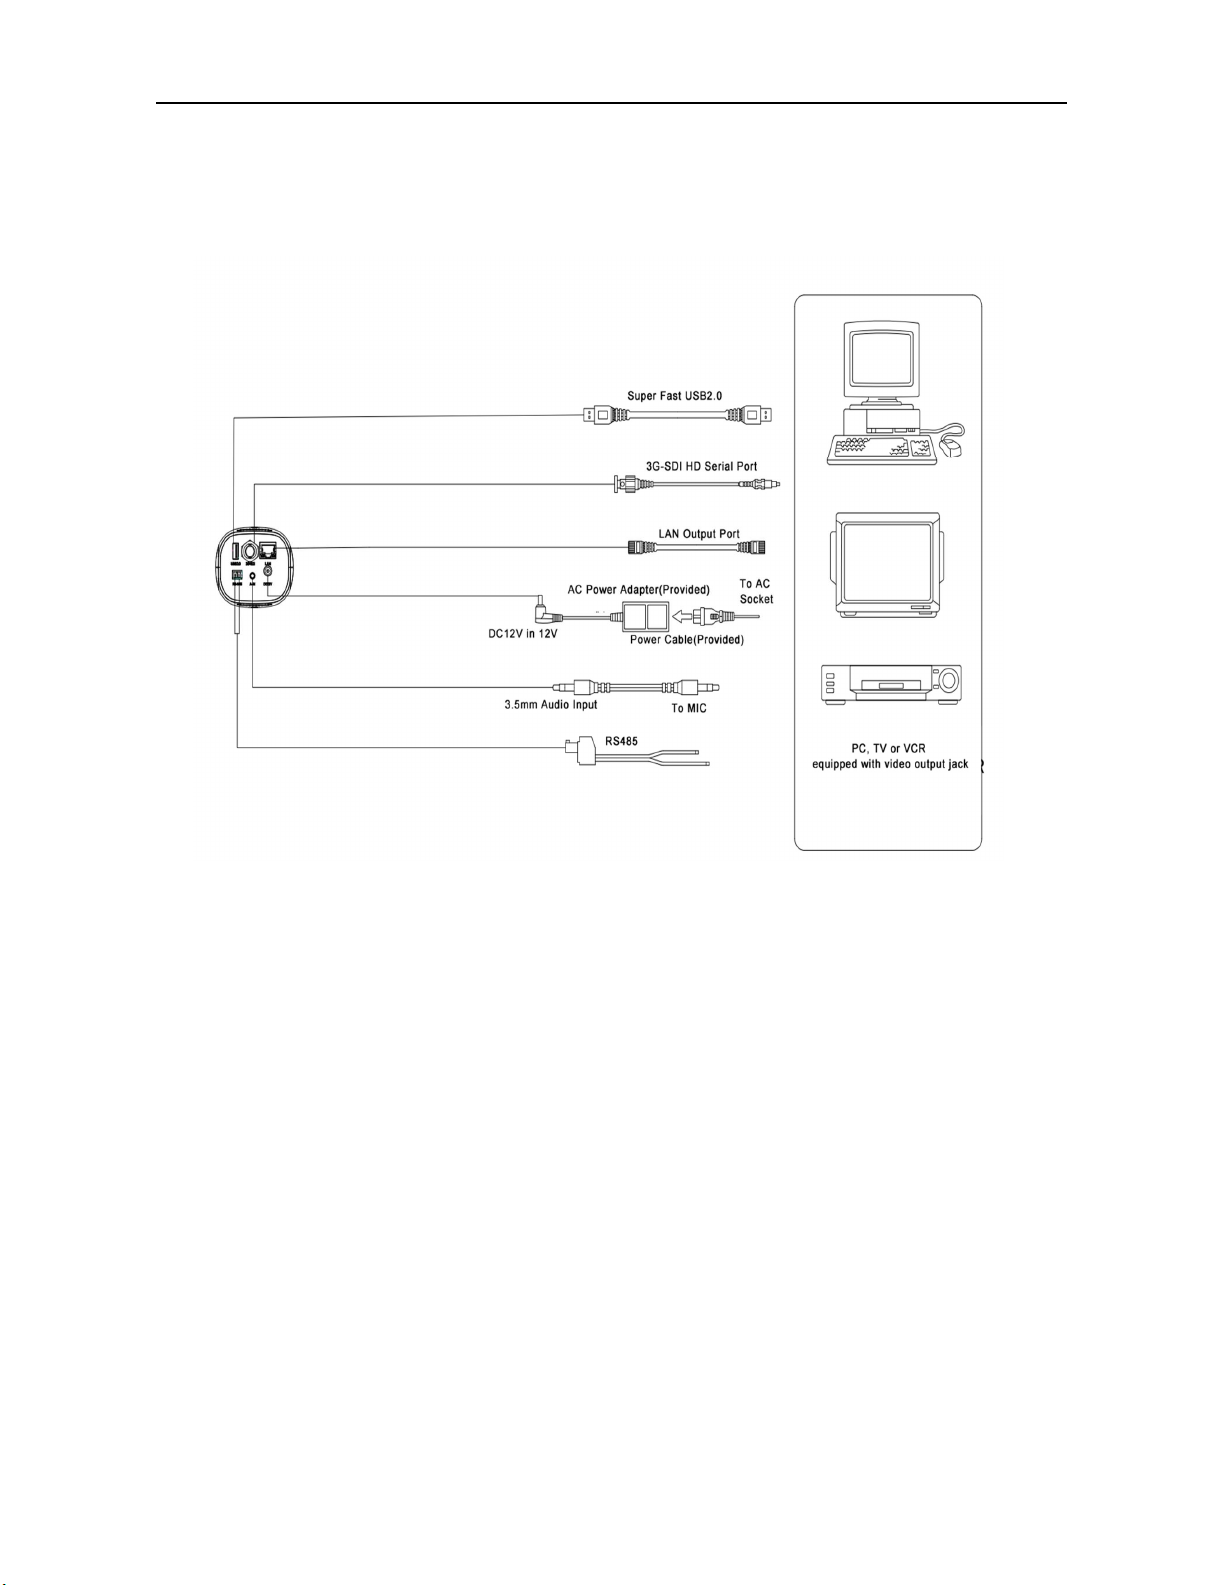
1.3 Rear Panel Diagram
The external interfaces of this product including: USB2.0, SDI, line-in, ethernet port, RS485, DC12V power supply, power
switch. The rear panel diagram is shown in below:
3
Page 8
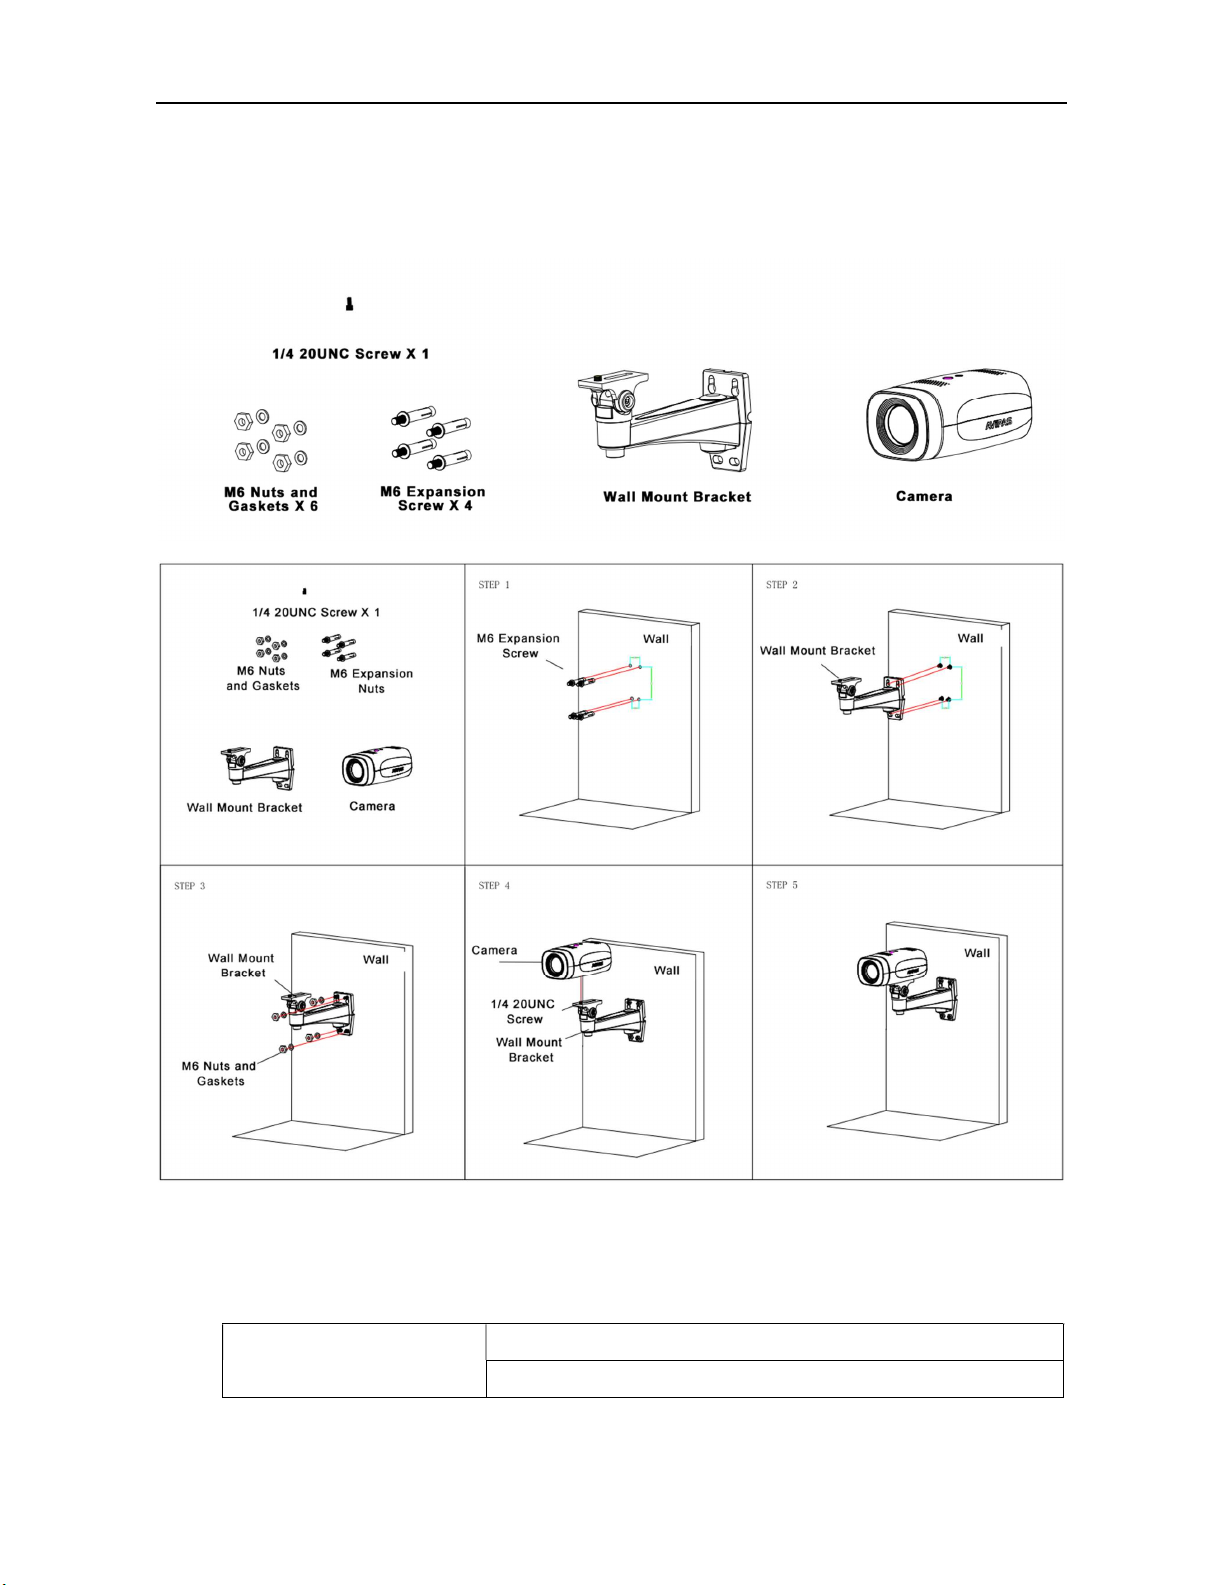
1.4 Bracket Installation
Steps of Wall Mount Installation
1.5 Accessory
When unpacked, check if all supplied accessories are included:
Table 1.5 Included Accessories
Power adapter
USB2.0 Cable
4
Page 9
Included Accessory
Optional Wall Mount Bracket
User manual
IR Remote Controller
1.6 Product Feature
Full HD Resolution: 1/2.8” 2.07M effective pixel SONY CMOS sensor, delivery the image resolution at
1080P with frame rate up to 60fps.
Optical Zoom Lens: 10x optical zoom, 5x digital zoom with 60.9° horizontal wide field of view.
Video outputs: Supports simultaneously SDI, USB2.0 and IP streaming (LAN) outputs.
Dual Stream outputs: Supports simultaneously main stream and sub stream output.
Video Compression: Support H.264, H.265
Audio input and encoding: 3.5mmAudio Line-in, embedded with IP streaming out with AAC, MP3, G.711A
audio encoding
Network Protocol: Support RTSP, RTMP, RTP multicast, ONVIF, GB/T28181 protocols
Control Protocol: Supports VISCA, PELCO-D, PELCO-P, ONVIF, UVC1.1 & VISCA-over-IP protocols and
automatic identified the protocols
Communication interface: Half-Duplex RS485 Phoenix connector
PoE (Power Over Ethernet): Supports PoE, IEEE standard 802.af. Ethernet cable can transmit Power, IP
control signal and video streaming output
USB2.0 Type-A Port: Able to connect with PC, Mac, or Chromebox computer easily. Compatible with any
web conferencing or streaming software
1.7 Technical Specification
Camera Parameter
Zoom 10x Optical, 5x Digital
Lens
Viewing Angle
Sensor 1/2.8-inch SONY CMOS sensor, Effective Pixel 2.07M
Video Format
Table 1.7-1 Camera Lens Parameter
F1.6 ~ F3.0, f=4.7 mm~ 47 mm
Horizontal:6.43˚(N)~ 60.9˚(W)
Vertical:4.1˚(N)~ 40.1˚(W)
SDI:
1080P60/50/30/25/59.94/29.97;1080I60/50/59.94;
720P60/50/30/25/59.94/29.97
USB2.0
MJPG:1920*1080/1280*720 /1024*768
/1024*576/960*540/800*600/720*576/720*480/704*576/640*480 /640*360
/352*288/320*240/320*180/176*144P30;
H.264:1920*1080/1280*720 /1024*768
/1024*576/960*540/800*600/720*576/720*480/704*576/640*480 /640*360
/352*288/320*240/320*180/176*144P30;
5
Page 10
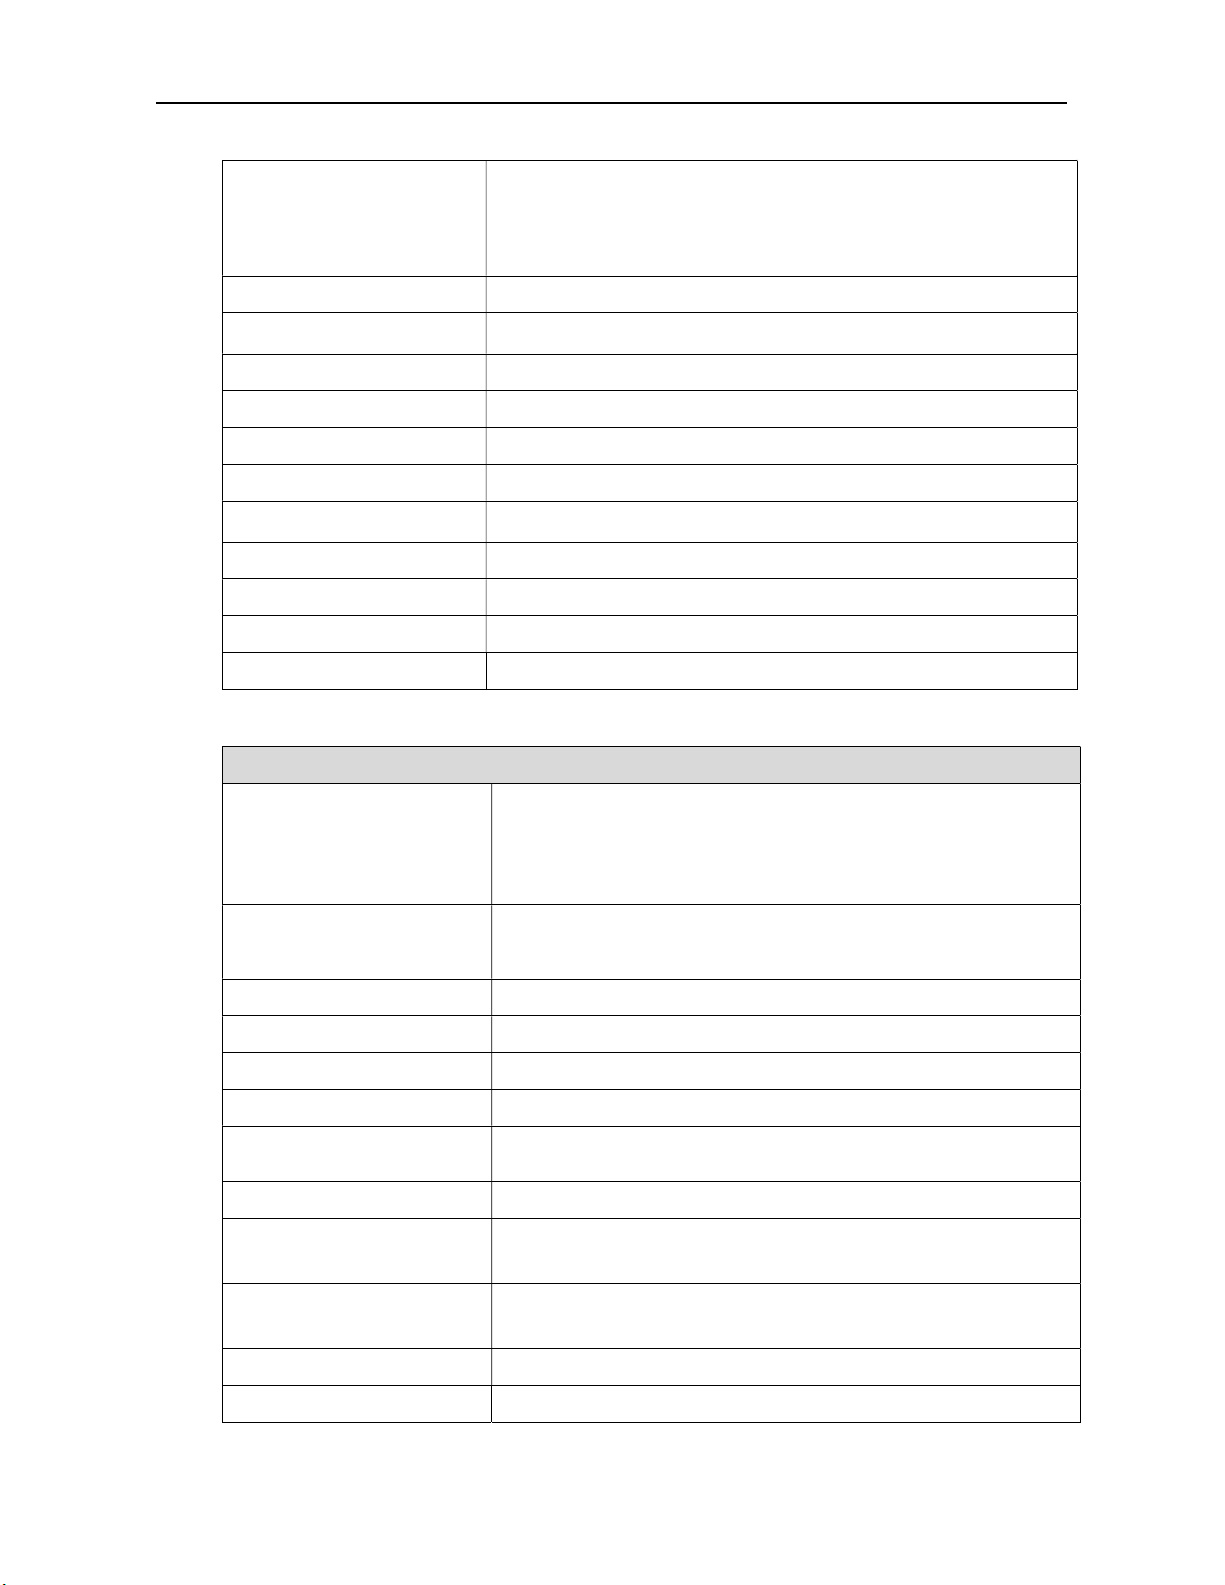
H.265:1920*1080/1280*720 /1024*768
/1024*576/960*540/800*600/720*576/720*480/704*576/640*480 /640*360
/352*288/320*240/320*180/176*144P30;
YUY2:800*448 P15; 640*480/640*360 /432*240/320*180/P30
Minimum Illumination 0.05Lux (F1.8, AGC ON)
Digital Noise Reduction
White Balance Auto / Manual/ One Push
Focus Auto/Manual/One Push
Exposure Mode Auto/Manual/Shutter Priority/Aperture Priority/Brightness Priority
Aperture Auto/Manual
Shutter Speed
Backlight Compensation ON/OFF
WDR OFF/ Dynamic level adjustment
Video Adjustment Brightness, Color, Saturation, Contrast, Sharpness, B/W mode, Gamma Curve
SNR ≥55dB
Interface Parameter
Video Out
2D﹠3D Digital Noise Reduction
1/25s~1/10000s
Table 1.7-2 Interface Parameter
1xSDI (3GSDI) BNC female,
1x RJ45 IP streaming 10M/100M/1000M adaptive Ethernet port
1x USB2.0 type-A
1x LAN (RJ45)
IP Video Compression
Audio Input 1x Double track 3.5mm LINE-IN
Audio Output SDI, IP Streaming
Audio Compression AAC, MP3, G.711A
Network Interface 1x RJ45
Network Protocols RTSP/RTMP, ONVIF, GBT28181, SRT, multicast mode
Control Port RS485, USB (eCam), RJ45
Control Protocol
Communication Protocol
USB Communication
Protocol
Power Supply HEC3800 Outlet (DC12V)/ PoE (IEEE standard 802.3af)
Power Adapter AC110V~AC220V to DC12V/ 2.5A
LAN:H.264, H.265
USB 2.0:MJPG、H.264、H.265、YUY2
VISCA/ Pelco-D/ Pelco-P
Support Baudrate: 115200/38400/9600/4800/2400
UVC1.1(Video Communication Protocol)
6
Page 11
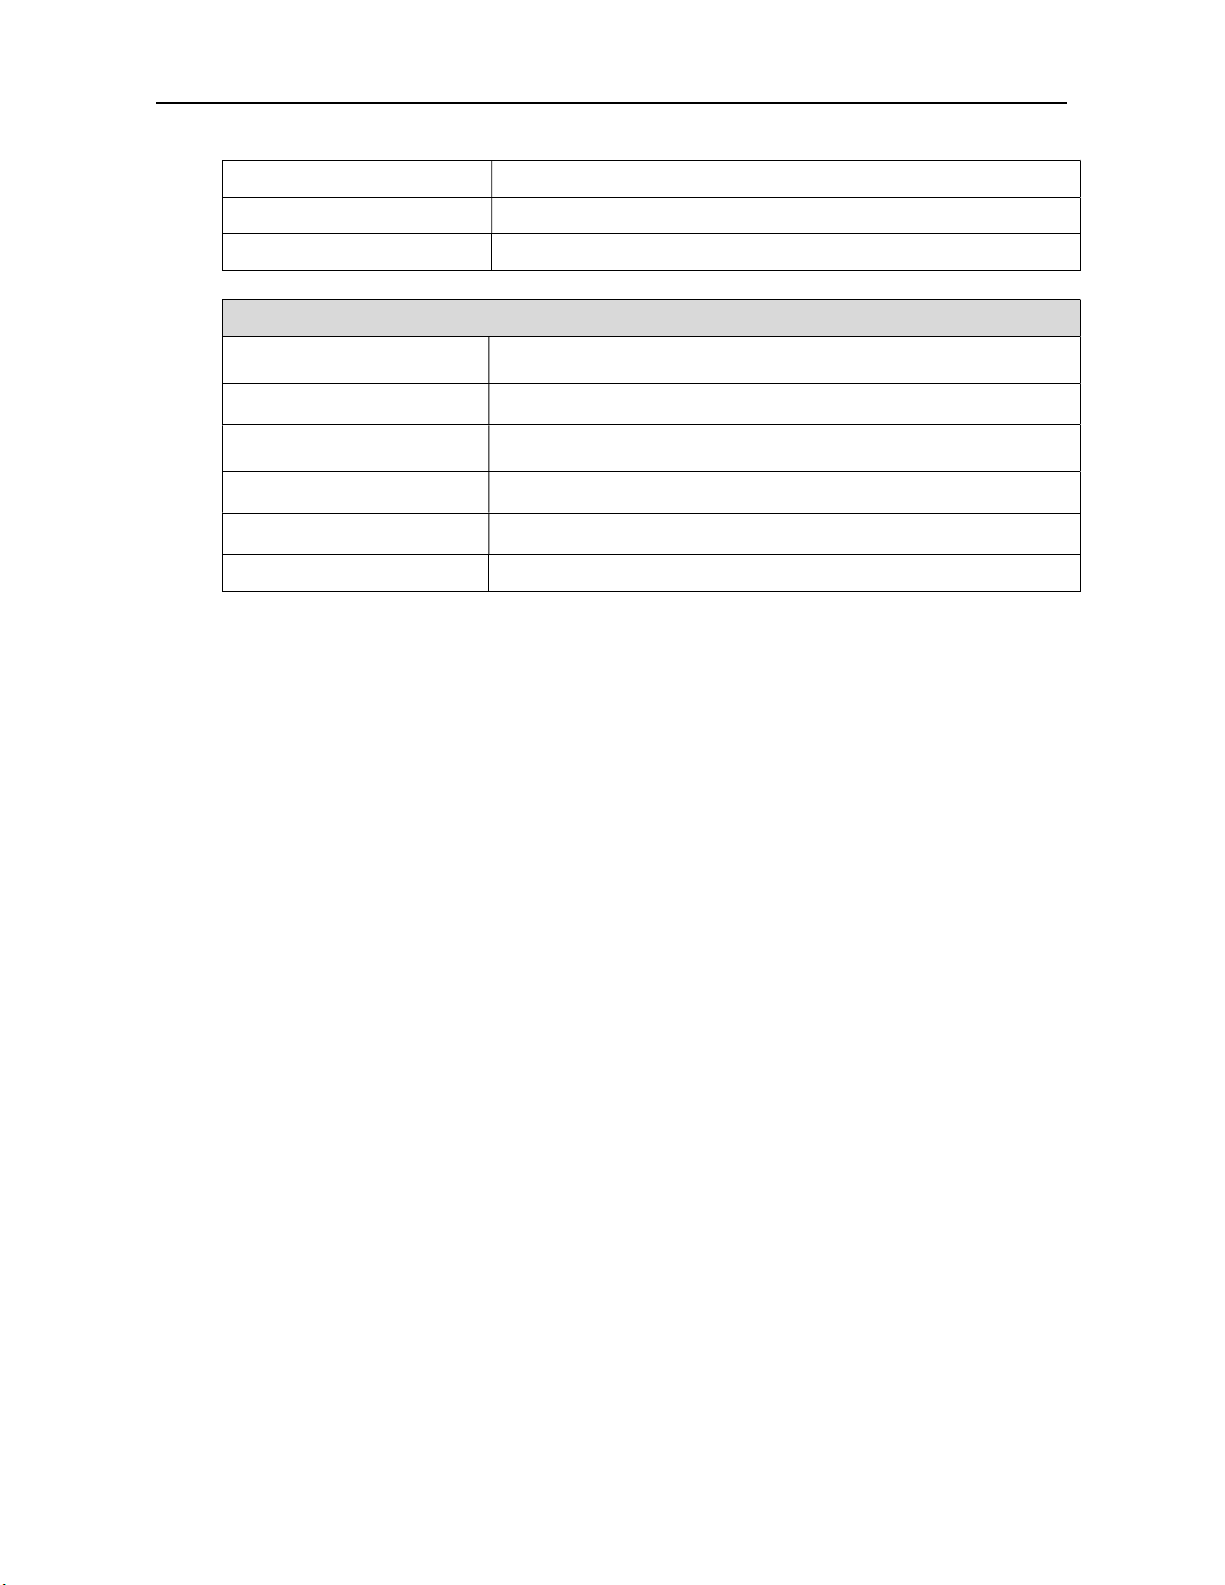
Input Voltage DC12V
Input <1A
Consumption <12W
Table 1.7-3 Other Parameter
Other Parameter
Storage Temperature
Storage Humidity
Working Temperature
Working Humidity
Dimension
Environment Indoors
-10℃~+60℃
20%~95%
-10℃~+50℃
20%~80%
149.7(L)mm×78.3mm(W)×65.9mm(D)
7
Page 12
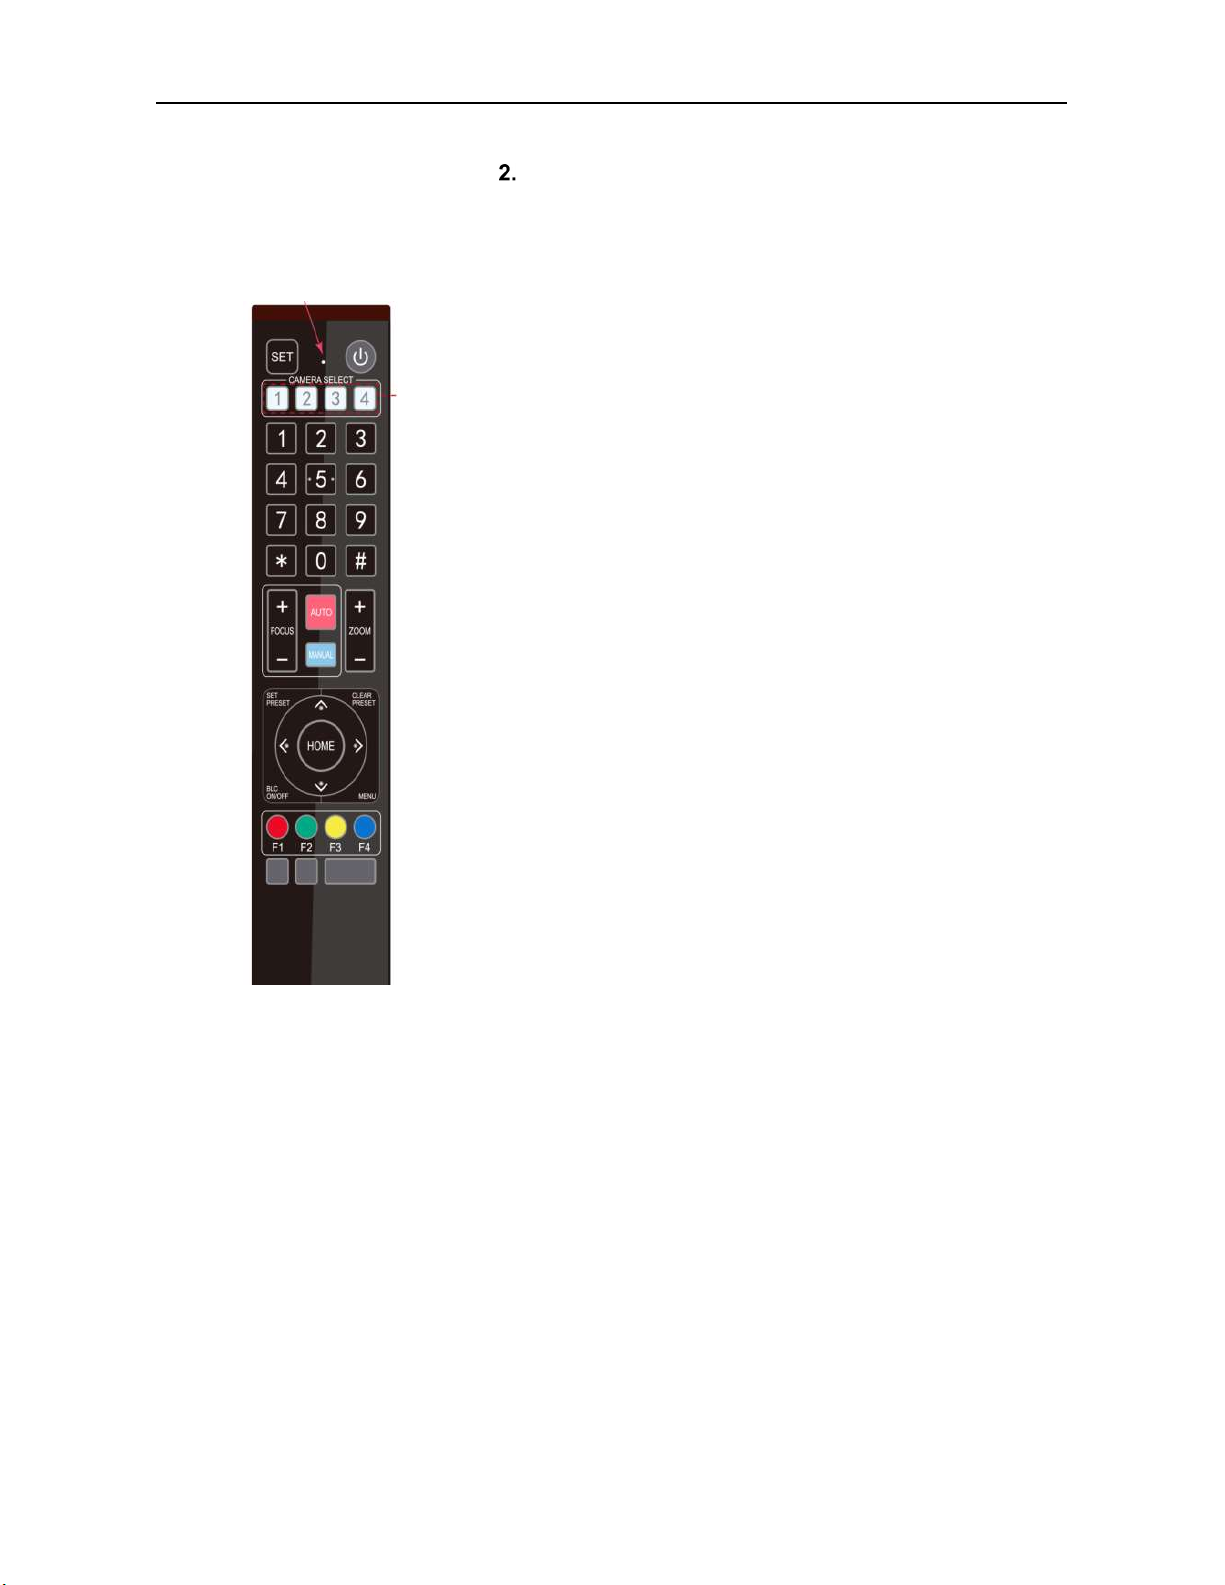
2.1 IR Remote Control Key
Press [AUTO] to enter auto focus mode.
IR Remote Control
1. Standby Key
Press and hold the key for 3 seconds to enter standby mode. Press and hold the
key for 3 seconds to back to normal mode.
2. Camera Select Section
Select the camera address which wants to be controlled
(The camera will be set to address #1 in default.)
3. Number Key
Use for combination keys
4,*,# Key
Use for combination keys with [F1 – F4] to set camera IR controller address.
Example: [*] + [#] + [F1] : camera IR controller address No.1
5. Focus Control Key
6. Zoom Control Key
[ZOOM+]: zoom in
[ZOOM-]: zoom out
7. Direction Control Keys
Directional arrow keys to control the OSD (on screen display) menu selections up,
down, left and right.
8. BLC Control Keys
Press [BLC] button to enable/disable backlight compensation. (Note: Backlight is
only effective under auto exposure mode)
9. Menu Setting
Press [MENU] to Open the OSD menu
Press [MENU] again to exit the OSD menu or return to the previous menu.
Press [HOME] to confirm the selection
10. Key Combination Functions
8
Page 13

【*】+【#】+ Manual:IP/user name/password restore
to default
【*】+【#】+【6】:Restore factory default 【#】+【#】+【1】: Switch video format to 1080P50
【*】+【#】+【9】:Vertically flip image 【#】+【#】+【2】: Switch video format to 1080I60
【#】+【#】+【0】: Switch video format to 1080P60
【#】+【#】+【3】: Switch video format to 1080I50
【#】+【#】+【4】: Switch video format to 720P60
【#】+【#】+【5】: Switch video format to 720P50
【#】+【#】+【6】: Switch video format to 1080P30
【#】+【#】+【7】: Switch video format to 1080P25
【#】+【#】+【8】: Switch video format to 720P30
【#】+【#】+【9】: Switch video format to 720P25
2.2 OSD Menu Setting
Main Menu
In normal working mode, press 【MENU】key to
display the menu, using direction arrow keys to
select different items.
Exposure: Enter into Exposure setting
Color: Enter into color setting
Image: Enter into image setting
Focus: Enter into focus setting
MENU
===============
Language English
(Setup)
(Exposure)
(Color)
(Image)
(Focus)
(Noise Reduction)
(Video Format)
(Version)
(Restore Default)
[↑↓] Select [← →]Change Value
Language: Language setting
Setup: System parameter setting
Noise Reduction: Enter into noise reduction
Video Format: Enter into sub menu
Restore Default: Enter into reset setting,
select YES or NO to confirm
[↑ ↓] Select: For selecting menu
[← →] Change Value: For modifying
parameters
[MENU] Back: Press [Menu] to return
[Home] OK: Press [Home] to confirm
Set Up
Move the pointer to the [SETUP] in the Main Menu,
press [HOME] key and enter into setup page as
shown below:
9
Page 14

SETUP
===============
Image Style Default
Protocol Auto
Visca Address 1
PELCO-P Address 1
PELCO-D Address 1
Baudrate 9600
Zoom speed 7
[↑↓]Select [← →]Change Value
[Menu]Back
BLC: ON/OFF for options (only available in auto
mode)
Anti-Flicker: OFF/ 50Hz/ 60Hz for options (only
available in Auto/ Iris priority/ Brightness priority
modes)
Gain limit: 0~15 (only available in Auto/ Iris priority
/Brightness priority mode)
DRC: 1~8, close
Color
Move the pointer to the [COLOR] in the Main
Menu, press [HOME] and enter the color setting
page as below:
Style: Default/Normal/Clear/Bright/Soft
Protocol: VISCA/Pelco-P/Pelco-D/Auto
Visca Address: VISCA=1~7/Pelco-P=1~255/ Pelco-
D=1~255
Baudrate: 2400/4800/9600/38400/115200
Zoom Speed: Set the zoom speed for the remote
control, 1~7
Exposure
Move the pointer to the [EXPOSURE] in the Main
Menu, press [HOME] and enter the exposure
setting page as below:
EXPOSURE
================
(Mode) Auto
(EV) OFF
(BLC) OFF
(Flicker) 50Hz
(G.Limit) 3
(DRC) 2
[↑↓]Select [← →]Change Value
[Menu]Back [Home]OK
Mode: Auto, Manual, Shutter priority, Iris priority
and Brightness priority.
COLOR
==============
WB Mode Auto
RG Tuning 0
BG Tuning 0
Saturation 100%
Hue 7
AWB Sensitivity High
[↑↓]Select [← →]Change Value
[Menu]Back
WB Mode: Auto, Manual, One Push, 2400K,
3000K, 3500K, 4000K, 4500K, 5000K, 5500K,
6000K, 6500K, 7000K, 7100K
Saturation:
60%,70%,80%,90%,100%,110%,120%,130%,140
%,150%,160%,170%,180%,190%,200%
Red fine-tuning: -10~10 (only available in
automatic mode)
Blue fine-tunable: -10~10 (only available in
automatic mode)
RED GAIN: 0~255(only available in Manual mode)
BLUE GAIN: 0~255(only available in Manual
mode)
AWB Sensitivity: high/middle/low
EV: On/Off (only available in auto mode)
10
Page 15

Color
[Menu]Back
Image
Move the pointer to the [IMAGE] in the Menu,
press the [HOME] and enter the image setting
page as below:
IMAGE
===============
Brightness 7
Contrast 7
Sharpness 6
Flip-H OFF
Flip-V OFF
B&W-Mode
Gamma Default
DCI Close
Electronic zoom Close
Low-Light Mode Close
[↑↓]Select [← →]Change Value
[Menu]Back
Brightness: 0~14
Contrast: 0~14
Sharpness: 0~15
Flip-H: On/Off
Flip-V: On/Off
B&W Mode: color, black/white
Gamma: Default/ 0.45/ 0.50/ 0.55/ 0.63
DCI: Dynamic Contrast: Off/ 1~8
Electronic zoom: On/ Off
Minimum Illumination: On/ Off
Focus
Move the pointer to the [FOCUS] in the Menu,
press [HOME] and enter the focus setting page as
below:
FOCUS
===============
Focus Mode Auto
AF-Zone ALL
AF-Sensitivity Low
[↑↓]Select [← →]Change Value
Focus Mode: Auto/ Manual/ OnePush
AF-Zone: Up/ Middle/ Down
AF-Sensitivity: High/ Middle/ Low
Noise Reduction
Move the pointer to the [NOISE REDUCTION] in
the Menu, press [HOME] and enter the noise
reduction setting page as below:
NOISE REDUCTION
================
NR-2D 3
NR-3D 3
Dynamic Hot Pixel OFF
[↑↓]Select [← →]Change Value
[Menu]Back
2D Noise Reduction: Auto, close, 1~7
3D Noise Reduction: Close, 1~8
Dynamic Hot Pixel: Close, 1~5
Video Format
Move the pointer to the [VIDEO FORMAT] in the
Menu, press [HOME] and enter the video format
setting page as below:
VIDEO FORMAT
===============
1080P60 1080P50
1080I60 1080I50
1080P30 1080P25
720P60 720P50
720P30 720P25
1080P59.94 1080I59.94
1080P29.97 720P59.94
720P29.97
[↑↓]Select
[Menu]Return [Home]OK
Note: After change the video format, please exit the
menu to save the changes.
Version
Move the pointer to the [VERSION] in the Main
Menu, press [HOME] and enter the version
information page as below:
11
Page 16

VERSION
================
Camera Version 1.0.0 2022-8-12
AF Version 1.0.2 2022-7-21
[Menu]Back
Camera Version: Display camera version
information
AF Version: Display AF version information
Restore Default
Move the pointer to the [RESTORE DEFAULT] in
the Main Menu, press [HOME] and enter the
setting page as below:
RESTORE DEFAULT
================
Restore Default? NO
[↑↓]Select [← →]Change Value
[Menu]Back [Home]OK
Restore default: Yes/ No
12
Page 17
NETWORK CONNECTION
3.1 Connection Method
Direct Connection: Connect the camera with computer via Cat5/Cat6 Ethernet cable.
Connection to LAN:Connect camera and computer to the same local LAN (router or switcher) via Cat5/Cat6
Ethernet cables
3.2 Camera’s Physical Address (MAC address)
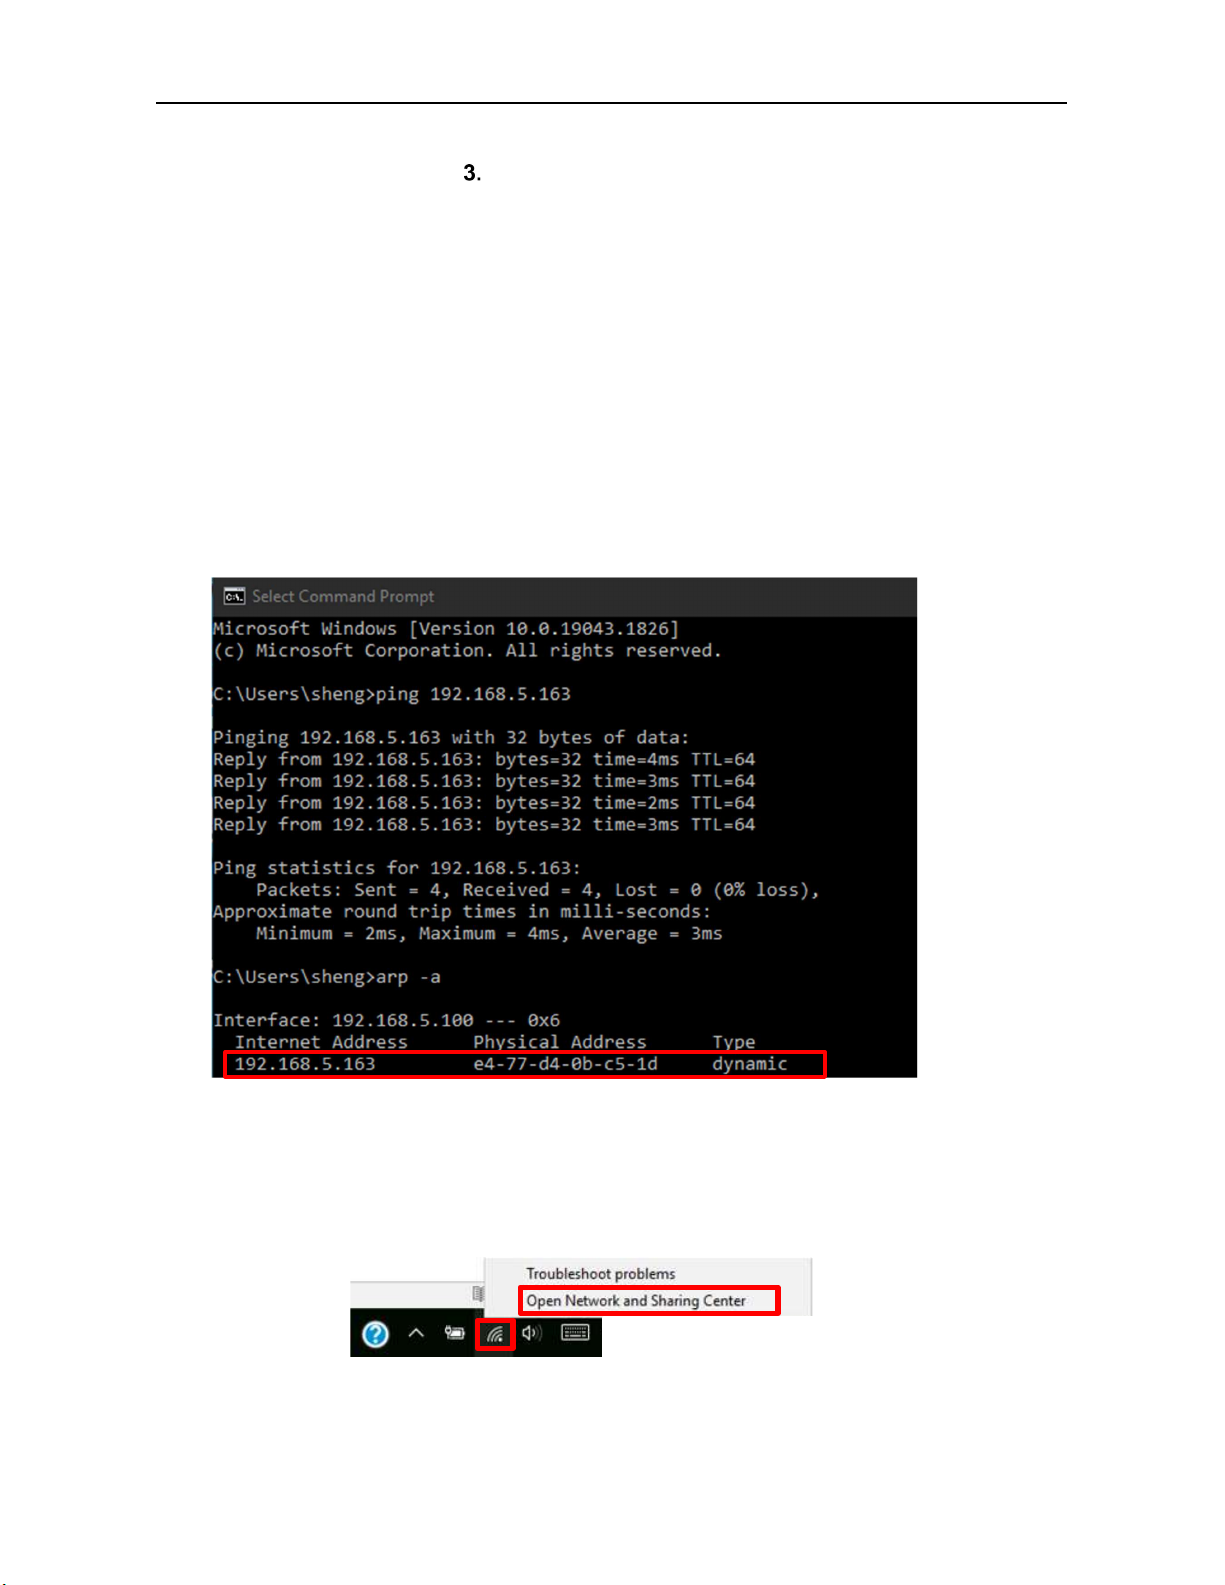
User can also use the Command Prompt or Terminal to verify network connection and the device’s physical
address.
1. Make sure the camera is in the same local network with laptop. Open Command Prompt or Terminal, type in:
ping 192.168.5.163; In order to check camera’s physical address, type in: arp -a.
If network connection is correct, the camera’s physical address will show up in screen as below
:
Access Camera via IP
3.3
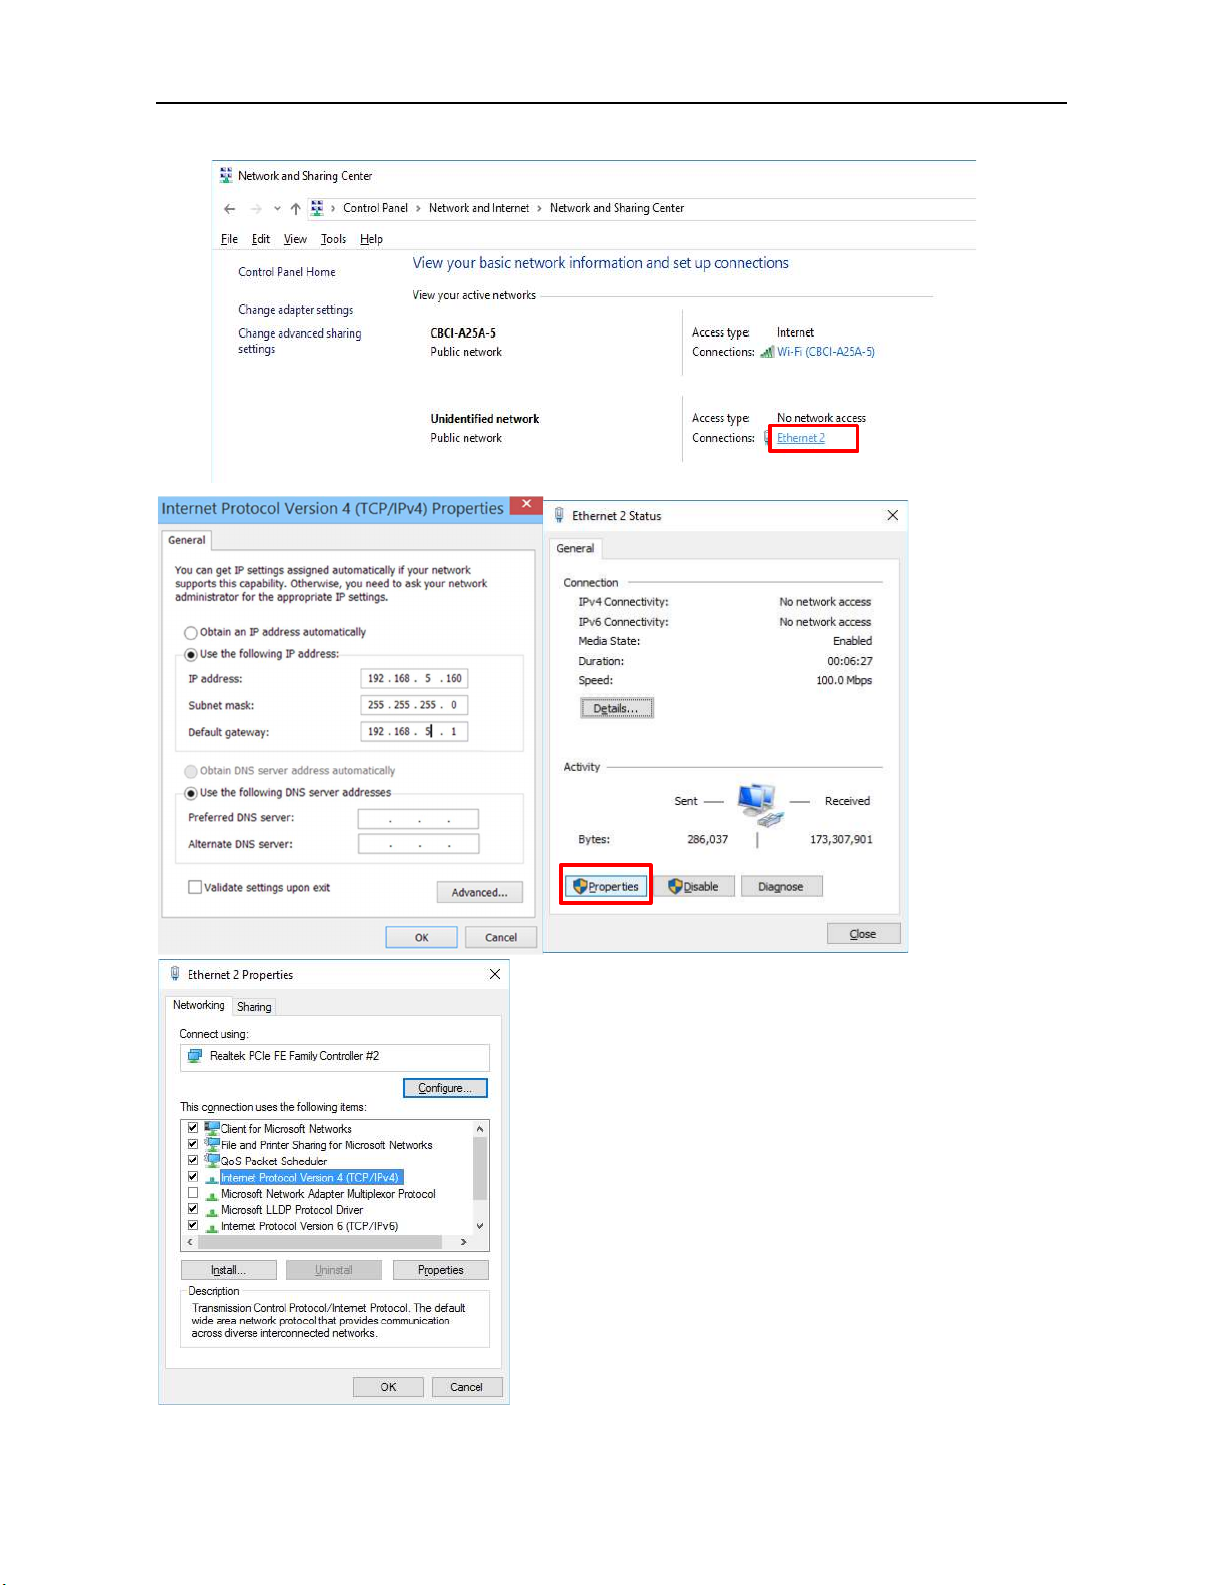
Connect the camera to your computer directly via an Ethernet cable.
On the bottom-right corner of your desktop, right click on the Network icon, then click on the “Open Network and
Sharing Center”.
Click on “Ethernet2” -> “Properties” -> double click on “Internet Protocol Version 4(TCP/IPv4)” -> select “Use the
following IP address” and enter the IP address.
13
Page 18
14
Page 19
Note: In order to access camera via IP, make sure that your computer is in the same network segment range as
the camera IP address. The device will not be accessible if the segment is not consistent. For example: AV-1180
camera’s IP address (default) is 192.168.5.163, then your computer IP address should be in this range
192.168.5.XXX (the first three section must be same, and the last one should be different).
3.4 Web Interface
1)Web Login
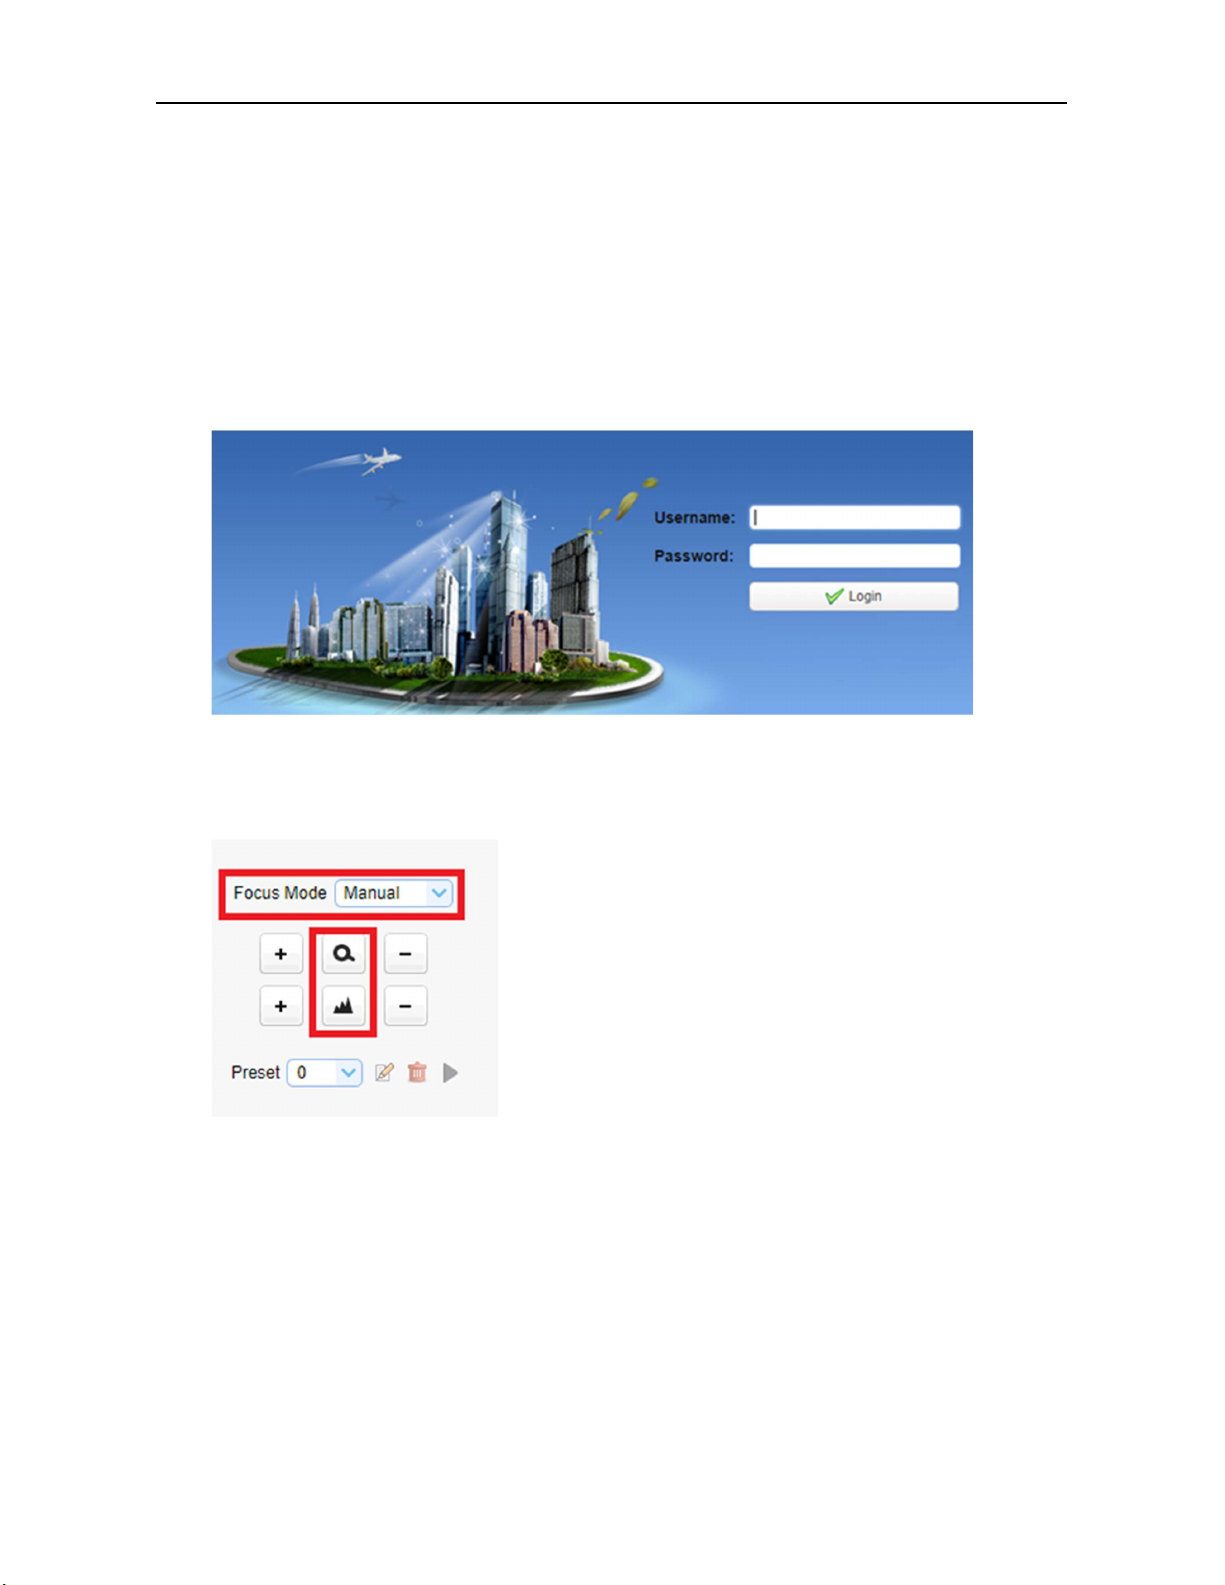
Open a browser, type in 192.168.5.163 in the address bar, log in with user name: admin, password: admin.
2) Preview Page
In the preview page, user can control the camera’s zoom, focus, video capture, sound, focus, and set the preset
position.
Focus Mode: Auto(default), Manual, Onepush
Zoom +/- : Zoom in/out
Focus +/- : Adjust focus (please select the focus mode as manual)
3) Configuration Page
Click Configuration to enter into the setting page.
15
Page 20
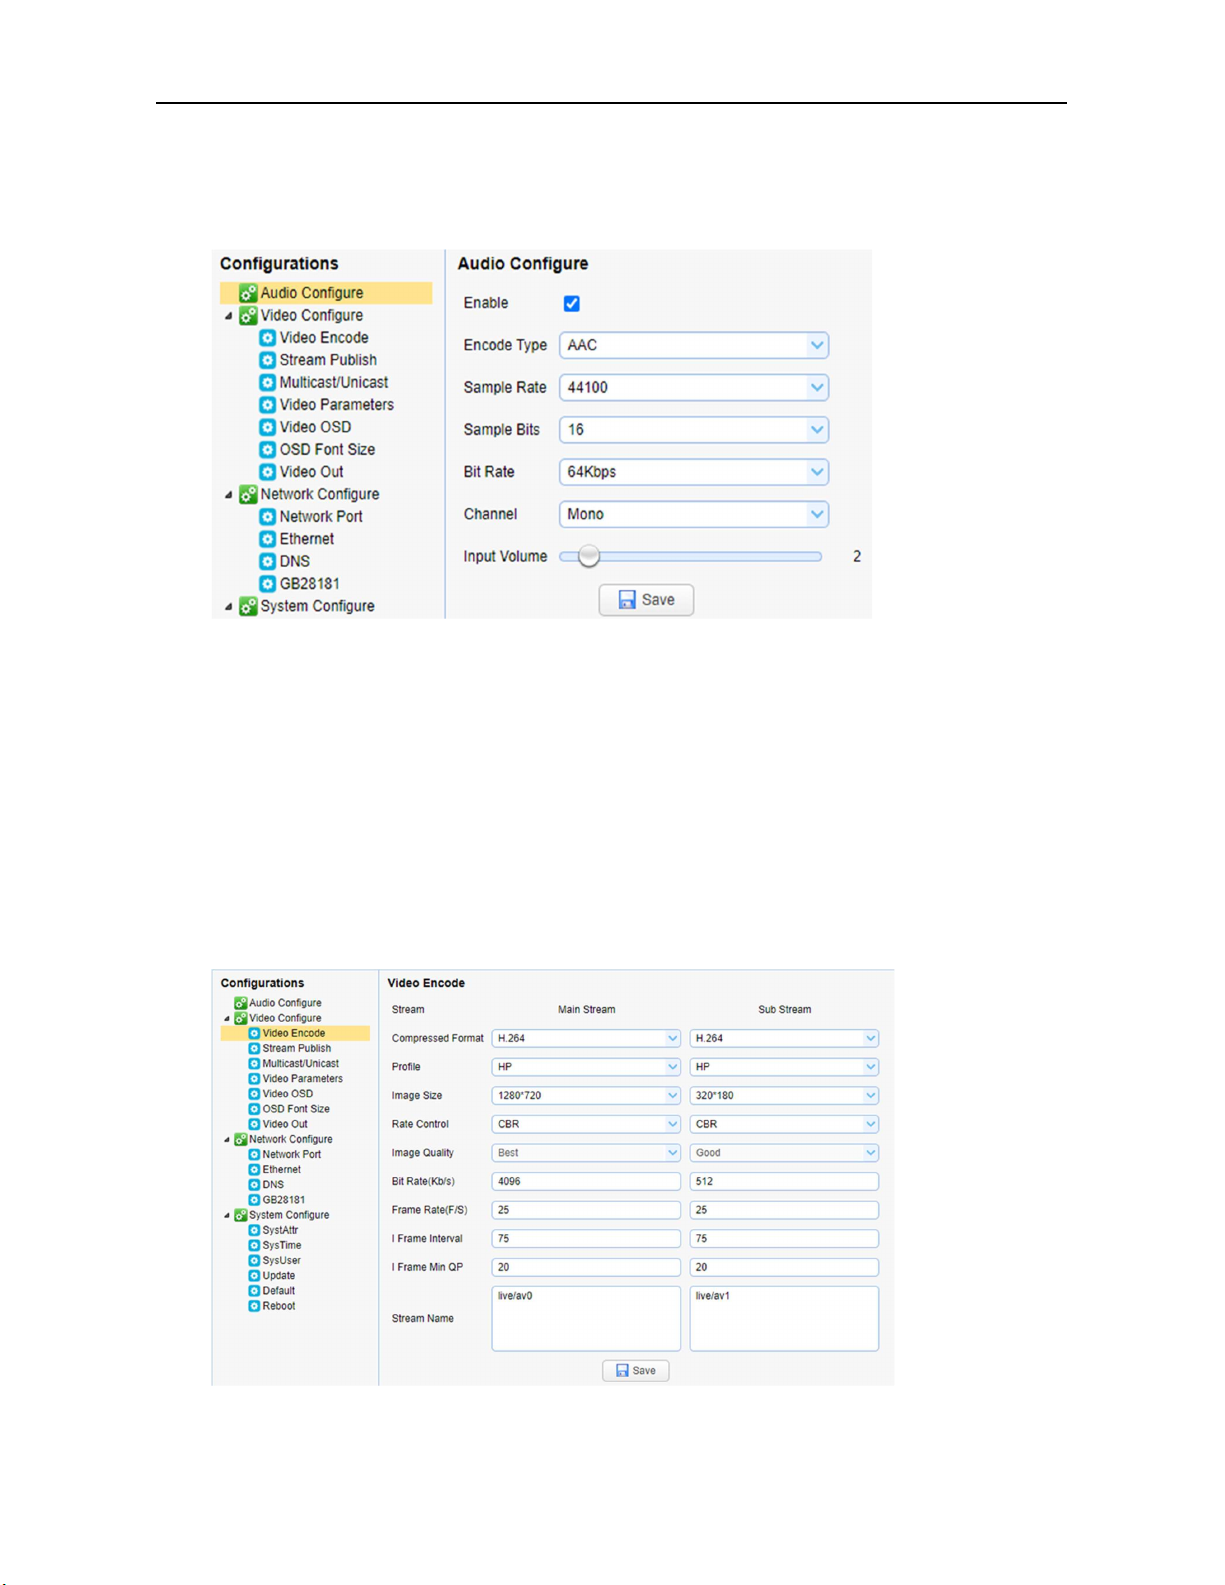
Audio Configure
Enable option:Choose to enable the audio or disable.
Encode Type: AAC (default), MP3, G.711A
Sampling Rate:16000, 32000, 44100(default), 48000
Sampling Bits: 16bits (default)
Bit Rate: 32K, 64K (default),48K, 96K,128K
Channel type: mono (default), stereo
Input Volume: Set the input volume (default 2, 1-10 optional)
Please click “Save” button after changes and reboot the camera to apply new settings
Video Configure
.
16
Page 21

Stream:Main Stream & Sub Stream settings
Compression Format:Set the video compression format (H.264, H.265)
Profile:HP (high profile)/ BP (base profile)/ MP (main profile)
Video Size:Main stream: 1920x1080, 1280x720 (default), Sub stream: 320x180(default), 640*360, 320*240,
1280*720, 1920*1080
Rate control:VBR (variable bitrate)/ CBR (constant bitrate).
Image Quality:Only available under VBR. Image quality selections: best, better, good, bad, worse, worst.
Rate (Kb /s): Set the video bit rate (main stream default 4096b/s, 64-40960Kb/s optional; sub stream default
512Kb/s, 64-40960Kb/s optional).
Frame rate (F/S): Set the video frame rate (main/ sub stream default 25F/S; main stream 5-50F/S optional, sub
stream 5-30F/S optional).
Key frame interval: Set the key frame interval (main / sub stream default 75; main stream 1-250F optional, sub
stream 1-150F optional).
Key frame Min QP: Set the key frame Min QP (main / sub stream default 20; main stream 10-51F optional, sub
stream 10-51F optional).
Stream Name: When streaming via RTSP or RTMP, user may modify stream name. Main Stream has
default setting as “live/av0”; Sub stream has default setting as “live/av1”.
Please click “Save” button after changes and reboot the camera to apply new settings.
Stream Publish
Switch:To enable or disable the main/ sub stream
Protocol type:primary / secondary stream applies RTMP protocol.
Host Port:server port number (default 1935, 0-65535 optional)
Host Address:server IP addresses (default 192.168.5.11)
Stream Name: choose a different stream name (live / av0, live / av1 optional).
User: Set the username
Password: Set the password.
Please click “Save” button after changes and reboot the camera to apply new settings.
For more information about live streaming, please refer to www.avipas.com -> Support -> “How-to Material”.
Multicast/Unicast
Main/Sub Stream: On/off
Protocol: RTP multicast, TS multicast, UDP unicast, TCP unicast
Address: Default 224.1.2.3.
Port: Main Stream Default Port: 4000, Sub Stream Default Port: 4002
Visit: Address comes up after setting. For example: rtp: //224.1.2.3:4000; udp: //@224.1.2.3:4000
Video Parameters
A)Focus:Focus mode, focus range, focus sensitivity can be set.
17
Page 22

Focus Mode: Auto(default), Manual and One Push
Focus range: Center(default), Top, Bottom and All
Focus Sensitivity: Low(default), High, Middle
B)Exposure:Exposure mode, exposure compensation, back light compensation, anti-flicker, gain limit, wide
dynamic, shutter speed, aperture value and brightness can be set.
Exposure Mode:Set the exposure mode (the default automatic, manual, shutter priority, aperture priority,
Brightness priority).
Exposure compensation:Exposure compensation setting is active when it is auto status (default is off).
Exposure compensation value:Set the exposure compensation value, valid when it is set for auto (default 0, -7 to
7 optional).
BLC:Set backlight compensation, Valid under auto exposure mode. Default: Off.
Anti-flicker:Anti-flicker, 50Hz and 60Hz options, default 50Hz. Valid under auto exposure, AAE and bright mode.
Gain limit:0-15 under auto, AAE, and bright mode; 0-20 under manual and SAE mode.
Dynamic range:Set the dynamic range (default 4, 1-8 optional).
Shutter speed:Active when it is status of manual or shutter-priority (default 1/100,
1/25,1/30,1/50,1/60,1/90,1/100,1/120,1/180,1/250,1/350,1/500,1/1000,1/2000,1/3000,1/4000,1/6000,1/10000
optional).
Aperture value:Set the aperture value, active when it is status of manual or aperture-priority (default F1.8, F11,
F9.6, F8.0, F6.8, F5.6, F4.8, F4.0, F3.4, F2.8, F2.4, F2.0, F1.8 optional).
Brightness:Set the brightness value, active when it is a state of brightness priority (default 7, 0-23 optional).
C)Color:White balance, saturation, color, white balance, sensitivity, color temperature, gain red and blue gain
can be set.
White balance modes:Set the white balance mode Auto(default), Manual, One Push and VAR (2400K-7100K).
Note: Click the “Adjust” button when selected the One-push white balance mode.
Red fine-tuning:default -10~10 (only available under auto mode)
Blue fine-tunable:default -10~10 (only available under auto mode)
Saturation:Set the saturation (default 60%, 70%, 80%, 90%, 100%, 110%, 120%, 130%, 140%, 150%,
160%,170%, 180%, 190%, 200% optional).
Chroma:Set the chroma (default 7, 0-14 optional)
Auto white balance Sensitivity:Sensitivity Auto white balance settings (default Low, Middle and high optional).
Red Gain:Set the red gain, effective when it is manual (default 145, 0-255 optional).
Blue Gain:Sets the Blue gain, effective when it is manual (default 56, 0-255 optional).
D)Image:Brightness, Contrast, Sharpness, Black and white mode, Gamma curve, Horizontal Flip and Vertical
Flip can be set.
Brightness:Set the brightness (default 7, 0-14 optional).
Contrast:Set the contrast (default 7, 0-14 optional).
Sharpness:Set the sharpness value (default 6, 0-15 optional).
18
Page 23

Gamma: Gamma value setting (default, 0.45, 0.50, 0.55, 0.63 optional).
Dynamic Contrast: Set the dynamic contrast (default off, 1~8 optional)
Black and white mode: Set black and white mode (default color, black/white optional).
Flip Horizontal: Set Flip Horizontal (default Off, On optional).
Flip Vertical: Set Auto flip (default Off, On optional).
Auto Flip: Set vertical flip (default Off, On optional).
Electronic zoom: set the electronic zoom (default Off, On optional)
E)Noise Reduction: 2D noise reduction, 3D noise reduction and dynamic dead pixel correction available.
2D Noise Reduction: Set 2D noise reduction level (default 3, Auto, 1-7 and Off optional).
3D Noise Reduction: Set 3D noise reduction level (default 5, 1-8 and Off optional).
Dynamic dead pixel correction: Set Dynamic dead pixel correction (default Off, 1-5 optional).
F)Style:select the picture style (default, normal, clarity, bright, soft optional)
Note: Click “Refresh” to make revision of any video parameters of a, b, c, d, e, f effective.
Video OSD
Display date and time: Enable/disable the display of time and date (default display).
Display Title: Enable/disable the display of the title (default display).
Font Color of Time: Set font color of time and date (default white, black, yellow, red, and blue optional).
Font Color of Title: Set font color of title (default white, black, yellow, red, and blue optional).
Time and title display: Set the display position of moving date, time and title, click on the "up, down, left, right"
buttons to move the corresponding character position.
Please click “Save” button after changes and reboot the camera to apply new settings.
Font Size
Automatically adjust font size according to the resolution: selectable
Main stream character size: Set the character size of the display (default 48, 28-200 optional)
Sub stream character size: Set the character size of the display (default 48, 28-200 optional)
Please click “Save” button after changes and reboot the camera to apply new settings.
Video output
SDI Output format: default 1080P50,1080P60、1080P59、1080P50、1080I60,1080I59、1080I50、1080P30、
1080P29、1080P25、720P60、720P59、720P50、720P30、720P29、720P25 optional
Network Configure
Network Port
Data port:set the data port, the device will restart automatically after changed (default 3000, 0-65535 optional)
Web port:Set Web port, the device will restart automatically after changed (default is 80, 0-65535 is optional)
19
Page 24

Onvif port:Set Onvif port, the device will restart automatically after changed (default 2000, 0-65535 optional)
Soap port:Set Soap port (default 1936, 0-65535 optional)
Rtmp port:Set RTMP port (default 1935, 0-65535 optional)
Rtsp port:Set RTSP port, the device will restart automatically after changed (default 554, 0-65535 optional).
Visca port:Set Visca port, the device will restart automatically after changed (default 1259,0-65535 optional).
Click on the "Save" button, the setting will be updated after "Save successful" pop-up.
RTSP Obtaining method: rtsp: // device IP address: 554 / live / av0 (av0 main stream; av1 secondary
stream)
RTMP Obtaining method: rtmp: // device IP address: 1935 / live / av0 (av0 main stream; av1 secondary
stream)
Ethernet parameters
DHCP: Enable or disable obtain IP automatically can be set. Save changes and reboot the device to takes
effect (default: OFF)
IP Address: Set the IP address, save changes and reboot the device to takes effect (default 192.168.5.163).
Note: This IP address is the current camera’s IP address which used for login web page. User can set new IP
address to the camera. Please save the changes and reboot the camera after editing.
Subnet Mask: Set the subnet mask (default 255.255.5.0).
Default Gateway: Set the default gateway (default 0.0.0.0).
Physical Address: Display the physical address of camera
Please click “Save” button after changes and reboot the camera to enable new settings.
DNS parameters
Preferred DNS server: set the preferred DNS server. (Default 0.0.0.0).
Alternate DNS server: Alternate DNS server settings. (Default 0.0.0.0).
Please click “Save” button after changes and reboot the camera to apply new settings.
GB28181
Switch:enable/disable GB28181
Time Synchronization: enable/disable synchronization time
Stream Type: stream type setting (the default main stream, sub stream optional)
Sign effective time (in seconds): 3600 Range 5-65535
Heartbeat time (seconds): 60 Range 1-65535
Register ID: 34020000001320000001
Register User name: IPC
Register Password: 12345678
Equipment ownership: Adjustable
Administrative regions: Adjustable
Alarm Zone: Adjustable
20
Page 25

Equipment installation address: Adjustable
Local SIP Port: 5060 Range 0-65535
GB28181 Server Address: IP address of the computer
Server SIP Port: 5060 Range 0-65535
Server ID: 34020000002000000001
Please click “Save” button after changes and reboot the camera to apply new settings.
System Configuration
A) Device Properties
Device Name: Set the device name (Default Camera-1, user can add their own).
Device ID: Set the device ID (default 1, read-only).
System Language: Set the system language (default English)
B) System Time
Date Format: Set the date format (YYYY-MM-DD default year - month - day, MM-DD-YYYY namely Month - Day -
Year, DD-MM-YYYY date - month - year Optional).
Date Separator: set the date separator (default '/','.','-' Optional).
Time Zone: Set the time zone (default UTC+08:00, other time zones optional).
Time Type: Set the time types (default 24 hours, optional 12 hours).
Enable NTP: Enable/disable NTP
Update Interval: Set the NTP server automatic updated time interval. Valid after setting NTP server synchronization
(default one day, 2-10 days Optional).
NTP Server Address or Domain Name: Set NTP server address or domain name (default time.nits.gov). Valid after
setting NTP server synchronization.
NTP Server Port: Sets the NTP server port (default 123).Valid after setting NTP server synchronization.
Please click “Save” button after changes and reboot the camera to apply new settings.
User Management
Select Users: Set the user type (the default administrator, User 1, User 2 optional)
User Name: Set the username (Select User Administrator default admin; select a common user1 default user1; to
select a common user 2 default user2; user can adjust the settings)
Password: Set a password (Select User Administrator default admin; select a common user1 default user1; to
select a common user 2 default user2; user can adjust the settings).
Password Confirmation: Confirm the passwords.
Version Update
The version information displayed on the page is read-only version and cannot be modified by the user. The version
information of different device models may vary.
Update File: Click "Browse" in the pop-up window and select the upgrade file; click the "Upgrade" button, the
upgrade dialog box will pop up. After successfully update, device will automatically reboot.
Note: Please make sure that the device is powered on and network are stable. Otherwise, the upgrade process
may interrupt or fail. For more firmware upgrade information, please check www.avipas.com or contact with
21
Page 26

[email protected]. After the version upgrade is completed, please restore the camera to factory default settings. In
order to do that, user may:
a, restore the factory default through web configuration;
b, restore the factory default value through the OSD menu;
c, press remote control shortcut key [*]+[#]+[6] to restore factory default;
Restore Factory Setting
Click "Restore Factory Defaults" button and choose “Yes” on pop-up window. The camera will restart automatically
and restore factory setting.
Reboot
Click "Reboot" button and choose “Yes” on the pop-up window. The device will restart automatically.
Logout
Click "Logout"; and choose "Yes” on pop-up window. User will exit the current page and return to the user login
interface.
22
Page 27
Serial Port Communication Control
In normal working state, user can control the camera through RS485 (VISCA IN) cable. The parameter of RS485 is list as
below:
Baud rate: 2400/4800/9600/115200/second
Start Bit:1 bit;
Data Bit:8 bit;
Stop Bit:1 bit;
Verification Bit:None.
4.1 VISCA Protocol List
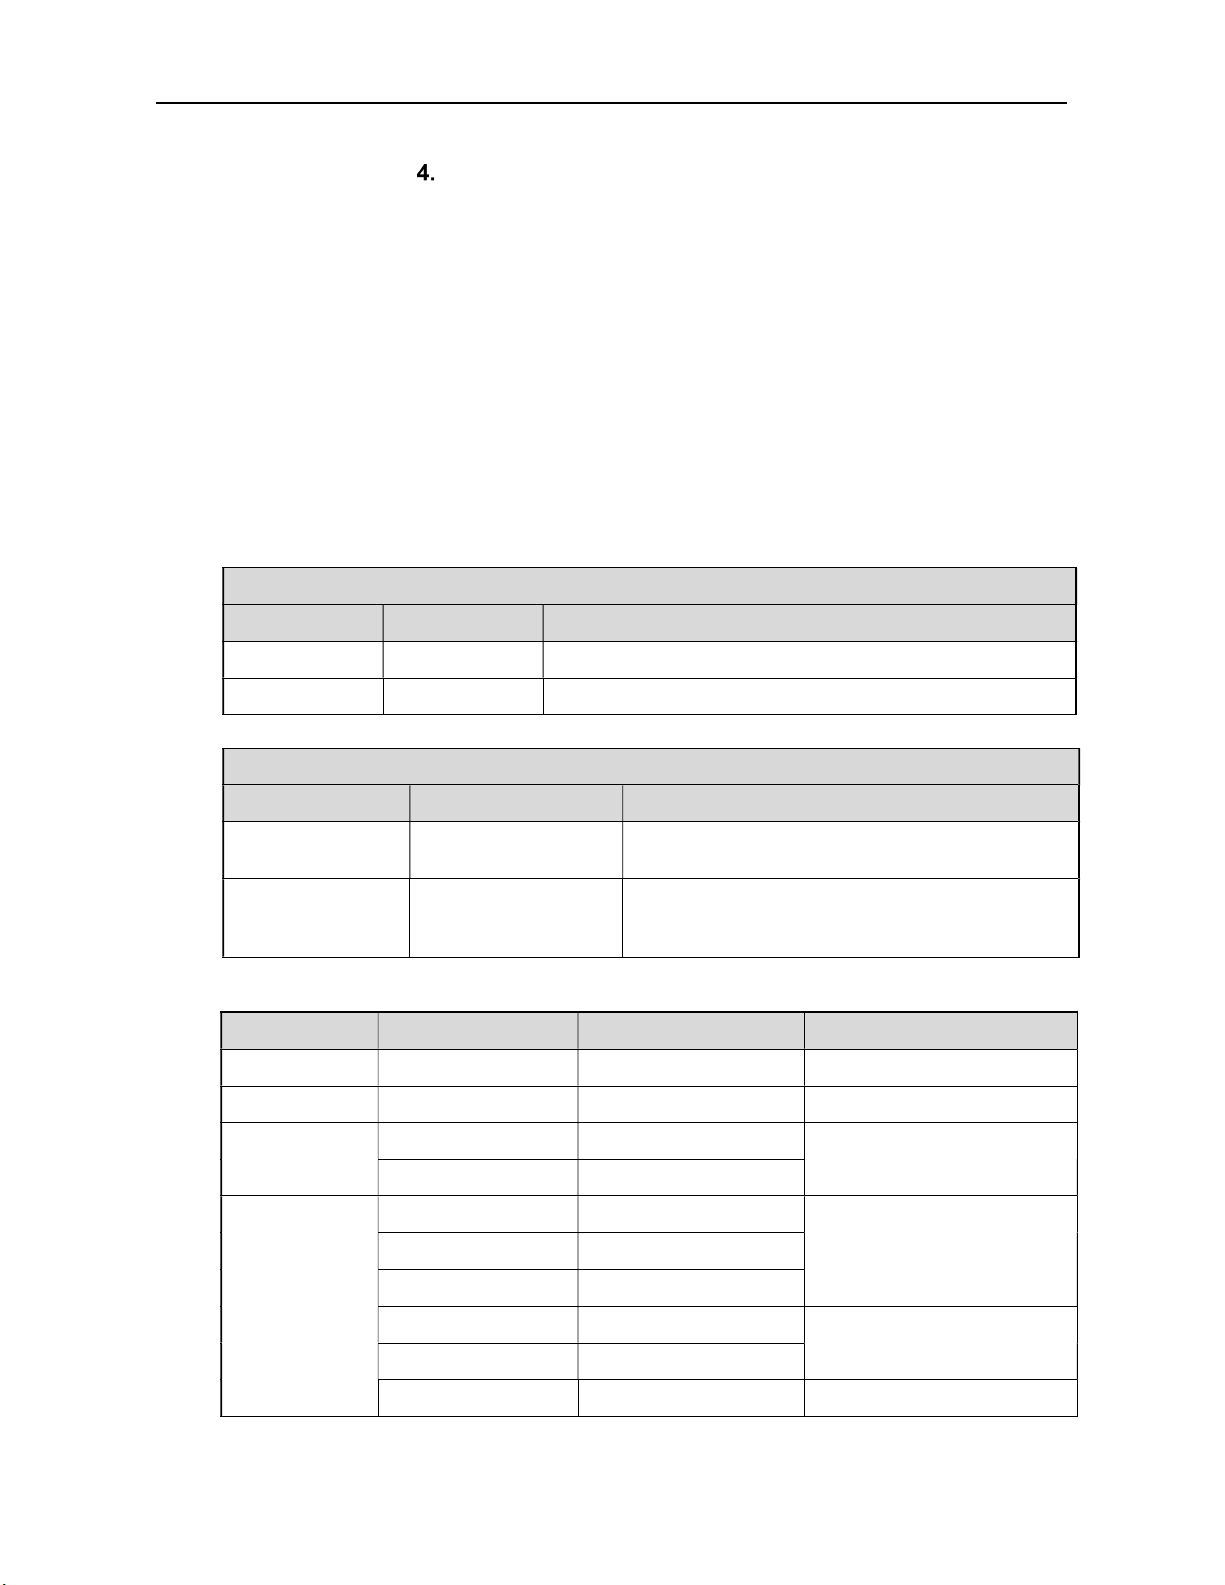
VISCA Protocol List
Ack/Completion Message
Command packet Remark
ACK z0 41 FF Returned when the command is accepted.
Completion z0 51 FF Returned when the command has been executed.
z = device address + 8
Error Messages
Command packet Remark
Syntax Error z0 60 02 FF
Command Not
Executable
Camera Control Command
Command Function Command Package Remark
IF_Clear Broadcast 88 01 00 01 FF I/F Clear
CommandCancel
CAM_Power
Returned when the command format is different or when a
command with illegal command parameters is accepted
Returned when a command cannot be executed due to current
z0 61 41 FF
8x 21 FF
On 8x 01 04 00 02 FF
Off 8x 01 04 00 03 FF
Stop 8x 01 04 07 00 FF
conditions. For example, when commands controlling the focus
manually are received during auto focus.
Power ON/OFF
Tele (Standard) 8x 01 04 07 02 FF
CAM_Zoom
Wide (Standard) 8x 01 04 07 03 FF
Tele (Variable) 8x 01 04 07 2p FF
p = 0(low) - 7(high)
Wide (Variable) 8x 01 04 07 3p FF
Direct 8x 01 04 47 0p 0q 0r 0s FF pqrs: Zoom Position
23
Page 28
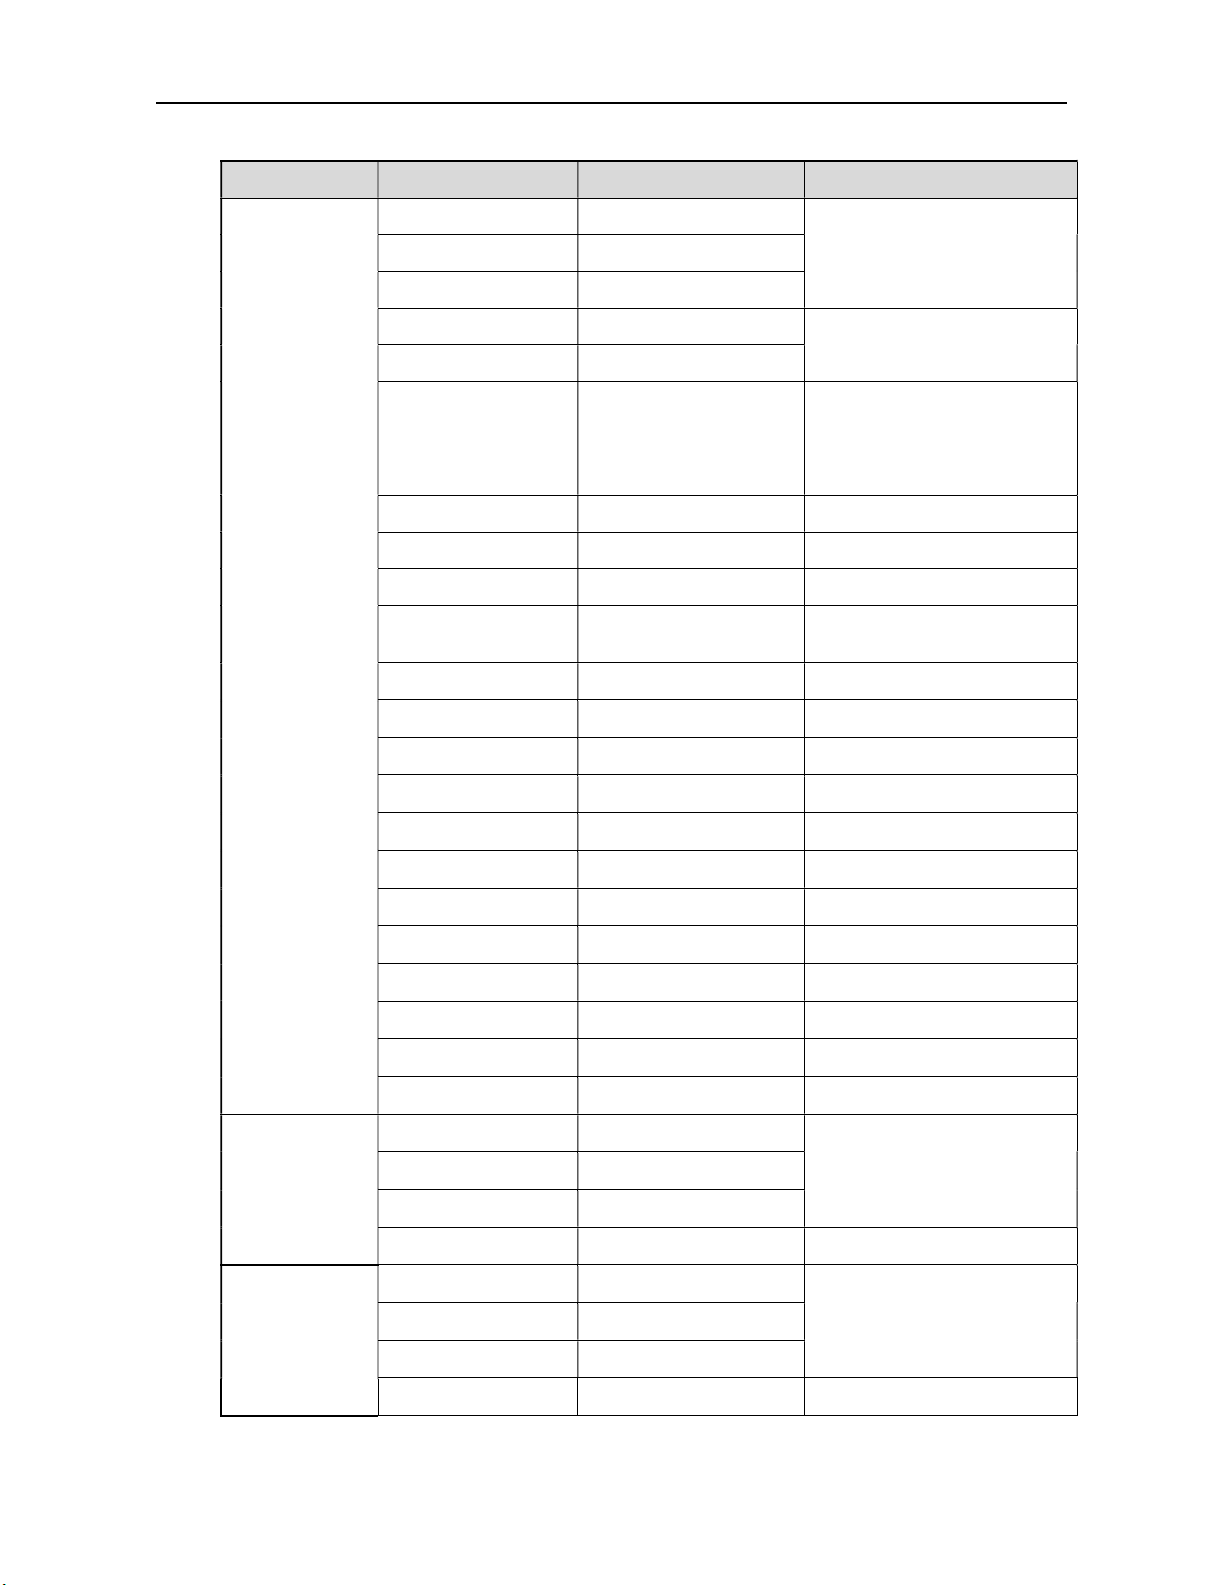
Command Function Command Package Remark
Stop 8x 01 04 08 00 FF
Far (Standard) 8x 01 04 08 02 FF
Near (Standard) 8x 01 04 08 03 FF
Far (Variable) 8x 01 04 08 2p FF
Near (Variable) 8x 01 04 08 3p FF
CAM _Focus
Direct 8x 01 04 48 0p 0q 0r 0s FF pqrs: Focus Position
Auto Focus 8x 01 04 38 02 FF
Manual Focus 8x 01 04 38 03 FF
One Push mode 8x 01 04 38 04 FF
CAM _Zoom Focus Direct
Auto 8x 01 04 35 00 FF
3000K 8x 01 04 35 01 FF
4000k 8x 01 04 35 02 FF
One Push mode 8x 01 04 35 03 FF
5000k 8x 01 04 35 04 FF
Manual 8x 01 04 35 05 FF
CAM_WB
6500k 8x 01 04 35 06 FF
8x 01 04 47 0p 0q 0r 0s
0t 0u 0v 0w FF
p = 0(low) - 7(high)
pqrs: Zoom Position
tuvw: Focus Position
CAM _RGain
CAM_ Bgain
3500K 8x 01 04 35 07 FF
4500K 8x 01 04 35 08 FF
5500K 8x 01 04 35 09 FF
6000K 8x 01 04 35 0A FF
7000K 8x 01 04 35 0B FF
Reset 8x 01 04 03 00 FF
Manual Control of R Gain Up 8x 01 04 03 02 FF
Down 8x 01 04 03 03 FF
Direct 8x 01 04 43 00 00 0p 0q FF pq: R Gain
Reset 8x 01 04 04 00 FF
Manual Control of B Gain Up 8x 01 04 04 02 FF
Down 8x 01 04 04 03 FF
Direct 8x 01 04 44 00 00 0p 0q FF pq: B Gain
24
Page 29
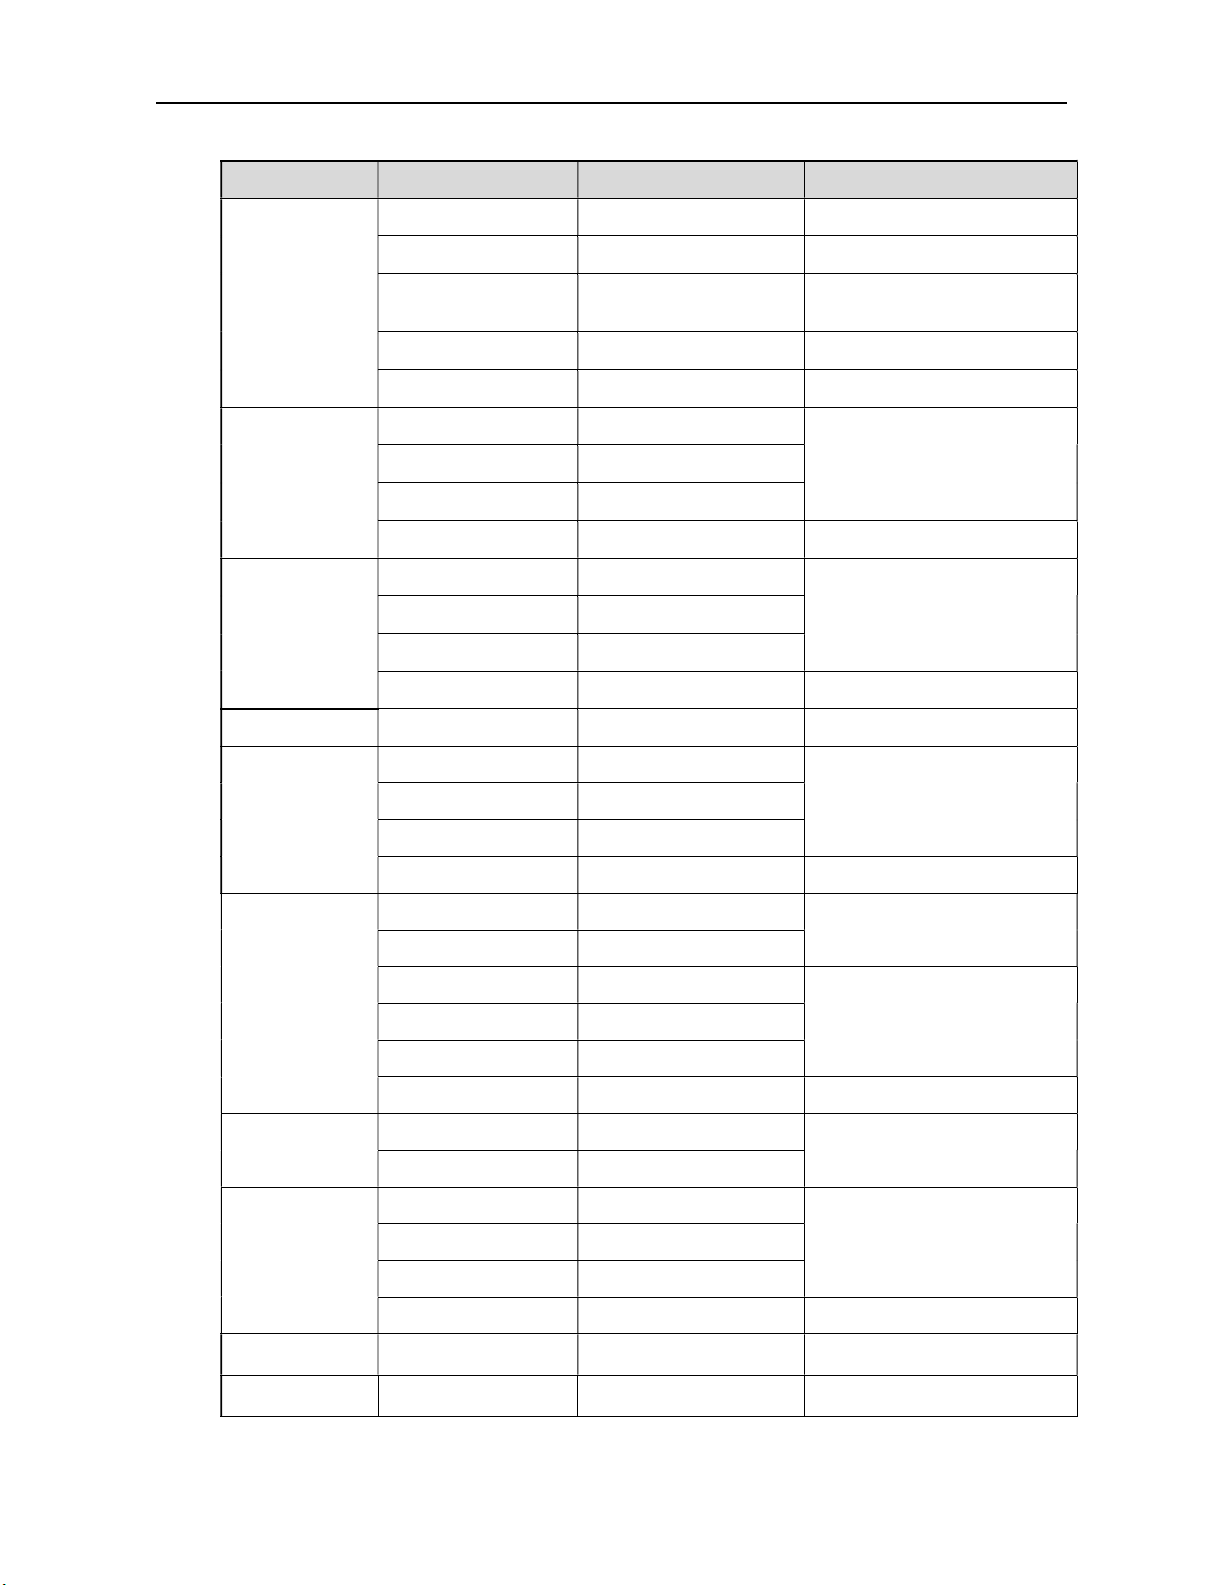
Command Function Command Package Remark
Full Auto 8x 01 04 39 00 FF Automatic Exposure mode
Manual 8x 01 04 39 03 FF Manual Control mode
CAM_AE
CAM_Shutter
CAM_Iris
CAM_Gain Limit Gain Limit 8x 01 04 2C 0p FF p: Gain Positon
CAM_Bright
Shutter priority 8x 01 04 39 0A FF
Iris priority 8x 01 04 39 0B FF Iris Priority Automatic Exposure mode
Bright 8x 01 04 39 0D FF Bright mode
Reset 8x 01 04 0A 00 FF
Down 8x 01 04 0A 03 FF
Direct 8x 01 04 4A 00 00 0p 0q FF pq: Shutter Position
Reset 8x 01 04 0B 00 FF
Down 8x 01 04 0B 03 FF
Direct 8x 01 04 4B 00 00 0p 0q FF pq: Iris Position
Reset 8x 01 04 0D 00 FF
Down 8x 01 04 0D 03 FF
Shutter Priority Automatic Exposure
mode
Shutter Setting Up 8x 01 04 0A 02 FF
Iris Setting Up 8x 01 04 0B 02 FF
Bright Setting Up 8x 01 04 0D 02 FF
CAM_ExpComp
CAM_Back Light
CAM_WDRStrength
CAM_NR(2D)
CAM_NR(3D)
Direct 8x 01 04 4D 00 00 0p 0q FF pq: Bright Positon
On 8x 01 04 3E 02 FF
Off 8x 01 04 3E 03 FF
Reset 8x 01 04 0E 00 FF
Up 8x 01 04 0E 02 FF
Down 8x 01 04 0E 03 FF
Direct 8x 01 04 4E 00 00 0p 0q FF pq: ExpComp Position
On 8x 01 04 33 02 FF
Off 8x 01 04 33 03 FF
Reset 8x 01 04 21 00 FF
Down 8x 01 04 21 03 FF
Direct 8x 01 04 51 00 00 00 0p FF p: WDR Level Positon
8x 01 04 53 0p FF P=0-7 0:OFF
8x 01 04 54 0p FF P=0-8 0:OFF
Exposure Compensation ON/OFF
Exposure Compensation Amount
Setting
Back Light
Compensation
WDR Level Setting Up 8x 01 04 21 02 FF
25
Page 30
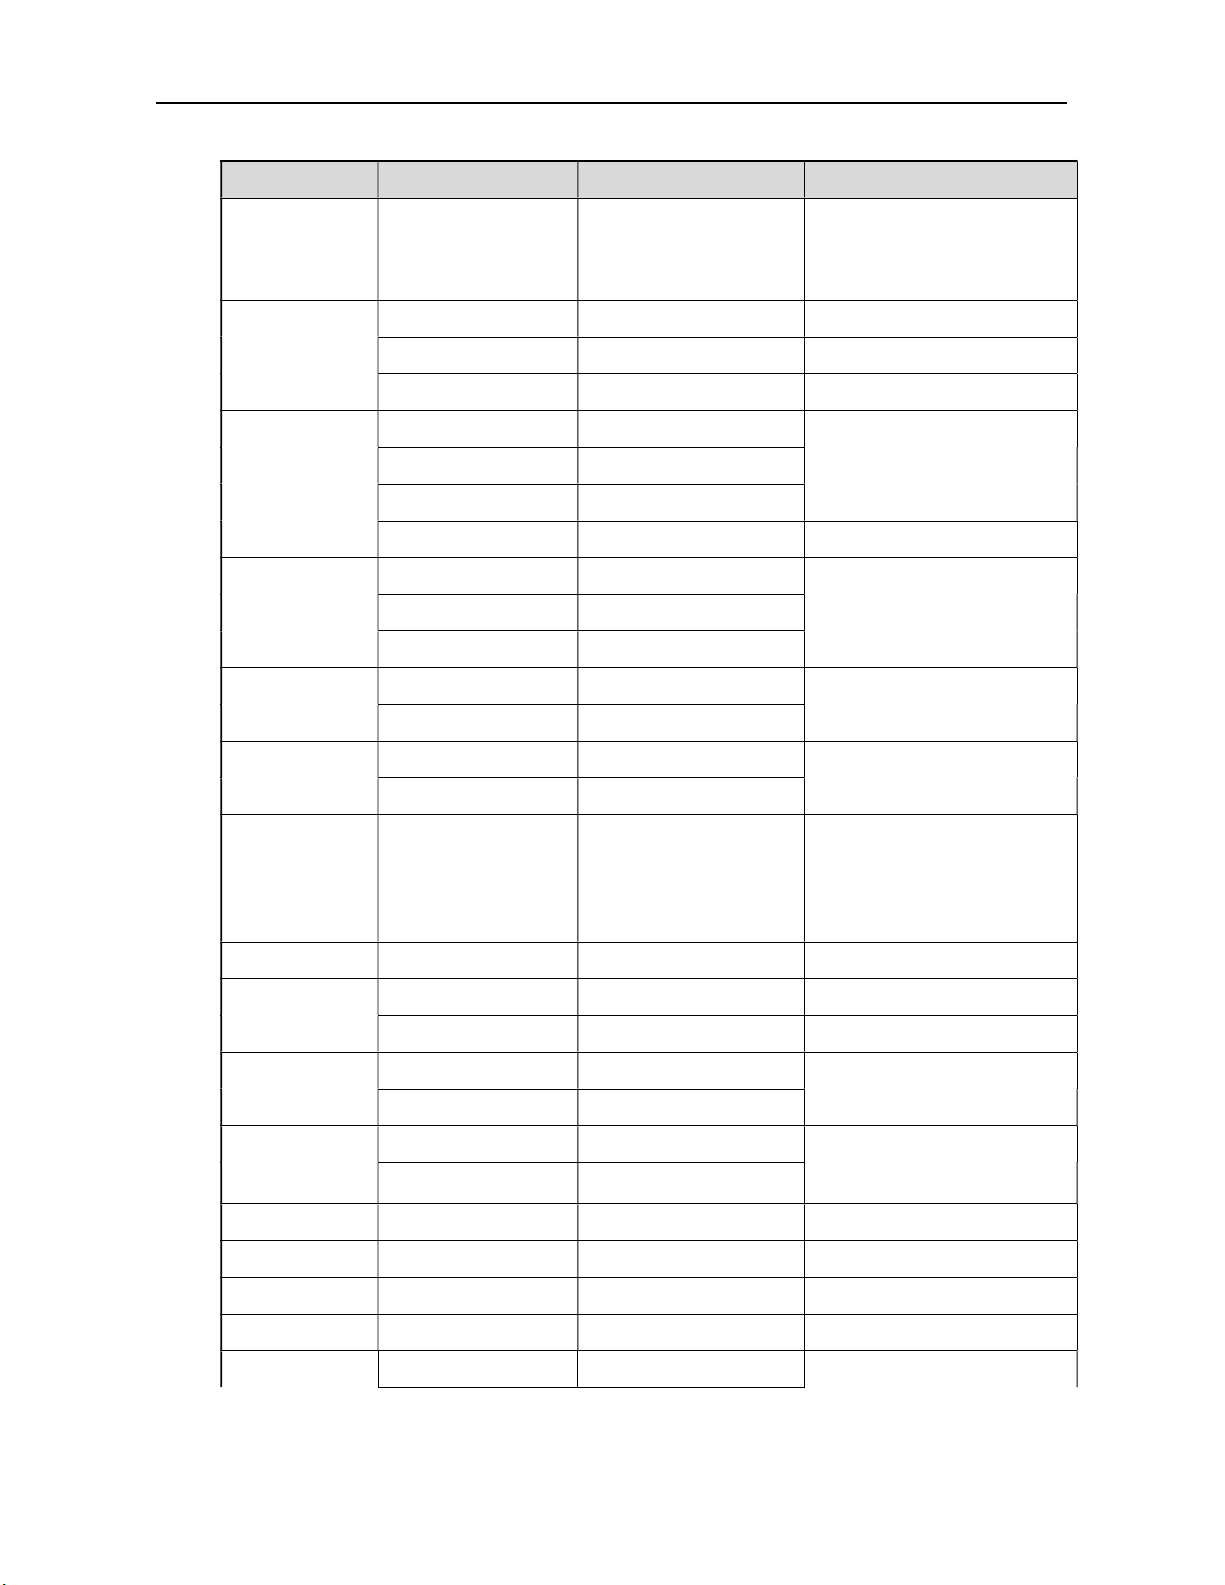
Command Function Command Package Remark
p = 0 – 4
CAM_Gamma 8x 01 04 5B 0p FF
OFF 8x 01 04 23 00 FF OFF
0:Default 1:0.45
2:0.50 3:0.55 4:0.63
CAM_Flicker
CAM_Aperture
CAM_Memory
CAM_LR_Reverse
CAM_PictureFlip
CAM_ColorSaturati
on
50HZ 8x 01 04 23 01 FF 50HZ
60HZ 8x 01 04 23 02 FF 60HZ
Reset 8x 01 04 02 00 FF
Aperture Control Up 8x 01 04 02 02 FF
Down 8x 01 04 02 03 FF
Direct 8x 01 04 42 00 00 0p 0q FF pq: Aperture Gain
Reset 8x 01 04 3F 00 pq FF
Set 8x 01 04 3F 01 pq FF
Recall 8x 01 04 3F 02 pq FF
On 8x 01 04 61 02 FF
Off 8x 01 04 61 03 FF
On 8x 01 04 66 02 FF
Off 8x 01 04 66 03 FF
Direct 8x 01 04 49 00 00 00 0p FF
pq: Memory Number(=0 to 254)
Corresponds to 0 to 9 on the Remote
Commander
Image Flip Horizontal ON/OFF
Image Flip Vertical ON/OFF
P=0-E
0:60% 1:70% 2:80% 3:90%
4:100% 5:110% 6:120% 7:130%
8:140% 9:150% 10:160% 11:160%
12:180% 13:190% 14:200%
CAM_IDWrite 8x 01 04 22 0p 0q 0r 0s FF pqrs: Camera ID (=0000 to FFFF)
SYS_Menu
IR_Receive
IR_ReceiveReturn
CAM_SettingReset Reset 8x 01 04 A0 10 FF Reset Factory Setting
CAM_Brightness Direct 8x 01 04 A1 00 00 0p 0q FF pq: Brightness Position
CAM_Contrast Direct 8x 01 04 A2 00 00 0p 0q FF pq: Contrast Position
Direct 8x 0A 01 32 0p 0q FF HDMI to SDI
CAM_Flip OFF 8x 01 04 A4 00 FF Single Command For Video Flip
ON 8x 01 04 06 06 02 FF Turn on the menu screen
OFF 8x 01 04 06 06 03 FF Turn off the menu screen
ON 8x 01 06 08 02 FF
OFF 8x 01 06 08 03 FF
On 8x 01 7D 01 03 00 00 FF IR(remote commander)receive
Off 8x 01 7D 01 13 00 00 FF
IR(remote commander)receive On/Off
message via the VISCA
communication ON/OFF
26
Page 31
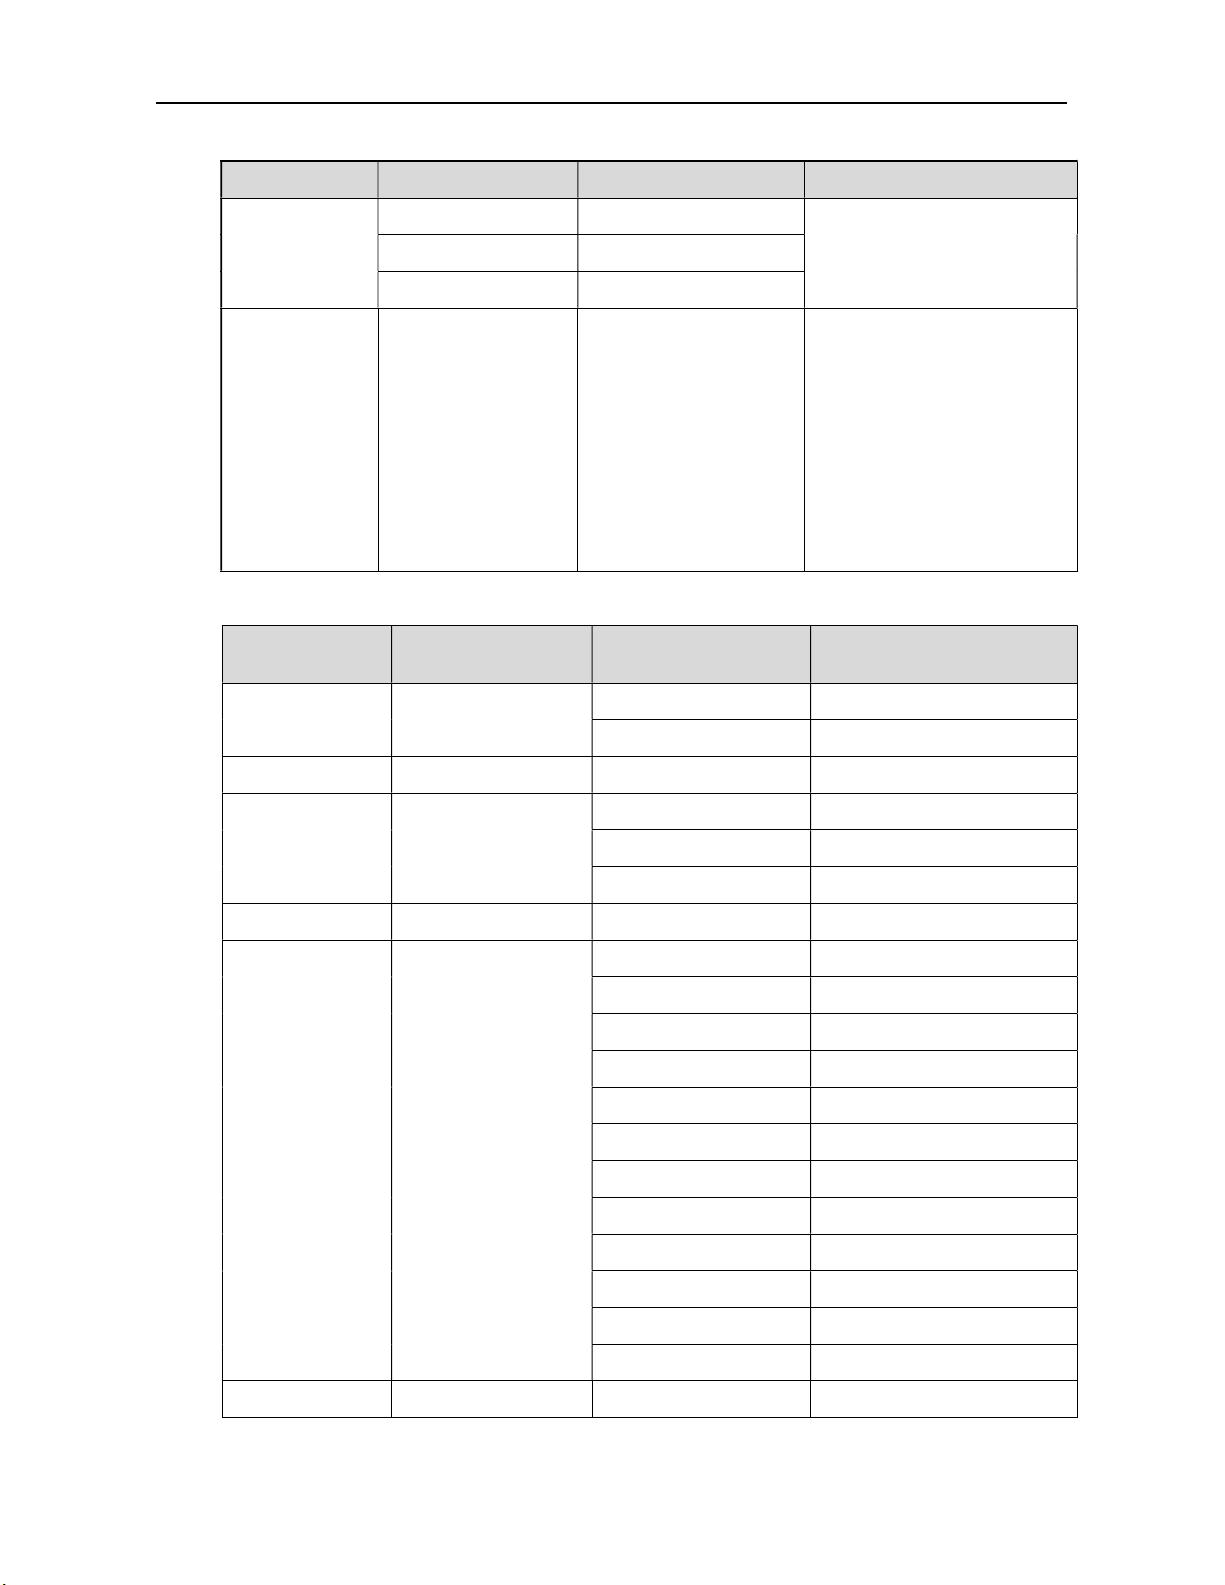
Command Function Command Package Remark
CAM_VideoSystem
Inquiry Command
Flip-H 8x 01 04 A4 01 FF
Flip-V 8x 01 04 A4 02 FF
Flip-HV 8x 01 04 A4 03 FF
Set Camera
video system
8x 01 06 35 00 0p FF
P: 0~E Video format
0:1080P60 8:720P30
1:1080P50 9:720P25
2:1080i60 A:1080P59.94
3:1080i50 B:1080i59.94
4:720P60 C:720P59.94
5:720P50 D:1080P29.97
6:1080P30 E:720P29.97
7:1080P25
Command
CAM_PowerInq 8x 09 04 00 FF
CAM_ZoomPosInq 8x 09 04 47 FF y0 50 0p 0q 0r 0s FF pqrs: Zoom Position
CAM_FocusAFModeI
nq
CAM_FocusPosInq 8x 09 04 48 FF y0 50 0p 0q 0r 0s FF pqrs: Focus Position
CAM_WBModeInq 8x 09 04 35 FF
Command
Package
8x 09 04 38 FF
Return Package Remark
y0 50 02 FF On
y0 50 03 FF Off(Standby)
y0 50 02 FF Auto Focus
y0 50 03 FF Manual Focus
y0 50 04 FF One Push mode
y0 50 00 FF Auto
y0 50 01 FF 3000K
y0 50 02 FF 4000K
y0 50 03 FF One Push Mode
y0 50 04 FF 5000K
y0 50 05 FF Manual
y0 50 00 FF 6500K
y0 50 06 FF 6500K
y0 50 07 FF 3500K
y0 50 08 FF 4500K
y0 50 09 FF 5500K
y0 50 0A FF 6000K
CAM_RGainInq 8x 09 04 43 FF y0 50 0B FF 7000K
27
Page 32
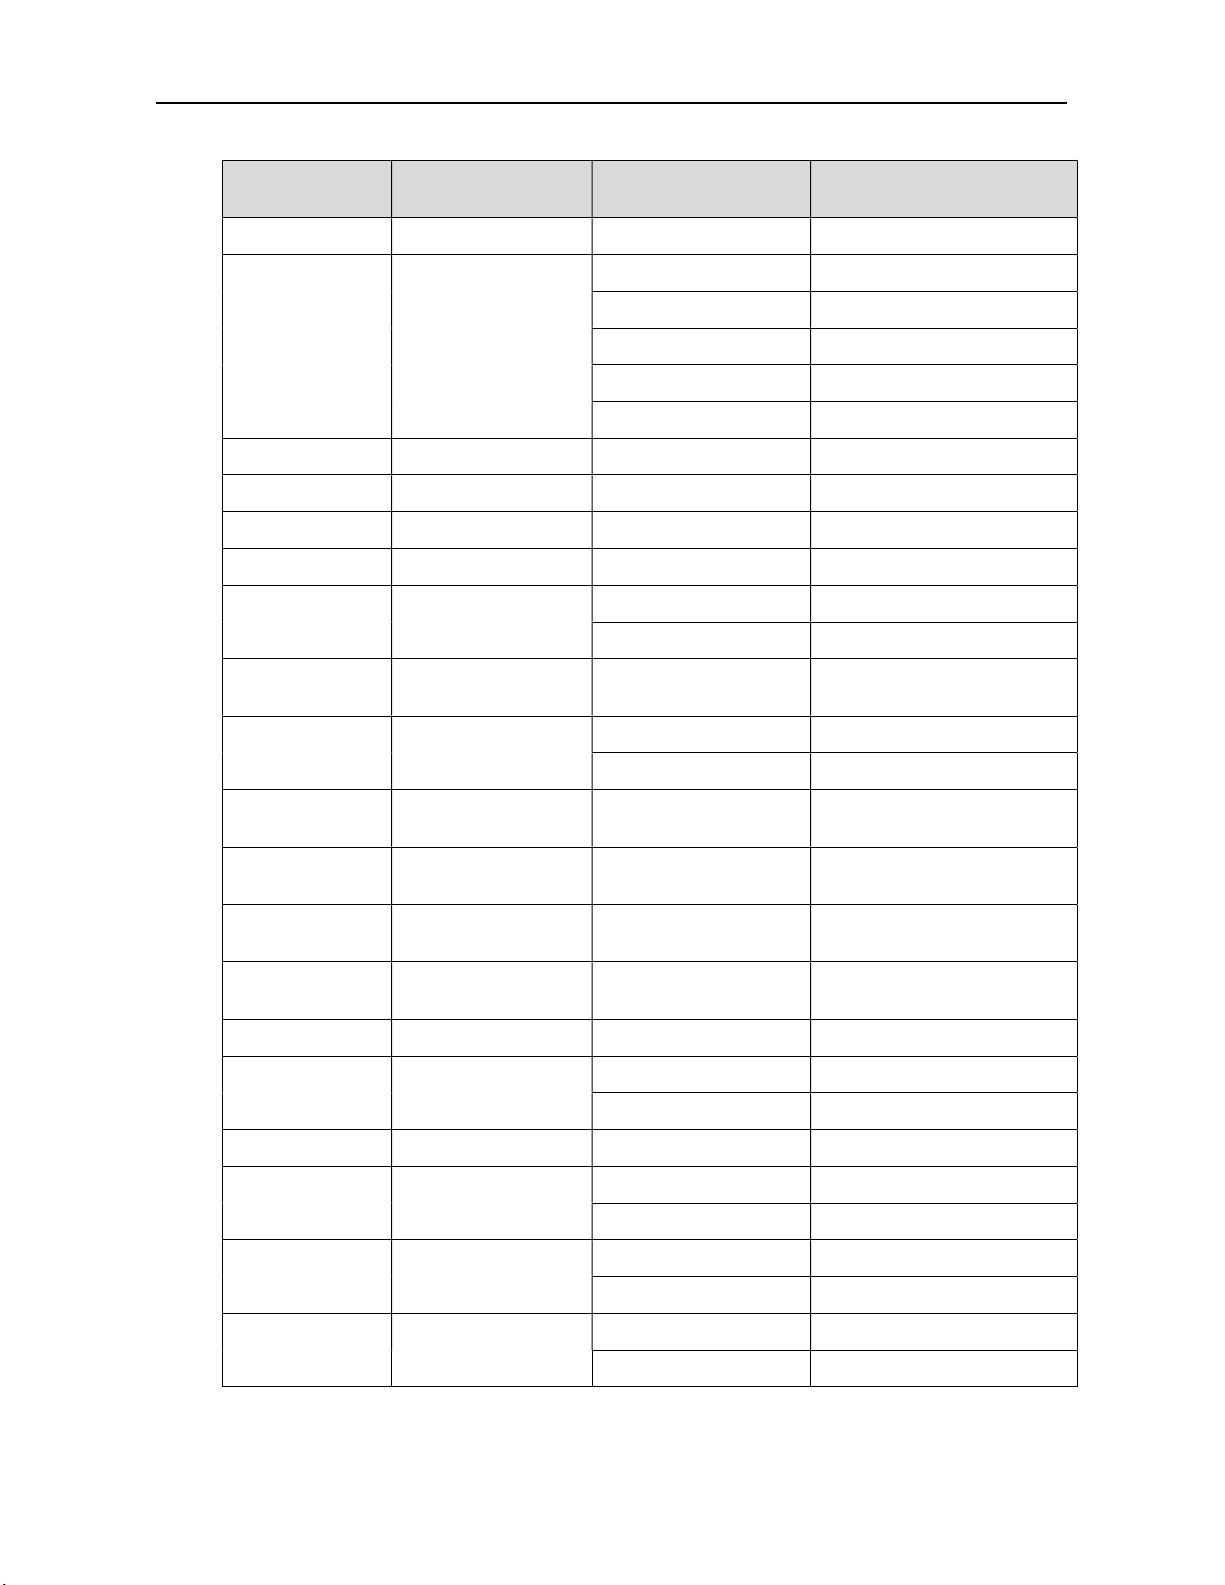
Command
CAM_BGainInq 8x 09 04 44 FF y0 50 00 00 0p 0q FF pq: B Gain
CAM_AEModeInq 8x 09 04 39 FF
CAM_ShutterPosInq 8x 09 04 4A FF y0 50 00 00 0p 0q FF pq: Shutter Position
CAM_IrisPosInq 8x 09 04 4B FF y0 50 00 00 0p 0q FF pq: Iris Position
CAM_Gain LimitInq 8x 09 04 2C FF y0 50 0p FF p: Gain Positon
CAM_ BrightPosiInq 8x 09 04 4D FF y0 50 00 00 0p 0q FF pq: Bright Position
CAM_ExpCompMode
Inq
CAM_ExpCompPosIn
q
CAM_BacklightModeI
nq
Command
Package
8x 09 04 3E FF
8x 09 04 4E FF y0 50 00 00 0p 0q FF pq: ExpComp Position
8x 09 04 33 FF
Return Package Remark
y0 50 00 FF Full Auto
y0 50 03 FF Manual
y0 50 0A FF Shutter priority
y0 50 0B FF Iris priority
y0 50 0D FF Bright
y0 50 02 FF On
y0 50 03 FF Off
y0 50 02 FF On
y0 50 03 FF Off
CAM_WDRStrengthIn
q
CAM_NRLevel(2D)
Inq
CAM_NRLevel(3D)
Inq
CAM_FlickerModeInq 8x 09 04 55 FF y0 50 0p FF
CAM_ApertureInq 8x 09 04 42 FF y0 50 00 00 0p 0q FF pq: Aperture Gain
CAM_PictureEffectMo
deInq
CAM_MemoryInq 8x 09 04 3F FF y0 50 0p FF p: Memory number last operated.
SYS_MenuModeInq 8x 09 06 06 FF
CAM_LR_ReverseInq 8x 09 04 61 FF
CAM_PictureFlipInq 8x 09 04 66 FF
8x 09 04 51 FF y0 50 00 00 00 0p FF p: WDR Strength
8x 09 04 53 FF y0 50 0p FF P: 2DNRLevel
8x 09 04 54 FF y0 50 0p FF P:3D NRLevel
p: Flicker Settings(0: OFF, 1: 50Hz,
2:60Hz)
y0 50 00 FF Off
8x 09 04 63 FF
y0 50 04 FF B&W
y0 50 02 FF On
y0 50 03 FF Off
y0 50 02 FF On
y0 50 03 FF Off
y0 50 02 FF On
y0 50 03 FF Off
28
Page 33

Command
CAM_ColorSaturation
Inq
CAM_IDInq 8x 09 04 22 FF y0 50 0p FF p: Gamma ID
IR_ReceiveInq 8x 09 06 08 FF
IR_ReceiveReturn
CAM_BrightnessInq 8x 09 04 A1 FF y0 50 00 00 0p 0q FF pq: Brightness Position
CAM_ContrastInq 8x 09 04 A2 FF y0 50 00 00 0p 0q FF pq: Contrast Position
CAM_FlipInq 8x 09 04 A4 FF
Command
Package
8x 09 04 49 FF y0 50 00 00 00 0p FF
Return Package Remark
y0 50 02 FF On
y0 50 03 FF Off
y0 07 7D 01 04 00 FF Power ON/OFF
y0 07 7D 01 04 07 FF Zoom tele/wide
y0 07 7D 01 04 38 FF AF ON/OFF
y0 07 7D 01 04 33 FF Camera _Backlight
y0 07 7D 01 04 3F FF Camera _Memery
y0 07 7D 01 06 01 FF Pan_titleDriver
y0 50 00 FF Off
y0 50 01 FF Flip-H
y0 50 02 FF Flip-V
p: Color Gain setting 0h (60%) to Eh
(130%)
y0 50 03 FF Flip-HV
CAM_GammaInq 8x 09 04 5B FF y0 50 0p FF p: Gamma setting
ab cd : vender ID ( 0220 )
CAM_VersionInq 8x 09 00 02 FF
VideoSystemInq 8x 09 06 23 FF y0 50 0p FF
y0 50 ab cd
mn pq rs tu vw FF
mn pq : model ID ST ( 0510 ) ,
U2( 0512 ),U3 ( 0513 )
rs tu:ARM Version
vw:reserve
P: 0~E Video format
0:1080P60 5:720P50
1:1080P50 6:1080P30
2:1080i60 7:1080P25
3:1080i50 8:720P30
4:720P60 9:720P25
A:1080P59.94
29
Page 34
Command
Note: [x] in the above table represents the address of the device to be operated, [y]= [x + 8].
Command
Package
Return Package Remark
B:1080i59.94
C:720P59.94
D:1080P29.97
E:720P29.97
4.2 Pelco-D Protocol Command List
Function Byte1 Byte2 Byte3 Byte4 Byte5 Byte6 Byte7
Zoom In 0xFF Address 0x00 0x20 0x00 0x00 SUM
Zoom Out 0xFF Address 0x00 0x40 0x00 0x00 SUM
Focus Far 0xFF Address 0x00 0x80 0x00 0x00 SUM
Focus Near 0xFF Address 0x01 0x00 0x00 0x00 SUM
Stop 0xFF Address 0x00 0x00 0x00 0x00 SUM
Query Tilt Position 0xFF Address 0x00 0x53 0x00 0x00 SUM
Query Tilt Position
Response
0xFF Address 0x00 0x5B
Value High
Byte
Value Low
Byte
SUM
Query Zoom
Position
Query Zoom
Position
Response
0xFF Address 0x00 0x55 0x00 0x00 SUM
0xFF Address 0x00 0x5D
4.3 Pelco-P Protocol Command List
Function Byte1 Byte2 Byte3 Byte4 Byte5 Byte6 Byte7 Byte8
Zoom In 0xA0 Address 0x00 0x20 0x00 0x00 0xAF XOR
Zoom Out 0xA0 Address 0x00 0x40 0x00 0x00 0xAF XOR
Stop 0xA0 Address 0x00 0x00 0x00 0x00 0xAF XOR
Focus Far 0xA0 Address 0x01 0x00 0x00 0x00 0xAF XOR
Focus Near 0xA0 Address 0x02 0x00 0x00 0x00 0xAF XOR
Query Tilt Position 0xA0 Address 0x00 0x53 0x00 0x00 0xAF XOR
Query Tilt Position
Response
Query Zoom
Position
Query Zoom
Position
Response
0xA0 Address 0x00 0x5B
0xA0 Address 0x00 0x55 0x00 0x00 0xAF XOR
0xA0 Address 0x00 0x5D
Value High
Byte
Value
High Byte
Value
High Byte
Value Low
Byte
Value Low
Byte
Value Low
Byte
SUM
0xAF XOR
0xAF XOR
30
Page 35

Maintenance and Troubleshooting
5.1 Camera Maintenance
1. If the camera will not be used for a long time, please turn off the power.
2. Use soft cloth or lotion-free tissue to clean the camera body.
3. Use soft dry lint-free cloth to clean the lens. If the camera is very dirty, clean it with a diluted neutral detergent. Do
not use any type of solvent or harsh detergent, which may damage the surface.
5.2 Unqualified Applications
1. Do not shoot extremely bright objects for a long period of time, including sunlight, ultra-bright light sources, etc.
2. Do not operate in unstable lighting conditions, otherwise the image may flicker.
3. Do not operate close to powerful electromagnetic radiation, including TV or radio transmitters, etc.
5.3 Troubleshooting
No image
⚫
1. Check whether the power connection, voltage.
2. Check whether the camera can “self-test” after startup.
3. Check that the SDI/USB2.0 cable is connected correctly.
When using the SDI, please make sure that the destination device is accessing the SDI port.
Abnormal display of image
⚫
Check setting of rotary dial on rear of camera. Be sure to use a resolution and refresh rate that is supported by your
software.
⚫ Image is shaky or vibrating.
1. Check whether camera is mounted solidly or sitting on a steady horizontal and level surface.
2. Check the building and any supporting furniture for vibration. Ceiling mounts are often affected by building
vibration more than wall mounts.
3. Any external vibration that is affecting the camera will be more apparent when in tele zoom (zoomed in) setting.
⚫ Not response to the remote control
1. Check the remote-control address setting (if the camera is restored to the factory, the remote-control address will
be set to #1)
2. Check whether the remote control has battery
3. Check whether the menu has not been exited. After exiting the menu, it can be controlled normally; if the web
page outputs images, the menu will not be displayed, and no operation will be performed. After 30s, the menu will
automatically exit and can control the camera.
⚫ The serial port cannot be controlled
1. Check whether the serial port device protocol, baud rate, and address are consistent with the device
2. Check whether the control cable is connected normally
3. Check whether the camera is under working mode
⚫ The webpage cannot be logged in
1. Use the monitor to check whether the camera has video output
2. Check whether the network cable is connected normally
31
Page 36
3. Check whether the computer has added a network segment and the network segment is consistent with the IP
address of the device
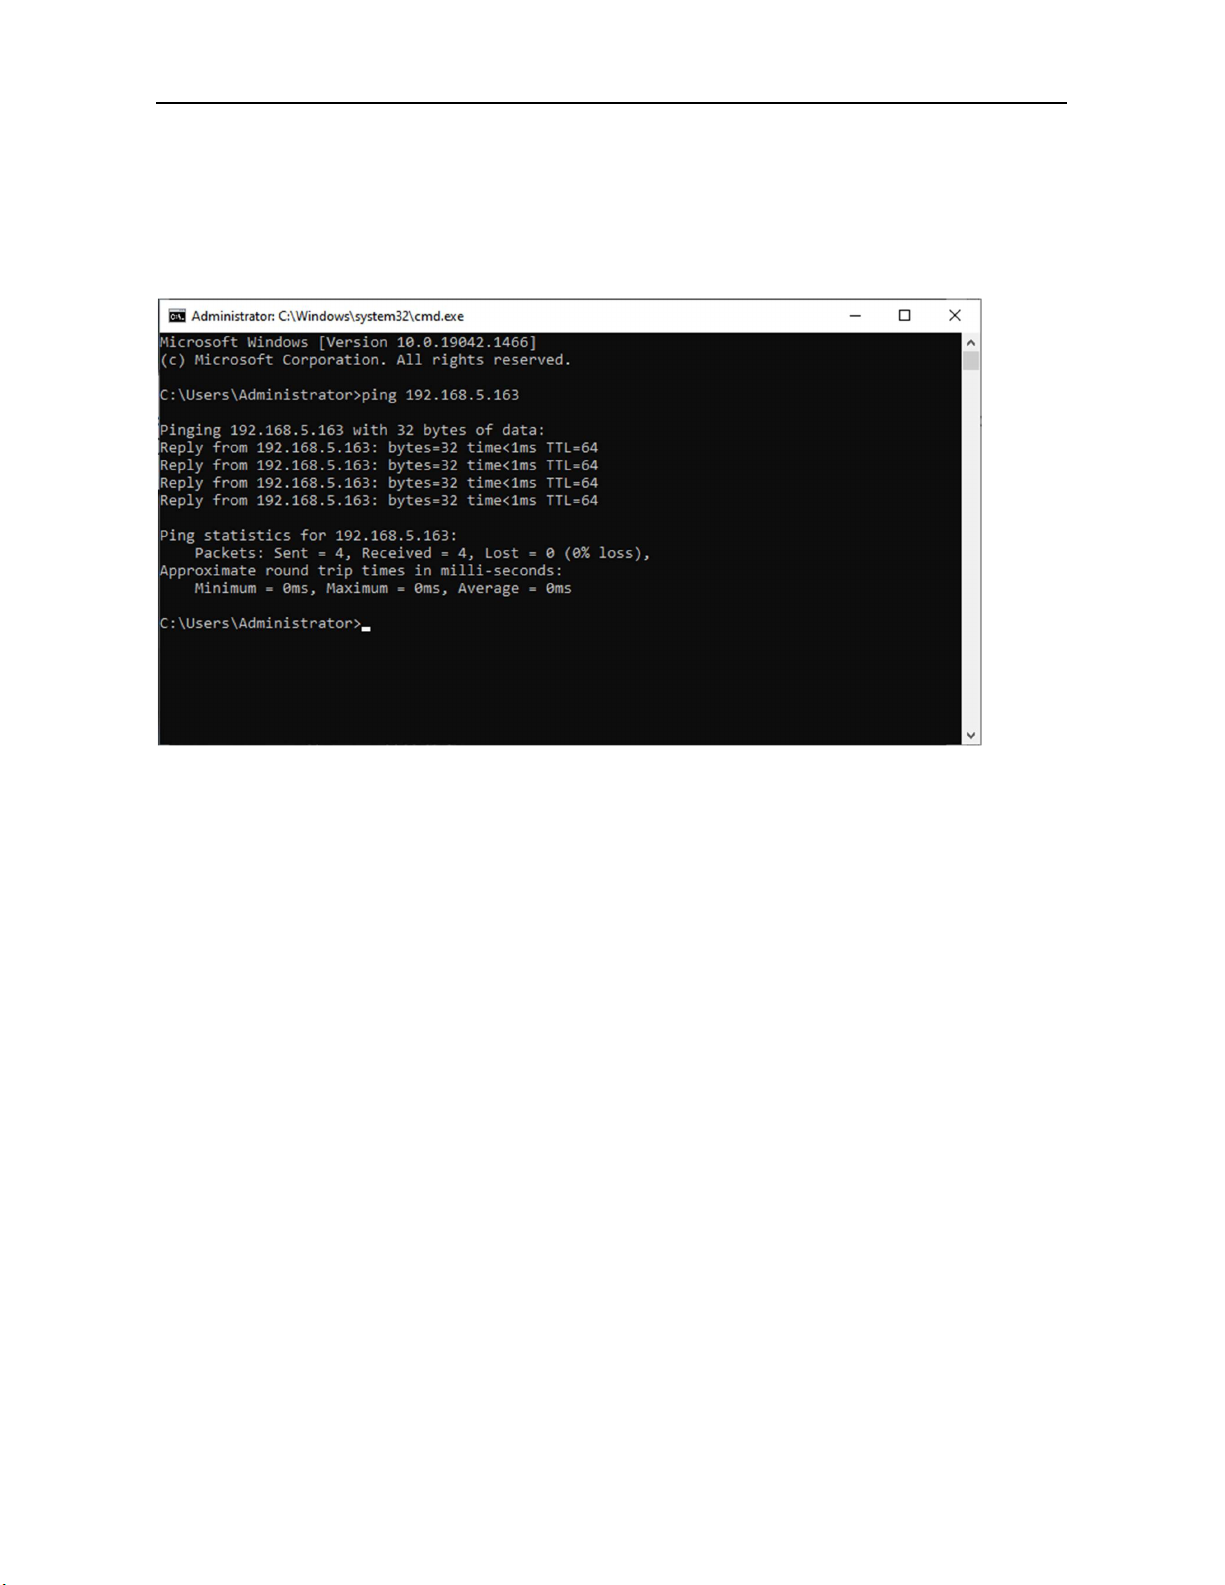
4. Open Command Prompt or Terminal, enter "ping 192.168.5.163" and press the Enter to display the connection
information shown in Figure 6-1 below:
32
Page 37

Warranty
Thank you for your interest in the products of AVIPAS Inc.
This Limited Warranty applies to HD Conference Camera purchased from AVIPAS Inc.
This Limited Warranty covers any defect in material and workmanship under normal use within the Warranty Period.
AVIPAS Inc. will repair or replace the qualified products at no charge.
AVIPAS Inc. provides a two (2)-year warranty (from the date of purchase) for this HD Conference Camera.
This Limited Warranty does not cover problems including but not limited to: improper handling, malfunction or damage
not resulting from defects in material.
To receive warranty service, please contact AVIPAS Inc. first. We will decide whether a repair or replacement is needed
and will advise you of the cost of such repair or replacement.
Copyright Notice
All contents of this manual, whose copyright belongs to our corporation cannot be cloned, copied or translated without
the permission of the company. Product specifications and information which were referred to in this document are for
reference only. We may alter the content at any time and without prior notice.
Contact Details:
AViPAS Inc.
Address: 1700 Wyatt Drive, Suite #3
Santa Clara, CA 95054
Phone: 1-844-228-4727
Fax: (408) 228-8438
Email: [email protected]
Website: http://www.avipas.com
 Loading...