

Page 1
I.C.E.
Integrated Cabin Entertainment
Operation Manual
Page 2

Table of Contents
General Information 1
General Description 1
Unpacking & Inspecting 2
Precautions 2
Thermal Protection Circuit 2
Damaged Discs 2
Irregular Shaped Discs 2
Proper Disc Handling 2
Caution for New Discs 2
Initial System Setup 3
PCU Controls & Operation 3
Secondary Output 4
DVD Operation 4
Initial System Setup 4
Preparation For Playback 4
To Play DVDs & CDs 4
To Adjust Volume / Bass / Treble 4
To Pause Playback 5
To Stop Playback 5
To Eject DVDs 5
AUX (External Input Mode) 5
Satellite Operation 5
To Subscribe To Sirius Satellite Radio 6
To Select A Channel 6
To Fast Tune 6
To Set Presets 6
To Listen To Presets 6
Display Change 7
To Cycle The Category Modes 7
Remote Control Functions 8
In Case of Difficulty 8
No Sound 8
No Function 9
No Play 9
Music Skips Excessively 9
Warranty 10
Notes 11
ii
ICE Operation Manual, P/N 8011-00, Rev A, January 18, 2006
Page 3

General Information
The purpose of this operation manual is to provide information to ensure proper
operation of this product.
It is the responsibility of those installing this item on or within a specific type or
class of certified aircraft to document and obtain approval for an acceptable installation from the administrator.
General Description
The ICE system consists of three main components:
• Passenger Control Unit (PCU)
• DVD Player (DVD)
• Remote Satellite receiver (SAT)
• Video Amplifier
The PCU will normally be mounted in an area accessible to the passengers. It
contains all of the controls and display for the system. All of the functions can be
operated from the PCU. There is an infrared remote controller that can control
the most frequently used functions such as volume, etc.
The SAT is mounted in a remote location not necessarily readily accessible to the
passenger. There are no passenger controls on the SAT unit.
The DVD player should be mounted in an area that passengers have access for
changing discs. This can be in a cabinet or entertainment equipment bay. The
only direct passenger operation on the DVD is “Eject” when the PCU is off. When
the system is on, the eject feature is controlled at the PCU.
The Video Amp is a remote-mounted video amp with 2 video inputs and 6 video
outputs. Each of the 6 video outputs is selected between Video 1 or 2 input. Six
individual 12 VDC power supplies at 0.75 amps each.
ICE Operation Manual, P/N 8011-00, Rev A, January 18, 2006
1
Page 4

Unpacking & Inspecting
Exercise extreme care when unpacking the ICE System. Make a visual inspection of the unit for evidence of damage incurred during shipment. If a claim for
damage is to be made, the unit must be returned in the original packaging.
Precautions
Thermal Protection Circuit
Be sure the temperature inside the aircraft is between –10°C (14°F) and +60°C
(140°F) and before attempting to use this system. If the temperature is over
+60°C (140°F), the protection circuit functions to stop operation of the system,
and “HI TEMP” is displayed.
Damaged Discs
Do not attempt to play cracked, warped, or damaged discs. Playing a bad disc
will cause skipping and could cause severe damage to the playback mechanism
Irregular Shaped Discs
Make sure the discs you use in this unit do not have any irregularities. The outer
and inner edges should be round and smooth. Use of irregular shaped discs may
cause damage to the mechanism.
Proper Disc Handling
Handle your disc as carefully as possible. Do not drop the disc while handling.
Hold the disc so you will not leave fingerprints on the surface. If the surface is
scratched, it may cause the pickup to skip. Do not affix tape, paper, or gummed
labels on the disc. Do not write on the disc.
Caution for New Discs
When a newly-purchased disc is inserted into the disk slot, the disc may fail to
play after initial loading. This is caused by small bumps around the center hole
and the outside of the disc, which prevent stable loading into the correct position.
To remove the bumps, rub the inside edge of the hole and the outside edge with
a ball point pen or other such instrument, and then insert the disc again.
2
ICE Operation Manual, P/N 8011-00, Rev A, January 18, 2006
Page 5

Initial System Setup
Immediately after installing or applying power to the unit, it should be initialized.
The DVD system does a self-test and should become usable within 30-45 seconds. During this time avoid pressing any buttons on the PCU.
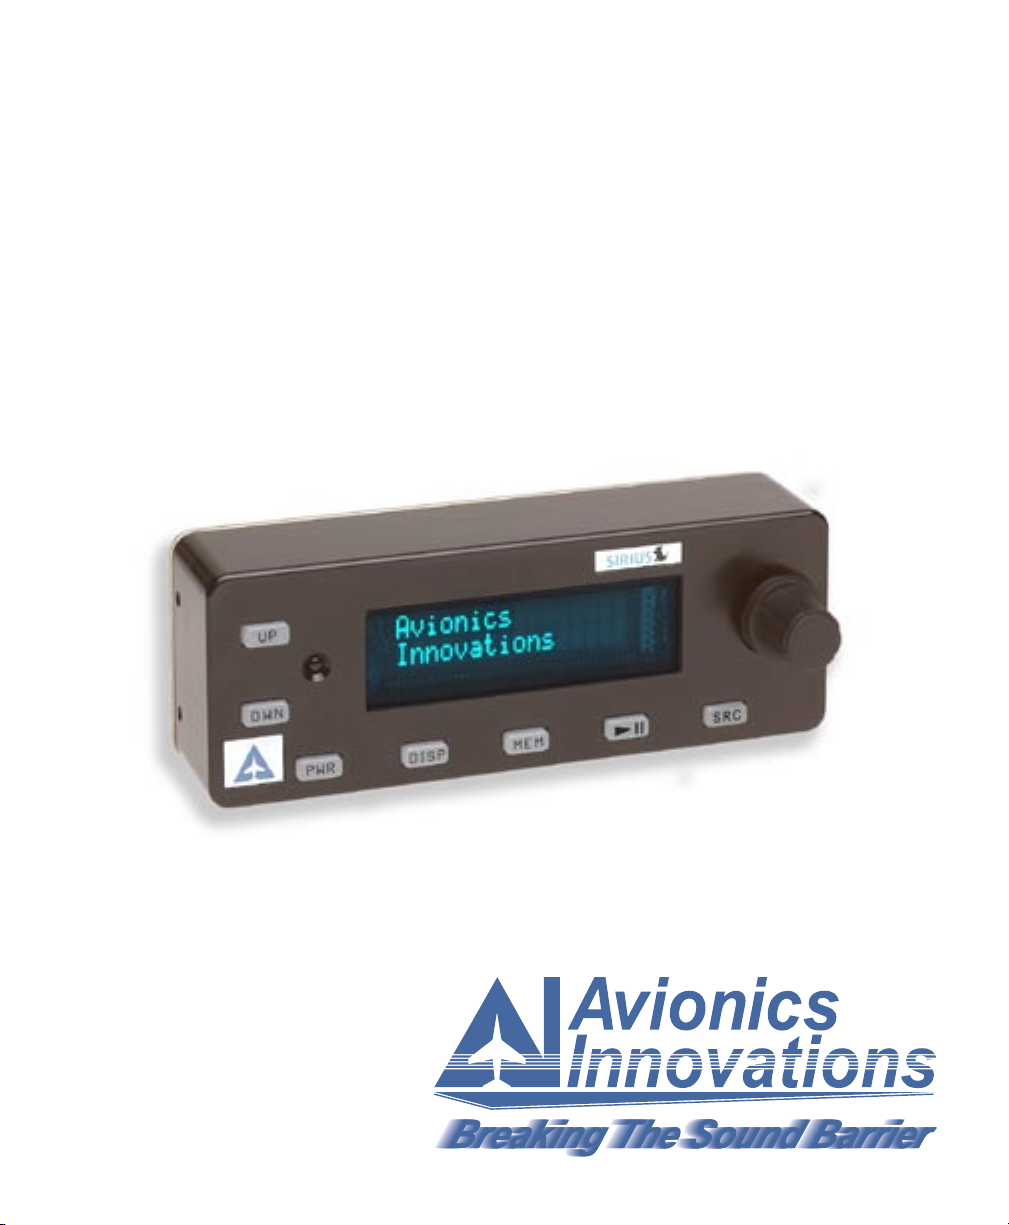
PCU Controls & Operation
The PCU contains all of the necessary controls and displays for the operation of
the ICE System. The controls are as follows:
PWR: This switch turns the power on to the PCU. Cycling this
switch turns the power from on to off and back to on.
Up: This button increments the SAT channel up or the track / chapter of the CD / DV
DWN: This button increments the SAT channel down or the track /
chapter of the CD / DVD.
DISP: This button changes the SAT display from channel to chapter
or title. This button ejects the DVD / CD during DVD mode.
MEM: This button is used for presetting the memorized favorites.
There are 18 presets available.
Arrow: This button is the play pause button for the DVD / CD.
SRC: This button changes the mode from SAT to DVD to AUX.
Rotary / Push-button: This knob is used to increment and decre
ment the volume and other features such as bass, treble and audio
selections. The knob is pushed to select the function to change
(Main Volume, Bass, Treble, Secondary Output Source, Secondary
Volume, and Sirius ID). When a menu item is displayed, rotating the
knob will change the value. Pushing the knob will move to the next
menu item.
ICE Operation Manual, P/N 8011-00, Rev A, January 18, 2006
-
3
Page 6

Secondary Output
When it is desired to have another audio output enabled for a flight attendant
or flight crew, simply enter the sub menu with the rotary knob until Secondary
source is displayed. You can then select which source the listener can listen to.
The next selection will be secondary volume. Here the listener can adjust the
desired volume.
NOTE: The secondary output does not mute with the External mute
system.
DVD Operation
Initial System Setup
Immediately after installing or applying power to the unit, it should be initialized.
The DVD system does a self-test and should become usable within 30-45 seconds. During this time avoid pressing any buttons on the PCU.
Preparation For Playback
1. Insert the DVD / CD with the label up.
2. Slide the DVD / CD in the slot located on the front of the DVD player until
the unit grabs the DVD / CD and loads it.
Note: Some DVD / CDs may auto play.
To Play DVDs & CDs
1. Press the POWER button on the PCU.
2. Press the SRC button to select “DVD.”
3. Press the PLAY / PAUSE button.
There is a slight delay as the DVD processes the commands slowly.
Note: During play you can use the “UP” and “DOWN” keys on the
PCU to advance or reverse in the track or chapters of the DVD /
CD.
To Adjust Volume / Bass / Treble
1. On the PCU, push the rotary knob to display the modification menu.
4
ICE Operation Manual, P/N 8011-00, Rev A, January 18, 2006
Page 7

2. When the desired menu item is displayed, rotate the knob to change the
value.
Note: Pushing the knob will move to the next menu item.
To Pause Playback
1. Press the PLAY / PAUSE button.
Press the PLAY / PAUSE button again to resume playback.
To Stop Playback
1. Press the DISP button.
To Eject DVDs
1. Push the DISP Button.
AUX (External Input Mode)
This unit is equipped with an external input mode capable of accepting a low—
level input from another audio device. Devices like an MP3 player or other portable music device will work for this input. After the unit is turned on, press the SRC
button to change to the external input mode. “AUX” will be displayed on the PCU
display. Use the controls on the external device to set volume.
Note: The PCU volume will adjust the overall volume.
Satellite Operation
After power has been applied to the system, “Avionics Innovations” will display
during the self-test and initiation. The display will then go blank until the PWR
button on the PCU is pressed.
The system will turn on in SAT mode and display the current channel tuned.
Note: “SAT” will not be displayed if the Sirius Satellite Radio (SSR)
unit is not installed.
Note: If Sirius service has not been subscribed to, the unit will only
display and play channel 184 (weather / preview channel).
ICE Operation Manual, P/N 8011-00, Rev A, January 18, 2006
5
Page 8

To Subscribe To Sirius Satellite Radio
The Sirius Satellite Radio Receiver holds a Sirius ID number for user identification. You can find the number by pushing the rotary knob until “SIRIUS ID” and
an 11 digit number is displayed. This number is your Sirius electronic serial number.
To obtain a subscriber contract and enable reception of Sirius Satellite Radio, call
the Sirius Service Center (888-539-7474) or visit Sirius on the web at www.sirius.
com. You will need to provide the Sirius ID number from your unit and your credit
card information.
Note: Pushing any button will restore normal operation.
To Select A Channel
1. Press the UP or DOWN button.
The channel number is displayed.
To Fast Tune
1. Press and hold the UP or DOWN button for 3 or more seconds.
The channels change rapidly until the button is released.
To Set Presets
1. Tune the desired channel.
2. Push and hold the Play / Pause button for 2 seconds.
A preset number (0-18) will be displayed. This is the next available preset.
3. Press the UP / DOWN button to navigate to another preset if desired.
Note: If you select an existing preset, it will be overwritten.
4. Press the ARROW buttons.
The channel is now set to that preset number.
To Listen To Presets
1. Press the MEM button until the display says “Preset.”
2. Press the UP / DOWN button to cycle through presets.
6
ICE Operation Manual, P/N 8011-00, Rev A, January 18, 2006
Page 9

Display Change
Pushing the DISP button will change what is displayed (channel with name, artist, song, category, or presets and number).
Pushing the SRC button will change the way the unit cycles through the channels
(Channel, Presets, and Category).
The UP and DOWN arrow keys will navigate through only the channels within
these selections.
If no presets are setup, the display will say “NO PRESETS” and navigation will
not be possible in that sub menu.
If you have selected the “POP” category, the UP arrow key will increment up
through all of the channels within that category. When you reach the highest
channel, the unit will loop back to the lowest channel.
To Cycle The Category Modes
1. Press the DISP button.
The category will be displayed.
2. Press the UP or DOWN button to navigate to the desired category.
3. Push the DISP button again.
Now the UP and DOWN buttons will change the channel within the category.
ICE Operation Manual, P/N 8011-00, Rev A, January 18, 2006
7
Page 10

VOLUME
MUTE
CD-CHG
SOURCE
A.PROC
BAND
PROG
PWR
ENT
Remote Control Functions
MUTE: This mutes all of the output channels until
the Mute is pushed again.
PWR: Turns System On / Off
ENT: This is the PLAY / PAUSE button for DVD
operation
CD-CHG: This is the eject button for DVD operation
BAND PROG: No function at this time
SOURCE: Selects between “SAT”, “DVD”, OR
“AUX”.
A.PROC: Accesses sub menu to set secondary
functions.
UP / DOWN / LEFT / RIGHT: Provides Up / Down
for Satellite Radio Channel and Up / Down for
DVD Chapters. Left / Right has no function.
In Case of Difficulty
No Sound
The volume level is too low.
- Turn up the volume
Bad connection to headphone.
Volume / Balance controls are not set to the proper positions.
The PA system has activated “Mute.”
8
- Check the headphone connection.
- Adjust the Volume / Balance.
- Switch off the PA.
ICE Operation Manual, P/N 8011-00, Rev A, January 18, 2006
Page 11

No Function
The operating temperature is outside of the allowable range (-10°C {14°F} and
+60°C {140°F}).
- Adjust the cabin temperature. Allow time for the unit temperature to adjust.
Moisture or condensation in the CD / DVD module.
- Allow enough time for the condensation to evaporate (about one hour).
Faulty connection of power or ground lead.
- Check the Wiring.
No Play
The unit is set to the “Pause” mode.
- Press the PLAY / PAUSE button to resume playback.
Scratched, warped, or bad disc.
- Insert a clean disc.
Music Skips Excessively
The CD player unit has not been mounted securely.
- Check the Mounting of the unit.
The disc is scratched or damaged.
- Replace the damaged disc with a clean disc.
ICE Operation Manual, P/N 8011-00, Rev A, January 18, 2006
9
Page 12

Warranty
Avionics Innovations warrants the ICE components against material or manufacturing defects for a period of one year from the date of installation. Avionics
Innovations will, upon receipt of the failed unit, repair or replace the unit at our
discretion. Avionics Innovations will pay UPS ground shipping charges for warranty returned items. Charges for express shipping will be the responsibility of the
sender. This warranty will be void if the unit has been tampered with or opened
by unauthorized personnel. To validate warranty you must return the enclosed
warranty registration form to Avionics Innovations with the following information:
1. Date of installation
2. Model and serial number of the unit
3. Make and model of aircraft
4. Registration number
5. Owner’s name and address
6. Name of installing agency
Ship to:
Avionics Innovations, Inc.
2450 Montecito Road
Ramona, CA 92065
(760) 788-2602 (760) 789-7098 fax
This warranty is not transferable. Any implied warranties expire at the expiration date of this warranty. WE SHALL NOT BE LIABLE FOR ANY INCIDENTAL
OR CONSEQUENTIAL DAMAGES. This warranty does not cover a defect that
has resulted from improper or unreasonable use or maintenance of the unit as
determined by us. This warranty is void if there is any attempt to disassemble
the unit without factory authorization. During the warranty period, the unit must
be returned to Avionics Innovations; if it is found to be under warranty, it will be
repaired or replaced at no charge.
IMPORTANT: Any labor charges associated with the removal of the unit or related troubleshooting by any firm other than Avionics Innovations will not be
covered.
10
ICE Operation Manual, P/N 8011-00, Rev A, January 18, 2006
Page 13

Notes
ICE Operation Manual, P/N 8011-00, Rev A, January 18, 2006
11
Page 14

Avionics Innovations, Inc.
2450 Montecito Road
Ramona, CA 92065
760-788-2602 / 760-789-7098 Fax
www.avionicsinnovations.com
ICE Operation Manual, 8011-00, Rev A, January 18, 2006
 Loading...