

Page 1

For Intelligent Projectors
T
iP Viewer Program Quick Reference
Version 1.4.XX (x is an arbitrary number)
This document describes the basic operations on the Intelligent Projector’s iP
Viewer program. For details, refer to the iP Viewer’s operating instructions.
Below, the “Intelligent Projector” is referred to simply as “the projector”, the iP
Viewer program as “iP Viewer”.
Names of the projector’s operating buttons and connectors
POWER
E
R
U
T
P
A
C
/
E
Z
INPUT
E
E
R
F
F
F
O
E
Z
E
RE
F
T
AI
R
FE
S
AN
R
T
R
T
R
PO
UT
P
IN
R
E
W
O
P
R
TEMP
Y
B
COVE
D
P/
N
A
T
LAM
S
/
N
O
ON/STANDBY
LAMP/COVER
TEMP
Model iP-30SE
Display of input selection icons (on the screen)
iP Viewer status bar (on the computer)
FREEZE OFF
PORTRAIT
FREEZE
TRANSFER
OHP PC VIDEO
The currently selected input
icon is framed.
/CAPTURE
TEST RGB S V L R AUDIO USB
Step
2
Operations possible when connected to the computer
The OHP picture, the computer’s screen and files can be stored and projected, captured docu-
ments can be processed, etc.
Saving the projected picture (scan function)
Documents of up to A4 size can be saved.
((
Operations on the projector
(First store the picture in the projector’s memory.)
1 Switch the input to “OHP”.
))
INPUT
2 Place the document on the glass surface
and adjust the capture position.
O
N
/S
L
A
T
A
M
ND
P
/
C
B
O
Y
V
T
E
E
R
M
POWER
P
I
N
PU
T
PO
R
TRAIT
TR
F
R
ANSFER
E
E
Z
E
O
F
F
F
R
EE
Z
E
/C
A
P
TU
R
E
T
E
S
T
R
G
B
SVL
R
A
U
D
I
O
U
S
B
3 Press the FREEZE/CAPTURE button.
“USB” is displayed on the projection screen while the picture
is being captured.
The next document can be captured once the “USB” indicator turns off.
To save multiple pictures, repeat steps 2 and 3.
FREEZE/CAPTURE
Step
1
Connecting and launching iP Viewer
1 Turn on the projector’s power and switch to “PC”.
POWER
INPUT
2 Connect the RGB cable and start up the computer.
Note that the shape of the USB connector differs on the projector and on the computer. Check
that the computer’s screen is displayed on the projector.
O
N
/S
LAMP/COVER
TA
N
D
B
Y
T
E
M
P
P
O
W
E
R
IN
P
U
T
P
O
R
T
R
A
I
T
T
F
R
R
A
E
N
E
S
Z
F
E
E
O
R
F
F
FREEZE
/
C
A
P
T
U
R
E
T
E
S
T
R
G
B
S
VL
R
A
U
D
I
O
U
S
B
Do not connect the USB cable at this
point.
4 Switch the input to “PC” then
press the [TRANSFER] button, or
if the input is set to “OHP”, longpress the [TRANSFER] button.
Transfer to the computer starts.
((
Operations on the computer
))
5 “Transfer” is lit green.
Once data transfer is completed, the “Transfer” indicator turns
off (turns light gray), and the message “File transfer from the
projector is completed.” is displayed in red.
INPUT
PORTRAIT
RANSFER
6 To check the transferred data, click the
“List” button and display the list window.
To return, click the “Close” button.
Click on a document to display it in the full-screen mode.
NOTE: The menu bar buttons do not operate when the list is
displayed.
Saving the computer’s screen (screen capture function)
The computer’s screen (Excel/Word file, browser window, etc.) can be captured and
saved.
3 Connect the USB cable.
Insert the plug, being sure to do so in the proper direction.
ON/STANDBY
L
A
M
P
/
C
O
V
T
E
E
R
M
POWER
P
INPUT
PORTRAIT
TRANSFER
FREEZE OFF
FRE
E
Z
E
/C
A
P
TU
R
E
T
E
S
T
R
G
B
S
V
L
R
A
U
D
I
O
U
S
B
4 The message “iP-Viewer start?”
appears. Click the “OK” button.
iP Viewer starts.
5 The iP Viewer’s operating instructions
can be viewed by clicking the
“manual” button on the iP Viewer’s
“settings” window.
iP Viewer is not installed on the computer. It is only
launched when the projector and computer are connected by USB cable.
1 Click the minimize button ( ) on the status
bar to minimize iP Viewer.
2 Launch the application and display the pic-
ture you want to save.
3 Click the screen capture tool icon ( ) and
display the window to be captured at the
forefront.
The window at the forefront switches each time the camera icon
( ) is clicked.
4 Click the “Capture” button ( ) to register.
Click the “Camera” button ( ) to bring the iP Viewer window to
the forefront.
Captured documents are indicated with a “
” mark on the list
window.
5 Display the iP Viewer window again.
Click on the task bar.
• Computer screens captured and saved using iP Viewer are hard
copy images and cannot be operated with the application. To
operate, click the camera icon (
window.
) and return to the application’s
7120433-R011
햲
Page 2
Capturing image files and PowerPoint files
1 Click the “Doc” button, then click the
“File” button.
2 Select an image or PowerPoint file,
then click the “Open” button.
PowerPoint files are automatically converted into JPEG
format and the first page is projected.
Processing captured data
Sales Report
xxxxxx
If you want to ….
Write on, change the direction or enlarge or reduce a document during the presentation:
Refer to “Processing captured data” under “Step 2” above.
Use as a slideshow:
1) From “Doc” 씮 “Folder” 씮 “Browse For Folder”,
select the desired folder to register all the documents at once. The first document is projected.
2) Click “Next->” to switch to the next page.
Step
4
Ending the presentation
Sales Report
xxxxxx
Checking saved documents and deleting unnecessary documents
Documents displayed from lists remain as edited images.
NOTE: The menu bar buttons do not operate when the list is displayed.
1 Click the “List” button, then click
the “Edited Image List” button on
the captured image list screen.
The edited image list screen is displayed.
○年度○期
■■営業報告書
xxxxxx
Edit List
Close
The pen tool can be used to write on, change the direction or size of, or move registered documents (if the picture is larger than the projection screen).
When a document is processed (displayed), the resulting image is registered in the
list of edited images.
The original document (image) is registered in the list of captured images.
On the list display, captured documents are indicated by the camera mark.
((
Writing on projected documents
Click the “Pen” button to display the pen tool, choose the
thickness and color of the pen, then write. It is also possible
to input characters from the keyboard.
For details, see the iP Viewer’s operating instructions.
((
Displaying and writing on the whiteboard
Click “Doc” then select “Whiteboard” from the selection window to display the whiteboard.
Click the “Pen” button to display the pen tool, then use the
pen tool to write notes or input characters from the keyboard.
))
))
2 To delete unnecessary docu-
ments, click the unnecessary
document, then click the “Delete”
button.
Documents displayed on the list of edited documents are saved with the saving operation.
3 Click the “Close” button to close
the list screen.
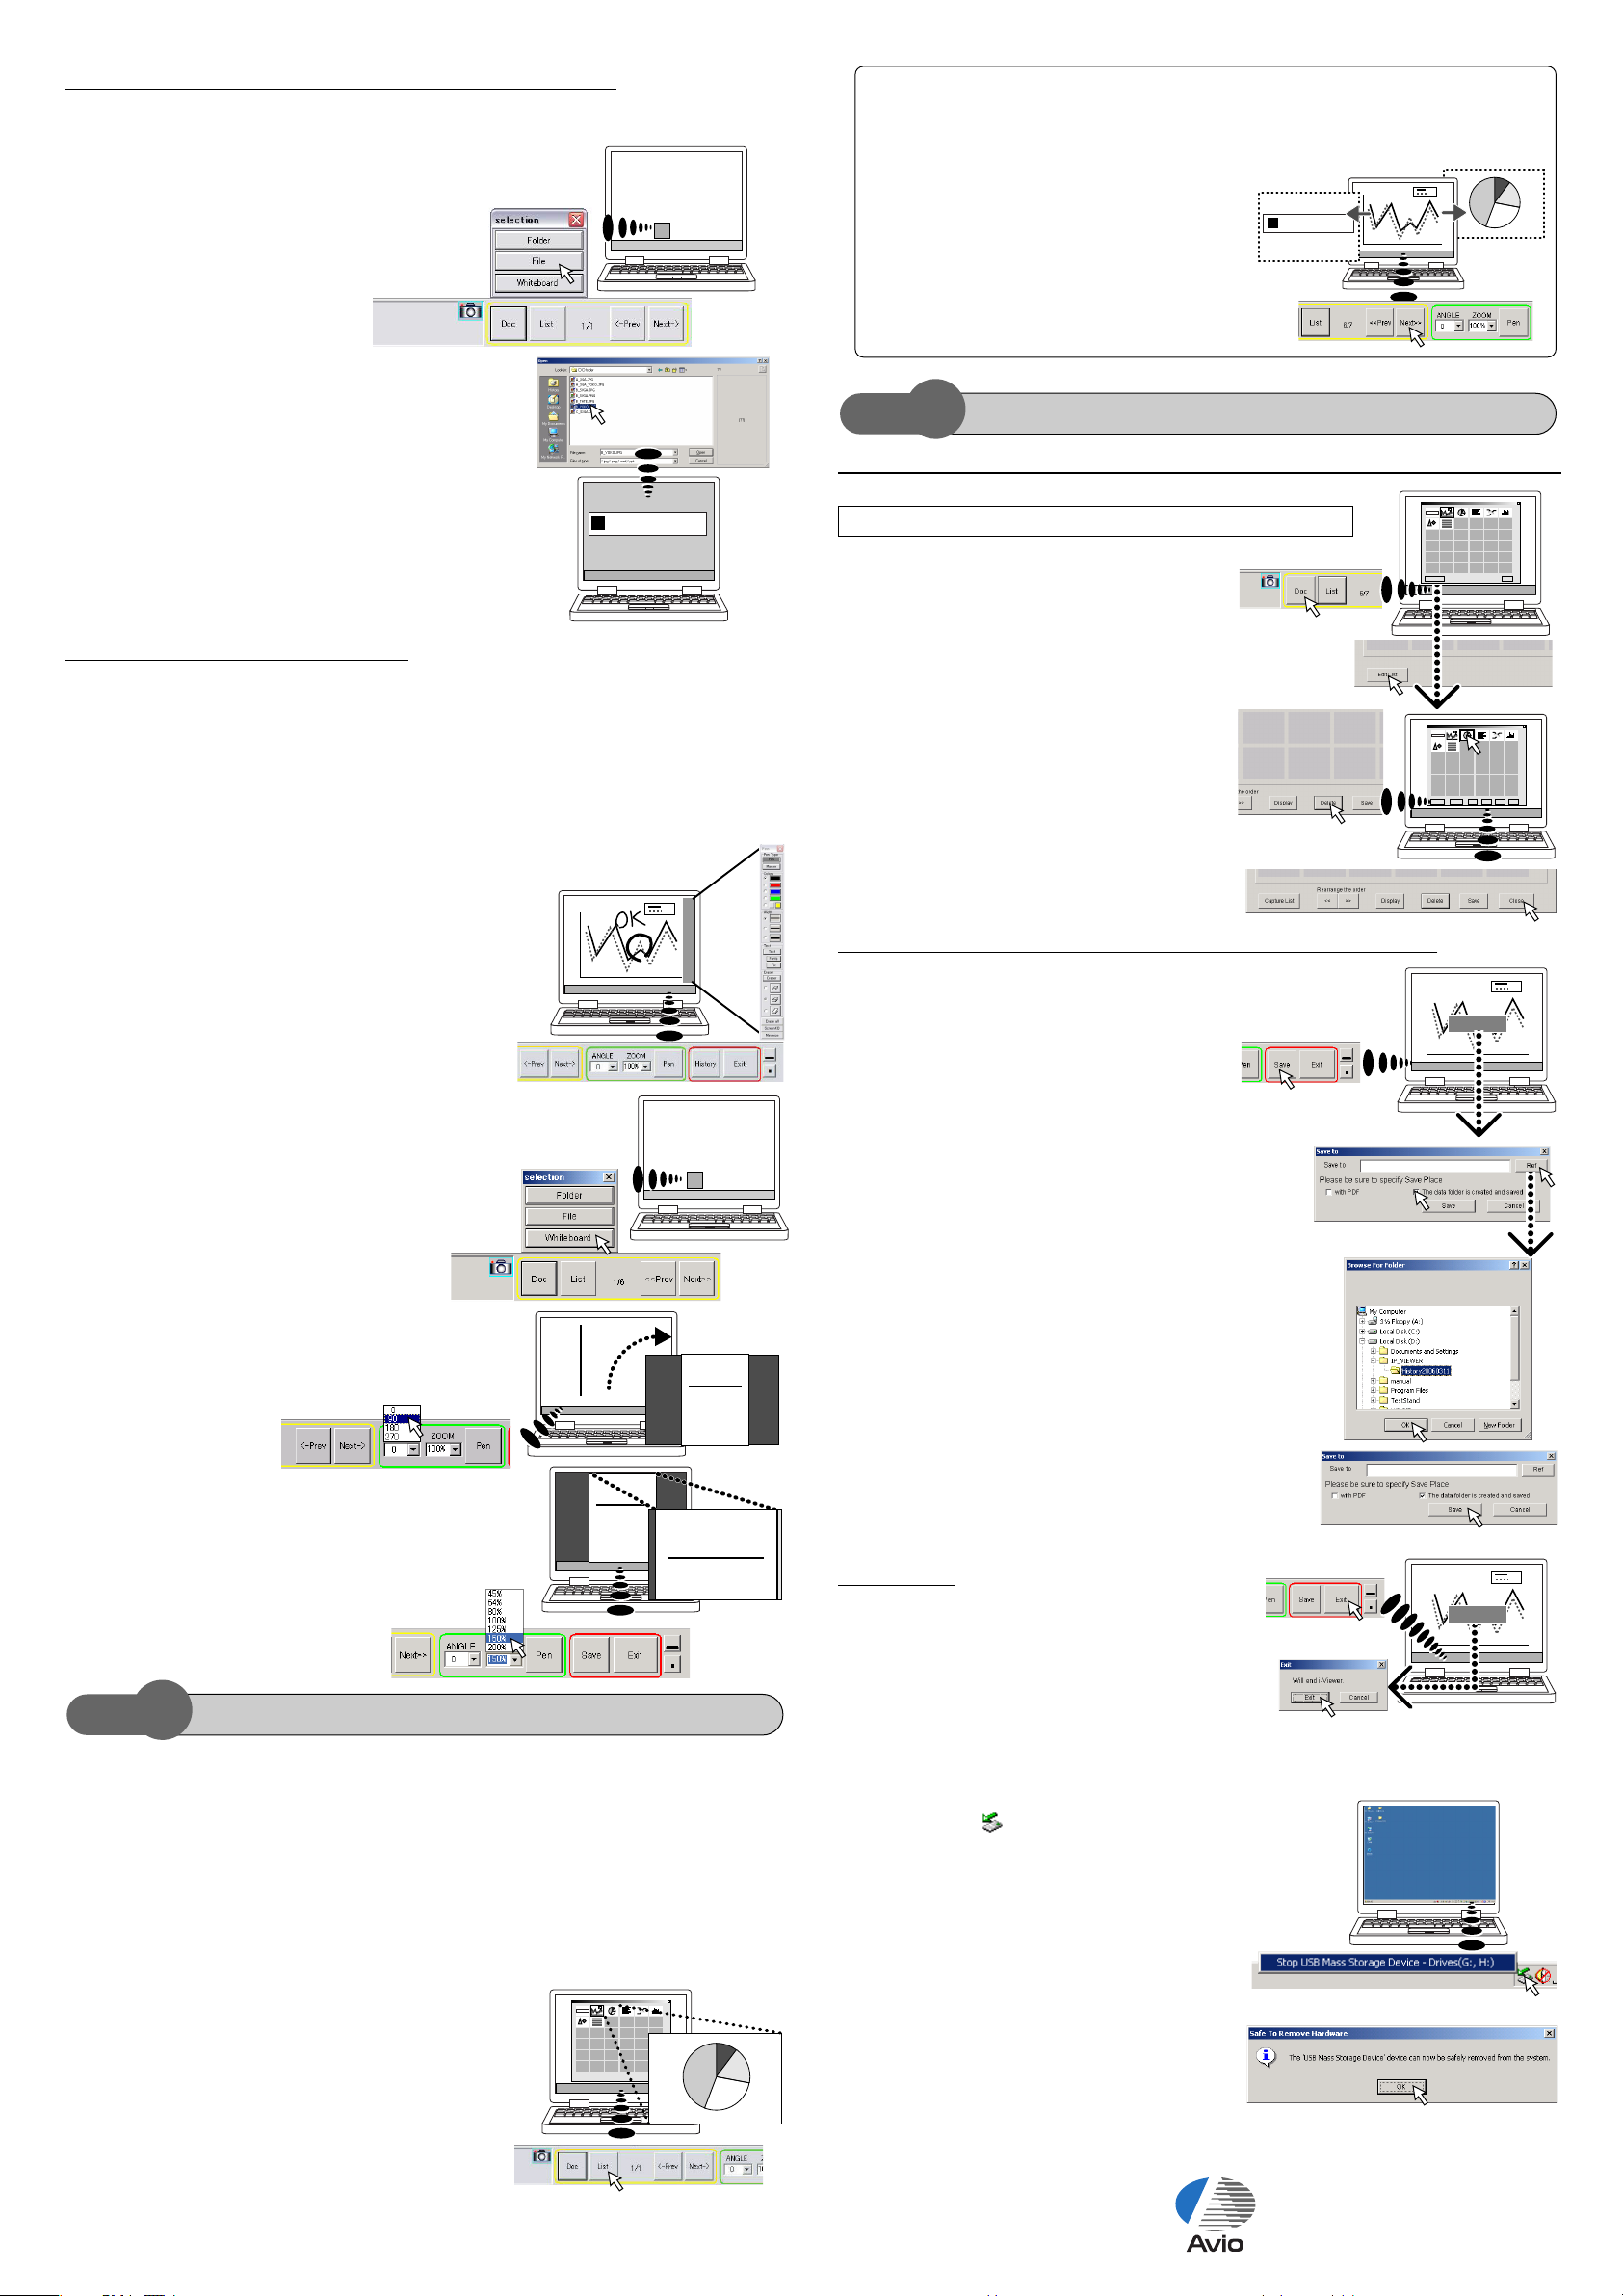
Saving edited documents (data save function)
1 Click the “Save” button.
The screen for selecting where the document is to be saved
is displayed.
If there are no changes from the previous time a
document was saved, the ending screen is displayed (see “Ending”).
2 Select the saving conditions.
To create a folder automatically, check the “The data folder
is created and saved” (“The data folder is created and saved”)
box.
To create a folder manually, uncheck the box.
○年度○期
■■営業報告書
xxxxxx
((
Changing the document’s direction
Click the arrow (“”) under “ANGLE” to display a selection
list, then click the desired angle.
((
Changing the document’s size
Click the arrow (“”) under “ZOOM” to display a selection
list, then click the desired magnification.
If the document is enlarged to a size larger than the projection screen, the position can be moved using the scroll bars.
Step
3
Conducting presentations
))
ABCD
abcdefg
hijklm
))
ABCD
abcdefg
hijklm
nop
ABCD
nop
abcdefg
hijklm
nop
ABCD
abcdefg
This section describes the flow of operations and the essentials of conducting presentations.
1 First register the documents.
There are three ways to register documents.
• For PowerPoint files: Refer to “Capturing image files and PowerPoint files” under “Step 2” above.
•To use images captured from the overhead projector: Refer to “Saving the projected picture (scan
function)” under “Step 2” above.
•To use images from applications other than PowerPoint: Refer to “Saving the computer’s screen
(screen capture function)” under “Step 2” above.
○年度○期
■■営業報告書
2 Select the document from the list dis-
xxxxxx
play and project it.
Click the “List” button to display the list window (thumbnails), then click on the desired document.
キャンセル
3 Switch the page.
Use the “Next->” and “<-Prev” buttons to switch pages.
3 Specify where the document is to be
saved.
Click the “Browse” button to display the “Browse for Folder”
window.
Click the folder in which the document is to be saved, then
click the “OK” button.
If the box is unchecked (to create a folder manually), click
“New Folder (M)”, input the name of the folder, then click the
“OK” button.
4 Click the “Save” button.
Saving starts, and the “Save to” window closes.
Ending
Click the “Exit” button.
The “Exit” confirmation message appears.
Click “Exit” on the confirmation message to close
iP Viewer.
Before disconnecting the projector and computer, perform the specified procedure for disconnecting the USB device on the computer.
1 Click the “ ” icon on the task bar
(normally at the lower right).
햲 Select “USB Mass Storage Device - Drives” from
the drive selection display.
햳 Click “Stop”.
햴 Click “OK”.
The display may differ, depending on your
computer’s operating system.
2 The USB device can be safely dis-
connected once the message “The
‘USB Mass Storage Device –
Drives’ can now be safely removed
from the system” appears.
 Loading...