

Page 1

Operating Instructions
Bedienungsanleitung
Mode d‘emploi
Instrucciones de uso
Руководство по эксплуатации
PURE IMAGE–PURESOUND –PUREPASSION
00107632
Page 2

Page 3
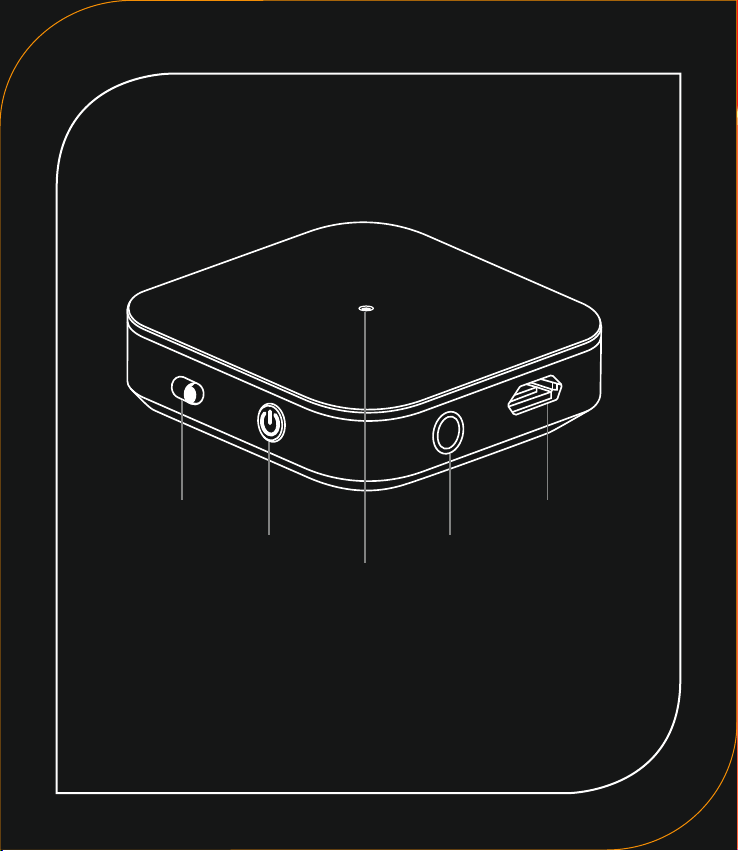
TX
RX
1 5
2 4
3
Page 4
G Operating instruction
Avinity: High Performance Accessories –born
of apassion for audio/video entertainment.
High-quality workmanship and performance
emphasise our commitment to premium
accessories.
Take your time and read the following instructions and information completely.Keep
these operating instructions in asafe place
for future reference.
Explanation of Warning Symbols and Notes
1.
Warning
This symbol is used to indicate safety
instructions or to draw your attention to
specichazards and risks.
Note
This symbol is used to indicate additional
information or important notes.
2. Package Contents
• Bluetooth® transmitter/receiver,
2-in-1 adapter
• 3.5 mm jack cable
• Micro-USB charging/connecting cable
• These operating instructions
3. Safety Notes
• The product is intended for private,
non-commercial use only.
• Protect the product from dirt, moisture
and overheating, and only use it in adry
environment.
• Do not use the product in the immediate
vicinity of heaters or other heat sources or
in direct sunlight.
• Do not allow yourself to be distracted by
the product, for example when driving avehicle or operating sports equipment. Always
pay attention to the surrounding tracand
your environment.
• Do not drop the product and do not expose
it to any major shocks.
• Do not operate the product outside the
power limits given in the specications.
• Do not open the device or continue to
operate it if it becomes damaged.
• Since the battery is integrated and cannot
be removed, you will need to dispose of the
product as awhole. Do this in compliance
with the legal requirements.
• Dispose of packaging material immediately
according to locally applicable regulations.
• Do not modify the product in any way.
Doing so voids the warranty.
Warning –Rechargeable battery
• Only use suitable charging devices or
USB connections for charging.
• As arule, do not use charging devices
or USB connections that are defective
and do not try to repair them yourself.
• Do not overcharge the product or allow
the battery to completely discharge.
• Avoid storing, charging or using
batteries in extreme temperatures.
• When stored over along period of time,
batteries should be charged regularly
(at least every three months).
Page 5
4.Getting Started
• The adapter is equipped with arechargeable battery.The battery must be fully
charged before using the device for the
rst time.
• Begin charging by connecting the included
Micro-USB charging/connecting cable to
the adapter’s Micro-USB connection (5)
and to asuitable USB charger.Please refer
to the operating instructions for the USB
charger used.
• The adapter’s status LED (3) emits aconstant red light during charging.
• It can take up to 2hours to fully charge the
battery.
• Charging begins and ends automatically.
5. Operation
5.1. Switching the adapter on/o
• Switching on:
With the device o,press and hold the
multifunction button (2) for 3seconds. The
status LED (3) lights up in blue.
• Switching o:
With the device on, press and hold the
multifunction button (2) for 3seconds. The
status LED (3) emits two red ashes before
the device turns o.
The rst time the device is turned on, pairing
is automatically started –see 5.2 Blue-
tooth®pairing in receiver (RX) mode.
Bluetooth®pairing in receiver (RX) mode
5.2.
Note –Pairing
• Make sure that your Bluetooth®-capable terminal device is on and
Bluetooth® is activated.
• For more information, please refer
to the operating instructions of your
terminal device.
• Connect your terminal device to the adapter using the included 3.5 mm jack cable
and the audio connection (AUX) (4).
• Select the adapter’s RX mode by moving
the switch (1) to the right.
• The adapter and the terminal device should
be no further than 1metre apart. The shorter the distance, the better.
• With the adapter on, press the multifunction button (2) twice. After approximately
3seconds, the status LED (3) will emit
ashes of alternating blue and red light to
indicate the device is in pairing mode.
• Open the Bluetooth®settings on your
terminal device and wait until Avinity
BTT-632 appears in the list of Bluetooth
®
devices found.
• Select Avinity BTT-632 and wait until the
adapter is listed as connected in the Bluetooth®settings on your terminal device.
Page 6
Note –Bluetooth®password
Some terminal devices require a
password in order to connect to another
Bluetooth®device.
• If your terminal device requests a
password to establish the connection,
enter 0000, 1234, 1111 or 8888.
Note
If pairing was successful, the status LED
(3) lights up in blue.
• Youcan now use the adapter.
5.3. Bluetooth®pairing in transmitter (TX)
mode
Note –Pairing
• Make sure that your Bluetooth®capable terminal device is on and
Bluetooth® is activated.
• For more information, please refer
to the operating instructions of your
terminal device.
• Connect your terminal device to the adapter using the included 3.5 mm jack cable
and the audio connection (AUX) (4).
• Select the adapter’s TX mode by moving
the switch (1) to the left.
• Turn on Bluetooth®on your Bluetooth
®
headphones/speaker.
• For more information, please refer to the
operating instructions of your terminal
device.
• The adapter and the Bluetooth®headphones/
speaker should be no further than 1metre
apart. The shorter the distance, the better.
• With the adapter on, press the multifunction button (2) twice. After approximately
3seconds, the status LED (3) will emit
ashes of blue light to indicate the device
is in pairing mode.
• The connection is now established automatically.
®
5.4. Automatic Bluetooth
connection
(after successful pairing)
Note –Pairing
• Make sure that your Bluetooth®capable terminal device is on and
Bluetooth® is activated.
• For more information, please refer
to the operating instructions of your
terminal device.
• Make sure that the adapter is on.
• After the devices have been paired once, the
connection is then established automatically.
• Youcan now use the adapter.
Note
• If pairing was successful, the status
LED (3) will be lit blue.
• It may be necessary to make settings
on your terminal device to enable automatic connection to the paired adapter.
Page 7
Note –Connection impaired
After the devices have been paired
once, the connection is then established automatically.Ifthe Bluetooth®
connection is not established automatically,check the following:
• Check the Bluetooth® settings of your
terminal device to see whether Avinity
BTT-632 is connected.
• If not, repeat the steps listed in 5.2
Bluetooth® pairing.
• Check whether obstacles are impairing
the range. If so, move the devices
closer together.
• The performance can also be aected
by aweak battery.
5.5. Pairing in transmitter (TX) mode with
two devices at the same time
• Switch on the adapter and your two
Bluetooth
®
-capable audio devices (BT
headphones/speaker) as described in 5.2
Bluetooth®pairing.
• The adapter automatically names the two
terminal devices Aand B, and establishes a
connection.
5.6. Deleting the pairing list
• Switch o the adapter in the current mode
(TX or RX). After approximately 3seconds,
move the switch (1) to the other mode
and switch the adapter on again; this will
delete all paired devices from the list.
5.7. Battery capacity
• The status LED (3) begins ashing red when
the battery charge is low.
• Charge the adapter as described in 4.
Getting started.
6. Care and Maintenance
Only clean this product with aslightly damp,
lint-free cloth and do not use aggressive
cleaning agents.
Page 8
7. Warranty Disclaimer
Hama GmbH &Co. KG assumes no liability
and provides no warranty for damage resulting from improper installation/mounting,
improper use of the product or from failure
to observe the operating instructions and/or
safety notes.
8. Service and Support
Please contact Hama Product Consulting if
you have any questions about this product.
Hotline: +49 9091 502-115 (German/English)
Further support information can be found
here: www.hama.com
9. Technical Data
Bluetooth®version 4.1
Prole A2DP
Range <10m
Battery type
Frequency band(s)
Maximum radiofrequency power
transmitted
Input 240 mA
Charging time Approx. 2h
Battery life of Bluetooth®transmitter
Battery life of
Bluetooth®receiver
Lithium polymer
rechargeable
battery
2402 –2480 MHz
3.94 mW E.I.R.P.
Approx. 13 h
Approx. 12 h
10. Recycling Information
Note on environmental protection:
After the implementation of the
European Directive 2012/19/EU and
2006/66/EU in the national legal
system, the following applies: Electric
and electronic devices as well as batteries
must not be disposed of with household
waste. Consumers are obliged by law to return
electrical and electronic devices as well as
batteries at the end of their service lives to
the public collecting points set up for this
purpose or point of sale. Details to this are
dened by the national law of the respective
country.This symbol on the product, the
instruction manual or the package indicates
that aproduct is subject to these regulations.
By recycling, reusing the materials or other
forms of utilising old devices/Batteries, you
are making an important contribution to
protecting our environment.
11. Declaration of Conformity
Hereby,Hama GmbH &CoKGdeclares
that the radio equipment type
[00107632] is in compliance with
Directive 2014/53/EU. The full text of the EU
declaration of conformity is available at the
following internet address:
www.hama.com-> 00107632 -> Downloads.
Page 9
D Bedienungsanleitung
Avinity: High Performance Accessories –
geboren aus der Leidenschaft für Audio/Video
Entertainment. Hochwertige Verarbeitung und
Performance unterstreichen unseren Anspruch
an Premium Zubehör.
Nehmen Sie sich Zeit und lesen Sie die folgenden Anweisungen und Hinweise zunächst ganz
durch. Bewahren Sie diese Bedienungsanleitung anschließend an einem sicheren Ort auf,
um bei Bedarf darin nachschlagen zu können.
1.
Erklärung von Warnsymbolen und Hinweisen
Warnung
Wird verwendet, um Sicherheitshinweise
zu kennzeichnen oder um Aufmerksamkeit auf besondere Gefahren und Risiken
zu lenken.
Hinweis
Wird verwendet, um zusätzlich Informationen oder wichtige Hinweise zu
kennzeichnen.
2. Packungsinhalt
• Bluetooth®-Sender/-Empfänger,
2in1-Adapter
• 3,5-mm-Klinkenkabel
• Micro-USB-Lade-/Verbindungskabel
• diese Bedienungsanleitung
3. Sicherheitshinweise
• Das Produkt ist für den privaten, nicht-gewerblichen Haushaltsgebrauch vorgesehen.
• Schützen Sie das Produkt vor Schmutz,
Feuchtigkeit und Überhitzung und verwenden Sie es nur in trockenen Umgebungen.
• Betreiben Sie das Produkt nicht in unmittelbarer Nähe der Heizung, anderer Hitzequellen oder in direkter Sonneneinstrahlung.
• Lassen Sie sich auf der Fahrt mit einem
Kraftfahrzeug oder Sportgerät nicht durch
Ihr Produkt ablenken und achten Sie auf die
Verkehrslage und Ihre Umgebung.
• Lassen sie das Produkt nicht fallen und
setzen Sie es keinen heftigen Erschütterungen aus.
• Betreiben Sie das Produkt nicht außerhalb
seiner in den technischen Daten angegebenen Leistungsgrenzen.
• Önen Sie das Produkt nicht und betreiben
Sie es bei Beschädigung nicht weiter.
• Der Akku ist fest eingebaut und kann nicht
entfernt werden, entsorgen Sie das Produkt
als Ganzes gemäß den gesetzlichen Bestimmungen.
• Entsorgen Sie das Verpackungsmaterial
sofort gemäß den örtlich gültigen Entsorgungsvorschriften.
• Nehmen Sie keine Veränderungen am Gerät
vor.Dadurch verlieren Sie jegliche Gewährleistungsansprüche.
Page 10
Warnung –Akku
• Verwenden Sie nur geeignete Ladegeräte oder USB-Anschlüsse zum Auaden.
• Verwenden Sie defekte Ladegeräte oder
USB-Anschlüsse generell nicht mehr und
versuchen Sie nicht, diese zu reparieren.
• Überladen oder tiefentladen Sie das
Produkt nicht.
• Vermeiden Sie Lagerung, Laden und
Benutzung bei extremen Temperaturen.
• Laden Sie bei längerer Lagerung regelmäßig (mind. vierteljährig) nach.
Multifunktionstaste (2) 3Sekunden lang gedrückt. Die Status-LED (3) leuchtet blau auf.
• Ausschalten:
Halten Sie im eingeschalteten Zustand die
Multifunktionstaste (2) 3Sekunden lang
gedrückt. Die Status-LED (3) leuchtet 2x rot
auf, bevor sich das Gerät abschaltet.
Beim ersten Einschalten wird automatisch
das Pairing gestartet –siehe 5.2. Bluetooth
Erstverbindung (Pairing) im Empfänger-Modus RX.
®
5.2. Bluetooth
Erstverbindung (Pairing) im
Empfänger-Modus RX
®
4. Inbetriebnahme
• Der Adapter verfügt über einen wieder auad-
baren Akku. Vorder ersten Anwendung muss
der Akku vollständig aufgeladen werden.
• Starten Sie den Ladevorgang, indem Sie das
beiliegende Micro-USB-Lade-/Verbindungskabel an den Micro-USB-Anschluss (5) des
Adapters und an ein geeignetes USB-Ladegerät anschließen. Beachten Sie hierzu
die Bedienungsanleitung des verwendeten
USB-Ladegeräts.
• Die Status-LED (3) des Adapters leuchtet
während des Ladevorgangs dauerhaft rot.
• Es kann bis zu 2Stunden dauern, bis der
Akku vollständig geladen ist.
• Der Ladevorgang startet und endet automatisch.
5.Betrieb
5.1. Ein-/Ausschalten des Adapters
• Einschalten:
Halten Sie im ausgeschalteten Zustand die
Hinweis –Pairing
• Stellen Sie sicher,dass Ihr Bluetooth®fähiges Endgerät eingeschaltet ist und
dass Bluetooth® aktiviert ist.
• Beachten Sie hierzu die
Bedienungsanleitung Ihres Endgerätes.
• Für die Verbindung zum jeweiligen Endgerät
verbinden Sie es über das beiliegende
3,5 mm-Klinkenkabel und den Audio-Anschluss (AUX) (4) mit dem Adapter.
• Wählen Sie den RX-Modus des Adapters,
indem Sie den Umschalter (1) nach rechts
schieben.
• Der Adapter und das Endgerät sollen nicht
weiter als 1Meter voneinander entfernt
sein. Je geringer der Abstand, desto besser.
• Drücken Sie zwei Mal die Multifunktionstaste (2) des eingeschalteten Adapters. Nach
ca. 3Sekunden blinkt die Status-LED (3)
abwechselnd blau und rot und signalisiert
dadurch den Kopplungsmodus.
Page 11
• Önen Sie auf Ihrem Endgerät die Bluetoo-
th® Einstellungen und warten Sie, bis in der
Liste der gefundenen Bluetooth® Geräte
Avinity BTT-632 angezeigt wird.
• Wählen Sie Avinity BTT-632 aus und warten
Sie, bis der Adapter als verbunden in den
Bluetooth® Einstellungen Ihres Endgerätes
angezeigt wird.
Hinweis –Bluetooth® Passwort
Manche Endgeräte benötigen für die
Einrichtung der Verbindung mit einem
anderen Bluetooth® Gerät ein Passwort.
• Geben Sie für die Verbindung das
Passwort 0000, 1234, 1111 oder 8888
ein, wenn Sie zur Eingabe von Ihrem
Endgerät aufgefordert werden.
Hinweis
Wenn die Kopplung erfolgreich war,
leuchtet die Status-LED (3) blau auf.
• Sie können den Adapter nun verwenden.
®
5.3. Bluetooth
Erstverbindung (Pairing) im
Sender-Modus TX
Hinweis –Pairing
• Stellen Sie sicher,dass Ihr Bluetooth®fähiges Endgerät eingeschaltet ist und
dass Bluetooth® aktiviert ist.
• Beachten Sie hierzu die
Bedienungsanleitung Ihres Endgerätes.
• Für die Verbindung zum jeweiligen Endgerät
verbinden Sie es über das beiliegende 3,5
mm-Klinkenkabel und den Audio-Anschluss
(AUX) (4) mit dem Adapter.
• Wählen Sie den TX-Modus des Adapters,
indem Sie den Umschalter (1) nach links
schieben.
• Schalten Sie Bluetooth® an Ihrem Bluetooth®-Kopfhörer/-Lautsprecher ein.
• Beachten Sie hierzu die Bedienungsanleitung Ihres Endgerätes.
• Der Adapter und der Bluetooth®-Kopfhörer/-Lautsprecher sollen nicht weiter als 1
Meter voneinander entfernt sein. Je geringer
der Abstand, desto besser.
• Drücken Sie zwei Mal die Multifunktionstaste (2) des eingeschalteten Adapters. Nach
ca. 3Sekunden blinkt die Status-LED (3)
blau und signalisiert dadurch den Kopplungsmodus.
• Die Verbindung erfolgt nun automatisch.
5.4. Automatische Bluetooth® Verbindung
(nach bereits erfolgtem Pairing)
Hinweis –Pairing
• Stellen Sie sicher,dass Ihr Bluetooth®fähiges Endgerät eingeschaltet ist und
dass Bluetooth® aktiviert ist.
• Beachten Sie hierzu die
Bedienungsanleitung Ihres Endgerätes.
• Vergewissern Sie sich, dass der Adapter
eingeschaltet ist.
• Nach einer erfolgreichen Erstverbindung
erfolgt die Verbindung automatisch.
• Sie können den Adapter nun verwenden.
Page 12
Hinweis
• Wenn die Kopplung erfolgreich war,
leuchtet die Status-LED (3) blau.
• Gegebenenfalls müssen Sie eine Einstellung auf dem Endgerät vornehmen,
um die automatische Verbindung mit
dem gekoppelten Adapter zuzulassen.
Hinweis –Verbindung beeinträchtigt
Nach einer erfolgreichen Erstverbindung
erfolgt die Verbindung automatisch. Sollte sich die Bluetooth® Verbindung nicht
automatisch wiederherstellen, prüfen Sie
die folgenden Punkte:
• Kontrollieren Sie in den Bluetooth®
Einstellungen des Endgerätes, ob Avinity BTT-632 verbunden ist.
• Wenn nicht, wiederholen Sie die
unter 5.2. Bluetooth® Erstverbindung
genannten Schritte
• Kontrollieren Sie, ob Hindernisse die
Reichweite beeinträchtigen. Wenn ja, positionieren Sie die Geräte näher zueinander.
• Auch bei schwacher Batterie kann die
Leistung beeinträchtigt sein.
5.5. Pairing im Sender-Modus TX mit zwei
Geräten gleichzeitig
• Schalten Sie den Adapter und Ihre zwei
Bluetooth®-fähigen Audio-Endgeräte (BT
Kopfhörer/-Lautsprecher) -wie unter 5.2.
Bluetooth®Erstverbindung beschrieben -ein.
• Der Adapter benennt die zwei Endgeräte
automatisch in Aund Bund stellt eine
Verbindung her.
5.6. Pairing-Liste löschen
• Schalten Sie den Adapter im aktuellen Modus (TX oder RX) aus. Stellen Sie nach ca. 3
Sekunden den Umschalter (1) auf den anderen Modus um und schalten Sie den Adapter
erneut ein, somit werden alle gekoppelten
Geräte aus der Liste gelöscht.
5.7. Akkukapazität
• Bei geringer Akkukapazität beginnt die
Status-LED (3) rot zu blinken.
• Laden Sie den Adapter –wie in 4. Inbe-
triebnahme beschrieben –auf.
6. Wartung und Pege
Reinigen Sie dieses Produkt nur mit einem
fusselfreien, leicht feuchten Tuch und verwenden Sie keine aggressiven Reiniger.
7. Gewährleistungsausschluss
Die Hama GmbH &Co. KG übernimmt keinerlei Haftung oder Gewährleistung für Schäden,
die aus unsachgemäßer Installation, Montage
und unsachgemäßem Gebrauch des Produktes
oder einer Nichtbeachtung der Bedienungsanleitung und/oder der Sicherheitshinweise
resultieren.
8. Service und Support
Bitte wenden Sie sich bei Fragen zum Produkt
gerne an den Avinity Kundendienst.
Avinity Hotline: +49 9091 502-950 (Deu/Eng)
oder per email an: [email protected]
Weitere Supportinformationen nden sie hier:
www.avinity-cable.com
Page 13
9. Technische Daten
Bluetooth®-Version 4.1
ProlA2DP
Reichweite <10m
Batterietyp
Frequenzband/
Frequenzbänder
Abgestrahlte maximale Sendeleistung
Stromaufnahme 240 mA
Auadezeit Ca. 2h
Bluetooth®-Sender
Betriebszeit
Bluetooth®-Empfänger
Betriebszeit
LithiumPolymer-Akku
2402 –
2480MHz
3,94mW
E.I.R.P.
Ca. 13 h
Ca. 12 h
10. Entsorgungshinweise
Hinweis zum Umweltschutz:
Ab dem Zeitpunkt der Umsetzung der
europäischen Richtlinien 2012/19/EU
und 2006/66/EG in nationales Recht
gilt folgendes: Elektrische und
elektronische Geräte sowie Batterien dürfen
nicht mit dem Hausmüll entsorgt werden. Der
Verbraucher ist gesetzlich verpichtet,
elektrische und elektronische Geräte sowie
Batterien am Ende ihrer Lebensdauer an den
dafür eingerichteten, öentlichen Sammelstellen oder an die Verkaufsstelle zurückzugeben. Einzelheiten dazu regelt das jeweilige
Landesrecht. Das Symbol auf dem Produkt,
der Gebrauchsanleitung oder der Verpackung
weist auf diese Bestimmungen hin. Mit der
Wiederverwertung, der stoichen Verwertung
oder anderen Formen der Verwertung von
Altgeräten/Batterien leisten Sie einen
wichtigen Beitrag zum Schutz unserer
Umwelt.
11. Konformitätserklärung
Hiermit erklärt die Hama GmbH &Co
KG, dass der Funkanlagentyp
[00107632] der Richtlinie 2014/53/EU
entspricht. Der vollständige Text der
EU-Konformitätserklärung ist unter der
folgenden Internetadresse verfügbar:
www.hama.com-> 00107632 -> Downloads.
Page 14
F Mode d‘emploi
Avinity :High Performance Accessories –des
produits conçus par amour de l‘équipement
audio/vidéo. Une fabrication et des performances de qualité supérieure répondent
aux exigences posées àdes accessoires de
première qualité.
Veuillez prendre le temps de lire l‘ensemble
des remarques et consignes suivantes et
conserver ce mode d‘emploi àportée de main
pour toute consultation ultérieure.
1. Explication des symboles d‘avertissement et des remarques
Avertissement
Ce symbole est utilisé pour indiquer des
consignes de sécurité ou pour attirer
votre attention sur des dangers et risques
particuliers.
Remarque
Ce symbole est utilisé pour indiquer des
informations supplémentaires ou des
remarques importantes.
2. Contenu de l‘emballage
• Émetteur/récepteur Bluetooth
adaptateur 2en1
•Câble jack 3,5 mm
• Câble de connexion/charge micro USB
• Mode d‘emploi
3. Consignes de sécurité
• Ce produit est destiné àune installation
domestique non commerciale.
®
,
• Protégez le produit de toute saleté, humidité, surchaueetutilisez-le uniquement
dans des locaux secs.
• N’utilisez pas le produit àproximité immédiate d‘un chauage, d’autres sources de chaleur ou exposé aux rayons directs du soleil.
• Ne laissez pas le produit capter votre attention lorsque vous pilotez un véhicule ou
un appareil de sport et veuillez concentrer
toute votre attention àlacirculation et à
votre environnement.
• Protégez le produit des secousses violentes
et évitez tout choc ou toute chute.
• N‘utilisez pas le produit en dehors des
limites de puissance indiquées dans les
caractéristiques techniques.
• Ne tentez pas d‘ouvrir le produit en cas de
détérioration et cessez de l’utiliser.
• La batterie est installée de façon permanente et ne peut pas être retirée ;recyclez
le produit en bloc conformément aux directives légales.
• Recyclez les matériaux d’emballage conformément aux prescriptions locales en vigueur.
• N’apportez aucune modication àl’appareil.
Des modications vous feraient perdre vos
droits de garantie.
Avertissement concernant la batterie
• Utilisez exclusivement un chargeur
approprié ou une connexion USB pour la
recharge.
• Cessez d‘utiliser tout chargeur ou toute
connexion USB défectueux et ne tentez
pas de réparer ces derniers.
• Ne surchargez ou ne déchargez pas
totalement le produit.
Page 15
• Évitez un stockage, une charge ou une
utilisation àdes températures extrêmes.
• Rechargez régulièrement le produit (au
moins une fois par trimestre) en cas de
longue période de stockage.
4. Mise en service
• L’adaptateur dispose d’une batterie rechargeable. La batterie doit être totalement chargée avant la première utilisation du produit.
• Démarrez le cycle de charge en connectant
le câble micro USB de connexion/charge
fourni au port micro USB (5) de l’adaptateur et àunchargeur USB adapté. Veuillez
également consulter le mode d’emploi du
chargeur USB utilisé.
• La LED d’état (3) de l’adaptateur s’allume en
rouge en permanence pendant la charge.
• La charge complète de la batterie peut durer
jusqu’à 2heures.
• Le cycle de charge commence et se termine
automatiquement.
5. Fonctionnement
5.1. Mise sous/hors tension de l’adaptateur
• Mise sous tension :
Maintenez la touche multifonctions (2) de
l’appareil hors tension enfoncée pendant 3
secondes. La LED d‘état (3) s‘allume en bleu.
• Mise hors tension :
Maintenez la touche multifonctions (2) de
l’appareil sous tension enfoncée pendant 3
secondes. La LED d’état (3) clignote 2fois en
rouge avant que l’appareil ne s’éteigne.
Lors de la première mise sous tension, le
couplage démarre automatiquement -voir
5.2. Première connexion Bluetooth
®
(couplage) en mode Récepteur RX.
5.2. Première connexion Bluetooth
®
(couplage) en mode Récepteur RX
Remarque
• Assurez-vous que votre appareil Bluetooth® est bien sous tension et que sa
fonction Bluetooth® est bien activée.
• Veuillez consulter le mode d’emploi de
votre appareil àcesujet.
• Pour établir la connexion avec un appareil,
raccordez ce dernier àl’adaptateur àl’aide
du câble jack 3,5 mm fourni et du port audio
(AUX) (4).
• Sélectionnez le mode RX de l’adaptateur en
poussant le commutateur (1) vers la droite.
• La distance entre l’adaptateur et votre
appareil ne doit pas excéder 1mètre. Plus
la distance est petite, meilleure serala
connexion.
• Appuyez deux fois sur la touche multifonctions (2) de l’adaptateur sous tension. Au
bout d’environ 3secondes, la LED d’état (3)
clignote alternativement en bleu et rouge,
signalant ainsi le mode de couplage.
• Ouvrez les paramètres Bluetooth®sur votre
appareil, puis patientez jusqu‘à ce que
l‘appareil Avinity BTT-632 apparaisse dans
la liste d‘appareils Bluetooth®détectés.
• Sélectionnez l‘appareil Avinity BTT-632,
puis patientez jusqu‘à ce que l’adaptateur
apparaisse en tant que connecté dans les
réglages Bluetooth®de votre appareil.
Page 16
Remarque concernant le mot de
passe Bluetooth
®
Certains appareils requièrent un mot
de passe pour l’établissement de la
connexion avec un appareil Bluetooth®.
• Saisissez 0000, 1234, 1111 ou 8888
dans le cas où l’appareil exige la saisie
d’un mot de passe.
Remarque
La LED d’état (3) s’allume en bleu après
un couplage conforme.
• L’adaptateur est maintenant prêt àl’emploi.
5.3. Première connexion Bluetooth
®
(couplage) en mode Émetteur TX
Remarque concernant le couplage
• Assurez-vous que votre appareil Bluetooth® est bien sous tension et que sa
fonction Bluetooth® est bien activée.
• Veuillez consulter le mode d’emploi de
votre appareil àcesujet.
• Pour établir la connexion avec un appareil,
raccordez ce dernier àl’adaptateur àl’aide
du câble jack 3,5 mm fourni et du port audio
(AUX) (4).
• Sélectionnez le mode TX de l’adaptateur en
poussant le commutateur (1) vers la gauche.
• Activez Bluetooth®sur votre casque/haut-
parleur Bluetooth®.
• Veuillez consulter le mode d’emploi de
votre appareil àcesujet.
• La distance entre l’adaptateur et votre
casque/haut-parleur Bluetooth®ne doit pas
excéder 1mètre. Plus la distance est petite,
meilleure seralaconnexion.
• Appuyez deux fois sur la touche multifonctions
(2) de l’adaptateur sous tension. Au bout d’environ 3secondes, la LED d’état (3) clignote en
bleu, signalant ainsi le mode de couplage.
• La connexion s’eectue alors automatiquement.
5.4. Connexion Bluetooth®automatique
(après un couplage conforme)
Remarque concernant le couplage
• Assurez-vous que votre appareil Bluetooth® est bien sous tension et que sa
fonction Bluetooth® est bien activée.
• Veuillez consulter le mode d’emploi de
votre appareil àcesujet.
• Assurez-vous que l’adaptateur est sous
tension.
• Après une première connexion conforme,
les connexions suivantes sont établies
automatiquement.
• L’adaptateur est maintenant prêt àl’emploi.
Remarque
• La LED d’état (3) s’allume en bleu après
un couplage conforme.
• Le cas échéant, vous devrez paramétrer votre appareil and’autoriser une
connexion automatique avec l’adaptateur couplé.
Page 17
Remarque concernant une
mauvaise qualité de connexion
Après une première connexion conforme,
les connexions suivantes sont établies
automatiquement. Vériez les points
suivants dans le cas où la connexion Bluetooth® ne s’établit pas automatiquement :
• Contrôlez, dans les paramètres Bluetooth® de votre appareil, que l’appareil
Avinity BTT-632 est bien connecté.
• Si tel n’est pas le cas, répétez les
étapes décrites au point 5.2. Première
connexion Bluetooth®.
• Vériez la présence d’obstacles sus-
ceptibles de réduire la portée. Si tel est
le cas, rapprochez les appareils l’un de
l’autre.
• Une batterie faible est également
susceptible d’inuencer négativement
le fonctionnement du produit.
5.5. Couplage en mode Émetteur TX
simultané avec deux appareils
• Mettez l’adaptateur et vos deux appareils
audio compatibles Bluetooth®(casque/hautparleur BT) sous tension -comme décrit au
point 5.2. Première connexion Bluetooth®.
• L’adaptateur nomme automatiquement les
deux appareils AetBet établit la connexion.
5.6. Supprimer la liste des couplages
• Mettez l’adaptateur,dans le mode (TX ou
RX) en cours d’utilisation, hors tension.
Au bout de 3secondes environ, placez le
commutateur (1) sur l’autre mode, puis
mettez ànouveau l’adaptateur sous tension
:tous les appareils couplés seront ainsi
supprimés de la liste.
5.7. Capacité de la batterie
• La LED d’état (3) se met àclignoter en rouge
en cas de batterie faible.
• Rechargez l’adaptateur –comme décrit au
point 4. Mise en service.
6. Soins et entretien
Nettoyez la balance uniquement àl’aide
d’un chion non breux légèrement humide ;
évitez tout détergent agressif.
7. Exclusion de garantie
La société Hama GmbH &Co. KG décline
toute responsabilité en cas de dommages
provoqués par une installation, un montage
ou une utilisation non conformes du produit
ou encore provoqués par un non respect
des consignes du mode d‘emploi et/ou des
consignes de sécurité.
8. Service et assistance
En cas de question concernant le produit,
veuillez vous adresser au service de conseil
produits de Avinity.
Ligne téléphonique directe :
+49 9091 502-115 (allemand/anglais)
Vous trouverez ici de plus amples informations concernant l‘assistance :
www.avinity-cable.com
Page 18
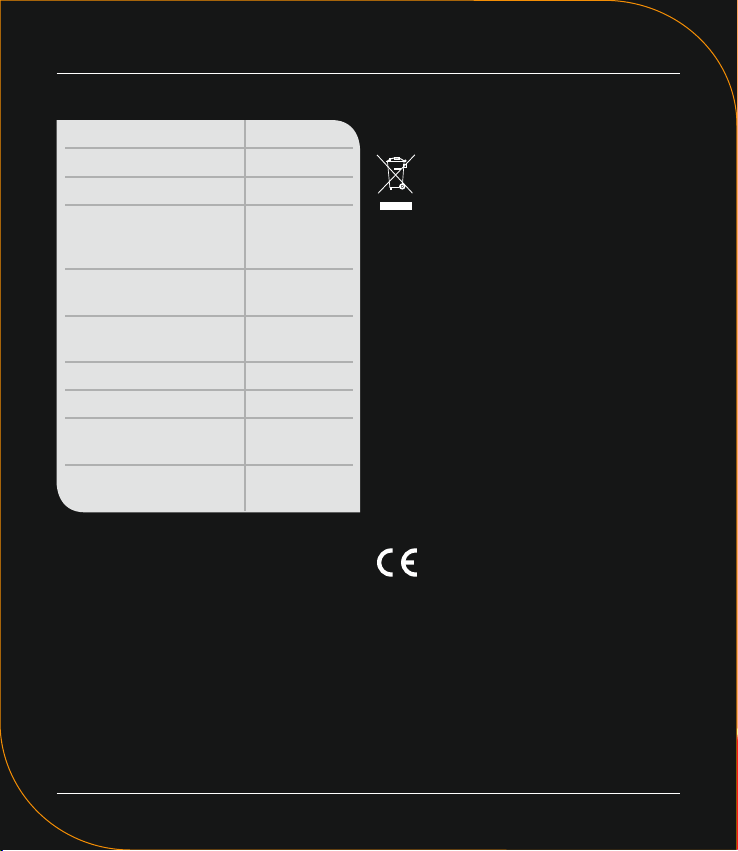
9. Caractéristiques techniques
Version Bluetooth
®
4.1
ProlA2DP
Portée <10m
Batterie
Type de batterie
lithiumpolymère
Bandes de fréquences
Puissance de
radiofréquence maximale
2402 –
2480 MHz
3,94 mW
E.I.R.P.
Alimentation 240 mA
Temps de recharge Env. 2h
Autonomie de l’émetteur
Bluetooth
Autonomie du récepteur
Bluetooth
®
®
Env. 13 h
Env. 12 h
10. Consignes de recyclage
Remarques concernant la protection de l’environnement:
Conformément àladirective
européenne 2012/19/EU et 2006/66/
CE, et and‘atteindre un certain
nombre d‘objectifs en matière de
protection de l‘environnement, les règles
suivantes doivent être appliquées: Les
appareils électriques et électroniques ainsi
que les batteries ne doivent pas être éliminés
avec les déchets ménagers. Le pictogramme
“picto” présent sur le produit, son manuel
d‘utilisation ou son emballage indique que le
produit est soumis àcette réglementation. Le
consommateur doit retourner le produit/la
batterie usager aux points de collecte prévus
àcet eet. Il peut aussi le remettre àun
revendeur.Enpermettant ennlerecyclage
des produits ainsi que les batteries, le
consommateur contribueraàlaprotection de
notre environnement. C‘est un acte écologique.
11. Déclaration de conformité
Le soussigné, Hama GmbH &CoKG,
déclare que l‘équipement
radioélectrique du type [00107632] est
conforme àladirective 2014/53/UE. Le texte
complet de la déclaration UE de conformité
est disponible àl‘adresse internet suivante:
www.hama.com-> 00107632 -> Downloads.
Page 19
E Instrucciones de uso
Avinity: High Performance Accessories –nacidos de la pasión por el entretenimiento de
audio/vídeo. Un acabado yunrendimiento de
alta calidad subrayan el carácter de nuestros
accesorios de alta gama.
Tómese tiempo yléase primero las siguientes
instrucciones eindicaciones. Después, guarde
estas instrucciones de manejo en un lugar
seguro parapoder consultarlas cuando sea
necesario.
1. Explicación de los símbolos de aviso yde
las indicaciones
Aviso
Se utiliza paracaracterizar las indicaciones de seguridad oparallamar la atención sobre peligros yriesgos especiales.
Nota
Se utiliza paracaracterizar informaciones
adicionales oindicaciones importantes.
2. Contenido del paquete
• Emisor/receptor Bluetooth®, adaptador 2en1
• Cable con jack de 3,5 mm
• Cable de carga/conexión Micro USB
• Estas instrucciones de manejo
3. Instrucciones de seguridad
• El producto es paraeluso doméstico priva-
do, no comercial.
• Proteja el producto de la suciedad, la hume-
dad yelsobrecalentamiento yutilícelo sólo
en recintos secos.
• No opere el producto en las inmediaciones
de la calefacción, de otras fuentes de calor o
bajo la radiación directa del sol.
• Durante los desplazamientos con un vehículo oaparato deportivo, no se distraiga con
el producto ypreste atención al tráco ya
su entorno.
• No deje caer el producto ni lo someta a
sacudidas fuertes.
• No opere el producto fueradelos límites de
potencia indicados en los datos técnicos.
• No abraelproducto ynolosiga operando de
presentar deterioros.
• La batería recargable está montada de forma
ja ynosepuede retirar,deseche el producto como una unidad yenconformidad con
los reglamentos locales.
• Deseche el material de embalaje en conformidad con las disposiciones locales sobre el
desecho vigentes.
• No realice cambios en el aparato. Esto
conllevaría la pérdida de todos los derechos
de la garantía.
Aviso –Batería
• Utilice solo cargadores adecuados o
conexiones USB paraefectuar la carga.
• No siga utilizando cargadores oconexiones
USB defectuosos ynointente repararlos.
• No sobrecargue ni descargue el producto
en profundidad.
• Evite el almacenamiento, la carga yeluso
en condiciones de temperaturaextrema.
• En caso de almacenamiento
prolongado, cargue regularmente (mín.
trimestralmente).
Page 20
4. Puesta en funcionamiento
• El adaptador incorporauna batería recargable. La batería debe haberse cargado
completamente antes del primer uso.
• Inicie el proceso de carga conectando el
cable de carga/conexión Micro USB adjunto
al puerto Micro USB (5) del adaptador ya
un cargador USB adecuado. Para ello, tenga
en cuenta las instrucciones de manejo del
cargador USB utilizado.
• El LED de estado (3) del adaptador luce de
color rojo de maneracontinua durante el
proceso de carga.
• Pueden transcurrir hasta 2horas hasta que
la batería esté totalmente cargada.
• La carga se inicia y naliza de forma auto-
mática.
5. Funcionamiento
5.1. Conexión/desconexión del adaptador
• Encendido:
Con el dispositivo apagado, mantenga
pulsada la tecla multifunción (2) durante 3
segundos. El LED de estado (3) se enciende y
luce de color azul.
• Apagado:
Con el dispositivo encendido, mantenga
pulsada la tecla multifunción (2) durante 3
segundos. El LED de estado (3) se enciende
2veces de color rojo antes de la desconexión del dispositivo.
®
5.2. Conexión inicial Bluetooth
(sincroniza-
ción) en el modo receptor RX
Nota –Sincronización
• Asegúrese de que su terminal compatible con Bluetooth® está encendido y
de que se ha activado Bluetooth®.
• Observe también las instrucciones de
uso de su terminal.
• Para la conexión con el dispositivo correspondiente, conéctelo mediante el cable con
jack adjunto de 3,5 mm ylaconexión de
audio (AUX) (4) con el adaptador.
• Seleccione el modo RX del adaptador deslizando el conmutador (1) aladerecha.
• Entre el adaptador yelterminal no debe
haber más de 1metro de separación. Cuanto
menor sea la distancia entre ellos, mejor.
• Pulse dos veces la tecla multifunción (2) del
adaptador conectado. Transcurridos aprox. 3
segundos, el LED de estado (3) parpadea alternando los colores azul yrojo, señalizando
así el modo de sincronización.
• En el terminal, abralaconguración Blue-
tooth®yespere hasta que se muestre Avi-
nity BTT-632 en la lista de los dispositivos
Bluetooth®encontrados.
• Seleccione Avinity BTT-632 yespere hasta
que el adaptador se muestre como conectado en la conguración Bluetooth®de su
dispositivo.
Durante el primer encendido se inicia automáticamente el proceso de sincronización
–véase 5.2. Conexión inicial Bluetooth
(sincronización) en el modo receptor RX.
®
Page 21
Nota –Contraseña Bluetooth®
Algunos dispositivos requieren una contraseña paralaconguración de la conexión con otro dispositivo Bluetooth®.
• Introduzca la contraseña 0000, 1234,
1111 u8888 paralaconexión si el
dispositivo lo requiriese.
Nota
Si la sincronización se ha realizado
correctamente, el LED de estado (3) se
enciende de color azul.
• Ahorapuede utilizar el adaptador.
5.3. Conexión inicial Bluetooth®(sincronización) en el modo emisor TX
Nota –Sincronización
• Asegúrese de que su dispositivo compatible con Bluetooth® está encendido
ydeque se ha activado Bluetooth®.
• Observe también las instrucciones de
uso de su dispositivo.
• Para la conexión con el dispositivo correspondiente, conéctelo mediante el cable con
jack adjunto de 3,5 mm ylaconexión de
audio (AUX) (4) con el adaptador.
• Seleccione el modo TX del adaptador deslizando el conmutador (1) alaizquierda.
• Active Bluetooth®en sus auriculares/su
altavoz Bluetooth®.
• Observe también las instrucciones de uso de
su dispositivo.
• Entre el adaptador ylos auriculares/el
altavoz Bluetooth®no debe haber más de 1
metro de separación. Cuanto menor sea la
distancia entre ellos, mejor.
• Pulse dos veces la tecla multifunción (2) del
adaptador conectado. Transcurridos aprox.
3segundos, el LED de estado (3) parpadea
de color azul, señalizando así el modo de
sincronización.
• Ahora, la conexión se efectúa de manera
automática.
®
5.4. Conexión Bluetooth
automática (una
vez realizada la sincronización)
Nota –Sincronización
• Asegúrese de que su dispositivo compatible con Bluetooth® está encendido
ydeque se ha activado Bluetooth®.
• Observe también las instrucciones de
uso de su dispositivo.
• Asegúrese de que el adaptador está
encendido.
• La conexión se establece de forma
automática tras el establecimiento correcto
de la conexión inicial.
• Ahorapuede utilizar el adaptador.
Nota
• Si la sincronización se ha realizado
correctamente, el LED de estado (3) luce
de color azul durante aprox. 2segundos.
• De ser necesario, puede que deba
efectuar un ajuste en el terminal para
permitir la conexión automática con el
adaptador sincronizado.
Page 22
Nota –Fallo en la conexión
La conexión se establece de forma automática tras el establecimiento correcto
de la conexión inicial. De no establecerse
la conexión Bluetooth® de forma automática, compruebe los siguientes puntos:
• Compruebe, en la conguración Blue-
tooth® del terminal, si Avinity BTT-632
aparece como conectado.
• De no ser así, repita los pasos indicados en 5.2. Conexión inicial Bluetooth®
• Verique la presencia de obstáculos
que puedan afectar al alcance. De
haberlos, reduzca la separación entre
los dispositivos.
• El rendimiento también puede verse
afectado por una carga baja de la batería.
5.5. Sincronización en el modo emisor TX
con dos dispositivos simultáneamente
• Conecte el adaptador ysus dos dispositivos
de audio compatibles con Bluetooth
®
(auriculares/altavoz BT) como se describe
en 5.2. Conexión inicial Bluetooth®.
• El adaptador denomina ambos dispositivos
automáticamente como AyByestablece
una conexión.
5.6. Borrado de la lista de sincronización
• Apague el adaptador en el modo actual
(TX oRX). Transcurridos aprox. 3segundos,
ponga el conmutador (1) en el otro modo
yvuelva aencender el adaptador; con ello
se borran de la lista todos los dispositivos
sincronizados.
5.7. Capacidad de la batería
• El LED de estado (3) comienza aparpadear
de color rojo en caso de que la capacidad de
la batería sea baja.
• Cargue el adaptador como se describe en 4.
Puesta en funcionamiento.
6. Mantenimiento ycuidado
Limpie este producto sólo con un paño ligeramente humedecido que no deje pelusas yno
utilice detergentes agresivos.
7. Exclusión de responsabilidad
Hama GmbH &CoKGnoseresponsabiliza ni
concede garantía por los daños que surjan por
una instalación, montaje omanejo incorrectos
del producto opor la no observación de las
instrucciones de manejo y/o de las instrucciones de seguridad.
8. Servicio ysoporte
Si tiene que hacer alguna consulta sobre el
producto, diríjase al asesoramiento de productos Avinity.
Línea directa:
+49 9091 502-115 (Alemán/Inglés)
Encontrar más información de soporte aquí:
www.avinity-cable.com
Page 23
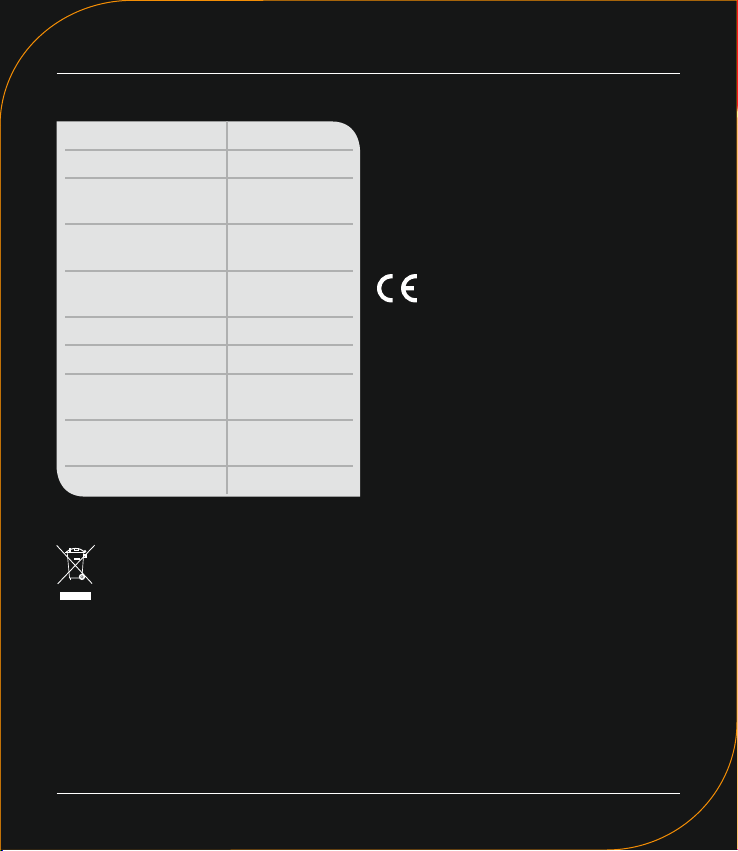
9. Datos técnicos
PerlA2DP
Alcance <10m
Tipo de batería
Banda obandas de
frecuencia
Potencia máxima de
radiofrecuencia
Batería de polímero de litio
2402 –
2480 MHz
3,94 mW E.I.R.P.
Consumo de corriente 240 mA
Tiempo de carga Aprox. 2h
Autonomía del emisor
Bluetooth
Autonomía del receptor Bluetooth
®
®
Aprox. 13 h
Aprox. 12 h
Consumo de corriente 50 mA
10. Instrucciones para desecho yreciclaje
Nota sobre la protección medioambiental:
Después de la puesta en marcha
de la directiva Europea 2012/19/
EU y2006/66/EU en el sistema legislativo nacional, se aplicaralosiguiente: Los
aparatos eléctricos yelectrónicos, así como
las baterías, no se deben evacuar en la basura
doméstica. El usuario está legalmente obligado allevar los aparatos eléctricos yelectrónicos, así como pilas ypilas recargables, al
nal de su vida útil alos puntos de recogida
comunales oadevolverlos al lugar donde los
adquirió. Los detalles quedaran denidos por
la ley de cada país. El símbolo en el producto,
en las instrucciones de uso oenelembalaje
hace referencia aello. Gracias al reciclaje,
al reciclaje del material oaotras formas de
reciclaje de aparatos/pilas usados, contribuye
Usted de forma importante alaprotección de
nuestro medio ambiente.
11. Declaración de conformidad
Porlapresente, Hama GmbH &CoKG,
declaraque el tipo de equipo
radioeléctrico [00107632] es conforme
con la Directiva 2014/53/UE. El texto
completo de la declaración UE de conformidad
está disponible en la dirección Internet
siguiente:
www.hama.com-> 00107632 -> Downloads.
Page 24
R
Руководство по эксплуатации
Avinity: высококачественные комплектующие
от страстных поклонников звука ивидео
Высшая категория технической сложности
обеспечивается культурой производства и
высокими характеристиками.
Перед началом эксплуатации внимательно
ознакомьтесь снастоящей инструкцией.
Храните инструкцию внадежном месте для
справок вбудущем.
1. Предупредительные пиктограммы и
инструкции
Внимание
Данным значком отмечены инструкции,
несоблюдение которых может привести к
опасной ситуации.
Примечание
Дополнительная или важная информация.
2. Комплект поставки
• Передатчик/приемник Bluetooth®,
переходник 2 в 1
• Аудиокабель 3,5 мм
• Зарядный/соединительный кабель Micro-USB
• Настоящая инструкция
3. Техника безопасности
• Изделие предназначено только для домаш-
него применения.
• Беречь от грязи, влаги иисточников тепла.
Эксплуатировать только всухих условиях.
• Не эксплуатировать внепосредственной
близости снагревательными приборами,
беречь от прямых солнечных лучей.
• Эксплуатация изделия не должна отвлекать
от вождения автомобиля, дорожного движения иокружающих условий.
• Не ронять. Беречь от сильных ударов.
• Соблюдать технические характеристики.
• Изделие не открывать. Запрещается экс-
плуатировать неисправное изделие.
• Аккумулятор замене не подлежит. Утилизацию продукта производить целиком
согласно нормативам.
• Утилизировать упаковку всоответствии с
местными нормами.
• Запрещается вносить изменения вконструкцию. Впротивном случае гарантийные
обязательства аннулируются.
Предупреждение: аккумулятор
• Используйте только подходящие
зарядные устройства или совместимые
USB-разъемы.
• Категорически запрещается использовать иремонтировать неисправные
зарядные устройства или USB-разъемы.
• Не допускайте избыточной зарядки и
глубокой разрядки изделия.
• Не подвергайте аккумулятор воздействию экстремальных температур при
хранении, зарядке ииспользовании.
• При длительном хранении заряжайте
аккумулятор не реже одного раза втри
месяца.
Page 25
4. Ввод вэксплуатацию
• Переходник оснащен перезаряжаемым
аккумулятором. Перед первым использованием необходимо полностью зарядить
аккумулятор.
• Для начала зарядки спомощью зарядного/соединительного кабеля Micro-USB (в
комплекте) соедините разъем Micro-USB (5)
переходника ссоответствующим зарядным
устройством USB. Соблюдайте инструкции
по эксплуатации зарядного устройства USB.
• Во время зарядки непрерывно горит красный светодиодный индикатор (3).
• Аккумулятор полностью заряжается до 2
часов.
• Процесс зарядки запускается изавершается автоматически.
5. Эксплуатация
5.1. Включение/выключение переходника
• Включение:
Удерживайте многофункциональную кнопку
(2) 3 секунды ввыключенном состоянии. Светодиодный индикатор (3) горит синим светом.
• Выключение:
Удерживайте многофункциональную кнопку
(2) 3 секунды во включенном состоянии.
Светодиодный индикатор (3) загорается
дважды красным светом перед тем, как
устройство отключится.
При первом включении автоматически запускается согласование – см. 5.2. Согласо-
вание по протоколу Bluetooth®врежиме
приемника RX.
5.2. Согласование по протоколу
Bluetooth®врежиме приемника RX
Примечание. Согласование
• Включите устройство воспроизведения иактивируйте на нем Bluetooth®.
• Подробнее смотрите инструкцию по
эксплуатации устройства.
• Для соединения соответствующего устройства спомощью аудиокабеля 3,5 мм (в
комплекте) соедините его саудиоразъемом
(AUX) (4) переходника.
• Выберите режим RX переходника, сдвинув
переключатель (1) вправо.
• Переходник иустройство должны располагаться не дальше 1 метра друг от друга. Чем
меньше дистанция между устройствами,
тем увереннее связь.
• Нажмите два раза многофункциональную кнопку (2) включенного переходника.
Примерно через 3 секунды светодиодный
индикатор (3) начнет мигать попеременно
синим икрасным светом, сигнализируя о
режиме согласования.
• Откройте настройки Bluetooth®на устройстве воспроизведения ивсписке найдите
устройство Avinity BTT-632.
• Выберите устройство Avinity BTT-632 и
подождите, пока переходник не появится в
списке устройств, подключенных по протоколу Bluetooth®.
Page 26
Примечание. Пароль Bluetooth
®
Для установки соединения снекоторыми устройствами может потребоваться
пароль Bluetooth®.
• При необходимости введите пароль по
умолчанию:0000, 1234, 1111 или 8888.
Примечание
Если согласование прошло успешно,
светодиодный индикатор (3) загорается
синим.
• Теперь можно пользоваться переходником.
5.3. Согласование по протоколу
Bluetooth®врежиме передатчика TX
Примечание. Согласование
• Включите устройство воспроизведения иактивируйте на нем Bluetooth®.
• Подробнее смотрите инструкцию по
эксплуатации устройства.
• Для соединения соответствующего устройства спомощью аудиокабеля 3,5 мм (в
комплекте) соедините его саудиоразъемом
(AUX) (4) переходника.
• Выберите режим TX переходника, сдвинув
переключатель (1) влево.
• Включите Bluetooth®на своих наушниках/
громкоговорителе Bluetooth®.
• Подробнее смотрите инструкцию по эксплуатации устройства.
• Переходник инаушники/громкоговоритель
Bluetooth®должны располагаться не дальше
1 метра друг от друга. Чем меньше дистан-
ция между устройствами, тем увереннее
связь.
• Нажмите два раза многофункциональную кнопку (2) включенного переходника.
Примерно через 3 секунды светодиодный
индикатор (3) начнет мигать синим светом,
сигнализируя орежиме согласования.
• Устройство подключается автоматически.
5.4. Автоматическое соедине-
ние по протоколу Bluetooth®(после успешного согласования
Примечание. Согласование
• Включите устройство воспроизведения иактивируйте на нем Bluetooth®.
• Подробнее смотрите инструкцию по
эксплуатации устройства.
• Убедитесь втом, что переходник включен.
• После первого соединения вдальнейшем
устройства будут подключаться автоматически.
• Теперь можно пользоваться переходником.
Примечание
• Если согласование прошло успешно,
светодиодный индикатор (3) загорается синим.
• При необходимости, чтобы разрешить
автоматическое подключение переходника, выполните соответствующие
настройки на устройстве.
Page 27
Примечание. Повторное соединение
• После первого соединения вдальнейшем
устройства будут подключаться автоматически. Если соединение Bluetooth
®
автоматически не устанавливается,
проверьте нижеследующие пункты.
• Внастройках Bluetooth® устройства
воспроизведения проверьте наличие
соединения сустройством Avinity
BTT-632.
• При отсутствии соединения повторите
операцию из главы 5.2 «Согласование
устройства по протоколу Bluetooth
®
».
• Следует учитывать, что препятствия
влияют на радиус соединения. При
наличии препятствий уменьшите дистанцию между устройствами.
• Разряженная батарея также отрицательно влияет на качество соединения.
5.5. Согласование врежиме передатчика
TX сдвумя устройствами одновременно
• Включите переходник идва аудиоустройства Bluetooth®(наушники/громкоговоритель BT), как описано вглаве 5.2 «Согласование устройств по протоколу Bluetooth®».
• Переходник автоматически присваивает
двум устройствам имена A и B ивыполняет
соединение.
5.6. Удаление списка согласования
• Выключите переходник втекущем режиме (TX
или RX). Примерно через 3 секунды переведите переключатель (1) вдругой режим иснова
включите переходник, при этом все согласованные устройства будут удалены из списка.
5.7. Емкость аккумулятора
• При низкой емкости аккумулятора светодиодный индикатор (3) начинает мигать
красным светом.
• Зарядите переходник, как описано вглаве
4. «Ввод вэксплуатацию».
6. Уход итехническое обслуживание
Чистку изделия производить только безворсовой слегка влажной салфеткой. Запрещается применять агрессивные чистящие
средства.
7. Отказ от гарантийных обязательств
Компания Hama GmbH &Co. KG не несет
ответственность за ущерб, возникший вследствие неправильного монтажа, подключения
ииспользования изделия не по назначению, а
также вследствие несоблюдения инструкции
по эксплуатации итехники безопасности.
8. Отдел техобслуживания
По вопросам ремонта или замены неисправных изделий обращайтесь кпродавцу или в
сервисную службу компании Avinity.
Горячая линия отдела техобслуживания:
+49 9091 502-115 (немецкий, английский)
Подробнее смотрите здесь:
www.avinity-cable.com
Page 28
9. Технические характеристики
Профиль A2DP
Дальность действия <10м
Батарея
Литий-полимерный аккумулятор
Ток потребления 240 мА
Диапазон/диапазоны
частот
Максимальная излучаемая мощность
2402 –2480 MHz
3,94
mWE.I.R.P.
Время зарядки Ок.2ч
Время работы передатчика Bluetooth
Время работы приемника Bluetooth
®
Ок.13ч
®
Ок.12ч
Ток потребления 50 мА
10. Инструкции по утилизации
Охрана окружающей среды:
Смомента перехода национального
законодательства на европейские
нормативы 2012/19/EU и 2006/66/EU
действительно следующее: Электрические
иэлектронные приборы, атакже батареи
запрещается утилизировать собычным мусором. Потребитель, согласно закону, обязан
утилизировать электрические иэлектронные
приборы, атакже батареи иаккумуляторы после их использования вспециально
предназначенных для этого пунктах сбора,
либо впунктах продажи. Детальная регламентация этих требований осуществляется
соответствующим местным законодательством. Необходимость соблюдения данных
предписаний обозначается особым значком
на изделии, инструкции по эксплуатации
или упаковке. При переработке, повторном
использовании материалов или при другой
форме утилизации бывших вупотреблении
приборов Вы помогаете охране окружающей
среды. Всоответствии спредписаниями
по обращению сбатареями, вГермании
вышеназванные нормативы действуют для
утилизации батарей иаккумуляторов.
11. Декларация производителя
Настоящим компания Hama GmbH &
Co KG заявляет, что
радиооборудование типа [00107632]
отвечает требованиям директивы 2014/53/ЕС.
Сполным текстомдекларации осоответствии
требованиям ЕС можно ознакомиться здесь:
www.hama.com-> 00107632-> Downloads.
Page 29

Page 30

AVINITY®– Designed andengineered in Germany,
distributedbyHama, 86652Monheim
All listed brands aretrademarks of thecorresponding companies. Errors andomissions
excepted, andsubject to technicalchanges. Ourgeneral termsofdeliveryand
paymentare applied.
 Loading...