

Page 1

User Guide
Avigilon™ H4 ES cameras
H4A-G-B, H4A-G-BOIR, H4A-G-DO, H4A-G-DP
Page 2

©2017,Avigilon Corporation. All rights reserved. AVIGILON, the AVIGILON logo, AVIGILON CONTROL
CENTER, ACC and TRUSTED SECURITY SOLUTIONS are trademarks of Avigilon Corporation. Other names or
logos mentioned herein may be the trademarks of their respective owners. The absence of the symbols ™ and ®
in proximity to each trademark in this document or at all is not a disclaimer of ownership of the related
trademark. Avigilon Corporation protects its innovations with patents issued in the United States of America and
other jurisdictions worldwide (see avigilon.com/patents). Unless stated explicitly and in writing, no license is
granted with respect to any copyright, industrial design, trademark, patent or other intellectual property rights of
Avigilon Corporation or its licensors.
The contents of this document and the specifications of the products discussed herein are subject to change
without notice. Avigilon Corporation reserves the right to make any such changes without notice. Neither
Avigilon Corporation nor any of its affiliated companies: (1) guarantees the completeness or accuracy of the
information contained in this document; or (2) is responsible for your use of, or reliance on, the information.
Avigilon Corporation shall not be responsible for any losses or damages (including consequential damages)
caused by reliance on the information presented herein.
Avigilon Corporation
avigilon.com
PDF-H4ES-A
Revision: 2 - EN
20171030
2
Page 3

Table of Contents
Introduction 4
System Architecture 4
Single Camera Site 4
Multi-Camera Site 5
Mixed Platform Site 5
Configuring the Camera 7
Changing the Camera Password 7
Configuring ACC 8
Web Interface Settings 8
Setting the Time 8
Changing the Communication Ports 9
Enabling Storage Management 9
Overriding the Login Limit 9
Formatting the Recorded Video Drive 10
Restarting ACC 10
ACC Client Settings 10
Changing the Site Password 11
Creating Larger Sites 11
Creating a Multi-Camera Site 11
Creating a Mixed Platform Site 12
Naming in ACC 12
Camera Connections 13
Troubleshooting 14
Discovering the H4 ES Site 14
USBWifi Adapter Method 14
Camera Discovery Method 14
For More Information 15
3
Page 4

Introduction
Avigilon H4 Edge Solution (ES) cameras are Avigilon cameras that feature an integrated solid state drive that is
pre-loaded with Avigilon Control Center™ (ACC) Server software.
Each H4 ES camera can be used as a standard camera, or accessed as its own network video recording server
with a pre-connected camera. The camera and server exist in the same body but can be configured separately.
You can configure both parts of the camera from the camera web interface and the Avigilon Control Center
Client software.
This guide describes how to configure the system after the camera has been installed and powered as
described in the camera installation guide.
System Architecture
The server component on the H4 ES camera can be joined with other servers and be managed together as a
site. H4 ES cameras are most commonly installed in the following configurations:
Single Camera Site
Figure 1: Single camera site. One H4 ES camera that can be accessed by the ACC Client on the localnetwork.
A single camera site is when the H4 ES camera works alone to stream and manage video. When you access the
site through the ACC Client for the first time, you are logging into a site that is named after the camera. By
default, two ACC users can be logged into the camera site simultaneously.
Figure 2: How asingle camera site appears in the ACC Client Setup tab.
Introduction 4
Page 5
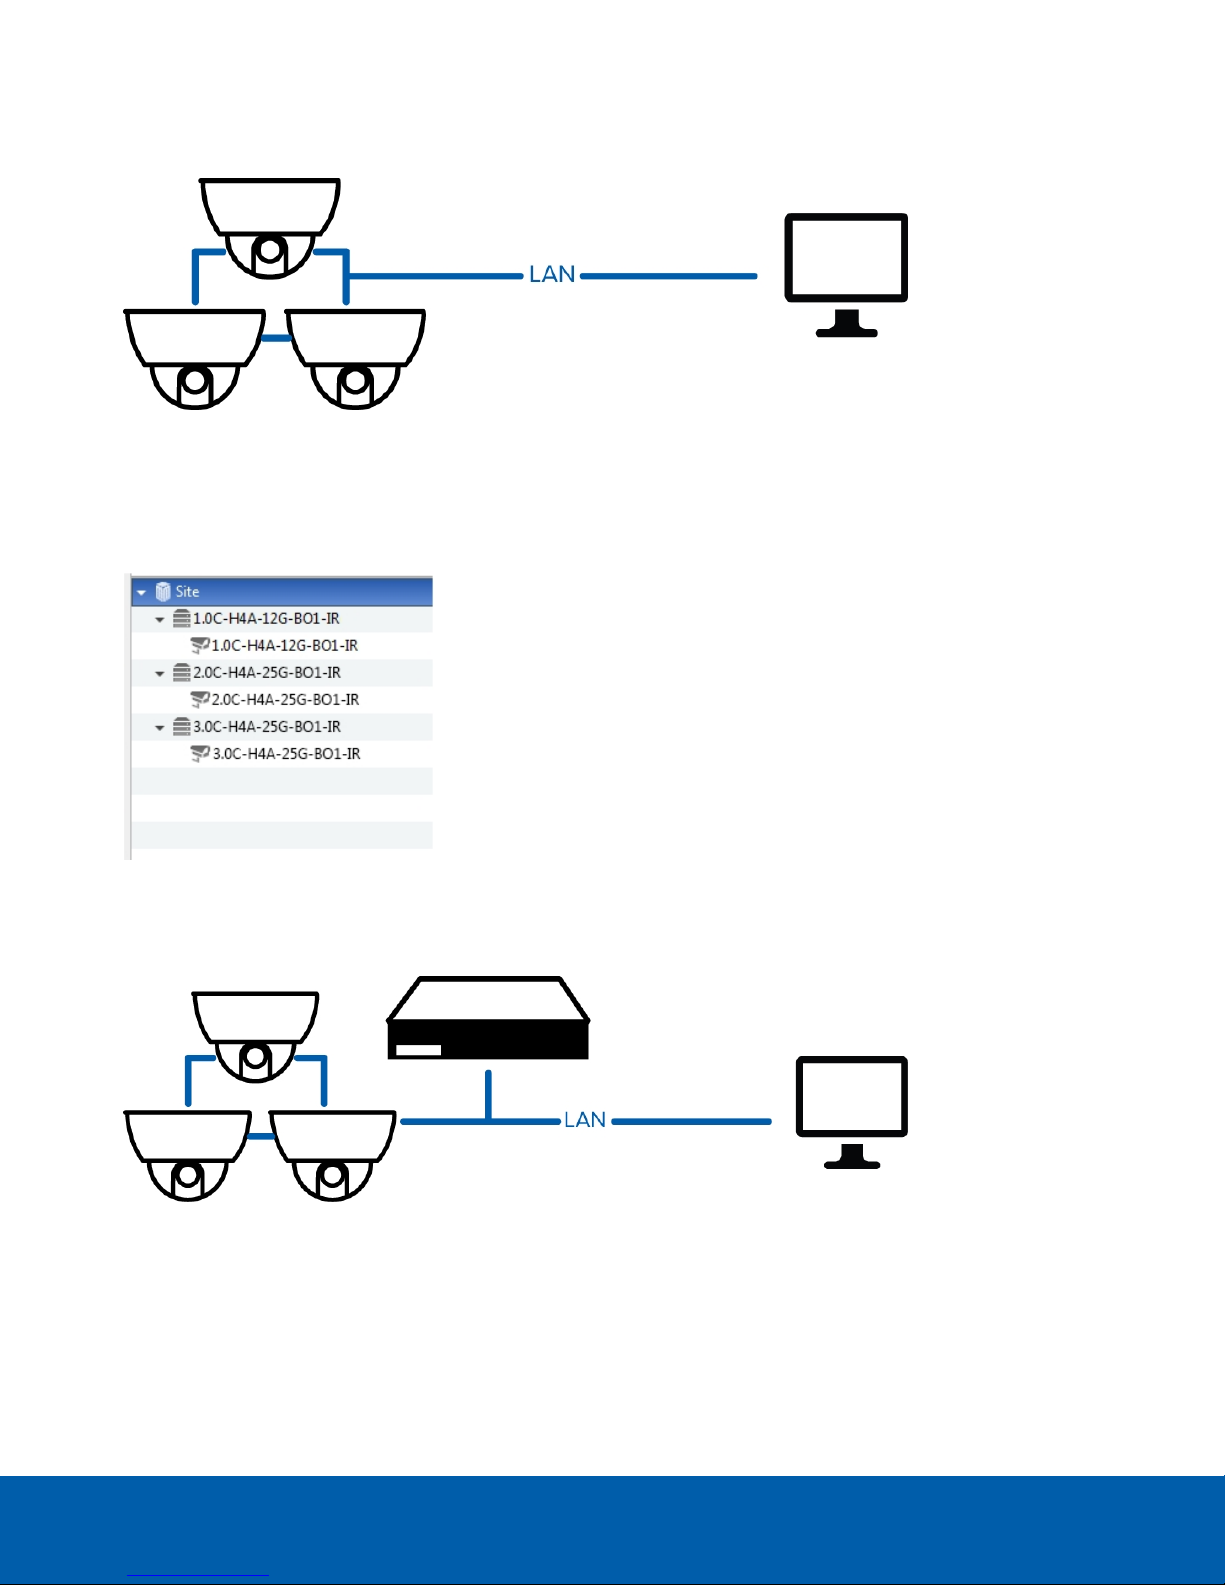
Multi-Camera Site
Figure 3: Multi-camera site. Multiple H4 ES cameras are joined togeth er to be one site.
You can join multiple H4 ES cameras together and manage them together as a site. An H4 ES camera only site
can include up to 16 cameras. The number of simultaneous ACC users increase proportionally by the number of
cameras in the site.
Figure 4: How amulti-camera site appears in the ACC Client Setup tab.
Mixed Platform Site
Figure 5: Mixed site that contains H4 ES cameras and servers.
You can create a site family by connecting your H4 ES camera site to other platform sites in the system. The
other sites may have their own camera connections, and may act as a parent site to manage the child site. Be
aware that H4 ES cameras can only be part of a child site, they cannot be in a parent site.
A mixed platform site can support up to 16 servers, 200 cameras and 100 defined users. The number of servers
can include H4 ES cameras, ACC ES HD Recorders and ACC servers.
Multi-Camera Site 5
Page 6

Figure 6: How amixed camera-server site appears in th e ACC Client Site Management tab.
Mixed Platform Site 6
Page 7

Configuring the Camera
The H4 ES camera features a camera component and a server component. You can configure the camera
component image and video settings like any other Avigilon camera.
In the camera web interface, you can configure the standard camera settings. The web interface is similar to
other Avigilon camera web interfaces, with the addition of an ACC ES section for the server component settings.
For more information about the camera web interface, see the Avigilon H.264 Web Interface User Guide.
In the ACC Client software, the camera is displayed as a camera connected to a site and server with the same
name. From the ACC Client software, you can configure video analytics and manage the camera connections
within larger sites. For more information, see the Avigilon Control Center Client User Guide.
Changing the Camera Password 7
Changing the Camera Password
The camera's default username and password is administrator without a password. It is recommended that
you add a password as soon as possible to avoid security issues. During the installation process, you may have
already changed the password through the Camera Configuration Tool or the USB Wifi Adapter. If that is the
case, you can skip this procedure.
NOTE: If you changed the camera password before accessing the ACC Client, you must use the new camera
password when you first log in to the site.
If you have not yet changed the camera password, you can also do so in the camera web interface.
1. Log in to the camera's web browser interface. For more information, see the Avigilon H.264 Web
Interface User Guide.
2. In the top left corner of page, select the Setup link.
The General page is displayed.
3. In the left menu pane, select Users.
The Users page is displayed.
4. In the User Name (Security Group) list, select administrator (Administrator) then click Modify.
5. In the Password field, enter a new password for the administrator.
6. In the ConfirmPassword field, enter the new password again.
7. Click Apply.
Next time you access the camera web interface, you will need to enter the new password.
The password for the camera component and server component are separate, so you can assign a different
password for accessing the site in the ACC Client. For more information, see Changing the Site Password on
page11.
Configuring the Camera 7
Page 8

Configuring ACC
The server component of the H4 ES camera acts as the ACC Server and allows you to control video and
recorded events. You can configure the server component like any other site in the Avigilon Control Center
system.
The camera web interface acts as the system admin tool. You can configure the administration settings in the
ACC ES section. For more information, see Web Interface Settings below.
In the ACC Client software, the H4 ES camera is initially displayed as a site, server and camera of the same
name. From the ACC Client software, you can change the site name and password, and connect the site to
larger sites. For more information, see ACC Client Settings on page10.
Web Interface Settings
Besides allowing you to configure the camera image settings, the camera web interface also acts as the system
admin tool. You can change the following server component settings in the web interface:
Setting the Time 8
Changing the Communication Ports 9
Enabling Storage Management 9
Overriding the Login Limit 9
Formatting the Recorded Video Drive 10
Restarting ACC 10
Setting the Time
Since the H4 ES camera is always connected to itself, it is recommended that you set the time on the camera so
that recorded video displays the correct time.
1. Log in to the camera web interface.
2. Display the Setup > Network page.
3. In the Time Settings area, select the camera time zone.
4. Click Apply.
5. At the bottom of the Time Settings area, click the Configure NTP Server link.
If you cannot see the link, select Network from the left menu pane.
6. In the NTP Server area, make sure the check box is selected then choose one of the following options:
l DHCP: select this option to automatically use an NTP server on the network.
l Manual: select this option to manually enter a specific NTPserver address in the NTP Server field.
7. Click Apply.
Configuring ACC 8
Page 9

If the H4 ES camera is working by itself as a server and camera, it will keep time with the configured NTP server.
If the H4 ES camera is connected to another ACC Server as a camera, it will use that server as its time source. If it
is unable to communicate with the server, the camera will use the configured NTP server.
Changing the Communication Ports
The server component communicates with the ACC Client through a range of UDP and TCP ports. The port
ranges only need to be changed if you need to access two or more instances of the ACC Server that are behind
the same NAT device (e.g. router), or if there is a port conflict on the network.
You can change these settings on the ACC ES > Setup page.
1. In the Service Ports and RTP Ports area, you can change the Base Port that is used to access the ACC
Server.
2. Click Apply.
3. When the browser displays the following error message, click OK:
The new service base port or login limits will only take effect once Control Center Server is restarted.
Restart Control Center Server now?
The server component restarts. The camera will continue to stream video but will not record anything until the
server component is back online.
Enabling Storage Management
To archive video from the ACC Client, you must enable it in the web interface first.
The ACC ES > Storage Management page allows you to enable the video archiving feature and set the network
location where archived video is saved.
1. Select the Enable Storage Management check box.
2. From the Network Protocol: drop down list, select one of the following:
l CIFS — Common internet file system. The network path is typically in this format: //<hostname or
IP> / <path>
l NFS — Network file system. The network path is typically in this format: <hostname or IP> : <path>
3. In the Network Path: field, enter the path to the preferred video archiving location.
4. If the network location requires authentication, select the Authentication check box then enter the
credentials in the Username and Password fields.
5. Click Apply.
You can now set up Storage Management in the ACC Client or archive video on demand.
Overriding the Login Limit
If your H4 ES camera is configured as a single camera site, only 2 users can log in to the site at the same time. If
you need extra access for users who will not be monitoring video, you can override the recommended login
limit.
NOTE: If more than 2 users log into the site simultaneously, be aware that this may cause degraded camera
performance depending on the camera settings.
You can change the login limit settings on the ACC ES > Setup page.
Changing the Communication Ports 9
Page 10

1. In the Login Limit area, select the Override ACC Client Login Limit check box.
2. In the Login Limit: field, enter how many users you would like to be able to login to the camera site at the
same time.
3. Click Apply.
Formatting the Recorded Video Drive
If you ever need to delete all configuration and recorded video data from the server component, you can
reinitialize the storage.
You can reinitialize storage on the ACC ES > Setup page.
1. To format the SSD, click Reinitialize Storage.
2. When the browser displays the following error message, click OK:
This will require the ACC ES application to restart and will delete all ACC ES configuration settings and
data. Are you sure you want to continue?
The server component restarts. The camera will continue to stream video but will not record anything until the
server component is back online.
Restarting ACC
If the ACC Server software is not operating as expected, you can try to resolve the issue by restarting the server
component.
You can restart the ACC Server software on the ACC ES > Setup page.
1. On the Setup page, click Disable ACC ES.
2. Click Apply.
The camera shuts down the ACC Server software.
3. Click Enable ACC ES to restart the ACC Server software.
Be aware that the camera will not record video to itself until after it finishes restarting.
ACC Client Settings
In the ACC Client, you can configure the server component site settings. Most site setup procedures are the
same as a standard ACC site, but the following procedures provide details that are specific to H4 ES cameras.
After you've set up the site in the ACC Client, you can monitor live and recorded video like any other
ACCsystem.
Changing the Site Password 11
Creating Larger Sites 11
Naming in ACC 12
Camera Connections 13
Formatting the Recorded Video Drive 10
Page 11

Changing the Site Password
The factory default site username and password is administrator without a password. If you've already
changed the password for the camera component, the site will automatically convert to using the camera
password when you login to the site for the first time.
The password for the camera component and server component are separate. It is recommended that different
passwords be used for each component to increase the security of the system.
After you log in to the site from the ACC Client, change the site password:
1. After you login, the Change Password dialog is displayed.
2. Enter a new password and then confirm the new password.
The password must meet the minimum strength requirements.
l
— password meets the strength requirements.
l
— password does not meet the strength requirements, enter a new password.
The password strength is defined by how easy it is for an unauthorized user to guess. If your password
does not meet the strength requirements, try entering a series of words that is easy for you to remember
but difficult for others to guess.
3. Click OK.
Creating Larger Sites
Besides keeping your H4 ES camera in a single camera site, you have the option of creating a larger multicamera or mixed managed site.
Creating a Multi-Camera Site
To combine multiple H4 ES cameras into one site, you would join the cameras together like you would a multiserver site.
1. In the ACC Client software, login to all the camera sites that you want to join together.
2.
In the site's Setup tab, click .
The Site Management tab is displayed. Each H4 ES camera should be listed separately as its own site
and server.
3. Choose one of the sites to be the base of the new site.
4.
Drag and drop the other servers to the chosen base site.
After you drag and drop each server, a confirmation message is displayed to warn you that all
configuration data will be merged. Click Yes.
It may take a few moments to join each server to the new site.
Changing the Site Password 11
Page 12

Creating a Mixed Platform Site
You have the option of adding the H4 ES camera site to a larger site that includes other platform servers: like an
NVR server, High Definition Video Recorder (HDVA) or ACC ESRecorder. Or, you can manage the H4 ES camera
site in a parent-child relationship.
Before you create a site family, be aware of the following requirements:
l Only Windows based ACC Servers can act as a parent.
l The H4 ES camera cannot act as a parent, it can only be a child site.
o
Since the H4 ES camera cannot act as a parent, the server component also cannot be added to a
site that is already a parent.
1. In the ACC Client software, login to all the sites that you want to join together.
2.
In the site's Setup tab, click .
The Site Management tab is displayed.
3. To create a new site with H4 ES camera and other platform servers:
a. Choose one of the sites to be the base of the new site.
b.
Drag and drop the other servers to the chosen base site.
After you drag and drop each server, a confirmation message is displayed to warn you that all
configuration data will be merged. Click Yes.
It may take a few moments to join each server to the new site.
4. To create a parent-child site relationship:
a.
Select the site that includes a H4 ES camera.
b. In the bottom right corner, click Connect to Parent Site.
c. In the following dialog box, select the parent site from the Connect to: drop down list.
d. In the Rank: drop down list, select a rank for the child site.
e. Click OK.
A confirmation message is displayed to warn you that all user management data will be
synchronized. Click Yes.
It may take a few moments to join the child site to the parent site.
Naming in ACC
To help you identify different devices in the ACC Client, you can change the name of the H4 ES camera. Be
aware that you can only change the name of the site and the camera. The server automatically uses the same
name as the camera.
The default name for the H4 ES camera is its display model number and serial number in this format: <model
number> - <serial number>.
Creating a MixedPlatform Site 12
Page 13

1. In the ACC Client software, login to the site.
2. Change the site name:
a.
In the site's Setup tab, click .
b. In the following dialog box, enter a new name in the Site Name: field.
c. Click OK to save the new name.
3. Change the camera name:
a.
In the camera's Setup tab, click .
b. In the following General dialog box, enter a new name in the Device Name: field.
c. Click OK to save the new name.
The system explorer will now display the new names. The camera name change also affects the name that is
displayed in the web interface.
Camera Connections
The H4 ES camera is a self-contained system. You cannot connect external cameras to the site.
While it is operating as a single camera site, you will not be able to see the H4 ES camera in the
Connect/Disconnect Devices tab.
If the H4 ES camera happens to be part of a larger site that includes other types of servers, the camera
component is displayed in the Discovered Devices list. The camera may still be recording to the server
component but is displayed in the list so that you can set up redundant recording.
Camera Connections 13
Page 14

Troubleshooting
Discovering the H4 ES Site
When you open the ACC Client software, the Site Login tab displays a list of all the sites that were automatically
discovered on the network. If the H4 ES camera site is not listed, it may be connected to a different subnet and
needs to be manually discovered.
There are two methods for manually discovering the H4 ES camera in the ACC Client software: through the USB
Wifi Adapter, or by first discovering the camera component in the ACC Client.
USBWifi Adapter Method
If you have access to a USB Wifi Adapter, you can connect to the camera mobile web interface and assign a
static IPaddress that can be used to discover the site in the ACC Client.
For more information about the USB Wifi Adapter and the mobile web interface, see the Avigilon™ USB Wifi
Adapter System User Guide.
1. Connect the USB Wifi Adapter to the camera and log in to the mobile web interface.
2. In the mobile web interface, tap the top-left menu icon then select Network.
3. On the Network page, tap the GENERAL tab.
4. Tap the Automatic Network Configuration switch to disable automatic IP addressing.
Once disabled, the screen displays the static IP settings.
5. Enter the IP Address, Subnet Mask, and Default Gateway that you want to use.
6. Tap SAVE.
7. Open the ACC Client software.
8. In the Site Login tab, click Find Site….
9. In the following dialog box, enter the static IP address that you assigned to the camera.
10. Click OK.
The H4 ES camera is discovered and added to the site list.
11. Select the discovered site and log in.
Camera Discovery Method
If you do not have a USB Wifi Adapter, you can try to find the camera component on the network first then
manually discover the site.
1. In the ACC Client software, log in to a site that includes other platform sites.
2. Open the Site Setup tab.
3.
Click .
4. Click Find Device….
Troubleshooting 14
Page 15

5. In the Find Device dialog box, enter the following options:
l Search Type: IP Address Range
l Device Type: Avigilon
l Start IP Address: enter the first IP address in the range that the camera may be using.
l End IP Address: enter the last IP address in the range that the camera may be using.
6. Click OK
The H4 ES camera is added to the Discovered Devices list. Cross-reference the MAC address listed on
the camera's serial number tag to confirm that you've found the correct camera.
7. Make a note of the listed camera IP address.
8. Open the Site Login tab then click Find Site….
9. In the following dialog box, enter the camera IP address.
10. Click OK.
The H4 ES camera is discovered and added to the site list.
11. Select the discovered site and log in.
For More Information
For more information about the configuration features available in the camera web interface and the Avigilon
Control Center Client software, see the following:
l Avigilon H.264 Web Interface User Guide
l Avigilon Control Center Client User Guide
For More Information 15
 Loading...