

Page 1
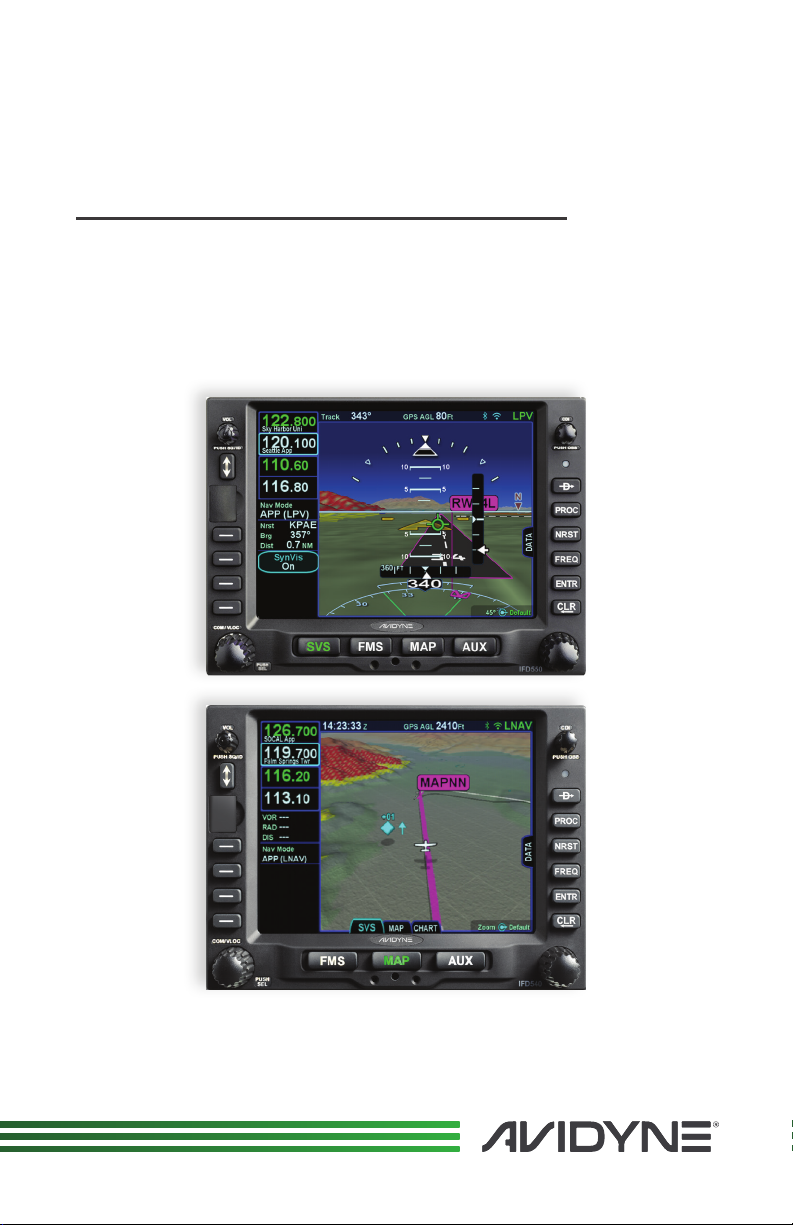
QUICK REFERENCE
IFD5XX
IFD550/IFD540 FMS/GPS/NAV/COM
IFD545/IFD510 FMS/GPS
IFD100 App for iPad
avidyne.com | 800.AVIDYNE
Page 2
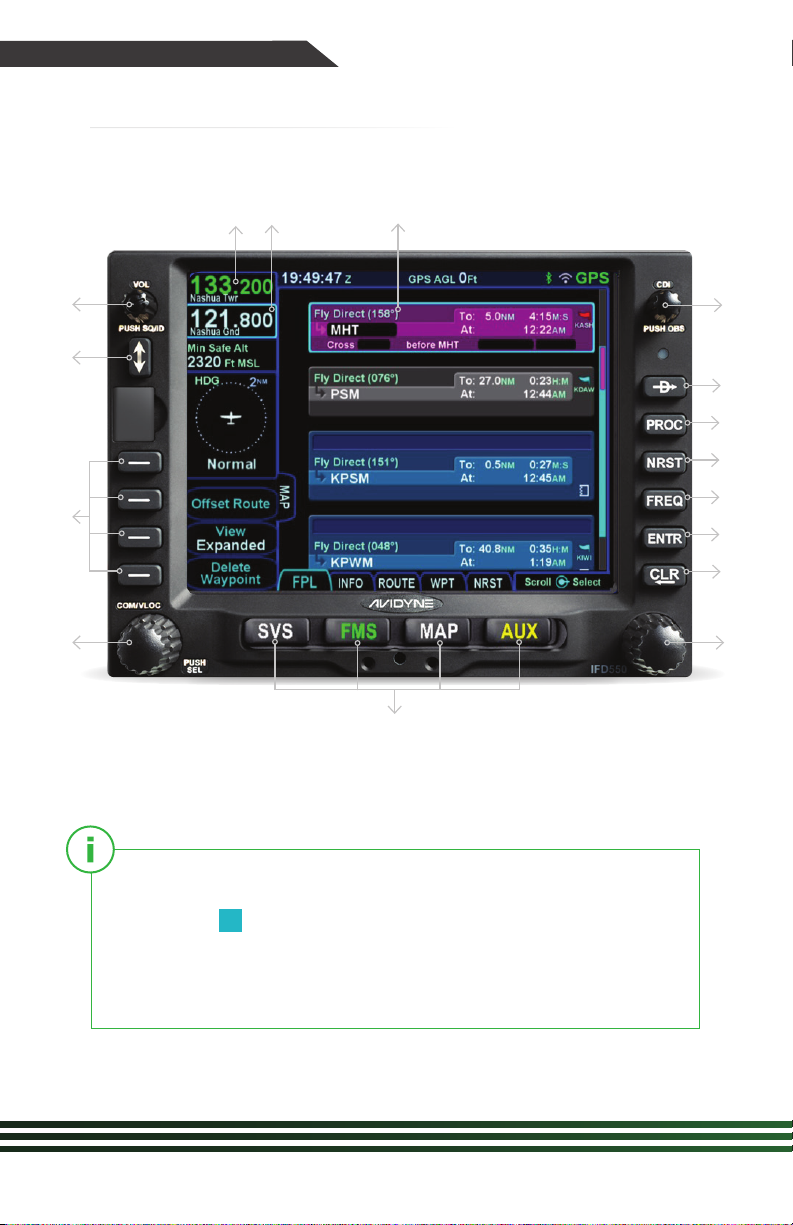
QuickReference IFD5XX
Overview Diagram
141516
1
2
3
4
5
13
12
11
10
9
8
7
6
To move your cursor, either:
1. Turn the
whereas the inner ring scrolls through the fields of each box), or
2. Utilize hybrid touch by tapping the screen on a waypoint
or in the blank space between waypoints.
avidyne.com | 800.AVIDYNE
2
6
FMS knob (the outer ring scrolls through each box,
Page 3
Volume/Power/
1
Squelch Knob
9
Frequency
Frequency Swap
2
(ip-op)
Line Select Keys
3
(LSK)
* COM/NAV Manual
4
Tuning Knob (Push for
NAV & Transponder)
Page Function Keys
5
(two-way rocker)
SVS**, FMS, MAP, AUX
FMS Knob (context-
6
sensitive: scroll, zoom/
push to select)
7
Clear (delete)
8
Enter (select)
10
11
12
13
14
15
16
Nearest
Procedure
Direct To
CDI Nav Source
Active Waypoint
Standby Frequency*
Active Frequency*
To start an FMS edit, either:
8
1. Press the
2. Push the
ENTR function key,
6
bottom right knob, or
3. Tap the screen in the same field twice.
*VHF COM/NAV controls appy to IFD550/IFD540 only
**SVS Page Button applies to IFD550/IFD545 only.
3
Page 4
QuickReference IFD5XX
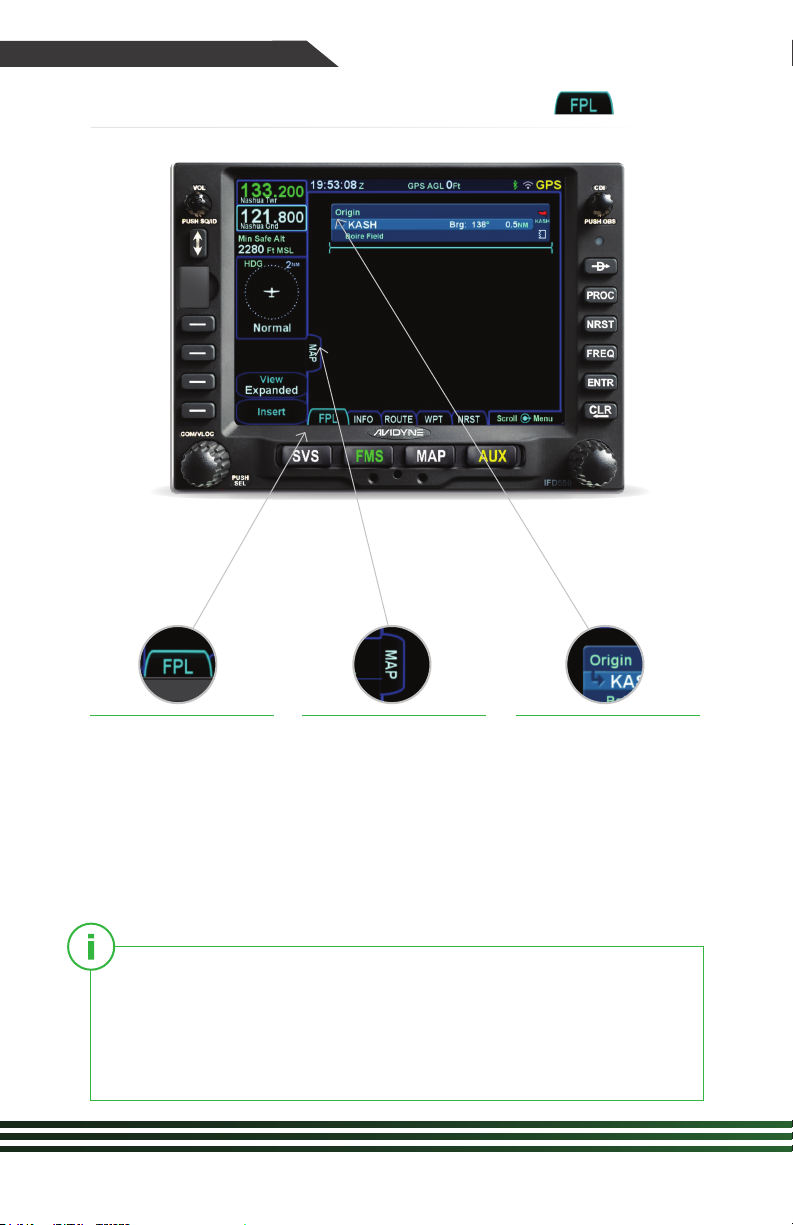
FMS Flight Plan Introduction
TAB
1 2 3
Following poweron, the first time the
“FPL” tab of the FMS
page is accessed,
an empty flight plan
page is presented with
the origin waypoint
pre-populated.
This FMS uses a database of published airways to quickly build
long flight plans. Here’s how: When a flight plan waypoint is a valid
airway entry point, a dropdown list of available airways appears.
Scroll to the desired exit point, and all intermediate intersections
along that airway are automatically populated into the flight plan.
avidyne.com | 800.AVIDYNE
4
We recommend to tap
the “Map” side tab to
view the moving Map
display while entering
your flight plan.
The origin will be the
closest airport to the
current GPS position,
or the airport from the
previous power down
if GPS position has
not locked on yet.
Page 5
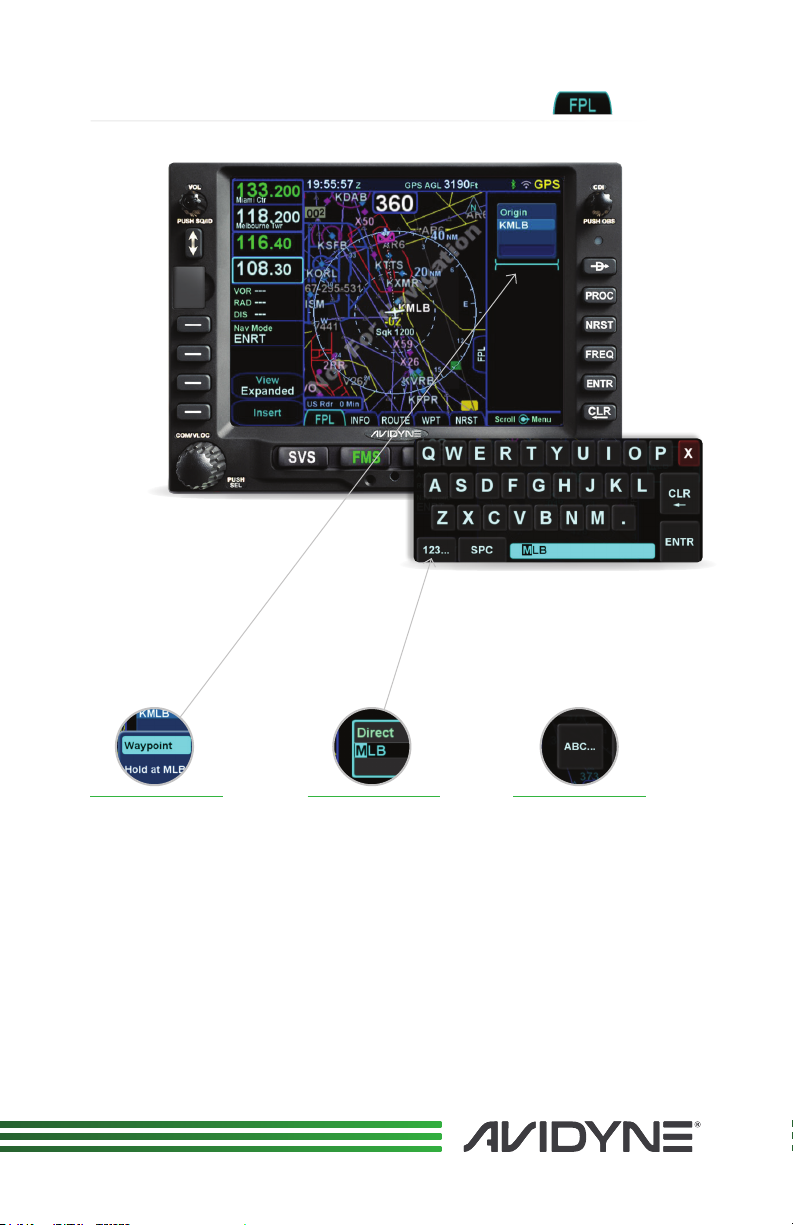
Inserting a Waypoint
TAB
1 2 3
To add a waypoint
to your flightplan,
tap the empty space
where your cursor is
below ‘Origin.’ The
IFD will present a
new waypoint with a
suggested identifier
(powered by Geofill™).
Use the right
knobs or tap the
identifier to display
the QWERTY
keyboard in order
to enter the
waypoint identifier.
Push the right
knob, press
ENTR, or tap
the ENTR key
on the QWERTY
keyboard to
enter the new
waypoint into
the flight plan.
5
Page 6
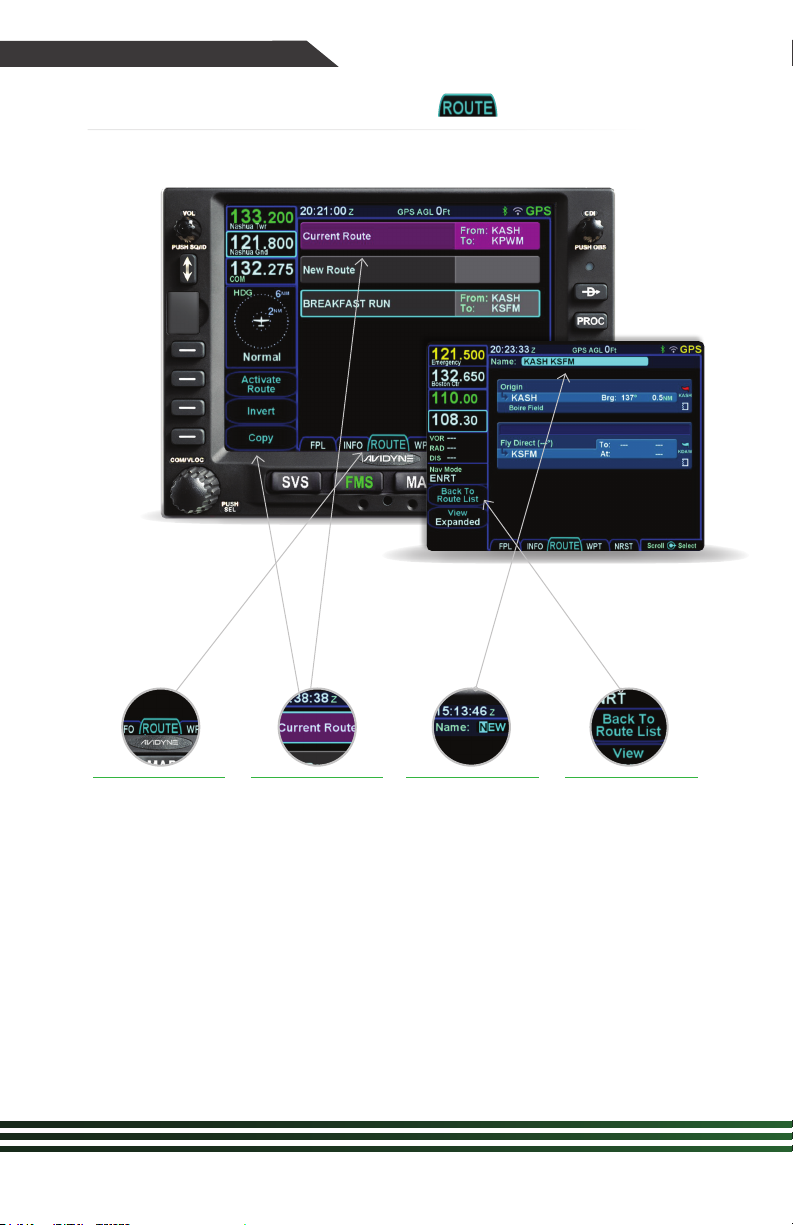
QuickReference IFD5XX
Saving the Flight Plan
TAB
1 4
Once you have
entered a Flight
Plan that you
would like to save
for future use go
to the route tab
on the FMS page.
avidyne.com | 800.AVIDYNE
6
2 3
Highlight current
route then select
Copy in the
bottom left of the
screen. You can
edit the Route
name or leave
as default name
(Origin IdentifierDest Identifier.)
You have now
saved the Flight
Plan as a route
for future use.
Select ‘Back
to Route List.’
The route will
now be one of
your saved route
selections.
Page 7
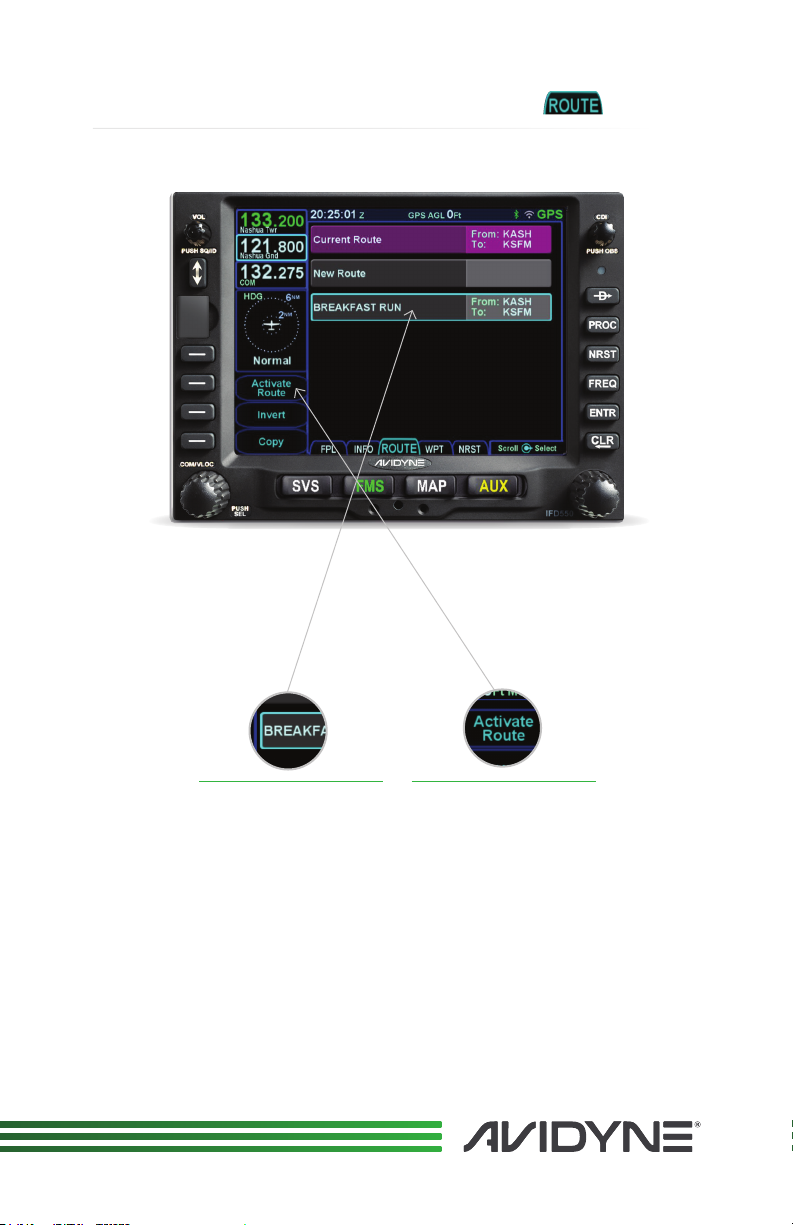
Activating a Stored Route
TAB
1 2
To activate a route
from the stored routes
list, tap the desired
route to select.
To activate, press the
“Activate Route” LSK or
touch-screen button.
Then Press again to
“Activate Flightplan.”
7
Page 8
QuickReference IFD5XX
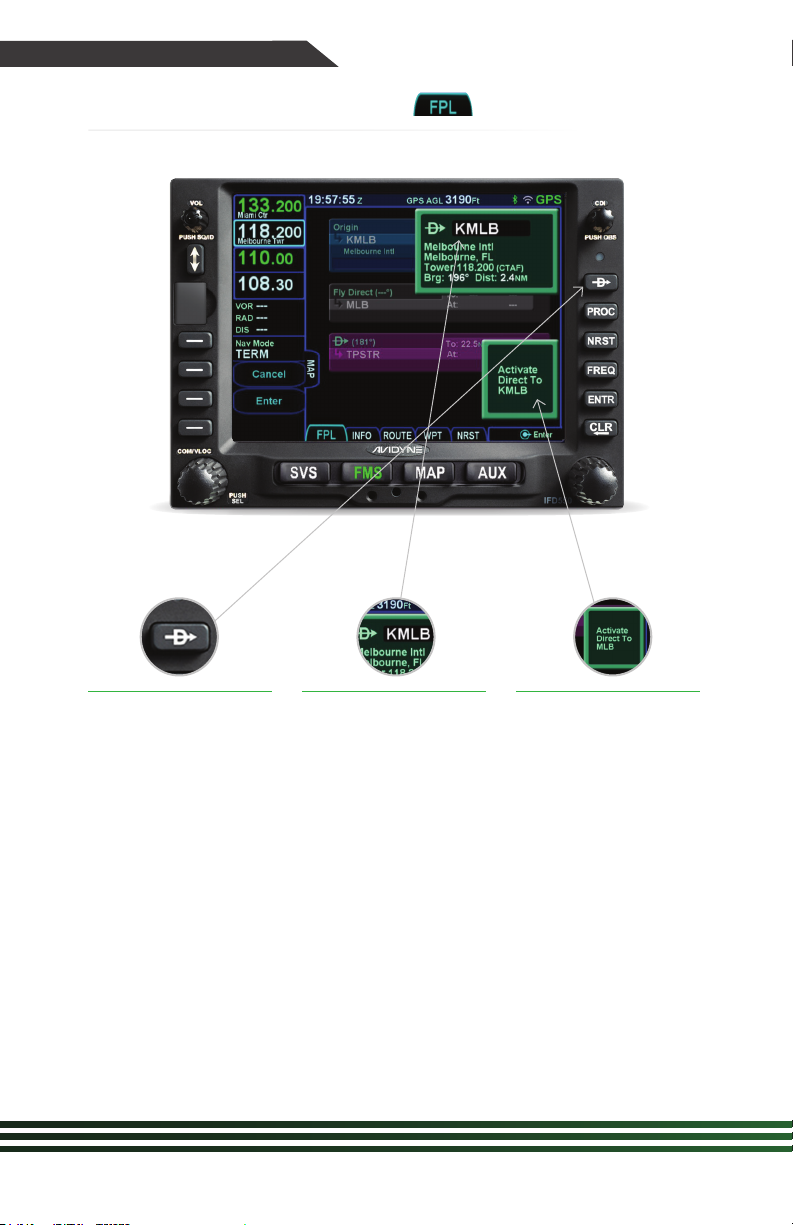
Direct-To Operation
TAB
1 2 3
Press the Direct-To
button to display a green
Direct-To dialog box
pre-populated with the
waypoint highlighted in
your current flightplan.
avidyne.com | 800.AVIDYNE
8
To enter a dierent
waypoint, tap the data
field in the top dialog
box. The QWERTY
keyboard appears for
you to enter the desired
waypoint identifier.
To approve, tap the
‘Activate’ dialog box to
select. Pressing ENTR
or the right knob can
also be used to confirm.
Page 9
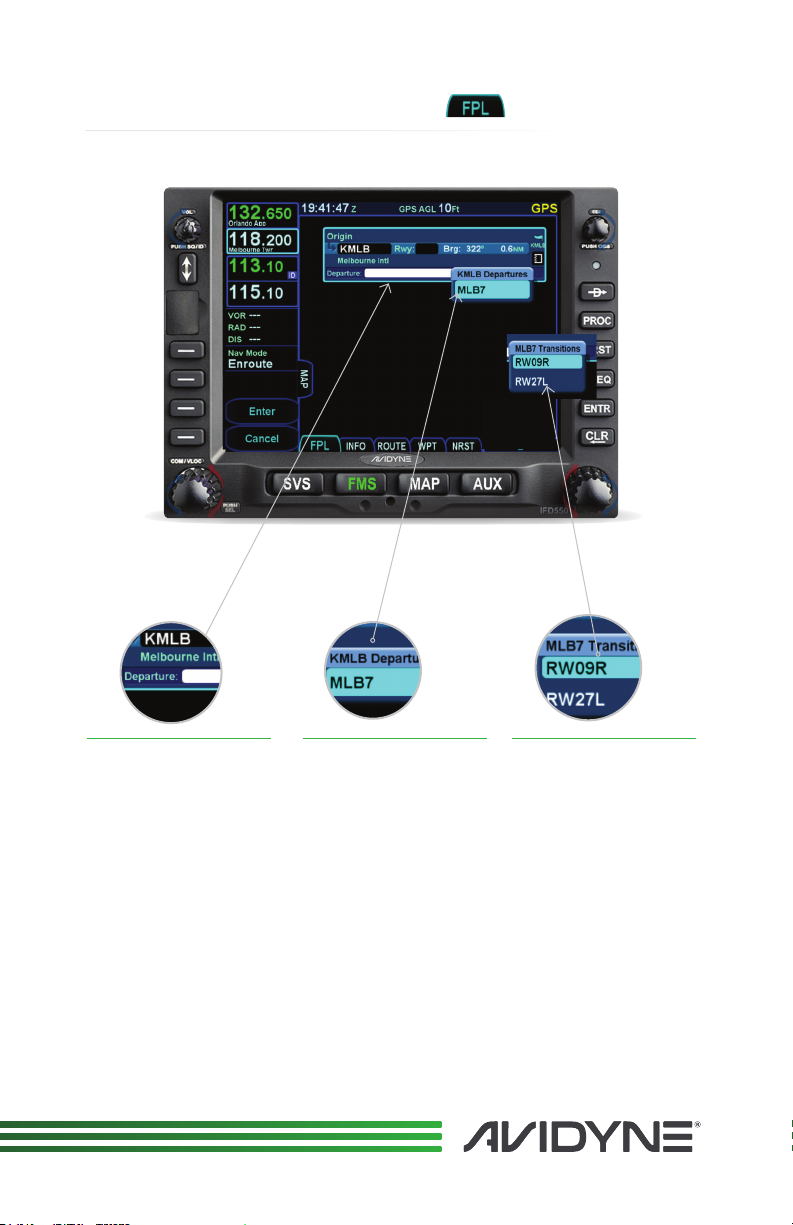
Selecting a Departure
TAB
1 2 3
Tap the ‘Departure’
field. A dropdown
list of available
departure procedures
will be displayed.
Select a departure
name and push ENTR.
Enter the Transition by
selecting the assigned
departure runway.
9
Page 10
QuickReference IFD5XX
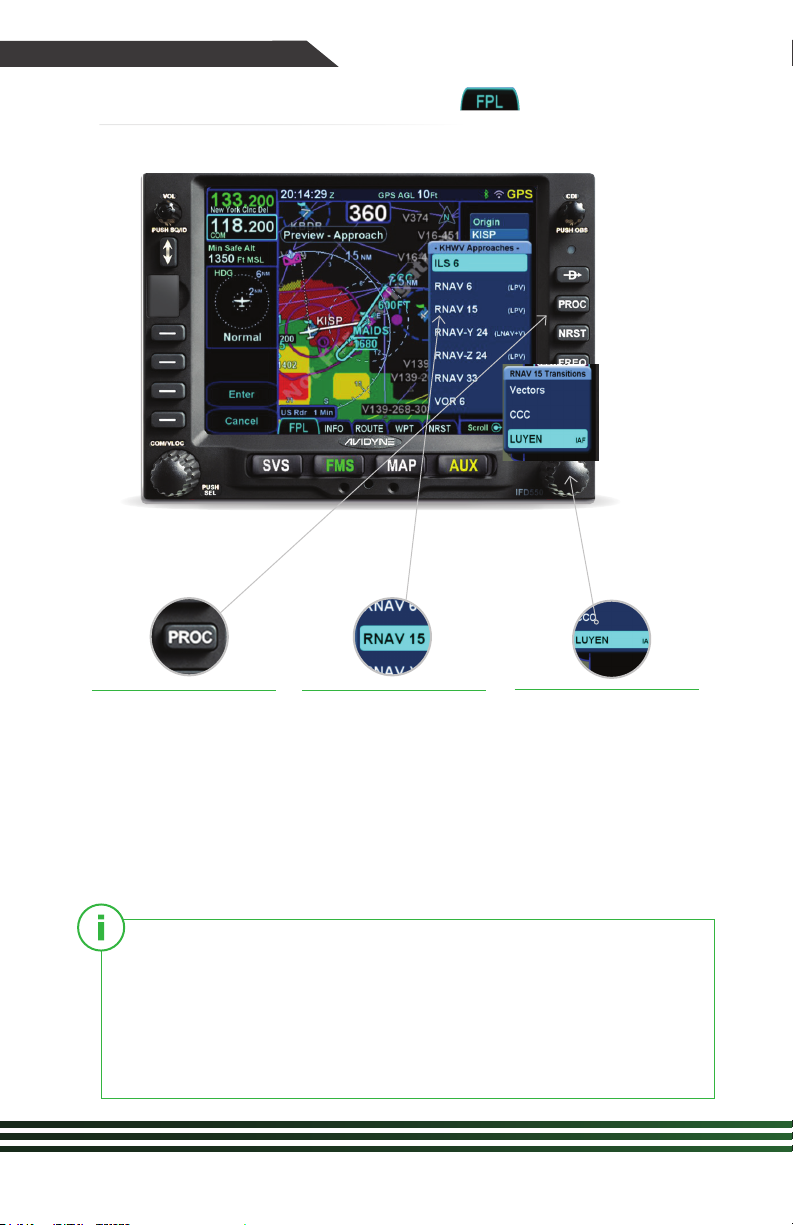
Selecting an Approach
1 2
TAB
3
To display the
Approach field of the
next destination, press
the “PROC” Function
key.* This will display a
dropdown list of available
published approaches.
*Pressing the “PROC” Function key a second time will move the cursor
over the Arrival field and present a drop down list of available published
arrivals. Each subsequent press of the “PROC” key will step through all
following destination airfield approaches/arrivals in the flight plan, and
wrap back around to the origin. When the drop down box appears over
the intended data field, tap the desired procedure to add to the flight plan.
avidyne.com | 800.AVIDYNE
10
To select the desired
Approach, twist
the FMS knob to
scroll, then push to
select, or tap the
highlighted selection.
To select the Transition,
twist the FMS knob
to scroll, then push
to select, or tap the
highlighted selection.
Page 11
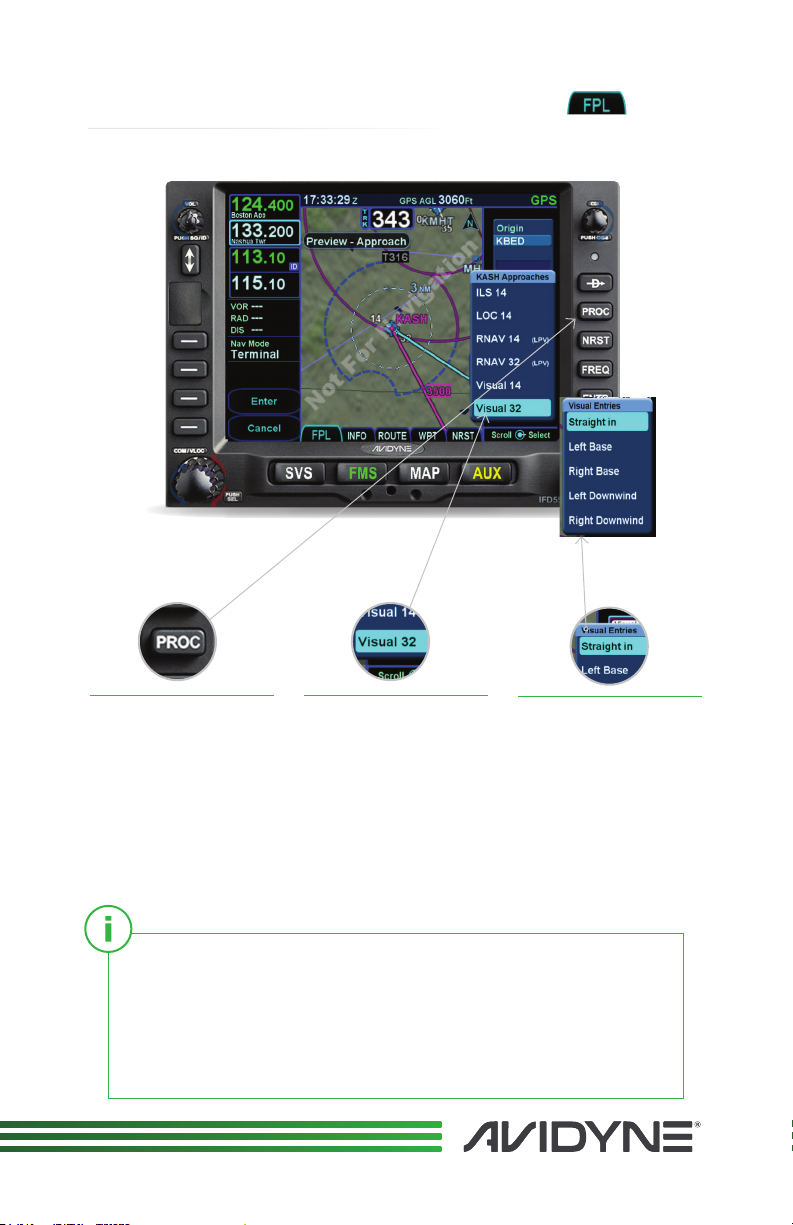
Selecting a Visual Approach
TAB
1 2
To select a Visual
Approach for your
destination airport ,
press the “PROC” Function
key.* This will display a
dropdown list of available
published approaches.
Go to Aux->Setup->FMS->Visual Approach Settings to set the
desired Glideslope Angle. The default setting is 4° but it can be
set to any angle between 1° and 6° in 0.1° increments. Glideslope
must be set to desired angle BEFORE loading the Visual Approach.
Remember you are still flying a VFR approach and proper clearance
and separation must be observed for the terrain in the area.
To select the desired
Visual Approach, twist
the FMS knob to scroll
down past any published
IFR approaches to see
the available Visual
Approaches, then push
to select, or tap the
highlighted selection.
3
Then select the Visual
Entry, (Straight In,
Left Base, Right Base,
Left Downwind, Right
Downwind) that
works best for your
direction of flight and
approach angle.
11
Page 12
QuickReference IFD5XX
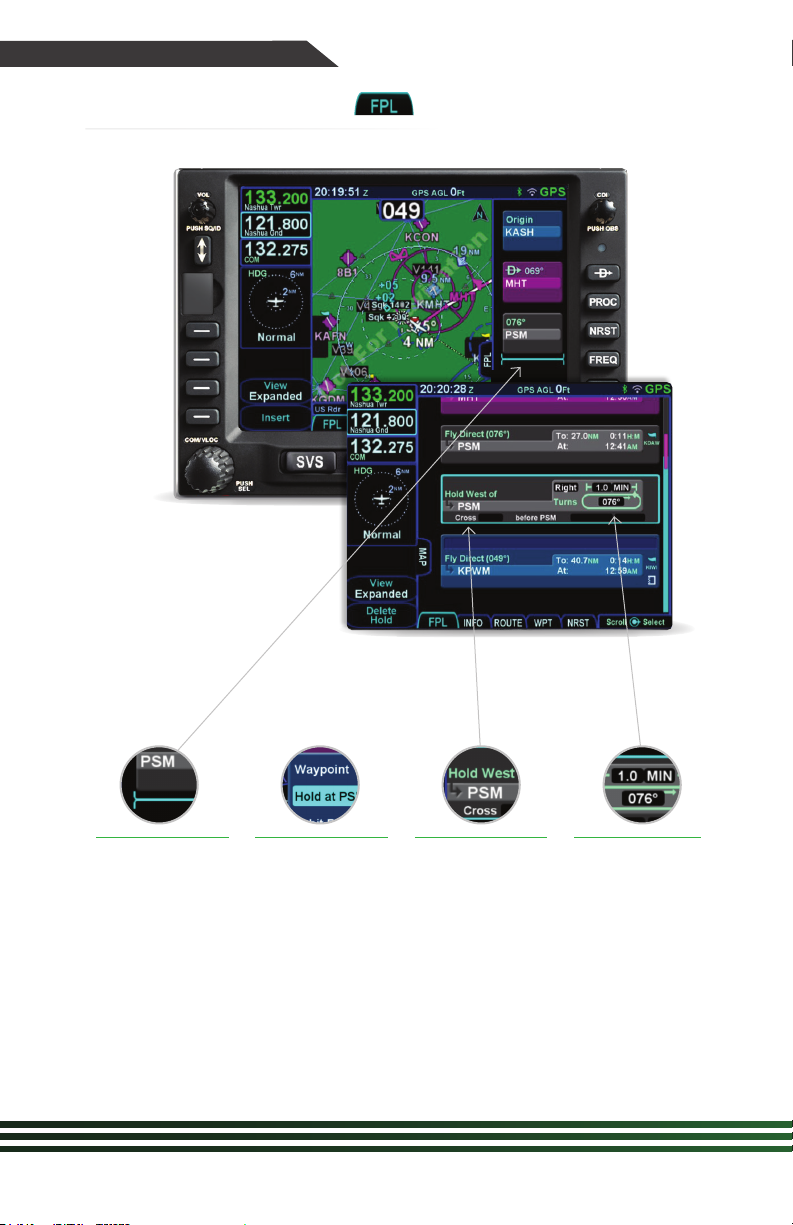
Entering a Hold
TAB
1
To enter a hold,
tap below the
waypoint of
interest to display
a drop down
list of options.
avidyne.com | 800.AVIDYNE
12
2 3 4
Near the
top of the list,
select “Hold at
<waypoint
name>” and
push the FMS
knob to select.
A holding
pattern
waypoint is
added to the
flight plan,
populated with
either standard
or published
hold data.
To edit the hold,
hide the map,
then touch the
field to be edited
(turn direction,
leg length,
inbound course).
Page 13
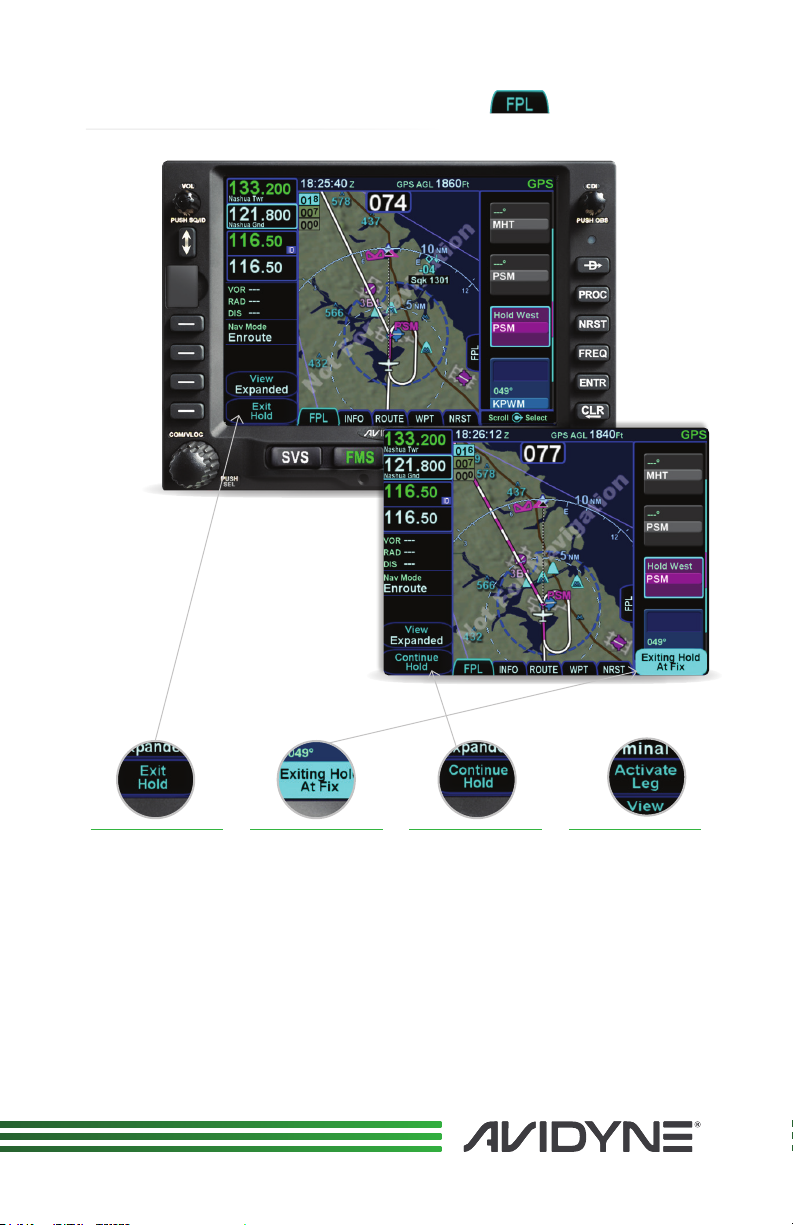
Exiting/Deleting a Hold
TAB
1 2 3 4
To Exit the hold,
select the “Exit
Hold” Line Select
Key (LSK1), and
the FMS will exit
the hold the next
time it passes
the hold fix.
A blue CAS
message will
alert you that you
are ‘Exiting hold
at Fix’ on your
next pass.
Should you need
to continue to
Hold, select
“Continue Hold”
using Line Select
Key (LSK1).
Other options
include deleting
the Hold
Waypoint with
CLR button, or
you can highlight
a downstream
waypoint in the
flightplan and
select ‘Activate
Leg’ (LSK3).
13
Page 14
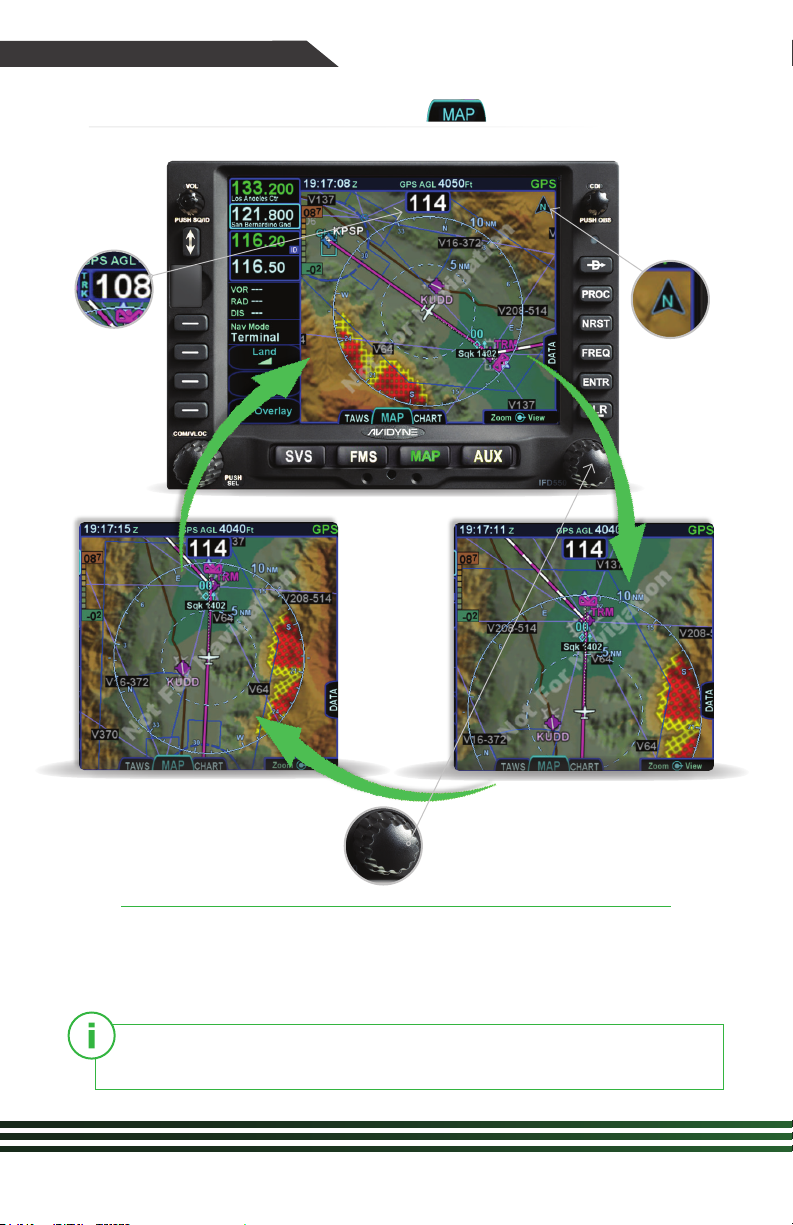
QuickReference IFD5XX
Changing Map View
‘TRK’ indicated
when Heading
not available.
North Up (360°)
TAB:
Indicates
‘North Up’
TRK Up (360°)
(or HDG Up* (360°)
To change Map View (orientation), push the small right knob,
which will cycle the Map between three dierent views:
North Up (360°) -> Track Up (240° arc view) -> Track Up (360°)
*If a Heading source is connected to the IFD, then you can set preference for
Heading Up rather than Track Up in AUX->SETUP page under Map Orientation.
avidyne.com | 800.AVIDYNE
14
TRK Up (240° arc view)
or HDG Up* (240° arc view)
Page 15
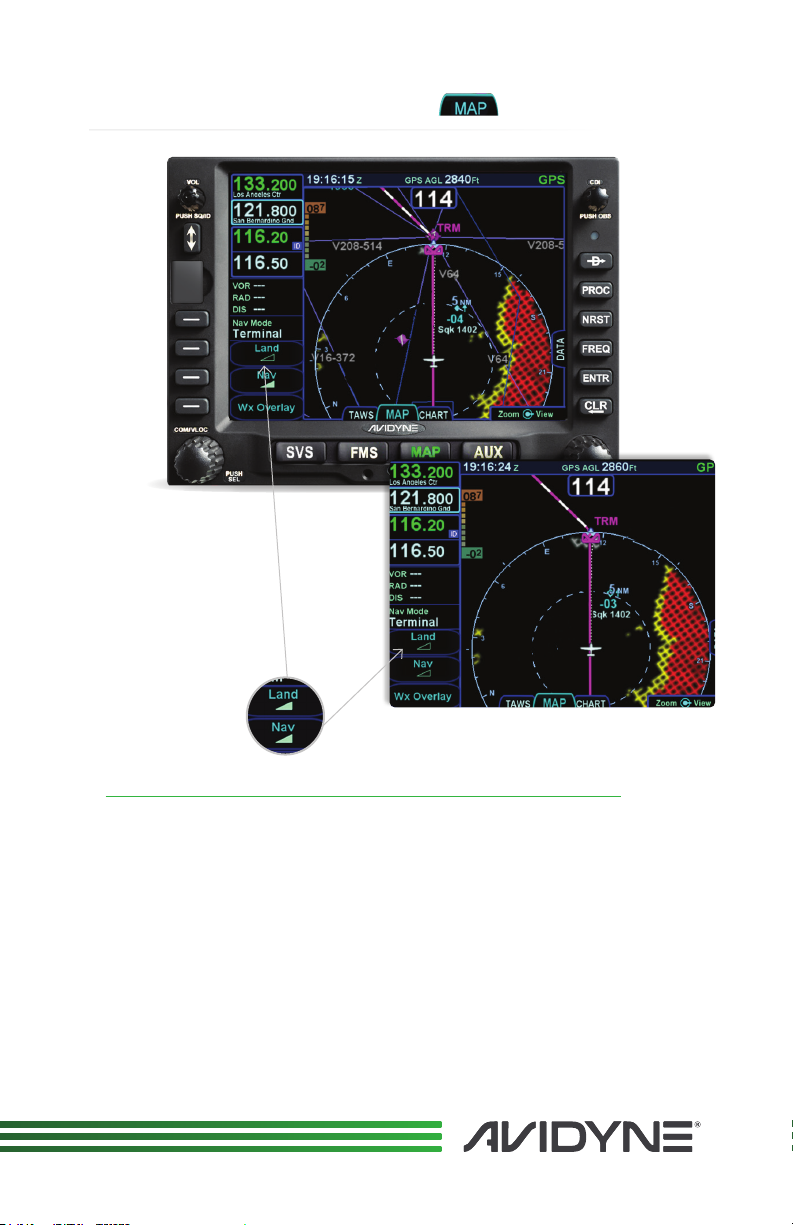
Decluttering the Map
TAB:
To select the preferred level of map density displayed, from the Map
Page, Map tab, press the “Land” LSK to declutter the terrain base map
and/or “Nav” LSK to declutter o-route NavAids (Intersections, Airports,
VORs etc). There are four levels of declutter for each. The specified level
of detail will remain consistent across all map pages. (Terrain Awareness
alerts and nearby Trac are not aected by declutter settings.)
15
Page 16
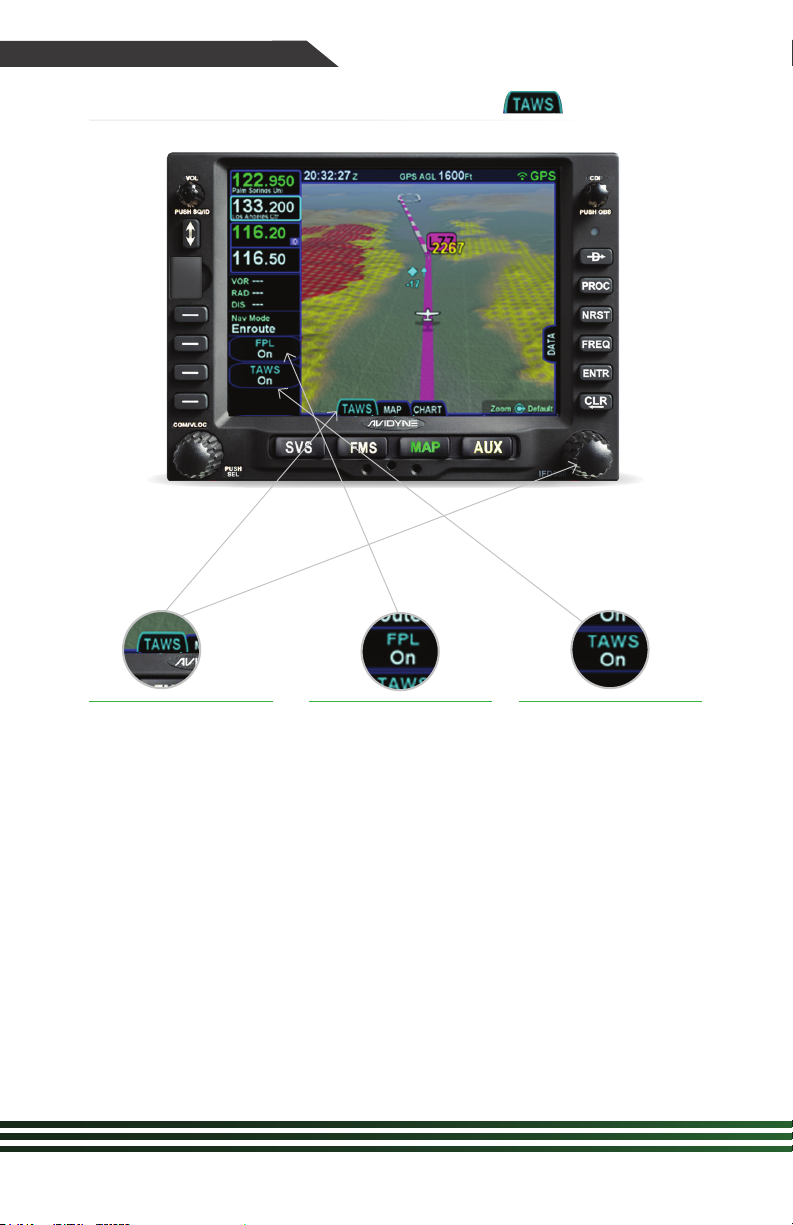
QuickReference IFD5XX
TAWS/Synthetic Vision
TAB:
Select the TAWS Tab
on the MAP page
of the IFD5XX to
view 3D Exocentric
Synthetic Vision, which
includes 3D Terrain,
Obstacles, Trac (when
available), Airports.
Turning the bottom right
knob or pinch zooming
the display will adjust
the perceived distance
above and behind the
ownship symbol.
avidyne.com | 800.AVIDYNE
16
Press the FPL button
(LSK3) to turn o
the Magenta Line and
just have the shadow
(which represents
aircraft position over
the ground), or push
again to remove both.
(On the TAWS page,
the Magenta line will
not appear unless
your aircraft is 1,000
ft AGL or greater, and
will disappear as you
descend below 1,000ft.
When TAWS button (LSK2)
is ON, the full TAWS-B
capability is enabled,
including:
- FLTA Altitude Callouts
- Premature Descent Alerts
- Excessive Descent Rate
- Negative Climb Rate
When TAWS button (LSK2)
is OFF, FLTA, and PDA
are disabled, but EDR and
NCR remain enabled.
Page 17
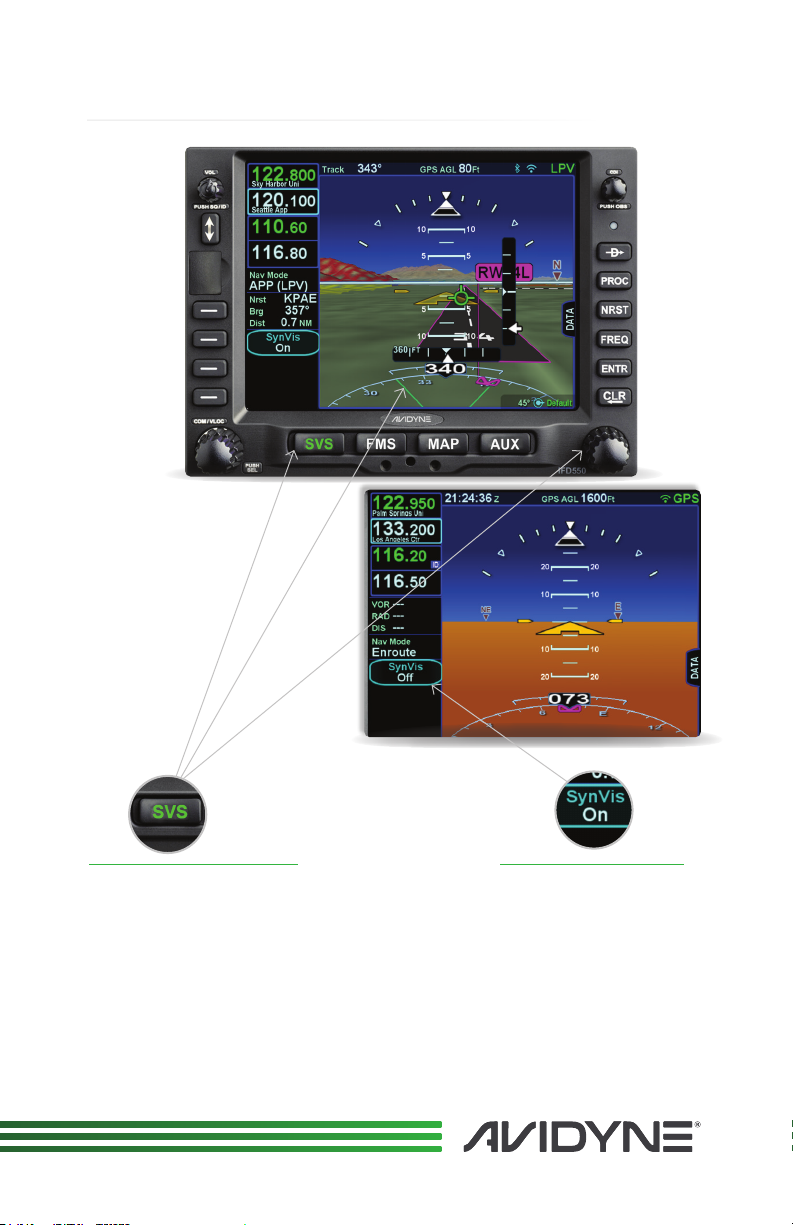
SVS Page
Applies to IFD550 & IFD545 only.
SVS Page provides ego-centric,
‘out-the-window’ view of SVS.
Twist the right knob or pinch
zoom the display to adjust pilotselectable horizontal field of view
ranging from 20 degrees to 120
degrees with a 45 degree default
Lateral (& Vertical) deviation
scales appear during Instrument
and Visual Approaches.
Push the SynVis button
(LSK3) to turn o the
Magenta Line. Push
again to turn o SVS,
and to show a standard
blue-over-brown
attitude display.
17
Page 18
QuickReference IFD5XX
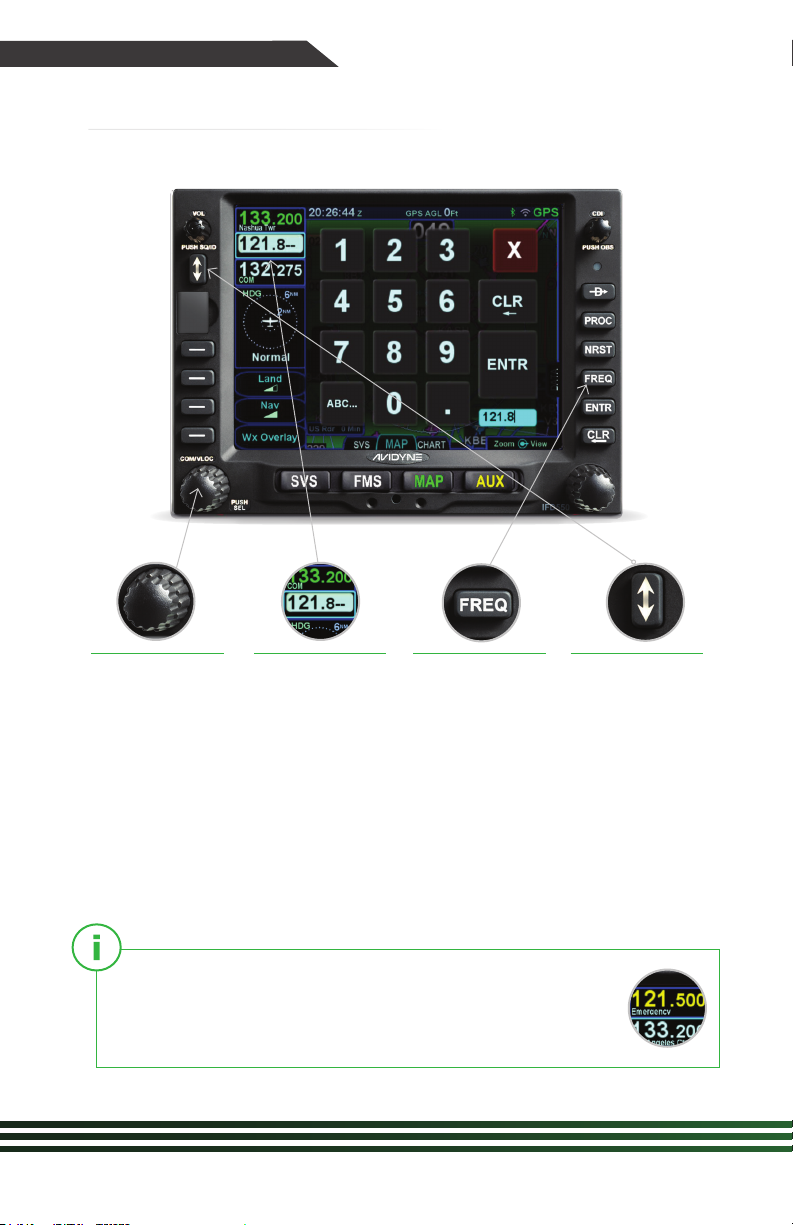
COM Radio Tuning
Radio Tuning can be accomplished through 3 dierent methods.
Applies to IFD550 & IFD540 only.
1 2 3 4
Twist the COM/
NAV knob. Use
the left inner knob
to adjust KHz and
the left outer knob
to adjust MHz.
Touch the standby
frequency field
to display the
numeric keypad.
Then enter the
desired frequency.
Press the FREQ
button. Select
the desired
frequency.
Activate the
frequency.
Once the desired
frequency has
been tuned in
to the standby,
press the flipflop button
to make it the
active frequency.
The Emergency COM Frequency, 121.5 kHz, can be quickly
tuned into the Active COM slot by pressing and holding the
flip-flop button for approximately three (3) seconds.
avidyne.com | 800.AVIDYNE
18
Page 19
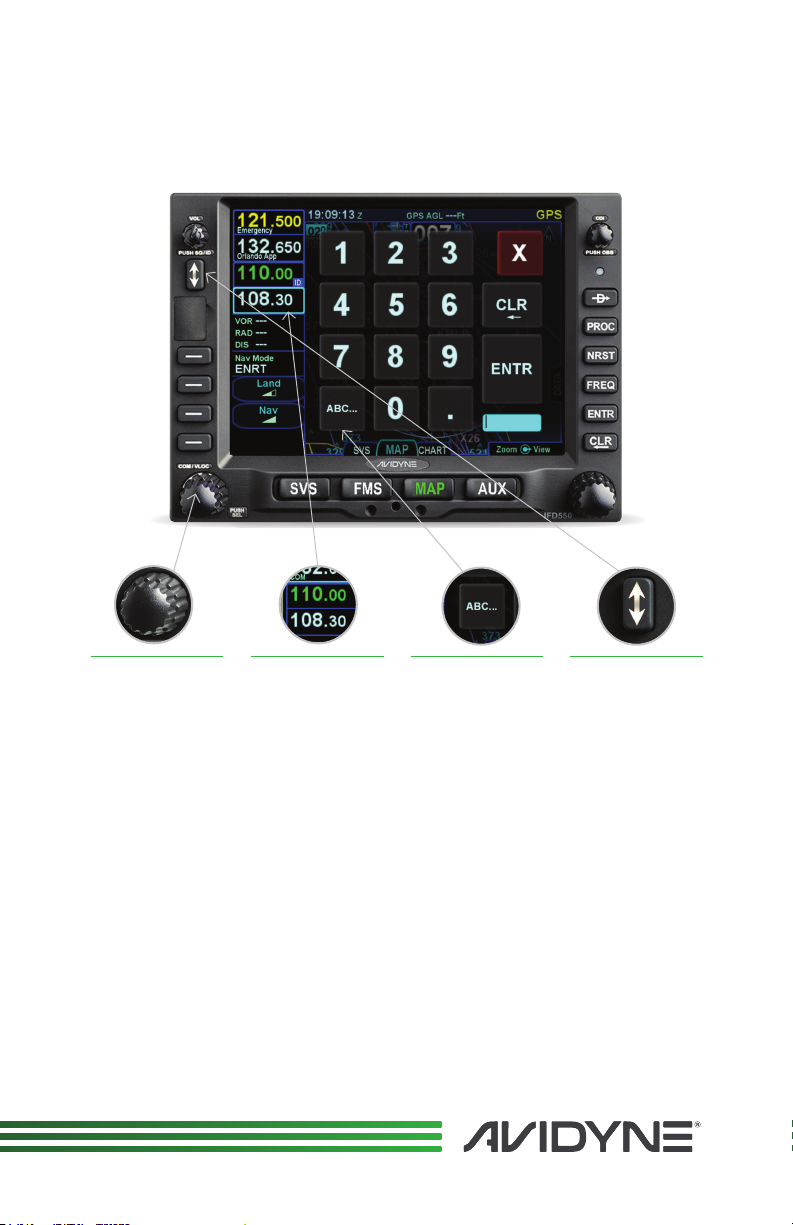
NAV Tuning
Nav radio tuning can be accomplished through 3 dierent methods.
Applies to IFD550 & IFD540 only.
1 2 3 4
Use the COM/NAV
knob. Push the
knob to display
NAV frequencies.
Then, twist the
inner knob to
adjust KHz and
the outer knob
to adjust MHz.
Touch the standby
frequency field
to display the
numeric keypad.
Enter the desired
frequency.
Touch the
standby
frequency,
then “ABC…”
to display
the QWERTY
keyboard. Type
the identifier
of the VOR
(powered by
GeoFill™).
Activate the
frequency.
Once the desired
frequency has
been tuned in
to the standby,
press the flipflop button
to make it the
active frequency.
19
Page 20
QuickReference IFD5XX
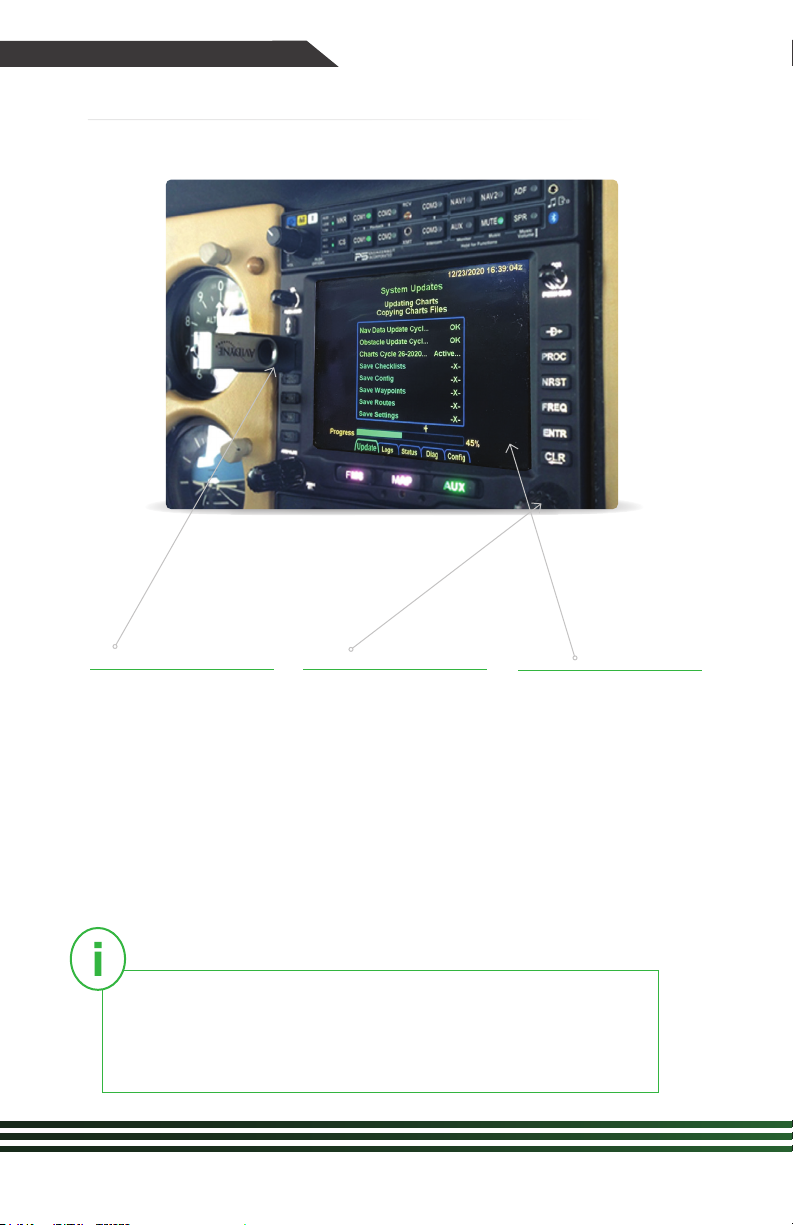
Updating Databases
1 2
Insert Jump Drive in
USB Port, then power
up. Jump drive must
be formatted to FAT32
and should have your
appropriate databases
loaded already.
You will notice that this operation puts the IFD into Maintenance
Mode. You can also download Maintenance Logs from this page
and pair your BT keyboard and more. Please use caution so as
not to inadvertently change port settings or other configurations,
For Tech Support and Training information, see back cover.
avidyne.com | 800.AVIDYNE
20
Use right knob to
select Data file(s) to
be transferred to IFD.
Twist the FMS knob to
highlight, then push to
select each data type.
A green Check Mark
will appear by each.
highlighted selection.
Press PROCEED line
select key (LSK).
3
Once you see “OK”
next to each selected
Data file, press DONE
button on screen when
complete, and IFD
will restart in normal
“Flight Mode.”
Page 21
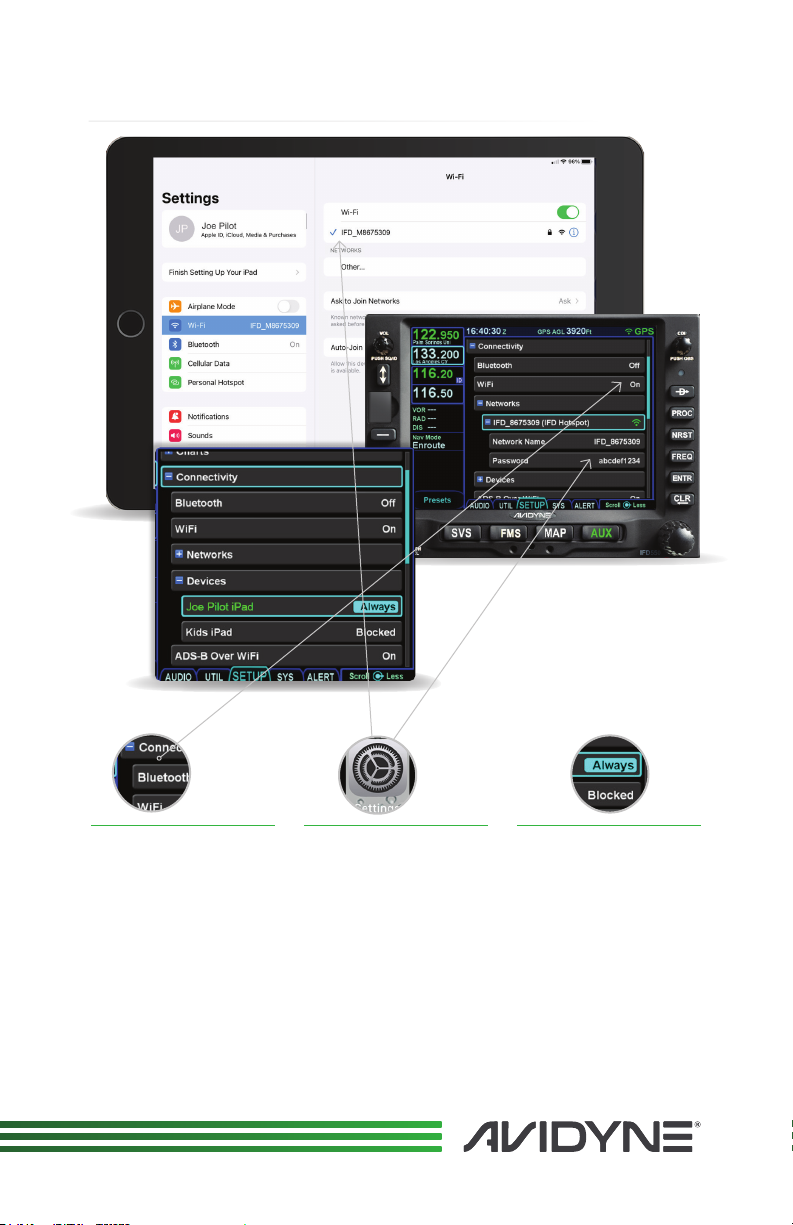
Connecting iPad to IFD via WiFi
1 2
From AUX->SETUP
page, double touch or
highlight and push right
knob to expand the
+Connectivity menu.
Set IFD WiFi to ‘ON’
using touchscreen or by
turning inner right knob.
Go to Settings Menu
on iPad and select WiFi
that matches your IFD’s
Network name. Enter
Password shown under
+Network menu. Then
launch IFD100 App
so that IFD sees that
you are trying to gain
permission to connect.
3
Under +Devices menu,
locate your iPad by
name and change
“Blocked” to “Always”
if you want it to
auto-connect on all
subsequent flights.
(you can also ‘Block’
unwanted iPad
connections).
21
Page 22
QuickReference IFD5XX
Using IFD100 iPad App
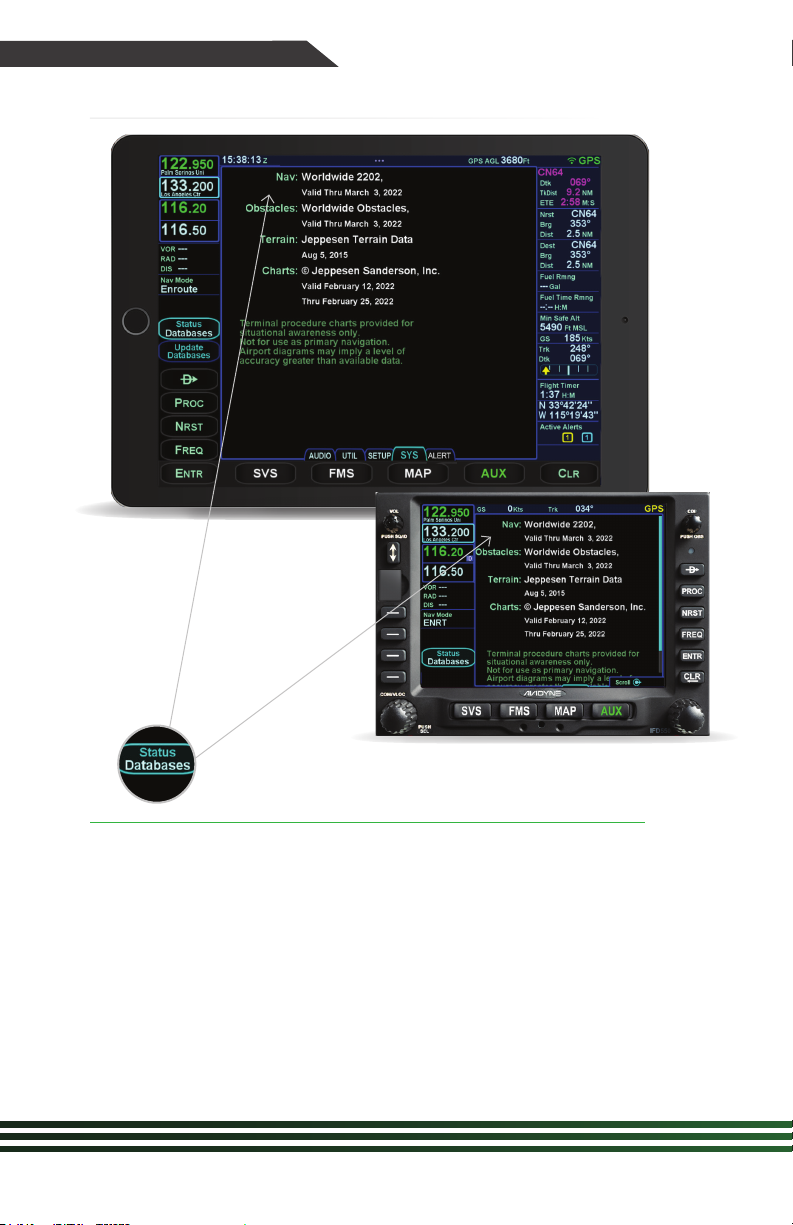
It is important to note the NAV databases of your IFD5XX and your IFD100
App must match, in that they must be the same cycle (have the same
expiration date). If you are not seeing a Flightplan on your IFD100 after
launch and you know your WiFi connection is good, it’s most likely that
these do not match. You can verify database expiration dates by going to
Go to AUX->SETUP and ‘Status - Databases’ page (LSK2).
avidyne.com | 800.AVIDYNE
22
Page 23
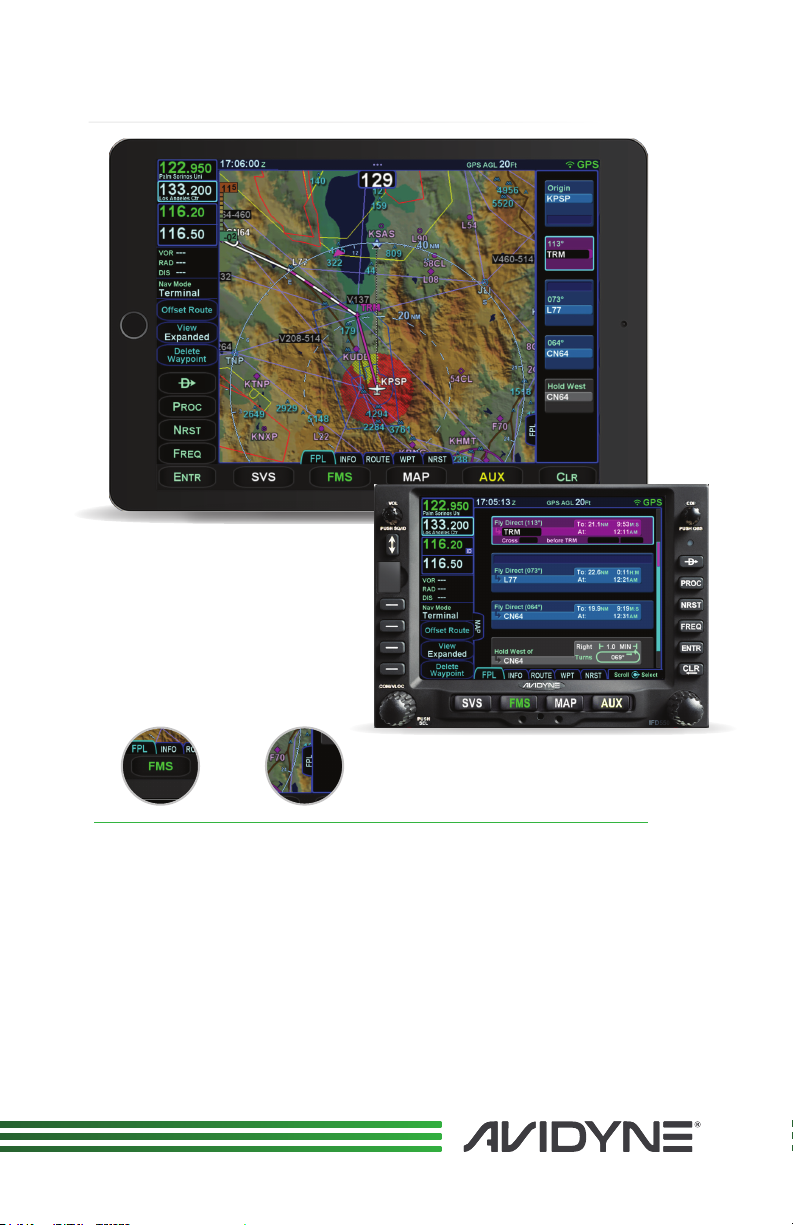
IFD100 - Page & Tab
Select dierent screens on the IFD100 in much the same way as with the
panel mounted IFD5XX. Page buttons on the IFD100 operate much the
same as the IFD5XX. Touching any of the available Tabs will switch the
display accordingly. Or you may access push the left or right side of the
Page button on the IFD100 to sequence left or right through the available
Tabs, acting just like the two-way rocker switches on the IFD5XX. Activate
the Side Tab on the IFD100 just as you would on the IFD5XX--either by
touching it directly, or by touching and holding the highlighted Page button.
23
Page 24
QuickReference IFD5XX
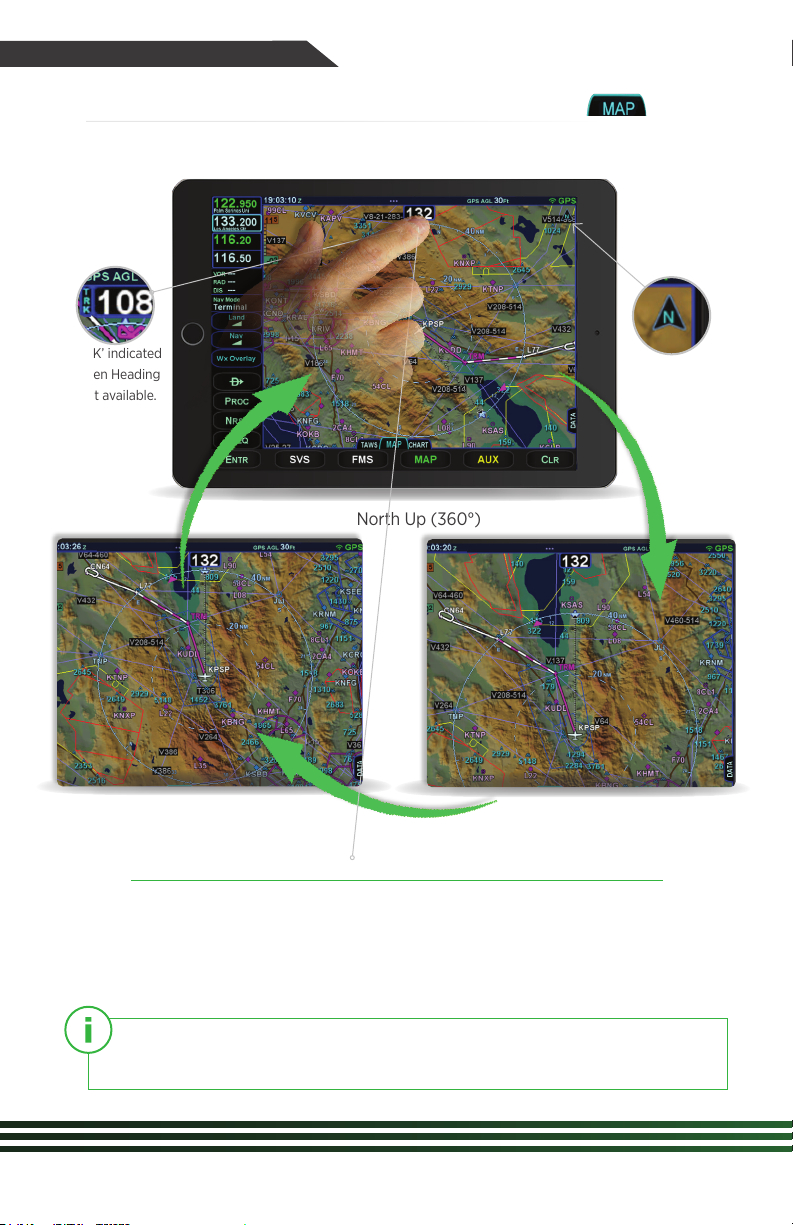
IFD100 - Changing Map View
‘TRK’ indicated
when Heading
not available.
North Up (360°)
TAB:
Indicates
‘North Up’
TRK Up (360°)
(or HDG Up* (360°)
You can change Map View of IFD100 (orientation)
by touching the HDG box on the MAP page, which will
cycle the Map between three dierent views:
North Up (360°) -> Track Up (240° arc view) -> Track Up (360°)
*If a Heading source is connected to the IFD5XX, then you can set preference for
Heading Up rather than Track Up in AUX->SETUP page under Map Orientation.
avidyne.com | 800.AVIDYNE
24
TRK Up (240° arc view)
or HDG Up* (240° arc view)
Page 25
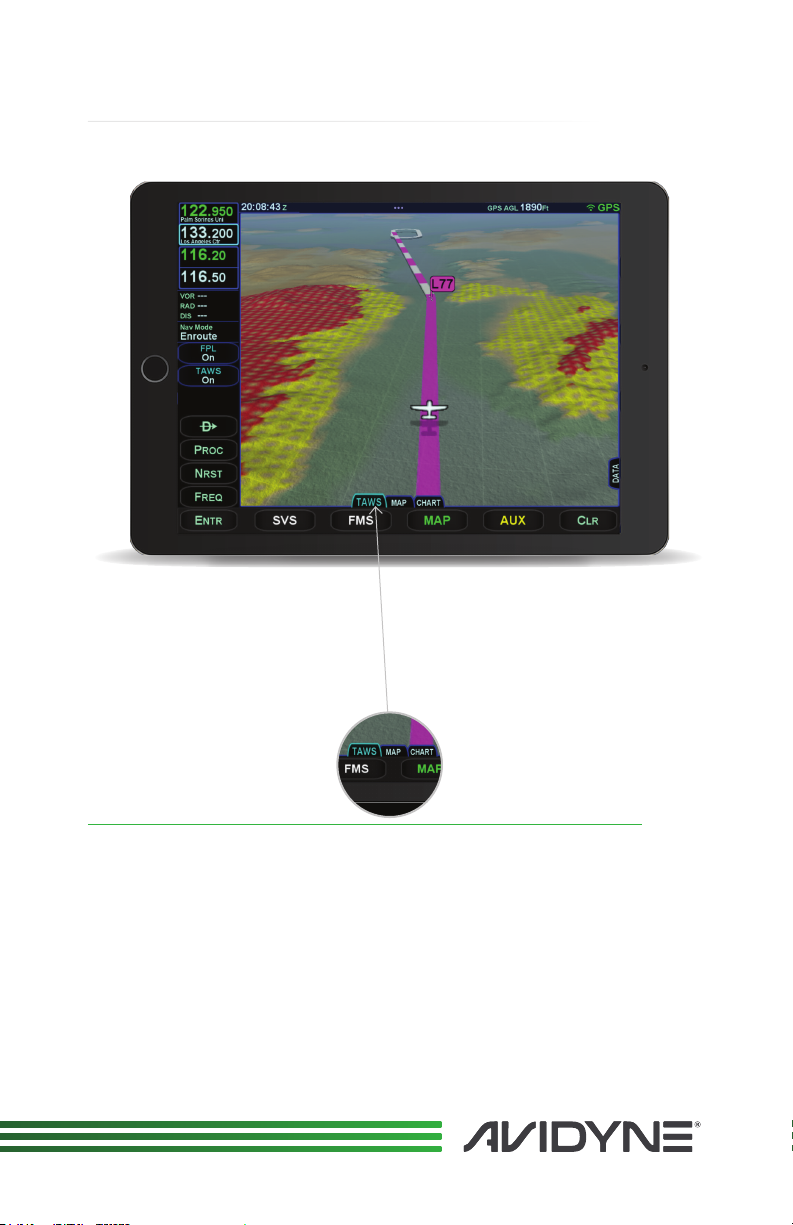
IFD100 - Synthetic Vision
Select the TAWS Tab on the MAP page of the IFD100 to
view 3D Exocentric Synthetic Vision, which includes 3D
Terrain, Obstacles, Trac (when available), Airports.
The Terrain Awareness and Alerting feature shows nearby
terrain within 1,000 feet as yellow hashed pattern, and terrain
within 100 feet or above in red hashed pattern.
Pinch zooming the display will adjust the perceived
distance above and behind the ownship symbol.
25
Page 26
QuickReference IFD5XX
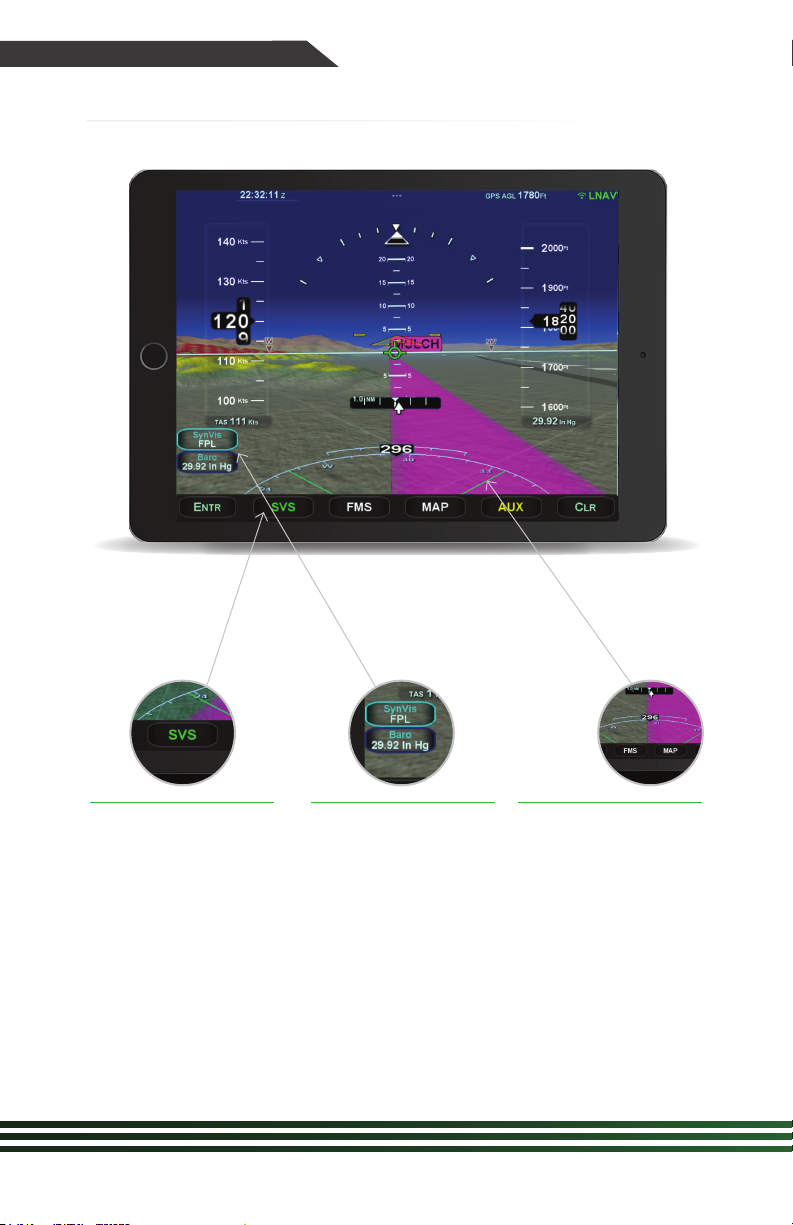
IFD100 - SVS Page
Applies to IFD550 & IFD540 only.
Just as with the IFD550/
IFD545, the SVS page
button on the IFD100
provides ego-centric,
Synthetic Vision and
attitude display including
Pitch ladder and Roll
pointer. giving you a
big-glass PFD display,
with Lateral and Vertical
Deviation when the FMS
is flying an Instrument
or Visual Approach.
avidyne.com | 800.AVIDYNE
26
SynVis-FPL cycles the
display as follows:
-SVS w/Flightplan
- SVS Night Vision mode
- Blue-over-Brown Attitude
-SVS w/o Flightlplan.
Baro Seting - Touch
to bring up numeric
keypad. Enter current
Baro to enable Altimeter
display on IFD100 PFD.
Perceived Field of
View - Pinch zooming
the display will adjust
the horizontal field
of view ranging from
20 degrees to 120
degrees with a 45
degree default.
Page 27
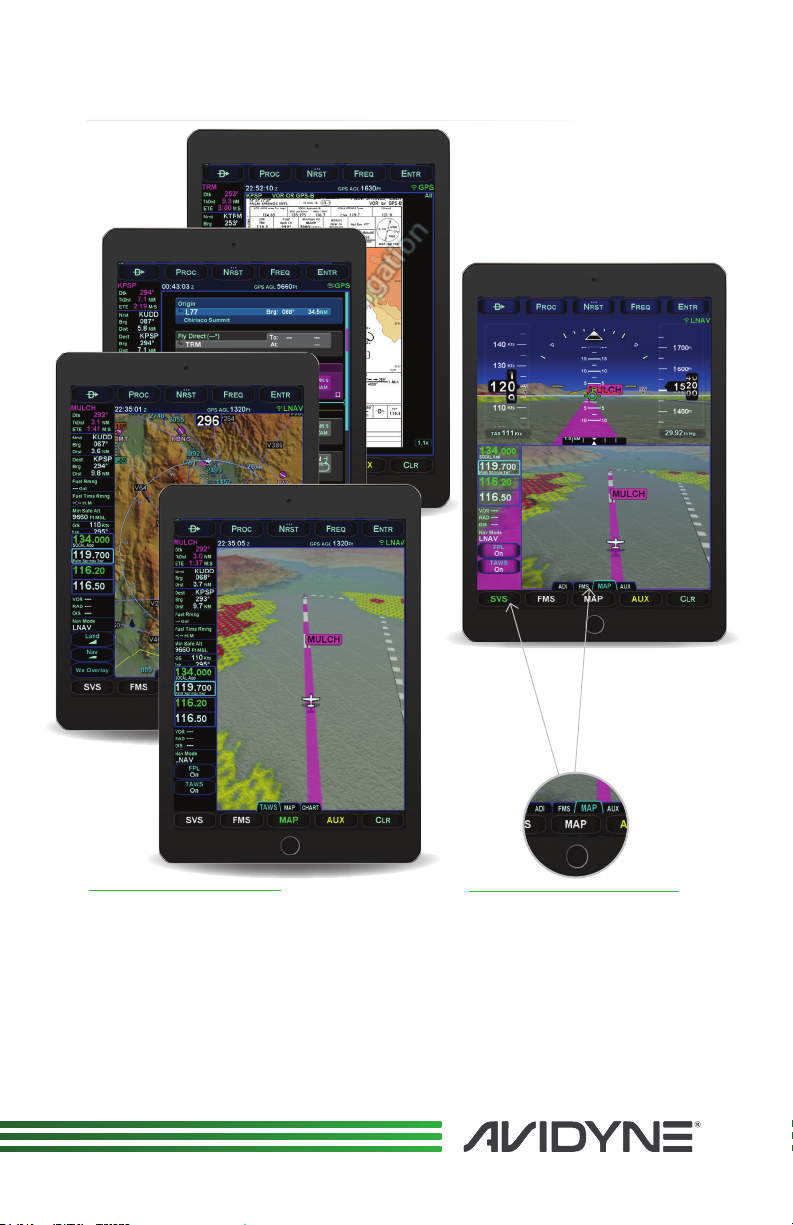
IFD100 - Portrait Mode
Only when connected to IFD550 or IFD545.
Rotate your iPad for Portrait
display of all the same screens
as in landscape mode, but with
better vertical map distance.
Portrait Split-screen (only
with the IFD550/IFD545)
from SVS page of IFD100.
Split screen view of ego-centric
PFD on upper half. Use tabs
to select lower half displays
of plan view map, exo-SVS,
Charts, FMS, or Aux Pages.
27
Page 28
QuickReference IFD5XX
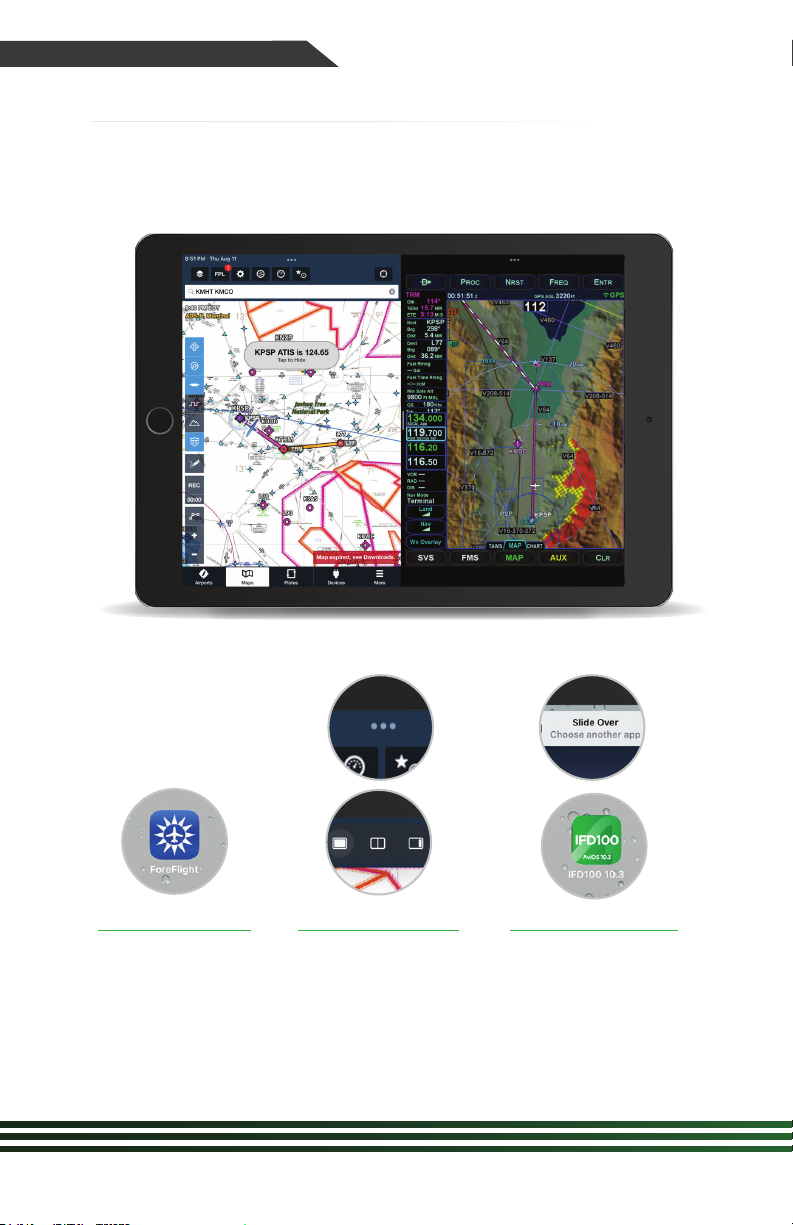
IFD100 - MultiTasking
Multitasking - allows you to view two Apps at the same time on single
iPad. In this example, we will launch Foreflight and then add IFD100.
1 2
Launch Foreflight
App.
avidyne.com | 800.AVIDYNE
28
Touch 3 dots in topmiddle of screen then
select Split Screen
(Middle icon).
3
Launch IFD 100- You will
be prompted to select
another App. This is
where you launch the
IFD100 App. Both apps
will now be running.
Page 29

NOTES
29
Page 30

PILOT SUPPORT
888.723.7592
Mon-Fri: 8:00AM–5:00PM EDT / 1200-2100 UTC
visit: pilotsupport.avidyne.com
email: [email protected]
AFTER HOURS TECHLINE™
877.900.4264
PILOT TRAINING
www.avidyne.com/training
P/N 600-00350-001 Rev01
AVI22-032 ©2022 Avidyne Corp. All Rights Reserved. 08/22
avidyne.com | 800.AVIDYNE
 Loading...