

Page 1

HD Native Installation Guide
Page 2

Legal Notices
This guide is copyrighted ©2011 by Avid Technology, Inc.,
(hereafter “Avid”), with all rights reserved. Under copyright
laws, this guide may not be duplicated in whole or in part
without the written consent of Avid.
003, 96 I/O, 96i I/O, 192 Digital I/O, 192 I/O, 888|24 I/O,
882|20 I/O, 1622 I/O, 24-Bit ADAT Bridge I/O, AudioSuite,
Avid, Avid DNA, Avid Mojo, Avid Unity, Avid Unity ISIS,
Avid Xpress, AVoption, Axiom, Beat Detective,
Bomb Factory, Bruno, C|24, Command|8, Control|24, DCommand, D-Control, D-Fi, D-fx, D-Show, D-Verb, DAE,
Digi 002, DigiBase, DigiDelivery, Digidesign,
Digidesign Audio Engine, Digidesign Intelligent Noise
Reduction, Digidesign TDM Bus, DigiDrive, DigiRack,
DigiTest, DigiTranslator, DINR, DV Toolkit, EditPack, Eleven,
EUCON, HD Core, HD I/O, HD MADI, HD OMNI,
HD Process, Hybrid, Impact, Interplay, LoFi, M-Audio,
MachineControl, Maxim, Mbox, MediaComposer, MIDI I/O,
MIX, MultiShell, Nitris, OMF, OMF Interchange, PRE,
ProControl, Pro Tools, Pro Tools|HD, Pro Tools LE,
Pro Tools M-Powered, Pro Tools MP, QuickPunch, Recti-Fi,
Reel Tape, Reso, Reverb One, ReVibe, RTAS, Sibelius,
Smack!, SoundReplacer, Sound Designer II, Strike, Structure,
SYNC HD, SYNC I/O, Synchronic, TL Aggro, TL AutoPan,
TL Drum Rehab, TL Everyphase, TL Fauxlder, TL In Tune,
TL MasterMeter, TL Metro, TL Space, TL Utilities, Transfuser,
Trillium Lane Labs, Vari-Fi, Velvet, X-Form, and XMON are
trademarks or registered trademarks of Avid Technology, Inc.
Xpand! is Registered in the U.S. Patent and Trademark Office.
All other trademarks are the property of their respective
owners.
Product features, specifications, system requirements, and
availability are subject to change without notice.
Guide Part Number 9320-65048-00 REV A 10/11
Documentation Feedback
At Avid, we are always looking for ways to improve our
documentation. If you have comments, corrections, or
suggestions regarding our documentation, email us at
techpubs@avid.com.
Page 3

Contents
Chapter 1. Welcome to HD Native. . . . . . . . . . . . . . . . . . . . . . . . . . . . . . . . . . . . . . . . . . . . . . . . . 1
HD Native Package . . . . . . . . . . . . . . . . . . . . . . . . . . . . . . . . . . . . . . . . . . . . . . . . . . . . . . . 1
HD Native Systems . . . . . . . . . . . . . . . . . . . . . . . . . . . . . . . . . . . . . . . . . . . . . . . . . . . . . . . 1
Registration. . . . . . . . . . . . . . . . . . . . . . . . . . . . . . . . . . . . . . . . . . . . . . . . . . . . . . . . . . . . . 2
System Requirements and Compatibility. . . . . . . . . . . . . . . . . . . . . . . . . . . . . . . . . . . . . . . . 2
Conventions Used in This Guide. . . . . . . . . . . . . . . . . . . . . . . . . . . . . . . . . . . . . . . . . . . . . . 2
About www.avid.com . . . . . . . . . . . . . . . . . . . . . . . . . . . . . . . . . . . . . . . . . . . . . . . . . . . . . . 3
Chapter 2. HD Native Hardware Overview . . . . . . . . . . . . . . . . . . . . . . . . . . . . . . . . . . . . . . . . . . 5
HD Native PCIe Card. . . . . . . . . . . . . . . . . . . . . . . . . . . . . . . . . . . . . . . . . . . . . . . . . . . . . . 5
DigiLink Mini Cables . . . . . . . . . . . . . . . . . . . . . . . . . . . . . . . . . . . . . . . . . . . . . . . . . . . . . . 5
Avid HD Audio Interfaces . . . . . . . . . . . . . . . . . . . . . . . . . . . . . . . . . . . . . . . . . . . . . . . . . . . 6
Chapter 3. Installing HD Native Hardware . . . . . . . . . . . . . . . . . . . . . . . . . . . . . . . . . . . . . . . . . . 9
Installing the HD Native Card in a Mac Pro . . . . . . . . . . . . . . . . . . . . . . . . . . . . . . . . . . . . . . 9
Installing the HD Native Card in a Windows Computer. . . . . . . . . . . . . . . . . . . . . . . . . . . . . 11
Connecting Audio Interfaces. . . . . . . . . . . . . . . . . . . . . . . . . . . . . . . . . . . . . . . . . . . . . . . . 12
Installing and Authorizing Pro Tools Software . . . . . . . . . . . . . . . . . . . . . . . . . . . . . . . . . . . 14
Installing HD Native Hardware Drivers . . . . . . . . . . . . . . . . . . . . . . . . . . . . . . . . . . . . . . . . 14
Chapter 4. Configuring Core Audio (Mac OS X Only). . . . . . . . . . . . . . . . . . . . . . . . . . . . . . . . 15
Avid Core Audio Driver Capabilities . . . . . . . . . . . . . . . . . . . . . . . . . . . . . . . . . . . . . . . . . . 15
Installing the Core Audio Driver . . . . . . . . . . . . . . . . . . . . . . . . . . . . . . . . . . . . . . . . . . . . . 15
Avid Core Audio Manager . . . . . . . . . . . . . . . . . . . . . . . . . . . . . . . . . . . . . . . . . . . . . . . . . 16
Configuring Avid HD Audio Interfaces for Third-Party Applications . . . . . . . . . . . . . . . . . . . . 19
Configuring the Apple Sound Preferences or Apple Audio MIDI Setup . . . . . . . . . . . . . . . . . 19
Chapter 5. Configuring ASIO (Windows Only) . . . . . . . . . . . . . . . . . . . . . . . . . . . . . . . . . . . . . 21
ASIO Driver Capabilities. . . . . . . . . . . . . . . . . . . . . . . . . . . . . . . . . . . . . . . . . . . . . . . . . . . 21
Installing the ASIO Driver. . . . . . . . . . . . . . . . . . . . . . . . . . . . . . . . . . . . . . . . . . . . . . . . . . 21
ASIO Driver Control Panel . . . . . . . . . . . . . . . . . . . . . . . . . . . . . . . . . . . . . . . . . . . . . . . . . 22
Contents iii
Page 4

Chapter 6. Low Latency Monitoring with Pro Tools. . . . . . . . . . . . . . . . . . . . . . . . . . . . . . . . . 25
Using Low Latency Monitoring. . . . . . . . . . . . . . . . . . . . . . . . . . . . . . . . . . . . . . . . . . . . . . 25
Configuring Low Latency Monitoring in the I/O Setup . . . . . . . . . . . . . . . . . . . . . . . . . . . . . 25
Low Latency Monitoring and Bounce To Disk . . . . . . . . . . . . . . . . . . . . . . . . . . . . . . . . . . . 26
Appendix A. Compliance Information . . . . . . . . . . . . . . . . . . . . . . . . . . . . . . . . . . . . . . . . . . . . 27
Environmental Compliance . . . . . . . . . . . . . . . . . . . . . . . . . . . . . . . . . . . . . . . . . . . . . . . . 27
EMC (Electromagnetic Compliance). . . . . . . . . . . . . . . . . . . . . . . . . . . . . . . . . . . . . . . . . . 28
Safety Compliance . . . . . . . . . . . . . . . . . . . . . . . . . . . . . . . . . . . . . . . . . . . . . . . . . . . . . . 29
第1章
第2章
第3章
第4章
HD Native
HD Native
HD Native
登録
システム要件と互換性
このガイドで使用する表記法
www.avid.com
HD Native
HD Native PCIe
DigiLink Mini
Avid HD
HD Native
HD Native
HD Native
オーディオ・インターフェースを接続する
Pro Tools
HD Native
Core Audio
Avid Core Audio Driver
Avid Core Audio Driver
へようこそ . . . . . . . . . . . . . . . . . . . . . . . . . . . . . . . . . . . . . . . . . . . . . . . . . . . . 31
のパッケージ
システム
. . . . . . . . . . . . . . . . . . . . . . . . . . . . . . . . . . . . . . . . . . . . . . . . . . . . . . 31
. . . . . . . . . . . . . . . . . . . . . . . . . . . . . . . . . . . . . . . . . . . . . . . . . . . . . . . . . 31
. . . . . . . . . . . . . . . . . . . . . . . . . . . . . . . . . . . . . . . . . . . . . . . . . . . . . . . . . . . . . . . . . . . . . 31
. . . . . . . . . . . . . . . . . . . . . . . . . . . . . . . . . . . . . . . . . . . . . . . . . . . . . . . . . 32
. . . . . . . . . . . . . . . . . . . . . . . . . . . . . . . . . . . . . . . . . . . . . . . . . . . . 32
について
. . . . . . . . . . . . . . . . . . . . . . . . . . . . . . . . . . . . . . . . . . . . . . . . . . . . . . 33
ハードウェアの概要 . . . . . . . . . . . . . . . . . . . . . . . . . . . . . . . . . . . . . . . . . . . . . . 35
カード
. . . . . . . . . . . . . . . . . . . . . . . . . . . . . . . . . . . . . . . . . . . . . . . . . . . . . . 35
ケーブル
. . . . . . . . . . . . . . . . . . . . . . . . . . . . . . . . . . . . . . . . . . . . . . . . . . . . . . . 35
オーディオ・インターフェース
ハードウェアをインストールする . . . . . . . . . . . . . . . . . . . . . . . . . . . . . . . . . . . . 39
カードを
カードを
Mac Pro
Windows
. . . . . . . . . . . . . . . . . . . . . . . . . . . . . . . . . . . . . . . . . . . . 35
へインストールする
コンピューターへインストールする
. . . . . . . . . . . . . . . . . . . . . . . . . . . . . . . . . . . . 39
. . . . . . . . . . . . . . . . . . . . . . . . . 40
. . . . . . . . . . . . . . . . . . . . . . . . . . . . . . . . . . . . . . . . . . . 41
ソフトウェアのインストールとオーソライズ
ハードウェアのドライバーをインストールする
の設定(
Mac OS X
の性能
をインストールする
のみ). . . . . . . . . . . . . . . . . . . . . . . . . . . . . . . . . . . . . . . 45
. . . . . . . . . . . . . . . . . . . . . . . . . . . . . . . . . . . . . . . . . . . . . . . . 45
. . . . . . . . . . . . . . . . . . . . . . . . . . . . . . . . . . 43
. . . . . . . . . . . . . . . . . . . . . . . . . . . . . . . . 43
. . . . . . . . . . . . . . . . . . . . . . . . . . . . . . . . . . . . . . . 45
Avid Core Audio Manager . . . . . . . . . . . . . . . . . . . . . . . . . . . . . . . . . . . . . . . . . . . . . . . . . . . 46
サードパーティー製アプリケーション用に
の[サウンド]環境設定または[
Apple
Avid HD
Audio MIDI
オーディオ・インターフェイスを設定する
設定]を設定する
. . . . . . . . . . . . . . . . . . . . . . . 49
. . . . . . . 49
HD Native Installation Guideiv
Page 5

第5章
の設定(
ASIO
ASIO Driver
ASIO Driver
Windows
の性能
をインストールする
のみ). . . . . . . . . . . . . . . . . . . . . . . . . . . . . . . . . . . . . . . . . . . . . . 51
. . . . . . . . . . . . . . . . . . . . . . . . . . . . . . . . . . . . . . . . . . . . . . . . . . . . . . . . 51
. . . . . . . . . . . . . . . . . . . . . . . . . . . . . . . . . . . . . . . . . . . . . . . 51
ASIO Driver Control Panel . . . . . . . . . . . . . . . . . . . . . . . . . . . . . . . . . . . . . . . . . . . . . . . . . . 52
第6章
Pro Tools
低レイテンシー・モニタリングを使う
[
I/O
[低レイテンシー モニタリング]と[ディスクへバウンス]
付録
コンプライアンス情報 . . . . . . . . . . . . . . . . . . . . . . . . . . . . . . . . . . . . . . . . . . . . . . . . . . . . . . 57
A
安全性コンプライアンス
を使用した低レイテンシー・モニタリング
. . . . . . . . . . . . . . . . . . . . . . . . . . . . . . . . . . . . . . . . . . . . . 55
設定]で低レイテンシー・モニタリングを設定する
. . . . . . . . . . . . . . . . . . . . . . . . . . . . . . . . . . . . . . . . . . . . . . . . . . . . . . 57
. . . . . . . . . . . . . . . . . . . . . . . . . . . . 5
. . . . . . . . . . . . . . . . . . . . . . . . . . . . . . . . . 55
. . . . . . . . . . . . . . . . . . . . . . . . . . . . . . . 56
5
Contents v
Page 6

HD Native Installation Guidevi
Page 7

Chapter 1: Welcome to HD Native
The HD Native PCIe card provides connectivity
for high-definition digital audio recording,
editing, signal processing, mixing, and I/O
capabilities with Avid
Avid HD audio interfaces and synchronization
peripherals.
HD Native hardware with HD audio interfaces
can also be used with Core Audio and
ASIO–compatible digital audio software with
support for up to 64 channels of I/O.
This guide covers installation of HD Native
hardware on Mac and Windows platforms.
For information about installing and
authorizing Pro Tools software, see the
Pro Tools Installation Guide that came with
your Pro Tools software package.
Pro Tools® software and
HD Native Package
The HD Native package includes the following:
•HD Native PCIe card
™
• 12’ DigiLink
HD Native card to an audio interface
• Registration Information Card
•This Install Guide, covering installation
and configuration of HD Native hardware
• HD Native Quick Setup, covering basic
hardware installation
• Health and Safety Guide
Mini cable for connecting the
HD Native Systems
All HD Native systems consist of the following:
• One of the following software packages (sold
separately):
•Pro Tools HD software
•ProTools software
•Third-party Core Audio or
ASIO–compatible software
•HD Native PCIe card
• At least one (up to four) of the following Avid
HD audio interfaces (sold separately):
•HD OMNI
•HD I/O
•HD MADI
Only one HD OMNI can be used in an HD
Native system.
Chapter 1: Welcome to HD Native 1
Page 8
Registration
Review the enclosed Registration Information
Card and follow the instructions on it to quickly
register your purchase online. This is one of the
most important steps you can take as a new user.
Registering your purchase is the only way you
can be eligible to receive:
• Information regarding technical support
• Future upgrade offers
• Limited warranty on hardware
Hardware Warranty
Your warranty can be found on the Registration
Information Card.
System Requirements and Compatibility
HD Native hardware can be used with a qualified
Mac or Windows computer running Pro Tools
HD software, Pro Tools software, or third-party
Core Audio- or ASIO-compatible software.
Avid can only assure compatibility and provide
support for hardware and software it has tested
and approved.
For complete system requirements and a list of
qualified computers, operating systems, hard
drives, and third-party devices, refer to the
latest information on our website:
www.avid.com/compatibility
Conventions Used in This Guide
All Pro Tools guides use the following
conventions to indicate menu choices and key
commands:
Convention Action
File > Save Choose Save from the
Control+N Hold down the Control
Control-click Hold down the Control
Right-click Click with the right
The names of
Commands, Options, and Settings
that appear on-screen are in a different font.
The following symbols are used to highlight
important information:
User Tips are helpful hints for getting the
most from your Pro Tools system.
Important Notices include information that
could affect your Pro Tools session data or
the performance of your Pro Tools system.
Shortcuts show you useful keyboard or
mouse shortcuts.
File menu
key and press the N key
key and click the mouse
button
mouse button
You can test your HD Native hardware using
Avid DigiTest. For more information, see the
Avid DigiTest Guide.pdf (available online
and also installed with Pro Tools).
HD Native Installation Guide2
Cross References point to related sections in
the Pro Tools Guides.
Page 9

About www.avid.com
The Avid website (www.avid.com) is your best
online source for information to help you get the
most out of your Pro Tools system. The
following are just a few of the services and
features available.
Product Registration
Register your purchase
online.
Support and Downloads
Contact Avid Customer
Success (technical support); download software
updates and the latest online manuals; browse
the Compatibility documents for system
requirements; search the online Knowledge Base
or join the worldwide Pro Tools community on
the User Conference.
Training and Education
Study on your own using
courses available online or find out how you can
learn in a classroom setting at a certified
Pro Tools training center.
Products and Developers
Learn about Avid
products; download demo software or learn
about our Development Partners and their plugins, applications, and hardware.
News and Events
Get the latest news from Avid
or sign up for a Pro Tools demo.
Chapter 1: Welcome to HD Native 3
Page 10

HD Native Installation Guide4
Page 11
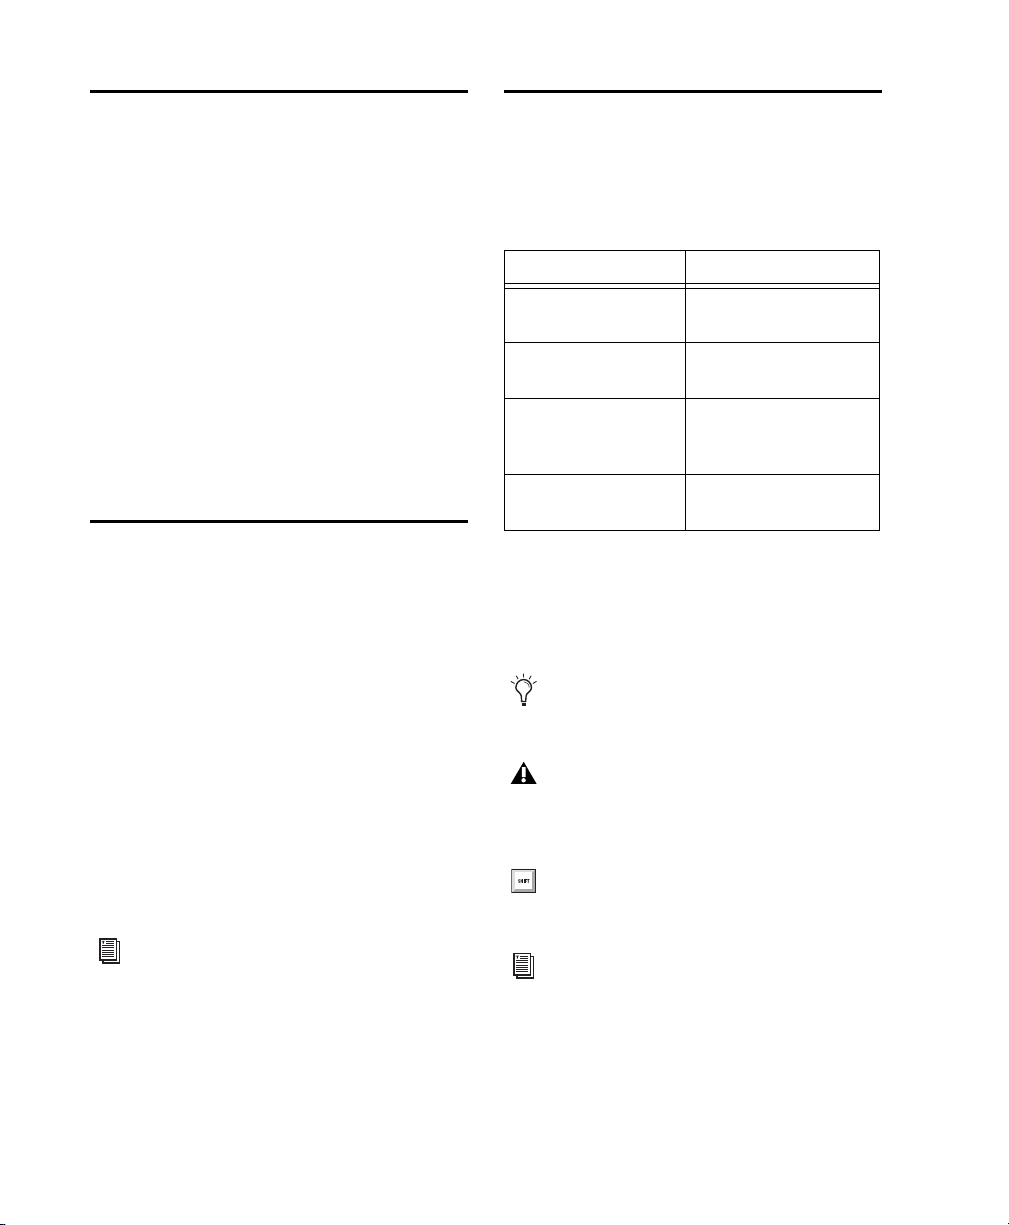
Chapter 2: HD Native Hardware Overview
PORT 1PORT 2
DigiLink
Mini
Port 2
DigiSerial
port
DigiLink
Mini
Port 1
HD Native PCIe Card
The HD Native PCIe card supports up to 64
channels of I/O for direct-to-disk recording and
playback, and supports up to 24-bit and up to
192 kHz audio streams. Additionally, the onboard FPGA provides dedicated processing
power for mixer configurations and low latency
monitoring with Pro Tools.
HD Native PCIe card
DigiLink Mini Ports
The HD Native PCIe card includes two DigiLink
Mini ports for connecting to Avid HD audio
interfaces. Each port provides up to 32 channels
of audio input and output for your audio
software.
DigiSerial Port
You can connect a SYNC peripheral to the
DigiSe ria l port on the HD Native P CIe card. This
connector is an 8-pin mini-DIN.
The DigiSerial port on an HD Native PCIe
card does not support MachineControl
connections.
DigiLink Mini Cables
Use DigiLink Mini cables to connect HD I/O,
HD OMNI, and HD MADI audio interfaces to
your HD Native card. There are five different
lengths of DigiLink Mini cables:
• 18” (0.46m) (included with HD I/O,
HD OMNI, and HD MADI audio interfaces)
• 12’ (3.6m) (one included with the
HD Native card)
• 25’ (7.62m) (sold separately)
• 50’ (15.25m), the maximum length
supported for 176.4 kHz and 192 kHz
sessions (sold separately)
• 100’ (30.5m), the maximum length
supported by 88.2 kHz and 96 kHz sessions
(sold separately)
Chapter 2: HD Native Hardware Overview 5
Page 12

Avid HD Audio Interfaces
To record and play audio with Pro Tools, or with
a qualified third-party Core Audio-compatible
or ASIO-compatible application, you must have
at least one Avid HD audio interface connected
to the first port of the HD Native card.
HD Native supports up to 4 Avid HD audio
interfaces for up to 64 simultaneous channels of
audio input and output.
HD OMNI Audio Interface
HD OMNI is a professional digital audio
interface designed for use with HD Native
systems. HD OMNI provides a compact preamp,
monitoring, and I/O solution for music
production and recording, and post production
studios.
• 2 1/4-inch TRS Send and 2 1/4-inch TRS
Return back panel jacks for hardware inserts
on channels 1 and 2
• 4 analog TRS line level back panel inputs
(Channels 1–4)
HD OMNI provides multiple analog input
connections, but only provides up to four
channels of simultaneous analog input.
• Soft Clip and Curv limiting circuits to protect
against clipping on analog input
• 8 channels of analog back panel output using a
DB-25 breakout cable (sold separately) with
variable output gain
• 2 channels of analog back panel output using
TRS (Mirrors channels 1–2 or 7–8 on DB-25
connector)
• Front panel stereo 1/4” headphone jack
For more information, see the HD OMNI
Guide.
Only one HD OMNI can be used in an
HD Native system.
HD OMNI Features
HD OMNI provides up to 8 discrete channels of
Pro Tools input and output, with 4-segment
LED meters for input or output (selectable).
Analog I/O
• 24-bit analog-to-digital (A/D) and digital-toanalog (D/A) converters, with support for
sample rates up to 192 kHz
• 2 high-quality Mic/DI preamps (Channels
1–2)
• 2 combined XLR and 1/4-inch TRS front panel
inputs for microphone and instrument level
input
• 2 XLR back panel microphone inputs
HD Native Installation Guide6
Digital I/O
• 8 channels of AES/EBU output (up to 192 kHz
Single Wire) using a DB-25 breakout cable
(sold separately)
• 2 channels of AES/EBU XLR input (up to
192 kHz Single Wire)
• 2 channels of S/PDIF RCA input and output
(up to 192 kHz)
• 8 channels of ADAT TOSLINK input and
output
• Support for ADAT S/MUX Optical for sample
rates of 88.2 kHz, 96 kHz, 176.4 kHz, and
192 kHz
• Support for two channels of S/PDIF Optical
with sample rates of up to 96 kHz
• Real-time sample rate conversion (SRC) on
Digital Inputs 1–2 of either AES/EBU, S/PDIF,
or Optical (S/PDIF)
SRC is not supported with ADAT S/MUX.
Page 13

Monitoring
• An additional stereo “CUE” output path in
Pro Tools for headphone monitoring from the
front panel headphone jack
• Front panel Control Room (MAIN/ALT) and
Headphone monitoring volume control
• Flexible monitoring with fold-down from all
stereo and surround formats (up to 7.1
surround)
• Input mixer for low latency direct monitoring
of a variety of incoming signals (configured in
the Pro Tools Hardware Setup)
Synchronization
• Loop Sync input and output for connecting
additional Avid HD audio interfaces and
peripherals
• External Clock input and output for
synchronizing HD OMNI with external Word
Clock devices
HD I/O Audio Interface
HD I/O is a multichannel digital audio interface
designed for use with HD Native systems.
HD I/O features extremely high quality 24-bit
analog-to-digital (A/D) and digital-to-analog
(D/A) converters, and supports sample rates of
up to 192 kHz.
HD I/O comes in three standard configurations:
• 8 x 8 x 8 (8 analog in, 8 analog out, and 8
digital in and out)
• 16 x 16 analog in and out
• 16 x 16 digital in and out
HD I/O Features
HD I/O provides up to 16 discrete channels of
Pro Tools input and output, with 4-segment
LED meters for input and output.
Analog I/O
• Up to 16 channels of 24-bit D/A and A/D
converters for superior analog input and
output at sample rates of 44.1 kHz, 48 kHz,
88.2 kHz, 96 kHz, 176.4 kHz, and 192 kHz
with Analog In and Analog Out HD I/O cards
• Soft Clip and Curv limiting circuits to protect
against clipping on analog input
Digital I/O
• Up to 16 channels of 24-bit digital I/O, using
AES/EBU, TDIF DB-25, or Optical at sample
rates of 44.1 kHz, 48 kHz, 88.2 kHz, 96 kHz,
176.4 kHz, and 192 kHz with a Digital HD I/O
card
• Real-time sample rate conversion on digital
inputs with a Digital I/O card (up to 16
channels of AES/EBU, Optical, or TDIF)
• Support for S/MUX Optical for sample rates of
88.2 kHz and higher
• Support for 2 channels of S/PDIF Optical
(enclosed) with sample rates of up to 96 kHz
• 2 channels of AES/EBU I/O (enclosed) with
support for sample rates up to 192 kHz
• 2 channels of 24-bit-capable S/PDIF I/O
(enclosed) with support for sample rates up to
192 kHz
You can also add or remove HD I/O Analog
Expansion cards (ADC and DAC) and HD I/O
Digital Expansion cards for custom
configurations.
See the HD I/O Guide for more information.
Chapter 2: HD Native Hardware Overview 7
Page 14

Synchronization
• Loop Sync input and output for connecting
additional Avid HD audio interfaces and
peripherals
•External Clock input and output for
synchronizing HD I/O with external Word
Clock devices
Expandability
• Optional addition of I/O cards to expand
analog or digital I/O
• Simultaneous use of multiple Avid HD audio
interfaces to further expand system input and
output (for more information see the
Expanded Systems Guide)
HD MADI Digital Audio Interface
HD MADI is a 64-channel, digital audio
interface designed for use with HD Native
systems. HD MADI supports the Multichannel
Audio Digital Interface (MADI) format and
sample rates of up to 192 kHz. HD MADI
provides simplified connectivity between your
HD Native system and MADI-compatible audio
equipment, such as routers, digital mixing
consoles, and converters.
`
For more information about HD MADI, see
the HD MADI Guide.
HD MADI Features
• 2 MADI Optical and Coaxial inputs and 2
MADI Optical and Coaxial outputs for up to 64
discrete channels of digital input and output
(32 channels per DigiLink Mini port)
• Supports sample rates of 44.1 kHz, 48 kHz,
88.2 kHz, 96 kHz, 176.4 kHz, and 192 kHz
• 24- or 16-bit resolution
• Sample Rate Conversion (SRC) on input or
output
• Front panel clock and SRC indicators
• Front panel signal present LEDs for input and
output
• BNC Word Clock I/O for synchronizing HD
MADI with external 1x Word Clock
•BNC Loop Sync I/O for synchronizing HD
MADI with additional Avid HD audio
interfaces and peripherals (such as HD I/O,
HD OMNI, or SYNC HD)
• Dedicated BNC Word Clock input and XLR
AES/EBU input (clock input only) for external
MADI synchronization (when using SRC on
output)
• Clock support for the following formats:
Internal, Loop Sync, Word Clock, AES/EBU,
and MADI
• Varispeed modes (supports both 64- and 56channel standards)
To use the full channel capacity of
HD MADI, only a single HD MADI can be
connected to an HD Native card using two
DigiLink Mini cables. No additional I/O
may be used with this configuration.
HD Native Installation Guide8
Page 15

Chapter 3: Installing HD Native Hardware
SATA drive trays and drives
PCIe slot 4
(hidden)
PCIe slot 1
(video card)
PCIe slot 3
PCIe slot 2
This chapter provides information on installing
and connecting the HD Native card and Avid HD
audio interfaces. If you are installing Pro Tools,
install your HD Native hardware before
installing Pro Tools software.
Install the HD Native card first. Once the card is
installed, connect Avid HD audio interfaces.
Installing the
HD Native
in a Mac Pro
The HD Native card is a 4x PCIe card. For
optimum performance, install the HD Native
card in a 4x or higher PCIe card slot in your
computer.
Follow these instructions carefully to avoid
damaging the card and its components.
If you are installing the HD Native card in
the slot furthest from the video card, you
may need to remove the SATA drive trays
first to avoid damaging the card when
installing it.
Card
Mac Pro
Chapter 3: Installing HD Native Hardware 9
Page 16
To install the HD Native card:
1 Turn off your computer and any peripherals.
Leave your computer’s power cable plugged in so
that the computer is grounded.
2 Disconnect all cables attached to the computer
(such as hard drives, displays, and USB and
FireWire devices) except for the power cable.
3 Lay the computer on its side so the access
panel is facing up.
4 Open the computer case using the latch located
on the back of the computer.
5 Remove the clamp that secures the metal
access port covers to the chassis.
6 Remove the metal access port covers for first
available 4x or higher PCIe slot.
Before handling the card, discharge static
electricity from your clothes or body by
touching a grounded metal surface, such as
the power supply case inside your computer
with the power cable connected.
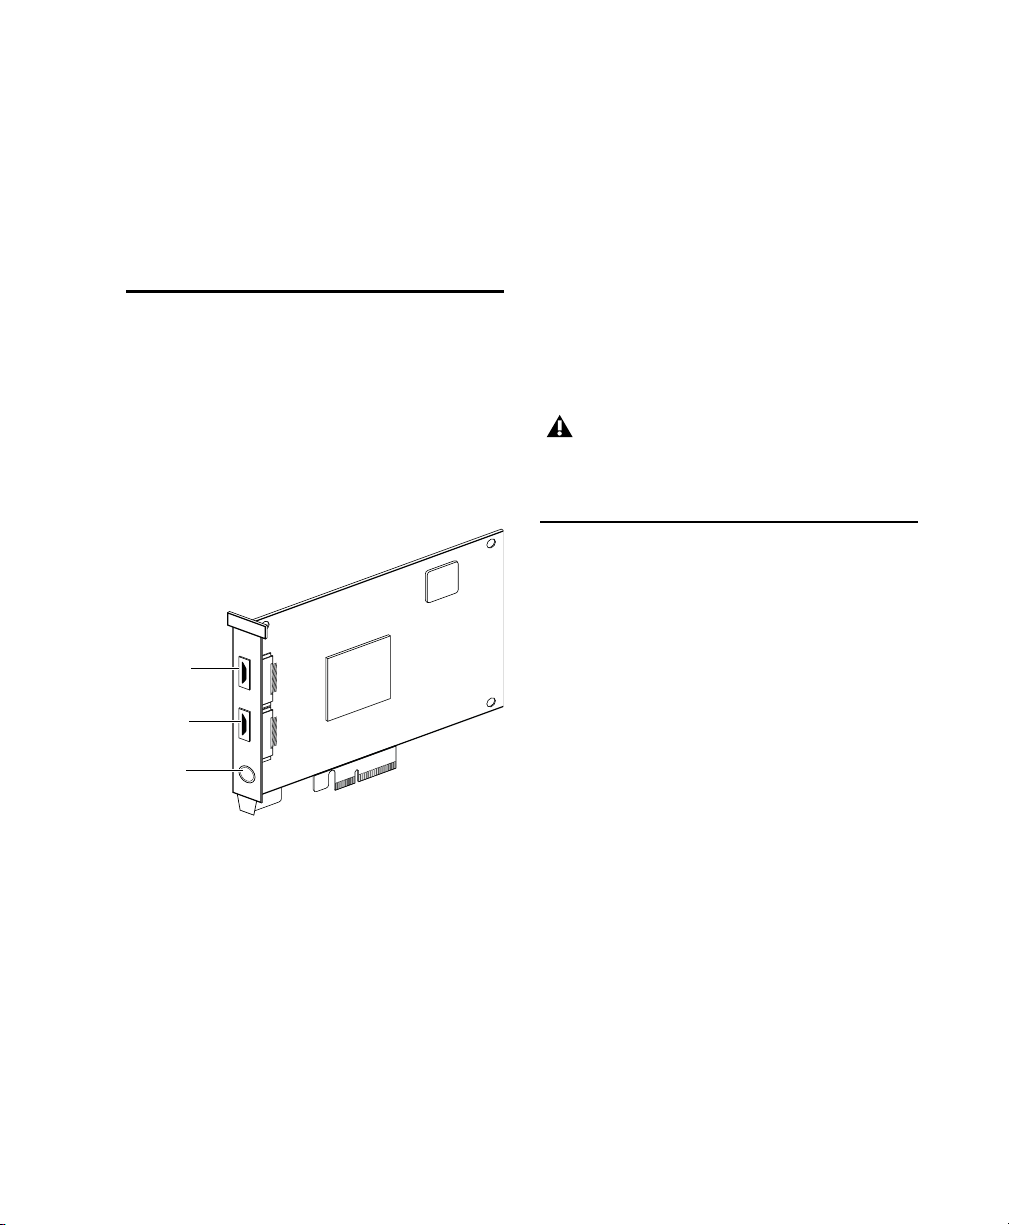
7 Install the HD Native PCIe card into the
corresponding PCIe slot in the computer. With
the card’s PCIe connectors facing down,
carefully insert the card straight down and
firmly seat the card’s PCIe connector into the
PCIe slot.
Inserting the HD Native card into a PCIe slot
8 Ensure that all cards are properly installed in
your system:
• Display card for your computer monitor
• HD Native PCIe card
• Avid-approved video capture card
(optional)
• Avid-approved Host-Bus Adapter card
(optional)
9 Reattach the clamp that secures the cards and
the slot covers to the chassis.
The card’s PCIe connectors will not seat
completely until you have replaced the
clamp that secures the cards and the metal
access port covers to the chassis.
HD Native Installation Guide10
Page 17
Installing the
HD Native
Card
in a Windows Computer
The HD Native card is a 4x PCIe card. For
optimum performance, install the HD Native
card in a 4x or higher PCIe card slot in your
computer.
To install the HD Native card:
1 Turn off your computer and any peripherals.
Leave your computer’s power cable plugged in so
the computer is grounded.
2 Disconnect all cables attached to the computer
(such as hard drives, displays, and USB and
FireWire devices) except for the power cable.
3 Open the computer case.
4 Remove the metal access port cover behind the
first available 4x or higher PCIe card slot
(typically, this will be the slot right next to the
video card) by removing the screw and sliding
the cover out from the access port.
Before handling any card, discharge static
electricity from your clothes or body by
touching a grounded metal surface, such as
the power supply case inside your computer.
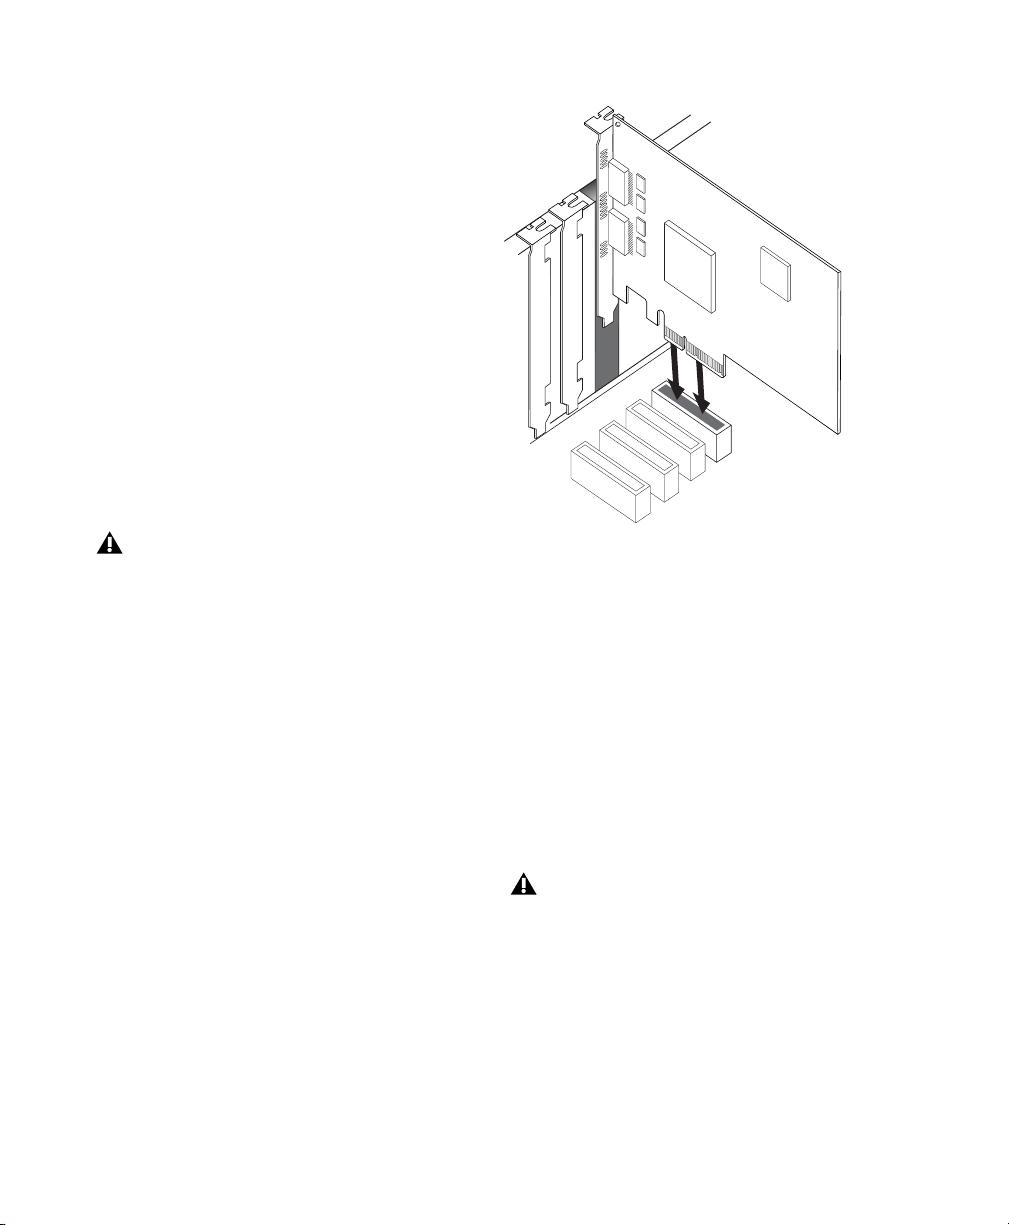
5 Install the HD Native card in the
corresponding PCIe slot.
Inserting the HD Native card into a PCIe slot
6 Secure the card in place with the slot access
port screw you removed earlier.
7 Ensure that all cards are properly installed for
your system:
• Display card for your computer monitor
•HD Native card (for PCIe)
•Avid-approved Host-Bus Adapter card
(optional)
Chapter 3: Installing HD Native Hardware 11
Page 18

Connecting Audio Interfaces
Each Avid HD audio interface provides several
different input and output options. For
example, HD OMNI supplies up to 8 channels of
input and output to your Pro Tools system,
HD I/O supplies up to 16 channels of input and
output, and HD MADI provides up to 64
channels. Audio interfaces can be connected
directly to the HD Native card, or through the
Expansion ports on other HD audio interfaces.
The HD Native card supports up to 64 channels
of audio input and output. To get a full 64
channels of I/O, you can connect up to 4 HD I/O
to the HD Native card. Two of the interfaces
connect directly to DigiLink Mini Ports 1 and 2,
and the other 2 interfaces connect to the
Expansion ports on those audio interfaces.
You can also get a full 64 channels of I/O with
HD MADI connected to the HD Native card
using 2 DigiLink Mini cables. However,
HD MADI will be the only audio interface in the
system.
To connect HD audio interfaces:
1 If you are using a single HD audio interface
(s uch as HD OM NI), connect the Primary Po rt to
DigiLin k Mini Port 1 on the HD Native card w ith
the included DigiLink Mini cable.
2 Connect an additional audio interface by doing
one of the following:
• Connect the Primary Port of the secondary
interface to the Expansion Port of the
primary interface with an additional
DigiLink Mini cable.
– or –
• Connect the Primary Port of the secondary
in ter fac e to D igiLi nk Min i Port 2 on the HD
Native card.
3 Make the necessary Loop Sync connections.
Refer to the HD OMNI Guide, HD I/O Guide, or
HD MADI Guide for specific details regarding:
• Front and back panel connectors and
indicators
• Installation of optional expansion I/O cards
(HD I/O only)
HD Native Installation Guide12
Page 19
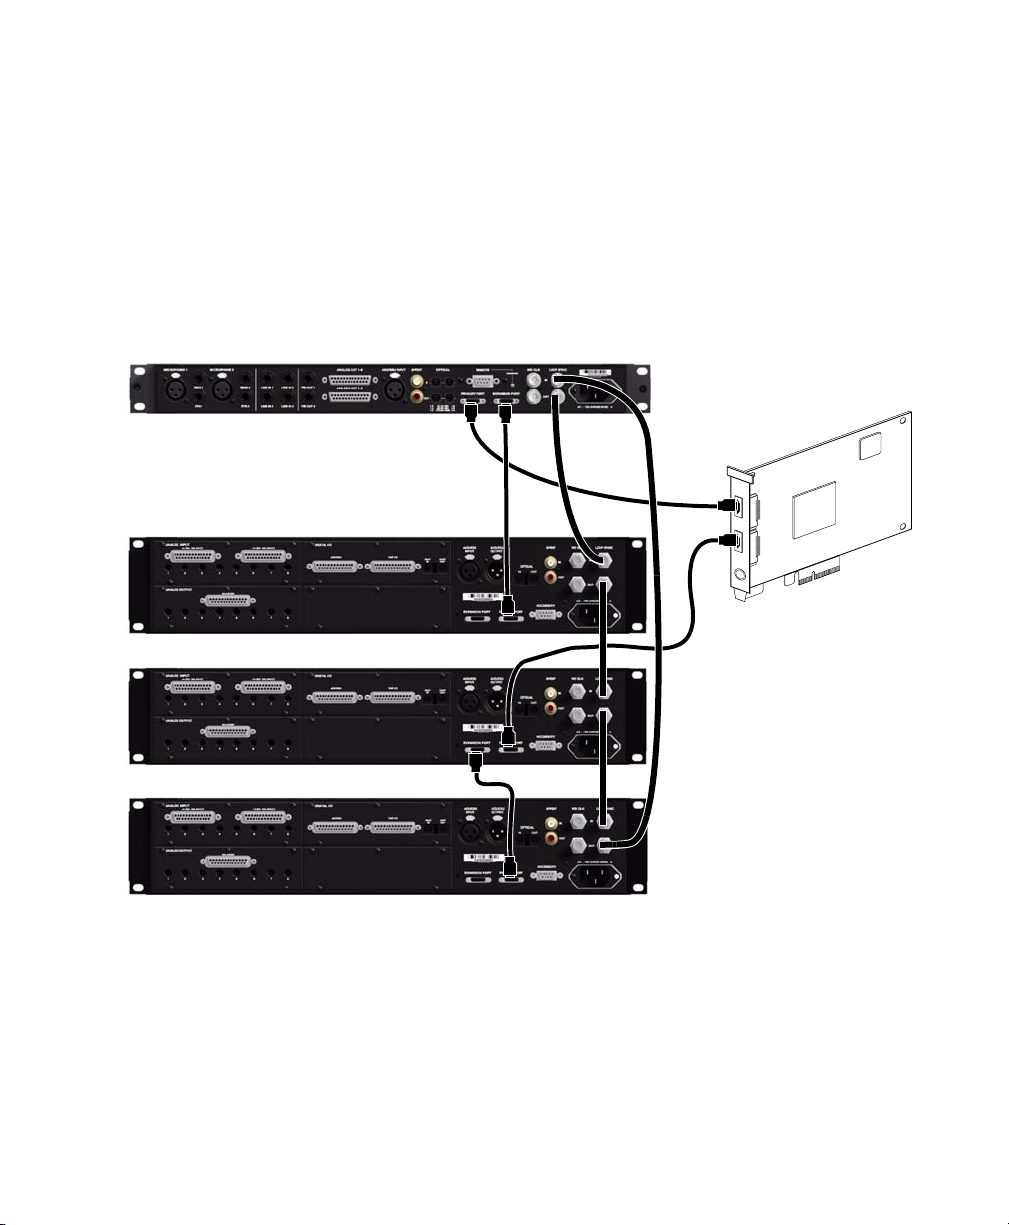
Connecting Loop Sync
PORT 1PORT 2
HD Native card
HD OMNI
HD I/O
HD I/O
HD I/O
12-foot DigiLink
Mini cable
18-inch DigiLink
Mini cable
Loop Sync
cables
If you are using two (or more) Avid HD audio interfaces or a SYNC peripheral, Loop Sync must be
connected to maintain proper clock among the devices.
To make Loop Sync connections:
1 Connect the Loop Sync Out of each interface to the Loop Sync In of the next interface with the BNC
cables included in your I/O packaging.
2 Connect the Loop Sync Out of the last interface to the Loop Sync In of the primary interface or SYNC
peripheral.
Making DigiLink Mini and Loop Sync connections
Chapter 3: Installing HD Native Hardware 13
Page 20
Maximum I/O Configuration
HD Native supports up to a maximum
combination of up to four total of the following
audio interfaces:
• HD OMNI (only one HD OMNI is supported
in a single HD Native system)
• HD I/O (up to four HD I/O can be used
simultaneously)
• HD MADI (full connectivity with one
HD MADI is possible when both DigiLink
Mini ports of the HD MADI are connected
to both DigiLink Mini ports on the HD
Native card)
For an example of connecting multiple Avid HD
audio interfaces, see Figure on page 13.
HD audio interfaces need room at their
sides to maintain proper air flow for
cooling. Do not block the sides of the unit or
disconnect the internal fan. If the units are
rack-mounted in a case, remove the case lids
or doors before operating the system.
Failure to do so can result in the units
overheating very quickly, which can
permanently damage sensitive components.
Installing and Authorizing Pro Tools Software
Once you have installed your HD Native
hardware in your computer, you can install and
authorize your Pro Tools or Pro Tools HD
software (sold separately).
For complete installation and
authorization instructions, see the
Pro Tools Installation Guide that came
with your Pro Tools software package.
Installing HD Native Hardware Drivers
HD Native hardware drivers are required for
your HD Native system to support digital audio
software, such as Pro Tools, and Core Audio
(Mac) or ASIO (Windows) compatible digital
audio software (such as Logic, Live, or Cubase).
If you install Pro Tools software, these drivers
are installed automatically. If you are not
installing Pro Tools, you can download the
driver installers from the Avid website
(www.avid.com)
For instructions on installing the Core
Audio driver, see “Installing the Core Audio
Driver” on page 15.
For instructions on installing the ASIO
driver, see “Installing the ASIO Driver” on
page 21.
HD Native Installation Guide14
Page 21

Chapter 4: Configuring Core Audio (Mac OS X Only)
Avid Core Audio Driver Capabilities
The Avid Core Audio Driver is a multi-client,
multichannel sound driver that lets Core
Audio–compatible applications record and play
back through HD Native hardware.
Full-duplex recording and playback of 24-bit
audio is supported at sample rates up to 96 kHz,
depending on your HD Native hardware and
CoreAudio client application.
The Avid Core Audio Driver provides up to 64
channels of I/O with an HD Native card.
Visit www.avid.com for the latest Avid Core
Audio drivers for HD Native hardware, as
well as current known issues.
Limitations of the CoreAudio Driver
The Avid Core Audio Driver has the following
limitations:
The Avid Core Audio Driver cannot be used to
preview sound files from the Mac Finder. When
a sound file is located in the Mac OS X
navigation window, a QuickTime transport bar is
displayed next to it. The QuickTime transport
bar lets you audition the sound file. The sound
will always play back though the Mac’s built-in
audio controller (through the Mac speaker or
headphone jack). However, if you double-click a
sound file, the QuickTime application will
launch, and can use the Avid Core Audio Driver
for playback.
The Avid Core Audio Driver cannot be used
for playback of Mac System Sounds.
Low Latency Monitoring is not available with
Core Audio software on HD Native hardware.
Installing the Core Audio Driver
The Avid Core Audio Driver is installed by
default when you install Pro Tools.
The Avid Core Audio Driver can also be installed
as a standalone driver on Mac systems that do
not have Pro Tools software installed. The
installer for the standalone Avid Core Audio
Driver is available on the Drivers Installer disc
that came with your Pro Tools Software
package, or from our website (www.avid.com).
If you uninstall Pro Tools, the Avid Core
Audio Driver is automatically uninstalled
at that time.
Chapter 4: Configuring Core Audio (Mac OS X Only) 15
Page 22

To install the standalone Avid Core Audio Driver:
1 Ensure that your HD Native hardware is
correctly installed.
2 Do one of the following:
• Insert the Driver Installers Disc that came
with your Pro Tools Software package in
your computer.
– or –
• Download the standalone Avid Core Audio
driver installer from our website
(www.avid.com).
3 Locate and double-click the Install HD Family
Driver.mpkg
.
Accessing the Avid Core Audio
Manager
The Avid Core Audio Manager application
launches automatically when the first client
application accesses the Avid Core Audio
Driver.
4 Follow the on-screen instructions to complete
the installation.
5 When the installation is complete, click
Restart.
Avid Core Audio Manager
You can configure the Avid Core Audio Driver
using CoreAudio Manager, or from within most
third-party CoreAudio-compatible client
applications (such as BIAS Peak or Logic). Refer
to the manufacturer’s documentation for more
information.
Some applications (such as Apple’s iTunes or
QuickTime Player), also require that you
configure either the Apple Sound Preferences or
Apple Audio MIDI Setup (AMS) to use the Avid
Core Audio Driver.
The Avid Core Audio Manager is configured to
auto-hide when first launched. To bring it to the
foreground, click on its icon in the dock.
The Avid Core Audio Manager is not used by
Pro Tools. It is only used by other Core Audio
applications.
Avid Core Audio Manager (HD Native shown)
Avid Core Audio Manager cannot be accessed
under the following circumstances:
• When Pro Tools is running
• When another application is using
Direct IO
To ensure proper playback with the Avid
Core Audio Driver, launch the Avid Core
Audio Manager first, making sure that its
status is “Connected.”
Preventing an Application from Accessing the
Avid Core Audio Driver
You can prevent an application from accessing
the Avid Core Audio Driver by holding down the
Shift key just before the application would
access the Avid Core Audio Driver, typically
when launching the application. Certain
applications (such as Apple Mail and iChat), do
not access the Avid Core Audio Driver until they
first play a sound, so you will need to hold down
the Shift key just prior to sound playback in
order to prevent the use of your Avid hardware
for playback.
HD Native Installation Guide16
Page 23

Using the Avid Core Audio
Manager
Use the Avid Core Audio Manager to change the
Core Audio Buffer Size setting, access the
Hardware Setup dialog for your Avid hardware
and control volume and mute for the Avid Core
Audio Driver. The Avid Core Audio Manager
also identifies your Avid hardware, the
supported number of Input and Output
Channels and the number of attached clients
(applications).
3 You can also change the buffer size from
within the client application if it is the only
client attached to the Core Audio Driver. Once
two or more clients are active, you will not be
able to change the sample rate or the buffer size.
HW Setup Button
The HW Setup button opens the Hardware Setup
dialog for your Avid hardware. The
HW Setup
button is only available when no clients are
using the Core Audio Driver.
Buffer Size
You can select from the following buffer sizes
(depending on your Avid hardware):
• 64 samples
• 128 samples
• 256 samples
• 512 samples
• 1024 samples
• 2048 samples
Changing the Buffer Size for the Avid Core
Audio Driver does not affect the
H/W Buffer Size
setting in the Pro Tools Playback Engine dialog.
To configure Avid Core Audio Hardware Buffer
Size:
1 Double-click the Avid Core Audio Manager file
(located in /Applications/Avid/).
2 From the Buffer Size pop-up menu, select the
desired Core Audio buffer size (in samples).
Generally, smaller buffer sizes are preferable.
However, if you experience any problems with
performance (such as clicks and pops during
recording or playback), try increasing the Core
Buffer Size setting.
Audio
To configure the Avid Core Audio HW Setup:
1 Quit any Core Audio client applications.
2 Double-click the Avid Core Audio Manager file
(located in /Applications/Avid/).
3 Click the HW Setup button to open the
Hardware Setup dialog.
4 Configure the Hardware Setup dialog for your
Avid hardware.
Hardware Setup dialog, HD I/O shown
For more information on the Hardware
Setup dialog, refer to the Pro Tools
Reference Guide.
5 When you are finished, click OK to close the
Hardware Setup dialog.
Chapter 4: Configuring Core Audio (Mac OS X Only) 17
Page 24

Prefs Button
Mirror Analog Outs 1 & 2 to Digit al Outs (002/003)
The Prefs button opens the Avid Core Audio
Manager Preferences dialog. There are several
options available configuring the Manager
application. When finished setting these
options, click
OK to close the Avid Core Audio
Manager Preferences window.
CoreAudio Manager Preferences
Hide Manager if Auto-Launched by Client
Enable
this option to hide the Manager panel after the
first client application accesses the Avid Core
Audio Driver. To open the Manager panel, click
on the Avid Core Audio Manager application
icon in the Dock.
Auto-Quit Manager when Last Client Quits
Enable this option to make the Manager
application quit when there are no longer any
clients using the Avid Core Audio Driver.
Use C|24 Stereo Routing (L/R to 1/3)
When using
C|24, enable this option to configure the Avid
Core Audio Driver to output through the C|24
standard stereo routing (outputs 1 and 3).
Use XMON Stereo Routing (L/R to 1/5)
When
using D-Control or D-Command, enable this
option to configure the Avid Core Audio Driver
to output through the D-Control or D-Command
standard stereo routing (outputs 1 and 5).
This option is grayed out for systems using an
HD Native card. When using 003, 003 Rack, 003
Rack+, Digi 002, or Digi 002 Rack, enable this
option to mirror the main outputs through the
digital outputs that are selected in the Hardware
Setup dialog.
Connect Button
The Connect button is available when the Avid
Core Audio Manager is launched and cannot
connect with the Pro Tools hardware (such as
when Pro Tools is launched and the hardware is
disconnected or disabled). Before trying to
connect, make sure to quit Pro Tools and make
sure that your hardware is connected and turned
on. You can then click on the
Connect button to
acquire the hardware.
If any application is launched prior to
pressing the Connect button and you want
that application to use the Avid Core Audio
Driver for playback, you will need to quit
and relaunch the application for it to
connect properly to the CoreAudio
Manager.
Quit Button
Use the Quit button to quit the Avid Core Audio
Manger. Be sure to quit any client applications
before using the
Quit button in the Manager. If
any applications are currently attached to the
Manager application when quitting, you may get
an error message indicating that the Pro Tools
hardware is no longer available. You may have
to change the application’s preferences to use
different hardware for playback or possibly quit
and relaunch the application for proper
playback to be resumed.
HD Native Installation Guide18
Page 25

Configuring Avid HD Audio Interfaces for Third-Party Applications
When using an HD Native card with an
application other than Pro Tools (such as Apple
GarageBand), you can configure hardware
settings using the audio preference settings
available in that application.
To configure hardware settings through a Core
Audio application (such as Apple GarageBand):
1 Select Avid HW (HD Native) for Audio Output
and Audio Input.
2 Select a buffer size for your system from one of
the following options:
•Maximum/Large buffer size
– or –
• Minimum/Small buffer size
For more information about the hardware
settings options for your specific Core Audio
application, refer to the manufacturer’s
documentation.
unnecessary since you can configure the Core
Audio Buffer Size setting and audio input and
output channels from within the client
application.
Apple Sound Preferences
To configure the Apple Sound Preferences:
1 Launch System Preferences (Apple menu >
System Preferences).
2 Click Sound.
3 Click Output and select Avid HW (HD Native) as
the device for sound output.
Configuring the Apple Sound Preferences or Apple Audio MIDI Setup
(Required for Using Avid Audio Interfac es with
Apple iTunes or QuickTime Player)
To use your Avid audio interface with certain
Core Audio–compatible playback applications
(such as Apple iTunes or QuickTime Player),
you will need to configure either Sound
Preferences or Audio MIDI Setup in addition to
Avid Core Audio Manager. However, for most
Core Audio–compatible client applications
(such as BIAS Peak or Ableton Live) this is
Sound Preferences, Output settings
4 Click Input and select Avid HW (HD Native) as
the device for sound input.
Chapter 4: Configuring Core Audio (Mac OS X Only) 19
Page 26

Sound Preferences, Input settings
5 Quit System Preferences.
4 In the Audio Devices window, click the Output
tab.
Apple Audio MIDI Setup application, Audio Devices
Output settings
Apple Audio MIDI Setup
To configure the Apple Audio MIDI Setup:
1 Launch Audio MIDI Setup (located in
Home/Applications/Utilities).
2 In the Audio Devices window, click the Input
tab.
Apple Audio MIDI Setup application, Audio Devices
Input settings
3 From the Audio Devices list on the left, select
HD Native.
5 From the Audio Devices list on the left, select
HD Native.
Leave System Output set to Built-in Audio.
The Avid Core Audio Driver cannot be used
for system sounds.
6 In the Audio Input or Audio Output page,
select the
Format (sample rate). Note that the
input sample rate and output rate are linked.
7 Choose Audio MIDI Setup > Quit Audio MIDI
Setup
.
HD Native Installation Guide20
Page 27

Chapter 5: Configuring ASIO (Windows Only)
ASIO Driver Capabilities
The ASIO Driver is a single-client, multichannel
sound driver that allows third-party audio
programs that support the ASIO Driver standard
to record and play back through qualified Avid
HD audio interfaces.
Full-duplex playback of 24- and 16-bit audio are
supported at sample rates up to 96 kHz,
depending on your Pro Tools hardware and
ASIO-client program used (such as Cubase or
Reason).
The ASIO Driver provides up to 64 channels of
input and output with a HD Native card.
Visit www.avid.com for the latest ASIO
drivers for hardware, as well as current
known issues.
Limitations of the ASIO Driver
The Avid ASIO Driver has the following
limitations:
It canno t be u sed wit h mu lti ple app lic ati ons at
the same time. Only one application at a time
can use the ASIO Driver, so be sure to disable the
Windows system sounds.
Low Latency Monitoring is not available with
Core Audio software on HD Native hardware.
It is recommended that you use a separate
sound card for games or other general work.
Installing the ASIO Driver
The ASIO Driver is installed by default when you
install Pro Tools.
The ASIO Driver can also be installed as a
standalone driver on Windows systems that do
not have Pro Tools software installed. The
installer for the standalone ASIO Driver is
available on the Drivers Installer disc that came
with your Pro Tools Software package, or from
our website (www.avid.com).
If you uninstall Pro Tools, the ASIO Driver
is automatically uninstalled at that time.
To install the standalone ASIO Driver:
1 Ensure that your HD Native card is correctly
installed.
2 Do one of the following:
• Insert the Driver Installers Disc that came
with your Pro Tools Software package in
your computer.
– or –
• Download the standalone ASIO driver
installer from our website (www.avid.com).
3 Locate and double-click the HD Family Driver
Setup.exe
4 Follow the on-screen instructions to complete
the installation.
5 When the installation is complete, click Finish
to quit the installer and restart your computer.
.
Chapter 5: Configuring ASIO (Windows Only) 21
Page 28

ASIO Driver Control Panel
1
2
Configuring ASIO Driver settings can be done
using the ASIO Control Panel, which is accessed
within some third-party ASIO-compatible client
applications.
Accessing the ASIO Driver
Control Panel
To access the ASIO Driver Control Panel from a
third-party application:
Refer to your ASIO-client program’s
documentation.
The ASIO Driver Control Panel cannot be
accessed under the following circumstances:
• When Pro Tools is running.
• When playing or recording in an audio
program that does not support the ASIO
Driver.
• When using a third-party audio program
that has an option to keep the ASIO Driver
open even when you are not playing or
recording. (You must close the audio
program before you can open the ASIO
Driver Control Panel.)
Example with Propellerheads Reason
To configure Propellerheads Reason:
1 Click the select ASIO Avid Driver from the
Audio Card Driver selector in the Audio
Preferences.
Setup Example, using Propellerheads Reason
Using the ASIO Driver Control
Panel
From the ASIO Driver Control Panel, you can
change the
Hardware Setup dialog for your Avid hardware.
Buffer Size setting or access the
2 Click the Contro l Panel button to open the Avid
ASIO Control Panel.
HD Native Installation Guide22
ASIO Control Panel
Page 29

Buffer Size
Advanced Button
Small buffers have the advantage of low
latency in the record monitor path. (Latency is
the time delay between a signal entering the
audio inputs and leaving the outputs during
recording.)
Larger buffers have the advantage of making
the ASIO Driver more immune to audio dropouts
during playback and recording.
In some ASIO-compatible audio programs,
performing various tasks will interrupt the
ASIO Driver and may result in clicks and pops in
audio playback or recording. Choosing medium
or large buffers (such as 256, 512, or 1024) can
help alleviate this problem.
Changing the
Driver does not affect the
Buffer Size setting for the ASIO
H/W Buffer Size
settings in the Pro Tools Playback Engine
dialog.
Device
The Device setting is always set to your installed
Avid hardware.
The Advanced button opens the Hardware Setup
dialog for the Avid hardware that you are using.
For more information on the Hardware
Setup dialog, see the Pro Tools Reference
Guide.
Hardware Setup dialog
Chapter 5: Configuring ASIO (Windows Only) 23
Page 30

HD Native Installation Guide24
Page 31

Chapter 6: Low Latency Monitoring with Pro Tools
Using Low Latency Monitoring
HD Native systems with Pro Tools can use the
Low Latency Monitoring option to record with an
extremely small amount of monitoring latency,
to as many tracks as the system supports. Only
tracks with input from an audio interface (not an
internal mix bus) use Low Latency Monitoring.
Low Latency Monitoring is not available with
Core Audio or ASIO–compatible software.
To use Low Latency Monitoring:
1 From the Output Path selector, assign each
track to the selected Low Latency Monitoring
Path (as set in the I/O Setup Output page). Only
tracks assigned to these outputs use Low Latency
Monitoring.
2 Record enable audio tracks by clicking their
Record Enable buttons.
3 Select Options > Low Latency Monitoring.
When
Low Latency Monitoring is enabled, any
plug-ins and sends assigned to record-enabled
tracks (routed to the selected Low Latency
Monitoring Path) are automatically bypassed,
and must remain bypassed. Also, these tracks do
not register on meters for Master Faders.
Configuring Low Latency Monitoring in the I/O Setup
The Output page of the I/O Setup lets you enable
(or disable) Low Latency Monitoring. It also lets
you specify any available Output path for Low
Latency Monitoring. The Output path for Low
Latency Monitoring can be of any channel width
(from Mono to 7.1). Low Latency Monitoring
uses Outputs 1–2 by default.
To configure Low Latency Monitoring in the I/O
Setup:
1 Open the I/O Setup dialog (Setup > I/O).
2 Click the Output tab.
3 Enable the Low Latency Monitoring option.
4 From the Low Latency Monitoring pop-up
menu, select the Output path you want to use for
Low Latency Monitoring.
Selecting the Output path for Low Latency Monitoring
5 Click OK to save changes and close I/O Setup.
Chapter 6: Low Latency Monitoring with Pro Tools 25
Page 32

Low Latency Monitoring and Bounce To Disk
With Low Latency Monitoring enabled, only audio
tracks are included with the
command—Auxiliary Input and Instrument
tracks are ignored. To include Auxiliary Input
and Instrument tracks, disable
Monitoring
before using Bounce to Disk.
External input cannot be recorded during a
Bounce to Disk. To include external input in
your bounce, it must be recorded to new
audio tracks before using Bounce to Disk.
Bounce to Disk
Low Latency
HD Native Installation Guide26
Page 33

Appendix A: Compliance Information
Environmental Compliance
Disposal of Waste Equipment by Users
in the European Union
This symbol on the product or its packaging indica tes that this
product must not be disposed of with other waste. Instead, it
is your responsibility to dispose of your waste equipment by
handing it over to a designated collection point for the
recycling of waste electrical and electronic equipment. The
separate collection and recycling of your waste equipment at
the time of disposal will help conserve natural res+ources and
ensure that it is recycled in a manner that protects human
health and the environment. For more information about
where you can drop off your waste equipment for recycling,
please contact your local city recycling office or the dealer
from whom you purchased the product.
Proposition 65 Warning
This product contains chemicals, including
lead, known to the State of California to
cause cancer and birth defects or other
reproductive harm. Wash hands after
handling.
Perchlorate Notice
This product may contain a lithium coin battery. The State of
California requires the following disclosure statement:
“Perchlorate Material – special handling may apply, See
www.dtsc.ca.gov/hazardouswaste/perchlorate.”
Recycling Notice
27
Page 34

EMC (Electromagnetic Compliance)
Avid declares that this product complies with the following
standards regulating emissions and immunity:
• FCC Part 15 Class A
• EN55103-1 E4
• EN55103-2 E4
• AS/NZS CISPR 22 Class A
• CISPR 22 Class A
FCC Compliance for United States
Communication Statement
Note: This equipment has been tested and found to comply
with the limits for a Class A digital device, pursuant to part
15 of the FCC Rules. These limits are designed to provide
reasonable protection against harmful interference when
the equipment is operated in a commercial environment.
This equipment generates, uses, and can radiate radio
frequency energy and, if not installed and used in
accordance with the instruction manual, may cause harmful
interference to radio communications. Operation of this
equipment in a residential area is likely to cause harmful
interference in which case the user will be required to
correct the interference at his own expense.
Any modifications to the unit, unless expre ssly approved by
Avid, could void the user's authority to operate the
equipment.
Australia and New Zealand EMC
Regulations
Canadian Compliance
This Class A digital apparatus meets all requirements of the
Canadian Interference-Causing Equipment Regulations.
Cet appareil numérique de la classe A respecte toutes les
exigences du Règlement sur le material brouilleur du Canada.
European Union Declaration of
Conformity
(EMC and Safety)
Avid is authorized to apply the CE (Conformité Europénne)
mark on this compliant equipment thereby declaring
conformity to EMC Directive 2004/108/EC and Low Voltage
Directive 2006/95/EC.
Korean EMC Regulations
HD Native Installation Guide28
Page 35

Safety Compliance
Safety Statement
This equipment has been tested to comply with USA and
Canadian safety certification in accordance with the
specifications of UL Standards: UL 60950-1, 2nd Ed 2007/IEC
60950-1, 2nd Ed and CSA C22.2 No. 60950-1-07, 2nd Ed
2007-03. Avid Inc., has been authorized to apply the
appropriate UL & CUL mark on its compliant equipment.
Warning
Important Safety Instructions
1) Read these instruction s .
2) Keep these instructions.
3) Heed all warnings.
4) Follow all instructions.
5) Do not use this equipment near water.
6) Clean only with dry cloth.
7) Do not block any ventilation openings. Install in accord ance
with the manufacturer’s instructions.
8) Do not install near any heat sources such as radiators, heat
registers, stoves, or other equipment (including amplifiers)
that produce heat.
9) Do not defeat the safety purpose of the polarized or
grounding-type plug. A polarized plug has two b lades with one
wider than the other. A grounding type plug has two blades
and a third grounding prong. The wide blade or the third pro ng
are provided for your safety. If the provided plug does not fit
into your outlet, consult an electrician for replacement of the
obsolete outlet.
10) Protect power cords from being walked on or pinched
particularly at plugs, convenience receptacles, and the point
where they exit from the equipment.
11) Only use attachments/accessories specified by the
manufacturer.
12) For products that are not rack-mountable: Use only with a
cart, stand, tripod, bracket, or table specified by the
manufacturer, or sold with the equipment. When a cart is
used, use caution when moving the cart/equipment
combination to avoid injury from tip-over.
13) Unplug this equipment during lightning storms or when
unused for long periods of time.
14) Refer all servicing to qualified service personnel. Servicing
is required when the equipment has been damaged in any
way, such as power-supply cord or plug is damaged, liquid
has been spilled or objects have fallen into the e quipment, the
equipment has been exposed to rain or moisture, does not
operate normally, or has been dropped.
15) For products that are a Mains powered device:
The equipment shall not be exposed to dripping or splashing
and no objects filled with liquids (such as vases) shall be
placed on the equipment.
Warning! To reduce the risk of fire or electric shock, do not
expose this equipment to rain or moisture.
16) For products containing a lithium battery:
CAUTION! Danger of explosion if battery is incorrectly
replaced. Replace only with the same or equivalent type.
17) The equipment shall be used at a maximum ambient
temperature of 40° C.
18) Use only with Listed ITE equipment.
29
Page 36

HD Native Installation Guide30
Page 37

第1章:
HD Native
へようこそ
HD Native PCIe
ウェア、
同期周辺機器と共に、高精細度デジタル・オーディ
オのレコーディング、編集、信号処理、ミキシング、
入出力のための接続を可能にします。
また
HD
HD Native
ジタル・オーディオ・ソフトウェアと共に使用する
こともでき、最大
このガイドは
での
HD Native
て説明します。
ProTools
ソリゼーションについて詳しくは、
フトウェア・パッケージに付属の
ンストール・ガイド』
HD Native
HD Native
•HD Native PCIe
•HD Native
スに接続するための
オンライン登録カード
•
このインストール・ガイド。
•
ウェアのインストールと設定について説明し
ます。
•HD Native
ハードウェアのインストールについて説明し
ます。
安全にお使いいただくためのガイド
•
カードは、
Avid HD
オーディオ・インターフェースを使用した
オーディオ・インターフェース、
ハードウェアは
64
MacとWindows
ハードウェアのインストールについ
ソフトウェアのインストールとオー
Avid ProTools®
Core AudioとASIO
チャンネルの
プラットフォーム上
をご参照ください。
I/O
のパッケージ
のパッケージの内容は以下のとおりです。
カード
カードをオーディオ・インターフェー
12’ DigiLink™ Mini
HD Native
クイック・セットアップ。基本的な
ソフト
互換デ
に対応します。
ProTools
『
Pro Tools
ソ
イ
ケーブル
ハード
HD Native
HD Native
以下のソフトウェア・パッケージの1つ(別売)
•
•Pro Tools HD
•ProTools
サードパーティーの
•
換ソフトウェア
•HD Native PCIe
以下の
•
Avi d HD
売)の少なくとも
システム
システムは以下によって構成されます。
ソフトウェア
ソフトウェア
Core Audio
カード
オーディオ・インターフェース(別
台(最大4台)
1
または
ASIO
互
•HD OMNI
•HD I/O
•HD MADI
1つのHD Native
のみが使用できます。
システムでは1台の
HD OMNI
登録
同封の登録情報カードをご覧になり、指示に従って
オンラインで購入情報をご登録ください。これは、
新規ユーザーとしての大切な手続きです。製品を登
録すると、以下のサービスが受けられます。
テクニカルサポートに関する情報
•
今後のアップグレードの案内
•
ハードウェアの限定保証
•
ハードウェアの保証
ご使用のハードウェアの保証は、オンライン登録
カードに記載されています。
第1章:
HD Native
へようこそ
31
Page 38

システム要件と互換性
HD Native
ア、
ティーの
を起動した、要件を満たす
ハードウェアは、
ProTools
Core Audio
ProTools HD
ソフトウェア、またはサードパー
または
ASIO
または
Mac
ピューターと共に使用できます。
Avidは、Avid
が動作確認を行ったハードウェアとソ
フトウェアに対してのみ互換性を保証し、サポート
を提供します。
すべてのシステム必要条件、要件を満たすコン
ピューター、オペレーティング・システム、ハード
ディスク、他社の機器の一覧については、以下の弊
社のウェブサイトの最新情報をごごご覧ください。
ソフトウェ
互換ソフトウェア
Windows
コン
www.avid.com/compatibility
ご使用の
DigiTest
報は、
または
ご覧になれます)を参照してください。
HD Native
を使ってテストできます。詳しい情
Avid DigiTest Guide.pdf
ProTools
ハードウェアは
(オンライン
をインストールすることで
Avid
このガイドで使用する表記法
すべての
ProTools
キー・コマンドを示すため以下の表記法を用います。
表記法 動作
[ファイル](
[保存](
Save
Control+N
クリック
Control-
右クリック マウスの右ボタンをクリックする
画面に表示される
は、フォントが異なります。
以下の記号は重要な情報を示すために使用します。
ProTools
アドバイス。
ガイドでは、メニューの選択と
File)>
)
[ファイル]メニューから
[保存]を選択する
キーを押さえてNキー
Control
を押す
キーを押さえてクリック
Control
する
コマンド、オプション、設定の名前
システムを活用するために役立つ
32
HD Native
インストール・ガイド
Pro Tools
ステムの処理能力に影響がある重要な注意。
キーボードやマウスの便利なショートカット。
ProTools
リファレンス。
セッションのデータや
ガイドの関連セクションを示すクロス
Pro Tools
シ
Page 39

www.avid.com
のウェブサイト(
Avid
システムを最大限に活用するための最良のオンライ
ン情報源です。次に、利用可能なサービスと機能の
一部を紹介します。
について
www.avid.com
)は 、
ProTools
製品登録
サポートとダウンロード
サポート)にアクセスします。ソフトウェア・アッ
プデートと最新のオンライン・マニュアルのダウン
ロード、互換性に関するマニュアルでのシステム要
件の参照、オンライン知識ベースの検索、ユーザー
会議での世界規模の
加などを行えます。
トレーニングと教育
通じて自己学習を行ったり、認定された
レーニング・センターのクラスルーム設定で学習方
法を見つけたりできます。
製品と開発者
ウェアのデモ版のダウンロード、デベロップメント・
パートナーとそのプラグイン、アプリケーション、
ハードウェアに関する情報をご覧いただけます。
ニュースとイベント
り、
購入した製品をオンラインで登録できます。
Avid Customer Success
ProTools
オンラインで利用可能なコースを
コミュニティへの参
ProTools
製品に関する情報、つまりソフト
Avid
の最新ニュースを取得した
Avid
ProTools
デモにサイン・アップできます。
(技術
ト
第1章:
HD Native
へようこそ
33
Page 40

34
HD Native
インストール・ガイド
Page 41

第2章:
PORT 1PORT 2
DigiLink Mini
ポート
2
DigiSerial
ポート
DigiLink Mini
ポート
1
HD Native
ハードウェアの概要
HD Native PCIe
HD Native PCIe
レコーディグ&プレイバックに対して最大
ネルの
I/O
のオーディオ・ストリームに対応します。また、搭
載された
と低レイテンシー・モニタリングのための専用の処
理能力を提供します。
HD Native PCIe
DigiLink Mini
HD Native PCIe
フェースへ接続するための
トを装備しています。各ポートは、ご使用のオー
ディオ・インターフェースに対して最大
ルのオーディオの入出力を提供します。
DigiSerial
周辺機器の
DigiSerial
ピンのミニ
8
HD Native PCIe
MachineControl
カードは、ダイレクト・ディスク・
に対応し、最大24ビットと最大
FPGAはProTools
カード
ポート
カードは、HDオーディオ・インター
ポート
SYNCはHD Native PCIe
ポートへ接続できます。このコネクターは
です。
DIN
カード
チャン
64
192 kHz
を使用したミキサー構成
2つのDigiLink Mini
カードの
の接続には対応していません。
DigiSerial
ポー
チャンネ
32
カードの
ポートは、
DigiLink Mini
HD Native
オーディオ・インターフェースの接続には
Mini
ケーブルには以下の5種類の長さがあります。
カードと
ケーブルを使用してください。
ケーブル
HD I/O、HDOMNI、HD MADI
DigiLink
DigiLink Mini
•18”(0.46m)(HD I/O、HDOMNI、HD MADI
オーディオ・インターフェースに付属)
•12’(3.6m)(HDNative
•25’(7.62m
)(別売)
•50’(15.25m)、176.4kHzと192kHz
ンに対する最大長(別売)
• 100’(30.5m)、88.2kHzと96kHz
ンに対する最大長(別売)
Avid HD
ProTools
Core Audio
を使用してオーディオをレコーディングまたはプレ
イバックするためには、少なくとも
オーディオ・インターフェースが
番目のポートに接続されていなければなりません。
1
HD Native
ターフェースに対応し、最大
ディオの入出力が同時に行えます。
HD OMNI
オーディオ・インターフェース
(または要件を満たすサードパーティーの
互換または
は、最大4台の
オーディオ・インターフェース
HD OMNIは、HD Native
めに設計された業務用デジタル・オーディオ・イン
ターフェースです。
ディング、ポストプロダクションの各スタジオにお
いて、コンパクトなプリアンプ、モニタリング、
ソリューションを提供します。
HD OMNI
カードに1本付属)
のセッショ
のセッショ
互換アプリケーション)
ASIO
台の
1
HD Native
Avid HD
システムと共に使用するた
第2章:
オーディオ・イン
チャンネルのオー
64
は、音楽制作、レコー
HD Native
カードの
ハードウェアの概要
Avid HD
I/O
35
Page 42

詳しくは、『
HDNative
使用できます。
HD OMNI
HD OMNI
システムでは1台の
の機能
HD OMNIは、ProTools
トの最大
インプットまたはアウトプット(選択可能)用の
セグメント
アナログ
•24
トは最大
高品質
•
マイクと楽器レベル入力用の
•
TRS
•XLR
チャンネル1と2のハードウェア・インサート用
•
のバックパネルの
ク
アナログ
•
インプット
アナログ入力のクリッピングを防ぐ「ソフト・
•
クリップ」と「カーブ」リミッティング回路
バックパネルに
•
(別売)を使用した可変アウトプット・ゲイン付き
8
•TRS
アナログ・アウトプット(
ンネル
フロントパネル・ステレオ
•
ジャック
のディスクリート・チャンネルを提供し、
8
メーターを搭載しています。
LED
I/O
ビットの
AD/DA
192kHz
プリアンプ
Mic/DI
のフロントパネル・インプット
バックパネル・マイク・インプット
× 2と1/4
インチ
ライン・レベル・バックパネル・
TRS
× 4
HD OMNI
ますが、同時に行えるアナログ入力は最大
ンネルです。
チャンネルのアナログ・アウトプット
を使用した、バックパネルの2チャンネルの
では複数のアナログ入力接続が行え
または
1-2
ガイド』をご参照ください。
HD OMNI
のインプットとアウトプッ
コンバーター、サンプルレー
まで対応
(チャンネル
× 2
XLRと1/4
× 2
インチ
1/4
リターン・ジャック
TRS
(チャンネル
ブレイクアウト・ケーブル
DB-25
DB-25
を反映)
7-8
センド・ジャッ
TRS
)
1-4
コネクターのチャ
ヘッドフォン・
1/4”
× 2
だけが
1-2
インチ
× 2
チャ
4
)
チャンネルの
•2
のシングルワイヤ)
192kHz
チャンネルの
•2
プット(最大
チャンネルの
•8
ウトプット
サンプルレート
•
の
ADAT S/MUX Optical
4
サンプルレート
•
ンネルに対応
•AES/EBU、S/PDIF
ジタル・インプット
ルレート変換(
SRCはADAT S/MUX
モニタリング
•ProTools
パス、フロントパネルのヘッドフォン・ジャック
からのヘッドフォン・モニタリング用
フロントパネルのコントロール・ルーム
•
(
ボリューム・コントロール
ステレオ・フォーマットとサラウンド・フォーマッ
•
ト(最大
ウン機能を搭載した柔軟なモニタリング
さまざまな入力信号の低レイテンシー・ダイレクト・
•
モニタリング用インプット・ミキサー(
[ハードウェア設定]で設定)
同期
追加の
•
続するための
プット
•HDOMNI
めの外部クロック・インプットとアウトプット
に、追加ステレオ「キュー」アウトプット・
MAIN/ALT
)とヘッドフォンのモニタリング・
サラウンド)すべてのフォールドダ
7.1
Avi d HD
を外部ワードクロック機器と同期するた
AES/EBU XLR
S/PDIF RCA
)
192kHz
ADAT TOSLINK
インプット(最大
インプットとアウト
のインプットとア
88.2kHz、96kHz、176.4kHz、192kHz
に対応
までの
96kHz
、または
)
SRC
1-2
S/PDIF Optical2
Optical(S/PDIF
のリアルタイム・サンプ
に対応していません。
)のデ
Pro Tools
インターフェースや周辺機器を接
Loop Sync
のインプットとアウト
チャ
の
36
デジタル
•DB-25
た、
8
192kHz
HD Native
I/O
ブレイクアウト・ケーブル(別売)を使用し
チャンネルの
のシングルワイヤ)
インストール・ガイド
AES/EBU
アウトプット(最大
Page 43

HD I/O
HD I/Oは、HD Native
に設計されたマルチチャンネル・デジタル・オー
ディオ・インターフェースです。
高品質の
サンプルレートは最大
オーディオ・インターフェース
システムと共に使用するため
HD I/O
ビットの
24
コンバーターを搭載し、
AD/DA
まで対応しています。
192kHz
は、極めて
サンプルレート
•
チャンネルに対応
2
サンプルレート
•
チャンネル
2
サンプルレート
•
(付属)2チャンネル
96kHz
192kHz
までの
192kHz
S/PDIF Optical
までの
AES/EBU I/O
までの24ビット
(付属)
(付属)
S/PDIF I/O
HDI/Oは、3
• 8 × 8 × 8(8
• 16 × 16
• 16 × 16
HD I/O
デジタル拡張カードを追加または取り外し、独自
I/O
に構成にすることも可能です。
HD I/O
HD I/Oは、ProTools
最大
16
ンプットとアウトプット用の
ターを搭載しています。
アナログ
優れたアナログのインプットとアウトプットを提
•
供する
バーターを搭載し、
Analog Out HD I/O
ト
44.1kHz、48kHz、88.2kHz、96kHz、176.4kHz
192kHz
アナログ入力のクリッピングを防ぐ「ソフト・
•
クリップ」と「カーブ」リミッティング回路
デジタル
•AES/EBU、TDIFdb-25
サンプルレート
176.4kHz、192kHz
トデジタル
•DigitalI/O
タイム・サンプルレート変換(最大
の
AES/EBU、Optical
サンプルレート
•
対応
種類の標準構成で提供されます。
アナログ・イン、8アナログ・アウト、
デジタル・イン/アウト)
8
アナログ・イン/アウト
デジタル・イン/アウト
アナログ拡張カード(
詳しくは、『
の機能
のディスクリート・チャンネルを提供し、イ
I/O
I/O
ビットの
24
に対応
HD I/O
のインプットとアウトプットの
D/A
カードを使ってサンプルレー
ADCとDAC)とHD
ガイド』をご覧ください。
セグメント
4
コンバーターと
Analog In HD I/O
、または
Optical
LED
A/D
カードと
を使用した
44.1kHz、48kHz、88.2kHz、96khz
の最大16チャンネルの24ビッ
を実現するデジタル
I/O
カードを使った、デジタル入力のリアル
、または
以上の
88.2kHz
HD I/O
チャンネル
16
)
TDIF
S/MUX Optical
メー
コン
カード
に
同期
追加の
•
•HDI/O
拡張性
•
•
Avi d HD
続するための
プット
を外部ワードクロック機器と同期するため
の外部クロック・インプットとアウトプット
オプションの追加
ジタル
I/O
複数の
Avi d HD
同時に使用し、さらにシステムのインプットとア
ウトプットを拡張できます(詳しくは『拡張シス
テム・ガイド』をご覧ください)。
HD MADI
インターフェースや周辺機器を接
Loop Sync
I/O
を拡張
オーディオ・インターフェースを
デジタル・オーディオ・インター
フェース
HD MADIは、HD Native
う設計された
インターフェースです。
(
Multichannel Audio Digital Interface
と最大
192kHz
、
HD MADI
コンソール、コンバーターなどの
ディオ機器と
なります。
`
HD MADI
ド』をご参照ください。
、
HD MADI
には、
ドに
この構成では追加の
チャンネルのデジタル・オーディオ・
64
のサンプルレートに対応しています。
により、ルーター、デジタル・ミキシング・
HD Native
について、詳しくは『
のチャンネルを最大に利用するため
1台のHD MADIを1つのHD Native
2本のDigiLink Mini
のインプットとアウト
カードでアナログまたはデ
システムと共に使用するよ
HD MADI
システムとの接続が簡単に
ケーブルで接続します。
は使用できません。
I/O
は、
MADI
)フォーマット
対応オー
MADI
HD MADI
ガイ
カー
第2章:
HD Native
ハードウェアの概要
37
Page 44

HD MADI
最大64のディスクリート・チャンネルのデジタル
•
入出力(
に対応する、
同軸インプット
アウトプットと同軸アウトプット
サンプルレート
•
176.4kHz、192kHz
•24
インプットまたはアウトプット上でのサンプル
•
レート変換(
フロントパネルにクロックと
•
フロントパネルにインプットとアウトプット用の
•
の機能
DigiLink Mini
ポートごとに32チャンネル)
オプティカル・インプットと
MADI
および
× 2
MADI
44.1kHz、48kHz、88.2kHz、96kHz
に対応
ビットまた16ビットの分解能
)
SRC
SRC
オプティカル・
× 2
のインジケータ
LED
•HD MADI
BNC
•HD MADI
フェースと周辺機器(
HD
外部
•
場合)のための専用
プットと
のみ)
以下のフォーマットのクロックに対応:
•
を外部1×ワードクロックと同期させる
ワードクロック
を追加の
I/O
Avi d HD
オーディオ・インター
HD I/O、HD OMNI、SYNC
など)と同期させる
同期(アウトプットに
MADI
XLR AES/EBU
BNC Loop Sync I/O
SRC
ワードクロック・イン
BNC
インプット(クロック入力
を使用する
Internal
Loop Sync、Word Clo c k、AES/EBU、MADI
バリスピード・モード(64チャンネルと56チャン
•
ネルの両方の規格に対応)
、
、
38
HD Native
インストール・ガイド
Page 45

第3章:
SATA
ドライブ・トレイとドライブ
PCIe
スロット
4
(隠れている)
PCIe
スロット
1
(ビデオ・カード)
PCIe
スロット
3
PCIe
スロット
2
HD Native
ハードウェアをインストールする
この章では
インターフェースのインストールと接続について説
明します。
ProTools
Native
はじめに
カードをインストールしたら、
インターフェースを接続します。
HD Native
ProTools
ソフトウェアをインストールする前に
をインストールしてください。
HD Native
HD Native
カードと
をインストールする場合は、
カードをインストールします。
Avid HD
Avid HD
カードを
Mac Pro
インストールする
HD Native
能力を得るため、ご使用のコンピューターの
のカード・スロットへ
てください。
カードは
以下の説明をよく読み、カードや部品を傷つけ
ないよう気をつけてください。
ビデオ・カードから最も遠いスロットに
カードをインストールする場合は、カー
Native
ドをインストールするときにカードを傷つけな
いよう
もしれません。
ドライブを取り外す必要があるか
SATA
カードです。最適な処理
4×PCIe
HD Native
をインストールし
オーディオ・
HD
オーディオ・
へ
以上
4×
HD
Mac Pro
第3章:
HD Native
ハードウェアをインストールする
39
Page 46

HD Native
コンピューターおよび周辺機器の電源を切ります。
1
コンピューターが接地(アース)されるよう、電源
ケーブルは接続したままにします。
コンピューターに取り付けられている、電源ケー
2
ブル以外のケーブル(ハードディスク、モニター、
USB、FireWire
アクセス・パネルが上を向くようにコンピュー
3
ターを横にします。
コンピューターの背面にある掛け金を使ってコン
4
ピューターのケースを開けます。
金属のアクセス・ポート・カバーをシャーシへ固
5
定している金具を取り外します。
最初に使用できる4×以上の
6
金属のアクセス・ポート・カバーを外します。
コンピューターの対応
7
PCIe
ネクターを下に向け、注意してまっすぐ下にカード
を差し込み、カードの
トにしっかりおさまるようにします。
カードをインストールするには:
など)をすべて外します。
スロットに対する
PCIe
カードを持 つ前に、電源ケーブ ル で接続 されてい
るコンピューター内の電源ケースなどの接地
(アース)された金属に触れ、体や服の静電気を
あらかじめ除去しておきます。
スロットに
PCIe
カードをインストールします。カードの
コネクターが
PCIe
HD Native
PCIe
スロッ
PCIe
コ
すべてのカードがシステムに正しくインストール
8
されていることを確かめます。
コンピューター・モニターのディスプレイ・カード
•
•HD Native PCIe
認定のビデオ・キャプチャー・カード(オプ
•Avid
ション)
認定のホスト・バス・アダプター・カード
•Avid
(オプション)
カードとスロット・カバーをシャーシへ固定する
9
金具を取り付けます。
カードの
セス・ポート・カバーをシャーシへ固定する金具
を取り付けるまでは完全には固定されません。
HD Native
カード
コネクタは、カードと金属のアク
PCIe
カードを
Windows
コ
ンピューターへインストールする
HD Native
能力を得るため、ご使用のコンピューターの
のカード・スロットへ
てください。
HD Native
コンピューターおよび周辺機器の電源を切ります。
1
コンピューターが接地(アース)されるよう、電源
ケーブルは接続したままにします。
コンピューターに取り付けられている、電源ケー
2
ブル以外のケーブル(ハードディスク、モニター、
USB、FireWire
コンピューターの本体を開けます。
3
アクセス・ポートのネジを外してカバーをスライド
4
させることにより、最初に使用できる
カード・スロット(通常はビデオ・カードのすぐ右
のスロット)の後にある金属のアクセス・ポート・
カバーを外します。
カードは
カードをインストールするには:
など)をすべて外します。
カードです。最適な処理
4×PCIe
HD Native
をインストールし
4×
4×
以上の
以上
PCIe
40
スロットに
PCIe
HD Native
HD Native
インストール・ガイド
カードを挿入します。
カードを持つ前に、コンピューター内の電源ケー
スなどの接地(アース)された金属に触れ、体や
服の静電気をあらかじめ除去しておきます。
HD Native
5
トールします。
カードを対応
スロットにインス
PCIe
Page 47

HD Native
出力に対応します。
には、
台のインターフェースは直接
2
1と2
オーディオ・インターフェースの拡張ポートに接続
します。
カードは64チャンネルのオーディオの入
チャンネルの
64
4台HD I/OをHD Native
に接続し、他の2台のインターフェースは
をすべて使う
I/O
カードに接続します。
DigiLink Mini
ポート
HD
スロットに
PCIe
先程取り外したアクセス・ポートのネジでカード
6
を固定します。
すべてのカードがシステムに正しくインストール
7
されていることを確かめます。
コンピューター・モニターのディスプレイ・
•
カード
•HD Native
•Avid
(オプション)
HD Native
カード(
認定のホスト・バス・アダプター・カード
カードを挿入します。
用)
PCIe
オーディオ・インターフェースを接続する
各
Avid HD
ざまなインプットとアウトプットのオプションを提
供します。たとえば、
ムに最大
チャンネルの入出力を、
ネルを提供します。オーディオ・インターフェースは、
直接
ディオ・インターフェースの拡張ポートへ接続します。
オーディオ・インターフェースは、さま
HDOMNIはProTools
チャンネルの入出力を、
8
HD Native
HD MADI
カードへ接続するか、別のHDオー
HDI/O
は最大64チャン
システ
は最大
16
本の
2
DigiLink Mini
カードへ接続した
の
が使用できます。ただし、
I/O
ムで唯一のオーディオ・インターフェースになります。
以下について詳しくは、『
ガイド』、『
•
•
HD
1
1
OMNI
ポートを
付属の
以下のいずれかを行って追加のオーディオ・イン
2
ターフェースを接続してください。
HDMADI
フロントパネルとバックパネルのコネクター
とインジケーター
オプションの拡張
(
HD I/O
オーディオ・インターフェースを接続するには:
台のHDオーディオ・インターフェース(
など)を 使 用している場合は、プライマリー・
HD Native
DigiLink Mini
• DigiLink Mini
ターフェースのプライマリー・ポートを
インターフェースの拡張ポートへ接続します。
または
–
•2
必要な
3
–
台目のインターフェースのプライマリー・ポート
を
HD Native
接続します。
Loop Sync
ケーブルを使って
HDMADI
では、全64チャンネル
HDMADI
HD OMNI
ガイド』をご参照ください。
カードのインストレーション
I/O
のみ)
カードの
ケーブルで接続してください。
ケーブルを使って、2台目のイン
カードの
接続を行います。
ガイド』、『
DigiLink Mini
DigiLink Mini
HD Native
がシステ
HD I/O
HD
ポート1へ
台目の
1
ポート2へ
第3章:
HD Native
ハードウェアをインストールする
41
Page 48

Loop Sync
PORT 1PORT 2
HD Native
カード
HD OMNI
HD I/O
HD I/O
HD I/O
12
フィート
DigiLink
Mini
ケーブル
18
インチ
DigiLink
Mini
ケーブル
Loop Sync
ケーブル
を接続する
台以上の
2
Avid HD
させるため
Loop Sync
各インターフェースの[
1
属の
2
ケーブルで接続します。
BNC
最後のインターフェースの[
オーディオ・インターフェースまたは1台の
Loop Sync
を接続するには:
を接続しなければなりません。
接続します。
Loop Sync Out
Loop Sync Out]を1
SYNC
]を次のインターフェースの[
台目のインタ−フェースまたは
を使用する場合は、機器を正しく同期
Loop Sync In]へI/O
SYNCの[Loop Sync In
パッケージに付
]へ
42
DigiLink MiniとLoop Sync
HD Native
インストール・ガイド
の接続
Page 49

最大
HD Native
最大
複数の
続する例は、
構成
I/O
は、以下のオーディオ・インターフェースの
台までの組み合わせに対応します。
4
•HDOMNI(1つのHD Native
HD OMNI
•HDI/O
にのみ対応)
(最大4台の
HDI/O
•HD MADI(HD MADI
が
HDNative
接続されている場合は
接続が可能)
Avid HD
オーディオ・インターフェースは、本体の両
HD
側に通気(冷却)用の空間を必要とします。本
体の両側を塞いだり、内蔵のファンを取り外し
たりしないでください。本体をケースにラックマ
ウントしている場合は、本体が急激に加熱され、
繊細な部分を損傷する恐れがありますので、シス
テムを起動する前にケースの蓋や扉を取り外し
てください。
カードの両方の
オーディオ・インターフェースを接
ページの図をご参照ください。
42
システムで1台の
を同時使用可)
の両方の
DigiLink
DigiLink
1台のHDMADI
ポート
ポートに
でフル
HD Native
ハードウェアのドライバー
をインストールする
HD Native
システムが
ASIO(Windows
ソフトウェア(
に対応するために必要です。
アをインストールする場合は、これらのドライバー
は自動的にインストールされます。
ストールしない場合は、
(
www.avid.com
をダウンロードしてください。
ハードウェアのドライバーは、
Pro ToolsやCore Audio(Mac
)互換のデジタル・オーディオ・
Logic、Live
、また は
Cubase
ProTools
ProTools
のウェブ・サイト
Avid
)からドライバー・インストーラー
Core Audio
については、
Audio Driver
ASIO
いては、
をご参照ください。
ドライバーをインストールする方法
ページの「
15
」をご参照ください。
ドライバーをインストールする方法につ
ページの「
21
Installing the Core
Installing the ASIO Driver
HD Native
)または
など)
ソフトウェ
をイン
」
ProTool s
ソフトウェアのインストー
ルとオーソライズ
HD Native
ストールしたら、
ProTools HD
ルとオーソライズが行えます。
ハードウェアをコンピューターにイン
ProTools
ソフトウェア(別売り)のインストー
インストールとオーソライズについて詳しくは、
ProTools
『
Pro Tools
ください。
ソフトウェア・パッケージに付属の
インストール・ガイド』をご参照
ソフトウェアまたは
第3章:
HD Native
ハードウェアをインストールする
43
Page 50

44
HD Native
インストール・ガイド
Page 51

第4章:
Core Audio
の設定(
MacOSX
のみ)
Avid Core Audio Driver
Avid Core Audio Driverは、Core Audio
ケーションが
コーディングとプレイバックを行うためのマルチク
ライアント、マルチチャンネル・サウンド・ドライ
バーです。
ご使用の
イアント・アプリケーションによって、最大
のサンプルレートで最大24ビットのオーディオのレ
コーディングとプレイバックに対応します。
HD Native
HD Native
Avid Core Audio Driverは、HD Native
大
チャンネルの
64
HD Native
Driver
ハードウェア用の最新の
、および既知の問題については
www.avid.com
CoreAudio Driver
Avi d Cor e Au dio Driv er
Mac Finder
でサウンド・ファイルを試聴するのに、
Avi d Core Au dio
ません。サウンド・ファイルが
ション・ウィンドウにある場合は、ファイルの隣に
QuickTime
QuickTime
ド・ファイルを作成できます。サウンドは、常に
内蔵のオーディオ・コントローラー(
カーやヘッドフォン・ジャック)を通じて再生され
ます。ただし、サウンド・ファイルをダブルクリッ
クすると、
のトランスポート・バーが表示されます。
トランスポート・バーを使用してサウン
QuickTime
Avi d Core Audio Driver
ハードウェアを使用してレ
ハードウェアと
を提供します。
I/O
をご覧ください。
の制限
には、以下の制限があります。
ドライバーを使用することはでき
MacOSX
アプリケーションが起動し、
を使って再生できます。
の性能
互換アプリ
CoreAudio
96kHz
システムで最
Core Audio
のナビゲー
のスピー
Mac
クラ
Mac
Avi d Core Audio Driverは、Mac
ンドの再生には使用できません。
HD Native
アを使って低レイテンシー・モニタリングを行うこ
とはできません。
ハードウェア上で
Avid Core Audio Driver
のシステム・サウ
Core Audio
ソフトウェ
をインス
トールする
Avid Core Audio Driverは、ProTools
ルするときにデフォルトでインストールされます。
Avid Core Audio Driverは、ProTools
インストールされていない
アロンのドライバーとしてインストールできます。
スタンドアロンの
トーラーは、
付属のドライバー・インストーラー・ディスクにあ
ります。また、弊社のウェブサイト(
からダウンロードできます。
ProTools
ProTools
をアンインストールすると、同時に
Avid Core Audio Driver
トールされます。
Mac
Avi d Core Audio D river
ソフトウェア・パッケージに
も自動的にアンインス
をインストー
ソフトウェアが
システムにスタンド
のインス
www.avid.com
)
第4章:
Core Audio
の設定(
Mac OS X
のみ)
45
Page 52

スタンドアロンの
するには:
HD Native
1
れていることを確かめます。
以下のいずれかを行います。
2
• ProTools
ライバー・インストーラー・ディスクをコン
ピューターに挿入します。
または
–
Avid Core Audio Driver
ハードウェアが正しくインストールさ
ソフトウェア・パッケージに付属のド
–
をインストール
Avid Core Audio Manager
最初のクライアント・アプリケーションが
Audio Driver
Manager
にアクセスすると、
アプリケーションが自動的に起動します。
を使用する
Avid Core Audio
Avid Core
スタンドアロン
•
トーラーを
ドします(
3
Install HD Family Driver.mpkg
します。
画面に表示される指示に従い、インストールを完
4
了します。
インストールが完了したら、[再起動] をクリック
5
します。
Avi d Core Audio Driver
ウェブサイトからダウンロー
Avi d
www.avid.com
)。
をダブルクリック
インス
Avid Core Audio Manager
Avid Core Audio Driver
Manager
クライアント・アプリケーション(
など)を使って行えます。詳しくは、それぞれのメー
カーの説明書をご参照ください。
また、
プリケーションは、
るために
MIDI
またはサードパーティーの
AppleのiTunesやQuickTime Player
の[サウンド]環境設定または[
Apple
設定](
)の設定を必要とします。
AMS
Avid Core Audio Manager
表示に設定されています。前面に移動するには、ドッ
クのアイコンをクリックします。
の設定は、
Core Audio
Core Audio
BIAS Peak、Logic
Avid Core Audio Driver
は初回起動時には自動非
互換
などのア
を使用す
Audio
Avid Core Audio Manager(HD Native
以下の状態では、
スすることはできません。
•Pro Tools
別のアプリケーションが
•
いる
Avid Core Audio Driver
には、まず
中」であることを確かめます。
アプリケーションが
スするのを防ぐ
アプリケーションを起動するときなど、アプリケー
ションが
キーを押さえると、アプリケーションが
に
Shift
Core Audio Driver
のアプリケーション(
最初にサウンドを再生するまでは
にアクセスしないので、
Driver
再生しないようにするためにはサウンドを再生する
直前に
Shift
Avid Core Audio Manager
を実行している
を使って正しく再生する
CoreAudio Manager
Avid Core Audio Driver
Avid Core Audio Driver
にアクセスするのを防げます。特定
Apple MailやiChat
キーを押さえる必要があります。
の例)
にアクセ
DirectIO
にアクセスする直前
を使用して
を起動し、「接続
へアクセ
Avid
など)は、
Avid Core Audio
ハードウェアで
Avid
Avid Core Audio ManagerはProTools
ません。その他の
み使用されます。
46
HD Native
インストール・ガイド
Core Audio
では使用され
アプリケーションでの
Page 53

Avid Core Audio Manager
Core Audio
使用の
イアログへのアクセス、
するボリュームの操作とミュートは、
Audio Manager
Audio Manager
ポートされている
れているクライアント(アプリケーション)数を認
識する機能が装備されています。
バッファー・サイズ
(使用している
バッファサイズから選択できます。
•64
• 128
• 256
• 512
• 1024
• 2048
のバッファー・サイズの設定の変更、ご
ハードウェアの[ハードウェア設定]ダ
Avid
Avid Core Audio Driver
を使って行います。また、
には、
I/O
Avid
サンプル
サンプル
サンプル
サンプル
サンプル
サンプル
ハードウェアの機種、サ
Avid
チャンネル数、および接続さ
ハードウェアにより)以下の
を使用する
に対
Avid Core
Avid Core
設定ボタン
HW
[
HW Setup
[ハードウェア設定]ダイアログを開きます。[
Setup
いるクライアントがないときだけ使用できます。
Avid Core Audioの[HW Setup
Core Audio
1
了します。
Avi d Core Audio Manager
2
(
/Applications/Avid/
[
3
ア設定]ダイアログを開きます。
ご使用の
4
[ハードウェア設定]ダイアログを設定します。
]ボタンは、ご使用の
]ボタンは、他に
クライアント・アプリケーションを終
HW Setup
]ボタンをクリックし、[ハードウェ
オーディオ・ハードウェアに対する
Avi d
ハードウェアの
Avid
Core Audio Driver
]を設定するには:
のファイル
)をダブルクリックします。
を使って
HW
Avid Core Audio Driver
しても、
アログの
ません。
Avid Core Audio
するには:
1
(
2
的の
を選択します。一般的には、バッファーを小さめの
サイズに設定するのが望ましいです。ただし、処理
能力に問題が起きる(レコーディングやプレイバッ
ク中にクリックやポップが発生する)場合は、
Audi o
クライアント・アプリケーションが
に接続されている唯一のクライアントの場合は、その
アプリケーション内からバッファー・サイズを変更
することもできます。複数のクライアントがアク
ティブになっていると、サンプルレートやバッ
ファー・サイズを変更することはできません。
ProTools
[
H/W
Avid Core Audio Manager
/Applications/Avid/
[バッファー・サイズ]ポップアップメニューから目
Core Audio
のバッファー・サイズ設定を大きくしてください。
のバッファー・サイズを変更
の[プレイバック エンジン]ダイ
バッファー サイズ]の設定には作用し
ハードウェアのバッファー・サイズを設定
のファイル
)をダブルクリックします。
バッファー・サイズ(サンプル単位)
Core
Core Audio Driver
[ハードウェア設定]ダイアログ、
[ハードウェア設定]ダイアログについて詳しく
は『
ProTools
ください。
完了したら、[
5
設定]ダイアログを閉じます。
リファレンス・ガイド』をご参照
]をクリックして[ハードウェア
OK
第4章:
Core Audio
HD I/O
の設定(
の例
Mac OS X
のみ)
47
Page 54

ボタン
Prefs
[
[
[OK]をクリックして
[
]ボタンは
Prefs
Preferences
リケーションを設定するオプションがいくつかあり
ます。これらのオプションの選択を終了したら、
Avid Core Audio Manager
]ダイアログを開きます。
Manager
アプ
Avid Core Audio Manager
Preferences
]ウィンドウを閉じます。
Mirror Analog Outs 1 & 2 to Digital Out s (002/003)
(アナログ・アウト1&2をデジタル・アウトへ反映
の
(
002/003))
は、このオプションはグレー・アウトされます。
HD Native
カードを使ったシステムで
003 Rack、003 Rack+、Digi 002、Digi 002 Rack
用しているときは、このオプションを選択すると
の
[ハードウェア設定ダイアログ]で選択したデジタル・
アウトプットを通してメイン・アウトプットが反映
されます。
003
を使
、
CoreAudio Manager
Hide Manager if Auto-Launched by Client
イアントによる自動起動時に
このオプションを選択すると、最初のクライアント・
アプリケーションが
セスした時点で、
換わります。
上の
Avid Core Audio Manager
クします。
Auto-Quit Manager when Last Client Quits
のクライアント終了時に
ションを選択すると、クライアント・アプリケーショ
ンが
Avid Core Audio Driver
点で、
Manager
ます。
Use C|24 Stereo Routing (L/R to 1/3)(C|24
オ・ルーティングを使用(
る場合、このオプションを選択すると、
Audio Driver
(アウトプット
設定できます。
環境設定
Manager
を非表示にする)
Avid Core Audio Driver
Manager
Manager
アプリケーションが自動的に終了し
のパネルが非表示に切り
のパネルを開くには、ドック
のアイコンをクリッ
Manager
を自動終了)
を使用しなくなった時
L/Rから1/3))
C|24
このオプ
を使用す
Avid Core
を
の標準ステレオ・ルーティング
C|24
)を使用して出力されるように
1と3
(クラ
にアク
(最後
ステレ
Connect
Avid Core Audio Manager
ハードウェアに接続できない場合(
ハードウェアの接続が解除または無効にされている
場合など)は、
続を試みる前に、必ず
ウェアが接続され電源が入っていることを確かめて
ください。次に、
ハードウェアを取得します。
Quit
[
Quit
Manager
イアント・アプリケーションを終了してください。
Manager
リケーションが接続されている場合、
ドウェアが利用できなくなった旨を示すエラーメッ
セージが表示されます。この場合、他のハードウェ
アを使用するようアプリケーションの設定を変更す
るか、場合によってはアプリケーションを再起動し
ないと、プレイバックを再開することができません。
ボタン
が起 動 し、かつ
ProTools
[
[
ケーションがあり、そのアプリケーションの再
生に
のアプリケーションを
しく接続するためにはアプリケーションを一旦
終了して再起動する必要があります。
ボタン
]ボタンは
]ボタンを押す前に起動したアプリ
Connect
Avid Core Audio Driver
Avid Core Audio Manger
の[
Quit
アプリケーションの終了時にその他のアプ
]ボタンが表示されます。接
Connect
を終了し、ハード
]ボタンをクリックして
を使用する場合、そ
[
Connect
ProTools
CoreAudio Manager
]ボタンを使用する前に必ずクラ
ProTools
が起動し、
へ正
を終了します。
ProTools
ハー
Use XMON Stereo Routing (L/R to 1/5)(XMON
ステレオ・ルーティングを使用(
または
D-Command
または
D-Command
(アウトプット
1と5
Avid Core Audio Driver
48
HD Native
インストール・ガイド
を使用しているとき、
標準のステレオ・ルーティング
L/Rから1/5))
)を通して出力されるように
を設定します。
D-Control
D-Control
Page 55

サードパーティー製アプリケーション用
に
Avid HD
オーディオ・インターフェ
イスを設定する
HD Native
ン(
そのアプリケーションのオーディオの環境設定を
使ってハードウェアの設定が行えます。
Core Audio
からハードウェアの設定を行うには:
オーディオ・インプットとオーディオ・アウトプッ
1
トに
以下のオプションからご使用のシステムのバッ
2
ファー・サイズを選択します。
カードを
Apple GarageBand
アプリケーション(
Avid HW(HD
)を選択します。
Pro Tools
•Maximum/Large
または
–
–
以外のアプリケーショ
など)と共に使用するときは、
Apple GarageBand
バッファー・サイズ
など)
Apple
Apple
1
を起動します。
2
3
サウンド出力用デバイスとして選択します。
の[サウンド]環境設定
の[サウンド]環境設定を設定するには:
システム環境設定([
[サウンド]をクリックします。
[出力]をクリックし、[
]メニュー]>[環境設定])
Appl e
Avid HW (HD Native)
]を
•Minimum/Small
特定の
Core Audio
ハードウェア設定オプションについて詳しく
は、各メーカーの説明書をご参照ください。
Apple
[
Audio MIDI
(
Apple iTunes
Audio
特定の
iTunes
インターフェースを使用するには、
Manager
MIDI
Core Audio
多く(
アプリケーション内から
サイズとオーディオの入出力チャンネルを設定でき
るため、これは不要です。
の[サウンド]環境設定または
インターフェースを使用するために必要)
Core Audio
や
QuickTime Player
に加え、[サウンド]環境設定または[
設定]を設定する必要があります。ただし、
互換クライアント・アプリケーションの
BIAS PeakやAbleton Live
バッファー・サイズ
アプリケーションに対する
設定]を設定する
または
QuickTime PlayerでAvid
互換再生アプリケーション(
など)で
Avid
Avid Core Audio
など)はクライアント・
Core Audio
のバッファー・
Apple
オーディオ・
Audio
[サウンド]環境設定、出力設定
[入力]をクリックし、[
4
サウンド入力用デバイスとして選択します。
[サウンド]環境設定、入力設定
システム環境設定を終了します。
5
Avid HW (HD Native)
]を
第4章:
Core Audio
の設定(
Mac OS X
のみ)
49
Page 56

Appleの[Audio MIDI
Appleの[Audio MIDI
[
Audio MIDI
1
]設定を設定するには:
設定](ホーム/アプリケーション
]設定
ユーティリティ)を起動します。
[オーディオ装置]ウィンドウで、[入力]タブを
2
クリックします。
システム出力は[内蔵オーディオ]のままにし
ておきます。
サウンド用に使用することはできません。
Avid Core Audio Driver
/
[オーディオ入力]または[オーディオ出力]ペー
6
[フォーマット](サンプルレート)を選択します。
ジで、
入力と出力のサンプルレートはリンクしていること
に注意してください。
[
7
Audio MIDI
択します。
設定]
> [Audio MIDI
設定を終了]を選
をシステム・
Appleの[Audio MIDI
装置の入力設定
左の[オーディオ装置]リストから[
3
設定]アプリケーション、オーディオ
HD Native
を選択します。
[オーディオ装置]ウィンドウから[出力]タブを
4
クリックします。
Appleの[Audio MIDI
装置の出力設定
左の[オーディオ装置]リストから[
5
設定]アプリケーション、オーディオ
HD Native
を選択します。
]
]
50
HD Native
インストール・ガイド
Page 57

第5章:
ASIO
の設定(
Windows
のみ)
ASIO Driver
ASIO Driver
ンネル・サウンド・ドライバーで、要件を満たす
オーディオ・インターフェースを通して
HD
Driver
ディオ・プログラムがレコーディングとプレイバッ
クを行うことを可能にします。
ご使用の
ト・プログラム(
最大
トのフル・デュプレックス再生に対応します。
ASIO Driverは、HD Native
の入出力を提供します。
ASIO
Avid ASIO Driver
同時に複数のアプリケーションで使用することは
できません。
つのアプリケーションだけですから、
ステム・サウンドは必ずオフにしてください。
HD Native
アで低レイテンシー・モニタリングを行うことはで
きません。
ゲームやその他の一般的な作業には別のサウンド・
カードを使用することを推奨します。
はシングル・クライアントのマルチチャ
規格に対応したサードパーティー製のオー
ProTools
のサンプルレートで24ビットと16ビッ
96kHz
ハードウェア用の最新の
知の問題点については、
ださい。
ドライバーの制限
ハードウェア上の
の性能
ハードウェアと
CubaseやReason
と共に最大64チャンネル
には、以下の制限があります。
ASIO Driver
を使用できるのは一度に
ASIO
など)によって、
ASIO Driver
www.avid.com
Windows
Core Audio
Avid
ASIO
クライアン
、および既
をご覧く
のシ
ソフトウェ
ASIO Driver
ASIO DriverはProTools
デフォルトでインストールされます。
ASIO Driverは、ProTools
されていない
ドライバーとしてもインストールできます。スタ
ンドアロンの
ProTools
バー・インストーラー・ディスクにあり、弊社のウェ
ブサイト(
ます。
スタンドアロンの
1
ることを確かめます。
2
1
3
ます。
4
了します。
5
てインストーラーを終了し、コンピューターを再起
動します。
ソフトウェア・パッケージに付属のドライ
www.avid.com
ProTools
も自動的にアンインストールされます。
Driver
HD Native
以下のいずれかを行います。
カードが正しくインストールされてい
• ProTools
ライバー・インストーラ・ディスクをコン
ピューターに挿入します。
または
–
•
HD Family Driver Setup.e xe
画面に表示される指示に従い、インストールを完
インストールが完了したら、[終了] をクリックし
–
スタンドアロンの
を弊社のウェブサイト(
ダウンロードします。
をインストールする
をインストールするときに
ソフトウェアがインストール
Window
システムに、スタンドアロン・
ASIO Driver
をアンインストールすると、同時に
ASIO Driver
ソフトウェア・パッケージに付属のド
用インストーラーは
)からもダウンロードでき
をインストールするには:
ASIO Driver
インストーラー
www.avid.com
をダブルクリックし
ASIO
)から
第5章:
ASIO
の設定(
Windows
のみ)
51
Page 58

ASIO Driver Control Panel
1
2
ASIO Driver
ASIO
クセスできる[
設定は、いくつかのサードパーティー製
互換クライアント・アプリケーション内からア
ASIO Control Panel
]で行います。
ASIO Driver Control Panel
スする
サードパーティー製アプリケーションから[
Control Panel
ASIO
ください。
以下の状況では、[
クセスできません。
•Pro Tools
•ASIO Driver
グラムでプレイバックまたはレコーディング
を行っているとき。
プレイバックまたはレコーディングをしてい
•
ないときも
くオプションを持つサードパーティー製オー
ディオ・プログラムを使用しているとき。
([
のオーディオ・プログラムを終了しなければな
りません。)
Propellerheads Reason
Propellerheads Reason
[
Audio Preferences
1
クターから
択します。
[
2
Control Panel
ASIO Control Panel
]にアクセスするには:
クライアント・プログラムの説明書をご参照
ASIO Driver Control Panel
の実行中。
に対応していないオーディオ・プロ
ASIO Driver
を開いたままにしてお
ASIO Driver Control Panel
の例
を設定するには:
]の[
Audio Card Driver
[
ASIO Avid Driver
]ボタンをクリックして[
]を開きます。
ASIO Driver
]を開く前に、そ
]をクリックして選
にアクセ
]にア
]セレ
Avi d
Propellerheads Reason
ASIO Driver Control Panel
ASIO Driver Control Panel
を変更したり、
設定]ダイアログにアクセスすることができます。
の設定例
では、[
Buffer Size
ハードウェアの[ハードウェア
Avid
を使用する
]設定
52
HD Native
インストール・ガイド
ASIO Control Panel
Page 59

Buffer Size
Advanced
ボタン
バッファー・サイズを小さく設定すると、レコー
ド・モニター時のレイテンシーを軽減できるという
長所があります。(レイテンシーとは、オーディオ・
インプットに入る信号からレコーディング中にアウ
トプットを出るまでの時間の遅れを指します。)
これに対して、バッファーサイズを大きくすると、
再生時とレコーディング時の両方で、
ASIO
ドライ
バーで、オーディオ信号のドロップ・アウトが少な
くなるという長所があります
いくつか
対応オー・ディオ・プログラムでは、
ASIO
操作を行うと、オーディオの再生やレコーディング
時にクリックやポップなどのノイズを生じてしまう
ものがあります。バッファー・サイズを中または大
(
256、512
または
など)に設定することで、症
1024
状を緩和できます。
ASIO Driver
ProTools
[
H/W
の[
Buffer Size
の[プレイバック エンジン]ダイアログの
バッファー サイズ]設定には作用しません。
]設定を変更しても、
Device
[
]設定は常にインストールされている
Device
ハードウェアに設定します。
Avid
[
Advanced
]ボタンはご使用の
ハードウェアの
Avid
[ハードウェア設定]ダイアログを開きます。
[ハードウェア設定]ダイアログについて詳しく
は、『
ProTools
照ください。
[ハードウェア設定]ダイアログ
リファレンス・ガイド』をご参
第5章:
ASIO
の設定(
Windows
のみ)
53
Page 60

54
HD Native
インストール・ガイド
Page 61

第6章:
ProTools
を使用した低レイテンシー・モニタリング
低レイテンシー・モニタリングを使う
ProTools
ムが対応している最大トラック数に対して極めて少
ないモニタリング・レイテンシーで録音ができる
レイテンシー
インプットをオーディオ・インターフェース(内部
ミックス・バスではなく)に設定しているトラック
のみ低レイテンシー・モニタリングが行えます。
低レイテンシー・モニタリングを使うには:
1
ら、選択した[低レイテンシー
(
Low Latency Monitoring Path
ウトプット]ページで設定)へ各トラックをアサイ
ンします。これらのアウトプットへアサインしたト
ラックだけが低レイテンシー・モニタリングを使え
ます。
2
トラックをレコーディング可能にします。
3
ング](
を使用した
モニタリング]オプションを使用できます。
低レイテンシー・モニタリングは
たは
ASIO
[アウトプット パス](
[レコード]ボタンをクリックしてオーディオ・
[オプション](
HD Native
互換ソフトウェアでは行えません。
Options) >
Low-Latency Monitoring
システムは、システ
Core Audio
Output Path
[低レイテンシー モニタリ
)セレクターか
モニタリング パス]
)([
設定]の[ア
I/O
)を選択します。
[低レイテンシー モニタリング]をオンにしたときは、
レコーディング可能なトラック(選択した低レイテ
ンシー・モニタリング・パスへルーティングされた)
へアサインされたプラグインとセンドは自動的にバ
[低
イパスされ、バイパスされたままでなければなりま
せん。またこれらのトラックはマスター・フェーダー
のメーターには表示されません。
[
設定]で低レイテンシー・モニタリ
ま
I/O
ングを設定する
[
設定]の[アウトプット]ページでは、低レイ
I/O
テンシー・モニタリングをオン(またはオフ)にで
きます。また低レイテンシー・モニタリング用のア
ウトプット・パスを指定することもできます。低レ
イテンシー用のアウトプット・パスのチャンネル幅
は任意(モノから
モニタリングは、デフォルトでは[アウトプット
]を使用します。
2
まで)です。低レイテンシー・
7.1
1-
第6章:
Pro Tools
を使用した低レイテンシー・モニタリング
55
Page 62

[
設定]の[低レイテンシー モニタリング]を設定するには:
I/O
[
設定](
I/O
1
I/O Setup
)([設定](
Setup) > [I/O
ダイアログを開きます。
[アウトプット](
2
[低レイテンシー モニタリング](
3
Monitoring
[低レイテンシー モニタリング]ポップアップメニュー
4
)オプションをオンにします。
)タブをクリックします。
Output
Low Latency
から低レイテンシー・モニタリング用に使用するア
ウトプット・パスを選択します。
低レイテンシー・モニタリング用のアウトプット・パスを選択する
[OK]をクリックして[
5
設定]を閉じ、変更を
I/O
保存します。
[低レイテンシー モニタリング]と[ディ
])
スクへバウンス]
[低レイテンシー モニタリング]をオンにしているときは、
オーディオ・トラックだけが
マンドの対象になります。
[ディスクへバウンス]コ
インプット・トラッ
AUX
クとインストゥルメント・トラックは無視されます。
インプット・トラックとインストゥルメント・
AUX
トラックを含めるときは、
ンドを使う前に
[低レイテンシー モニタリング]をオフ
[ディスクへバウンス]コマ
にしてください。
[ディスクへバウンス]の実行中は外部入力へは
レコーディングできません。バウンスに外部入
力を含めるときは、[ディスクへバウンス]コマ
ンドを使う前に新規オーディオ・トラックへ録
音しておく必要があります。
56
HD Native
インストール・ガイド
Page 63

付録
コンプライアンス情報
A
安全性コンプライアンス
安全性ステートメント
本機器は以下のUL規格の仕様に従って
合するようテストされています。
IEC60950-1
2007-03
を適用する権限を与えられています。
、
2nd Ed、CSA C22.2 No.60950-1-07、2nd Ed
。
Avid Inc.
UL60950-1、2nd Ed 2007/
は、その規格準拠装置に適切な
警告
重要な安全指示
これらの指示をお読みください。
1)
これらの指示を守ってください。
2)
)すべての警告に注意してください。
3
)すべての指示に従ってください。
4
本装置は水などの液体に近づけて使用しないでください。
5)
必ず乾いた布で清掃してください。
6)
通気口を塞がないでください。メーカーの指示に従って設置してくだ
7)
さい。
熱を発生する放熱器、蓄熱器、ストーブなどの(アンプを含む)熱源
8)
の近くに設置しないでください。
とカナダの安全認可に適
USA
UL & CUL
マーク
分極または接地タイプのプラグの安全規定を妨げないでください。分極
9)
プラグには
接地タイプのプラグには、
います。幅広のブレードまたは
ます。提供されたプラグがコンセントに合わない場合は、役立たないコ
ンセントを電気技師に交換してもらう必要があります。
10)
ドが踏みつけられたり、つままれたりしないよう保護してください。
11)
さい。
12)
か、または装置とともに販売されるカート、スタンド、三脚、ブラケッ
ト、またはテーブルのみと一緒に使用してください。カートを使用する
ときは、カートと装置を一緒に移動するときに転倒による怪我を負わな
いよう十分注意してください。
13)
ださい。
14)
置が何らかの原因で破損した場合は、保守・サービスが必要になります。
電源コードまたはプラグが破損した、液体がこぼれた、装置に物が落下
した、装置が雨または湿気にさらされた、装置が正しく作動しない、装
置を落としたなどのケースが考えられます。
15)
装置に水滴や水などがかからないようにしてください。また液体が入っ
た物(花瓶など)を本装置の上に置かないでください。
警告
さないようにしてください。
16
注意!電池を正しく交換しないと爆発する可能性があります。同じか同等
なタイプの電池に交換してください。
17
18
つのブレードがあり、一方が他方より幅広になっています。
2
特にプラグ、利便性レセプタクル、装置に近い位置などで電源コー
メーカーが指定した付属品またはアクセサリーのみを使用してくだ
ラック・マウントできない製品の場合は、メーカーが指定している
雷雨時または長期間使用しない場合は、本装置のプラグを抜いてく
すべての補修・修理は認定された保守要員に依頼してください。装
製品が主電源を使用するデバイスの場合:
火災や電気ショックの危険を減らすため、本装置を雨や湿気にさら
!
)リチウム電池を含んでいる製品の場合:
)本製品は周囲温度を
)一緒に使用する機器は
つのブレードと3番目の接地用ピンが付いて
2
番目のピンは、安全のために付いてい
3
以内に保って使用してください。
40° C
にリストされているものに限られます。
ITE
57
Page 64

Avid
2001 Junipero Serra Boulevard
Daly City, CA 94014-3886 USA
Technical Support (USA)
Visit the Online Support Center at
www.avid.com/support
Product Information
For company and product information,
visit us on the web at www.avid.com
 Loading...