

Page 1

®
Eleven Rack User Guide
Page 2

Legal Notices
This guide is copyrighted ©2011 by Avid Technology, Inc.,
(hereafter “Avid”), with all rights reserved. Under copyright
laws, this guide may not be duplicated in whole or in part
without the written consent of Avid.
003, 96 I/O, 96i I/O, 192 Digital I/O, 192 I/O, 888|24 I/O,
882|20 I/O, 1622 I/O, 24-Bit ADAT Bridge I/O, AudioSuite,
Avid, Avid DNA, Avid Mojo, Avid Unity, Avid Unity ISIS,
Avid Xpress, AVoption, Axiom, Beat Detective, Bomb Factory,
Bruno, C|24, Command|8, Control|24, D-Command, D-Control,
D-Fi, D-fx, D-Show, D-Verb, DAE, Digi 002, DigiBase,
DigiDelivery, Digidesign, Digidesign Audio Engine, Digidesign
Intelligent Noise Reduction, Digidesign TDM Bus, DigiDrive,
DigiRack, DigiTest, DigiTranslator, DINR, D-Show, DV Toolkit,
EditPack, Eleven, HD Core, HD Process, Hybrid, Impact,
Interplay, LoFi, M-Audio, MachineControl, Maxim, Mbox,
MediaComposer, MIDI I/O, MIX, MultiShell, Nitris, OMF,
OMF Interchange, PRE, ProControl, Pro Tools M-Powered,
Pro Tools, Pro Tools|HD, Pro Tools LE, QuickPunch, Recti-Fi,
Reel Tape, Reso, Reverb One, ReVibe, RTAS, Sibelius,
Smack!, SoundReplacer, Sound Designer II, Strike, Structure,
SYNC HD, SYNC I/O, Synchronic, TL Aggro, TL AutoPan,
TL Drum Rehab, TL Everyphase, TL Fauxlder, TL In Tune,
TL MasterMeter, TL Metro, TL Space, TL Utilities, Transfuser,
Trillium Lane Labs, Vari-Fi Velvet, X-Form, and XMON are
trademarks or registered trademarks of Avid Technology, Inc.
Xpand! is Registered in the U.S. Patent and Trademark Office.
All other trademarks are the property of their respective
owners.
Product features, specifications, system requirements, and
availability are subject to change without notice.
This product is subject to the terms and conditions of a
software license agreement provided with the software. The
product may only be used in accordance with the license
agreement.
Guide Part Number 9320-65073-00 REV B 06/21
Documentation Feedback
At Avid, we are always looking for ways to improve our
documentation. If you have comments, corrections, or
suggestions regarding our documentation, email us at
techpubs@avid.com.
Page 3

Contents
Part I Playing Guitar through Eleven Rack
Chapter 1. Introduction . . . . . . . . . . . . . . . . . . . . . . . . . . . . . . . . . . . . . . . . . . . . . . . . . . . . . . 3
Quick Start Instructions . . . . . . . . . . . . . . . . . . . . . . . . . . . . . . . . . . . . . . . . . . . . . . . . . . . . 3
System Requirements and Compatibility . . . . . . . . . . . . . . . . . . . . . . . . . . . . . . . . . . . . . . . . 5
Getting Around This Guide . . . . . . . . . . . . . . . . . . . . . . . . . . . . . . . . . . . . . . . . . . . . . . . . . . 5
Conventions Used in This Guide . . . . . . . . . . . . . . . . . . . . . . . . . . . . . . . . . . . . . . . . . . . . . . 6
About www.avid.com . . . . . . . . . . . . . . . . . . . . . . . . . . . . . . . . . . . . . . . . . . . . . . . . . . . . . . 7
Chapter 2. Hardware Overview . . . . . . . . . . . . . . . . . . . . . . . . . . . . . . . . . . . . . . . . . . . . . . . . 9
Eleven Rack Front Panel . . . . . . . . . . . . . . . . . . . . . . . . . . . . . . . . . . . . . . . . . . . . . . . . . . . 9
Eleven Rack Back Panel . . . . . . . . . . . . . . . . . . . . . . . . . . . . . . . . . . . . . . . . . . . . . . . . . . 13
Chapter 3. Exploring Rigs . . . . . . . . . . . . . . . . . . . . . . . . . . . . . . . . . . . . . . . . . . . . . . . . . . . 17
Overview . . . . . . . . . . . . . . . . . . . . . . . . . . . . . . . . . . . . . . . . . . . . . . . . . . . . . . . . . . . . . 17
Rig Input . . . . . . . . . . . . . . . . . . . . . . . . . . . . . . . . . . . . . . . . . . . . . . . . . . . . . . . . . . . . . 17
Rig Select Mode . . . . . . . . . . . . . . . . . . . . . . . . . . . . . . . . . . . . . . . . . . . . . . . . . . . . . . . . 18
Rig Organization . . . . . . . . . . . . . . . . . . . . . . . . . . . . . . . . . . . . . . . . . . . . . . . . . . . . . . . . 19
Selecting Rigs Live . . . . . . . . . . . . . . . . . . . . . . . . . . . . . . . . . . . . . . . . . . . . . . . . . . . . . . 19
What’s In A Rig? . . . . . . . . . . . . . . . . . . . . . . . . . . . . . . . . . . . . . . . . . . . . . . . . . . . . . . . . 20
Rig View . . . . . . . . . . . . . . . . . . . . . . . . . . . . . . . . . . . . . . . . . . . . . . . . . . . . . . . . . . . . . . 21
Signal Chain Devices and Utility Settings in Rig View . . . . . . . . . . . . . . . . . . . . . . . . . . . . . . 21
Signal Routing . . . . . . . . . . . . . . . . . . . . . . . . . . . . . . . . . . . . . . . . . . . . . . . . . . . . . . . . . 24
Rig Edit Mode . . . . . . . . . . . . . . . . . . . . . . . . . . . . . . . . . . . . . . . . . . . . . . . . . . . . . . . . . . 24
Saving Your Work . . . . . . . . . . . . . . . . . . . . . . . . . . . . . . . . . . . . . . . . . . . . . . . . . . . . . . . 25
The Amps . . . . . . . . . . . . . . . . . . . . . . . . . . . . . . . . . . . . . . . . . . . . . . . . . . . . . . . . . . . . . 26
DC Custom Amps . . . . . . . . . . . . . . . . . . . . . . . . . . . . . . . . . . . . . . . . . . . . . . . . . . . . . . . 32
General Amp Controls . . . . . . . . . . . . . . . . . . . . . . . . . . . . . . . . . . . . . . . . . . . . . . . . . . . . 33
The Speaker Cabinets . . . . . . . . . . . . . . . . . . . . . . . . . . . . . . . . . . . . . . . . . . . . . . . . . . . . 35
Speaker Breakup . . . . . . . . . . . . . . . . . . . . . . . . . . . . . . . . . . . . . . . . . . . . . . . . . . . . . . . 36
Contents iii
Page 4

The Microphones . . . . . . . . . . . . . . . . . . . . . . . . . . . . . . . . . . . . . . . . . . . . . . . . . . . . . . . 37
The Effects . . . . . . . . . . . . . . . . . . . . . . . . . . . . . . . . . . . . . . . . . . . . . . . . . . . . . . . . . . . 38
General Effects Controls . . . . . . . . . . . . . . . . . . . . . . . . . . . . . . . . . . . . . . . . . . . . . . . . . . 49
Don’t Forget to Save! . . . . . . . . . . . . . . . . . . . . . . . . . . . . . . . . . . . . . . . . . . . . . . . . . . . . 49
Chapter 4. Eleven Rack Live Setup . . . . . . . . . . . . . . . . . . . . . . . . . . . . . . . . . . . . . . . . . . 51
Basic Live Setup. . . . . . . . . . . . . . . . . . . . . . . . . . . . . . . . . . . . . . . . . . . . . . . . . . . . . . . . 52
Using an Amp Onstage . . . . . . . . . . . . . . . . . . . . . . . . . . . . . . . . . . . . . . . . . . . . . . . . . . . 53
Effects and Foot Controllers. . . . . . . . . . . . . . . . . . . . . . . . . . . . . . . . . . . . . . . . . . . . . . . . 55
External Foot Controllers . . . . . . . . . . . . . . . . . . . . . . . . . . . . . . . . . . . . . . . . . . . . . . . . . . 56
Display Mode and Visibility . . . . . . . . . . . . . . . . . . . . . . . . . . . . . . . . . . . . . . . . . . . . . . . . 57
Part II Setting Up and Using Pro Tools with Eleven Rack
Chapter 5. Installing and Connecting Eleven Rack . . . . . . . . . . . . . . . . . . . . . . . . . . . . 61
Chapter 6. Eleven Rack Studio Setup . . . . . . . . . . . . . . . . . . . . . . . . . . . . . . . . . . . . . . . . 63
Using Eleven Rack as Your Pro Tools Interface . . . . . . . . . . . . . . . . . . . . . . . . . . . . . . . . . . 63
Listen to Your Sound from Pro Tools . . . . . . . . . . . . . . . . . . . . . . . . . . . . . . . . . . . . . . . . . 64
Analog Audio Inputs . . . . . . . . . . . . . . . . . . . . . . . . . . . . . . . . . . . . . . . . . . . . . . . . . . . . . 65
Digital Audio Input and Output. . . . . . . . . . . . . . . . . . . . . . . . . . . . . . . . . . . . . . . . . . . . . . 66
MIDI Connections . . . . . . . . . . . . . . . . . . . . . . . . . . . . . . . . . . . . . . . . . . . . . . . . . . . . . . . 67
Using Eleven Rack with an Existing Pro Tools System. . . . . . . . . . . . . . . . . . . . . . . . . . . . . . 68
Chapter 7. Using Eleven Rack with Pro Tools . . . . . . . . . . . . . . . . . . . . . . . . . . . . . . . . . 73
Pro Tools Interface Capabilities . . . . . . . . . . . . . . . . . . . . . . . . . . . . . . . . . . . . . . . . . . . . . 73
External Processor Capabilities . . . . . . . . . . . . . . . . . . . . . . . . . . . . . . . . . . . . . . . . . . . . . 73
The Eleven Rack Control Window . . . . . . . . . . . . . . . . . . . . . . . . . . . . . . . . . . . . . . . . . . . . 74
Accessing the Eleven Rack Control Window . . . . . . . . . . . . . . . . . . . . . . . . . . . . . . . . . . . . 75
Rig View Section . . . . . . . . . . . . . . . . . . . . . . . . . . . . . . . . . . . . . . . . . . . . . . . . . . . . . . . 76
Master Control Section . . . . . . . . . . . . . . . . . . . . . . . . . . . . . . . . . . . . . . . . . . . . . . . . . . . 80
Guitar Recording with Pro Tools . . . . . . . . . . . . . . . . . . . . . . . . . . . . . . . . . . . . . . . . . . . . . 81
Recording Wet and Dry Signals when Using Eleven Rack as an External Processor . . . . . . . . . 82
Embedding Rig Settings in Audio Regions. . . . . . . . . . . . . . . . . . . . . . . . . . . . . . . . . . . . . . 83
Re-Amping. . . . . . . . . . . . . . . . . . . . . . . . . . . . . . . . . . . . . . . . . . . . . . . . . . . . . . . . . . . . 86
Controlling Eleven Rack Parameters with MIDI Data . . . . . . . . . . . . . . . . . . . . . . . . . . . . . . 87
Eleven Rack User Guideiv
Page 5

Chapter 8. User Options. . . . . . . . . . . . . . . . . . . . . . . . . . . . . . . . . . . . . . . . . . . . . . . . . . . . . 89
Exploring the User Options . . . . . . . . . . . . . . . . . . . . . . . . . . . . . . . . . . . . . . . . . . . . . . . . . 89
User Options . . . . . . . . . . . . . . . . . . . . . . . . . . . . . . . . . . . . . . . . . . . . . . . . . . . . . . . . . . . 89
Part III Reference
Chapter 9. Eleven Rack MIDI Controls . . . . . . . . . . . . . . . . . . . . . . . . . . . . . . . . . . . . . . . . 97
General/Frequently Used Controls. . . . . . . . . . . . . . . . . . . . . . . . . . . . . . . . . . . . . . . . . . . . 97
Amplifier Controls . . . . . . . . . . . . . . . . . . . . . . . . . . . . . . . . . . . . . . . . . . . . . . . . . . . . . . . 98
Effects . . . . . . . . . . . . . . . . . . . . . . . . . . . . . . . . . . . . . . . . . . . . . . . . . . . . . . . . . . . . . . 113
Utility Settings. . . . . . . . . . . . . . . . . . . . . . . . . . . . . . . . . . . . . . . . . . . . . . . . . . . . . . . . . 123
Miscellaneous MIDI Controls . . . . . . . . . . . . . . . . . . . . . . . . . . . . . . . . . . . . . . . . . . . . . . 124
Chapter 10. Resources. . . . . . . . . . . . . . . . . . . . . . . . . . . . . . . . . . . . . . . . . . . . . . . . . . . . . 125
About the Pro Tools Guides . . . . . . . . . . . . . . . . . . . . . . . . . . . . . . . . . . . . . . . . . . . . . . . 125
About www.avid.com . . . . . . . . . . . . . . . . . . . . . . . . . . . . . . . . . . . . . . . . . . . . . . . . . . . . 126
Chapter 11. Compliance Information . . . . . . . . . . . . . . . . . . . . . . . . . . . . . . . . . . . . . . . . 127
Environmental Compliance. . . . . . . . . . . . . . . . . . . . . . . . . . . . . . . . . . . . . . . . . . . . . . . . 127
EMC (Electromagnetic Compliance). . . . . . . . . . . . . . . . . . . . . . . . . . . . . . . . . . . . . . . . . . 128
Safety Compliance . . . . . . . . . . . . . . . . . . . . . . . . . . . . . . . . . . . . . . . . . . . . . . . . . . . . . 129
Contents v
Page 6

Eleven Rack User Guidevi
Page 7

Part I: Playing Guitar through Eleven Rack
1
Page 8

2
Page 9
Chapter 1: Introduction
To play guitar with Eleven Rack:
Quick Start Instructions
You’ve Got Eleven Rack, You’ve
Got Your Guitar. What’s Next?
Eleven Rack is a high-quality audio and MIDI interface, with classic guitar amp and effects processing built right in. This means that Eleven
Rack is useful when recording, gigging, and
practicing.
At home or in the studio, you can plug guitars,
microphones, and other instruments into
Eleven Rack, and record directly into a Pro Tools
session on your computer. You can use the amp
and effects modelling capabilities of Eleven Rack
to process signals as you record them, or to process previously recorded audio.
When away from the computer, you can use
Eleven Rack as a standalone guitar processor,
sending classic guitar tones straight to a venue’s
PA system, to a guitar amp, or both. You can also
simply plug in a pair of headphones and practice by yourself.
1 Connect outputs from Eleven Rack to your
monitors or headphones:
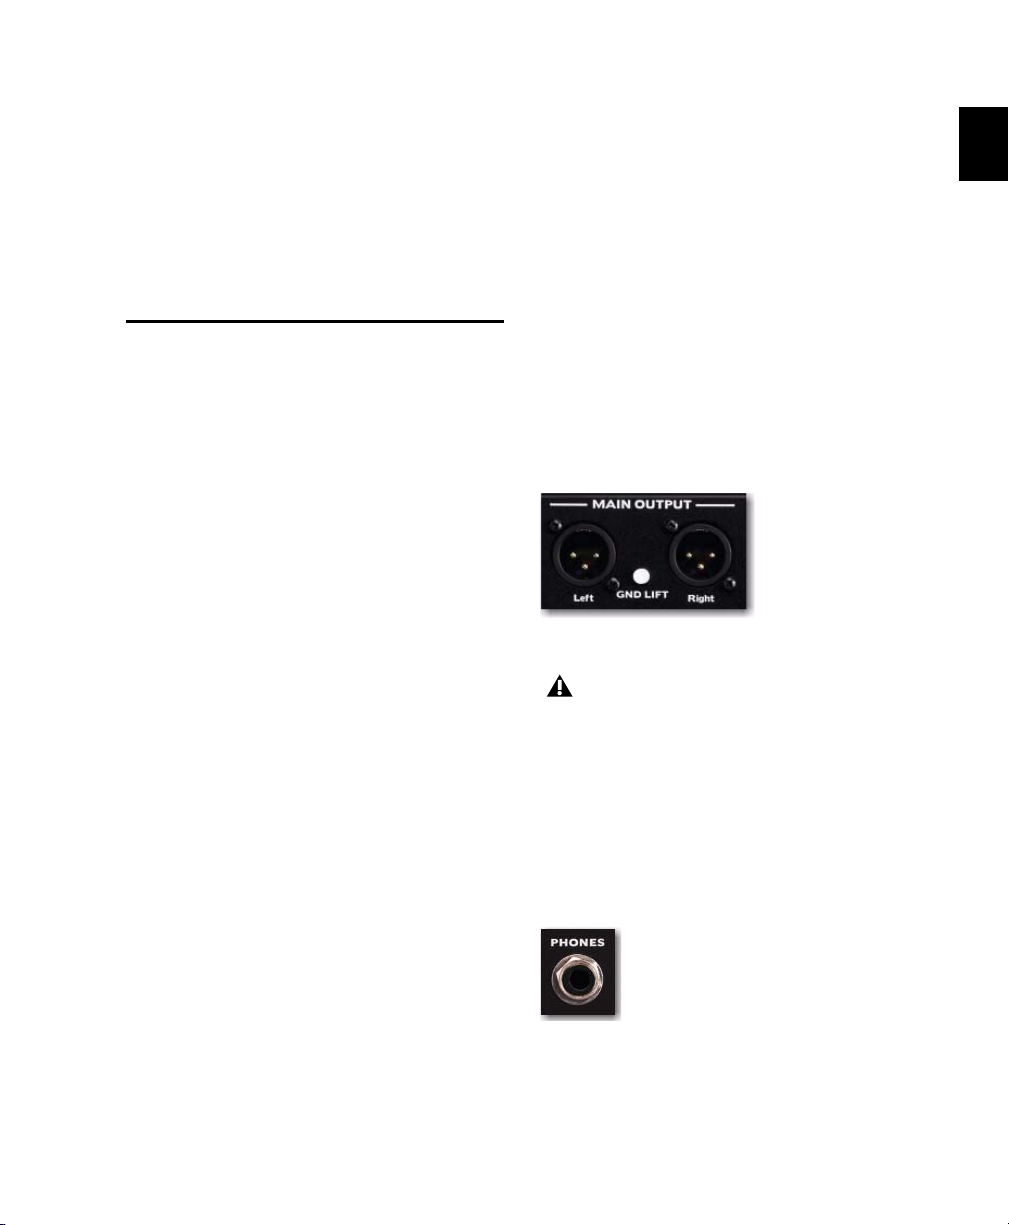
• If you’re connecting to self-powered studio
Eleven Rack Main outputs (back panel)
• If you’re using a pair of headphones, con-
monitors, a stereo power amp and speakers,
or mixer inputs, use the Main outputs.
The Main outputs are line-level, rather than
mic-level outputs. When connecting to a
mixer or other device with microphone preamps, it is best to use the device’s line-level
inputs, if provided. If only inputs with preamps are available, adjust the preamp gain
on each channel to avoid clipping.
nect them to the Phones output.
You’re probably excited to start playing with
your new Eleven Rack right away, so let’s get
started!
Phones output (front panel)
Chapter 1: Introduction 3
Page 10
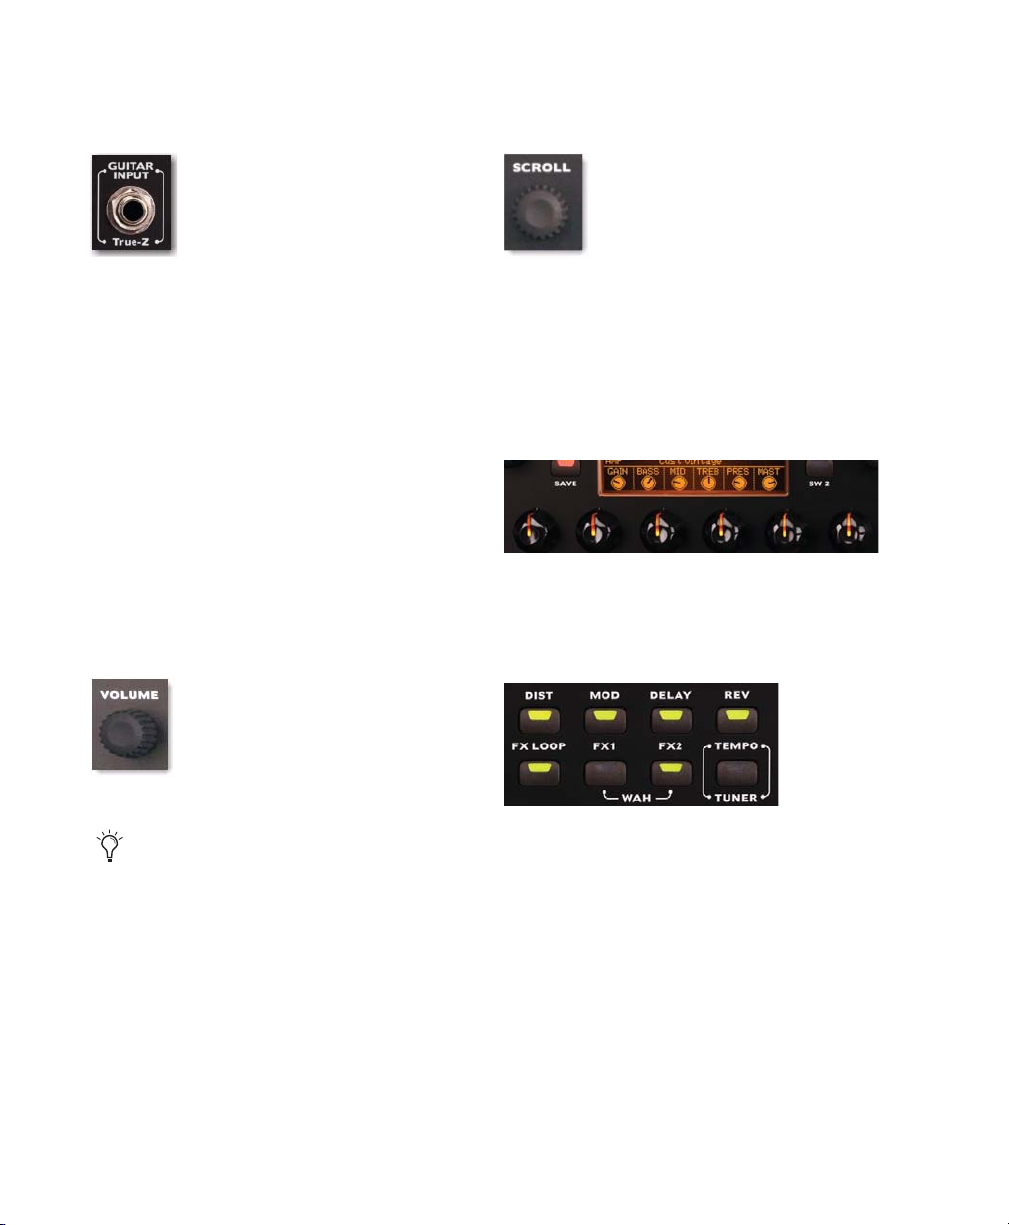
2 Connect your guitar to the Guitar Input on
the front panel of Eleven Rack.
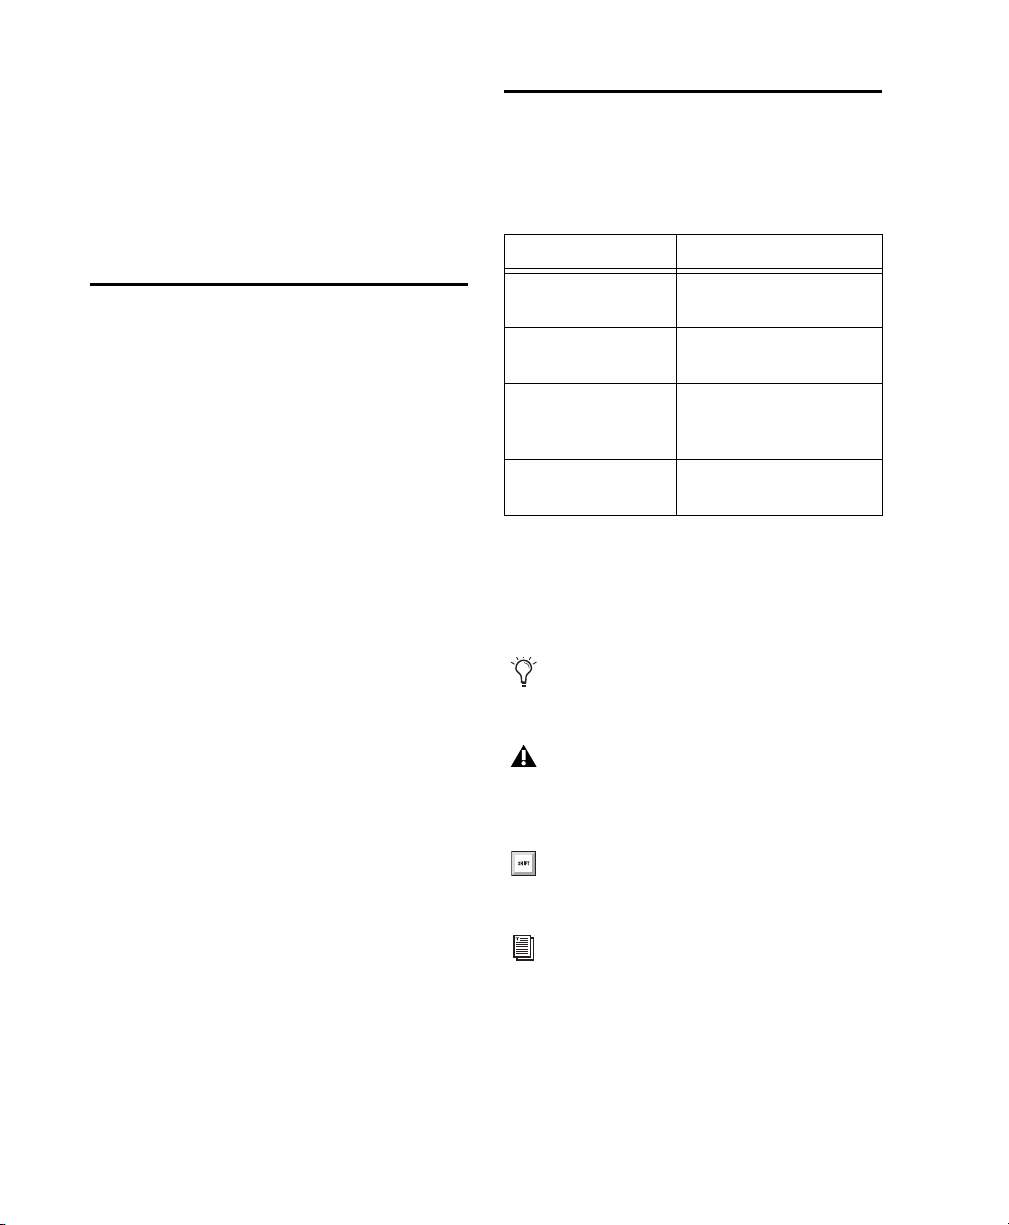
8 You can browse through Eleven Rack’s various
Rigs, by turning the Scroll wheel.
Guitar input (front panel)
3 Connect the power cable.
4 Make sure any connected amplifiers or pow-
ered monitors are turned off or muted.
5 Set the Eleven Rack Power switch to On. The
Eleven Rack logo will appear, and the Eleven
Rack will begin its warm-up process.
6 When the name of the first preset sound (or
Rig) is displayed, turn your amp or powered
speakers back on.
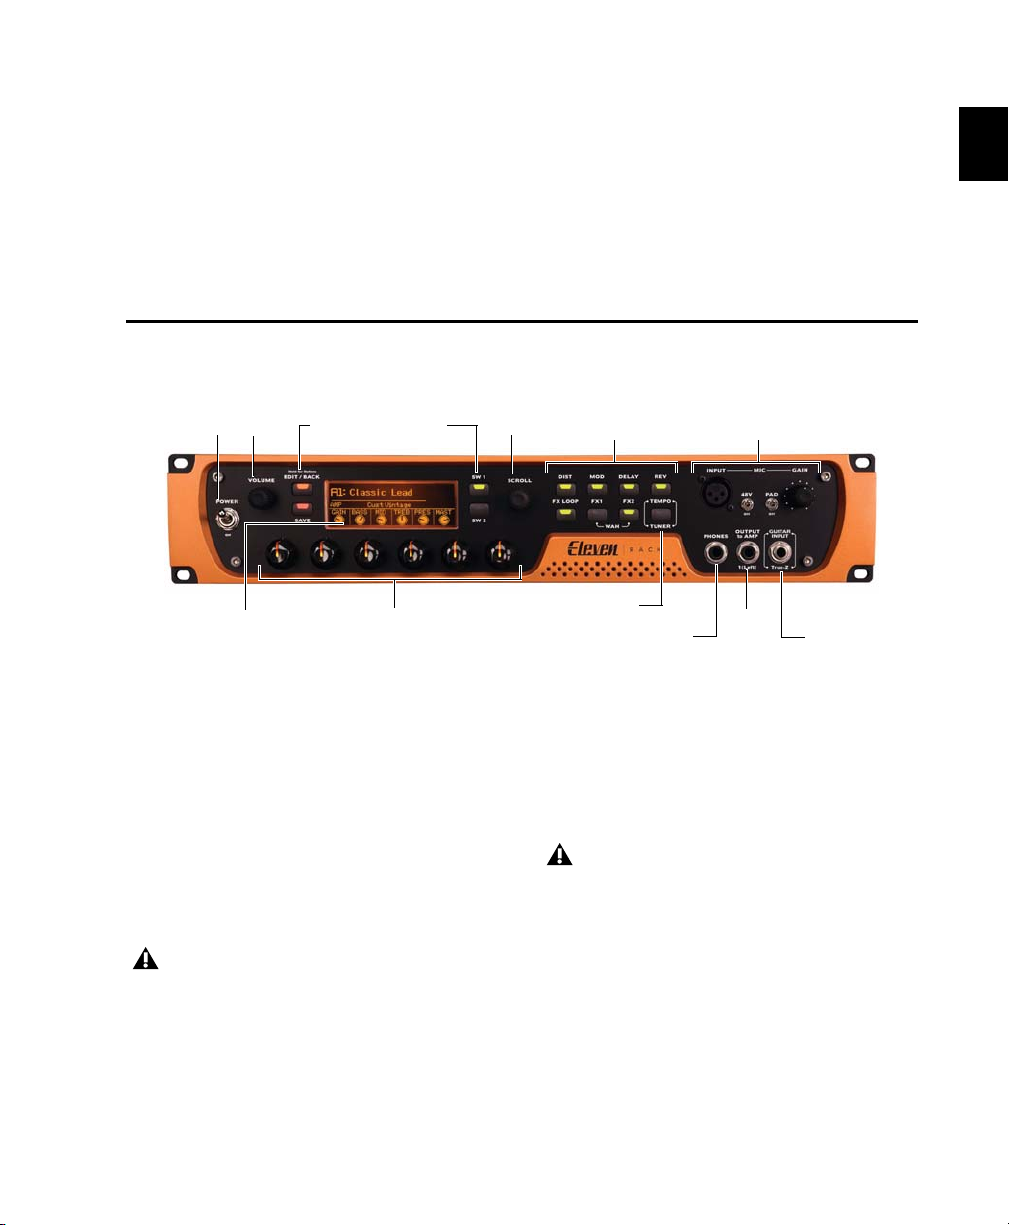
7 Try playing your guitar. Make sure the guitar’s
volume is turned up. How’s it sound? You may
want to adjust the output volume of Eleven Rack
by turning the Volume knob on the front panel.
Volume knob (front panel)
If you aren’t getting sound when you play
your guitar, make sure that the Rig Input
User Option is set to Guitar. For more information, see “Rig Input” on page 17
.
Scroll wheel (front panel)
9 Try adjusting the lit Control Knobs to change
the featured amp or effects settings. You can see
what kind of control each knob is assigned to on
the display. In the following example, the leftmost knob controls Gain, the second knob controls Bass, and so on.
Control knobs and displayed knob assignments
10 Press some of the Effects Bypass buttons
(such as Dist, Mod, or Delay) to toggle the various effects on and off.
Effects Bypass buttons
Eleven Rack User Guide4
Page 11

System Requirements and Compatibility
To use Eleven Rack as a standalone preamp and
processor for a Guitar or other instrument, you
need:
• A guitar, bass, or other electric instrument
• One or more of the following, for monitoring:
• A guitar amplifier
• A set of speakers, with an amplifier
• A set of headphones
• Cables to connect your chosen devices
To use Eleven Rack with Pro Tools, you need:
• One of the following:
• A qualified Mac or Windows computer running Pro Tools 8.0.1 or higher (when using
Eleven Rack as a Pro Tools interface)
– or –
• A qualified Mac or Windows computer running Pro Tools 8.0.1 or higher with an
Avid-qualified interface (when using
Eleven Rack as an external signal device).
• Included USB and power cables for use with
Eleven Rack
• Internet access for registration purposes
Avid can only assure compatibility and provide
support for hardware and software it has tested
and approved.
For complete system requirements and a list of
qualified computers, operating systems, hard
drives, and third-party devices, visit:
www.avid.com/compatibility
Getting Around This Guide
There are two main ways to use Eleven Rack. It
can be used as a live guitar processor (see Part I,
“Playing Guitar through Eleven Rack.”) Or,
Eleven Rack can be used as an audio interface
and effects processor with Pro Tools (see Part II,
“Setting Up and Using Pro Tools with Eleven
Rack.”)
Part 1: Playing Guitar through
Eleven Rack
You’re looking at it. Part 1 gives you an overall
view of Eleven Rack, its features and basic operation.
• Chapter 1, “Introduction”
• Chapter 2, “Hardware Overview”
• Chapter 3, “Exploring Rigs”
• Chapter 4, “Eleven Rack Live Setup”
Part 2: Setting Up and Using
Pro Tools with Eleven Rack
In Part 2, you can learn how to set up and use
Eleven Rack as part of a Pro Tools recording and
mixing system.
• Chapter 5, “Installing and Connecting
Eleven Rack”
• Chapter 6, “Eleven Rack Studio Setup”
• Chapter 7, “Using Eleven Rack with
Pro Tools”
• Chapter 8, “User Options”
Chapter 1: Introduction 5
Page 12
Part 3: Reference
In Part 3, we get into the technical (and very
useful) details behind the scenes.
• Chapter 9, “Eleven Rack MIDI Controls”
• Chapter 10, “Resources”
Registration
Conventions Used in This Guide
Pro Tools guides use the following conventions
to indicate menu choices and key commands:
:
Convention Action
File > Save Choose Save from the
File menu
Review the enclosed Registration Information
Card and follow the instructions on it to quickly
register your purchase online. By registering,
you become eligible to receive the following:
• Information regarding technical support
• Software update and upgrade notices
• Limited warranty on hardware
Warranty
Your warranty can be found on the Registration
Information Card.
Control+N Hold down the Control key
and press the N key
Control-click Hold down the Control key
and click the mouse
button
Right-click Click with the right mouse
button
The names of Commands, Options, and Settings
that appear on-screen are in a different font.
The following symbols are used to highlight important information:
User Tips are helpful hints for getting the
most from your Pro Tools system.
Important Notices include information that
could affect your data or the performance of
your system.
Shortcuts show you useful keyboard or
mouse shortcuts.
Cross References point to related sections in
this guide and other related guides.
Eleven Rack User Guide6
Page 13

About www.avid.com
The Avid website (www.avid.com) is your best
online source for information to help you get
the most out of your Pro Tools system. The following are just a few of the services and features
available.
Product Registration Register your purchase
online.
Support and Downloads Contact Avid Customer
Success (technical support); download software
updates and the latest online manuals; browse
the Compatibility documents for system requirements; search the online Knowledge Base
or join the worldwide Pro Tools community on
the User Conference.
Training and Education Study on your own using
courses available online or find out how you can
learn in a classroom setting at a certified
Pro Tools training center.
Products and Developers Learn about Avid
products; download demo software or learn
about our Development Partners and their
plug-ins, applications, and hardware.
News and Events Get the latest news from Avid
or sign up for a Pro Tools demo.
Chapter 1: Introduction 7
Page 14

Eleven Rack User Guide8
Page 15
Chapter 2: Hardware Overview
Scroll
Effects Control
Mic input and controls
Power
switch
Vol ume
knob
Edit/Back
and Save
buttons
SW1 and SW2
buttons
wheel
buttons
Control knobs
Tap Tempo
and Tuner button
Phones
output
Guitar
input
Output
To Am p
1 (L)
Display
Eleven Rack Front Panel
Figure 1. Eleven Rack front panel
The Eleven Rack front panel provides the
following:
Power Switch
Use the heavy-duty Power switch to turn Eleven
Rack on and off. Eleven Rack will take a few seconds to warm up. When the Rig name appears
on the display, you’re ready to rock.
Before you power on Eleven Rack, make
sure any powered monitors or amplifiers
are turned off or muted, and take off any
headphones.
Volume Knob
Turning the Volume knob will simultaneously
adjust the output level of the Main outputs and
the Headphone output.
The Volume knob can also be set to control
other output volume settings in
Eleven Rack. For more information, see
“Volume Control” on page 94.
Chapter 2: Hardware Over view 9
Page 16
Edit/Back and Save Buttons
Effects Control Buttons
Use the Edit/Back button to enter Rig View,
which gives you access to the inner workings of
the current Rig (preset). When in Rig View or
any other non-default view, you can Press
Edit/Back to step backwards to the previous
view. When you’re satisfied with the changes
you’ve made, press the Save button to save your
settings.
For more information on Rig View, see
Chapter 3, “Exploring Rigs.”
User Options Mode
Hold the Edit/Back button to enter User Options
mode, where many settings that change the behavior and configuration of Eleven Rack can be
found.
For information on User Options mode, see
Chapter 8, “User Options.”
SW1 and SW2 Buttons
Use the SW1 and SW2 buttons to toggle various
switched behaviors on and off, and to navigate
through editing views in Eleven Rack. The part
of the display next to the SW1 and SW2 buttons
shows the current function of the buttons.
Use the Effects Control buttons to toggle effects
on and off by type. Press and hold any of the effects buttons to access the controls for that effect. Pressing the FX1 and FX2 buttons simultaneously toggles the Wah effect on and off.
Tap Tempo/Tuner Button
Tap the Tap Tempo/Tuner button at quarternote intervals to set the current Rig’s FX tempo.
Time-based effects (such as Delay and Tremolo)
can be set to synchronize with the new tempo.
Most Rigs are not set up to sync to Rig or Session
tempo by default. You may need to turn on the
Sync parameter in the effect you want to sync.
For more information on syncing effects, see
“Sync” on page 49.
If you want to save the new tempo setting with
the current Rig, press the Save button.
To access the built-in guitar tuner, hold the Tap
Tempo/Tuner button down for one second. The
display shows the Tuner view.
When one of the SW buttons are actively usable
in the current screen, it will be lit.
Scroll Wheel
Use the Scroll wheel to browse through Rigs,
navigate through sections in Rig View, and manipulate applicable parameters throughout
Eleven Rack.
Eleven Rack User Guide10
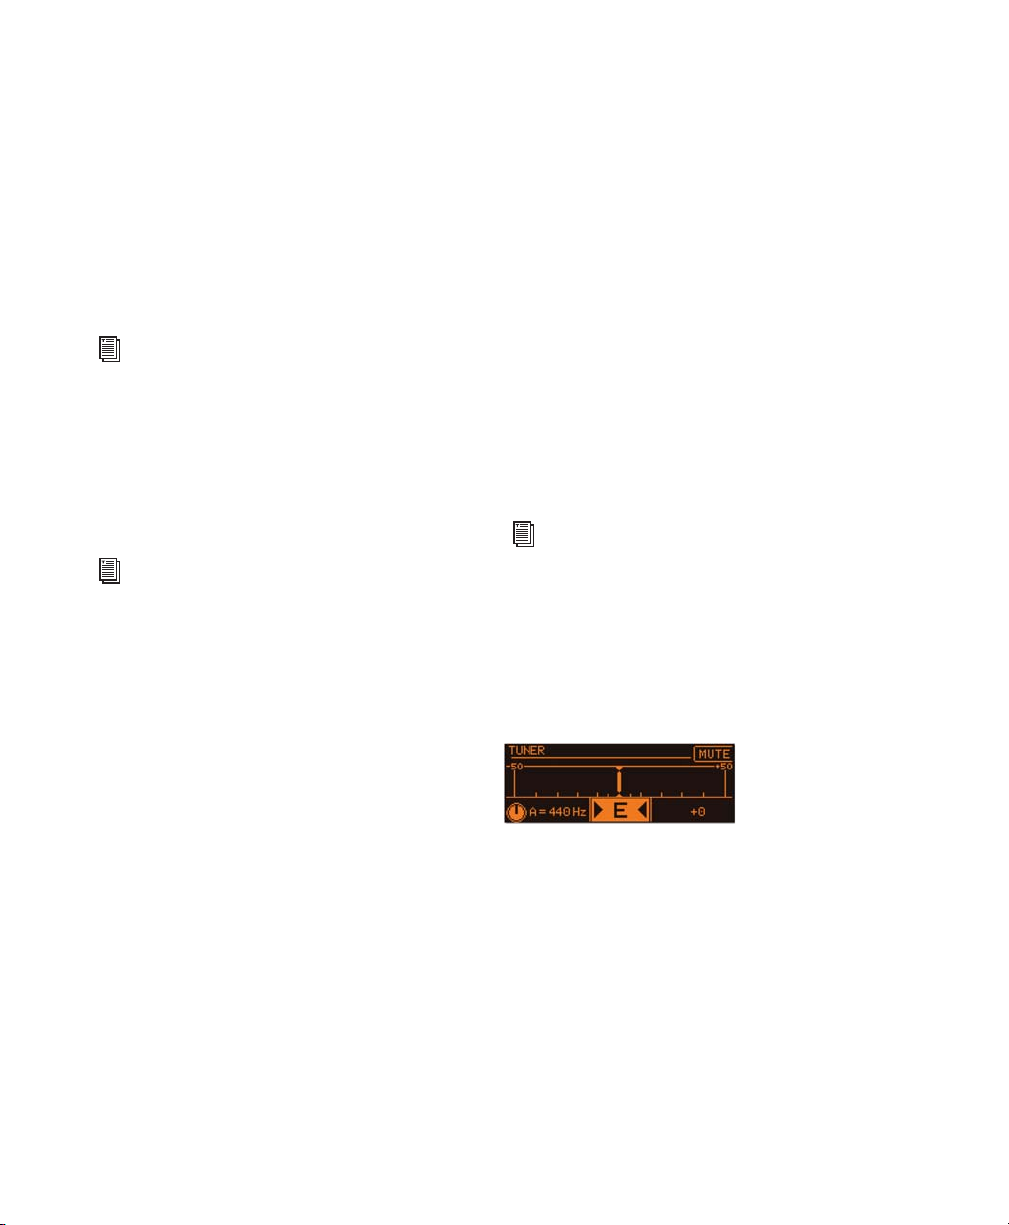
Tuner v iew
The guitar signal can be muted by pressing SW1.
The reference pitch can be adjusted by turning
the lit Control knob. The default reference pitch
is A-440 Hz. This pitch is the standard reference
pitch that most tuners are calibrated to.
When you’re finished tuning, press any button
to return to the previous screen.
Page 17

Mic Input and Controls
Display
Use the Mic input to record and/or process miclevel signals. Controls for preamp gain, phantom power, and pad are provided.
When using Eleven Rack as a standalone
preamp and processor, it’s important to note
that only one input type can run through the
Rig at one time. The Rig Input User Option
setting must be set to the correct input type,
or no audio will pass to the outputs. For
more info on selecting the input that feeds
the rig, see “Rig Input” on page 90.
When using Eleven Rack as an audio interface with Pro Tools, all inputs are usable simultaneously (though the Rig is still limited
to processing one input type at a time).
48V (Phantom Power)
Use this switch for microphones that require
phantom power.
Most condenser microphones (such as an AKG
C3000) do require phantom power to operate.
Dynamic microphones (such as a Shure SM57)
do not require phantom power, but are not
harmed by it.
Although phantom power is safe for most
microphones, it is possible to damage some
ribbon mics with it. Always turn off phantom power and wait at least ten seconds before connecting or disconnecting a ribbon
microphone.
If you are not sure about the phantom power requirements for your microphone, consult your
microphone’s documentation or contact the
manufacturer.
The Display is an LCD screen used to show Rigs,
settings, and data (such as firmware version). It
also works in tandem with the front panel Control knobs and buttons, displaying the currently-controllable parameters and their settings.
For more information on the interaction between the display and the physical controls
on Eleven Rack, see Chapter 3, “Exploring
Rigs.”
Control Knobs
Use the Control knobs to access amp and effects
controls, as well as other Eleven Rack settings.
The controls are pre-assigned, depending on the
current mode. The knobs light up in different
colors, depending on their state:
Amber The current knob is assigned to an amp,
cab, or FX loop parameter.
Green The current knob is assigned to an effects
parameter.
Red The current knob is positioned differently
than the assigned control’s saved position in the
current Rig. You can match the knob position to
the saved parameter by turning the knob until it
lights Amber or Green again. If you want to save
your new settings to the current preset or a new
preset, press the Save button.
The above only applies when you are still
viewing the page you’re adjusting. For example, if you adjust Amp Gain, then scroll
to Distortion, then back to Amp, the Gain
control will not show as red. Keep an eye on
the Save light to be sure.
When a Control knob isn’t active in the current
screen, it is not lit.
Chapter 2: Hardware Over view 11
Page 18

Phones Output
The Phones output is a 1/4-inch TRS jack that
drives a pair of headphones with the same signal
that is being sent out of the Main outputs of
Eleven Rack. This can be either the output signal
of the current Rig when using Eleven Rack as a
standalone device, or the output signal of
Pro Tools or other applications when using
Eleven Rack as an audio interface.
The headphone output level is adjusted in tandem with the Main volume when you turn the
Volume knob on the front panel of Eleven Rack
or adjust the Main volume from within
Pro Tools. If you want the headphone volume to
differ from that going to your speakers, you can
adjust the Headphone Offset setting in User Options mode.
For more information on Headphone Offset,
see “Headphone Volume” on page 93.
Output To Amp 1 (L)
The Output To Amp 1 (L) is one of two outputs
specifically designed for connecting to the input
of a guitar amplifier or effects unit. It is an instrument-level output. Since most amplifier input jacks are located on the amp’s front panel,
we put one of these jacks on the front panel of
Eleven Rack for easy patching.
You can select from specific points in the signal
chain to feed each Output To Amp jack. This lets
you choose the type of processing you want on
the output signal.
Guitar Input with True-Z
The Guitar input is a 1/4" TS, instrument-level
input. Designed for electric guitars, the jack also
works well with bass guitars, acoustic guitars
with pickups, and even vintage electric pianos.
Most recent keyboards have line-level outputs and sh ould be conne cted to the Line inputs on the back panel of Eleven Rack.
Eleven Rack features a special variable-impedance circuit called True-Z, which automatically
changes the input impedance of the Eleven Rack
guitar input depending on which amp or effects
model is first in the chain of the current Rig.
True-Z alters the frequency response of your guitar signal by loading your pickups in the same
manner as plugging into a real amp or effect.
This setting only effects instruments with passive pickups.
When using an instrument with active (batterypowered) pickups, we recommend setting the
True-Z setting to 1M. This feature can be manually controlled and saved as part of a Rig setting.
The Output to Amp 2 jack, which outputs the
right channel signal, is located on the back of
Eleven Rack. It can be used independently of
Output 1, or along with it for stereo amplifier
configurations.
The Output to Amp jacks can output a live guitar signal in real time as you play, or a pre-recorded signal from Pro Tools, for re-amping purposes.
Eleven Rack User Guide12
When using Eleven Rack as a standalone
preamp and processor, it’s important to note
that only one input type can run through the
Rig at one time. The Rig Input User Option
setting must be set to the correct input type,
or no audio will pass to the outputs. For
more info, see “Rig Input” on page 90.
When using Eleven Rack as an audio interface with Pro Tools, all inputs are usable simultaneously (though the Rig is still limited
to processing one input type at a time).
Page 19
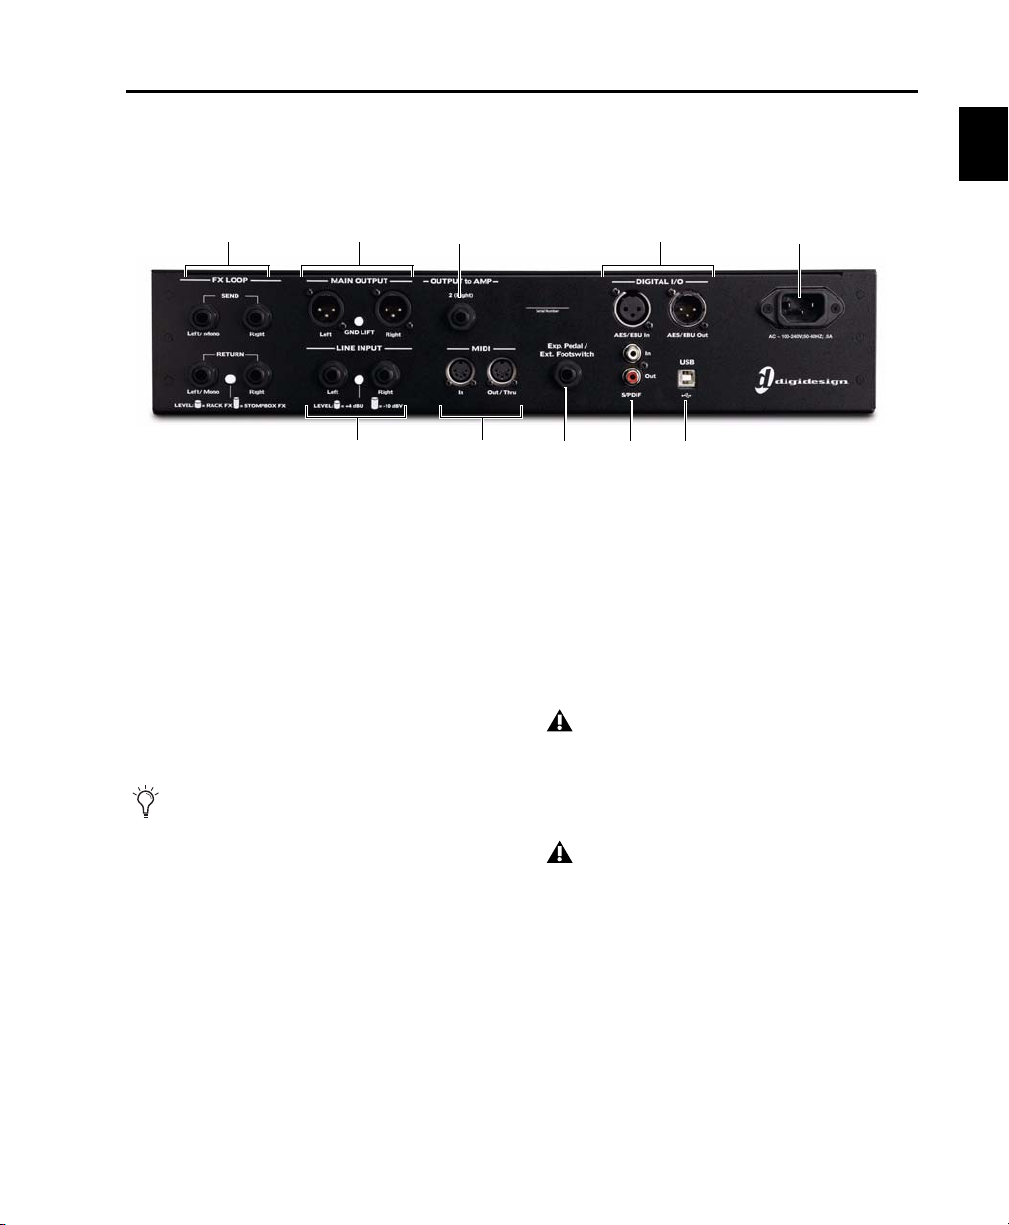
Eleven Rack Back Panel
FX Loop
Main output
Sends and Returns
Output To
AES/EBU
AC power input
USB port
S/PDIF
Exp. Pedal/
MIDI I/O
Line input
digital I/O
digital I/O
Footswitch
input
Amp 2 (R)
Figure 2 identifies each port on the back panel of the Eleven Rack.
Figure 2. Eleven Rack back panel
The Eleven Rack back panel provides the
following:
FX Loop Sends and Returns
The FX Loop Sends and Returns are a pair of 1/4inch TRS inputs and outputs, which can be used
to insert a mono or stereo external effects processor into the guitar signal.
The Level switch lets you adjust the signal level
to be suitable for either a line-level effects processor (Rack FX) or a guitar-level effects processors (Stompbox FX).
When sending and receiving mono signals,
use the Left/Mono input and output. You
can set the FX Loop to mono in this case, by
visiting User Options > FX Loop. For more
information, see “FX Loop” on page 92.
Main Outputs
The Main output section includes a stereo, XLR,
line-level analog output pair. Connect these to
studio monitors, a power amp, mixer, or PA system.
When using the Main outputs to feed a live
sound console, alert the sound engineer that
the signal you’re sending is line-level, rather
than mic-level.
Use caution when connecting the Main Outputs to devices (such as mixers), which provide 48V phantom power over the connection. We recommend that you make sure
48V phantom power is disabled on these
devices before connecting your Eleven Rack.
The Gnd Lift switch is useful for suppressing
hum in some situations, but should usually be
left switched off unless it is really needed.
Chapter 2: Hardware Over view 13
Page 20

Output To Amp 2 (R)
S/PDIF
The Output To Amp 2 (R) is one of two outputs
specifically designed for connecting to the input
of a guitar amplifier or effects unit. Like Output
to Amp 1 (L), it is an instrument-level output. It
can be used independently of Output 1 (located
on the front panel), or along with it for stereo
amplifier configurations.
The Output to Amp jacks can output a live guitar signal in real time as you play, or a pre-recorded signal from Pro Tools, for re-amping purposes.
You can select from specific points in the signal
chain to feed each Output To Amp jack. This lets
you choose the amount of processing you want
on the output signal.
Digital Inputs and Outputs
Eleven Rack can support AES/EBU and S/PDIF
digital formats, but not both at once. For information on switching between digital formats,
see “Digital Clock/Input” on page 91
AES/EBU
The AES/EBU In and Out ports are balanced
three-conductor XLR connectors that can support up to 24-bit, 96 kHz audio.
The AES/EBU format is used in many professional digital converters, recorders, and signal
processors.
The S/PDIF In and Out ports are unbalanced
two-conductor phono (RCA) connectors that
can support up to 24-bit, 96 kHz resolution.
The Sony/Philips Digital Interface Format
(S/PDIF) is used in many professional and consumer CD recorders and DAT recorders. To
avoid RF interference, use 75-ohm coaxial cable
for S/PDIF transfers and keep the cable length to
a maximum of 10 meters.
AC Power Input
The AC power input accepts a standard IEC
power cable (included with Eleven Rack). The
power supply in Eleven Rack is universal, so
wherever you go, all you need is a standard IEC
power cable with the correct plug for your region.
Line Inputs
The Line inputs accept one stereo or two mono
line-level analog signals. The Level switch lets
you select between +4 (for professional gear) or
–10 dBV (for consumer gear).
MIDI I/O
The MIDI In and MIDI Out ports are standard
5-pin MIDI ports, each providing 16 channels of
MIDI input or output. These ports can interface
with a variety of MIDI devices.
When Eleven Rack is used as a standalone processor, the MIDI jacks are used to communicate
with MIDI foot controllers, sending and receiving program changes and continuous controller
data.
Eleven Rack User Guide14
Page 21

When Eleven Rack is used with Pro Tools, you
can connect a MIDI keyboard or controller and
send MIDI data to Eleven Rack to control virtual
instruments in your Pro Tools session. You can
also send MIDI data from Pro Tools to your
MIDI-equipped gear.
Exp Pedal/Ext Footswitch Input
The Exp Pedal/Ext Footswitch input supports an
expression pedal or a momentary footswitch
(single or dual). You can control sweepable parameters (such as Wah, Volume and Multi FX)
with an expression pedal, or switchable settings
(such as Rig switching, amp channel switching,
and effects on/off) with a footswitch.
USB Port
The USB port lets you connect Eleven Rack to
your computer for use with Pro Tools software,
another Pro Tools system, or for maintenance
tasks like updating firmware.
We recommend using the included USB cable to
connect Eleven Rack. If the included cable isn’t
available, use a high-quality USB cable, five meters (16 feet) or shorter.
Chapter 2: Hardware Over view 15
Page 22

Eleven Rack User Guide16
Page 23

Chapter 3: Exploring Rigs
To set the Rig Input User Option to match your
Overview
Eleven Rack is a powerful guitar signal processor
that delivers tones from a wide variety of amplifiers, speaker cabinets, microphones, and effects
units. The combination of all of this gear and
their control settings make up a Rig.
Eleven Rack comes loaded with over 100 Rigs
that showcase the range of tones our amps and
effects can achieve. The built-in Rigs are a good
place to start, but the power of Eleven Rack really comes into play when you create your own.
input type:
1 Hold the Edit/Back button for one second to
enter User Options Mode.
2 Scroll to Rig Input using the Scroll wheel.
3 Press SW1 to enter the Rig Input User Option.
4 Use the illuminated Control knob to set the
input to the type you want to run through the
current Rig.
5 Press the Edit/Back button twice to return to
your previous view.
You can audition, manage, edit and create Rigs
from the front panel of Eleven Rack. When using Eleven Rack with Pro Tools, the built-in
Eleven Rack Control window offers another
convenient way to do this work.
For details on working with Rigs from
within Pro Tools, see “The Eleven Rack
Control Window” on page 74.
Rig Input
The Amp/Effects processor inside Eleven Rack
can process one input signal at a time. To hear
your audio when using Eleven Rack as a standalone signal processor, you must set the Rig Input User Option to the input you plan to use
(such as Guitar, Mic, or Line).
Rig Input and Pro Tools
When using Eleven Rack as an audio interface
with Pro Tools, all of the inputs on Eleven Rack,
as well as the output of the Rig, are available as
separate channels for recording.
The Rig Input setting is then used to choose
which input channel is processed by the Rig.
That input’s dry signal is still available for recording separately.
Chapter 3: Exploring Rigs 17
Page 24
Rig Select Mode
When you turn on Eleven Rack, it’s already in
Rig Select mode. In this mode, you can turn the
Scroll wheel to find and select a Rig.
Details Mode
Rig Select Display Modes
The Rig Select page can be viewed four different
ways. To cycle through the display modes, press
the SW1 button.
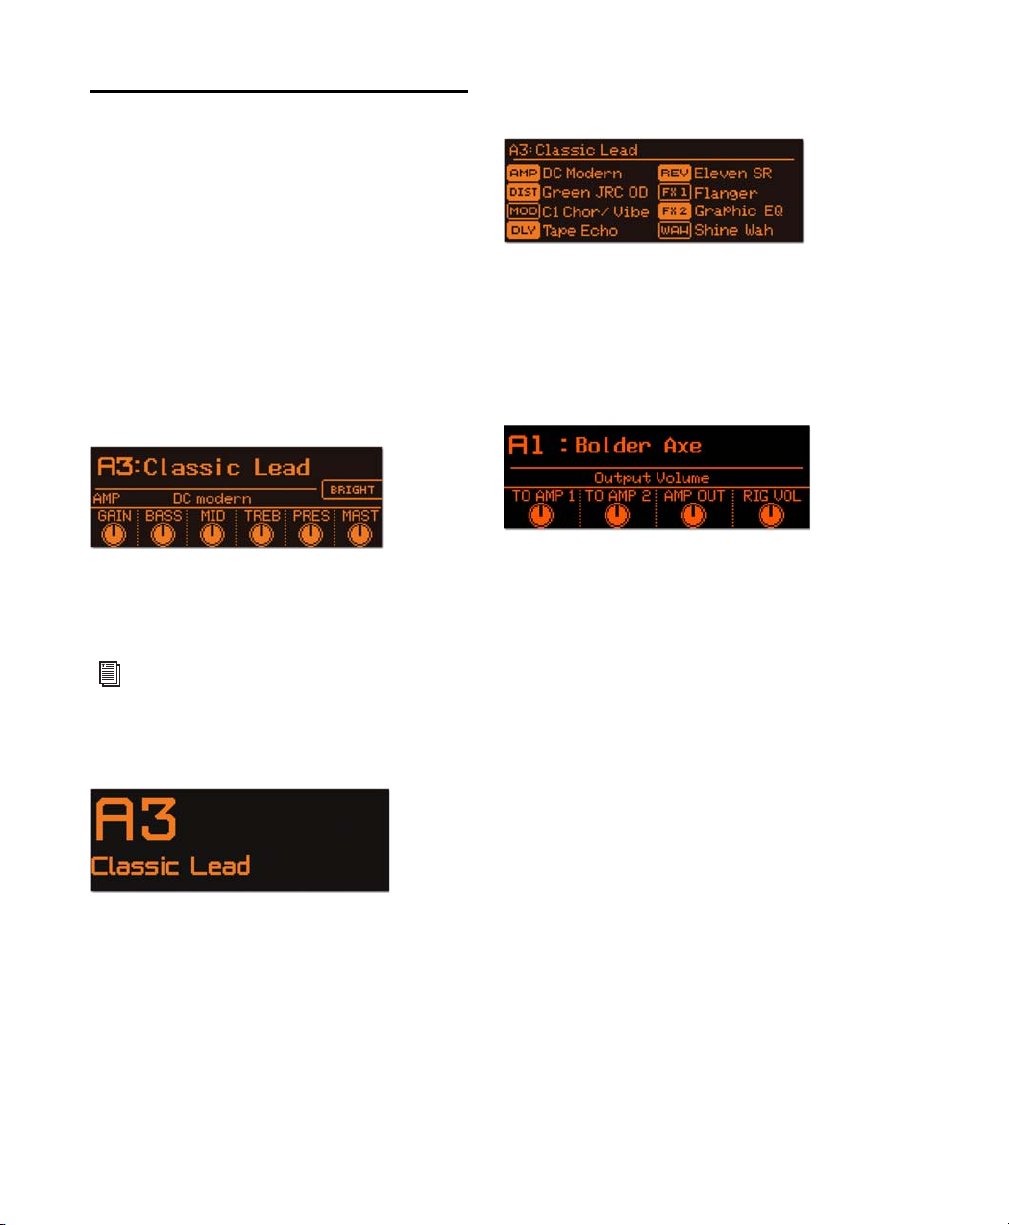
Default Mode
This mode shows the Rig number and name,
and provides a set of amp or effects controls that
you can change without entering Rig View.
For more information about Rig View, see
“Rig View” on page 21.
Simple Mode
This mode lists the amp, cabinet, and effects
models that are used in the current Rig, plus
their on/off status.
Outputs Mode
This mode offers fast access to the output settings for the current Rig. It provides four lit control knobs. These are labeled TO AMP 1 (Output
To Amp 1 volume), TO AMP 2 (Output To Amp 2
volume), AMP OUT (amp output volume), and
RIG VOL (Rig output volume).
This mode shows the Rig number and name in
the largest typeface possible. It’s perfect for seeing from across a dark stage.
Eleven Rack User Guide18
Page 25
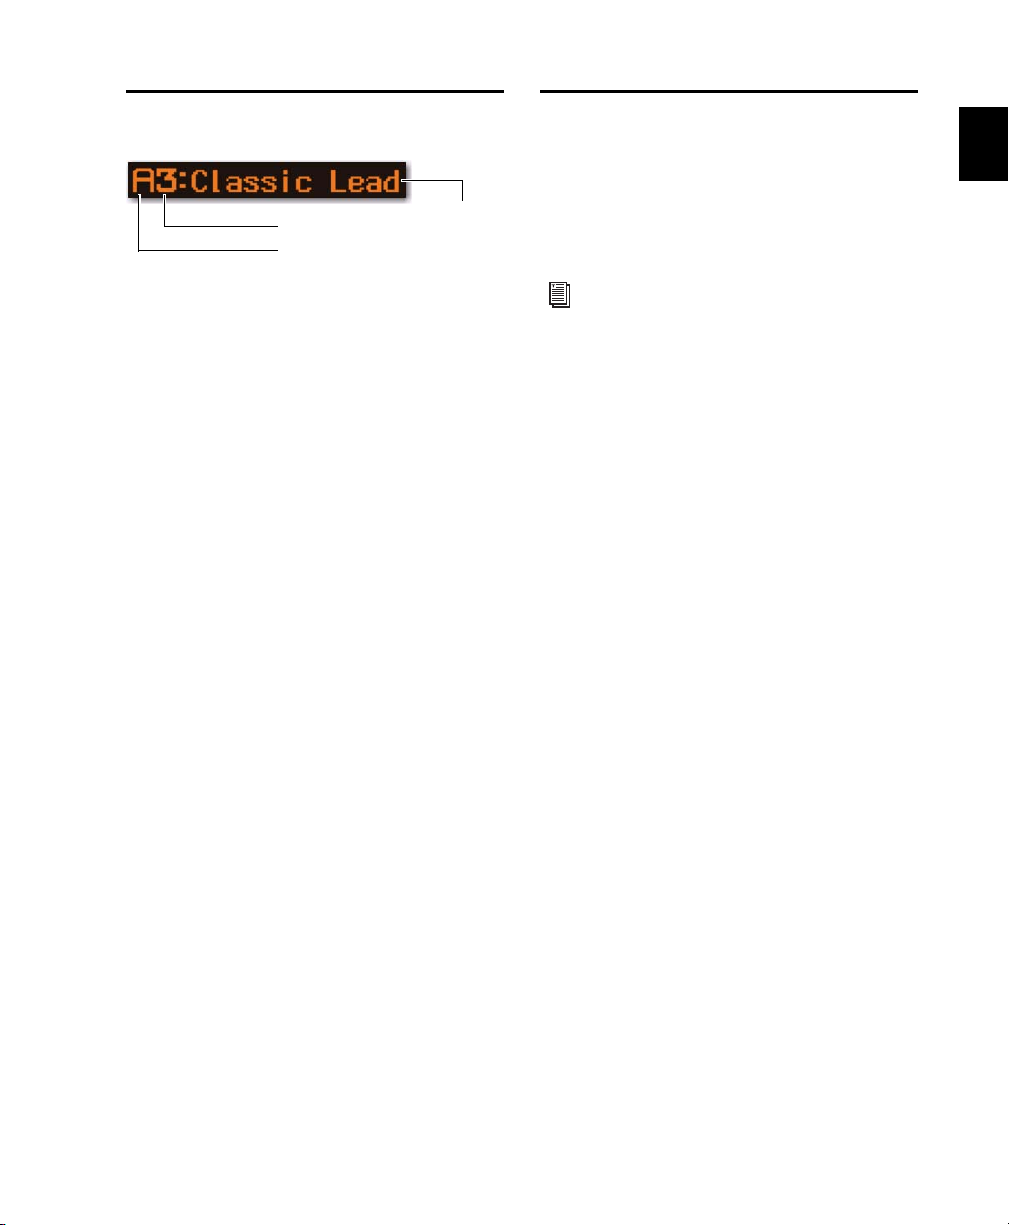
Rig Organization
Rig name
Rig Bank
Rig number
Selecting Rigs Live
When using Eleven Rack in live performance situations, we recommend using a footswitch accessory or a dedicated MIDI foot controller to
switch from Rig to Rig. This lets you switch Rigs
more quickly and conveniently.
Eleven Rack has storage for 208 Rigs. Half of
these are user-editable Rigs, and the other half
are factory preset Rigs. You can also save and
store an unlimited number of your favorite Rigs
as plug-in settings files on your computer.
The 208 Rigs in Eleven Rack are arranged into
two sets of 26 banks, each containing four Rigs.
Each bank is marked with a letter from A to Z,
and a numeral from 1 to 4. Banks with uppercase letters are user banks, and those with lowercase letters are factory banks. For example, the
third preset in user bank D is referred to as “D3.”
User Rigs and Factory Rigs
By default, all 104 user Rigs are copies of the 104
factory Rigs. This gives you a place to start when
you set out to make your own Rigs. As you scroll
through, notice that when you get past the end
of the uppercase (user) Rigs, you’ll then begin to
see the lowercase (preset) Rigs.
The user Rigs are yours to edit, change, copy,
and mangle as you see fit. The preset Rigs will always stay the same. If you make changes to a
preset Rig and want to save it, you can save it as
a new User Rig.
For info on using a footswitch accessory, see
“External Pedals” on page 92. For info on
using a MIDI controller, see Chapter 9,
“Eleven Rack MIDI Controls.”
Chapter 3: Exploring Rigs 19
Page 26
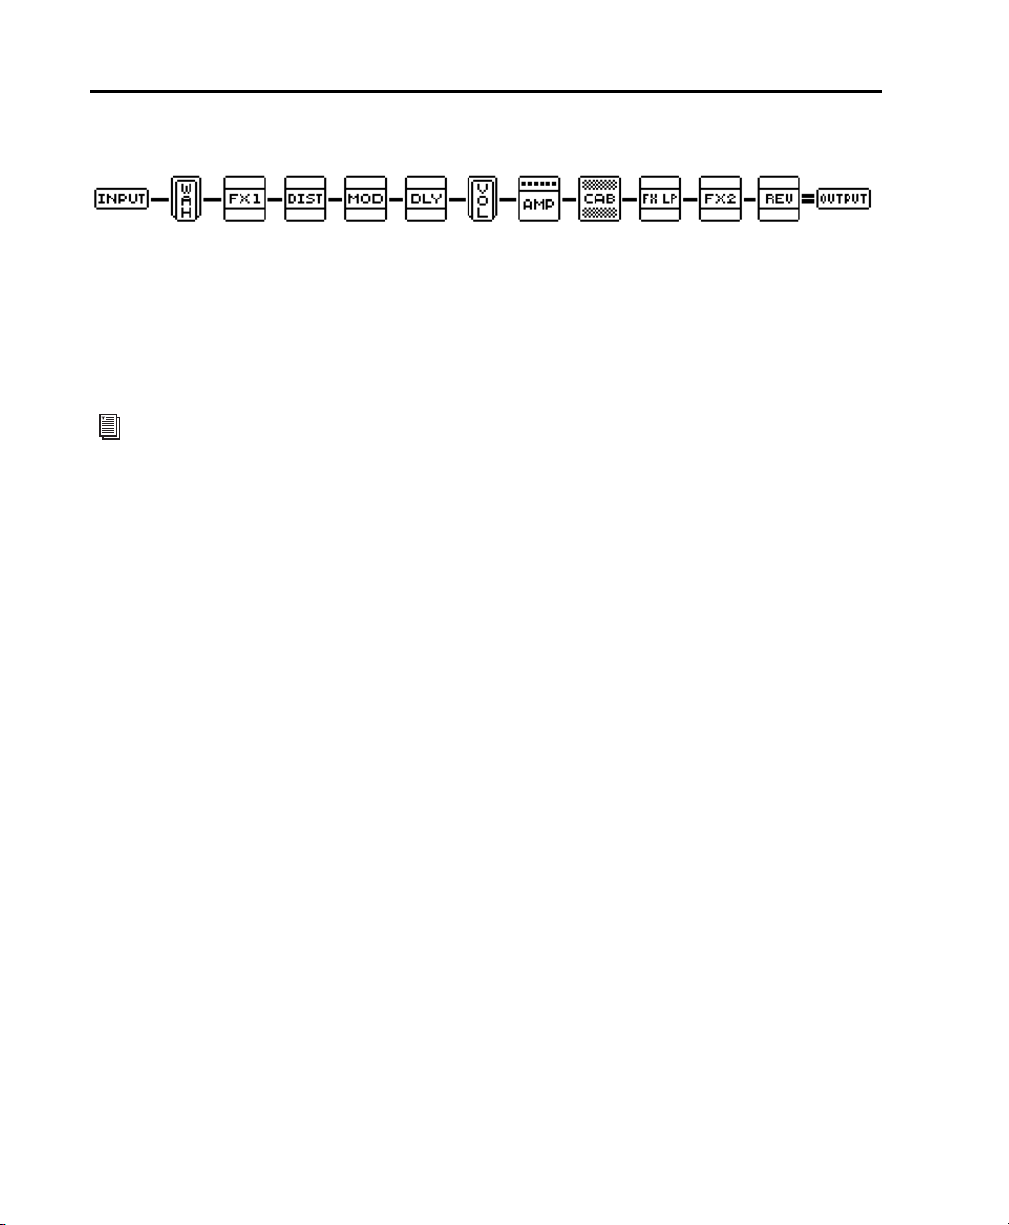
What’s In A Rig?
Figure 3. Example of a common Eleven Rack Rig signal chain
Each Rig in Eleven Rack contains the following
devices for processing your guitar signal from input to output. Each device has settings you can
control. Also, some devices can be moved to different points in the signal chain.
For more information on changing the order
of devices, see “Signal Routing” on page 24.
Signal Chain Devices
Each Rig contains a group of devices that make
up the processing signal chain. You can sculpt,
manipulate, and optimize the sound you’re running through the Rig by adjusting settings in the
following devices.
Input Lets you manipulate the True-Z input impedance circuitry. In the Eleven Rack Rig, this
device is represented by the INPUT icon.
Amplifier Lets you select and tweak the amp of
your choice. In the Eleven Rack Rig, this device
is represented by the AMP icon.
Speaker Cabinet and Microphone Lets you
choose cabinet and microphone models to suit
the desired tone, and add realistic speaker
breakup effects to your signal. In the
Eleven Rack Rig, this device is represented by
the CAB icon.
Effects Lets you choose and manipulate an extensive set of guitar effects, including Distortion, Modulation (such as Chorus and Flanger),
and Reverb. In the Eleven Rack Rig, Effects are
represented by a variety of icons, such as DIST
(for distortion) and DLY (for delay).
Output Lets you change the Rig volume and To
Amp output volume, and switch the Rig output
between mono and stereo. In the Eleven Rack
Rig, this device is represented by the OUTPUT
icon.
Utility Settings
Each Rig also contains the following “Utility”
settings, which can be found to the right of the
Output device in Rig View:
Display Lets you set the device whose controls
are displayed in Rig Select view (such as Amp,
Mod, or FX1). In the Eleven Rack Rig, this device
is represented by the DISPLY icon.
Tem po Lets you set the Rig tempo. In the
Eleven Rack Rig, this device is represented by
the TEMPO icon.
Pedal Lets you configure an external footswitch
or expression pedal accessory. In the
Eleven Rack Rig, this device is represented by
the PEDAL icon.
Meter Lets you meter the signal level at various
points inside the Rig and at the inputs and outputs (analog, digital, and USB) of Eleven Rack.
This device is represented by the METERS icon.
Eleven Rack User Guide20
Page 27

Rig View
Rig View lets you access every aspect of the current Rig, from the amp, cabinet, and microphone type, all the way to choosing effects, and
changing their order in the signal chain.
You can switch to Rig View from Rig Select View
by pressing the Edit/Back button on the front
panel of Eleven Rack.
Page Indicator
In Eleven Rack’s editing screens, a Page indicator appears on the display if there is more than
one page of controls. The Page indicator shows
the number of pages, as well as the name of the
page you’re viewing. Turn the Scroll wheel to
switch between pages.
Page indicator, showing page two of four
Signal Chain Devices and Utility Settings in Rig View
Rig View
Once you’ve entered Rig View, you’ll see a selection of icons, each representing a different device or utility setting within the current Rig.
Turn the Scroll wheel to select the element you
want to access.
As you scroll through the list, certain functions
will be assigned to the lit Control Knobs, (such
as choosing the type of amp or effect you want
to use).
When you’re finished editing, press the
Edit/Back button again to get back to the main
Rig Select mode.
If you make changes you want to save, be
sure to use the Save button before switching
to a different Rig. For details, see “Saving
Your Work” on page 25.
This section describes the functions of the signal
chain devices and utility settings pages found in
Rig View.
If the device or setting you select in Rig View has
additional controls, pressing SW1 (labeled
CONTROLS) takes you to a special page of additional controls for that device. When you’re finished, press Edit/Back to go back to Rig View.
For more details on accessing additional
controls, see “Rig Edit Mode” on page 24.
Input
Turn the lit Control knob to manipulate the
True-Z impedance circuitry in Eleven Rack.
When set to Auto, the input impedance is determined by the first active effect or amp in the signal chain. You can also choose a specific load
value to best match your pickups.
Chapter 3: Exploring Rigs 21
Page 28

Amplifier, Cabinet, and
Microphone
AMP
Turn the lit Control knob to select the type of
simulated amp you want to use. Press CONTROLS
to access additional amp settings.
Effects
VOL
Press CONTROLS to access a Control page where
you can adjust the position and minimum volume of the Volume pedal, using the lit Control
knobs.
CAB
By default, when Cab is selected in Rig View,
you can access the following controls:
CAB and MIC Turn the lit Control knobs to select the type of cabinet and microphone you
want to use.
ON AXIS/OFF AXIS Press SW2 to toggle the microphone position on or off-axis.
CONTROLS Press SW1 to reach two additional
pages of Cab controls. You can then scroll between control pages with the Scroll wheel.
The two control pages let you access the following additional controls:
BYPASS (Page One) Press SW1 to bypass the
current cabinet and microphone model.
SPEAKER BREAKUP (Page Two) Turn the lit
Control knob to dial in the appropriate amount
of the Speaker Breakup simulation.
When playing Eleven Rack through a guitar
amp, you may want to bypass the Cab and
Mic simulations. With some amplifiers, the
additional tone shaping of the Eleven Rack
Cab and Mic processing may cause the tone
to sound “fizzy” or “muddy.”
WAH
Turn the lit Control knob to select the type of
Wah pedal you want to use. Press CONTROLS to
access a Control page, where you can adjust the
position of the Wah pedal.
DIST
Turn the lit Control knob to select the type of
Distortion effect you want to use. Press CON-
TROLS to access additional settings for the chosen Distortion effect.
MOD
Turn the lit Control knob to select the type of
Modulation effect you want to use. Press CON-
TROLS to access additional settings for the chosen Modulation effect.
FX1 and FX2
The FX1 and FX2 pages let you choose two additional effects not found in the other categories
(such as compressor or graphic EQ) as well as a
variety of modulation effects, using the lit Control knob. Press CONTROLS to access additional
settings for the chosen effect.
REV
Turn the lit Control knob to select the type of
Reverb effect you want to use. Press CONTROLS
to access additional settings for the chosen Reverb effect.
Eleven Rack User Guide22
Page 29

DLY
TEMPO
Turn the lit Control knob to select the type of
Delay effect you want to use. Press CONTROLS to
access additional settings for the chosen Delay
effect.
FX LOOP
Press CONTROLS to access a Control page where
you can adjust the gain and blend settings of the
FX Loop, using the lit Control knobs.
Effects and the FX Loop can be moved to
different locations in the signal chain of the
Rig. For that reason, when an effect or the
FX Loop is selected in Rig View, SW2 is labeled MOVE. For more details, see “Signal
Routing” on page 24.
Output
RIG VOL
This volume setting is a tonally transparent volume control, intended for making fine adjustments to the relative volume levels of different
Rigs.
Turn the lit Control knob to set the Rig tempo.
Any amp or effects settings that have a control
set to sync to a specific subdivision of Rig tempo
will lock to this tempo.
Press MIDI to toggle sync of Rig tempo to incoming MIDI clock (from the MIDI input of Eleven
Rack) on or off.
Press FINE to toggle fine tempo editing mode on
or off. In this mode, turn the Scroll wheel to adjust the Rig tempo in tenths of a BPM, rather
than the coarse adjustments that are made with
the Control knob. Press FINE again to return to
the normal mode.
PEDAL
Turn the lit Control knob to choose the parameter controlled by an external expression pedal,
if attached. The following choices are available:
Wah Lets you control the sweep of the Wah effect.
Volume Pedal Lets you control the sweep of the
Volume Pedal effect.
TO AMP 1 and TO AMP 2
These volume settings let you optimize signal
level for the amp(s) or external processors you
are sending signal to.
MONO/STEREO Press SW1 to toggle between
mono or stereo or mono output.
Utility Settings
DISPLAY
Turn the lit Control knob to specify what controls are displayed in the Default view of Rig Select mode.
Rig Volume Lets you control the overall Rig
volume.
Multi FX Lets you control up to four different
amp and/or effects parameters at once. Press
SW1 for options. There are four pages of options, each one addressing one parameter that is
to be controlled.
On each page, set the device you want to control
and the parameter you want to sweep. The Toe
and Heel settings govern the range of the control that is able to be swept.
If you set the Heel number higher than
the Toe number, the control can be swept
in reverse.
Chapter 3: Exploring Rigs 23
Page 30
None No parameter will be affected when the
pedal is moved.
Rig Edit Mode
For information on toggling Eleven Rack
between expression pedal and footswitch
control, see “External Pedals” on page 92.
METER
Turn the lit Control knob to choose which signal the meter shows. You can meter various
points within the Rig, or the input or output
level of any of the analog, digital, or USB
(P ro Tools ) I/ Os on Elev en Rack. T hi s funct io n is
useful for troubleshooting purposes (such as
finding clipping in the signal chain, or identifying a bad guitar cable).
Signal Routing
The position of many of the devices in the signal
chain can be changed. The order that devices are
plugged into each other can make a large difference in the sound you get.
Most effects can be moved anywhere before or
after the amp and cabinet models. The FX Loop
can be moved to one of four places:
• The beginning of the chain
• Immediately before the amp and cab
• Immediately after the amp and cab
• Immediately before the final output
To move an effect:
1 Turn the Scroll wheel to select the effect you
want to move.
1 Press SW2 to enter Move mode.
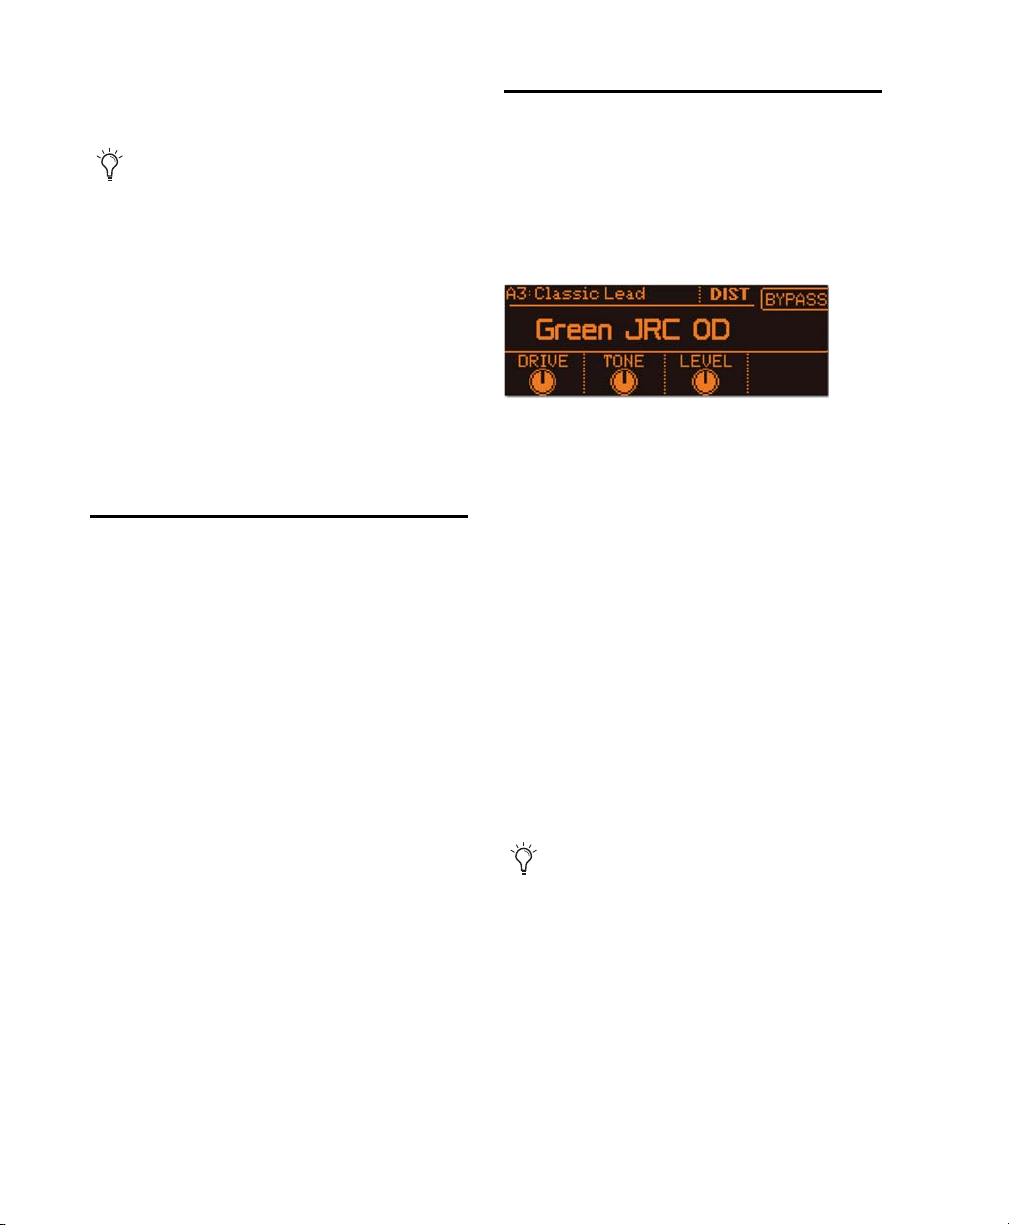
When there are additional controls available for
the device or utility setting you’ve selected,
pressing SW1 (labeled CONTROLS) takes you to a
special editing screen for that device, called Rig
Edit Mode.
Control page for Green JRC OD effect
The Control knobs that are assigned to controls
in the current device will light amber, if you’re
editing Amp, Cab, or FX Loop settings, or green,
if you’re editing an effect. The display shows
what parameter each knob is assigned to, and
the current setting of each parameter.
When you turn a knob away from its saved setting, it will light red, to show you that the setting has changed. If you want to return a control
to its saved setting, turn the knob until it goes
back to amber or green.
SW1 and SW2 are assigned to various functions,
(such as BYPASS), which toggles the current element on and off, and other switched behaviors,
such as BRIGHT (bright switch).
Individual effects may be toggled on and off
at any time by pressing the corresponding
Effects Control button on the front panel of
Eleven Rack. The Wah effect can be toggled
on and off by pressing FX1 and FX2 simultaneously.
2 Turn the Scroll wheel to move the effect to a
different position in the signal chain.
3 Press SW2 again to keep the change, or SW1 to
cancel the move.
Eleven Rack User Guide24
Page 31

If there is more than one page of controls available for the current device or utility setting, a
Page indicator is displayed. Turn the scroll
wheel to switch between pages. You can also use
the Scroll wheel to scroll quickly through all of
the devices in the current Rig.
When you’re finished editing, press Edit/Back to
go back to Rig View. Don’t forget to save your
work!
Saving Your Work
When you’re done editing the current Rig, you
may want to save its settings, or save the new
settings to a different user Rig without affecting
the current Rig.
Keep in mind that if you switch to another Rig
before saving, the edits you’ve made will be lost.
To create a new Rig with the new settings:
1 Press the Save button. The display will show
the Save View.
2 Turn the scroll wheel to select a preset Rig that
you don’t mind overwriting.
3 Choose a name for your new Rig, using the lit
Control knobs and SW switches:
• The first lit knob moves the cursor from left
to right.
• The second knob lets you choose an uppercase letter from A-Z.
• The third knob lets you choose an lowercase letter from a-z.
• The fourth knob lets you choose a number
or symbol.
• SW1 lets you insert a space.
• SW2 lets you delete an unwanted character.
4 Press Save again to save the new Rig.
Save page
To save the new settings to the current Rig:
1 Press the Save button. The display will show
the Save View.
2 Press Save again to save the updated settings
to the current Rig.
Chapter 3: Exploring Rigs 25
Page 32

The Amps
This section takes you through all of the emulated amplifiers available in Eleven Rack, and
touches on any special features and controls
each amp offers.
‘59 Tweed Lux
Based on a classic late-50s tube combo amp with
a single 12-inch speaker and a pair of 6V6 tubes
delivering 15 watts, the ‘59 Tweed Lux model is
the picture of vintage simplicity. With just a
simple treble-cutting tone control, the Tweed
Lux delivers crunchy clean sounds when used
with single-coil pickups, and fat leads when
driven with humbucking pickups.
The inputs on this model are “jumped” so you
can feed both the Instrument and Mic inputs in
parallel.
‘59 Tweed Bass
Just like the Tweed Lux, the Tweed Bass is also
“jumped,” so you can feed both the Bright and
Normal inputs in parallel.
‘64 Black Panel Lux Vibrato and
Normal
The amp we based the ‘64 Black Panel Lux Vibrato and Normal models on is regarded by
some as the ultimate small club amp. A 60s tube
combo with a single 12-inch ceramic-magnet
speaker and a pair of 6V6s putting out just over
20 watts, this amp has long been a standard in
the studio as well as onstage.
At low volumes its crisp, clean high-end has
been favored by country rockers, but push the
amp past 7 with a humbucking pickup, and
you’ve got an amazingly dynamic lead tone. For
Eleven, we’ve modeled both channels of this
classic blackface-era amp.
The Lux Vibrato model has two gain stages and
the tremolo effect is toggled using SW2. Lux
Normal has a single gain stage and tremolo is always on, unless the Intensity control is rolled all
the way off.
Based on a late-50s low-wattage tube bass
combo amp, the ‘59 Tweed Bass model has a
tight bass response and a warm, twang-friendly
high-end. Along with controls for Bass, Middle
(midrange), and Treble, a negative feedback
Presence control lets you tweak high-end frequency response.
Eleven Rack User Guide26
Page 33

‘64 Black Vib
‘65 Black Mini
Produced for a short time in the mid-60s, the
amp we based the ‘64 Black Vib model on is another one of the all-time great US-made smaller
club amps. With an easy-to-overdrive but still
not over-loud 40-watt 6L6GC-based power section and a single 15-inch speaker in an openback cabinet, this amp strikes a great compromise between the crunch of the smaller models
in the line and the hall-filling clean tones of the
larger models.
We added a midrange control for further tonal
versatility. Set it to ~7 to match the flat response
of the original amp.
‘65 Black SR
This amp model is based on a US-made 60s-era
40-watt combo amp, with four 10-inch speakers
in an open-back configuration. This amp offered
both tremolo and spring reverb effects. Known
for chiming clean tones at comparatively high
volumes, this amp is a favorite of country pickers, blues players, and other aficionados of highvolume clean tones.
Toggle the Bright switch on and off with the
SW2 button.
The ‘65 Black Mini amp model is based on a USmade 60s era 6-watt tube combo amp, with a
single eight-inch speaker in an open-back configuration.
Though small both in stature and volume, this
amp offers sweet gently driven tones and
straight-ahead spank in droves. Its ability to produce classic tube amp sounds at low volumes
has made this amp a studio standard for decades.
Toggle the Bright switch on and off with the
SW2 button.
’65 J45
This amp model is based on a British-made 60s
era 45-watt tube head, the very first amp made
by this company. It was known for its then-fresh
take on a classic US-made bass amp (which was
used primarily by guitarists). It features two
bridged input channels, each with its own volume setting.
Those two channels, which can be blended together using the Volume1 and Volume 2 controls, have different tonalities. Channel 1 has a
fairly flat tonal response, while Channel 2 is
somewhat darker-sounding.
Chapter 3: Exploring Rigs 27
Page 34

‘66 AC Hi Boost
‘67 Black Panel Duo
Originally released in 1958, the British amp we
based our ‘66 AC Hi Boost model upon went
through a few design changes that would eventually define the sound of British pop/rock in
the ‘60s.
First available as a modification mounted in the
back of the amp, the “Top Boost” circuit added
an extra tube and controls for Treble and Bass. It
became so popular that it eventually became a
part of the standard componentry of the amp.
The glassy high-end and chime of the AC Hi
Boost lends a classic propulsion to rhythm guitar parts, and at higher gain settings, singing
lead tones are a snap to achieve.
For our model, we’ve “jumped” the Normal and
Brilliant channels. The Cut (presence) control is
active on both channels. However, just like the
original, the Treble and Bass controls are only
part of the Brilliant channel, and have no effect
on the Normal channel.
Go to the second Control page and press SW2 to
toggle the tremolo on and off.
Without a doubt, the blackface-era amp we
based our ‘67 Black Panel Duo model upon is
considered one of the greatest combo amps ever
made. With two 12-inch ceramic-magnet speakers and a quartet of 6L6 tubes pushing 80 watts,
no concert stage has been complete without one
since it was introduced in the late 60s.
One of the main reasons for the amp’s popularity is that it can maintain classic vintage clean
sounds even at high volume levels. Another special Black Duo feature is the inclusion of a Bright
switch.
For our model, just like the original, as you turn
the Volume knob up, the Bright switch has less
of an effect. Dial the Volume knob around 3 or 4
with the Bright switch on, and you’ll get that ultra-clean snap that it’s famous for.
On the first Control page, SW2 is set to toggle
the Bright switch on and off. On the second
page, SW2 toggles vibrato on and off.
Eleven Rack User Guide28
Page 35

‘67 Plexiglas Vari
This amp model is based on a British-made,
1967-vintage 100-watt tube head, similar to the
1969-vintage amp we used as the basis for our
‘69 Plexiglas 100w model. This new model simulates that amp having its voltage reduced by a
variable transformer called a Variac. The voltage
reduction changes the amp’s tone and sustain
characteristics dramatically, producing the
much-loved Brown tone some famous users of
this amp were known for.
The amp’s two channels, which can be blended
together using the Volume1 and Volume 2 controls, have different tonalities. Channel one has
a fairly flat tonal response, while Channel two is
somewhat darker-sounding.
‘68 Plexiglas 50w
This amp model is based on a British-made, 60s
era 50-watt tube head, the lower-wattage version of the amp that was the basis for our Plexiglas model. This amp was designed with a lower
power tube plate voltage, and thus is known to
break up at lower levels than its 100-watt counterpart.
For our model, we’ve based it on the legendary
50-watt 1968 version. We’ve also “jumped”
both channels, for further gain.
‘69 Plexiglas 100w
Based on one of the most highly sought-after
high-volume amplifiers of the late 1960s, our
‘69 Plexiglas model delivers no-nonsense British
crunch. The original amp's dual 4x12 cabinets
and 100-watt head offered unprecedented volume and power for the time, helping to usher in
the era of the Guitar God.
For our model, we’ve based it on the legendary
100-watt 1968/69 version. We’ve also “jumped”
both channels, for further gain.
‘69 Blue Line Bass
This amp model is based on a US-made, late-60s
300-watt tube bass head. This amp originally
sold with a pair of 8x10 speaker cabinets, and
was known for its massive volume and wide
range of usable tones.
The U-Lo and U-Hi controls add low or high harmonics to the signal. On the original amp, these
controls were on-off switches. Here, the U-Lo
and U-Hi controls are continuously variable.
The Mid Freq control, which selects the center
frequency affected by the Mid control, was a
three-way switch on the original amp. Here, the
frequency setting is continuously variable.
Chapter 3: Exploring Rigs 29
Page 36

‘82 Lead 800
Based on the early-80s descendent of the amp
we based our Plexiglas model upon, the ‘82 Lead
800 adds a higher-gain cascaded preamp design
and a master volume control. Unlike the highvolume heads of the 60s, which needed to be on
10 to achieve an overdrive sound, this amp
could conjure up real distortion at any volume
level, and that made it very popular in the burgeoning 80s heavy metal scene.
‘85 M-2 Lead
‘89 SL100 Drive, Crunch, and
Clean
Our ‘89 SL100 model is based on a late-80s highgain 100-watt tube head, which was popular for
its singing sustain and clear articulation. The
Bright switch on the Clean and Crunch models
boosts the high-end for lead lines and cutting
tones.
For the Drive model, we simulated a bright
switch modification that was popular for this
amp. Set to Normal, the amp is stock. With
Bright engaged, the treble boost that would normally happen at lower gain settings is removed,
which leads to a rounder, thicker sound. The
Bright switch circuit has progressively less effect
as the gain is raised, and no effect when the preamp is set to 10.
Based on a classic mid-80s high-end tube combo
amp, the ‘85 M-2 Lead model delivers hotrodded overdrive and searing solo tones. With a
full complement of tone controls and independent input volume, overdrive and master volume controls, the gain structure can be tweaked
to your heart's content.
The M-2 Lead emulation is based on the lead
channel with the fat, bright, and gain boost options on.
Eleven Rack User Guide30
Toggle the Bright switch on and off with the
SW2 button.
Page 37

’92 Treadplate Modern and
Vintage
Released in 1989, the amp that inspired our ‘92
Treadplate Modern and Vintage models seemed
cooler than a high-performance racecar. With
more tone-tweaking options and distortion
than any amp before it, the amp became the industry standard for players looking to achieve a
massive sound.
With the ability to run on either 6L6 or EL34
tubes, this amp offered a choice between either
tube or silicon diode rectifier circuits. On top of
that, an AC power selection switch offered a
Bold or a Spongy option, which would drop the
voltage like a Variac for a more “brown” sound.
For our Treadplate, we modeled two different
channels and selected the appropriate rectifier
and AC power switch setting. For Treadplate M
(for Modern), we set it on the Red channel using
6L6s, a silicon rectifier, and the Bold power setting for a tight, aggressive tone. For Treadplate V
(for Vintage), we modeled the orange channel
wit h 6 L6 s, a tu be re ct if ie r, an d t he spo ng y p ow er
setting for a more fluid lead tone.
‘93 MS-30
The MS-30 amp model is based on a US-made,
early-90s boutique combo amp, the first design
by its manufacturer. Featuring a 30-watt EL84based power section and two twelve-inch speakers in an open-back configuration, it excels at a
range of sounds, from squeaky-clean all the way
to beautifully-overdrive high-gain tones.
Known for finely-tuned, interactive tone controls, and a fresh take on classic “Class-A” amp
topologies, this amp claims a long list of celebrity fans.
‘97 RB-01b Red, Blue, and Green
These amp models are based on the three distinct channels in a US-made, late-90s 100-watt
boutique tube head.
At a time when racked-up multi-preamp/external power amp setups seemed de rigueur for variety-hungry guitarists, this amp was designed to
cover a huge range of vintage amp tones without the tonal and ergonomic issues of modular
amp setups. To that end, it came with three separate, distinct preamp circuits, one for each
channel.
The Red channel excels at high-gain lead tones,
while the Blue is suited to chunky rhythm playing, and the Green focuses on clean tones.
Chapter 3: Exploring Rigs 31
Page 38

The Boost control simulates the Boost and Structure switches on the original amp. Setting Boost
to 10 simulates both Boost and Structure
switches on. A setting of 5 simulates Boost
on/Structure off. A setting of 0 simulates both
switches off.
Toggle the Bright switch on and off with the
SW2 button.
DC Custom Amps
This section describes the DC Custom amp
models that come with Eleven Rack. These include The DC Modern Overdrive (and its offshoot models, the DC Modern SOD, Modern
800, and Modern Clean), the DC Vintage
Crunch (and its offshoot models, the DC Vintage OD and Vintage Clean), and the DC Bass
model.
Rather than base these models on specific amps,
we blended the characteristics and features of
many of our favorite amps to create some absolute monsters.
DC Custom SW1 and SW2 Switch
Functions
On the first Control page, SW2 is set to toggle
the Bright switch on and off. On the second
page, SW2 toggles vibrato on and off.
DC Modern Overdrive
The Modern model augments a modified highgain British amp flavor with a Bright switch and
classic American-style Tremolo.
DC Modern SOD
This amp is loosely based on a US-made, late-80s
100-watt tube head. It features a tight, extended
low-end and high-gain capability, perfect for
players of extended-range guitars.
DC Modern 800
This amp model is a variant of our Lead 800
model, itself based on a British-made, 80s-era
high-gain tube head. A couple of simple component swaps change the tone significantly, and
the added Bright switch provides additional
tonal range.
DC Modern Clean
This amp is loosely based on US-made, 60s-era
85-watt tube combo amp. It has been tweaked to
provide shimmering clean tones.
Eleven Rack User Guide32
Page 39

DC Vintage Crunch
The Vintage model combines tonal attributes of
50s and 60s-era American tube amps, with
added gain potential and a Bright switch.
DC Vintage OD
This amp is loosely based on a combination of
two British-made tube amps. It takes the preamp
section from our Plexiglas model and marries it
to the power section of our AC Top Boost model,
with further tonal enhancements.
DC Vintage Clean
This amp is loosely based on the same Britishmade tube amp we used as the basis for our AC
Top Boost model. It has been further refined to
offer a range of tones from very clean (cleaner
than the original amp) to a slight amount of
breakup.
General Amp Controls
The Amp controls can be accessed by selecting
the AMP device in Rig View and pressing CON-
TROLS. There are two pages of controls for every
amp. These controls are configured and named
to closely match the amps we modeled for
Eleven Rack.
When you view the Amp controls, a Page indicator is displayed to show you which page of
controls you’re viewing. Turn the Scroll wheel
to switch pages.
Amp Control page
Tremolo Controls
Some amps, (such as the ‘64 Black Panel Lux Vibrato, ‘66 AC Hi Boost, and DC Modern Overdrive), feature authentic Tremolo circuits. These
controls include:
Speed Lets you set the speed of the Tremolo effect’s amplitude modulation.
DC Bass
This bass amp is based on the same US-made
300-watt bass head we used as the basis for the
Blue Line Bass model. It is designed with a
scooped lower-midrange response, adding the
capability for bigger lows with a tighter response
than the original amp. It also, unconventionally
for a bass amp, offers a tremolo circuit.
Eleven Rack is not affiliated with,
sponsored, or endorsed by the makers
of the amplifiers that it emulates.
Sync When set to a rhythmic value, the SYNC
control sets the Tremolo’s speed to cycle at the
selected rhythmic interval, in sync with the Rig
tempo. When set to “OFF”, the speed is not synchronized and can be manually set with the
SPEED control.
Depth Sets the amount of amplitude modulation.
Chapter 3: Exploring Rigs 33
Page 40

When using Eleven Rack with Pro Tools,
you can choose to sync tremolo and other effects to either the Rig tempo or the tempo of
the Pro Tools session. For more details, see
“Rig Tempo” on page 77.
Noise Gate Controls
Amp Output
The amp models in Eleven Rack are so faithful to
the classics they’re based on that the output
level can increase significantly as the preamp,
volume or master controls are cranked. Also,
from one amp the next, output levels will vary
depending on their design.
Each of the amps in Eleven Rack has a Noise
Gate, which can be used to suppress noise coming from the instrument before the signal
reaches the amp model. Noise can be especially
problematic when boosted heavily at high-gain
settings. Its controls are:
Noise Gate Lets you set the threshold of the
Noise Gate. Adjust this control until you find a
good balance between effective gating and cutting off the signal prematurely on sustained
notes.
Rel Sets the release time for the envelope that
runs the Noise Gate. A longer release time can
sound more natural, while a shorter release can
help to rein in a really noisy signal.
The Noise Gate remains usable even when
the amp model has been bypassed.
The OUTPUT control lets you compensate for
those differences with no coloration added to
the tone you’re getting.
The amp output volume can also be accessed in Rig View, by selecting AMP and
manipulating the Amp Out Vol Control
knob.
Bypass
The Bypass control toggles the amp simulation
on and off, leaving any effects in the Rig unchanged.
Eleven Rack User Guide34
Page 41

The Speaker Cabinets
This section describes all of the emulated
speaker cabinets available in Eleven Rack.
2x12 AC Blue
This cab model is based on the original speakers
and cabinet that match the AC Hi Boost amp
model. With two British ceramic 12-inch speakers in an open-back cabinet, it offers chimey,
mid-focused tones.
2x12 Black Duo
The Cab page in Rig View
1x8 Custom
This cabinet model is based on a small speaker
cabinet with a single 8-inch ceramic-magnet
speaker in an open-back configuration. It
sounds especially great with the ‘65 Black Mini
amp model.
1x12 Black Lux
This cab model is based on the original speaker
and cabinet that match the Lux Vibrato and Lux
Normal amp models. With a single 12-inch ceramic speaker in an open back cabinet, it offers a
bright, warm, dynamic sound.
1x12 Tweed Lux
This cab model is based on the original speaker
and cabinet that match the Tweed Lux amp
model. With a single 12-inch alnico speaker in
an open-back cabinet, it offers mellow, sweet
warm tones with a hint of vintage grit.
This cab model is based on the original speakers
and cabinet that match the Black Duo amp
model. With two ceramic 12-inch speakers in an
open-back cabinet, it offers bright, full-range
tones.
2x12 B30
This cabinet model is based on a US-made boutique 2x12 cabinet. It features two 30-watt 12inch ceramic-magnet speakers in an open-back
configuration.
A strong contender for any high-gain amp, this
cabinet pairs especially well with the ‘97 RB01b
amp model.
2x12 Silver Cone
This cabinet model is based on the speaker cabinet of a classic Japanese solid state combo amp.
It features 12-inch ceramic-magnet speakers in
an open-back configuration. It excels at sparkling clean tones, and pairs especially well with
the DC Modern Clean amp model.
1x15 Open Back
This cabinet model is based on the speaker cabinet of a classic US-made combo amp. It features
a single 15-inch alnico-magnet speaker in an
open-back configuration. Pairs well with the ‘64
Black Vib amp model.
4x10 Tweed Bass
This cab model is based on the original speakers
and cabinet that match the Tweed Bass amp
model. With four alnico 10-inch speakers in an
open-back cabinet, it offers warm, bright, tones
with tight bass.
Chapter 3: Exploring Rigs 35
Page 42

4x10 Black SR
This cabinet model is based on the speaker cabinet of a classic US-made tube combo amp. It
features four 10-inch alnico-magnet speakers in
an open-back configuration.
4x12 Classic 30
This cab model is based on a classic 1960s 4x12
British closed-back cabinet. The classic 30 watt
speakers we modeled for this unit give it a wide
frequency response and major power.
4x12 65W
This cabinet model is based on a classic Britishmade 4x12 cabinet. It features four 65-watt 12inch ceramic-magnet speakers in a closed-back
configuration. This cabinet is strongest for
Metal and Hard Rock tones.
4x12 Green 25W
This cab model is based on a classic 1960s 4x12
British closed-back cabinet. The vintage 25 watt
speakers we modeled for this unit give it a
smooth, thick tone, perfect for soulful leads.
Speaker Breakup
Also worth mentioning is the new inclusion of
Speaker Breakup emulation (first offered in the
plug-in version of Eleven Rack). This function
can be reached using the front panel controls by
selecting the Cab block in Rig View, pressing
SW1 to access Cab controls, and scrolling one
step to the right with the Scroll wheel. The illuminated control knob then works as the Speaker
Breakup control.
Speaker Breakup control
The Speaker Breakup setting lets you specify
how much distortion is produced by the current
speaker model. Increasing the Speaker Breakup
control adds distortion that is a combination of
cone breakup and other types of speaker distortion.
4x12 Green 20W
This cabinet model is based on a classic Britishmade 4x12 cabinet. It features four 20-watt 12inch ceramic-magnet speakers in a closed-back
configuration. It pairs very well with the J45
amp model, providing perfect tones for electric
blues and classic rock.
8x10 Blue Line
This cabinet model is based on a classic US-made
8x10 bass cabinet. It features eight 10-inch ceramic-magnet speakers in a chambered, closedback configuration. It works well with the
‘69 Blue Line Bass and DC Bass amp models.
Eleven Rack User Guide36
Page 43

Sonic Effects of Speaker Breakup
The range of the control is 0 to 10. We recommend starting with a setting between 4 and 6.
Around 1-2, the algorithm adds a relatively subtle “smoothing” of the high-end. By about 3,
natural speaker “compression” of the high-end
kicks in fully, which results in a somewhat
darker sound.
Above 8, the speaker breakup modeling starts to
become more extreme than what occurs in an
actual guitar speaker. These higher settings tend
to work better with darker-sounding cabs. As a
general rule, high gain amps work better with
lower breakup settings, while low-to-mediumgain amps often work well with higher breakup
settings.
The Microphones
This section describes all of the emulated microphones available in Eleven Rack.
Dyn 7
Based on a large-diaphragm American dynamic
microphone, the Dyn 7 model has a smooth,
powerful tone quality.
Dyn 57
Based on a midsize-diaphragm American dynamic mic, the Dyn 57 model has a classic aggressive tone with a bright edge and pronounced mids.
Below certain frequencies, the speaker cone vibrates as one unit. Above those frequencies (typically between 1 kHz and 4 kHz), the cone vibrates in sections. By the time a wave travels
from the apex at the voice coil out to the edge of
the speaker cone, a new wave has started at the
voice coil. The result is comb filtering and other
anomalies that contribute to the texture of the
overall sound.
Speaker Breakup with External Amps
and Cabinets
We found that the Speaker Breakup emulation
in Eleven Rack can be useful even when using an
external amp and cabinet, with the internal Cab
simulation off.
Actual speaker breakup usually requires playing
through an amp at high volume. However, dialing a bit of the Eleven Rack Speaker Breakup
simulation can help simulate those tones at
lower volumes.
Dyn 409
Based on a midsize-diaphragm German dynamic mic, the Dyn 409 offers a detailed midrange and a focused, tight pickup pattern.
Dyn 421
Based on a large-diaphragm German dynamic
mic, the Dyn 421 model offers deep bass, solid
mids, and smooth treble.
Cond 67
Based on a classic German tube condenser mic,
the Cond 67 model offers a warm, crisp sound.
Cond 87
Based on a solid-state German condenser mic,
the Cond 87 model lacks the fuzzy tube warmth
of Cond 67, but retains a high level of treble detail and nuanced midrange.
Chapter 3: Exploring Rigs 37
Page 44

Ribbon 121
Based on a modern ribbon microphone, the Ribbon 121 model offers rounded, sweet highs and
mids, and solid, deep lows.
The Effects
This section takes you through the effects available in Eleven Rack.
Bass Cabinet Microphones
The following two mics are specifically for micing bass cabinets, so they work exclusively with
the 8x10 Blue Line cabinet model.
Dyn 12
This mic model is based on a classic Austrian
large-diaphragm dynamic bass drum microphone. It offers a rounded, extended sub-bass response, and a pronounced peak around 3k,
which emphasizes attack and string noise.
Dyn 20
This mic model is based on a classic US-made
large-diaphragm dynamic mic. It is known for a
lack of bass-exaggerating proximity effect, and a
smooth, near-linear frequency response.
Eleven Rack is not affiliated with, sponsored,
or endorsed by the makers of the speaker cabinets or microphones that are emulated in
this product.
Volume Pedal
The Volume Pedal is a sweepable volume control. You can use it to fade notes or chords in
and out, or to vary the volume of your signal in
real time, for timbral or rhythmic effects.
The Volume Pedal is most useful when controlled with an expression pedal or MIDI foot
controller.
For more information about using external
foot controllers, see “External Foot Controllers” on page 56.
Eleven Rack User Guide38
Page 45

Wah Effects
Distortion Effects
Black Wah
Black Wah is a standard wah pedal effect, offering a sweepable resonant filter that lets you add
animation and special timbral effects to the guitar signal.
Like the Volume Pedal, wah effects (such as
Black Wah) are particularly useful when controlled with an expression pedal or MIDI foot
controller.
Shine Wah
Tri-Knob Fuzz
The pedal that inspired Tri-Knob Fuzz was a
transistor-based unit, originally popular with
lead guitarists searching for ever-higher gain in
the 70s. It shone again in the 90s grunge rock
scene, probably pushed further into woolly
grind than its makers would have ever anticipated.
Vol um e Sets the overall output volume of the effect.
Sustain Sets the gain of the fuzz circuit.
Ton e Changes the tonal balance of the effect,
from deep and full of sub-bass to high and shrill.
Shine Wah works and sounds similar to Black
Wah, but with a vintage-style filter circuit and
sweep response.
BlackOp Distortion
Inspired by an 80s-era op-amp-based distortion
pedal, BlackOp Distortion offers massive crunch
and power. Its hard-clipping drive can squeeze
aggressive rhythm and lead tones out of softsounding vintage amps, and create surprisingly
hard-edged tones when paired with more modern amps.
Chapter 3: Exploring Rigs 39
Page 46

Green JRC Overdrive
DC Distortion
Green JRC Overdrive was inspired by a low-gain
70s overdrive pedal, loved by blues and bluesrock players the world over for its sweet, singing
sting. It can be used to simply drive an amp’s input section into gentle clipping, or supply some
dirty glow of its own.
White Boost
This booster effect, based on a well-loved clean
booster pedal with 20 dB of gain boost and a
built-in EQ, is useful for driving the preamp section of any amp model into a gentle (or not so
gentle) overdrive. The EQ controls boost and cut
frequencies as normal, but in this usage, they
help shape the overdrive response as well.
Gain Controls the amount of boost added to the
signal.
This distortion effect, a custom model built just
for Eleven Rack, offers a range of overdriven
tones, aided by its built-in Bass and Treble EQ,
which help shape the response of the clipping
circuit.
Distortion Controls clipping level.
Treble Adds treble to the boosted signal.
Bass Adds bass to the boosted signal.
Vol um e Controls final output volume.
Tre ble Adds treble to the boosted signal.
Bass Adds bass to the boosted signal.
Vol um e Controls final output volume.
Eleven Rack User Guide40
Page 47

Modulation Effects
Flanger
Originating from the act of pressing on the
flanges of tape reels, and becoming even more
popular with the advent of analog pedals, the
Flanger effect can be coaxed into bell-like resonant sweeps, or add a silky, shimmering sheen.
This effect works well when positioned before or
after the amplifier in the signal chain.
Pre-Dl Sets the amount of pre-delay, which
changes the phase relationship between the dry
signal and the delayed signal, with timbral results.
Depth Sets the amount of delay. The higher the
setting, the more “jet-engine” artifacts will be
introduced.
Fdback Sets the amount of signal fed back into
the modulated delay. Higher settings introduce
more ringing, whistling artifacts.
C1 Chorus/Vibrato
Based on a heavyweight late-70s analog chorus/vibrato pedal, CI Chorus/Vibrato offers
warm, liquid modulation effects. In Chorus
mode, the signal is routed through a modulated
short delay, which is mixed with the dry signal,
creating a washy, doubled sound.
In Vibrato mode, the dry signal is absent and
there is more control over the depth of pitch
modulation, allowing for everything from an
understated “wobble” to wacky, synth-like pitch
modulation.
Chorus Sets the intensity and speed of the Chorus effect, only when the Chorus/Vibrato switch
is set to Chorus.
Depth Sets the depth of the Vibrato effect, only
when the Chorus/Vibrato switch is set to Vibrato.
Rate Controls the Vibrato rate, only when the
Chorus/Vibrato switch is set to on.
Chorus/Vibrato Toggles the effect between Chorus and Vibrato.
When set to CHORUS, the Vibrato’s Rate
and Depth controls are inactive. Inversely,
when set to VIBRATO, the Chorus control
will not function.
Chapter 3: Exploring Rigs 41
Page 48

Multi-Chorus
Vibe Phaser
This modulation effect is based on the Air MultiChorus plug-in that comes with Avid’s Pro Tools
recording software. It offers the ability to stack
multiple layers of chorusing, for thick, swirling
sound.
Rate Controls the rate of the internal modulating LFO.
Sync Controls synchronization of the internal
LFO to Rig or Pro Tools Session tempo. Ranges
from OFF (no sync, set rate with Rate control) to
a variety of rhythmic note values.
Depth Controls the amount of delay time modulation caused by the internal LFO.
Pre-Delay Sets the amount of time between an
incoming transient signal and the start of modulation.
Mix Sets the wet/dry balance of the effect.
Tri/Sine Switch Sets the waveform of the inter-
nal LFO to either a triangle or sine wave.
Voi ce s Sets the number of layered chorus voices
in the effect.
Width Controls the stereo width of the effect.
The psychedelic-era phaser that inspired our
Vibe Phaser effect was traditionally paired with
an expression pedal that could be used to vary
the rate of pitch modulation over time. Like the
C1, you can choose to run it as a Chorus, with
the modulated and dry signals mixed together,
or in Vibrato mode, which leaves the pitchmodulated signal alone, with rippling, disorienting effects.
Chorus/Vibrato Toggles the dry signal on (Chorus) and off (Vibrato).
Orange Phaser
Don’t let that single knob fool you. Inspired by
a ubiquitous 70s analog phaser pedal,
Orange Phaser offers a deep, warm phasing effect that ranges from a slow harmonic sweep to
out-of-control wobbles.
Speed Controls the Phaser effect’s rate of modulation.
Sync Synchronizes the modulation rate to the
Rig tempo by a specific rhythmic subdivision.
Eleven Rack User Guide42
Page 49

Roto Speaker
Inspired by the rotating speaker cabinets that
made classic tonewheel organs roar, Roto
Speaker offers added motion and vintage grit.
Speed Sets the speed of the rotating speaker effect in three increments: Slow, Fast, and Brake.
Balance Sets the blend between the upper and
lower rotors of the rotating speaker.
Typ e Chooses between various types of rotary
speakers.
Reverb Effects
Blackpanel Spring Reverb
Blackpanel Spring Reverb was inspired by a classic outboard tube-driven spring reverb. It can
add a surfy twang and dark, warm ambience to
your signal.
Mix Controls the blend between dry and reverbed signal.
Decay Controls the length of the reverb’s decay.
Ton e Applies a high-cut EQ, making the reverb
tone darker.
Eleven SR (Stereo Reverb)
A smooth, clean digital reverb, Eleven SR is
based on the popular Reverb One Pro Tools
plug-in from Avid.
Pre-Dly Sets the amount of pre-delay, which
changes the time relationship between the dry
signal and the reverbed signal. As this setting is
turned higher, the apparent size of the synthesized reverb “room” grows larger.
Typ e Selects from a variety of different reverb
types.
Chapter 3: Exploring Rigs 43
Page 50

Delay Effects
Tap e Echo
Inspired by the ultimate vintage solid state tape
echo unit, Tape Echo supplies supple, crunchy
echoes, and can, with a flick of the wrist, can be
pushed into swells of wild self-oscillation, each
repeat more murky, dusty, and gritty than the
next. A classic.
Rec Lev Controls the signal level running to the
tape circuitry. Higher settings create a more distorted tone color.
Head Simulates the alignment (or misalignment) of the tape head with the tape, which affects the tone of the delay.
BBD Delay
When “bucket brigade” analog delays arrived in
the mid-70s, their relatively small size and solidstate reliability made them a godsend to tape
loop-addled guitarists. It went on to become a
classic of its own, with a smooth, round delay
sound and a Chorus-Vibrato mode that let it
double as a modulation effect.
Input Sets the input level to the delay effect.
Cranked up, it can push the signal into useful
distortion.
Mod Switches the modulation effect between Vibrato (only the delayed signal is passed) and
Chorus (both the dry and delayed signal are
passed.)
Wow Controls the amount of wow and flutter in
the tape mechanism. Lower settings minimize
fluctuations of pitch and tone color, and higher
settings accentuate it.
Hiss For some serious authenticity in your tape
echo tone, this switch Toggles modeled analog
tape hiss in or out of the signal. With high feedback settings, the tape hiss can push the echo
into self-oscillating mayhem.
Eleven Rack User Guide44
Depth Controls the level of modulation of the
delayed signal.
Noise Toggles modeled analog hiss in or out of
the signal.
When Hiss or Noise is turned on in one of
the delay effects and the feedback level is
sufficiently high, the delay will self-oscillate
and make sound of its own, even when bypassed. If this effect is not desired, turn
down the feedback control.
Page 51

Dyn Delay
This stereo delay effect is based on the Air Dynamic Delay plug-in that comes with Avid’s
Pro Tools recording software. A powerful effect,
Dyn delay can be synchronized to Rig or Session
tempo, and offers an envelope follower, that lets
you modulate various parameters, based on the
amplitude envelope of incoming signal. This effect includes the following controls:
Delay Sets the length of the delay, in milliseconds.
Sync Controls synchronization of the delay
time to Rig or Session tempo. Ranges from OFF
(no sync, set delay time with the Delay control)
to a variety of rhythmic note values.
Feedback Sets the amount of delay feedback.
Ranges from just one repeat, to a long-lasting
cascade of repeats.
Mix Sets the wet/dry balance of the effect.
Fine Toggles finer control of delay time in or
out. Toggled by SW2 in page one of the controls.
Mode Switches between the following four feedback routing options:
• Mono: Sums the incoming stereo signal to
mono, then offers separate left and right
delay output taps from that signal.
• Stereo: Processes the left and right channels
of the incoming stereo signal independently and outputs the processed signal on
the corresponding left and right channels.
• Cross: Processes the left and right channels
of the incoming stereo signal independently, and feeds the each side’s delayed
signal back to the opposite channel.
• Pong: Acts much like Cross, but the incoming left and right signals are summed and
output from the left channel only. Due to
the cross-channel feedback, the signal
moves back and forth across the stereo
spectrum.
Ratio Sets the ratio of left to right delay times.
Move the control all the way down, and the left
channel delay time is half the right channel delay time. Move the control all the way to the up,
and the right channel delay time is half the left
channel delay time.
Hi-Cut Adjusts the frequency for the High Cut
filter. For less treble, lower the frequency.
Lo-Cut Adjusts the frequency for the Low Cut filter. For less bass, raise the frequency.
Width Lets you adjust the width of the delay effect in the stereo field.
Em Rate Sets how quickly the Feedback and Mix
parameters respond to input from the Envelope
follower.
Em Feedback Sets how much the Envelope follower affects the Feedback amount.
Em Mix Sets how much the Envelope follower
affects the wet/dry mix.
Chapter 3: Exploring Rigs 45
Page 52

EQ & Compressor Effects
Graphic EQ
Useful for simple frequency sculpting, a good
Graphic EQ can find a place in almost any pedalboard. Graphic EQ can wring a variety of tones
out of other pedals (such as when placed before
Distortion effects). The EQ can also be used as a
signal booster when positioned in front of amps.
Para EQ
This effect provides a high-quality 4-band EQ,
with adjustable gain, frequency, Q (bandwidth),
and output for each band. The Low and High
bands let you switch between the following
functions:
• Shelf: Boost or cut of all frequencies below (in
the Low band) or above (in the High band)
the chosen frequency.
• Peak: Boost or cut of a band of frequencies
centered on the chosen band frequency, the
width of which is controlled by the Q control.
• Low-Pass (High band) or High-Pass (Low
band): Cuts frequencies above (Low-Pass) or
below (High-Pass) the selected frequency,
with a choice between 6 dB, 12 dB, or 24 dBper-octave curves.
• Notch: Rejects frequencies around the chosen
EQ frequency, with bandwidth control via the
Q control.
This effect includes the following controls:
L Gain Sets the gain of the low-frequency EQ
band.
L Frequency Sets the center frequency of the low
EQ band.
L Q Sets the bandwidth of the low EQ band.
L Type Sets the mode of the low EQ band.
Choose between Shelf, Peak, High-Pass (in 6, 12,
and 24 db curves), or Notch.
Output (Accessible from every page) Sets the final output level of the EQ’d signal.
Eleven Rack User Guide46
Page 53

LM Gain Sets the gain of the low-midrange frequency EQ band.
LM Frequency Sets the center frequency of the
low-midrange EQ band.
LM Q Sets the bandwidth of the low-midrange
EQ band.
HM Gain Sets the gain of the upper-midrange
frequency EQ band.
HM Frequency Sets the center frequency of the
upper-midrange EQ band.
HM Q Sets the bandwidth of the upper-midrange
EQ band.
H Gain Sets the gain of the high-frequency EQ
band.
H Frequency Sets the center frequency of the
high-frequency EQ band.
H Q Sets the bandwidth of the high-frequency
EQ band.
H Type Sets the mode of the high-frequency EQ
band. Choose between Shelf, Peak, Low-Pass (in
6, 12, and 24 db curves), or Notch.
Gray Comp
Inspired by a well-loved solid-state 70s compressor pedal, Gray Comp can add singing sustain to
leads or lend power and girth to chunky rhythm
guitar parts.
Sustain Sets the threshold, and thus, the
amount of compression, in the Compressor effect.
Level Sets the overall output volume of the effect.
Eleven Rack is not affiliated with, sponsored, or endorsed by the makers of the effects that are emulated by this product.
Chapter 3: Exploring Rigs 47
Page 54

Dyn III Compressor
This effect is based on the Compressor plug-in
from the Dynamics III plug-in set that comes
with Pro Tools. It lets you control the dynamics
of your guitar signal, much like Gray Comp.
However, while Gray Comp emulates a classic
guitar-specific compressor pedal with a smooth,
liquid tone, Dyn3 Comp is more versatile, acting more like an outboard compressor used in
recording situations. This effect includes the following controls:
Threshold Sets the level that your signal must exceed to trigger compression or limiting. Signals
that go above this level will be compressed. Signals that are below it, will not.
Attack Sets the attack time, or the rate at which
gain is reduced after the input signal crosses the
threshold you’ve set. The smaller the value, the
faster the attack. The faster the attack, the more
rapidly the Compressor reduces the signal’s volume.
If you use fast attack times, you should generally
use a proportionally longer release time, particularly when the material contains many fast
peaks, (such as a staccato palm-muted guitar
part). Very fast attack times (especially below
1 ms) can produce undesirable distortion on
guitar.
Release Sets the length of time it takes for the
Compressor/Limiter to be fully deactivated after
the input signal drops below the threshold
you’ve set.
Release times should be set long enough that if
signal levels repeatedly rise above the threshold,
the gain reduction “recovers” smoothly. If the
release time is too short, the gain can rapidly
fluctuate as the compressor repeatedly tries to
recover from the gain reduction.
If the release time is too long, a loud section of
the audio material could cause an effect called
“pumping and breathing” in which quieter
parts of the signal are affected in ways that may
or may not be desirable.
Gain Lets you boost overall output gain to compensate for heavily compressed or limited signals.
Ratio Sets the compression ratio, or the amount
of compression applied as your signal goes
above the threshold. For example, a 2:1 compression ratio means that a 2 dB increase of level
above the threshold produces a 1 db increase in
output.
Knee Sets the sharpness of the gain curve the
compressor follows when reducing gain.
As you increase this control, it goes from applying “hard-knee” compression to “soft-knee”
compression:
• With hard-knee compression, compression
begins when the input signal exceeds the
threshold. This can sound abrupt and is ideal
for limiting.
With soft-knee compression, gentle compression begins and increases gradually as the input
signal approaches the threshold, and reaches
full compression after exceeding the threshold.
This creates smoother compression.
Eleven Rack User Guide48
Page 55

General Effects Controls
Sync
The time-based effects in Eleven Rack (such as
Chorus, Delay and Flanger) can be set to synchronize with Rig or Session tempo (including
tempos set with the Tap Tempo button).
Most Rigs are not set up to sync to Rig or Session
tempo by default. You may need to turn on the
Sync parameter in the effect you want to sync.
When the Sync control on these effects is set to
a rhythmic subdivision of the incoming tempo,
the effect locks to it. When Sync is set to Off, or
the Rate or Delay control is moved, the control
takes over, and the rate of modulation or delay
can be set by hand.
Delay+ and Fine
You’ll see these two controls when working with
some delay effects. Delay+ quadruples the available delay time, for when longer echoes are
needed. Fine switches the delay’s Rate control
into a fine-adjust mode, where the delay time
can be set by the millisecond with the Scroll
wheel. Press Fine again to return the Scroll
wheel to normal operation.
Don’t Forget to Save!
When you’ve got things tweaked just right,
make sure to save your settings. If you switch to
a different Rig before saving, you’ll lose your
changes. To save the current state of the Rig
you’re working on to the same Rig memory location, press the Save button, then press it
again.
See “Saving Your Work” on page 25.
Chapter 3: Exploring Rigs 49
Page 56

Eleven Rack User Guide50
Page 57

Chapter 4: Eleven Rack Live Setup
MIDI Foot Controller
Footswitch or
Expression Pedal
Effects
PA Mixer
In live performance or practice, Eleven Rack can be used as a standalone guitar preamp and processor,
connected to an amplifier and/or direct to a PA system. This chapter will describe how to make the
necessary connections.
Figure 4. Eleven Rack Live Setup
Chapter 4: Eleven Rack Live Setup 51
Page 58

Basic Live Setup
PA Mixer
Figure 5. Eleven Rack connected directly to the PA mixer
Plugging in Your Guitar
Connect your guitar to the Guitar input on the
front of Eleven Rack with a 1/4" TS cable.
Eleven Rack User Guide52
Connecting Eleven Rack to a PA
System
The simplest way to play live with Eleven Rack is
to connect it directly to the PA mixer using the
Main XLR outputs. When doing so, it is recommended to tell the person running the PA system that you are providing a line-level signal,
rather than a mic-level signal, so that they can
correctly set the input on the console.
If a buzz or hum occurs, try toggling the Gnd
Lift switch.
Page 59

Using an Amp Onstage
PA Mixer
Figure 6. Eleven Rack connected to the PA mixer and an onstage amplifier
In some cases, having an amplifier onstage can
be handy for monitoring or tone reasons. Eleven
Rack makes it easy to feed your signal to both a
PA mixer and an amp.
Connecting Eleven Rack to a
Guitar Amplifier
The Output To Amp outputs on Eleven Rack can
be connected to one or more guitar amplifiers
using standard 1/4" TS cables.
• If using a single, mono amplifier, use the Output To Amp 1 (L) output.
• If using two amplifiers, or an amp with stereo
inputs, connect each Output To Amp output
to a separate amp or channel input.
Before you power on Eleven Rack, make sure
any connected amplifiers or mixer channels
are turned off or muted.
Sending the Correct Signal
Eleven Rack lets you choose the point in the signal path that feeds each Output To Amp jack. If
you’re using an amplifier with a distinct tone of
its own, you may want to send it a signal with
little processing (for example, only the effects)
so the sound of the amp can ring through
clearly.
Chapter 4: Eleven Rack Live Setup 53
Page 60

If you prefer to use the amp simulations in
Eleven Rack to set your tone, you will want to
send the signal just after the amp simulation,
but before the cabinet simulation, to your amplifier.
To set the type of signal to send to the amp:
1 Press and hold the Edit/Back button to show
the User Options mode.
6 Press Edit/Back twice to leave User Options
mode.
The signal level running to each Output To
Amp output can be set on a per-Rig basis in
the Output section in Rig View or in the
Eleven Rack Control window. For more details, see “Output” on page 23, or “Output
to Amp Selectors” on page 78.
2 Scroll to Outputs To Amp with the Scroll wheel.
3 Press SW1 to enter the Outputs To Amp
screen.
4 Choose the output you plan to use to feed the
amp, with the Scroll wheel.
5 Set the Signal control to one of the following,
using the first lit Control knob:
• Rig Input (no processing)
• Amp Input (pre-amp effects only)
• Amp Output (pre-amp effects and amp simu-
lation)
• Rig Output (all processing)
• Rig Out No Cab (all effects, amp, and Speaker
Breakup simulation, no cabinet or microphone simulation)
When the Signal control is set to Rig Output
or Rig Out No Cab, the Rig Volume setting
no longer has any effect. Output volume
must be set using the To Amp controls in
the Output section in Rig View.
Because Eleven Rack simulates various preamps and tone circuits, you may want to bypass your amp’s preamp and tone circuitry
by plugging into the amplifier’s effects return jack(s), if available, rather than the
standard input(s).
If your amp does not have an effects loop,
try setting the amp controls for maximum
transparency (EQ flat, gain stages set to
clean.)
Eleven Rack User Guide54
Page 61

Effects and Foot Controllers
Figure 7. Effects and foot controller connections
Connecting Effects
Use the FX loop jacks to connect stomp boxes,
rack effects, or other external processors to the
live guitar signal. These can be either rack or
stompbox effects, or a combination thereof, in
mono or stereo. The FX Loop accepts 1/4" plugs.
To connect external effects to Eleven Rack:
1 Connect the FX Loop Send output on Eleven
Rack to the input of your first (or only) effects
unit. If the unit is mono, use the Left/Mono output. If the unit is stereo, use both outputs.
2 Connect the output of the final (or only) ef-
fects unit to the FX Loop Return input on Eleven
Rack. If the unit is mono, use the Left/Mono input. If the unit is stereo, use both inputs.
If using a combination of mono and stereo
effects, it is usually best to put the mono effects units first in the chain, with the final
mono unit connected to the mono input on
the first stereo unit.
3 If using a line-level rack effect, toggle the Rack
FX/Stompbox FX switch to the Rack FX position. If using a guitar-level stompbox effect, toggle the switch to the Stompbox FX position.
If using a combination of guitar-level
(stompbox) and line-level (rack) effects, it
may be preferable to put the guitar-level
unit(s) first in the chain. If your line-level
unit(s) have guitar-level outputs available,
the order is not important. See your effects
unit(s) documentation for more details.
The User Options and Rig View modes in
Eleven Rack contain a variety of settings
that control the behavior of the FX loop. For
more information, see “The Amps” on
page 26 and “FX Loop” on page 92.
Chapter 4: Eleven Rack Live Setup 55
Page 62

External Foot Controllers
7 Move the expression pedal to its heel position,
and press Next.
Eleven Rack has a 1/4" TRS input that can accept
input from an expression pedal or a single or
dual momentary footswitch.
Expression Pedal
An expression pedal can be used to control continuously variable parameters within Eleven
Rack (such as volume or wah position).
In addition to commonly-used expression pedals, a standard volume pedal with a “Y” adapter
cable (two 1/4-inch TS plugs to one 1/4-inch TRS
plug) can be used, though keep in mind that the
taper of the potentiometer in a volume pedal is
exponential, rather than linear as in an expression pedal.
Expression Pedal Calibration
The response of expression pedals vary slightly
from model to model, and even unit to unit, so
it is important to calibrate Eleven Rack to follow
your pedal’s sweep correctly.
To calibrate Eleven Rack to your expression pedal:
1 Hold the Edit/Back button to enter User Op-
tions mode.
8 Move the expression pedal to its toe position,
and press Next.
9 Sweep the pedal to test its functionality. If the
pedal is working correctly, the Active indicator
on the display will light up.
10 Press Done to exit calibration mode.
11 Press Edit/Back twice to return to the previ-
ously chosen screen.
Momentary Footswitch
(Single or Dual)
Most single or dual momentary footswitches
can be used to toggle various switched functions
within Eleven Rack (such as effects on/off and
cycling through Rigs).
Choose a momentary footswitch with a
1/4-inch TS (single switch) or 1/4-inch TRS (dual
switch) connection.
For more information on the use of pedals
and footswitches with Eleven Rack, see “External Pedals” on page 92.
2 Use the Scroll wheel to navigate to External
Pedals.
3 Press Select to access the External Pedals set-
tings page.
4 Turn the Scroll wheel to select Expression
Pedal.
5 Turn the lit Control knob to select your pedal
type. If in doubt, use Normal.
6 Press Calib to enter calibration mode.
Eleven Rack User Guide56
Page 63

MIDI Foot Controller
You can connect a MIDI foot controller to the
MIDI input on Eleven Rack, providing control
over a larger range of simultaneous parameters.
For details on Eleven Rack controls that you
can control with a MIDI foot controller, see
“Eleven Rack MIDI Controls” on page 97.
Display Mode and Visibility
When playing live, you may find it easier to
keep track of what Rig is selected by switching
the display to Simple mode.
For information on switching display
modes, see “Rig Select Mode” on page 18.
Chapter 4: Eleven Rack Live Setup 57
Page 64

Eleven Rack User Guide58
Page 65

Part II: Setting Up and Using Pro Tools with Eleven Rack
59
Page 66

60
Page 67

Chapter 5: Installing and Connecting Eleven Rack
To use Eleven Rack with Pro Tools or any other
CoreAudio- or ASIO-compatible applications,
you must install the Eleven Rack hardware drivers on your computer.
This chapter provides instructions on installing
the drivers on Mac and Windows, and connecting the Eleven Rack to your computer.
For Pro Tools installation instructions, see
the Pro Tools Installation Guide.
Do not start this procedure with your
Eleven Rack connected to your computer.
Before installing the hardware drivers, refer
to the Read Me information included with
the drivers installer for your device.
To install the drivers and connect the Eleven Rack:
1 Make sure you are logged in as an Administra-
tor for the account where you want to install the
drivers.
For details on Administrator privileges, see
the documentation for your computer.
2 Do one of the following:
• Insert the Drivers Installer disc that came
with your Pro Tools software package into
your computer.
– or –
• Download the Eleven Rack drivers installer
for your computer platform from
www.avid.com/drivers. After downloading,
make sure the installer is uncompressed
(.dmg on Mac or .ZIP on Windows).
3 Run the installer and follow onscreen instruc-
tions to install the driver.
4 When installation is complete, click Restart.
5 Connect the Eleven Rack to a grounded power
outlet with the included IEC power cable
6 Flip the Power Switch on Eleven Rack to On.
Chapter 5: Installing and Connecting Eleven Rack 61
Page 68

7 After the computer has restarted, connect the
small end of the included USB cable to the USB
port on Eleven Rack and connect the other end
to any available USB port on your computer.
Eleven Rack must be connected to a dedicated port on the computer in order to function properly. Do not connect Eleven Rack
to a USB hub.
You can now use your Eleven Rack with
Pro Tools, or with any other CoreAudio- or
ASIO-compatible application.
Eleven Rack User Guide62
Page 69

Chapter 6: Eleven Rack Studio Setup
Using Eleven Rack as Your Pro Tools Interface
This section will take you through connecting and configuring Eleven Rack to work at its best with
Pro Tools software and the other gear in your recording setup (such as speakers, headphones, instruments and microphones).
Figure 8. Studio Setup with Eleven Rack as your Pro Tools audio interface
For information on using Eleven Rack as a standalone processor with other Pro Tools systems, see
“Using Eleven Rack with an Existing Pro Tools System” on page 68.
Chapter 6: Eleven Rack Studio Setup 63
Page 70

Listen to Your Sound from Pro Tools
To hear audio from Pro Tools, you will need to
connect a set of speakers or a pair of headphones
to Eleven Rack. Sound from Pro Tools cannot be
played through your computer’s speakers or
your computer’s sound output.
Connecting the Main Outputs
The Main outputs on the back of Eleven Rack are
male XLR connectors. To listen to audio coming
from Eleven Rack, these outputs should be connected to a set of monitor speakers (self-powered
or with an external amplifier) or a mixer or
monitor controller system.
Main outputs Left and Right output the audio
that is routed to the Main Out L/R output path
within Pro Tools.
The signal coming out of the Main outputs
is at line level (+4 dbu). Take care to use
line-level (not mic-level) inputs when connecting Eleven Rack to a mixer.
Connecting a Pair of Headphones
On the front panel of the Eleven Rack is a
1/4-inch jack to connect a pair of headphones.
The Phones jack outputs the audio that is routed
to the Main Out L/R output path within
Pro Tools.
Setting Monitor Volume
The Volume knob on the front of Eleven Rack
adjusts the output volume of the Main outputs
and the Headphone Outs simultaneously. You
can offset the Headphone volume from the
Main output volume (higher or lower) by
changing the setting in User Options Mode. For
more details, see “Headphone Volume” on
page 93.
Configuring Your Inputs
Eleven Rack provides connectors that support a
variety of devices that generate or reproduce
sound. These include analog devices (such as
mics and instruments), digital devices (such as
keyboards), and even a signal line dedicated for
re-amping (see “Re-Amping” on page 86).
All inputs, as well as the output of the current
Rig, are available from within Pro Tools as separate channels for recording. One input at a time
can be routed through the Rig. That input’s
clean signal will still be available in Pro Tools for
separate recording or processing.
When using Eleven Rack as a standalone
preamp and processor, it’s important to note
that only one input type can run through the
Rig at one time. The Rig Input User Option
setting must be set to the correct input type,
or no audio will pass to the outputs. For
more info, see “Rig Input” on page 90.
When using Eleven Rack as an audio interface with Pro Tools, all inputs are usable simultaneously (though the Rig is still limited
to processing one input type at a time).
To choose which input is routed through the Rig:
1 Hold the Edit/Back button for one second to
bring up the User Options screen.
2 Use the scroll wheel to select the Rig Input
User Option.
3 Press the SW1 button to enter the Rig Input
menu.
4 Set the input you wish to route through the
Rig with the illuminated control knob.
Eleven Rack User Guide64
Page 71

5 Press Edit/Back twice to return to your original
Mic input Phantom
Power (48v)
On/Off
Pad
On/Off
switch
Mic
Gain
control
switch
view.
To ensure you hear your audio when using
Eleven Rack as a standalone signal processor, be sure to set the Rig Input User Option
to the type of input you plan to use (Guitar,
Mic, Line).
Analog Audio Inputs
Eleven Rack features three types of analog inputs that can be used with Pro Tools. There is a
dedicated guitar (instrument-level) input, a stereo line input, and a mic-level input. All three
are available as inputs for recording in Pro Tools.
You can route one of those inputs through the
Rig at a time, and route the output of the Rig to
Pro Tools. For more info on selecting the input
that feeds the rig, see “Rig Input” on page 90.
Connecting Your Guitar
To connect a keyboard, mixer or other line-level
device to Eleven Rack:
1 Plug your device into the Line inputs on the
back panel of Eleven Rack using one or two standard 1/4-inch (TRS or TS) cables. If the device is
mono, plug it into one of the Line inputs. If the
device is stereo, plug it into both the left and
right Line inputs with two cables.
2 Set your device’s output volume to its optimal
level. For example, the optimal level for most
keyboards is between 80% and 100% of maximum volume.
3 If your device has unbalanced (TS) outputs, set
the line inputs on Eleven Rack to –10 dVB by
toggling the Level switch between the Line input jacks to its outward position. If your device
has balanced (TRS) outputs, set the Line inputs
to +4 dVB by toggling the Level switch to its inward position.
Connecting a Microphone to
Eleven Rack
Use the Guitar input for instruments (such as
electric guitar or electric bass) that usually have
a lower level of output than line level instruments.
To connect a guitar or other instrument-level
device to Eleven Rack:
Connect your instrument to the Guitar input
on the front panel of Eleven Rack using a standard 1/4-inch TS guitar cable.
Connecting Line-Level Devices
Use the Line inputs for line level devices (such as
keyboards, mixers, and mic preamps).
Eleven Rack provides an XLR mic input. It can
accept a microphone, DI box, or any other
mic-level device.
Eleven Rack mic-level input and controls
Chapter 6: Eleven Rack Studio Setup 65
Page 72

To connect a microphone or other mic-level device
to Eleven Rack:
1 If using a microphone that may be damaged
by phantom power (some ribbons, some tube
condensers), flip the Phantom Power switch (labeled 48V) to OFF.
2 Plug your microphone cable into the Mic in-
put on the front of Eleven Rack.
3 If your microphone requires phantom power,
make sure the microphone is connected, then
flip the Phantom Power switch to ON.
4 Carefully turn the Gain control up to increase
the input level of your microphone signal.
To connect a digital device to Eleven Rack, do one
of the following:
• Connect the AES/EBU output on the device to
the AES/EBU input on Eleven Rack, and the
device’s AES/EBU input to Eleven Rack’s
AES/EBU output, with two AES/EBU-format
XLR cables.
– or –
• Connect the S/PDIF output on the device to
the S/PDIF input on Eleven Rack, and the device’s S/PDIF input to Eleven Rack’s S/PDIF
output port, using two 75-ohm coaxial cables
with male RCA connectors on both ends.
5 If the incoming signal seems too loud or
sounds distorted, even with the Gain knob all
the way down, flip the Pad switch to ON to engage the –20 dB pad.
6 On the front of the Eleven Rack, carefully turn
the Gain control to the right to increase the input level of your microphone signal.
Digital Audio Input and Output
Eleven Rack provides digital inputs and outputs
for AES/EBU and S/PDIF format digital audio devices. You can use these connections to record
from digital sources, use external digital effects,
or send Pro Tools audio to an external digital recorder.
Eleven Rack can have devices connected to
both the AES/EBU and S/PDIF ports simultaneously, but only one format of device can
be used at one time. You can switch between these two formats from within
Pro Tools, or from the front panel of Eleven
Rack, if using it as a standalone processor.
Digital Device Sample Rates
When connecting to external gear digitally,
Eleven Rack and Pro Tools must be set to the
same sample rate and digital format as your digital device. Pro Tools must also be set to clock
from the digital device, or no audio can pass between them.
To configure Pro Tools to interface with a digital
device:
1 Choose Setups > Hardware Setup.
2 Select AES External or S/PDIF External from the
Clock Source pop-up menu, to match with the
device.
3 Change the sample rate of your external de-
vice to match the rate you are using or plan to
use in your Pro Tools session. If your device operates in a limited range of sample rates, you’ll
need to stay within that range when choosing
the sample rate for your Pro Tools session.
4 Click OK.
Eleven Rack User Guide66
Page 73

At this point, you can try to record some signal
MIDI In
MIDI Out
from the digital device (if it is a sound source,
such as a keyboard or CD player), or try inserting
it onto a pre-recorded track (if it’s an effects processor), and so on.
If you get no signal or a compromised signal,
double-check that Pro Tools and your external device are set to the same sample rate and
digital I/O format, and that Pro Tools is set
to receive sync from the external device.
MIDI Connections
The two MIDI ports on Eleven Rack let you take
advantage of all the MIDI features of Pro Tools,
including recording and editing MIDI data for to
automate controls on Eleven Rack, and/or compose using virtual or hardware MIDI sound
sources.
If you need additional MIDI ports you can add a
compatible USB-based MIDI interface to your
system.
To connect a MIDI device to Eleven Rack:
1 Connect a standard 5-pin MIDI cable from the
MIDI Out port of your device to the MIDI In
port on the back of Eleven Rack.
2 If the device has a MIDI input and you plan to
send MIDI signals to it from Pro Tools, connect
another MIDI cable from the MIDI Out port on
the back of Eleven Rack to the MIDI In port of
your device.
Eleven Rack MIDI connections
Chapter 6: Eleven Rack Studio Setup 67
Page 74

Using Eleven Rack with an Existing Pro Tools System
Analog I/O Digital I/O-or-
Pro Tools HD Audio Interface
Figure 9. Eleven Rack connected to a Pro Tools|HD system
Apart from its roles as a Pro Tools interface and
standalone guitar processor, Eleven Rack can
also be used alongside an existing Pro Tools system, acting as a remote-controlled processing
system and guitar preamp.
You’ll need a digital or analog audio connection
to and from the Pro Tools system to run audio
through Eleven Rack. If you want to use the
Eleven Rack Control window in Pro Tools to
control Eleven Rack and manage Rigs,
Eleven Rack must be connected to the computer
using USB.
Eleven Rack User Guide68
For info on which versions of Pro Tools software
support Eleven Rack, visit the compatibility section of our website:
www.avid.com/compatibility
Page 75

Audio Connections
To connect Eleven Rack to your Pro Tools
interface using analog I/O:
1 Connect the Main outputs on Eleven Rack to
an open pair of analog line inputs on your audio
interface.
2 Hold the Edit/Back button on Eleven Rack to
enter Edit mode.
3 Choose the input you need for the current
task:
• If you want to re-amp pre-recorded signals
through Eleven Rack, choose Line L+R.
– or –
• If you want to record an analog signal using Eleven Rack’s input circuitry and Rig
processing, choose the Guitar, Mic, or Line
option, to match the input you’re using.
4 Connect the Line inputs on Eleven Rack to an
open pair of analog line outputs on your audio
interface.
Press Edit/Back twice to return to the main Rig
Select Screen.
To connect Eleven Rack to your Pro Tools
interface using AES/EBU or S/PDIF digital I/O:
1 Connect the Eleven Rack to an open pair of
digital inputs and outputs on your audio interface, either AES/EBU or S/PDIF.
2 Hold the Edit/Back button on Eleven Rack to
enter User Options mode.
3 Select Rig Input, and press the SW1 button.
4 Choose the input you need for the current
task:
• If you want to re-amp pre-recorded signals
through Eleven Rack, choose Digital L+R.
• If you want to record an analog signal using the input circuitry and Rig processing
in Eleven Rack, choose the Guitar, Mic, or
Line option, to match the input you’re using.
5 Press Edit/Back to move back to the previous
screen.
6 Select Digital Clock/Input, and press SW1.
7 Set the Clock Source to External.
8 Set the Digital Input to AES/EBU or S/PDIF, to
match the type of connection you’re using.
9 Press Edit/Back to move back to the previous
screen.
10 Select Digital Output, and press SW1.
11 Choose Rig Outputs.
12 Press Edit/Back twice to return to the main
Rig Select Screen.
Chapter 6: Eleven Rack Studio Setup 69
Page 76

Configuring Your Existing
Pro Tools System
First, you’ll need to install the correct Pro Tools
software and connect Eleven Rack to your computer using USB.
Eleven Rack Driver Install
When installing Pro Tools, Eleven Rack drivers
are not installed by default. If you do not have
current drivers installed, you will need to install
them.
To configure your Pro Tools system to interface
with Eleven Rack:
1 If your existing Pro Tools system is not yet
running at least version 8.0.1, install the included Pro Tools software update from the supplied DVD.
A pre-existing installation of Pro Tools version 8.0 or higher is required to install this
update.
2 If the Eleven Rack driver is not installed on
your Pro Tools system, install it. For more information, see “Eleven Rack Driver Install” on
page 70.
3 Use the supplied USB cable (or another high-
quality USB 2.0 cable, shorter than five meters)
to connect Eleven Rack to an open USB 2.0 port
on your computer.
4 Launch Pro Tools. If the software has been in-
stalled correctly and Eleven Rack is connected
via USB, the Eleven Rack Control window will
open, giving you access to the controls and Rig
management features.
For more information on controlling Eleven
Rack from Pro Tools, see “The Eleven Rack
Control Window” on page 74.
Although these downloads are labeled
“Pro Tools 9,” these drivers will work with
Pro Tools 8.0.5 and 8.1.1 as well.
To install the newest Eleven Rack Driver:
1 Using a web browser, visit
http://www.avid.com/drivers.
2 Scroll down to the Pro Tools USB Device Driv-
ers section and click on Eleven Rack Drivers.
3 Select and download the Mac or Windows
driver installer,
4 Run the installer and follow onscreen instruc-
tions to install the driver.
Setting Eleven Rack Sample Rate and
Clock Source
When Eleven Rack is connected to a digital device, the sample rate must match between the
two devices, and the clock relationship (one device internally clocked, the other receiving external clock) must be established.
If the device is a standalone unit (such as a signal processor or digital console), you must set
the sample rate and clock behavior of Eleven
Rack using the Digital Clock/Input User Options
page, accessed from the front panel of Eleven
Rack.
For more information on setting the sample
rate and clock source of Eleven Rack using
the front panel controls, see “Digital
Clock/Input” on page 91.
Eleven Rack User Guide70
Page 77

The same sample rate and clock rules apply
when connecting Eleven Rack digitally for use
as a standalone processor with an existing
Pro Tools system.
However, when Eleven Rack is connected to
your computer via USB (in this case, for control
reasons), the sample rate and clock source can
no longer be set from the front panel.
Instead, use the Digidesign Eleven Rack System
Preferences page (Mac) or Control Panel (Windows) to change these settings.
To access Eleven Rack’s sample rate and clock
source settings when connected via USB:
1 Open the Digidesign Eleven Rack settings:
•On Mac, open System Preferences from the
Apple menu and choose Digidesign Eleven
Rack.
– or –
• On Windows, click the Start button, choose
Control Panel and double-click Digidesign
Eleven Rack.
2 The Digidesign Eleven Rack Properties win-
dow will appear.
3 Choose the desired clock source and sample
rate.
4 Close the System Preferences window (Mac) or
the Digidesign Eleven Rack Properties dialog
(Windows) when finished.
Chapter 6: Eleven Rack Studio Setup 71
Page 78

Eleven Rack User Guide72
Page 79

Chapter 7: Using Eleven Rack with Pro Tools
This chapter shows you how to take advantage
of some of the unique features that Eleven Rack
brings to Pro Tools. If you’ve never recorded
with Pro Tools before, be sure to check out the
Intro to Pro Tools Guide that comes with
Eleven Rack.
Pro Tools Interface Capabilities
When used as a Pro Tools audio interface,
Eleven Rack provides the following capabilities:
• Eight channels of simultaneous audio input:
• Stereo Rig output
• All analog inputs
• Stereo digital input
• Six channels of simultaneous audio output:
• Main/Phones outputs
• Output To Amp outputs
• Stereo digital output
• Re-amping of signals from Pro Tools using the
Output To Amp outputs
• Full control of Eleven Rack using the Eleven
Rack Control Window.
• P la yb ack of up to 48 mon o o r s te re o di gi ta l a udio tracks, or a combination of playing back
and recording up to 48 mono or stereo digital
audio tracks, depending on your computer.
• Up to 128 audio tracks (with up to 48 active
tracks), 128 Auxiliary Input tracks, 64 Master
Fader tracks, 256 MIDI tracks, and 32 Instrument tracks per session.
• 16-bit or 24-bit audio resolution, at sample
rates up to 96 kHz.
• Non-destructive, random-access editing and
mix automation.
• Audio processing with up to 10 inserts per
track (RTAS
• Up to 10 sends per track.
• Up to 32 internal mix busses.
For complete information on recording in
Pro Tools, see the Pro Tools Reference Guide.
® plug-ins or hardware inserts).
External Processor Capabilities
When used as an external preamp and processor
with an existing Pro Tools system, Eleven Rack
provides the following capabilities:
• Processing of one analog or digital input
type through the Eleven Rack Rig
• Full control of Eleven Rack using the
Eleven Rack Control Window (USB connection and updated Pro Tools software required)
Chapter 7: Using Eleven Rack with Pro Tools 73
Page 80

The Eleven Rack Control Window
Rig View
Effect preset
Control section
Master Control
(Showing the
selected effect’s
controls)
section
selector
section
Figure 10. Eleven Rack Control window (in Pro Tools)
The Eleven Rack Control window is a special window in Pro Tools that lets you control Eleven Rack
entirely from your computer when Eleven Rack is connected to your computer’s USB port. It can be
accessed whether Eleven Rack is your Pro Tools interface or you have Eleven Rack connected to an existing Pro Tools system as a standalone preamp and processor.
You can open the Eleven Rack Control window by choosing Window > Eleven Rack.
Eleven Rack User Guide74
Page 81

Accessing the Eleven Rack Control Window
Opens Eleven Rack
Control window
In Pro Tools, you can access the Eleven Rack Control Window by clicking Window > Eleven Rack. This
applies whether you are using Eleven Rack as an audio interface for Pro Tools, or as a preamp and processor along with an existing Pro Tools system.
The Eleven Rack Control window can be minimized to a basic floating window. When minimized, it
shows the Rig Library menu, basic monitoring controls and a button which activates the Tuner.
Eleven Rack Control window, minimized
Similar controls can be accessed from the Guitar panel in the top bar of controls in the Edit window.
Click the small amplifier-shaped icon in the Guitar panel to open the Eleven Rack Control window.
Guitar panel in Edit window control toolbar
The Guitar panel can be hidden and/or moved within the toolbar. For more details,
see the Pro Tools Reference guide by selecting Help > Pro Tools Reference Guide.
Chapter 7: Using Eleven Rack with Pro Tools 75
Page 82

Rig View Section
Rig Settings Rig Utility settings
Effects name/ Selected
bypass button Effect
To Amp Effect
Output 1
selector
selector
Rig name
Save button
Rig
number
Load Rig from
Eleven Rack
Load one (or all)
Rigs from computer
Load embedded
Rig from audio
Region
Figure 11. Eleven Rack Control window (in Pro Tools)
In the Rig View section, you can access all of the
amp, cab, effects, and utility parameters of the
current Rig, as well as load and save Rigs to and
from your computer.
Rig Settings
The Rig Settings section lets you load, access,
and save Rigs to and from Eleven Rack and your
computer.
If you want to save this Rig into Eleven Rack for
later use, be sure to save it using the Eleven Rack
Control Window or the Save button on the
front panel of Eleven Rack.
Eleven Rack User Guide76
Clicking on the Rig name brings up a menu
where you can call up any Rig stored in the
memory of Eleven Rack or in your computer, or
load a Rig setting from an audio file with embedded Rig data.
The chosen Rig will be loaded into Eleven Rack
temporarily, and can then be edited via the
Eleven Rack Control window or the front panel
of Eleven Rack.
For info on embedding Rig data in audio, see
“Embedding Rig Settings in Audio Regions”
on page 83.
Page 83

Clicking on the Rig number brings up the Rig Librarian, an all-in-one view of all Rigs currently
stored in the memory of Eleven Rack.
The name shown in the Rig Librarian is that of
the most recently loaded Rig. When changes are
been made to the Rig, the Save button turns red
and the Rig number and name are shown in italics.
To save the current state of your Rig Settings:
Click on the Save button. You can choose to
save the changes you’ve made to a Rig on Eleven
Rack, to a file on your computer, or save all of
the Rigs currently on Eleven Rack to the computer in one folder.
The files you save to the computer can be sent to
collaborators or brought with you as you work
at other computers, so you always have access to
your settings.
Rig Utility Settings
When Pro Tools is set to manual tempo (ignoring the Conductor track), and Eleven Rack is set
to lock to Session tempo, changes in Rig tempo
will shift the tempo of your Pro Tools session,
and vice versa.
When Pro Tools is set to follow the Conductor
track, and Eleven Rack is locked to Session
tempo, any changes made in the Conductor
track over time will be followed by Eleven Rack.
To lock Rig tempo to Pro Tools session tempo:
Click the small Lock icon next to the tempo
display.
Exp. Pedal
The Exp. Pedal menu lets you set the behavior
and assignment of an external expression pedal.
The Rig Utility settings section lets you control
the True-Z impedance-matching circuitry, volume, tempo, and expression pedal functions for
the current Rig.
Rig Tempo
The Rig Tempo menu sets the tempo of the current Rig. Set a tempo, and the time-based effects
(tremolo, delay, etc) that are set to sync will follow the new tempo. You can also choose to have
Rig tempo sync to the tempo of your Pro Tools
session.
Multiple FX
When set to Multiple FX, the button to the left
of the assignment name will highlight. Clicking
this button will bring up a window where you
can edit up to four parameters that will be swept
by the pedal simultaneously.
Chapter 7: Using Eleven Rack with Pro Tools 77
Page 84

Each of the four Configs can be set to one parameter of one of the devices in the Rig. The Toe
and Heel settings govern the top and bottom of
the sweep of the control.
If you set the Heel number higher than the
Toe number, the control can be swept in
reverse.
Output to Amp Selectors
The Output to Amp selectors let you choose
what point in the signal path feeds Output To
Amp outputs one and two, and set the output
volume for each, to better match the input sensitivity of the external amp or processor.
To set the volume of the signal sent to each To
Amp output:
Left-click the chosen To Amp output selector,
and adjust the volume using the fader.
To choose what signal feeds each To Amp output:
Right-click one of the To Amp Output selec-
tors, and do one of the following:
• If the selector you click is not yet assigned
(greyed out), a menu is displayed, letting
you choose to send the signal at the chosen
location to Output to Amp output one,
two, or both in stereo.
– or –
• If the selector you click is already assigned
to an Output to Amp out (highlighted),
you get a menu letting you assign that To
Amp output to another point in the signal
chain.
Amp/Cab, Effects and Pedal
Settings
This section of the Rig View pane lets you reveal,
select, move, and bypass all of the amp, cabinet,
effects, and pedals in the current Rig. Click on a
piece of gear to highlight it, and it will show up
in the Control section below.
For more information on the functions of
the amp, cab, and effects controls, see “The
Amps” on page 26, and see “The Effects”
on page 38.
Bypassing Amps, Cabs, and
Effects
You can toggle the various gear in the current
Rig on and off by clicking the name of the desired element.
Eleven Rack User Guide78
Page 85

Changing The Order
Control Section
In the Rig View pane, you can change the order
of the pedals and effects in the current Rig just
like you can in the Rig View on Eleven Rack. Visualize the signal travelling from left to right
through the signal chain.
To change the order of gear in the signal path:
1 Click and drag a device.
2 Drop it into the desired position.
Some items in the Rig have restrictions
about where they can be placed. When
dragging a restricted item (such as the FX
Loop), it will snap between the allowed
spots.
Selecting Effects
Most of the effects have more than one available
model.
When a device is highlighted in the Rig View
pane, the controls of the device are shown in the
Control section.
On the displayed device, you can turn the
knobs, toggle the switches, and rock the pedals,
and everything you do is transmitted to
Eleven Rack, so you can hear the changes you
make in real time.s
Effects Preset Selector
To select a different effect:
Click the Effect selector beneath the desired
Effect type, and choose a new model from the
menu.
This section will take you through the features
of the Control window.
The Effects preset selector lets you save and recall preset settings for individual Eleven Rack effects, within Pro Tools.
For example, if you’ve dialed in the perfect lead
tone on the Tri-Knob Fuzz, you can save the settings for that effect and recall them without
having to save or load a new Rig.
These presets are handled by the same system
(using the same file types and functions) that
manages plug-in presets in Pro Tools.
For more information on working with presets, see the Pro Tools Reference Guide.
Chapter 7: Using Eleven Rack with Pro Tools 79
Page 86

Master Control Section
Figure 12. Master Control section
The Master Control section houses the controls
and features that apply to all of Eleven Rack.
Tun er
User Options Mode
Pressing the User Options button in the Master
Control section brings up User Options mode,
which lets you access many of the under-thehood options you normally would access using
the User Options mode on Eleven Rack.
For more information on User Options
Mode and the settings it provides access to,
see “Exploring the User Options” on
page 89.
This tuner works like the one you can access using the front panel of Eleven Rack, but is much
larger and easier to see when working in
Pro Tools.
Figure 13. Tuner section
For more information on the Tuner controls, see “Tap Tempo/Tuner Button” on
page 10.
Input Selector
This menu lets you choose which input on
Eleven Rack will be fed through the Rig. This can
be a physical input, or the Re-Amp outputs from
Pro Tools.
Output Mute Buttons
These two buttons let you mute the Headphone
output and the Main outputs on Eleven Rack
from within Pro Tools.
This comes in handy when recording with a microphone while wearing headphones (mute the
main outputs to cut out bleed from the speakers), or when headphones might bleed into a recording track (mute the headphones).
Main Volume Knob
This knob acts just like the Volume knob on the
front panel of Eleven Rack, varying the overall
output volume of the Main and Headphone outputs.
For more information on these controls, see
“Eleven Rack Front Panel” on page 9, and
see “User Options” on page 89.
Eleven Rack User Guide80
Page 87

Guitar Recording with
Input selector
Record-enable
button
Pro Tools
(Eleven Rack as Pro Tools Interface Only)
This section provides information on recording
guitars using Eleven Rack as your Pro Tools audio interface.
The simplest way to record guitar with
Eleven Rack is to simply plug in your guitar, create a track in Pro Tools, and record the sound
coming from the Rig.
To record guitar through the Rig to a track in
Pro Tools:
1 Click on the Track menu in Pro Tools and se-
lect New.
Recording Wet and Dry Signals
2 In the New Tracks dialog, create one stereo au-
dio track.
3 Using the Input Selector, assign the input on
the stereo track you’ve created to Interface >
Eleven Rig L/R.
4 Record-enable the track.
5 Select a Rig in the Eleven Rack Control win-
dow, and tweak its settings, if necessary.
6 Press Record, then Play, in the Pro Tools trans-
port.
7 Record your guitar part.
Example of Dry and Processed tracks in Pro Tools
The Guitar Input on Eleven Rack shows up in
Pro Tools as a standard mono input path (Guitar
In). This input passes the guitar signal, unprocessed, to Pro Tools, where it can be recorded as
normal.
The guitar signal also passes through the processing features of Eleven Rack, and the processed stereo output from the amp, cabinet, mic
and effects simulations shows up as a second,
stereo input path in Pro Tools for monitoring
and/or recording (Eleven Rig L and R). Thus, the
dry guitar signal and the output of the Rig can
be recorded onto separate tracks, for processing
and editing flexibility.
This means that when recording guitars with
Eleven Rack, you can decide on a tone you enjoy
and record your parts, but retain a clean version
of those parts as well.
Chapter 7: Using Eleven Rack with Pro Tools 81
Page 88

Later, if you decide you want a different sound,
or simply want to stack different tones on top of
one another, you can re-amp those original, unaffected guitar tracks through a different set of
Rig characteristics on Eleven Rack, or even another external guitar setup.
The dry track will be hidden and will not play,
but Pro Tools will retain the data for later use.
You can access the track again at any time.
For more info on inactive and hidden
tracks, see the Pro Tools Reference Guide.
For information on the re-amping process,
see “Re-Amping” on page 86.
To record wet and dry versions of a guitar part
simultaneously for future re-amping:
1 Click on the Track menu in Pro Tools and
select New.
2 In the New Tracks dialog, do the following:
• Create one mono audio track
– and –
• Create one stereo audio track.
3 Assign the input on the mono track you’ve
created to Interface > Guitar In.
4 Assign the input on the stereo track you’ve
created to Interface > Eleven Rig L/R.
5 Record-enable the two tracks.
6 Select a Rig in the Eleven Rack Control win-
dow.
7 Tweak the settings of the Rig, if necessary.
8 Press Record, then Play, in the Pro Tools trans-
port.
The Guitar In input signal will look quite
low when compared to other recorded signals in Pro Tools. This is because the input
signal is optimized for future re-amping
through Eleven Rack. If you need to do intricate rhythmic editing and find the audio
hard to visualize, you may want to increase
the vertical zoom level in the Edit window.
Recording Wet and Dry Signals when Using Eleven Rack as an External Processor
You can even record separate wet and dry tracks
when using Eleven Rack as an external processor
with an existing Pro Tools system.
The wet and dry tracks will be mono, and must
be routed into your Pro Tools system using one
of the digital outputs on Eleven Rack.
9 Record your guitar part.
10 Press Stop to stop recording.
If you don’t plan to use the dry signal right
away, you can make the mono track inactive
and hide it.
Eleven Rack User Guide82
Page 89

To send wet and dry channels to your existing
Pro Tools system:
1 Connect one of the digital outputs on
Eleven Rack to one of the digital inputs on your
Pro Tools interface using a S/PDIF or AES/EBU
cable.
2 Connect one of the digital inputs on
Eleven Rack to one of the digital outputs on
your Pro Tools interface using a S/PDIF or
AES/EBU cable.
3 Press and hold the Edit/Back button on
Eleven Rack for one second to open User Options Mode.
4 Use the Scroll wheel to select Rig Input.
Embedding Rig Settings in Audio Regions
(Eleven Rack as Pro Tools Interface or with
Existing Pro Tools System)
Despite the fact that we designed Eleven Rack to
store Rig settings to your computer and to its internal memory, we felt there had to be a better
way to keep track of which Rig settings you use
as you track your guitar.
Pro Tools lets you embed the current Rig’s settings into audio regions as you record them, so
that you can retrieve that same setting for further use later.
5 Press SW1 to enter the Rig Input User Option.
6 Turn the lit Control knob to set Rig Input to
the type of input you plan to use (such as Guitar,
Mic, or Line).
7 Press the Edit/Back button to return to the pre-
vious view.
8 Use the Scroll wheel to select
Digital Clock/Input.
9 Press SW1 to enter the Digital Clock/Input
User Option.
10 Set the Clock Source control to External.
11 Set the Digital Input control to match the in-
put type coming from the Pro Tools system
(S/PDIF or AES/EBU).
12 Press the Edit/Back button to return to the
previous view.
13 Use the Scroll wheel to select Digital Output.
14 Press SW1 to enter the Digital Output User
Option.
15 Set the Output control to Split In/Out.
16 Press Edit/Back twice to return to the original
view.
This feature is also available when
Eleven Rack is connected to an existing
Pro Tools system using USB.
This can also be helpful when collaborating or
bringing sessions or regions to a different system
using Eleven Rack, because your settings travel
with the files.
To embed Rig settings in recorded audio:
1 Open the Eleven Rack Control window.
2 Click the User Options button. The Embed Set-
ting From menu appears.
3 Set the Embed Setting From menu to the input
you plan to record through.
4 Create an audio track, and set its input to the
input you’ve chosen, using the Input selector.
5 Record enable the track.
6 Press Record, then Play, in the Pro Tools trans-
port.
Chapter 7: Using Eleven Rack with Pro Tools 83
Page 90

7 Record your part.
Indicator icon
8 Press Stop to stop recording.
The settings of the currently loaded Rig (as of
the moment you stop recording) will be embedded in each audio region that is recorded from
the input you select in the Embed Setting From
menu.
Audio regions with embedded Rig data are
marked with a small Eleven Rack logo icon in
both the Edit Window and the Region Browser
in Pro Tools.
Audio region with Eleven Rack logo indicator icon
Retrieving Embedded Rig Settings
You can access Rig settings fro m a ny re gion wi th
embedded settings that has been recorded or imported into your Pro Tools session. You can do
this by selecting regions directly in the Edit window, or you can access any embedded region in
the session using the Eleven Rack Control Window.
4 The Rig is loaded into Eleven Rack and is
ready to use.
Loading settings from a region in the Edit window
To load a Rig setting from a region in the Edit
window:
1 Open the Edit window by clicking Window >
Edit.
2 Locate the region you want to load Rig Set-
tings from.
3 Right-click the region and choose Load Guitar
Rig Settings, at the bottom of the menu.
Eleven Rack User Guide84
Page 91

To load an embedded Rig setting from within the
Eleven Rack Control Window:
1 Open the Eleven Rack Control window by
clicking Window > Eleven Rack.
2 Click the Rig Settings menu.
3 Any regions with embedded Rig data will
show up as a list at the bottom of the menu.
4 The Rig is loaded into Eleven Rack and is
ready to use.
Choosing a region from the RIg Settings menu
Once you have retrieved a Rig setting from a
region, you may want to save it to your computer or the Eleven Rack memory.
Rig settings data can only be embedded in
.WAV or .AIFF files. MP3 encoding strips
audio files of their embedded Rig data, so be
sure to choose .WAV or .AIFF format when
exporting audio files with embedded Rig
data.
Chapter 7: Using Eleven Rack with Pro Tools 85
Page 92

Re-Amping
(Eleven Rack as Pro Tools Interface Only)
This section describes the Re-Amping process
when using Eleven Rack as your Pro Tools audio
interface.
Re-Amping is the process of sending pre-recorded audio (in this case, from within
Pro Tools,) to an external guitar amplifier or effects unit, and then re-recording the processed
audio to a new track.
3 Set the Rig Input on Eleven Rack to Re-Amp,
using the Rig Input setting in User Options, or
the Eleven Rack Control Window in Pro Tools.
4 Create a new audio track, and assign its input
to Interface > Eleven Rig.
5 In Pro Tools Edit window, click with the Selec-
tor tool at the beginning of the first audio region
on the track to be re-amped.
6 Select a Rig in the Eleven Rack Control win-
dow, and adjust the settings as desired.
7 Start recording in Pro Tools.
This is sometimes done when a guitar track is recorded dry and the amp and effects sound is to
be decided upon later (see “Guitar Recording
with Pro Tools” on page 81).
In the case of Eleven Rack, re-amping can be
done one of two ways.
• Tracks can be sent from Pro Tools into the onboard guitar processor in Eleven Rack, and rerecorded to a new track.
– or –
• Tracks can be sent from Pro Tools, out
through the Output To Amp outputs on
Eleven Rack, into one or more external guitar
amps or processors, and then re-recorded
through the microphone, line, or guitar inputs on Eleven Rack, depending on the type
of external devices being used.
To re-amp a signal using the guitar processor in
Eleven Rack:
1 Choose the track in Pro Tools to be re-amped.
2 Assign the output of the track to one of the
following:
• Interface > ReAmp L/R (if signal is stereo)
• Interface > ReAmp L or ReAmp R (if signal is
mono)
8 The audio from the chosen track will be pro-
cessed through Eleven Rack, and re-recorded to
the new stereo Audio track.
By default, the re-amped signal is muted
when you press Play on the transport, but
are not recording. If you want to hear the reamped signal while in playback, turn on Input Only Monitoring mode by clicking
Track > Input Only Monitoring. For more
information on Input Only Monitoring
mode, see the Pro Tools Reference Guide.
To re-amp a signal using the Output To Amp
outputs on Eleven Rack:
1 Choose the track in Pro Tools to be re-amped.
2 In the Eleven Rack Control window, choose
what point in the signal chain will be fed to one
or both of the To Amp outputs using the To Amp
Output selectors.
See “Output to Amp Selectors” on page 78
for details.
3 Create a new audio track, and assign its input
to match the device you are using to re-amp, as
follows:
• If re-amping through a guitar amp and microphone, or a device with an XLR DI output, select Interface > Mic In.
Eleven Rack User Guide86
Page 93

• If re-amping through a guitar-level stomp-
box or processor, select Interface > Guitar In.
• If re-amping through a processor with a
line-level output, select Interface > Line In-
put L.
4 Set up and connect your chosen external amp
and microphone and/or processor to the Output
To Amp 1 (L) output and the appropriate input
on Eleven Rack.
• If using the mic input, ensure that the gain
and other settings (such as phantom power
and pad) are set correctly.
• If using an amplifier and microphone in
the same room as your Pro Tools system, be
sure to turn off or mute your monitor
speakers, to avoid feedback.
5 Record-enable the new mono track.
6 In Pro Tools Edit window, click with the Selec-
tor tool at the beginning of the first audio region
on the track to be re-amped.
7 Start recording in Pro Tools.
8 The audio from the selected track is sent out of
Eleven Rack, processed through your amp or
processor, and then re-recorded to the new Audio track.
Controlling Eleven Rack Parameters with MIDI Data
(Eleven Rack as Pro Tools Interface Only)
When using Eleven Rack as your Pro Tools audio interface, you can record real time changes
to your Rig settings, edit them, and play them
back to Eleven Rack, all using MIDI tracks. This
can be quite powerful when re-amping signals
through Eleven Rack.
In the following example, you’ll control the Rig
Volume parameter in Eleven Rack with MIDI
data from Pro Tools.
To control the Rig Volume on Eleven Rack with
MIDI CC data from Pro Tools:
1 Create a MIDI track in Pro Tools.
2 Assign its output to Predefined > Eleven Rack >
channel-1.
3 On Eleven Rack, press and hold the Edit but-
ton for 1 second to enter User Options mode.
4 Scroll with the Scroll wheel to MIDI, and press
the SW1 switch.
5 Use the lit Control knob to choose a MIDI re-
ceive channel. In this example, use channel 1.
6 In the Pro Tools Edit window, select CC 17 in
the Track View menu for the MIDI track you’ve
created. You’ll see a line running across the
track. This is the MIDI CC envelope that controls Rig Volume.
7 With the Pencil tool, draw a curving line from
the beginning of the track to a point around 10
seconds later.
8 Press Play on the Pro Tools transport. You will
see the Rig Volume setting on the Eleven Rack
Control window move in time to match the
curve you’ve drawn.
This technique can be used for any of the MIDI
CC controls Eleven Rack can respond to.
For a full list of MIDI CC data that Eleven
Rack can accept, see Chapter 9, “Eleven
Rack MIDI Controls.”
For more information on using MIDI CC
data in Pro Tools, see the Pro Tools Reference Guide, which can be accessed from
within Pro Tools by selecting Help > Pro
Tools Reference Guide.
Chapter 7: Using Eleven Rack with Pro Tools 87
Page 94

Eleven Rack User Guide88
Page 95

Chapter 8: User Options
This section describes the details of the User Options mode within Eleven Rack. User Options
mode lets you access the behind-the-scenes controls in Eleven Rack.
Exploring the User Options
Let’s start looking into the changes you can
make using User Options.
User Options mode
To explore User Options mode from the front panel
of Eleven Rack:
1 Press and hold the Edit/Back button until the
User Options screen appears.
2 Turn the Scroll wheel to select the option you
want to change.
To explore User Options mode when using Eleven
Rack with Pro Tools:
1 Show the Eleven Rack Control window, by
clicking Window > Eleven Rack.
2 Press the User Options button on the Control
window.
User Options
This section lists and defines the available options in the User Options menu.
These descriptions and parameter names
match those within the display on Eleven
Rack. The Eleven Rack Control window’s
User Options mode contains most of these
controls, but some are named slightly differently.
3 Press the SW1 button to access the controls for
that option.
4 Press Edit/Back once to return to the User Op-
tions menu, or twice to exit User Options mode
and return to the previous screen.
Chapter 8: User Options 89
Page 96

Rig Input
Cabinet Resonance
This setting lets you specify which input on
Eleven Rack will be routed through the Rig. This
can be set to any of the analog or digital inputs
on Eleven Rack, or the signal sent to the Re-Amp
output in Pro Tools.
For more information on Re-Amping, see
“Re-Amping” on page 86.
Running the mic input through the Rig with
your monitor speakers on can result in severe feedback, due to the amount of gain
available in the amp and effects emulations. Be sure to mute or turn down the
main outputs before proceeding.
Outputs To Amp
In this page, you can what signal feeds the Output To Amp outputs. Turn the Scroll wheel to
switch between controlling Output 1 or Output
2. If you want to use the Outputs To Amp in stereo, you may want to match the controls for
both channels.
Part of what's captured in the speaker cabinet
emulation of Eleven Rack is the acoustical nature that a cabinet will resonate when driven by
an amplifier.
It is a phenomenon particular to the type of amplifier used as well the type of cabinet used.
Each combination reacts in a different way depending on the gain settings of the amp.
The button labeled RESO (SW2) will indicate the
continued presence of cabinet resonance even
when the cabinet is bypassed. If the Output to
Amps User Option is set to Amp Output or Rig Out-
put No Cab, the cabinet resonance will still affect
the signal feeding the Output to Amp.
If the continued presence of cabinet resonance
is disengaged by pressing SW2, bypassing the
cabinet will also turn off the resonance. If the
Output to Amps User Option is set to Amp Out-
put, the signal feeding the Output to Amp will
not be affected by cabinet resonance.
In either case, it is not possible to remove cabinet resonance when the cabinet is not bypassed.
Signal
Using the Signal control, you can set what point
in the signal path feeds each Output to Amp
output:
Rig Input The clean, unprocessed guitar signal,
as is present at the input of the Rig.
Amp Input The signal after any processing that
occurs before the Amp model in the signal
chain.
Eleven Rack User Guide90
By default, when an Output to Amp is set to Amp
Output, the signal is fed directly from the amp
model to the output. When RESO is switched
on, the signal is fed from the amp model,
through the cabinet resonance model, and then
to the output.
Depending on settings, this can produce a fatter,
thicker sound, especially with high amp gain.
Amp Output The signal after passing through the
amp emulation, but before the cab, mic, and
any effects emulations placed after the amp in
the signal path.
Page 97

Rig Output The fully processed signal, run
through every part of the current Rig (including
cab and mic emulation).
Rig Out No Cab The fully processed signal, with
the Cab model automatically bypassed.
When either Output to Amp is set to Rig
Output or Rig Out No Cab, the other will be
set to the same setting. Output to Amp 1
will output the left channel of the Rig, and
Output to Amp 2 will output the right channel.
When feeding signal to a external guitar
amplifiers, it is generally preferred to apply
no cab and mic emulation to the signal.
Since the speaker being driven by the amplifier will naturally shape the tone of your
signal, using the cab and mic emulations in
Eleven Rack could produce compromisedsounding results.
Keep in mind that the Speaker Breakup simulation is always on, so when looking for
minimum coloration, turn the Speaker
Breakup control down. It can be found in the
Cab section in Rig View
Digital Clock/Input
When Eleven Rack is being used standalone and
is not plugged into a computer, it lets you
choose the clock source (internal or external),
sample rate (if using internal clock), and digital
format you want to work with.
Clock Source Lets you choose between the following clock sources:
• Int 44.1 kHz (Internal clock)
• Int 48 kHz (Internal clock)
• Int 88.2 kHz (Internal clock)
• Int 96 kHz (Internal clock)
• External
Digital Input Lets you choose the digital format
you want to use for input, either AES/EBU, or
S/PDIF.
When Eleven Rack is plugged into a computer
with USB for use with Pro Tools, these options
must be set in the host software (Pro Tools or
other). The Digital Clock/Input screen will just
show the current settings and whether or not
there is a valid clock signal present at the currently chosen digital input.
For more information on how to access
these controls from within Pro Tools, see
the Pro Tools Reference Guide.
Digital Output
Adjust the Output control to choose the type of
signal being passed to the digital outputs.
DAW The output from the Digital Out L/R output path in Pro Tools will be sent to the digital
outs.
Mirror Analog The same signal that is being sent
to the Main Outputs will be sent to the digital
outs.
Rig Outputs The left and right Rig outputs are
sent to the left and right digital outputs respectively.
Chapter 8: User Options 91
Page 98

Split In/Out The left and right Rig outputs are
summed and sent to the left digital output, and
the signal as present at the Rig input (the “dry”
signal) is sent to the right digital output.
CC When engaged, front-panel control changes
will send corresponding MIDI CC messages to
Pro Tools, and be output through the MIDI output jack.
FX Loop
The FX Loop screen is where you control the
mono/stereo behavior of the FX loop. Set the
control to Mono if using a mono effect, to Mono
to Stereo, if using an effect that takes a mono
signal but has a stereo output, or Stereo, if using
a true stereo effects unit.
External Pedals
This screen lets you set up an expression pedal
or a dual footswitch, plugged into the Exp
Pedal/Ext Footswitch jack on the back of Eleven
Rack.
Turn the Scroll wheel to select the type of pedal
you’ll be using. In expression pedal mode, you
can press SW1 to enter calibration mode. Follow
the on-screen instructions to calibrate your expression pedal. In Dual Footswitches mode, you
can use the Tone Control knobs to select a function for each footswitch.
Each footswitch can be set to do one thing,
whether it’s cycling through Rigs, turning a certain effect on and off or just bringing up the
tuner.
MIDI
Rig Balancing
This screen lets you adjust the relative signal
level of each of the saved Rigs. If you find that a
certain Rig is much louder or quieter than the
others, you can tweak it here.
Turn the scroll wheel to select a Rig to adjust,
and use the lit Tone Control knob to adjust the
volume.
When you’re done editing these settings and
you back out of the Rig Balancing screen, a “Saving” message appears on the display for a few
moments as the new settings are saved.
Amp/Cab Linking
This parameter toggles the linking of amplifier
and cabinet models that were historically used
together. With Amp/Cab Linking on, when you
choose certain amps in Rig View, the cabinet
that goes with it will also be chosen. You can
still change the cabinet you want to use later.
Display Contrast
This control allows you to set the contrast of the
LCD display to match your viewing angle or
light conditions.
The MIDI page lets you set up how Eleven Rack
responds to MIDI data.
Channel Sets the MIDI receive and send channel,
from 1-16.
Thru Toggles MIDI thru on and off.
Eleven Rack User Guide92
Page 99

Knob Display/Action
Headphone Volume
This screen lets you configure the way knob settings are displayed onscreen, and how they act.
Display
This control lets you see the current positions of
the control knobs as either graphic knobs or as
numeric values. If you choose to display the
controls as knobs, keep in mind that you can see
the exact numeric value of a control temporarily
by turning the knob slightly.
Action
This control lets you choose between the following knob behaviors:
Normal Moving a Control knob will cause the
currently assigned setting to immediately follow
the knob’s position.
Latch When a Control knob is positioned differently than the current value of the assigned control, the control’s setting will not update until
the knob is swept past the current setting.
Blink
The Tempo button on the front panel of
Eleven Rack can be set to blink in time with the
current Rig tempo. The Blink control toggles
this behavior on and off.
This control sets the volume of the Headphone
outputs on Eleven Rack, as an offset from the
Main output volume.
Persistent Volume Pedal
By default, the Volume Pedal setting is stored as
a fixed setting just like the other amp and effects
settings in a Rig. This can be handy when the
fi xe d s ett in g i s u se d to af fe ct ga in st ag ing wi th in
the Rig in a manner that you would want to recall each time you used that Rig.
Engaging the Persistent Volume Pedal behavior
will allow you control the Volume Pedal in manner more like using a real volume pedal. With
an external pedal or MIDI controller set to control the Volume Pedal setting, its position will
override the stored setting in each Rig. Even as
you switch Rigs, the position of your external
pedal will determine the Volume Pedal setting.
To make the most of this feature, use it with Rigs
that have the same Taper and Minimum Volume settings so the behavior is consistent when
you switch Rigs. For even more consistency,
make sure the Volume Pedal is located in the
same place in the signal chain.
In the Persistent Volume Pedal User Option
page, pressing SW1 will toggle the Persistent
Volume Pedal behavior on and off. When the
PERSIST label is lit, the Volume pedal setting
will stay with your foot pedal position, regardless of Rig setting.
Chapter 8: User Options 93
Page 100

Volume Control
MIDI CC Reference
In this screen, use the lit control knob to choose
which output volume is controlled by the Volume knob on the front panel of Eleven Rack.
The choices are as follows:
• Main Outputs (default setting)
• Output to Amp 1
• Output to Amp 2
• Outputs to Amp 1 & 2
• Main + Outputs to Amp 1 & 2
If the Volume knob is set to control one or
both Output to Amp settings, the main and
headphone outputs will be reset to their
highest output level.
Reset Memory
In this screen, pressing SW1 will reset the memory of Eleven Rack back to factory specs. All usercreated Rigs and settings will be erased.
You can exit this screen without resetting the
memory by pressing the Edit/Back button.
This screen contains a chart of all MIDI continuous controllers that are assigned to controls in
Eleven Rack. This is useful when setting MIDI
controllers when you don’t have a copy of the
manual handy.
Scroll up and down the list with the Scroll
Wheel.
This reference chart can also be found in
Chapter 9, “Eleven Rack MIDI Controls.”
Firmware Version
On this screen, you can check to see what firmware version is running on your Eleven Rack.
Eleven Rack User Guide94
 Loading...