

Page 1

VIEW-i Lite/Pro/Silver/Gold/Ruby
User Manual v.2.6.24
Please read carefully before using this product.
Page 2

Table of Contents
1. Liability
2. Precautions
3. Components
4. Functions
5. Features
6. Installation
7. View-i Product Manual
8. View-i PC Player Manual
9. View-i Product Trouble-Shootin
g
2
g
10. Specifications and Certifications
※ Warranty
Page 3

1. Liability
1. This product was designed to assist you in driving safely
by recording driving information and data for
driver reference.
2. This product does not guaranteed to record information
on every accident.
- A minor force will not trigger the G-Force sensor to activate
Event Recording. Therefore the user must use the Manual Record
Button located on the device itself.
3. This product is not liable for any data loss caused by
physical damage to the product or it accessories.
4. The manufacturer has no liability for any injury or damage
to property associated
with the
use of this product
3
to property associated with the use of this product
5. The manufacturer limits any and all liability to the exclusive remedies
of product repair or replacement at the manufacturer’s discretion,
to the fullest extent permitted by the law
Page 4

2. Precautions (Device)
Do not operate product while driving
Only operate in safe environments
Only install this product within the
recommended installation area
It could result in poor GPS reception
If product is physically damaged during a
Do not open/fix/alter this device
Any customer alterations will void the
warranty
Do not use any accessories other then
those included with the recorder
The use of any additional accessories will
void the product warranty
fatal accidents, it may not record any data
During sudden lighting changes, such as
entering a dark runnel, alley, or turning
toward direct sunlight on a very bright day,
video recording may be compromised due
to the limitations of video technology
Check the product frequently to ensure that
the camera angle is properly adjusted
After violent force is applied to the vehicle or
product, the camera angle may be altered
Do not connect the device directly to car’s
battery
Connecting the device directly to the car’s
battery will void the product warranty.
Use this product only under the
recommended power guidelines
Using this product in alternative power
situation will void the product warranty
and could result in fire
4
resulting in poor picture quality
Do not spray automobile cleaning products
directly to product
Product will be damaged if directly exposed to
cleaning products
Remove all substance from the lens
,
including the plastic film, that may affect
the quality of the recording Any
obstruction may degrade recording
quality.
Do not expose this product to extreme
temperatures (high or low)
This product will be damaged if it is
exposed outside recommended working
temperature
Page 5
Only use SD memory card from the manufacturer
Product may not function correctly if un-tested SD memory cards is used
Do not open/fix/modify SD memory card
Product could be damaged and warranty does not cover such damage.
SD memory card need to be replaced with a new product once it reaches end of
p
roduct life Product might malfunction if SD card’s writing speed decreases.
2. Precautions (SD Card)
p
ggp
Backup from SD memory card to HDD or CD if any data needs to be preserved
Data might get lost due to memory corruption in SD memory card.
Check SD memory card’s data regularly to check its operation
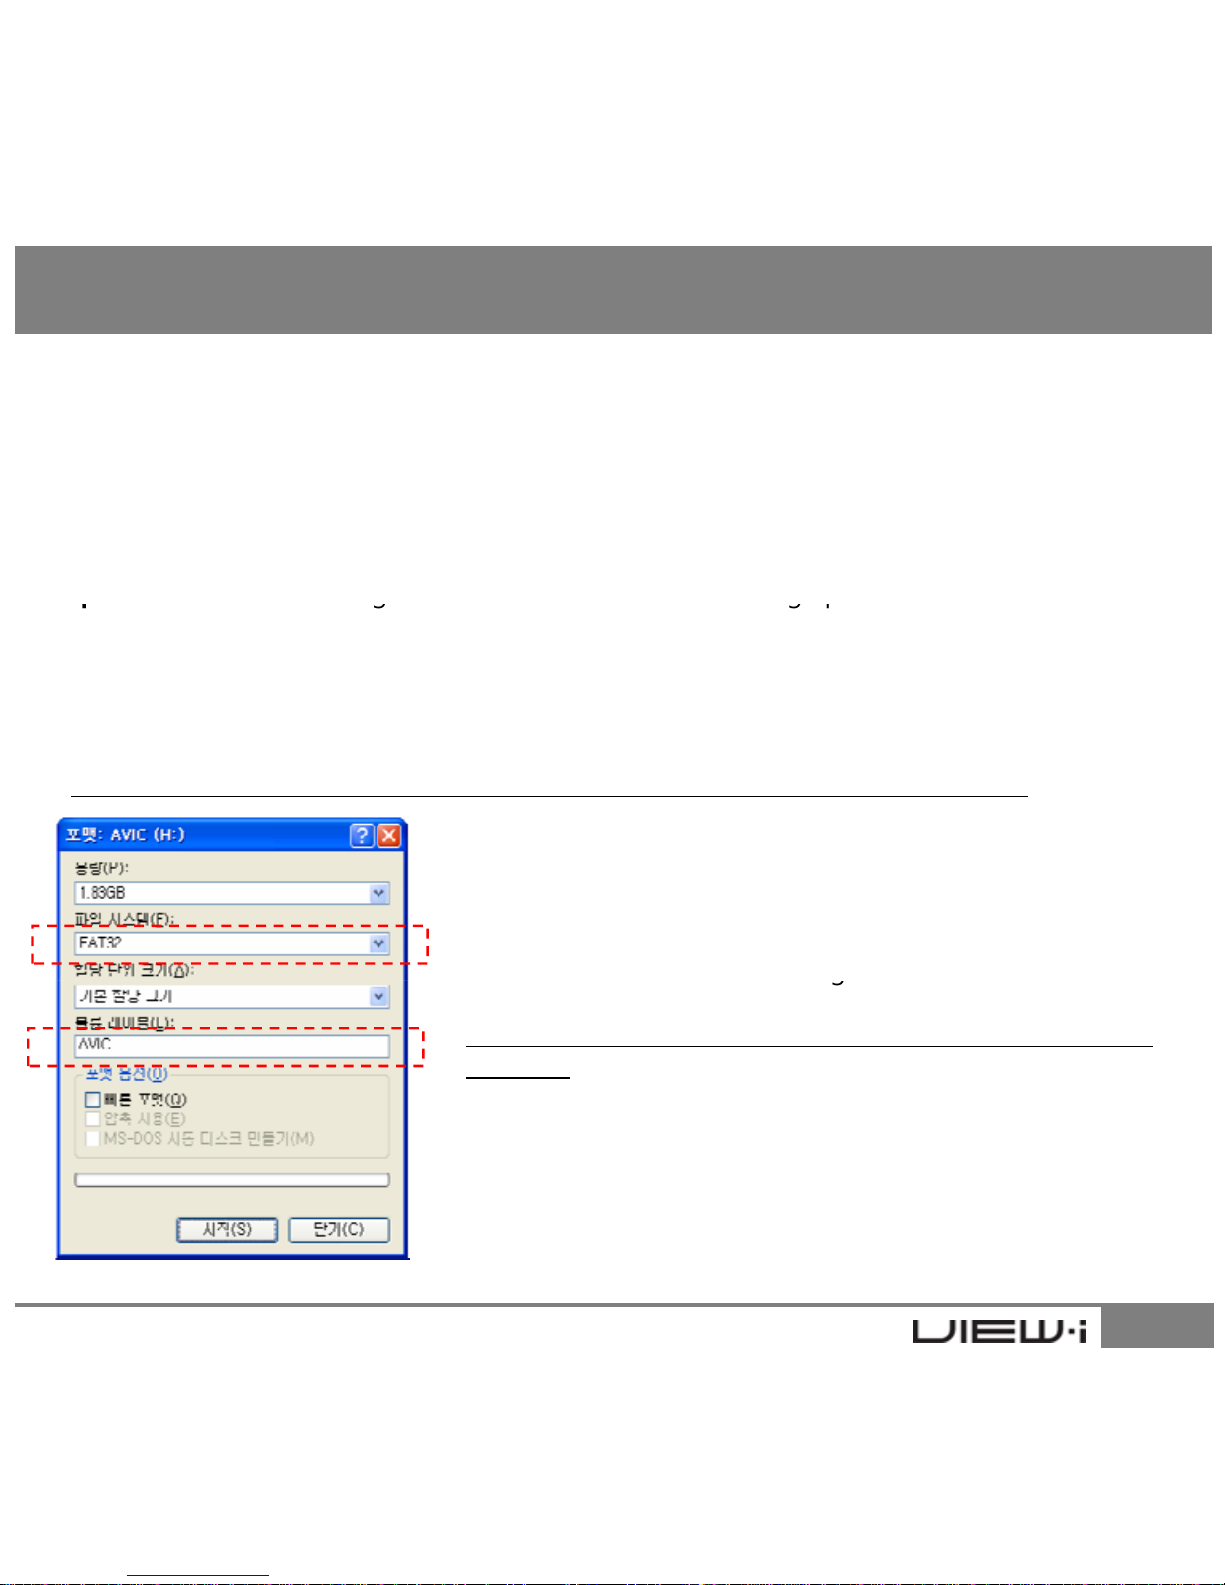
[NOTE] Format SD memory card at least once a week for optimal performance
HOW TO FORMAT SD CARD
1. Insert SD Card to user PC
2. Select [Start] -> [My Computer]
3. Select SD card driver and ri
g
ht click and select “Format”
5
g
4. Select “FAT32”
If “FAT” format is to be selected, device will not function
normally
5. Click “Start” button
Do not remove SD memory card during product
operation while power is on
Product or SD memory card could be damaged.
Manufacturer is not liable for SD card’s recorded contents outside SD card limited product life
Page 6
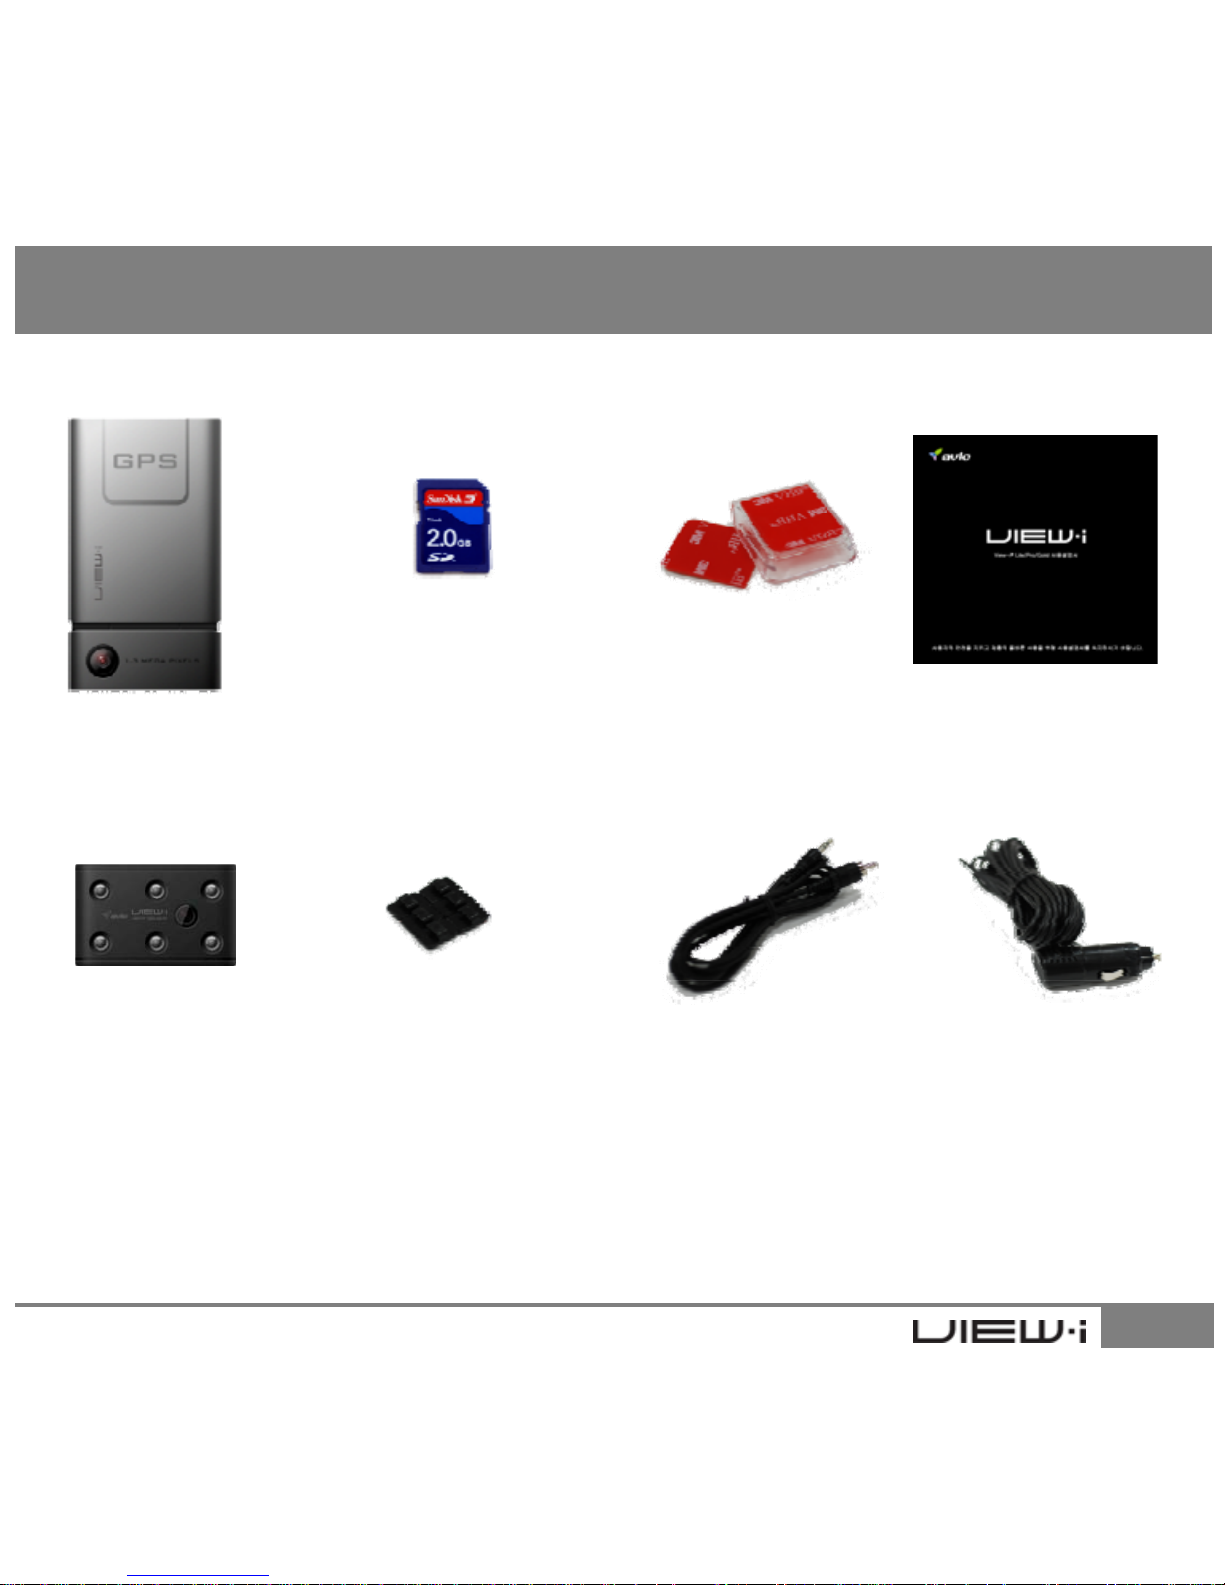
Please confirm below package list in the box
3. Product Package
Device
SD Card
(Included View-i PC Player)
Cradle &
Double Side Tape x
2ea
User Manual
6
Wire Clip x 6 ea TV-out Cable Cigarjack
Power Cable
IR Lighting
Module
(Ruby Model Only)
Product package may change for product enhancement without any notification
TV-out cable : Display which doesn’t have composite port must be adjusted to the correct
display format
Page 7
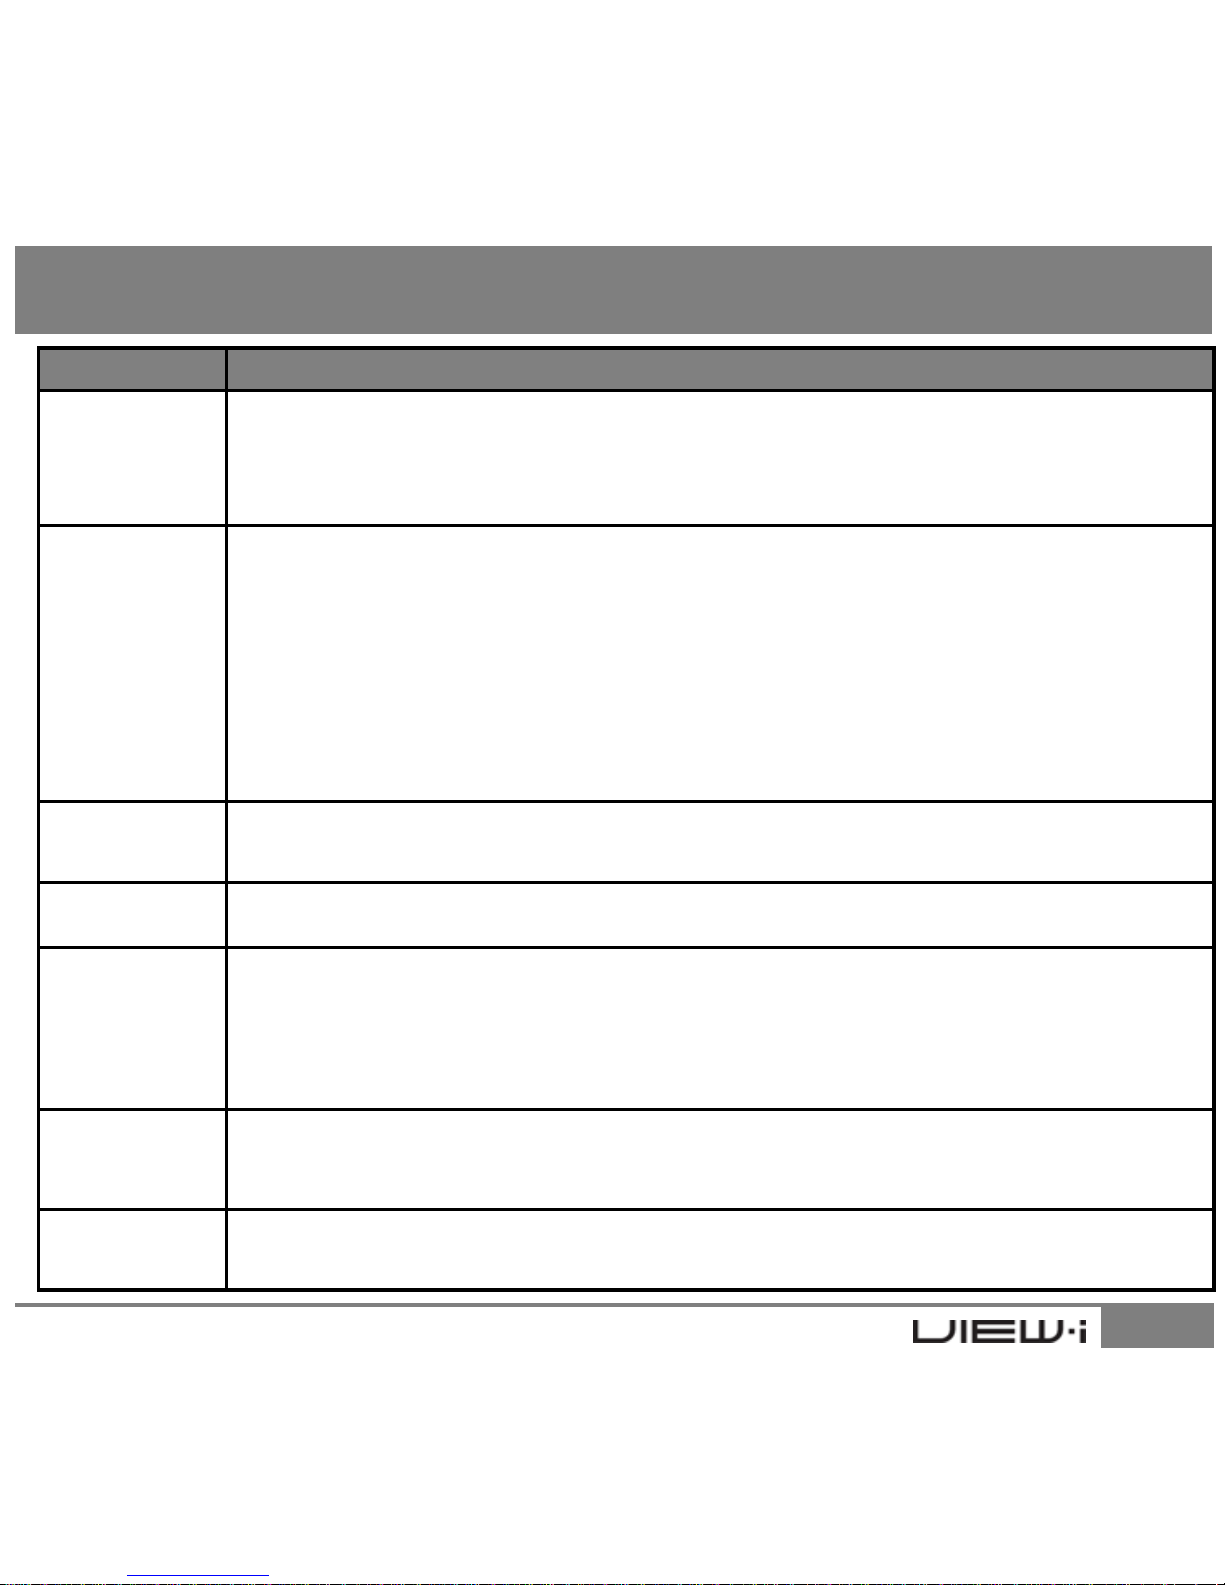
Function Description
Constant
Recording
Records everything during device power on status
[NOTE] If memory exceeds its capacity, device deletes oldest file to make
room for new recordings. Therefore, if user wants to keep the old recordings, user
must backup the recordings before they are automatically deleted
When device detects exceeded force in the device, device automatically saves
15 seconds before and after of the triggered event.
4. Functions
Event
Recording
(Reference: 7.View-i Product Manual)
[NOTE] Event videos can be saved upto 200 files. If event files saved upto 160 files,
device alerts sounds(beep-beep-beep) to warn the user. If event files are saved
upto 200 files, device alerts sounds(tee-lee-lee) and starts deleting oldest
recording to save room for new recordings. Therefore, if user wants to keep the
old recordings, user must backup the recordings before it is automatically deleted
Audio
Recording
Supports audio recording with on/off button (Reference: 5. Features)
JPEG
Capture
Supports JPEG capture (Reference : 7.View-i Product Manual)
Internal GPS records time/speed/route information.
7
GPS Sensor
(View-i Pro/Gold/Ruby product only)
These information can be checked with View-i PC Player
(Reference : 8.View-i PC Player Manual)
[NOTE] GPS needs to be connected to Satellite before recording
G-Sensor
Internal G-sensor records quick start/stop/curve information
This information can be checked with View-i PC Player
(Reference : 8.View-i PC Player Manual)
TV-out
User can check recorded files to nearest display with TV-out function
(Reference : 5. Features)
Page 8
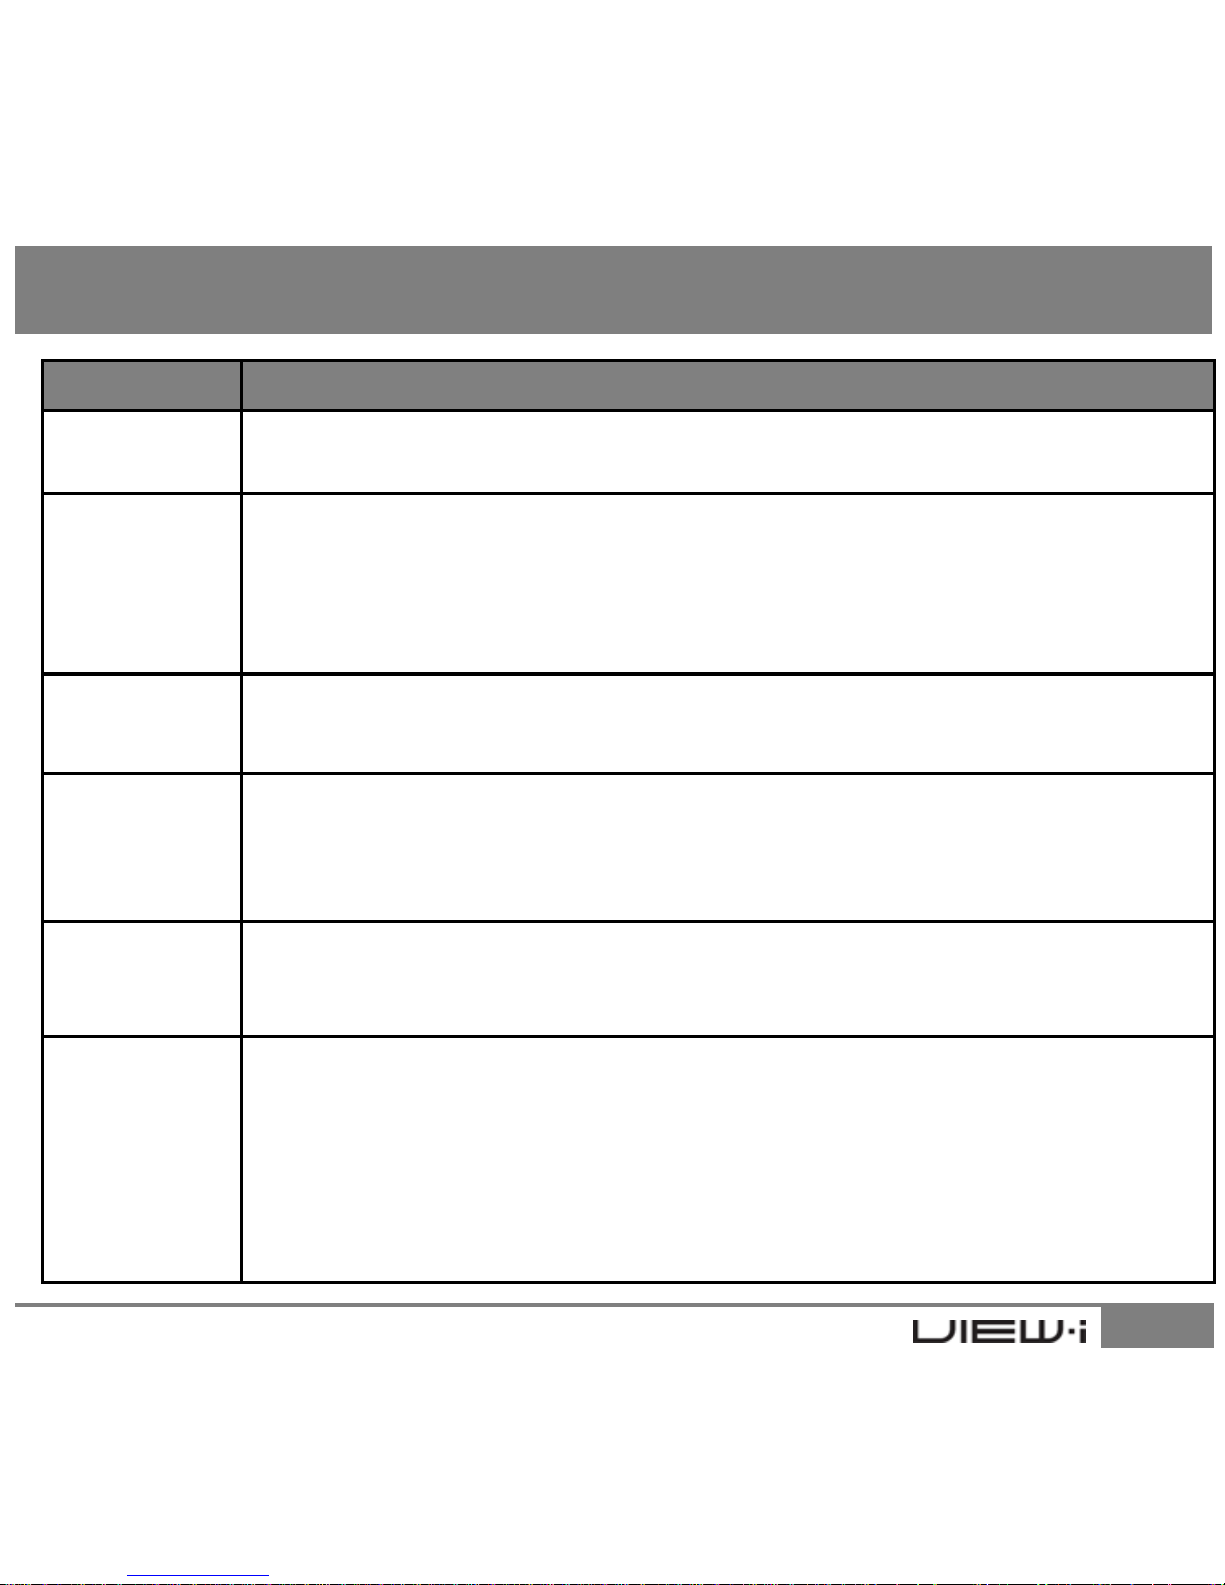
Function Description
View-i PC
Player
View-i PC Player can be used to check recorded videos on SD card
Google Map
View driver’s route in Google Map embedded in View-i PC Player
[NOTE] GPS needs to be connected to the satellites in order to sync
4. Functions
Sync
data with Google Maps
G-Sensor
Graph
View G-force data with View-i PC Player
ECO-Drive
Report
Driver driving patterns can be diagnosed using GPS & G-Sensor data.
This data will coach drivers to develop safer driving habits
[NOTE] Functions are limited for non-GPS products
Creates reference report detailing the accident which may be helpful to
8
Event Report
police or insurance company
[NOTE] Functions are limited for non-GPS products
CRASH
GUARD™
CRASH GUARD™ system is provided inside View-i PC Player,
View-i PC Player can recover corrupt data occurred by SD card being
separated from the device
[NOTE] CRASH GUARD™ cannot repair any data if SD card’s file system
was damaged or SD card was physically damaged
Page 9
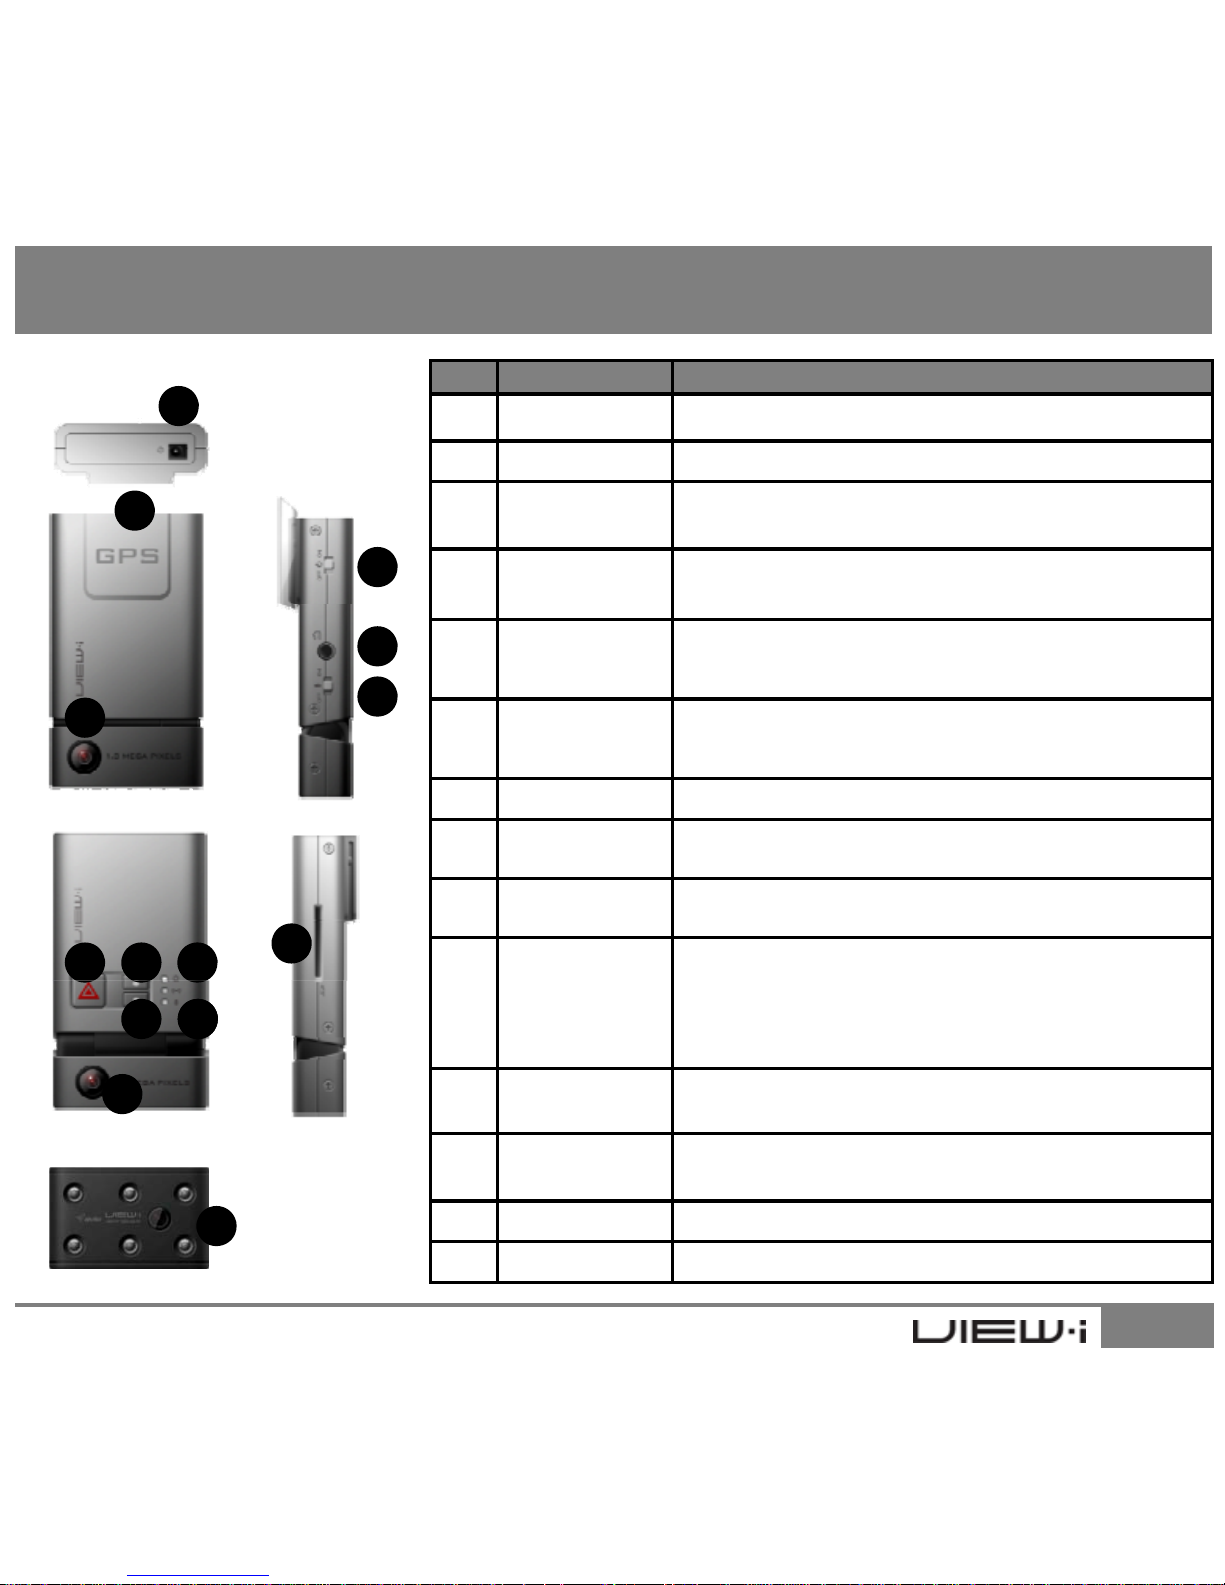
# Name Description
① Power Port DC 12V/DC 24V
②Internal GPS GPS
③ Front Camera 130M Pixel CMOS Image Sensor
④ Power Switch Device Power on/off switch
5. Features
1
2
4
⑤TV-Out Port
Preview/Replay recorded files to
nearest display (NTSC/PAL)
⑥ Mic Switch Mic on/off switch
⑦ Buzzer Status buzzer
⑧
Manual
Recording
User can activate Event Recording
⑨
Memory
Format
User can format inserted SD card
8 9 11
13
3
5
6
9
⑩
Video Replay
/
JPEG Capture
User can replay recorded videos
User can capture JPEG image
⑪LED
Status LED for Power status, GPS reception,
Mic status, Recording status
⑫ Rear Camera 1.3M Pixel CMOS Image Sensor
⑬ SD Cart Slot SD memory card slot
⑭ IR Lighting IR Lighting for Rear Camera / RUBY Model Only
710
12
14
7
Page 10
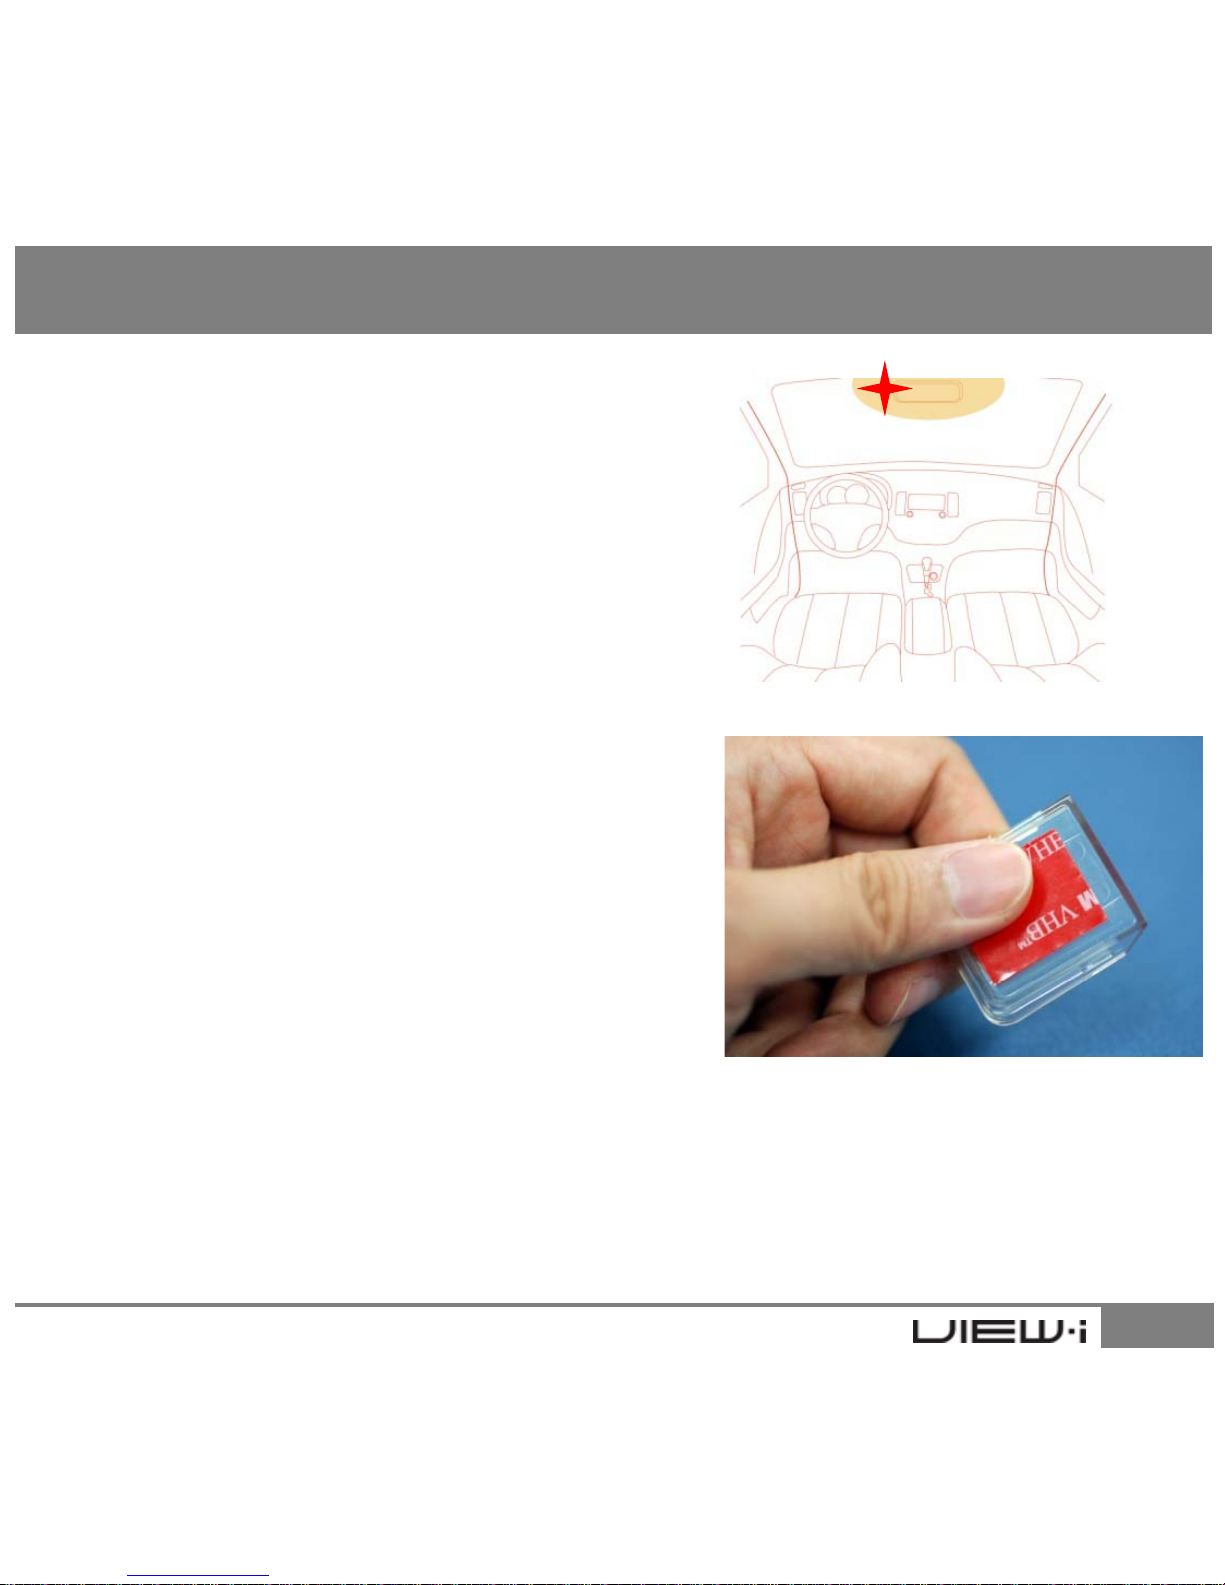
6.1 Recommendation
For Sedans and SUVs, install the device near
rear view mirror to the driver side where GPS
and Camera does not have physical interrupts
6. Installation
6.2 Placing the Cradle
Remove tape cover and place according to the
diagram in 6.1 with open side up
[NOTE] If device was installed any place other
then what is recommended in diagram 6.1, it will
prevent optimal functioning of the GPS reception
and camera
10
[TIP] Please wipe the wind shield clean before
placing the cradle.
Page 11
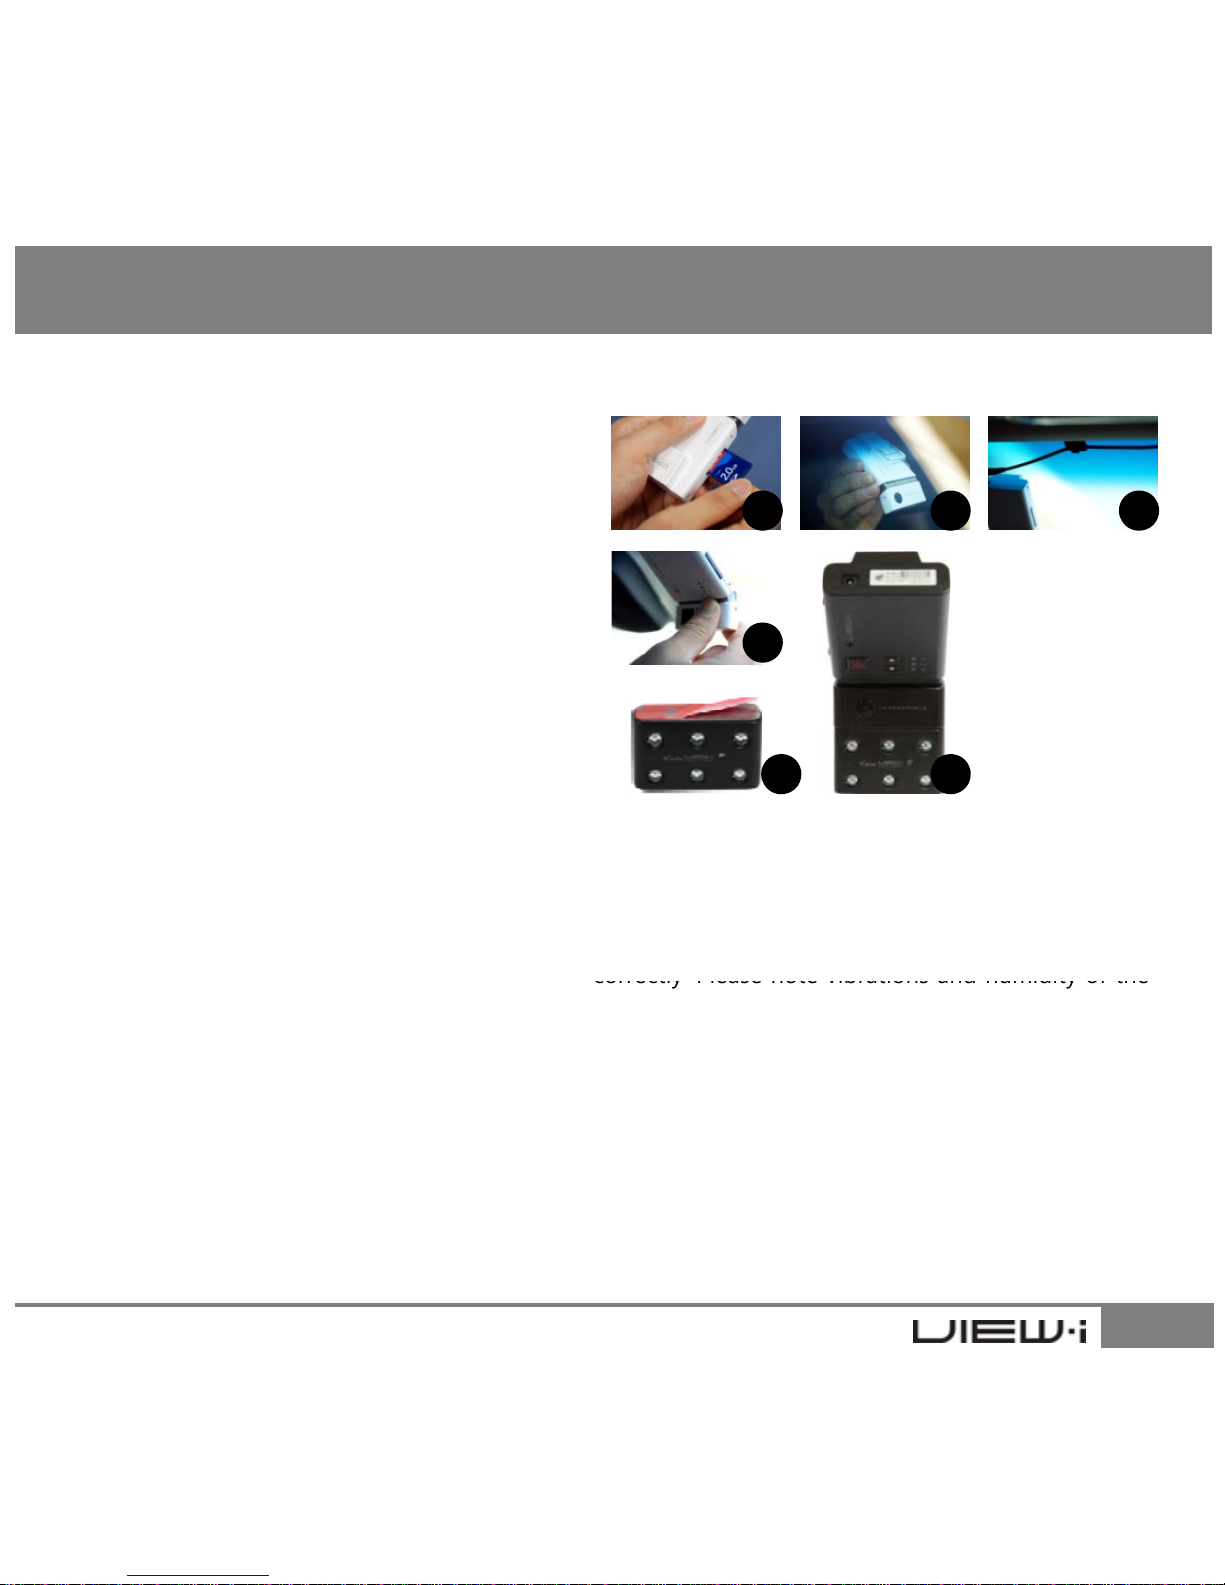
6.3 Installing the product into the Cradle
1. Insert SD memory card to the product
2. Hold product so camera part is at the
bottom and then slide it into the cradle from top to
bottom until it makes a clicking sound
3. Connect the power cable from product to cigar
jack of your vehicle. Then organize the lines using
1 2 3
6. Installation
li
ne clips
4. Adjust the camera angle to your preference
[TIP] Use TV-out cable to connect to nearest display
to check the actual recording view and
make sure hood and dashboard does not show over
¼ of video’s bottom screen
RUBY Products :
5. Remove the tape cover
6. Attach IR lighting facing the same direction as Rear
Camera
[NOTE] If direction of the Rear Camera and IR Lighting
does not align, Rear Camera recordings might not record
4
5 6
11
6.4 Confirmation
correctly. Please note vibrations and humidity of the
vehicle might detach the IR Lighting
1. Check to see that the SD card is correctly placed into the device and power switch is on
2. Start the car engine and check power is correctly connected to the device
3. Check Red LED is on following with Blue and Orange LED blinks.
4. Listen for a beep sound of 1CH products, 2 beeps for 2CH products and Orange LED to
stop blinking (booting complete, recording starts).
5. GPS connection can be confirmed as follows:.
If Blue LED blinks on and off, GPS reception is not complete and still in search
If Blue LED does not blink and stays on, GPS reception has been made
Page 12
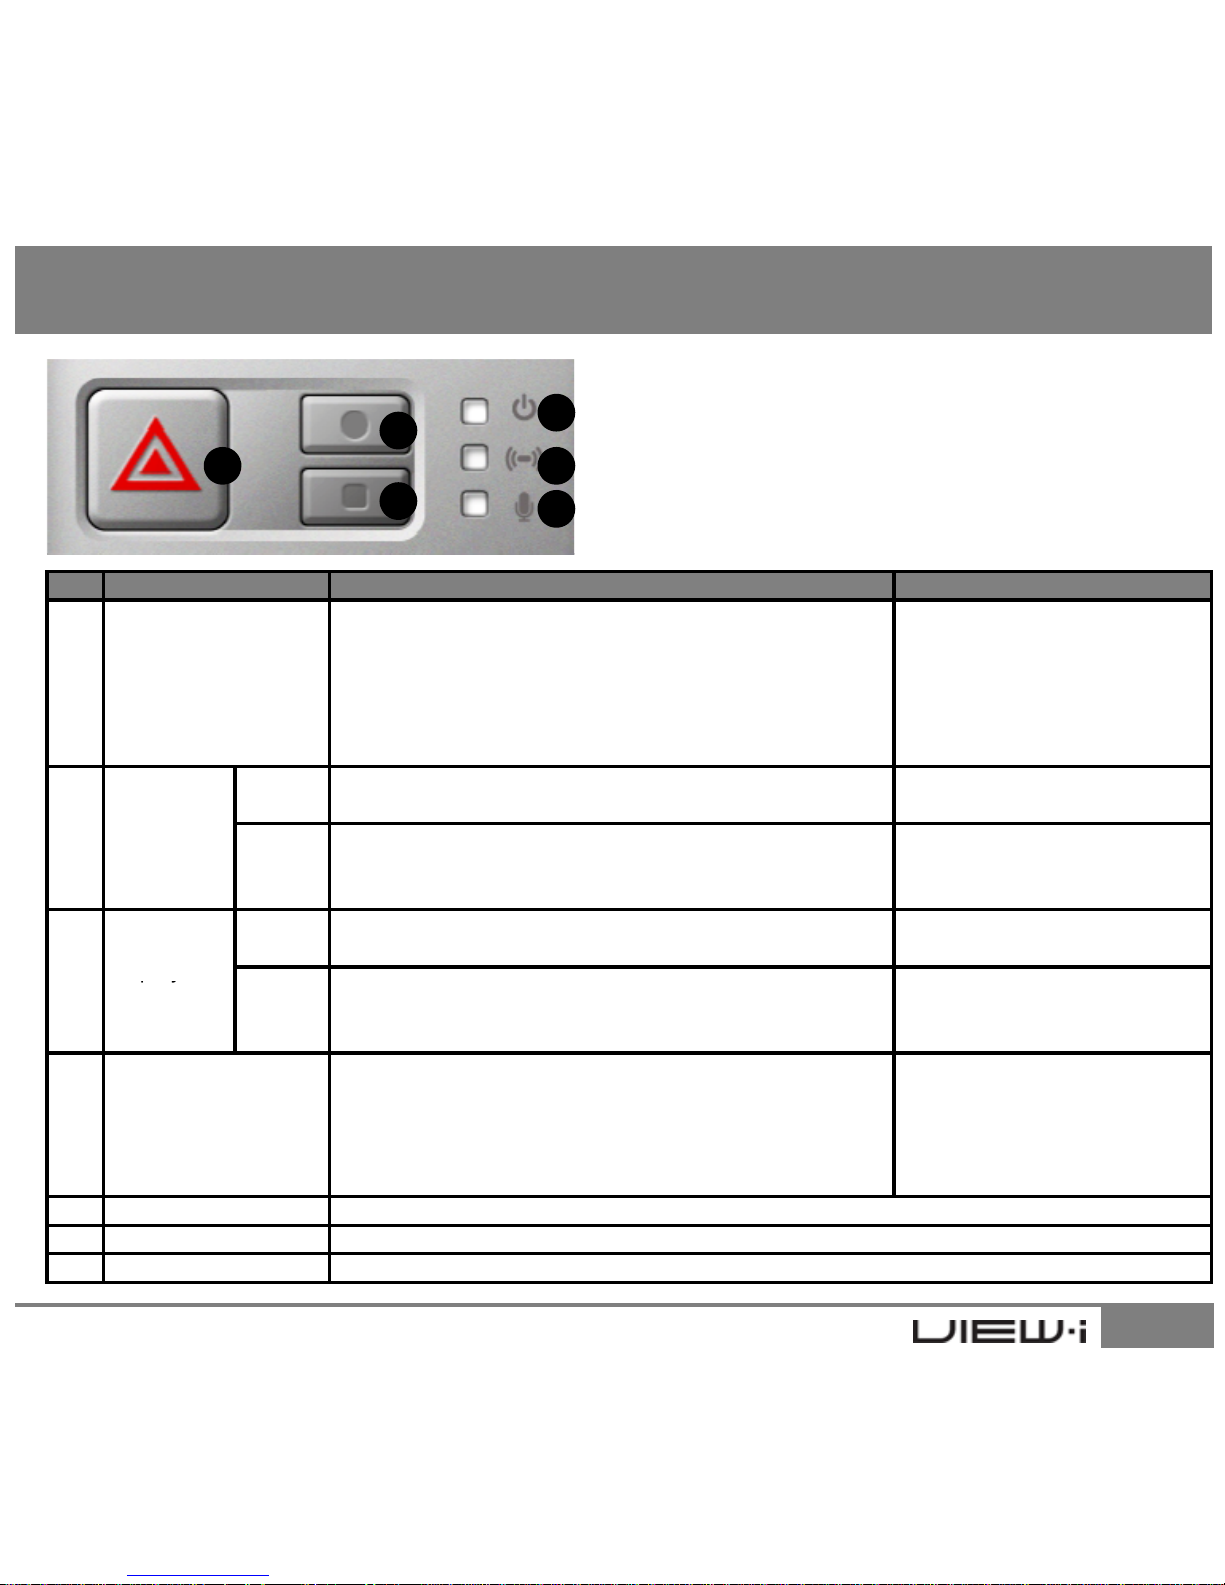
# Name Recording Mode Replay Mode(TV-OUT)
1
2
3
4
5
6
7. View-i Product Manual
①
Manual Recording
Button
Manually start event recording
If button is pressed, device will make
“tic-tic” sound and blue and orange LED
will blink quickly
Same as Recording Mode
②
Memory
Format
Button
Short
Press
No function Previous File
Long
Press
Hold for 8 seconds to start formatting SD card
after a beep. 2 beeps will sound after completing
the format
Change folders
Video
Re
play
/
Short
Press
JPEG capture Next File
12
③
py
JPEG
Capture
Long
Press
Press for more then 2 seconds,
device will change to Replay Mode
Press for more then
2 seconds, device will
change to Recording Mode
②③Rear Camera
ON/OFF Button
[Applies for on/off both]
Press #2 button followed by #3 button
If rear camera is successfully turned off, device will
make 3 beeps. Device will make 5 beeps if rear
camera is turned backed on
④ Power LED Red LED, Displays Power On/Off Status
⑤ Function LED Blue LED, Displays GPS Reception Status
⑥ Mic LED Orange LED, Displays Mic On/Off Status
Page 13
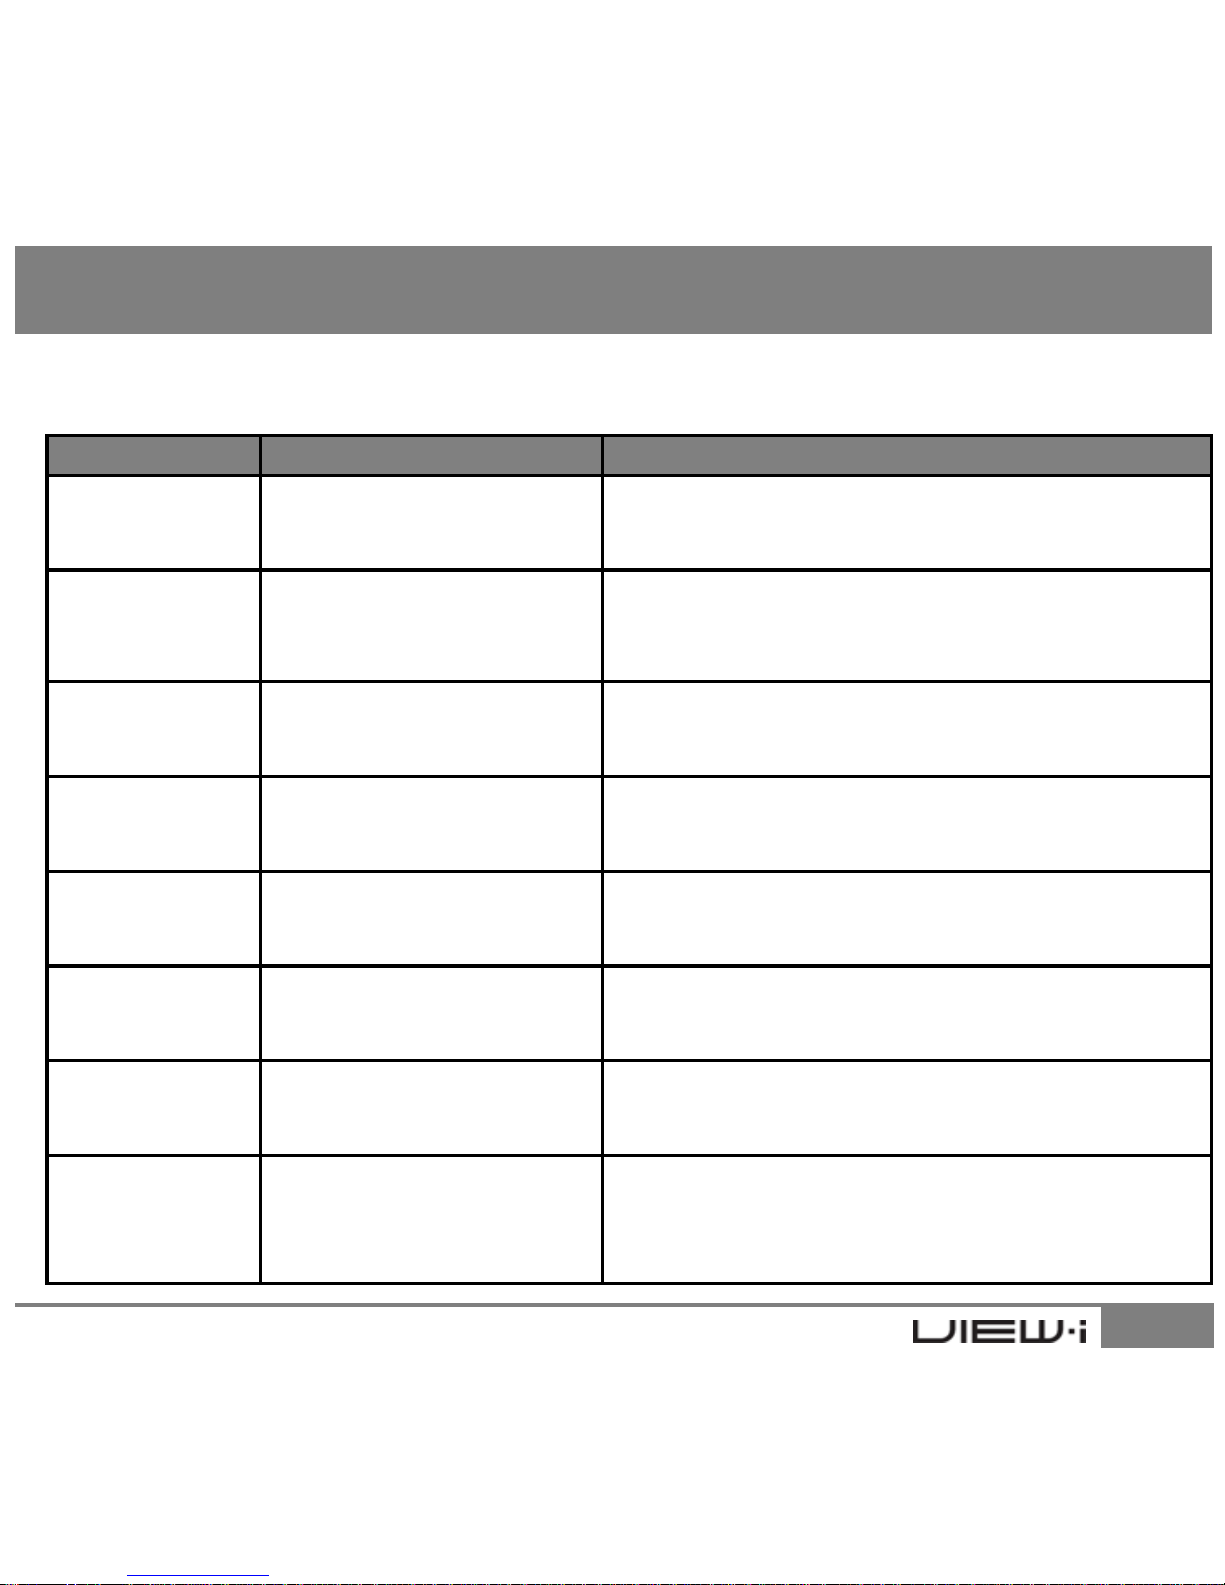
Name Buzzer LED
Booting Status
1 beep for 1CH products
2 beeps for 2CH products
Red LED : On
Blue LED : Blink
Orange LED : Blink
If SD card is not inserted,
Red LED : On
7.1 Buzzer/LED Scenario
7. View-i Product Manual
SD Card
Insert Status
Device w
ill
make a beep
sound every second till
SD card is inserted
Blue LED : Blink
Orange LED : Blink
Constant
Recording Status
Red LED : On
Blue LED : Operate according to GPS status
Orange LED : Operate according to Mic status
GPS Reception
Status
Red LED : On
Blue LED : Blink = search / On = GPS connect
Orange LED : operate according to Mic status
Event/Manual
Recording Status
Short “tic-tic”
Red LED : On
Blue LED : Blink (Fast Blink = 0.5 sec)
Orange LED : Blink (Fast Blink = 0.5 sec)
13
Mic On/Off
Short “tic”
Red LED : On
Blue LED : Blink
Orange LED : On/off according to Mic status
Power Off
Status
“Beep~”
Red LED : Off
Blue LED : Off
Orange LED : Off
Event/Manual
Recording
Memory
Full Alert
80%:“Beep Beep Beep ~
Beep Beep Beep”
100% : “Tee-lee-lee”
Red LED : On
Blue LED : Operate according to GPS status
Orange LED : Operate according to Mic status
Page 14
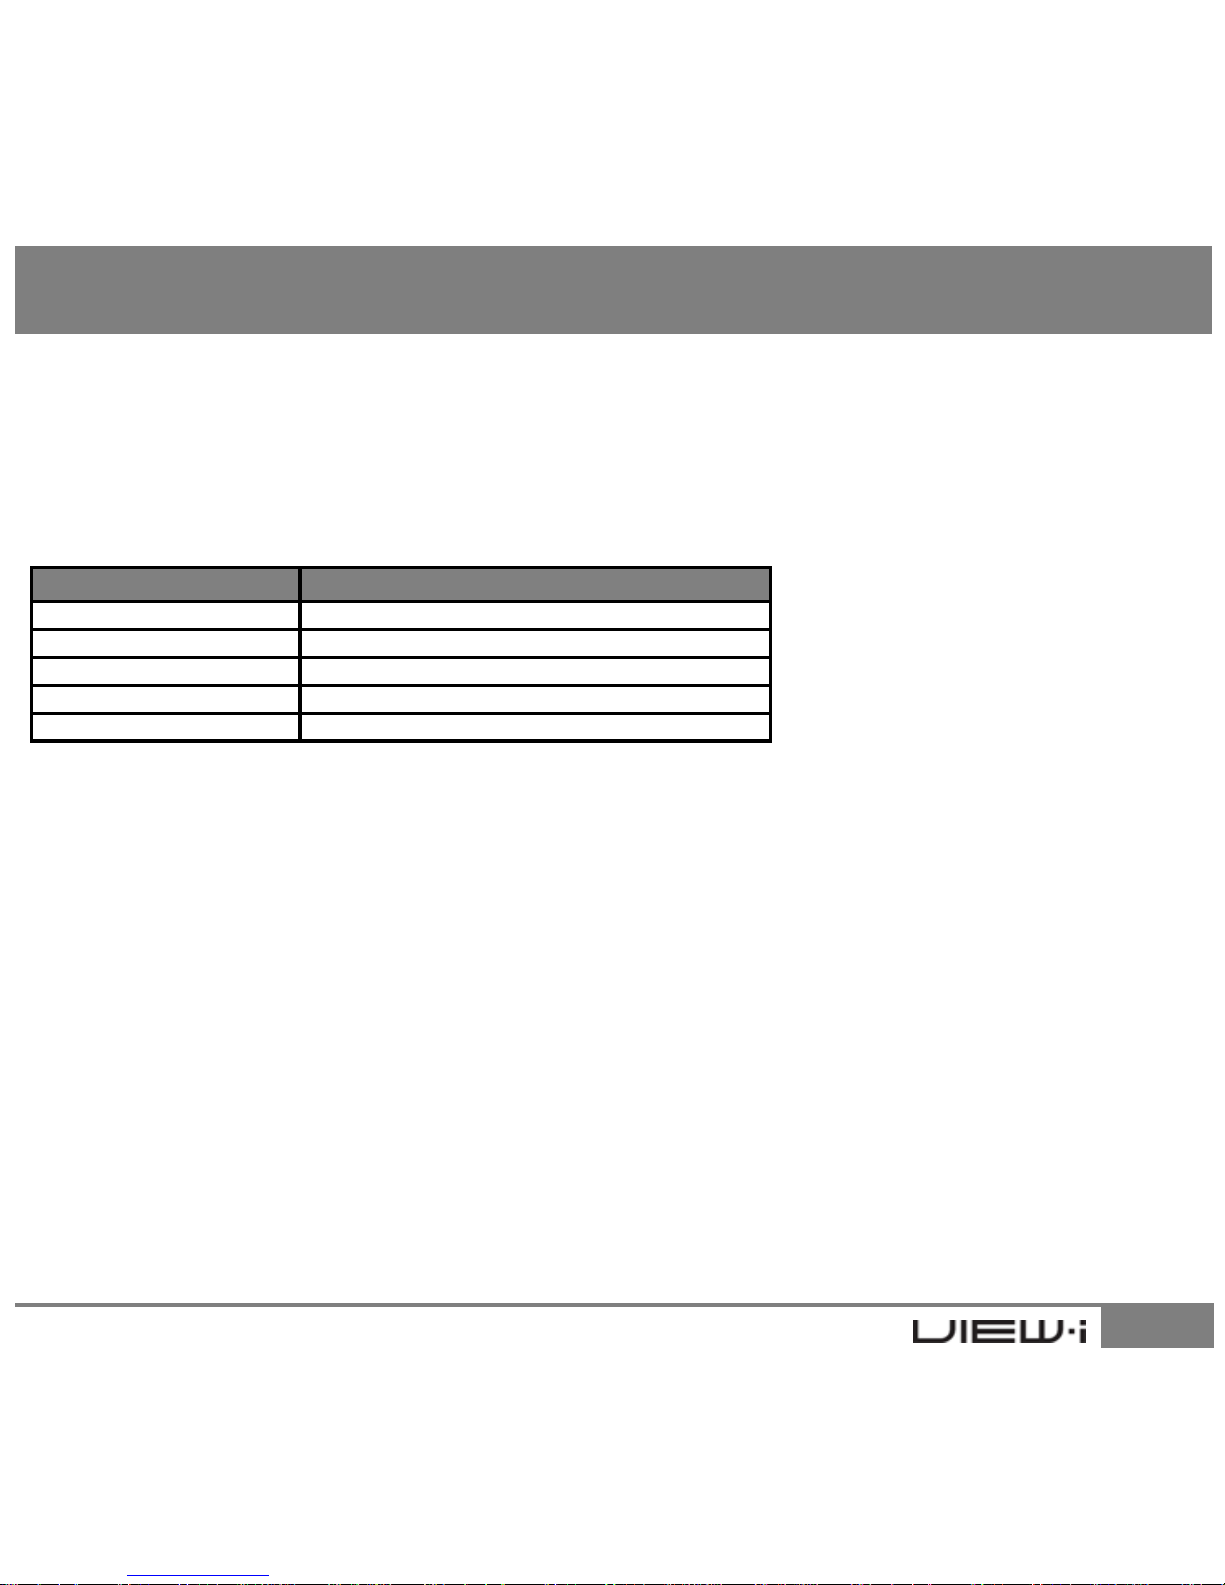
Item Description
This part of the manual explains the use of View-i PC Player, video and utility player. With
View-i PC Player, user may view the contents of View-i Lite/Pro/Silver/Gold products.
* Windows Media Player and other player may show videos but G-Sensor, GPS, MAP, Report
functions can only be used in View-i PC Player.
8.1 System Requirement
8. View-i PC Player Manual
Operating System Window XP, Windows Vista, Windows 7
CPU Pentium 4 / 1.8Ghz Processor or above
RAM More then 512MB
Free HDD Space More then 200MB
Display More then 1024 x 768 pixels
8.2 Installing the Software
1. Connect SD card into the computer
2. Clikc [Start] and enter [My Computer]
3. Select SD card drive and double click “Setup.exe” file in the product folder
14
4. Follow installation instructions
6. Select [Start]->[Programs]->[View-i]-> View-i PC Player to start the application
* Check http://www.avic.co.kr for latest View-i PC Player updates
Page 15
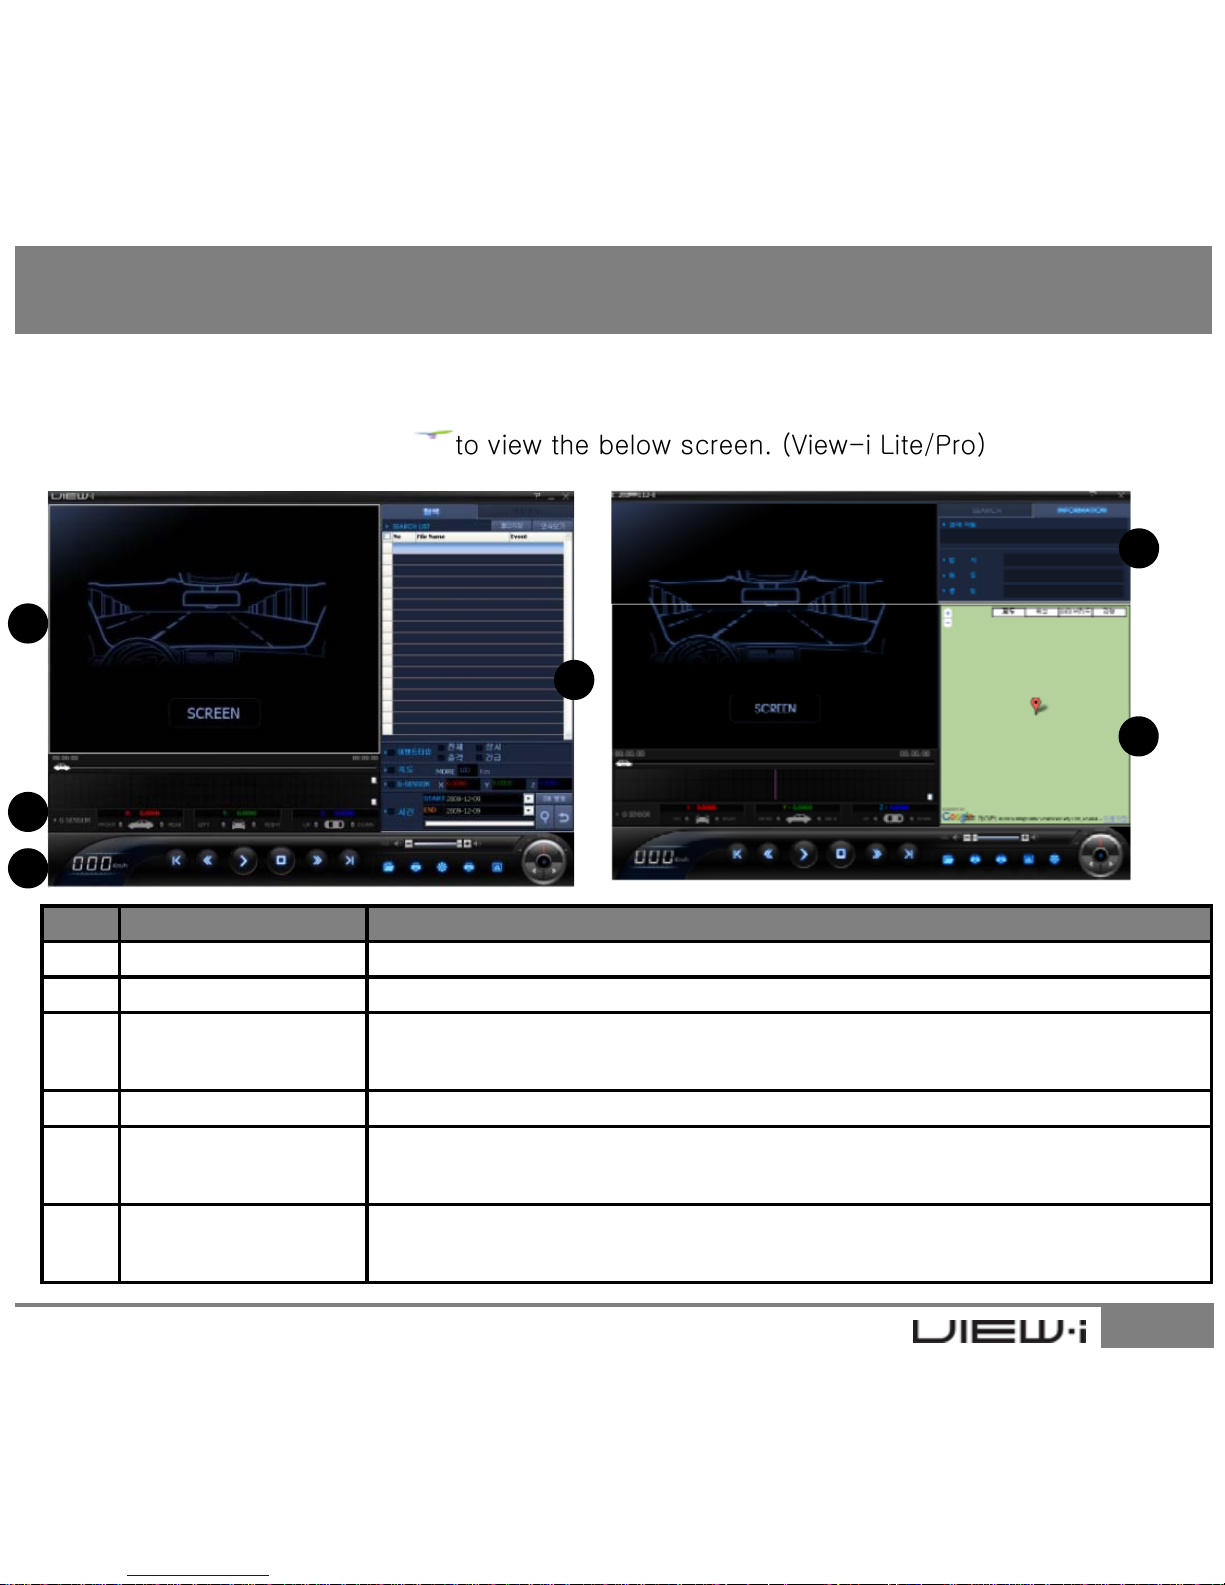
8.3 View-i PC Player - 1 Channel
Double click on ”View-i” icon to view the below screen. (View-i Lite/Pro)
5
8. View-i PC Player Manual
# Name Description
① Video Screen Video play screen of designated video file
1
2
3
4
6
15
②G-Sensor Graph G-sensor data of video screen for user analysis
③
Speed-o-meter /
Menu
Display driving speed (View-i Pro)
Button listing for video and menu control
④ File Search Search function for listed video files
⑤ File Information
Displays file name and recording type
Displays GPS information (View-i Pro)
⑥ Google Map
Displays current position of the video on Goggle map
(Internet connection required : View-i Pro)
Page 16
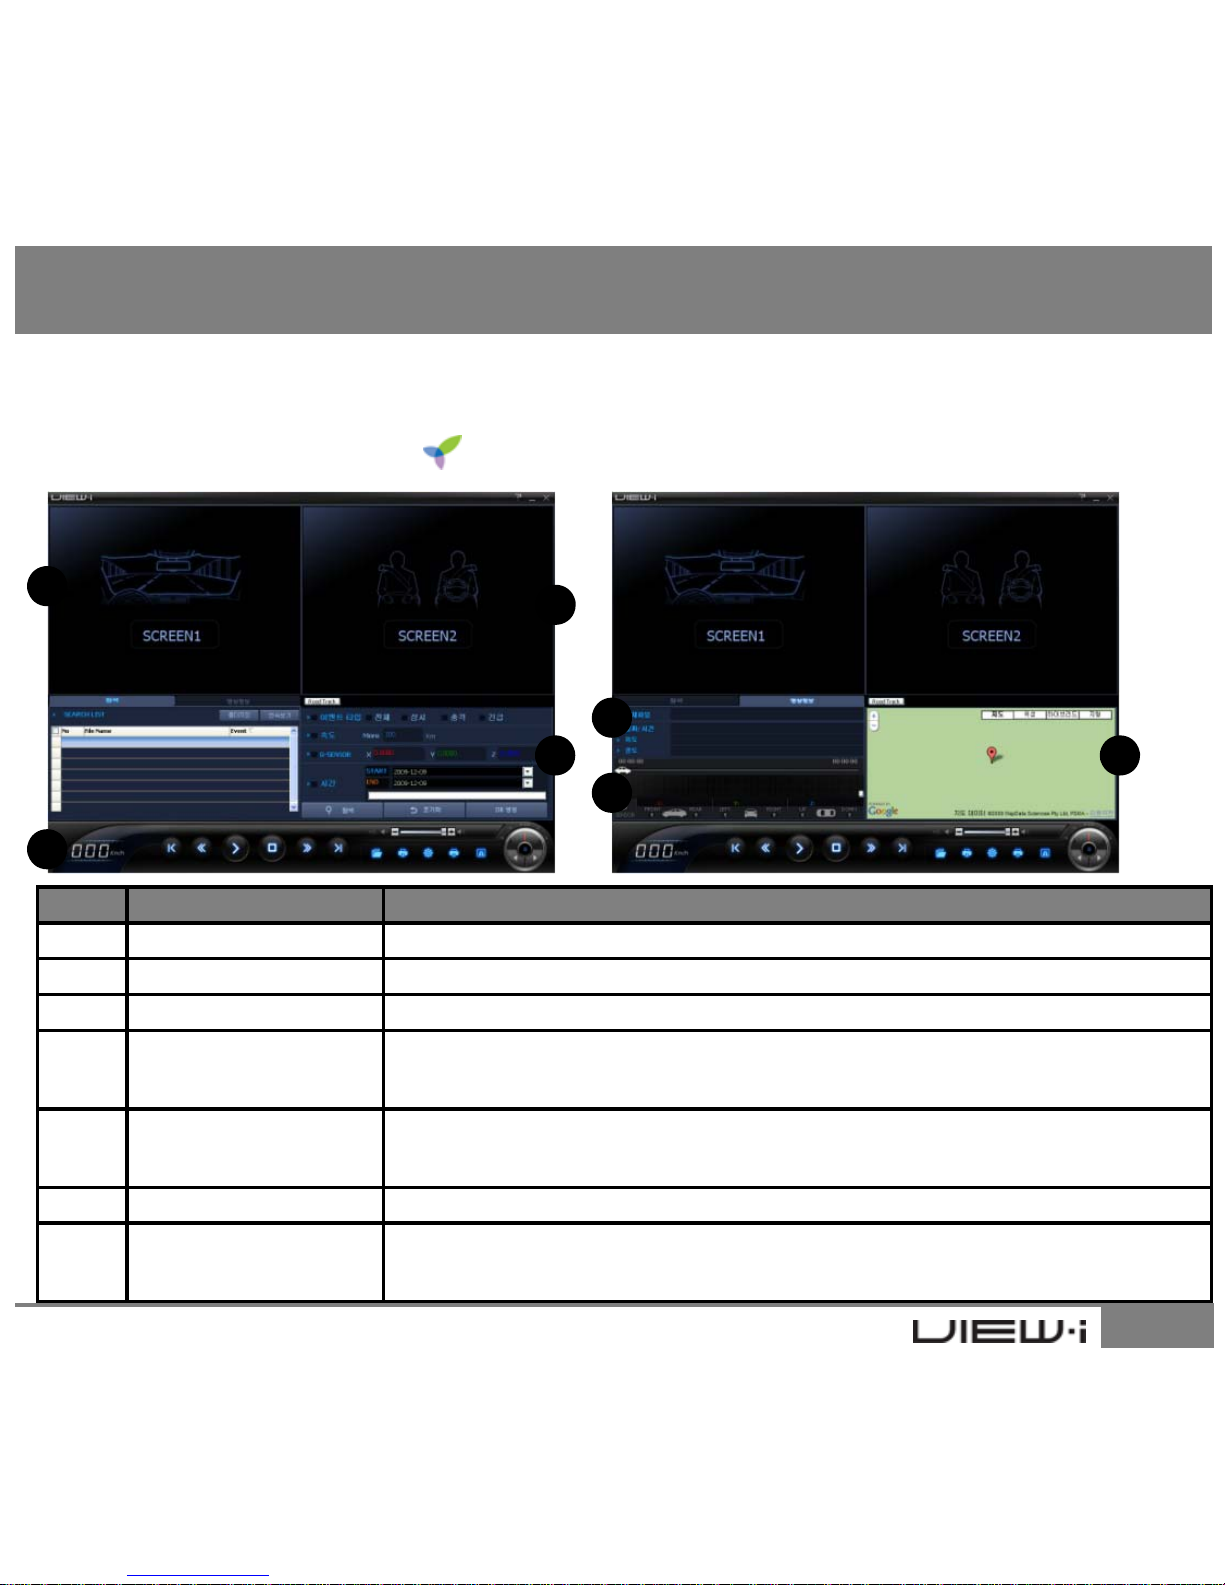
8.4 View-i PC Player - 2 Channel
Double click on ”View-i2” icon to view the below screen. (View-i Silver/Gold/Ruby)
1
8. View-i PC Player Manual
# Name Description
① Front Video Screen Front video play screen of designated video file
2
3
4
5
6
7
16
②
Rear Video Screen
Rear video play screen of selected front video file
③ File Search Search function for listed video files.
④
Speed-o-Meter/
Menu
Display driving speed (View-i Gold/Ruby)
Button listing for video and menu control
⑤ File Information
Displays file name and recording type
Displays GPS information (View-i Gold/Ruby)
⑥G-Sensor Graph G-sensor data of video screen for user analysis
⑦ Google Map
Displays current position of the video on Goggle Maps
(Internet connection required : View-i Gold/Ruby)
Page 17
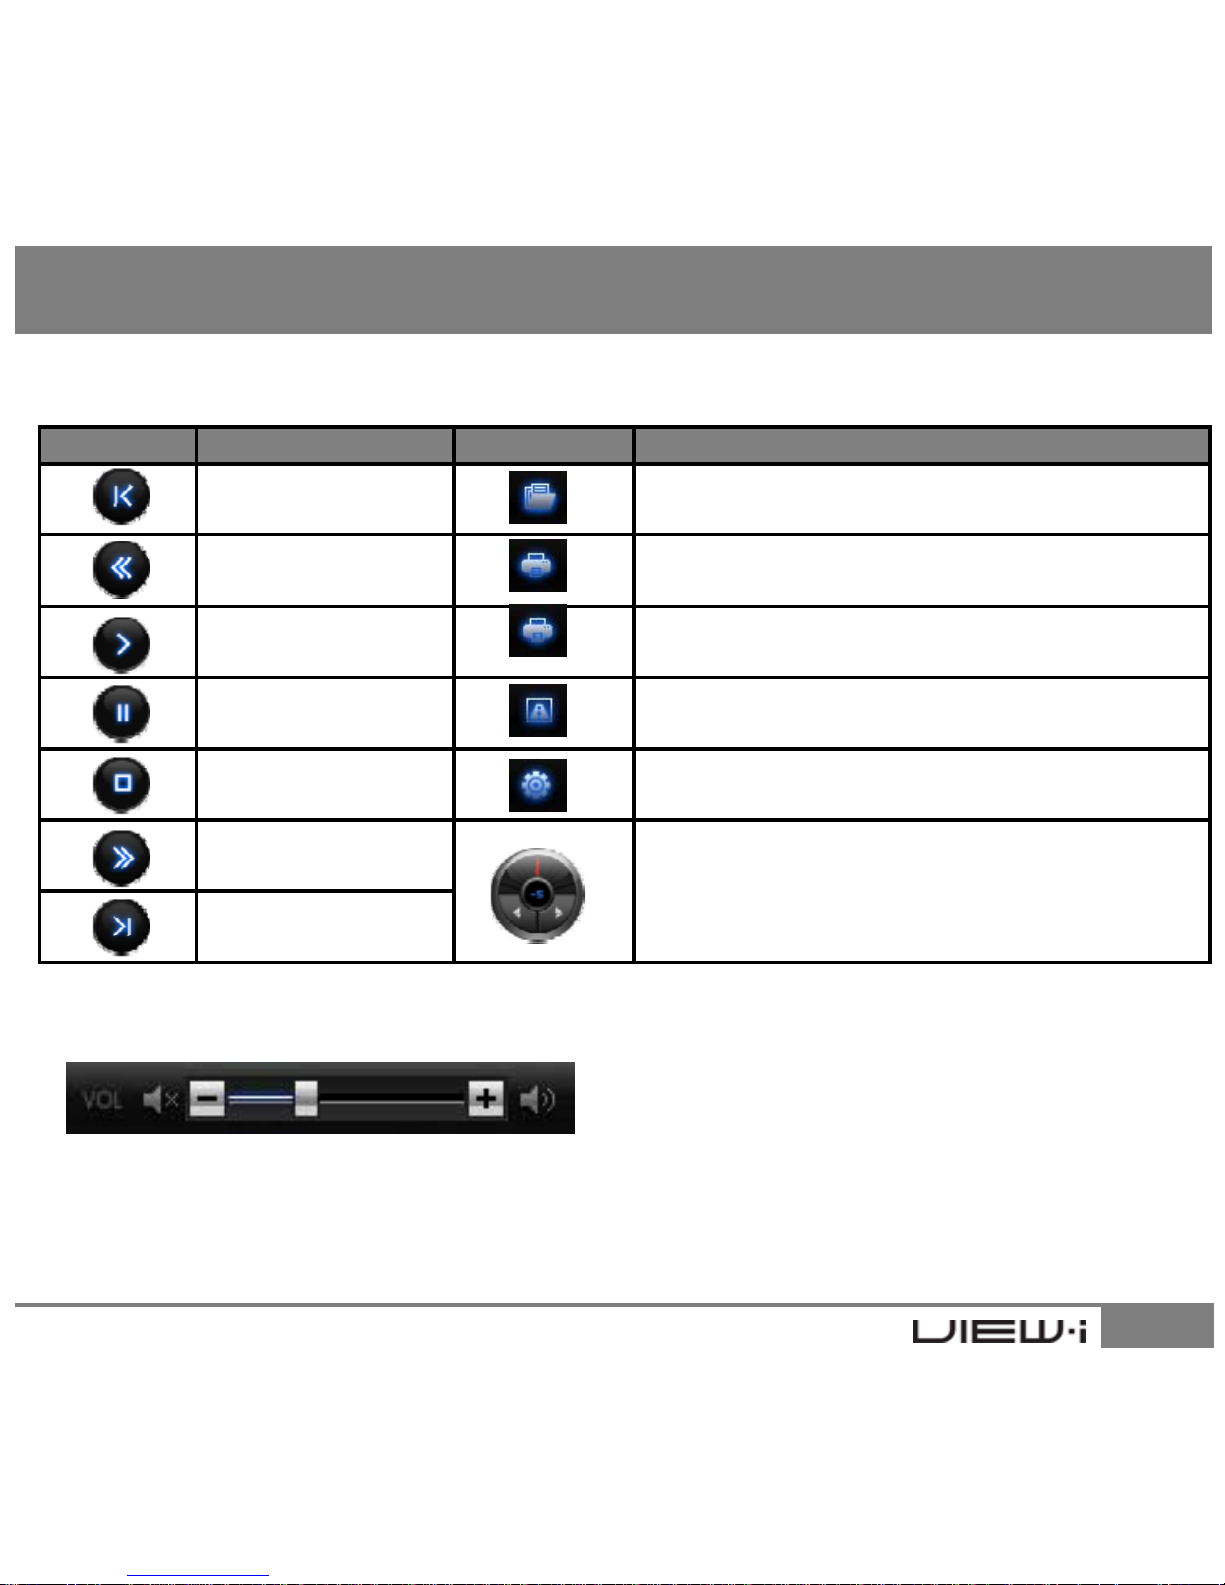
Button Description Button Description
Previous File Open 1 file
Rewind Print Screen
8.5 Buttons
8. View-i PC Player Manual
Play ECO-Drive Report
Pause Event Report
Stop Setting
Fast-forward
Play Speed Control
Next File
17
8.6 Control Bar
Volume Control : Video volume control with
mute function
Page 18
8.7 Open File / Play
• Recorded contents can be found inside device’s SD card.
Constant files can be found under “NORMAL” folder / folder name under date/hour.
• Event videos can be found under “EVENT” folder.
• Move the recorded videos to user computer for best performance.
(video play navigation, search, etc)
8. View-i PC Player Manual
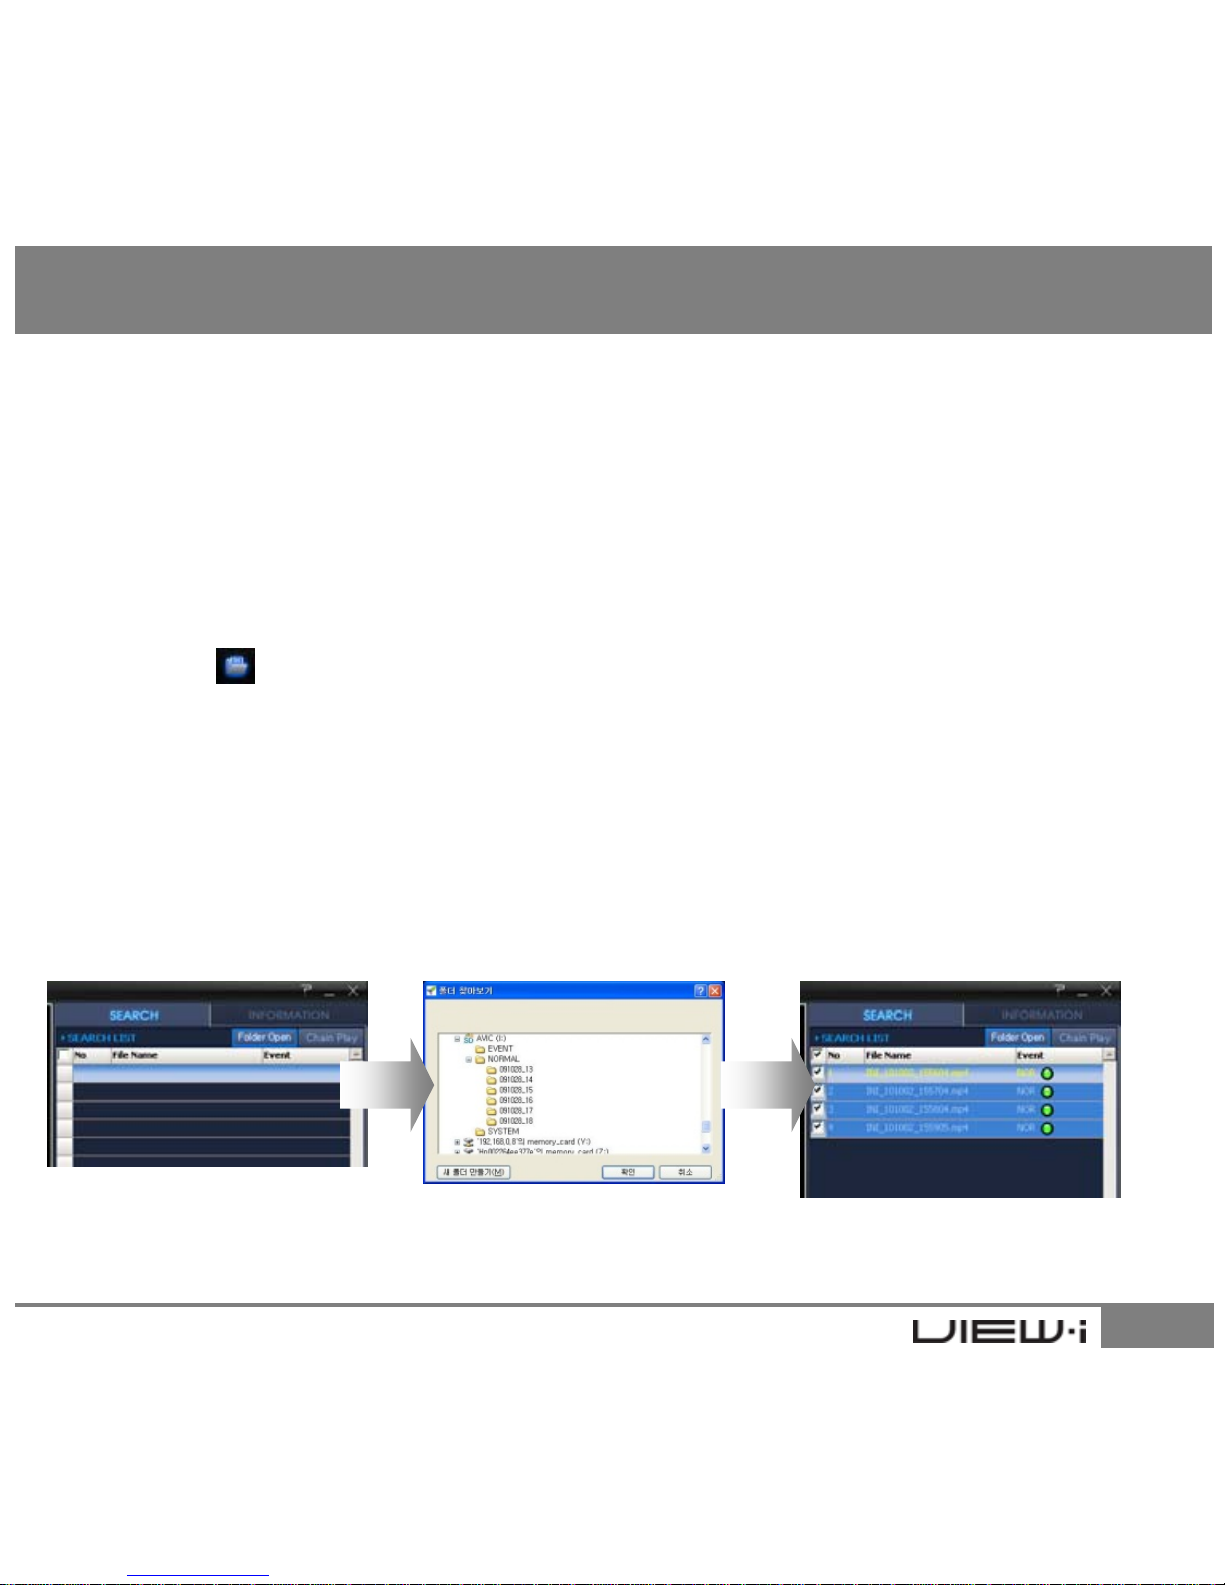
1. Opening single file and playing
Click on the button located lower part of View-i PC Player.
Navigate to the folder to find the wanted play contents and double click
on the video file to play.
2. Opening a folder and playing
• Click on “Folder Open” button on the top right of Search screen.
• Navigate to the folder of user choice and select “OK” button
• When the file list appears in the Search screen, check the checkbox in the
left of the file name and click on “Chain Play” to play the videos.
18
Page 19
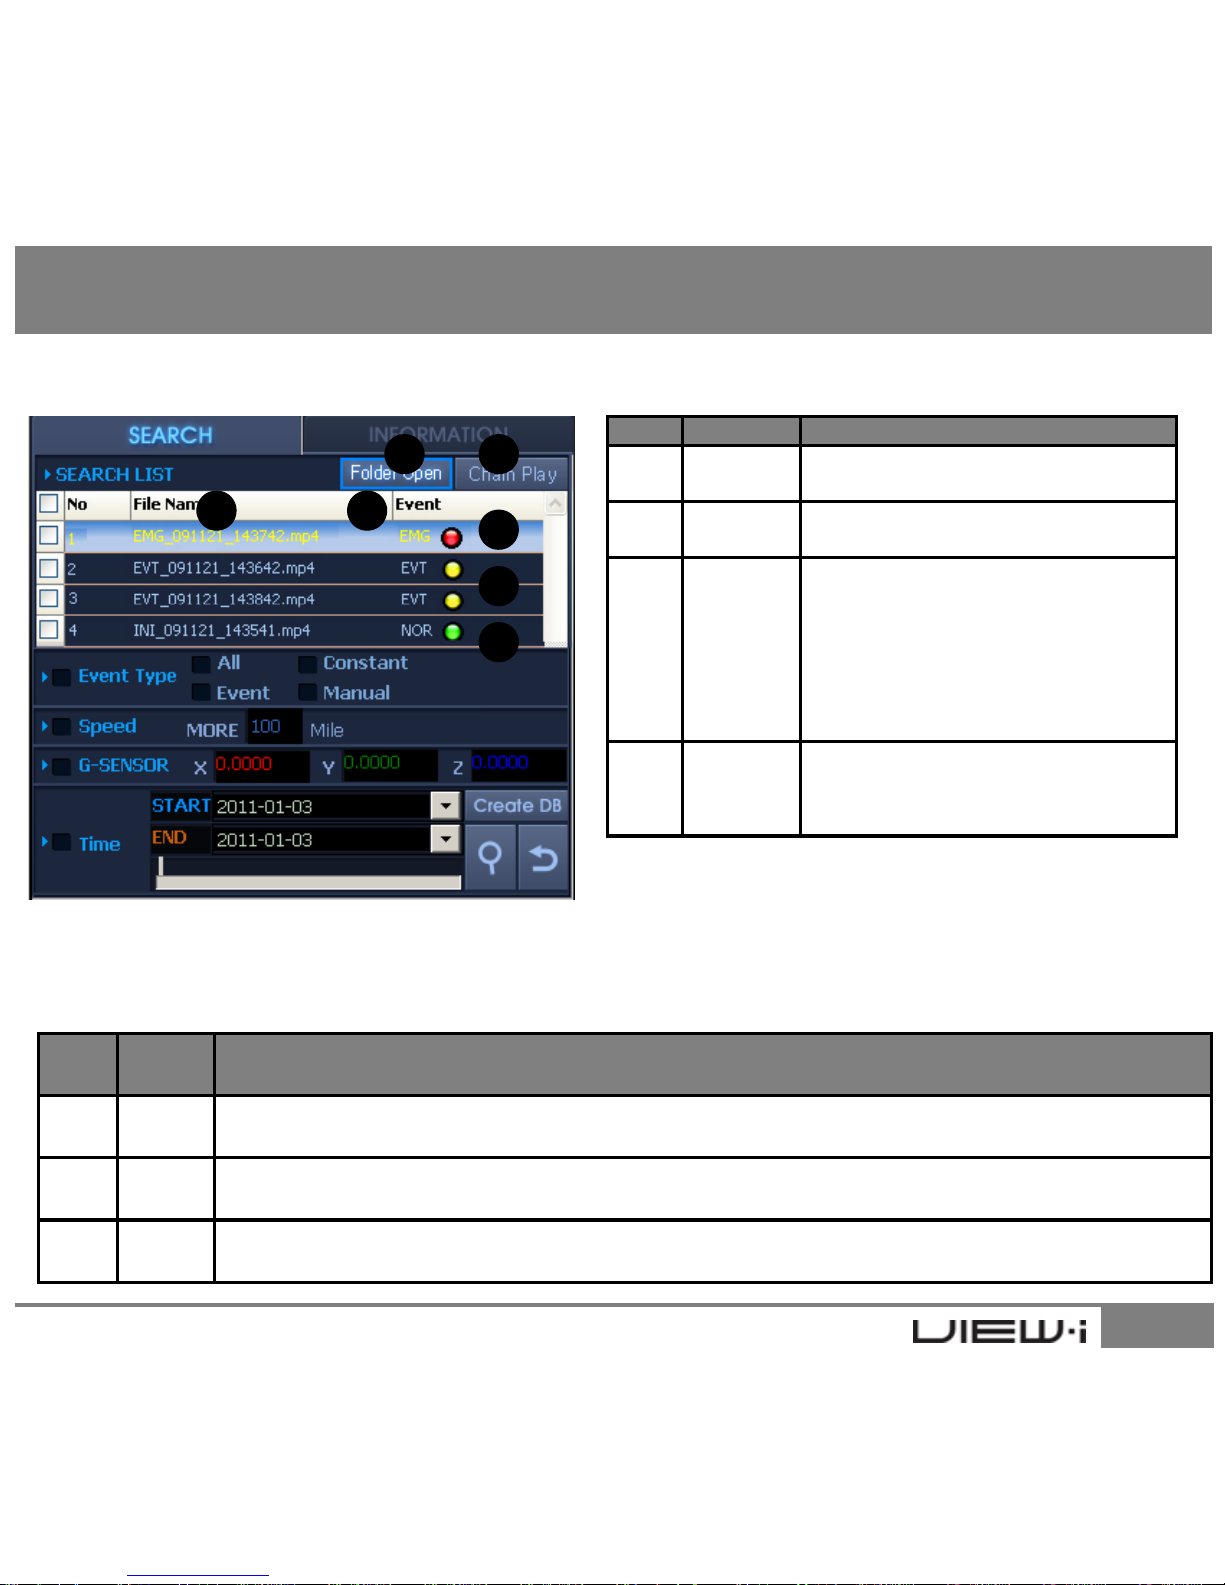
8.8 File List Screen
# Name Description
①
Folder
Open
Open a folder with recorded
videos
②
Chain
Play
Play button for continual playing
of checked listed files
File name consist of date/hour
1 2
3 4
5
7
8. View-i PC Player Manual
③
File
Name
of recordings
.
EVT_090919_201518.mp4
-> EVT or INI : Recording type
-> 090919 : 09/09/19 (date)
-> 201518 : 20:15:18 (time)
④
Event
Type
Displays recording type.
(EVT : Event / EMG : Manual
NOR : Constant)
6
19
# Name Description
⑤NOR
Constant recording files display as “NOR”
⑥EVT
G-Sensor triggered recording files display as “EVT”
⑦EMG
Manual button triggered recording files display as “EMG”
• File can be organized by clicking on the top File Name, Event titles
Page 20
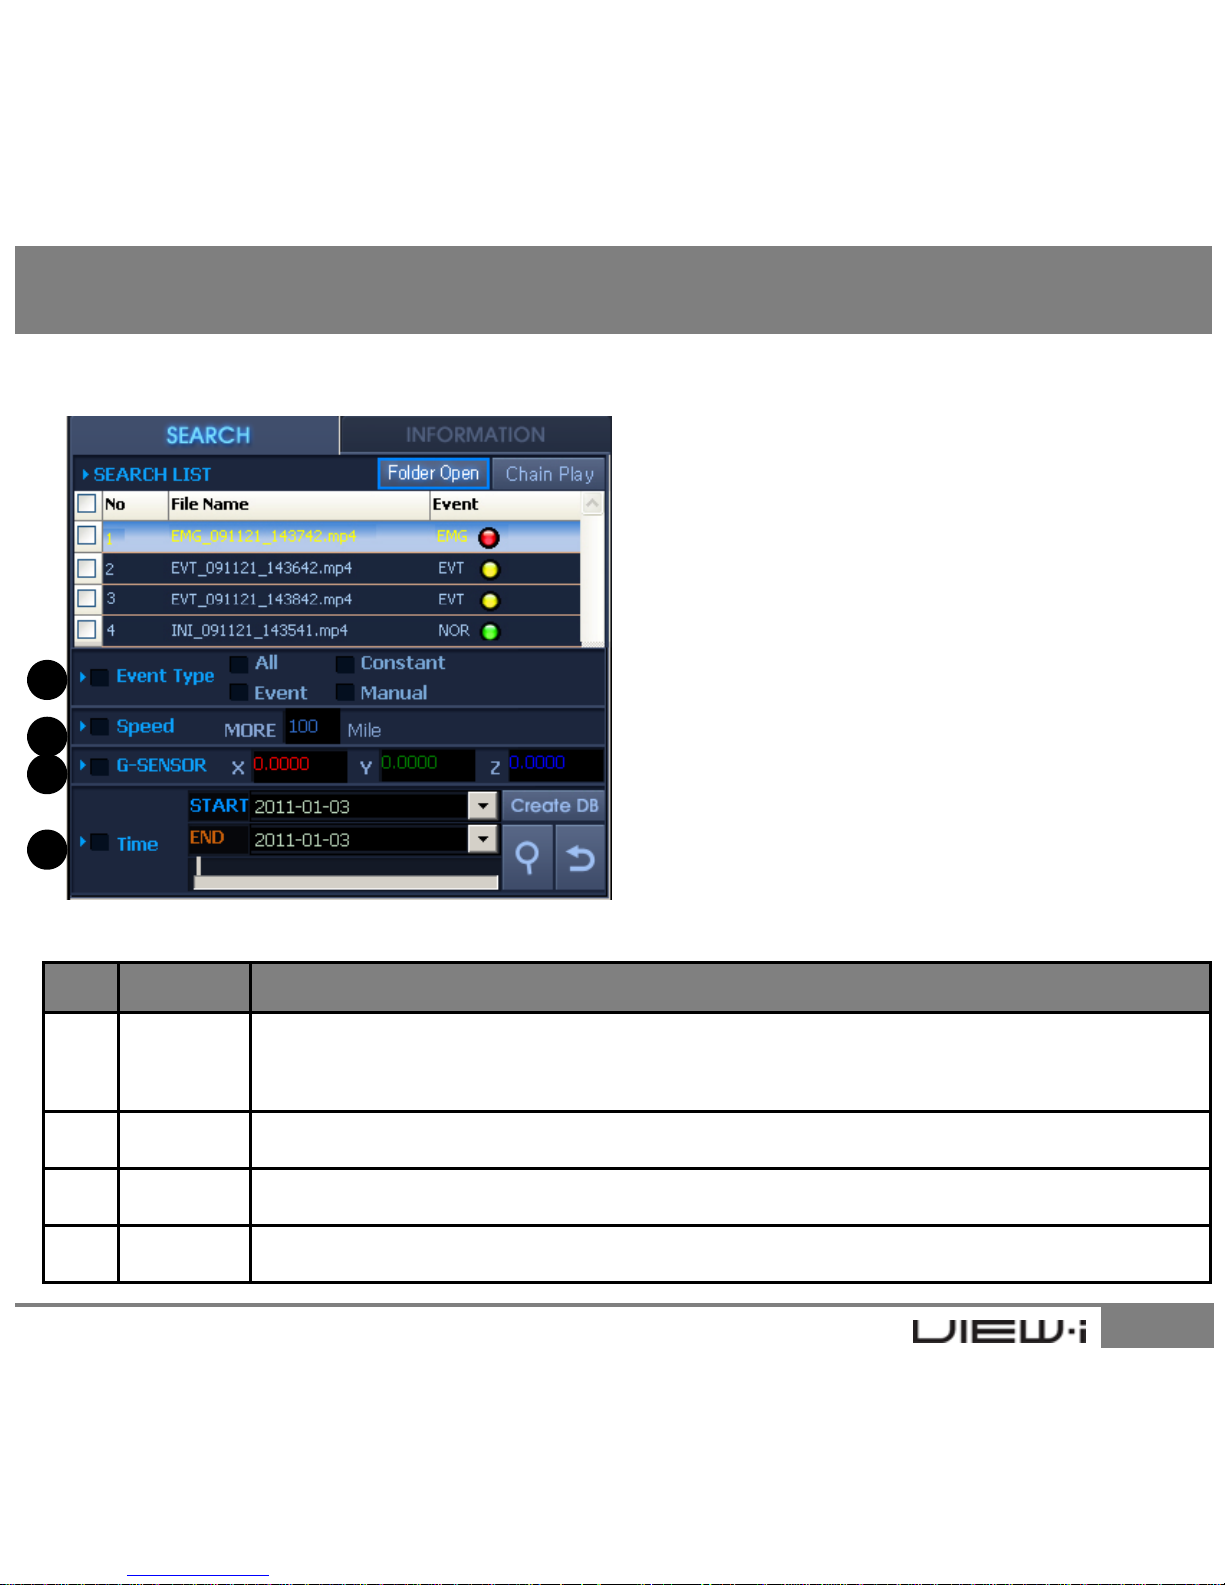
8.9 Search - DB
1. Import play list to the Search screen
(Reference : 8.6 Open File / Play)
2. Click on “Create DB” to make database
*Database must be created before searching
3. Select search option and click “Search” bu
8. View-i PC Player Manual
1
2
3
4
tton
4. Searched list will appear in Search screen
6. Click on “Chain Play” to play searched file
20
#
N
ame
D
escription
①
Event
Type
Select recording type to filter videos with selected recording type
②
Speed
Input speed value to filter videos above selected speed value
③
G-Sensor
Input X/Y/Z G-sensor values to filter videos above selected G-sensor value
④
Time
Input time value to filter videos within time section
Page 21
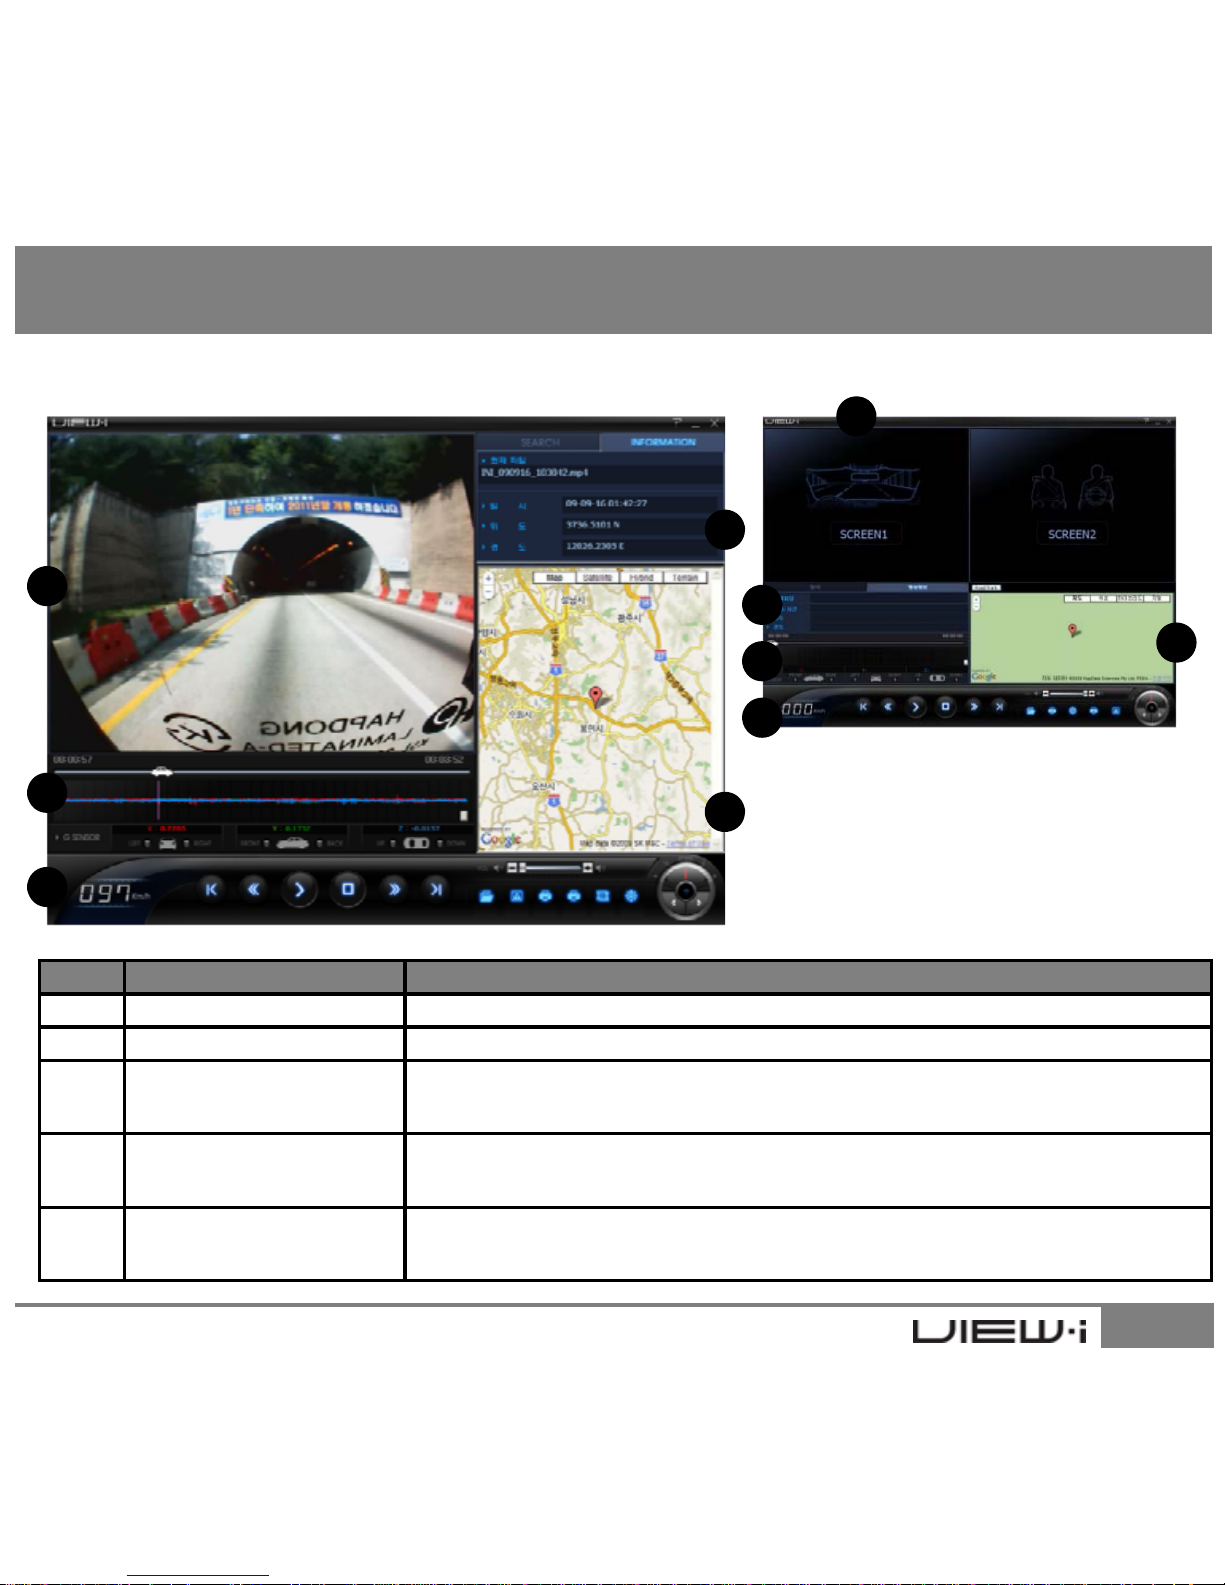
8.10 Play Screen
1
4
1
8. View-i PC Player Manual
View-i Lite/Pro
View-i Silver/Gold/Ruby
2
3
5
2
3
4
5
21
#
Name
Description
①
Video Screen Video play screen of designated video file
②
G-Sensor Screen G-sensor data of video screen for user analysis
③
Speed-o-Meter /
Menu
Display driving speed (View-i Pro)
Button listing for video and menu control
④
Information Screen
Displays file name and recording type
Displays GPS information (View-i Pro)
⑤
Google Map
Displays current position of the video on Goggle map
(Internet connection required : View-i Pro)
Page 22
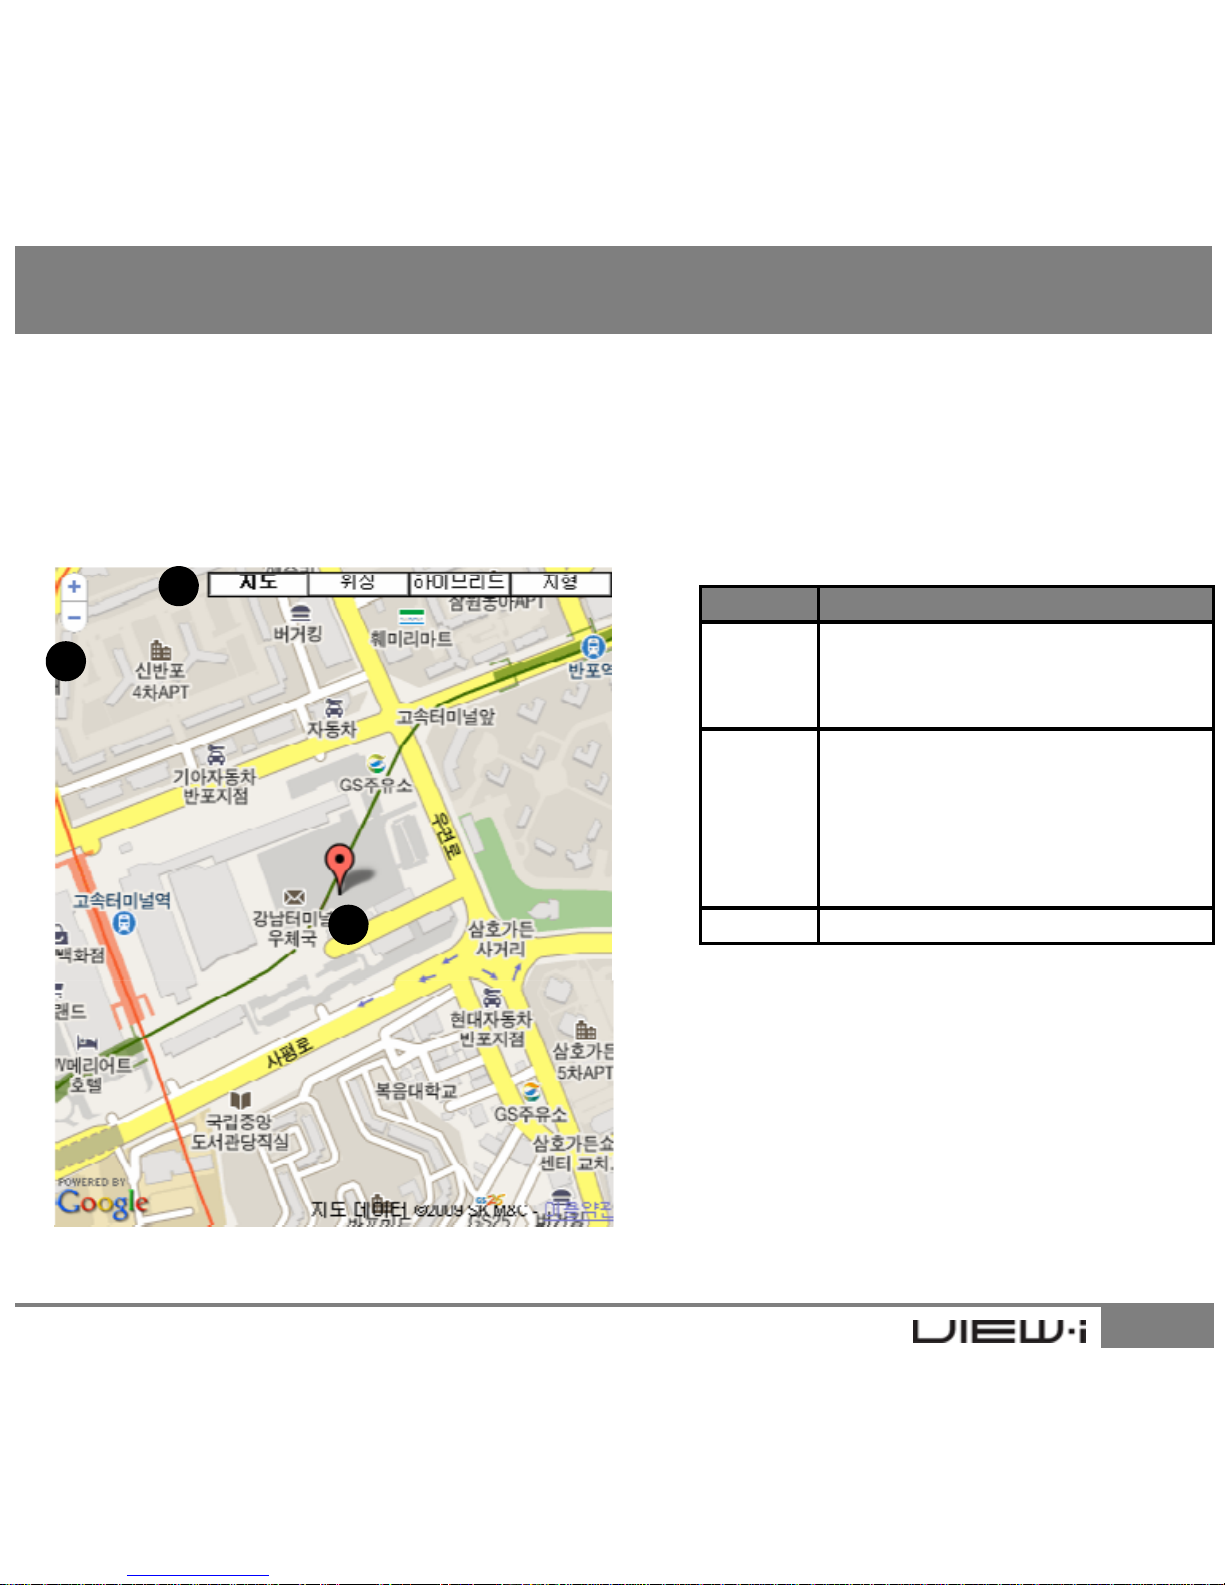
8.11 Google Map Interface
1. View-i PC Player supports Google Map interface
Internet must be connected for Google map interface
2. Navigate through Goggle Map with mouse cursor
2
8. View-i PC Player Manual
Number
Description
①
Adjust Map size
+ : Zoom in
- : Zoom out
②
View Mode
(Map, hybrid, landscape)
③ Current Position
1
3
22
[NOTE] Depending on Google API policy, service might be disconnected without notice
Page 23
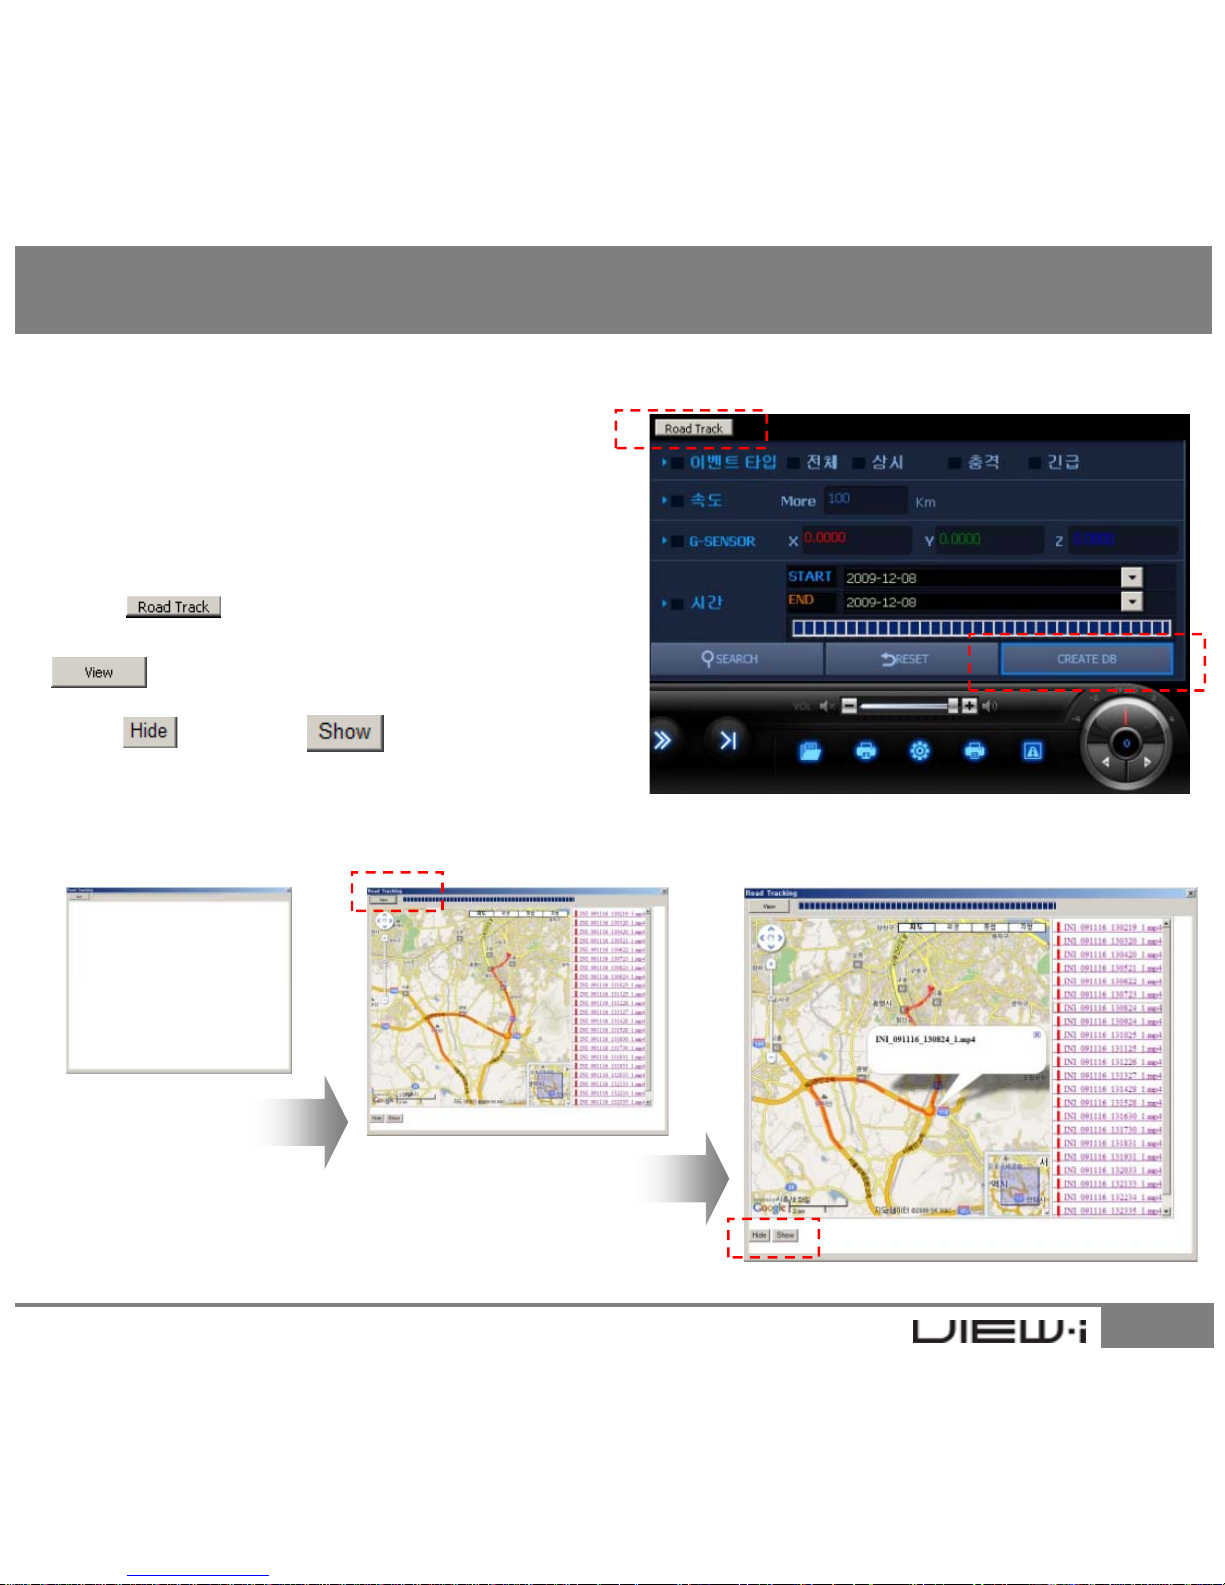
8.12 Road Track™
1. Road Track™ shows driving path of
selected files. In order to use this function,
user must first call in the video files and
create database
2. After creating the database, click on
8. View-i PC Player Manual
button
3. After new map screen appears, press
button
4. Use button or button to
display or hide driving route in the Google
Map
23
Page 24
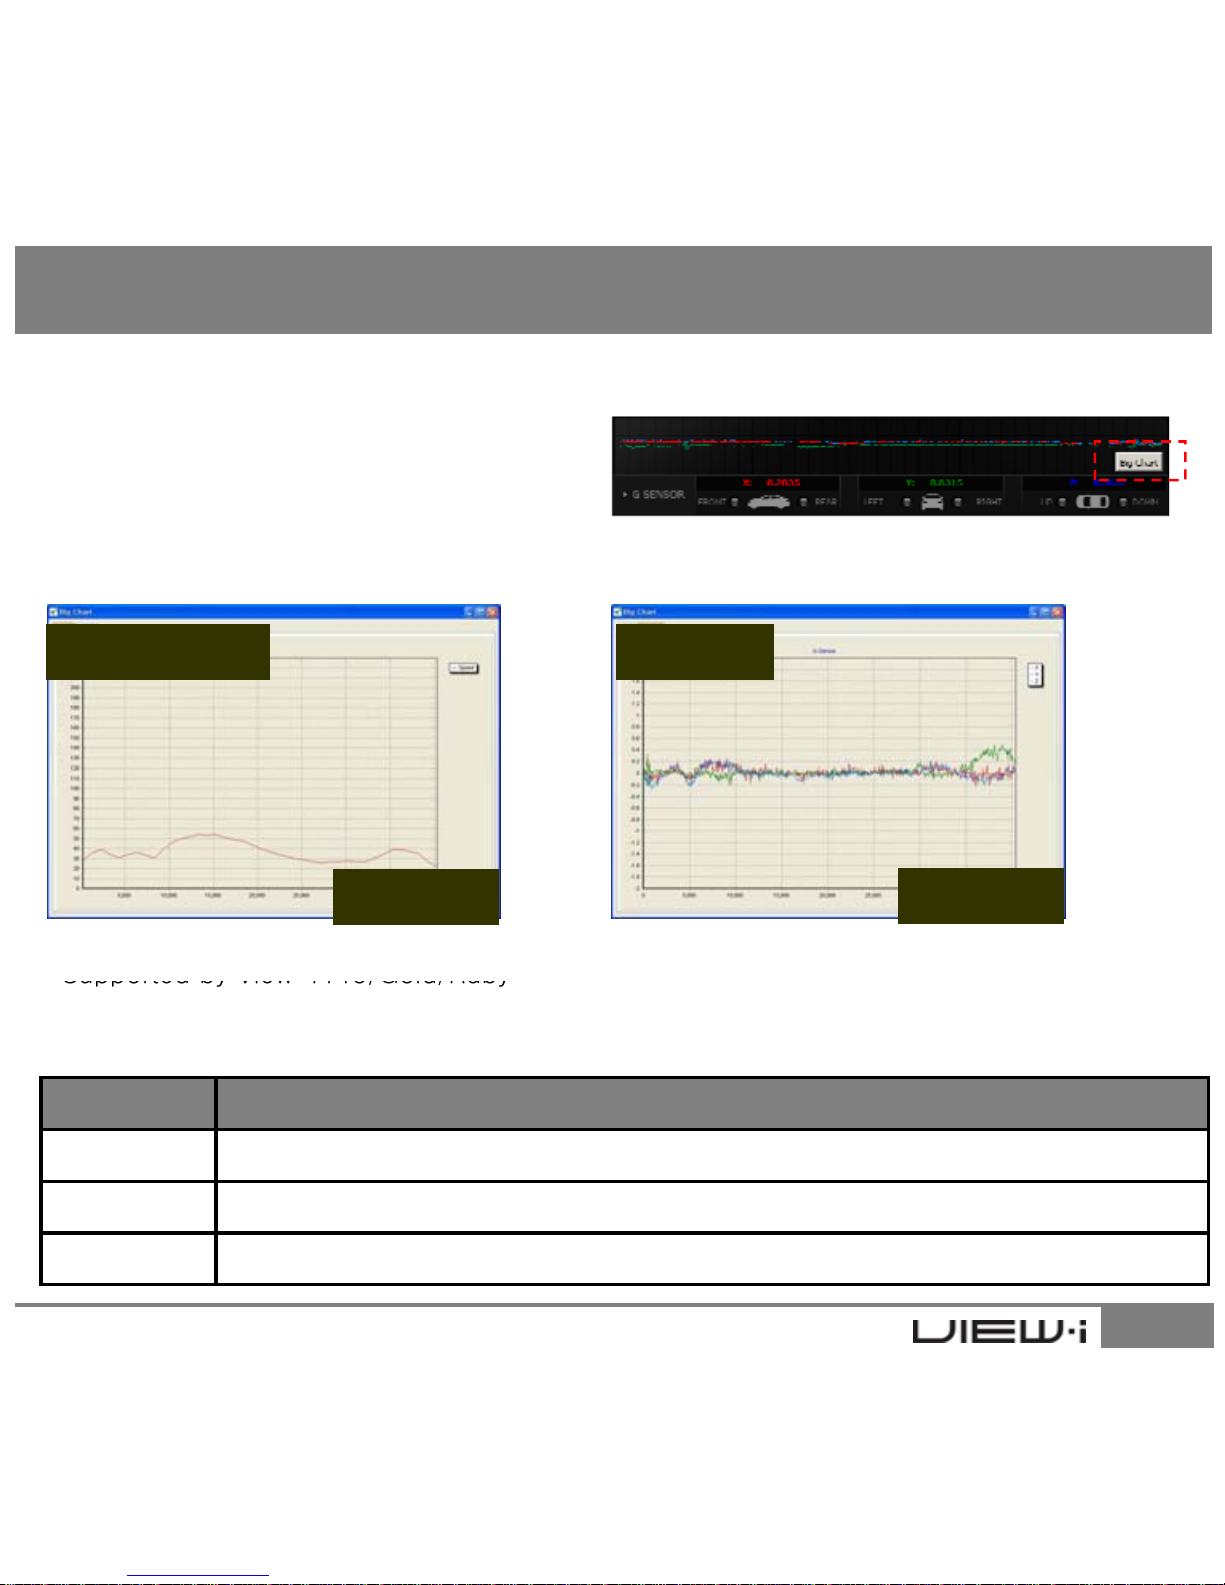
8.13 Speed/G-Sensor
1. View-i PC Player supports detailed view
of speed and G-Sensor data
2. Click on “Big Chart” button in the G-sensor
screen to display below pop-up screens
8. View-i PC Player Manual
Speed (Km/H) G sensor
Play Time
Play Time
Speed
-
G-Sensor
24
Axis Description
X-Axis Display Vehicle’s X axis movement - Quick Start / Quick Stop
Y-Axis Display Vehicle’s Y axis movement - Quick Turns
Z-Axis Display Vehicle’s Z axis movement - Up/down movement
Supported by View
i Pro/Gold/Ruby
G-Sensor data can be used for road conditions or driver’s driving pattern analysis
Page 25
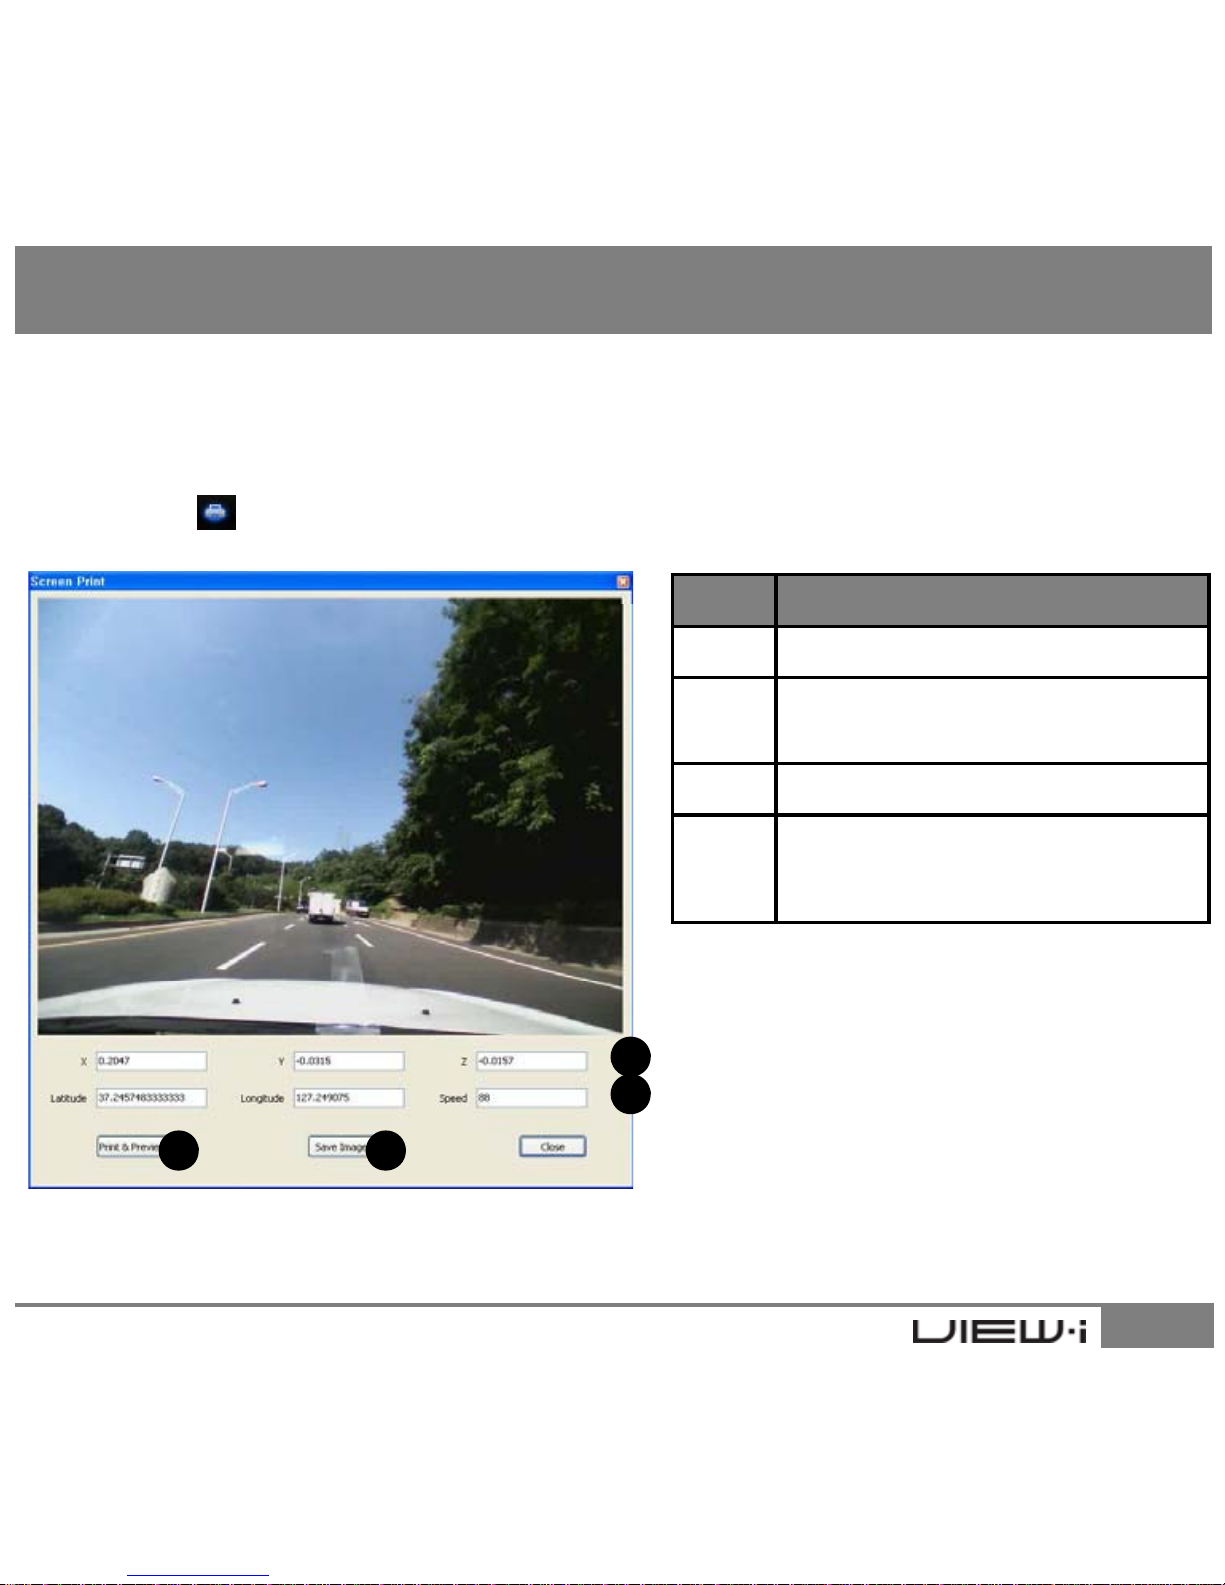
8.14 Screen Capture Print/Save
1. View-i PC Player supports screen capture function which can print / save
specific screen of user choice
2. Click on button to view the screen below
8. View-i PC Player Manual
#
Description
①G Sensor Data
②
GPS Data
(View-i Pro/Gold only)
③ PRINT button for image print
④
SAVE button for create JPEG
image file
25
1
2
3 4
Page 26
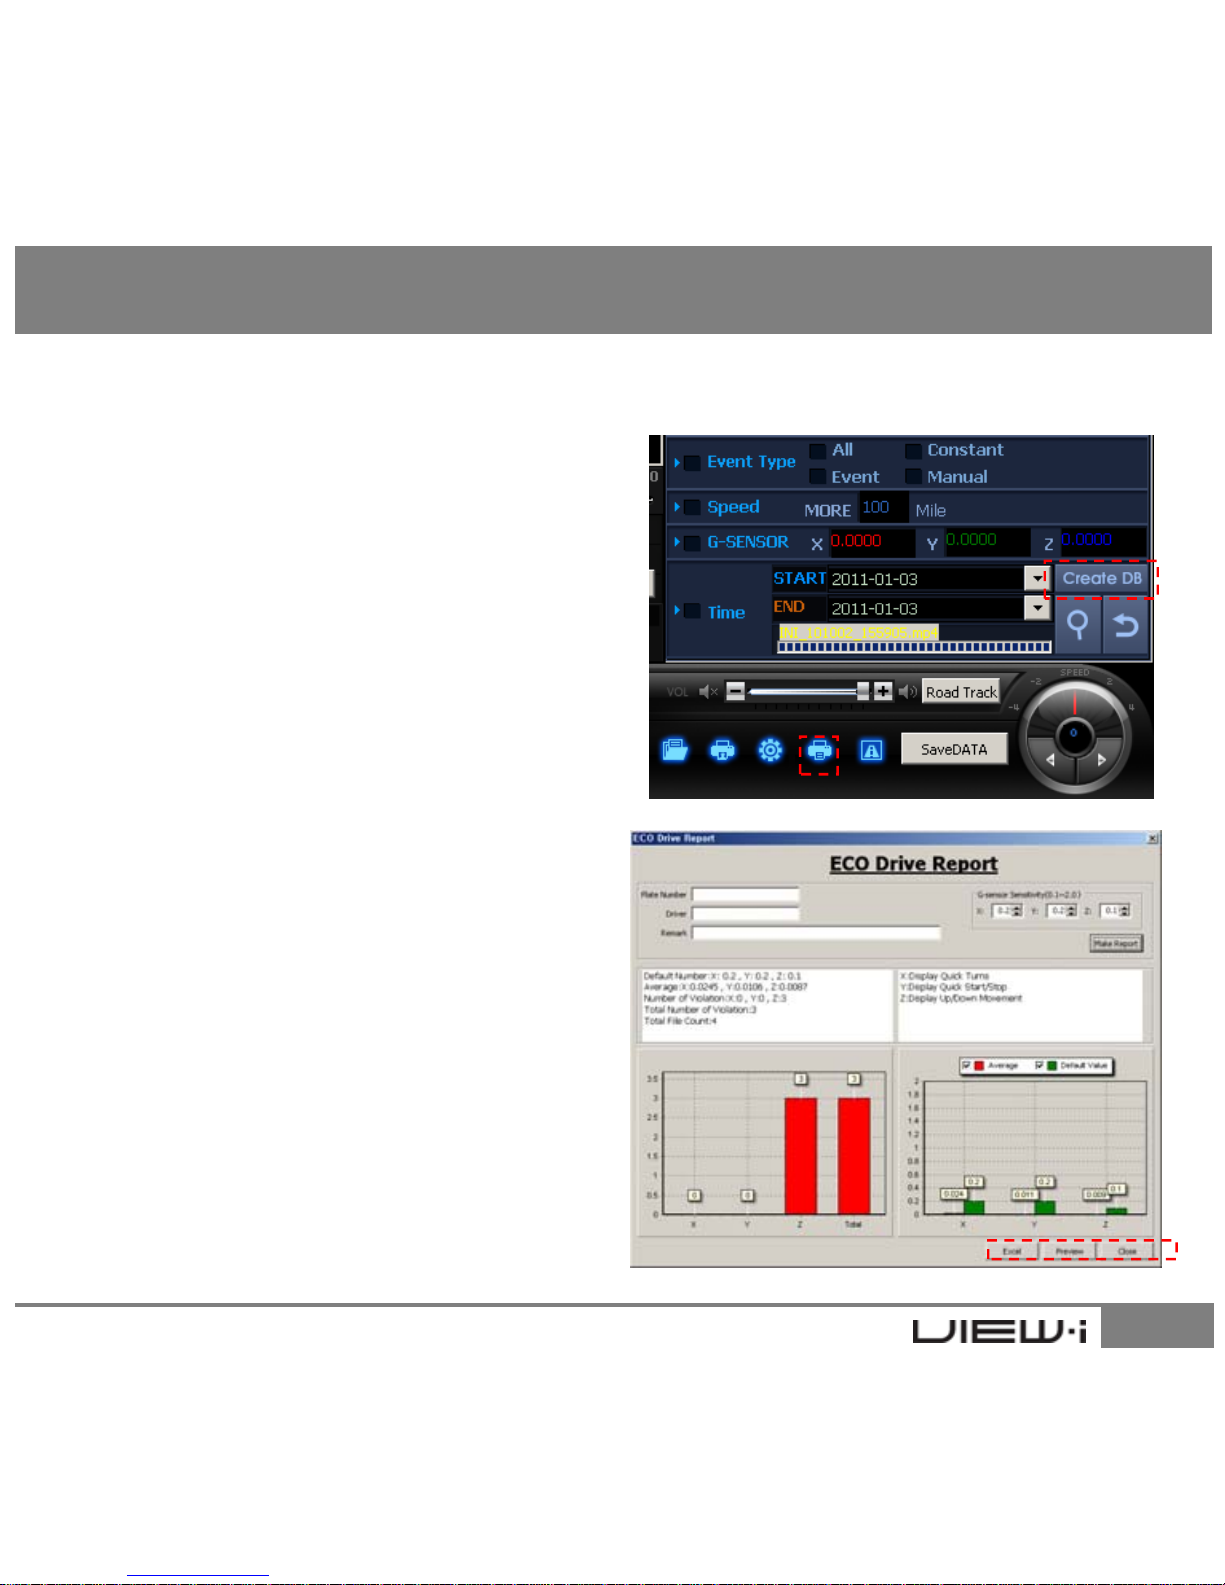
8.15 ECO-Driver Report
1. Create database from user selected video files
2. Click “Eco-Drive Report” button
8. View-i PC Player Manual
3. Input basic user information and click
“Make Report” button to create a report
4. Use “Excel” and “Preview” button
to save the re
p
ort to a file or print
26
pp
Page 27
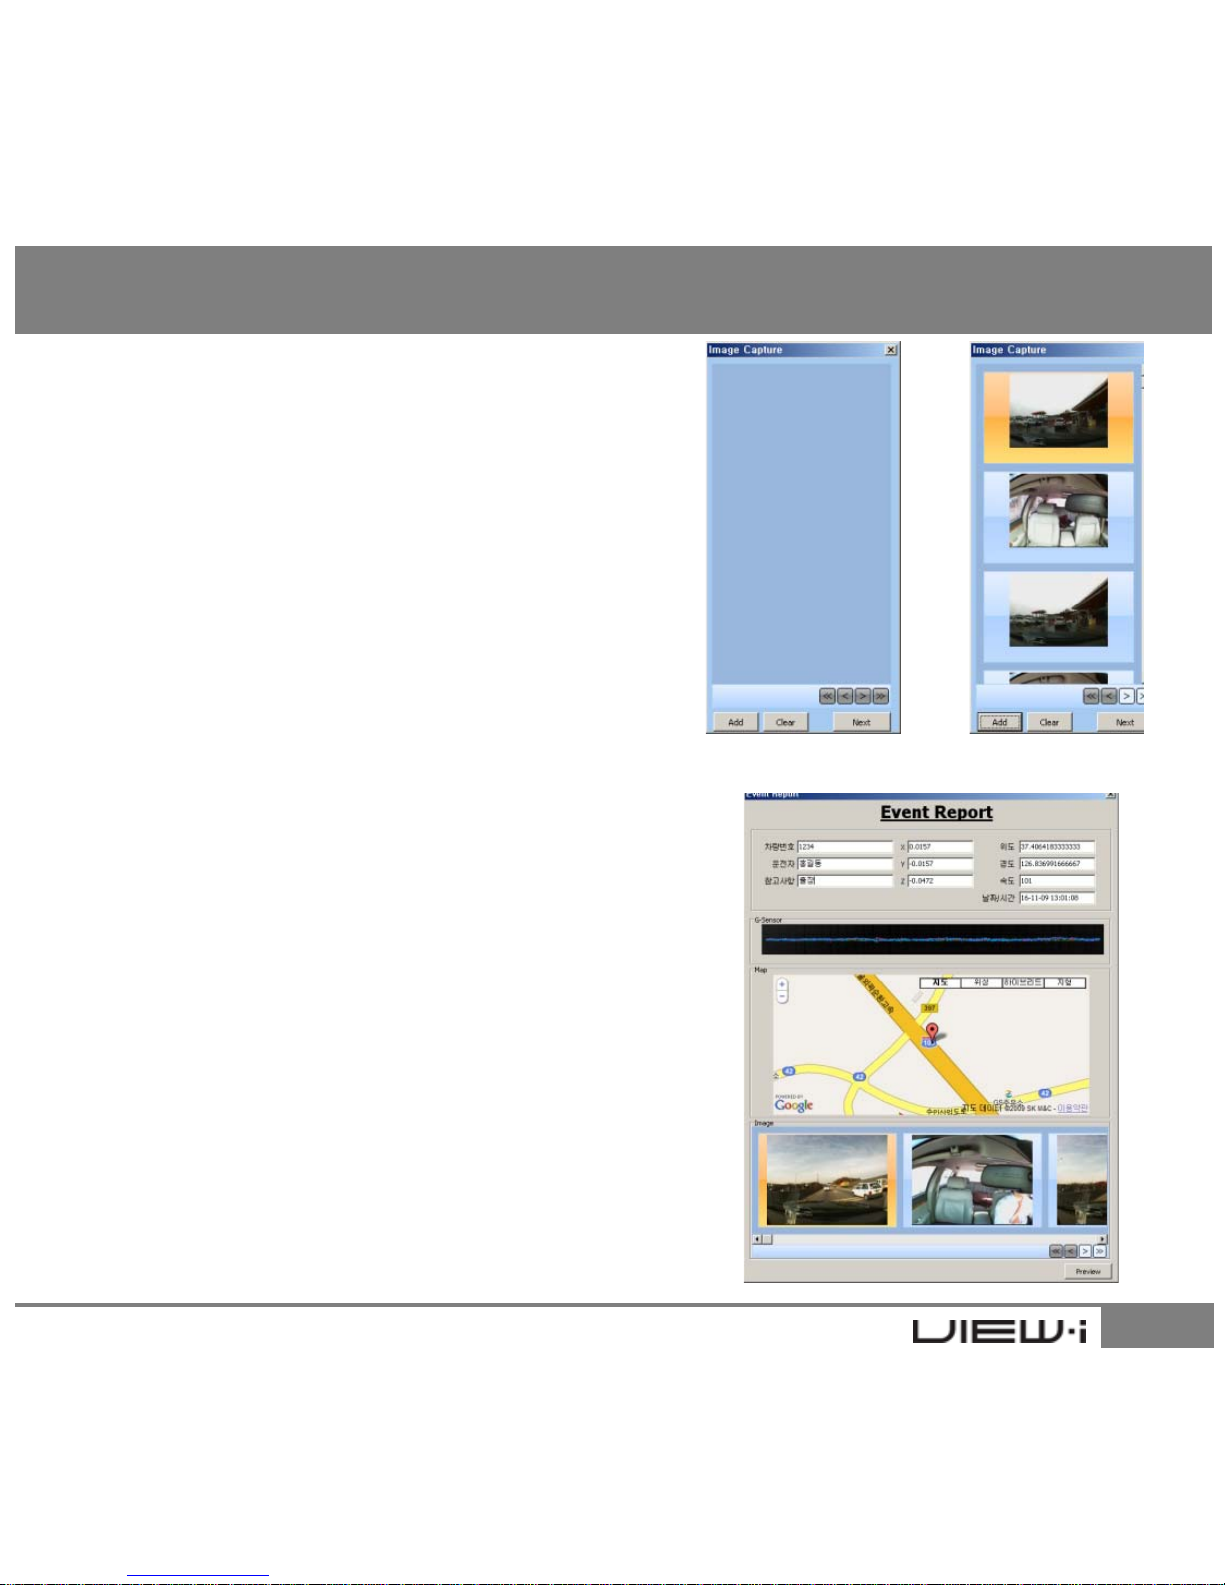
8.16 Event Report
1. Click on “Event Report” button to retrieve the
image capture screen
2. Click on the “Add” button to save 4 different video
screen and click on “Next” button
3. Use “Clear” button to remove selected screens
“
”
8. View-i PC Player Manual
4. Input basic information and click on
Preview
button to create the report
27
Page 28
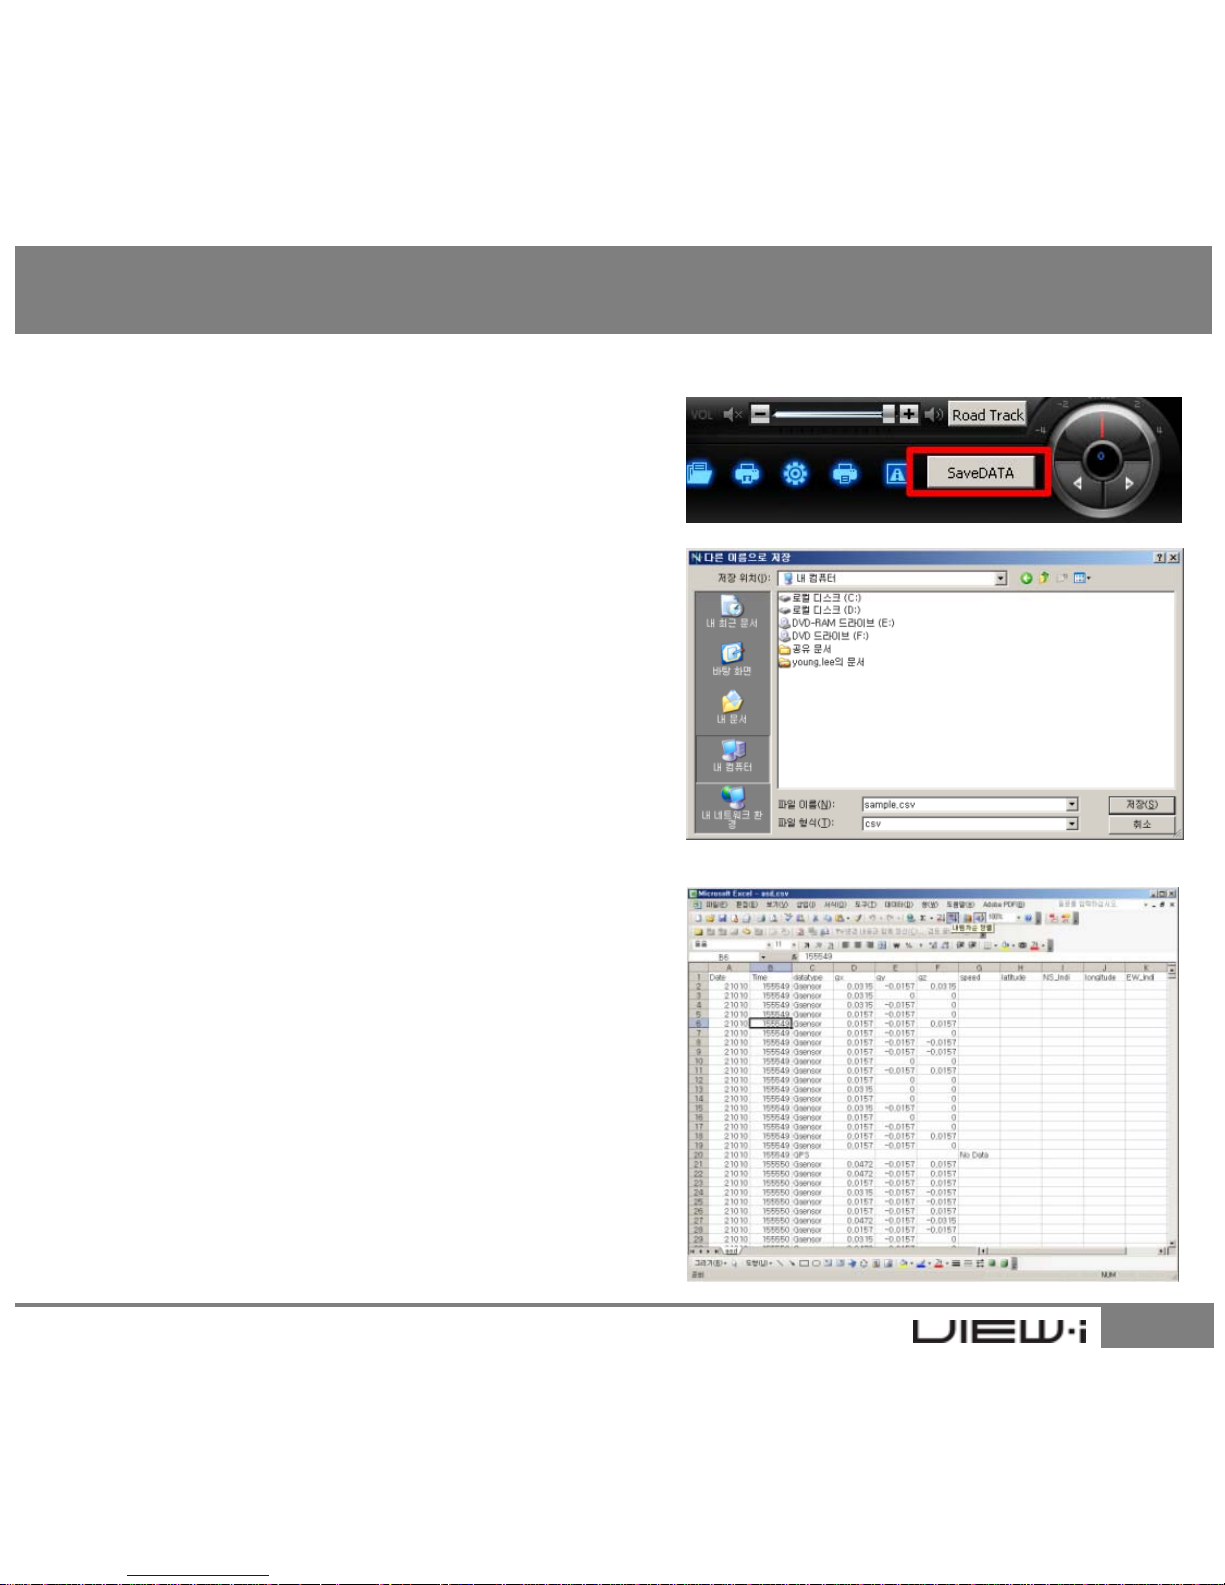
8.17 GPS/G-Sensor Data Export
1. Create database from user selected video files
2. Click “Save Data” button
3. Save CSV file to user preference location in PC
4. User may utilize *.csv file in their preference
8. View-i PC Player Manual
28
Page 29
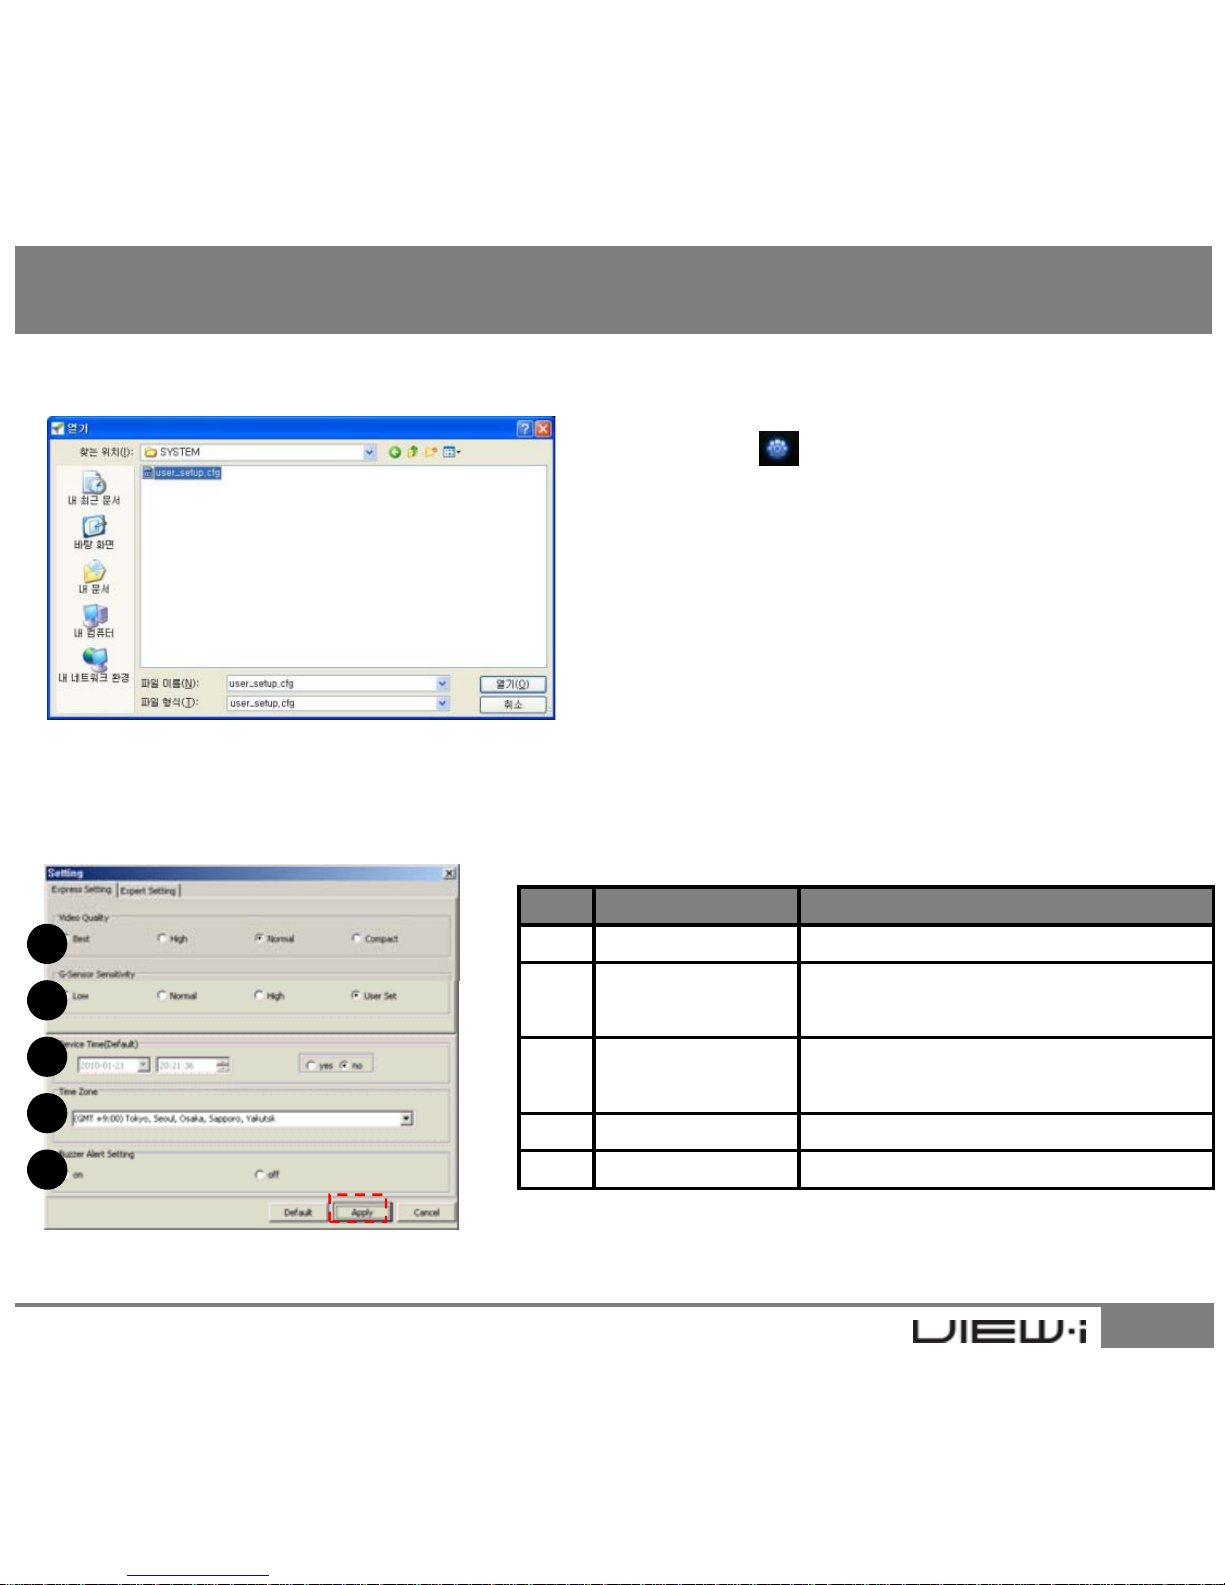
8.18 Setting - Open
1. Click on button
2. Select user_setup.cfg file in your SD Card
3. Click on “Open” button.
8. View-i PC Player Manual
# Name Description
① Video Quality Video quality setting
8.18.1 Setting - Express 1. Express setting allows for quick and easy
device configuration
1
29
②
G-S
ensor
Setting
G-S
ensor sens
itivit
y selec
t
(Low = sensitive / High = Dull)
③ Device Time
VIEW-i Lite/Silver user must
manually set the time
④ Time Zone Select user time zone
⑤ Sound Setting Buzzer on/off
2. Click “Apply” button and re-insert SD Card
to the device to save the changes
.
2
3
4
5
Page 30
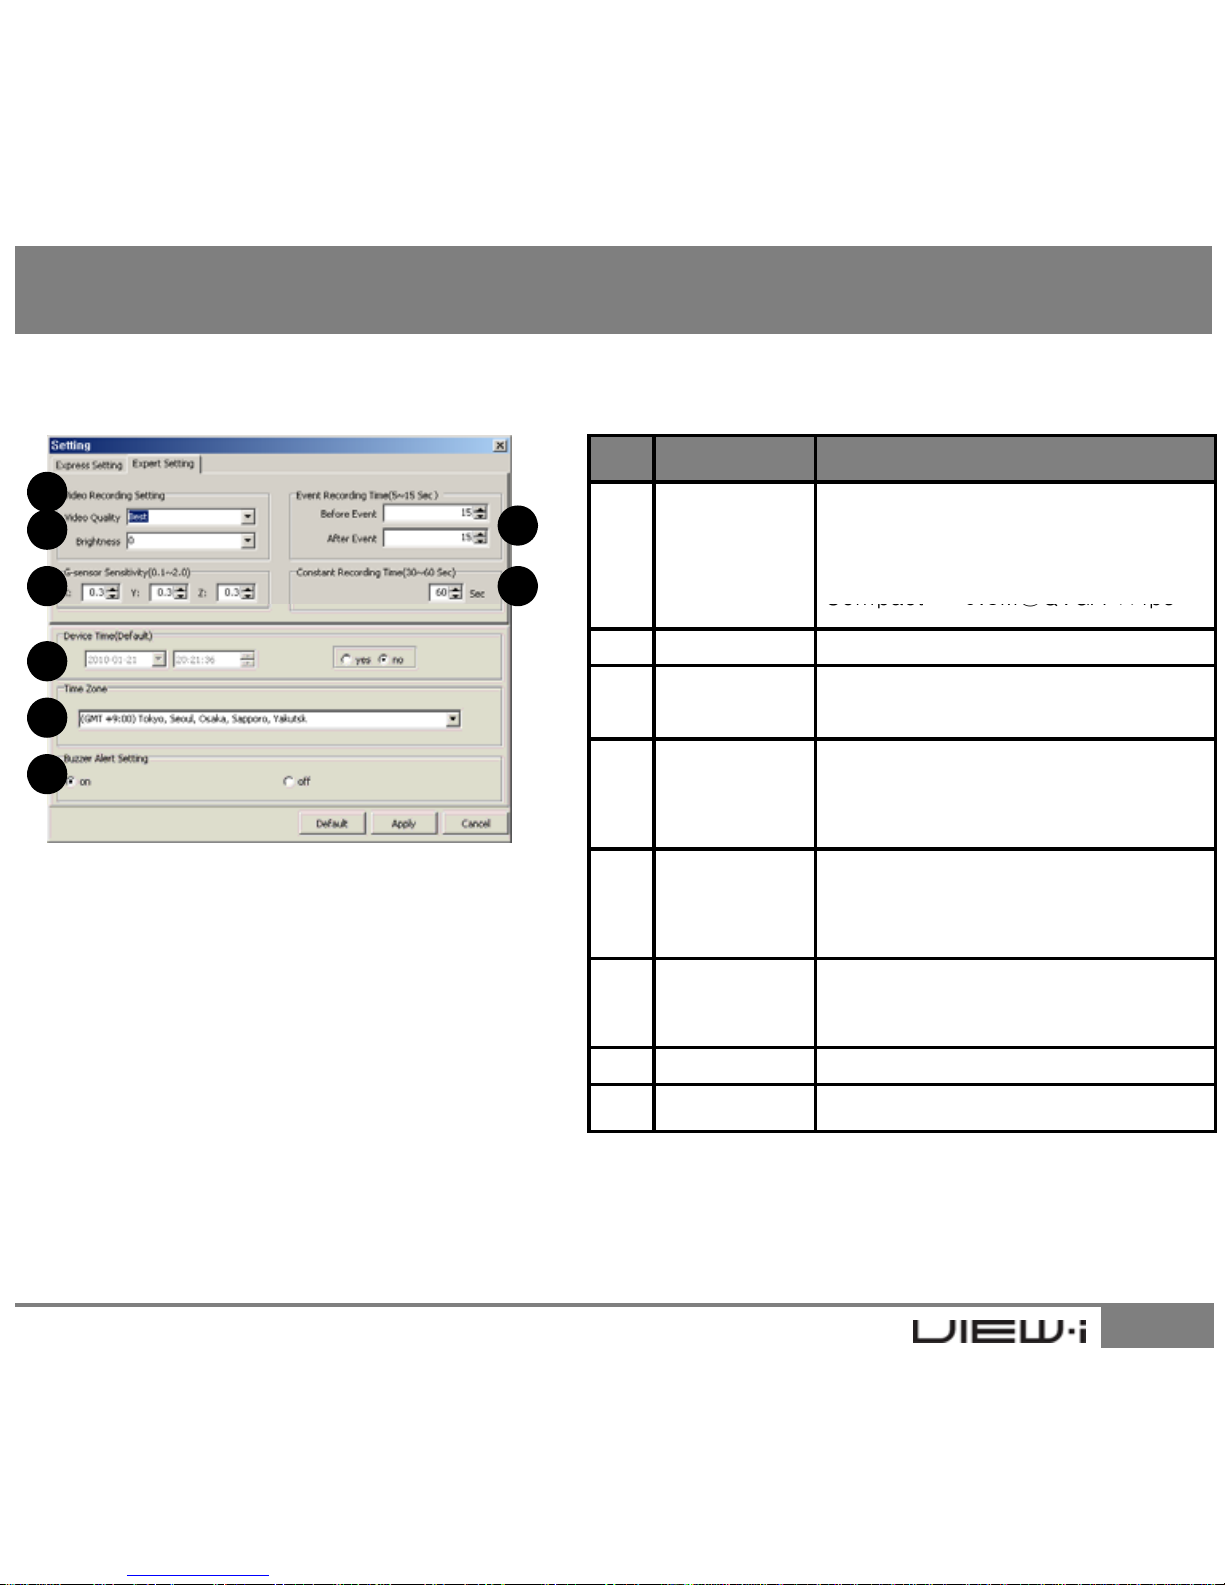
# Name Description
①Video Quality
Best : 1.3M@VGA 17fps
Good : 1.3M@VGA 20fps
Normal : 0.3M@VGA 30fps
:
8.18.2 Setting - Expert
1
2
3
4
5
8. View-i PC Player Manual
Compact
0.3M@QVGA 17fps
② Brightness (Dark)-4 ~ +4(Bright)
③
G-Sensor
Sensitivity
0.1~2.0
(Low=sensitive / High=dull)
④
Event
Recording
Time
0~15 sec for before and after
Event triggers
⑤
Constant
Recording
Time
Lite/Pro : 30sec~1min
Silver/Gold/Ruby:30sec~2min
8
6
7
30
⑥ Device Time Select user local time
⑦ Time Zone Select user time zone
⑧ Buzzer Buzzer on/off
1. Do use Express setting unless you are an advanced user
2. Click “Apply” button and re-insert SD Card to the device to save the changes
Page 31
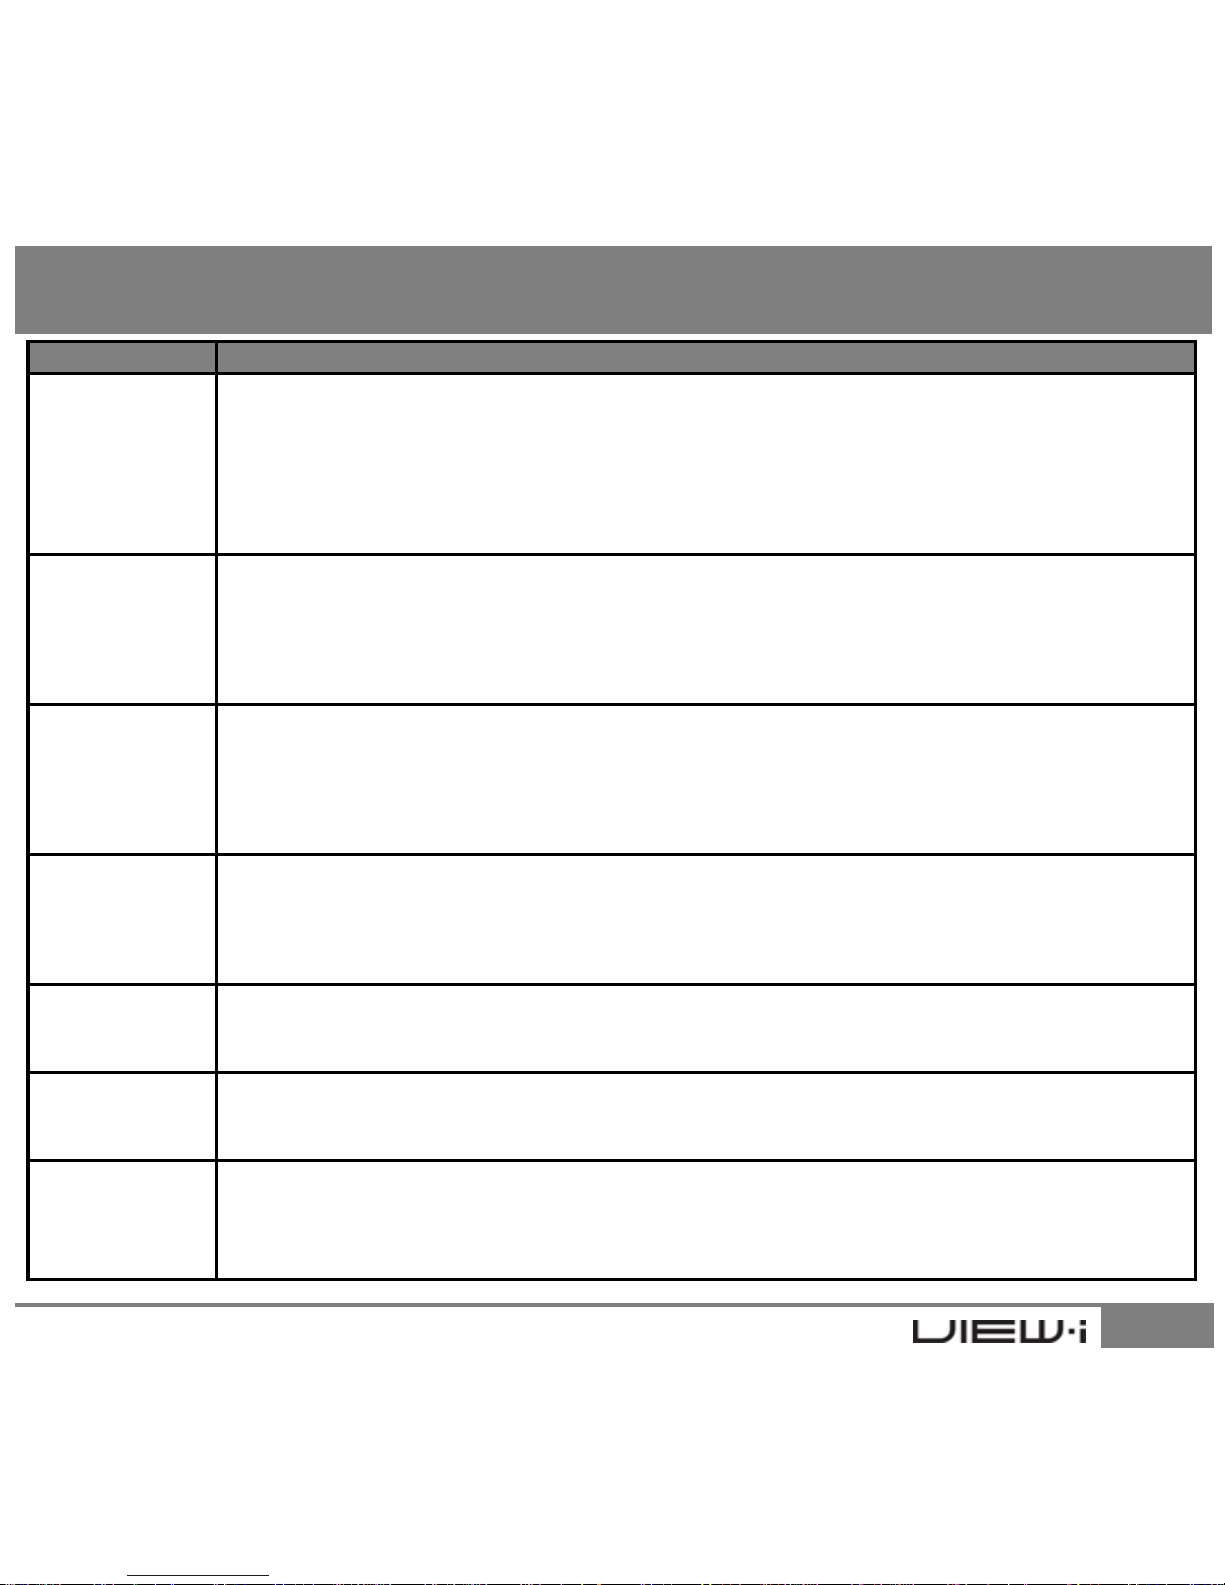
Symptom Solution
No Power
Please check power cable connection to the device
Please check power cable connection to vehicle power source
Please check power switch on the device
If all power connections are correct then remove SD Card and re-insert and try again
If you have attempted the above remedies, and the device is still not working properly,
please contact your dealer
“
”
Please check to see if SD card is correctly inserted
9. View-i Product Trouble-Shooting
Beep ~ Beep
sound does
not stop
Please back up and format the SD card (FAT32 / Block size 32Kb)
If you have attempted the above remedies, and the device is still not working properly,
SD card may have reached its end of product life.
Please contact your dealer to purchase new SD card
LED keeps
Blinking
LED may blink if there are any problem with SD Card
Please back up and format the SD card (FAT32 / Block size 32Kb)
If you have attempted the above remedies, and the device is still not working properly,
SD card may have reached its end of product life.
Please contact your dealer to purchase new SD card
Recording
videos does
not play
correctly
Please check lens for any alien substance.
If videos are too dark, please raise the brightness in the setting configuration
If you have attempted the above remedies, and the device is still not working properly,
please contact your dealer
31
Recorded
files has
no sound
Please verify that the mic switch is turned on; orange LED should be lit
If you have attempted the above remedies, and the device is still not working properly,
please contact your dealer
Event
Recording
does work
Please check event recording settings in the View-i PC Player setting menu
If you have attempted the above remedies, and the device is still not working properly,
please contact your dealer
GPS reception
does not
function
correctly
Please check device installation inside the vehicle and install accordingly to the manual
Please remove all possible metallic parts from the vicinity of the device
If you have attempted the above remedies, and the device is still not working properly,
please contact your dealer
Page 32
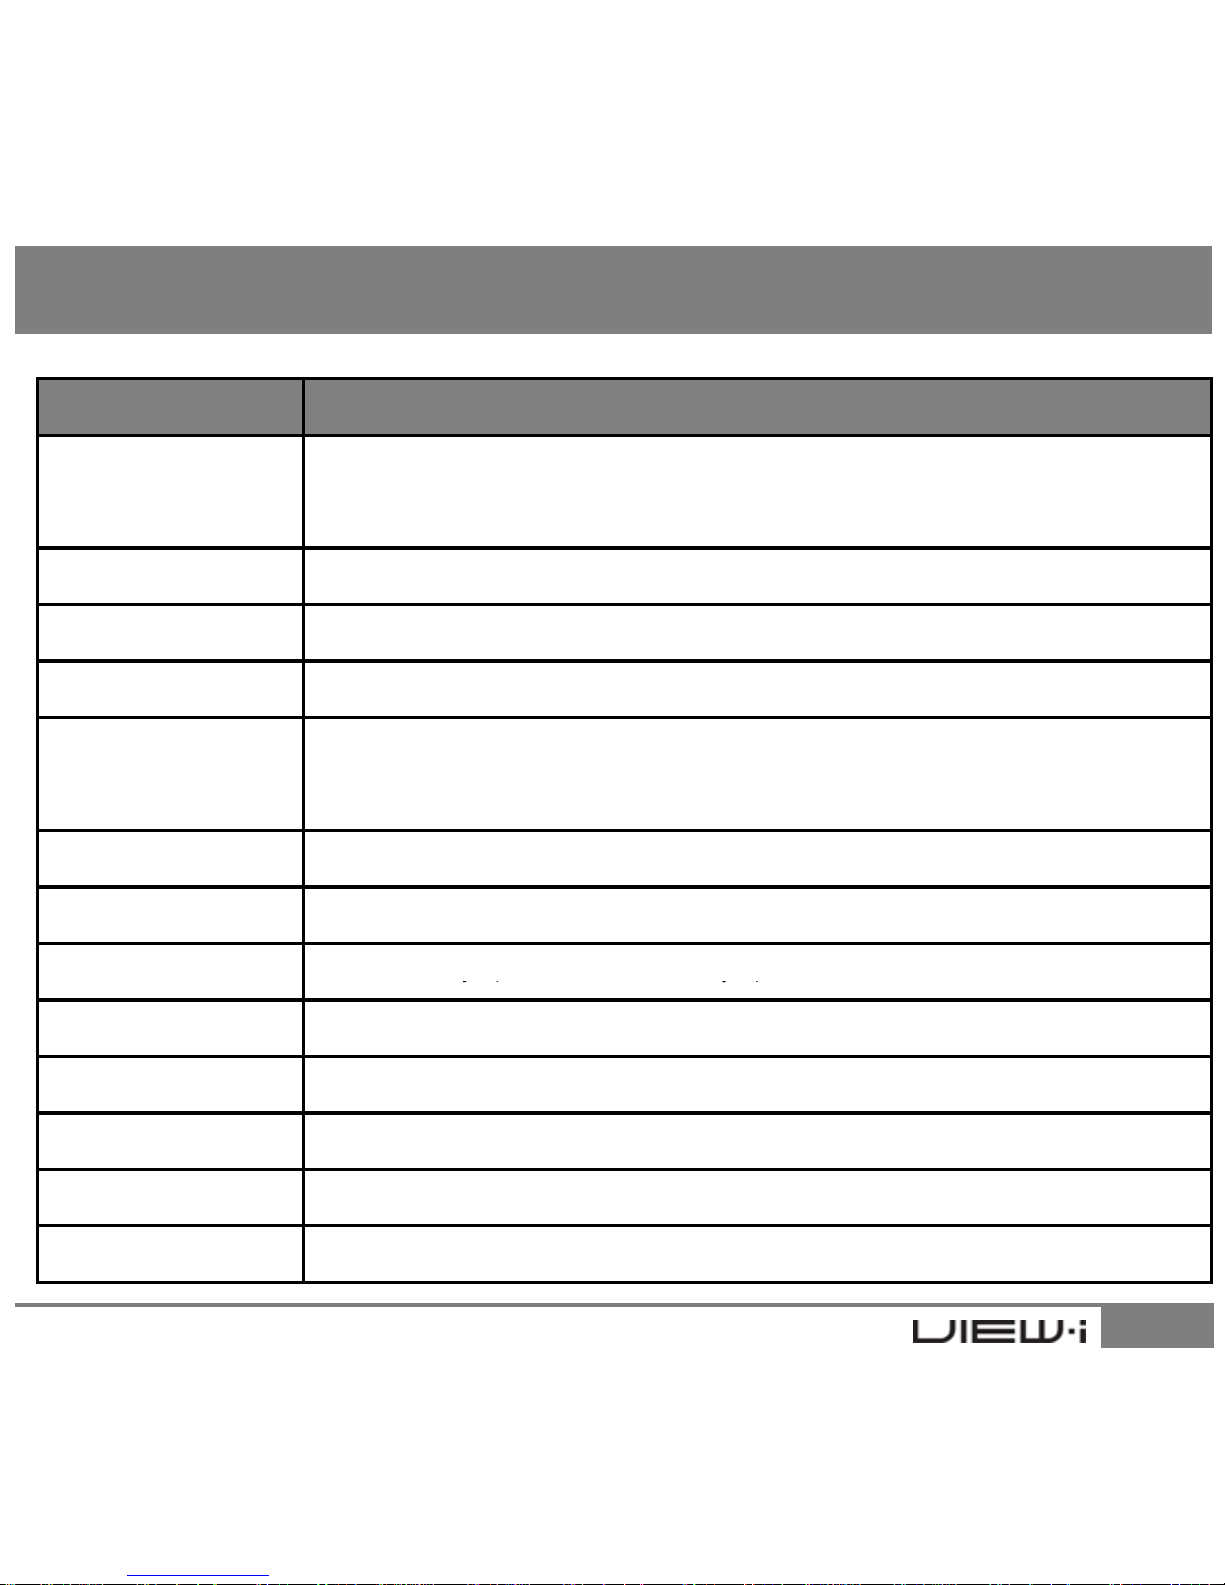
List Description
Camera
1.3M Pixel CMOS Image Sensor - 1Ch(View-i Clik/Lite/Pro),
1.3M Pixel CMOS Image Sensor - 2Ch(View-i Silver/Gold/Ruby)
View-Angle Front View angle 120° / Rear view angle 149 °
10. Specification and Certifications
GPS Internal GPS (only in View-i Pro/Gold/Ruby)
G-Sensor Internal G-Sensor
Video
1CH : MPEG4 1.3M Pixel 20fps(max) / MPEG4 0.30M Pixel 30fps(max)
2CH : MPEG4 1.3M Pixel 10fps(max) / MPEG4 0.30M Pixel 15fps(max)
Audio Internal Mic, AAC Codec
Storage SD Card (Max 16GB)
PC Viewer View-i PC Pla
yer,
Windows Media Player, and more
32
y, y,
Voltage 12V~24V
Size 52(W) x 94(H) x 18(D)mm
Weight View-i Clik/Lite : 70g / View- Pro/Silver : 85g / View-Gold/Ruby : 90g
Manufacturer AVIC Imaging Inc. / Manufactured in South Korea
Certification KCC / FCC / CE / / RoHS
Page 33
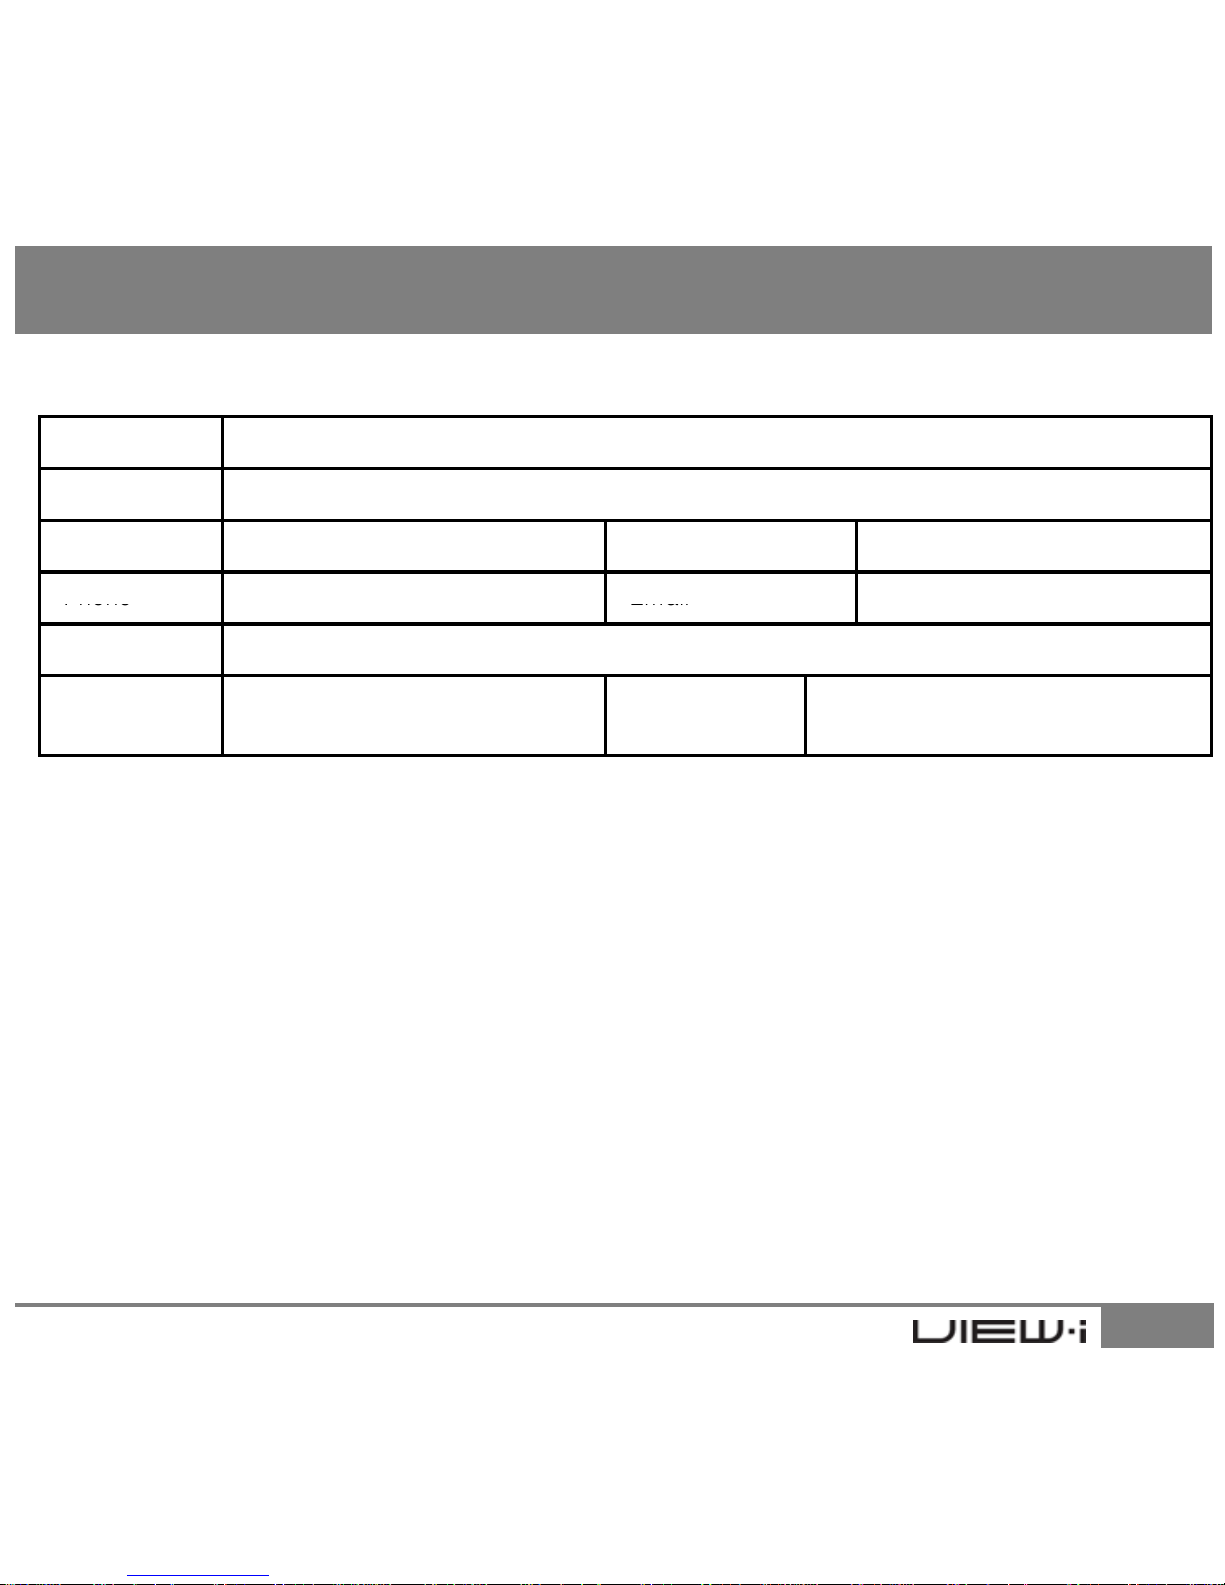
Product View-i Lite / View-i Pro / View-i Silver / View-i Gold / View-I Ruby
Model VSDR-1000 / VSDR-1100 / VSDR-2000 / VSDR-2100 / VSDR-2200
Name Serial Number
Thank you for purchasing AVIC Imaging Inc.’s product.
Warranty
Phone
Email
Address
Purchase
Date
Dealer
Guarantee
1. AVIC Imaging Inc. grants the following warranty period on the product commencing
on the date of purchase.
2. Warranty Period : see store policy
33
Page 34

www.avic.co.kr
34
Screens and pictures may be different in product use
View-i® Lite/Pro/Silver/Gold/Ruby
 Loading...