

Page 1
Please read carefully before using this product.
Page 2

2
Contents
1. Package Contents Page 4
2. Quick Start Guide
- Installing the Camera Page 5
- Installing the Infrared Module Page 6
- Setting Up GPS Connection Page 7
- Installing the View-I PC Player Page 8
- PC Player Password Page 9
- Set Time and Date on the PC Player Page 10
3. Formatting SD Cards Page 12
4. View Recordings From SD Cards Page 13
5. Camera Features Page 15
6. Camera Functions Page 16
7. Camera Button & Lights Page 17
8. Software Features Page 18
9. PC Requirements Page 19
10. Password Settings Page 20
11. PC Player - Playback Screen Page 21
12. PC Player - Buttons Functions Page 22
Continued...
Page 3

3
Contents
13. PC Player and Camera Settings Page 23
14. Search List Screen Page 26
15. PC Player Search Engine Page 27
16. Google Maps Page 28
17. Speed and G-Sensor Reports Page 29
18. Screen Capture Page 30
19. ECO Driver Report Page 31
20. Event Report Page 32
21. GPS Data Report Page 33
22. Buzzer/LED Alert Warning Page 34
23. SD Card Recording Times Page 35
24. Liability Page 36
25. Camera Precautions Page 37
26. SD Card Precautions Page 39
27. Trouble Shooting Page 40
28. Specification Page 43
29. Warranty Page 44
Page 4
4
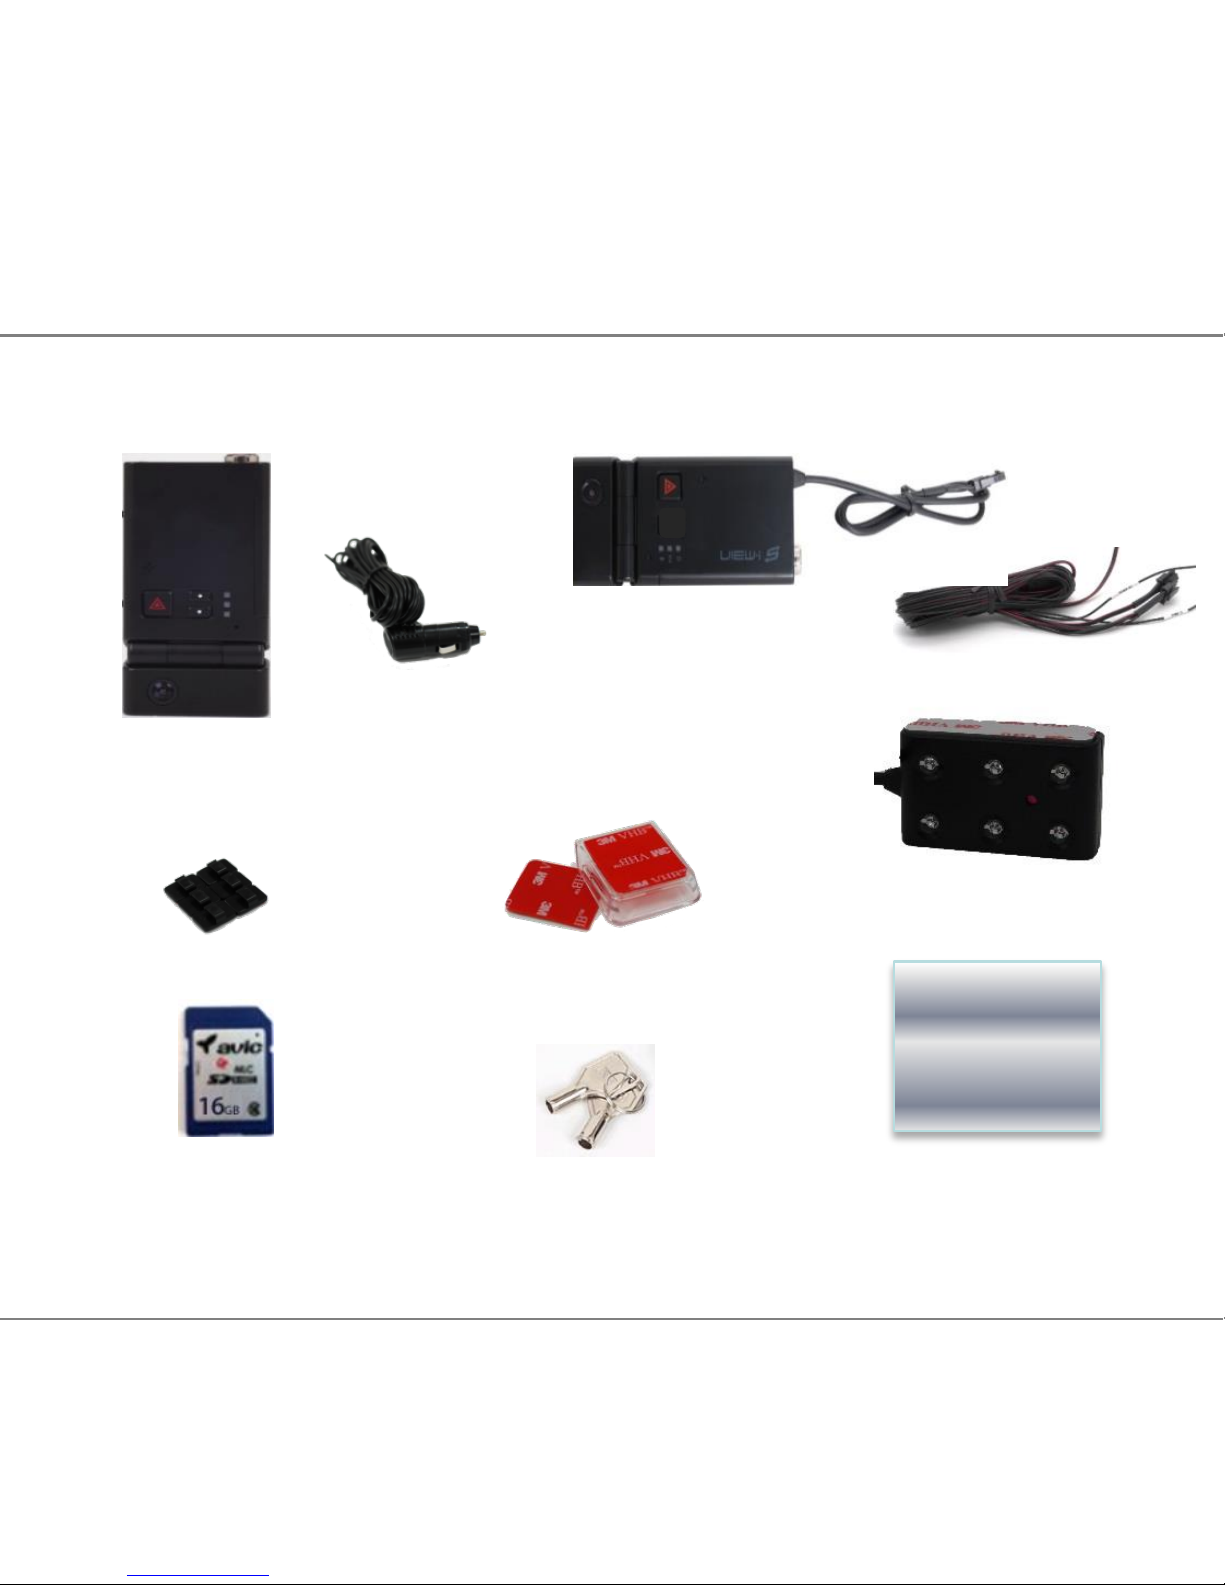
1. Package Contents
Please confirm below package list in the box *
HD-SL-Ruby &
Cigar Power cable
Cradle &
Double Side Tape
* Product specification and package may change for product enhancement without any notification in advance.
Wire Clip x 4
User Manual
Key x 1
Infrared Module
SD Card
( Sales Option)
Soft Copy
HD-SL-Ruby-Wired &
Power Cable
Page 5
5
2. Quick Start Guide
WARNING! When installing the camera and PC Player for the first time, the
following steps MUST be performed with the SD card supplied with your
product. If installing with a larger card, SD card must be formatted before
use (see page 12) Ensure the camera has completely turned off during all
movements of the SD Card.
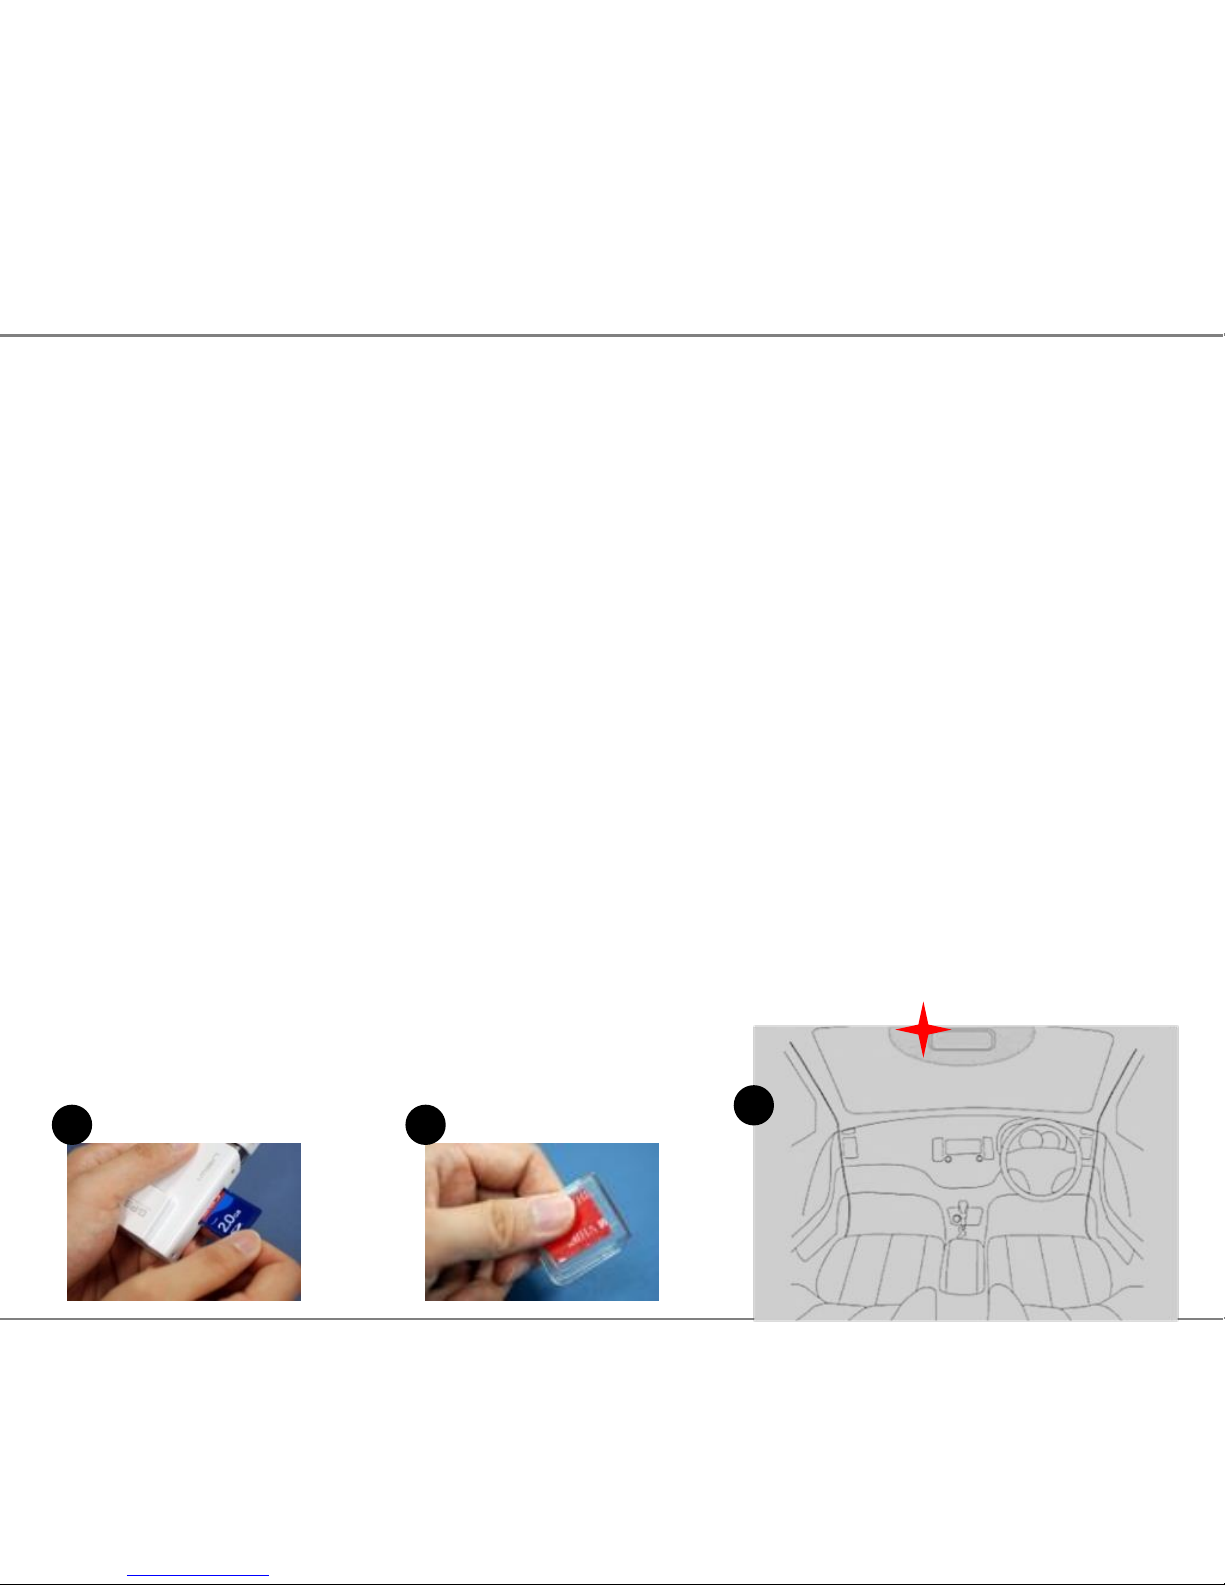
1 2
3
Step 1 – Installing the Camera
2.1 Unlock the camera with the provided key, slide the SD Cover upwards and
Insert the SD card into slot on side of the camera, Slide the cover back into
place and lock the camera with the provided key..
2.2 Remove one of the plastic covers from the sticky pad and firmly place it
on the flat side of the mounting bracket.
2.3 Slide the camera into the bracket until it securely clicks into place.
2.4 Clean the window surface area behind the rear view mirror, left hand side
on the passengers side.
Ensure the camera is positioned to allow clear view from the internal lens.
Do not position where the camera obstructs the drivers view of the road or
within the wiper area or any other location that may infringe MOT regulations.
Continued...
Page 6
6
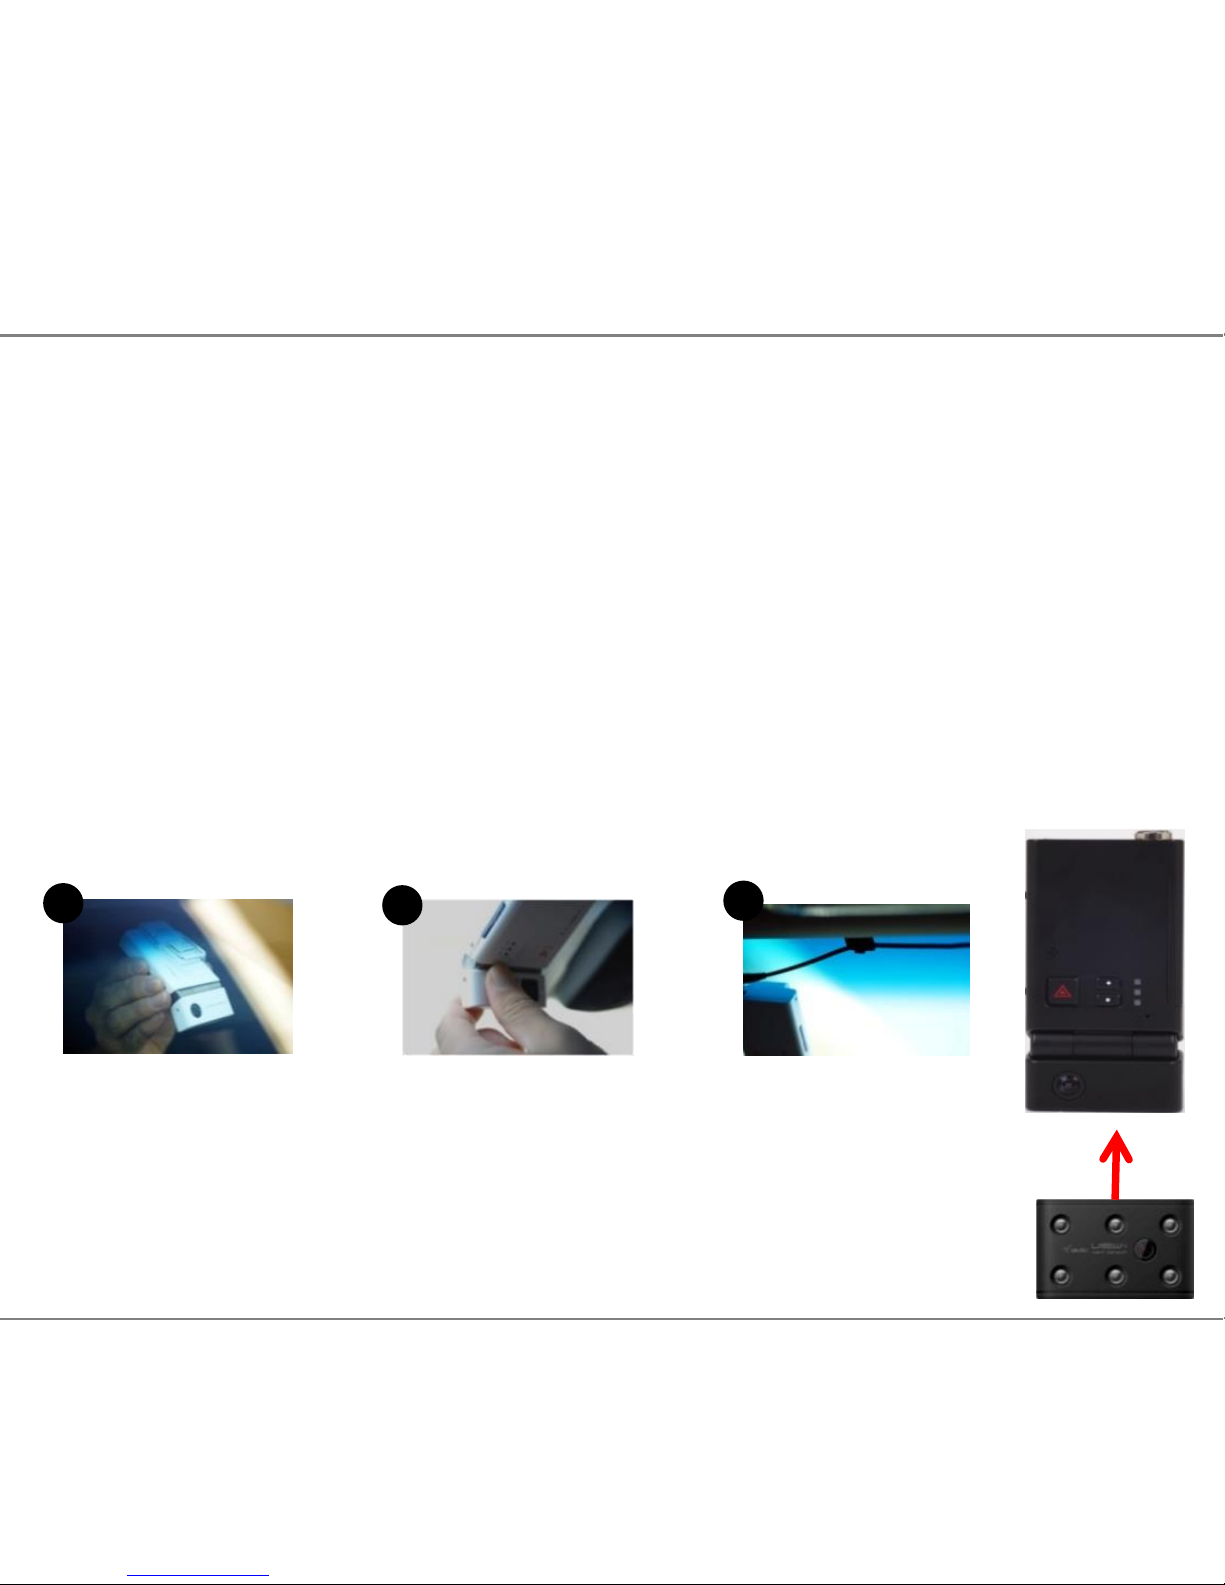
2. Quick Start Guide - Setting Up the Camera
Continued...
2.5 Remove the second plastic cover from the sticky pad.
2.6 Carefully position and firmly place the camera on the window.
2.7 Connect the fused Red wire to 12v ignition feed and the Black earth wire
to a chassis earth.
2.8 If fitting alongside a tracker, take the Trigger Out wire to the trigger input
of your unit. If fitting an external button, take the activation feed to the
Trigger In wire. If neither such devices are being fitted, shield the two
wires and loom out of the way.
2.9 Angle the lens to allow clear view of the road ahead, remove grommet from
the hinge area and tighten the screw to lock camera angle in place.
2.10 Ensure the plastic covers are removed from both lenses.
2.11 Organise the cables using the cable clips provided.
4
5
6
2.12 Remove the plastic cover from the sticky pad on the module.
2.13 Firmly place the module at the bottom of the camera with
the lights facing inside the vehicle.
2.14 Connect the 4 and 3 pin connectors between the harness,
camera and infrared module.
2.15 Organise the cables using the cable clips provided.
Page 7

7
Step 2 – Setting Up GPS Connection
Important: For the initial GPS lock on, the camera must be powered for approx
5 minutes. The vehicle must be in an open clear area. Not inside a garage or
an area where GPS connection will be affected. A flashing blue light indicates
camera is recording without GPS data. Constant blue light indicates the camera
is recording with GPS data. (See page 37 for Buzzer/LED Alert Warnings)
Note: GPS is sometimes unable to connect to a satellite in vehicles fitted with fully
heated windscreens or metal trims around the front window.
2.16 Ensure the 4 way power connection is linked between the harness and
the camera.
2.17 Turn the vehicle engine on.
2.18 Leave the camera powered on until blue light is on constantly to indicate
GPS has locked on..
2.19 Once the camera has locked onto GPS, turn the vehicle engine off and
safely remove the SD card once the camera has completely shut down.
Important; After setting up the camera and GPS for the first time, install the PC
Player onto a PC and set Date and Time through the Settings button on the
software. Follow the next steps to complete installation.
2. Quick Start Guide - Setting Up GPS
Page 8
8
Step 3 – Installing the PC Player
2.20 Insert the card into the SD card slot
in a PC or laptop.
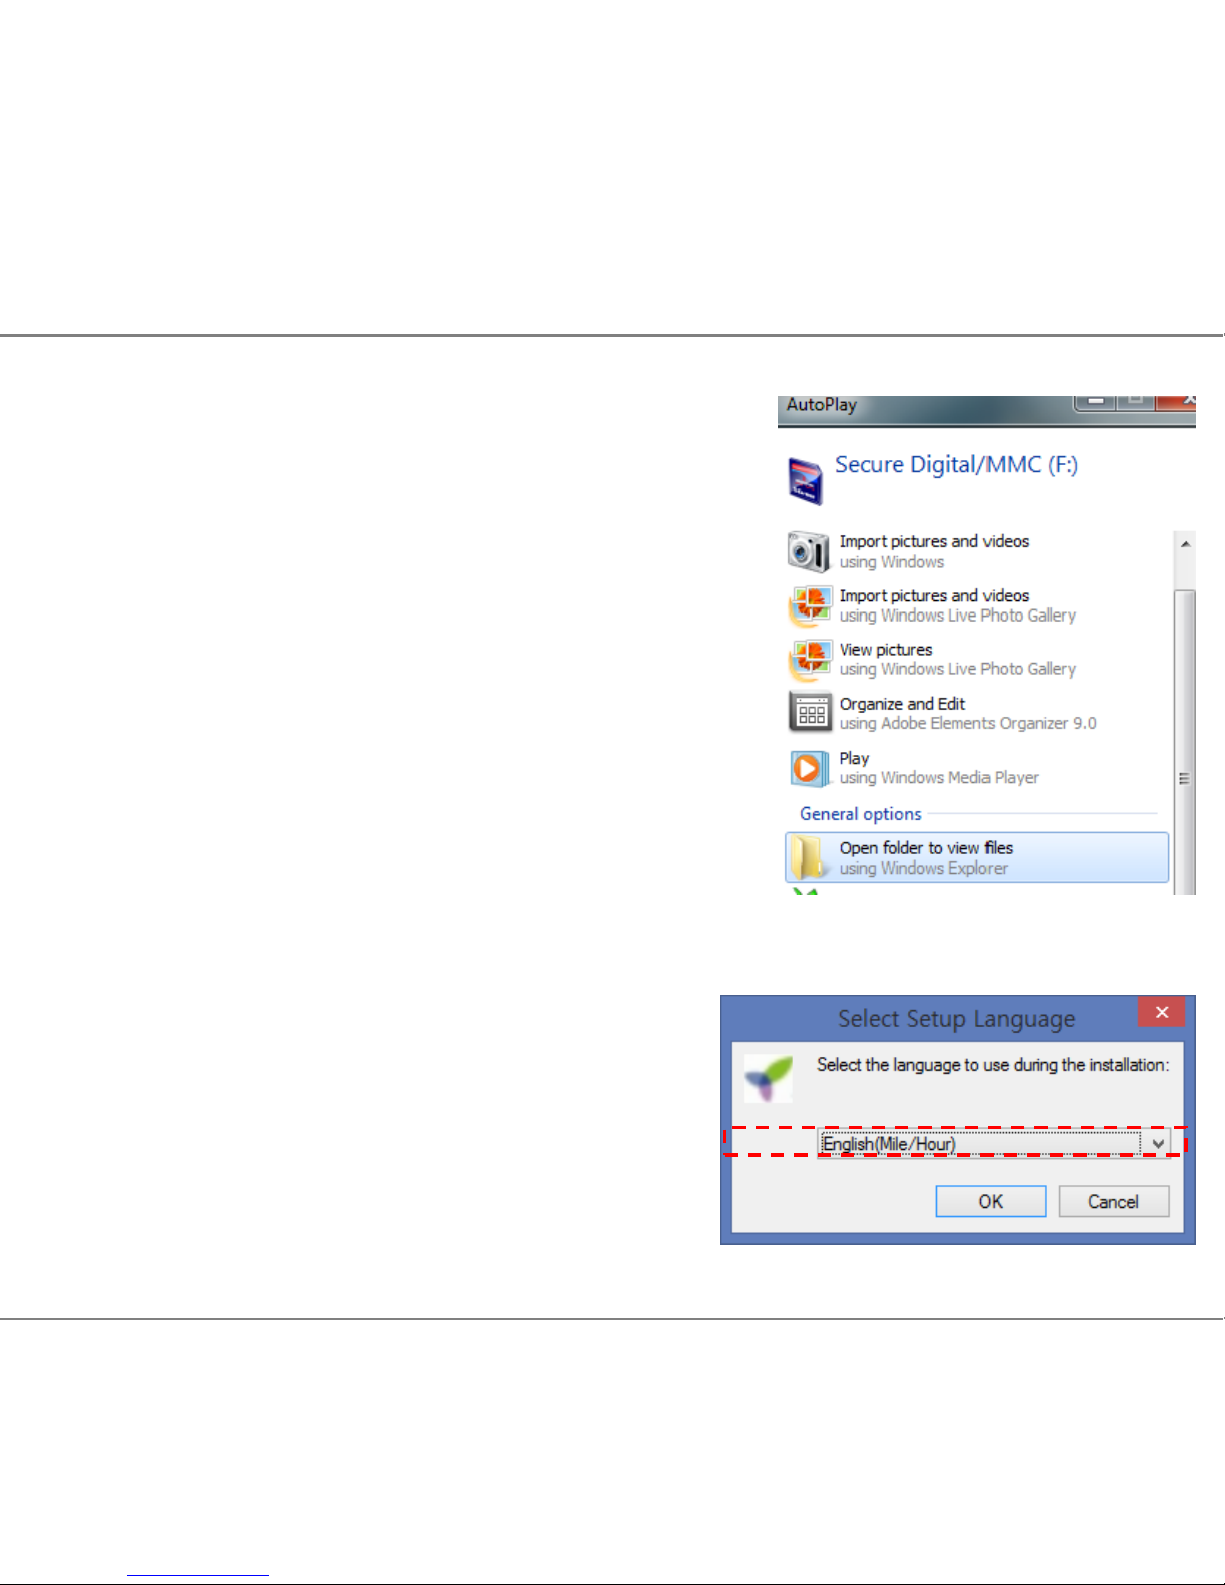
2.21 If AutoPlay box opens, double click on Open
Folder To View Files.
If not, left click Start - Computer then double click
on the SD card drive.
2.22 Double click on player setup (or right click
and select “Run as administrator” to ensure
constant permissions and full access):
View-iHD_US_setup1.8
2.23 Left click Run.
2.24 Ensure the Language is set to –
English(Mile/Hour) by left clicking on the
small arrow on the right.
Continued...
2. Quick Start Guide - Installing the PC Player
Page 9
9
Continued...
2.25 Left click Next on the Wizard Setup.
2.26 Left click Next again.
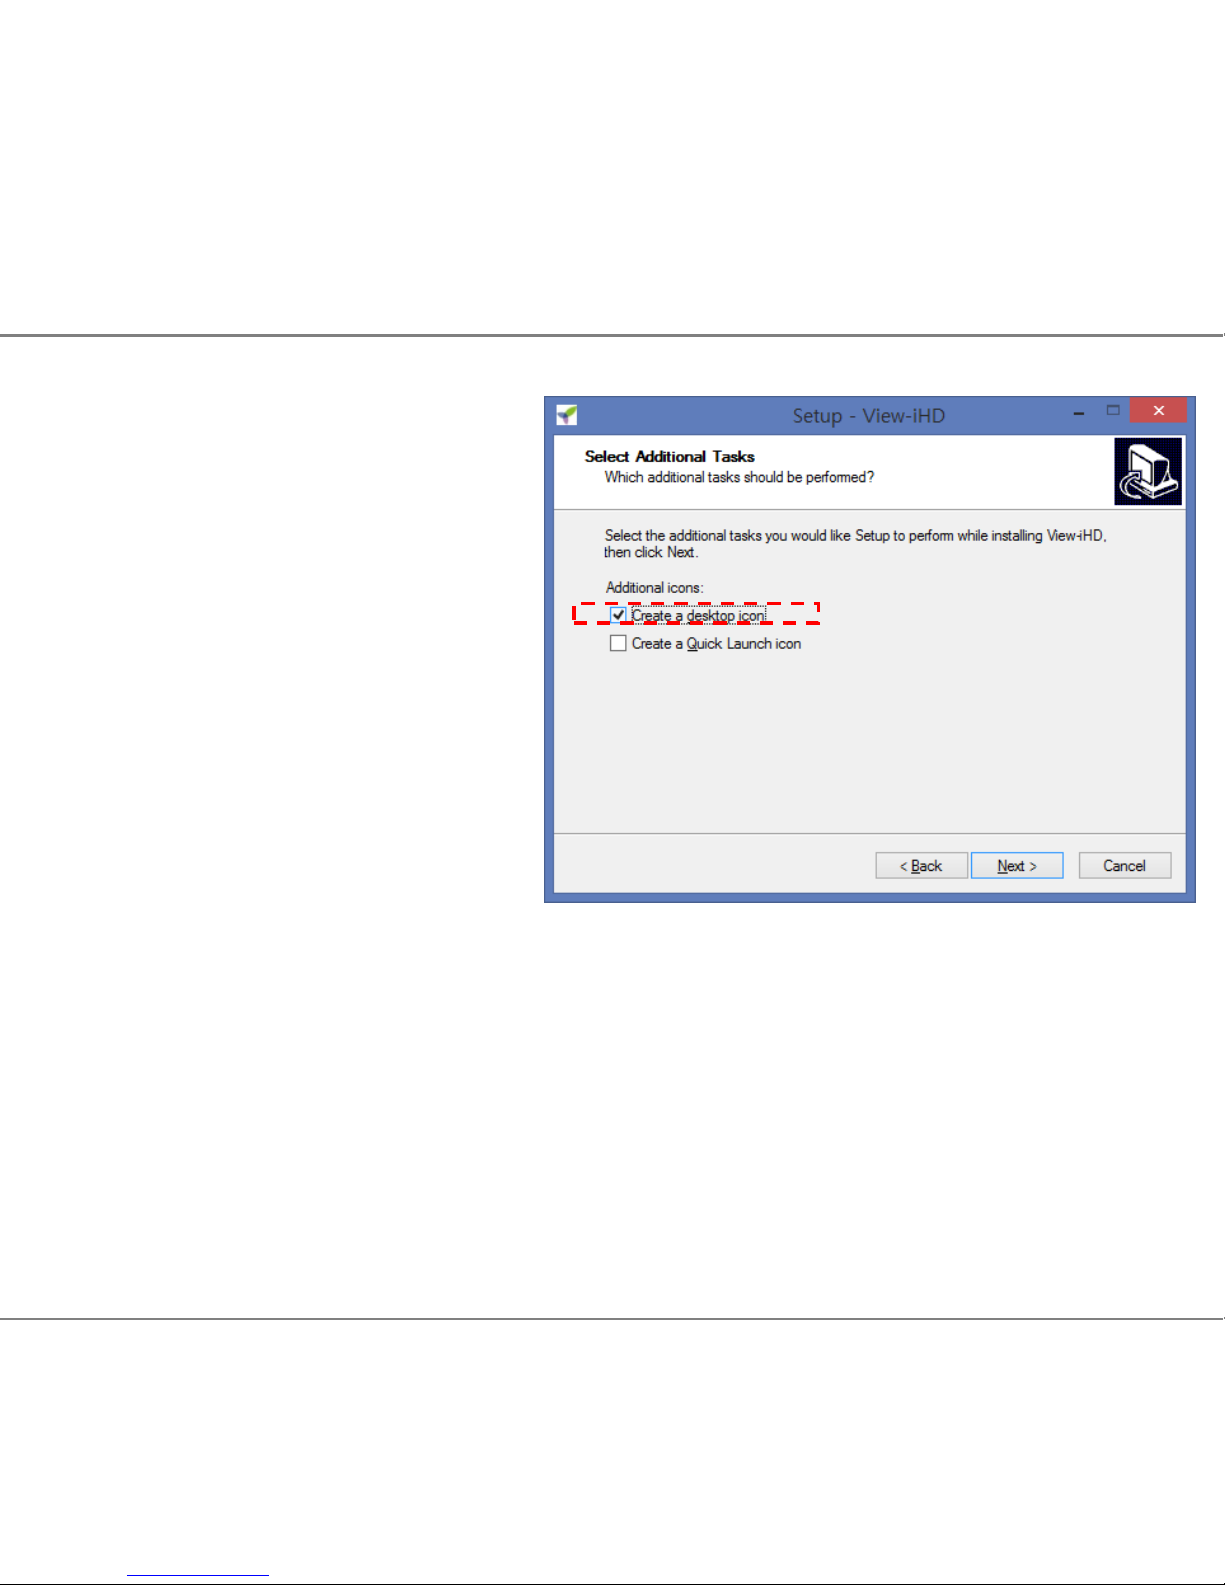
2.27 Left click on box next to the
Create a Desktop Icon if not
already ticked, then left click Next.
2.28 Left click Install then Finish.
The PC Player will automatically pop up. If not, close the Wizard Setup window by left click
on the X button in top right hand corner and any other windows
still open.
Password(Encryption Software Only)
2.29 During standard viewing use, the password box should be left blank.
If you wish to change any settings on the software or camera, then
the software must be opened in administrator mode (right click on shortcut
and select “Run as administrator” and the password default will then be 0000.
2. Quick Start Guide - Installing the PC Player
Page 10
10
Step 4 – Set Time and Date on the PC Player
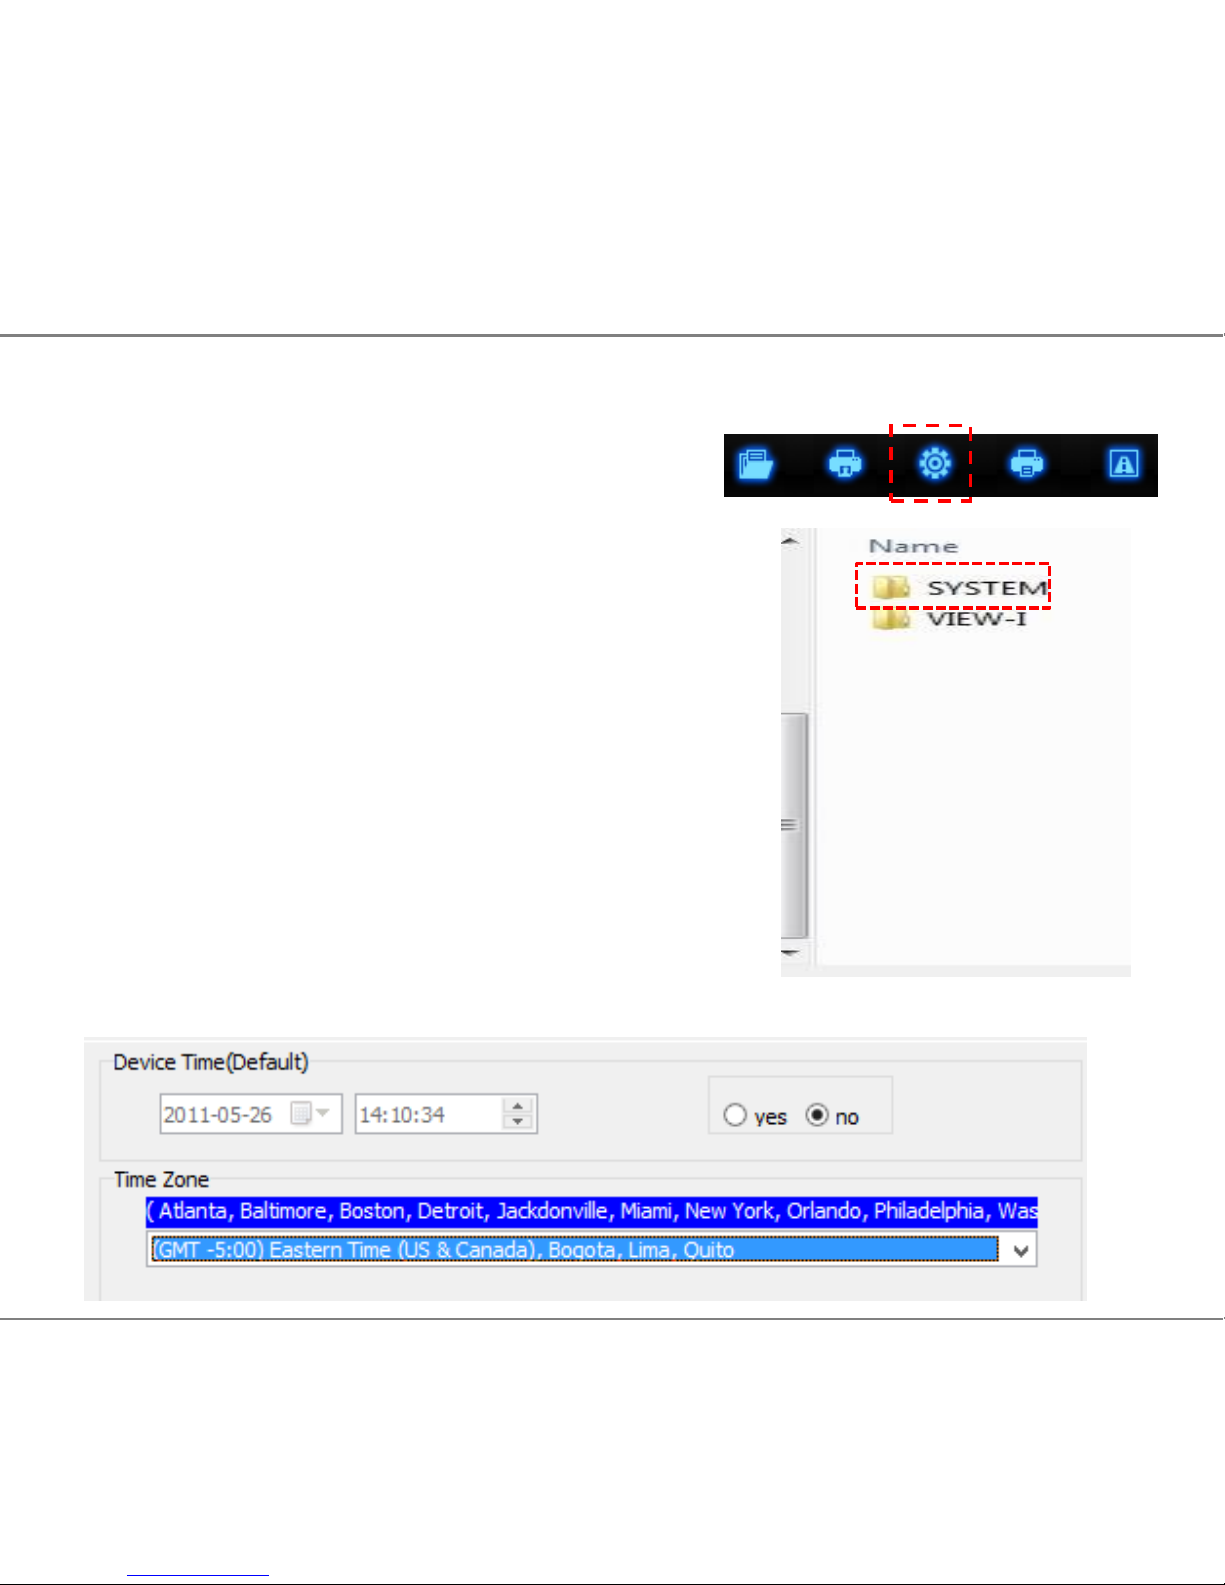
2.30 Left click on the Settings button, bottom
right hand corner of player.
2.31 The Open box will appear. Double click
on the SD card drive.
2.32 Double click on System folder.
2.33 Double click on user_setup.cfg and the,
setting box will appear.
2.34 In the Device Time section, click Yes
to edit the time and date.
2.35 Set Time Zone to: (GMT -5:00) Atlanta, Baltimore, New York ,….
2. Quick Start Guide - Set Time and Date
Page 11

11
Continued..
2.36 To save the changes, left click Apply and repeat step.2.31 - 2.33 then
click Save
2.37 Left click the red cross in top right hand corner of player to close
the Player.
2.38 Safely remove the SD card from the SD card slot in the PC and insert the
card into the camera.
2.39 Power the camera for at least 3 minutes to allow changes to be copied
to the camera.
2.40 Insert the main SD card into the camera. Ensure it has been formatted
to FAT32 before use (see page 12 for more information).
2.41 Check and position the lens correctly.
Quick Plug and Play Installation complete.
Important: Any changes made on the Settings in the software must be saved
in the camera by following steps 2.38 and 2.40 to ensure recorded data is
more accurate.
Important: If using a larger card for recording, ensure the card has been
Formatted correctly before use. Using an unformatted card could prevent
the camera to record data or malfunction. See page 12 for How to Formatting
SD cards.
2. Quick Start Guide - Set Time and Date
Page 12
3. How To Format SD Cards
12
Important: Formatting SD cards will delete all data on the card. Data must be backed up onto
another device if the data is to be used for future reference. Recommended - Format SD card
at least once every 4 weeks for optimal performance.
3.1 Insert the card into a SD card slot in a PC/laptop.
3.2 If the Auto play box automatically appears, left click
Open Folder to View Files. If the automated box
doesn’t appear, left click Start Computer.
3.3 Right click on the SD card slot.
3.4 Left click on Format...
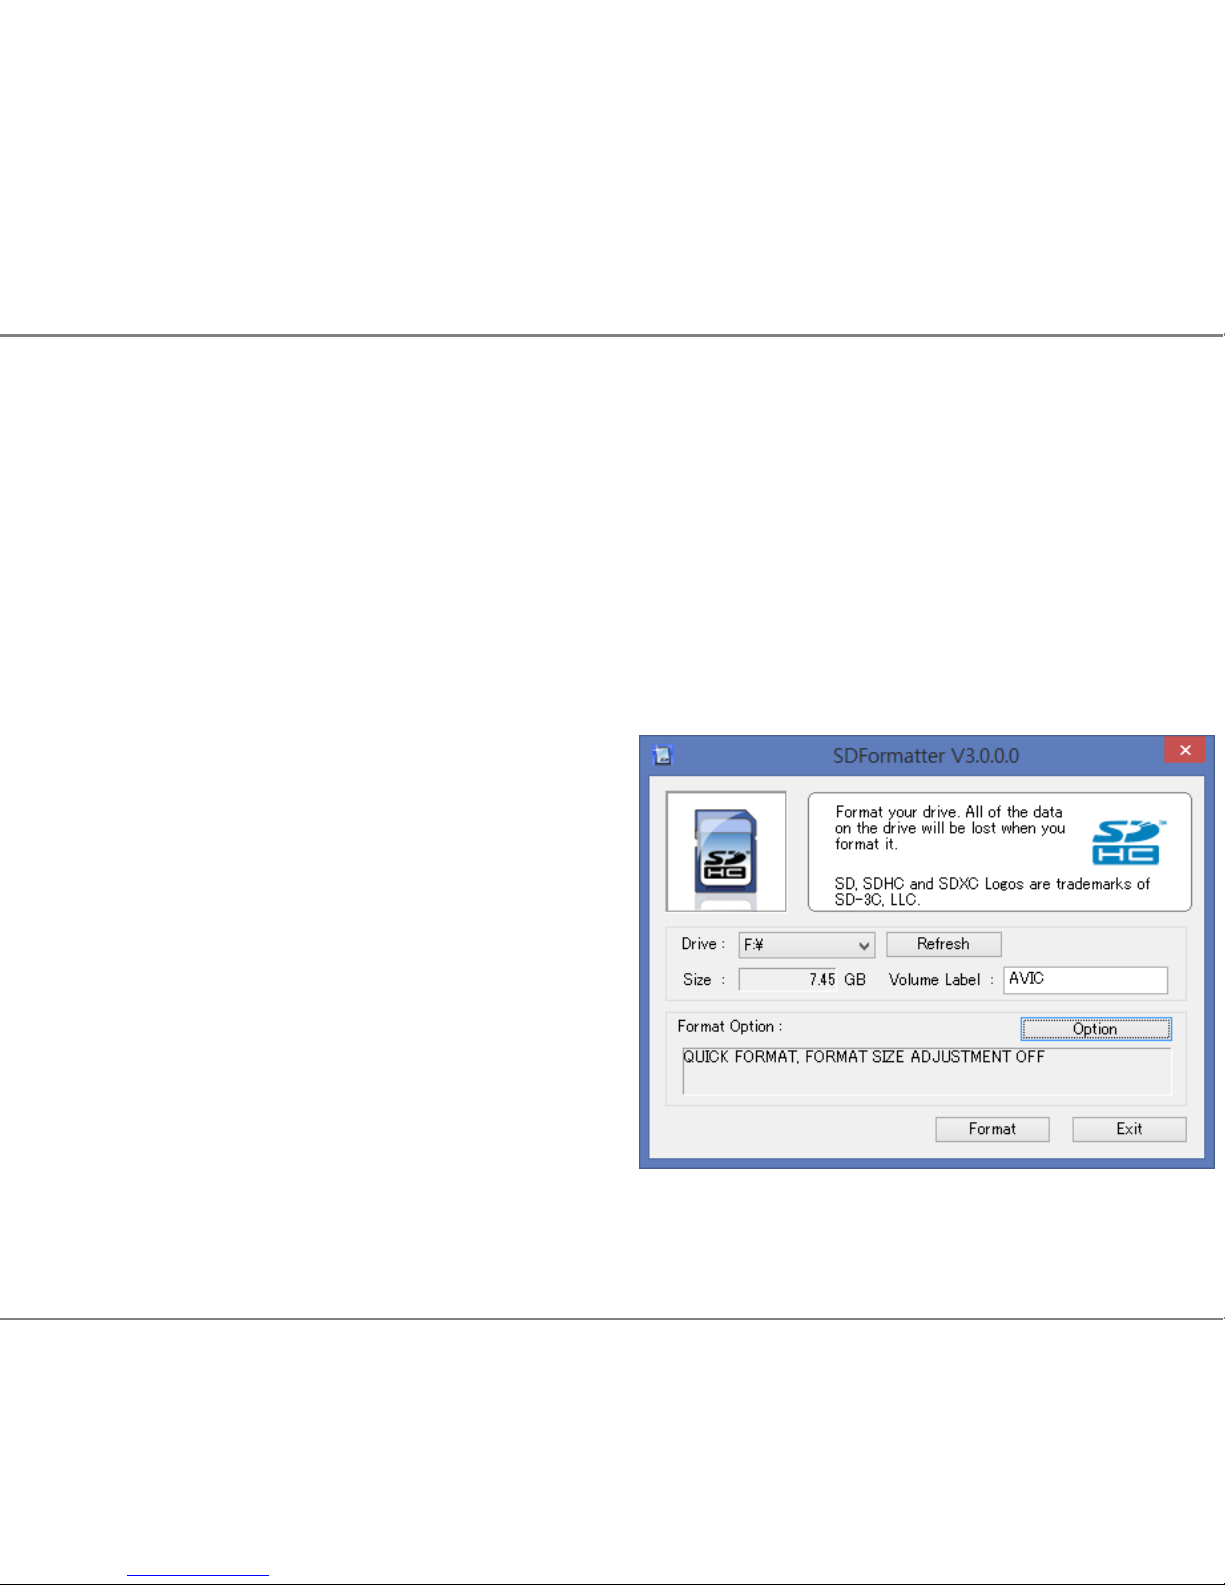
3.5 Ensure the following settings are made:
File System is set to FAT32. If FAT32 has not been
Selected when formatted. The camera may be
Damaged or prevented from recording data.
Allocation Unit Size is set to 32Kb.
Quick Format box is ticked.
3.6 Left click Start.
3.7 Left click Yes to next prompt.
3.8 Left click OK.
3.9 Safely remove the card from slot.
Once formatting is complete you can insert the card
back into the camera and continue as normal.
Page 13
4. View Recordings Saved on SD Cards
13
How to Watch Footage Saved on the SD Card
Important: The HD PC Player software must be installed to Desktop to
watch any recorded data. If the PC Player has not been installed, see page 8,
Installing the PC Player.
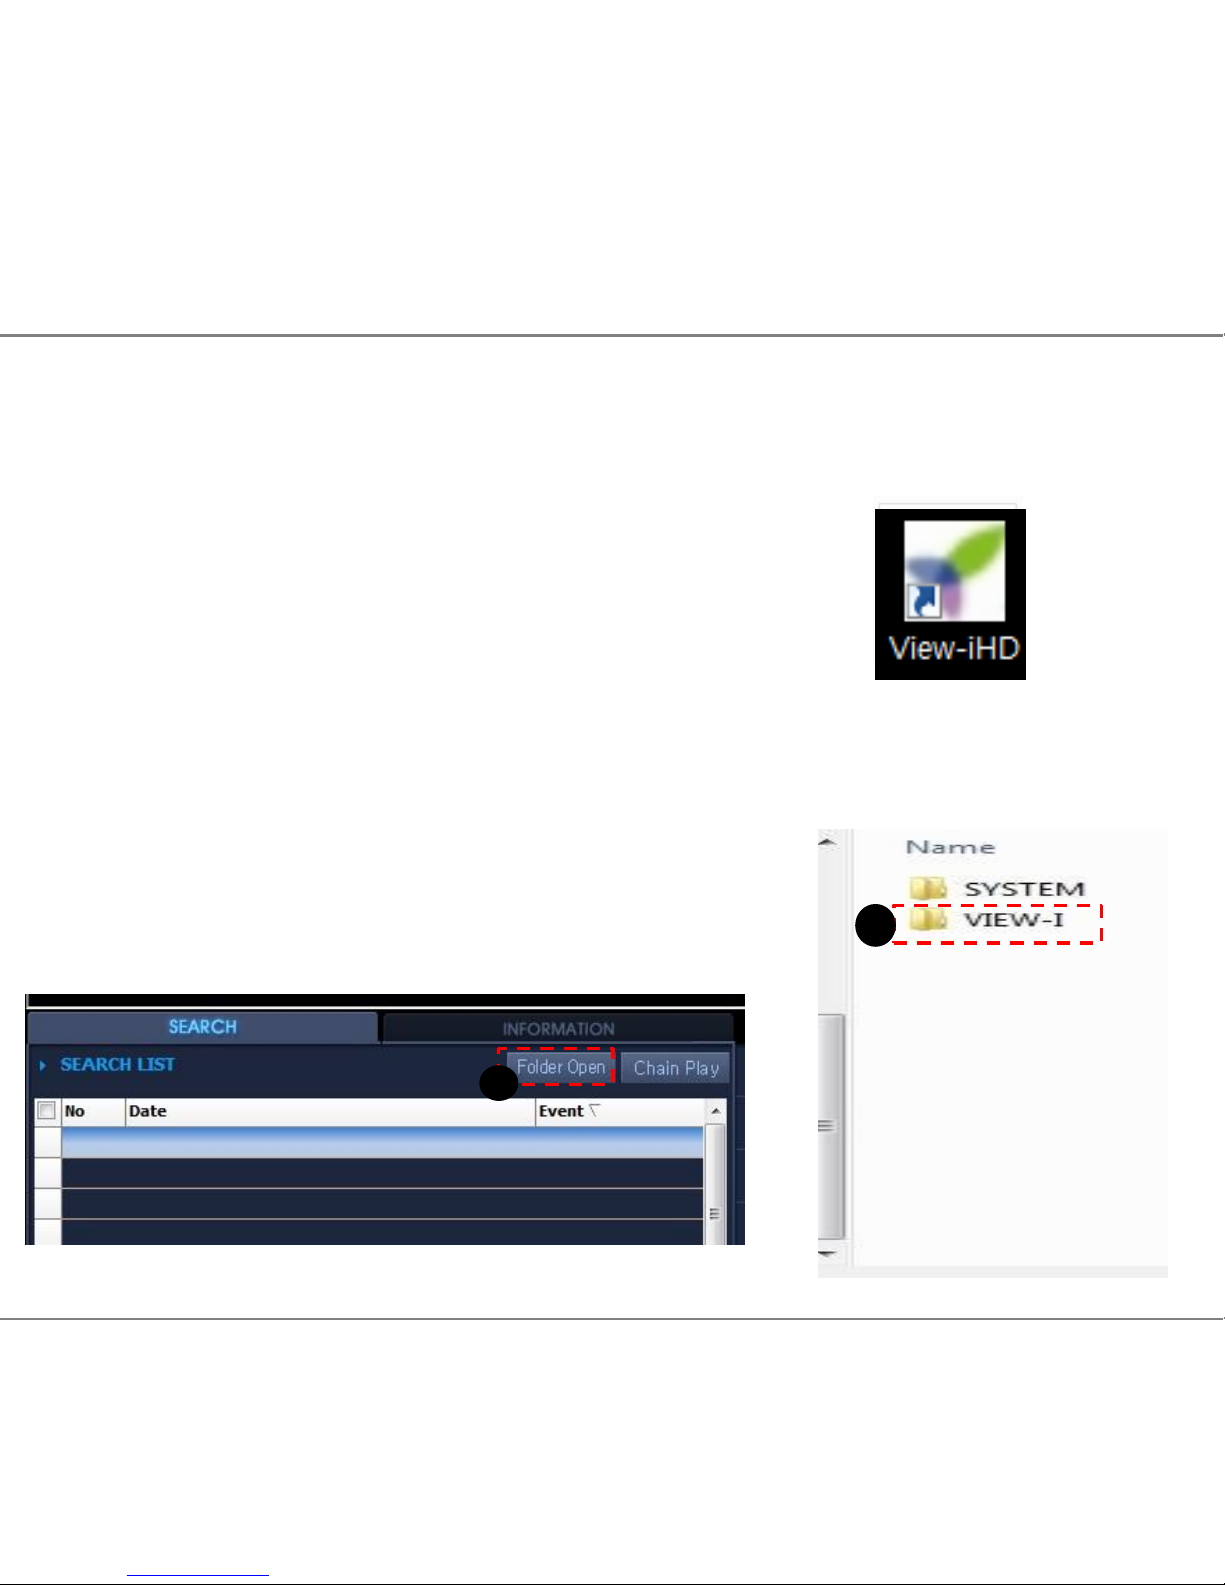
4.1 Insert the SD card into the SD card slot. Administrator
Rights
4.2 Double click on the View-I HD Icon on Desktop and enter
the password required.
4.3 Left click on Folder Open button.
This is found about the white frame list box in the
lower left quarter of your software window
Continued...
1
2
Page 14
14
Continued...
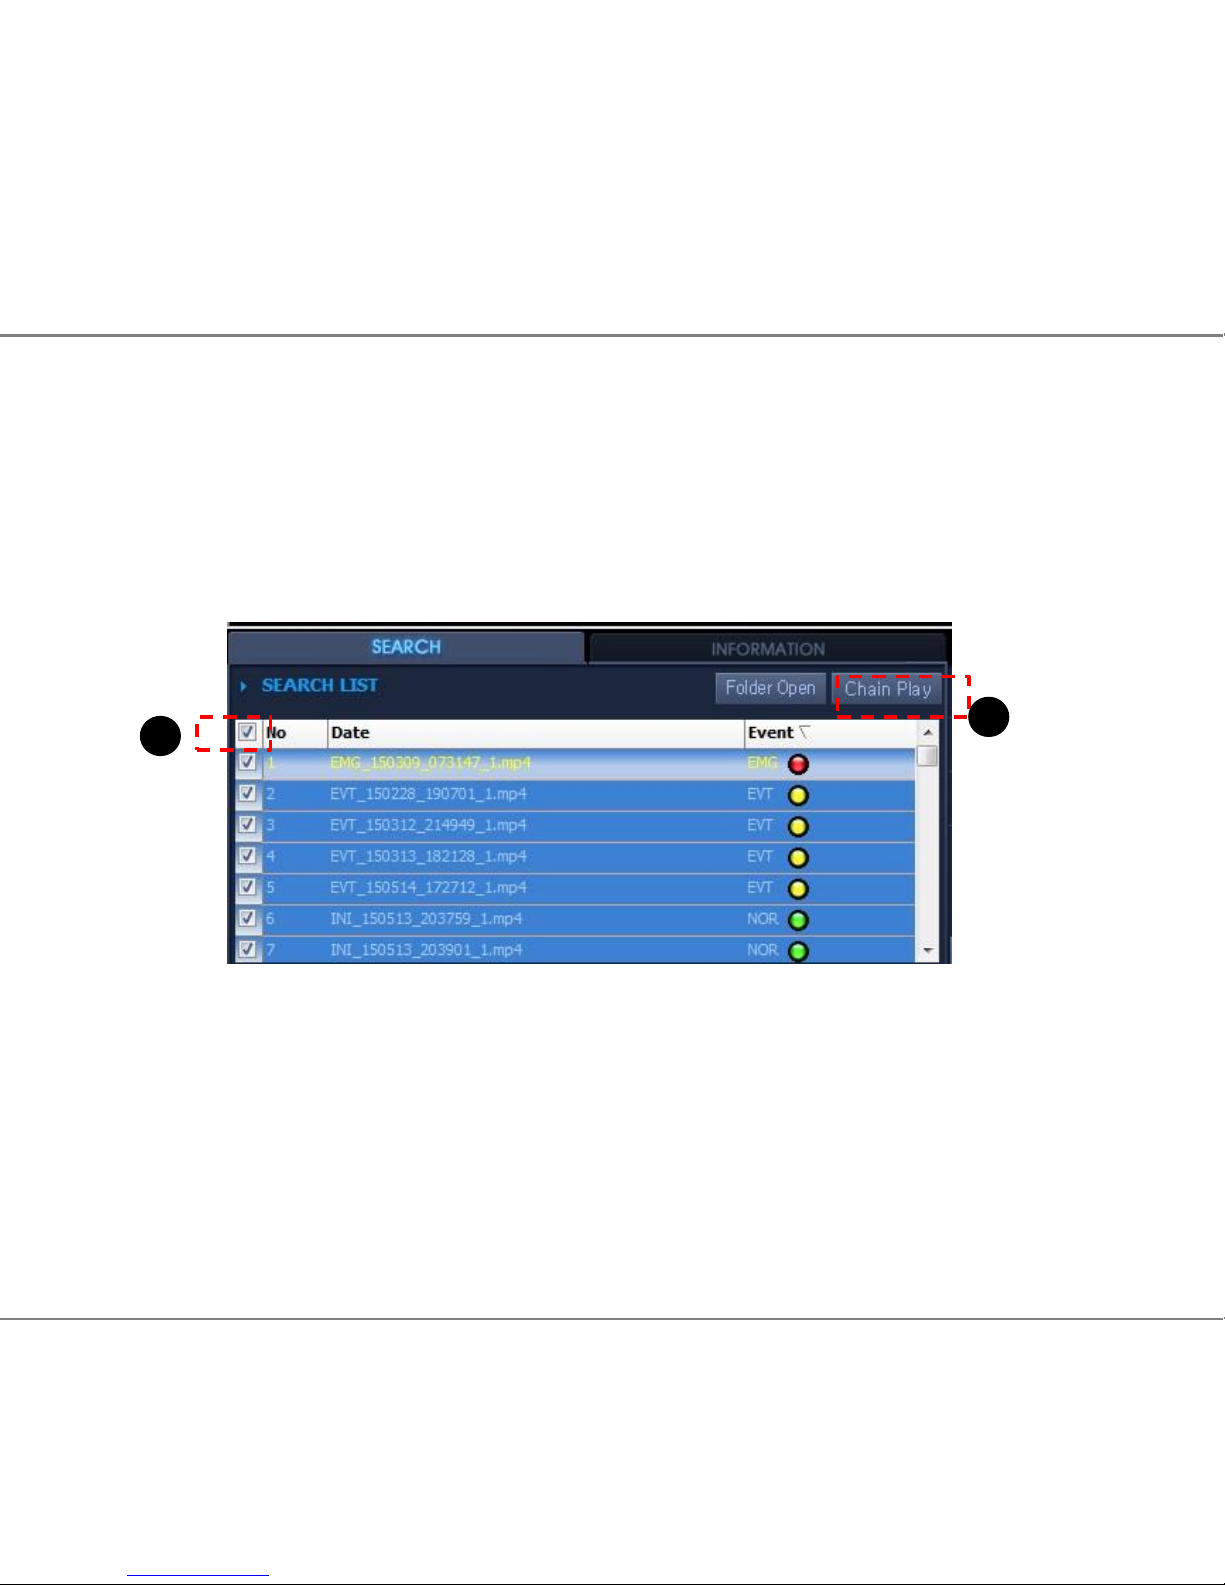
4.4 A list of recordings will appear. To play the recordings the list must be
highlighted. Always tick the box in the top left hand side of the list, next to “No”, to highlight t
he recordings.
4.5 Left click Chain Play or double click on a desired clip to play. Emergency
clips(EMG) will be listed at the top followed by Event clips(EVT) then Normal
clips(INI).
4.6 To get back to the list of recordings, left click on Search button above the
list of recordings.
4. View Recordings Saved on SD Cards
3
4
Page 15
15
5. Camera Features
Function Description
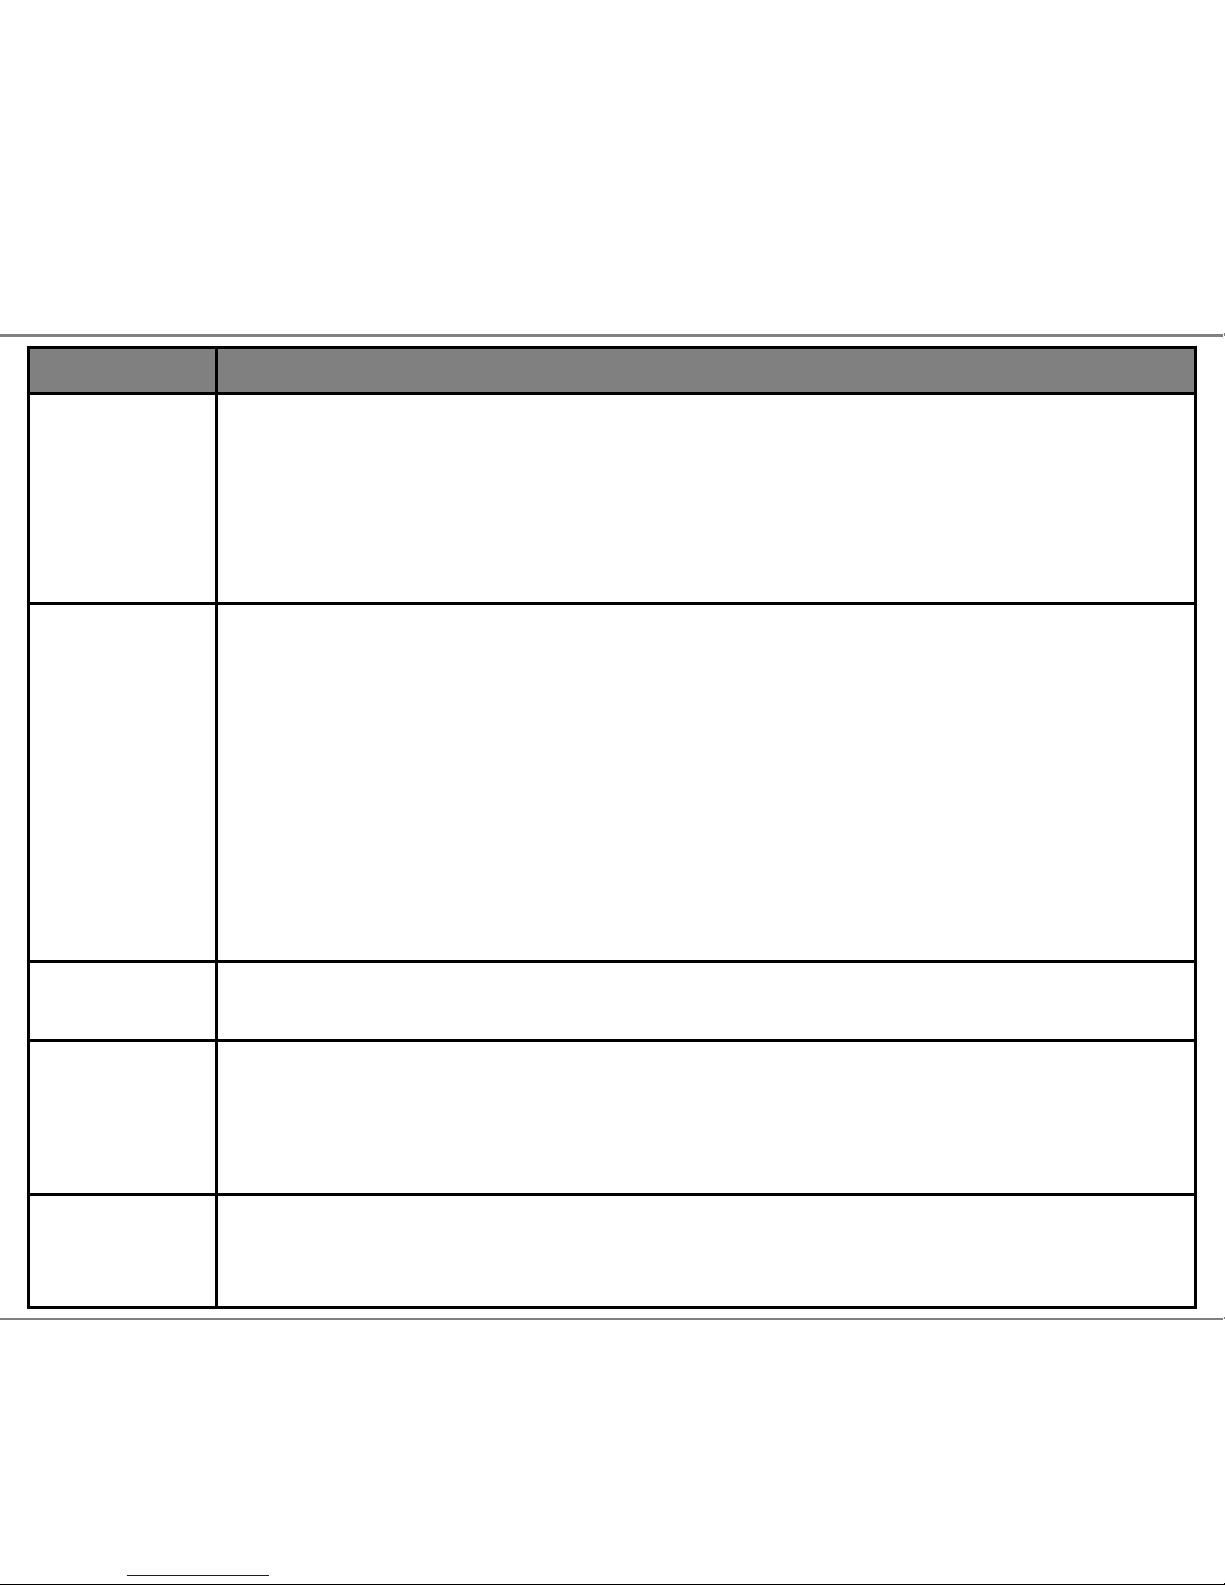
Constant
Recording
Records everything when camera is powered on.
[NOTE] When the SD card is full of data, the camera deletes the oldest
INI file to make room for new recordings. Therefore, if the user needs to
keep the old recordings, the user must backup the recordings before they
are automatically overwritten.
Event
Recording
When the camera detects exceeded force , the camera will automatically save 10
seconds before and 15 seconds after the triggered event. (adjustable via PC
software).
[NOTE] When the card reaches 80% capacity used on EVENT recordings, the camera
will make a (beep-beep-beep) sounds to warn the user of limited space remaining.
When the card reaches 100% capacity with EVENT recordings, the camera will make a
constant (tee-lee-lee) sound and can no longer record to the card. The card should be
removed and a back up made of any required data before being reformatted (see
page 12)
Audio
Recording
Supports audio recording with on/off settings via PC Player
GPS Sensor
Internal GPS records time/speed/route information via Google Map
GPS information can only be checked through VIEW-I HD PC Player.
[NOTE] Camera needs to be connected to satellites for GPS data to be recorded.
G-Sensor
Internal G-sensor records quick start/stop/curve information.
This information can be checked with VIEW-I HD PC Player .
Page 16
16
6. Camera Functions
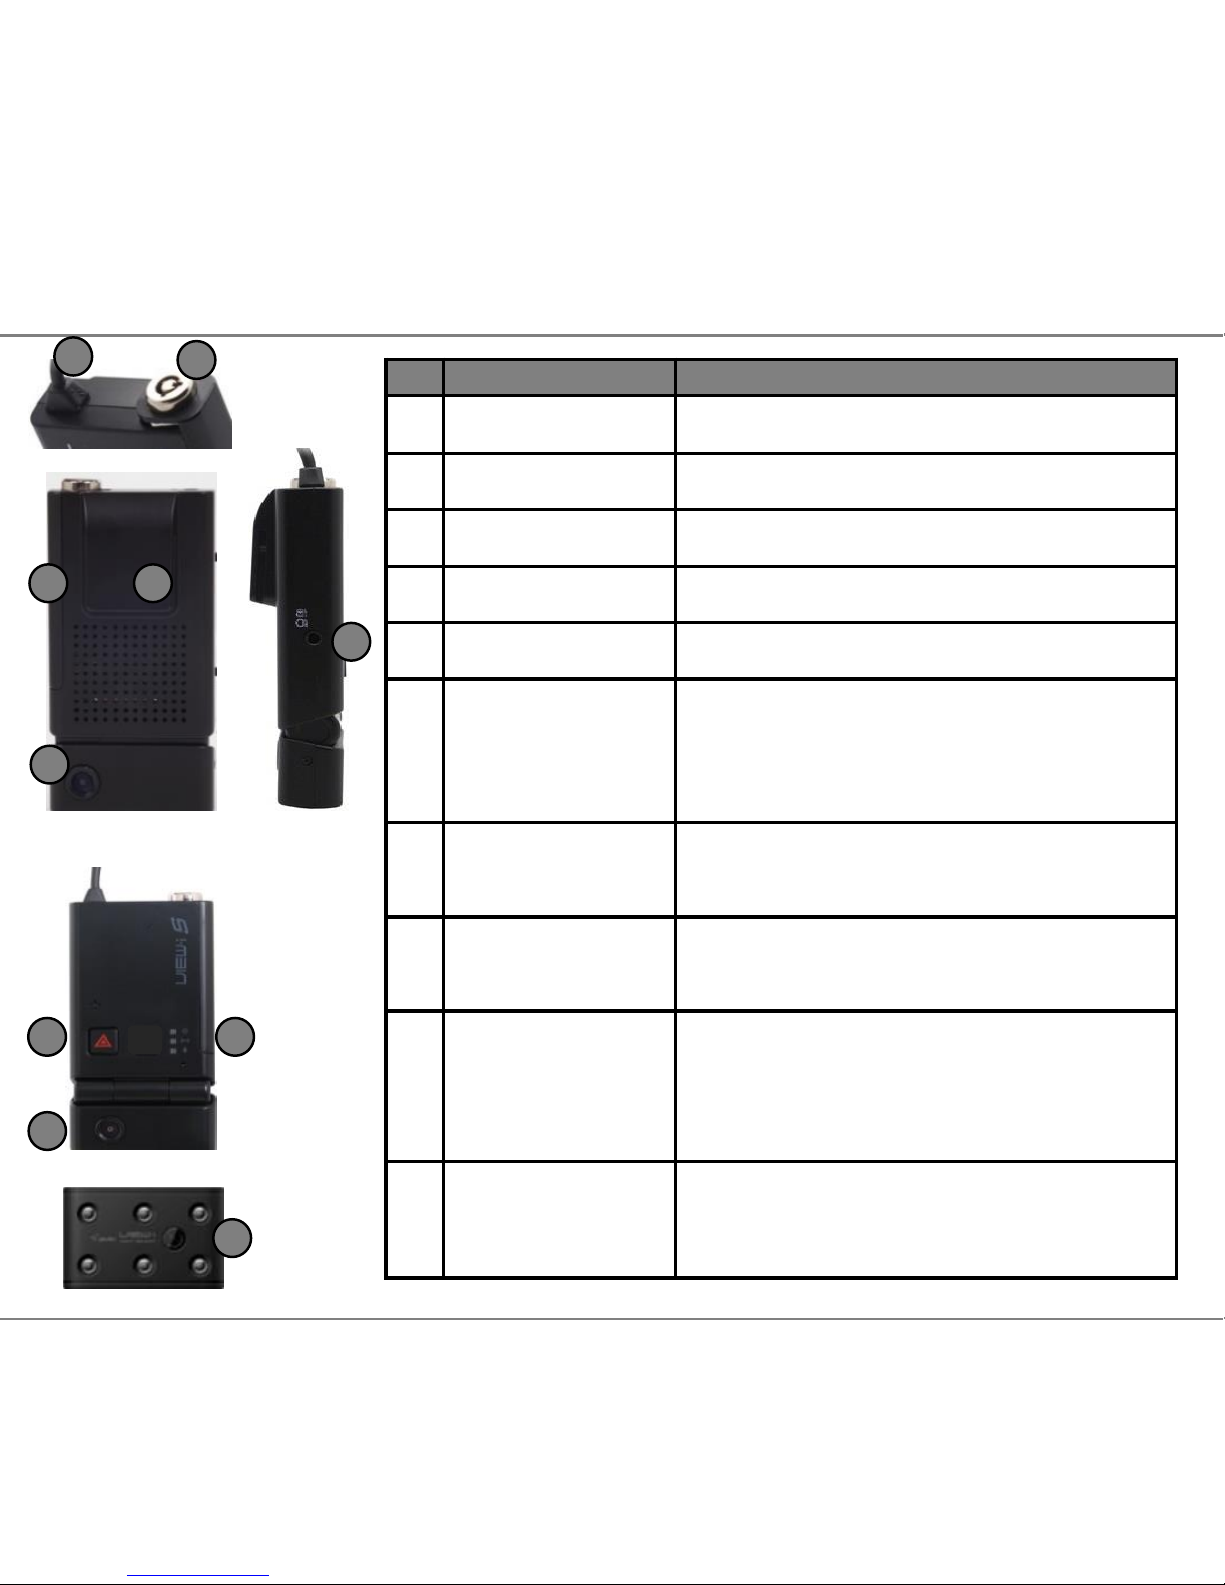
# Name Description
1 Power Feed DC 12/24v
2 SD Lock Key lock
3 SD Cart Slot SD card slot
4 GPS Internal GPS Antenna
5 Front Camera 2.0 mega pixel CMOS lens
6 TV-Out Port
View real-time footage on an
external display. 3.5mm male jack,
4 pole connector input support
7 Rear Camera 2.0 mega pixel CMOS lens
8
Manual
Recording
User activated Event Recording
9 LED’s
Status LED for Power status(red),
GPS reception(blue),
Mic status(amber) and Recording
status
10 IR Module
Infrared Lighting for Internal lens
for night time recording
8 9
1
3 4
6
7
5
2
10
Page 17
17
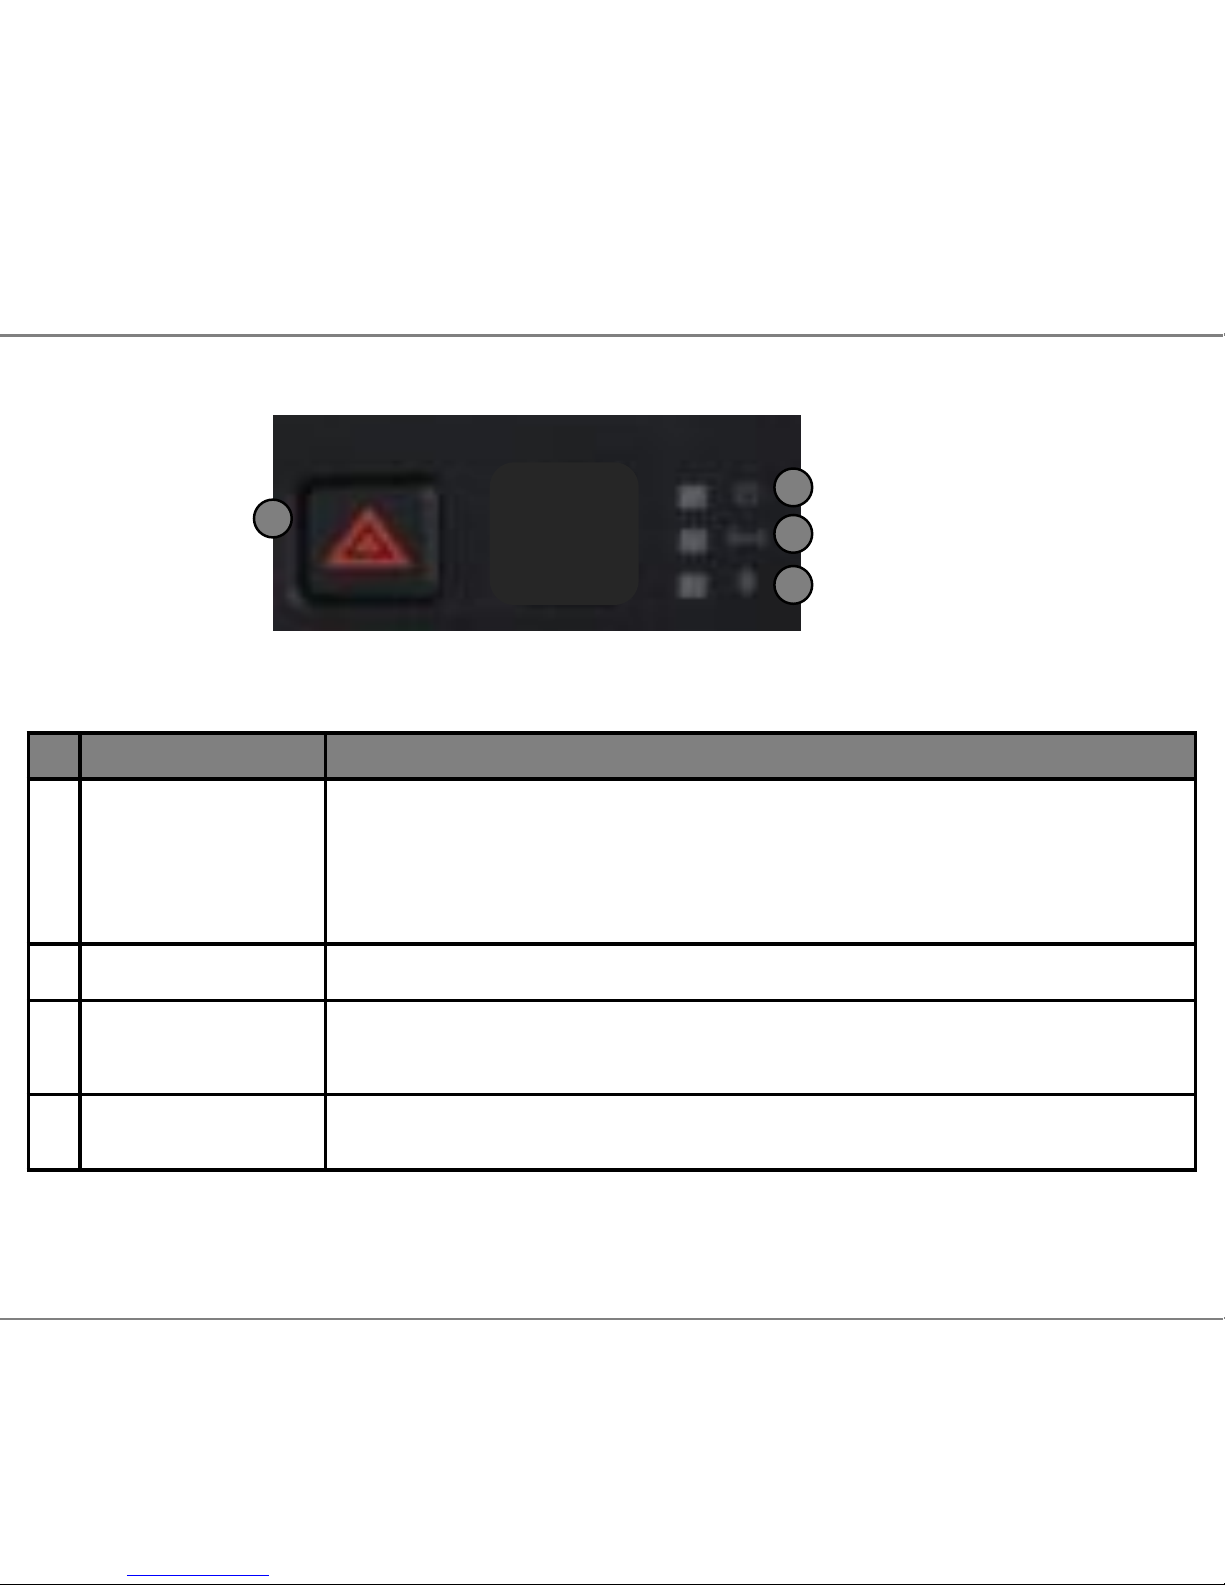
7. Camera Button & Lights
# Name Recording Mode
1
Manual
Recording
Button
Manually start Event recording if button is pressed, camera
will make “tic-tic” sound and blue and orange LED will flash
quickly. These clips will be saved as an Emergency file.
Push the button over 5seconds, toggle Mic on/off
2 Power LED Red LED, Displays Power On/Off Status
3 GPS LED
Blue LED, Displays steady blue when GPS data is recording.
Flashing blue when GPS data is not recording.
4 Mic LED Amber LED, Displays Mic On/Off Status
1
3
4
2
Page 18
18
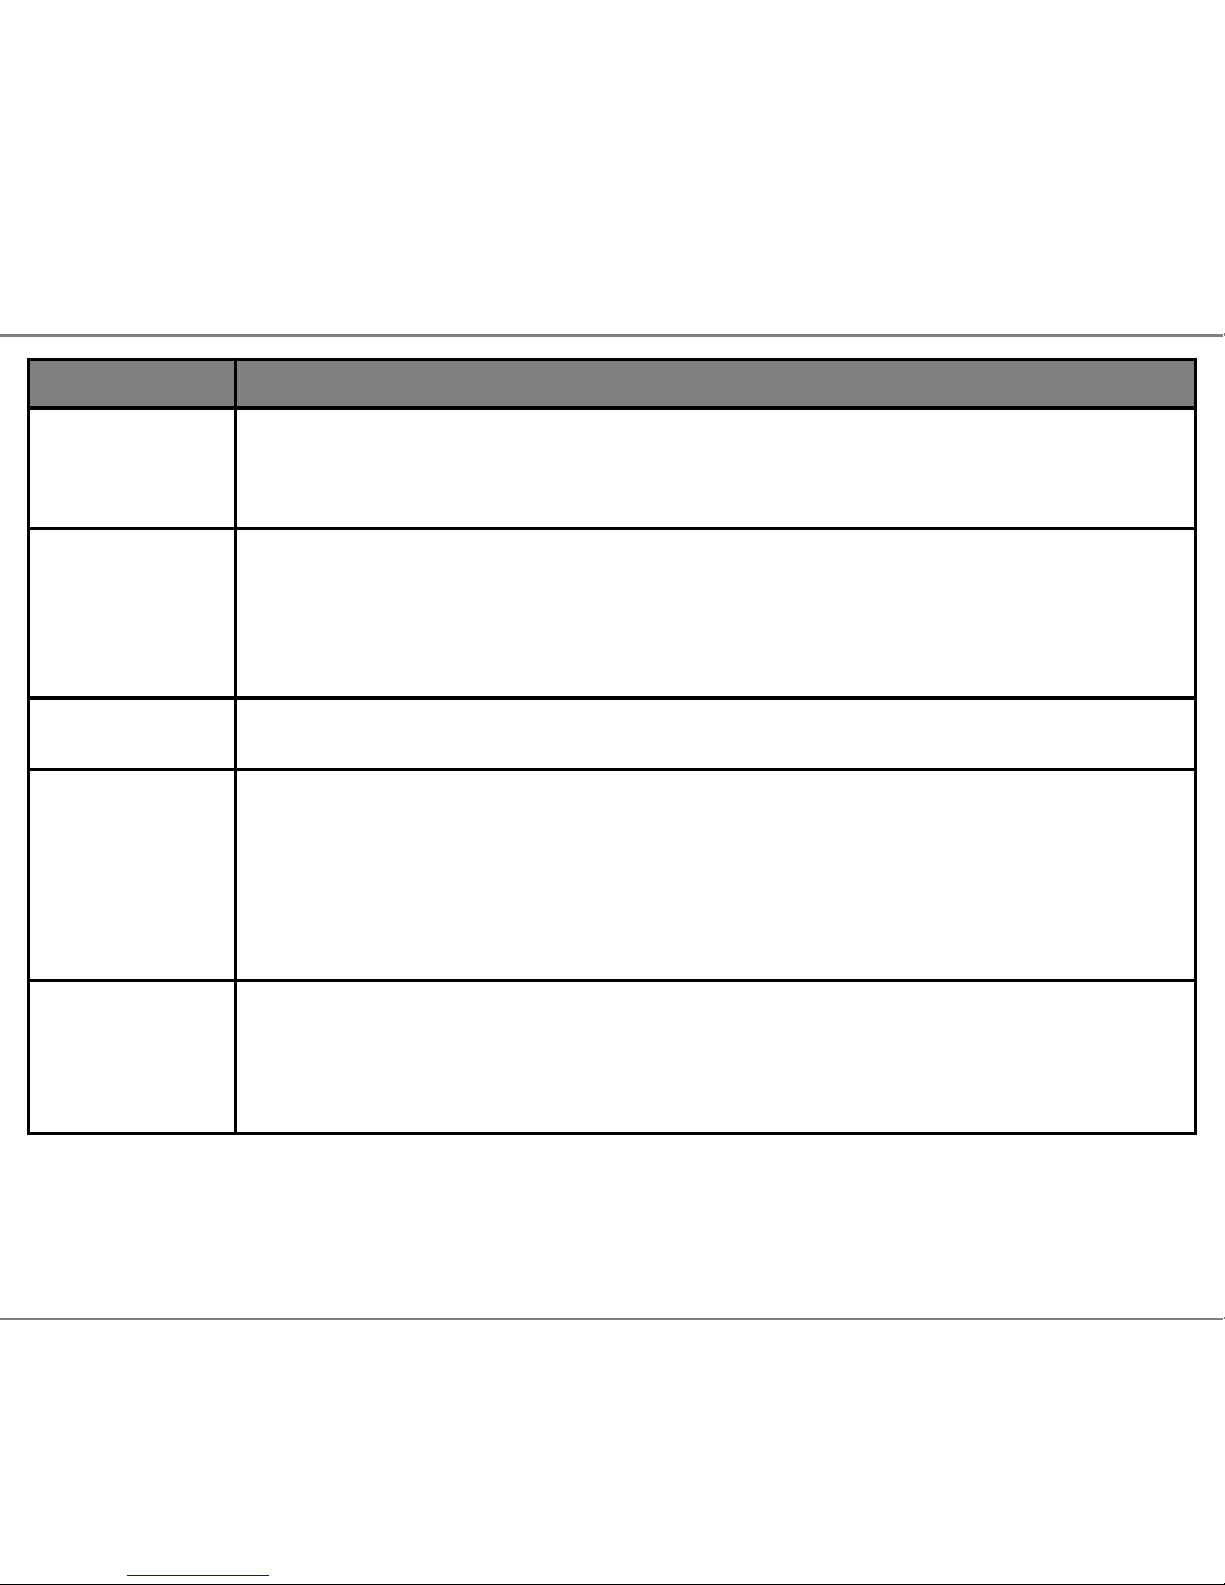
8. Software Features
Features Description
HD PC
Player
Software to view recordings.
View GPS data, generate reports can be done through the dedicated player.
Google Map
Sync
View driver’s route via Google Map through the PC Player.
[NOTE] GPS needs to be connected to the satellites in order to sync data
with Google Maps. Internet connection on the PC required to view Google
map.
G-Sensor
Graph
View G-force impact data.
ECO-Drive
Report
Driver’s driving patterns can be checked and documented in reports.
Recorded data can give an overall score on how good or bad a driver is.
Reports will coach drivers to develop safer driving habits [NOTE] Functions
are limited for non-GPS data.
Event
Report
Creates reference report detailing the accident which may be helpful to
police or insurance company’s investigations.
[NOTE] Functions are limited for non-GPS data.
Page 19
19
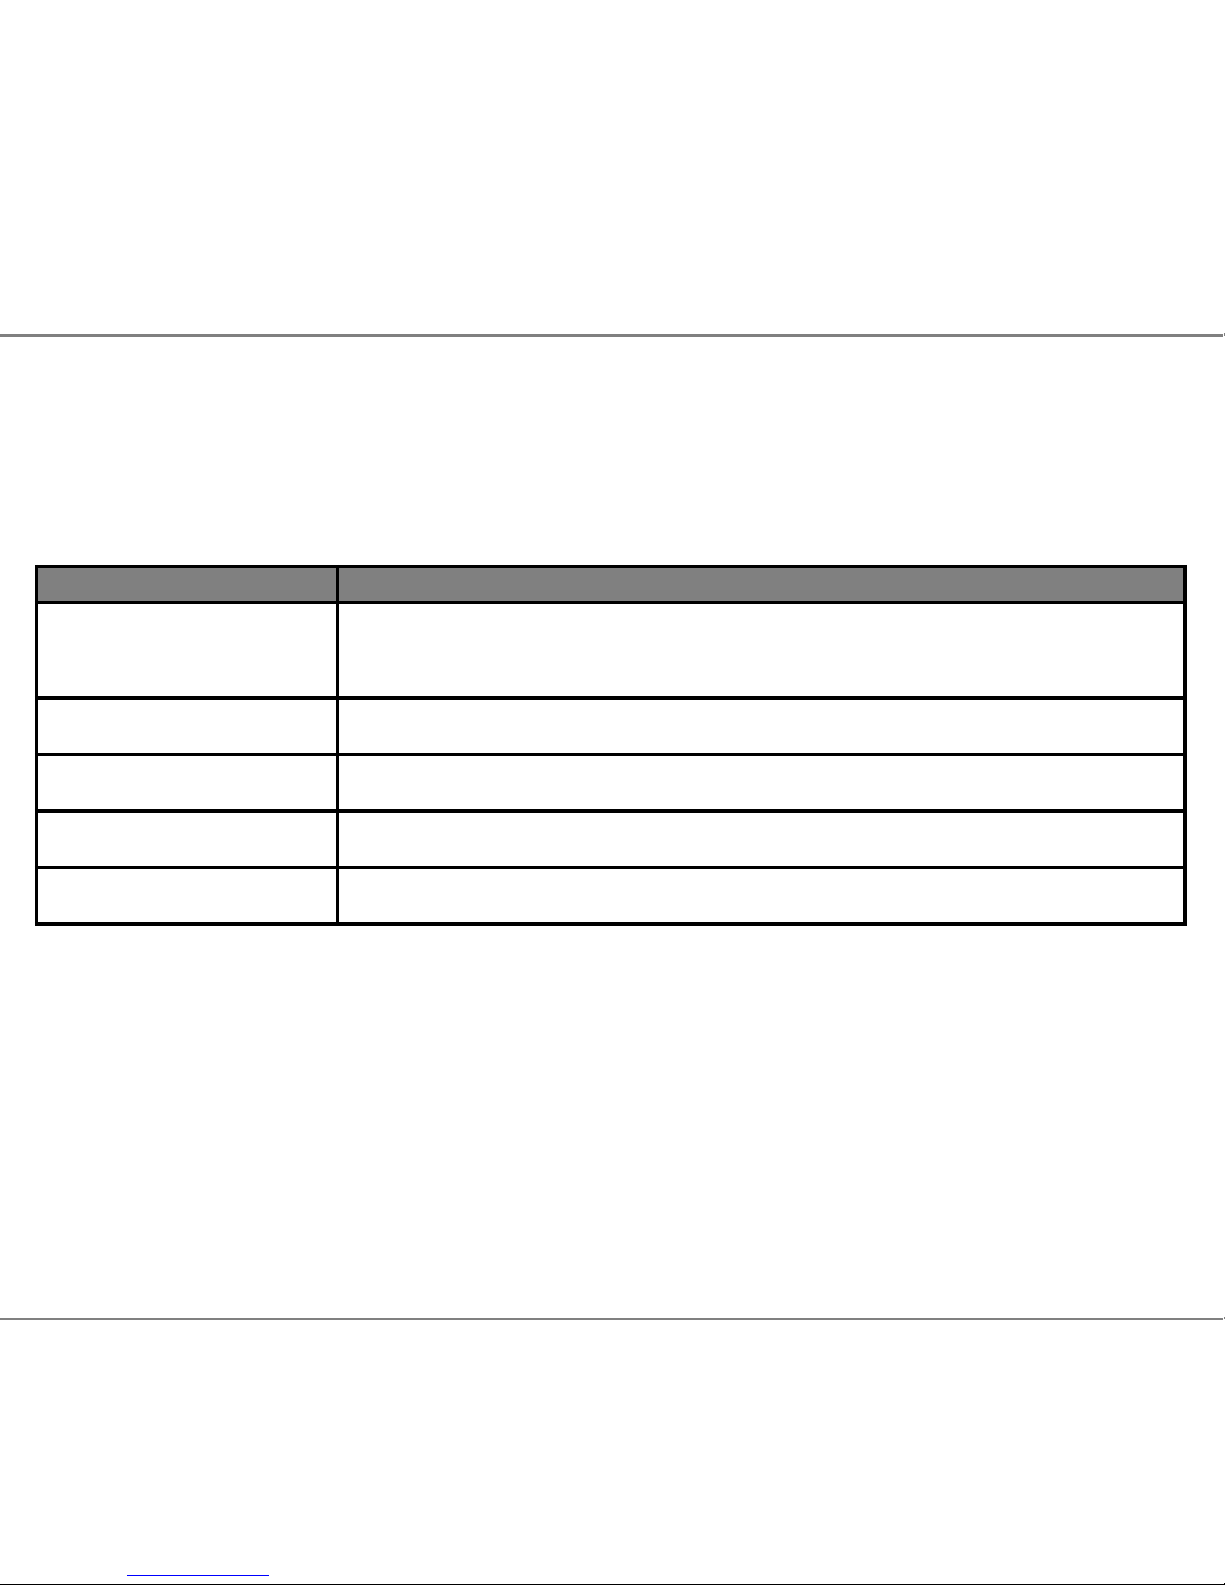
9. PC Requirements
System Requirement
Item Description
Operating System
Window XP, Windows Vista, Windows 7 & 8,
(English version)
CPU Pentium 4 / 1.8Ghz Processor or above
RAM More than 512MB
Free HDD Space More than 200MB
Display More than 1024 x 768 pixels
Page 20
20
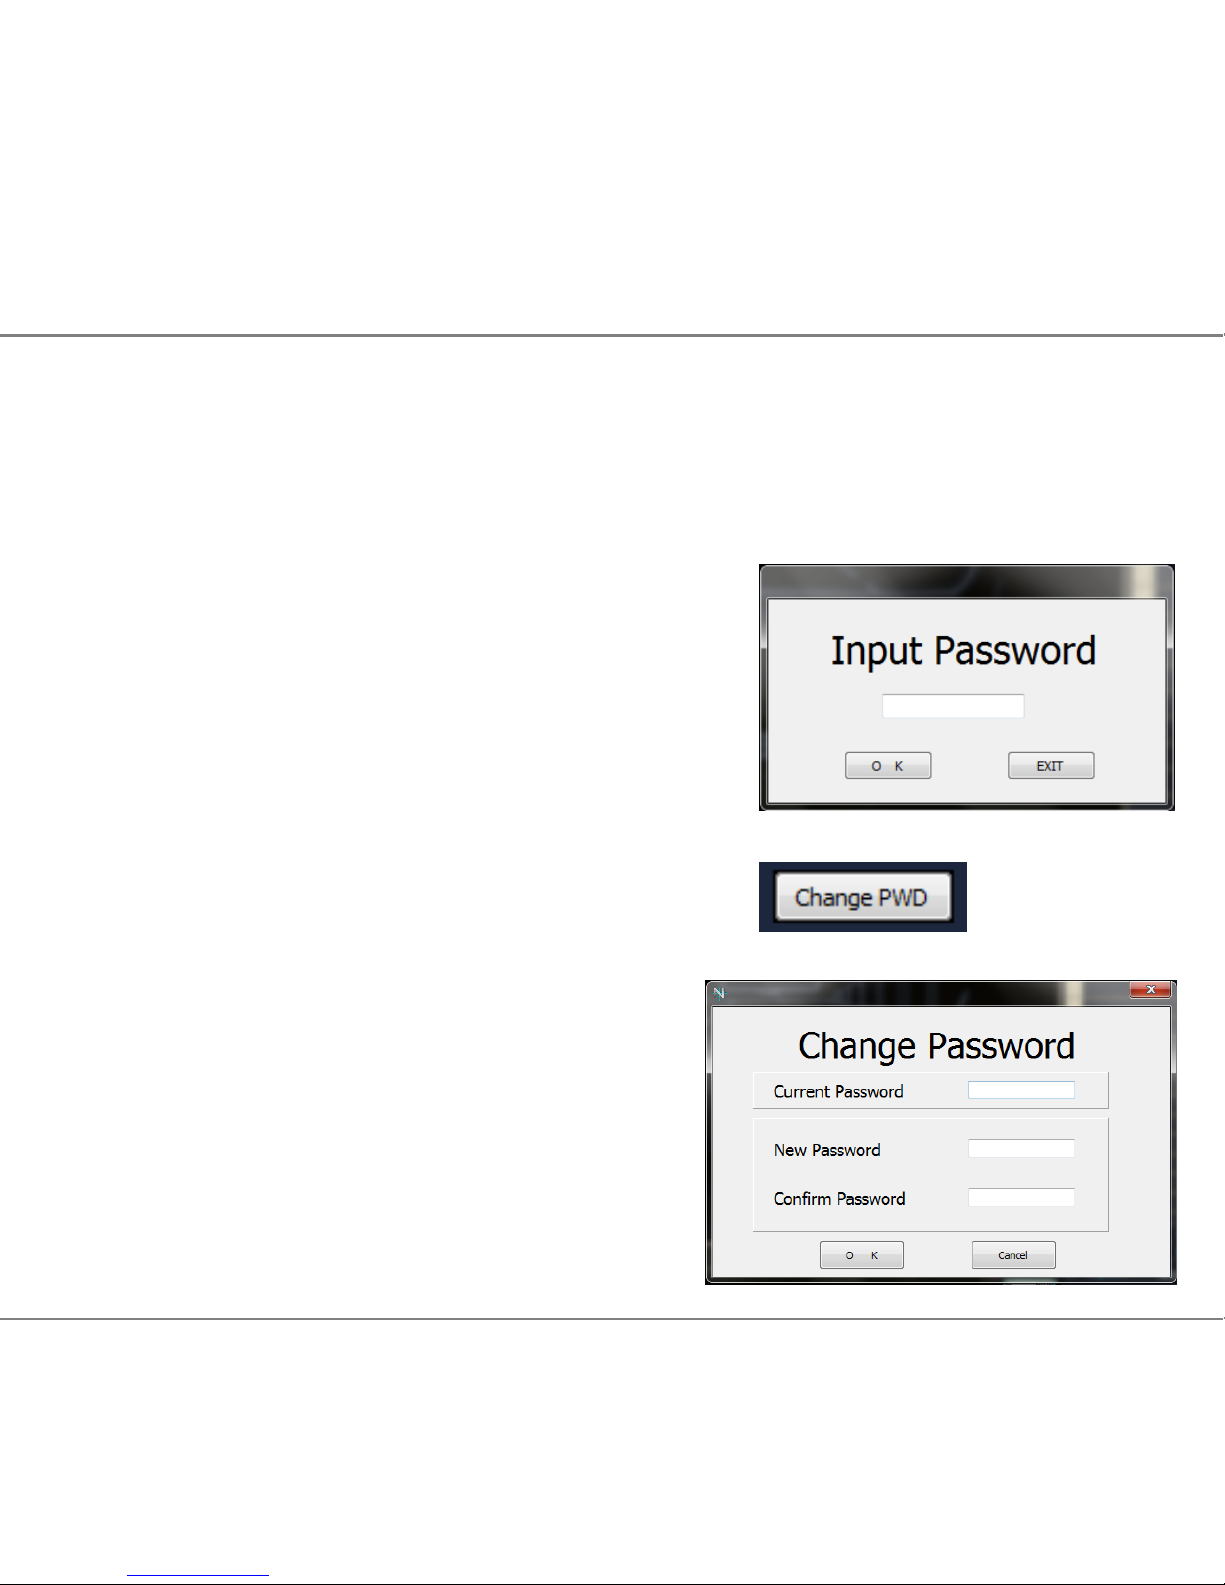
Encryption PC Player only(Password Settings)
In order to protect the recorded data being accessed by an unauthorised user, the PC
Player has a password protection function. To enter and change passwords, please follow
the below.
12.1 When entering the HD SCE 1.7
Player for the first time, leave the entry blank
and click OK. If you are running in Administrator
Mode, input 4 zero’s (0000)
12.2 To change your password, click on the
Change Password button in the PC Player.
12.3. When new window appears, input
Current / New / Confirm Password info and
click “OK” button to change password.
12.4 If the password has been forgotten,
uninstall and reinstall the PC player.
10. PC Player Password Settings
Page 21
21
8. View-i PC Player Manual
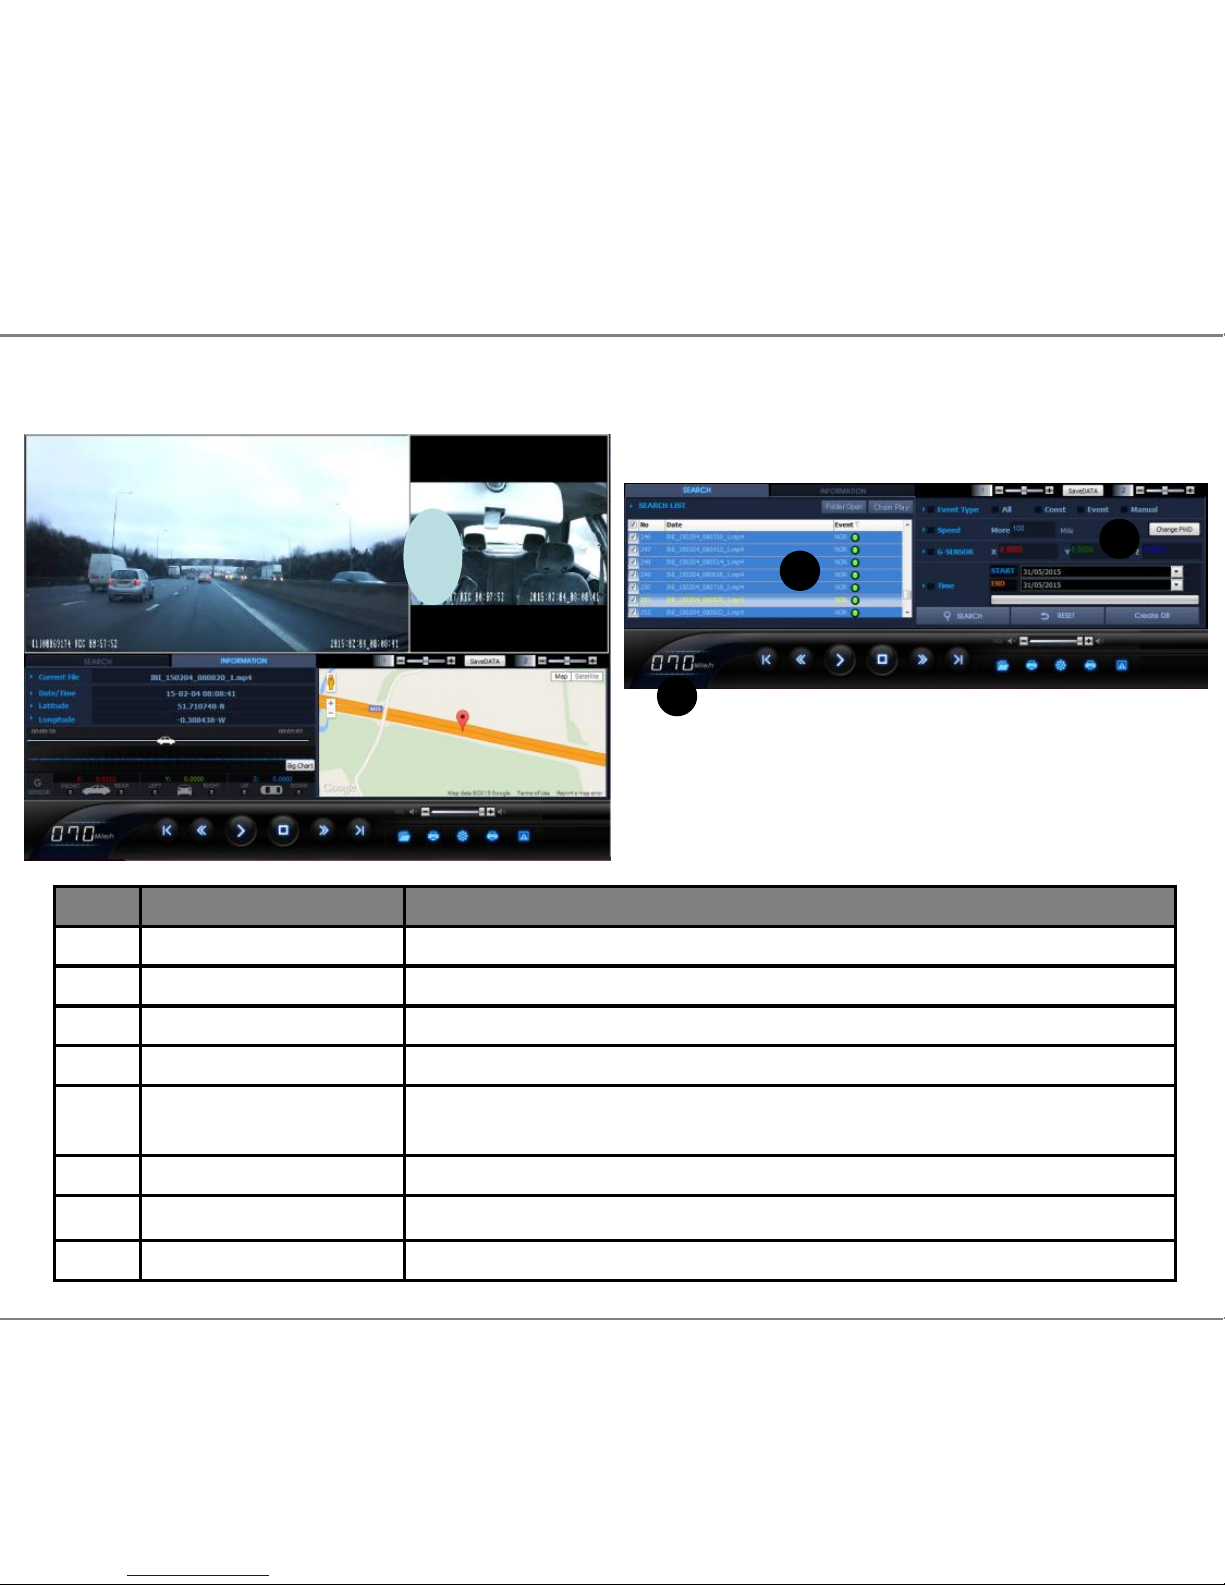
11. Playback Screen
# Name Description
1 Front Video Screen Front video play screen of designated video file
2 Rear Video Screen Interior/Second Camera screen of selected video file
3 File Information Displays file name, time and date, longitude and latitude.
4 G-Sensor Graph G-sensor data of video screen for user analysis
5 Google Map
Displays current position of the video on Goggle Maps
(Internet connection required)
6 File List List of recorded files.
7 Speedometer Shows vehicle speed.
8 Search Engine Search for specific clips with certain criteria
PC Player Playback Screen
1
2
3
4
5
6
7
8
Page 22
22
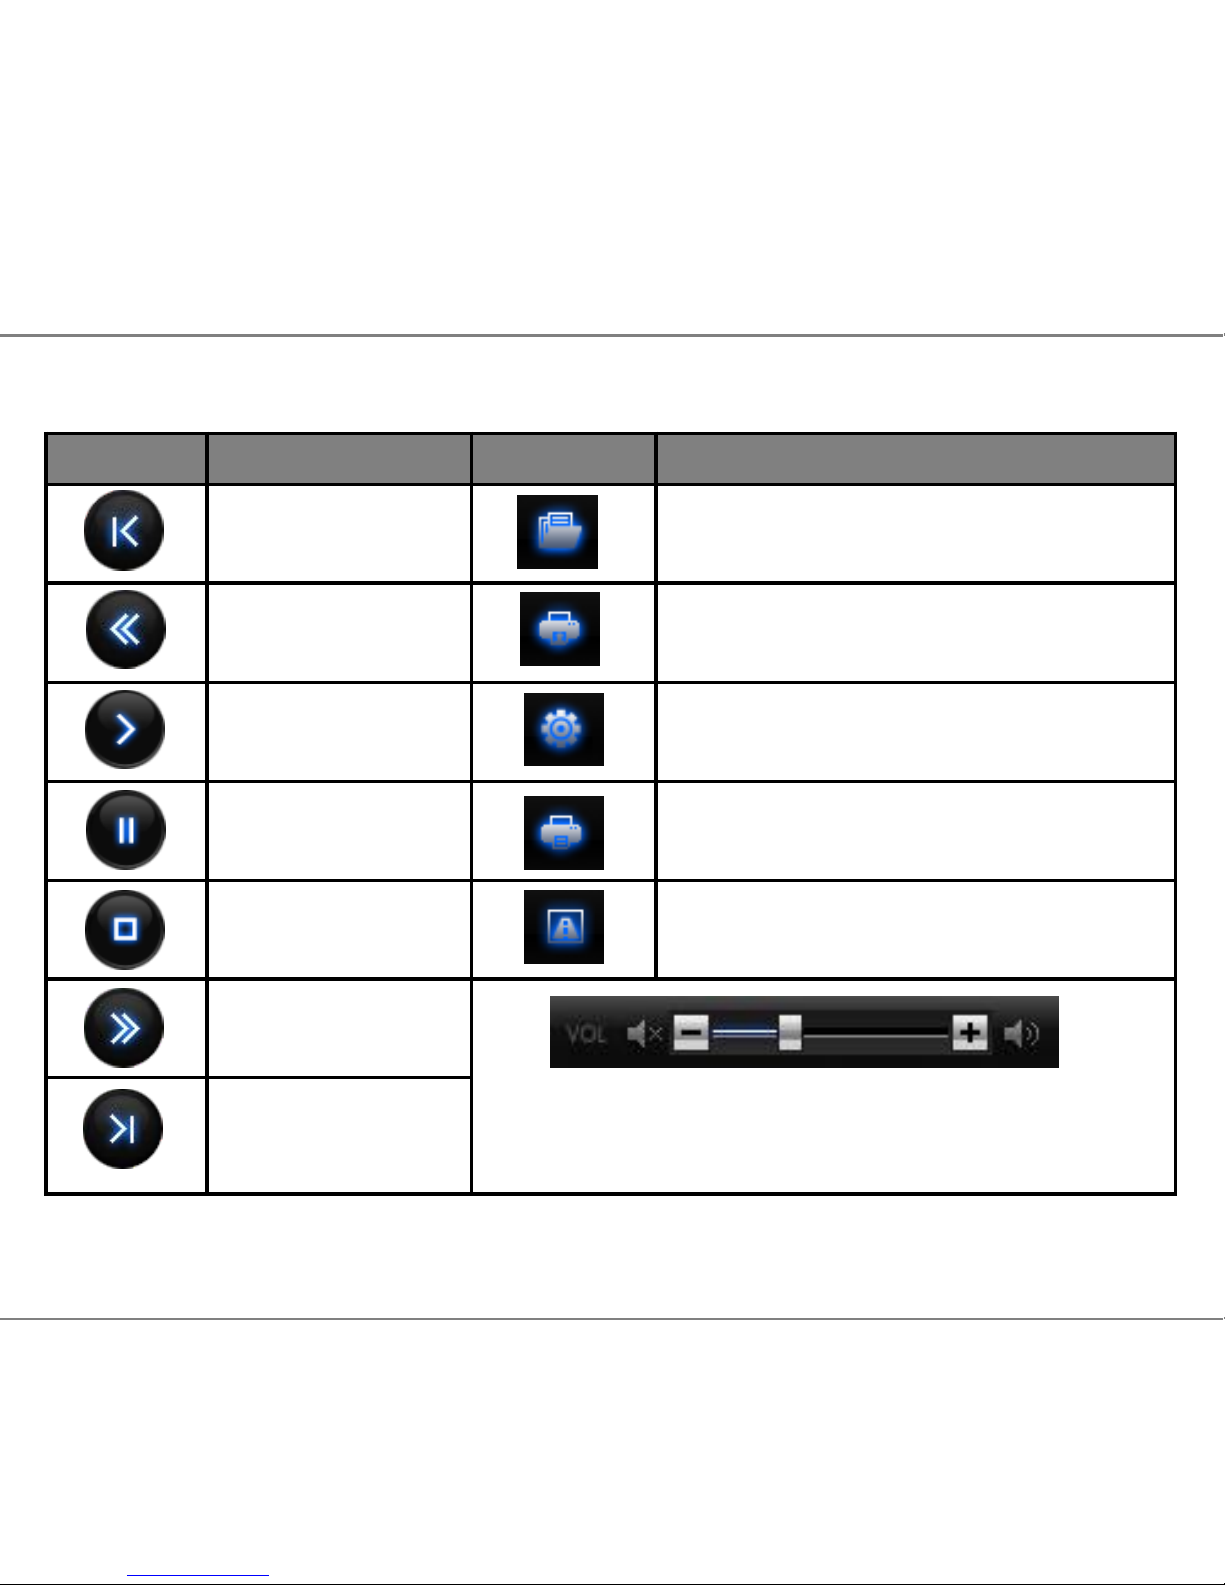
12. PC Player Button Functions
Buttons Functions on PC Player Software
Button Description Button Description
Previous File
Open 1 file
Rewind
Print Screen
Play
Settings
Pause
ECO-Drive Report
Stop
Event Report
Fast-forward
Volume Control : Video volume control with mute
function
Next File
Page 23
13. PC Player and Camera Settings
23
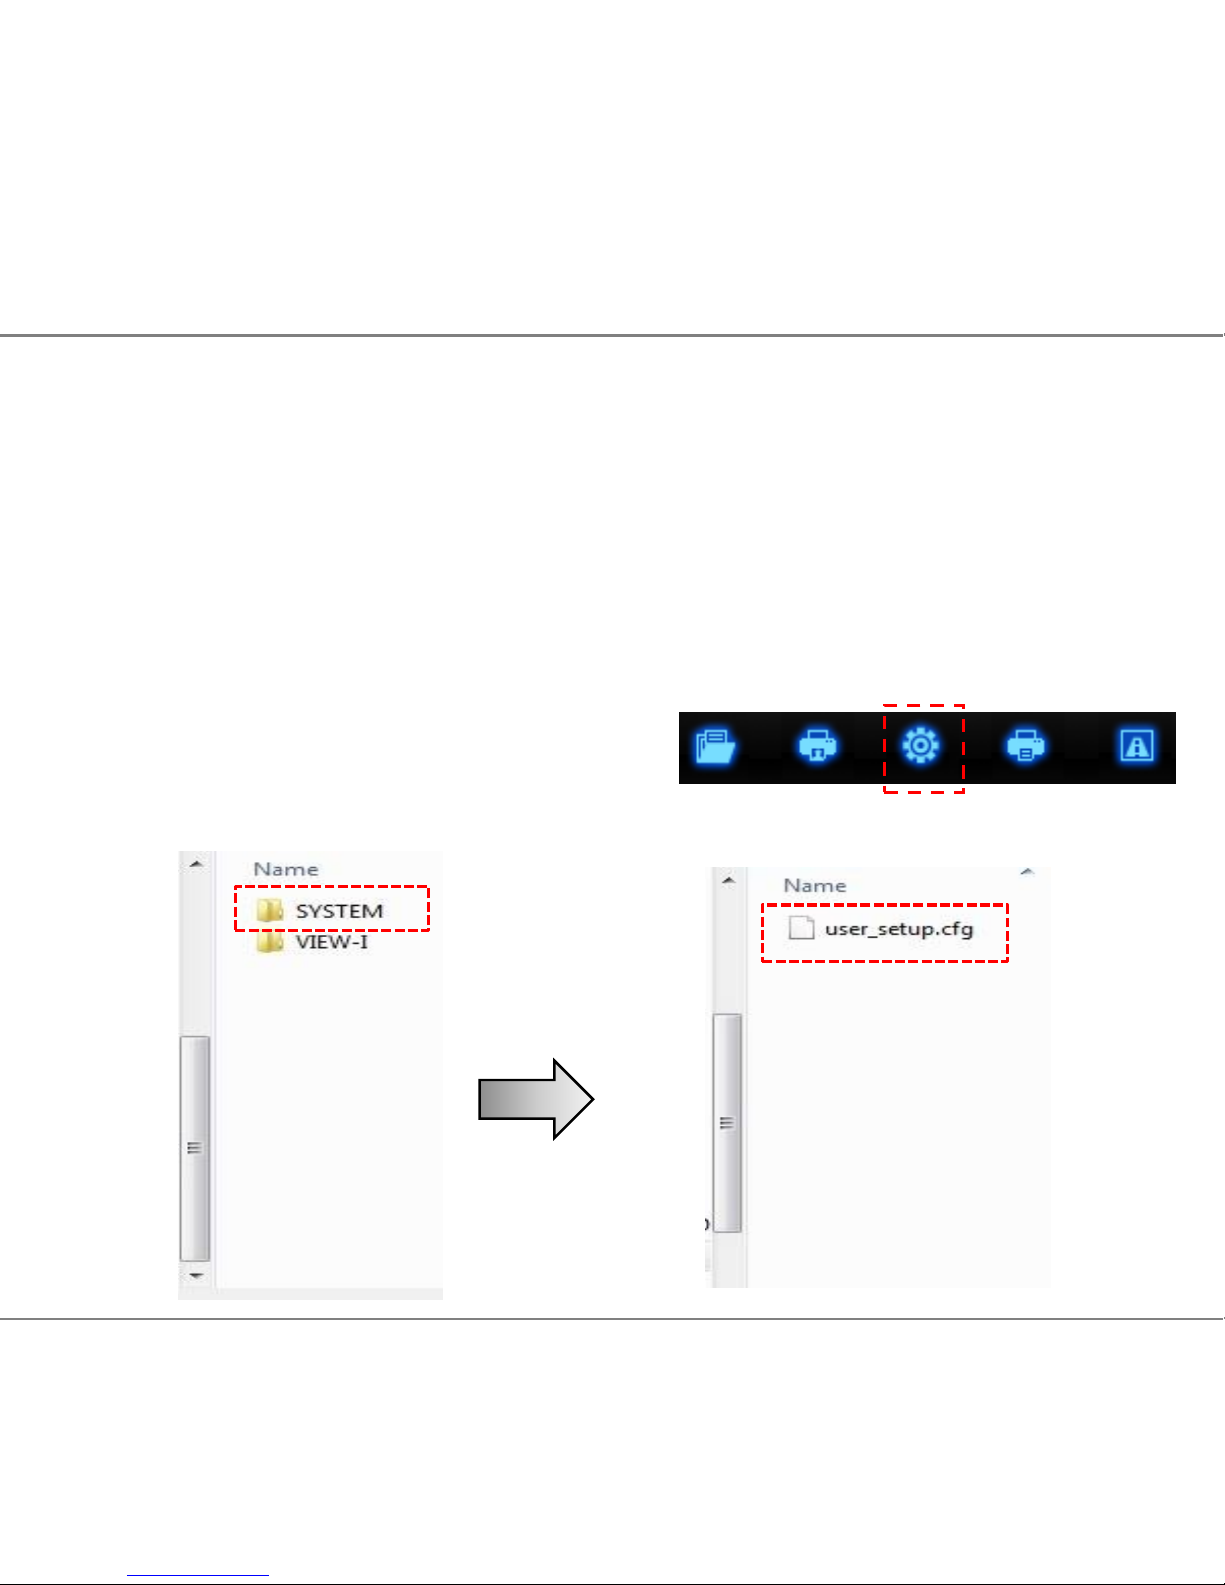
Open /Change Player and Camera Settings
Important: Check/set the Time and Date Settings during initial install to ensure
recorded data is accurate. Any changes made on the Settings in the software
must be saved in the camera. Ensure the SD card is inserted into the camera
after changes have been made and power the camera for at least 3 minutes.
15.1 Open HD PC Player.
15.2 Left click on the Settings button, bottom right hand corner of
player.
15.3 Double click on the SD card drive.
15.4 Double click on System folder.
15.5 Double click on user_setup.cfg file, the Setting box will appear.
Page 24
13. PC Player Settings - Express
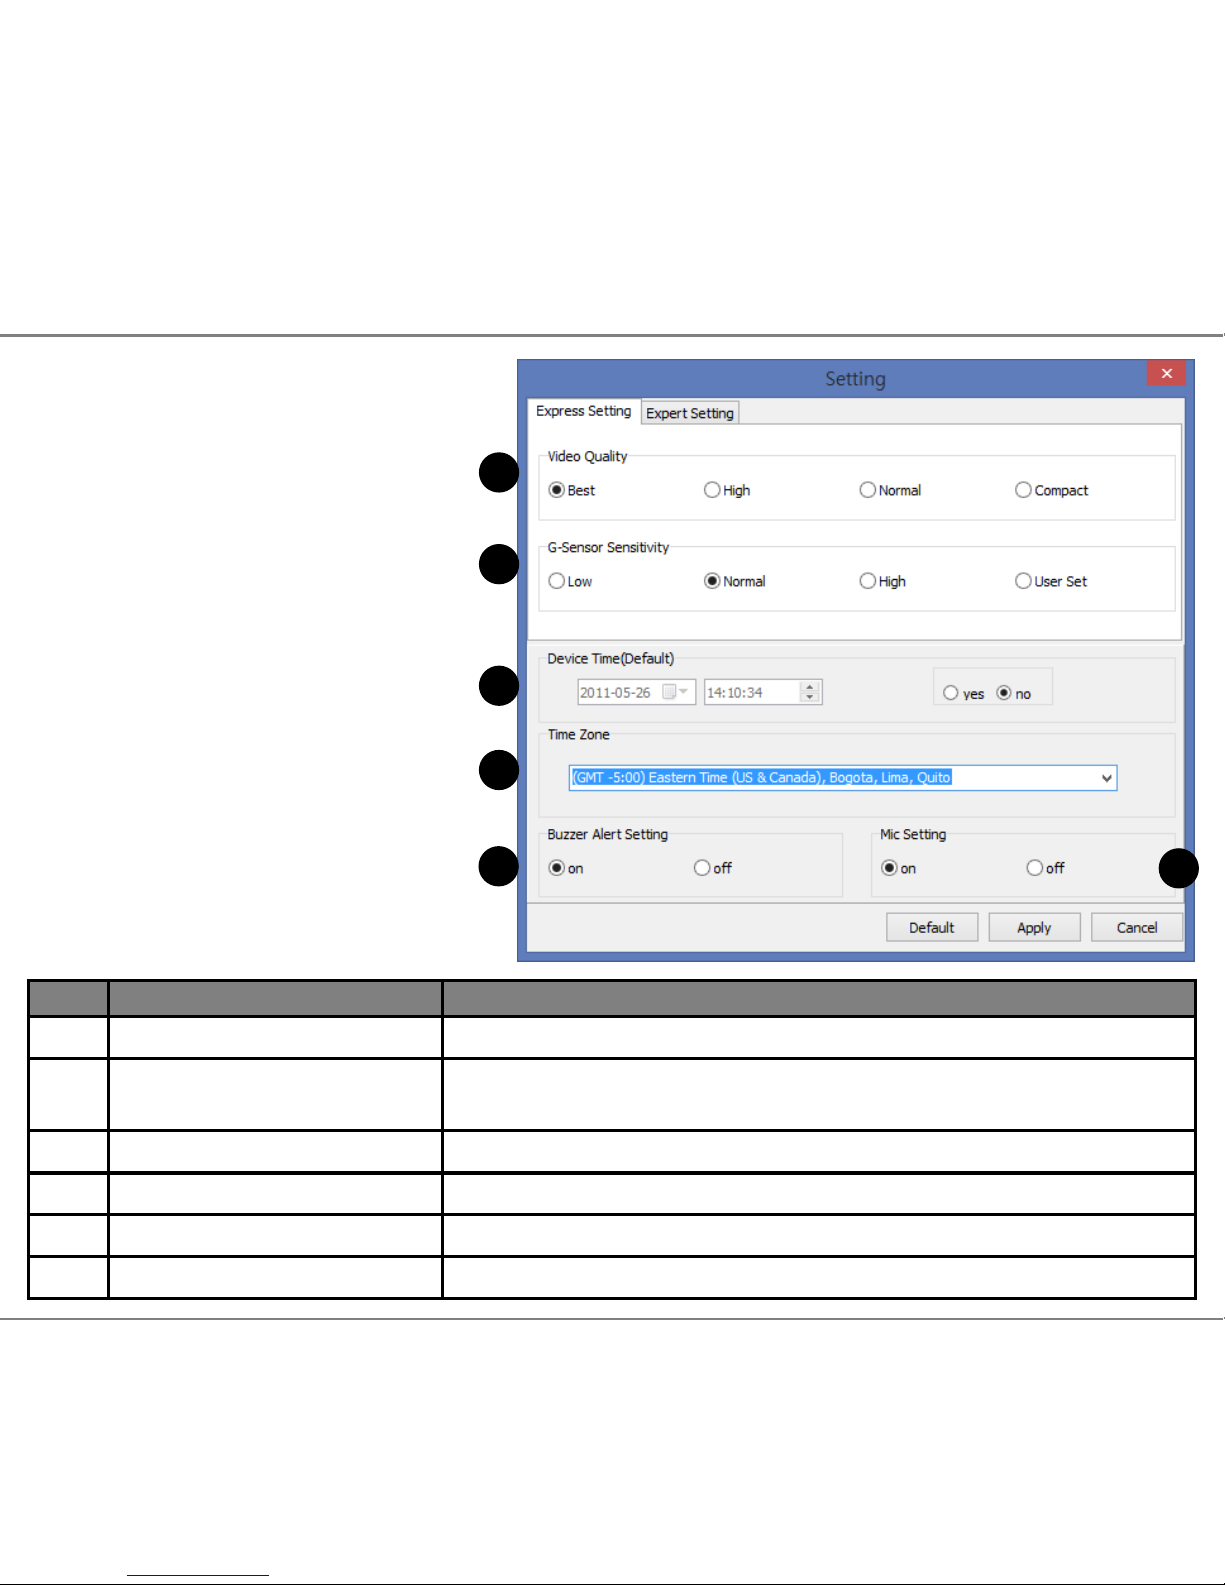
Express Settings
Adjust camera and PC Player
settings.
Important: Any adjustments
made must be saved on the
SD card and camera.
Click “Apply” button save
Settings to the card.
Re-insert SD Card into the
camera to upload the changes
# Name Description
1 Video Quality Higher quality settings will use more memory
2
G-Sensor
Sensitivity
G-Sensor sensitivity select
(Low = sensitive / High = Dull)
3 Device Time Set Date and Time
4 Time Zone Set location of user
5 Buzzer Alert Setting Turn audio alert sounds Off/On
6 Mic Setting Turn audio recording Off/On
2
3
4
5
1
6
24
Page 25
25
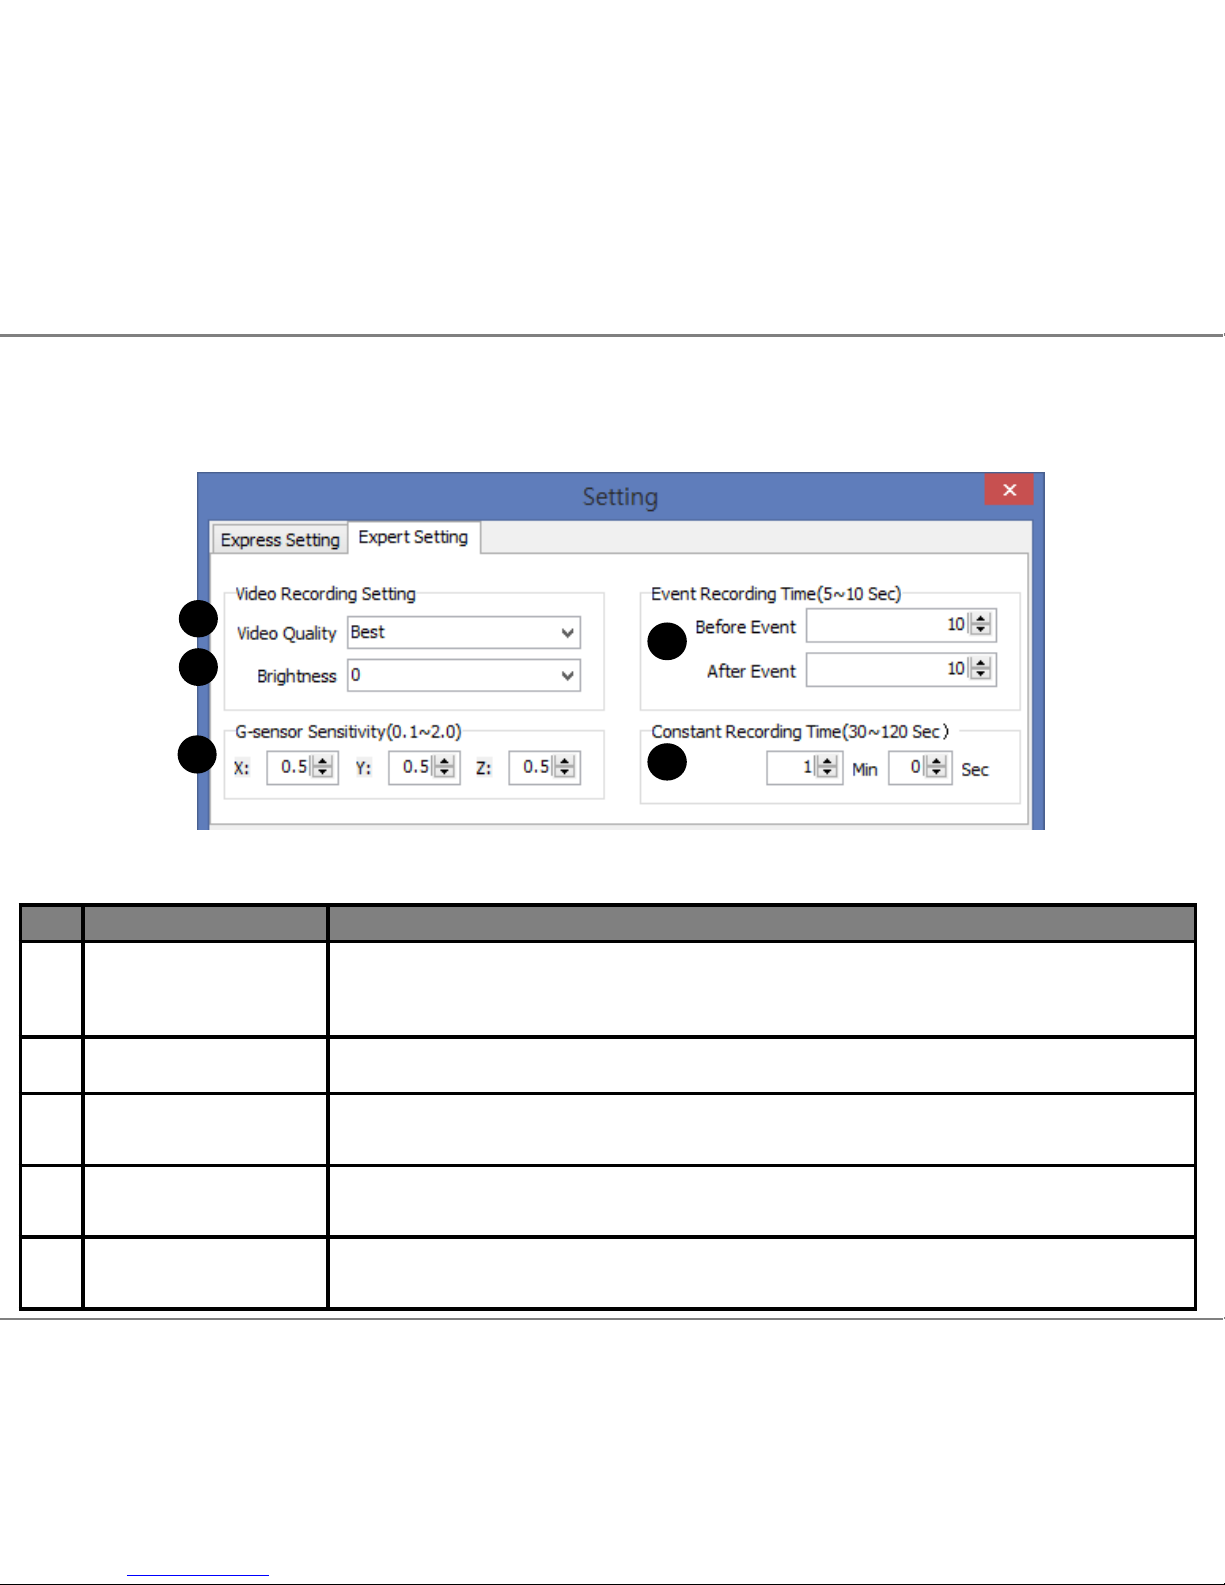
13. PC Player Settings - Expert
Expert Settings
Only use Expert setting if you are an advanced user.
# Name Description
1 Video Quality
Best: 2M@VGA 30fps / Good: 2M@VGA 25fps
Normal: 2M@VGA 15fps / Compact: 2M@QVGA10fps
2 Brightness (Dark)-4 ~ +4(Bright)
3
G-Sensor
Sensitivity
0.1~2.0 (Low=sensitive / High=dull)
4
Event
Recording Time
10 sec before and 5~20 sec after event trigger
5
Constant
Recording Time
30sec~2min per clip
1
2
3
4
5
Click “Apply” button and re-insert SD Card to the device to save the changes
Page 26
26
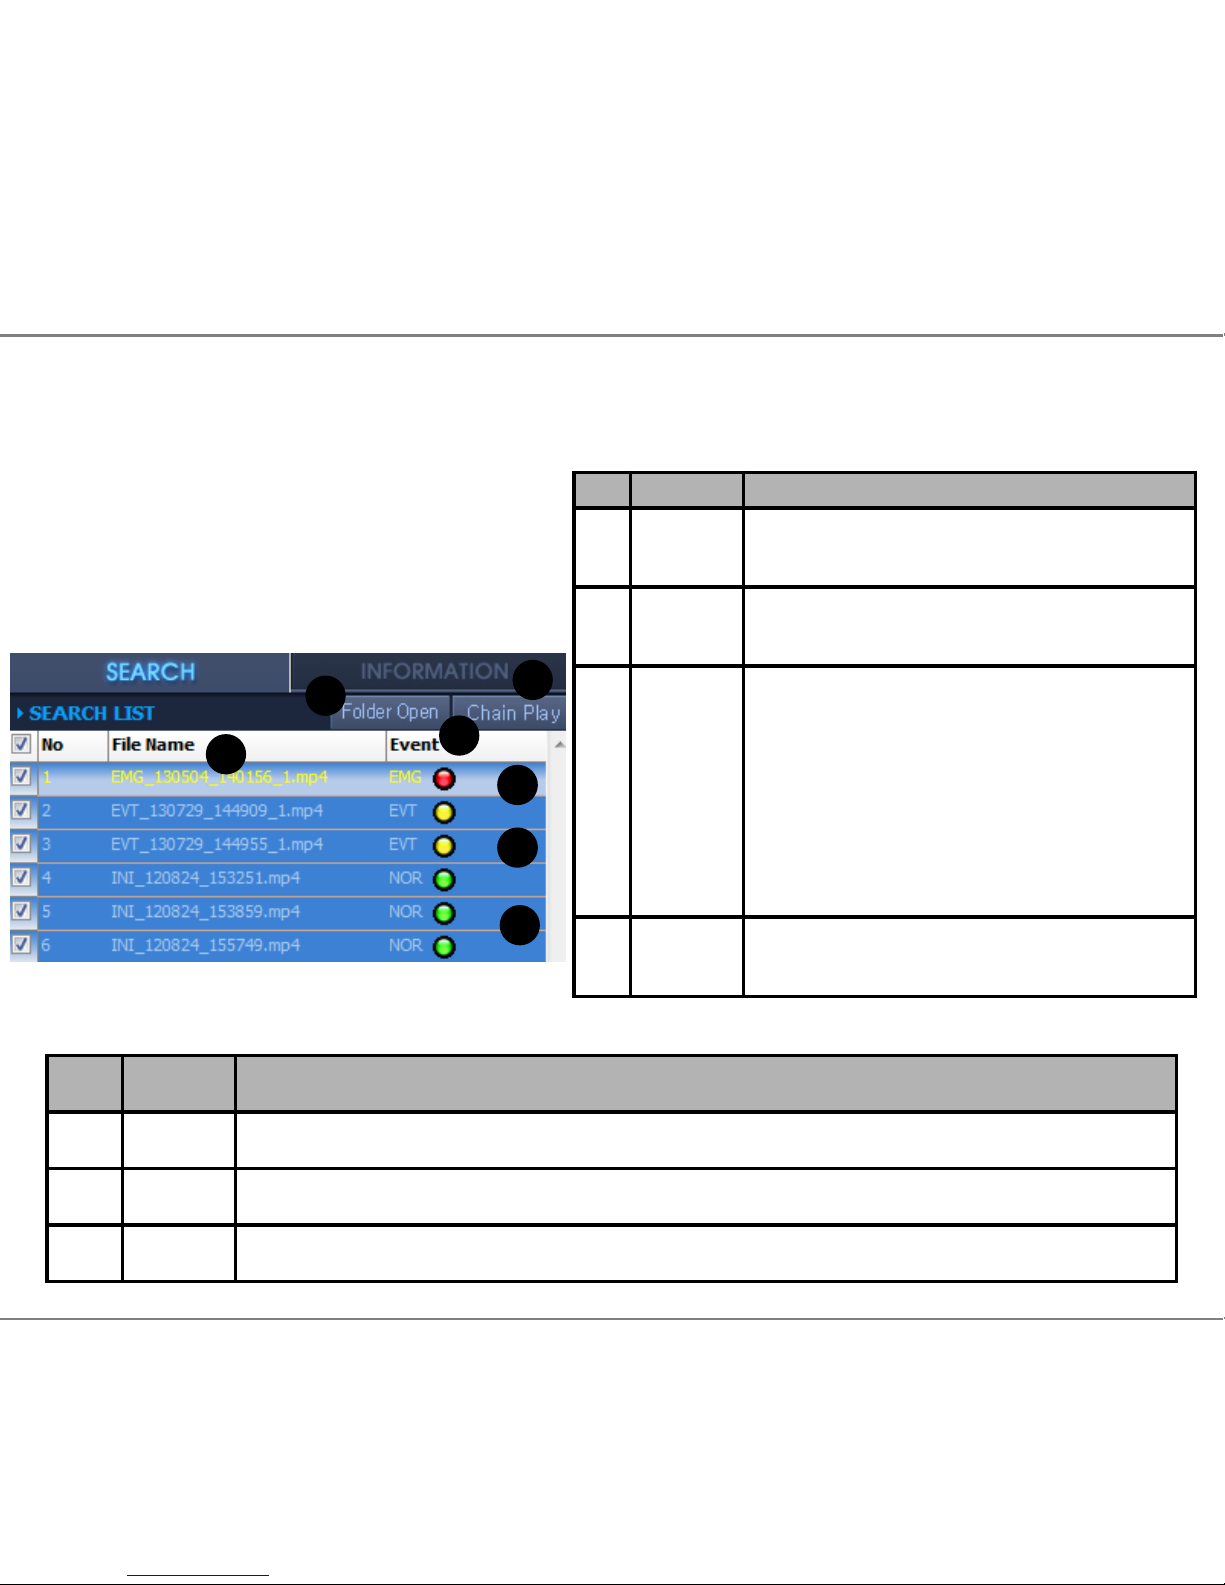
14. PC Player – Search List Screen
# Name Description
5 NOR Constant recording files display as “NOR”
6 EVT G-Sensor triggered recording files display as “EVT”
7 EMG Manual button triggered recording files display as “EMG”
Search and Play List Screen
The Search List screen is the main navigation screen. Upload data from
SD cards, select files to view
recordings.
1
2
3
4
5
6
7
# Name Description
1
Folder
Open
Open recorded clips on
SD card
2
Chain
Play
Play button for continual
playing of checked listed files
3
File
Name
File name consist of date/time
of recordings
EMG,EVT,INI : Recording type
eg. EVT_130729_144909.mp4
130729 : 29/07/13 (date)
144909 : 14:49:09 (time)
4
Event
Type
Displays recording type
Page 27
27
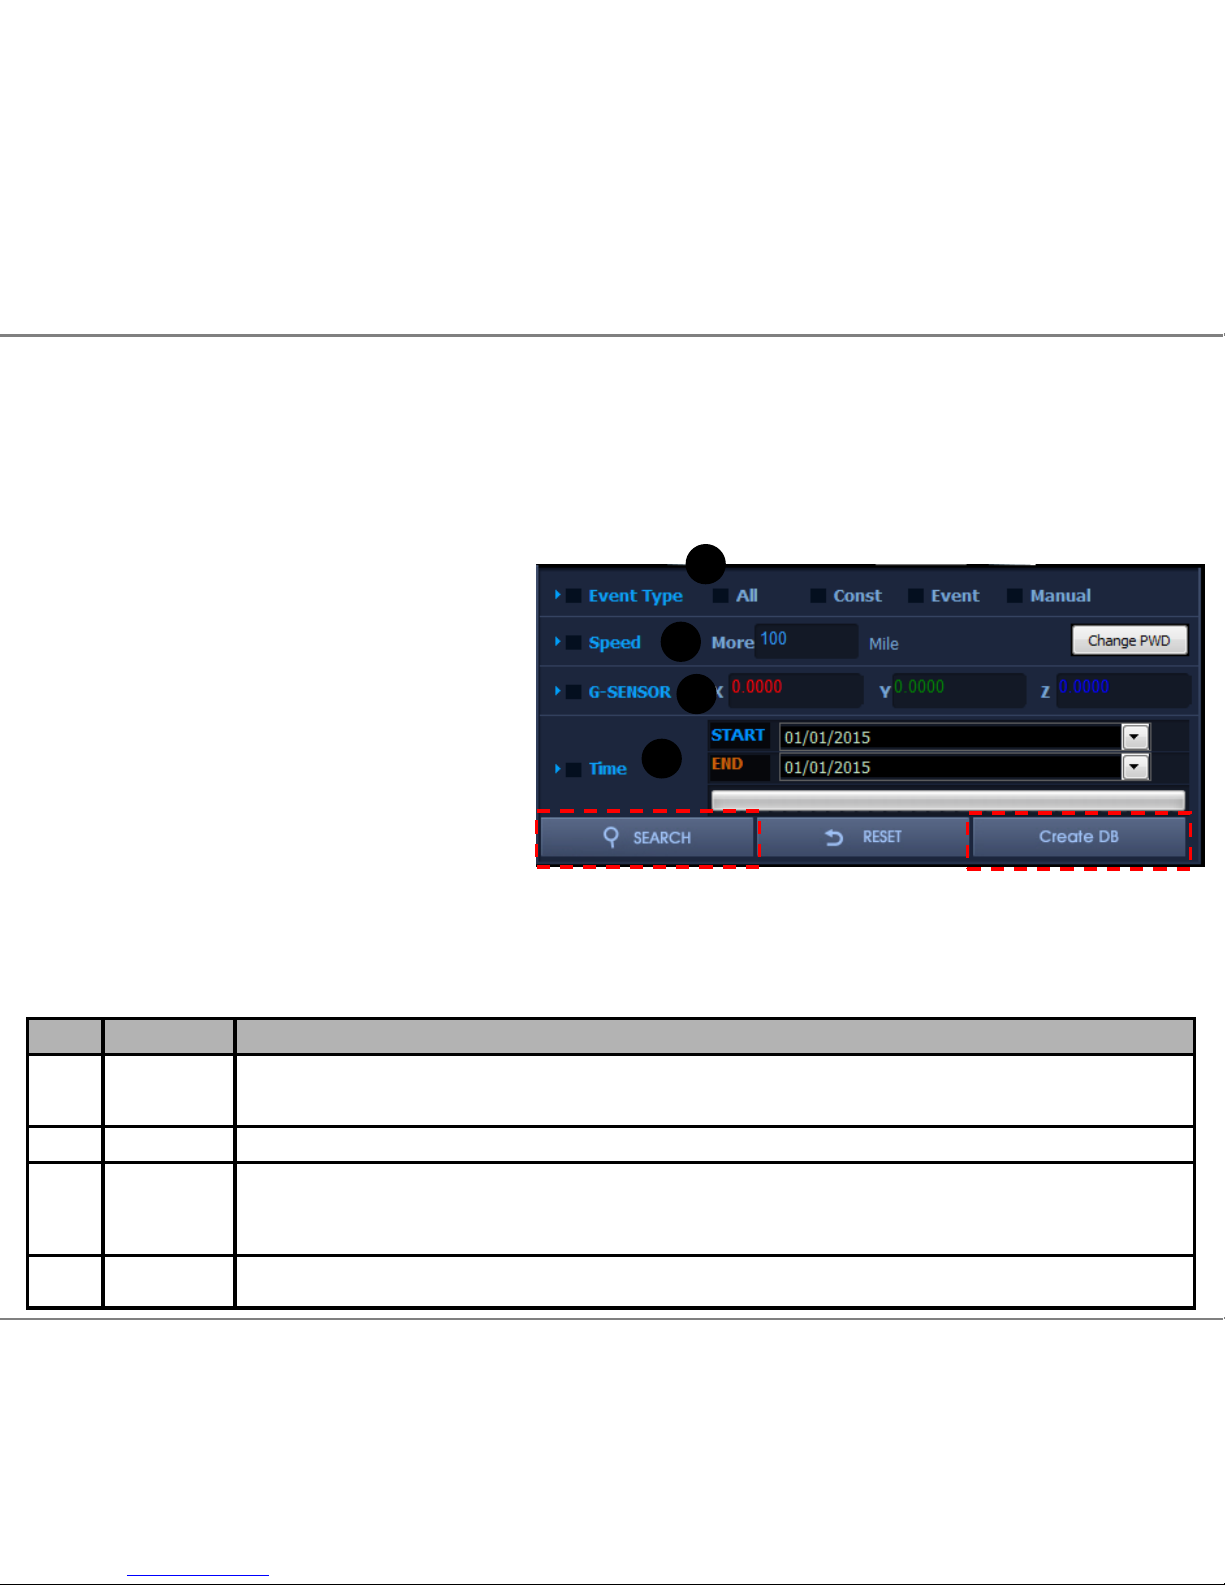
15. PC Player – Search Engine
Create and Search Database
The in-built search engine can catagorise the recorded data to allow users
search specific criteria such as Speed, G-Senor etc, saving time filtering
through hours of data.
17.1 Import data from the SD card
to the Search List screen.
17.2 Click on “Create DB”.
*Database must be created before
searching.
17.3 Set the search criteria and
click on the “SEARCH” button.
17.4 List of matched data will
appear in Search List.
17.5 Click on “Chain Play” to play
searched file or double click on
desired clip.
# Name Description
1
Event
Type
Select recording type to filter videos with selected recording type
2 Speed Input speed value to filter videos above selected speed value
3 G-Sensor
Input X/Y/Z G-sensor values to filter videos above selected
G-sensor value
4 Time Input time value to filter videos within time section
1
2
3
4
Page 28
28
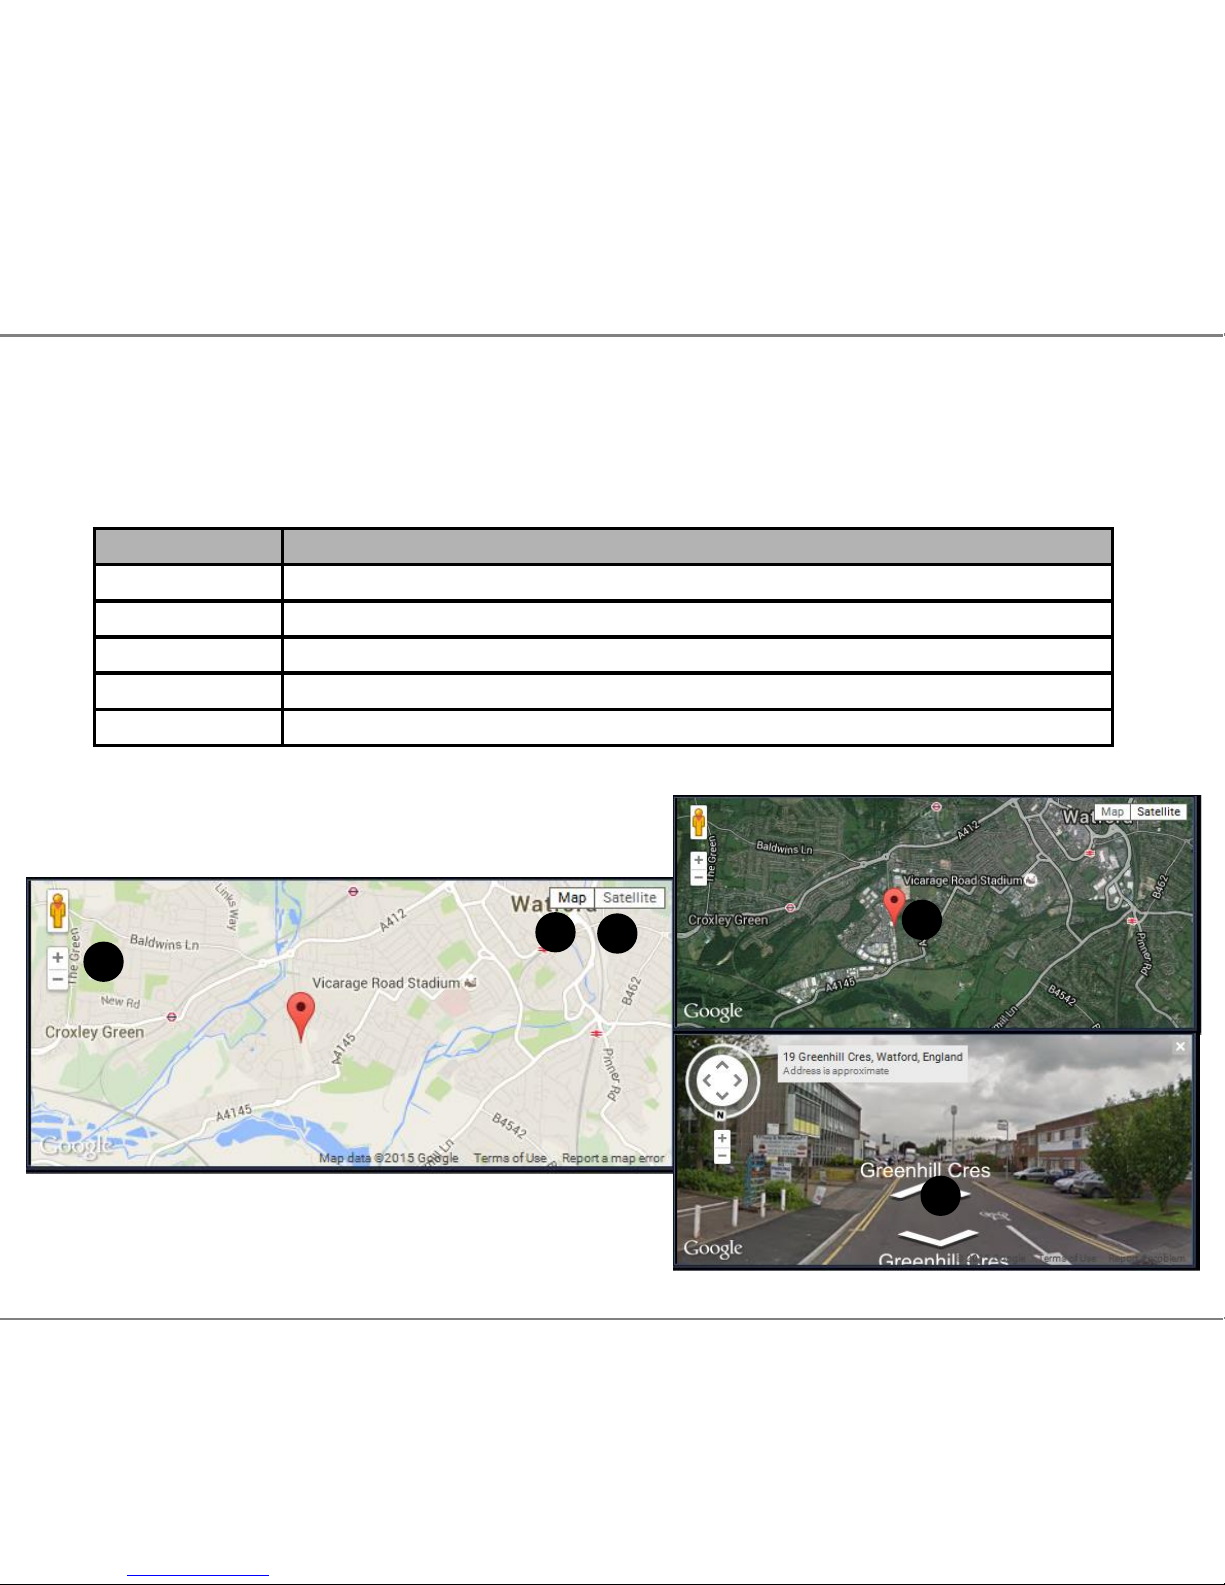
16. PC Player – Google Map
Google Map Interface
The PC Player supports Google Map interface. User must have internet connection to view
Google map data.
Number Description
1 Adjust Map size: + : Zoom in - : Zoom out
2 View Mode: Map
3 View Mode: Satellite
4 View Mode: Street
5 Current Position
1
2
3
4
5
Page 29
29
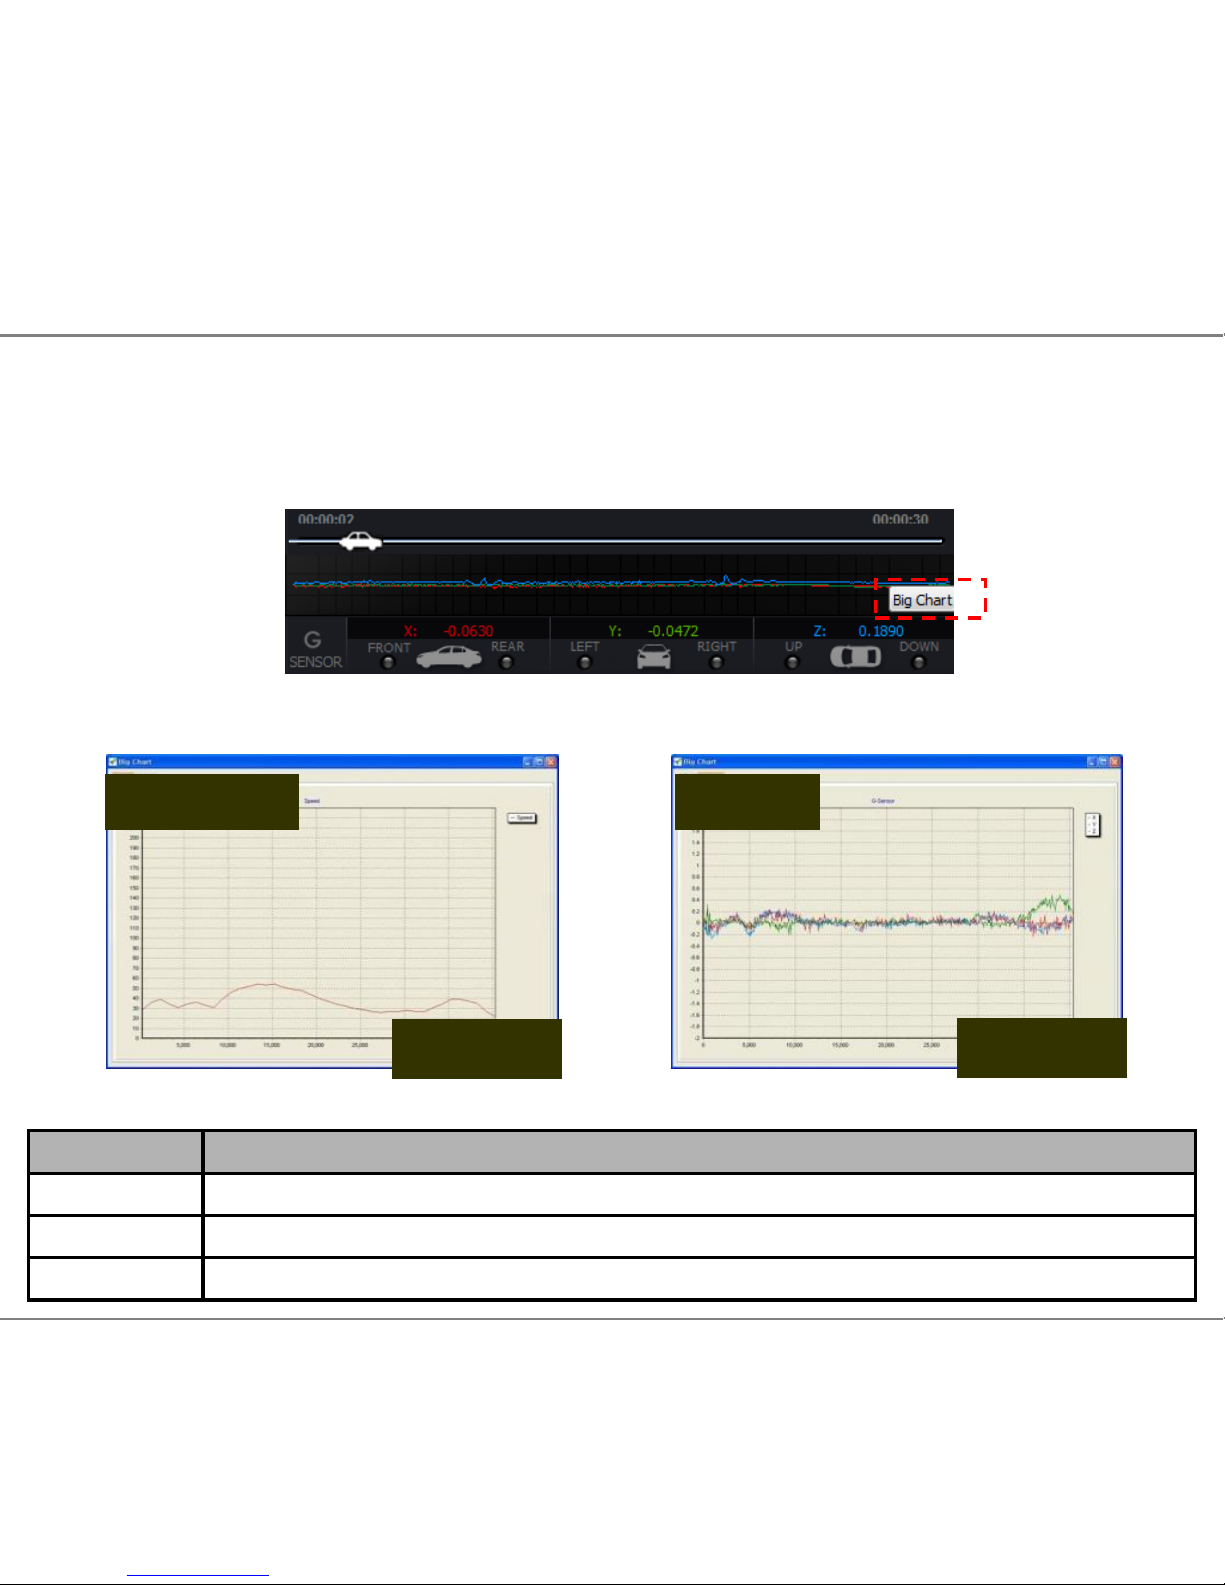
17. PC Player – Speed / G-Sensor
Speed and G-Sensor Reports
HD PC Player can generate detailed reports of recorded speed
and G-Force impact data. These reports can be used for analyzing the driver’s driving patterns.
20.1 Click on “Big Chart” button in the G sensor screen to display below screens.
Speed (MPH) G sensor
Play Time
Play Time
Speed
G-Sensor
Axis Description
X-Axis Display Vehicle’s X axis movement - Quick Start / Quick Stop
Y-Axis Display Vehicle’s Y axis movement - Quick Turns
Z-Axis Display Vehicle’s Z axis movement - Up/down movement
Page 30
30
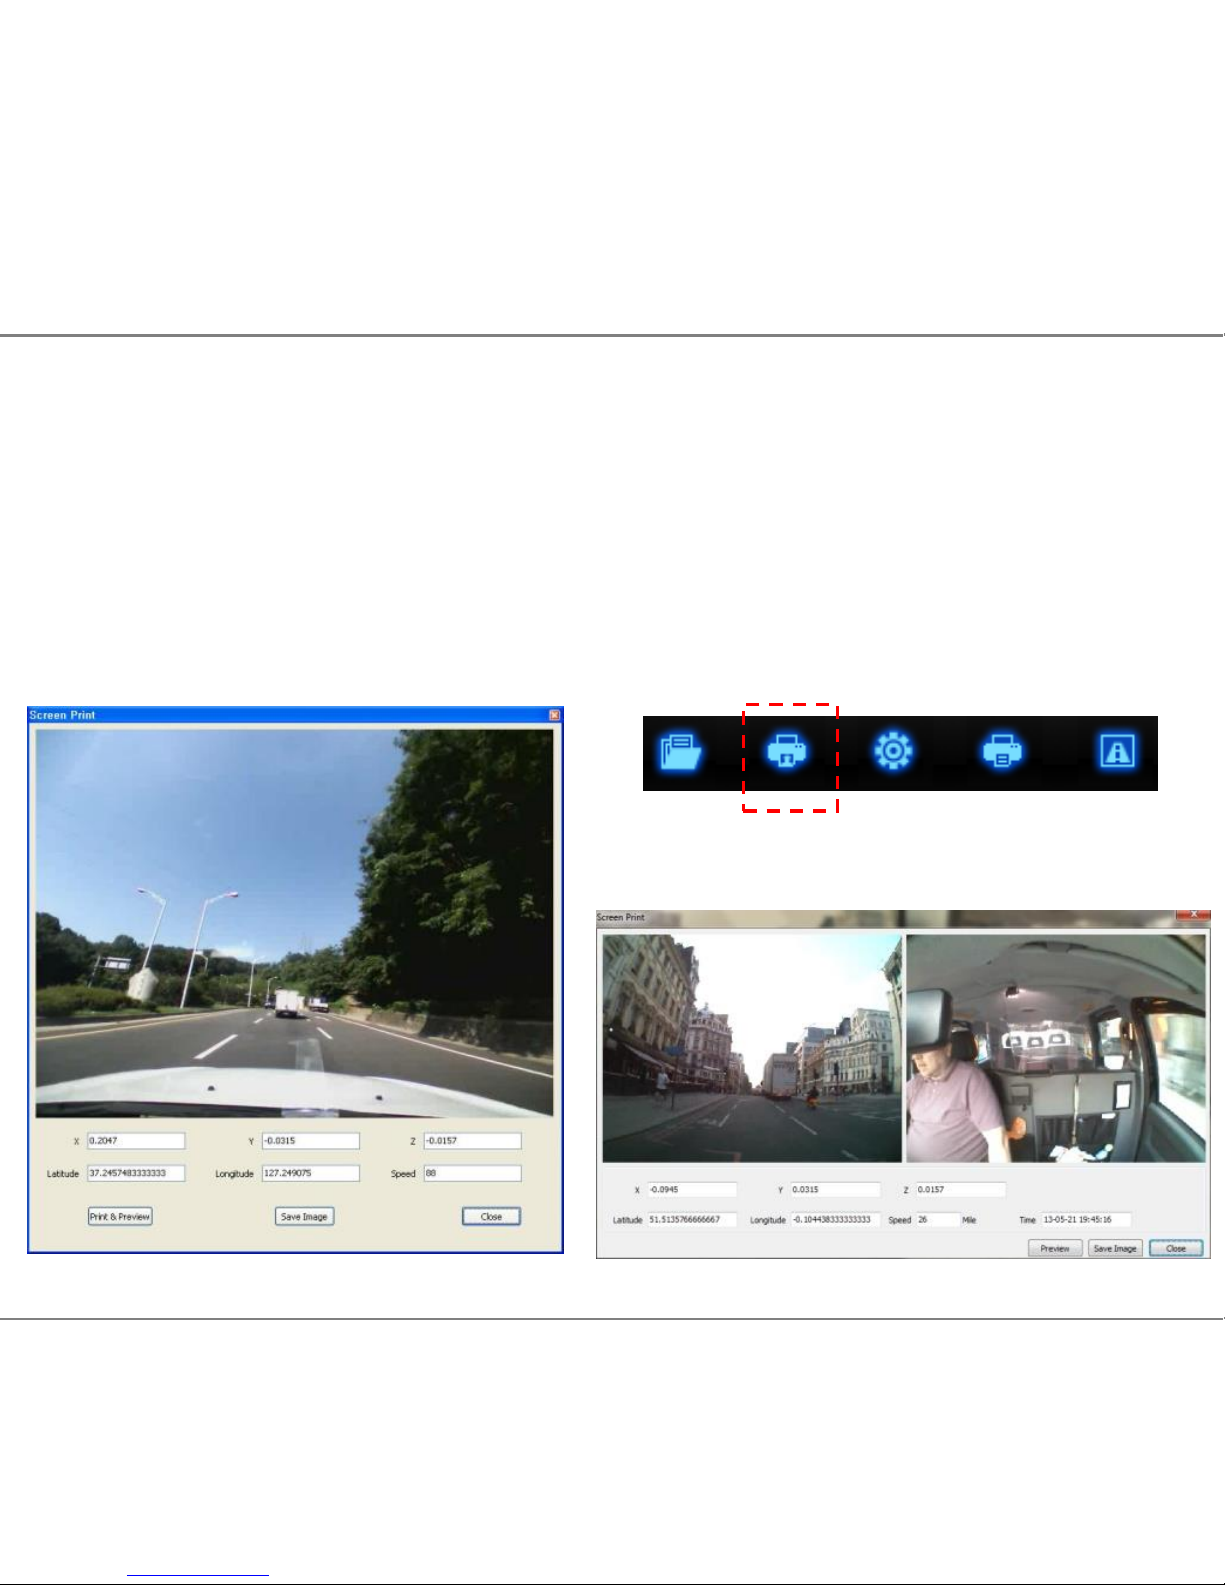
18. PC Player – Screen Capture
Screen Capture Print/Save
This function allows users to take screenshots of a incident or e.g. a number plate. The data
can be easily be emailed as a detailed report along with location and G-Force data
21.1 Click on Screen Print to capture the picture.
1
2
SSL Silver software
SSL Ruby software
Page 31
31
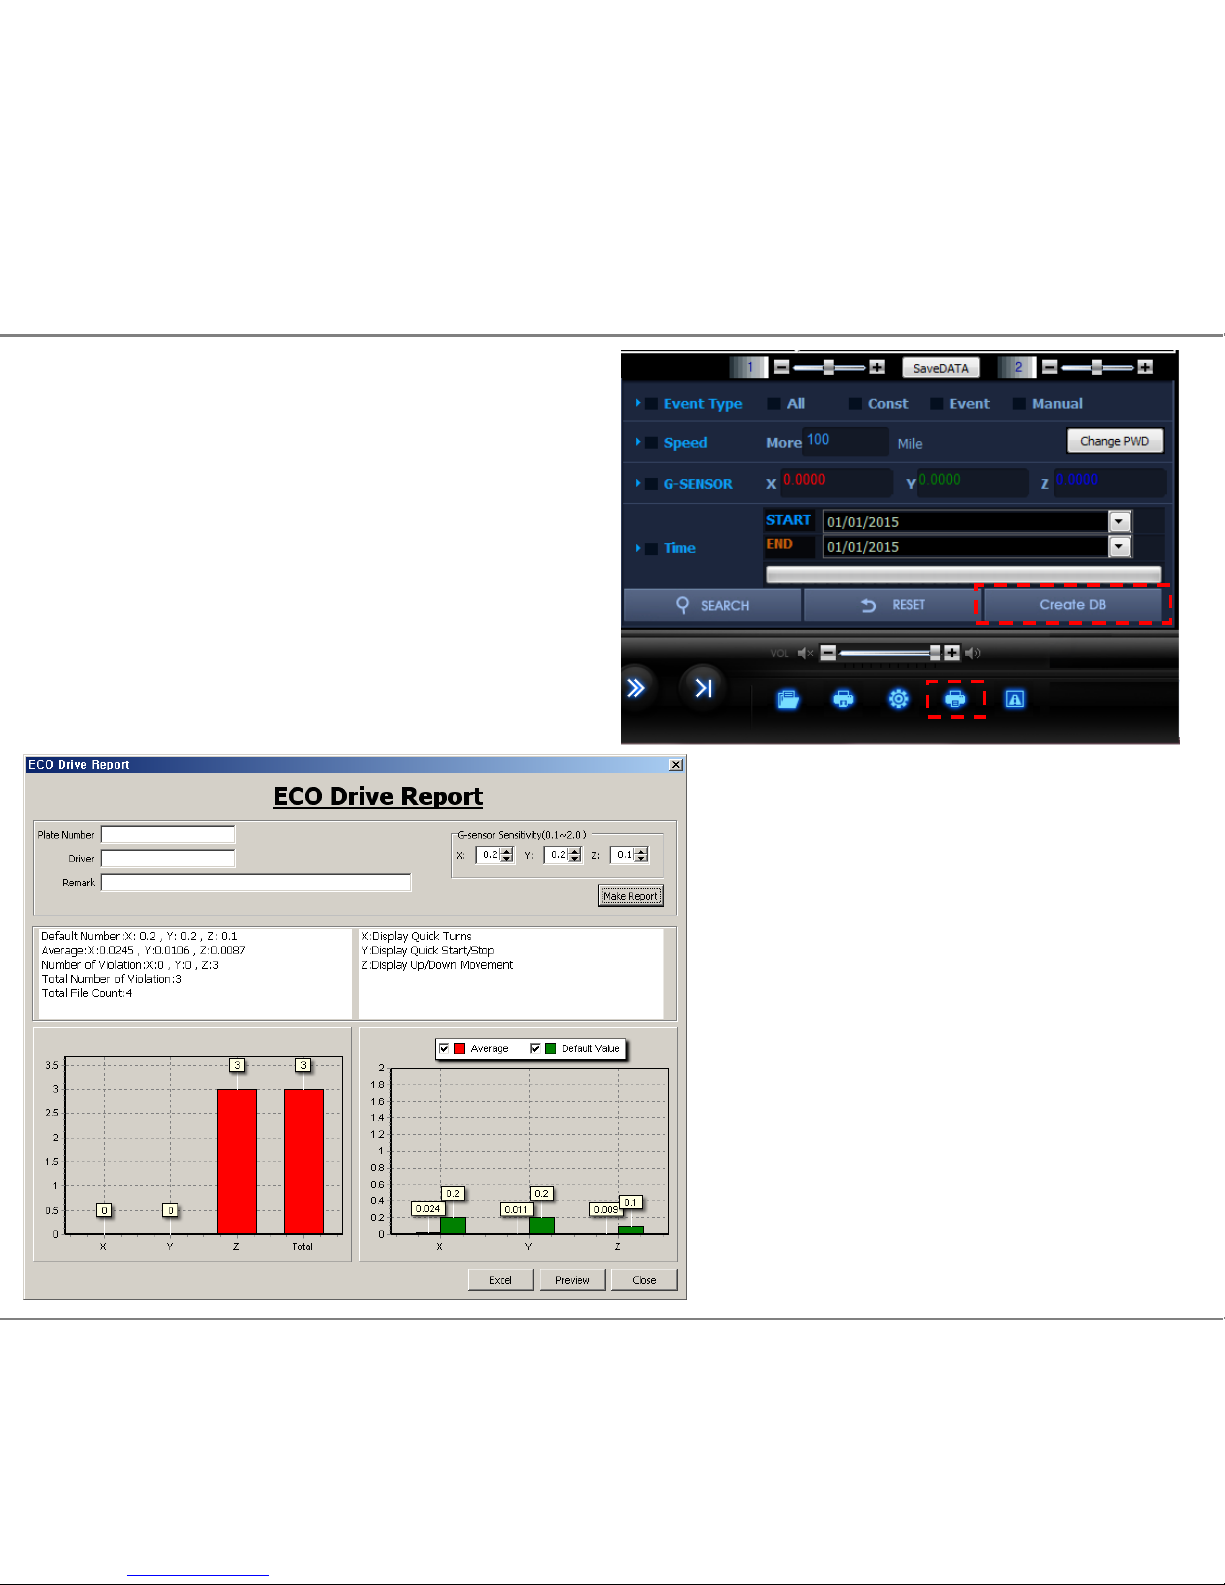
19. PC Player – ECO Driver Report
ECO-Driver Report
This report can provide information on
the drivers driving behavior and bad
habits. It can advise on how good or
bad a driver is by scoring the recorded
data.
21.1 Import data from the SD card to
the Search List screen.
21.2 Click on “Create DB”.
21.3 When database complete, click on
Data Print.
21.4 Input basic user information
and click on “Make Report” to generate
the drivers report.
21.5 Click on “Excel” to create the
report in Excel format.
Page 32
32
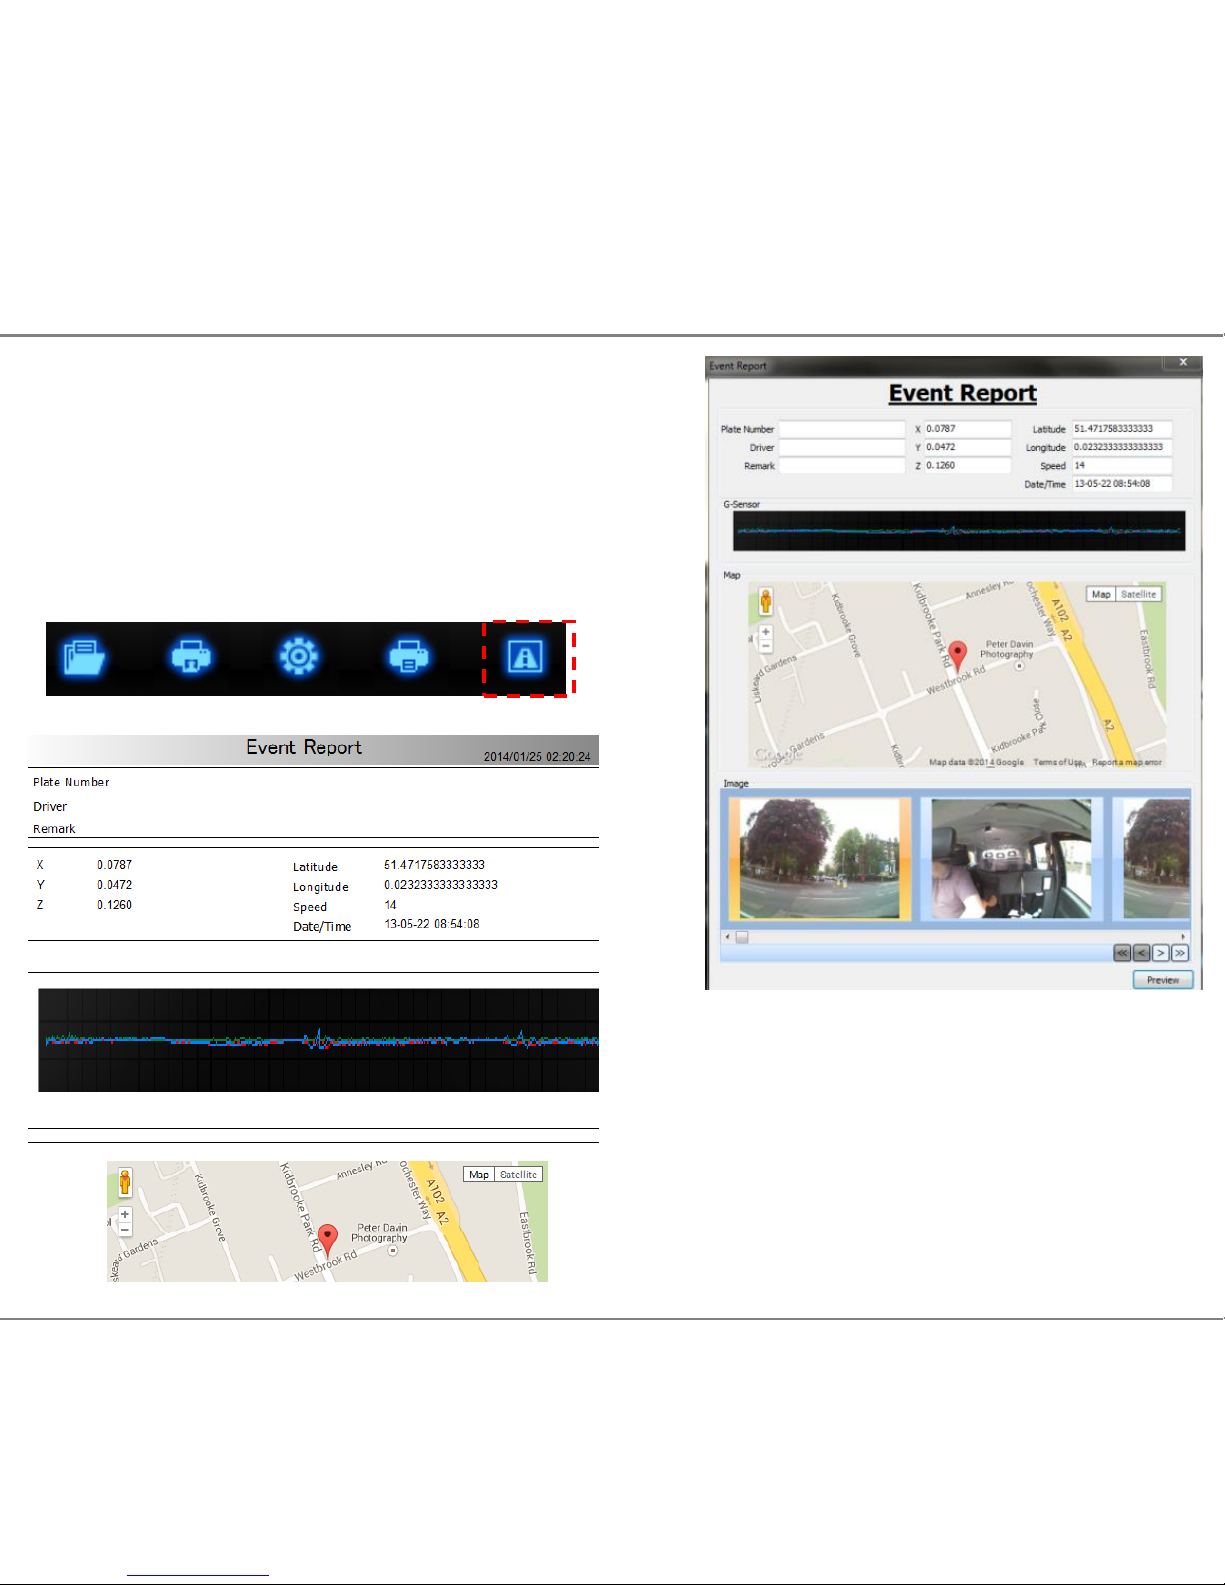
20. PC Player – Event Report
Create an Event Report
This function allow users to take 4 screenshots of the
build up to the incident. The data can be easily be
emailed as a detailed report along with location and GForce data.
22.1 Click on “Event Report”
22.2 Click on the “Add” button to save 4
screenshots. Then click on the “Next” button.
22.3 Input basic information and click on
“Preview” button to create the report.
Page 33
33
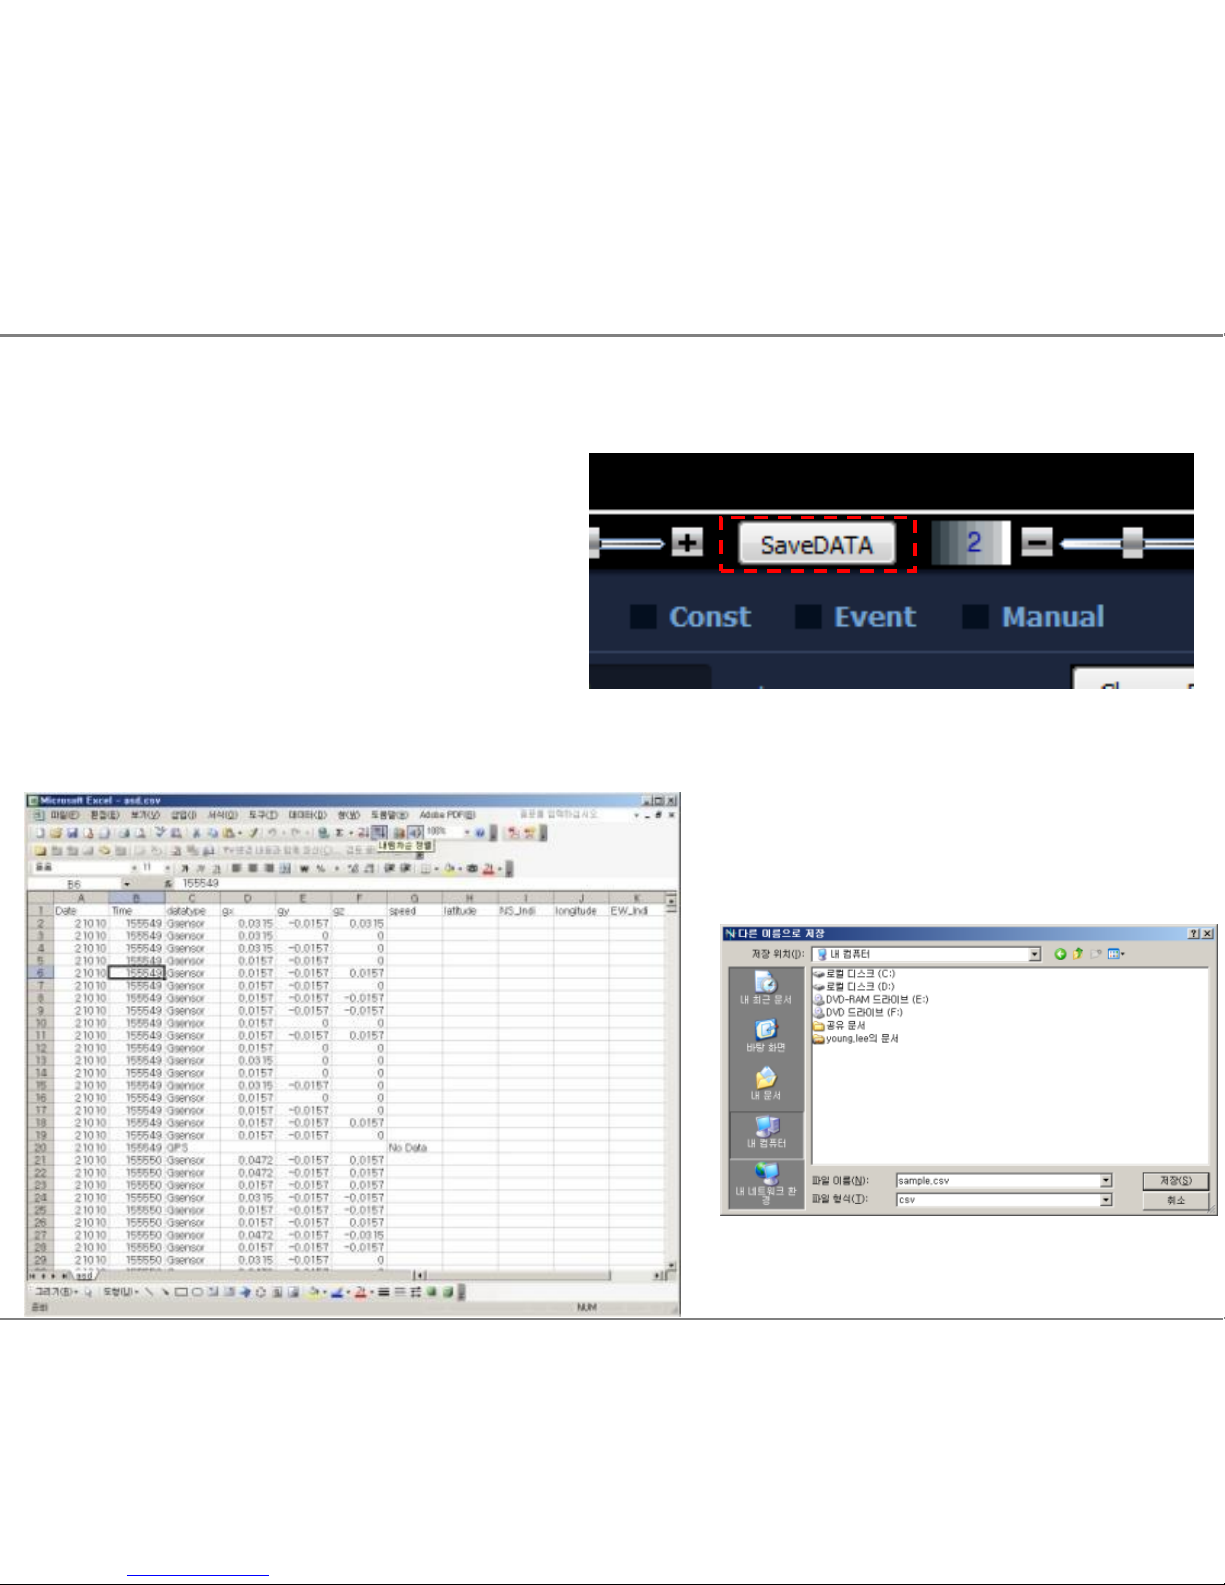
GPS and G-Sensor Data Export
This function will export the recorded GPS and G-Sensor shock data into
Excel format.
23.1 Import data from the SD card to
the Search List screen.
(See pages 13 & 14, 4.3 onward)
23.2 Click on “Create DB”.
23.3 Click on “Save Data”
23.4 Select location and save the CSV file.
21. PC Player – GPS Data Report
Page 34
34
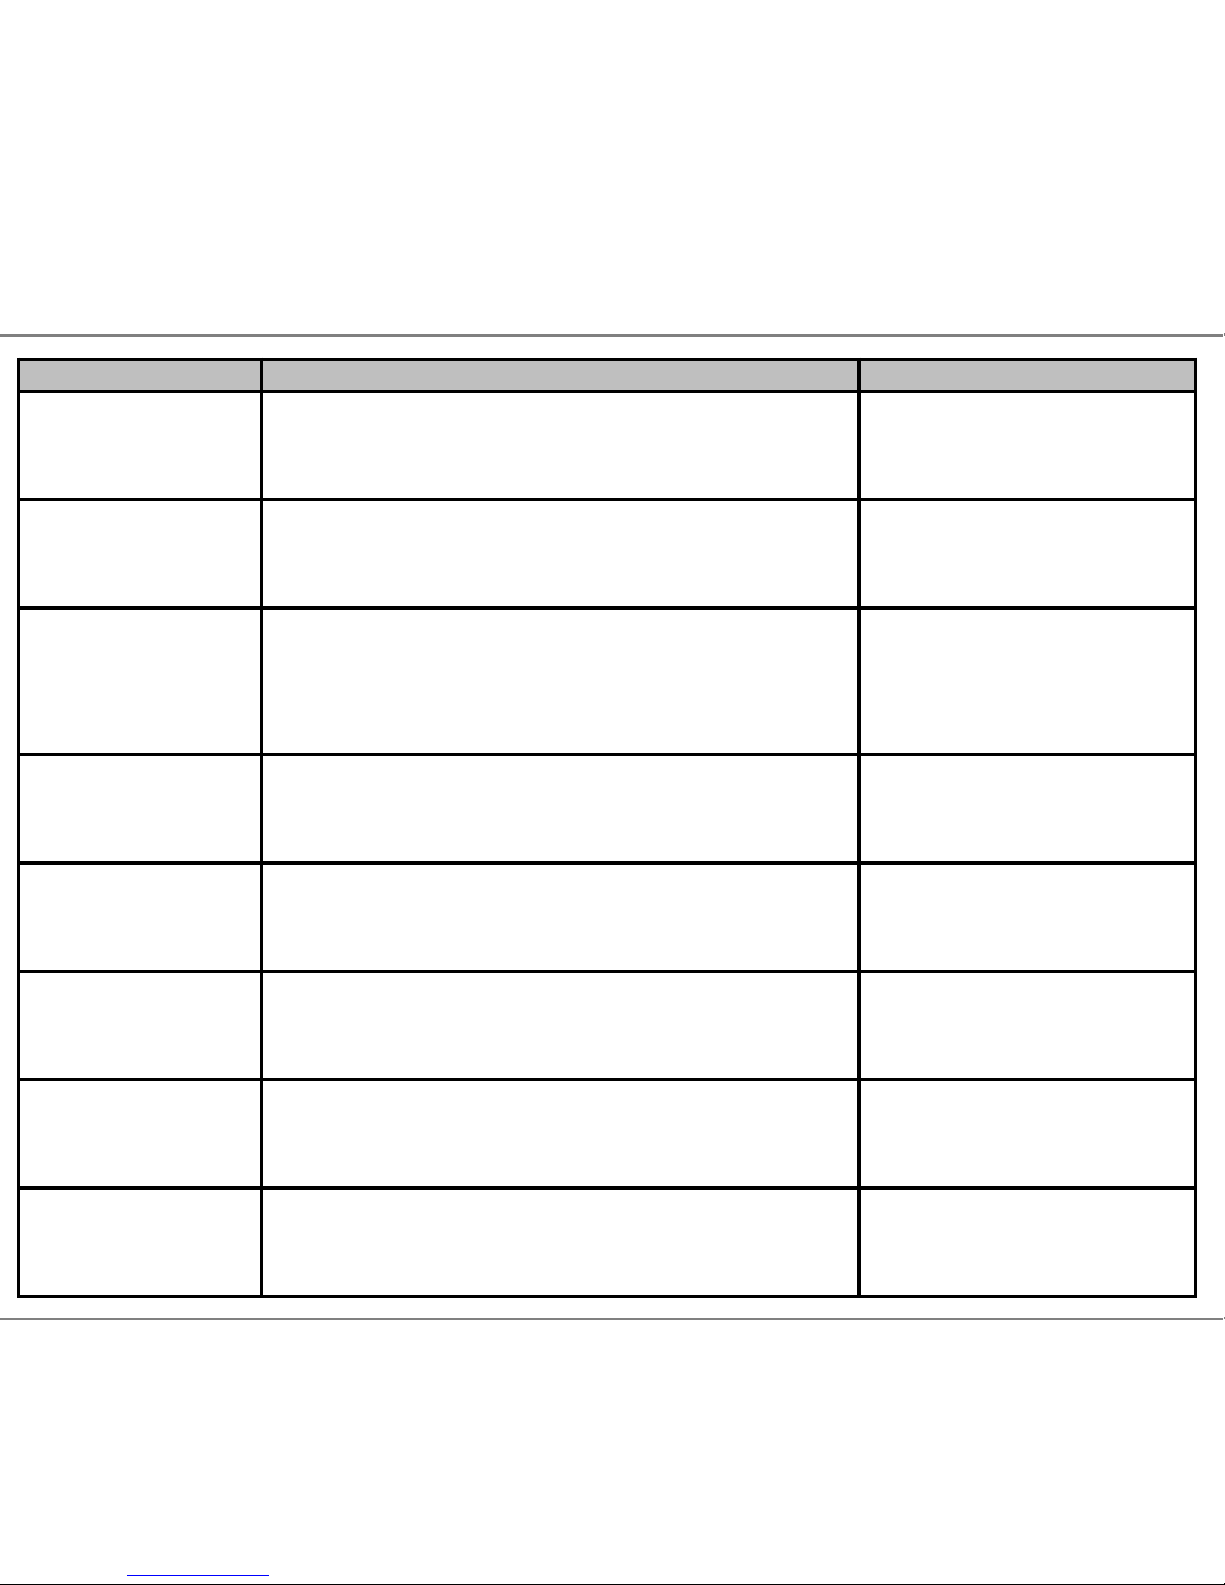
22. Buzzer/LED Alert Warnings
Warning LED Alert Buzzer Alert
Booting Status
Red LED : On
Blue LED : Flash for apprx 10secs
Orange LED : Flash for apprx 10secs
“beep, beep” sound
SD Card Insert
Status
Red LED : On
Blue LED : Constant Flashing
Orange LED : Constant Flashing
If SD card is not
inserted: Constant
“Beep” every second
GPS Reception
Status
Red LED : On
Blue LED : Flashing = searching for GPS
On = GPS connected
Orange LED : operate according to Mic status
Mic On/Off
Red LED : On
Blue LED : On if GPS Connected
Orange LED : On/off according to Mic status
Constant
Recording Status
Red LED : On
Blue LED : On if GPS Connected
Orange LED : Operate according to Mic status
Event/Manual
Recording Status
Red LED : On
Blue LED : Flash for 15secs
Orange LED : Flash for 15secs
Short “tic-tic”
Event/Manual
Recording
Memory Full Alert
Red LED : On
Blue LED : On if GPS Connected
Orange LED : Operate according to Mic status
80%:“Beep Beep
Beep ~Beep Beep Beep”
100% : “Tee-lee-lee”
Power Down
Red LED : Off
Blue LED : Off
Orange LED : Off
“Beep~”
Page 35
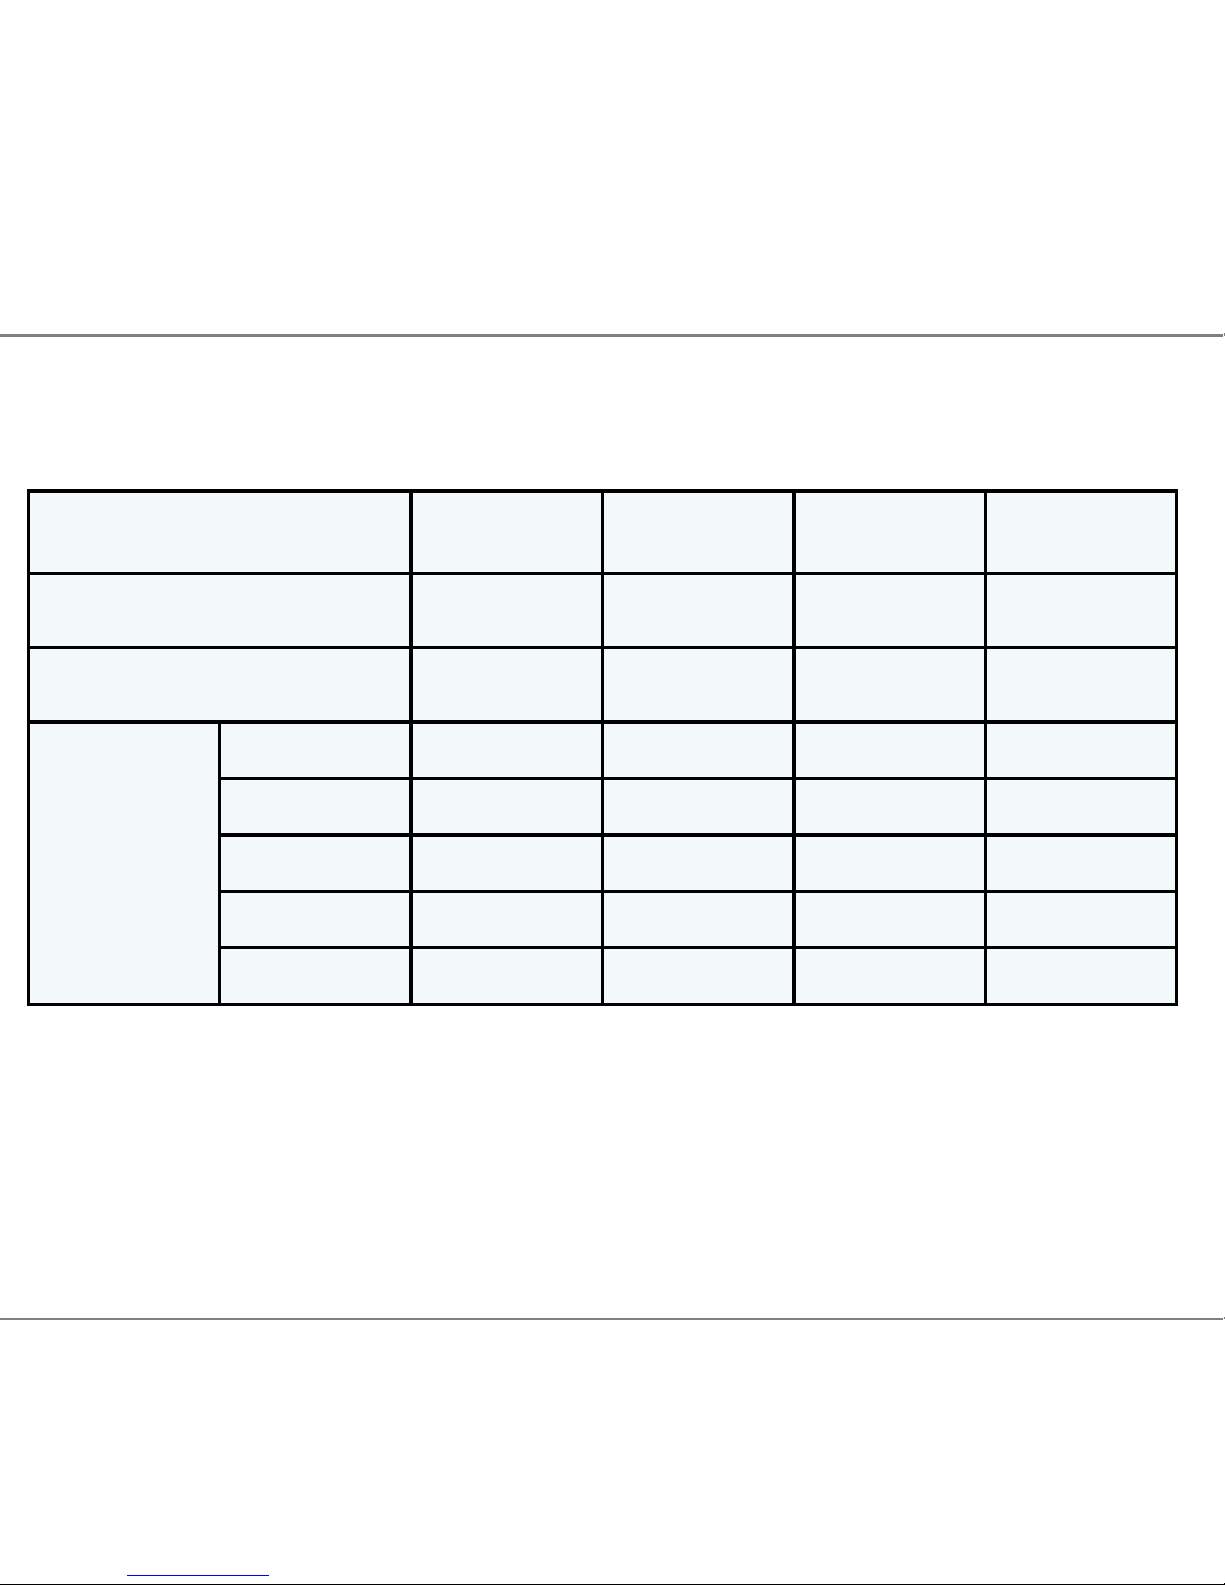
23. SD Card Recording Times
35
H = Hour / M = Minutes
QUALITY
Best
(Default)
High
Normal
Compact
PIXELS
HD
1280x720
HD
1280x720
HD
1280x720
HD
1280x720
Frame Per Sec. 30fps/30fps 25fps/25fps 15fps/15fps 10fps/10fps
Memory
Size
4GB 1H20M 1H32M 2H00M 2H41M
8GB 2H41M 3H06M 4H00M 5H23M
16GB 5H23M 6H12M 8H00M 10H47M
32GB 10H47M 12H25M 16H00M 21H35M
64GB 21H35M 24H50M 32H00M 43H10M
Page 36

36
24. Liability
Please read the follow liability information:
26.1 This product is offered for use on the provision that all guidelines, advice
and recommendations are followed, and the device is used for its intended
Purpose only.
26.2 You may not modify, reproduce, create derivative works from, transfer or
sell , any information, software, products or services without the express
permission of the manufacturer.
26.3 In no event shall the manufacturer be liable for any direct, indirect, punitive, incidental,
special or consequential damages whatsoever, arising out of or
connected with the use or misuse of this product or its accessories
26.4 This product requires a certain level of maintenance to ensure optimal
performance. The manufacturer limits any and all liability for loss or unrecorded
data.
26.5 This product is not guaranteed to record information on every incident...
26.5.1 Minor incidents may not trigger the G-Force sensor, therefore it is the
responsibility of the driver to use the Manual Record Button to ensure an Event
Record is created.
26.5.2 Loss of power during an Event Record will result in loss of footage.
It is the drivers responsibility, where possible, to ensure that power remains to
The camera throughout the duration of an Event Record.
26.6 The manufacturer limits any and all liability to the exclusive remedies of
product repair or replacement (at the manufacturer’s discretion) to the fullest
extent required by law.
Page 37

37
25. Camera Precautions
Please read the camera precaution information below:
27.1 Do not open/fix/alter this device. Any customer alterations will void the warranty.
27.2 Do not use any accessories other than those provided with the product.
The use of any additional accessories will void the product warranty.
27.3 Do not connect the device directly to car’s battery. Connecting the device directly to
the car battery will void the product warranty.
27.4 Use this product only under the recommended power guidelines. Using this product
with alternative power will void the product warranty and could result in a fire.
27.5 Remove the plastic film and any substance from the lens. Any obstruction may affect
and degrade the quality of recording.
27.6 Do not expose this product to extreme temperatures (high or low).
This product will be damaged if it is exposed outside recommended working temperature.
27.7 Do not operate product while driving. Only operate in safe environments.
Continued...
Page 38

38
Continued...
27.8 Check the product regularly to ensure that the camera lens angle is properly
adjusted. Always check when replacing the camera into the bracket. After violent force is
applied to the vehicle or product, the camera angle may be altered resulting in poor picture
quality.
27.9 Do not place the camera where its obstructs the drivers view of the road.
27.10 Don’t not place the camera within the window wiper area. Placing the camera
inside the wiper area could void inspections and regulations.
27.11 Do not spray automobile cleaning products directly on product. Product will be
damaged if directly exposed to cleaning products.
27.12 Only install this product within the recommended installation area.
This could result in poor GPS reception. Vehicles with fully heated front window or with
metal elements may prevent GPS connection to the camera. Therefore, the camera will
record without GPS data.
27.13 If the product is physically damaged during a fatal accidents, data may not be
recorded.
25. Camera Precautions
Page 39

39
26. SD Card Precautions
IMPORTANT: Format the SD card at least once every 2-4 weeks for optimal performance.
(See page 12 for How to Format a SD Card)
28.1 Check SD card’s data regularly to ensure the camera is recording correctly.
28.2 Backup the data regularly if any data needs to be saved for future reference or as
evidence. Wanted data may get recorded over with new data if the data is not backed up.
Data may be lost due to corruption caused by the SD card if not formatted as recommended.
28.3 SD card should be replaced once it reaches the end of its product life .
Warranty of the SD card is 6 months. When used daily during long journeys, the card’s
writing speed decreases after 6 months. Using expired or unformatted cards may result in
the camera to malfunction and the camera may not be able to record data.
28.4 SD Card Class 10 Rating. Class 10 SD cards are highly recommended for optimal
performance and reliability. Using a lower class may prevent the camera recording data.
28.5 Only use SD card from the manufacturer. The camera may not function correctly if untested SD cards are used.
28.6 Do not remove SD card during product operation or while power is on. The camera or
SD card could be damaged.
28.7 Do not open/fix/modify SD card. The camera could be damaged and the warranty
does not cover such damage.
Page 40

40
27. Trouble Shooting
Problem Solution
Camera has
No Power
- Check the power cable connection to the camera.
- Check the power cable fuse.
- Check the power cable connection to vehicle power source.
- If all power connections are correct then remove SD Card, re-insert and
turn the ignition on.
- If all the above solutions fail to correct the problem, please contact your
dealer.
“Beep ~Beep”
sound does
not stop
- Check the SD card is correctly inserted.
- Check data on the SD card. Event files folder is full. Back up any data
required, format the SD card and continue to record.
See page 12 for more info. (File System: FAT32, Allocation Size: 32 Kb)
- Try a new SD card as current card may have reached end of life. Contact your dealer.
Life span: approx 6 months(varies on frequency usage of SD card) New cards must be
formatted before use.
- If all the above solutions fail to correct the problem, please contact your
dealer.
LED lights
keeps Flashing
- Blue LED only – check vehicle position is not affecting GPS connection.
- LED lights may flash if there is a problem with the SD Card. Save any
Data required, format the SD card and. See page 12 for more info.
(File System: FAT32, Allocation Size: 32 Kb)
- Try a new SD card as current card may have reached end of life. Contact your dealer.
Life span: approx 6 months(varies on frequency usage of SD card) New cards must be
formatted before use.
- If the above solutions fail to correct the problem, contact your dealer.
Page 41

41
Problem Solution
Recorded
clips do
not play
correctly
- Check the correct and latest PC Player version is being used.
- Open a single clip by File Open button instead of Folder Open button.
- If videos are too dark, please raise the brightness in the setting
configuration
- Back up any data required, format the SD card and continue to record.
See page 12 for more info. (File System: FAT32, Allocation Size: 32 Kib)
- Try a new SD card as current card may have reached end of life. Contact your dealer.
Life span: approx 6 months(varies on frequency usage of SD card) New cards must be
formatted before use.
- If all the above solutions fail to correct the problem, please contact your
dealer.
Recorded
clips have
no audio
- Verify that the mic switch is turned on; orange LED should be lit.
- Check PC speakers are working and turned on.
- Back up any data required, format the SD card and continue to record.
See page 12 for more info. (File System: FAT32, Allocation Size: 32 Kb)
- Try a new SD card as current card may have reached end of life. Contact your dealer.
Life span: approx 6 months(varies on frequency usage of SD card) New cards must be
formatted before use.
- If all the above solutions fail to correct the problem, please contact your
dealer.
27. Trouble Shooting
Page 42

42
Problem Solution
Event
Recording
doesn’t
function
correctly
- Check event recording settings in the PC Player setting menu.
Sensitivity might be to low. Event recordings will not be triggered by small or minor
impact. Press Manual button to trigger a Event recording.
- Back up any data required, format the SD card and continue to record.
See page 12 for more info. (File System: FAT32, Allocation Size: 32 Kb)
- Try a new SD card as current card may have reached end of life. Contact your dealer.
Life span: approx 6 months(varies on frequency usage of SD card) New cards must be
formatted before use.
- If all the above solutions fail to correct the problem, please contact your
dealer.
GPS
connection
doesn’t
function
correctly
- Check initial GPS installation has been completed inside the vehicle
correctly accordingly to the manual. (See page 10 for more info)
- Check/remove all possible metallic parts from the camera.
- Check for heat elements, small metal zig zags lines throughout the front windscreen.
HD model required for GPS connection.
- Back up any data required, format the SD card and continue to record.
See page 12 for more info. (File System: FAT32, Allocation Size: 32 Kb)
- Try a new SD card as current card may have reached end of life. Contact your dealer.
Life span: approx 6 months(varies on frequency usage of SD card) New cards must be
formatted before use.
- If all the above solutions fail to correct the problem, please contact your
dealer.
27. Trouble Shooting
Page 43
43
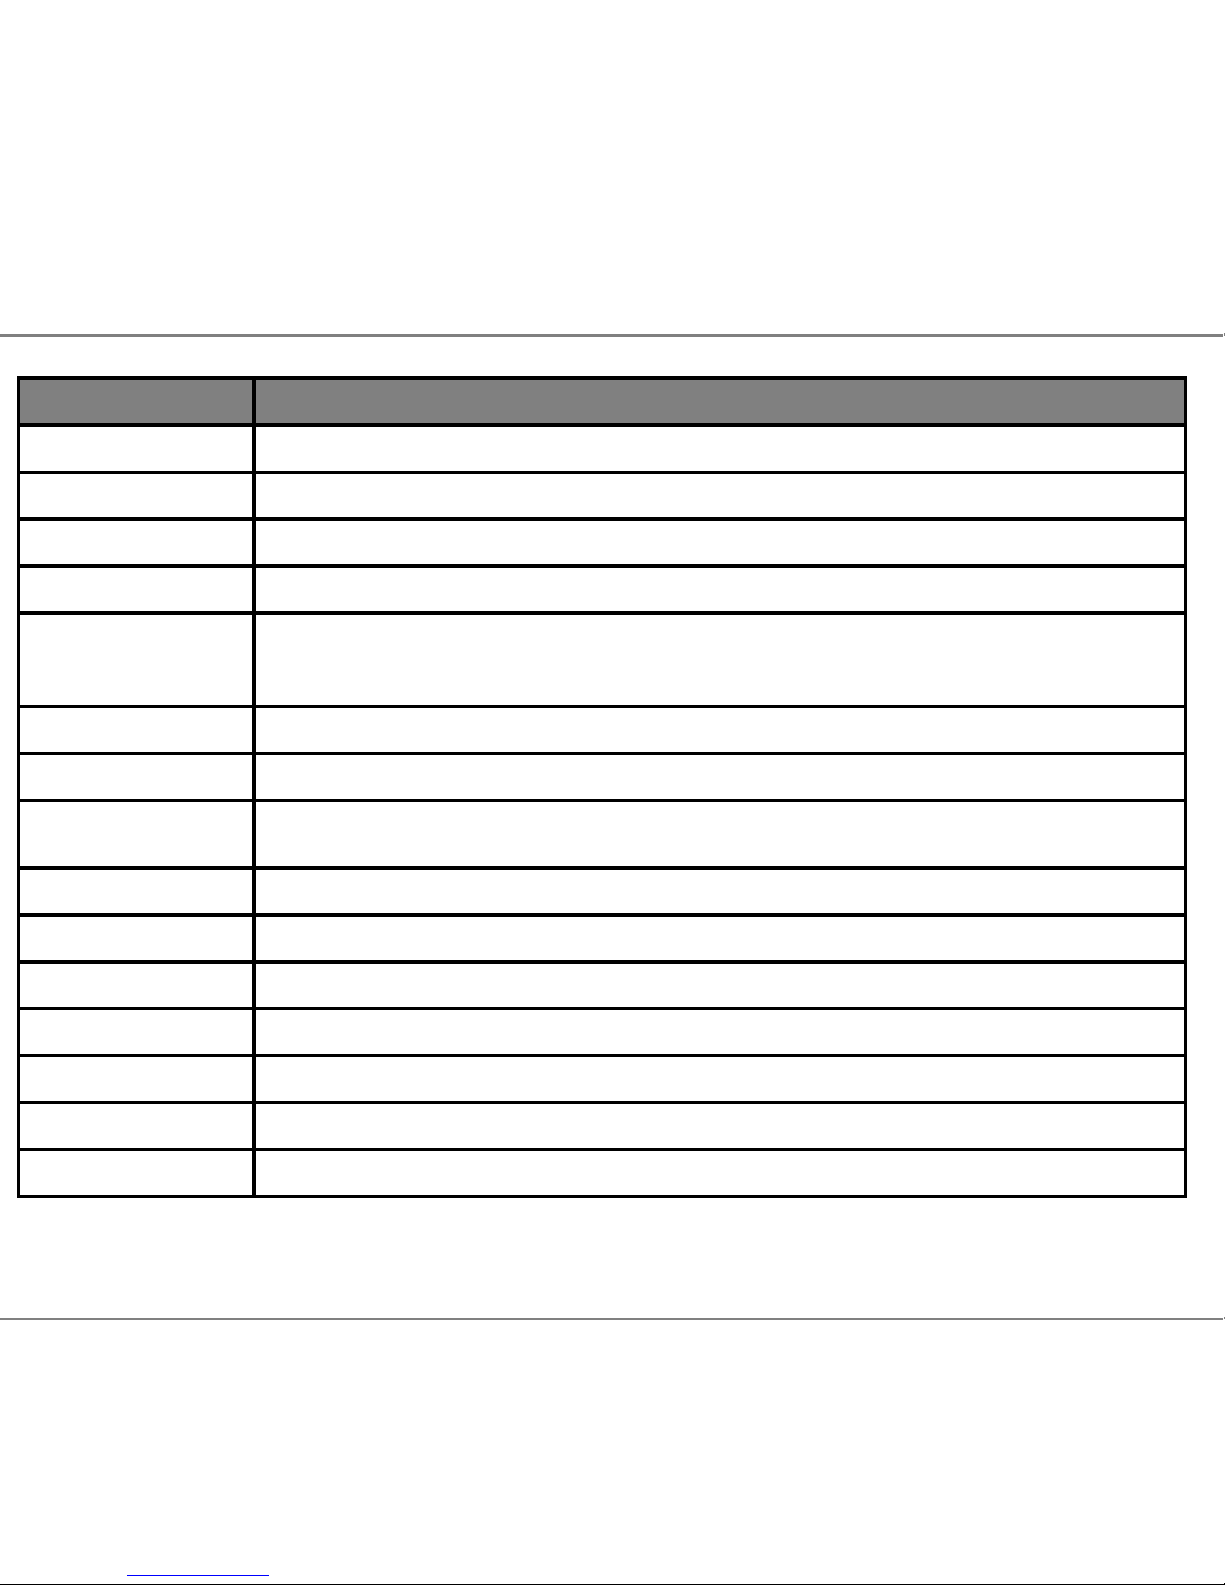
28. Specification and Accreditations
List Description
Camera 2M Pixel CMOS Image Sensors
View-Angle Front View: 120° view / Internal View: 149° view
GPS Internal GPS
G-Sensor Internal 3G Sensor (X, Y & Z)
Video
Forward: MPEG4 - 2M Pixel 20 fps at 1280x720 (HD) resolution
Internal: MPEG4 – 2M Pixel 10fps at 640x480 resolution
Audio Internal Mic (ON/OFF)
Storage SD Card (Max 64GB, Class 10 only)
PC Viewer Windows PC Player (Win XP,Vista,7,8)
Firmware Update via SD Card
Voltage 12V~24V
Consumption 250mA @ 12v
Backup Internal Super Cap – 10 second failsafe
Temp Working Temperature -20oC ~ 70oC
Size 52(W) x 94(H) x 18(D)mm
Weight 65g
Page 44
44
29. Warranty
Thank you for purchasing View-i HD product.
Product VIEW-I HD (
KCC / FCC / CE / RoHS
)
Model
Name Serial Number
Phone Email
Address
Purchase
Date
Dealer
Guarantee
Attention: AVIC will not be liable in any way in respect of:
1. The failure by the user of the device to drive safely and in accordance with all road traffic laws
and regulations.
2. The failure by the user to maintain and level of maintenance of the camera or SD card.
3. Warranty: one year
4. Life time of SD Card: 6 months.
AVIC WILL NOT BE HELD LIABLE FOR ANY INDIRECT OR CONSEQUENTIAL LOSS OR
DAMAGE (WHETHER FOR LOSS OR BUSINESS OR OTHERWISE) COSTS, EXPENSES OR
OTHER CLAIMS, WHICH ARISE OUT OF OR IN CONNECTION WITH THE USE OF THE DEVICE.
 Loading...