

Avic View-i HD User Manual

User Manual ver 1.10
Please read carefully before using this product.

Table of Contents
1. Liability
2. Precautions
3. Components
4. Functions
5.Feat
ures
6. Installation
7. Product Manual
8. PC Pla
y
er Manual
y
9. Product Trouble-Shooting
10. Specifications and Certifications
11. Warranty
2

1. Liability
1. This product was designed to assist you in driving safely
by recording driving information and data for
driver reference.
2. This product does not guaranteed to record information
on every accident.
- A minor force will not trigger the G-Force sensor to activate
E
vent Recording. Therefore the user must use the Manual Recor
d
Button located on the device itself.
3. This product is not liable for any data loss caused by
physical damage to the product or it accessories.
4. The manufacturer has no liability for any injury or damage
to property associated with the use of this product
5. The manufacturer limits any and all liability to the exclusive remedies
of product repair or replacement at the manufacturer’s discretion ,
3
to the fullest extent permitted by the law

2. Precautions (Device)
Do not spray automobile cleaning products
directly to product
Product will be damaged if directly exposed to
cleaning products
Do not open/fix/alter this device
Any customer alterations will void the
warranty
Do not operate product while driving
Only operate in safe environments
Only install this product within the recommended
installation area
It could result in poor GPS reception
Do not use any accessories other then
those included with the recorder
The use of any additional accessories will
void the product warranty
Only use manufacturer’s power connecting
cable in direct connection to car battery
The Use of any other power cable will void the
If
product is physically damaged during a fatal
accidents, the recorded data may get damaged
and not be able to recover them
During sudden lighting changes, such as entering
a dark runnel, alley, or turning toward direct
sunlight on a very bright day, video recording may
be compromised and video may be at poor quality
pro
d
uct warrant
y
[Caution] Manufacturer is not liable for any problem
occurring if manufacturer’s power cable is not used
Disconnect power from device after long use of
direct power connect to car battery
Failing to do so may result in battery discharge
Check the product frequently to ensure that the
camera angle is properly adjusted
After violent force is applied to the vehicle or product,
the camera angle may be altered resulting in poor
picture quality
R
emove all substance from the lens, including
the plastic film, that may affect the quality of
the recording Any obstruction may degrade
recording quality.
Do not expose this product to extreme
temperatures (high or low)
This product will be damaged if it is exposed
4
outside recommended working temperature
Only use MicroSD memory card from the manufacturer
Product may not function correctly if un-tested MicroSD memory cards is used
2. Precautions (Micro SD Card)
Do not open/fix/modify MicroSD memory card
Product could be damaged and warranty does not cover such damage.
MicroSD memory card need to be replaced with a new product after 6month use or more Product might
malfunction if MicroSD card’s writing speed decreases.
Check MicroSD memory card’s data regularly to check its operation
[NOTE] Format SD memory card at least once a week for optimal performance
Backup from MicroSD memory card to HDD or CD/DVD if any data needs to be preserved
Data might get lost due to memory corruption in SD memory card.
Causion : Important data have to backup before format.
The format will delete all data.
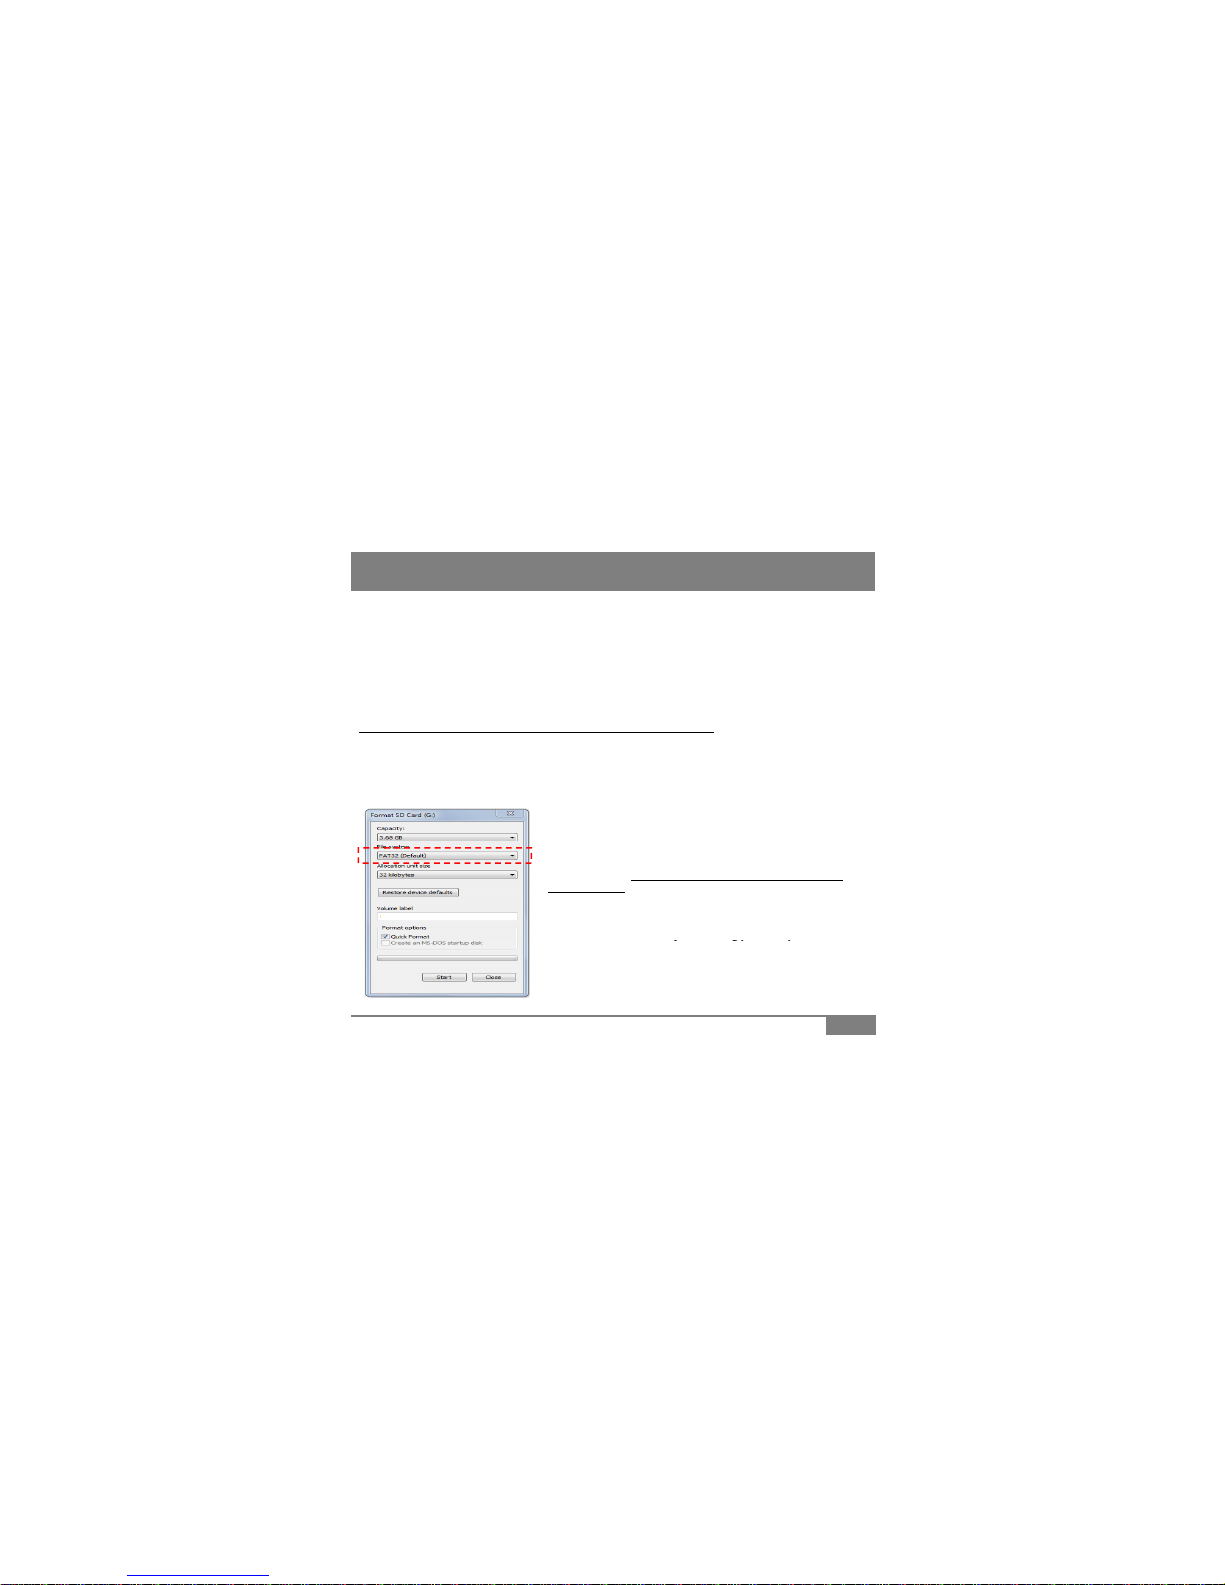
HOW TO FORMAT SD CARD
1. Connect MicroSD Card to user PC
2. Select [Start] -> [My Computer]
3. Select SD card driver and right click and select “Format”
4. Select “FAT32” If “FAT” format is to be selected, device will not
function normally
5. Click “Start” button
6. If you want to format the MicroSD card at device, please reference
page 13.
Do not remove SD memor
y
card during product operation while
5
ygpp
power is on
Product or SD memory card could be damaged.
Manufacturer is not liable for MicroSD card’s recorded contents outside its limited product life
Please contact your sales vendor if your are missing any components or components
are at fault
3. Product Package
B
A
S
I
C
Manual
Device
MicroSD Card + Adopter
(Include PC Player)
Cigar jack
Power Cable
User Manual
P
A
C
K
A
G
Mount &
Double-side Tape X2
Wire Clip
IR Lighting
(Include in Certain
Model Only)
E
O
Rear View Camera
(Include in Certain
Model Only)
6
Video out
Cable
Anti-Battery
Discharge Unit
P
T
I
O
N
MicroSD Reader Battery Direct
Power Cable
Function Description
Records everything during device power on status
4. Functions
Normal
Recording
yg g p
[NOTE] If memory exceeds its capacity, device deletes oldest file to make
room for new recordings. Therefore, if user wants to keep the old recordings, user
must backup the recordings before they are automatically deleted
Event
Recording
When device detects exceeded force in the device, device automatically saves
10 seconds before and after of the triggered event.
(Reference: 7.Product Manual)
Fixed
Recording
If device can’t detect any movement, such as in parking, device will automatically
set itself to fixed recording mode. Fixed Recording mode will save more
recording/hour then normal Recording Mode. When device’s camera detects
movement or G-sensor detects change of force, it will trigger event recording mode
and save them under event recording folder
Audio
Recording
Supports audio recording with on/off button (Reference: 7. Product Manual)
TV-out
User can check recorded files to nearest display with TV-out function
(Reference : 5. Features)
HD
HD recording at 1280x720 pixel @ 30fps Max.
7
Recording
Power Safe
Supporting safe power off with internal saved power to protect deletion of last video
before power cut

Function Description
4. Functions
Additional
Wire Camera
Additional camera can be connected via “Video-in” port to enable 2 camera
recording
(for device including 2 cameras, 2
nd
camera can be toggled between on-device and wire
input camera)
Status LED
Blinking status LED is positioned in front of the device to alert other as a warning
Sound
Guidance
Device will guide users via sound communication for easier product experience
Image
Capture
User can capture image files from video recording
’
Google Map
Sync
View driver
s route in Google Map embedded in PC Player
[NOTE] GPS needs to be connected to the satellites in order to sync
data with Google Maps
View-i PC
Player
PC Player can be used to check recorded videos on MicroSD card
-
-
8
G
Sensor
Analysis
View G
force data in PC Player to check wild driving habits or to build better
driving habits thus achieving safe driving habits
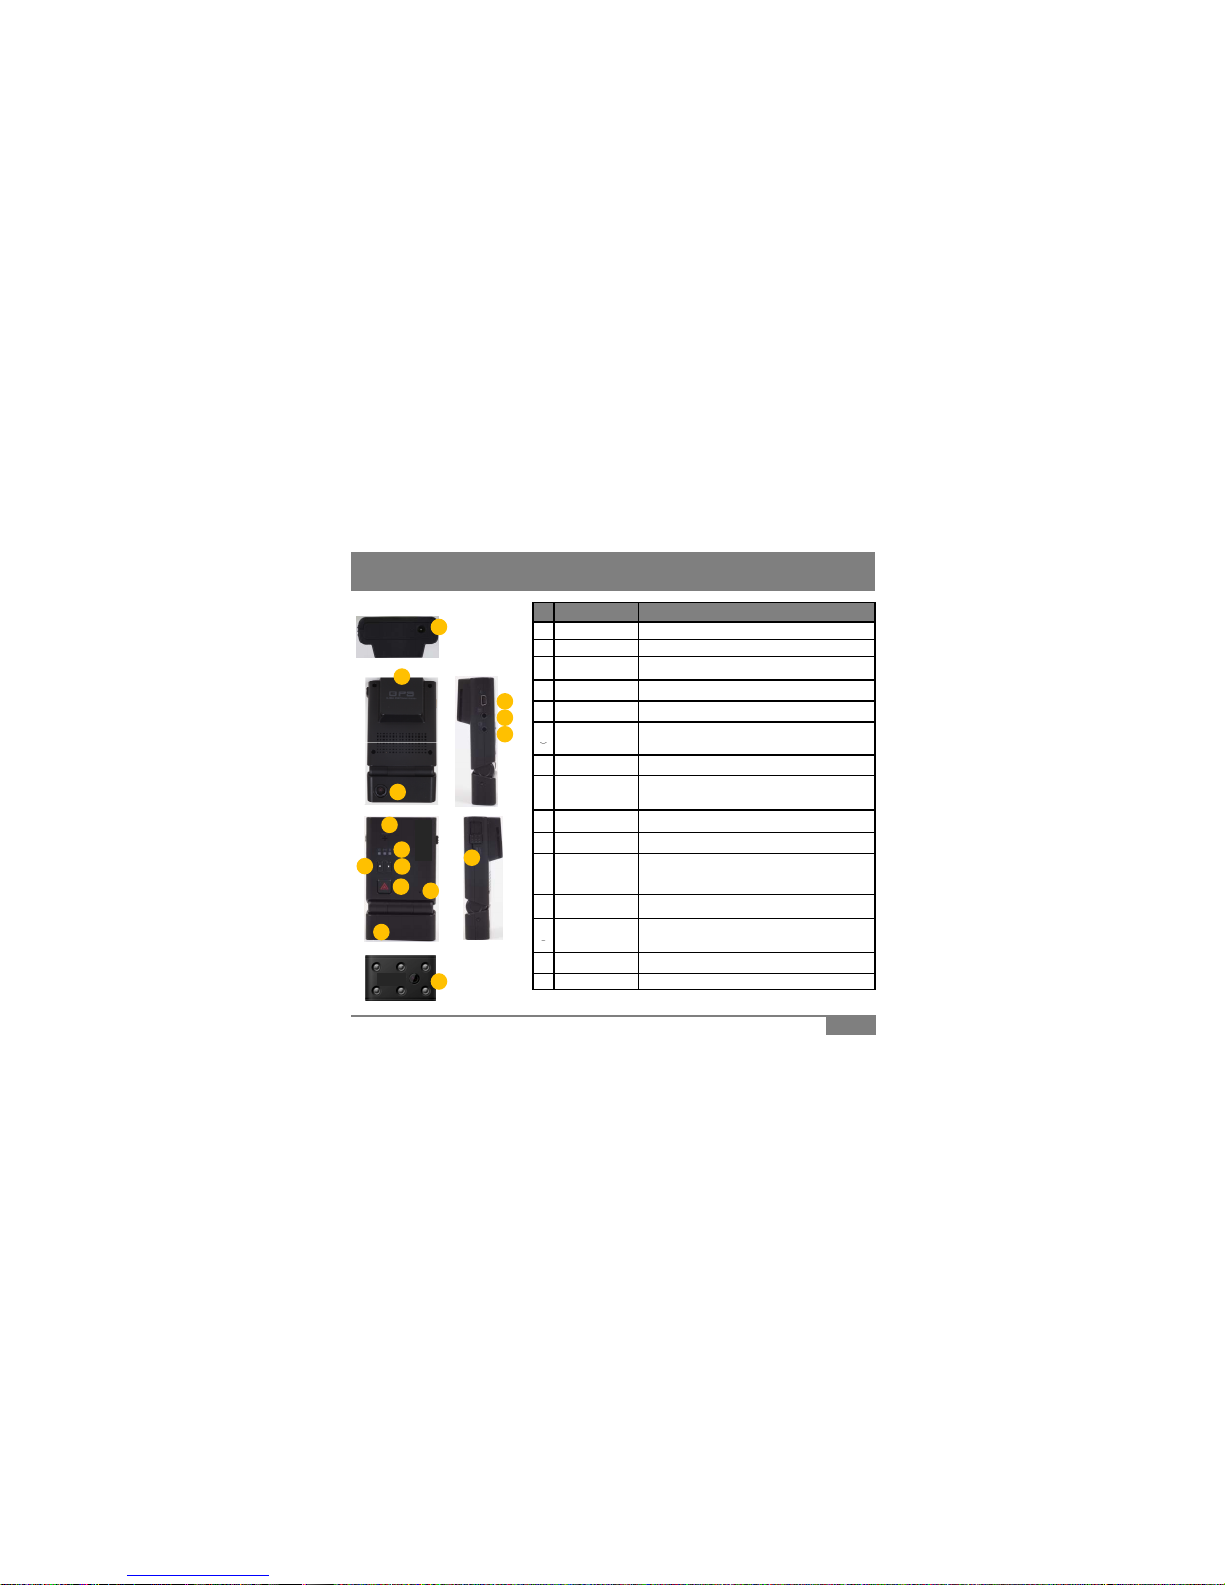
# Name Description
①
Power Port DC 12V~24V
5. Features
1
②
Internal GPS Detect GPS info, time, and speed
③
Front Camera 2M Pixel CMOS Image Sensor
④
Mini USB Port 5V 400mA power input
⑤
Video-in Port Connect wire camera for rear view or other angles
TV-Out Port
Preview/Replay recorded files to
2
4
5
6
⑥
nearest display
(NTSC/PAL)
⑦
Speaker Voice communication and guidance
⑧
LED Status
Red : Power / Blue : GPS Reception /
Yellow : Microphone On or Off Status
⑨
Mic Button Sound recording on/off button
3
7
⑩
Power Button
Power on/off button
⑪
Manual Record/
Memory Format
Manual Event Recording trigger or
Manually format MicroSD card
⑫
Mic Records audio sounds
⑬
Internal Camera
1.3M Pixel CMOS Image Sensor
8
9
10
11
12
14
13
9
⑬
(installed in specific models only)
⑭
MicroSD Slot MicroSDcard input slot
⑮
IR Lighting IR Lighting (included in specific models only)
15
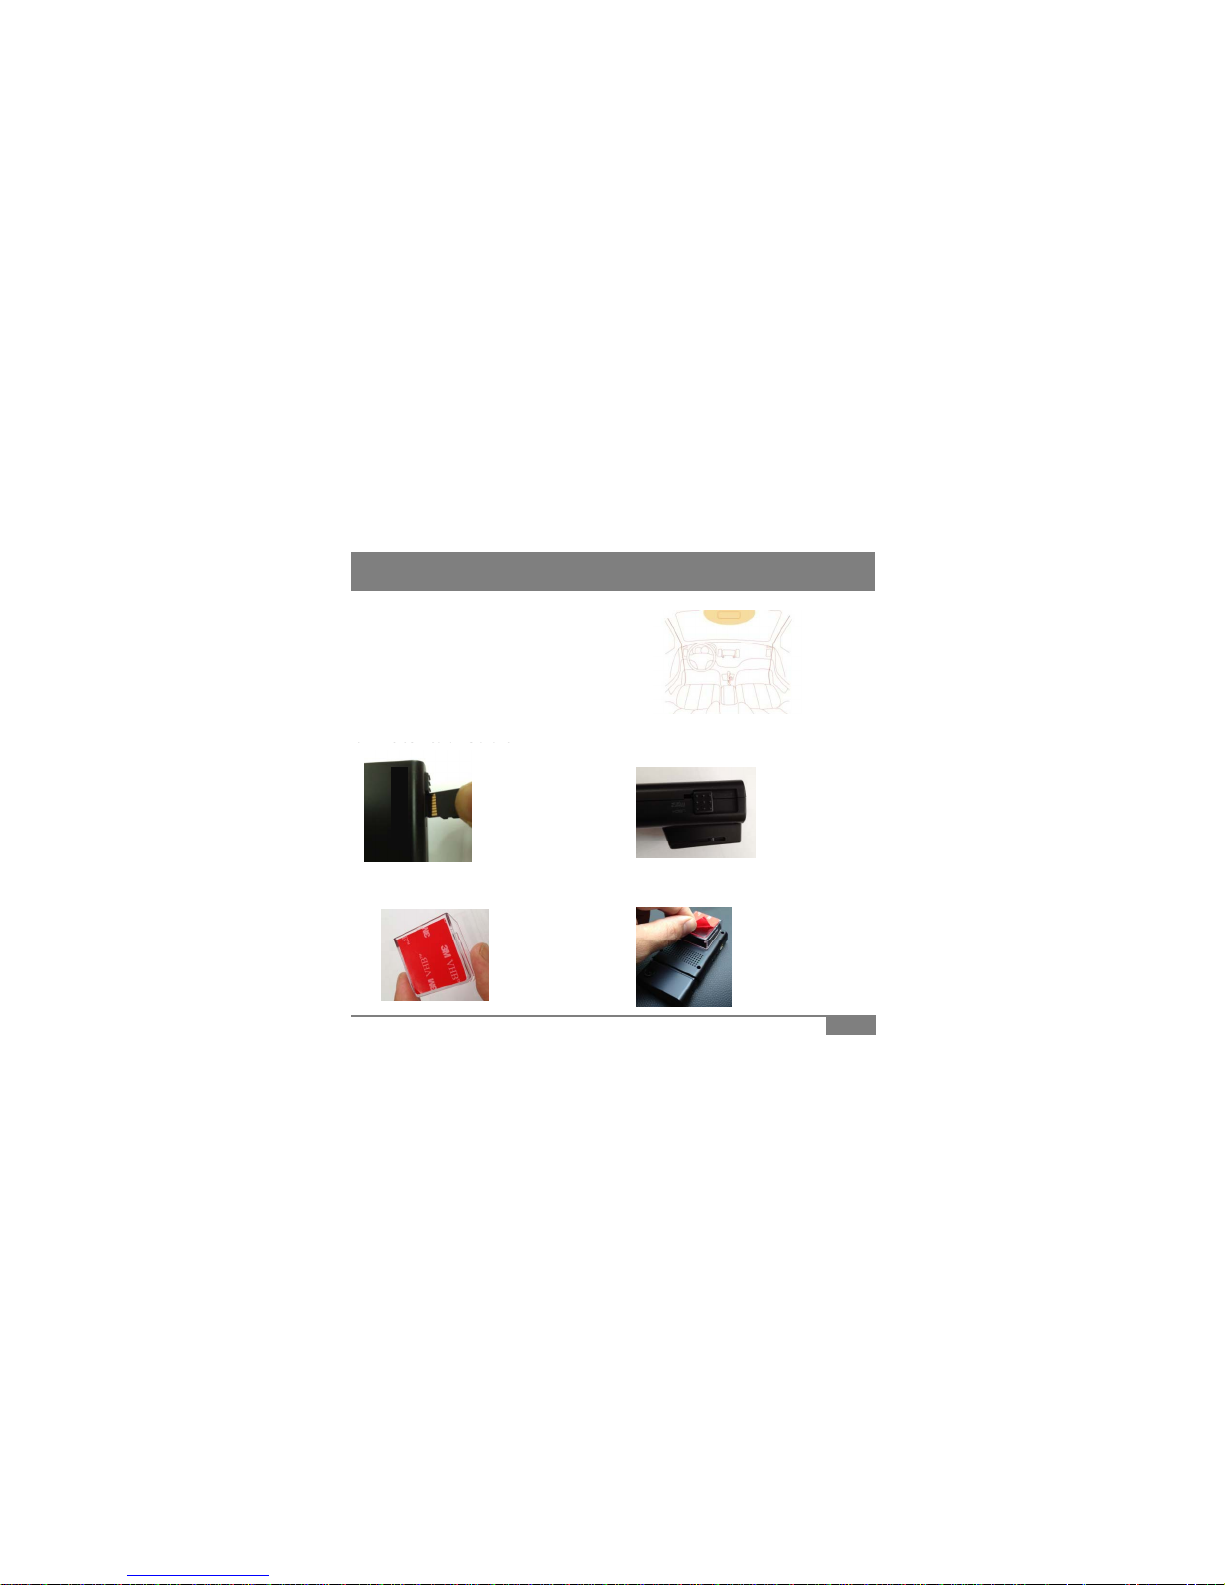
6.1 Recommendation
Place device near rear view mirror to the driver side
where GPS and Camera does not have physical
6. Installation
int
errupts(sedan standar
d)
[Caution] Placing device other then recommended
area may cause foul recording or GPS reception
problem. Such as heat wire or filmed windows may
cause poor GPS reception.
6.2 MicroSD Card Installation
• Insert MicroSD Card in
same direction as the
picture. Push hard until
“click” sound is heard
• Push in the card to
release and pull in out
•Pull down
Lock switch
6.3 Installing Device to Window Mount
• Attach double
• Slide in window
mount to device until
y
ou feel a locking
10
side tape to
window mount
shown in left
picture
yg
force
• Remove outside
cover of double side
tape
 Loading...