

Avic VIEW-i Elite DL2, VIEW-i Elite PLUS DL2 User Manual

Please read carefully before using this product.
VIEW-i ELITE DL2/Elite PLUS DL2
User Manual

2
Contents
1. Package Contents
2. Quick Start Guide
- Installing the Camera
- Installing the Infrared Module
- Setting Up GPS Connection
- Installing VIEW-I ELITE PC Player
3. Playback of the Video Footage
4. PC Player Button Function
5. Camera Settings
6. Camera Features
7. Camera Functions
8. Camera Button & Lights
9. PC Requirements
10. Liability
11. Camera Precautions
12. SD Card Precautions
13. Trouble Shooting
14. Specification
15. Warranty
3
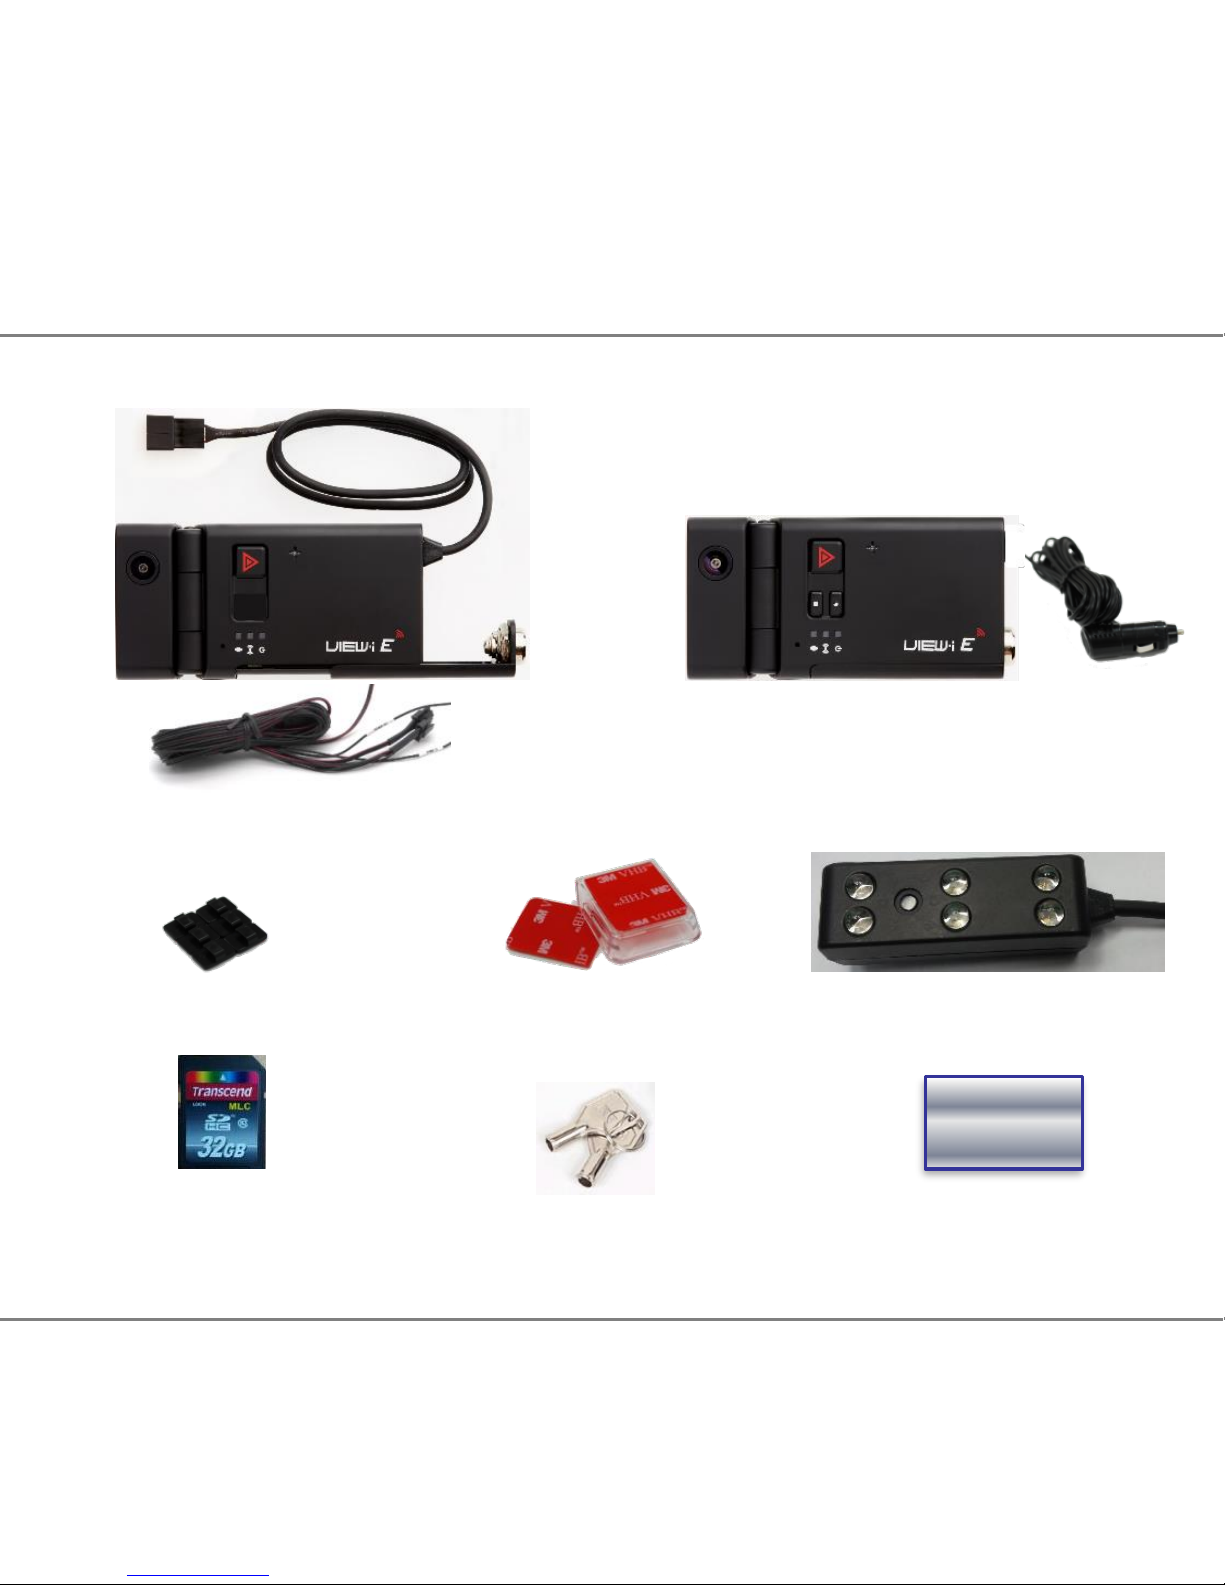
1. Package Contents
Please confirm below package list in the box *
Elite Plus DL2 &
Cigar Power cable
Cradle &
Double Side Tape
* Product specification and package may change for product enhancement without any notification in advance.
Wire Clip x 3
User ManualKey x 1
IR LED for night view
SD Card
( Sales Option)
Soft Copy
Elite Plus DL2(Tamper Proof)
& Power Cable
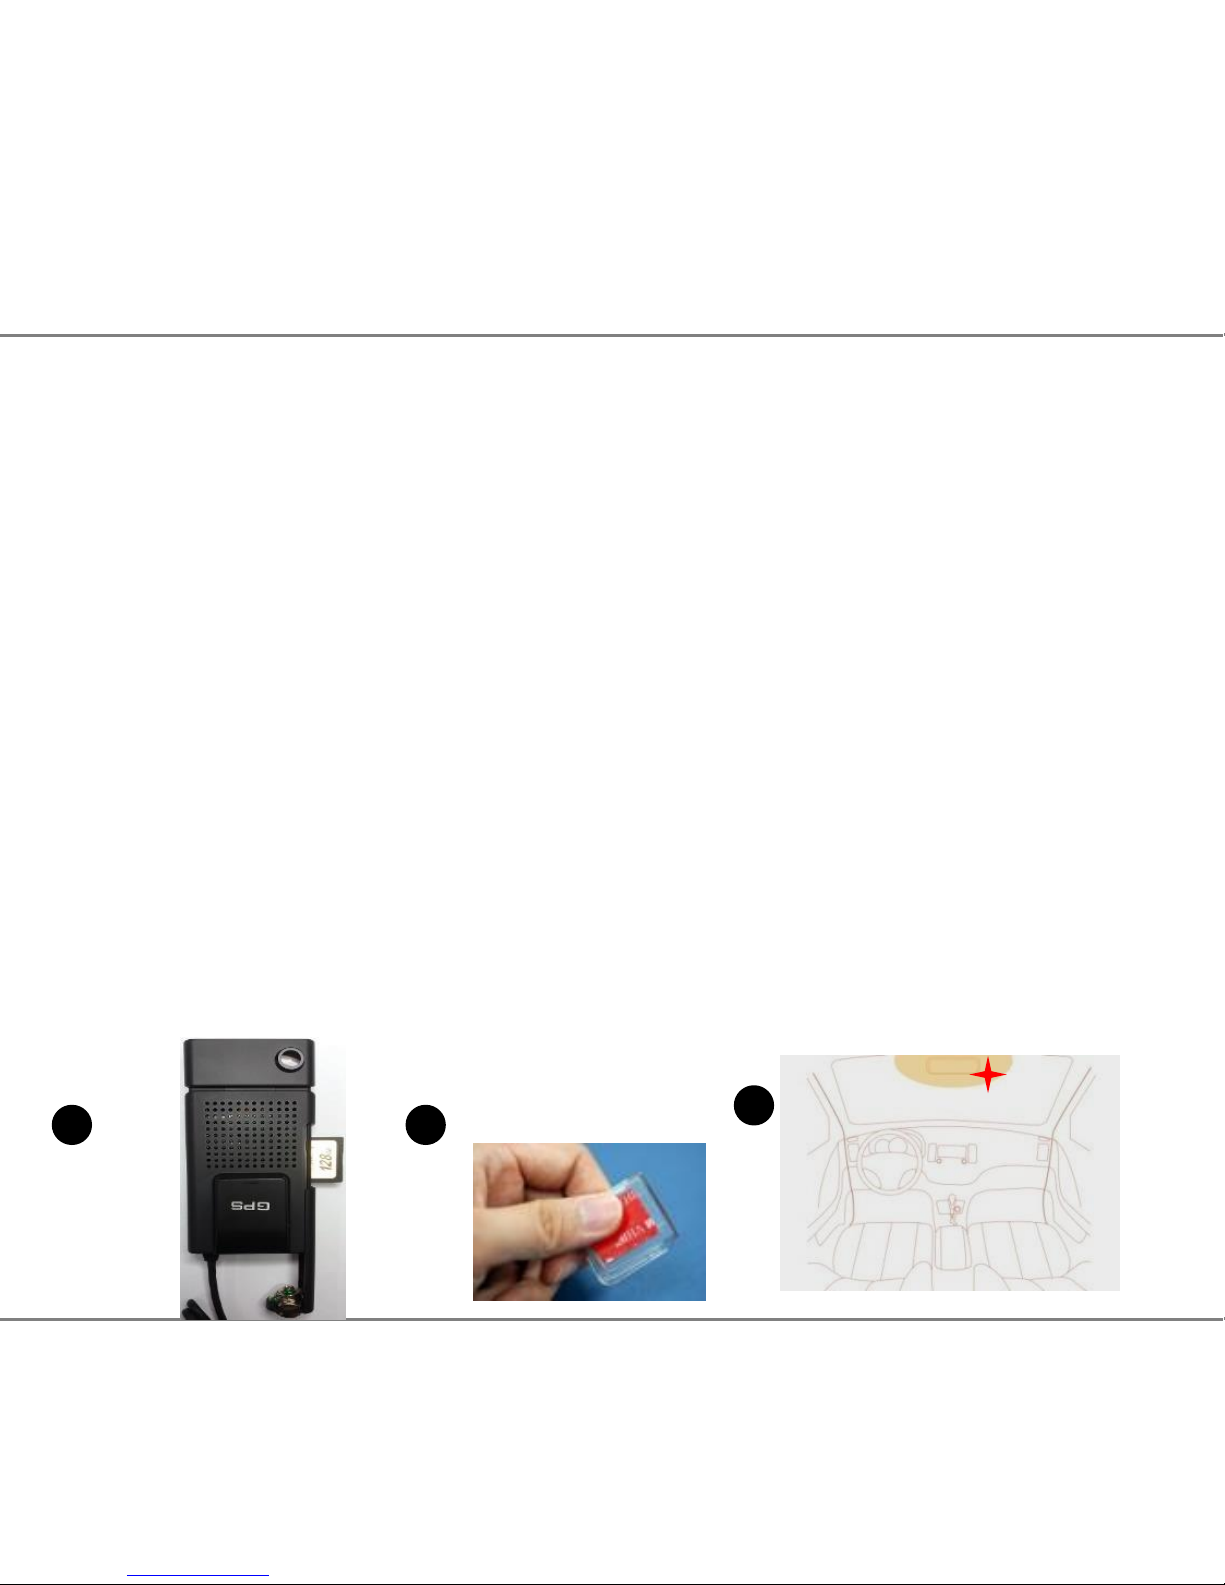
Step 1 – Installing the Camera
2.1 Unlock the camera with the provided key, slide the SD Cover upwards and
Insert the SD card into slot on side of the camera, Slide the cover back into
place and lock the camera with the provided key.(Picture 1)
2.2 Remove one of the plastic covers from the sticky pad and firmly place it
on the flat side of the mounting bracket.(Picture 2)
2.3 Slide the camera into the bracket until it securely clicks into place.
2.4 Clean the window surface area behind the rear view mirror, left hand side
on the passengers side. (Picture 3)
Ensure the camera is positioned to allow clear view from the internal lens.
Do not position where the camera obstructs the drivers view of the road.
Continued...
4
2. Quick Start Guide
WARNING! SD card must be formatted before Use.
Ensure the camera has completely turned off during all movements of the SD Card.
1 2
3
5
2. Quick Start Guide - Setting Up the Camera
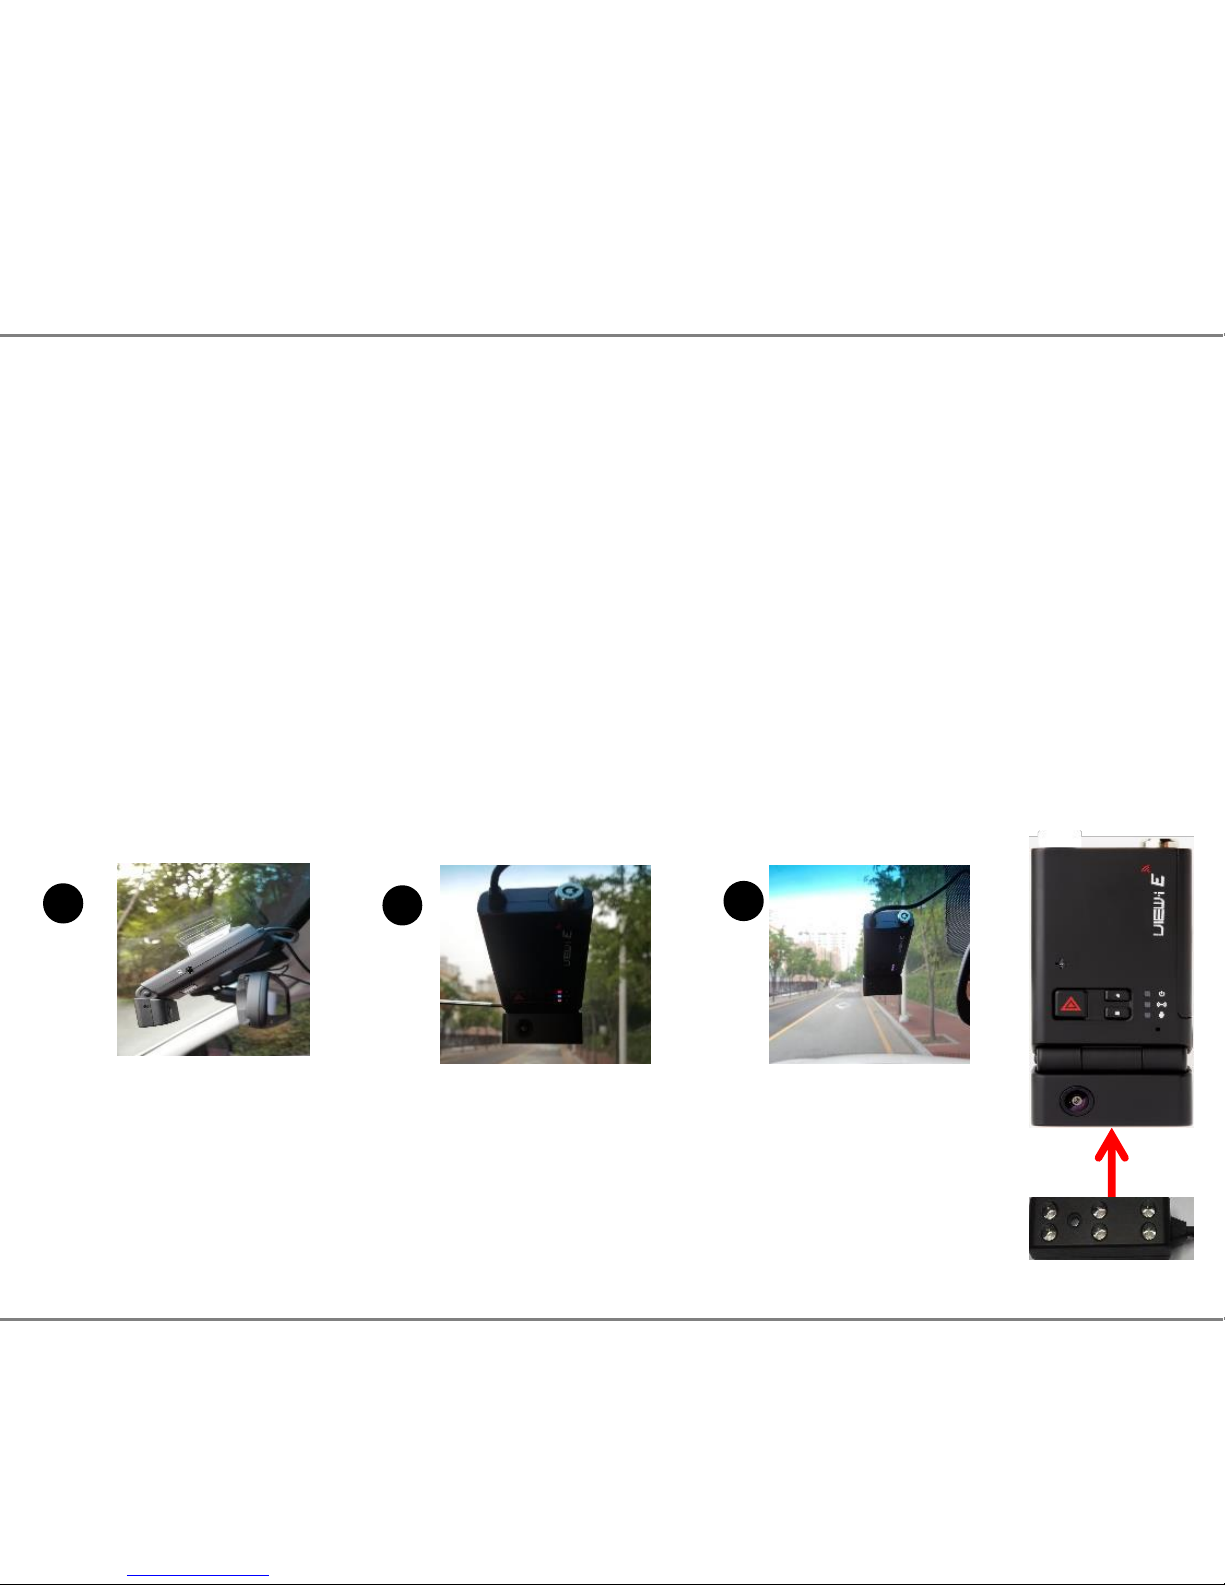
Continued...
2.5 Remove the second plastic cover from the sticky pad.
2.6 Carefully position and firmly place the camera on the window.(Picture 4)
2.7 Connect the fused Red wire to 12v ignition feed and the Black earth wire
to a chassis earth.
2.8 If fitting alongside a tracker, take the Trigger Out wire to the trigger input
of your unit. If fitting an external button, take the activation feed to the
Trigger In wire. If neither such devices are being fitted, shield the two
wires and loom out of the way.
2.9 Angle the lens to allow clear view of the road ahead, remove grommet from
the hinge area and tighten the screw to lock camera angle in place.(Picture 5)
2.10 Ensure the plastic covers are removed from both lenses.(Picture 6)
4
5
6
2.12 Remove the plastic cover from the sticky pad on IR LED module.
2.13 Firmly place IR LED module at the bottom of the camera with
the lights facing inside the vehicle.
2.14 Connect the 3 pin connectors between the harness,
camera and IR LED module.

6
Step 2 – Setting Up GPS Connection
Important: For the initial GPS lock on, the camera must be powered for approx
5 minutes. The vehicle must be in an open clear area. Not inside a garage or
an area where GPS connection will be affected. A flashing blue light indicates
camera is recording without GPS data. Constant blue light indicates the camera
is recording with GPS data.
Note: GPS is sometimes unable to connect to a satellite in vehicles fitted with fully
heated windscreens or metal trims around the front window.
2.16 Ensure the 4 way power connection is linked between the harness and
the camera.
2.17 Turn the vehicle engine on.
2.18 Leave the camera powered on until blue light is on constantly to indicate
GPS has locked on..
2.19 Once the camera has locked onto GPS, turn the vehicle engine off and
safely remove the SD card once the camera has completely shut down.
Important; After setting up the camera and GPS for the first time, install the PC
Player onto a PC and set Date and Time through the Settings button on the
software. Follow the next steps to complete installation.
2. Quick Start Guide - Setting Up GPS
7
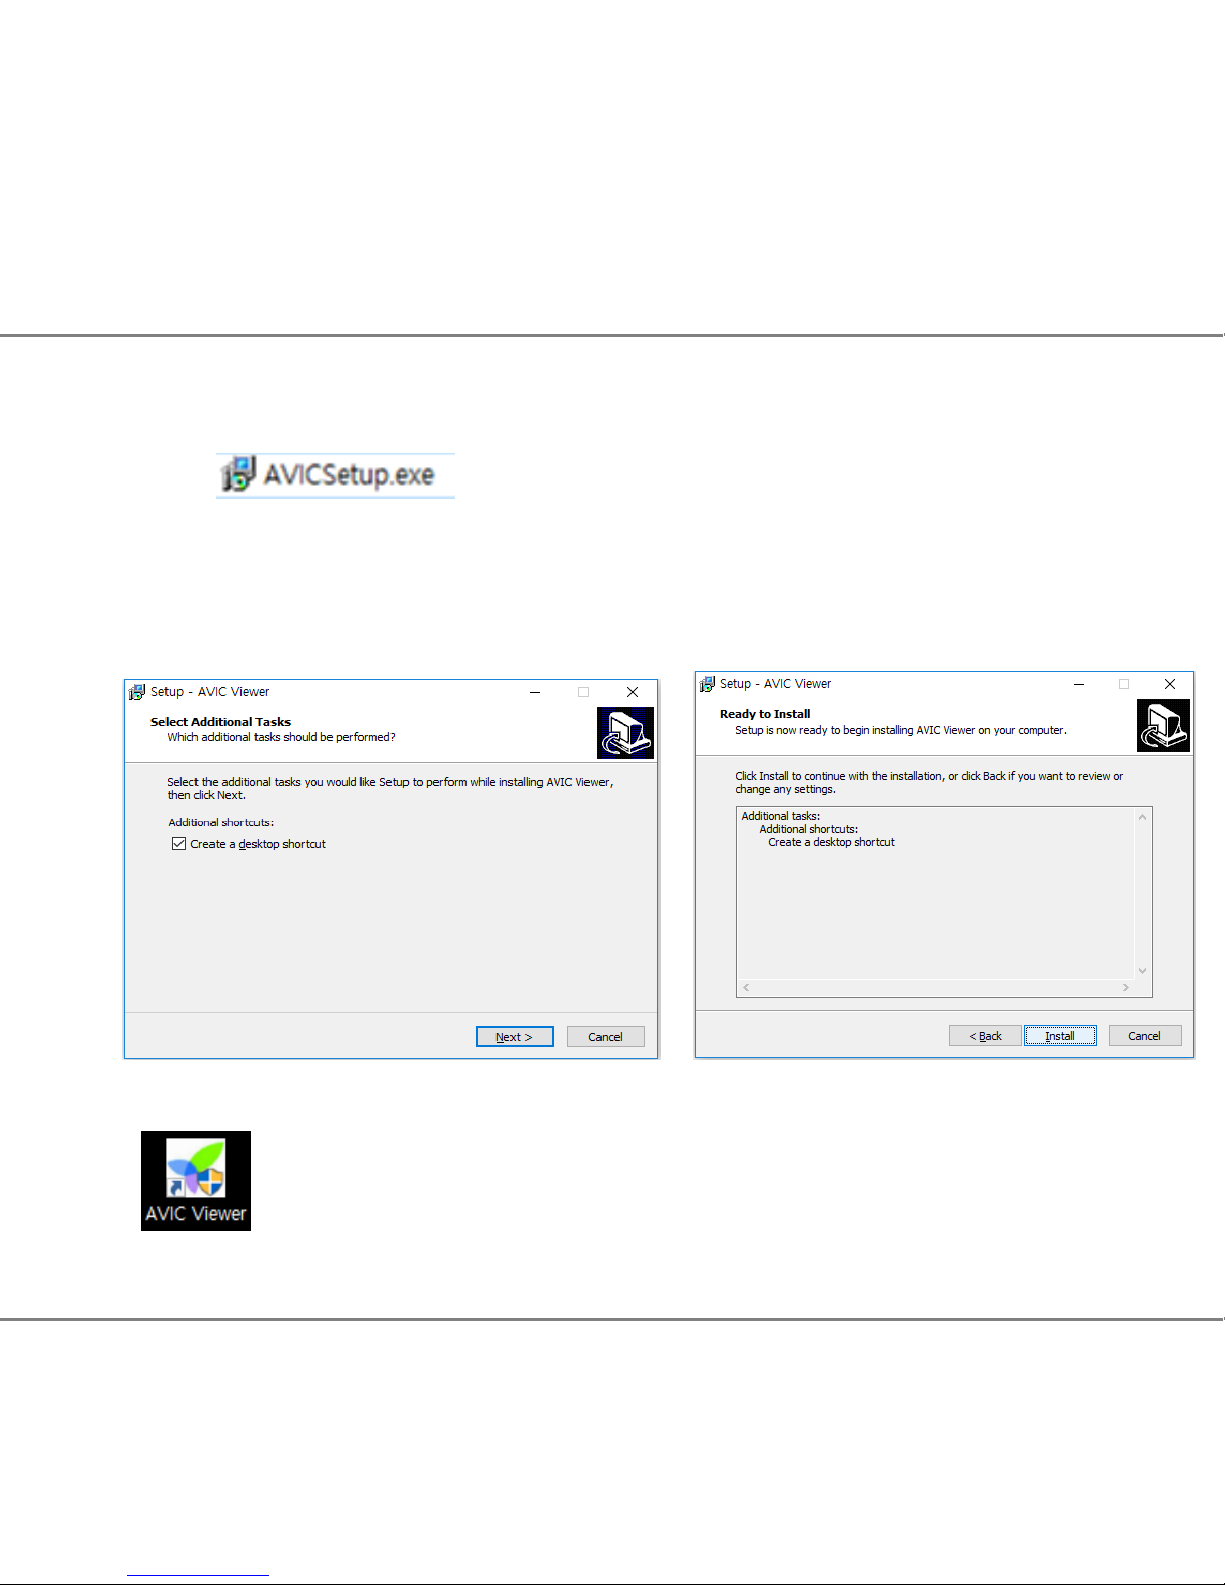
Step 1 – Installing the PC Player
2.1 Search file on the SD card (contact the dealer to get this file)
2.2 Right click on this file and select “Run as administrator” to ensure
constant permissions and full access:
2.3 Click “Next” button and then Click “Install” button
2.4 “AVIC Viewer” icon is displayed on the lap top computer
Continued...
2. Quick Start Guide - Installing the PC Player
8
Continued...
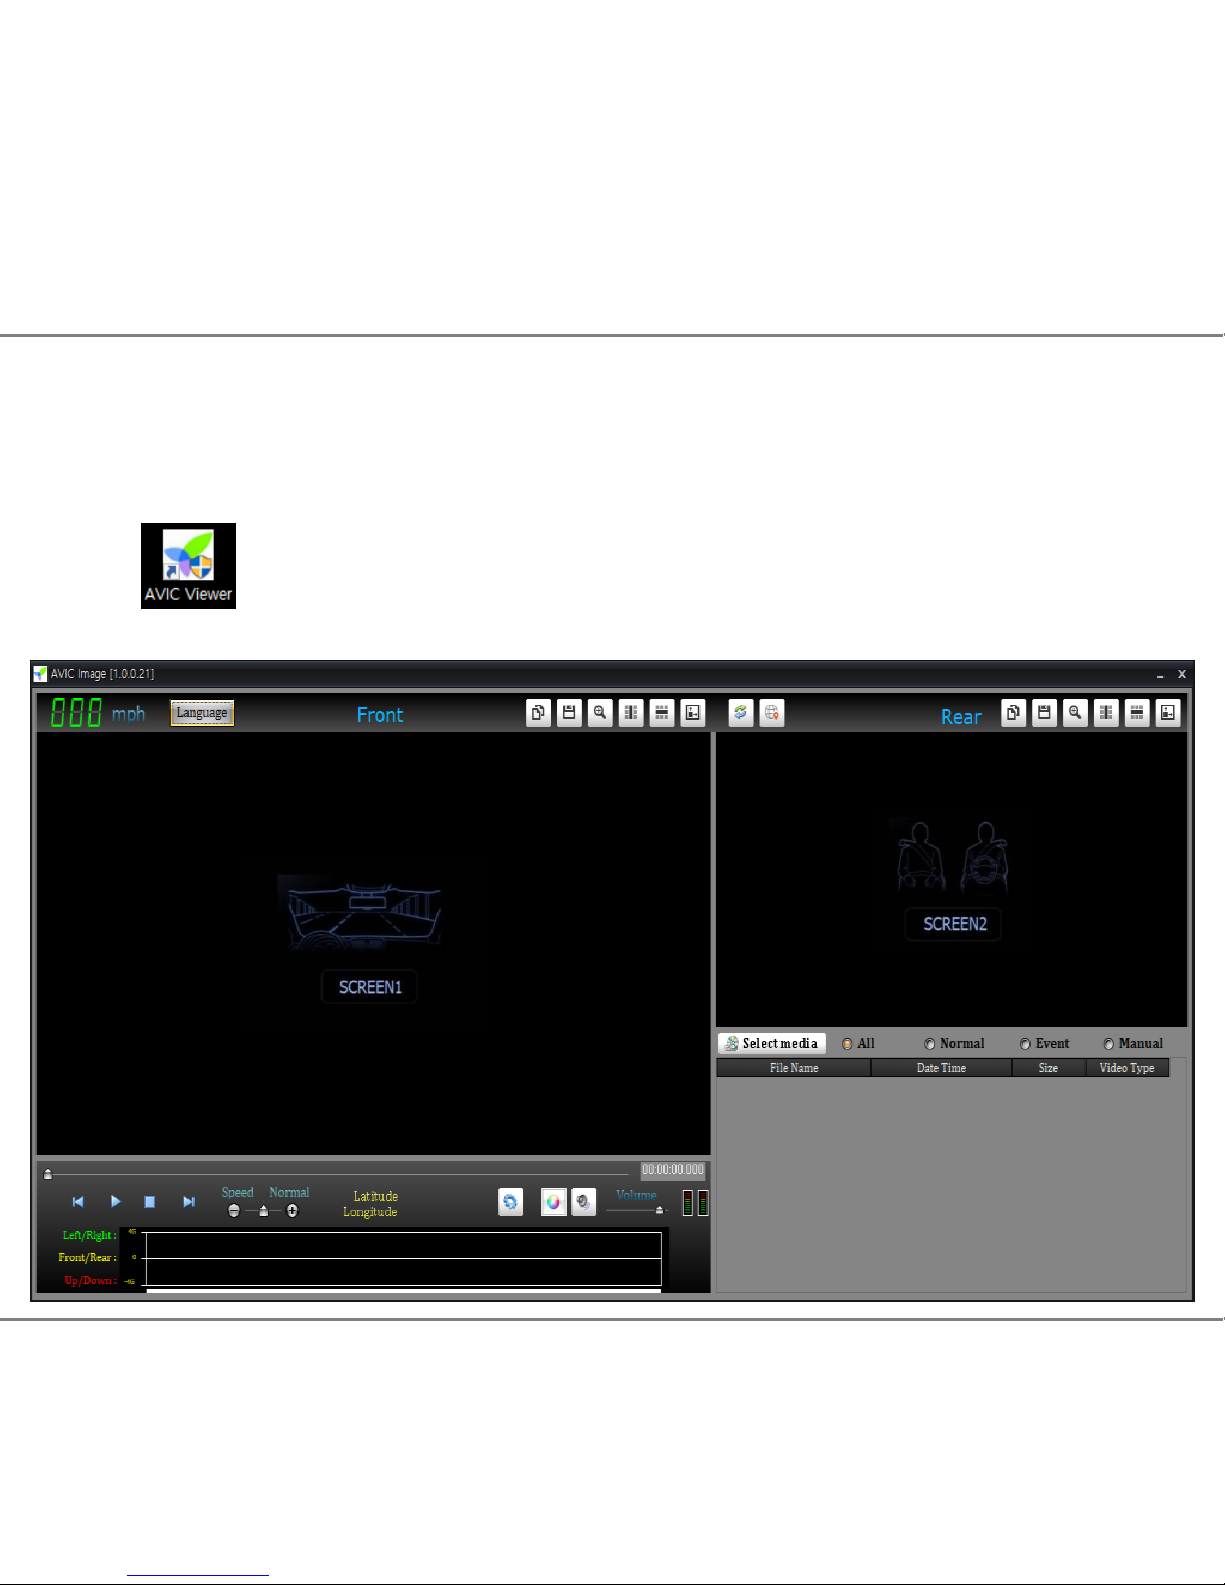
2.5 Double Click “AVIC Viewer” icon .
Or right click on “AVIC Viewer” icon and select “OPEN” in the pop-up window
The PC Player will automatically pop up.
2. Quick Start Guide - Installing the PC Player
9
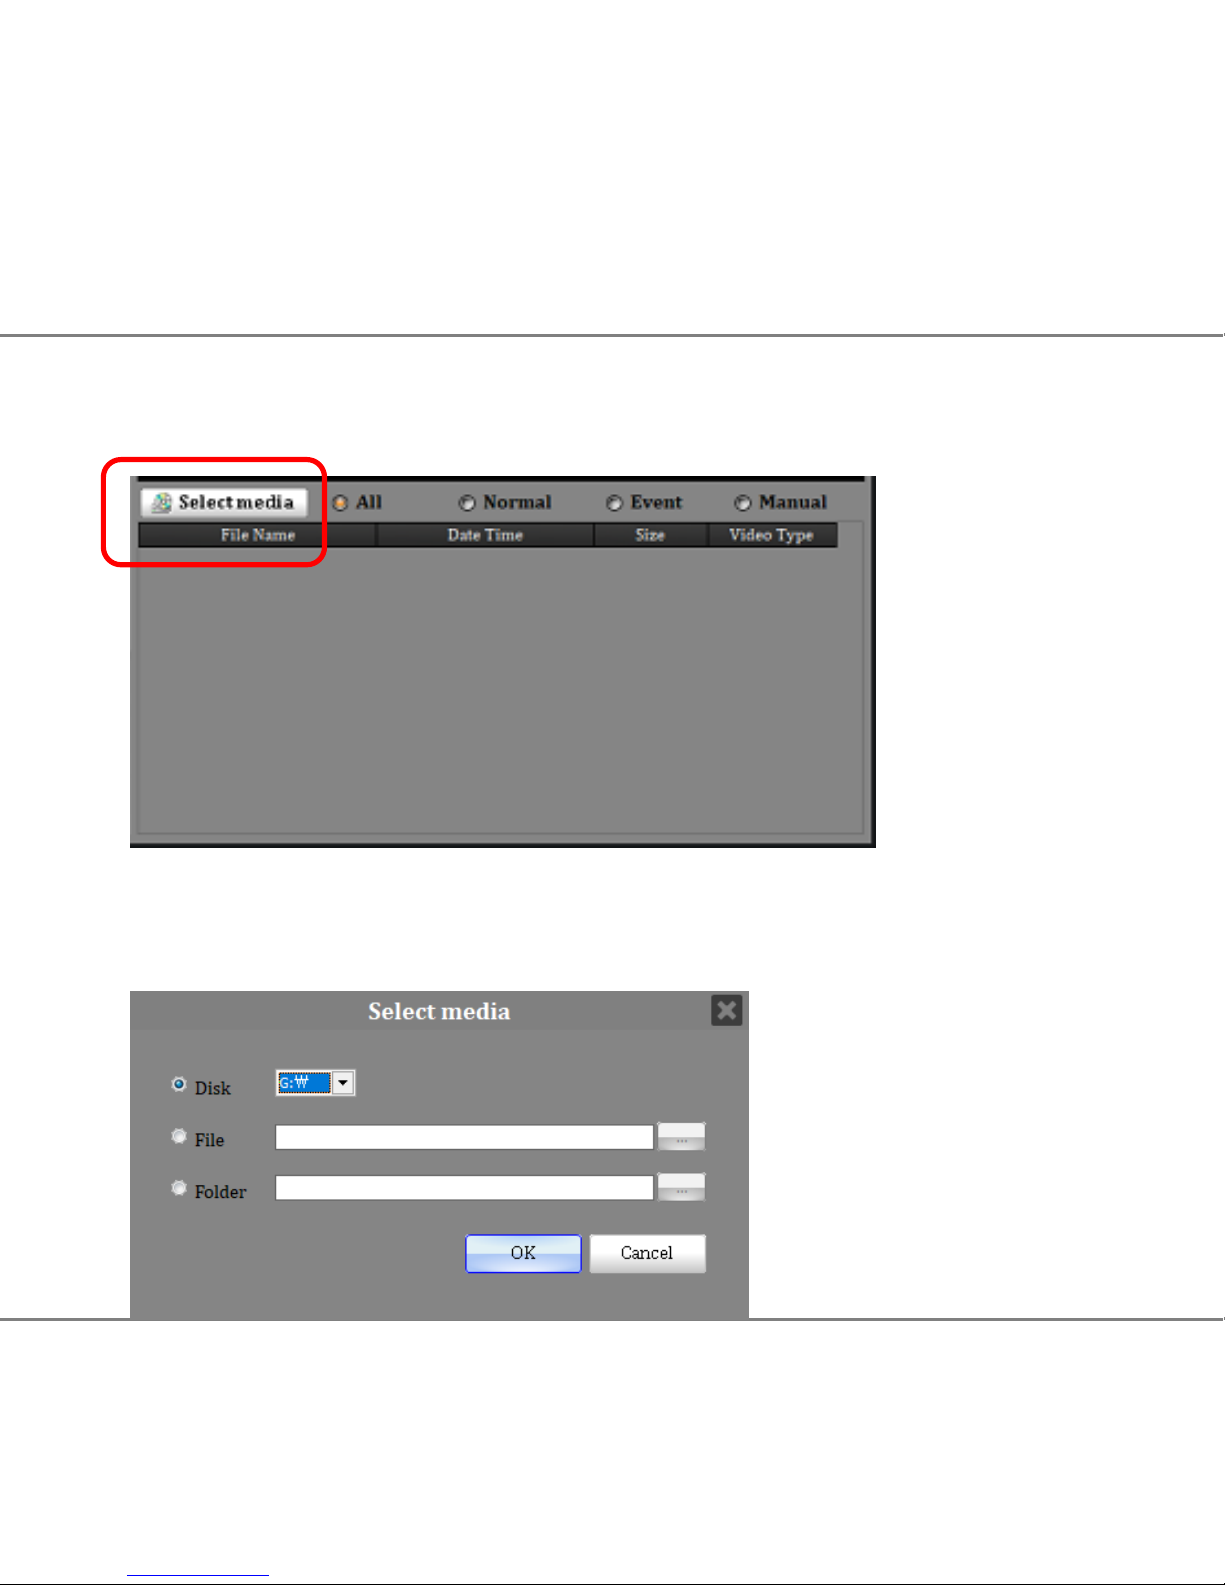
3.1 Click “Select media” button and click one option
You can choose one of “All” / “Normal” / “Event” / “Manual” (default “All”)
3.2 “Select media window” will automatically pop up on the screen.
Click OK button after selection.
3. Playback of the video footage
 Loading...