

Page 1
MODEL NO.:NN43A
.
Page 2
TABLE OF CONTENTS
Inst ru ct io ns
TV Bracket assemble
Media
Medi a
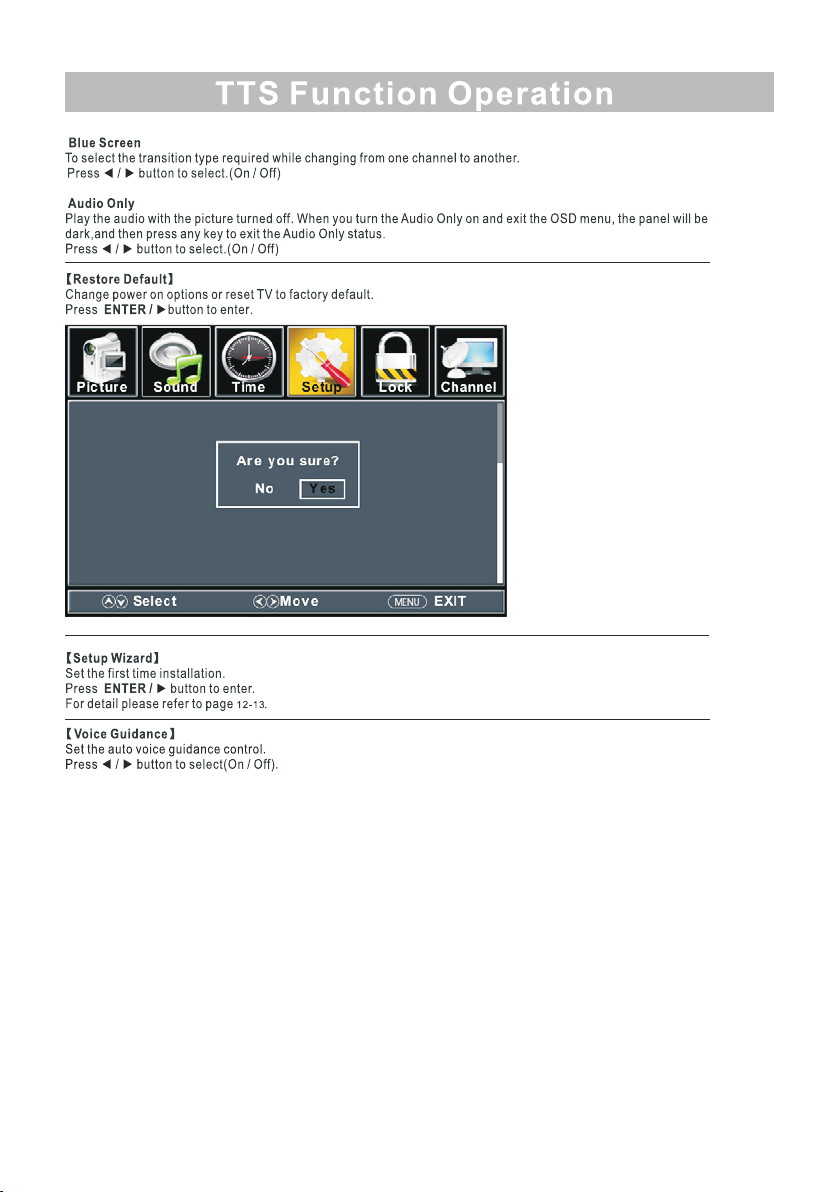
TTS Function Operation
DVD Setup
DVD Setup
38
40
41
42
37
39
Page 3
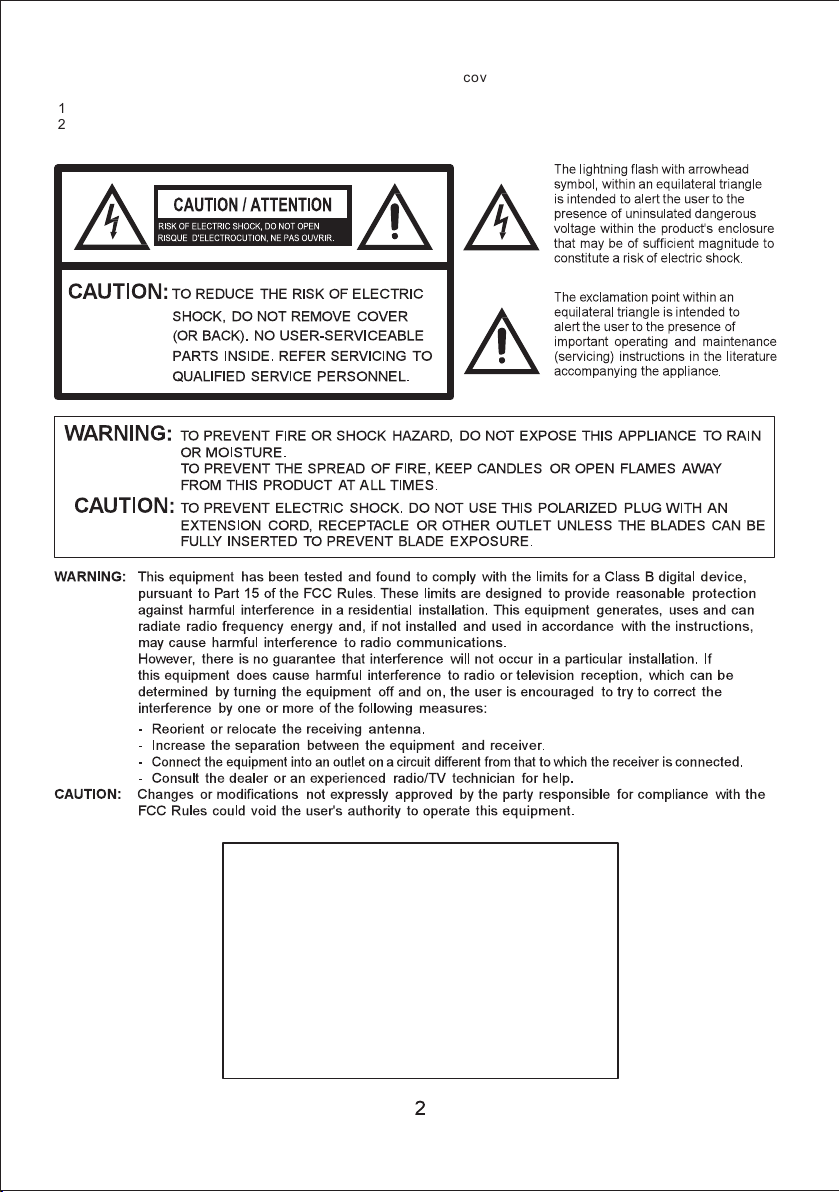
War ni ng: To redu ce t he r is k of electric s ho ck , do n ot remove cov er ( or b ac k) as there are n o us er -s erviceabl e
parts insid e. R ef er s ervicing to q ua li fi ed personne l.
1)No naked fl am e so ur ces, such as li gh te d ca ndles, shou ld b e pl ac ed on the appar at us .
2)Atten ti on s ho ul d be drawn to env ir on me ntal aspect s of b at te ry disposal .
3)Use of th e ap pa ra tu s in moderate c li ma te s.
FCC Dec la ratio n or C onfor mi ty Comp li ance st at ement
This de vi ce comp li es with P ar t 15 of the F CC r ules.
Opera ti on is sub je ct to the f ol lowin g tw o condi ti ons: (1 )
inter fe rence r ec eived , in cludi ng i nterf er ence th at m ay
cause u nd esire d op erati on . The p ar ty resp on sible f or
this de vi ce may no t ca use har mf ul
inter fe rence , an d (2) thi s de vice mu st a ccept a ny
70 75 Fl yi ng Cl ou d Dri ve E den P ra iri e, M N 553 44
(Part 1 5) :
compl ia nce to th es e rules i s:
Blues tem Bra nds Inc .
PH:952- 626-3 824
Page 4
Ins truction s
a tip-ov er an d/ or injury.
Page 5
Ins truction s
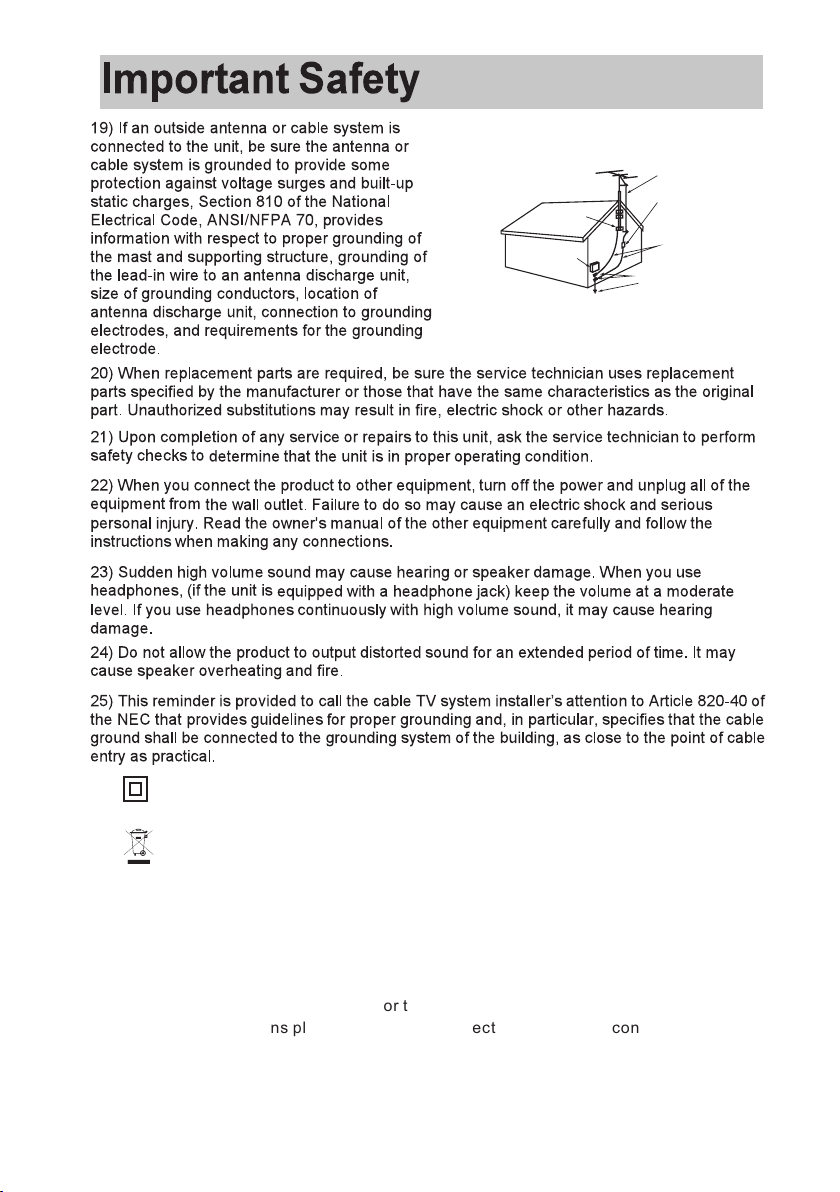
EXA MPLE OF AN TENNA GR OUNDI NG AS PER THE N ATIONA L ELECTR ICAL CO DE
ANT ENNAL EADIN W IRE
ANT ENNA
GRO UND
CLA MP
ELE C TRIC SER VICE
EQU IPMEN T
NEC -NATIO NAL ELEC TRICA L COD E
S28 98A
DIS CHAGR E UNIT
(NE C SECTIO N 810-2 0)
GRO UNDIN G CONDU CTORS
(NE C SECTIO N 810-2 1)
GRO UND CLA MPS
POW ER SERVIC E GROU NDING
ELE CTROD E SYSTE M
(NE C ART 25 0,RAR TH)
26)
This e qu ip ment is a Class II or d ou bl e insulated ele ct ri cal appliance . It h as b een
desi gn ed i n such a way that it do es n ot r equire a safety c on ne ction to electr ic al e arth.
27) Corr ec t di sposal of this pr od uc t. Thi s marking indic at es t hat this produc t sh ou ld not
be dis po se d with other hous eh ol d waste. To prevent possibl e ha rm t o the environ me nt o r
huma n he al th from uncontr ol le d waste disposa l, r ec ycle it respons ib ly t o promote the
sust ai na ble reuse of mate ri al r esources.
28)T he v en tilation shou ld n ot b e impeded by cove ri ng t he ventilatio n op en ings with items
such a s ne ws paper, table-c lo th s, curtains etc .
29)WA RNING: The batterie s (b at tery pack or batt er ie s installed) sh al l no t be exposed to
exce ss iv e heat such as suns hi ne , fire or the like.
30)WA RNING: The mains plug i s us ed a s disconnect de vi ce , the disconnec t de vi ce shall
rema in r ea dily operable .
4
Page 6
Ins truction s
War ni ng: batteri es (p ac k or batterie s in st al led) should n ot b e ex po sed to excess iv e he at
such as sunsh in e, f ir e or other heat s ou rc es .Please do no t mi x ne w ba ttery and old b at te ry
for recyc le u si ng .
5
Page 7
Ins truction s
have b ri ght spots /pixels.
6
Page 8
Ins truction s
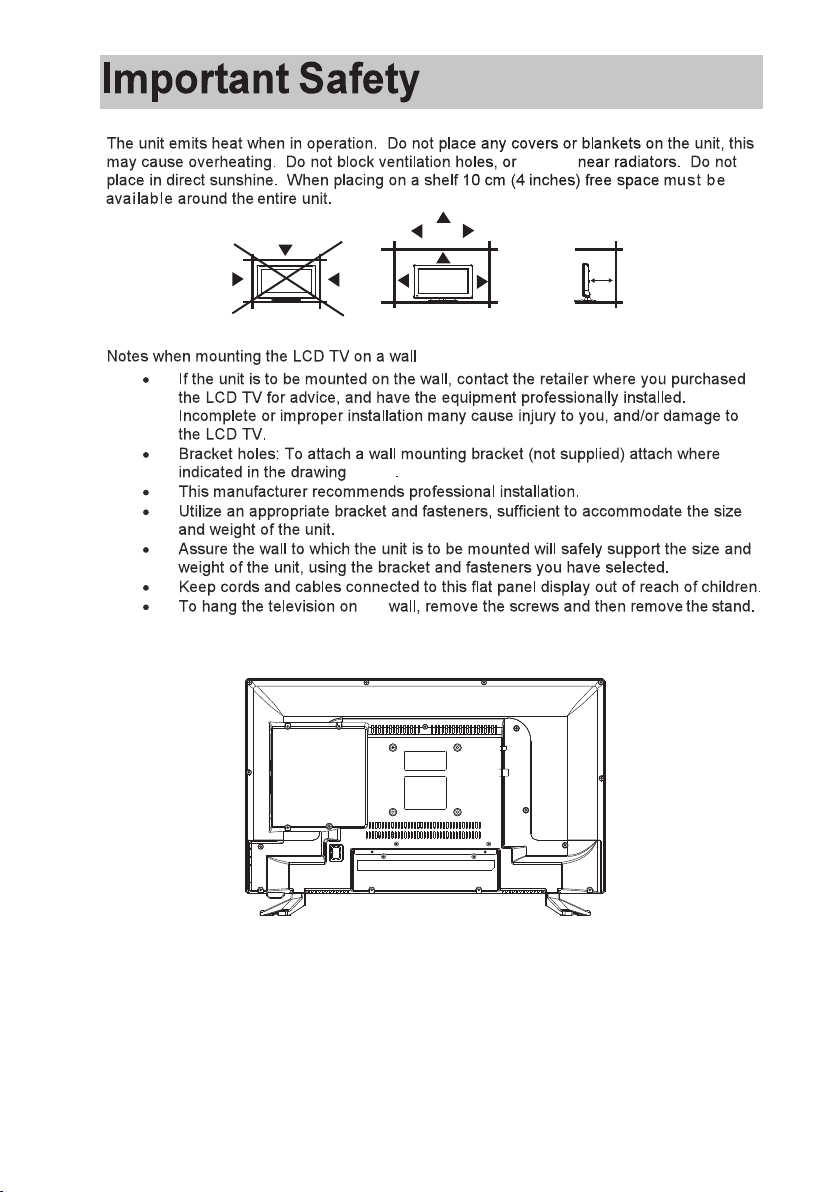
operat e
10cm
10cm
below
the
To avoid d am ag e to the TV, place the TV on a table, f ac e do wn on a soft surfac e.
Note: D ra win g is a r epres en tativ e ex amp le o nly
7
Page 9
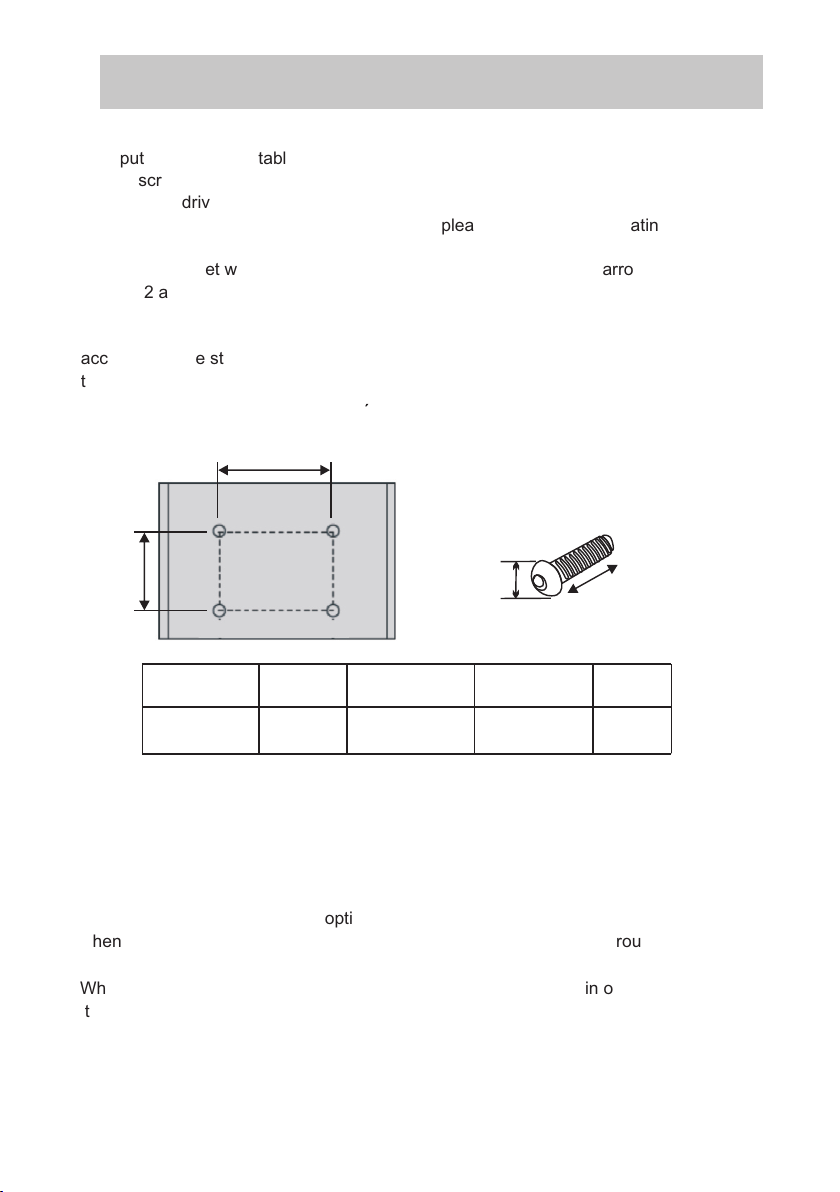
TV Bracket assemble
Fix the TV on the wall
1.First,put the TV on the table smoothly and put some soft cloth on the table to avoid
getting scratched the screen.
2.Use a screw driver to take off the screws which are fixed on the bottom stand
(the direction of the arrow, refer to the photo1).please be careful when tating off the
bottom stand).
3.Make one bracket which can fix on the wall according to the size of arrow direction
of photo2 and photo3.
4.Drill four holes properly on the wall (the size only for reference) and put into four
screws.(optional parts)
5.according to the step 4,use the screwdriver to lock the screw on the back of the TV.
then hang the TV on the wall.
Wallmounting Installation
A
B
Product family Inches Standard screw
LED TV 24 10cm x 10cm M4*L6
Note: "D" is the effective length of the screw in the mounting hole.
The figures and illustrations in this manual are provided for reference only
and may differ from their actual appearance. The product design and
specifications may change without notice.
Specifications
VESA(A*B)
C
(C*D)
D
quantity
4
Note:
1.The bracket fixed on the wall is optional part.
2.when you assemble the TV, there should be no other articles on the around and front
and please keep the distance from other articles.
3.When assemble the TV, please ask the professional worker to fix in order to avoid
the danger.
4.The fixing picture is only for reference.
5.Please follow the user’s manual about bracket assemble to fix the TV.
6.Attach the mounting bracket with the VESA compatible wall mounting kit.
8
Page 10
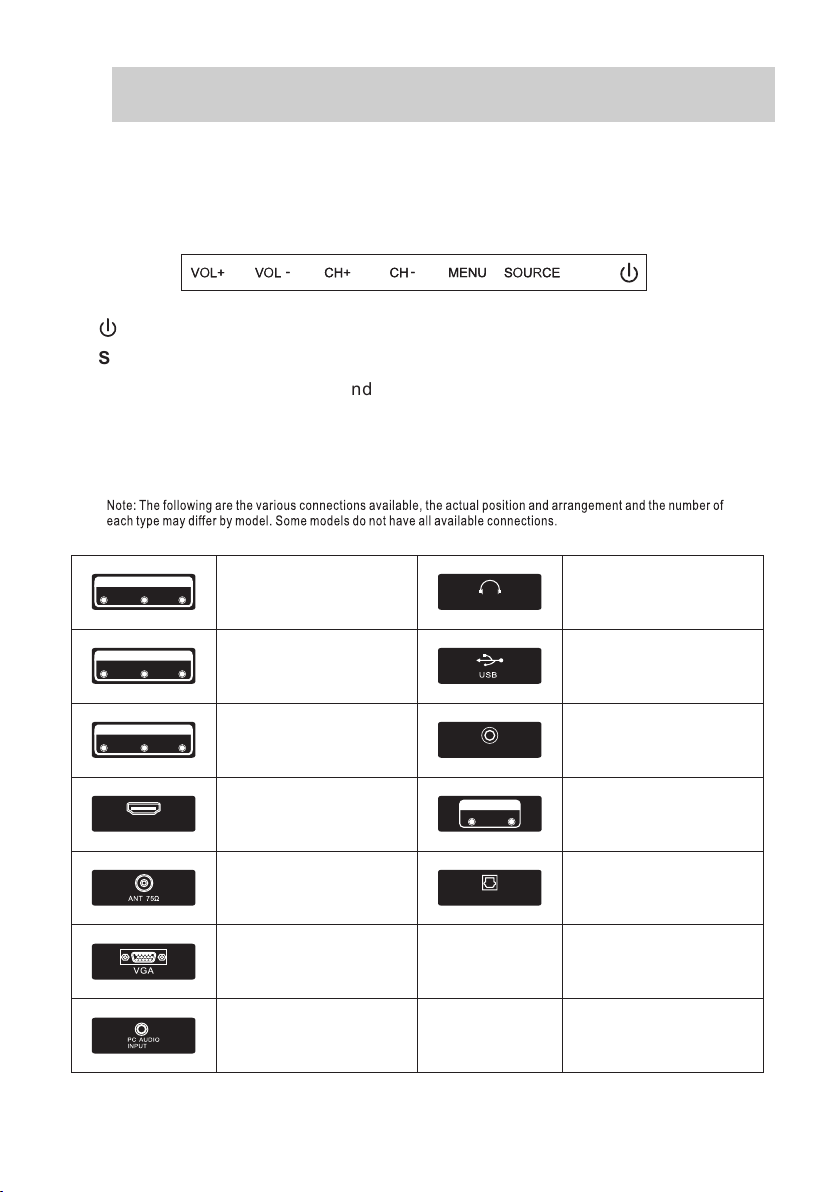
TV Buttons and Connections
TV Buttons
Note: The following is only a representation of the buttons on your unit. The actual
position and arrangement of the buttons may differ by model.
:Tu rn ON/O FF Powe r.
SOUR CE:External Signal Input Selection.
MENU:Display Main MENU And Confirm MENU Item Selection.
CH+/-:Select Channel.
VOL+ /-:Ad just Vol ume.
Connections
INP UT
VIDE O R L
OUT PUT
VIDE O R L
INP UT
Y Pb Pr
HDM I
AV inp ut
Ext ernal AV Si gna l Input a nd
Rig ht/Le ft Audio I nputs .
AV Out put
Ext ernal AV Si gna l Outpu t and
Rig ht/Le ft Audio O utput s.
Com ponen t Input
Con nect to a c ompon ent out put
con necti on on you r exter nal dev ice.
HDM I Input (HDMI 1,2,3 )
Con nect to a H DMI out put
con necti on on you r exter nal dev ice.
ANT 7 5/RF Co nnect ion
Con nect to t he ante nna/c able TV
out put of yo ur devi ce or wal l plate .
VGA I npu t
Con nect to y our PC us ing a VGA
cab le(no t provi ded).
PC Au dio I npu t
Con nect to y our PC Aud io Out
usi ng 1/8 li ne cord .
9
HEA DPHON E
COAX IAL
OUTP UT
R
OPT ICAL
HEA DPHON E JACK
Plu g earph ones in to jack f or priv ate
lis tenin g. Over rides s peake rs.
USB I nput
Con nect to y our USB d evice .
COA XIAL Ou tpu t
Con nect to y our SPD IF devi ce
L
Out put
Aud io Out Ri ght/L eft
Con nect to y our ext ernal d evice .
OPT ICAL
Dig ital Aud io Outp ut.
Page 11
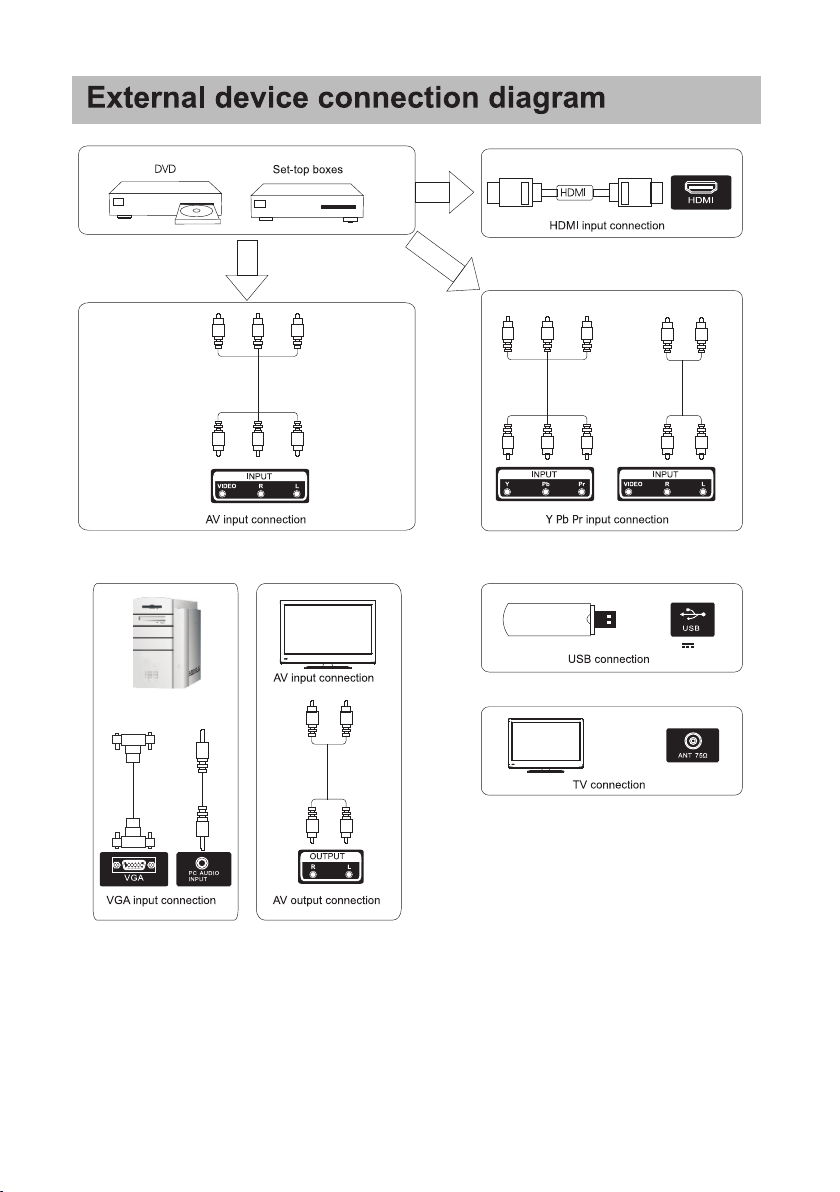
10
5V 0. 5A
Page 12
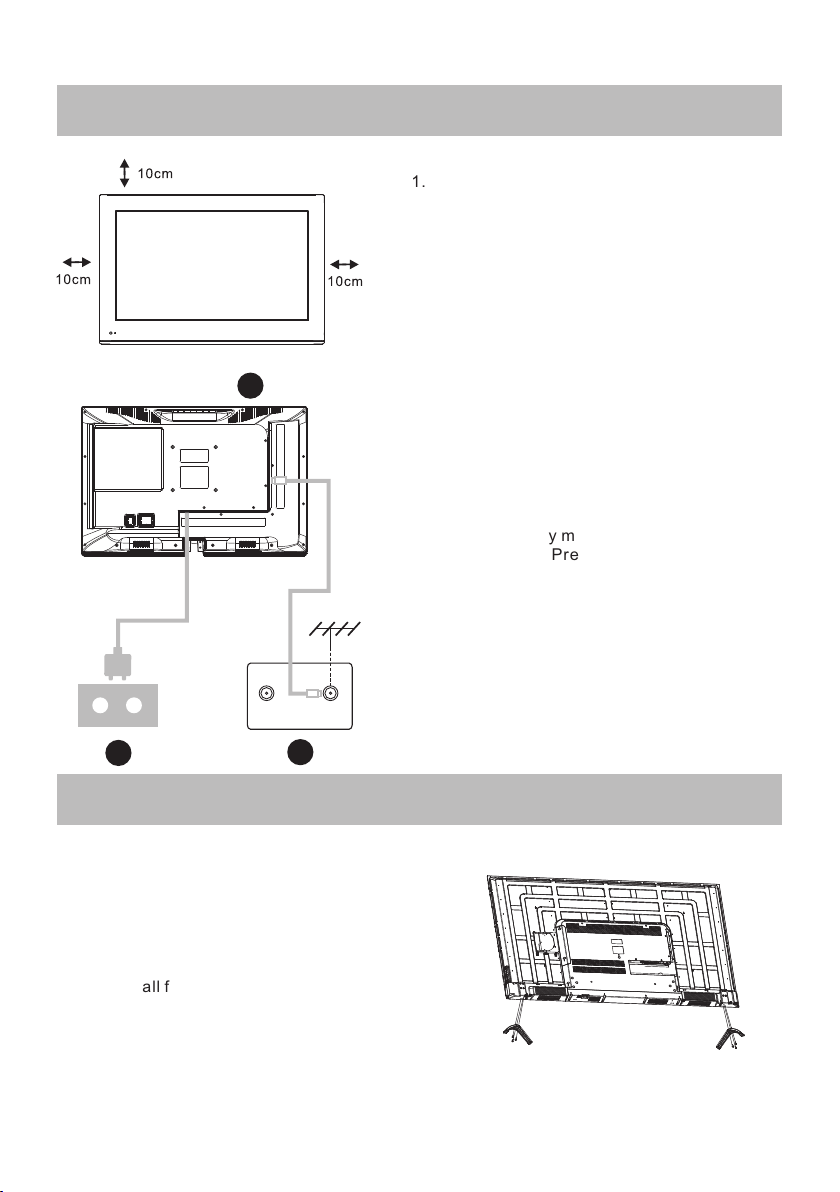
Install and Connect TV
3
Setu p yo ur TV
1.Pu t yo ur TV in a p lace that can b ea r the
weight of th e TV.
To avoi d da nger, plea se d o not assembl e
the TV near wate r or e xtreme heat (s uch
as a fu rnace, ligh t so urce,or c an dle.)
Do not bl oc k the ventila ti on on the bac k
of th e TV.
Conn ec t signal sour ce a nd power
2. Con ne ct the antenn a ca ble to the RF
conn ec tion on the bac k or s ide of the TV,
and/ or t he signal sou rc e HDMI cable to t he
HDMI i np ut(s) on the re ar o r side of TV. Plug
the TV into th e wa ll power outl et ( AC120 ~ 60Hz) .
Turn on the TV
3.Wh il e in standby mo de t he power indi ca tion
ligh t wi ll be red.Pre ss t he power butt on o n
t he TV or r emote contr ol .The ligh t wi ll c hange
to gre en .
FM ANT
TV si gnal ou tput
TV ANT
Note:
Picture for reference purposes only.
2
1
TV Feet Installation Instructions
1.Op en t he c arton and remov e th e TV,
acce ss or ie s, and the stan d/ fe et.
2.To avo id d am age to the TV, place on
a tabl e, f ac e do wn on a soft surf ac e.
The feet are att ac he d to the
TV with the prov id ed s crews.
3.En su re a ll feet screws ar e ti gh tened securel y.
Do not o ve rt ig hten.
Your TV wi ll h av e either a Feet.
Asse mb le a ccordingly.
11
Page 13
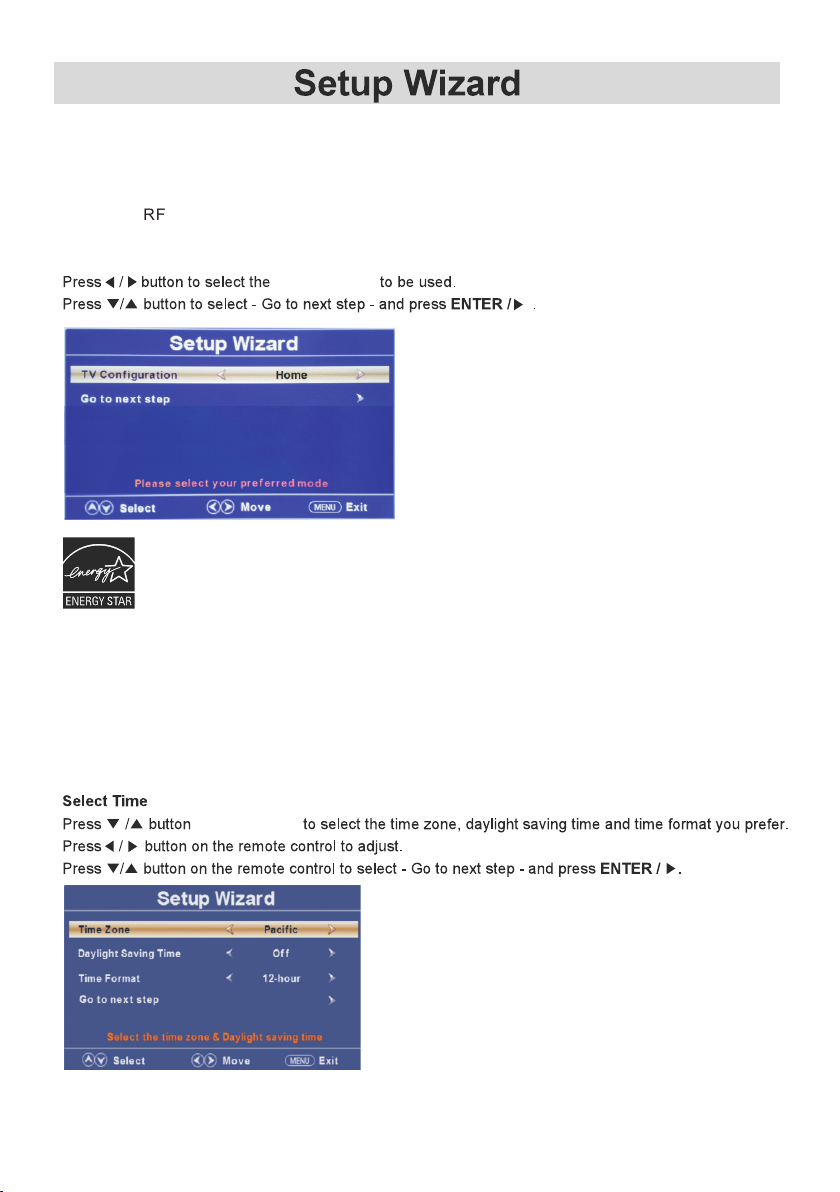
Setu p Wi za rd
If your preferre d la ng ua ge i s Fr en ch o r Sp an is h, e xi t th is S et up Wizard by pressing the Menu
button, and foll ow t he i ns tr uc ti on o n pa ge 1 9 to m ak e yo ur l an gu age selection and re-enter the
Setup Wizard fro m th at M en u sc re en .
Conn ec t a RF c able from your in co mi ng antenna/ca bl e ja ck to the TV ’s i np ut labeled “ANT ”,
and/ or a H DM I cable from your s ig na l source to the HDM I in pu t jack.
Sele ct T V Co nf iguration
TV Conf ig ura ti on
This prod uc t me et s EN ERGY STAR® gu id elines for en er gy e ff iciency. EN ER GY S TAR® and
the ENERGY STA R® mark are regi st er ed U .S. marks . ENE RG Y STAR® is a regist er ed m ar k
owned by th e U. S. g ov er nment.
Home Mode (E ne rg y Sa ving):S el ec t Ho me M ode to maximi ze e ne rg y eff ic ie nc y.Plea se n ot e if y ou select Hom e
Mode,the pi ct ur e wi ll be darker . Th is m od e me ets the requi re me nt s of ENERGY STAR® q ualificat io n .
Retail Mo de : Se le ct R etail Mod e if y ou w ou ld l ike your pict ur e to b e br ighter. At time s th is m od e may use more
energy to ope ra te t he Vo lume/Soun d Mo de a nd t he picture Mo de .I n th is setting, th e po we r consumpti on m ay
possibly ex ce ed t he l imitted req ui re me nt of the ENERG Y STA R® qualifi ca ti on .
ENERGY STA R® is a s et of power-s av in g gu idelines is su ed b y th e U. S. Enviro nm en ta l Pr otectio n Age nc y( EPA).
ENERGY STA R® is a j oint progra m of U .S . En vironment al P ro te ction Agenc y an d th e U. S. Departme nt o f
Energy help in g us a ll s ave money and p ro te ct t he environm en t th ro ugh energy ef fi ciency prod uc ts a nd
practices .
on the r em ot e
12
Page 14
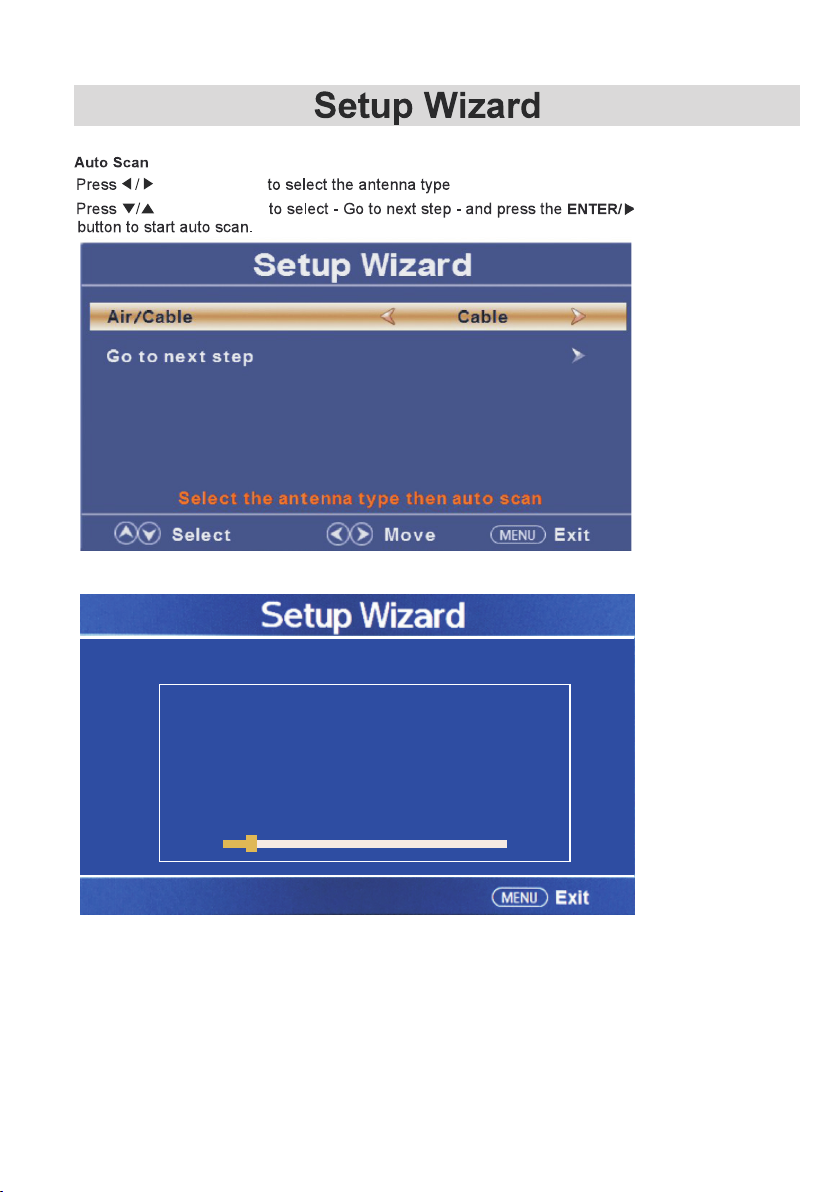
on the r em ot e
on the r em ot e
Analog : 0
Digital : 0
RF CH : 10
Total Found: 0
(Air /C ab le).
Cable
13
Page 15
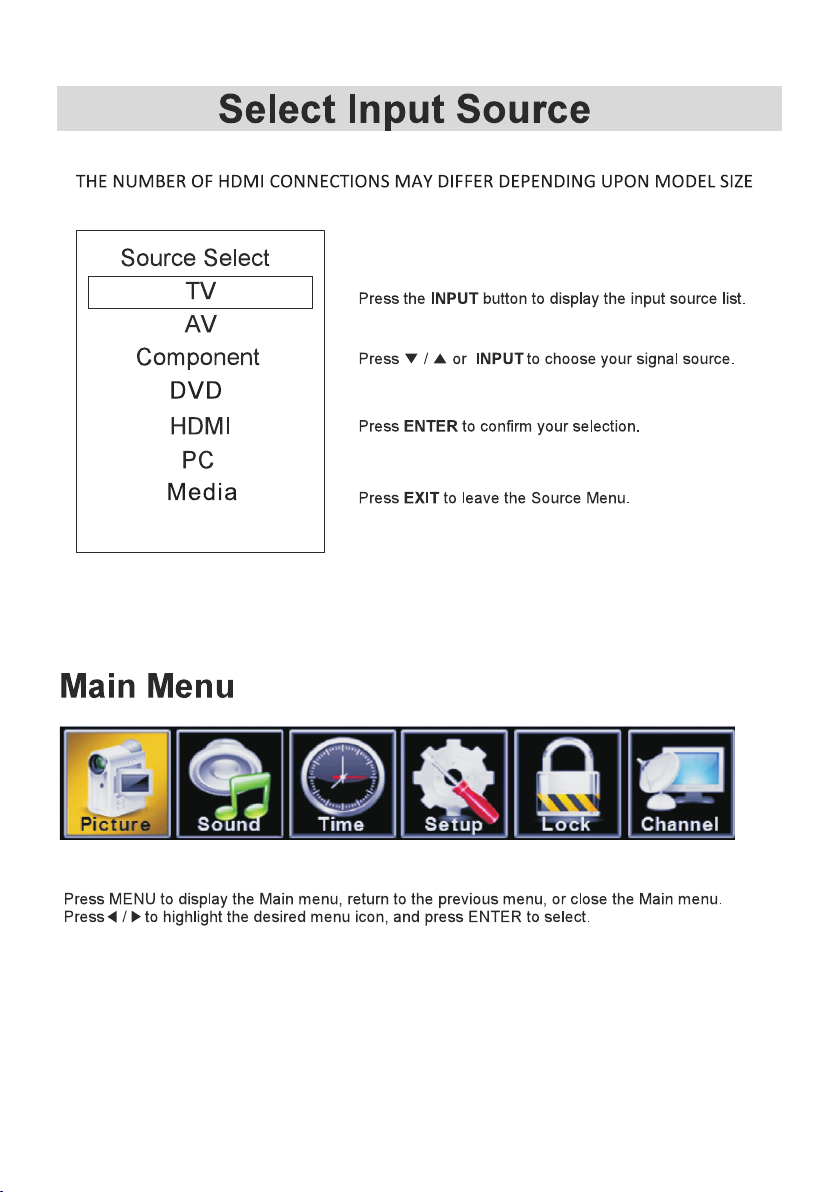
14
Page 16
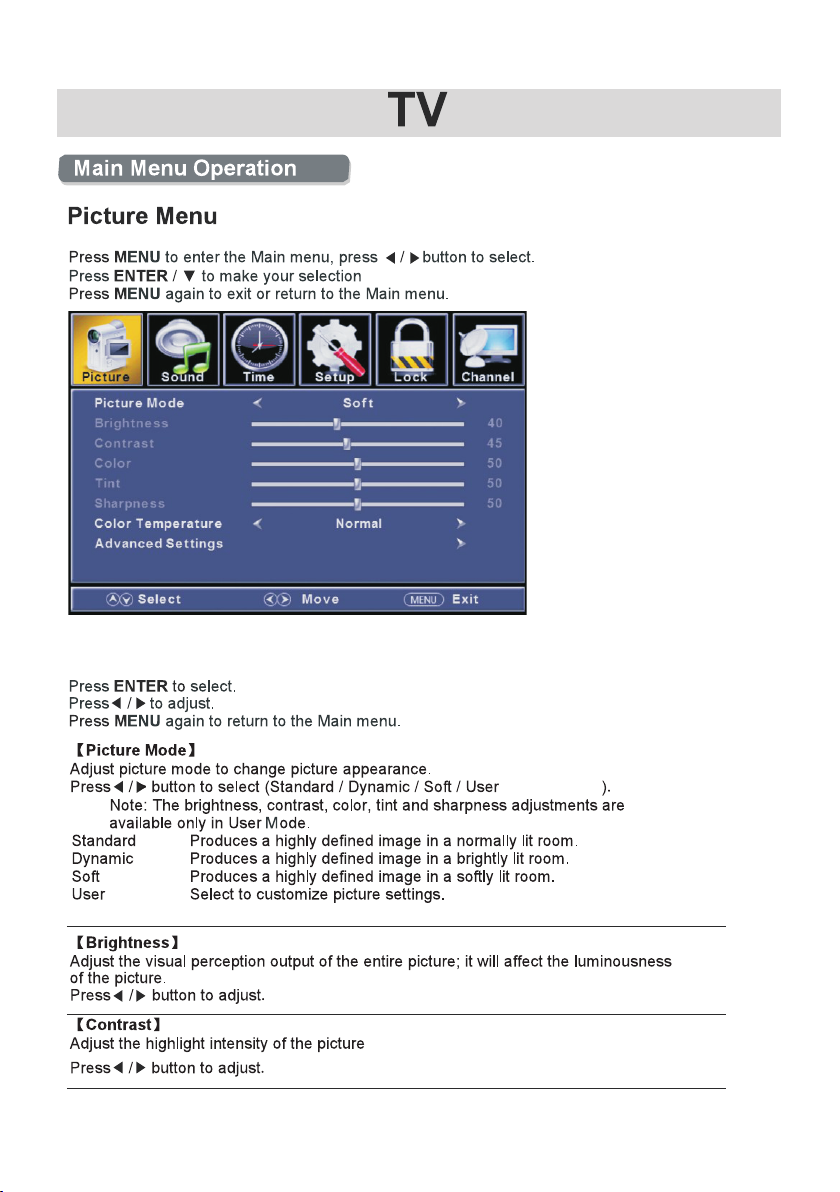
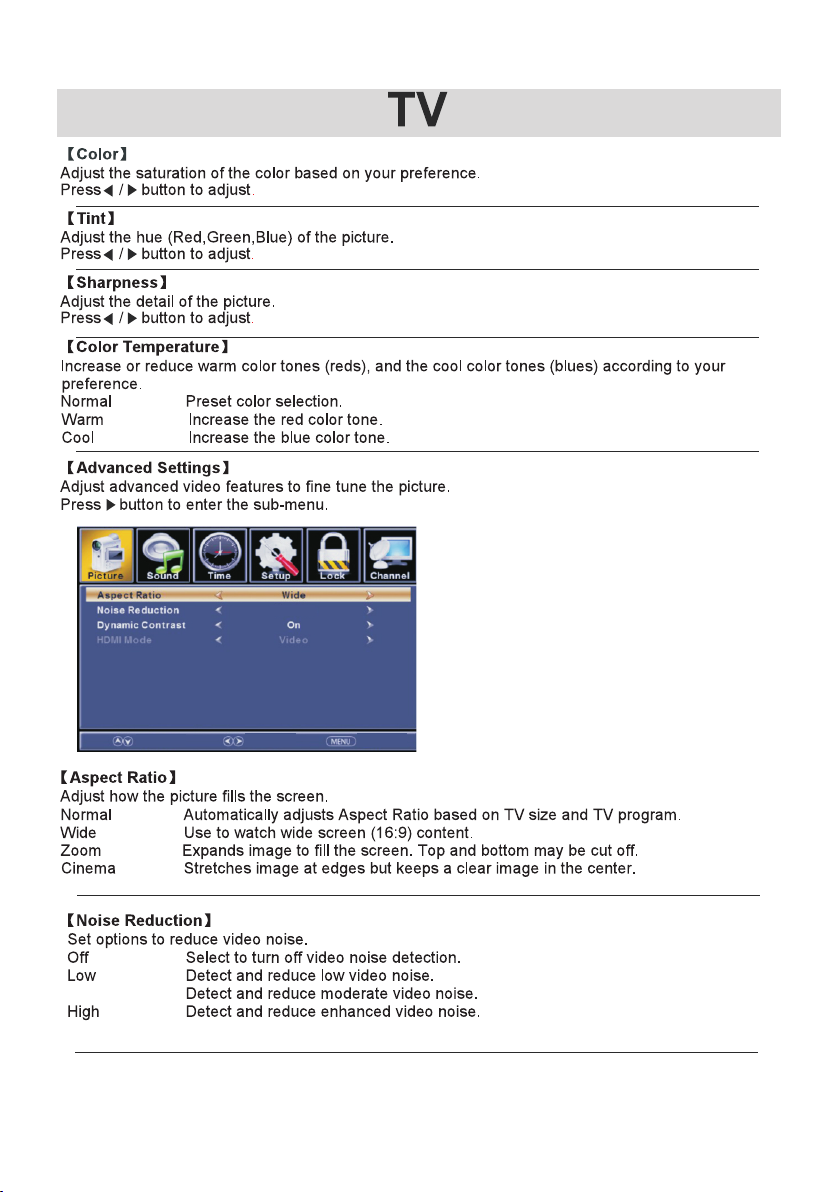
Press ▼ / ▲ button to select among Pi cture Mode /Brightness/ Contrast / Color / Tint / Sharpness /
Advanced Settings. Color Temperature/
/ Power saving
Powe r sa vi ng Lower power co ns um ption.
. The shadow of th e pi ct ure cannot be adj us te d.
15
Page 17
Mid dle
Middle
Move
Selec t
Retur n
16
Page 18
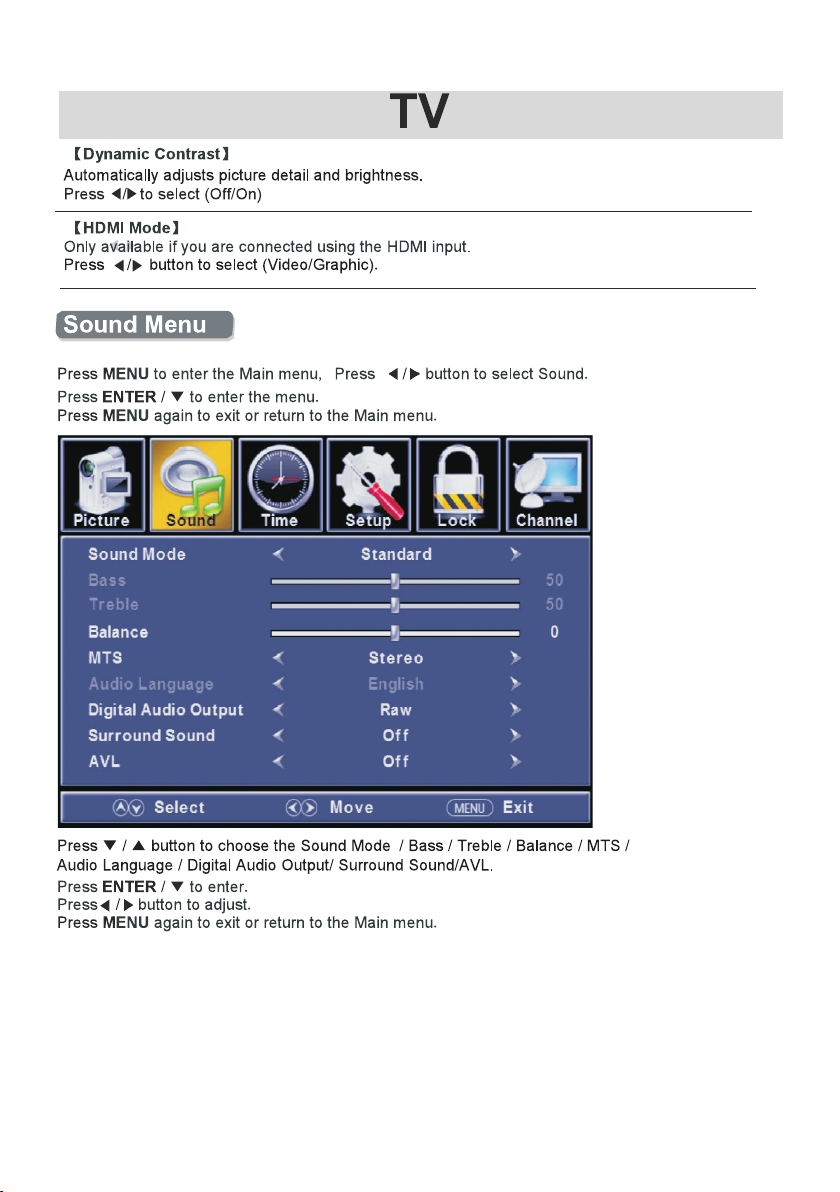
17
Page 19
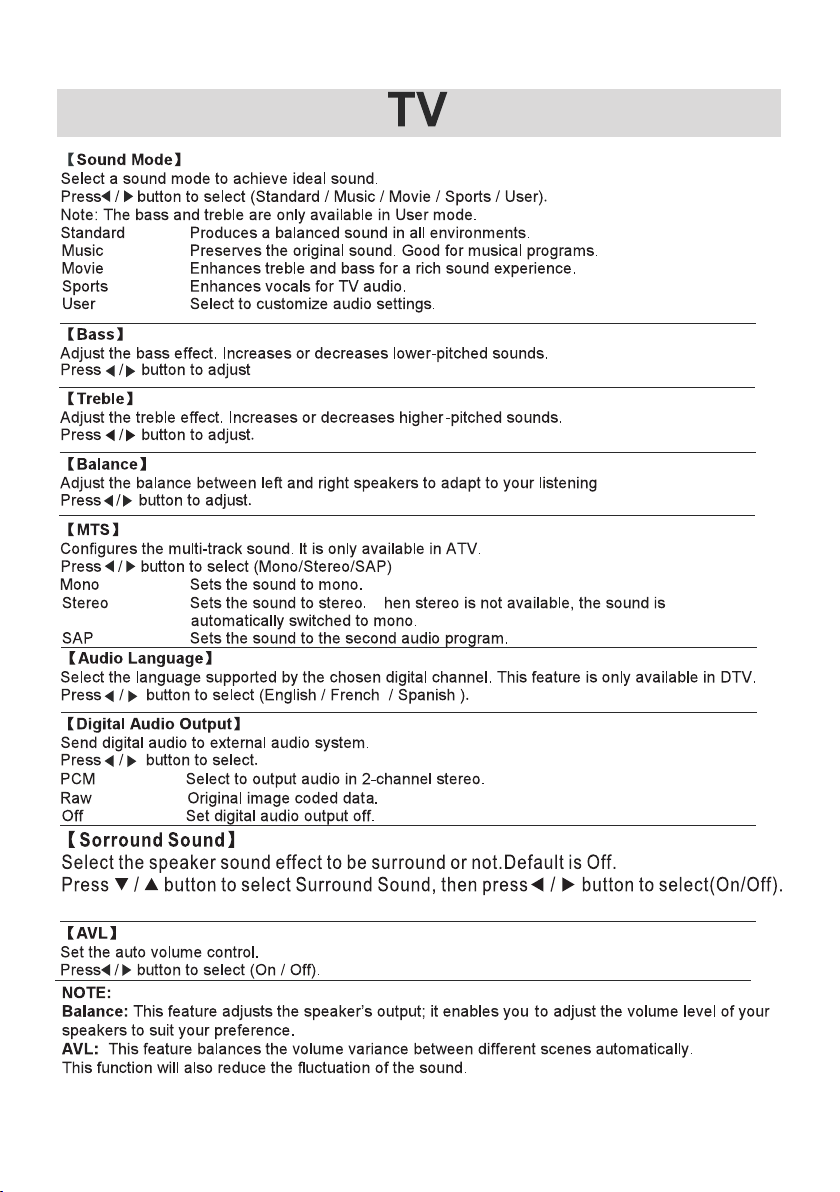
Default is off.
pref er en ce.
W
18
Page 20
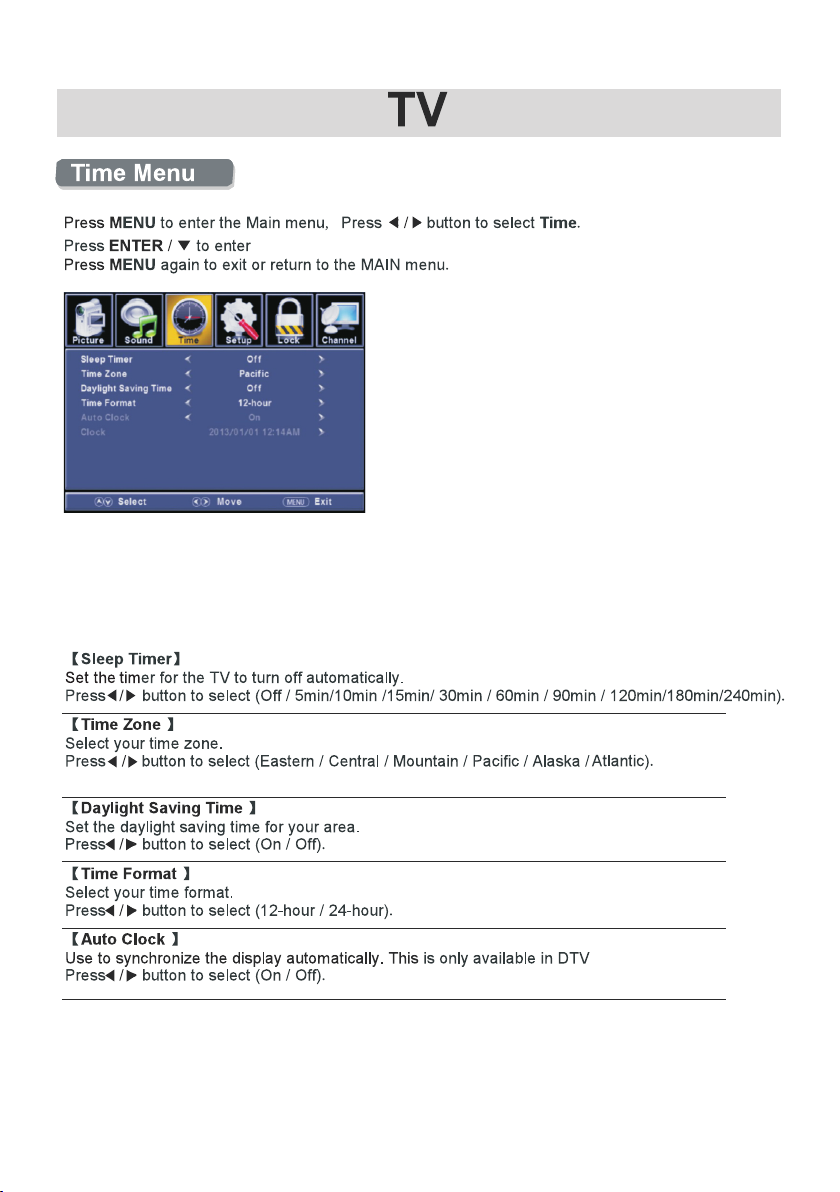
butt on to sel ect amo ng Slee p Timer / Tim e Zone / Da yligh t Savin g Time /
Pre s s ▼ / ▲
Time Fo rm at / Auto Clock / C lock.
Pre s s to ente r. ENTE R / ▼
Pre s s b utton to adjus t.◄ / ►
ENU ag ain or ba ck to pare nt m enu. Pre s s M
19
Page 21
Mov e
Nex t
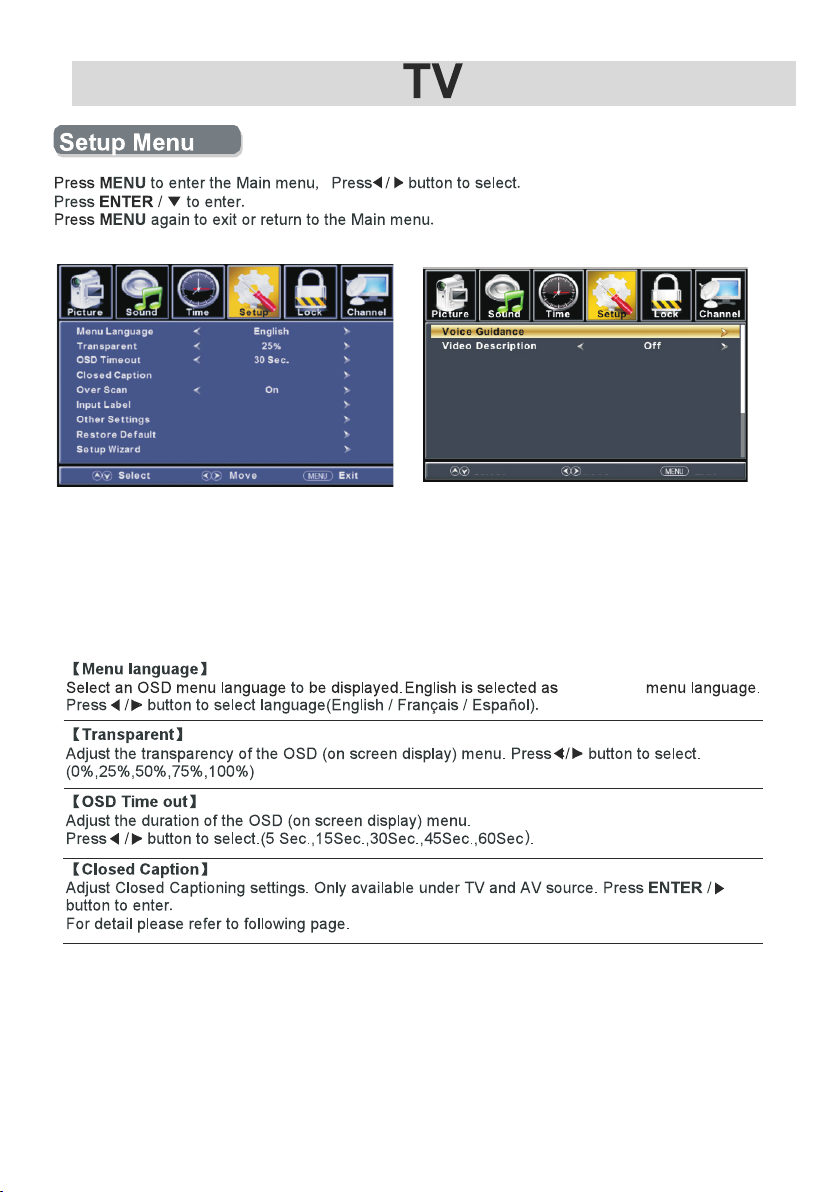
Press ▼ / ▲ button to select am ong Men u Langu age / Tran sparent /
OSD Timeout / Closed Capti on /Ove r Scan/ I nput La bel /Other settings /
Restore Default / Setup W izard /Voice G uidan ce/Video Descript ion.
Pre ss to enter. ENTER / ▼
Pre ss butt on to adjust.◄ / ►
ENU again or back to parent menu. Pre ss M
the defa ul t
Ret urn
20
Page 22
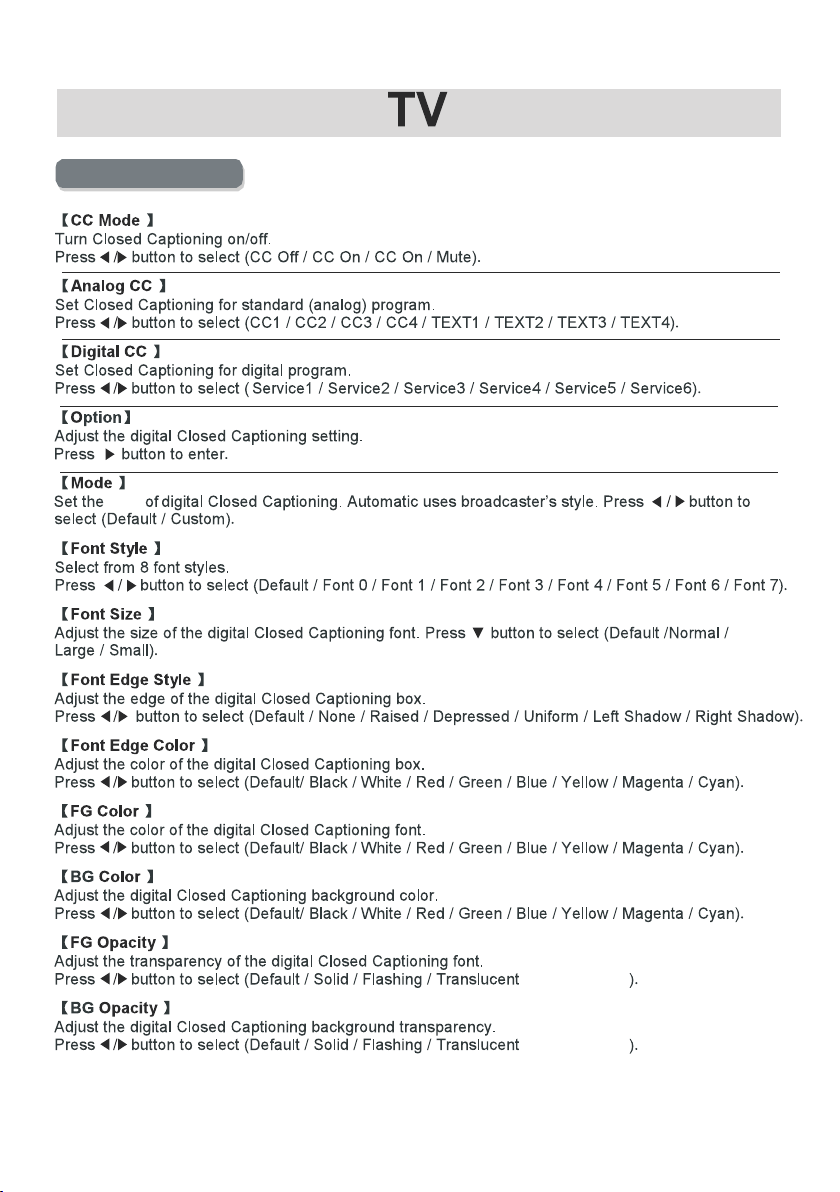
Closed Caption
styl e
21
/ Trans pa re nt
/ Trans pa re nt
Page 23
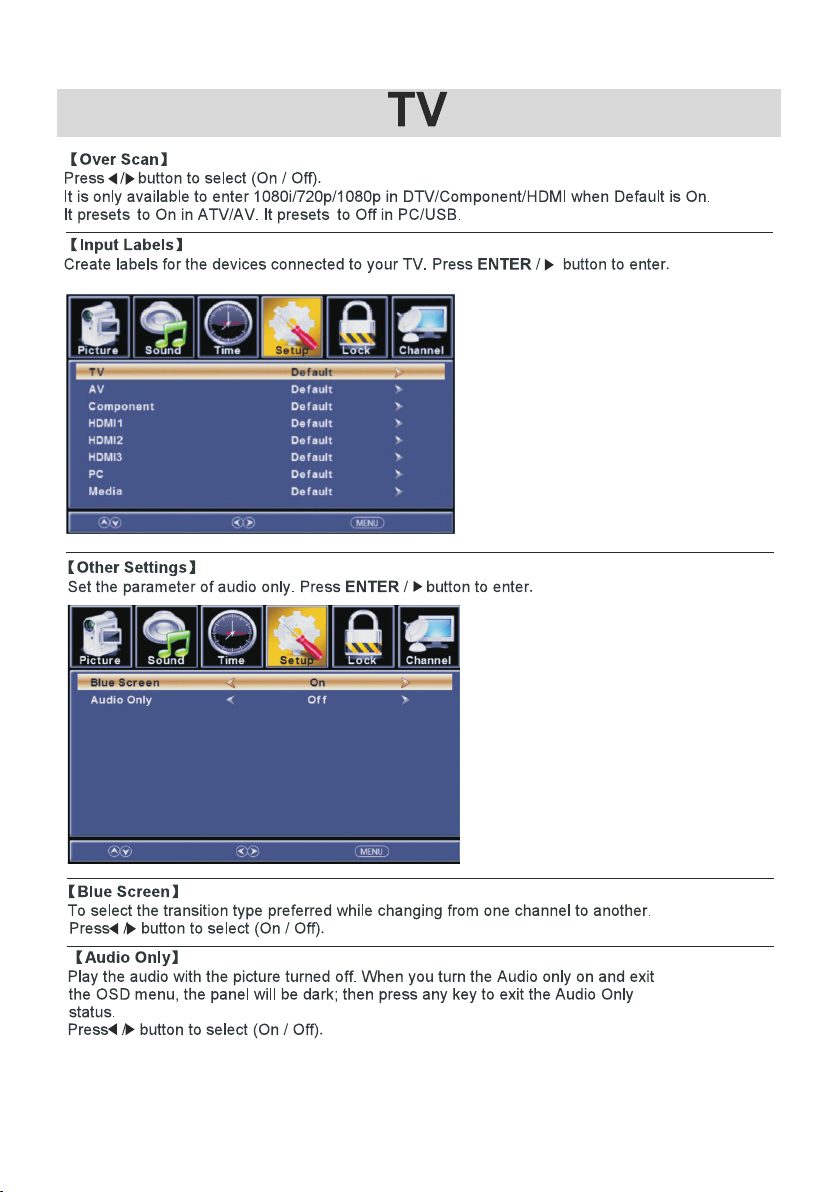
Move
Selec t
Retur n
Move
Selec t
Retur n
22
Page 24
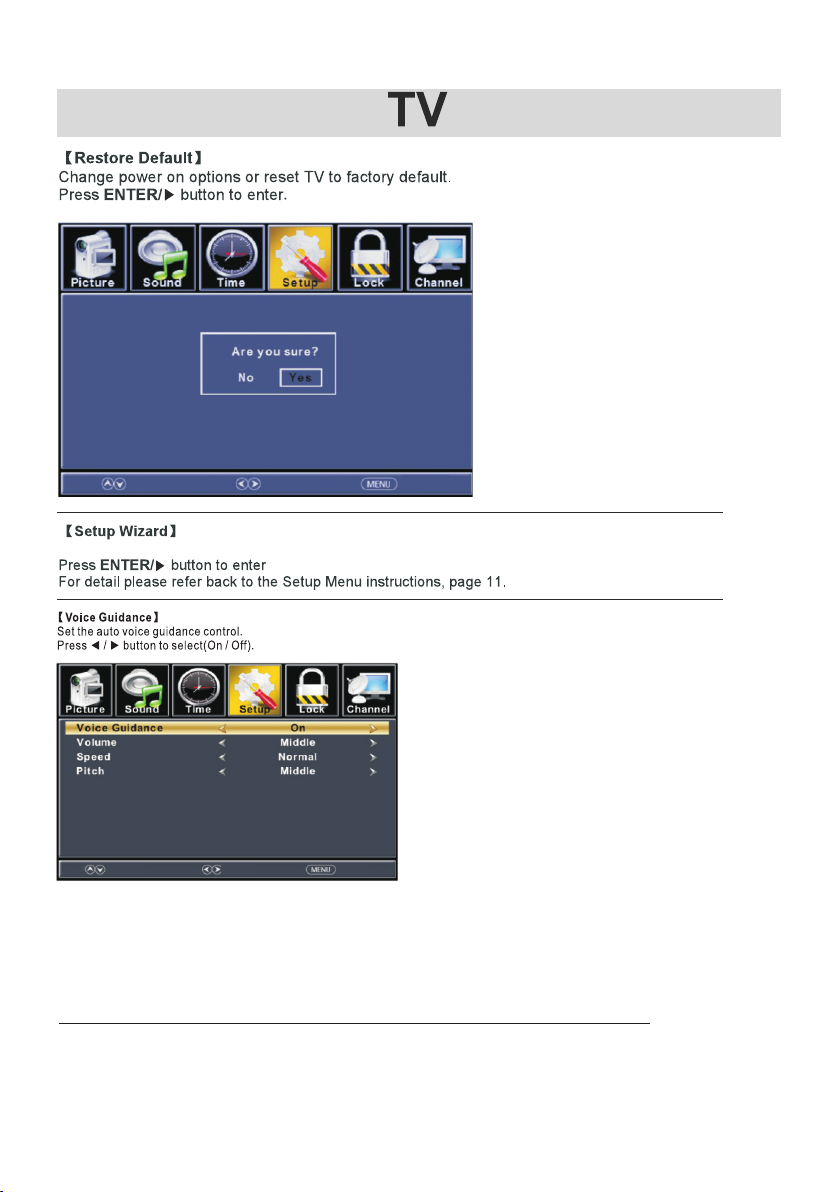
Move
Selec t
Retur n
Reset to initial sett in gs .
Ret urnSel ectMove
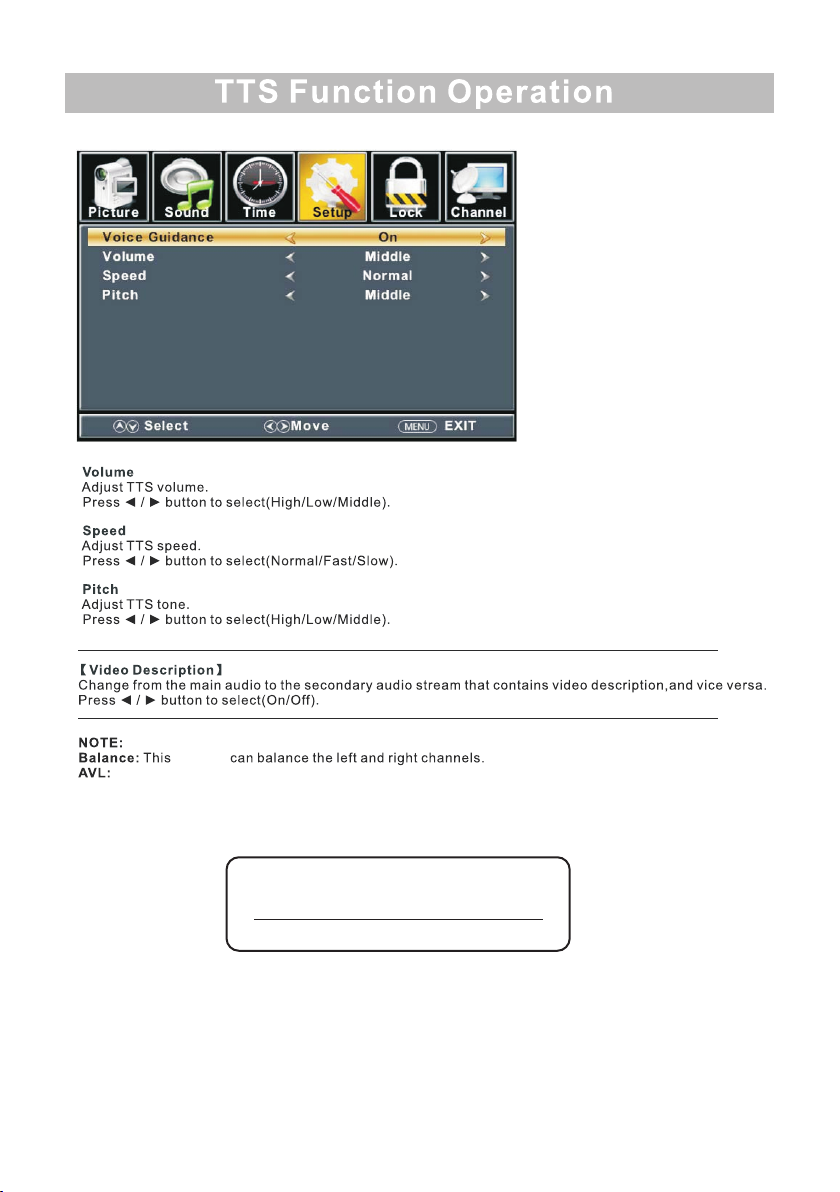
Volume
Adjust TTS volume.
Press ◄ / ► button to select(High/Low/Middle).
Speed
Adjust TTS speed.
Press ◄ / ► button to select(Normal/Fast/Slow).
Pitch
Adjust TTS tone.
Press ◄ / ► button to select(High/Low/Middle).
【 】Video Description
Selec t ma in au di o/sec on dar y au dio str eam con ta ini ng t he vide o de scr ip tion.
Press ◄ / ► button to select(On/Off)
23
Page 25
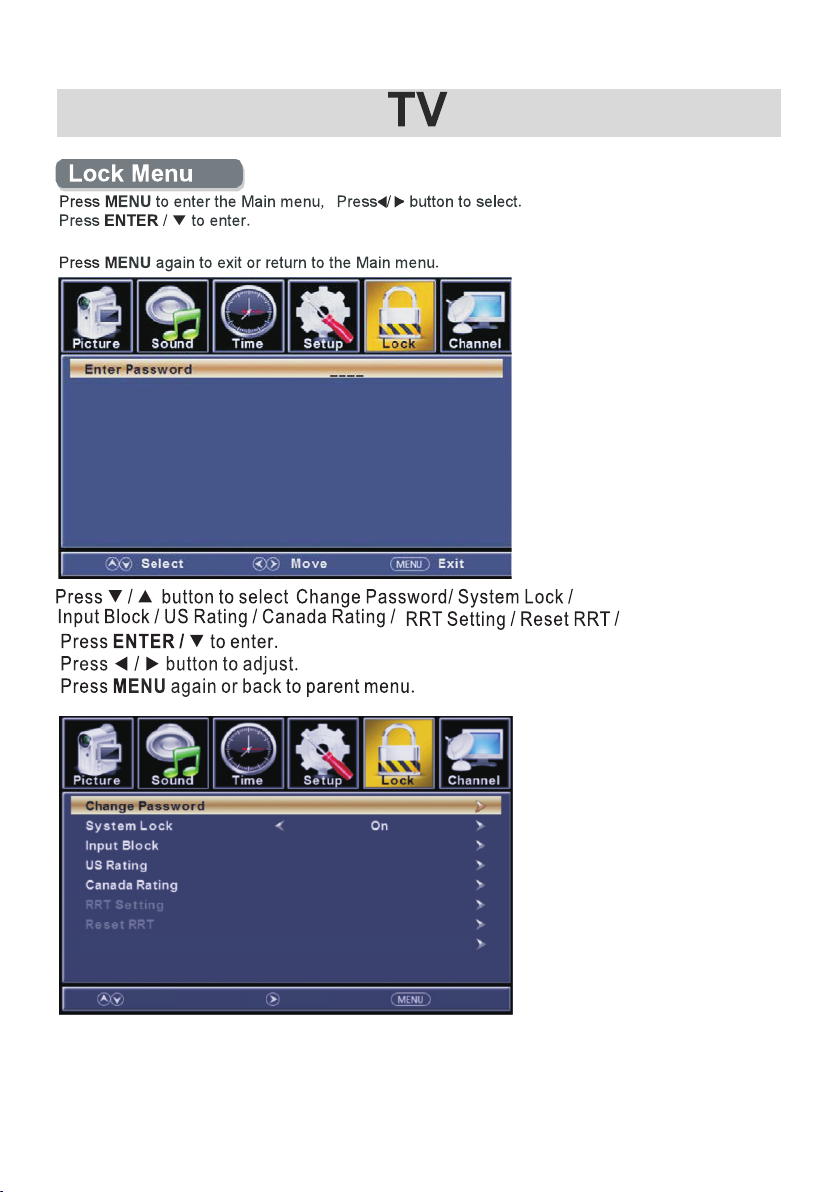
Lock M en u de feat password “0000 ”.
Hote l Menu
Hot el Menu
ReturnNextMove
24
Page 26
Move
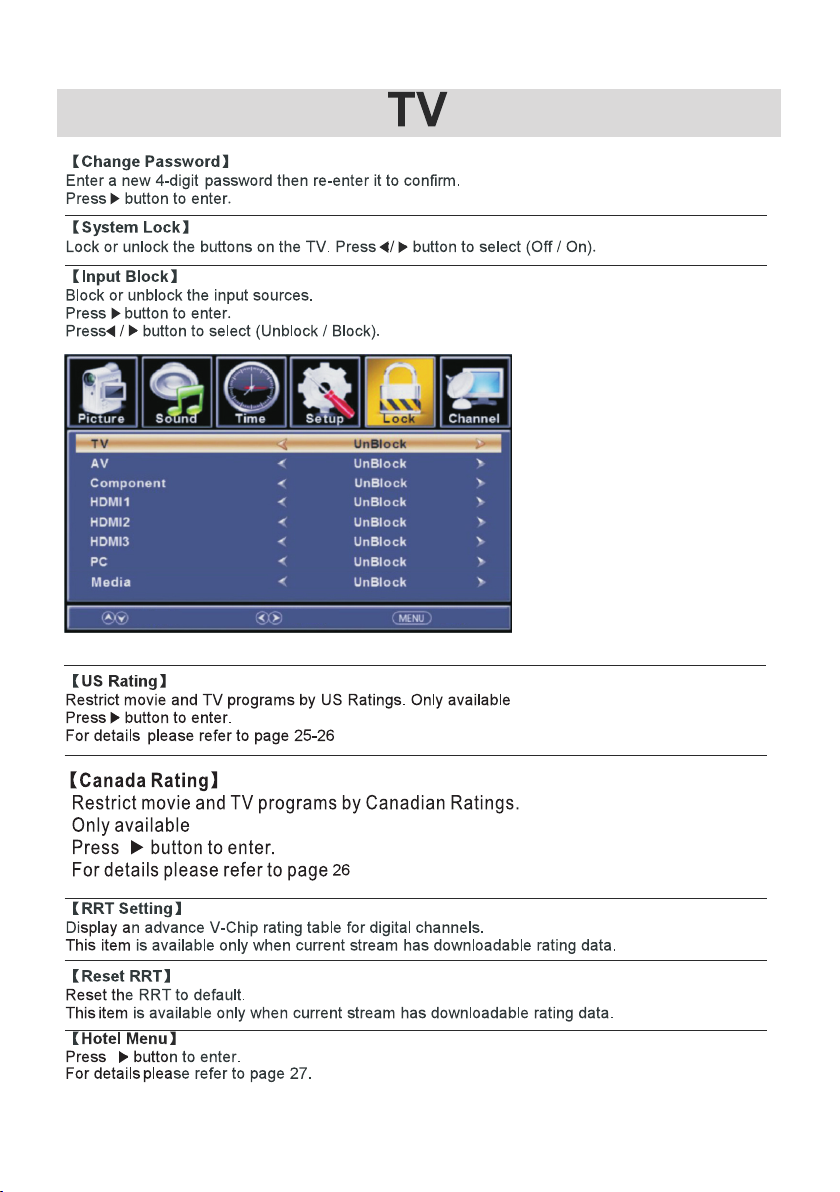
when S ys te m Lo ck is on.
Selec t
Retur n
when S ys te m Lo ck is on.
2525
Page 27
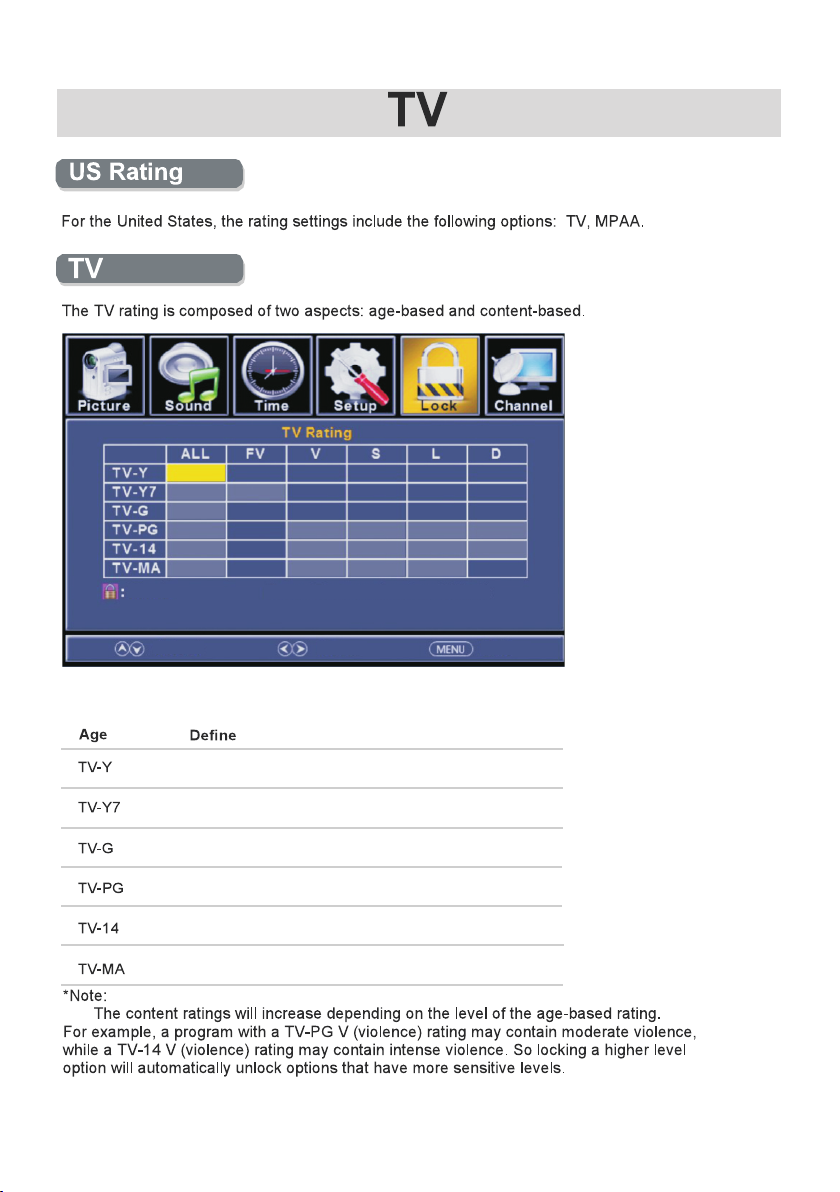
Lock
Press O K to L ock or Un lo ck
Move
All children
7 years old and above
General audienc e
Parental guidan ce
14 years old and abov e
17 years old and abov e
Selec t
Retur n
26
Page 28
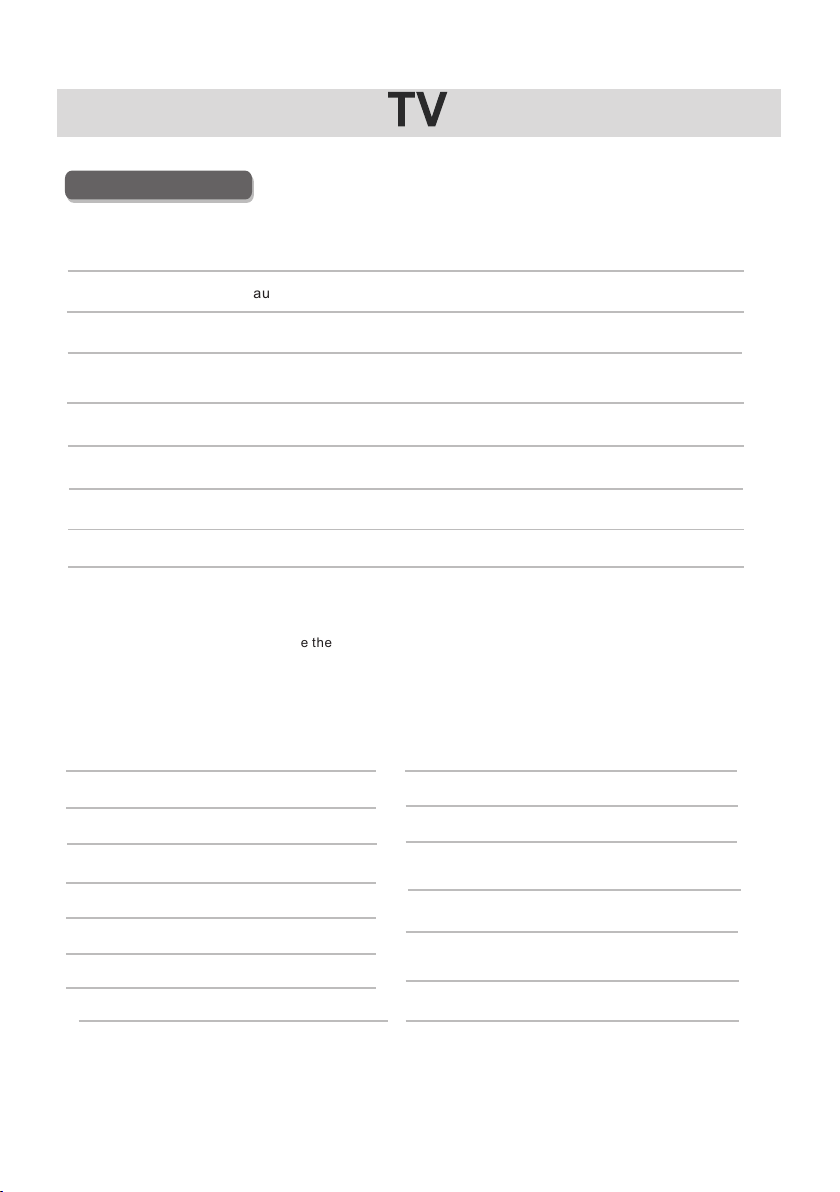
MPAA
This system def in es t he r at in g control which c om e fr om M PAA rules.
Rating
Define
G
PG
PG-13
R
NC-17
X
Off
General audie nc e. Al l ag es a dm itted.
Parental guid an ce s ug ge st ed. Some materi al m ay n ot b e su it able for children .
Parents stron gl y ca ut io ne d. Some materia l ma y be i na pp ro priate for childr en
under 13.
Restricted. C hi ld re n un de r 17 require acco mp an yi ng p ar ent or adult guardi an .
No one 17 and under a dm it te d.
Adult audienc e on ly.
No R at in g Se t. Off er s no r es tr ic tion to access.
Canada Rating
For Can ad a, t he rati ng s et ting incl ud e the follo wi ng o ption s: C an ada Eng li sh , Fre nc h.Canad a
Canadian English
These r at in gs are fo r pr og rams whic h ar e the
Engli sh r at ing syste m.
Ratin g
Off
C
C8+
G
PG
14+
18+
Defin ed a s
News an d sp or ts
Child re n
Child re n 8 ye ars and old er
Gener al p ro gramm in g
Paren ta l gu idance
Vie we rs 1 4 and old er
Adult p ro gr ammin g
Canadian French
The ratings are for programs
French rating system.
Ratin g
Off
G
8 ans+
13 ans+
16 ans+
18 ans+
Defin ed a s
News an d sp or ts
Gener al
Not rec om me nded fo r
under a ge 8
Not rec om me nded fo r ch il dren
under a ge 1 3
Not rec om me nded fo r
under a ge 1 6
This pr og ra m is rest ri ct ed to adult s
which are the
child re n
child re n
27
Page 29
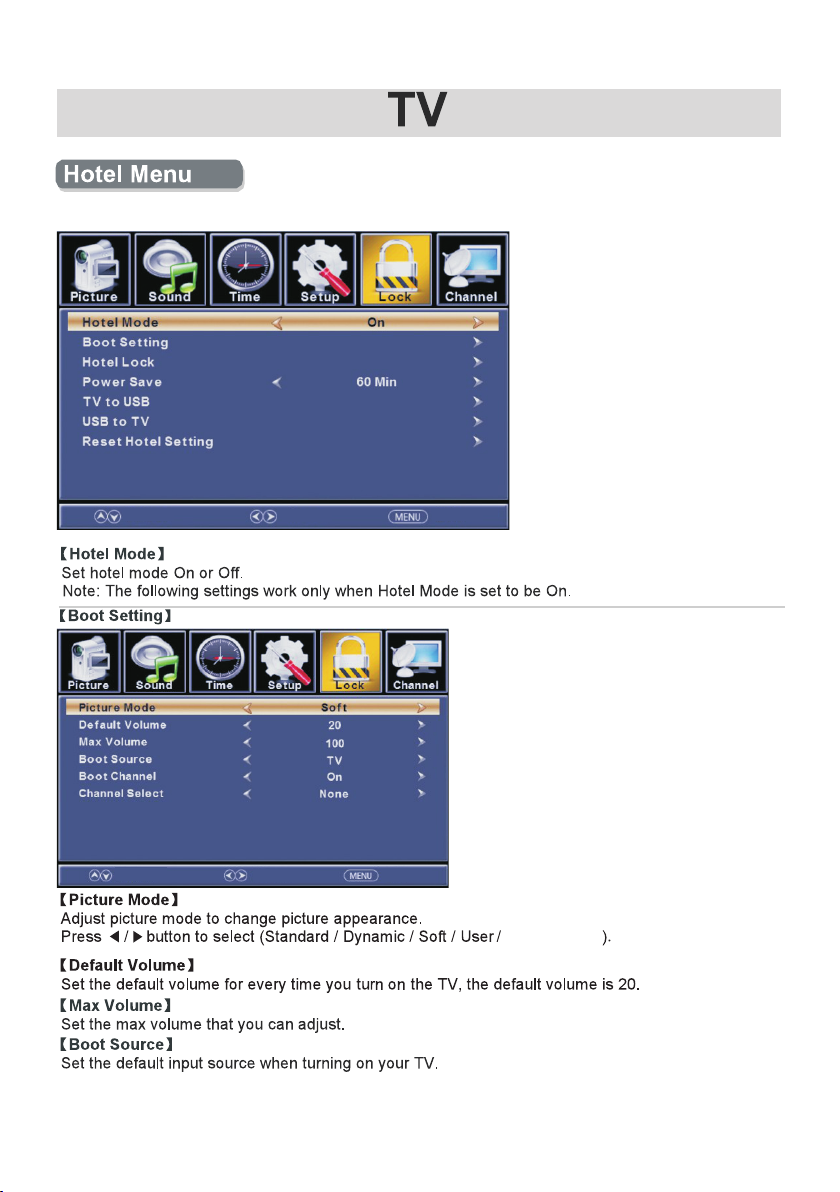
The Hot el m enu is lo ck ed i n the fac to ry sett in g.
To unlock , pl ease pr es s Me nu, the n 12 29 usin g th e remot e co nt rol .
Move
Move
Move
Selec t
Selec t
Selec t
Retur n
Retur n
Retur n
Powe r saving
28
Page 30
Move
Selec t
Retur n
29
Page 31
30
Page 32
31
Page 33
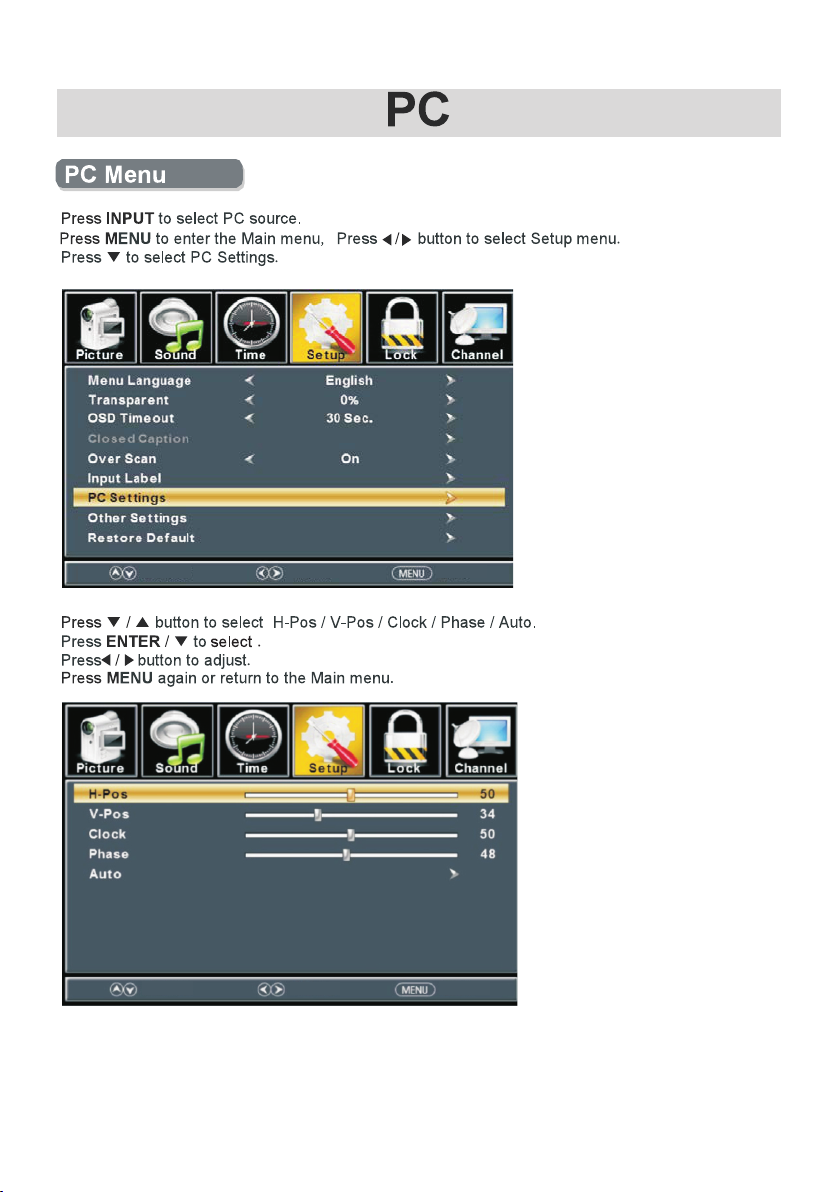
Selec t
Retur nMove
Move
Selec t
Retur n
32
Page 34
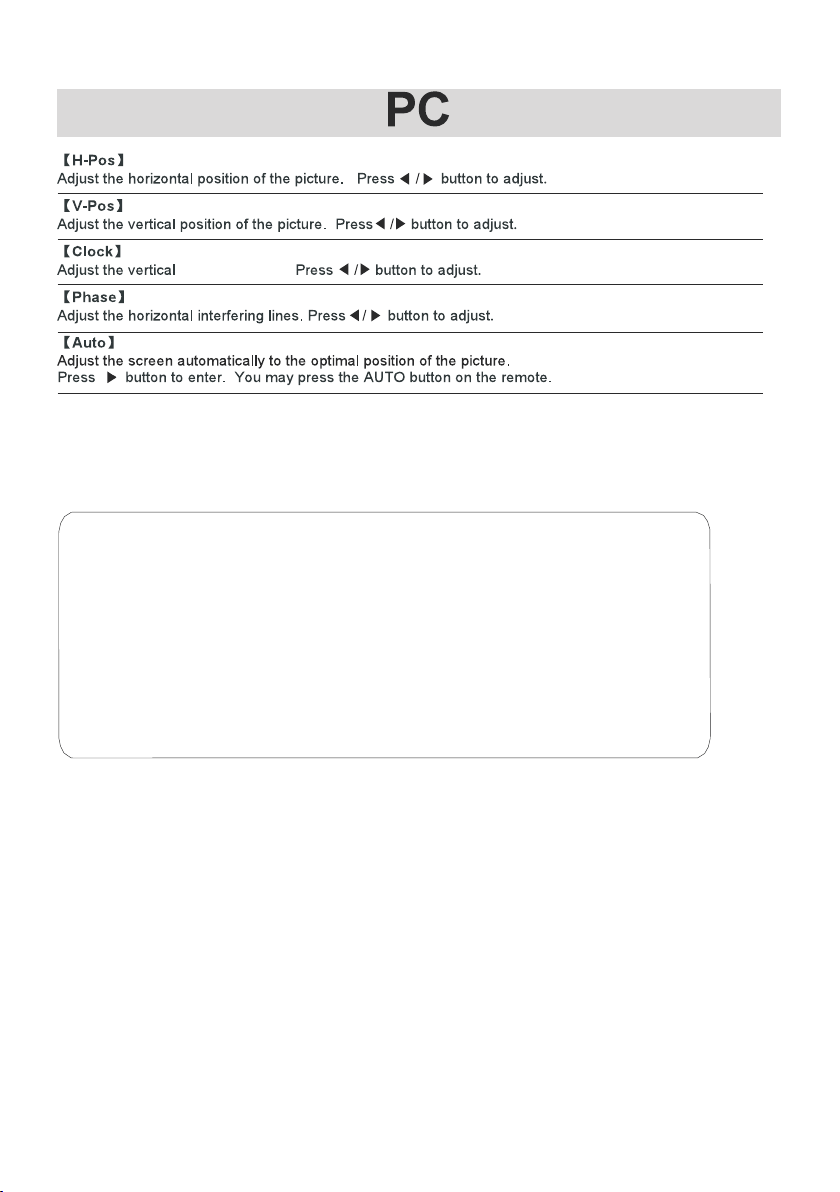
interferi ng l in es .
*Notes: In PC Mode the following f unc tions are not available.
1. Color, Tint, Sharpness, Noise R edu ction, Dynamic Contrast and
HDMI Mode in PICTURE.
2. MTS and Audio Language in the SOUN D men u.
3. Auto Clock in TIME menu.
4. Closed Caption in SETUP menu.
5. US Rating, RRT Se tti ng and Reset RRT in LOCK menu.
6. CHANNEL menu.
33
Page 35
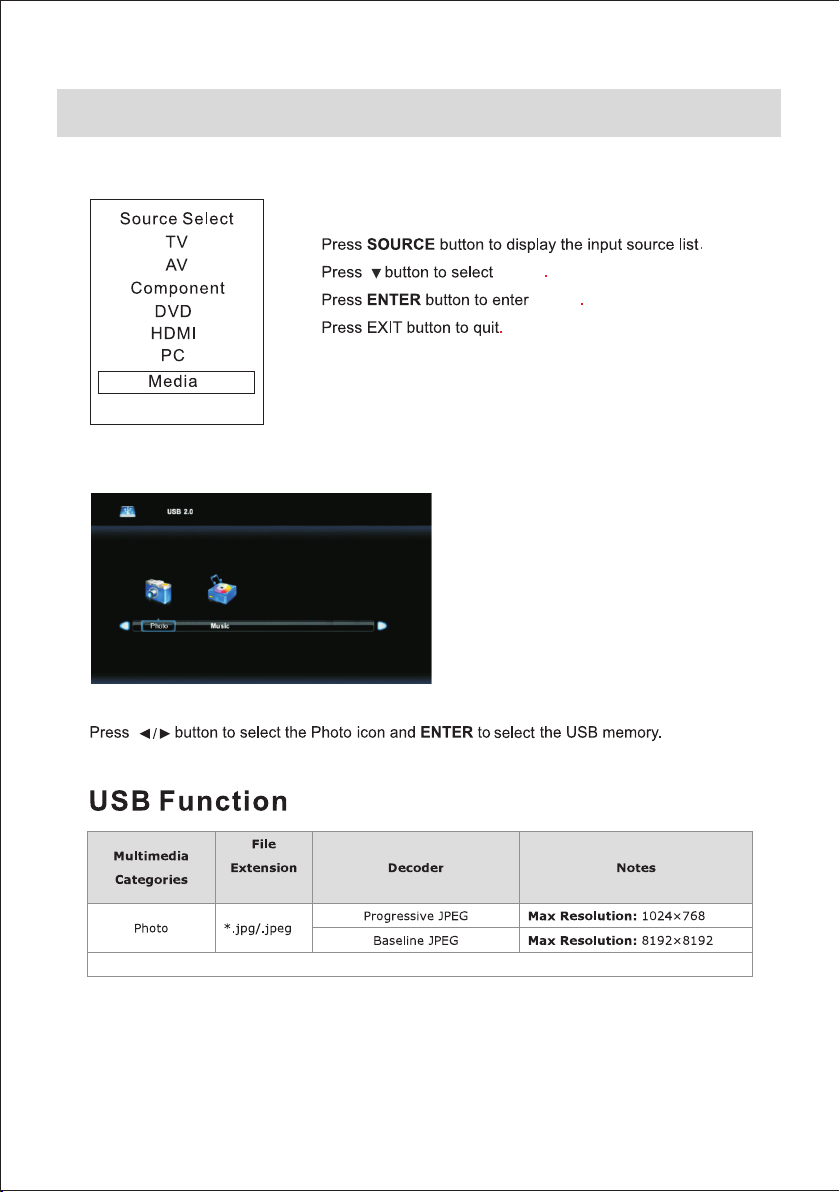
Media
The USB input is comp at ib le w it h fl as h
drives containi ng . jp g/ .j pe g fi le s only.
HDD (hard disk driv e) m ay b e co nn ec te d
with a maximum stor ag e ca pa ci ty o f 40 0G .
Acceptable file t yp es i nc lu de F S, FAT32,
FAT16, an d NT FS ( NT FS c om pr essed files
are not supported ).
Medi a
Medi a
Note: C op yri gh t Lic en ses (wh er e app li cable t o di spl ay ed fi le s) are th e re spo ns ibili ty o f the e nd u ser.
34
Page 36
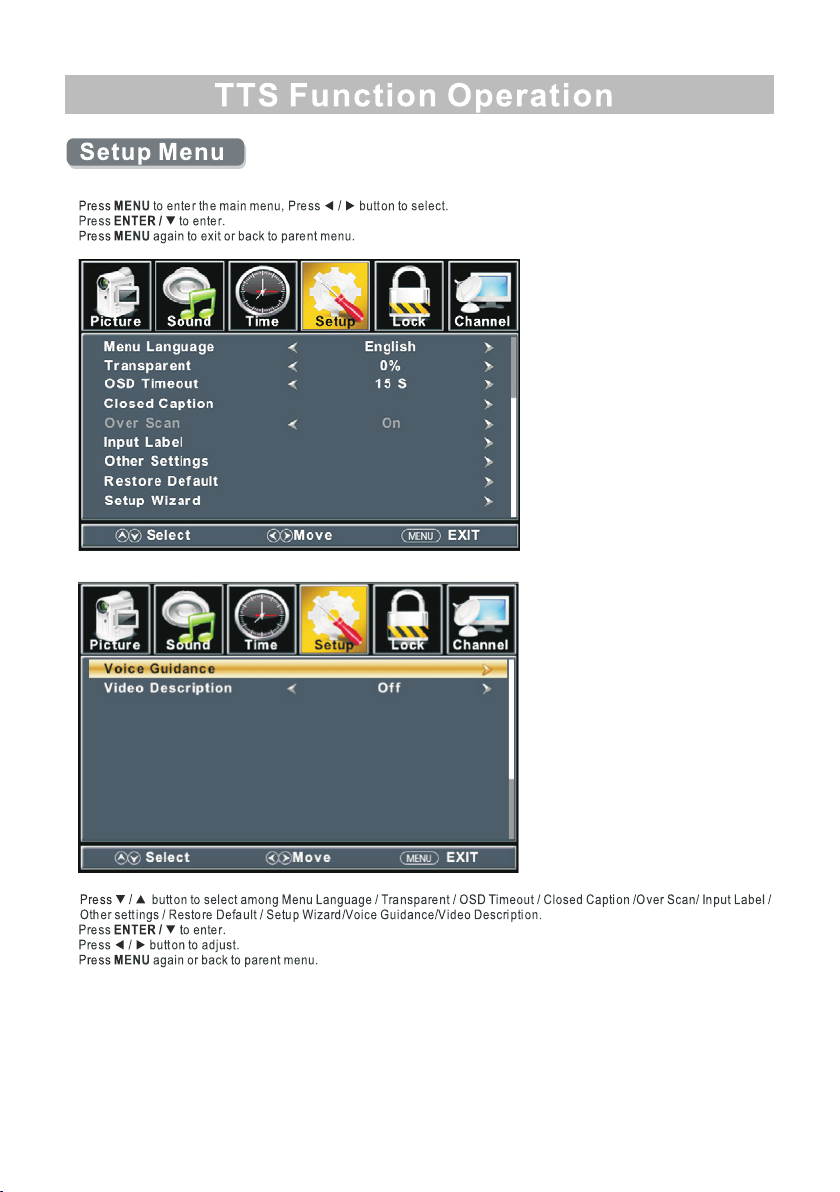
35
Page 37
36
Page 38
This function is used for reducing the difference between channel and program volume automatically.
This feature reduces the fluctuation of the sound/volume.
feature
TTS funct io n de sc rition down lo ad l in k:
http:// ww w.exp re ss lu ck.com/do wn .h tm l
37
Page 39
DVD Setup
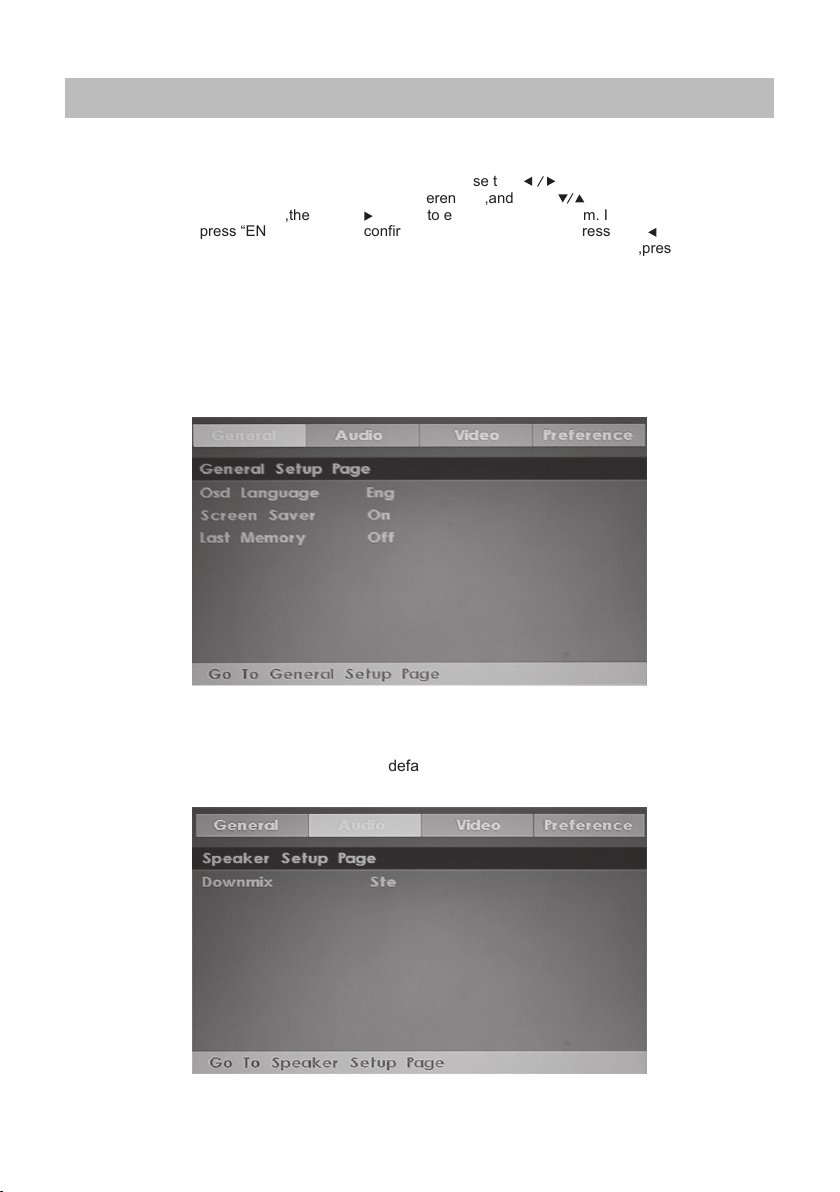
Press the “D.Setup” button to enter the DVD settings menu,use the “ ” buttons to select
the desired menu page (General / Audio / Video / Preferences),and use “ ” buttons
to select the items in each menu,then use “ ” buttonto enter the selected item. If you then
change any setting,press “ENTER” button toconfirm the value you changed.Press the “ ”button
to return to the left submenu;to go back up to one of the main DVD menu pages,press
“EXIT” button.
1.General Setup Page
Osd Language:Set the language of the setup menu and screen display.
Screen saver:Set the screen protection.
Last Memory:Remember and resume from the position of the previous playback.
2.Speaker Setup Page
Downmix: This is DVD L/R and stereo output,defaut as stereo output.
38
Page 40
DVD Setup
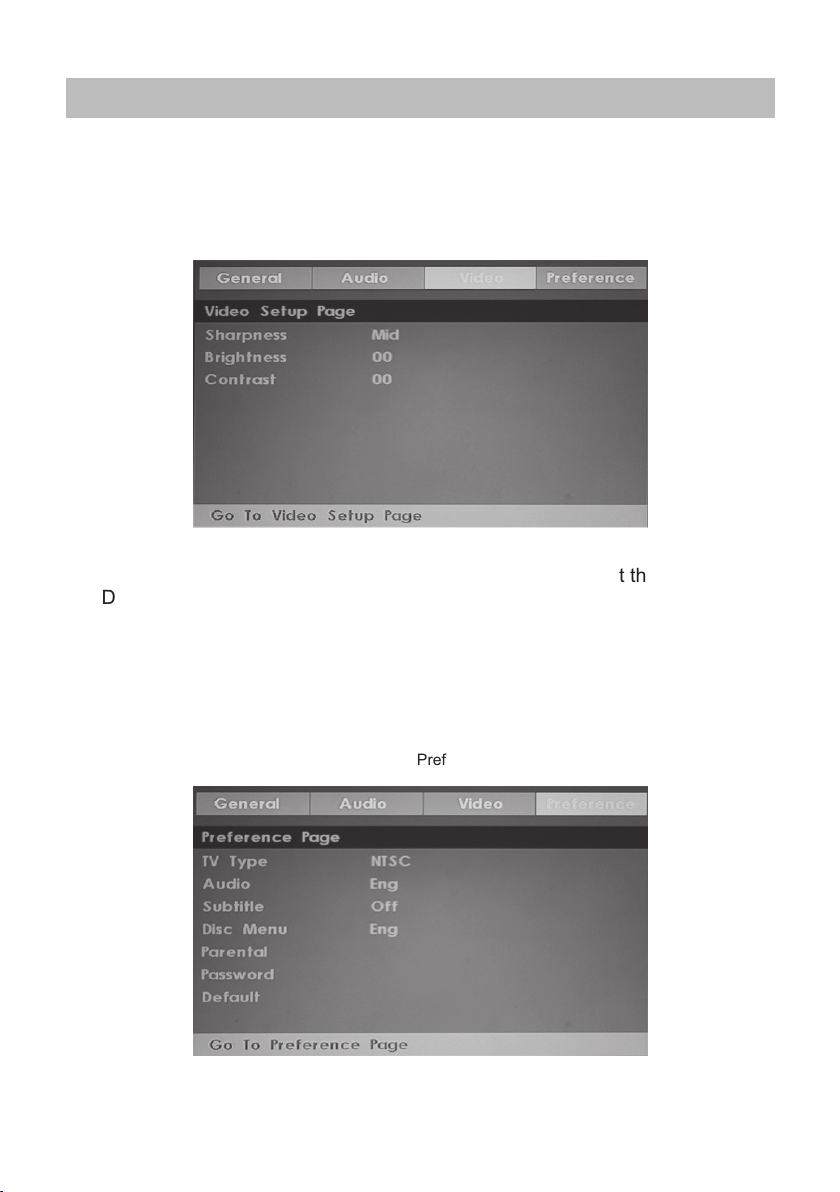
3.Video Setup Page
Sharpness:adjust the sharpness of the image.
Brightness:adjust the brightness of the image.
contrast:adjust the contrast of the image.
4.Preference Page (Note:This menu page will pop up before put the disc
into DVD.)
TV Type: Select the local TV system (PAL TV/Multi/NTSC TV)
Audio: Disc audio language selection (disc dependent)
Subtitle: Disc subtitle language selection (disc dependent)
Disc Menu: Disc Menu language selection (disc dependent)
Parental: Set the maximum disc rating (Kid Safe/G/Pg/Pg 13/Pgr/R/Nc 17/Adult) that can be
viewed without a password
(default password is 0000)
Password: Change the password
Default: Choose this to restore the original default Preference settings
39
Page 41
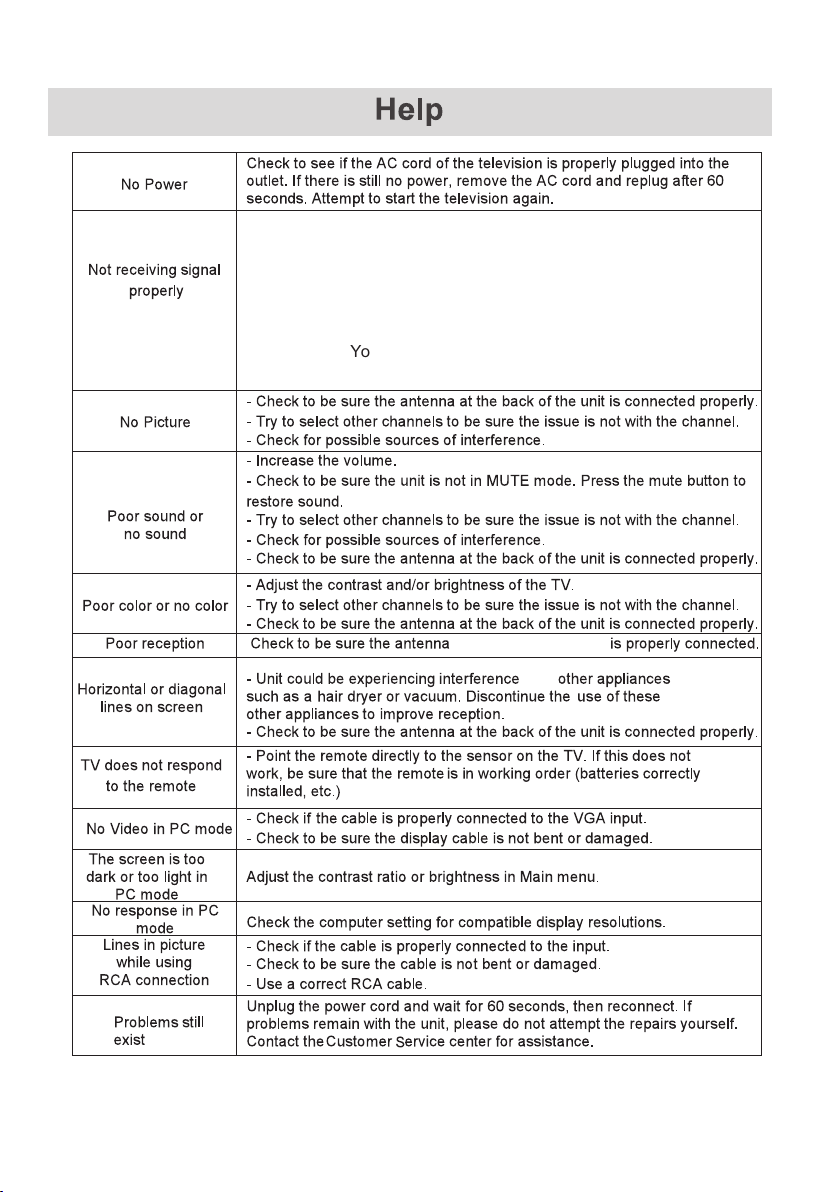
- A double ima ge o r ghost cou ld be cause d by o bstruct io ns of
the ex te rnal ante nna. Cons ul t the anten na i nstruct ion manual
to cha ng e the direc tion of the ext ernal ant en na.
- Perh ap s the locat ion of the an te nna is not go od . Use of a
tall er a ntenna ca n improve t he q uality of t he i mages.
- If you u se a n antenna , reception m ay be difficult i n some
situ at ions. You can a ttempt to a dj ust the ant en na to impro ve
the im ag e.
at the back of the u ni t
from
40
Page 42
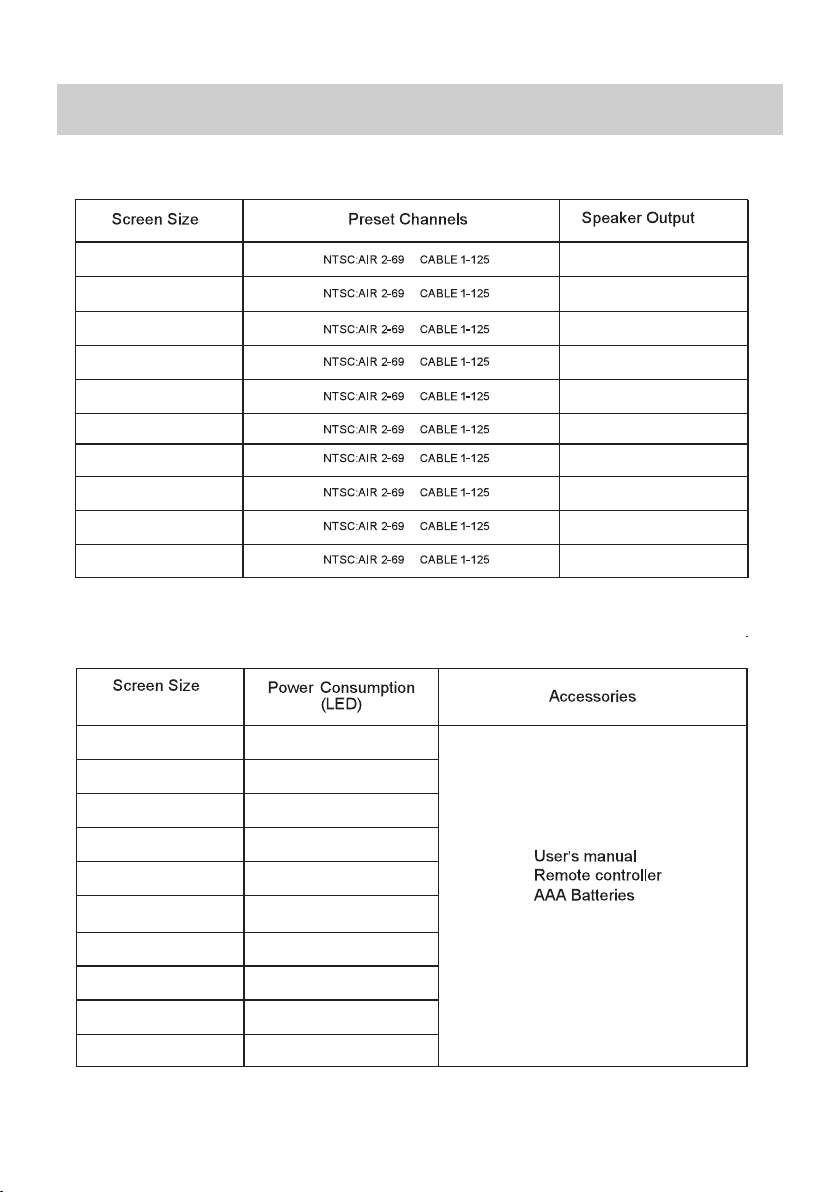
Specifications
24”
28”
32”
39”
40”
42”
43”
50”
55”
65”
24”
28”
32”
39”
40”
5W+5 W
7W+7 W
7W+7 W
7W+7 W
8W+8 W
8W+8 W
8W+8 W
8W+8 W
8W+8 W
8W+8 W
31W
31W
32W
76W
60W
42”
43”
50”
55”
65”
67W
65W
108W
100W
159W
41
Page 43
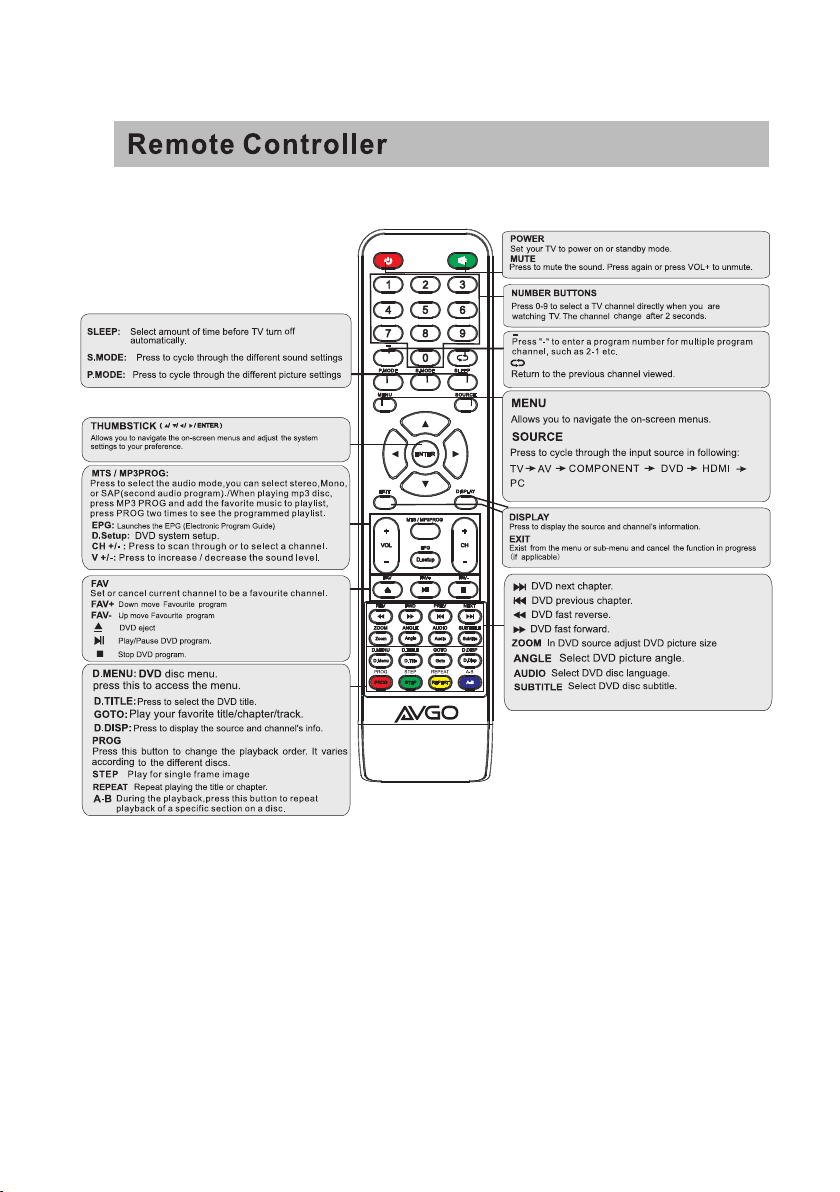
42
Page 44
43
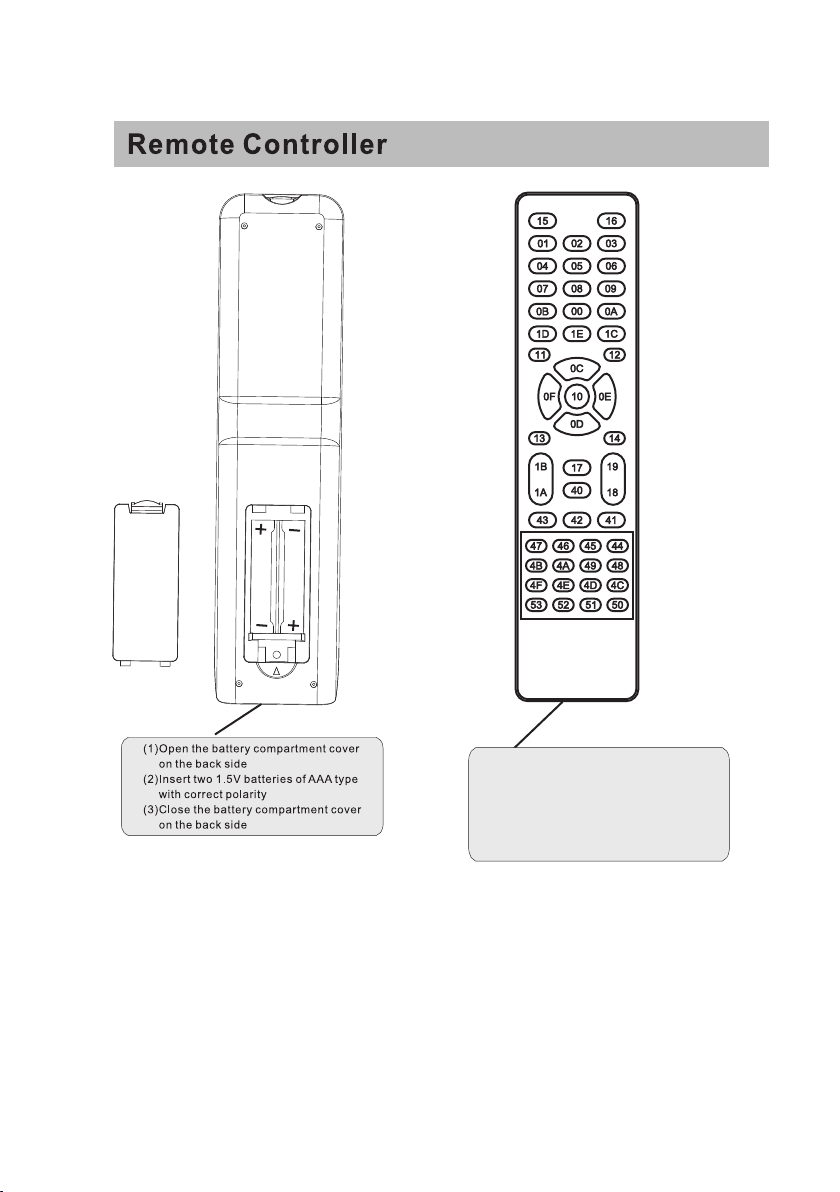
Uni versa l remot e code
Thi s is the co de for re mote co ntrol o f
NN4 3A,if y ou want t o chang e to a
uni versa l remot e contr ol,yo u can ent er
thi s code in to your u niver sal rem ote con trol.
Uni versa l Remot e Contr ol code :007F
(Un ivers al Remo te cont rol is no t inclu ded)
 Loading...