

Page 1

AVG AntiVirus for Mac
User Manual
Document revision AVG.03 (30.9.2015)
Copyright AVG Technologies C Z, s.r.o. All rights reserved.
All other trademarks are the property of their respective owners.
Page 2

Contents
21. Introduction
21.1 What is the AVG AntiVirus for Mac?
21.2 Installation Requirements
32. Installation Process
32.1 Introduction
42.2 License
52.3 Destination Select
52.4 Standard Install
62.5 Installation
72.6 Summary
83. Welcome Wizard
93.1 Opening dialog
93.2 Zen network login
113.3 Activation completed
134. Finding your way around the AVG AntiVirus
134.1 Main user interface
164.2 Icon in the task bar
174.3 Menu in the task bar
185. Scanning
185.1 Mac Scanner
205.2 File Scanner
215.3 Scanning Results
246. Realtime Protection
267. Quarantine
288. AVG AntiVirus for Mac Preferences
288.1 General
298.2 Scanning
308.3 Quarantine
318.4 Exceptions
329. Updates
3310. Contact & Support
1
Page 3

1. Introduction
This user manual offers a general overview of the tasks and detection technologies provided by AVG AntiVirus
for Mac. We will briefly talk about the program installation, initial startup, configuration and use.
AVG AntiVirus is provided free-of-charge. It is up and running immediately from the moment of installation. All
basic settings have been pre-set by the manufacturer, so most of the time you will not have to worry about
anything – just let AVG AntiVirus work in the background and protect you without any effort on your part.
However, there might be situations where you need to adjust the program settings, or decide what to do with a
virus infected file; this manual is here to provide detailed information and assist you with any task.
1.1. What is the AVG AntiVirus for Mac?
The purpose of AVG AntiVirus for Mac is to detect any malicious code that might reside in your Mac. This
protects your Mac from harm, and prevent it from inadvertently becoming infective to others (especially PCs as
these are generally more vulnerable to viruses and other types of malware).
1.2. Installation Requirements
The AVG AntiVirus for Mac will only run on computer with Mac OS X 10.8.x or higher.
Please note that only Intel platform is supported!
2
Page 4
2. Installation Process
To download the installation file of AVG AntiVirus for Mac visit the AVG AntiVirus for Mac site. Scroll to its
very bottom and click the green Get it FREE button. You will be redirected to the download page; your
download should start after just a few seconds.
Once you have downloaded and saved the installation file on your hard drive, you can launch the installation
process. Double-click your package (the avg_avc_mac_all_2015_????_???.dmg file) to open the first
installation dialog.
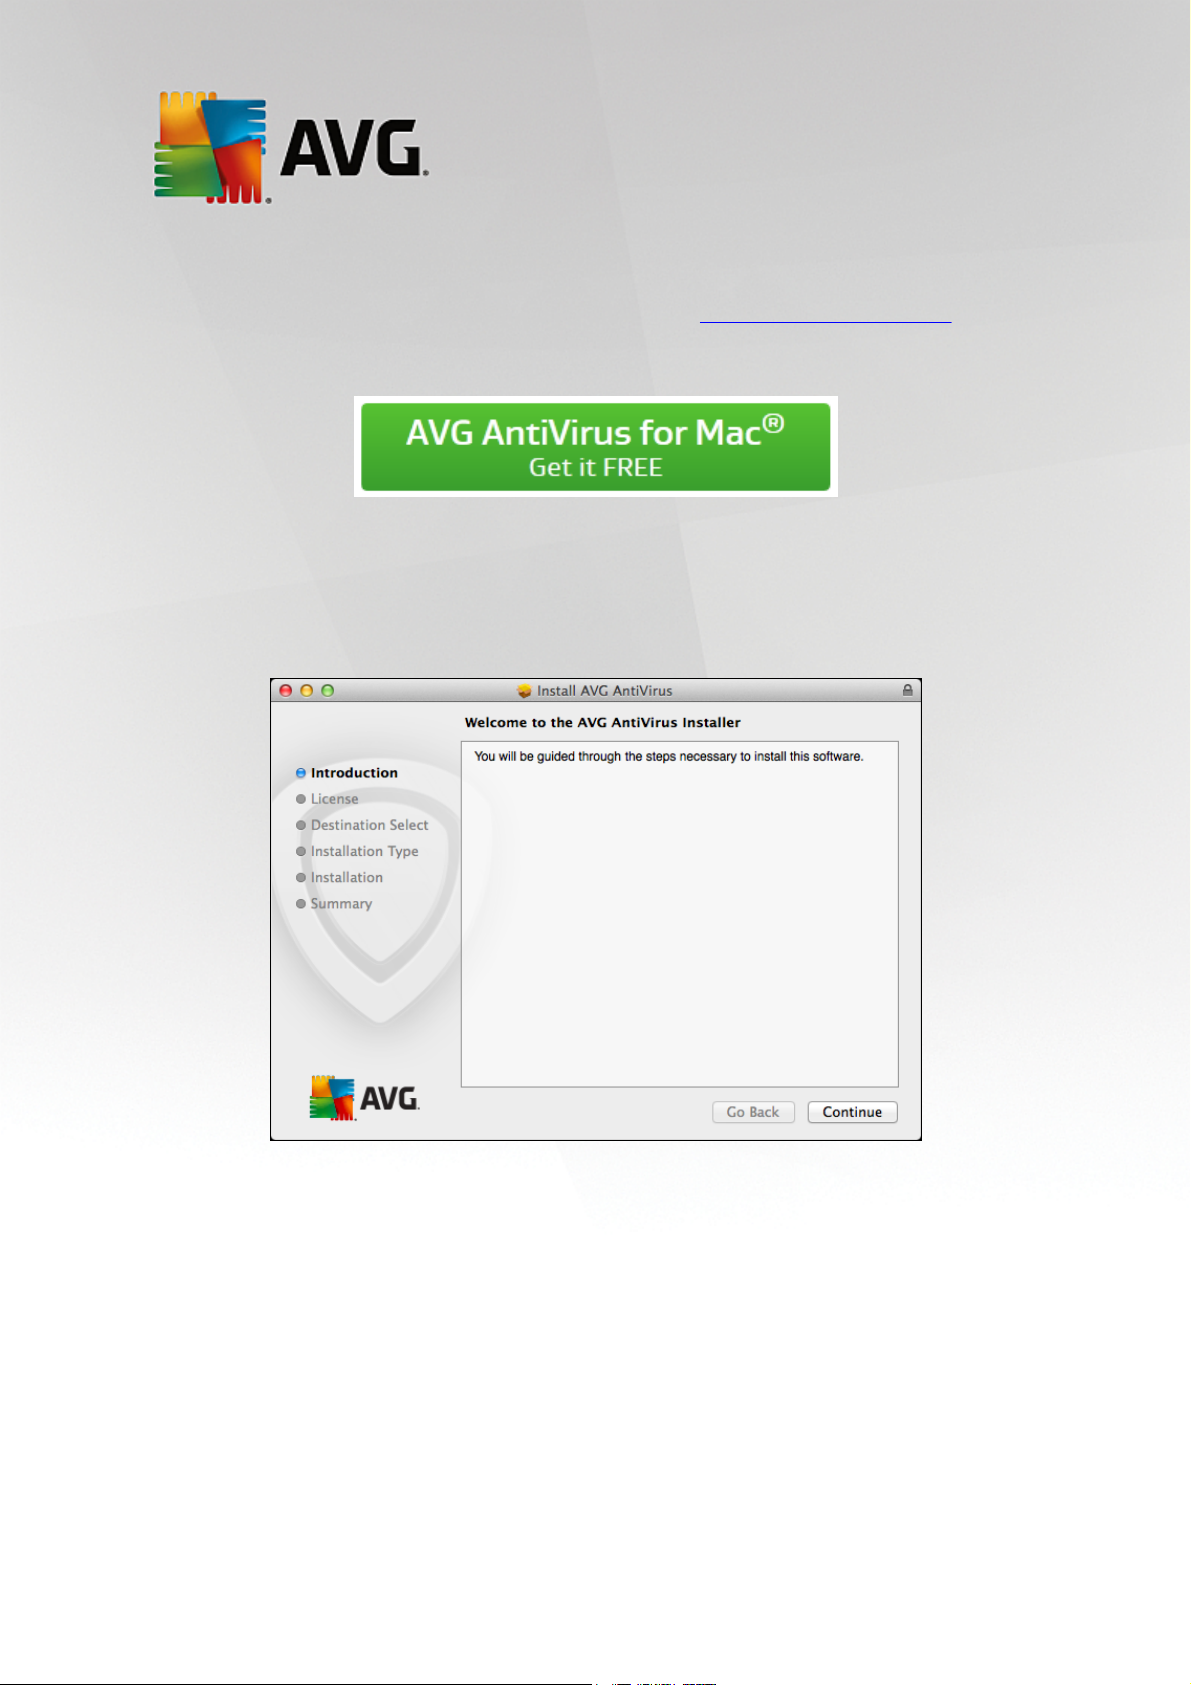
2.1. Introduction
The installation process starts with the Welcome to the AVG AntiVirus Installer window. Click the Continue
button to go on with the installation process.
3
Page 5
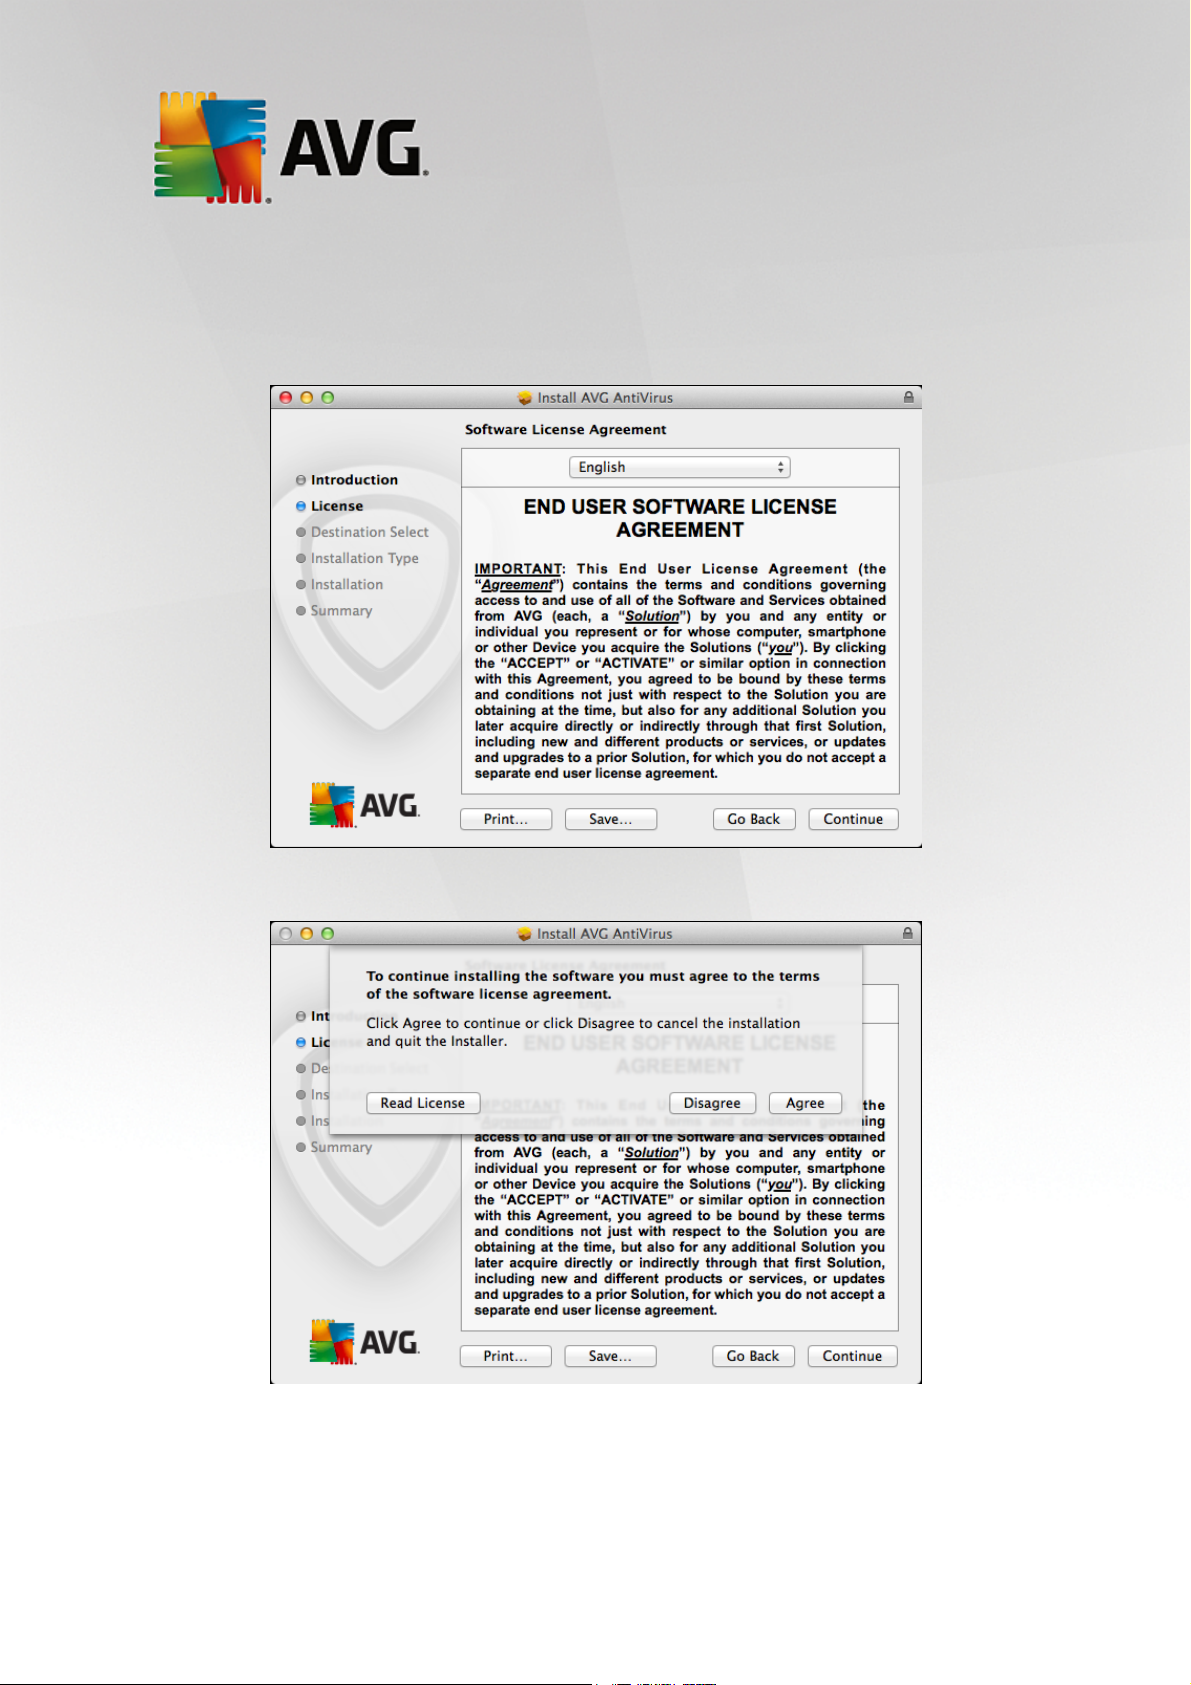
2.2. License
The next dialog provides information on AVG AntiVirus for Mac terms of use. Please read it carefully. Right
now, this license agreement (and the application as whole) is only available in English language.
Once you have finished reading, click the Continue button to trigger a little pop-up dialog:
In this dialog confirm that you have read, understood and accept the agreement by pressing the Agree button.
If you do not agree with the terms of use stated, press the Disagree button, and the installation process will be
terminated immediately.
4
Page 6

2.3. Destination Select
This dialog is informative only since the AVG AntiVirus will always be installed for all users of this computer
and into the preset location (/Application/AVG Antivirus.app/). Therefore you can only proceed by clicking
the Continue button.
2.4. Standard Install
This dialog informs you that your AVG AntiVirus for Mac will be installed on your local hard drive. You can
either click the Change Install Location... button in order to return to the previous dialog, allowing you to
5
Page 7

select a different destination for your installation, or click the Install button.
Right after that you will be prompted to type an administrator's name and password (otherwise the Installer
won't be allowed to make changes and the installation process won't be able to continue). If you do not know
the login name and password, you will need to contact the person who administers your computer. Once you
enter appropriate credentials and click the Install Software button, the installation process will start
immediately.
2.5. Installation
This dialog shows the progress of the installation process, and does not require any intervention. All you have
to do is to sit and wait until the installation is complete (it doesn't take long).
6
Page 8
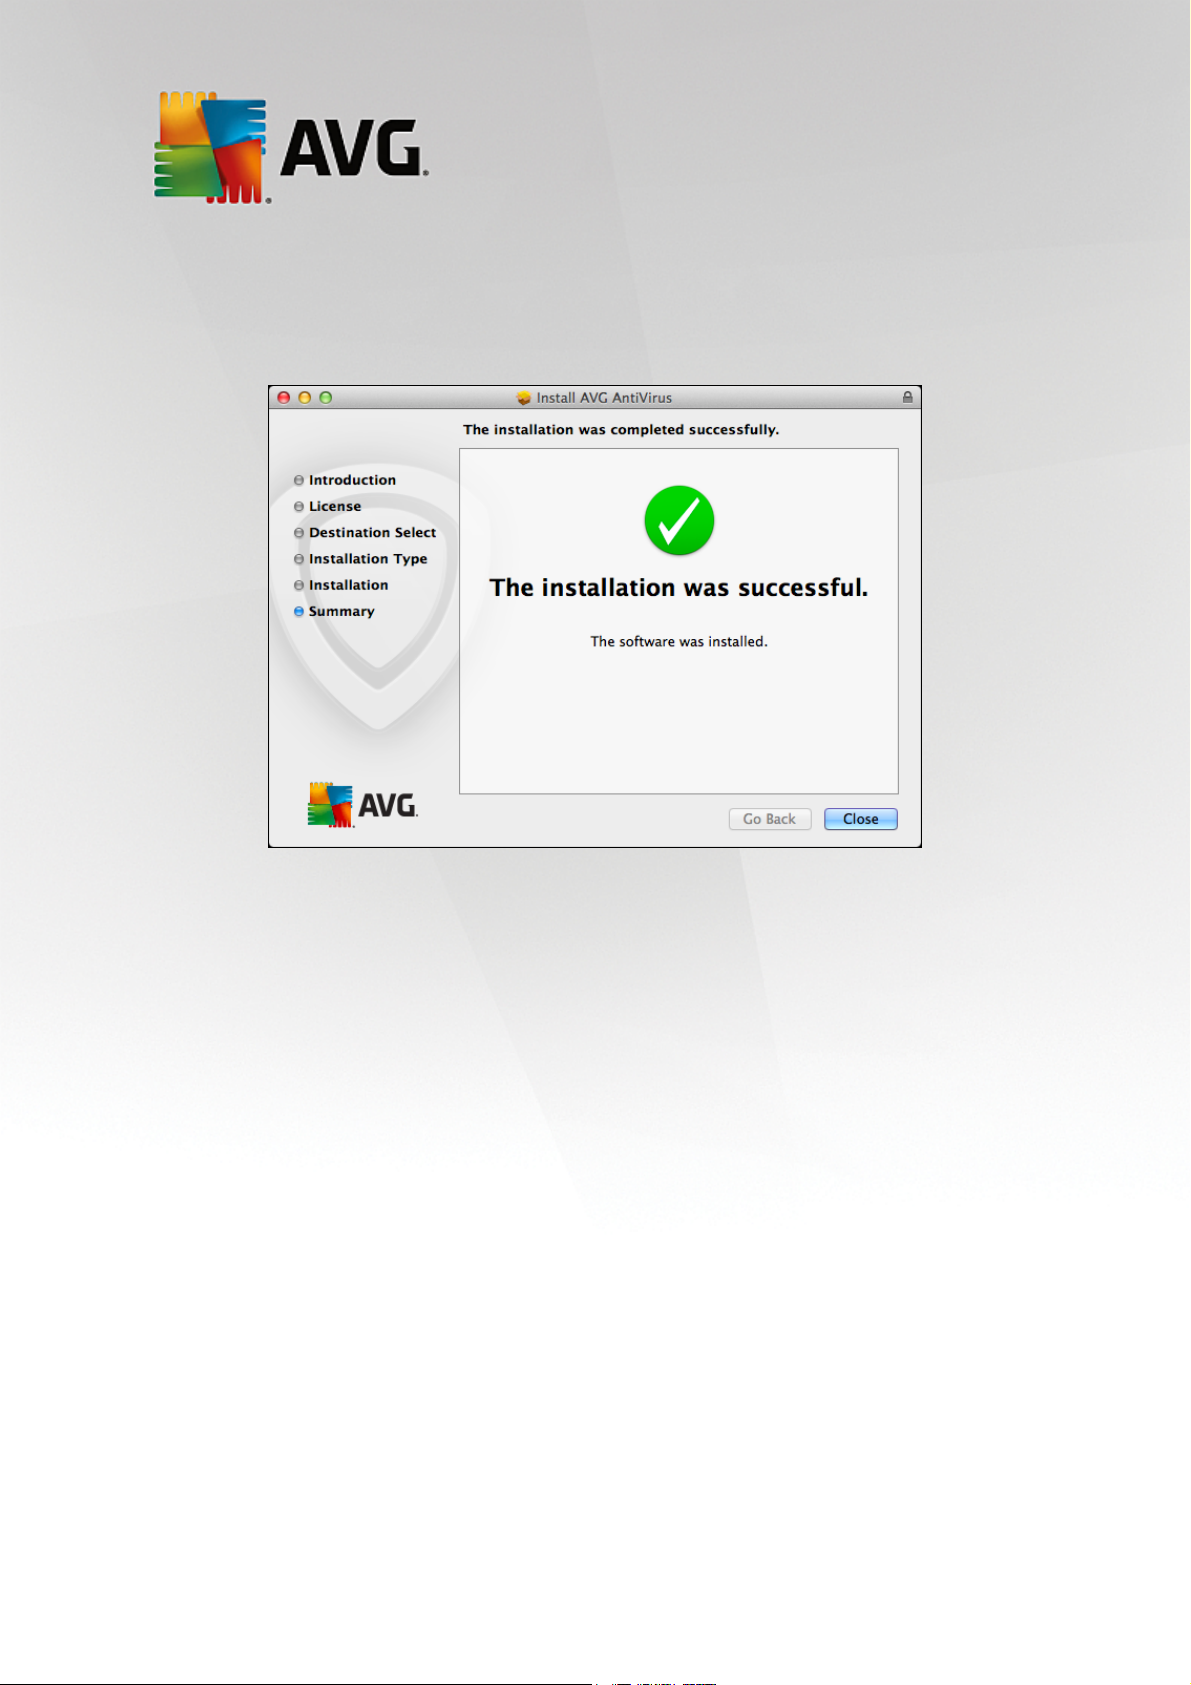
2.6. Summary
This dialog is the last step of the AVG AntiVirus for Mac installation process. AVG AntiVirus for Mac is now
installed on your computer. Simply click the Close button to the product activation wizard.
7
Page 9

3. Welcome Wizard
Right after the installation AVG AntiVirus for Mac of is finished, the Welcome Wizard will appear. This little set of dialog allows you to add your software to some AVG Zen network, thus adding extra security and protection for your Mac.
What is a Zen Network?
AVG Zen is a central platform for managing AVG protection on multiple devices. It allows to create a personal/
family network of devices across various platforms (Mac, PC, Android) and to monitor the status of most AVG
products on them remotely, from one place.
Please note that the AVG Zen control application is only available for PCs, not Macs, which means that it is
not possible to administer other devices in a Zen Network from a Mac.
To get complete information about AVG Zen, please visit AVG Zen page.
What is an AVG MyAccount?
AVG MyAccount is a free cloud (web-based) service from AVG that enables you to:
Connect to Zen Network
Manage your personal information and password
View your registered products and license information
Easily renew your subscription and download your products
Check past orders and invoices
AVG MyAccount can be accessed directly at MyAccount page.
8
Page 10

3.1. Opening dialog
The first dialog of the wizard is purely informative, containing some info about the application and its features.
Click Continue button in order to proceed.
3.2. Zen network login
This dialog allows you to connect your AVG AntiVirus for Mac to a Zen network or to create a new one.
Please note that Zen Network connection is not mandatory. You can always click the Skip for Now button to
proceed directly to the AVG AntiVirus for Mac user interface. Still, this dialog can be easily triggered at any
future time, so you can become a part of Zen Network later on.
There are three easy ways to achieve such connection:
9
Page 11
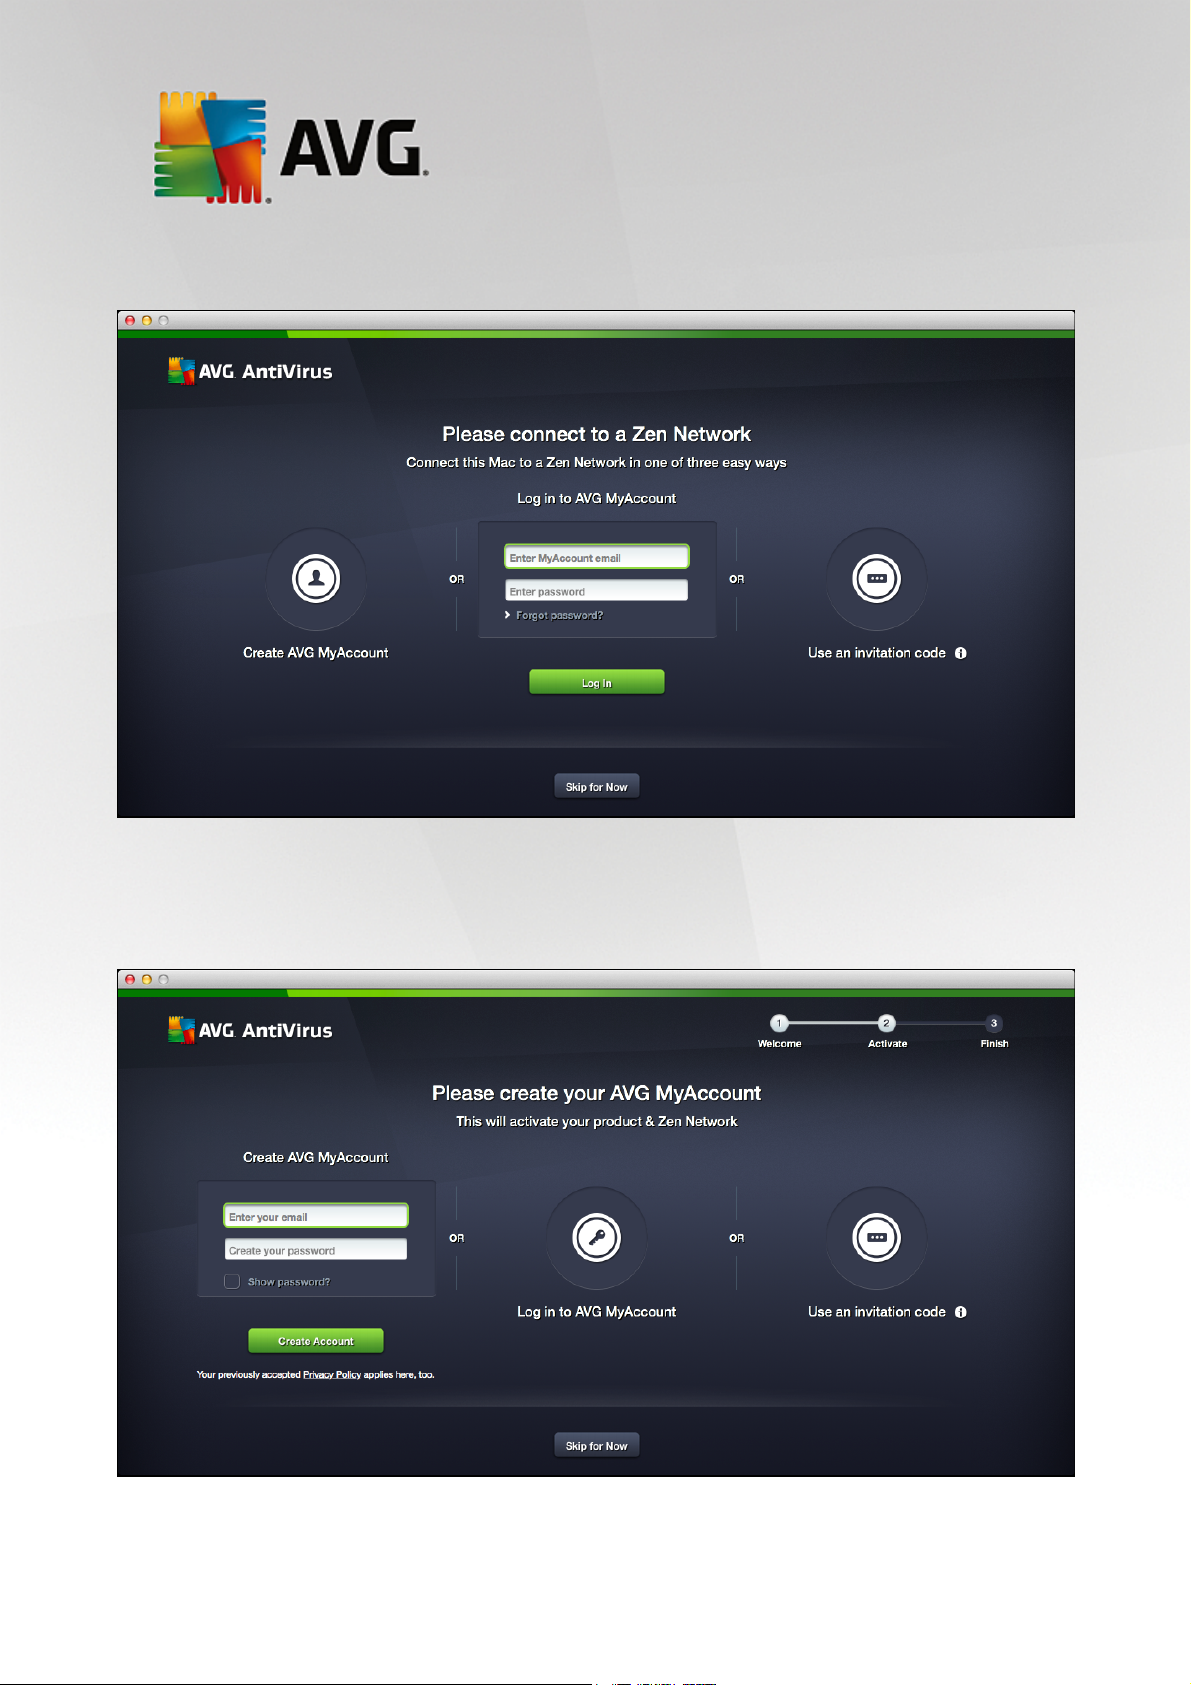
Joining an existing Zen Network:
Simply enter appropriate AVG MyAccount credentials, i.e. your user name (MyAccount email) and password,
then click the Log In button below.
New Zen Network creation:
Enter your login email and set your password (check the Show password box below if you want to see hidden
10
Page 12

characters), then click the Create Account button.
Accepting Zen Network invitation:
Enter the invitation code that was previously sent you by required network's administrator (the best way is to
copy and paste it from the invitation email). After you insert the code, click the Connect button.
3.3. Activation completed
11
Page 13

This dialog only appears if you have successfully entered a Zen Network (no matter which of the three available
options you have chosen the previous dialog). Congratulations! You are a part of Zen Network now. However, if
you ever change your mind, you can easily disconnect at any time.
12
Page 14

4. Finding your way around the AVG AntiVirus
In the AVG AntiVirus for Mac you can choose between three ways of accessing various settings, overviews,
and functions:
clicking the AVG AntiVirus for Mac icon in the Dock opens the main user interface, providing you
access to various AVG security features. Click to learn more about the AVG AntiVirus for Mac
main user interface.
clicking the icon that is displayed (optionally) in the right part of the task bar triggers a little context
menu allowing you to scan your Mac or to perform an update. You can also use it to opens the main
user interface. Click to learn more about the AVG AntiVirus for Mac icon in the task bar.
clicking the AVG AntiVirus for Mac menu is your only way to access application preferences with
several options (mostly scanning-related) that can be turned on or off. You can also use to uninstall
your AVG AntiVirus for Mac, should you ever wish to do so. Click to learn more about the AVG
AntiVirus for Mac menu in the task bar.
4.1. Main user interface
To access the main user interface, simply click the docked icon.
Thereafter the main user interface will be displayed:
13
Page 15

Overview
the lower section of the main user interface displays the security features of your AVG protection, often with
some additional info (like scanning progress or scan results). There is always a special action button (or
switch), allowing you to use the selected security feature (or to turn it off or on). The security features of
your AVG AntiVirus for Mac are as follows:
o Mac Scanner – enables you to scan the whole Mac.
o File Scanner – enables you to scan a specific part of your Mac.
o Realtime Protection – works continuously in the background, automatically scanning all files that are
being opened, modified or saved.
o Quarantine – is a safe storage for virus infected or suspicious files that have been removed by AVG
AntiVirus for Mac.
in the upper-right part of the main user interface, you can see the Zen Network connection button. There
two possible states:
14
Page 16

This is how the button looks like
when you are not connected to
any Zen network. In order to
connect to a Zen Network (or to
create a new one), click the
Connect option. A new dialog
will be opened, allowing you to
choose from three available
connection options. There are
also two browser links – Tell Me
More and Visit AVG
MyAccount. These two will open
the AVG Zen web page and the
AVG MyAccount web page
(respectively). Click here to learn
more about AVG Zen and AVG
MyAccount.
This is how the button looks like
when you are connected to a
Zen network. In order to leave
this Zen Network, click the
Leave This Network option.
You will be immediately
disconnected (however, you can
easily join this, or any other Zen
Network at any time in the
future) There are also two
browser links – Tell Me More
and Visit AVG MyAccount.
These two will open the AVG
Zen web page and the AVG
MyAccount web page
(respectively). Click here to learn
more about AVG Zen and AVG
MyAccount.
beneath the Zen Network connection button, there is an update-related section. Here you can check whether
When this text is
displayed, it means
that you are already
using the latest version
of the product, so there
is nothing you have to
worry about.
This text means that
update is currently
being performed – the
most up-to-date version
your is currently up-to-date:
15
Page 17

of the product is being
downloaded and
installed.
Click here here to learn more about update process in AVG AntiVirus for Mac.
The Realtime Protection
component is turned on.
The Realtime Protection
component is turned off.
Your Mac is currently being
scanned for viruses and other
threats.
two navigation buttons ( – back and forward) are located in the upper-left corner of the main user
interface. In the newly-opened main screen, both these buttons are disabled. However, in other dialogs (like
scanning progress), these two buttons allow you to quickly access the main screen, or to navigate back to
any previously displayed dialog.
4.2. Icon in the task bar
The icon can be optionally displayed in the right part of the task bar. If it is not visible, you can display it by
turning on the Show AVG AntiVirus icon in the task bar option in AVG AntiVirus for Mac Preferences. Upon
clicking the icon, you get a context menu resuming neatly relevant options of the application menus:
Scan Your Mac – click to start scanning your whole Mac.
Check for Updates... – click to immediately start the update process.
Open AVG AntiVirus... – displays the AVG AntiVirus main user interface.
Apart from quick access to frequently used items, the icon also indicates the status of your AVG AntiVirus
for Mac:
16
Page 18

4.3. Menu in the task bar
Whenever the Main User Interface is opened, the AVG AntiVirus for Mac menu appears in the right part of the
task bar:
This menu provides you access to a few basic options:
About AVG AntiVirus – displays a small dialog with copyright and version number information.
Preferences... – displays a new dialog allowing you to adjust several additional settings.
Check for Updates... – performs an update check and installs new updates (if available).
Uninstall AVG AntiVirus... – start the AVG AntiVirus for Mac Uninstaller allowing you to completely remove
this software from your Mac.
Hide AVG AntiVirus – minimizes the main user interface (without turning the AVG AntiVirus for Mac menu
protection off).
Quit AVG AntiVirus – turns the AVG AntiVirus for Mac menu protection off.
17
Page 19

5. Scanning
These days, the vast online world has become quite a dangerous place; unfortunately, not having to be careful
about which emails you open and which files you download on your computer is a thing of the past.
Sophisticated computer viruses roam the internet just waiting for the chance to infiltrate your system and
cause some serious damage. A virus scan is a tool that notifies you when something unsavory manages to
access your Mac.
The AVG AntiVirus for Mac offers you two a bit different scanning-based security features – the Mac
Scanner and the File Scanner.
5.1. Mac Scanner
This security feature enables you to scan the whole Mac. To start the scan, simply click the Scan Mac
button.
Please note that before scanning, you may want to adjust the Scanning preferences to include some filetypes
and locations in the scan, or the General preferences to remove any found threats automatically.
A running scan indicates its progress visually, and you can stop it any time by clicking Cancel button. Please
note that it will stop the scan completely, not pause it (it will not be possible to simply continue scanning from
that point later on). You can also click the Details button to view the detailed progress (names of files being
currently scanned and number of objects scanned so far). You can switch to the simple view at any time
simply by clicking the Back to Dashboard button.
18
Page 20

When the scan is finished, you will be informed whether any threats have been found; if so, click View Results
button to access the result overview and deal with the infection.
If the scan was not completed, you will get information what had been scanned (in %). Please consider running
the scan again to complete it, especially if threats have been found.
19
Page 21

To reset the scanner back to stand-by mode, click OK (if no threats were found) or Ignore Results (if some
threats were found).
5.2. File Scanner
This security feature enables you to scan a specific part of your Mac. To scan a specific file or folder, drag it
from the Finder and drop onto the File Scanner where labelled "Drop here". You can also drag & drop multiple
selected files (adding files one by one is not supported). Alternatively, you can click Scan Files to select the
desired file(s) in a file browser. The scan will start automatically upon selecting or dropping the file(s).
Please note that before scanning, you may want to adjust the Scanning preferences to include some filetypes
and locations in the scan, or the General preferences to remove any found threats automatically.
20
Page 22

A running scan indicates its progress visually, and you can stop it any time by clicking Cancel. Please note
that it will stop the scan completely, not pause it (it will not be possible to simply continue scanning from that
point later on).
When the scan is finished, you will be informed whether any threats have been found; if so, click View Results
to access the result overview and deal with the infection.
If the scan was not completed, you will get information what had been scanned (in %). Please consider running
the scan again to complete it, especially if threats have been found.
To reset the scanner back to stand-by mode, click OK (if no threats were found) or Ignore Results (if some
threats were found).
5.3. Scanning Results
The list of malicious or infected files detected by AVG AntiVirus for Mac during a scan enables you to view
the details and delete the files. All found threats have been blocked for your safety and cannot be accessed
(opened or executed, copied, etc.), however, deleting them completely is always the safest option.
21
Page 23

The safest and simplest way to proceed now is to click Protect All Files. All files will be treated
automatically, one by one, and AVG AntiVirus for Mac will choose the best action for each. First, it will try to
heal the file (that is, remove the infection and restore the file to its original state), and if not possible, move it
to Quarantine.
To handle each detection separately, click Protect Me on each respective line. If you are positive that a
detected file is actually clean and harmless, you can skip it; however, please consider sending it to AVG
ThreatLabs via Sample Submit Form for analysis. (Select "False alarm" in the form.)
Also, you can manually add a safe file to Exceptions. If the file is a PUA (Potentially Unwanted Application),
there will be a link Allow application to unblock it and add it to Exceptions with just one click.
If you do not like having to solve threats after scanning yourself, you can set AVG AntiVirus for Mac to move
them to Quarantine automatically. All you need to do is activate the function Move all threats to Quarantine
in General preferences.
22
Page 24

To return from the scan result back to the main screen of AVG AntiVirus for Mac, click Go to Dashboard.
The scan result will be kept until you resolve all threats, click Ignore Results on the component in Dashboard,
or close AVG AntiVirus for Mac. Please note that any unresolved (ignored) files will remain in their
original locations, accessible and potentially dangerous!
How to delete threats manually
If AVG AntiVirus cannot remove a file (typically due to access rights) to Quarantine, we recommend that you
remove it manually:
1. Put down the exact location and name of the infected file.
2. Locate the file in Finder and delete it (move to Trash).
3. Empty Trash.
If that is not possible either, please refer to the Contact & Support chapter for further help.
If you have a reason to believe that a detected file is actually clean and harmless, please send it to us via
Sample Submit Form for analysis. Please select "False alarm" in the form. Similarly, if there is a suspicious
file that AVG AntiVirus does not detect, but you believe that it might be infected, you can send it to us via the
same form to examine (in this case, select "Malware for analysis" in the form).
To return from the scan result back to the main screen of AVG AntiVirus, click Go to Dashboard.
23
Page 25

6. Realtime Protection
This proactive security feature is a resident shield for your Mac. You do not have to do anything to be
protected; it works continuously in the background, automatically scanning all files that are being opened,
modified or saved. If malicious code is detected, the file will be blocked for your safety and you will get a
detailed alert message (see below).
The only available setting option enables you to turn the protection on and off by sliding the On/Off switch.
Please note that the action requires the administrator's password.
By displaying the following alert message, AVG AntiVirus informs you that it has detected malicious code on
your Mac and blocked it for your safety:
If you choose Keep Blocking, or simply close the dialog, the detected file will be only blocked for a limited
time, after which it will be accessible (and potentially dangerous) again. The safest way to proceed now is to
click Protect Me for the best automatic action. AVG AntiVirus will try to heal the file (that is, remove the
infection and restore the file to its original state), and if not possible, move it to Quarantine. You will get a
message whether the action will have been successful.
Sometimes, AVG AntiVirus may not be authorized to access a file, therefore it will not be able to remove it. In
such cases, we recommend that you delete the file manually.
Should you have a reason to believe that the detected file is actually clean and harmless, there will be two
options:
if the file is a PUA (Potentially Unwanted Application), there will be an additional button Make
Exception which you can use to instantly unblock the application and add it to Exceptions from
scanning.
if the file is a regular file, simply click Keep Blocking to keep the file in its place. For a short period
of time, it will also remain blocked, i.e. not possible to access (open or execute, copy, etc.); then you
can also add the file to Exceptions manually.
24
Page 26

If there are multiple threats detected, you can tick the box Do this for all threats and then click either button
to treat all infected files at one time.
If you are not sure what to do, it is always best option to select Protect Me. Even if the file is safe, and gets
removed, it can be restored from the Quarantine for up to 30 days afterwards, so you needn't take risks by
leaving a suspicious file out of control.
If you have a reason to believe that a detected file is actually clean and harmless, please send it to us via
Sample Submit Form for analysis. Please select "False alarm" in the form. Similarly, if there is a suspicious
file that AVG AntiVirus does not detect, but you believe that it might be infected, you can send it to us via the
same form to examine (in this case, select "Malware for analysis" in the form).
25
Page 27

7. Quarantine
The Quarantine is a safe storage for virus infected or suspicious files that have been removed by AVG
AntiVirus. All files are locked, encrypted and cannot do your Mac any harm. The main purpose of this special
storage is to keep any deleted file for a certain period of time, so that you can make sure you do not need the
file any more.
Each line represents one quarantined item and information about it (threat name, full path to the original
location of the file, date of detection). By clicking the little arrow next to an item, you can expand it to view
more details.
To resolve an item, you need to select it in the list (mark its checkbox) first. You can select more than one file,
and you can use Select all threats to start with. The following actions are then available:
Restore will move the file from Quarantine to any available location on your Mac. You will be able to
either put the file back to the folder where it was previously detected, or browse for another folder
manually.
Delete will remove the file completely and irreversibly from your Mac.
26
Page 28

Please note that both actions require administrator's password.
Preferences
By default, all files in Quarantine are kept for either 30 days, or until the total number of files in Quarantine
exceeds 1000. You can change these settings in Quarantine preferences.
27
Page 29

8. AVG AntiVirus for Mac Preferences
This dialog allows you to modify all adjustable settings of your AVG AntiVirus for Mac. To access it, open
the AVG AntiVirus for Mac menu in the task bar and select Preferences.
Preferences contain the following pages:
General
Scanning
Quarantine
Exceptions
8.1. General
The adjustable options are as follows:
Move all threats to quarantine – when this box is checked, all threats found during scanning will be
automatically moved to Quarantine, which is the safest option. Files are kept in Quarantine for up to
30 days; during this time, you can either restore the files to the original location, or delete them
forever. Please note that this option only applies to Mac Scanner and File Scanner, not to Realtime
Protection.
Show AVG AntiVirus icon in the task bar – shows (or hides) the icon in the task bar. This icon
offers convenient access to instant scan, update and to the application interface, and also indicates
the background protection status.
I'd like to help AVG improve its products – anonymous data about detected threats will be silently
sent to AVG ThreatLabs, which will help our malware researchers react swiftly to the latest threats
and make AVG protection even more effective.
28
Page 30

8.2. Scanning
The adjustable options are as follows:
Scan archives (such as ZIP, RAR, 7z, etc.) – by default, this option is switched on for maximum
protection, however, you can switch it off to boost the scanning speed; archives are often quite large
so if skipped, the scan takes less time. Also, archives generally pose low risk, and if an infected
archive should occur in your system, it will be detected and blocked by the Realtime Protection as
soon as you try to unpack it.
Scan external drives and shared folders – switching this option on enables scanning of mounted
volumes, i. e. external locations and devices connected to your Mac (portable hard drives, USB
sticks, memory cards, shared folders on external servers etc.). External drives may be very large, and
therefore by default excluded from scanning for capacity reasons.
Scan for potentially unwanted programs (PUPs) – allows scanning for potentially unwanted
programs, such as spyware, adware and similar types of malware. PUPs generally play certain
malicious or annoying tricks on users, and may vary from positively serious to only potential threats to
your privacy. Those posing a security risk may, for example, store personal information (including
passwords and credit card numbers) or allow to perform certain actions in a computer remotely.
Sometimes, these programs are installed intentionally, or consent is given through accepting License
Agreement while installing another program.
Use enhanced scanning to identify even more PUPs – this is an addition to the previous option; it
turns on detection of an extended package of PUPs: programs that are perfectly ok and harmless
when acquired from the manufacturer directly, but can be misused for malicious purposes later, or
programs that are always harmless but might be unwanted (various toolbars etc.). This additional
measure increases your computer security and comfort even more, however it can possibly block
legal programs, and is therefore switched off by default.
Please note that the above options apply to both Mac Scanner and File Scanner, and if switched off,
the concerned filetypes/folders will not be scanned during either scan. Example: You drag and drop a
single archived file to the File Scanner. If scanning archives is not activated, you will get a message "No
threats found" but the archive will have not been scanned at all.
29
Page 31

8.3. Quarantine
On this page, you can specify how to handle items stored in Quarantine.
Please note that if you want to make changes on this page, you will need to unlock it with administrator's
name and password.
Automatic file deletion from Quarantine – this option activates automatic deletion of files in
Quarantine under the conditions specified below. If the feature is switched off, the maximum size of
Quarantine on disk will be unlimited, and all files in it will be kept until you restore them, or remove
them manually.
Delete files older than: – default value is 30 days, which means that files will be stored in
Quarantine for 30 days, and then automatically deleted. The aim of this feature is to keep each file
long enough to make sure it doesn't need to be restored.
Maximum number of files in Quarantine: – default value is 1000 files, which means that if number
of files in Quarantine exceeds 1000, the files over that number will be deleted (deletion starts with the
oldest stored files). The aim of this feature is to keep the size of Quarantine on disk reasonable.
30
Page 32

8.4. Exceptions
The page contains a list of items (files or folders) that should be ignored, i.e. never scanned by AVG AntiVirus
for Mac. Exceptions are useful if you have some positively harmless files that AVG AntiVirus keeps blocking
and reporting as threats. Typically, this applies to PUA (Potentially Unwanted Applications), which is
borderline category of malware. Please note that in order to make changes on the page, you will need to
unlock it with administrator's password first.
You can set up detection of PUA (Potentially Unwanted Applications) and read more about it in Scanning
preferences.
You can edit the list very simply as follows:
click the plus button to browse for a file or folder to add to exceptions.
click the minus button to remove a selected exception immediately (please note that only the
exception will be removed, not the application/file/folder itself).
Please consider each exception carefully! Always make sure that the file is positively harmless. If unsure, you
can send the file to AVG ThreatLabs via Sample Submit Form for analysis.
31
Page 33

9. Updates
The main purpose of an update is to add definitions of new threats to the internal database stored locally on
your Mac. This is very important because new threats emerge every day, and fully updated antivirus program is
the most reliable protection from them. Keeping your AVG AntiVirus up-to-date is therefore essential for its
correct functioning.
The definition files and other improvements are delivered to your Mac silently from our dedicated update
servers, via your regular Internet connection. The whole update process (new files' download and their
application) usually takes only a couple of minutes, with its speed depending on your Internet connection
quality.
If you wish to update immediately:
1. In the menu bar, click on the AVG AntiVirus menu in the task bar, or on the icon in the task bar.
2. Select Check for updates.
The current update status (updated/outdated) is displayed in the top right corner of the main page of AVG
AntiVirus, so there two variants that you might see:
In the latter case, you can easily click the Update Now button to launch the update process.
Usually, you will not need to worry about updating because AVG AntiVirus updates automatically every day for
you. However, the manual update is advisable if you are about to run a scan, or your Mac has been offline for
some time and could not have been updated automatically.
To find out the date of the last successful update proceed with the following:
1. In the task bar, click on the AVG AntiVirus menu.
2. Select About AVG AntiVirus.
3. Look for the line Last update.
32
Page 34

10. Contact & Support
To get further help and support, there are the following options:
for FAQ, Technical Support and Sales Support, go to the dedicated AVG AntiVirus for Mac
Support of our website.
to discuss your issue with other Mac users and AVG technical support staff, use the AVG forums.
Our staff read and respond to the forums on a regular basis.
to send a specific file (infected, suspicious or falsely detected) to our malware experts for analysis,
use the Sample Submit Form.
All AVG products are developed and supplied by AVG Technologies CZ. To learn more about us, please visit
www.avg.com.
For the complete portfolio of our Mac products, you can go directly to www.avg.com/for-mac.
33
 Loading...