

Page 1
MC1000-S
Assembly and mounting Instructions
Thank you for purchasing VFI's MC1000 Metal Cart.
This product was designed for video conferencing applications
and is suitable for single TV configurations.
Note:
If you cannot understand these instructions or are concerned about safety of the installation
Contact a qualified contractor or contact VFI at 1-877-834-3876.
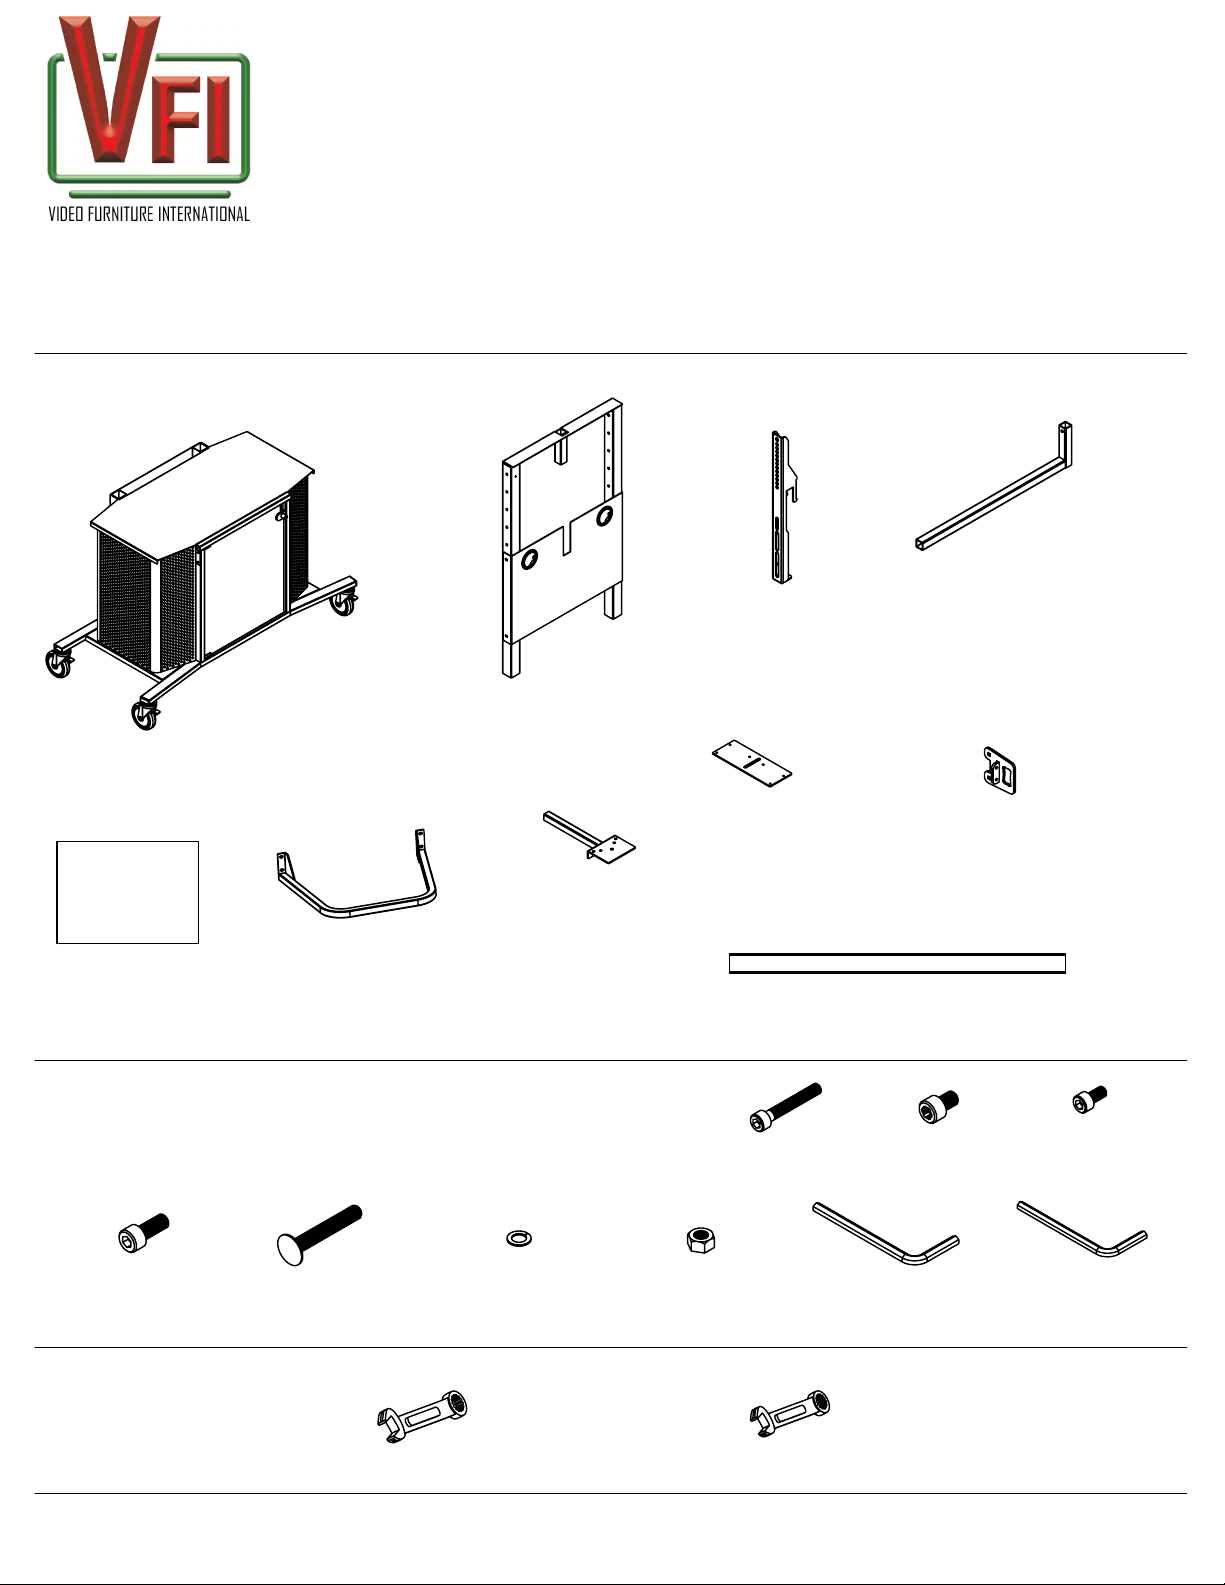
Confirm all hardware is included before you begin assembly.
Not all hardware supplied will be used depending on the manufacturer of your display/s.
Supplied Parts:
TV Bracket (2)
Page 1
Cam Arm (1)
of 7
MC1000
Cart (1)
Hardware
Bags
Supplied Hardware:
Handles (2)
TV
Hardware Bag
Spine
Assembly (1)
Cam Bracket (1)
Camera
Hardware
Bag
Cam Plate (1)
M6 x 30
(1)
Tube (1)
M8 x 12
Tube Bracket (2)
M6 x 12
(2)
(1)
M8 x 20
(4)
Tools required:
Not Included
VIDEO FURNITURE INTERNATIONAL
190 Don Hillock Drive Aurora , Ontario L4G 0G9 www.video-furn.com
Toll Free: 1-877-834-3876 Fax: 1-905-751-1488 Local:905-751-1459
5/16 Carriage
Bolt (4)
Lock
Washer (4)
9/16" Wrench
or Socket
5/16 Nut (4)
M8 Hex Key
(1)
1/2" Wrench
or Socket
M6 Hex Key
(1)
Page 2
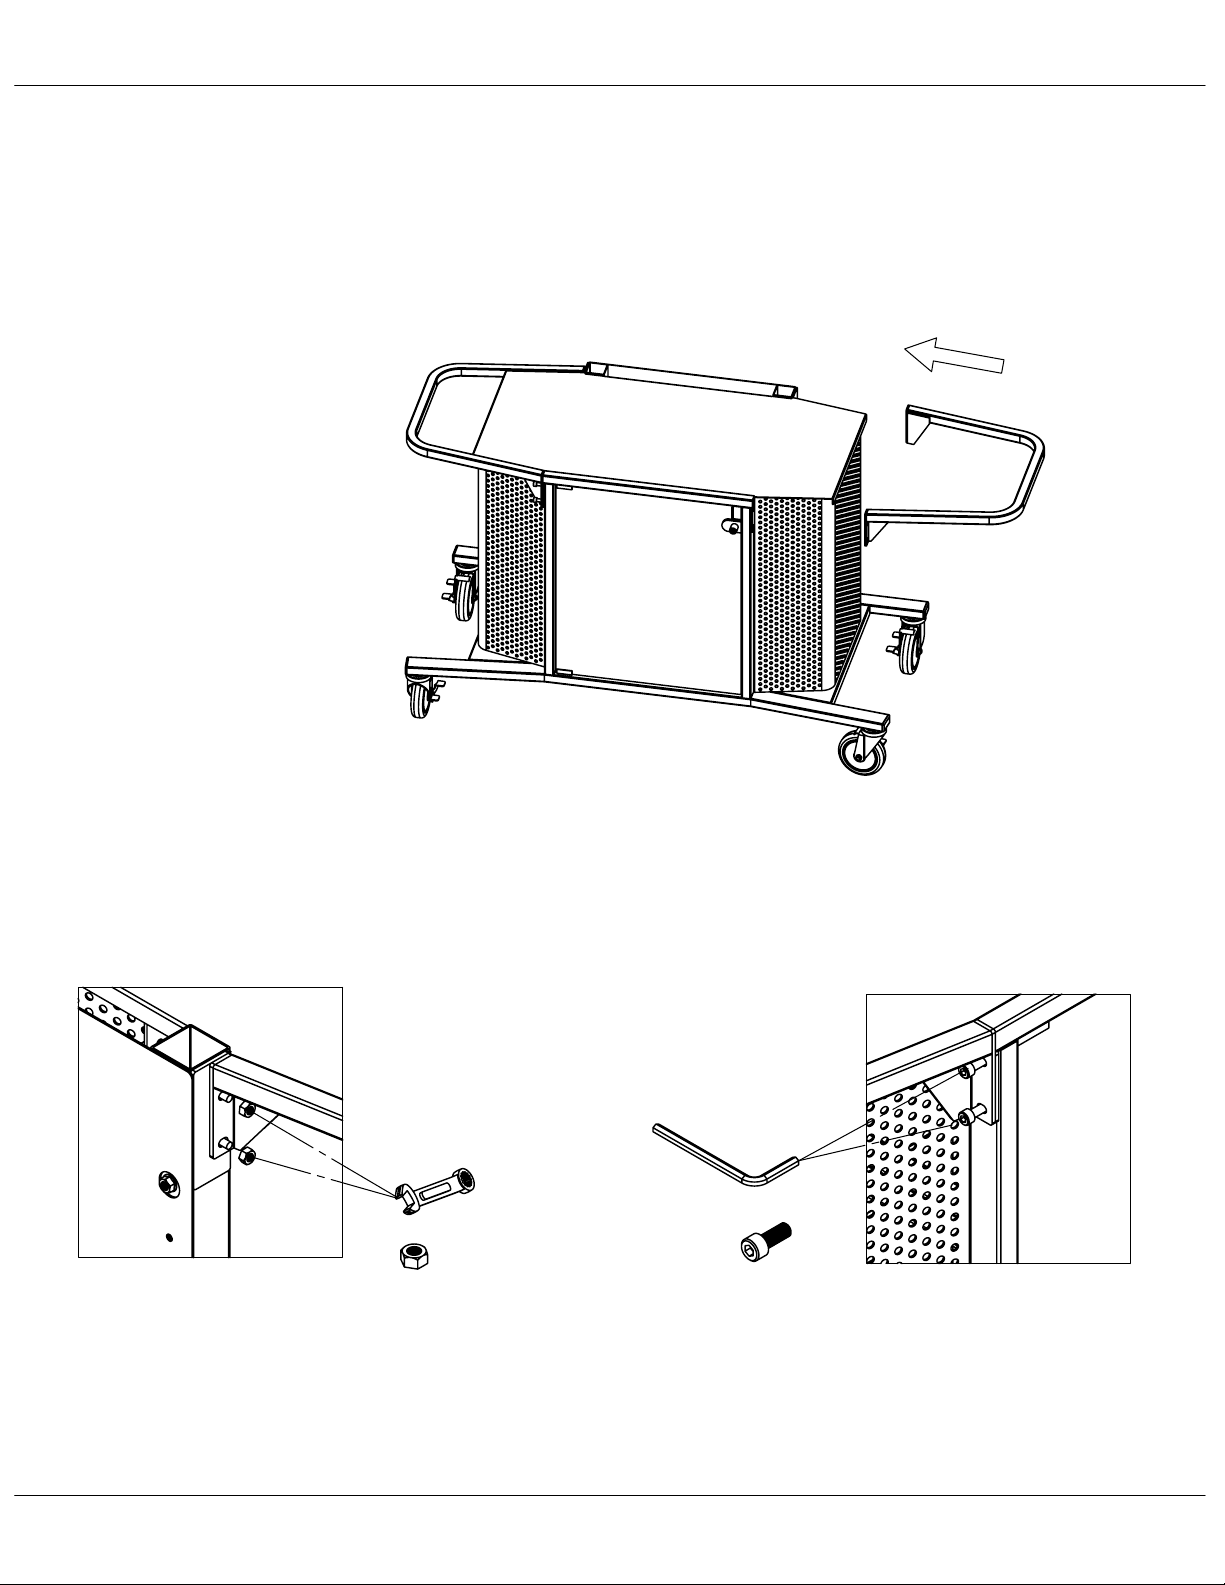
Attaching Handles
Step 1
Align handles with the matching
locations on the sides of the cart. Use
an M8 bolt and hex key to secure the
front side and a 1/2" wrench or socket
to secure the back side.
Page 2
of 7
Back
1/2" Wrench
or Socket
5/16 Nut (4)
VIDEO FURNITURE INTERNATIONAL
190 Don Hillock Drive Aurora , Ontario L4G 0G9 www.video-furn.com
Toll Free: 1-877-834-3876 Fax: 1-905-751-1488 Local:905-751-1459
M8 Hex Key
M8 x 20
(4)
Front
Page 3
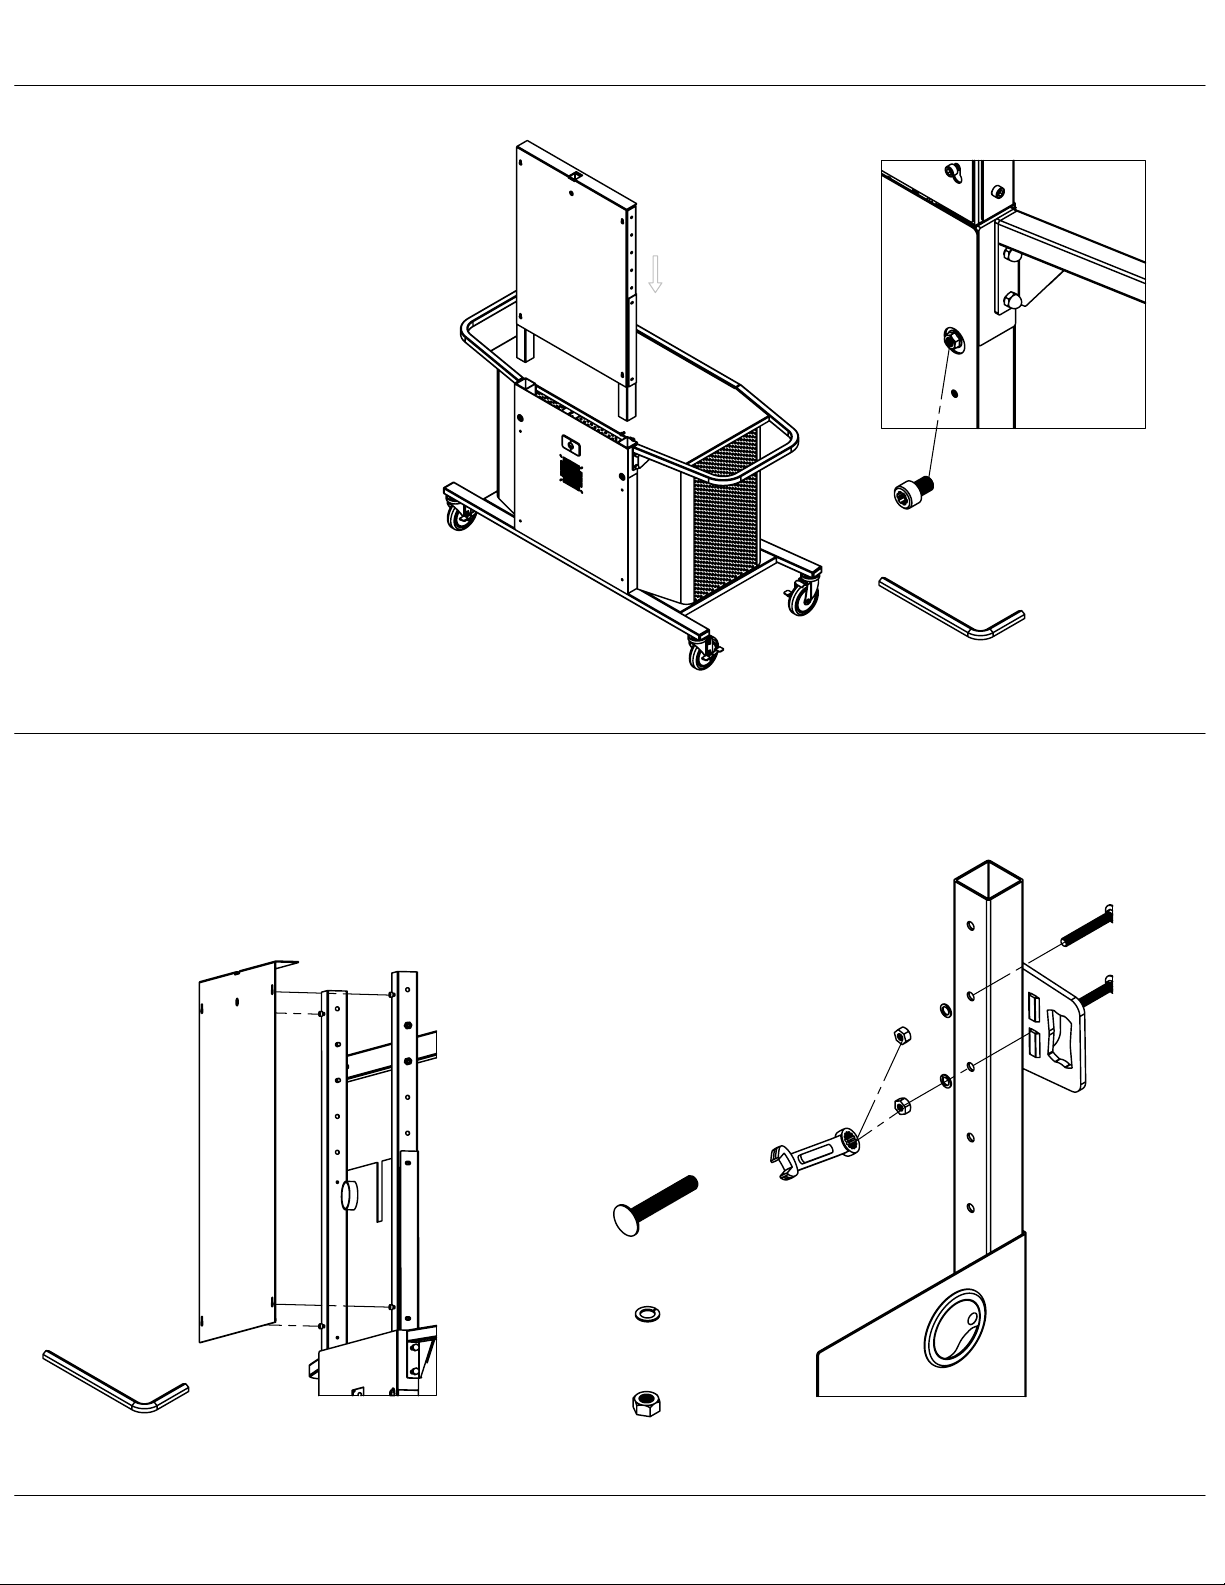
Installing Spine Assembly
Step 2
Slide the spine assembly into the
locations on the top of the cart with
the large cover facing the back.
Secure in place with an M8 bolt on
each side.
M8 x 12
(2)
Page 3
of 7
Installing Tube Brackets
Step 3
1)
Remove the back cover by first
loosening the M6 bolts, then sliding
upwards and out.
2) Attach tube brackets at a
desired height using the provided
hardware and 9/16" wrench or socket.
(If your TV's mounting locations are
600mm wide install the bar brackets on
the inside of the vertical tube.)
9/16"
Wrench
5-16 Carriage
Bolt (4)
or Socket
M8 Hex Key
M6 Hex Key
Lock
Washer (4)
5/16 Nut (4)
VIDEO FURNITURE INTERNATIONAL
190 Don Hillock Drive Aurora , Ontario L4G 0G9 www.video-furn.com
Toll Free: 1-877-834-3876 Fax: 1-905-751-1488 Local:905-751-1459
Page 4
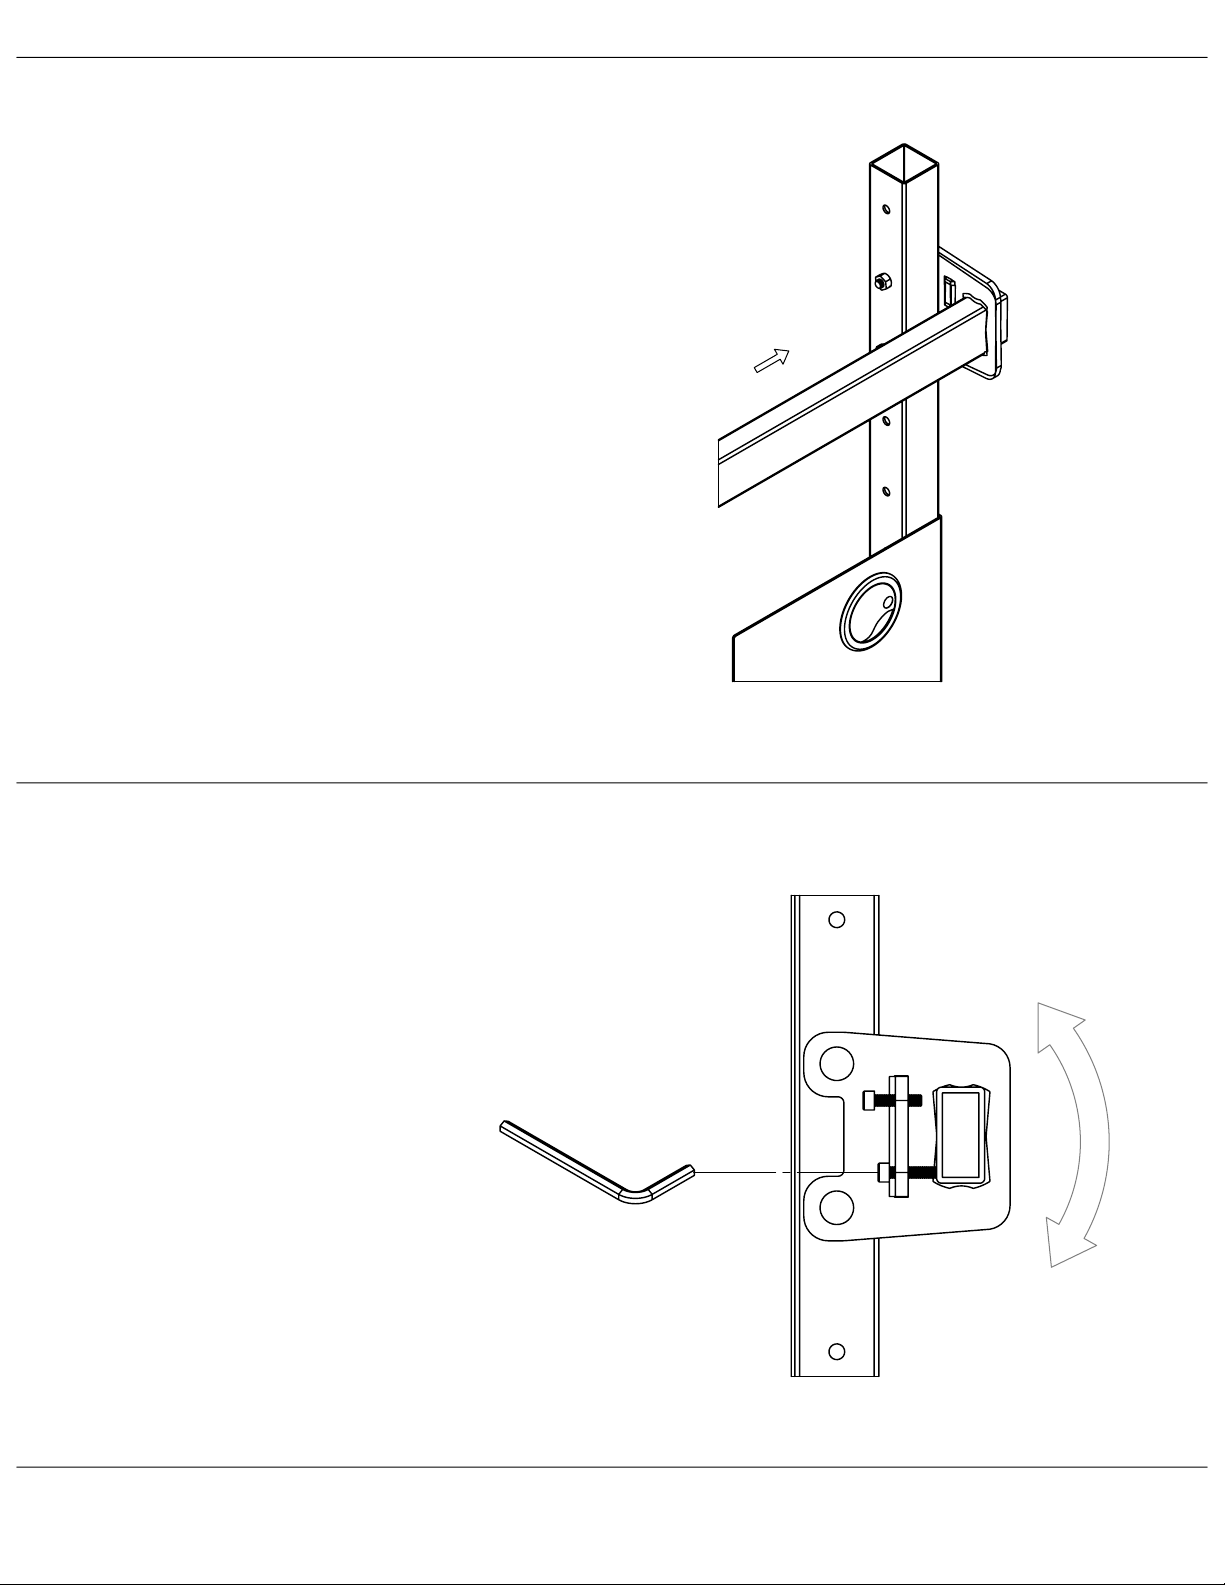
Setting TV Angle
Step 4
1)
Slide the PM2 tube through the tube
bracket slots until centred.
Page 4
of 7
2)
Tighten the bottom bolt on the back of
each tube bracket until the tube is at the
desired angle. Tighten the top bolt to
secure the tube in place.
M8 Hex Key
VIDEO FURNITURE INTERNATIONAL
190 Don Hillock Drive Aurora , Ontario L4G 0G9 www.video-furn.com
Toll Free: 1-877-834-3876 Fax: 1-905-751-1488 Local:905-751-1459
Page 5
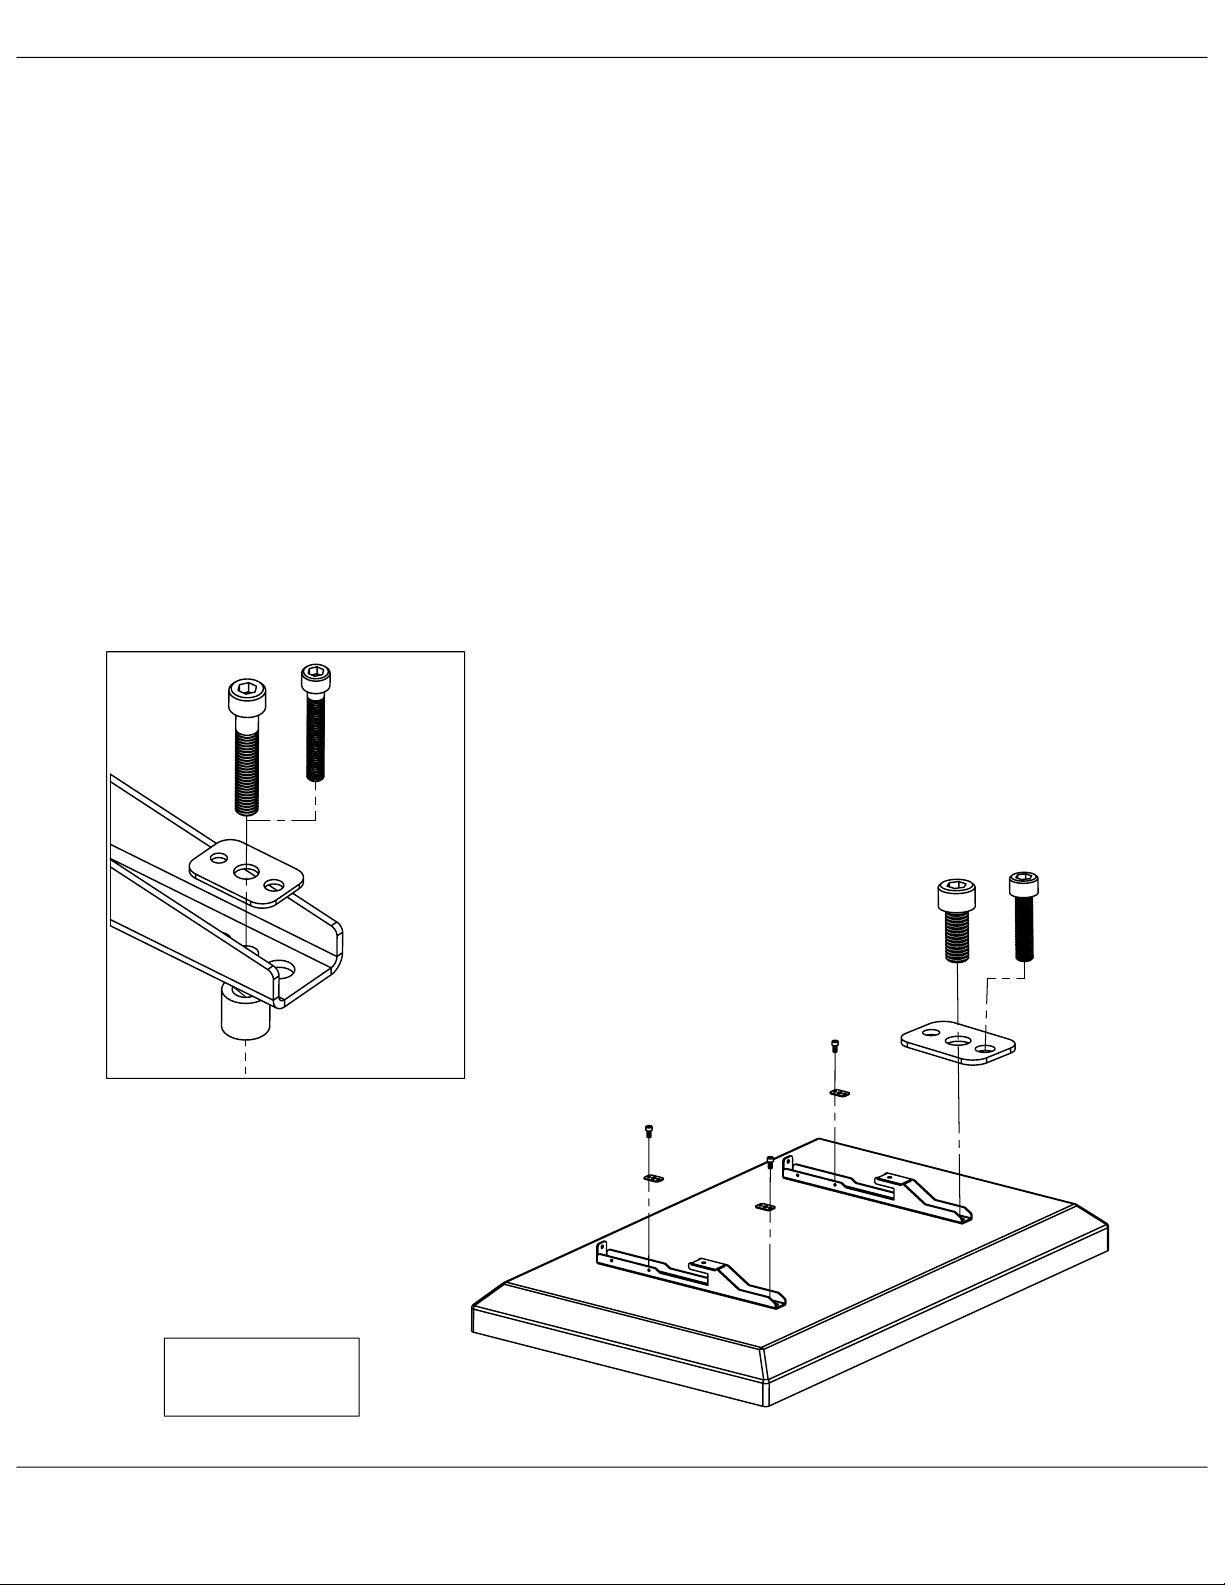
Attaching TV Brackets
Step 5
1.Place TV face down on blanket or non abrasive surface such as cardboard.
2.Check to see if your TV came with mounting hardware or not.
If not,we have supplied the most common hardware.
Most displays under 42" will use the M6 bolt. Most 42"+ will use the M8 bolts.
See which bolt length you need by hand tightening only.
3.Place TV brackets so you can see the TV mounting holes through the bracket
and insert bolt through a multi washer.
4.Use the Hex key to tighten until there is resistance, then give a half turn.
DO NOT OVERTIGHTEN AS THIS CAN DAMAGE OR PUNCTURE THE TV
Page 5
of 7
Notes
•
•
.
Have 2 people lift the TV as it can be very heavy and awkward.
As some TV's require non standard hardware, this bracket was made to
accomodate up to M10 bolts which can be found at your local hardware
store along with longer versions of the included hardware.
Optional Spacer mounting
M8 X 40
M6 X 40
Multi
TV Bracket
Spacer
M8 x 20
M6 x 25
OR
M5 x 25
Spacer is used when the back of TV is
not flat or the mount holes are sunk into
the back of the TV. (Rarely used)
TV
Hardware Bag
VIDEO FURNITURE INTERNATIONAL
190 Don Hillock Drive Aurora , Ontario L4G 0G9 www.video-furn.com
Toll Free: 1-877-834-3876 Fax: 1-905-751-1488 Local:905-751-1459
Multi
Washer
Page 6
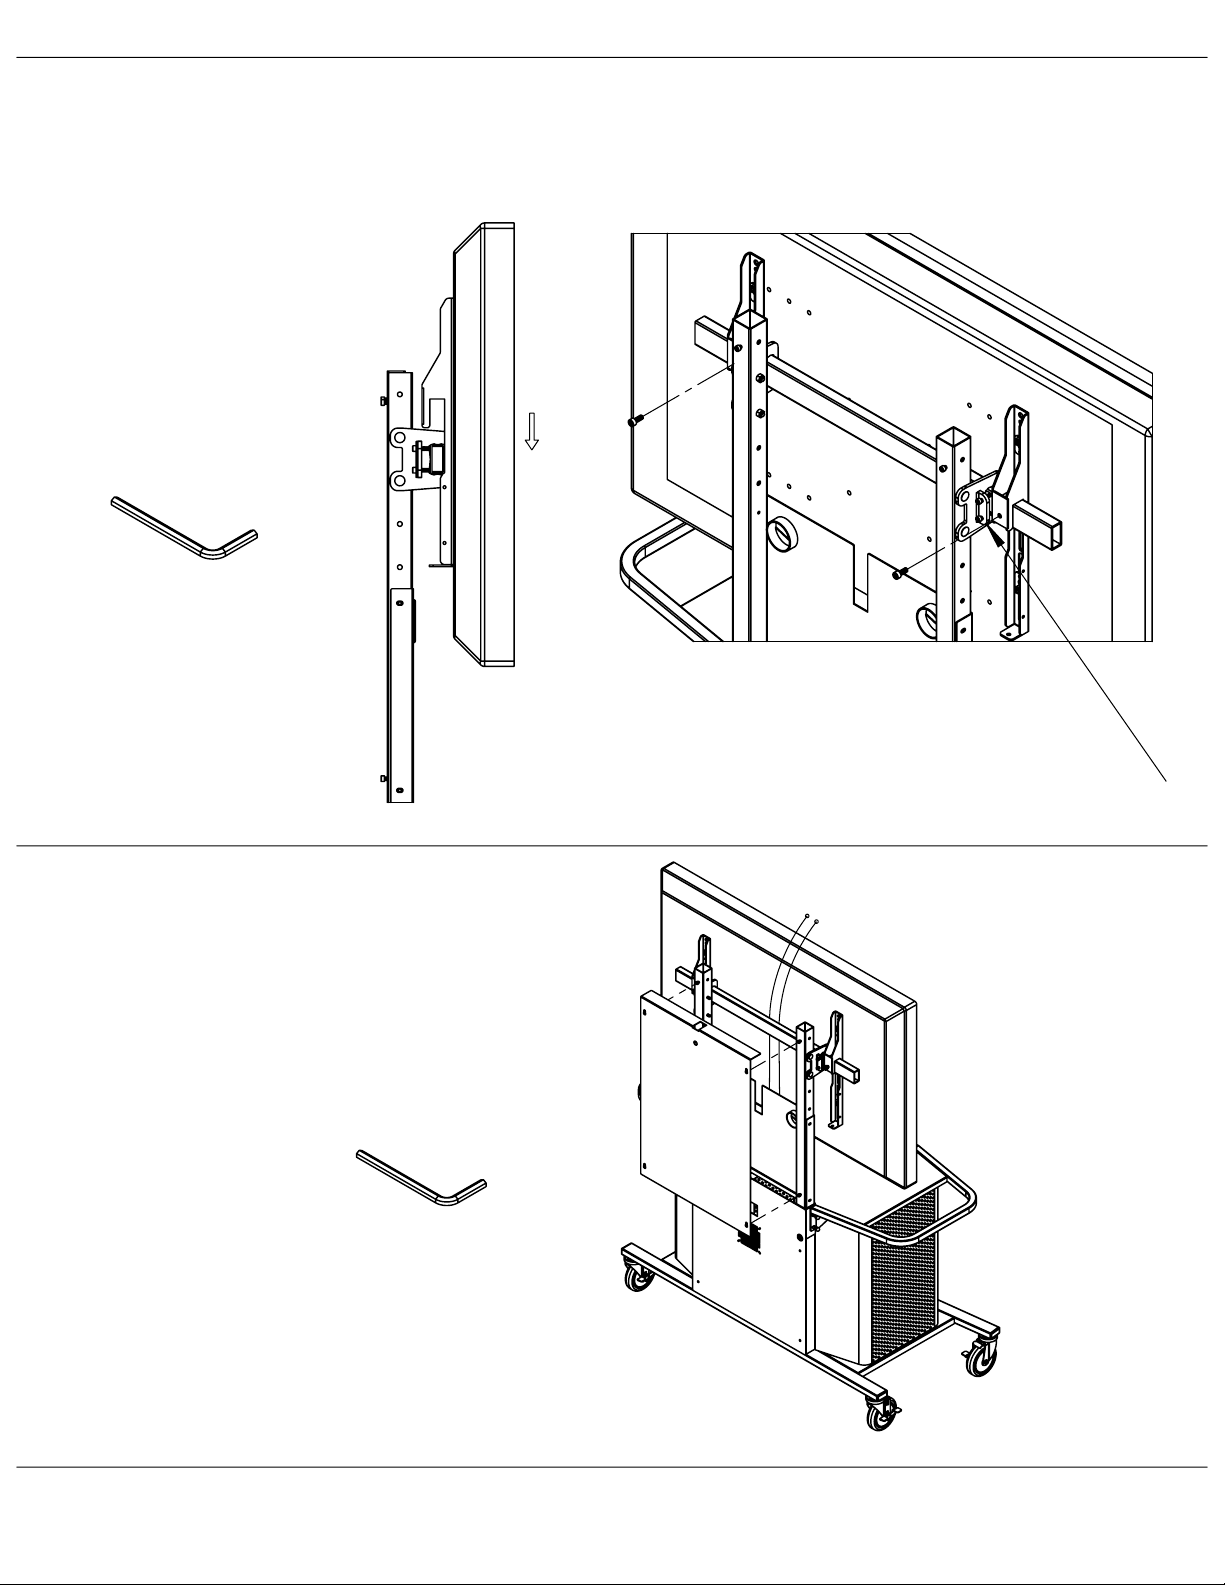
Mounting and Securing TV
Step 6
Page 6
of 7
1)
Slide TV with attached brackets
onto the installed TV bar.
2)
Secure in place by tightening
the M8 bolts on the back of each
TV bracket.
3)
Connect all cables including
those that will be attaching to
the camera.
M8 Hex Key
In some cases the TV brackets will interfere
with the tube brackets requiring the same location.
Go back to
instead of outside.
step 3-2
and place the tube brackets inside
Installing Back Cover
Step 7
Re-install the back cover and tighten
M8 bolts to secure in place.
M6 Hex Key
VIDEO FURNITURE INTERNATIONAL
190 Don Hillock Drive Aurora , Ontario L4G 0G9 www.video-furn.com
Toll Free: 1-877-834-3876 Fax: 1-905-751-1488 Local:905-751-1459
Page 7
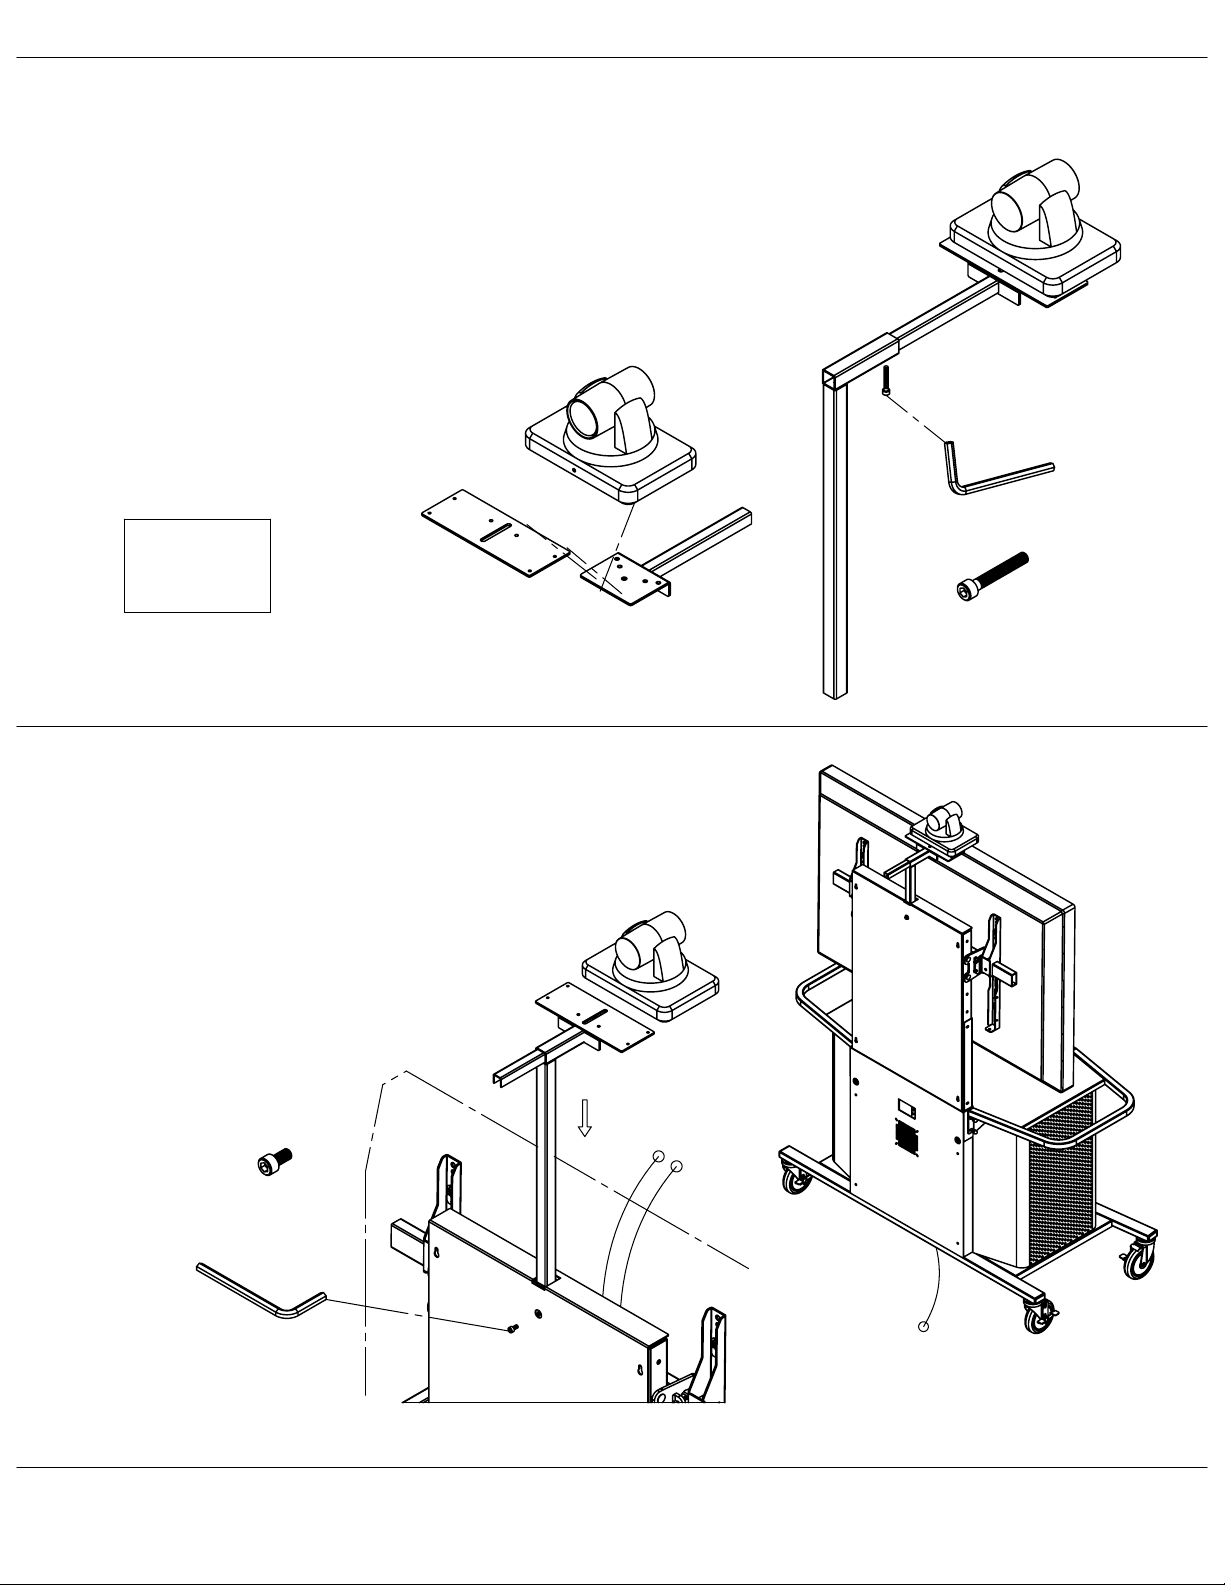
Assembling Cam Bracket
Step 8
Page 7
of 7
1)
Mount your video conferencing
camera onto the cam bracket using
contents of the camera bag. Install the
cam plate first if you camera requires it.
2)
Slide the cam bracket into the cam
arm and secure in place with an M6 bolt.
Camera
Hardware
Bag
Installing Cam Bracket Assembly
M6 Hex Key
M6 x 30
(1)
Step 9
1)
Slide the assembled Cam Arm
into the top of the Spine assembly
and secure in place with an M6
bolt.
2)
Connect cables to your camera
and run the power bar cord through
the bottom of the cart.
M6 x 12
(1)
M6 Hex Key
Your Done!
VIDEO FURNITURE INTERNATIONAL
190 Don Hillock Drive Aurora , Ontario L4G 0G9 www.video-furn.com
Toll Free: 1-877-834-3876 Fax: 1-905-751-1488 Local:905-751-1459
 Loading...