

Page 1
ZQ375
Checkweigher
User Instructions
AWT35-500812
Issue AC
Page 2

© Avery Weigh-Tronix, LLC 2012. All rights reserved.
No part of this publication may be reproduced, stored in an electronic retrieval system, or transmitted in any form
or by any means, electronic, mechanical, photocopying, recording or otherwise without the prior written consent of
the copyright owner, or as permitted by law or under license. Full acknowledgment of the source must be given.
Avery Weigh-Tronix is a registered trade mark of the Avery Weigh-Tronix, LLC. This publication was correct at the
time of going to print however, Avery Weigh-Tronix, LLC reserves the right to alter without notice the specification,
design, price or conditions of supply of any product or service at any time.
All third party brands and product names used within this document are trademarks or registered trademarks of
their respective holders.
ZQ375_u_en_500812.book
Page 3

Table of Contents
page
Chapter 1 General information and warnings ......................................................................................... 7
About this manual ..............................................................................................................7
Text conventions ......................................................................................................... 7
Special messages ....................................................................................................... 7
Installation .......................................................................................................................... 8
Safe handling of equipment with batteries .................................................................. 8
Wet conditions ............................................................................................................. 8
Routine maintenance ......................................................................................................... 8
Cleaning the machine ........................................................................................................ 9
ZQ375 cleaning process ............................................................................................. 9
Indicator ..................................................................................................................... 10
Cleaning the Rear of the Column .............................................................................. 11
Base Cleaning ........................................................................................................... 11
Training ............................................................................................................................ 11
Sharp objects ................................................................................................................... 12
FCC and EMC declarations of compliance ...................................................................... 12
United States ...................................................................................................... 12
Canada ............................................................................................................... 12
European Countries ............................................................................................ 12
Declaration of Conformity ................................................................................................ 13
Chapter 2 Introduction ............................................................................................................................ 14
Initial setup ....................................................................................................................... 14
Front panel ....................................................................................................................... 15
Annunciators ............................................................................................................. 17
Tolerance entry procedure ............................................................................................... 18
Example: To increase a value of 0.002 to 0.125: ................................................ 18
Numeric entry procedure ................................................................................................. 19
Example: To key in the number 507: .................................................................. 19
ID Entry Procedure .......................................................................................................... 19
Powering up the ZQ375 ................................................................................................... 20
Battery option ................................................................................................................... 20
Installation ................................................................................................................. 21
Proper charging of the ZQ-BAT ................................................................................. 22
Charging the battery pack using the supplied wall charger ................................ 22
Charging the battery pack through a ZQ375 indicator: ....................................... 23
Battery states indicated by LEDs .............................................................................. 23
Checkweigher Operation on Battery Power .............................................................. 24
Light stack option .............................................................................................................25
Light stack operation ................................................................................................. 25
Chapter 3 Checkweighing applications ................................................................................................. 26
Checkweighing terminology ............................................................................................. 26
Normal weighing procedures ........................................................................................... 28
Gross weighing .......................................................................................................... 28
Tare/Net weighing ..................................................................................................... 28
Using Pushbutton Tare (if enabled) .................................................................... 29
Using Preset Tare (if enabled) ............................................................................ 29
Sim375 application ........................................................................................................... 31
Checkweighing .......................................................................................................... 31
Switching Between Checkweighing and Normal Weighing Mode ....................... 31
ZQ375 Checkweigher User Instructions 3
Page 4

Setting a New Target Weight and Simple Checkweighing .................................. 31
View the High and Low Tolerances .................................................................... 32
Set New High and Low Tolerances ..................................................................... 32
Mid375 application ........................................................................................................... 33
SELECT key operation .............................................................................................. 33
Checkweighing .......................................................................................................... 33
Negative checkweighing ............................................................................................ 34
Sample mode checkweighing .................................................................................... 35
Sampling Method ................................................................................................ 35
Manual Target Weight Entry ............................................................................... 35
View the Target Weight and Upper and Lower Tolerances ................................ 36
Set New Upper and Lower Tolerances ............................................................... 36
Transaction counter ................................................................................................... 37
Adv375 application ........................................................................................................... 38
SELECT key operation .............................................................................................. 38
Checkweighing .......................................................................................................... 38
Setting a New Target Weight and Checkweighing .............................................. 39
Choosing a PLU and Checkweighing ................................................................. 39
View the Upper and Lower Tolerances ............................................................... 40
Set New Upper and Lower Tolerances ............................................................... 40
Transaction counter ................................................................................................... 41
Statistical Package and Packrun ............................................................................... 41
Printing the report: .............................................................................................. 41
Report Example: ................................................................................................. 42
X-Bar/R Program ....................................................................................................... 42
Per375 application ........................................................................................................... 43
Checkweighing .......................................................................................................... 43
Setting a New Target Percentage and Checkweighing ...................................... 43
Choosing a PLU and Checkweighing ................................................................. 44
View the Upper and Lower Tolerances ............................................................... 44
Set New Upper and Lower Tolerances ............................................................... 44
Grad375 application ......................................................................................................... 46
Positive vs. negative grading ..................................................................................... 46
Grade classifying ....................................................................................................... 46
Setting weight grades ................................................................................................ 46
Positive grading ......................................................................................................... 47
Negative grading with autotare enabled .................................................................... 47
Negative grading with autotare disabled ................................................................... 48
Chapter 4 Menus ...................................................................................................................................... 49
Accessing the menus ....................................................................................................... 49
Menu annunciators .......................................................................................................... 49
Exiting the menus ............................................................................................................ 50
USER level menus ........................................................................................................... 50
User menu ....................................................................................................................... 51
Time .......................................................................................................................... 51
Date ...........................................................................................................................52
Site ID ........................................................................................................................53
Seal ...........................................................................................................................53
About menu ...................................................................................................................... 54
Boot ...........................................................................................................................54
Firm and App ............................................................................................................. 55
Serial .........................................................................................................................55
Option ........................................................................................................................ 55
Enet ...........................................................................................................................56
Dload ......................................................................................................................... 57
Audit menu ....................................................................................................................... 57
4 ZQ375 Checkweigher User Instructions
Page 5

Counter ...................................................................................................................... 58
Print ........................................................................................................................... 58
Chapter 5 Error messages ...................................................................................................................... 59
PLU CSV file import error messages .............................................................................. 60
Chapter 6 Communications .................................................................................................................... 61
Default print formats ......................................................................................................... 61
Chapter 7 Supervisor menu .................................................................................................................... 63
Supervisor menu for Sim375 application ......................................................................... 64
Setpoint ..................................................................................................................... 65
Annunciators ....................................................................................................... 65
Inputs .................................................................................................................. 66
Print ..................................................................................................................... 66
Reset ................................................................................................................... 66
Check ........................................................................................................................ 67
Outputs ............................................................................................................... 67
Output-gross zero band ...................................................................................... 68
Under segment division ...................................................................................... 68
Over segment division ........................................................................................ 68
Reset ................................................................................................................... 69
Battery ....................................................................................................................... 69
Enable ................................................................................................................. 69
Timeout ............................................................................................................... 70
Supervisor menu for Mid375 application .......................................................................... 71
Setpoint ..................................................................................................................... 72
Tare ...........................................................................................................................72
Tare Register 1-10 .............................................................................................. 72
Printing ................................................................................................................ 73
Reset ................................................................................................................... 73
Check ........................................................................................................................ 73
Outputs ............................................................................................................... 74
Output-gross zero band ...................................................................................... 74
Under segment division ...................................................................................... 75
Over segment division ........................................................................................ 75
Digits ................................................................................................................... 75
Graph .................................................................................................................. 76
Type .................................................................................................................... 76
Auto Tare ............................................................................................................ 76
Reset ................................................................................................................... 77
Battery ....................................................................................................................... 77
Supervisor menu for Adv375 application ......................................................................... 78
Setpoint ..................................................................................................................... 79
Tare ...........................................................................................................................79
Check ........................................................................................................................ 79
Outputs ............................................................................................................... 80
Outputs-gross zero band .................................................................................... 80
Under segment division ...................................................................................... 80
Over segment division ........................................................................................ 81
Print total ............................................................................................................. 81
Total format ......................................................................................................... 82
Clear total ............................................................................................................ 82
Digits ................................................................................................................... 82
Graph .................................................................................................................. 83
Stats .................................................................................................................... 83
Packrun ............................................................................................................... 84
Type .................................................................................................................... 84
ZQ375 Checkweigher User Instructions 5
Page 6

Auto Tare ............................................................................................................ 84
Reset ................................................................................................................... 85
PLU ........................................................................................................................... 85
Edit ...................................................................................................................... 85
Print ..................................................................................................................... 87
Import .................................................................................................................. 87
Export .................................................................................................................. 88
Reset ................................................................................................................... 88
Battery ....................................................................................................................... 88
Supervisor menu for Per375 application .......................................................................... 89
Setpoint ..................................................................................................................... 90
Tare ...........................................................................................................................90
Check ........................................................................................................................ 90
PLU ........................................................................................................................... 90
Battery ....................................................................................................................... 90
Supervisor menu for the Grad375 application ................................................................. 91
Setpoint ..................................................................................................................... 92
Tare ...........................................................................................................................92
Grading ...................................................................................................................... 92
Battery ....................................................................................................................... 92
6 ZQ375 Checkweigher User Instructions
Page 7

1 General information and warnings
1.1 About this manual
This manual is divided into chapters by the chapter number and the large text at the top
of a page. Subsections are labeled using the 1.1 and 1.1.1 convention. The names of
the chapter and the next subsection level appear at the top of alternating pages of the
manual to remind you of where you are in the manual. The manual name and page
numbers appear at the bottom of the pages.
1.1.1 Text conventions
Key names are shown in bold and reflect the case of the key being described. If a key
has dual functions, the name of the key is shown first followed by the function in
parentheses and in bold, such as in these examples: TAR E(), UNITS(), etc.
Displayed messages appear in bold italic type and reflect the case of the displayed
message.
1.1 About this manual
1.1.2 Special messages
Examples of special messages you will see in this manual are defined below. The
heading words have specific meanings to alert you to additional information or the
relative level of hazard.
CAUTION!
This is a Caution symbol.
Cautions give information about procedures that, if not observed, could result
in damage to equipment or corruption to and loss of data.
NOTE: This is a Note symbol. Notes give additional and important information, hints
and tips that help you to use your product.
ZQ375 Checkweigher User Instructions 7
Page 8
General information and warnings
1.2 Installation
NO USER SERVICEABLE PARTS. REFER TO QUALIFIED SERVICE
PERSONNEL FOR SERVICE.
1.2.1 Safe handling of equipment with batteries
CAUTION: Danger of explosion if battery is incorrectly replaced. Replace only
with the same or equivalent type recommended by the manufacturer. Dispose
of used batteries according to the manufacturer’s instructions.
ATTENTION: Il y a danger d'explosion s'il y a remplacement incorrect de la
batterie, remplacer uniquement avec une batterie du même type ou d'un type
équivalent recommandé par le constructeur. Mettre au rebut les batteries
usagées conformément aux instructions du fabricant.
1.2.2 Wet conditions
Under wet conditions, the plug must be connected to the final branch circuit via an
appropriate socket / receptacle designed for washdown use.
Installations within the USA should use a cover that meets NEMA 3R specifications
as required by the National Electrical Code under section 410-57. This allows the unit
to be plugged in with a rain tight cover fitted over the plug.
Installations within Europe must use a socket which provides a minimum of IP56
protection to the plug / cable assembly. Care must be taken to make sure that the
degree of protection provided by the socket is suitable for the environment.
1.3 Routine maintenance
IMPORTANT: This equipment must be routinely checked for proper operation
and calibration.
Application and usage will determine the frequency of calibration required for
safe operation.
Always turn off the machine and isolate from the power supply before starting any
routine maintenance to avoid the possibility of electric shock.
Before use in any NSF / ANSI 3-A food application this scale must be regularly
inspected to guarantee cleanliness at all times.
Scale needs to be regularly inspected to guarantee there are no loose or missing nuts
and that all bolt and knob threads are completely covered.
8 ZQ375 Checkweigher User Instructions
Page 9
1.4 Cleaning the machine
Check that the indicator and any battery or external OPTO22 relay box are secured
correctly in place with the correct locking knob.
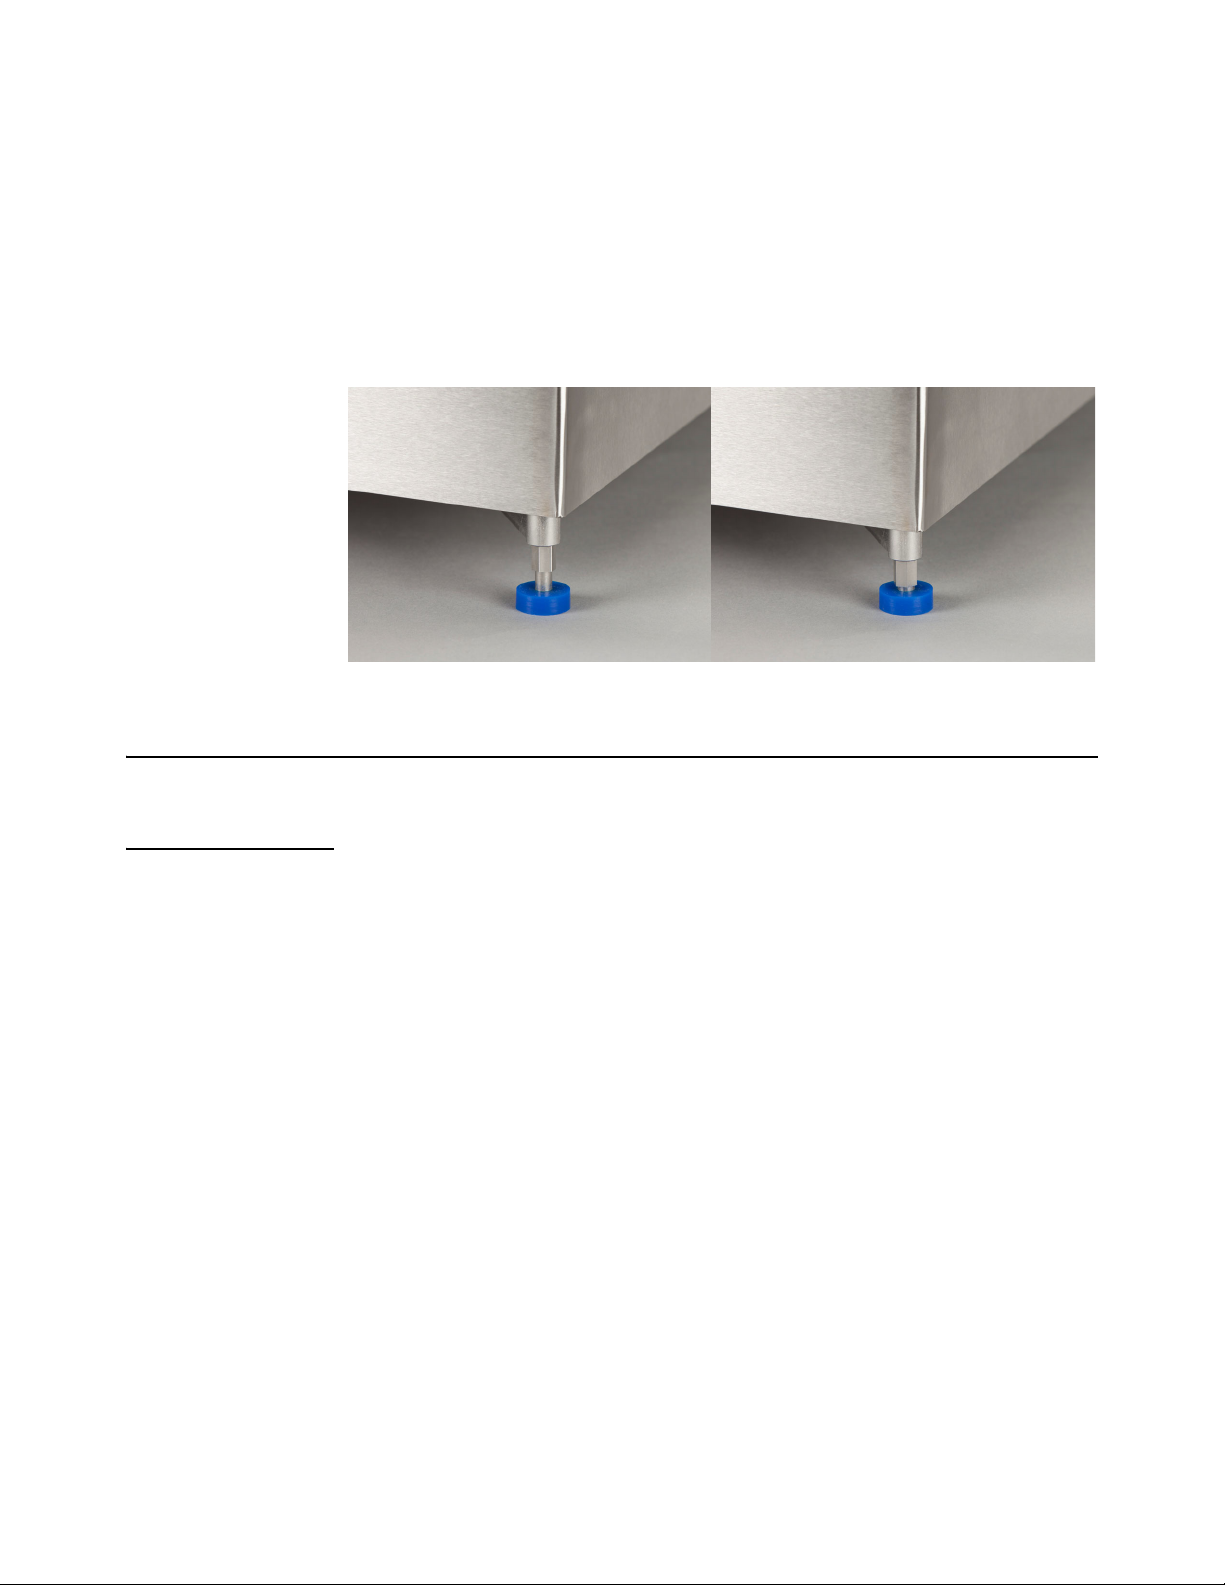
Check that the scale is set on a clean, flat, stable surface and levelled using the scale
feet and bubble level found between the column and the base.
Feet can be adjusted by loosening the locking sleeve and rotating the foot in or out until
the base becomes level.
Once level, the locking sleeve needs to be retightened with a spanner onto the base,
guaranteeing there are no threads visible once locked in place. See the illustration
below:
1.4 Cleaning the machine
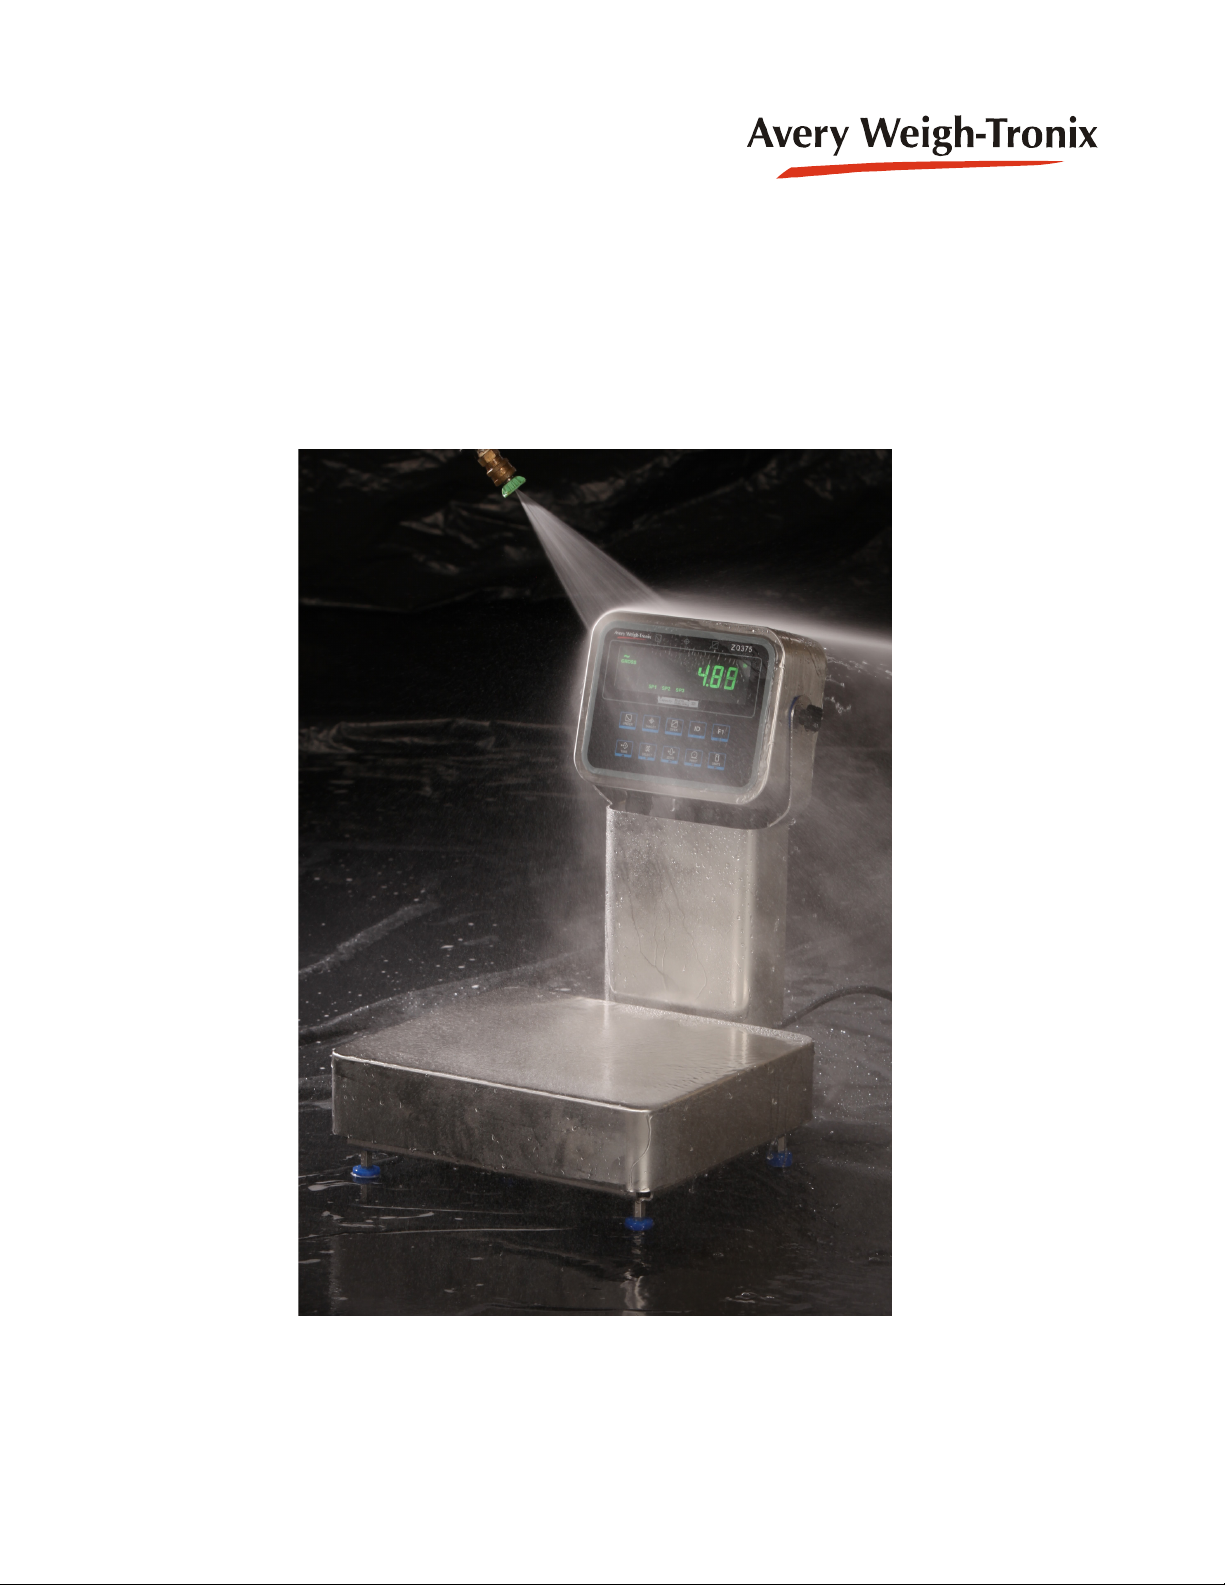
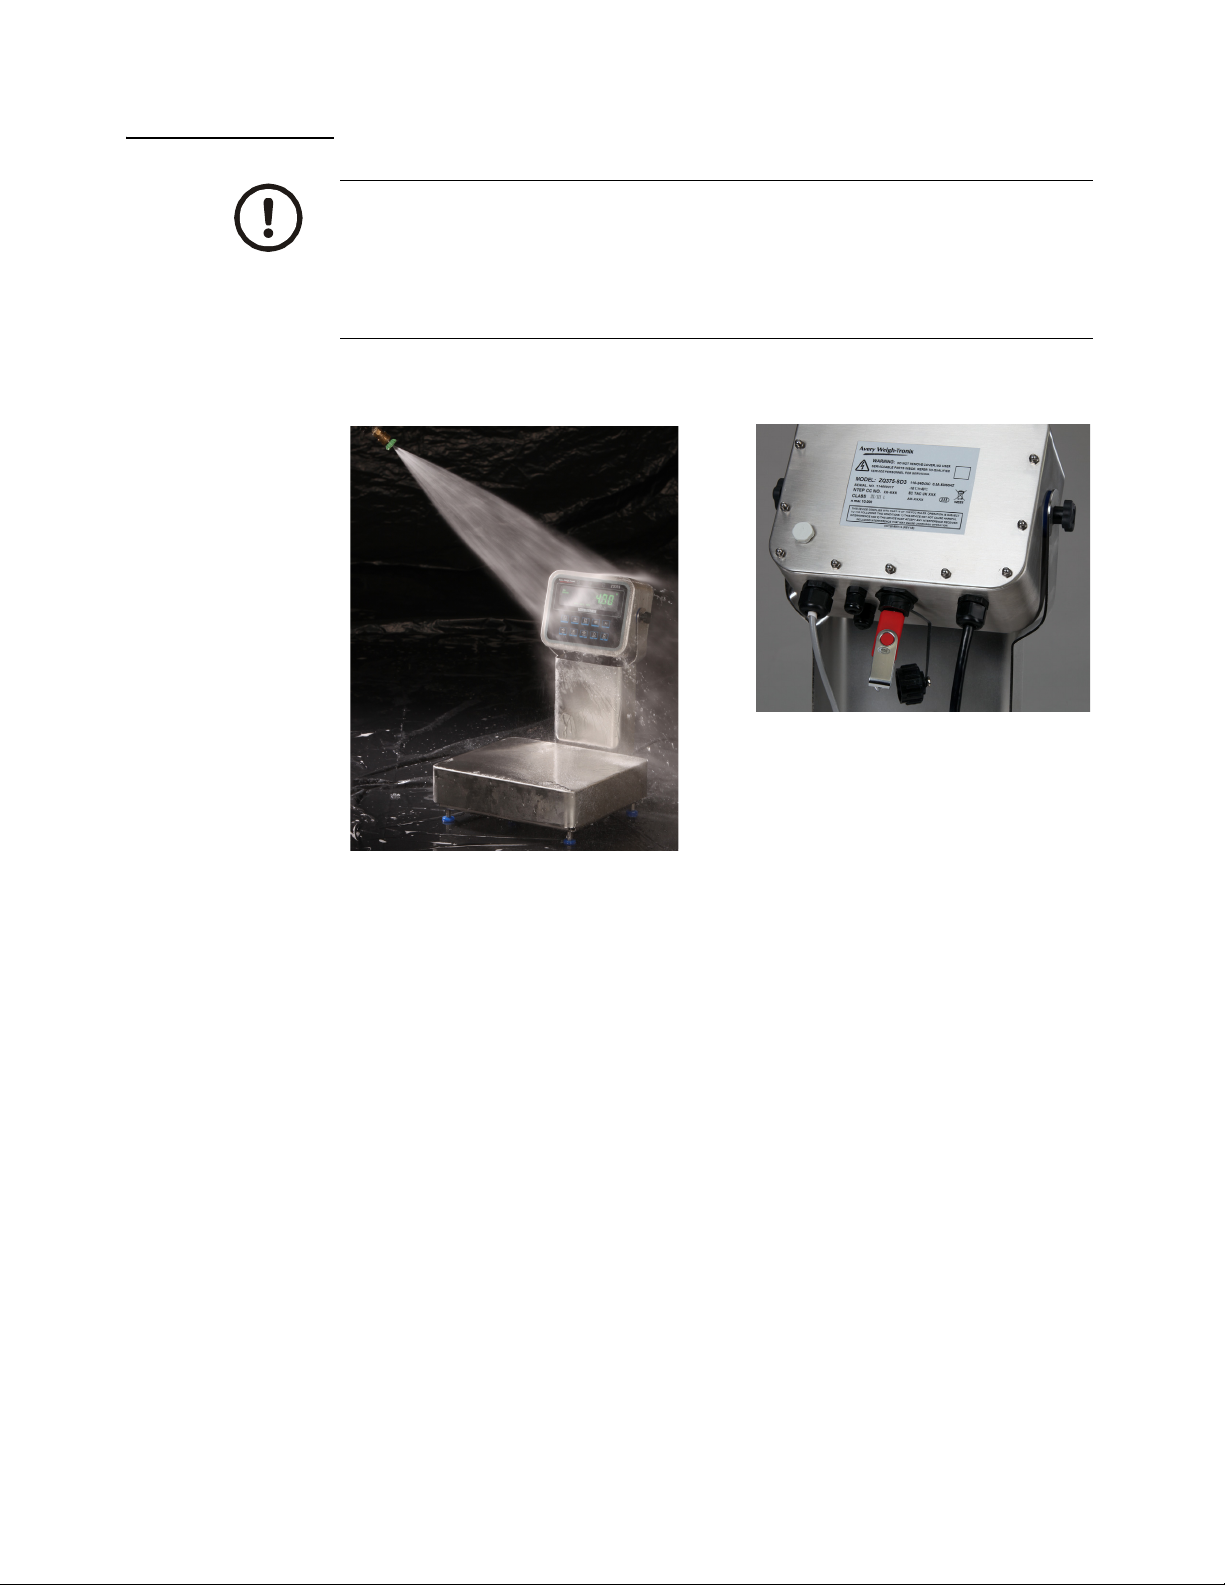
1.4.1 ZQ375 cleaning process
The ZQ375 checkweigher has been designed for use within NSF / ANSI 3-A food
applications.
It has minimum food trap areas to aid fast and efficient cleaning. All versions of the
ZQ375 scale, indicator, remote battery pack and external opto22 relay box can be
subjected to external high pressure cleaning to IP69K standards.
Bases marked with Model number BSF are suitable for high pressure cleaning
externally and under the scale platter in line with IP69K standards.
Bases marked with model number BSG are only suitable for high pressure cleaning
externally. Extra care has to be taken cleaning under the scale platter in line with IP65
/ Nema4X standards.
ZQ375 Checkweigher User Instructions 9
Page 10
General information and warnings
1.4.2 Indicator
CAUTION: It is essential that the power plug is kept in a safe dry area while
cleaning is in progress.
If external USB or Ethernet glands are installed in the indicator, it is essential
these be sealed with water tight caps prior to cleaning or when the connectors
are not in use.
10 ZQ375 Checkweigher User Instructions
Page 11
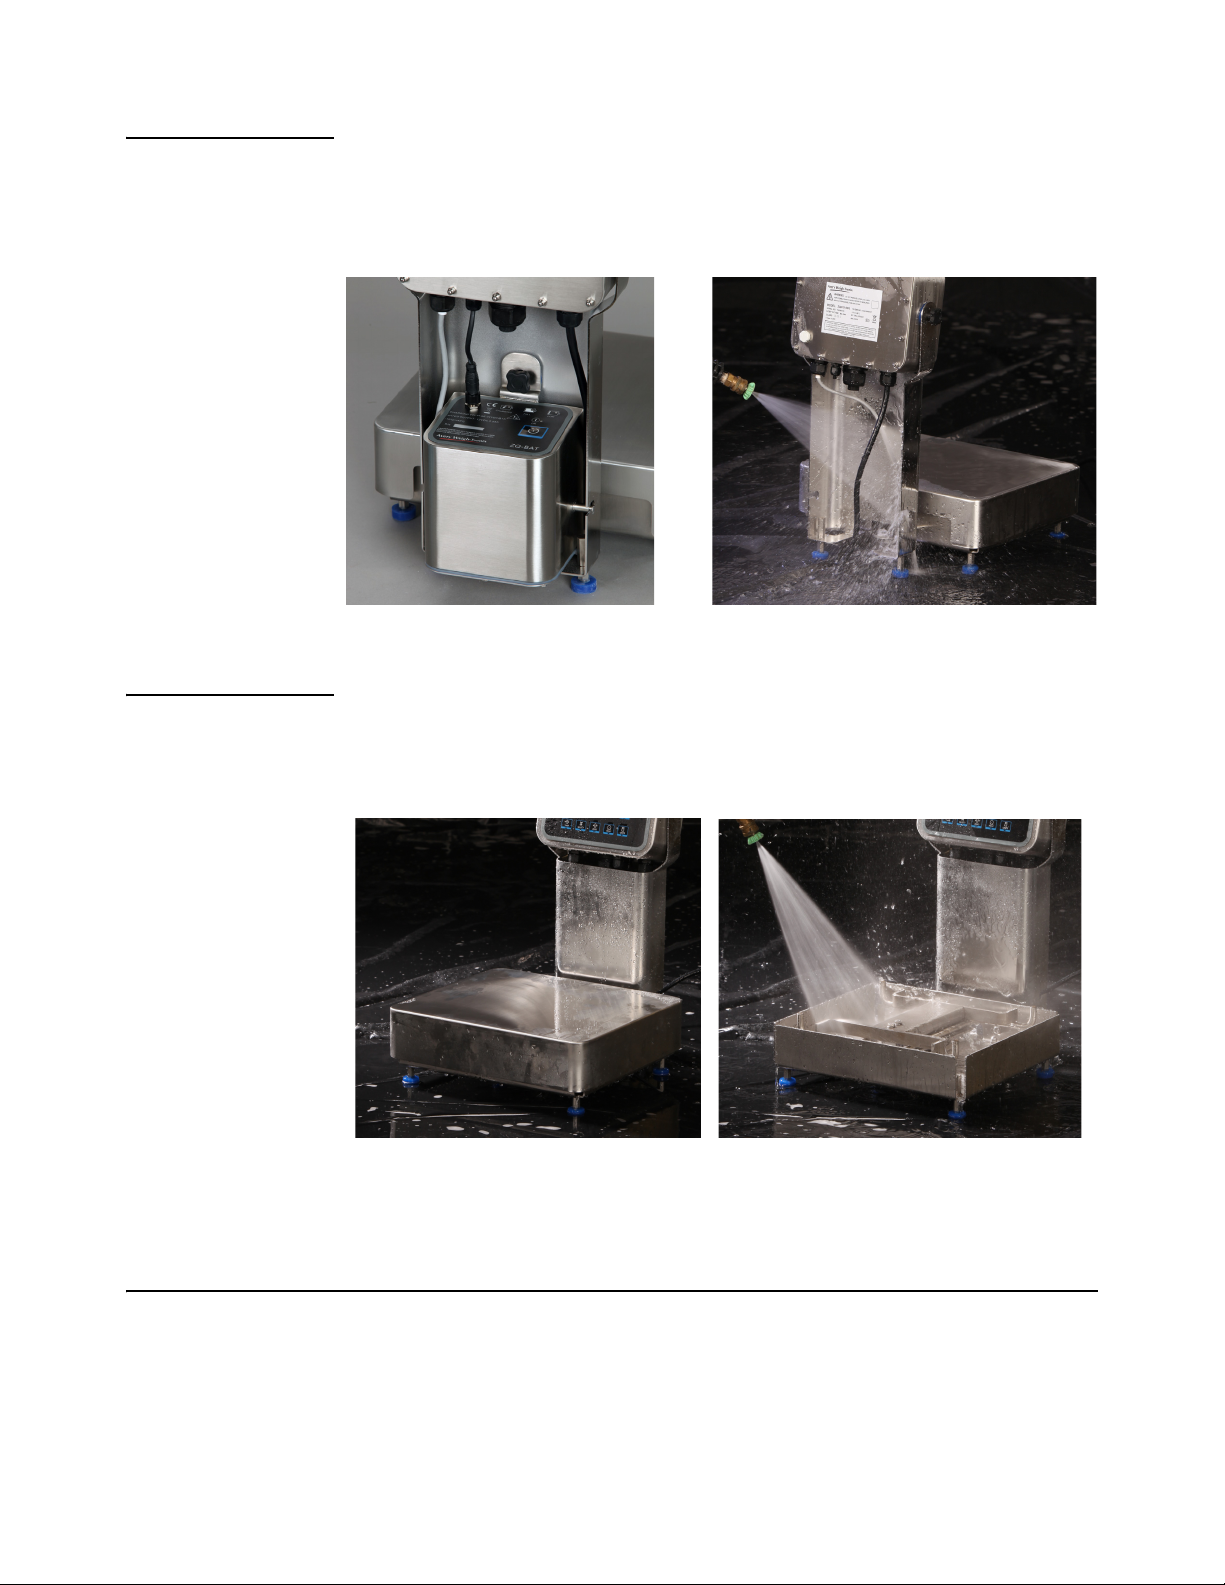
1.4.3 Cleaning the Rear of the Column
For rigorous cleaning it is recommended that the external battery pack or external relay
box, if installed, are removed to allow better access to the rear of the column while
cleaning. Before high pressure washing the battery, protect the battery connector with
the water tight cap supplied.
1.5 Training
1.4.4 Base Cleaning
While cleaning, it is essential that the weighing platform and the support plate should
be removed to allow full easy access into the base to aid the cleaning process and help
to sanitize all areas of the base.
1.5 Training
Do not attempt to operate or complete any procedure on a machine unless you have
received the appropriate training or read the instruction books.
To avoid the risk of RSI (Repetitive Strain Injury), place the machine on a surface which
is ergonomically satisfactory to the user. Take frequent breaks during prolonged usage.
ZQ375 Checkweigher User Instructions 11
Page 12

General information and warnings
1.6 Sharp objects
We do not recommend the use of sharp objects such as knives or screwdrivers to
operate the keys. This may shorten the life span of the keys.
1.7 FCC and EMC declarations of compliance
United States
This equipment has been tested and found to comply with the limits for a Class A digital device, pursuant to Part 15 of the FCC Rules.
These limits are designed to provide reasonable protection against harmful interference when the equipment is operated in a
commercial environment. This equipment generates, uses, and can radiate radio frequency energy and, if not installed and used in
accordance with the instruction manual, may cause harmful interference to radio communications. Operation of this equipment in a
residential area is likely to cause harmful interference in which case the user will be required to correct the interference at his own
expense.
Canada
This digital apparatus does not exceed the Class A limits for radio noise emissions from digital apparatus set out in the Radio
Interference Regulations of the Canadian Department of Communications.
Le présent appareil numérique n’émet pas de bruits radioélectriques dépassant les limites applicables aux appareils numériques de
la Classe A prescrites dans le Règlement sur le brouillage radioélectrique edicté par le ministère des Communications du Canada.
European Countries
WARNING: This is a Class A product. In a domestic environment, this product may cause radio interference in which the user may be
required to take adequate measures.
12 ZQ375 Checkweigher User Instructions
Page 13
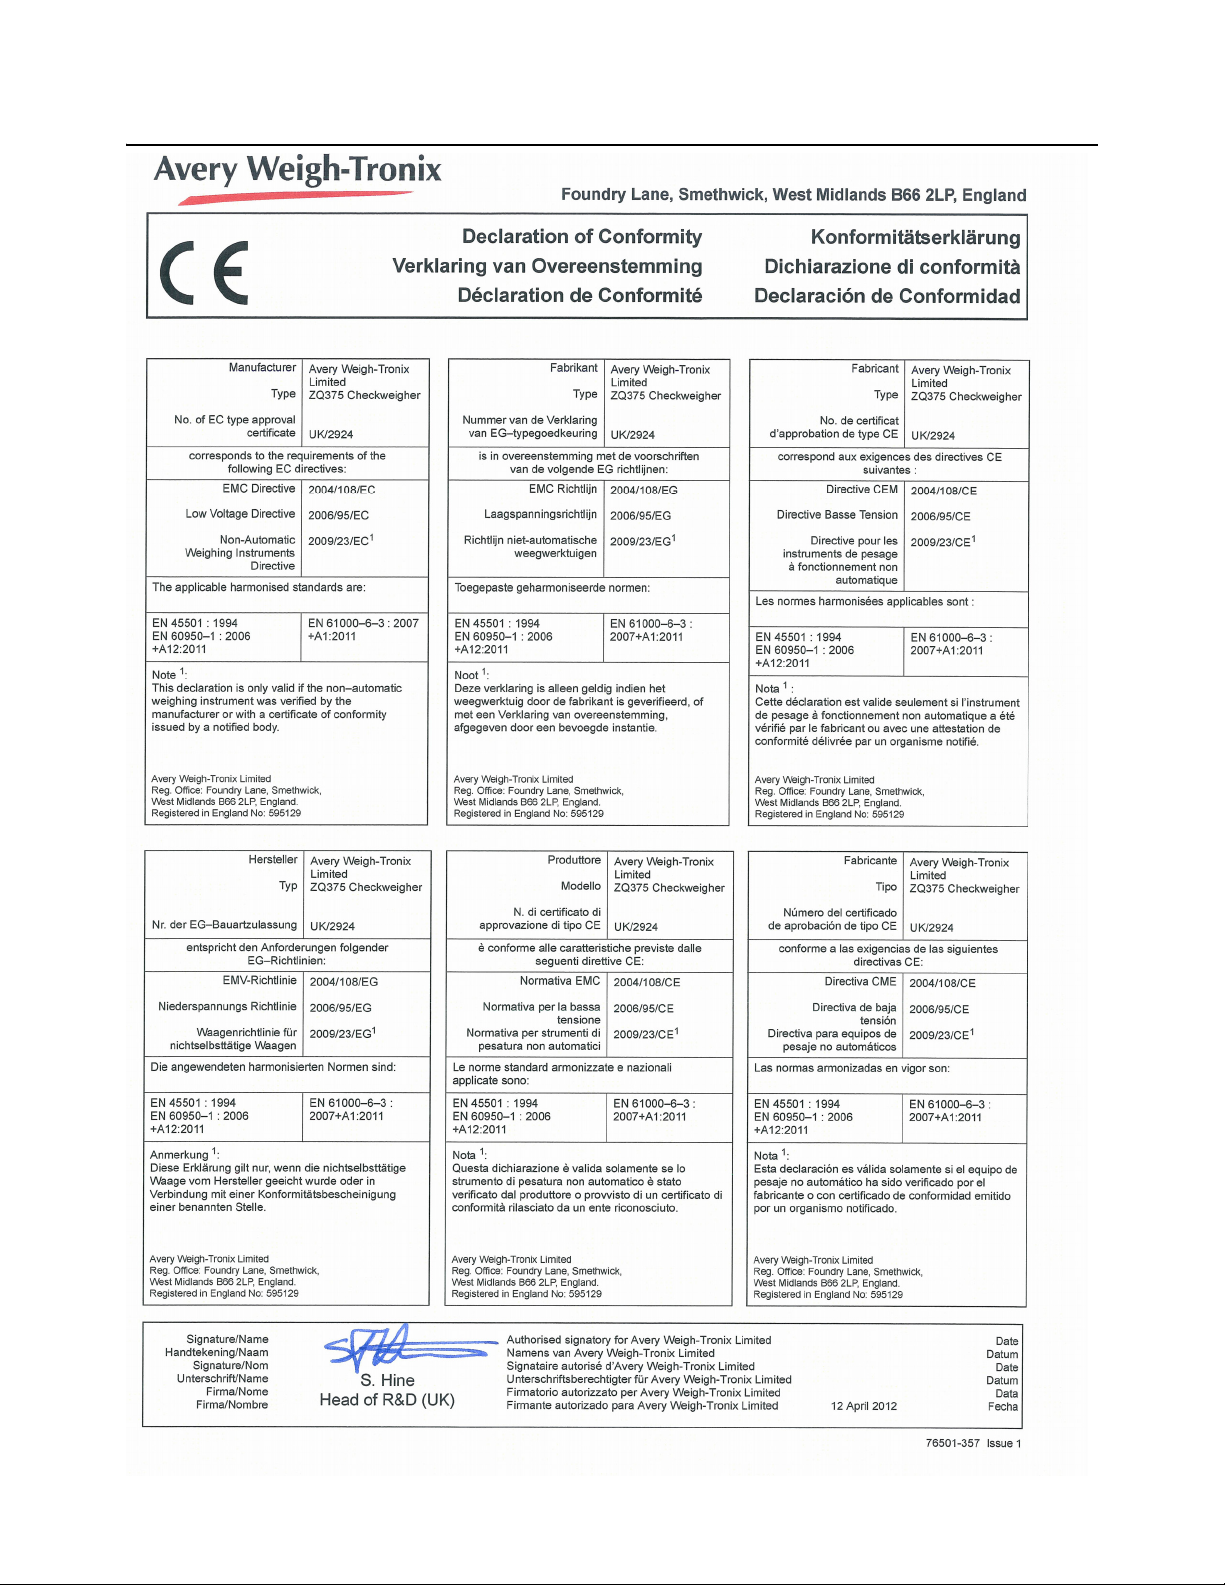
1.8 Declaration of Conformity
1.8 Declaration of Conformity
ZQ375 Checkweigher User Instructions 13
Page 14

Introduction
2 Introduction
This manual covers operation of the ZQ375 Checkweigher from Avery Weigh-Tronix.
The checkweigher consists of a bench scale, an attached column and the ZQ375
Checkweigher head or indicator.
The ZQ375 Checkweigher is a reliable, easy to operate, high speed weighing scale,
designed to allow entry of a target weight, along with selected over and under weight
limits for the rapid processing of items that must be checked for conformity to a precise
weight range. It offers a range of standard statistical packages to allow precise
monitoring of any pack run. The data received enables the operation to be fine-tuned
to maximise performance and profitability.
It may be used in stand-alone or interfaced applications. The ZQ375 incorporates serial
multi-scale communications capabilities. The scale is housed in a watertight enclosure
to permit use in wet environments and can be washed down as necessary to meet
sanitary requirements.
This scale has been calibrated and inspected for mechanical and electronic integrity
prior to shipment. It should be free of defects and in perfect operating condition upon
receipt. To confirm this, the scale should be inspected immediately for any physical
damage incurred in transit. If the scale is damaged, contact your local Avery Weigh-
Tronix supplier.
2.1 Initial setup
Unpack the unit and place the it on a stable, non-vibrating, level surface. Feet can be
adjusted to level the scale by loosening the locking sleeve and rotating the foot in or
out until the base becomes level. Use the bubble level located between the scale and
the column.
Once level, tighten the locking sleeve up against the base to completely cover the feet’s
threads and to keep the feet from turning. See Figure 2.1.
Figure 2.1 Locking sleeve shown in unlocked and locked position
Plug the unit into an easily accessible, grounded power receptacle. See General
information and warnings on page 7 for a complete list of precautions concerning the
electrical safety of this product and for cleaning procedures.
14 ZQ375 Checkweigher User Instructions
Page 15

2.2 Front panel
ZQ375
GROSS
NET
TARE
COUNT
PRINT
SP1 SP2 SP3
%
PT
oz
g
kg
lb
TAR E SELECT
ZERO PRINT
UNITS
F1
ESC
OVERTAR GETUNDER
ID
TAR E
SELECT
PRINT
ZERO
UNITS
The front panel, shown in Figure 2.2, consists of the keys and the display.
2.2 Front panel
Figure 2.2 ZQ375 front panel
Never press a key with anything but your finger. Damage to the overlay may result if
sharp or rough objects are used.
The function of the keys on the front panel are listed below.
Weigh / Checkweigh mode - In weigh mode the TARE key will work as configured
via the Admin menu.(See the Service manual). In checkweigh mode, the TARE key
does not function and the display will show cAnt.
Menu navigation - Acts as an up arrow key.
Numeric / Tolerance Entry - Increments a value.
Weigh / Checkweigh mode - Press this key to change from weighing mode to
checkweighing mode and vice versa.
Menu navigation - Acts as a Down Arrow key.
Numeric / Tolerance Entry - Decrements a value.
Weigh / Checkweigh mode - Press to perform a print function.
Menu navigation - Functions as the Left Arrow key.
Numeric / Tolerance Entry - Functions as a backspace.
Weigh / Checkweigh mode - Press to zero the weight display.
Menu navigation - Functions as an Enter key to accept displayed choices.
Numeric / Tolerance Entry - Functions as an Enter key.
Weigh / Checkweigh mode - Press UNITS to cycle the displayed unit of measure
through all the available units of measure.
Menu navigation - Functions as the Right Arrow key.
Numeric / Tolerance Entry - Moves the cursor position to the right in the Numeric
Entry Procedure.
ZQ375 Checkweigher User Instructions 15
Page 16
Introduction
UNDER
TAR GET
OVER
ID
F1
Weigh / Checkweigh mode - Press UNDER to briefly display the active under
value. Press and hold UNDER to add or modify an existing under value tolerance.
Menu navigation - N/A
Numeric / Tolerance Entry - N/A
Weigh / Checkweigh mode - TARGET key acquires a target value, when
applicable. Its function changes in different applications. See the appropriate
application section.
Menu navigation - N/A
Numeric / Tolerance Entry - N/A
Weigh / Checkweigh mode - Press OVER to briefly display the active over value.
Press and hold OVER to add or modify an existing over value tolerance.
Menu navigation - N/A
Numeric / Tolerance Entry - N/A
Weigh / Checkweigh mode - Press the ID key briefly to view the active ID number.
Press and hold the ID key to view a prompt for ID number entry. Use the Numeric
Entry Procedure on page 18 to scroll in a new ID.
Menu navigation - N/A
Numeric / Tolerance Entry - N/A
Weigh / Checkweigh mode - Press to access PLU database, if enabled.
Press and hold to access the menu password display.
Menu navigation - Press to escape a screen without doing anything and move up
in the menu.
Numeric / Tolerance Entry - Press to escape a screen without doing anything and
move up in the menu.
EU trade regulations state a scale is not allowed to display more than 20 divisions
below gross zero. Any weight below this allowable limit will cause the display to show
under bars (_ _ _ _).
When a tare is active, EU trade regulations do not allow the scale to be zeroed. If the
scale displays under bars with no weight on the scale and the ZERO key will not rezero the scale, this could mean the zero was changed prior to setting a tare.
To clear this, press and hold the TA R E key until CLEAr is displayed and then press
the ZERO key. The scale should now display gross zero.
16 ZQ375 Checkweigher User Instructions
Page 17
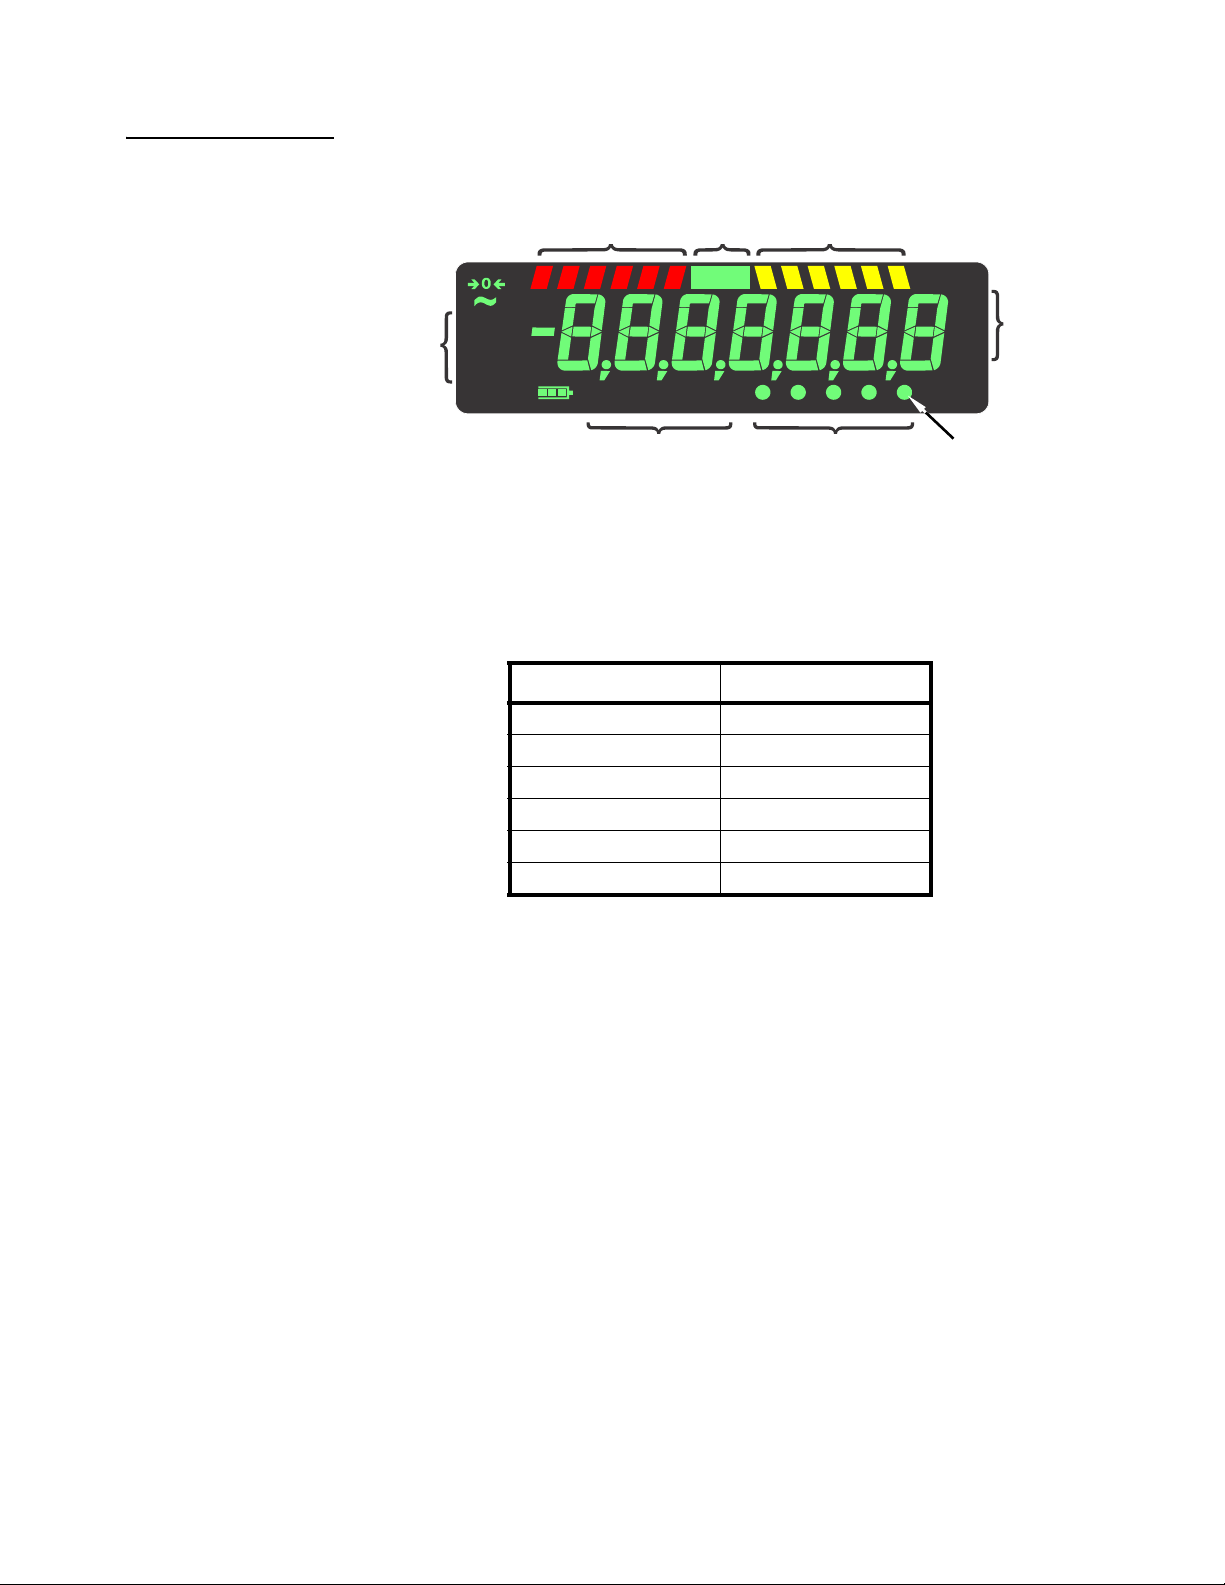
2.2.1 Annunciators
GROSS
NET
TARE
COUNT
PRINT
SP1 SP2 SP3
%
PT
oz
g
kg
lb
Target
segment
Over
segments
Under
segments
Units of
measure
See Table 2.1Setpoints
Battery
level
Active
Display
Stable
Center
of Zero
Print
Preset tare
Percent
Transaction
counter
The annunciators on the display are shown and labeled in Figure 2.3.
These annunciators will light during operation to inform the user of the weighing mode,
active unit of measure, etc.
2.2 Front panel
Figure 2.3 Annunciators
Table 2.1 Circle Annunciator assignments
Annunciator Indicates
Circle 1 (left most) Network activity
Circle 2 Custom unit
Circle 5 Transaction counter
Gross + Circle 5 Gross total
Net + Circle 5 Net total
Tare + Circle 5 Transaction total
ZQ375 Checkweigher User Instructions 17
Page 18
Introduction
TARE /
-
SELECT /
-
These segments flash in tolerance entry mode
Press to increment right most digit by 1.
Press and hold to rapidly increase the value,
first by 10s and then by 100s
Press to decrement right most digit by 1.
Press and hold to rapidly decrease the value,
first by 10s and then by 100s
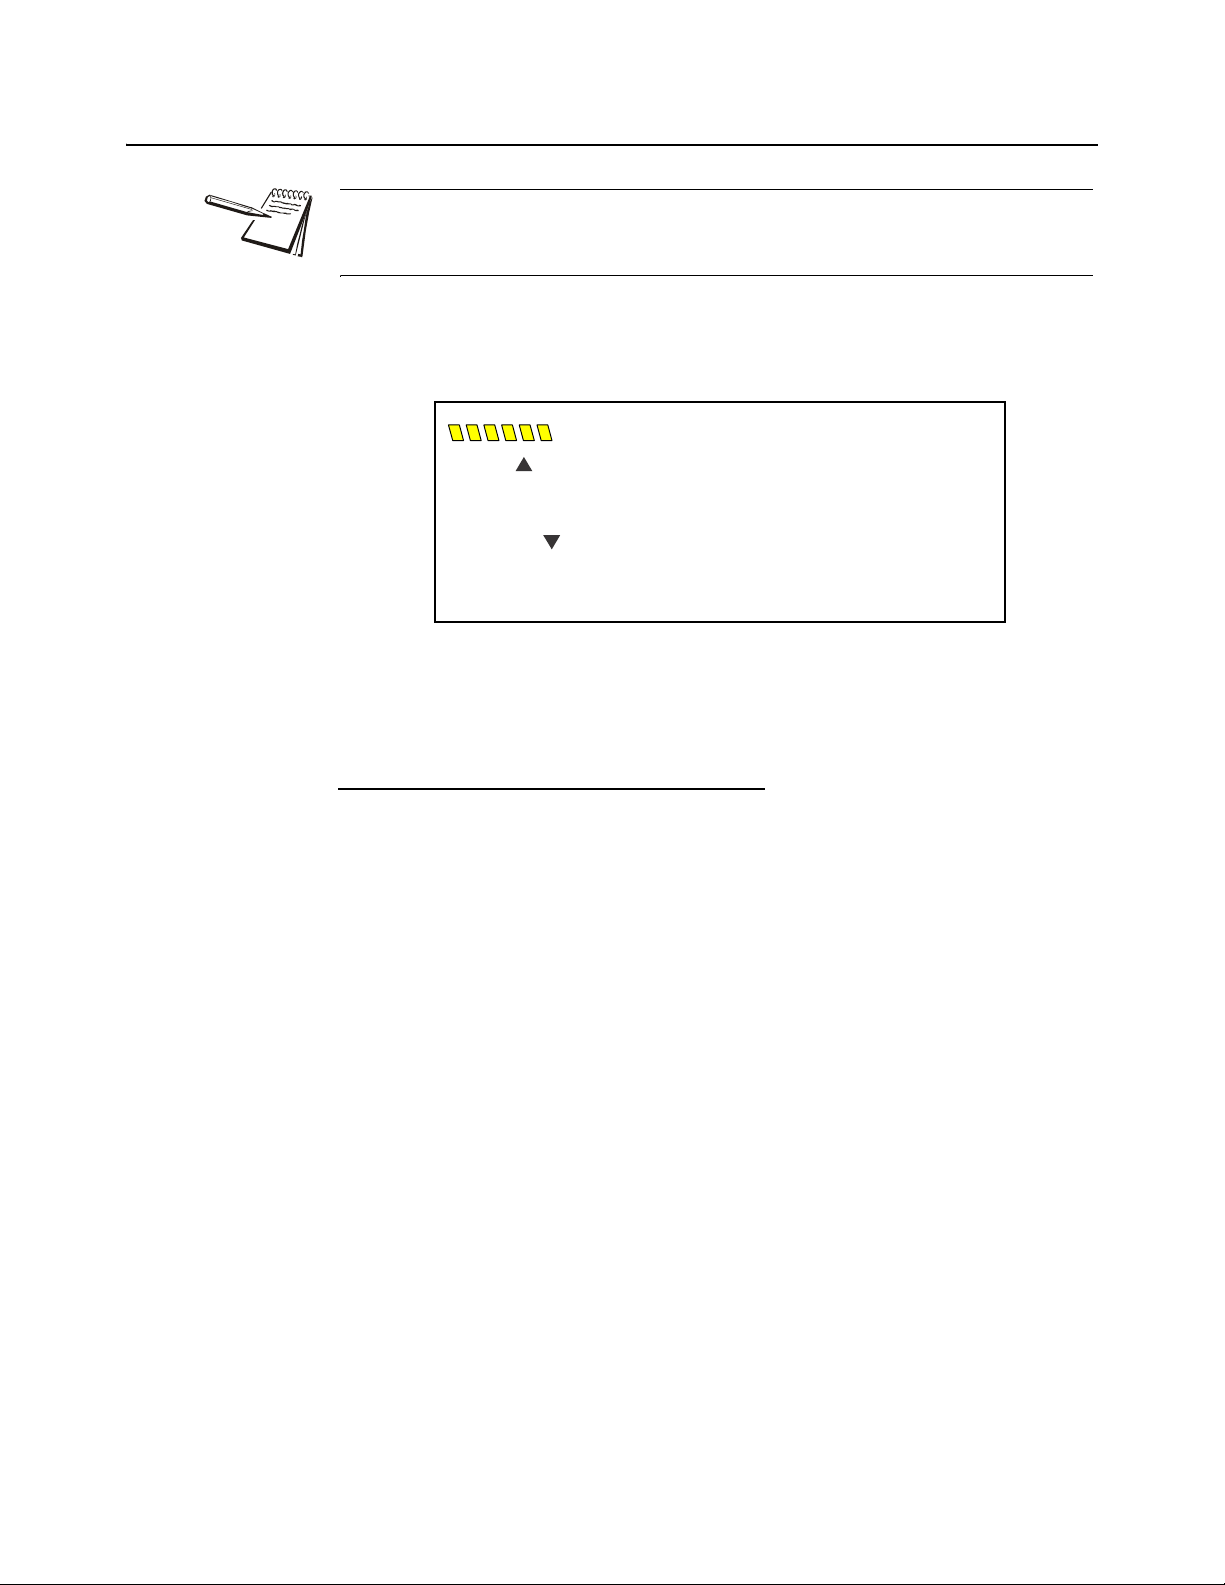
2.3 Tolerance entry procedure
If you are in a target or tolerance value entry screen and no key is pressed within five
seconds, the scale will act as if the F1/Escape key was pressed and return to the
previous screen without saving any information.
When you are in a tolerance entry screen the yellow OVER segments flash as a
reminder. Figure 2.4 shows the key functions when in this mode.
Figure 2.4 Key functions in tolerance entry
In tolerance entry screens, the segments shown in Figure 2.4 flash. Use the keys, as
described in Figure 2.4, to enter a value on the display. Following is an example:
Example: To increase a value of 0.002 to 0.125:
Press and hold TAR E() key until the number approaches 0.125. Number will increase
by 0.010s for a short time and then by 0.100s.
Press and release TAR E() to increment the right most digit by 1.
If you overshoot, press and release SELECT() to decrement the right most digit by 1.
Press and hold SELECT() to decrease the value by 0.010s and then by 0.100s, the
longer you hold it.
When the display show 0.125, or the value you desire, press the ZERO key to enter or
accept the value. The screen returns to the previous mode.
18 ZQ375 Checkweigher User Instructions
Page 19

2.4 Numeric entry procedure
TARE /
-
SELECT /
-
PRINT /
-
UNITS /
-
ZERO /
-
F1 /
ESC -
These segments flash in numeric entry mode
Press to increment the flashing number
Press to decrement the flashing number
Press to backspace cursor in a number
Press to advance cursor in a number
Press to accept a value
Press to escape an entry screen
The keys in Figure 2.5 have alternate functions in numeric entry screens.
Figure 2.5 Key function during numeric entry
Use the keys, as described in Figure 2.5, to enter a value on the display. Following is
an example:
Example: To key in the number 507:
2.4 Numeric entry procedure
Repeatedly press the TARE() or SELECT() key until 5 appears on the display.
Press the UNITS() key once to move cursor one space to the right.
Repeatedly press the TARE() or SELECT() key until 0 appears on the display.
Press the UNITS() key once to move cursor one space to the right.
Repeatedly press the TARE() or SELECT() key until 7 appears on the display.
Press the ZERO key to enter or accept the value.
Press the PRINT() key to move the entry function one digit to the left. This effectively
deletes the current value in that position and allows you to enter a new value in that
position.
2.5 ID Entry Procedure
1. To enter an ID number, press and hold the ID key …
The current ID number is displayed with the digit or digits flashing.
2. Within five seconds begin to use the Numeric entry procedure on page 19 to
scroll in a new ID and press ZERO to accept.
3. The new ID number is now active.
If the entry screen times out and disappears, repeat step 1 and try again. You must
start the number entry procedure within five seconds.
ZQ375 Checkweigher User Instructions 19
Page 20
Introduction
2.6 Powering up the ZQ375
Power is always on as long as the power cable is plugged into the appropriate electrical
outlet. Power can be supplied by:
l AC power cord connected to a properly grounded outlet (100 VAC - 240
VAC, 50 or 60 Hz)
l AC to DC power converter. (12 to 36 VDC)
l Optional ZQ-BAT rechargeable battery
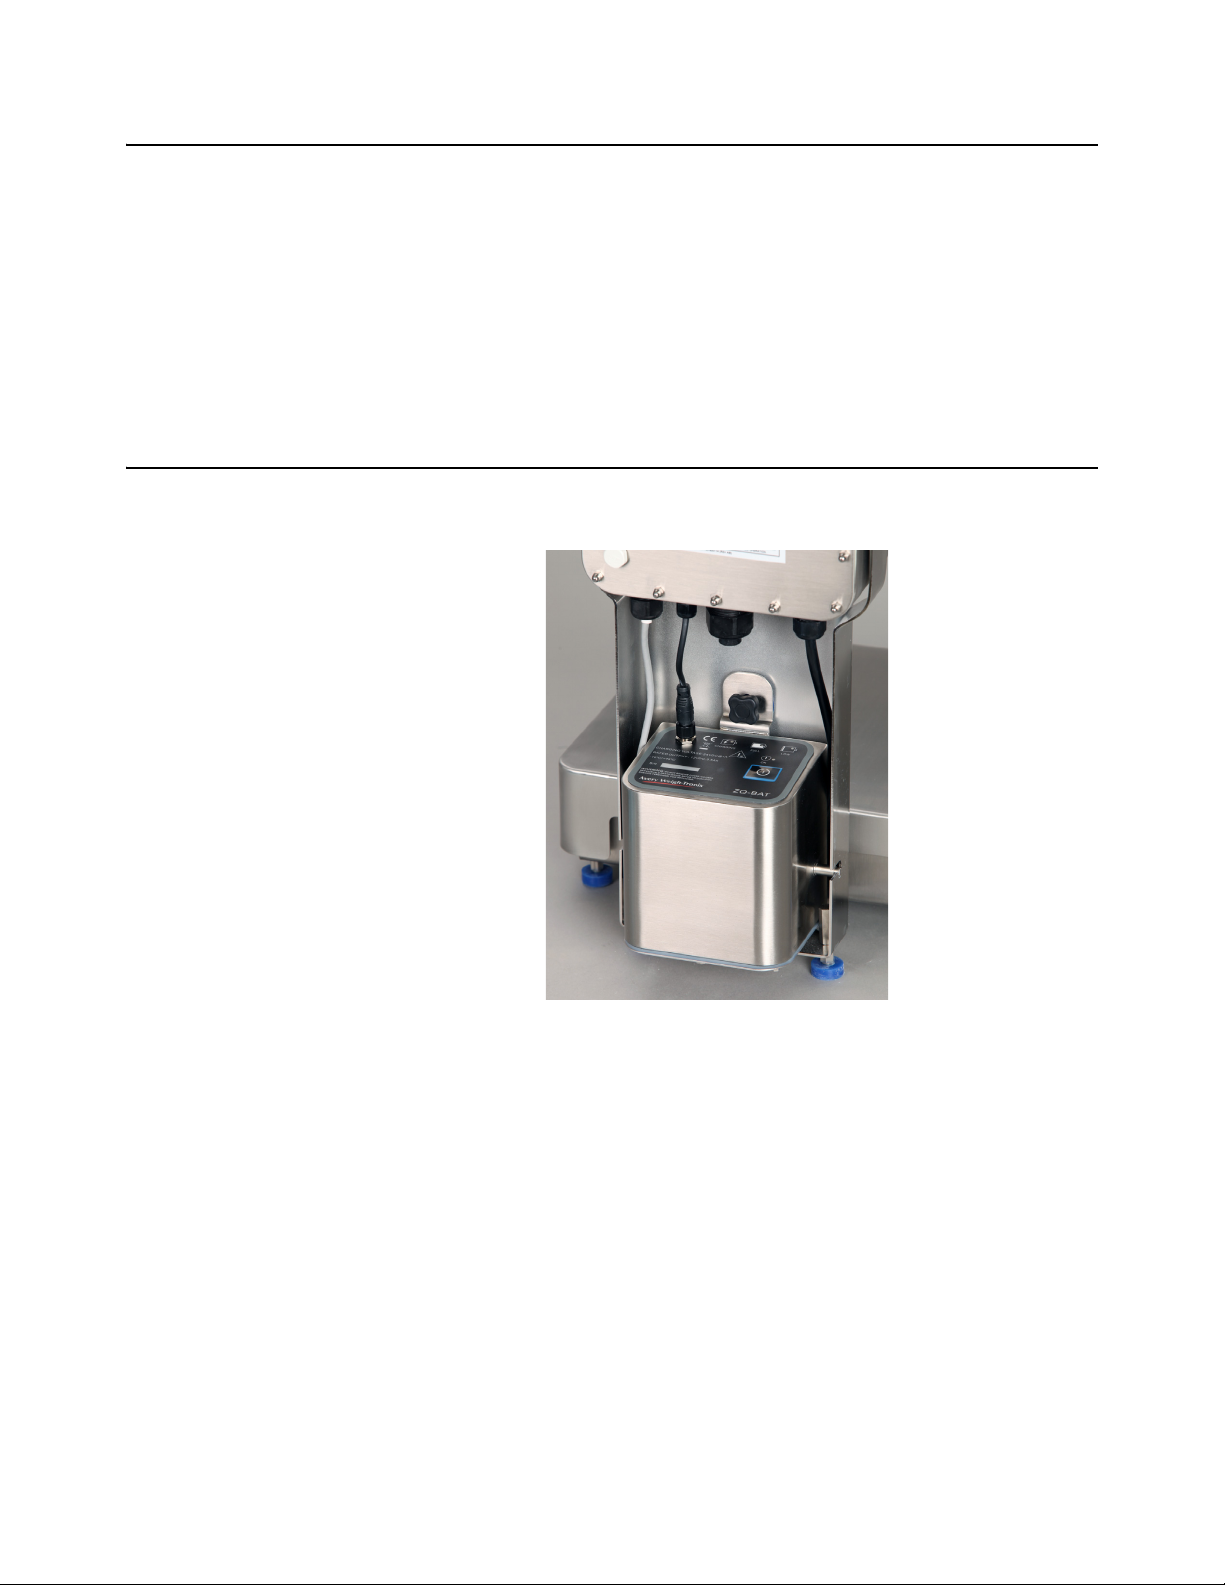
2.7 Battery option
The ZQ375 can be operated on battery power by the ZQ-BAT battery option. See
Figure 2.6.
Figure 2.6 ZQ-BAT battery option installed in the column
20 ZQ375 Checkweigher User Instructions
Page 21
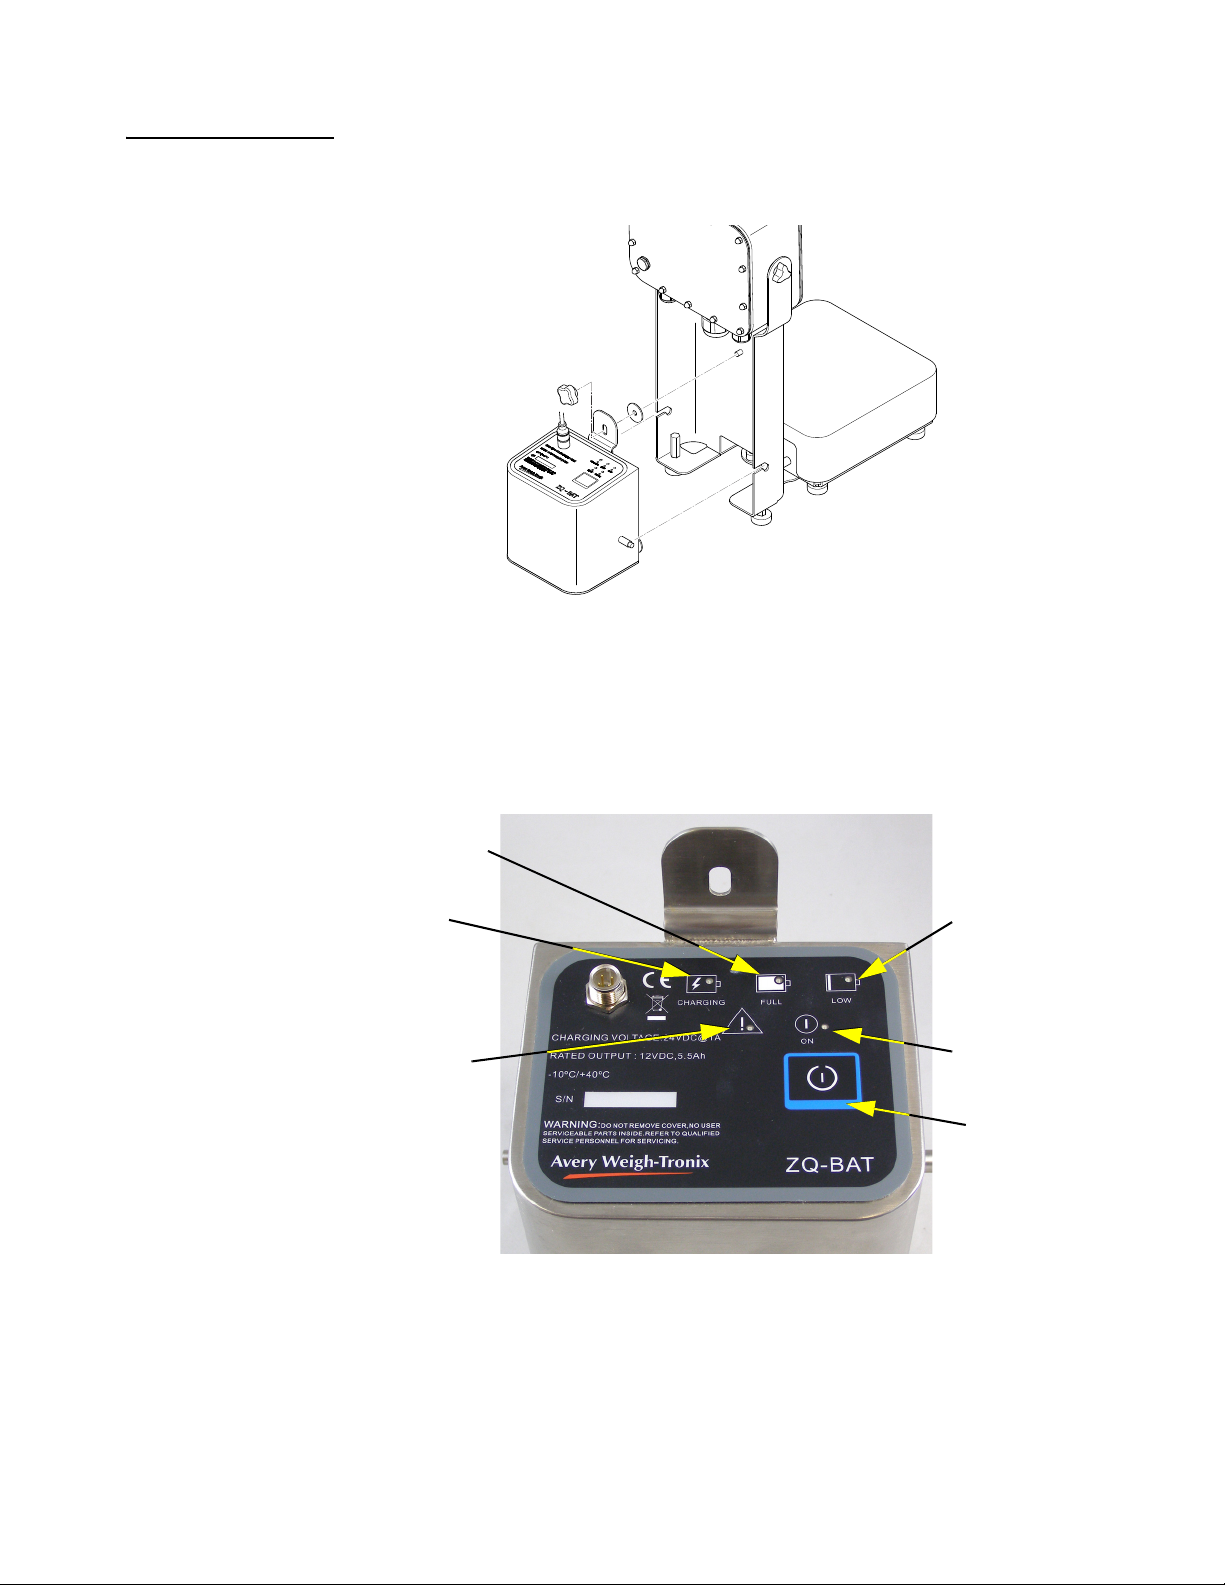
2.7.1 Installation
Battery Full
LED
Battery
Charging
LED
Battery
Fault LED
Battery
ON LED
Battery
Low LED
ON/OFF
Key
The battery pack is easy to install. The projections on the side of the pack slide into the
slots in the column. The tab on the top of the pack goes over the threaded stud on the
column and the pack is secured in place with the star knob. See Figure 2.7.
2.7 Battery option
Figure 2.7 ZQ-BAT installation
Attach the battery cable from the indicator to the connector on the top of the battery.
The battery has five annunciator lights to tell you when the unit is charging, when the
battery level is low or high, when there is a fault in the battery and when the battery is
on or off. Below these lights is the ON/OFF button. See Figure 2.8.
Figure 2.8 Top of ZQ-BAT battery pack
ZQ375 Checkweigher User Instructions 21
Page 22

Introduction
2.7.2 Proper charging of the ZQ-BAT
Charging the battery pack using the supplied wall charger
1. Turn the battery pack ON.
2. Plug the charger into an outlet, then connect it to the battery.
The LOW and FAULT indicators may turn on if the battery pack is not
switched on.
3. Once connected to the charger, the CHARGING indicator will blink green to
indicate the battery is in a slow charge state.
4. After 75 seconds the charger will automatically switch to its fast charge state,
and the indicator will stay solid green.
5. Once the battery is fully charged, the CHARGING indicator will shut off and the
FULL indicator will turn green.
6. Disconnect the battery from the charger and turn the battery pack OFF.
Frequent charging of a battery that is not in a low state will decrease the battery life
span.
22 ZQ375 Checkweigher User Instructions
Page 23
2.7 Battery option
ON
Charging the battery pack through a ZQ375 indicator:
1. Connect the battery pack to a ZQ375 indicator and turn the battery pack ON.
2. Plug the indicator power cord into an outlet
The LOW and FAULT indicators may turn on if the battery pack is not
switched on.
3. The CHARGING indicator will blink green to indicate the battery is in a slow
pre-charge state.
4. After 75 seconds the charger will automatically switch to its fast charge state,
and the indicator will stay solid green.
5. Once the battery is fully charged, the CHARGING indicator will shut off and the
FULL indicator will turn green. At this point the indicator will stop the charging
sequence and simply maintain the voltage of the battery until it is needed. This
prevents the battery from being overcharged, allowing it to be left either ON or
OFF without damage.
6. The battery can now be used to power your ZQ indicator and scale system.
Battery life is rated at 16 hours continuous duty.
If so configured, the checkweigher will automatically switch off the battery after a set
amount of time if no scale motion or keypad activity occurs.
WARNING: Ensure the battery is fully charged before its first use.
Begin recharging the battery pack as soon as possible after the LOW indicator
LED comes on. Discharging the battery too far beyond this point may damage
the battery.
2.7.3 Battery states indicated by LEDs
Table 2.2 Battery Power States
LED Status
Battery Power
State
Powered ON ON The battery must be powered on to power an indicator and to be recharged
Powered OFF OFF The battery can be powered off to conserve charge when not in use
Power
Notes
ZQ375 Checkweigher User Instructions 23
Page 24

Introduction
LOW
CHARGING
FULL
Table 2.3 Battery Voltage States
LED Status
Battery
Voltage
LOW Fault
Notes
States
Above 9.3V OFF OFF The battery can be used to power an indicator
Below 9.3V ON OFF The battery should be recharged as soon as possible
Fault ON FLASHING A charger has been connected without the battery being powered on
Table 2.4 Battery Charging States
LED Status
Battery
Charging States
Charging Full Fault
Notes
Pre-Charge FLASHING OFF OFF The battery is slowly charged for 75 seconds
Fast Charge ON OFF OFF
Fully Charged
(Wall Charger)
OFF ON OFF
Maintenance
Charging
OFF ON OFF
(QZ375)
No faults were found so the battery is now charged
quickly
The unit is fully charged and should be disconnected
from the power supply
The unit is fully charged and the indicator is simply
maintaining the correct voltage
Over Temp - Battery is hot and needs to cool before
Waiting OFF OFF FLASHING
charging continues
No Power - The battery circuit has not been turned on
Battery is above the allowed voltage
Charging
Failure
OFF OFF ON
Battery has been discharged below 5V
Other failure
2.7.4 Checkweigher Operation on Battery Power
1. To operate the checkweigher using the battery pack, be sure the pack is fully
charged and connected to the checkweigher. Press the ON/OFF key on the
battery pack …
The Battery ON LED will light.
2. The ZQ375 should power up as soon as the battery is turned on.
3. To power down the battery and the ZQ375, press the ON/OFF key …
The Battery ON LED light will go out and the ZQ375 will power down.
24 ZQ375 Checkweigher User Instructions
Page 25
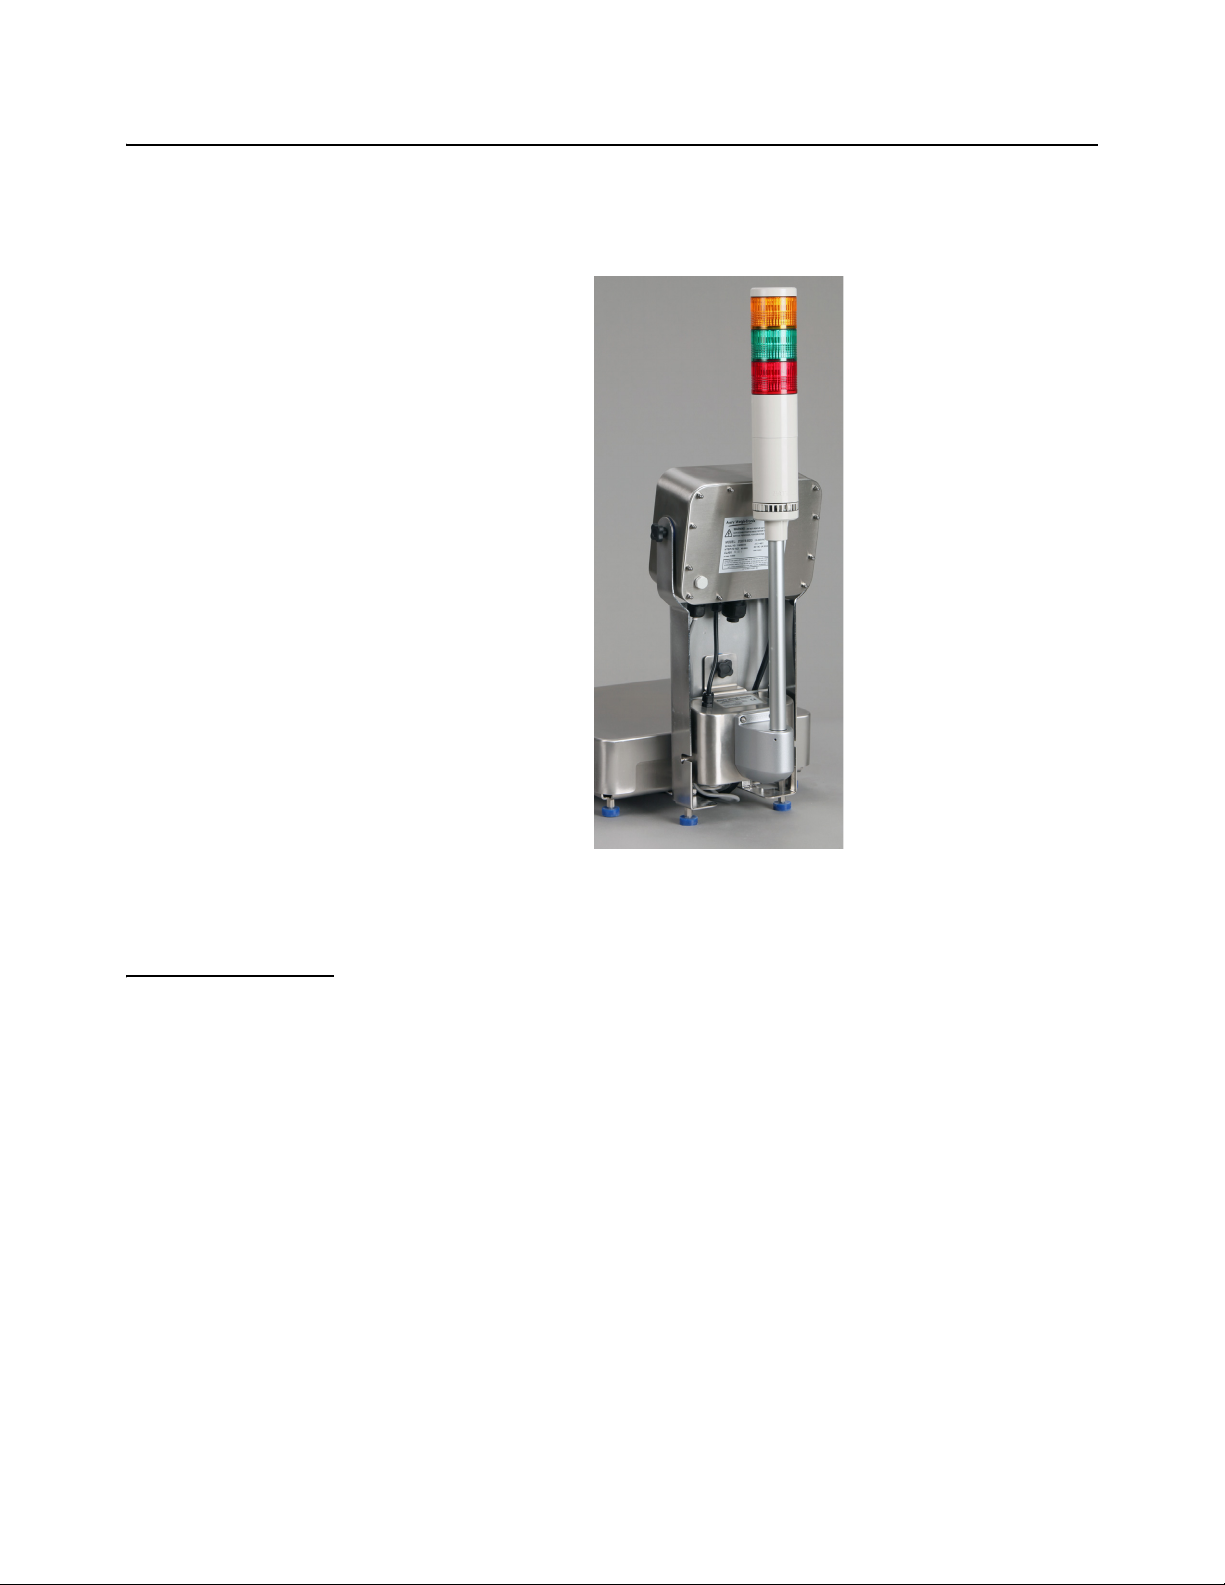
2.8 Light stack option
The ZQ375 has an optional light stack for a bright, visual sign that an object on the
scale is over, under or at the acceptable target weight. The unit, shown installed in
Figure 2.9, attaches to the column in exactly the same was as the battery pack and
connection is also made with a simple screw-in connector.
2.8 Light stack option
2.8.1 Light stack operation
The lights function the same way as the bargraph, showing red for under, orange for
over and green for accept conditions.
Figure 2.9 Light stack option
ZQ375 Checkweigher User Instructions 25
Page 26

Checkweighing applications
3 Checkweighing applications
The ZQ375 has five applications for different levels of checkweighing and specialty
checkweighing.
Sim375 Simple, quick checkweighing application. Fast and simple to set up.
Displays a ± deviation reading from the target weight set within the scale.
See Sim375 application on page 31.
Mid375 Mid-level checkweighing. This application uses weigh mode versus
deviation mode. It is fast and simple to set up and displays target weight in
gross or net weight. Target weight is setup by either the TARGET key or
entered through the indicator keypad. See Mid375 application on page 33.
Adv375 Advanced checkweighing. This is like Mid375 but adds a Product Look Up
(PLU) database. This allows you to quickly activate target weights and high
and low tolerances for up to 500 products from the PLU database.
Statistical packages like X-bar/R and Standard Deviation are also included
in this application. See Adv375 application on page 38.
Per375 Percent checkweighing allows the operator to accurately increase the
weight of a product by a set percentage of the starting weight. See Per375
application on page 43.
Grad375 This application categorizes weight within up to 10 bands or weight
windows. See Grad375 application on page 46.
Applications are enabled in a password protected menu. See the Service manual (PN
AWT35-500813 for the English version).
3.1 Checkweighing terminology
There are some terms you should understand when checkweighing.
Target The exact weight desired
Target-Hi Target weight plus the Tolerance-Hi
Target-Low Target weight minus the Tolerance-Low
Tolerance-Low Weight allowed under the target weight but still considered
acceptable
Tolerance-Hi Weight allowed over the target weight but still considered
acceptable
Sample Adds “Toler-Hi” and subtracts “Toler-Lo” from target weight for
over/accept/under ranges.
Example: Toler-Hi = 1.0 Toler-Lo = 2.0 Target = 4.0
“Target” – “Toler-Lo” = “Lower Acceptable Target Limit” or (4-2=2)
Therefore all weights below 2 are considered under weight.
“Target” + “Toler-Hi” = “Upper Acceptable Target Limit” or (4+1=5)
Therefore all weights above 5 are considered over weight.
This would mean all weights above 2 and below 5 would be
acceptable as being within target sample tolerances.
26 ZQ375 Checkweigher User Instructions
Page 27

3.1 Checkweighing terminology
Limits Any weight above “Targ-Lo” and below “Targ-Hi” is acceptable as
being within target limits.
Example: Targ-Hi = 6.0 Targ-Lo = 2.0
All weights below 2 are considered under the target weight.
All weights above 6 are considered over the target weight.
Halfway between the upper and lower target value limits is the
value 4, This is the calculated target value.
This would mean all weights above 2 and below 6 would be
acceptable as being within the target limits.
ZQ375 Checkweigher User Instructions 27
Page 28

Checkweighing applications
3.2 Normal weighing procedures
The Sim375, Mid375 and Adv375 applications allow normal weighing using gross and
net weighing. Below are the steps for the normal weighing practices.
3.2.1 Gross weighing
If enabled, press UNITS to change the unit of measure.
To perform gross weighing, power up the unit and follow these steps:
1. Press the SELECT key if the GROSS annunciator is not lit …
The GROSS annunciator lights and the scale is in gross weighing mode.
2. Empty the scale and press ZERO to zero the display …
0 is displayed and the center-of-zero annunciator lights.
3. Place item to be weighed on the scale …
4. Repeat steps 1 through 3.
3.2.2 Tare/Net weighing
In the Sim375 application, the tare functionality is not available
There are two kinds of tare entry. These are enabled when the indicator is configured.
l Pushbutton tare
l Preset tare
If Preset Tare is enabled, Pushbutton Tare is automatically disabled.
Weight is displayed.
There is also a function called auto tare clear. If this is enabled, after a weighment,
when the weight falls into the gross zero band and is steady, any tare is removed from
the indicator. No tare remains active between weighments.
The two types of tare are explained below.
28 ZQ375 Checkweigher User Instructions
Page 29

3.2 Normal weighing procedures
Using Pushbutton Tare (if enabled)
To perform a net weighment using pushbutton tare, power up the unit and follow these
steps:
1. Empty the scale and press ZERO …
0 is displayed and the center-of-zero annunciator lights.
2. Place item to be tared on the scale …
Weight is displayed.
3. Press TAR E …
0 is displayed and the NET annunciator lights.
To clear a tare weight, remove all weight from the scale and press TA R E .
4. Place material to be weighed on the scale …
Net weight of material is displayed.
5. Repeatedly press SELECT to view the gross, tare, and net values.
6. Remove all weight from the scale.
7. To repeat weighing the net weight, place a container of the same weight on the
scale and then the material to be weighed …
Net weight of material is displayed.
8. To remove the tare, remove all weight from the scale. With 0 displayed, press
TARE.
The tare is cleared and the scale is in gross weigh mode.
Using Preset Tare (if enabled)
Preset tares are entered in a password protected menu. Check with your supervisor on
this Mid375 and Adv375 feature. There can be up to 10 tare registers numbered 1-10.
To perform a net weighment using one of the preset tares, power up the unit, go to
normal gross weighing mode and follow these steps:
1. Empty the scale and press ZERO …
0 is displayed and the center-of-zero annunciator lights.
2. Press TARE …
Tare register number entry screen appears.
3. Use the Numeric entry procedure on page 19 and key in the preset tare register
number and press ZERO …
-X is displayed and the NET annunciator lights. X is the recalled tare
value.
ZQ375 Checkweigher User Instructions 29
Page 30

Checkweighing applications
4. Place the container or object (equal to tare value) to be tared and material to
be weighed on the scale …
Net weight of material is displayed.
5. Repeatedly press SELECT to view the gross, tare, and net values.
6. Remove all weight from the scale …
-X is displayed.
7. Repeat steps 4 - 6 until you are finished using that tare weight.
30 ZQ375 Checkweigher User Instructions
Page 31

3.3 Sim375 application
This section applies if the Sim375 application is enabled. See the Service manual for
information on enabling the applications.
The SIM375 application is a fast and efficient checkweighing application that displays
the ± deviation from a target point set by the operator.
Using Pushbutton or Preset Tare is not available in the SIM375 application
3.3.1 Checkweighing
Switching Between Checkweighing and Normal Weighing Mode
To switch between checkweighing and normal weighing mode, press SELECT. When
the GROSS annunciator is displayed, the unit is in normal weighing mode. Press
SELECT again and the GROSS annunciator disappears. The unit is now in
checkweighing mode. The display may show a negative weight and the Under
segments of the bargraph may be lit if there is an active target value.
3.3 Sim375 application
Setting a New Target Weight and Simple Checkweighing
1. With the unit in Checkweighing mode, press ZERO to zero the scale and place
an item of the correct weight on the scale and press TAR G ET …
The scale will read 0 weight and the center Accept segment will light
showing the target weight has been set successfully.
If motion is present for greater than 2-3 seconds after the TARGET key press, the
target operation will be aborted and the word cant will be displayed briefly.
2. Clear the scale and place the next item on the scale …
The bargraph will show the item is under the target weight, over the
target weight or on target.
By default the Target segment lights if the weight is within ± the high and low
tolerance of the target weight. The over and under segments each represent 1
division.
3. Repeat step 2 for all the other items to be weighed.
ZQ375 Checkweigher User Instructions 31
Page 32

Checkweighing applications
View the High and Low Tolerances
1. To view the high tolerance, press and hold OVER …
toL-hi (high tolerance) is briefly displayed, then the value for this high
tolerance is briefly displayed before the normal checkweighing mode
returns.
2. To view the low tolerance, press and hold UNDER …
toL-Lo (low tolerance) is briefly displayed then the value for this low
tolerance is briefly displayed before the normal checkweighing mode
returns.
Set New High and Low Tolerances
You can escape from an entry screen or choice level. Press F1 and the action is
aborted and the display returns to its previous state.
To set custom tolerances follow these steps:
1. Press UNDER to set the low tolerance …
x.xxx is displayed. This is the current low tolerance. The Under
segments also flash.
2. Refer to the Tolerance entry procedure on page 18 and key in a new tolerance
and press ZERO to accept …
Display returns to checkweighing mode with the new low tolerance
active.
3. Press OVER to set the high tolerance …
x.xxx is displayed. This is the current high tolerance. The Over
segments also flash.
4. Refer to the Tolerance entry procedure on page 18 and key in a new tolerance
and press ZERO to accept …
Display returns to checkweighing mode with the new high tolerance
active.
The tolerances can be set from 1 division to the capacity of the scale.
32 ZQ375 Checkweigher User Instructions
Page 33

3.4 Mid375 application
Tar ge t
Target + Tol-Hi
By default Tol-Lo and
Tol-Hi are 1 division
This section applies if the Mid375 application is enabled. See the Service manual for
information on enabling the applications.
In the Mid375 application the checkweigher mode is always active and the target
weight is always displayed in either gross or net weight. Unlike the Sim375 application
that only displays the deviation from target, the Mid375 application displays the weight.
3.4.1 SELECT key operation
In the Mid375 application, press SELECT to cycle through the active display values:
GROSS, NET, TARE and TRANSACTION COUNT. The appropriate annunciator will
light for each display value. (The transaction count annunciator is the green circle
under the right digit on the display.)
3.4.2 Checkweighing
To start checkweighing you need to enter a target weight by using live weight or keying
in the value. By default the lower tolerance (Tol-Lo) is -1 division and the high tolerance
(Tol-Hi) is +1 division. These tolerances can be adjusted. These steps are described in
the following sections.
3.4 Mid375 application
The ZQ375 adds Tol-Hi and subtracts Tol-Lo from the target weight for over/accept/
under ranges.
Example: Tol-Hi = 0.1
Tol-Lo = 0.2
Target = 4.0
Target – Tol-Lo = Lower Acceptable Target Limit or (4 - 0.2 = 3.8).
Therefore all weights below 3.8 are considered under weight.
Target + Tol-Hi = Upper Acceptable Target Limit or (4 + 0.1 = 4.1).
Therefore all weights above 4.1 are considered over weight.
This would mean all weights above 3.8 and below 4.1 would be acceptable
as being within target sample tolerances.
ZQ375 Checkweigher User Instructions 33
Page 34

Checkweighing applications
3.4.3 Negative checkweighing
Negative checkweighing is functional in the MID375 and ADV375 applications. Follow
these steps:
1. Place a full container on the scale and press TARE.
2. Remove a desired amount of material from the container and press TARGET.
3. Press TARE and start the negative checkweigh process by removing material
until inside the target zone.
Tolerance values work in opposite fashion:
Target + Lo Tolerance = Target Lo
Target – Hi Tolerance = Target Hi
34 ZQ375 Checkweigher User Instructions
Page 35

3.4.4 Sample mode checkweighing
Setting a target weight can be done in two ways:
l Sampling an item of the correct weight
l Entering a known target weight through the front panel
By default in both the quick check and preset target methods, the low tolerance
(toL-Lo) is -1 division and the high tolerance (toL-hi) is + 1 division. These tolerances
can be adjusted. See Set New High and Low Tolerances on page 32.
When inside the Gross Zero Band, press TAR G E T and you can adjust the target
weight using the Tolerance entry procedure on page 18.
Sampling Method
1. Place an item of the correct weight on the scale and press TARGET …
3.4 Mid375 application
The scale will show the target weight and the center Accept segment will
light showing the target weight has been set successfully.
If motion is present for greater than 2-3 seconds after the TARGET key press, the
target operation will be aborted and the word cant will be displayed briefly.
2. Clear the scale and place the next item on the scale …
The bargraph will show the item is under the target weight, over the
target weight or on target.
3. Repeat step 2 for all the other items to be weighed.
Manual Target Weight Entry
1. Empty the scale and press ZERO to zero the scale, then press TARGET …
The current value for target is displayed.
2. Use the Tolerance entry procedure on page 18 to key in a value for target and
press ZERO to accept …
The target weight becomes active.
3. Place an item on the scale …
The weight will be displayed and OVER, UNDER or ACCEPT segments
will light depending on the weight.
4. Clear the scale.
5. Repeat steps 3 and 4.
ZQ375 Checkweigher User Instructions 35
Page 36

Checkweighing applications
View the Target Weight and Upper and Lower Tolerances
1. To view the target weight, press and hold TARGET …
tArGEt is briefly displayed, then the value is briefly displayed before the
normal checkweighing mode returns.
2. To view the upper tolerance, press and hold OVER …
toL-hi or tArGhi (high tolerance) is briefly displayed, then the value is
briefly displayed before the normal checkweighing mode returns.
3. To view the lower tolerance, press and hold UNDER …
toL-Lo or tArGLo (low tolerance) is briefly displayed, then the value is
briefly displayed before the normal checkweighing mode returns.
Set New Upper and Lower Tolerances
You can escape from an entry screen or choice level. Press F1 and the action is
aborted and the display returns to its previous state.
To set custom tolerances follow these steps:
1. Press UNDER to set the lower or under tolerance …
x.xxx is displayed. This is the under tolerance value. The Under
segments also flash.
2. Refer to the Tolerance entry procedure on page 18 and key in a new tolerance.
Press ZERO to accept …
Display returns to checkweighing mode with the new lower tolerance
active.
3. Press OVER to set the upper tolerance …
x.xxx is displayed. This is the over tolerance value. The Over segments
also flash.
4. Refer to the Tolerance entry procedure on page 18 and key in a new tolerance.
Press ZERO to accept …
Display returns to checkweighing mode with the new upper tolerance
active.
The tolerances can be set from 1 division to the capacity of the scale.
36 ZQ375 Checkweigher User Instructions
Page 37

3.4.5 Transaction counter
You can view the number of transactions since the last clearing by pressing the
SELECT key until the transaction count display is shown. The counter is incremented
every time PRINT is pressed. See example in Figure 3.1.
If enabled in a password protected menu, press and hold PRINT to clear the
transaction count.
3.4 Mid375 application
Figure 3.1 Transaction count display
ZQ375 Checkweigher User Instructions 37
Page 38

Checkweighing applications
3.5 Adv375 application
This section applies if the Adv375 application is enabled. See the Service manual for
information on enabling the applications.
3.5.1 SELECT key operation
In the Adv375 application, press SELECT to cycle through the active display values:
GROSS, NET, TARE and TRANSACTION COUNT. The appropriate annunciator will
light for each display value. (The transaction count annunciator is the green circle
under the right digit on the display.)
3.5.2 Checkweighing
The Adv375 application is identical in function to the Mid375 application with the
addition of Product Look Ups (PLUs). PLUs consist of a PLU# (1-500), the lower
tolerance, the target weight and the upper tolerance. These are created and edited in
a password protected menu. See your supervisor for more information.
A short key press of the OVER, UNDER, and TARG E T keys will do nothing if the
active PLU# is from 1 to 500. If the active PLU# = 0, these keys will work like in the
Mid375 application. See Set New Upper and Lower Tolerances on page 36.
If you press and hold the OVER, UNDER, and TARGET keys and the active PLU# = 1
to 500, you will see hi tolerance, target and low tolerance, respectively. If the active
PLU# = 0, then the over, under, target values will be shown, but the values are only
temporary ones since the active PLU#=0. PLU#0 values are not retained during
power down or reboot from menu access.
38 ZQ375 Checkweigher User Instructions
Page 39

3.5 Adv375 application
Setting a New Target Weight and Checkweighing
You can escape from an entry screen or choice level. Press F1 and the action is
aborted and the display returns to its previous state.
When inside the Gross Zero Band, press TAR G E T and you can adjust the target
weight using the Tolerance entry procedure on page 18.
These steps apply only if the active PLU# is 0.
1. In gross weighing mode, press ZERO to zero the scale. Place an item of the
correct weight on the scale and press TARGET …
The scale will read show the weight of the item, the center Accept
segment will light showing the target weight has been set successfully
and the Gross or Net annunciator will be lit.
If motion is present for greater than 2-3 seconds after the TARGET key press, the
target operation will be aborted and the word cant will be displayed briefly.
2. Clear the scale and place the next item on the scale …
The bargraph will show the item is under the target weight, over the
target weight or on target.
3. Repeat step 2 for all the other items to be weighed.
Choosing a PLU and Checkweighing
Over, under and target values for the PLU registers are entered in a password
protected menu. Contact your supervisor for information.
Use these steps when you want to recall a PLU and checkweigh.
1. Press ZERO to zero the scale, then press F1 …
A flashing 0 is displayed prompting you for the PLU # you wish to recall.
2. Use the Numeric entry procedure on page 19 to enter the PLU number and
press ZERO to accept …
The PLU values are recalled. The target, upper and lower tolerances
become active. If that PLU number has no values assigned, the display
will show cAnt.
3. Place an item on the scale …
The scale will show the weight and the bargraph segments will light in
accordance with the target and tolerances that are active.
ZQ375 Checkweigher User Instructions 39
Page 40

Checkweighing applications
4. Clear the scale and place the next item on the scale …
The bargraph will show the item is under the target weight, over the
target weight or on target.
5. Repeat step 2 through 4 for all the other items to be weighed.
View the Upper and Lower Tolerances
1. To view the upper tolerance, press and hold OVER …
toL-hi (high tolerance) is briefly displayed, then the value is briefly
displayed before the normal checkweighing mode returns.
2. To view the lower tolerance, press and hold UNDER …
toL-Lo (low tolerance) is briefly displayed, then the value is briefly
displayed before the normal checkweighing mode returns.
Set New Upper and Lower Tolerances
You can escape from an entry screen or choice level. Press F1 and the action is
aborted and the display returns to its previous state.
If the active PLU# is 0, you can set custom tolerances. Follow these steps:
1. Press UNDER to set the lower or under tolerance …
x.xxx is displayed. This is the under tolerance value. The Under
segments also flash.
2. Refer to the Tolerance entry procedure on page 18 and key in a new tolerance.
Press ZERO to accept …
Display returns to checkweighing mode with the new lower tolerance
active.
3. Press OVER to set the upper tolerance …
x.xxx is displayed. This is the over tolerance value. The Over segments
also flash.
4. Refer to the Tolerance entry procedure on page 18 and key in a new tolerance.
Press ZERO to accept …
Display returns to checkweighing mode with the new upper tolerance
active.
The tolerances can be set from 1 division to the capacity of the scale.
40 ZQ375 Checkweigher User Instructions
Page 41

3.5.3 Transaction counter
You can view the number of transactions since the last clearing by pressing the
SELECT key until the transaction count display is shown. The counter is incremented
every time PRINT is pressed.
If enabled in a password protected menu, press and hold PRINT to clear the
transaction count for the active PLU.
Transaction counts and accumulators are stored with each PLU.
3.5.4 Statistical Package and Packrun
If the statistical package, Standard Deviation, is enabled, after a configurable number
of transactions have occurred (packrun quantity), the ZQ375 will totalize the number of
transactions and compute the standard deviation of the transactions.
Pack Run is the same as the Sample Size or quantity of weighments before a report is
automatically printed.
3.5 Adv375 application
If standard deviation is turned on and Pack Run is set to 0 (zero) you will get individual
weights each time the PRINT key is pressed and the statistical report when the PRINT
key is held for 4 seconds. The samples are cleared from memory when printed
If the Pack Run is set for any number of samples, you will get individual weights until
you reach the number set for the sample size (pack-run). Once this value has been
reached the statistical report will print out, then the samples are cleared from memory.
With Pack Run at 0 place product on scale. When the weight stabilizes press the
PRINT key. The individual weight will be stored and printed. (Auto Print Feature may
be used) Continue weighing product until a statistical report is required.
ACCEPT: 12.34 lb
OVER: 12.36 lb
OVER: 12.64 lb
UNDER: 9.72 lb
ACCEPT: 12.29 lb
UNDER: 0.00 lb
Printing the report:
Press and hold print key for 4 seconds, display will flash “Std-dEv Prn-tot” and the
report will be printed, then the samples will be cleared from memory.
ZQ375 Checkweigher User Instructions 41
Page 42

Checkweighing applications
Report Example:
Tolerance Hi = 0.35 lb
Tolerance Lo = 0.25 lb
Cnt of Over Wt = 2
Cnt of Under Wt = 1
Cnt of Target Wt = 3
Mean Net Wt = 10.30 lb
Max Net Wt = 12.64 lb
Min Net Wt = 0.00 lb
SD Net Wt = 5.05
CV Net Wt = 0.49 PCT
Cnt of Tot Wt = 6
If autoprint is enabled or the PRINT key is pressed a valid transaction occurs. Valid
transactions are counted as one entry in a packrun.
To end a packrun before the configured quantity is met, press and hold PRINT and the
valid transactions are totaled and standard deviation is performed.
If enabled, the standard deviation report is printed automatically upon completion of the
packrun.
3.5.5 X-Bar/R Program
The X-bar/R program is designed to weigh process samples, establish the average
weight, calculate the range between high and low weights, and the trend of deviation.
If the X-bar/R feature is enabled, the ZQ375 will keep a queue of the average weights
of the last eight sample sets. This queue of averages is used to print trend information
on the statistical reports.
The Report Printout for the X-Bar/R program can be customized to present statistical
data of your choosing. This information is found in the Service manual.
Trend Message Meaning
1 of 1 The last average in the queue has an error greater than 3x the limit
2 of 3 Two of the last three averages in the queue have an error greater that the limit.
4 of 5 Four of the last five averages have an error greater than the limit.
8 of 8 Eight of eight averages are on the same side of the target weight.
42 ZQ375 Checkweigher User Instructions
Page 43

3.6 Per375 application
This section applies if the Per375 application is enabled. See the Service manual for
information on enabling the applications.
3.6.1 Checkweighing
The Per375 application is identical in function to the Adv375 application with the
exception that weights are now expressed in percentages. PLUs consist of a PLU#, the
lower tolerance, the target percentage and the upper tolerance. These are created and
edited in a password protected menu. See your supervisor for more information.
A short key press of the OVER, UNDER, and TARG E T keys will do nothing if the
active PLU# is from 1 to 500. If the active PLU# = 0, these keys will work like in the
Mid375 application. See Set New Upper and Lower Tolerances on page 36.
If you press and hold the OVER, UNDER, and TARGET keys and the active PLU# = 1
to 500, you will see hi tolerance, target and low tolerance, respectively. If the active
PLU# = 0, then the over, under, target values will be shown, but the values are only
temporary ones since the active PLU#=0.
3.6 Per375 application
Setting a New Target Percentage and Checkweighing
You can escape from an entry screen or choice level. Press F1 and the action is
aborted and the display returns to its previous state.
These steps apply only if the active PLU# is 0.
1. In gross weighing mode, press ZERO to zero the scale. Press TARGET …
The display will show the last target value in percentage and the%
annunciator will turn on. The Target segment will light.
If motion is present for greater than 2-3 seconds after the TARGET key press, the
target operation will be aborted and the word cant will be displayed briefly.
2. Press ZERO to accept the displayed value or use the Tolerance entry
procedure on page 18 to key in a new target value and press ZERO to accept.
3. Place the item on the scale and press TARGET …
Percent of item on the scale is now displayed. This should be 0.0%.
4. Add additional weight (for example, by injection) until the target percentage
has been reached …
When the target percentage is reached, the center Accept segment will
light.
5. Clear the scale and place the next item on the scale. Repeat steps 1 and 4.
ZQ375 Checkweigher User Instructions 43
Page 44

Checkweighing applications
Choosing a PLU and Checkweighing
Use these steps when you want to recall a PLU and checkweigh.
Over, under and target values for the PLU registers are entered in a password
protected menu. Contact your supervisor for information.
1. Press ZERO to zero the scale, then press F1 …
A flashing 0 is displayed prompting you for the PLU # you wish to recall.
2. Use the Numeric entry procedure on page 19 to enter the PLU number and
press ZERO to accept …
The PLU values are recalled. The target, upper and lower tolerances
become active. If that PLU number has no values assigned, the display
will show cAnt.
3. Place an item on the scale and press TARGET …
The display will show 0.0 and the Under segments will light in.
4. Add additional weight until the target percentage has been reached …
The center Accept segment will light.
5. Clear the scale and repeat steps as needed.
View the Upper and Lower Tolerances
1. To view the upper tolerance, press and hold OVER …
toL-hi (high tolerance in percent) is briefly displayed, then the value is
briefly displayed before the normal checkweighing mode returns.
2. To view the lower tolerance, press and hold UNDER …
toL-Lo (low tolerance in percent) is briefly displayed, then the value is
briefly displayed before the normal checkweighing mode returns.
Set New Upper and Lower Tolerances
You can escape from an entry screen or choice level. Press F1 and the action is
aborted and the display returns to its previous state.
If the active PLU# is 0, you can set custom tolerances. Follow these steps:
1. Press UNDER to set the lower or under tolerance …
x.x percent is displayed. This is the under tolerance value. The%
annunciator is lit and the Under segments also flash.
44 ZQ375 Checkweigher User Instructions
Page 45

3.6 Per375 application
2. Refer to the Tolerance entry procedure on page 18 and key in a new tolerance.
Press ZERO to accept …
Display returns to checkweighing mode with the new lower tolerance
active.
3. Press OVER to set the upper tolerance …
x.x percent is displayed. This is the over tolerance value. The%
annunciator is lit and the Over segments also flash.
4. Refer to the Tolerance entry procedure on page 18 and key in a new tolerance.
Press ZERO to accept …
Display returns to checkweighing mode with the new upper tolerance
active.
ZQ375 Checkweigher User Instructions 45
Page 46

Checkweighing applications
Grad 1 Grad 2 Grad 3 Grad 4 Grad 5 Grad 6 Grad 7 Grad 8 Grad 9 Grad 10
Live
Weight
Live
Weight
<=
Weight
point #1
<=
Weight
point #2
<=
Weight
point #3
<=
Weight
point #4
<=
Weight
point #5
<=
Weight
point #6
<=
Weight
point #7
<=
Weight
point #8
<=
Weight
point #9
<=
Weight
point #10
<=>>>>>>>>>>>
Weight
point #11
3.7 Grad375 application
This section applies if the Grad375 application is enabled. See the Service manual for
information on enabling the applications.
3.7.1 Positive vs. negative grading
Your unit can be configured for positive or negative grading. Positive grading classifies
a weight as 1 of 10 weight grades. The process is described in Positive grading on page
47.
Negative grading is used to classify objects removed, one at a time, from a full tote or
box. The process is described in Negative grading with autotare enabled on page 47.
3.7.2 Grade classifying
Grade classifying is the same whether your unit is configured for positive or negative
grading. You set the weight values for each division between the grades. If the weight
on the scale falls below or is equal to the weight value of a grade division, it is in the
grade below the line. If it is greater than a weight value, it is in the grade above the line.
Default value for Weight Points 2 through 10 is 0. See Figure 3.2 for an illustration.
Figure 3.2 Weight grade illustration
3.7.3 Setting weight grades
Follow these steps to set the weight points illustrated in Figure 3.2.
1. With the Grad375 application active, press and hold TARG E T …
grAding is displayed.
2. Press SELECT …
grAd 1 is displayed. This is the first weight point that defines the lower
limit of Grad 1.
3. Press SELECT …
A numeric entry screen is displayed.
4. Key the first weight point and press ZERO to accept …
grAd 1 is displayed.
5. Press UNITS to move to the next weight point …
grAd 2 is displayed.
46 ZQ375 Checkweigher User Instructions
Page 47

6. Repeat steps 3 through 5 until you’ve completed all 11 weight points …
7. Press TARE twice …
3.7.4 Positive grading
1. With the weight points set, zero the scale and place the item to be weighed on
the scale.
2. Remove the item from the scale and weigh the next item.
3.7 Grad375 application
grAd 11 is displayed.
Indicator returns to the normal operating mode and the current weight is
displayed.
Any weight below weight point #1 or above weight point #11 will be
displayed as weight.
Any other weight will be shown as one of the 10 Grades. The display will
show grAd X, with X being the grade number for that weight.
You can reduce the number of grades by setting Grad Points to 0.
For example: To create 3 grades, set Grad Points 1, 2 and 3 normally. Set Grad
Points 4 through 10 to 0 and set Grad Point 11 to the last value to create your third
grade.
3.7.5 Negative grading with autotare enabled
If your unit is configured for negative grading with autotare enabled, follow these steps.
1. Zero the empty scale, if necessary.
2. Place a tote or box loaded with the items to be graded on the scale …
The weight is shown briefly and then the scale autotares.
3. Remove an item …
The grade of the removed item is shown for 0.5 seconds and the scale
autotares. If the removed item weight is less than the grade 1 value the
scale will still perform the autotare when stable.
4. Repeat step 3 until all items have been graded.
5. Remove the tote and repeat steps 1 through 4.
If Negative grading autoprint is enabled a print will occur when an item is removed
from the scale. See the Grading (Format #30) on page 62. If you get out of sequence,
start over. With the tote on the scale press the TARE key, then remove an item.
ZQ375 Checkweigher User Instructions 47
Page 48

Checkweighing applications
3.7.6 Negative grading with autotare disabled
If your unit is configured for negative grading with autotare disabled, follow these steps:
1. Zero the empty scale, if necessary.
2. Place a tote or box loaded with the items to be graded on the scale and press
the TAR E key.
3. Remove an item …
The grade of the removed item is shown.
4. Press the TAR E key.
5. Repeat step 3 until all items have been graded.
6. Remove the tote and repeat steps 1 through 4.
48 ZQ375 Checkweigher User Instructions
Page 49

4 Menus
Press SELECT/ to move down in a menu
Press TARE/ to move up in a menu, except at the
bottom item in a menu, then use ZERO/ or F1
Press PRINT/ to move left in a menu
Press UNITS/ to move right in a menu
Press ZERO/ to accept a value or choice and
move up in the menu.
Press F1 to escape and move up in the menu
Password protected menus are available to customize the indicator and to view
information.
4.1 Accessing the menus
Follow these steps to access the menus in the ZQ375.
1. With the indicator powered up and in normal operating mode, press and hold
the F1 key …
Pass is displayed, prompting you to enter the password.
2. Key in the password for the menu you want and press the ZERO key …
The first item in the top level of the menu you accessed is displayed.
3. Use the navigation keys, shown below, to navigate through the menu
structure. The symbols in the chart appear on the bottom of the keys.
Menu Navigation Keys:
4.1 Accessing the menus
4.2 Menu annunciators
The menu structure is made up of menu items, parameters, value entry screens and
lists from which you choose one item. To help you know where you are in the menu,
the bargraph at the top of the display is on while the indicator is in the menus and will
change appearance according to the following rules:
All segments flashing This means you are in the menu structure but not
Center flashing / others solid This means you are in a parameter prompt
Center flashing / others off This means you are in a numeric or octet entry
ZQ375 Checkweigher User Instructions 49
Right flashing / others off This means you are in a list. Scroll through the
in any of the following screens.
screen. See Parameter Code section.
screen. Enter a number and press ZERO to
accept.
choices with the PRINT and UNITS keys and
press ZERO to accept.
Page 50

Menus
User About Audit
See
page 51
See
page 54
See
page 57
Normal
Weighing Mode
Press and
hold F1 key
Enter 111
& press ZERO
SELECT =
TARE =
PRINT =
UNITS =
ZERO =
F1 = Escape or
Left most solid / others off This means you are in a screen for string or hex
4.3 Exiting the menus
1. If you are at the bottom item in a menu use ZERO to accept a choice or value
and move up a level, or use F1 to escape and move up one level without
accepting the choice or value. From that point, press the TARE key repeatedly
until …
SAVE no is displayed. This means “Do not save changes. “
2. Use the PRINT or UNITS key to scroll through the choices: SAVE no,
SAVEYES and CAnCEL. Press Enter to accept the displayed choice.
If you choose SAVE no or SAVEYES the indicator exits the menu and
returns to normal weighing mode.
OR
If you choose CAnCEL, the indicator remains in the menu.
data entry.
4.4 USER level menus
The USER level menus are available to the user. The other menu levels are for
supervisors and technicians only.
The USER level (password 111) contains the User, About, and Audit menus arranged
as shown in Figure 4.1.
Figure 4.1 USER level (password 111) menus
Under some of the section headings you will see menu items with small arrows
(). These are reminders of the menu structure and how you got to the menu
item.
50 ZQ375 Checkweigher User Instructions
Page 51

4.5 User menu
User
Site ID
Seal
Time
Date
Set
Style
h- m- s-
12hr 12hr-AP 24hr
Set
Style
y- m- d-
MMDD4YMMDD2Y DDMM2Y
DDMM4Y
Enter
Site ID
View
Seal
Status
SELECT =
TARE =
PRINT =
UNITS =
ZERO =
F1 = Escape or
The User menu is shown in Figure 4.2.
4.5 User menu
Figure 4.2 User menu
All numeric values require scroll entry. See Numeric entry procedure on page 19.
Use this menu to set the time and date, to enter a site ID, and view the physical seal
status. Each is explained below:
4.5.1 Time
User Time
1. Access the User menu (see Accessing the menus on page 49) and press
SELECT …
ZQ375 Checkweigher User Instructions 51
2. Press SELECT …
tiME is displayed. Use this to set the time and clock style.
SEt is displayed.
3. Press SELECT …
h- x is displayed, with the x flashing. This is a numeric entry screen for
the hour value.
Page 52

Menus
4. Key in the hour of the day using military (24 hr) time and press ZERO …
The choice is made and M- x is displayed, with the x flashing. This is a
numeric entry screen for the minute value.
5. Key in the minute value and press ZERO …
The choice is made and S- x is displayed, with the x flashing. This is a
numeric entry screen for the second value.
6. Key in the seconds value and press ZERO …
The choice is made and SEt is displayed.
7. Press UNITS …
StYLE is displayed. Use this to set the style of clock for printouts.
Choices are 12hr, 12hr-AP (AM/PM) and 24hr (military time).
8. Press SELECT …
12hr is displayed.
9. Press PRINT or UNITS to scroll through the choices. Press ZERO when your
choice is displayed …
4.5.2 Date
User Time Date
The choice is made and StYLE is displayed.
10. Press TARE …
tiME is displayed.
1. Press UNITS …
dAtE is displayed.
2. Press SELECT …
SEt is displayed.
3. Press SELECT …
y- x is displayed, with the x flashing. This is a numeric entry screen for
the year value.
4. Key in the year and press ZERO …
The choice is made and M- x is displayed, with the x flashing. This is a
numeric entry screen for the month.
5. Key in the month value and press ZERO …
The choice is made and d- x is displayed, with the x flashing. This is a
numeric entry screen for the day value.
6. Key in the day value and press ZERO …
The choice is made and SEt is displayed.
52 ZQ375 Checkweigher User Instructions
Page 53

7. Press UNITS …
8. Press SELECT …
9. Press PRINT or UNITS to scroll through the choices. Press ZERO when your
choice is displayed …
10. Press TARE …
4.5.3 Site ID
User Time Date Site ID
1. Press UNITS …
4.5 User menu
StYLE is displayed. Use this to set the style of date for printouts.
Choices are MMDD2Y, MMDD4Y, DDMM2Y and DDMM4Y.
MMDD2Y is displayed.
The choice is made and StYLE is displayed.
dAtE is displayed.
SitE id is displayed.
2. Press SELECT …
A numeric entry screen is displayed.
3. Key in a site ID number on the numeric keypad and press ZERO to accept …
SitE id is displayed.
The Site ID can be used in transmitted or printing information.
4.5.4 Seal
User Time Date Site ID Seal
1. Press UNITS …
SEAL is displayed.
2. Press SELECT …
unSEALE or SEALEd is displayed. This is the status of the physical seal
inside the indicator. If the unit is sealed, no changes can be made to the
configuration of the indicator.
3. Press F1 to return to the SEAL display.
4. To exit the menu, see Exiting the menus on page 50.
ZQ375 Checkweigher User Instructions 53
Page 54

Menus
Serial
About
App.
EnetOption
FirmBoot
Ver sionPartno
IP
Gateway
Subnet
VersionPartno
VersionPartno
Ver sion
Mac
Dload
Sserial
Dserial
Typ e
Displays the
bootloader
PN
Displays the
bootloader
version #
Displays the
firmware
part number
Displays the
firmware
version number
Displays the
application
part number
Displays the
application
version
number
View
Serial
Number
Displays
IP address
Displays
Subnet
info
Displays
Gateway
info
Displays
Mac
info
SELECT =
TARE =
PRINT =
UNITS =
ZERO =
F1 = Escape or
4.6 About menu
The About menu is shown in Figure 4.3.
Figure 4.3 About menu
Use this menu to display information about the various items shown in Figure 4.3. Each
is explained below:
4.6.1 Boot
About Boot
1. Access the About menu and press SELECT …
boot is displayed.
54 ZQ375 Checkweigher User Instructions
2. Press SELECT …
PArtno is displayed
3. Press SELECT …
4. Press ZERO to return to the PAr t no display.
5. Press PRINT or UNITS to move to the other item in this level …
The 1st half of the bootloader PN is displayed. Press UNITS to view the
2nd half.
VErSion is displayed.
Page 55

6. Press SELECT …
The version number of the bootloader is displayed.
7. Press ZERO to return to the VErSion display.
8. Press TARE to return to the boot display.
4.6.2 Firm and App
About Boot Firm and App
1. Press UNITS to move to the next item in this level …
FirM is displayed. This stands for firmware.
2. Repeat the same pattern of key presses in steps 2 through 3 to view the part
number and version for the FirM. and APP menu items.
4.6.3 Serial
About Boot Firm App Serial
4.6 About menu
1. With APP displayed, press UNITS to move to the next item in this level …
SEriAL is displayed.
2. Press SELECT …
The indicator’s serial number is displayed.
3. Press TARE to return to the SEriAL display.
4.6.4 Option
About Boot Firm App Serial Option
1. Press UNITS to move to the next item in this level …
oPtion is displayed.
2. Press SELECT …
VErSion is displayed. This stands for the software revision or version of
the currently installed option card. This can be useful service
information.
3. To view the version, press SELECT …
The software revision number is shown.
4. Press ZERO …
oPtion is displayed.
5. Press UNITS to move to the other item in this level …
tYPE is displayed. This stands for the type of option card installed. The
four option cards are: Analog, 802.11g wireless, USB-d, and RS-485.
ZQ375 Checkweigher User Instructions 55
Page 56

Menus
6. Press SELECT …
The currently installed option card name is displayed.
7. Press ZERO …
tYPE is displayed.
8. Press TARE …
oPtion is displayed.
4.6.5 Enet
About Boot Firm App Serial Option Enet
If the indicator is connected to an ethernet network, the values displayed will be the
current assigned addresses.
1. Press UNITS …
EnEt is displayed. Use this item to view the values for the IP, Subnet,
Gateway and MAC addresses.
2. Press SELECT …
iP is displayed. Use this item to view the four part IP address.
3. Press SELECT …
0 0 is displayed. This is first portion of the IP address
4. Press ZERO …
1 0 is displayed. This is second portion of the IP address.
5. Press ZERO …
2 0 is displayed. This is third portion of the IP address.
6. Press ZERO …
3 1 is displayed. This is fourth portion of the IP address.
7. Press ZERO …
iP is displayed.
8. Press UNITS …
Subnet is displayed.
9. Repeat this sequence of key presses for the Subnet, Gateway and MAC
addresses.
10. When you are finished, from the menu item, press TARE to return to the Enet
menu item.
56 ZQ375 Checkweigher User Instructions
Page 57

4.6.6 Dload
Audit
Print
Counter
Config Calib
Port 1 Port 2 USB
SELECT =
TARE =
PRINT =
UNITS =
ZERO =
F1 = Escape or
About Boot Firm App Serial Option Enet Dload
1. From EnEt, press UNITS …
dLoAd is displayed. This stands for download. Under SSEriAL you can
view the serial number of the software application that created the
configuration file. Under dSEriAL you can view the serial number of the
software application that downloaded the configuration file. This is used
for security and licensing purposes.
2. Press SELECT …
SSEriAL is displayed.
3. Press SELECT …
The 1st half of the serial number of the creating application of the
configuration file is displayed.
4. Press ZERO to show the 2nd half.
5. Press F1 …
4.7 Audit menu
6. Press UNITS …
7. Press SELECT …
8. Press ZERO to show the 2nd half.
9. Press F1 …
10. Press TARE until About is displayed.
11. To exit the menu, see Exiting the menus on page 50.
4.7 Audit menu
The Audit menu is shown in Figure 4.4.
SSEriAL is displayed.
dSEriAL is displayed.
The 1st half of the serial number of the downloading application of the
configuration file was downloaded to, is displayed.
dSEriAL is displayed.
ZQ375 Checkweigher User Instructions 57
Figure 4.4 Audit menu
Page 58

Menus
4.7.1 Counter
Audit Counter
Use this menu to display audit counters for configuration and calibration and to print the
information. Each is explained below:
1. Access the Audit menu and press SELECT …
countEr is displayed. This has two counters that tell you how many
times the indicator has been configured and calibrated.
2. Press SELECT …
conFig is displayed.
3. Press SELECT again …
A number appears showing how many times the indicator has been
configured.
4. Press ZERO …
conFig is displayed.
5. Press UNITS to move to the next item in this level …
6. Press SELECT …
7. Press ZERO …
8. Press TARE …
4.7.2 Print
Audit Counter Print
1. Press UNITS …
2. Press SELECT …
cALib is displayed.
A number appears showing how many times the indicator has been
calibrated.
cALib is displayed.
countEr is displayed.
Print is displayed.
Port1 is displayed. This is the first of three choices: Port 1, Port 2 or
uSb. Use these to select which port to print the audit report through.
3. Press PRINT or UNITS to scroll through the choices and press ZERO when
your choice is displayed …
The audit log is printed through the chosen port and Print is displayed.
4. This completes the Audit menu. To exit the menu, see Exiting the menus on
page 50.
58 ZQ375 Checkweigher User Instructions
Page 59

5 Error messages
The following errors may be displayed during use of the indicator.
In the PER375 application, this means
an initial Target value is not set.
Message Display
Overload
Can’t fit on display.
Underload
Can’t
Entry not in valid range
Password entry failed
General error.
Report to repair tech.
The indicator failed the attempted action
Checkweigher did not reach a stable zero weight within
time window set for automated weighing process.
If this message is cycling on the display every 10 - 20
seconds, it indicates that the battery option is enabled
but the checkweigher is not using a battery with the built-
in power down circuitry
ZQ375 Checkweigher User Instructions 59
Page 60

Error messages
5.1 PLU CSV file import error messages
Message Display
Failed to get csv file handle
Failed to allocate memory for csv file
First line of csv file is invalid
Failed to read csv file, size didn't match
StrRowData too big
Field count mismatch
60 ZQ375 Checkweigher User Instructions
Page 61

6 Communications
Gross 272.04 lb
Tare 95.88 lb
Net 176.16 lb
Accept: 176.16 lb
Reject: 142 lb
3.601 lb OVER
The ZQ375 can communicate through these ports:
l Serial
l Ethernet
l USB
l Wireless 802.11g
6.1 Default print formats
Below are examples of the default formats that are available. Any print format can be
customized to suit your application needs please contact your Avery Weigh-Tronix
representative for assistance. Additional information on print formats can be found in
the Service Manual.
General Weighing (Format #1)
6.1 Default print formats
Under/Over/Accept (Format #24)
Accept/Reject (Format #25)
Net Weighment w/Band (Format #27)
ZM303 Indicator User Instructions 61
Page 62

Communications
Tolerance Hi = 0.650 lb
Tolerance Lo = 0.150 lb
Cnt of Over Wt = 3
Cnt of Under Wt = 6
Cnt of Target Wt = 3
Mean Net Wt = 0.073 lb
Max Net Wt = 0.879 lb
Min Net Wt = 0.00 lb
SD Net Wt = 0.254
CV Net Wt = 3.464 PCT
Cnt of Tot Wt = 12
TARGET HI = 2.650 lb
TARGET LO = 1.850 lb
MEAN NET WT= 1.512 lb
MEDIAN NET WT= 1.518 lb
Grad3 6.005 lb
Standard Deviation (Format #28)
X-Bar/R (Format #29)
Grading (Format #30)
The ZQ375 can be configured for many other outputs to match the application. Refer
to the Service manual for full details on available print formats.
62 ZM303 Indicator User Instructions
Page 63

7 Supervisor menu
Press SELECT/ to move down in a menu
Press TARE/ to move up in a menu, except at the
bottom item in a menu, then use ZERO/ or F1
Press PRINT/ to move left in a menu
Press UNITS/ to move right in a menu
Press ZERO/ to accept a value or choice and
move up in the menu.
Press F1 to escape and move up in the menu
This menu allows a supervisor to change those functions of an application that are
configurable. Access the supervisor menu using the password 1793. Refer to
Accessing the menus on page 49 for instructions.
The Supervisor menu changes based on the active application. Each is shown on the
following pages.
l Supervisor menu for Sim375 application on page 64
l Supervisor menu for Mid375 application on page 71
l Supervisor menu for Adv375 application on page 78
l Supervisor menu for Per375 application on page 89
l Supervisor menu for the Grad375 application on page 91
Below is a chart showing how the keys are used in navigating through the menus.
There is an abbreviated version in next to each menu as a reminder of the key
functions.
Menu Navigation Keys:
ZQ375 Checkweigher User Instructions 63
Page 64

Supervisor menu
Super
Setpnt
Off
On
Edit Print
Reset
Annun In1
No
Yes
In2 In3
None
Print Units
Select
Ta re
Zero
F1
Tar ge t
ID
Under
Over
Accu
Check
Outputs
Out-gZb USegdiv
OSegdiv
Reset
No
Yes
Battery
Enable
Tmout
Off
On
Latch
Unlatch
On
Off
Port 1
Port 2
USB
PrntHld
User
1-3600
minutes
Key in
UNDER
segment
div. size
Key in
OVER
segment
div. size
SELECT =
TARE =
PRINT =
UNITS =
ZERO =
F1 = Escape or
7.1 Supervisor menu for Sim375 application
This section applies if the Sim375 application is active. The Sim375 Supervisor menu
is shown in Figure 7.1.
All numeric values require scroll entry. See Numeric entry procedure on page 19.
Figure 7.1 Sim375 Supervisor menu
Follow these steps to use the Supervisor menu:
Access the Supervisor menu (password 1793). See Accessing the menus on page 49.
64 ZQ375 Checkweigher User Instructions
Page 65

7.1.1 Setpoint
Super Setpoint
7.1 Supervisor menu for Sim375 application
The and symbols stand for direction moved in the menu. So Super Setpoint
illustrates that you move down from Super to Setpoint. This will help you keep track
of where you are in the menu structure.
The Setpoint menu is the same for all the applications so will only be explained once
here.
1. From SuPEr, press SELECT …
SEtPnt is displayed. Use this to:
l set the function of the setpoint annunciators
l select inputs for up to three inputs
l print the setpoint settings
l reset all setpoint settings to factory defaults.
Annunciators
Setpoint Edit Annun
2. Press SELECT …
Edit is displayed.
3. Press SELECT …
Annun is displayed. This stands for annunciators, referring to the SP1,
SP2 and SP3 setpoint annunciators. .By default (oFF) these
annunciators follow the condition of the checkweigh fan graph. If Under
then SP1 is on, if Accept then SP2 is on, If Over then SP3 is on. If
ANNUN is set to ON it will invert these conditions. Setting ANNUN to ON
is not a typical usage for checkweighing.
4. Press SELECT …
The current setting is displayed (oFF or on).
5. Press PRINT or UNITS to toggle between the choices and when your choice is
displayed, press ZERO to accept …
Annun is displayed.
ZQ375 Checkweigher User Instructions 65
Page 66

Supervisor menu
Inputs
Setpoint Edit Annun Inputs
6. Press UNITS …
in1 is displayed. This stands for input 1. Use this to assign a function to
input 1 when an external switch is tripped. Default choice is nonE. The
choices are listed in Figure 7.1. Some may not apply in this application.
The remote input can be used to perform an accumulated print total function. Use the
PrintHoLd function to simulate a “press and hold” of the PRINT key. If you are using
a momentary switch, press and release. If you are using a toggle switch, switch it ON
then OFF to reset the function for the next time.
7. From in1, press SELECT …
The current choice is displayed.
8. Press PRINT or UNITS to scroll through the choices and when your choice is
displayed, press ZERO to accept …
in1 is displayed.
9. Press UNITS …
in2 is displayed.
10. Repeat steps 7 through 9 for in2 and in3. Press TARE when finished …
Edit is displayed.
Print
Setpoint Edit Print
11. Press UNITS …
Print is displayed. Use this to print the settings under SEtPnt.
12. Press SELECT …
Port 1 is displayed.
13. Press F1 to abort the print process or press UNITS to scroll to the desired port
and press ZERO to print the information …
Print is displayed after either action.
Reset
Setpoint Edit Print Reset
14. Press UNITS …
rESEt is displayed. Use this to reset the settings under Edit to factory
defaults.
66 ZQ375 Checkweigher User Instructions
Page 67

15. Press SELECT …
16. Press ZERO to abort the reset or press UNITS …
17. Press ZERO to reset the settings to factory defaults …
18. Press TARE …
7.1.2 Check
Super Setpoint Check
1. From tArE press UNITS …
7.1 Supervisor menu for Sim375 application
no is displayed.
YES is displayed.
rESEt is displayed.
SEtPnt is displayed.
chEcK is displayed. This is the checkweighing configuration item. Under
this you can:
l Set the outputs to be latched or unlatched
l Enable output-gross zero band (out-gZb)
l Set the under and over segment division size
l Reset all the checkweighing items to factory defaults.
Follow the steps below.
Outputs
Check Outputs
2. From chEcK, press SELECT …
outPutS is displayed. There are two choices for outputs, LAtch and
unLAtch (default). If you choose LAtch, this means that weights will
have to stabilize at or above the output value before the relay or
annunciator changes. If you choose unLAtch, the relay and annunciator
will change instantly as the weight swings above and below the output
value.
3. From outPutS, press SELECT …
The current choice is displayed.
4. Press PRINT or UNITS to toggle between the choices and when your choice is
displayed, press ZERO to accept …
outPutS is displayed.
ZQ375 Checkweigher User Instructions 67
Page 68

Supervisor menu
Output-gross zero band
Check Outputs Out-gzb
5. Press UNITS to go to the next menu item …
out-gZb is displayed. This stands for output-gross zero band. You can
set outputs to on (default) while the weight is in the gross zero band or
set them to oFF while the weight is in the gross zero band.
6. Press SELECT …
The current choice is displayed.
7. Press PRINT or UNITS to toggle between the choices and when your choice is
displayed, press ZERO to accept …
out-gZb is displayed.
Under segment division
Check Outputs Out-gzb USegDiv
8. Press UNITS to go to the next menu item …
uSEgdiV is displayed. This stands for under-segment division size.
Choose how many divisions are equal to one segment on the UNDER
display bargraph. You can key in a value from 1 to 1000 divisions per
segment.
All numeric values require scroll entry. See Numeric entry procedure on page 19.
9. Press SELECT …
The current value is displayed.
10. Key in a new value and press ZERO to accept …
uSEgdiV is displayed.
Over segment division
Check Outputs Out-gzb USegDiv OSegDiv
11. Press UNITS to go to the next menu item …
oSEgdiV is displayed. This stands for over-segment division size.
Choose how many divisions are equal to one segment on the OVER
display bargraph. You can key in a value from 1 to 1000 divisions per
segment.
12. Press SELECT …
The current value is displayed.
13. Key in a new value and press ZERO to accept …
oSEgdiV is displayed.
68 ZQ375 Checkweigher User Instructions
Page 69

7.1 Supervisor menu for Sim375 application
Reset
Check Outputs Out-gzb USegDiv OSegDiv Reset
14. Press UNITS to go to the next menu item …
rESEt is displayed. Use this to reset the factory defaults for the
checkweighing parameters.
15. Press SELECT …
no is displayed. This is the default value.
16. Press ZERO to abort the reset or, to reset the defaults, press UNITS …
YES is displayed. Accepting this will reset the defaults.
17. Press ZERO to accept …
The defaults are reset and rESEt is displayed.
18. Press TARE …
chEcK is displayed.
7.1.3 Battery
Super Setpoint Tare Battery
The Battery menu is the same for all the applications so will only be explained once
here.
1. Press UNITS to go to the next menu item …
Enable
Battery Enable
2. Press SELECT …
bAttErY is displayed. Use this to enable the battery and to set a timeout
length (in minutes). If this time expires with no scale or keypad activity,
the battery will be shut off.
EnAbLE is displayed. Choices are OFF (default) and on. Choose OFF to
disable battery usage. Choose on to enable battery usage.
ZQ375 Checkweigher User Instructions 69
Page 70

Supervisor menu
3. Press PRINT or UNITS to toggle between the choices and when your choice is
displayed, press ZERO to accept …
EnAbLE is displayed.
Only enable the battery and set the tMout value if the ZQ-BAT option is being used. If
battery use is enabled, setpoint output 3 cannot be used for setpoints in
checkweighing applications. It is used as a shutoff signal to the ZQ-BAT battery
option.
Non ZQ-BAT supplied power may require external shut off circuitry. See the Service
Manual for information on this feature.
Timeout
Battery Enable Timeout
4. Press UNITS to go to the next menu item …
tMout is displayed. Use this to set the length of time before inactivity on
the scale and keypad cause battery power to be shutoff. Values between
1 and 3600 minutes are valid. Default value is 60 minutes.
5. Press SELECT …
A numeric entry screen appears.
6. Use the Numeric entry procedure on page 19 to key an a value, in minutes and
press ZERO to accept …
tMout is displayed.
7. This completes the Supervisor menu for the Sim375 application. Repeatedly
press TARE to return to normal operating mode.
70 ZQ375 Checkweigher User Instructions
Page 71

7.2 Supervisor menu for Mid375 application
Digits
Super
Setpnt
Off
On
Edit Print Reset
Annun In1
No
Yes
In2 In3
Check
Outputs
Out-gZb USegdiv OSegdiv
Latch
Unlatch
On
Off
Type
A-tare
Limits
Sample
Battery
Enable
Tmout
Off
On
Ta re
Edit Print Reset
No
Ye s
Tar e 1 Ta r e 1 0
None Print Units
Select Tar e Zero F1
Ta rg e t
ID Under Over
AccuOnOff
Reset
No
YesOnOff
Port 1
Port 2 USB
Port 1
Port 2 USB
Graph
On
Off
PrntHld
User
Key in
UNDER
segment
div. size
Key in
OVER
segment
div. size
1-3600
minutes
Appears only
if Preset Tare enabled
SELECT =
TARE =
PRINT =
UNITS =
ZERO =
F1 = Escape or
7.2 Supervisor menu for Mid375 application
This section applies if the Mid375 application is active. The Mid375 Supervisor menu
is shown in Figure 7.2.
Figure 7.2 Mid375 Supervisor menu
All numeric values require scroll entry. See Numeric entry procedure on page 19.
Follow these steps to use the Supervisor menu:
Access the Supervisor menu (password 1793). See Accessing the menus on page 49.
ZQ375 Checkweigher User Instructions 71
Page 72

Supervisor menu
7.2.1 Setpoint
Super Setpoint
The Setpoint menu is the same in all the applications. See Setpoint on page 65.
7.2.2 Tare
Super Setpoint Tare
The Tare menu is the same in any application that it appears so will only be explained
once here. It appears only if Preset Tare is configured in a password protected menu.
1. From SEtPnt press UNITS …
tArE is displayed.
Use this to:
l set values for up to 10 preset tares
l print the values of the preset tares
l reset all preset tares to factory defaults of 0
The following steps describe the procedures.
Tare Register 1-10
Tare Edit Tare 1-10
2. Press SELECT …
Edit is displayed.
3. Press SELECT …
tArE 1 is displayed. This is the first of the 10 preset tare values you can
set.
4. Press SELECT …
The current value is displayed with a flashing right digit.
5. Press ZERO to accept the displayed value or key in a new value and press
ZERO to accept …
tArE 1 is displayed.
6. Press UNITS …
tArE 2 is displayed.
72 ZQ375 Checkweigher User Instructions
Page 73

7.2 Supervisor menu for Mid375 application
7. Repeat steps 4 through 6 for tArE 2 through tArE 10. Press TARE when
finished …
Edit is displayed.
If the active unit of measure is lb-oz then tare weights must be entered in the oz
equivalent. To enter 2 lb 4.5 oz you would need to enter 36.5 oz (2 lb = 32 oz plus the
4.5)
Printing
Tare Edit Print
8. Press UNITS …
Print is displayed. Use this to print the preset tare values.
9. Press SELECT …
Port 1 is displayed.
10. Press F1 to abort the print process or press UNITS to scroll to the desired port
and press ZERO to print the information …
Print is displayed after either action.
Reset
Tare Edit Print Reset
11. Press UNITS …
rESEt is displayed. Use this to reset all the preset tares to the factory
default of 0.
12. Press SELECT …
no is displayed. no is the default.
13. Press ZERO to abort the reset or press UNITS …
YES is displayed.
14. Press ZERO to reset the settings to factory defaults …
rESEt is displayed.
15. Press TARE …
tArE is displayed.
7.2.3 Check
Super Setpoint Tare Check
1. From tArE press UNITS …
chEcK is displayed. This is the checkweighing configuration item. Under
this you can:
ZQ375 Checkweigher User Instructions 73
Page 74

Supervisor menu
l Set the outputs to be latched or unlatched
l Enable outputs on or off in gross zero band
l Set the under and over segment division size
l Turn weight digits on or off during checkweighing
l Turn the bargraph on or off during checkweighing
l Set the type of checkweighing: Limits or Sample
l Reset all the checkweighing items to factory defaults.
Follow the steps below.
Outputs
Check Outputs
2. From chEcK, press SELECT …
outPutS is displayed. There are two choices for outputs, LAtch and
unLAtch (default). If you choose LAtch, this means that weights will
have to stabilize at or above the output value before the relay or
annunciator changes. If you choose unLAtch, the relay and annunciator
will change instantly as the weight swings above and below the output
value.
3. From outPutS, press SELECT …
The current choice is displayed, LAtch or unLAtch.
4. Press PRINT or UNITS to toggle between the choices and when your choice is
displayed, press ZERO to accept …
outPutS is displayed.
Output-gross zero band
Check Outputs Out-gzb
5. Press UNITS to go to the next menu item …
out-gZb is displayed. This stands for output-gross zero band. You can
set outputs to on (default) while the weight is in the gross zero band or
set them to oFF while the weight is in the gross zero band.
6. Press SELECT …
The current choice is displayed.
7. Press PRINT or UNITS to toggle between the choices and when your choice is
displayed, press ZERO to accept …
out-gZb is displayed.
74 ZQ375 Checkweigher User Instructions
Page 75

7.2 Supervisor menu for Mid375 application
Under segment division
Check Outputs Out-gzb USegDiv
8. Press UNITS to go to the next menu item …
uSEgdiV is displayed. This stands for under-segment division size.
Choose how many divisions are equal to one segment on the UNDER
display bargraph. You can key in a value from 1 to 1000 divisions per
segment. 1 is the default value.
All numeric values require scroll entry. See Numeric entry procedure on page 19.
9. Press SELECT …
The current value is displayed.
10. Key in a new value and press ZERO to accept …
uSEgdiV is displayed.
Over segment division
Check Outputs Out-gzb USegDiv OSegDiv
11. Press UNITS to go to the next menu item …
oSEgdiV is displayed. This stands for over-segment division size.
Choose how many divisions are equal to one segment on the OVER
display bargraph. You can key in a value from 1 to 1000 divisions per
segment. 1 is the default value.
12. Press SELECT …
The current value is displayed.
13. Key in a new value and press ZERO to accept …
oSEgdiV is displayed.
Digits
Check Outputs Out-gzb USegDiv OSegDiv Digits
14. Press UNITS to go to the next menu item …
digitS is displayed. Use this to turn the weight display oFF or on
(default) when in checkweighing mode. When set to oFF the bargraph is
the only part of the display that is on.
15. Press SELECT …
The current choice is displayed.
16. Press PRINT or UNITS to toggle between the choices and when your choice is
displayed, press ZERO to accept …
digitS is displayed.
ZQ375 Checkweigher User Instructions 75
Page 76

Supervisor menu
Graph
Check Outputs Out-gzb USegDiv OSegDiv Digits Graph
17. Press UNITS to go to the next menu item …
grAPh is displayed. Use this to turn the graph display oFF or on
(default) when in checkweighing mode. When set to oFF the weight
digits are the only part of the display that is on.
18. Press SELECT …
The current choice is displayed.
19. Press PRINT or UNITS to toggle between the choices and when your choice is
displayed, press ZERO to accept …
grAPh is displayed.
Type
Check Outputs Out-gzb USegDiv OSegDiv Digits Graph Type
20. Press UNITS to go to the next menu item …
TYPE is displayed. Use this to choose which type of checkweighing you
want to do: SAMPLE or LiMitS.
Select SAMPLE mode (default) if you want to enter a target weight by
placing a sample on the scale and pressing the TARGET key. The upper
and is automatically set to +1 division and the lower tolerance is
automatically set to -1 division.
Select LiMitS mode to enter an upper and lower limit which defines the
acceptable weight range.
21. Press SELECT …
The current choice is displayed.
22. Press PRINT or UNITS to toggle between the choices and when your choice is
displayed, press ZERO to accept …
TYPE is displayed.
Auto Tare
Check Outputs Out-gzb USegDiv OSegDiv Digits Graph Type
A-tare
23. Press UNITS to go to the next menu item …
A-tArE is displayed. Use this to disable or enable (oFF (default) or on)
an auto tare when the target weight is reached. This allows you to add
items to a box or pallet and auto-tare the weight of each item if it falls in
the target range.
24. Press SELECT …
The current choice is displayed.
76 ZQ375 Checkweigher User Instructions
Page 77

7.2 Supervisor menu for Mid375 application
25. Press PRINT or UNITS to toggle between the choices and when your choice is
displayed, press ZERO to accept …
A-tArE is displayed.
Reset
Check Outputs Out-gzb USegDiv OSegDiv Digits Graph Type
A-tare Reset
26. Press UNITS to go to the next menu item …
rESEt is displayed. Use this to reset the factory defaults for the
checkweighing parameters.
27. Press SELECT …
no is displayed. This is the default value.
28. Press ZERO to abort the reset or, to reset the defaults, press UNITS …
YES is displayed. Accepting this will reset the defaults.
29. Press ZERO to accept …
The defaults are reset and rESEt is displayed.
30. Press TARE …
chEcK is displayed.
7.2.4 Battery
Super Setpoint Tare Check Battery
The Battery menu is the same in all the applications. See Battery on page 69.
This completes the Supervisor menu for the Mid375 application. Repeatedly press
TARE to return to normal operating mode.
ZQ375 Checkweigher User Instructions 77
Page 78

Supervisor menu
Super
Setpnt
Off
On
Edit Print Reset
Annun In1
No
Ye s
In2 In3
Check Plu
Outputs
Out-gZb USegdiv
Edit Print
Reset
No
Yes
OSegdiv
Prt tot
Tot F m t
Clr Tot
Stats
Packrun
TypeOnOff
Limits
Sample
Digits
Battery
Enable
Tmout
Off
On
Ta re
Edit Print Reset
No
Yes
Tare 1 Tar e 1 0
Import Export
On
OffOnOff
Latch
Unlatch
On
Off
A-tare
Reset
No
Yes
On
Off
None
Print Units
Select Ta re
ZeroF1Target
ID Under
Over
Accu
Port 1
Port 2
USB
Port 1
Port 2 USB
Port 1
Port 2 USB
Disabled
Ta rg et To l -L o To l -H i
TargLo
Ta rg H i
If SAMPLE chosen
as Type
If LIMITS chosen
as Type
OR
Graph
On
Off
PrntHld
User
Key in
UNDER
segment
div. size
Key in
OVER
segment
div. size
Key in
Total Print
Format #
1-3600
minutes
Key in
PLU # to
edit
Tolerance
entry
Tolerance
entry
Tolerance
entry
Key in
pack
size
Appears only
if Preset Tare enabled
SELECT =
TARE =
PRINT =
UNITS =
ZERO =
F1 = Escape or
Tolerance
entry
Tolerance
entry
7.3 Supervisor menu for Adv375 application
This section applies if the Adv375 application is active. The Supervisor menu is shown
in Figure 7.3.
78 ZQ375 Checkweigher User Instructions
Figure 7.3 Supervisor menu for Adv375 applications
Page 79

All numeric values require scroll entry. See Numeric entry procedure on page 19.
Follow these steps to use the Supervisor menu:
Access the Supervisor menu (password 1793). See Accessing the menus on page 49.
7.3.1 Setpoint
Super Setpoint
The Setpoint menu is the same in all the applications. See Setpoint on page 65.
7.3.2 Tare
Super Setpoint Tare
7.3 Supervisor menu for Adv375 application
The Tare menu is the same in all the applications. See Tare on page 72.
7.3.3 Check
Super Setpoint Tare Check
1. From SEtPoint press UNITS …
chEcK is displayed. This is the checkweighing configuration item. Under
this you can:
l Set the outputs to be latched or unlatched
l Enable outputs on or off in gross zero band
l Set the under and over segment division size
l Enable/disable printing of the total in a packrun
l Choose the total print format number
l Enable/disable clearing the total after a packrun
l Turn weight digits on or off during checkweighing
l Turn checkweighing graph on or off during checkweighing
l Enable/disable Standard Deviation calculation on a packrun
l Choose the number of weighments in a packrun
l Set the type of checkweighing: Limits or Sample
l Enable/disable auto tare when target weight is reached
l Reset all the checkweighing items to factory defaults.
Follow the steps below.
ZQ375 Checkweigher User Instructions 79
Page 80

Supervisor menu
Outputs
Check Outputs
2. From chEcK, press SELECT …
outPutS is displayed. There are two choices for outputs, LAtch and
unLAtch (default). If you choose LAtch, this means that weights will
have to stabilize at or above the output value before the relay or
annunciator changes. If you choose unLAtch, the relay and annunciator
will change instantly as the weight swings above and below the output
value.
3. From outPutS, press SELECT …
The current choice is displayed, LAtch or unLAtch.
4. Press PRINT or UNITS to toggle between the choices and when your choice is
displayed, press ZERO to accept …
outPutS is displayed.
Outputs-gross zero band
Check Outputs Out-gzb
5. Press UNITS to go to the next menu item …
out-gZb is displayed. This stands for output-gross zero band. You can
set outputs to on (default) while the weight is in the gross zero band or
set them to oFF while the weight is in the gross zero band.
6. Press SELECT …
The current choice is displayed.
7. Press PRINT or UNITS to toggle between the choices and when your choice is
displayed, press ZERO to accept …
out-gZb is displayed.
Under segment division
Check Outputs Out-gzb USegDiv
8. Press UNITS to go to the next menu item …
uSEgdiV is displayed. This stands for under-segment division size.
Choose how many divisions are equal to one segment on the UNDER
display bargraph. You can key in a value from 1 to 1000 divisions per
segment. 1 is the default value.
9. Press SELECT …
The current value is displayed.
80 ZQ375 Checkweigher User Instructions
Page 81

7.3 Supervisor menu for Adv375 application
10. Key in a new value and press ZERO to accept …
uSEgdiV is displayed.
All numeric values require scroll entry. See Numeric entry procedure on page 19.
Over segment division
Check Outputs Out-gzb USegDiv OSegDiv
11. Press UNITS to go to the next menu item …
oSEgdiV is displayed. This stands for over-segment division size.
Choose how many divisions are equal to one segment on the OVER
display bargraph. You can key in a value from 1 to 1000 divisions per
segment. 1 is the default value.
12. Press SELECT …
The current value is displayed.
13. Key in a new value and press ZERO to accept …
oSEgdiV is displayed.
Print total
Check Outputs Out-gzb USegDiv OSegDiv Prt tot
14. Press UNITS to go to the next menu item …
Prt tot is displayed. Use this to enable/disable printing of the total
packrun information. Choose on (default) to enable and oFF to disable
this function.
15. Press SELECT …
The current choice is displayed.
16. Press PRINT or UNITS to toggle between the choices and when your choice is
displayed, press ZERO to accept …
Prt tot is displayed.
ZQ375 Checkweigher User Instructions 81
Page 82

Supervisor menu
Total format
Check Outputs Out-gzb USegDiv OSegDiv Prt tot Tot Fmt
17. Press UNITS to go to the next menu item …
tot FMt is displayed. Use this to choose a print format for the Total report
of the packrun.
The Total Report for the pack run can be customized to present statistical data of your
choosing. This information is found in the Service manual.
18. Press SELECT …
The current print format number is displayed.
19. Press ZERO to accept this or use the Numeric entry procedure on page 19 to
enter a new print format number and press ZERO to accept …
tot FMt is displayed.
Clear total
Check Outputs Out-gzb USegDiv OSegDiv Prt tot Tot Fmt
Clr Tot
20. Press UNITS to go to the next menu item …
cLr tot is displayed. Use this to enable or disable the clearing of the total
packrun information. Choose on (default) to enable and oFF to disable
the clearing of the information.
21. Press SELECT …
The current choice is displayed.
22. Press PRINT or UNITS to toggle between the choices and when your choice is
displayed, press ZERO to accept …
cLr tot is displayed.
Digits
Check Outputs Out-gzb USegDiv OSegDiv Prt tot Tot Fmt
Clr Tot Digits
23. Press UNITS to go to the next menu item …
digitS is displayed. Use this to turn the weight display on (default) or
oFF when in checkweighing mode. When set to oFF the bargraph is the
only part of the display that is on.
24. Press SELECT …
The current choice is displayed.
82 ZQ375 Checkweigher User Instructions
Page 83

7.3 Supervisor menu for Adv375 application
25. Press PRINT or UNITS to toggle between the choices and when your choice is
displayed, press ZERO to accept …
digitS is displayed.
Graph
Check Outputs Out-gzb USegDiv OSegDiv Prt tot Tot Fmt
Clr Tot Digits Graph
26. Press UNITS to go to the next menu item …
grAPh is displayed. Use this to turn the graph display oFF or on
(default) when in checkweighing mode. When set to oFF the weight
digits are the only part of the display that is on.
27. Press SELECT …
The current choice is displayed.
28. Press PRINT or UNITS to toggle between the choices and when your choice is
displayed, press ZERO to accept …
grAPh is displayed.
Stats
Check Outputs Out-gzb USegDiv OSegDiv Prt tot Tot Fmt
Clr Tot Digits Graph Stats
29. Press UNITS to go to the next menu item …
StAtS is displayed. Use this to enable or disable the standard deviation
statistical program, the X-Bar/R program or to disable StAtS.
If you choose Std dEV, the standard deviation will be calculated after a
packrun is complete.
If you choose X bAr, the trend of the last eight weighments will be
reported in a printout. For more information see X-Bar/R Program on
page 42.
The Reported Printout for the pack run can be customized to present statistical data
of your choosing. This information is found in the Service Manual.
If you choose diSAbLEd, no statistical information will be calculated.
This is the default choice.
30. Press SELECT …
The current choice is displayed.
31. Press PRINT or UNITS to toggle between the choices and when your choice is
displayed, press ZERO to accept …
StAtS is displayed.
ZQ375 Checkweigher User Instructions 83
Page 84

Supervisor menu
Packrun
Check Outputs Out-gzb USegDiv OSegDiv Prt tot Tot Fmt
Clr Tot Digits Graph Stats Packrun
32. Press UNITS to go to the next menu item …
PAcKrun is displayed. Use this to set the number of items in the
packrun.
33. Press SELECT …
The current packrun number is displayed.
34. Press ZERO to accept this or use the Numeric entry procedure on page 19 to
enter a new packrun number and press ZERO to accept …
PAcKrun is displayed.
Type
Check Outputs Out-gzb USegDiv OSegDiv Prt tot Tot Fmt
Clr Tot Digits Graph Stats Packrun Type
35. Press UNITS to go to the next menu item …
TYPE is displayed. Use this to choose which type of checkweighing you
want to do: SAMPLE (default) or LiMitS.
Select SAMPLE mode (default) if you want to enter the Toler-Hi and
Toler-Lo and target weight in the PLU editor.
Select LiMitS if you want to enter the targ-lo and targ-hi and target
values.
36. Press SELECT …
The current choice is displayed.
37. Press PRINT or UNITS to toggle between the choices and when your choice is
displayed, press ZERO to accept …
TYPE is displayed.
Auto Tare
Check Outputs Out-gzb USegDiv OSegDiv Prt tot Tot Fmt
Clr Tot Digits Graph Stats Packrun Type A-tare
38. Press UNITS to go to the next menu item …
A-tArE is displayed. Use this to disable or enable (oFF (default) or on)
an auto tare when the target weight is reached. This allows you to add
items to a box or pallet and auto-tare the weight of each item if it falls in
the target range.
39. Press SELECT …
The current choice is displayed.
84 ZQ375 Checkweigher User Instructions
Page 85

7.3 Supervisor menu for Adv375 application
40. Press PRINT or UNITS to toggle between the choices and when your choice is
displayed, press ZERO to accept …
A-tArE is displayed.
Reset
Check Outputs Out-gzb USegDiv OSegDiv Prt tot Tot Fmt
Clr Tot Digits Graph Stats Packrun Type A-tare Reset
41. Press UNITS to go to the next menu item …
rESEt is displayed. Use this to reset the factory defaults for the
checkweighing parameters.
42. Press SELECT …
no is displayed. This is the default value.
43. Press ZERO to abort the reset or, to reset the defaults, press UNITS …
YES is displayed. Accepting this will reset the defaults.
44. Press ZERO to accept …
The defaults are reset and rESEt is displayed.
45. Press TARE …
chEcK is displayed.
7.3.4 PLU
Super Setpoint Tare Check Plu
1. Press UNITS to go to the next menu item …
PLu is displayed. This stand for Product Look Up. Use this to edit the
PLU list, print the list or reset the PLUs to factory defaults.
PLUs consist of a sequential number as an identifier, a target weight, a
target-low weight and a target-high weight.
Edit
PLU Edit
2. Press SELECT …
Edit is displayed. Use this item to setup the PLU list.
3. Press SELECT …
A numeric entry screen appears with a flashing 0.
ZQ375 Checkweigher User Instructions 85
Page 86

Supervisor menu
4. Use the Numeric entry procedure on page 19 to enter the PLU number you
wish to create or edit and press ZERO to accept …
tArGEt is displayed. Use this to set the target weight.
If you are editing an existing PLU, the tolerance and target values displayed will be
the values stored in the PLU.
If you are creating a new PLU, default values will be displayed.
5. Press SELECT …
The current value of the net weight on the scale platform is displayed.
This is done so that you can use the actual product assigned to this
specific PLU number to establish the target weight without having to
manually enter the value.
6. Press ZERO to accept this value or use the Numeric entry procedure on page
19 to enter the target weight and press ZERO to accept …
tArgEt is displayed.
7. Press UNITS to go to the next menu item …
If SAMPLE mode is chosen as checkweighing type, toL-Lo is displayed.
If LiMitS mode is chosen as checkweighing type, tArgLo is displayed.
Use either to set the lowest weight that is still acceptable--the Target or
Tolerance Low weight.
8. Press SELECT …
A default value appears with a flashing rightmost digit. If this is the
tArgLo value, the displayed value will be the current net weight on the
scale minus one division. If this is the toL-Lo value, the displayed value
will be the current division size.
9. Use the Numeric entry procedure on page 19 to enter the value and press
ZERO to accept …
toL-Lo or tArgLo is displayed.
10. Press UNITS to go to the next menu item …
If SAMPLE mode is chosen as checkweighing type, toL-hi is displayed.
If LiMitS mode is chosen as checkweighing type, tArghi is displayed.
Use either to set the highest weight that is still acceptable--the Target or
Tolerance High weight.
11. Press SELECT …
A default value appears with a flashing rightmost digit. If this is the
tArghi value, the displayed value will be the current net weight on the
scale plus one division. If this is the toL-hi value, the displayed value will
be the current division size.
86 ZQ375 Checkweigher User Instructions
Page 87

7.3 Supervisor menu for Adv375 application
12. Use the Numeric entry procedure on page 19 to enter the target high weight
and press ZERO to accept …
toL-hi or tArghi is displayed.
13. Press TARE …
Edit is displayed.
Print
PLU Edit Print
14. Press UNITS to go to the next menu item …
Print is displayed. Use this to print the PLU information.
15. Press SELECT …
Port 1 is displayed.
16. Press F1 to abort the print process or press UNITS to scroll to the desired port
and press ZERO to print the information …
Print is displayed after either action.
Import
PLU Edit Print Import
17. Press UNITS …
iMPort is displayed. Use this to import a .CSV (comma separated value)
file of PLU values from a plugged in USB thumbdrive. This will overwrite
any existing PLU values.
The USB drive MUST be plugged in before you enter the Supervisor menu for the
iMPort and EXPort commands to work.
To insure that the CSV file format to Import is acceptable do the following: Create at
least one PLU using PLU>EDIT, then Export to the USB thumbdrive.
Open the file using Excel and copy and paste the row containing the PLU values into
the number of rows necessary. Edit changes to the PLUNumber (1-500) and the
target and tolerance values for Sample mode or the target high and low values for
Limits mode as needed. Then save the file on the thumbdrive and Import back into the
indicator. See PLU CSV file import error messages on page 60.
18. With iMPort displayed, press SELECT to import the file …
buSY and donE are briefly displayed as the .CSV file is imported and
the old PLU values are overwritten. iMPort is displayed when finished.
ZQ375 Checkweigher User Instructions 87
Page 88

Supervisor menu
Export
PLU Edit Print Import Export
19. Press UNITS …
EXPort is displayed. Use this to export the current PLU settings to a
.CSV file in a connected USB thumbdrive.
20. With EXPort displayed, press SELECT to export the file …
buSY and donE are briefly displayed as the .CSV file is exported to the
USB drive. EXPort is displayed when finished.
Reset
PLU Edit Print Import Export Reset
21. Press UNITS …
rESEt is displayed. Use this to reset the accumulation channels and
associated data.
22. Press SELECT …
no is displayed. This is the default choice.
23. With no displayed, press ZERO to abort the reset action or press UNITS to
toggle to YES and press ZERO to reset the information …
rESEt is displayed after either action.
24. Press TARE …
PLu is displayed.
7.3.5 Battery
Super Setpoint Tare Check Plu Battery
The Battery menu is the same in all the applications. See Battery on page 69.
This completes the Supervisor menu for the Adv375 application. Repeatedly press
TARE to return to normal operating mode.
88 ZQ375 Checkweigher User Instructions
Page 89

7.4 Supervisor menu for Per375 application
Super
Setpnt
Off
On
Edit Print Reset
Annun In1
No
Yes
In2 In3
Check Plu
Outputs
Out-gZb USegdiv
Edit Print
Reset
No
Yes
OSegdiv
Prt tot
Tot F m t
Clr Tot
Stats
Packrun
Type
Reset
On
Off
Limits
Sample
No
Yes
Digits
Battery
Enable
Tmout
Off
On
Ta re
Edit Print Reset
No
Ye s
Tar e 1 Ta re 10
Disabled
Import Export
On
OffOnOff
Latch
Unlatch
On
Off
Port 1
Port 2
USB
Port 1
Port 2 USB
None
Print Units
Select Ta r e
ZeroF1Target
ID Under
Over
Accu
Port 1
Port 2 USB
Target To l- L o To l -H i
Ta rg L o
Ta rg H i
If SAMPLE chosen
as Type
If LIMITS chosen
as Type
OR
Graph
On
Off
PrntHld
User
Key in
UNDER
segment
div. size
Key in
OVER
segment
div. size
Key in
Total Print
Format #
1-3600
minutes
Key in
PLU # to
edit
Tolerance
entry
Tolerance
entry
Tolerance
entry
Key in
pack
size
Appears only
if Preset Tare enabled
SELECT =
TARE =
PRINT =
UNITS =
ZERO =
F1 = Escape or
Tolerance
entry
Tolerance
entry
7.4 Supervisor menu for Per375 application
This section applies if the Per375 application is active. The Supervisor menu is shown
in Figure 7.4.
ZQ375 Checkweigher User Instructions 89
Figure 7.4 Supervisor menu for Per375 applications
Page 90

Supervisor menu
Access the Supervisor menu (password 1793). See Accessing the menus on page 49.
All numeric values require scroll entry. See Numeric entry procedure on page 19.
7.4.1 Setpoint
Super Setpoint
The Setpoint menu is the same in all the applications. See Setpoint on page 65.
7.4.2 Tare
Super Setpoint Tare
The Tare menu is the same in all the applications. See Tare on page 72.
7.4.3 Check
Super Setpoint Tare Check
The Check menu is the same as the Check menu in the Adv375 application with one
exception: A-tare (auto tare) is not available in the Per375 application. See Check on
page 79.
7.4.4 PLU
Super Setpoint Tare Check Plu
The PLU menu is the same as the PLU menu in the Adv375 application. See PLU on
page 85.
7.4.5 Battery
Super Setpoint Tare Check Plu Battery
The Battery menu is the same in all the applications. See Battery on page 69.
90 ZQ375 Checkweigher User Instructions
Page 91

7.5 Supervisor menu for the Grad375 application
Ta re
Super
Setpnt
Battery
Enable
Tmout
Off
On
Grading
Grad 1 Grad 11
Edit Print
Reset
No
Yes
Tar e 1 Tar e 1 0
Off
On
Edit Print Reset
Annun In1
No
Yes
In2 In3
Port 1
Port 2 USB
Port 1
Port 2 USB
None Print Units
Select Ta r e Zero
F1
Target
ID Under
Over
Accu
Type
Pos
Neg
Ta re
Manual
Auto
Print
Manual
Auto
PrntHld
User
1-3600
minutes
Appears only
if Preset Tare enabled
SELECT =
TARE =
PRINT =
UNITS =
ZERO =
F1 = Escape or
Appears only if Negative
grading selected under tYPE
7.5 Supervisor menu for the Grad375 application
This section applies if the Grad375 application is active. The Grad375 Supervisor menu
is shown in Figure 7.5.
All numeric values require scroll entry. See Numeric entry procedure on page 19.
Figure 7.5 Supervisor menu for the Grad375 application
ZQ375 Checkweigher User Instructions 91
Page 92

Supervisor menu
7.5.1 Setpoint
Super Setpoint
The Setpoint menu is the same in all the applications. See Setpoint on page 65.
7.5.2 Tare
Super Setpoint Tare
The Tare menu is the same in all the applications. See Tare on page 72.
7.5.3 Grading
Super Setpoint Tare Grading
Use Grading to set the weight points that define up to 10 weight grades. Follow the
process found in Setting weight grades on page 46.
After the last weight point is set there is another item called tYPE. Under this are two
choices: PoS or nEg. Positive is the default and operates as described in Positive
grading on page 47. If you choose nEg, refer to Negative grading with autotare enabled
on page 47 for instructions.
If negative grading is chosen, two more items appear after tYPE: tArE and Print. Under
each Auto (default) or Manual can be chosen.
Auto Tare If you choose auto tare the scale will tare automatically after each
item is removed from the tote.
Manual Tare If you choose manual tare the user will need to press the TARE
key after the grade is displayed to continue the process.
Auto Print If you choose auto print the print format associated with a PRINT
key press will be performed automatically after each item is
graded.
Manual Print If you choose manual print the print format associated with a
PRINT key press will be performed if the user presses the PRINT
key.
The ‘grading’ token must be used in the print format for the print function to report the
correct weight.
7.5.4 Battery
Super Setpoint Tare Grading Battery
The Battery menu is the same in all the applications. See Battery on page 69.
This completes the Supervisor menu for the Grad375 application. Repeatedly press
TARE to return to normal operating mode.
92 ZQ375 Checkweigher User Instructions
Page 93

Page 94

Avery Weigh-Tronix USA
1000 Armstrong Dr.
Fairmont MN 56031 USA
Tel:507-238-4461
Fax:507-238-4195
Email: usinfo@awtxglobal.com
www.wtxweb.com
Avery Weigh-Tronix UK
Foundry Lane,
Smethwick, West Midlands,
England B66 2LP
Tel:+44 (0) 8453 66 77 88
Fax: +44 (0)121 224 8183
Email: info@awtxglobal.com
www.averyweigh-tronix.com
 Loading...