

Page 1
MONARCHNET2™
1
OPER ATIN G
INSTRUCTIONS
Monarch® Products
TABLETOP PRINTER
TCADTP1MN2OI Rev. AA 7/15
© 2015 Avery Dennison Corp. All rights reserved.
Page 2

Each product a nd program carr ies a respective wr itten warrant y, the only warrant y on which the
customer c an rely. Av ery Dennis on Corp. r eserves the r ight to m ake changes in the prod uct, the
programs, an d their availabil ity at any time and with out notice. Altho ugh Avery Dennis on Corp.
has made ever y effort to provide com plete and accur ate information in this manual, Aver y
Dennison Corp . shall not be liab le for any omissions or inaccuracies . Any update will be
incorporat ed in a later edition of th is manual.
2015 Aver y Dennison Corp. All rights reserved . No part of this publica tion may be repro duced,
transmitted, stored in a retrieval system, or translated into any language in any form by an y
means, witho ut the prior written per mission of Aver y Dennison Corp.
Trademarks
Monarch and Mo narch Net2 are tradem arks of Av ery Dennison Corp.
Microsoft, W indows, an d NT are tr ademark s of Microsoft Corporation in the Unit ed States and/or
other countries.
Firefox is a trademark of Mozill a Corporati on.
UNIX is a tr ademark of The Open Gr oup.
Novell and N etWare ar e trademark s of Novell, Inc. in th e United St ates and o ther countr ies.
HP Jet Adm in and HP W eb Jet Adm in are trad emarks of Hewlett-Packard, Inc.
The Bluetooth trademarks are owned by Bluetoot h SIG, Inc.
Excerpts re printed from Wireless LANs Implementi ng High Perform ance IEEE 802.1 1 Networks,
Second Edit ion with per mission.
Avery Denn ison Printer Systems Di vision
170 Monarch Lane
Miamisburg, OH45342
Page 3

TABLE OF CONTENTS
GETTING STARTED ................................................................................................................................... 1-1
Audience .............................................................................................................................................. 1-1
System Requirements ........................................................................................................................... 1-1
Specifications ....................................................................................................................................... 1-2
Verifying a Wireless Connection ............................................................................................................. 1-2
Printing a MonarchNet2 Test Label......................................................................................................... 1-2
USING A WEB BROW SER .......................................................................................................................... 2-1
Logging In ............................................................................................................................................ 2-1
Configuring the Printer .......................................................................................................................... 2-3
Changing the Printer Setup ................................................................................................................ 2-3
Changing the System Setup ............................................................................................................... 2-4
Configuring the Network Settings ........................................................................................................... 2-5
Changing TCP/IP Settings .................................................................................................................. 2-5
Changing SNMP Settings ................................................................................................................... 2-7
Changing Wireless Settings ................................................................................................................ 2-8
Basic Security Configurations ............................................................................................................. 2-9
Using WEP...................................................................................................................................... 2-11
Configuring Certificates ................................................................................................................... 2-12
Reset/Initialize Network ....................................................................................................................... 2-13
Reading the Virtual Panel .................................................................................................................... 2-13
Using Custom Commands .................................................................................................................... 2-14
Changing the Password ....................................................................................................................... 2-15
CONSOLE COMMA NDS .............................................................................................................................. 3-1
Conventions ......................................................................................................................................... 3-1
Accessing Telnet Console Mode ............................................................................................................. 3-1
Help Commands ................................................................................................................................... 3-2
General Commands ............................................................................................................................... 3-3
Setup Commands .................................................................................................................................. 3-4
RFID Commands ................................................................................................................................... 3-7
802.11b/g Wireless Commands .............................................................................................................. 3-7
TCP/IP Commands ................................................................................................................................ 3-7
SNMP Commands ................................................................................................................................. 3-8
Using the Network Packet ...................................................................................................................... 3-8
TROUBLESHOOTING ................................................................................................................................. 4-1
Printing a MonarchNet2 Test Label......................................................................................................... 4-1
General Troubleshooting Information ...................................................................................................... 4-2
Troubleshooting Wireless Configuration Problems ................................................................................... 4-3
GLOSSARY ............................................................................................................................................... A-1
Page 4

Page 5

1
GETTING STARTED
Your Avery Dennison Monarch Tabletop Printer 1 may contain a wirele ss module
with MonarchNet2 s oftware. A wireless module a llows remote access to conf igure and control
your printers using a W LAN (wireless local area net work) or WWW (world-wide web) connect ion.
The wireless module comm unicates on an 802.11a/b/g/ n wireless network.
Refer to your network m anuals for more information. T his manual does not include inf ormation
about setting up your wireles s network.
Audience
This manual is written f or the System Administrator who set s up printers on the network and is
familiar with basic net working principles.
System Requirements
To use the wireless module for printing from a wireless network, you need an 802.11a/b/g/n wireless
network. The wireless networ k consists of either of t he following:
♦ An 802.11a/b/g/n wireless-enabled computer pr inting straight to the printer (Ad-Hoc mode).
♦ An 802.11a/b/g/n wireless access point allowing wireless a nd wired Ethernet-enabled com puters
to print to the wireless module (infrastr ucture mode).
To configure and print , you need the following:
1. The MAC address from the label of the wireless modu le(for example: 004017023 F96).
2. The following inform ation from your wireless net work administrator:
♦ Wireless mode (infrast ructure or Ad-Hoc).
♦ The SSID (service set identif ier) for your wireless net work.
♦ If you are using TCP/IP (recom mended for Windows Networks) and are not connected to a
DHCP server (for obtaining an IP address automaticall y), you need a unique IP address f or
the wireless modu le (for example: 192.0.0.1 92) and a subnet mask. If the wireles s module is
not on the same IP subnet as the com puters you are printing f rom, you need a router. A
wireless modu le with an IP address of 192.0.0.192 will not be seen b y a network looking for
devices with a prefix of 10.1.xxx.xxx. A router (default gateway) address is optiona l.
♦ Wireless security settings.
Getting Started1-1
Page 6

Mode:
Wireless icon and signal strength
IP Address
Specifications
Link Layer:
Protocols:
802.3 Commun ication Rate:
Frequency:
Communication
Rate:
Channels
Encryption:
Authentication:
802.3 or optional 802.11a/b/g/n
TCP/IP
Passthru
DHCP
LPD/LPR
Telnet
RSH (remot e shell)
FTP
SNMP
HP JetAdmin™
10 Mbps or 1 00 Mbps
2.4 GHz ran ge, direct s equence
1, 2, 5.5, 11 , 12, 18, 24 , 36, 48, or 54 megabi ts per seco nd
1 to 11
Ad-Hoc or infrastructur e
WEP 64 or WEP 128
WPA or W PA2
EAP-FAST
LEAP
PEAP
TLS
TTLS
PSK
Verifying a Wireless Connection
When the printer is turned on, the wireless mod ule r uns through a set of power-up diag nostics for a
few seconds. Then the displa y shows the wireless connecti on icon, wireless connect ion signal
strength, and your pri nter’s IP (Internet Proto col) address.
Printing a MonarchNet2 Test Label
Press TLABEL and selec t Mnet2 Label
1-2 MonarchNet2 Operating Instructions
Page 7
2
USING A WEB BROWSER
You can configure and manage the printer using a Web browser. The recommended minimum
screen resolution for your computer is 1024 x 768 pixels. Before you begin, you need to know your
printer’s IP address. T he printer should be turned on and r eady to receive data.
Note: The screens shown in this manual may not exactly match what you see.
It may take about a minute, depe nding on network traff ic, for the printer to connect to an access
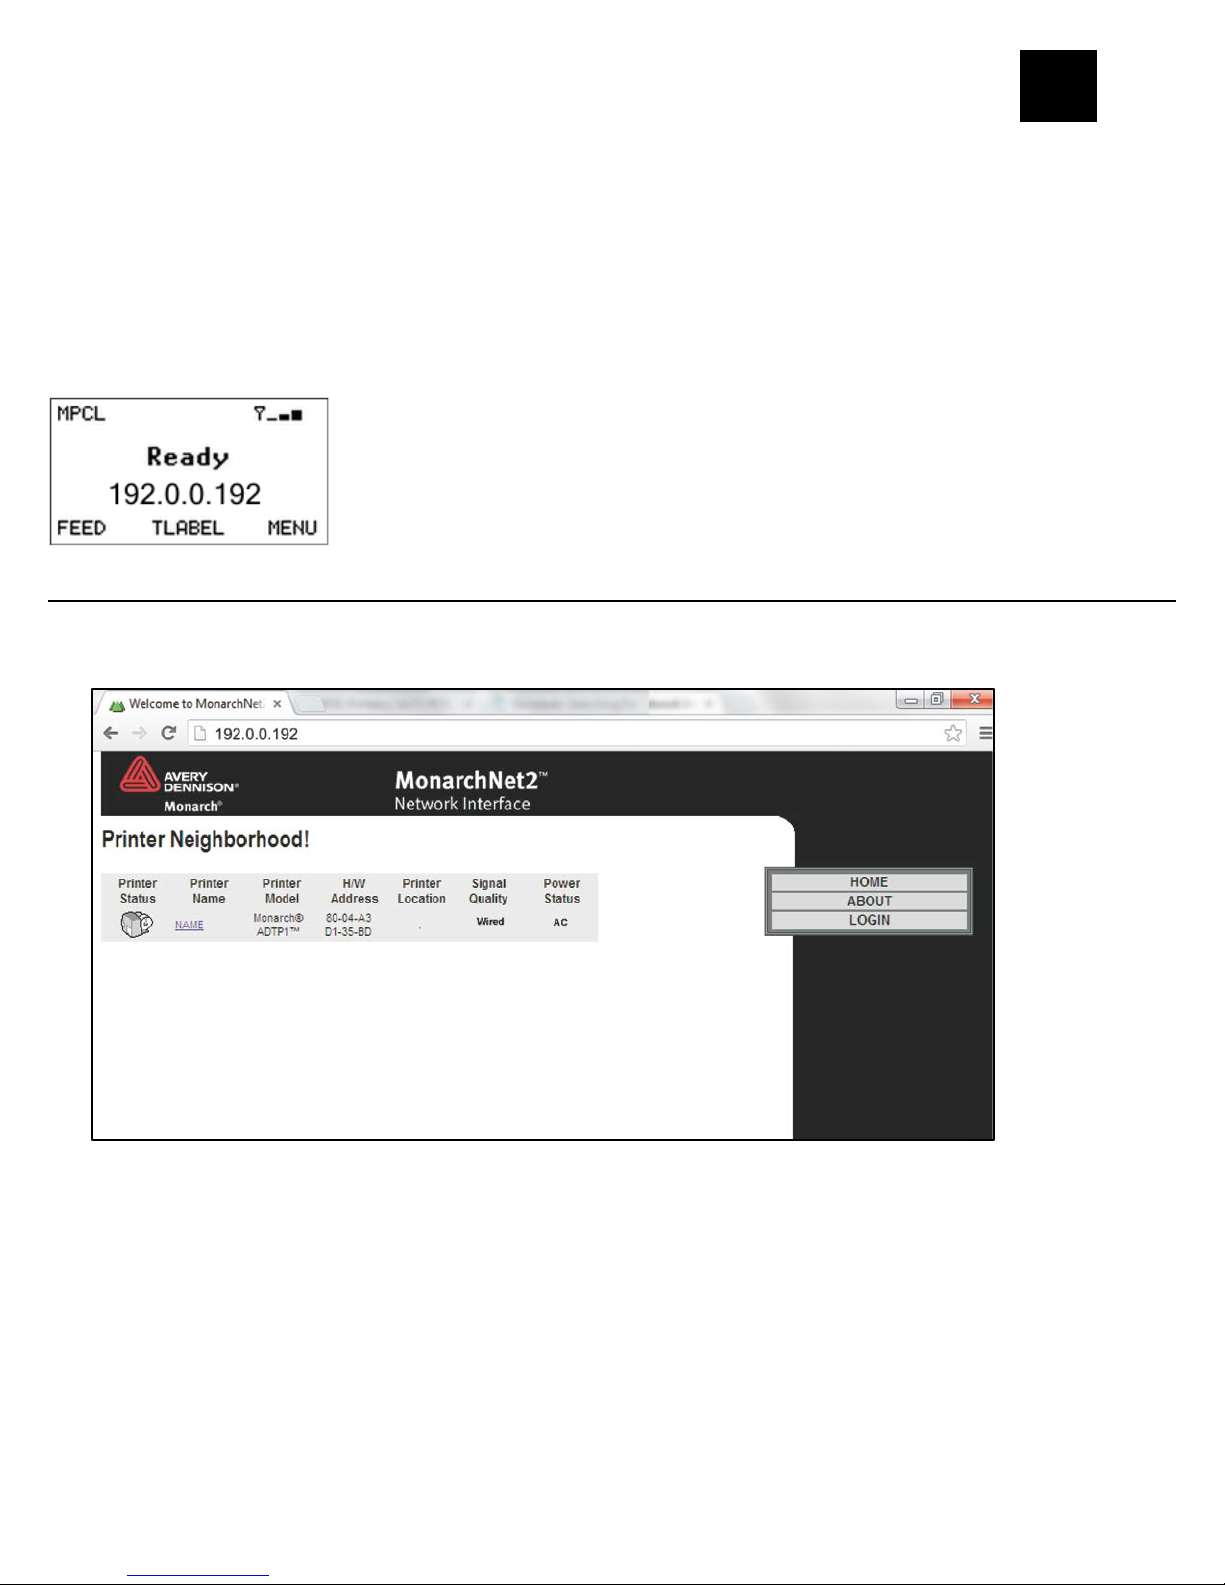
point. When the printer is co nnected and ready to receive data you see:
The printer’s display sho ws the antenna symbol when the pr inter is connected and read y to receive
data.
Logging In
1. Start your Web browser.
2. Type in your printer’s IP addr ess and press Enter. For example, 192 .0.0.192.
If the printer is experiencing a ribbon or supply problem, t he icon for Printer Status appear s
with a red backgr ound.
If the printer has a wireless connection, the signal str ength icon appears.
The power status shows AC or DC (us ing a Mobile Work Station) depending on your
connection.
3. Click Log In or the printer’s name (for example: PXR8A983A).
Using a Web Browser2-1
Page 8
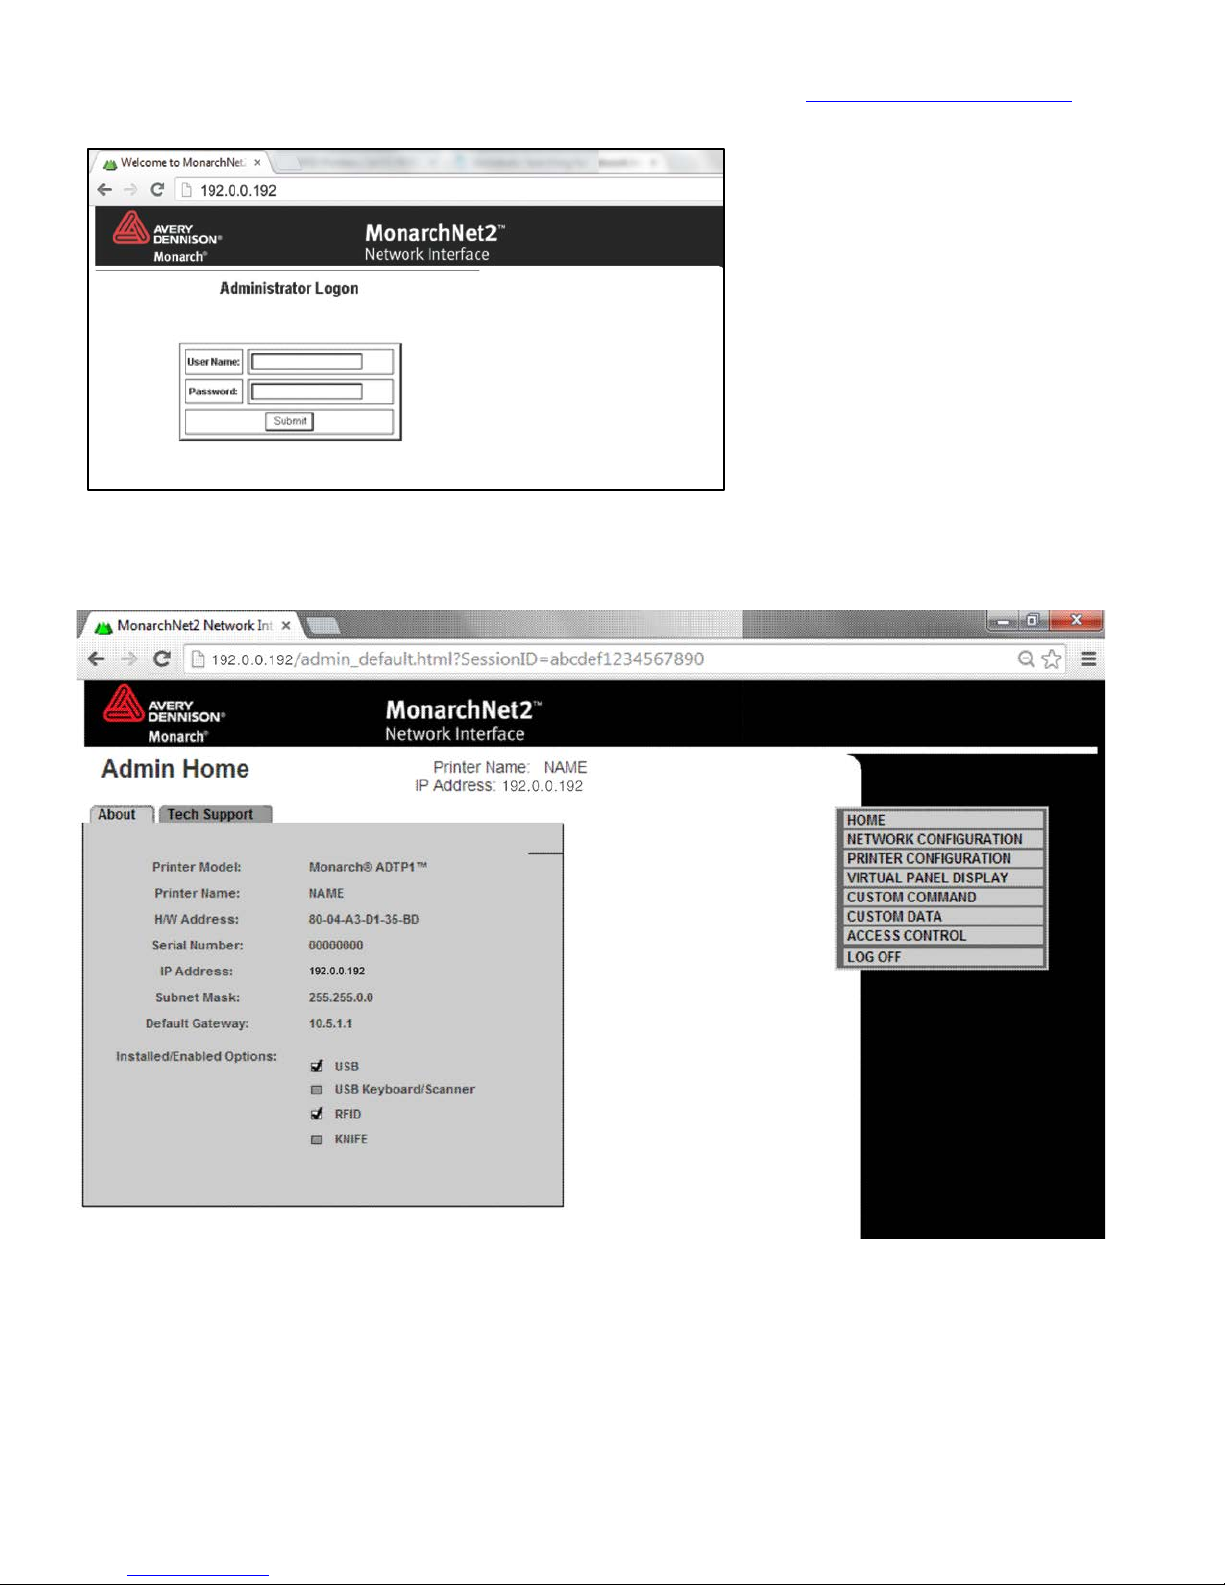
4. Type access for the password and click Submit. You do not need a us er name. The password
is case-sensitive and saved in the pr inter’s flash memor y. See “
Changing the Password” to
change the password.
The About tab appears with inf ormation about your printer , including printer name, IP address,
installed/enabled opt ions, and more.
Click the Tech Support t ab if you need to contact us.
2-2 MonarchNet2 Operating Instructions
Page 9
Configuring the Printer
You can configure the printer using your Web browser.
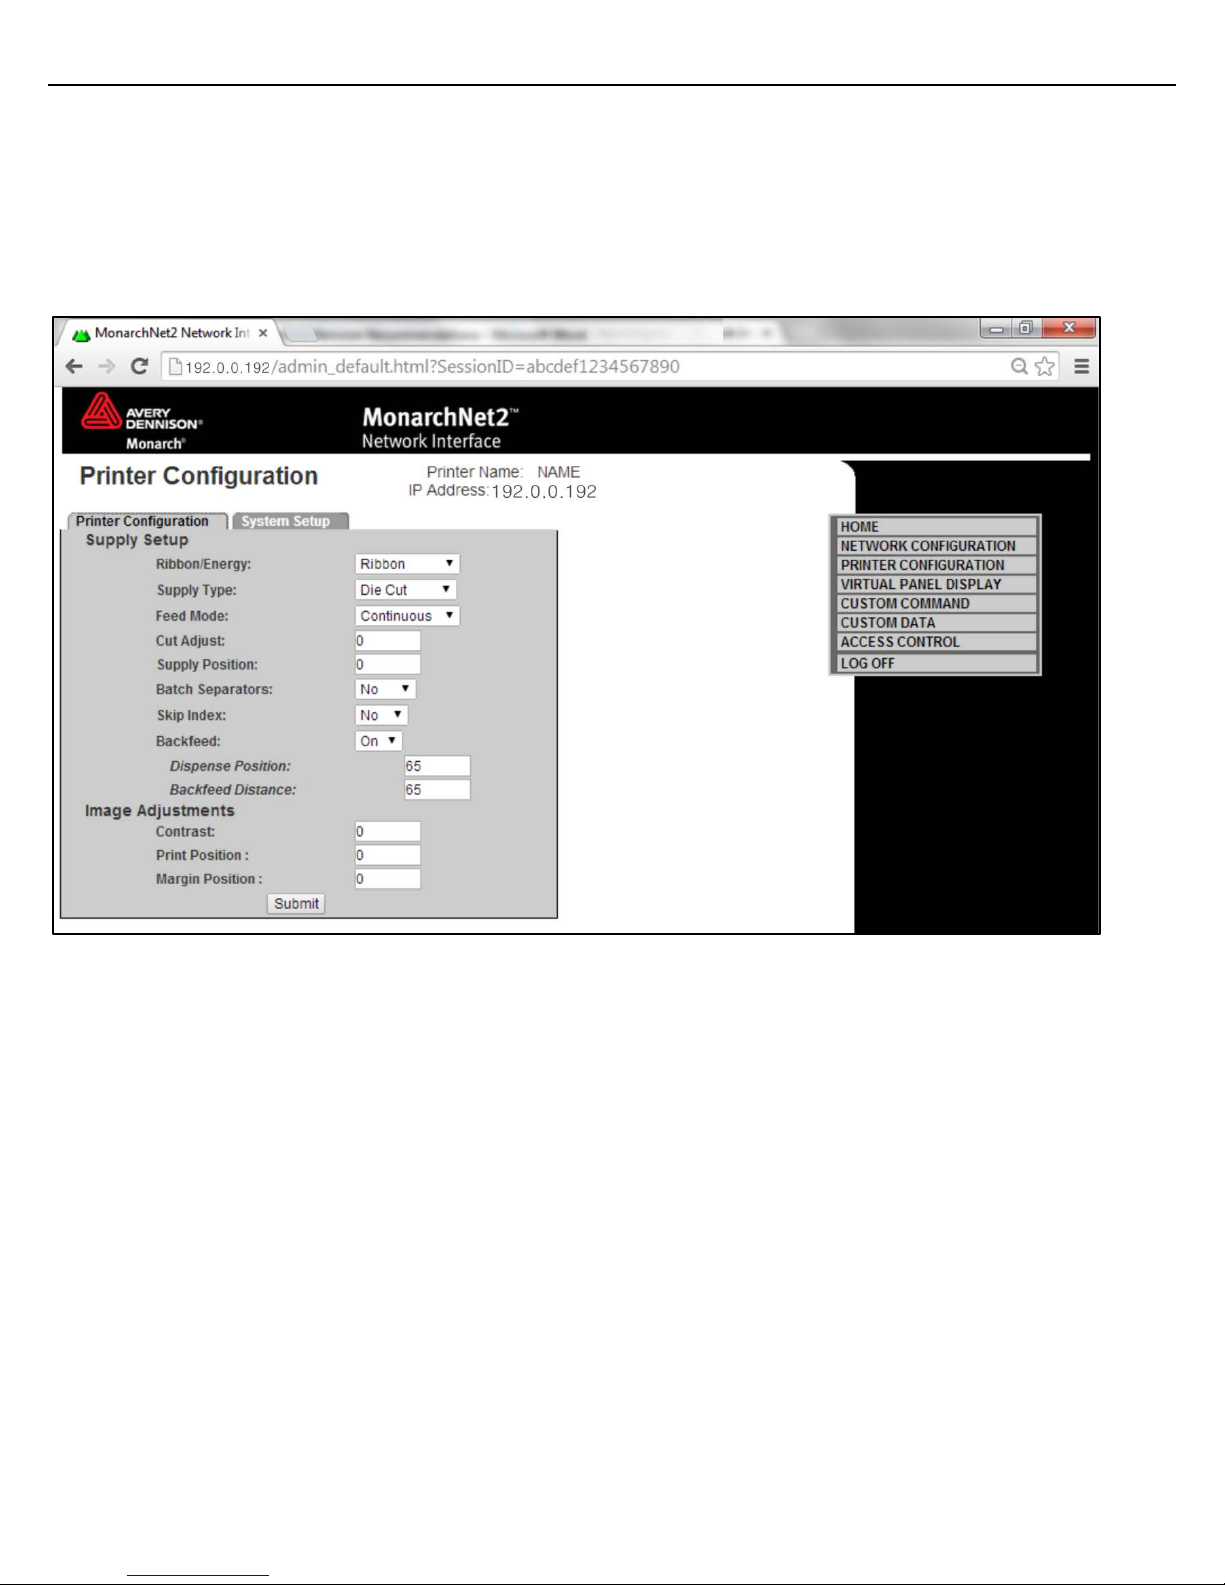
1. From the side Menu Bar, click Pri nter Configuration.
2. Select one of the following tabs: Printer Setup or Sup ply Setup.
Changing the Pri nter Setup
Only configure the set tings required for your network /printer.
Note: Only the available options f or your printer are displa yed.
1. On the Printer Setup tab, set the Ribbon: None, Ribbon, or Hig h Energy.
2. Set the Supply Type: Edge Aperture, Edge Die Cut, Edge Black Mark, Continuous, Cent er
Aperture, Center D ie Cut, or Center Black Mark .
3. Set the Feed Mode: Continuous, On Demand, or Liner take-up (o ptional).
4. Enter a value for the Cut Adjust (Pos ition). The range is –300 to 300. T his adjusts where the
tag is cut.
5. Enter a value for the Suppl y Position. The range is –300 to 300. This adjusts the printer to
print at the vertical 0, 0 point. Only adjust on initial pr inter setup.
6. Set the Batch Separators: No, Yes, or Long.
7. Set the Skip Index mode: No or Yes. Skip index allows you to print an imag e over multiple
labels.
8. Set the Backfeed: Off, On, or Extended. Backfeed advances each printe d label to the specified
dispense position and t hen backs up the next label to be print ed underneath the printh ead. Do
not use extended backfeed on print ers without a cutter.
9. Enter a value for the Dispens e Position (range is 50 to 200). This adjusts the stopping point of
the label after it is pri nted.
10. Enter a value for the Backfee d Distance (range is 20 t o 200). This is the amount to move the
label backwards before printing.
Using a Web Browser2-3
Page 10
11. Enter a value for the Contrast (range is –69 9 to 699). This adjusts the dar kness of printing on
the supply.
12. Enter a value for the Print Posi tion (range is –450 to 450). This adjusts where data print s
vertically on the suppl y.
13. Enter a value for the Margin Posi tion (range is –99 to 99). This adjusts where data prints
horizontally on the suppl y.
14. Click Submit when f inished.
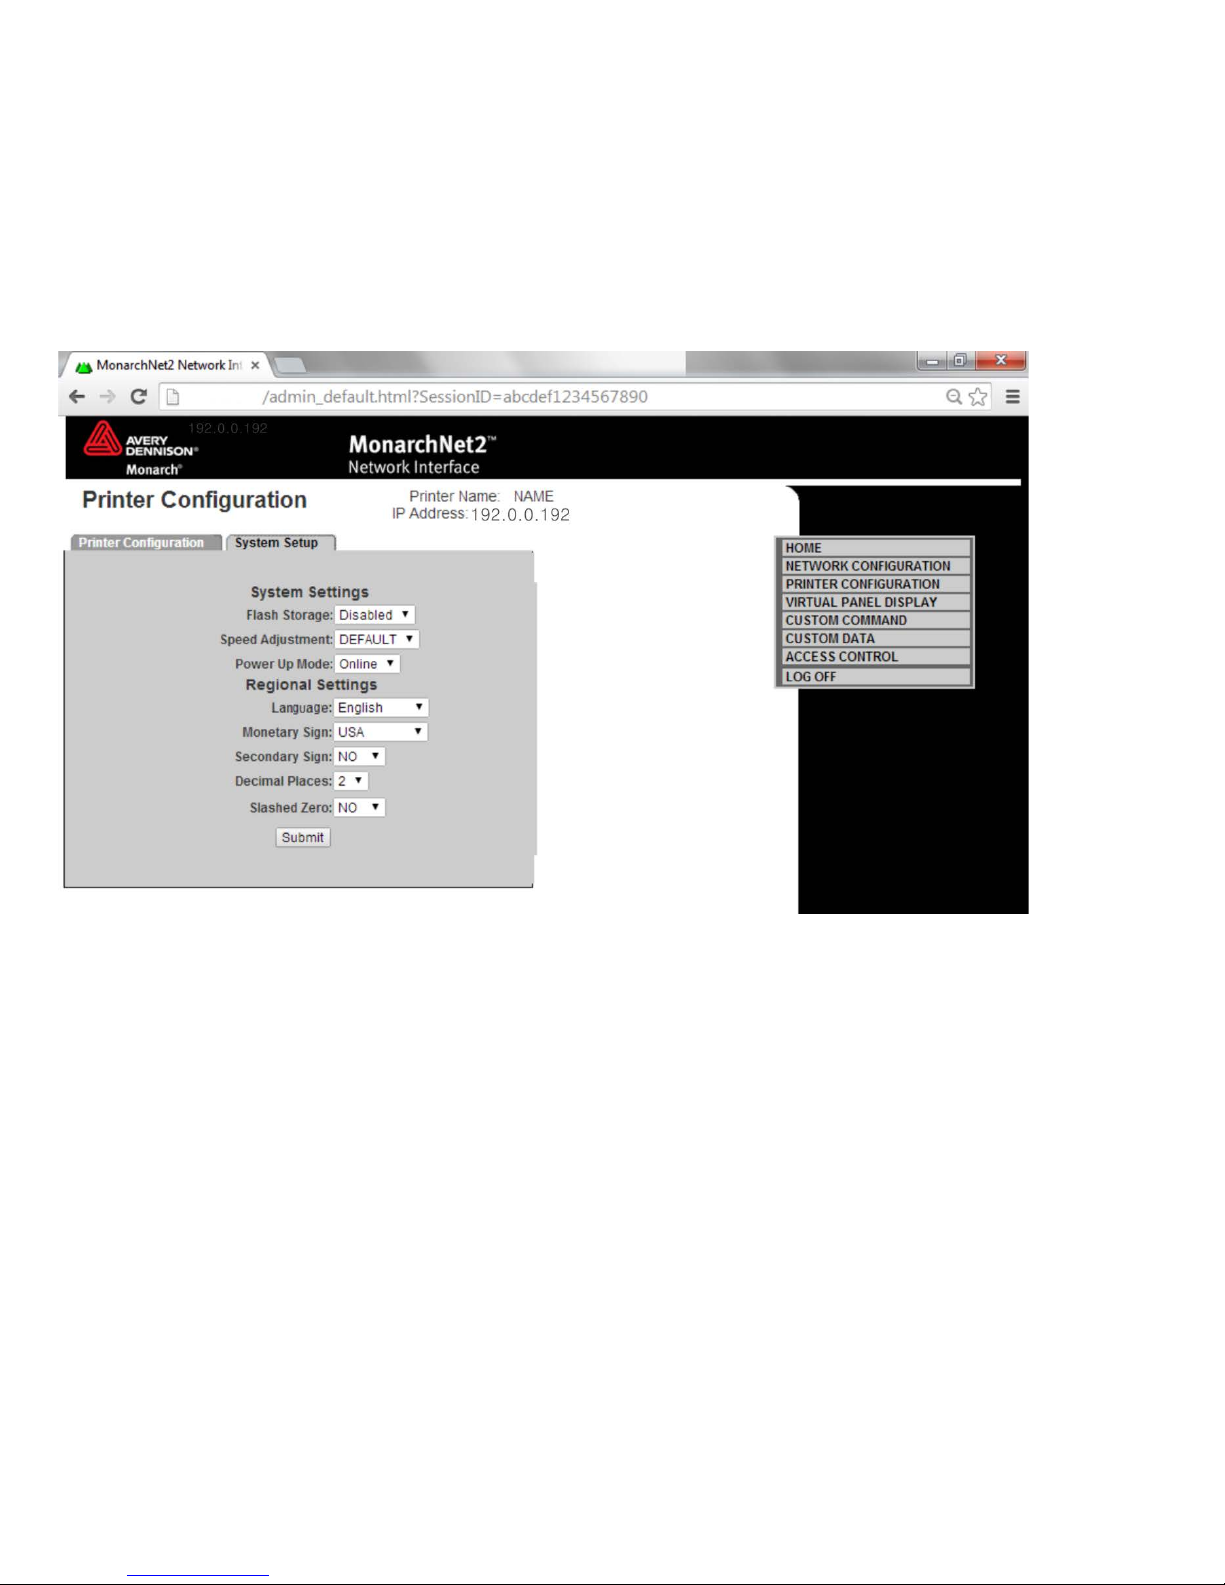
Changing the S ystem Setup
Only configure the set tings required for your printe r.
1. On the System Setup tab, set the Flash Storage: Enabled or Disable d. Flash storage allows
packets with “R” or “N” selector s to be stored in Flash Memory, instead of volatile RAM. Packet s
stored in flash memory are sa ved when the printer is turned off .
2. Set the Speed Adjustment: Default, 2 .5, 4.0, 6.0, 8.0 10.0, or 12.0 ips. If you select “Default, ”
serial bar codes print at 2. 5 ips; parallel bar codes print at 6.0 ips.
3. Set the Power Up Mode: Online or Off line.
4. Select the Language.
5. Set the Monetary Sign: None, USA, UK, Japan, Germany, France, Spain, I taly, Sweden,
Finland, Austria, India , Russia, Korea, Thailand, Ch ina, Euro-Dollar.
6. Set the Secondary Sign: No or Yes.
7. Set the number of Decimal Place s: 0, 1, 2, or 3.
8. Select Slashed Zer o to print zeros with a slash (Ø ): No or Yes.
9. Click Submit when finished.
2-4 MonarchNet2 Operating Instructions
Page 11
Configuring the Network Settings
You can configure the printer to operate on your net work.
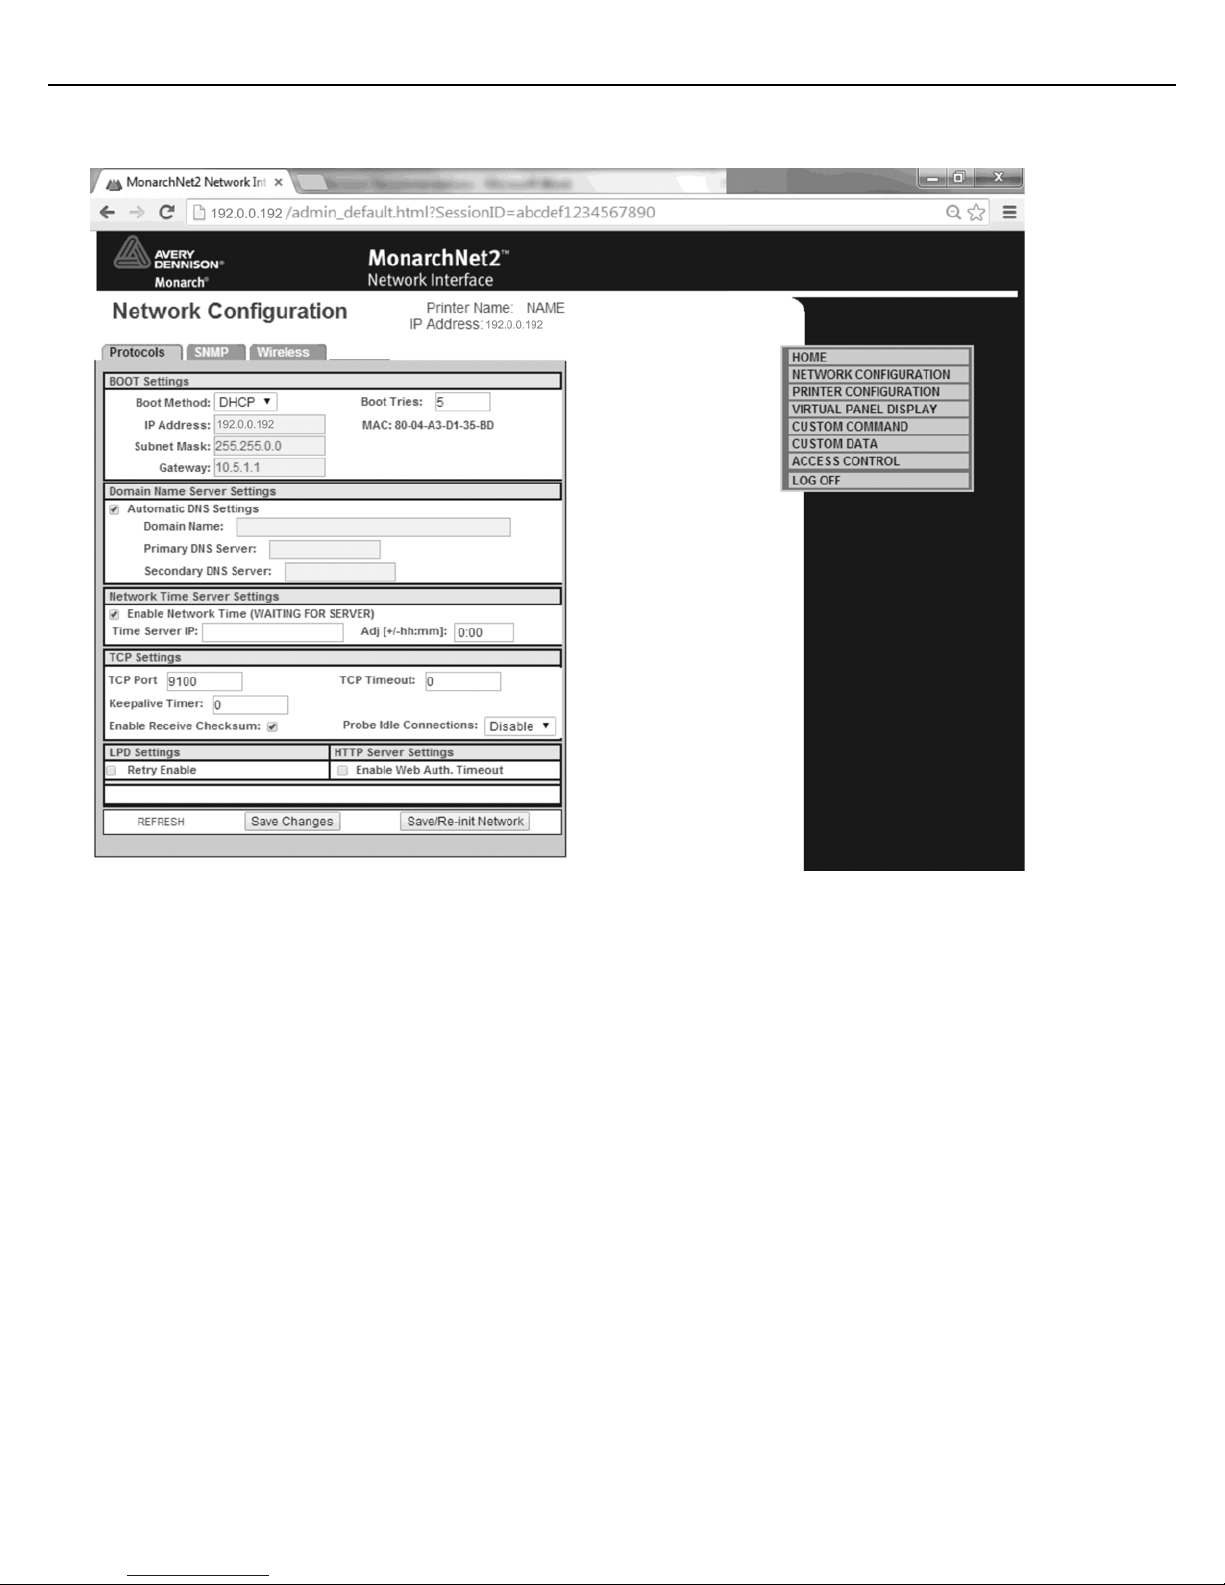
1. From the side Menu Bar, click Netw ork Configuration.
2. Select one of the following tabs: Protocols, SNMP, Wireless , or Alerts.
Changing TCP/IP Settings
Only configure the set tings required for your network /printer.
1. On the Protocols tab, set the Boot Method: Auto, DHCP, or Static.
2. Set the number of Boo t Tries : 1-10. The default is 3. If you are ha ving a problem receiving an
IP address with BOOTP, s et this number to 10.
3. Change the IP Address if necessary.
4. Set or change the Subnet Mask.
5. Set or change the Gateway.
6. Select either No Subnet or No Gateway for RARP.
7. Select Automat ic DNS Settings to automat ically configure the domain name se ttings.
8. Enter the Domain Name.
9. Enter the Primar y DNS Server’s IP address .
10. Enter the Secondary DNS Ser ver’s IP address.
11. Select Enable Netw ork Time to enable the networ k time protocol, which allo ws the printer to
query a time server on the net work and synchronize the clock in the printer.
Using a Web Browser2-5
Page 12

12. Enter the Time Server’s IP address. The printer waits 20 seconds for the server to respond.
The status is displayed with in parentheses: “W aiting for Server,” “Time Server Error,” or the
current date and time.
13. Enter the Time Zone Adjustment in ho urs and minutes, from Green wich Mean Time (GMT).
This offset varies by locat ion and time zone. For example, East ern/Standard time is f ive hours
behind GMT. Use –5:00 f or the offset. For an offset of 3. 5 hours, use 3:30.
Note: Changes for Daylight Sa vings Time are not made automatica lly. If your time zone
participates in Daylight Savings Time, change the t ime zone offset accordingly.
14. Set the TCP Window. 10240 is the default.
15. Set the TCP Port. Port 9100 is t he default.
16. Set the TCP Timeout (in minutes). The default is 0, which is no timeout .
17. Set the Keepalive Timer (in minut es). The default is 1 minute.
18. Enable or Disable IP Receive CheckSum and Probe Idle Conn ections.
19. Select Retry Enable f or LPD/LPR.
20. Select Enable Web Authorization Timeout t o make the Web pages time out after five (5)
minutes of inactivity.
Note: The time out period is set f or five minutes and cannot be chang ed.
21. Select Enable HP Jet Admin if using HP Jet Admin. No ot her settings are require d for HP
JetAdmin.
22. Click Save Changes to save changes or click Save/Re-init Netw ork to save the changes and re-
initialize the network with the new settings. Any chang es made on this screen or other s creens
do not take effect unt il you click Save/Re-init Netw ork.
This process takes a few minutes.
2-6 MonarchNet2 Operating Instructions
Page 13
Changing SNMP S ettings
Only configure the set tings required for your network /printer.
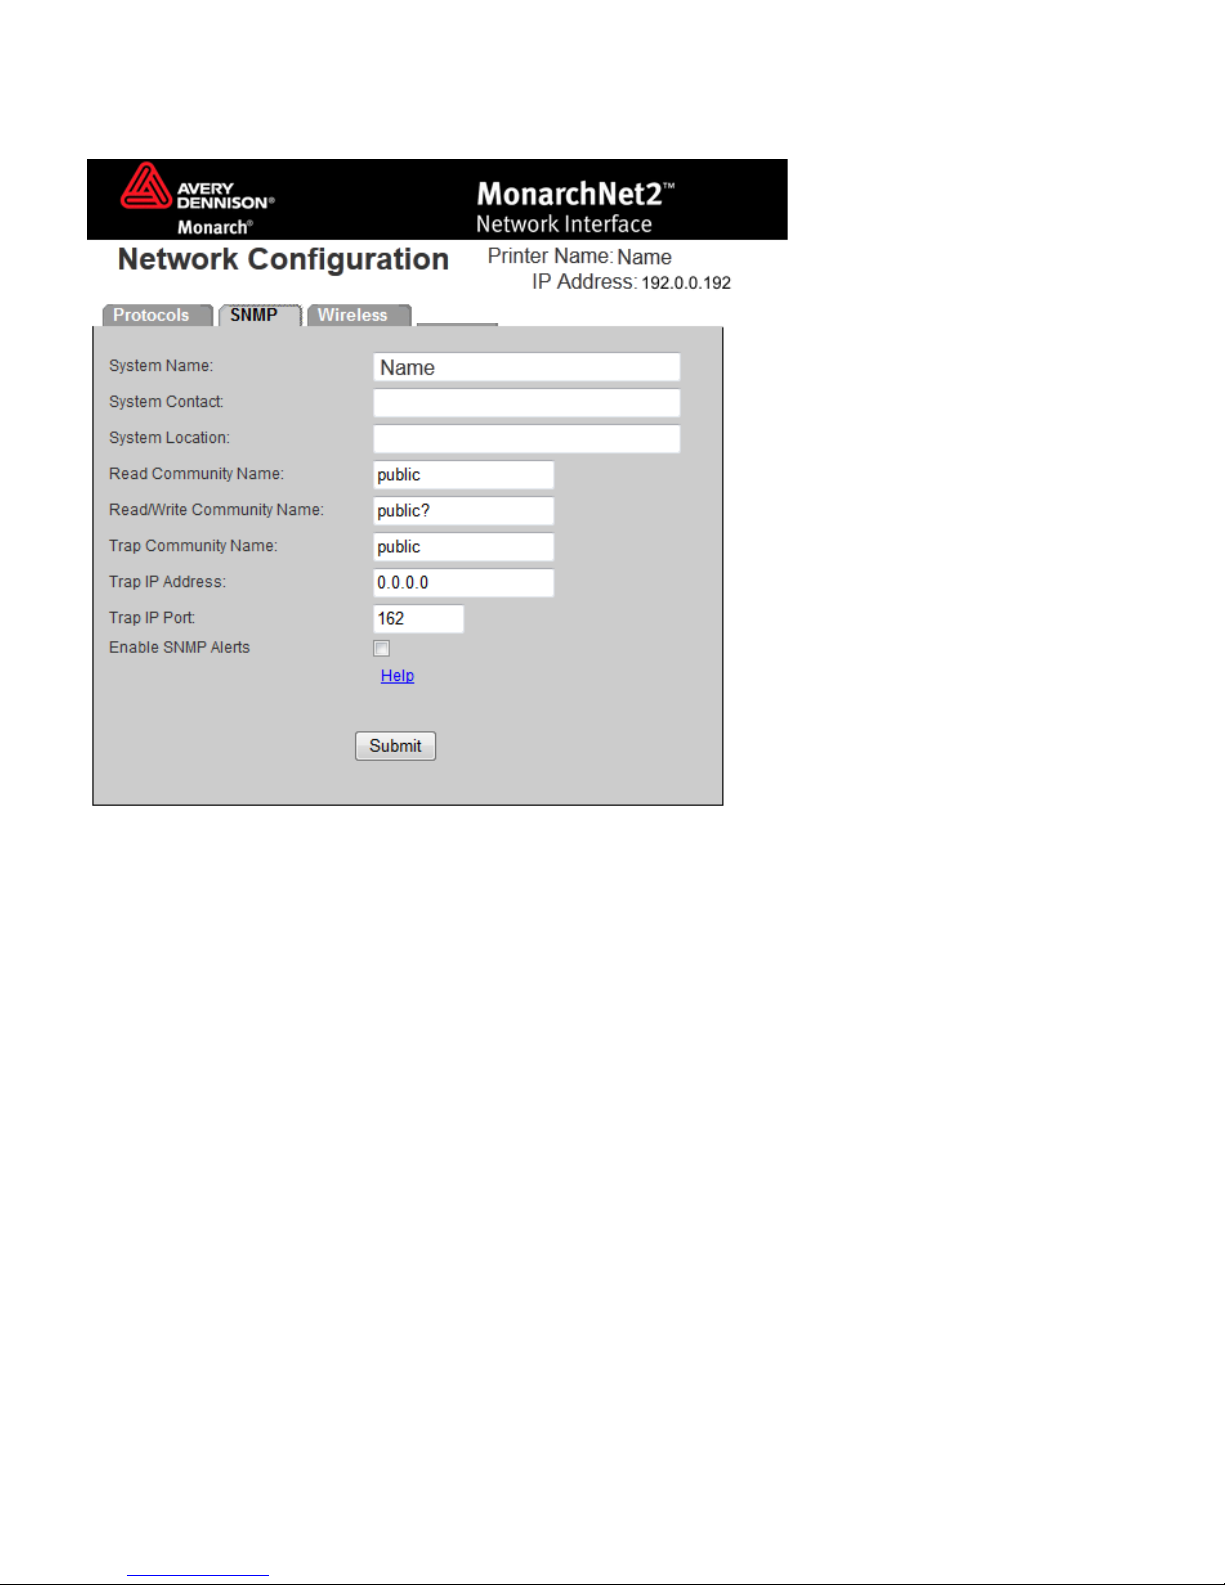
1. Click the SNMP tab to change SNMP setti ngs.
2. Enter the System Name, if it does not automatically appear.
3. Enter the System Contact.
4. Enter the System Location.
5. Verify the Read Communit y Name a nd change if necessary.
6. Verify the Read/Write Comm unity Name and change if necessary.
7. Verify the Trap Communit y Name and c hange if necessary.
8. Enter the Trap IP Address, if it does not automatically appear.
9. Enter the Trap IP Port , if it does not automatica lly appear.
10. Enable SNMP Alerts if necessar y. Set which alerts you need to r eceive. See “Setting Alerts”
for more information.
11. Click Submit when y ou are finished.
12. Click the Protocols tab.
13. Click Save Re-ini t Network (on the Protocols tab) before any changes t ake effect. Even
though you submitted your cha nges on the previous screen, they do not take effec t until you
click Sa ve Re-init Netw ork. This process takes a few minutes .
Using a Web Browser2-7
Page 14
Changing Wireles s Settings
Only configure the set tings required for your network /printer.
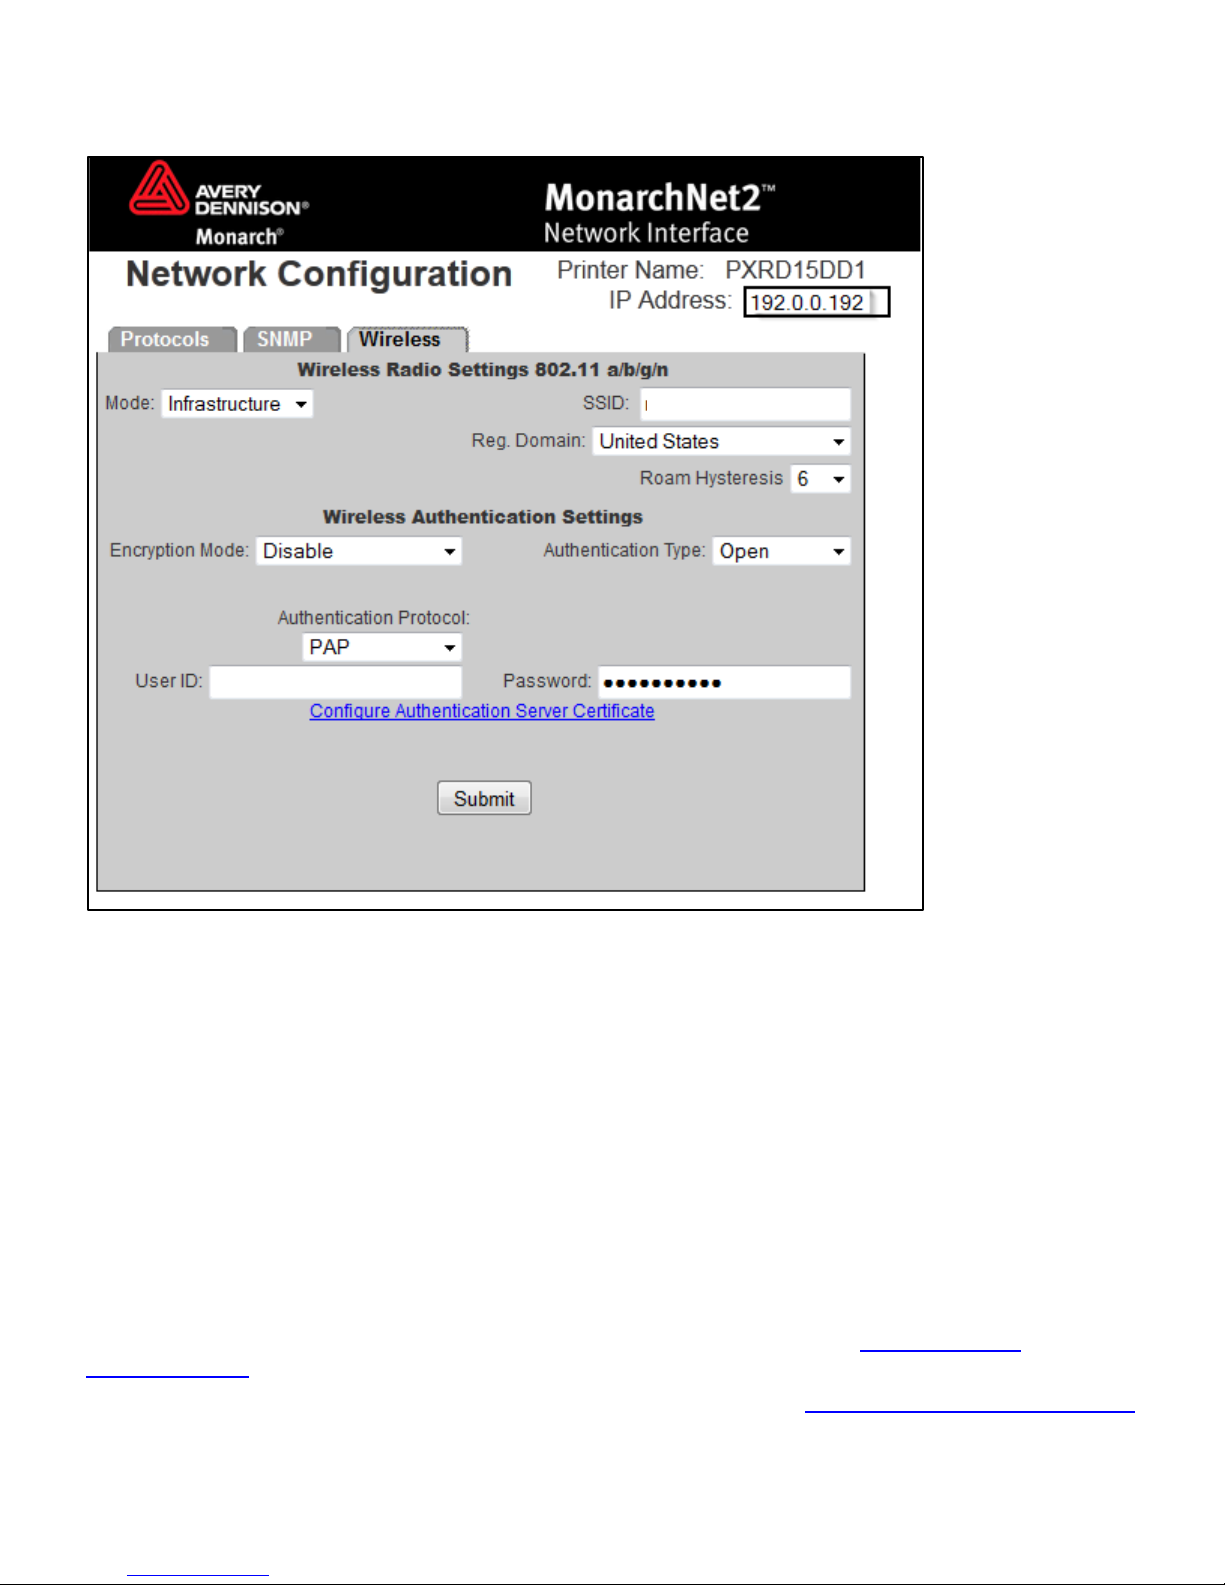
1. Click the Wireless tab to configur e the wireless network (802.11a/b/g/n) settings.
2. Set the Mode: Ad-Hoc or inf rastructure. In Ad-Hoc mode, you d o not need an access point.
Infrastructure mod e requires an access point to comm unicate.
3. Set the SSID. The SSID is a uniq ue identifier that must match for all nodes on a subnetwork to
communicate with each ot her.
4. Set the Regulatory Domain, wh ich is the country of use.
5. Set the Roam Hysteresis. T he range is 1 – 15. Whenever the printer ’s signal strength g ets
below this value, the print er connects to another access p oint in range with better signal
strength. This prevent s excessive roaming between acces s points if the printe r is located near
two access points.
6. Set the Encryption Mode: Disa ble, 64 BIT Encryption, 128 BIT Encryption, WPA, WPA2, WPA2-
WPA, and DYNAMI C WEP. The encryption m ode determines the algorithm used to encrypt
messages.
7. Set the Authentication T ype: Open, Shared, T LS, TTLS, LEAP, PEAP, or EAP-FAST. The
authentication type specif ies how users are identif ied and verified on a network . These options
vary depending on what was select ed as the Encryption Mode. See “
Basic Security
Configurations” f or more information.
8. Set the Authentication Prot ocol: PAP, or MSCHAP_V2 . See “
Basic Security Config urations”
for more information.
9. Enter the User ID.
2-8 MonarchNet2 Operating Instructions
Page 15

Encryption Method
10. Enter the Password.
11. Click Submit when y ou are finished.
12. Click the Protocols tab.
13. Click Save Re-init Network (on the Protocols tab) before any changes take effect. Even
though you submitted your cha nges on the previous screen, they do not take effec t until you
click Sa ve Re-init Netw ork. This process takes a few minutes.
Basic Securit y Configurations
There are two main decisions to be m ade when choosing wirele ss security: encryption m ethod and
authentication protoc ol.
The encryption method det ermines the algorithm used t o encrypt the message. The aut hentication
type specifies how user s are identified and verified on a network. Is the device seek ing connection
what (and who) it claim s to be?
Select an Encryption Method f rom the following table:
Type Algorithm Size
(bits)
WEP RC4 64/128 This is the 64 or 128 bi t WEP Ke y that must m atch other nodes’ enc ryption
WPA RC4 64/128
WPA2 AES 128 Improves on W PA by replacing RC4 wi th AES (Advance d Encryption
Description
keys in order to comm unicate. T he user can only defi ne 10 hex ch aracters
(40 bits) f or 64 bit W EP or 26 char acters (10 4 bits) for 1 28 bit W EP.
Improves on W EP by using TKIP* (Tem poral Key Integri ty Protocol), wh ich
dynamicall y changes t he encrypt ion key and MIC (Messa ge Integrit y Code),
which replaces CRC.
Standard) f or encrypt ion. The us er can onl y define 26 c haracters (104 bits)
for 128 bit W PA2.
Dynamic WEP cannot be selected d irectly, so select 128 for the encryption mode and select an
authentication mode f rom one of the following: LEAP, PEAP, EAP-FAST, TLS, or TTLS.
Authentication Protocol
Type RADIUS
Enterprise LEAP
PEAP*
TLS Required*
TTLS N/A
EAP-
FAST
Server
Protocol
PAP or
MSCHAPv2
User ID &
Password
Required
Certificate Private Key
Info File
No N/A
N/A
Optional*
PAC* N/A
Using a Web Browser2-9
Page 16

Encryption
Authentication
WEP
WPA, WPA (TKIP), WPA2
*PEAP This is on ly for serv er-side c ertificates.
*Optional Leaving th e Certificat e Root Ke y and the Cert ificate CN ( common) n ames blank , no
validation of the host certificat e is performed. T he values are set to “nul l” and all host
certificates are accept ed.
*Required The Wireless module c omes with a default Pr ivate Key I nformation File. You c an either
download th at file from the wire less module and add it to the TLS authenticat ion server,
or overwrite a new one on the wireless module.
*PAC EAP-F AST does not us e certificates to authenticate , but a PAC (Protecte d Access
Credential) , which is manage d dynamicall y by the server. The PAC is dis tributed one
at a time to the client m anuall y or automatic ally.
See the following table of acceptable combinations:
Open
Static No
Shared
LEAP
PEAP
EAP-FAST
Dynamic Yes
TLS*
TTLS
*Load the local key before enabling TLS.
2-10 MonarchNet2 Operating Instructions
Page 17
Using WEP
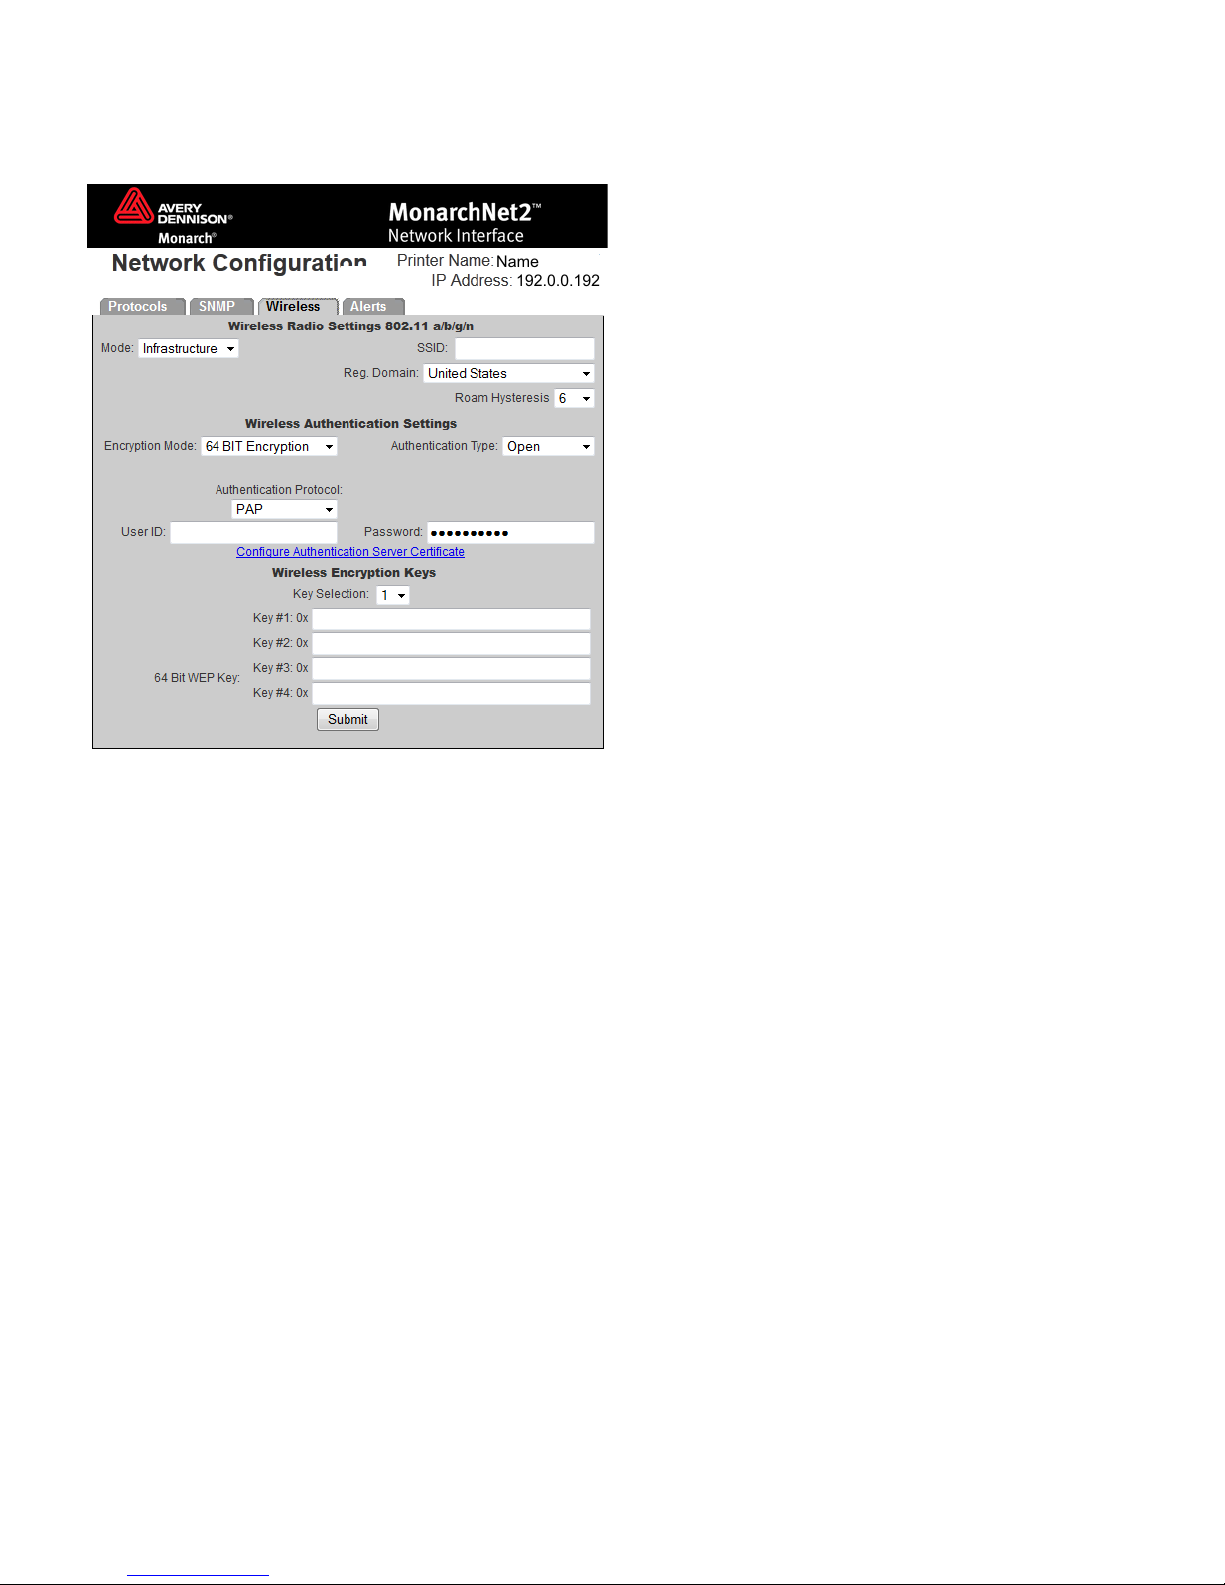
If you select 64 BIT Encryption or 128 BIT Encryption, you need to enter the WEP keys.
1. Determine which Key Selection to us e: 1-4.
2. Set the WEP Key values. You must use the same key values for devices to communicate with
each other on the network .
Note: As you enter the values for t he WEP keys, you can see the characters . However, the next
time you view this tab, t he values are displayed as asterisk s (*).
3. Click Submit when finished.
4. Click the Protocols tab.
5. Click Save Re-init Network (on the Protocols tab) before any changes take affect. Even
though you submitted your cha nges on the previous screen, they do not take affect unt il you
click Sa ve Re-init Netw ork. This process takes a few minutes.
Using a Web Browser2-11
Page 18
Configuring Certif icates
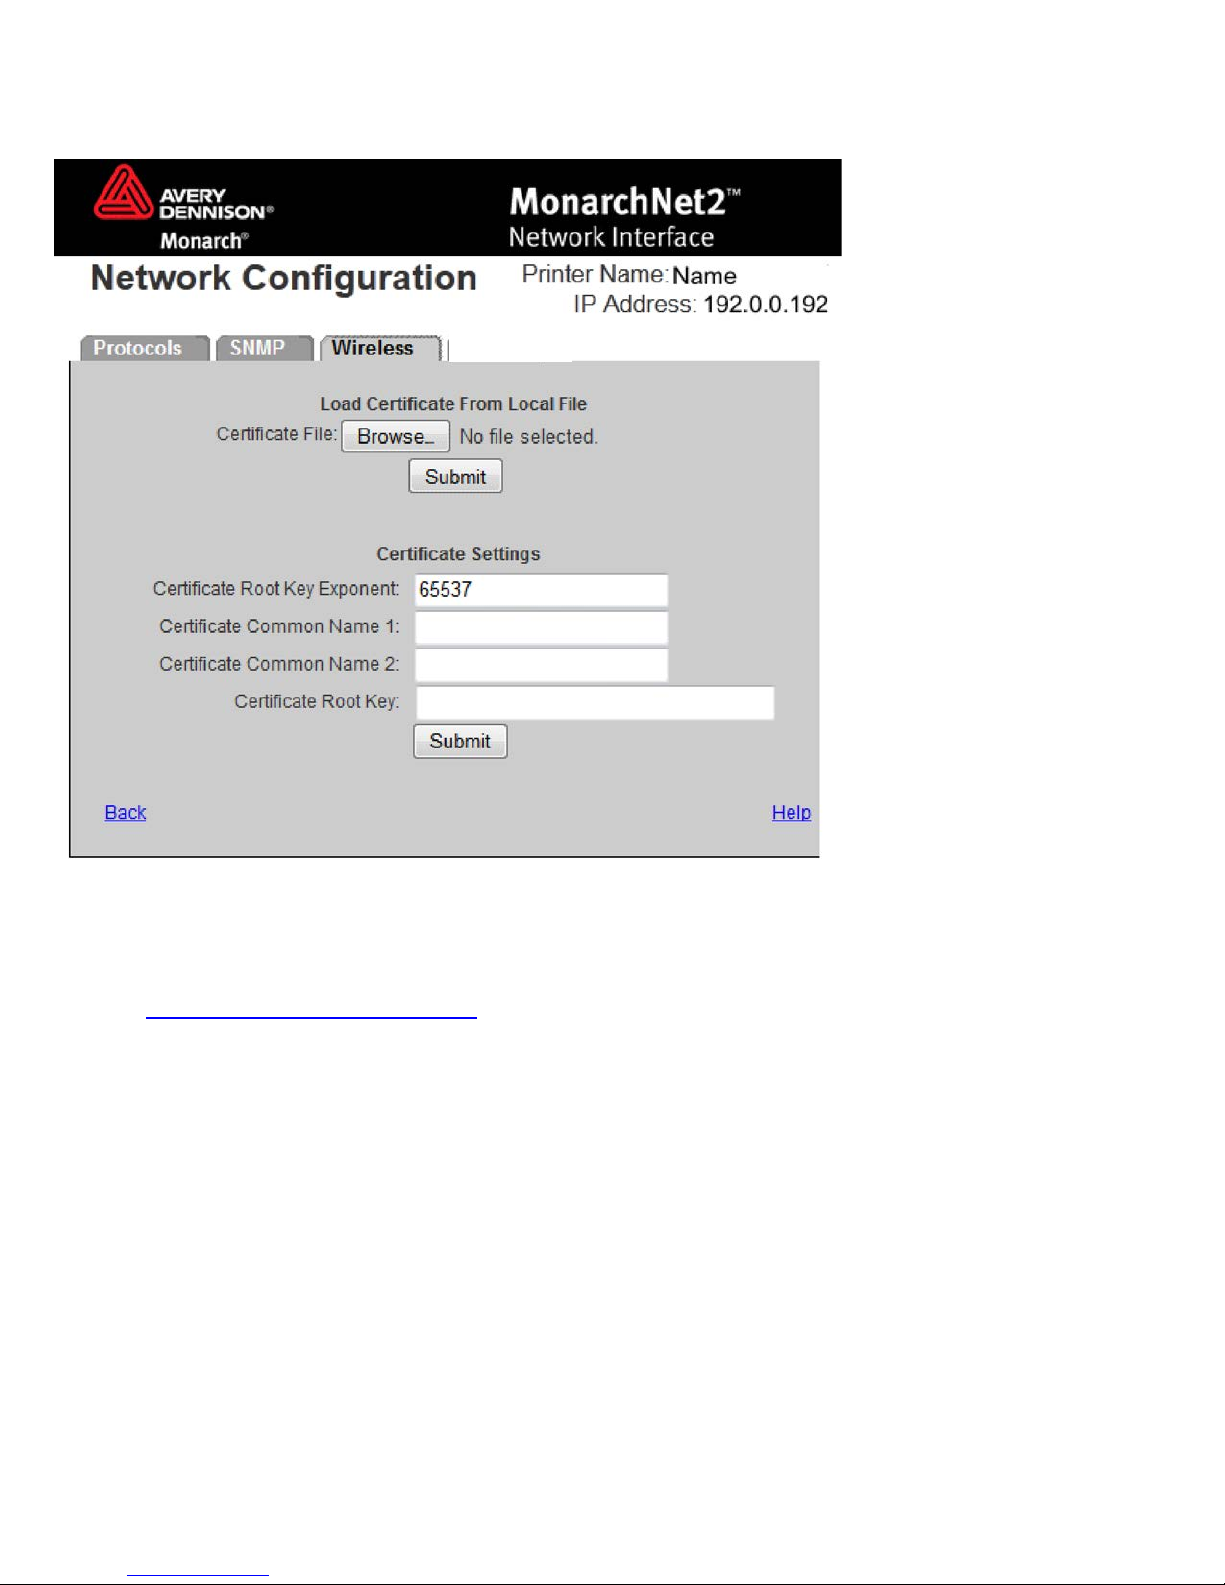
For TLS and TTLS authenticatio n, you may need to configu re the Authentication Server Certificate.
1. Select Configure Authent ication Server Certificat e (on the Wireless tab).
2. Click Browse to search for the appropriat e Root Certificate.
Click Submit. You see the Root (Public) Key in the Certif icate Root Key window. The exponent
is almost always 65537 (def ault).
See “
Basic Security Conf igurations” for more infor mation.
The Certificate Root Ke y is us ed to verify the root certificate in the certif icate chain
provided by the authenticat ion server. Leaving this f ield blank sets the value to “nul l.”
The Certificate Root Ke y Exponent value must mat ch the authentication server cer tificate
value.
3. Enter the Certificate Comm on Name 1, which is the name of the cer tificate on the primary
authentication server .
Note: If both common names are lef t blank, the values are set to “nul l” and all host certificat es
are accepted.
4. Click Submit at the bottom of the screen when finished.
5. Click Back to r eturn to the previous screen .
6. Click the Protocols tab.
7. Click Save Re-init Network (on the Protocols tab) before any changes take effect. Even
though you submitted your cha nges on the previous screen, they do not take effec t until you
click Sa ve Re-init Netw ork. This process takes a few minutes.
2-12 MonarchNet2 Operating Instructions
Page 19
Reset/Initialize Network
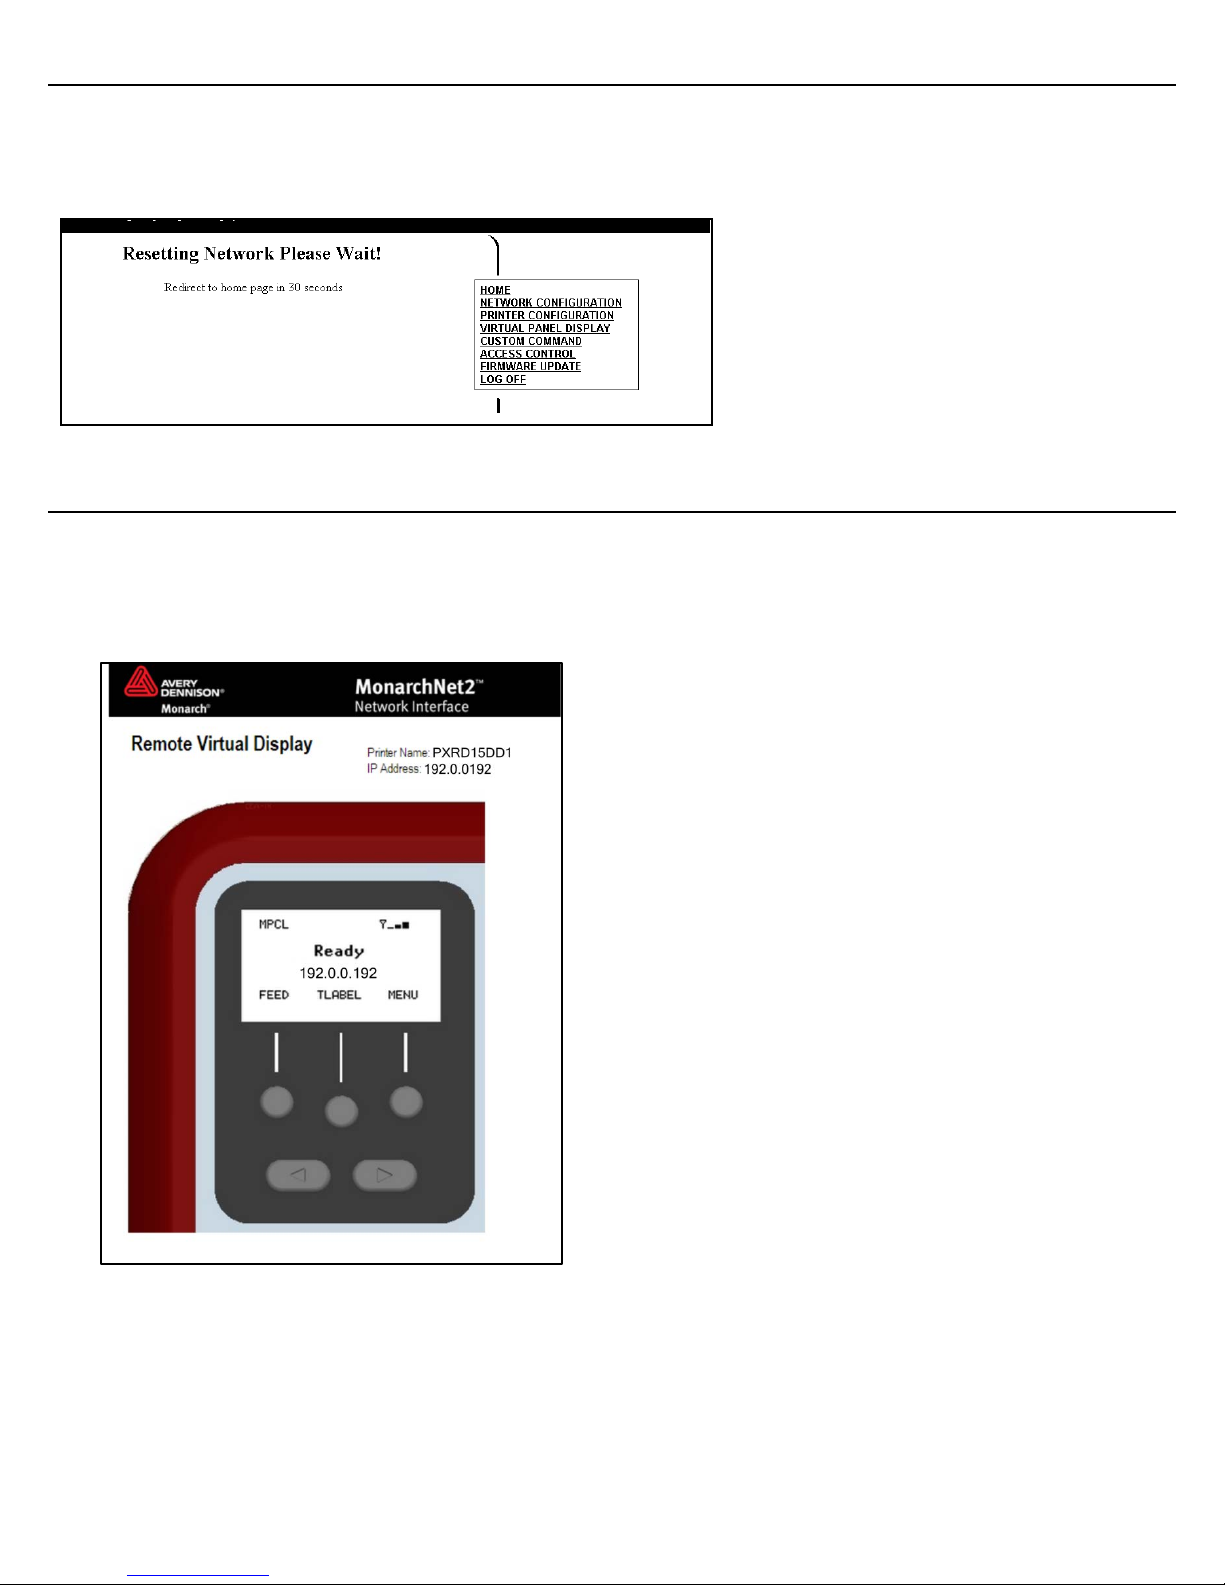
Click Save/Re-ini t Network (on the Protocols tab) to reset and initia lize the network interf ace.
Any changes made on previous scre ens do not take eff ect until you click Reset Networ k.
This process takes a few minutes f or the printer to respond with t he new settings.
Reading the Virtual Panel
The virtual panel operat es just like the printer’s contr ol panel. You can use the virtual panel to
clear errors, feed labels, and more.
1. From the side Menu Bar, click Vir tual Panel Display.
2. The current status of the printer appears on the virtual pa nel’s display.
3. If there is an error, click Escape/Clear to clear the er ror. If you want to feed a label, click
Feed/Cut.
Using a Web Browser2-13
Page 20
Using Custom Commands
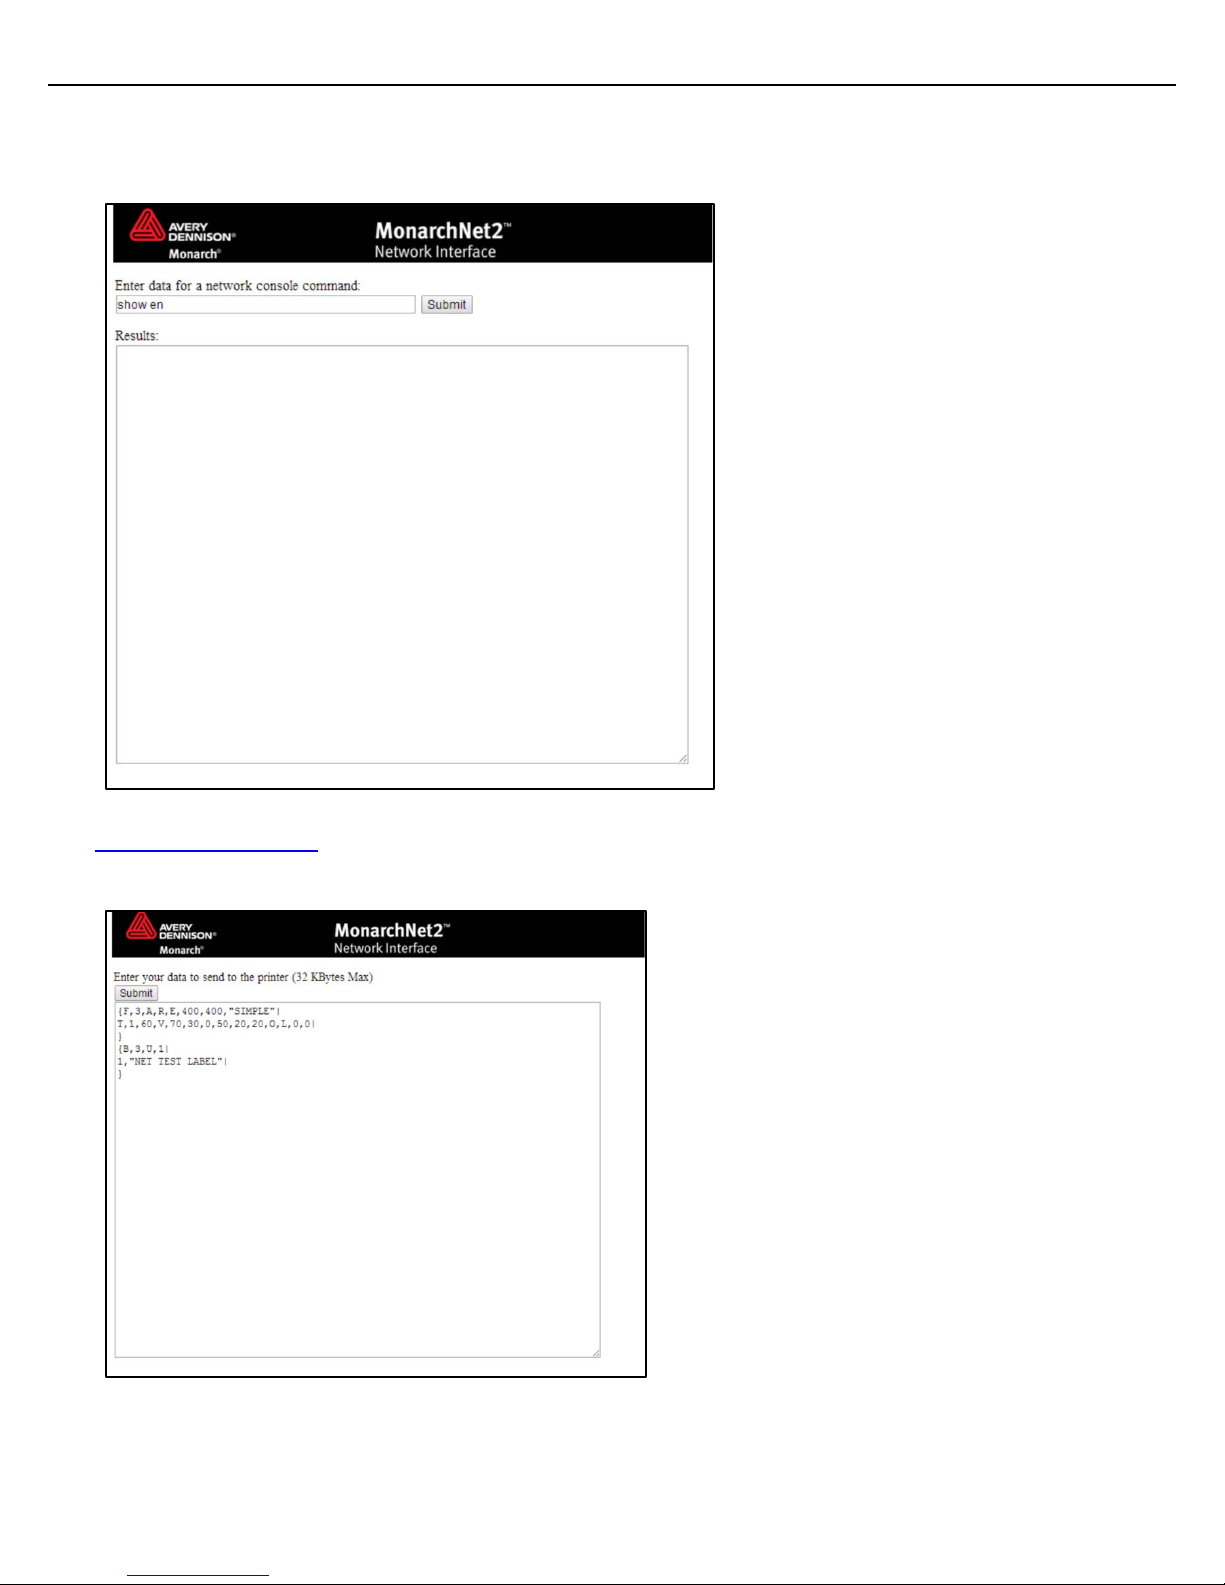
The Custom Commands menu allo ws you to enter MPCL format and batch data t o print a label or
enter Telnet console comm ands.
1. From the side Menu Bar, click Custom Command.
2. Enter any MCPL format and batch d ata or enter a Telnet console comm and. See Chapter 3,
“
Console Commands,” for more information.
3. Click Submit. The MPCL form at is sent or results from a Telnet cons ole command appear.
2-14 MonarchNet2 Operating Instructions
Page 21
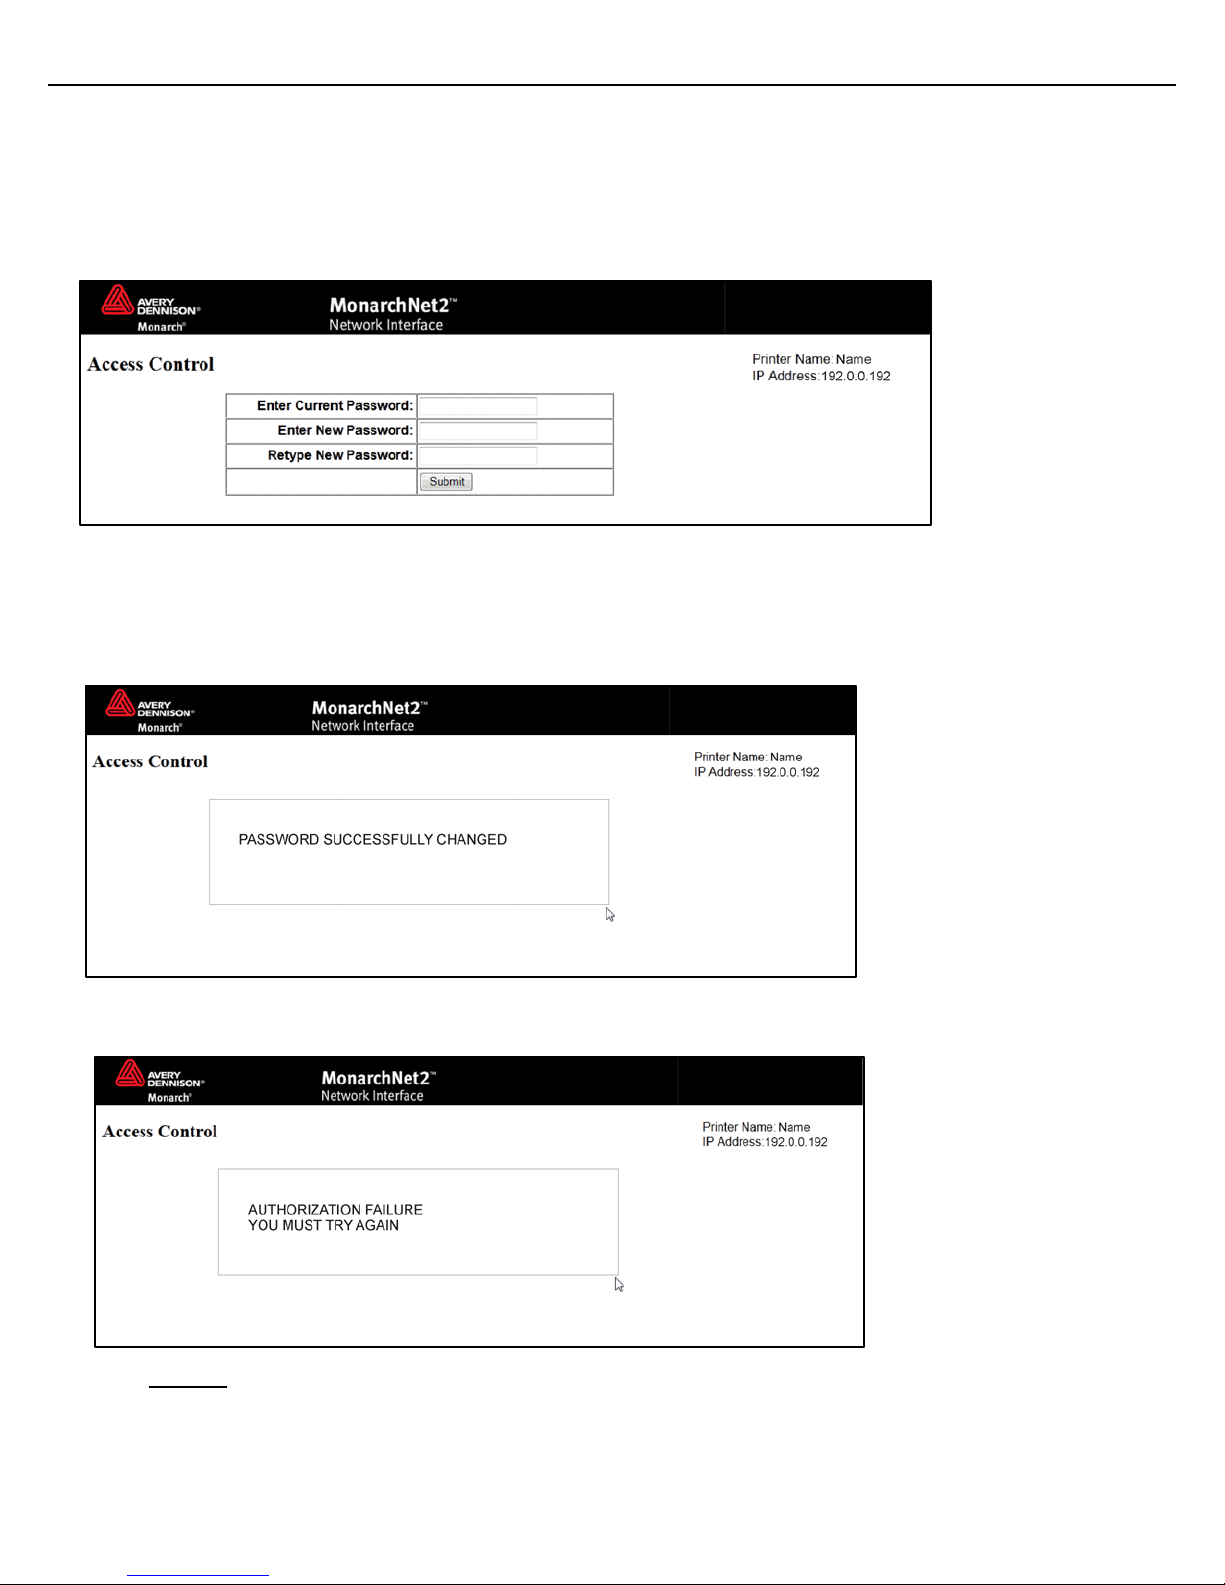
Changing the Password
You can change the access passwor d for MonarchNet2. This should o nly be done by your System
Administrator. The def ault is access.
The password is case-sensitive and saved in the printer’s f lash memory.
Note: Make a note of the password if you change it. Changing the pass word also restricts access
to Telnet sessions.
1. From the side Menu Bar, click Access Control.
2. Enter the Current Passw ord.
3. Enter the New Password.
4. Retype the New Passw ord to confirm it.
5. Press Submit when finished.
If you change the password and att empt to log in using the old pass word, this message
appears. It also appears f or various error conditions when conf iguring the printer.
6. Click LOGIN to login using the cor rect password and correct the problem.
Using a Web Browser2-15
Page 22

2-16 MonarchNet2 Operating Instructions
Page 23

[options]
<values>
n
3
CONSOLE COMMANDS
Use this chapter to conf igure the Wireless module using Telnet. You must have a basic
understanding of the T elnet application. For init ial setup, do not use Telnet, use aut o-discover
mode. Once you have the IP address, you can use Telnet or a W eb browser.
RSH (remote shell) s upport is available. Rem ote shell support is a common UNIX application that
provides remote command execution capability fo r networked devices. For more inf ormation, refer
to your UNIX documentation.
♦ You can use Telnet if you do not ha ve access to the MonarchNet2 sof tware.
♦ This chapter also inclu des information about the Net work Packet (Console Passthru) .
Note: The default port is Por t 23.
Conventions
This section uses the following conventions:
KEYwords
Type the capitalized let ters of each keyword instead of the whole keyword. Some
keywords require more capita lized letters than others. For example,
SEt
KEYVAL
RAdio
Mutually-exclusive op tions are included within sq uare brackets and separat ed by
a forward slash. Select onl y ONE of the options. For example,
[DISable/STRICT/FLEXible]
Values are included with in brackets. Values that cont ain spaces (multiple words)
must be enclosed within quot ation marks (""). For example,
SEt EN PW <value>
SEt EN PW "Store 876"
Numeric digits are indicat ed by the letter (n).
For example,
SEt IP BOot n
SEt IP BOot 5
SEt EN CHannelnn
SEt EN CHannel 11
Accessing Telnet Console Mode
1. Start a Telnet session.
2. Type telnet [your print er’s IP address] (f or example, 192.0.0.192 )then press Enter.
3. You see “Welcome to MonarchNet2 Ent er Password:”
Type access as the pass word then press Enter (access is the default password.).
The password is case-sensitive. You ma y not be prompted for a username.
Note: The Telnet session times ou t after 10 minutes of inacti vity.
Console Commands3-1
Page 24

4. To view the current wireless ( or network) settings, t ype sh en (show wireless settings) then
press Enter:
WiFi Mode = INFRASTRUCTURE
WiFi SSID: ABC123
Speed = 54
International Roaming: Flexible
Dynamic Frequency Selec tion: Unsupported
Regulatory Domain = USI
WiFi FW Ver = 2.13.10.0 LMAC, 2.12.18.0 UMAC
AP density = LOW
Authentication type= OP EN SYSTEM
Encryption is Disabled
Local certificate loade d
AP MAC Address = 00 A0 F8 51 B4 FC
Signal Quality = Excell ent (100%)
Connected to SSID ENG41 21 on channel 11
5. To show the current IP setting s, type ship (show TCP/IP settings) then press Enter.
IP is enabled
IP address 192.0.0.192 Boot tries 3
Subnet mask 255.255.0.0 Boot method AUTO
IP Gateway 192.1.1.192 Max window 10240
(via DHCP 192.2.2.192 )
LPD banner disabled Timeout 0 min
LPD retries are disable d Keepalive 1 min
Service Port TCP port
PXR1E8580_X1 X1 9100
6. To change the SSID, type set e n ssidtestsystemthenpress Enter.
7. To set the IP address, type set ipad 192.0.0.192then pressEnter.
8. To set the subnet mask, type set ips ub 255.255.0.0then pressEnter.
9. Type INIT and press Enter to save the settings and initialize the unit.
10. Type EXIT to exit Telnet.
See the following sect ions for a list of the most frequen tly used commands.
Help Commands
For help at any time, type “Help” and a list of available comm ands appears. The Help command
builds on itself, because f or each command you type, more det ails appear for each option.
Note: There are help menus for all suppor ted commands. To access a help menu for a specific
command, type Help<command>.
Syntax: Help set
DEFAULT Set parameters to factory defau lts
EN Network Parameters
LOAd Firmware update parameters
PAssword<password> Set console password
PORt<name> . Parameter for port <nam e>
SERVEr Server and LAT parameters
SERVIce<name> Service Parameters
SNMP SNMP Variables
Syslog Syslog Parameters
DNS DNS Parameters
STRing n "..." BOT/EOT string
IP LPD/TCP P arameters
POWERON <delay-sec> Power on delay
3-2 MonarchNet2 Operating Instructions
Page 25

Displays a list of the available help com mands for “Set.”
Syntax: Help set ip
IP LPD/TCP Param eters
ADdress aa.bb.cc.dd IP node address
ARP [EN/DIS] IP set via ARP
BAnner [EN/DIS] LPD banner printing
CHKSUM [EN/DIS] IP receive checksum
BOot n Number of DHCP/BOOTP tr ies
ENable/DISable Enable or Disable IP Processing
FTIme [EN/DIS] Fast timeout
FTP [EN/DIS] FTP proto col
HTTP [EN/DIS] HTTP protocol
KEepalive n Keepalive interval (min)
LPD [EN/DIS] LPD protocol
MEthod<type> Set method of getting IP addres s
PIng aa.bb.cc.dd Test connection to IP h ost
PRObe [EN/DIS] TCP connection probes
RANge [EN/DIS/ALL] aa.b b.cc.dd {MAxee.ff.gg.h h}
RARp flags nn 1=no subnet, 2=no router, 3=neither
REtry [EN/DIS] LPD retry continuation
ROuter aa.bb.cc.dd Default router address
SUbnet aa.bb.cc.dd Subnet ma sk
TCP [EN/DIS] Raw TCP ( 9100) protocol
TELnet [EN/DIS] TELNET protocol
TFTP [EN/DIS] TFTP protocol
TImeout n Inactivity timeout (min utes)
TRAP n [ADDR/PORT/TRIG] TRAP configuration
WIndownn LPD/TCP maximum window size
Displays a list of the availab le help commands for “Set IP.”
General Commands
From the list of commands, t he brackets - [] indicate to p ick one of the options listed, the items
inside curly braces - {} are opt ional and do not need to be specif ied.
Set/CLear/DElete/PUrge
Used in conju nction wit h addition al parameter s.
EXIT
Exits conso le mode.
HElp
Displays the l ist of available com mands.
SET
Sets a spec ified param eter.
SHow
Displays cur rent setti ngs.
INIT
Saves settin gs and initializes unit.
SET DEFAULT
Sets wir eless m odule to f actory defa ults.
SET PAssword
Sets conso le password . The user is prompted for old p assword, ne w password, and to verify ne w password.
The default pass word is access.
Note: The password is case-sensitive.
SET SERVErNAme<name>
Console Commands3-3
Page 26

Sets server node nam e.
SHow FREE
Shows amou nt of availa ble memor y.
SHow PRN FEEdlabel
Feeds a label.
SET PRN FIRMWARE
Sets the printer in boot loa der mode to r eload the firmware.
SHow PRN KEYpad
Shows the current status of the keypad lock.
SET PRN KEYpad [LOck/UNlo ck]
Locks or unl ocks the pr inter’s ke ypad.
SET PRN RESET
Rests the pr inter (Te lnet and rem ote shell o nly).
SHow PRN STAtus
Shows the printer’s c urrent stat us (decode d ENQ status bytes).
SHow PRN TEStlabel
Prints a test label.
SHow PRN UPASSwordstatus
Shows the cur rent statu s of the off line menu user passw ord (on or of f).
SET PRN UPASSwordstatus [ YEs/NO]
Turns the of fline menu user pass word on or off.
SHowSERVEr
Shows the ser ver para meters.
SHowVErsion
Shows the ser ver firm ware versio n.
UPTIME
Shows how long the pri nter has bee n on in for mat hh:mm:ss up N day(s), hh:mm:ss.
Setup Commands
SET PRN BACkfeedcontrol [ ACtion/ DISPensepositio n/ DISTance] value
Sets the spec ified back feedcontro l paramet er to the spec ified valu e.
SHow PRN BACkfeedcontrol {ACtion/ DISPens eposition/ DISTance}
Shows the sp ecified b ackfeedcon trol param eter’s curre nt setting. If no param eter is spec ified, it shows t he
current set tings of al l parameters in the bac kfeedcontr ol categor y.
SET PRN BATchoptions[CLea rfields/ NUmberofparts/ CUTOption/ CUTMultip le/
PRintmultiple/ QUantity] PRompt [YEs/ NO]
Turns on or off the s pecified batch en try prompt. Thes e parameters also have correspond ing values, such as
“cut last tick et” for CUTOption.
SET PRN BATchoptions [CLe arfields/ NUmberofparts / CUTOption/ CUTMulti ple/
PRintmultiple/ QUantity] value
Sets the spec ified batc hoptions p arameter to the specif ied value.
SET PRN BATchoptions [CUT LTicketprompt/ CUTAfter batchprompt/
NOCutbeforeprompt/ CUTLSt ripprompt] [YEs/ NO]
Sets the spec ified batc hoptions p arameter’s c urrent se tting. If no parameter is specifi ed, it shows the curre nt
setting of all paramet ers in the batchopt ions categor y.
SHow PRN BATchoptions {CL earfields/ NUmberofpart s/ CUTOption/ CUTMult iple/
CUTLTicketprompt/ CUTAfte rbatchprompt/ NOCutbefo reprompt/ CUTLStrippr ompt/
PRintmultiple/ QUantity}
3-4 MonarchNet2 Operating Instructions
Page 27

Shows the sp ecified b atchoptions parameter ’s current setting. I f no paramet er is specified, it s hows the
current set tings of al l parameters in the batc hoptions c ategory.
SET PRN COMmunication [BA udrate/ WOrdlength/ STo pbits/ PArity/ FLowco ntrol/
PPort/ PMode] value
Sets the spec ified com municatio n parameter to the specified value.
SHow PRN COMmunication {B Audrate/ WOrdlength/ ST opbits/ PArity/ FLowc ontrol/
PPort/ PMode}
Shows the sp ecified co mmunicati on paramet er’s current setting. If no param eter is spec ified, it s hows the
current set tings for a ll parameters in the comm unication category.
SET PRN CONtrolcharacters [STartheader/ PAramsep arator/ QUotedstrings /
FIeldseparator/ ENDheaderDAta escape/ IMmediatecmd/ ENQRequest/
ENQTerminator/ JObtermina tor] value
Sets the spec ified contr ol charact er to the s pecified va lue. Sett ing the imm ediate comm and charac ter
enables imm ediate com mands; setti ng the ENQ status requ est charact er enables ENQ status polling.
SHow PRN CONtrolcharacters {STarthead er/ PAramseparator/ QUotedstrings/
FIeldseparator/ ENDheader / DAtaescape/ IMmediate cmd/ ENQRequest/
ENQTerminator/ JObtermina tor}
Show the sp ecified co ntrol char acter’s curr ent setting . If no param eter is sp ecified, it s hows the cur rent
settings of all paramet ers in the c ontrol ch aracters cate gory.
CLear PRN CONtrolcharacte rs [DAtaescape/ IMmedia tecmd/ ENQRequest/
ENQTerminator/ JObtermina tor]
Clears the s pecified c ontrol char acter. Cle aring the im mediate com mand char acter disab les imm ediate
commands. C learing the ENQ stat us request charac ter disables ENQ status polling.
SHow PRN INFo {MOdel/ SErial/ FIrmver sion/ BOotversion/ COntr astpot/
PIcversion/ KNifeversion/ RFidversion/ NEtworkve rsion/ TOtals}
Shows the sp ecified inf o parameter . If no par ameter is specified, it shows a ll parameter s in the inf o
category.
SET PRN MEMoryconfig [DOw nloadablefonts/ FORmat/ IMage/ REceive/ TRan smit/
VEctorfonts] value
Sets the spec ified buf fer’s size t he specifie d value.
SHow PRN MEMoryconfig [DO wnloadablefonts/ FORmat / IMage/ REceive/ TRa nsmit/
VEctorfonts]
Shows the specified buffer’s current size. If no buffer is specified, it shows t he current sizes of al l buffers.
SET PRN MONetary [MOnetar ysign/ SEcondarysign/ D Ecimaldigits] value
Sets the specif ied monetar y parameter to the spec ified value.
SHow PRN MONetary {MOnetarysign/ SEcondar ysign/ DEcimaldigits}
Shows the sp ecified m onetary par ameter’s c urrent sett ing. If no par ameter is s pecified, it shows the current
settings of all paramet ers in the m onetar y category.
SET PRN PRIntcontrol [COntrast/ PRintopos ition/ MArginposition/ SPeed/
PHeadwidth] value
Sets the s pecified pr intcontrol p arameter t o the specif ied value.
SHow PRN PRIntcontrol {CO ntrast/ PRintoposition/ MArginposition/ SPee d/
PHeadwidth}
Shows the sp ecified pr intcontro l parameter ’s current s etting. If no parameter is specifi ed, it sho ws the
current sett ings of all parameter ’s in the print con trol categor y.
SET PRN QUEuecontrolREpea t
Repeats last printed b atch.
CLear PRN QUEuecontrol [A Llcancel/ CUrrentcancel / ABorterror/ Reseter ror]
Performs th e specifie d action.
SHow PRN STOrageFLash
Shows the amount of unused flash mem ory.
Console Commands3-5
Page 28

SHow PRN STOrageFORmats {format # or ALl}
Shows head ers for indi vidual or a ll formats. Note that ‘ 0’ is shorth and for ‘AL l’.
SHow PRN STOrageFONts
Shows headers for all fonts.
CLear PRN STOrage [RAm/ F Lash] FORmats [format # or ALl]
Clears the s pecified for mat or all formats fr om volatile RAM or flas h memor y. Note that ‘0’ is shor thand for
‘ALl’.
CLear PRN STOrage [RAm/ F Lash] FONts [font # or ALl]
Clears the s pecified fo nt or all fo nts from volatile RA M or flash m emory.
Note that ‘0’ is shorthand for ‘ALl’.
CLear PRN STOrage [RAm/ F Lash] GRaphics [graphic # or ALl]
Clears the s pecified gr aphic or all graphics from volat ile RAM or f lash mem ory. Note th at ‘0’ is s horthand for
‘ALl’.
CLear PRN STOrage [RAm/ F Lash] CDigits [CD schem e #]
Clears the s pecified c heck digit sc heme from volatile RAM or flas h memor y.
SET PRN SUPply [TYpe/ RIb bon/ FEedmode/ SUpplypo sition/ CUtposition/
SKipindex/ KNifecontrol/ ERroraction] value
Sets the spec ified supp ly parameter to the s pecified valu e.
SHow PRN SUPply [TYpe/ RIbbon/ FEedmode/ SUpplyp osition/ CUtposition/
SKipindex/ KNifecontrol/ ERroraction]
Shows the sp ecified su pply param eter’s curr ent setting . If no par ameter is spec ified, it s hows the c urrent
settings of all paramet er’s in the supply category.
SHow PRN SUPplySYncsupply
Resynchron izes the su pply.
SET PRN SYStem [POwerupmo de/ LAnguage/
BAtchseparators/SLashedze ro/SYmbolset] value
Sets the spec ified s ystem paramet er to the s pecified v alue.
SHow PRN SYStem {POwerupmode/ LAnguage/
BAtchseparators/SLashedzero/SYmbolset}
Shows the sp ecified s ystem param eter’s curre nt setting. If no param eter is spec ified, it s hows the c urrent
settings of all paramet ers in the s ystem cate gory.
SET PRN SCRipts [LOad/ EN able/ DISable/ DELETE]
Loads, enabl es, disables, or deletes a script. N ote that LO ad, ENAble , DISable, and DELETE take no
arguments.
SET PRN SCRipts [ENQpollb eforescript/ IMmcmdbefo rscript] value
Sets the specified scripts parameter to the specified value.
SHow PRN SCRipts {STatus/ INfo/ ENQpollbefore script/ IMmcmdbeforescript}
Shows the sp ecified scr ipts param eter’s curr ent setting . If no par ameter is s pecified, it shows the c urrents
settings of all paramet ers in the s cripts cat egory.
SET PRN VERifier [STate/ SCanbeam/ CAbledetect] value
Sets the specif ied verifier par ameter to the spec ified value.
SHow PRN VERifier {STate/ SCanbeam/ C Abledetect/ SUmmary}
Shows the sp ecified ve rifier par ameter’s cur rent settin g. If no par ameter is s pecified, i t shows the c urrent
settings of all paramet ers in th e verifier c ategory.
CLear PRN VERifierSUmma ry
Clears the verif ier summar y data (number of good an d bad verifier lab els).
3-6 MonarchNet2 Operating Instructions
Page 29

RFID Commands
SHow PRN RFId {MOduletype / VErsion/ WRiteattempt s/ PRotocol/ RPower/ WPower/
REgion/ FRequency/ SUmmar y}
Shows the specified RFID parameter’s current s etting. If n o parameter is specifi ed, it shows the curren t
settings of all paramet ers in the RFID categ ory.
CLear PRN RFIdSUmmary
Clears RFID summar y data (number of good a nd bad RFID tags).
802.11b/g Wireless Commands
In the following commands, EN and NW (network settings) ar e interchangeable.
CLear EN SSid
Clears the SSID, so th e server co nnects to an y access p oint.
SET EN AUTHtype [OPEN/SHA RED/TTLS/LEAP/PEAP/WPA-PSK]
Sets the authe ntication type. Se e Chapter 3, “Using the Web Browser ” for more informat ion.
SET EN ENC [DISable/64/12 8/WPA/WPA2/WPA2-WPA/
Dynamic WEP]
Sets the encr yption m ode. See C hapter 3, “Us ing the W eb Browser” for more i nformation.
SET EN INAP [PAP/MSCHAP_V 2]
Sets the EAP inner authentication protocol.
SET EN KEY# <1/2/3/4>
Sets which WEP key number to use (default is 1).
SET EN KEYVAL <WEPkey>
Sets WEP ke y value.Must be hexad ecimal.
SET EN MODE [IN/AD]
Sets 802.11b/g/n wire less mode to infras tructure or Ad-Hoc mode.
SET EN ROAm
Sets the Roam Threshold.
SET EN SSID “<ssid>”
Sets 802.11b/g/n wire less SSID. Use quotes if there is a space i n SSID. This is case s ensitive.
SET EN WPAPSK <WPAkey>
Sets th e W PA pre-shar ed key or pass-p hrase. Use 64 hex ch aracters for the PSK or 8-63 char acters for t he
pass-phrase . This is only valid whe n authenticat ion mode is WPA -PSK.
TCP/IP Commands
SET IP ADdress
Sets IP address of wireless module .
SET IP BOot n
Sets number of retries (n) for DHCP, BOOTP, RARP
SET IP KEepalive n
Sets keep a live inter val (n) in m inutes.
SET IP MEthod [DHCP/STATI C]
Sets metho d of getting IP address.
SET IP SUBnet aa.bb.cc.dd
Sets defau lt subnet m ask.
SET IP TImeout n
Sets timeout (n) in min utes.
Console Commands3-7
Page 30

SNMP Commands
CLear SNMP CONtact<string >
Removes SNM P SysContact.
CLear SNMP LOCation<strin g>
Removes SNM P SysLocation.
SET SNMP GETCOMM <string >
Gets SNMP c ommunit y.
SET SNMP SETCOMM1 <string > or SET SNMP SETCOMM2 <string>
Sets SNMP comm unity 1 or comm unity 2 name.
Note: An incoming se t request ca n use either name for c omm1 or com m2.
SET SNMP CONtact<string>
Sets SNMP S ysContact .
SET SNMP LOCation<string>
Sets SNMP Sys Location.
Using the Network Packet
Use the Network Packet to send console commands directly to the ne twork card via the printer’s
serial port. If the networ k card does not appear to be communi cating with the printer , you can use
the Network Packet to chang e the SSID, IP address, etc. of the network card.
Note: You can use Network Packet e ven if MonarchNet2 is disabled or not installed. Printer
console commands are avai lable but network cons ole commands are not.
Syntax {N,number,action,device,”name”¦
C,”con_cmds”¦}
N1. N Network Console Packet.
N2. number Number from 0-999 to identify the network console packet.
N3. action Enter A to add to packet to the printer.
N4. device Enter T to pass the packet through the printer and stores the packet in the network card.
N5. “name” Packet name, 0-8 characters, enclose within quotation marks.
C1. C Command field.
C2. “con_comds” Console commands. Must be enclosed within quotation marks. Each command must be
on a separate line. The maximum number of characters per command is 100. See the list
of commands earlier in this chapter for more information.
Note: The maximum number of commands per packet is twenty-f ive (25).
Example {N,1,A,T,”mystore”¦
C, ”set ip me static”¦
C, ”init” ¦
C, ”exit” ¦}
Sends the Network Packet 1 “my store” directl y to the network card (T) and sets the IPmethod to
static for determ ining IP addresses. Init and Exit comm ands must be used to save changes an d
initialize the network card.
3-8 MonarchNet2 Operating Instructions
Page 31

4
IP Address
TROUBLESHOOTING
If you have difficulty comm unicating with the wirele ss module, verify that the printer is operat ing
properly, is online, and s upplies are loaded correct ly.
Printing a MonarchNet2 Test Label
Press TLABEL and selec t Mnet2 Label
The test label displays t he settings for the IP address, subnet address, IP gateway, bo ot tries, boot
method, SSID, wireless m ode, WiFi WEP, WiFi signal, pack ets received, bad packets rec eived, and
packet collisions. It also lists Smart Relay infor mation. See Chapter 2 or 3 if you need to chang e
any of the IP or wireless sett ings.
Use this table to solve some com mon printer/network problem s.
Problem Action
Printer does not appear to save
IP, subnet, or gatewa y address.
Printer does not comm unicate
with access point.
The printer does not
communicate with your network .
Cannot see the printer on the
network.
The value f or each seg ment must be less than 255 in thes e
addresses.
If you have reset network or wireless settings, allow time for the
printer to r eset and co nnect to a n access poi nt. This m ay take a
minute or m ore, depend ing on net work traff ic.
The network settings m ust match t he printer’s settings for:
♦ IP address, gateway, a nd subnet m ask
♦ SSID
♦ Ad-Hoc or infrastructure mode
♦ Security
The devices m ust be on the same lo gical net work and the subnet
masks shou ld be the sa me.
Configuration/test label shows
“searching” or “set m anually” for
boot method/ DHCP.
The messag e “searchin g” indicates the printer has not yet
connected t o the netwo rk.
The messag e “set manua lly” indica tes the boo t method is Static. If
the boot m ethod is not Static, the printer was not able to connect to
the network .
Troubleshooting4-1
Page 32

Use this table to solve some com mon MonarchNet2 Web browser problem s.
Problem Action
Verifier does not appear
as an insta lled/enabl ed
option thr ough your W eb
browser.
“Error sen ding the
discovery re quest”
message on your
computer/W eb browser.
MonarchNet 2 does not
appear to be work ing.
“Authorization Failure”
message from
MonarchNet 2 on your
computer/W eb browser.
The optional v erifier must be ena bled and properl y connected. For
more inform ation, see your verif ier’s Oper ating Instructi ons.
The printer is not com municating on the netw ork. Verif y network and
wireless settings, including I P address, etc.
Turn off the printer an d turn it bac k on. Pri nt a MN2 test label to
confirm the IP ad dress, etc. Enter th e correct IP addres s in your Web
browser.
Enter the correc t password when l ogging into Monarc hNet2. The
default pass word is access.
General Troubleshooting Information
Use the following infor mation if your wireless printer is not oper ating properly.
1. Verify that the printer is turned on.
If the printer is used on a Monarc h Mobile Work Station (MWS), the MWS unit’s power AND
the printer must be turne d on.
2. If you are switching between wired and wireless mode on dif ferent subnets, turn of f the printer
and then turn it back on to r einitialize the wireles s module.
3. Verify the wireless modul e is functioning.
There is a wireless icon indicat or on the printer’s displa y.
4. Print an MN2 test la bel.
Use four-inch supply. If you are using supply that is shorter t han four inches long,
temporarily change your s upply type to “continuous” t o print the entire test label. Af ter
printing the test label, change your supply type to your pr evious setting.
Once you see “Ready” on the displ ay, print a test label. If this does not print or the printer
does not display “Ready,” t he printer is locked up. Tur n off the printer, wait 15 second s and
then turn it back on.
5. On the test label, verif y your IP and WiFi settings. The “ wired/wireless:” value shou ld be
“W IRED” for Ethernet cable and “W IRELESS” for RF.
Check the “WiFi SSID” and the “ signal strength.” Is the SSID cor rect? Is the signal strengt h
greater than zero? If the signal streng th is 0, there is no connection with the access point;
30 (or less) indicates you may be e xperiencing interf erence or close to being out of t he
access point’s range, and belo w 50, printing perfo rmance could be affected. If the signal
strength is low, increase t he number of retries. To imp rove the signal strength, t ry moving
the printer closer to the access po int and away from other radio de vices such as Bluetooth
wireless devices, micr owave ovens, or 2.4-GHz cordless phones.
4-2 MonarchNet2 Operating Instructions
Page 33

6. Telnet to the printer.
Note: After the wire less module has been reset, you may need to re-enabl e Telnet.
Once you have verified connect ivity, Telnet to t he printer. (i.e.telnet aa.bb.cc.d d)
You see “Welcome to MonarchNet2 Ent er Password:”
Type access as the pass word and press Enter. (access is the de fault password.)
The password is case-sensit ive. You may not be prompted f or a user name. Once here,
you have verified operat ion to the wireless module.
7. Ping the printer.
Pinging the printer tells you if it is "seen" on the net work. If you cannot ping the print er, turn the
printer off and then on. Then ping every device in the path to t he printer – access points,
routers, etc. Any device you cannot ping needs attention.
Ping ip address (i.e. ping 192.0.0. 192)
8. Verify connection to t he data port by starting a Telnet sess ion to the printer using Por t 9100 (i.e.
telnet aa.bb.cc.dd 9100) .
Press Ctrl-E on your k eyboard. This sends an ENQ req uest.
The printer responds with t hree characters. Depending upon the Telnet being used, y ou
may not see the first character , as it is a hex 05 value. The ot her two characters are ASCII
characters. You will see
A@
which means the printer is onl ine and waiting. Alternat ively, you can type
{J,2}
Note: The J must be capital.
The printer responds with {J,0,0,””,””}.
No response means that the pr inter may have an open session to som e other connection.
Either terminate the ot her connection or turn off t he printer and turn it back on.
Troubleshooting Wireless Configuration Problems
1. Your computer’s wirele ss adapter and/or access point should be configured t o match your
printer’s wir eless sett ings.
2. The printer should be withi n range (90 meters or 300 f eet) of your computer and away from metal
objects and other devices with radio signals (Bluetooth , 2.4 GHz cordless phones, and
microwaves).
3. Use infrastructure m ode to connect through an access po int.
Use Ad-Hoc mode to connect without an access point.
4. To use encryption or to pass word protect your wireless net work, and your wireless adapt er or
access point normally us es a password or pass-phrase inst ead of WEP, it should allow you t o
enter 0x followed by a ten dig it (for 40-bit or 64-bit W EP) or twenty-six digit (for 128-bit WEP)
key in hexadecimal form at (0-9 or A-F).
5. Change the RF channel ( Ad-Hoc mode only) t o correct intermittent con nection problems or slo w
performance. Change it t o at least three channels lower or hig her than any other wireless
networks within range .
Troubleshooting4-3
Page 34

4-4 MonarchNet2 Operating Instructions
Page 35

Absolute
The full path of a file, including the computer system and any directories or subdirectories.
c:\p rogram files\monarch software\mpcl toolbox\9855.phu
Access Point
An interface between a wireless network and a wired network. Access points can be used
with Ethernet or other communications to enable roaming throughout a facility.
Ad-Hoc
A wireless network composed of devices that contain a network interface card and no access
not required.
Authentication
This method identifies users on a network, based on a username and password. There are
FAST, and PSK.
Auto Method
One of the available boot methods. Auto tries DHCP, BOOTP, and RARP, then sets to the
methods.
BOOTP or
One of the available boot methods. It is a protocol used by devices that know their MAC
Boot Method
The wireless wireless module uses this method to obtain an IP address. This can be set to
Auto, DHCP, BOOTP, RARP, or Static.
Boot Tries
The number of times the device tries to get an IP address from the server when using the
BOOTP and DHCP methods.
BSS or
Set
A set of 802.11b/g/n devices operating as a fully connected wireless network.
BSSID
See MAC Address.
Channel or
You can select which channel your network devices use to communicate. All devices must
operate/interfere if they are on the same channel as your network.
DHCP or
One of the available boot methods. It is a protocol that issues IP addresses automatically
Gateway
Allows connections (communications) between different subnets on a network.
Infrastructure
Requires an access point to communicate with other devices on the network. In
network.
IP Address
An Internet Protocol identifier for a device on a network.
Most company networks have ranges for their IP addresses.
LAN or
A computer network that connects personal computers, workstations, servers, and printers.
telephone lines or radio waves. See WLAN.
(Lightweight
with unique WEP keys for each user. New keys are issued based on a time limit. Changing
A
GLOSSARY
Pathname
Network/Mode
Method
Bootstrap
Protocol
Basic Service
For example,
point.
Ad-Hoc mode is also called peer-to-peer (point-to-point) communications or BSS network. As
long as the devices are in range and are on the same channel and SSID, they connect and
communicate. Use this mode if a wireless infrastructure does not exist or where services are
two types: open and shared. Authentication protocols include LEAP, PEAP, TLS, TTLS, EAP-
last IP address used if the IP address is not automatically set using any of the previous
address, but do not know their IP address. The device broadcasts its hardware address and
the BOOTP server responds with the IP address for it. The network administrator must enter
the MAC address in the BOOTP Config file to obtain the IP address from the server.
RF Channel
Dynamic Host
Configuration
Protocol
EAP (Extensible
Authentication
Protocol)
FAST (Flexible
Authentication
via Secure
Tunneling)
Mode
Local Area
Network
be on the same channel to communicate in Ad-Hoc mode. Other radio devices such as
Bluetooth® wireless devices, microwave ovens, or 2.4-GHz cordless phones may
within a specified range to devices (such as printers) when they are first turned on. The
device keeps the IP address for a defined period of time set by your System Administrator;
however, a device could have a different IP address every time it connects to the network.
Defines how to pass authentication information between the device and authentication
server. The authentication is handled by the EAP type: FAST, TLS, TTLS, etc.
Cisco Systems® developed this authentication protocol.
It does not use certificates to authenticate, but a PAC (Protected Access Credential), which
is managed dynamically by the server. The PAC is distributed one at a time to the client
manually or automatically.
infrastructure mode, wireless devices can communicate with each other or with a wired
It consists of four 3-digit numeric fields, separated by periods. Each number can be zero to
255. An IP address has two components, the network address and the host address.
This allows each user on the network the ability to share devices, such as printers, and
communicate with each other via email, etc. LANs can be connected to each other by
LEAP
Cisco Systems® introduced this authentication protocol and provides mutual authentication
Glossary A-1
Page 36

Extensible
the WEP key time limits provides additional security.
LPD/LPR
A printer protocol that uses TCP/IP to establish connections between printers on a network.
Also known as Line Printer Daemon/Line Printer Remote.
MAC Address or
Control
A hardware address (6-by te) that uniquely identifies each node of a network. The MAC
Cards (NIC)will not have the same value.
Protocol)
NIC or
Interface Card
An adapter (board or card) that can be inserted into a device, so the device can be
received from the network
Node
A processing location on a network. The location can be a workstation, computer, or printer.
Each Node has a unique MAC address.
Open
This allows any device to authenticate and then attempt to communicate with the access
shared key authentication.
Pathname
The location of a particular file or directory that includes the full path to the needed filename
PEAP (Protected
Ping
A way to determine if a device is accessible. It sends a packet to the specified address and
waits for a reply.
Protocol
This is the way two devices transmit data between each other, including error checking, data
compression, and how messages start and end.
RARP or
Protocol
One of the available boot methods. The device sends an RARP request and the RARP
Relative
Pathname
The file or directory location on the user’s system relative to the user’s current location on
the system (what directory the user is currently in). For example, mpcl toolbox\9855.phu
Router
Any device that forwards data along networks. Routers are located at gateways.
Shared
The access point sends an unencrypted challenge text string to any device attempting to
authentication.
Authentication
Protocol)
Media Access
MSCHAPv2
(Challenge
Handshake
Authentication
Network
Authentication
PAP (Password
Authentication
Protocol)
Extensible
Authentication
Protocol)
address is set during manufacturing and does not change. Also, two Network Interface
MSCHAPv2 is the Microsoft® version of CHAP. It is a three-way handshake protocol that is
more secure than PAP.
It provides mutual authentication between devices.
connected to a network. The NIC converts data from the device into the form transmitted or
point. Any wireless device can authenticate with the access point, but if WEP is used, the
device can communicate only if its WEP keys match the access point's. There is no
challenge that occurs, you either have the correct key or not when you communicate with the
access point. By eliminating the challenge process, it actually makes this more secure than
A simple authentication protocol used with PPP (Point-to-Point Protocol). It is a plain text
password system, which is not very secure.
or directory. This is a combination of path and filename.
Authenticates clients into a network using only server-side certificates, which makes
implementing and administering a wireless LAN easier.
PSK
(Pre-Shared
Key)
RADIUS (Remote
Authentication
Dial-In Ser ver)
Reverse
Address
Resolution
Authentication
Authentication mode of WPA used in SOHO environments.
The key value (or pass-phrase) is used for net work authentication only (not data encryption).
It does not use a RADIUS server like the other modes, but uses a shared key to provide the
initial authentication with the access point or host.
This is an authentication server, such as the Cisco® ACS, Micros oft® IAS, etc.
server responds with an IP address. The device knows its MAC address and the server
responds with the IP address for it.
communicate with it. The device requesting authentication encrypts the challenge text and
sends it back to the access point. If the challenge text is encrypted correctly, the access
point allows the requesting device to authenticate. Both the unencrypted challenge and the
encrypted challenge can be monitored; however, this leaves the access point open to attack.
Because of this weakness, shared key authentication can be less secure than open
2 MonarchNet2 Operating Instructions
Page 37

Signal Strength
A percentage (1 to 100) of the connection between the device and access point. If the signal
2.4-GHz cordless phones.
Speed or
Sets the maximum rate of communication between the devices on the network. It is also
Identifier
Method
IP address remains the same every time the device connects to the network.
fixed.
and they run as if you were entering them directly on the server console.
Security)
Transmit Rate
See Speed.
Area Network
WPA (Wi-Fi
WPA2
strength is 0, there is no connection with the access point; 30 or less indicates you may be
experiencing interference or close to being out of access point range, and below 50, printing
performance could be affected. To improve the signal strength, try moving the printer closer
to the access point and away from other radio devices such as Bluetooth® wireless devices,
microwave ovens, or
Transmit Rate
SSID or
Service Set
Static
Subnet A portion of a network that shares a common address component. On TCP/IP networks,
Subnet Mask
Telnet A Terminal Emulation program for TCP/IP networks that runs on your computer and connects
TCP/IP A way that two devices can transmit data between each other. TCP/IP (Transmission Control
TKIP (Temporal
Ke y In teg ri ty
Protocol)
TLS (Transport
Layer Security)
TTLS (Tunneled
Transport Layer
called transmit rate. The speeds are in megabits per second (Mbps) and include: 1, 2, 5.5,
11, 12, 18, 24, 36, 48, and 54.
A unique identifier that must match for all nodes on a subnetwork to communicate with each
other. It consists of up to 32 characters (any printable character, including spaces).
If using the space character, it must be enclosed in quotation marks. It is case-sensitive.
One of the available boot methods. Use static if your network uses fixed configuration. The
subnets are all devices with the same prefix. For example, all devices that start with
192.192.192 are part of the same subnet. Dividing a network into subnets is useful for both
security and performance reasons.
A mask is used to determine what subnet an IP address belongs to. Companies often have
ranges of IP addresses that can be described by one or more masks. For example, a mask of
255.255.255.0 allows variation in the last position only, because the first three positions are
your computer to a server on the network. You enter commands through the Telnet program
Protocol/ Internet Protocol) is generally the standard for transmitting data over a network.
Changes the encryption keys regularly and has time limits before new keys are created.
Changing the key periodically provides additional security.
A cryptographic protocol that uses client-side and server-side certificates to authenticate
users on the Web. It can dynamically create user-based and s ession-based keys.
Provides certificate-base d, server-side, mutual authentic ation of the client and network
through an encrypted channel (or tunnel). It can dynamically create user-based and
session-based keys.
WEP or
Wired
Equivalent
Privacy
128 Bit / 64 Bit
WEP Key
WLAN or
Wireless Local
Protected
Access)
(or IEEE 802.11i)
A security protocol for wireless local area networks. WEP was designed to provide the same
level of security as that of a wired network, which is inherently more secure than a wireless
network because wired networks are easily protected against unauthorized access. Wireless
networks use radio waves to communicate and can be vulnerable to unauthorized users.
WEP provides security by encrypting data over radio waves so that it is protected as it is
transmitted. However, it has been found that WEP is not as secure as once believed.
Note: If one part of a wireless network has WEP enabled, they all must have it enabled with
the same key or they cannot communicate.
This is the 64 or 128 bit WEP key that must match other Nodes’ encryption keys in order to
communicate: 10 hex characters for 64 bit (40 user-specified characters), or 26 hex
characters for 128 bit (104 user-specified c haracters). You must use the same key values for
devices to communicate with each other.
A LAN that uses high-freq uency radio waves to communicate between nodes, rather than
telephone wires, etc.
A network security protocol that uses improved authentication and temporal keys. It was
created to address the weaknesses of WEP encryption.
A network security protocol with stronger encryption than WPA. It was created to address
the weaknesses of WEP encryption.
A-3
Page 38

Page 39

Page 40

Avery Dennison Printer
Systems Division,
170 Monarch Lane,
Miamisburg, OH 45342
US
CA
http://rbis.averydennison.com/ADTP1
Printer Documentation
 Loading...