

Page 1
Operator’s Handbook
28028
0
Monarch 9417
Food Freshness System
®
TC9417OH Rev. A% /13
©2013 Avery Dennison Corp. All rights reserved.
Page 2

Each product and program carries a respective written warranty, the only warranty on which the customer can rely. Avery Dennison reserves the
right to make changes in the product, the programs, and their availability at any time and without notice. Although Avery Dennison has made every
effort to provide complete and accurate information in this manual, Avery Dennison shall not be liable for any omissions or inaccuracies. Any
update will be incorporated in a later edition of this manual.
©2013 Avery Dennison Corporation. All rights reserved. No part of this publication may be reproduced, transmitted, stored in a retrieval system, or
translated into any language in any form by any means, without the prior written permission of Avery Dennison.
WARNING
This equipment has been tested and found to comply with the limits for a Class A digital device, pursuant to Part 15 of the FCC Rules. These limits
are designed to provide reasonable protection against harmful interference when the equipment is operated in a commercial environment. This
equipment generates, uses, and can radiate radio frequency energy and, if not installed and used in accordance with the instruction manual, may
cause harmful interference to radio communications. Operation of this equipment in a residential area is likely to cause harmful interference in
which case the user will be required to correct the interference at his own expense.
CANADIAN D.O.C. WARNING
This digital apparatus does not exceed the Class A limits for radio noise emissions from digital apparatus set out in the Radio Interference
Regulations of the Canadian Department of Communications. Le présent appareil numérique n’émet pas de bruits radioélectriques dépassant les
limites applicables aux appareils numériques de la classe A prescrites dans le Réglement sur le brouillage radioélectrique édicte par le ministère
des Communications du Canada.
Trademarks
Monarch®, Freshmarx®, and Avery Dennison® are trademarks of Avery Dennison Corp.
McDonald’s® is a trademark of McDonald’s Corp.
Avery Dennison
170 Monarch Lane
Miamisburg, OH 45342
Page 3

TABLE OF CONTENTS
GETTING STARTED......................................................................................................................1-1
Using This Manual ..............................................................
Audience
Printer Ove
Connecting the Power Co
Loading Labels – Left Pri
Loading Labels – Right P
PRINTING LABELS.......................................................................................................................
About the System................................................................
Printing Freshness Labels
Printing Use First Labels......................................................
CARE & MAINTENANCE
Clearing Label Jams............................................................
Cleaning the Platen Roller and
Cleaning the Display
Cleaning the Printer
TROUBLESHOOTING....................................................................................................................
Error Codes........................................................................
Technical Su
SPECIFICATIONS
System Specifications .........................................................
............................................................................
rview.................................................................
rd..................................................
nter ...............................................
rinter .............................................
....................................................
................................................................................................................3-1
Printhead ..............................
...........................................................
............................................................
pport...............................................................
........................................................................................................................ A-1
..................................................... 1-1
..................................................... 1-1
..................................................... 1-2
.....................................................1-2
..................................................... 1-3
.....................................................1-6
2-1
..................................................... 2-1
..................................................... 2-2
.....................................................2-3
.....................................................3-1
.....................................................3-1
.....................................................3-2
.....................................................3-2
4-1
..................................................... 4-1
.....................................................4-1
.................................................... A-1
i
Page 4

ii Operator’s Handbook
Page 5

GETTING STARTED
Use the Monarch® FreshMarx® 9417 Food Freshness System for produc t freshness
and to label inventory. The printer is available as a single printer (left printer only) or dual
printer (left and right printer).
Using This Manual
Following is a summary of the contents of this manual .
Chapter Contents
Getting Started Installing the printer and loading supp lies.
1
Printing Labels Printing product labels and Use First labels.
2
Care & Maintenance Clearing supply jams and cle aning the printer.
3
Troubleshooting Common problems and their solutions.
4
Specifications Printer specifications.
A
Audience
1
The Operator's Handbook is for users who print and apply freshness labels.
Your Manager or System Administrat or should review the information in th e System
Administrator’s Guide. It describes how to set the printe r’s time and date, configure the
printer, and use the built-in FreshMarx application.
Getting Started 1-1
Page 6
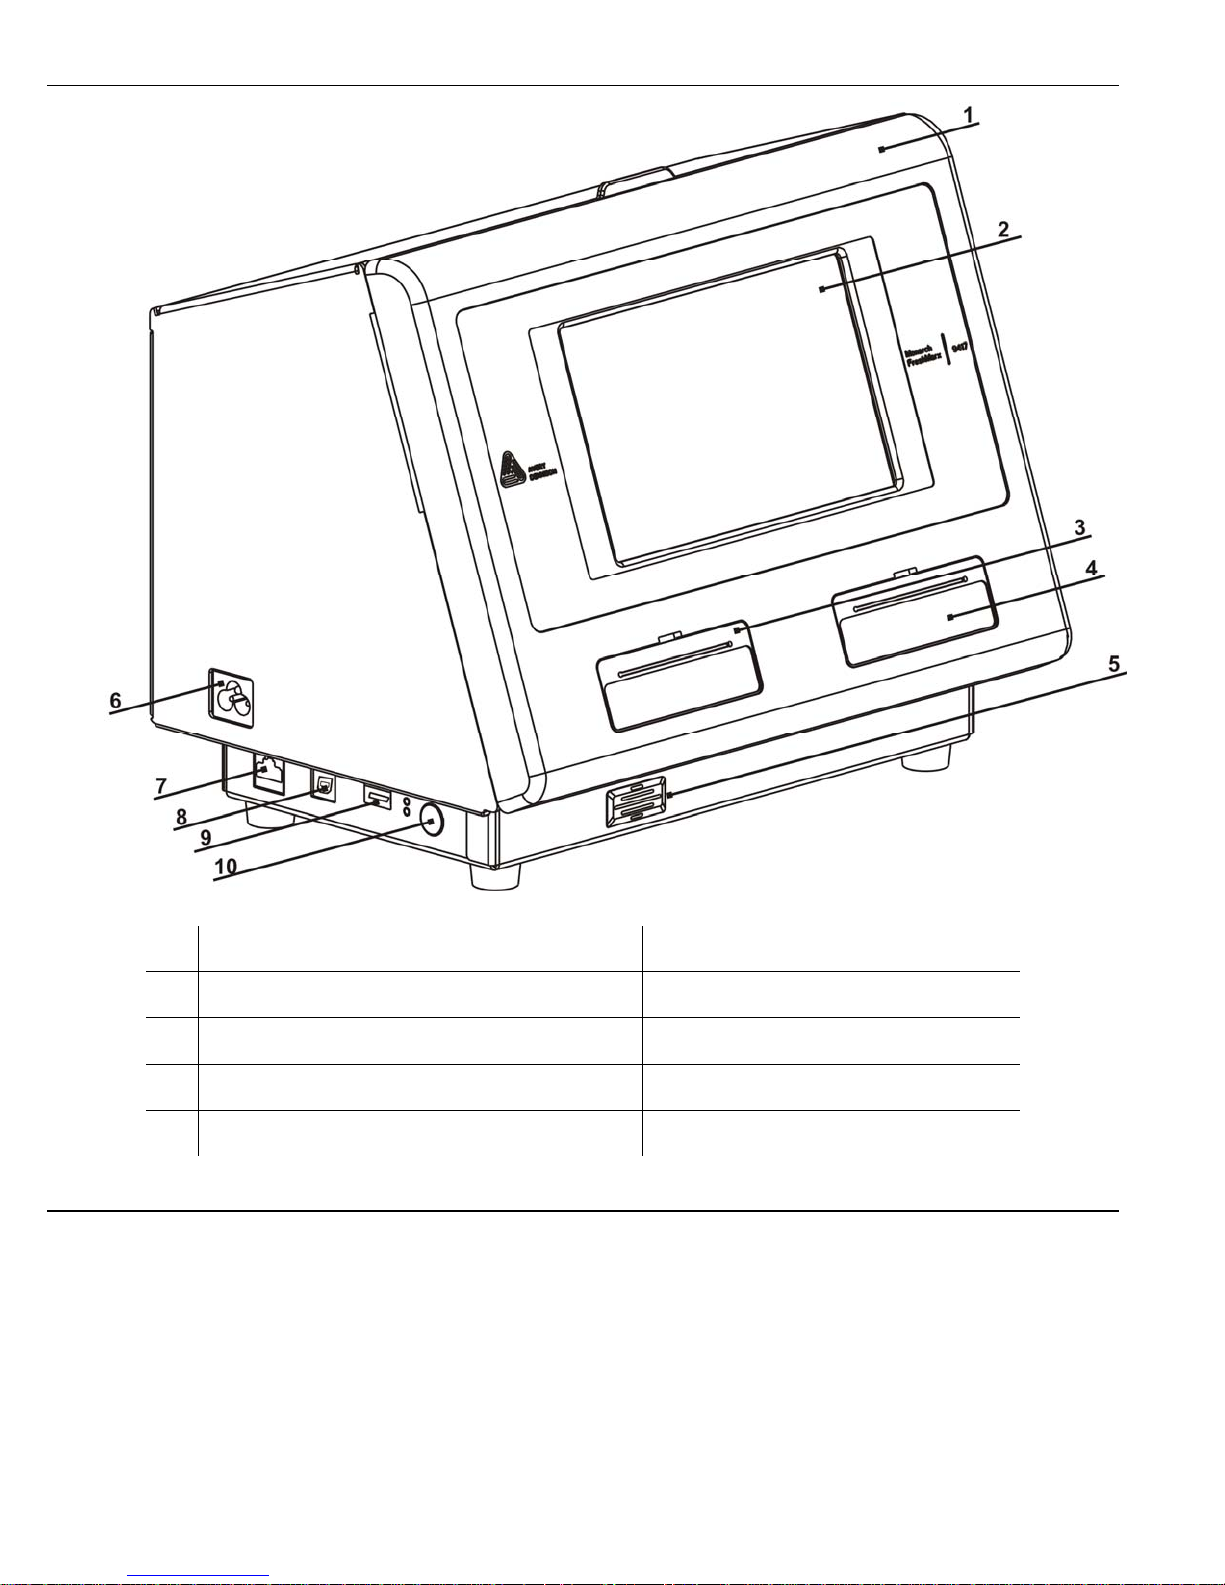
Printer Overview
1. Cover 6. Power Cord Connection
2. Display 7. Ethernet Port
3. Left Printer 8. USB (Type B) Port
4. Right Printer 9. USB (Type A) Port
5. Speaker 10. Power Button
Connecting the Power Cord
1. Plug the power cord into the socket on the side of the printer (#6 above).
2. Plug the other end of the power cord into a grounded electrical outlet.
3. Turn on the printer. Press the p ower button on the side of the prin ter.
Warning: The printer should never be operated in a location where it can get wet. Personal
injury could result.
1-2 Operator’s Handbook
Page 7
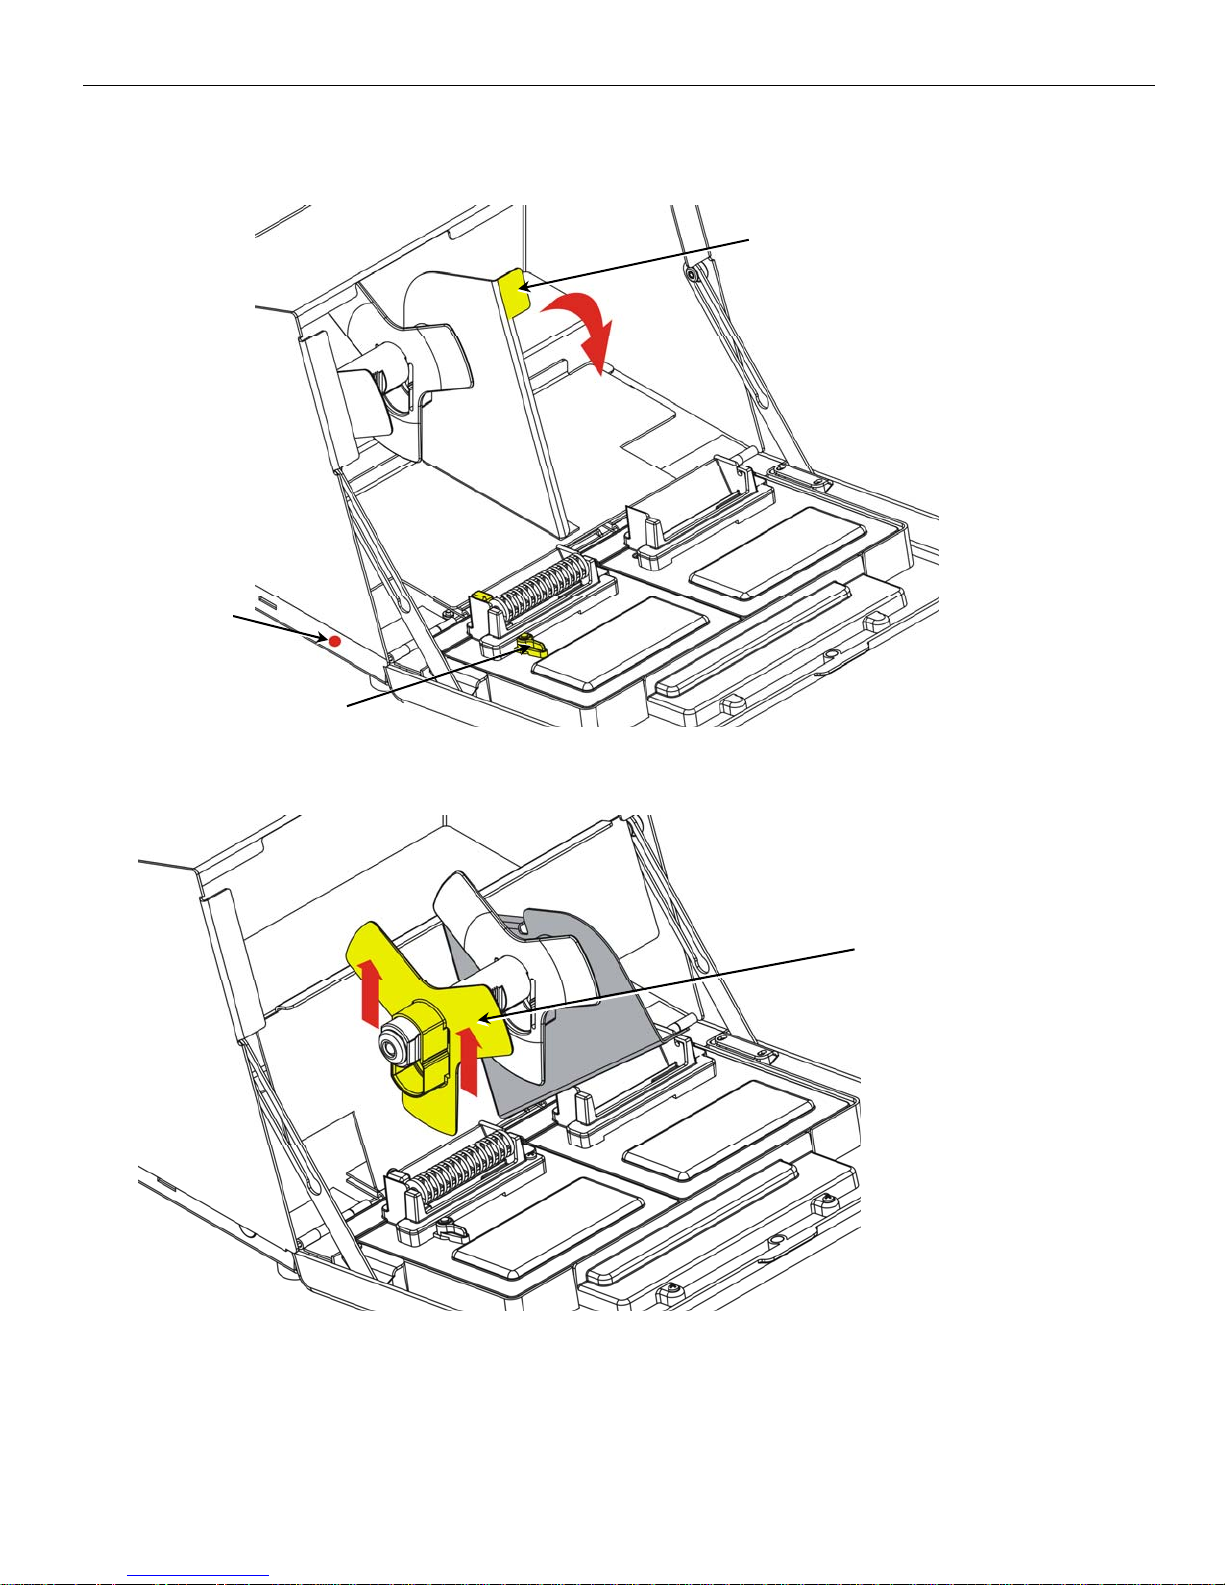
Loading Labels – Left Printer
1. Turn on the printer. Press the p ower button on the side of the prin ter.
2. Open the cover.
3. Pull on the supply tab.
Supply Tab
Power Button
Supply Lever
Note:
When loading supply, open the supply le ver as shown above.
4. Unlock the supply guide. Remove t he supply guide from the supply holder.
Supply Guide
5. Place a roll of labels (label side up) on the supply holder.
Getting Started 1-3
Page 8
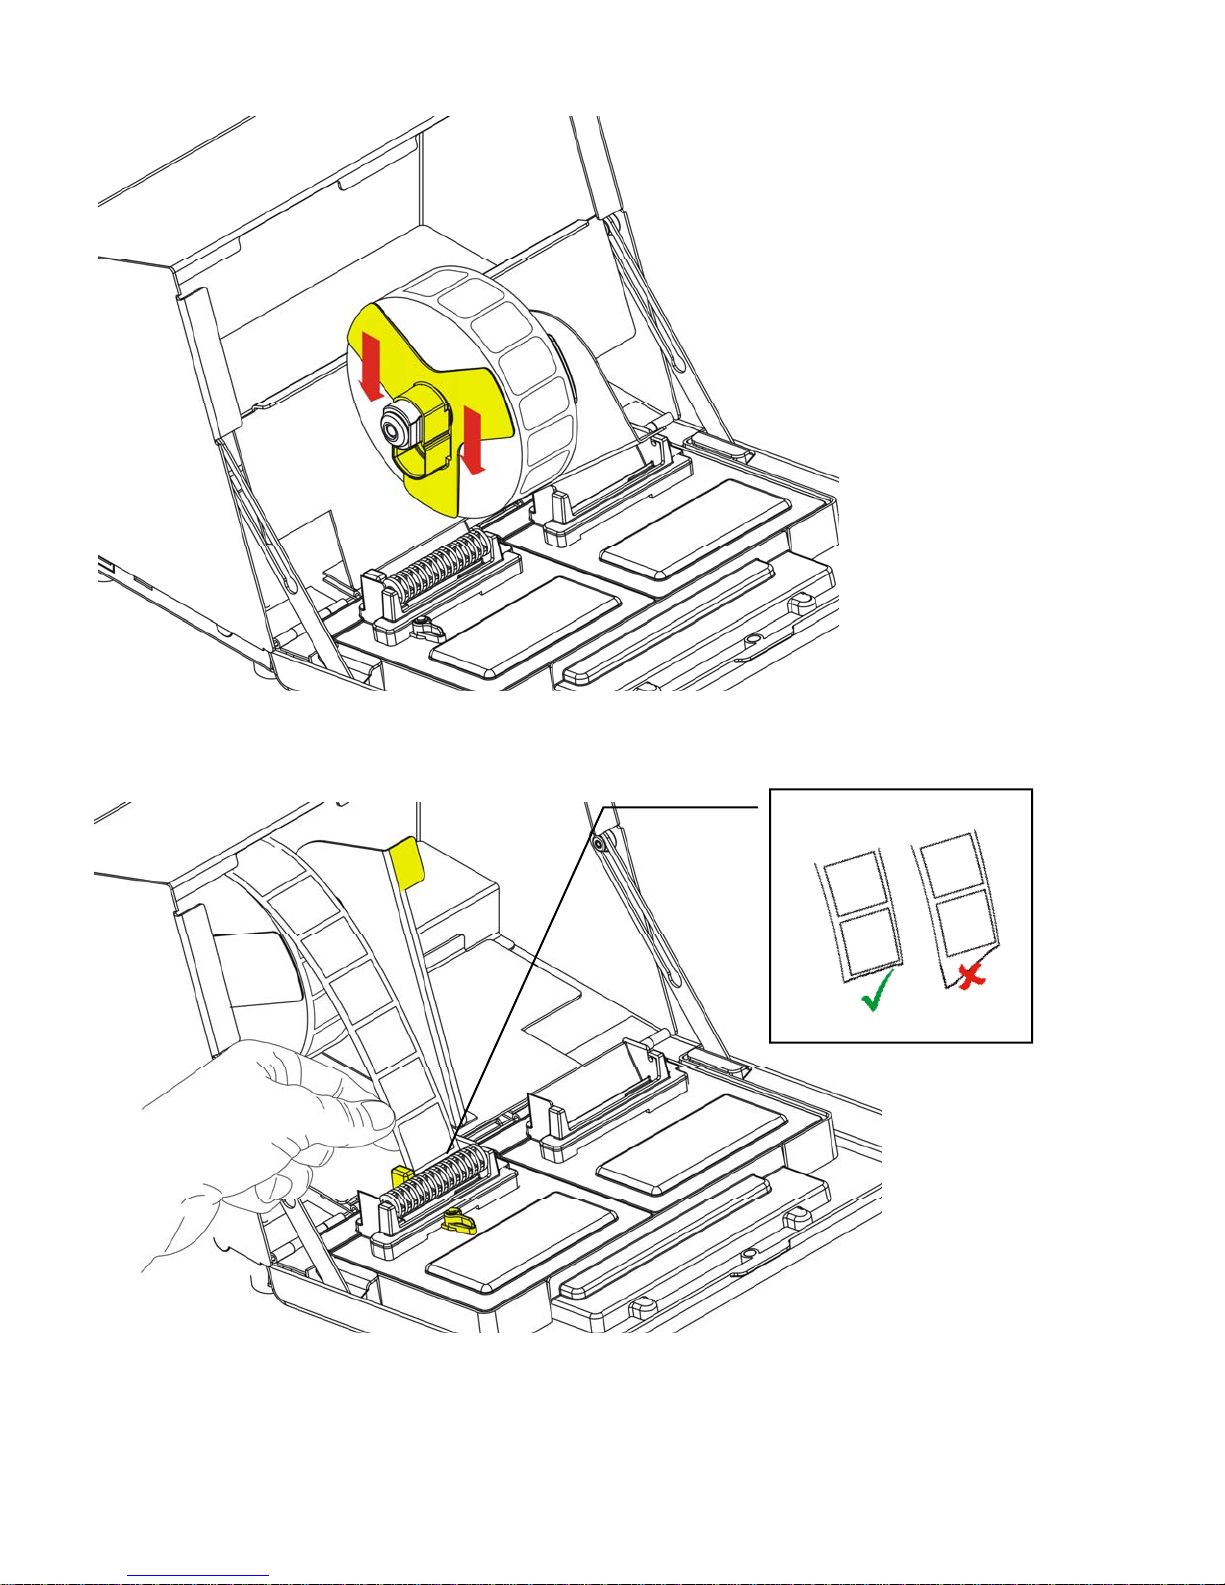
6. Place the supply guide on the suppl y holder until it touches the supply. L ock the supply
guide.
7. Put the supply tab back.
8. Guide the labels along the inside edge and into the slot (behind the white roller). The
printer feeds the supply.
Note: Tear a straight edge on the supply before feeding it into the printer.
1-4 Operator’s Handbook
Page 9
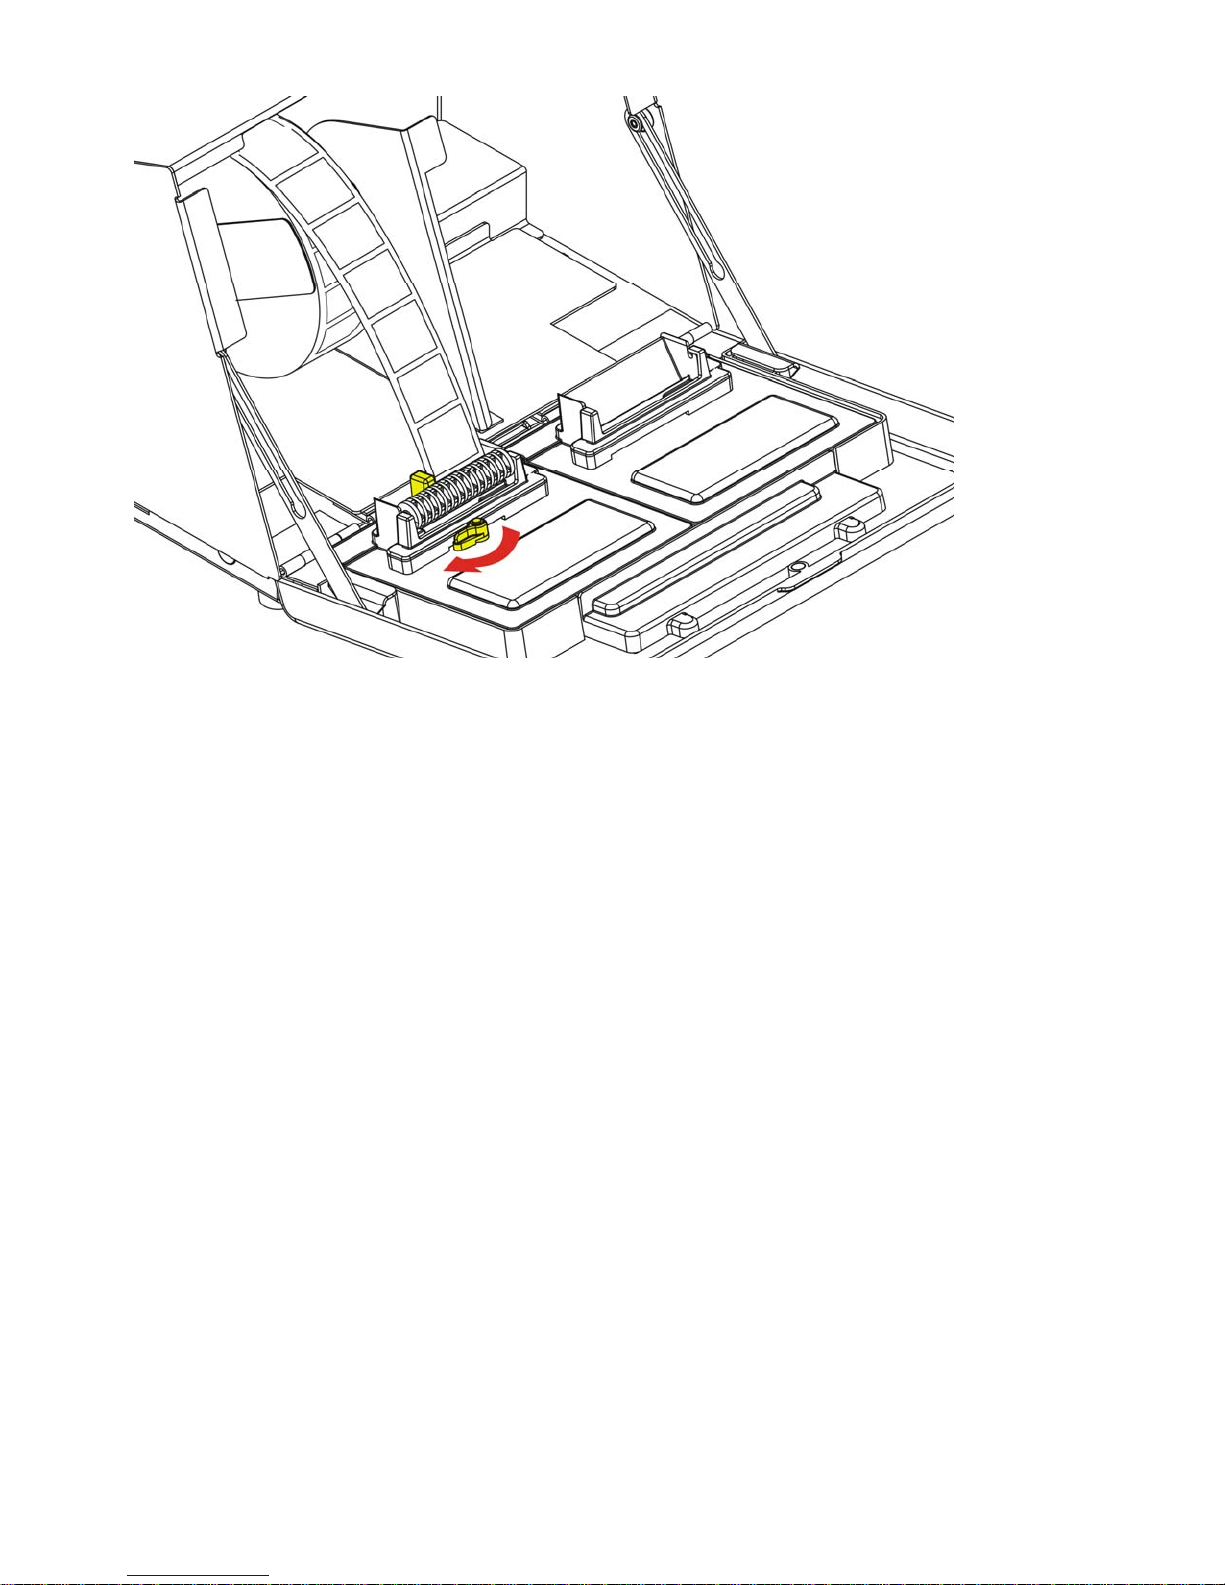
Slide the supply lever next to the supply. Close the supply le ver.
9.
10. Close the cover.
Getting Started 1-5
Page 10
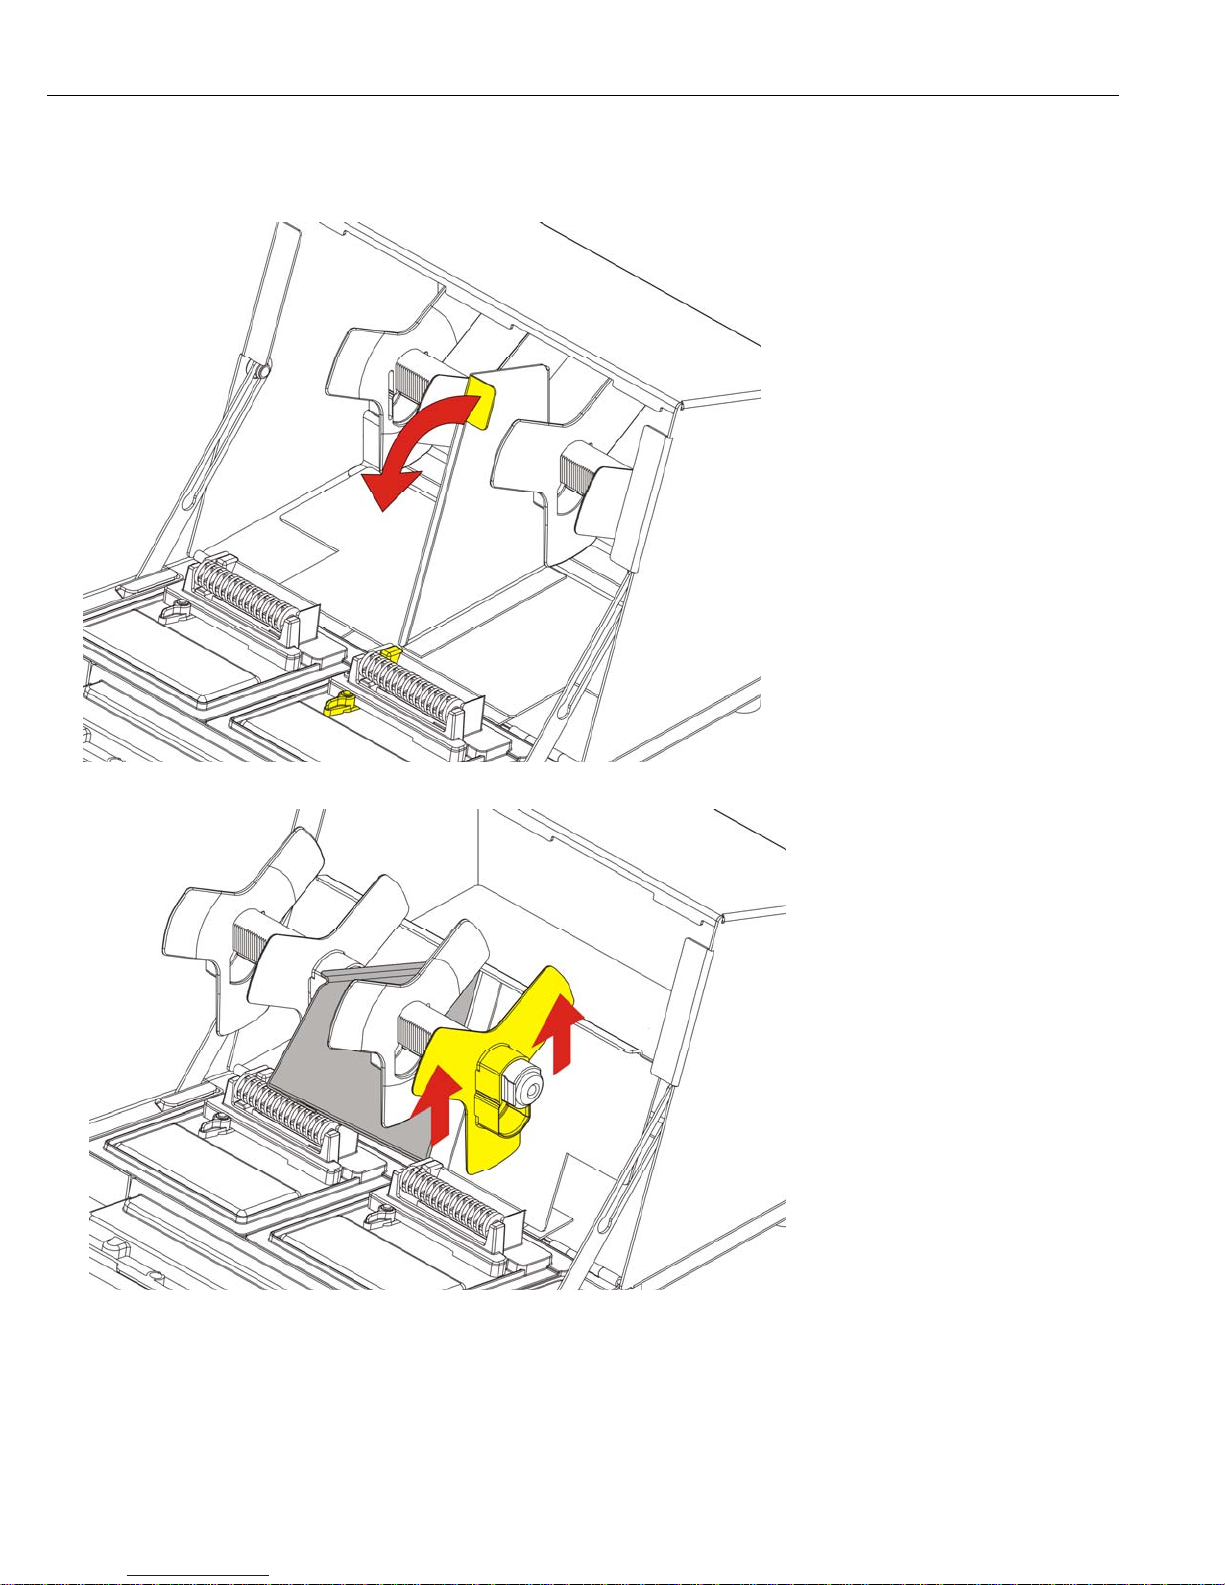
Loading Labels – Right Printer
1. Turn on the printer. Press the power button on the si de of the printer.
2. Open the cover.
3. Pull on the supply tab.
4. Un
lock the outer supply guide a nd remove it.
1-6 Operator’s Handbook
Page 11
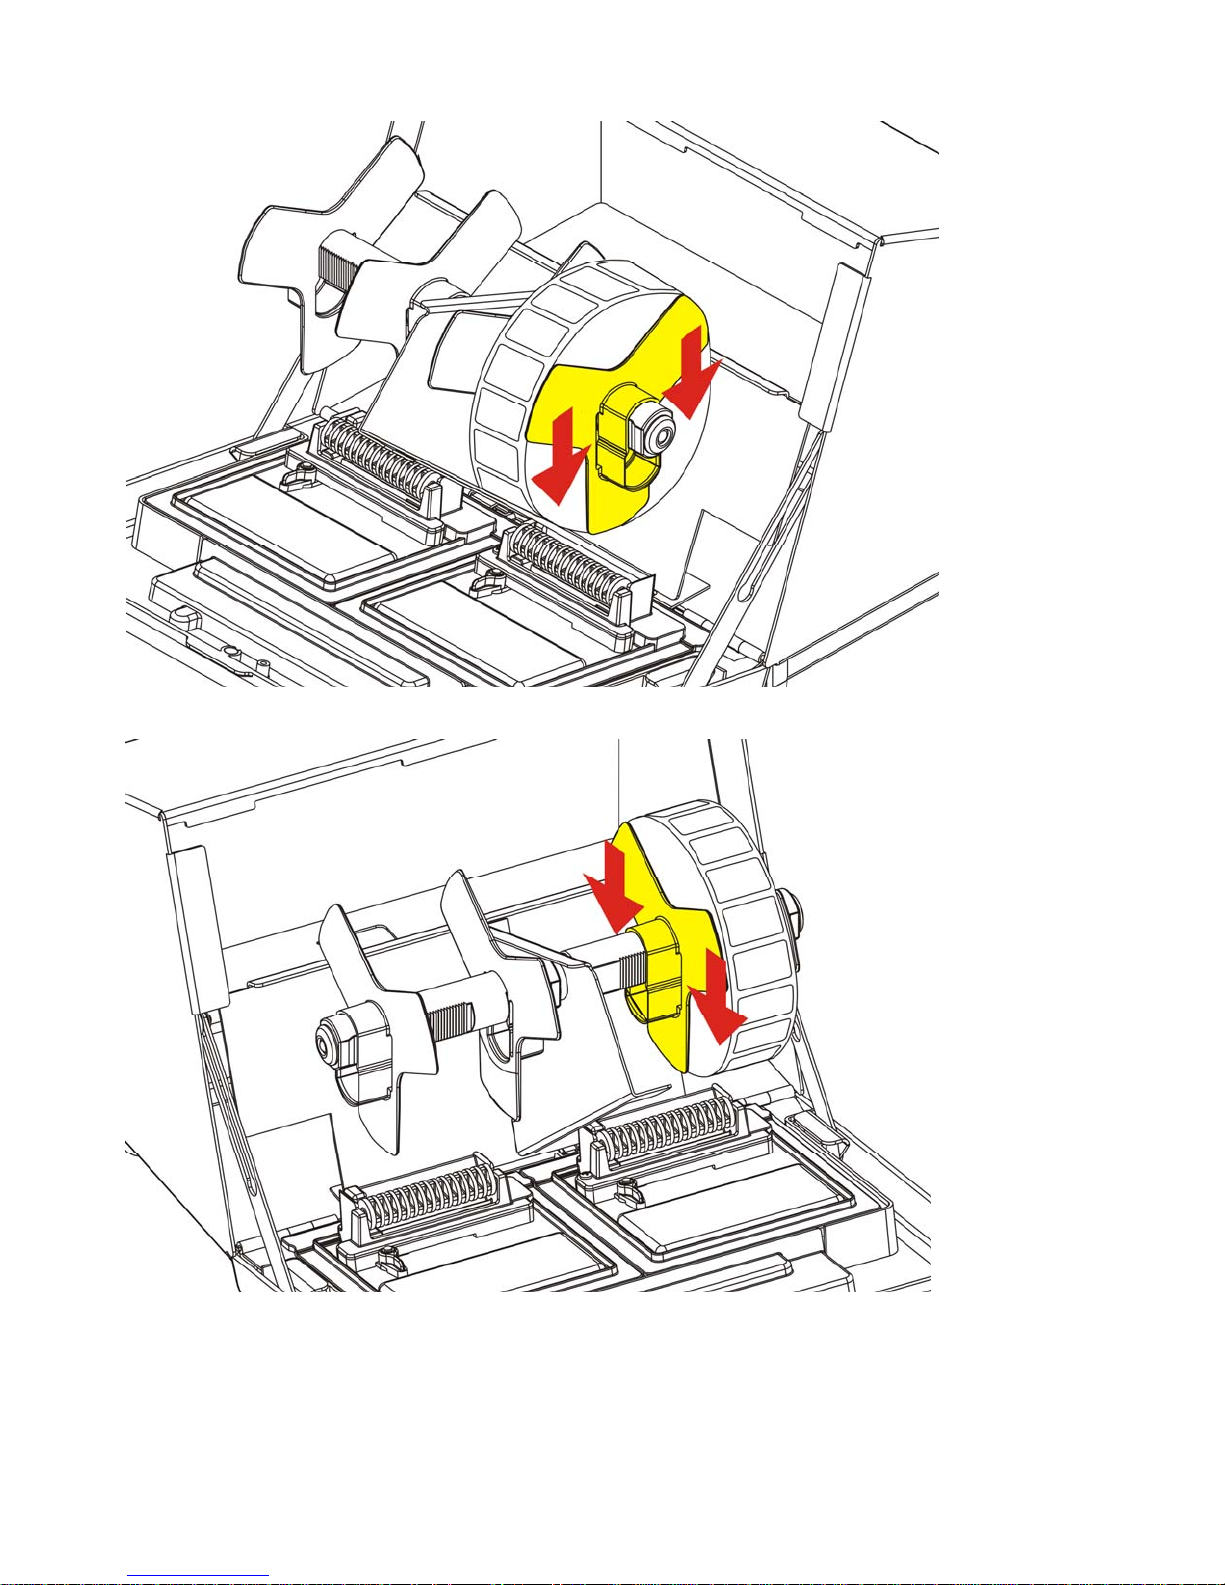
5. Place a roll of labels (label side up) on the supply hold er.
6. Place the outer supply guide on the supply holder and lock it in p lace.
7. Un
lock the inner supply guide a nd move it until it touches the supply. Lock it into place.
8. Put
the supply tab back.
Getting Started 1-7
Page 12
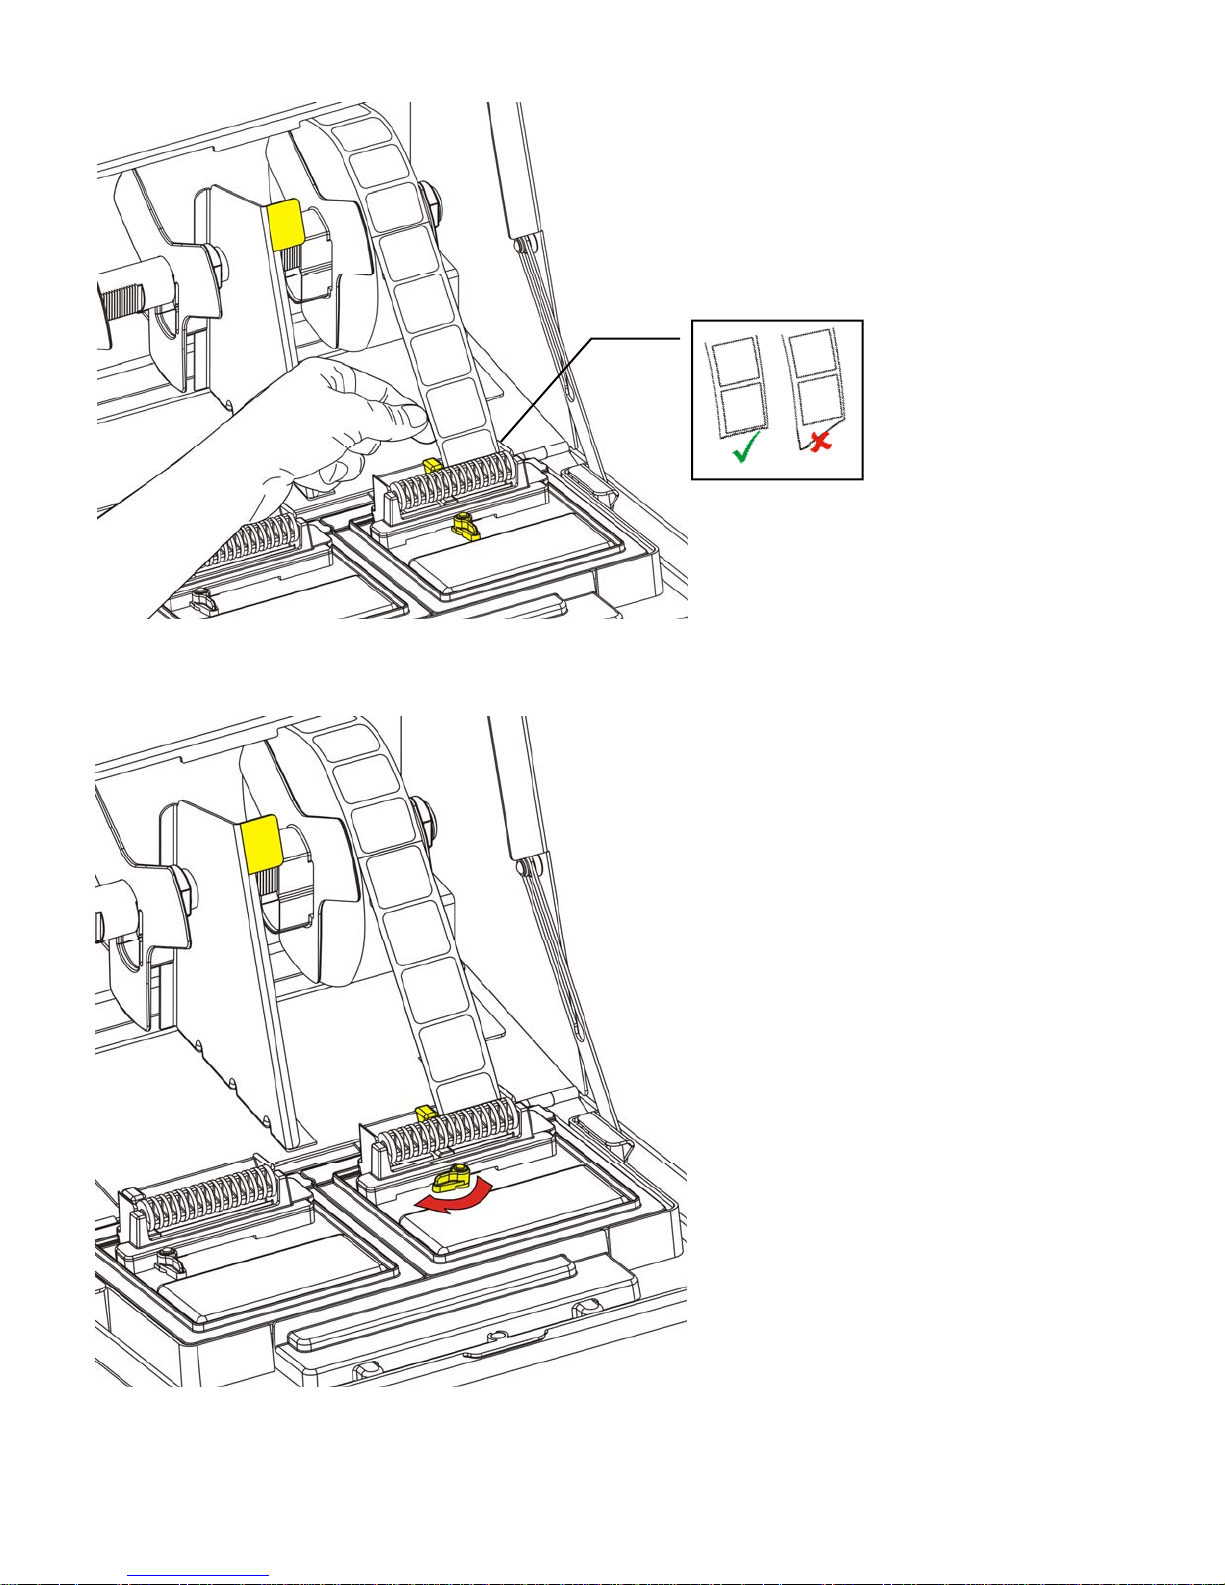
9. Gu
ide the labels along the outside edge and into the slot. The print er feeds the supply.
Note: Tear a straight edge on the supply before feeding it into the printer.
. Slide the supply lever next to the suppl y and close it.
10
. Close the cover.
11
1-8 Operator’s Handbook
Page 13
PRINTING LABELS
This chapter describes how to
use the application
print freshness labels
print Use First labels.
About the System
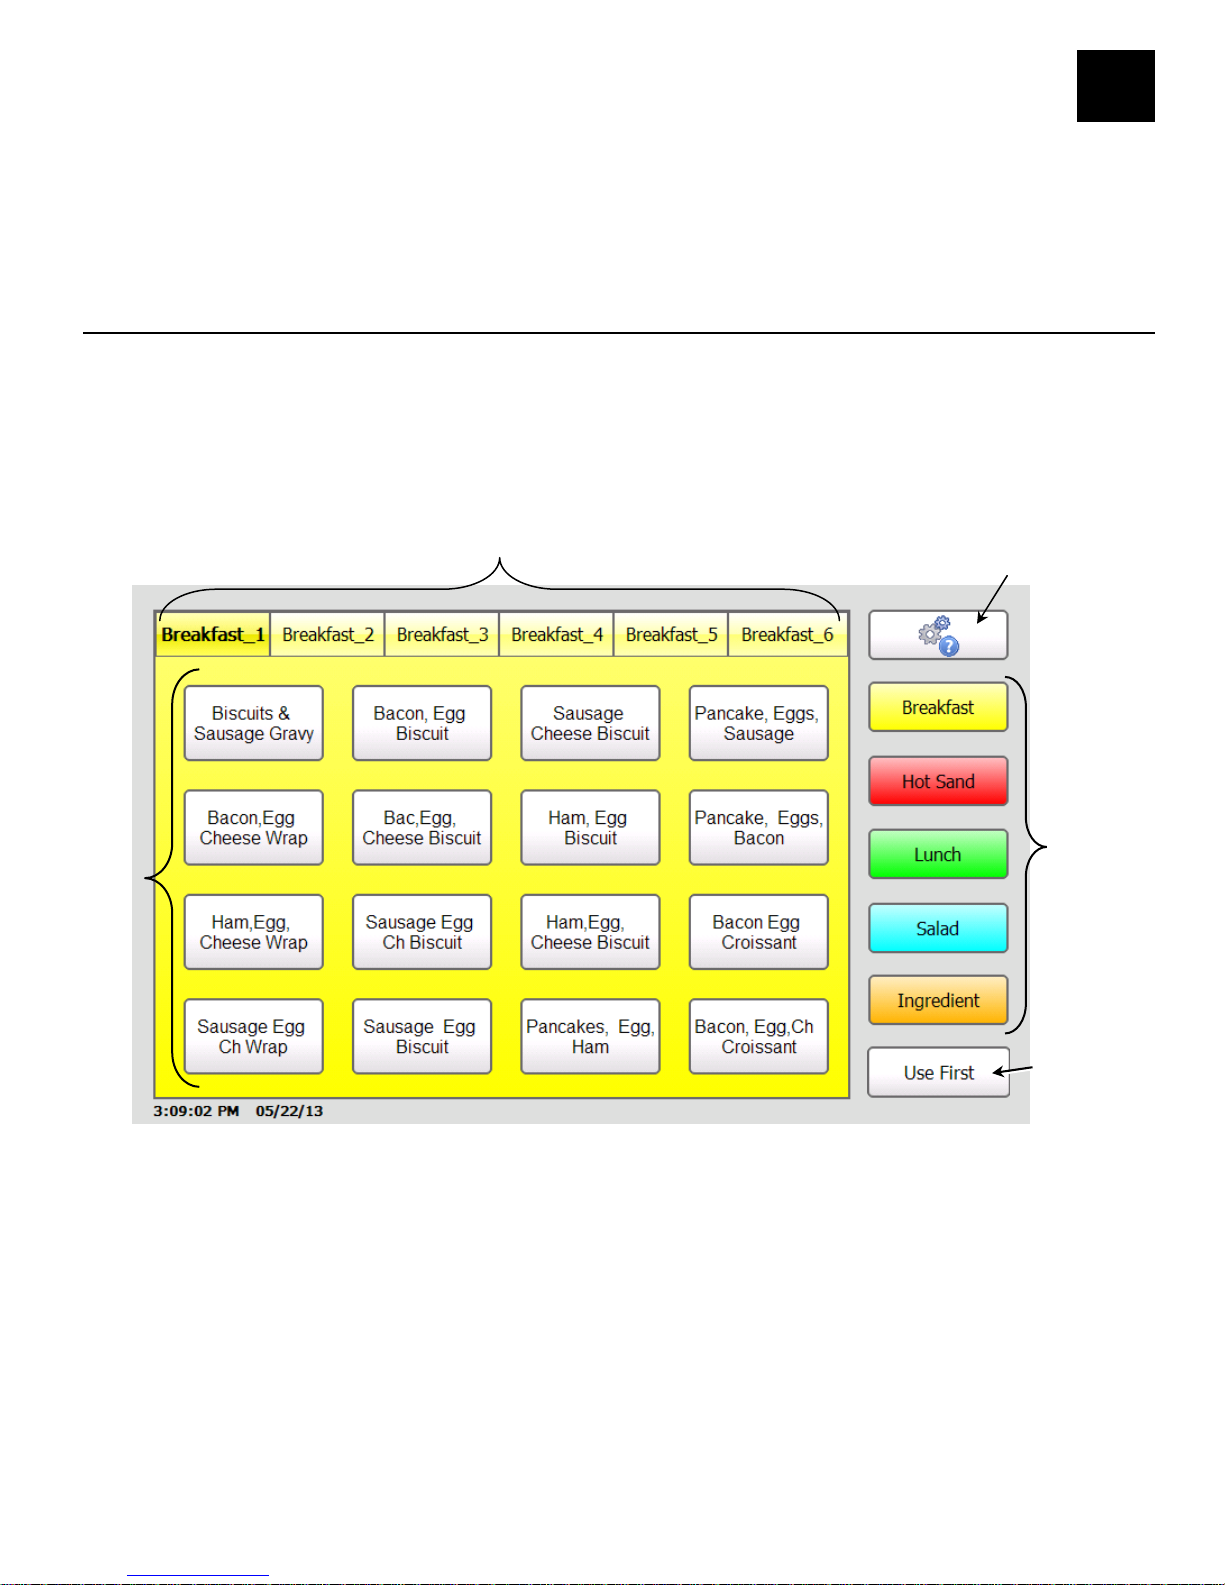
The main screen consis ts of a language toggle butto n, tools button, five produ ct category
buttons, each with six tabs of product buttons, and a “Use First” button.
The product category buttons and their tabs of product b uttons are color-coded so you can
easily print freshness label s.
Select a new category by touching one of the color-code d buttons on the right side of the
screen.
Tabs
Tools
2
Category
Product
Buttons
Note: All products in a category may not appear on the screen. Use the numbered tabs at
the top of the screen to view more products .
Buttons
Use First
Button
Printing Labels 2-1
Page 14
Printing Freshness Labels
1. Turn on the printer.
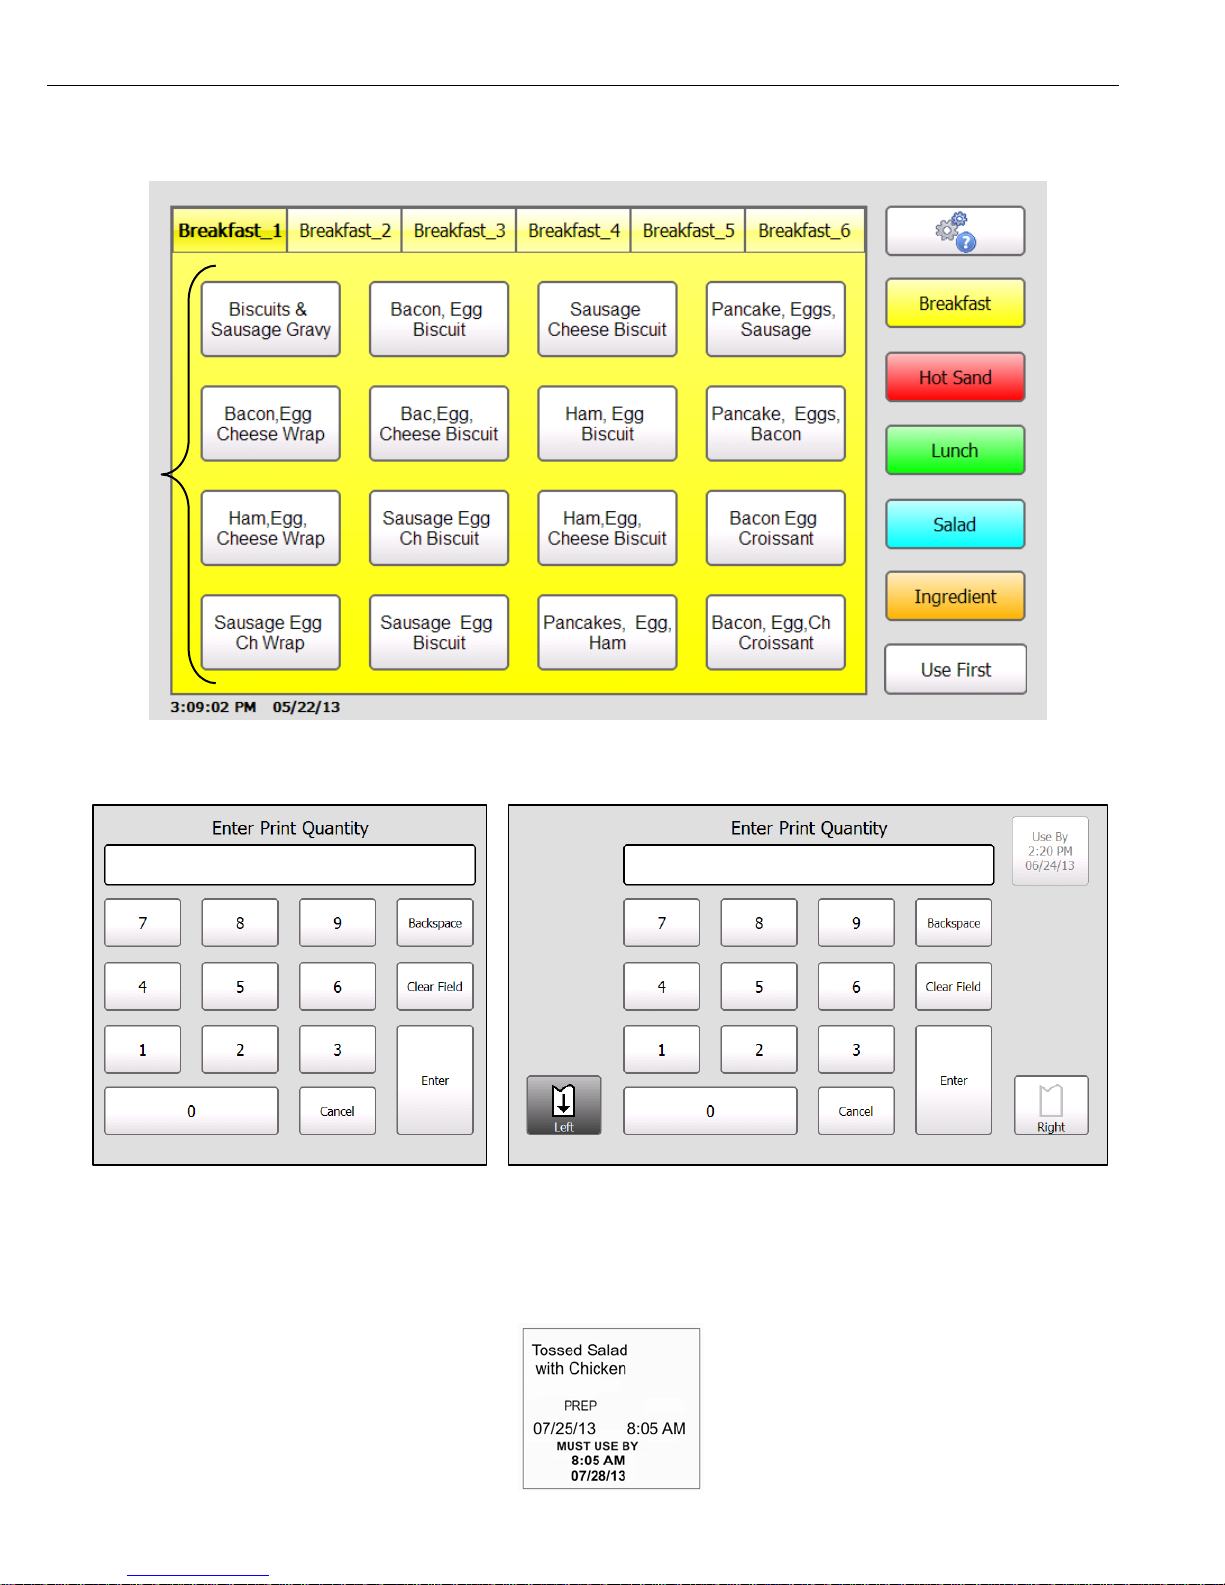
2. Press the product button of the label to print.
Product
Buttons
3. Se
lect the number of labels to print and press Enter. To print a single label, press Enter.
Single Printer
Dual Printer with Backup Printer Selection
Note: If you have a dual printer, your System Administrator can enable the Backup Printer
selection option. Select the number of labels to prin t, then select the printer (left or
right), and then press Enter.
Labels print for the selected product.
2-2 Operator’s Handbook
Page 15
Printing Use First Labels
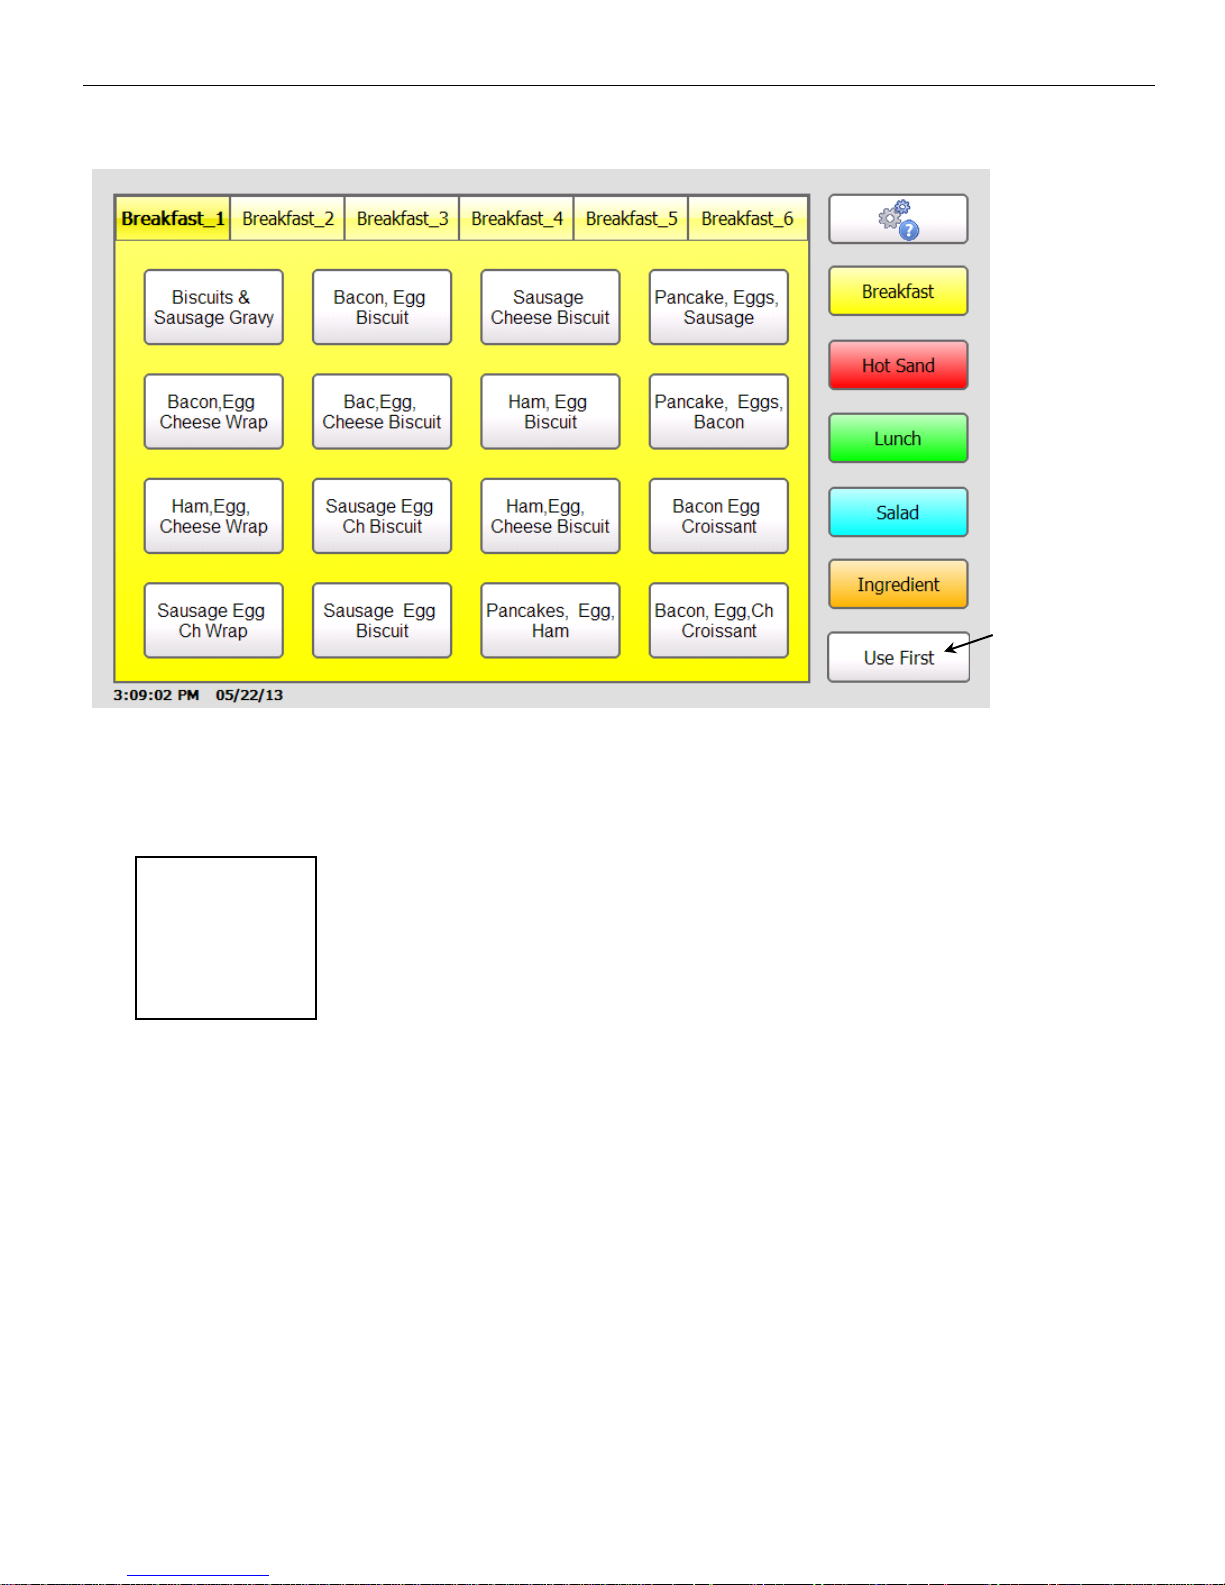
Apply a “Use First” label to a ny product that needs to be used f irst.
1. Press the Use First category button on the right side of the screen.
Use First Button
2. Ent
Labels with the words "Use First" print.
er the quantity of Use First labels you need to print and press Enter.
OR
Press Enter without entering a quantity to print a single label.
USE
FIRST
USE PRIMERO
Sample Label
Printing Labels 2-3
Page 16

2-4 Operator’s Handbook
Page 17
CARE & MAINTENANCE
This chapter tells you how to
clear label jams
clean the platen roller and printhead
clean the printer.
3
Clearing Label Jams
To clear a jam:
1. Open the cover.
2. Tear the supply and remove the label roll.
3. Remove the jammed labels.
Caution: Do not use sharp or pointed objects t o remove labels. It may damage th e printer.
4. Remove any adhesive that might be on the platen roller. See “Cleaning the Platen Roller
and Printhead” for more information.
5. Reload the labels.
6. Close the cover.
Cleaning the Platen Roller and Printhead
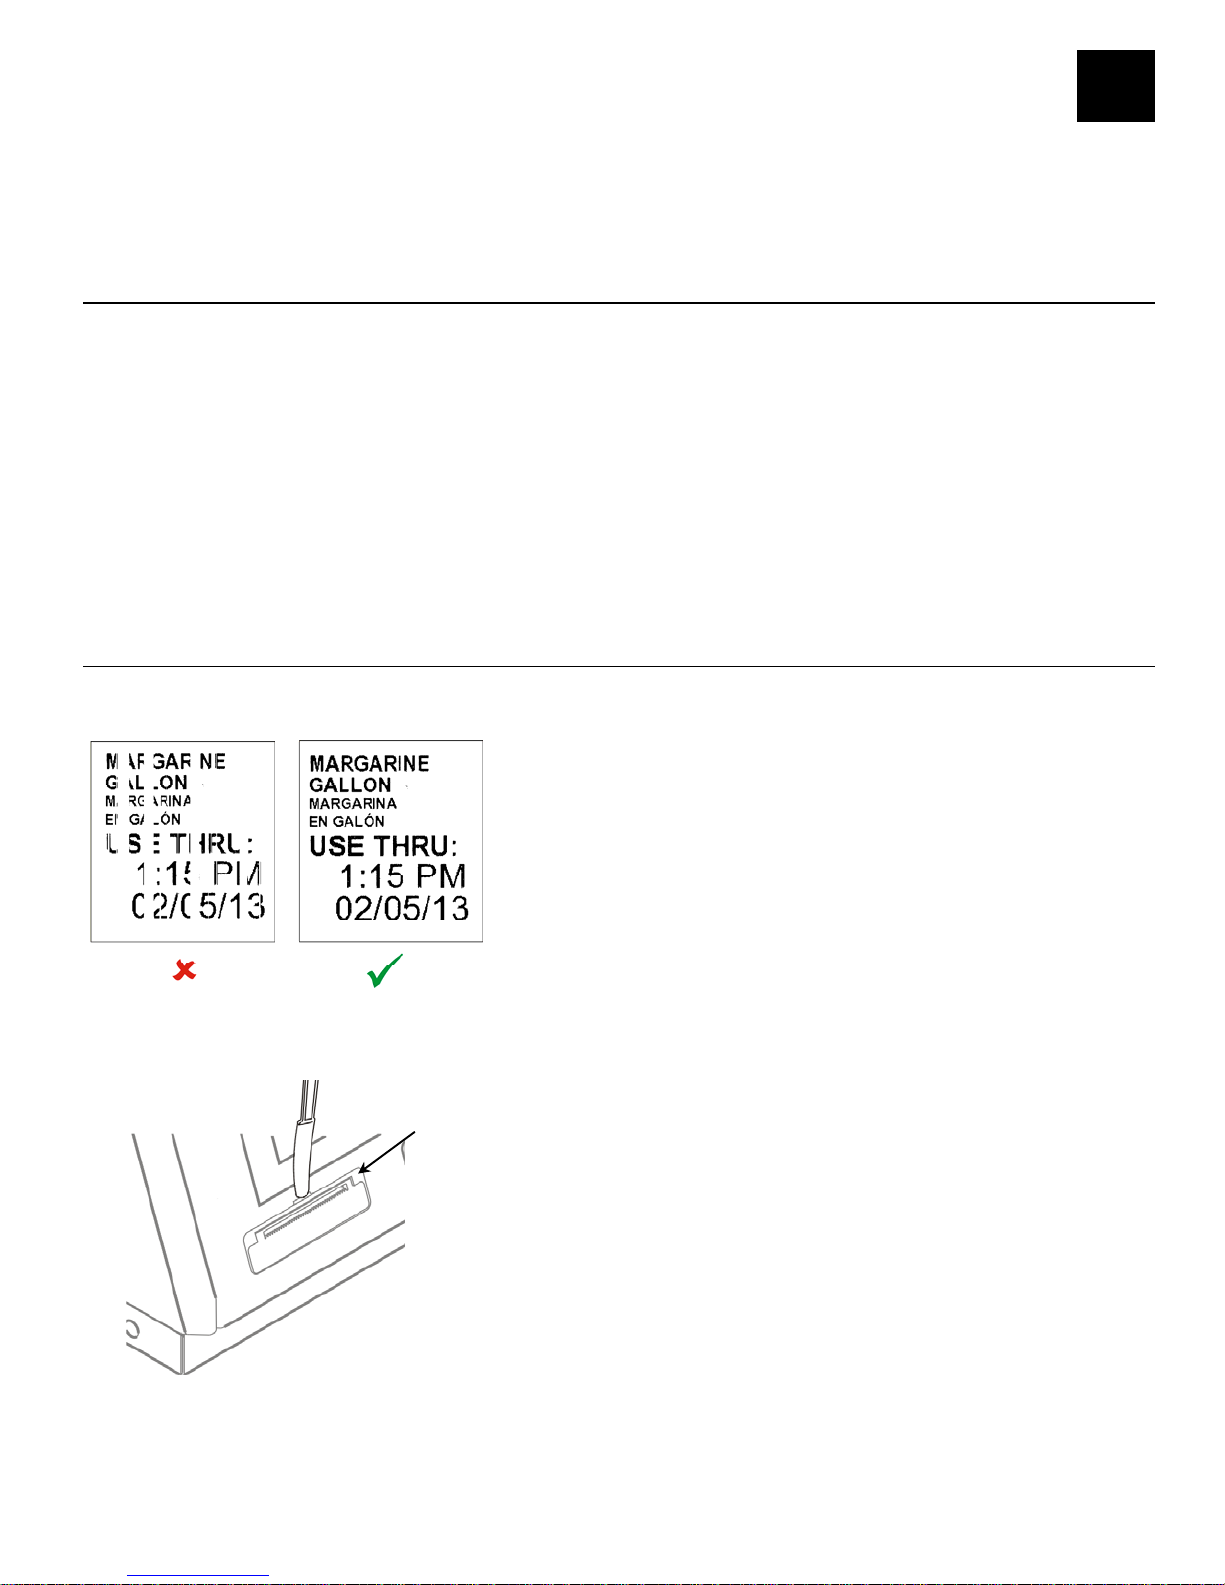
Clean the platen roller and printhead after every five rolls of labels or when you see voids in
the print.
1. Remove any
2. Use a plastic knife to remove the supply slot cover.
labels.
Supply Cover
Care & Maintenance 3-1
Page 18
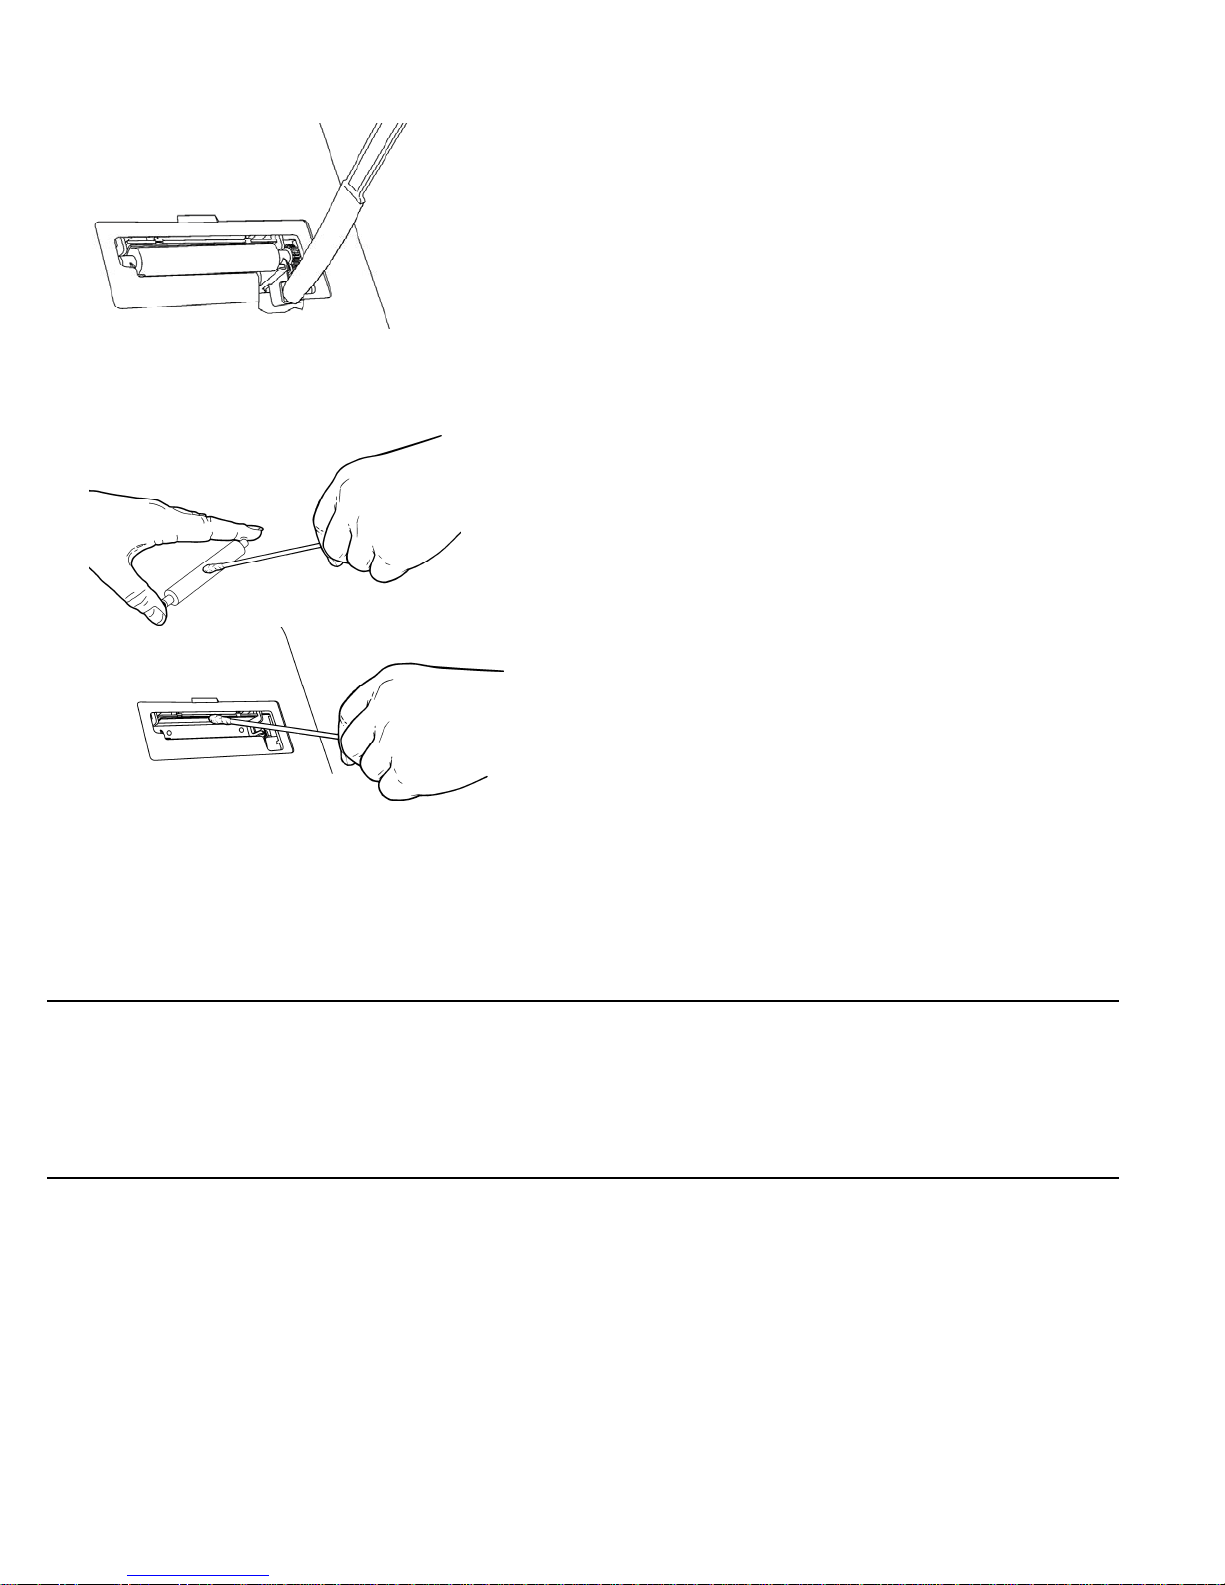
3. Use the plastic knife to press the L-shaped bar. The platen roller is released. You may
need to slightly open the front cover to eject the plate n roller.
Note: Art is cut-away to show detail.
4. Cle
5. All
6. Replace the platen roller.
7. Snap the cover into place.
8. Reload the labels. See “Loading Labels” in Chapter 1 for more information.
an the platen roller and printhead using a cotton swab moistened with isopropyl alcohol.
ow time for the parts to dry.
Cleaning the Display
Make sure the printer is turned off when cleaning the display. Use a soft, lint-free cloth to
wipe the display.
Caution: Do not use sharp objects or abrasive cleaners on the d isplay; they can cause
damage.
Cleaning the Printer
Slightly dampen a cloth with water and wipe off the printer’s cas e.
Open the cover and use a dry, soft-bristled brush to remove paper du st.
Caution: Do not use household cleaners to clean the printer.
3-2 Operator’s Handbook
Page 19

TROUBLESHOOTING
This section lists some common printer problems and solutions.
Problem Action
The screen is off or the printer
is not responding.
The printer does not print, has
voids, or is too light.
Printing stops OR the printer
does not correctly advance
from one label to the next.
Error Codes
Call Service if you receive an error message that is not listed below.
Code(s) Description
Press the Power Button to turn the printer off, press it
again to turn the printer back on. If the printer will not
turn off, unplug it from the outlet, wait 10 seconds, then
plug it back in.
Make sure the printer is turned on an d has power.
Correctly load supply.
Clean the printhead.
Clear any jammed labels.
Correctly load supply.
Make sure your printer is turned on and has power.
4
004 - 005 Supply size is incorrect. Reload t he correct supplies. See “Loading
Supplies” in Chapter 1 for more information.
267 – 271
410 - 413
703 - 704 Supply Error. Load supplies or ma ke sure they are loaded correctly.
706 Remove any jammed supplies. See “Clearing Supply Jams” in Chapter
750 Printhead overheated. Turn off the printer to let it cool.
751 - 753 The printer sensed a problem wi th a mark on the supplies. Check the
756 The printer is out of supplies. Load supplies.
757 The calibrated supply length differs by plus or minus .25 inches from
768 Printhead error. See your System Administrator.
790 - 791 The printer is busy or has an error pending. Turn off the printer, wait
Communication error. See your System Administrator.
3 for more information.
supplies to see if they are loaded correctly.
the format. Load correct supplies.
two seconds, and then turn it back on.
904 – 911 System error. See your System Ad ministrator.
SYSTEM
ERROR
VECTOR ##
System error. See your System Administrator.
Troubleshooting 4-1
Page 20

4-2 Operator’s Handbook
Page 21

SPECIFICATIONS
System Specifications
Height: 10.06” (255.55 mm)
Width: 11.86" (301.41 mm)
Depth: 8.36” (212.24 mm)
Weight: 12.42 lbs (5.63 kg), without supply, single printer
13.38 lbs (6.07 kg), without supply, dual printer
Power: 100-240V AC, 47 to 63Hz input
supplies 24V DC, 90W to system
Operating Limits: Operating: 32 to 122 F (0 to 50 C)
Storage: -4 to 149 F (-20 to 65 C)
Relative Humidity: 0% - 90% non-condensing
Printhead: 203 dpi (8.0 dots per mm)
Printing Method: Thermal Direct
Display: 7” LCD Touch Screen
Memory: 256 MB NAND Flash
A
Specifications A-1
Page 22
Avery Dennison
170 Monarch Lane
Miamisburg, OH 45342
1-800-543-6650 (In the U.S.A.)
1-800-387-4740 (In Canada)
www.monarch.com
28028
0
 Loading...