


Electronic Top Pan Balances
TB/TC Series
User Instructions
76101–241 Issue 5 21.07.97


Contents
1 Installation 3
1.1 Changing the voltage setting 3
2 Weighing 4
3 Keyboard functions 5
3.1 Using the Dual Units key 6
3.2 Using the Tare key 6
3.3 Using the Weigh/Count key 6
3.4 Using the Print key 7
4 Calibration procedure 8
4.1 Calibrating the balance 8
4.1.1 Unsuccessful calibration 9
5 Setup procedure 10
5.1 Data send 10
5.1.1 ConfIguring data send 10
5.2 Dual weight unit 11
5.2.1 Configuring the dual weight unit 11
6 Counting 13
7 Checkweigher 15
7.1 InstallatIon 15
7.2 Calculating tolerances 15
7.3 Checkweighing 15
7.4 Checkcountlng 17
7.5 General notes 17
8 Output 18
9 Suspended weighing 18
10 Cleaning 18
11 Mains fuse 19
12 Safety precautions 20
User Instructions for TB/TC Series Balances
1

Congratulations – you have now taken delivery of your new
balance. Designed and manufactured to the highest possible
standards, this balance is equally at home in the factory,
laboratory or the classroom. These user instructions describe the
operation of both the two key and four key balances. The
features available with the four key version are clearly identified
and should simply be ignored if you have purchased the two key
version.
TC60
Two key version 6000 x 1g
Four key version 6000 x 1g
TC61
Two key version 600 x 0.1g
Four key version 600 x 0.1g
TB151
Two key version 1500 x 0.1g
Four key version 1500 x 0.1g
2
User Instructions for TB/TC Series Balances

1 Installation
1. Place the balance in its chosen position, which should be
free from vibration and draughts for optimum performance.
2. Remove any packing material.
3. Place the pan on the pan support.
4. The balance is factory set to either 110–120V or 220–240V
50/60 Hz AC supply. Ensure that the voltage on the
rating plate on the rear of the balance corresponds with
the supplied voltage. If not refer to section 1.1.
5. Connect the mains lead to the balance and an AC supply.
6. Turn on the mains switch which is located at the rear of the
balance.
The readout displays a row of dashes for a short period,
then all eights, and then zero. The balance is now ready for
weighing since little or no warm up time is required.
1 Installation
1.1 Changing the voltage setting
1. Remove the mains lead from the balance.
2. Prise out the voltage selector/fuse holder.
3. Replace the fuse with one of the correct rating.
New Supply Fuse RatIng
110V – 120V 20mm, 500mA, anti–surge
220V – 240V 20mm, 250mA, anti–surge
4. Replace the voltage selector/fuse holder in the correct
orientation.
User Instructions for TB/TC Series Balances
3

2 Weighing
2 Weighing
Place the load on the pan. The weight is displayed on the
readout. When the weight is stable the unit symbol appears at the
right hand side of the display.
If you apply a load in excess of the weighing capacity, the reading
blanks and the top row of display segments illuminates until you
remove the overload.
If you remove the pan, the reading blanks and the bottom row of
display segments illuminates.
4
User Instructions for TB/TC Series Balances
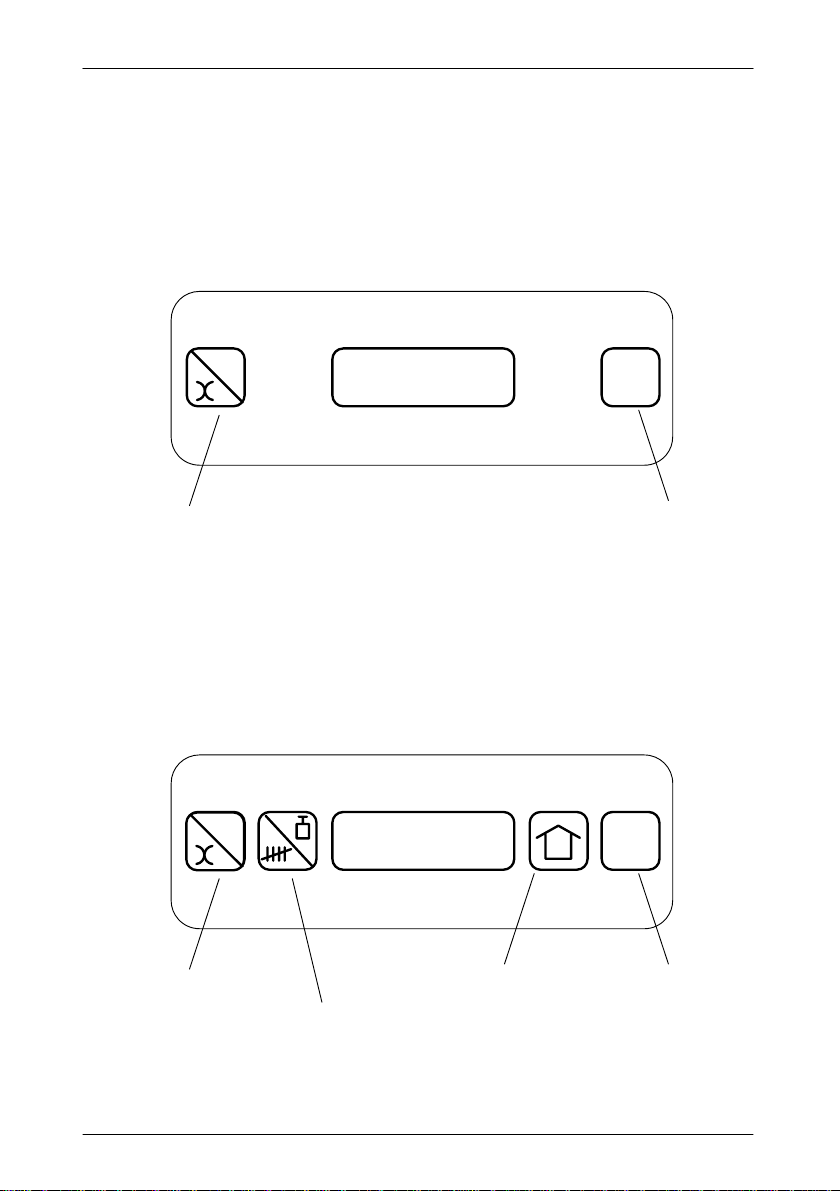
3 Keyboard functions
The functions available depend on whether your balance is the
two key version or the four key version.
Two key balance
g
Dual units key Tare key
3 Keyboard functions
T
Four key balance
g
g
Dual units key
Weigh/count key
User Instructions for TB/TC Series Balances
T
Print key Ta re key
5
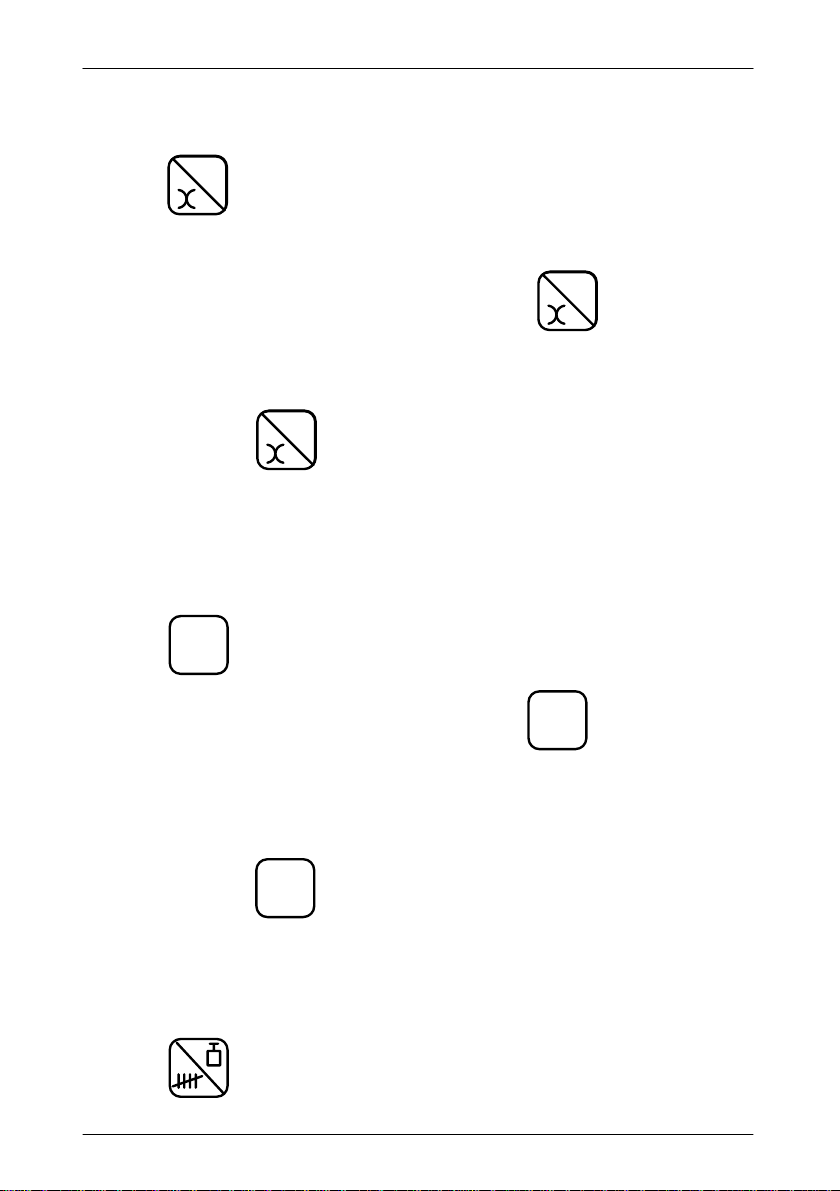
3 Keyboard functions
3.1 Using the Dual Units key
g
g
has two functions:
At switch on
During the power up sequence, pressing
various secondary weighing units available, see section 5.2.
Normal weighing
g
g
Pressing
in grams or converted to the selected secondary weighing unit.
The symbol
denotes a converted weight.
causes the balance to display the weight either
g
denotes a weight in grams. Any other symbol
3.2 Using the Tare key
g
g
displays the
tares off the weight of an empty container, for example.
T
Place a container on the pan and press
weight display to be zeroed. Any material now added to the
container is displayed as a net weight.
When you remove the container and contents the tare weight is
displayed with a negative sign. The tare may be cancelled by
pressing
Loads up to full capacity may be tared but the net weighing
capacity is reduced by the amount tared.
again when the pan is empty.
T
3.3 Using the Weigh/Count key
is used when counting components, see section 6.
6
User Instructions for TB/TC Series Balances
. This causes the
T

3.4 Using the Print key
has two functions:
At switch on
3 Keyboard functions
Pressing
Continuous data send or Request data send, see section 5.1.
Normal weighing
If the balance is set to Request data send pressing
causes the balance to display centre bars and send the
information displayed to a peripheral such as a tally roll printer or
PC.
enables you to configure the balance for either
User Instructions for TB/TC Series Balances
7

4 Calibration procedure
4 Calibration procedure
You can set the accuracy of calibration either at full load or at
intermediate weight values. Use one of the following weights
during calibration:
TB6l TB151 TC60
200g 500g 2000g
500g 1000g 5000g
600g 1500g 6000g
The weight used should ideally correspond with the operable
weight. If the balance is to be used for general weighing over a
wide range, select the maximum weight.
4.1 Calibrating the balance
1. Ensure that the pan is empty and the display shows zero.
2. Place the required calibration weight centrally on the pan.
g
3. Press and hold
g
. Press
until the display
T
shows CAL and then release both keys.
The display shows CAL for a short while and then displays
the value of the calibration weight used. This signifies that
calibration is complete.
4. Wait until calibration is complete and then remove the
weight from the pan.
5. Check that the balance is calibrated accurately by ensuring
that the display shows
D zero when no weight is on the pan
D the correct value when a calibration weight is applied
6. If the balance is not accurately calibrated repeat from
step 1.
8
User Instructions for TB/TC Series Balances

4.1.1 Unsuccessful calibration
Under certain circumstances the message ERROR may appear
during the calibration process. This indicates that calibration has
been unsuccessful due to one of the following reasons:
D The calibration weight used was not one of the
permitted nominal values.
D The calibration weight used, though nominally
correct, was outside the permitted tolerance.
D The pan was not empty and the display did not show
zero before you started.
4 Calibration procedure
User Instructions for TB/TC Series Balances
9

5 Setup procedure
5 Setup procedure
5.1 Data send
You can send data from a four key balance either continuously or
on request. You can send data from a two key balance only
continuously.
Continuously
The balance sends data as a continuous message which is
regularly updated as the weight on the balance changes.
Selecting option P2 prints data automatically only when the weight
is stable.
Selecting option P4 prints data automatically at any time.
On request
The balance sends data to a peripheral such as a tally roll printer
or PC when the operator presses
Selecting option P1 prints data when
the weight is stable.
Selecting option P3 prints data whenever
5.1.1 ConfIguring data send
1. Switch on the balance.
2. Press
The display shows the option currently selected.
3. Press
10
during the power up sequence.
to display the required option (P1 to P4).
User Instructions for TB/TC Series Balances
.
is pressed only if
is pressed.

5 Setup procedure
4. To return to normal weighing press
5. To configure the
5.2 Dual weight unit
The balance can display the weight in either grams or one of the
secondary weighing units listed below. The units available and the
relevant symbols are listed below:
Option
POUND Pounds (Imperial)
OUNCE Ounces (Imperial) 0z
TROY Troy ounces t0
PENNY Penny weight dt
T AEL 1 Tael (Taiwan) t
T AEL 2 Tael (Hong Kong) t
T AEL 3 Tael (Singapore) t
T AEL 4 Tael (China) t
H–ltr Kilogram/hectolitre g/h
N–TON Newtons N
GRAIN Grains gr
Unit
Decimal
T
g
g
key see section 5.2.1.
Displayed
symbol
lb
.
If a secondary unit is not required set the balance to NONE.
5.2.1 Configuring the dual weight unit
1. Switch on the balance.
g
g
2. Press
The display shows the option currently selected.
User Instructions for TB/TC Series Balances
during the power up sequence.
11

5 Setup procedure
3. Press
g
g
to display the required option.
4. To return to normal weighing press
5. To configure data send see section 5.1.1.
Configuring kilogrammes/hectolitre
If H–Itr is selected as the secondary weighing unit (see
section 5.2) the balance calculates kilogrammes per hectolitre.
1. Ensure you are in setup mode.
g
2. Press
3. Place a 500ml volumetric container on the pan and zero the
balance.
4. Fill the container with the grain under test, using a
repeatable filling method.
5. Replace the container and contents on the pan.
The display shows the sample weight compared with its
volume expressed as kilogrammes/hectolitre.
g
to display H–Itr.
T
.
12
User Instructions for TB/TC Series Balances

6 Counting
You can use the balance to determine the number of identical
components in a batch by first carrying out a sample weighing
operation.
If the balance is linked to a peripheral such as a tally roll printer
you can obtain a printed record.
Notes
The balance will not sample if the display shows the under weight
lower bars or over weight upper bars.
To count a different component repeat the counting procedure.
1. Either
Ensure that the pan is empty and the display shows zero.
Or
Place an empty container on the pan.
6 Counting
Press
2. Place a number of components on the balance pan.
These components are called the sample size. The sample
size can comprise 5 – 50 components in steps of 5.
3. Press and hold
required sample size.
The display shows SPLE followed by the sample sizes in
steps of 5. This is the number of components you intend to
use in the initial sample. The scrolling sequence always
starts at the last selected sample size. When you release
the key the display shows the sample size and a small c in
the top right hand corner of the display to designate count is
in operation.
4. Add further components.
The display automatically increments accordingly.
to zero the weight display.
T
until the display shows the
User Instructions for TB/TC Series Balances
13

6 Counting
5. To re–sample on a larger number of components press
until the display shows SPLE.
The balance recalculates the piece weight with the new
weight and sample count information. Take care if the step
between the two samples is too large as errors may occur.
6. To obtain a printed record press
The following information is printed:
COUNT xxxx
WEIGHT xxxx g
PcWt x.xg
7. To return to normal weighing press
.
briefly.
14
User Instructions for TB/TC Series Balances

7 Checkweigher
The checkweigher unit (part number 70571–644) is a simple
device which indicates if the item being weighed is within two
tolerances. The unit can also be used for checkcounting, see
section 7.4.
7.1 Installation
The unit is simple to install. Just plug the unit into the output port
at the back of the balance and switch on.
Note
Early versions of the TC/TB series cannot be connected to the
checkweigher. Before using a checkweigher with an existing TC
or TB balance check the label on the rear face of the balance.
The balance identity code must contain the numbers 35 or 45, for
example TC060–1 35Z.
7.2 Calculating tolerances
The two tolerances are called UNDER and OVER limits. The
UNDER limit is the lowest acceptable number. The OVER limit is
the highest acceptable number. To enter the limits you must place
components on the pan until the required value is reached.
Pressing
enters the value. Pressing
T
7 Checkweigher
g
g
clears the
previously entered value. These values are stored in the balance.
Example
To weigh an item to $10% you must first calculate the UNDER
and OVER limits. If an item weighs 100 grams the UNDER value
is 90 grams and the OVER value is 110 grams.
7.3 Checkweighing
1. Switch on the balance with the checkweigher connected.
The balance display shows the last stored UNDER value
and a small u to the right of the display.
2. To accept the UNDER value, press
step 6.
User Instructions for TB/TC Series Balances
T
and go to
15

7 Checkweigher
3. To change the UNDER value, press
The display shows zero.
4. Place components on the pan until the display shows the
required UNDER value.
g
g
.
5. Press
The balance display shows the last stored OVER value and
a small o to the right of the display.
6. To accept the OVER value, press
The balance is ready for use.
7. To change the OVER value, press
The display shows zero.
8. Place components on the pan until the display shows the
required OVER value.
9. Press
The balance is ready for use.
T
T
.
.
T
g
g
.
.
16
User Instructions for TB/TC Series Balances

7.4 Checkcountlng
Checkcounting enables you to use the balance for checking
batches or bundles of items as normal but with the ability to
update the piece weight of the components.
1. Set up the balance for counting by following steps 1. to 3.
on page 13.
2. Switch off the balance.
3. Switch on the balance with the checkweigher connected.
The balance display shows the last stored UNDER value
and a small u to the right of the display.
4. Press
5. Go to page 15 and follow the instructions for
checkweighing in section 7.3 from step 2. Set the UNDER
and OVER limits by count and not weight.
g
7 Checkweigher
g
to select count.
6. With the same under and over values you can set a new
piece weight by re–sampling as described in steps 1. to 3.
on page 13.
7.5 General notes
g
D You can use
balance is connected to the checkweigher.
D RS232 output is not available when the
checkweigher is connected.
D Switching the balance off and on again with the
checkweigher connected retains the previously
entered UNDER and OVER limits.
D Switching the balance off and on again with the
checkweigher disconnected sets the balance to
normal weighing. Previously entered limits are
User Instructions for TB/TC Series Balances
g
and (if fitted) when the
17

8 Output
8 Output
The output from this balance is uni–directional RS232C. The
output socket is at the rear of the balance and is a Plug–hole Cord
Connector (PCC).
PIN No. 1 2 3 4 5 6
MAIN TX OVD RX OVD +12V CTRL 1
retained and displayed when the checkweigher is
re–connected.
D The output port provides RS232 output (see
section 8) if the checkweigher is disconnected.
Output connector
Further information on this output configuration can be found on
the RS232 applications sheet available from Avery Berkel.
9 Suspended weighing
You can suspend loads beneath the balance from the suspension
eye which is exposed by removing the plastic cover in the
baseplate of the balance.
18
User Instructions for TB/TC Series Balances
61

10 Cleaning
To simplify cleaning remove the large screw in the centre of the
plate and lift off the pan support plate. When replacing the plate
ensure the locating peg aligns with the corresponding hole.
The balance exterior and fitting may be wiped clean with a soft
cloth moistened with water or a dilute soap or detergent solution.
Scouring cleaners, alkali cleaning solutions such as washing
soda, or solvents should not be used.
11 Mains fuse
WARNING
TO AVOID THE POSSIBILITY OF ELECTRIC SHOCK
OR DAMAGE TO THE MACHINE, ALWAYS SWITCH
OFF THE MACHINE AND ISOLATE FROM THE
POWER SUPPLY BEFORE CARRYING OUT ANY
ROUTINE MAINTENANCE.
10 Cleaning
The mains input fuse is situated at the rear of the balance and is
located behind a small plastic cover immediately beside the mains
input socket. Prise out the cover with a small screwdriver or
similar tool. A spare fuse is mounted in the cover. Replace as
follows:
Mains supply Fuse Rating
110–120V 20mm, 500mA Anti–Surge Type
220–240V 20mm, 250mA Anti–Surge Type
Caution:
You must use the same type of fuse. If in doubt contact
your Avery Berkel centre.
User Instructions for TB/TC Series Balances
19

12 Safety precautions
12 Safety precautions
Avery Berkel has made every effort in design and construction to
ensure this balance is safe when used in normal conditions and
circumstances. You should however still adhere to the following
aspects of safe working practice.
D This is an electronic product. Observe all safety
precautions and practice applicable to electrically
powered devices when using this balance.
D When installing the balance, ensure the mains lead is
not placed or does not trail where the flex could be
cut or cause anyone to trip.
D There are no user serviceable parts inside the
balance. Any attempt to dismantle the balance could
cause electric shock and also voids the warranty.
D The balance is protected by an anti–surge fuse on
the balance (see section 11). Disconnect the
balance from the power supply before attempting to
change the fuse. Ensure the replacement fuse is the
correct rating.
20
D Prolonged exposure to certain corrosive chemicals
including some organic solvents could affect the
appearance of the balance or possibly cause actual
damage. Contact Avery Berkel for advice.
D The keypad is made of an inert, tough polycarbonate
material. Do not use sharp or pointed instruments
which could pierce the keypad. A clear plastic
window behind the display aperture helps protect the
display from accidental damage.
D Although the balance is covered by a full warranty
against faulty components and workmanship, we
recommend that you enter into a service agreement
with Avery Berkel to maintain the continued good
working order of the unit.
D If a fault occurs with this balance do not attempt to
repair or correct the fault. Contact your local Avery
Berkel centre.
User Instructions for TB/TC Series Balances


The address of your local service branch is ...
Avery Berkel is a trading name of GEC Avery Limited
The right is reserved to vary or modify any specification without prior notice.
A Company
 Loading...