

Page 1
HD420
Night Vision HD Indoor/Outdoor IP
Mini Bullet Camera
User Manual
Page 2

HD420: Night Vision HD Indoor/Outdoor IP Bullet
Operations Manual
Manual Edition 35156AA – Au gust 201 6
©2016, AvertX
All Rights Reserved
No part of this document may be reproduced by any means, electronic or
mechanical, for any purpose, except as expressed in the Software License
Agreement. AVERTX shall not be liable for technical or editorial errors or
omissions contained herein. The information in this document is subject to
change without notice.
The information in this publication is provided “as is” without warranty of any
kind. The entire risk arising out of the use of this information remains with
recipient. In no event shall AVERTX be liable for any direct, consequential,
incidental, special, punitive, or other damages whatsoever (including without
limitation, damages for loss of business prof it s, bus ine ss inte rrupt io n or loss
of business information), even if AVERTX has been advised of the po ssibil it y
of such damages or whether in an action, contract or tort, including
negligence.
This software and documentation are copyrighted. All other rights, including
ownership of the software, are reserved to AvertX. AVERTX, and AvertX,
are registered trademarks of AVERTX in the United States and elsewhere;
Windows is a registered trademarks of Microsoft Corporation. All other brand
and product names are trademarks or registered trademarks of the
respective owners.
The following words and symbols mark special messages throughout this
guide:
WARNING: Text set off in this manner indicates that failure to follow
directions could result in bodily harm or loss of life.
CAUTION: Text set off in this manner indicates that failure to follow
directions could result in damage to equipment or loss of
information.
AVERTX
2. Retain Instructions
Save these instructions for future reference.
3. Attachments / Accessories
Do not use attachments or accessories unless recommended
by the appliance manufacturer as they may cause hazards,
damage product and void warranty.
4. Installation
Do not place or mount this product in or on an unstable or
improperly supported location. Improperly installed product
may fall, causing serious injury to a child or adult, and damage
to the product. Use only with a mounting device recommended
by the manufacturer, or sold with the product. To insure proper
mounting, follow the manufacturer's instructions and use only
mounting accessories recommended by manufacturer.
5. Power source
This product should be operated only from the type of power
source indicated on the marking label.
IMPORTANT SAF EGUARDS
1. Read Instructions
Read all of the safety and operating instructions before using
the product.
35156AA
2
Page 3

Precautions
REGULATION
Operating
• Before using, make sure power supply and oth er s are properly
connected.
• While operating, if any abnormal condition or malfunction is
observed, stop using the camera immediately and then contact
AvertX Customer Support.
Handling
• Do not disassemble or tamper with parts ins ide the ca mera.
• Do not drop or subject the camera to shock and vibration as
this can damage camera.
• Do not block the cooling holes on the bracket. T his ca mera h as
a cooling fan inside the housing. Blocking the cooling holes will
cause heat to build up and cause malfunction.
• Care must be taken when you clean the clear lens cover.
Scratches and dust will ruin the image quality of your camera.
Do not use strong or abrasive detergents when cleaning the
camera body. Use a dry cloth to clean the camera when it is
dirty. In case the dirt is hard to remove, use a mild detergent
and wipe the camera gently.
Installation and Storage
• Do not install the camera in areas of extreme temperatures in
excess of the allowable range. (-35°F~ 122°F / -37°C ~ 50°C)
• Avoid installing in humid or dusty places. The relative humidity
must be below 90%.
• Avoid installing in places where radiation is present.
• Avoid installing in places where there are strong magnetic
fields and electric signals.
• Avoid installing in places where the camera would be subject
to strong vibrations.
• Never face the camera toward the sun. Do not aim at bright
objects. Whether the camera is in use or not, never aim it at
the sun or other extremely bright objects. Otherwise the
camera may be damaged.
This device complies with Part 15 of the FCC Rules. Operation is
subject to the following two conditions: (1) this device may not cause
harmful interference, and (2) this device must accept any interfer en ce
received, including interference that may cause undesired operation.
This symbol on the product or on its packaging indicates that this
product shall not be treated as household waste in accordance with
Directive 2002/96/EC. Instead it shall be hand ed over t o the appl ica ble
collection point for the recycling of electric al and ele ctron ic e quip ment .
By proper waste handling of this product you ensure that it has no
negative consequences for the environment and human health, which
could otherwise be caused if this product is thrown into the garbage bin.
The recycling of materials will help to conserve natural resources.
For more details information about recy cl ing of this prod uct, please
contact your local city office, your household waste disposal service or
the shop where you purchased the product.
Compliance is evidenced by written declaration from our suppliers,
assuring that any potential trace contamination levels of restricted
substances are below the maximum level set by EU Directive
2002/95/EC, or are exempted due to their application.
WARNING
DANGEROUS HIGH VOLTAGES ARE PRESENT INSIDE THE
ENCLOSURE.
REFER SERVICING TO QUALIFIED PERSONNEL ONLY.
.
35156AA
3
Page 4

CAUTION
35156AA
4
Page 5

TABLE OF CONTENTS
TABLE OF CONTENTS ................................................................................................................................................................................................................... 5
INTRODUCTION .............................................................................................................................................................................................................................. 9
Overview .................................................................................................................................................................................................................. 9
Camera Default Settings ................................................................................................................................................................................... 9
Product Features ............................................................................................................................................................................................... 9
ONE: GETTING STARTED ........................................................................................................................................................................................................... 10
Box Contents .......................................................................................................................................................................................................... 10
Camera Overview ................................................................................................................................................................................................... 10
Camera Diagram ............................................................................................................................................................................................. 10
Dimensions ...................................................................................................................................................................................................... 11
Connections .................................................................................................................................................................................................... 11
Weather Resistant Cable Connector ........................................................................................................................................................ 12
TWO: CONNECTING ..................................................................................................................................................................................................................... 13
Bench test............................................................................................................................................................................................................... 13
AvertX Camera Finder ..................................................................................................................................................................................... 13
Finding IP Cameras.................................................................................................................................................................................. 13
Accessing the Camera ............................................................................................................................................................................. 13
Changing the IP Address ......................................................................................................................................................................... 13
THREE: SETUP AND CONFIGURATION ..................................................................................................................................................................................... 14
Installing the camera .............................................................................................................................................................................................. 14
Ceiling and Wall Installation ............................................................................................................................................................................ 14
Considerations for Infrared (IR) Lights ..................................................................................................................................................... 15
Resetting the Camera ..................................................................................................................................................................................... 15
MicroSD Card .................................................................................................................................................................................................. 15
35156AA
5
Page 6

Removing the Lens Cover ............................................................................................................................................................................... 16
Focusing the Camera Lens ............................................................................................................................................................................. 16
Cleaning the Lens Cover ................................................................................................................................................................................. 16
To clean the lens cover: ........................................................................................................................................................................... 16
Connecting to the Camera ...................................................................................................................................................................................... 17
Connecting in a Web Browser ......................................................................................................................................................................... 17
Default Username and Password ............................................................................................................................................................. 17
Administrator/User Privileges .......................................................................................................................................................................... 17
Connecting a Stream ....................................................................................................................................................................................... 17
Preparation ............................................................................................................................................................................................................. 18
Logging Into the Web Interface............................................................................................................................................................................... 19
Introduction to the Web Interface ............................................................................................................................................................................ 19
Initial Configuration ................................................................................................................................................................................................. 19
FOUR: CONFIGURING SETTINGS ............................................................................................................................................................................................... 21
Network Configuration ............................................................................................................................................................................................ 21
TCP/IP ............................................................................................................................................................................................................. 21
IPv4 .......................................................................................................................................................................................................... 21
Port .................................................................................................................................................................................................................. 22
DDNS .............................................................................................................................................................................................................. 23
FTP ................................................................................................................................................................................................................. 23
E-Mail .............................................................................................................................................................................................................. 24
Port Mapping ................................................................................................................................................................................................... 24
Video Configuration ................................................................................................................................................................................................ 25
Video Configuration ......................................................................................................................................................................................... 25
Configuring Capture ........................................................................................................................................................................................ 25
Image Configuration ............................................................................................................................................................................................... 26
Image Enhancement ................................................................................................................................................................................ 26
Exposure .................................................................................................................................................................................................. 27
35156AA
6
Page 7

Smart Illumination ..................................................................................................................................................................................... 29
White Balance .......................................................................................................................................................................................... 29
Defog ........................................................................................................................................................................................................ 30
OSD Settings ................................................................................................................................................................................................... 31
Privacy Mask ................................................................................................................................................................................................... 32
Alarm Configuration ................................................................................................................................................................................................ 33
Configuring Motion Detection Alarm ................................................................................................................................................................ 33
Configuring Tampering Alarm .......................................................................................................................................................................... 35
Security .................................................................................................................................................................................................................. 36
User Management ........................................................................................................................................................................................... 36
Setting Secure Data Transmission .................................................................................................................................................................. 36
HTTPS ..................................................................................................................................................................................................... 36
APR Binding ............................................................................................................................................................................................. 37
Hide Vendor Information.................................................................................................................................................................................. 37
Video Watermark ............................................................................................................................................................................................. 37
System ................................................................................................................................................................................................................... 37
Setting the System Time ................................................................................................................................................................................. 37
Viewing Device Status ..................................................................................................................................................................................... 38
Upgrading the Device ...................................................................................................................................................................................... 38
Restarting the System ..................................................................................................................................................................................... 39
Importing and Exporting System Configuration File ........................................................................................................................................ 39
FIVE: LIVE VIEW ........................................................................................................................................................................................................................... 40
Live View Toolbar ................................................................................................................................................................................................... 40
APPENDIX A GLOSSARY ............................................................................................................................................................................................................ 41
APPENDIX B FAQ ......................................................................................................................................................................................................................... 42
APPENDIX C: SPECIFICATIONS ................................................................................................................................................................................................. 43
Camera Specifications ............................................................................................................................................................................................ 43
35156AA
7
Page 8

35156AA
8
Page 9

INTRODUCTION
IP Address
192.168.0.250
Username
admin
Password
1234
Management Port
80
Streaming Port
554
OVERVIEW
The HD420 Night Vision HD Indoor/Outdoor IP camera is capable of
providing real time streaming video with smooth image quality. The
HD420 offers dual streaming and can be used in a variety of
installations including shops, stores, banks, factories and for building
surveillance.
With Power over Ethernet (PoE), the need for separate power lines is
eliminated and cabling and installation costs can be significantly
reduced. The light weight and small size allow for quick and simple
installation on either the ceiling or walls of structures or vehicles.
The HD420 is equipped with Spectrum Vision Wide Dynamic Range,
which makes it possible to identify details even in lighting conditions
with severe shadows or backlighting, and the IR LEDs make it a perfect
camera for dark areas and nightt im e surv eil lan ce.
Camera Default Settings
Product Features
• Progressive Scan CMOS Sensor
• 4MP Resolution
• Integrated Heater
• H.264 Encoding
• Dual Streaming
• Multi-Language Support
• Tampering Alarm
• Spectrum Vision Wide Dynamic Range (WDR)
• Motion Detection
• Privacy Masks
• Smart Picture Quality / 3D Noise Reduction
• Network Failure Detection
• True Day/Night (ICR)
• IR LED Module (working distance up to 100’)
• Weatherproof (IP6 6 Outdoor Rated)
• ONVIF Support
35156AA
9
(RTSP)
Page 10
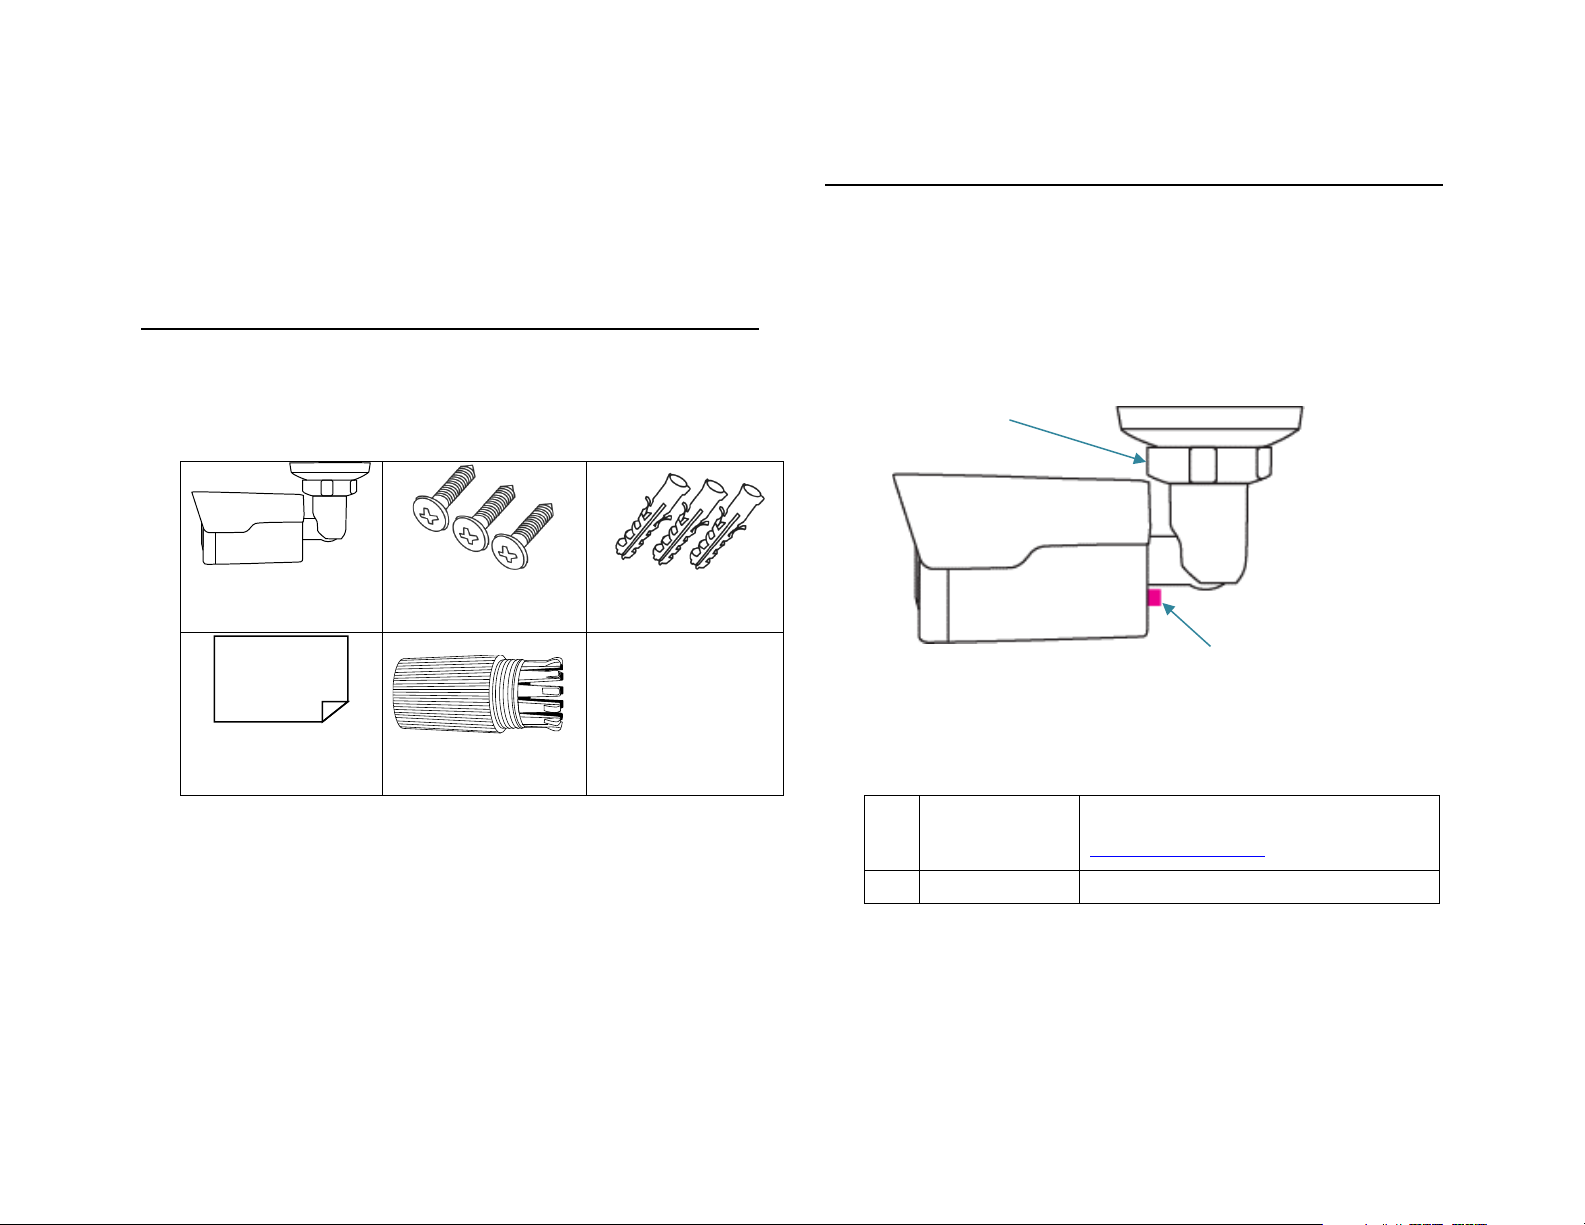
ONE: GETTING
HD420 Camera
Self Tapping
Plastic Anchors
Quick Start Guide
IP66 Cable
1
Reset button
Restore camera settings to default
2
Lock Nut
To adjust angle, loosen lock nut.
1
2
CAMERA OVERVIEW
STARTED
BOX CONTENTS
Before proceeding, please check that the box contains the items listed
here. If any item is missing or has defects, DO NOT install or operate
the product and contact y our dealer for assistance.
Mounting Screws
Connector
(includes extra)
Before installing or connecting the bullet camera, please refer t o this
section and complete preparations for camera setup and all switch
settings.
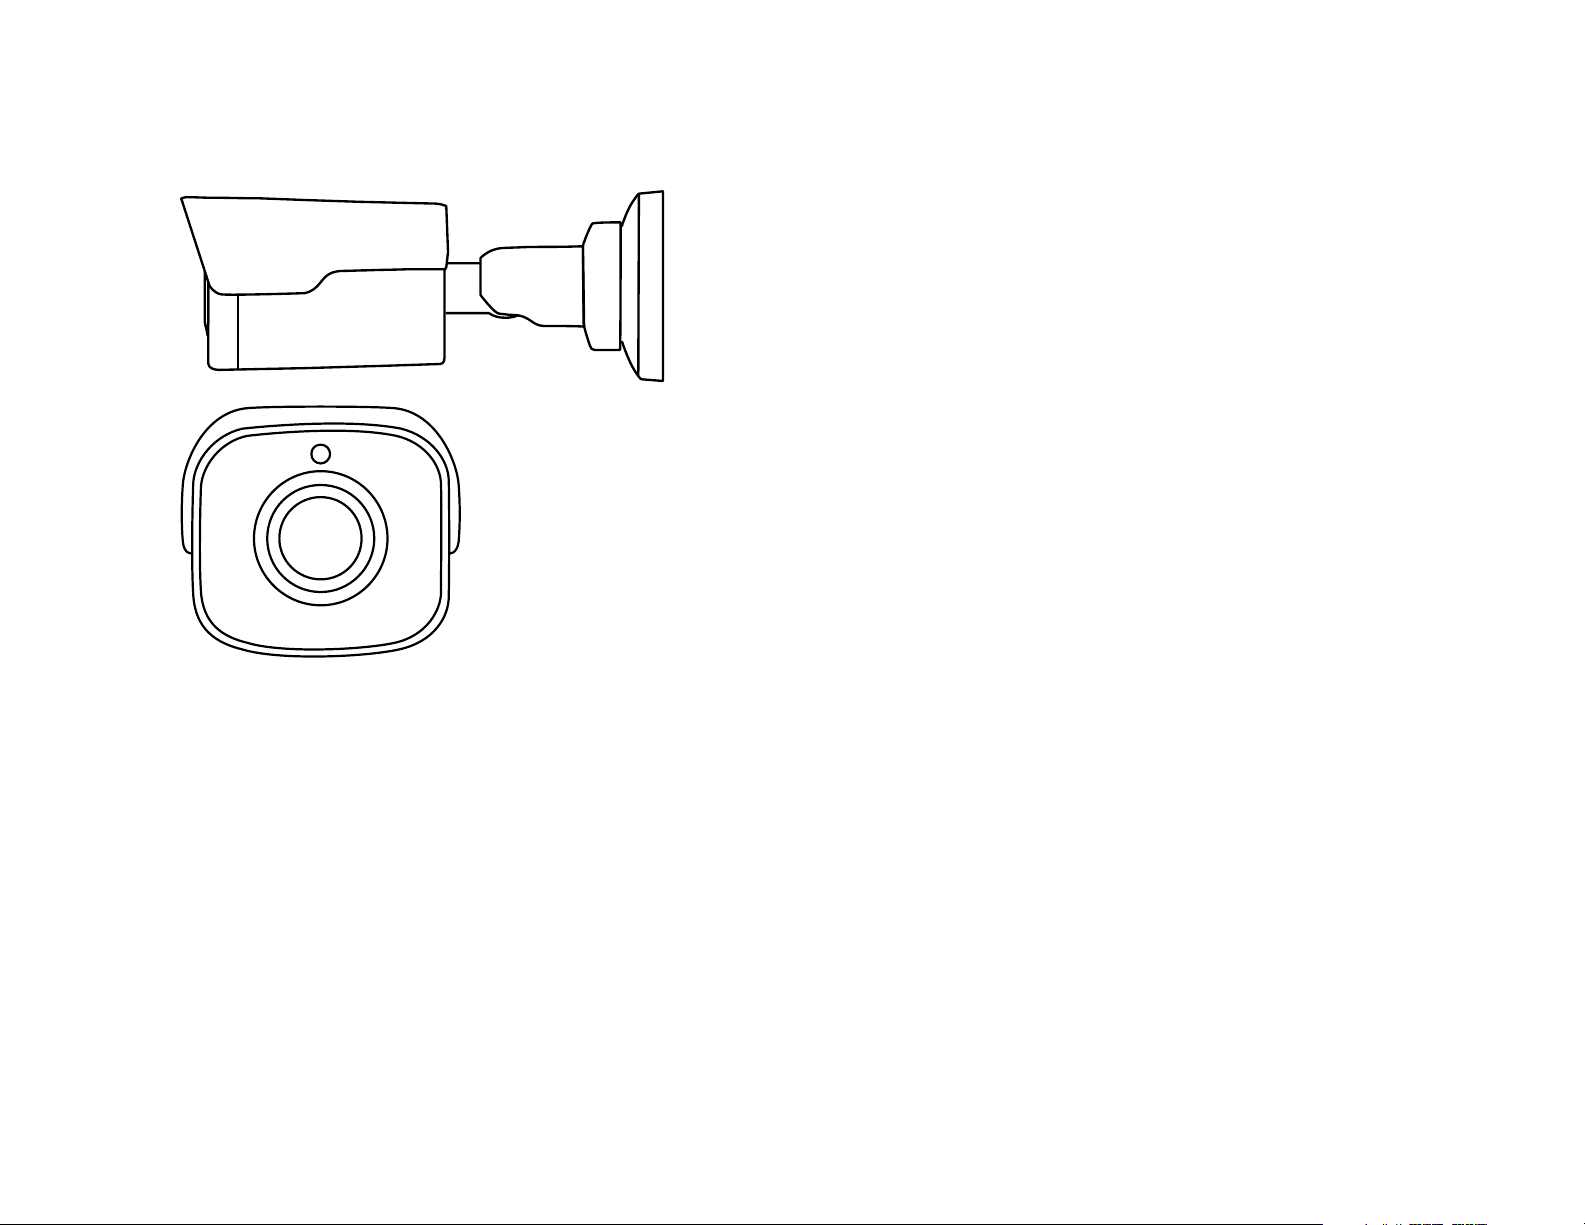
Camera Diagram
settings. For more information see
Resetting the Camera
35156AA
10
Page 11
Dimensions
Length – 6.25” (157 mm)
Width – 2.5” (63 mm)
Height – 2.5” (63 mm)
Connections
The HD420 cameras use Power over Ethernet (PoE). The only
connection on the camera is the RJ45 Ethernet dongle located on the
rear of the camera. Connect one end of the Ethernet cable to the
dongle, and connect the other end to the recorder, or to a PoE switch.
• Protect the network cable connection from water damage by
running the cord inside a wall or ceiling, or through conduit.
• If passing the cord through a wall or ceiling, drill a 3/4” hole.
• For outdoor installations, seal any holes in the wall or ceiling with
silicone caulk to protect against water intrusion.
AvertX recommends using Category 5 Ethernet cable to connect the
camera to your network. For the best transmission quality, the cable
length should not exceed 328 feet (100 meters).
35156AA
11
Page 12
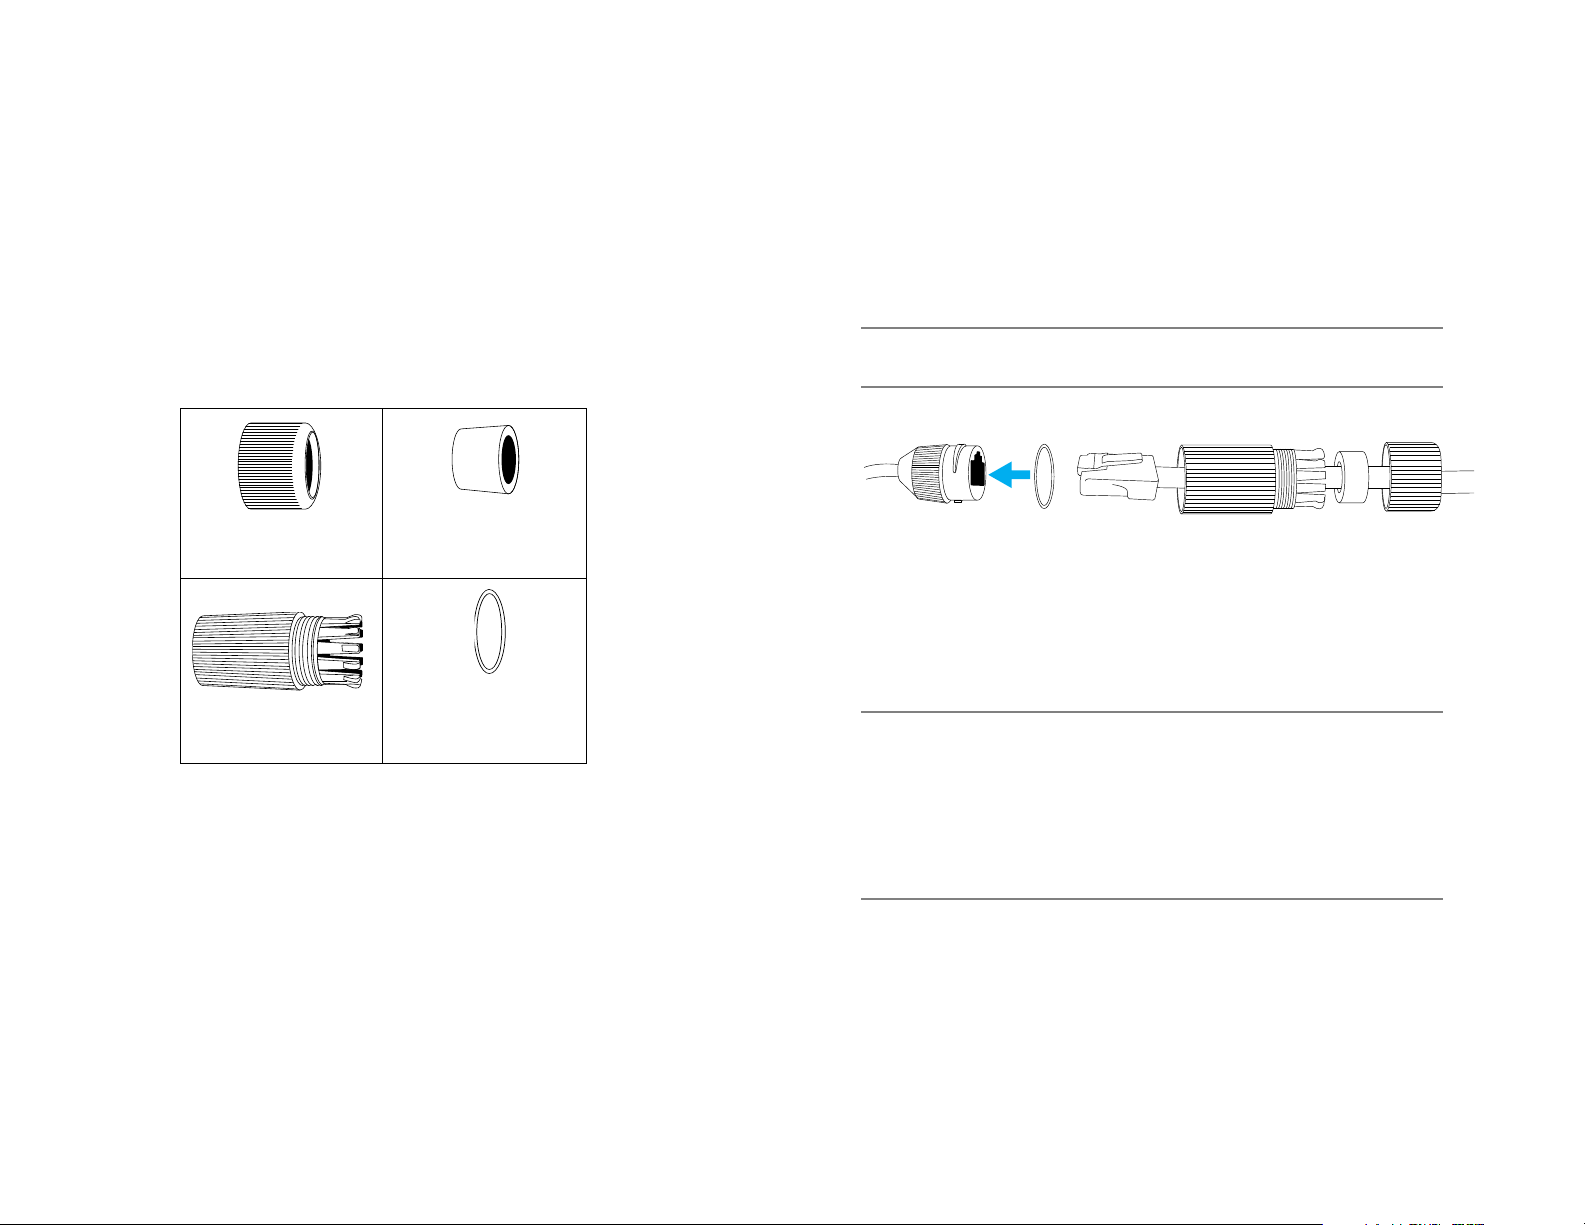
Weather Resistant Cable Connector
Thread Lock Cap
Silicone Seal Ring
RJ45 Enclosure
Small Silicone “O”
This camera features an IP66-rated weather resistant connector. For
unprotected outdoor connections, screw the connector on the included
Ethernet camera cable onto the camera dongle. If your installation
location does not require a water resistant connection, loosen and slide
the connector back on the cable until it’s out of the way.
This camera features an IP66-rated waterproof cable connector for
unprotected outdoor connections. You do not need to re-terminate
the cable to use the waterproof cable connector.
Included Pieces:
To Install the weather resistant cable connector, follow these steps:
1. Slide all pieces of the waterproof cable connector over the cable
plug in this order:
• Thread Lock Cap
• Flexible silicone seal ring. You will need to stretch the sil ico n e
seal over the RJ-45 plug.
TIP: Insert the flexible silicone seal ring onto the tip of a pair of
needle nose pliers and stretch the seal over the RJ45 plug
• RJ45 Enclosure
Ring
2. Stretch the small silicone “O” ring onto the camera dongle
3. Connect the camera cable to the plug on the dongle. Screw the
RJ45 Enclosure into the dongle.
4. Insert the flexible silicone seal into the “crown” section of the l arge
plastic ring
5. Screw the small plastic ring into the large plastic ring
TIP: To remove the RJ45 enclosure from the camera cable,
tape down the locking tab on the RJ45 plug with electrical
or office tape.
CAUTION: Do not attempt to disconnect the camera connection
without loosening the smaller thread lock cap. Do not force.
Forcing the assembly will break the camera dongle and will
void camera warranty.
35156AA
12
Page 13
TWO: CONNECTING
BENCH TEST
AvertX recommends that you perform a bench test of your camera
before installation. This will confirm that your camera is functioning
correctly and familiarize yourself with the functions before it is installed
and possibly out of reach.
To bench test your camera, attach the camera network connector to
your recorder and test whether or not the camera is functioning
correctly. Once the camera is connected to the recorder, test all
functions (especially Auto Focus, Zoom, IR Night Vision) to ensure
proper operation.
If the camera will not connect or is not functioning correct ly , do not
install and contact AvertX Support.
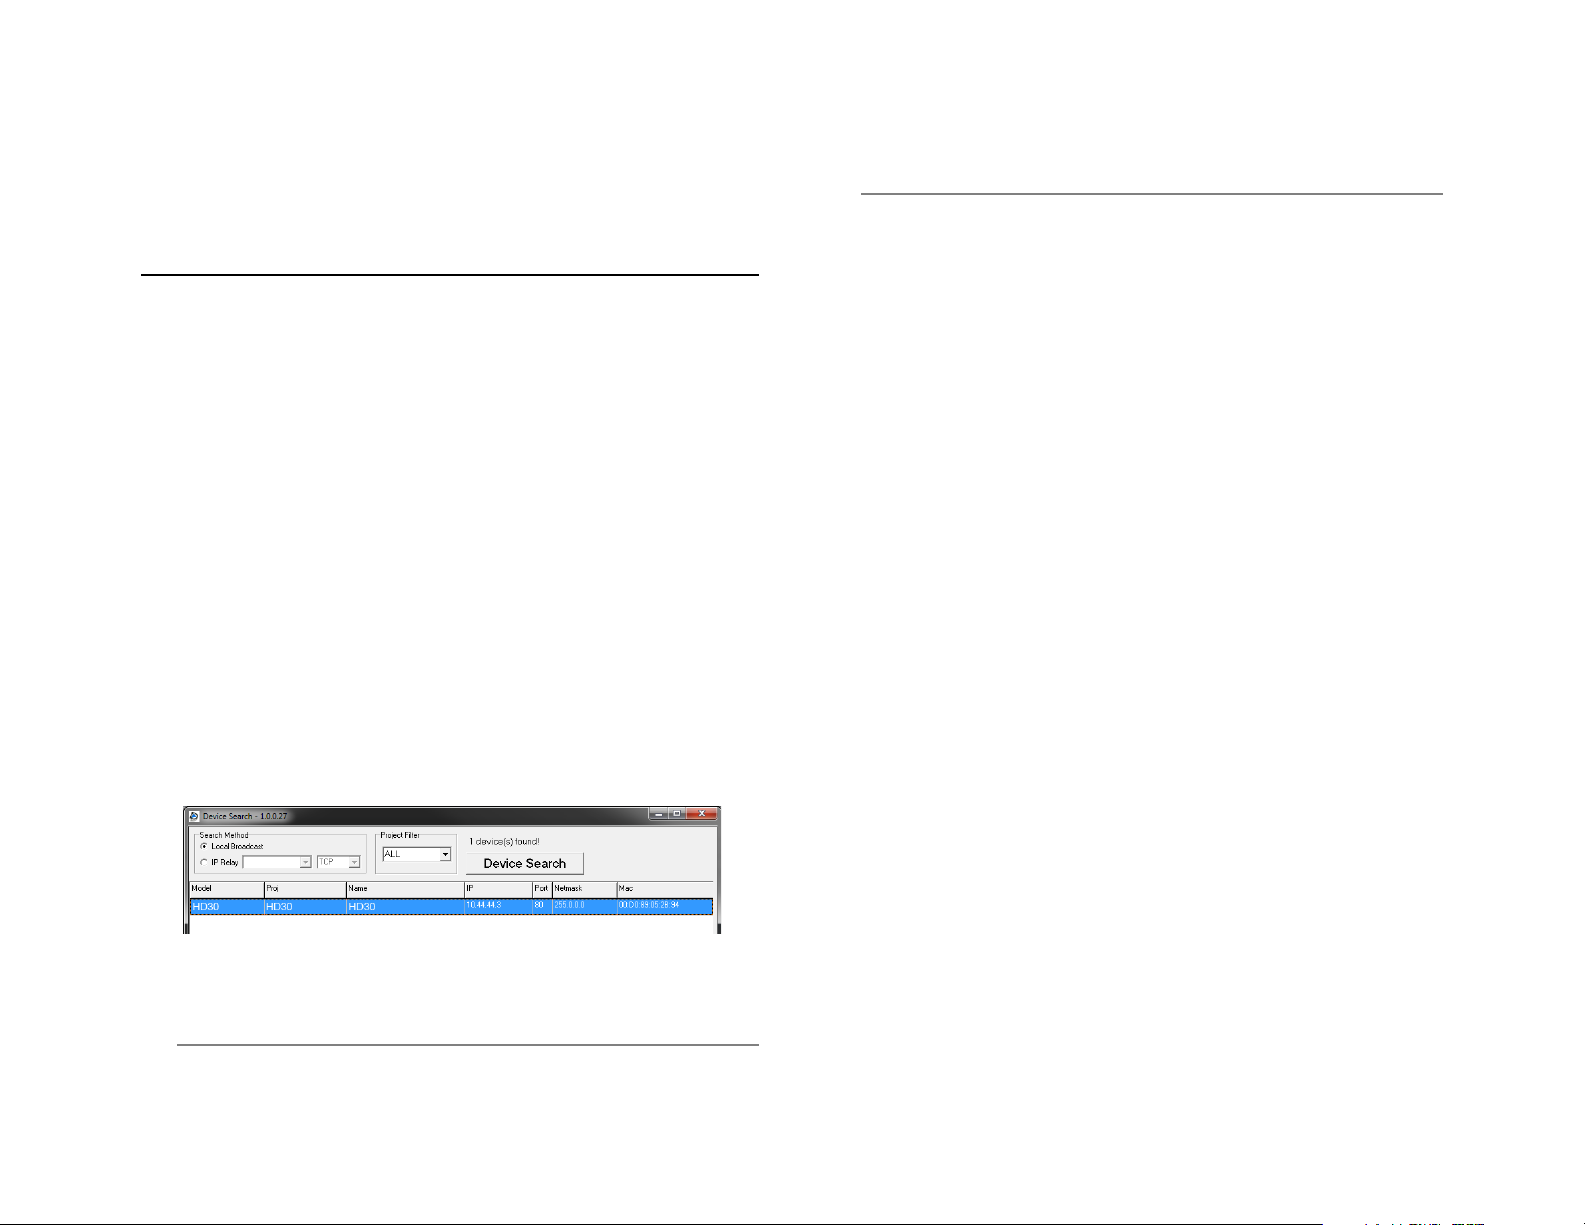
AvertX Camera Finder
The Camera Finder application is available to download at avertx.com.
Finding IP Cameras
1. Open the folder where you downloaded Camera Fin der .
2. Click Camera Finder.
3. Click Device Search on the Device Search window.
Note If you cannot connect to the camera you may need to change
the camera’s IP address to match your network settings.
Accessing the Camera
You can view live video and access the camera configuration by
accessing the camera in an internet browser.
1. Right-click the desired network device and select Browse.
2. Type the default username and password in the login window to
access the video server using your internet browser.
Changing the IP Address
If you are not directly connecting to an AvertX HDIP recorder, you must
manually change the IP address. Change the IP address to a number in
the same subnet as your existing network or to the recommended
network settings for your network.
1. Right-click the desired network device and then click Network
Setup.
2. Select the Static IP option.
3. Enter the new IP Address, Gateway, Netmask, and DNS for
camera.
The Mighty Squirrel Co ntroller
4. If a Windows Security Alert window opens, click Unblock to allow
the IP utility to access your network.
5. Click Device Search again to find all connected IP devi ces .
Tip The default IP address of your IP camera is 192.168.0.250
35156AA
13
Page 14
THREE: SETUP AND
Mounting Bracket Base
Screw
Twist
Screw
Screw
Screw
Adjust aim
Twist
CONFIGURATION
INSTALLING THE CAMERA
Note: Before installing this camera, please refer to the Quick Start
Guide included in the camera box.
The camera can be installed directly onto the wall or ceiling. Be sure
that the structure is strong enough to support the camera.
Ceiling and Wall Installation
Bullet cameras are suitable for mounting on either a wall or ceiling.
1. Use the included mounting template to pre-drill holes for the
mounting screws and, if passing the cable through the ceiling or
wall, drill a ¾” hole.
2. Connect the Ethernet cable from ceiling or wall to the dongle on the
camera.
• Protect the network cable connection from water damage
by running the cord inside a wall or ceiling, or through
conduit
• For outdoor installations, seal any holes in the wall or
ceiling with silicone caulk to protect against water
intrusion.
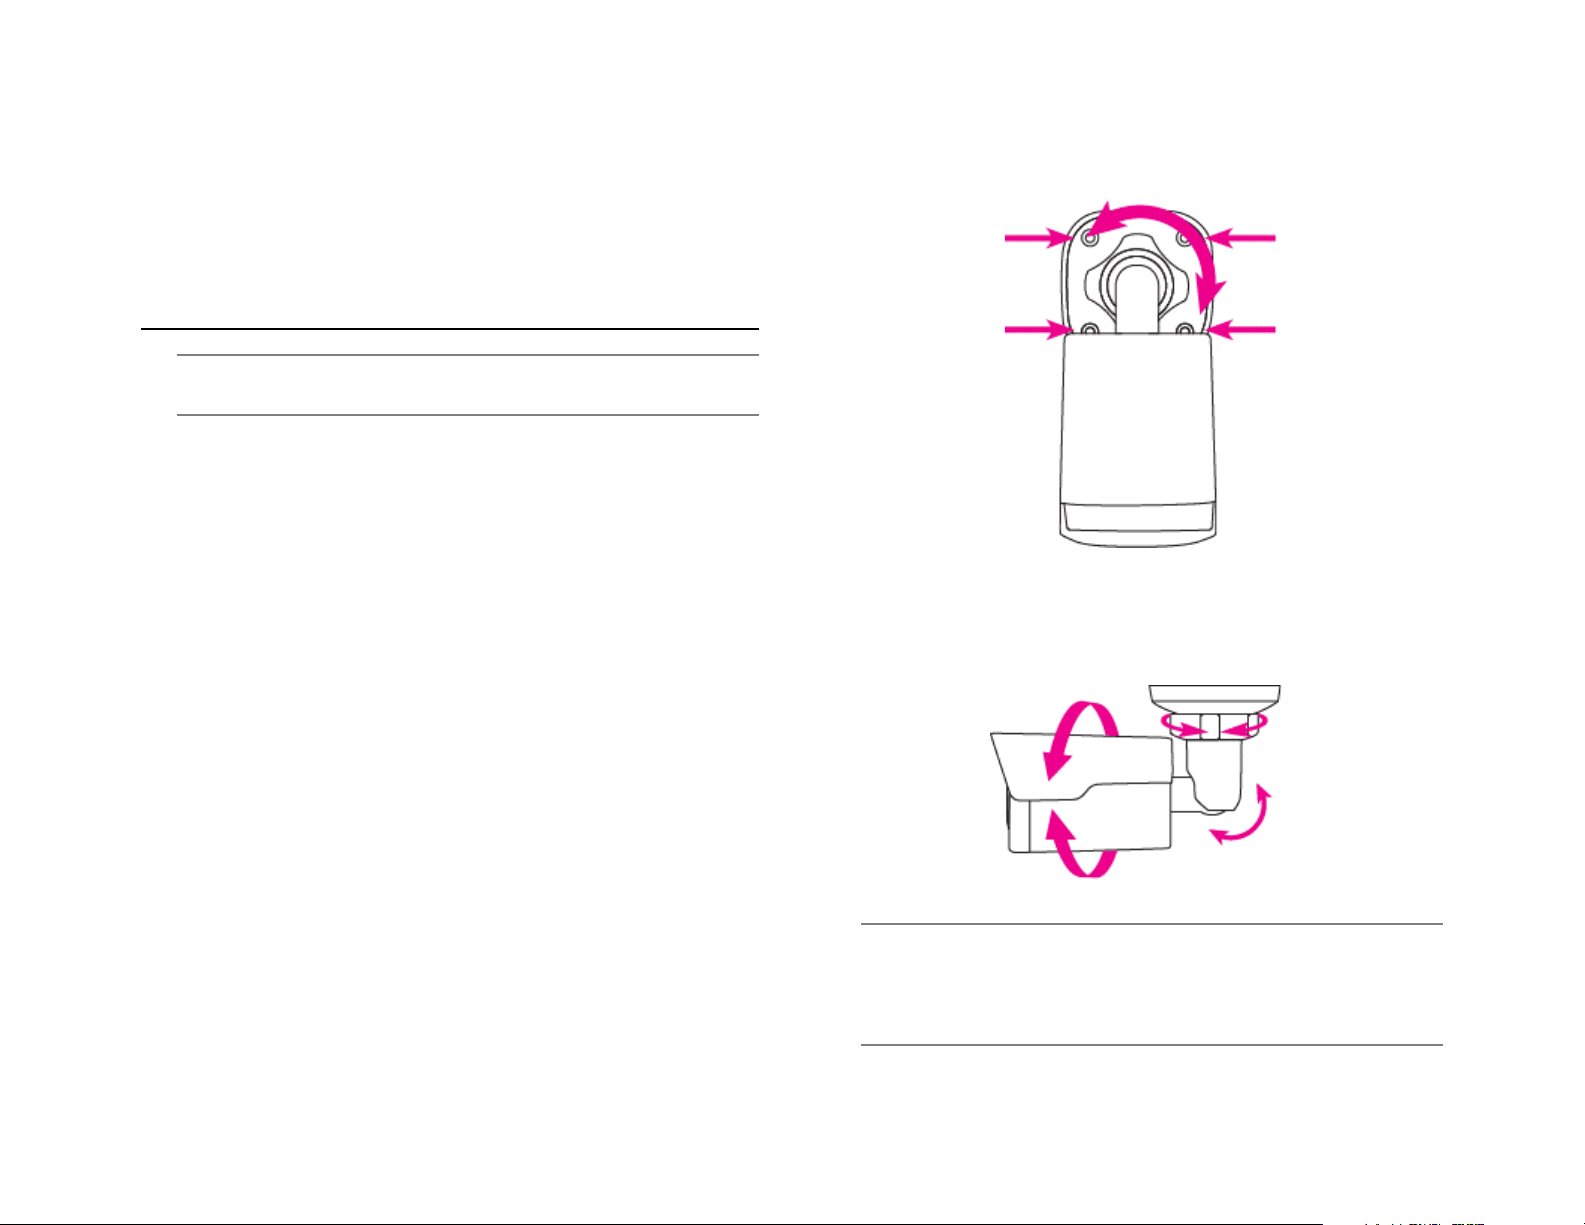
3. Loosen the locknut on the camera bracket mount. Aim the camera
down to access screw holes
4. Affix the camera base to the ceiling or wall with the included
screws. When mounting on an unprotected wall, the cable notch
should be positioned downward.
5. Adjust the position of your camera. Be careful not to damage the
cable when moving the camera.
Tighten the locknut to secure your camera.
6. Use a Phillips screwdriver to loosen the screw on the side of the
bracket mount.
7. Adjust the position of your camera.
8. Tighten the screw to secure your camera.
Note HD420 cameras are equipped with a seal inside the housing
to prevent moisture from entering. If you have any concerns
about moisture entering the housing or wall through the cable
egress, AvertX recommends sealing the opening at the wall
and at the base of the camera with silicone caulking.
35156AA
14
Page 15

Considerations for Infrared (IR) Lights
Reset Button
Environmental factors can limit the performance of night vision using IR
illuminator lights. Infrared light behaves the same as visible light and will
reflect off of bright or shiny objects and overexpose the image. The
camera will adjust to properly expose the bright areas of the image,
which may leave the dark areas obscured.
For best IR Night Vision performance:
Be aware of surfaces that can cause IR light to reflect back into the
camera.
• Reflective (shiny) or light colored surfaces and objects close to the
camera can reflect IR light back into the camera.
o Remove the reflective (shiny) or light colored surfaces and
objects or reposition the camera away from these objects.
• Mounting the camera directly to light colored or shiny soffits (white
aluminum, for example) can reflect IR light back into the camera.
o Reposition the lens so the IR lights aren’t pointed at the
soffit.
o Cover the reflecting surfaces with non-reflective surface
(non-reflective tape, dark paint)
o Mount the camera on a nearby wall using a mounting
bracket.
Resetting the Camera
Your HD420 camera is equipped with a reset button to return the
camera to factory default settings, if necessary. To reset your camera,
power cycle the camera then push and hold the reset button for 15
seconds. This has to be performed within 10 min after the camera has
been powered on or the reset will fail. The IP address of the camera will
return to 192.168.0.250.
MicroSD Card
Note: Do not use solvents, paper towels, newspaper, or other rough
materials to clean the lens cover. This can scratc h the lens
cover and cause IR distortion
35156AA
15
Your camera includes a microSD card slot, which can be used for
emergency video backup. The microSD card is not included. You must
remove the cover of the camera to access the microSD card slot.
For more information, please consult the Memory Card Storage
in this manual.
section
Page 16

Removing the Lens Cover
Cleaning the Lens Cover
The HD420 mini bullet camera is factory sealed and cannot be opened
for access or service. Removing the lens cover or otherwise opening
the camera will destroy the seal and void the warranty.
Focusing the Camera Lens
The HD420 is pre-focused at the factory and cannot be adjusted by the
end user. If your camera is out of focus, contact AvertX Support.
The Lens Cover of the HD420 is made of hardened polycarbonate. It is
extremely durable, but can be damaged if cleaned impr operly.
To clean the lens cover:
• To clean dust or loose dirt, use compressed air.
• To clean smudges or stuck on dirt, use warm water with a few
drops of dish soap (Dawn, Palmolive, etc) and a clean microfiber
cloth.
CAUTION: The following products can damage the lens cover and
cause IR distortion and a reduction in clarity.
Do not use:
• Ammonia, alcohol, or other solvents
• Paper towels, newspaper, or other rough materials
35156AA
16
Page 17

CONNECTING TO THE CAMERA
Connecting in a Web Browser
1. Type the IP address of the camera in a web browser.
or
Use the Camera Finder software and locate the ca mera on th e IP
Finder list, then double-click the camera to open the Viewer
software in your web browser.
2. Log in to the camera with the appropriate User Name and
Password.
Default Username and Password
The username and password are case sensitive. It is strongly
recommended that the password be changed after the initial setup to
prevent unauthorized access.
Username – admin
Password – 1234
Administrator/User Privileges
The Administrator account has the authority to configure the IP camera
and authorize users’ access to the camera. The User accounts have
access to the camera with limited authority.
Connecting a Stream
AvertX IP cameras are optimized for use with AvertX HDIP recorders,
but you can also connect to your AvertX IP cameras using third party
software like VLC media player (http://www.videolan.org
To connect the camera you may need to provide the stream URL. All
AvertX IP cameras are capable of delivering two RTSP streams, as well
as streaming MJPEG over HTTP. The stream URLs are listed below:
rtsp://<ipaddress>:<rtspport>/media/video1 - stream 1
rtsp://<ipaddress>:<rtspport>/media/video2 - stream 2
VLC will ask for the user name and password for your AvertX camera,
use the following administrative credentials:
Username: admin
Password: 1234
).
35156AA
17
Page 18

PREPARATION
After you have completed the installation in accordance with the quick
guide, connect the camera to power to start it. After the camera is
started, you can access the camera from a PC client installed with a
web browser or the video management software.
Check before login
• The camera is operating correctly.
• The network connection between the PC and the camera is
normal.
Add the IP address as a trusted site
Note: The IP address 192.168.0.250 in this example is the default IP
address. Please replace it with the actual address of your
camera if it has been changed.
35156AA
18
Page 19

LOGGING INTO THE WEB
Item
Description
1. Set the TCP/IP address
for the
Reconfigure the device IP and network
parameters based on the actual
networking.
2. Log out and log in again
to
Web using the new IP
address.
-
3. Set the system time.
Set the system time based on the actual
situation.
4.(Optional) Setting the
servers.
Set the management server based on the
actual networking.
5. Set OSD.
Set the information displayed on the
screen as needed, for example, time.
6. (Optional) Manage users.
Change the default password and add
common users as needed.
INTERFACE
• To clear the Username and Password text boxes and the
Save Password check box, click Reset.
The default static IP address of the camera is 192.168.0.250, and the
default subnet mask is 255.255.255.0. DHCP is turned on by default. If
a DHCP server is used in the network, the IP address of your camera
may be assigned dynami cal ly, and you need to use the correct IP
address to log in. Use the video management software to view the
dynamic IP address of your camera.
The following takes IE as an example to describe the login procedure.
• Browse to the login page by entering the correct IP address of
your camera in the address bar.
• If you log in for the first time, follow system prompts and install
the ActiveX. You need to close your browser to complete the
installation.
Note: To manually load the ActiveX, type http://IP
address/ActiveX/Setup.exe in the address bar and press
Enter.
• The default password is used for your first login. To ensure
account security, please change the password after your first
login. You are recommended to set a strong password (no less
than eight characters).
• The camera protects itself from illegal access by limiting the
number of failed login attempts. If login fails six times
consecutively, the camera locks automatically for ten minutes.
• Enter the username and password, and then click Login. For
the first login, use the default username: admin and password
1234.
• If you log in with Live View selected, live video will be
displayed when you are logged in. Otherwise, you need to start
live video manually in the live view window.
• If you log in with Save Password selected, you do not need to
enter the password each time when you log in. To ensure
security, you are not advised to select Save Password.
INTRODUCTION TO THE WEB INTERFACE
By default the live view window is displayed when you are logged in to
the Web interface. The following shows an example.
INITIAL CONFIGURATION
After you log in to the device, please perform the following initial
configuration.
device.
the
35156AA
19
Page 20

No.
Description
1
Menu
2
Live view window
3
Live view toolbar
1 2 3
You can watch the live video after finishing the initial configuration.
Please configure other parameters as need ed.
• The parameters that are grayed out cannot be modified. For
the actual settings, see the Web interface.
35156AA
20
• It is recommended that you change the password when you
are logged in the first time. For details about how to change a
password, see Security.
Page 21

FOUR:
• The configurations of DNS (Domain Name System) server
are applicable when the device is accessed by domain name.
CONFIGURING
SETTINGS
NETWORK CONFIGURATION
TCP/IP
Modify communication settings such as the IP address for the camera
so that the camera can communicate with other devices.
IPv4
DHCP
The Dynamic Host Configuration Protocol (DHCP) is enabled by default
when the camera is delivered. If a DHCP server is deployed in the
network, the camera can automatically obtain an IP address from the
DHCP server.
To manually configure DHCP, follow the steps below:
1. Click Setup > Network > TCP/IP.
2. Select DHCP from the IP Obtain Mode drop-down list.
3. Click Save.
Static Address
1. Click Setup > Network > TCP/IP.
2. Select Static IP from the IP Obtain Mode drop-down list.
3. Enter the IP address, subnet mask, and default gateway address.
Make sure that the IP addre ss of the camera is unique in the
network.
4. Click Save.
If a gatekeeper or firewall is used in the network, Universal Network
Passport (UNP) can be used to interconnect the network, and the UNP
server will assign an IP address to the connected cameras.
1. Select Enable for UNP Service.
2. In the UNP Server IP text box, enter an IP address for the UNP
server. Select Yes to enable authentication, and then set the
username and password for UNP authentication.
3. Click Save.
PPPoE
Note: After you have changed the IP address, you need to use the
new IP address to log in.
35156AA
21
If the camera is connected to the network through Point to Point Over
Ethernet (PPPoE), you need to select PPPoE as the IP obtainment
mode.
1. Click Setup > Network > TCP/IP.
Page 22

2. Select PPPoE from the IP Obtain Mode drop-down list.
3. Enter the username and password provided by your internet
Service Provider (ISP).
4. Click Save.
Port
1. Click Setup > Network > Port.
2. Configure relevant port numbers.
3. Click Save.
Note: If the entered HTTP port number has been occupied, a
prompt message will be displayed as Port conflicts. Pleas e
try again. 23, 81, 82, 85, 3260 and 49152 are occupied by
default. And other occupied ports will be detected
automatically.
35156AA
22
Page 23

DDNS
FTP
DDNS (Dynamic Domain Name Service) is a service that allows a
connection to an IP address using a hostname (URL) address instead of
a numeric IP address. Most Internet Service Providers use Dynamic IP
Addressing that frequently changes the public IP address of your
internet connection; this means that when connecting to the camera
over the internet, you need to know if your IP address has changed.
DDNS automatically redirects traffic to your current IP address when
using the hostname address.
1. Click Setup > Network > DDNS.
2. Enable DDNS Service.
3. Enter DDNS info provided by your DDNS provider.
4. Click Save.
After the configuration of FTP, you will be able to upload snapshots from
network cameras to a specified FTP server.
1. Click Setup > Network > FTP.
2. Configure the IP address, port number of the FTP server, the
username and password of the upload account, enable Upload
Images and Overwrite Storage, and then set the overwrite image
threshold.
3. Click Save.
35156AA
23
Page 24

Parameter
Description
Attach Image
When enabled, the e-mail will contain 3 instant
snapshots as attachment according to the Capt ur e
Interval.
After the configuration of E-mail, when alarms are triggered, you will be
able to send messages to the specified E-mail address.
3. Click Save.
Port Mapping
1. Click Setup > Network > Port Mapping.
2. Enable Port Mapping and select mapping type. If Manual is
selected, then external ports must be configured (external IP is
obtained automatically by the camera). If the configured port is
occupied, then the Status w ill show Inactive.
3. Click Save.
The camera can send an e-mail via Simple Mail Transfer Protocol
(SMTP) when a variety of events occur. SMTP is a protocol for sending
e-mail messages between servers. SMTP is a re lativ ely simple, t extbased protocol, where one or more recipients of a message are
specified and the message text is transferred. Consult your email
provider to get your SMTP server information.
Three accounts can be configured. Each set inclu des, Acco unt Name,
Password and E-mail Address settings. For SMTP server, contact your
network service provider for more specific information.
1. Click Setup > Network > E-mail.
2. Configure relevant parameters of the sender and the recipient The
following table describes some major parameters.
35156AA
24
Page 25

VIDEO CONFIGURATION
Parameter
Description
Bitrate Type
CBR: Constant Bit Rate, which means that the camera
Frame Rate
Frame rate for encoding images. Unit: FPS (frame per
Image Quality
When Encoding Mode is VBR, you can move the slider
image quality. Moving the slider toward Quality
Smoothing
Set the extent of smoothing. Choosing Clear means
Video Configuration
You can set video parameters that your camera. You may also enable
sub-stream.
After enabling the sub, modify the parameters as required. The
parameters for the sub and third stream have the same meanings as
that for the main stream.
1. Click Setup > Video > Video.
2. Modify the settings as required. The following table describes some
major parameters.
transmits data at a constant data rate.
VBR: Variable Bit Rate, which means that the camera
adjusts the bit rate dynamically according to image
quality.
second).
Note:To ensure image quality the frame rate should not
be greater than the reciprocal of shutter speed.
Configuring Capture
With the function of capture configured, w hen an alarm is trig gered, the
camera will automatically upload the captured snapshots to the FTP
server or send snapshots the specified email address.
1. Click Setup > Video > Capture.
2. Configure relevant parameters.
3. Click Save.
to adjust quality level for images. Moving the slider
toward Bit Rate decreases the bit rate and may affect
disabling Smoothing. Moving the slider toward Smooth
increases the level of smoothing but will affect image
quality.
Note:In a poor network environment, you can enable
smoothing to get more fluent video.
3. Click Save.
35156AA
25
Page 26

IMAGE CONFIGURATION
Item
Description
Brightness
Set the degree of brightness of images.
Saturation
Set the intensity of color in the image.
Contrast
Set the degree of difference between the
Hue
Overall tendency of colors in an image.
Sharpness
Contrast of boundaries of objects in an
2D Noise
Reduce the noise of images. The function
Image Enhancement
Note: You may move the sliders to adjust settings or enter values in
the text boxes directly. Clicking Default will restore all the
default image settings.
1. Click Setup > Image > Image and then click Image Enhancement.
2. Use the sliders to change the settings. You may also enter values
directly. The following table describes some major parameters.
blackest pixel and the whitest pixel.
Low contrast High contrast
Low brightness High brightness
35156AA
26
Low saturation High saturation
Reduction
Normal hue Other hue
image.
Low sharpness High sharpness
may cause image blurring.
Page 27

3D Noise
Reduction
Reduce the noise of images. The function
Image Rotation
Rotation of the image.
may cause motion blur (or ghosting in some
applications).
Normal Flip Vertical
Exposure
The default settings are used for common scenes. Keep the default
settings unless a particular scene is required.
1. Click Setup > Image > Image and then click Exposure.
Flip Horizontal 180°
90° Clockwise 90° Anti-clockwise
• To restore default settings in this area, clic k Default.
2. Set the parameters as required. The following table describes some
major parameters.
35156AA
27
Page 28

Parameter
Description
Exposure Mode
Select the correct exposure mode to achieve the
Shutter (s)
Shutter is used to control the light that comes into the
Gain (dB)
Control image signals so that the camera outputs
Mode is set to Manual or Gain Priority.
Slow Shutter
Improves image brightness in low light conditions.
Slowest Shutter
Set the slowest shutter speed that the camera can use
Shutter is set to On.
Compensation
Adjust the compensation value as required to achieve
Mode is not set to Manual.
Metering Control
Set the way the camera measures the intensity of
Day/Night Mode
Automatic: The camera outputs the optimum images
mode and night mode based on the alarm input.
Day/Night
Light threshold for switching between day mode and
Day/Night
Set the length of time before the camera switches
WDR
Enable WDR to distinguish the bright and dark areas
light.
Center-Weighted Average Metering: Measure light
mainly in the central part of images.
desired exposure effect.
lens. A fast shutter speed is ideal for scenes in quick
motion. A slow shutter speed is ideal for scenes that
change slowly.
Note:You can set a shutter speed when Exposure
Mode is set to Manual or Shutter Priority.
If Slow Shutter is set to Off, the reciprocal of the
shutter speed must be greater than the frame rate.
standard video signals according to the light condition.
Note:You can set this parameter only when Exposure
Evaluative Metering: Measure light in the
customized area of images.
Note:You can set this parameter only when Exposure
Mode is not set to Manual.
according to the light condition. In this mode, the
camera can switch between night mode and day
mode automatically.
Night: The camera provides high-quality black and
white images using the existing light
Day: The camera provides high-quality color images
using the existing light.
Input Boolean: The camera switches between day
Note:You can set this parameter only when Exposure
Mode is not set to Shutter Priority and when Image
Stabilizer is disabled.
during exposure.
Note:You can set this parameter only when Slow
the desired effects.
Note:You can set this parameter only when Exposure
35156AA
28
Sensitivity
Switching(s)
night mode. A higher sensitivity means that the
camera is more sensitive to the change of light and
becomes more easily to switch between day mode
and night mode.
Note:You can set this parameter only when Day/Night
Mode is set to Automatic.
between day mode and night mode after the
conditions for switching are met.
Note:You can set this parameter only when Day/Night
Mode is set to Automatic.
in the same image.
Note:You can set this parameter only when Exposure
Mode is set to Automatic, Indoor 50Hz, Indoor 60Hz
and when Image Stabilizer and Defog is disabled.
Page 29

WDR Level
After enabling the WDR function, you can improve
the image by adjusting the WDR level.
to disable WDR or use level 1-6.
Parameter
Description
Control Mode
Global Mode: The camera adjusts IR illumination
Overexposure Restrain: The camera adjusts IR
Manual: This mode allows you to manually control
Illumination Level
Set the intensity level of the IR light. The greater
Description
White Balance
Adjust the red or blue offset of the image:
without adjustment.
Red Offset
Adjust the red offset manually.
Blue Offset
Adjust the blue offset manually.
Note:Use level 7 or higher when there is a high
contrast between the bright and dark areas of the
scene. In the case of low contrast, it is recommended
3. To restore the default settings, click Default.
Smart Illumination
1. Click Setup > Image > Image and then click Smart Illumination.
2. Select the corresponding lightning type and then configure other
parameters.
and exposure to achieve balanced image effects.
Some areas might be overexposed if you select this
option. This option is recommended if monit ored
range and image brightness are your first priority.
illumination and exposure to avoid regional
overexposure. Some areas might be dark if you
select this option. This option is recommended if
clarity of the central part of the image and
overexposure control are your first priority.
the intensity of IR illumination.
White Balance
White balance is the process of offsetting unnatural color cast in images
under different color temperatures so as to output images that best suit
human eyes.
1. Click Setup > Image > Image and then click White Balance.
2. Select a white balance mode as required. The following table
describes some major parameters.
Note: The camera adjusts the red and blue offset
automatically according to the light condit ion (the co lor
tends to be blue).
Fine Tune: Allow you to adjust the red and blue offset
manually.
Sodium Lamp: The camera adjusts red and blue offset
automatically according to the light condit ion (the co lor
tends to be red).
Outdoor: It is recommended for the outdoor scenes with
a wide range of the color temperature variation
Locked: Lock the current color temperature sett i ngs
Note:You can set this parameter only when White
Balance is set to Fine Tune.
3. Select the correct IR control mode and set the parameters. The
following table describes some major parameters.
4. To restore the default settings, click Default.
35156AA
29
the value, the higher the intensity. 0 means that the
IR light is turned off.
Note:You can set this parameter only when Control
Mode is set to Manual.
Note: You can set this parameter only when White
Balance is set to Fine Tune.
3. To restore the default settings, click Default.
Page 30

Defog
Use the defog function to adjust the clarity of images captured in fog or
haze conditions.
1. Click Setup > Image > Image and then click Advanced.
Note: This function can be configured only when WDR is disabled.
2. Enable the defog function and then select a level for the scene.
Level 5 achieves the maximum defog effects, and level 1 achieves
the minimum.
3. To restore the default settings, click Default.
35156AA
30
Page 31

OSD Settings
On Screen Display (OSD) is the text displayed on the screen with video
images and may include time and other customized contents.
1. Click Setup > Image > OSD.
2. Select the check box, the content of the OSD and then set the
position to display it.
3. Position: Click the desired box in the Live View area. After the
cursor shape is changed, click and hold the button to move the box
to the desired position. To set the position precisely, use the X and
Y coordinates under Overlay Area.
4. Overlay OSD Content: The drop-down list provides Time, Preset
and Serial Info. You may also select Custom and enter the
content you want.
You may right-click in the previ ew window and then choose to view in
full screen mode or at an aspect ratio. You may also double-click the
preview window to enter or exit full screen mode.
To cancel OSD for an area, clear the OSD content in the Overlay OSD
Content column or select None in the Position column.
The following shows an example time OSD.
5. After you have set the position and OSD content, the symbol
appears in the Status column, which means that the OSD is set
successfully. You may set multiple lines of contents for each area
and use and to adjust the sequence of display.
6. After you have completed the settings, a message appears to
indicate the successful settings.
35156AA
31
Page 32

Privacy Mask
On certain occasions, you may need to set a mask area on the camera
image to protect privacy, for example, the keyboard of an ATM machine.
When PTZ changes its position or zooms, the Privacy Mask will be
adjusted accordingly to protect the area all along.
1. Click Setup > Image > Privacy Mask.
2. Click Add to add a privacy mask, and click Delete to delete a mask.
3. To mask a position: Click the box (with Mask displayed on it) to
activate the mask. After the cur sor shap e has changed, drag the
box to the intended position.
4. To mask an area: Use the mouse to draw a box on the area you
want to mask.
When privacy mask is configured, the intended area is blocked.
35156AA
32
Page 33

ALARM CONFIGURATION
Item
Description
Suppress
Alarm(s):
After an alarm is triggered, the same alarm will not be
reported within the set time.
Clear Alarm(s):
After an alarm is tri ggered, If the same alarm is not
Upload to FTP
With Upload to FTP selected, the camera will
You can schedule alarm reporting and set actions that can be triggered
by other devices so that alarms and the triggered actions can be
handled in time.
Alarm reporting can be scheduled for motion detection alarm and
tampering detection alarm.
Configuring Motion Detection Alarm
Motion Detection
Motion detection detects the object motion in a specified rectangular
area during a period. You need to set a detection area, sensitivity of
detection, object size, and history for the camera to decide whether to
report a motion detection alarm when it detects motion.
2. In the Detection Area area, click to add a new detection area.
To delete a detection area, click .
3. Click and drag the mouse to set a detection area.
4. Set the detection sensitivity, object size, and history for the camera
to decide whether to report a motion detection alarm.
5. Moving the slider to the right increases detection sensitivity. When
the extent of motion within the detection area exceeds the set
object size, and if the duration of motion exceeds the set duration,
the camera reports an alarm.
6. Motion detection results are shown in real time. The red lines
represent the raised motion detection alarms. The longer a line, the
greater the extent of motion. The denser the lines, the greater the
frequency of motion.
7. Set the alarm parameters.
8. Set actions to be triggered by motion detection alarm and the plan.
The following table describes the alarm parameters and the alarmtriggered actions and how to set a schedule.
1. Click Setup > Events > Common Alarm > Motion Detection.
35156AA
33
triggered within the set time, the alarm will be cleared
and the same alarm can be reported again.
If the same alarm is triggered within the set time, the
alarm will not be cleared until the suppress alarm time
expires. Then the same alarm can be reported again.
automatically upload snapshots to the specified FTP
server when an alarm is triggered.
Note: Make sure you have completed FTP and
Configuring Capture before using this function.
Page 34

Trigger E-mail
With Trigger E-mail selected, the camera will
Trigger Storage
With Trigger Storage enabled, the camera
Enable Schedule
Select the check box and set the start and end times
9. Click Save.
automatically send snapshots to the specified E-mail
address when an alarm is triggered.
Note: Make sure you have completed E-Mail and
Configuring Capture before using this function.
automatically starts recording after an alarm is
triggered.
Note: Make sure you have completed the post-
recording time settings before using this function.
during which motion detection alarm is effective. You
can directly drag the mouse to draw a plan and click
Edit to edit time periods in the table. The time periods
cannot overlap. The camera reports alarms during the
specified period(s) only.
You can select from Monday to Sunday and set four
periods for each day.
35156AA
34
Page 35

Configuring Tampering Alarm
Configure tampering alarm so that the camera reports a tampering
alarm when the lens is blocked for a certain length of time.
4. Set actions to be triggered by tampering alarms and the plan. For
detailed steps, see the descriptions of alarm-triggered actions in
Configuring Motion Detection Alarm.
5. Click Save.
1. Click Setup > Events > Tampering Alarm.
2. Select Enable for Tampering Alarm.
3. Set detection sensitivity and duration for the camera t o decide
whether to report a tampering alarm. The camera can be more
sensitive to the blocking even it only blocks the camera len s slig htly
from a farther location when sensitivity is set to high. The camera
reports an alarm when the lens is blocked for a specified length of
time.
Tampering alarm is effective to the whole screen. To disable tampering
alarm, clear the Tampering Alarm check box.
35156AA
35
Page 36

SECURITY
Setting Secure Data Transmission
User Management
There are two types of users in the system:
• Administrator: referred to as “admin” in this manual. The
default name of the administrator is admin, which cannot be
modified. Admin has full permission and can manage all users
and devices. Only one admin user is allowed in the system.
• Common user: referred to as “user” in this manual. User only
has permission to play live and recorded video. Up to 31
common users are allowed in the system.
You can add a user on the user management interface (under Setup >
System > Security > User).
After the user is added successfully, you can change the password by
entering the new password or delete the user by clearing the username.
Note: Only admin can change passwords. Changing the username
or password for a user when the user is still logged in will
force the user to log out. The user must use the new
username or password to log in.
• Only admin can add and delete users. Deleting a user when
the user is still logged in will force the user to log out. A deleted
user cannot log in.
HTTPS
HTTPS allows secure connections between the IP Camera and web
browser that protects camera settings or Username/Password info from
snooping.
To use HTTPS, you are r equ ir ed to inst al l a self-signed certificate or a
Authority (CA) -signed certificate. The HTTPS certificate can be
obtained by either creating and sending a certificate request to a CA or
creating a self-signed HTTPS certificate
1. Click Setup > Network > Port.
2. Enter the port number in the HTTPS Port text box and then click
Save.
3. Click Setup > System > Security.
4. Under HTTPS, select Enable. Uploading a custom SSL certificate
is also supported to ensure security.
5. Click Save.
Next time you log in, enter the address in https://IP:HTTPS port number
format, for example, https://192.168.0.250:443,
mode. If HTTPS uses a default port number, enter the address in
https://IP directly.
to enter secure channel
35156AA
36
Page 37

APR Binding
This function can protect the camera from ARP attacks. When the
camera visits an IP of another network segment via a gateway, it can
communicate only with the MAC address binding to the gateway
address in the same segment.
1. Click Setup > System > Security > ARP Binding.
2. Select the check box to enable the ARP binding function and set
the MAC address.
3. Click Save.
Hide Vendor Information
You can set to hide the vendor information of the network camera on
the Web interface.
1. Click Setup > System > Security.
2. Under Registration Info, select Enable.
Video Watermark
You can set the video watermark for the camera to encrypt the video
and protect it from being deleted or modified.
1. Click Setup > System > Security > Video Watermark.
2. Select Enable and set the watermark content.
3. Click Save.
SYSTEM
Setting the System Time
You can use the following methods to adjust the system time of your
device.
Manually Setting or Synchronizing the System Time
1. Click Setup > Common > Time, and then click the Time tab.
2. Select Enable for Client Time Synchronization.
3. Click Save.
Synchronizing with the NTP Server
1. Click Setup > Common > Time, and then click the Time tab.
2. Select Enable for NTP, and then enter the IP address of the NTP
server and the camera's sync interval with the NTP server.
3. Click Save. The camera will periodically synchronize time with the
NTP server.
Setting the DST
1. Click Setup > Common > Time, and then click the DST tab.
2. Select Enable DST, set the start time, end time, and DST bias.
3. Click Save.
35156AA
37
Page 38

Viewing Device Status
Upgrading the Device
You can view the current status of your camera.
• Click Setup > Common > Basic Info.
• Click Refresh for the latest status information.
• View the device information.
New versions of camera firmware is available periodically and can be
found at http://www.avertx.com/product-downloads/
.
Note: Make sure the software upgrade file is available before
starting the software upgrade.
1. Click Setup > System > Maintenance.
2. Under Firmware Upgrade, c l ick Browse and select the correct
upgrade file.
3. (Optional) Select the check box to enable Upgrade Boot Program.
4. Click Upgrade and then confirm to start. The camera will restart
automatically after the upgrade is completed.
Note: You must use the correct upgrade file for you camera.
Otherwise, unexpected results may occur.
• The upgrade file is a ZIP file and must include all the necessary
files.
• The boot program loads the operating system and then the
system starts running. The upgrade boot program function is
disabled by default, and only the camera will be upgraded to
the latest version. If enabled, both the camera and the boot
program are upgraded, and the operating system of the
following new versions can be booted properly and the camera
can be upgraded conveniently.
35156AA
38
Page 39

• Ensure that the power supply is normal during upgrade.
The device will restart after the upgrade is completed.
Restarting the System
1. Click Setup > System > Maintenance.
2. Under Device Restart, click Restart. The device will restart after
you confirm the operation. You may also enable auto-restart by
selecting Enable Auto Restart and setting a time for auto-start.
The device will restart at the set time.
CAUTION! Perform this operation with caution because restarting the
system interrupts the ongoing service.
Importing and Exporting System Configuration File
Export the current configurations of the camera and save them to the
PC or an external storage medium. You can also quickly restore
configurations by importing backup configurations stored on the PC or
an external storage medium back to the camera.
CAUTION! After you perform the Default operation, all settings are
restored to factory defaults, except the following: login
password of the system administrator, network settings,
and system time.
4. To restore default configurations, click Default and then confirm the
operation. The device will restart and restore the default
configurations.
Make sure you import the correct configuration file for your
camera. Otherwise, unexpected results may occur. The
camera will restart when the configuration file is imported
successfully.
1. Click Setup > System > Maintenance.
2. To import configurations that you have backed up, click Browse
next to the Import button and sele ct the configurations you want to
import, and then click Import. The result will be displayed.
3. To export configurations, click Browse next to the Export button,
select the destination folder, and then click Export.
35156AA
39
Page 40

FIVE: LIVE VIEW
Button
Description
Display in full screen mode.
Play/stop live video.
Live view means playing live video (real-time audio and video) received
from a camera in a window through the Web interface.
LIVE VIEW TOOLBAR
/
35156AA
40
Page 41

APPENDIX A
Acronym
Description
ARP
Address Resolution Protocol
CBR
Constant Bit Rate
DNS
Domain Name Service
DDNS
Dynamic Domain Name Service
DHCP
Dynamic Host Configuration Protocol
DST
Daylight Saving Time
FTP
File Transfer Protocol
GOP
Group Of Pictures
GUI
Graphical User Interface
HTTPS
Hyper Text Transfer Protocol over SSL
IE
Internet Explorer
IMOS
IP Multimedia Operation System
IP
Internet Protocol
IPC
IP Camera
MTU
Maximum Transmission Unit
NTP
Network Time Protocol
OSD
On Screen Display
PoE
Power over Ethernet
PPPoE
Point-to-Point Protocol over Ethernet
PTZ
Pan, Tilt, Zoom
ROI
Region of Interest
SMTP
Simple Mail Transfer Protocol
SSL
Secure Socket Layer
UNP
Universal Network Passport
USB
Universal Serial Bus
VBR
Variable Bit Rate
WDR
Wide Dynamic Range
GLOSSARY
35156AA
41
Page 42

APPENDIX B FAQ
What to do if no message prompts me to install ActiveX when I log in on a Windows 7 PC the first time
Answer: Follow these steps to turn off UAC and then log in again:
• Click the Start button, and then click Control Panel.
• In the search box, type uac, and then click Change User
Account Control Settings.
• Move the slider to the Never Notify position, and then click
OK.
• After UAC is turned off, log in again.
What to do if the installation of ActiveX failed
Answer: If the installation failed, add the IP address of the camera as a
trusted site: open Internet Option
in IE, click the Security tab, click Trusted sites, and then click Sites to
add the website.
If you use Windows 7, you need to save the setup.exe to your PC first,
right-click the file, select Run as administrator , and then install it
according to instructions.
What to do if live video fails when I log in for the first time
Answer: Close the firewall on your PC and then log in to the Web
interface again.
35156AA
42
Page 43

APPENDIX C:
Model
HD420
Resolution
4MP (2592×1520)
Number of Video Streams
2 (High resolution stream for single
Frames Per Second
20 fps @ 4MP (2592 × 1520) or 30
Image Sensor
1 / 3” CMOS
Wide Dynamic Range
Spectrum Vision True WDR / HDR
Focal Length
3.6 mm Fixed
FOV
90.5°
Lens Adjustment
3-Axis
Iris Control
Auto Iris
Backlight Compensation
Yes
Auto Gain Control
Yes
Minimum Illumination
Color Mode: 0.06 Lux, B/W Mode: 0
Day / Night
True Day / Night with IR Cut Filter
IR LEDs
2 High Intensity IR LEDs
Max IR Range*
Up to 100 feet (30 m) from camera
Optimal IR Range*
Up to 60 feet (20 m) from camera
Auto White Balance Range
2700K ~ 7800K
Compression
H.264
MicroSD Backup Slot
No
Input Voltage
PoE Only IEEE 802.3af Power over
ONVIF Compliance
Profile S**
IP Rating
IP66
Heater
Yes
Operating Temperature
-35° ~ 140°F (-37° ~ 60°C)
Cold Start Temperature
-35° F (-37° C)
Audio
No
Dimensions
6.2” L × 2.5” W × 2.5”H
Weight
1 lbs (450 g)
Mounting Hardware Included
Yes
SPECIFICATIONS
CAMERA SPECIFICATIONS
camera view, low resolution stream
for multiple camera view)
fps @ 3MP (2048×1520)
Ethernet 48vDC
(157 × 63 ×63 mm)
35156AA
43
Lux with IR on
Page 44

Are any parts of this manual incomplete or unclear? Please let us know!
Contact us at support@avertx.com
www.avertx.com
1-855-2AVERTX
© 2015 AvertX
All rights reserved. No part of this publication may be reproduced by any
means without written permission from AvertX. The information in this
publication is believed to be accurate in all respects. However, AvertX
cannot assume responsibility for any consequences resulting from the use
thereof. The information contained herein is subject to change without
notice. Revisions or new editions to this publication may be issued to
incorporate such changes.
IRREL!
with your comments.
35156AA
44
 Loading...