

Page 1

AVerTV 6
User Manual English
DISCLAIMER
All the screen shots in this documentation are only example images. The images may vary depending on the pro duct and software version.
Information presented in this documentation has been carefully checked for reliability; however, no responsibility is assumed for inaccuracies.
The information contained in this documentation is subject to change without notice.
COPYRIGHT
© 2008 by AVerMedia TECHNOLOGIES, Inc. All rights reserved. No part of this publication may be reproduced, transmitted, transcribed, stored
in a retrieval system, or translated into any language in any form by any means without the written permission of AVerMedia TECHNOLOGIES,
Inc.
AP-6.0.18
200808
Page 2

AVerTV 6
Table of Contents
Chapter 1 Device Introduction.........................................................1
Chapter 2 AVerTV 6 Introduction ....................................................7
Chapter 3 Introducing the AVerTV 6 Application...........................8
3.1 Launching the AVerTV 6 Application ..................................................................................8
3.2 Running the AVerTV 6 Application for the First Time ........................................................ 9
3.2.1 Scanning for Analog Programs.................................................................................................... 9
3.2.2 Scanning for Digital Programs .................................................................................................. 11
3.2.3 Scanning for Digital Satellite Programs .................................................................................... 12
3.3 Introducing the User Interface .............................................................................................14
3.4 The Control Panel................................................................................................................ 15
3.5 Remote Control (Optional).................................................................................................. 17
3.5.1 Remote Control Buttons (Model 1) ........................................................................................... 17
3.5.2 Remote Control Buttons (Model 2) ........................................................................................... 18
3.5.3 Remote Control Buttons (Model 3) ........................................................................................... 20
3.5.4 Remote Control Buttons (Model 4) ........................................................................................... 22
3.5.5 Remote Control Buttons (Model 5) ........................................................................................... 24
3.5.6 Remote Control Buttons (Model 6) ........................................................................................... 25
3.6 Changing TV Monitor Resolution ....................................................................................... 28
3.7 Resizing the TV Monitor Window ...................................................................................... 28
3.8 Changing Display Aspect Ratio........................................................................................... 28
3.9 Always on Top..................................................................................................................... 28
3.10 Setting Windows® Power Options....................................................................................... 29
3.11 Setting Time for Turning on the Application ......................................................................30
3.12 Minimize the Application .................................................................................................... 31
3.13 Changing Video Renderer ...................................................................................................31
Chapter 4 TV....................................................................................32
4.1 Analog TV ........................................................................................................................... 32
4.1.1 Scanning Channels .................................................................................................................... 32
4.1.2 Scanning Channels (For Advanced Users) ................................................................................ 33
4.1.3 Customize Video Recording Settings........................................................................................ 34
4.1.4 Fine Tuning Color and Display Quality .................................................................................... 38
i
Page 3

AVerTV 6
4.1.5 Enhancing the Video Quality..................................................................................................... 39
4.2 Digital Satellite TV.............................................................................................................. 40
4.2.1 Scanning channels (Importing a Frequency Table) ................................................................... 40
4.2.2 Scanning channels (Adding Frequencies Manually) ................................................................. 44
4.2.3 Editing or Removing Frequencies ............................................................................................. 45
4.2.4 Scanning Channels (For Advanced Users) ................................................................................ 45
4.3 Digital TV............................................................................................................................ 46
4.3.1 Scanning Channels .................................................................................................................... 46
4.3.2 Scanning Channels (For Advanced Users) ................................................................................ 48
4.3.3 Customize Video Recording Settings........................................................................................ 49
4.3.4 Using the EPG Function............................................................................................................ 53
4.3.5 Fine Tuning Color and Display Quality .................................................................................... 53
4.3.6 Enabling the Subtitle Function .................................................................................................. 54
4.4 Adding and Deleting Channel Groups................................................................................. 55
4.5 Selecting a TV/ Digital Radio Channel ...............................................................................56
4.6 Adding and Deleting Program Grouping List...................................................................... 57
4.7 Adjusting Volume................................................................................................................ 58
4.8 Specifying a Channel Name or Description ........................................................................ 58
4.9 Modifying a Program List Name......................................................................................... 58
4.10 Removing Unwanted Channels ...........................................................................................59
4.11 Using the OverScan Function.............................................................................................. 59
4.12 16-Channel Preview............................................................................................................. 60
4.13 Changing the OSD Attributes.............................................................................................. 61
4.14 Changing Signal Source ...................................................................................................... 62
4.15 Sound Controlling (Optional) .............................................................................................. 63
Chapter 5 AM/FM Radio .................................................................64
5.1 AM/FM Radio Controls....................................................................................................... 64
5.2 How to Auto Scan AM/FM Radio Channels ....................................................................... 65
5.3 Manually Scanning Specific AM/FM Channels.................................................................. 65
5.4 Selecting a Channel .............................................................................................................66
5.5 Skipping Unwanted Channels.............................................................................................. 66
5.6 Adding a Radio Frequency .................................................................................................. 66
5.7 Modifying a Channel Name................................................................................................. 66
ii
Page 4

AVerTV 6
5.8 Adding and Deleting Channel Groups................................................................................. 67
5.9 Customizing Audio Recording Settings .............................................................................. 67
Chapter 6 TimeShift........................................................................69
6.1 TimeShift Controls .............................................................................................................. 69
6.2 Customizing TimeShift Recording Settings ........................................................................ 70
6.3 Customizing TimeShift Video Quality Settings (Analog TV only) .................................... 70
6.4 Using the TimeShift Function ............................................................................................. 71
Chapter 7 PVR.................................................................................72
7.1 PVR Controls....................................................................................................................... 72
7.2 Recording Settings............................................................................................................... 73
7.3 Using the Recording Function ............................................................................................. 73
7.4 Playing the Recorded Programs........................................................................................... 73
7.5 Picture-in-Picture Display ................................................................................................... 74
Chapter 8 Image Capture ...............................................................76
8.1 Before Capturing ................................................................................................................. 76
8.2 Capturing a TV/ Video Image .............................................................................................76
8.3 Multiple Image Sequence Capture....................................................................................... 78
Chapter 9 Teletext / MHEG-5..........................................................79
9.1 MHEG-5 Support (UK Digital Teletext Service) ................................................................79
9.2 Teletext ................................................................................................................................ 80
9.2.1 Customize the Display Mode..................................................................................................... 80
9.2.2 Overview ................................................................................................................................... 81
9.2.3 Toolbar Buttons ......................................................................................................................... 82
9.2.4 LED Lamp................................................................................................................................. 82
9.2.5 Using Teletext ........................................................................................................................... 83
Chapter 10 Scheduler......................................................................85
10.1 Schedule Management......................................................................................................... 85
10.2 Adding Schedules ................................................................................................................86
Chapter 11 Hot Keys........................................................................88
Chapter 12 Customer Service.........................................................89
Appendix ............................................................................................90
Satellite Internet Access.................................................................................................... 90
Universal DVB Plug-in ..................................................................................................... 92
iii
Page 5

AVerTV 6
Video Gaming Plug-in (for Microsoft Vista MCE only) ...............................................92
Video Quality Enhancement Plug-in (for Microsoft Vista MCE only)........................ 93
Common Interface for Conditional Access (optional) ................................................... 94
iv
Page 6

AVerTV 6
Chapter 1 Device Introduction
Thanks for purchasing AVerMedia’s product. The table below lists an overview of the
product you purchased. From this table, you can quickly learn about your product features
and know which chapter you need to read. Please do read this table before using AVerTV
6 application.
Product Name:
AVerTV Volar AX
AVerTV Hybrid Volar HX
AVerTV Volar Lite
AVerTV DVB-T Volar X
1
Page 7

AVerTV 6
Product Name AVerTV Volar AX
Model No. A827A
TV System ☐ Digital TV (☐ DVB-T ☐ ATSC ☐ DVB-S)
; Analog TV (; NTSC ; PAL ; SECAM)
Audio Mode ; Stereo ; Mono ; SAP
AM/FM Radio ; Support ☐ Not Support
Remote Control ; Support (☐ Model 1 ☐ Model 2 ☐ Model 3 ; Model 4
; Model 5 ☐ Model 6)
☐ Not Support
External Signal
Source
Others ; Teletext ☐ MHEG-5
Reference
Chapter
; S-Video ; Composite
☐ EPG ; iEPG (USA only)
; Closed Caption ☐ Digital Subtitle
☐ CI/CA
; Chapter 1
; Chapter 2
; Chapter 3 (;3.1 ; 3.2.1 ;3.3 - 3.4 ;3.5.4-3.5.5 ;3.6 -
3.13)
; Chapter 4 (;4.1 ;4.4 - 4.15)
; Chapter 5
; Chapter 6
; Chapter 7
; Chapter 8
; Chapter 9
; Chapter 10
; Chapter 11
; Chapter 12
Appendix ☐ Satellite Internet Access (Window XP only)
☐ Universal DVB Plug-in (for Microsoft XP / Vista MCE only)
; Video Gaming Plug-in (for Microsoft Vista MCE only)
;Video Quality Enhancement Plug-in (for Microsoft Vista
2
Page 8

MCE only)
☐ Common Interface for Conditional Access (optional)
Product Name AVerTV Hybrid Volar HX
Model No. A827
TV System ; Digital TV (; DVB-T ☐ ATSC ☐ DVB-S)
; Analog TV (; NTSC ; PAL ; SECAM)
Audio Mode ; Stereo ; Mono ; SAP
AM/FM Radio ; Support ☐ Not Support
Remote Control ; Support (; Model 1 ☐ Model 2 ☐ Model 3 ☐ Model 4 ;
Model 5 ☐ Model 6)
☐ Not Support
AVerTV 6
External Signal
Source
Others ; Teletext ; MHEG-5
Reference
Chapter
; S-Video ; Composite
; EPG ; iEPG (USA only)
; Closed Caption ;Digital Subtitle
☐ CI/CA
; Chapter 1
; Chapter 2
; Chapter 3 (;3.1 ;3.2.1-3.2.2 ;3.3 – 3.4 ;3.5.1 ; 3.5.5
;3.6 - 3.13)
; Chapter 4 (;4.1 ; 4.3 - 4.15)
; Chapter 5
; Chapter 6
; Chapter 7
; Chapter 8
; Chapter 9
; Chapter 10
; Chapter 11
; Chapter 12
Appendix ☐ Satellite Internet Access (Window XP only)
3
Page 9

☐ Universal DVB Plug-in (for Microsoft XP / Vista MCE only)
; Video Gaming Plug-in (for Microsoft Vista MCE only)
; Video Quality Enhancement Plug-in (for Microsoft Vista
MCE only)
☐ Common Interface for Conditional Access (optional)
Product Name AVerTV Volar Lite
Model No. A827A
TV System ☐ Digital TV (☐ DVB-T ☐ ATSC ☐ DVB-S)
; Analog TV (; NTSC ; PAL ; SECAM)
Audio Mode ; Stereo ; Mono ; SAP
AM/FM Radio ; Support ☐ Not Support
AVerTV 6
Remote Control ; Support (☐ Model 1 ☐ Model 2 ☐ Model 3 ; Model 4
; Model 5 ☐ Model 6)
☐ Not Support
External Signal
Source
Others ; Teletext ☐ MHEG-5
Reference
Chapter
☐ S-Video ☐ Composite
☐ EPG ; iEPG (USA only)
; Closed Caption ☐ Digital Subtitle
☐ CI/CA
; Chapter 1
; Chapter 2
; Chapter 3 (;3.1 ;3.2.1 ;3.3 - 3.4 ;3.5.4 - 3.5.5 ;3.6 -
3.13)
; Chapter 4 (;4.1 ;4.4 - 4.15)
; Chapter 5
; Chapter 6
; Chapter 7
; Chapter 8
; Chapter 9
; Chapter 10
4
Page 10

; Chapter 11
; Chapter 12
Appendix ☐ Satellite Internet Access (Window XP only)
☐ Universal DVB Plug-in (for Microsoft XP / Vista MCE only)
☐ Video Gaming Plug-in (for Microsoft Vista MCE only)
☐ Video Quality Enhancement Plug-in (for Microsoft Vista
MCE only)
☐ Common Interface for Conditional Access (optional)
Product Name AVerTV DVB-T Volar X
Model No. A815
TV System ; Digital TV (; DVB-T ☐ ATSC ☐ DVB-S)
☐ Analog TV (☐ NTSC ☐ PAL ☐ SECAM)
AVerTV 6
Audio Mode ; Stereo ; Mono ; SAP
AM/FM Radio ☐ Support ; Not Support
Remote Control ; Support (☐ Model 1 ; Model 2 ☐ Model 3 ☐ Model 4 ;
Model 5 ☐ Model 6)
☐ Not Support
External Signal
Source
Others ; Teletext ; MHEG-5
Reference
Chapter
☐ S-Video ☐ Composite
; EPG ☐ iEPG (USA only)
☐ Closed Caption ; Digital Subtitle
☐ CI/CA
; Chapter 1
; Chapter 2
; Chapter 3 (;3.1 ; 3.2.2 ; 3.3 -3.4 ; 3.5.2 ;3.5.5 ;3.6
- 3.13)
; Chapter 4 (; 4.2 - 4.14)
☐ Chapter 5
; Chapter 6 (; 6.1 - 6.2 ; 6.4)
; Chapter 7
5
Page 11

; Chapter 8
; Chapter 9
; Chapter 10
; Chapter 11
; Chapter 12
Appendix ☐ Satellite Internet Access (Window XP only)
☐ Universal DVB Plug-in (for Microsoft XP / Vista MCE only)
☐ Video Gaming Plug-in (for Microsoft Vista MCE only)
☐ Video Quality Enhancement Plug-in (for Microsoft Vista
MCE only)
☐ Common Interface for Conditional Access (optional)
AVerTV 6
6
Page 12

AVerTV 6
Chapter 2 AVerTV 6 Introduction
Now, with this product, you can watch TV, listen to the radio, record your favorite
programs and enjoy other features on your PC. Turn your computer system into a real
multimedia entertainment center.
You’ll never miss your favorite ball games, soaps or game shows anymore because the
TimeShift function performs background recording of a TV program. This means you can
return and watch from the part of the program where you left off.
®
To enjoy high quality TV or radio programs, AVerMedia
Please be noted that the functions or the remote control mentioned in this manual may
vary depending on the product you purchase and the area you live.
product is your best choice.
7
Page 13
AVerTV 6
Chapter 3 Introducing the AVerTV 6
Application
The AVerTV 6 application allows you to watch TV, listen to the radio, record programs,
and capture still images while you work on your computer.
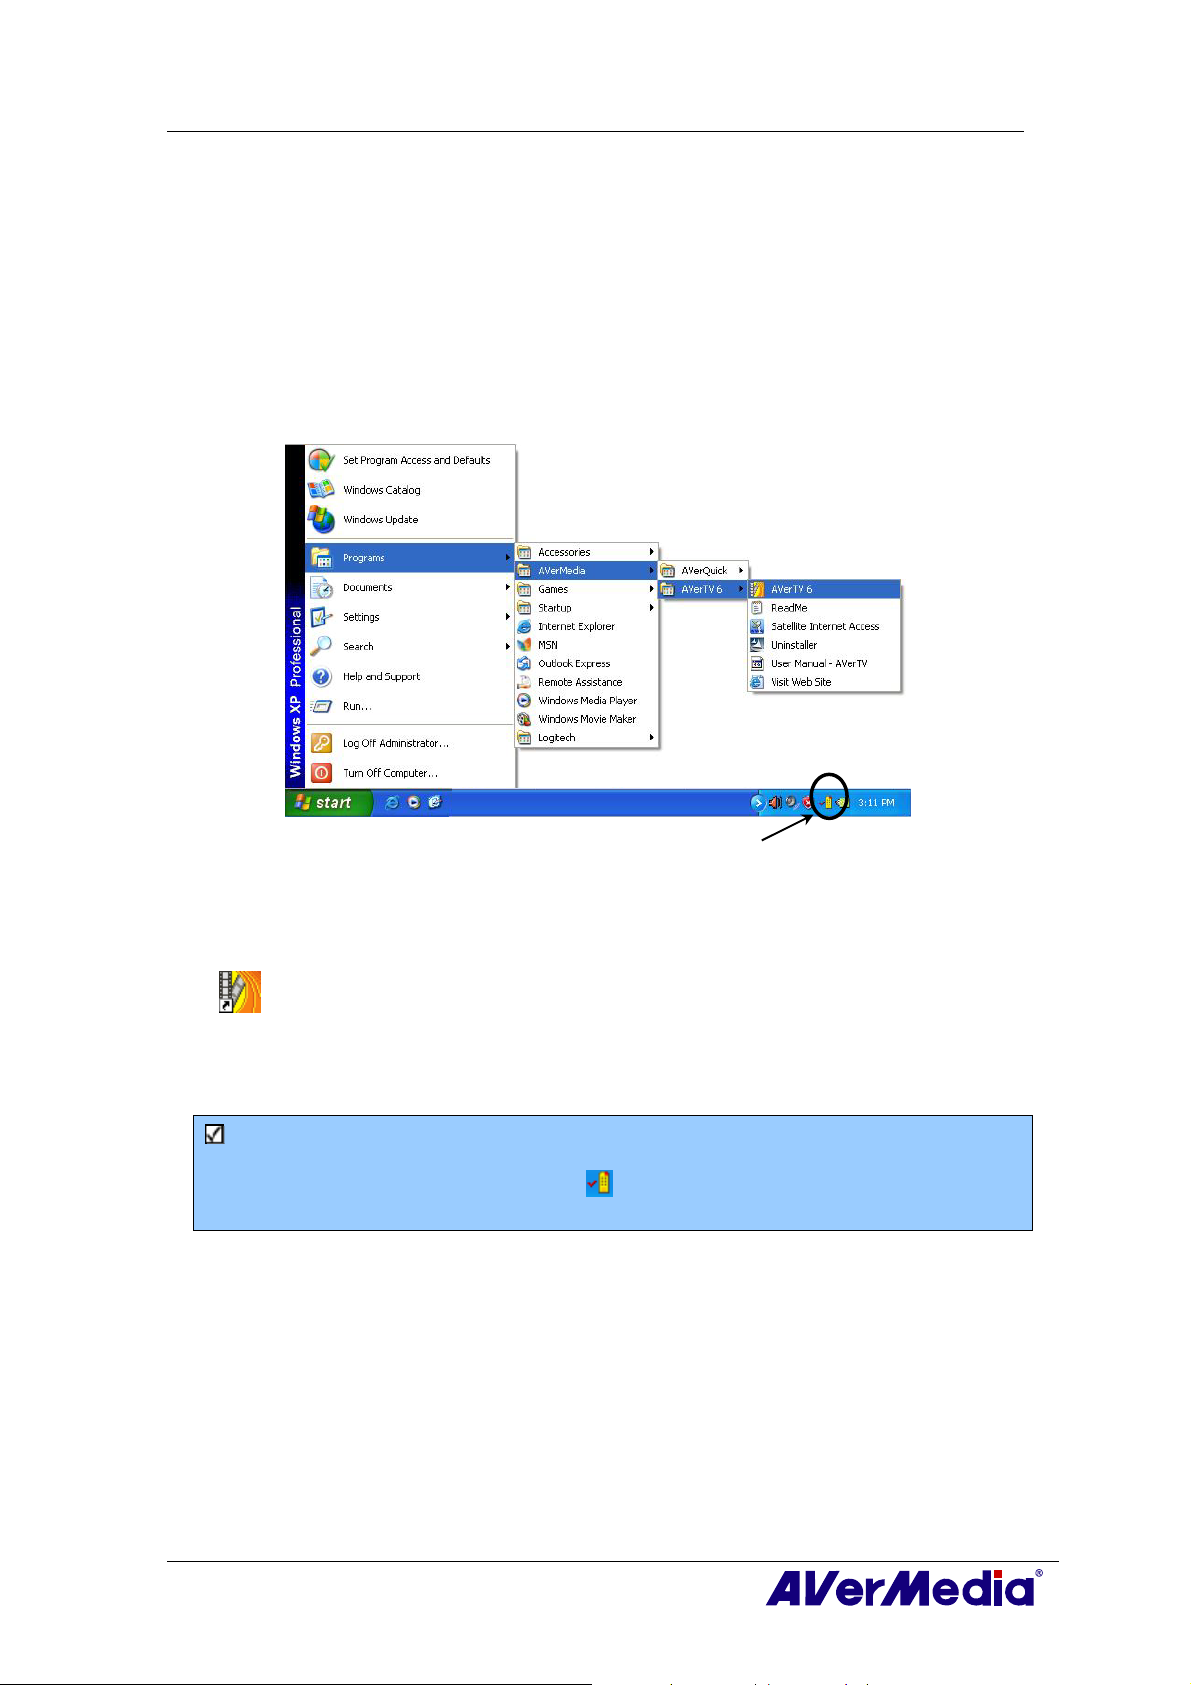
3.1 Launching the AVerTV 6 Application
Run the AVerTV 6 application from the Programs menu.
To run the application, click
and then click AVerTV 6. Another way is to double-click the AVerTV 6 program icon
“
”on the desktop. Or, you can double-click the AVerQuick launcher located in the
lower right corner of the screen.
Note: AVerQuick allows to set the desired default application, which means you can
choose either AVerTV 6 or AVer MediaCenter as the default application when
double clicking AVerQuick icon . To do this, right click AVerQuick, choose
“Setting”, and select the preferred application in the “Application” tab.
Start, point to Programs, choose AVerMedia, AVerTV 6,
AVerQuick
8
Page 14

AVerTV 6
3.2 Running the AVerTV 6 Application for the First Time
If this is your first time running the application, the Setup dialog box will appear to
prompt you to scan for channels. (For details, please refer to the section Scanning
Channels).
3.2.1 Scanning for Analog Programs
1. Select Analog TV (or Programs) on the left pane of the Setup dialog box.
Note: Before choosing the signal input, please make sure that your country/region is
correct. For more information, please refer to “Scanning Channels” in Chapter 4.
a.First, select an available AVermedia device in the left pane.
b.From the Region/Country drop-down list, select your country or region.
c.Click Apply to save the settings.
(This picture is only for reference.)
2. On this page, choose the TV option to search only for air channels or select CATV to
scan for cable channels.
3. Click New and the Program List dialog box will appear. Type in the desirable name
and click OK.
4. Click Program Scan for searching for available channels/programs in your area.
9
Page 15

AVerTV 6
5. After scanning, the active TV channels will be listed inside the box. Click Apply to
save the scanned channels.
6. To exit the current dialog box, click OK.
Note: After Media Center Edition scan, you may not be able to lock channels with
AVerTV 6. Please restart the computer to make it function normally.
10
Page 16

3.2.2 Scanning for Digital Programs
1. Select Digital TV (or Programs) on the left pane of the Setup dialog box.
AVerTV 6
2. Click New and the Program List dialog box will appear. Type in the desirable name
and click OK.
3. Click Program Scan for searching for available channels/programs in your area.
4. After scanning, the active TV channels will be listed inside the box. Click Apply to
save the scanned channels.
5. To exit the current dialog box, click OK.
Note:
1. This can only supports DVB-T Radio Broadcasts, not the Digital Audio Broadcast
system.
2. When scanning digital signals and if your country broadcasts logical channel data, the
scanned channel will be allocated based on the assigned logical channel number.
11
Page 17

3.2.3 Scanning for Digital Satellite Programs
1. Select Digital TV on the left pane of the Setup dialog box.
AVerTV 6
(This picture is only for reference.)
2. Choose the switch type that is used by your satellite system.
3. From the Satellite drop-down list under Input 1, choose the correct satellite. If you
cannot find the satellite you want but the input port DOES receive satellite signals,
choose Custom…. Otherwise, choose None.
4. Click Edit to configure the satellite information.
5. In the Satellite Information dialog box, type in the satellite’s name in the Satellite box.
(This picture is only for reference.)
6. Specify the frequencies that you want to scan for available satellite programs.
There are two ways to do this:
12
Page 18

AVerTV 6
Import the existing frequency data: refer to the section 4.2.1 Scanning
Channels (Importing a Frequency Table) for details.
Manually add frequencies: refer to 4.2.2 Scanning Channels (Adding
Frequencies Manually) for details. If you add frequencies manually, please
make sure you specify the correct longitude data.
7. Click OK to exit the Satellite Information dialog box.
8. From the LNB drop-down list, choose the appropriate setting.
• None: If you do not use any LNB device, choose this option.
• Universal Ku Band LNB or C Band LNB: Choose this option if your LNB device
is this type.
• Custom: When you choose this option, click Edit to configure your own LNB
information, such as specifying an LNB name, its frequency type, input range, etc.
For related data, refer to the documentation that comes with your LNB device.
9. Repeat steps 1 to 8 if you need to configure Input 2, Input 3, etc. Then click Apply
to save the settings.
10. Select Programs under the Digital TV icon on the left pane, and click Program Scan
to start the scanning process.
11. Click Apply to save the scanning results.
Note: After Media Center Edition scan, you may not be able to lock channels with
AVerTV 6. Please restart the computer to make it function normally.
13
Page 19

3.3 Introducing the User Interface
The TV monitor allows you to watch live TV or video.
AVerTV 6
1 Panel On / Off 8 Channel Up/Down
2 Playback Seek Slider 9 Resize Window
3 Play / Pause 10 Show / Hide Video Frame
4 Stop 11 Minimize
5 TimeShift 12 Full Screen
6 Record 13 Exit
7 Volume
The Control Panel provides button controls for selecting channels, adjusting volume,
capturing images, and more. It has a panel display that shows the current channel number
and channel name.
To display or hide the
corner of the TV Monitor.
Control Panel, click the button located in the lower left
14
Page 20

3.4 The Control Panel
AVerTV 6
30
29
28
27
2526
1
2 3 4 5 6 7 8 9 11
31
(This picture is only for reference.)
The table below describes functions of the buttons on the Control Panel.
BUTTON FUNCTION
1 Signal Status /
Enable or disable Repeat
Play
2 Signal Strength Display signal strength.
3 Backward Move backwards in intervals.
TV/Radio mode: Display the current signal status.
Playback mode: Right click and enable the Repeat function. The
system will continuously playback the files in the playlist.
2324
22
21
20
19
18
17
15
16
14131210
4 Channel Loop Return to previously accessed channel.
5 16-Channel Preview Display 16 consecutive TV channels on the TV Monitor
window.
6 Channel Up/ Down Go to the next upper or lower active channel.
7 Mute Turn off the sound.
8 Setup Allows you to:
* Scan channels.
* Set the Windows power options.
* Configure snapshot settings.
* Customize recording settings.
* Customize the TimeShift function.
9 Teletext View Teletext/MHEG-5/Closed Caption information
10 EPG View EPG information.
11 Snapshot Capture a single image or a sequence of images.
12 Forward Skip forward in intervals.
13 Always on Top Make the TV monitor float over the top of other program
windows.
14 Full Screen Show TV/Video programs in full screen.
15 Program List Display the program list.
16 Audio Mode Switch between available audio modes.
17 Schedule Display Schedule dialog box.
18 Play List Create a playlist of video files to playback.
15
Page 21

AVerTV 6
19 Show/ Hide Numeric
Panel
20 Radio Source
21 Change Video Source Switch between available video sources.
22 Record Record the current program.
23 TimeShift / Pause Performs background recording of the live program. This
24 Next File Play the next file in the playlist.
25 Previous File Play the previous file in the playlist.
26 Stop Stop the playback, recording, TimeShift, etc.
27 Play / Pause Play back recorded video files. / Freeze the playback
28 Volume Control Drag your mouse up/down to increase/decrease the volume
29 Help View User’s Manual.
30 Numeric Buttons Select channels/programs.
Playback Seek Drag the slider tab to move to any part of the recorded TV
31
Toggle between displaying or hiding the Numeric Panel.
Switch to radio mode. (AM/FM or Digital Radio)
function lets you view the recorded parts, while at the same
time, recording is in progress. / Freeze the TimeShift
temporarily.
temporarily.
level.
program.
16
Page 22

AVerTV 6
3.5 Remote Control (Optional)
After installing drivers and applications, you can use remote control to turn on/off the
programs, select channels, adjust volume and so on.
(The remote control can only be used on AVerMedia AVerTV 6 application.)
Note: To control two or more than two cards/devices with a remote control, it is
recommended to enable the multiple infrared receiver function first. To do this,
right click AVerQuick icon at the lower right corner of the screen, choose
“Setting”, “Remote control” tab and select check boxes next to the device
name. Please check your supported remote control model before activating this
function.
3.5.1 Remote Control Buttons (Model 1)
6
7
Button Description
1. Power Turn on/off the application
2. VOL +/- Volume up/down.
3. Source Switch between available signal sources.
4. Numeric Buttons Select a TV channel.
5. MUTE Turn on/off the sound.
6. CH ▲/▼ Go up or down to the next active channel.
7. CH RTN Go to the previously selected channel.
1
2
3
4
5
17
Page 23

3.5.2 Remote Control Buttons (Model 2)
Button Description
1. Power Turn on/off the application
2. Numeric Buttons - Select a TV channel.
- Under the 16-Channel preview mode, use↑↓← → to highlight the
intended channel.
3. CH RTN Go to the previously selected channel.
4. 16-CH PREV 16-Channel Preview.
5. VOL▲/▼ Volume up/down.
6. FULL SCREEN Display TV in full screen.
7. AUDIO Switch between available audio modes.
8. ► (Play) Play the last recorded or played file.
9. ■ (Stop) - End the Playback or recording.
- End the TimeShift mode and return to real-time TV or Radio
mode.
10. (Forward) - Advance the playback.
- Jump to the Teletext page of the corresponding color according
to this button.
11. SLEEP - Go to the next file in the playlist.
- Set the time to put your computer in Stand By or Hibernate
mode.
- Jump to the Teletext page of the corresponding color according
to this button.
12. MENU
13. EPG
14. WAKE UP
15. TELETEXT
16. TIMESHIFT
/PAUSE
17. (Rewind)
Display or hide the Control Panel.
Launch the Electronic Programme Guide.
- Go to the previous file in the playlist.
- Set the time to bring your computer out of Stand By or Hibernate
mode.
- Jump to the Teletext page of the corresponding color according
to this button.
View Teletext/MHEG-5/ Closed Caption information.
- Freeze the playback.
- Switch from real-time TV or Radio to TimeShift mode.
- Rewind the playback.
- Jump to the Teletext page of the corresponding color according
to this button.
AVerTV 6
18
Page 24

AVerTV 6
18. ● (Record)
19. MUTE
20. CH ▲/▼
21. SNAPSHOT
22. DISPLAY
23. Source
Switch to PVR mode and record the current program or video into
your hard drive.
Turn on/off the sound.
Go up or down to the next active channel.
Capture the on-screen image to a bitmap file.
Display information.
Switch between available signal sources.
19
Page 25

3.5.3 Remote Control Buttons (Model 3)
AVerTV 6
Button Description
1. Power Turn on/off the application
2. Numeric Buttons - Select a TV channel.
- Under the 16-Channel preview mode, use↑↓← → to highlight the
intended channel.
3. CH RTN Go to the previously selected channel.
4. 16-CH PREV 16-Channel Preview.
5. VOL▲/▼ Volume up/down.
6. FULL SCREEN Display TV in full screen.
7. AUDIO Switch between available audio modes.
8. ► (Play) Play the last recorded or played file.
9. ■ (Stop) - End the Playback or recording.
- End the TimeShift mode and return to real-time TV or Radio
mode.
10. (Rewind) - Rewind the playback.
- Jump to the Teletext page of the corresponding color according
to this button.
11. (Forward) - Advance the playback.
- Jump to the Teletext page of the corresponding color according
to this button.
12. (Next File) - Go to the next file in the playlist.
- Jump to the Teletext page of the corresponding color according
to this button.
13. (Previous File) - Go to the previous file in the playlist.
- Jump to the Teletext page of the corresponding color according
to this button.
14. TELETEXT View Teletext/MHEG-5/ Closed Caption information.
15. TIMESHIFT - Freeze the playback.
- Switch from real-time TV or Radio to TimeShift mode.
16. ● (Record) Switch to PVR mode and record the current program or video into
your hard drive.
20
Page 26

17. MUTE Turn on/off the sound.
18. EPG Launch the Electronic Program Guide.
19. CH ▲/▼ Go up or down to the next active channel.
20. DISPLAY Display information.
21. Source Switch between available signal sources.
AVerTV 6
21
Page 27

3.5.4 Remote Control Buttons (Model 4)
AVerTV 6
Button Description
1. POWER
2. SOURCE
3. Numeric Buttons - Select a TV channel.
4. CH RTN
5. 16-CH PREV
6. VOL▲/▼
7. FULL SCREEN
8. AUDIO
9. MENU
10. PIP
11. SLEEP - Go to the next file in the playlist.
12. WAKE UP - Go to the previous file in the playlist.
13. ■ (Stop) - End the Playback or recording.
14. ► (Play)
15. ● (Record)
16. TIMESHIFT
/PAUSE
17. (Rewind) - Rewind the playback.
18. (Forward) - Advance the playback.
19. TELETEXT
Turn on/off the application
Switch between available signal sources.
- Under the 16-Channel preview mode, use↑↓← → to highlight the
intended channel.
Go to the previously selected channel.
16-Channel Preview.
Volume up/down.
Display TV in full screen.
Switch between available audio modes.
Display or hide the Control Panel.
Display or hide the PIP window.
- Set the time to put your computer in Stand By or Hibernate
mode.
- Jump to the Teletext page of the corresponding color according
to this button.
- Set the time to bring your computer out of Stand By or Hibernate
mode.
- Jump to the Teletext page of the corresponding color according
to this button.
- End the TimeShift mode and return to real-time TV or Radio
mode.
Play the last recorded or played file.
Switch to PVR mode and record the current program or video into
your hard drive.
- Freeze the playback.
- Switch from real-time TV or Radio to TimeShift mode.
- Jump to the Teletext page of the corresponding color according
to this button.
- Jump to the Teletext page of the corresponding color according
to this button.
View Teletext/MHEG-5/ Closed Caption information.
22
Page 28

AVerTV 6
20. EPG
21. MUTE
22. CH ▲/▼
23. SNAPSHOT
24. DISPLAY
Launch the Electronic Program Guide.
Turn on/off the sound.
Go up or down to the next active channel.
Capture the on-screen image to a bitmap file.
Display information.
23
Page 29

3.5.5 Remote Control Buttons (Model 5)
AVerTV 6
Button Description
1. SOURCE
2. FULL SCREEN
3. ● (Record)
4. (Rewind)
5. ■ (Stop) - End the Playback or recording.
6. DISPLAY
7. VOL+/-
8. Numeric Buttons - Select a TV channel.
9. CH RTN
10. MUTE
11. CH ▲/▼
12. EPG
13. ► (Play) /
PAUSE
14. (Forward)
15. AUDIO
16. POWER
Switch between available signal sources.
Display TV in full screen.
Switch to PVR mode and record the current program or video into
your hard drive.
Rewind the playback.
- End the TimeShift mode and return to real-time TV or Radio
mode.
Display information.
Volume up/down.
- Under the 16-Channel preview mode, use 2 4 6 8 to highlight the
intended channel.
Go to the previously selected channel.
Turn on/off the sound.
Go up or down to the next active channel.
Launch the Electronic Program Guide. (DVB-T only)
Play the last recorded or played file. / Freeze the playback.
Advance the playback.
Switch between available audio modes.
Turn on/off the application
24
Page 30

3.5.6 Remote Control Buttons (Model 6)
AVerTV 6
Button Description
(1)
(2)
(3)
(4)
(5)
(6)
(7)
Turn on/off the application.
Turn off/on the sound.
Use numeric buttons to select a channel.
Live TV: Watch live TV
Fullscreen: Display TV in full screen.
Change between available audio modes.
MCS: Main Screen: Use the arrow button to navigate all on-screen items.
Use OK to confirm the selection.
PIP Mode: Change size or position of the selected screen by the arrow
buttons.
Volume up / Volume down.
25
Page 31

AVerTV 6
(8)
(9)
(10)
(11)
(12)
(13)
(14)
MCS: Main Screen: A shortcut to the main menu-- “Video”.
Teletext Mode: Jump to the teletext page of the corresponding color
according to this button.
MCS: Main Screen: A shortcut to the main menu--“TV”.
Teletext Mode: Jump to the teletext page of the corresponding color
according to this button.
View Teletext / Close Caption information.
View EPG information. (This function is only available for digital TV)
Record the current program.
Play the selected file or temporarily freeze the playback.
AP/MCS: Go to the previous item in the playlist.
AP: Set the time to bring your computer out of Stand By or Hibernate
mode.
(15)
(16)
(17)
(18)
(19)
(20)
(21)
(22)
Move backwards in intervals.
Skip forward in intervals.
AP/MCS: Go to the next item in the playlist.
AP: Stand By / Hibernate mode, exit the application or turn off the
computer.
Stop the playback, recording, TimeShift, etc.
Switch from real-time TV or Radio to TimeShift mode.
Activate the Picture in Picture (PIP) / Multi-Channel Display function.
Capture an image or a continuous sequence of images.
MCS: Main Screen: A shortcut to the main menu--“Pictures”.
Teletext Mode: Jump to the teletext page of the corresponding color
according to this button.
(23)
(24)
(25)
MCS: Main Screen: A shortcut to the main menu--“Music”.
Teletext Mode: Jump to the teletext page of the corresponding color
according to this button.
Channel up and channel down.
MCS: Go back to the previous page.
26
Page 32

AVerTV 6
(26)
(27)
(28)
MCS: Go to the main menu.
CI/CA: Exit from CI/CA Information dialog.
Return to previously accessed channel.
Change between available signal sources.
27
Page 33

AVerTV 6
3.6 Changing TV Monitor Resolution
To switch the resolution of the TV monitor,
simply right click on the TV monitor. When a
pop-up menu appears, point to Video and
choose an appropriate resolution (320x240,
640x480, 720x480, 720x576).
3.7 Resizing the TV Monitor Window
To enlarge or reduce the size of the TV Monitor window, click and drag the lower right
edge of the window.
Double-click the TV Monitor window to display it in full screen or click the Full Screen
button
When in full screen mode, just double-click anywhere on the screen to revert to the
normal TV window size.
on the Control Panel.
3.8 Changing Display Aspect Ratio
Aspect ratio indicates the ratio of the width of an image
to its height. To switch the aspect ratio of the display,
Right click on the TV monitor. When a pop-up menu
appears, point to Video and choose a desired option.
4:3 and 16:9 is the two most common aspect ratio of
home video. You can choose Free to adjust the aspect
ratio as you want. Or select Keep Aspect Ratio to
preserve the original width and height of an image.
3.9 Always on Top
To make the TV monitor window float over the top of other program windows, right-click
on the TV monitor. In the pop-up menu, point to Video and choose Always on Top.
OR,
Click the Always on Top button
on the Control Panel.
28
Page 34

AVerTV 6
3.10 Setting Windows® Power Options
This option allows you to put your computer in Stand By / Hibernate mode, power off,
exit the application or log off from the computer while you are away from the computer.
Note:
Stand By: Stand By is a state in which your monitor and hard disks turn off, so that your
computer uses less power.
Hibernate: Hibernation is a state in which your computer shuts down to save power but
first saves everything in the memory on your hard disk.
Please do the following:
1. First, Click the Setup button
Miscellaneous icon on the left pane.
2. By default, the system is set to enable the Stand By/Hibernation option. What you
have to do is to choose the desired power-saving settings. If your computer has
problem with being out of Stand By or Hibernate mode, please clear the Stand
By/Hibernate option.
(This picture is only for reference.)
and in the Setup dialog box, click on the
There are two ways to set the time to put the computer into Stand By or Hibernation.
◆ If the product you purchase with a remote control, you can press the Sleep button
repeatedly on the remote control.
◆ Or you can right click on the TV monitor, point to Sleep and select the desired
mode. Then right click on the TV monitor again, point to Sleep and choose an
execution time. The time setting will be displayed on the TV monitor. For details,
please see the description below.
29
Page 35

AVerTV 6
Time setting mode Descript ion
Now Your computer will go into the selected mode in about 10
seconds.
Sleep 30/60/90/120 Minute(s) Your computer will go into the selected mode in
30/60/90/120 minutes.
Cancel Your computer will return to original settings.
3.11 Setting Time for Turning on the Application
If your product with a remote control, this function allows you to turn on the application
at a preset time.
1. Press the Wake Up button (the green one) on the remote control.
2. Set the time you want by pressing the Wake Up button continuously. (For more
information, please refer to the table below.) Then the application will be turned on
automatically at the time you want.
Description
Cancel Wake Up Disable the Wake Up function.
Wake Up after
30/60/90/120 min(s)
The application will be turned on in 30/60/90/120
minutes.
30
Page 36

AVerTV 6
3.12 Minimize the Application
To minimize AVerTV 6 application to the system tray (notification area), click the Setup
button
Select the Minimize to Tray check box. Otherwise clear the check box to minimize the
application to a taskbar button.
and in the Setup dialog box, click Personalise icon on the left pane. Then
(This picture is only for reference.)
3.13 Changing Video Renderer
To select the video renderer you prefer, click the Setup button and in the Setup dialog
box, click Personalise icon on the left pane. Then select the preferred video renderer
from the drop-down list.
By default, the renderer is set to Automatic (Overlay Mixer is chosen in Windows XP
system and Enhanced Video Renderer (EVR) in Windows Vista system.)
(This picture is only for reference.)
31
Page 37

AVerTV 6
Chapter 4 TV
In this chapter, we will introduce methods to scan programs, select a TV/Radio program,
create a group and so on.
4.1 Analog TV
4.1.1 Scanning Channels
If you haven’t done channel scanning when you first run the application, please follow
the steps to complete this procedure.
1. Click the Setup button
AVerMedia device in the left pane.
Note:
Make sure that your Country/Region is correct.
a. First, select an available Avermedia device in the left pane.
b. From the Region/Country drop-down list, select your country or region.
c. Click Apply to save the settings.
and in the Setup dialog box, select an available
(This picture is only for reference.)
2. Then select Analog TV (or Programs). On this page, choose the TV option to search
only for air channels or select CATV to scan for cable channels.
3. Click New and the Program List dialog box will appear. Type in the desirable name
and click OK.
32
Page 38

AVerTV 6
4. Then Click Program Scan to start the searching process.
The application comes with a default frequency table therefore the application will
use this table to search for active channels/programs. If you want to terminate the
searching process, just click Stop.
5. You can check the scanning progress from the progress bar. After scanning, the active
TV/Radio channels will be listed inside the box. Click Apply to save the scanned
channels.
(This picture is only for reference.)
Note: After Media Center Edition scan, you may not be able to lock channels with
AVerTV 6. Please restart the computer to make it function normally.
4.1.2 Scanning Channels (For Advanced Users)
1. Click Advance located at right-lower corner in the Programs Information section.
Then the Advance Program Configuration dialog box will appear.
33
Page 39

AVerTV 6
2. If you don’t want to miss any channels, click All Frequencies Scan.
3. When a warning message appears, click Yes to continue the procedure or click No to
abort this operation.
4. After scanning, new active channels/programs will be memorized and listed in the left
pane of the dialog box.
5. Click Apply to save the scanned channel.
4.1.3 Customize Video Recording Settings
To customize the video recording settings, please do the following.
1. Click the Setup button and in the Setup dialog box, click Analog TV (or
Programs) icon on the left pane.
2. Select the Record Format option.
3. Determine the video file format you wish to use for saving the recorded video file.
4. You can use the default format or select New to create your own file format.
34
Page 40

AVerTV 6
(This picture is only for reference.)
5. Click New and the Format dialog box appears. In the Format dialog box, select the
file format you want and enter the desired name in the text box. Then click Next.
(This picture is only for reference.)
6. In the Video dialog box, you can set the video format and audio format. The setting
options in the Video dialog box will vary according to the video format you chose.
35
Page 41

AVerTV 6
(This picture is only for reference.)
7. Click Finish to save the settings. To abort this operation, click Cancel.
8. If you want to change the settings of your own file format, click Modify or you can
click Delete to remove the unwanted file format that you created earlier.
Information:
File Format Description
MPEG-1
MPEG-2
VCD
DVD
AVI
Choose MPEG-1 format for video files that are intended for CD-ROM
playback on a computer or for Internet transmission. MPEG-1 allows
file compression and offers VHS quality picture. Just about every
system available today can play MPEG-1 and does not need special
software or hardware.
Videos compressed using MPEG-2 have extremely high quality pictures
and full CD-quality sound. Choose MPEG-2 format for video files that
are intended for DVD-ROM playback on a computer or if you want
broadcast quality videos.
When you choose this format, the recorded video file will be saved in
MPEG-1 format that is compliant with VCD standards. Standard VCD
frame size and frame rate are 352 x 240 pixels at 29.97 fps for NTSC
and 352 x 288 pixels at 25 fps for PAL.
When you choose this format, the recorded video file will be saved in
MPEG-2 format that is compliant with DVD standards. Standard DVD
frame size and frame rate are 720 x 480 pixels at 29.97 fps for NTSC
and 720 x 576 at 25 fps for PAL.
AVI is the most common video file format for playback on the
computer. It can be saved in uncompressed form if you want high
quality video, or compressed using any of the available codecs if you
want to minimize the file size.
WMA
WAV
WMV
MPEG4-H.264
Windows Media Audio. An audio compression format, which can offer
higher quality than MP3 at the same bit rate.
A common audio file format for Windows computers. It was created by
Microsoft and has become a standard PC audio file format.
WMV is a video format encoded with Microsoft ISO MPEG-4 video
codec and Windows Media Audio codec. It can be used to provide
downloadable or streaming video.
Videos compressed using MPEG-4 standard which is two or three
36
Page 42

AVerTV 6
times more efficient than MPEG-2. This format can be applied to a
wide variety of applications or networks
Digital TV, Broadcast and Streaming applications.
and systems like HD-DVD,
iPod
A video format base on H.264 standard but has smaller video bit rate.
It’s an iPod -compatible format.
--To record program in MPEG-4 format--
1. If you want to record program in MPEG-4 format, you need to download codec from
the website first. We recommend downloading the DivX codec from www.divx.com or
D codec from www.xvid.org. Then install the codec.
Xvi
xt, run the AVerTV 6 and click the Setup
2. Ne
Analog TV (or Programs) icon on the left pane.
3. Select the Record Format option.
button . In the Setup dialog box, click
(This picture is only for reference.)
4. When you click New and the Format dialog box appears. In the Format tab, select
AVI and enter the desired name in the text box.
(This picture is only for reference.)
5. In the Video tab, you can choose the desired codec, such as XviD MPEG-4 codec, and
click OK to confirm your selection.
37
 Loading...