

Page 1
INTRODUCTION
English
This covers the installation guide for AVerMedia® AVerTV and AVerMedia®
AVerTV Studio, which either include with A2, NICAM or SAP stereo standard. With
either product, you can watch TV, record your favorite program or video to your hard
drive, watch a TV replay, capture images, play music CD, and video conference on
your PC. If you purchased the AVerMedia® AVerTV Studio package, you can even
listen to FM radio!
PACKAGE CONTENTS
• TV Tuner/Capture Card • Stereo Audio Cable
• Installation CD • Quick Installation Guide
• FM Radio Antenna (AVerMedia® AVerTV Studio only)
If you purchased the one with remote, your package will also include:
• Remote Control
• Infrared Sensor Cable
(Batteries included)
• Two-in-one Cable
(8-pin Mini-Din S-video/Remote connector)
System Requirements
System requirements are described very clearly on the package box. Before installing
the AVerMedia® AVerTV and AVerMedia® AVerTV Studio card and software,
make sure your PC meets the listed requirements.
HARDWARE INSTALLATION
Step 1. Installing the Card to the PC
1. Remove the system unit cover.
2. Insert the tuner/capture card in an empty
PCI expansion slot on the motherboard.
3. Replace back the system unit cover.
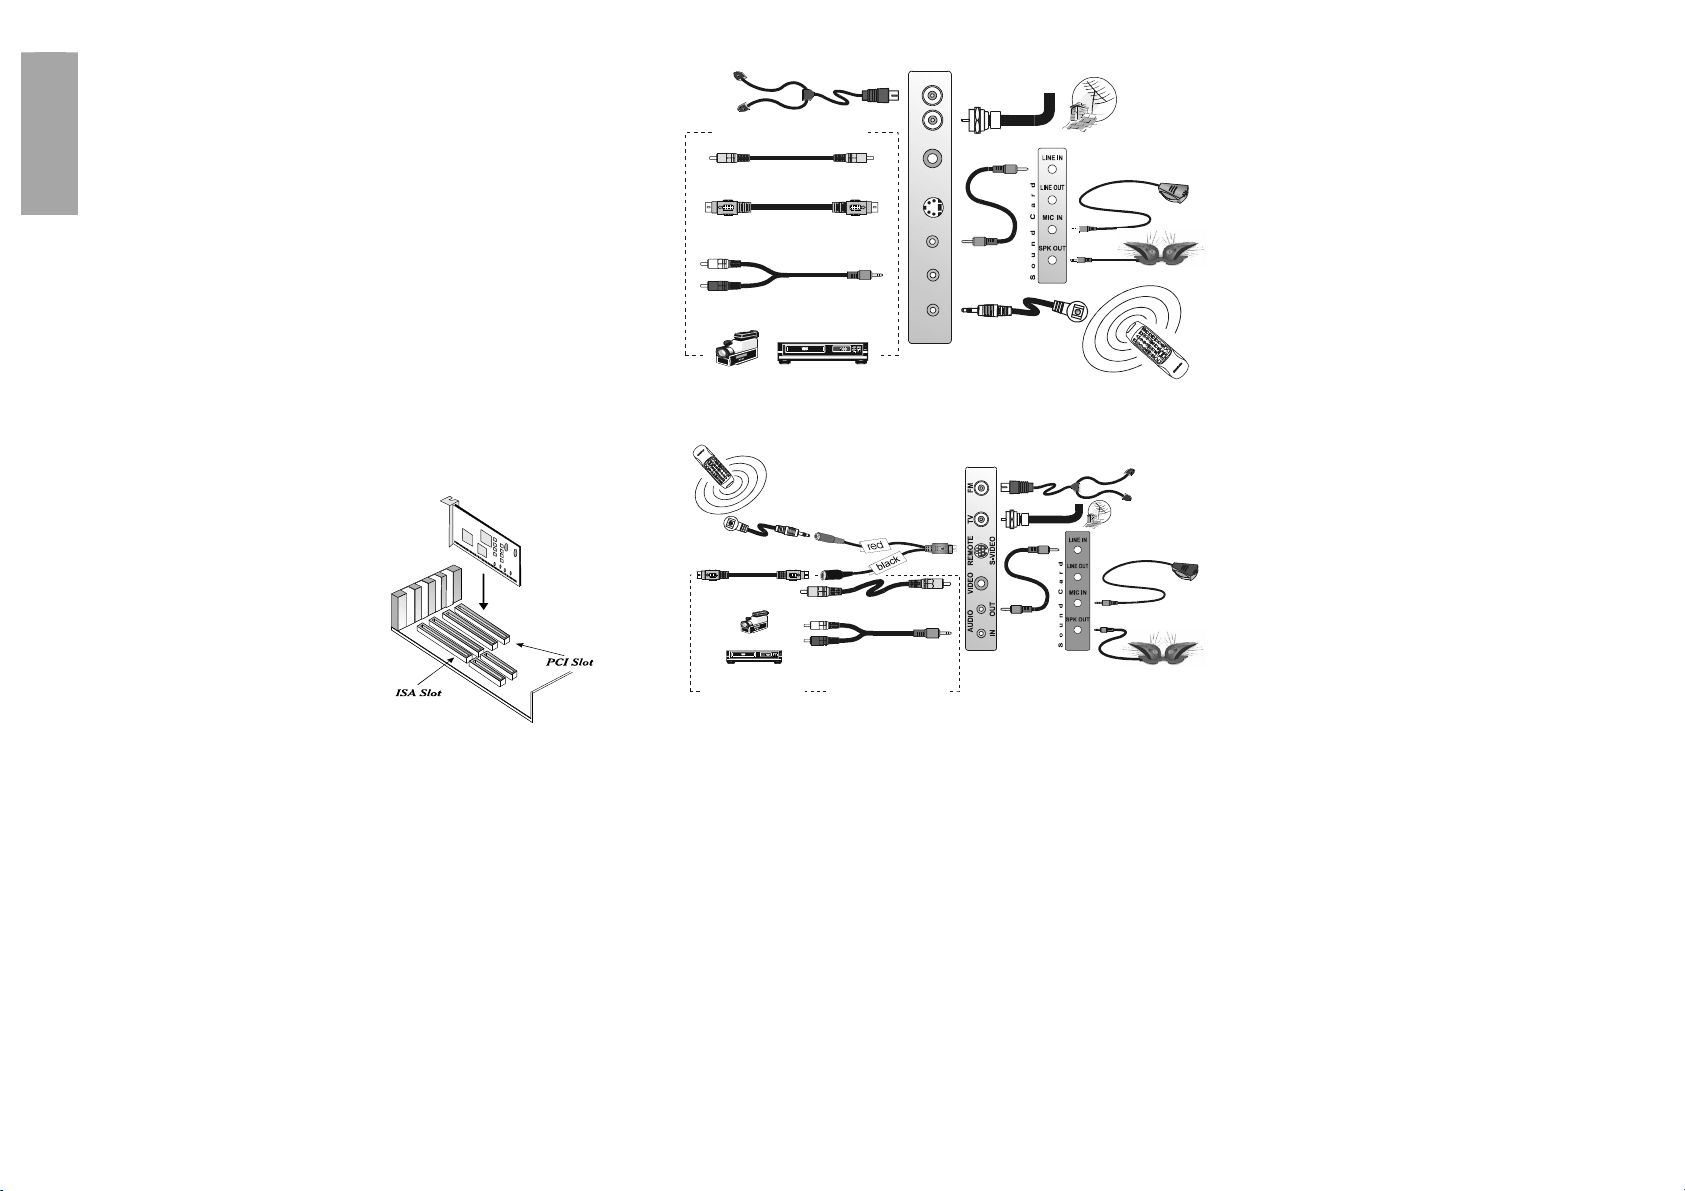
Step 2. Making the Connections
The AVerMedia® AVerTV and AVerMedia® AVerTV Studio cards have the same
connectors, except that AVerMedia® AVerTV Studio has an additional "FM" port. A
“remote” port will be available, if you purchase the one with a remote function.
The figure on the next page shows clearly, which cable should be connected to
each port.
To Video/S-Video Out and Left & Right Audio Out
Camcorder
FM Radio Antenna
(AVerMedia AVerTV Studio only)
Connecting to a Video Source
Video Cable
(not supplied)
S-Video Cable
(not supplied)
Audio Cable
(not supplied)
of Video Source
VCR
M
F
V
T
O
E
D
I
V
O
E
D
I
V
S
T
U
O
I
O
D
U
A
N
I
E
T
O
M
E
R
TV Antenna/
Cable
Stereo Audio
Cable
Infrared Sensor Cable
(option)
Microphone
(Not Suppli ed)
External Amplified Speaker
If you have the one with 8-pin Mini-Din s-video/remote connector, see the
diagram below for proper cable connection.
Infrared Sensor Cable
S-Video Cable
(not supplied)
Camcorder
To Video/S-Video Out and
Left & Right Audio Out
of Video Source
VCR
(option)
Two-in-one cable
Video Cable
(not supplied)
Audio Cable
(not supplied)
Connecting to a Video Source
FM Radio Antenna
(AVerMedia AVerTV Studio only)
TV Antenna
Stereo Audio
Cable
Microphone
(Not Supplied)
External Amplified
Speaker
INSTALLING THE DRIVER
After you have properly installed the card, turn on your computer. The
system will automatically detect the newly installed device on the first time
you reboot your computer. Simply follow the installation procedures and
restart the computer when you’re instructed to do so.
1 2
Page 2

Installing WDM driver for Windows ME/XP
1. In Add New Hardware Wizard dialog box, choose Automatic search for a
better driver (Recommended). Click Next.
2. Select the one with <CD-ROM drive>:\DRIVER\WIN..\....then click OK.
3. Click Finish. The Audio, Tuner and Crossbar portion of the installation
will continue. The screens that you will encounter are exactly the same
as the screens in video capture installation.
4. The AVerMedia TV Series dialog box will prompt you to key-in the product key
number. In the text box, type the product key then click OK.
Installing WDM driver For Windows 2000
1. The Found New Hardware Wizard dialog box will appear. Click Next.
2. Select Search for a suitable driver for my device (recommended). Click
Next.
3. Select CD-ROM drives. Place the Installation CD into your CD-ROM drive.
Click Next.
4. The wizard now detects the correct driver. Click Next.
5. Ignore the warning message. Click Yes to install the rest of the file.
6. Click Finish. The Audio, Tuner and Crossbar portion of the installation will
continue. The installation screens will be identical to the video capture installation
program.
7. The AVerMedia TV Series dialog box will prompt you to key-in the product key
number. In the text box, type the product key then click OK.
Installing WDM driver For Windows 98SE(second edition)
You must have your Windows 98SE and the AVerMedia TV Series installation CD nearby.
1. The Add New Hardware Wizard dialog box will appear. Click Next.
2. Select Search for the best driver for your device
(Recommended). Click Next.
3. Select CD-ROM drive. Place the AVerMedia TV Series installation CD
into your CD-ROM drive. Click Next.
4. You’ll be prompted to insert the AVerMedia Bt878 WDM Driver Disk
click OK. In the next dialog box, at the Copy files from text box, type:
<CD-ROM drive>:\Driver \Win98SE.
5. If the required files are in your windows directory, the following steps
are not needed.
When prompted, insert the MS Windows98SE installation CD into your CD-ROM drive.
Click OK. In the next dialog box, type: <CD-ROM drive>:\Win98 then click OK.
6. Click Finish. The Audio, Tuner and Crossbar portion of the installation will
continue. The installation screens will be identical to the video capture
installation program.
7. The AVerMedia TV Series dialog box will prompt you to key-in the product key
number. In the text box, type the product key then click OK.
Installing VxD driver For Windows 98/95
1. The Add New Hardware Wizard dialog box will appear. Click Next.
2. Select Search for the best driver for your device
(Recommended). Click Next.
3. Select Specify a location then type: <CD-ROM drive>:\Driver
\Win98. Place the Installation CD into your CD-ROM drive then click
Next.
4. Click Finish. Windows 98 will then proceed to install the audio
capture driver. The screens that you will encounter are exactly the
same as the screens in video capture installation.
5. The AVerMedia TV Series dialog box will prompt you to key-in the product key
number. In the text box, type the product key then click OK.
For Windows NT 4.0
To install the drivers and utility software:
1. Insert the Installation CD into your CD-ROM drive and type:
Your CD-ROM Drive:\NT40\Disk1\Setup.exe
2. A Welcome dialog box will first appear. Click Next.
3. The next dialog box shows a list of system requirements. If your PC does not meet any
of listed requirements, stop the installation and properly upgrade your PC.
If your computer is already properly equipped, click Yes and continue with the
installation.
4. Th e Select Country dialog box will then appear. Choose the name of your
country from this dialog box.
If the name of your country is not listed, choose any country which uses the same
TV system as yours. Based on your selection, the installation program will
automatically set which TV system the card would receive.
5. The destination folder in which the utility software will be installed is displayed
in the Choose Destination Location dialog box.
If you want to specify your own folder, click Browse and enter a pathname.
Click Next.
6. Next, specify the program folder in which to place the utility software.
Then, click Next.
7. At this point, setup is complete.
3 4
Page 3
If you want to open the Readme file and view the most up-to-date information on
P
T
AVerMedia TV Series, select View the README file. Otherwise, clear this
option if do not want to view the Readme file.
If you want to automatically run the utility software after the installation, select
Launch the TV Series App.
Important! The software must be installed only AFTER the drivers are
completely installed. If the installation main screen appear,
click Exit to resume the driver installation.
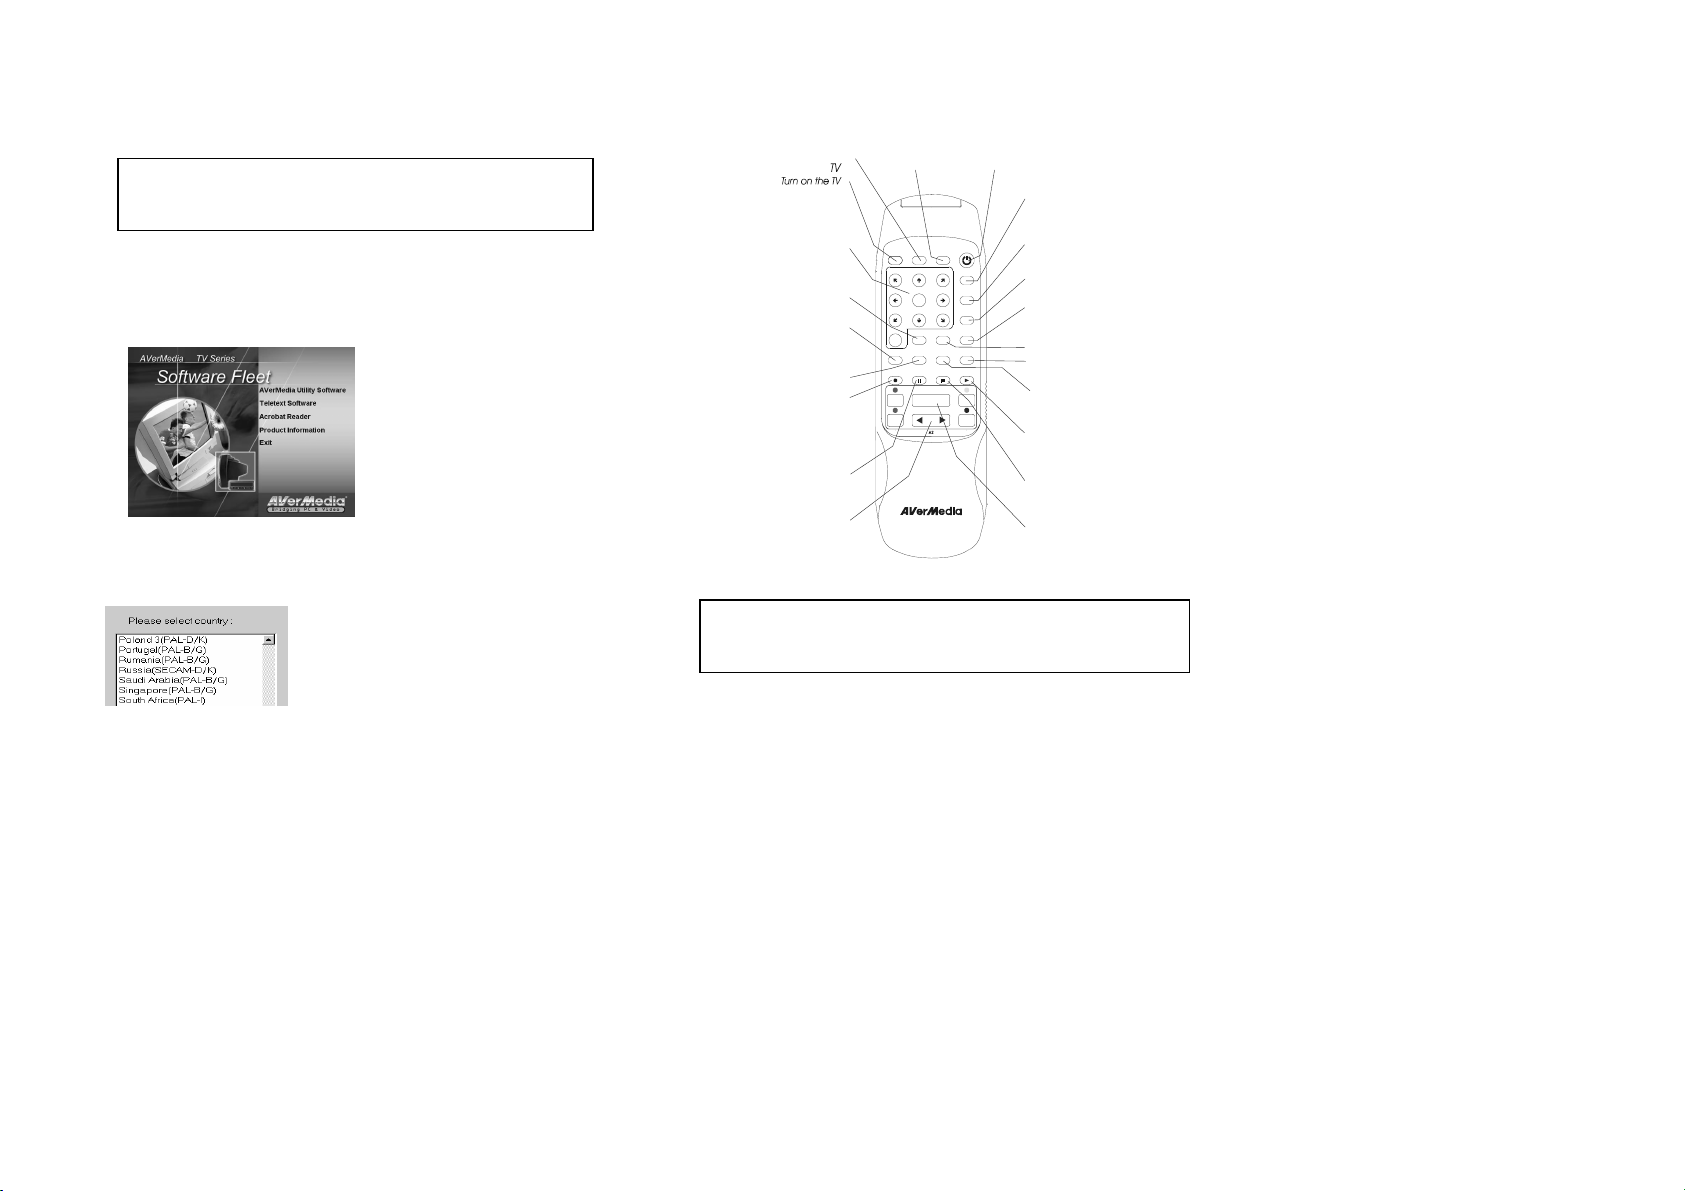
Installing the Utility Software
After the driver installation has been completed, install the utility software and
bundled software. Press the "Eject" button of your CD-ROM drive and re-insert the
Installation CD.
The Installation Main Screen will then appear:
Click on the name of each
software and follow the on-screen
instructions to complete each
installation.
Click Exit after you have finished
installing all the software.
Important:
While installing the AVerMedia Utility Software, you will encounter the Select
Country dialog box. Choose the name of your country from this dialog box.
If the name of your country is not listed,
choose any country, which uses the same TV
system as yours. Based on your selection, the
installation program will automatically set
which TV system the card would receive.
You will also be prompted to install DirectX. Since the AVerMedia TV Series requires
DirectDraw, you must install DirectX.
purchased the AVerTV Studio, you can even listen to FM radio with the remote. The
remote control can also functions as a Remote Mouse.
TV Control Buttons
1 2 3
5 6
4
DRAG.
7 8 9
0
DISPLAY LOOP
LR
FREEZE MUTEAUTOSCAN
PAUS E PL AYRECORD STOP
VOLUME
- +
CHANNEL/PAGE
POWER
Run the Utility Software
or exit from the utility
POWER
VIDEO
AUDIO
FULL
SCREEN
PREVIEW
CAPTURE
VIDEO
Switch to TV,
Composite video,
or S-Video
AUDIO
Choose Mono,
Stereo or SAP
FULL SCREEN
Display TV or
video in full screen
PREVIEW
16-channel Preview
LOO P
Go to the previously
selected channel
MUTE
Tur n off the so un d
CAPTURE
Capture the on-screen
image to a bitmap file
Play (Time Shift)
ress to continue watching and
forward skip 10 sec. of the
temporary recorded TV show
Stop (Time Shift)
Switch back to
real time TV mode
VOLUME
Increase/Dec rease
volume level
for WDM
for WDM
* Select a TV channel
* In 16-channel preview,
use the to
highlight the channel
above, below, left and right
Memorize all active TV
channels in your area
Switch to VCR mode
and record th e current
program or video into
PAU SE (Tim e Sh if t)
Switch to Time Shift mode
and pause the live TV show
CHANNEL Up/Down
Go up or down to the
next active TV channel
Turn on the CD Player
CHANNEL
SELECTION
↑↓←→
DISPLAY
Display information
AUTOSCAN
FREEZE
Freeze/Unfreeze
RECORD
your hard drive
for WDM
CD
TELETEX
View Teletext
information
TV/FM CD TELETEXT
ENTER
Note: Due to system requirement, the time shift, I-record and saving the
video in MPEG2 format will not be featured using the VxD driver.
We recommend you to install the WDM driver.
The Remote Control
The AVerMedia® AVerTV and AVerMedia® AVerTV Studio with remote package
allows you to use infrared remote control to watch TV, record TV programs or video
to your hard drive, watch a TV replay, play music CD, and capture still images. If you
5 6
Page 4
Français
INTRODUCTION
Le présent manuel couvre le guide d’ installation pour AVerMedia® AVerTV et
AVerMedia® AVerTV Studio, qui sont au standard stéréo A2, NICAM ou SAP.
Avec ces produits, vous pourrez regarder la télévision, enregistrer vos programmes ou
vos vidéo favoris sur votre disque dur, regarder un enregistrement télévisé, capturer
des images, lire des CD musicaux, et participer à des conférences vidéo, le tout sur
votre ordinateur. Si vous avez acheté AVerMedia® AVerTV Studio, vous pouvez
même écouter la radio FM!
CONTENU DE L’EMBALLAGE
• Carte de Tuneur TV /Capture • Câble audio stéréo
• CD d’installation • Guide de mise en route rapide
• Antenne de radio FM (AVerMedia AVerTV Studio seulement)
Si vous avez acheté la version à distance,les éléments suivants sont aussi
inclus:
• Télécommande
(Piles inclues)
• Câble du détecteur infra-rouge
• Câble deux-en-un
(Connecteur S-vidéo 8-pin Mini-Din)
Installation du matériel
Etape 1. Installer la carte dans le PC
1. Démontez le capot de l'unité système.
2. Insérez la carte de capture/tuner dans
un emplacement PCI disponible sur
la carte mère.
3. Remettez le capot de l'unité système
en place.
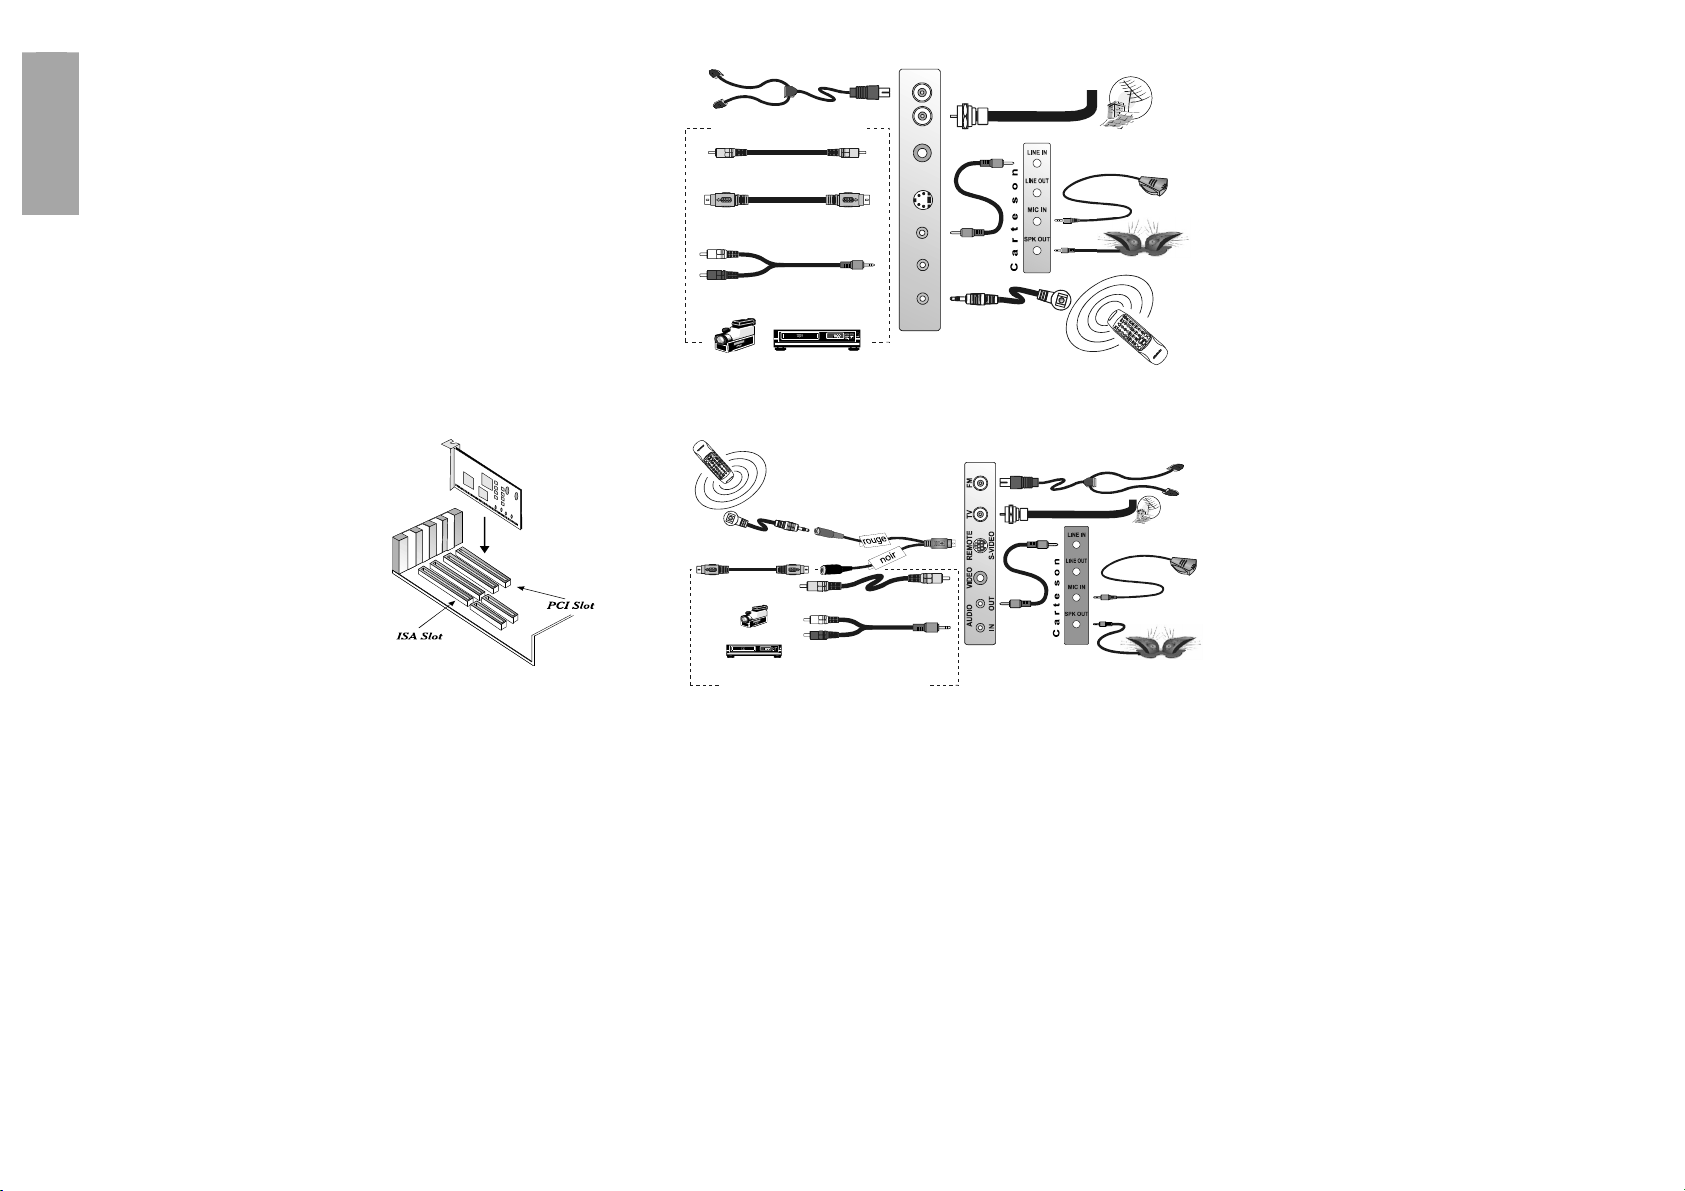
Etape 2. Les connexions
Les cartes AVerMedia® AVerTV et AVerMedia® AVerTV Studio ont les mêmes
connecteurs, excepté pour AVerMedia® AVerTV Studio qui possède un port FM
additionnel. Un port “à distance”est disponible si vous avez acheté un modèle avec la
fonction de contrôle à distance.
La figure se trouvant sur la page suivante, montre clairement quels câbles
doivent être connectés à quels ports.
Antenne de radio FM
(AVerMedia AVerTV Studio seulement)
Connexion vers une source vidéo
Câble Viedo
(Non fourni)
Câble S-Vidéo
(Non fourni)
Câble Audio
Vers sortie Vidéo/S-Vidéo et sorties audio
droite et gauche de la source vidéo
Camescope
(Non fourni)
Magnétoscope
Câble d'anntenne de Télévision
TV FM
VIDEO
OUT
Câble audio
stéréo
AUDIO S-VIDEO
IN
REMOTE
Câble du détecteur
infra-rouge
(En option)
Micro
(Non fourni)
Hauts-parleurs externes amplifiés
Télécommande
(En option)
Si vous possédez la carte comprenant un connecteur s-vidéo 8-pin Mini-Din,
veuillez vous référer au diagramme ci-dessous pour la connexion du câble.
Télécommande (En option)
Câble du détecteur infra-rouge
(En option)
Câble S-Vidéo
(Non fourni)
Camescope
Magnétoscope
Connexion vers une source vidéo
Vers sortie Vidéo/ S-Vidéo et sorties a udio
droite et gauche de la source vidéo
Câble deux- en-un
Câble Audio
(Non fourni)
Câble Viedo
(Non fourni)
Antenne de radio FM
(AVerMedia AVerTV Studio seulement)
Câble d'anntenne de Télévision
(Non fourni)
Câble audio
stéréo
Hauts-parleurs externes amplifiés
Micro
INSTALLATION DU PILOTE
Après avoir correctement installé la carte, mettez votre ordinateur sous
tension. Le système détecte alors automatiquement le nouveau périphérique
lorsque votre ordinateur est amorcé. Suivez alors tout simplement les
différentes étapes de l’installation, puis redémarrer votre ordinateur
lorsqu’on vous le demandera.
1 2
Page 5

Installer le pilote WDM pour Windows ME/XP
1. Dans la boîte de dialogue Assistantd’installation de nouveau matériel, choisissez
Recherche automatique du meilleur pilote (Recommendé). Cliquez sur
Suivant.
2. Sélectionnez <Lecteur CD-ROM >:\DRIVER\WIN..\....puis cliquez sur OK.
3. Cliquez sur Terminé. L’installation du tuneur, de l’audio et de la
Crossbar continue. Les écrans que vous allez voir s’afficher sont
exactement les mêmes que pour l’installation de la capture vidéo.
4. La boîte de dialogue de AVerMedia TV Series vous demandera d’entrer le numéro
clé du produit. Dans le champ texte, tapez la clé du produit puis cliquez sur OK.
Installer le pilote WDM pour Windows 2000
1. La boîte de dialogue Assistantd’installation de nouveau matériel s’affiche.
Cliquez sur Suivant.
2. Sélectionnez Recheche d’un pilote adéquate pour mon périphérique
(recommendé). Cliquez sur Suivant.
3. Sélectionnez Lecteurs de CD-ROM. Placez le CD d’installation dans votre
lecteur de CD-ROM. Cliquez sur Suivant.
4. L’assistant détecte alors le pilote adéquate. Cliquez sur Suivant.
5. Ignorez le message d’avertissement. Cliquez sur Oui pour installer le reste du
fichier.
6. Cliquez sur Terminé. L’installation du tuneur, de l’audio et de la
Crossbar continue. Les écrans que vous allez voir s’afficher sont
exactement les mêmes que pour l’installation de la capture vidéo.
7. La boîte de dialogue de AVerMedia TV Series vous demandera d’entrer le numéro
clé du produit. Dans le champ texte, tapez la clé du produit puis cliquez sur OK.
Installer le pilote WDM pour Windows 98SE(seconde
édition)
Vous avez besoin du CD d’installation de Windows 98SE et de AVerMedia TV Series.
1. La boîte de dialogue Assistantd’installation de nouveau matériel s’affiche.
Cliquez sur Suivant..
2. Sélectionnez Recherche du meilleur pilote (Recommendé). Cliquez
sur Suivant.
3. Sélectionnez Lecteur de CD-ROM. Placez le CD d’installation d’
AVerMedia TV Series dans votre lecteur de CD-ROM. Cliquez sur
Suivant.
4. On vous demandera d’insérer le disque du pilote AVerMedia Bt878
WDM, cliquez alors sur OK. Dans la boîte de dialogue suivante, dans le
champ de texte Copier les fichiers de, tapez: <Lecteur de CD-ROM
>:\Driver \Win98SE.
5. Si les fichiers requis sont dans votre répertoire windows, les étapes
suivantes de sont pas nécessaires.
Lorsqu’on vous le demande, insérez le CD d’installation de MS Windows98SE dans
votre lecteur de CD-ROM. Cliquez sur OK. Dans la boîte de dialogue suivante, tapez:
<Lecteur de CD-ROM>:\Win98 puis cliquez sur OK.
6. Cliquez sur Terminé. L’installation du tuneur, de l’audio et de la
Crossbar continue. Les écrans que vous allez voir s’afficher sont
exactement les mêmes que pour l’installation de la capture vidéo..
7. La boîte de dialogue de AVerMedia TV Series vous demandera d’entrer le
numéro clé du produit. Dans le champ texte, tapez la clé du produit puis cliquez
sur OK.
Installer le pilote VxD pour Windows 98/95
1. La boîte de dialogue Assistantd’installation de nouveau matériel s’affiche.
Cliquez sur Suivant..
2. Sélectionnez Recherche du meilleur pilote (Recommendé). Cliquez
sur Suivant..
3. Sélectionnez Specifier une location puis tapez: <Lecteur de CD-
ROM>:\Driver \Win98. Placez le CD d’installation dans votre lecteur de
CD-ROM puis cliquez sur Next.
4. Cliquez Terminé. Windows 98 continue alors avec l’installation du
pilote de capture audio. Les écrans qui s’afficheront seront
exactement les mêmes que pour l’installation du pilote de capture
vidéo.
5. La boîte de dialogue de AVerMedia TV Series vous demandera d’entrer le
numéro clé du produit. Dans le champ texte, tapez la clé du produit puis cliquez
sur OK..
Installation pour Windows NT
Pour installer les pilotes et le logiciel utilitaire :
1. Insérez l’Installation CD dans votre lecteur de CD-ROM et tapez :
Votre lettre de lecteur:\NT40\Disk1\Setup.exe
2. Une boîte de dialogue apparaît d’abord. Cliquez sur Next.
3. La boîte de dialogue suivante affiche une configuration minimum. Si
votre ordinateur ne correspond pas à la configuration, arrêtez
l’installation et reconfigurez votre ordinateur au niveau requis.
4. La boîte de dialogue Please select country apparaît alors. Choisissez
votre pays dans cette boîte de dialogue.
Si le nom de votre pays n’est pas sur la liste, choisissez un autre pays qui
utilise le même système télé que le vôtre. Sur la base de votre sélection, le
programme d’installation définira automatiquement le système télé qui sera
reçu par la carte.
5. Le dossier de destination dans lequel le logiciel utilitaire sera installé
est affiché dans la boîte de dialogue Choose Destination Location.
Si vous désirez spécifier votre propre dossier, cliquez sur Browse et
entrez un chemin. Cliquez sur Next.
3 4
Page 6

6. Spécifiez ensuite le dossier programme dans lequel le logiciel
A
utilitaire sera placé. Cliquez ensuite sur Next.
7. À ce moment, la configuration est terminée.
Si vous désirez ouvrir le fichier Readme et lire les informations les plus
récentes sur AVerMedia TV Series, sélectionnez View the README
file. Dans le cas contraire, désélectionnez cette option si vous ne désirez
pas lire le fichier Readme.
Si vous ne voulez pas exécuter automatiquement le logiciel utilitaire après
l’installation, sélectionnez Launch the TV Series App.
Important! Le logiciel doit être installé APRES que les pilotes aient
été complètement installés. Si l’écran principal de
l’installation apparaît, cliquez Quitter pour reprendre
l’installation des pilotes.
Installer l'utilitaire
Une fois l'installation du pilote terminée, installez l'utilitaire et les logiciels
fournis avec la carte. Appuyez sur le bouton "Ejection" de votre lecteur de
CD-ROM et réinsérez le CD d'installation.
Le menu principal d'installation (Installation Main Screen) s'affiche :
Cliquez sur le nom de chaque logiciel
et suivez les instructions qui
s'affichent sur l'écran pour mener à
bien chaque installation.
Cliquez sur Quitter lorsque vous avez
fini d'installer tous les logiciels.
Important:
Pendant l'installation de l'Utilitaire AVerMedia, vous verrez s'afficher la boîte
de dialogue Sélectionner le pays. Choisissez le nom de votre pays dans cette
boîte de dialogue.
Si le nom de votre pays n'apparaît pas,
choisissez n'importe quel pays qui utilise la
même norme de télévision que le vôtre. En
fonction de votre choix, le programme
d'installation sélectionnera le système TV
On vous demandera également d'installer DirectX. Etant donné que les cartes
AVerMedia AVerTV et AVerMedia AVerTV Studio nécessitent DirectDraw,
vous devez installer DirectX.
que doit recevoir votre carte.
LA Télécommande
L’ AVerMedia® AVerTV et AVerMedia® AVerTV Studio possédant la fonction de
contrôle à distance vous permettent d’utiliser la télécommande à infra-rouge pour
regarder la télévision, enregistrer des programmes télévisés ou vidéo sur votre disque
dur, regarder un enregistrement télévisé, lire des CD musicaux, et capturer des
images. Si vous avez acheté le AVerTV Studio, vous pourrez même écouter la radio
FM avec la télécommande. La télécommande peut aussi fonctionner comme souris à
distance.
Utiliser la télécommande comme souris télécommandée
CD
Mettre le lecteur
de CD sous tension
CHANNEL
SELECTION
* Sélectionne r un canal TV
* utilisez les boutons
pour mettre en valeur le cana
au-dessus de, ci-dessous,
Informat ions d'affichage
Mémoriser tous les canaux TV
actifs dans votre région
Basculer en mode magnétoscope
et enre gistrer le programme
ou la vidéo courant (e) sur
PAU SE ( Ti me S hif t) p ou r
Passez en mode Time Shift
et effectuez une pause
CHANNEL Up/Down
Aller sur le canal TV actif
↑↓←→
à gauche et à droitel
DISPLAY
AUTOSCAN
FREEZE
Geler/Débloquer
RECORD
votre disque dur
WDM
de la télé en direct.
suivant ou précéden t
TELETEXT
Afficher les
informations Télétexte
TV/FM CD TELETEXT
1 2 3
4 5 6
DRAG.
8
7
0
ENTER
LR
AUTOSCAN
FREEZE MUTE
PAUSE PLAYRECORD STOP
- +
CHANNEL/PAGE
VOLUME
9
LOOP
CAPTURE
POWER
Exécuter l'utilitaire
Ou quitter l'utilitaire
POWER
VIDEO
UDIO
FULL
SCREEN
PREVIEWDISPLAY
VIDEO
Basculer sur TV,
Vidéo composite
ou S-Vidéo
AUDIO
Choisir Mono,
Stéréo ou SAP
FULL SCREEN
Afficher la TV ou la
vidéo en plein écran
PREVIEW
prévision de 16 canaux
LOOP
Aller sur le canal
sélectionné précédemment
MUTE
Couper le son
CAPTURE
Capture l' image sur
l'écran dans un flchier bitmap
Play (Time Shift) pour
Pour continuer à regarder et faire
un saut vers l'avant de 10 s de
l'émission télé enregistrée
temporairement.
Stop (Time Shift) pour
Retoum e au mode t élé
en temps réel.
VOLUME
Augmenter/ Réduire
le niveau de volume
WDM
WDM
Remarque: A cause du système requis, le time shift, I-record et
enregistrement des vidéo au format MPEG2 ne seront pas
disponible avec le pilote VxD . Nous vous recommendons
d’installer le pilote WDM.
5 6
Page 7

Á
A
Português
INTRODUÇÃO
Antena de Rádio FM
(AVerMedia AVerTV Studio apenas)
Use este guia para instalar os produtos AVerMedia® AVerTV e AVerMedia®
AVerTV Studio, que operam com padrão estéreo A2, NICAM ou SAP. Com esses
produtos, é possível assistir a TV, gravar em disco rígido seus programas e vídeos
favoritos, assistir a uma reprise de TV, capturar imagens, tocar CD de música e
realizar videoconferências no PC. Se você adquiriu o modelo AVerMedia® AVerTV
Studio, é possível até escutar rádio FM!
CONTEÚDO DA EMBALAGEM
• Placa de Captura/Sintonia de TV • Cabo de Áudio Estéreo
Conexão a uma Fonte de Vídeo
Cabo de Vídeo
(não fornecido)
Cabo de S-Vid eo
(não fornecido)
• CD de Instalação • Guia Rápido de Instalação
• Antena de Rádio FM (AVerMedia® AVerTV Studio apenas)
Se você adquiriu um modelo com controle remoto, a embalagem também
contém:
• Controle Remoto
• Cabo do Sensor de Infravermelho
(baterias incluídas)
• Cabo 2-em-1
(Conector Mini-Din de 8 pinos para S-Video/Controle Remoto)
Requisitos de Sistema
Os requisitos do sistema estão claramente descritos na embalagem do produto. Antes
À Saída de Vídeo/S-Video e às Saídas de
Áudio Esquerda e Direita da Fonte de Vídeo
Filmadora
Se você possui o cabo com conector Mini-Din de 8 pinos para S-Video/controle
remoto, siga o diagrama abaixo para fazer as conexões.
Cabo de Áudio
(não fornecido)
Videocassete
Remote Control (opcional)
de instalar a placa AVerMedia® AVerTV ou AVerMedia® AVerTV Studio e o
programa, certifique-se de que seu PC atenda aos requisitos relacionados.
INSTALAÇÃO DO HARDWARE
Passo 1. Instalação da Placa no PC
1. Remover a tampa do gabinete do PC.
Cabo do Sensor de Infravermelho
(opcional)
Cabo de S-Video
(não fornecido)
2. Inserir a placa de captura/sintonia num slot
de expansão PCI disponível na placa-mãe.
3. Instalar a tampa do gabinete do PC.
Passo 2. Conexões
As placas AVerMedia® AVerTV e AVerMedia® AVerTV Studio têm conectores
iguais, exceto a entrada "FM" presente no modelo AVerMedia® AVerTV Studio. A
entrada "REMOTE" está disponível nos modelos com controle remoto.
A figura na página seguinte mostra claramente como conectar cada cabo.
Filmadora
Videocassete
Conexão a uma Fonte de Vídeo
À Saída de Vídeo/S-Video e às Saídas de
Áudio Esquerda e D ireita da Fonte de Vídeo
INSTALAÇÃO DO DRIVER
Depois de instalar corretamente a placa, ligue o computador. Ao iniciar o
computador pela primeira vez, o sistema detectará automaticamente o novo
dispositivo. Basta seguir os procedimentos de instalação e reiniciar o
computador quando solicitado.
TV FM
VIDEO
AUDIO S-VIDEO
REMOTE
Cabo 2-em-1
Cabo de Vídeo
(não fornecido)
Cabo de Áudio
(não fornecido)
Antena de TV/Cabo
OUT
Cabo de
udio Estéreo
IN
Cabo do Sens or de
Infravermelho
(opcional)
(AVerMedia AVerTV Studio apenas)
Caixas Amplificadas Externas
Antena de Rádio FM
ntena de TV/Cabo
Cabo de
Áudio
Estéreo
Microfone
(não fornecido)
Remote Control
(opcional)
Microfone
(não fornecido)
Caixas Amplificadas Externas
1 2
Page 8

Instalação do driver WDM para Windows ME (Millennium
Edition)/ XP
1. Na caixa de diálogo Assistente para adicionar novo hardware, selecione
Procurar automaticamente por um driver melhor (recomendável).
Clique em Avançar.
2. Selecione <Unidade de CD-ROM>:\DRIVER\WIN..\.... e clique em OK.
3. Clique em Concluir. As etapas de Audio, Tuner e Crossbar da instalação
continuarão. As telas que você encontrará serão exatamente iguais às
telas na instalação de captura de vídeo.
4. A caixa de diálogo AVerMedia TV Series solicitará que você digite o número da
chave do produto. Na caixa de texto, digite o número da chave do produto e, a
seguir, clique em OK.
Instalação do driver WDM para Windows 2000
1. Aparecerá a caixa de diálogo Assistente para adição de novo hardware. Clique
em Avançar.
2. Selecione Procurar por um driver adequado para o dispositivo
(recomendado). Clique em Avançar.
3. Selecione Unidades de CD-ROM. Insira o CD de Instalação na unidade de
CD-ROM. Clique em Avançar.
4. O assistente detectará o driver correto. Clique em Avançar.
5. Ignore a mensagens de advertência. Clique em Sim para instalar os arquivos
restantes.
6. Clique em Concluir. As etapas de Audio, Tuner e Crossbar da instalação
continuarão. As telas de instalação serão idênticas ao programa de instalação de
captura de vídeo.
7. A caixa de diálogo AVerMedia TV Series solicitará que você digite o número da
chave do produto. Na caixa de texto, digite o numero da chave do produto e
clique em OK.
Instalação do driver WDM para Windows 98SE (Segunda
Edição)
Tenha em mãos o CD de instalação do Windows 98SE e do AVerMedia TV Series.
1. Aparecerá a caixa de diálogo Assistente para adicionar novo hardware.
Clique em Avançar.
2. Selecione Procurar o melhor driver para seu dispositivo.
(recomendável). Clique em Avançar.
3. Selecione Unidade de CD-ROM. Coloque o CD de instalação do
AVerMedia TV Series na unidade de CD-ROM. Clique em Avançar.
4. Será solicitado que você insira o disco AVerMedia Bt878 WDM Driver
Disk, clique em OK. Na caixa de diálogo seguinte, na caixa de texto
Copiar arquivos de, digite: <Unidade de CD-ROM>:\Driver \Win98SE.
5. Se os arquivos necessários estão no seu diretório Windows, os seguintes
passos não são necessários.
Quando solicitado, insira o CD de instalação do MS Windows 98SE na unidade de CD-
ROM. Clique em OK. Na caixa de diálogo seguinte, digite: <Unidade de CD-
ROM>:\Win98 e clique em OK.
6. Clique em Concluir. As etapas de Audio, Tuner e Crossbar da instalação
continuarão. As telas de instalação serão idênticas ao programa de instalação de
captura de vídeo.
7. A caixa de diálogo AVerMedia TV Series solicitará que você digite o número da
chave do produto. Na caixa de texto, digite o numero da chave do produto e
clique em OK.
Instalação do driver VxD para Windows 98/95
1. Aparecerá a caixa de diálogo Assistente para adicionar novo hardware. Clique
em Avançar.
2. Selecione Procurar o melhor driver para seu dispositivo.
(recomendável). Clique em Avançar.
3. Selecione Especificar um local e digite: <Unidade de CD-
ROM>:\Driver \Win98. Insira o CD de Instalação na unidade de CD-
ROM e clique em Avançar.
4. Clique em Concluir. O Windows 98 prosseguirá com a instalação do
driver de captura de vídeo. As telas que você encontrará serão
exatamente iguais às telas na instalação de captura de áudio.
5. A caixa de diálogo AVerMedia TV Series solicitará que você digite o número da
chave do produto. Na caixa de texto, digite o numero da chave do produto e
clique em OK.
Para Windows NT 4.0
Para instalar os drivers e o programa utilitário:
1. Insira o CD de Instalação na unidade de CD-ROM e digite:
Unidade de CD-ROM:\NT40\Disk1\Setup.exe
2. Aparecerá a caixa de diálogo Welcome (Bem-vindo) Clique em Avançar.
3. A caixa de diálogo seguinte mostra uma lista de requisitos de sistema. Se o seu PC não
atende a qualquer um dos requisitos listados, interrompa a instalação e atualize o seu
PC. Se o seu computador atende a todos os requisitos, clique em Sim e continue
com a instalação.
4. Aparecerá a caixa de diálogo Select Country (Escolher País). Escolha o
nome do seu país a partir desta caixa de diálogo.
Se o nome do seu país não estiver presente, escolha qualquer país que use o
mesmo sistema de TV da sua localidade. Baseando-se na sua seleção, o programa
de instalação se ajustará automaticamente para o sistema de TV que a placa deve
receber.
3 4
Page 9

5. A pasta de destino na qual o programa utilitário será instalado é exibida na caixa
A
P
de diálogo Choose Destination Location (Escolher Destino).
Se você deseja especifica sua própria pasta, clique em Procurar e informe um
nome de caminho.
Clique em Avançar.
6. A seguir, especifique a pasta na qual o programa utilitário será colocado.
Então, clique em Avançar.
7. Nesse instante, a instalação está completa.
Se você deseja abrir o arquivo Readme e ler as informações mais atuais sobre o
AVerMedia TV Series, selecione View the README file (Ler arquivo
README) Caso contrário, desmarque essa opção.
Se você deseja executar o programa utilitário automaticamente, logo após a
instalação, selecione Launch the TV Series App (Iniciar o Aplicativo TV
Series)..
Important! The software must be installed only AFTER the drivers are
completely installed. If the installation main screen appear,
click Exit to resume the driver installation.
Instalação do Programa Utilitário
Depois de concluir a instalação do driver, instale o programa utilitário e o programa
que o acompanha. Pressione o botão "Ejetar" da unidade de CD-ROM e volte a inserir
o CD de Instalação.
Aparecerá a tela principal de instalação "Installation Main Screen":
Clique no nome de cada programa
e siga as instruções de tela para
concluir cada instalação.
Clique em Sair depois de ter
instalado todos os programas.
Importante:
Ao instalar o programa AVerMedia Utility Software, você verá a caixa de diálogo
Select Country (Escolher País). Escolha o nome do seu país a partir dessa caixa de
diálogo.
Se o nome do seu país não estiver presente, escolha
qualquer país que use o mesmo sistema de TV da
sua localidade. Baseando-se na sua seleção, o
programa de instalação se ajustará
automaticamente para o sistema de TV que a placa
deve receber.
5 6
Também será solicitado para instalar o DirectX. Como o AVerMedia TV Series requer
o uso de DirectDraw, deve-se instalar o DirectX.
Controle Remoto
O modelo de AVerMedia® AVerTV e AVerMedia® AVerTV Studio com controle
remoto permite usar um controle remoto para assistir a TV, gravar programas de TV
no seu disco rígido, assistir a uma reprises de TV, tocar CD de música e capturar
imagens fixas. Se você adquiriu o modelo AVerTV Studio, pode-se até ouvir rádio
FM com o controle remoto. O controle remoto também funciona como Mouse
Remoto.
Botões do Controle da TV
Liga o reprodutor de CD
CHANNEL
* Para selecionar um canal de TV
* No modo de visualização de
16 canais, use para
abaixo, à esquerda e à direita
Memoriza todos os canais
de TV ativos na sua região
videocassete (VCR) e grav a
PAUSE (Time Shift) para
apresentação de TV ao vivo
SELECTION
↑↓←→
realçar o canal acima,
DISPLAY
Exibe informações
AUTOSCAN
Congela/Descongela
Alterna para o modo de
o programa ou o vídeo
atual no seu disco rígido
Time Shift e pausa uma
CHANNEL Up/Down
Avança ou retrocede
os canais de TV ativos
FREEZE
RECORD
Alterna para o modo
WDM
TELETEXT
Exibe informações
de teletexto
TV/FM CD TEL ETEXT
1 2 3
5 6
4
DRAG.
7 8 9
0
ENTER
LR
FREEZE MUTEAUTOSCAN
PAUSE PLAYRECORD STOP
- +
CHANNEL/PAGE
VOLUME
POWER
bre ou fecha o Utility Software
POWER
VIDEO
AUDIO
FULL
SCREEN
PREVIEWDISPLAY LOOP
CAPTURE
VIDEO
Alterna entre T V, vídeo
composto e S-Video
AUDIO
Alterna entre Mono,
Estéreo e SAP
FULL SCREEN
Exibe a imagem de TV ou
de vídeo em tela inteira
PREVIEW
Visualização de 16 canais
LOOP
Retor na ao
canal anteri or
MUTE
Desliga o so m
CAPTURE
Captura a imagem na tela
como um arquiv o bitmap
Play (Time Shift) para
ressione para continuar assistindo e
para avançar 10 segundos em
uma apresentaç ão de TV
gravada temp orariamente
Stop (Time Shift) para
Retorna ao modo de
TV em tempo real
VOLUME
Aumenta/Diminui o volume
WDM
WDM
CD
Nota: Devido aos requisitos de sistema, as funções de Time Shift, I-
Record e Gravação de vídeo em formato MPEG2 não serão
implementadas com o uso do driver VxD. Recomendamos que
você instale o driver WDM.
Page 10

A
Introducción
A
Español
Estas instrucciones se refieren a la instalación de las tarjetas AVerMedia® AVerTV y
AVerMedia® AVerTV Studio, que contienen el estándar de estéreo A2, NICAM o
SAP. Con cualquiera de estos productos, podrá ver la TV, grabar sus programas
favoritos o de video a su disco duro, ver repeticiones de programas, capturar imágenes,
reproducir CDs musicales y hacer vídeo conferencia en el PC. Si el modelo es
AVerMedia AVerTV Studio, también podrá oír la radio FM.
Incluido con el paquete
• Tarjeta sintonizadora • Cable de audio estéreo
• CD de instalación • Guía rápida de instalación
• Antena de radio FM (sólo con AVerMedia AVerTV Studio)
Si usted adquiere uno con control remoto, su paquete también contendrá:
• Mando a distancia (baterías incluídas)
• Cable del sensor de infrarrojos
• Cable "todo en uno" (sólo conector de 8 terminales Mini-Din vídeo-
S/remoto)
Requerimientos de sistema
Los requerimientos del sistema están descritos claramente en la caja. Antes
de instalar la tarjeta AVerMedia® AVerTV o AVerMedia® AVerTV Studio y
sus aplicaciones, asegúrese de que su PC cumple los requerimientos.
INSTALACIÓN DEL HARDWARE
Paso 1. Instalación de la tarjeta
1. Quite la cubierta a la unidad.
2. Inserte la tarjeta en una ranura PCI
vacía de la placa base.
3. Coloque de nuevo la cubierta.
Paso 2. Haciendo las conexiones
Las placas AVerMedia AVerTV y AVerMedia AVerTV Studio tienen los
mismos conectores, excepto que AVerMedia AVerTV Studio tiene una entrada
adicional de “FM”. Un puerto “remoto” estará disponible si usted tiene el
paquete con una función remota.
La ilustración en la página siguiente muestra claramente cuál cable debe
conectarse a cada puerto.
VER 01
P/N 300AAAV2
1 2
MADE IN TAIWAN
Antena de radio FM
Cable de Video
(no provisto)
Antena De la TV
TV FM
Micrófono
VIDEO
(no provisto)
(sólo con AVerMedia AVerTV Studio)
Conexión de una fue nte de vídeo
Cable de S-video
(no provisto)
Cable de audio estéreo
(no provisto)
A Video/S-Video hacia fuera y a la izquierda y
a la derecha audio fuera de la fuente video
Camcorder
VCR
OUT
Cable de
audio estére
AUDIO S-VIDEO
IN
REMOTE
Cable del sensor
de infrarrojos
(Opción)
ltavoces Externos
Autoamplificados
Si usted tiene uno con el conector de 8 terminales Mini-Din vídeo-S/remoto,
consulte el esquema abajo para la debida conexión del cable.
Antena de radio FM
(sólo con AVerMedia AVerTV Studio)
Cable del sensor de inf rarrojos
(Opción)
Cable de S-video
(no provisto)
Camcorder
VCR
A Video/S-Video hacia fuera
y a la izquierda y a la derecha audio
fuera de la fuente video
Cable "todo en uno"
Cable de Video
(no provisto)
Cable de audio estéreo
(no provisto)
Conexión de una fuente de vídeo
Antena De la TV
Cable de
audio estére
Micrófono
(no provisto)
ltavoces Externos
Autoamplificados
INSTALACIÓN DEL PROGRAMA PILOTO
Tras haber instalado correctamente la tarjeta, ponga en marcha el ordenador.
El sistema detectará automáticamente el dispositivo recién instalado al
reiniciar su computadora. Simplemente siga los procedimientos de
instalación y reinicie la computadora cuando se le solicite.
Page 11

Instalación del Controlador WDM para Windows ME
(Millennium Edition)/ XP
1. En el cuadro de diálogo Asistente para Agregar Nuevo Hardware, seleccione
Buscar automáticamente el controlador (Recomendado). Haga clic en
Siguiente.
2. Seleccione <CD-ROM drive>:\DRIVER\WIN..\....enseguida haga clic en
ACEPTAR.
3. Haga clic en Finalizar. La porción de Audio, Sintonizador y Barras Cruzadas de
la instalación continuará. Las pantallas que usted encontrará son exactamente las
mismas de la instalación para captura de vídeo.
4. El cuadro de diálogo AVerMedia TV Series le solicitará para escribir el número
clave del producto. En el cuadro de texto, escriba la clave del producto y haga
clic en ACEPTAR.
Instalación del controlador WDM para Windows 2000
1. Aparecerá el cuadro de añadir nuevos dispositivos. Pulse Siguiente.
2. A continuación seleccione Buscar una unidad adecuada para su
dispositivo (Recomendado). Pulse Siguiente.
3. Select CD-ROM drives. Inserte el CD de instalación en su unidad de CD. Pulse
Siguiente.
4. El asistente ahora detecta el controlador correcto. Pulse Siguiente.
5. Ignore el mensaje de aviso. Haga clic en Sí para instalar el resto del archivo.
6. Haga clic en Finalizar. La parte de Audio, Sintonizador y barras Cruzadas de la
instalación seguirá. La pantalla de instalación será idéntica al programa de
instalación para captura de vídeo.
7. El cuadro de diálogo AVerMedia TV Series le solicitará para escribir el número
clave del producto. En el cuadro de texto, escriba la clave del producto y haga
clic en ACEPTAR.
Instalación del controlador WDM Para Windows
98SE(second edition)
Su Windows 98SE y el CD de instalación de AVerMedia TV Series deben estar disponibles.
1. El cuadro de diálogo Asistente Agregar Hardware aparecerá. Pulse Siguiente.
2. Seleccione Buscar el mejor controlador para su dispositivo. (Se
recomienda). Pulse Siguiente.
3. Seleccione Unidad de CD-ROM. Ponga el CD de instalación de AVerMedia TV
Series en su unidad de CD-ROM. Pulse Siguiente.
4. Cuando solicitado inserte el disco del Controlador AVerMedia Bt878 WDM y
haga clic en ACEPTAR En el cuadro de diálogo siguiente, en el cuadro de texto
Copiar archivos de, escriba: <CD-ROM drive>:\Driver \Win98SE.
5. Si los archivos requeridos están en su directorio de windows, se
necesitan los pasos a continuación.
Cuando solicitado, inserte el CD de instalación del MS Windows98SE en su
unidad de CD-ROM. Haga clic en ACEPTAR. En el cuadro de diálogo siguiente,
escriba: <CD-ROM drive>:\Win98 enseguida haga clic en ACEPTAR
6. Haga clic en Finalizar. La parte de Audio, Sintonizador y barras Cruzadas de la
instalación seguirá. La pantalla de instalación será idéntica al programa de
instalación para captura de vídeo.
7. El cuadro de diálogo AVerMedia TV Series le solicitará para escribir el número
clave del producto. En el cuadro de texto, escriba la clave del producto y haga
clic en ACEPTAR.
Installing VxD driver For Windows 98/95
1. El cuadro de diálogo Asistente Agregar Hardware aparecerá. Pulse Siguiente.
2. Seleccione Buscar el mejor controlador para su dispositivo. (Se
recomienda). Pulse Siguiente.
3. Seleccione Especificar una ubicación enseguida escriba: <CD-ROM
drive>:\Driver \Win98. Ponga el CD de Instalación en su unidad de CD-ROM
y haga clic en Siguiente.
4. Haga clic en Finalizar. Windows 98 comenzará a instalar el controlador de
captura de audio. Las pantallas que usted encontrará son exactamente las mismas
de la instalación para captura de vídeo.
5. El cuadro de diálogo AVerMedia TV Series le solicitará para escribir el número
clave del producto. En el cuadro de texto, escriba la clave del producto y haga
clic en ACEPTAR.
Instalación en Windows NT
Para instalar el software de los controladores y utilitarios:
1. Introduzca el CD de Instalación en su unidad de CD-ROM y teclee:
Su unidad deCD-ROM:\NT40\Disk 1\Setup.exe
2. Un cuadro de diálogo de bienvenida le aparecerá. Pulse sobre Siguiente.
3. El siguiente cuadro de diálogo muestra una lista de los requerimientos de
sistema. Si su ordenador no los cumple, no sigua con la instalación.
Si su ordenador está bien equipado, pulse sobre Sí y continue con la instalación.
4. Aparecerá el cuadro de diálogo de selección de País. Seleccione su país de la
lista.
Si el nombre de su país no aparece, seleccione uno con el mismo sistema de TV.
En función de su selección, el programa de instalación configurará
automáticamente el sistema de TV que usará la tarjeta.
5. La carpeta de destino donde quedará ubicada la aplicación le será solicitada.
Si desea especificar su propia carpeta, pulse sobre Browse e introduzca el camino.
Pulse sobre Siguiente.
6. A continuación, especifique ese camino de destino.
Luego pulse sobre Siguiente.
7. Aquí finaliza la instalación.
3 4
Page 12

Si quiere abrir el fichero Readme y ver la información más reciente sobre
A
AVerMedia TV Series, seleccione ver el fichero README. Sino, elimine esta
opción para no ver el fichero informativo.
Si quiere que se ejecute la aplicación automáticamente tras realizar la instalación,
seleccióne Launch the TV Series App.
Importante! El software sólo debe instalarse DESPUÉS DE haber
instalado completamente los controladores. Si aparece la
pantalla principal de instalación, haga clic en Salir para
reiniciar la instalación del controlador.
Instalación de las utilidades
Una vez finalizada la instalación del controlador, proceda a instalar las utilidades
incluídas. Abra el compartimento del CD-ROM e introduzca el CD de instalación.
Aparecerá la pantalla principal de instalación:
Pulse sobre cada uno de los
programas y siga las
instrucciones de pantalla para
completar la instalación.
Pulse sobre Salir al acabar la
instalación.
Importante:
Mientras instala las aplicaciones de AVerMedia, deberá seleccionar el nombre
de su país de una lista como la siguiente.
Si el nombre de su país no aparece en la lista, seleccione
uno que utilice el mismo sistema de TV que el suyo. En
función de su selección, el programa establecerá el sistema
de TV para la configuración.
También solicitará la instalación de DirectX. AVerMedia AVerTV y AVerMedia
AVerTV Studio requiren DirectDraw. Instale DirectX.
El mando a distancia
Con el AVerMedia® AVerTV y AVerMedia® AVerTV Studio con paquete remoto
usted puede usar el control remoto por infrarrojo para ver TV, grabar programas de
TV o de vídeo a su disco duro, ver una repetición de TV, reproducir CD de música, y
capturar imágenes fijas. Si además su compra ha sido de AVerMedia AVerTV
Studio, podrá escuchar la radio FM. El mando, además, hace las veces de ratón
remoto. El control remoto también puede funcionar como Ratón Remoto.
Botones de control de la TV
* En visualización de 16 canales,
Activa el reproductor de CD
CHANNEL
SELECTION
* Establece un canal de TV
use las flechas para
resaltar el canal arriba, abajo,
↑↓←→
izquierda y derecha
DISPLAY
Visualiza información
AUTOSCAN
Memoriza todos los
canales de TV
FREEZE
Congela/Desconge la
RECORD
Cambia ente los modos
VCR y graba el programa
actual de vídeo a disco
duro del ordenador
PAU SE (Cambio de
tiempo) para WDM
Alterne al modo
Cronodesplazamiento
y pause el programa
de TV en vivo
CHANNEL Up/Down
Up/Down Vaya hacia
arriba o abajo al canal de
TV activo siguiente
CD
TELETEXT
Ver información
de teletexto
TV/FM CD T ELETEXT
1 2 3
4 5 6
7 8 9
0
ENTER
DRAG.
LR
FREEZE MUTEAUTOSCAN
PAUSE PLAYRECORD STOP
VOLUME
- +
CHANNEL/PAGE
POWER
Ejecuta la aplicación
o sale de ella
POWER
VIDEO
UDIO
FULL
SCREEN
PREVIEWDISPLAY
LOOP
CAPTURE
VIDEO
Conmuta entre TV, vídeo
compuesto o S-VHS
AUDIO
Selecciona , oMono
Estéreo SAP
FULL SCREEN
Muestra la TV o el vídeo
a pantalla compl eta
PREVIEW
Previsualiza 16 canales
LOOP
Vuelve al canal previo
MUTE
Desactiva el sonido
CAPTURE
Captura la imagen de
pantalla a un BMP
Play (Cambio de
tiempo) para WDM
Presione para seguir
viendo y salte hacia
adelante 10 s del programa
de TV temporal grabado
Stop (Cambio de
tiempo) para WDM
Alterne hacia atrás al
modo de TV en tiem po real
VOLUME
Sube/Baja el vol umen
Nota: Debido a los requisitos del sistema, el cronodesplazamiento,
registro de entrada y el guardar el vídeo en el formato MPEG2 no
estarán disponibles al usar el controlador VxD. Recomendamos
instalar el controlador WDM.
http://www.aver.com.tw
5 6
 Loading...