

Page 1
Page 2

Table of Contents
Preface...............................................................................................................................i
Important Safety Information.........................................................................................iii
Components of the Voya 320 .........................................................................................1
Standard Components....................................................................................................... 1
Optional Components........................................................................................................ 1
Names and Functions of Elements on the Voya 320....................................................2
Front .................................................................................................................................. 2
Back................................................................................................................................... 2
Name andFunction of Elements on theVoya 320............................................................. 3
Installation........................................................................................................................4
Inserting SD/MMC Memory Card....................................................................................5
Power Mode and Battery Recharging............................................................................5
About Reset Mode...........................................................................................................6
Preferences......................................................................................................................7
Starting the Software.......................................................................................................8
Map Page.......................................................................................................................... 9
Zoom In/Out....................................................................................................................... 9
Track Up(Heading) or North Up........................................................................................ 9
Navigation and Panning Modes....................................................................................... 10
POIs Displayed on the Map Page....................................................................................11
GPS Info.......................................................................................................................... 12
Map ViewStyle................................................................................................................ 13
Creating and Usingan Auto Route .................................................................................. 14
Destination by Address.................................................................................................... 15
Destination by Intersection...............................................................................................16
Destination byPoints of Interest (POI).............................................................................17
Destination from Favorites............................................................................................... 18
Multi-Stop Trip.................................................................................................................18
Destination from Recent .................................................................................................. 18
Destination from City Center............................................................................................18
To Set the Route Options ................................................................................................ 19
To Set the Display Options .............................................................................................. 19
To Createor Add to the FavoritesList ............................................................................. 20
To Add a label to your Favorites...................................................................................... 20
Panning andZooming...................................................................................................... 21
To Zoom In and Out......................................................................................................... 21
Adjusting theVolume....................................................................................................... 21
Page 3

Localization...................................................................................................................... 22
Localization...................................................................................................................... 22
Speed alert...................................................................................................................... 22
Exit MapProgram - About Screen................................................................................... 23
Connecting System to Your PC....................................................................................24
Installing theUSB Driver..................................................................................................25
Distinguishing Between Removable Disks ....................................................................... 25
Copying Files.................................................................................................................26
Safely Removing Hardware..........................................................................................26
Windows XP ....................................................................................................................26
Windows XP ....................................................................................................................27
Using Supplemental Programs.....................................................................................28
Getting Ready.................................................................................................................. 28
Menu Program................................................................................................................. 28
Music Player.................................................................................................................... 29
Movie Player.................................................................................................................... 31
Picture Player.................................................................................................................. 33
In-Depth Description of Functions.................................................................................... 34
Functions and ControlButtons......................................................................................... 34
Setting Environments....................................................................................................... 35
Names andFunctions...................................................................................................... 35
Troubleshooting ............................................................................................................39
System Specifications...................................................................................................39
Page 4

Preface
Precautions
Please read this section carefully before using this product.
This product is intended to provide turn-by-turn instructions to safely guide you to your desired
destination. Please make sure that all persons using this navigation software carefully read these
precautions and the operating instructions inthe Voya 320 User's Guide.
Averatec, Inc. cannot accept any responsibility whatsoever for accidents resulting from failure to
observe these precautions.
Your personal judgment, traffic regulations, and common sense must always take
precedence over instructions produced by the software.
This product is not a substitute for your driving technique, driving knowledge or especially
your personal judgment. Route suggestions made by this navigation system should never
supersede any traffic regulations, your personal judgment, or your knowledge of safe
driving practices. If you feel that a route suggestion made by the software instructs you to
perform an unsafe or illegal maneuver, places you in an unsafe situation, or routes you
into an area that you consider unsafe, do not follow the instructions. Your personal
judgment, traffic regulations, and common sense must always take precedence over
instructions produced by the software.
When your vehicle is moving, keep your eyes on the road instead of looking at the
screen. If you need to look at the screen for a prolonged time, always park the car in a
safe manner and in accordance with all traffic regulations.
Do not select or input destinations, change settings or otherwise manually operate this
software unless you have parked your car in a safe manner, observing all traffic
regulations.
If you are responding to an emergency, it may not be prudent to rely on this system
unless you have no other means to obtain accurate directions. The database does not
include all of the facilities and streets necessary for emergency response, and the
system’s maps may not reflect recent changes in roads, traffic controls and driving
conditions. Use your own judgment in these situations.
The database utilized by this software is the most accurate and up-to-date database
available. Because of road closures, construction, weather, new roads and other
conditions, the database might not contain accurate information regarding all streets and
locations. If so, the system might not be able to correctly guide you on your route or may
inaccurately estimate the time needed to reach your destination. Please use your
judgment in these cases. Renewing your subscription to the database will aid in keeping
it up-to-date.
There are situations when the navigation system will incorrectly display the vehicle’s
position on the map. Usually this situation will correct itself automatically. Use your own
judgment at all times. If you need to reset the position, pull over in a safe manner
observing all traffic regulations.
i
Page 5

Safety Information
X Do not secure in front of airbag
X Do not loosely place on dashboard
X Do not block driver’s view
VOYA 350
The detailed mapping software is provided by NAVTEQ and Netropa. The detailed mapping
software is as accurate and detailed as possible. Whenever maps are digitized, there is still a
possibility that some inaccurate or incomplete data can be found. It is because of these
inaccuracies that the Voya 320 is a travel aid and is not intended for precise measurement in
navigation or aircraft use. Differences between manufactured and shipped versions of the
software may be present; this software may be updated frequently. If the descriptions in this
manual are different from your software version, please follow the software version currently on
hand.
Whistler VOYA 350
FCC Compliance
This device complies with Part 15 of the FCC Rules. Operation is subject to the following two
conditions:
(1) This device may not cause harmful interference, and
(2) this device must accept any interference received, including interference that may cause
undesired operation. This equipment has been tested and found to comply with the limits for a
Class B digital device, pursuant to part 15 of the FCC Rules. These limits are designed to provide
reasonable protection against harmful interference in a residential installation. This equipment
generates, uses and can radiate radio frequency energy and, if not installed and used in
accordance with the instructions, may cause harmful interference to radio communications.
However, there is no guarantee that interference will not occur in a particular installation. If this
equipment does cause harmful interference to radio or television reception, which can be
determined by turning the equipment off and on, the user is encouraged to try to correct the
interference by one or more of the following measures:
• Reorient or relocate the receiving antenna.
• Increase the separation between the equipment and receiver.
Introduction
Congratulations on your purchase of an Averatec Voya 320 GPS receiver! This system can
provide an auto route to the destination of your choice using signals from Global Positioning
Satellites (GPS) orbiting the earth.
There are 24 GPS satellites orbiting the earth. A GPS device can calculate your position on the
earth if it can receive signals from at least three of these satellites. When it receives at least four
signals, a GPS device can also calculate your altitude (height above sea level).
To use the GPS receiver for the first time you need to charge the battery for at least four hours.
The Voya 320 comes with maps preloaded on the SD card so map loading is not necessary.
Maps of other countries are sold separately.
ii
Page 6

Important Safety Information
Check the conditions of the Voya 320 before driving. Operating the Voya 320 while you drive is very
dangerous. If you need to operate the Voya 320, park your car in a safe location before operating the Voya
320.
Search the path to yourdestination before you drive. If youdo not fully understand the instructions from the
Voya 320,or the instructionsare questionable, refer to themap on the screen only when you areabsolutely
sure that you are in safe conditions.
Information from the Voya 320 such as voice instruction or the maps may be different from the actual
road conditions. The traffic signals and regulations on the actual roads must be observed, and special
attention shallbe paid to trafficsituations andpedestrians aroundyou.
Do not use the system for measuring drivingspeed or distance.The systemis only for navigation.
GPS signals may varyin sensitivity dependentupon locationof your car. You may suffer from weak signals
inside a tunnel or under an overpass or by a tall building, and sensitivity of signals may be affected by
overcast skies or thick fog.
GPS signals may notbe correctlyreceivedif you are inside a building, if there is anobjectinterrupting signal
receptionin thevicinity of the antenna, or if a system radiating radio interrupting signal is inside your car.
If youusethe Voya 320 aftera prolongedperiod of storage, it may takeextensivetimefor you tobeginto
receive signals,even though the Voya 320 is operating normally.
Installthe system on an appropriatelocation inside your car. Donot install the systemon alocation that
may causetrouble inoperation of the airbags, or obstruct your vision while you aredriving.
When you install the system, remove any foreign materials from the suction mount and surface of the
window, and affix the system while paying special attention to prevent air from being introduced between
the suction mount and the window surface. Any damage of the product or other objects inside your car
caused by detachment of the system from the window because of poor suction is the user’s
responsibility.
Do not leave thesystem under direct light or in a location subject to heat from the engine ofyour car for an
extensive period. Heating the battery may cause an explosion. Do not leave the system unattended for a
prolonged period when thetemperature is very hot, as in summer.
Do not expose the system to moisture, heat, or rapidly changing temperatures. Condensation may take
place inside the system, and cause damage to the system. If the system is exposed to high humidity, dry
the system immediately, and usethesystem only after you are sure thatthe system is free frommoisture.
If you disassemble,reassemble or modify the system without Averatec’sconsent, itmay cause abnormal
operation ofthe system. In such a case, you are solely responsible for the trouble.
The system contains lithium-ion batteries that may cause explosion or leakage of hazardous liquid. Never
give an impact to or destroy the system, and do not keep the system together with objects probable of
explosion ofgas or liquid, or fire.
Do not use the A/Cor D/C adaptor in a high humidity environment, and never touch the adapter with wet
hands.You may receive an electric shock. Do notwrap the adapter with sheetsof paper, vinyl or cloth while
you use thesystem,and make sureof properventilation for cooling the adapter. Pleasemake sure that you
are using the correctpower source as indicated on the housing or the package.
Do notexercise excessive force with the system and do not cleanthe system when thepower ison. Do not
use paper tissues- generating dust, or rigid materials -probable of scratching when tryingto clean the LCD.
Usea soft clothonly.
When you are not using the SD/MMC card, protect the system from dust or moisture, and pay special
attention to keep the slots free from foreign materials. Always make sure that the slot is free from foreign
material beforeinserting thememory card into the system.
iii
Page 7

Components of the Voya 320
Standard Components
Voya 320 GPS
Dash Disk Cigarette LighterAdapter Quick Reference Guide
SD/MMC Memory Card
Optional Components
Suction Mount
USB Cable
AD/DC Adapter
1
Page 8
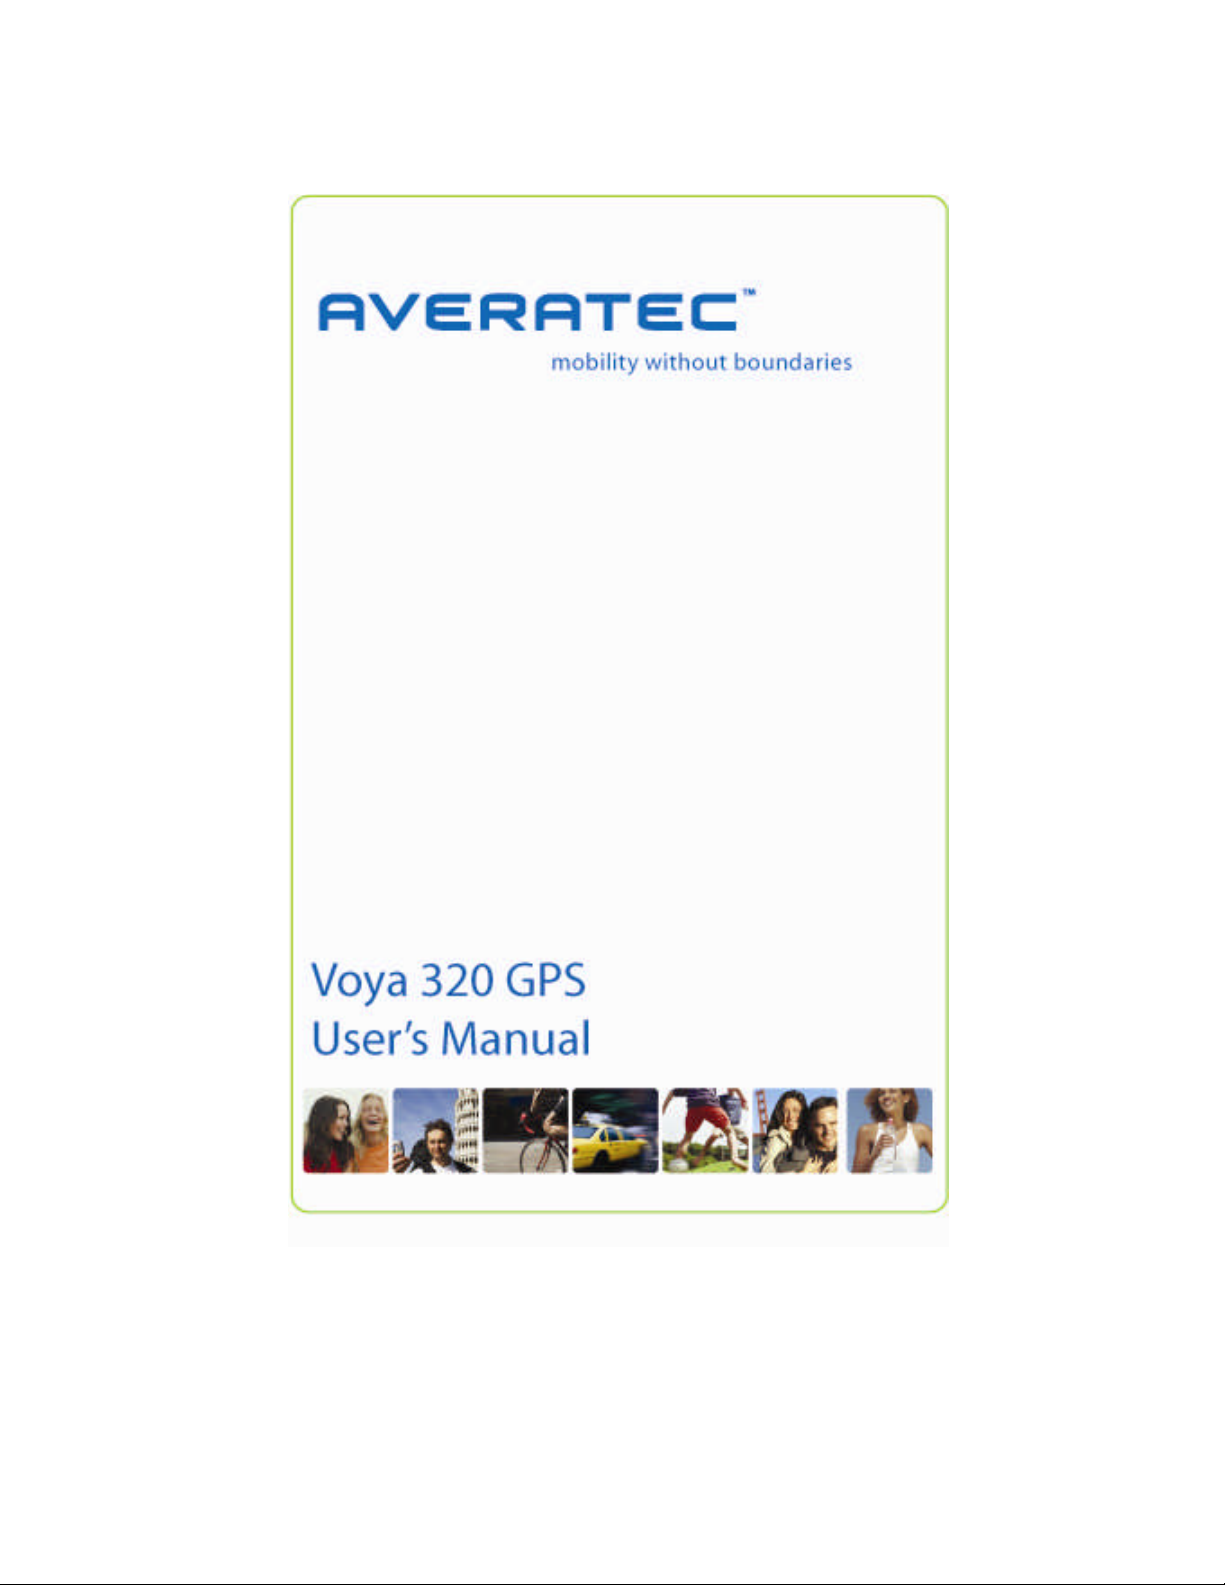
Names and Functions of Elements on the Voya 320
Front
GPS Receiver
Volume-upButton
Volume-down Button
SD/MMC Memory Card Slot
Earphone Jack
3.5” TFT LCD
Menu Button
Power Button
Back
External speaker
Reset Button
Power Jack
Docking mountconnector
USB Port
2
Page 9
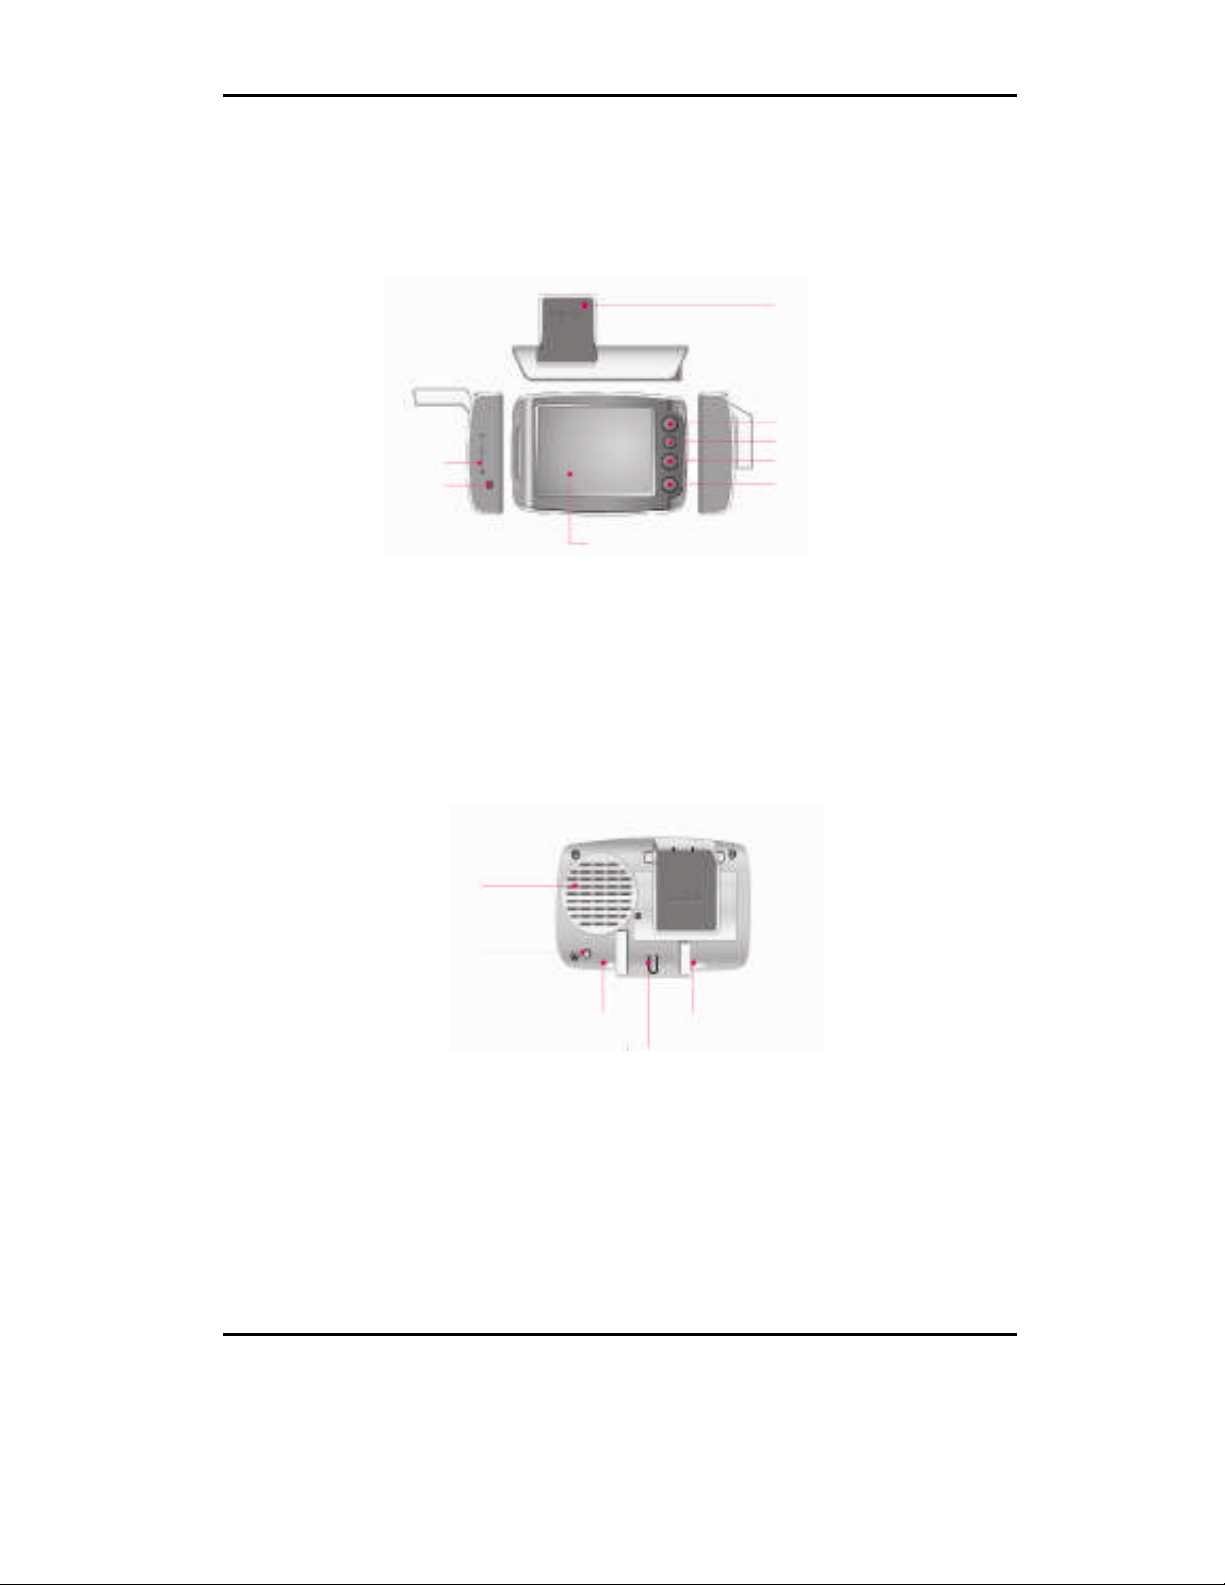
Name and Function of Elements on the Voya 320
Power Button
Volume
-
Menu Button
Power Indicator
Mount Connector
The receiver receives data fromsatellite. Always extend theGPS receiver
horizontally facing the sky when you operate the system.
The jack accommodates anearphone orexternalspeakers.
The speaker playsvoice instructions or other sounds.
The receptacle isconnected toAC/DC power, or the cigarette lighter adapter in an
automobile.
Pressingthe buttononce increases the volume byone level. (Refer to “Adjusting
Volume.”)
Pressingthe buttonruns themenu program.
The color of light in the power button indicates the current power mode and the
status of the battery. (Refer to “Power Mode and Battery Recharging.”)
Card Slot
Button
Thespring-loaded slotaccommodatesthe SD/MMC memory card.Insert the
memorycard intothe slot and lightlypress thecard. Thecard willbe seatedin
place inside the slot. Pay attention to theorientationof the cardas itis being
inserted; thecard slotis keyed and can onlybe inserted inone direction. Never
insert an object other thanthe SD/MMCmemory card.
The mount connectoris used for connecting the suctionmount in the automobile.
(Referto “Installing On YourCar.”)
The port accommodates theUSB cablewhen the systemis connectedto a PC.
Pressingthe buttononce decreases the volumeby one level. (Refer to ”Adjusting
Volume.”)
Pressingthe buttonswitchesthe systemto thepower-saving mode. Pressing it
again returns thesystem tothe operation mode (Referto ”Power Mode and Battery
Recharging.”)
Pressingthe buttoninitializes the system (Refer to “About Reset Mode.”)
3
Page 10
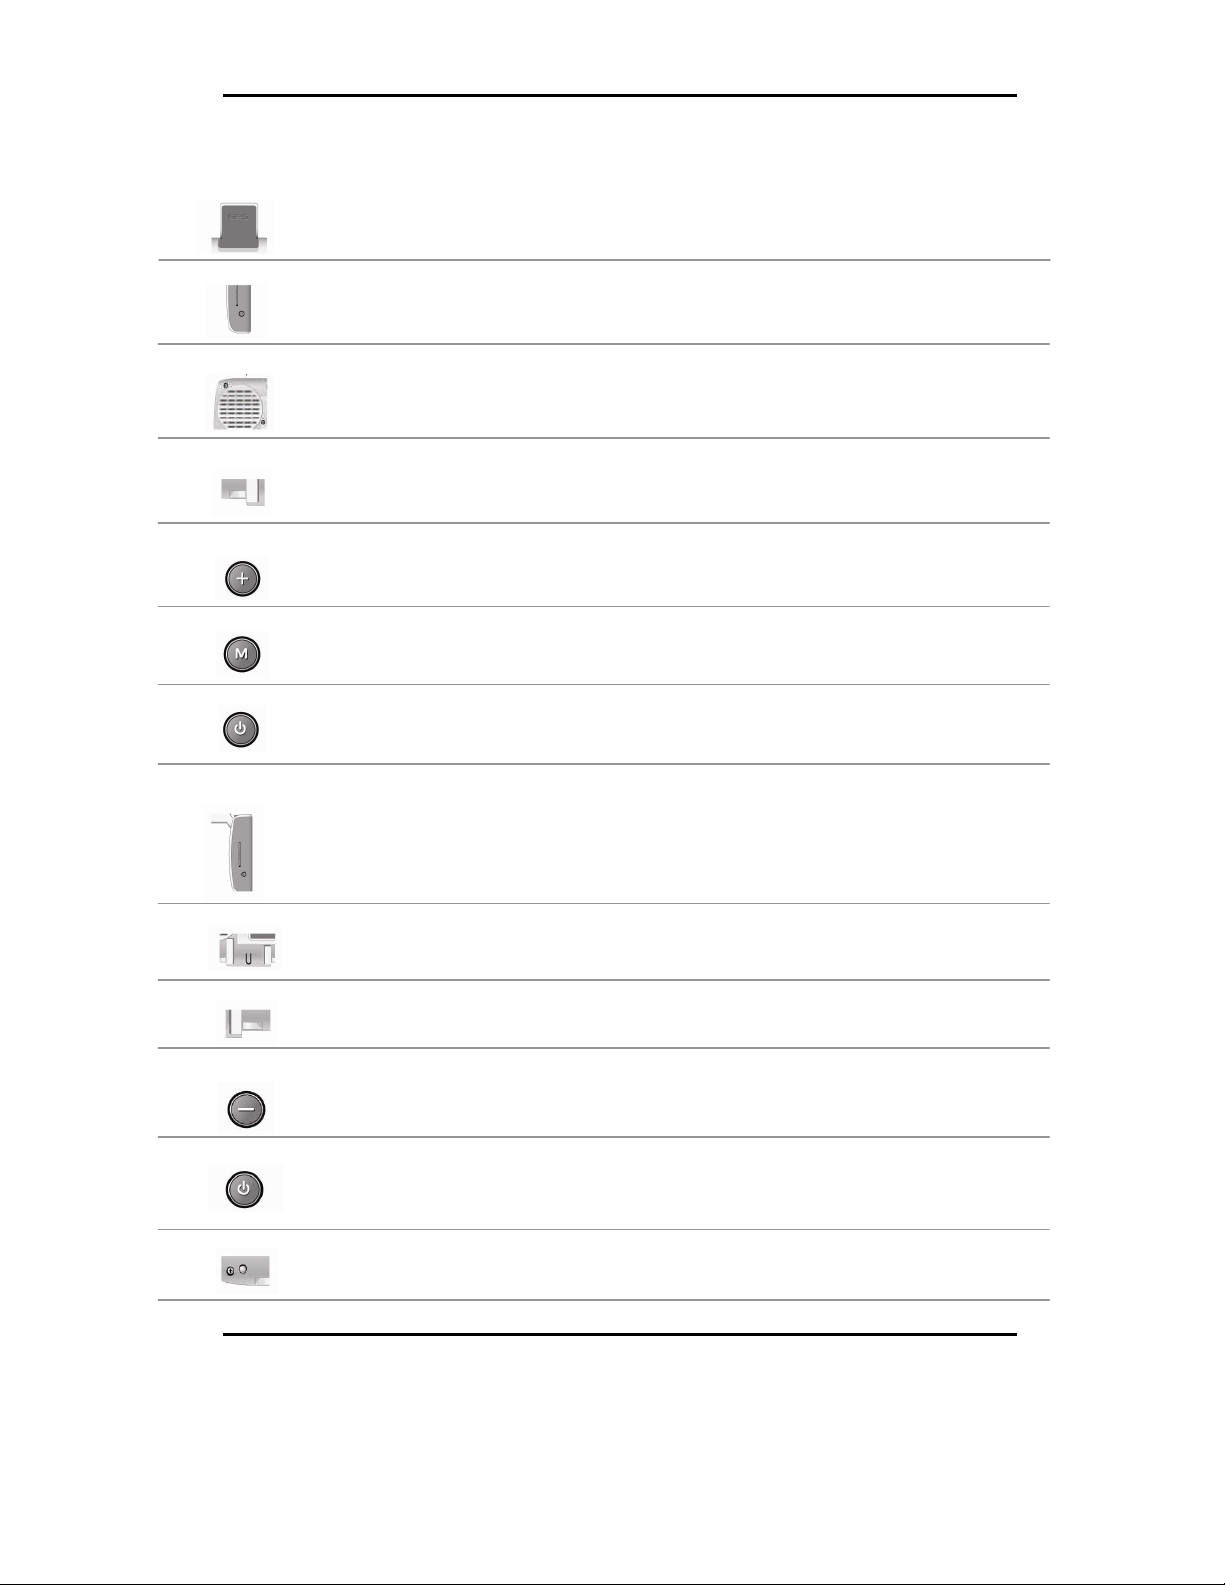
Installation
1. Extend the GPS receiver folder in horizontal direction as shown in figure below.
2. Insert the mount into themount connector asshown in figure below.
3. Tightlypress the suction mount on the window of your car, and turn the locking lever down.
4. Connect the DC Cigarette Lighter adapter to the power receptacle.
Lightly press the Reset button to initialize thesystem. (Refer to “About Reset Mode.”)
Do not install the system in a location that may obstruct your view or interfere with safe driving.!
Note
4
Page 11
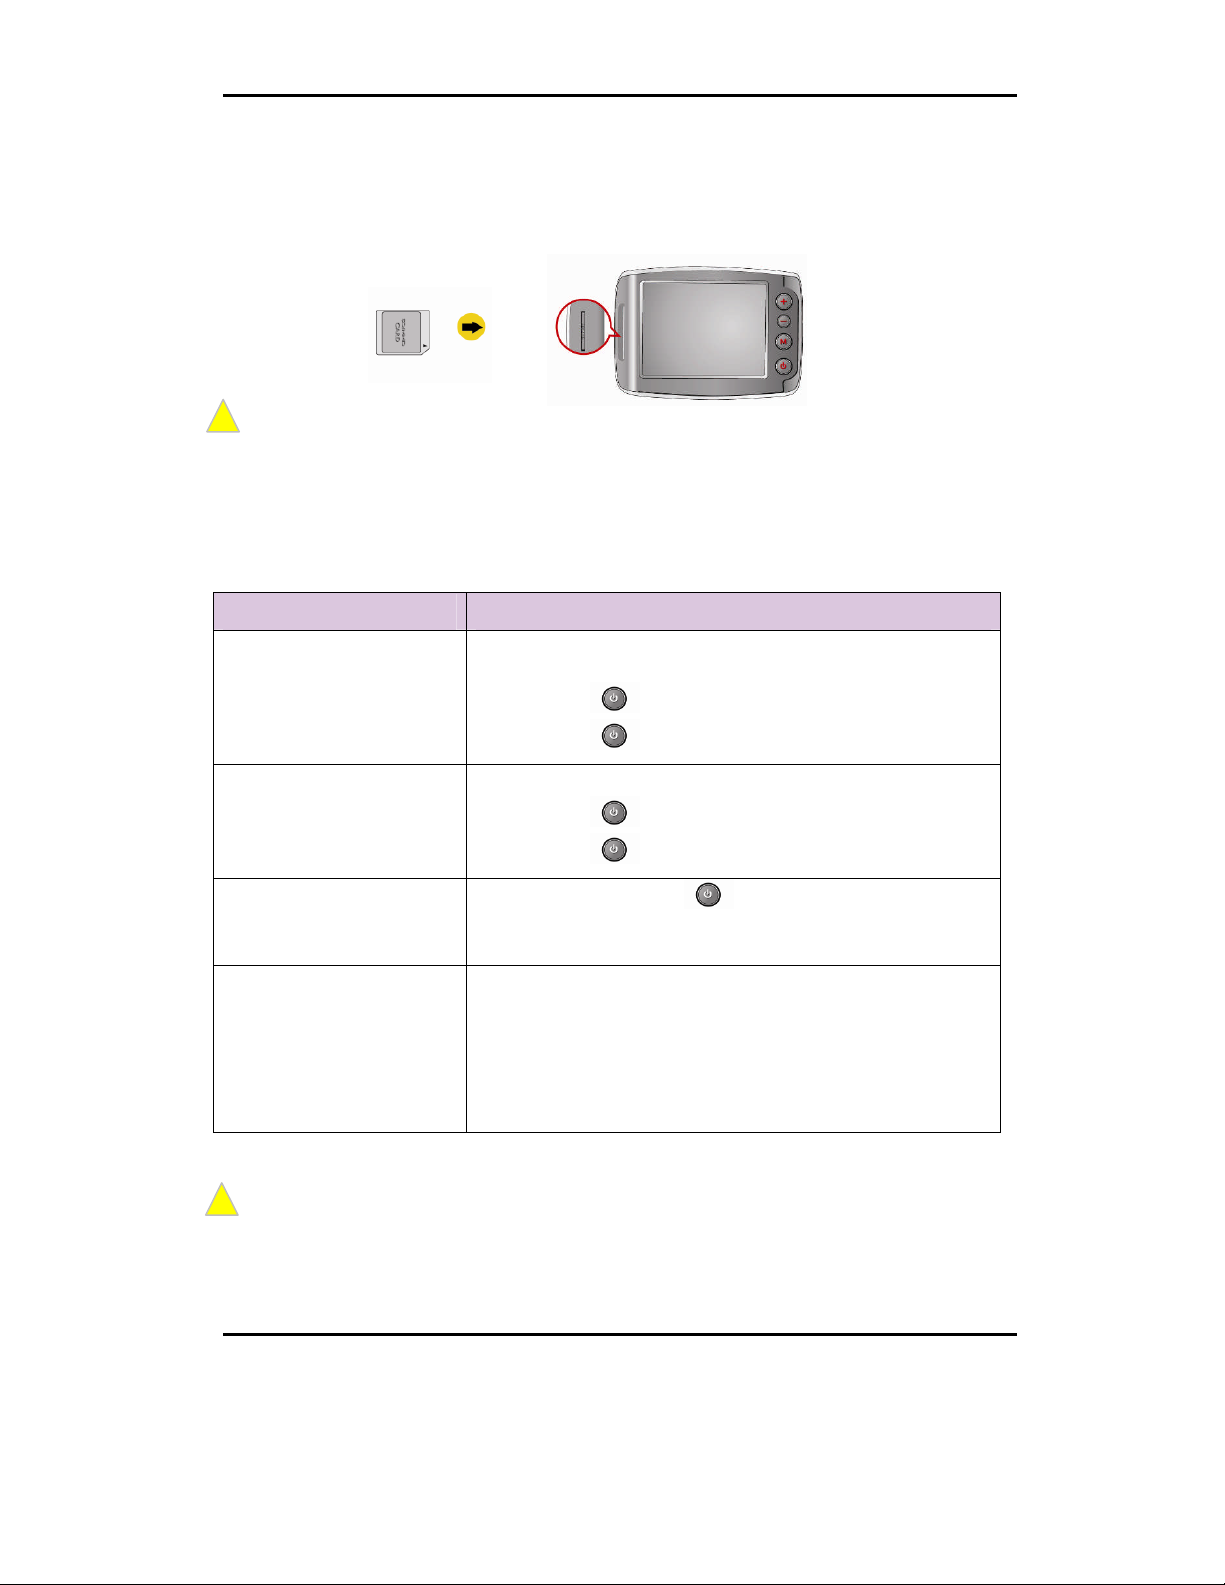
Inserting SD/MMC Memory Card
Insert the SD/MMC memory card into the slot while paying attention to the orientation of the card
as shown below:
!
Exerting excessive force to insert into the slot in the wrong direction may damage the SD/MMC card or slot
Note
Power Mode and Battery Recharging
Power Mode Conditions of Charged Battery
Power is supplied to the system for operation from the AC/DC
adapter or the cigarette adapter/charger inyour car.
External Power Mode
[Power button ] lights red: The battery is being charged.
[Power button ] lights green: Thebattery is fullycharged.
Power is supplied to the system for operation from the battery.
Battery-Powered Mode
Power-Saving Mode
Forced Power-Saving Mode
It takes three hours or longer to fully charge the battery from the forced power-saving mode, when using the
navigation function only in the preference conditions.
!
It is possible to operate the system with the fully charged battery for about two hours, when using the
Note
navigation function only in the preference conditions.
Battery life will vary depending on usage.
[Power button ] lights red: The battery is being charged.
[Power button ] lights green: Thebattery is fullycharged.
Pressing the Power button switches thesystem to the
power-saving mode. Pressing the powerbutton againreturns the
system to the operation mode.
When the remainder power in the battery is 20-30% of its full
capacity, the warning window is displayed. In such a case,
immediately recharge the battery. If the battery is almost
discharged, it enters forced power-saving mode automatically.
Once it enters the forced saving mode, it cannot be turned on
again until the power is supplied by connecting the cigarette
adapter/charger or AD/DC adapter.
5
Page 12
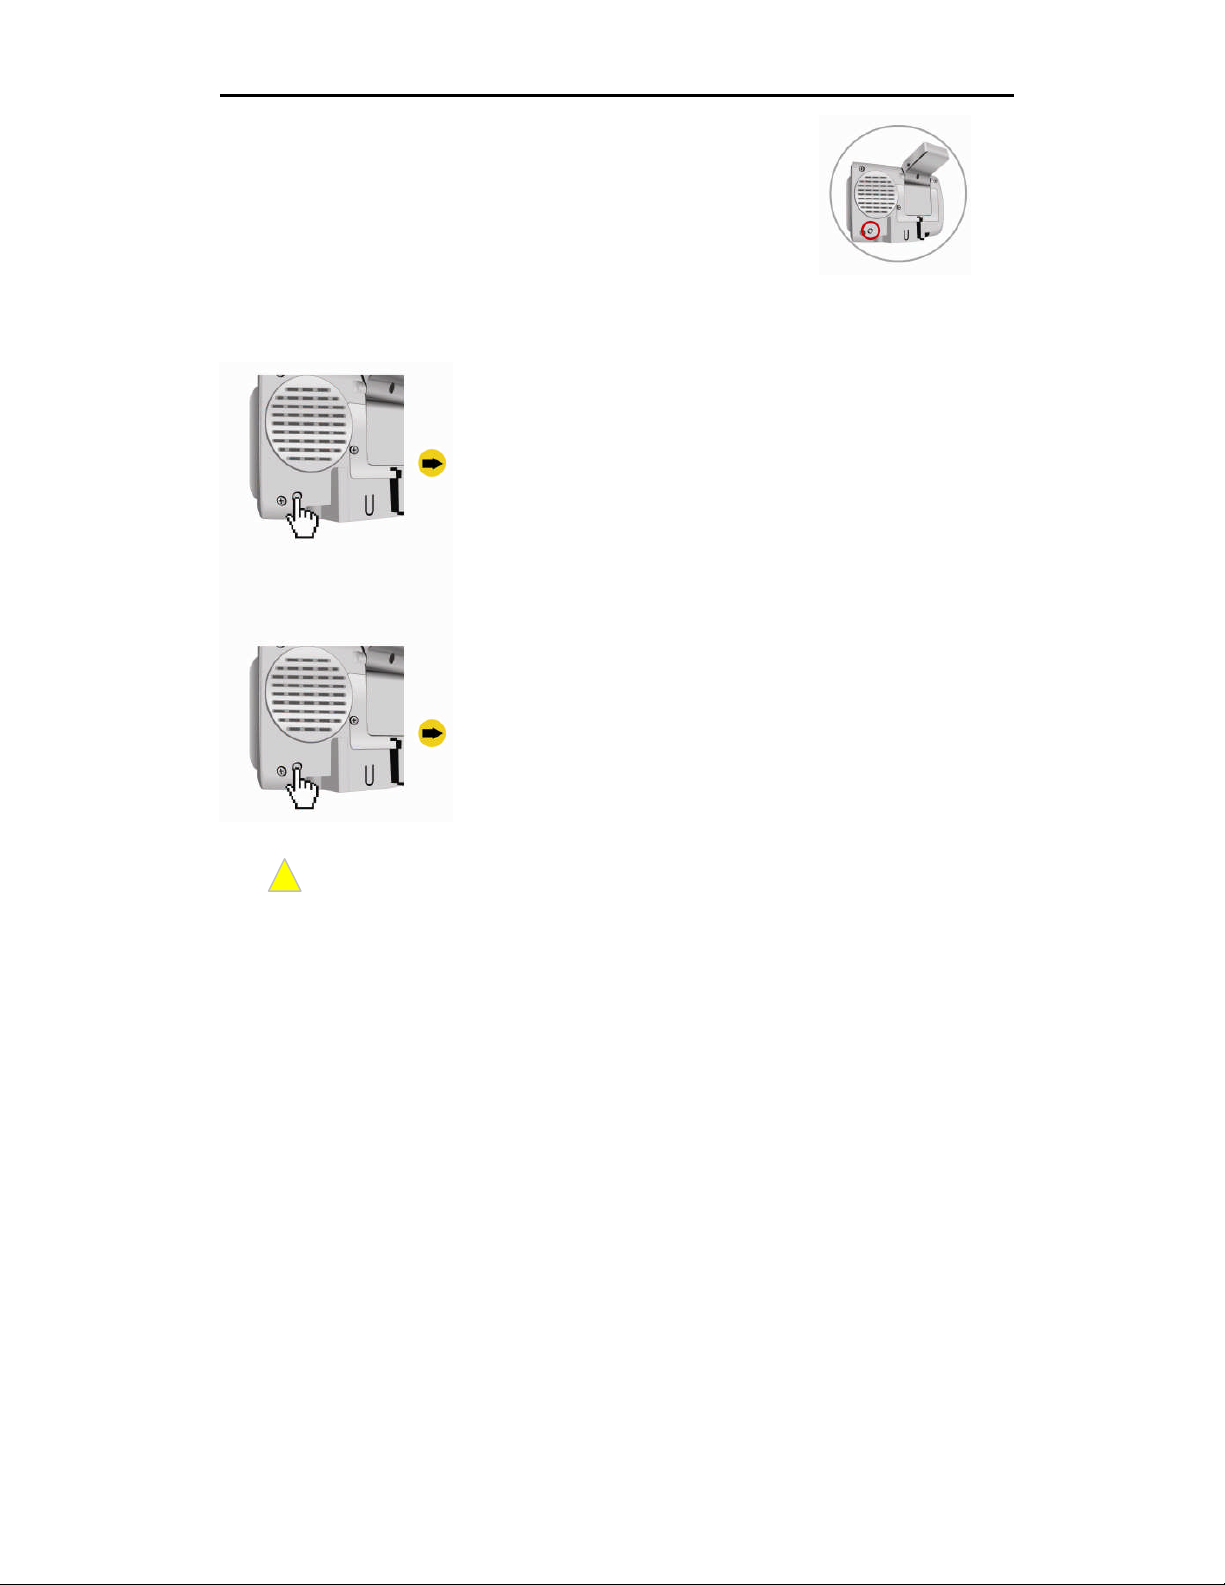
About Reset Mode
Two reset modes are provided on the system. You can select the
desired reset mode by pressing the reset button on the rear of the body as
shown right.
Soft Reset
Execute the soft reset by the pressingthe Reset button as
shown left: Lightly press the button once.
Function
Lightly pressing the Reset button exits all of the current
programs, and restarts the system. This mode is used when the
system is shut down due to fault in programs.
Hard Reset
Execute the hard reset by pressing the Reset button as shown
left.
Function
Press the Reset button until the unit turns off. After three
seconds, lightly press the reset button again to restart the
system. This mode is used when the soft reset does not solve
the problem.
The soft reset mode is not allowed when the system is connected toa PCvia theUSB cable.
!
Note
You MUST reset the system when supplyingpower tothe fullydischarged system.
After Reset
After reset, the system starts up.
Page 13

Preferences
Brightness of the backlight and the sound volume upon initial power supply are set as described
in the table below.
Setting Defaults
Backlight Level 4 (Lowest: Level 1; Highest: Level 4)
Volume Level 9 (Lowest: Level 0; Highest: Level 10)
Page 14
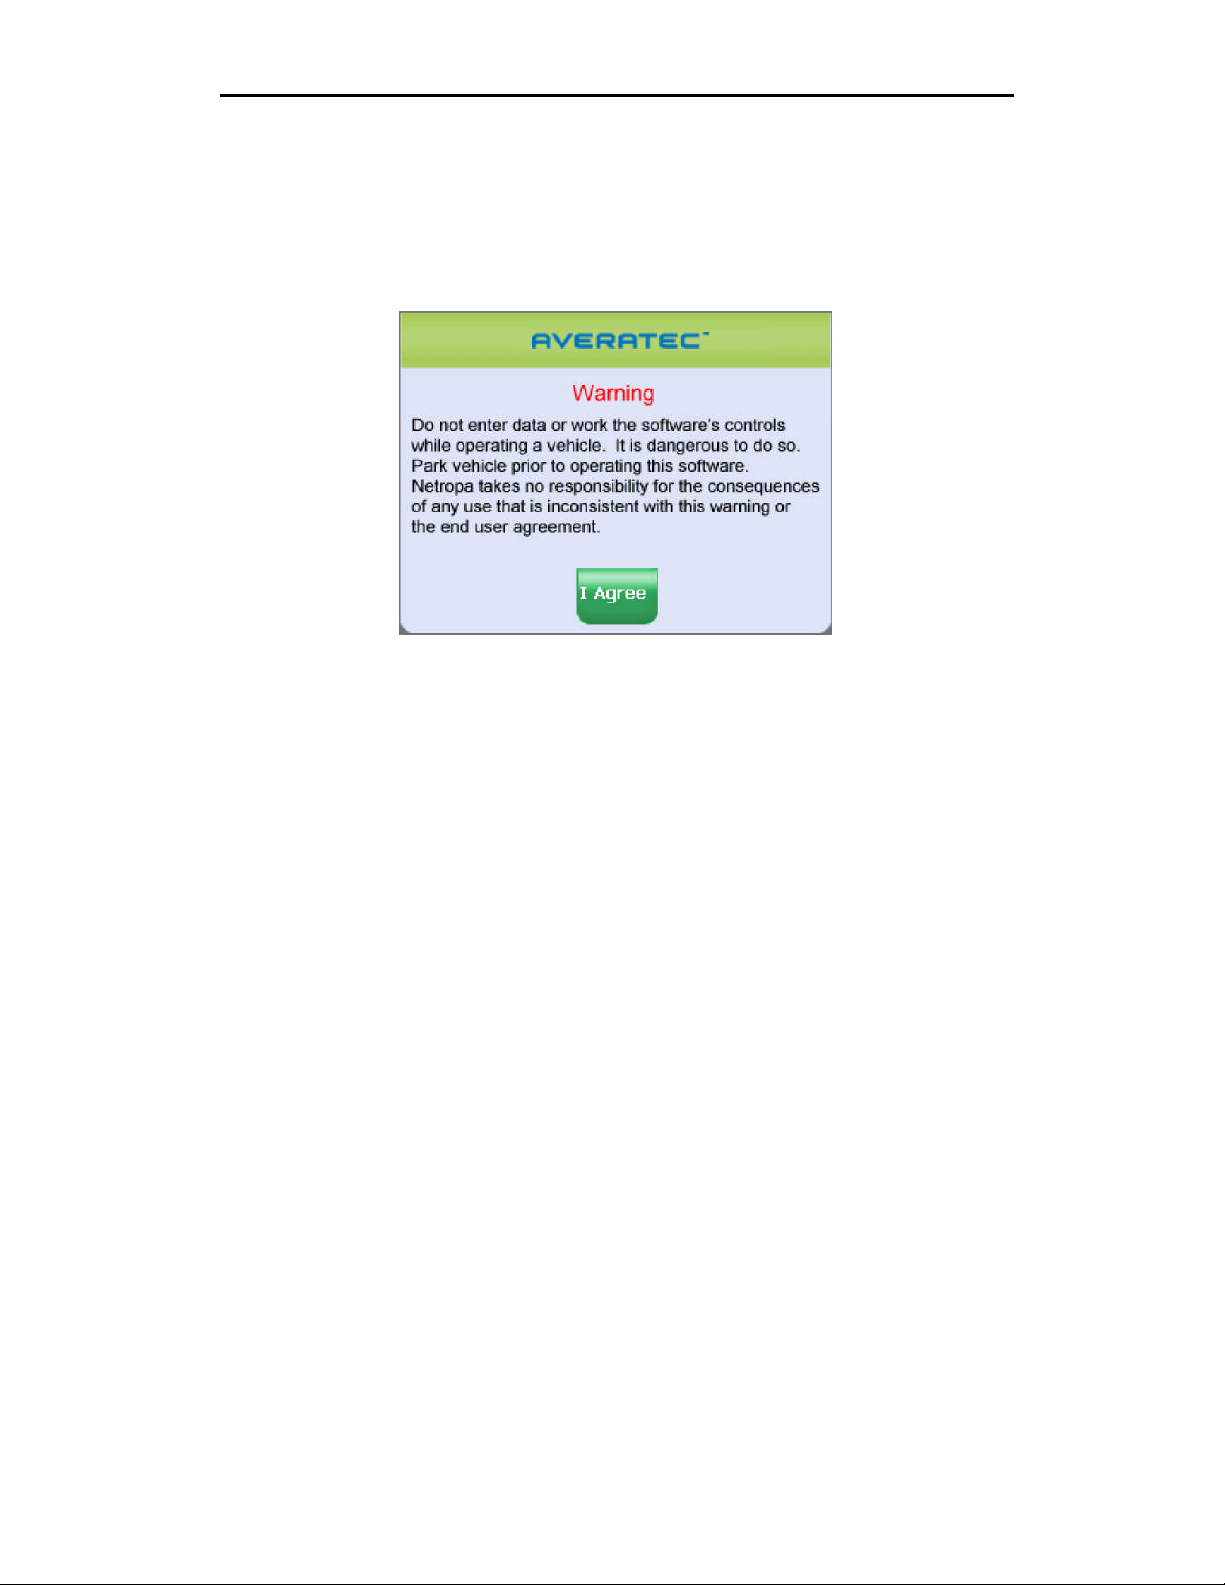
Starting the Software
Once the GPS receiver is turned on and navigation software is started, the unit will automatically go
to the GPS receiver’s main menu or display the map page.
Once you select Navigation, a warning screen will appear first. Simply read and tap the I Agree
icon.
It is best to be outside and have a clear sky above to allow the GPS to obtain better
reception of the satellites. Clear sky means: no trees, bridges, overhangs, carports etc.
Cloudy skies are ok. The unit is ready to travel and navigate once the map page is displayed
and the position icon changes from red to green or yellow.
Page 15

Map Page
The Map Page displays your current position, zoom in/out icons and zoom level in miles, the street
you’re traveling on, your current speed, and Menu icon. The pointer represents your location and
direction on the map.
North IconPointer Icon
Zoom Out Icon
Menu Icon
The pointer icon also indicates the signal strength of the satellite signals: Silver = no signal; Red =
poor signal; Yellow = weak signal and Green = good signal.
Zoom In Icon
Zoom In/Out
The zoom level is displayed in the lower center of the map page. To change the zoom level, tap the
zoom icons on the screen or the (+) or (-) buttons on the GPS unit. Note: Street details are not
shown higher than zoom level of 2000 ft.
Track Up (Heading) or North Up
In the upper right hand corner is the North indicator icon. This indicator will always point to the
north. While traveling, the direction of travel (Pointer Icon) is always pointing up and the map
rotates around the Pointer Icon.
When the map is switched to North Up from the defaulted Track Up, North is always at the top of
the screen while the direction of travel (N,S,E,W etc.) is displayed under the red arrow. See Figure
above for an example fora NE direction of travel.
There are three ways to change the display:
Page 16

10
1. Access Display Options through Settings.
2. Simply tap the North indicator and the icon will change from one setting to the other.
3. Go to: Main Menu/Display Options/Orientation and change the option.
4. Simply press the direction button in the up position.
Navigation and Panning Modes
The map page can be displayed in two views; Navigation Mode and Panning Mode. Navigation
Mode displays movements along the map.
Panning Mode allows Points of Interest (POI) and street name information to be displayed andalso allows
movementof the map to different
areas for viewing.
To enter Panning Mode: Simply tap and drag
along the screen to allow movement of the
map to view different areas.
To exit Panning Mode, tap the red “X” button
in the lower right corner of the display.
To find out more info on a POI, simply tap on
the POI’s icon and the POI Info screen will be
displayed.
Tap here to exit
panning mode
getdetailed POI
information
screenis displayed
Page 17

11
The POI Info screen provides the POI’s name and phone number.
At the bottom of the POI Info page there are three choices for the POI info displayed:
Nav = Set an auto route to the POI
Fav = Saves thisPOI intothe Favorites folder
Map = Return to the map page
POIs Displayed on the Map Page
Selecting only certain POIs is helpful in large city
areas where the POI icons could overwhelm the
map page.
To change the default settings.
1. Tap Menu, Settings, Display Options.
2. Under the POI Icons column, select what POIs
are shown on the map page. Default setting is
all POIs are selected.
POI on
POI off
Page 18

12
GPS Info
This page displays the GPS receiver’s satellite reception, local and UTC time (24hr format independent of the GPS receiver’s own clock), current longitude and latitude, altitude and traveling
speed accessed under
Settings
Bars indicatedevice is receiving
satellite signal
Satellite signalstrength
The vertical bars on the Satellite page indicate the signal strength of the received satellite(s). The
higher the bar, also higher the number, the stronger the signal. The number below each bar
indicates the satellite numbers.
Page 19

13
Map View Style
The map page canbe viewedin different dimensions;normal 2Dand threeoptions of3D. There
are two ways to change the display view:
1. Simplytaponthedesiredviewingoption.
2. Go to: Menu/Settings/Display Options/3D View and change the option.
3. Tap either the OK Icon to accept or the X to cancel.
Select thedisplay
viewing style
One of three 3D Views
Page 20

14
Creating and Using an Auto Route
When an auto route is selected the map page will show the route on the map by changing the road color to blue.
Streetname of upcoming
Turn approaching and
distance tothe turn
and displayedwitha
blue road along the
route(green in Night
mode)
turn
Estimated time of
arrival atdestination
Estimated time
traveling todestination
Distance todestination
Vehicle speed
To start an auto route, begin from the map page.Tap the Menu icon and from the Main Menu
page tap on the Destination icon.
Tap on the Menu
icon to enterthe
Main Menupage.
Figure 16C
Tap on theDestination icon to enterthe
Destination Menu page.
Page 21

When theDestination Menu is shown, select the
category to create an auto route.
The followingpagescover how tocreate an auto
route fromthese categories.
Destination by Address
1. Tap Menu, Destination, Address.
2. Tap Change to select the state in which to search.
3. Tap Street First to enter the street name first or
City First to enter the city name first.
Note: Any time the keyboard is displayed, the program will display choices that closely match the
category name being typed. Tap the OK icon once a choice is correctly shown.
If Street First is selected
1. Enter street name and tap OK.
(!) Advisory - DO NOT ENTER STREET TYPE. For
Main Street just enter Main. Note: The program will
display choices that closely match the street name
being typed. Tap theOK icon once a choice is
correctly shown.
2. Enter house number and tapOK.
3. From the match list, select the desired address.
4. Tap Navto navigate to this location; or
5. Tap Fav to add this location to the Favorites
folder; or
6. Tap Map to set this location as your starting point
and see location on the map.
Page 22

If City First is selected
1. Enter city name and tap OK.
2. Enter street name and tap OK.
(!) Advisory - DO NOT ENTER STREET TYPE. For
Main Street just enter Main.
3. Enter house number and tap OK.
4. From the match list, select the desired address.
5. Tap Nav to navigate to this location; or
6. Tap Fav to add this location to the Favorites folder;
or
7. Tap Map to set this location as the starting point and
see the location on the map.
(i) Information- If a largenumber ofrecords arefound
by the Street First method, the program will automaticallyrevert to City
First method.
Destination by Intersection
1. Tap Menu, Destination, Intersection.
2. Tap Change to select the state in which to search.
3. Tap either Street First to enter the street name first
or City First to enter the city name first.
If Street First is selected:
1. Enter street name and tap OK.
(!) Advisory - DO NOT ENTER STREET TYPE. For
Main Street justenter Main.Note: Theprogram will
display choices that closely match the street name
being typed. Tap the OK icon once a choice is
correctly shown.
2. Enter the name of the cross street and tap OK.
(!) Advisory - DO NOT ENTER STREET TYPE. For
Main Street just enter Main.
3. From the match list, select the desired intersection.
4. Tap Nav to navigate to this location; or
5. Tap Fav to add this location to the Favorites folder;
or
6. Tap Map to set this location as the starting point and see the location on the map.
Page 23

If City First is selected:
1. Enter city name and tap OK.
2. Enter street name and tap OK.
(!) Advisory - DO NOT ENTER STREET TYPE. For
Main Street just enter Main.
3. Enter the name of the cross-street and tap OK.
(!) Advisory - DO NOT ENTER STREET TYPE.
4. From the match list, select the desired intersection.
5. Tap Nav to navigate to this location; or
6. Tap Fav to add this location to the Favorites folder; or
7. Tap Map to set this location as the starting point and see
(i) Information - If alarge number of records are found by the Street First method, the
program will automatically revert to CityFirst method.
Destination by Points of Interest (POI)
1. Tap Menu, Destination, Points of Interest.
2. Tap one of the categories for Points of Interest.
3. Tap a sub category (See figure 20A or selection (if
shown)
4. SelectAlphabetical or By Distance within 25 miles
or Alphabetical under List All or By City.
Page 24

If Alphabetical is selected:
1. Enter the name of the destination.
2. Select a matching POI location from the list.
3. Tap OKto accept the location. The location details will be shown.
4. Tap Nav to navigate to this location; or
5. Tap Fav to add this location to the Favorites folder; or
6. Tap Map to set this location as the starting point and see the location on the map.
If By Distance is selected:
1. Select a POI from the list
2. Tap Nav to navigate to this location; or
3. Tap Fav to add this location to the Favorites folder; or
4. Tap Map to set this location as the starting point and see the location on the map.
Destination from Favorites
1. Tap Menu, Destination, Favorites.
2. Select a destination from the list if you have already created one.
3. Tap Nav to navigate to this location; or
4. Tap Map to set this location as your starting point and see the location on the map; or
5. Tap Edit to create a label (i.e.HOME) for this destination or change the label ifone already
exists; or
6. Tap Del to delete this location from the Favorites folder.
Multi-Stop Trip
1. Once a destination is established, Tap Menu, Destination
2. Select the “Stop Over” tab, input your selection
Destination from Recent
1. Tap Menu, Destination, Recent.
2. Select the destination.
3. Tap Nav to navigate to this location; or
4. Tap Map to set this location as your starting point and see the location on the map; or
5. Tap Fav to add this location to the Favorites folder; or
6. Tap Del to delete this location from the Recent list.
Destination from City Center
This option auto routes to a city instead of a street or POI. City choices can be made statewide or
within 25 miles from the current location.
Page 25

To Set the Route Options
1. Tap Menu, Settings, Route Options to open the Route Options screen.
2. Select the desired option(s).
3. Tap OK to accept or Cancel to reject changes.
Method: Selects the method of routing. Thequickest route, shortest route, route thatfavors major
roads, or route that favors local roads.
Ferries: Selects whether ferries should be included or excluded in the route calculation. Note:
selecting ferries does not include ferry schedules or time spent on the ferry.
Toll Roads: Selects whether toll roads should be included or excluded in the route calculation.
Carpools: Selects whether carpool lanes (High Occupancy Vehicle lanes) should be included or
excluded in the route calculation.
Turns: Selects more or less turns in the auto route.
Green color
indicates selected
option
To Set the Display Options
1. Tap Menu, Settings, Display Options to
open the Display Options screen.
2. Select the desired option(s).
3. Tap OK to accept or Cancel to reject
change(s)
Page 26

Orientation: Orients the Map screen so that the driving direction is heading up orNorth is always
up
Day/Night: The Auto setting changes from Day to Night Mode automatically at approximately
sunrise and sunset. Select “Day” to have the display be bright or select “Night” to have the display
change to be better suited for night driving.
POI Icons: The “default” setting will display only commonly displayed icons that appear on the map
at 1000 ft zoom level or closer. The “Off” option turns off all POI icons so that none are displayed.
The “Custom” option allows which type or category of POI to be displayed.
Color: Sets the background color of the map page to several color choices.
3D View: Sets the viewing angle from the default setting of 2D to 3 different 3D views. Note: when
map page is set to 3D, tapping on the map will not provide POI information. Different views can be
toggled from 2D to 3D by pressing down on the directional button.
To Create or Add to the Favorites List
1. Enter a destination.
2. From the match list, tap Fav.
3. Tap OK.
- or -
1. TapMenu, Recent.
2. Select a recent destination.
3. Tap Fav.
4. Tap OK.
To Add a label to your Favorites
1. Tap Menu, Destination, Favorites.
2. Select a destination.
3. Tap Edit.
4. Enter a label using the keypad.
5. Tap OK
Page 27

Panning and Zooming
To Pan the Map
From the Map screen tap and drag the map area.
(i) Information - While in Panning Mode, tap the X iconto return to the Map screen. Tap on the
North icon displayed to rotate the map so that North or Heading is pointing up.
To Zoom In and Out
Use the hardware up(+) and down(-) buttons to zoom in andzoom out. You can also use the zoom
icons (+/-) on the Map screen. See figure 10A.
Adjusting the Volume
Volume adjusted with the volumebuttons is applied to the whole system. However, the volume of the music player
!
or the movie player affects only the concerned program.
Note
1. Press the Volume-up button or the Volume-down
2. A box indicating the current volume is displayed as shown left.
Pressing the Volume-up button or the Volume-down button
increases or decreases the system volume by one level.
3. You can adjust the volume from Volume 0 to Volume 10. When there is
no further input, the volume entered last is stored. The volume
indication box automatically disappears after two seconds.
Page 28

Localization
The localization options, under Settings, give you control
over settings affected by your location, including:
- Language
- Time zone
- Daylight savings time
- Units
Speed alert
You can use the speed alert feature to warn you if your vehicle is exceeding the speed limit. There
are two speed alert options: Auto speed alert and fixed speed alert. Auto speed alert uses the type
of road to determine the probably speed limit. Fixed speed alert lets you enter a speed and will
warn you if that speed is exceeded.
To set the speed alert:
1. Tap MENU. The main menu appears.
2. Tap Settings, Speed Alert.The Speed Alert screen
appears.
3. To set auto speed alert:
• Tapthe Auto Speed Alert check box. Acheck
mark indicates that Auto Speed Alert is on.
• Tap OK. A warning appears.
• Tap OK to close the warning.
• Tap OK. You return to the map.
4. To set a fixed speed alert:
• Tap theFixed Speed Alertcheckbox.A check mark
indicates that Fixed Speed Alert is on.
• Tap thespeed you want to use as a maximum
speed.
•Tap OK. You return to the map.
Page 29

Exit Map Program - About Screen
For software version information and alsoto exit the mapping program, follow these steps.
1. Tap Menu.
2. Tap System Information, the About screen will be shown.
3. Tap the left arrow icon to return to the map page.
4. Tap Exit to turn off the GPS program.
Page 30

Connecting System to Your PC
1. It is possible to copy map data, music ormoving picture files into the built-in flash
memory inside the body or the SD/MMC memory card by connecting the systemto a PC
via the USB cable.
It is not allowed to execute functions other than file copying and moving when the system is
connected to a PC via the USB cable; the button, the touch screen, the soft reset mode and the GPS
receiver become inoperable.
!
Note
The system operates with the power fromthe USB port of the PC when the system is connected to the
PC. Therefore, the system shall be connected with the USB port where the power is normally
supplied. The system may not be capable of normal operation when connecting with the USB hub.
The battery is not recharged via the USB port
2. After booting the PC, connect the system to the PC using the USB cable as shown
below.
3. When the system is successfully connected to the PC, the screen displays as follows:
4. When the system is normally connected to the PC, you can see two ‘removable disk’
drives in the Windows Explorer window.
Page 31

Installing the USB Driver
No driver is needed when using Windows XP. No other operating system is supported.
Distinguishing Between Removable Disks
The two ‘removable disks’ represents ‘Built-in flash memory’ and ‘SD/MMC
memory’ of the system, respectively.
‘Built-in flash memory’ and ‘SD/MMC memory’ are indicated in Windows Explorer as
‘Removable disk (*:)’ and ‘Removable disk (*:)’, respectively. Drive letters will be
assigned according to the system resources available. Of the two drives, the first drive
(*:) corresponds to ‘Built-in flash memory.
Disconnect the USB cable once map data updating or filecopying work is complete.
When disconnecting the USB cable, the system restarts.
Page 32

Copying Files
To play the media data usedin each media player program, e.g. music player, movie player, and
picture viewer, the data files must be located in the ‘SD/MMC Memory’ folder only. The data files
specific to each media player must be stored in the specified folder in ‘SD/MMC Memory’ when
you wish to use the programs.
The folder names of the respective media player programs are as shown in the table below.
Supplementary Program Folder Name
Music player ‘Music’
Movie player ‘Movie’
Picture viewer ‘Picture’
Connect the system to the PC via the USB cable, and copy necessary files from Windows
Explorer on the PC to ‘SD/MMCMemory’ folder. (Refer to “Connecting System with PC-
Distinguishing Between Removable Disks.”)
Opening the ‘SD/MMC memory’ folder on PC Window Explorer displays the screenas shown.
Do not copy files of music, movie, or pictures to the‘Built-in flash memory’ folder.
Do not forget to execute ‘Safely Remove Hardware’ on the PC after you complete copying files.
!
Note
Do not disconnect the USB cable or remove the ‘SD/MMC memory’ card while you are copying files.
Safely Removing Hardware
Windows XP
File copying is normally complete only when executing ‘Safely
Remove Hardware’ on the PCafter copying the files by
connecting the system to the PC via the USB cable.
Page 33

Windows XP
Select
Double click the Window tray icon to execute ‘Safely Remove Hardware’ as shown below.
Page 34

Using Supplemental Programs
Getting Ready
Storing Files
Files of music, movies and pictures can only be stored in ‘SD/MMC memory’. It is not allowed to
play the files of music, movies and pictures stored in ‘Built-in flash memory’ with the
supplemental programs.
Copy the desired files under their respectiveMusic, Movie or Picture folder in ‘SD/MMC memory’
before playing the file.
Playing Music Files
Normal MP3 or WMA files can be played with the Music player. However, certain MP3 files or
OGG files encoded in the variable bit rate mode can only be played with the Movie player
(Refer to ‘Movie Player’).
Menu Program
1. When the system starts, the menu selection screen is displayed as
shown right. If you make no selection for five seconds from the
menu selection screen, the system is switched automatically to the
navigation mode.
2. When you press the desired icon once, the
system is switched to the selected program
(The screens shown are for the music
player.)
3. Pressing the menu button on the front of the
body returns the system to the menu
program from the current program.
The figures are an example ofreturning to the menu program from the music player.
Page 35

Music Player
Names and Functions
Play list window
Icon of current music
Indicating selected music
In-Depth Description of Functions
Search of Playing Position
The Location Searching Slider indicates the play position of a music file. You can adjust the play
position to a desired point.When moving the slider bar, the Play time window displays the moved
position in duration.
Play/pause button
Stop button
Next music button
Previous music button
Exit button
Navigation return button
Functions of the Control Buttons
Icon Button Function
Play button Plays a music file selected from the play list.
Stop Button Stops playing the file.
Pause Button
Next Music Button
Previous Music
Button
Exit Button
Navigation
Return Button
Pauses playing the file. Pressing the icon again resumes playing
The next music file of the current file in the play list is played
The previous music file of the current file in the play list is played.
Exits the music player.
Switches the system from the music player to the navigation
program.
Page 36

Volume Adjusting and Muting
The volume adjusting slider indicates the current volume. You can
adjust the volume to the desired level by moving the slider bar left or
right.
You can turn off the sound by pressing the Mute button.
Displaying the Play List
Connect the Voya 320 to the PC (Refer to ‘Connecting System to YourPC’), and copy
the music file to the‘Music’ folder in the SD/MMC memory.
You cannot create sub-foldersunder the ‘Music’ folder. The music player is capable of
!
Note
The music indicated with the speaker icon is the current music file selected.
Double-clicking the desired music file from the Play list window, plays the new music file.
playing the files stored in the ‘Music’folder only.
Pressing the Stop button stops playing the current music file. Click the desired music file once
from thePlay list window, and press the Play button to play the selected music.
Supported File Formats
MP3 and WMA files are supported.
Certain files with extension of MP3 may not be supported, it is dependent upon
!
Note
encoding method of that file.
Page 37

Movie Player
Play Time Window
Names and Functions
Volume Adjusting Slider
Play/pause Button
Stop Button
File Button
Full Screen Button
Exit Button
Mute Button
Navigation Return Button
In-Depth Description of Functions
Search of Playing Position
The Location Searching Slider indicates theplay position of a movie file. You can adjust the play
position to a desired point.When moving the slider bar, the Play Time Window displays the
moved position.
Page 38

Functions of Control Buttons
Icon Button Function
Play button Plays a file selected from the play list.
Stop Button Stops playing the file.
Pause Button
File Button
Full Screen
Button
Exit Button
Navigation
Return Button
Pauses playing the file. Pressing the icon again resumes playing
Moves the play list window and the play screen window.
Switches the screen to the full screen mode when playing a movie.
Exits the movie player.
Switches the system from the movie player to the navigation
program.
Volume Adjusting and Muting
The Volume Adjusting Slider indicates the current volume. You can adjust the volume to the
desired level by moving the slider bar left or right.
You can turn off the sound when pressing the Mute button.
Storing Movie Files and Viewing Movies
Connect the Voya 320 to the PC (Refer to ‘Connecting System to YourPC’), and copy
the movie file to the‘Movie’ folder in the SD/MMC memory.
You cannot create sub-foldersunder the ‘Movie’ folder. The movie player is capable of
!
playing the files stored in the ‘Movie’ folder only.
Note
Pressing the File button displays the movie file list in the
‘Movie’ folder.
Page 39

Select the desired movie file from the figure above, and press the Play button, or double
Window
click the desired movie file from the Play list window to play the selected movie file.
Pressing the File button while playing a movie causes the current movie to pause
!
Note
playing, and the play list is displayed. Pressing the File button again returns to the
movie play screen. Pressing the Play button will resume playing the current movie.
Pressing the Full Screen button, or clicking the Play Screen window once, switches the
screen to the full screen. Clicking the full screen once returns the screen to the original
size.
Supported File Formats
File formats of MP4, WMA, AVI and DIVX are supported.
Close the navigation program when you use the movie player. When you run multiple programs,
!
Note
the playing of the movie may be interrupted, or anerror message may bedisplayed indicating
insufficient memory.
If another program gets activated while using the movie program, the movie player is switched to
Pause.
Listening to Music with the Movie Player
The Movie player can even play some MP3 files or OGG files that are notcompatible with
the Music Player. Copy the MP3 or OGG file to ‘Movie’ folder, and play the file with the
movie player.
!
Note
Music files or movie files stored in the‘Movie‘folder are played in sequential manner.
Picture Player
Names and Functions
Previous File Button
File Button
Next File Button
Full Screen Button
Slide Show Button
Exit Button
Navigation Return Button
Page 40

In-Depth Description of Functions
Functions and Control Buttons
Icon Button Function
File Button Switches the picture view window to the file list window.
Full Screen Button Displays the selected picture in the full screen .
Previous File Button
Next File Button
Slide Show Button
Exit Button
Navigation
Return Button
Pauses playing the file. Pressing the icon again resumes playing
the file.
Moves to the previous file in the list window.
Switches the screen to the full screen slide show mode.
Exits the movie player.
Switches the system from the picture viewer to the navigation
program.
Storing Image Files and Viewing Images
Connect the Voya 320 to the PC (Refer to‘Connecting Systemto Your PC’), and copy the image
file to the‘Picture’ folder in the SD/MMC memory.
Double clicking the desired file from the File list window displays the image as shown below:
Double Click
Select the desired file from theFile List window and press the Full Screen button to display the
selected image in the full screen.
Select the desired file from theFile List window and press the Slide Show button to display the
images in the full screen from the selected file insequential manner.
Press the Full Screen button with the selected image on the Image window to display the image
in the full screen.
Only JPG file format is supported.
Note: High resolution and largesize pictures taken by a digital camera may not be displayed on the Voya
!
Note
320. Lower the resolution of your images for faster processing. The system is optimized at 16-bit color with
resolution of 320 x 240 (width x height).
Page 41
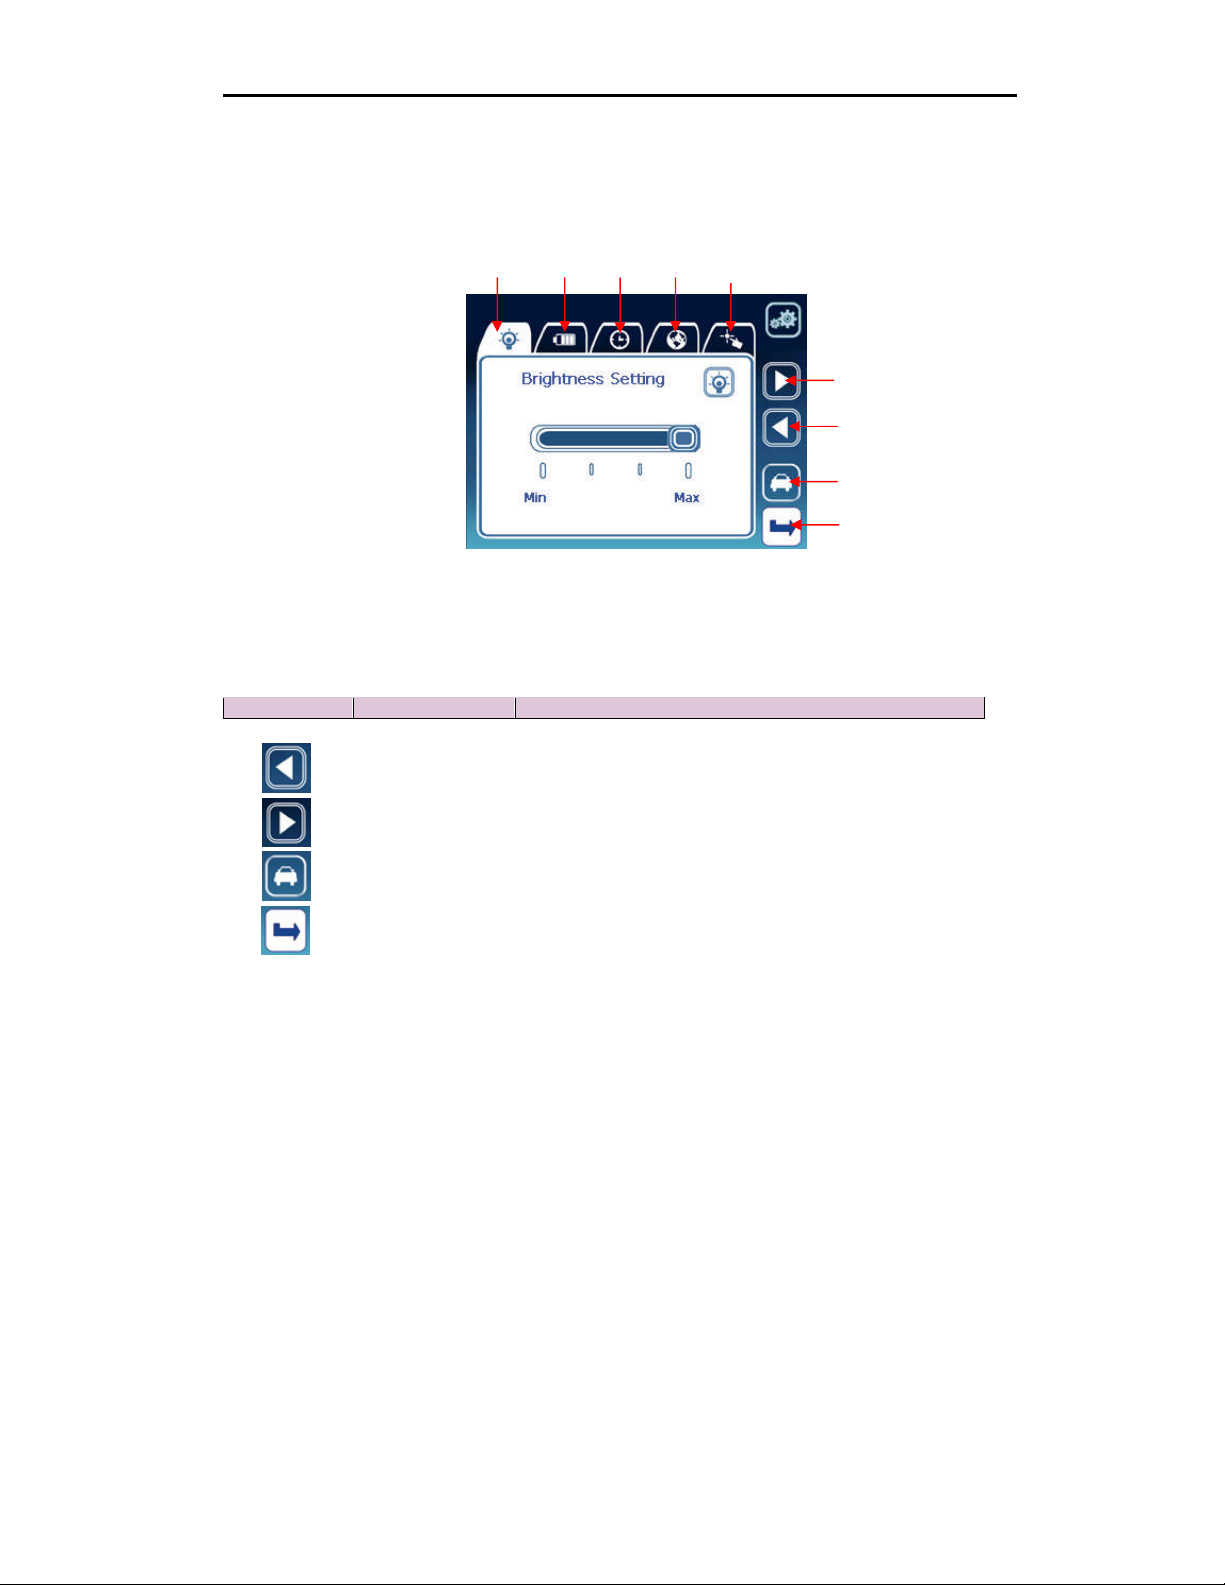
Setting Environments
Time
Calibration
Names and Functions
Tab
Tab
Tab
Tab
Functions of Control Buttons
Icon Button Function
Previous Tab Button Moves to the previous tab from the current tab.
Next Tab Button Moves to the next tab from the current tab.
Tab
Next Tab Button
Previous Tab Button
Navigation Return Button
Exit Button
Navigation Return
Button
Exit button
Switches the system from the setting menu to the navigation program
Exits environments setting.
Page 42

Adjusting the Brightness Backlight
Brightness of the backlight can be adjusted to four levels ranging from
level 1 to 4. You can adjust the brightness by moving the Brightness
Adjustment slider. The default setting of the backlight is set to level 4.
Brightness Adjustment Slider
Press the Power button for about two seconds to set the backlight to level 1. Press and
hold the power button for two seconds again to return the backlight to the original
brightness.
Keep pressing the button for
about two seconds.
Checking Battery Conditions
When the AC/DC adapter or the cigarette lighter adapter is connected, the Power Status icon is
displayed as ‘Adapter.’
Power Status Icon
Battery Remainder PowerMeter
When the battery is being recharged, the Battery Remainder Power meter alternately moves
between the four levels. During this process, the Power button flashes red.
Page 43

When the battery is fully charged, the Battery Remainder Power
meter does not move, but is kept at the‘Full’ condition. The Power
button on the body lights green.
In the battery-powered mode, the Power Status icon is displayed as ‘Battery’, and the Battery
Remainder Power meter indicates the current remaining Power Status icon power in the
battery.
Power Status Icon
The value indicated by the battery power meter may be different from the actual remaining power in the
!
battery dependent upon environmental conditions.
Note
When the remaining power in the battery is 20-30% of its full capacity,
the warning window is displayed as shown right. In such a case,
immediately recharge the battery.
When you fail to recharge the battery after the warning window is displayed, the system is
forcibly switched to the power-saving mode.
Refer to ‘Power Mode and Battery Recharging.’
Time Setting
Change the current time setting by clicking the item you want to
change and increase or decrease the value with the new one using
the ‘Add button’ or the ‘Subtract button’.
Add Button
Subtract button
In case the battery completely discharged or if you make hard reset, the time setting is initialized with the
!
system default value.
Note
Page 44

Language Setting
You can change the current language used in the menu program by
clicking the ‘Previous button’ or the ‘Next button’. All text will be
changed to selected one.
Previous Button
Next Button
!
This setting will be applied onthe menu program only. It has no effect onthe system language.
Note
Touch Screen Calibration
If there is deviation between the point touched by you and the point actually indicated on the
screen during operation of the system, you can recalibrate the touch screen.
Press the Touch Calibration button as shown.
Touch Calibration Button
Keeping the cross mark pressed moves the cross mark in the arrow
direction, as shown. Press the cross mark again to the moved position.
Repeat this until the Exit screen is displayed.
When the touch calibration is successfully executed, the Exit screen is
displayed. When touching the screen once, the screen is returned to the
touch calibration screen.
New calibration is now complete. Click on the screen.
Page 45

Troubleshooting
Problem Troubleshooting
When themachine will not work or you cannotsee
anything on the screen.
If you cannot hear any sound when you start
playing the music or movie files
Soft or hard reset the machine.
Check thebattery life and recharge the battery, if
necessary
Make sure the data files residein the SD/MMC
memory. Make sure the volume is properly set.
Make sure the machine is properly connected
When you cannot copy files tothe machine
to the computer. Make sure you have enough
empty space in the memory.
When the system suddenly stops during
operation and will not work
Press the RESET button
Check if you are in anunderground parking lot,
When the current location in the navigation is
inaccurately displayed
under a road, or between a tall buildings; if so,
change your location. Check if there is any
object interfering with the signal reception in
the car of in the vicinity of the antenna, if
possible, remove it.
When the navigation shows you the wrong
way, even though the GPS signal reception
status is good.
Map data may not be identical to the actual
road condition. Check your data and update
the map data if updates are available.
System Specifications
General
Hardware
Software
Model Voya 320
Colors Black (front),silver (rear)
Dimensions 4.33” (w) x 3.07” (H) x 0.83” (D)
Weight 5.93 ounces
CPU Samsung S3C2440, 300 MHz
Memory RAM 64 MB, Flash ROM 32/64/128/256/512/1 GB
Power DC 12-24 V
Battery
Input mode Touch screen
LCD 320 x 240, 3.5”, 65K colors, TFT LCD
Memory card SD/MMC memory card slot
Speaker Built-in speaker, 1W
Headphone output 40 mW (left) + 40 mW (rght): (16_, max. volume)
GPS SIRF III 20-channel
USB USB spec. 1.1 full speed (12 Mb/s)
USB Storage
OS
Music Player File formats Mp3, wma
Movie Player
Picture Viewer
Version Windows CE4.2 Core
File formats Mp4, wmv, avi, divx
Audio play Mp3, ogg supported
File format Jpg
Picture resolution 320 x 240, 65K colors
Lithium-ion, 1,100 mA
Recharging time: Approx. 3 hours
Discharging time: Average approx. 2 hours
(Default settings + navigation program)
USB Mass Storage Class Bulk-OnlyTransport (Flash ROM,
SD/M MC)
PC OS: Windows 98, ME, 2000 and XP supported
 Loading...