

Page 1
Page 2

Table of Contents
Preface.......................................................................................................................i
Important Safety Information...................................................................................iii
Components of the Voya 320....................................................................................1
Standard Components........................................................................................1
Optional Components.........................................................................................1
Names and Functions of Elements on the Voya 320.................................................2
Front...............................................................................................................2
Back...............................................................................................................2
Name andFunction of Elements on the Voya 320.................................................... 3
Installation................................................................................................................4
Inserting SD/MMC Memory Card...............................................................................5
PowerMode and Battery Recharging........................................................................5
About Reset Mode....................................................................................................6
Preferences...............................................................................................................7
Starting the Software................................................................................................8
Map Page........................................................................................................9
Zoom In/Out.....................................................................................................9
Track Up (Heading) or North Up........................................................................... 9
Navigation and Panning Modes.......................................................................... 10
POIs Displayed on theMap Page....................................................................... 11
Current Route................................................................................................. 12
Trip Information Page....................................................................................... 12
GPS Info....................................................................................................... 13
Almanac........................................................................................................ 13
Current Location............................................................................................. 13
Map View Style............................................................................................... 14
Creating andUsing an Auto Route...................................................................... 15
Destination by Address..................................................................................... 16
Destination by Intersection................................................................................ 17
Destination by Points of Interest (POI)................................................................. 18
Destination from Favorites................................................................................. 19
Destination from Recent ................................................................................... 19
Destination from City Center.............................................................................. 19
To Set the Route Options.................................................................................. 20
To Set the Display Options................................................................................ 20
To Create or Add totheFavorites List.................................................................. 21
To Add a label to yourFavorites......................................................................... 21
Page 3

Panning and Zooming...................................................................................... 22
To Zoom In and Out......................................................................................... 22
Adjustingthe Volume....................................................................................... 22
Localization.................................................................................................... 23
Localization.................................................................................................... 23
Speed alert.................................................................................................... 23
Exit Map Program - About Screen....................................................................... 24
Connecting System to Your PC..............................................................................25
Installing theUSBDriver................................................................................... 26
Distinguishing Between Remov ableDisks............................................................ 26
Copying Files..........................................................................................................27
Safely Removing Hardware.....................................................................................27
Windows XP................................................................................................... 27
Windows XP................................................................................................... 28
Using Supplemental Programs...............................................................................29
GettingReady ................................................................................................ 29
Menu Program................................................................................................ 29
Music Player.................................................................................................. 30
Movie Player.................................................................................................. 32
Picture Player................................................................................................. 34
In-Depth Description of Functions....................................................................... 35
Functions and Control Buttons........................................................................... 35
Setting Environments....................................................................................... 36
Names and Functions...................................................................................... 36
Troubleshooting .....................................................................................................40
System Specifications............................................................................................40
Page 4

Preface
Precautions
Please read this section carefully before usingthis product.
This product is intended to provide turn-by-turn instructions to safely guide you to your desired
destination. Please make sure that all personsusing thisnavigation software carefully read these
precautionsand the operating instructionsin the Voya 320 User'sGuide.
Averatec, Inc. cannot accept any responsibility whatsoever for accidentsresulting from failure to
observe these precautions.
Your personal judgment, traffic regulations, and commonsense must always take
precedence over instructions produced by the software.
This productis not a substitute for yourdriving technique, driving knowledge or especially
your personal judgment. Route suggestions made by thisnavigation system should never
supersede any traffic regulations, your personal judgment, or your knowledge of safe
driving practices. If you feel that a route suggestion made by the software instructs you to
perform an unsafe or illegal maneuver, places you in an unsafe situation, or routes you
into an area that you consider unsafe, do not follow the instructions. Your personal
judgment, traffic regulations, and common sense must always take precedence over
instructionsproduced by the software.
When your vehicle is moving, keep your eyes on the road instead of looking at the
screen. If you need to look at the screen for a prolonged time, always park the car in a
safe manner and in accordance with all traffic regulations.
Do not select or input destinations, change settings or otherwise manually operate this
software unless you have parked your car in a safe manner, observing all traffic
regulations.
If you are responding to an emergency, it may not be prudent to rely on this system
unless you have no other means to obtain accurate directions. The database does not
include all of the facilities and streets necessary for emergency response, and the
system’s maps may not reflect recent changes in roads, traffic controls and driving
conditions. Use your own judgment in these situations.
The database utilized by this software is the most accurate and up-to-date database
available. Because of road closures, construction, weather, new roads and other
conditions, the database might not contain accurate information regardingall streets and
locations. If so, the system might notbe able to correctly guide you on your route or may
inaccurately estimate the time needed to reach your destination. Please use your
judgment in these cases. Renewing your subscription to the database will aidin keeping
itup-to-date.
There are situations when the navigation system will incorrectly display the vehicle’s
position on the map. Usually this situation will correct itself automatically. Use your own
judgment at all times. If you need to reset the position, pull over in a safe manner
observing all traffic regulations.
i
Page 5

Safety Information
X Do not securein front of airbag
X Do not looselyplaceon dashboard
X Do not blockdriver’sview
VOYA350
The detailed mapping software is provided by NAVTEQ and Netropa. The detailed mapping
software is as accurate and detailed as possible. Whenever maps are digitized, there is still a
possibility that some inaccurate or incomplete data can be found. It is because of these
inaccuracies that the Voya 320 is a travel aid and is not intended for precise measurement in
navigation or aircraft use. Differences between manufactured and shipped versions of the
software may be present; this software may be updated frequently. If the descriptions in this
manual are different from your software version, please follow the software version currently on
hand.
Whistler VOYA 350
FCC Compliance
This device complies with Part 15 of the FCC Rules. Operation is subject to the following two
conditions:
(1) Thisdevice may not cause harmful interference, and
(2) this device must accept any interference received, including interference that may cause
undesired operation. This equipment has been tested and found to comply with the limits for a
Class B digital device, pursuant to part 15 ofthe FCC Rules. These limits are designed to provide
reasonable protection against harmful interference in a residential installation. This equipment
generates, uses and can radiate radio frequency energy and, if not installed and used in
accordance with the instructions, may cause harmful interference to radio communications.
However, there is no guarantee that interference will not occur in a particular installation. If this
equipment does cause harmful interference to radio or television reception, which can be
determined by turning the equipment off and on, the user is encouraged to try to correct the
interference byone ormore of the following measures:
• Reorient or relocate the receiving antenna.
• Increase the separation between the equipment and receiver.
Introduction
Congratulations on your purchase of an Averatec Voya 320 GPS receiver! This system can
provide an auto route to the destination of your choice using signals from Global Positioning
Satellites(GPS)orbiting the earth.
There are 24 GPS satellites orbiting the earth. A GPS device can calculate your position on the
earthifit can receive signals from at least three of these satellites. When it receivesat least four
signals, a GPSdevice can also calculate your altitude (heightabove sea level).
To use the GPS receiver for the first time you need to charge the battery for at least four hours.
The Voya 320 comes with maps preloaded on the SD card so map loading is not necessary.
Mapsof other countries are sold separately.
ii
Page 6

Important Safety Information
Check the conditions of the Voya 320 before driving. Operating the Voya 320 while you drive is very
dangerous.If you needto operate the Voya 320,park your car in a safelocation beforeoperating theVoya
320.
Search the path toyour destination beforeyou drive. If youdo notfully understand the instructionsfrom the
Voya320, or the instructions are questionable, referto themap on thescreenonly whenyou are absolutely
surethatyouare insafe conditions.
Information from the Voya 320 such as voice instruction or the maps may be different from the actual
road conditions. The traffic signals and regulations on the actual roads must be observed, and special
attentionshall bepaidtotraffic situations and pedestrians aroundyou.
Donot usethe systemformeasuringdrivingspeed or distance. Thesystemisonlyfornavigation.
GPSsignals may vary insensitivity dependent upon location ofyour car.Youmay sufferfrom weaksignals
inside a tunnel or under an overpass or by a tall building, and sensitivity of signals may be affected by
ov ercast skies orthickfog.
GPSsignals may notbecorrectly received if youare inside a building, if thereis an object interrupting signal
reception in thevicinity of theantenna, or if asystem radiating radio interrupting signalis insideyourcar.
If youusetheVoya 320after a prolonged period of storage, itmay takeextensivetimeforyoutobeginto
receivesignals, eventhough theVoya 320 isoperating normally.
Installthe system on an appropriatelocation insideyourcar.Do not installthesystemona locationthat
may cause trouble in operationofthe airbags, orobstructyourvision whileyouare driving.
When you install the system, remove any foreign materials from the suction mount and surface of the
window, and affix thesystem while paying special attention to prevent air from being introduced between
the suction mount and the windowsurface. Any damage of the product or other objects inside yourcar
caused by detachment of the system from the window because of poor suction is the user’s
responsibility.
Do not leavethesystem under direct light or in a location subject toheat fromtheengine of yourcar for an
extensiveperiod. Heating thebattery may cause an explosion. Do not leave the system unattendedfor a
prolonged periodwhen thetemperature is very hot, as insummer.
Do not expose the system tomoisture, heat, or rapidly changing temperatures. Condensation may take
place inside the system, and causedamage tothe system. If the system is exposedto high humidity, dry
thesystem immediately, and usethe system only afteryou are surethat thesystem is free frommoisture.
If youdisassemble, reassemble ormodify thesystem without Averatec’s consent, itmay causeabnormal
operation of the system.Insuch acase, youare solely responsibleforthe trouble.
Thesystem contains lithium-ion batteries that may cause explosion or leakage of hazardous liquid.Never
give an impact to or destroy the system, and do not keep the system together with objects probable of
explosion ofgas or liquid, orfire.
Do not usethe A/C or D/C adaptor in a high humidity environment, and never touchthe adapter with wet
hands.Youmay receive anelectric shock. Do not wrap the adapter withsheets of paper, vinyl orcloth while
youusethe system, and makesure of properventilationforcoolingthe adapter. Pleasemakesure thatyou
are usingthecorrect power sourceas indicatedon the housing orthepackage.
Do not exerciseexcessiveforcewith thesystem anddo notclean thesystem when thepower is on.Donot
usepaper tissues - generating dust, or rigidmaterials - probableofscratching whentryingtocleanthe LCD.
Use a softcloth only.
When you are not usingthe SD/MMC card, protect the system from dust or moisture, and pay special
attention to keepthe slots freefrom foreign materials. Always make sure that the slot is free from foreign
material beforeinsertingthe memory card into thesystem.
iii
Page 7
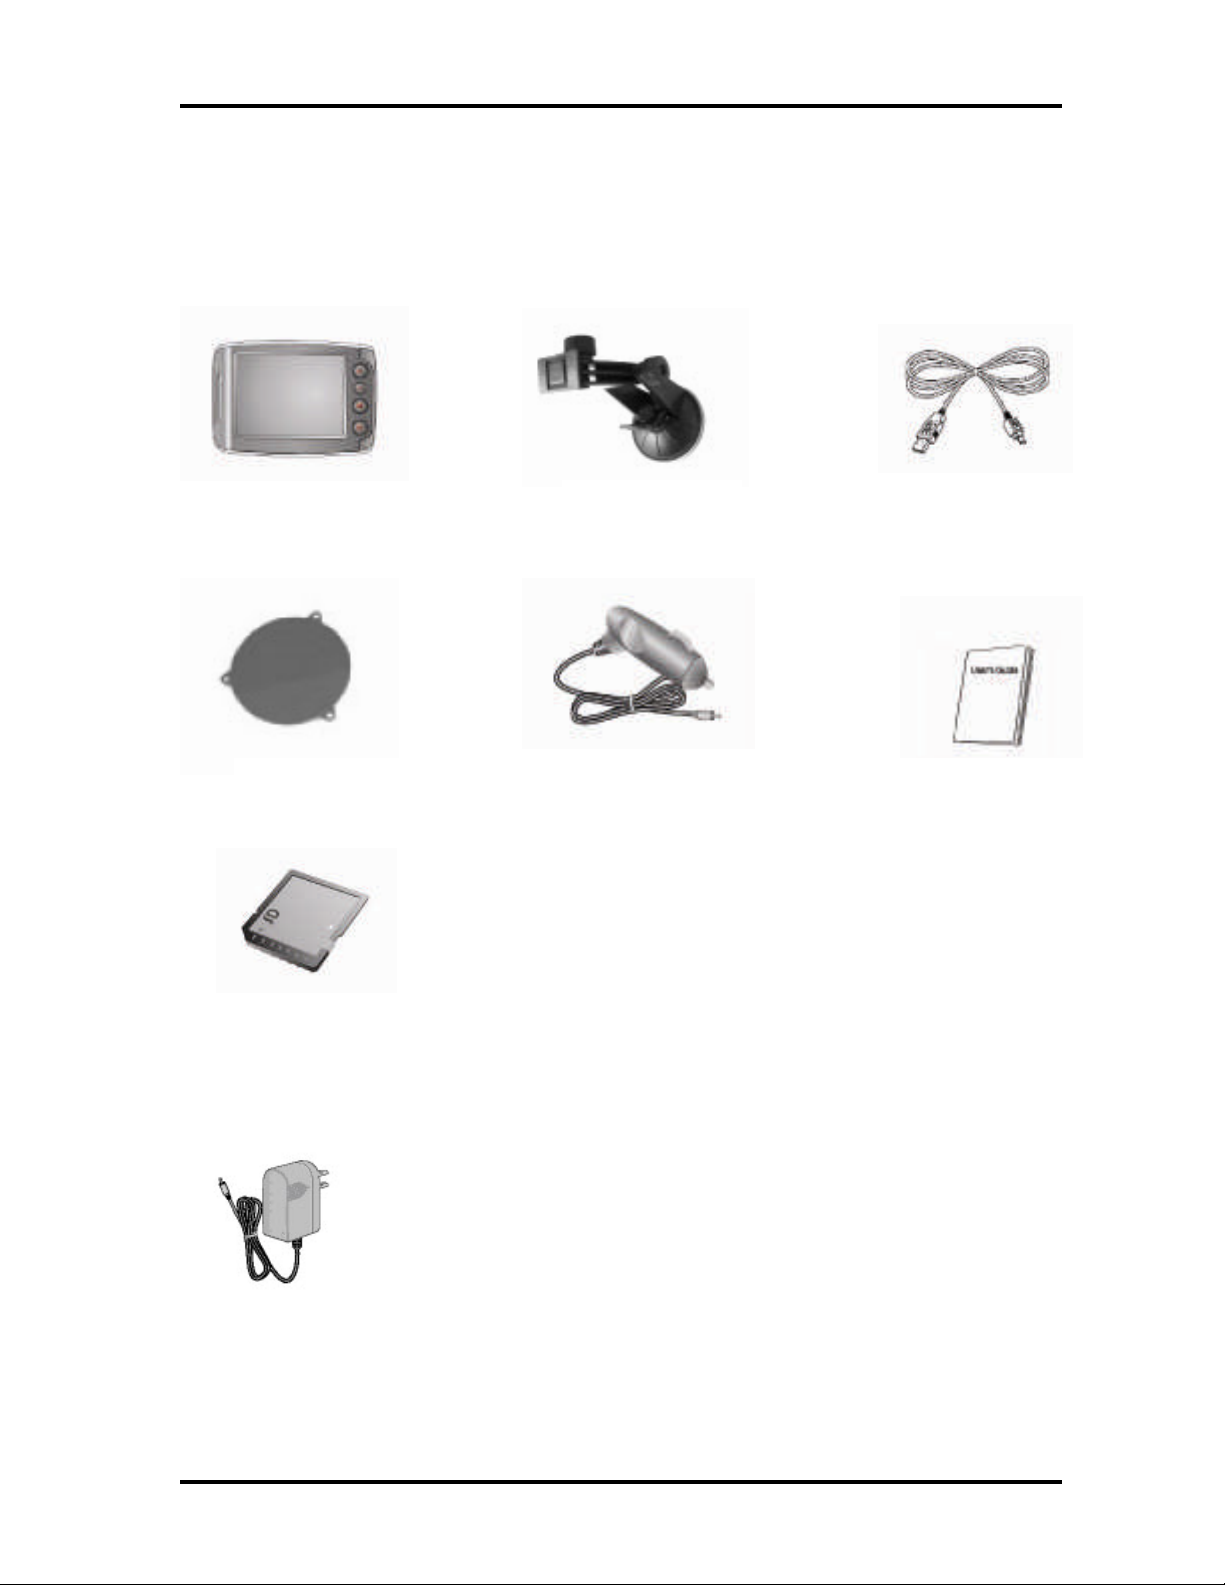
Components of the Voya 320
Standard Components
Voya320 GPS
Dash Disk Cigarette LighterAdapter Quick Reference Guide
SD/MMCMemory Card
Suction Mount
USB Cable
Optional Components
AD/DC Adapter
1
Page 8

Names and Functions of Elements on the Voya 320
Front
GPS Receiver
Volume-up Button
Volume-downButton
SD/MMCMemory Card Slot
Earphone Jack
3.5”TFT LCD
MenuButton
PowerButton
Back
External speaker
Reset Button
Power Jack
Dockingmount connector
USB Port
2
Page 9
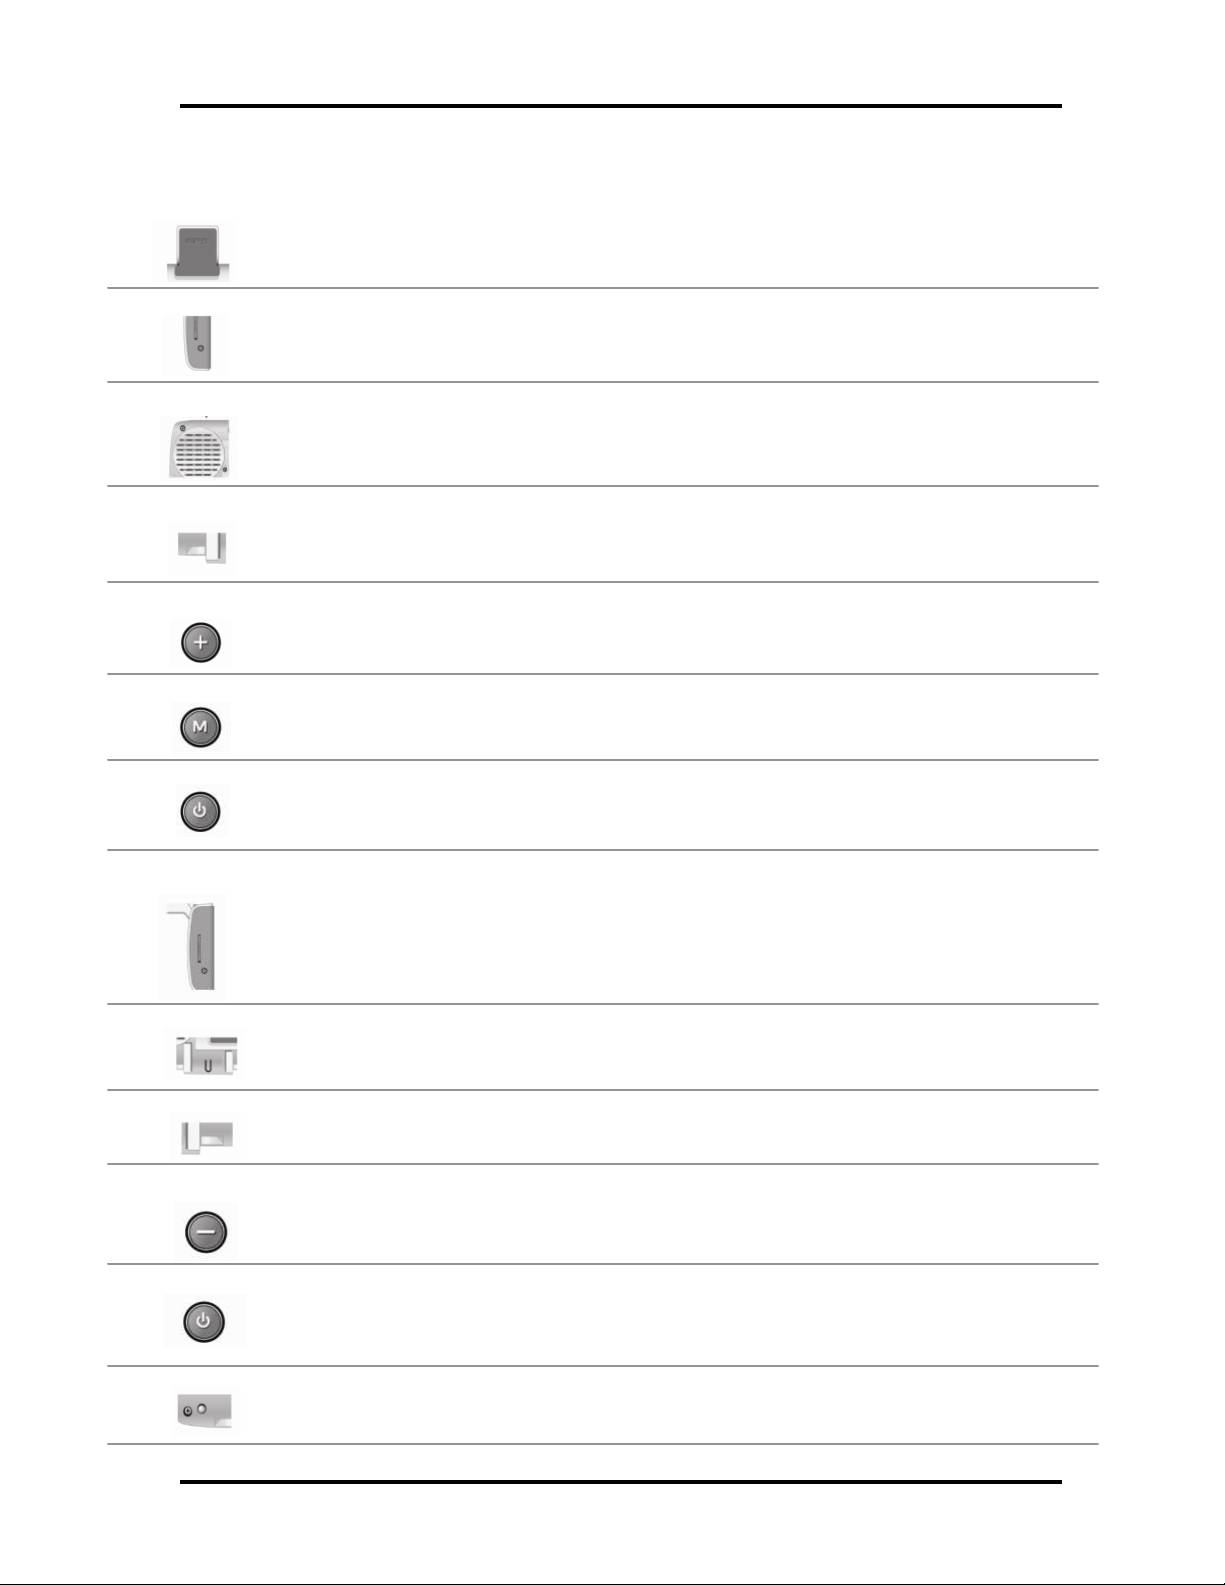
Name and Function of Elements on the Voya 320
Power Button
Volume
-
down
GPS Receiver
Earphone Jack
External Speaker
Power Receptacle
Volume
-
up Button
Menu Button
Power I
ndicator
SD/MMC Memory
Mount Connector
USB Port
Reset Button
The receiver receives data from satellite.Always extend the GPS receiver
horizontally facingthe sky when you operate the system.
The jackaccommodatesan earphone or external speakers.
The speaker playsvoiceinstructionsorother sounds.
The receptacleisconnected toAC/DC power,orthe cigarettelighter adapterin an
automobile.
Pressing the button once increases the volume by onelevel. (Referto“Adjusting
Volume.”)
Pressing the button runs the menu program.
Card Slot
Button
The color of light in the power button indicatesthecurrent power mode and the
status of the battery. (Refer to “Power Mode and Battery Recharging.”)
The spring-loaded slot accommodatesthe SD/MMCmemory card.Insert the
memory cardintothe slotand lightly pressthe card.The card will be seated in
placeinsidethe slot. Pay attention tothe orientation of the card asit isbeing
inserted; the card slot is keyed and can onlybeinsertedin one direction. Never
insertan object other thantheSD/MMCmemory card.
The mountconnectorisused for connecting the suctionmount in the automobile.
(Refer to “Installing OnYour Car.”)
The port accommodates the USB cable when the system is connected to a PC.
Pressing the button once decreases the volume by one level. (Referto ”Adjusting
Volume.”)
Pressing the button switches the system to the power-savingmode.Pressing it
again returns the system to the operation mode (Referto ”Power Mode and Battery
Recharging.”)
Pressing the button initializesthe system (Refer to “About ResetMode.”)
3
Page 10
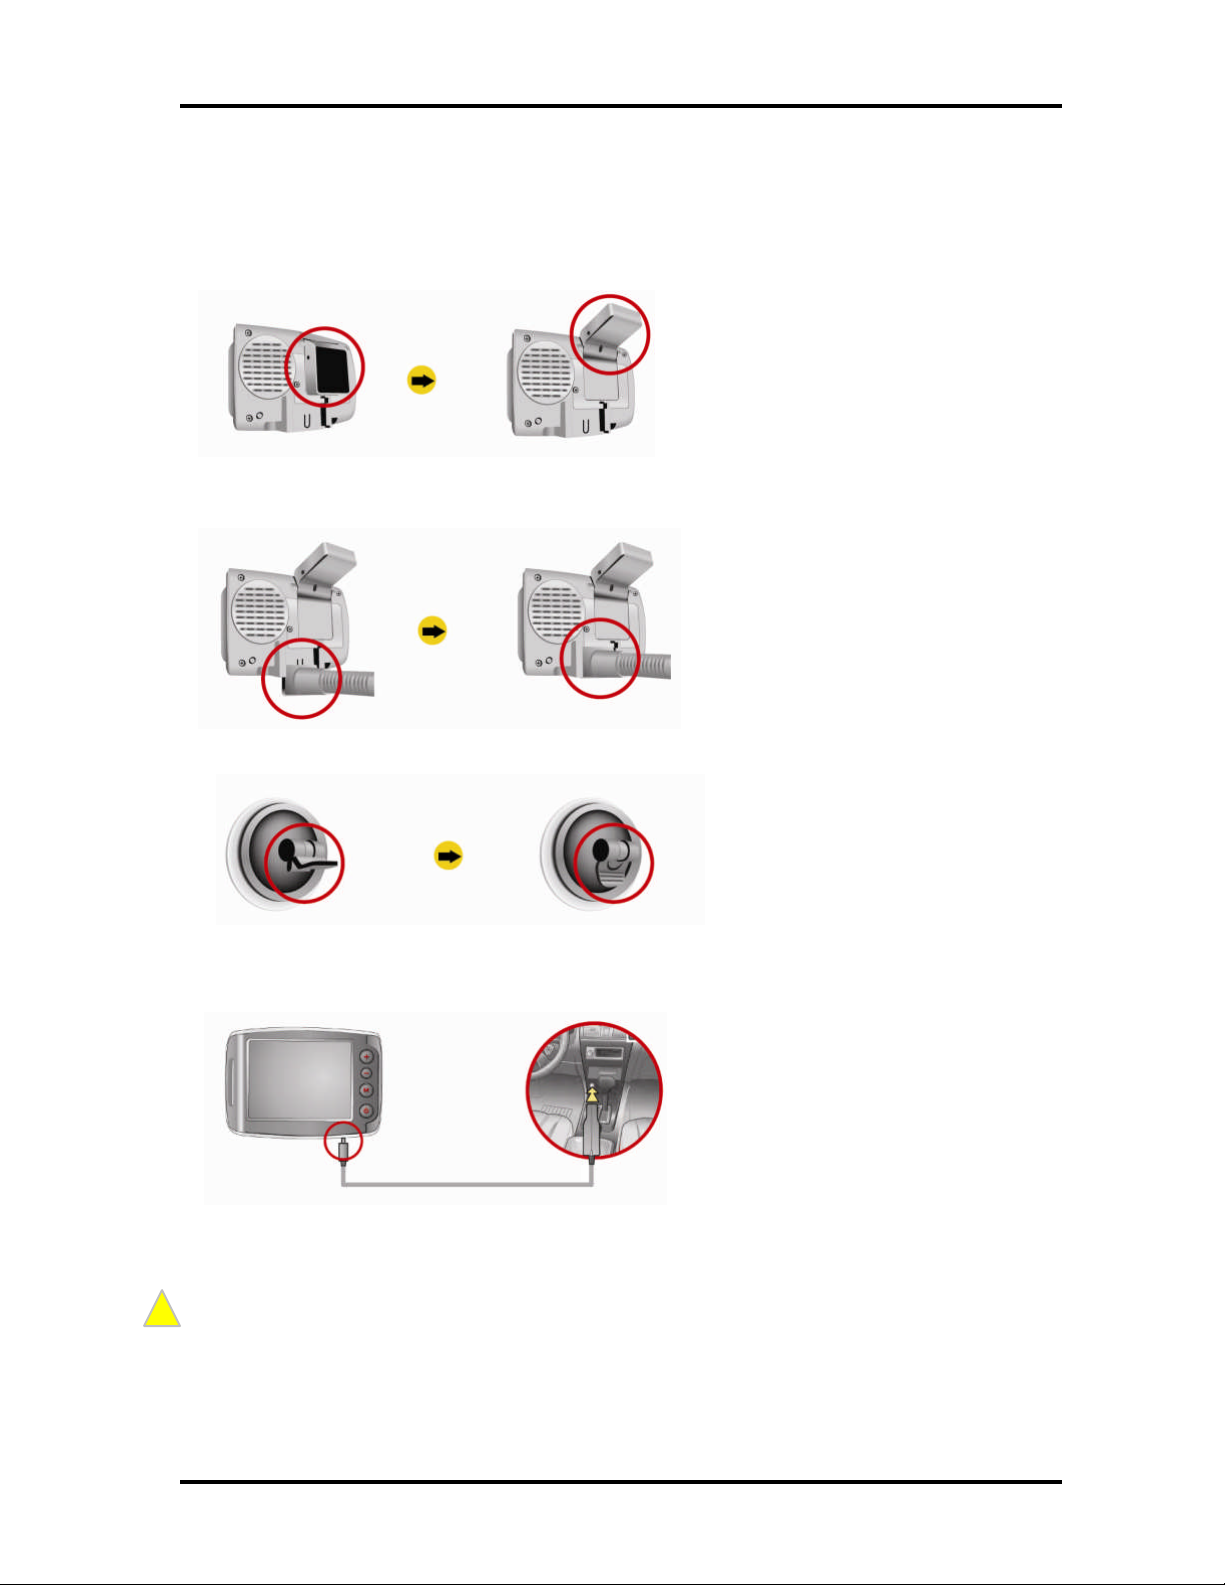
Installation
!
1. Extend the GPS receiver folderin horizontal direction asshownin figure below.
2. Insert themount into the mount connectoras shown in figure below.
3. Tightly pressthe suction mount on the window ofyour car, and turn the locking lever down.
4. Connect the DC Cigarette Lighter adapter to the power receptacle.
Lightly pressthe Reset button toinitialize the system. (Referto “AboutResetMode.”)
Do notinstall thesysteminalocation that may obstruct your viewor interfer e withsafe drivi ng.
Note
4
Page 11
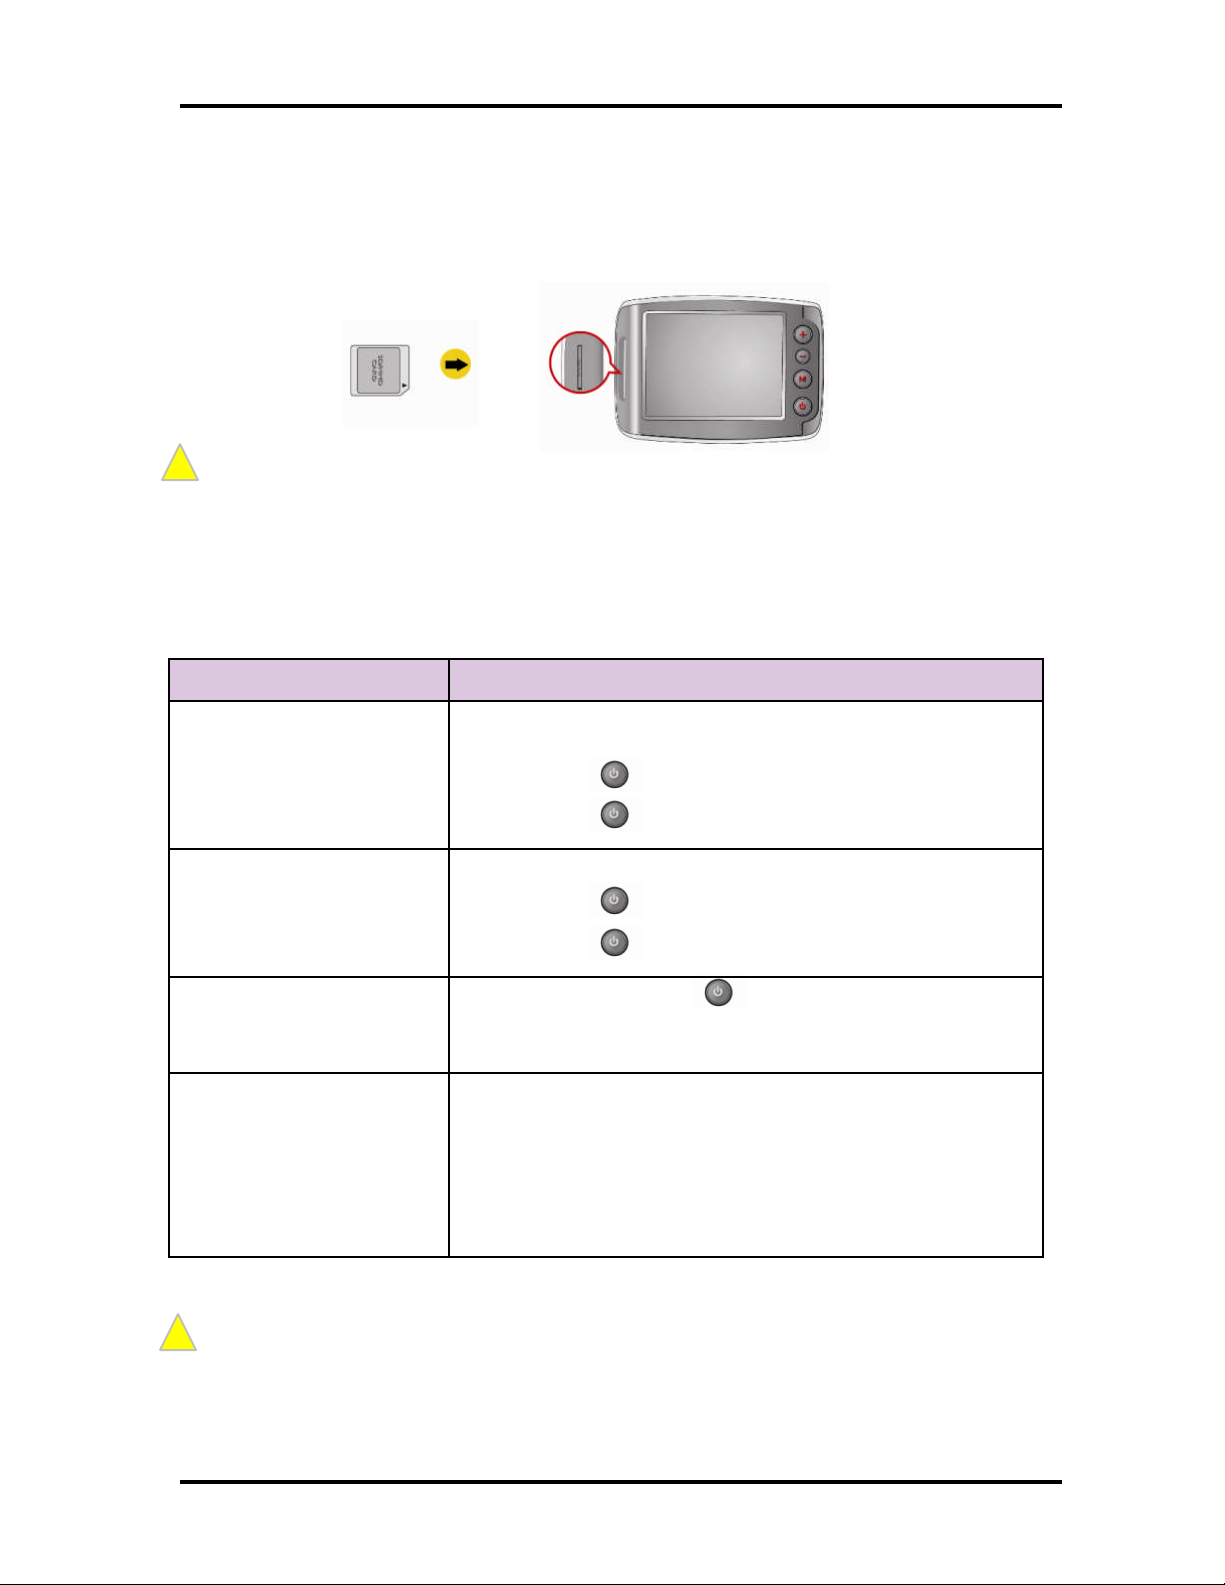
Inserting SD/MMC Memory Card
!
!
Insert theSD/MMCmemory card into the slot whilepaying attention to the orientation of the card
as shown below:
Exerting excessive forcetoinsert intothe slotin the wrong direction may damage theSD/MMC card or slot
Note
Power Mode and Battery Recharging
PowerMode ConditionsofCharged Battery
Powerissupplied to the system for operation from the AC/DC
adapter or the cigaretteadapter/charger in your car.
External PowerMode
[Power button ] lightsred:The battery is being charged.
[Power button ] lightsgreen: The batteryisfully charged.
Powerissupplied to the system for operation from the battery.
Battery-Powered Mode
Power-SavingMode
Forced Power-SavingMode
Ittakes three hours or longer to fullycharge the batteryfrom the forced power-saving mode, when using the
navigation functiononl yinthe preference conditions.
Itis possible tooperate thesystem withthe fullycharged battery for about two hours, when using the
Note
navigation functiononl yinthe preference conditions.
Batterylife will vary dependi ng on usage.
[Power button ] lightsred:The battery is being charged.
[Power button ] lightsgreen: The batteryisfully charged.
Pressing the Powerbutton switchesthe system to the
power-saving mode. Pressing the power button again returnsthe
system to the operationmode.
When the remainder powerin the battery is20-30% of its full
capacity, the warning windowisdisplayed. In such a case,
immediately recharge the battery. If the battery isalmost
discharged, itentersforced power-saving mode automatically.
Once it enters the forced saving mode, it cannot be turned on
again until thepower issupplied by connectingthecigarette
adapter/charger or AD/DC adapter.
5
Page 12
6
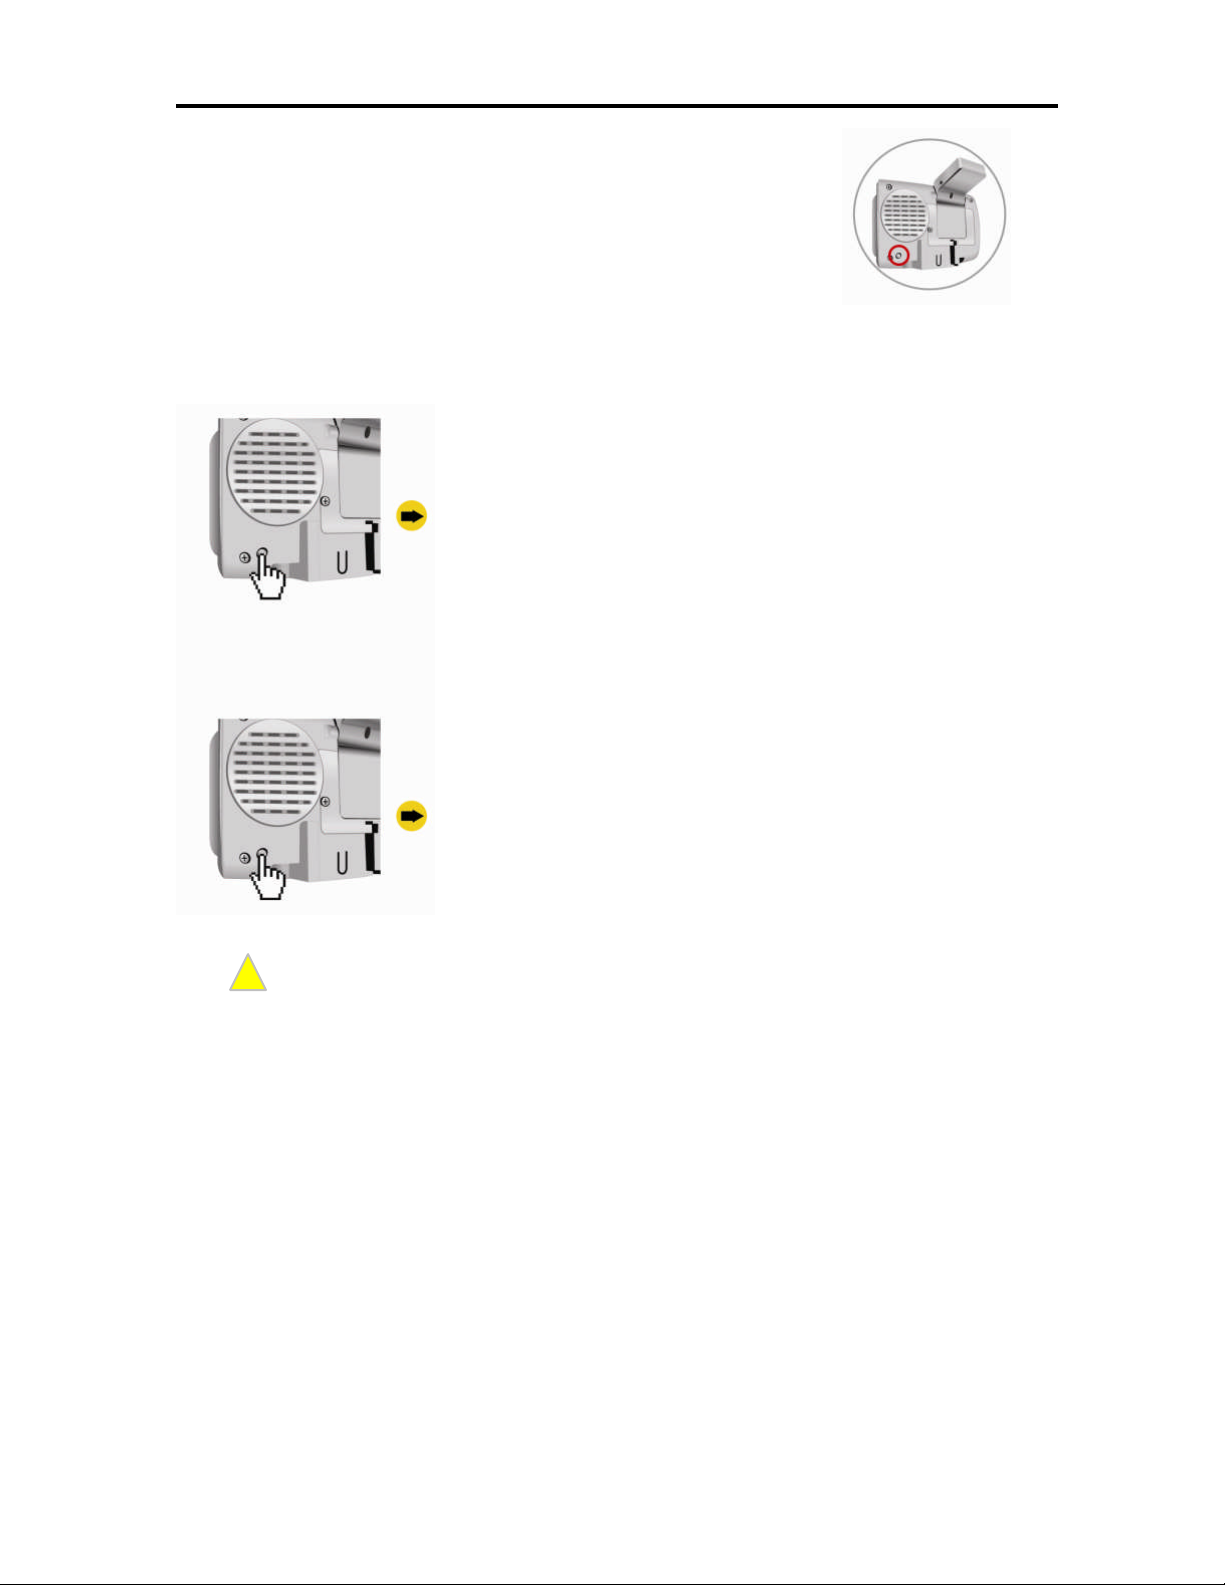
About Reset Mode
!
Two resetmodesare provided on the system. You can select the
desired reset modeby pressing the reset button on the rear of the body as
shown right.
Soft Reset
Execute the soft reset by the pressing the Reset button as
shown left: Lightly press the button once.
Function
Lightly pressing the Reset button exits all of the current
programs, and restarts the system. This mode isused when the
system is shut downdue to fault in programs.
Hard Reset
Execute the hard reset bypressing the Resetbutton asshown
left.
Thesoft reset modeis not allowed when the systemis connected to a PC vi a the USBcable.
You MUST reset the system when suppl ying power to thefully discharged system.
Note
After Reset
After reset, the system startsup.
Function
Press the Reset button until theunit turnsoff. After three
seconds, lightly pressthe reset button againto restart the
system. This modeisused when the soft reset does not solve
the problem.
Page 13
7
Preferences
Brightnessof the backlight and the sound volume upon initial power supply are set as described
in the table below.
Setting Defaults
Backlight Level 4 (Lowest: Level 1;Highest: Level 4)
Volume Level 9 (Lowest: Level 0;Highest: Level 10)
Page 14
8
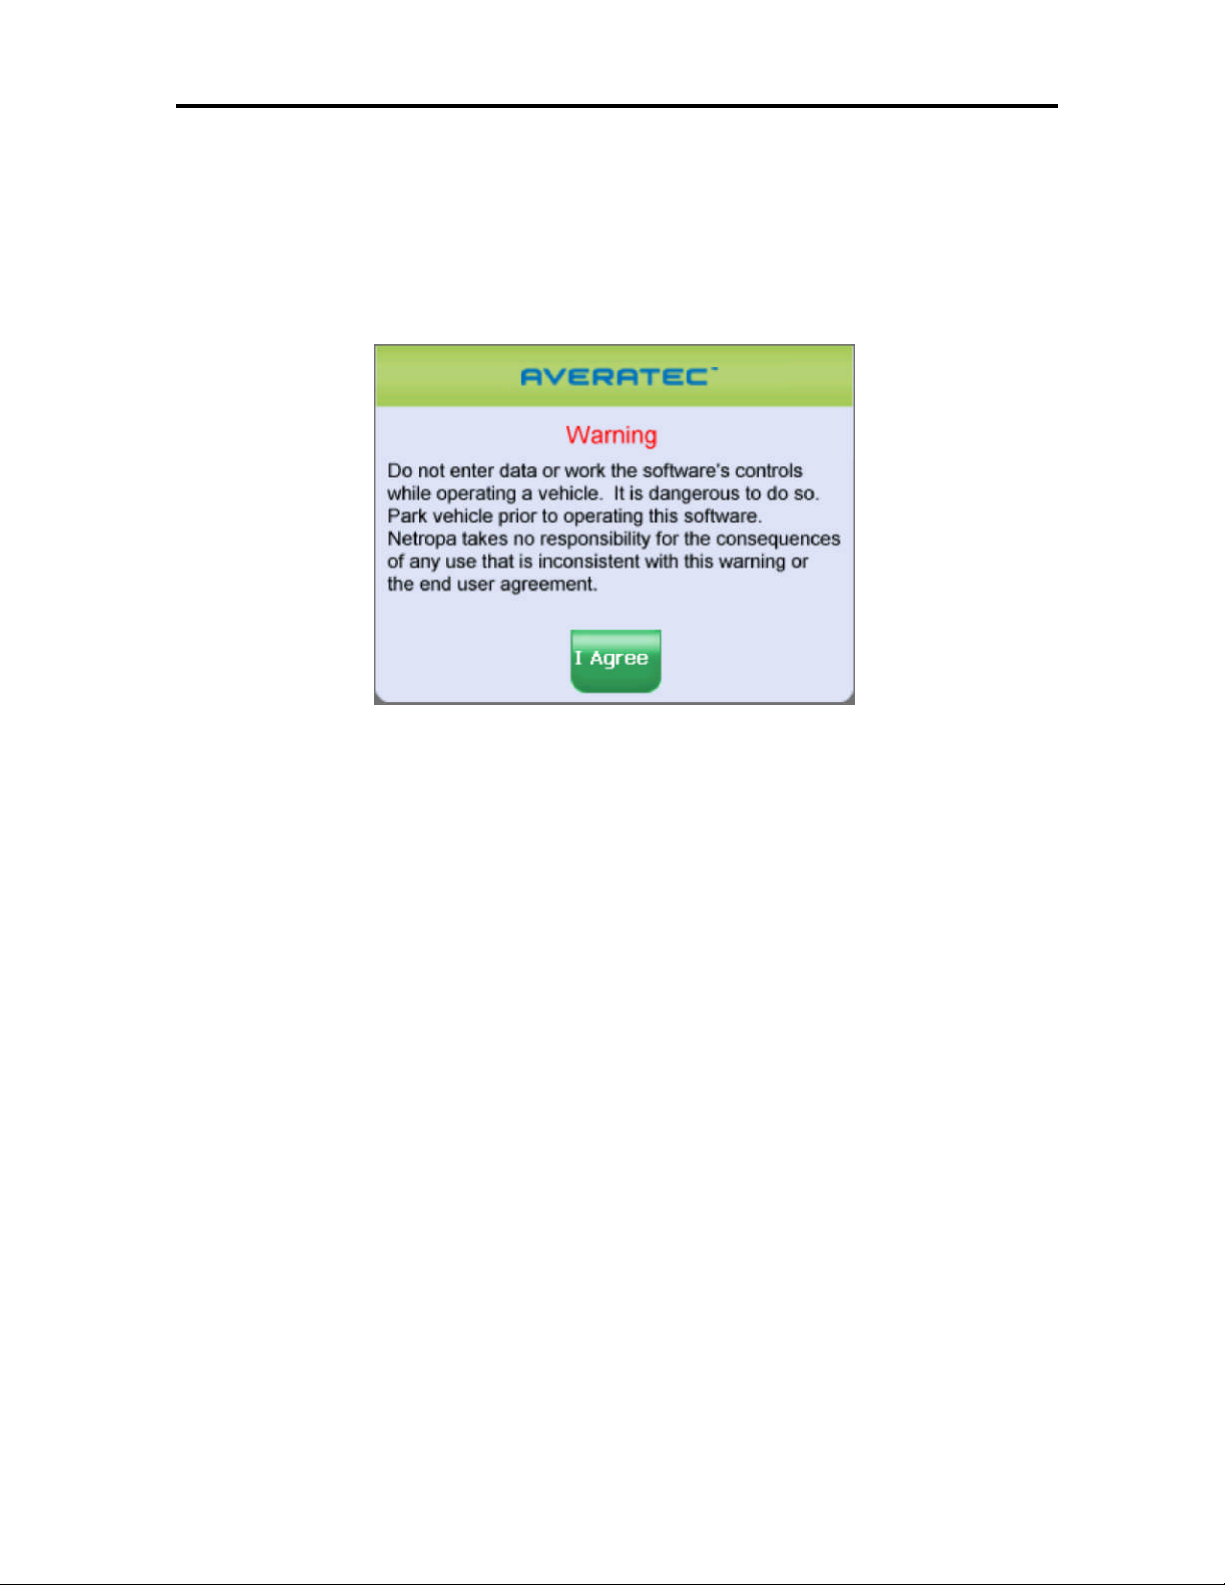
Starting the Software
Once the GPS receiver isturned on and navigation software isstarted, theunit will automaticallygo
to the GPS receiver’smain menu or display the map page.
Once you select Navigation, a warningscreen will appearfirst. Simply read and tap the I Agree
icon.
It is best to be outside and have a clear sky above to allow the GPS to obtain better
reception of the satellites. Clear sky means: no trees, bridges, overhangs, carports etc.
Cloudy skies are ok. The unit is ready to travel and navigate once the map pageis displayed
and the position icon changes from red to green or yellow.
Page 15
9
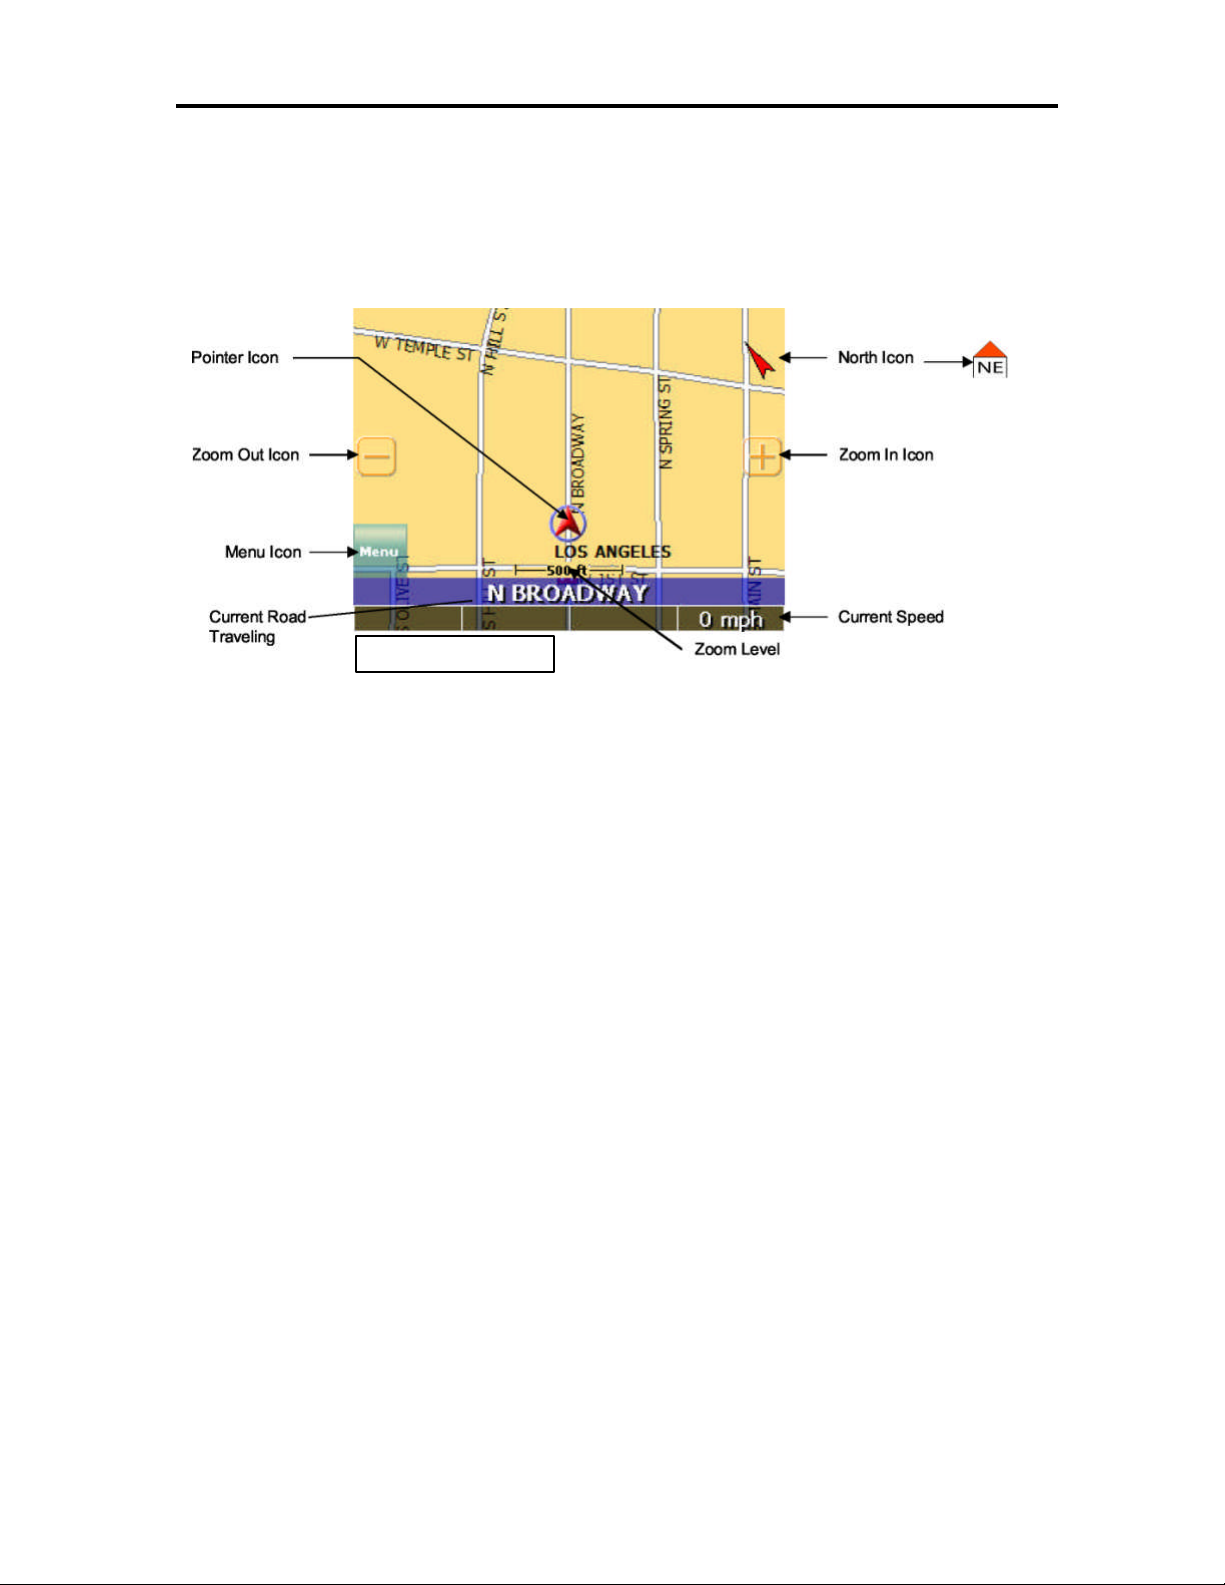
Map Page
Nav igation Mode
The Map Page displaysyour current position, zoom in/out iconsand zoom level in miles, the street
you’re traveling on, your current speed, and Menu icon. The pointer represents your location and
direction onthemap.
NorthIconPointer Icon
Zoom Out Icon
Menu Icon
The pointer iconalso indicatesthe signal strength of the satellite signals: Silver = no signal; Red =
poor signal;Yellow = weak signal and Green = good signal.
Zoom In Icon
Zoom In/Out
The zoom level isdisplayedin the lower center of the map page.To change the zoom level, tap the
zoom icons on the screen or the (+) or (-) buttons on the GPS unit. Note: Street details are not
shown higher than zoom level of 2000 ft.
Track Up (Heading) or North Up
In the upper right hand corner is the North indicator icon. This indicator will always point to the
north. While traveling, the direction of travel (Pointer Icon) is always pointing up and the map
rotates around the Pointer Icon.
When the map is switched to North Up from the defaulted Track Up, North is always at the top of
the screen while the direction of travel (N,S,E,W etc.)isdisplayed under the red arrow. See Figure
above for an example for a NE direction of travel.
Thereare three waysto change the display:
Page 16

10
1. AccessDisplay Optionsthrough Settings.
Panning Mode allowsPoints ofInterest (POI) and street name information to be displayedand
also allows
To enter Panning Mode: Simply tap and drag
Tap
on the POI icon
to
POI information
2. Simply tap the North indicator and the icon will change from one setting to the other.
3. Go to: Main Menu/Display Options/Orientation and change the option.
4. Simply press the direction button in the up position.
Navigation and Panning Modes
The map page can be displayedintwo views; Navigation Mode and Panning Mode. Navigation
Modedisplaysmovementsalong themap.
movement ofthemap todifferent
areasfor viewing.
along the screen toallow movement of the
map to view different areas.
To exit Panning Mode, tap the red“X” button
inthelower right corner of the display.
To find out more info on a POI, simply tap on
the POI’sicon and the POI Info screen will be
displayed.
get detailed POI
information
Tap here to exit
panning mode
screen isdisplayed
Page 17

11
The POI Info screen providesthe POI’sname and phone number.
At the bottom of the POI Infopage there are three choicesfor the POIinfo displayed:
Nav = Setan auto route tothe POI
Fav = SavesthisPOIinto the Favorites folder
Map =Return to the map page
POIs Displayed on the Map Page
Selectingonly certain POIsishelpful in large city
areaswhere the POIiconscould overwhelm the
map page.
To change the default settings.
1. Tap Menu, Settings, Display Options.
2. Under the POI Icons column, select what POIs
are shown on the map page. Default setting is
all POIsare selected.
POI on
POI off
Page 18

12
Current Route
the yellow
arrow icons or thescroll
This page isnormally blank unless a navigation route is entered. All turnswithintheroute are
displayed.Thispage is useful when looking for the next turn or turnsthat are approaching.
Tapping the Map iconwill
show the highlightedturn on
the map. Themap page will
be shown in panning mode.
Tap on either
bar to see all turns in
the route
Trip Information Page
The Trip Information Page can store three different trips. The information displayed includes: trip
time, top speed,average speed, total distance, date and time information.
Tap thisicon to
Start/Stop atrip.
Page 19

13
GPS Info
Numbers belowthe bars indicatesatellite number
This page displays the GPS receiver’s satellite reception, local and UTC time (24hr format independent of the GPS receiver’sown clock), current longitude and latitude, altitude and traveling
speed accessed under
Settings
Bars indicate device is receiving
satellite signal
Satellitesignal strength
The vertical barson the Satellite page indicate the signal strength of the received satellite(s). The
higher the bar, also higher the number, the stronger the signal. Thenumber below each bar
indicatesthe satellite numbers.
Almanac
The Almanac isa simple page that provides
sunrise and sunset times, current phase of the
moon, age of the moon,full moon and the next
newmoonexpected.
Current Location
Use this page to get information about the
current position and from thispage the location
can be saved tothe Favoritesfolder.
Page 20

14
TappingtheSaveicon willshow
the edit screen to allow
renaming thelocation before
saving it in theFavorites folder
Map View Style
The map page can be viewedin differentdimensions; normal 2D and three optionsof 3D.There
are two waysto change the displayview:
1. Simplytaponthedesiredviewingoption.
2. Go to: Menu/Settings/Display Options/3DView and change theoption.
3. Tap either the OKIcon to accept or the X to cancel.
Tap on eithertheyellow
arrow icons orthescroll
bar toseetheavailable
information.
Select the display
viewing style
One of three 3D Views
Page 21

15
Creating and Using an Auto Route
Estimated time of
Estimated time
travelingto destination
Distanceto destination
Street nameof upcoming
turn
Turn approaching and
Auto routeengaged
When an auto routeisselected the map page will show the route on the map by changing the road color to blue.
distance totheturn
and displayed with a
blue road along the
route (green in Night
mode)
arriv al at destination
Vehicle speed
To start an auto route, begin from themap page. Tap the Menu iconand from the Main Menu
page tap on theDestination icon.
Tap on the Menu
icon toenter the
Main Menu page.
Figure 16C
Tap on theDestination iconto enter the
Destination Menu page.
Page 22

16
When theDestination Menu is shown, select the
category to create an auto route.
Thefollowing pages cover howtocreatean auto
route f rom thesecategories.
Destination by Address
1. Tap Menu, Destination, Address.
2. Tap Change to select the state in which to search.
3. Tap Street First toenter the street name first or
City First to enter the city name first.
Note: Any time the keyboard isdisplayed, the program will display choicesthat closelymatch the
category name being typed.Tap the OKicon once a choice iscorrectly shown.
If Street Firstisselected
1. Enter streetname and tap OK.
(!) Advisory - DO NOT ENTER STREET TYPE. For
Main Streetjust enter Main. Note: The program will
display choices that closelymatchthe streetname
being typed. Tap the OK icononce a choiceis
correctly shown.
2. Enter house number and tap OK.
3. From the match list, select the desired address.
4. Tap Nav to navigate to thislocation; or
5. Tap Fav to add thislocation to the Favorites
folder;or
6. Tap Map to set this location asyour starting point
and see location on the map.
Page 23

17
If City First isselected
1. Enter city name and tap OK.
2. Enter street name and tap OK.
(!) Advisory - DO NOT ENTERSTREET TYPE. For
Main Streetjust enter Main.
3. Enterhouse number and tap OK.
4. From the match list, select the desired address.
5. Tap Nav to navigate to this location;or
6. Tap Fav to add thislocation to the Favorites folder;
or
7. Tap Map to set this location as the starting point and
see the location on the map.
(i) Information - If a largenumberof records are found
by the Street First method, the program will automatically revertto City
First method.
Destination by Intersection
1. Tap Menu, Destination, Intersection.
2. Tap Change to select the state in which to search.
3. Tap eitherStreet First toenter the street name first
or City First to enter the city name first.
If Street Firstisselected:
1. Enter street name and tap OK.
(!) Advisory - DO NOT ENTERSTREET TYPE. For
Main Streetjust enterMain. Note:The program will
display choices that closelymatchthe streetname
being typed. Tap the OK icononce a choiceis
correctly shown.
2. Enterthe name of the cross street and tap OK.
(!) Advisory - DO NOT ENTERSTREET TYPE. For
Main Streetjust enter Main.
3. From the match list, select the desired intersection.
4. Tap Nav to navigate to this location;or
5. Tap Fav to add thislocation to the Favorites folder;
or
6. Tap Map to setthis location as the starting pointand see the location on the map.
Page 24

18
If City First isselected:
1. Enter city name and tap OK.
2. Enter street name and tap OK.
(!) Advisory - DO NOT ENTERSTREET TYPE. For
Main Streetjust enter Main.
3. Enterthe name of the cross-street and tap OK.
(!) Advisory - DO NOT ENTER STREET TYPE.
4. From the match list, select the desired intersection.
5. Tap Nav to navigate to this location;or
6. Tap Fav to add thislocation to the Favorites folder; or
7. Tap Map to set this location as the starting point and see
(i) Information - If a largenumber of records are found by the Street First method, the
program will automatically revert to City First method.
Destination by Pointsof Interest (POI)
1. Tap Menu, Destination, Points of Interest.
2. Tap one ofthecategoriesforPointsofInterest.
3. Tap a sub category (See figure 20A or selection (if
shown)
4. Select Alphabetical or By Distance within 25miles
or Alphabetical under List All or By City.
Page 25

19
If Alphabetical isselected:
1. Enterthe name of the destination.
2. Select a matching POIlocation from the list.
3. Tap OKto accept the location. The location detailswill be shown.
4. Tap Nav to navigate to this location;or
5. Tap Fav to add thislocation to the Favorites folder; or
6. Tap Map to set this location as the starting point and see the location on the map.
If By Distance isselected:
1. Select a POI from the list
2. Tap Nav to navigate to this location;or
3. Tap Fav to add thislocation to the Favorites folder; or
4. Tap Map to set this location as the starting point and see the location on the map.
Destination from Favorites
1. Tap Menu, Destination, Favorites.
2. Select a destination from the list if you have already createdone.
3. Tap Nav to navigate to this location;or
4. Tap Map to set this location as your starting point and see the location on the map; or
5. Tap Editto create a label (i.e. HOME) forthis destination or changethelabel if one already
exists; or
6. Tap Deltodelete this location from the Favoritesfolder.
Destination from Recent
1. Tap Menu, Destination, Recent.
2. Select the destination.
3. Tap Nav to navigate to this location;or
4. Tap Map to set this location as your starting point and see the location on the map; or
5. Tap Fav to add thislocation to the Favorites folder; or
6. Tap Deltodelete this location from the Recent list.
Destination from City Center
This optionauto routesto a city instead of a street orPOI. Citychoicescan bemade statewide or
within 25 milesfrom the current location.
Page 26
20
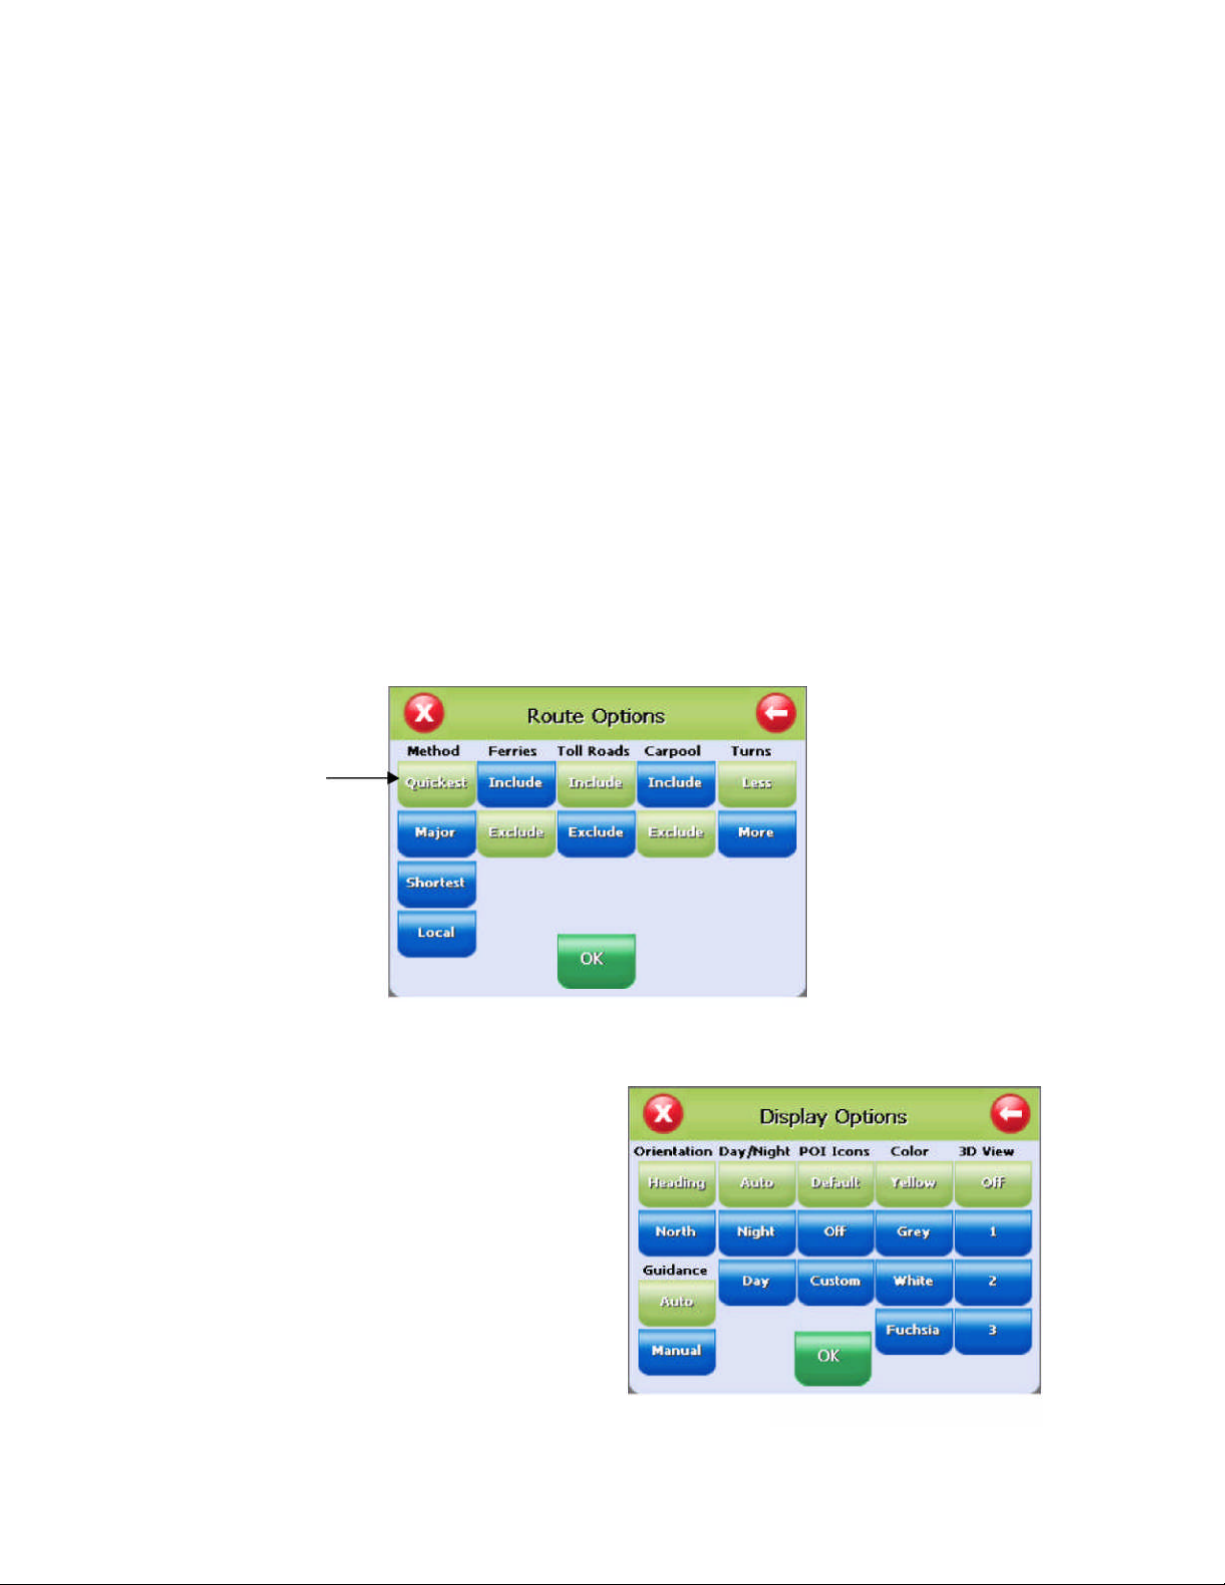
To Set the Route Options
1. Tap Menu, Settings, Route Options to open the Route Optionsscreen.
2. Select the desired option(s).
3. Tap OK toaccept or Cancel to reject changes.
Method:Selectsthe method of routing.The quickest route,shortest route,route that favors major
roads, or route that favors local roads.
Ferries: Selectswhether ferries should be included or excluded in the route calculation. Note:
selecting ferries doesnot include ferry schedules or time spenton the ferry.
Toll Roads: Selects whether toll roads should be included or excluded in theroute calculation.
Carpools: Selectswhether carpool lanes(HighOccupancy Vehiclelanes) should be included or
excluded in the route calculation.
Turns: Selects more orlessturnsin theauto route.
Green color
indicates selected
option
To Set the Display Options
1. Tap Menu, Settings, Display Options to
open the Display Optionsscreen.
2. Select the desired option(s).
3. Tap OK toaccept or Cancel to reject
change(s)
Page 27

21
Orientation: Orientsthe Map screen so that the driving direction isheadingup or North isalways
up
Day/Night: The Auto setting changes from Day to Night Mode automatically at approximately
sunrise and sunset. Select “Day” to have the display be bright or select “Night” to have the display
change to be better suited fornight driving.
POI Icons: The “default” setting will display onlycommonlydisplayed icons that appearon the map
at 1000 ft zoom level or closer. The “Off” option turns off all POIicons so that none are displayed.
The “Custom”option allowswhich type or category of POIto be displayed.
Color: Sets the background color of the map page toseveral color choices.
3D View: Sets the viewing angle from the default setting of 2D to 3 different 3D views. Note: when
map page isset to 3D, tapping on the map will not provide POIinformation. Different viewscan be
toggledfrom 2D to 3D by pressing down on the directional button.
To Create orAdd to the FavoritesList
1. Entera destination.
2. From the match list, tap Fav.
3. Tap OK.
- or -
1. TapMenu, Recent.
2. Select a recent destination.
3. Tap Fav.
4. Tap OK.
To Add a label to your Favorites
1. Tap Menu, Destination, Favorites.
2. Select a destination.
3. Tap Edit.
4. Entera label using the keypad.
5. Tap OK
Page 28
22
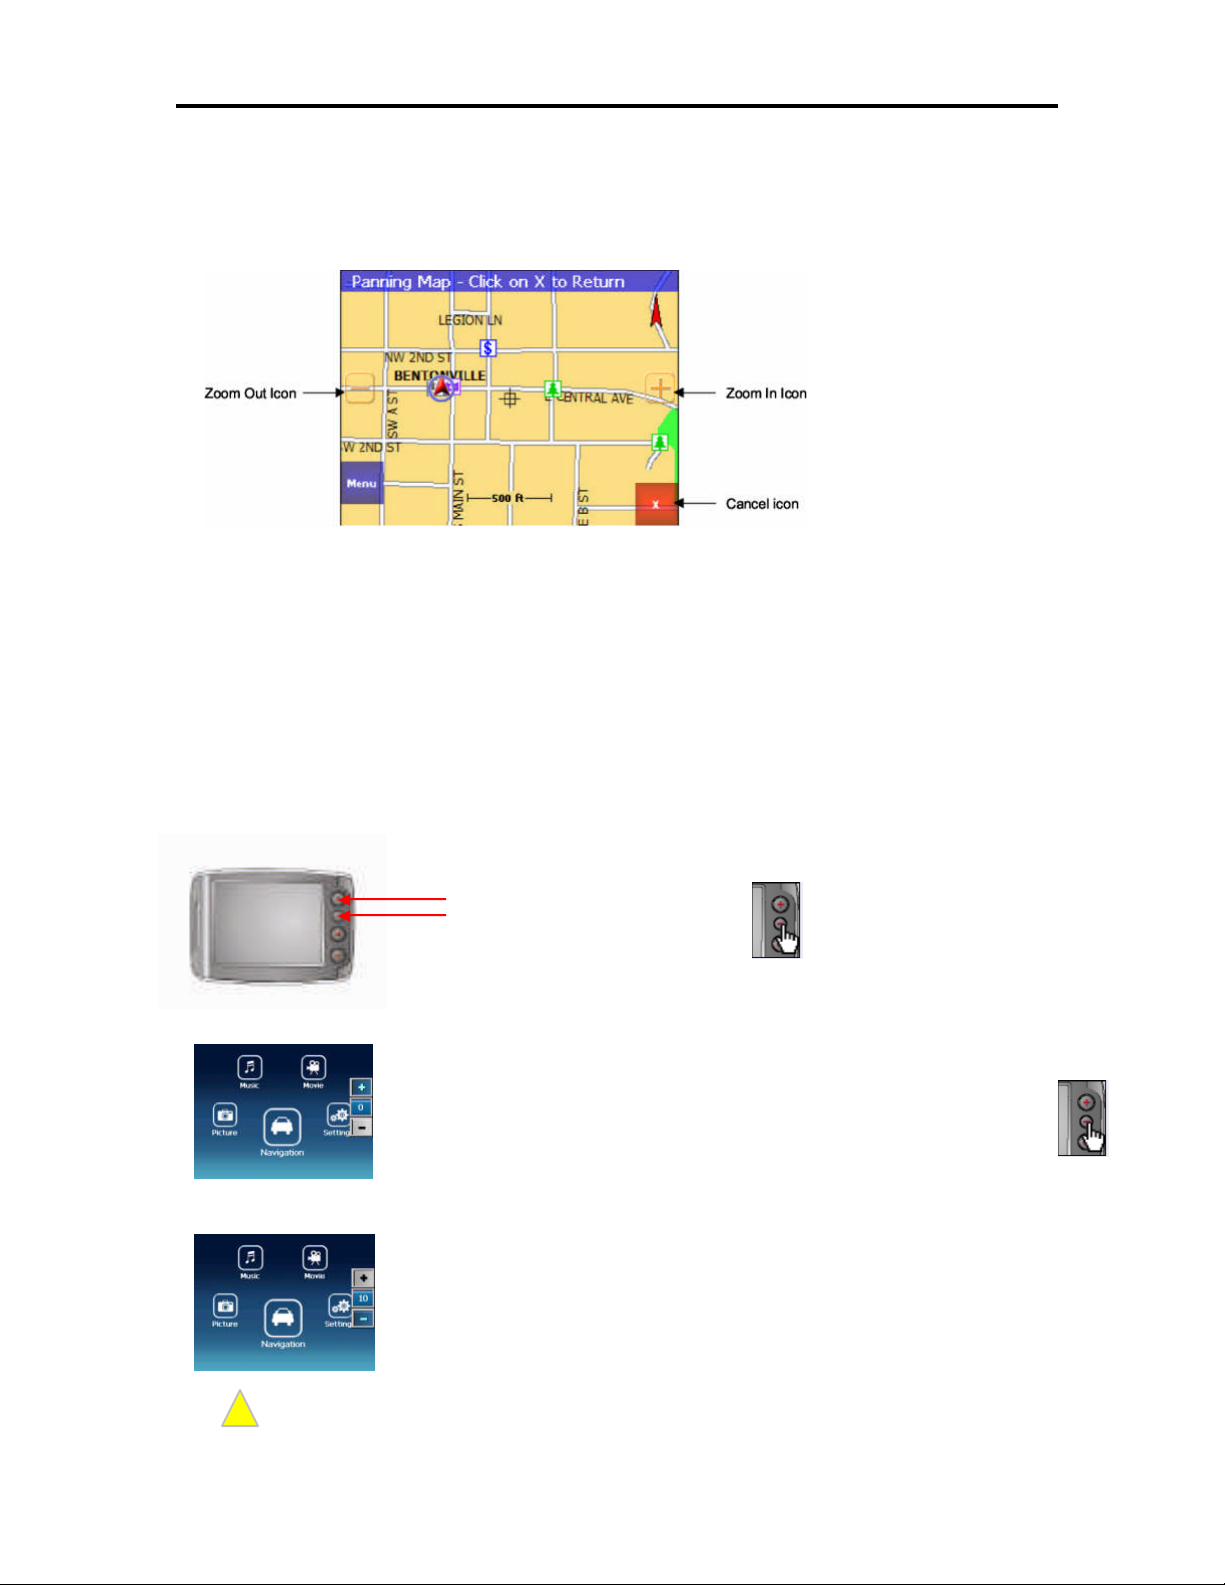
Panning and Zooming
Volume UP button
Volume DOWN button
!
ToPan the Map
From the Map screen tap and drag the map area.
(i) Information - Whilein PanningMode,tap the X icon to return to the Map screen.Tap on the
North icon displayed to rotate the map so that North or Heading ispointing up.
To Zoom In and Out
Use the hardware up(+) and down(-) buttons to zoom in and zoom out. You canalso use the zoom
icons(+/-) on the Map screen. See figure 10A.
Adjusting the Volume
1. Pressthe Volume-up button or the Volume-down
2. A boxindicating the current volume isdisplayed asshown left.
Pressing the Volume-up button or the Volume-down button
increasesor decreasesthe system volume byone level.
3. You can adjust the volume from Volume 0 to Volume 10. When there is
no further input, the volumeentered last isstored. The volume
indication box automatically disappearsafter two seconds.
Volume adjusted withthe volume buttons is appliedtothe whole system.However,the volume of the music player
or the movie player affectsonly theconcerned program.
Note
Page 29

23
Localization
The localization options, under Settings,give you control
over settingsaffected by your location,including:
- Language
- Time zone
- Daylight savings time
- Units
Speed alert
You can use the speed alert feature to warn you if your vehicle is exceeding the speedlimit. There
are two speed alert options: Auto speed alert and fixed speed alert. Auto speed alert usesthe type
of road to determine the probably speed limit. Fixed speed alert lets you enter a speed and will
warn you if that speed isexceeded.
To set the speed alert:
1. Tap MENU.The main menu appears.
2. Tap Settings, Speed Alert. The Speed Alert screen
appears.
3. To setauto speed alert:
• Tap the Auto SpeedAlert check box. A check
markindicates that AutoSpeedAlertison.
• Tap OK. A warning appears.
• Tap OK to close the warning.
• Tap OK. You return tothemap.
4. To seta fixed speed alert:
• Tap the Fixed Speed Alertcheckbox. A check mark
indicatesthat Fixed Speed Alert ison.
• Tap the speed you wantto use as a maximum
speed.
• Tap OK.You return to the map.
Page 30
24
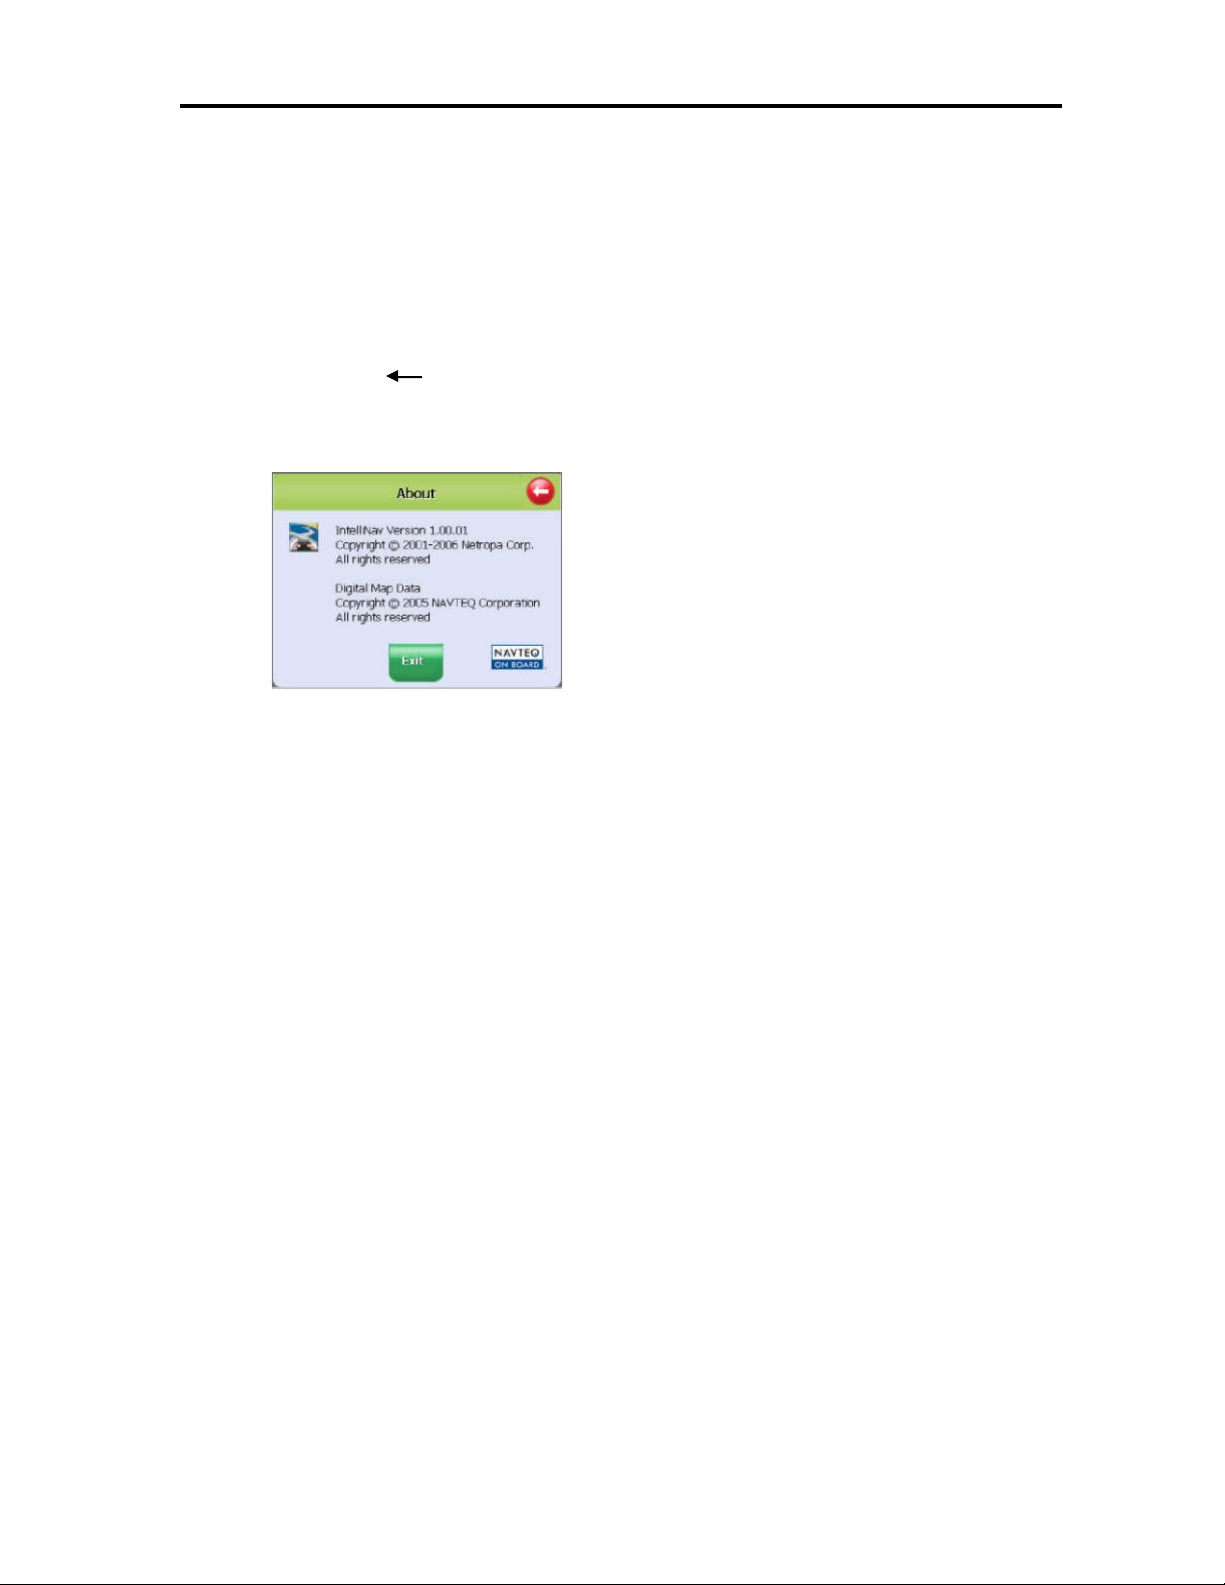
Exit Map Program - About Screen
For software version information and also toexit the mapping program, followthese steps.
1. Tap Menu.
2. Tap System Information, the About screen will be shown.
3. Tap the left arrow icon to return to the map page.
4. Tap Exit to turn off the GPS program.
Page 31

25
Connecting System to Your PC
!
1. It ispossible to copy map data,music ormoving picturefiles into the built-in flash
memoryinside the body orthe SD/MMCmemory card by connecting the system to a PC
viathe USB cable.
Itis not allowed to execute functions other thanfile copying and moving when the system is
connectedto a PC via theUSB cable; the button, the touchscr een, thesoft reset mode and theGPS
receiver becomeinoperable.
Note
Thesystem operates with the power fromtheUSBportofthe PC when the system is connectedto the
PC.Therefore, the system shall be connected withthe USB port wherethe power is normally
supplied. The system may not be capable of normal operation whenconnecting withthe USB hub.
The batteryis notrecharged viathe USBport
2. After booting the PC, connect the system to the PC using the USB cable asshown
below.
3. When thesystem issuccessfully connected to the PC, the screen displays as follows:
4. When thesystem isnormally connected to the PC, you can see two ‘removable disk’
drives in the WindowsExplorer window.
Page 32

26
Installing the USB Driver
No driver isneeded when using WindowsXP. No other operating system issupported.
Distinguishing Between Removable Disks
The two ‘removable disks’ represents‘Built-in flash memory’ and ‘SD/MMC
memory’ of thesystem, respectively.
‘Built-in flash memory’ and ‘SD/MMC memory’ are indicated in WindowsExplorer as
‘Removable disk (*:)’ and ‘Removable disk (*:)’, respectively. Driveletterswill be
assigned according to the system resources available. Of the twodrives, the first drive
(*:) corresponds to ‘Built-inflash memory.
Disconnect the USB cable once map data updating or file copying workiscomplete.
When disconnecting the USB cable, thesystem restarts.
Page 33

27
Copying Files
!
To playthe media data usedineach media player program, e.g. music player, movie player, and
picture viewer, the data filesmust be locatedinthe ‘SD/MMC Memory’ folder only.The data files
specific to each media playermust be stored in the specified folder in ‘SD/MMC Memory’ when
you wish to use theprograms.
The foldernamesof therespective media playerprogramsare as shown in the table below.
Supplementary Program Folder Name
Music player ‘Music’
Movie player ‘Movie’
Picture viewer ‘Picture’
Connect the system to the PC via the USB cable,and copy necessary files from Windows
Explorer on the PC to‘SD/MMC Memory’ folder. (Refer to “Connecting System with PC-
Distinguishing Between Removable Disks.”)
Openingthe ‘SD/MMCmemory’ folderonPC WindowExplorerdisplays the screen asshown.
Donot copyfiles of music, movie, or pictures tothe‘Built-in flash memory’ folder.
Donot forget to execute‘Safel yRemoveHardware’ onthe PC after you complete copying files.
Note
Donot disconnect the USBcableor removethe ‘SD/MMC memory’ card whil e you are copying files.
Safely Removing Hardware
Windows XP
File copyingisnormally complete only when executing ‘Safely
Remove Hardware’ on the PCafter copying thefiles by
connecting the system to the PC via the USB cable.
Page 34

28
Windows XP
Double Click
Select
Select
Click
Select
Click
Double clickthe Windowtray icon to execute ‘Safely Remove Hardware’ asshown below.
Page 35

29
Using SupplementalPrograms
Getting Ready
Storing Files
Files ofmusic,movies and pictures canonly be stored in ‘SD/MMCmemory’. Itisnotallowed to
play the files ofmusic, moviesand pictures stored in ‘Built-in flash memory’ with the
supplemental programs.
Copy the desired files under their respectiveMusic, Movie orPicture folder in ‘SD/MMC memory’
before playing the file.
Playing Music Files
Normal MP3 or WMA files can be played with the Music player. However, certain MP3 files or
OGG filesencoded inthe variable bit rate mode can onlybe played with the Movie player
(Refer to ‘Movie Player’).
Menu Program
1. When the system starts, the menu selection screen isdisplayed as
shown right. If youmake no selection for five seconds from the
menu selection screen, the system isswitchedautomaticallyto the
navigation mode.
2. When you pressthe desired icon once, the
system isswitched to the selected program
(The screens shown are for the music
player.)
3. Pressing the menu button onthe front of the
body returnsthe system tothemenu
program from the current program.
The figures are an example of returning to the menuprogram from the musicplayer.
Page 36

30
Music Player
the file.
Playlist window
Locationsearching slider
Mutebutton
Names and Functions
Icon of current music
Indicating selected music
Volume adjusting slider
Play/pause button
Stop button
Next music button
Previous music button
Exit button
Navigation return button
In-Depth Description of Functions
Search of Playing Position
The Location Searching Sliderindicates the playposition of a music file. Youcan adjust theplay
position to a desired point. Whenmoving the sliderbar, the Playtimewindowdisplaysthemoved
positionin duration.
Functions of the Control Buttons
Icon Button Function
Play button Plays a music file selectedfrom the play list.
Stop Button Stops playing the file.
Pause Button
Next Music Button
Previous Music
Button
ExitButton
Navigation
Retur nButton
Pauses playing the file.Pressing the icon again resumes playing
The next musicfile of the current file in the play listis played
The previous music file of the current file in the playlist isplayed.
Exitsthe music player.
Switches the system fr omthe music playerto the navigation
program.
Page 37

31
Volume Adjusting and Muting
!
!
The volume adjusting slider indicates the current volume. You can
adjust the volume to the desired level by moving the slider barleftor
right.
You can turnoff the sound bypressing the Mute button.
Displaying the Play List
Connect the Voya 320 to the PC (Refer to ‘Connecting System to YourPC’), and copy
the music file to the‘Music’ folder in the SD/MMCmemory.
You cannotcreate sub-foldersunder the ‘Music’ folder. Themusic playeriscapable of
Note
The musicindicated with the speaker iconisthe current music file selected.
playing the filesstored in the ‘Music’ folderonly.
Double-clicking the desired music file from the Playlist window, plays the newmusic file.
Pressing the Stop button stops playing the current music file. Click the desired music file once
from the Playlist window, and press the Play button toplay the selected music.
Supported File Formats
MP3 and WMA filesare supported.
Certain files with extensionof MP3 may notbe supported,itisdependentupon
Note
encoding method of that file.
Page 38

32
Movie Player
Playlist window
Location Searching Slider
Volume Adjusting Slider
MuteButton
PlayTimeWindow
Navigation Return Button
Exit Button
Full Screen Butto
n
File Button
Stop Button
Play/pause Button
Names and Functions
In-Depth Description of Functions
Search of Playing Position
The Location Searching Sliderindicates the playposition of a movie file.You can adjust theplay
position to a desired point. Whenmoving the sliderbar, the PlayTime Window displays the
movedposition.
Page 39

33
Functions of Control Buttons
the file.
!
Icon Button Function
Play button Plays a file selectedfrom the playlist.
Stop Button Stops playing the file.
Pause Button
File Button
Full Screen
Button
ExitButton
Navigation
Retur nButton
Pauses playing the file.Pressing the icon again resumes playing
Moves the play list window and the play screen window.
Switches the screen tothe full screen mode when playing a movie.
Exitsthe movi e player.
Switches the system fr omthe movie player to the navigation
program.
Volume Adjusting andMuting
The Volume Adjusting Sliderindicatesthe current volume. You can adjust the volume to the
desired level by moving the sliderbarleft or right.
You can turnoff the sound when pressing the Mute button.
Storing Movie Files and Viewing Movies
Connect the Voya 320 to the PC (Refer to ‘Connecting System to YourPC’), and copy
the movie file to the‘Movie’ folder in the SD/MMC memory.
You cannotcreate sub-foldersunder the ‘Movie’ folder. Themovie playeriscapable of
Note
playing the filesstored in the ‘Movie’ folder only.
Pressing the File button displaysthe movie file list in the
‘Movie’ folder.
Page 40

34
Select the desired movie file from the figure above, and press the Playbutton, or double
!
!
!
File ListWindow/Image
Navigation Return Button
Exit Button
SlideShow Button
Full Screen B
utton
Next File Button
File Button
Previous File Button
click the desired movie filefrom the Play list window to play the selectedmovie file.
Pressing the File button while playing a movie causesthe current movie topause
playing, and the playlist is displayed.Pressing the File button again returnsto the
Note
movie play screen. Pressing the Play button will resume playing the current movie.
Pressing the Full Screen button,or clicking the Play Screen windowonce, switchesthe
screen to the full screen. Clicking the full screen once returnsthe screen to theoriginal
size.
Supported File Formats
File formats of MP4, WMA, AVI and DIVXare supported.
Close the navigation program when you use the movie player. When you run multiple programs,
the playing ofthe movie may beinterrupted, or an error message may be displayed indicating
insufficient memory.
Note
Ifanother program gets acti vated while using themovie program, the movie player is switched to
Pause.
Listening to Music with the Movie Player
The Movie player caneven play some MP3 filesor OGG filesthat are not compatible with
the Music Player. Copy the MP3 or OGGfile to ‘Movie’ folder, and play the file with the
movie player.
Music files or movie files stored in the‘Movie‘folder are playedin sequential manner.
Note
Picture Player
Names and Functions
Window
Page 41

35
In-Depth Description of Functions
Movesto theprevious picture file when viewing the current pict
ure.
Movesto the
next
picture file when viewi ng the
current picture
!
Double Click
Functions and Control Buttons
Icon Button Function
File Button Switches the picture view windowto the file list window.
Full ScreenButton Displays the selectedpicture in the full screen .
Previous File Button
Next File Button
Slide Show Button
ExitButton
Navigation
Retur nButton
Pauses playing the file.Pressing the icon again resumes playing
the file.
Movesto theprevious file in the list window.
Switches the screen tothe full screen slide show mode.
Exitsthe movi e player.
Switches the system fr omthe picture viewer tothe navigati on
program.
Storing Image Files andViewing Images
Connect the Voya 320 to the PC (Refer to‘Connecting System to Your PC’),and copy the image
fileto the‘Picture’ folder inthe SD/MMC memory.
Double clicking the desired file from the File list window displaysthe image as shown below:
Selectthe desired file from the File List window and pressthe Full Screenbutton todisplay the
selectedimage in thefull screen.
Selectthe desired file from the File List window and pressthe SlideShow button to display the
images in the full screen from the selected file in sequential manner.
Press the Full Screen button with the selected image on the Image windowto displaytheimage
inthe full screen.
Only JPG fileformat issupported.
Note: Highresolution and largesize pictures takenby a digital camera may not be displayed on the Voya
Note
320.Lower the resolution of your images for faster processing. The systemis opti mized at 16-bitcolor with
resolutionof320 x 240 (width xheight).
Page 42
36
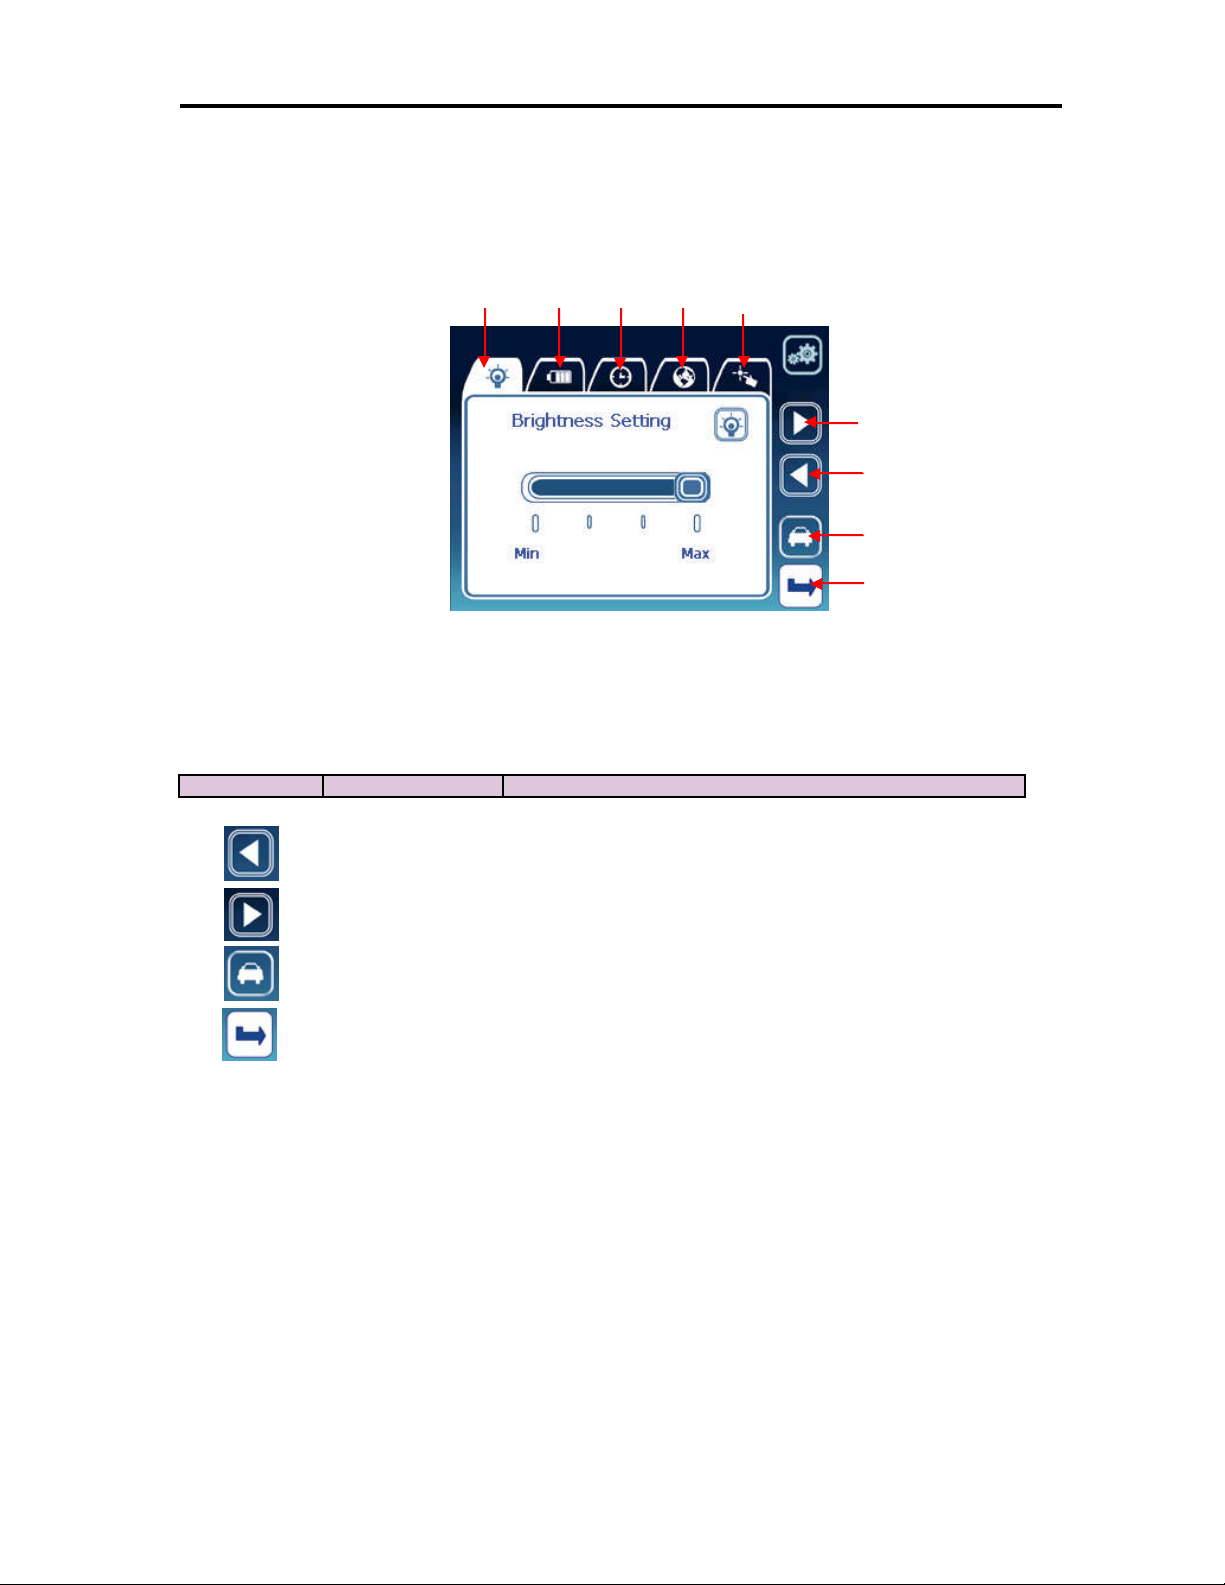
Setting Environments
Backlight
Battery
Time
Calibrat
ion
Language
Next Tab Button
Previous Tab Button
Navigation Return Button
Exit Button
Names and Functions
Tab
Tab
Tab
Tab
Functions of Control Buttons
Icon Button Function
Previous Tab Button Movesto theprevious tabfrom the current tab.
Tab
Next Tab Button Movesto the next tab fromthecurrent tab.
Navigation Return
Button
Exit button
Switches the systemfrom the setting menu to the navigation program
Exits environments setting.
Page 43
37
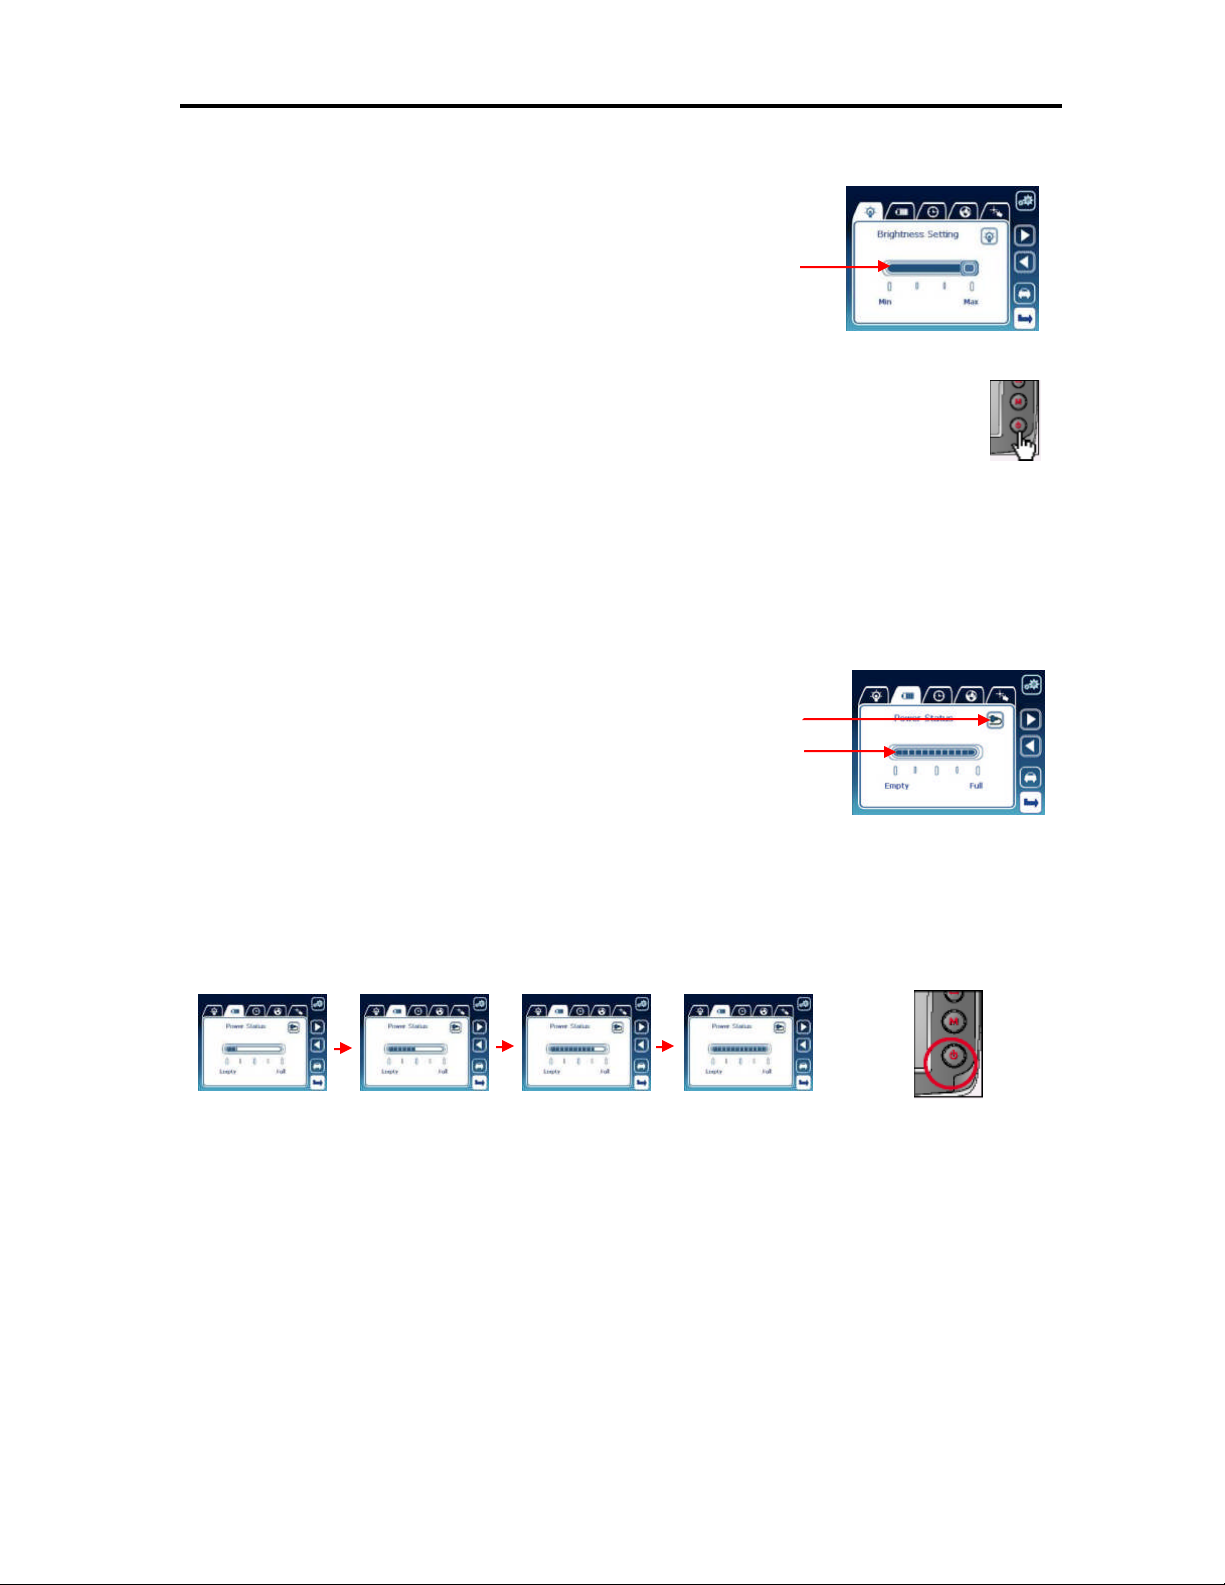
Adjustingthe Brightness Backlight
Brightness of the backlight can be adjusted to four levelsranging from
level 1 to 4. You can adjust the brightness by moving the Brightness
Adjustment slider.The default setting ofthe backlightis set to level 4.
Brightness AdjustmentSlider
Press the Power button for about two secondsto set the backlight to level 1. Press and
hold the power button for two seconds again to return the backlight to the original
brightness.
Keep pressing the button for
about two seconds.
Checking Battery Conditions
When the AC/DC adapter or the cigarette lighteradapter isconnected, the Power Statusicon is
displayed as ‘Adapter.’
Power Status Icon
Battery Remainder Power Meter
When the batteryis being recharged, the Battery Remainder Powermeter alternatelymoves
between the four levels. During thisprocess, the Power button flashesred.
Page 44

38
When the battery isfully charged, the Battery Remainder Power
!
Add Button
!
meter doesnot move, butis kept at the‘Full’ condition. The Power
button on the body lightsgreen.
In thebattery-powered mode, the Power Status icon isdisplayed as ‘Battery’, and the Battery
Remainder Power meter indicatesthe current remaining Power Statusicon powerin the
battery.
Power Status Icon
The valueindicated bythe batter y power meter may be different from the actual remaining power in the
Note
When the remaining power in the batteryis20-30% ofits full capacity,
the warning window isdisplayedas shown right. In such a case,
immediately recharge the battery.
batterydependent upon environmental conditions.
When you fail to recharge the battery after the warning window isdisplayed, the system is
forcibly switched to thepower-saving mode.
Refer to ‘Power Mode and Battery Recharging.’
Time Setting
Change the current time setting by clicking the item you wantto
change and increase or decrease thevalue with the new one using
the ‘Add button’ or the ‘Subtract button’.
Subtract button
Incasethe batterycompletely dischargedorif you make hard reset, the time setting is initialized with the
system default value.
Note
Page 45
39
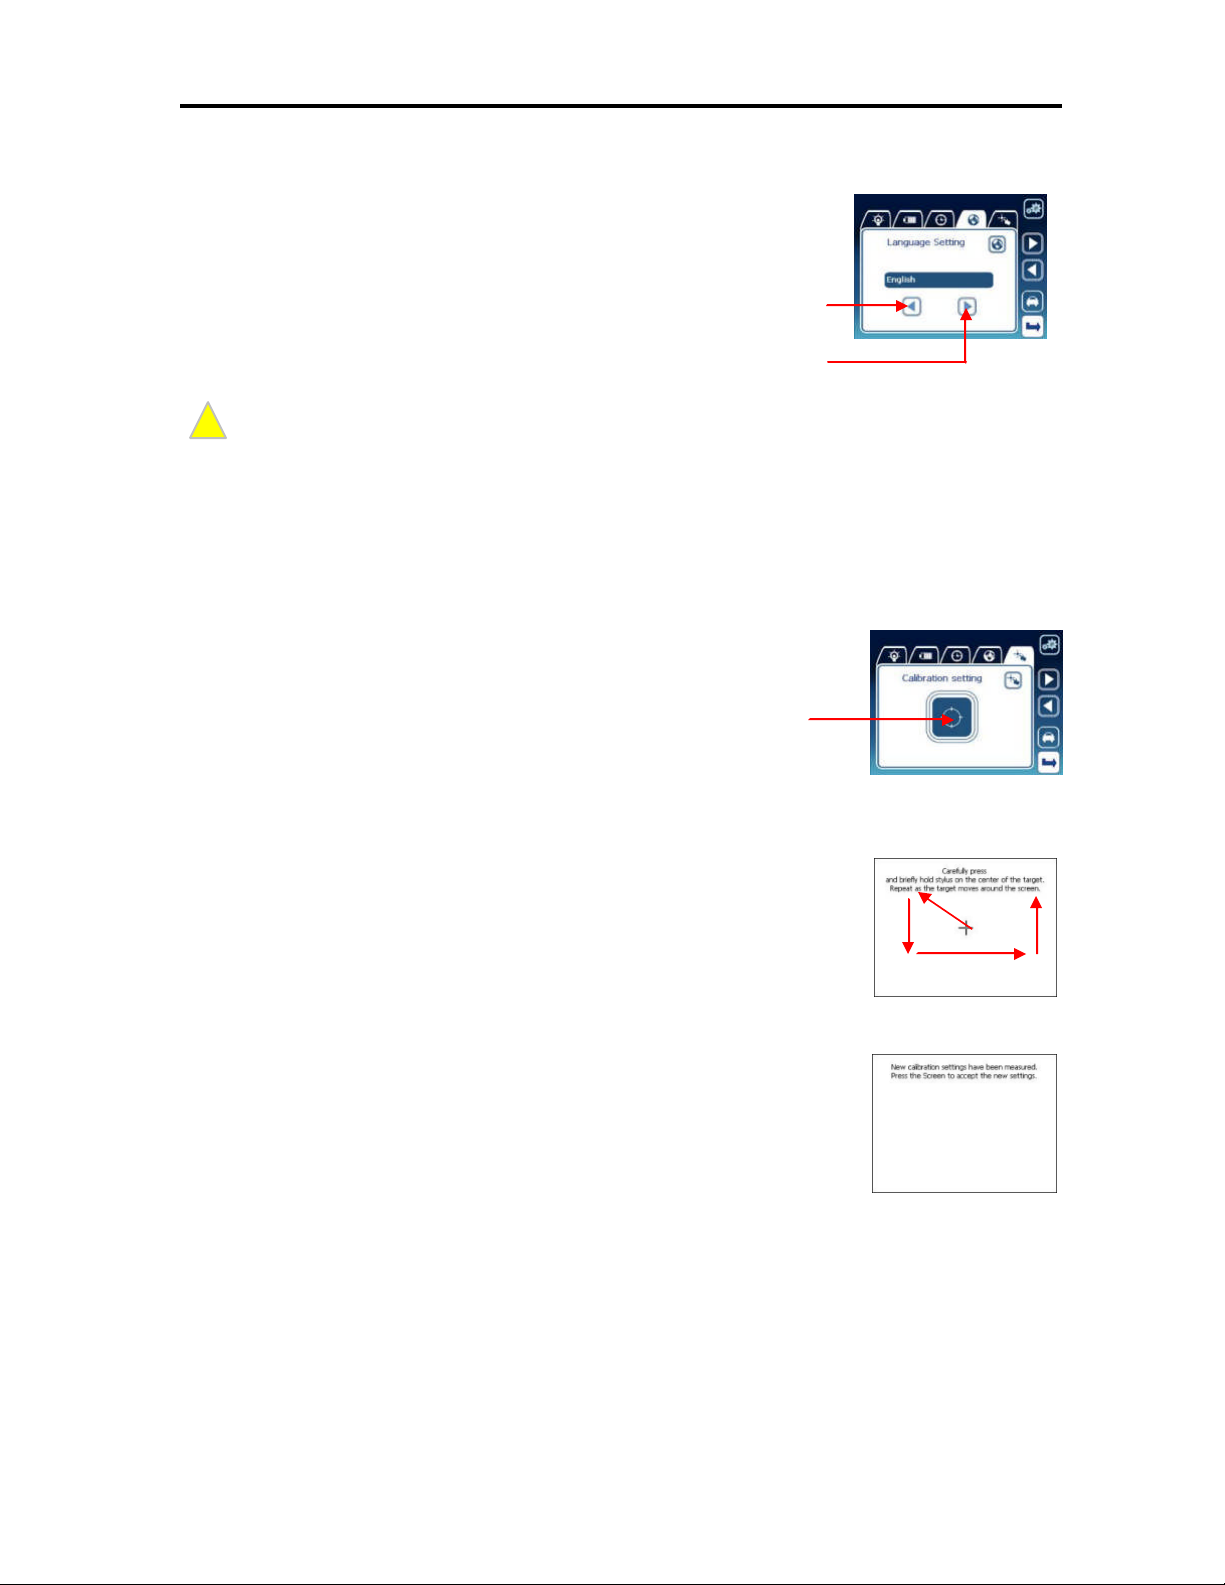
Language Setting
!
You can change the current language used in the menu program by
clicking the ‘Previousbutton’ or the ‘Next button’. All textwill be
changed to selected one.
Previous Button
Next Button
This setting will beapplied on the menu program onl y. It has no effect on the system language.
Note
Touch Screen Calibration
If thereis deviation between the point touched by you and the point actually indicated on the
screen during operation of the system, you can recalibrate the touch screen.
Press the Touch Calibration button asshown.
Touch Calibration Button
Keeping the cross mark pressed moves the cross mark in the arrow
direction, as shown. Press the cross mark again to the moved position.
Repeat thisuntil the Exit screen isdisplayed.
When the touch calibration issuccessfully executed, the Exit screen is
displayed. When touching the screen once, the screen is returned to the
touch calibration screen.
New calibration isnow complete. Clickon the screen.
Page 46
40
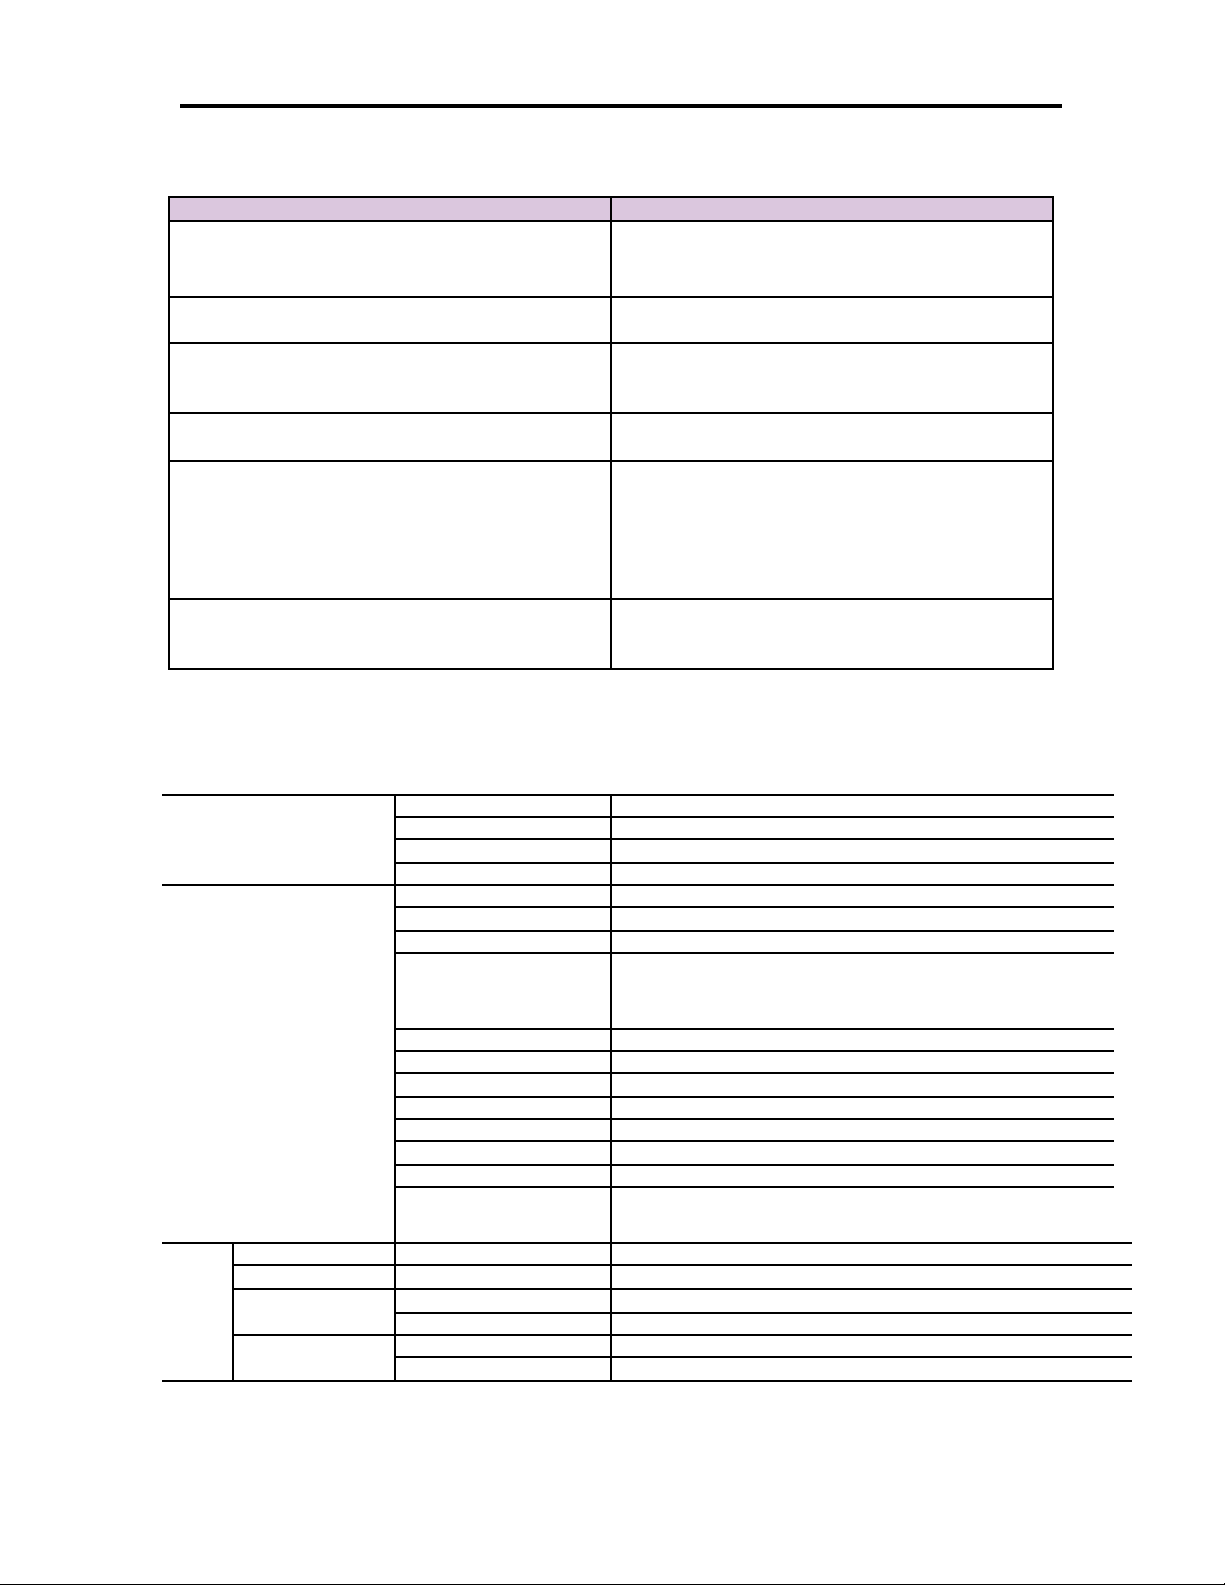
Troubleshooting
Problem Troubleshooting
When themachine will not work or youcannot see
anything onthe screen.
If you cannot hearany sound when you start
playing the music ormovie files
When you cannot copy files to the machine
When the system suddenly stopsduring
operation and will notwork
When the currentlocation in the navigationis
inaccurately displayed
When the navigation shows you the wrong
way, even though the GPS signal reception
status is good.
Soft or hard reset themachine.
Check thebattery lif eand rechargethe battery, if
necessary
Make sure the data files resideinthe SD/MMC
memory. Make sure the volume isproperly set.
Make sure the machine isproperly connected
to the computer.Make sure you have enough
empty space in the memory.
Press the RESET button
Check if you arein an underground parking lot,
under a road, orbetween a tall buildings; if so,
change yourlocation. Checkif there is any
object interfering with the signal reception in
the car ofin the vicinity oftheantenna,if
possible, remove it.
Map data may not be identical tothe actual
road condition. Checkyourdata and update
the map data ifupdatesareavailable.
System Specifications
General
Hardware
Software
OS
Music Player File formats Mp3, wma
Movie Player
PictureViewer
Model Voya 320
Colors Black(front), silver (rear)
Dimensions 4.33” (w) x3.07” (H) x0.83” (D)
Weight 5.93ounces
CPU Samsung S3C2440, 300MHz
Memory RAM 64MB, FlashROM 32/64/128/256/512/1GB
Power DC 12-24 V
Battery
Input mode Touch screen
LCD 320 x240, 3.5”, 65K colors,TFT LCD
Memorycard SD/MMC memorycard slot
Speaker Built-in speaker, 1W
Headphone output 40 mW (left) + 40 mW (rght): (16_, max. volume)
GPS SIRF III 20-channel
USB USB spec. 1.1full speed(12 Mb/s)
USBStorage
Version Windows CE 4.2 Core
File formats Mp4, wmv,avi, divx
Audio play Mp3,ogg supported
File format Jpg
Pictureresolution 320 x240, 65K colors
Lithium-ion, 1,000mA
Recharging time: Approx. 3 hours
Discharging time: Average approx. 2 hours
(Default settings + navigation program)
USBMass Storage Class Bulk-OnlyTransport (FlashROM,
SD/M MC)
PC OS: Windows98, ME, 2000 and XPsupported
 Loading...