

Page 1
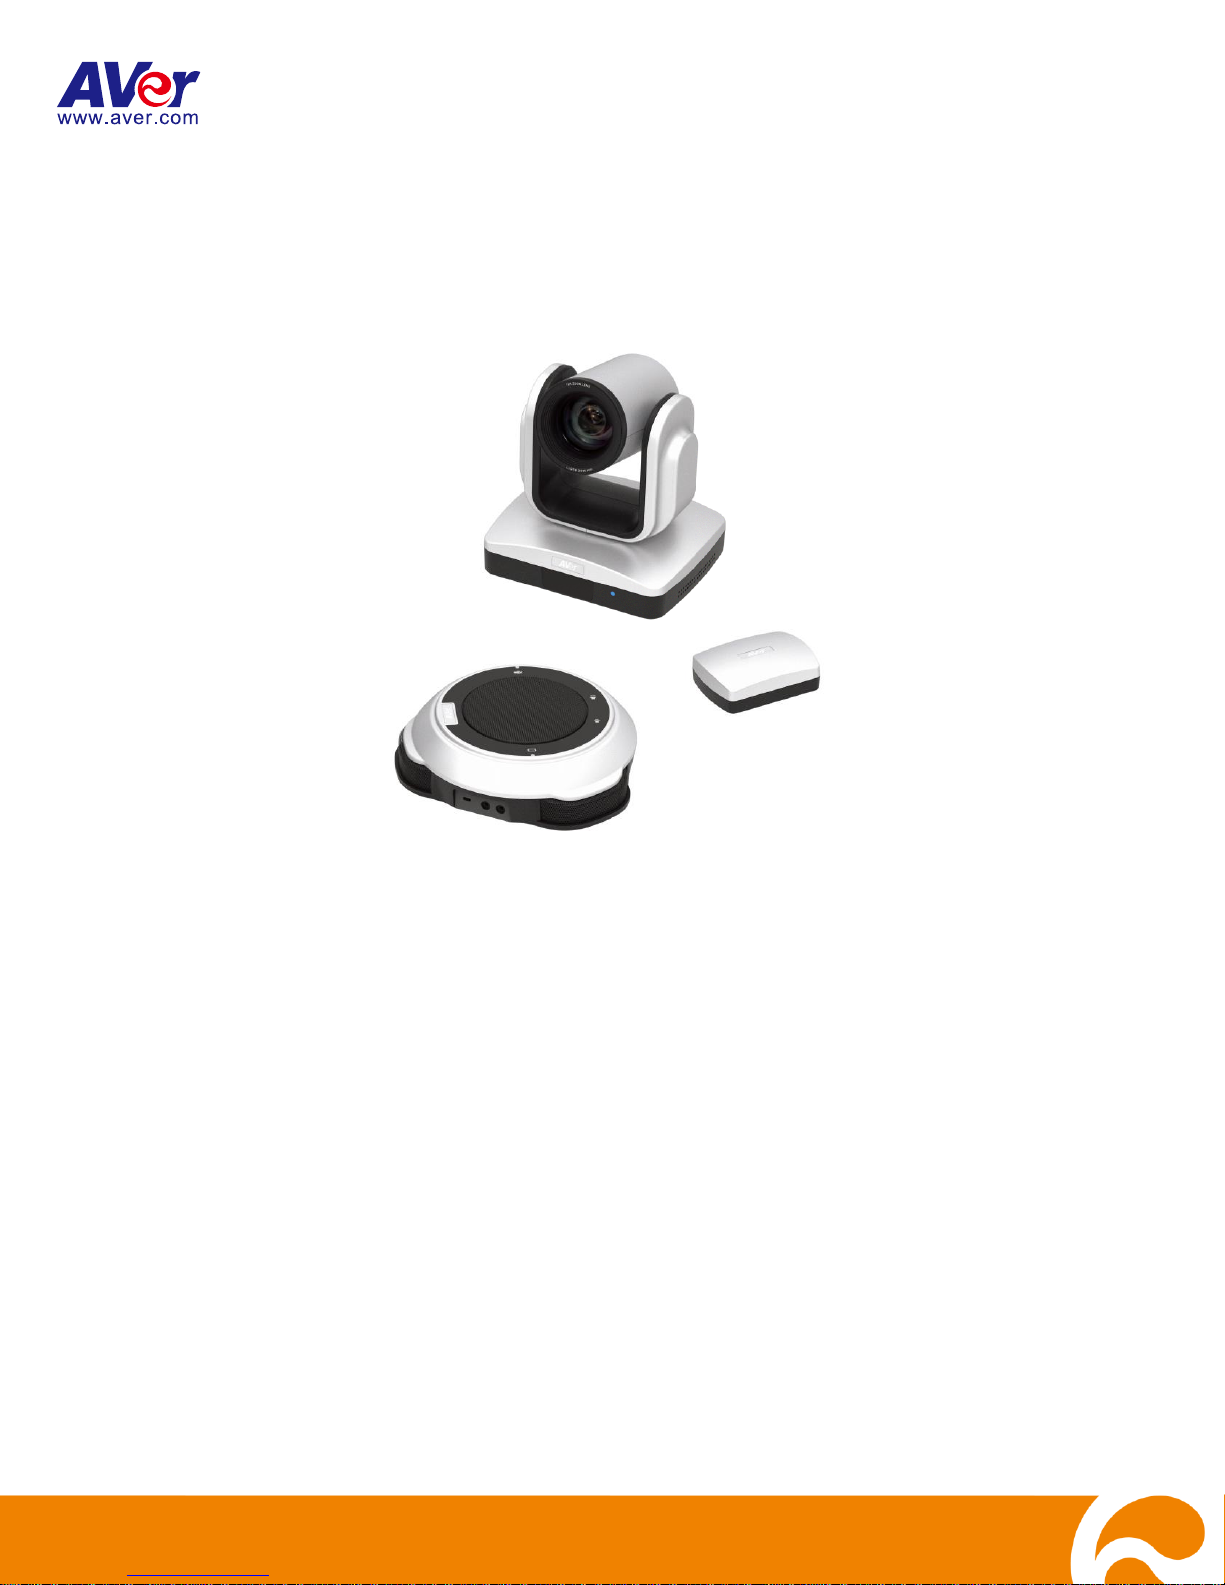
VC520
User Manual
English
Deutsch
Español
Français
Italiano
Page 2
English
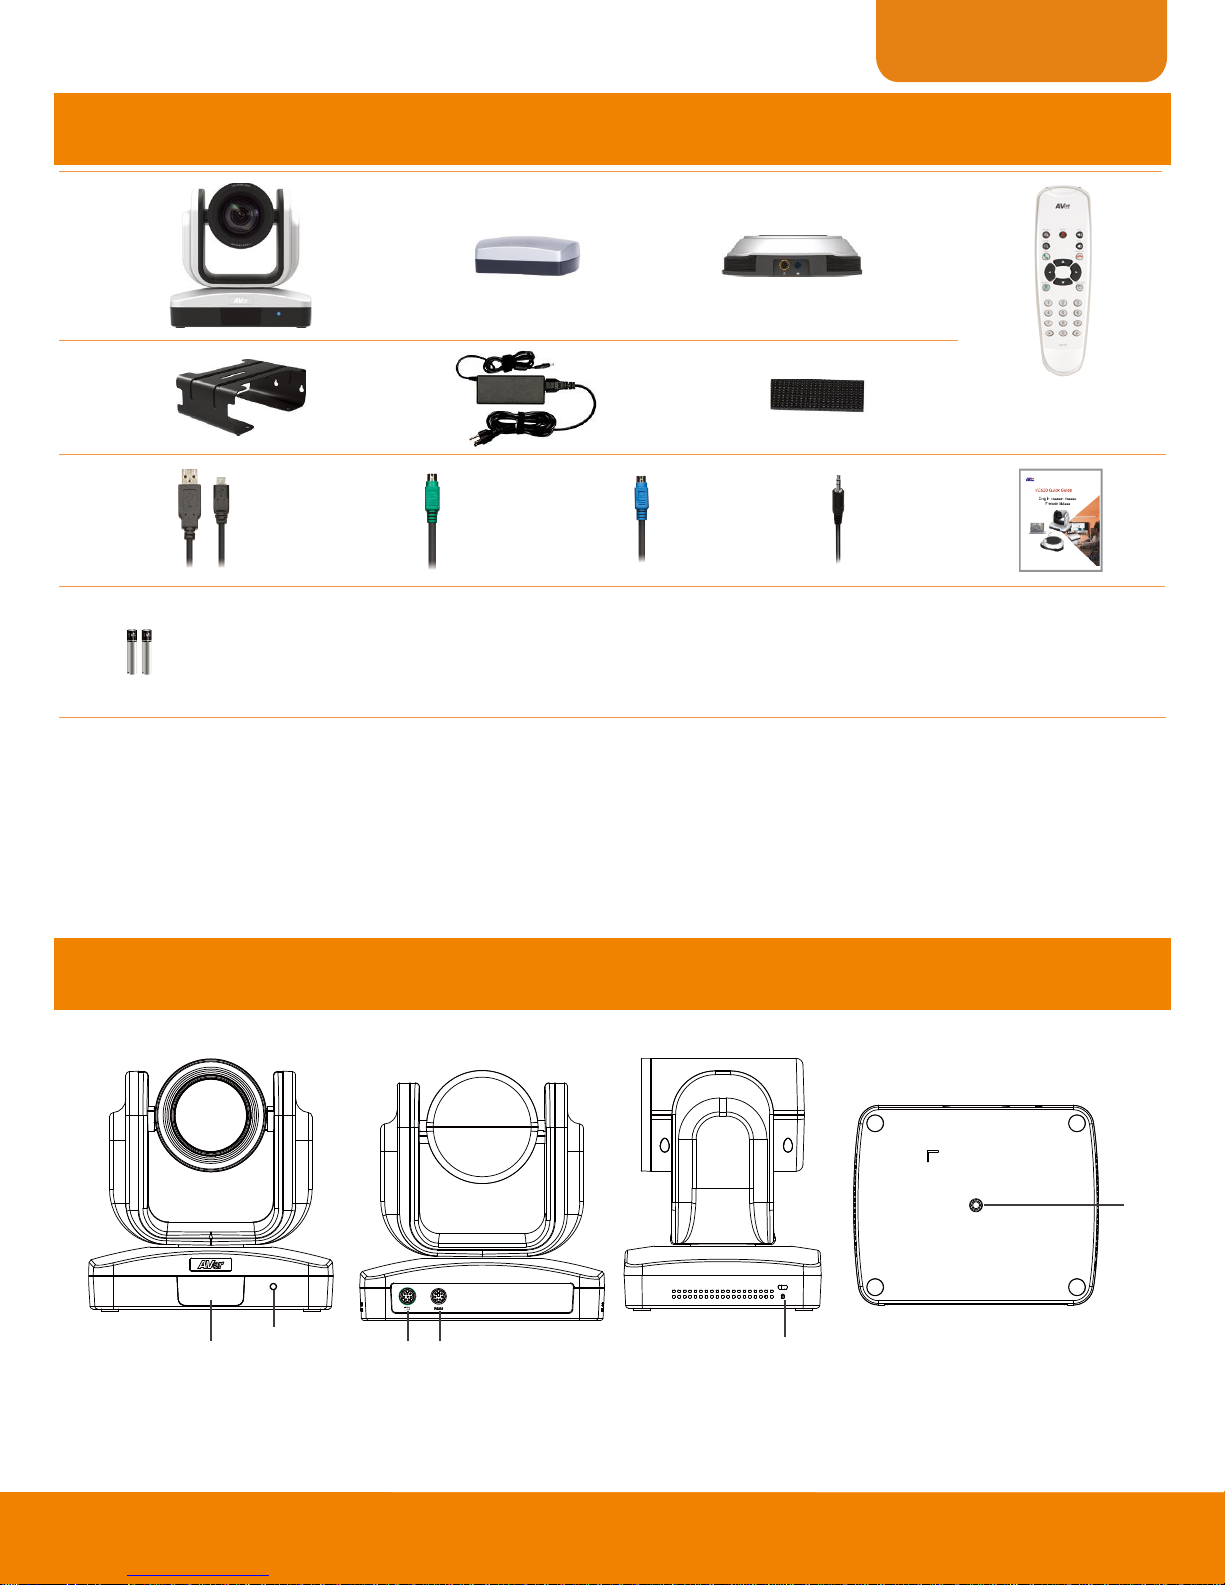
1 2 3 4
5 6 7
8 9 10 11 12
13
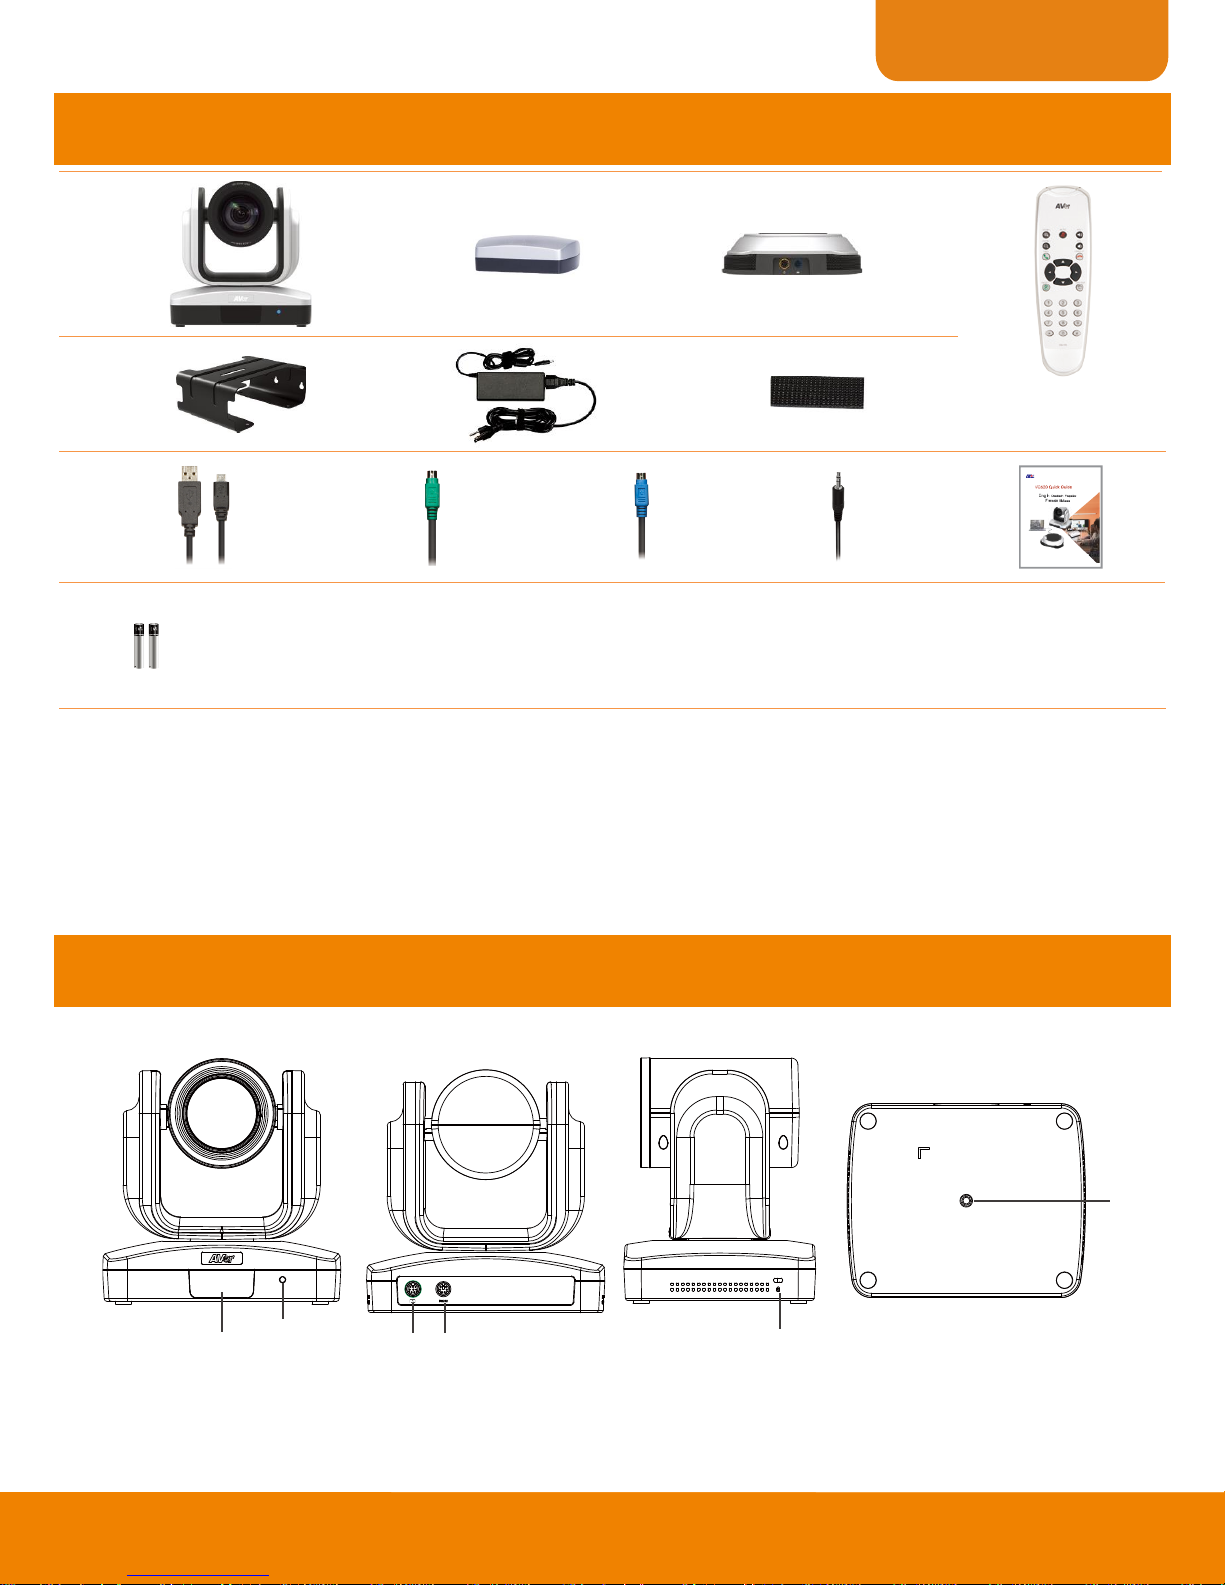
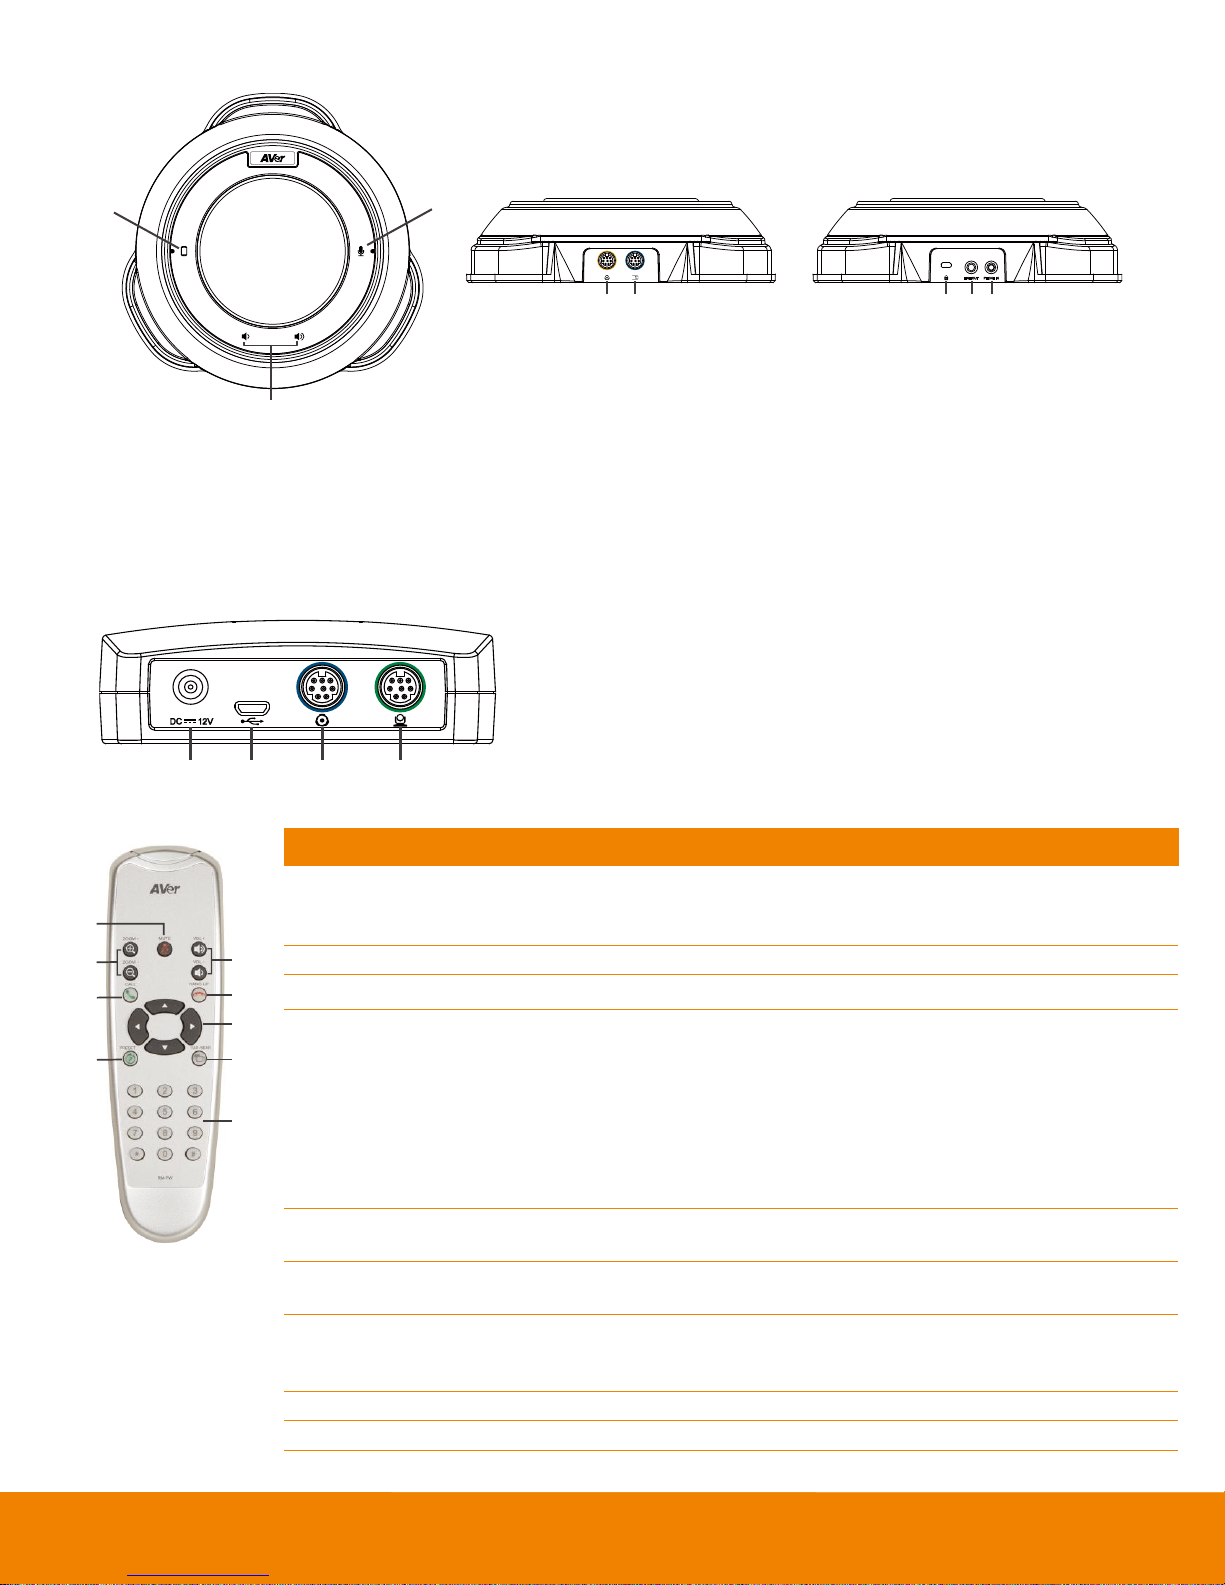
1. Camera
2. Hub
3. Speakerphone
4. Remote Controller
5. Mount (mounting screws are included)
6. Power Cord1 & Power adapter
7. Velcro for hub2
8. USB cable
9. Camera cable
10. Speakerphone cable
11. 3.5mm AUX cable
12. Quick Installation Guide
13. AAA Batteries (x2)
6
1
2
3 4 5
1. IR Sensor
2. Power indictor
3. Hub connection
4. RS232 connection*
5. Kensington lock
6. Screw hole for mounting
Package Contents
[Note] 1. The power cord will vary depending on the standard power outlet of the country where it is sold.
2. Adhesive fastener holds the hub when mounted under your flat surface. Use appropriate cleaning solution when removing the fastener. Test the
cleaning solution to make sure that it will not damage the surface.
Product Introduction
Camera
* If you need a converter or instructions on how to use RS232, please contact AVer.
English-1
Page 3
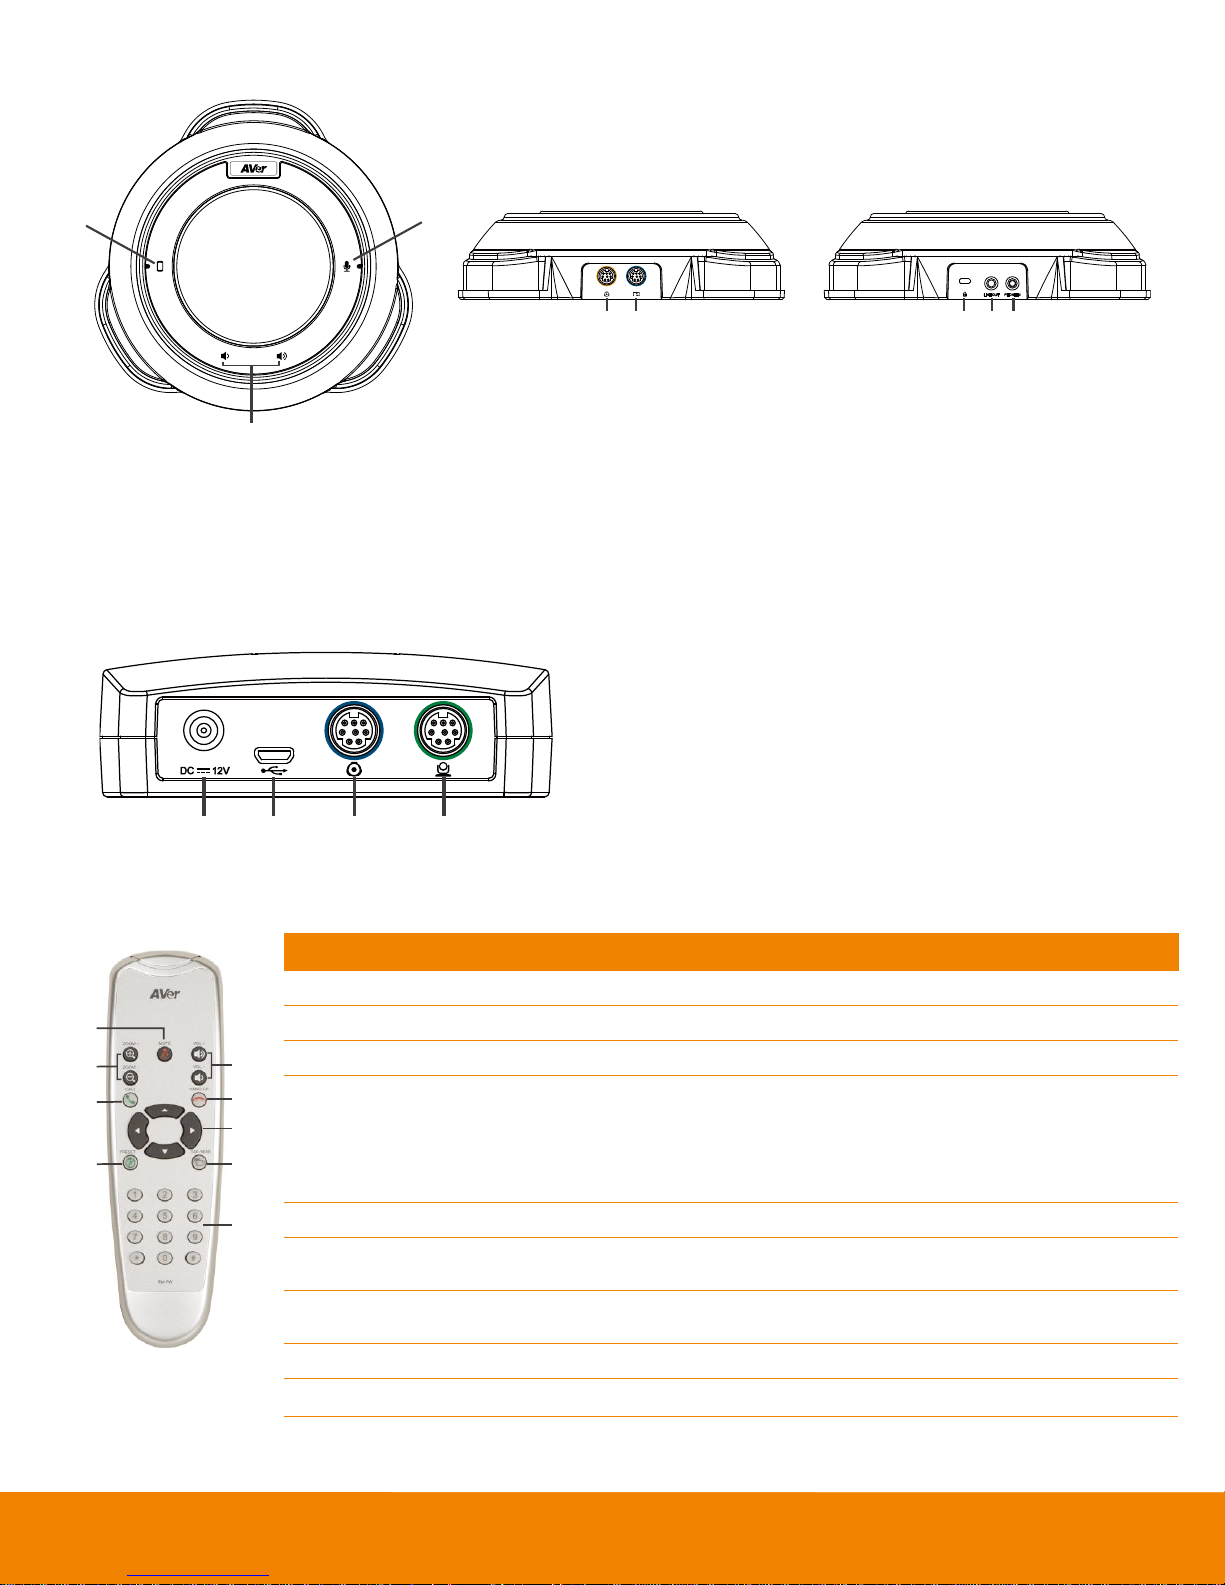
Speakerphone
1
2
3
4 5 6 7 8
1. Cellphone indicator
2. Volume up/down
3. Mute/unmute speakerphone*
4. Speakerphone(daisy chain)
5. Hub connection
6. Kensington lock
7. Line out
8. Phone in
1 2 3 4
9
2
1
8
7
6
5
3
4
* Function requires AVer PTZ
app
Name
Function
1. Mute/Unmute Speakerphone
Mute/Unmute the speakerphone.
2. Zoom in/Zoom out
Increase/Decrease the camera zoom.
3. Call/answer*
Answer a call or start a call.
4. Preset
Press to get back to “home” position that user has set.
Move camera to desired position. Press and hold the preset button until saved
message is displayed on screen. Select preset position button 0~9 to save
current camera position. Press preset + preset position button (0~9), camera
will go to saved position.
5. Preset position
Press preset + preset position button (0~9), camera will go to saved position.
6. Far site camera control
Press the Far/Near button to control the far site camera for pan, tilt, or zoom
functions.
7. Camera direction control
Use the direction button on the remote to control the direction of the camera. Press
the direction button to move the camera or press and hold for continuous pan or tilt.
8. Hang up*
End the call.
9. Volume up/down
Adjust volume up or down.
1. Power jack
2. USB port
3. Speakerphone connection
4. Camera connection
* Red LED: speakerphone is on mute
* Blue LED: speakerphone is active (or live)
Hub
Remote Controller
English-2
Page 4
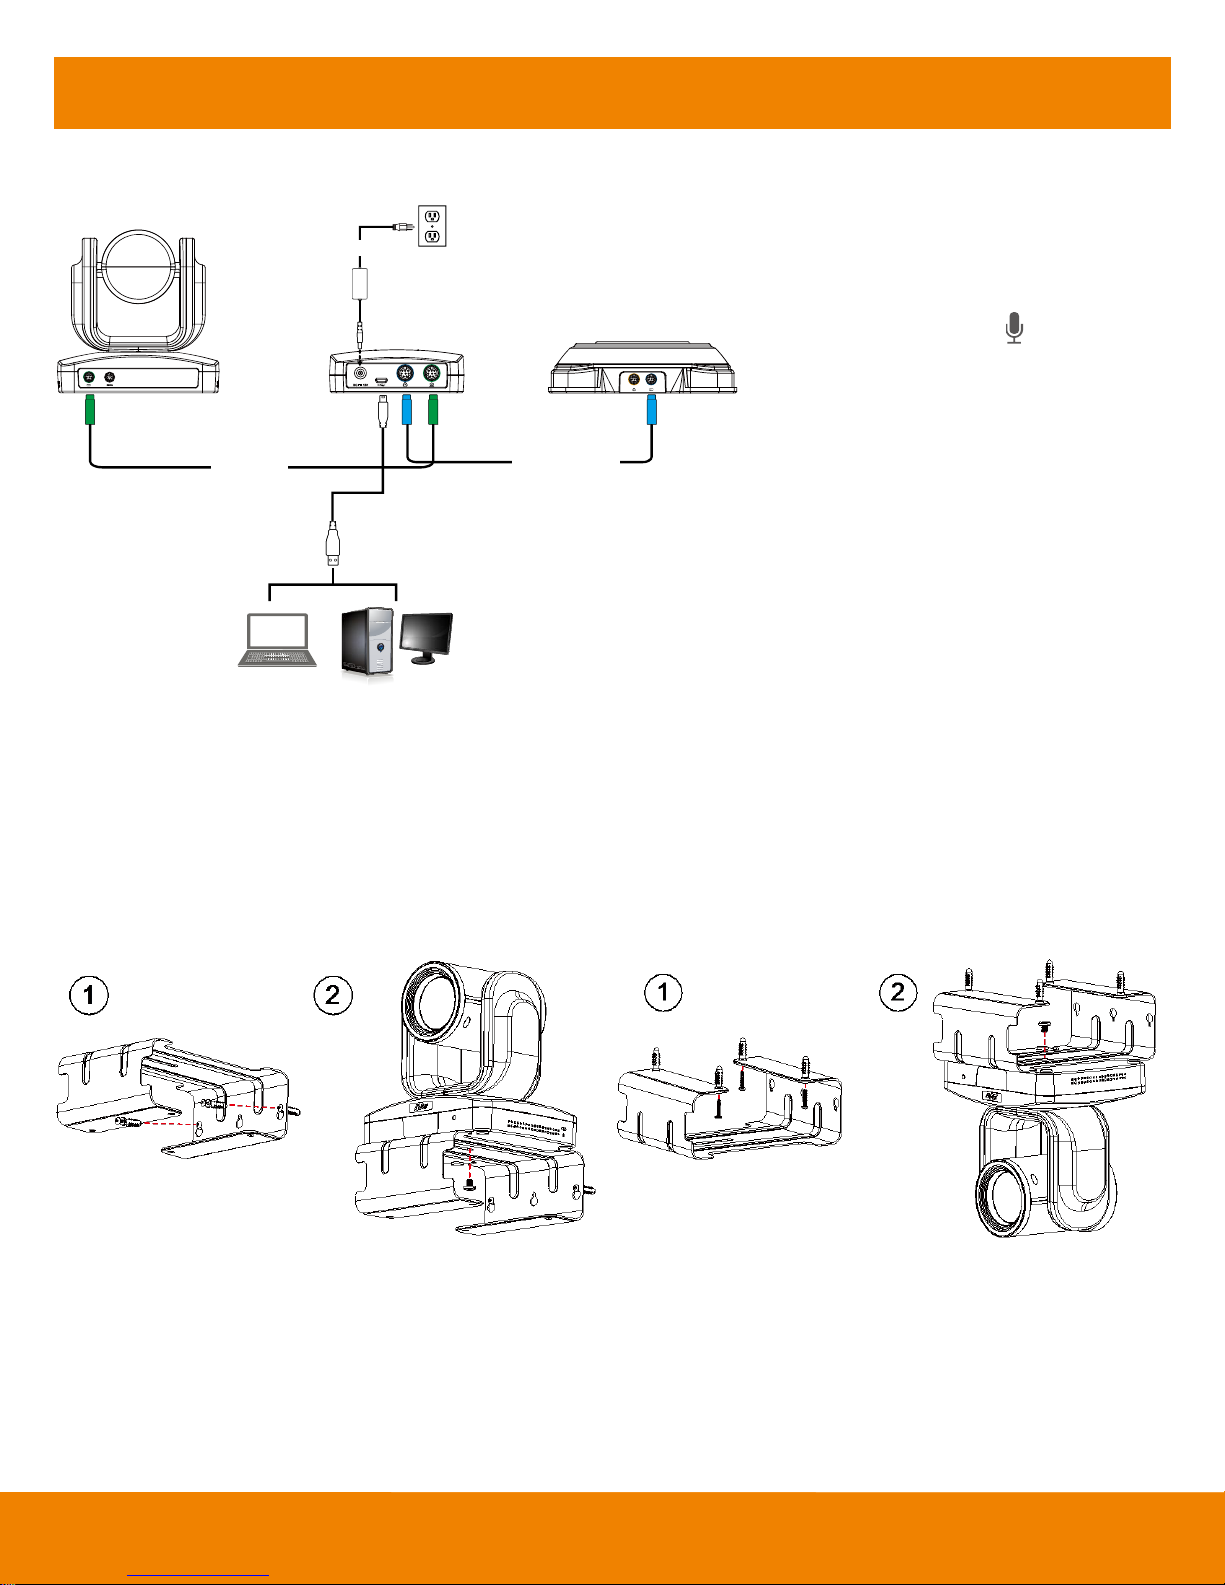
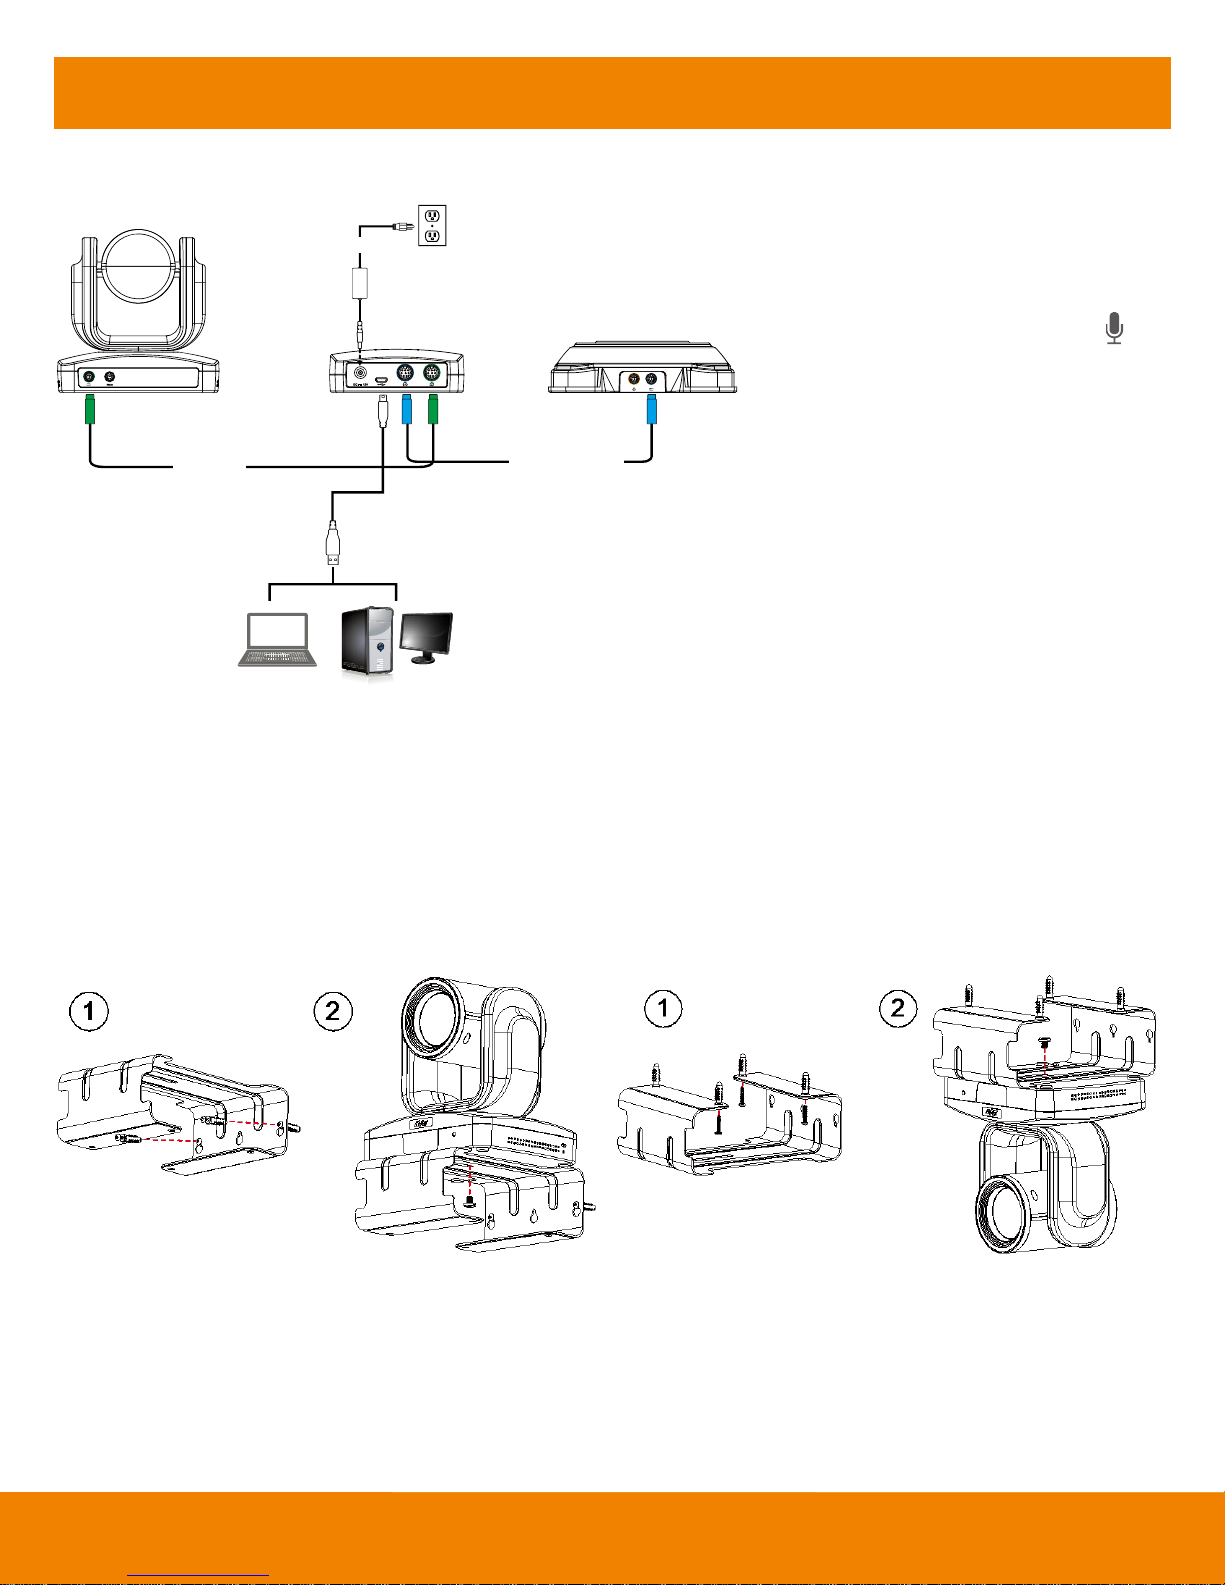
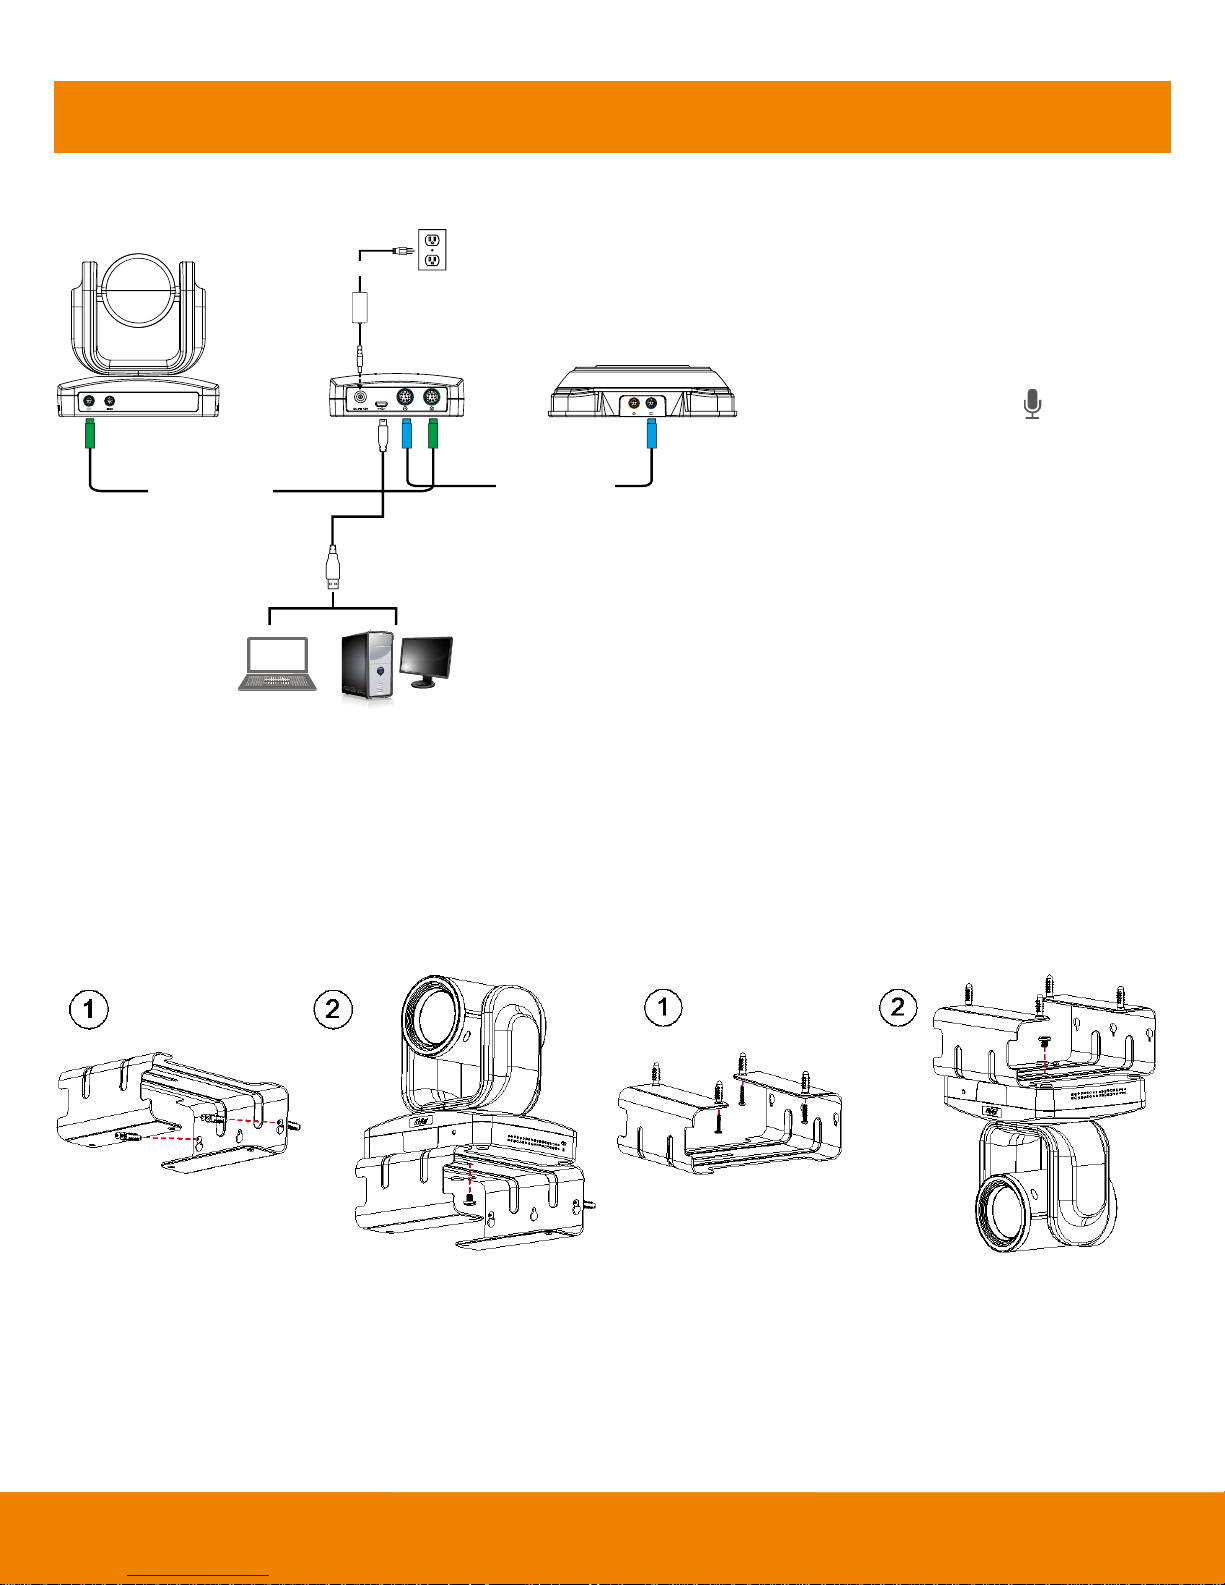
Setup VC520
DC 12V
Camera cable
Speakerphone cable
Power cable
Wall outlet
Camera
Hub
Speakerphone
USB cable
Laptop PC
Wall
Ceiling
1. Use the camera cable and the speakerphone cable to
connect the camera, hub, and speakerphone (refer to
diagram above).
2. Use USB cable to connect the hub to your PC/laptop
(refer to diagram above).
3. Connect the power to the hub; LED will light up,
camera head will rotate, and the camera power
indictor will light up.
4. Install AVer PTZ app on laptop or PC that is connected
with VC520. The app can be used to adjust and
setup the parameters of the camera (refer to section of
AVer PTZ app)
5. To make a call, run your video application (SkypeTM,
Microsoft ®LyncTM, Google HangoutsTM, Cisco
WebEx®, GoToMeetingTM, WebRTC, and etc.), select
VC520 as your video and audio device.
Device Connection
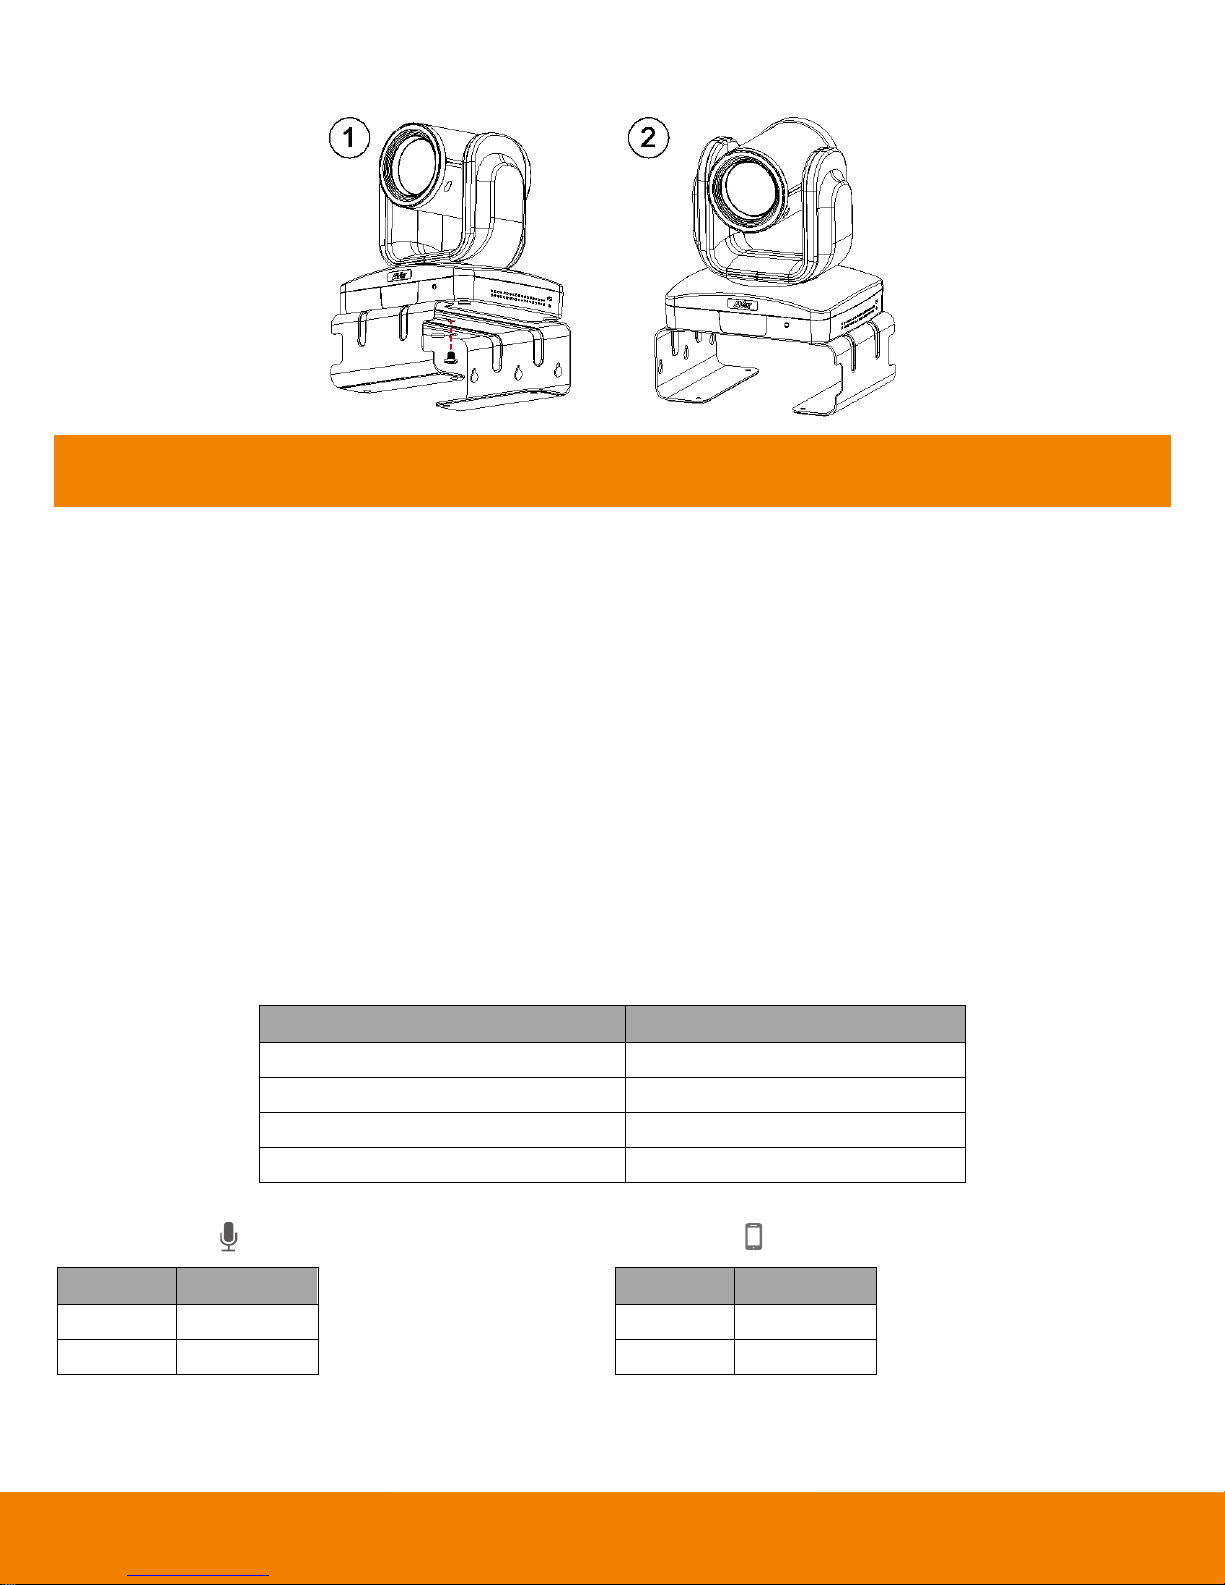
Mounting Camera
There are 3 ways to mount the camera – on the wall, on the ceiling, and on a table with the mount and screws included in the package.
[Warning]
1. When securing the camera mount on a wall or celling, only use hardware and materials certified to support 22 lb (10 kg) weight. For dry wall installation,
please use Sleeve-Type Hollow Wall Anchors (a.k.a. Molly Bolts).
2. If the camera mount is secured to a table, please note excessive table movement or pulling on the camera cables may cause the mount and camera to
fall. Ensure the cables and camera are secured properly.
English-3
Page 5
Table
Status
LED
Starting
Flashing blue and camera head is rotating
Normal
Solid blue
Camera is not being used by the computer
Solid orange
Camera is not connected
Solid orange and camera head is down.
Speakerphone( )
Cellphone( )
Status
LED
Mute
Solid Red
Unmute
Solid blue
Status
LED
Connect
Light on
Disconnect
Light off
Use VC520
Make a Video Call
1. Make sure all devices (camera, hub, speakerphone, and laptop/PC) are well connected and hub is powered on.
2. Run your video application (SkypeTM, Microsoft ®LyncTM, Google Hangout, Cisco WebEx®, GoToMeetingTM, WebRTC, and etc.) on your laptop or PC.
3. Set the VC520 camera as the primary camera for your video application (refer to your video application user guide). You can now make your call.
4. The VC520 is a plug-and-play conference camera. The system requires no special drivers, but we do recommend installing the AVer PTZ app for a better
user experience. For information on how to install and use the AVer PTZ app, refer to the AVer PTZ App section in this user manual.
Phone in
To connect the VC520 speakerphone to your mobile phone as a hands free call device.
1. Use the included 3.5mm AUX cable to connect your mobile device to the “Phone In” jack on the speakerphone.
2. Once the VC520 detects the proper connection to your mobile phone, When connection is successful, the “Cellphone” indicator will light up.
Line in
To connect another VC520 speakerphone to extend the distance of speakerphone coverage to cover a room that has a diameter larger than 30’ and increase
the volume:
1. Connect one side of the daisy chain cable (not included) to the speakerphone port (daisy chain).
2. Connect the other side of the cable to the speakerphone port on the other VC520 speakerphone.
LED Indicator
Camera
English-4
Page 6
a
c
b
d
e
f
g
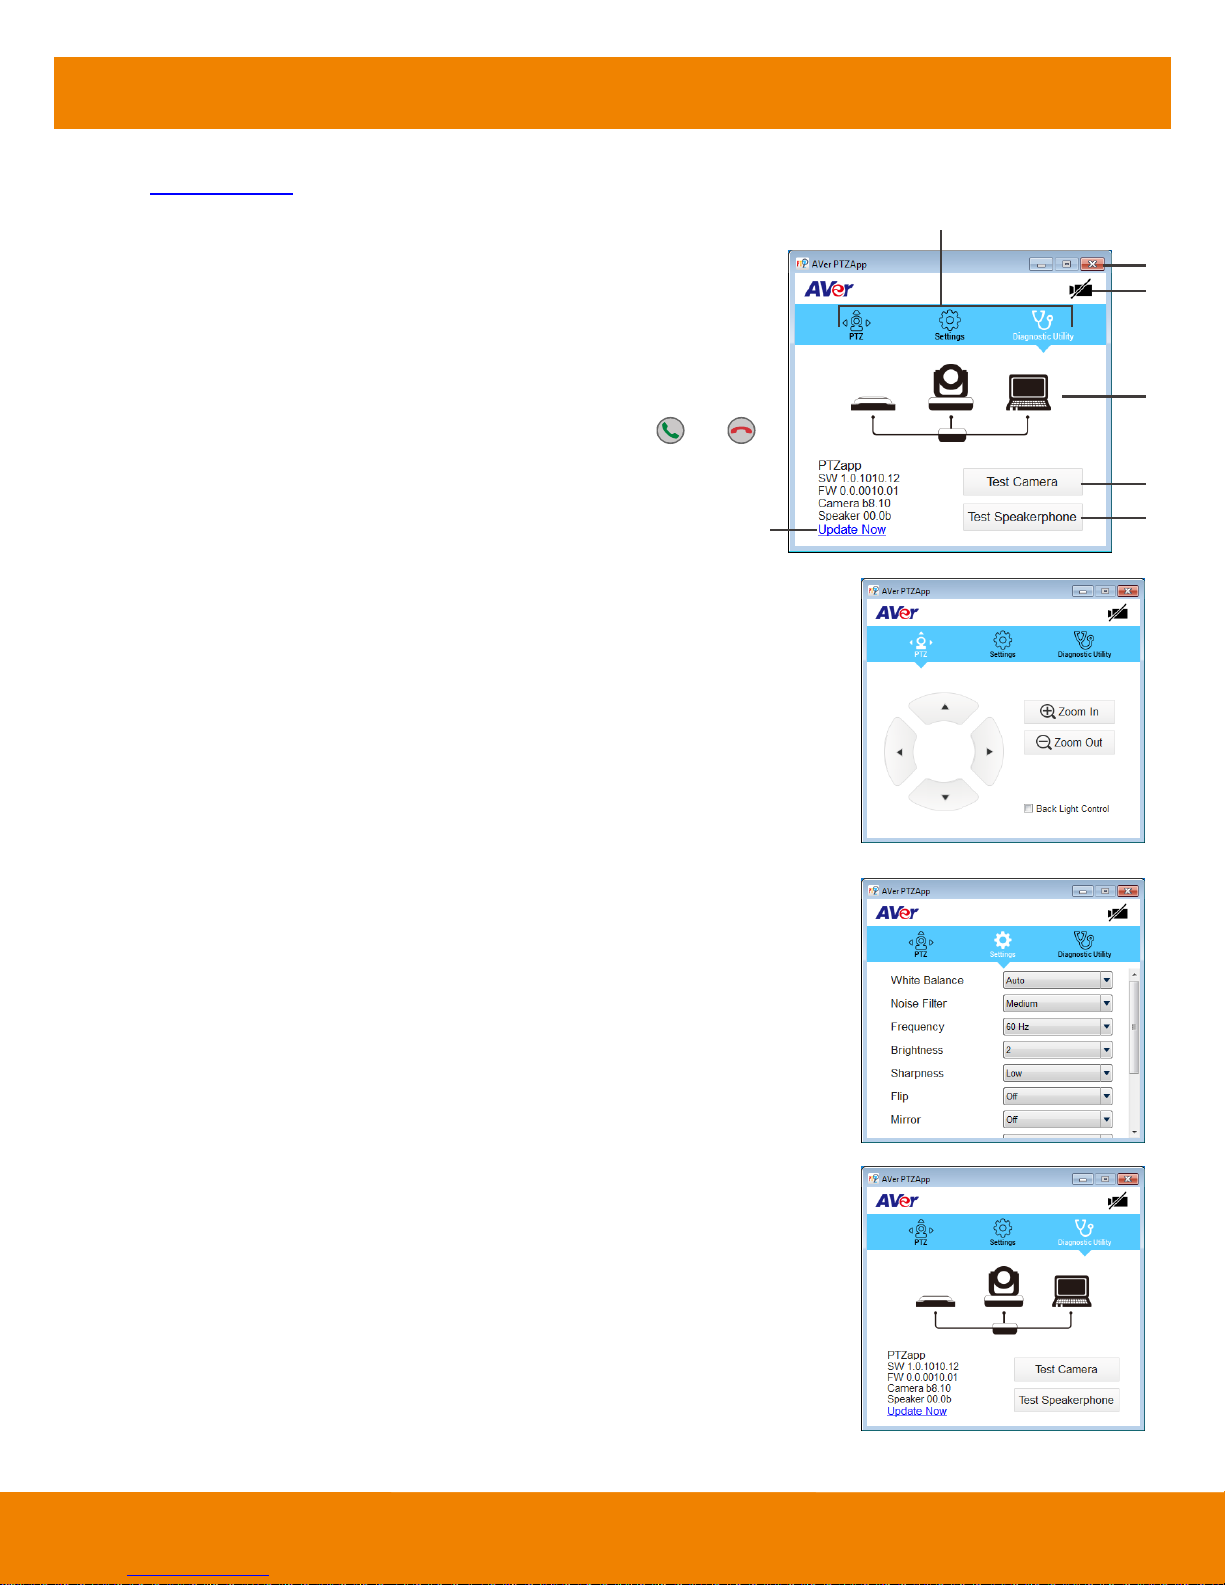
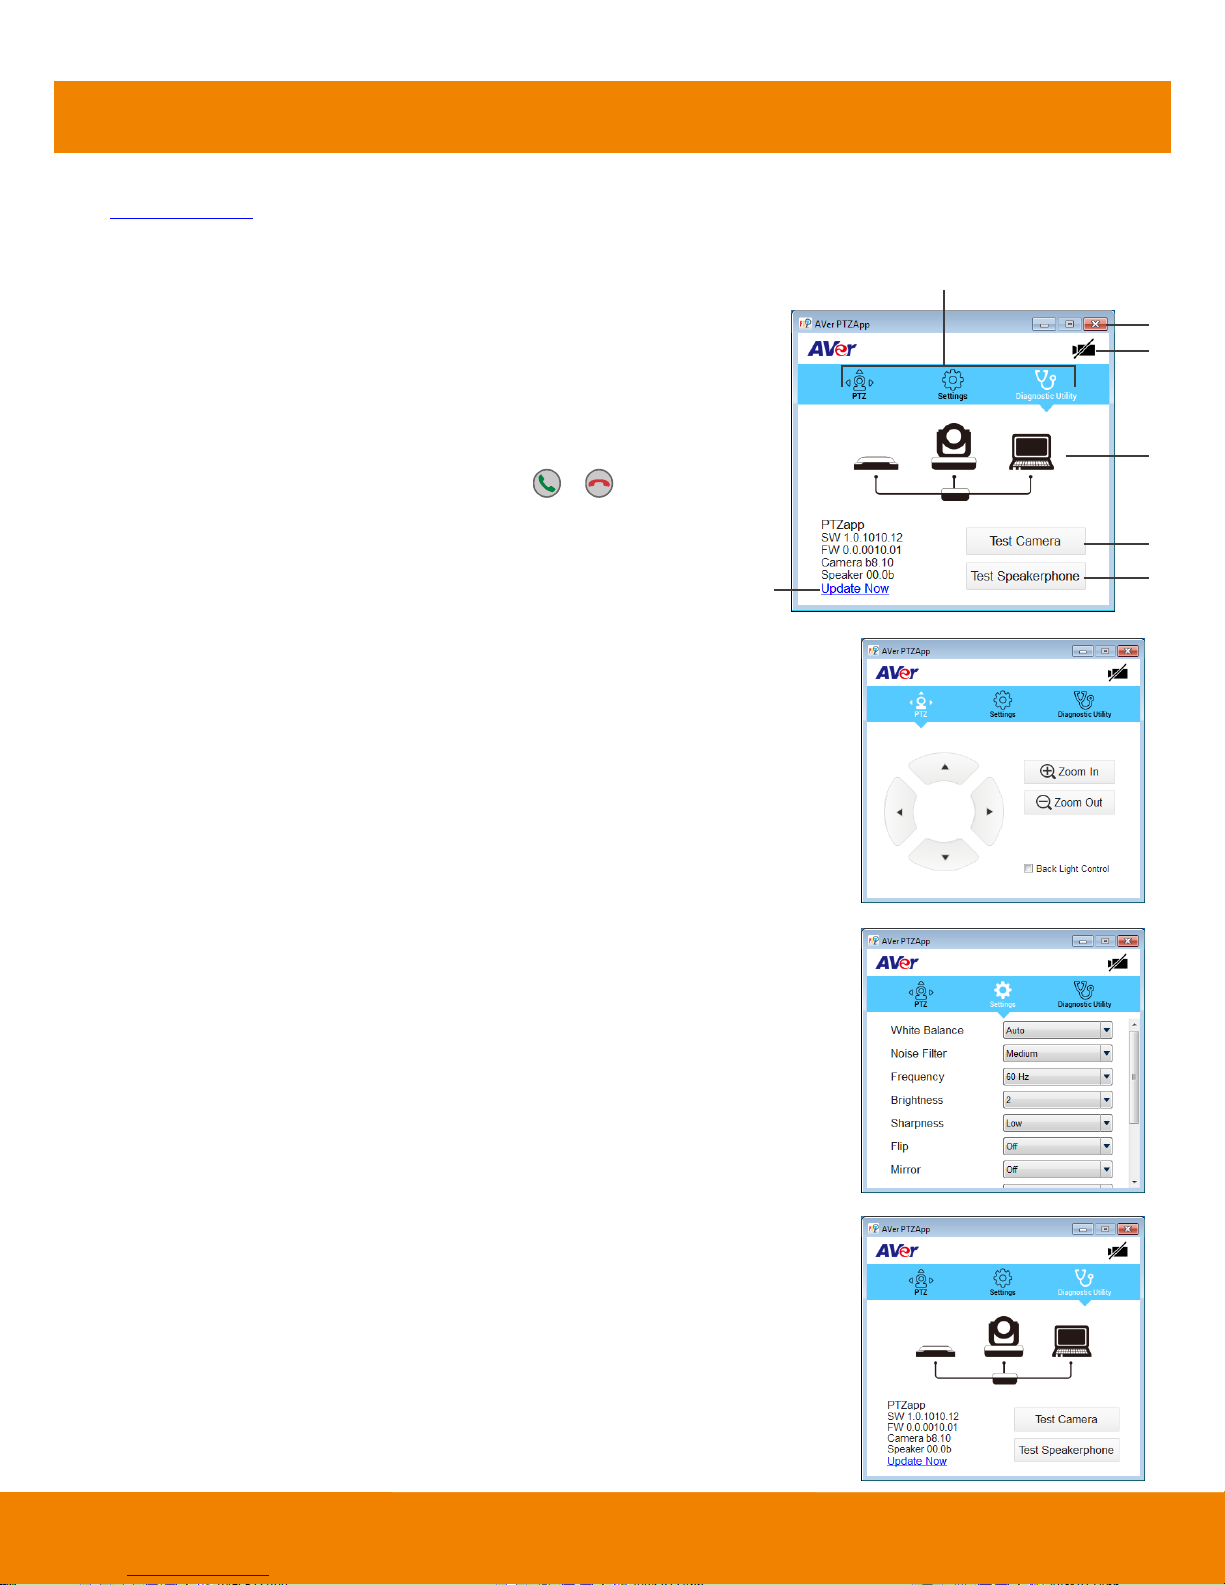
AVer PTZ App
a. Function icon: Click it to switch to the function’s page
- PTZ: To control the camera direction, zoom in and out, and to enable/disable the backlight compensation
during your video call.
- Settings: To setup parameters of the camera – White balance, noise filter, frequency, brightness,
sharpness, flip, mirror, ADDR, and baud rate. ADDR and baud rate is for RS232 connection setting. Click
the Save button to save all settings. To change all the settings, back to the default values, click the
Factory Default button.
- Diagnostic Utility: To display the S/W and F/W version and the devices connection status. You can also
test the camera and speakerphone status, and update the firmware of the camera.
Install AVer PTZ App
Please go to http://www.aver.com > Support > Download Center > Video Conferencing to download the AVer PTZ app. After downloading, double-click on
the file and follow the on screen instructions to complete the installation.
Remember to select the “Skype plug-in” option during installation.
After installing the AVer PTZ app, double-click on the AVer PTZ app icon to run the application.
Use AVer PTZ App
1. To run you video application, a plug-in request will be displayed on your video application
interface. Click on it to accept the plug-in; your video application can now be control by AVer
PTZ app and remote control.
If you have the Skype plug-in checked during the installation, a plug-in request will be displayed
in Skype. Click on the Skype plug-in request to accept the plug-in; this enables and
funcationality on the Remote Control.
2. During your video call, you can use the AVer PTZ app to pan, tilt and zoom the camera in/out
and enable/disable the backlight feature.
3. For the first time use, you can check the connection, camera, and speaker status, and setup
the camera’s parameters. Each function will be described below:
English-5
Page 7
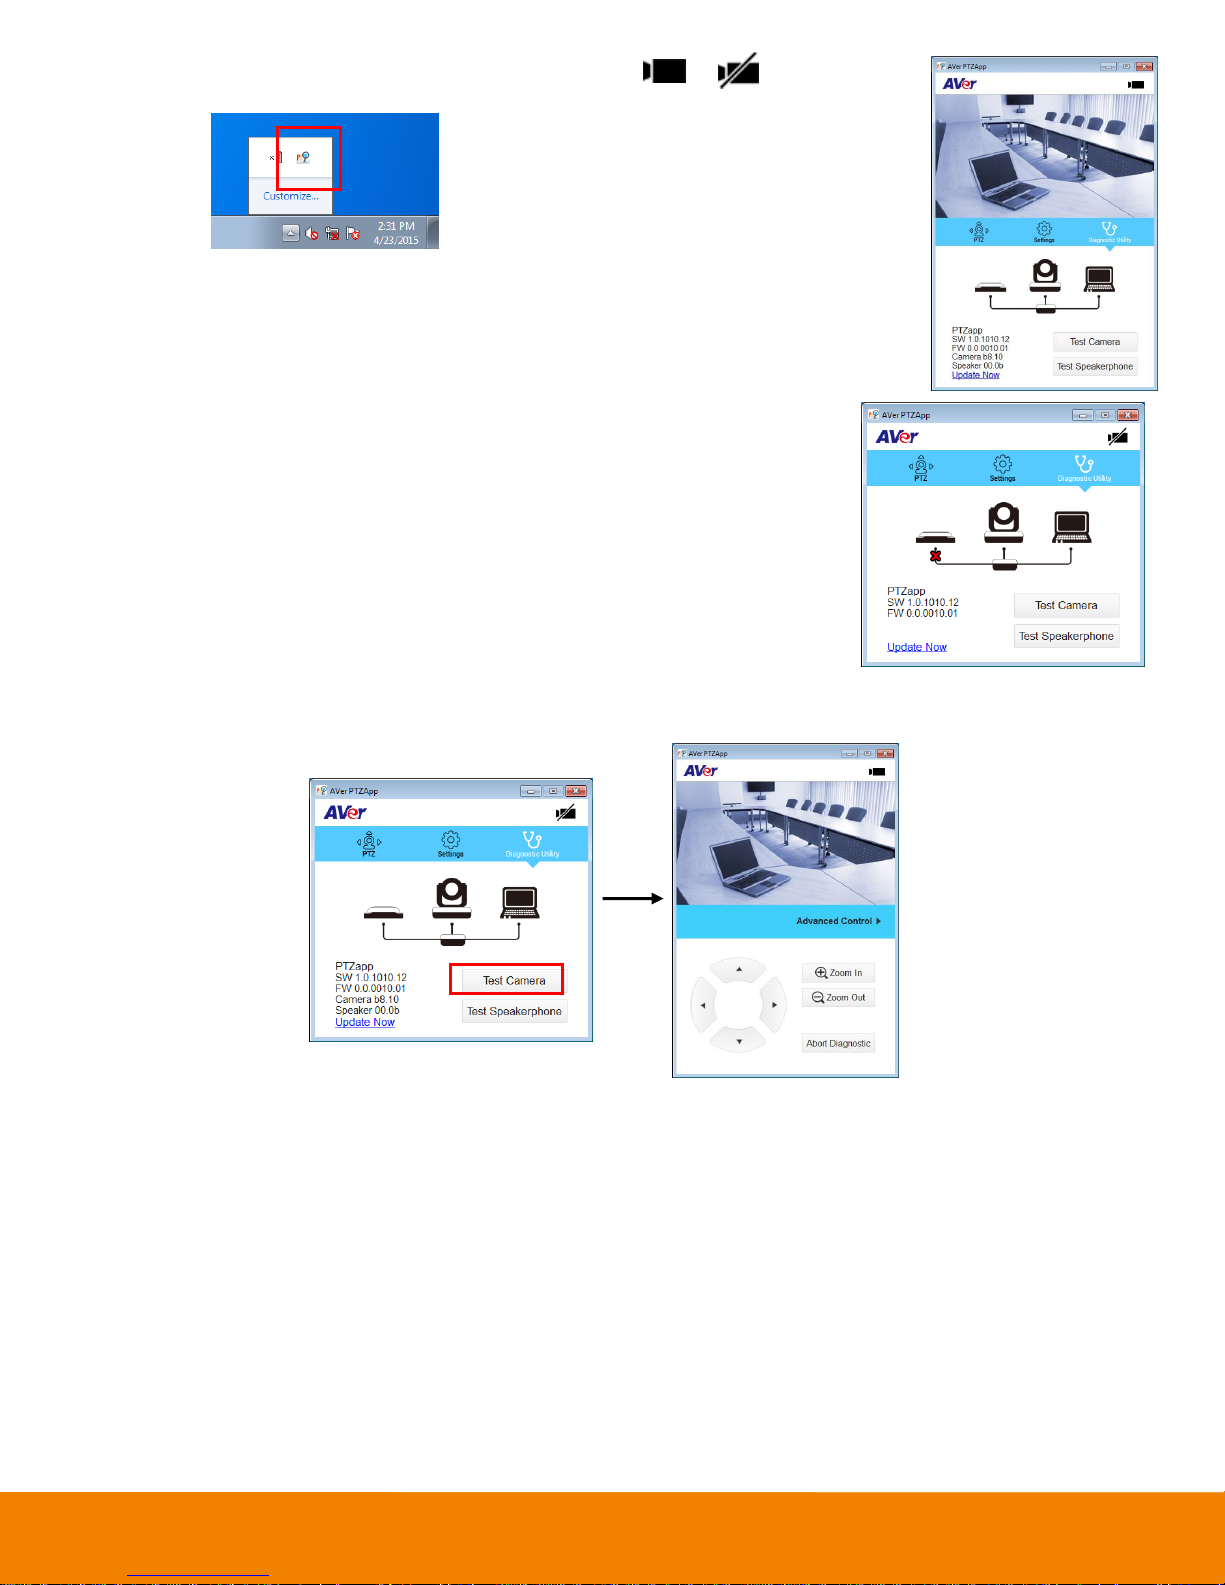
b. Minimize: Minimize the app to system tray. To quit the application,
right-click the icon on the system tray and select “Quit”.
c.
/
(Camera): Click it to
view the camera live view. Click the
camera icon again to close the
camera live view. If the live video did
not appear, please check the camera,
hub, and the laptop/PC connection to
make sure all are correct and well
connected.
d. Connection diagnostic: Display devices connection status. If the AVer PTZ app has detected that some
of the devices (camera, speakerphone, hub, and laptop/PC) are not connected well, the diagram will
display an “X” on the device to indicate the connection has a problem. If the camera is in use by another
application, it will display “Can’t start video” warning.
e. Test Camera: Click the “Test Camera” button to check the camera video display status. You can adjust the camera direction and view of the zoom
in/out. To leave the page, click the Abort Diagnostic button.
f. Test Speakerphone: Click to check the speakerphone status. It will require the user to record a short message and play it back to ensure the
© 2015 AVer Information Inc. All rights reserved.
speakerphone is working.
g. Update Now: Allows the user to update the VC520 camera’s firmware.
1. Click” Update Now”.
2. A dialog will display the current firmware version and available new firmware version (internet connection is required).
3. To auto update, click “Auto Update” and update process will start. The new firmware will be downloaded first; then, the new firmware will be uploaded
to camera.
4. To update the firmware manually, click “Manual Update” and locate the new firmware to start the process.
[Note] Before updating the new firmware to the camera, please make sure camera, hub, and laptop/PC are all well connected and stay connected
during the entire process.
English-6
Page 8
Deutsch
1 2 3 4
5 6 7
8 9 10 11 12
13
1. Kamera
2. Hub
3. Speakerphone
4. Fernbedienung
5. Stativ (Befestigungsschrauben beiliegend)
6. Stromkabel1 & Netzteil
7. Klettverschluss für Hub²
8. USB Kabel
9. Kamerakabel
10. Speakerphone-Kabel
11. 3,5-mm-AUX-Kabel
12. Kurzanleitung
13. AAA-Batterien (x2)
6
1
2
3 4 5
1. IR-Sensor
2. Netzanzeige
3. Hub-Anschluss
4. RS232-Anschluss*
5. Kensington-Schloss
6. Montageschraubenöffnung
Inhalt der Verpackung
[Hinweis] 1. Das Stromkabel variiert abhängig von den im Verkaufsland üblichen Steckdosen.
2. Ein Klettverschluss sichert den Hub, wenn dieser unter einer flachen Fläche montiert wird. Entfernen Sie den Verschluss bitte mithilfe einer
geeinigten Reinigungslösung. Vergewissern Sie sich zuvor, dass die Reinigungslösung die Oberfläche nicht beschädigt.
Produktvorstellung
Kamera
* Wenn Sie einen Konverter oder Informationen zur RS232-Nutzung benötigen, wenden Sie sich bitte an AVer.
Deutsch-1
Page 9
Speakerphone
1
2
3
4 5 6 7 8
1. Mobiltelefon-Meldeleuchte
2. Lautstärke erhöhen/verringern
3. Speakerphone laut/stumm schalten*
4. Speakerphone (Daisy Chain)
5. Hub-Anschluss
6. Kensington-Schloss
7. Leitungsausgang
8. Telefoneingang
1 2 3 4
9
2
1
8
7
6
5
3
4
* Für diese Funktion wird die
AVer PTZ-App benötigt
Bezeichnung
Funktion
1. Speakerphone stumm
schalten/Stummschaltung
aufheben
Speakerphone laut/stumm schalten.
2. Zoom in/Zoom out.
Kamera-Zoom vergrößern/verkleinern.
3. Gespräch/Annahme*
Gesprächsannahme oder -aufbau.
4. Voreinstellung
Drücken, um zu der vom Benutzer festgelegten "Start"-Position
zurückzukehren.
Kamera in die gewünschte Position bewegen. Halten Sie die
Voreinstellungstaste gedrückt, bis die "gespeichert"-Nachricht angezeigt wird.
Speichern Sie die aktuellen Kameraposition mit der
Position-Voreinstellungstaste 0-9. Drücken Sie die Tasten "Voreinstellung" +
"Voreingestellte Position" (0-9); die Kamera schaltet in die gespeicherte
Position um.
5. Voreingestellte Position
Drücken Sie die Tasten "Voreinstellung" + "Voreingestellte Position" (0-9); die
Kamera schaltet in die gespeicherte Position um.
6. Steuerung der Kamera des
Konferenzpartners
Für die Steuerung der Funktionen Schwenken, Neigen oder Zoom der Kamera des
Konferenzpartners drücken Sie die Taste "Far/Near".
7. Steuerung der Kamerarichtung
Mit der Richtungstaste an der Fernbedienung steuern Sie die Richtung der Kamera.
Um die Kamera zu bewegen, drücken Sie die Richtungstaste. Für kontinuierliches
Schwenken oder Neigen halten Sie die Taste gedrückt.
8. Auflegen*
Gespräch beenden.
9. Lautstärke erhöhen/verringern
Lautstärke nach oben oder unten anpassen.
1. Strombuchse
2. USB-Schnittstelle
3. Speakerphone-Anschluss
4. Kameraanschluss
* Rote LED: Speakerphone stumm geschaltet.
* Blaue LED: Speakerphone aktiv (oder Live)
Hub
Fernbedienung
Deutsch-2
Page 10
Einrichtung der VC520
DC 12V
Kamerakabel
Speakerphone-Kabel
Stromkabel
Wandsteckdose
Kamera
Hub
Speakerphone
USB-Kabel
Laptop
PC
Wand
Decke
1. Verbinden Sie Kamera, Hub und Speakerphone mit
dem Kamera- und dem Speakerphone-Kabel (siehe
Diagramm oben).
2. Mit dem USB-Kabel verbinden Sie den Hub mit
Ihrem PC/Laptop (siehe Diagramm oben).
3. Verbinden Sie den Hub mit dem Stromnetz; die
LED leuchtet, der Kamerakopf dreht sich und die
Netzanzeige an der Kamera leuchtet.
4. Installieren Sie die AVer PTZ-App auf dem Laptop
oder PC, der mit dem VC520 verbunden ist.
Mithilfe der App können die Parameter der Kamera
angepasst und eingerichtet werden (siehe Abschnitt
"AVer PTZ-App").
5. Um ein Gespräch aufzubauen, führen Sie Ihre
Video-App (SkypeTM, Microsoft ®LyncTM, Google
HangoutsTM, Cisco WebEx®, GoToMeetingTM,
WebRTC etc.) aus und wählen die VC520 als Video-
und Audiogerät.
Einrichtung der VC520
Mounting Camera
Es gibt drei Möglichkeiten für die Montage der Kamera: an der Wand, an der Decke und auf einem Tisch. Verwenden Sie dazu die beiliegende Halterung und
die Schrauben.
[Warnung]
1. Verwenden Sie für die sichere Befestigung der Kamera an einer Wand oder Decke ausschließlich Beschläge und Befestigungsmittel mit einer
nachweislichen Tragkraft von 10 Kg. Für die Befestigung an einer Trockenwand verwenden Sie bitte Wandanker und Dübel (z. B. Spreizdübel).
2. Wenn die Kamera auf einem Tisch montiert wird, beachten Sie bitte, dass die Halterung und die Kamera herabfallen können, wenn der Tisch zu stark
bewegt oder an den Kabeln gezogen wird. Kabel und Kamera müssen richtig gesichert werden.
Deutsch-3
Page 11

Tisch
Estado
LED
Start
Blinkt blau und der Kamerakopf dreht sich.
Normal
Leuchtet statisch Blau.
Die Kamera wird nicht vom Computer verwendet.
Leuchtet statisch Orange
Die Kamera ist nicht angeschlossen.
Leuchtet statisch Orange und Kamerakopf ist nach unten gerichtet.
Speakerphone ( )
Mobiltelefon ( )
Estado
LED
Stumm
Leuchtet statisch Rot.
Stummschaltung aufheben
Leuchtet statisch Blau.
Estado
LED
Verbinden
Licht ein
Trennen
Licht aus
Benutzung der VC520
Ein Videogesprä ch führen
1. Alle Geräte (Kamera, Hub, Speakerphone und Laptop/PC) müssen richtig angeschlossen und der Hub eingeschaltet sein.
2. Führen Sie Ihre Video-App (SkypeTM, Microsoft ®LyncTM, Google HangoutsTM, Cisco WebEx® , GoToMeetingTM, Web RTC etc.) auf Ihrem Laptop oder
PC aus.
3. Legen Sie die VC520-Kamera als primäre Kamera für Ihre Video-App fest (ziehen Sie die Bedienungsanleitung Ihrer Video-App heran). Nun können Sie
das Gespräch führen.
4. Die VC520 ist eine Plug-&-Play-Konferenzkamera. Für das System werden keine speziellen Treiber benötigt. Für das verbesserte Benutzererlebnis
empfehlen wir jedoch die Installation der AVer PTZ-App. Informationen zur Installation und Nutzung der AVer PTZ-App entnehmen Sie bitte dem
Abschnitt "AVer PTZ-App" in dieser Bedienungsanleitung.
Telefoneingang
Verbindung Ihres VC520-Speakerphone als Freisprecheinrichtung mit Ihrem Mobiltelefon.
1. Verbinden Sie Ihr Mobiltelefon mit dem beiliegenden 3,5-mm-AUX-Kabel mit der "Phone In"-Buchse am Speakerphone.
2. Nachdem die VC520 die Verbindung erkannt und aufgebaut hat, leuchtet die Meldeleuchte "Cellphone" (Mobiltelefon).
Leitungseingang
Um ein weiteres VC520-Speakerphone anzuschließen, die Reichweite des Speakerphones in einem Raum mit einem Durchmesser von ca. 76,20 cm zu
vergrößern und die Lautstärke zu erhöhen, gehen Sie wie folgt vor:
1. Verbinden Sie eine Seite des (nicht beiliegenden) Girlandenkabels mit dem Speakerphone-Anschluss (Daisy Chain).
2. Verbinden Sie das andere Ende des Kabels mit dem Speakerphone-Anschluss an dem anderen VC520-Speakerphone.
LED-Meldeleuchte
Kamera
Deutsch-4
Page 12

a
c
b
d
e
f
g
AVer PTZ-App
a. Funktion-Symbol: Klicken Sie darauf, um zur Seite "Funktionen" umzuschalten.
- PTZ: Steuerung der Kamerarichtung, Vergrößern und Verkleinern, Aktivierung/Deaktivierung der
Hintergrundbeleuchtungsstärke während des Videogesprächs.
- Einstellungen: Einrichtung der Kameraparameter - Weißabgleich, Geräuschfilter, Frequenz, Helligkeit,
Schärfe, Drehen, Spiegeln, ADDR und Baud-Rate. ADDR und die Baud-Rate werden für die Einstellung
der RS232-Verbindung verwendet. Klicken Sie auf Save (Speichern), um die Einstellungen zu speichern.
Um die vorgenommenen Einstellungen auf die Werkseinstellungen zurückzusetzen, klicken Sie auf
Factory Default (Werkseinstellungen).
- Diagnose-Dienstprogramm: Anzeige der S/W- und F/W-Version und des Geräteverbindungsstatus. Sie
können auch den Status von Kamera und Speakerphone überprüfen und die Kamera-Firmware
aktualisieren.
Installation der AVer PTZ-App
Laden Sie die AVer PTZ-App bitte unter http://www.aver.com > Support > Download Center > Video Conferencing herunter. Nach dem Download führen Sie
einen Doppelklick auf die Datei aus und befolgen die Bildschirmanweisungen, um die Installation abzuschließen.
Wählen Sie während der Installation bitte unbedingt das “Skype Plug-In”.
Nach der Installation der AVer PTZ-App führen Sie einen Doppelklick auf das AVer PTZ-App-Symbol
aus, um die App auszuführen.
Verwendung der AVer PTZ-App
1. Damit Sie die Video-App ausführen können, wird auf Oberfläche Ihrer Video-App die Frage zur
Installation des Plug-Ins angezeigt. Klicken Sie, um das Plug-In zu akzeptieren. Nun können Sie
Ihre Video-App mit der AVer PTZ-App und der Fernbedienung steuern.
2. Wenn Sie Installation des Skype-Plug-Ins während der Installation zugelassen haben, wird die
Plug-In-Anfrage in Skype angezeigt. Klicken Sie auf die Skype Plug-In-Anfrage, um das Plug-In
zu aktivieren. Damit werden und die Funktion an der Fernbedienung aktiviert.
3. Während des Videogesprächs können Sie die AVer PTZ-App verwenden, um die Kamera zu
schwenken, zu neigen, die Anzeige zu vergrößern/verkleinern und die Hintergrundbeleuchtung
zu aktivieren/deaktivieren.
4. Bei der erstmaligen Verwendung können Sie die Verbindung, die Kamera und den
Lautsprecherstatus überprüfen und die Kameraparameter einrichten. Die einzelnen Funktionen
werden nachstehend erläutert:
Deutsch-5
Page 13

b. Minimieren: Verkleinerung der App auf die Taskleiste. Um die App zu
verlassen, klicken Sie das Symbol in der Taskleiste mit der rechten
Maustaste an und wählen “Quit (Beenden)”.
c.
/
(Kamera): Klicken
Sie das Symbol für die
Kamera-Live-Ansicht an. Klicken Sie
erneut auf das Kamera-Symbol, um
die Live-Ansicht zu beenden. Wenn
das Live-Video nicht angezeigt
werden sollte, überprüfen Sie bitte
Kamera-, Hub- und die
Laptop/PC-Verbindung.
d. Verbindungsdiagnose: Anzeige des Geräteverbindungsstatus. Wenn die AVer PTZ-App erkennt, dass
ein bestimmtes Gerät (Kamera, Speakerphone, Hub und Laptop/TC) nicht richtig angeschlossen ist, wird ein
"X" angezeigt; dies ist ein Hinweis darauf, dass ein Verbindungsproblem mit dem Gerät vorliegt. Wenn die
Kamera von einer anderen App verwendet werden sollte, wird "Can't start video" (Video starten nicht
möglich) angezeigt
e. Test Camera (Kameratest): Klicken Sie auf die Schaltfläche "Test Camera", um die Kamera Videoanzeigestatus zu überprüfen. Sie können die
Kamera Richtung und Blick auf den Zoom in / out einzustellen. Um die Seite zu verlassen, klicken Sie auf die Schaltfläche Abort Diagnostic
(Diagnose beenden).
f. Speakerphone-Test: Durch Anklicken überprüfen Sie den Speakerphone-Status. Dann muss der Benutzer eine kurze Nachricht aufnehmen und diese
© 2015 AVer Information Inc. Alle Rechte vorbehalten.
abspielen, um die Funktionsfähigkeit des Speakerphone zu überprüfen..
g. Jetzt aktualisieren: Der Benutzer kann die Firmware der VC520-Kamera aktualisieren.
1. Klicken Sie auf "Update Now (Jetzt aktualisieren)”.
2. Im Dialogfeld werden die aktuelle sowie die verfügbare neue Firmware-Version angezeigt (es wird eine Internetverbindung benötigt)..
3. Für die automatische Aktualisierung klicken Sie auf “Auto Update”; die Aktualisierung wird ausgeführt Zuerst wird die neue Firmware heruntergeladen
4. Für die manuelle Firmware-Aktualisierung klicken Sie auf “Manual Update (Manuelles Update)”. Suchen Sie die neue Firmware und starten Sie den
und dann wird die neue Firmware auf die Kamera geladen.
[Hinweis] Vergewissern Sie sich vor der Aktualisierung der neuen Firmware auf der Kamera, dass Kamera, Hub und Laptop/PC richtig angeschlossen
sind. Trennen Sie die Verbindung während der Aktualisierung nicht..
Vorgang.
Deutsch-6
Page 14

Español
1 2 3 4
5 6 7
8 9 10 11 12
13
1. Cámara
2. Concentrador
3. Altavoz
4. Mando a distancia
5. Soporte (tornillos de montaje incluidos)
6. Cable de alimentación1 & adaptador de
corriente
7. Velcro para el concentrador2
8. Cable USB
9. Cable de la cámara
10. Cable del altavoz
11. Cable AUX de 3,5 mm
12. Guía de instalación rápida
13. Pilas AAA (x2)
6
1
2
3 4 5
1. Sensor de infrarrojos
2. Indicador de encendido
3. Conexión del concentrador
4. Conexión RS232*
5. Conector de seguridad Kensington
6. Orificio del tornillo del soporte
Contenido del paquete
[Note] 1. The power cord will vary depending on the standard power outlet of the country where it is sold.
2. Adhesive fastener holds the hub when mounted under your flat surface. Use appropriate cleaning solution when removing the fastener. Test the
cleaning solution to make sure that it will not damage the surface.
Presentació n del producto
Cámara
* Si necesita un convertidor o instrucciones sobre cómo utilizar RS232, póngase en contacto con AVer.
Español-1
Page 15

1
2
3
4 5 6 7 8
1. Indicador de teléfono móvil
2. Subir/Bajar volumen
3. Desactivar/Activar sonido de
altavoz*
4. Altavoz (conexión en cadena)
5. Conexión del concentrador
6. Conector de seguridad
Kensington
7. Salida de línea
8. Entrada de teléfono
1 2 3 4
9
2
1
8
7
6
5
3
4
* Esta función requiere la
aplicación AVer PTZ
Nombre
Función
1. Desactivar/Activar altavoz
Desactiva o activa el altavoz.
2. Acercar/Alejar
Aumenta o disminuya el zoom de la cámara.
3. Llamar/Responder*
Inicia o responde una llamada.
4. Preajuste
Pulse el botón de preajuste para volver a la posición de “inicio” establecida por
el usuario.
Mueva la cámara a la posición deseada. Mantenga pulsado este botón hasta
que se muestre el mensaje para guardar la posición establecida. Seleccione el
botón de posición predefinida 0~9 para guardar la posición actual de la
cámara. Pulse el botón de preajuste + el botón de posición predefinida (0~9)
para que la cámara se establezca en la posición guardada.
5. Posición predefinida
Pulse el botón de preajuste + el botón de posición predefinida (0~9) para que la
cámara se establezca en la posición guardada.
6. Control de cámara remota
Pulse este botón para controlar las funciones de zoom y movimiento horizontal y
vertical de la cámara remota.
7. Control de dirección de la
cámara
Utilice el botón de dirección del mando a distancia para controlar la dirección de la
cámara. Pulse el botón de dirección para mover la cámara o manténgalo pulsado
para un movimiento horizontal/vertical continuos.
8. Colgar*
Finaliza la llamada.
9. Subir/Bajar volumen
Sube o baja el volumen.
1. Puerto USB
2. Puerto USB
3. Conexión del altavoz
4. Conexión de la cámara
Altavoz
* LED rojo: el sonido del altavoz está desactivado
* LED azul: el altavoz está activo (o en uso)
Concentrador
Mando a distancia
Español-2
Page 16

DC 12V
Cable de la cámara
Cable del altavoz
Cable de alimentación
Toma de corriente
Cámara
Concentrador
Altavoz
Cable USB
Portátil
PC
Pared
Techo
1. Utilice el cable de la cámara y el cable del altavoz
para conectar la cámara, el concentrador y el altavoz
(consulte el diagrama superior).
2. Utilice el cable USB para conectar el concentrador al
PC/portátil (consulte el diagrama superior).
3. Conecte la alimentación al concentrador; el LED
se encenderá, la cabeza de la cámara rotará y el
indicador de encendido de la cámara también se
encenderá.
4. Instale la aplicación AVer PTZ en el portátil o PC
conectado a la VC520. Esta aplicación permite ajustar
y configurar los parámetros de la cámara (consulte la
sección correspondiente a la aplicación AVer PTZ).
5. Para realizar una llamada, ejecute su aplicación de
vídeo (SkypeTM, Microsoft ®LyncTM, Google
HangoutsTM, Cisco WebEx®, GoToMeetingTM,
WebRTC®, etc.) y seleccione la VC520 como
dispositivo de vídeo y audio.
Configuració n de la VC520
Conexión del dispositivo
Mounting Camera
La cámara puede montarse de tres maneras: en la pared, en el techo o sobre una mesa con el soporte y los tornillos suministrados.
[Advertencia]
1. Cuando fije el soporte de la cámara a la pared o al techo, utilice únicamente materiales certificados para soportar 10 kg (22 libras) de peso. Para la
instalación en pared seca, utilice anclajes de pared tipo de tipo casquillos (también conocidos como pernos de expansión).
2. Si el soporte de la cámara se fija a una mesa, procure no mover la mesa en exceso o tirar de los cables de la cámara para evitar que el soporte y la
cámara caigan al suelo. Asegúrese de que los cables y la cámara estén bien sujetos.
Español-3
Page 17

Estado
LED
Iniciando
Azul intermitente y cabeza de la cámara en rotación
Normal
Azul fijo
El ordenador no está usando la cámara
Naranja fijo
La cámara no está conectada
Naranja fijo y cabeza de la cámara hacia abajo.
Altavoz ( )
Teléfono móvil ( )
Estado
LED
Sonido desactivado
Rojo fijo
Sonido activado
Azul fijo
Estado
LED
Conectado
Luz encendida
Desconectado
Luz apagada
Mesa
Uso de la VC520
Realización de una videollamada
1. Asegúrese de que todos los dispositivos (cámara, concentrador, altavoz y portátil/PC) estén bien conectados y que el concentrador esté encendido.
2. Inicie su aplicación de vídeo (SkypeTM, Microsoft ® LyncTM, Google HangoutsTM, Cisco WebEx®, GoToMeetingTM, WebRTC, etc.) en el portátil o PC.
3. Establezca la cámara VC520 como la cámara principal para su aplicación de vídeo (consulte la guía del usuario de su aplicación de vídeo). Ahora ya
puede realizar una llamada.
4. La VC520 es una cámara para videoconferencias de tipo plug-and-play. El sistema no requiere la instalación de controladores especiales, pero se
recomienda instalar la aplicación AVer PTZ para una óptima experiencia del usuario. Si desea obtener información sobre cómo instalar y utilizar la
aplicación AVer PTZ, consulte la sección correspondiente a la aplicación AVer PTZ en este manual.
Entrada de telé fono
Permite conectar el altavoz de la VC520 a su teléfono móvil como un dispositivo de llamada manos libres.
1. Utilice el cable AUX de 3,5 mm suministrado para conectar su teléfono móvil al conector "Phone In" (Entrada de teléfono) del altavoz.
2. Una vez que la VC520 detecte la conexión con el teléfono móvil, se encenderá el indicador del teléfono móvil.
Entrada de línea
Si desea conectar otro altavoz VC520 para aumentar el volumen y ampliar el alcance del altavoz.
1. Conecte un extremo del cable de conexión en cadena (no incluido) al puerto del altavoz (conexión en cadena).
2. Conecte el otro extremo del cable al puerto del altavoz del otro altavoz VC520.
Indicador LED
Cámara
Español-4
Page 18
a
c
b
d
e
f
g
a. Icono de funciones: haga clic acceder a la página de funciones.
- PTZ: permite controlar la dirección y el zoom de la cámara, y activar/desactivar la compensación de
retroiluminación durante una videollamada.
- Settings (Ajustes): permite configurar los parámetros de la cámara: balance de blancos, filtro de ruido,
frecuencia, brillo, nitidez, volteo, reflejo, ADDR y velocidad en baudios. Los ajustes ADDR y velocidad en
baudios corresponden a la configuración de la conexión RS232. Haga clic en el botón Save (Guardar)
para guardar la configuración. Para restablecer los valores predeterminados de todos los ajustes, haga
clic en el botón Factory Default (Configuración predeterminada de fábrica).
- Diagnostic Utility (Utilidad de diagnóstico): permite visualizar la versión del software y firmware, y el
estado de conexión de los dispositivos. También puede comprobar el estado de la cámara y el altavoz, y
actualizar el firmware de la cámara..
Aplicació n AVer PTZ
Instalación de la aplicación AVer PTZ
Vaya a http://www.aver.com > Support > Download Center > Video Conferencing (Soporte > Centro de descargas > Videoconferencias) para descargar la
aplicación AVer PTZ. Tras la descarga, haga doble clic en el archivo y siga las instrucciones en pantalla para completar la instalación.
Recuerde seleccionar la opción “Skype plug-in” (Complemento de Skype) durante la instalación.
Después de instalar la aplicación AVer PTZ, haga doble clic en el icono de la aplicación para
ejecutarla.
Uso de la aplicación AVer PTZ
1. Para ejecutar su aplicación de vídeo, se mostrará una solicitud de complemento en la interfaz
de su aplicación de vídeo. Haga clic para aceptar el complemento y controlar la aplicación de
vídeo mediante AVer PTZ y el mando a distancia.
2. Si selecciona la opción correspondiente al complemento de Skype durante la instalación, se
mostrará una solicitud de complemento en Skype. Haga clic en la solicitud de complemento
de Skype para aceptar el complemento y activar las funciones y del mando a
distancia.
3. Durante la videollamada, puede utilizar la aplicación AVer PTZ para controlar el zoom y el
movimiento horizontal/vertical de la cámara, y activar/desactivar la función de
retroiluminación.
4. La primera vez que utilice la aplicación, podrá comprobar la conexión, la cámara, el estado
del altavoz y los parámetros de la cámara. A continuación se describe cada una de las
funciones:
Español-5
Page 19

b. Minimizar: permite minimizar la aplicación en la bandeja del sistema.
Para cerrar la aplicación, haga clic con el botón derecho del ratón en la
bandeja del sistema y seleccione “Quit” (Salir).
c.
/
(Cámara): haga clic
para ver el vídeo en directo de la
cámara. Vuelva a hacer clic en el
icono de la cámara para salir. Si no
aparece el video en directo,
compruebe la conexión de la cámara,
del concentrador y del portátil/PC.
d. Diagnóstico de la conexión: muestra el estado de conexión de los dispositivos. Si la aplicación AVer PTZ
ha detectado que alguno de los dispositivos (cámara, altavoz, concentrador o portátil/PC) no está bien
conectado, el diagrama mostrará una “X” en el dispositivo para indicar que hay un problema de conexión. Si
la cámara está siendo utilizada por otra aplicación, mostrará la advertencia “Can’t start video” (No se puede
iniciar el vídeo).
e. Test Camera (Probar cámara): Haga clic en el botón "Cámara de prueba" para comprobar el estado de visualización de vídeo de la cámara. Se puede
ajustar la dirección de la cámara y la vista del zoom in / out. Para salir de la página, haga clic en el botón Abort Diagnostic (Cancelar diagnóstico).
© 2015 AVer Information Inc. Todos los derechos reservados.
f. Test Speakerphone (Comprobar altavoz): haga clic en este botón para comprobar el estado del altavoz. El usuario deberá grabar un mensaje corto y
reproducirlo para asegurarse de que el altavoz funciona correctamente.
g. Update Now (Actualizar ahora): permite al usuario actualizar el firmware de la cámara VC520.
1. Haga clic en “Update Now” (Actualizar ahora).
2. Un cuadro de diálogo mostrará la versión de firmware actual y nueva (se necesita una conexión a Internet).
3. Para realizar una actualización automática, haga clic en “Auto Update” (Actualización automática). Se iniciará el proceso de actualización. Primero se
4. Para actualizar el firmware manualmente, haga clic en “Manual Update” (Actualización manual) y localice el nuevo firmware para iniciar el proceso de
descargará el firmware y después se instalará en la cámara.
[Nota] Antes de actualizar el firmware de la cámara, asegúrese de que la cámara, el concentrador y el portátil/PC estén bien conectados y que no se
interrumpa la conexión mientras dure el proceso de actualización.
actualización.
Español-6
Page 20

Français
1 2 3 4
5 6 7
8 9 10 11 12
13
1. Caméra
2. Concentrateur
3. Haut-parleur téléphonique
4. Télécommande
5. Support (vis de montage incluses)
6. Cordon électrique1 et adaptateur de courant
7. Velcro pour le concentrateur2
8. Câble USB
9. Câble de la caméra
10. Câble du haut-parleur
11. Câble AUX 3,5mm
12. Guide d’installation rapide
13. Piles AAA (x2)
6
1
2
3 4 5
1. Capteur IR
2. Indicateur d’alimentation
3. Connecteur du concentrateur
4. Connecteur RS232*
5. Verrou Kensington
6. Trou de vis pour montage
Contenus de la boîte
[Note] 1. Le cordon électrique varie selon les normes des prises du pays où l’appareil est vendu..
2. Le support adhésif maintient le concentrateur en place lorsqu’il est monté sous une surface plane. Utilisez une solution de nettoyage adaptée pour
enlever l’adhésif. Testez d’abord la solution de nettoyage sur une petite surface pour vérifier qu’elle n’endommage pas la surface.
Introduction au produit
Caméra
*Si vous avez besoin d’un adaptateur ou d’instructions concernant l’utilisation du RS232veuillez contacter AVer.
Français-1
Page 21

1
2
3
4 5 6 7 8
1. Indicateur du portable
2. Bouton augmenter le volume
3. Activer/Désactiver la sourdine*
4. Haut-parleur téléphonique
(chaîne)
5. Connecteur du concentrateur
6. Verrou Kensington
7. Ligne de sortie
8. Ligne d’entrée
1 2 3 4
9
2
1
8
7
6
5
3
4
* Cette fonction requiert l’appli
AVer PTZ
Nom
Fonction
1. Activer/Désactiver le haut-parleur
Activer/Désactiver le haut-parleur
2. Zoom avant/Zoom arrière
Augmenter/Diminuer le zoom
3. Appel/Réponse*
Répondre à un appel ou initier un appel.
4. Preset (Présélection)
Appuyez sur ce bouton pour revenir à la position « Accueil » que
l’utilisateur a configuré.
Déplacer la caméra vers la position souhaitée. Appuyez et maintenez
le bouton « preset » jusqu’à ce que le message indiquant que la
sélection a été enregistrée, s’affiche. Sélectionnez la position
présélectionnée avec les boutons 0~9 pour enregistrer la position
actuelle de la caméra. Appuyez sur le bouton preset + preset position
(0~9) et la caméra se déplacera vers la position enregistrée.
5. Preset position (Position
présélectionnée)
Appuyez sur le bouton preset + preset position (0~9) et la caméra se
déplacera vers la position enregistrée.
6. Commande de la caméra à distance
Appuyez sur le bouton « Far/Near » pour contrôler les fonctions
panoramique, inclinaison, zoom de la caméra à distance.
7. Commande de la direction de la caméra
Utilisez le bouton de direction de la télécommande pour contrôler la
direction de la caméra. Appuyez sur le bouton direction pour déplacer la
caméra ou appuyez et maintenez pour faire une prise panoramique
continue ou pour incliner la caméra.
8. Raccrocher*
Mettre fin à l’appel.
9. Bouton augmenter/Baisser le volume
Régler le volume vers le bas ou vers le haut.
1. Prise électrique
2. Port USB
3. Connecteur du haut-parleur
4. Connecteur de la caméra
Haut-parleur té léphonique
* LED rouge: le haut-parleur est en sourdine.
* LED bleue: le haut-parleur est actif (ou en direct).
Concentrateur
Télécommande
Français -2
Page 22

DC 12V
Câble de la caméra
Câble du haut-parleur
Cordon électrique
Prise murale
Caméra
Concentrateur
Téléphone haut-parleur
Câble USB
Ordinateur portable
PC
Mur
Plafond
1. Utilice el cable de la cámara y el cable del altavoz
para conectar la cámara, el concentrador y el altavoz
(consulte el diagrama superior).
2. Utilice el cable USB para conectar el concentrador al
PC/portátil (consulte el diagrama superior).
3. Conecte la alimentación al concentrador; el LED
se encenderá, la cabeza de la cámara rotará y el
indicador de encendido de la cámara también se
encenderá.
4. Instale la aplicación AVer PTZ en el portátil o PC
conectado a la VC520. Esta aplicación permite
ajustar y configurar los parámetros de la cámara
(consulte la sección correspondiente a la aplicación
AVer PTZ).
5. Para realizar una llamada, ejecute su aplicación de
vídeo (SkypeTM, Microsoft ®LyncTM, Google
HangoutsTM, Cisco WebEx®, GoToMeetingTM,
WebRTC®, etc.) y seleccione la VC520 como
Configuration VC520
Connexion du dispositif
Montage de la camé ra
Il existe trois façons de fixer la caméra avec les supports et les vis fournies - au mur, au plafond et sur une table.
[Avertissement]
1. Utilisez uniquement des équipements et des matériaux certifiés pour supporter un poids supérieur à 22 lb (10 kg). Pour l’installation sur cloisons sèches,
utilisez des chevilles pour murs creux (chevilles Molly).
2. Remarquez que même si le support de la caméra est monté sur une table, les mouvements excessifs de la table ou le fait de tirer sur les câbles de la
camera risquent de faire tomber le support et la caméra. Vérifiez que les câbles et la caméra sont bien attachés.
Français -3
Page 23

État
LED
Démarrage
Clignote bleu et la tête de la caméra tourne
Normal
Bleue constant
La caméra n’est pas en cours d’utilisation par l’ordinateur
Orange constant
La caméra n’est pas connectée
Orange constant et la tête de la caméra est tournée vers le bas.
Haut-parleur téléphonique ( )
Portable ( )
État
LED
Sourdine
Rouge constant
Enlever la sourdine
Bleue constant
État
LED
Connexion
Lumière allumé
Déconnecter
Lumière éteinte
Table
Utiliser VC520
Faire un appel vidéo
1. Vérifier que tous les appareils (caméra, concentrateur, Haut-parleur téléphonique, ordinateur portable/PC) soient bien connectés et que le concentrateur
soit allumé.
2. Démarrez votre application de vidéo-conférence (SkypeTM, Microsoft ®LyncTM, Google HangoutsTM, Cisco WebEx®, GoToMeetingTM, WebRTC, etc.),
sur votre portable ou votre PC.
3. Configurez la caméra VC520 comme la caméra principale pour votre application vidéo (consultez le manuel de l’utilisateur de votre application vidéo).
Vous pouvez maintenant passer un appel.
4. La VC520 est une caméra de conférence plug-and-play. Le système ne requiert pas de pilotes particuliers mais nous recommandons l’installation de
l’appli AVer PTZ pour obtenir la meilleure expérience d’utilisateur. Pour en savoir plus sur comment installer et utiliser l’appli AVer PTZ, referez-vous à la
section Appli AVer PTZ de ce manuel.
Ligne d’entrée
Comment connecter le haut-parleur téléphonique à votre téléphone portable comme appareils mains libres.
1. Utilisez le câble AUX de 3,5 mm inclut pour connecter votre appareil mobile à la prise « Phone In » du haut-parleur.
2. Une fois que le VC520 détecte la connexion au téléphone portable et que la connexion est réussie, l’indicateur « Cellphone » s’allume.
Ligne d’entrée
Comment connecter un autre haut-parleur téléphonique pour augmenter la surface couverte par le haut-parleur et augmenter le volume lorsque le diamètre de
la salle excède 9 mètres.
1. Connectez un côté du câble de la connexion en chaîne (non inclus) au port du haut-parleur (daisy chain).
2. Connectez l’autre côté du câble au port de haut-parleur de l’autre haut-parleur téléphonique.
Indicateur LED
Caméra
Français -4
Page 24

a
c
b
d
e
f
g
a. Icônes de fonction : Cliquez dessus pour passer à la page des fonctions.
- PTZ : Pour contrôler la direction de la caméra et pour activer/désactiver la rétro-illumination
compensatoire pendant l’appel vidéo, faire zoom avant/zoom arrière.
- Paramètres(Settings) : Pour configurer les paramètres de la caméra – Équilibre des blancs, filtre de
bruit, fréquence, luminosité, netteté, pivotement, miroir, ADDR, et débit de bauds. L’ADDR et le débit de
baud correspondent au paramètre de connexion RS232. Cliquez sur le bouton Enregistrer pour
enregistrer les paramètres. Pour rétablir les paramètres par défaut appuyez sur le bouton Paramètres
d’usine.
- Utilitaire de diagnostic(Diagnostic Utility) : Permet d’afficher les versions S/W et F/W et l’état de
connexion des appareils. Vous pouvez aussi tester la caméra, l’état du haut-parleur et mettre à jour le
progiciel de la caméra.
Appli AVer PTZ
Installation de l’appli AVer PTZ
Veuilez consulter http://www.aver.com > Support > Download Center > Video Conferencing pour télécharger l’appli AVer PTZ. Après le téléchargement,
double-cliquez sur le fichier et suivez les instructions à l’écran pour terminer l’installation.
N’oubliez pas de sélectionner l’option « Skype plug-in » pendant l’installation.
Après avoir installé l’appli AVer PTZ, double-cliquez sur l’icône AVer PTZ pour exécuter
l’application.
Utilisation de l’appli AVer PTZ
1. Lors du lancement de l’application vidéo, une requête d’autorisation du plug-in va s’afficher sur
l’interface de votre application vidéo. Cliquez dessus et acceptez le plug-in ; votre application
peut maintenant être contrôlée par l’appli AVer PTZ et la télécommande.
2. Si vous avez coché le plug-in Skype au cours de l’installation, la requête de plug-in sera
affichée dans Skype. Cliquez sur le plug-in Skype pour accepter le plug-in; ceci active et
la fonctionnalité sur la télécommande.
3. Au cours de votre appel vidéo, vous pouvez utiliser l’appli AVer PTZ pour incliner la caméra,
faire des zooms avant et arrière et activer/désactiver la caractéristique de rétro-illumination.
4. Lors de la première utilisation, vous pouvez vérifier l’état de la connexion, de la caméra et du
haut-parleur et configurer les paramètres de la caméra. Toutes les fonctions sont décrites
ci-dessous:
Français -5
Page 25

b. Minimiser : Minimise l’appli dans la barre des tâches. Pour quitter
l’application, faire un clic de droite dans la barre des tâches et
sélectionnez « Quitter ».
c.
/
(Caméra) : Cliquez
dessus pour voir la vue en direct de la
caméra. Cliquez de nouveau sur
l’icône de la caméra pour refermer la
vue en direct. Si la vidéo en direct
n’apparaît pas, examinez les
connexions de la caméra, du
concentrateur et du portable /PC.
d. Diagnostic de connexion Affiche l’état de connexion des appareils. Si l’appli AVer PTZ a détecté que
certains appareils (camera, Haut-parleur téléphonique, concentrateur et portable/PC) ne sont pas
connectés, le diagramme affichera un « X » sur l’appareil pour indiquer qu’il existe un problème. Si la
caméra est en cours d’utilisation par une autre application, elle affichera l’avertissement « Can’t start
video » (impossible de démarrer la vidéo).
e. Testez la caméra : Cliquez sur Testez la caméra pour vérifier l’état de l’affichage de la caméra vidéo. Vous pouvez régler la direction
de la caméra et la vue du zoom avant/arrière. Pour quitter cette page, cliquez sur le bouton « Interrompre le diagnostic ».
© 2015 AVer Information Inc. Tous droits réservés.
f. Testez le haut-parleur téléphonique : Cliquez pour voir l’état du Haut-parleur téléphonique. L’utilisateur devra enregistrer un bref message puis le jouer
pour vérifier que le Haut-parleur téléphonique fonctionne.
g. Mise à jour : Permet aux utilisateurs de mettre à jour le progiciel de la caméra VC520.
1. Cliquez sur « Mettre à niveau maintenant ».
2. Une boîte de dialogue affiche la version du progiciel installé et les versions disponibles (une connexion internet est requise.
3. Pour installer automatiquement les mises à jour, cliquez « Mise à niveau automatique » et le processus de mise à niveau commencera. Le nouveau
4. Pour mettre à jour le progiciel manuellement, cliquez sur « Mise à niveau manuelle » et trouvez le nouveau progiciel pour commencer le processus.
progiciel sera téléchargé ; puis installé sur la caméra.
[Remarque] Avant de mettre à jour le progiciel de la caméra, vérifiez que la caméra, le concentrateur et le portable/PC sont bien connectés et
demeurent connectés tout au long de la procédure.
Français -6
Page 26

Italiano
1 2 3 4
5 6 7
8 9 10 11 12
13
1. Telecamera
2. Hub
3. Altoparlante
4. Telecomando
5. Supporto (le viti di montaggio sono fornite in
dotazione)
6. Cavo di alimentazione1 & Adattatore di
corrente
7. Velcro per hub2
8. Cavo USB
9. Cavo della telecamera
10. Cavo dell'altoparlante
11. Cavo AUX da 3.5 mm
12. Guida all'installazione rapida
13. Batterie AAA (x2)
6
1
2
3 4 5
1. Sensore Infrarossi
2. Indicatore di alimentazione
3. Collegamento Hub
4. Collegamento RS232*
5. Lucchetto Kensington
6. Foro della vite per il montaggio
Contenuto della confezione
[Nota] 1. Il cavo di alimentazione varia a seconda della presa di corrente standard per il paese in cui viene venduto.
2. Un elemento di fissaggio adesivo tiene in posizione l'hub quando viene montato sotto a una superficie piatta. Servirsi di una soluzione detergente
adeguata in fase di rimozione dell'elemento di fissaggio. Testare la soluzione detergente per verificare che non danneggi la superficie.
Introduzione al prodotto
Telecamera
* Qualora sia necessario un convertitore o istruzioni su come usare il dispositivo RS232, vi invitiamo a contattare AVe.
Italiano-1
Page 27

1
2
3
4 5 6 7 8
1. Indicatore telefono cellulare
2. Volume su/giù
3. Disattiva/attiva audio
altoparlante*
4. Altoparlante (collegamento a
margherita)
5. Collegamento Hub
6. Lucchetto Kensington
7. Uscita linea
8. Ingresso telefono
1 2 3 4
9
2
1
8
7
6
5
3
4
* La funzione richiede l'app
AVer PTZ
Nome
Funzione
1. Disattiva/attiva audio altoparlante
Disattiva/attiva audio dell'altoparlante.
2. Ingrandisci/Riduci
Aumenta/Riduci lo zoom della telecamera.
3. Chiama/Rispondi*
Risponde a una chiama o avvia una chiamata.
4. Preset
Premere per tornare alla posizione "home" impostata dall'utente.
Portare la telecamera nella posizione desiderata. Premere e tenere
premuto il pulsante preset fino a che il messaggio salvato non verrà
visualizzato a video. Selezionare il pulsante di posizione preset 0~9 per
salvare la posizione attuale della telecamera. Premere il pulsante di
posizione preset + preset (0~9), la telecamera andrà alla posizione salvata.
5. Posizione preset
Premere il pulsante di posizione preset + preset (0~9), la telecamera andrà alla
posizione salvata,
6. Controllo della telecamera da
lontano
Premere il pulsante Lontano/Vicino per controllare la camera nel sito lontano
per le funzioni pan, tilt, o zoom.
7. Controllo della direzione della
telecamera
Servirsi del pulsante direzionale sul telecomando per controllare la direzione
della telecamera. Premere il pulsante direzionale per spostare la telecamera,
oppure premere e tenere premuto per funzioni continuative di pan o tilt.
8. Riattacca*
Concludere la chiamata.
9. Volume su/giù
Regolare in volume verso l'alto o verso il basso.
1. Jack di alimentazione
2. Porta USB
3. Collegamento altoparlante
4. Collegamento telecamera
Altoparlante
* LED rosso: l'altoparlante è in modalità "audio disattivato"
* LED blu: l'altoparlante è attivo (o in diretta)
Hub
Telecomando
Italiano -2
Page 28
DC 12V
Cavo della telecamera
Cavo dell'altoparlante
Cavo di alimentazione
Presa a parete
Telecamera
Hub
Altoparlante
Cavo USB
Laptop
PC
Parete
Soffitto
1. Usare il cavo della telecamera e il cavo
dell'altoparlante per collegare telecamera, hub e
altoparlante (rimandiamo allo schema indicato più
sopra).
2. Servirsi del cavo USB per collegare l'hub al proprio
PC/laptop (rimandiamo alla schema indicato più
sopra).
3. Collegare l'alimentazione all'hub; il LED si
illumina, la testa della telecamera gira e l'indicatore di
alimentazione della telecamera si accende.
4. Installare AVer PTZ app sul laptop o sul PC collegato a
VC520. L'app può essere usata per regolare e
configurare i parametri della telecamera (rimandiamo
alla sezione dell'app AVer PTZ)
5. Per effettuare una chiamata, avviare l'applicazione
video (SkypeTM, Microsoft ®LyncTM, Google
HangoutsTM, Cisco WebEx®, GoToMeetingTM,
WebRTC, ed ecc.), selezionare VC520 come
dispositivo audio e dispositivo video.
Configurazione VC520
Collegamento del dispositivo
Montaggio della telecamera
Ci sono 3 modi per montare la telecamera: a parete, a soffitto, su un tavolo con montaggio e viti comprese nella confezione.
[Avvertenza]
1. In fase di fissaggio del supporto telecamera a parete o soffitto, servirsi unicamente di attrezzi e materiali certificati per supportare un peso di 10 kg. Per
l'installazione a parete servirsi di dispositivi cavi di ancoraggio a parete, tipo manica (noti anche come ancoraggio di espansione).
2. Se il fissaggio della telecamera viene fissato a un tavolo, si prega di notare che i movimenti eccessivi del tavolo, o gli strattonamenti dei cavi della
telecamera possono causare la caduta del supporto e della telecamera. Verificare che i cavi e la telecamera siano fissati saldamente.
Italiano -3
Page 29

Stato
LED
Avvio
Lampeggiamento blu e la testa della telecamera sta ruotando
Normale
Blu fisso
La telecamera non viene usata dal computer
Arancione fisso
La telecamera non è connessa
Arancione fisso, e la testa della telecamera è rivolta verso il basso.
Altoparlante ( )
Cellphone( )
Stato
LED
Disattiva audio
Solid Red
Interrompi la
disattivazione audio
Solid blue
Stato
LED
Collegare
Luce accesa
Scollegare
Luce spenta
Tavolo
Utilizzo del dispositivo VC520
Effettuare una videochiamata
1. Verificare che tutti i dispositivi (telecamera, hub, altoparlante, e laptop/PC) siano collegati in modo adeguato e che l'hub sia acceso.
2. Avviare l'applicazione video (SkypeTM, Microsoft ®LyncTM, Google HangoutsTM, Cisco WebEx®, GoToMeetingTM, WebRTC, ed ecc.), sul proprio laptop o
PC.
3. Impostare la telecamera VC520 come telecamera primaria per la propria applicazione video (rimandiamo alla guida utente dell'applicazione video). Sarà
ora possibile effettuare una chiamata.
4. Il VC520 è una telecamera da conferenza plug-and-play. Il sistema non richiede driver speciali, ma consigliamo tuttavia di installare il dispositivo AVer PTZ
per una migliore esperienza utente. Per informazioni su come installare e usare l'app AVer PTZ rimandiamo alla sezione App AVer PTZ nel presente
manuale dell'utente.
Ingresso telefono
Per collegare l'altoparlante VC520 al proprio cellulare in modo che funzioni come auricolare per le proprie chiamate.
1. Servirsi del cavo AUX da 3.5mm fornito in dotazione per collegare il dispositivo cellulare alla presa “Phone In” sull'altoparlante.
2. Non appena il VC520 rileva il collegamento adeguato al cellulare, quando il collegamento avviene con successo, l'indicatore "Cellphone" si illumina.
Line in
Per collegare un altro altoparlante VC520 ed estendere la distanza di copertura fino a coprire una stanza con un diametro superiore a 30’ e aumentare il
volume:
1. Collegare un lato del cavo "catena a margherita" (non fornito in dotazione) alla porta dell'altoparlante (catena a margherita):
2. Collegare l'altro lato del cavo alla porta dell'altoparlante sull'altro altoparlante VC520.
Indicatore LED
Telecamera
Italiano -4
Page 30

a
c
b
d
e
f
g
a. Icona funzione: Fare clic per passare alla pagina della funzione.
- PTZ: Per controllare la direzione della telecamera, ingrandimento e rimpicciolimento, oltre che per
attivare /disattivare la compensazione della retroilluminazione durante la videochiamata.
- Impostazioni: Per configurare i parametri della telecamera – Bilanciamento dei bianchi, filtro rumore,
frequenza, luminosità, nitidezza, capovolgi, specchio, ADDR, e velocità baud. ADDR e velocità baud
servono per l'impostazione di configurazione della connessione RS232. Fare clic sul pulsante Salva per
salvare tutte le impostazioni. Per modificare tutte le impostazioni e tornare ai valori predefiniti, fare clic
sul pulsante Factory Default (Impostazioni predefinite di fabbrica).
- Utilità diagnostica: Per visualizzare la versione S/W e F/W e lo stato di collegamento dei dispositivi.
Sarà possibile testare lo stato della telecamera e dell'altoparlante, e aggiornare il firmware della
telecamera.
Applicazione AVer PTZ
Installare l'applicazione AVer PTZ
Andare sul sito http://www.aver.com > Assistenza > Centro Download > Video Conferenza per scaricare l'applicazione AVer PTZ. Dopo il download fare
doppio clic sul file, e seguire le istruzioni a video per completare il processo di installazione.
Ricordare di selezionare l'opzione "Plug-in Skype" in fase di installazione.
Dopo aver installato l'applicazione AVer PTZ, fare doppio clic sull'icona dell'applicazione AVer PTZ per avviare l'applicazione.
Usare l'applicazione AVer PTZ
1. Per avviare l'applicazione video, verrà visualizzata una richiesta di plug-in sull'interfaccia
dell'applicazione video. Fare clic per accettare il plug-in; l'applicazione video può ora essere
controllata dall'app AVer PTZ e dal telecomando.
2. Qualora vi sia il plug-in Skype spuntato in fase di installazione, verrà visualizzata su Skype una
richiesta di plug-in. Fare clic sulla richiesta di plug-in Skype per accettare il plug-in; in questo
modo vengono abilitate le funzionalità e sul Telecomando.
3. Durante la video-chiamata sarà possibile usare l'applicazione AVer PTZ per eseguire le azioni di
pan, tilt e zoom (ingrandimento/rimpicciolimento) della telecamera oltre che attivare/disattivare la
funzione di retroilluminazione.
4. Quando il dispositivo viene usato per la prima volta sarà possibile controllare il collegamento, la
telecamera, lo stato dell'altoparlante, oltre che configurare i parametri della telecamera. Ogni
funzione verrà descritta qui di seguito:
Italiano -5
Page 31

b. Riduci a icona: Ridurre l'icona alla barra delle applicazioni. Per uscire
dall'applicazione, fare clic col tasto destro sull'icona nella barra delle
applicazioni, quindi selezionare "Esci".
c.
/
(Telecamera): Fare
clic per visualizzare l'output della
telecamera in tempo reale. Fare clic
nuovamente sull'icona della
telecamera per chiudere la vista dal
vivo della telecamera. Qualora non si
veda il video dal vivo, controllare la
telecamera, l'hub, e il collegamento
laptop/PC per fare in modo che il tutto
sia collegato in modo giusto e
adeguato.
d. Diagnostica di connessione: Stato di collegamento dispositivi display. Qualora l'app AVer PTZ abbia
rilevato che alcuni dei dispositivi (telecamera, altoparlante, hub, e laptop/PC) non siano collegati in modo
adeguato, lo schema visualizzerà una "X" sul dispositivo per indicare che il collegamento ha un problema.
Qualora la telecamera sia usata da un'altra applicazione, visualizzerà l'avvertenza "Can’t start video" (Non
è possibile avviare il video).
e. Test della telecamera: Fare clic Test della telecamera per controllare lo stato del display video della telecamera. Sarà possibile regolare la direzione
della telecamera nonché la vista dell'ingrandimento/rimpicciolimento zoom. Per uscire dalla pagina, fare clic sul pulsante Annulla Diagnostica.
© 2015 AVer Information Inc. Tutti i diritti riservati.
f. Test dell'altoparlante: Fare clic per controllare lo stato dell'altoparlante. Richiederà all'utente di registrare un breve messaggio e di riprodurlo al fine di
verificare che l'altoparlante stia funzionando correttamente.
h. Aggiorna ora: Consente all'utente di aggiornare il firmware della telecamera VC520.
1. Fare clic su "Update Now" (Aggiorna ora).
2. Una finestra di dialogo visualizzerà la versione firmware disponibile e la nuova versione di firmware disponibile (è richiesto un collegamento a
Internet).
3. Per eseguire l'aggiornamento automatico, fare clic su "Auto Update" e verrà avviato il processo di aggiornamento. Come prima cosa verrà scaricato il
4. Per aggiornare manualmente il firmware, fare clic su "Manual Update" (Aggiornamento manuale) e localizzare il nuovo firmware per avviare il
nuovo firmware, poi il nuovo firmware verrà caricato nella telecamera.
[Nota] Prima di caricare il nuovo firmware nella telecamera, verificare che telecamera, hub, e laptop/PC siano e rimangano collegati lungo tutto il
processo.
processo.
Italiano -6
 Loading...