

Page 1
VC320
User Manual
Page 2
Federal Communication Commission Interference Statement
This device complies with Part 15 of the FCC Rules. Operation is subject to the following
two conditions: (1) This device may not cause harmful interference, and (2) this device
must accept any interference received, including interference that may cause undesired
operation.
This equipment has been tested and found to comply with the limits for a Class B digital device,
pursuant to Part 15 of the FCC Rules. These limits are designed to provide reasonable protection
against harmful interference in a residential installation. This equipment generates uses and can
radiate radio frequency energy and, if not installed and used in accordance with the instructions, may
cause harmful interference to radio communications. However, there is no guarantee that interference
will not occur in a particular installation. If this equipment does cause harmful interference to radio or
television reception, which can be determined by turning the equipment off and on, the user is
encouraged to try to correct the interference by one of the following measures:
Reorient or relocate the receiving antenna.
Increase the separation between the equipment and receiver.
Connect the equipment into an outlet on a circuit different from that to which the receiver is
connected.
Consult the dealer or an experienced radio/TV technician for help.
FCC Caution: Any changes or modifications not expressly approved by the party responsible for
compliance could void the user's authority to operate this equipment.
This transmitter must not be co-located or operating in conjunction with any other antenna or
transmitter.
Radiation Exposure Statement:
This equipment complies with FCC radiation exposure limits set forth for an uncontrolled environment.
This equipment should be installed and operated with minimum distance 20cm between the radiator &
your body.
Europe – EU Declaration of Conformity
This device complies with the essential requirements of the R&TTE Directive 1999/5/EC.
The following test methods have been applied in order to prove presumption of
conformity with the essential requirements of the R&TTE Directive 1999/5/EC.
Industry Canada statement
This device complies with RSS-210 of the Industry Canada Rules. Operation is subject to the following
two conditions: (1) This device may not cause harmful interference, and (2) this device must accept
any interference received, including interference that may cause undesired operation.
Ce dispositif est conforme à la norme CNR-210 d'Industrie Canada applicable aux appareils radio
exempts de licence. Son fonctionnement est sujet aux deux conditions suivantes: (1) le dispositif ne
doit pas produire de brouillage préjudiciable, et (2) ce dispositif doit accepter tout brouillage reçu, y
compris un brouillaVge susceptible de provoquer un fonctionnement indésirable.
Radiation Exposure Statement:
This equipment complies with IC radiation exposure limits set forth for an uncontrolled environment.
This equipment should be installed and operated with minimum distance 20cm between the radiator &
your body.
Déclaration d'exposition aux radiations:Cet équipement est conforme aux limites d'exposition
aux rayonnements IC établies pour un environnement non contrôlé. Cet équipement doit être installé
et utilisé avec un minimum de 20 cm de distance entre la source de rayonnement et votre corps.
Page 3
低功率電波輻射性電機管理辦法
第十二條
經型式認証合格之低功率射頻電機,非經許可,公司、商號或使用者均不得擅自變更頻率、加大功率或
變更原設計之特性及功能。
第十四條
低功率射頻電機之使用不得影響飛航安全及干擾合法通信﹔經發現有干擾現象時,應立即停用,並改善
至無干擾時方得繼續使用。前項合法通信,指依電信法規定作業之無線電通信。
低功率射頻電機須忍受合法通信或工業、科學及醫療用電波輻射性電機設備之干擾。
Battery Caution
Risk of explosion if battery is replaced by an incorrect type.
Dispose of used batteries in a safe and proper manner.
DISCLAIMER
No warranty or representation, either expressed or implied, is made with respect to the contents of this
documentation,C its quality, performance, merchantability, or fitness for a particular purpose.
Information presented in this documentation has been carefully checked for reliability; however, no
responsibility is assumed for inaccuracies. The information contained in this documentation is subject
to change without notice.
In no event will AVer Information Inc. be liable for direct, indirect, special, incidental, or consequential
damages arising out of the use or inability to use this product or documentation, even if advised of the
possibility of such damages.
TRADEMARKS
“AVer” is a trademark owned by AVer Information Inc. Other trademarks used herein for description
purpose only belong to each of their companies.
COPYRIGHT
© 2016 AVer Information Inc. All rights reserved.
All rights of this object belong to AVer Information Inc. Reproduced or transmitted in any form or by any
means without the prior written permission of AVer Information Inc. is prohibited. All information or
specifications are subject to change without prior notice.
The mark of Crossed-out wheeled bin indicates that this product must not be disposed
of with your other household waste. Instead, you need to dispose of the waste
equipment by handing it over to a designated collection point for the recycling of waste
electrical and electronic equipment. For more information about where to drop off your
waste equipment for recycling, please contact your household waste disposal service or
the shop where you purchased the product.
QDID:83671
この装置は、クラスB情報技術装置です。この装置は、家庭環境で使用することを 目的としていますが、この装
置がラジオやテレビジョン受信機に近接して使用される と、受信障害を引き起こすことがあります。 取扱説明書
に従って正しい取り扱いをして下さい。 VCCI-B
Page 4

Contents
Package Contents ................................................................................................................ 1
Product Introduction ............................................................................................................. 2
Front side ........................................................................................................................ 2
Back Side ........................................................................................................................ 3
LED Indicator .................................................................................................................. 4
Take out the Remote Control from VC320 ...................................................................... 4
Remote Control Battery .................................................................................................. 5
Remote Control ............................................................................................................... 6
Setup VC320 ........................................................................................................................ 8
Use VC320 ........................................................................................................................... 9
Video Conference Mode ................................................................................................. 9
Presentation Mode ........................................................................................................ 10
Bluetooth Mode ............................................................................................................. 11
NFC connection ............................................................................................................ 12
EZCrop Function ........................................................................................................... 12
Battery Operation .......................................................................................................... 12
Adjust Camera Lens ..................................................................................................... 13
AVer PTZApp ...................................................................................................................... 14
Install AVer PTZApp ...................................................................................................... 14
Use AVer PTZApp ......................................................................................................... 14
Test Camera ......................................................................................................... 19
Test Speakerphone ............................................................................................... 19
Test Bluetooth ....................................................................................................... 20
Test Present ......................................................................................................... 21
Update Now .......................................................................................................... 22
Hotkey Control ...................................................................................................... 23
Page 5
1
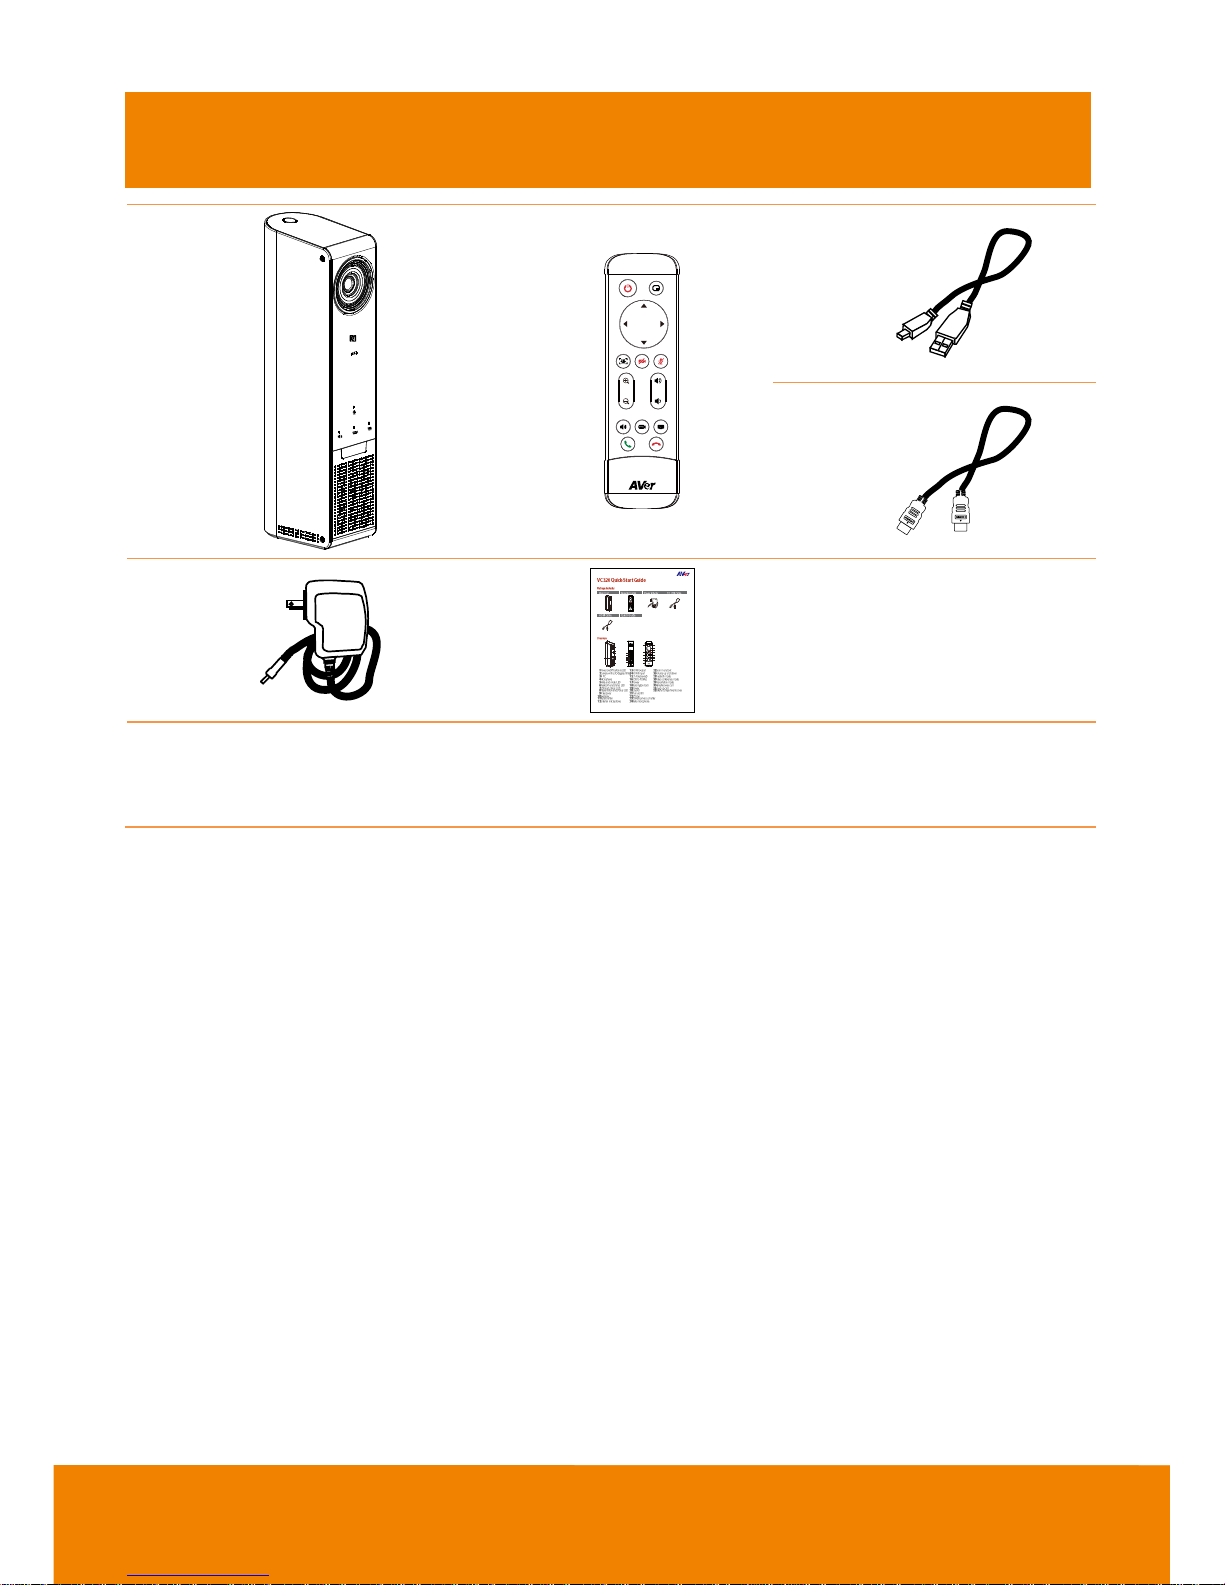
Package Contents
1 2
3
4
5 6
1
2
3
4
5
7
8
9
10
6
19
22
25
27
30
32
20
21
23
24
26
28
29
31
HDMI OUTMICHDMI INRESET2.1 A
11
12
13
14
15
16
17
18
1. VC320 camera unit
2. Remote control
3. HDMI cable
4. USB cable
5. Power adapter*
6. Quick Installation Guide
*The power plug will vary depending on the standard power outlet of the country where it is sold.
Page 6
2
Product Introduction
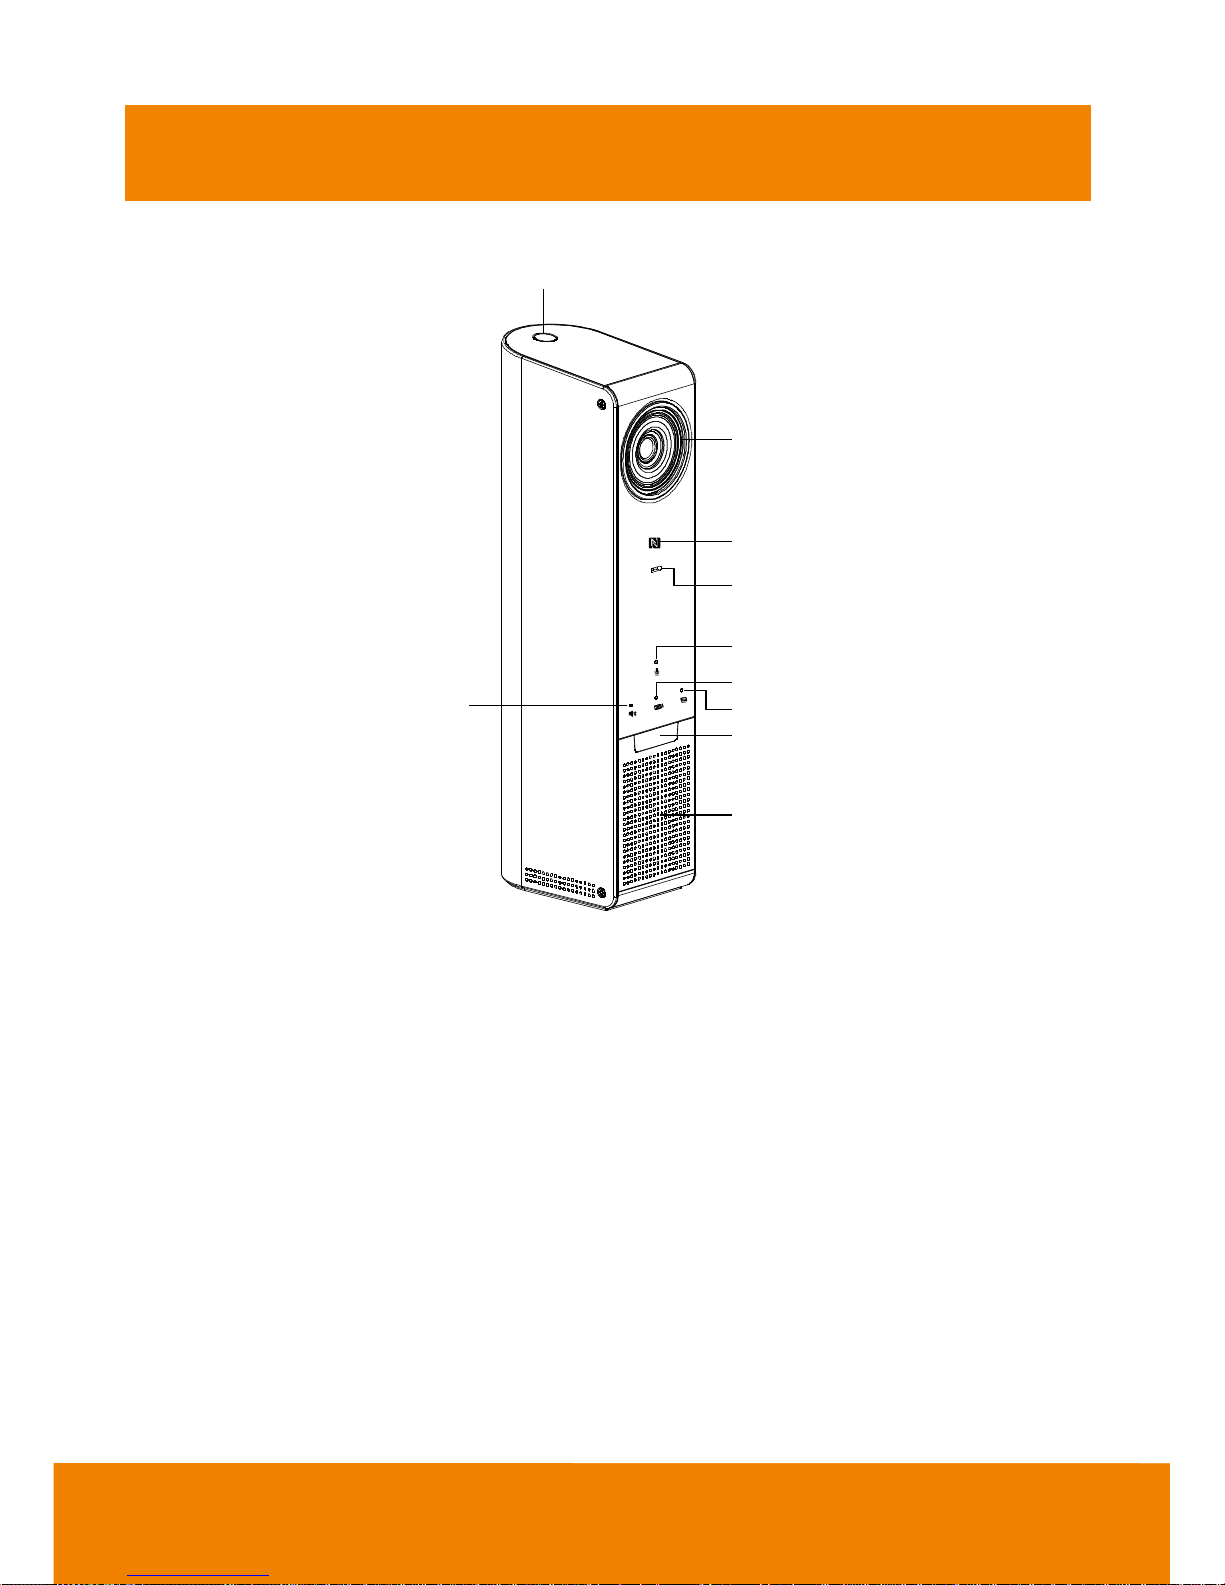
Front side
1
2
3
4
5
7
8
9
10
6
1. Power on/off button & LED
2. Camera lens with ±10 degree tilting
3. NFC
4. Microphone
5. Mute and status LED*
6. Bluetooth and status LED*
7. Video conference and status LED*
8. Presentation and status LED*
9. IR receiver
10. Speaker
* Buttons are capacitor touch sensitive.
Page 7

3
Back Side
1
2
3
4
5
6
7
8
HDMI OUT HDMI INRESET 2.1A
1. 2.1A (reserved)
2. HDMI input
3. HDMI output
4. USB to PC/Mac
5. Reset button
6. Power adapt input
7. Kensington lock
8. Tripod mount hole
Page 8
4
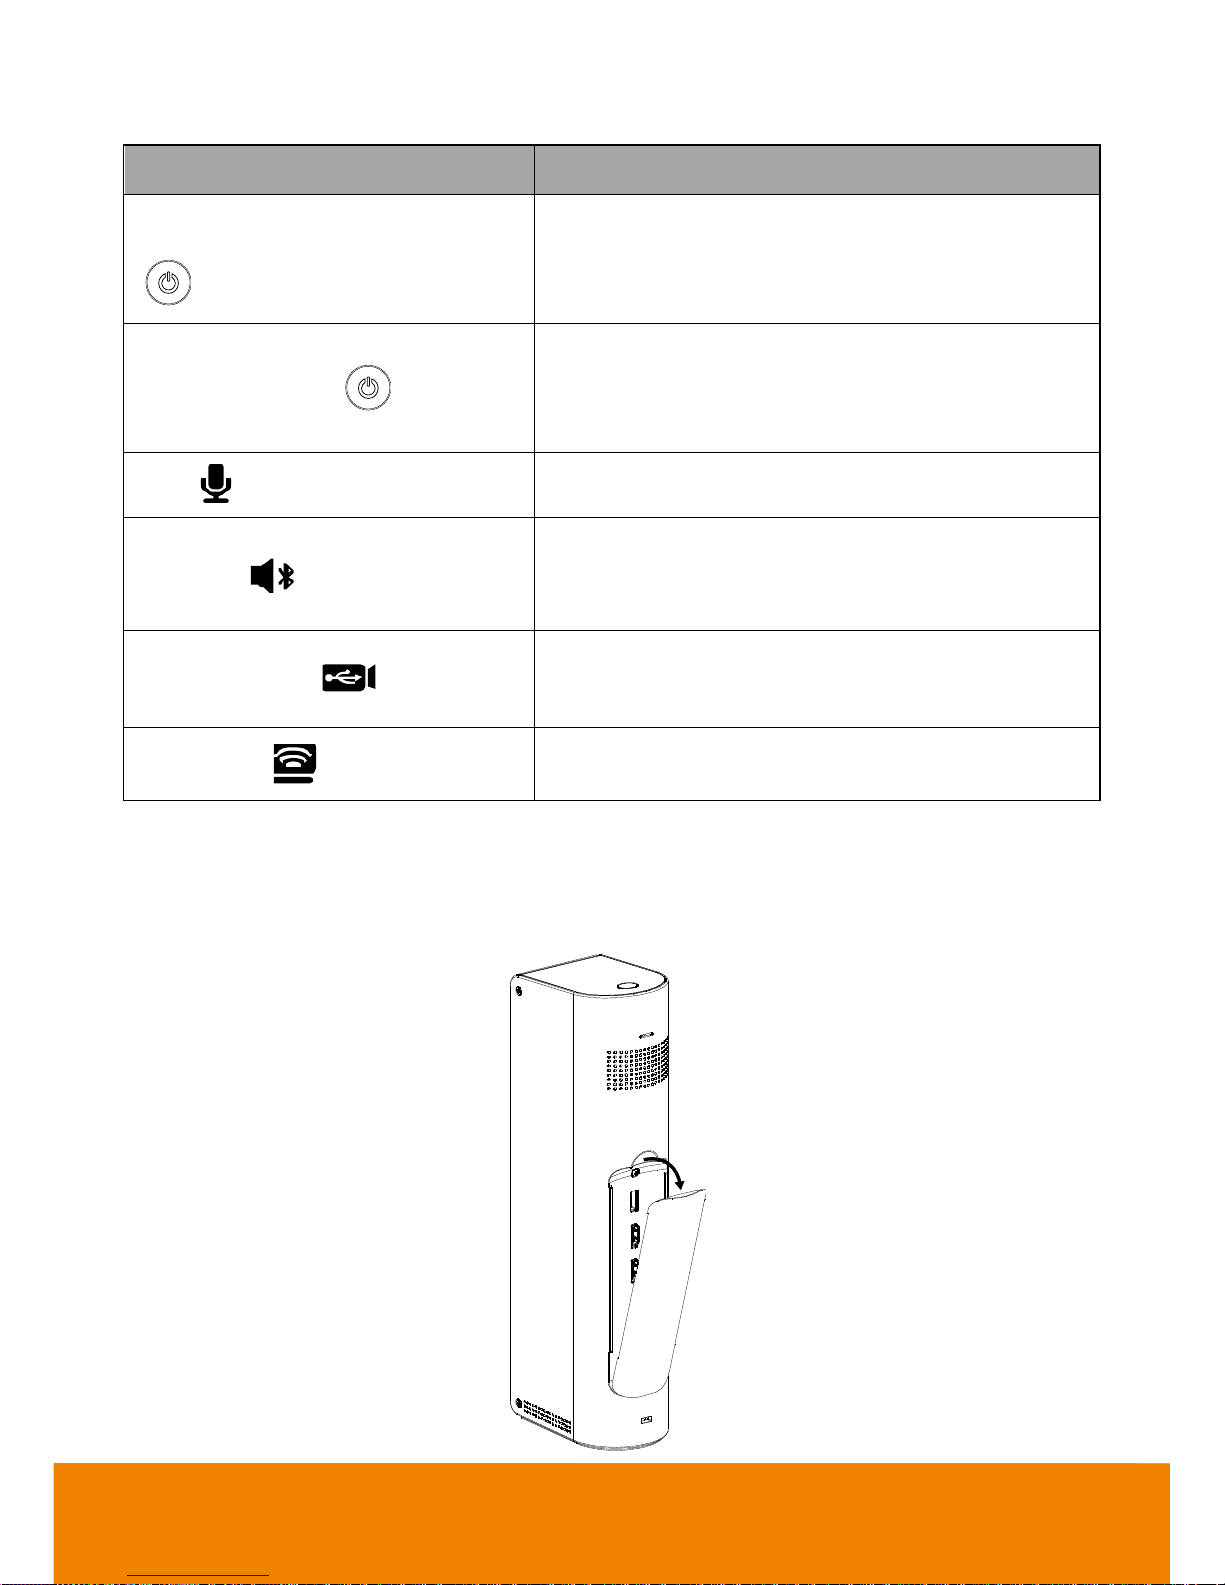
LED Indicator
Function
LED
Power while charger connected
( )
- Blinking orange: battery is charging
- Steady orange: battery charge is completed
- Blink Blue: powering up or powering down
- Steady blue: powered up
Power from battery ( )
- Blink green: powering up or powering down
- Steady Green: powered up
- Blink alternate orange blue: low battery, can't power
up
Mute ( )
- Blue: unmute
- Red: mute
Bluetooth ( )
- White: on
- Light off: off
- Blinking white: VC320 is pairing with mobile phone
Video conference( )
- White: on
- Light off: off
- Blink white: Video conference is use
Presentation( )
- Blue: on
- Light off: off
Take out the Remote Control from VC320
The remote control is located on back side of VC320; you need to take it out from VC320 to use it.
Please remove film between remote control battery compartment before first use.
Page 9
5
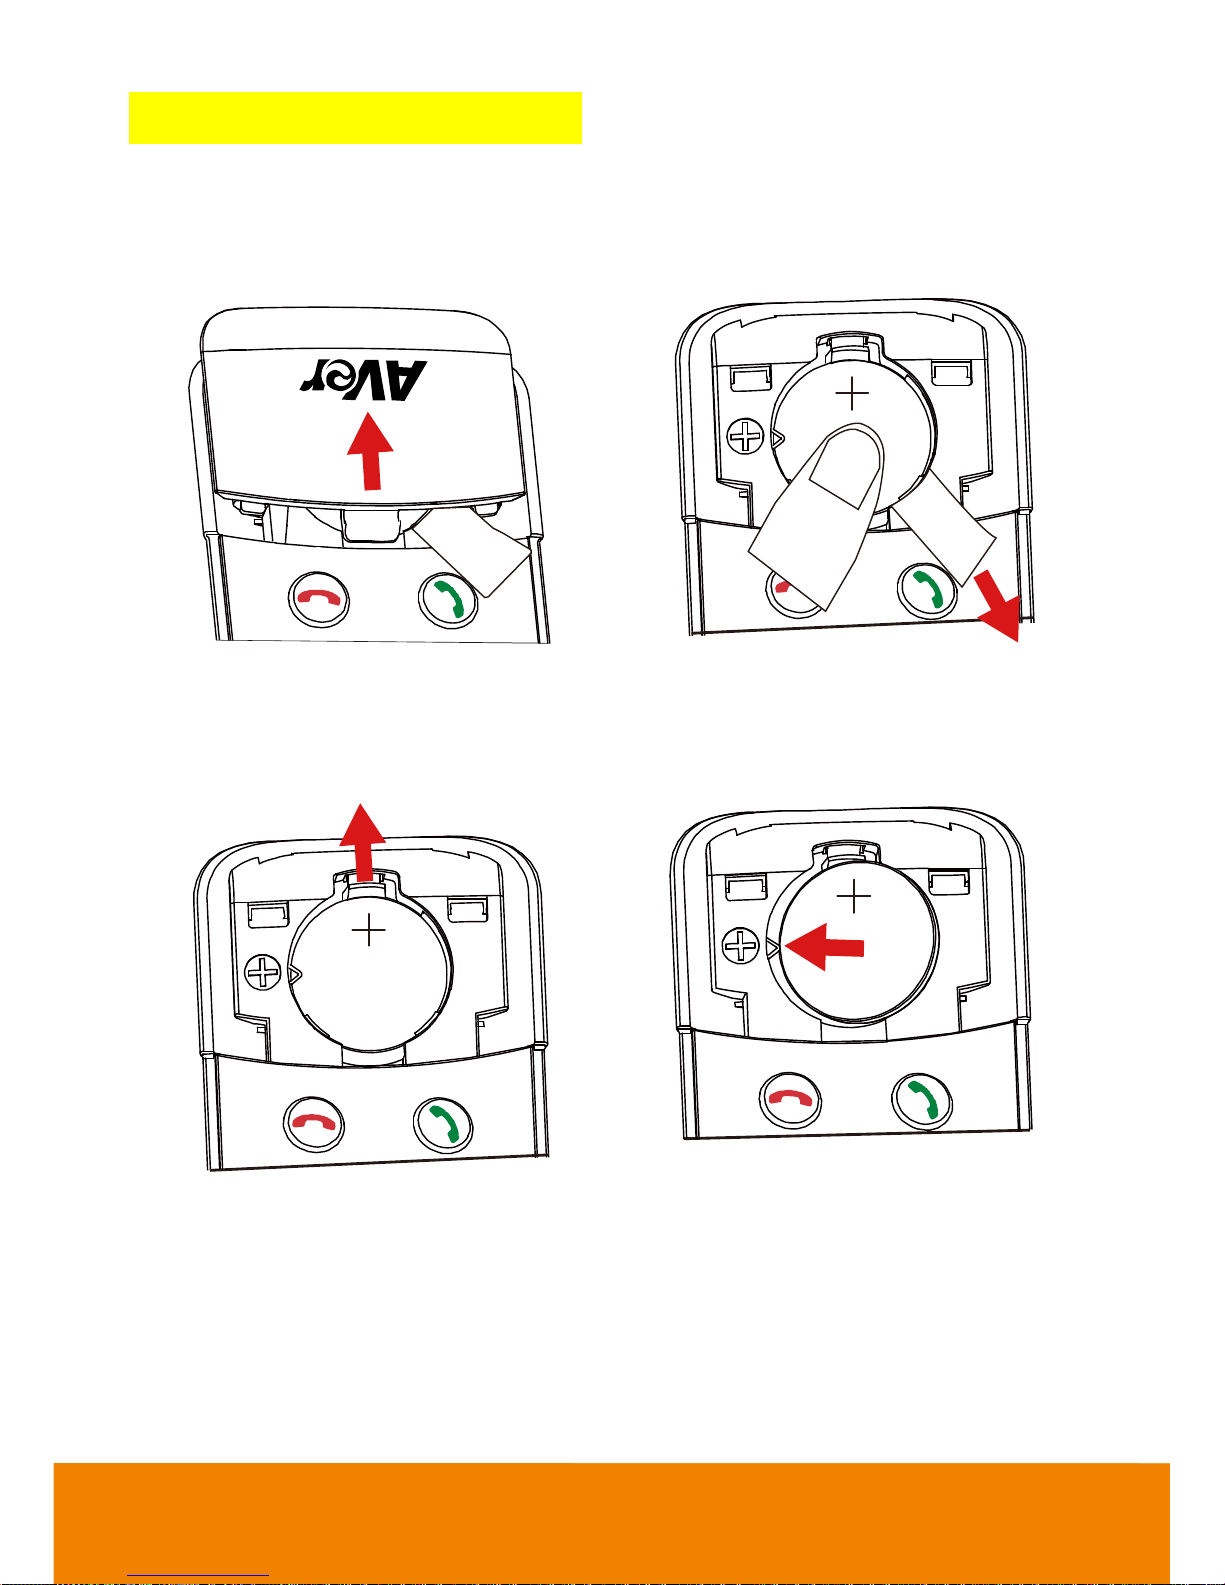
Remote Control Battery
[Note]
Remove the battery film tab before first use.
1. Push and press remote cover toward back
end.
2. Lightly touch battery and completely pull out
the film tab blocking the battery.
1.
2.
To remove or replace the battery.
1. Press clip holder toward back end to release
the battery.
2. Place new CR232 battery + side up under the
triangle contact and clip.
Page 10

6
Remote Control
2
3
5
6
8
10
11
13
Name
Function
1. Power
Turn on/off VC320 when charger connected.
2. Layout
In Video Conference and Presentation modes, press it to switch
between HDMI input and camera input on screen.
3. Pan and tilt
To pan and tilt camera view in Zoom in mode.
4. EZCrop
In Video Conference mode, EZCrop automatically crops camera
video to fill faces detected into frame, detected into full frame.
5. Camera Privacy shutter
In Video Conference mode, press it to stop camera video.
6. Mute/Unmute
Mute/Unmute the microphone.
7. Zoom in/out
Press to digital zoom in or zoom out.
8. Volume up/down
Adjust volume up or down.
9. Bluetooth mode
Press it to turn on/off Bluetooth mode.
10. Video conference mode
Press it to turn on/off video conference mode. The default is
“ON”.
11. Presentation mode
Press it to turn on/off presentation mode.
Page 11

7
Name
Function
12. Call/answer*
Answer a call or start a call.
13. Hang up*
End the call.
14. Battery compartment cover
Press (toward down) it to open for battery installation.
* Function requires AVer PTZApp
Page 12

8
On/Off
Setup VC320
1. Use the USB cable connects VC320 and PC/laptop.
2. Connect the power (DC12V) to a standard 100V~240V AC power outlet. The VC320 has
recharged battery inside, please fully charge for the first time use.
[Note] 1. When power LED turn to steady orange, the battery is fully charged.
2. If power LED is in blinking orange instead green while power on, it means VC320 battery is low.
Please plug in power adapter and power on VC320 again; charging may take few minutes
before starting power up.
3. In battery powered status, if power LED blinks orange and blue alternatively, power VC320 from
wall outlet immediately.
3. Install Aver PTZApp on laptop that is connected with VC320. The VC320
is a plug-and-play conference camera. The system requires no special
drivers, but we do recommend installing the AVer PTZApp for a better user
experience. For information on how to install and use the AVer PTZApp,
refer to the AVer PTZApp section in this user manual.
[Note] AVer PTZApp version is 1.2.1028.30 at least or above.
4. Power on the VC320.
[Note] 1. When power on with wall power, the power LED is blue.
2. When power on by battery power, the power LED is green.
5. To make a call, run your video application (SkypeTM, Microsoft ®LyncTM, Google Hangout, Cisco
WebEx®, GoToMeeting
TM
, WebRTC, and etc.); select VC320 as your video and audio device.
Page 13

9
Use VC320
Video conference mode, presentation mode, and Bluetooth mode can be used independently or
combined together. Each function mode is described in following.
Video Conference Mode
HDMI OUTMIC HDMI INRESET 2.1 A
USB Cable
Laptop
Power
outlet
1. Make sure all devices (camera and laptop) are well connected and are powered on.
2. Run your video application (SkypeTM, Microsoft ®LyncTM, Google Hangout, Cisco WebEx®,
GoToMeetingTM, WebRTC, and etc.) on your laptop.
3. Select VC320 camera, microphone and speaker in device settings of your video communication
applications.
4. You can now make your call.
Page 14

10
Presentation Mode
During conferencing call, present the content on your laptop screen, mobile phone, or pad device to
participants.
Press button on VC320 or remote control to turn on presentation mode.
There are three way to use presentation mode and are described in following.
HDMI connection: two ways to use present function.
Use presentation mode to display computer content locally while using VC320 camera and
speakerphone for communication app.
HDMI OUTMIC HDMI INRESET 2.1A
Power
outlet
HDMI Cable
(IN)
Laptop
HDMI Cable
(OUT)
TV
USB Cable
Laptop
Use presentation mode to show camera capture to HDMI display.
HDMI OUTMIC HDMI INRESET 2.1A
Power
outlet
HDMI Cable
(OUT)
TV
USB Cable
Laptop
Page 15

11
Chromecast 2: Through the Chromecast 2 to wireless screen mirror mobile phone/pad device on
HDMI display.
HDMI OUTMIC HDMI INRESET 2.1A
Chromecast2
HDMI
IN
TV
HDMI
OUT
Charging through the USB
USB Cable
Laptop
Power
outlet
Mobile
phone
Pad
device
Bluetooth Mode
Use Bluetooth to connect to VC320 and use it as a hands
free speakerphone.
[Note] You need to manually pair the mobile phone to VC320
before first usage of this VC320 function.
1. Power on the VC320.
2. Press Bluetooth button ( ) on VC320 or remote
control to turn on Bluetooth function. The Bluetooth LED
will light up. And, Press Bluetooth button over 3 second
to start pairing. The Bluetooth LED will be flashing and
ready to make a pairing.
3. Turn on the Bluetooth function on your mobile phone.
And then, find the name “AVer” to make a connection.
[Note] The Bluetooth LED must in flashing for pairing.
4. Once your mobile phone has connected with VC320
through Bluetooth; the VC320 will make a connection automatically next time when Bluetooth
function is on.
[Note]
a. VC320 will memorize four mobile phones for automatically pairing.
b. To clear pairing memorize, use AVer PTZApp. For more detail, refer to section “Test
Bluetooth”.
c. Remember to disconnect from VC320 to disable hands free call function.
Mobile
phone
Page 16

12
NFC connection
Through NFC to pair VC320 with mobile phone.
1. Power on the VC320.
2. Press Bluetooth button ( ) on VC320 or remote control to turn on Bluetooth function. The
Bluetooth LED will light up.
3. Turn on the NFC function on your mobile and put the phone on NFC icon (
)
to make a
connection.
[Note] While connecting, the Bluetooth LED light will flash.
EZCrop Function
In Video Conference mode, press button on remote control can automatically detect up to 8
faces and zoom in to fit faces detected to full frame.
[Note] The EZCrop only can detect faces up to 30° angle each side.
30℃
30℃ 30℃
30℃
Battery Operation
If battery is running low while you are using VC320, it will beep low power warning every 5
seconds. We suggest you plug in power charger promptly. Otherwise, it will automatically
shutdown to protect battery health.
Page 17

13
Adjust Camera Lens
VC320 camera lens can be manually tilted up or down up to 10 degrees.
±10°
Page 18

14
AVer PTZApp
Install AVer PTZApp
Please go to http://www.averusa.com/video-collaboration/support/downloads.asp to download the
AVer PTZApp. After downloading, double-click on the file and follow the on screen instructions to
complete the installation.
[Note] AVer PTZApp version must be 1.2.1028.30 or above.
Remember to select the “Skype plug-in” option during installation.
After installing the AVer PTZApp, double-click on the AVer PTZApp icon to run the application.
Use AVer PTZApp
1. To use certain remote control buttons within selected video communication application, a plug-in
needs to be installed and an approval request will be prompted.
2. If you have the Skype plug-in checked during the installation, a plug-in request will be displayed
in Skype. Click on the Skype plug-in request to accept the plug-in; this enables and
funcationality on the Remote Control.
3. During your video call, you can use the AVer PTZApp to pan, tilt and zoom the camera in/out and
enable/disable the backlight feature.
4. Each function will be described as following.
Currently selected device: Displays currently selected VC or CAM device controlled by
PTZApp. If there is more than one AVer VC or CAM devices connected to one PC/Mac
PTZApp is running, you can click on the drop down list to select other AVer VC or CAM device.
Page 19

15
Function icon: Click it to switch to the function’s page.
- PTZ: To control the camera direction, zoom in and out, and to enable/disable the backlight
compensation during your video call.
Page 20

16
- Settings: To setup parameters of the camera – White balance, noise filter, frequency,
brightness, sharpness, flip, mirror, ADDR, baud rate, H.264 stream, and hotkey control. ADDR
and baud rate is for RS232 connection setting. Click the Save button to save all settings. To
change all the settings, back to the default values, click the Factory Default button.
- Diagnostic Utility: To display the S/W and F/W version and the devices connection status.
Also test the camera, speakerphone, Bluetooth mode, and present mode status, and update
the firmware of the camera.
Page 21

17
Minimize: Minimize the app to system tray. To quit the application, right-click the icon on the
system tray and select “Quit”.
/ (Camera): Click it to view the camera live view. Click the camera icon again to
close the camera live view. If the live video did not appear, please check the camera and laptop’s
connection to make sure all are correct and well connected.
Normal Un-normal
Page 22

18
Connection diagnostic: Display devices connection status. If the AVer PTZApp has detected
that camera and laptop are not connected well, the diagram will indicate the connection has a
problem and display “Can’t start video” warning.
Troubleshooting: collect more system information for troubleshooting before you contact AVer
technical support.
Page 23

19
Test Camera
Click the Test Camera button to check the camera status. Click to view camera live video. Also,
you can adjust the camera direction and view of the zoom in/out. To leave the page, click the Abort
Diagnostic button.
Test Speakerphone
Click to check the speakerphone status. It will require the user to record a short message and play it
back to ensure the speakerphone is working.
Page 24

20
Test Bluetooth
Make sure the Bluetooth function is enabled (press Bluetooth button on VC320 or remote
control).
Click “Test Bluetooth”.
You can refer to instruction and diagram to make a Bluetooth connection.
- Currently Paired Device: Display the currently connected mobile phone information.
- Remembered Paired Device: Four mobile phones can be memorize by VC320 and are listed
in “Remembered Parried Devices “column.
- Manual Pairing: Click it to pair with mobile phone manually.
- Clear Pair Device Memory: To clear the memorized mobile phone from Remembered Parried
Devices list.
-
Abort Diagnostic: exit the dialog.
Page 25

21
Test Present
Check video source status in present mode.
Make sure the present mode is on (Press present mode button on VC320 or remote control).
Click “Test Present”.
AVer PTZApp will detect current mode status and display on dialog box as below shown.
Click “Toggle Source” can switch video source between HDMI input and USB input.
To exit the dialog, click” Abort Diagnostic” button.
Page 26

22
Update Now
Allows the user to update the VC320 camera’s firmware.
1. Click” Update Now”.
2. A dialog will display the current firmware version and available new firmware version (internet
connection is required).
3. To auto update, click “Auto Update” and update process will start. The new firmware will be
downloaded first; then, the new firmware will be uploaded to camera.
[Note] Before updating the new firmware to the camera, please make sure camera and laptop are
all well connected and stay connected during the entire process.
Download new firmware Update new firmware to camera
4. To update the firmware manually, click “Manual Update” and locate the new firmware to start the
process.
Page 27

23
Hotkey Control
Enable hotkey control to use keyboard control camera’s movement and backlight.
1. Select “Settings”
2. Set Hotkey Control to “On”.
3. A hotkey description as below figure shown:
1
2
Page 28

 Loading...