

Page 1
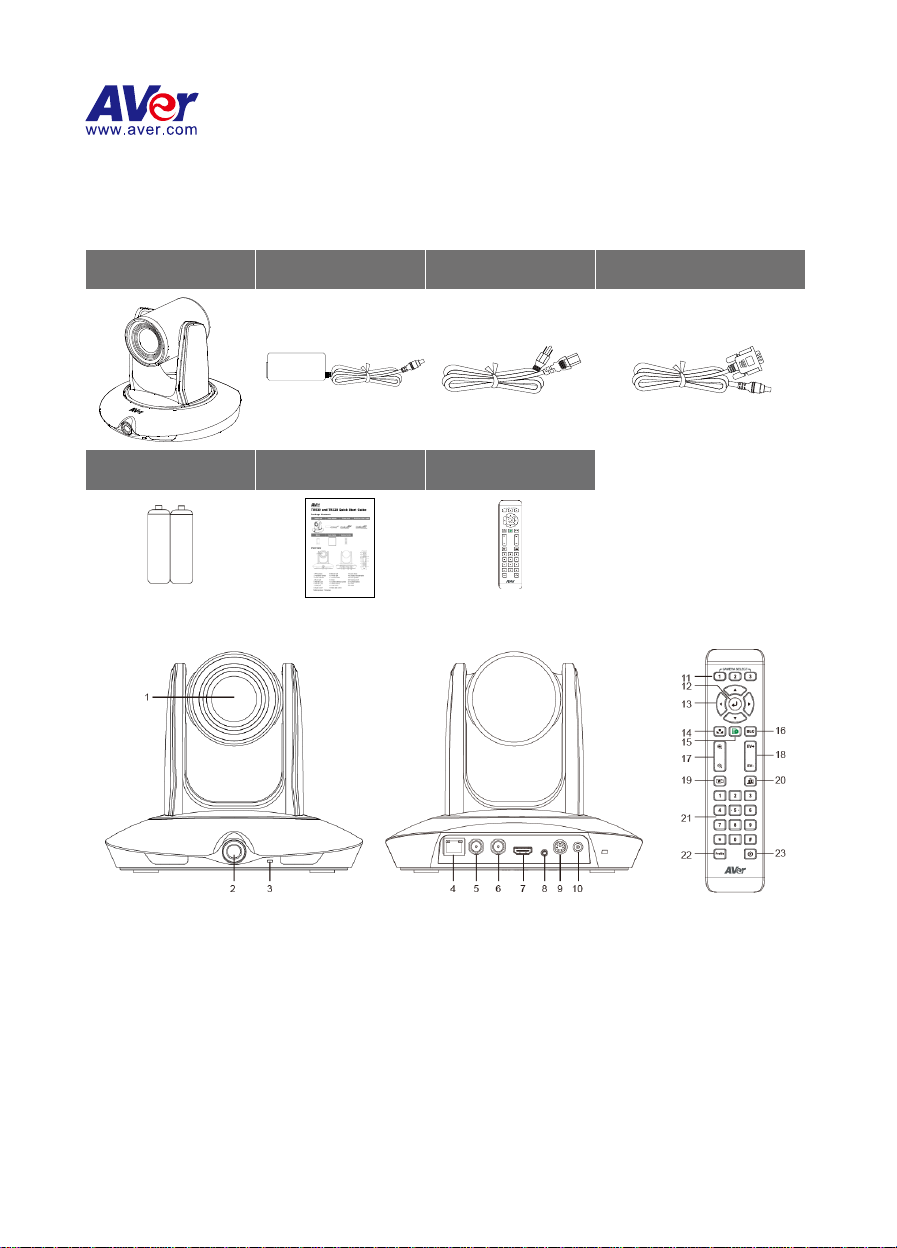
Camera unit
Power adapter
Power cord
RS-232 to D-Sub 9 cable
Battery
Quick Guide
Remote Controller
AAA AAA
1. PTZ camera
9. RS-232 port
17. Zoom in/out
2. Panoramic camera
10. Power jack
18. Exposure compensation
3. Power indicator
11. Camera select
19. Home position
4. RJ-45 port
12. Enter
20. Tracking on/off
5. 3G-SDI 2 port
13. Camera direction control
21. Number buttons
6. 3G-SDI 1 port
14. White balance
22. Profile
7. HDMI port
15. OSD menu
23. Preset
8. Audio in port*
16. Back light control
*Audio input level: 1Vrms(max.)
P/N: 300AU9P1-ECV
Tracking Camera Quick Start Guide
Package Contents
Overview
Page 2
Audio Mixer
RJ-45 cable
Projector TV
Recording System
HDMI cable
or
Multi Media Management System
Power
Outlet
Power
Adaptor
Power
cord
Control System
RS-232 to
D-Sub 9 cable
Audio
cable
coaxial
cable
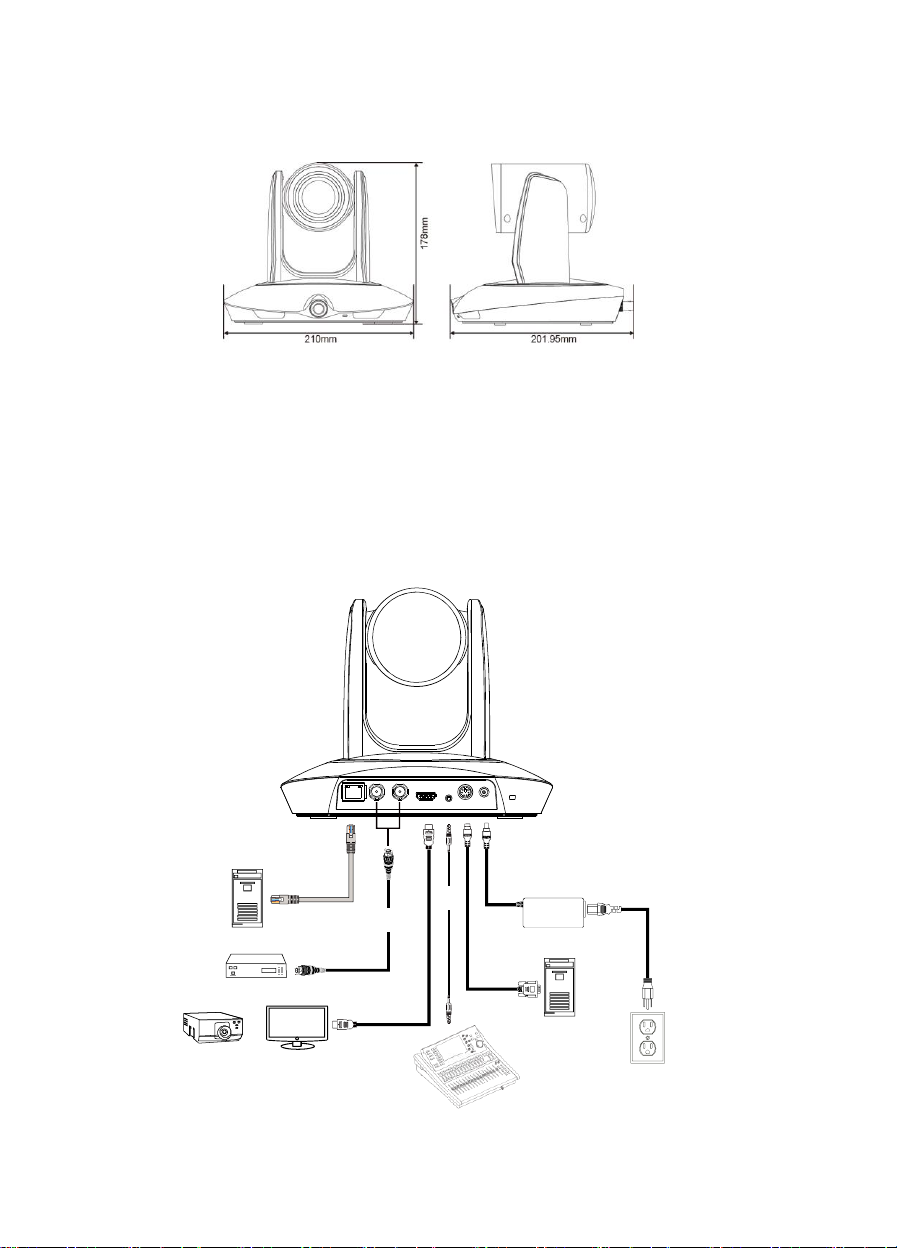
Dimension
Connections
Installation Suggestion:
Install height: 2~3m (6.56~9.84 feet). 2.4m (7.87 feet) is recommended. If the camera height is too
low, tracking may be compromised.
Distance from podium:
TR320: 4~10m (13~33 feet)
TR530: 4~15m (13~49 feet)
Page 3

Setup IP Address
There are two ways to setup IP address of the camera. Please follow the steps below to setup the IP
address.
Static IP Address
1. After starting-up, press button on remote control to call setup menu.
2. Use ▲ and ▼ buttons to select the Camera > Static IP > IP, then press button to enter IP
address.
[Note] If DHCP is on, please turn off DHCP before setup static IP address. Go to Camera > DHCP >
DHCP > Off.
3. To setup gateway and DNS, use ▲ and ▼ to select “Gateway” or “DNS”. Then, press button to
enter the value.
Dynamic IP Address
1. After starting-up, press button on remote control to call setup menu.
2. Use ▲ and ▼ buttons to select the Camera > DHCP > DHCP > On, then press button to get IP
address from local DHCP server.
Page 4

3. Use ▲ and ▼ buttons go to “Information” to check the IP address information.
Camera Setup Guide
A more comprehensive HOW-TOs, video guides can be found here:
https://www.averusa.com/pro-av/support/
For the best experience, we recommend using the Google Chrome browser to access the camera.
If you are having problems accessing the camera login page or having intermittent video streaming
on your browser please upgrade the firmware on the camera to the latest version:
https://www.averusa.com/pro-av/support/ (Selecting Firmware)
More information and FAQs can be accessed from this site: https://averusa.force.com/support/s/
Visit “How to video” by scanning QR code or via URL:
or
After login the web interface (password: admin), select “ ” to start setup.
https://youtu.be/sUllNz-x5qQ
Page 5

Page 6

Federal Communication Commission Interference Statement
NOTE: This equipment has been tested and found to comply with the limits for a Class A digital device,
pursuant to part 15 of the FCC Rules. These limits are designed to provide reasonable protection against
harmful interference when the equipment is operated in a commercial environment. This equipment
generates, uses, and can radiate radiofrequency energy and, if not installed and used in accordance with
the instruction manual, may cause harmful interference to radio communications. Operation of this
equipment in a residential area is likely to cause harmful interference in which case the user will be
required to correct the interference at his own expense.
FCC Caution: Any changes or modifications not expressly approved by the party responsible for
compliance could void the user's authority to operate this equipment.
This device complies with part 15 of the FCC Rules.
Operation is subject to the following two conditions:
(1) This device may not cause harmful interference, and
(2) this device must accept any interference received, including interference that may cause undesired
operation.
Warning: This is a class A product. In a domestic environment this product may cause radio interference
in which case the user may be required to take adequate measures.
Remote Controller Battery Safety Information
- Store batteries in a cool and dry place.
- Do not throw away used batteries in the trash. Properly dispose used batteries through
specially approved disposal methods.
- Remove the batteries if they are not in use for long periods of time. Battery leakage and
corrosion can damage the remote control. Dispose of batteries safely and through approved
disposal methods.
- Do not use old batteries with new batteries.
- Do not mix and use different types of batteries: alkaline, standard (carbon-zinc) or rechargeable
(nickel-cadmium).
- Do not dispose of batteries in a fire.
- Do not attempt to short circuit the battery terminals.
©2019 AVer Information Inc. All rights reserved.
Contact Information
AVer Information Inc.
668 Mission Ct
Fremont, CA 94539
pro.averusa.com
Toll-free: 1(877)528-7824
Local: 1(408)263-3828
 Loading...