

Page 1
ENGLISH
TabCam
User Manual
Page 2
ENGLISH
The mark of Crossed-out wheeled bin indicates that this product must not be
disposed of with your other household waste. Instead, you need to dispose of the
waste equipment by handing it over to a designated collection point for the
recycling of waste electrical and electronic equipment. For more information
about where to drop off your waste equipment for recycling, please contact your
household waste disposal service or the shop where you purchased the product.
Federal Communications Commission Statement(Class A)
NOTE- This equipment has been tested and found to comply with the limits for a Class A digital
device, pursuant to Part 15 of the FCC Rules. These limits are designed to provide reasonable
protection against harmful interference in a residential installation. This equipment generates
instructions, may cause harmful interference to radio communications. However, there is no guarantee that
interference will not occur in a particular installation. If this equipment does cause harmful interference to
radio or television reception, which can be determined by tuning the equipment off and on, the user is
encouraged to try to correct the interference by one or more of the following measures:
Class A ITE:
Class A ITE is a category of all other ITE which satisfies the class A ITE limits but not the class B ITE limits.
Such equipment should not be restricted in its sale but the following warning shall be included in the
instructions for use:
Warning - This is a class A product. In a domestic environment this product may cause radio interference in
which case the user may be required to take adequate measures.
DISCLAIMER
No warranty or representation, either expressed or implied, is made with respect to the contents of this
documentation, its quality, performance, merchantability, or fitness for a particular purpose. Information
presented in this documentation has been carefully checked for reliability; however, no responsibility is
assumed for inaccuracies. The information contained in this documentation is subject to change without
notice.
In no event will AVer be liable for direct, indirect, special, incidental, or consequential damages arising out of
the use or inability to use this product or documentation, even if advised of the possibility of such damages.
COPYRIGHT
© 2013 by AVer Information Inc. All rights reserved.
All rights of this object belong to AVer Information Inc. Reproduced or transmitted in any form, or by any
means without the prior written permission of AVer Information Inc. is prohibited. All information or
specifications are subject to change without prior notice. “AVer”, “AVerVision”, and “AVerZoom” are
trademarks owned by AVer Information Inc. Other trademarks used herein for description purpose only
belong to each of their companies.
uses and can radiate radio frequency energy and, if not installed and used in accordance with the
Reorient or relocate the receiving antenna.
Increase the separation between the equipment and receiver.
Connect the equipment into an outlet on a circuit different from that to which the receiver is connected.
Consult the dealer or an experienced radio/television technician for help.
Page 3

ENGLISH
Table of Contents
1. Package Contents ............................................................................................. 1
2. Optional Accessories ........................................................................................ 1
3. Get Familiar with the TabCam .......................................................................... 2
Right Panel .................................................................................................... 2
Control Panel ................................................................................................. 3
LED Light ...................................................................................................... 3
4. Setting Up and Operating TabCam .................................................................. 4
Unfolding the TabCam ................................................................................... 4
TabCam Deployment Criteria & Guidelines ................................................... 4
Basic Deployment Criteria & Guidelines ................................ ..................... 4
Advanced Deployment Criteria & Guidelines .............................................. 5
Battery Safety Information ........................................................................ 5
Battery Usage ........................................................................................ 5
Set up TabCam using the QR Code .............................................................. 6
Use iPad or Android Pad App ................................................................... 6
Desktop Version ............................................................................................ 6
Firmware Upgrade ................................................................................. 10
Connect to a Microscope ....................................................................... 13
TabCam Operating Height & Angle .............................................................. 15
Paper Guide ................................................................ ................................ 15
What’s New? ............................................................................................... 16
Continuous Auto Focus ......................................................................... 16
Area Focus .......................................................................................... 16
Auto Shut Off ....................................................................................... 16
5. Technical Specifications ................................................................................. 17
Image .......................................................................................................... 17
Optics .......................................................................................................... 17
Function ...................................................................................................... 17
Page 4

ENGLISH
Compatibility ................................................................................................ 17
Power .......................................................................................................... 18
Input/Output Connections ............................................................................ 18
Dimension ................................................................................................... 18
Package Contents ....................................................................................... 18
Optional Accessories ................................................................................... 18
Others ......................................................................................................... 18
6. Troubleshooting .............................................................................................. 19
7. Limited Warranty ............................................................................................. 22
Page 5
ENGLISH
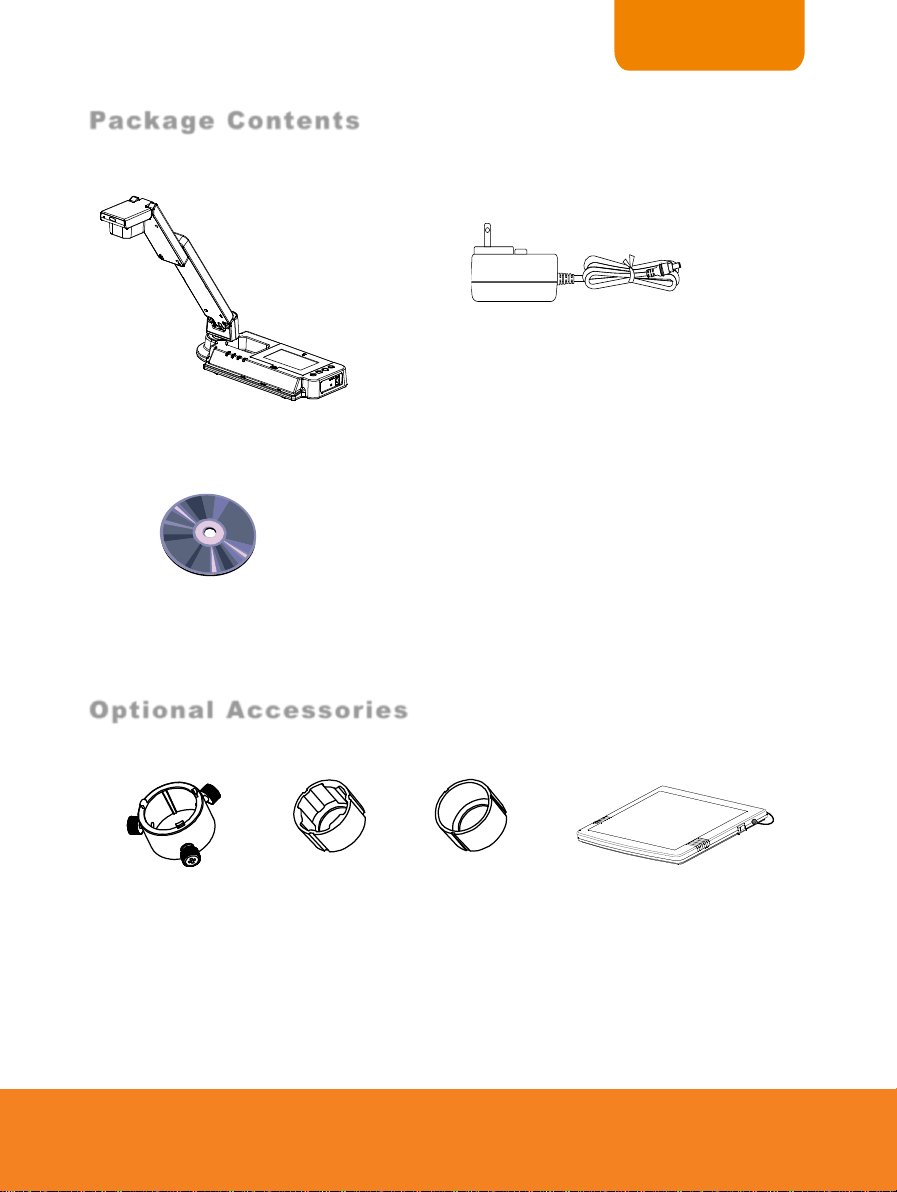
0BPack a g e C o n t ents
TabCam
Power Adapter (12V, 3A)
* The power adapter will vary
depending on the standard
power outlet of the country
where it is sold
Software CD
1BOptional A c c e ssories
Microscope Adapter
28mm Rubber
Coupler
34mm Rubber
Coupler
Light Box
Make sure the following items are included in the package.
1
Page 6
ENGLISH
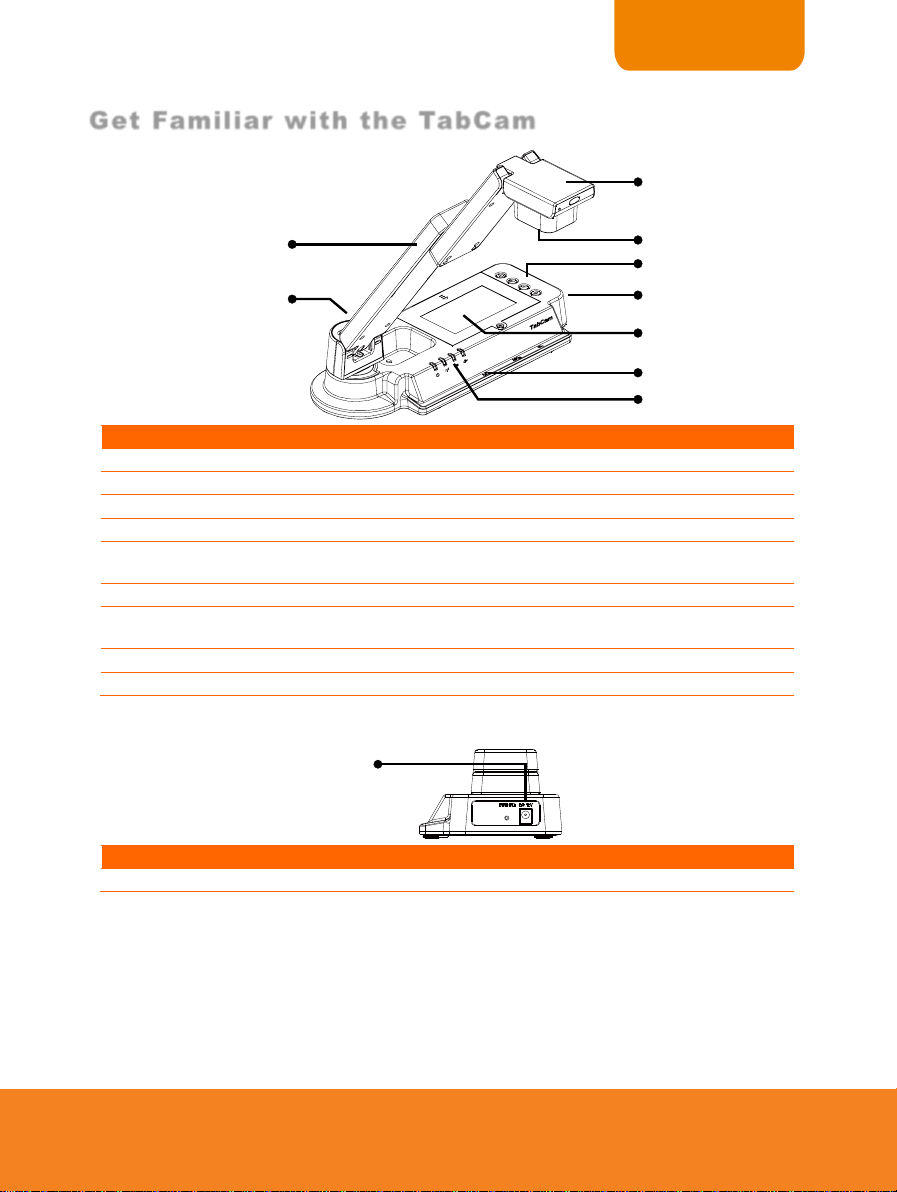
Get Fa m i liar with the Ta b C am
Name
Function
(1) Camera Head
Contain the camera sensor.
(2) Camera Lens
Focus the image in the camera.
(3) Control Panel
Easy access to various functions.
(4) Right Panel
Connection for the power adapter to charge the battery.
(5) Battery
Compartment
Rechargeable battery location.
(6) Paper Guide
Guide to position A4 size paper.
(7) LED Light
Indicate wireless signal condition, power status, battery life, and
power connection mode.
(8) Label Slot
Label the TabCam.
(9) Swivel Arm
Fold and unfold the arm of the TabCam.
Name
Function
(1) DC12V
Connect the power adapter into this port to charge the battery.
(8)
(9)
(4)
(1)
(2)
(6)
(3)
(5)
(7)
(1)
Right Panel
2
Page 7
ENGLISH
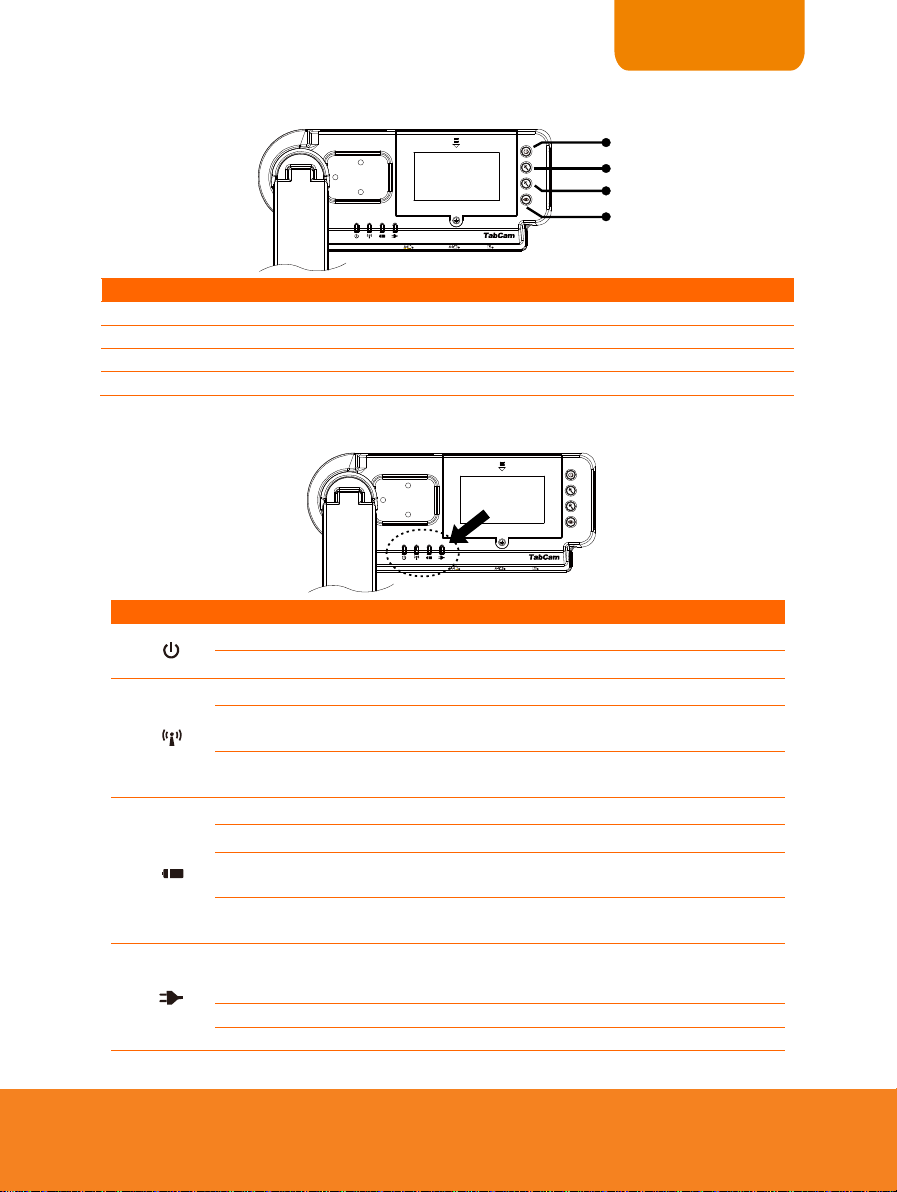
Name
Function
(1) Power
Turn the TabCam on/off.
(2) Zoom +
Increase the magnification of the TabCam image.
(3) Zoom -
Decrease the magnification of the TabCam image.
(4) Auto Focus
Adjust the focus automatically.
Symbol
LED Pattern
State
(1)
Steady Orange
Power on
No Light
Power off
(2)
Steady Green
Connecting to Wi-Fi router.
Continuous
Green Flashing
Currently sending TabCam data to computer/tablet.
Slow
Green Flashing
Reconnecting to Wi-Fi router
(3)
Green
Good charge.
Orange
Medium charge.
Red
Low charge. The TabCam battery should be recharged
soon.
Red Light Blinks
Very low charge. The TabCam battery should be
recharged immediately.
(4)
Green
Battery is fully charged. You may unplug the power
adapter or continue to use the power source from the
power adapter.
Red
Charging the battery.
No Light
The power adapter is not connected.
(4)
(1)
(2)
(3)
Control Panel
LED Light
3
Page 8
ENGLISH
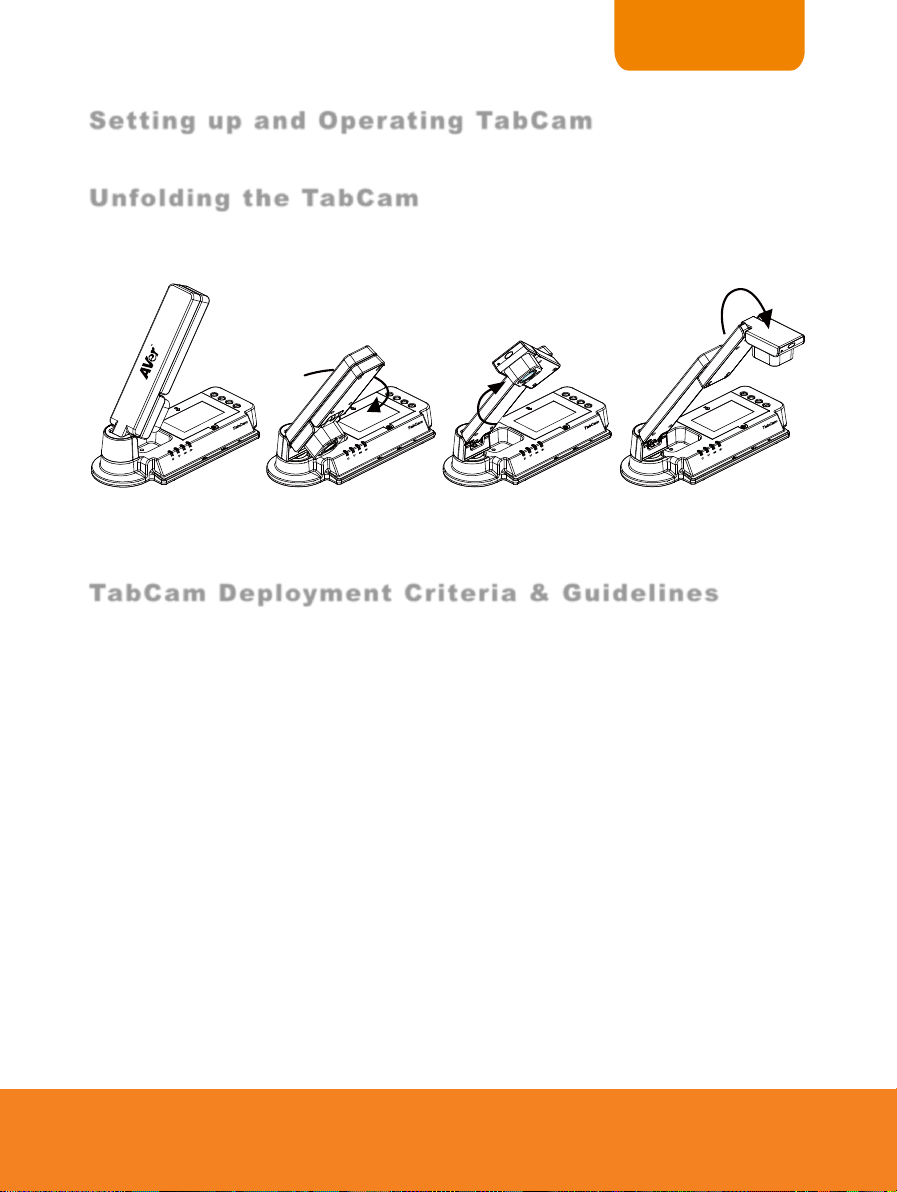
4BSetting up and O p e r ating Ta bCam
Unfoldi n g t he TabCam
(1) Unfold the arm.
(2) Turn clockwise 90°.
(3) Swivel up to extend
arm.
(4) Fold the camera head
down.
Ta b C am Deploymen t C r i teria & Guideline s
This section provides useful tips on how to adjust the TabCam to meet your needs.
Follow the step by step procedure below to setup the unit.
Before deploying TabCam, please confirm the user environment meets the following
criteria.
Basic Deployment Criteria & Guidelines
At least one tablet that can connect to a wireless access point (wireless router).
A display device, e.g. TV or projector, with a method for outputting tablet content,
e.g. Lighting to VGA adapter, Lightning to HDMI adapter, Apple TV, etc.
Access to a 2.4 GHz 802.11g/n wireless network. (The AVer TabCam solution does
NOT work in other wireless networks, e.g. 5 GHz and 802.11a networks)
Check for sources of potential interference, e.g. microwave ovens, Bluetooth
devices, faulty satellite television cables, power lines, cordless telephones,
wireless speakers, flat-panel televisions, etc.
Confirm the firmware for your TabCam wireless camera and the firmware for you
wireless access point are current.
Confirm your TabCam app is current. To install and/or upgrade the TabCam app,
connect to the Apple App Store or Google Play and search “TabCam”.
4
Page 9

ENGLISH
Advanced Deployment Criteria & Guidelines
If you are connecting to an 802.11b/g/n wireless access point, set the 2.4 GHz
Radio Mode on the device to 802.11g/n.
If you are connecting to a dual band wireless access point, confirm the TabCam
can connect through the 2.4 GHz band.
If you must use WEP security, configure your wireless access point to use only a
single WEP key in key index 1. Also, for 128-bit WEP networks, always choose a
13-character password (and 5 characters for 40-bit).
If your wireless access point uses WPA / WPA2 Enterprise security, please note
TabCam supports only PEAP authentication.
Battery Safety Information
Store batteries in any cool & dry place.
Do not dispose of used batteries in waste bins. Please dispose of batteries at
special collection points.
Do not dispose of batteries by burning them in a fire.
Do not attempt to short circuit the battery terminals.
Battery Usage
1. Normal charging procedure
Please charge the battery at least 4 hours until the 4th LED is green.
2. Full battery discharges should be avoided
Because fully discharging the battery seriously stresses the battery and can even
damage, it's recommended to partially discharge the battery to capacity levels of
20~30% and frequently charge the battery, instead of fully discharging the battery
and then fully charging it.
3. Heat and cold conditions can permanently reduce battery life
5
Page 10

ENGLISH
Setting up TabCam using the QR Code
Using iOS / Android App: Connecting your TabCam to the Wi-Fi network.
1. Download the free AVer TabCam App from the Apple App Store or Google Play.
(Search for TabCam).
2. Make sure your tablet is connected to a Wi-Fi environment.
3. Start your AVer TabCam App.
4. Select the home button to go to the setup screen as shown in the following
picture.
Press
Setup
Button
6
Page 11

ENGLISH
5. Enter your Wi-Fi information as shown in the following picture.
a. Enter the Security type
b. Enter the name of the Wi-Fi network your tablet is currently using.
c. Enter an acceptable username (if WPA/WPA2 Enterprise is chosen)
d. Enter the password for this Wi-Fi network (if applicable)
e. Select a custom name for your TabCam.
6. On the next page, place the tablet under the TabCam as shown in the following
picture.
Select
Security
Enter
Wi-Fi
Name
Enter
TabCam
Name
Enter
User
Name
Enter
Password
(if needed)
Place the
tablet under
TabCam
7
Page 12

ENGLISH
7. For step 3 – Align the camera head – position the camera head like the image
shown on the screen. *To reduce the effects of glare from ceiling lights, place a
flat, opaque object, like a piece of paper, on top of the camera head.
8. For step 4 – Scan the QR Code – press the Zoom-in and Auto focus buttons
together for five seconds, then release. *Wait approximately 20-30 seconds for
scanning to complete.
To reduce
glare, place
paper on top
of camera
Scan the
QR Code
Connected!
8
Page 13

ENGLISH
9. Upon successful connection, and the TabCam App will return to the home page
and show a live preview of the connected TabCam camera.
Select
TabCam
Live
TabCam
view
Press
Start!
9
Page 14

ENGLISH
Desktop Version
Firmware Upgrade
Using a computer: Updating your TabCam’s firmware version.
1. Open AVer A+ Suite software’s Device Manager and select “Advanced Settings.”
2. Select the TabCam you wish to upgrade, press “Unlock” and key in the
password(fdefault password is “admin”).
10
Page 15

ENGLISH
3. If you key in the correct password, then TabCam’s status will change from
“Locked” to “Free” and an automatic firmware version check will begin. Select
“Yes” to begin downloading the latest firmware.
4. After you download the latest firmware version, press “Firmware upgrade”
button.
11
Page 16

ENGLISH
5. The firmware update has now begun. If the update is not successful, reopen
your TabCam and try again.
30B
12
Page 17

ENGLISH
Connecting to a Microscope
Connecting the TabCam to a microscope enables you to examine microscopic objects on
a big screen.
1. Change the image display mode to Microscope by selecting (camera
controls) -> select Image adjustment tab -> select MODE -> Press
(microscope).
2. Aim the camera head at the farthest point and press AUTO FOCUS.
3. Adjust the focus of the microscope.
13
Page 18

ENGLISH
For the eyepiece, we suggest using
15.5mm eye relief or higher.
Microscope
eyepiece
Microscope
Adapter
Microscope
4. Select the appropriate rubber coupler size for the microscope eyepiece and
insert it in the microscope adapter.
5. Remove the microscope eyepiece from the microscope and connect it to the
microscope adapter with the rubber coupler inserted. Fasten the 3 bolts until the
adapter secures the eyepiece.
6. Attach the microscope adapter to the TabCam head. Then connect the eyepiece
to the microscope.
Be sure to match the latches to the holes and the arrow on the microscope
adapter and TabCam head are on the same side. Connect and then twist
counterclockwise to lock.
14
Page 19

ENGLISH
Ta b C am Oper ating Height & A n g l e
Paper Gu i d e
336 mm
90°
90°
140 mm
330 mm
248 mm
The approximate height of TabCam should be 336 mm and angled at 55° to display an A4
landscape size document.
The A4 paper marks serve as a guide for placing an A4 size document under the camera.
The approximate shooting area of TabCam is 330 x 248 mm.
15
Page 20

ENGLISH
30BW hat’s New ?
Continuous Auto Focus
When you find the image from your TabCam is obscure, you can double tap to activate
Continuous Auto Focus. Continuous Auto Focus will adjust the lens of your TabCam to
focus on the subject you're photographing or recording to ensure it's sharp whether it is
near or far from the camera.
Before Auto Focus After Auto Focus
Area Focus
If the image from your TabCam includes more than one subject, you can tap and hold to
activate Area Focus. Area Focus allows you to identify a specific point and set it as the
image’s focal point.
Before Area Focus After Area Focus
Auto Shut Off
If TabCam is idle for one hour, then it will shut off automatically to preserve battery life.
*This feature is inactive when TabCam is running on AC power.
16
Page 21

ENGLISH
7BTechnical Specifications
Focus
Auto / Manual
Shooting Area
Max. 13” x 9.76” (330 x 248 mm)
Zoom
16X Digital Zoom
Image Effect
Color / B&W / Negative / Freeze (Software controlled)
Direct AV Recording
Yes (Software)
Capture Mode
Single (Software controlled)
Wireless Streaming
To Apple iPad via Standard Wi-Fi Access Point
To Android tablets via Standard Wi-Fi Access Point
To computer (PC or Mac) via Wi-Fi Access Point
Image Storage
Through computer or tablet
Wireless Network
802.11g/n (45 ft effective range)
Wireless Security
Supports WEP (64/128 bit), WPA/WPA2 Personal and
Enterprise
Operating Systems
(Computer)
Windows XP SP3 (32-bit) Windows 7 (32/64 bit)
Mac OS X 10.6, 10.7, 10.8
Operating Systems
(Tablet)
iOS 5, 6.0.1+ (iPad2, iPad Mini, New iPad)
Android 4.1+ Jellybean
AVer Software
A+ Suite, AVer TabCam App for tablet
Image Sensor
HD 1/2” CMOS
Frame Rate
30 fps (max.) @ XGA
White Balance
Auto / Manual (Software controlled)
Exposure
Auto / Manual (Software controlled)
Image Mode
Sharp/Motion
Effect
Color / B/W / Negative / Rotate / Freeze (Software
controlled)
Image
Optics
Function
Compatibility
17
Page 22

ENGLISH
Battery
Built in 6-cell Li-ion (7.2V/6600 mAh)
Power Source
DC 12V, 3A, 100-240V, 50-60Hz
DC 12V Input
Power Jack
Camera Operating
20.47” x 4.49” x 13.23” inches
520 x 114 x 336 mm
Camera Folded
10.83” x 4.49” x 2.79” inches
275 x 114 x 71 mm
Camera Weight
3.53 lbs (1.6kg)
TabCam Device
1 unit
Power Adapter
1 unit
SW and Quick
Guide CD
1 unit
Microscope Adapter
Part number: VISIFSEMA
Anti-Glare sheet
Part number: PANTIGLA1 (A5 size 8.26” x 5.84”)
Carrying Bag
Part number: VISIONCPCC
Warranty
3 years (Battery warranty = 1 year)
Advanced
Replacement
During warranty period
Operating
temperature range
32° F to 95° F (0° C to 35° C)
Power
Input/Output Connections
Dimension
Package Contents
Optional Accessories
Others
18
Page 23

ENGLISH
Troubleshooting
This section provides many useful tips on how to solve common problems while using
TabCam. You can also test your Wi-Fi with our Wi-Fi tool to check compatibility before you
use our TabCam. Please follow these steps:
1. Connect two wireless devices (PC, iPad, or Android) to the same Wi-Fi network.
2. Install WiFi Test Tool by AVer Information Inc. on both devices:
a. For PC: Download the WiFi Test Tool here
b. For iPad: Download the WiFi Test Tool by AVer Information Inc. in the App
Store (search AVer)
c. For Android: Download the WiFi Test Tool by AVer Information Inc. in the
Google Play Store (search AVer)
3. Run the WiFi Test Tool on both devices and enter the Remote Device IP of the
other device (this is the devices IPv4 address) and press Start on both devices to
begin the test
4. If the test passes, your Wi-Fi is compatible with the TabCam and should have no
problems connecting. If the test fails, you may have to change some settings in
your router for the TabCam to connect.
5. Please call our tech support and let us know the error log that is generated from
the WiFi Test Tool in order for us to help you troubleshoot the problem.
I went through the setup page, but my TabCam is not connecting.
If Power LED is always flashing,
It means the QR Code scanning has failed. Please check the following steps:
1. Make sure when you scan the QR Code that you minimize the glare on the tablet
by placing a piece of paper over the camera head.
2. Adjust focus: Press auto-focus button.
3. Avoid being out-of-range: Make sure your computer/tablet screen is about 13
inches (330 mm) away from camera head.
4. Reset: If repeating this sequence still does not work, press zoom-in or zoom-out
to cancel the scanning process and restart the application. Go through the setup
instructions again to connect your TabCam to the Wi-Fi netowrk.
The Power LED light changes to steady but the Network LED lights blink
sequentially and do not turn solid green.
After scanning the QR Code successfully, activation should take about 30 seconds. If it
takes longer than 30 seconds, this could mean your Wi-Fi network password was
incorrect, or that your network may not be fully compatible with TabCam. Please check the
following steps:
1. If you have multiple Wi-Fi networks, choose the one with the strongest signal.
2. Make sure the Wi-Fi router is still up and the security key is correctly entered.
19
Page 24

ENGLISH
TCP/UDP
Port
UDP
1900
TCP
9527
TCP
9528
TCP
8557
3. Check Wi-Fi Network Names and Passwords. TabCam can only join Wi-Fi
networks with names and passwords containing only letters and numbers. If the
Wi-Fi router is WPA/WPA2 Enterprise, it is very possible the wrong password
may cause the user's login to be locked. Please check with MIS to unlock it.
4. Make sure your TabCam’s firmware version is the latest one.
The Power and Network LED lights are steady, but my TabCam is not
detected by the software.
1. Make sure your the computer/tablet is connected to the same Wi-Fi network
(same SSID) as the TabCam.
2. Security software (firewall, anti-virus) installed on your computer may be blocking
communication between TabCam and the computer/tablet. Your Wi-Fi router also
may be blocking some TCP/UDP ports. When these ports are blocked, TabCam
cannot access the Wi-Fi network. Please check with MIS to unblock them. Below
is a list of ports used by TabCam.
I can see my TabCam in the list, but I cannot see the live view when I select
the TabCam.
There may be some signal strength issues with the Wi-Fi connection. Please go through
the following steps:
1. TabCam and your computer/tablet must be within 45 feet (13m) of your Wi-Fi
router.
2. There may be other devices using your Wi-Fi network at the same time.
Bandwidth usage, packet loss and other connection elements may cause the
poor video quality.
3. Make sure your Internet connection has a minimum upload speed of 2.8 Mbps.
4. Your Wi-Fi router must be 802.11 g/n compatible.
The video quality of TabCam is poor or is frequently disconnected.
This is also an issue regarding the strength of the Wi-Fi connection. You can follow the
previous steps to check.
I could use my TabCam before, but now I cannot see my TabCam in the list
and the Network LED light is always flashing.
There may some setting issues with the Wi-Fi router. Please check the following steps:
20
Page 25

ENGLISH
1. Check the Wi-Fi Network Names and Passwords. If the Wi-Fi Network Names
and Passwords are changed, please follow the steps on the Wi-Fi setup page to
reset the Wi-Fi information for TabCam.
2. If the Wi-Fi Network Names and Passwords have not changed, please restart the
Wi-Fi router and your TabCam.
The battery light is flashing red frequently.
Make sure you charge your TabCam with the power adapter included in your package.
Battery life is estimated at 6~8 hours.
I cannot upload videos to YouTube.
1. Make sure YouTube is not blocked on your network.
2. Make sure you set up your YouTube account under “Settings” prior to uploading.
I want to change the name of my recorded video and snapshots. How do I
do this?
The name of the videos and snapshots are generated through time stamps. To change
the format of the name, go to “Settings” and select “Capture” (for screenshots) and
“Recording” (for videos) to change the filename format.
How do I capture a screenshot of the TabCam live view?
Press the camera button on the right-left corner of the main screen.
How do I capture a screenshot of the TabCam live view?
For additional help with setting up TabCam, please go to our website: www.aver.com.
21
Page 26

ENGLISH
Limited War ranty
For a period of time beginning on the date of purchase of the applicable product and
extending as set forth in the “Warranty Period of AVer Product Purchased” section of
the warranty card, AVer Information Inc. (“AVer”) warrants that the applicable product
(“Product”) substantially conforms to AVer’s documentation for the product and that its
manufacture and components are free of defects in material and workmanship under
normal use. “You” as used in this agreement means you individually or the business entity
on whose behalf you use or install the product, as applicable. This limited warranty
extends only to You as the original purchaser. Except for the foregoing, the Product is
provided “AS IS.” In no event does AVer warrant that You will be able to operate the
Product without problems or interruptions, or that the Product is suitable for your
purposes. Your exclusive remedy and the entire liability of AVer under this paragraph shall
be, at AVer’s option, the repair or replacement of the Product with the same or a
comparable product. This warranty does not apply to (a) any Product on which the serial
number has been defaced, modified, or removed, or (b) cartons, cases, batteries,
cabinets, tapes, or accessories used with this product. This warranty does not apply to
any Product that has suffered damage, deterioration or malfunction due to (a) accident,
abuse, misuse, neglect, fire, water, lightning, or other acts of nature, commercial or
industrial use, unauthorized product modification or failure to follow instructions included
with the Product, (b) misapplication of service by someone other than the manufacturer’s
representative, (c) any shipment damages (such claims must be made with the carrier), or
(d) any other causes that do not relate to a Product defect. The Warranty Period of any
repaired or replaced Product shall be the longer of (a) the original Warranty Period or (b)
thirty (30) days from the date of delivery of the repaired or replaced product.
Limitations of Warranty
AVer makes no warranties to any third party. You are responsible for all claims, damages,
settlements, expenses, and attorneys’ fees with respect to claims made against You as a
result of Your use or misuse of the Product. This warranty applies only if the Product is
installed, operated, maintained, and used in accordance with AVer specifications.
Specifically, the warranties do not extend to any failure caused by (i) accident, unusual
physical, electrical, or electromagnetic stress, neglect or misuse, (ii) fluctuations in
electrical power beyond AVer specifications, (iii) use of the Product with any accessories
or options not furnished by AVer or its authorized agents, or (iv) installation, alteration, or
repair of the Product by anyone other than AVer or its authorized agents.
Disclaimer of Warranty
EXCEPT AS EXPRESSLY PROVIDED OTHERWISE HEREIN AND TO THE MAXIMUM
EXTENT PERMITTED BY APPLICABLE LAW, AVER DISCLAIMS ALL OTHER
WARRANTIES WITH RESPECT TO THE PRODUCT, WHETHER EXPRESS, IMPLIED,
STATUTORY OR OTHERWISE, INCLUDING WITHOUT LIMITATION, SATISFACTORY
QUALITY, COURSE OF DEALING, TRADE USAGE OR PRACTICE OR THE IMPLIED
WARRANTIES OF MERCHANTABILITY, FITNESS FOR A PARTICULAR PURPOSE OR
NONINFRINGEMENT OF THIRD PARTY RIGHTS.
22
Page 27

ENGLISH
For warranty period, please refer to the warranty card.
Limitation of Liability
IN NO EVENT SHALL AVER BE LIABLE FOR INDIRECT, INCIDENTAL, SPECIAL,
EXEMPLARY, PUNITIVE, OR CONSEQUENTIAL DAMAGES OF ANY NATURE
INCLUDING, BUT NOT LIMITED TO, LOSS OF PROFITS, DATA, REVENUE,
PRODUCTION, OR USE, BUSINESS INTERRUPTION, OR PROCUREMENT OF
SUBSTITUTE GOODS OR SERVICES ARISING OUT OF OR IN CONNECTION WITH
THIS LIMITED WARRANTY, OR THE USE OR PERFORMANCE OF ANY PRODUCT,
WHETHER BASED ON CONTRACT OR TORT, INCLUDING NEGLIGENCE, OR ANY
OTHER LEGAL THEORY, EVEN IF AVER HAS ADVISED OF THE POSSIBILITY OF
SUCH DAMAGES. AVER’S TOTAL, AGGREGATE LIABILITY FOR DAMAGES OF ANY
NATURE, REGARDLESS OF FORM OF ACTION, SHALL IN NO EVENT EXCEED THE
AMOUNT PAID BY YOU TO AVER FOR THE SPECIFIC PRODUCT UPON WHICH
LIABILITY IS BASED.
Governing Law and Your Rights
This warranty gives you specific legal rights; You may also have other rights granted under
state law. These rights vary from state to state.
23
 Loading...