

Page 1
New
Quick Guide
Page 2
Federal Communication Commission Interference Statement
This equipment has been tested and found to comply with the limits for a Class B
digital device, pursuant to Part 15 of the FCC Rules. These limits are designed to
provide reasonable protection against harmful interference in a residential
installation. This equipment generates, uses and can radiate radio frequency energy and, if
not installed and used in accordance with the instructions, may cause harmful interference
to radio communications. However, there is no guarantee that interference will not occur in
a particular installation. If this equipment does cause harmful interference to radio or
television reception, which can be determined by turning the equipment off and on, the user
is encouraged to try to correct the interference by one of the following measures:
- Reorient or relocate the receiving antenna.
- Increase the separation between the equipment and receiver.
- Connect the equipment into an outlet on a circuit different from that to which the
receiver is connected.
- Consult the dealer or an experienced radio/TV technician for help.
This device complies with Part 15 of the FCC Rules. Operation is subject to the following
two conditions: (1) This device may not cause harmful interference, and (2) this device
must accept any interference received, including interference that may cause undesired
operation.
FCC Caution: Any changes or modifications not expressly approved by the party
responsible for compliance could void the user's authority to operate this equipment.
IMPORTANT NOTE: FCC Radiation Exposure Statement:
This equipment complies with FCC radiation exposure limits set forth for an uncontrolled
environment. End users must follow the specific operating instructions for satisfying RF
exposure compliance.
This transmitter must not be co-located or operating in conjunction with any other antenna
or transmitter.
CE NOTICE
This is a Class B product.
ClassILASERProduct
低功率電波輻射性電機管理辦法
第十二條
經型式認証合格之低功率射頻電機,非經許可,公司、商號或使用者均不得擅自變更
頻率、加大功率或變更原設計之特性及功能。
第十四條
低功率射頻電機之使用不得影響飛航安全及干擾合法通信﹔經發現有干擾現象時,應立即停
用,並改善至無干擾時方得繼續使用。
前項合法通信,指依電信法規定作業之無線電通信。
低功率射頻電機須忍受合法通信或工業、科學及醫療用電波輻射性電機設備之干
擾。
Page 3
DISCLAIMER
No warranty or representation, either expressed or implied, is made with respect to
the contents of this documentation, its quality, performance, merchantability, or
fitness for a particular purpose. Information presented in this documentation has been
carefully checked for reliability; however, no responsibility is assumed for
inaccuracies. The information contained in this documentation is subject to change
without notice.
In no event will AVerMedia be liable for direct, indirect, special, incidental, or
consequential damages arising out of the use or inability to use this product or
documentation, even if advised of the possibility of such damages.
TRADEMARKS
"AVerMedia" is a trademark (or registered trademark) of AVerMedia Technologies, Inc
and has been authorized AVerMedia Information Inc to use. “AVerVision” and “AVer”
are trademarks (or registered trademarks) of AVerMedia Information, Inc. Other
trademarks used herein for description purpose only belong to each of their
companies.
COPYRIGHT
©2011 by AVerMedia Information, Inc. All right reserved. No part of this document
may be reproduced or transmitted in any form, or by any means without the prior
written permission of AVerMedia Information Inc. AVerMedia Information Inc. reserves
the right to modify its models, including their characteristics, specifications,
accessories and any other information stated herein without notice. The official
printout of any information shall prevail should there be any discrepancy between the
information contained herein and the information contained in that printout.
THE MARK OF CROSSED-OUT WHEELED BIN INDICATES THAT
THIS PRODUCT MUST NOT BE DISPOSED OF WITH YOUR
OTHER HOUSEHOLD WASTE. INSTEAD, YOU NEED TO
DISPOSE OF THE WASTE EQUIPMENT BY HANDING IT OVER
TO A DESIGNATED COLLECTION POINT FOR THE RECYCLING
OF WASTE ELECTRICAL AND ELECTRONIC EQUIPMENT. FOR
MORE INFORMATION ABOUT WHERE TO DROP OFF YOUR
WASTE EQUIPMENT FOR RECYCLING, PLEASE CONTACT
YOUR HOUSEHOLD WASTE DISPOSAL SERVICE OR THE SHOP
WHERE YOU PURCHASED THE PRODUCT.
Page 4

Table of Contents
Introduction................................................................1
Minimum System Requirements............................1
Package Contents....................................................2
Technical Specification............................................3
Teacher Pen Parts...................................................4
Student Pen Parts....................................................5
Charging Teacher Pen............................................. 6
Replacing the Battery............................................... 6
Connecting the USB Dongle to Computer............7
Using the Teacher Pen Slide Switch.....................7
Holding the Pen........................................................7
Antenna and Battery LED Status...........................8
Teacher Pen..............................................................8
Student Pen...............................................................8
Binding the AVerPen with the Dongle...................9
Page 5

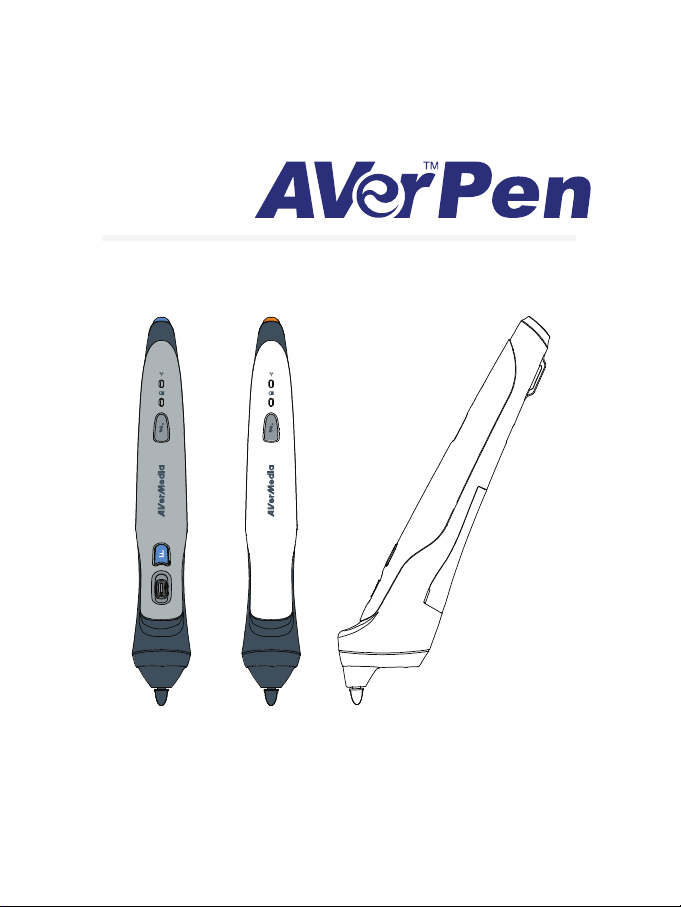
Introduction
Thank you for purchasing AVerMedia® New AVer™Pen. The New AVerPen comes in 2
different packages: teacher pack, and student pack. Each package comes with a dongle
that uses advanced 2.4GHz license exempt radio-frequency wireless technology. The pens
are already pre-bound with the dongle in the factory. All you need is to install the bundled
software and connect the dongle to any free USB slot in your computer.
The New AVerPen design allows the optical pen sensor to have flawless accurate motion
detection and easy pen holding. It uses (1) AAA battery which could last for about 8 hour
non-stop operation.
Minimum System Requirements
For Windows XP
• Intel Pentium III 1 GHz or later x86 processor (Intel Core 2
Duo 1.66GHz recommended)
• 512 MB of RAM (1 GB recommended)
• 100 MB free hard disk space for basic installation (w/o
Gallery content)
• CD-ROM and USB 1.1 or above
For Windows Vista
• Intel Core Duo 1.5 GHz or later x86 processor (Intel Core 2
Duo 1.66GHz recommended)
• 1 GB of RAM (2 GB recommended)
• 100 MB free hard disk space for basic installation (w/o
Gallery content)
• CD-ROM and USB 1.1 or compatible
For Mac OS 10.4 and later
• 1GHz G4 processor or Intel Core Duo 1.83 GHz or later
x86 processor (Intel Core 2 Duo 2.0 GHz recommended)
• 1 GB of RAM (2 GB recommended)
• 100 MB free hard disk space for basic installation (w/o
Gallery content)
• CD-ROM and USB 1.1 or compatible
1
Page 6

Package Contents
Check the items in the table below the type of package you have.
Items
Installation CD 1 1
User Manual CD 1 1
Dual USB Port
AC Charger
USB Cable 1 -
Lanyard Chord 1 -
Pen Pouch 1 1
Warranty Card 1 1
Quick Guide 1 1
Pen Sticker 10/sheet 10/sheet
Dongle 1 1
Battery Rechargeable Non-rechargeable
Teacher Pack Student Pack
QTY QTY
1 -
2
Page 7

Technical Specification
Length 5.94in (151mm)
Weight 1.59oz (45g)
Teacher Pen: Power, Info, F (right-click button), Scroll
Buttons
Student Pen: Power, Info, and Pen tip (left-click button)
Wireless technology 2.4GHz RF Wireless
Range 50ft (15m)
Up/Down, and Pen tip (left-click button)
Bandwidth supports
up to
Memory register up to 50 AVerPen
Pen tip technology proprietary optical sensor
Connectivity USB dongle
Battery AAA size
Battery time 8 hours non-stop operation
Power adapter
Operating
temperature
Warranty
Certifications FCC, CE
7 AVerPen simultaneous operation
input : 100-240V / 50-60Hz / 0.4A
output : 5V / 3A
0-40°C (32-104°F)
3 years for the New AVerPen,
1 year for the accessories.
3
Page 8

Teacher Pen Parts
The teacher pen can be used in multiple ways and behaves like a master pen which can
fully control all the functions with the bundled software. It allows you to use it as a full
function mouse with left and right buttons and scroll wheel, use it as a wireless remote
presenter to control your PowerPoint slide presentation, and use it to operate the Windows
media player.
(1)
(2)
(3)
(4)
(5)
(6)
(7)
(8)
(9)
(10)
(11)
Name Function
(1) Power Turn on/off the pen. Press and hold
the power button for more than 3 sec
to completely turn off the pen.
(2) Antenna LED
Show the signal strength.
Indicator
(3) Battery LED
Show the battery strength.
Indicator
(4) Info Check the signal strength and battery
status.
(5) Function Use as the right-click button,
start/stop slide show when using in
MS PowerPoint, or play/pause the
video when using in Windows Media
Player.
(6) Slide switch Use as the mouse wheel, change
slide in MS PowePoint, or adjust the
volume in Windows media player.
Push it towards F button to scroll
down, go to previous slide, or
increase the volume and away to
scroll up, go to next slide, or
decrease the volume.
(7) Pen tip Use as the left-click button to make a
selection.
(8) Lanyard hole Attach the supplied lanyard strap.
(9) Mini USB port Use to recharge the battery.
(10) Battery
Compartment
(11) Optical Pen
Sensor
Use the supplied rechargeable AAA
battery.
Detect the movement of the pen to
control the motion of the cursor.
4
Page 9

Student Pen Parts
The student pen is restricted to fewer features and can only be used with the bundled
software. It requires activating it with the use of a teacher pen or use the computer mouse
to enable the student pen to annotate on the screen.
(1)
(2)
(3)
(4)
(5)
(6)
(7)
(8)
Name Function
(1) Power Turn on/off the pen. Press and hold the power button
for more than 3 sec to completely turn off the pen.
(2) Antenna LED
Show the signal strength.
indicator
(3) Battery LED
Show the battery strength.
indicator
(4) Info Check the signal strength and battery status.
(5) Pen tip Use as the left-click button to make a selection.
(6) Lanyard hole Attach a lanyard strap.
(7) Battery
Insert the supplied non-rechargeable AAA size battery.
compartment
(8) Optical pen
sensor
Detect the movement of the pen to control the motion of
the cursor.
5
Page 10

Charging Teacher Pen
Make sure the battery used in teacher pen is an AAA size rechargeable battery. Use the
supplied USB cable and connect the mini USB jack to the pen and the other end to
computer USB port.
USB cable
Desktop
Laptop
You may also use the supplied dual USB port AC charger. Plug the dual USB port AC
charger to a standard 100V~240V AC power outlet. The adapter plug will vary depending
on the standard power outlet of the country where it is sold.
insert
remove
Wall outlet
USB cable
Replacing the Battery
Both teacher and student pen use AAA size battery.
Pull
to open
6
Insert
and push it
back to close
Page 11

Connecting the USB Dongle to Computer
The USB dongle can detect the pens within the range of up to 50ft (15m). You can register
a maximum of 50 pens per dongle and allows 1 teacher pen and 6 student pen to interact
on the same page at the same time. To register the pen with the USB dongle, you need to
bind the pen with the dongle.
+
x 6
Laptop
Desktop
Using the Teacher Pen Slide Switch
The slide switch in teacher pen acts like the mouse wheel. Pushing towards the pen tip
allows you scroll up, switch to previous slide when using it with PowerPoint and increase
volume when using it with Windows Media Player. Pushing towards the pen tail allows you
to scroll up, switch to next slide and decrease volume.
Scroll up
Previous slide
Volu me up
Scroll down
Next slide
Volu me dow n
Holding the Pen
Grab the AVerPen and hold it as you would normally do with a pen. Keep the pen sensor
and the writing surface parallel.
7
Page 12

Antenna and Battery LED Status
Each time you power on the AVerPen, the LED will light to indicate the antenna strength
and battery status. To check the antenna strength and battery status, press button.
Teacher Pen
Antenna LED Flash Pattern State
Green Flash 3 times and off Connected
Red Continuous flashing No connection
Green + Red Alternate flashing Binding with the USB dongle in progress
Battery LED Flash Pattern State
Green
Red
Amber Solid for 3 sec and off
Solid for 3 sec and off
Remain solid Fully charged
Solid for 3 sec and off Power off
Continuous flashing
Remain solid Charging in progress
> 30% battery life / Power on
10% battery life
30% and > 10% battery life
Student Pen
Antenna LED Flash Pattern State
Green Flash 3 times and off
Green + Red Alternate flashing Binding with the USB dongle in progress
Flash 3 times and off Deactivate student to annotate on the
Red
Continuous flashing No connection
Amber Flash 3 sec and off Response to AVerPen ID query
Battery LED Flash Pattern State
Green Solid for 3 sec and off
Red
Amber Solid for 3 sec and off
Continuous flashing
Solid for 3 sec and off Power off
Connected / Activate student to annotate
on the screen
screen
> 30% battery life / Power on
10% battery life
30% and < 10% battery life
8
Page 13

Binding the AVerPen with the Dongle
In the bundled software Management/Device Management
panel, Binding column, click Assign/Add and press the pen
and buttons at the same time. If you are binding a
teacher pen, the button in the Binding column will change to
Remove button in Teacher table and as for student pen, a
new pen will appear in Student table.
AVer+ v1.7
Troubleshooting
Problem Cause Solution
• Teacher pen is not
bound with the
dongle.
Mouse cursor is not
responding with the
teacher pen
Mouse cursor is not
responding with the
student pen
Mouse cursor moves The cursor speed is set
• USB dongle is not
properly connected to
the computer USB
port.
• Teacher pen is power
off.
• Battery life is too low.
• Student pen is not
bound with the
dongle.
• Battery life is too low.
• USB dongle is not
properly connected to
the computer USB
port.
9
AVer+ 2
Page 14

too fast too high.
10
 Loading...