

Page 1
www.avenview.com
1
4X2 DVI Matrix Switch
Models
SW-DVI-4X2
User’s Guide
© 2008 Avenview Inc. All rights reserved.
The contents of this document are provided in connection with Avenview Inc. (“Avenview”) products. Avenview makes no representations
or warranties with respect to the accuracy or completeness of the contents of this publication and reserves the right to make changes to
specifications and product descriptions at any time without notice. No license, whether express, implied, or otherwise, to any intellectual
property rights is granted by this publication. Except as set forth in Avenview Standard Terms and Conditions of Sale, Avenview assumes
no liability whatsoever, and disclaims any express or implied warranty, relating to its products including, but not limited to, the implied
warranty of merchantability, fitness for a particular purpose, or infringement of any intellectual property right.
Reproduction of this manual, or parts thereof, in any form, without the express written permission of Avenview Inc. is strictly
prohibited.
Page 2

www.avenview.com
2
Table of Contents
Section 1: Getting Started ...................................................................................................................... 3
1.1 Important Safeguards ............................................................................................................ 3
1.2 Safety Instructions ................................................................................................................. 4
1.3 Regulatory Notices Federal Communications Commission (FCC) ......................................... 4
1.4 Introduction ........................................................................................................................... 4
1.5 Package Contents ..................................................................... Error! Bookmark not defined.
1.6 Before Installation.................................................................................................................. 5
1.7 Installation ............................................................................... Error! Bookmark not defined.
1.8 General Troubleshooting ......................................................... Error! Bookmark not defined.
Section 2: Specifications ......................................................................................................................... 9
Page 3

www.avenview.com
3
Section 1: Getting Started
1.1 Important Safeguards
Please read all of these instructions carefully before you use the device. Save this manual for future
reference.
What the warranty does not cover
Any product, on which the serial number has been defaced, modified or removed.
Damage, deterioration or malfunction resulting from:
Accident, misuse, neglect, fire, water, lightning, or other acts of nature, unauthorized
product modification, or failure to follow instructions supplied with the product.
Repair or attempted repair by anyone not authorized by us.
Any damage of the product due to shipment.
Removal or installation of the product.
Causes external to the product, such as electric power fluctuation or failure.
Use of supplies or parts not meeting our specifications.
Normal wear and tear.
Any other causes which does not relate to a product defect.
Removal, installation, and set-up service charges.
Page 4

www.avenview.com
4
1.2 Safety Instructions
Do not dismantle the housing or modify the module.
Dismantling the housing or modifying the module may result in electrical shock or burn.
Refer all servicing to qualified service personnel.
Do not attempt to service this product yourself as opening or removing housing may expose you to
dangerous voltage or other hazards
Keep the module away from liquids.
Spillage into the housing may result in fire, electrical shock, or equipment damage. If an object or liquid
falls or spills on to the housing, unplug the module immediately.
Have the module checked by a qualified service engineer before using it again.
1.3 Regulatory Notices Federal Communications Commission (FCC)
This equipment has been tested and found to comply with Part 15 of the FCC rules. These limits are designed
to provide reasonable protection against harmful interference in a residential installation.
Any changes or modifications made to this equipment may void the user’s authority to operate this
equipment.
1.4 Introduction
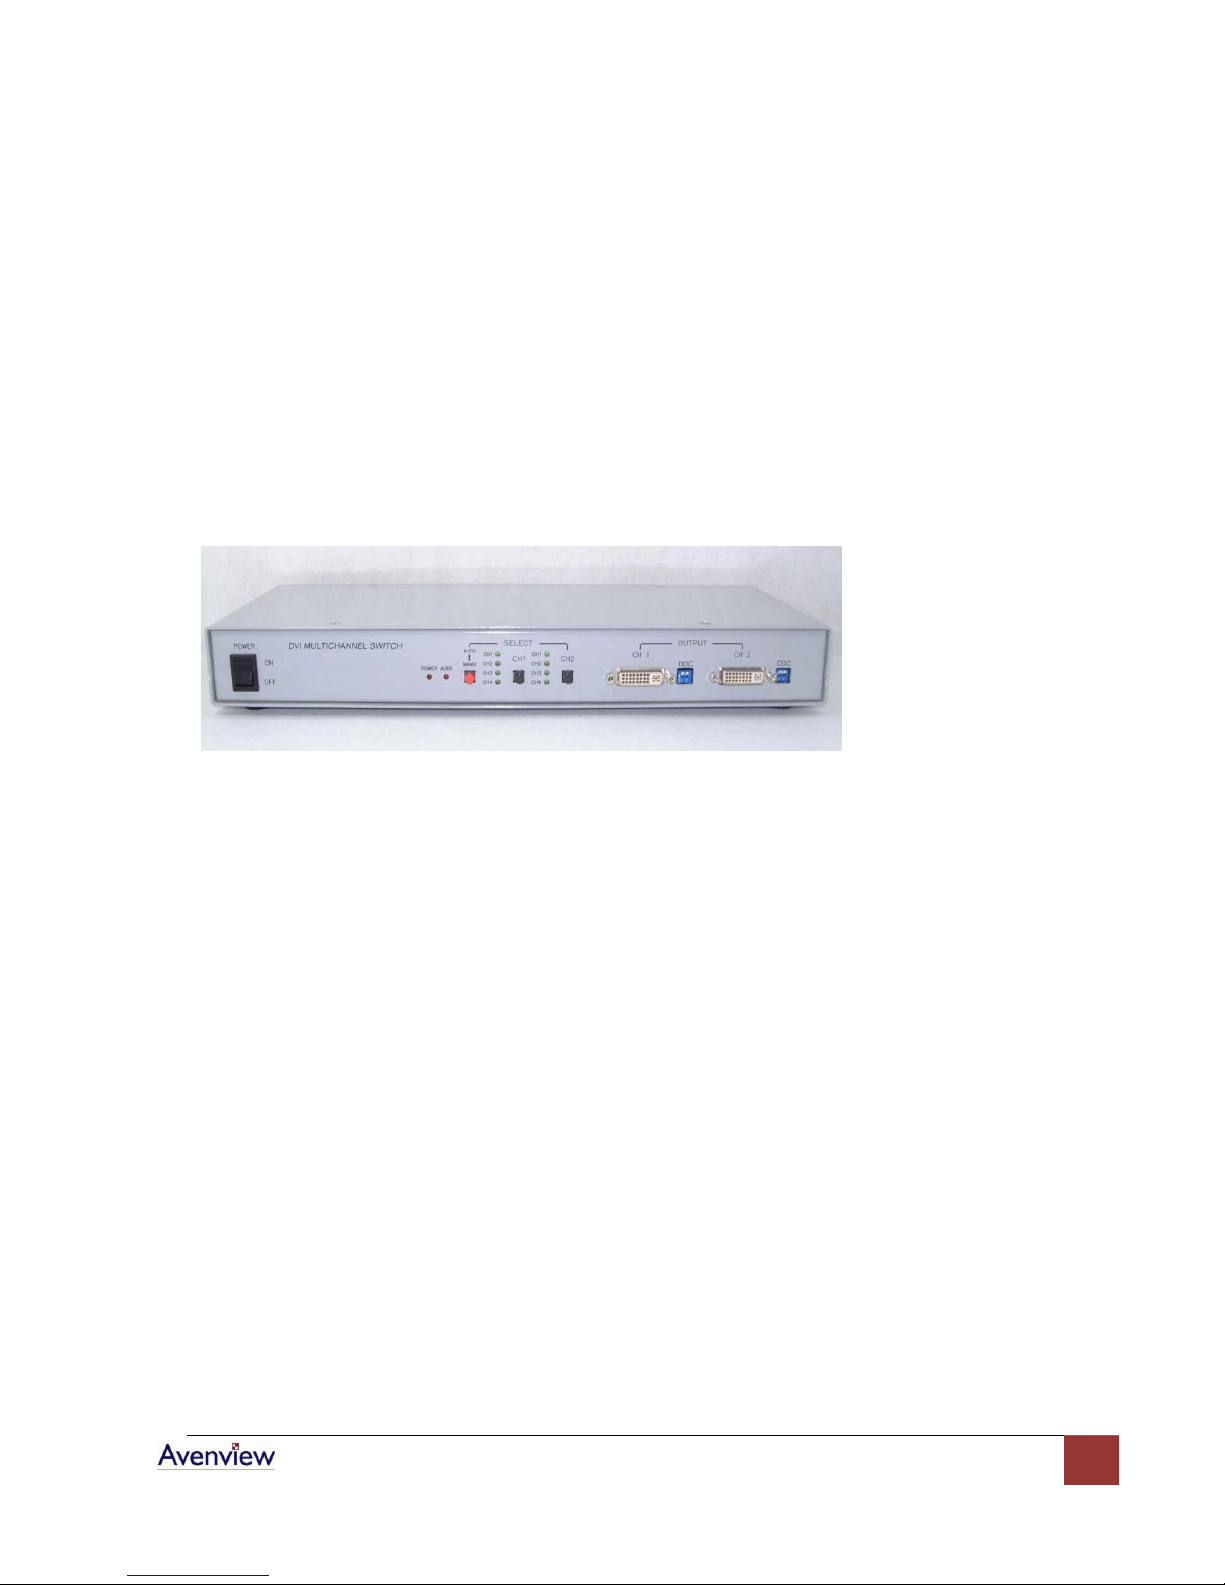
Avenview SW-DVI-4X2 Matrix Switch enables you to switch and scan DVI source from up to 4 DVI signals of
host computers by RS485 communication. It can output to 2 DVI source monitors or TV. SW-DVI-4X2 also
supports HDCP compliant device. User can control input and output connection easily by manual or automatic
mode by using RS-485 communication.
- Select a DVI graphic source from multi sources by data communication software.
- Multi Input and Multi Output
- Auto and Manual mode select
- Uses standard DVI-I connection
- Flexibly increase number of channel by multi step connection
- HDCP compliant
Page 5
www.avenview.com
5
1.5 Before Installation
Put the product in an even and stable location. If the product falls down or drops, it may cause an
injury or malfunction.
Don’t place the product in too high temperature (over 50°C), too low temperature (under 0°C) or high
humidity.
Use the DC power adapter with correct specifications. If inappropriate power supply is used then it
may cause a fire.
Section 2: Installation
Avenview SW-DVI-4X2 is designed to self detect the resolution of the monitor and change the resolution
accordingly. Follow these steps for connecting to a device:
1. Power on your display
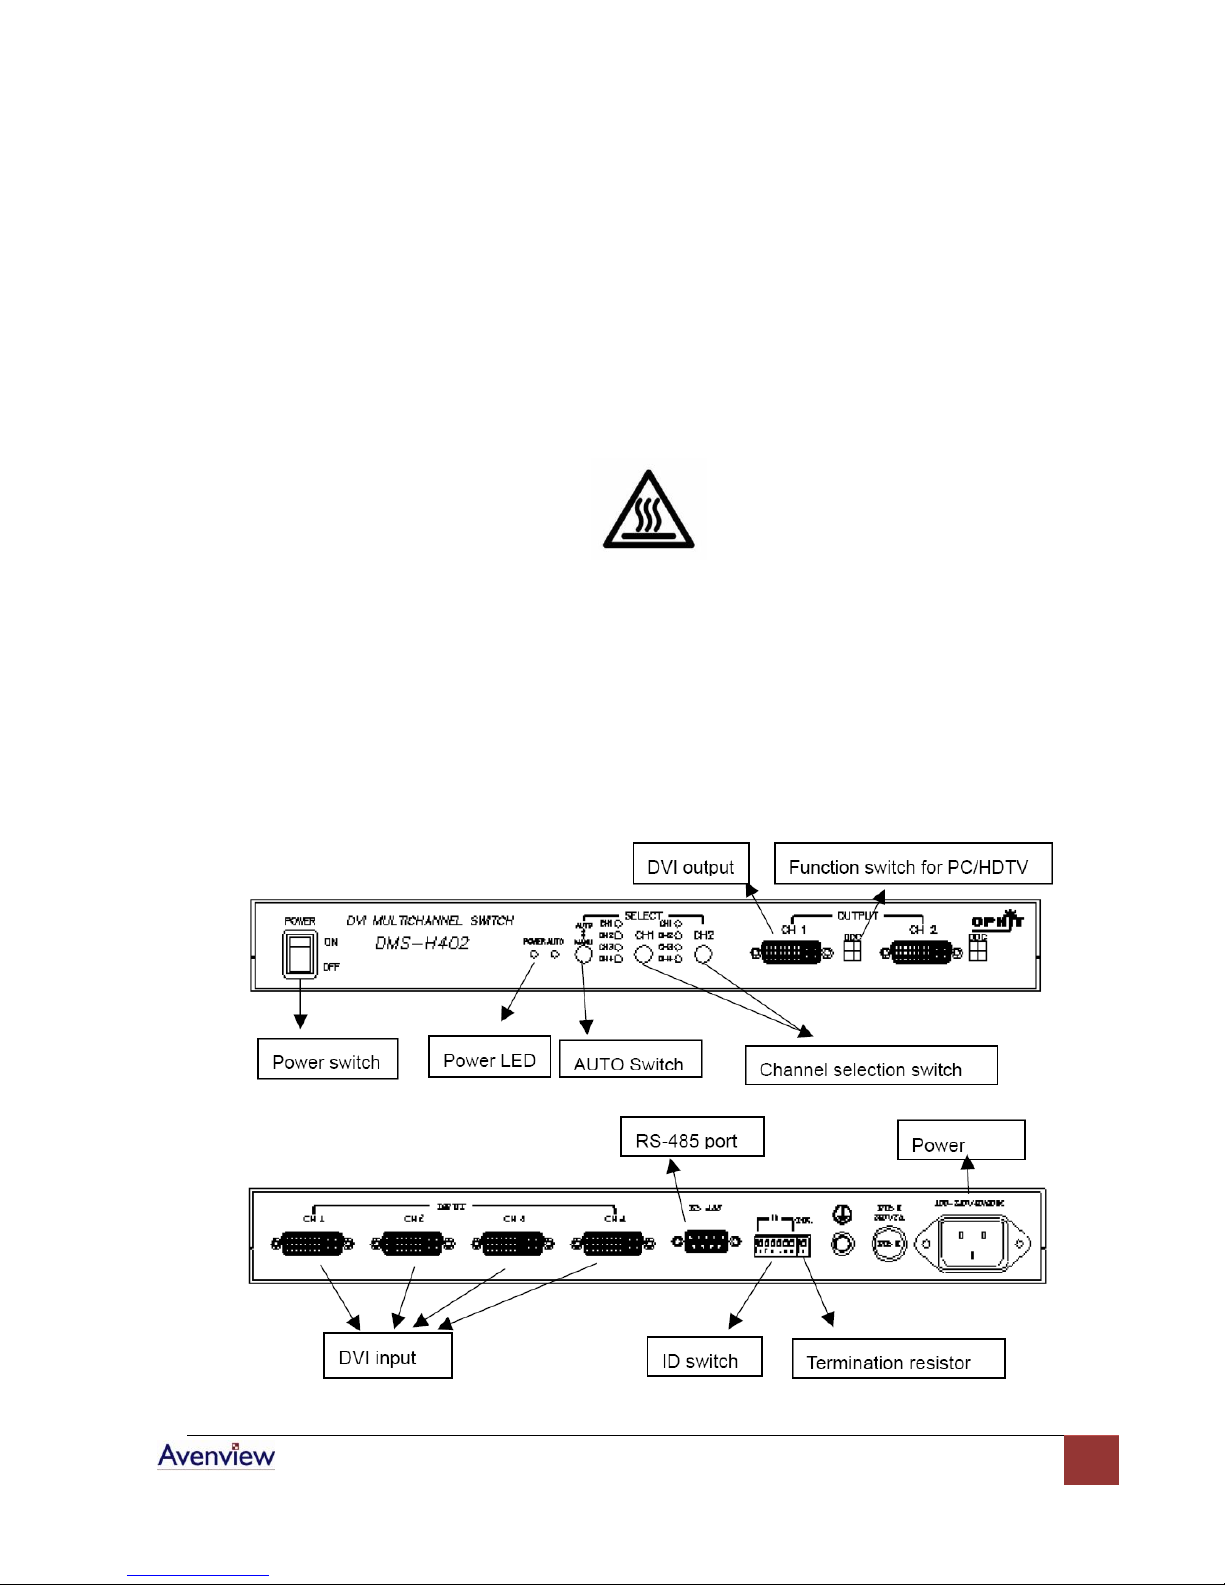
2. Connect Input and Output Sources to the DVI Port of SW-DVI-4X2 Matrix Switch
3. Plug the DC power of Matrix Switch
4. Power on DVI 4X2 Matrix Switch
Connection diagram of SW-DVI-4X2
Page 6
www.avenview.com
6
2.1 Auto / Manual Mode Setting
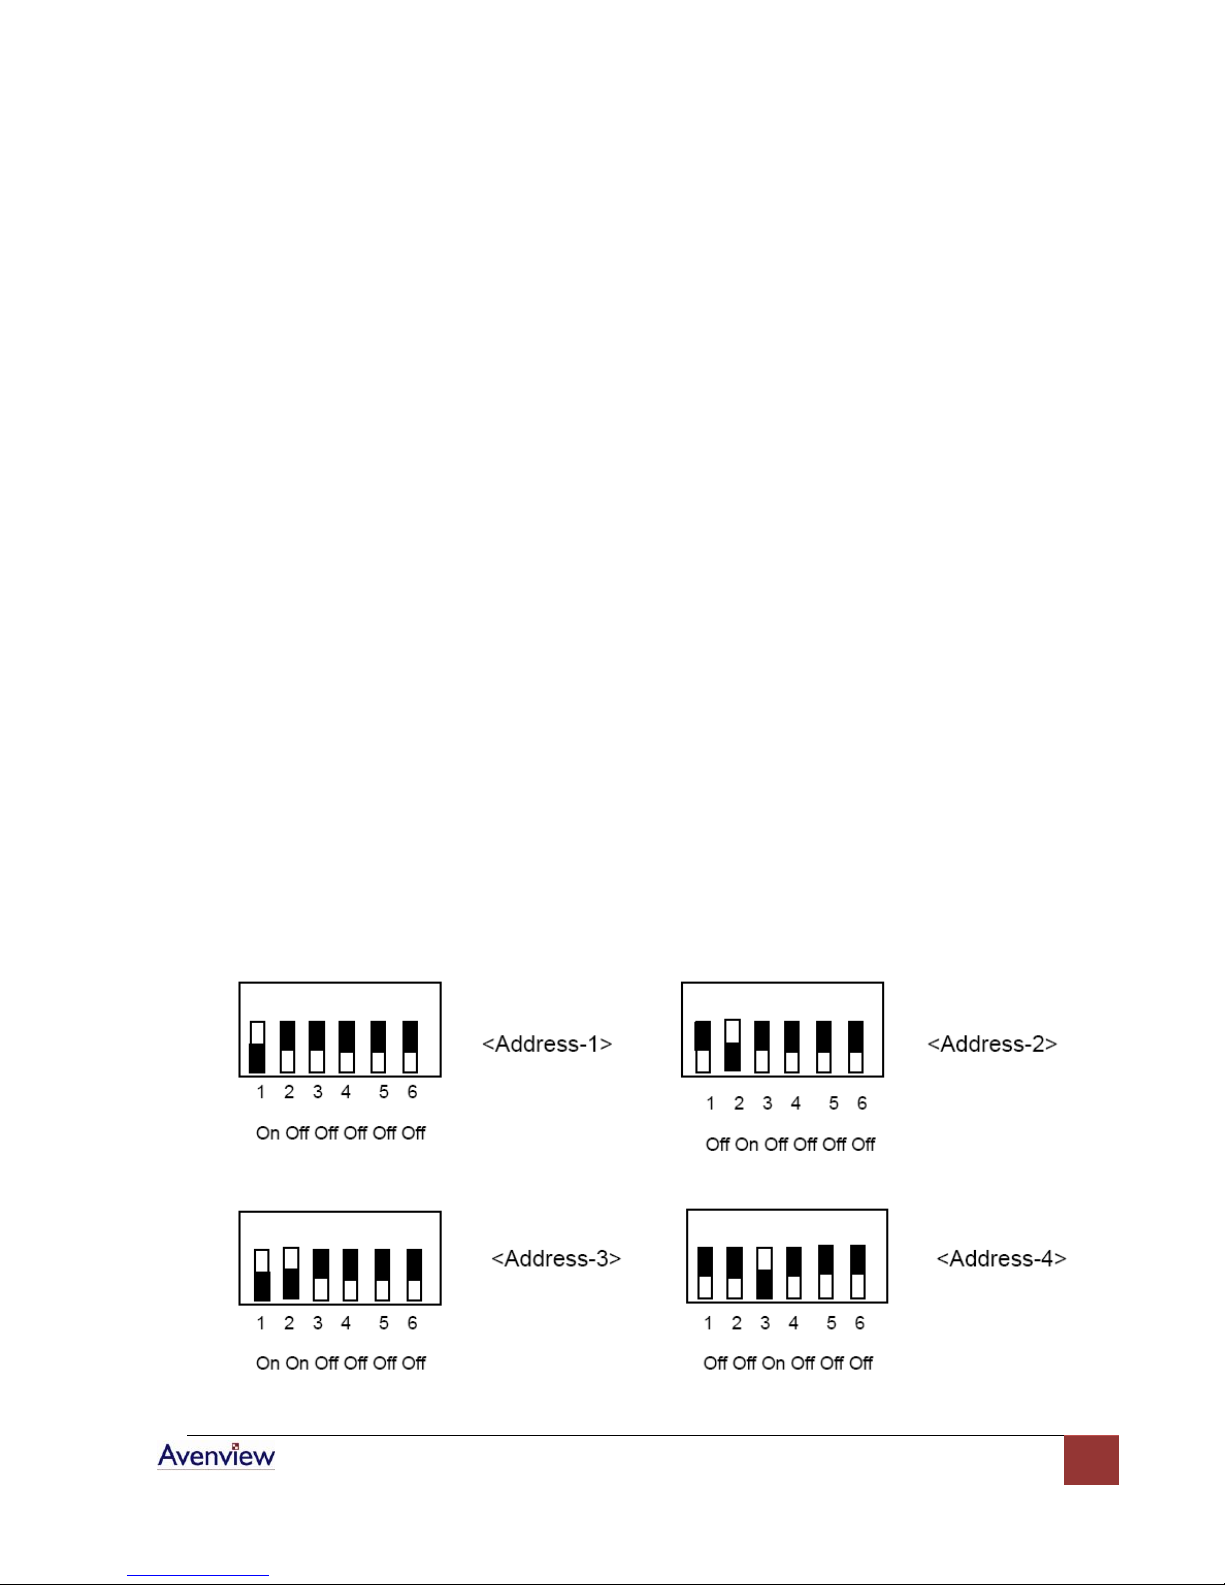
Avenview SW-DVI-4X2 set to Auto Mode when it is started the first time. Auto/Manual mode can be changed
by mode selection switch. In manual mode, each corresponding output to channel (CH1, CH2, CH3, CH4) can
be setup by DIP Switch. e.g: CH1CH2CH3CH4NONECH1, by DIP Switch
2.2 Termination Resister
You can switch ON or OFF terminal resister from the back of the Matrix Switch as shown above.
ON Setting the Termination Resister
OFF Remove the Termination Resister
2.3 ID Address Settings
SW-DVI-4X2 Matrix switch can address up to 64ID (0 ~ 63) by Dip Switch.
↓ ON : Set by 1
↑ OFF : Set by 0
Page 7
www.avenview.com
7
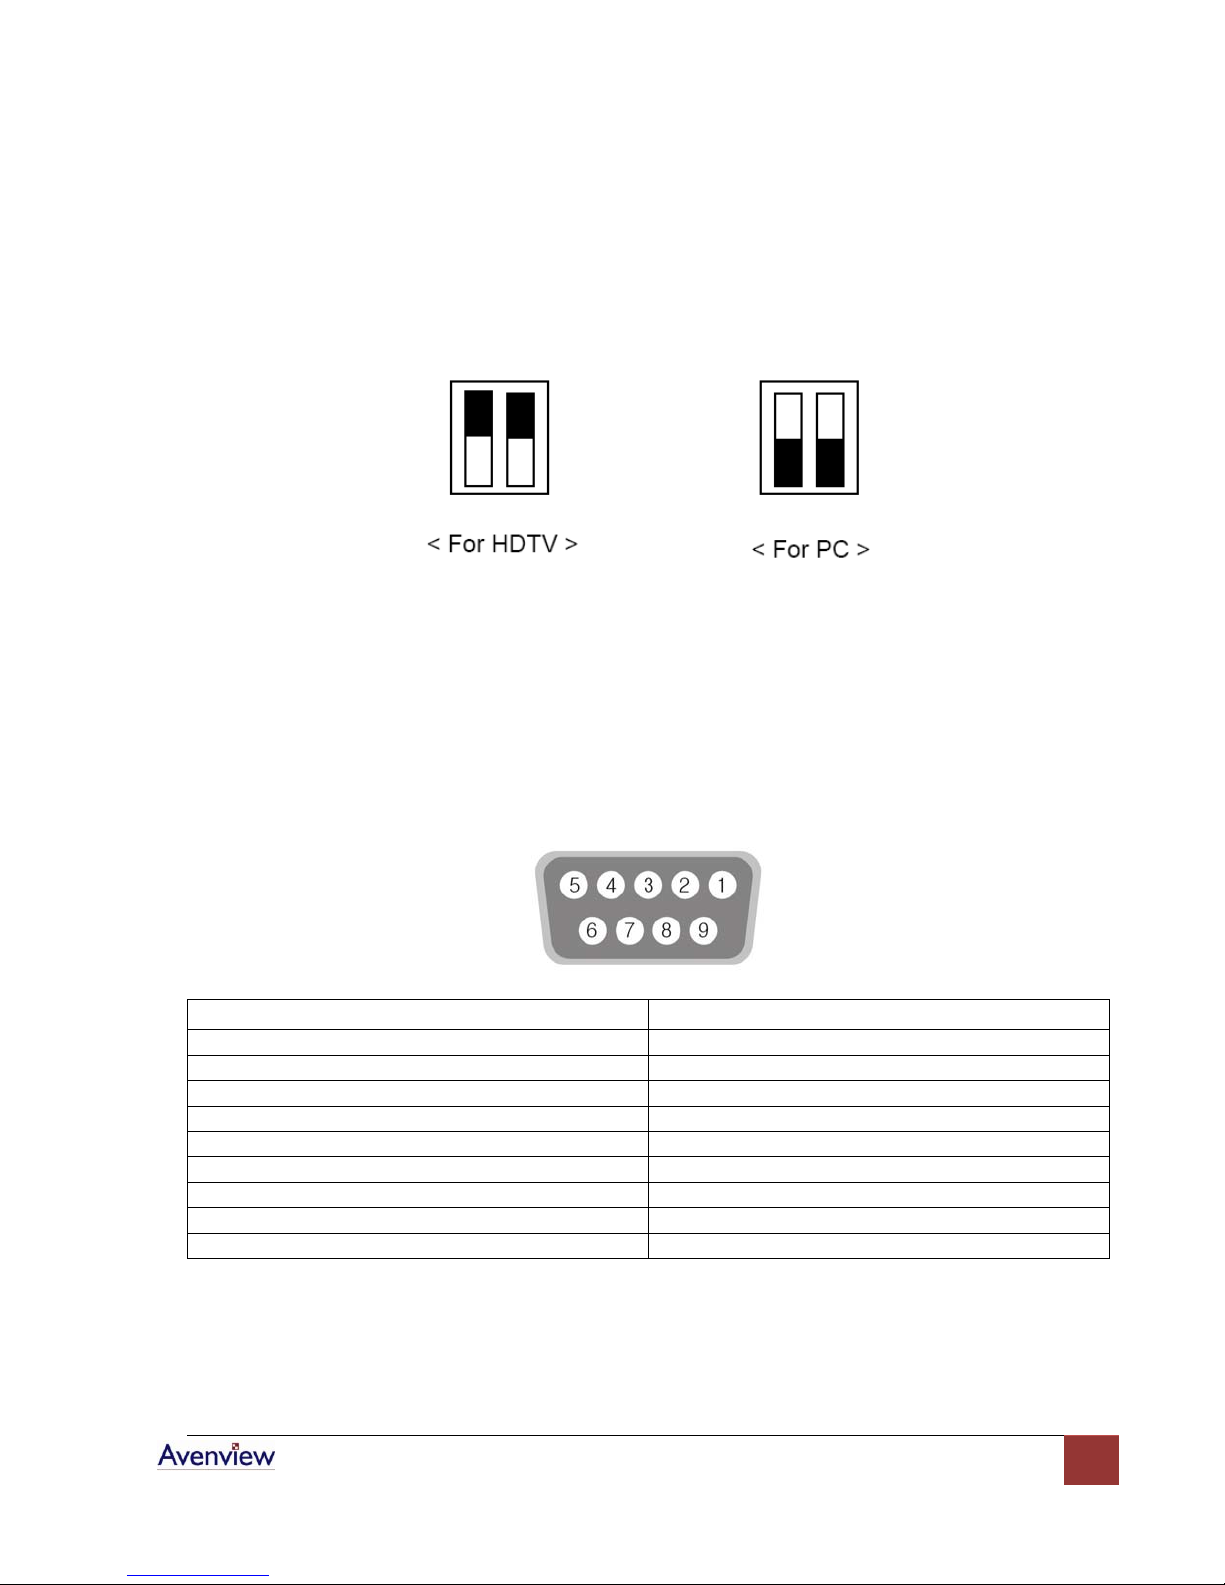
2.4 Function Switch for PC/HDTV
Pin Number
Pin Name
1
NC 2 A(+) 3 B(-) 4 NC
5
GND 6 NC 7 NC
8
NC 9 NC
It is possible to select HDTV by function switch as shown below:
Section 3: RS485 Communication
3.1 RS485 Connector Configuration
The Pin assignment of SW-DVI-4X2 is as follow:
Page 8
www.avenview.com
8
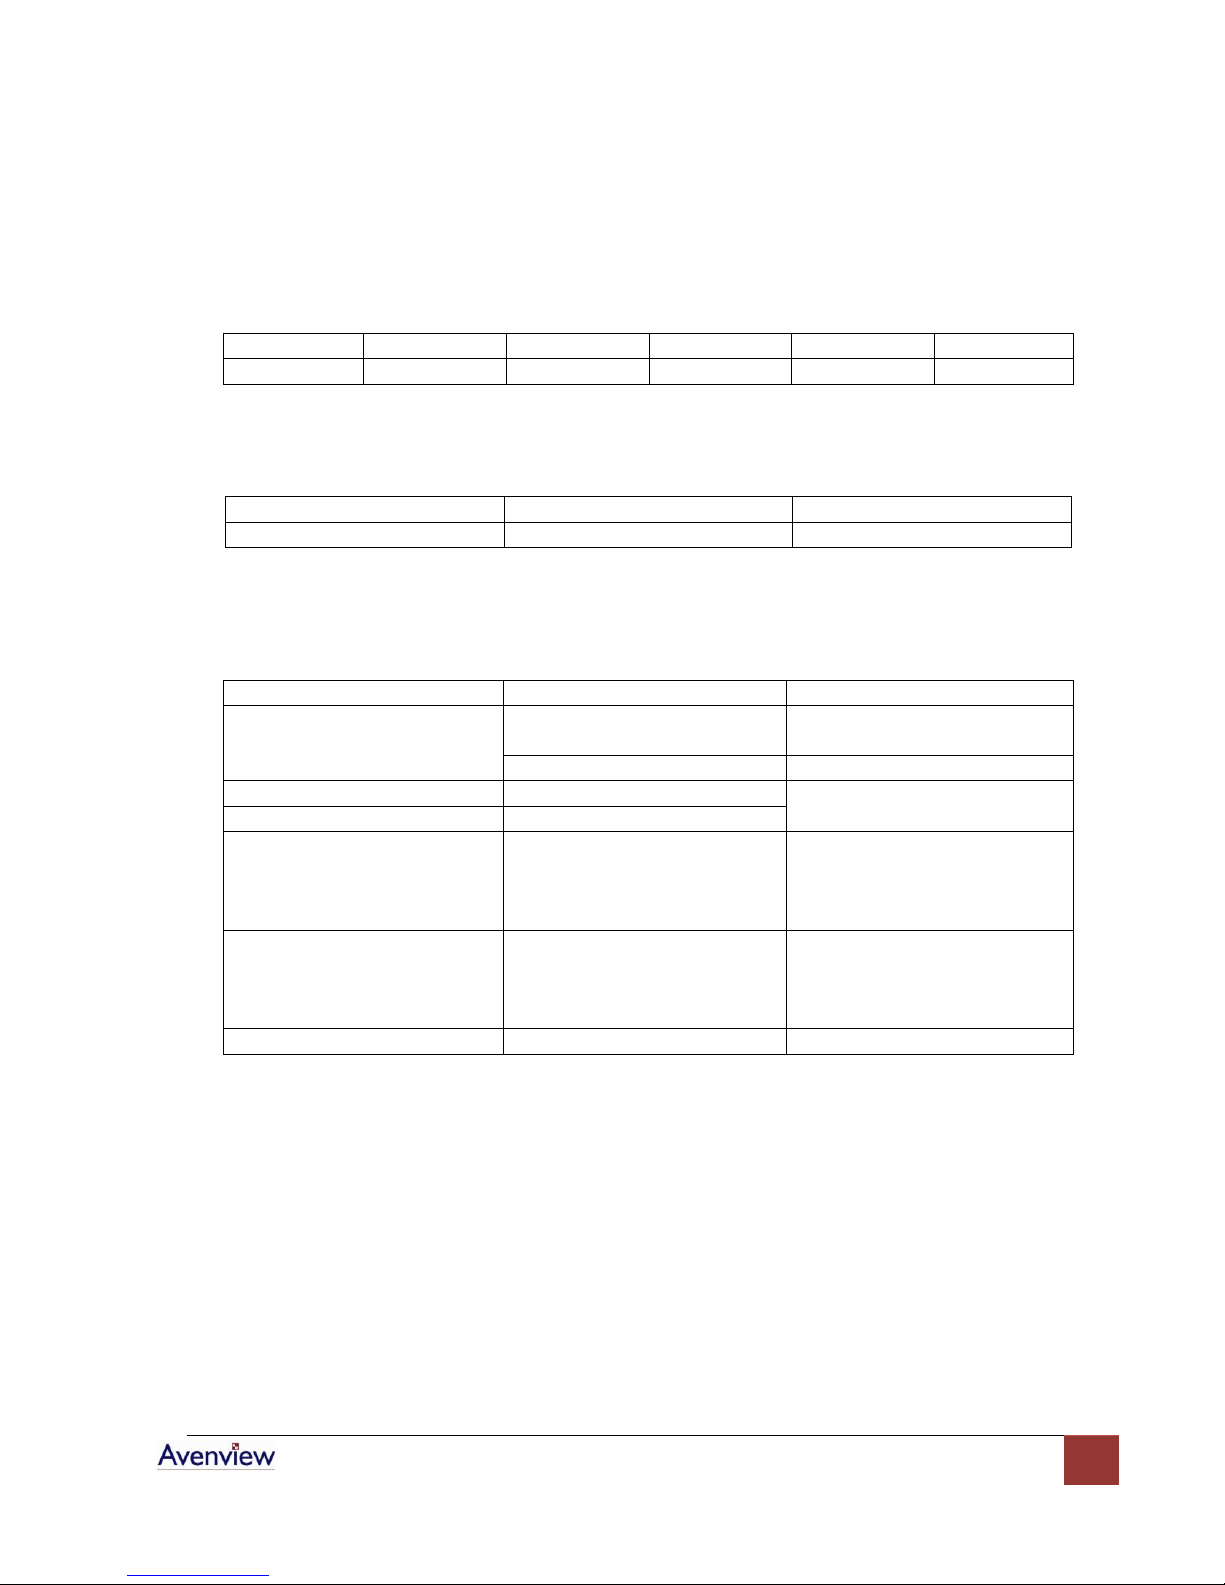
3.2 Communication Protocol
Head
Address
Output 1
Output 2
Output 3
Tail
1 byte
2 byte
1 byte
1 byte
1byte
1 byte
Head
Address
Tail
1 byte
2 byte
1 byte
Name
(HEX)
Note
HEAD
0x21(‘!’)
Request: Request from main
computer
0x24(‘$’)
Reply: Reply from SW-DVI-4X2
ID1
0x30 ~ 0x39
2 Byte HEX ASCII
ID2
Ox30 ~ 0x39
OUT1
0x31 ~ 0x34
Output 1 Select
0: Current Output Port OFF
1 ~ 4: Connect each Channel
with Output No.1 Channel
OUT2
0x31 ~ 0x34
Output 2 Select
0: Current Output Port OFF
1 ~ 4: Connect Each Channel
with Output No. 1 Channel
TAIL
0x2A(*)
Frame End Mast
3.2.1 Request Signal from Host to Matrix Switch
3.2.2 Reply Signal from Matrix Switch to Host
3.2.3 Data of Each Signal
e.g. 1: In case of digital switcher address 3,
Output Port 1 →Input Port #4, Output #2 →Input Port #3, Output Port #3 →Input Port #6,
Request Frame: 0x21, 0x30, 0x33, 0x34, 0x33, 0x36, 0x2a
Replay Frame: 0x24, 0x30, 0x33, 0x2a
3.2.4 Communication Protocol
- Baud Rate: 9600bps
- Data Bit: 8 bit
- Stop Bit: none
For RS485 communication, please use RS232 to RS485 converter
Page 9
www.avenview.com
9
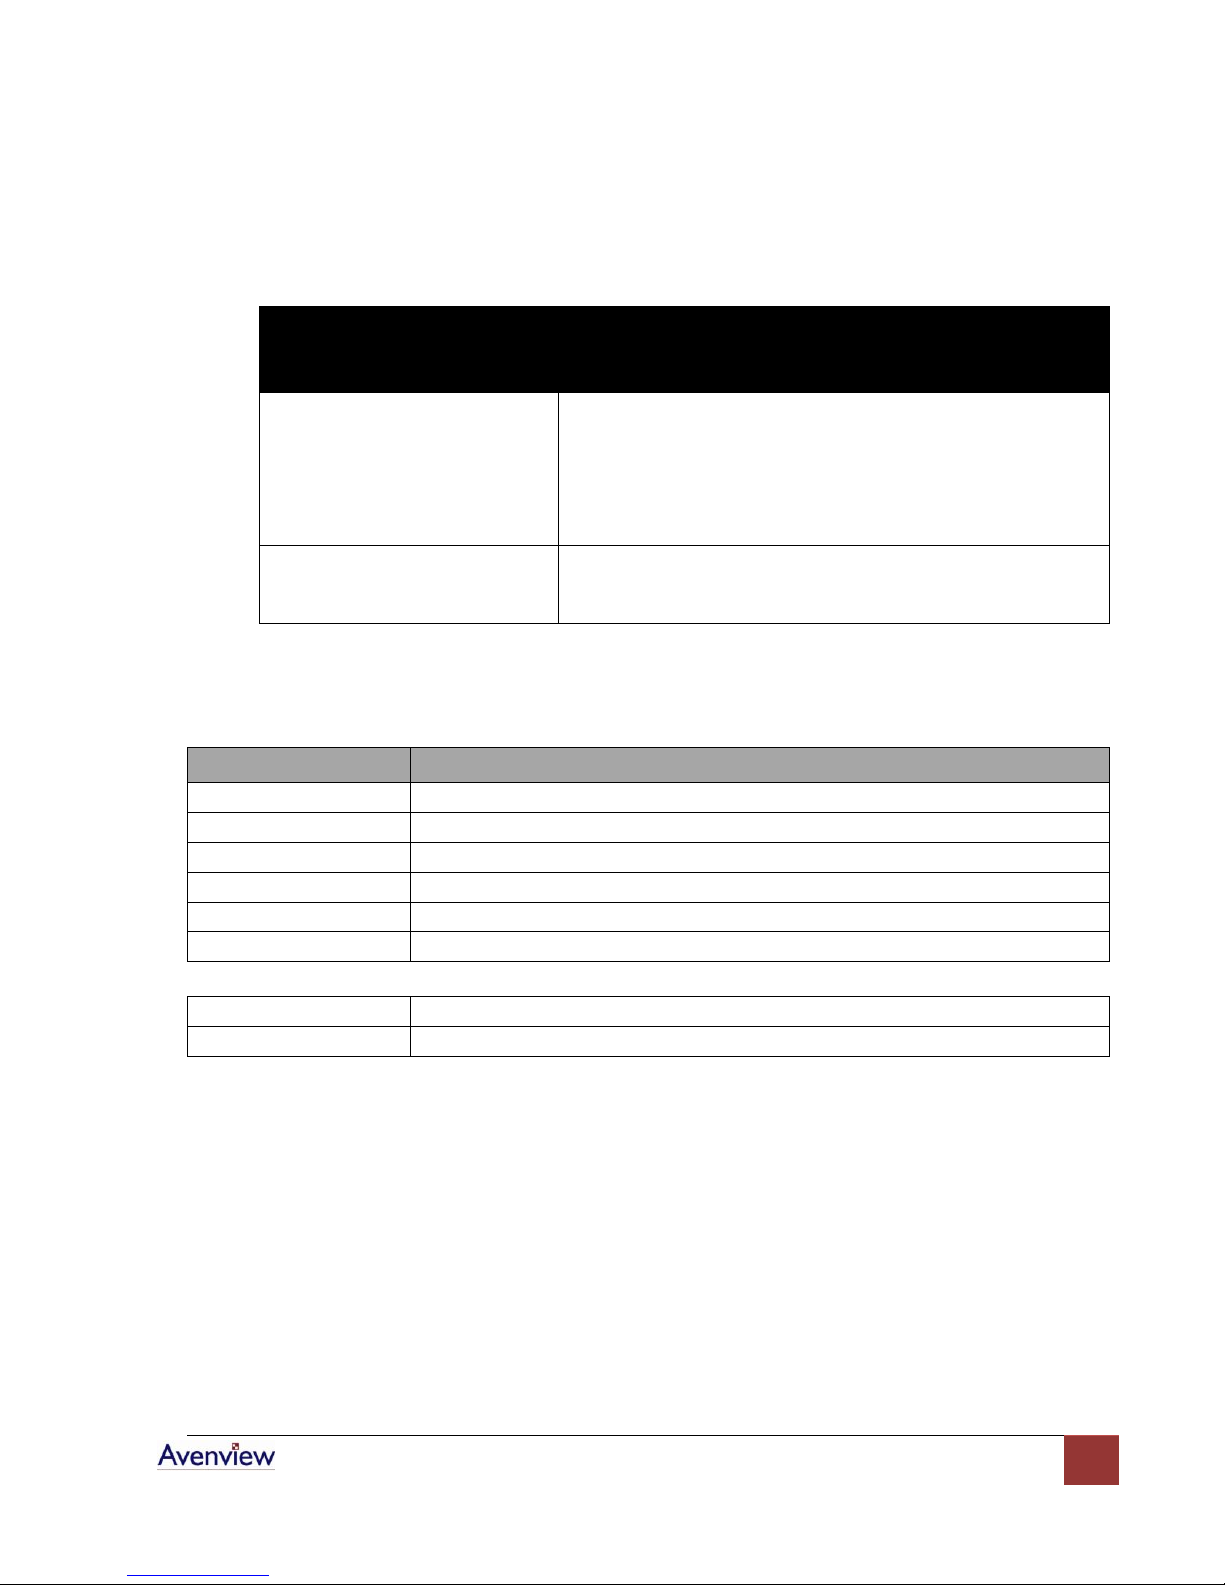
Section 4: General Troubleshooting
Problem
Possible Solution
No Image
Check the power cable connection
Turn the Power button off and on again.
Check the video input on input connector
Ensure that cables are connected securely
Check the Auto/Manual LED is ON or OFF, especially when
Auto/Manual DIP Switch is changed
RS485 Communication Doesn’t
Work
Check the cable connection
Check RS485 communication protocol
Ensure that distance is not more than 1Km.
Item
Description
Video Bandwidth
1.65Gbps (Single Link)
Connector
DVI-I 24Pin Receptacle
Input Channels
4
Output Channels
2
Power Consumption
4.0 Watt (max)
Supported Resolution
SXGA 1280 x 1024
Environmental
Operation
0˚ to 50˚C Degree
Storage
-20˚ to 70˚C Degree
Section 5: Specifications
Page 10
www.avenview.com
10
Disclaimer
While every precaution has been taken in the preparation of this document, Avenview Inc. assumes no liability with respect to the
operation or use of Avenview hardware, software or other products and documentation described herein, for any act or omission of
Avenview concerning such products or this documentation, for any interruption of service, loss or interruption of business, loss of
anticipatory profits, or for punitive, incidental or consequential damages in connection with the furnishing, performance, or use of the
Avenview hardware, software, or other products and documentation provided herein.
Avenview Inc. reserves the right to make changes without further notice to a product or system described herein to improve reliability,
function or design. With respect to Avenview products which this document relates, Avenview disclaims all express or implied warranties
regarding such products, including but not limited to, the implied warranties of merchantability, fitness for a particular purpose, and
non-infringement.
 Loading...