

Page 1
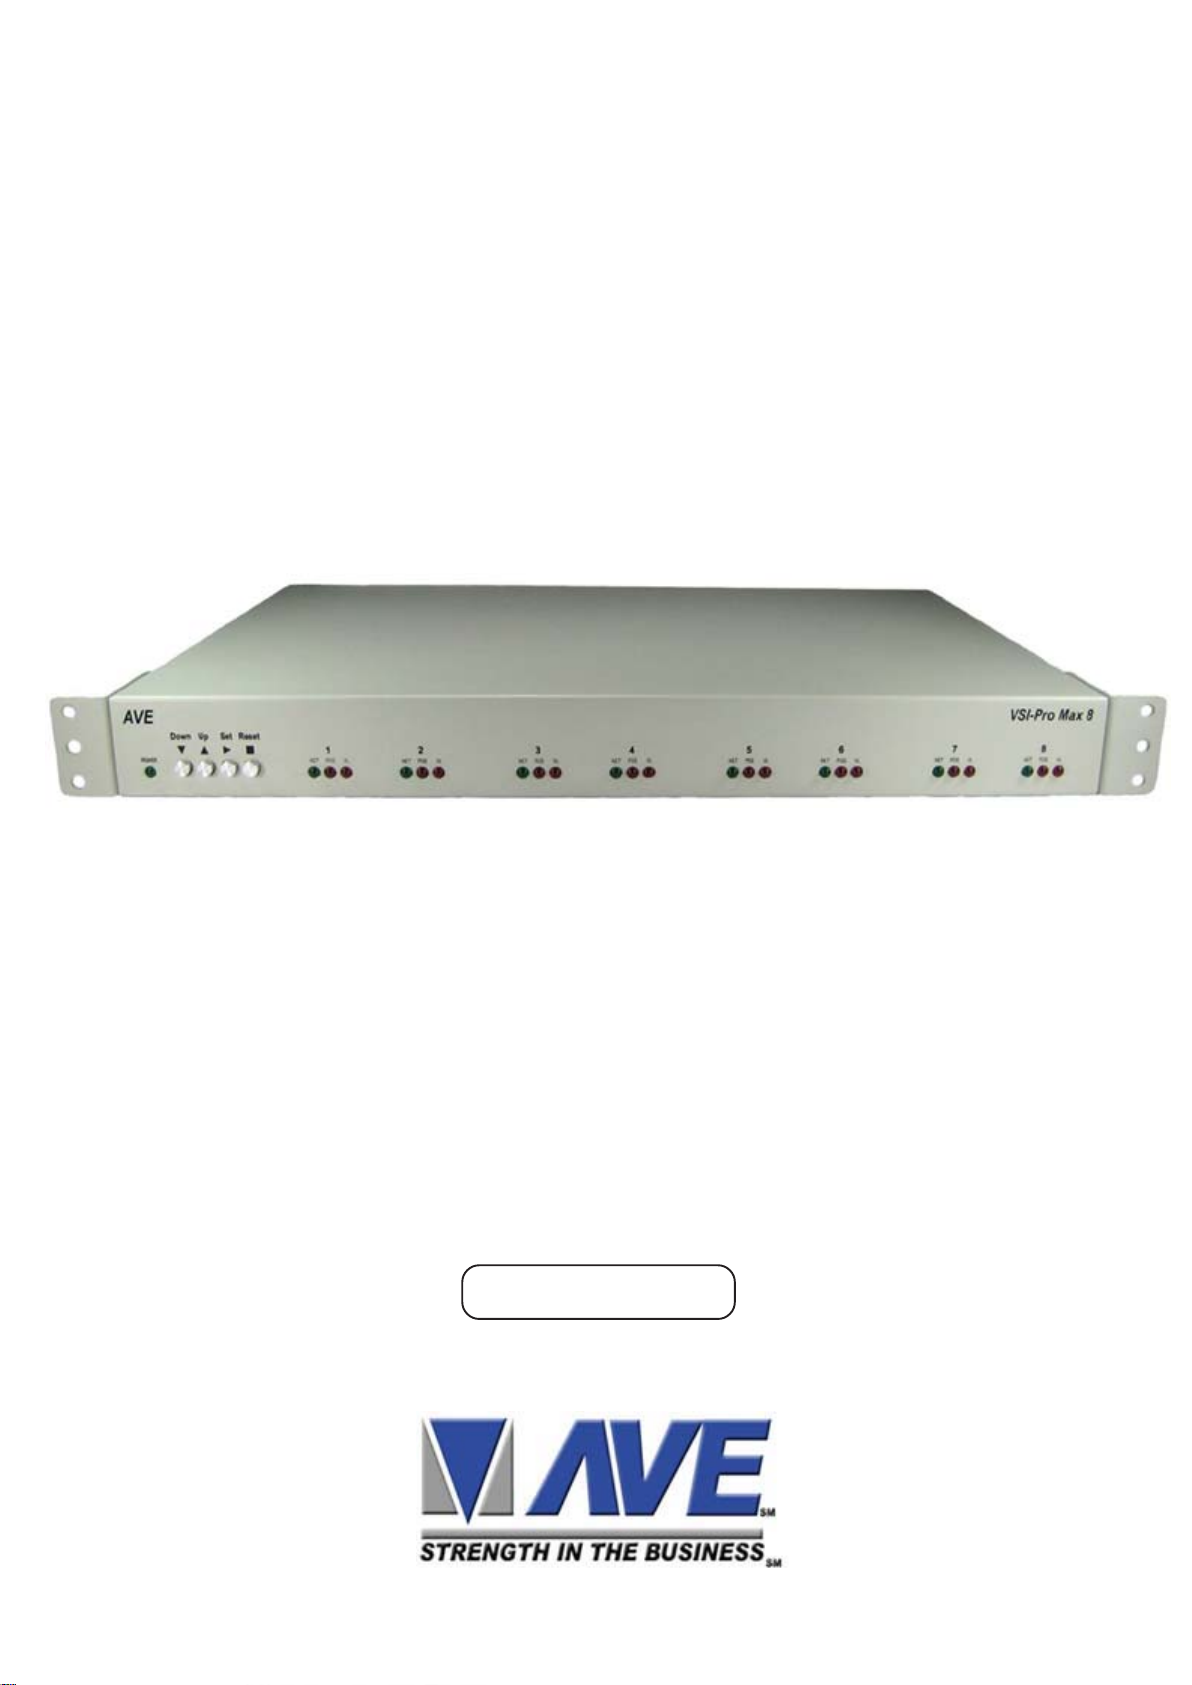
VSI-PRO
MAX 8
8 CHANNEL
EXPANDABLE
POS / CASH REGISTER
INTERFACE
Operation Manual
September 2010
Page 2
VSI-Pro Max 8
CAUTION!
RISK OF ELECTRICAL SHOCK!
DO NOT OPEN!
TO PREVENT ELECTRIC SHOCK, DO NOT REMOVE THE
COVER. DO NOT EXPOSE THE EQUIPMENT TO RAIN OR
MOISTURE. NO USER SERVICEABLE PARTS ARE INSIDE.
REFER SERVICING TO QUALIFIED PERSONNEL.
W ARNING!
THIS EQUIPMENT GENERA TES, USES, AND CAN RADIA TE RADIO FREQUENCY ENERGY AND IF NOT INSTALLED AND USED IN ACCORDANCE WITH THE INSTRUCTION MANUAL MAY CAUSE INTERFERENCE TO RADIO COMMUNICATIONS. IT HAS BEEN TESTED AND
FOUND TO COMPLY WITH THE LIMITS FOR A CLASS A COMPUTING
DEVICE PURSUANT TO SUBPART J OF PART 15 OF FCC RULES,
WHICH ARE DESIGNED TO PROVIDE REASONABLE PROTECTION
AGAINST SUCH INTERFERENCE WHEN OPERATED IN A COMMERCIAL ENVIROMENT. OPERATION OF THIS EQUIPMENT IN A RESIDENTIAL AREA IS LIKEL Y TO CAUSE INTERFERENCE IN WHICH CASE
THE USER AT HIS/HER OWN EXPENSE WILL BE REQUIRED TO TAKE
WHATEVER MEASURES MAY BE REQUIRED TO CORRECT THE INTERFERENCE.
AVE Multiview UK
Endeavor House 3rd Floor
Coppers End Rd.,Stansted,
Essex, CM24 1SJ, UK
Tel: 440-845-600-9323
Fax: 440-845-600-9363
Email: ave-uk@multiview.net
www.multiview.net
A VE Europe LTD
123 Millennium Business Park
Ballycoolin, Dublin 15, Ireland
Tel:353 1 684 7450 Fax: 353 1 684 7451 Email; sales@ave-europe.eu Website: www.ave-europe.eu
AVE Multiview USA
2501 Central Parkway C-1
Houston, Texas, 77092
Tel: 1-281-443-2300
Fax: 1-281-443-8915
Email: sales@aveusa.com
http://www.americanvideoequipment.com
A VE Thailand Co., Ltd.
147 Soi On-Nut 44
Sukhumvit 77 Rd., Suan Luang
Bangkok 10250,Thailand
Tel: 662-331-9364, 331-9285
Fax: 662-331-9365
Email: ave@avethailand.com
http://www.ave.co.th (Thai)
http://www.avethailand.com (English)
Copyright C AVE Thailand Co., Ltd. 2000-2010
2
Page 3

CONTENTS
1. Introduction...................................................................................................................................................................................................8
1.1 VSI / VSI+ / VSI-Pro / VSI-Pro Max Backward Compatibility ............................................................................................8
2. Features & Specifications..........................................................................................................................................................................9
2.1 Features.......................................................................................................................................................................................9
2.2 Specifications..........................................................................................................................................................................10
3. Connections.................................................................................................................................................................................................11
3.1 LED Indicators..........................................................................................................................................................................11
3.2 RS-232 Serial Input.................................................................................................................................................................12
4. User Front Panel Controls........................................................................................................................................................................15
4.1 Front Panel Controls...............................................................................................................................................................15
5. Programming..............................................................................................................................................................................................17
5.1 Getting Started.........................................................................................................................................................................17
5.2 Main- Menu Programming.....................................................................................................................................................17
5.3 Register Select.........................................................................................................................................................................17
TCPIP...................................................................................................................................................................................18
Generic ..............................................................................................................................................................................19
Addressable VSI (VSI-ADD) .........................................................................................................................................19
ANSI Commands ............................................................................................................................................................19
Registers A - Z .........................................................................................................................................................19 - 25
5.4 Screen Setup............................................................................................................................................................................26
Text Grayscale.................................................................................................................................................................26
Background Gayscale....................................................................................................................................................26
Character Positioning ...................................................................................................................................................26
Clock..................................................................................................................................................................................26
On-Screen Titler ..............................................................................................................................................................27
Language Settings .........................................................................................................................................................28
5.5 Text Display ................................................................................................................................................................................29
Screen Blank....................................................................................................................................................................29
Display Lines....................................................................................................................................................................29
Characters per Line .......................................................................................................................................................29
Display Format.................................................................................................................................................................30
Space Compress ...........................................................................................................................................................30
Left Justified.....................................................................................................................................................................30
Scroll Delay........................................................................................................................................................................30
Display........................................................................................................................ ........................................................30
5.6 Communication........................................................................................................................................................................31
Register Settings ............................................................................................................................................................31
Interface Type................................................................................................................. ..................................31
RX Baudrate......................................................................................................................................................31
TX Baudrate......................................................................................................................................................32
TX Protocol........................................................................................................................................................32
Parity...................................................................................................................................................................32
Data Bits............................................................................................................................................................32
Hardware Handshaking................................................................................................................................32
Software Handshaking ..................................................................................................................................33
Auto Linefeed....................................................................................................................................................33
Network Settings ............................................................................................................................................................33
Type....................................................................................................................................................................33
Address .............................................................................................................................................................34
Protocol .............................................................................................................................................................34
Baud Rate .........................................................................................................................................................34
Network Program...........................................................................................................................................................35
Address ID......................................................................................................................................................35
Select Channel...............................................................................................................................................35
Network Master Reset.................................................................................................................................................36
Address ID........................................................................................................................................................36
Do Master Reset..............................................................................................................................................36
Master Reset and Programming Network Settings Menu Using A PC..............................................................37
5.7 Exception Report.....................................................................................................................................................................42
Overview...........................................................................................................................................................................42
Exception History...........................................................................................................................................42
DVR Selection...................................................................................................................................................44
Time Search....................................................................................................................................................44
Output Exceptions ..........................................................................................................................................45
Set Exceptions.................................................................................................................................................................45
Exception String...............................................................................................................................................47
Range..................................................................................................................................................................48
3
Page 4

CONTENTS
5.8 Alarm Output............................................................................................................................................................................51
5.9 Test / Demo Mode.......................................................................................................... ..........................................................55
5.10 Download/Upload Setup.......................................................................................................................................................59
5.11 Help............................................................................................................................................................................................67
Operator............................................................................................................................................................48
Time Stamping................................................................................................................................................................50
Duplicate Line .................................................................................................................................................................50
Scroll Matching...............................................................................................................................................................50
Alarm No...........................................................................................................................................................................52
Alarm Trigger ..................................................................................................................................................................52
Normal State.....................................................................................................................................................................52
Alarm Duration.................................................................................................................................................................53
Flag Type............................................................................................................................................................................53
Flag Duration....................................................................................................................................................................53
Triggered T ext..................................................................................................................................................................53
RTS Triggered T ext Delay ............................................................................................................................54
Set Triggered T ext...........................................................................................................................................54
Video Loss ........................................................................................................................................................................54
Port 1 Test........................................................................................................................................................................55
Data Capture....................................................................................................................................................................57
Register Demo..................................................................................................................................................................58
Version ID...........................................................................................................................................................................58
Download/Upload Setup Using VSI-Pro Max to VSI-Pro Max...............................................................................59
Download/Upload Setup Using a PC............................................................................................................................61
PC Programming Software..........................................................................................................................................61
Update Firmware..............................................................................................................................................................64
Firmware Update Utility .................................................................................................................................................64
APPENDICES
Appendix A : Problem Solving Guide.........................................................................................................................................................67
Appendix B : Hard Alarm Output................................................................................................................................................................70
Appendix C : DVR T ext Input Connections................................................................................................................................................71
Appendix D : UTP Connections.....................................................................................................................................................................72
Appendix E : P2RS Parallel to Serial Converter......................................................................................................................................73
Appendix F : USB to RS-232 Converter......................................................................................................................................................75
Appendix G : VSIB Installation.....................................................................................................................................................................76
Appendix H : ECR Interface Cards.............................................................................................................................................................77
Appendix I : ANSI Driver Commnads.........................................................................................................................................................77
Appendix J : RS-232 to RS-485 Converter...............................................................................................................................................78
Appendix K : TCIP232 Adapter ....................................................................................................................................................................79
Appendix L : VSI-Pro Max 8 Networking ..................................................................................................................................................80
Appendix M : Network Communication and Configuration .................................................................................................................81
Hydra / Regcom .............................................................................................................................................................................81
Master Protocol (VSI-ADD) ..........................................................................................................................................................84
Vnetworker Connections ............................................................................................................................................................85
Vnetworker PC Application ..........................................................................................................................................................86
Appendix N : VSI-Pro Max Jumper Settings.............................................................................................................................................89
Appendix P : AL-16 Alarm Relay Expanison Device................................................................................................................................91
Appendix Q : POS / CCTV Applications......................................................................................................................................................91
Appendix R : Warranty ...................................................................................................................................................................................92
Appendix S : Master Reset to Factory Defaults......................................................................................................................................93
T ABLES
T able 1 : Pin-Out of the DB-9 Female Connector on the VSI-Pro MaxRS-232...................................................................................12
T able 2 : RS-232 DB-9 Pin-Out vs VSI-Pro Max DB-9 Pin-Out...............................................................................................................12
T able 3 : Pin-Out of the DB-9 Female Connector on the VSI-Pro Max RS-422 / RS-485.................................................................13
T able 4 : ANSI Driver Commands................................................................................................................................................................77
Table 5 : VSI-Pro Max 8 Master DB-9 Pin-Out...........................................................................................................................................82
T able 6 : Hydra DB-9 Pin-Out........................................................................................................................................................................82
T able 7 : RJ-45 Pin-Out...................................................................................................................................................................................82
Table 8 : RS-485 Network Dat a Cable Wiring...........................................................................................................................................83
T able 9 : Hydra RS-232 Parameters ........................................................................................................................................................83
T able 10 : Network Parameters ...............................................................................................................................................................83
Table 1 1: Hydra / Regcom Dipswitch Settings .......................................................................................................................................83
4
Page 5

CONTENTS
FIGURES
Figure 1 : VSI-Pro Max 8 Front Indicator LEDs and Programming Pushbuttons.......................................................................11
Figure 2 : VSI-Pro Max 8 Rear Connections.............................................................................................................................................11
Figure 3 : VSI-Pro Max 8 Connections....................................................................................................................................................13
Figure 4 : VSI-Pro Max 8 Earth Grounding Connection.......................................................................................................................14
Figure 5 : Four Front Panel Push Button of VSI-Pro Max 8................................................................................................................15
Figure 6 : Four Front Panel Push Button of VSI-Pro Max 8 (Down) .................................................................................................15
Figure 7 : Four Front Panel Push Button of VSI-Pro Max 8 (Up) ......................................................................................................16
Figure 8 : Four Front Panel Push Button of VSI-Pro Max 8 (Set) .....................................................................................................16
Figure 9 : VSI-Pro Max 8 Main-Menu.........................................................................................................................................................17
Figure 10 : Register Select Sub-Menu......................................................................................................................................................18
Figure 11 : TCPIP Sub Menu........................................................................................................................................................................18
Figure 12 : Addressable VSI Sub-Menu (VSI-ADD) ...............................................................................................................................19
Figure 13 : ADS Sub-Menu...........................................................................................................................................................................19
Figure 14 : Beetle / 50 Printers Sub-Menu...............................................................................................................................................19
Figure 15 : Casio TK-T 500 Sub-Menu.......................................................................................................................................................19
Figure 16 : Casio TE-2200 Sub-Menu........................................................................................................................................................19
Figure 17 : Clarity Epos Sub-Menu..............................................................................................................................................................19
Figure 18 : Delta Sono 3.1 Sub-Menu.........................................................................................................................................................20
Figure 19 : Dresser Wayne Sub-Menu......................................................................................................................................................20
Figure 20 : POS / CDU Sub-Menu................................................................................................................................................................20
Figure 21 : Nucleus Sub-Menu....................................................................................................................................................................20
Figure 22 : Edacom Sub-Menu....................................................................................................................................................................20
Figure 23 : Model E90 Sub-Menu................................................................................................................................................................20
Figure 24 : Epson Generic Sub-Menu.........................................................................................................................................................20
Figure 25 : Fujitzu 9920 Sub-Menu..............................................................................................................................................................20
Figure 26 : Gasboy Sub-Menu......................................................................................................................................................................21
Figure 27 : Gilbarco Sub-Menu.....................................................................................................................................................................21
Figure 28 : IBM 3151 T erminal Sub-Menu.................................................................................................................................................21
Figure 29 : IBM RDS Sub-Menu....................................................................................................................................................................21
Figure 30 : Micrelec Sub-Menu....................................................................................................................................................................21
Figure 31 : Micrelec MS Series Sub-Menu...............................................................................................................................................21
Figure 32 : Micrelec 9500 Sub-Menu.........................................................................................................................................................21
Figure 33 : Micros Sub-Menu.......................................................................................................................................................................22
Figure 34 : Micros IDN Networker...............................................................................................................................................................22
Figure 35 : Micros ISN Networker................................................................................................................................................................22
Figure 36 : NCR Sub-Menu............................................................................................................................................................................22
Figure 37 : Nixdorf Beetle Sub-Menu..........................................................................................................................................................22
Figure 38 : Norand 1200 Sub-Menu.............................................................................................................................................................23
Figure 39 : Nucleus Printer Sub-Menu........................................................................................................................................................23
Figure 40 : Omega 2000 Sub-Menu............................................................................................................................................................23
Figure 41 : Panasonic Sub-Menu................................................................................................................................................................23
Figure 42 : Schlumberger Sub-Menu.........................................................................................................................................................23
Figure 43 : Sharp Sub-Menu.........................................................................................................................................................................23
Figure 44 : Sharp 750 ER-01PUSub-Menu..................................................................................................................................................24
Figure 45 : Sharp ER-A410/420Sub-Menu..................................................................................................................................................24
Figure 46 : Sharp UP600/700 Sub-Menu....................................................................................................................................................24
Figure 47 : Sicom Sub-Menu.........................................................................................................................................................................24
Figure 48 : Spedit CCTV Sub-Menu.............................................................................................................................................................24
Figure 49 : Suntronic Sub-Menu..................................................................................................................................................................24
Figure 50 : TCI Sub-Menu..............................................................................................................................................................................24
Figure 51 : TEC Slip Printer Sub-Menu.......................................................................................................................................................24
Figure 52 : TKMAX Sub-Menu......................................................................................................................................................................25
Figure 53 : Uniwell UN 4025 Sub-Menu......................................................................................................................................................25
Figure 54 : UP3000/3300 Sub-Menu.........................................................................................................................................................25
Figure 55 : Verifone Sub-Menu....................................................................................................................................................................25
Figure 56 : Weigh Scale Sub-Menu.............................................................................................................................................................25
Figure 57 : Screen Setup Sub-Menu............................................................................................................................................................26
Figure 58 : Clock Display Sub-Menu...........................................................................................................................................................27
Figure 59 : On-Screen Titler Sub-Menu......................................................................................................................................................28
Figure 60 : Language Sub-Menu..................................................................................................................................................................28
Figure 61 : Text Display Sub-Menu.............................................................................................................................................................29
Figure 62 : Communication Sub-Menu.......................................................................................................................................................31
Figure 63 : Register Settings Sub-Menu....................................................................................................................................................31
Figure 64 : Network Settings Sub-Menu...................................................................................................................................................33
Figure 65 : Network Program Sub-Menu..................................................................................................................................................35
Figure 66 : Main Menu of Slave Channels.................................................................................................................................................35
Figure 67 : Network Master Reset Sub-Menu..........................................................................................................................................36
Figure 68 : VSI-Pro Max 8 with PC/Laptop Connection..........................................................................................................................37
5
Page 6

CONTENTS
Figure 69 : Main Menu Page.........................................................................................................................................................................37
Figure 70 : Remote Menu Page....................................................................................................................................................................37
Figure 71A : Communication Setting Page................................................................................................................................................38
Figure 71B : VSI-Pro PC Software can establish communication with VSI-Pro Max 8..................................................................38
Figure 72 : Master Reset Page....................................................................................................................................................................39
Figure 73A : Communication Menu Page...................................................................................................................................................40
Figure 73B : Download Complete Page......................................................................................................................................................41
Figure 74 : Exception Report Sub-Menu.....................................................................................................................................................43
Figure 75 : Exception History Sub-Menu....................................................................................................................................................43
Figure 76 : Display of View Exception.........................................................................................................................................................43
Figure 77 : DVR Selection Sub-Menu.........................................................................................................................................................44
Figure 78 : DVR-3011,3021,MVDR3000, MVDR5000 Sub-Menu..........................................................................................................44
Figure 79 : Display of Time Search.............................................................................................................................................................44
Figure 80 : VSI-Pro Max 8 with DVR Control Connections....................................................................................................................45
Figure 81 : Set Exception Sub-Menu..........................................................................................................................................................46
Figure 82 : Scroll Matching Sub Menu.......................................................................................................................................................51
Figure 83 : Alarm Output Sub-Menu...........................................................................................................................................................51
Figure 84 : Triggered T ext Sub-Menu........................................................................................................................................................53
Figure 85 : Set Triggered T ext Sub-Menu.................................................................................................................................................54
Figure 86 : Test / Demo Mode Sub-Menu..................................................................................................................................................55
Figure 87 : Port 1 Sub-Menu........................................................................................................................................................................55
Figure 88 : Recerve [ RX ] T est Sub-Menu...............................................................................................................................................55
Figure 89 : Transmit [ RX ] T est Sub-Menu...............................................................................................................................................56
Figure 90 : RX / TX Test Sub-Menu.............................................................................................................................................................56
Figure 91 : Baudrate Scan Sub-Menu........................................................................................................................................................56
Figure 92 : Data Capture Sub-Menu...........................................................................................................................................................57
Figure 93 : Capture to Port 1 Sub-Menu....................................................................................................................................................57
Figure 94 : Capture to Memory....................................................................................................................................................................57
Figure 95 : Register Demo Sub-Menu........................................................................................................................................................58
Figure 96 : Download/Upload Data Cable.................................................................................................................................................59
Figure 97 : Download/Upload Setup Using VSI-Pro Max to VSI-Pro Max..........................................................................................59
Figure 98 : Download/Upload Sub-Menu..................................................................................................................................................60
Figure 99 : Download Setup Sub-Menu & Display.................................................................................. ..................................................60
Figure 100 : Upload Setup Sub-Menu & Display.....................................................................................................................................60
Figure 101 : Program Download Main Menu...........................................................................................................................................61
Figure 102 : Remote Menu............................................................................................................................................................................62
Figure 103 : File Menu.....................................................................................................................................................................................63
Figure 104 : About Menu...............................................................................................................................................................................63
Figure 105 : PC Programming Cable Pin Out............................................................................................................................................63
Figure 106 : Firmware Update Sub Menu.................................................................................................................................................64
Figure 107 : Hyper Terminal Main Menu....................................................................................................................................................64
Figure 108 : Connect To Menu.....................................................................................................................................................................65
Figure 109 : Port Settings Menu..................................................................................................................................................................65
Figure 110 : In-System Programming Display .........................................................................................................................................66
Figure 11 1 : Help Sub-Menu..........................................................................................................................................................................67
Figure 112 : Hard Alarm Output...................................................................................................................................................................70
Figure 113 : VSI-Pro Max 8 with DVR T ext Input Connections .............................................................................................................71
Figure 114 : VSI-Pro Max 8 and DVR RS-485 Pin Outs............................................................................. ...............................................71
Figure 115 : VSI-Pro Max 8 UTP Connections...........................................................................................................................................72
Figure 116 : VSI-Pro Max 8 RJ45 Pin Out s.................................................................................................................................................72
Figure 117 : RJ45 Connector .........................................................................................................................................................................72
Figure 118 : VSI-Pro Max 8 and CA T5 Breakout ......................................................................................................................................72
Figure 119 : P2RS Parallel to Serial Converter Front Panel..................................................................................................................73
Figure 120 : P2RS Parallel to Serial Converter Rear Panel .................................................................................................................73
Figure 121 : P2RS Parallel Connection Cables.........................................................................................................................................73
Figure 122 : DB-25 Cable................................................................................................................................................................................73
Figure 123 : Centronics Cable......................................................................................................................................................................73
Figure 124 : Pin-Out for P2RS to VSI-Pro Max 8......................................................................................................................................73
Figure 125 : P2RS-Pro Front Panel..............................................................................................................................................................74
Figure 126 : P2RS-Pro Rear Panel...............................................................................................................................................................74
Figure 127 : VSI-Pro Max 8 with P2RS and P2RS-Pro Connections...................................................................................................74
Figure 128 : USB to RS-232 Converter PCB .............................................................................................................................................75
Figure 129 : USB232 Adapter ......................................................................................................................................................................75
Figure 130 : VSI-Pro Front Panel.................................................................................................................................................................76
Figure 131 : VSIB Front Panel.......................................................................................................................................................................76
Figure 132 : VSIB Rear Panel........................................................................................................................................................................76
Figure 133 : VSIB Connection Cable...........................................................................................................................................................76
Figure 134 : Cable Connection to the VSIB................................................................................................................................................76
Figure 135 : Pin-Out for VSIB to VSI-Pro....................................................................................................................................................76
Figure 136 : TK 6000/7000 PCB and Cable................................................................................................................................................77
6
Page 7

CONTENTS
Figure 137 : TK 2300 and Adapter ................................................................................................................................................................77
Figure 138 : TE-2200 Thermal Printer Adapter ........................................................................................................................................77
Figure 139 : RS-232 to RS-485/422 Converter PCB ................................................................................................................................78
Figure 140 : RS-422/RS-485 Connections..................................................................................................................................................78
Figure 141 : RS-232 Connections ...............................................................................................................................................................78
Figure 142 : Front of TCPIP232 Adapter .....................................................................................................................................................79
Figure 143 : Rear of TCPIP 232 Adapter ....................................................................................................................................................79
Figure 144 : VSI-Pro Max 8 Connections with TCPIP 232 Adapter ......................................................................................................79
Figure 145 : Pin-Out for TCPIP 232 Adapter to VSI-Pro Max 8..............................................................................................................79
Figure 146 : RJ45 Connector Pin Out..........................................................................................................................................................81
Figure 147 : DS-20-OF VSI-Pro Max PCB Rack........................................................................................................................................81
Figure 148 : VSI-Pro Max 8 Networking Connection Diagram..............................................................................................................82
Figure 149 : VSI-Pro Max 8 Front Panel.....................................................................................................................................................83
Figure 150 : Hydra / Regcom Front Panel.................................................................................................................................................83
Figure 151 : Hydra /Regcom Rear Panel....................................................................................................................................................83
Figure 152 : VSI-Pro Max 8 Connnection Diagram for RS-485 Network............................................................................................85
Figure 153 : Hydra Connnection Diagram for RS-485 Network...........................................................................................................85
Figure 154 : Laptop Connnection Diagram for RS-485 Network.........................................................................................................86
Figure 155 : Vnetworker Software Main Menu.......................................................................................................................................86
Figure 156 : Status Display ..........................................................................................................................................................................87
Figure 157 : Window Tile Options ...............................................................................................................................................................87
Figure 158 : Remote Keyboard Window ...................................................................................................................................................88
Figure 159 : Time / Date Set Up Window ..................................................................................................................................................89
Figure 160 : Front Side of VSI-Pro Max 8 PCB Jumper Settings.........................................................................................................89
Figure 161 : Rear Side of VSI-Pro Max 8 PCB Jumper Settings..........................................................................................................90
Figure 162 : Network Termination of VSI-Pro Max 8 PCB Jumper Settings.....................................................................................90
Figure 163 : AL-16 RS-232 & Power Connector ......................................................................................................................................91
Figure 164 : AL-16 Relay Output Connectors...........................................................................................................................................91
7
Page 8

1. INTRODUCTION
The VSI-Pro Max 8 is the latest in the evolution of the popular VSI line of POS / Cash Register Interfaces from
A VE. The VSI-Pro Max 8, now with larger memory space can hold ALL the A VE Interfaces in one unit with full remote PC
or DVR programming for selection and setups and onsite firmware updating. New video processing circuitry allows use
with new WDR cameras and low video of commonly used UTP adapters. Built in RS-232, RS-485, Passive and the new
Opto-Isolated selection, gives complete isolation from the POS/Cash Register from the video system. Internal 40 Mhz
operation allows for combining the Networking functions of the Hydra, Regcom, Networker or Vnetworker within one
convenient unit with looping RJ45s for a seem-less solution for multiple till configurations.
Each channel of VSI-Pro Max 8 allows characters to be inserted into any video source via an RS-232 / RS-422
/ RS-485 link. This allows cash registers, computers, scales, pole displays, printers or any RS-232 / RS-485 / RS-422
communicating device to display alpha-numerics in the video picture of any CCTV system. Simple front panel pushbuttons allow the user to simply program all functions and features of the master and slave channel of VSI-Pro Max 8.
This includes characters position, gray scale and a wide variety text processing function including exceptions and
alarming features.
Whether used with a cash register providing real time data on an RS-232 port or tapping off a serial printer or pole
display , the VSI-Pro Max 8 is a valuable tool in loss prevention. When used in conjunction with AVE’s extensive line of
adapters this device can connect to any POS (Point of Sale) / ECR (Electronic Cash Register) or peripheral on the
market today . Now available the TCPIP232 Adapter for interfacing to Ethernet LAN networks to capture common printer
data or monitor any single register transactions.
Each channel of the VSI-Pro Max 8 can be used to trigger switchers, time lapse VCRs, DVRs, remote transmission devices or other alarming devices via the 2 hardwired open collector alarm outputs.
The VSI-Pro Max 8 also has an additional RS-232/RS-485 output that can send the formated ASCII text to a
DVR which can store the data as an electronic file in addition to inserted in the actual video image. This additional RS485 port supports full networking of up to 2 VSI-Pro Max 8 without any external devices.
The Exception Processor of the each channel of VSI-Pro Max 8 provides the intelligence to bring questionable or
exceptional transactions to view for the user. This allows the user to quickly and easily review employee transactions to
identify fraud and theft transactions at the cash register. When used with a comp atible DVR, each channel of VSI-Pro
Max 8 can command or be commanded by the DVR to automatically search to the transaction in question for instant
review of the recorded video.
With the new “Scroll Matching” feature, users can easily set and erase scrolling advertising messages from the
customer display but always record the valid transactions.
The VSI-Pro Max 8 is fully networkable with our “Networker”, “Vnetworker”, “Hydra” and “Regcom” line of products. These device connect to the VSI-Pro or ECR Interfaces or Adapters directly and communicate back via an RS-485
network to the central location. PC Windows-based software can also be used as the controller of this network and store
transaction files for up to 16 cash registers for remote viewing or downloading to produce reports for management.
The VSI-Pro Max 8 is fully remotely downloadable, uploadable or programmable by our PC VSI Programmable
software. This utilizes a direct connection via RS-232 from a laptop to the VSI-Pro Max 8 in desired channel. Complete
each channel of VSI-Pro Max 8 settings can be saved on the laptop and uploaded to the desired channel of VSI-Pro Max
8 at will. This is mainly used for dealer maintanence or for single station user programming or when cameras or monitors
are not easily available.
Firmware is also downloadable in the field with our Firmware Utility so new updates and features can be
easily passed to customers without changing EPROMs or opening the unit.
1.1 VSI / VSI+ / VSI-Pro / VSI-Pro Max Backward Compatibility
Since 1990 various versions of the VSI have been on the market solving cash register retail problems. Several special
version are available to interface to other RS-232 devices like scales, coin counters, PLCC, gambling machines and ATMs along
with countless other generic RS-232 devices. The first VSI, Version 9 had no exception processing until the release of Version
10. However these versions had the ability to output the data so are compatible with the Regcom line of networking adapters. As
features increased we moved to the VSI+ Version 11, which had the first powerful set of exception processing and printing
functions. This version also had hardware handshaking capability which allows it to be fully operational with the Networker and
Regcom line. The introduction of the VSI-Pro Version 12 added on-screen selection of various model registers for ease of
installation and supported many characters sizes for multiple units to display data on one camera view. This version also
supports the Networker and Regcom products. The VSI-Pro Version 13.XX has improved features and additional registers and
the Version 13.00 supports North America cash registers and Version 13.24 supports UK and European models. All Version
13.XX VSI-Pro support the Networker and Regcom products. All Version 13.XX can be upgraded to the latest Ver . 13 release. This
release adds PC Programming capability, Firmware update externally and Vnetworker support along with Networker and
Regcom compatibility. The VSI-Pro Max 8 is the latest in the development line and includes all register of Ver. 14.XX in one
convenient unit along with built in Hydra, Regcom, Networker and Vnetworker hardware and software.
Contact the AVE factory for additional details on upgrading and networking with any DVR or learn about the advanced
features when integrated with the AVE line of text insertion and search DVRs locally or remotely.
VSI-Pro Max 8 POS / Cash Register Interface
8
Page 9

2. FEATURES & SPECIFICATIONS
NOTE: Y ou can not change the Network Protocol or Address of any slave from this menu or the units will stop commu-
nicating. If you wish to change these settings you must do by independently connecting the PC Programming software
to each channel. The default Network Protocol is RegCom 9600 so all must be the same if you do change any .
Y ou will be able to change the Network Protocol and address of the Master Channel which is Channel 1 so if you
do and it is not the same as all the slaves then will not be able to communicate to any slaves. If you add additional VSIPro Max via the RS-485 network they also must be the same and address unique or greater than 8. Y ou can add another
VSI-Pro Max 8 but then you independently change the addresses to 8-16 via the PC Programming software.
f you set channel 1 to have Hydra or Master Output to the DVR using the VSI-ADD protocol you must reset this
via the on-screen menu back to default via the on-screen menu to use the PC Programming software for all channels
See Page 35 “Network Program” for additional information.
2.1 FEATURES per Channel
............352 Register Selections Selectable via OSD
............User Selectable Full Duplex Bi-Directional POS / Cash Register Communications
RS-232C
RS-232C Optically Isolated
RS-485 Full Duplex, RS-422 Half Duplex
Passive T ap (Hi-Z)
............RS-232C or RS-485 Output of all data or exceptions to printers, computers, modems and DVRs
............Dual RJ45 Connectors for easy Networking with Standard CAT5 Cabling
............Built In Hydra, Regcom, Networker and Vnetworker Hardware and Protocol
............Diagnostic LEDs for Power, POS Communication & Network Communication
............Video Input AGC and Video Output can Drive two 75 ohm loads at 1VP-P
............Video and Power Input Surge and Lightning Suppression with External Grounding Lug
............Video Low and Lost LED indication and alarming function
............40 Mhz Processing with 128K Program and 128K SRAM Memory for High Proformance Processing
.............Programmable Time-S tamp and T rigger Text On-Screen and Exception Output
............Time/Date Searchng with Compatible DVR
............Universal Time/Date Format , Automatic Daylight Savings Adjustment and Register T/D Locking
............800 Lines of Exception History Buffer
............16 Triggered Text associated with 16 virtual alarms
............2 Built-in Programmable Hard Alarm Outputs
............Alarm Input for drawer open, safe open, etc. with programmable time delay
............Large Data Buffers for input/output to accommodate newer and faster registers
............Powerful Data Filtering Algorithms like T runcating, Scroll Matching, S pace Filtering, Duplicate Line Filtering
............Easy On-Screen Menu-Driven Setup and Programming
............Auto Baud Rate Detection
............24 Field Programmable Exceptions with Numeric Range
............On-screen Flagging of Exceptions with Asterisk or Reverse Text
............Programmable Delayed Screen Blanking
.............Scroll Delay for non real time recording
............Choice of 1 to 1 1 lines Displayed On-Screen up to 40 Characters per Line
............On-screen Titler up to 40 characters
............Gray scale and Border Selection from Front Panel
............Built-in Test and Diagnostic Modes
............Built-in Cash Register Demo
............Upload/Download and Programming to a PC
............Data Captured either to the Memory or to the Serial Port
............Local Firmware Downloadable independently per channel via RS-232 port
............Local / Remote Programming via PC Software or Compatible DVR
............Compatible with A VE AL-16 External Relay Interface adapter
VSI-Pro Max 8 POS / Cash Register Interface
9
Page 10

FEATURES & SPECIFICATIONS per Channel
2.2 SPECIFICATIONS
Video In (BNC) .5VP-P to 2VP-P AGC Term. 75 ohms, 90V Gas Discharge Suppression
Video Out (BNC) 1V P-P Terminated or Unterminated can drive two 75 ohm loads
Video S / N better than 50dB
Video B / W better than 7MHz
Power (DC Coax 2.1mmx5.5mm) 9-12VDC 1500mA 18V MOV Surge Suppression
Battery Backup NiMH 1 year with 24 hour charge
Register Serial Port Bi-Directional RS-232C RS-232 Opto RS-485 / RS-422 Passive Hi-Z
(DB9 Female) RXD - Pin 2 RXD - Pin 2 A - Pin 4 RXD - Pin 2
TXD - Pin 3 GND - Pin 5 B - Pin 6 TXD - Pin 3
GND - Pin 5 Jumpers 14&18 GND - Pin 5 GND - Pin 5
Jumpers 5 &7
Baud Rate AUTO, 1200, 2400, 4800, 9600, 19.2K, 28.8K, 38.4K, 57.6K, 1 1 5.2K
Word Length 7 or 8
Parity ODD, EVEN, NONE
Stop Bits 1
RTS / CTS Handshaking ON or OFF (3.3K Pull Up)
DTR / DSR 3.3K Pull Up (3.3K Pull Up)
Data Buffer 128K bytes
Data/Network Port (RJ45 X2 in Parallel) RS-232 or RS-485 TXD Only or RS-485 Bi-Directional (Jumper 4 &1 1)
Baud Rate 1200-115.2K, 8 bits, No Parity, 1 stop Bit
Alarm Outputs Pin 1 & 9 Open Collector 12VDC @ 20mA (Jumpers 18 & 19,Jumpers 6 & 7)
Alarm Input Pin 7 (RTS) Closure to Ground, 12 VDC Max
Real Time Clock 12 or 24 Hr with Auto Daylight Savings Time Programmable
Date Format MM/DD/YY, DD/MM/YY, YY/MM/DD Julian Calendar
Display Characters 40
Number of Lines 1-11
Character and Border Gray Scale 8 levels of Gray
Screen Update Delay .5s ON or OFF
Auto Scolling from last line
Line Processing Compress, Truncate, Space Compress, Left Justify, Scroll Matching
DVR Support MVDR2000, 3000, 4000, 5000, DMS-3001, DVR-3011, DVR-3021
Watchdog Timer Hardware and Software Local / Remote Programming via PC Software
Local Firmware Downloading History Buffer Downloadable / Searchable
40 Mhz Processor Operation
Temperature Rating 0 - 50 degrees Celsius
32 - 122 degrees Fahrenheit
Humidity Non-Condensing 85% RH
Weight 4.05 Kg or 9 lbs
Metal Enclosure Beige 482L x 303W x 45H (mm)
19L x 11.93W x 1.77H (in)
Maximum Size with Connectors 482L x 313W x 47H (mm)
19L x 12.32W x 1.85H (in)
Packed in White Box with Manual 4.75 Kg or 10.5 lbs
560L x 460W x 110H (mm)
22L x 18W x 4.33H (in)
VSI-Pro Max 8 POS / Cash Register Interface
10
Page 11
3. CONNECTIONS
Each channel of VSI-Pro Max 8 will overlay the characters on any input video source. The video input can be virtually any
baseband or composite video source. The VSI-Pro will accept NTSC, RS-170, RS-330, CCIR, PAL or SECAM video
formats.The Video input to the desired channel of VSI-Pro Max 8 is a standard BNC connector , terminated at 75 [ohms].
NOTE ?
The input video level must be between 0.5V - 2.0V Peak to Peak. If the video is lower or not
present the VL LED will illuminate signifying low or no video and the VSI-Pro Max 8 will have a
poor or no output video signal.
After completing the interface installation as described in the separate Installation Guide for your specific cash
register, computer, radar gun or other serial device, connect the video input source to the video input BNC on the
rear of the desired channel of VSI-Pro Max 8. The BNC video output goes out to the video system (VCR, DVR, quad,
switcher, multiplexer , or monitor). This connection is shown in Figure 3. The video output from this channel of VSI-Pro
Max 8 is 1[V] Peak to Peak into a 75 [ohm] load. Most monitors or televisions with direct video inputs are terminated with
a 75 ohm load. If the monitor is not terminated, this channel of VSI-Pro Max 8 will still output 1[V] Peak to Peak. Each
channel of VSI-Pro Max 8 will be able to drive two terminated loads without loss of video level.
The VSI-Pro Max 8 uses a 9-12VDC @1500 [mA] UL/CSA power supply which must be plugged into the Power input on
the VSI-Pro Max 8’s Real Panel.
3.1 LED Indicators
Power Green Signifies power is supplied to the unit
Network LED Green This LED flashes whenever data is sent or received on the Network Port
Register Data Re d This LED flashes whenever data is received from the cash register
Video Error Re d This LED illuminates with the video level is not present or too low
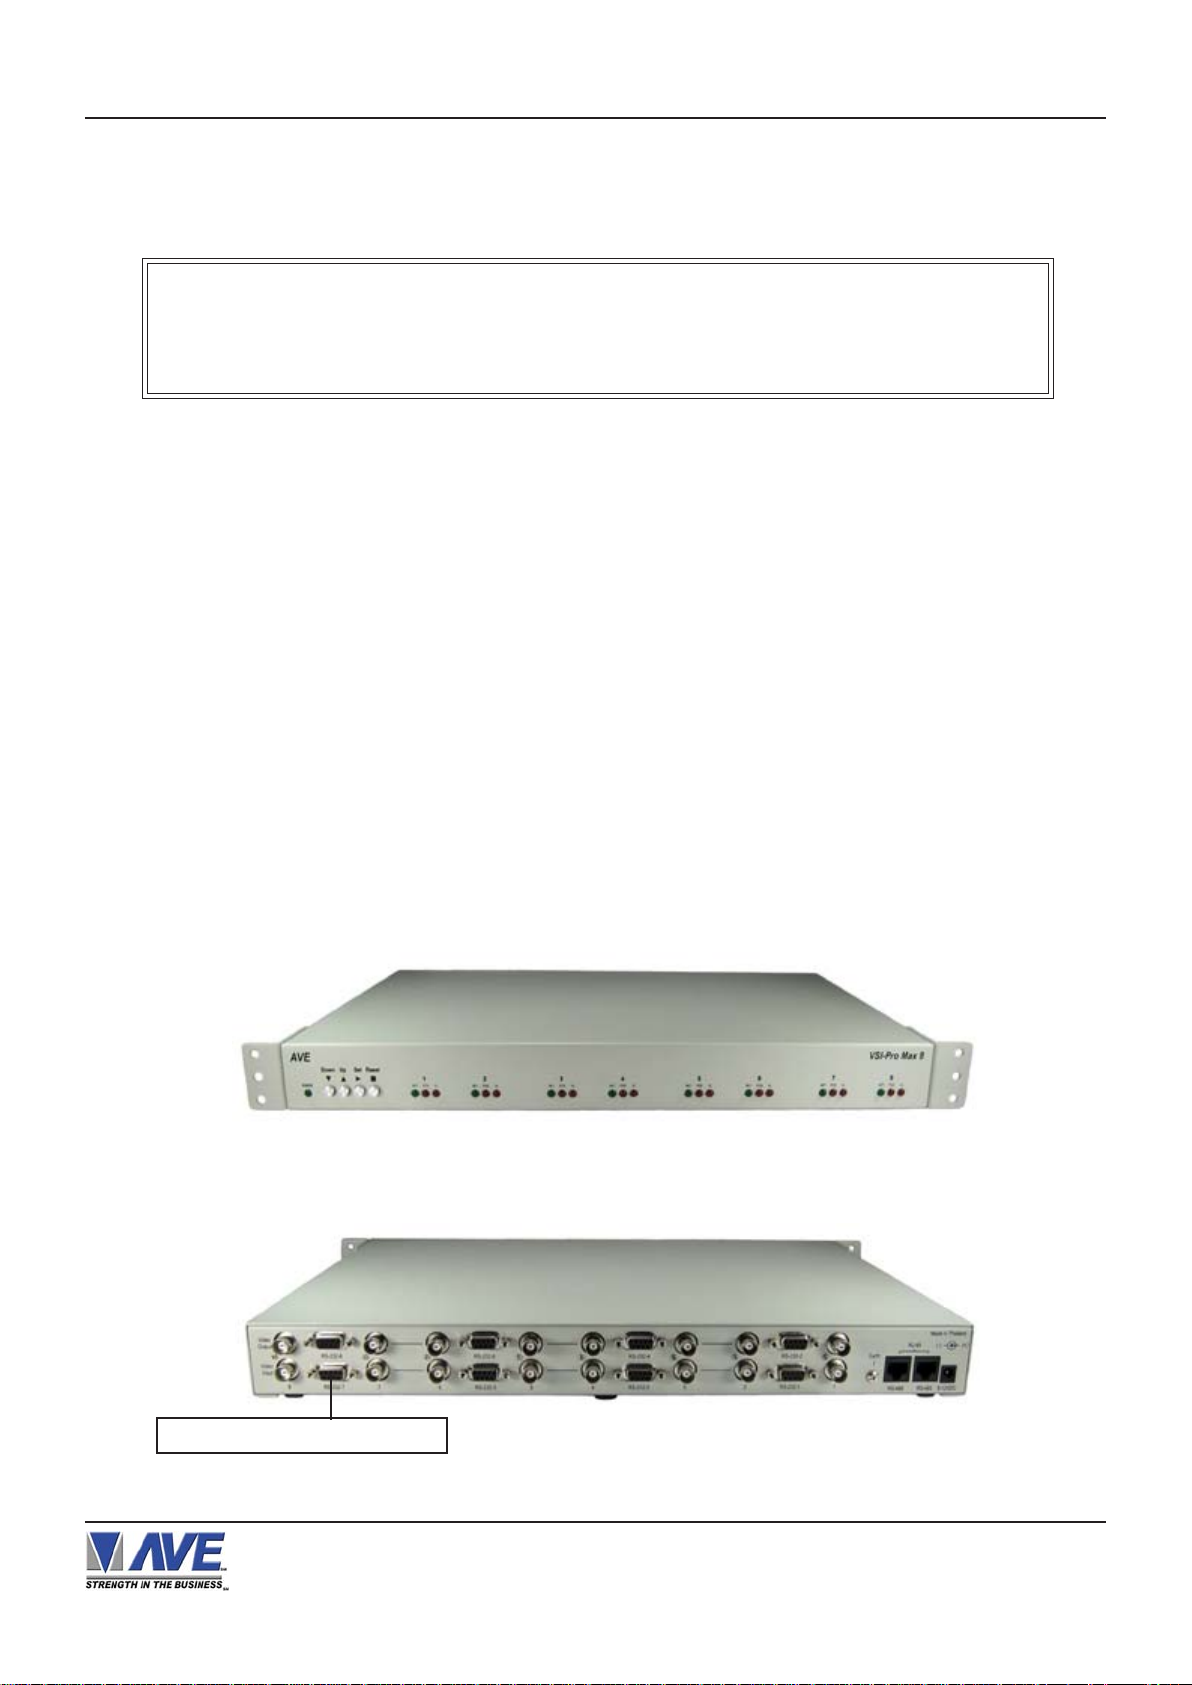
Figure 1: VSI-Pro Max 8 Front Indicator LEDs and Programming Pushbuttons
Channel 7 of VSI-Pro Max 8
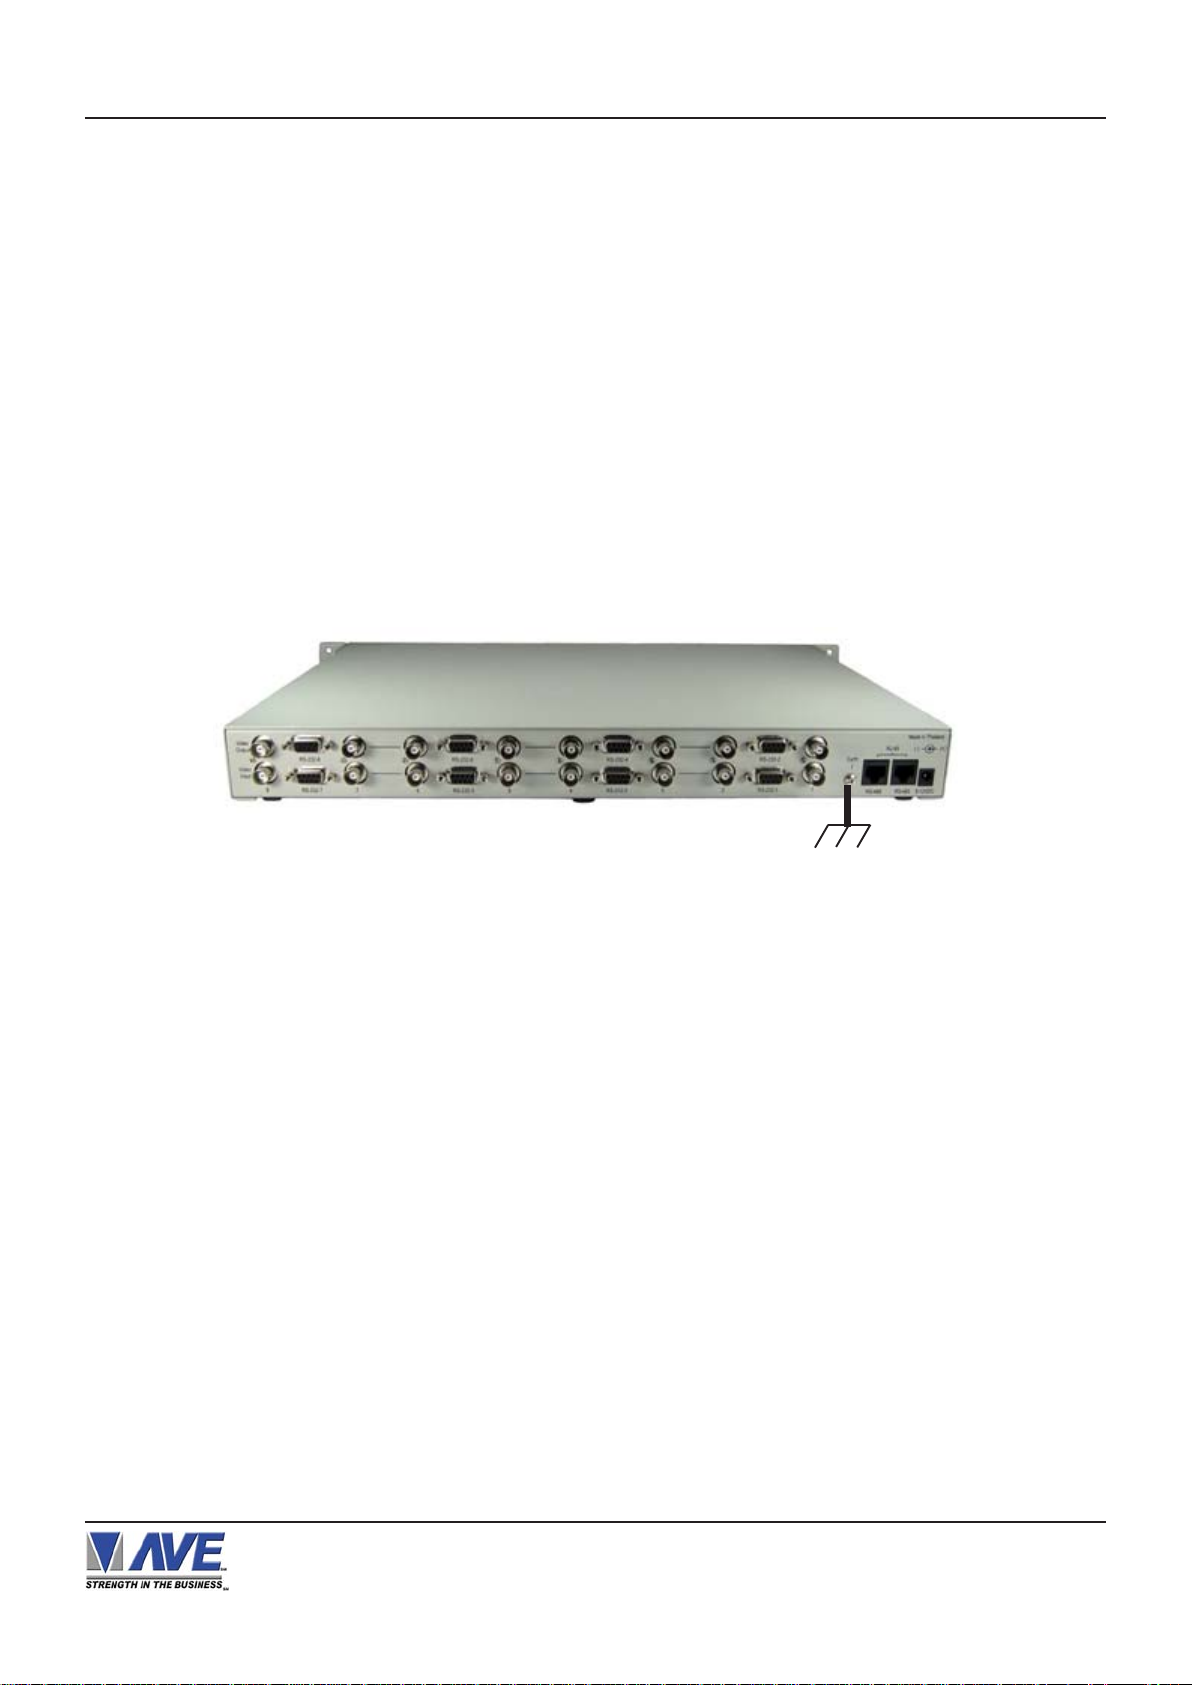
Figure 2: VSI-Pro Max 8 Rear Connections
VSI-Pro Max 8 POS / Cash Register Interface
11
Page 12
CONNECTIONS
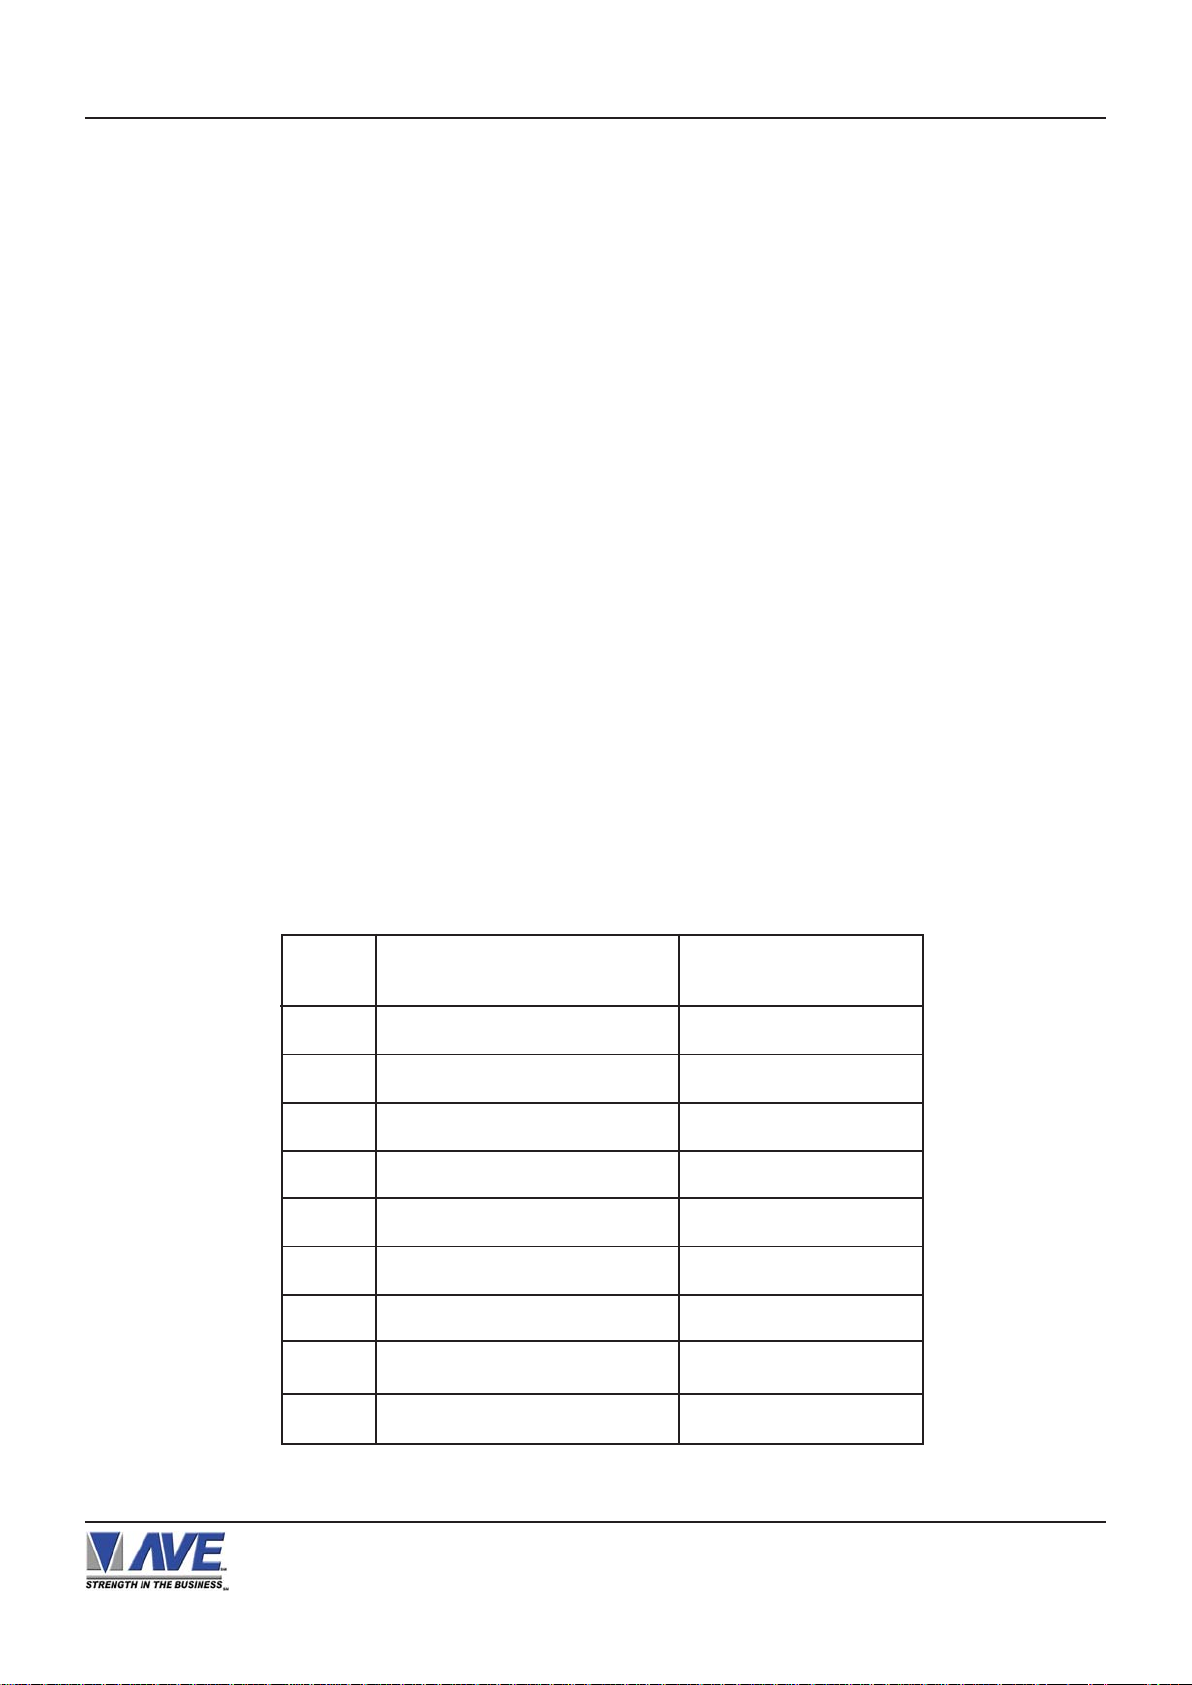
Pin # Label Direction Function
1 Alarm Out 1 From VSI-Pro Max 8 Open Collector Transisitor
2 Receive Data To VSI-Pro Max 8 Data from Cash Register
3 Transmit Data From VSI-Pro Max 8 Data to Cash Register
4 DT R From VSI-Pro Max 8 Remain High or RS-485 Input (+)(A)
5 Ground ------------------- Signal / Power Gnd or Isolated RS-232 Input Gnd
6 DSR From VSI-Pro Max 8 Remain High or RS-485 Input (-)(B)
7 RTS To VSI-Pro Max 8 Alarm Input or Hardware Handshaking
8 CTS From VSI-Pro Max 8 DVR RS-232 Output or Hardware Handshaking
9 Alarm Out 2 From VSI-Pro Max 8 Open Collector Transistor or Signal / Power Gnd
Table 1: Pin-Out of the DB-9 Female Connector on the VSI-Pro Max8
3.2 RS-232 SERIAL INPUT
Each channel of VSI-Pro Max 8 accepts serial data via the DB-9 Female connector located on the rear of VSI-Pro Max
8. This connector is similar to “AT” type computer RS232 serial ports and the pin out is identical. Table 1 shows the
standard pin out each channel of VSI-Pro Max8 RS-232 female connector. On the other hand T able 2 compares the VSIPro Max 8 RS-232 with standard “A T” computer’s RS-232 connector.
PIN # SIGNAL NAME ( RS232 )
1 CD (Carrier Detect ) Alarm Out 1
2 RXD ( Recieve Data ) RXD
3 TXD ( Transmit Data ) TXD
4 DTR ( Data Terminal Ready ) Aways True
5 SG ( Signal Control ) G ND
6 DSR ( Data Set Ready ) Aways True
VSI-Pro Max 8
7 RTS ( Request to Send ) RTS ( Option)
8 CTS ( Clear to Send ) CTS ( Option)
9 RI ( Ring Indicator ) Alarm Out 2
T able 2: RS-232 DB-9 Pin-Out vs VSI-Pro Max 8 DB-9 Pin-Out
VSI-Pro Max 8 POS / Cash Register Interface
12
Page 13
CONNECTIONS
PIN #
FUNCTION
DIRECTION
1 Alarm Out 1 Open Collector T ransisitor
2 No Function No Function
3 TXD RS-232 From VSI-Pro Max 8 (Option)
4 RS-485 (+) A Data From or To VSI-Pro Max 8
5 Ground
6 RS-485 (-) B Data From or To VSI-Pro Max 8
7 RTS ( Alarm In ) To VSI-Pro Max 8
8 CTS From VSI-Pro Max 8
9 Alarm Out 2 Open Collector Transistor
Note: When the RS-485 port is set for Bi-Directional RS-485 the TXD port has no function. When the RS-485
port is set for recieve data only then the TXD port can be used for an RS-232 output.
Table 3 : Pin-Out of the DB-9 Female Connector on the VSI-Pro RS-422 / RS-485
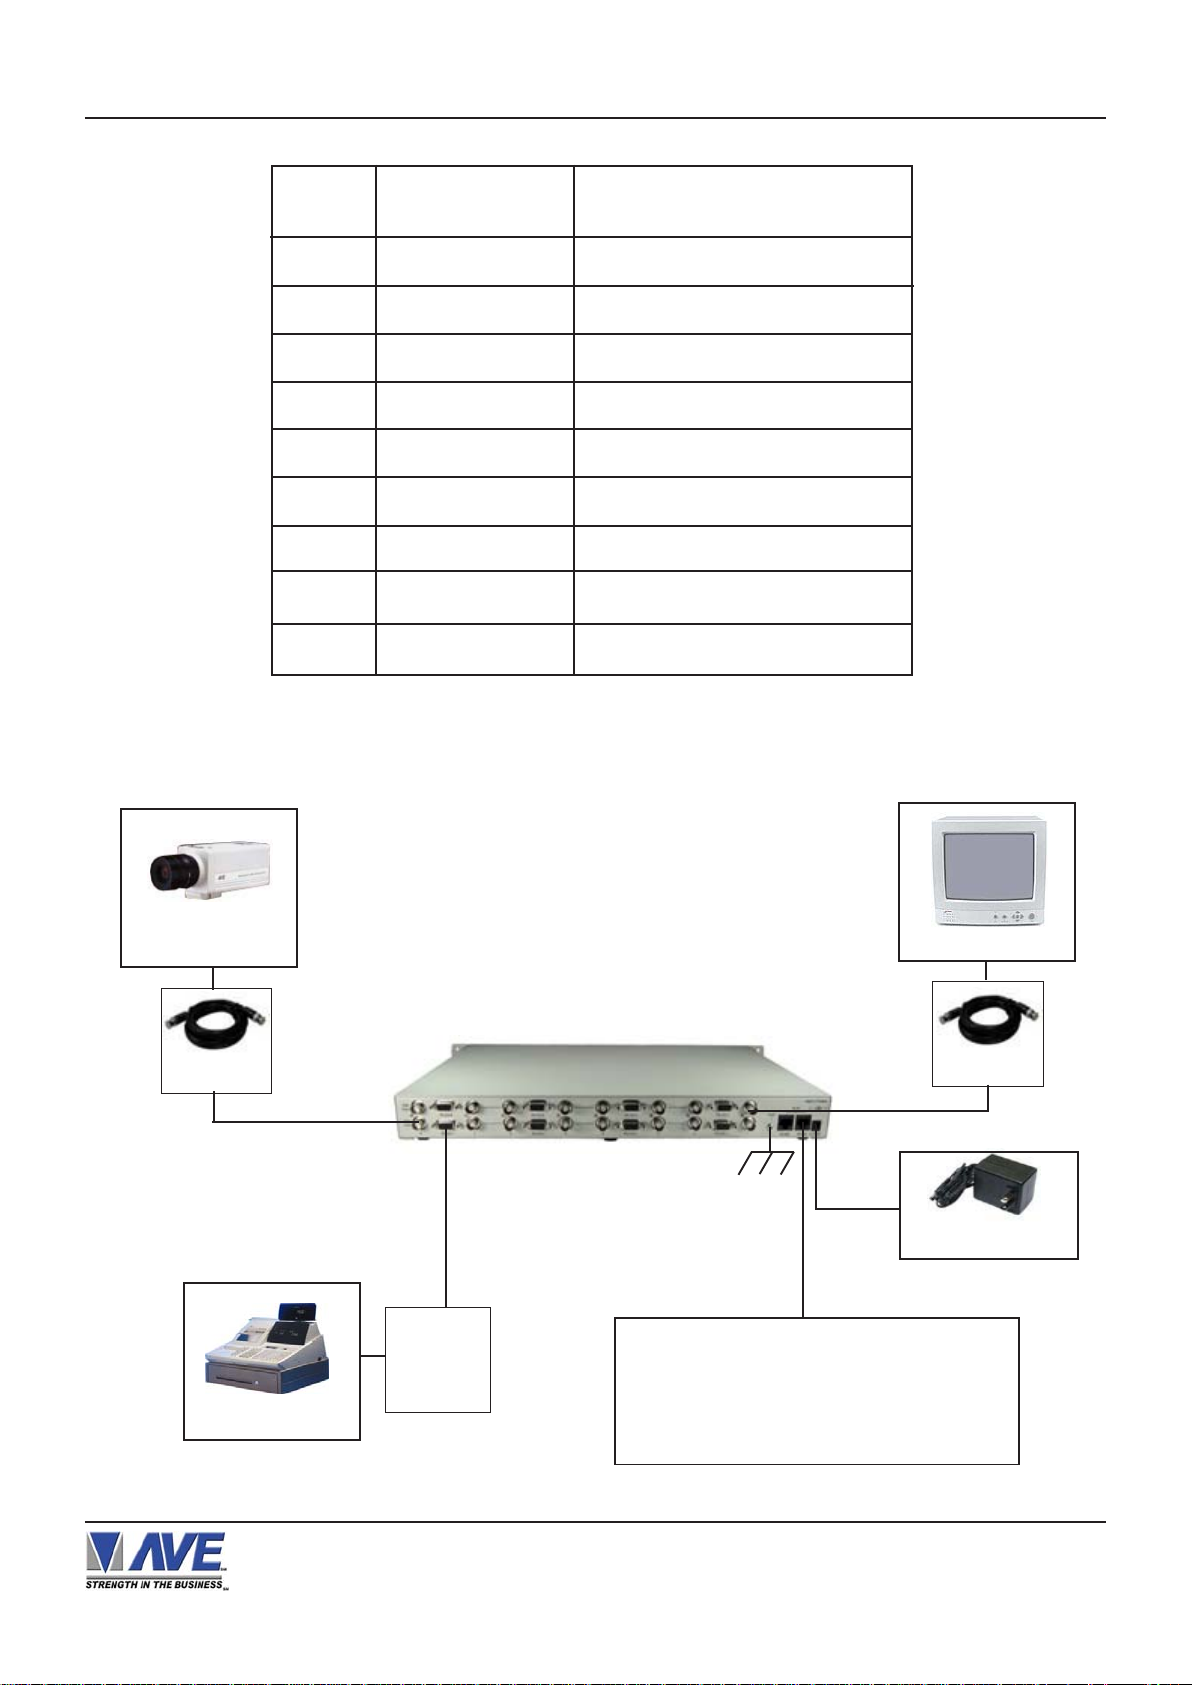
CAMERA
RG-59U
CASH REGISTER
VSI-Pro Max 8
T o Earth Ground for
Surge Suppression
RS-232 or
RS-485
Direct or
ECR
Interface
Networking to additional VSI-Pro Max,
VSI-Pro Max 8, HyDra, Regcom,
Networker, Vnetworker or PC Software
Application
Figure 3: VSI-Pro Max 8 Connections
MONITOR
RG-59U
WALL TRANSFORMER
9-12VDC 2000mA
VSI-Pro Max 8 POS / Cash Register Interface
13
Page 14
CONNECTIONS
Grounding and Isolation
The VSI-Pro Max 8 has an isolated internal signal/power ground from the case or chassis ground. Therefore maintaining
this isolation will insure proper surge and lightning suppression when the chassis grounded properly .
Video Surge / Lightning Protection
The VSI-Pro Max 8 has an internal Gas Discharge Surge Suppressor on the video input. This enables high input surges
to be suppressed so not to damage the internal circuitry of the VSI-Pro Max 8. Voltage spikes between video signal and
video ground will be clamped and also between both of these signals and chassis ground. For this suppression to be fully
effective the “Earth” grounding lug between the two BNC connectors must be connected to a solid and true earth ground.
A good earth ground is a long metal rod into the ground 6’ or connection to copper water pipes.
NOTE: If ground loops are in excess of 90 VAC to Earth or Signal ground the internal surge suppress make not be
effective and cause undo noise in the video. If this is the case do not use the chassis grounding lug for undo voltage
will be shorted through the suppression circuitry of the VSI-Pro Max 8.
Earth Ground
Figure 4: VSI-Pro Max 8 Earth Grounding Connection
Power Surge / Lightning Suppression
The VSI-Pro Max 8 has MOV (Metal Oxide V aristors) across the power input to signal ground and from both of these
signal to chassis ground clamping at 18VDC. For this suppression to be fully effective the “Earth” grounding lug between
the two BNC connectors must be connected to a solid and true earth ground. A good earth ground is a long metal rod into
the ground 6’ or connection to copper water pipes.
RS-232 DB9F Shielding
The shield of the DB9 RS-232 connector also connects to chassis ground. Therefore this shield should not be
connected to any signal ground of any RS-232 signal or power signal. If for some reason the source or destination
devices have internal connections from signal ground to the shield then the shield should not be connected on VSIPro Max 8 end to maintain signal ground and earth ground isolation. Proper shielding of RS-232 signals will extend the
length of wiring especially at high data rates and eliminate noise being coupled into the either a source or destination
device by surrounding EMI or RFI generated by other equipment within the installation.
VSI-Pro Max 8 POS / Cash Register Interface
14
Page 15
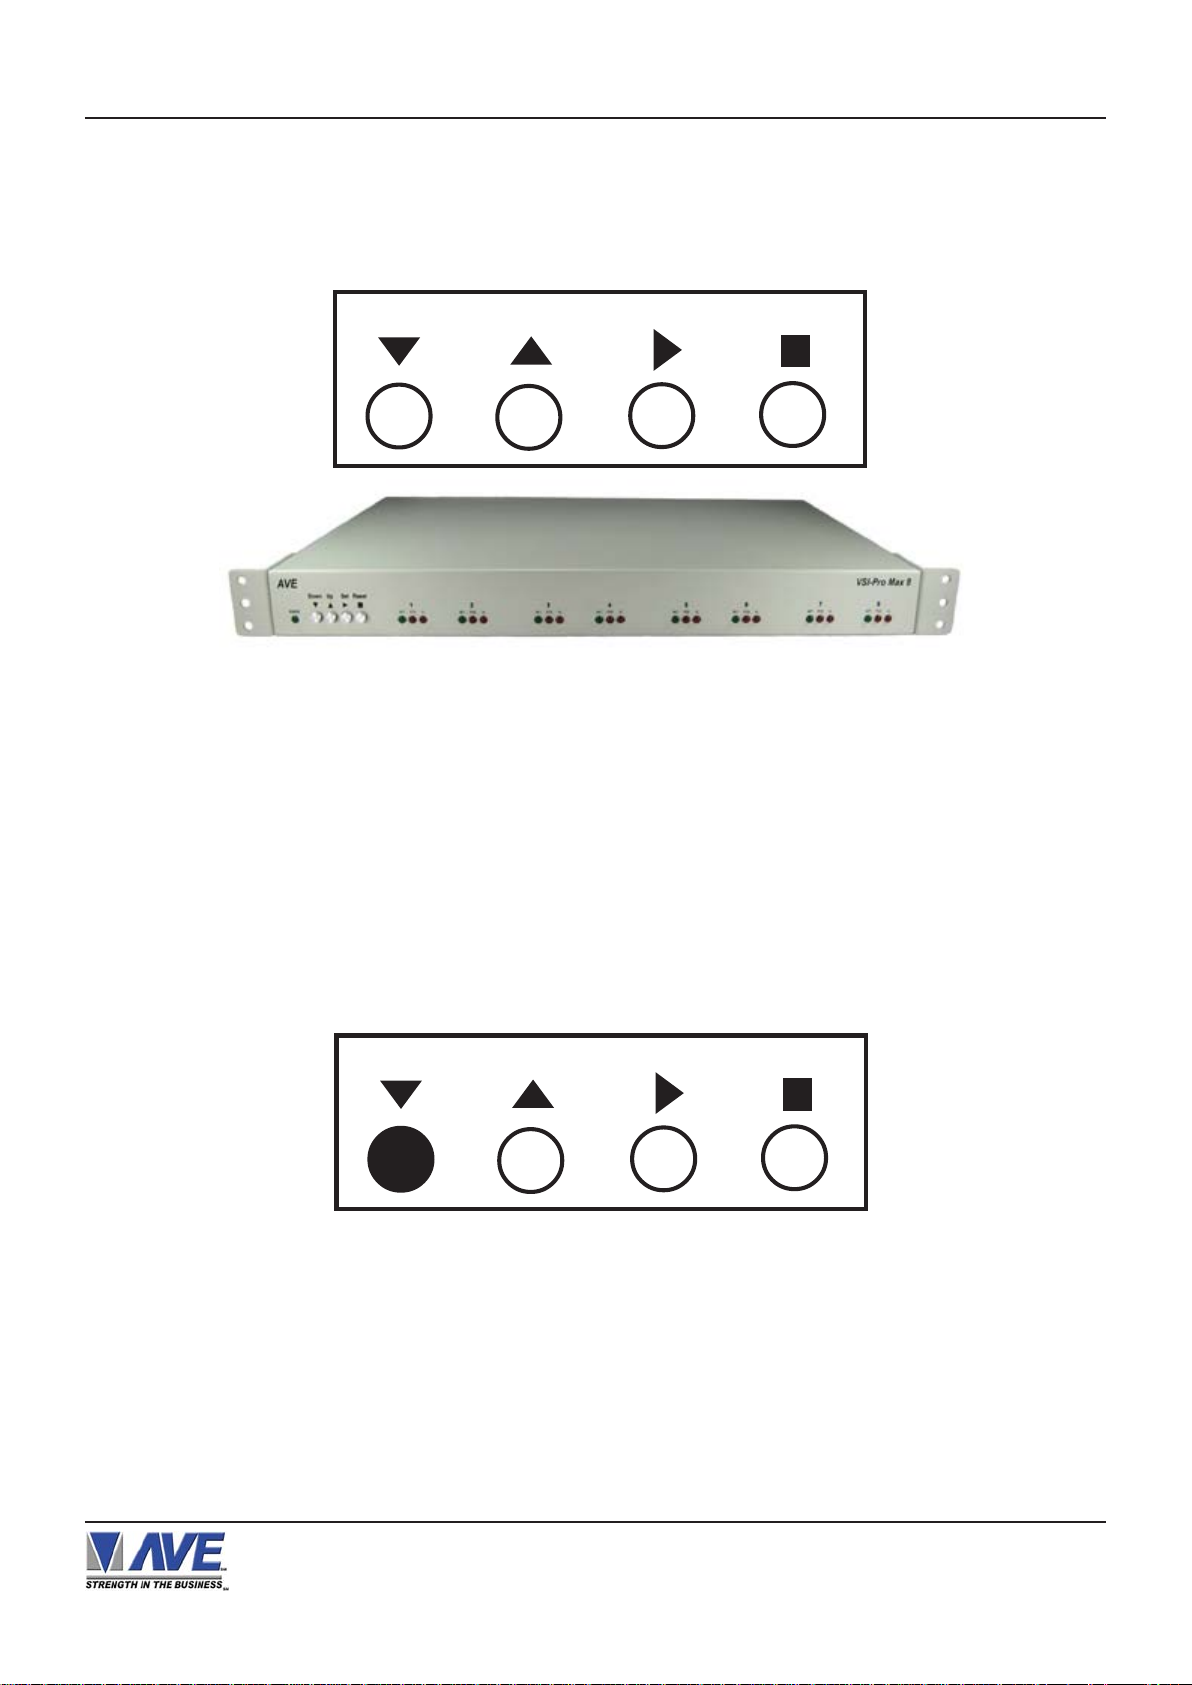
4. USER FRONT PANEL CONTROLS
The VSI-Pro Max 8 is programmed by pressing and releasing specific combinations of the four front panel push
buttons. Via these four simple buttons, all of the powerful programming features of the Text Inserter are
available. A video source and a monitor must be connected in order to see the programming menus.
Down
Figure 5: Four Front Pannel Push Buttons of VSI-Pro Max 8
Up
Set
Reset
4.1 FRONT P ANEL CONTROLS
The front panel controls are provided to allow simple changing of the Master unit’s only display’s vertical and horizontal
position and the gray scale or border. This eliminates the need of the user to enter the main menu and inadvertently
change important programming setups.
NOTE: To change the display position or grayscale of any of the slave channels this must be done independently. See
Page 35 “Network Program” for additional information.
Changing the Gray Scale
Down
Figure 6: Four Front Pannel Push Buttons of VSI-Pro Max 8 (Down)
1) Press and hold the “Down” button.
2) Press and release the “Reset” button.
3) Release the “Down” button.
4) Press “Down” or “Up” to select the Gray Scale.
5) When choice is made, press and release the “Set” button.
Up
Set
Reset
VSI-Pro Max 8 POS / Cash Register Interface
15
Page 16

USER FRONT PANEL CONTROLS
Changing the Horizontal Position
Down
Figure 7: Four Front Pannel Push Buttons of VSI-Pro Max 8 (Up)
1. Press and hold the “Up” button.
2. Press and release the “Reset” button.
3. Release the “Up” button.
4. Press “Down” or “Up” to move the text block.
5. When the choice is made, press and release the “Set” button.
NOTE: To change the display position or grayscale of any of the slave channels this must be done independently. See
Page 35 “Network Program” for additional information.
Up
Set
Reset
Changing the Vertical Position
Down
Figure 8: Four Front Pannel Push Buttons of VSI-Pro Max 8 (Set)
1) Press and hold the “Set” button.
2) Press and release the “Reset” button.
3) Release the “Set” button.
4) Press “Down” or “Up” to move the text block.
5) When the choice is made, press and release the “Set” button.
NOTE: To change the display position or grayscale of any of the slave channels this must be done independently. See
Page 35 “Network Program” for additional information.
Up
Set
Reset
VSI-Pro Max 8 POS / Cash Register Interface
16
Page 17
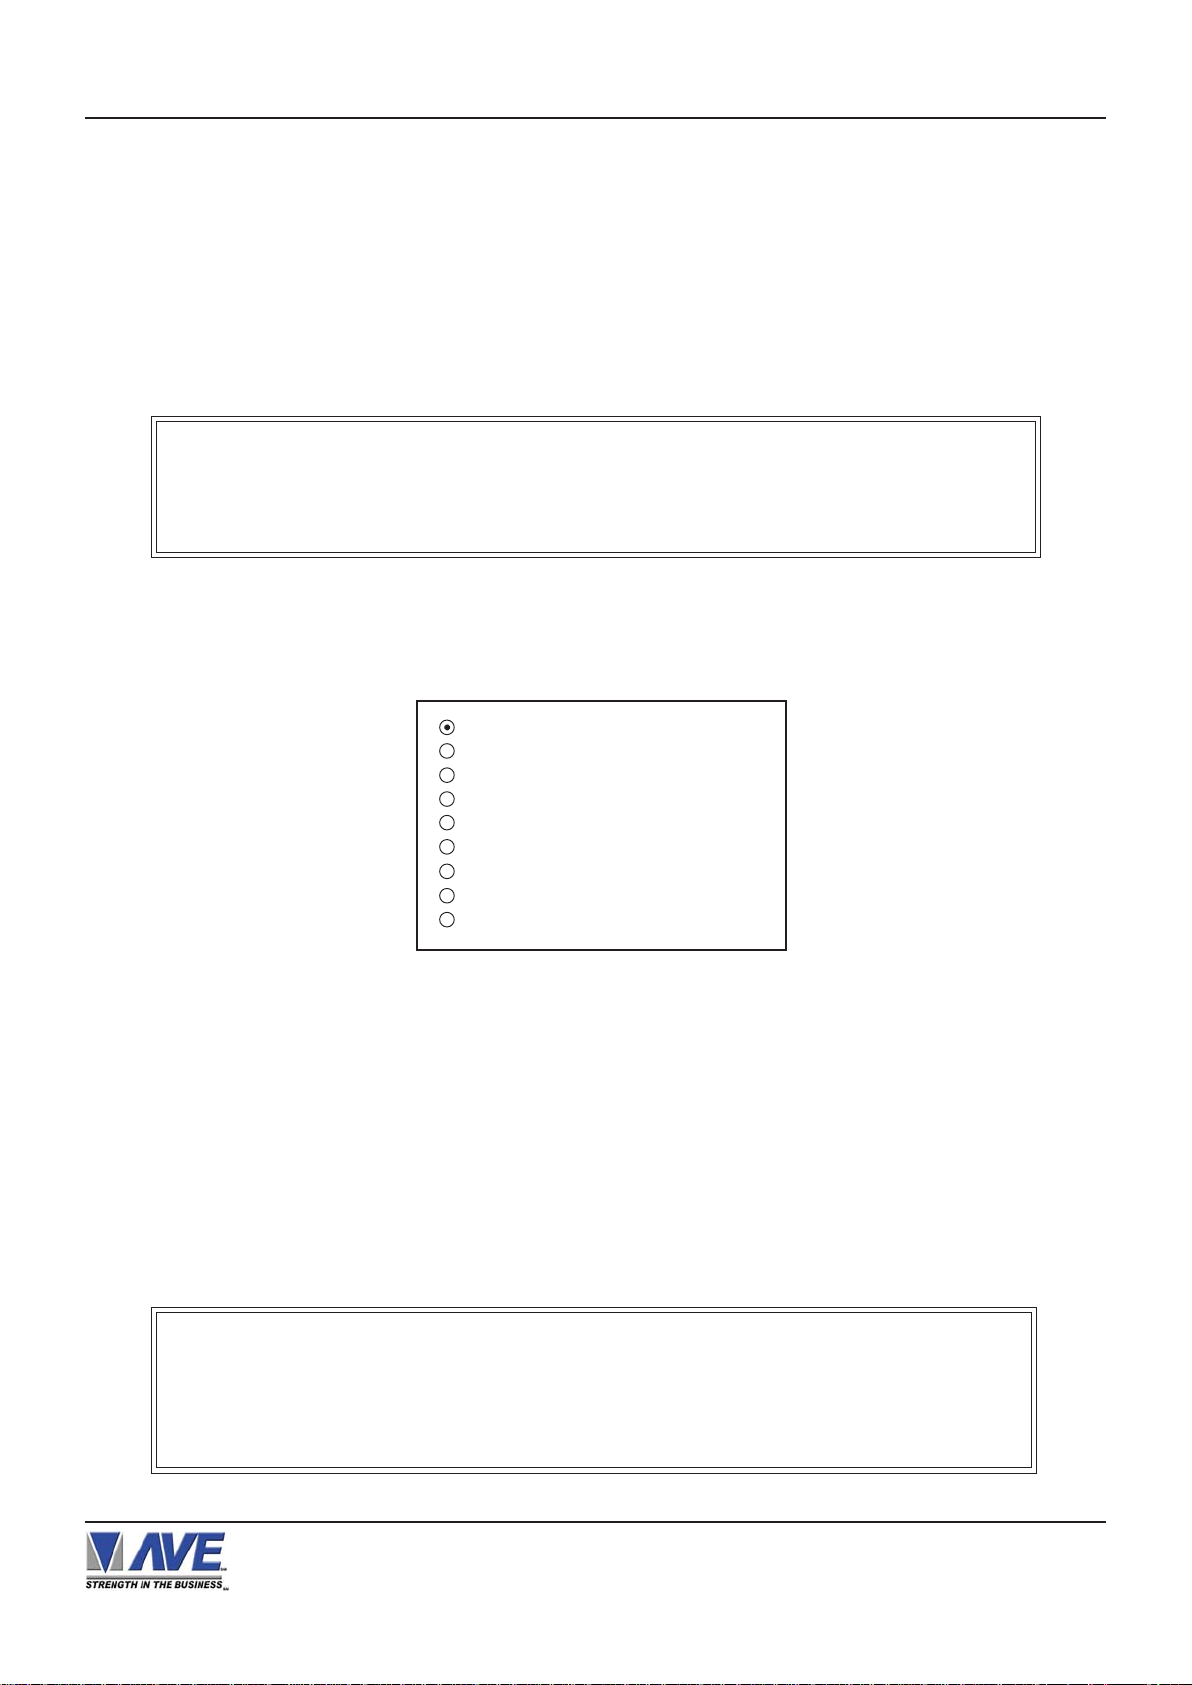
5. PROGRAMMING
5.1 GETTING STARTED
T o access the Main-Menu of the VSI-Pro Max 8, simult aneously hold down the “Down” & “Up” buttons and press and
release the “Reset” button and then release the “Down” & “Up” buttons. This will take you to the main programming menu.
To navigate through this menu, simply use the “Down” and “Up” buttons to position the cursor in front of the desired
function, then press “Set” to access that function.
If you have difficulty entering the main-menu, try the following procedure exactly. With your left thumb, lightly press
and hold in the two buttons to the left (Up & Down). While holding down these buttons, press and release the “Reset”
button with your right thumb. Then release the other buttons.
NOTE ?
If a sub-menu has an “EXIT” selection, always go there and press "Set". Pressing
"Reset" at the main-menu exits you from the programming mode.
5.2 MAIN PROGRAMMING MENU
Following is a detailed description of the menu selections and the programming capabilities of the VSI-Pro Max 8.
REGISTER SELECT
SCREEN SETUP
TEXT DISPLAY
COMMUNICATION
EXCEPTION REPORT
ALARM OUTPUTS
TEST/DEMO MODE
DOWNLOAD/UPLOAD SETUP
HELP
Figure 9 : VSI-Pro Max 8 Main-Menu
5.3 REGISTER SELECT
To select a specific register, press the “Up” or “Down” button to move the cursor to “REGISTER SELECT“ and press
“Set”. The REGISTER SELECT menu will bring up a sub-menu consisting of registers shown in Figure 10-A. You can
go to the next or previous page by placing the cursor in front of “NEXT” or “PREVIOUS“ and then pressing “Set”. To
select the desired register, press the “Up” or “Down” button to move the cursor to that register and press “Set”. After
selecting the register, exit out of the REGISTER SELECT menu by pressing the “Up” or “Down” button to move the
cursor to “EXIT” and then pressing “Set”. In the main-menu, press “Reset” to activate the programing for that specific
register. REGISTER SELECT automatically formats the VSI-Pro to match your register’s communication settings.
However, if you need to change these settings, you can do so through the COMMUNICATION menu described later
in this manual.
NOTE ?
Whenever you select a register in this menu, certain programming features are reset to
the default settings. Always set the register selection first, get the data on-screen, then
proceed with additional programming.
VSI-Pro Max 8 POS / Cash Register Interface
17
Page 18
PROGRAMMING
TCP/IP
Press the “Up” or “Down” button to move the cursor to
“REGISTER SELECT” and press “Set”. The REGISTER SELECT menu will appear:
3. Press the “Up” or “Down” button to move the cursor
to “EXIT” and press “Set” to return to the previous
menu.
GENERIC
TCPIP
ADDRESSABLE VSI
AD4323
ADS
ANSI
BEETLE/50 PRINTERS
CASIO QT2100 REM DISPLAY
CASIO QT6000
- - - - - - - - - NEXT PAGE
EXIT
Figure 10: REGISTER SELECT Sub-Menu
Press the “Up” or “Down” button to move the cursor
to “TCPIP” and press “Generic”. In this mode is
simply no filtering of the input data and will display
any printable character in the video. If you are not
sure of what you are connecting to this is the first
selection so you will see everything and then later
choose the options you want to better filter the
display to your liking.
1. Press the “Up” or “Down” button to move the
cursor to “TCPIP” and press “Set” to enter and
change the IP address to the same as the IP
address you wish to monitor.
EXAMPLE: If the IP address is 192.168.0.141, set
the address on the TCPIP 232 Adapter using this
menu.
IP ADDRESS 19 2
IP ADDRESS 2 168
IP ADDRESS 3 0
IP ADDRESS 4 141
DOWNLOAD CONFIGURATION
EXIT
Figure 11: TCPIP Sub-Menu
2. Press the “Up” or “Down” button to move the cursor
to “Download Configuration” and press “Set” to
execute. Make sure a TCPIP232 Adapter is connected
and the VSI-Pro will download the IP settings to this
device.
Refer to Appendix I for additional information on the
TCPIP232 Adapter or the manual included with the
adapter.
NOTE: The TCPIP232 Adapter can be programmed
by this method or by using a standard PC with a
serial cable along with the AVE IP setting software.
Refer to the TCIP232 Adpater Manual for doing this.
Once you have set the IP address of the TCPIP232
Adapter you will be in the “Generic” display mode.
You may select another register driver to format this
display. When you do this the VSI-Pro loads the
default register baudrate as if a direct connection to
the register so make sure you set the proper
baudrate as described below.
The TCPIP232 Adpater communicates with the VSIPro via RS-232 at a baudrate of 19.2K. Therefore
when you select this menu option the baudrate of the
VSI-Pro is changed to this rate so communication for
downloading the configuration can occur. When
using the TCPIP232 adpater with other register
drivers or data dump mode make sure you change
the RXD baudrate to 19.2K so the VSI-Pro Max will
communicate.
TCP/IP Limitations
The TCPIP232 Adapter can monitor any Ethernet
LAN either 10MBs or 100MB/s. However the actual
long term throughput of the adpater is limited to
5MB/s. This is more than enough for network printers
for cash receipts, bar code scanners or single cash
registers that operate in a “Live Mode”. Live Mode
means the register transmitts the data on the network line by line or at the end of each transaction.
Some cash registers have large local built in memories for thousands of items and then only batch
multiple transactions on the network at any given
time or controlled by the server. Cash Registers
utilizing this kind of batch processing are not suitable
for security monitoring. Other devices that output
large amounts of data will overrun the buffers of
either the TCPIP232 Adapter or VSI-Pro Max and
data will be lost and would not be suitable for security monitoring anyway.
The VSI-Pro Max 8 has a set of powerful data dump
modes that compatible with the TCPIP232 Adpater. If
large data packets need filtering or special formats
are required contact the factory.
VSI-Pro Max 8 POS / Cash Register Interface
18
Page 19
PROGRAMMING
GENERIC
Press the “Up” or “Down” button to move the cursor to
“PC COM 1,2,3,4” and press “Set”. No menu will apprear
and merely sets the desired channel of VSI-Pro Max 8
to “Generic” mode.
ADDRESSABLE VSI (VSI-ADD)
Press the “Up” or “Down” button to move the cursor to
“ADDRESSABLE VSI” and press “Set”. The ADDRESSABLE VSI menu will appear:
SET ADDRESS AN Y
EXIT
Figure 12: ADDRESSABLE VSI Sub-Menu
SET ADDRESS
Choices: ANY, 1, 2, 3,..., 253, 254, 255
AD4323
BEETLE/50 PRINTERS
Press the “Up” or “Down” button to move the cursor to
“NIXDORF BEETLE” and press “Set”. The NIXDORF
BEETLE menu will appear:
REMOTE SLIP
OPERATOR DISPLAY
Figure 14: NIXDORF BEETLE Sub-Menu
CASIO TK-T500
Press the “Up” or “Down” button to move the cursor to
“CASIO TK-T500” and press “Set”. The CASIO TK-T500
menu will appear:
MODEL : TK-T500
MODE : EMULATING
EXIT
Figure 15: CASIO TK-T500 Sub-Menu
Press the “Up” or “Down” button to move the cursor to
“AD4323” and press “Set”. No menu will apprear and
merely sets the desired channel of VSI-Pro Max 8 to
support the special protocol of this model.
ADS
Press the “Up” or “Down” button to move the cursor to
“ADS” and press “Set”. The ADS menu will appear.
DISPLAY RECEIPT
EXIT
Figure 13: ADS Sub-Menu
DISPLAY
Choices:JOURNAL, RECEIPT
ANSI
Press the “Up” or “Down” button to move the cursor to
“ANSI” and press “Set”.
This selects an ANSI driver for each channel of VSI-Pro
Max 8. In this mode standard ANSI terminal commands
sent to the desired channel of VSI-Pro Max 8 will control
the display of the data on the screen. See Appendix for a
detailed command set supported.
MODE
Choices: TAPPING, EMULATING
CASIO TE-2200
Press the “Up” or “Down” button to move the cursor to
“CASIO TE-2200” and press “Set”. The CASIO TE-2200
menu will appear:
MODEL : TE-2200
MODE : EMULATING
EXIT
Figure 16: CASIO TE-2200 Sub-Menu
MODE
Choices: TAPPING, EMULATING
CLARITY EPOS
Press the “Up” or “Down” button to move the cursor to
“CLALITY EPOS” and press “Set”. The CLALITY EPOS
menu will appear:
SET TERM NO AL L
EXIT
Figure 17: CLARITY EPOS Sub-Menu
VSI-Pro Max 8 POS / Cash Register Interface
19
Page 20

PROGRAMMING
DELTA SONO 3.1
Press the “Up” or “Down” button to move the cursor to
“DELTA SONO 3.1” and press “Set”. The DEL T A SONO
3.1 menu will appear:
DEL T A JOURNAL
DELTA RECEIPT
EPSON JOURNAL
EPSON RECEIPT
EXIT
Figure 18: DEL T A SONO 3.1 Sub-Menu
DRESSER WAYNE
Press the “Up” or “Down” button to move the cursor to
“DRESSER WAYNE” and press “Set”. The DRESSER
WAYNE menu will appear:
POS / CDU
NUCLEUS
EDACOM
Press the “Up” or “Down” button to move the cursor to
“EDACOM” and press “Set”. The EDACOM menu will
appear:
MODEL E90
EXIT
Figure 22: EDACOM Sub-Menu
Press the “Up” or “Down” button to move the cursor to
“MODEL E90” and press “Set”. The MODEL E90 menu
will appear:
MODEL E9010
EXIT
Figure 23: MODEL E90 Sub-Menu
MODEL
Choices: E90, E9010
Figure 19: DRESSER WAYNE Sub-Menu
Press the “Up” or “Down” button to move the cursor to
“POS / CDU” and press “Set”. The POS / CDU menu
will appear:
JOURNAL PRINTER
RECEIPT PRINTER
Figure 20: POS / CDU Sub-Menu
Press the “Up” or “Down” button to move the cursor to
“NUCLEUS” and press “Set”. The NUCLEUS menu
will appear:
Terminal 1
Terminal 2
Terminal 3
Terminal 4
Terminal 5
Terminal 6
Terminal 7
Terminal 8
Figure 21: NUCLEUS Sub-Menu
EPSON GENERIC
Press the “Up” or “Down” button to move the cursor to
“EPSON GENERIC” and press “Set”. The EPSON GENERIC menu will appear:
ST ANDARD
DOUBLE CHAR PRINTER
POLE DISPLAY
POLE DISPLAY 20
POLE VIA PRINTER
RECIEPT PRINTER ONLY
JOURNAL PRINTER ONLY
SLIP PRINTER ONLY
GRAPHIC FILTER
EXIT
Figure 24: EPSON GENERIC Sub-Menu
FUJITSU 9920
Press the “Up” or “Down” button to move the cursor to
“FUJISU 9920” and press “Set”. The FUJISU 9920
menu will appear:
DISPLAY JOURNAL
EXIT
Figure 25: FUJITZU 9920 Sub-Menu
VSI-Pro Max 8 POS / Cash Register Interface
20
Choices: Journal, Receipt
Page 21
PROGRAMMING
GASBOY
Press the “Up” or “Down” button to move the cursor to
“GASBOY” and press “Set”. The GASBOY20-A menu
will appear:
DEVICE CONSOLE
DEVICE ADDRESS 01
EXIT
Figure 26: GASBOY Sub-Menu
DEVICE
Choices: PRINTER, CONSOLE,CSL OLD
DEVICE ADDRESS
Choices: ANY, 01, 02, 03,..., 17
GILBARCO
Press the “Up” or “Down” button to move the cursor to
“GILBARCO” and press “Set”. The GILBARCO menu
will appear:
IBM RDS
Press the “Up” or “Down” button to move the cursor to
“IBM RDS ” and press “Set”. The IBM RDS menu will
appear:
DISPLAY JOURNAL
EXIT
Figure 29: IBM RDS Sub-Menu
DISPLAY
Choices: JOURNAL, RECEIPT, MIXED
MICRELEC
Press the “Up” or “Down” button to move the cursor to
“MICRELEC” and press “Set”. The MICRELEC menu
will appear:
MICRELEC MS SERIES
MICRELEC 9500
EXIT
PC G-SITE
TCRG / 2
TCR 15 G [ OLD FMT ]
TCR 15 G [ NEW FMT ]
PASSPORT
Figure 27: GILBARCO Sub-Menu
IBM 3151 TERMINAL
Press the “Up” or “Down” button to move the cursor to
“IBM 3151 TERMINAL” and press “Set”. The IBM 3151
TERMINAL menu will appear:
DISPLAY MIXED
EXIT
Figure 28: IBM 3151 TERMINAL Sub-Menu
DISPLAY
Choices: JOURNAL, RECEIPT, MIXED
Figure 30: MICRELEC Sub-Menu
Press the “Up” or “Down” button to move the cursor to
“MICRELEC MS SERIES” and press “Set”. The
MICRELEC MS SERIES menu will appear:
OPERA T OR
CUSTOMER
COMBINED
EXIT
Figure 31: MICRELEC MS SERIES Sub-Menu
Press the “Up” or “Down” button to move the cursor to
“MICRELEC 9500” and press “Set”. The MICRELEC9500
menu will appear:
JOURNAL
RECEIPT
CHECK
CREDIT
EXIT
VSI-Pro Max 8 POS / Cash Register Interface
21
Figure 32: MICRELEC 9500 Sub-Menu
Page 22
PROGRAMMING
SOURCE TYPE
Press the “Up” or “Down” button to move the cursor to
“MICROS” and press “Set”. The MICROS menu will
appear:
LOCAL VSS
MICROS IDN NETWORK
MICROS ISN NETWORK
EXIT
Figure 33: MICROS Sub-Menu
MICROS IDN NETWORK
Press the “Up” or “Down” button to move the cursor to
“MICROS IDN NETWORK” and press “Set”. The MICROS IDN NETWORK menu will appear:
DEVICE : PRINTER
DEVICE ADDRESS: ANY
MODE: TAP
EXIT
Figure 34: MICROS IDN NETWORK Sub-Menu
DEVICE
Choices: PRINTER, VIDEO
DEVICE ADDRESS
Choices: ANY, 01, 02, 03,...,13, 14, 15
MODE
SOURCE TYPE
Choices: ANY, 00, 01, 02 ,03,..., 09
SRC ISN GNA
Choices: ANY, 00, 01, 02, 03,..., 32
SRC ISN LNA
Choices: ANY, 00, 01, 02, 03,..., 32
SRC IDN ID
Choices: ANY, 00, 01, 02, 03,..., 15
DESTIN TYPE
Choices: ANY, 00, 01, 02, 03,..., 09
DST ISN GNA
Choices: ANY, 00, 01, 02, 03,..., 32
DST ISN LNA
Choices: ANY, 00, 01, 02, 03,..., 32
DST IDN ID
Choices: ANY, 00, 01, 02, 03,..., 15
NCR
Press the “Up” or “Down” button to move the cursor to
“NCR” and press “Set”. The NCR menu will appear:
Choices: EMULATE,TAP
MICROS ISN NETWORK
Press the “Up” or “Down” button to move the cursor
to “MICROS ISN NETWORK” and press “Set”. The
MICROS ISN NETWORK menu will appear:
SOURCE TYPE : AN Y
SRC ISN GNA : ANY
SRC ISN LNA : ANY
SRC IDN ID : ANY
DESTIN TYPE : ANY
DST ISN GNA : ANY
DST ISN LNA : ANY
DST IDN ID : ANY
EXIT
Figure 35: MICROS IDN NETWORK Sub-Menu
VSI-Pro Max 8 POS / Cash Register Interface
NCR 2113,31 10
NCR 745X [ POLE ]
NCR JRNL PRINTER
NCR RCPT PRINTER
NCR SLIP PRINTER
Figure 36: NCR Sub-Menu
NIXDORF BEETLE
Press the “Up” or “Down” button to move the cursor to
“NIXDORF BEETLE” and press “Set”. The NIXDORF
BEETLE menu will appear:
JOURNAL PRINTER
RECEIPT PRINTER
Figure 37: NIXDORF BEETLE Sub-Menu
22
Page 23
PROGRAMMING
NORAND 1200
Press the “Up” or “Down” button to move the cursor to
“NORAND 1200” and press “Set”. The NORAND 1200
menu will appear:
TITLE DISPLA Y : ON
CONSOLE ID : ANY
WORKING MODE :
EXIT
Figure 38: NORAND 1200 Sub-Menu
TITLE DISPLAY
Choices: ON, OFF
CONSOLE ID :
Choices: ANY, 1, 2, 3, 4, 5, 6, 7, 8
WORKING MODE
Choices: ACK , TAP
NUCLEUS PRINTER
Press the “Up” or “Down” button to move the cursor to
“NUCLEUS PRINTER” and press “Set”. The NUCLEUS
PRINTER” menu will appear:
P ANASONIC
Press the “Up” or “Down” button to move the cursor to
“P ANASONIC” and press “Set”. The P ANASONIC menu
will appear:
MODEL : 6000
WORKING MODE : TAP
EXIT
Figure 41: P ANASONIC Sub-Menu
MODEL
Choices : 6000, 7000, 8000
WOKING MODE
Choices : ACK , TAP
SCHLUMERGER
Press the “Up” or “Down” button to move the cursor to
“SCHLUMBERGER” and press “Set”. The
SCHLUMBERGER menu will appear:
DISPLAY RECEIPT
EXIT
Figure 42: SCHLUMBERGER Sub-Menu
ST ANDARD [Both]
PRINTER WITH POLE
POLE VIA PRINTER
Figure 39: NUCLEUS PRINTER Sub-Menu
OMEGA 2000
Press the “Up” or “Down” button to move the cursor
to “OMEGA 2000” and press “Set”. The OMEGA 2000
menu will appear:
JOURNAL PRINTER
RECEIPT PRINTER
Figure 40: OMEGA 2000 Sub-Menu
DISPLAY
Choices: RECEIPT, CDU[ 2L ], C.D.U.
SHARP
Press the “Up” or “Down” button to move the cursor to
“SHARP” and press “Set”. The SHARP menu will appear.
2590
3100,3110
3220,3221,3250
3310,3311,3550
A-460,A-470
A-550,A-570
A-610,A650
A-750
A-770
Figure 43: SHARP Sub-Menu
VSI-Pro Max 8 POS / Cash Register Interface
23
Page 24
PROGRAMMING
SHARP 750 ER-01PU
Press the “Up” or “Down” button to move the cursor to
“SHARP 750 ER-01PU” and press “Set”. The SHARP
750 ER-01PU menu will appear:
DISPLAY RECEIPT
EXIT
Figure 44: SHARP 750 ER-01PU Sub-Menu
DISPLAY
Choices: RECEIPT, JOURNAL
SHARP ER-A410/420
Press the “Up” or “Down” button to move the cursor to
“SHARP ER-A410/420” and press “Set”. The SHARP ERA410/420 menu will appear:
TAP
EMULATE
TA P US
EMULATE US
SPEDI CCTV
Press the “Up” or “Down” button to move the cursor to
“SPEDI CCTV ” and press “Set”. The SPEDI CCTV menu
will appear:
SET ADDRESS AN Y
EXIT
Figure 48: SPEDI CCTV Sub-Menu
SET ADDRESS
Choices: ANY, 1, 2, 3,..., 255
SUNTRONIC
Press the “Up” or “Down” button to move the cursor to
“SUNTRONIC” and press “Set”. The SUNTRONIC menu
will appear.
890,891,960
2000
Figure 45: SHARP ER-A410/420 Sub-Menu
SHARP UP600/700
Press the “Up” or “Down” button to move the cursor to
“SHARP UP600/700” and press “Set”. The SHARP
UP600/700 menu will appear:
TAP
EMULATE
Figure 46: SHARP UP600/700 Sub-Menu
SICOM
Press the “Up” or “Down” button to move the cursor to
“SICOM ” and press “Set”. The SICOM menu will appear:
SECNET ADDRESS 8
EXIT
Figure 49: SUNTRONIC Sub-Menu
TCI
Press the “Up” or “Down” button to move the cursor to
“TCI” and press “Set”. The TCI menu will appear:
DEVICE ADDRESS 000
EXIT
Figure 50: TCI Sub-Menu
DEVICE ADDRESS
Choices : 000, 001, 002,..., 999
TEC SLIP PRINTER EMULATE
Press the “Up” or “Down” button to move the cursor to
“TEC SLIP PRINTER EMULATE” and press “Set”. The
TEC SLIP PRINTER EMULA TE” menu will appear:
Figure 47: SICOM Sub-Menu
SECNET ADDRESS
Choices: ANY, 1, 2, 3,..., 255
VSI-Pro Max 8 POS / Cash Register Interface
MODEL: TEC SLIP PRINTER
MODE: EMULATING /TAPPING
EXIT
Figure 51: TEC SLIP PRINTER Sub-Menu
24
Page 25
PROGRAMMING
TKMAX
Press the “Up” or “Down” button to move the cursor to
“TKMAXX” and press “Set”. The TKMAXX menu will appear:
JOURNAL PRINTER
RECEIPT PRINTER
Figure 52: TKMAXXSub-Menu
UNIWELL
Press the “Up” or “Down” button to move the cursor to
“UNIWELL UN 4025” and press “Set”. The UNIWELL UN
4025 menu will appear:
DEVICE ADDRESS 000
ANY ADDRESS ON
EXIT
Figure 53: UNIWELL UN 4025 Sub-Menu
VERIFONE
Press the “Up” or “Down” button to move the cursor to
“VERIFONE” and press “Set”. The VERIFONE menu will
appear:
JOURNAL T APPING
RECEIPT TAPPING
JOURNAL EMULATING
RECEIPT EMULATING
Figure 55: VERIFONE Sub-Menu
WEIGHSCALE
Press the “Up” or “Down” button to move the cursor to
“WEIGH SCALE” and press “Set”. The WEIGH SCALE
menu will appear:
A VER Y
MOLENS
LEON LD5204
DEVICE ADDRESS
Choices: 000, 001, 002,..., 999
ANY ADDRESS
Choices: ON, OFF
UP3000/3300
Press the “Up” or “Down” button to move the cursor to
“UP3000/3300” and press “Set”. The UP3000/3300 menu
will appear:
TERMINAL 1
EXIT
Figure 54: UP3000/3300 Sub-Menu
TERMINAL
Choiecs: 1, 2, 3,...,16
Figure 56: WEIGH SCALE Sub-Menu
VSI-Pro Max 8 POS / Cash Register Interface
25
NOTE ?
As we continually add new registers, these
menus are subject to change.
Page 26

PROGRAMMING
5.4 SCREEN SETUP
Press the “Up” or “Down” button to move the cursor to “SCREEN SETUP” and press “Set”. The following
menu will appear:
TEXT GRA YSCALE
BLACKGROUND GRAYSCALE
HORIZONTAL POSITION
VERTICAL POSITION
CLOCK
ON-SCREEN TITLER
LANGUAGE SETTINGS
EXIT
Figure 57: SCREEN SETUP Sub-Menu
TEXT GRAYSCALE
To change the display border and/or the grayscale of the text on screen, press the “Up” or “Down” button to move the
cursor to “TEXT GRA YSCALE” and press “Set”. Cycle through the selections by pressing the “Up” or “Down” buttons.
There are 10 settings to choose from. Make your selection and press “Set” to return to the previous menu.
BACKGROUND GRAYSCALE
To change the display border and/or the grayscale of the text on screen, press the “Up” or “Down” button to move the
cursor to “BACKGROUND GRAY SCALE” and press “Set”. Cycle through the selections by pressing the “Up” or
“Down” buttons. There are 10 settings to choose from. Make your selection and press “Set” to return to the previous
menu.
HORIZONTAL POSITION
To change the horizontal position of the inserted text on-screen, press the “Up” or “Down” button to move the cursor
to “HORIZONTAL POSITON” and press “Set”. Press the “Up” or “Down” buttons to move the text to the desired
horizontal position.
VERTICAL POSITION
To change the vertical position of the inserted text on-screen, press the “Up” or “Down” button to move the cursor to
“VERTICAL POSITION” and press “Set”. Press the “Up” or “Down” buttons to move the text to the desired vertical
position.
NOTE ?
Upon powering up for the first time or when the battery becomes depleted, the on-screen
Time / Date display may be incorrect or have unreadable characters. If this is the case,
enter the clock menu and “Reset Time / Date”. The Time / Date will then show readeable
characters and be unaffected by a Master Reset.
CLOCK
To program the clock's functions, press the “Up” or “Down” button to move the cursor to “CLOCK” and press “Set”.
The following menu will appear:
VSI-Pro Max 8 POS / Cash Register Interface
26
Page 27

PROGRAMMING
T/D DISPLAY ON
TIME FORMAT 12 HOUR
DATE FORMAT MM/DD/YY
DAYLIGHT SAVING DISABLED
SET TIME / DATE
RESET TIME / DATE
T/D LOCKING ON
EXIT
Figure 58: CLOCK Sub-Menu
T/D DISPLAY turns the time/date display on or off. Press the “Up” or “Down” button to move the cursor to “T/D
DISPLAY” and press “Set”. The cursor will start flashing. Press the “Up” or “Down” button to toggle between “ON”
or “OFF” and press “Set” when the desired value is displayed.
TIME DISPLAY selects either 12-hour AM/PM or 24-hour Military Time format with AM/PM. Press the “Up” or
“Down” button to move the cursor to “TIME DISPLAY” and press “Set”. The cursor will start flashing. Press the
“Up” or “Down” button to toggle between time formats and press “Set” when the desired format is displayed.
DATE FORMAT chooses one of the three available formats. Press the “Up” or “Down” button to move the cursor
to “DATE FORMAT” and press “Set”. The cursor will start flashing. Press the “Up” or “Down” button to toggle
between date formats and press “Set” when the desired format is displayed.
DAYLIGHT SAVING selects, for example, UK, USA, Canada, Australia and Tasmania or is disabled. Press the
“Up” or “Down” button to move the cursor to “DAYLIGHT SAVING” and press “Set”. The cursor will start flashing.
Press the “Up” or “Down” button to toggle between values and press “Set” when the desired value is displayed.
SET TIME/DATE sets the clock manually. Press the “Up” or “Down” button to move the cursor to “SET TIME/
DATE” and press “Set”. The time/date will appear and the cursor will start flashing. Press the “Up” and “Down”
button to change the value and press “Set” when the desired value is displayed. The value is selected and the
cursor will advance to the next position. When the desired time/date is displayed, press the “Up” and “Down”
buttons simultaneously to enter the time/date into memory and return to the previous menu.
RESET TIME/DATE resets the clock to the default value. Press the “Up” or “Down” button to move the cursor to
“RESET TIME/DATE” and press “Set” to reset the time/date.
T/D LOCKING turns the time/date locking on or off. If the time/date locking is turned on, make sure that the time
and date format selected is the same as the ATM time and date format. Press the “Up” or “Down” button to move
the cursor to “T/D LOCKING” and press “Set”. The cursor will start flashing. Press the “Up” or “Down” button to
toggle between “ON” or “OFF” and press “Set” when the desired value is displayed.
If the T/D LOCKING is turned on, make sure that the time format selected is the same as the register’s time/date
format. If the T/D LOCKING is turned on, the desired channel of VSI-Pro Max 8 will monitor the incoming data string. If
it finds a valid time and date in one or two consecutive lines, it will set the clock to whatever time/date it finds. A valid
time has the following formats:
HH:MM, HH:MM:ss
HH:MM AM, HH:mm:ss AM
HH:MM PM, HH:MM:ss PM
where hh is a number between 0 and 12 ( 24 if either AM or PM not present )
A valid date has the same format as for date display and has either “/” or “-" as a separator .
ON-SCREEN TITLER
Press the “Up” or “Down” button to move the cursor to “ON-SCREEN TITLER” and press “Set”. The following menu will
appear:
VSI-Pro Max 8 POS / Cash Register Interface
27
Page 28
PROGRAMMING
TITLER OFF
TITLE
EXIT
Figure 59: ON-SCREEN TITLER Sub-Menu
TITLER
To change the status of the on-screen titler, press the “Up” or “Down” button to move the cursor to “TITLER” and
press “Set”. The cursor will start flashing. Select either “ON” or “OFF” by pressing the “Up” or “Down” button. After
making a selection, press “Set”. This will return the cursor to the non-flashing mode. Now select “EXIT” to return to
the previous menu.
TITLE
The VSI-Pro gives you the option of a 40-character display for easy register identification in addition to the actual
register transaction data.
To create a title, press the “Up” or “Down” button to move the cursor to “TITLE” and press “Set”. You will see a row of
40 boxes and the first box will be flashing.
To change the character in the first position, press the “Up” or “Down” buttons to cycle through the alpha-numeric
selections from the following list of available characters.
ABCDEFGHIJKLMNOPQRSTUVWXYZ
abcdefghijklmnopqrstuvwxyz =:.+-*/9876543210
The solid white box is used for a blank space. Make your selection and press “Set”. This will advance to the next
block, repeat until you have entered the desired title. When finished, simultaneously press and release the “Down” &
“Up” buttons to enter your title into memory. The white boxes will disappear and your title will be displayed as it will
appear on-screen. Press the “Up” or “Down” button to move the cursor to “EXIT” and press “Set” to return to the
previous menu.
NOTE ?
Remember, enabling the TITLE will limit text insertions to 10 lines maximum.
LANGUAGE SETTINGS
Selecting Language Settings will give you the following menu;
LANGUAGE ENGLISH
EXIT
Figure 60: Language Selection
The language selection options are English or Spanish
EXIT
Press the “Up” or “Down” button to move the cursor to “EXIT” and press “Set” to return to the previous menu.
VSI-Pro Max 8 POS / Cash Register Interface
28
Page 29
PROGRAMMING
5.5 TEXT DISPLAY
This menu will give you more control over the actual text block formatting and its appearance on the screen.T o access
the menu, press the “Up” or “Down” button to move the cursor to “TEXT DISPLAY” and press “Set”. The following
sub-menu will appear:
SCREEN BLANK 20
DISPLAY LINES 1 0
DISPLAY CHARACTER/LINE 40
DISPLAY FORMAT TOP
LINE COMPRESS OFF
SPACE COMPRESS OFF
LEFT JUSTIFIED OFF
SCROLL DELAY OFF
DISPLAY ON
EXIT
SCREEN BLANK
Choices: NONE, 6, 12, 20, 30, 60, 120, 180, 300
Figure 61: Text Display Sub-Menu
This is the amount of time that the VSI-Pro text display will remain on-screen after a transaction before blanking itself
off (not the video picture, just the register transaction data) until the next transaction.
To change the SCREEN BLANK setting, press the “Up” or “Down” button to move the cursor to “SCREEN BLANK”
and press “SET”. The cursor will begin flashing. Press the “Up” or “Down” buttons to cycle through the selections.
Press “Set” when the desired time is displayed. The cursor will stop flashing and you may continue programming.
NOTE ? Choosing “NONE” means No Blanking. The VSI-Pro will display the last
transaction until a new transaction is performed.
DISPLAY LINES
You have the choice of how many lines of text to display on-screen for register transactions. The choices are up to
11 lines.
To change the DISPLA Y LINES setting, press the “Up” or “Down” button to move the cursor to “DISPLAY LINES” and
press “Set”. The cursor will begin flashing. Press the “Up” or “Down” buttons to cycle through the selections. Press
“Set” when the desired number is displayed. The cursor will stop flashing and you may continue programming.
NOTE ? All register transaction data will scroll up regardless of the number of lines you choose to
display on-screen and the more lines you display on-screen, the greater the amount of time that the
transaction data will be recorded. However, some applications may limit the number of lines and the
size of the on-screen display. If you are using an on-screen title, it will occupy Line 1, leaving 10 lines
for the text insertion. If you enable the on-screen Time/Date then this takes one additional line also.
DISPLAY CHARACTER / LINE
This setting allows you to change the number of characters per line from 10 to 40.
VSI-Pro Max 8 POS / Cash Register Interface
29
Page 30

PROGRAMMING
DISPLA Y FORMA T
If “TOP” is selected which is the default, the data scrolls from the top most line down to the selected number of lines
displayed. “T/D” and/or “TITLE” is displayed at the top of the screen. If “BOTTOM” is selected then the data scrolls
up from the bottom most line to the top of the screen and “T/D” and/or “TITLE” is displayed at the bottom of the
screen.
LINE COMPRESS
NOTE ? Set your Exceptions first before enabling this feature.
The VSI-Pro automatically compresses the spaces in a line first as it reaches 40 characters. With LINE COMPRESS
“ON”, the VSI-Pro will additionally remove multiple spaces and then vowels from the text to further compress the
display as necessary.
To make this selection, position the arrow in front of “LINE COMPRESS” and press and release “Set”. The arrow will
start flashing. Cycle through “ON” or “OFF” by pressing either the “Up” or “Down” button, and press “Set” when your
choice is displayed. The cursor will stop flashing and you can continue programming.
SPACE COMPRESS
Space Compress allows you select the number of maximum spaces next to each other in a line. The selections are
1,2,3,4,5 and OFF. If you select “1” then if three spaces are shown on the receipt the VSI-Pro will delete 2 and only
show 1 space between characters on the video and on the output data to the DVR.
LEFT JUSTIFICATION
When LEFT JUSTIFIED is “ON”, the VSI-Pro will start each line of text with no leading spaces from the left margin of
the text display block.
SCROLL DELAY
Scroll delay ensures that lines of text remain on-screen a minimum of 0.5 seconds. This is especially useful with
registers that run at a high baud rate, time-lapse VCRs in extended record modes, switchers, or multiplexers.
Sometimes, the register can produce characters so quickly that they can scroll up too fast on the screen to be
recorded. When SCROLL DELAY is “ON”, the VSI-Pro slows down this data feed just enough to insure that each line
of text is recorded.
The choices for SCROLL DELAY are either “ON” or “OFF”. To make this selection, position the arrow in front of
“SCROLL DELA Y” and press and release “Set”. The arrow will st art flashing. Cycle through “ON” or “OFF” by pressing
either the “Up” or “Down” button, then press “Set” when your choice is displayed. The cursor will stop flashing and
you can continue programming.
DISPLAY
You have the choice to globally turn “ON” or “OFF” the complete VSI-Pro text insertion function. This means no data
will be visible on the monitor if you select DISPLAY “OFF”. However, if you select the DISPLAY “OFF”, you can still
command each exception independently to either display on-screen or not through its program setup menu under
“EXCEPTION REPORTS”. You may also choose to enable an alarm output to occur during an exception while not
displaying the exception data through the program set-up in the ALARM OUTPUTS menu. With the display “OFF”,
the VSI-Pro will still perform all functions as programmed, for example, exception reporting will still function, but the
information will not appear on-screen unless programmed to do so in the EXCEPTIONS REPORT menu. Also the
data will not show in the history buffer if not displayed.
EXIT
Press the “Up” or “Down” button to move the cursor to “EXIT” and press “Set” to return to the previous menu.
VSI-Pro Max 8 POS / Cash Register Interface
30
Page 31

PROGRAMMING
5.6 COMMUNICATION
This was discussed briefly in the section under “REGISTER SELECT” and will be fully explained here. When you
choose your register type under the REGISTER SELECT menu, this automatically formats the VSI-Pro to the appropriate settings needed to communicate with your register. There may be times when you will need to amend these
settings for a specific register.
To access the Communication menu, press the “Up” or “Down” button to move the cursor to “COMMUNICATION”
and press “Set”. The following menu will appear:
REGISTER SETTINGS
NETWORK SETTINGS
Figure 62: COMMUNICA TION Sub-Menu
The “Register Settings” selects and allows you to program the communication and protocol parameters used to
communicate with the POS or Cash Register using the DB9 connector. The “Network Settings” selects and allows
you to program the communication and protocol parameters used to network the desired channel of VSI-Pro Max 8 to
other channel.
REGISTER SETTING
NETWORK PROGRAM
NETWORK MASTER RESET
EXIT
T o access the Register Setting menu, press the “Up” or “Down” button to move the cursor to “REGISTER SETTING”
and press “Set”. The following menu will appear:
INTERFACE TYPE RS-232
RX BAUD RATE AUTO
TX BAUD RATE AUTO
TX PROTOCOL ASCII
PARITY NONE
DATA BITS 8
HW HANDSHAKING OFF
SW HANDSHAKING NONE
AUTO LINEFEED O N
EXIT
INTERFACE TYPE
Choices: RS-232, PASSIVE TAP, RS-485
T o set the interface type for your p articular device, press the “Up” or “Down” button to move the cursor to “INTERF ACE
TYPE” and press and release “Set”. The cursor will start flashing. You can now use the “Up” or “Down” button to make
your selection. When your selection appears, press “Set” again. The cursor will stop flashing and you can proceed to
the next menu item for programming. RS-232 and RS-485 are defined by IEEE standards, however , the Passive Tap
is a high impedance (100K) input with full diode protection. Refer to Table 1 and 1A for respective pin-out s of RS-232
or RS-485.
Figure 63: Register Settings Sub-Menu
RX BAUD RATE
Choices: AUTO, 1200, 2400, 4800, 9600, 14.4K, 19.2K, 28.8K, 38.4K, 57.6K, 115.2K
To set the baud rate for your particular device, press the “Up” or “Down” button to move the cursor to “RX Baud
Rate” and press “Set”. The cursor will start flashing. You can now use the “Up” or “Down” button to make your
selection. When your selection appears, press “Set” again. The cursor will stop flashing and you can proceed to the
next menu item for programming.
VSI-Pro Max 8 POS / Cash Register Interface
31
Page 32

PROGRAMMING
TX BAUD RA TE
Choices: AUTO, 1200, 2400, 4800, 9600, 14.4K, 19.2K, 28.8K, 38.4K, 57.6K, 115.2K
This feature allows you to set the transmit baud rate to a separate device if you are looping the data back out of the
VSI-Pro.
To set the TX Baud Rate for your particular device, press the “Up” or “Down” button to move the cursor to “TX BAUD
RATE” and press “Set”. The cursor will start flashing. You can now use the “Up” or “Down” buttons to make your
selection. When your selection appears, press “Set”. The cursor will stop flashing and you can proceed to the next
menu item for programming.
TX PROTOCOL
This selection allows you program the protocol or format of the data that is transmitted out the TX port. This is only
available for registers that do not use the TX line of the POS/Cash Register port for emulate modes. When using the
register port for tapping then the data output in ASCII mode simulates the function of the VSI-Pro previous versions
and utilizes the same pinout connection. When using the desired channel of VSI-Pro Max 8 in the Master mode this TX
line is used to output the data in the VSI-ADD protocol to be compatible with the Hydra output to DVRs.
Choices: ASCII, VSI-ADD, VNet, Dallmeier, MVDR, Norbain Vista
NOTE: The choices in the above selection will change depending on the progreamming selections in the Network
Settings submenu. In the “Master” mode the data can be sent out the VSI-ADD format which is the standard AVE
protocol for register data which is supported by all AVE DVRs and many 3rd party DVR manufactures. The VNET
format is only support by the AVE Vnetworker PC Software. The MVDR format is a subset of the VNET format that is
supported by the AVE MVDR line of DVRs. The Dallmeier setting supports communication to the Dallmeier DVR in
Commanding mode. ASCII is not supported in the Master mode selection.
PARITY
Choices: NONE, ODD, EVEN
Press the “Up” or “Down” button to move the cursor to “P ARITY” and press “Set”. The cursor will st art flashing. Press
the “Up” or “Down” button to cycle through the values and press “Set” when the desired value is displayed.
DATA BITS
Choices: 7 or 8
If you select 7 Data Bits, you must select “ODD” or “EVEN” Parity in the Parity menu. Press the “Up” or “Down” button
to move the cursor to “DATA BITS” and press “Set”. The cursor will start flashing. Press the “Up” or “Down” button to
cycle through the values and press “Set” when the desired value is displayed.
HW HANDSHAKING
Choices: ON, OFF
Hardware handshaking is an electrical signal that tells the cash register or computer that the desired channel of VSIPro Max 8 is ready to receive data. It may not be necessary and/or need not be connected to an outgoing signal from
the cash register or computer since the channel of VSI-Pro Max does not require handshaking. The channel of VSI-Pro
Max 8 handshaking signal is always true signally the cash register or computer to send data.
Handshaking guarantees that the internal buffer is not over run or text is not lost. Most AVE interfaces do not
support this function. Also since the VSI-Pro has a 128K buffer this feature is generally not required.
VSI-Pro Max 8 POS / Cash Register Interface
32
Page 33

PROGRAMMING
SW HANDSHAKING
Choices: NONE, XON/XOFF, ACK/NAK
Software handshaking is a command that is embedded in the data stream that is read and/or sent by the channel of
VSI-Pro Max 8 that controls the flow of data to or from an external device.
AUTO LINEFEED
Choices: ON, OFF
Auto Linefeed makes the VSI-Pro append a CR/ LF after each displayed line. The default of this function is “ON”, but
if you would like to disable it then press the “Up” or “Down” button to move the cursor to “AUTO LINEFEED” and
press “Set”. The cursor will start flashing. Press the “Up” or “Down” button to cycle through the values and press “Set”
when the desired value is displayed.
NETWORK SETTINGS
Press the “Up” or “Down” button to move the cursor to “NETWORK SETTINGS” and press “Set”. The following menu will
appear:
TYPE OFF
ADDRESS N/A
PROTOCOL REGCOM 9.6K
BAUD RATE 9600
EXIT
Figure 64: Network Settings Sub-Menu
Press the “Up” or “Down” button to move the cursor to “TYPE” and press “Set”. The cursor will start flashing. Press the
“Up” or “Down” button to cycle through the values and press “Set” when the desired value is displayed.
TYPE
Choices: GENERIC, MASTER, SLAVE, OFF
GENERIC
This is the default setting of the VSI-Pro Max 8. Also the default Jumper setting of the Channel of VSI-Pro Max 8
connects the Network Serial RS-232 to the DB9 Pin 8 and outputs the Exception Data from this port which can be
connected to a DVR or Serial Printer. Also the Network RJ45 port outputs the same dat a via RS-485.
For normal exception data output to be backward compatible with all VSIs set Protocol for ASCII.
MASTER
This setting configures the Network RJ45 port to be a Master which is formerly called Hydra. The Master uses RS-
485 bi-directional communication to slave devices using either the Regcom or Vnet protocol.
The “OUTPUT” RS-232 data with the selected format is sent out the DB9 TXD Pin 3 for RS-232. In the RS-232 mode
you can still use the Channel of VSI-Pro Max to interface to a POS or Cash Register but only in the tap mode using the
DB9 RXD Pin 2 only to recieve the data. Emulation modes require the use of both the RXD and TXD so this mode is
prohibited while using the Channel of VSI-Pro Max 8 in the Master mode.
NOTE: The default RegCom/VNET address of the internal Cash Register port of the channel of VSI-Pro MAX 8 is N/A.
Therefore you must select what address you require to be assigned to the Master Mode channel of VSI-Pro MAX 8 data
output so the DVR will assign its register data to the proper camera.
The “OUTPUT” RS-485 data with the selected format is sent out the DB9 Pins 4 &6 and the baud rate, etc, is set via the
communications setting not in this menu. In this mode the channel of VSI-Pro Max 8 can not connect to any POS or
Cash Register.
VSI-Pro Max 8 POS / Cash Register Interface
33
Page 34

PROGRAMMING
Related Settings
“ADDRESS” selects the RegCom address of the internal Cash Register port
“PROTOCOL” which the choices are REGCOM or VNET
“TX PROTOCOL” which the choices will be MVDR, DALLMEIER, VSI-ADD, VNET
“BAUD RA TE” 1200- 115.2K
SLAVE
This setting confirgures the Network RJ45 port to be a Slave which is formerly called Regcom or Vnetworker. The Slave
uses RS-485 bi-directional communication to the Master unit.
Related Settings
“ADDRESS” choices are 1-16
“PROTOCOL” which the choices are REGCOM or VNET
“BAUD RATE” 1200 - 115.2K
OFF No data is sent out the Network Port either via RS-232 or RS-485.
ADDRESS
Choices: N/A, 1-16
This select the address or camera number when configured as a slave device. The selections are 1-16 so that the POS/
Cash Register is assigned a unique number up to a maximum of 16 to send the data over the RS-485 network back to a
Master unit or a Hydra device which then sends all the data to the DVR or PC for recording.
PROTOCOL
Choices: REGCOM or VNET
This setting selects the protocol of the RS-485 Network. There are two protocols to be compatible with two different
devices and functions. The REGCOM can be selected for compatibility with the Regcom networking device. The
Regcom device can be set for either 9600 or 57600 baud rate to match the installed device settings. However when
not using the Regcom device and using only the Channel of VSI-Pro Max 8 then any baud rate can be set. The Regcom
Protocol only has the ability to receive register data only .
The VNET can be configured for compatibility with the Vnetworker or Networker devices. A baud rate of 19200 can
be only used for these external devices. However when used with a desired channel of VSI-Pro Max 8 device and no
external Vnetworker or Networker devices are used then any baud rate can be used. The Vnetworker protocol has the
ability to receive register data, Program remote the desired channel of VSI-Pro Max 8 devices, receive remote alarming
and Time/Date information.
BAUD RATE
Choices: 1200 - 115200 baud rate
This sets the comunication speed for the Network port in all configurations. Care must be given to selecting the
proper baud rate for the T ype of operation you wish and configuration you set for the desired channel of VSI-Pro Max 8.
EXIT
Press the “Up” or “Down” button to move the cursor to “EXIT” and press “Set” to return to the previous menu.
VSI-Pro Max 8 POS / Cash Register Interface
34
Page 35

PROGRAMMING
NETWORK PROGRAM
The “Network Program” selects and allows you to program or setting slave channel of VSI-Pro Max 8.The Sub-Menu of
Network Program can be accessed when the TYPE sub-menu in NETWORK SETTINGS menu is set to MASTER.
NOTE: Y ou can not change the Network Protocol or Address of any slave from this menu or the units will stop
communicating. If you wish to change these settings you must do by independently connecting the PC Programming software to each channel. The default Network Protocol is RegCom 9600 so all must be the same if
you do change any.
Y ou will be able to change the Network Protocol and address of the Master Channel which is Channel 1 so if
you do and it is not the same as all the slaves then will not be able to communicate to any slaves. If you add
additional VSI-Pro Max via the RS-485 network they also must be the same and address unique or greater
than 8. You can add another VSI-Pro Max 8 but then you independently change the addresses to 8-16 via the
PC Programming software.
If you set channel 1 to have Hydra or Master Output to the DVR using the VSI-ADD protocol you must reset this
via the on-screen menu back to default via the on-screen menu to use the PC Programming software for all
channels
To access the NETWORK PROGRAM sub-menu, press the “Up” or “Down” button to move the cursor to “NETWORK
PROGRAM” and press “Set”. The following menu will appear:
ADDRESS ID 1
ADDRESS ID
Choices: N/A,1,2,3,4,5,...,16
This select to the channel that want to programming.
To select the Address ID, press the “Up” or “Down” button to move the cursor to “ADDRESS ID” and press “Set”. The
cursor will start flashing. Then press the “Up” or “Down” button to cycle through the values and press “Set” when the
desired address is displayed.
SELECT CHANNEL
This select when you want to access “Main Programming Menu of Slave Channel” that selected from “ADDRESS ID”
sub-menu.
The SELECT CHANNEL can operate when the RS-485 network protocol of master identical with RS-485 network protocol of slave channel that selected from ADDRESS ID sub-menu.
T o access “Main Programming Menu of Slave Channel”, press the “Up” or “Down” button to move the cursor to “SELECT
CHANNEL” and press “Set”. The following menu will appear:
Figure 65: Network Program Sub-Menu
REGISTER SELECT
SCREEN SETUP
TEXT DISPLAY
COMMUNICATION
EXCEPTION REPORT
ALARM OUTPUTS
TEST/DEMO MODE
DOWNLOAD/UPLOAD SETUP
HELP
SELECT CHANNEL
EXIT
Figure 66: Main Menu of Slave Channels
VSI-Pro Max 8 POS / Cash Register Interface
35
Page 36

PROGRAMMING
When you want to exit from Main Programming Menu of Slave Channel, press the “Up” and “Down” and “Set” button
in the same time, or lightly press and hold in the two button to the left (Up & Down ). While holding down these buttons,
press and release the “Set” button. Then release the other buttons. The “NETWORK PROGRAM” sub-menu will
appear.
EXIT
Press the “Up” or “Down” button to move the cursor to “EXIT” and press “Set” to return to the “COMMUNICATION” sub
menu.
NETWORK MASTER RESET
The “Network Master Reset” selects and allows you to master reset the slave channel of VSI-Pro Max 8.The Sub-Menu
of Network Master Reset can be accessed when the TYPE sub-menu in NETWORK SETTING menu is set to MASTER.
To access the NETWORK MASTER RESET sub-menu, press the “Up” or “Down” button to move the cursor to “NET WORK MASTER RESET” and press “Set”. The following menu will appear:
ADDRESS ID 1
DO MASTER RESET
EXIT
Figure 67: Network Master Reset Sub-Menu
ADDRESS ID
Choices: N/A,1,2,3,4,5,...,16, ALL
This select to the channel that want to master reset.
To select the Address ID, press the “Up” or “Down” button to move the cursor to “ADDRESS ID” and press “Set”. The
cursor will start flashing. Then press the “Up” or “Down” button to cycle through the values and press “Set” when the
desired address is displayed.
DO MASTER RESET
This select to master reset the channel that selected from ADDRESS ID.
T o select the DO MASTER RESET, press the “Up” or “Down” button to move the cursor to “DO MASTER RESET” and
press “Set”.
If the ADDRESS ID sub-menu of Network Master Reset is set to address 1, 2, ..., 16. The DO MASTER RESET can
operate when the RS-485 network protocol of master identical with RS-485 network protocol of slave channel that
selected from ADDRESS ID sub-menu.
DO MASTER RESET cannot change the TYPE, ADDRESS ID and RS-485 network protocol of the Channel of VSI-Pro
Max 8. When you want to change TYPE, ADDRESS ID and RS-485 network protocol of the desired channel of VSI-Pro
Max 8.Y ou must use the VSI-Pro PC Software program ONL Y.
EXIT
Press the “Up” or “Down” button to move the cursor to “EXIT” and press “Set” to return to the “COMMUNICA TION” Sub
Menu.
VSI-Pro Max 8 POS / Cash Register Interface
36
Page 37

PROGRAMMING
MASTER RESET and PROGRAMMING NETWORK SETTINGS MENU USING A PC
Y ou can use a Laptop PC and VSI-Pro PC Software to master reset or programming the VSI-Pro Max 8 in the desired
channel.Plug DB9 Male of RS-232 cross cable to Channel of VSI-Pro Max 8 that want to master reset or programming.
VSI-Pro Max8(DB-9M) PC Side(DB-9F)
RXD 2 ------------------ 3 TXD
TXD 3 ------------------ 2 RXD
GND 5 ------------------ 5 GND
Figure 68: VSI-Pro Max8 with PC/Laptop Connection
Software Installation
Click Setup.exe for install the VSI-Pro PC Software
After installation is complete, run the program. The following window will be loaded.
Figure 69: Main Page Menu
Click the Tab “Remote” and you will see the following Menu.
Figure 70: Remote Menu
VSI-Pro Max 8 POS / Cash Register Interface
37
Page 38

PROGRAMMING
Click on “Set Comport” button and then you will see the Com-
munication Setting Page, Figure 71A.Select comport installed
on your computer in comport drop down list menu and then
click on “Baudrate Scan” button.
If VSI-Pro PC Software can establish communication with
the channel of VSI-Pro Max 8 that want to master reset or
programming. The following Page, Figure 71B,will appear :
Figure 71A:Communication Setting Page
Figure 71B: VSI-Pro PC Software can establish communication with VSI-Pro Max 8
VSI-Pro Max 8 POS / Cash Register Interface
38
Page 39

PROGRAMMING
Master Reset each Channel of VSI-Pro Max 8
Click on “Master Reset” button. If VSI-Pro PC Software can master reset the channel of VSI-Pro Max 8 that selected.The
following Page will appear:
Figure 72: Master Reset Page
NOTE : The master channel of VSI-Pro Max 8 can not connect with VSI-Pro PC Software, then you can not use VSI-Pro
PC Software to master reset the master channel of VSI-Pro Max 8 .
RECOMMEND : Y ou should be set to channel one ,RS-232-1, as master ONLY. Because the channel one is connected
with four front pannel push buttons of VSI-Pro Max 8, then you can use the four push buttons to do master reset the
master channel of VSI-Pro Max 8.
VSI-Pro Max 8 POS / Cash Register Interface
39
Page 40

PROGRAMMING
Programming the Network Settings menu with internal RS-485 communication
Using VSI-Pro PC Software to do master reset.The TYPE, ADDRESS ID and internal RS-485 network protocol will be
reset to default,TYPE is set to GENERIC, ADDRESS is set to N/A, and PROT OCOL is set to N/A .So, internal RS-485
communication of VSI-Pro Max 8. Will not work. You can define TYPE, ADDRESS ID and internal RS-485 network
protocol using VSI-Pro PC Software program ONL Y.
Click the T ab “COMMUNICA TION” and you will see the following Menu.
Figure 73A: Communication Menu Page
To install the internal RS-485 communication in each channel of the VSI-Pro Max 8.In the Network Settings Part of
COMMUNICA TION T ab.
The TYPE drop down list menu, select MASTER or SLA VE.
The VSI-Pro Max 8 can have only one the master channel.
The ADDRESS drop down list menu, select 1,2,3,...,16.
The PROTOCOL drop down list menu select REGCOM 9.6K or REGCOM 57.6K or VNET.
If the TYPE drop down list menu is set to SLAVE. The internal RS-485 network protocol,PROTOCOL drop down list
menu, will be identical to the MASTER channel of the VSI-Pro Max 8.
VSI-Pro Max 8 POS / Cash Register Interface
40
Page 41

PROGRAMMING
When setting is complete. Click the Tab “REMOTE” again. Then Figure 71B will appear. Click on the “DOWNLOAD”
button in “REMOTE” T ab for download the configurations to the channel of VSI-Pro Max 8 that selected.
When the download complete.The following page will appear .
Figure 73B: Download Complete Page
VSI-Pro Max 8 POS / Cash Register Interface
41
Page 42

PROGRAMMING
5.7 EXCEPTION REPORTS
EXCEPTION REPORT OVERVIEW
The Exception Report gives you the option to assign an on-screen flag, trigger an alarming device, or send data to
another serial device on any questionable transaction that you have preprogrammed into the desired channel of VSI-Pro
Max 8. The desired channel of VSI-Pro Max 8 will allow programming of up to 24 separate exceptions. These exceptions
can be VOIDS, REFUNDS, COUPONS, P AID OUT , RETURNS, individual departments, specific items, or any transaction
that you determine (by programming) to be “exceptional” or questionable.Y ou may even set ranges for the exceptions.
For example, all transactions over $100, between $8.00 and $25.00, or lower than $10 and greater than $25.00, all
transactions by a specific cashier, or whatever transactions you need to watch exceptionally close.
The following is a brief overview of how to set up Exception Reports.
1. On the main-menu, press the “Up” or “Down” button to move the cursor to “EXCEPTION REPORT” and press “Set”.
2. On the sub-menu, press the “Up” or “Down” button to move the cursor to “EXCEPTION HISTORY” and press “Set”.
3. On the sub-menu, press the “Up” or “Down” button to move the cursor to “DVR SELECTION” and press “Set”. Thenn
select the model of DVR you are using.
4. Exit and press the “Up” or “Down” button to move the cursor to “SET EXCEPTION” and press “Set”.
5. To select the Exception No. that you wish to program, press the “Up” or “Down” button to move the cursor to the
desired Exception No. then press “Set”. Press the “Up” or “Down” button to toggle between the choices.
6. Make sure that DISPLAY is set to “ON” for any exception data to be saved in the Exception History .
7. Program the Exception String in the Exception Report to compare the data that shows on the screen for time
search mode in the Exception History menu.
8. After you have set up the desired configurations, press the REC button on the DVR to record video into a hard drive
or use alarm output for triggering the DVR at record input.
9. The monitor should display a flashing REC message and the REC button will light up indicating the DVR is in the
recording mode.
ON-SCREEN FLAGS
Y ou have several options for programming your Exception Report. The first option typically has all programmed exceptions
display a flashing asterisk in the upper right corner of the on-screen display , or reversing the entire text display. This onscreen flag is controlled through the ALARM OUTPUTS menu. Y ou assign a corresponding alarm to an exception and set
the parameters for the flag in this menu. Y ou do this by choosing “DISPLA Y” for the corresponding exception number and
selecting “ON”. With this option, all questionable transactions (exceptions) will be “flagged” with the flashing asterisk.
Y ou can then review these exceptions by putting your DVR or VCR in play and pressing the FF button. This will give you
a fast scan of the tape and you can go into normal play when you see the flashing asterisk and view that transaction in
real time or slow play or frame by frame, depending on the type of playback options of your particular DVR or VCR.
HARD ALARM OUTPUT
The VSI-Pro allows you to program exceptions to trigger external alarming devices such as DVRs, Time-lapse VCR’s,
quads, enunciators, LED’s etc. Using the ALARM OUTPUT you can have your DVR record only exceptions, or have an
alarming quad go to full screen on an exception, or even trigger a buzzer to alert you that an exception has occurred.
VSI-Pro Max 8 POS / Cash Register Interface
42
Page 43

PROGRAMMING
DVR or PRINTER OUTPUT
There may be situations where you want to send all the data to store on a DVR or do not want cashiers or other
employees to know what triggers an exception. In this case, the desired channel of VSI-Pro Max 8 provides a separate
serial output that will send data to a remotely located DVR or serial printer . If you turn the on-screen display off and the
output on and you have a remote serial printer hooked up to the desired channel of VSI-Pro Max 8, then, whenever an
exception is reported, it is sent out to the serial printer only. The printer will give you a hard copy printout of the
questionable transaction with the time and date. With this hard copy printout of the exception report, you can then review
the tape by going directly to that exception’s time.
The serial output of the desired channel of VSI-Pro Max 8
can be programmed to send out the entire transction. The
output can be connected to the other equipment such as
DVRs, computers, phone line transmissions or digital storage
devices for later retrieval.The VSI-Pro also has a “triggered
text” feature. This feature allows programmed text or control
characters to be sent out when an exception occurs to trigger
devices like DVR’s to save the data file for future review . Other
computer devices can wait for this specified text string and
do other functions at this time via the serial communication
process.From the main programming VSI-Pro Max 8 menu,
press the “Up” or “Down” button to move the cursor to
“EXCEPTION REPORT” and press and release “Set”. The
following menu will appear:
EXCEPTION HISTORY
Press the “Up” or “Down” button to move the cursor to “ EXCEPTION HISTORY ” and press “Set”. The following menu
will appear:
TOT AL EXCEPTIONS
EXCEPTION HISTORY
SET EXCEPTION
OUTPUT ON
TIME STAMP OFF
DUPLICATE LINE OFF
SET SCROLL MATCHING
EXIT
Figure 74: EXCEPTION REPORT Sub-Menu
TOT AL EXCEPTION 000
VIEW EXCEPTIONS
DVR SELECTION
TIME SEARCH
OUTPUT EXCEPTIONS
CLEAR HISTORY
EXIT
This is not a selection for just displays the total exception
count kept in the Exception History Buffer maximum 800.
VIEW EXCEPTIONS
This displays the buffered exceptions on-screen, starting with the oldest exception in the buffer. Press the “Up” or
“Down” button to move the cursor to “VIEW EXCEPTIONS” and press “Set”. Once in the exception displaying
screen, press the “Up” or “Down” button to scroll to the next screen. Press “Set” to exit and return to the previous
menu. Remember, you must turn the DISPLAY “ON” for exceptions to be saved in history.
11:09:45A 9/12/05 MO N REC
11:09:45 A 9/12/05 NO SALE
11:13:12 A 9/12/05 RETURN
11:20:23 A 9/12/05 NO SALE
11:22:21 A 9/12/05 CANCEL
11:26:18 A 9/12/05 NO SALE
**** END OF EXCEPTION ****
12-09-2005 11:30:05
Figure 76: Display of View Exceptions
Figure 75: EXEPTION HISTORY Sub-Menu
@ NOTE For any exception you must program Display “ON” for any exception data tobe saved in
the Exception History.
VSI-Pro Max 8 POS / Cash Register Interface
43
Page 44

PROGRAMMING
DVR SELECTION
Press the “Up” or “Down” button to move the cursor to “DVR SELECTION” and press “Set”. The following menu will
appear:
NONE
DMS-3001
DVR-3011,3021
MVDR3000, MVDR5000
EXIT
Figure 77: DVR Selection Sub-Menu
DVR-3011 / DVR-3021 / MVDR3000 / MVDR5000
Press the “Up” or “Down” button to move the cursor to “DVR-3011,3021” and press “Set”. An asterisk appears to
indicate your selection.
DEST ID 1
SCR ID 32
EXIT
Figure 78: DVR-3011,3021,MVDR3000,MVDR5000 Sub-Menu
DEST ID and SRC ID
Choices: 1 through 32 Note:The DEST ID and SRC ID can not be the same value or can not send any command.
TIME SEARCH
Press the “Up” or “Down” button to move the cursor to “TIME SEARCH” and press “Set”. The following sub-menu
will appear:
NO SALE
PREVIOUS PAGE
11:20:23 A 9/12/08
11:22:21 A 9/12/08
11:22:21 A 9/12/08
11:22:21 A 9/12/08
11:22:21 A 9/12/08
NEXT PAGE
EXIT
Figure 79: Display of TIME SEARCH
Use the “Up” or “Down” button to scroll to the desired exception in the transaction history. As you select the lline
the exception string will display at the top of the page.
Then press “Set” and the DVR will be commanded by the desired channel of VSI-Pro Max 8 to go to the selected
transaction via its Time/Date Search function. Therefore you must make sure the T/D of the DVR is very close to the
setting of the VSI-Pro Max or their will be an effor in the actual search time. V erify the proper connection to the DVR
from the diagram on the following page.
EXAMPLE
Define “NO SALE” as an exception string In Exception No. 2 , DISPLA Y to be “ON”, and define OPERA TOR “IN”.
If the screen is displayed “NO SALE”, the VSI-Pro will keep this displayed line on Exception History .
VSI-Pro Max 8 POS / Cash Register Interface
44
Page 45

RS-232
RXD
PROGRAMMING
VSI-Pro Max 8
CAMERA
VIDEO OUT
VIDEO IN
RS-232
TXD
VIDEO IN
VSI-Pro Max DB9M DVR DB9F
3 ------------------------- 2
5 ------------------------- 5
or
8 ------------------------- 2
MONITOR
5 ------------------------- 5
Figure 80: VSI-Pro Max 8 with DVR Control Connections
NOTE:
Each Channel of VSI-Pro Max 8 can control the DVR RS-232 port from either Pin 3 or Pin 8 depending on the configuration. Default setting is to Pin 3. In the Cash Register “T apping Mode” the channel of VSI-Pro Max 8 uses Pin 3 to send
out auxillary ASCII data and DVR control signals. Therefore in this mode you can operate the Channel of VSI-Pro Max 8
in the “Slave Mode” and connect to control the DVR via Pin 3. You can not use this Channel of VSI-Pro Max 8 in the
“Master Mode”. If you select “Master Mode” this will have priority and when you select DVR Time/Data Search you will
generate an error message.
In the Cash Register “Emulate Mode” the Channel of VSI-Pro 8 Max uses Pin 3 to connect to the cash register supplying
the proper emulate handshaking signals. Therefore Pin 8 must be connected to the DVR to command the Exception
Search mode. Therefore you can not use this Channel of VSI-Pro Max 8 in “Slave Mode” and utilize the DVR control
feature while connecting in “Emulate Mode”. If you choose the “Slave Mode” this will have priority over the DVR control
mode and will generate an Error Message when DVR Time/Date is selected. The same will be true if “Master Mode” is
selected.
OUTPUT EXCEPTIONS
This selection allows you to have the buffered exceptions sent out for printing. This is a global setting for all exceptions, but you also need to turn on the output for each independent exception.
CLEAR HISTORY
This selection clears all the buffered exceptions and resets the TOTAL EXCEPTIONS counter.
EXIT
Press the “Up” or “Down” button to move the cursor to “EXIT” and press “Set” to return to the previous menu.
SET EXCEPTION
Press the “Up” or “Down” button to move the cursor to “SET EXCEPTION” and press “Set”. The following submenu will appear:
VSI-Pro Max 8 POS / Cash Register Interface
45
Page 46

PROGRAMMING
EXCEPTION NO. 1
DISPLAY ON
OUTPUT ON
HISTORY BUFFER ON
EXCEPTION STRING
NO SALE
RANGE
00,000,000.00 - 00,000,000.00
OPERATOR NONE
EXIT
Figure 81: SET EXCEPTION Sub-Menu
EXCEPTION NO.
Choices: 1 through 24
T o select the Exception No. that you wish to program, press the “Up” or “Down” button to move the cursor to “EXCEPTION NO.” and press “Set”. The cursor will start flashing. Use the “Up” & “Down” button to sequence through the
choices. Make your selection and press “Set”. The cursor will stop flashing and you may continue to the next menu
item.
DISPLAY
Choices: ON, OFF
The DISPLA Y item lets you control whether or not this p articular exception is displayed on the video monitor. Please
understand that if you are not using a remote serial printer and if you do not turn on the Exceptions display here, you
will not have the on-screen flag and consequently no record of the exception when it occurs.
To make your selection, press the “Up” or “Down” button to move the cursor to “DISPLAY” and press “Set”. The
cursor will start flashing. Press the “Up” or “Down” button to toggle between “ON” or “OFF”. Make your selection and
press “Set”. The cursor will stop flashing and you may continue to the next menu item.
APPLICATION NOTE
If the display of the Exception is turned off here, the exception data will actually be erased
from the screen. This feature can be used to generate what we refer to as “Negative
Exceptions”, allowing the removal of unwanted text from the screen. See “Negative
Exceptions” that follows.
OUTPUT
Choices: ON, OFF
The OUTPUT controls the RS-232 data from the VSI-Pro. Typically this is sent to a remote Serial Printer to provide
a hard copy of Exceptions with time and date on it. This data can also be sent out to a computer with appropriate
software and give you the ability to analyze data. You could also use an auto answer modem and have the data sent
to a central office or even to your home. The serial devices must have the same Baud Rate, Parity, and Data Bits as
the VSI-Pro for optimum performance of data transfer.
To make your selection, press the “Up” or “Down” button to move the cursor to “OUTPUT” and press “Set”. Press the
“Up” or “Down” button to toggle between “ON” or “OFF”. Make your selection and press “Set”. The cursor will stop
flashing and you may continue to the next menu item.
VSI-Pro Max 8 POS / Cash Register Interface
46
Page 47

PROGRAMMING
HISTORY BUFFER ON/OFF
The history buffer stores all the exceptions that are occur in the VSI-Pro. Sometimes this can be very large and
consume a large portion of the memory of the VSI-Pro. This can be used to automatically search a compatible
DVR, upload to a PC to save or print out and view on screen on the VSI-Pro. This setting allows the user to
enable or disable this feature as to conserve memory allocation for other features.
PROGRAMMING NOTE
The following sections defines the Exceptions Strings, the Operator and the Range. The
Exception String is programmed first, then Range is defined and finally the Operator is
selected. The VSI-Pro looks at the Exceptions String first, and if there is data that matches,
it then checks to see if a Range has been defined.
EXCEPTION STRING
The VSI-Pro compares the data that is printed to video to the data entered in the Exception String. The Exception
String can also be used without a defined range. Example of this would be to assign a word “ VOID” as an exception.
VSI-Pro will look for that string so range definition is not necessary. However, exception string “ VOID” could be
further defined by assigning a Range, i.e. all “VOID” over $20.
You can also define a global exception to flag all negative transactions. An example of this using the Samsung ER4715 would
Samaung ER-4715 register an assigned Exception string “..-” will flag all Void, Refund, Merchandise Return and
Paid out to the monitor.
You can also use wild card symbol “.”, a centered dot on any data location. An example of this would be instead of
assigning eight different exception strings for dept 00 to dept 07, you can assign only one exception string e.g. “dept
.”.”. That wild card exception string will handle exceptions for all eight departments.
To program the exception string, press the “Up” or “Down” button to move the cursor to “EXCEPTION STRING” and
press “Set”. The first 40 character exception will become active after flashing. Program in your exception string.
be the following exception to flag any transaction that contains a “-”,
or negative sign. For example, in the
NOTE ?
Remember to enter your Exception String based on the way that data prints to video,
including spaces. Also remember pressing “Set” advances to the next position. Pressing
“Down” and “Up” at the same time enters the string into memory and returns to the
menu for further programing.
TIP
If you make a mistake and need to erase a character, pressing “Up” and “Set” at the
same time will change the character back to a blank space.
VSI-Pro Max 8 POS / Cash Register Interface
47
Page 48

PROGRAMMING
NEGATIVE EXCEPTION
You can remove unwanted text from the screen using the VSI-Pro. The VSI-Pro displays data in the text block 11
lines by 40 characters wide for total of 440 characters. To remove unwanted messages from the register data you
first determine how the unwanted messages prints to the video. For example, a typical message which scrolls on the
customer display or appears on the video monitor.
The removing of the above string is referred to as the Negative Exception. Follow the following steps to program the
negative exception. Turn the display off for that exception. In the Exception String enter the words “WELCOME TO
XYZ SUPER” exactly as they appear on the screen, including spaces.
NOTE ?
Only 40 characters are allowed in each Exception String, including blank spaces.
RANGE
Choices: 00,000,000.00-99,999,999.99
The Range defines the limits of the Operator. These are numeric only. As you can see from the previous examples,
the range has two separate fields that are separated by a double-sided arrow. This format must be followed.
To program the range, press the “Up” or “Down” button to move the cursor to “RANGE” and press “Set”. The first “0”
in the range starts to flash. This means it is active and ready for programming. Press the “Up” or “Down” button to
cycle through the values and press “Set” when the desired value is displayed. This will advance the active block to
the next character. While you are on an active block, pressing the “Up” and “Set” buttons simultaneously will return
that block back to a blank, which is designated by a solid white box. Y ou can follow this format to program your range.
When you have finished and want to set this range into the VSI-Pro memory, simultaneously press and release the
“Up” and “Down” buttons.
When you are ready to exit and continue on, simultaneously press and release the “Up” and “Down” buttons. This will
set the range in the VSI-Pro memory and exit you back to the previous menu.
OPERATOR
Choices: NONE, IN, OUT
The Operator determines the behavior of the Range. Think of the Operator in mathematical terms. Setting the
correct range and specifying “IN” or “OUT” will make the Operator perform “greater than”, “less than”, “equal to”, “in
the range”, or “out of the range” calculations.
With this version of the VSI-Pro, you can define ranges for your exceptions and have the VSI-Pro alarm when an
exception falls within the range’s parameters or outside the range of the two numbers. The choices are “IN”, “OUT”,
and “NONE”. To program the operator, press the “Up” or “Down” button to move the cursor to “OPERATOR” and
press “Set”. The cursor will start flashing. Press the “Up” or “Down” button to cycle through the values and press
“Set” when the desired value is displayed.
VSI-Pro Max 8 POS / Cash Register Interface
48
Page 49

PROGRAMMING
EXAMPLES FOR SETTING EXCEPTION
EQUAL
Suppose Exception #2 would be flag all $10 sales on Register Department 1. This would be the settings for this
Exception: (For these examples, we are using the Samsung ER-4715 Electronic Cash Register)
Exception No. 2
Display ON
Output ON,OFF (depending on presence of serial printer)
Exception String 1 . . .
Range 0010.00-0010.00
Operator IN
OUT RANGE
Suppose Exception #3 would “FLAG” every transaction on Department 2 that is under 10 cents and over $100 dollars.
This would be the settings for this Exception:
Exception No. 3
Display ON
Output ON, OFF (Depending on presence of serial printer).
Exception String 2 . . .
Range 0000.10 -0099.99
Operator OU T
IN RANGE
Suppose Exception # 5 would flag all transactions between $50.00 & $100.00 on Department 3:
Exception No. 3
Display ON
Output ON or OFF (Depending on presence of serial printer).
Exception String 3 ...
Range 0049.99-0099.99
Operator IN
With this exception all sales between $50 and $100 dollars will be flagged.
VSI-Pro Max 8 POS / Cash Register Interface
49
Page 50

PROGRAMMING
GREATER THAN
This example will show you how to program an exception to flag all sales in department 5 greater than $100 dollars
Exception No. 2
Display ON
Output ON or OFF
Exception String 5...
Range 0000.01- 0099.99
Operator OUT
Now whenever anyone rings a sale of $100 or more on Department 5, the transaction will be flagged.
LESS THAN
This example will show you how to program an exception to flag all sales in Department 6 of less than $100. 00:
Exception No. 4
Display ON
Output ON or OFF
Exception String 6
Range 0000.01-0099.00
Operator IN
OUTPUT
Choices: ON, OFF
This is global output to send data to the serial printer . When “ON” is selected all the data will be send to the serial printer
regardless of what setting of out put has selected in the individual output in set exception menu. When “OFF” is selected
only those exception will send to the serial printer whose out put is “ON” under set exceptions menu for individual
exceptions. To turn output “ON” or “OFF”, press the “Up” or “Down” button to move the cursor to “OUTPUT” and press
“Set”. Press the “Up” or “Down” button to cycle through the values and press “Set” when the desired value is displayed.
TIME ST AMP
Choices: ON, OFF
If TIME STAMP is selected “ON” then printer will print the exception with time stamp flag, otherwise just print the
Exception. T o turn TIME ST AMP “ON” or “OFF”, press the “Up” or “Down” button to move the cursor to “TIME ST AMP” and
press “Set”. Press the “Up” or “Down” button to cycle through the values and press “Set” when the desired value is
displayed.
DUPLICATE LINE
Choices: ON, OFF
If this selection is turned on then any transaction line that is the exact duplicate of the previous one is not displayed or
processed by the exception processor and is basically ignored. Be careful in selecting this function because many POS/
Cash Register have a “Repeat” key to ring up multiple items. In this case true transactions will be deleted and not shown.
This function is useful when used with Customer Displays that continuously refresh the display with identical data and
not related to new transactions and causes unecessary data to be sent to the interface.
SCROLL MATCHING
Scroll Matching is a feature to better remove those advertising scrolling messages on the customer display of
cash registers so they do not clutter up the video recording.
VSI-Pro Max 8 POS / Cash Register Interface
50
Page 51

PROGRAMMING
SCROLL MATCHING ON
TIMEOUT 1S
EXIT
Figure 82: Scroll Matching Sub Menu
Exception Strings (with Scroll Matching OFF) are compared to any text in a line or any text after a CR LF up to 40
characters. If the line is longer than 40 characters we insert a virtual LF CR. Therefore an exception string can not be
longer than 40 characters. If you use a wild card in front of or behind of a normal exception string then no matter what
letter is recieved in that position of the wild card it will be accepted as part of exception string.
Typically to erase these scrolling messages we would use the Negative Exception feature and turn “Off” the display
after we entered in the words with or without wildcards. However this left many unwanted bits and pieces of the
scrolling message visible because the transactions interrupt the scrolling message and then when the transaction is
completed the scrolling message goes back to the exact place in the message where it was interrupted. This is
different than normal transactions for they always start with a the description, quantity and price usually in one line.
In scrolling messages we may not have LF and sometimes no CR. This has the first character of every line usually
different in the scrolling message and even partial words starting at any place within any one of the words of the
scrolling message. Therefore conventional Exceptions even with the wild card does not remove all.
Scroll Matching “On” changes the way the Channel of VSI-Pro Max 8 processes exceptions. Scroll matching only works
with advertising messages that are scrolling in the video by typically shifting accross a customer display . Messages that
are displayed in full, then erased in full will have not be erased by scroll matching and conventional Negative Exception processing will have to be used for this message or messages. Therefore if the message is scrolling then the
Channel of VSI-Pro Max 8 will erase the entire message if the scrolling continues within the Time Out setting. The default
Time Out is 1 second but is programmable if the display scrolls slower than normal. When the Time Out exceeds the
programmed time the internal memory buffer of the scrolling message is erased and the process is repeated. This allows
for new or different messages to be fully erased by the scroll matching feature.
EXIT
Press the “Up” or “Down” button to move the cursor to “Set” to return to the previous menu.
5.8 ALARM OUTPUTS
To access alarm output, press the “Up” or “Down” button to move the cursor to “ALARM OUTPUTS” and press “Set”.
The following sub-menu will appear:
ALARM NO. 1
ALARM TRIGGER EX 1
NORMAL STATE NO
ALARM DURATION 20
FLAG TYPE FLASH *
FLAG DURATION 010
TRIGGERED TEXT
VIDEO LOSS OFF
EXIT
Figure 83: ALARM OUTPUTS Sub-Menu
NOTE: The ALARM OUTPUTS menu controls not only the formatting of the external alarms
but also the formatting of the on-screen flags assigned to individual exceptions.
VSI-Pro Max 8 POS / Cash Register Interface
51
Page 52

PROGRAMMING
ALARM NO.
Choices: 1, 2, 3, 4, 5, 6, 7, 8, 9, 10, 11, 12, 13, 14, 15, 16
The VSI-Pro Max allows you up to 16 alarms that may be used with any of the user programmed exceptions.
However there are only 2 hardwired alarm outputs and these correspond to Alarm 1 & 2 only. The other 14 alarms
can be used to send trigger text, serial data out or flash the screen. To select the Alarm Number that you want to
program, press the “Up” or “Down” button to move the cursor to “ALARM NO.” and press “Set”. The cursor will start
flashing. Press the “Up” or “Down” button to cycle through the values and press “Set” when the desired value is
displayed.
ALARM TRIGGER
Choices: 1, 2, 3, 4, 5, 6, 7, 8, 9, 10, 11, 12, 13, 14, 15, 16, 17, 18, 19, 20, 21, 22, 23,24 , 1-12, 13-24, 1-24, RTS
An Alarm Trigger is the source of activity programmed to activate a certain alarm. The alarm trigger tells the VSI-Pro
Max what exception to use to trigger the alarming device or the on-screen flag.
Choices: Exceptions 1, 2, 3, 4, 5, 6, 7, 8, 9, 10, 11, 12, 13, 14, 15, 16, 17, 18, 19, 20, 21, 22, 23, and 24 (alarms when
data is received that matches what you have set in these exception strings).
Exceptions 1-12: alarms when data is received that matches any data set in Exception 1-12.
Exceptions 13-24: alarms when data is received that matches any data set in Exception 13-24.
Exceptions 1-24: alarms when data is received that matches any data set in Exception.
RTS
External alarm input. The VSI-Pro Max has 1 alarm input, if you are not using the handshaking function. A contact
closure to ground on pin 7 will trigger this alarm. Coupled with the RTS Triggered text, you can now display a 40
character message from an external alarm input.
1
The RTS alarm input can be connected to the drawer of a cash register or safe to alarm and
send the message "DRAWER OPEN" to the screen if the drawer is open too long.
To select the alarm trigger that you want to program, press the “Up” or “Down” button to move the cursor to “ALARM
TRIGGER” and press “Set”. The cursor will start flashing. Press the “Up” or “Down” button to cycle through the
values and press “Set” when the desired value is displayed.
NORMAL STATE
RTS APPLICATION NOTE
Choices: NO (Normally open), NC (Normal closed)
There are two choices: NO (normally open) or NC (normal closed). These selections determine whether the alarm
outputs will act as a normally open switch or a normally closed switch.
T o select the Normal S tate that you want to program, press the “Up” or “Down” button to move the cursor to “NORMAL
STATE” and press “Set”. The cursor will start flashing . Press the “Up” or “Down” button to cycle through the values
and press “Set” when the desired value is displayed.
VSI-Pro Max 8 POS / Cash Register Interface
52
Page 53

PROGRAMMING
ALARM DURATION
This is the amount of time in seconds that the alarm will remain activated once it is triggered. The selections for alarm
duration are: PULSE, 6, 12, 20, 30, 60, 120, 180, and 300 seconds. (PULSE sends a 200mS alarm pulse to the alarm
device.)
To select the amount of time in seconds that you want to program the alarm duration, press the “Up” or “Down” button
to move the cursor to “ALARM DURATION” and press “Set”. The cursor will start flashing. Press the “Up” or “Down”
button to cycle through the values and press “Set” when the desired value is displayed.
FLAG TYPE
This feature allows you to insert a visual alarm flag on each exception that you program to aid in the review of the
video tape. This flag can appear as an asterisk “*” , a flashing asterisk, reverse text, or flashing reverse text.
To make your selection, press the “Up” or “Down” button to move the cursor to “FLAG TYPE” and press “Set”. The
cursor will start flashing. Press the “Up” or “Down” button to cycle through the values and press “Set” when the
desired value is displayed.
FLAG DURATION
Choices: 6, 12, 30, 60, 120, 180,..., 300
This is the amount of time in seconds that the on-screen FLAG, either the Asterisk or the Reverse mode, will remain
activated once it is triggered.
NOTE?
Flag Duration is independent of the Alarm Duration. Flag Duration is the amount of time
the on-screen flag will remain on after activation, while, Alarm Duration is the amount of
time that the hard-wired Alarm Output remains activated after it is triggered.
To select the amount of time in seconds that you want to program for the flag duration, press the “Up” or “Down”
button to move the cursor to “FLAG DURATION” and press “Set”. The cursor will start flashing. Press the “Up” or
“Down” button to cycle through the values and press “Set” when the desired value is displayed.
TRIGGERED TEXT
A Triggered Text is a data string that associates with one of the 16 alarms or with external RTS alarm. When the
alarm is triggered by a source, the associated string is sent out and/or displayed, if enabled respectively. Each
Triggered Text can contain up to 40 printable ASCII data. If non-printable data (control code) is included, each
control code occupies 3 printable spaces. Therefore, only 13 control codes maximum can be programmed in one
Triggered Text. T o program the TRIGGERED TEXT, go to the ALARM OUTPUTS sub-menu. Select desired ALARM
NO or RTS for external alarm. Then go to the TRIGGERED TEXT sub-menu.
DISPLA Y TEXT OFF
OUTPUT TEXT OFF
RTS TRIGGERED DELA Y 30S
SET TRIGGERED TEXT
EXIT
Figure 84: TRIGGERED TEXT Sub-Menu
VSI-Pro Max 8 POS / Cash Register Interface
53
Page 54

PROGRAMMING
DISPLAY TEXT
Choices: ON, OFF
Press the “Up” or “Down” button to move the cursor to “DISPLAY TEXT” and press “Set”. The cursor will start
flashing. Press the “Up” or “Down” button to cycle through the values and press “Set” when the desired value is
displayed. Selecting “OFF” will not display any exception text on the video output.
OUTPUT TEXT
Choices: ON, OFF
Press the “Up” or “Down” button to move the cursor to “OUTPUT TEXT” and press “Set”. The cursor will start
flashing. Press the “Up” or “Down” button to cycle through the values and press “Set” when the desired value is
displayed. Selecting “OFF” will not send any exception text to the serial printer.
RTS TRIGGERED DELAY
Choices: OFF, 1S, 5S, 10S, 20S, 30S, 1M, 5M, 10M
Press the “Up” or “Down” button to move the cursor to “RTS TRIGGERED DELAY” and press “Set”. The cursor will
start flashing. Press the “Up” or “Down” button to cycle through the values and press “Set” when the desired value is
displayed. Selecting “OFF” will give no delay and will trigger the alarm immediately upon RTS closure..
This function introduces a time delay for the RTS Trigger Input before initiating an alarm condition. The alarm must
be continuous for the entire time of the delay setting or the time out will be reset. This is useful to connector to cash
drawers or safe doors and wait a programmable amount of time before sounding the alarm. Leaving cash drawers or
safe doors open are indicative of theft or simple forgetfullness and an alarm condition will deter this behavior.
SET TRIGGERED TEXT
Press the “Up” or “Down” button to move the cursor to “SET TRIGGERED TEXT” and press “Set”. The following submenu will appear:
DISPLAY TEXT OFF
OUTPUT TEXT OFF
RTS TRIGGERED DELA Y OFF
SET TRIGGERED TEXT
EXIT
Figure 85: Set Triggered Text Main-Menu
You can enter 2 lines with 40 alpha numeric text on each line. You can also enter non-printable data (control code)
instead of triggered text. Each control code occupies 3 charactors, therefore you can enter 13 control codes in a line.
To enter control code, first print up arrow ^ follwed by 2 hex digit. For example, hex code 01 has to be entered like ^
01. Press “Up” and “Down” simultaneously to exit.
VIDEO LOSS
Choices: Manual, 1s, 2s, 3s, 4s, 5s, 10s, 20s, 30s, 1M
Video Loss allows the each channel of VSI-Pro Max 8 to generate an alarm condition when low or lost video occurs.
When set for manual the alarm follows the state of the video loss, when set for 1s-1M this means the video must be lost
continuously for that period of time before an alarm is triggered. The alarm mode is a timed mode so once the video loss
alarm is triggered the alarm time out must expire and get another video loss to retrigger the alarm.
EXIT
Press the “Up” or “Down” button to move the cursor to “EXIT” and press “Set” to return to the previous menu.
VSI-Pro Max 8 POS / Cash Register Interface
54
Page 55

PROGRAMMING
5.9 TEST/DEMO MODE
The TEST/DEMO MODE provides you with several ways to test the each channel of VSI-Pro Max 8 and demonstrate
its capabilities as a cash register interface. Press the “Up” or “Down” button to move the cursor to “TEST/DEMO MODE”
and press “Set”. The following sub-menu will appear:
PORT 1 TEST
DATA CAPTURE
REGISTER DEMO
VERSION ID
EXIT
Figure 86: TEST/DEMO MODE Sub-Menu
PORT 1 TEST
Sending and receiving data performance can be analyzed under the PORT 1 TEST sub-menu. Press the “Up” or
“Down” button to move the cursor to “PORT 1 TEST” and press “Set”. The following sub-menu will appear:
RECEIVE [ RX ] TEST
TRANSMIT [ TX ] TEST
RX/TX TEST
BAUD RATE SCAN
EXIT
Figure 87: PORT 1 TEST Sub-Menu
RECEIVE [ RX ] TEST
The purpose of this test is to determine that if each channel of VSI-Pro Max 8 is receiving the data or not. Press the “Up”
or “Down” button to move the cursor to “RECEIVE [ RX ] TEST”. The following display will appear (example only):
RX BAUDRA TE : AUTO
TX B AUD RATE : 2400
P ARITY : NONE
DATA BIT : 8
HANDSHAKING : OFF
RECEIVING :
BAUDRATE DETECTION..
Figure 88: RECEIVE [ RX ] TEST Display
Receiving data will be appear in three sperate lines, scrolling from right to left. The first line is the actual ASCII data
coming from the register while last two lines are HEX conversion of ASCII dat a. If you do not receive any data, check
the connections between the Channel of VSI-Pro Max 8 and Register or any additional interfacing device.
Press “Set” to return to the previous menu.
NOTE ?
In the above or below tests, you can stop the scrolling data by holding down either
“Up” or “Down” button.
VSI-Pro Max 8 POS / Cash Register Interface
55
Page 56

PROGRAMMING
TRANSMIT [ TX ] TEST
The purpose of this test is to determine that if the Channel of VSI-Pro Max 8 is able to transmit data or not. Press the
“Up” or “Down” button to move the cursor to “TRANSMIT [ TX ] TEST” and press “Set”. The following display will appear
(example only):
If the Channel of VSI-Pro Max 8 transmitting data you will see some predefined ASCII character on the screen. If you
don’t see any characters on the screen, check the connections and try again.
Press “Set” to return to the previous menu.
RX / TX TEST
In the RX/ TX test the Channel of VSI-Pro Max 8 echos whatever it receives. Press the “Up” or “Down” button to move the
cursor to “RX/TX TEST” and press “Set”. The following display will appear (example only):
RX BAUDRA TE : AUTO
TX B AUD RATE : 2400
P ARITY : NONE
DATA BIT : 8
HANDSHAKING : OFF
TRANSMITTING :
BAUDRATE DETECTION..
Figure 89: TRANSMIT [ TX ] TEST Display
RX BAUDRA TE : AUTO
TX B AUD RATE : 2400
P ARITY : NONE
DATA BIT : 8
HANDSHAKING : OFF
ECHOING :
BAUDRATE DETECTION..
Figure 90: RX /TX TEST Display
Press “Set” to return to the previous menu.
BAUD RATE SCAN
The Baud Rate Scan test can scan the baud rate of your register. Press the “Up” or “Down” button to move the cursor
to “BAUD RATE SCAN” and press “Set”. The following display will appear (example only):
RX BAUDRA TE : AUTO
TX BAUDRATE : 2400
P ARITY : NONE
DATA BIT : 8
HANDSHAKING : OFF
BAUDRATE SCAN :
BAUDRATE DETECTION..
Figure 91: Baudrate Scan Display
Enter a transaction from the register. The Channel of VSI-Pro Max 8 will detect the baud rate and display it in front of RX
Baud rate.Press “Set” to return to the previous menu.
EXIT
Press the “Up” or “Down” button to move the cursor to “EXIT” and press “Set” to return to the previous menu.
VSI-Pro Max 8 POS / Cash Register Interface
56
Page 57

PROGRAMMING
DATA CAPTURE
This feature allow user to store the data either internal memory of the Channel of VSI-Pro Max 8 or some external data
storing device. Press the “Up” or “Down” button to move the cursor to “DA T A CAPTURE” and press “Set”. The following
sub-menu will appear:
CAPTURE TO PORT 1
CAPTURE TO MEMORY
DUMP MEMORY
EXIT
Figure 92: DA T A CAPTURE Sub-Menu
Press “Set” to return to the previous menu.
CAPTURE TO PORT 1
This feature redirect the incoming data to the Channel of VSI-Pro Max 8 to its output ( Pin 3 of AT type RS-232 female
connector ) where that data can be stored to data storing devices (e.g. PC). This feature is useful to store non-RS 232
format data. Press the “Up” or “Down” button to move the cursor to “CAPTURE TO PORT 1 and press “Set”. The following
display will appear (example only):
RX BAUDRA TE : AUTO
TX B AUD RATE : 2400
P ARITY : NONE
DATA BIT : 8
HANDSHAKING : OFF
BAUDRATE DETECTION..
Figure 93: CAPTURE TO PORT 1 Display
Press “Set” to return to the previous menu.
CAPTURE TO MEMORY
This feature allow you to store the data in the internal memory of the Channel of VSI-Pro Max 8. Y ou can store up to 20
kilobytes of data in the internal memory of the Channel of VSI-Pro Max 8. Power up the VSI-Pro Max 8 for 24 hours prior
to download of data. This will provide VSI-Pro Max 8’s internal battery a full charge to hold dat a in its memory . Press the
“Up” or “Down” button to move the cursor to “CAPTURE TO MEMORY” and press “Set”. The following display will appear
(example only):
RX BAUDRA TE : AUTO
TX B AUD RATE : 2400
P ARITY : NONE
DATA BIT : 8
HANDSHAKING : OFF
BAUDRATE DETECTION..
Figure 94: CAPTURE TO MEMORY Display
Press “Set” to return to the previous menu.
NOTE ?
Each Channel of VSI-Pro Max 8 can hold up to 120 kilobytes of data to make sure that you
only transfer the data which is in correct format.
VSI-Pro Max 8 POS / Cash Register Interface
57
Page 58

PROGRAMMING
NOTE ? Any Programming or data transfer of any kind can overwrite the saved data in memory.
DUMP MEMORY
You can upload any saved information from the Channel of VSI-Pro Max 8 memory to any PC or some specific
communication devices using appropriate upload cable. To upload the information into a PC you must have any
communication software which can transfer the binary data. Press the “Up” or “Down” button to move the cursor to
“DUMP MEMORY” and press “Set”. The Channel of VSI-Pro Max 8 will start uploading the data.
REGISTER DEMO
This demonstration simulates transaction data from a register . This is used to demonstrate the each Channel of VSI-Pro
Max 8’s capabilities with just a monitor and camera without having a register hooked up. When the demo mode is active
the Channel of VSI-Pro Max 8 thinks the data is actually coming from a real register. You can use this demo data to
configure exceptions and alarms to be fully functional for a complete customer demonstration.
Press the “Up” or “Down” button to move the cursor to “REGISTER DEMO” and press “Set”. Y ou will see the following;
Figure 95: Register Demo
Sub-Menu
Selecting “Characters 19 or 37” will give you two options of 19 or 37 characters per line.
Selecting “Type” will give you the choices of a demo from a Fast Food Resturant, Convenience Store, Grocery , Pizza
Shop, Coffee Shop or a Retail Store.
If you select “DEMO ON POWER UP” as “ON” then pressing the “Reset” or powering up or down will have no effect
on the demo mode and will continuously work until disabled by this menu selection. If you connect the Channel of VSIPro Max 8 to a cash register and it sends data to the Channel of VSI-Pro Max 8 during this demo mode then the demo
mode will also be disabled until you press “Reset” or power down and up again.
Selecting “Start Demo” will exit the proramming mode immediately and st art to display the data of the selected demo.
VERSION ID
When selected, this will display the version of software in use by the each Channel of VSI-Pro Max 8 shown detail
(example below).
EXIT
CHARACTERS 19 or 37
TYPE FAST FOOD
DEMO ON POWER UP OFF
START DEMO
EXIT
VSI-PRO Version 14.00 R12
08/26/2010
Press the “Up” or “Down” button to move the cursor to “EXIT” and press “Set” to return to the previous menu.
VSI-Pro Max 8 POS / Cash Register Interface
58
Page 59

PROGRAMMING
5.10 DOWNLOAD/UPLOAD SETUP
This feature lets you upload or download data between two VSI-Pro Max’s or a VSI-Pro Max 8 and a PC. This feature is
especially helpful on multi-interface installations. You can program single channel of VSI-Pro Max 8 and download the
data to another channel of VSI-Pro Max 8 with the download/upload feature and a data transfer cable. The cable is made
up of two male DB-9 connectors and the pin-out is below. NOTE: This feature is only available to like versions and
release. Therefore you can only program a VSI-Pro Max V er. 14 R2 with a same exact VSI-Pro Max or errorenous dat a
will occur.
DOWNLOAD/UPLOAD SETUP USING VSI-Pro Max TO VSI-Pro Max
To insure that the DOWNLOAD/UPLOAD process is accomplished, you need to access the programming menu for
both VSI-Pro Max, so each VSI-Pro Max needs a video input and a monitor. The optimum way to perform the
DOWNLOAD/UPLOAD process would be to have a system set up with two separate cameras and monitors and the
programmed VSI-Pro Max with the download data cable attached. The VSI-Pro Max programming data is stored
internally in a battery backed 128K SRAM. This would allow you to program one VSI-Pro Max on-site and bring the
programmed VSI-Pro Max back to the shop or office and program additional VSI-Pro Maxs quickly. We realize this
may not always be possible to do and that there may be a need for field programming. The only difficulty with the field
DOWNLOAD/UPLOAD process is accessing the programming menus of both VSI-Pro Max simultaneously .
The use of the diagram in Figure 87 will let you perform the DOWNLOAD/UPLOAD process in the field. For this, you will
need a short BNC to BNC cable approximately a foot long, the data cable, and a monitor that can be used next to the
VSI-Pros.
CAMERA IN
DOWNLOAD/UPLOAD DA TA CABLE
PIN 2 ------------- PIN 3
PIN 3 ------------- PIN 2
BNC TO BNC CABLE
PIN 5 ------------- PIN 5
VIDEO OUT TO MONITOR
Figure 96: Download/Upload Data Cable
Figure 97: DOWNLOAD/UPLOAD SETUP
Using VSI-Pro Max to VSI-Pro Max
The PROGRAMMED VSI-Pro Max will upload data to the UNPROGRAMMED VSI-Pro Max. In the configuration in
the Figure 87, you can get the programming menus for both VSI-Pro Max on the screen at the same time. Use the
front panel shortcut to position the text block from the PROGRAMMED VSI-Pro Max on the left side of the screen. To
do this, press and hold down “Up”, then press and release “Reset” and then release “Up”. Now, by using the “Up” and
“Down” buttons you can move the display side to side on the screen. Move the text block as far to the left as you can
and press “Set” to exit. To move the display to the top of the screen, press and hold down “Set” and press and release
“Reset”, then release “Set”. Now by using the “Up” and “Down” buttons you can move the display up and down on the
screen. Move the display to the top of the screen. When you have it in the correct position, press “Set” to exit.
Go to the UNPROGRAMMED VSI-Pro and follow the same instructions to move the display to the right side of the
screen. After you have both displays positioned properly, the next step is to bring up both programming menus.
Let’s bring up the PROGRAMMED VSI-Pro Max first. To do this, simultaneously press and hold “Up” and “Down” and
press and release “Reset”, then release “Up” and “Down”. This will bring up the main-menu and it should be on the
top left of the screen. Now go to the UNPROGRAMMED VSI-Pro Max and do the same thing. You should now have
both programming menus side by side.
NOTE ?
These two menus may overlap, but should not be a problem.
VSI-Pro Max 8 POS / Cash Register Interface
59
Page 60

PROGRAMMING
T o proceed with the DOWNLOAD/UPLOAD SETUP, we will configure the UNPROGRAMMED VSI-Pro first. From the
main-menu, press the “Up” or “Down” button to move the cursor to “DOWNLOAD/UPLOAD SETUP” and press “Set”. The
following sub-menu will appear:
DOWNLOAD SETUP
UPLOAD SETUP
UPDATE FIRMWARE
EXIT
Figure 98: DOWNLOAD/UPLOAD SETUP Sub-Menu
Press the “Up” or “Down” button to move the cursor to “DOWNLOAD SETUP” and press “Set”. The following submenu will appear. Move to the cursor to “DOWNLOAD SETUP” and press “Set” and the display “DOWNLOAD
SETUP...” will appear:
DOWNLOAD SETUP
UPLOAD SETUP
UPDATE FIRMWARE
EXIT
DOWNLOAD SETUP ...
Figure 99: DOWNLOAD SETUP Sub-Menu & Display
The UNPROGRAMMED VSI-Pro Max is now waiting to receive data from the PROGRAMMED VSI-Pro Max.
Now go to the main-menu of the PROGRAMMED VSI-Pro Max and follow the previous instructions to get to “UP-
LOAD SETUP” and press “Set”. The following sub-menu will appear. Move to the cursor to “UPLOAD SETUP” and
press “Set” and the display “UPLOAD SETUP...” will appear:
DOWNLOAD SETUP
UPLOAD SETUP
UPDATE FIRMWARE
EXIT
UPLOAD SETUP ...
Figure 100: UPLOAD SETUP Sub-Menu & Display
The data transfer will begin and you will have a screen count down of the status that reads:
Programmed VSI Unprogrammed VSI
UPLOADING ... DOWNLOADING ...
01
01
The count will end at 100. When this prompt clears the screen, the data transfer is complete. Press “Reset” to exit
this menu on both VSI-Pro Max’s.
Now go to the main-menu of the previously UNPROGRAMMED VSI-Pro Max on the right side of the screen. Enter
the EXCEPTIONS menu. You should see your exceptions and other programmed data just as they were on the
original PROGRAMMED VSI-Pro Max.
NOTE : This feature are not support with VSI-Pro Max 8.
VSI-Pro Max 8 POS / Cash Register Interface
60
Page 61

PROGRAMMING
DOWNLOAD/UPLOAD SETUP USING A PC
Y ou can use a Laptop PC and A VE’s IC, HyperTerminal or equivalent communications program to store data from each
channel of VSI-Pro Max 8 to a file. This file can then be uploaded to other channel of VSI-Pro Max8 units with the same
software revision level. Use 38400,n,8,1 baud for the PC’s baud rate.NOTE: This feature is only available to like versions
and release. Therefore you can only program a Ver. 14.00 R5 with a same exact VSI-Pro Max or errorenous data will
occur.
NOTE ?
For locations or companies with a large number of interfaces, we strongly advise that
you keep one programmed VSI-Pro Max as a master and a backup to insure your system
integrity. This will also aid in reprogramming any changes and protect against any
catastrophic events.
VSI-Pro Max Remote Program Downloading Ver. 1.0
Each channel of VSI-Pro Max 8 has the ability to upload or download all the programming settings and history files via
a PC Windows based application. Customer or specific registers configurations can now be saved in a laptop for ease of
service and programming. Y ou can set the each channel of VSI-Pro Max 8 clock in sync with a laptop or manually enter .
Simple keyboard strokes can enter titles, exceptions and trigger strings quickly and easily. This is accomplished by
using a Com port of the laptop or a USB to RS-232 adapter. Auto connection time out and error recovery guarantees the
VSI-Pro Max 8 will function under any condition including cable breakage, power down of laptop or VSI-Pro Max 8 and
accidentally hitting reset on the VSI-Pro Max during connection.
Software Installation
Click Setup.exe for the VSI-Pro Max 8 Program Download V1.0
After installation is complete, run the program. The following window will be loaded.
Figure 101 Program Download Main Menu
VSI-Pro Max 8 POS / Cash Register Interface
61
Page 62

PROGRAMMING
Click the Tab “Remote” and you will see the following Menu.
Figure 102 Remote Menu
Click on “Set Comport”. If the Channel of VSI-Pro Max 8 that want to download/upload setup is in the “Baudrate Detection” Mode then you can set any baud rate and the Channel of VSI-Pro Max 8 that want to download/upload setup will self
configure. However if this Channel of VSI-Pro Max 8 is already set to a baud rate you must select the exact baud rate and
communication configuration in this Channel of VSI-Pro Max 8 for connection to occur. If the unit does not display
“Connected” then you have either entered the wrong baud rate or communication settings or a cable problem or the VSIPro Max 8 not powered.
Once connected then click “Remote” and will display “Accessed” or will go back to “No Access” if the baud rate or
cable connection is not proper and will also go back to “Not Connected” so you can reset the communication settings.
Once you have “Access” then you can do any function on this menu screen. “Upload” data which reads the current
settings of this channel of VSI-Pro Max 8 into the PC. “Download” which sends the PC settings to this Channel of VSIPro Max 8. “Set Time” can set a new time or PC sync time to the Channel of VSI-Pro Max 8. “Load History” reads the
History File of Exceptions from the Channel of VSI-Pro Max 8 and saves as a text file on the PC.
Note: If the cable is disconnected, VSI-Pro Max 8 reset or powered down, PC program closed, the PC and/or the VSI-Pro
Max 8 has a 30 second timeout and will reset itself for normal operation.
VSI-Pro Max 8 POS / Cash Register Interface
62
Page 63

PROGRAMMING
File Menu
Figure 103 File Menu
“Open” allows you to select a file which contains a previously saved version of the VSI-Pro Max 8 setups.
“Open History” allows you to view a previously saved History File downloaded from the VSI-Pro Max 8.
“Save” allows you to save a current set of Channel of the VSI-Pro Max 8 settings that are configured in the program or
previously uploaded from the Channel of the VSI-Pro Max.
About Menu
Figure 104 About Main Menu
“Help” gives you all the help topics of the VSI-Pro Max Program Download Ver . 1.0.
“VSI-Pro Max Manual” is an online .pdf of the current VSI-Pro Max manual for easy reference to all the setups and
programming features and applications of the VSI-Pro Max.
“About” shows you the version and release of this software.
Communication Cable Pin Out
The Com cable is RS-232 from the PC or laptop to the Channel of the VSI-Pro Max 8 as follows. This cable can be no
more than 100’ but if additional length is required you will need a set of the AVE RS-232 to RS-422 adapter which will
extend the range to 3000’.
Figure 105: PC Programming Cable Pin Out
VSI-Pro Max 8 POS / Cash Register Interface
63
PC / Laptop DB9F VSI-Pro DB9M
2 ------------------------------------ 3
3 ------------------------------------ 2
5 ------------------------------------ 5
Page 64

PROGRAMMING
VSI-Pro Max 8 Firmware Download Menu
T o update firmware on each channel of the VSI-Pro Max 8, load the VSI-Pro Max 8 Firmware Download Utility and
follow the instructions below. Then select “UPDA TE FIRMW ARE” from the menu selection.
Figure 106: Update Firmware
Sub-Menu
VSI-Pro Max 8 Firmware Download Utility
This document describes the VSI-Pro Max 8. This feature allows a user to download firmware update via the RS-232
port. The executable program is loaded via any terminal program such as Hyper Terminal via a PC or compatible device.
All firmware files are encoded to the A VE propriet ary format and decoded by the bootstrap loader for standard program
execution.
Update Firmware of VSI-Pro Max 8
Y ou have to connect the channel of VSI-Pro Max8 that want to update firmware with a Serial Program Terminal such as
HyperT erminal, IC etc. But advise to use HyperT erminal.
First, you have to set the baud rate HyperTerminal to 1 15,200.See PC Windows below to verify proper HyperTerminal
setup.
DOWNLOAD SETUP
UPLOAD SETUP
UPDATE FIRMWARE
EXIT
Figure 107: HyperTerminal Main Menu
VSI-Pro Max 8 POS / Cash Register Interface
64
Page 65

PROGRAMMING
Click File and select Properties, you will see the configuration window then select communication port.
Then click the configure... button
Choose Bits per second to 1 15200 and click connect.
Figure 108: Connect to Menu
Figure 109: Port Setting Menu
VSI-Pro Max 8 POS / Cash Register Interface
65
Page 66

PROGRAMMING
Second, Plug DB9-Male of RS232 cross cable to Channel of the VSI-Pro Max 8 that want to update firmware. Y ou go to
the main menu of the VSI-Pro Max 8 then select “Network Program“ and then select “ADDRESS ID” that want to update
firmware. The main menu of channel that selected to update firmware will appear , then select “Download/Upload Setup”
and then select “Update Firmware” and the press “Set” button. Now you will see message in Hyper Terminal.
Figure 110: In-System Programming Display
“Do you want to update? [Y/N]”
Press “Y” to accept update.
Y ou will see message warning again.
“Doing this will erase the program memory [Y/N]”
Press “Y” again to accept update.
NOTE: Pressing “Y es” again will permanently erase the entire program memory and the VSI-Pro will not function until
firmware is loaded. Make sure you have the proper firmware file ready or the VSI-Pro will be rendered useless.
Finish erasing the program memory step.
Next, you have to send file to update firmware by click on “Transfer Menu” and select “Send Text File” and wait until
finished programming. Progress dots will be displayed on the terminal program until finished and takes approximately
2.5 minutes.
NOTE: If for some reason you are disconnected from the VSI-Pro during downloading, power is lost to the RegCom-
Pro or PC or the firmware update does not finish for any reason you can repeat the procedure above again. The
bootstrap loader never is erased and will always request for a valid firmware update until achieved.
T o do this just power up the RegCom-Pro or press reset while the terminal program is connected and you will see the
prompt messages as above window
VSI-Pro Max 8 POS / Cash Register Interface
66
Page 67

PROGRAMMING
5.11 HELP
“HELP” on the main-menu provides a quick reference guide of the functions of the “Up” and “Down” and “Set”
buttons.
Key Definitions :
UP/DOWN _ _ Change value
SET _ _ Enter change mode
Save change
Go to position
UP AND DOWN _ _ Save string input
UP AND SET _ _ Erase character
Figure 11 1: HELP Sub-Menu
PROBLEM SOLVING GUIDE APPENDIX A
NO DATA ON-SCREEN and/or REGISTER LED NOT FLASHING
1. Press the “Reset” button on the VSI-Pro Max 8 front panel.
2. Incorrect register selected in the REGISTER SELECT menu.
3. Data cable is miswired.
4. Data cable is too long or did not use shielded cable.
5. May be connected to the wrong port.
6. Need RS-232 Optical Isolation so enable this feature in the VSI-Pro Max 8
REGISTER LED FLASHING but NO or Wrong DATA ON-SCREEN
1. Incorrect register selected in the REGISTER SELECT menu.
2. Baud Rate wrong, change to Auto Baud rate and do transaction
3. Interface Type set wrong
3. Data cable is miswired.
4. Data cable is too long or did not use shielded cable.
5. May be connected to the wrong port.
PROBLEMS WITH ECR / TPIF BOARDS
1. Upon regsiter power up verify on-screen ECR power up test.
2.Check that the board is seated properly in the register.
3. Check jumper settings on the board if applicable.
4. For ECR boards make sure the 2 pin data cable is plugged in correctly.
PROBLEMS WITH N2RS, NCR2RS, DTS2RS, B2RS ETC.
1. Check the cable to the register.
2. If VSI-Pro Max 8 was working and stopped, power cycle the system. Turn off the register, unplug the power to the
N2RS, and unplug the power to the VSI-Pro. Now power up the system, plug in the VSI-Pro and the N2RS. Turn
on the register and do a transaction. The data should re-appear.
3. Check the cable between the VSI-Pro Max 8 and the N2RS.
VSI-Pro Max 8 POS / Cash Register Interface
67
Page 68

PROBLEM SOLVING GUIDE APPENDIX A
NO NETWORK COMMUNICA TION OR LED FLASHING
1. Verify the RJ11, RJ12 or RJ45 is locked into the connector firmly and the locking tab no broken
2. Verify the RJ connector is crimped and wired properly, Pins 4 &5 the two in the very center.
3. Verify the unit is set to either the Master or Slave Mode
4. Verify all network modules are connected and the last in the loop terminated.
NO DA T A TO THE DVR FROM MASTER CHANNEL
1. Verify the TX Protocol is set correctly and matches the DVR type and setting
2. Verify the DVR ComPort is enabled
3. Verify the cable from the master Channel of VSI-Pro Max 8 to the DVR is correct.
NOTE ?
The VSI-Pro Max 8 requires 0.5VP-P to 2V P-P to properly overlay data on the video image
NO VIDEO ON MONITOR
1. VSI-Pro Max 8 transformer not plugged in, or is malfunctioning.
2. Video In/Out connectors reversed, or BNC connector is not correctly wired.
3. No video input signal.
4. Bad video cable or connector.
5. Camera Iris is closed.
6. Other video device in system is off or malfunctioning.
CHARACTERS JITTER, JUMP, OR SKEW
1. Darken the gray scale of the characters.
2. The VSI-Pro Max 8 requires the input video signal to be 0.5VP-P to 2V P-P. If the voltage is too high or low, then the
VSI has trouble syncing the text to the video. Use an amplifier such as AVE’s VDA-401 or VECA to get the proper
level.
3. Poor input sync signals - too many AC coupled amplifiers in the video input signal.
4. Noisy or poor quality video source. Replace with better source.
5. Check for double termination.
6. Video level too high; VSI-Pro Max 8 will clip video.
7. The text block is too close to the edge of the screen. T ry repositioning the text block. Also, changing the size may
help.
8. Too much light in the video picture may cause character distortion. Reposition the camera or reduce the amount
of light to which the camera view is exposed. If the camera you’re using has an auto iris lens, try adjusting the iris
to average and then reduce or increase the level.
NO COLOR IN THE PICTURE
1. Cable run too long and color signal too low, use AVE ARXD Active Reciever to recovery signal.
2. Cable run too long and color signal too low, use AVE VECA on the camera end to amplify the signal.
VSI-Pro Max 8 POS / Cash Register Interface
68
Page 69

APPENDIX A PROBLEM SOLVING GUIDE
HUM BARS or NOISE IN THE VIDEO
1. Check video coax connectors for proper grounding
2. Check power ground for proper connection
3. Possible large ground loop fault and must use Video Isolation Transformer
VL VIDEO ERROR LED NOT ON BUT VIDEO LOOKS BAD
1. VL Video Error measures the level of the sync signal not the overall video peak to peak level. Therefore if sync
signal is correct and the video level is noisy or low or high the display might be too light or too dark. In this case
the addition of a video amplifier or adjustment of the camera settings might help.
VL VIDEO ERROR LED ON BUT VIDEO LOOKS GOOD
1. The VL Video Error measures the level of the sync signal not the overall video peak to peak level. Therefore it is
detecting the sync signla is low and amplifying the video signal to its maximum of 2 times. In this case the sync
is sufficient for the monitor or DVR to lock to and show a good image. If the inserted text from the Channel of VSI-Pro
Max 8 is stable then the Channel of VSI-Pro Max 8 is able to lock to this low signal. If the text jitters or is skewed
then a video amplifier must be placed in line with the Channel of VSI-Pro Max 8 to bring the signal up to at least .5V
P-P so the AGC circuitry can adjust to the proper output level.
FUNNY CHARACTERS OR GARBAGE ON SCREEN
1. Power disconnected for too long and memory is lost.
2. Lightning strike, power line noise or power surge.
3. ECR / TPIF boards make sure data cable is plugged in correctly.
4. Ground and Data wires are reversed. Verify correct DB-9 cable wiring.
HOW TO DO A MASTER RESET ON The Master Channel of VSI-Pro Max 8
1. Press and hold in simultaneously the “Down”, “Up” and “Set” buttons.
2. While holding those three buttons in, press and release the “Reset” button and then release the other three
buttons.
3. This will display the copyright notice.
4. Restores the master channel of VSI-Pro Max 8 to all the factory default settings and erases all user programming.
HOW TO DO A MASTER RESET ON The Slave Channel of VSI-Pro Max 8
Go to Section MASTER RESET and PROGRAMMING NETWORK SETTINGS MENU USING A PC
MY CUSTOMER IS CHANGING REGISTERS. WILL THE VSI-Pro Max 8 WORK WITH THE NEW REGISTER?
This is a tricky one. The VSI-Pro Max 8 interfaces to over 400 different registers. The probability the VSI-Pro Max 8 will
work with a new system is relatively high. The chances any additional boards or boxes will work is lower , unless your
customer is staying with the same manufacturer and within the same register series.
Contact AVE’s Product Support Specialists for additional help with this issue.
IF I INSTALL YOUR INTERFACE BOARD INTO A NEW REGISTER, WILL IT VOID MY CUSTOMER’S WARRANTY?
If you are connecting to an external RS-232 port of the register, generally it does not void the warranty . But if you want
to add the interface board inside your new cash register, we will highly recommend you to cont act the manufacturer of
the cash register for sometimes opening the register does void the warranty .
VSI-Pro Max 8 POS / Cash Register Interface
69
Page 70

12 VDC
5 VDC
R
5 VD C
HARD ALARM OUTPUT APPENDIX B
The each Channel of VSI-Pro Max 8 provides two open collector transistor alarm outputs to trigger alarming devices.
These are Alarm 1 & 2 in the Alarm menu. Upon an Exception, a Channel of VSI-Pro Max 8 can be programmed to trigger
a VCR to go to its fastest record time, have a Quad go full screen, home a switcher, trigger a preprogrammed PTZ, or
provide visual or audible alarms. The each Channel of VSI-Pro Max 8 provides two alarm outputs that are rated at 12VDC
@ 20mA maximum.
The following are some basic circuit designs to take advantage of the alarm output option of the each Channel of VSI-Pro
Max 8.
Internal
To
VSI-Pro
470 OH M
LED
Alarm 1 or 2
Output
5 VD C
1K OHM
LED
Alarm 1 or 2
Output
Internal
To
VSI-Pro
BUZZER
ELAY SPD T 1N4001
Alarm 1 or 2
Output
Internal
To
VSI-Pro
Figure 112: Hard Alarm Output
VSI-Pro Max 8 POS / Cash Register Interface
70
Internal
To
VSI-Pro
Alarm 1 or 2
Output
Page 71

APPENDIX C DVR TEXT INPUT CONNECTIONS
The A VE MVDR5000 DVR has the ability to input two Channel of VSI-Pro Max 8 ASCII Text directly without any networking. The RS-232 DB9M connector on the rear of the DVR can accept the data from the Channel of VSI-Pro Max 8. The
RS-485 or RJ12 connector can also accept data from the Channel of VSI-Pro Max 8. The RS-232 port inserts the data on
Camera 1 and the RS-485 port inserts on Camera 2.
RS-232
RXD
Cash Register #2
RS-232
RXD
Cash Register #1
VSI-Pro Max 8 DVR
DB9M DB9F
VSI-Pro Max 8
RS-232
TXD
RS-485
TXD
CAMERA # 2
CAMERA # 1
3 ------------------------- 2
5 ------------------------- 5
or
8 ------------------------- 2
MONITOR
5 ------------------------- 5
Figure 113 : VSI-Pro Max 8 with DVR Text Input Connections
When using the Channel of VSI-Pro Max 8 in the register “T apping Mode” the RS-232 Pin 3 or Pin 8 can be used to output
the text to the DVR. If you are using the Channel of VSI-Pro Max 8 for “Slave Mode” networking then you can not use the
RJ45 RS-485 or RS-232 Pin 8 as an output to the DVR and only RS-232 is available from Pin 3. If you are not using the
Channel of VSI-Pro Max in 8 the “Slave Mode” then you can use RS-232 Pin 8 or RJ45 RS-485 output to the DVR. If using
the Channel of VSI-Pro Max in 8 the “Master Mode” then only RS-232 Pin 3 can be used to connect to the DVR or use
the AVE RS-232 to RS-485 converter to connect to the DVR RS-485 input.
When using the Channels of VSI-Pro Max 8 in the register “Emulate Mode” only Pin 8 can be used for RS-232 output or
the RJ45 Network connector can be used for RS-485 output to the DVR. The Channel of VSI-Pro Max 8 can not be used
in either the “Slave or Master Mode” while providing any ASCII text output to the DVR in either RS-232 or RS-485 format.
Therefore the Channel of VSI-Pro Max 8 when used in the “Emulate Mode” can only be used in conjunction with the
“Slave Mode” OR T ext output mode using RS-232 Pin 8 or RJ45 RS-485.
MVDR3000 / 5000 VSI-Pro Max 8 VSI-Pro Max 8 RS-232 to RS-422/485 Adapter
RJ12 - 6 Pin Modular RJ45 - 8 Pin Modular DB9F Screw Terminals
1 --- N/C
2 --- GND -------------------------- N/C ----------------------------- N/C ------------------------- GND ------Terminal 5
3 --- V+ ------------------------------ 4 --------------------------------- 4 ------------------------------ A+ ----- Terminal 1
4 --- V- ------------------------------- 5 --------------------------------- 6 ------------------------------ B- ------ Terminal 2
5 --- GND ---- N/C
6 --- N/C
Figure 114: VSI-Pro Max 8 and DVR RS-485 Pin Out s
VSI-Pro Max 8 POS / Cash Register Interface
71
Page 72

UTP CONNECTIONS APPENDIX D
Pair 3
Pair 2
Pair 4 Pair 1
AGC
The each Channel of VSI-Pro Max 8 has an AGC (Automatic Gain Control) circuit on the video input. This means that
even if the video signal is as low as 0.5 V P-P the Channel of VSI-Pro Max 8 will automatically amplify to the proper level
of 1 V P-P and insert the cash register data into the video flawlessly . Also if for some reason the video signal is as high
as 2 V P-P the Channel of VSI-Pro Max 8 will reduce the video signal to 1 V P-P.
With the increasing cost of RG-59U coaxial cable many installers are using the lower cost UTP (Unshielded Twisted
Pair) cable and video adpaters similar to the AVE TwistPlex line of passive and active adapters. When passive
transmitters like the AVE UTP-1500 are used at the camera end and long runs of UTP or CAT5 wire is used, the
video signal is reduced significantly by the time it reaches the Channel of VSI-Pro Max 8. Therefore the built in AGC
circuitry of the VSI-Pro Max allows the use of low cost passive recievers like the A VE UTP-1500 and recovers the video
signal.
VSI-Pro Max 8
CAMERA
UTP-1500
UTP or CAT 5
UTP-1500
Figure 115: VSI-Pro Max UTP Connections
Network RJ45 Connector
The VSI-Pro Max 8 has two RJ45 connectors on the side of the unit mainly for Network communications. However only
two pins of this connector is used for the networking RS-485 signals Pins 4&5. All other pins are wired in p arallel so can
pass other LAN signals utilizing the same cable. When using CA T5 or CA T6 cable for 10Mbs or 100Mbs only Pins 1&2
and 3&6 are used for the Ethernet LAN connections so the VSI-Pro Max 8 networking signals can use Pins 4&5 without
any conflict with the LAN connections. Therefore IP cameras or Internet can ride on the same cable. Furthermore Pins
7&8 can be used to for power or the video signal utilizing the UTP-1500.
T568B VSI-Pro Max RJ45 Pin Outs
RJ45 In RJ45 Out VSI-Pro Max
1 -------------------------- 1 ------------------ N/C
2 -------------------------- 2 ------------------ N/C
1 2 3 4 5 6 7 8
3 -------------------------- 3 ------------------ N/C
4 -------------------------- 4 ------------------ A+ VSI-Pro Max Network
5 -------------------------- 5 ------------------ B- VSI-Pro Max Network
6 -------------------------- 6 ------------------ N/C
7 -------------------------- 7 ------------------ N/C
8 -------------------------- 8 ------------------ N/C
Figure 116: VSI-Pro Max RJ45 Pin Outs Figure 117: RJ45 Connector
CAT 5 Breakout
The AVE CAT5 Breakout makes all these connections simply plug and play. This device has an RJ45 connector for
the CAT5/6 wire connection of all 4 pairs. It also has an additional RJ45 for the addition of Ethernet LAN, another
RJ45 for the VSI-Pro Max Networking or Telco signals and a built in UTP-1500 for passive video transmission on the
same cable.
VSI-Pro Max8 Network
CA T 5/6 Cable
Camera
Figure 118: VSI-Pro Max & CAT5 Breakout
VSI-Pro Max 8 POS / Cash Register Interface
72
Ethernet LAN 10/100
Page 73

APPENDIX E P2RS Parallel to Serial Converter
There are a myriad of PC-based systems out there which do not appear on the AVE Cash Register Compatibility List.
Most of the PC-based cash registers that are not included in the AVE Cash Register Compatibility List are able to
interface to the Channel of VSI-Pro Max 8 . To find the compatibility of a cash register we need to determine following:
Does the cash register use a stand-alone receipt printer? If it does it can either be a serial or parallel printer. Serial
printers use DB9 , DB25 or RJ45 type connectors. However parallel printers generally use Centronics type connectors, but on the cash register side use DB25. If it is a serial printer then you can use an AVE Triport DB9 or Triport
DB25.
USB ports are also commonly connected to printers. The AVE USB232 adapter will emulate a printer and output
RS-232 data to the Channel of VSI-Pro Max 8. A sof tware driver is supplied with the unit which needs to be installed on
the PC prior to running the POS software.
The each Channel of VSI-Pro Max 8 can also interface with a parallel printer, if a high speed p arallel-to-serial converter
is connected with either the cash register or with the printer. You can also use AVE’s high speed serial-to-parallel
converter “P2RS” for interfacing the VSI-Pro to the parallel port. A VE’s high speed P2RS converter is shown below .
Pole or Customer Displays are similar to printers and are either serial, parallel or USB and all the above also apply.
Figure 119: P2RS Parallel-to-Serial Converter
Front Panel
Serial Input
Power
Printer
Cable
Figure 121: P2RS Parallel-to-Serial Converter
Connection Diagram
Figure 120: P2RS Parallel-to-Serial Converter
Rear Panel
Figure 122: DB-25 Cable
Figure 123: Centronics
Cable
The Pin-Out for the cable between the P2RS and the VSIPro is as follows.
P-2-RS ( DB-9F ) VSI-Pro Max 8( DB-9M )
TXD 3 2 RXD
GND 1 5 GND
Figure 124: Pin-Out for P2RS to VSI-Pro Max 8
VSI-Pro Max 8 POS / Cash Register Interface
73
Page 74

P2RS Parallel to Serial Converter APPENDIX E
The P2RS-Pro is a multi-functional POS / Cash Register Interface peripheral. Similar to the P2RS the unit can tap or
emulate Centronics Parallel printer data from a normal or enhanced LPT port of any POS or PC. This data also is
exported via the Data RS-232 port in ASCII format to the VSI-Pro line of text inserters or directly to a DVR for display or
database storage.
The P2RS-Pro has the additional features that allow up to 16 units to be daisy chained on the AVE RS-485 two
conductor RegCom network to deliver all the POS data to one serial port of a DVR or multiple VSI-Pro devices.
An additional high speed UART has been added to the P2RS-Pro to allow connection to any POS or Cash Register port
accomodating any baud rate, parity, and bit selections and higher speeds to accomodate the latest IRC and
communications protocol.
Figure 125: P2RS-Pro Parallel-to-Serial Converter
Pro Front Panel
VSI-Pro Max 8
RG-59U
RG-59U
P2RS to VSI-Pro Max8 Cable
P2RS Printer Cable
CASH REGISTER
Figure 126: P2RS-Pro Parallel-to-Serial Converter
Pro Rear Panel
RS-485
P2RS-Pro
P2RS Printer Cable
CASH REGISTER
RS-232
CASH REGISTER
P2RS-Pro
Figure 127: VSI-Pro Max 8 with P2RS and P2RS-Pro Connections
VSI-Pro Max 8 POS / Cash Register Interface
74
RS-485
Page 75

DC Jack
USB to RS-232 Converter APPENDIX F
9-12 VDC
JP3
JP2
P1
JP5
JP4
JP1
USB
JP7
JP6 JP8
RS485
Figure 128: USB to RS-232 Converter PCB Figure 129: USB232 Adapter
A
B
JP1 - USB type B Connector.
JP7 - RS485 Connector.
P1 - RS232 Connector (DB9 Male).
JP6 - RS485 load resister jumper (120 Ohm).
Configuration Settings
RXD RS232 RS485 A(+) B(-)
JP8 2-3 1-2
RS232 Configuration
Jumper Setting (2-3) (1-2)
RXD (JP3) PIN 2 PIN 3
TXD (JP2) PIN 2 PIN 3
CTS (JP5) PIN 7 PIN 8
RTS (JP4) PIN 7 PIN 8
Jumper Default Setting
JP8 1-2 Select RS485
RXD (JP3) 2-3 Connect to DB9 PIN 2
TXD (JP2) 1-2 Connect to DB9 PIN 3
CTS (JP5) None Not connected
RTS (JP4) 1-2 Connect to DB9 PIN 7
Baud Rate
This device can scan terminal baudrate and set device Baud rate as same as terminal.
Compatible Baud rate (Bit per second)
300, 1200, 2400, 4800, 9600, 19200, 38400, 57600, 115200
Power
This device can use power from USB bus or power from DC adaptor 9-12 VDC
See users guide for Software Installation and compatibility
VSI-Pro Max 8 POS / Cash Register Interface
75
Page 76

APPENDIX G VSIB INSTALLATION
VSIB for Thai, Korean or Chinese Languages
The VSIB is a bit-mapped display device that can display Thai, Korean, or Chinese characters. This device works in
conjunction with the VSI-Pro. A special cable is connected between the VSI-Pro and the VSIB so all on-screen
programming is done via the VSIB but the controls and menus are the same as the VSI-Pro. Therefore after connection, the programming will be identical to this manual. The VSIB must be ordered independently for any of the above
supported languages and the language must be specified.
Figure 130: VSI-Pro Front Panel
Figure 132: VSIB Rear Panel
Disconnect the standard
VSI-Pro and plug its
cable into the female
connector of the T riport.
Figure 131: VSIB Front Panel
Serial Input Power Video Input Video Output
Figure 133: VSIB Connection Cables
The pin-out for the VSIB between the VSI-Pro and the VSIB
is as follows:
VSIB ( DB-9M ) VSI-Pro ( DB-9M )
TXD 3 2 RXD
Use the BNC connectors of the
VSIB for your
Video Input &
Output
Figure 134: Cable Connection to VSIB
VSI-Pro Max 8 POS / Cash Register Interface
RTS 7 8 CTS
GND 5 5 GND
Figure 135: Pin-Out for VSIB to VSI-Pro
76
Page 77

ECR / TPIF INTERFACE CARDS APPENDIX H
The ECR Interfaces are small PCBs that mount internally to the cash registers. These PCBs convert internal data
from matrix and drum printers or thermal printers to RS-232 data. This RS-232 data is then connected directly to the
VSI-Pro for display . It also can be connected directly to the Regcom to send up to 16 cash register’s data on a central
collection PC or DVR.
The ECR Interfaces have many different connection types depending on the make and model of cash register.
Typically the RS-232 cable comes from the rear of the register to further connect to the VSI- Pro or DVR. The
manufacturer and model number of the cash register must be supplied when ordering this ECR Interface.
Figure 136: TK6000/7000 PCB and Cable Figure 137: TK2300 and Adapter
When using the AVE IF ECR Interface PCBs that are generally installed inside the cash register and an RS-232
connector mounted on the register or the RS-232 cable fitted through the rear of the till. These interfaces output
direct converted and formatted RS-232 of the printer. This data can be connected directly to the AVE line of DVRs
without additional conversion up to 100’. If additional lengths are needed then the AVE RS-232 to RS-422/485
converter can be used to extend this range to 3000’.
The Regcom interface can directly connect to these devices and report up to 16 tills on the Regcom network back to
the PC Program or to the AVE line of DVRs converted using the Hydra.
Figure 138: TE2200 Thermal
Printer
ANSI DRIVER COMMANDS APPENDIX I
SET CURSOR
<ESC>[Y;XH -> Y is vertical, X is horizontal , X and Y set by numeric character (0-9)
Ex. Vertical line = 5 , Parameter Y will be set to “35H”
Horizontal line = 19 , Parameter X will be set to “31H39H”
Result Hex format = 1BH 5BH 35H 3BH 31H 39H 48H
CLEAR DISPLAY
<ESC>[2J
REVERSE TEXT
<ESC>[7M
FLASH TEXT
<ESC>[5M
NORMAL TEXT
<ESC>[0M
** <ESC> = 1BH
** Pn = The distance moved is determined by this parameter. If the parameter value is not set then default value will
be 1
Table:4 ANSI Driver Commands
CLEAR CURRENT CURSOR TO END OF LINE
<ESC>[K
CURSOR DOWN
<ESC>[PnB
CURSOR UP
<ESC>[PnA
CURSOR LEFT
<ESC>[PnC
CURSOR RIGHT
<ESC>[PnD
VSI-Pro Max 8 POS / Cash Register Interface
77
Page 78

APPENDIX J RS-232 to RS-422/RS-485 Converter
For some installations exceptional long runs are required, then RS-232 can not support for is normally
limited to about 100 ft. In this case one would convert the RS-232 to RS-485 which can be extended up to
about 3000 ft. Then on the other end another converter would convert back to RS-232. When using the
Channel of VSI-Pro Max 8 this additional converter is not required for already has built in RS-485 compatibility .
However termination for the POS / Cash Register port is via JP2 internally to the Channel of VSI-Pro Max 8
is required.
Jumper Setting
JP1 OPEN/CLOSE RS485 / RS-422 Transmit Termination On/Off 120 Ohm
JP2 OPEN/CLOSE RS-422 Receive Termination On/Off 120 Ohm
JP4 CLOSE 1-2 RS-232 TXD to DB9M Pin 3
JP4 CLOSE 2-3 RS-232 TXD to DB9M Pin 2
JP5 CLOSE 1-2 RS-232 RXD to DB9M Pin 2
JP5 CLOSE 2-3 RS-232 RXD to DB9M Pin 3
JP6 CLOSE 1-2 Enable RS-485
JP6 CLOSE 2-3 Enable RS-422
JP7 CLOSE 1-2 Enable RS-485
JP7 CLOSE 2-3 Enable RS-422
Figure 139: RS-232 to RS-485/422 Converter PCB
Jumper Setting for RS422
JP1 CLOSE RS-422 Transmit
Termination On 120 Ohm
JP2 CLOSE RS-422 Receive
Termination On 120 Ohm
JP4 CLOSE 1-2 RS-232 TXD to DB9M Pin 3
JP5 CLOSE 1-2 RS-232 RXD to DB9M Pin 2
JP6 CLOSE 2-3 Enable RS485
JP7 CLOSE 2-3 Enable RS485
DB9M Pin Out
1 —————————— N/C
2 —————————— RXD/TXD
3 —————————— RXD/TXD
4 —————————— DTR True
5 —————————— GND
6 —————————— N/C
7 —————————— RTS
8 —————————— N/C
9 —————————— 12VDC Input
Jumper Setting for RS485 (Default )
JP1 CLOSE RS-485
Termination On 120 Ohm
JP2 OPEN RS-422 Receive
Termination Off 120 Ohm
JP4 CLOSE 1-2 RS-232 TXD to DB9M Pin 3
JP5 CLOSE 1-2 RS-232 RXD to DB9M Pin 2
JP6 CLOSE 1-2 Enable RS-485
JP7 CLOSE 1-2 Enable RS-485
Figure 140: RS-422/485
Connector of the RS-232 to
RS-422/485 Converter.
Figure 141: RS-232 Connector of the RS-232 to RS422/485 Converter.
VSI-Pro Max 8 POS / Cash Register Interface
78
Page 79

TCPIP 232 ADAPTER APPENDIX K
TCPIP 232 ADAPTER
Interfacing the Channel of VSI-Pro Max 8 to the cash register TCP/IP network requires the TCPIP 232 Adapter along with
the Channel of VSI-Pro Max 8. The IP address of the cash register is programmed into the TCPIP 232 Adapter via onscreen programming. The cash register LAN cable is plugged into the adapter and the supplied additonal LAN cable is
then plugged into the cash register. Therefore this DOES NOT require an additional network port for the cash register
interface or any host programming of the router or switch. The TCPIP232 Adapter is not AutoSense so make sure the
router is set for MDI so normal straight thru cables are used.
Figure 142: Front of TCPIP 232 Adapter Figure 143: Rear of TCPIP 232 Adapter
RG-59U
TCPIP 232
ADAPTER
LAN
LAN
MONITOR
CAMERA
VSI-Pro Max 8
RS-232 TXD
RG-59U
RS-485
Figure 144: VSI-Pro Max 8 Connections with TCPIP 232 Adapter
The pin-out between the TCPIP 232 Adapter and the Channel of VSI-Pro Max 8 is as follows:
TCPIP232 Adapter (DB-9M) VSI-Pro Max8(DB-9M)
RXD 2 ------------------------------------ 3 TXD
TXD 3 ------------------------------------ 2 RXD
GND 5 ------------------------------------ 5 GND
CASH REGISTER
CASH REGISTER
Figure 145: Pin-Out for TCPIP 232 Adapter to VSI-Pro Max 8
VSI-Pro Max 8 POS / Cash Register Interface
79
Page 80

APPENDIX L VSI-Pro Max NETWORKING
The VSI-Pro Max 8 is an evolution in the philosophy of AVE to be fully backward compatible with older products along
with advancing the features and performance of our new products. Not only can the VSI-Pro Max 8 be fully compatible
with all AVE Networking devices like the original Hydra / Regcom, the lower cost Networker and Vnetworker but it can
translate between these protocols to integrate older installations and configurations seemlessly with the latest products.
Both communication ports of the VSI-Pro Max 8 are either RS-232 or RS-485 so the need of external converters is now
eliminated.
Network Types
Traditionally the Hydra / Regcom system connected to VSIs, ECR Cards or adapter directly with a buffered product
and allows the register data to be collected on one RS-485 network and delivered to a DVR or PC offering a moderately priced solution
The Hydra / Networker system connected only to VSIs using the VSI internal buffer and allows the register data to be
collected on one RS-485 network and delivered to a DVR or PC offering a low cost solution.
The Hydra / Vnetworker system connected only to VSI-Pro using the VSI-Pro internal buffer and remote programming ability to program and control the VSI-Pro remotely by the DVR or PC along with register data collection and
delivery via the RS-485 network.
VSI-Pro Max Network Capability
The VSI-Pro Max 8 can interface to all of the above network types and then output this network data in the Master or
Hydra mode in any format selectable by the user. Therefore existing systems can simply add a VSI-Pro Max 8 to them
and configure for whatever they choose. The following is some examples;
1) Systems using VSIs with Regcoms and a Hydra Master can simply add the VSI-Pro Max 8 as a slave register
interface expanding the existing system.
2) Systems using the VSIs with Regcoms can replace the Hydra Master with a VSI-Pro Max 8 which will do the Hydra
function and add another register to the system. Then with the VSI-Pro Max 8 as the Master the protocol can be
translated from Regcom to Vnet allowing connection to the AVE MVDR5000 and have remote programming capability
from the DVR front panel for the master channel of VSI-Pro Max 8. The older VSIs and Regcoms on the network will
remain to collect data but will not be able to be remotely programmed by the DVR.
3) If a user is using an older version of PC software for data collection for Regcoms or Vnetworkers, the same
software can be used to collect data from another network type by the translation capability of the VSI-Pro Max 8.
However the latest release of PC Programming software for the VSI-Pro Max 8 includes all versions in one and superseds
all previous multiple versions.
4) Systems using Networkers can add Vnetworkers seemlessly to these networks or VSI-Pro Max 8. The programming
capability of Vnetworkers and VSI-Pro Max 8 are macro sets of the Networker so would seemlessly together . However
you could use a VSI-Pro Max 8 as the Hydra Master and translate the Vnetworker protocol to the Regcom protocol and
deliver the data to a DVR that only supports the VSI-ADD protocol. Then if the DVR software is updated to support the
Vnetworker protocol, simply select the output protocol of the VSI-Pro Max 8 accordingly and take advantage of remote
programming capability of the DVR.
Summary
The VSI-Pro Max 8 is now the solution to almost every new application or configuration of any A VE POS/Cash Register
Interface solution. Compatibility with existing cables for both the register and the network make the VSI-Pro Max 8 Plug
and Play as a standalone or an addition to any existing AVE interface installation.
VSI-Pro Max 8 POS / Cash Register Interface
80
Page 81

MASTER / HYDRA APPENDIX M
Pair 3
Pair 2
Pair 4 Pair 1
MASTER COMMUNICA TION PROTOCOL
OPERATION
The VSI-Pro Max 8 or Hydra/Regcom/Vnetworker/Networker use a bi-directional, 2-wire RS-485 databus to communicate.
A VSI-Pro Max 8 can be a Slave or a Master . A Regcom, Vnetworker or Networker are used to convert the VSI-Pro, ECR
Cards or Adapters to be slaves. The Hydra is a “Master” device and only one unit required for up to 16 Slaves. Only one
master device can exist on a single network. When the Channel of VSI-Pro Max 8 is used to connect to a register that
uses the emulate mode then it can not be a Master. However the Channel of VSI-Pro Max 8 can connect to a normal
register in tap mode and still be configurable as a master or slave.
The master device controls the flow of data by polling each of the slaves in turn. When polled, a slave device will
either respond with a ‘‘No Data’’ code to say it has no data to send, or it will begin sending data from its buffer.
The Hydra or VSI-Pro Max 8 can support many manufactures of DVR for direct storage of the transaction data on the
DVR as a file rather than just inserting in the video image for recording. It also supports the VSI-ADD (VSI Addressable)
format which allows multiple VSI-Pros or VSI-Pro Max 8 to be mounted in a convenient rack and connected to a Master
for display of cash register data remotely . See Figure below .
T568B
HYDRA COMP A T ABILITY LIST
DVR
1 2 3 4 5 6 7 8
< Norbain Columbus
< GE StoreSafe
< Kalatel StoreSafe
< NOVAR VP
< Dallmeier
< Appro
< Pinetron
Figure 146: RJ45 Connector Pin Out
The Network Port of a VSI-Pro Max 8, Regcom or Hydra use an RJ45 connector. Each unit has two RJ45s and the
Networking signals Pins 4&5 are in parallel. However in the VSI-Pro Max 8 all pins are wired in parallel but the Regcom
or Hydra are not. The useage of an RJ45 connector allows the installer to use either RJ1 1, RJ12 or RJ45 connectors since
all support the center two pins of the connector which are the only pins used.
Figure 147: DS-20-OF VSI-Pro Max PCB Rack using VSI-ADD protocol
VSI-Pro Max 8 POS / Cash Register Interface
81
Page 82

APPENDIX M MASTER / HYDRA
VSI-Pro Max 8 Networking
The each Channel of VSI-Pro Max 8 as a slave allows the connection of multiple cash register terminals to a master
Channel of VSI-Pro Max 8 for the purpose of transaction logging.
RS-232 or
RS-422 RXD only
Cash Register
RS-232 or
RS-422 RXD only
Cash Register
Figure 148: VSI-Pro Max 8 Networking Connection Diagram
NETWORK TERMINATION
RS-232 or
RS-422 RXD only
Cash Register
VSI-Pro Max 8
Cash Register Cash Register
ASCII Data for
Text Search
and Exceptions
RS-232 or
RS-422 RXD only
RS-232
RS-232 or
RS-422 RXD only
A VE DVR
RS-232 or
RS-422 RXD only
Cash Register
RS-232 or
RS-422 RXD only
Cash Register
The device at end of the network must be “TERMINATED”. For the Hydra an 8 DIP Switch on the rear of the unit is
used to set the termination. When the switch is set to “ON”, the device is terminated. When the switch is set to
“OFF”, it will be un-terminated. For the VSI-Pro Max 8 an internal jumper JP15 must be set to terminate.
DB-9 Pin-Out
Pin 1 Alarm 1
Pin 2 To Register
Pin 3 TXD (Master)
Pin 4 DTR
Pin 5 Ground
Pin 6 DSR
Pin 7 RTS
Pin 8 CTS
Pin 9 Alarm 2
T able 5:VSI-Pro Max8 Master Output
DB-9 Pin-Out
Pin 1
Pin 2 RX ( RS-232 )
Pin 3 TX ( RS-232 )
Pin 4
Pin 5 Ground
Pin 6
Pin 7
Pin 8
Pin 9
Table 6: Hydra DB-9 Pin-Out
RJ-45 Pin-Out
Pin 1
Pin 2
Pin 3
Pin 4 RS-485 ( + )
Pin 5 RS-485 ( - )
Pin 6
Pin 7
Pin 8
Table 7: RJ-45 Pin-Out
VSI-Pro Max 8 POS / Cash Register Interface
82
Page 83

HYDRA and REGCOM APPENDIX M
RS-485 NETWORK DATA CABLE WIRING
RS-232 Parameters
(120 Ohm impedance, twisted pair)
RJ-45 RJ-45
Pin 4 Pin 4
Pin 5 Pin 5
Table 8: RS-485 Network Data Cable Wiring
LED STATUS INDICATION
Status light A illuminates whenever data is sent from the
Regcom to the master unit. This is the same as Network
LED on the each Channel of VSI-Pro Max 8.
Status light B illuminates to indicate the Regcom is
correcly connectly connected via the RS-485 network to
the master unit. This is the same as the Register LED on
the each Channel of VSI-Pro Max 8.
Baud rate 9600 or 57.6K
Data bits 8
Parity None
Stop bits 1
Table 9: Hydra RS-232 Parameters
Network Parameters
Standard RS-485
Max line length 4000 ft
Cable type 120 Ohm twised pair
Table 10: Network Parameters
Figure 149: VSI-Pro Max 8 Front Panel
Figure 150: Hydra / Regcom
Front Panel
Figure 151: Hydra / Regcom
Rear Panel
Dipswitch Settings
The following are the rear dipswitch settings for both the Regcom and Hydra. SW1-5 select the address for the
Regcom and the communication parameters for the Hydra. SW6 has no function. SW7 has no function for the
Hydra but selects Baud rate for the Regcom On- 57.6K, Off 9600 baud. SW8 terminates either device with 120
ohms and should be on for the Hydra and on for the last Regcom in the network.
Regcom (Note) Term Hydra Functions
Address On/Off Input Output
SW1 SW2 SW3 SW4 SW5 SW6 SW7 SW8
--- Off Off Off Off Off Off ---- ---- Regcom VSI-ADD 9600 baud
1 On Off Off Off Off Off ---- ---- Vnetworker Vnetworker
2 Off On Off Off Off Off ---- ---- Vnetworker MVDR3000/5000
3 On On Off Off Off Off ---- ---- Regcom Dallmeier Addr 1-8
4 Off Off On Off Off Off ---- ---- Vnetworker Dallmeier Addr 1-8
5 On Off On Off Off Off ---- ---- Regcom VSI-ADD 57.6K baud
6 Off On On Off Off Off ---- ---- TBD
7 On On On Off Off Off ---- ---- TBD
8 Off Off Off On Off Off ---- ---- TBD
9 On Off Off On Off Off ---- ---- TBD
10 Off On Off On Off Off ---- ---- TBD
11 On On Off On Off Off ---- ---- TBD
12 Off Off On On Off Off ---- ---- TBD
13 On Off On On Off Off ---- ---- TBD
14 Off On On On Off Off ---- ---- TBD
15 On On On On Off Off ---- ---- TBD
16 Off Off Off Off On Off ---- ---- TBD
Table 11: Hydra / Regcom
Dipswitch Settings
VSI-Pro Max 8 POS / Cash Register Interface
83
Page 84

APPENDIX M MASTER PROTOCOL
AVE POS Networking Protocol
(VSI-ADD Protocol)
The AVE VSI-Pro Max 8, IF ECR Interface Cards and other POS Adapters export the POS data in
formatted ASCII text via RS-232 directly . This data can be read by any DVR Com Port for recording
as a separate data file appended to the Audio/Video file.
For multiple POS on one DVR you could use multiple RS-232 ports but this is cumbersome and
the length of runs is limited.
The Channel of VSI-Pro Max 8 in the Slave mode or the “Regcom” device connects directly to any of
the AVE POS interfaces listed above or any RS-232 source. This buffered device takes the POS
data and converts it to an RS-485 network.
The “Networker” connects only to the older VSI-Pro and supports the same RS-485 network. This
network is terminated by a “Hydra” or a Channel of VSI-Pro Max 8 in the Master mode which decodes
the RS-485 network and sends all the data to one RS-232 Com Port on the DVR.
The data from the Master device to the DVR Com Port has the following data format:
<ESC> ADDR {TEXT TO BE DISPLA YED}
Where ESC is 1BH; ADDR is one byte binary code. The valid address is 1 through 16.
The DVR will then read this protocol and decode the proper POS interface data to be associated
with the respective camera.
Network Protocol
For advanced interfacing a DVR may directly control the RS-485 Regcom Network by implementing
the full poll/select protocol. For more information on this contact the AVE factory.
The latest in the development of RS-485 networking is called the Vnetworker Protocol. This is an
enhanced poll/select protocol that allows the remote master to program and control the remote VSIPro Max 8 or VSI-Pro with Vnetworker device. Not only will this allow transaction logging but allow
reading Alarm input s, setting/reading/locking to T/D and full programming and register configuration
remotely . Implementation of this protocol brings seemless POS /Cash Register /A TM interfacing to
the A VE or 3rd p arty DVR suppliers. For more information on this contact the A VE factory .
VSI-Pro Max 8 POS / Cash Register Interface
84
Page 85

RS-485 VNETWORKER APPENDIX M
Cash Register
VSI-Pro
RS-232 or
RS-422 RXD
only
Vnetworker
RS-232
RS-232
VSI-Pro Max8
RS-485 Network
Networker
RS-232 or
RS-422 RXD only
VSI-Pro Max
A VE DVR
RS-232
ASCII Data for
Text Search
and Exceptions
RS-232
VSI-Pro
RS-232 or
RS-485 Full Duplex
Vnetworker
VSI-Pro
RS-232
Cash Register
RS-232
Cash Register
Figure 152: VSI-Pro Max8 Vnetworker Connection
ASCII Data for T ext Search
and Exceptions
Hydra
RS-485 Network
Networker
RS-232
VSI-Pro
RS-232 or
RS-422 RXD only
RS-232
RS-232 or
RS-485 Full Duplex
Cash Register
A VE DVR
VSI-Pro Max8
Cash Register
Figure 153: Hydra Vnetworker Connection
VSI-Pro Max 8 POS / Cash Register Interface
Cash Register
85
Cash Register
Page 86

APPENDIX M RS-485 VNETWORKER
Introduction
The Vnetworker Software can communicate directly with a VSI-Pro Max 8 or a VSI-Pro with Vnetworker
or a VSI-Pro with Networker and connects to the Cash Register . The VSI-Pro Max 8 or Vnetworker or
Networker take the RS-232 or RS-485 data from a cash register and puts it on a common RS-485
network and sends it back to a PC. This network supports up to 64 cash registers. The Vnetworker
software is able to program the VSI-Pro Max 8 or VSI-Pro with Vnetworker remotely along with gathering the transaction or exception data. The VSI-Pro with Networker can only send back the transaction data. The VSI-Pro must be V er. 13.00 or 13.24 and Release 12 or higher . Any VSI-Pro Ver . 13.00
or 13.24 can be upgraded with a uP software change for the hardware of the VSI-Pro remains the
same.
Figure 154: Laptop Connection
to RS-485 Network
RS-232 to RS-485
Converter
Vnetworker
RS-232
VSI-Pro
RS-232
Networker
VSI-Pro
RS-232 or
RS-422 RXD only
RS-232
Laptop
RS-485 Network
VSI-Pro Max8
RS-232
RS-232 or
RS-485 Full Duplex
Cash Register
Figure 155: Vnetworker Main Menu
VSI-Pro Max 8 POS / Cash Register Interface
Cash Register
86
Cash Register
Page 87

RS-485 VNETWORKER APPENDIX M
View Status
Pull Down the Window to select ComPort and select 32 Address when using less than 32 registers
and select 64 if using more than 32 registers.
The Green Led is indicated when a Networker is Detected.
The Red Led is indicated no Networker at that Address.
Figure 156: Status Display
Windows
Windows Tile Horizontally
Windows Tile Vertically
Windows Cascade
Figure 157: Window Tile Options
Files:
C:\Logfiles directory contains all the files with the name extension Address1.txt, Address2.txt, etc
corresponding to the address of the Networker . These files are updated continuously. If you copy
and then delete the file, a new log file will be created with the same number as new data is
recieved. Viewing the files is updated every 2 seconds.
VSI-Pro Max 8 POS / Cash Register Interface
87
Page 88

APPENDIX M RS-485 VNETWORKER
Remote Keyboard
This function allows the user to select the appropriate Channel of VSI-Pro Max 8 on the network with the Select Address
setting. Once this is done you then click “Programming”. The Vnetworker will then signal the VSI-Pro to exit the register
interface mode and go to the programming mode. Note: While in this mode all data from the cash register will not be
stored or displayed in the VSI-Pro and will be lost.
After a brief pause, communication is established with the VSI-Pro and the following menu will be displayed. This is
the same as the on-screen menu and using the “Up”, “Down”, “Enter” buttons you can navigate the VSI-Pro menu
just like at the local pushbuttons.
Control Button
• Programming
• Up
• Down
• Enter
• Erase Character
• Save String Input
• Reset
VSI-Pro Max 8 POS / Cash Register Interface
Figure 158: Remote Keyboard
Address Select :
You should select the address for
Programming, then press the
Programming Button
88
Page 89

RS-485 VNETWORKER APPENDIX M
The new menu items are “Set Time / Date” and “Remote Keyboard”.
The “Set Time / Date” functions allows you to set this value from the PC Time/Date or manually enter yourself.
Select ID sets the address value of the appropriate VSI-Pro on the network you wish to up date.
Figure 159: Time / Date Set up Menu
VSI-Pro Max Jumper Settings APPENDIX N
See independent sections for complete description of jumper settings relating to its particular function. All Factory
Control Jumpers should not be changed for are only used for factory testing and configuration.
Jumper Default
Register RS-422/485 T ermination
JP 8 ON - Term 120 ohm O N
OFF - No T erm
DB9 Pin 9 Selection
JP 6 ON 1-2 Alarm 2 O N
OFF -Enable Signal Gnd Ref
JP7 ON - Signal Gnd Reference OFF
DB9 Pin 5 Selection
JP 5 ON - RS-232 Signal Gnd ON
OFF - RS-232 Isolate Gnd
Register RS-232 T ype
JP22 & JP23 ON 1-2 RS-232C ON
ON 2-3 Opto Isolated RS-232
NOTE: Must remove JP5 and use Pin 5 for isolated ground
when using Opto Isolated RS-232 input. If using TXD or other
input/output signals simulatenously , must remove JP6 and put
JP7 ON and use Pin 9 for signal ground reference.
DB9 Pin 8 Output (Only one ON)
JP10 ON - CTS Output OF F
JP11 ON - Network RS-232 ON
Force Chip to Programming Mode
JP 9 ON - T o Programming Mode
OFF - T o Operating Mode OFF
VSI-Pro Max 8 POS / Cash Register Interface
Figure 160: Front Side of VSI-Pro Max8 PCB Jumper
Settings
89
Page 90

APPENDIX N VSI-Pro Max Jumper Settings
Jumper Default
Register RS-422/485 T ermination
JP 2 ON - Term 120 ohm O N
OFF - No T erm
DB9 Pin 9 Selection
JP19 ON 1-2 Alarm 2 O N
OFF -Enable Signal Gnd Ref
JP18 ON - Signal Gnd Reference OFF
DB9 Pin 5 Selection
JP14 ON - RS-232 Signal Gnd ON
OFF - RS-232 Isolate Gnd
Register RS-232 T ype
JP20 & JP21 ON 1-2 RS-232C O N
ON 2-3 Opto Isolated RS-232
NOTE: Must remove JP14 and use Pin 5 for isolated ground
when using Opto Isolated RS-232 input. If using TXD or other
input/output signals simulatenously , must remove JP19 and
put JP18 ON and use Pin 9 for signal ground reference.
DB9 Pin 8 Output (Only one ON)
JP 3 ON - CTS Output OFF
JP4 ON - Network RS-232 ON
Force Chip to Programming Mode
JP12 ON - To Programming Mode
OFF - T o Operating Mode OFF
Jumper Default
Network RS-422/485 T ermination
JP15 ON - T erm 120 ohm ON
OFF - No T erm
Figure 161: Rear Side of VSI-Pro Max8 PCB Jumper
Settings
Figure 162: Network T ermination
of VSI-Pro Max8 PCB
Jumper Settings
JP25 ON - T erm 120 ohm ON
OFF - No T erm
VSI-Pro Max 8 POS / Cash Register Interface
90
Page 91

APPENDIX P AL-16 Alarm Output Adapter
Trigger Text not only sends out printable data for the user to be notified visually or markers for the DVR Text Search
function but also can send out special Control Characters or Escape Sequences. The AVE AL-16 accepts commands to trigger independent Form C Relay contacts via RS-232 communication. Therefore the proper command
sequences can be programmed into the Trigger Text and sent to this device upon alarm or exception. This will
expand the number of hard alarm outputs of the VSI-Pro or Channel of VSI-Pro Max 8 to the maximum of 16. This allows
simple wire connection to presets of PTZ, gate openers, lights, IR illuminators and any other external device that needs
to be controlled by the powerful exception and alarm processor of the Channel of VSI-Pro Max 8.
Figure 163: AL-16 RS-232 & Power Connector
Figure164: AL-16 Relay Output Connectors
APPENDIX Q POS & CCTV APPLICATIONS
PTZ Control
Trigger Text not only sends out printable data for the user to be notified visually or markers for the DVR Text
Search function but also can send out special Control Characters or Escape Sequences. PTZ commands for homing
to preset positions are very common. When using a PTZ dome to monitor more than one POS / Cash Register the
Channel of VSI-Pro Max 8 can be programmed to send out a homing preset string via RS-485 to the PTZ controller upon
an exception. Therefore the dome will then home to that particular register and view the exception in progress. Multiple
VSI-Pro Max 8 can be paralleled on the RS-485 since in the recieve mode until the exception occurs.
In gasoline or petrol stations the same function is very useful. One PTZ can cover several pumps. When a
customer slides his credit card or activates the pump the channel of VSI-Pro Max 8 can send out the homing preset
string for the PTZ and capture images of the user and vehicle for every transaction. This will allow close up images of each
transaction from one camera rather than many fixed cameras.
Cash Drawers, Safes and Security Doors
The RTS Alarm Input can be programmed to be a generic Hard Alarm input. This can be connected to a
Cash Drawer and alarmed when the drawer is open. With the RTS Alarm Delay feature a time can be programmed
to wait for this alarm to be true longer than that time and then trigger the alarm. This is very powerful to detect when
cash drawers or safes are open for an excessive amount of time which is indicative of theft practices.
The RTS Alarm input can also be connected to entry and exit doors and generate alarm conditions when the
door open too long. This in conjunction with the Trigger Text can send specific text data to the DVR upon this
condition so later the DVR database can be searched for such events. Therefore hard alarms in conjunction with
user programmed data strings provide powerful search criteria for exceptional events.
Access Control Panels
Each Channel of VSI-Pro Max 8 can be connected to read the data coming directly from an access control panel
or to the server. The Channel of VSI-Pro Max 8 has RS-485 or RS-422 comp atibility along with RS-232 in passive mode
which can be connected in parallel with most access panels with no effect on transmission to the server . The Channel of
VSI-Pro Max 8 can then programmed for a specific user ID and generate alarm or exception conditions and alerts when
they enter. It also can deliver an e-journal of all entries directly to the database of the A VE DVRs and then later search
directly to a user name or specific Time & Date.
VMD and Cash Registers
In a normal check out lane if motion is detected in the customer area but no motion in the clerk area this is a
potential problem. If this exists and the cash drawer is opened or a transaction is detected by the Channel of VSI-Pro
Max 8 then this is indicative of a theft. Many VMDs like the DigiS pec DS1-PL has logic on the alarm input to the VMD so
it can be connected in series with the Channel of VSI-Pro Max 8 alarm output functions detecting cash drawer open or
transactions being entered. Therefore a single camera with this type of VMD can detect motion in several areas independently with one camera view and combined with the Channel of VSI-Pro Max 8 to detect these types of situations.
VSI-Pro Max 8 POS / Cash Register Interface
91
Page 92

LIMITED WARRANTY APPENDIX R
LIMITED W ARRANTY
(Terms and Conditions)
For 2 Years from the date of shipment, Seller warrants to Buyer that the Product is free from defects in material or
workmanship under normal use and service. Equipment manufactured by other than Seller but furnished by Seller
carries the same warranty to Buyer as Seller receives from the other manufacturer, notwithstanding any provision to
the contrary . If Buyer has specified a particular manufacturer’s product which is not the brand standardly supplied by
Seller, Buyer shall look only to the other manufacturer’s warranty and Seller shall not warrant such item.
EXCLUSIONS. Seller’s warranty does not cover the following :
1. In-transit damage claims, improper handling by carrier or post office.
(Only the consignee of the shipment can file a claim with the common carrier.)
2. Damages caused by incorrect use, modification, carelessness, improper storage, hostile operating conditions,
or unauthorized service, installation or repairs without proper training from the Seller.
3. Damages caused by fire, flood, lightning, collision, acts of God or other events beyond the control of Seller.
4. Products or parts thereof that have had serial numbers removed, altered or defaced.
5. Products returned without an RMA number and sales or delivery receipt showing the date of original purchase.
6. Use of components that do not meet Seller’s specifications.
7. External parts such as cabinets or keypads.
8. Periodic maintenance and adjustments resulting from normal use.
WARRANTIES EXCLUDED, SELLER EXPRESSLY DISCLAIMS AND EXCLUDES ANY EXPRESS OR
IMPLIED WARRANTY OR MERCHANTABILITY OR FITNESS FOR A PARTICULAR PURPOSE WHICH
EXCEEDS OR IS INCONSISTENT WITH THE WARRANTY HEREIN EXPRESSLY SET FORTH.
NON-WARRANTY CLAIMS
In the event Buyer makes a warranty claim and Seller’s warranty does not apply, Buyer shall reimburse Seller for all
reasonable expenses incurred by Seller in diagnosing the installation/repair problem.
BUYER’S EXCLUSIVE REMEDIES
If the Product supplied shall fail to conform to the contract or any applicable warranty, Buyer shall immediately notify
Seller of such condition and afford Seller a reasonable opportunity to inspect said Product. Seller shall, at its option,
either repair or replace such nonconforming Product. Seller shall not be responsible for labor charges for removal or
installation of such equipment or material or charges for transportation, handling and shipping except as provided in
Seller’s written service policy. No Product shall be returned without Seller’s prior written consent.
VSI-Pro Max 8 POS / Cash Register Interface
92
Page 93

APPENDIX R LIMITED WARRANTY
SELLER SHALL NOT BE LIABLE FOR ANY SPECIAL, DIRECT INCIDENTAL OR CONSEQUENTIAL
DAMAGES OF A COMMERCIAL NATURE ARISING OUT THE USE OF OR INABILITY TO USE
SELLER’S PRODUCT BY REASON OF THE FACT THAT SUCH PRODUCT DOES NOT CONFORM
TO THE CONTRACT OR TO ANY EXPRESS OR IMPLIED WARRANTY. SELLER’S MAXIMUM LIABILITY SHALL BE LIMITED TO THE COST OF REPAIR AND/OR REPLACEMENT OF THE PRODUCT CLAIMED TO BE DEFECTIVE OR NONCONFORMING, SUBJECT TO SELLER’S RIGHT OF
REMOVAL AND RETURN OF PRODUCT.
All of the foregoing constitute Buyer’s sole and exclusive remedy and Seller ’s sole and exclusive liability for supplying nonconforming or defective Product.
RETURNS
AVE products are fully inspected and carefully packed to ensure you are delivered a quality product in good condition. If you are not fully satisfied with our product, returns of standard stocking items with no restocking fee can be
made within thirty (30) days of invoice to Buyer. All such returns must have prior consent of Seller by obtaining an
RMA number and must include the sales or delivery receipt showing the date of original purchase and be in an
unused condition contained in its original packaging. Any other returns must have prior written consent of Seller and
are subject to a restocking fee of fifteen percent (15%) and freight charges.
RMA NUMBER
The RMA (Return Material Authorization) number must be obtained by contacting Seller prior to the shipment of the
product for return. The RMA number is valid only for 15 days from the date of issue. The RMA number must be clearly
displayed on all shipping labels.
MASTER RESET APPENDIX S
WARNING!
DOING A MASTER RESET CLEARS ALL PROGRAMMING AND
THE VSI-Pro Max 8 DEFAULTS TO THE FACTORY SETTINGS.
If you have difficulty entering the main-menu or you changed uP or updated the Firmware in your VSI-Pro Max 8, do the
following procedure exactly: Lightly press and hold in the 3 buttons to the left (“Up”, “Down” & “Set”). While holding down
these buttons, press and release the “Reset” button. Then release the other buttons. Wait a few seconds and the
copyright notice will appear on-screen along with the version of software installed in your VSI-Pro Max 8.
Upon powering up the VSI-Pro Max 8 for the first time, if the battery is depleted the master reset should be done. However
in some cases the Time/Date display may not have the correct or legible characters. If this occurs, go to the Clock
programming section of the menu and reset the clock and program the correct time. The Time/Date display will then
function properly and any subsequent master resets will not affect the time.
The internal rechargeable NiMH battery needs a full 24 Hr charge if fully discharged to be fully charged.
VSI-Pro Max 8 POS / Cash Register Interface
93
Page 94

NOTE
VSI-Pro Max 8 POS / Cash Register Interface
94
Page 95

NOTE
VSI-Pro Max 8 POS / Cash Register Interface
95
Page 96

NORTH AMERICA
American Video Equipment (A VE)
2000 West Governors Circle, Suite E
Houston, T exas 77092
T el: 281-443-2300
Fax: 281- 443-8915
Email: aveus@ave-us.com
www.americanvideoequipment.com
UNITED KINGDOM
A VE Multiview
Endeavor House 3rd Floor
Coppers End Rd.,Stansted
Essex, CM24 1SJ, UK
T el: 440-870-770-9323
Fax: 440-870-770-9363
Email: ave-uk@multiview.net
www.multiview.net
EUROPE
AVE Europe LTD
123 Millennium Business Park
Ballycoolin, Dublin 15, Ireland
Tel:353 1 684 7450 Fax: 353 1 684 7451
Email: sales@ave-europe.eu
www.ave-europe.eu
ASIA
A VE Thailand Co., Ltd.
147 Soi On-Nut 44
Sukhumvit 77 Rd., Suan Luang
Bangkok, 10250 Thailand
Tel: 662-331-9364, 331-9285
Fax: 662-331-9365
Email: ave@avethailand.com
www.avethailand.com (English)
www.ave.co.th (Thai)
96
 Loading...