

Page 1
1
RT-195
EVENT RECORDER
Operations
Manual
AVE
American Video Equipment
1617 E. Richey Road • Houston, Texas 77073
Phone: (281 )443-2300 • Fax: (281) 443-8915
AVE is on-line!
E-mail us at aveus@ibm.net or visit AVE’s web site at
www.americanvideoequipment.com
NTSC V ersion
Page 2
2
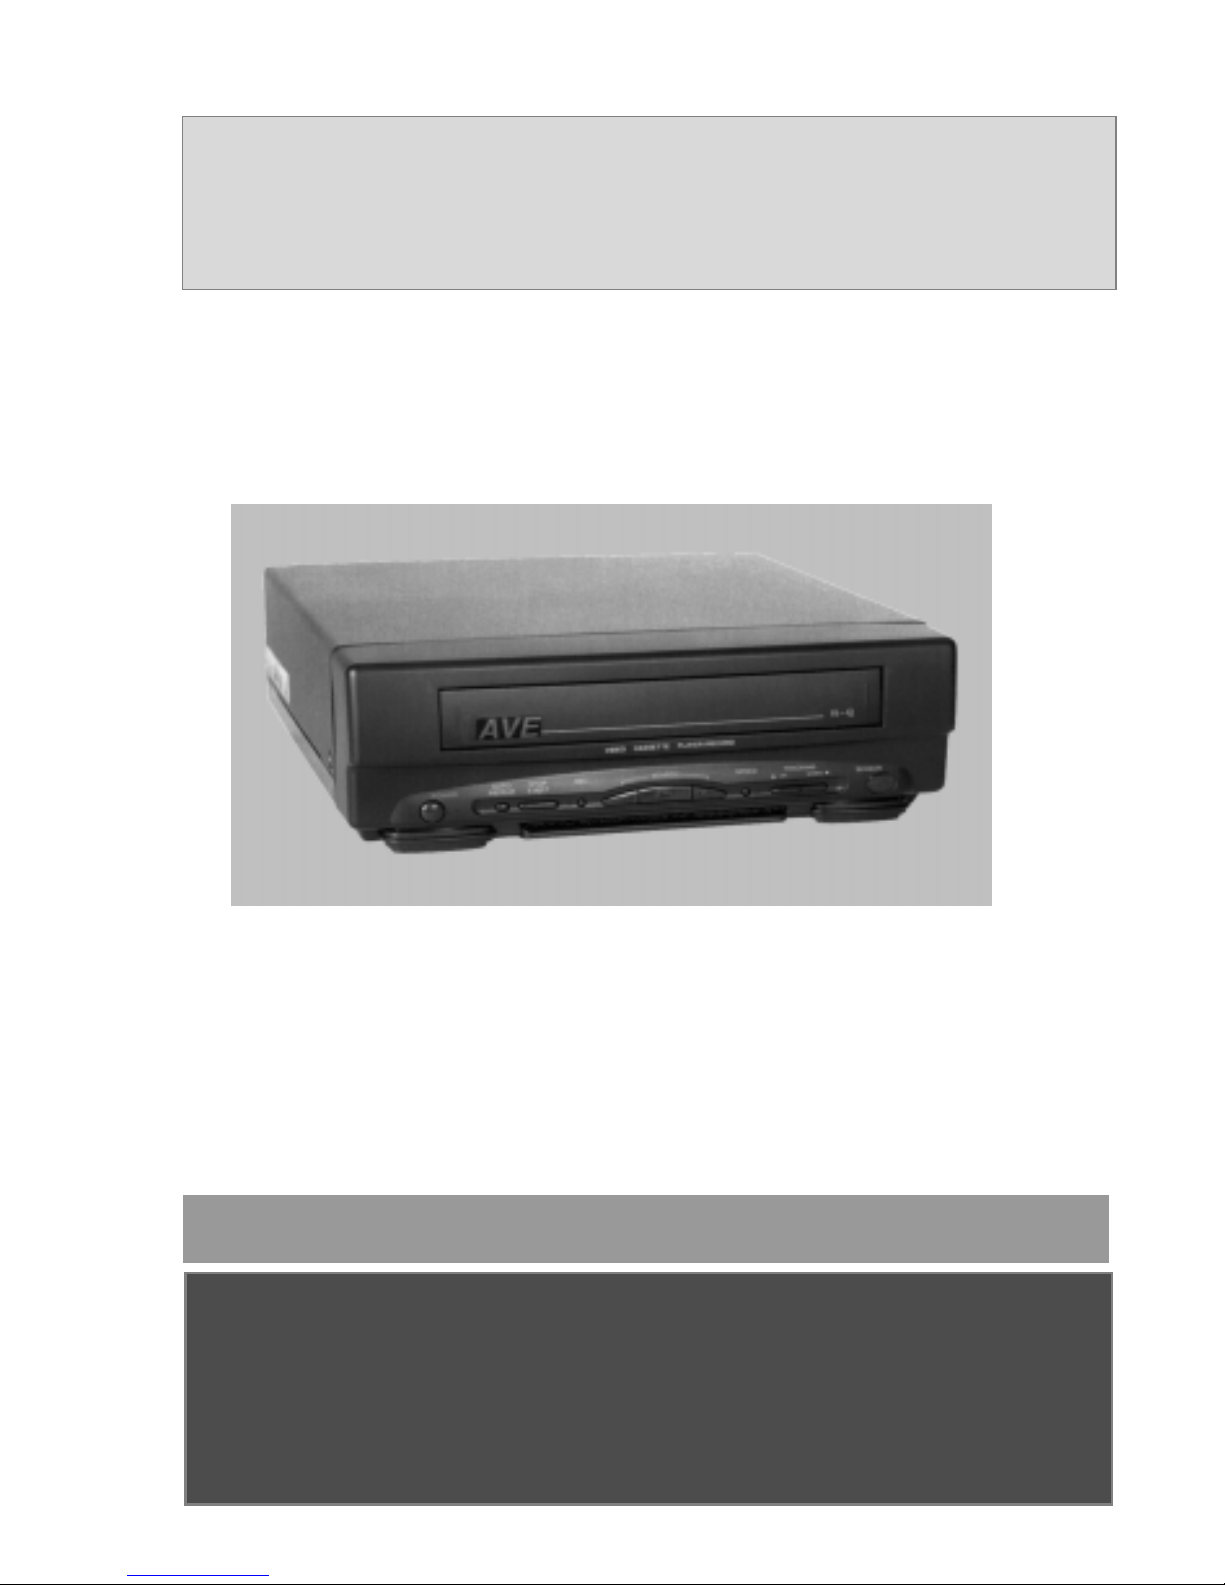
RT-195 Event Recorder
The RT-195 is AVE’s newest addition to our Mobile VCR product
line. The RT-195 is a low cost, 12VDC mobile event recorder with
interactive on-screen programming.
The features of the RT-195 include:
•Time and Date
•20 character title
•Recycle Record
•Power-(+) Record
•Master/ Slave configuration
•Alarm Record Dwell
•Display Settings: Horizontal & Vertical Position and Grayscale
•On-screen Alarm Counter (1-99)
The interactive on-screen programming menu is accessed through
the VCR’s own IR Remote using a combination of the Stop, Pause/
Still(P/S) and plus (+) and minus (-) buttons. The RT-195 can record
(+) to 8 hours using a T-160 tape in EP mode.
WARNING!
THIS EQUIPMENT GENERATES, USES, AND CAN RADIATE RADIO FREQUENCY AND IF
NOT INSTALLED AND USED IN ACCORDANCE WITH THE INSTRUCTIONS MANUAL, MAY
CAUSE INTERFERENCE TO RA DIO COMMUNICATIONS. IT HAS B EEN TESTED AND FOUND
TO COMPLY WITH THE LIMITS FOR A CLASS A COMPUTING DEVICE PURSUANT TO
SUBPART J OF PART 15 FCC RULES, WHICH ARE DESIGNED TO PROVIDE REASONABLE
PROTECTION AGAINST SUCH INTERFERENCE WHEN OPERATED IN A COMMERCIAL
ENVIRONMENT.
OPERATION OF THIS EQUIPMENT IN A RESIDENTIAL AREA IS LIKELY TO CAUSE
INTERFERENCE IN WHICH CASE THE USER AT HIS OWN EXPENSE WILL BE REQUIRED
TO TAKE WHA TEVER MEASURES MAY BE REQUIRED TO CORRECT THE INTERFERENCE.
WARNING: TO PREVENT FIRE OR ELECTRIC SHOCK, DO
NOT EXPOSE THIS APPLIANCE TO RAIN OR MOISTURE!
CAUTION!
RISK OF ELECTRICAL SHOCK!
DO NOT OPEN!
CAUTION! TO PREVENT ELECTRIC SHOCK, DO NOT
REMOVE COVER. NO USER SERVICEABLE PARTS
INSIDE. REFER SERVICING TO QUA L IFIED PERSONNEL .
Page 3
3
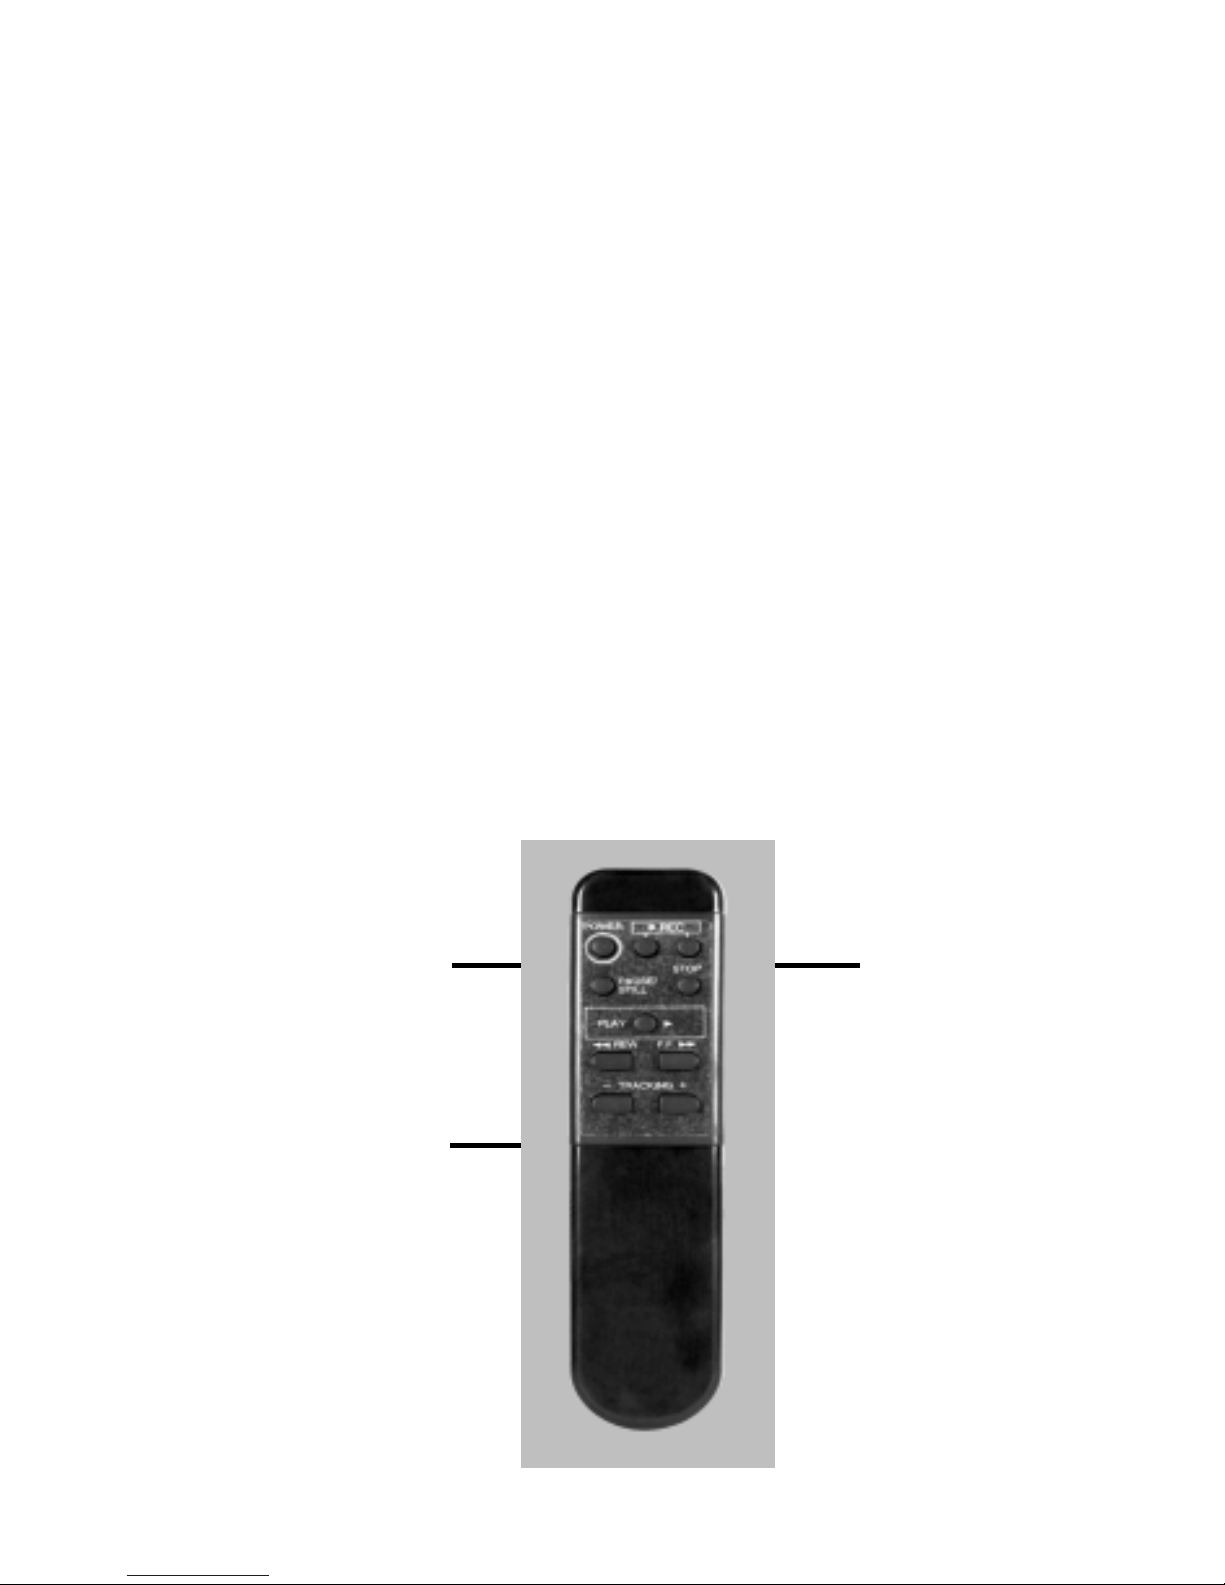
RT-195 IR Remote Control
The RT-195 is programmed with the VCR’s IR Remote Control. The
IR remote still maintains its normal functions, but when the Onscreen programming mode is entered, several buttons take on
alternate roles.
1 STOP: Press and hold the STOP button for approximately 5
seconds to access the main programming menu of the RT-195.
2 PAUSE/STILL: The PAUSE/STILL (P/S) button is used in conjunction with the arrow to access the sub menus of most menu items.
In some menus, pressing the P/S button advances the active
programming position to the next position to the right. If you
hold the PAUSE/STILL button down for 5 seconds programming will be reset to factory defaults.
3 (-) & (+): These buttons serve 2 functions. In the main menu.
They control the arrow cursor position. The (-) moves the arrow
down and (+) moves the arrow up. Once a sub menu is entered,
these buttons are used to toggle between selections or increment/decrement a selection.
3
1
2
Page 4
4
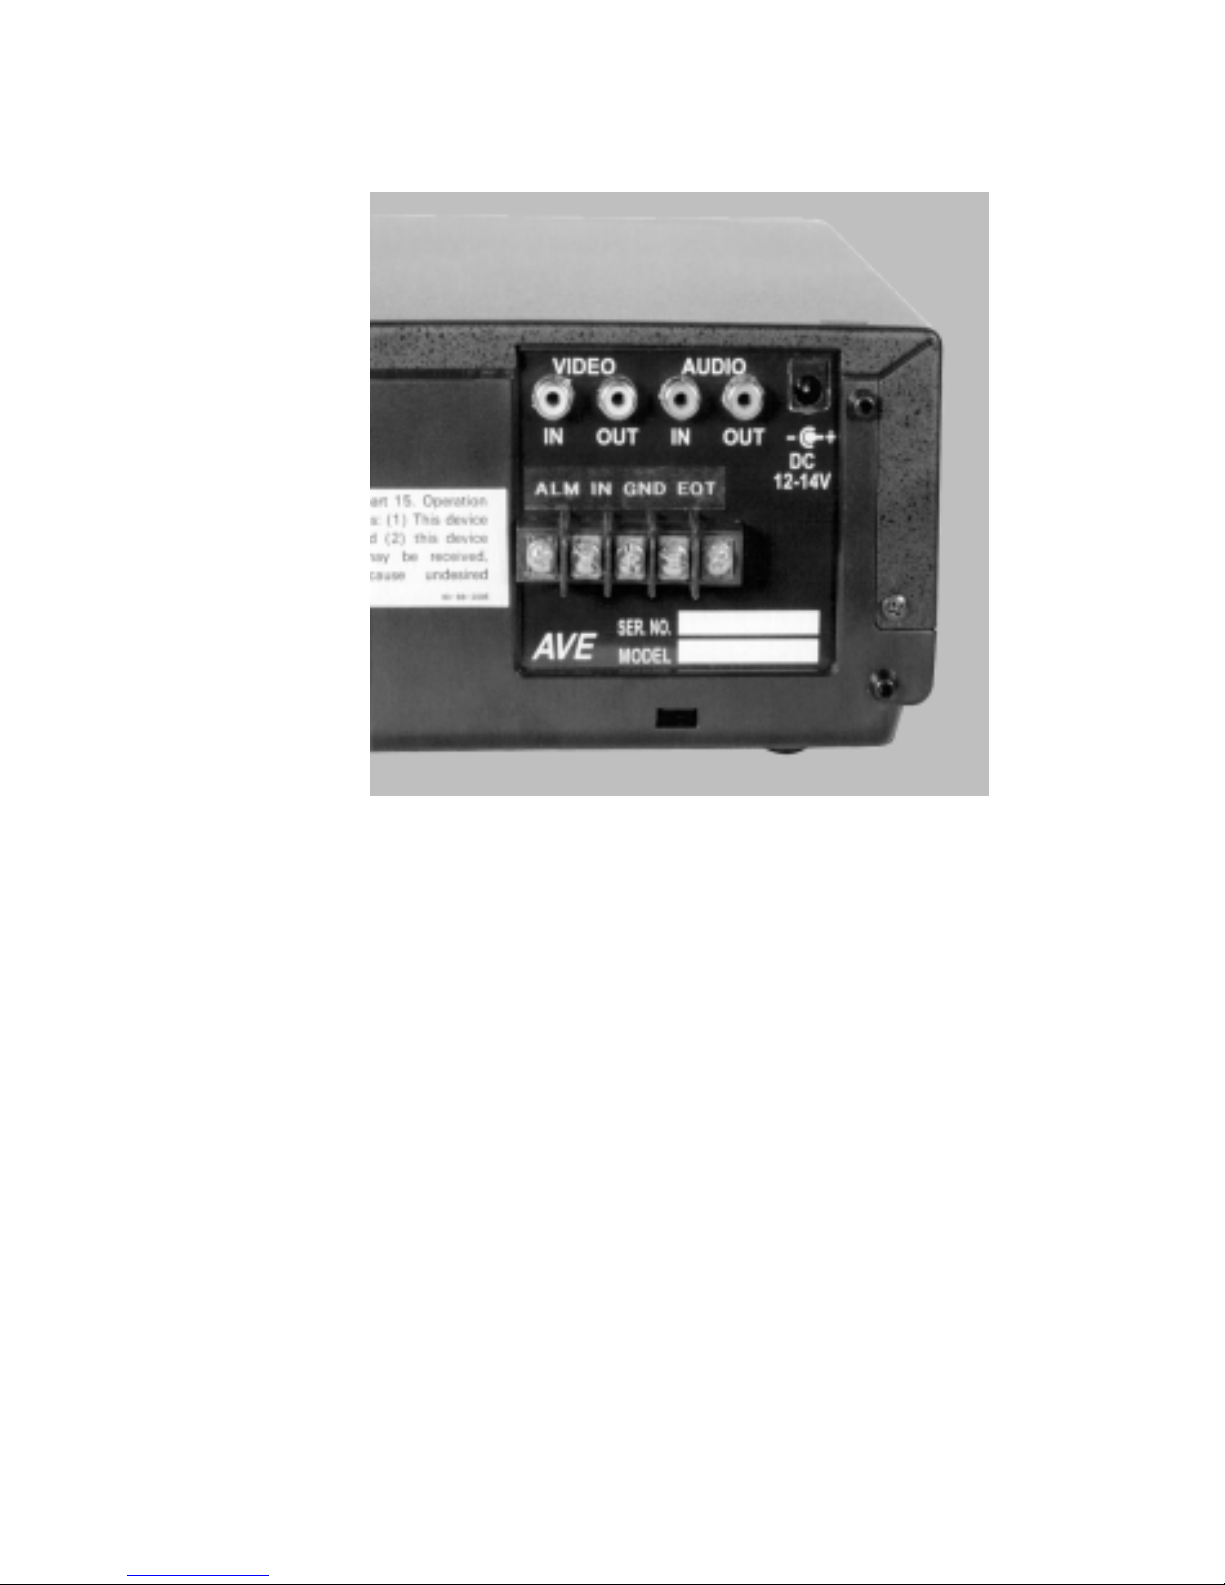
RT-195 Connections
The RT-195 requires the use of composite video. To see the onscreen programming menu, you must have a video camera in
and a monitor connected.
The audio and video jacks are standard RCA type jacks. You will
need to use RCA to BNC adapters when using standard CCTV
cameras with BNC connectors.
The Alarm Input is a contact closure to ground. The alarm pulse
must be at least 200mS to trigger the VCR.
Page 5

5
RT-195 On-screen Programming
The RT-195 can be programmed via the included IR remote control. You will need a video source in and a monitor connected to
be able to see the programming menu.
To access the programming menu of the RT-195 VCR, Press and
hold the STOP button for approximately 5 seconds. The following program menu will appear:
1 TIME/DATE
2 TITLER
3 RECORD
4 ALARM
5 TAPE SPEED
6 DISPLAY
7 MASTER RESET
8 EXIT
The arrow should be in front of SET TIME/DAT; if it's not, simply
press the (-) or (+) buttons to move the arrow in front of SET
TIME/DATE.
To set the time and date, with the arrow in front of SET TIME/
DATE, press and release the P/S button.
The following sub menu will appear:
1 TIME FORMAT
2 SET TIME/DATE
3 T/D DISPLAY
4 EXIT
First of all we need to select the time format. You will have a
choice between 12 HR and 24 HR (military time).
The arrow sould be in front of the 1 TIME FORMAT menu. If it is
not, use the (-) or (+) button to move it there and press and
release the P/S button.
The currently selected TIME FORMAT will appear.
Use the (-) or (+) to toggle between the choices. Make your
selection and press and release the P/S button again. Your selection will disappear and we can go on to programming the
correct time.
Page 6

6
Programming the TIME/DATE
Use the (-) button to move the arrow in front of: 2 SET TIME/DATE
and press and release the P/S button.
The hour position will be flashing. Use the (-) and (+) buttons to
set the correct hour (Make sure the A (am) or P (pm) corresponds
to the hour in 12 hour mode). When the correct hour is displayed,
press and release the P/S button. This will advance the cursor to
the minutes position. Follow the same procedure to set the minutes.
Pressing P/S after you have the minutes programmed will advance you to the Day/Month/Year position, followed by the day
of the week (abbreviated). Use the (-) or (+) buttons to select the
correct date. When you're changing the month, you will notice
that the day of the week changes at the same time. The correct
day of the week will be displayed after you program the correct
date.
Follow the same procedure to set the correct year.
After the correct Time/Date is set, press and release the STOP button. This will take you back to the sub-menu.
T/D Display
The RT-195 has the option of turning its display on or off. There
may be applications where the time and date are being generated from a different source, but you still need the Event Recording capabilities.
To turn off the RT-195 display, place the arrow in front of :
3 T/D DISPLAY and press and release the P/S button. The current
choice will appear (the default is ON). To turn the display off, use
the (-) or (+) buttons to toggle between the choices. When you
have made your selection, press and release the P/S button and
your selection will dissapear.
Use the (-) button to place the arrow in front of EXIT and press and
release the P/S button. This will take you back to the main programming menu. Now press (-) again to drop down to: 2 Titler.
Then press and release P/S and the Title Display will appear.
Programming a Title
The RT-195 provides you with the option of displaying a 1 line by 20
character title. This will appear as one line of 20 solid blocks, with
the first block flashing. Use the (-) or (+) buttons to select the first
character of your TITLE. After your selection is displayed, press and
release the P/S button to advance to the next character position.
Follow this procedure to complete the programming of your TITLE.
Page 7

7
When you have programmed the last character of your TITLE,
press and release the STOP button. This will return you to the
main menu. Your onscreen display will show your Title right
below the Time and Date. Press the (-) button to drop down
to: 3 Record.
Programming Record
First you will need to access the sub-menu for Record by pressing and releasing the P/S button, and the following sub-menu
will appear:
1 RECYCLE RECORD
2 POWER UP REC
3 MASTER/SLAVE
4 EXIT
Recycle Record
This optional feature will automatically rewind the tape at EOT
and start the VCR recording again.
The choices for this feature are: ON or OFF. The default is OFF.
To turn this feature on, from the main menu place the arrow
in front of 3 RECYCLE RECORD and press and release P/S. The
current selection will be displayed. To change the selection,
use the (-) or (+) button to toggle between the choices, OFF or
ON. After your selection is showing, press and release the P/
S button and your choice will disappear and you can continue programming other features.
Power-up Rec
The POWER-UP REC option will allow the RT-195 to go into the
RECORD mode when power is applied. (Of course, a blank
tape must be in the VCR.)
The choices for this feature are: ON or OFF. The default is OFF.
To turn this feature on, from the main menu place the arrow
in front of 3 POWER-UP RECORD and press and release P/S.
The current selection will be displayed. To change the selection, use the (-) or (+) button to toggle between the choices,
OFF or ON. After your selection is showing, press and release
the P/S button and your choice will disappear and you can
continue programming other features.
Page 8

8
Master/Slave
This feature allows the use of multiple RT-195's to be used in
applications where you need real time continuous recording
with out interuption for more than 8 hours. Using 3 RT-195's
in this configuration will allow for 24 hour real-time recording.
Using the RT-195's in a Master/Slave configuration requires
the use of the EOT and Alarm input terminal strip on the rear
of the RT-195. The wiring diagram appears on the next page.
To use the Master/Slave feature, each VCR must be programmed to ON in the MASTER/SLAVE menu.
To do this, from the main programming menu, place the arrow in front of 3 MASTER/SLAVE and press and release the
P/S button. The current selection will be displayed. (The default is OFF).
Use the (-) or (+) buttons to toggle between the selections.
When you choice is displayed, press and release the P/S button. Your selection will disappear and you can go on with
additional programming or EXIT the main menu.
When the Master/Slave mode is turned on, the POWER-UP
RECORD and RECYCLE RECORD are automatically defeated.
Note: Because the VCR unloads tape 5 minutes after it
goes idle, it takes time to put it back to the business of
recording. To overcome this problem, the RT-195 has a 4
minute timer to keep track of the idle time. After the idle
mode is detected, the controller starts a timer. If the timer
times out in the idle mode, the controller sends a record
command and a stop command 0.25 seconds later. In this
way, the VCR is always loaded with tape.
Programming Alarm
Back in the main menu, the arrow should be pointing to 3
RECORD, so press the (-) button to select ALARM, then press
and release the P/S button to display ALARM’s sub-menu,
which should appear as follows:
1 ALM REC DWELL
2 ALARM COUNTER
3 EXIT
Page 9

9
RT-195 Master/Slave Connection Diagram
Connect any number of RT-195's together following the diagram
below. Program each VCR's Master/Slave option to ON in
the main programming menu. Place a tape in each machine
and start the first VCR recording. When the first VCR reaches the
end of its tape it will automatically start the next VCR to record.
The first VCR will rewind its tape to the beginning and it can be
removed and a new tape placed in this machine. In the Master/
Slave configuration, Recycle Record is disabled.
Page 10

10
Alarm Record Dwell
The arrow should be pointing to ALM REC DWELL, which is a
feature used in conjunction with the alarm input jack on the
rear of the VCR. If you supply the RT-195 a contact closure,
the VCR will alarm record for the length of time set in the
ALARM RECORD DWELL menu.
The choices for the dwell time are 1S, 2S, 4S, 8S, 16S, 32S,
1M, 2M, 3M, 4M, and 5M. ("S" is seconds and "M" is minutes).
The VHS tape loading mechanism of the RT-195 only requires
approximately 1 second to actually start recording from the
time the VCR receives the alarm pulse. Additionally, the alarm
pulse must be at least 200mS to engage the alarm feature of
the RT-195.
To change the setting, with ALM REC DWELL selected, press
and release the P/S button. The current setting will appear.
Use the (-) or (+) buttons to toggle through the choices. Once
the setting you desire appears, press and release P/S. Your
selection will disappear and you can continue with additional
programming.
Alarm Counter
Use the (-) or (+) button to select this feature, and the P/S
button to display its current setting (the default is OFF). Use
the (-) or (+) to change the setting. If you turn the alarm counter
on, the number will appear below the title on your On-Screen
display. You would use this feature to inform you of how many
times the alarm input has been triggered, from 0 to 99 times,
at which point it returns to 0. The VCR will keep count of the
number of alarm inputs, regardless of the setting you choose,
and you may turn it on at any time to see the actual number
of inputs which have occurred. Once you have decided upon
the setting, press P/S to hide your choice, press (-) to select
EXIT, then press P/S again to return to the main programming menu.
Tape Speed
The settings for TAPE SPEED are EP (Extended Play) or SP (Short
Play). EP is an option that effectively doubles the length of your
video tape, but may only be played on other VCR’s with the
same
Page 11

11
option. SP is the standard, and is the default setting for the RT-
195. If you wish to change the speed to EP, first select TAPE
SPEED with the (-) or (+) button, then press and release P/S
and you will see the setting displayed. (-) or (+) toggles back
and forth between settings. After making your decision, use
the P/S button to return to the main programming menu.
Note: After the tape speed is set, it cannot be changed
by pressing the SP/EP button on the remote because it is
controlled by the VCR controller.
Display Setting
This menu allows control of the Horizontal and Vertical position of the on-screen display andthe Grayscale level. To use
this feature, place the arrow in front of 7 DISPLAY SETTING
and press and release the P/S button. The following sub menu
will appear:
1 HORIZONTAL POS
2 VERTICAL POS
3 GRAY SCALE
4 EXIT
Horizontal Position
To change the horizontal position, place the arrow in front of
1 HORIZONTAL POS and press and release P/S. The screen
will display a 5 line by 20 character text block. Pressing the () or (+) buttons over and over will move the display left and
right on the screen. When you get it in the position you want,
press and release the P/S button and this will return you to
the Display Setting Sub-menu.
Vertical Position
To change the vertical position, place the arrow in front of
2 VERTICAL POS and press and release P/S. The screen will
display a 5 line by 20 character text block. Pressing the (-) or
(+) buttons over and over will move the display left and right
on the screen. When you get it in the position you want, press
and release the P/S button and this will return you to the
Display Setting Sub-menu.
Grayscale
To change the gray scale, place the arrow in front of:
3 GRAYSCALE and press and release P/S. The screen will dis
Page 12

12
play a 5 line by 20 character text block. Pressing the (-) or (+)
buttons over and over will toggle the text block through the 8
levels of gray from white to black and two levels with backgrounds. When you get the gray scale level you want, press
and release the P/S button and this will return you to the
Display Setting Sub-menu.
Go to EXIT and press and release P/S; this will take you back
to the main programming menu.
Master Reset
There may be a need to completely clear the RT-195 programming back to the factory defaults.
To perform a Master Reset, from the main menu, place the
arrow in front of: 8 MASTER RESET and press and release the
P/S button. The following sub menu will appear:
1 BACK TO MAIN MENU
2 DO MASTER RESET
CAUTION: MASTER RESET CLEARS ALL SETTINGS
AND EXITS PROGRAM MODE.
To Master Reset the RT-195, place the arrow in front of:
2 DO A MASTER RESET and press and release the P/S button.
You will be presented with a copyright notice which lists the
software version for the RT-195. This will go away after a few
seconds and the Time/Date display will appear reset back
to:
12:00:00 1-01-95
Copyright (c) 1996
TransAmerican International, Inc.
 Loading...