

Page 1
QM4 & QM8
B&W Simplex
Multiplexer
EIA / NTSC
OPERA TIONAL MANUAL
Page 2
CAUTION!
RISK OF ELECTRICAL SHOCK!
DO NOT OPEN!
CAUTION! TO PREVENT ELECTRIC SHOCK, DO NOT
REMOVE COVER. NO USER SERVICEABLE PARTS
INSIDE. REFER SERVICING TO QUA L IFIED PERSONNEL .
WA RNING!
THIS EQUIPMENT GENERATES, USES, AND CAN RADIATE RADIO FREQUENCY AND IF
NOT INSTALLED AND USED IN ACCORDANCE WITH THE INSTRUCTIONS MANUAL, MAY
CAUSE INTERFERENCE T O RADIO COMMUNICATIONS. IT HA S BEEN TESTED A ND FOUND
TO COMPLY WITH THE LIMITS FOR A CLASS A COMPUTING DEVICE PURSUANT TO
SUBPART J OF PART 15 FCC RULES, WHICH ARE DESIGNED TO PROVIDE REASONABLE
PROTECTION AGAINST SUCH INTERFERENCE WHEN OPERATED IN A COMMERCIAL
ENVIRONMENT.
OPERATION OF THIS EQUIPMENT IN A RESIDENTIAL AREA IS LIKELY TO CAUSE
INTERFERENCE IN WHICH CASE THE USER AT HIS OWN EXPENSE WILL BE REQUIRED
TO T AK E WHATEVER MEASURES MAY BE REQUIRED T O CORRECT THE INTERFERENCE.
WARNING: TO PREVENT FIRE OR ELECTRIC SHOCK, DO
NOT EXPOSE THIS APPLIANCE TO RAIN OR MOISTURE!
Copyright (c)1999
TransAmerican International, Inc.
Printed in Thailand
CE
Page 3

TABLE OF CONTENTS
1. FEATURES ................................................................ 5
2. SPECIFICATIONS ..................................................... 6
3. INTRODUCTION ....................................................... 7
4. FRONT PANEL .......................................................... 8
5. BACK PANEL .......................................................... 10
6. CONNECTIONS ....................................................... 11
7. DB-25 CONNECTIONS ........................................... 12
8. BASIC OPERATION................................................. 13
6.1 Record Mode
.................................................... 13
6.2 Play Back Mode ...............................................
15
9. PROGRAMMING ..................................................... 16
7.1 Main Menu ....................................................... 18
7.2 Time & Date ..................................................... 19
7.3 Camera Titler ................................................... 21
7.4 Display Settings .............................................. 24
7.5 Normal Record Mode ...................................... 25
7.6 Alarm Record Mode ........................................ 30
7.7 Remote Port ..................................................... 33
7.8 Input Termination ............................................ 36
7.9 Sequence Dwell ............................................... 37
GENERAL POLICIES .................................................... 37
A VE’S LIMITED EQUIPMENT W ARRANTY FOR QM .... 38
Page 4

Figure 1 Front Panel QM4 .......................................9
Figure 2 Back Panel of QM4 .................................10
Figure 3 Basic QM4 Connections ............................11
Figure 4 DB-25 Pinouts ...........................................12
Figure 5 Main Menu ...............................................18
Figure 6 Time/Date Menu .......................................19
Figure 7 Time&Date .................................................20
Figure 8 Camera Titler Main Menu .........................21
Figure 9 Sub-Menu of Set Titler ............................22
Figure 10 Display Settings Menu ............................24
Figure 11 Normal Record Mode Menu ...................25
Figure 12 Extrernal Trigger Connection ..................26
Figure 13 Set by Hour Menu ......................................28
Figure 14 Set by Field Interval Menu ........................29
Figure 15 Alarm Record Mode ..................................30
Figure 16 Remote Port Menu ...........................................34
Figure 17 Input Termination Menu ............................35
Figure 18 Sequence Dwell Menu ..............................36
FIGURES
TABLES
Table 1 Remote Control DB-25 to DB-9 Cable .....33
Table 2 Remote Control DB-25 to DB-25 .............33
Table 3 RS-232 Commands ..................................34
Page 5

5
1. FEATURES
n 580 lines High Resolution
672x480 pixels with 256 levels of gray (8 bit)
n Real Time 60 Hz Quad Mode, Duopage Quad for
QM8 or Multiplexed Output in Record Mode
n Quad or Full Screen in Playback Mode
Duopage Quad for QM8
n 2X Zoom in all modes with 9 Centering Positions
n Camera Switcher Pulse Input for automatic VCR
synchronization
n 2 Monitor Outputs – Playback and Call Up
n Video Loss Detection Bypassing and Alarming
n Alarm Inputs one per camera
n Alarm Output
n RS-232 Standard Commands
n Time / Date Universal Format
n Titling for each Camera Input
n 12VDC Low Power Input
n Looping Inputs with programmable termination
n Rugged 18 gauge metal case
n On-Screen Programming
Page 6

6
2. SPECIFICATIONS
Resolution:
Better than 580 lines B&W, 672x480 pixels with 256 levels of gray (8 bit)
Video Inputs:
QM4 - 4 Camera 1V P-P BNC Looping
QM8 - 8 Camera 1V P-P BNC Looping
Programmable 75 ohm termination On/Off
1 VCR Input 1 V P-P BNC 75 ohm termination On/Off
Video Outputs:
1 VCR Output 1V P-P BNC into 75 ohm (Record Only)
1 Playback Monitor Output 1 V P-P BNC into 75 ohm (Record & Playback)
1 Call Monitor Output 1 V P-P BNC into 75 ohm (All sources switchable)
Live Mode:
QM4 - Quad, Full Screen, or Sequencing Full Screen
QM8 - Quad, Duoquad Sequencing, Full Screen, or Sequencing Full Screen
Record Mode: Full Frame Mode - 60Hz maximum new picture rate
Playback Mode:
QM4 - Full Screen or Quad
QM8 - Full Screen, Quad or Sequencing DuoQuad
Zoom Mode: 2X in all modes with 9 centering positions
Camera Pulse: Active low negative going edge – DB-25F
Camera Pulse Out: Active low negative going edge when recording – DB-25F
Remote Control: RS-232C Industry standard command set – DB-25F
Alarm Inputs:
QM4 - 4 NO / NC Programmable - DB-25F
QM8 - 8 NO / NC Programmable - DB-25F
Alarm Output: 1 NO Output – DB-25F
Enclosure: 18 gauge painted metal three piece design
Battery back Up: 1 year all programming
Certifications: FCC, CE
Power: 8-14 VDC @ 400 mA
2.1 mm x 5.5 DC coax connector
Warranty: 1 yr parts & Labor
Page 7

7
The term multiplexer was given to an electronic device that time-multiplexes video pictures from numerous cameras onto one VCR. This means
that one field or frame from one camera was switched to the VCR, then immediately following that picture was another field or frame from another camera and so on from each camera, then it started over again. This technique
maintains full resolution as does normal video switchers but reduces the time
between recorded images so the 2-3 second dead time between normal camera switching was reduce to 17ms (milliseconds) times the number of cameras. The multiplexer electronically marks each picture with a camera number so it can be identified upon playback.
When the recorded tape is played back through the multiplex the multiplexer electronically identifies the desired picture to be viewed. When the
picture is identified the multiplexer updates the viewable image on the monitor so you only see the requested image or images if in the quad mode.
There exits three types of multiplexers in Black & White or Color; Simplex, Duplex or Full Duplex. The Simplex models are for unattended operation since they can only view switched images when the multiplexer is in the
recording mode. Duplex models allow simultaneously recording on the VCR,
while the operator can view the total number of cameras viewed at once on
the multi-screen display. Full Duplex allows the playback of a second VCR
while viewing the multi-screen display while the first VCR remains recording.
The AVE QM line of multiplexers are Black & White Simplex. They do
however have features above the standard Simplex design. The high resolution give the QM line the most advanced performance & features of any Black
& White simplex multiplexeres. The name QM stands for Quad or Multiplexer since the QM series has the ability to be a real time 60 Hz quad or
sequencing Duoquad (QM8) or a high performance simplex multiplexer. W ith
2 monitor outputs the user can be viewing the call monitor with live images
while watching the playback on an additional monitor.
For additional information on multiplexers visit the AVE website at
www.americanvideoequipment.com and click “Education”. A more detailed
white paper on multiplexer technology is available here.
3. INTRODUCTION
Page 8

8
4. FRONT PANEL
There are 16 push buttons on the QM8, and 12 push buttons in QM4 as shown in Figure 1.
They are described as follows:
MENU:
Press this button to bring out the menu-driven setup feature. Press it again while in
the programming mode will exit the menu immediately .
ZOOM/SET :
In record or play mode, press this button to zoom in the picture. It is a 2x zoom with 9
centering positions. In programming mode, use to set or change the value or enter
into a sub menu.
FULL/<:
In record mode, press to get into multiplex recording; In the play mode, press to switch
to full screen display; in ZOOM mode, press to move the zoomed picture to the left
position; in programming mode, press to move cursor left whenever necessary .
QUAD/>:
In the record mode, press the switch to view the real time quad output; for the QM8
press again to view the alternate quad; In the playback mode, press to switch the
display to Quad; In the QM8 press to switch to the alternate quad;in ZOOM mode,
press to move the zoomed picture to the right position; in programming mode, press
to move the cursor right whenever necessary .
SEQ/UP:
In the record mode, press to switch the cameras sequentially . If the MON LED is ON,
the Call Monitor output will be switched sequentially . If MON LED is off then the record
output to the VCR will be a sequencing image rather than the multiplexed record signal. In ZOOM mode, press to move the zoomed picture up; in programming mode,
press to move cursor up or change the value if the cursor is flashing..
MON/DOWN:
In the record or play mode, press to switch the front panel push buttons to control the
call monitor output. When selected the MON LED will be ON, SEQ, CAM1-8 are
used to switch the call monitor output; in ZOOM mode, press to move the zoomed
picture down; in programming mode, press to move cursor down or change the
value if the cursor is flashing.
PLA Y :
Puts the QM in in Quad play mode, also switches the call MON OUT to playback
mode.
RECORD:
Puts the QM in the record mode, also switches the call MON OUT to sequence
through all cameras live.
CAM1-CAM8:
If the MON LED is OFF , switches the VCR OUT to selected camera input. If the
MON LED is ON, switches the call MON output to selected camera input.
Warning: The QM series has the ability to change the multiplex recording output to
either a single camera or sequencing through all cameras with a digitized image.
When the MON LED is off you are programming this record output.
Page 9

9
(a)
Figure1:(a) Front Panel Of QM4
Combination Buttons
Playback:
While in the playback mode both monitors will show the playback image
the same. If you want to view the live multiplexed output of the VCR or to program the
VCR via its on-screen programming, press the PLA Y and MON buttons simultaneously.
Pressing the Play button again will return to the normal play mode.
Page 10
10
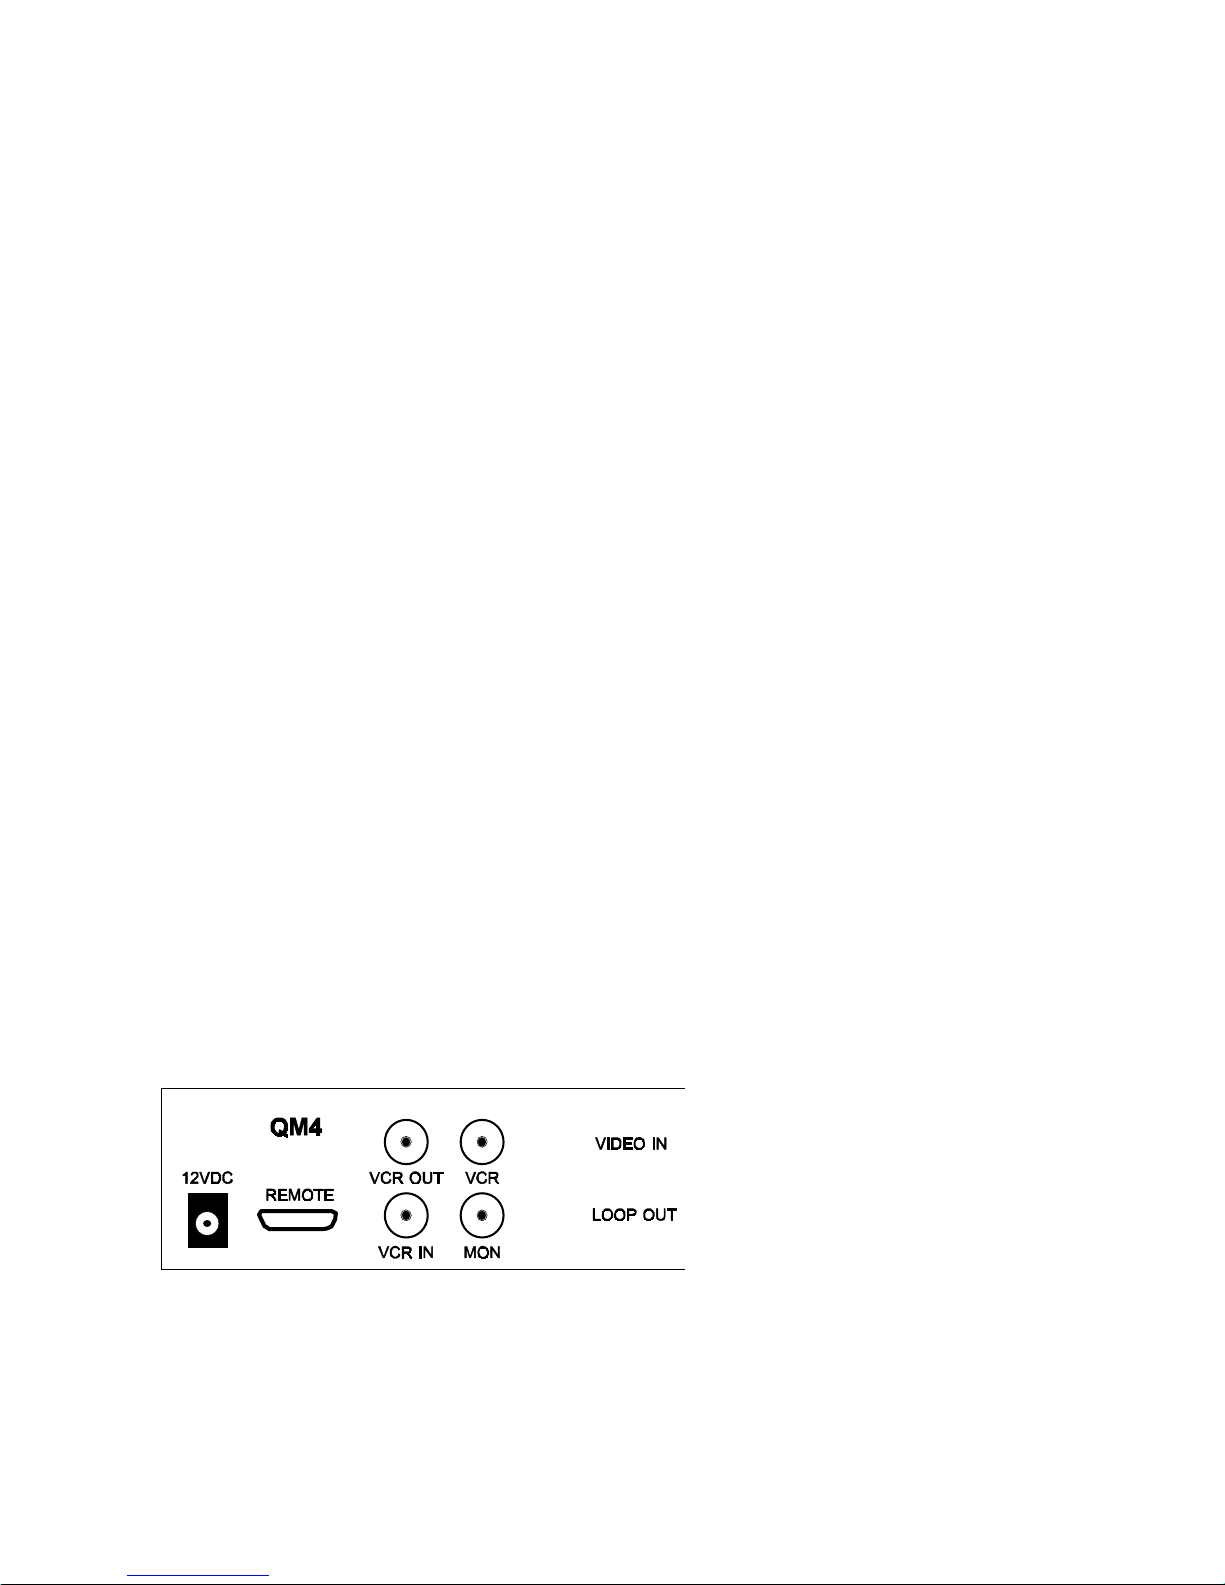
5. BACK PANEL
POWER:
The QM takes 12VDC @ 400 ma via a DC adapter that plugs in the back of the
QM.
VCR OUT:
The VCR OUT should be connected to the input of the VCR.
VCR:
VCR is the playback / record monitor output. In the record mode it displays the
multiplexed picture output to the VCR, in the playback mode it displays the quad or
full screen playback or the live multiplexed output of the VCR.
VCR IN:
VCR IN should be connected to the output of the VCR and is programmable terminated or unterminated.
MON:
MON can be connected to the input of the call monitor.
VIDEO IN:
Cameras can be connected to QM VIDEO IN connectors and are programmable
terminated or unterminated as a global setting.
LOOP OUT:
Video output of the corresponding camera. Must be programmed for Hi-Z or
unterminated when this option is used to guarantee quality recorded video.
REMOTE CONTROL:
The DB-25 female connector is used for RS-232 communication, alarm input/output and trigger pulse input/output connections. The pin out of Remote Control is
shown in figure 4.
Figure 2: Back panel of QM4
Page 11
11
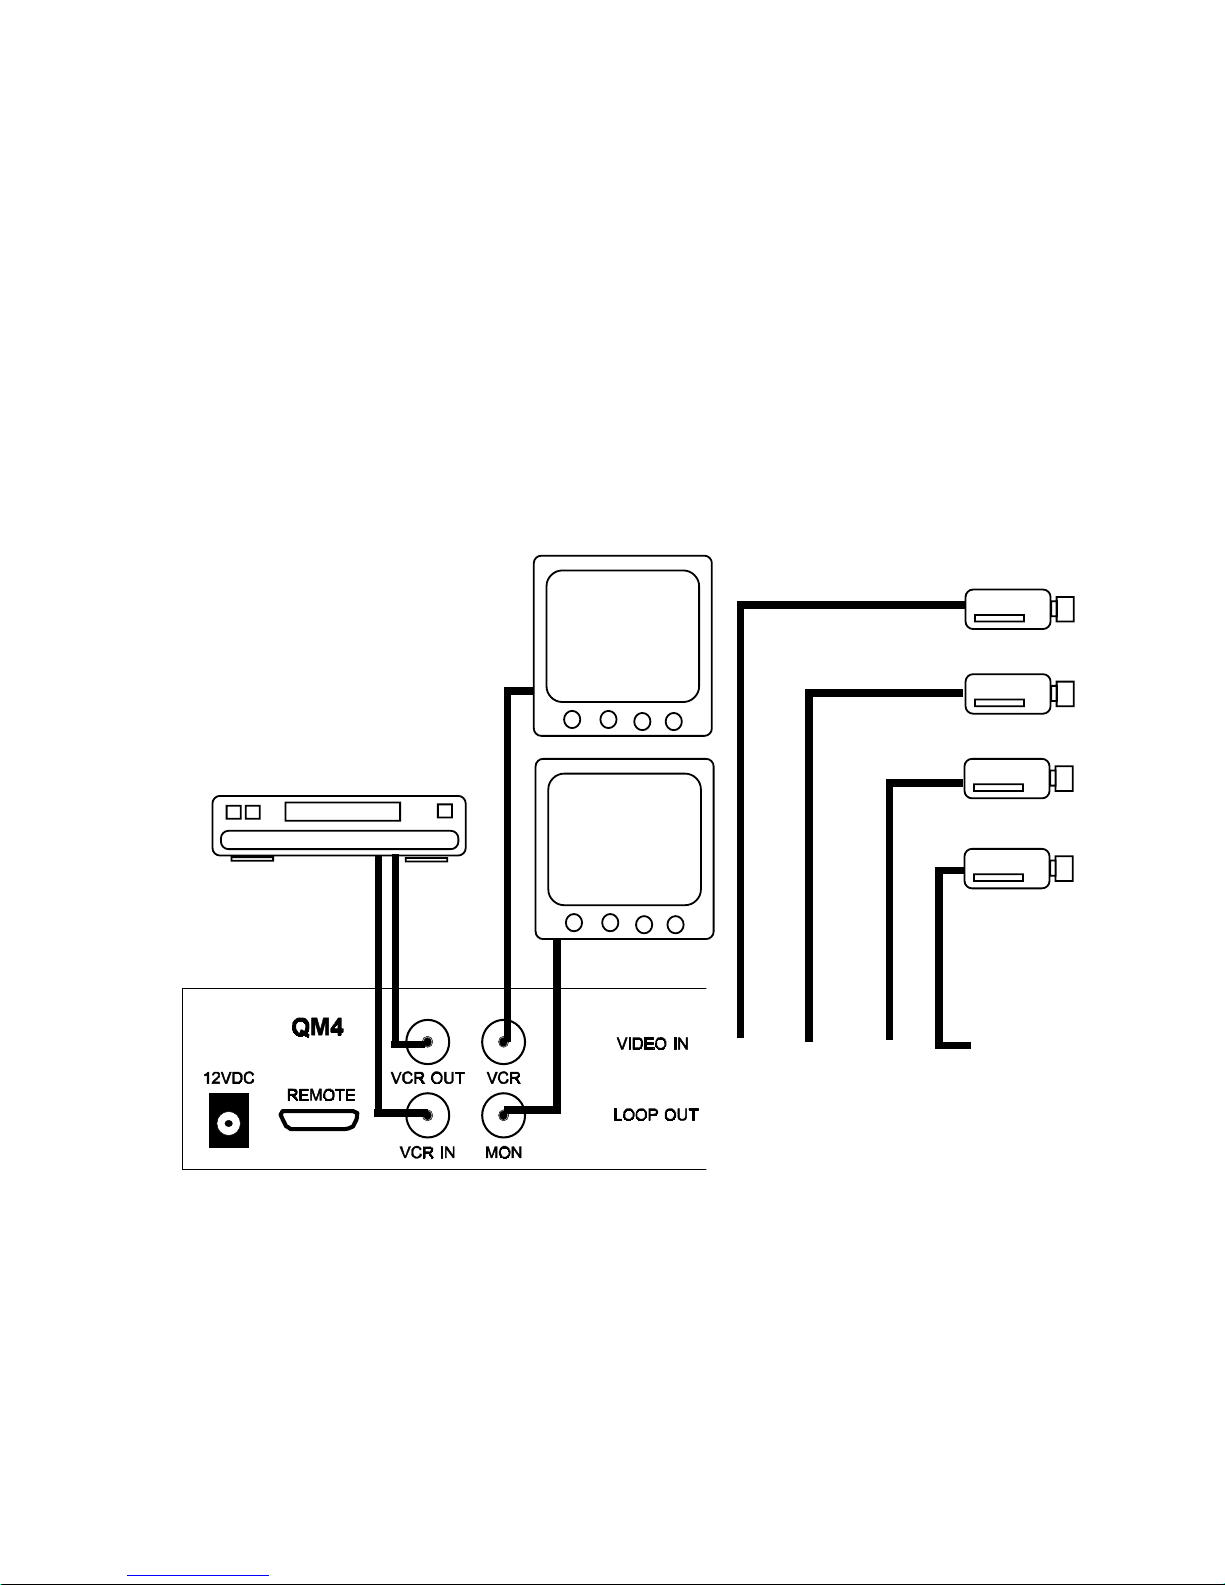
6. Connections
1. Before connecting make sure all the equipment is powered down.
2. Connect the QM with Cameras, VCRs, Monitors and power as shown in
Figure 3.
3. Power up the system. The QM will go into the multiplexer record mode
by default, the call monitor will be sequencing through the live cameras,
and the VCR playback monitor will have the multiplexed image that goes
to the VCR.
Figure 3: Basic QM4 connection
Call Monitor
VCR Monitor
VCR
Cameras
Page 12
12
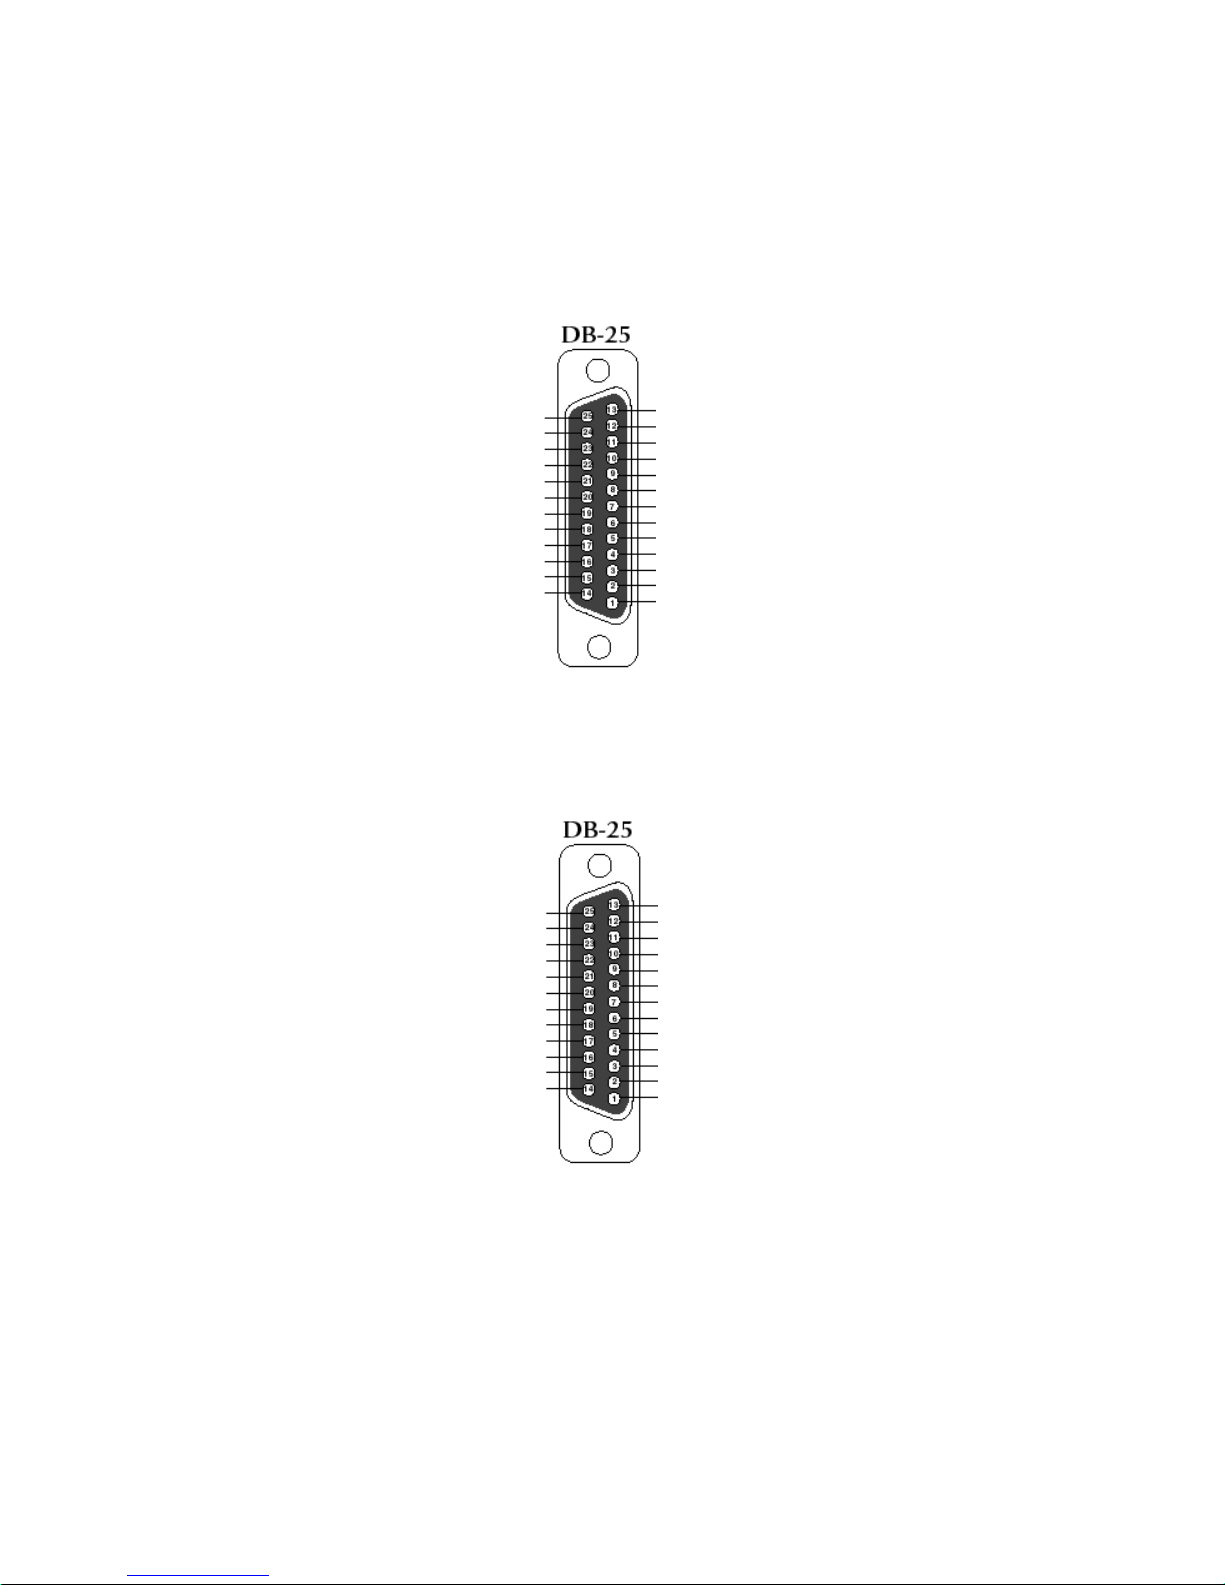
7. DB-25 Connections
GROUND
TxD
RxD
GROUND
ALARM IN 1
ALARM IN 2
ALARM IN 3
ALARM IN 4
SWITCHING PULSE IN
SWITCHING PULSE OUT
ALARM OUT
GROUND
GROUND
GROUND
GROUND
GROUND
GROUND
GROUND
TxD
RxD
GROUND
ALARM IN 1
ALARM IN 2
ALARM IN 3
ALARM IN 4
ALARM IN 5
SWITCHING PULSE IN
SWITCHING PULSE OUT
ALARM OUT
GROUND
GROUND
GROUND
GROUND
GROUND
GROUND
ALARM IN 6
ALARM IN 7
ALARM IN 8
(a)
(b)
Figure 4: Remote Control Pinout (a) QM4 (b) QM8
The above connections are shown as the solder points to the mating DB-25M connector.
Page 13

13
8. BASIC OPERATION
In this section we will discuss the basic operation of the multiplexer without doing any
programming. We will assume the programming is at the factory default settings. There
are two basic modes of operation in the QM; namely the Record mode and the Play back
Mode.
Power Up the QM
Power up the QM after making the connections as shown in the Figure 3. The LEDs
on the RECORD and FULL buttons will be turned on which is the power up operational
mode. You will see the multiplex image on the VCR monitor indicating that the QM is
sending the Multiplex record signal to the VCR. The Call monitor will also have the multiplexed signal in case y ou are only using one monitor. T o view the call monitor sequencing
throught the live views of all cameras press “MON” and the “SEQ”. Any blinking LED on
the CAM buttons indicate that cameras’ input is not present and a video loss is detected.
6.1 Record Mode
There are 5 possible ways of recording in the QM; Multiplex, Quad, Zoom, Full
Screen, and Full Screen Sequence recording. The VCR monitor output will always show
the actual video signal going to the input of the VCR. While you are recording in any of the
above modes you can also view the full screen output of any specific camera or all the
cameras sequentially on the call monitor. To do that make sure a monitor is connected to
the MON output of the QM as shown in figure 3. See the MON mode to set this option.
Multiplex Recording / Viewing
By default the QM will power up in the multiplexed recording mode. The LED on the
RECORD and FULL buttons illuminated only indicates that the QM is sending multiplexed
images to VCR. Y ou can see the m ultiplex ed image on the VCR monitor also . You can
also activate this mode by pressing the “RECORD” button any time. If you want to see any
specific camera on your call monitor , press the MON button then press the “CAM #”
(where # is the number of camera you want to view). If you want to automatically sequence
through all the cameras, press the SEQ button. The LEDs on the MON, SEQ, and
RECORD button will be on, while the LEDs on the CAM buttons will be ON sequentially
and will remain ON for the amount of time set in SEQUENCE DWELL . See the programming section to set the sequence timing. If you connect a separate monitor on the “VCR”
output then you can view the multiplex ed image on that monitor . If y ou desire to view the
multiplex ed recording image on the call monitor, press the RECORD button.
Warning: When the MON LED is off you can change the recording output signal to the
VCR. The normal mode of multiplexed recording is when the FULL LED is on. If this is off
then either one camera or a sequence of cameras is being recorded as in a normal video
switcher .
Page 14

14
Quad or Duoquad Recording/Viewing
T o record the real time quad image press the “RECORD” button. In this mode you will
now be able to change the recording signal to the VCR. If you are only using a call monitor you
will be viewing the same as the VCR monitor output. Press the “QUAD” button and you will
be viewing cameras 1-4 in quad mode. If using a QM8, press again to view camera 5-8. If you
want to sequence between the two quads in the QM8 press the “SEQ” button. The sequence
dwell time will be the same as the camera sequencing dwell setting. Remember, none of the
above modes records in the multiplex recording mode, press “RECORD” at any time to go
back to the normal QM multiplexed record mode.
Full Screen Recording/Viewing
T o record just one camera’s output press the “RECORD” button. In this mode you will
now be able to change the recording signal to the VCR. If you are only using a call monitor
you will be viewing the same as the VCR monitor output. Press the “CAM#” button for the
camera images you want to record at this time. The LED on the RECORD, FULL and
CAM # button will be turned on. If you want to view a different camera on call monitor press
the “MON” button followed by the “CAM#”. If you want to view all cameras sequentially
press the “MON” followed by the “SEQ” button. This is a digital sequencing mode and all
cameras are time base corrected. That means there will be no monitor roll and no interruption on the recorded VCR signal between camera switching. Remember, none of the
above modes records in the multiplex recording mode, press “RECORD” at any time to go
back to the normal QM multiplexed record mode.
Sequential Full Screen Recording/Viewing
T o record a sequencing full screen output press the “RECORD” button. In this mode
you will now be able to change the recording signal to the VCR. If you are only using a call
monitor you will be viewing the same as the VCR monitor output. In this mode you will now
be able to change the recording signal to the VCR. If you want to record all cameras
sequentially press the “SEQ” button. See the programming section for changing the camera dwell. This is a digital sequencing mode and all cameras are time base corrected.
That means there will be no monitor roll and no interruption on the recorded VCR signal
between camera switching. Remember, this mode does not record in the multiplex recording mode, press “RECORD” at any time to go back to the normal QM record mode.
Zoom Recording/Viewing
T o record or view the 2X zoom of any camera input on the VCR monitor press the
“RECORD” button. In this mode you will now be able to change the recording signal to the
VCR. If you are only using a call monitor you will be viewing the same as the VCR monitor
output. In this mode you will now be able to change the recording signal to the VCR. Now
press the ZOOM button, the LED on ZOOM, FULL, and RECORD will be ON. Now press
“LEFT”, “RIGHT”, “UP” or “DOWN” button to set the position of the zoom. Y ou can then
select what camera to zoom via the “CAM#” buttons. Y ou can not record the multiplexed
output on the VCR while you are using the zoom mode. The zoomed picture goes to the
input of the VCR for recording. T o exit out of zoom mode press the ZOOM button again.
Page 15

15
6.2 Play Back Mode
The multiplexed-recorded cassette tape can be viewed in quad, duoquad, full screen,
and zoom mode or as the actual images coming from the VCR. The default of the QM is to
display the playback on both monitors in the quad mode. If you desire to use the VCR
monitor for playback while the Call monitor is displaying something else refer to MON
programming.
Quad Mode
To view the multiplexed-recorded tape in the Quad mode, first press the “PLAY”
button on your VCR. Now on the QM press the “PLAY” button. LEDs on PLAY and
QUAD buttons will be ON and a Quad image will appear on the VCR and Call monitor
screens. If you are using QM8 then pressing the Quad button again will toggle between
the quad image of cameras 1 to 4 or cameras 5 to 8. If you are in the full screen playback mode and wish to view in the quad mode just press the “QUAD” button.
Full Screen Mode
The multiplexed-recorded tape can also be viewed in the full screen mode. To play
the full screen mode press the “PLAY” and then the “FULL” button on your QM. The
camera full screen will be the one previously selected. You can now select the camera
number that you want to view in the full screen mode. You may also go directly from
pressing the “PLAY” button to pressing the desired CAM# to select the full screen playback of that camera. In this mode the LEDs on PLAY and FULL button will be on along
with the respective LED above the selected camera.
Zoom Mode
To view the multiplexed-recorded tape in the zoom mode press the “PLAY” and
“ZOOM” buttons. The camera full screen will be the one previously selected or press
the “CAM #” whose image you want to view in zoom mode. The lights on ZOOM, FULL,
and PLAY will be on along with the CAM# LED you selected. Use “UP”, “DOWN”,
“LEFT”, and “RIGHT” buttons to select the zoom position. You may zoom directly from the
quad display mode and again the camera selected will be the previous camera full selected and zoomed.
Page 16

16
8. PROGRAMMING
uneMniaM
etaD/emiT
reltiTaremaC
sgnitteSyalpsiD
edoMdroceRlamroN
edoMdroceRmralA
troPetomeR
noitanimreTtupnI
llewDecneuqeS
tixE
etaD/emiT
NOyalpsiDD/T
ruoH21tamroFemiT
YY/DD/MMtamroFetaD
etaD/emiTteS
etaD/emiTteseR
tixE
reltiTaremaC
NOyalpsiDreltiT
THGIRnoitisoPreltiT
reltiTteS
tixE
ruoHybteS
4ruoHdroceR-
TRLAUTRIVedoMdroceR
ELBUODytisneDdroceR
tixE
lavretnIdleiFyBteS
fotuo1droceR-74
tixE
troPetomeR
0069etarduaB
tixE
noitanimrettupnI
Z-IHtupnIaremaC
SMHO57tupnIRCV
TIXE
llewDecneuqeS
ces3tuOnoM
ces3tuORCV
TIXE
edoMdroceRmralA
NOdroceRmralA-
ruoHybteS
levretnIdleiFybteS
ONedoMnImralA
ONedomtuOmralA
ces1llewDmralA
tixE
edoMdroceRlamroN
FFOreggirTtxE
ruoHybteS
levretnIdleiFybteS
tixE
lavretnIdleiFyBteS
fotuo1droceR-74
tixE
HT89/10/1P73:11:1
QM4 MENU
sgnitteSyalpsiD
noitisoPyalpsiD
dnuorgkcaB/elacsyarG
tixE
ruoHybteS
4ruoHdroceR-
TRLAUTRIVedoMdroceR
ELBUODytisneDdroceR
tixE
reltiTteS
1reltiTteS2reltiTteS
3reltiTteS
4reltiTteS
tixE
Page 17

17
uneMniaM
etaD/emiT
reltiTaremaC
sgnitteSyalpsiD
edoMdroceRlamroN
edoMdroceRmralA
troPetomeR
noitanimreTtupnI
llewDecneuqeS
tixE
etaD/emiT
NOyalpsiDD/T
ruoH21tamroFemiT
YY/DD/MMtamroFetaD
etaD/emiTteS
etaD/emiTteseR
tixE
reltiTaremaC
NOyalpsiDreltiT
THGIRnoitisoPreltiT
reltiTteS
tixE
ruoHybteS
4ruoHdroceR-
TRLAUTRIVedoMdroceR
ELBUODytisneDdroceR
tixE
lavretnIdleiFyBteS
fotuo1droceR-74
tixE
troPetomeR
0069etarduaB
tixE
noitanimrettupnI
Z-IHtupnIaremaC
SMHO57tupnIRCV
TIXE
llewDecneuqeS
ces3tuOnoM
ces3tuORCV
TIXE
edoMdroceRmralA
NOdroceRmralA-
ruoHybteS
levretnIdleiFybteS
ONedoMnImralA
ONedomtuOmralA
ces1llewDmralA
tixE
edoMdroceRlamroN
FFOreggirTtxE
ruoHybteS
levretnIdleiFybteS
tixE
lavretnIdleiFyBteS
fotuo1droceR-74
tixE
HT89/10/1P73:11:1
reltiTteS
1reltiTteS-
2reltiTteS
3reltiTteS
4reltiTteS
5reltiTteS
6reltiTteS
7reltiTteS
8reltiTteS
9reltiTteS
QM8 MENU
sgnitteSyalpsiD
noitisoPyalpsiD
dnuorgkcab/elacsyarG
tixE
ruoHybteS
4ruoHdroceR-
TRLAUTRIVedoMdroceR
ELBUODytisneDdroceR
tixE
8. PROGRAMMING
Page 18

18
The pervious section shows the menu legends of the QM. In the next sections we
will discuss the powerful programming features of QM. To access the main menu of QM
follow the steps below.
1 Press and release the Menu button. (Main menu will pop up on the screen as
shown in the Figure 4)
2 To access any of the sub menus, place the cursor in front of “T/ D display”,
“Camera Titler”, “Normal Record Mode”, “Remote port”, “Input Termination”, or
“Sequence Dwell” and press and release “SET” button. This is accomplished by
using the “SEQ/UP” or “MON/DOWN” buttons to move the cursor up or down to
put the cursor in front of the desired selection.
3 To Exit out of main menu place the cursor in front of “EXIT” and press and re-
lease the “SET” button. You may also exit from the menu at any time by pressing
the menu button again.
Figure 5: Main Menu of QM8/QM4
uneMniaM
etaD/emiT
reltiTaremaC
sgnitteSyalpsiD
edoMdroceRlamroN
edoMdroceRmralA
troPetomeR
noitanimreTtupnI
llewDecneuqeS
tixE
7.1 Main Menu
Page 19

19
An Internal clock circuit generates the time and date that is super imposed on the
monitor screens. After the clock is set, the date and time modes are displayed on the
monitor screens (live picture and multiplexed record). Under the Time & Date menu you
can turn the time and date display “ON” or “OFF”. Set the date format as YY/MM/DD or
MM/DD/YY or DD/MM/YY. You may also set the clock for AM/PM 12 hour time or military or 24 hour European style time format. Set the time or set the time to factory default. Following subsections describe to set the above mentioned settings.
Display Time & Date on Screen
1 In “Time/Date” sub menu place the cursor in front of “T/D Display” and press and
release the “ SET” button .
2 Press the “UP” or “DOWN” buttons to select “ON” or “OFF”.
3 Press and release the “SET” button again .
4 To exit out of the Display Time & Date, place cursor in front of “Exit” and press
and release “SET” button.
5 To activate your selection place your cursor in front of “EXIT” in the main menu
and press and release the “SET” button.
Note: Selecting “OFF” will turn off “Time & Date” display.
etaD/emiT
NOyalpsiDD/T
ruoH21tamroFemiT
YY/DD/MMtamroFetaD
etaD/emiTteS
etaD/emiTteseR
tixE
Figure 6: Time/Date Menu
Selecting Time Format
1 Place the cursor in front of “Time Format” and press and release the “SET” but-
ton.
2 Cursor will start blinking.
3 Now push “Up” or “Down” button to select “12” or “24” time display mode.
4 After selecting the desired selection press and release the “SET” button that will
stop cursor to blink.
5 Exit out from all the menus to activate your selection.
7.2 Time & Date
Page 20

20
Selecting Date Format
1. Under the “Time & Date” menu place the cursor in front of “Date Format” and
press and release “ SET” button.
2. Cursor will start blinking.
3. Chose the format from the selection yy/mm/dd or mm/dd/yy or dd/mm/yy by
pressing either “UP” or “Down” button. YY is the year selection, MM is the month
selection and DD is the day selection.
4. Exit out from all the menus to activate your selection.
Set Time & Date
1 Under the “Time & Date” menu, place the cursor in front of “Set Time/Date” and
press and release “SET” button.
2 Time and Date window pop on the screen as shown in the figure 7.
HT89/10/1P73:11:1
Figure 7: Time & Date
3 By pressing “UP” or “DOWN” button you can change the blinking digit of the
Time or Date.
4 Press “LEFT” and “RIGHT” button to move the blinking digit either to the left or
right direction to finish all the programming selections.
5 After setting the Time or Date press and release the “SET” button.
6 Exit out all the menus to activate the time and date that had been enter.
Reset Time & Date
1 Under the Time & Date menu select “Reset Time/Date”.
3 Press and release “SET” button.
4 It will reset the time and date to factory default.
5 Exit out from all the menus to activate the above selection.
Page 21

21
The Camera Titler allows you to turn the titler “ON” or “OFF”, set the position of the
titler, or let you enter the titler on any specific camera or on all of the cameras connected
with QM. If no titler is entered then the QM by default will display the camera number
on the screen. The following section describes the setting of the above features.
Camera Titler main menu
To access the camera titler main menu, follow the following steps;
1 Press and release the Menu button. ( Main menu will pop up on the monitor as
shown in the Figure 5)
2 Place the cursor in front of “Camera Titler” option.
3 Press and release the “SET” button to access the “Camera Titler” main-menu.
Camera titler menu pops up as appeared in the figure 8.
7.3 Camera Titler
reltiTaremaC
NOyalpsiDreltiT
THGIRnoitisoPreltiT
reltiTteS
tixE
Figure 8: Camera Tiller Main Menu
Titler Display
Titler Display gives you control of turning the titler “ON” or “OFF”. To turn “ON” or
“OFF” the titler do the following steps.
1. Under the “Camera titler” menu, place your cursor in front of Titler Display and
press and release “SET” button.
2. Now press either “UP” or “DOWN” button to select “ON” or “OFF”.
3. Press and release the “SET”.
4. Exit out from all the menu to activate the above selection.
Page 22

22
Titler Position
You can place the titler in the center bottom , right bottom, or left bottom of the
channel. To set the titler position follow the following steps.
1. In the “Camera tiler” menu place the cursor in front of Titler Position and press
and release the “ZOOM SET” button.
2. Now press either “UP” or “DOWN” button to choose bottom left, bottom right, or
bottom center title position.
3. After making your selection press and release “SET” button again.
4. Exit out from all the menus to activate your selection.
Set Titler
Set Titler lets you enter the title for any camera in the QM4 or QM8. To enter the
titler follow the following instructions.
1. Under the camera titler menu move your cursor in front of “Set Titler” and press
and release “ SET” button.
2. “Set Titler menu” will pop up on the screen as shown in Figure 9a for QM4 and
Figure 9b for QM8.
reltiTteS
1reltiTteS2reltiTteS
3reltiTteS
4reltiTteS
tixE
reltiTteS
1reltiTteS2reltiTteS
3reltiTteS
4reltiTteS
5reltiTteS
6reltiTteS
7reltiTteS
8reltiTteS
9reltiTteS
(a)
(b)
Figure 9: Sub-menu of Set Titler
Page 23

23
WONKOTSGNIHT
gnidnecsanitebahplaehtsevomnottub"NWOD"
.redirognidnecsednisciremundnaredro
redrognidnecsednistebhplaehtsevomnottub"PU"
.redrognidnecsanisciremundna
thgirdrawotrosrucehtevomnottub"THGIR"
.noitisop
.ecapskcab"TFEL"
3 Now move your cursor to the desired title number and press and release “ SET” but-
ton. (e.g. If you want to put title on camera 3 then select “ SET TITLE 3” )
4 A blinking cursor will appears on the screen.
5 Use “UP”, or “DOWN” to scroll through the available letters, numbers and special
characters available for titling. Use the “RIGHT” or “LEFT buttons to move the cursor
right or left to select the next character position for programming.
6 After entering the title press and release the “SET” button.
7 Exit out of all the menus to activate all the selection.
Page 24

24
7.4 Display Settings
Display Settings are provided to allow simple changing of the display’s verticle and
horizontal position, and the gray scale or the background settings. The following menu
will pop up on the screen when display settings are selected from the main menu.
sgnitteSyalpsiD
noitisoPyalpsiD
dnuorgkcab/elacsyarG
tixE
Display Position
Follow the steps below to set the horizontal postion or the verticle position of the
inserted text.
1 Under the Display settings menu place the cursor infront of Display Position and
press “SET” button.
2 Press “UP” or “DOWN” button to set the horizontal settings.
3 Pree “LEFT” or “RIGHT” button to set the verticle settings.
4 Exit out of programming mode to activate the selection
Gray Scale / Background
There are 10 settings to choose the grayscale/ background settings. Follow the
steps to set the grayscale/ background settings.
1 Under the Display settings menu place the cursor in front of Grayscale/ back-
ground and press the “SET” button .
2 Press “UP” or “DOWN” button to set the grayscale/ background settings.
3 Exit out of programming mode to activate the selection.
Figure 10: Display Settings Menu
Page 25

25
7.5 Normal Record Mode
Normal Recording mode lets you set the recording speed of the QM. The QM al-
lows you to set the recording speed in three different ways
.
• Set by External Trigger (usually from the VCR)
• Set Speed Hour (the recording hour of the timelapse VCR)
• Set By Field Interval (integral number of pictures between cameras)
This section will discuss the setting of above mentioned speed selection method. To
access the Normal Record mode place the cursor infront of Normal Record Mode in the
main menu and press the “SET” button. The Normal Record mode menu will appears
on the monitor screen.
edoMdroceRlamroN
FFOreggirTtxE
ruoHybteS
levretnIdleiFybteS
tixE
Set Recording Speed by External or Internal Trigger
Trigger In
The camera switcher or CS pulse output of a VCR triggers when the VCR is recording an image. Some VCRs record the image while their VCR tape is stopped, therefore
the tape moves directly after the pulse is issued. Some VCR record while the tape is
moving. This pulse when supplied to the QM will initiate the unit to go to the next camera in the multiplexer sequence and output to the VCR until the next CS pulse comes in.
If the CS pulse goes away during the process then the QM will continue to play the
image until it receives the pulse. Some VCRs output a CS pulse while in the Time lapse
record mode but when in the real time 2 hour mode this pulse is not available. If the CS
pulse is not recieved by the QM within 30 secs the QM will assume a 2 hour record
speed and switch accordingly .
The following figure show the relationship between the CS Pulse In to video output
of the QM. Figure 12 shows the pin out information from remote control port to the
VCR.
CAM 1
CAM 2
TRIGGER IN
VIDEO OUT
Figure 11: Normal Record Mode menu
Page 26

CAM 1
CAM 2
TRIGGER OU
T
VIDEO IN
26
The following figure shows the connections that need to be made between the QM
remote control connector and the VCR CS output so that QM can receive the trigger
output from the VCR.
After making that connection turn ON the external trigger of QM by using the following
programming steps.
1 In the Normal Record Mode sub-menu move the cursor in front of EXT
TRIGGER and press and release the “SET” button.
2 Cursor will start blinking.
3 Now Press either “UP” or “DOWN” button to select EXT Trigger “ON”.
4 Press and release “SET” button again.
5 Exit out from all the menus to activate your selection.
.
Tr igger Out
The QM trigger output gives a signal to the VCR to record the current image
immediately because the multiplexer is switching to the next camera in the sequence.
The following figure showed the relation between the output pulse and the input camera.
To activate that option you need to make sure that “EXT Trigger” is on OFF position. For turning that OFF repeat step 1 through 5 again and make sure to select “OFF”
in step number 3 instead of “ON”.
After making the connection shown in Figure 12 and turning “ OFF” the EXT Trigger
you can now control the VCR recording speed via QM.
Figure 12: External Trigger Connection.
Switching Pulse Out
Switching Pulse In
Ground
Page 27

27
WONKOTSGNIHT
ruoHdroceRfotnuomatahttneserperruohdroceR:
SHVsruoh2dradnatsnodrocernacuoytahtemit
.ettessac
edoMdroceRlaeR,elbaliavaeraedoMeerhT:
emiTdna,edomemiTlaeRlautriV,edomemiT
.edomespaL
:ytisneDdroceRerauoyfielbaneylnonoitpotahT
elgniseranoitpostI.edomespaLemiTehtgnisu
.ytisnedelpirtdna,ytisnedelbuod,ytisned
1 In the Normal Record mode menu place your cursor in front of “Set by
Hour” and press and release “SET” button.
2 Normal Record Mode screen pop up on the as shown in figure 13.
3 Place your cursor in front of “Record Hour” and press and release “SET”.
4 Select your desired speed of recording by pushing “UP” or “DOWN” button.
6 Press and release the “SET” button again.
7 Now move cursor in front “Record mode” and press and release the “SET
button.
8 Cursor will start blinking again.
9 Press either “UP” or “down” button until “REAL TIME” appears in front
Record mode.
10 Press and release “SET” button again.
11 Now exit out all the menus to activate the selection.
12 You are ready to record in real time mode.
Virtual Real Time Recording
1 In the Normal Record mode menu place your cursor in front of “Set by
Hour” and press and release “SET” button.
2 Normal Record Mode screen pop up on the as shown in figure 13.
3 Place your cursor in front of “Record Hour” and press and release “SET”.
4 Cursor will start blinking.
5 Select the recording speed by pressing “UP” or “DOWN” button.
6 Press and release the “SET” button.
Set speed Manually
The QM Normal record menu gives you option to set the recording speed manually.
The speed selection options are Real time, Virtual real time, and Time Lapse recording.
Following the sections below described the setting of the Real Time, Virtual Real Time,
and the Time Lapse settings.
Real Time Recording
Page 28

28
7 Now move cursor in front “Record mode” and press and release the “SET”
button.
8 Cursor will start blinking again.
9 Press “UP” OR “DOWN” button until “ VIRTUAL REAL TIME” appears in
front of “Record mode”.
10 Press and release “SET” again.
11 Now exit in all the sub-menus to exit out of programming mode.
12 You are ready to record in Virtual Real time mode.
ruoHybteS
4ruoHdroceR-
TRLAUTRIVedoMdroceR
ELBUODytisneDdroceR
tixE
Figure 13: Set by Hour menu
Time Lapse Recording
1 In the Normal Record mode menu place your cursor in front of “Set by
Hour” and press and release “SET” button.
2 Normal Record Mode screen pop up on the as shown in figure 13.
3 Place your cursor in front of “Record Hour” and press and release “ZOOM
SET”.
4 Cursor will start blinking.
5 Select the recording speed by pressing “UP” or “DOWN” button.
6 Press and release the “SET” button. .
7 Now move cursor in front “Record mode” and press and release the “SET”
button.
8 Cursor will start blinking again.
9 Press “UP” or “DOWN” button until “ TIME LAPSE” appears in front of
record mode.
10 Press and release “SET” button again.
11 Move your cursor in front of “Record Density” and press and release the
“SET” button.
12 On blinking cursor select the desire recording density (e.g. single, double,
or triple).
13 After selecting the density press and release the “SET” button.
11 Exit out of all the menus to activate above selection.
12 You are ready to record in Time Lapse mode.
Page 29

29
Setting by Field Interval
This option is designed for more experienced users. You can set the record speed
by fieldd interval. Follow the following steps to set recording speed by field interval.
1 In the “Normal Record mode” menu place your cursor in front of “Set by
Field Interval” and press and release “SET” button.
2 Set By Field Interval menu pop up on screen as shown in figure 14.
3 Place your cursor in front of Record 1 out of ----, and press and release the
“SET” button.
4 Now you can select number of fields from which you want to Record one
field.
5 Press and release the “ SET” button after you completing the Field selec-
tion.
6 Exit out of all the menu to activate recording.
lavretnIdleiFyBteS
fotuo1droceR-74
tixE
Figure 14: Set by Field Interval Menu.
When setting the Normal Record or Alarm Mode of the QM the follow is a description of the functions. When you set by hour this assumes the VCR is recording a pre
determined number of pictures per second on the tape. In real time mode all VCRs
record 60 pictures per second, the NTSC standard. In the Virtual Real time mode most
VCRs record 20 pictures per second however it is possible for this to be improved in the
future. In the time lapse mode of 24 hours and above for standard density recording most
VCRs record 5 pictures per second. When using double or triple density VCRs this is
either doubled or tripled to 10 or 15 picturs per second. If you choose to set the QM by field
rate interval the same will be true only this menu breaks down the time computation to
number of fields rather than recording time. Since each field takes 17 ms to complete you
are actually programming by time also just using a multiple of 17
ms between pictures. Make sure you understand the recording pictures per second of
your VCR to issue the best performance of the QM multiplexer. To eliminate all the above
use the VCR camera switcher pulse which automatically controls the QM to record at the
best possible picture rate.
Understanding Record Timing
Page 30

30
7.6 Alarm Record Mode
Alarm recording is one of the most powerful feature of QM. QM upon receiving the
Alarm input the user can change the recording speed, i.e. if QM recording speed is on
Time Lapse can be change to Real Time ( or any other selected speed). If no selection
is made for the speed then QM by default switch the recording speed to Real Time
recording. When a particular camera is alarmed that cameras recording rate is doubled
to capture more information from the alarmed camera.
The following menu will pop up on screen when Alarm Record mode is selected.
Under Alarm record menu you can set the Alarm record option ON or OFF, set the alarm
record mode recording speed, set the alarm in mode to normally open or normally
close, and also set the alarm output to normally open or normally close.
edoMdrocermralA
droceRmralA-
NO
ruoHybteS
levretnIdleiFybteS
ONedoMnImralA
ONedomtuOmralA
ces1llewDmralA
tixE
Enabling the Alarm Record Mode
You can enable or disable the alarm record mode. The following is the procedure
to enable or disable the Alarm record mode.
1 Under the alarm record mode menu place the cursor in front of Alarm record
mode and press the “SET” button.
2 On blinking cursor select between “ON” or “OFF”.
3 After making selection press “SET” button again and exit out from the menu.
Selecting Alarm mode Recording Speed
You can select the recording speed in three different ways. These recording speed
are independent from the recording speed that has selected in the Normal Recording
mode. The QM will automatically switch between these recording speeds after receiving
the Alarm in signal. Following sections describe the setting of recording speed in the
Alarm record mode.
Figure 15: Alarm Record Mode
Page 31

31
By External or Internal Trigger
The QM can either adjust its recording speed with the VCR by Internal trigger or
can set the speed of the VCR by the external trigger. To set the speed with external or
internal trigger follow the following procedure.
NOTE: This option only work with the VCRs which support internal trigger input or external trigger output.
1 Under the main menu move the cursor in front of Normal Record mode and press
“SET” button.
2 Under the Normal Record mode menu move cursor in front of “Ext Trigger” and
turn “OFF” to enable External trigger or select “ON” to enable the Internal Tr igger.
3 After making the selection exit out of all the menus.
Note: Select the recording speed if you choose to enable the external trigger.
Setting the Speed Manually
You can set the recording speed to Real Time, Virtual Real time, or the Time Lapse
manually by follow the following procedure.
1 Under the Alarm Record mode menu select “Set by Hour” and press “SET”.
2 The “Set by Hour “ Window will pop up on the screen.
3 Place the cursor in front of “Record Hour” and press “Set”.
4 Select the Recording time and press “SET” again.
5 Now place the cursor infront of “Record Mode” and press “SET”.
6 Press “Up” or “Down” button to chose Real Time, Virtual real Time, and Time
Lapse Mode.
7 If you choose the Time Lapse mode then place the cursor in front of the Record
density and press set.
8 Press “UP” or “DOWN” buttons to select from Single, Double , and Triple.
9 After making the selection exit out of all the menus.
Setting the Speed by the Field interval
Follow the steps to set the recording speed by field interval.
1 Under the Alarm record menu place the cursor in front of Set by Field Interval and
press “SET”.
2 Set by Field Interval window will pop up on the screen.
3 Move the cursor in front “of Record 1 out of” and select the field number by press-
ing “UP” or “DOWN” button.
4 After making the selection exit out of all the menus to activate the choice.
Page 32

32
Alarm In Mode
The QM provides an option to set the alarm input as active high or active low.
Follow the steps to set the QM alarm input as active high (NC Normally Closed) or
active low (NO Normally Open).
1 Under the Alarm Record mode place the cursor in front of Alarm In Mode and
press the “SET” button.
2 On blinking cursor press either “UP” or “DOWN” button to select “NO” (Nor-
mally Open) or “NC” (Normally Close).
3 Exit out from all the menus to activate the selection.
Alarm Out Mode
QM provide a option to set the alarm output as active high or active low. Follow
the steps to set the QM alarm input as active high or active low.
1 Under the Alarm Record mode place the cursor in front of Alarm In Mode and
press the “SET” button.
2 On blinking cursor press either “UP” or “DOWN” button to select “NO” (Nor-
mally Open) or “NC” (Normally Close).
3 Exit out from all the menus to activate the selection.
Alarm Dwell
Alarm Dwell feature of QM let you specify the time for which you want to keep the
alarm signal active after the alarm signal goes away. To set the time place the cursor
infront of Alarm Dwell and press “SET” button. Then select a time by pressing the
“UP” or “DOWN” button.
Page 33

33
7.7 Remote Port
The QM accepts commands from the RS-232C port. That means you can control
the QM remotely via a computer or any other serial device. To interface the computer
with the QM, the remote port of the multiplexer should connected with the DB-9 or DB25
connectors with the following connection.
Note: When using a PC you must defeat the hardware port handshaking in software
or by hardware. In hardware you must connect RTS to CTS and also connect DTR to
DTS. In other words make the computer think the QM is always ready to recieve data.
)8/4MQ(52BD
LAIRES9BD
TROP
22
33
75
)8/4MQ(52BD
LAIRES52BD
TROP
23
32
77
Table 1: Remote Control connection with DB-25 to DB-9 Cable
Table 2: Remote Control connection with DB-25 to DB-25
Page 34

Follow the steps to set the baud rate in the QM.
1 Press and Release the “menu” button to access the main menu.
2 Place cursor in front of “Remote Port” and press and release “SET” button.
3 Remote Port menu will pop up on screen as shown in Figure below .
4 Place you cursor in front of Baud rate and press and release “SET” button.
5 Select the baud rate and pressing the “UP” or “DOWN” buttons.
6 Exit out from all the menus to activate the selection..
7 QM is ready to receive the command from your computer or serial port
device.
34
The QM uses the above set of RS-232 commands.
To communicate with the serial de vice the Baud rate of the QM and the serial device must be the same. Also configure the serial device as 8 bits, No parity, and 1 stop
bit.
DNAMMOC NOITCNUF
TA/uneM
ZF/mooZ
PP/lluF
22/dauQ
VL/droceR
PT/yalP
QS/ecneuqeS
LS/noM
)8MQ(80/-10/
niylnO(8maC-1maC
)8MQ
)4MQ(40/-10/
niylnO(4maC-1maC
)4mQ
Table 3: RS-232 Commands
Figure 16: Remote Port Menu
troPetomeR
0069etarduaB
tixE
Page 35

35
7.8 Input Termination
The QM4 and QM8 gives you the option to terminate the input of the VCR or Cameras either with 75 ohms or with high impedance. The cameras termination is a global
one which means all must be terminated or all unterminated. If you are mixing looping
with terminating you must supply an external terminator on cameras not looping. To set
the termination follow the following steps.
Note: All outputs of the QM (except camera looping output) have the ability to drive an
unterminated or 75 ohm ter minated loads at 1 V P-P. You may “T” these outputs to two
75 ohm terminated devices like VCRs or monitors and still maintain 1V P-P output from
the QM series.
1 Press and Release the menu button to access the main menu.
2 Place your cursor in front of Input termination and press and release the
“SET”.
3 Input termination menu will pop up on the screen as shown in the figure
below.
4 Place cursor in front of Camera input and press and release the “SET”
button.
5 Select either “75 OHM” or “ HI -Z” by pressing “UP” or “Down” buttons.
6 Now place the cursor in front of “VCR input” and press and release the
“SET” button.
7 Select either “75 OHM” or “ HI -Z” and press and release the “SET” button.
8 Exit out from all menus to activate above changes Sequence Dwell
noitanimrettupnI
Z-IHtupnIaremaC
SMHO57tupnIRCV
TIXE
Figure 17: Input Termination Menu
Page 36

36
7.9 Sequence Dwell
Sequence Dwell lets you specify the amount of time that a camera image can stay
on the monitor or VCR before switching to different camera image. Different switching
timing can be selected for Monitor output and for VCR output. To change the timing
follow the following steps.
1 Press and Release the menu button to access the main menu.
2 Place cursor in front of “Sequence Dwell” and press and release the “SET”
button.
3 Sequence Dwell menu will pop up as shown in the figure below.
4 Place the cursor in front of MonOut Sequence and press and release the
“SET” button.
5 Select the sequencing trimming by pressing the “UP” or “DOWN” button.
6 Press the “Set” button after the selecting the desired trimming.
7 To Select the VCR out put sequence trimming move the cursor in front of
VCRout.
8 Select the desired timing by pressing the “Up” or “Down” buttons.
9 Exit out from all the menus to activate the selection.
llewDecneuqeS
ces3tuOnoM
ces3tuORCV
TIXE
Figure 18: Sequence Dwell Menu
Page 37

37
GENERAL POLICES
Freight Policy
Products and Prices are shipped F.O.B. Houston, Texas.
Refused Shipments
All refused shipments will be subject to a 15% restocking fee and freight charges.
Shipping and Return Policy and Procedure
We are fully inspected our products to insure quality and carefully packed for delivery to
you in good condition. In case that you are not satisfied with our products and must
return them, please follow our Return Policy and Procedure.
· No return is accepted after 30 days from the date of purchase.
· Products returned for credit must be in unused condition and contained in its original
package.
· All return other than the products under the A VE manufacture warranty are subjected
to 15% restocking and freight charges.
· Call our customer service toll free number to obtain the RMA number (Return Material Authorization) prior to the shipment of the product to return.
· The RMA number must be clearly displayed on all the shipping labels.
· The RMA number is VALID ONLY FOR 15 DAYS from the issued date.
NOTE: The RMA number is required for all returned products, i.e. warranty and nonwarranty products for services and repair.
Page 38

38
AVE’S LIMITED EQUIPMENT WARRANTY FOR QM
AVE’s Products are guaranteed to be free of defects in workmanship and material. If
any failure, resulting from either workmanship or material defects should occur under
normal and proper usage within the period stated below for each product form the
original provable date of purchase, such failure should be repaired at no cost to the
buyer for labor and if the defective product(s) is sent to AVE.
QM: One (1) Parts & Labor,.
This AVE warranty does not cover the following:
Products received for repair without an RMA number, sales or delivery receipt showing
date of purchase by original customer.
Damages caused by incorrect use, carelessness, unauthorized alterations, improper
Storage or unauthorized service installation or repairs.
Damage caused by fire, flood, lighting, vandalism, collision, act of God, or other events
beyond the control of AVE.
External parts such as cabinet and key pad.
Damages resulting from loss of use, loss of time or inconvenience, cost of temporary
replacement units or spares, property damage caused by this unit or its failure to work,
or any other incidental or consequential damages.
Hostile operating environments.
In transit damage claims, improper handling by carrier of post offices.
Products or parts thereof which have had serial numbers removed, altered or defaced.
Damage defect or failure caused by or resulting from the operation of the unit by
incorrect voltages.
The use of components that do not meet AVE specifications.
Periodic maintenance and adjustments resulting from normal use such as video head
cleaning, mechanical part ware, etc.
Damage resulting from use of cleaning cassettes.
IMPORTANT: This warranty is in lieu of all other warranties, guarantees or agreements
whether expressed or implied and no person, dealer, or company is authorized to
change, modify, or extend its term in any manner what so ever.
Page 39

NOTES Date ______________
Site Information_______________________________________
_____________________________________________________
_____________________________________________________
Camera 1_____________________________________________
Camera 2_____________________________________________
Camera 3_____________________________________________
Camera 4_____________________________________________
Camera 5_____________________________________________
Camera 6_____________________________________________
Camera 7_____________________________________________
Camera 8_____________________________________________
Normal Record Setting__________________________________
Alarm Record Setting___________________________________
Normal VCR Setting ____________________________________
Alarm VCR Setting _____________________________________
_____________________________________________________
_____________________________________________________
_____________________________________________________
_____________________________________________________
Page 40

E -mail address: aveus@ibm.net
Visit AVE’s websites:
www.americanvideoequipment.com
www.aveuk.com
www.avethailand.com
1617 E. Richey Road • Houston, Texas 77073 USA
Phone: (281) 443-2300 • Fax: (281) 443-8915
Printed in Thailand
 Loading...