

Page 1
Audio VertriebsEntwicklungsgesellschaft
mbH
_____________________________________________________________________
DMX 84
Digital mixer
Includes 8 microphone / line-inputs and 4 outputs
Operating manual
AVE GmbH . Gustav-Rau-Straße 6, . D-74321 Bietigheim-Bissingen,
Telephone +49 7142 788790 . Fax +49 7142 7887918
E-mail: info@ave-stuttgart.de homepage: www.ave-stuttgart.de
Technical changes are reserved
Page 2

2
Contents
1. Introduction
1.1 Security advice
1.2 Scope of delivery
2. Description of components and functions
3. The parameter menue and programming of DMX 84
3.1 Installation of the software
3.2 Apply files
3.3 Adjust presets
3.3.0 General information
3.3.1 Adjustments for inputs
3.3.1.1 Gain
3.3.1.2 Parametric equalizer
3.3.1.3 Micro- / line inputs
3.3.1.4 Master adjustments
3.3.1.5 Automix
3.3.1.6 Matrix
3.3.1.7 Graphic equalizer
3.3.1.8 Parametric 4-band equalizer
3.3.1.9 Delay
4. Handling of DMX 84 with switched on protection
4.1 Recall of stored presets
4.2 Modification of entire volume
5. Modification of adjustments while switched off protection
5.1 Switch on and off protection
5.2 Menue “Save”
5.3 Menue “Preset”
5.3.1 How to name a preset
5.3.2 Master Status on / off
5.3.3 Master volume
5.3.4 Open microphones
5.4 Menue “configuration”
5.4.1 Start-up Preset
5.4.2 Input functions
5.4.3 Matrix select functions
5.4.4 Output functions
5.4.5 Phase
5.5 Menue “Utility
5.6 Menue “Firmware”
Page 3

3
1. Introduction
Thank you very much for choosing the AVE-digital 8-channel mixer DMX 84 with 8
microphone line/inputs and 4 outputs.
With it’s state of the art conception it doesn’t matter whatever demand you have, a problemfree use for all kinds of acoustic irradiation in every different accommodations as e.g.:
churches, courtrooms, government buildings, conference rooms, schools, university’s are
possible.
The following explanations and descriptions refer to the DMX 84, but are also
applicable to the DMX 168. Simply the in- and outputs are different.
The DMX 84 is equipped with its own software for Windows XP and Windows 2000. So the
programming with Laptop or PC is very simple and convenient. A lot of functions can be
recalled and changed directly at the unit with the so-called “presets”. So the possibility exists
to adapt all in- and outputs to the respective demand with parameters and to store them as
further presets.
With delivery ex works the unit is pre-adjusted with 2 presets (5 and 6) named W 5 and W 6.
These presets can be changed if necessary.
1.1 Security advice
There is dangerous voltage inside the unit, so please never remove the
coverage of the unit. Internal modifications or service should be done only by
authorized personnel.
The DMX 84 is delivered with a power cable according to regulations. One end has a
triple-poled main connection socket (rubber connector) and the other a CEconforming safety plug to connect to a 230 V / 50 Hz AC voltage source. Please
regard absolutely that the power cable is not damaged. Do not use any damaged
power cables.
1.2 Scope of delivery
After receiving the unit please check the package to intactness and the content to
completeness, as well as the correct delivery of the unit.
Scope of delivery includes:
- DMX 84
- CD
- USB cable
- Operating manual
- Short description
- Power cable
Please keep the operating manual thoroughly and provide it to the authorized
personnel if necessary to accomplish changes at the unit.
Page 4
4
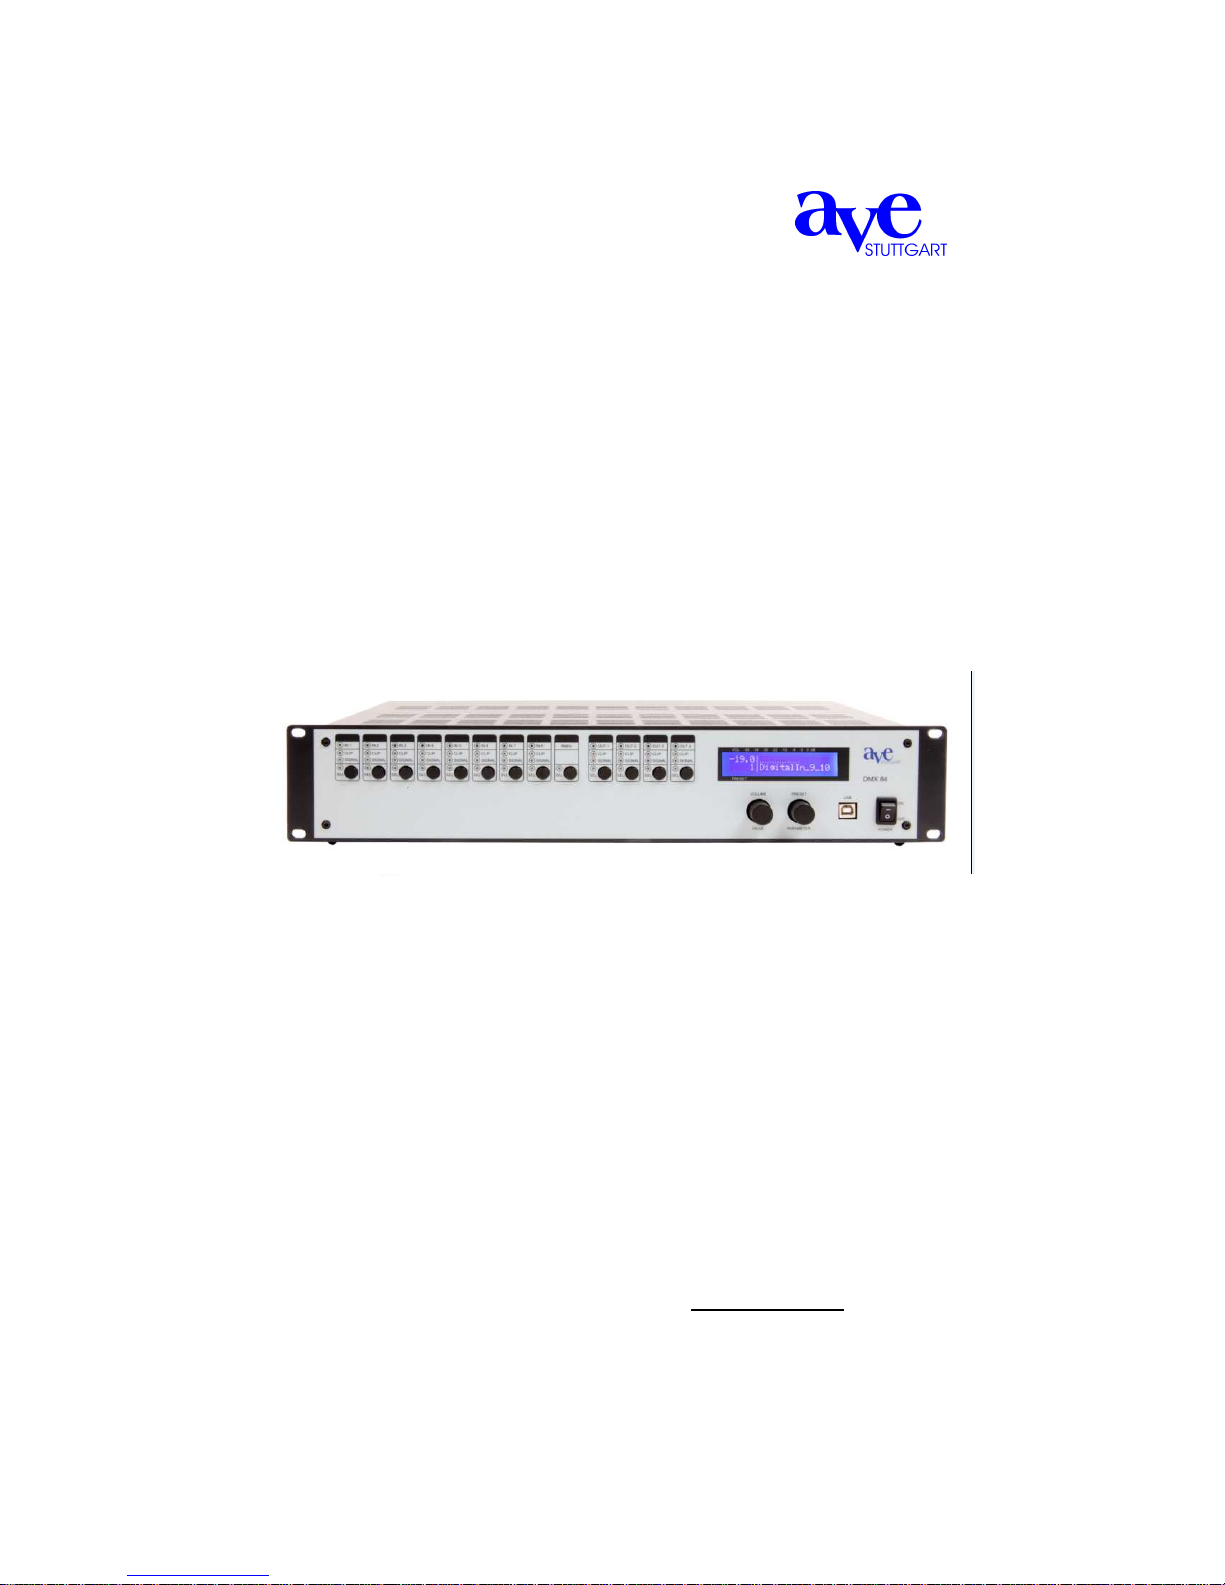
2. Description of components and functions
First of all you should familiarize yourself with the different functions and the
optic features of the unit before starting the programming.
1 8 inputs – each input has the same function
2 Matrix
3 4 outputs – each output has the same function
4 Display
5 Volume / value and preset / parameter
6 USB-connection
7 Power switch
2.1 8 Inputs - each input has the same function
2.1.1 Select button for input of the respected input. The display shows the input status
(on/off)
2.1.2 LED-display, select, input-on, CLIP, Signal-on
1
2
4
5 6
7
3
2.1.1
2.1.2
Page 5

5
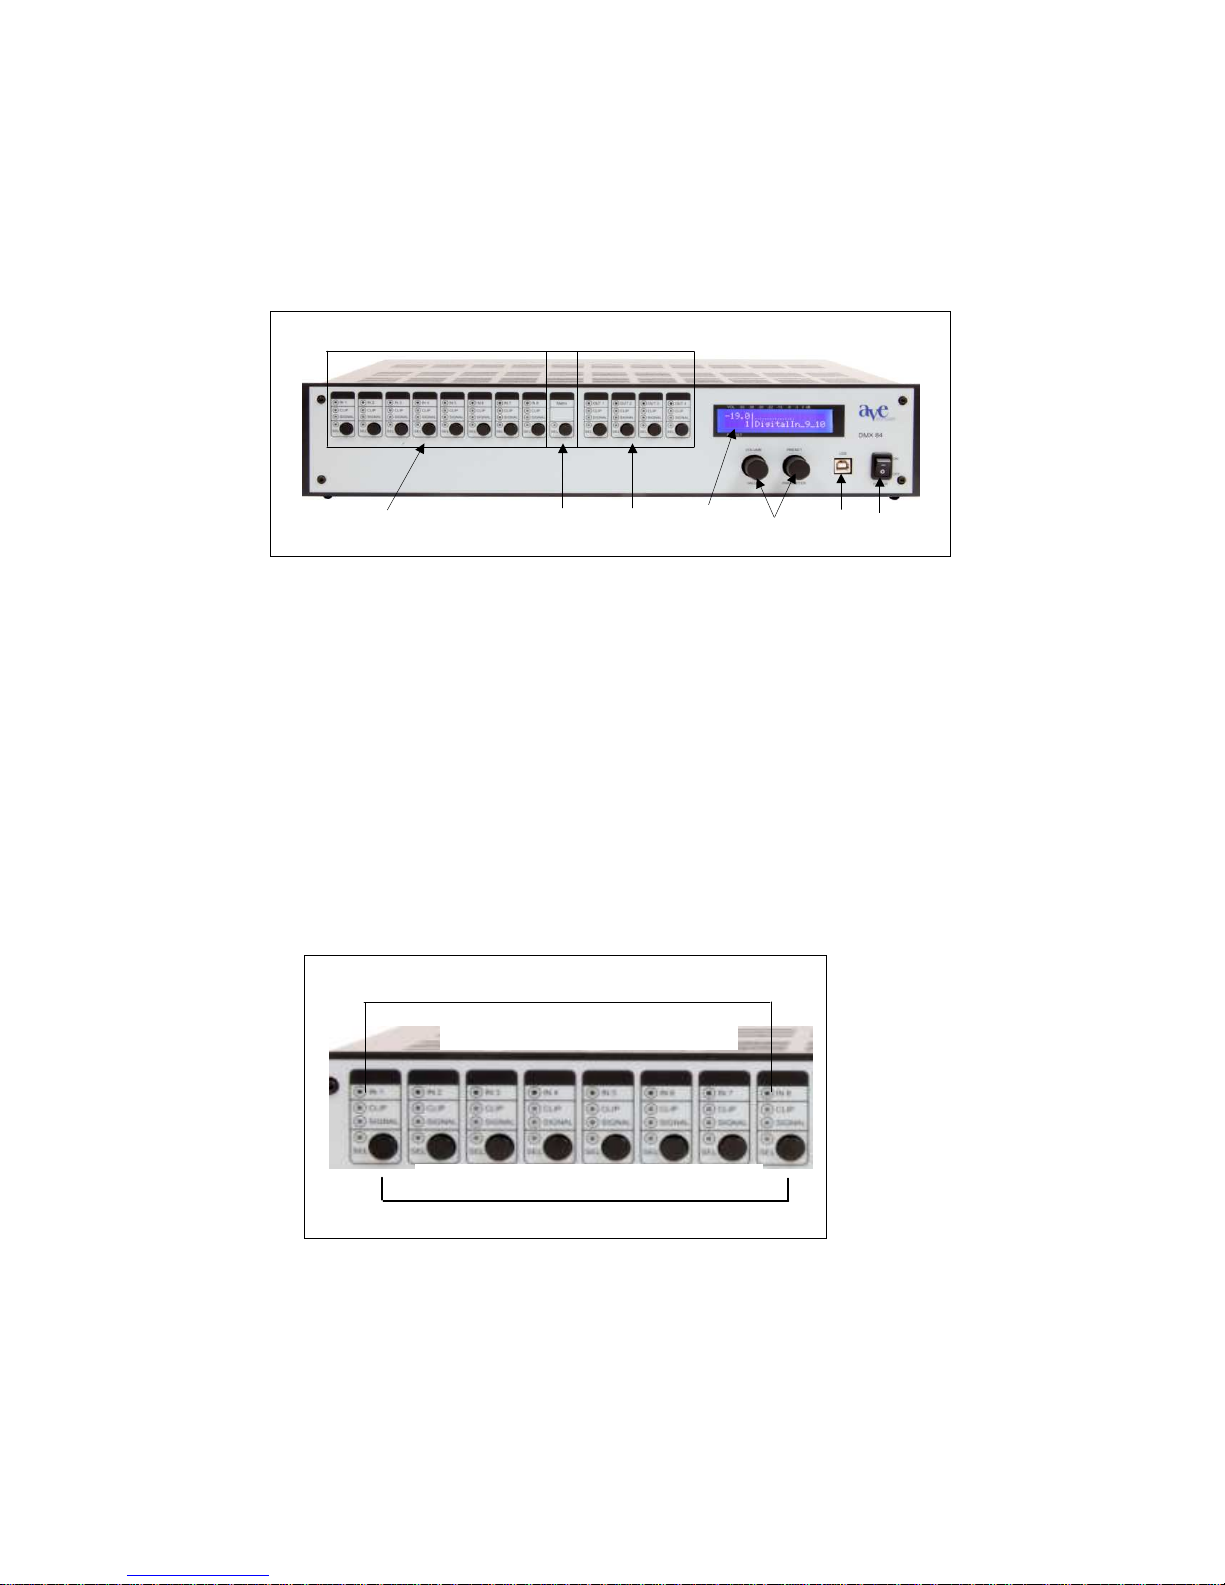
2.2 Matrix
2.2.1 Matrix select buttons for the allocation of the in- and outputs
2.2.2 LED-display for select
2.3 4 outputs each output has the same function
2.3.1 select button for output of the respective output. The display shows the output status
(on/off)
2.3.2 LED-display: select, output – on, CLIP, signal - on
2.2.1
2.2.1
Matrix
2.3.1
2.3.2
Page 6
6
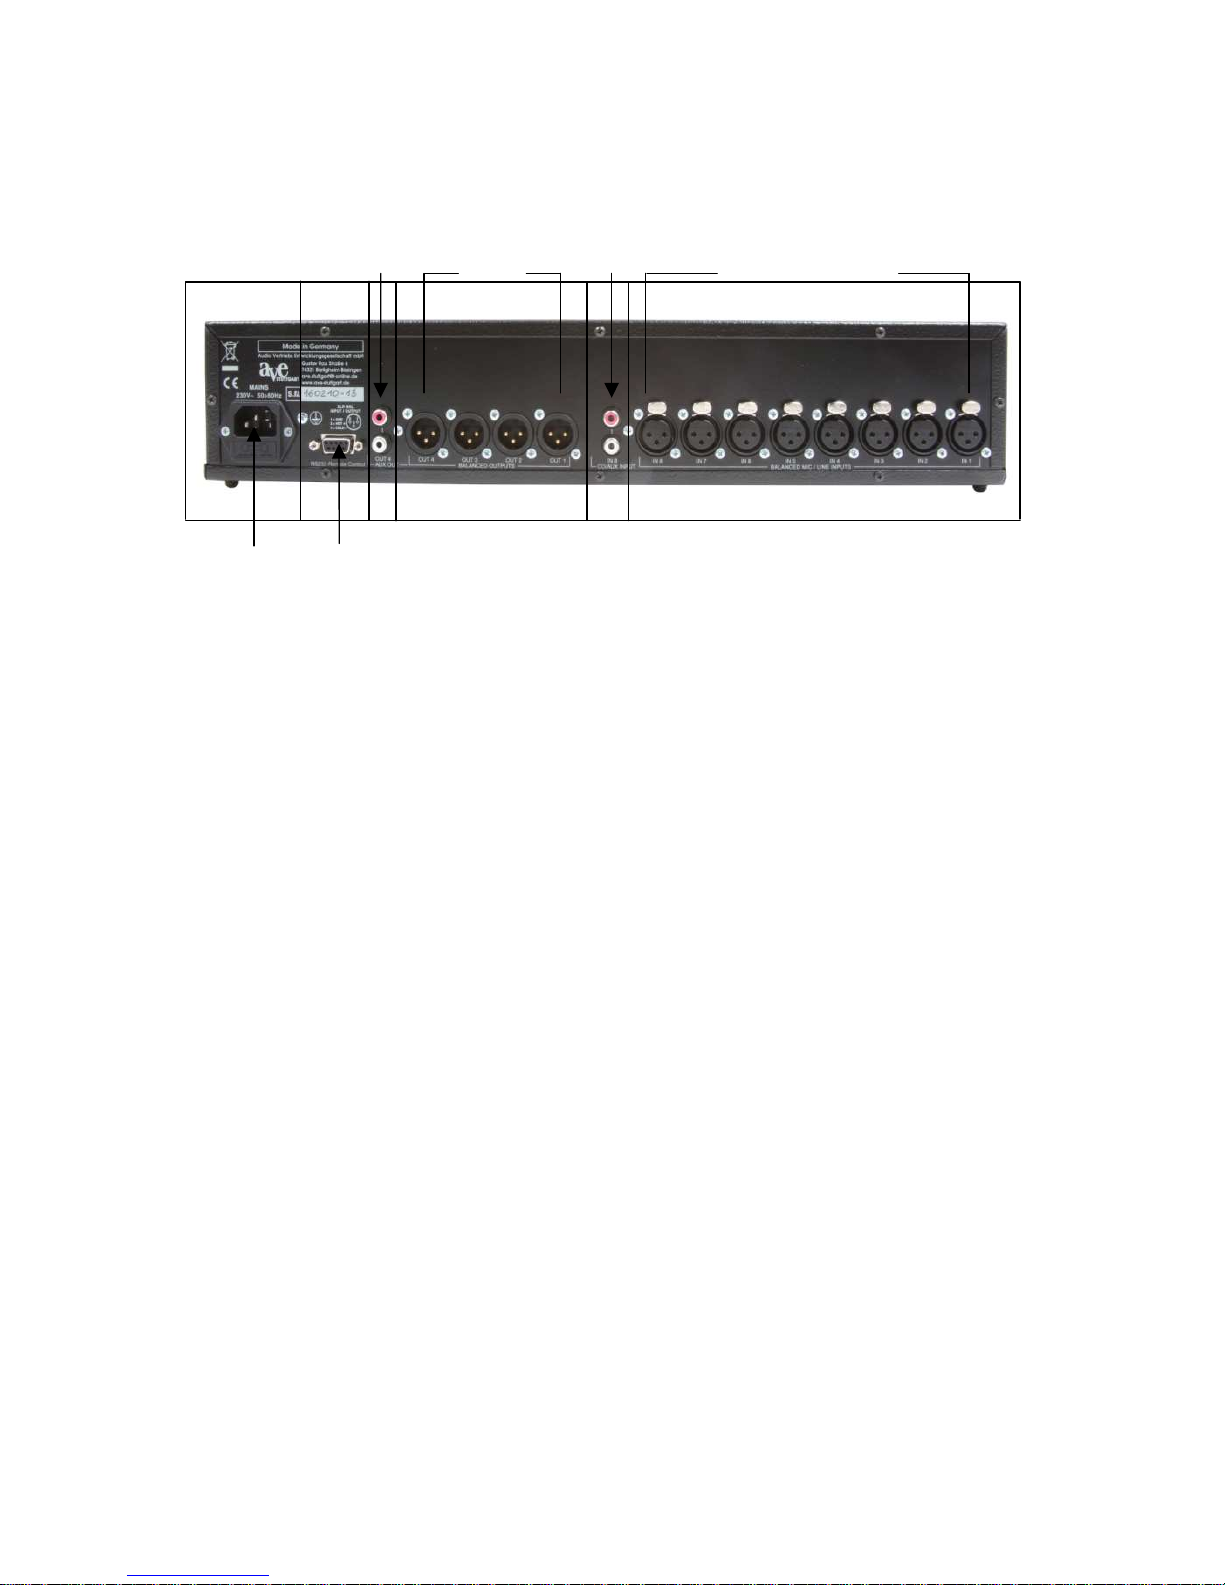
The backside of the DMX 84
1 Inputs 1 - 8
2 CD / Aux
3 outputs 1 - 4
4 Aux – output
5 RSC 232
6 electric supply
This operating manual is devided into 3 sections:
The first section is for authorized personnel to adjust and program the parameters, the
automatic, the matrix, the delay e.g. with PC or Laptop
The second section describes how users can easily access the presets of the DMX 84 (up
to 20) and change the whole audibility with online protection without using a PC or Laptop.
The third section describes how to take adjustments directly at the unit with offline
protection and without using PC or Laptop. These adjustments can be stored and accessed if
applicable.
1 2 3 4
Page 7
7
First section
The following modifications have to be done exclusively by
authorized personnel
3. Parameter menue / programming of DMX 84
The functions and adjustments which can be made in the parameter menue should
exclusively be done by authorized personnel only.
A big advantage of the digital control is the programmability of the different operating
functions. In this parameter menue the whole programming of the DMX 168 is made.
3.1 Installation of software
First of all you have to install the software for the DMX 84 to your PC or Laptop by using the
provided CD. After installation please restart your PC or Laptop to accomplish the program
correctly. Please connect your Laptop with the DMX 84 by using the provided connection
cable. Start the program. The following picture will appear on your desktop:
On the left side you can access the adjustments for the inputs (1 – 8) and on the right side
for the outputs (1 – 4). Master volume is identified as M.
Page 8

8
3.2 Apply files
Before you access any adjustments – create presets – you have to apply a file to store your
presets. The software will access as well to this file if you want to call a preset on your PC or
Laptop. Please click to the file symbol () and the data medium will open (see following
picture). Here you can apply a new file e.g. with the name “Presets DMX 84”. Then click to
“choose directory”
In the future you can store in this file the applied presets with your given name, after you
gave them a number (file: “Save preset”) and a name (file: “Preset name”) and store it by
using the “save-button”.
The program stores the presets with the numbers 1 – 20, when recalling the given name
appears in the field “preset name” and on the display with the button “Prst”.
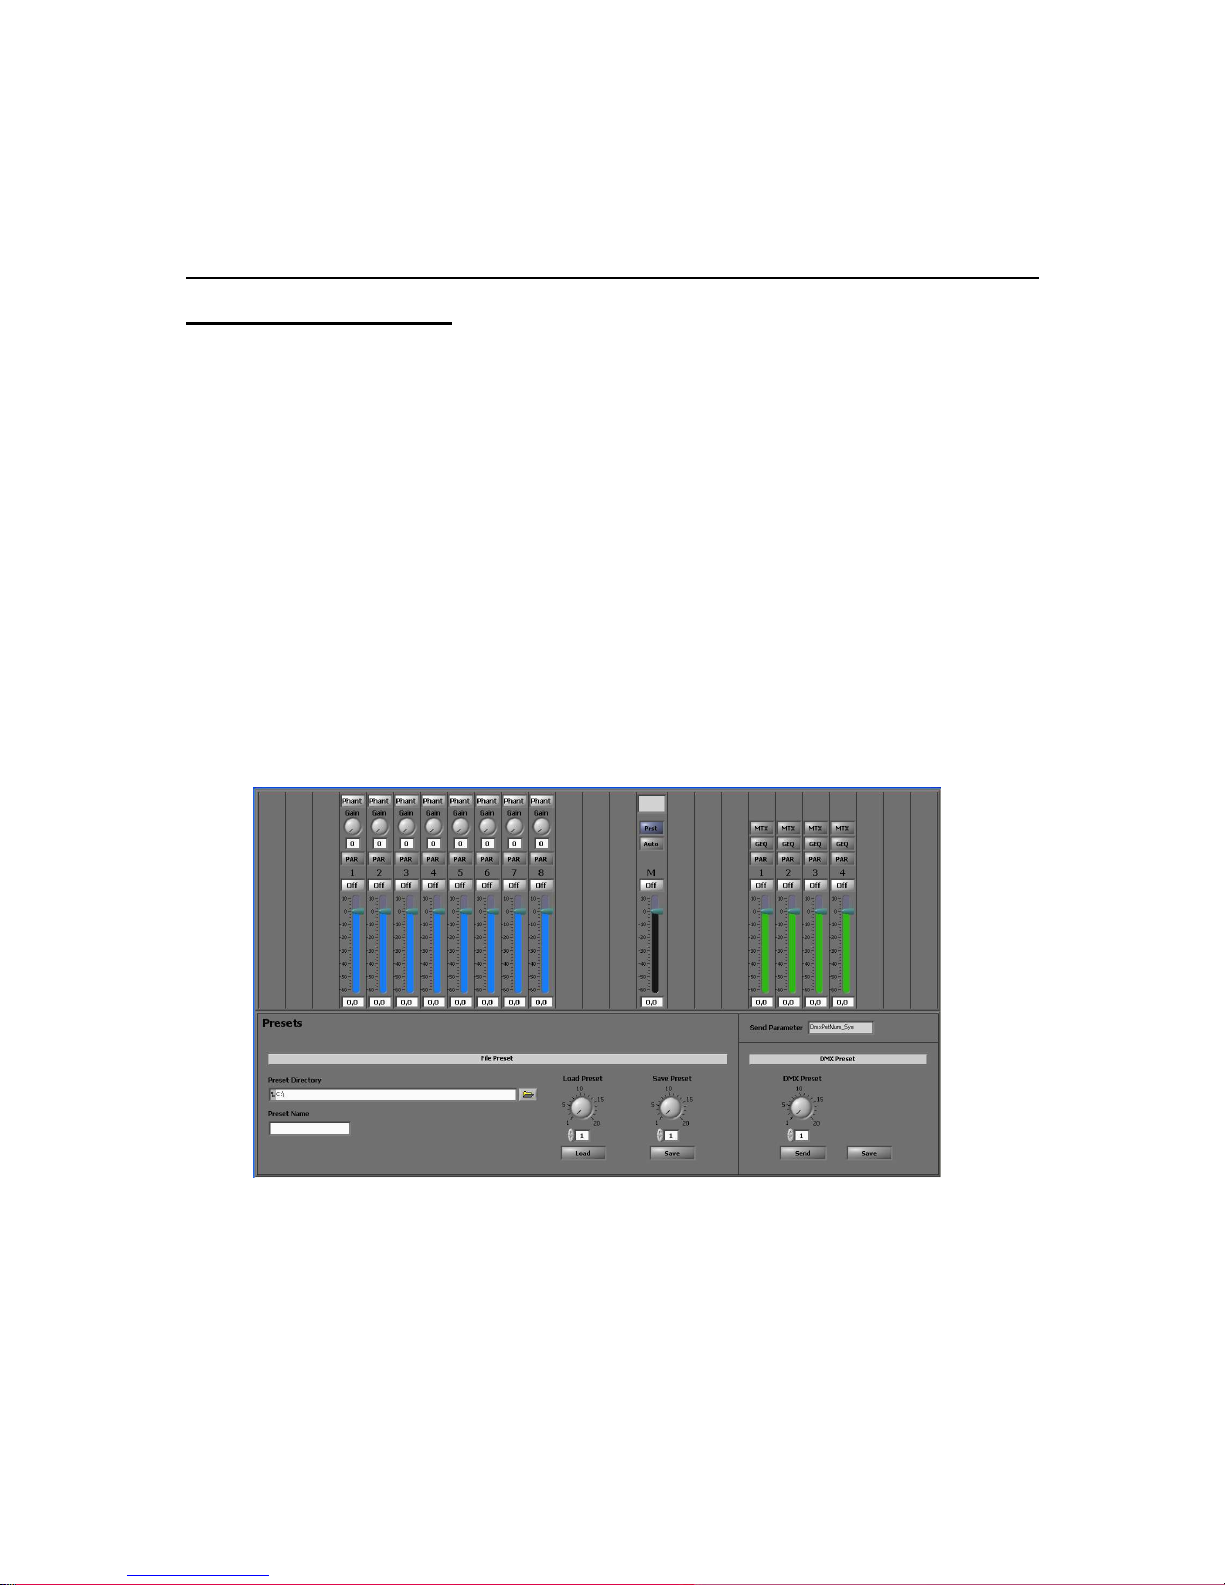
3.3 Establish presets
You can make different adjustments for your presets by using the mouse or the screentouch
and the keyboard.
By clicking the single buttons you can activate or deactivate the stored functions
behind.
3.3.0 General information:
The adjustments are always made in the same way:
turning the controller via mouse to adjust the gain, modification of the slide
control for the other adjustments
or by entering the number with the keyboard (set cursor into data field) and
confirm with “enter”
Page 9

9
or by using up-/and downwards arrow-buttons (set cursor into data field)
3.3.1 Adjustments for Input (1 – 8)
Phantom voltage on / off
GAIN input sensitivity
Parameter parametric Equalizer
- Limiter
- Compressor
- Gate Threshold
Level on / off
Level adjustment
3.3.1.1 Gain
To change the input sensitivity follow the above mentioned instructions!
3.3.1.2 Parameters
The parametric triband equalizer of the designated input can be activated by clicking the
button “PAR”. The following tableau appears on your desktop:
The adjustments can be made for F (Hz), G (dB) and Q as mentioned above on 3.3.0
HPF (high pass filter) (on/off) by clicking
On the right photo you have the following possibilities:
Limiter (on/off)
Compressor (on / off) and
Adjustment of:
- Gain
- Thres
- Ratio
- Attack
- Release
Gate Thres (on / off)
Page 10

10
3.3.1.3 Micro- /Line- inputs
on/off-button
slide control for volume
3.3.1.4 Master
on/off button
slide control for volume
Declaration of value
3.3.1.5 Automix
By clicking the button „Auto“ the following tableau appears:
Page 11

11
In the Automix-modus you can assign if the inputs shall be controlled by the automatic
control system or not.
Off = inputs are not controlled by the Automix
On = inputs are controlled by Automix
With the slide control (number..) you can select the amount of simultaneously speakable
inputs.
3.3.1.6 Matrix
by clicking the „MTX“ button the Matrix-function Output 1 can be activated and the following
picture appears:
Now you can choose which inputs to place to Output 1 by clicking the relevant “On/Offbutton” (1 – 8).
The adjustment for the respective input is done as described above in 3.3.0.
The matrix adjustments for Output 2 – 4 are made in the same way
3.3.1.7 Graphic Equalizer
By clicking the „GEQ“ button the Graph EQ of Output 1 can be activated and the following
picture appears:
Page 12

12
Here are 31 bands available to do the accordingly equalizations.
3.3.1.8
The parametric four-band-equalizer is activated by clicking the „Par“ button. The following
picture appears:
The adjustments for F (Hz), G (dB) and Q are done as described on 3.3.0
Rotation of Phase by 1800 by clicking the button:
3.3.1.9 Delay (m) and Delay (ms):
Adjustment of the accordingly operating time up to 233 m (679ms)
On the right side you can adjust:
Limiter (on/off)
Compressor (on/off) and
Adjustment of:
- Gain
- Thres
- Ratio
- Attack
Page 13

13
- Release
Gate-Thres (on/off)
After generating a preset give a name to the preset and store it at your erected memory
location (see as well chapter “storing a preset”)
In this way further presets can be generated and stored.
So there is the chance to try a lot of different adjustments in the corresponding
accommodations.
A stored preset can be selected by clicking the “Prst” button. The following picture
appears:
Click to the file () behind the column “Preset directory”. Now choose the storing position
and click the button “Verzeichnis wählen”
With „Load Preset“ the designated preset can be choosen (1 – 20):
- By using the control dial
- Or by entering with the keyboard (set cursor into numbers)
- or by using the arrow-buttons up and down (set cursor into numbers) and pressing
the button „Load“. The name of the preset appears in the column “Preset name”
and on the display by using the button “Prst”.
To carry over a preset to the DMX 84 and to store it there choose the preset number and
click at „DMX Preset“ to the button “Send”.
You can follow the data carry over on the display at the „send parameter“. Press “Save”
when the data transfer has finished. Now your presets are available on the DMX 84.
Page 14

14
Additional changes can be made naturally with the laptop. Call the preset and go on like
described above. It’s very useful to store the presets as well on an USB-stick.
Section 2
In this section it is explained how the user can call away the Presets of the DMX 84 (up to
20) easily and comfortably directly in the device without use of the laptop and change the
whole volume with switched on Protection
4 Handling with switched on Protection
With switched on Protection you have in the control dial with integrated tracers
- Volume/Value (VOL/VAL) and
- Preset/Parameter (PRE/PAR)
the following possibilities:
4.1 Recall of stored Presets
When turning on the DMX 84 on the display appears with which Preset the device starts.
To call another Preset you press PRE/PAR and turn him until in the display the desired
Preset appears
4.2 Modification of entire volume
Press VOL/VAL and turn him easily to the left to lower the volume or to raise to the right, in
order the volume.
General information:
If you turn the Preset/parameter Regulator around a click to the right, you reach always to
the subitem next in each case, i.e. to the next parameter which should be put. Therefore, this
rotary knob is also marked with "parameter". Of the simplicity half he is called in the whole
operating manual continuously PRE/PAR.
The change of a numerical value or a letter always occurs through turning the "Volume"
regulator. He is called here of the simplicity half continuously VOL/VAL.
It concerns with the VOL/VAL a dynamic control dial, i.e. with slow rotary movements the
numerical value changes in very small steps, with quicker trick the numerical value changes
disproportionate fast. This allows a speedy and exact adjusting of the desired value.
By pressing the VOL/VAL you reach a level higher in the menu hierarchy. Whenever you
have made changes, you are asked whether you would like to store your changes („Save
Page 15

15
changes?“) by pressing the PRE/PAR ("yes") you confirm the storage ( "Saving.... do not
interrupt"); your changes are rejected by pressing the VOL/VAL ("no").
Section 3
5 Modification of adjustments while switched off protection
Please, peruse absolutely these instructions exactly, before you carry out changes in
the settings!
Changes of the settings can be made only, if the "VOL/Preset - Protection" is switched
off.
5.1 Switch on and off protection
Switch off the DMX 84 in case of that it is switched on.
Hold PRE/PAR compressed and at the same time switch on the DMX 84.
After approx. 3 sec the announcement appears on the display
Next to SAVE the arrow () appears. By turning of PRE/PAR you can move it to the
designated menue.
( registers that changes can be made here)
For the following setting you move the arrow to "CONFIG". By pressing the PRE/PAR you
reach in the Config menu, and on the display appears the Preset in which the DMX 84 was
started currently.
Turn now PRE/PAR until the following adjustment appears on the Display
By turning of VOL/VAL you switch the Protection off or on.
Press now VOL/VAL and confirm the protection of the setting by pressing PRE/PAR.
By renewed pressure of VOL/VAL you leave the menu, and on the display appears the
information with which Preset was started.
„VOL/Preset
-
Protection”
(on or off)
SAVE
PRESET
CONFIG UTILITY
Page 16

16
After pressing the PRE/PAR you reach the announcement of 4 menus again.
Now the following changes can be made in the respective menus: (Description of the
approach below section!)
5.2 Menue „SAVE“: storing of all changes
5.3 Menue „PRESET“: Naming (Name) of the Presets (up to 20 Preset names are
possible
- Master-Status on/off
- Master- Volume
- Number of the open microphones
5.4 Menue „CONFIG“: Start up Preset (information about which preset started)
VU-Meter Output (brags which source signal in the display is
indicated)
LCD-contrast (setting of the contrast on the display)
VOL-Preset-Protection (switch on and off Protection)
RCA-Input 8 (Switch over the input 8 to music reproduction)
Welcome-Screen (enter greeting, church name etc)
Input name (see as well “name a preset”)
Input Name (enter the name of input 1 –8)
Output Name (enter the name of output 1 – 4)
5.5 Menue „UTILITY“: copy of parameter adjustments
5.6 Menue „FIRMWARE“ Model- and Software identification (no changes can be made
here)
Approach for changes in the respective menus
5.2.1 Changes in the menue „SAVE“
Press VOL/VAL und PRE/PAR, to store or not to store conducted changes
Page 17

17
5.3 Changes in the menue „PRESET“
5.3.1. How to name a preset
Position the arrow next to „PRESET“ and press PRE/PAR.
The following display appears:
By turning VOL/VAL you reach the Preset - up to 20 - , which name you would like to
change
turn
PRE/PAR to the right, the display shows:
The cursor flashes under the first letter. Now you can award the Preset name. By turning
VOL/VAL letters, figures and special characters will run through in the following order: A-Z,
Ä, Ö Ü, a – z, ä, ö, ü, 0 – 9, blanks! „# $ %‚ () * +,-. /
Pressing PRE/PAR confirms the current sign and moves the cursor further to the right to give
the next sign.
5.3.2 Modification of Master-Status
If you have entered the name you can do further adjustments for the elective Preset, while
turning PRE/PAR around a click to the right. You will reach in the next subitem „Master
status On/off. By turning VOL/VAL you switch on or off the whole volume.
5.3.3 Modification of Master-Volume
Turn PRE/PAR one click further to the right you will reach the subitem „Master Volume“.
Here you have the possibility to raise or reduce the whole volume.
5.3.4 Modification of open microphones
Turn PRE/PAR a click further to the right you reach in the subitem „Number of open
microphones“. Here you can determine the number by turning VOL/VAL.
Preset Select
Nr. of Presets, Name of Presets
Preset Name
[Name of Preset]
Page 18

18
You are asked for pressure of the VOL/VAL whether you want to store the change. Press
moreover the suitable VOL/VAL (no) or PRE/PAR (yes).
5.4 Modifications in the menue „CONFIG“
5.4.1 Modification of Start up Preset
After pressing PRE/PAR you reach the announcement of the 4 menues.
Position the arrow next to „CONFIG“ and press PRE/PAR
The following picture appears on the display
The start up Preset registers with which Preset the DMX 84 was started
By turning VOL/VAL you can choose another Preset with which the DMX 84 will start in the
future.
By further turnings of PRE/PAR you reach to the settings for VU meter of output, LCDContrast, VOL-Preset-Protection, RCA input which you can change by turning VOL/VAL in
each case.
You can carry out the changes in the Welcome-Screen, input name and output name after
pressing PRE/PAR.
5.4.2 Modification of Input-functions
Press the select button of input 1 and the following picture appears:
By turning VOL/VAL you switch on input 1 or off (on/off)
With On setting a green light shines about the Select key with input 1.
By turning PRE/PAR you reach to the level of the input 1 which you can change by turning
VOL/VAL.
By turning PRE/PAR further more you reach to the Gain of input 1 where you can change
the input delicacy by turning VOL/VAL.
By turning PRE/PAR further more you reach to the phantom power of the input 1 which you
can switch on or switch off by turning VOL/VAL (on/off).
Start up Preset 1 (or 2 ...)
Input
-
Status
on / off Input 1
Page 19

19
By turning RE/PAR further more you reach in the other functions of the DMX 84 which you
cannot change, however.
By pressing VOL/VAL you reach back in the starting menue.
This approach is also valid for the changes of the other inputs (2 – 8).
5.4.3 Matrix – Select – functions
press the both Matrix – Select – button and the following picture appears:
By turning VOL/VAL you can change Input 1 to Output 1 on or off (on/off).
By turning PRE/PAR you reach to matrix level input 1 where you can change the level of
input 1 to output 1 by turning VOL/VAL.
To change the other inputs (2 – 8) you must select the suitable input by pressing the Select button.
To change the inputs to outputs (2 – 4) you must select the suitable outputs by pressing the
Select - button.
By pressing VOL/VAL you reach back in the starting menue.
5.4.4 Modification of Output-Functions
Press the Select-button of Output 1 and the following picture appears:
By turning VOL/VAL you can switch Output 1 on or off (on/off).
With On setting a green light shines about the Select button with output 1.
By turning PRE/PAR you reach to the level of the output 1 which you can change by turning
VOL/VAL.
By turning PRE/PAR you reach to phase Invert where you can reverse the phase by turning
VOL/VAL, whereat off-position the phase is normal.
By turning PRE/PAR further more you reach to the other functions of the DMX 84 which you
cannot change, however.
To change the other outputs (2 – 4) you must go forward the suitable outputs by pressing the
Select – button -as described in this section.
Matrix Status
Input 1
on / off Output 1
Output
-
Status
on / off Output 1
Page 20

20
By pressing VOL/VAL you reach back in the starting menue.
5.5 Menue „UTILITY“:
Position the arrow next to „Utility“ and press PRE/PAR.
the following picture appears:
Press PRE/PAR and choose afterwards with VOL/VAL the suitable Preset which you want to
copy. By turning PRE/PAR you move the cursor to the right where you put the Preset
number for the copy filing. Move the cursor in front of "Copy" and press PRE/PAR.
DMX 84 – technical datas:
Inputs:
• 7 XLR + 1 XLR/RCA
• Sensibility per input: Mic/Line
• Digital controlled Gain-input area 60 dB
• Digital controlled Phantom power per input 48 V
• Dynamic area analog/digital converter >=110dB
• Distortion factor <=0,01 %
• Maximum input level 20 dBu
Outputs
• 3 XLR + 1 XLR/RCA
• Dynamic area digital / analog converter at >=110dB
• Distortion factor <=0,01 %
• Nominal output level (Master Volume at–16dB 4 dBu (1.23 Vrms)
• Maximum output level 20 dBu
• Output resistance 50 Ohm
Digital
Signal arrangement
Inputs:
• 3 parametric Eqs per input (peaking type)
• Highpass Filter 160Hz/12dB per Octave on each input
Copy
Firmware
Page 21

21
Outputs:
• Grafic EQ per Line-output 31 band (1/3 oct)
• Gate / compressor /Liniter per output
• Delay per Line-output 233 m (679 ms)
• Phase changer per Line-output
Input / output
Routing Matrix
• Matrix size 8 In / 4 Out
Individual volume regulation (Fader) per cross point
Automix:
• Automatic mixing function
• Automatic mixing function with selectable channels at the same time
General:
• Sampling rate 48kHz
User Interface
• Total level adjustable with operation panel
• 20 preset adjustable with operation panel
• The adjustment parameters of the Gain-input and from the phantom power can be stored
in presets
• Individual input- and output levels adjustable with the operation panel
• Peak- and Signal signifier for each input channel on operating panel
• Peak- und Signal signifier for each output channel on operation panel
• DSP-Parameter adjustable with operation panel; PC/Notebook-USB-Interface adjustable
• Preset can be stored and recalled as data file
• Remote control with RS 232-interface
Switchable Protection-adjustment
 Loading...