

Page 1

This product represents a new generation of MP3 players supporting MP1, MP2, MP3, WMA,
WMV, ASF, and WAV.
FEATURES SUMMARY
● Compact size
● Support virtually all music file formats such as: MP1, MP2, MP3, WMA, WMV, ASF, and
WAV.
● Supports firmware update the latest firmware can always be downloaded from the AVB
website (www.avbusa.com).
● Supports FM radio Using Auto-search or manual search, the player can save up to 40
different radio stations. The frequency varies from 87 KHz to 108 KHz.
● No need to have any driver for Windows 2000 or above. The MP3 player can be used as a
removable USB disk
● Disk encrypt and Disk partition using the enclosed software tools it is possible to encrypt
and partition the disk space as you like.
● Record/Repeat With built-in voice recorder the recorded files can be saved in WAV or ACT
file formats. It is possible to mark a recorded segment for subsequent compare or repeat;
useful feature for the language self-study.
● Equalizer settings include Natural, Rock, Pop, Classic, Soft, Jazz, DBB
● 7-color backlight display.
● Music repeat modes include Normal, Folder, Repeat one, Repeat folder, Repeat all,
Random, and Introduction.
●Timing off Automatic off by time and sleep time can be set.
Page 2
INTRODUCTION
Congratulations on purchasing of this MP3 player! Before starting to use it please, read
this manual carefully. Due to the constant production improvement, the MP3 Player you have
purchased might be slightly different then the one described in this manual. We recommend
you to visit the www.avbusa.com to download the updated Manual and Software in this case.
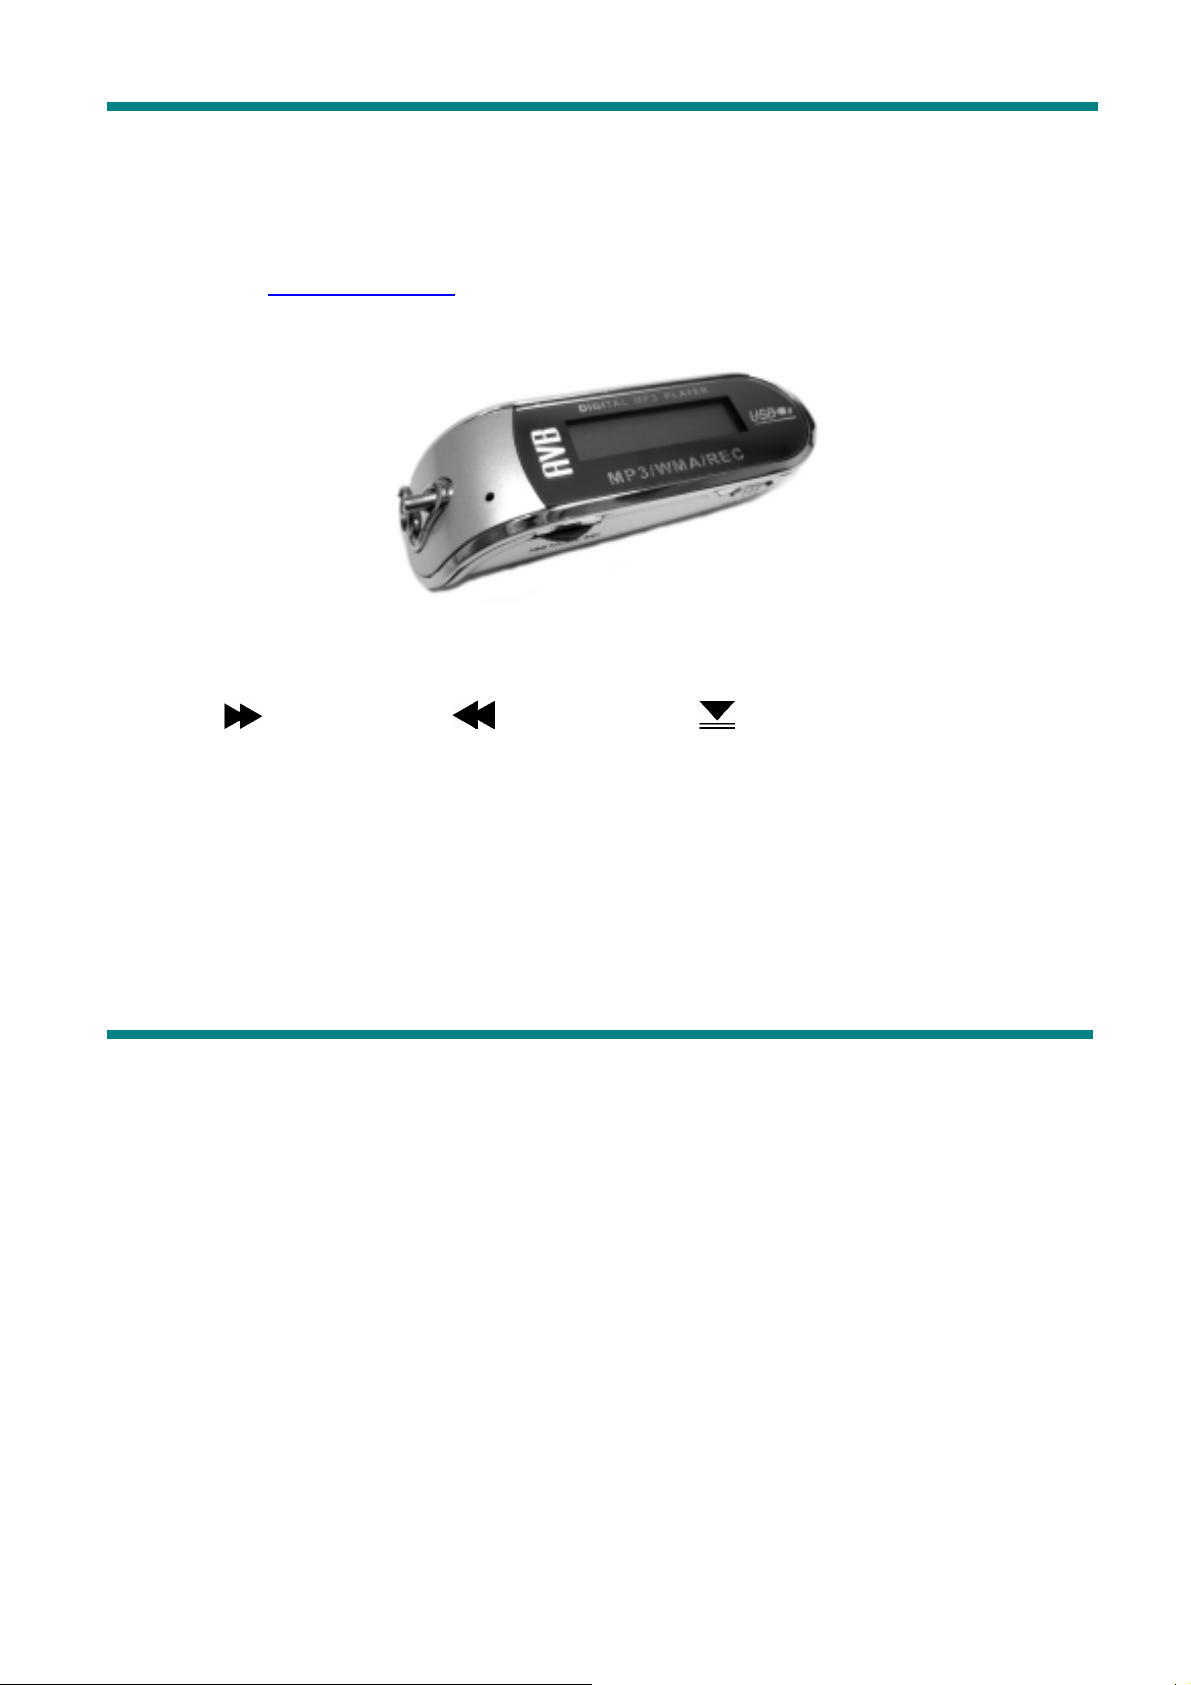
Know about AVB MP3
z Housing
Play
USB
HOLD
Earphone hole
• Buttons and controls definition
- Express Forward; - Express Backward; - Play/Pause
1. “Play/Pause”: Power ON/PLAY/STOP/OFF.
2. “Mode”: General confirmation button.
3. “VOL+”: Increase volume. Speed up.
4. “VOL–”: Decrease volume. Speed down.
5. “Forward”: Next one. Fast Forward. Next
6. “Backward”: Previous one. Fast Backward. Last
7. “USB”: USB plug.
8. “Earphone jack”: Standard earphone connector.
Mode
Page 3
Buttons usage definition
The buttons can be used in 3 different ways:
Press: Press the button then release it immediately.
Long time press: Press and hold the button for about 2 seconds, then release it.
Press and hold: Press and keep holding the button.
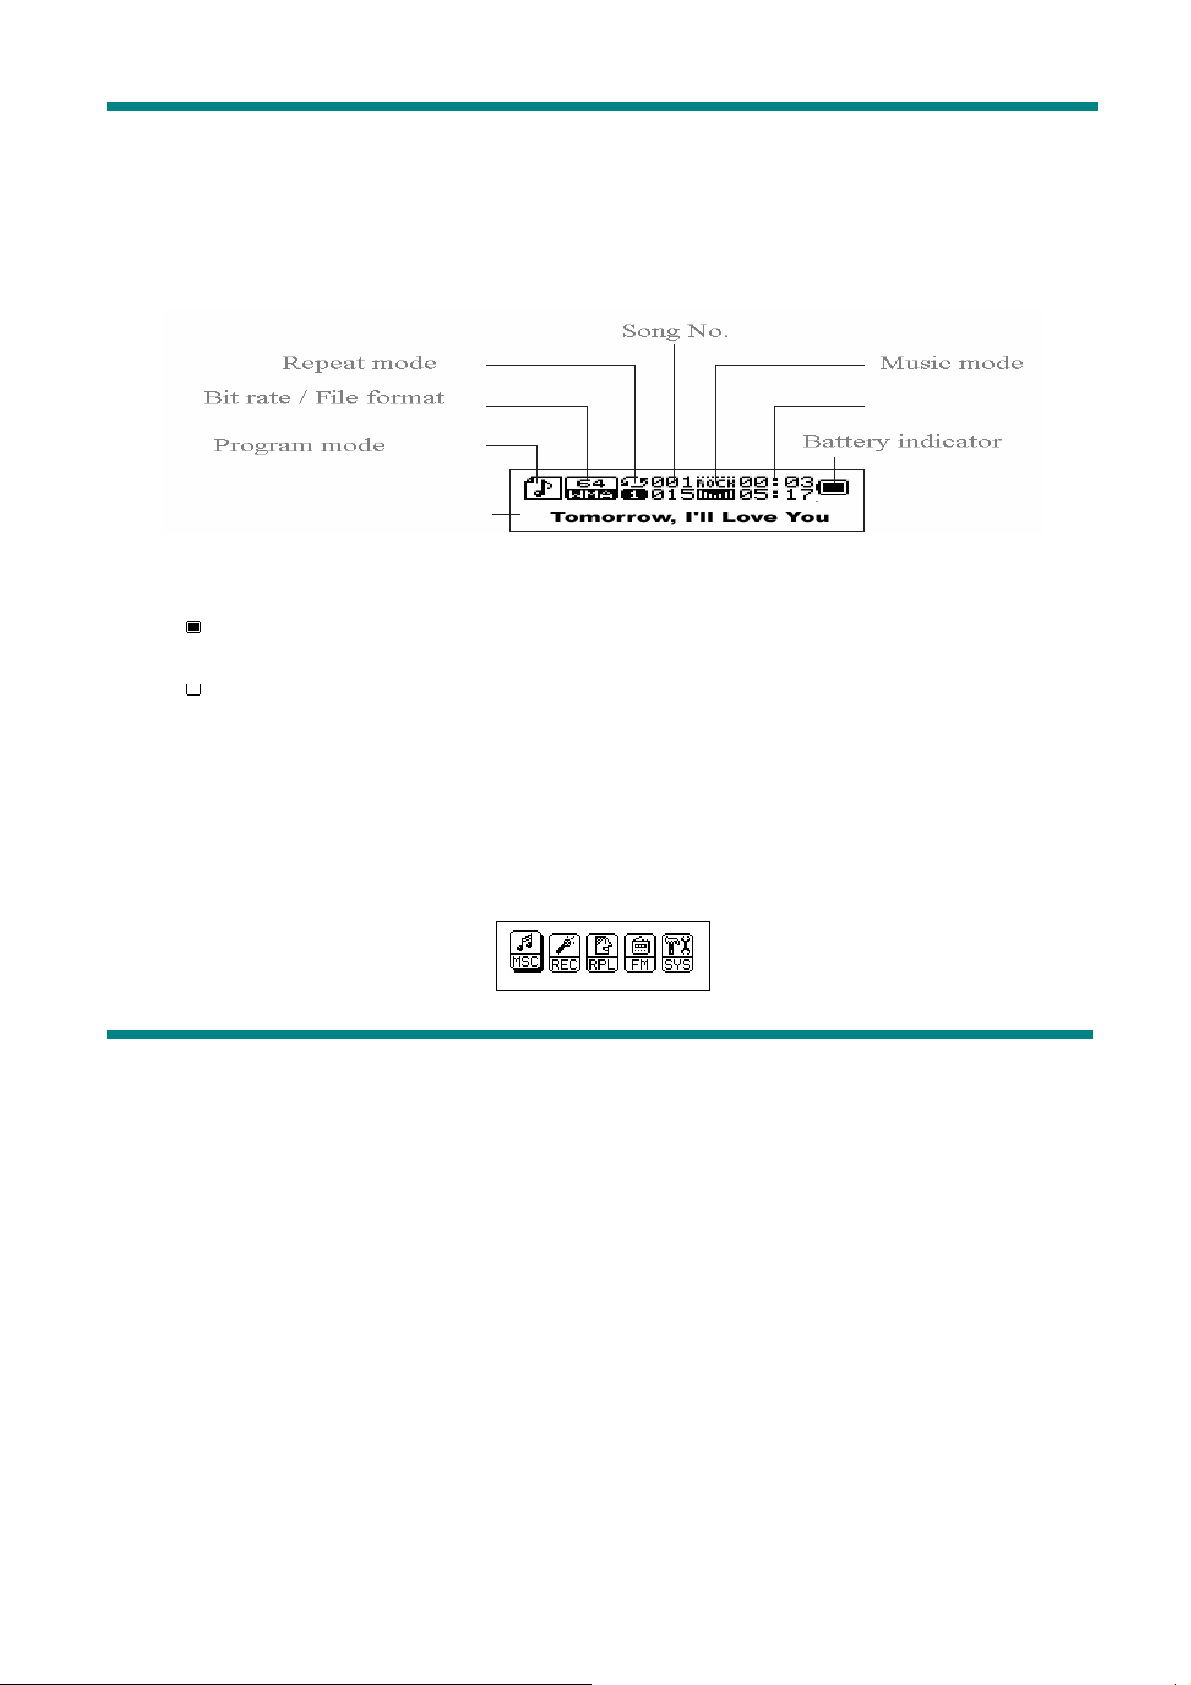
• Display screen
• Battery indicator
Displays the battery current charging status.
When the battery is fully charged it will be displayed as on the picture (black
square).
When the battery is low the square will became empty.
MAIN FUNCTIONS
z Enter the Menu
Press “Mode” button to enter the menu. There is the main menu and lots of
submenus.
z Display preview
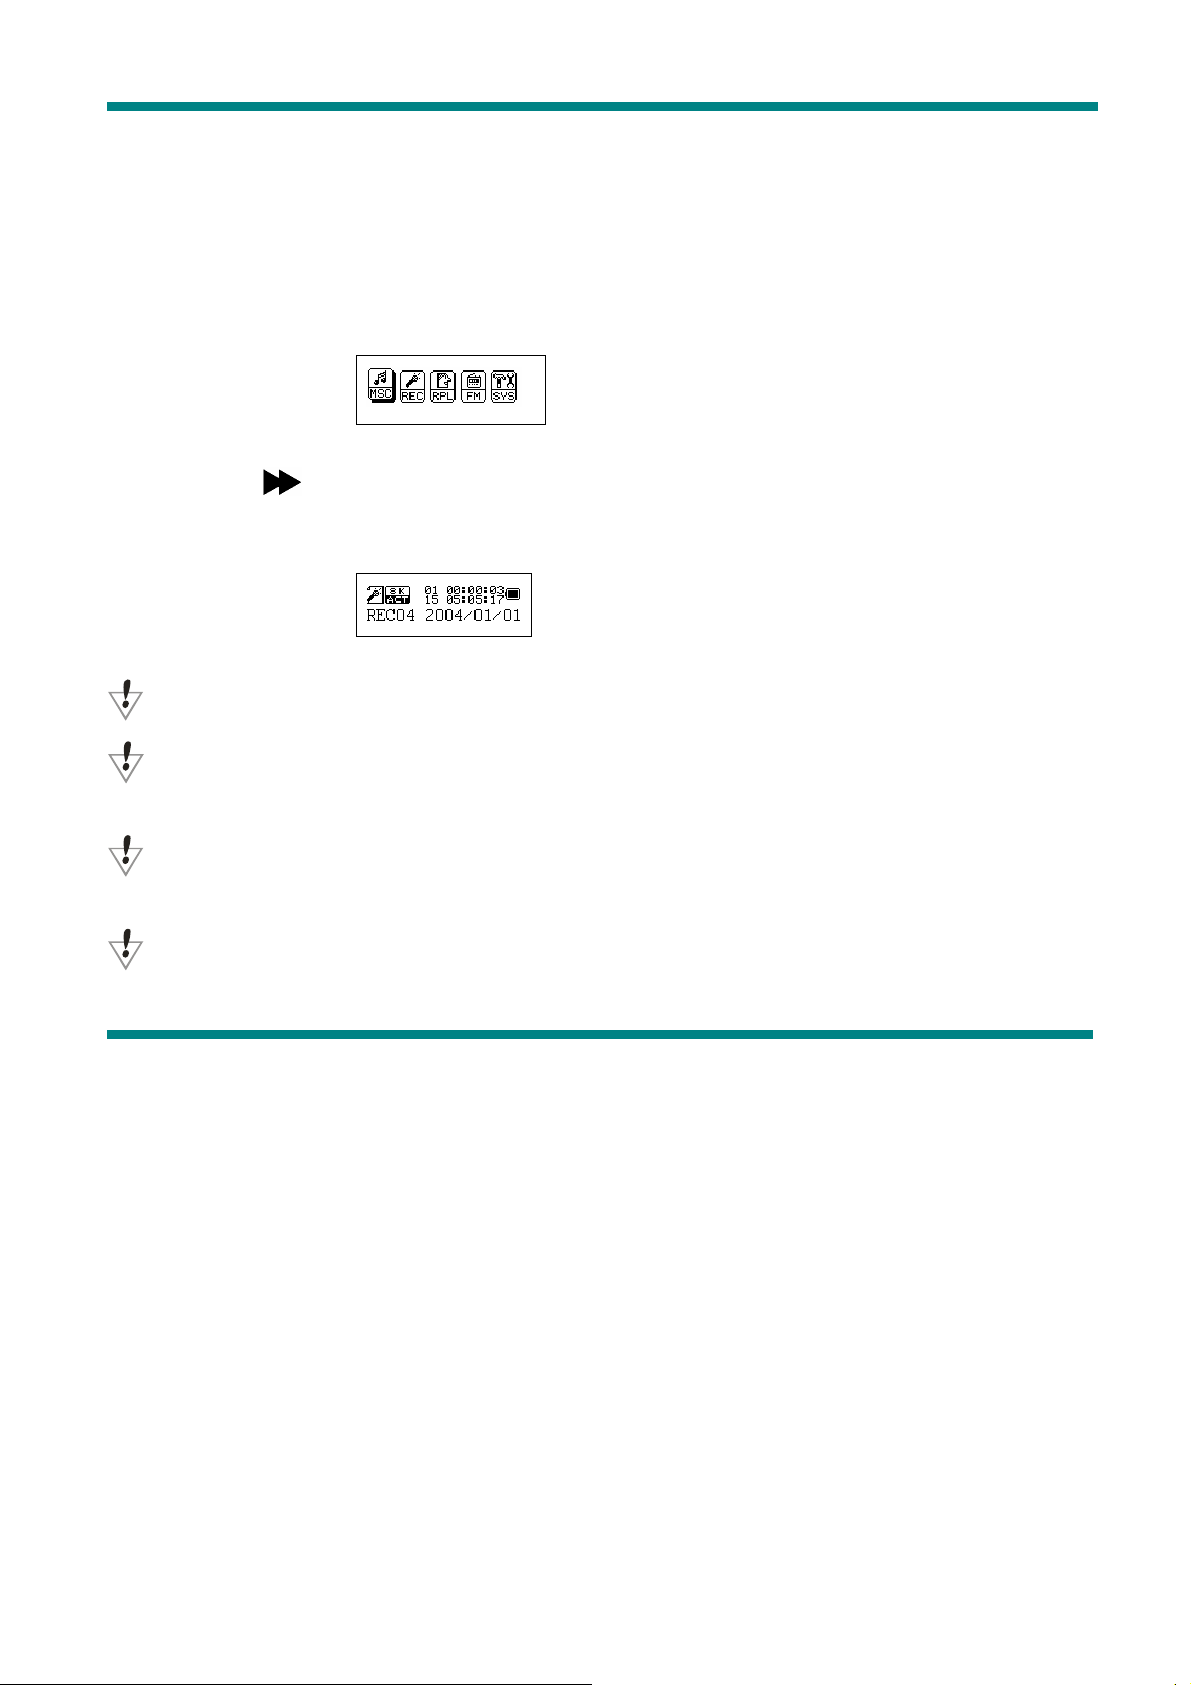
o The main menu screen looks like that:
o Music mode screen:
Page 4
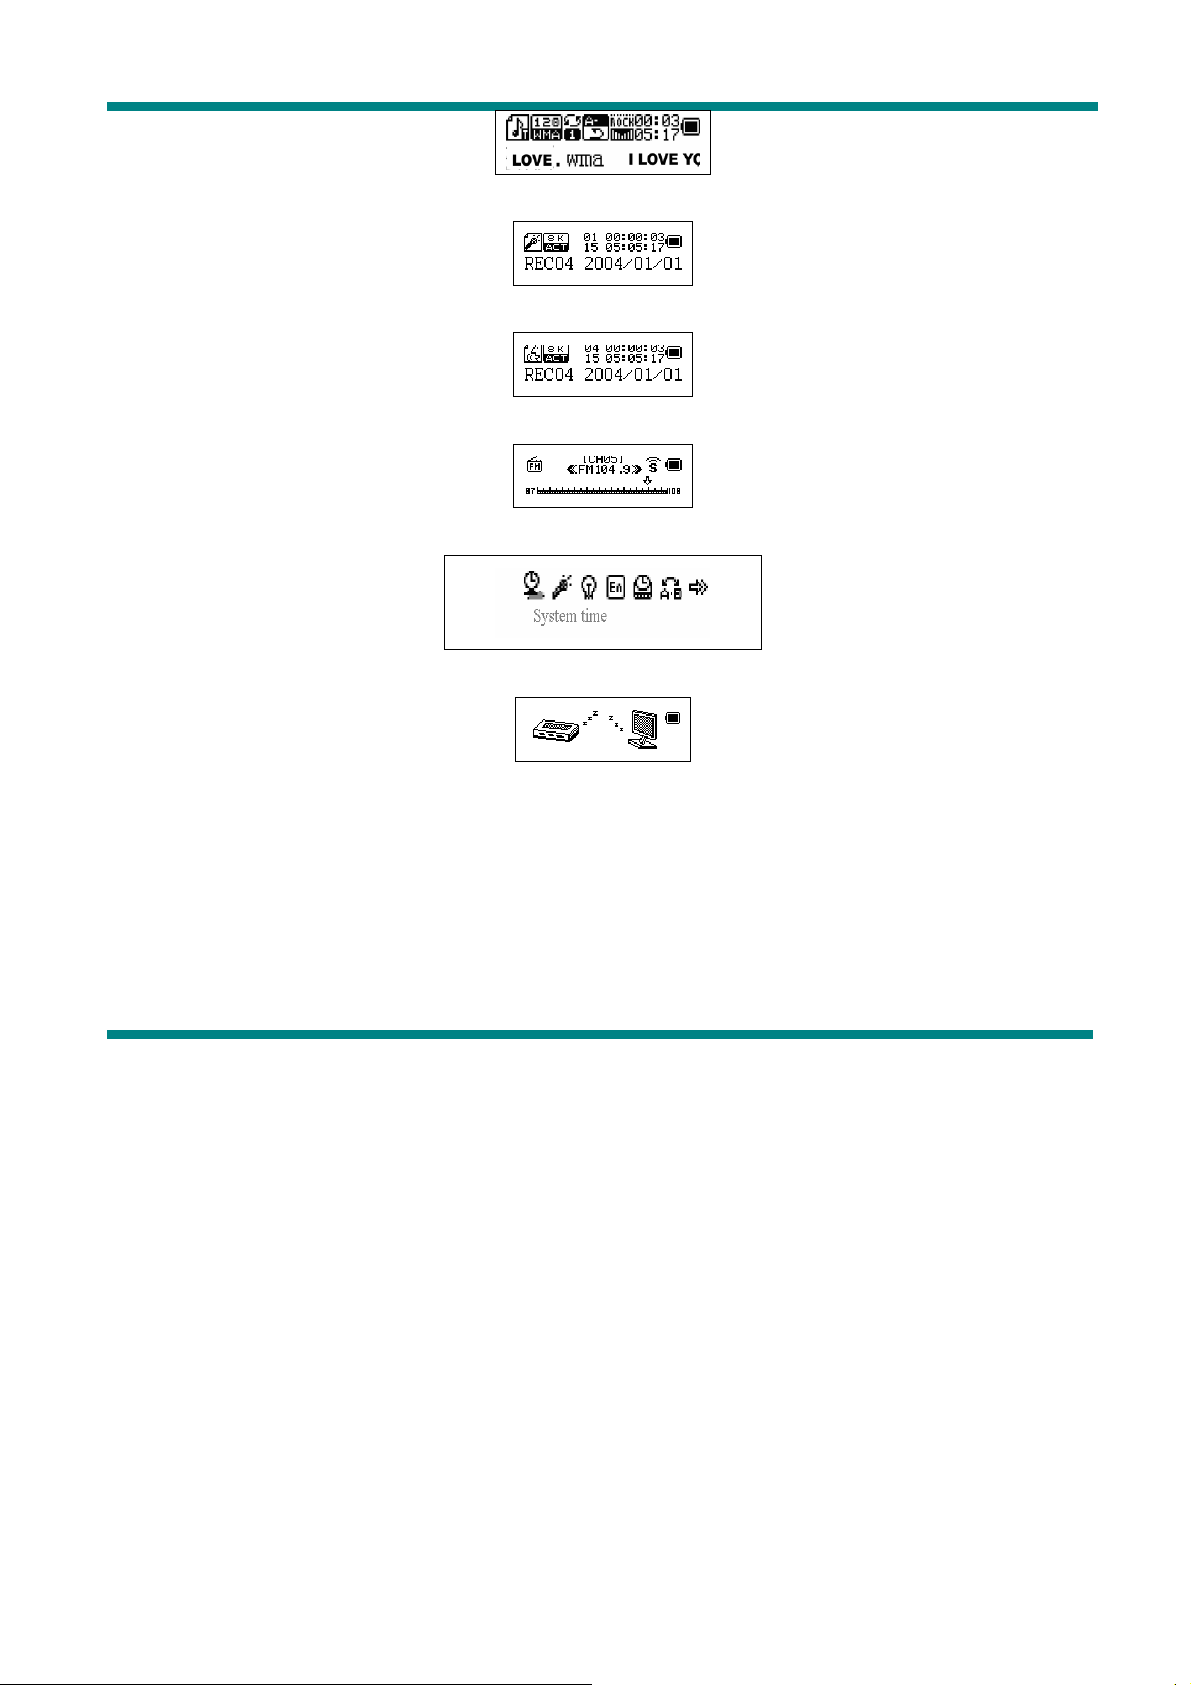
o Record mode screen:
o Recording playback mode screen:
o FM mode screen:
o System settings screen:
o Connection with PC screen:
• Volume adjustment
Press “VOL+” to increase the volume.
Press “VOL–” to decrease the volume.
• Power ON/OFF
Press and hold “Play/Pause” button to turn the Mp3 player on.
Page 5

While the MP3 is playing, press and hold the “Play/Pause” to turn the MP3 player
off.
• Play/Pause
In the Music mode press the “Play/Pause” button to playback the music.
• Record/Pause
In the Record mode press this button to start or stop recording, press the button for
more than 2 seconds (long time press) to stop the recording.
In any mode press the “Mode” button for 2 seconds (long time press) to enter the
main menu.
Page 6
• Music playback
Please, follow the steps below
1. Connect your earphone to the earphone jack of the MP3 player.
2. Press the “Play/Pause” button for 2 seconds (long time press) to turn your MP3
player on, enter the Music mode, then press “Play/Pause” again to playback the
music.
3. Select music: Press the button to select the next, to select the
previous one.
4. Volume control: VOL+ : Increase the volume VOL- : Decrease the volume
• Display of the song name and song text
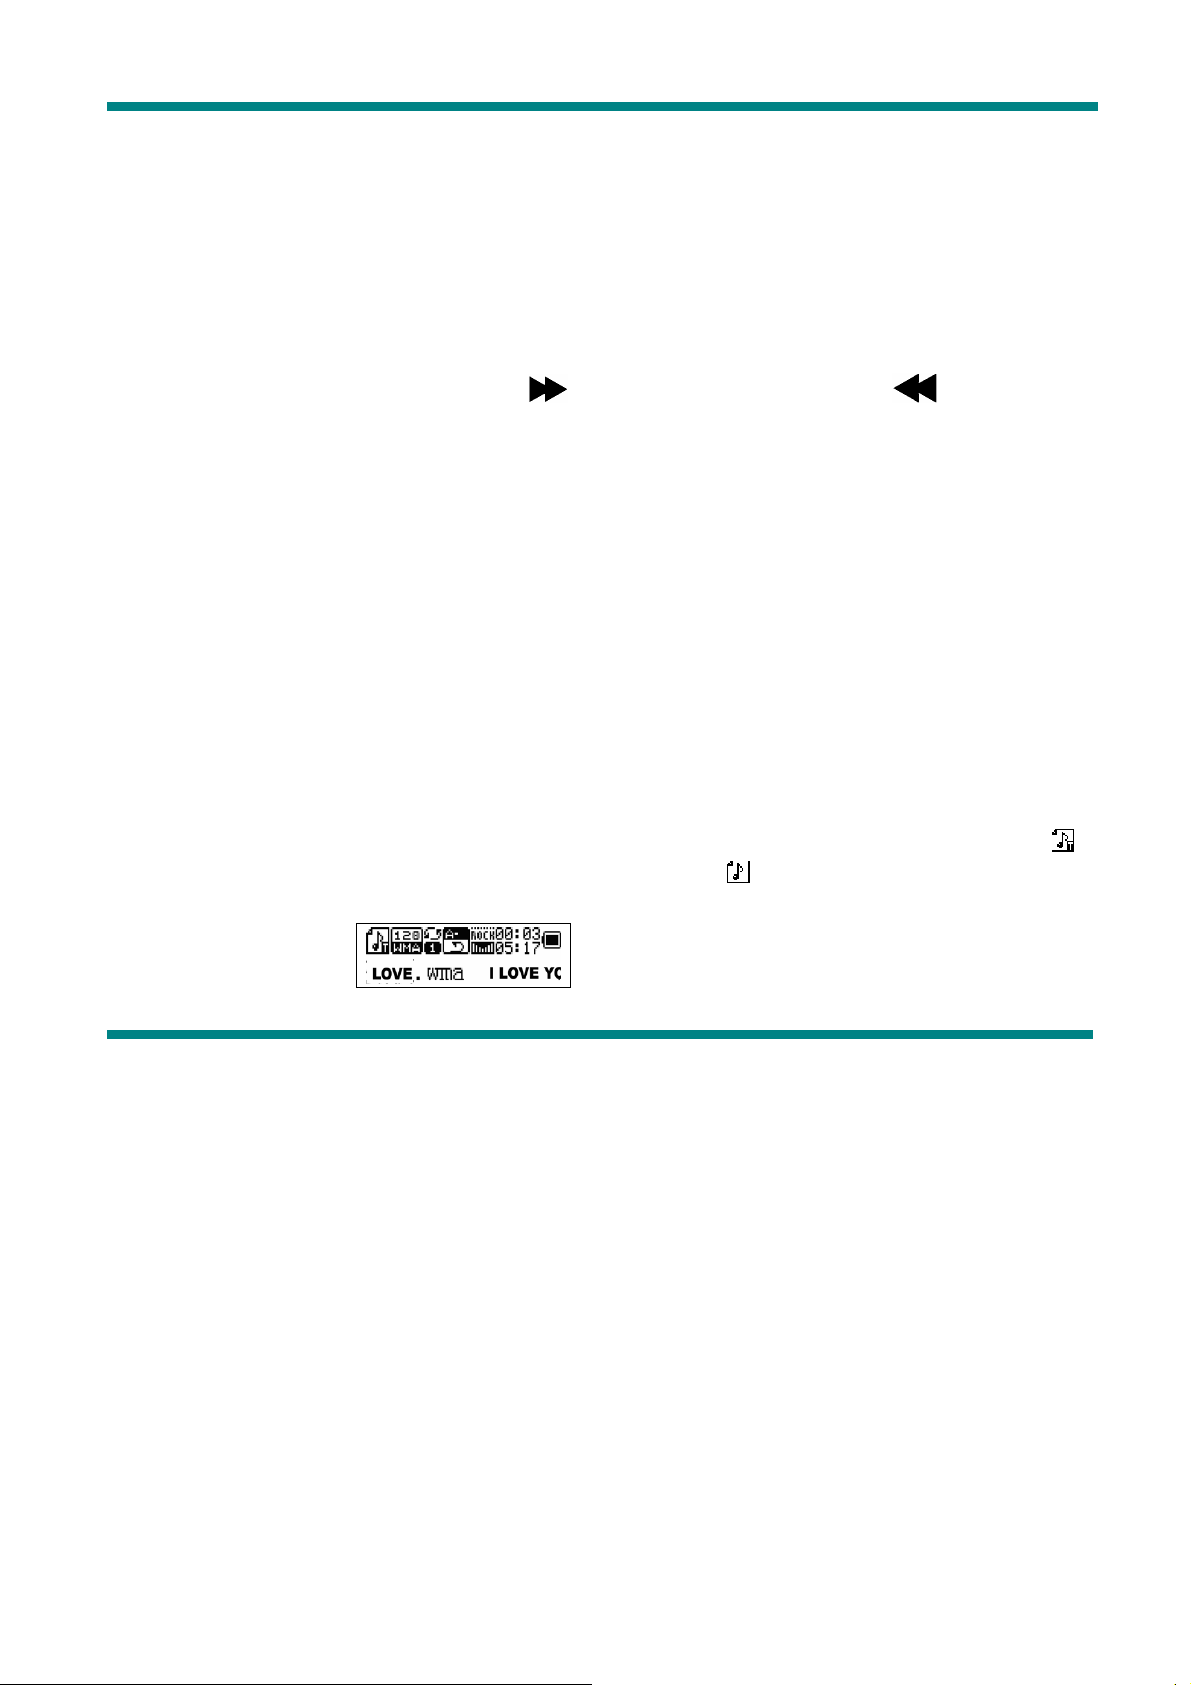
This MP3 Player supports “*.LRC” file format song text, with the .LRC file the MP3 player
can display the song text synchronously with the song playback.
o How to use the song text file (*.LRC)?
The .LRC should have the same file name as the song.
For example:
If the song name is: Love.mp3
Then the song text file should be: Love.lrc
o How to make sure the MP3 player has recognized the .LRC file with the song text?
The icon in the left corner of the screen during the music playback will look like if
the song has the text, otherwise the icon will look like “ ”.
Below is the example of the screen with the song text:
Page 7
• Voice recording
The MP3 player can save up to 99 recorded files in its memory.
ο Recording
1. Enter the Main menu:
2. Press the ” button to select the record mode.
3. Press the “Mode” button to enter the record mode:
4. Press the “Play/Pause” to start recording.
Recorded file can be saved either in the root directory or in the sub-directory.
If you get the message “Disk full” on the screen, that means there is not enough space to
save the recorded file, you should delete the file to get the space.
If you get the message “Directory full” on the screen, that means that the recorded files
quantity exceeded 99, you should save the recorded file to another directory.
During the recording, only the “Play/Pause” button can be used.
Page 8
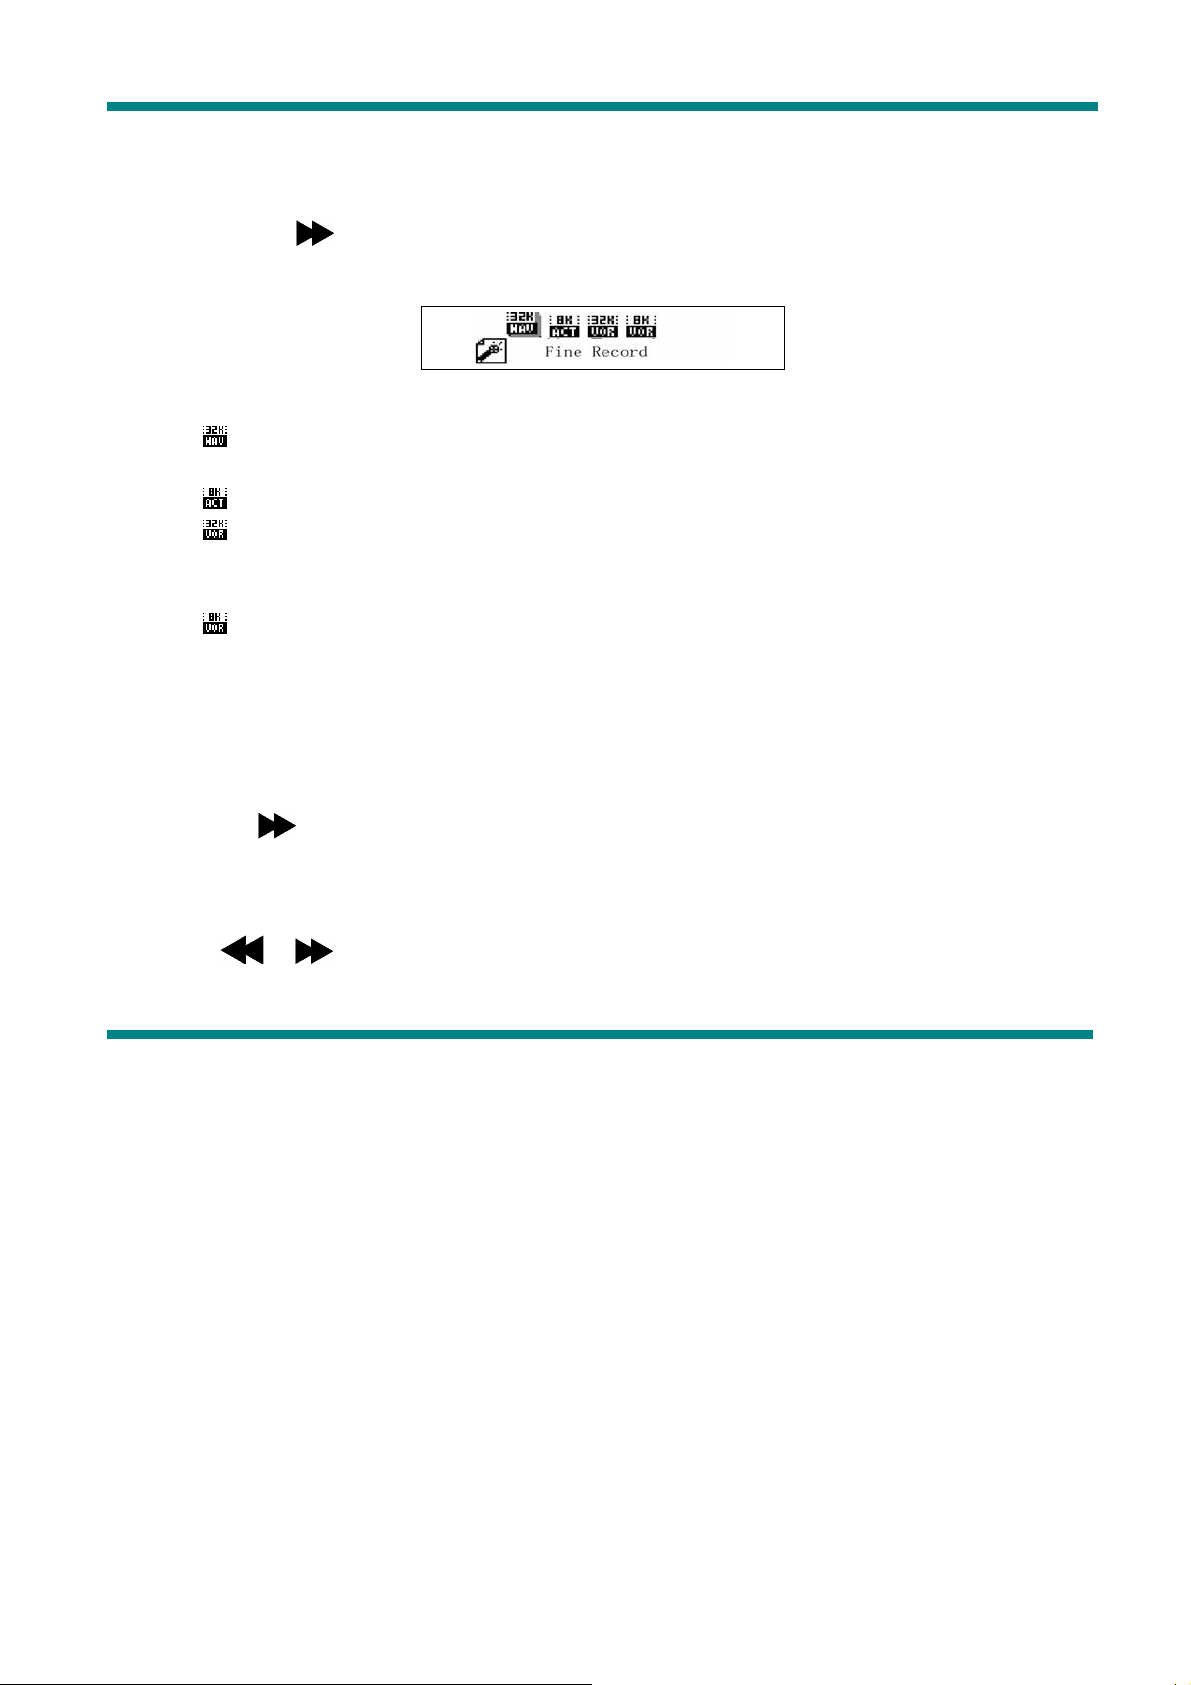
ο Select recording type
1. Enter the Record submenu pressing the “Mode” button
2. Press the “ ” button to select the record type, press “Mode” button to confirm the
choice:
ο The record type can be one of the following:
: Fine Record, .WAV file format, the best quality sound but creates much bigger
files.
: Long time record, .act file format, average quality sound.
: High quality voice control recording, .WAV format. In this mode the MP3 will not
record anything if there is no sound around. Recording is performed in .WAV file format for the
best quality sound.
: The same as above but .ACT file format.
5. Press the “Play” button to start recording.
ο Playback the recorded file
1. Enter the main menu.
2. Press the button until you select “RPL”
3. Press the “Mode” button to enter the submenu.
4. Press the “Play” button to start the playback.
5. Press “ / ” to select the recorded file.
6. Volume control
Page 9
VOL+ : Increase volume
VOL- :Decrease volume
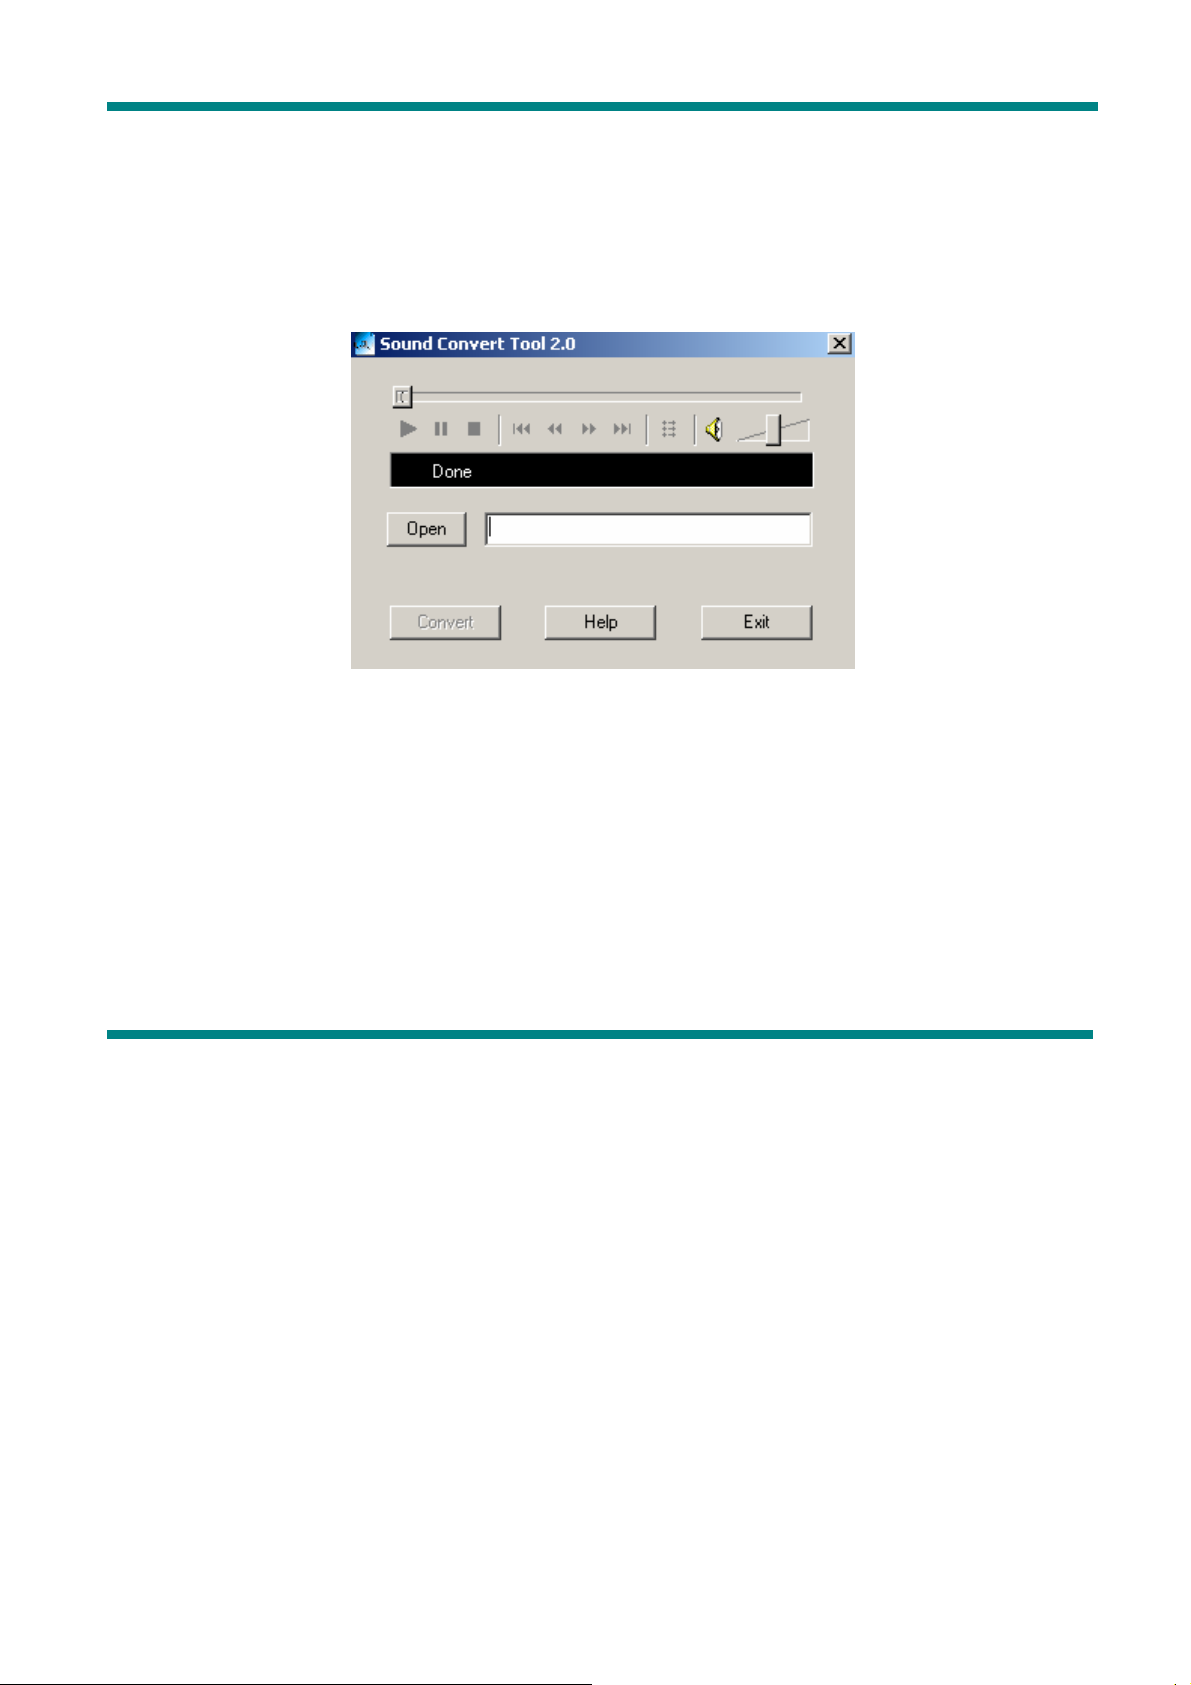
• File recorded in .ACT format can be converted to .WAV
Use the supplied utility software to convert the recorded .ACT file to the .WAV file.
1. Run the “Sound Converter” software utility. You will see the following dialog box:
2. Select the recorded file.
Page 10
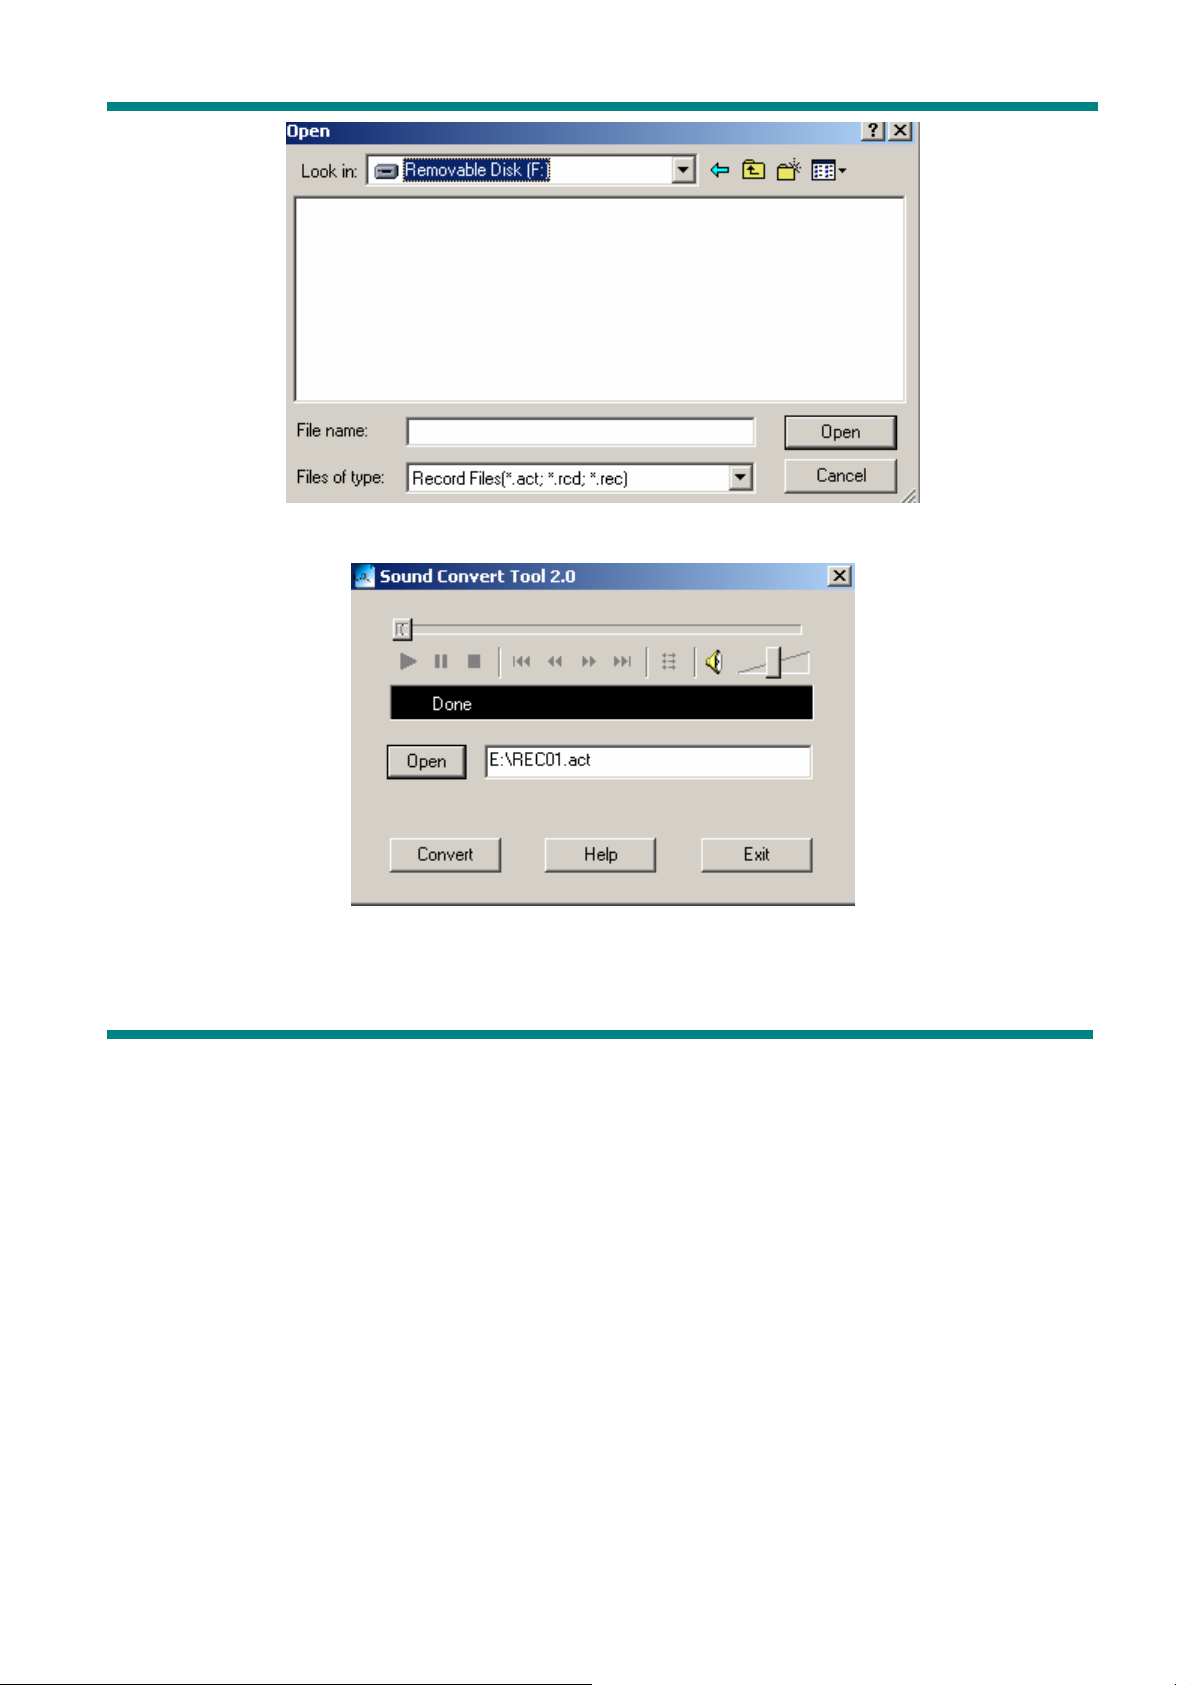
3 .Click “Convert” to create .WAV file.
You can also convert the .WAV file to MP3 format using the same utility.
Page 11
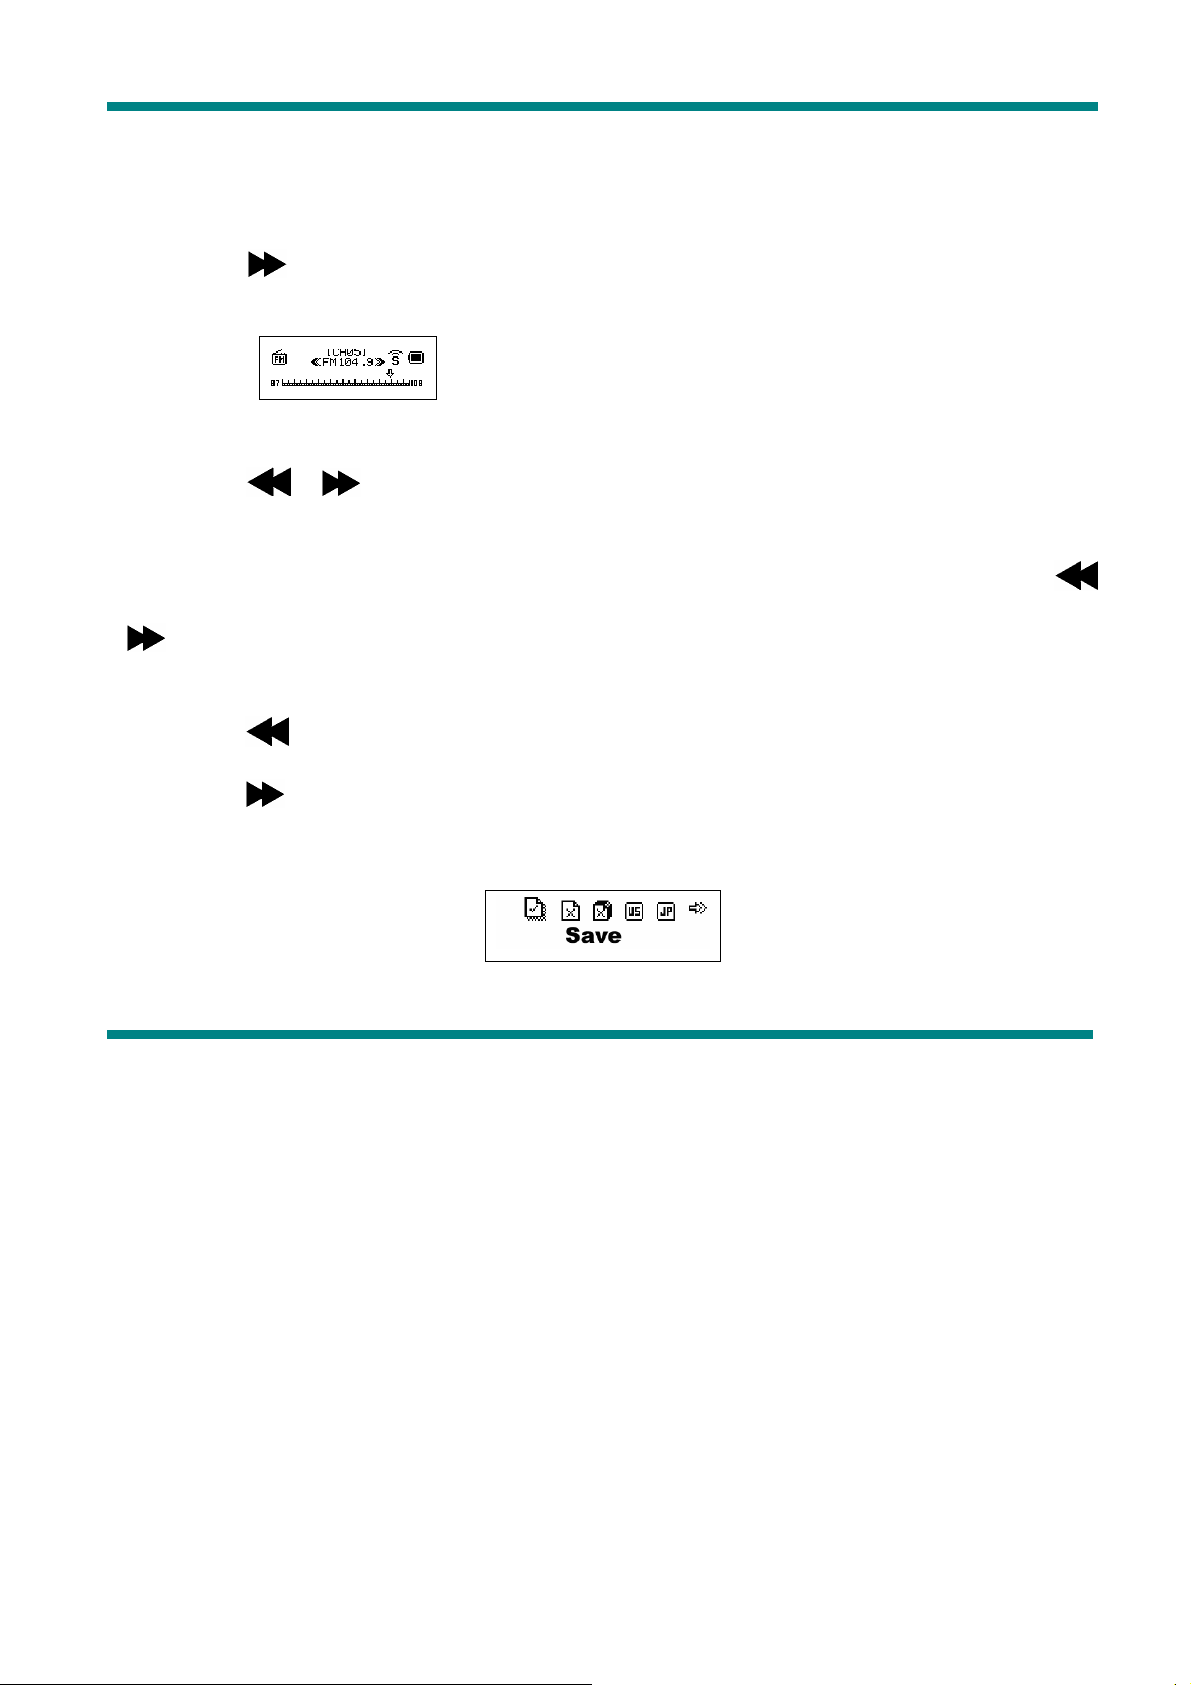
z FM Radio
To use the FM radio please, follow the steps below:
1. Enter the main menu
2. Press the button until you select “FM”
3. Press the “Mode” button to enter the “FM” menu.
4. Auto search for the Radio station
Press the “ / ” button for 2 seconds (long time press), the player will auto search for
the next Radio station with the 100KHz increment forward or backward, it will not stop until the
a clear radio station has been found. If you want to cancel the auto search, just press the “
/ ” button again.
5. Manual search
Press the button to try the next FM frequency backwards
Press the button to try the next FM frequency forwards
6. Save Radio Station
Press the “Mode” button enter the “FM” submenu
Press the “Mode” button to save this radio station.
7. To choose the previously saved radio station
Page 12

Press the “Play/Pause” button to select and listen to the saved radio station.
8. Volume Control
Press Vol+ or Vol- to increase or decrease the volume.
: You can save up to 20 radio stations in your MP3 player.
: To delete the radio station please refer to the section Delete file below.
Page 13
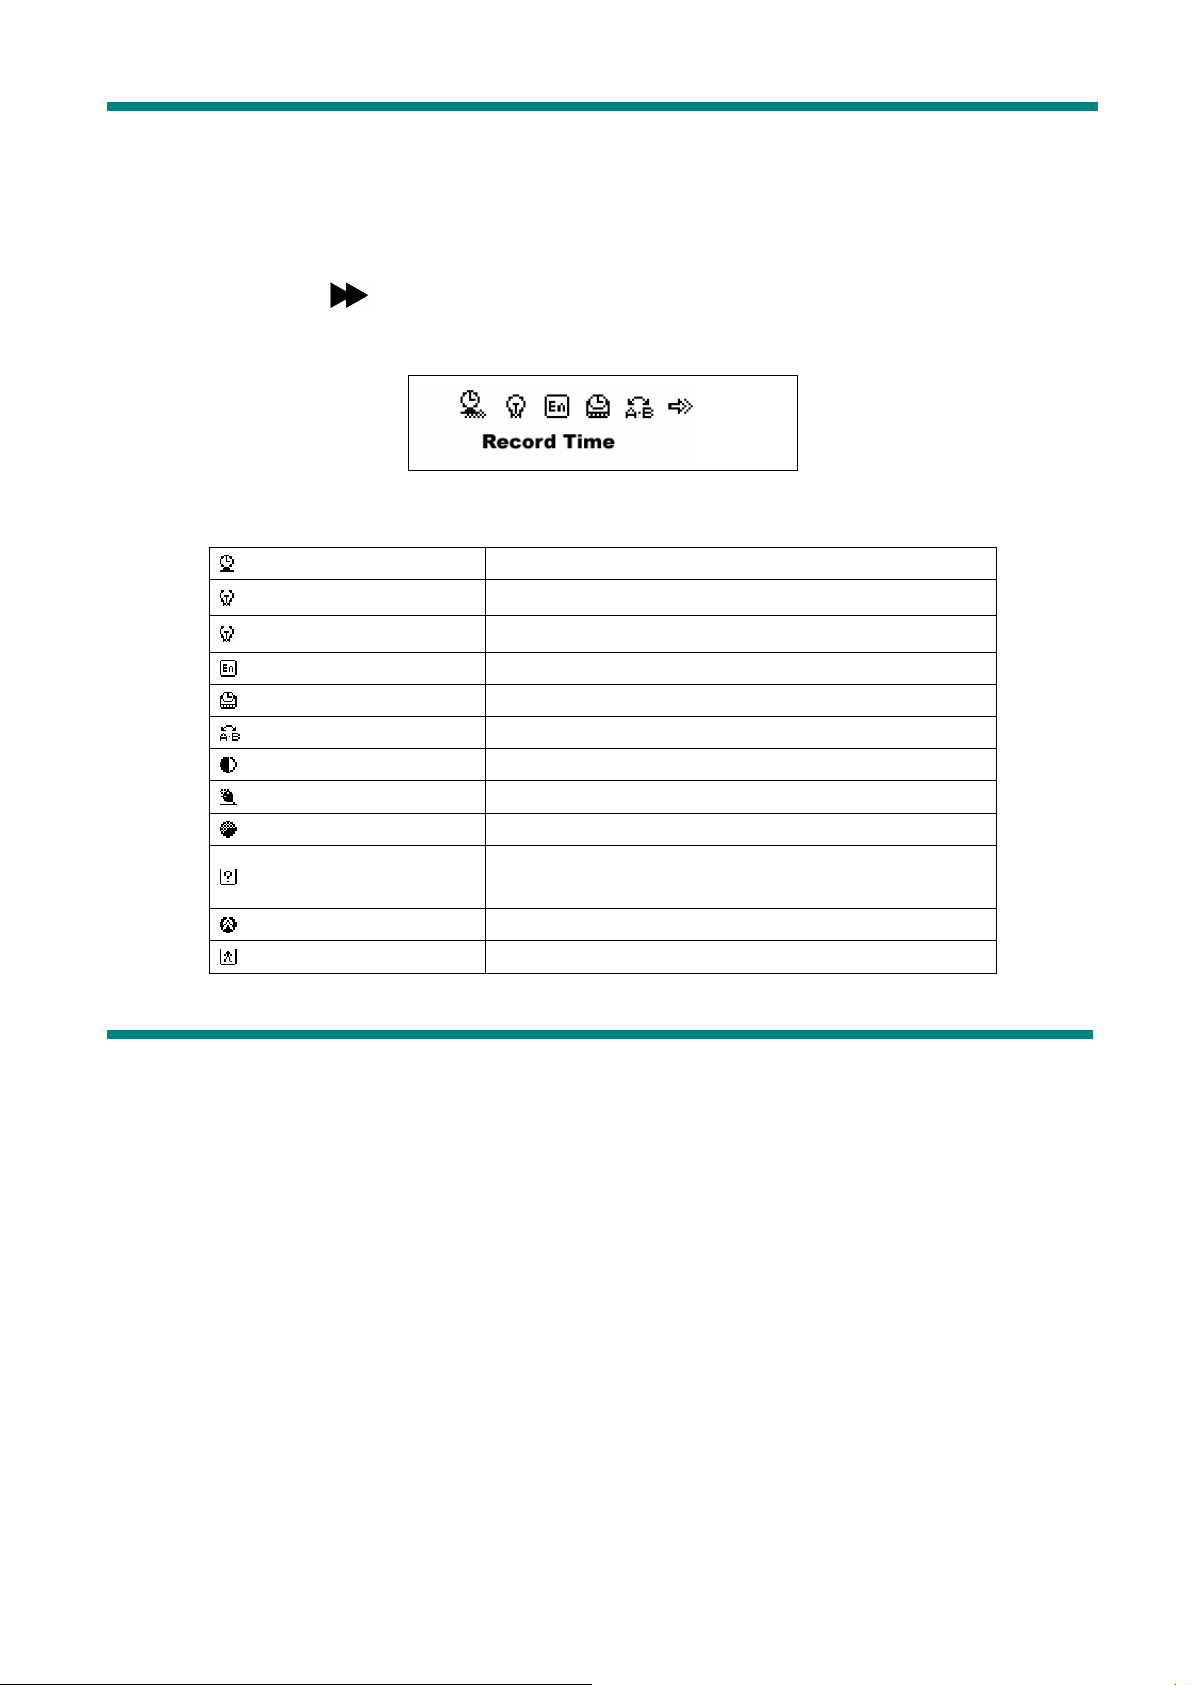
SYSTEM SETTINGS
• How to change the System settings
1. Enter the main menu
2. Press the button to select “SYS”
3. Press “Mode” button to enter the “SYS” system settings submenu.
• The system settings are listed below
(Record Time) Sets the date and time of the recorded files.
(Back Light)
Sets the timing of the backlight.
(Back Light Mode)
Sets backlight color
(Language) Sets the language
(Power off ) Sets the time of the auto-power off.
(Replay Mode) Sets the Replay mode.
(Contrast) Sets the Contrast of your LCD
(Online Mode) Sets the function of the MP3 removable disk
(Memory Info) Checks capacity of the flash memory
(Firmware Version)
Displays the date of the current firmware
version
(Firmware Update) Use this setting for the firmware update
(Exit) Exit the submenu
Page 14
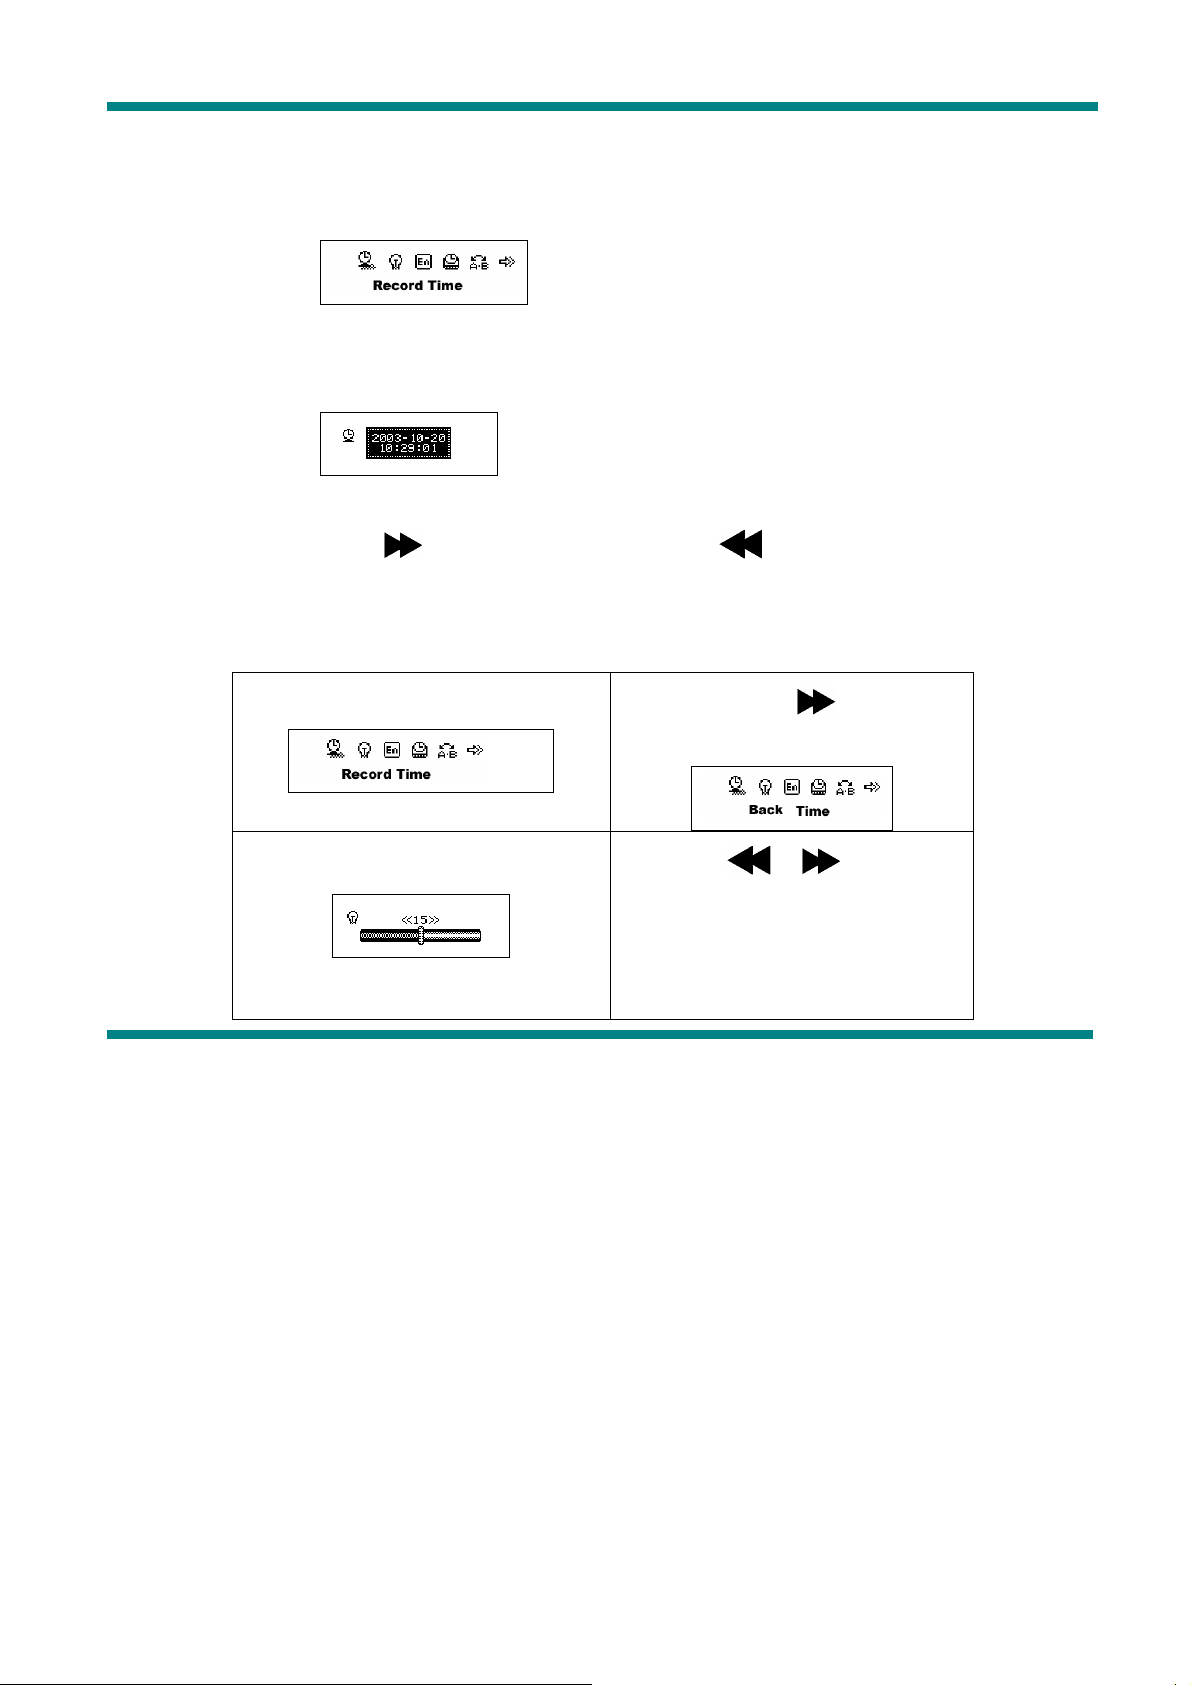
• System settings explanation
○ Setting “Record Time”
1. The screen will look as shown below:
2. Press the “Mode” button to enter the submenu.
The screen will look as shown below:
3. Press “VOL+” (VOL-)to select the date and time.
4. Press the button to increase or press to decrease.
5. Having finished adjusting the time, Press the “Mode” button to confirm.
○ Setting “Back Time”
1.Enter the system settings menu
2. Press the button to
3. Press “Mode” enter the setting
as shown below:
select ”Back time”
4. Press “ / ” buttons to
set the time.
5. Press the “Mode” button to
confirm and exit.
Page 15
○ Setting “Language”. Please, operate in a similar fashion as the “Back time”
setting.
○ Setting “Power off“. The same as the “Back time”. There are two settings here:
Off time: Set your auto-off time, the unit is in seconds
Sleep time: Set your sleep mode time, the unit is in minutes, the max setting is
120 minutes.
○ Settings “Replay mode”/ “Contrast”/“Online mode”. The same as the “Back time”.
○ “Memory Info.” Shows the percentage of the disk storage space which is currently
used and free.
○ “Firmware Version”. Displays the current Firmware Version.
○ “Firmware Update”. Use this setting only if you want to perform the firmware update.
Press “Mode” button to confirm your setting, then press “Play/Pause” button to exit the
submenu.
Page 16
• Use MP3 player as a USB Disk
This MP3 player can be used as a USB disk. There is no need to install any driver (with
exception of Windows 98) under Windows 2000/XP, Mac OS 10.3 or above, Linux Reshat 8.0
or above.
The MP3 player can use the USB port power, so when it is connected to the PC the
battery is not used. If you want to playback the music when MP3 player is connected to the
computer, during the “wait mode” press the “Mode” button, then you will enter the main menu.
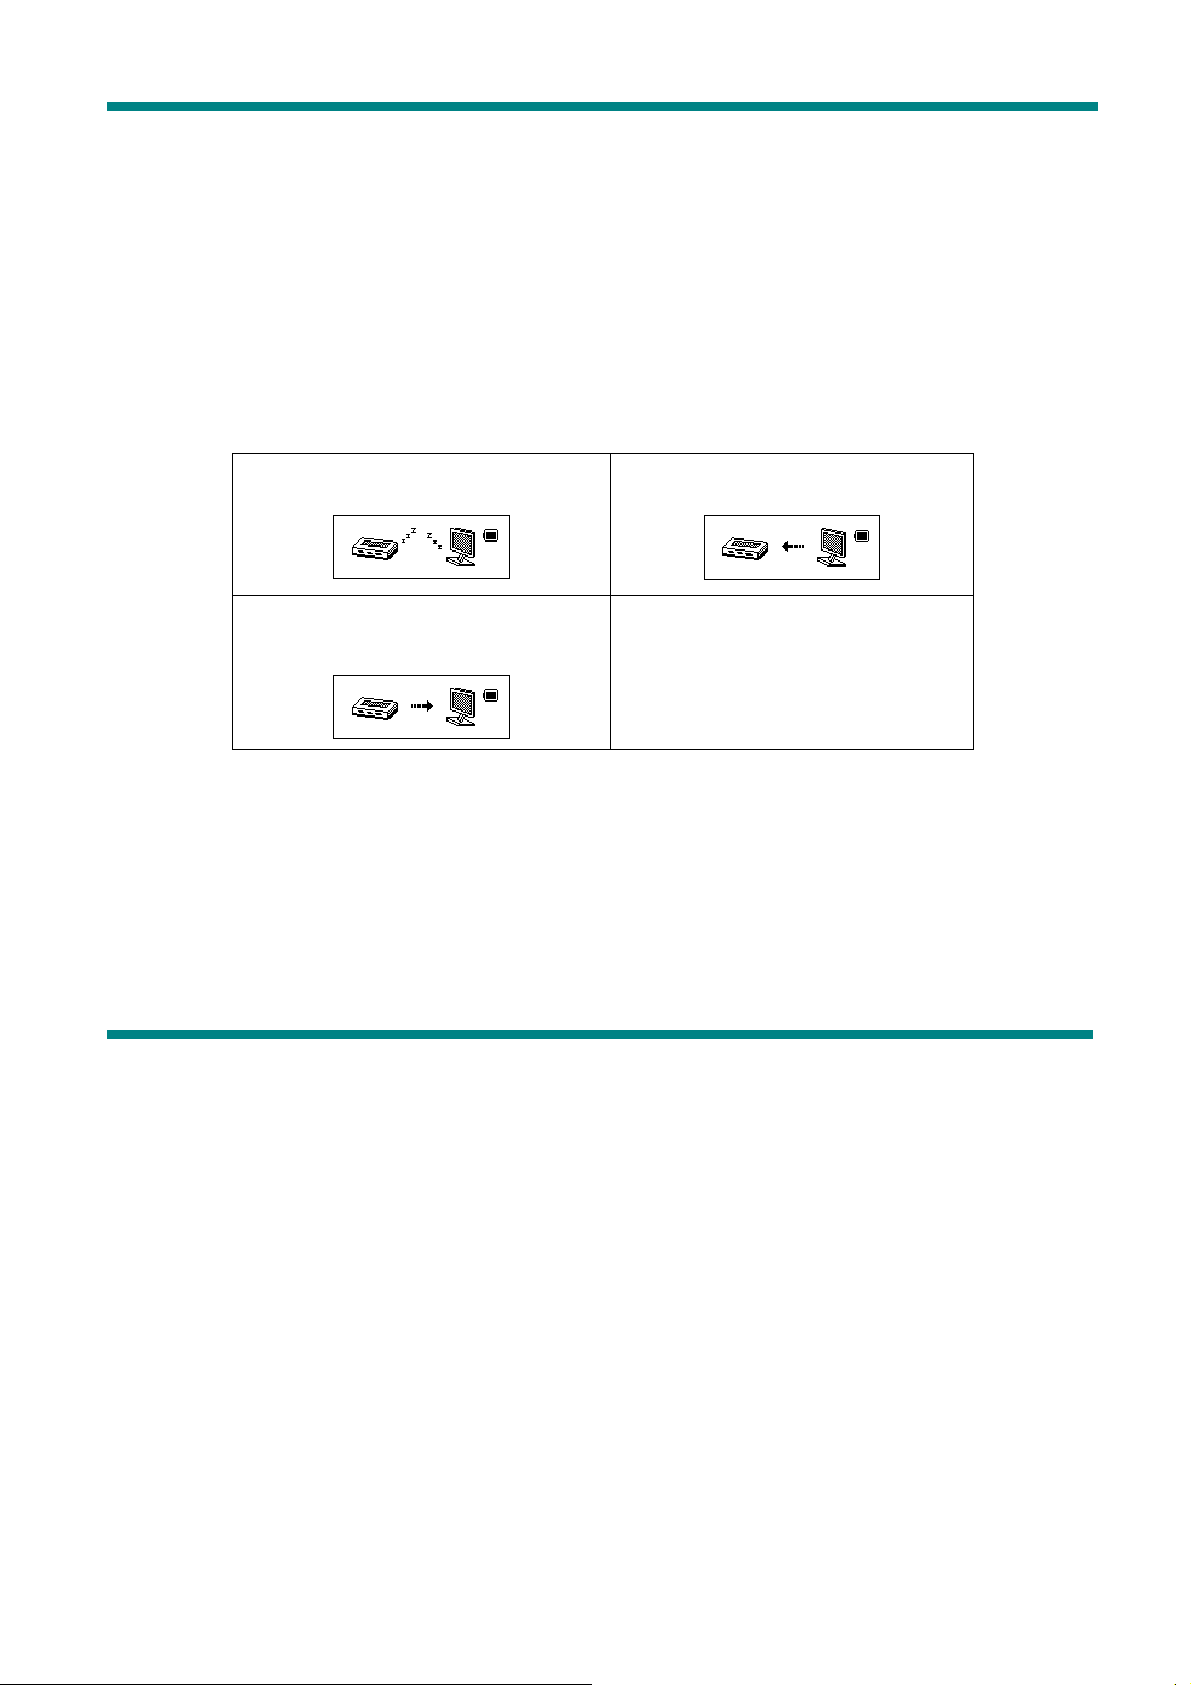
After connection with the PC has been established, there are three kinds of MP3 modes which
are shown on the screen in the following way:
2.A file being downloaded 1.Waiting status
3. A file being uploaded
Page 17

• MP3 player firmware update
Your MP3 player can be updated use the utility software supplied with it. To upgrade the
MP3 player firmware please, follow the steps below:
1. Enter the main menu
2. Press the button to select “Sys Set”
3. Press the “Mode” button to enter the “Sys Set” submenu.
4. Press the button to select the “firmware update”, then press the “Mode” button to
enter the submenu.
5. Connect your MP3 player to PC.
6. Run“MP3 Player Update” utility
It’s used in the interface of firmware upgrade. (Please check AVB web : www.avbusa.com for more
information)
Page 18
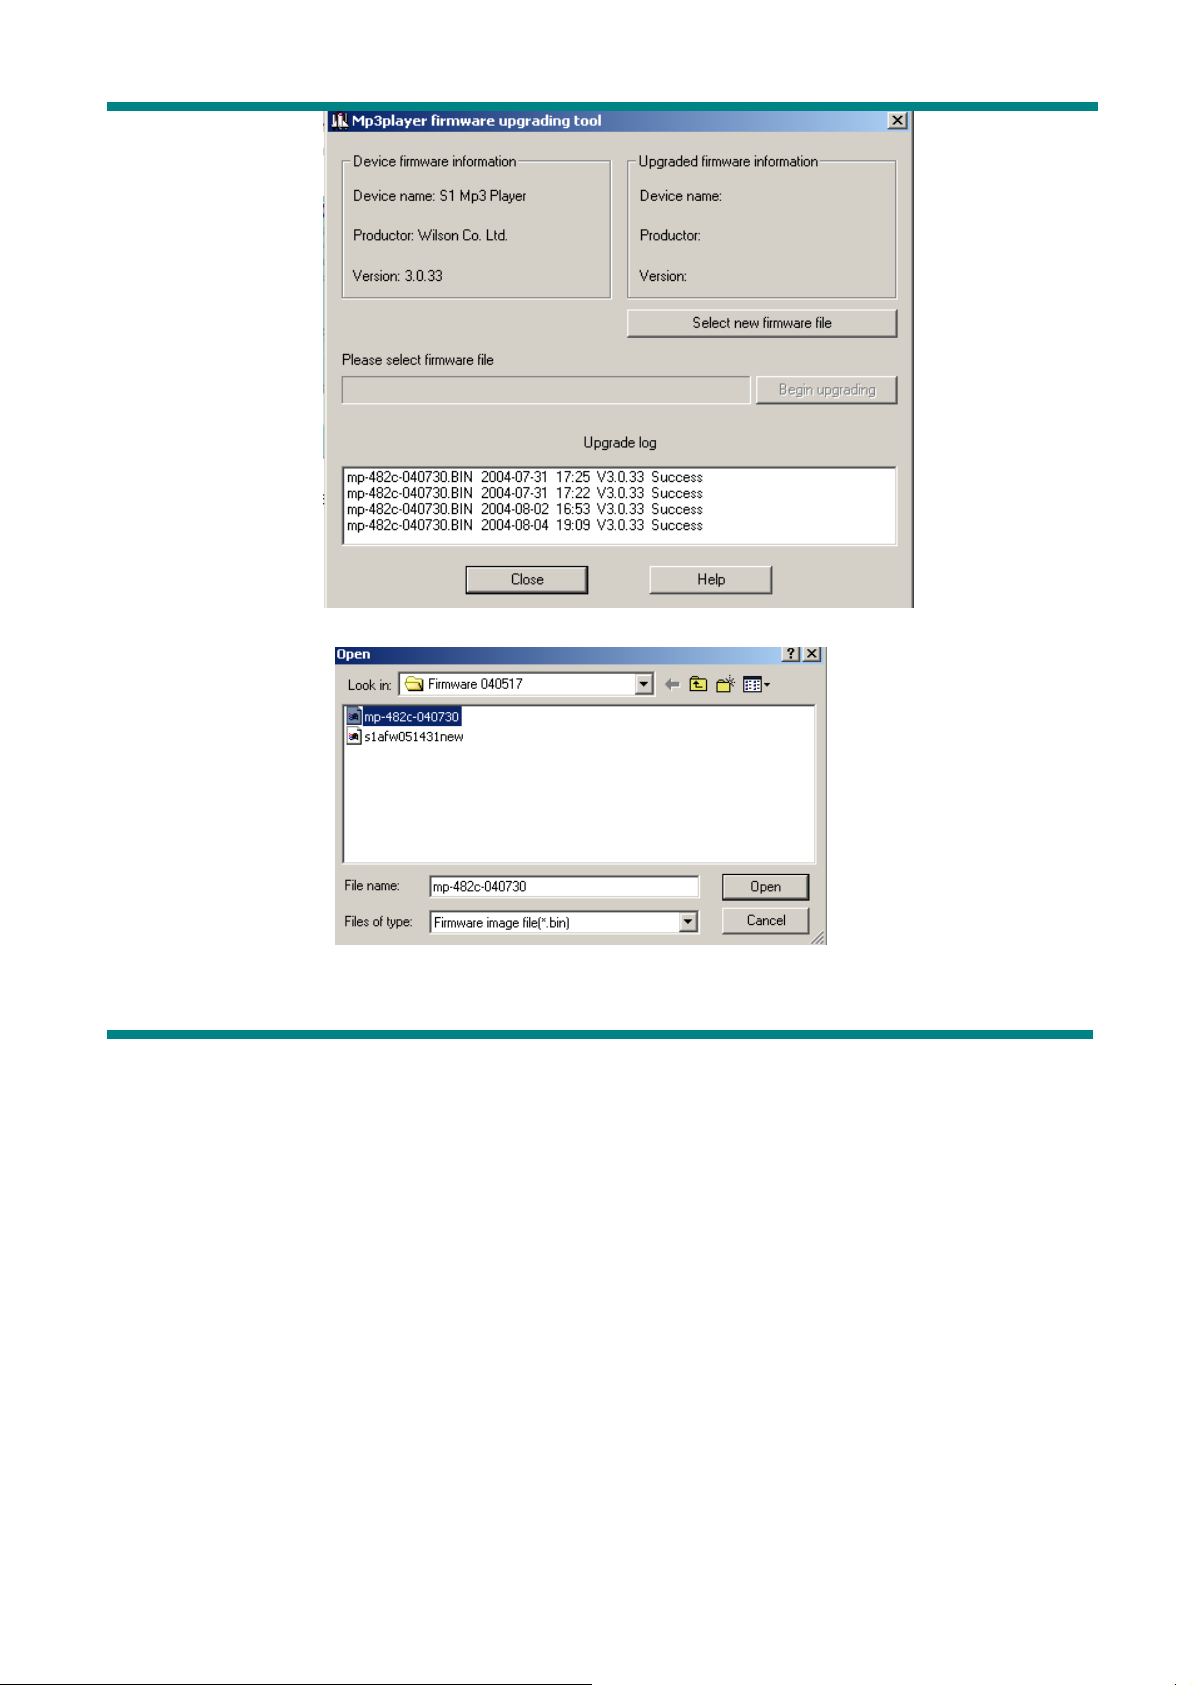
8. Select the new firmware file
9. Click the “Begin Upgrading” button to update the player.
Page 19
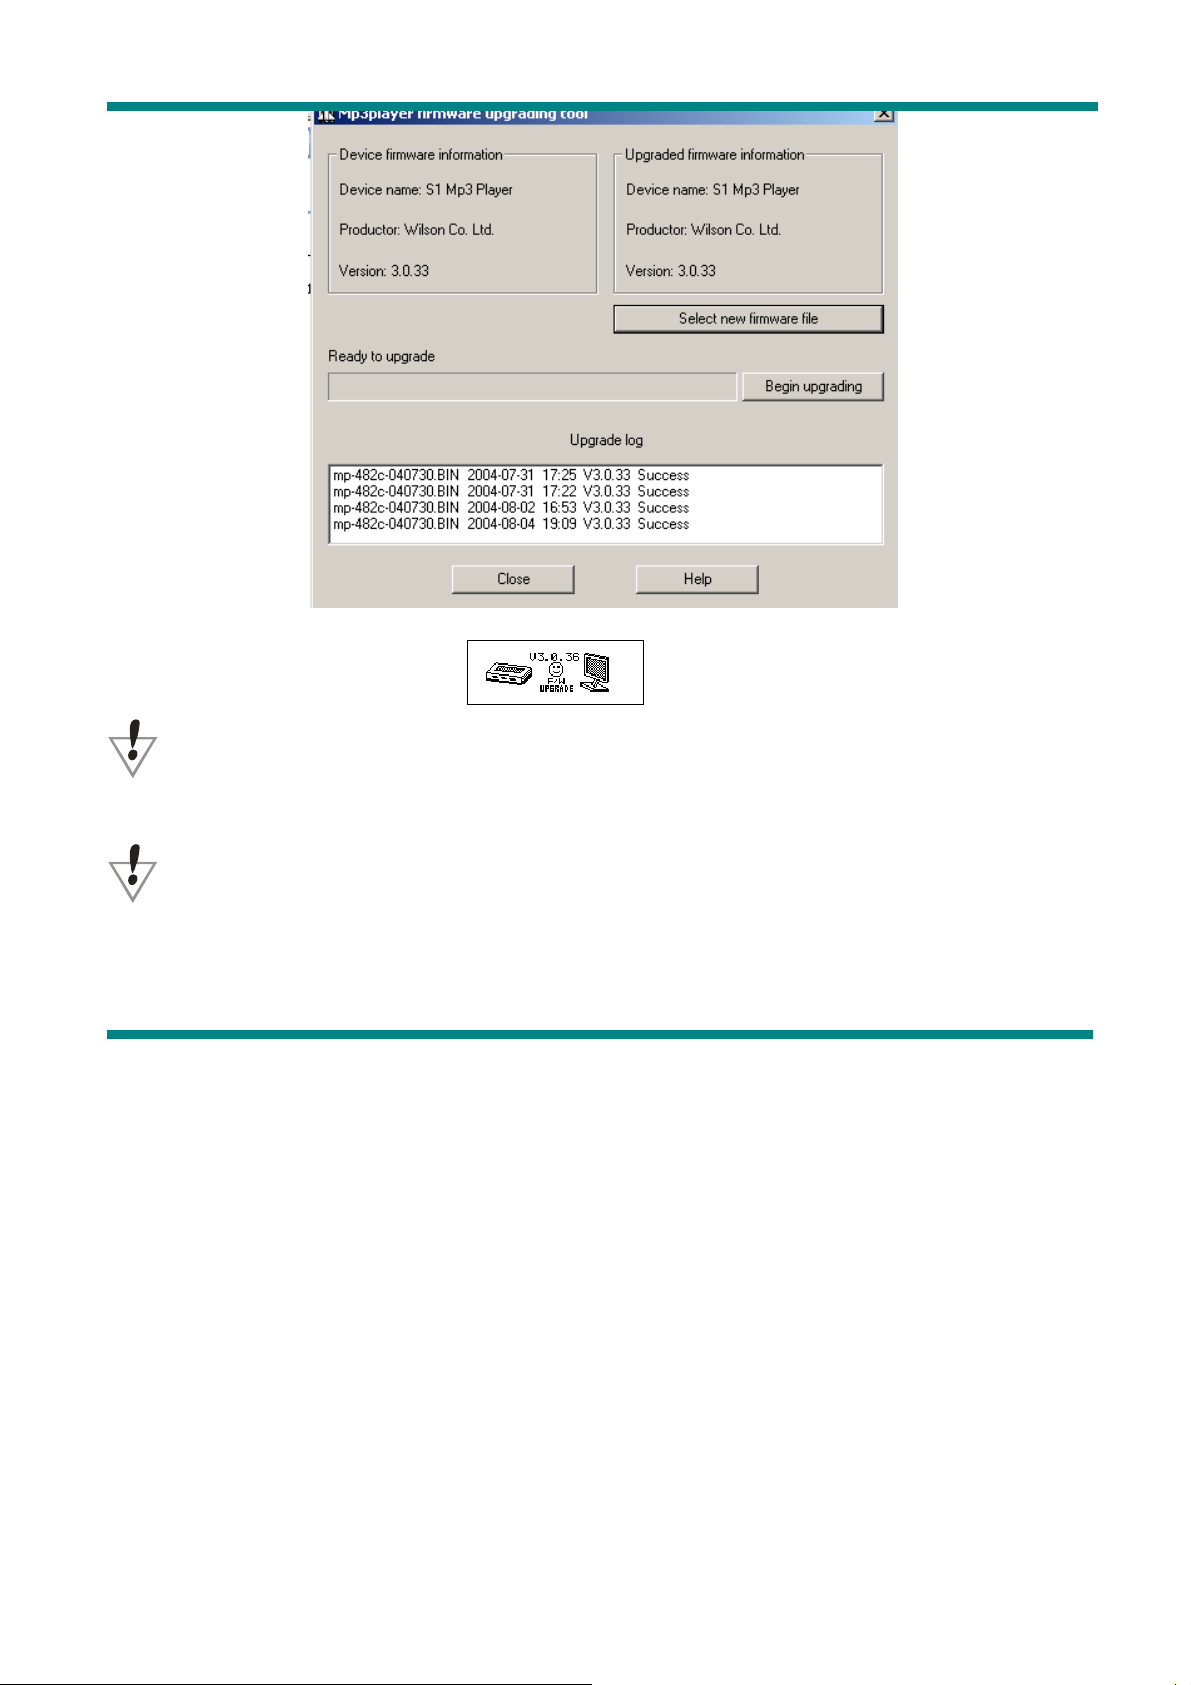
If update is successful the mp3 player will display the following:
Firmware update is to improve the mp3 player, however it is not necessary to do that,
your MP3 player will work normally without any update.
Firmware update used in a wrong way might damage your MP3 player! Before updating
please, read the instruction carefully. Make sure that the uploaded file does correspond to
your model of the MP3 player. The person performing update is supposed to have some
experience in working with computers.
Page 20
OTHER SETTINGS
• Select different directory
It is possible to use a different directory rather than the root directory for the recording or
music playback. The MP3 player can support up to 9 directories which the MP3 can use to
playback files in there. To do that please, follow the steps below
.
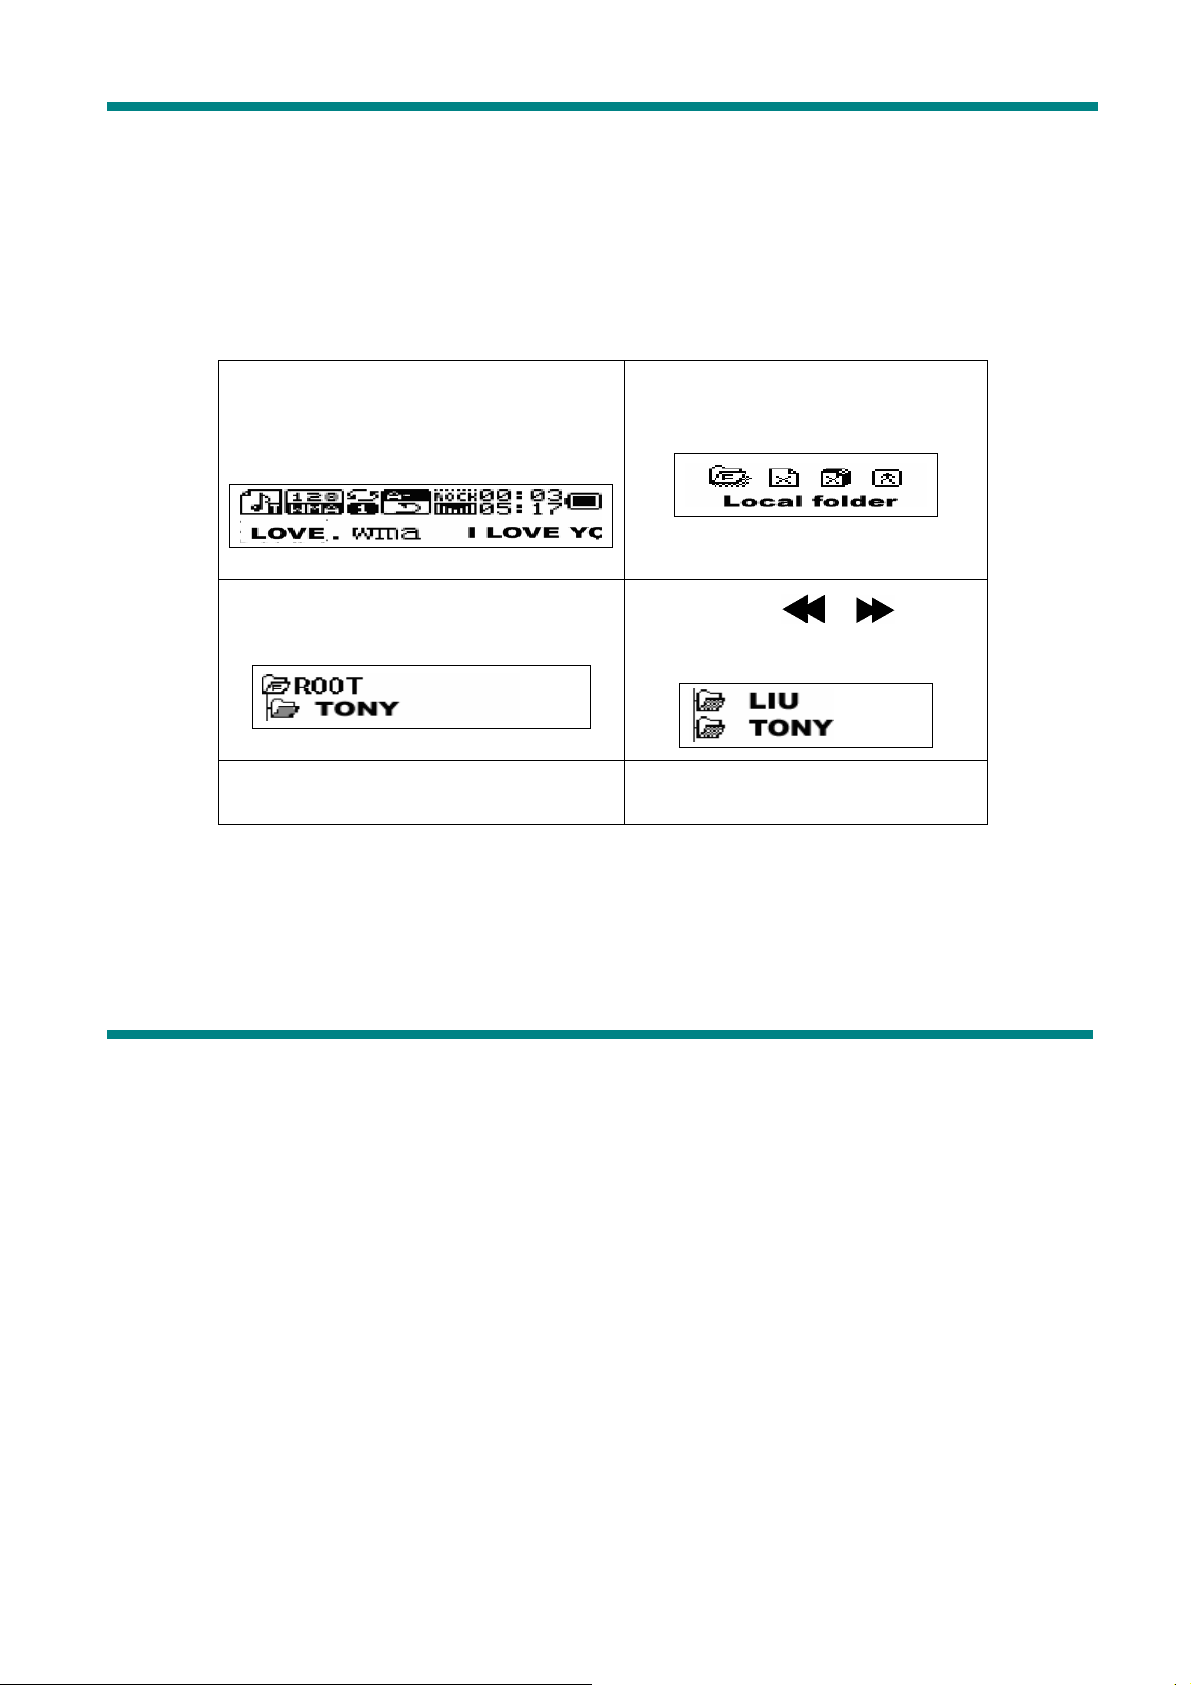
1. The player should be stopped in
music mode (shown below),
2. Press the “Mode” button to
enter the following menu.
recording or playback mode.
3. Press the “Mode” button again to
enter the directory choice
4. Press the “ / ” button
to select the desired directory
5. Press the “Mode” button to
confirm the choice
Note: You can set different directories for “Music Mode”, “Record Mode” and “Playback
Mode”.
• Delete file
In “Music Mode”, “Record Mode”, “Playback Mode” and “FM Mode” you can delete
Page 21
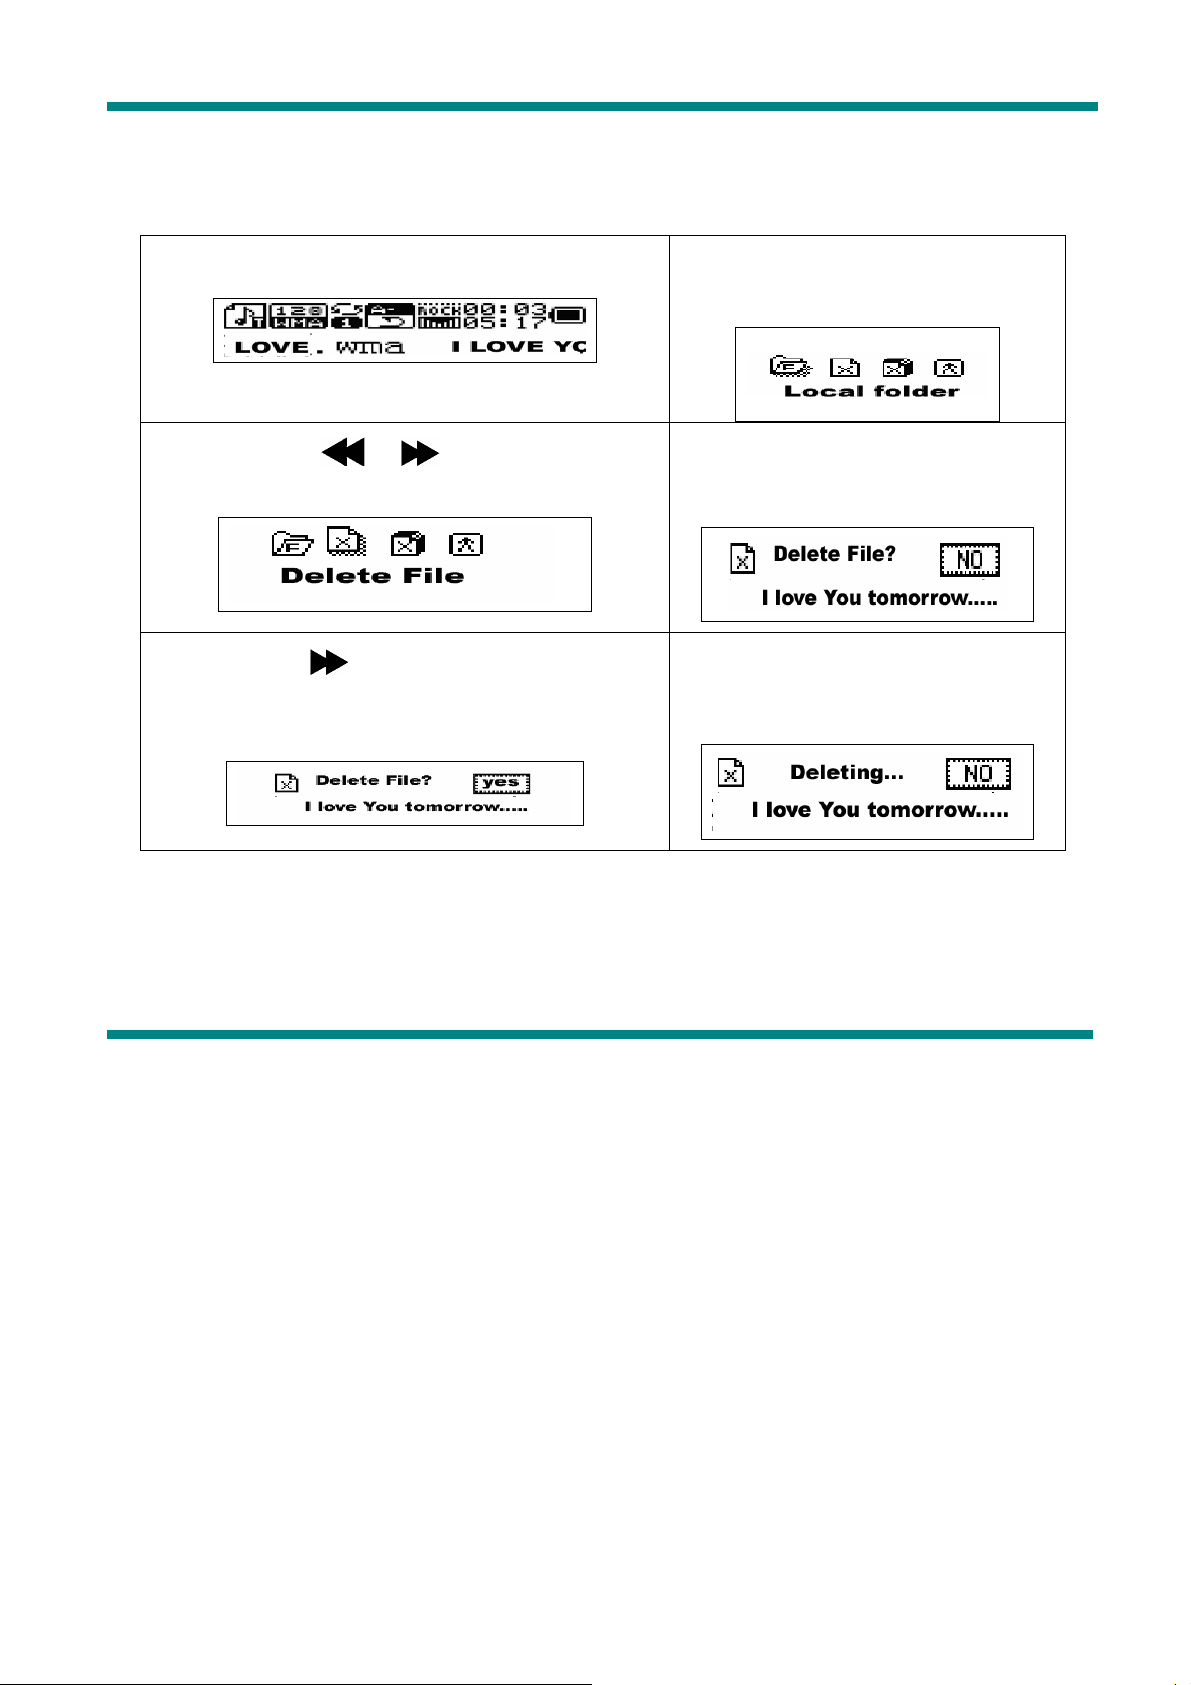
files and the Radio stations.
To do that, follow the steps below:
1. The MP3 should be stopped.(In all modes
excluding FM)
2. Press “Mode” button to choose
the directory
3. Press the “ / ” button to select
“single file” or “all files”.
following screen:
6. Press “Mode” button to confirm
4. Press “Mode” button to get the
5. Press the button to change “NO” to
“YES”
the choice
The choice “Delete All” will delete all the files in the selected directory for the chosen
mode (e.g. if the MP3 is in the “Music mode” it will delete all the music files, but not the other
ones, such as recorded files)
In FM Radio you can delete the pre-saved radio station in a similar fashion.
Page 22
If you prefer to delete the files from your PC when MP3 is connected to the USB port,
make sure you use the Safely Remove Device wizard of Windows before you unplug the MP3
player from the USB port. Otherwise some data might get corrupted.
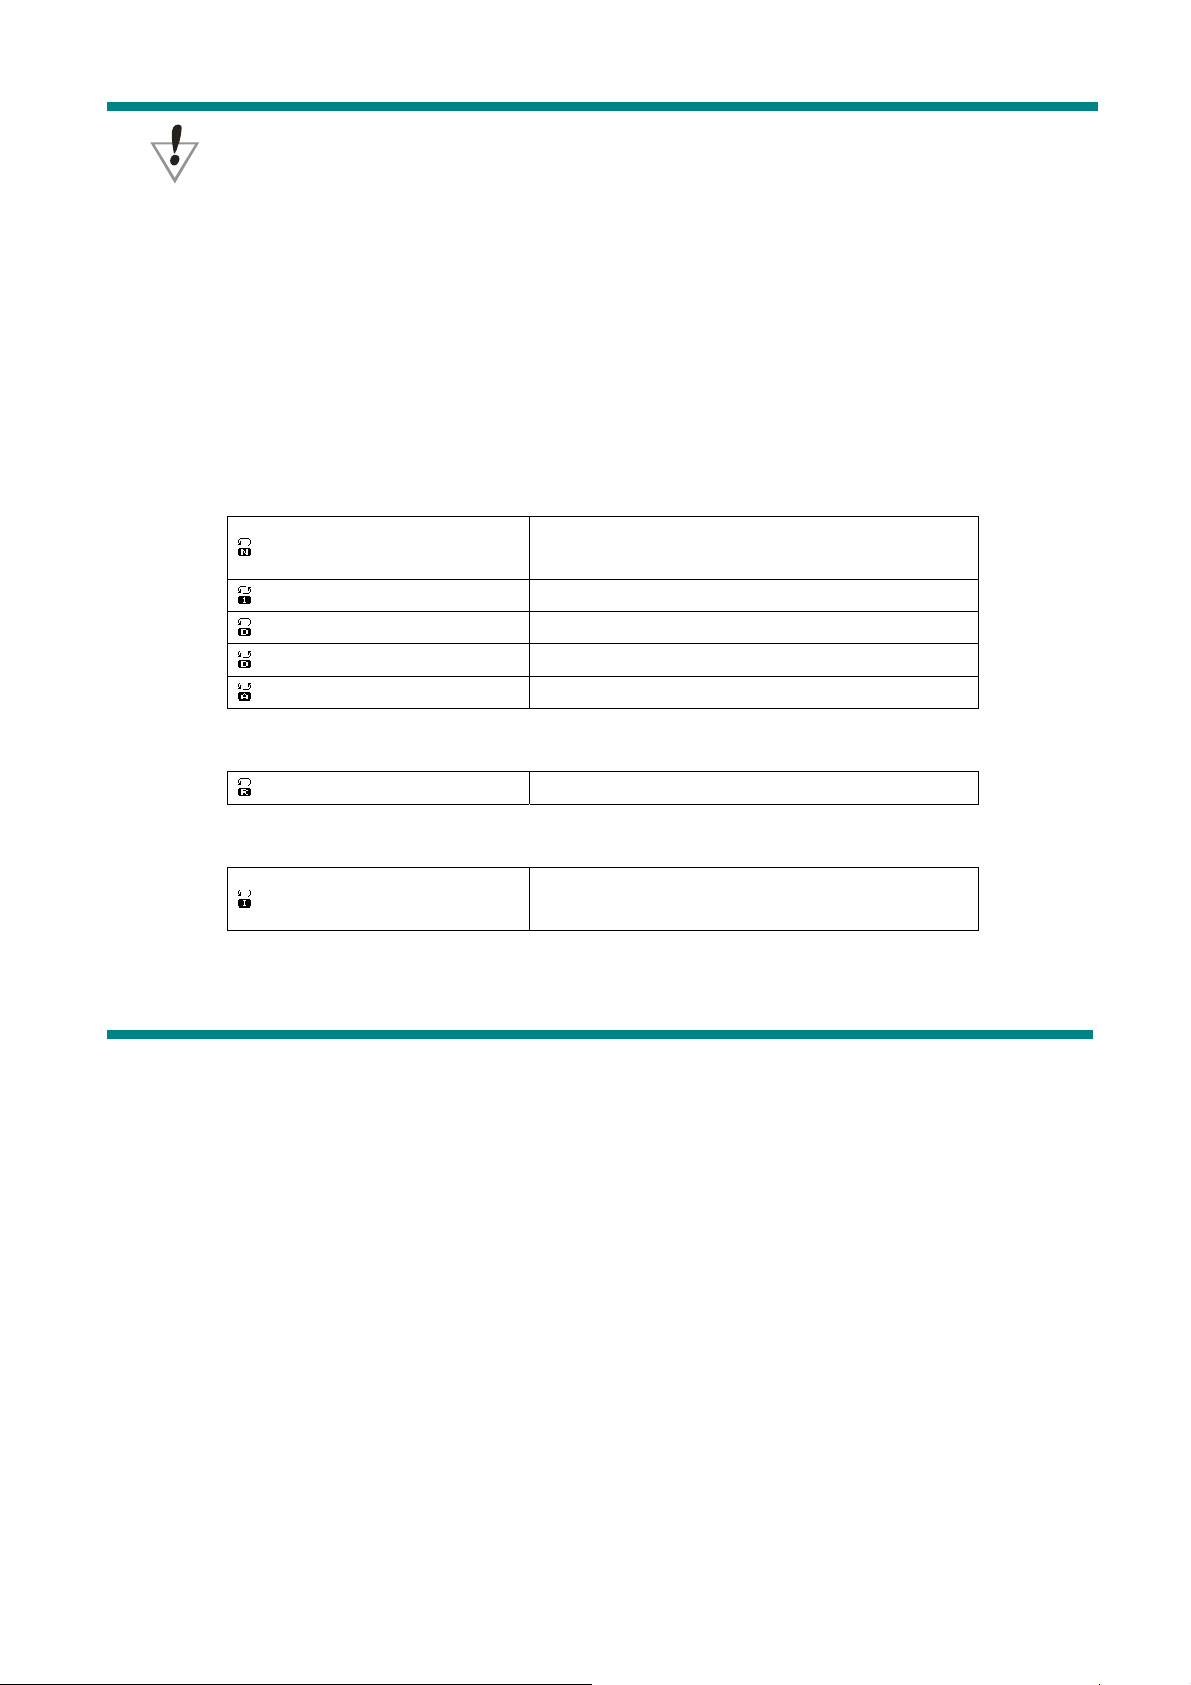
• Repeat Mode(Playback submenu)
During music and recorded file playback, it is possible to choose a number of special
“playback modes” (e.g. repeat, shuffle etc.)
During the music playback, press the “Mode” button to enter the “repeat” submenu,
then press the “Mode” button again to select one of the following options:
○ REPEAT
(Normal)
Playback one song one after another.
Having finished all of them, stop.
(Repeat One) Repeat one song.
(Folder) Play all the songs in this folder
(Repeat Folder) Repeat all the songs in the same folder
(Repeat All) Repeat all the songs in the MP3 player
○ SHUFFLE
(Random) Play the songs at random
○ (INTRO)
(Preview,Intro)
Play 10 first seconds of each song in the
current folder
• Playback speed
Page 23
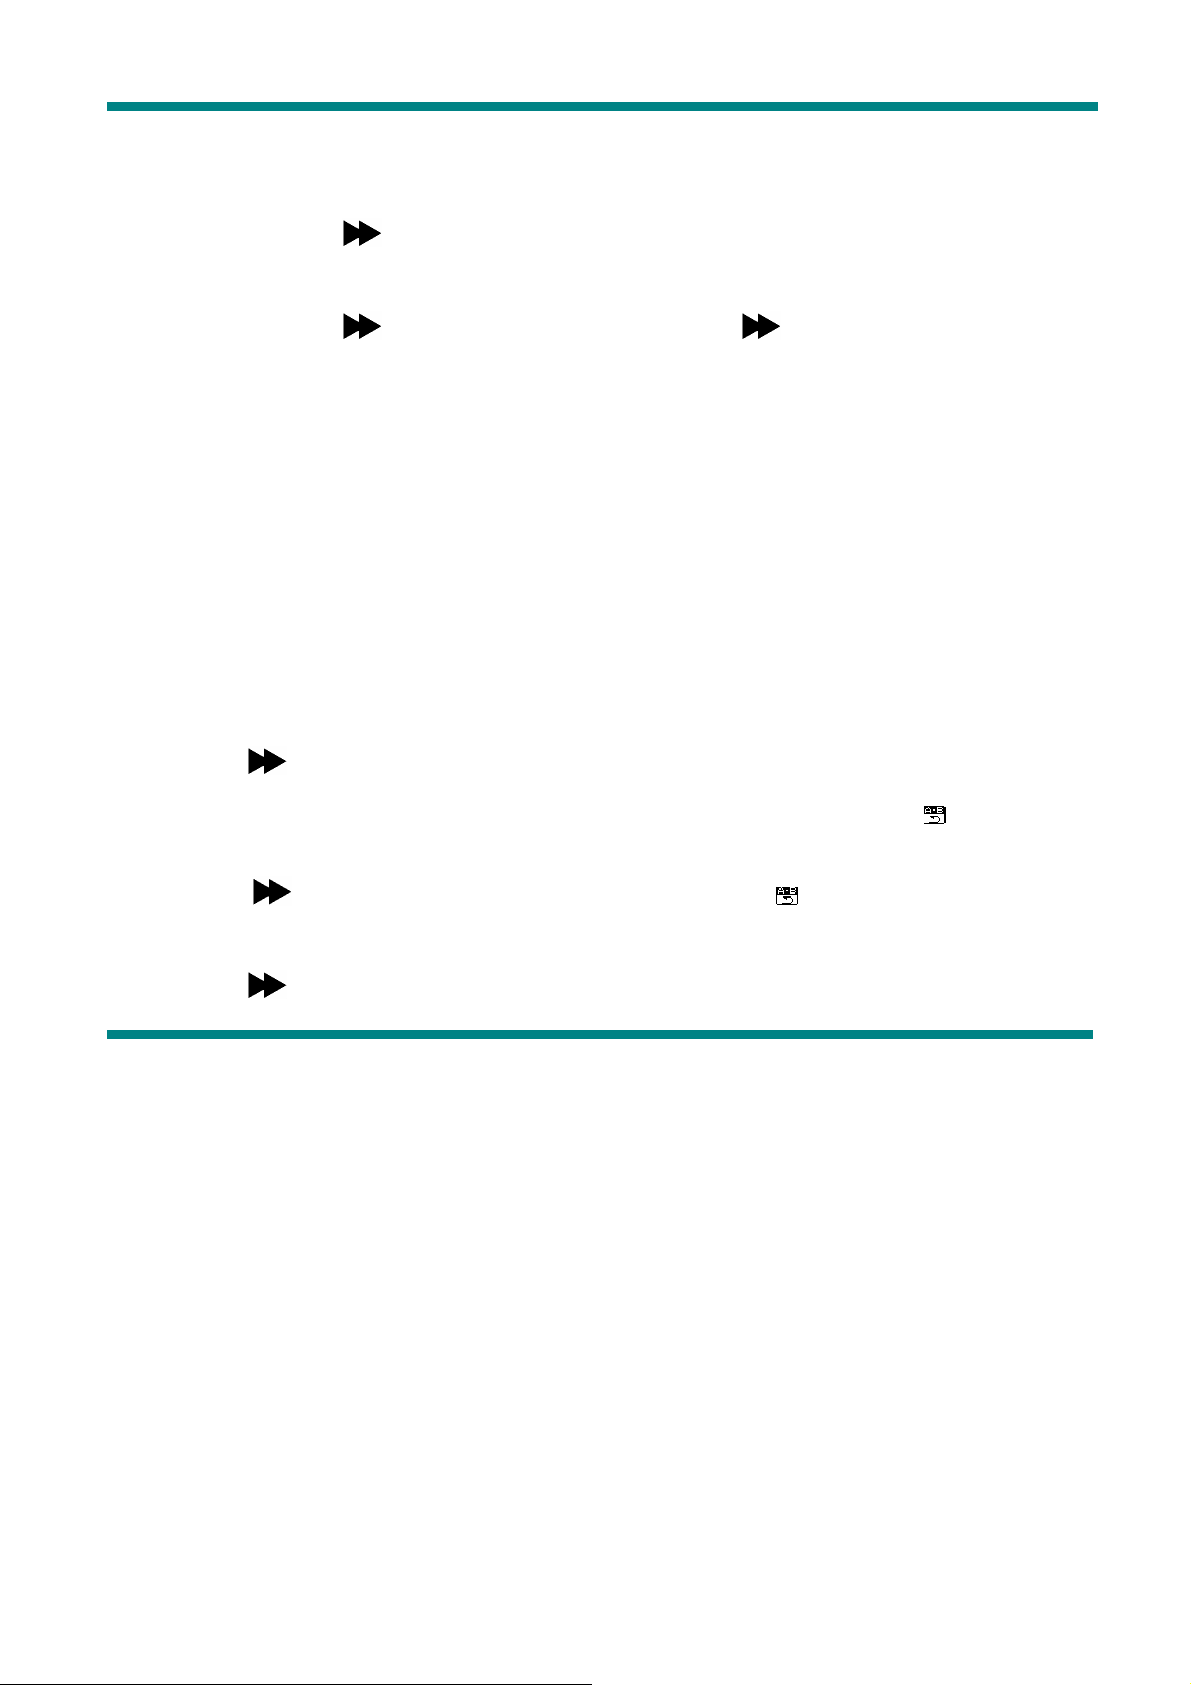
During the music playback (only for the MP3 file), it is possible to choose different
playback speed (speed up or slow down), the volume will not change.
1. During the music playback press the “Mode” button to enter the menu.
2. Press the button to select “Play Speed” menu.
3. Press the “Mode” button to enter the “Play Speed” submenu.
4. Press the button to “speed up” or press the to slow down.
Note: The playback speed will be saved in the MP3 player memory and it won‘t
change until you set it again.
• Repeat Mode
■ During the music playback press the “Mode” button to enter the “repeat mode”.
■ The following choices are possible:
ο A-B Repeat
Using this function it is possible to mark the music fragment for subsequent playback. To do
that, please follow the steps below:
1. During the music or recorded file playback press the “Mode” button to enter the submenu.
2. Press the button to select the “repeat mode” submenu.
3. Press the “Mode” button to enter the “repeat mode”. You will see the icon and the letter
“A” will blink.
4. Press the ” button to confirm the point A. On the icon the letter “B” will now start
blinking.
5. Press the
button to confirm the point B.
Page 24
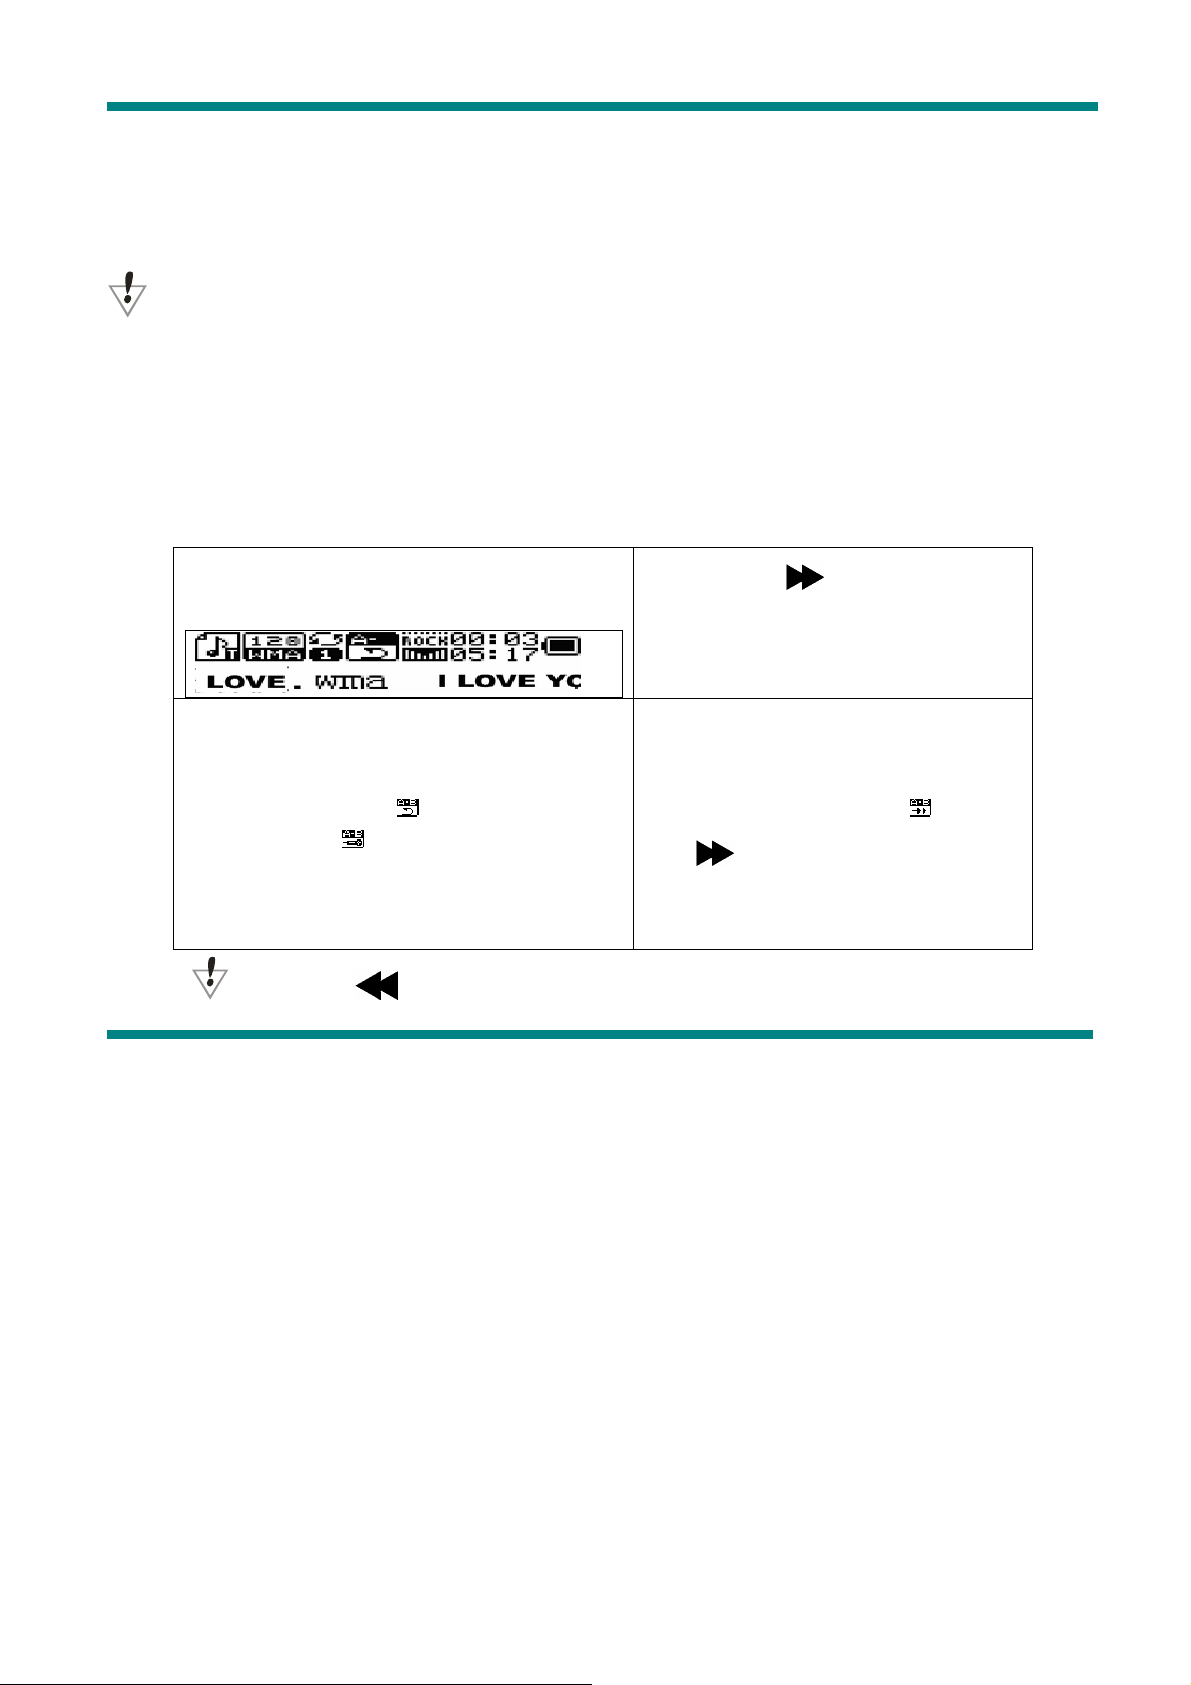
The MP3 will now start to repeat the playback from the point A to the point B. Having repeated
the marked fragment for a number of times (this number can be set) the playback will stop.
When the player is in the repeat mode it is possible to renew the setting of the points A and B.
During the “repeat mode”, you can press the VOL+ or VOL- button to set the “playback
speed”.
○ “Compare” function (this function is only available with the music playback) is
designed to let you compare recorded voice with the original MP3 file (tip – this feature is
especially useful for the language self-study). To use this function, please, follow the steps
below:
1. The player should be in the A-B
segment repeat mode
2. Press the button to enter the
“Repeat Mode”.
4. After recording is finished, the
MP3 player will first play the
original MP3 file. The icon on the
3. The repeat icon“ ”will change to the
screen will change to “ ”. Press
following icon“ ”. Now the MP3 player
will record the voice, the recording time is
the same as the playback time from the
point A to the point B.
the button to listen to your
recorded file and to enter the
compare mode.
Press the button to return back to the “A-B repeat” mode.
Page 25
1.After you enter the Compare
Mode, the icon will display “ ”,
then the MP3 player will
playback the original MP3 file.
2. Having finished the
playback of the original
fragment the icon will change
to“ ” and the MP3 will
playback your recording.
Press the button to return back.
During the “compare mode”, press “Mode” button to exit the “repeat mode”.
ο The number of repeat times
Please refer to the “backlight time” system setting.
ο Repeat interval
Please refer to the “backlight time” system setting. Repeat interval is the time between
two consequent playbacks in the repeat mode (the unit is set in seconds).
IMPORTANT! Disk encryption function IMPORTANT!
With the supplied utility you can divide the MP3 player into two sections (public and
encrypted). Under Windows 2000 SP4 and above you will see 2 disks in this case. Under
older operating systems only one removable disk will be seen on your computer. If you still
want to see the other, you should enter the “SYS” menu of your MP3 player and select “Multi
Drive” for “Online Mode”. To encrypt the MP3 player please, follow the steps below:
1. Connect the MP3 player to your computer.
2. Run the “MP3 Player Disk Tool” utility
Page 26
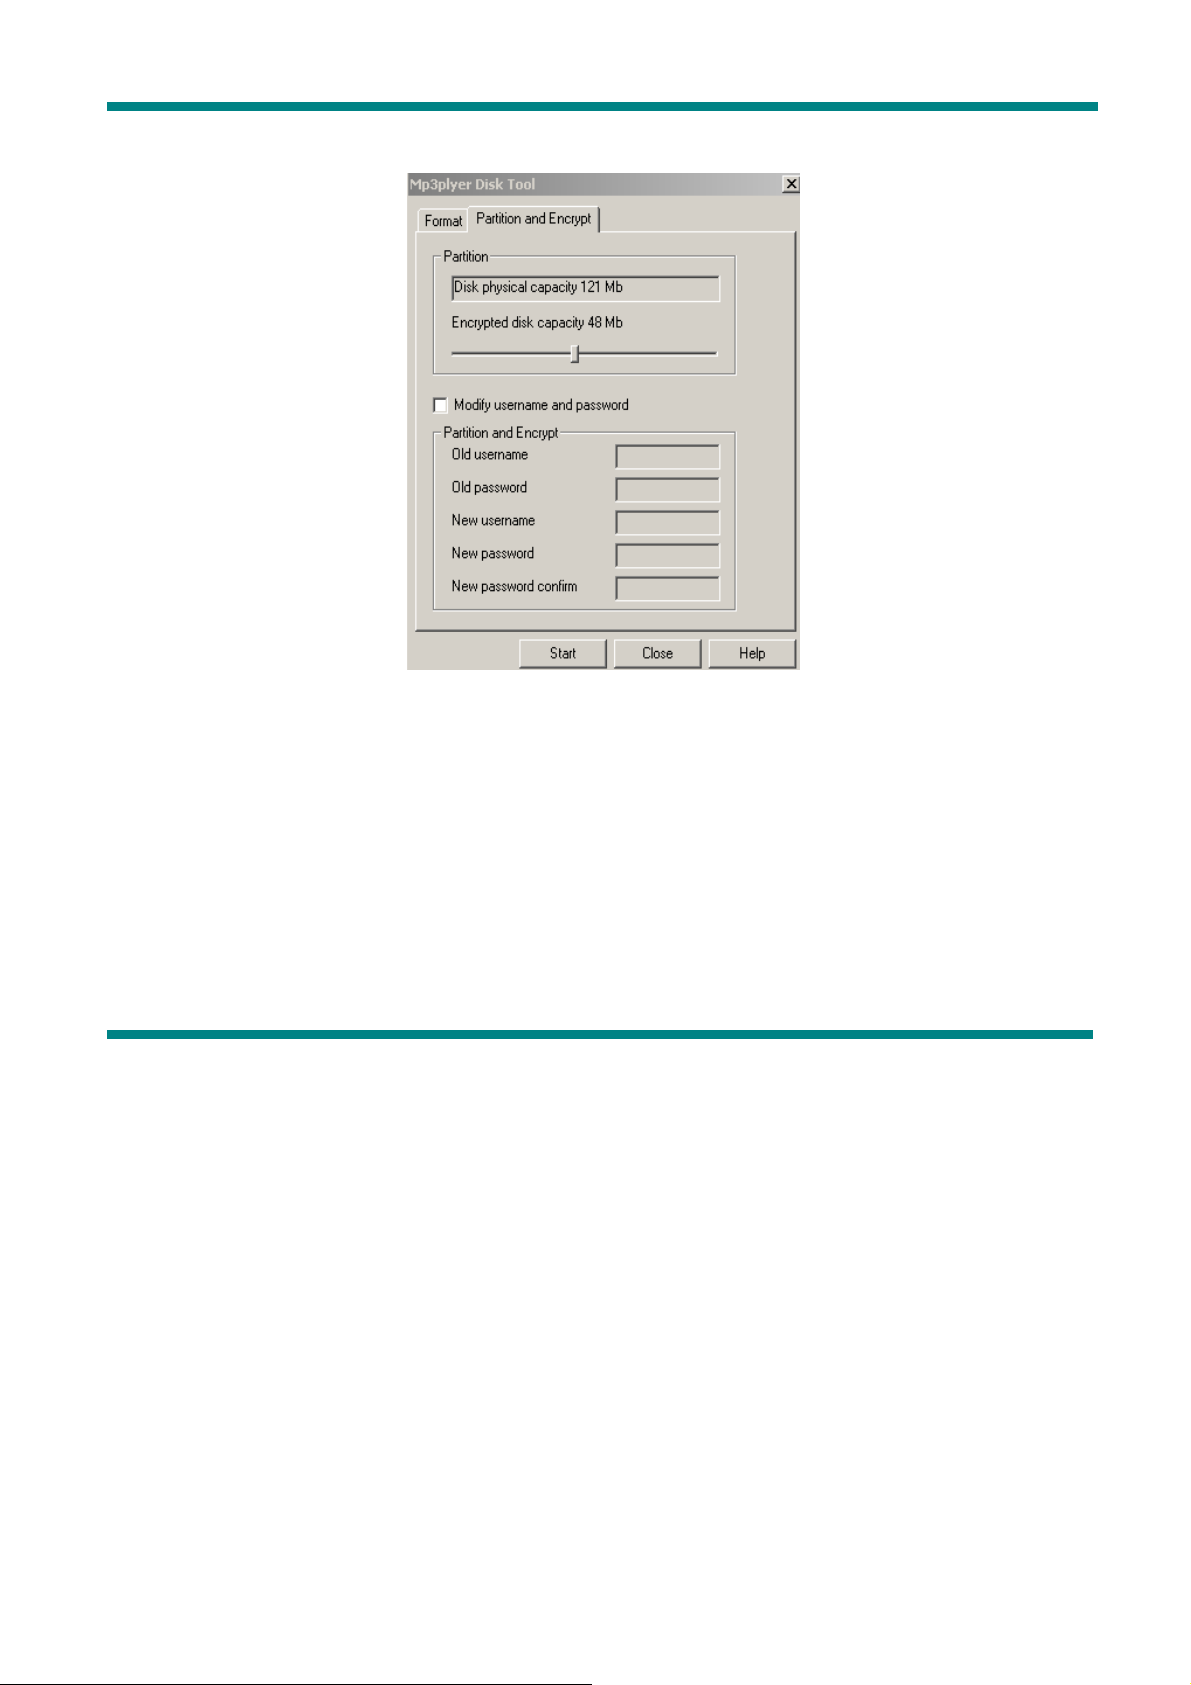
3. The following window will be displayed:
4. You can select the size of the encrypted part of the disk, then press the “Start” button
5. Press “OK” and then restart your computer.
6. After computer finishes the reboot, you will see two removable disks on your computer
(see the comments above about the operating systems before Windows 2000 SP4). Choose
the encrypted disk, you will see only three files there (two of which will be hidden), one of them
is the .exe file, the size of the disk will appear to be only 300Kb.
7. Run the “RdiskDecrypt.exe”, in the dialog box which will appear enter your user name
and password, then you will be able to access your whole disk and copy files to it.
Page 27
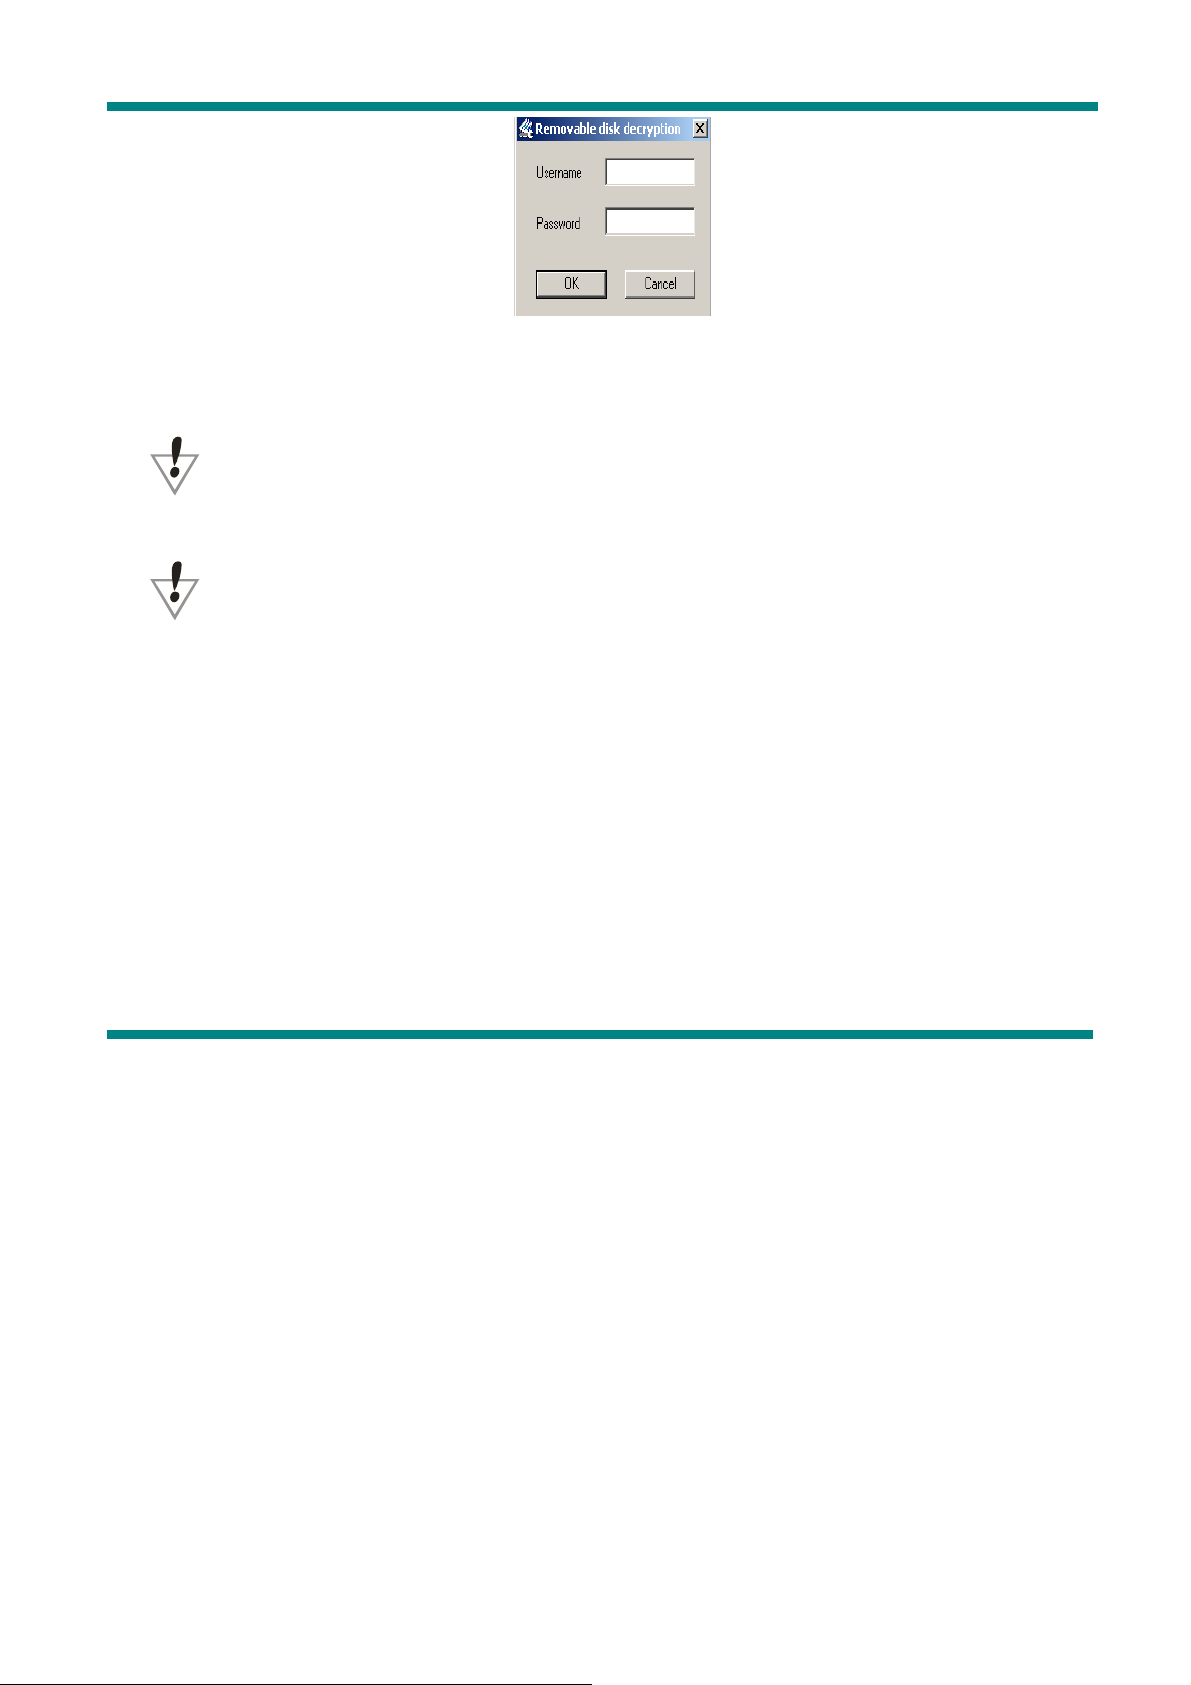
.
8. Now whenever you connect your MP3 player to the computer, you won’t be able to use it
until you enter the user name and the password.
Note: If you want to encrypt the disk in the way described above, please, first
backup your files, all the data will be lost after the encryption.
Warning: Don‘t forget your password and the user name, otherwise you won’t be
able to use your disk. In case the password is lost, you can only format the disk to regain the
access, but then all your files will be lost.
Page 28
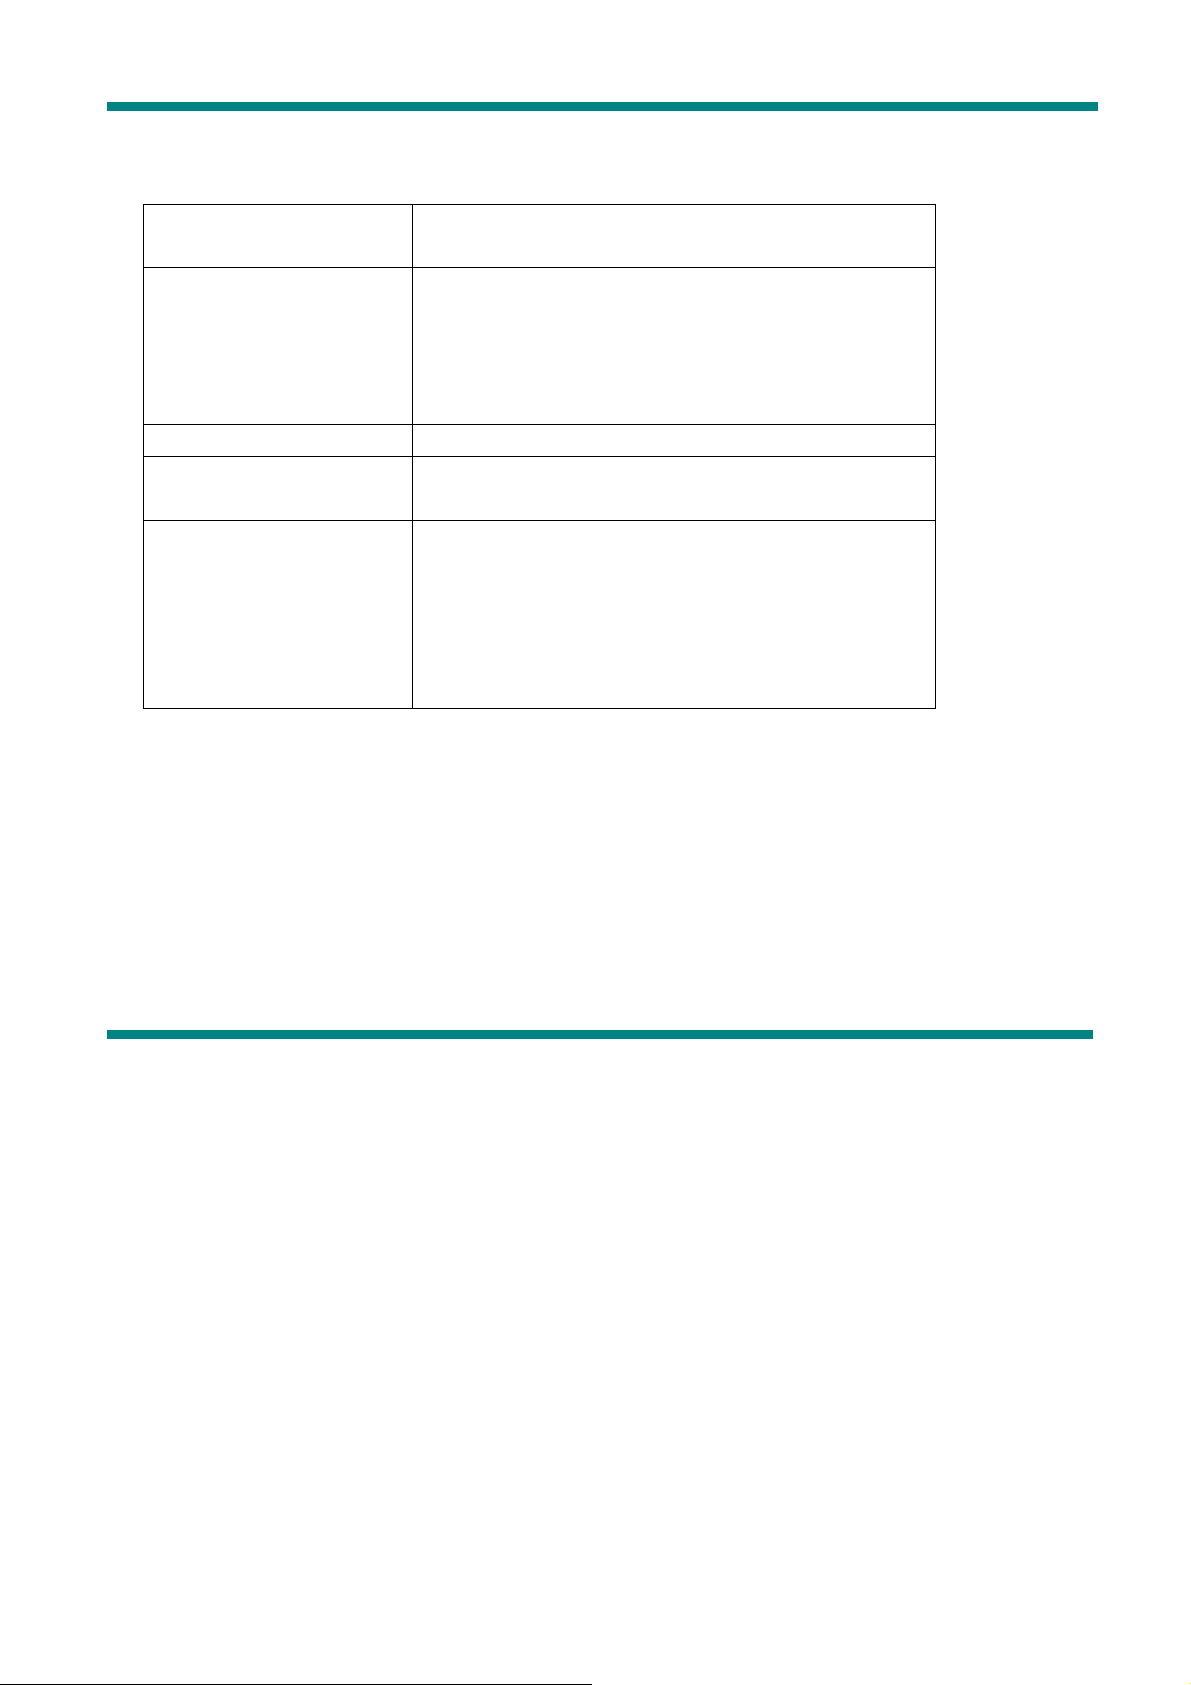
TROUBLESHOOTING
No power Check battery
Check your power switch
No music is heard in
the earphones
1. Check the Volume level
2. Check the connection (earphone to the
earphone jack)
3. Check if the music file can be played by the
MP3 player.
Wrong language Set correct language
FM radio is not very
clear
Check if you have any interference with the
nearby electric power devices
Can‘t download music 1. Check if the USB cable properly connected
to your computer
2. Check if you have installed the driver
(under Windows 98)
3. Check if you have enough disk space to
download the music file
Page 29
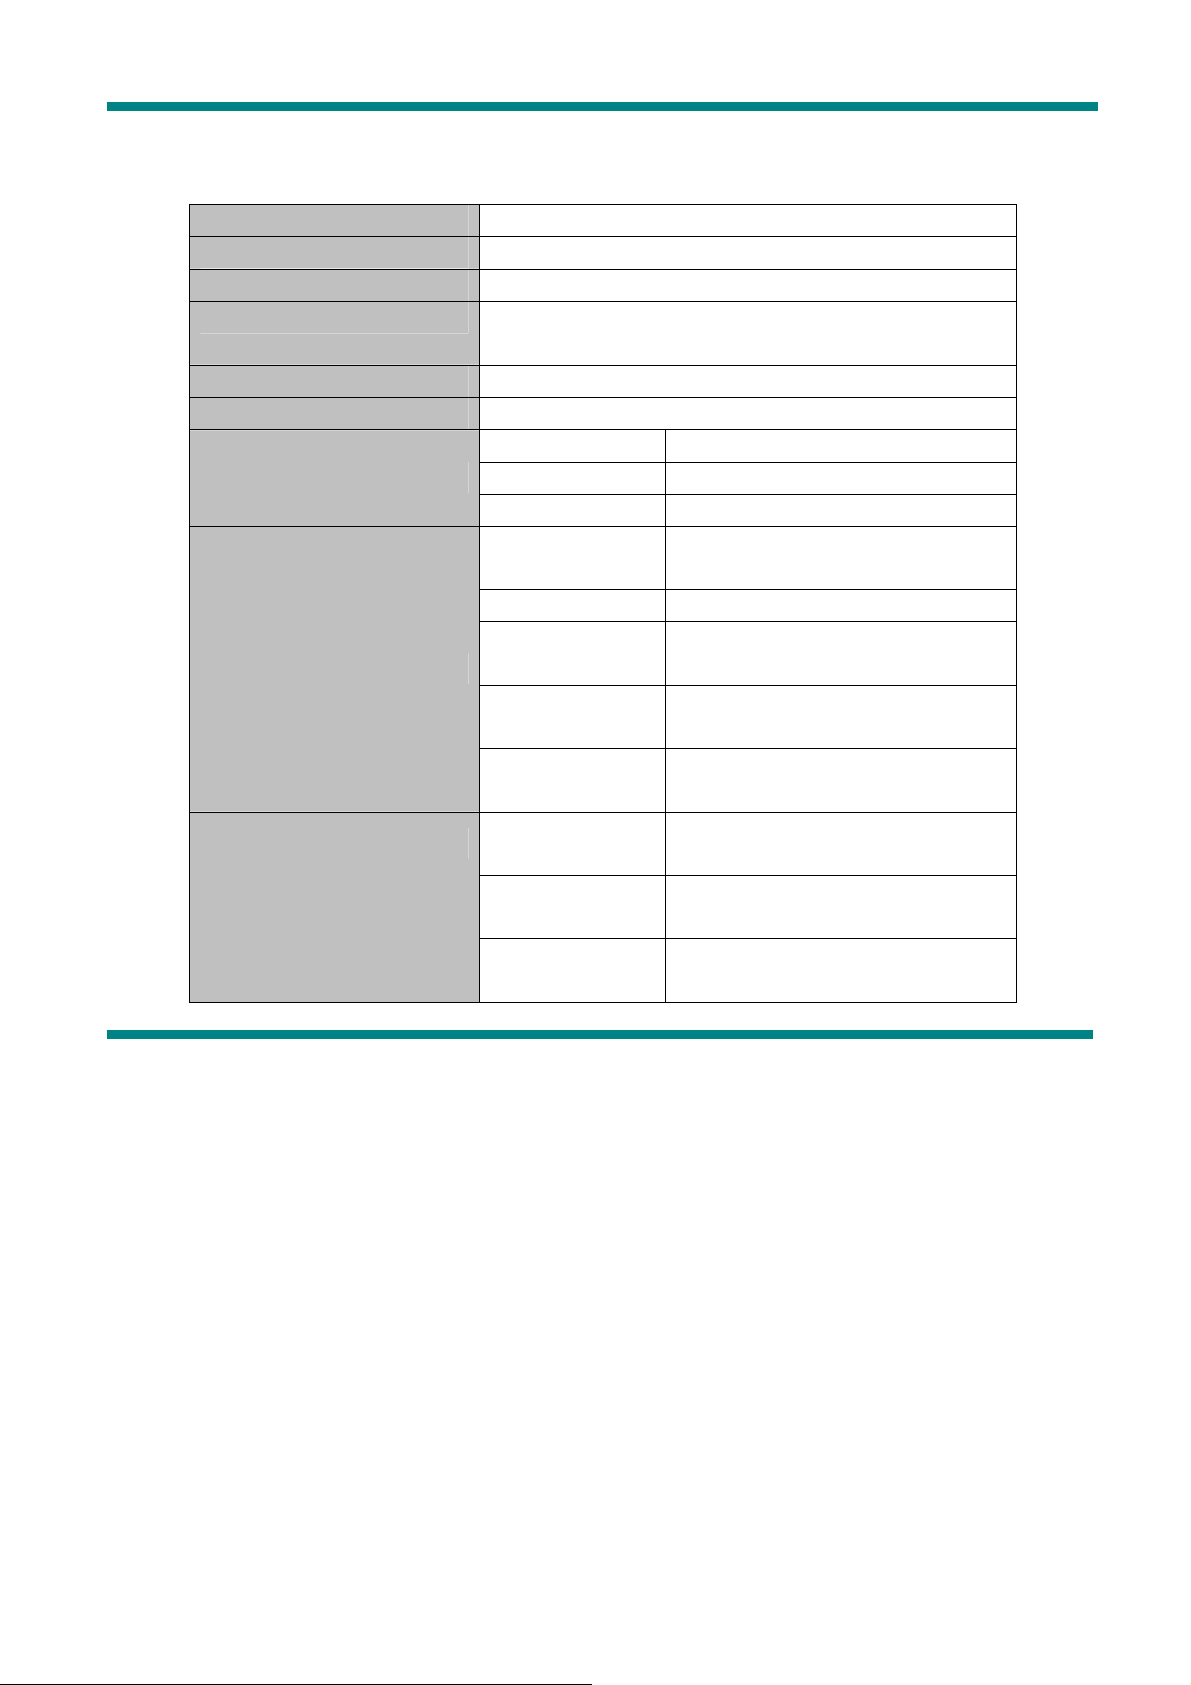
SPECIFICATIONS
Outside Dimensions 31mm×70mm×17mm
Weight 25g (not including battery)
Display area Lattice (128×32) EL Backlight
Computer interface Full Speed USB 2.0 (Read 1000KB, Write
800KB)
Memory Flash memory: Nand Flash.
Battery lifetime Playback up to 10~14 hours.
Rate 8KHz
Recording
Record format WAV(32K bps),ACT(8K bps)
Record time 35 Hours(ACT for 128M Flash)
Earphone max
(L)10mW + (R)10mW(32Ohm)
power
MP3 bit rate 8Kbps – 320Kbps
MP3,WMA,WMV,ASF
FM Radio
WMA, WMV,
ASF bit rate
Frequency
response
Signal to Noise
ratio
FM frequency
range.
Total number of
radio stations
Earphone Max
Power
5Kbps – 384Kbps
20Hz - 20KHz
85dB
76MHz–96MHz/87MHz–108M
Hz
20+20
(L)10mW+(R)10mW(32Ohm)
Page 30

Signal to noise
ratio
Music formats supported MP1, MP2, MP3, WMA, WMV, ASF, WAV
Temperature range -5 ~ +40 Degree
Language support English, German, Chinese, …
Operating system Windows98SE/ME/2000/XP,Mac OS 10, Linux
2.4.2
Web : www.avbusa.com
Support : [email protected]
45dB
 Loading...