

Page 1

Using Avaya IX™ Workplace Client for IP
Office
Release 11.0
Issue 6.1.1
July 2020
Page 2

©
2020, Avaya Inc.
All Rights Reserved.
Notice
While reasonable efforts have been made to ensure that the
information in this document is complete and accurate at the time of
printing, Avaya assumes no liability for any errors. Avaya reserves
the right to make changes and corrections to the information in this
document without the obligation to notify any person or organization
of such changes.
Documentation disclaimer
“Documentation” means information published in varying mediums
which may include product information, operating instructions and
performance specifications that are generally made available to users
of products. Documentation does not include marketing materials.
Avaya shall not be responsible for any modifications, additions, or
deletions to the original published version of Documentation unless
such modifications, additions, or deletions were performed by or on
the express behalf of Avaya. End User agrees to indemnify and hold
harmless Avaya, Avaya's agents, servants and employees against all
claims, lawsuits, demands and judgments arising out of, or in
connection with, subsequent modifications, additions or deletions to
this documentation, to the extent made by End User.
Link disclaimer
Avaya is not responsible for the contents or reliability of any linked
websites referenced within this site or Documentation provided by
Avaya. Avaya is not responsible for the accuracy of any information,
statement or content provided on these sites and does not
necessarily endorse the products, services, or information described
or offered within them. Avaya does not guarantee that these links will
work all the time and has no control over the availability of the linked
pages.
Warranty
Avaya provides a limited warranty on Avaya hardware and software.
Refer to your sales agreement to establish the terms of the limited
warranty. In addition, Avaya’s standard warranty language, as well as
information regarding support for this product while under warranty is
available to Avaya customers and other parties through the Avaya
Support website:
https://support.avaya.com/helpcenter/
getGenericDetails?detailId=C20091120112456651010 under the link
“Warranty & Product Lifecycle” or such successor site as designated
by Avaya. Please note that if You acquired the product(s) from an
authorized Avaya Channel Partner outside of the United States and
Canada, the warranty is provided to You by said Avaya Channel
Partner and not by Avaya.
“Hosted Service” means an Avaya hosted service subscription that
You acquire from either Avaya or an authorized Avaya Channel
Partner (as applicable) and which is described further in Hosted SAS
or other service description documentation regarding the applicable
hosted service. If You purchase a Hosted Service subscription, the
foregoing limited warranty may not apply but You may be entitled to
support services in connection with the Hosted Service as described
further in your service description documents for the applicable
Hosted Service. Contact Avaya or Avaya Channel Partner (as
applicable) for more information.
Hosted Service
THE FOLLOWING APPLIES ONLY IF YOU PURCHASE AN AVAYA
HOSTED SERVICE SUBSCRIPTION FROM AVAYA OR AN AVAYA
CHANNEL PARTNER (AS APPLICABLE), THE TERMS OF USE
FOR HOSTED SERVICES ARE AVAILABLE ON THE AVAYA
WEBSITE,
HTTPS://SUPPORT.AVAYA.COM/LICENSEINFO UNDER
THE LINK “Avaya Terms of Use for Hosted Services” OR SUCH
SUCCESSOR SITE AS DESIGNATED BY AVAYA, AND ARE
APPLICABLE TO ANYONE WHO ACCESSES OR USES THE
HOSTED SERVICE. BY ACCESSING OR USING THE HOSTED
SERVICE, OR AUTHORIZING OTHERS TO DO SO, YOU, ON
BEHALF OF YOURSELF AND THE ENTITY FOR WHOM YOU ARE
DOING SO (HEREINAFTER REFERRED TO INTERCHANGEABLY
AS “YOU” AND “END USER”), AGREE TO THE TERMS OF USE. IF
YOU ARE ACCEPTING THE TERMS OF USE ON BEHALF A
COMPANY OR OTHER LEGAL ENTITY, YOU REPRESENT THAT
YOU HAVE THE AUTHORITY TO BIND SUCH ENTITY TO THESE
TERMS OF USE. IF YOU DO NOT HAVE SUCH AUTHORITY, OR IF
YOU DO NOT WISH TO ACCEPT THESE TERMS OF USE, YOU
MUST NOT ACCESS OR USE THE HOSTED SERVICE OR
AUTHORIZE ANYONE TO ACCESS OR USE THE HOSTED
SERVICE.
Licenses
THE SOFTWARE LICENSE TERMS AVAILABLE ON THE AVAYA
WEBSITE,
HTTPS://SUPPORT.AVAYA.COM/LICENSEINFO,
UNDER THE LINK “AVAYA SOFTWARE LICENSE TERMS (Avaya
Products)” OR SUCH SUCCESSOR SITE AS DESIGNATED BY
AVAYA, ARE APPLICABLE TO ANYONE WHO DOWNLOADS,
USES AND/OR INSTALLS AVAYA SOFTWARE, PURCHASED
FROM AVAYA INC., ANY AVAYA AFFILIATE, OR AN AVAYA
CHANNEL PARTNER (AS APPLICABLE) UNDER A COMMERCIAL
AGREEMENT WITH AVAYA OR AN AVAYA CHANNEL PARTNER.
UNLESS OTHERWISE AGREED TO BY AVAYA IN WRITING,
AVAYA DOES NOT EXTEND THIS LICENSE IF THE SOFTWARE
WAS OBTAINED FROM ANYONE OTHER THAN AVAYA, AN AVAYA
AFFILIATE OR AN AVAYA CHANNEL PARTNER; AVAYA
RESERVES THE RIGHT TO TAKE LEGAL ACTION AGAINST YOU
AND ANYONE ELSE USING OR SELLING THE SOFTWARE
WITHOUT A LICENSE. BY INSTALLING, DOWNLOADING OR
USING THE SOFTWARE, OR AUTHORIZING OTHERS TO DO SO,
YOU, ON BEHALF OF YOURSELF AND THE ENTITY FOR WHOM
YOU ARE INSTALLING, DOWNLOADING OR USING THE
SOFTWARE (HEREINAFTER REFERRED TO
INTERCHANGEABLY AS “YOU” AND “END USER”), AGREE TO
THESE TERMS AND CONDITIONS AND CREATE A BINDING
CONTRACT BETWEEN YOU AND AVAYA INC. OR THE
APPLICABLE AVAYA AFFILIATE (“AVAYA”).
Avaya grants You a license within the scope of the license types
described below, with the exception of Heritage Nortel Software, for
which the scope of the license is detailed below. Where the order
documentation does not expressly identify a license type, the
applicable license will be a Designated System License as set forth
below in the Designated System(s) License (DS) section as
applicable. The applicable number of licenses and units of capacity
for which the license is granted will be one (1), unless a different
number of licenses or units of capacity is specified in the
documentation or other materials available to You. “Software” means
computer programs in object code, provided by Avaya or an Avaya
Channel Partner, whether as stand-alone products, pre-installed on
hardware products, and any upgrades, updates, patches, bug fixes,
or modified versions thereto. “Designated Processor” means a single
stand-alone computing device. “Server” means a set of Designated
Processors that hosts (physically or virtually) a software application
to be accessed by multiple users. “Instance” means a single copy of
the Software executing at a particular time: (i) on one physical
machine; or (ii) on one deployed software virtual machine (“VM”) or
similar deployment.
License type(s)
Designated System(s) License (DS). End User may install and use
each copy or an Instance of the Software only: 1) on a number of
Designated Processors up to the number indicated in the order; or 2)
up to the number of Instances of the Software as indicated in the
order, Documentation, or as authorized by Avaya in writing. Avaya
may require the Designated Processor(s) to be identified in the order
by type, serial number, feature key, Instance, location or other
specific designation, or to be provided by End User to Avaya through
electronic means established by Avaya specifically for this purpose.
Concurrent User License (CU). End User may install and use the
Software on multiple Designated Processors or one or more Servers,
so long as only the licensed number of Units are accessing and using
the Software at any given time. A “Unit” means the unit on which
Avaya, at its sole discretion, bases the pricing of its licenses and can
be, without limitation, an agent, port or user, an e-mail or voice mail
account in the name of a person or corporate function (e.g.,
webmaster or helpdesk), or a directory entry in the administrative
database utilized by the Software that permits one user to interface
with the Software. Units may be linked to a specific, identified Server
or an Instance of the Software.
Cluster License (CL). End User may install and use each copy or an
Instance of the Software only up to the number of Clusters as
indicated on the order with a default of one (1) Cluster if not stated.
“Cluster” means a group of Servers and other resources that act as a
single system.
Page 3

Enterprise License (EN). End User may install and use each copy or
an Instance of the Software only for enterprise-wide use of an
unlimited number of Instances of the Software as indicated on the
order or as authorized by Avaya in writing.
Named User License (NU). You may: (i) install and use each copy or
Instance of the Software on a single Designated Processor or Server
per authorized Named User (defined below); or (ii) install and use
each copy or Instance of the Software on a Server so long as only
authorized Named Users access and use the Software. “Named
User”, means a user or device that has been expressly authorized by
Avaya to access and use the Software. At Avaya’s sole discretion, a
“Named User” may be, without limitation, designated by name,
corporate function (e.g., webmaster or helpdesk), an e-mail or voice
mail account in the name of a person or corporate function, or a
directory entry in the administrative database utilized by the Software
that permits one user to interface with the Software.
Shrinkwrap License (SR). You may install and use the Software in
accordance with the terms and conditions of the applicable license
agreements, such as “shrinkwrap” or “clickthrough” license
accompanying or applicable to the Software (“Shrinkwrap License”).
Transaction License (TR). End User may use the Software up to the
number of Transactions as specified during a specified time period. A
“Transaction” means the unit by which Avaya, at its sole discretion,
bases the pricing of its licensing and can be, without limitation,
measured by the usage, access, interaction (between client/server or
customer/organization), or operation of the Software within a
specified time period (e.g. per hour, per day, per month). Some
examples of Transactions include but are not limited to each greeting
played/message waiting enabled, each personalized promotion (in
any channel), each callback operation, each live agent or web chat
session, each call routed or redirected (in any channel). End User
may not exceed the number of Transactions without Avaya’s prior
consent and payment of an additional fee.
Heritage Nortel Software
“Heritage Nortel Software” means the software that was acquired by
Avaya as part of its purchase of the Nortel Enterprise Solutions
Business in December 2009. The Heritage Nortel Software is the
software contained within the list of Heritage Nortel Products located
https://support.avaya.com/LicenseInfo under the link “Heritage
at
Nortel Products” or such successor site as designated by Avaya. For
Heritage Nortel Software, Avaya grants Customer a license to use
Heritage Nortel Software provided hereunder solely to the extent of
the authorized activation or authorized usage level, solely for the
purpose specified in the Documentation, and solely as embedded in,
for execution on, or for communication with Avaya equipment.
Charges for Heritage Nortel Software may be based on extent of
activation or use authorized as specified in an order or invoice.
Copyright
Except where expressly stated otherwise, no use should be made of
materials on this site, the Documentation, Software, Hosted Service,
or hardware provided by Avaya. All content on this site, the
documentation, Hosted Service, and the product provided by Avaya
including the selection, arrangement and design of the content is
owned either by Avaya or its licensors and is protected by copyright
and other intellectual property laws including the sui generis rights
relating to the protection of databases. You may not modify, copy,
reproduce, republish, upload, post, transmit or distribute in any way
any content, in whole or in part, including any code and software
unless expressly authorized by Avaya. Unauthorized reproduction,
transmission, dissemination, storage, and or use without the express
written consent of Avaya can be a criminal, as well as a civil offense
under the applicable law.
Virtualization
The following applies if the product is deployed on a virtual machine.
Each product has its own ordering code and license types. Unless
otherwise stated, each Instance of a product must be separately
licensed and ordered. For example, if the end user customer or
Avaya Channel Partner would like to install two Instances of the
same type of products, then two products of that type must be
ordered.
Third Party Components
“Third Party Components” mean certain software programs or
portions thereof included in the Software or Hosted Service may
contain software (including open source software) distributed under
third party agreements (“Third Party Components”), which contain
terms regarding the rights to use certain portions of the Software
(“Third Party Terms”). As required, information regarding distributed
Linux OS source code (for those products that have distributed Linux
OS source code) and identifying the copyright holders of the Third
Party Components and the Third Party Terms that apply is available
in the products, Documentation or on Avaya’s website at:
support.avaya.com/Copyright or such successor site as designated
by Avaya. The open source software license terms provided as Third
Party Terms are consistent with the license rights granted in these
Software License Terms, and may contain additional rights benefiting
You, such as modification and distribution of the open source
software. The Third Party Terms shall take precedence over these
Software License Terms, solely with respect to the applicable Third
Party Components to the extent that these Software License Terms
impose greater restrictions on You than the applicable Third Party
Terms.
The following applies only if the H.264 (AVC) codec is distributed with
the product. THIS PRODUCT IS LICENSED UNDER THE AVC
PATENT PORTFOLIO LICENSE FOR THE PERSONAL USE OF A
CONSUMER OR OTHER USES IN WHICH IT DOES NOT RECEIVE
REMUNERATION TO (i) ENCODE VIDEO IN COMPLIANCE WITH
THE AVC STANDARD (“AVC VIDEO”) AND/OR (ii) DECODE AVC
VIDEO THAT WAS ENCODED BY A CONSUMER ENGAGED IN A
PERSONAL ACTIVITY AND/OR WAS OBTAINED FROM A VIDEO
PROVIDER LICENSED TO PROVIDE AVC VIDEO. NO LICENSE IS
GRANTED OR SHALL BE IMPLIED FOR ANY OTHER USE.
ADDITIONAL INFORMATION MAY BE OBTAINED FROM MPEG LA,
L.L.C. SEE
Service Provider
THE FOLLOWING APPLIES TO AVAYA CHANNEL PARTNER’S
HOSTING OF AVAYA PRODUCTS OR SERVICES. THE PRODUCT
OR HOSTED SERVICE MAY USE THIRD PARTY COMPONENTS
SUBJECT TO THIRD PARTY TERMS AND REQUIRE A SERVICE
PROVIDER TO BE INDEPENDENTLY LICENSED DIRECTLY FROM
THE THIRD PARTY SUPPLIER. AN AVAYA CHANNEL PARTNER’S
HOSTING OF AVAYA PRODUCTS MUST BE AUTHORIZED IN
WRITING BY AVAYA AND IF THOSE HOSTED PRODUCTS USE
OR EMBED CERTAIN THIRD PARTY SOFTWARE, INCLUDING
BUT NOT LIMITED TO MICROSOFT SOFTWARE OR CODECS,
THE AVAYA CHANNEL PARTNER IS REQUIRED TO
INDEPENDENTLY OBTAIN ANY APPLICABLE LICENSE
AGREEMENTS, AT THE AVAYA CHANNEL PARTNER’S EXPENSE,
DIRECTLY FROM THE APPLICABLE THIRD PARTY SUPPLIER.
WITH RESPECT TO CODECS, IF THE AVAYA CHANNEL
PARTNER IS HOSTING ANY PRODUCTS THAT USE OR EMBED
THE H.264 CODEC OR H.265 CODEC, THE AVAYA CHANNEL
PARTNER ACKNOWLEDGES AND AGREES THE AVAYA
CHANNEL PARTNER IS RESPONSIBLE FOR ANY AND ALL
RELATED FEES AND/OR ROYALTIES. THE H.264 (AVC) CODEC
IS LICENSED UNDER THE AVC PATENT PORTFOLIO LICENSE
FOR THE PERSONAL USE OF A CONSUMER OR OTHER USES
IN WHICH IT DOES NOT RECEIVE REMUNERATION TO: (I)
ENCODE VIDEO IN COMPLIANCE WITH THE AVC STANDARD
(“AVC VIDEO”) AND/OR (II) DECODE AVC VIDEO THAT WAS
ENCODED BY A CONSUMER ENGAGED IN A PERSONAL
ACTIVITY AND/OR WAS OBTAINED FROM A VIDEO PROVIDER
LICENSED TO PROVIDE AVC VIDEO. NO LICENSE IS GRANTED
OR SHALL BE IMPLIED FOR ANY OTHER USE. ADDITIONAL
INFORMATION FOR H.264 (AVC) AND H.265 (HEVC) CODECS
MAY BE OBTAINED FROM MPEG LA, L.L.C. SEE
WWW.MPEGLA.COM.
Compliance with Laws
You acknowledge and agree that it is Your responsibility for
complying with any applicable laws and regulations, including, but not
limited to laws and regulations related to call recording, data privacy,
intellectual property, trade secret, fraud, and music performance
rights, in the country or territory where the Avaya product is used.
Preventing Toll Fraud
“Toll Fraud” is the unauthorized use of your telecommunications
system by an unauthorized party (for example, a person who is not a
corporate employee, agent, subcontractor, or is not working on your
company's behalf). Be aware that there can be a risk of Toll Fraud
HTTP://WWW.MPEGLA.COM.
https://
HTTP://
Page 4

associated with your system and that, if Toll Fraud occurs, it can
result in substantial additional charges for your telecommunications
services.
Avaya Toll Fraud intervention
If You suspect that You are being victimized by Toll Fraud and You
need technical assistance or support, call Technical Service Center
Toll Fraud Intervention Hotline at +1-800-643-2353 for the United
States and Canada. For additional support telephone numbers, see
the Avaya Support website:
successor site as designated by Avaya.
Security Vulnerabilities
Information about Avaya’s security support policies can be found in
the Security Policies and Support section of
support.avaya.com/security.
Suspected Avaya product security vulnerabilities are handled per the
Avaya Product Security Support Flow (https://
support.avaya.com/css/P8/documents/100161515).
Downloading Documentation
For the most current versions of Documentation, see the Avaya
Support website: https://support.avaya.com, or such successor site
as designated by Avaya.
Contact Avaya Support
See the Avaya Support website: https://support.avaya.com for
product or Hosted Service notices and articles, or to report a problem
with your Avaya product or Hosted Service. For a list of support
telephone numbers and contact addresses, go to the Avaya Support
website:
designated by Avaya), scroll to the bottom of the page, and select
Contact Avaya Support.
Trademarks
The trademarks, logos and service marks (“Marks”) displayed in this
site, the Documentation, Hosted Service(s), and product(s) provided
by Avaya are the registered or unregistered Marks of Avaya, its
affiliates, its licensors, its suppliers, or other third parties. Users are
not permitted to use such Marks without prior written consent from
Avaya or such third party which may own the Mark. Nothing
contained in this site, the Documentation, Hosted Service(s) and
product(s) should be construed as granting, by implication, estoppel,
or otherwise, any license or right in and to the Marks without the
express written permission of Avaya or the applicable third party.
Avaya is a registered trademark of Avaya Inc.
All non-Avaya trademarks are the property of their respective owners.
Linux® is the registered trademark of Linus Torvalds in the U.S. and
other countries.
https://support.avaya.com (or such successor site as
https://support.avaya.com or such
https://
Page 5

Contents
Chapter 1: Introduction............................................................................................................ 9
Purpose.................................................................................................................................. 9
Change history........................................................................................................................ 9
Chapter 2: Avaya IX™ Workplace Client for IP Office overview.......................................... 11
Simultaneous mode overview................................................................................................. 12
Simultaneous mode limitations......................................................................................... 14
Chapter 3: Avaya IX™ Workplace Client navigation............................................................. 15
Viewing the Avaya IX™ Workplace Client tutorial...................................................................... 18
Icons.................................................................................................................................... 18
Shortcut keys for Avaya IX™ Workplace Client for Mac and Windows......................................... 20
Chapter 4: Setting up Avaya Equinox®................................................................................. 22
System requirements and interoperability................................................................................ 22
Mobile clients........................................................................................................................ 22
Security certificates on mobile devices.............................................................................. 22
Installing Avaya IX™ Workplace Client on mobile devices.................................................... 23
Android permissions........................................................................................................ 23
Desktop clients...................................................................................................................... 24
Security certificates on desktops....................................................................................... 24
Installing Avaya IX™ Workplace Client on desktops............................................................ 24
Opening the Avaya IX™ Workplace Client application for the first time........................................ 25
Automatic configuration overview............................................................................................ 25
Configuring Avaya IX™ Workplace Client settings automatically................................................. 26
Using the Avaya IX™ Workplace Client menu........................................................................... 27
Manual configuration of Avaya IX™ Workplace Client settings................................................... 28
Avaya IX™ Workplace Client Top of Mind screen................................................................ 28
Configuring the layout of the Top of Mind screen................................................................ 29
Using the Top of Mind screen........................................................................................... 29
Configuring the display preferences.................................................................................. 30
Configuring the contact search settings on Avaya IX™ Workplace Client for Android............. 31
Configuring the contact search settings on desktop clients.................................................. 32
Modifying contact settings................................................................................................ 32
Modifying audio and video settings on mobile clients.......................................................... 33
Modifying audio and video settings on desktop clients........................................................ 36
Configuring the video resolution........................................................................................ 36
Installing a client identity certificate from the system certificate store................................... 37
Installing a client identity certificate from a file.................................................................... 38
Removing a client identity certificate................................................................................. 38
Services settings............................................................................................................. 39
Configuring the dialing rules manually............................................................................... 42
July 2020 Using Avaya IX™ Workplace Client for IP Office 5
Comments on this document? infodev@avaya.com
Page 6

Contents
Pausing iTunes during calls.............................................................................................. 43
Viewing release and version information............................................................................ 43
Viewing the certificates that Avaya IX™ Workplace Client uses............................................ 43
Viewing licensing information........................................................................................... 43
Logging in and out of the Avaya IX™ Workplace Client phone service.................................. 44
Maximizing the battery life of the device............................................................................ 44
Configuring the setting to automatically start and log in to Avaya IX™ Workplace Client......... 45
Configuring the Avaya IX™ Workplace Client add-in for Microsoft Outlook setting.................. 45
Configuring the browser add-in setting.............................................................................. 46
Enabling the Avaya IX™ Workplace Client Google Chrome browser extension...................... 46
Uninstalling the Avaya IX™ Workplace Client Google Chrome browser extension.................. 47
iOS notifications.................................................................................................................... 48
Chapter 5: Managing calls..................................................................................................... 49
Making and handling calls...................................................................................................... 49
Call management overview.............................................................................................. 49
Shared control mode overview......................................................................................... 53
Making an audio or video call........................................................................................... 55
Answering or ignoring a call............................................................................................. 55
Managing calls................................................................................................................ 56
Viewing call details.......................................................................................................... 60
Listening to voice mails.................................................................................................... 61
Ending a call................................................................................................................... 62
Emergency calls.............................................................................................................. 62
Hunt Groups overview..................................................................................................... 62
Viewing the hunt groups list.............................................................................................. 62
Enabling a hunt group manually........................................................................................ 63
Disabling a hunt group manually....................................................................................... 63
Enabling mobile twinning for incoming call......................................................................... 64
Configuring call forwarding to destination for desktop clients............................................... 65
Configuring call forwarding to destination for mobile clients................................................. 66
Chapter 6: Conferencing using Avaya Equinox® Conferencing........................................ 67
Avaya Equinox® Conferencing overview.................................................................................. 67
Download and installation of Avaya Equinox® Conferencing client....................................... 67
User types...................................................................................................................... 68
Moderator role................................................................................................................ 68
Starting a meeting........................................................................................................... 69
Starting a conference by adding contacts to an existing call................................................ 69
Joining a meeting............................................................................................................ 71
Adding a participant to a meeting...................................................................................... 74
Requesting access to join a meeting................................................................................. 75
Accessing your meeting portal.......................................................................................... 75
Inviting participants to a meeting....................................................................................... 75
Scheduling a meeting...................................................................................................... 76
July 2020 Using Avaya IX™ Workplace Client for IP Office 6
Comments on this document? infodev@avaya.com
Page 7

Contents
Schedule a Meeting field descriptions............................................................................... 76
Customizing your virtual room.......................................................................................... 78
Virtual Room field descriptions......................................................................................... 78
Accessing the recordings and events................................................................................ 79
User Settings field descriptions......................................................................................... 80
General Settings field descriptions.................................................................................... 80
Changing the meeting portal password............................................................................. 81
Configuring the local settings............................................................................................ 81
Handling conference calls................................................................................................ 82
Requesting to become a moderator.................................................................................. 83
Managing the conference as a moderator.......................................................................... 83
Managing conference participants.................................................................................... 88
Ending a conference........................................................................................................ 92
Chapter 7: Managing contacts............................................................................................... 93
Viewing the self-contact information........................................................................................ 93
Searching for a contact.......................................................................................................... 94
Creating a new contact.......................................................................................................... 94
Deleting a contact.................................................................................................................. 95
Contact avatars..................................................................................................................... 96
Chapter 8: Using Avaya Spaces............................................................................................ 97
Avaya Spaces overview......................................................................................................... 97
Signing up for Avaya Spaces from Avaya IX™ Workplace Client................................................ 97
Logging in to Avaya Spaces................................................................................................... 98
Opening Avaya Spaces from within Avaya IX™ Workplace Client............................................... 98
Chapter 9: Using presence and instant messaging.......................................................... 100
Presence and instant messaging.......................................................................................... 100
Changing your presence status manually........................................................................ 101
Management of incoming calls and instant messages during DND.................................... 101
Changing your presence note......................................................................................... 102
Instant messaging using Avaya Spaces Direct Messaging................................................ 102
Working with instant messages....................................................................................... 102
Working with attachments.............................................................................................. 104
Searching for an instant message................................................................................... 105
Chapter 10: Configuring Avaya Equinox® add-in for Microsoft Outlook........................ 107
Avaya IX™ Workplace Client add-in for Outlook...................................................................... 107
Microsoft Outlook requirements............................................................................................ 108
Avaya IX™ Workplace Client add-in for Microsoft Outlook installation....................................... 108
Joining a meeting................................................................................................................ 108
Joining a meeting by using the Avaya IX™ Workplace Client Add-in for Outlook.................. 108
Joining a meeting by using Microsoft OWA...................................................................... 109
Making an Avaya IX™ Workplace Client call from within Microsoft Outlook............................... 109
Making an Avaya IX™ Workplace Client call from a browser.................................................... 110
Chapter 11: Uninstalling and upgrading Avaya Equinox................................................... 111
July 2020 Using Avaya IX™ Workplace Client for IP Office 7
Comments on this document? infodev@avaya.com
Page 8

Contents
Mobile clients...................................................................................................................... 111
Removing data from mobile clients.................................................................................. 111
Uninstalling Avaya IX™ Workplace Client from mobile devices........................................... 111
Desktop clients.................................................................................................................... 112
Removing data from desktop clients................................................................................ 112
Uninstalling Avaya IX™ Workplace Client on desktops....................................................... 112
Chapter 12: Resources......................................................................................................... 113
Documentation resources..................................................................................................... 113
Finding documents on the Avaya Support website............................................................ 113
Viewing Avaya Mentor videos............................................................................................... 114
Support............................................................................................................................... 114
Using the Avaya InSite Knowledge Base......................................................................... 115
Additional IP Office resources......................................................................................... 115
July 2020 Using Avaya IX™ Workplace Client for IP Office 8
Comments on this document? infodev@avaya.com
Page 9

Chapter 1: Introduction
Purpose
This document describes how to set up and use Avaya IX™ Workplace Client for Android, iOS,
Mac, and Windows.
End users can do all the tasks without assistance.
This document only includes IP Office content for Avaya IX™ Workplace Client. Avaya Aura
content for Avaya IX™ Workplace Client is covered in Avaya Aura® documentation.
Change history
The following table describes the major changes made in this document for each release:
®
Issue Date Summary of changes
1, Release
11.0.5.1
October,
2019
Rebranded Avaya Equinox® for IP Office to Avaya IX™ Workplace Client.
These changes take effect with Avaya IX™ Workplace Client Release 3.7.
Added new content:
• Hunt Group overview
• Viewing the hunt group list
• Enabling a hunt group manually
• Disabling a hunt group manually
• Enabling mobile twinning for incoming call
• Configuring call forwarding to another extension for desktop clients
• Configuring call forwarding to another extension for mobile clients
Table continues…
July 2020 Using Avaya IX™ Workplace Client for IP Office 9
Comments on this document? infodev@avaya.com
Page 10

Introduction
Issue Date Summary of changes
1, Release
11.0.5
August,
2019
Added content on:
• Avaya Cloud Authorization feature
• Apple Push Notification service (APNs)
• USB call control with Avaya IX™ Workplace Client for Mac and Windows
while using Avaya L100 Series Headsets
1, Release
11.0 FP4
February
2019
• Added information on:
- Shared Control feature
- Avaya IX™ Workplace Client support on Avaya Vantage
- Support for Presence and Directory integration on Avaya Vantage
- Support for Avaya Cloud Services
- User Interface changes
2, Release
June 2018 First version of the document.
11.0
™
™
July 2020 Using Avaya IX™ Workplace Client for IP Office 10
Comments on this document? infodev@avaya.com
Page 11

Chapter 2: Avaya IX™ Workplace Client for
IP Office overview
The Avaya IX™ Workplace Client for IP Office is a soft phone application that provides access to
Unified Communications (UC) and Over the Top (OTT) services, such as Avaya Equinox® Meetings
Online. You can access the Avaya IX™ Workplace Client on the following platforms:
• Mobile platforms:
- Android: From a mobile phone, tablet, or an Avaya Vantage™ device
- iOS: From an iPad, iPhone, or iPod Touch
Note:
In Avaya Vantage™ Release 2.0.1, the K165 and K175 devices support the Avaya IX
Workplace Client. The K155 device does not support the Avaya IX™ Workplace Client.
• Desktop platforms:
™
- Mac
- Windows
With the Avaya IX™ Workplace Client, you can use the following functionality:
• Make point-to-point audio and video calls.
• Listen to your voice mail messages.
• Join and host conference calls with Avaya Equinox® Meetings Online.
• Use point-to-point and conference call control functionality. You can also add participants to a
conference.
• Answer calls and send all calls to voice mail.
• View your call history that is stored locally on the device.
• Access your IP Office contacts by using IP Office directory.
• Access your local contacts.
• Send instant messages using Avaya Spaces direct messaging.
• Capture photo, audio, and video files, and send generic file attachments in an instant message
conversation.
• Manage your presence status and presence status messages.
July 2020 Using Avaya IX™ Workplace Client for IP Office 11
Comments on this document? infodev@avaya.com
Page 12

Avaya IX™ Workplace Client for IP Office overview
• Log in to your extension and answer, and transfer calls across multiple devices if Simultaneous
mode is configured.
Simultaneous mode can be used with supported SIP deskphones and an H.323 deskphone.
Avaya IX™ Workplace Client on Avaya Vantage™ supports the following features:
• Making outgoing calls.
• Handling incoming calls.
• Putting call on hold and resuming the call.
• Muting and unmuting a call.
• Transferring a call.
• Escalating an audio call to video call and de-escalating video call to audio call.
• Entering DTMF digits using the keypad.
• Access your local contacts
• Access your IP Office contacts by using IP Office directory.
• Manage your presence status and presence status messages.
Note:
Some Avaya IX™ Workplace Client features must be configured for your enterprise before you
can use them.
Avaya Vantage™ deskphone supports the following:
• Handset
- Wired
- Bluetooth
• Headset
- 3.5 mm Audio Jack
- Bluetooth
- RJ9
• LED indication for incoming calls and message waiting
Simultaneous mode overview
Avaya IX™ Workplace Client for IP Office supports Simultaneous mode, where Equinox for IP
Office can connect as simultaneous client. You can use your extension with one of the supported
devices in parallel with the deskphone.
In Standalone mode, you can use only one of the supported devices at a time. You are logged out
of deskphone or any other client if you log in to another Avaya IX™ Workplace Client device with
July 2020 Using Avaya IX™ Workplace Client for IP Office 12
Comments on this document? infodev@avaya.com
Page 13

Simultaneous mode overview
the same extension. Standalone mode is enabled when the user profile is set to Basic user or
Mobile Worker with the “Enable Desktop/Tablet VoIP client” option selected, and Avaya softphone
license is available. Note that Standalone mode does not support the “Enable Mobile VoIP client”
option in the user profile.
In Simultaneous mode, you can use more than one devices at a time, along with the deskphone.
You are not logged out of deskphone or any other device if you log in to another Avaya IX
™
Workplace Client with the same extension. Simultaneous mode is enabled when the user profile is
set to Office, Telecommute, or Power user with the appropriate “Enable Desktop/Tablet VoIP
client” or “Enable Mobile VoIP client” option selected.
With Simultaneous mode, you can:
• Hear simultaneous ringing on all the logged-in devices when a call is made to your extension.
For example, the deskphone and other simultaneous clients.
• Answer a call from any of the logged-in devices.
• Transfer call to any of your devices.
Device support for Simultaneous mode
In parallel with your deskphone, you can use your extension with one of the following supported
devices:
Note:
When you are logged in to a device from any of the following categories and then you log in to
another device within the same category, then the existing device displays a message
indicating that you will be logged out from it. At a time, you can remain logged in to only one
device of a category.
• Any one of following desktop or tablet VoIP clients:
- Avaya IX™ Workplace Client for Windows
- Avaya IX™ Workplace Client for Mac
- Avaya IX™ Workplace Client for iPad
- Avaya Communicator for Windows
- Avaya Communicator for iPad
• Any one of following mobile VoIP clients:
- Avaya IX™ Workplace Client for Android
- Avaya IX™ Workplace Client for iPhone
- Avaya one-X® Mobile for iOS
- Avaya one-X® Mobile for Android
• Any one of the following WebRTC-based clients:
- Avaya Communicator for Web
- Avaya IP Office Web Client
- IP Office Web Collaboration for Windows
July 2020 Using Avaya IX™ Workplace Client for IP Office 13
Comments on this document? infodev@avaya.com
Page 14

Avaya IX™ Workplace Client for IP Office overview
- IP Office Contact Center Web User Interface
Simultaneous mode limitations
Support on other devices
• Some devices do not support Simultaneous mode. You might be able to log in to these
devices using the same extension that you used to log in to your Avaya IX™ Workplace
Client. However, other Simultaneous mode functionality, such as the ability to answer a new
call or join an existing call, might not work properly.
• If you simultaneously subscribe Simultaneous mode devices for Presence Services and
publish to the presence state, Presence Services aggregates the presence state across
multiple devices.
• Presence states are supported only between Avaya IX™ Workplace Client only, and not
between an Avaya IX™ Workplace Client and another client type.
Video escalation
• When more than one device is on a call, you cannot escalate the call to video. If additional
devices drop from the call and only one device remains on the call, you can escalate that call
to a video call.
• When a second device joins a video call, the video screen becomes blank.
July 2020 Using Avaya IX™ Workplace Client for IP Office 14
Comments on this document? infodev@avaya.com
Page 15
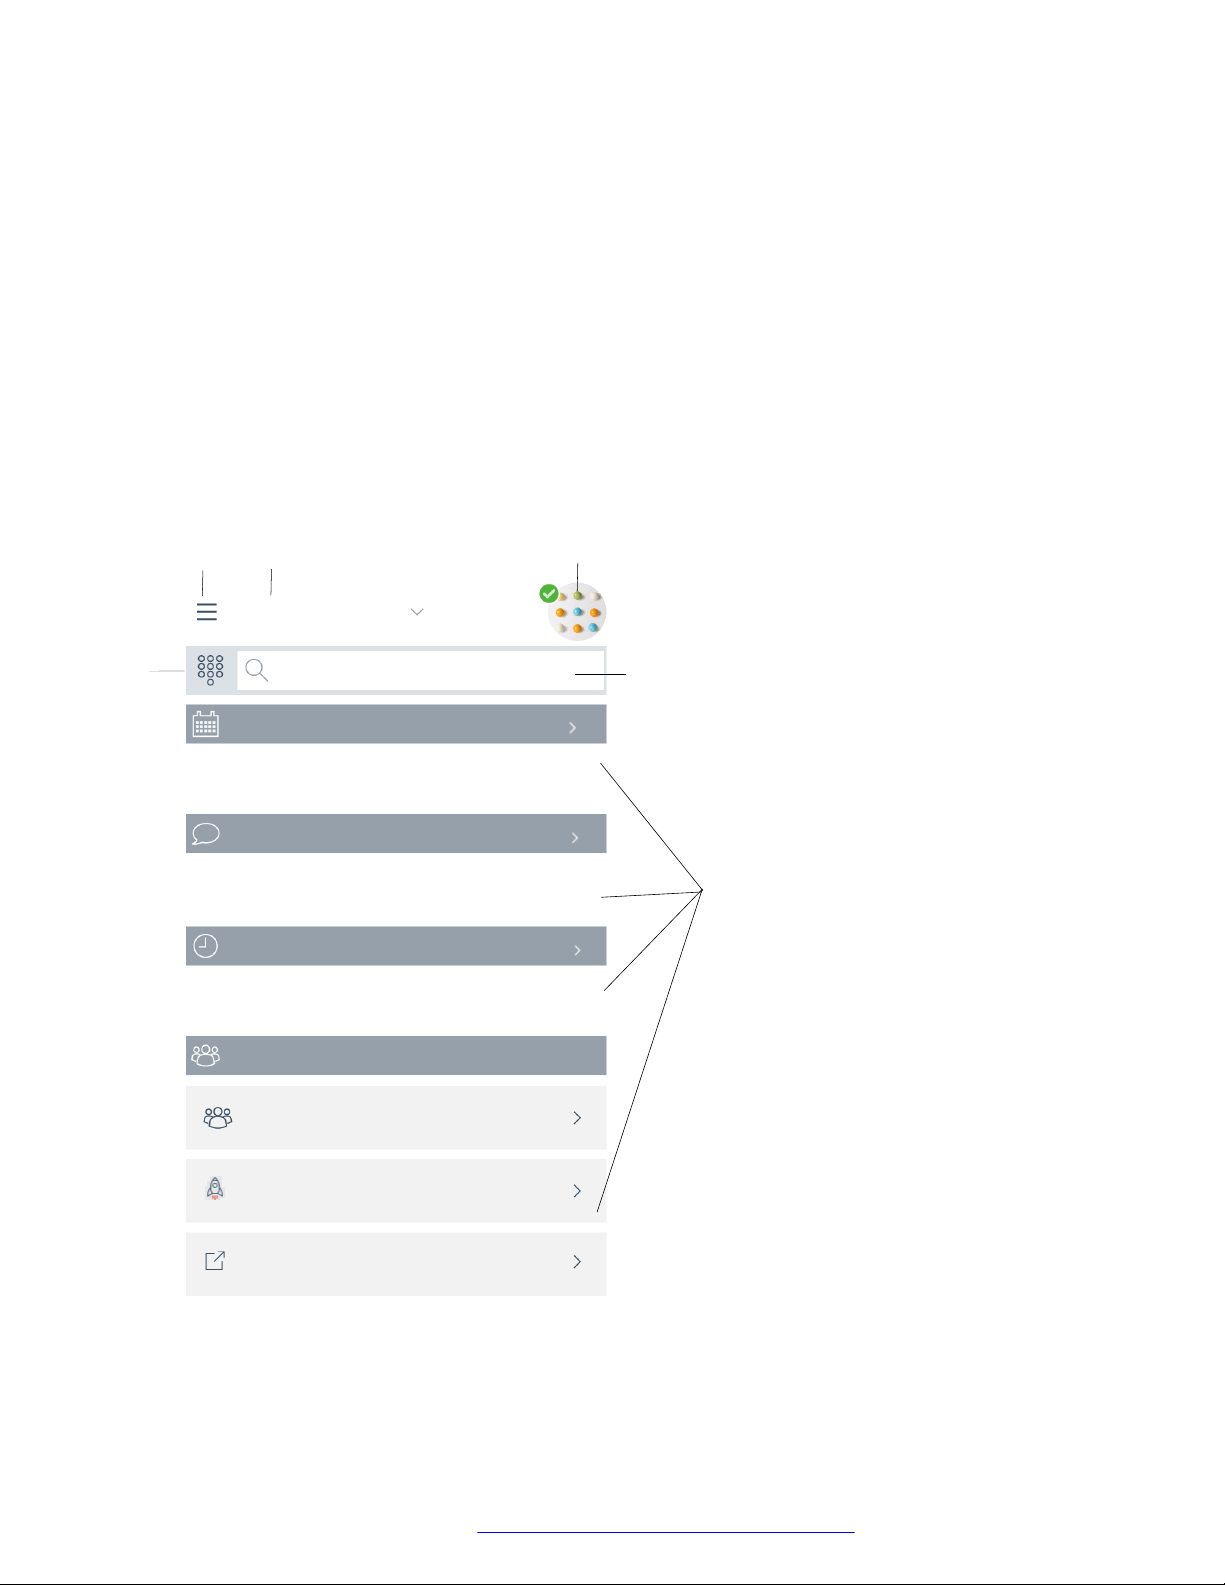
Chapter 3: Avaya IX™ Workplace Client
Top of Mind
Find someone
Next Meetings
More
No more meetings today!
Now you can get some work done :)
Messages
History
Sign in to view conversations
Your recent calls will appear here
Workplace Meetings
Workplace Meetings
1
2
3
4
5
6
Go to My Meeting Portal
Spaces Sign in / Sign up
navigation
The following images display the Top of Mind screen of the Avaya IX™ Workplace Client on mobile
and desktop devices. You can access the various settings of Avaya IX™ Workplace Client through
the Top of Mind screen as mentioned in the table following the images.
Mobile client
July 2020 Using Avaya IX™ Workplace Client for IP Office 15
Comments on this document? infodev@avaya.com
Page 16
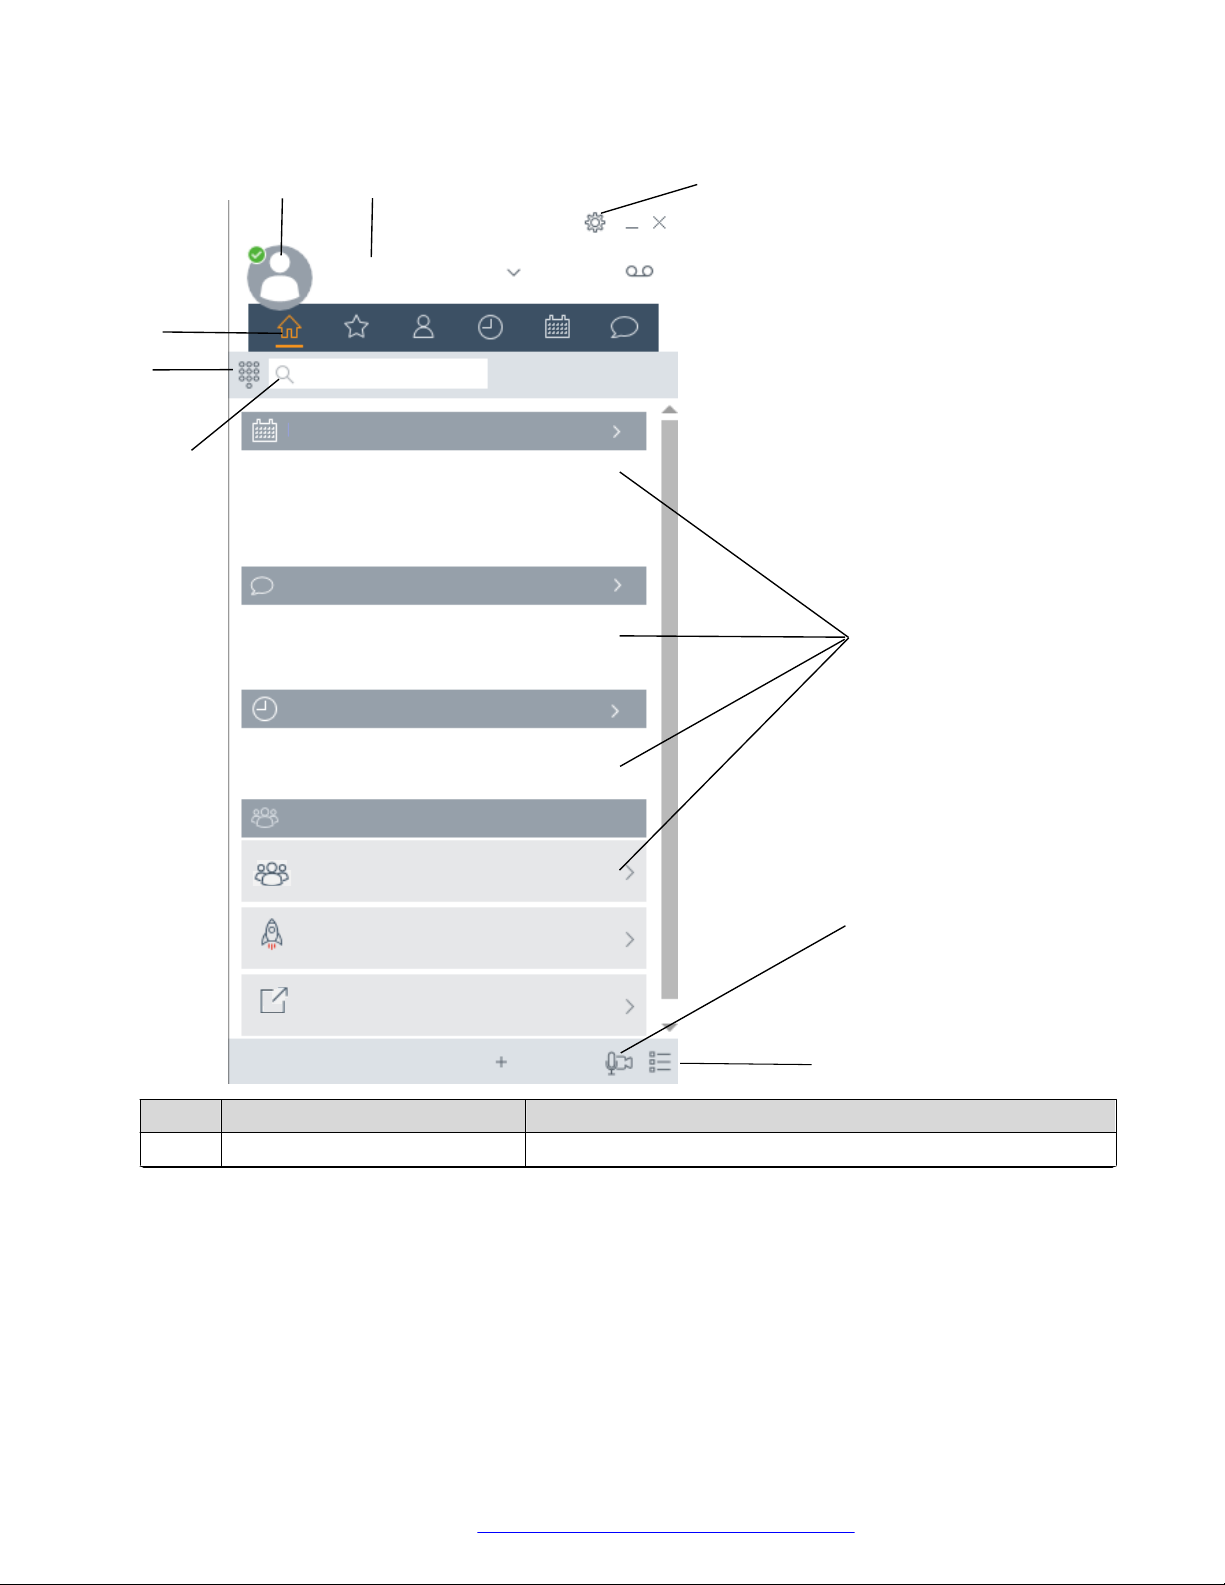
Avaya IX Workplace
Top of Mind
name or number
Next Meetings
No more meetings today!
Now you can get some work done :)
Messages
History
Your recent messages will appear here
Your recent calls will appear here
Workplace Meetings
Workplace Meetings
New Conversation
1
2
4
3
2
5
6
Spaces Sign in / Sign up
Go to My Meeting Portal
7
8
Avaya IX™ Workplace Client navigation
Desktop client
No. Name Description
1 Dialpad Access the dialpad to make an audio or video call.
Table continues…
July 2020 Using Avaya IX™ Workplace Client for IP Office 16
Comments on this document? infodev@avaya.com
Page 17
No. Name Description
2 Menu Access the following screens from the Avaya IX™ Workplace
Client menu:
• Top of Mind
• Favorites
• Contacts
• History
• Messages
• Meetings
• Features: Only on mobile clients
You can also manually configure the settings, access your voice
mail messages, and exit from the Avaya IX™ Workplace Client
application.
3 Top of Mind Access the settings for configuring the layout of the Top of Mind
screen.
4 Presence status indicator Access the incoming and outgoing calls settings. You can also
configure your presence status and message, and sign out from
the Avaya IX™ Workplace Client application.
5 Search Search for a contact.
You can start an instant messaging conversation by typing the
messaging address.
6 Next Meetings, Messages,
History, and Equinox Meetings
• Join Avaya IX™ Workplace Client and Spaces meetings with
one touch and view your meeting calendar.
Note:
You cannot click to join an Avaya IX™ Workplace Client
meeting from your calendar. However, if you are using the
Avaya IX™ Workplace Client add-in for Microsoft Outlook,
you can click to join from the meeting invitation.
• Respond to the latest messages and view your active
conversations.
• Return important missed calls and view your call activity.
• Start a meeting, join an Avaya IX™ Workplace Client meeting,
log in to Spaces or open the Spaces dashboard, and go to
your meeting portal.
The Workplace Meetings area is applicable if you are using
only Avaya IX™ Workplace Client Conferencing.
Related links
Viewing the Avaya IX Workplace Client tutorial on page 18
Icons on page 18
July 2020 Using Avaya IX™ Workplace Client for IP Office 17
Comments on this document? infodev@avaya.com
Page 18
Avaya IX™ Workplace Client navigation
Shortcut keys for Avaya IX Workplace Client for Mac and Windows on page 20
Viewing the Avaya IX™ Workplace Client tutorial
Procedure
1. In the Avaya IX™ Workplace Client settings, select Support.
2. Do one of the following:
• On mobile clients: Select Tutorial.
• On Avaya IX™ Workplace Client for Windows: Select Open Tutorial.
• On Avaya IX™ Workplace Client for Mac: Select Show Tutorial.
3. Select one of the following:
• Skip or Skip Tutorial: To exit the tutorial.
• Next: To view the next screen.
• Back or Previous: To view the previous screen.
• Done: To finish viewing and exit the tutorial.
Related links
Avaya IX Workplace Client navigation on page 15
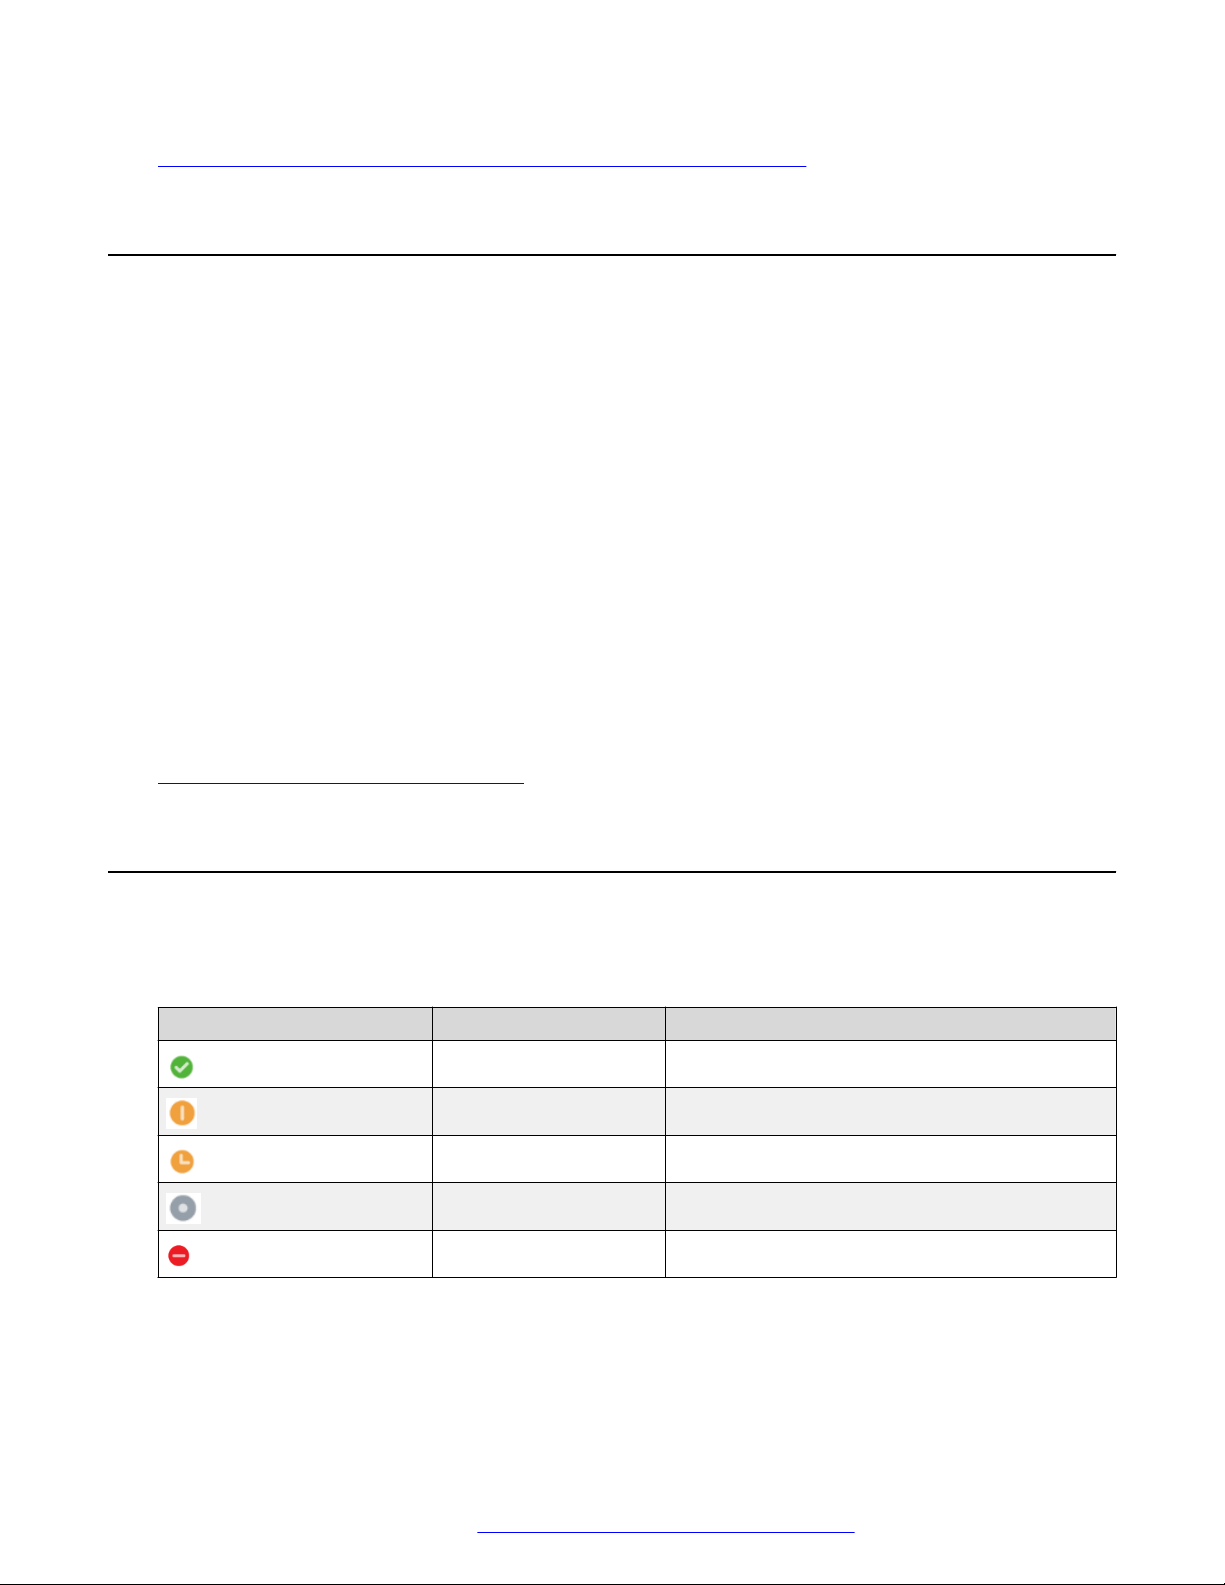
Icons
Avaya IX™ Workplace Client displays the following icons on the various screens:
Presence status
Button
Name Notes
Available
Busy
Away
Offline
Do not disturb
July 2020 Using Avaya IX™ Workplace Client for IP Office 18
Comments on this document? infodev@avaya.com
Page 19
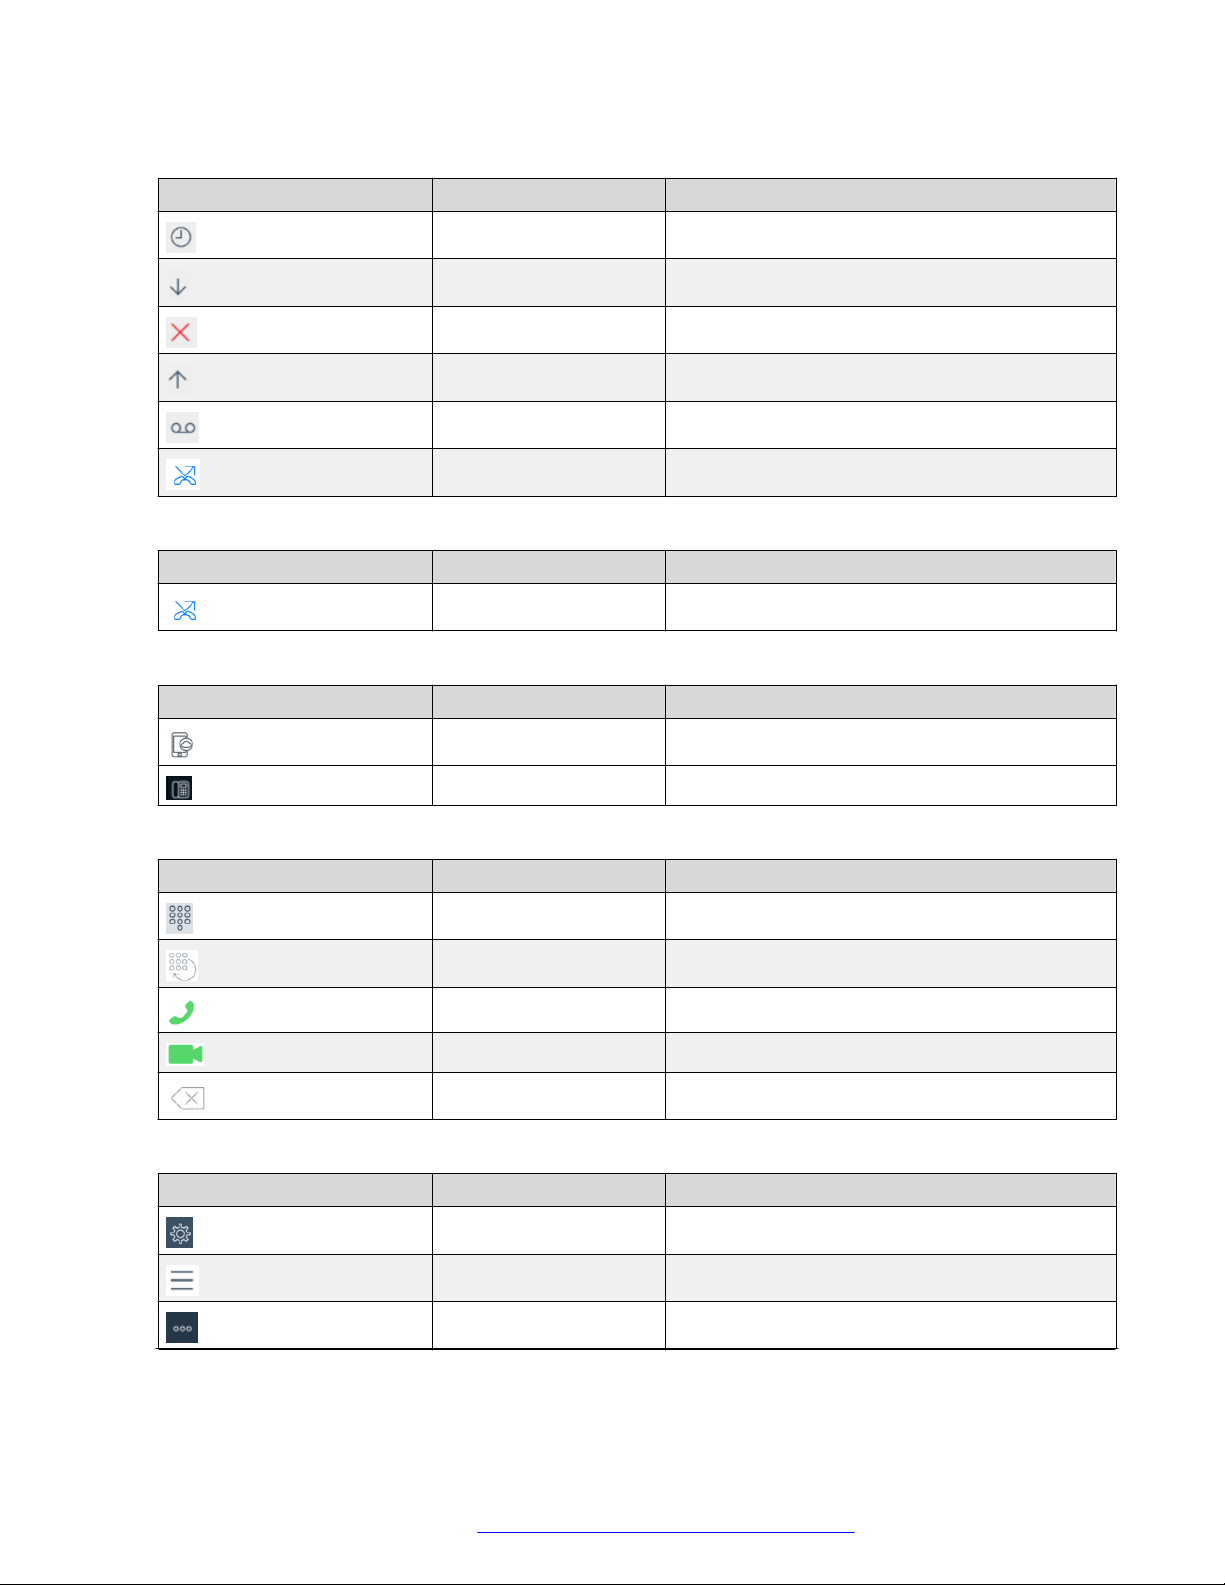
History screen
Button Name Notes
All History View your complete call history.
Incoming Calls
Missed Calls
Outgoing Calls
Voicemail View your voice mail messages.
Send All Calls Send all calls to voice mail.
Incoming Calls screen
Button Name Notes
Send All Calls Send all calls to voice mail.
Icons
Outgoing Calls screen
Button Name Notes
VoIP Call Calls are made using Wi-Fi or your cellular data.
My Desk Phone Calls are made using your desk phone.
Dialpad icons
Button
Name Notes
Dialpad Opens the Dialpad.
Redial
Audio Call
Video Call
Clear
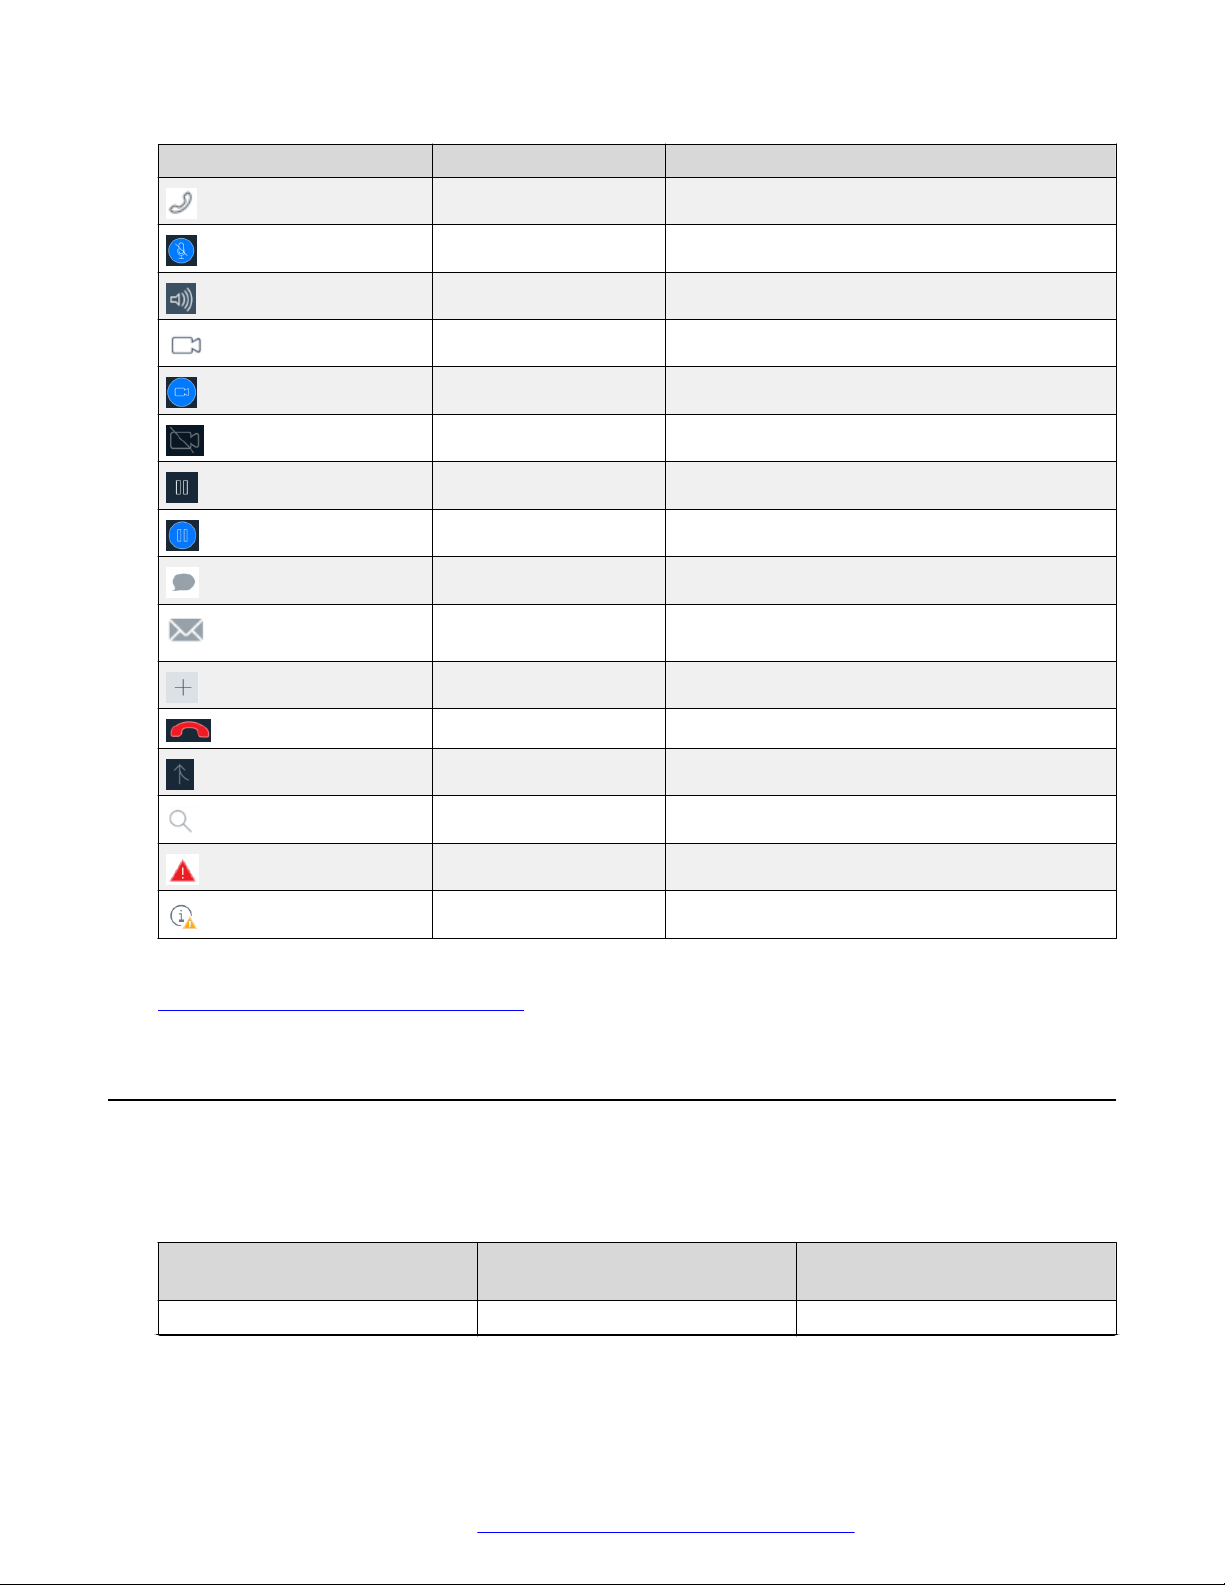
General icons
Button
Name Notes
Settings
Menu
More
Table continues…
July 2020 Using Avaya IX™ Workplace Client for IP Office 19
Comments on this document? infodev@avaya.com
Page 20
Avaya IX™ Workplace Client navigation
Button Name Notes
Audio Call
Mute Audio Call Audio is muted during the call.
Speaker
Video Call
Stop Video Call Video is stopped during the call.
Block camera
Resume Call
Hold Call Call is placed on hold.
Instant Messaging
Email Email is sent to a contact using the native email
Add
application.
End Call
Merge Call Active call is merged with the held call.
Search
Alert
Information
Related links
Avaya IX Workplace Client navigation on page 15
Shortcut keys for Avaya IX™ Workplace Client for Mac and
Windows
You can access the following functionality in the desktop clients by using keyboard shortcut keys:
Function
Open Dialpad command + D Ctrl + D
Avaya IX™ Workplace Client for
Mac
Avaya IX™ Workplace Client for
Windows
Table continues…
July 2020 Using Avaya IX™ Workplace Client for IP Office 20
Comments on this document? infodev@avaya.com
Page 21

Shortcut keys for Avaya IX™ Workplace Client for Mac and Windows
Function Avaya IX™ Workplace Client for
Mac
Open Keypad while on a call command + D Ctrl + D
Dial from clipboard option + W Alt + W
Search for someone
Answer a call option + command + A Alt + Ctrl + A
End a call option + command + E Alt + Ctrl + E
Mute toggle control + M Ctrl + M
Hold toggle shift + control + H Ctrl + H
Transfer a call option + command + T Ctrl + T
Navigation
Select the Top of Mind tab shift + command + T Alt + T
Select the Favorites tab shift + command + F Alt + F
Select the Contacts tab shift + command + C Alt + C
Select the History tab shift + command + H Alt + H
Select the Messages tab shift + command + I Alt + I
Select the Meetings tab shift + command + M Alt + M
F3 F3
Avaya IX™ Workplace Client for
Windows
Related links
Avaya IX Workplace Client navigation on page 15
July 2020 Using Avaya IX™ Workplace Client for IP Office 21
Comments on this document? infodev@avaya.com
Page 22

Chapter 4: Setting up Avaya Equinox
®
System requirements and interoperability
For the latest and most accurate compatibility information for Avaya IX™ Workplace Client, use the
Compatibility Matrix tool on the Avaya Support website at https://support.avaya.com/
CompatibilityMatrix/Index.aspx.
Ensure that your mobile device or desktop system includes the latest OS updates. Your system
must have the latest vendor supplied drivers, specifically for:
• Headsets
• Cameras
• Display adapters
Mobile clients
Security certificates on mobile devices
Avaya IX™ Workplace Client requires security certificates to establish connections with various
servers. If you are using a certificate signed by one of the major certificate authorities such as
Verisign, you do not need to install anything. The built-in system certificates are enough. However,
the administrator must include the certificate in the private trust store.
The administrator might provide a web address, send you an email, or provide the certificate using
other mechanisms. Install the certificates on your device using the procedure specified by your
device manufacturer.
Note:
If you manually install the certificates, you must enable a screen lock on your device so that
the device has a minimal level of security.
If you are using Avaya IX™ Workplace Client on Avaya Vantage™, do not install any certificates
manually. The certificates are automatically installed when you provide the file server path in
Settings > Wireless & networks > > More > File Server on Avaya Vantage™.
July 2020 Using Avaya IX™ Workplace Client for IP Office 22
Comments on this document? infodev@avaya.com
Page 23

For detailed information about server certificates and security for Avaya IP Office, see IP Office
Platform Security Guidelines at https://downloads.avaya.com/css/P8/documents/101039408.
Installing Avaya IX™ Workplace Client on mobile devices
About this task
Use this procedure to install Avaya IX™ Workplace Client on your mobile device.
Note:
If you do not want to receive notifications from Avaya IX™ Workplace Client, you can disable
the notifications on your mobile device. The notifications are controlled by the operating
system on your mobile device rather than any application. The exact method of disabling
notifications varies on each mobile device.
Procedure
1. On the mobile device for:
• Android: Open the Play Store application.
Mobile clients
• iOS: Open the App Store application.
2. Search for Avaya IX™ Workplace Client.
3. Select the entry for Avaya IX™ Workplace Client.
4. Install Avaya IX™ Workplace Client.
5. After the installation process is complete, select Open.
6. Accept the terms of the license agreement and the message to not use Avaya IX
Workplace Client to make emergency calls.
Android permissions
After you install and open Avaya IX™ Workplace Client for Android, you must configure a few
permissions for Avaya IX™ Workplace Client to work properly. Permissions are categorized into
required and optional.
To use Avaya IX™ Workplace Client, you must provide the required permissions at a minimum. To
get the best user experience, you must provide all permissions. For example, permission to record
audio and to make and manage phone calls is mandatory for Avaya IX™ Workplace Client to
function properly. Permission to provide access to your contacts, calendar, and camera is optional.
™
July 2020 Using Avaya IX™ Workplace Client for IP Office 23
Comments on this document? infodev@avaya.com
Page 24

Setting up Avaya Equinox
®
Desktop clients
Security certificates on desktops
Avaya IX™ Workplace Client requires security certificates to establish connections with various
servers. If you are using a certificate signed by one of the major certificate authorities such as
Verisign, you do not need to install anything. The built-in system certificates are enough. However,
the administrator must include the certificate in the private trust store.
The administrator might provide a web address, send you an email, or provide the certificate using
other mechanisms. Install the certificates on your desktop using the procedure specified by your
desktop manufacturer.
For the Avaya strategy on server certificates, see Updating server certificates to improve end-user
security and client user experience at https://downloads.avaya.com/css/P8/documents/
100180626.
For detailed information about server certificates and security for Avaya IP Office, see IP Office
Platform Security Guidelines at https://downloads.avaya.com/css/P8/documents/101039408.
Installing Avaya IX™ Workplace Client on desktops
About this task
Use this procedure to install Avaya IX™ Workplace Client desktop clients. The administrator can
also install Avaya IX™ Workplace Client desktop clients using a command line option.
Before you begin
• Ensure that your Windows or Mac device meets the following minimum hardware
requirements:
- Dual-core processor
- 2 GB of RAM
- 1.5 GB free hard disk space
• Get the location of the Avaya IX™ Workplace Client build for Windows or Mac from your
administrator.
• Download the build to your desktop.
• For Avaya IX™ Workplace Client for Windows, ensure that:
- Windows 7 computer, Windows 8 computer, Windows 10 computer, Windows Server 2008,
Windows Server 2012, or Windows Server 2016 has Microsoft .NET Framework 4.5 or a
later version.
- Microsoft Visual C++ Redistributable for Visual Studio 2017 package is installed.
• For Avaya IX™ Workplace Client for Mac, ensure that Mac OS is 10.11 or a later version.
July 2020 Using Avaya IX™ Workplace Client for IP Office 24
Comments on this document? infodev@avaya.com
Page 25

Opening the Avaya IX™ Workplace Client application for the first time
Procedure
1. On the desktop for:
• Windows: Double-click the Avaya Equinox Setup XXX.msi file.
• Mac: Double-click the Avaya Equinox–XX.dmg file.
2. Accept the terms of the license agreement, select the default values, and complete the
installation.
By default, the Windows installer installs Outlook Plugin. Additionally, the Windows installer
installs Web Extension on Microsoft Internet Explorer and Mozilla Firefox.
Note:
Outlook Plugin uses the language of the Microsoft Office suite and Web Extension
uses the language of the web browser.
(Optional) On Avaya IX™ Workplace Client for Windows, if you do not want to install
3.
Outlook Plugin and Web Extension by default:
a. Select the Custom setup type.
b. Disable the Outlook Plugin and Web Extension installation, and complete the
installation.
Opening the Avaya IX™ Workplace Client application for
the first time
About this task
Use this procedure after you install Avaya IX™ Workplace Client and open it for the first time.
If you have an account, you can configure Avaya IX™ Workplace Client and log in to Avaya IX
Workplace Client. Alternatively, you can just join a meeting.
• To join a meeting, select Join a Meeting.
Note:
To join a meeting, you must be subscribed to the relevant services, such as Avaya
Equinox® Meetings Online.
• To configure your account, select Configure my account.
Automatic configuration overview
You can configure the Avaya IX™ Workplace Client settings automatically by using your email
address or the automatic configuration web address.
™
July 2020 Using Avaya IX™ Workplace Client for IP Office 25
Comments on this document? infodev@avaya.com
Page 26

Setting up Avaya Equinox
If you type your email address and the DNS check:
• Is successful, the automatic configuration file is downloaded. If the administrator has
provisioned more than one environment, you must choose an environment before the
automatic configuration file is downloaded.
• Fails, your email address is automatically searched in the following accounts and in the
following priority:
1. Avaya Cloud Services
2. Avaya Equinox® Meetings Online
By using Avaya Cloud Services or Avaya Equinox® Meetings Online, if the automatic configuration
file is:
• Found in the URL, the automatic configuration file is downloaded.
• Not found in the URL, you must enter a web address or manually configure the application.
If the automatic configuration file is found in the web address, the automatic configuration file
is downloaded.
In both instances, if the administrator has provisioned more than one environment, you must
choose an environment before the automatic configuration file is downloaded.
®
If the automatic configuration file that is downloaded does not include your credentials for the
various services, you must manually enter your credentials to log in to each service.
You might be able to view further screens related to Avaya Cloud accounts depending on whether:
• Your Avaya Cloud account exists for Avaya Cloud Services and Messaging.
• The administrator has enabled the Avaya Cloud Account setting for your account.
You can additionally configure your account to use the Avaya Equinox® Meetings Online service.
Configuring Avaya IX™ Workplace Client settings
automatically
About this task
Use this procedure if you have an Avaya IX™ Workplace Client account and want to sign in to
Avaya IX™ Workplace Client. You can configure the Avaya IX™ Workplace Client settings
automatically using your email address or the automatic configuration web address. This
configuration option is applicable only for IP Office Release 11.0.5 deployments.
For automatic configuration of the Avaya IX™ Workplace Client, the administrator can choose IP
Office or any other web server.
You cannot use this procedure on Avaya IX™ Workplace Client on Avaya Vantage™ because the
Avaya IX™ Workplace Client settings are automatically configured when you provide the file server
path in Settings > Wireless & networks > More > File Server.
July 2020 Using Avaya IX™ Workplace Client for IP Office 26
Comments on this document? infodev@avaya.com
Page 27

Using the Avaya IX™ Workplace Client menu
Before you begin
• Ensure that Avaya Cloud Authorization service is enabled in IP Office Web Manager.
• Ensure that a unique identity is configured for the user in IP Office Web Manager.
• Ensure that the user has a valid Avaya Cloud Services account.
• If the administrator has set up the correct DNS records, you can automatically configure
Avaya IX™ Workplace Client using your email address. Else, you can get the automatic
configuration web address from the administrator.
Procedure
1. On the Avaya IX™ Workplace Client select Configure my account
You can configure your account in one of the following ways:
2. (Optional) To use your work email address for auto discovery:
a. In the Email field, type your email address and select Next.
b. Choose the enterprise environment that you want to use and select Next.
3. (Optional) To use the automatic configuration web address for auto discovery:
a.
Select Options and Settings ( ).
b. Select Use a web address.
c. In the Web Address field, type the web address and select Next.
Avaya IX™ Workplace Client displays the Avaya Cloud Services login screen.
4. Depending on what the screen displays, do one or more of the following:
• If the automatic configuration file includes support for OAuth and if your Avaya Cloud
account exists, type your credentials for Avaya Cloud Services and select Sign In.
However, if you close the page without performing OAuth authentication, Avaya IX
Workplace Client displays the login screen to enter your extension and password.
• If you have an account on Google, Office365, Salesforce, or Avaya, select the
corresponding icon to log in to Avaya Cloud Services with your account credentials.
• If the automatic configuration file does not include Avaya Cloud Authorization
configuration for the various services, manually enter your credentials to log in to each
service.
5. Select Next.
Avaya IX™ Workplace Client configures the settings automatically.
™
Using the Avaya IX™ Workplace Client menu
Procedure
1. On mobile clients, on the Top of Mind screen, select .
July 2020 Using Avaya IX™ Workplace Client for IP Office 27
Comments on this document? infodev@avaya.com
Page 28

Setting up Avaya Equinox
2. To view a screen, select the corresponding option:
• Top of Mind
• Join Meeting
• Favorites
• Contacts
• History
• Messages
• Meetings
• Features: Only on mobile clients
• Exit: Only on Avaya IX™ Workplace Client for Android
Avaya IX™ Workplace Client on Avaya Vantage™ does not display this option.
®
Manual configuration of Avaya IX™ Workplace Client
settings
You must configure the Avaya IX™ Workplace Client settings in the Services screen manually if
you are not using automatic configuration. For more information, see
page 39.
The following sections describe how to manually configure and update all client settings. You
might need to restart Avaya Equinox® after you manually configure or update the client settings.
Avaya IX™ Workplace Client Top of Mind screen
Avaya IX™ Workplace Client displays the Top of Mind screen as the home screen. You can use the
Top of Mind screen to:
• Join Avaya IX™ Workplace Client and Spaces meetings with one touch and view your
meeting calendar.
Note:
You cannot click to join an Avaya IX™ Workplace Client meeting from your calendar.
However, if you are using the Avaya IX™ Workplace Client add-in for Microsoft Outlook,
you can click to join from the meeting invitation.
Services settings on
• Respond to the latest messages and view your active conversations.
• Return important missed calls and view your call activity.
• Start a meeting, join an Avaya IX™ Workplace Client meeting, log in to Spaces or open the
Spaces dashboard, and go to your meeting portal.
July 2020 Using Avaya IX™ Workplace Client for IP Office 28
Comments on this document? infodev@avaya.com
Page 29

Manual configuration of Avaya IX™ Workplace Client settings
The Workplace Meetings area is applicable if you are using only Avaya Equinox
Conferencing and not Avaya Aura® Conferencing.
®
Configuring the layout of the Top of Mind screen
About this task
Use this procedure to configure what you want to view on the Top of Mind screen. For example,
you might choose to view the meeting calendar and meeting room details, but hide call history and
messages.
Procedure
1. On the Top of Mind screen, select the Top of Mind filter.
2. (Optional) If the Top of Mind switch is disabled, select Top of Mind. Otherwise, go to the
next step.
3. Do the following:
• To hide your meeting information, in the Next Meetings area, select Hide.
• To configure the number of meetings to be displayed on the Top of Mind screen, select
Auto or Full Day.
If you select Auto, the number of meetings displayed depends on the Avaya IX
Workplace Client logic. If you select Full Day, Avaya IX™ Workplace Client displays the
meetings for the current day.
™
• To configure the calendars that you want to display, select Calendars to show and
select the option for the corresponding account.
• To hide your messages, in the Messages area, select Hide.
• To hide your call history, in the History area, select Hide.
• To hide your meeting room details, in the Workplace Meetings area, select Hide.
• To view the default layout on the Top of Mind screen, select Reset Layout to Default.
Using the Top of Mind screen
About this task
Use this procedure to perform most of your daily activities in the enterprise.
• Start typing the name of the contact or the contact details that you want to look for in the
following field:
- On mobile clients: find someone
- On desktop clients: name or number
Avaya IX™ Workplace Client displays the contacts that match the search text.
July 2020 Using Avaya IX™ Workplace Client for IP Office 29
Comments on this document? infodev@avaya.com
Page 30

Setting up Avaya Equinox
• In the Next Meetings area, you can select the following:
-
: To view additional meetings.
- A meeting: To view more information about the meeting.
or : To join the Avaya IX™ Workplace Client meeting.
To view both the audio and video options for a meeting entry, on Android devices, you
must press and hold a meeting entry. While on iOS devices, you must swipe to the right on
a meeting entry.
You can join a meeting using this option only if the conference bridge number is in the Tel:
URL format. For example, tel:+16135959132. You must include this format in the Location
field or the Body area of the email.
-
: To join the Spaces meeting by using the Spaces application only on mobile devices or
the default browser.
For best experience, the default browser must be WebRTC compliant.
• In the Messages area, you can select the following:
®
-
: To view all your active conversations.
- A conversation: To view more information about the conversation.
• In the History area, you can select the following:
-
: To view the complete call history.
- A call: To view more information about the call.
or : To call the number.
• In the My Meeting Room area, you can select the following:
- Start My Meeting: To start your meeting.
- Workplace Meetings: To join a meeting. By default, Avaya IX™ Workplace Client saves
the details of your last meeting.
- Spaces Dashboard: To open the Spaces dashboard.
If you are not logged in to Avaya Cloud Services, you must sign in to Spaces. If you do not
have an account, you must sign up for Spaces.
- Go to My Meeting Portal: To view the portal where you can configure your virtual room
and other settings.
Configuring the display preferences
About this task
Use this procedure only on desktop clients to configure the functionality of the Avaya IX
Workplace Client main window when you select X on the main window.
July 2020 Using Avaya IX™ Workplace Client for IP Office 30
Comments on this document? infodev@avaya.com
™
Page 31

Manual configuration of Avaya IX™ Workplace Client settings
Procedure
1. In the Avaya IX™ Workplace Client settings, select User Preferences.
2. Select Display.
3. In the Main Window X Preferences field, select one of the following:
• Minimize to the taskbar
• Exit application
• Minimize to the notification area: Only on Avaya IX™ Workplace Client for Windows
4. Save the changes.
Configuring the contact search settings on Avaya IX™ Workplace
Client for Android
About this task
Use this procedure only on Avaya IX™ Workplace Client for Android. For iOS, you must use the
local OS setting.
You can configure the contact search settings so that Avaya IX™ Workplace Client arranges and
displays the list of names by first name or last name.
Procedure
1. In the Avaya IX™ Workplace Client settings, tap User Preferences.
2. Tap Contacts.
3. In the Display Preferences area, tap Name Display Preferences.
4. Tap one of the following:
• First Name First
• Last Name First
5. In the Display Preferences area, tap Name Sort Preferences.
6. Tap one of the following:
• First Name
• Last Name
7. Save the changes.
Avaya IX™ Workplace Client displays the contact search results according to the selected
criteria the next time that you perform a search.
July 2020 Using Avaya IX™ Workplace Client for IP Office 31
Comments on this document? infodev@avaya.com
Page 32

Setting up Avaya Equinox
®
Configuring the contact search settings on desktop clients
About this task
You can configure the contact search settings so that Avaya IX™ Workplace Client arranges and
displays the list of names by first name or last name.
Note:
On Avaya IX™ Workplace Client on desktop platforms, on the Favorites screen, you can
arrange your favorite contacts by dragging and dropping the contacts according to your
preference.
Procedure
1. In the Avaya IX™ Workplace Client settings, click User Preferences.
2. Click Contacts.
3. In the Name Display Preferences area, click one of the following:
• First, Last
• Last, First
4. In the Name Sort Preferences area, click one of the following:
• First Name
• Last Name
5. To view local contacts, click Show Local Contacts.
6. Save the changes.
Avaya IX™ Workplace Client displays the contact search results according to the selected
criteria the next time that you perform a search.
Modifying contact settings
About this task
Use this procedure to enable Avaya IX™ Workplace Client to access your Contacts list.
Note:
Avaya collects data for quality improvement purposes. No personal identity information is
tracked.
Procedure
1. In the Avaya IX™ Workplace Client settings, select User Preferences.
2. (Optional) If available on the Avaya IX™ Workplace Client platform, select Contacts. Else,
go to the next step.
July 2020 Using Avaya IX™ Workplace Client for IP Office 32
Comments on this document? infodev@avaya.com
Page 33

Manual configuration of Avaya IX™ Workplace Client settings
3. Select Messaging Address Validation.
4. Save the changes.
Modifying audio and video settings on mobile clients
About this task
Use this procedure only on mobile clients.
Note:
• Currently, there is no option in Avaya IX™ Workplace Client for iOS to change the default
ringtone for incoming calls.
• On Android devices, during a video call, you can switch the audio path between the
speaker and earpiece if external audio devices are unavailable. Avaya IX™ Workplace
Client for iOS has a limitation that the earpiece option is unavailable during video calls.
iOS reduces the number of allowable audio routes to be only those that are appropriate
for video chat applications. Any external audio devices that are attached to the iOS
device are added to the routable output list so that you can switch the audio path.
Procedure
1. In the Avaya IX™ Workplace Client settings, select User Preferences > Audio / Video.
Avaya IX™ Workplace Client displays the audio and video settings.
On Avaya IX™ Workplace Client for Android, do the following:
2. Select Ringtone.
3. Select the new ringtone, and save the changes.
On all mobile clients, do the following:
4. Select Use VoIP for calls and then select one of the following:
• Never: Avaya IX™ Workplace Client removes the VoIP option from the Outgoing Calls
screen.
• Prefer Wi-Fi: You can view the VoIP option on the Outgoing Calls screen if you log in to
the VoIP service. This is the default option.
• Wi-Fi only: If you are using Wi-Fi and you log in to the VoIP service, Avaya IX
Workplace Client displays the VoIP option on the Outgoing Calls screen. If not, Avaya
IX™ Workplace Client removes the VoIP option from the Outgoing Calls screen.
• Prefer cellular data: You can view the VoIP option on the Outgoing Calls screen if you
log in to the VoIP service.
5. (Optional) To have video on a call, select Video Calling.
™
6. (Optional) To have video on a call only over the cellular data network, select Video calling
over cellular.
You cannot view the Video calling over cellular option if the administrator configures the
VoIP calling parameter with value as Wi-Fi only.
July 2020 Using Avaya IX™ Workplace Client for IP Office 33
Comments on this document? infodev@avaya.com
Page 34

Setting up Avaya Equinox
®
7. (Optional) To configure the microphone and camera settings when you join an Avaya
Equinox® Conferencing meeting, do the following:
• To mute your microphone, select Mute my Microphone when Joining Meeting.
• To block your camera, select Block my Camera when Joining Meeting.
If the administrator hides or locks one or both of these settings, you might not be able to
change the microphone and camera settings.
8. Save the changes.
VoIP calls
The administrator can configure the following values for the VOIPCALLINGENABLED attribute in
the settings file:
• 0: Never
• 1: Prefer Wi-Fi
• 2: Wi-Fi only
• 3: Prefer cellular data
Avaya IX™ Workplace Client maintains an internal variable to represent user preferences for the
Use VoIP for calls setting:
• 0: Never
• 1: Prefer Wi-Fi
• 2: Wi-Fi only
• 3: Prefer cellular data
The Avaya IX™ Workplace Client logic depends on both the administrative setting in the settings
file and the user preference in Avaya IX™ Workplace Client.
Variable
VOIPCALLINGENA
BLED = 0
Use VoIP for calls
= Never
Avaya IX
Workplace Client
displays this option
as selected by the
administrator. The
user cannot edit
the setting.
™
Use VoIP for calls
= Prefer Wi-Fi
The user cannot
select this option.
Use VoIP for calls
= Wi-Fi only
The user cannot
select this option.
Use VoIP for calls
= Prefer cellular
data
The user cannot
select this option.
Table continues…
July 2020 Using Avaya IX™ Workplace Client for IP Office 34
Comments on this document? infodev@avaya.com
Page 35

Manual configuration of Avaya IX™ Workplace Client settings
Variable Use VoIP for calls
= Never
VOIPCALLINGENA
BLED = 1
The user can select
this option.
The Avaya IX
™
Workplace Client
logic depends on
the user setting.
VOIPCALLINGENA
BLED = 2
The user can select
this option.
The Avaya IX
™
Workplace Client
logic depends on
the user setting.
VOIPCALLINGENA
BLED = 3
The user can select
this option.
The Avaya IX
™
Workplace Client
logic depends on
the user setting.
Use VoIP for calls
= Prefer Wi-Fi
Avaya IX
™
Workplace Client
displays this option
as selected by the
administrator.
The user can select
this option.
The Avaya IX
™
Workplace Client
logic depends on
the user setting.
The user cannot
select this option.
The user cannot
select this option.
Use VoIP for calls
= Wi-Fi only
The user can select
this option.
The Avaya IX
™
Workplace Client
logic depends on
the user setting.
Avaya IX
™
Workplace Client
displays this option
as selected by the
administrator.
The user can select
this option.
The Avaya IX
™
Workplace Client
logic depends on
the user setting.
The user cannot
select this option.
Use VoIP for calls
= Prefer cellular
data
The user cannot
select this option.
The user cannot
select this option.
Avaya IX
™
Workplace Client
displays this option
as selected by the
administrator.
The user can select
this option.
The Avaya IX
™
Workplace Client
logic depends on
the user setting.
The Wi-Fi network’s DNS resolves the domain name when both Wi-Fi and mobile data are
enabled on the OS. To resolve the connection to the Avaya SBCE IP addresses, you must
correctly map the domain names on the DNS server. If the DNS mapping is incorrect, Avaya IX
™
Workplace Client cannot register to Avaya SBCE with the Prefer cellular data option.
On Avaya IX™ Workplace Client for iOS, consider a situation where you configure the
VOIPCALLINGENABLED parameter with the value 3 and the user selects the Prefer cellular data
option. In this case, if the user selects Wi-Fi when the mobile data, 3G, or 4G is enabled, only the
SIP traffic uses mobile data, 3G, or 4G. The other Avaya IX™ Workplace Client for iOS traffic,
July 2020 Using Avaya IX™ Workplace Client for IP Office 35
Comments on this document? infodev@avaya.com
Page 36

Setting up Avaya Equinox
which is HTTPS, uses Wi-Fi only, including PPM. Enterprises must configure their Wi-Fi networks
to allow the ports and traffic to register to Avaya SBCE.
On Avaya IX™ Workplace Client for Android, if the user selects the Prefer cellular data option, both
SIP and HTTPS traffic use mobile data, 3G, or 4G.
®
Modifying audio and video settings on desktop clients
About this task
Use this procedure only on desktop clients.
Caution:
You might face audio issues with some bluetooth headsets if you do not select the correct
microphone and speaker.
Procedure
1. In the Avaya IX™ Workplace Client settings, select User Preferences > Audio / Video.
Avaya IX™ Workplace Client displays the audio and video settings.
2. Do the following:
• Select the microphone, speaker, and camera that you want to use.
• To decrease or increase the volume of the microphone and speakers, move the sliders
to the left or right.
• To have video on a call, select Video Calling.
• To mute your microphone when you join an Avaya Equinox® Conferencing conference,
select Mute my Microphone when Joining Meeting.
If the administrator hides or locks this setting, you might not be able to change the
microphone setting.
• To block your camera when you join an Avaya Equinox® Conferencing conference,
select Block my Camera when Joining Meeting.
If the administrator hides or locks this setting, you might not be able to change the
camera setting.
3. Save the changes.
Configuring the video resolution
About this task
Use this procedure only on desktop clients to configure the video resolution.
July 2020 Using Avaya IX™ Workplace Client for IP Office 36
Comments on this document? infodev@avaya.com
Page 37

Manual configuration of Avaya IX™ Workplace Client settings
Procedure
1. In the Avaya IX™ Workplace Client settings, select Advanced.
2. In the Video Max. Resolution field, select one of the following:
• Auto: Avaya recommends the use of this option to automatically configure the video
resolution.
• 1080p
• 720p
• 480p
• 360p
• 240p
• 180p
3. Save the changes.
4. Restart Avaya IX™ Workplace Client.
Installing a client identity certificate from the system certificate store
About this task
Use this procedure only on Avaya IX™ Workplace Client on desktop platforms.
Procedure
1. In the Avaya IX™ Workplace Client settings, select Advanced.
2. Select Identity Certificate.
3. In the Install new certificate area, do one of the following:
• On Avaya IX™ Workplace Client for Mac: In the Select from the keychain field, select a
certificate.
• On Avaya IX™ Workplace Client for Windows: In the Select from the system certificate
store field, select a certificate.
4. In the confirmation dialog box, confirm the action.
In the Installed certificate area, Avaya IX™ Workplace Client displays the client identity
certificate that you installed.
5. Save the changes.
6. Restart Avaya IX™ Workplace Client.
July 2020 Using Avaya IX™ Workplace Client for IP Office 37
Comments on this document? infodev@avaya.com
Page 38

Setting up Avaya Equinox
®
Installing a client identity certificate from a file
About this task
Use this procedure only on Avaya IX™ Workplace Client for Android and desktop platforms.
Note:
Some versions of Android require the certificate file to have the .p12 extension as part of the
file name.
Procedure
1. In the Avaya IX™ Workplace Client settings, select Advanced.
2. Do one of the following:
• On Avaya IX™ Workplace Client for Android: Select Client Certificate.
• On desktop clients: Select Identity Certificate.
On Avaya IX™ Workplace Client for Android, do the following:
3. Select Other options.
On all clients, do the following:
4. Select select from a file.
5. Select the certificate file that you want to install.
6. In the confirmation dialog box, confirm the action.
7. In the password prompt dialog box, type the password for the certificate and then select
Next.
In the Installed certificate area, Avaya IX™ Workplace Client displays the client identity
certificate that you installed.
8. Save the changes.
On desktop clients, do the following:
9. Restart Avaya IX™ Workplace Client.
Removing a client identity certificate
Procedure
1. In the Avaya IX™ Workplace Client settings, select Advanced.
On Avaya IX™ Workplace Client for Android and desktop platforms:
2. Do one of the following:
• On Avaya IX™ Workplace Client for Android: Select Client Certificate.
July 2020 Using Avaya IX™ Workplace Client for IP Office 38
Comments on this document? infodev@avaya.com
Page 39

Manual configuration of Avaya IX™ Workplace Client settings
• On desktop clients: Select Identity Certificate.
On all clients:
3. Do one of the following:
• On Avaya IX™ Workplace Client for Android: In the Installed certificate area, tap the X
icon next to a certificate.
• On Avaya IX™ Workplace Client for iOS: Select Delete Client Certificate.
• On desktop clients: In the Installed certificate area, select Remove certificate.
4. In the confirmation dialog box, confirm the action.
Avaya IX™ Workplace Client removes the selected client identity certificate.
5. Save the changes.
On desktop clients, do the following:
6. Restart Avaya IX™ Workplace Client.
Services settings
You can manually configure the settings for the following services in Avaya IX™ Workplace Client if
you are not using automatic configuration:
• VoIP
• Avaya Cloud Services
• Exchange Calendar
• Voice mail
• Meetings
Modifying VoIP settings
About this task
Use this procedure to enable VoIP interoperability with Avaya IX™ Workplace Client.
Procedure
1. In the Avaya IX™ Workplace Client settings, select Services.
2. (Optional) Do one of the following:
• On mobile clients: Select Service Details.
• On desktop clients: Select Show Details.
3. Select Phone Service.
4. (Optional) If the Phone Service switch is disabled, select Phone Service. Otherwise, go to
the next step.
July 2020 Using Avaya IX™ Workplace Client for IP Office 39
Comments on this document? infodev@avaya.com
Page 40

Setting up Avaya Equinox
5. In the Server Address field, type the IP address or the FQDN of the VoIP server.
6. In the Server Port field, type the VoIP server port number.
7. In the Domain field, type the SIP domain to which Avaya IX™ Workplace Client must
register.
8. To use a secure connection to the VoIP server, select Use TLS.
By default, Avaya IX™ Workplace Client supports TLS and the port number for it is 5061. If
you clear this setting, the default port value changes to 5060. You can also manually
configure the port value.
9. In the Adhoc Conference Address field, type the URL that defines the adhoc conference
resource to be used by the endpoint.
10. Save the changes.
®
Modifying Avaya Cloud Services settings
About this task
Use this procedure to enable Avaya Cloud Services interoperability with Avaya IX™ Workplace
Client. If you enable Avaya Cloud Services, Avaya Spaces integrates with Avaya IX™ Workplace
Client.
Procedure
1. In the Avaya IX™ Workplace Client settings, select Services.
2. (Optional) Do one of the following:
• On mobile clients: Select Service Details.
• On desktop clients: Select Show Details.
3. Select Avaya Cloud Services.
4. (Optional) If the Avaya Cloud Services switch is disabled, select Avaya Cloud Services.
5. Save the changes.
Modifying voice mail settings
About this task
Use this procedure to change the voice mail number setting in Avaya IX™ Workplace Client. On
desktop clients, you can only change the voice mail number.
Note:
You cannot use this procedure on Avaya IX™ Workplace Client on Avaya Vantage™.
Procedure
1. In the Avaya IX™ Workplace Client settings, select Services.
2. Do one of the following:
• On mobile clients: Select Service Details.
July 2020 Using Avaya IX™ Workplace Client for IP Office 40
Comments on this document? infodev@avaya.com
Page 41

Manual configuration of Avaya IX™ Workplace Client settings
• On desktop clients: Select Show Details.
3. Select Voicemail.
4. (Optional) If available through VMPro on IP Office, select System Number.
a. Change the voice mail number.
b. If available through VMPro on IP Office, select Save.
Result
Avaya IX™ Workplace Client verifies and saves the setting.
Modifying Exchange Calendar settings
About this task
Use this procedure to enable Microsoft Exchange Calendar interoperability with Avaya IX
Workplace Client. This is only applicable if you are getting the Exchange Calendar information
through Exchange Web Services. On Android and iOS devices, you can access the Exchange
Calendar information in Avaya IX™ Workplace Client using the device’s native calendar support. If
the Exchange server has been configured to prevent mobile access, you cannot access the
Exchange Calendar information.
™
Procedure
1. In the Avaya IX™ Workplace Client settings, select Services.
2. (Optional) Do one of the following:
• On mobile clients: Select Service Details.
• On desktop clients: Select Show Details.
3. Select Exchange Calendar.
4. (Optional) If the Exchange Calendar switch is disabled, select Exchange Calendar.
Otherwise, go to the next step.
5. In the Domain field, type the Exchange server domain to which Avaya IX™ Workplace
Client must register.
For example, avaya.com.
6. In the Server Address field, type the IP address or the FQDN of the Exchange server.
For example, usmail.avaya.com.
7. Save the changes.
Modifying enterprise directory settings
About this task
Use this procedure only on desktop clients to enable enterprise directory interoperability with
Avaya IX™ Workplace Client.
July 2020 Using Avaya IX™ Workplace Client for IP Office 41
Comments on this document? infodev@avaya.com
Page 42

Setting up Avaya Equinox
Procedure
1. In the Avaya IX™ Workplace Client settings, select Services.
2. (Optional) Select Show Details.
3. Select Enterprise Directory.
4. (Optional) If the Enterprise Directory switch is disabled, select Enterprise Directory.
Otherwise, go to the next step.
5. In the Server Address field, type the IP address or the FQDN of the Enterprise Directory
server.
6. In the Server Port field, type the Enterprise Directory port number.
7. To use SSL, select Use TLS.
8. In the LDAP Search Base field, type the Enterprise Directory search base.
For example, cn=users,dc=svucacloud,dc=com.
9. Save the changes.
®
Configuring the dialing rules manually
About this task
Avaya IX™ Workplace Client populates the dialing rules when you use automatic configuration.
However, to manually configure or update the following dial rules, use this procedure after
consulting your system administrator:
• The number to dial to access an outside line.
• Your country code.
• Your area or city code.
• The main prefix of the PBX.
• The number to dial for long distance calls.
• The number to dial for international calls.
• The length of internal extensions.
• The length of national phone numbers.
• The option to remove the area or city code for local calls.
• The option to apply dialing rules to plus sign (+) numbers.
Procedure
1. In the Avaya IX™ Workplace Client settings, select Advanced.
2. Select Dialing Rules.
3. Select Dialing Rules.
July 2020 Using Avaya IX™ Workplace Client for IP Office 42
Comments on this document? infodev@avaya.com
Page 43

Manual configuration of Avaya IX™ Workplace Client settings
4. Configure or update the required dialing rules setting.
5. Save the changes.
Pausing iTunes during calls
About this task
Use this procedure only on Avaya IX™ Workplace Client for Mac.
Procedure
1. In the Avaya IX™ Workplace Client settings, select User Preferences.
2. Select General > Pause iTunes when making / receiving a call.
Viewing release and version information
Procedure
In the Avaya IX™ Workplace Client settings, select Support > About.
Viewing the certificates that Avaya IX™ Workplace Client uses
About this task
If you are using private trusted credentials, you can view a list of certificates that Avaya IX
Workplace Client uses.
Procedure
1. In the Avaya IX™ Workplace Client settings, select Advanced.
2. (Optional) On Avaya IX™ Workplace Client for Windows, to use both the platform and
private trust store, select Use coalesced Trust Store.
3. Do one of the following:
• On mobile clients and Avaya IX™ Workplace Client for Windows: Select Certificates.
• On Avaya IX™ Workplace Client for Mac: Select SSL Certificates.
4. To view the details of a particular certificate, select that certificate.
™
Viewing licensing information
Procedure
1. In the Avaya IX™ Workplace Client settings, select Support.
July 2020 Using Avaya IX™ Workplace Client for IP Office 43
Comments on this document? infodev@avaya.com
Page 44

Setting up Avaya Equinox
2. Select Legal.
3. Select one of the following:
• EULA
• Third Party Licensing
®
Logging in and out of the Avaya IX™ Workplace Client phone
service
About this task
Use this procedure to log in and out of the IP Office phone service on Avaya IX™ Workplace Client.
Note:
• You must not use passwords that include diacritic symbols.
Procedure
1. In the Avaya IX™ Workplace Client settings, select Accounts.
Avaya IX™ Workplace Client displays the Accounts screen.
2. Log in to the IP Office Phone Service using your credentials.
3. Do one of the following:
• On mobile clients: Select Connect.
• On desktop clients: Select Done.
4. To log out of the phone service on Avaya IX™ Workplace Client, select Sign Out.
You can also log out from Avaya IX™ Workplace Client by selecting the presence status
indicator and then selecting Sign Out.
Maximizing the battery life of the device
About this task
Use this procedure only on Avaya IX™ Workplace Client for Android.
If you use a service, such as VoIP, the battery consumption on the device increases. If you do not
use Avaya IX™ Workplace Client outside business hours, you can exit Avaya IX™ Workplace Client
to maximize the battery life.
Procedure
Go to the Avaya IX™ Workplace Client menu and then select Exit.
You are signed out from Avaya IX™ Workplace Client, and the Avaya IX™ Workplace Client
application window is closed.
July 2020 Using Avaya IX™ Workplace Client for IP Office 44
Comments on this document? infodev@avaya.com
Page 45

Manual configuration of Avaya IX™ Workplace Client settings
Configuring the setting to automatically start and log in to Avaya
IX™ Workplace Client
About this task
Use this procedure to configure the setting so that Avaya IX™ Workplace Client starts by default
when the operating system starts and you are logged in automatically.
Note:
You cannot use this procedure on Avaya IX™ Workplace Client for iOS.
Before you begin
On the Accounts screen, do one of the following :
• On mobile clients: Select Remember passwords.
• On desktop clients: Select Remember Password.
Procedure
1. In the Avaya IX™ Workplace Client settings, select User Preferences.
2. Select General > Auto Start/Login.
3. Save the changes.
Configuring the Avaya IX™ Workplace Client add-in for Microsoft
Outlook setting
About this task
Use this procedure only on Avaya IX™ Workplace Client on desktop platforms to configure the
Microsoft Outlook add-in setting.
Before you begin
Log in as a UC user or a OTT named user.
Procedure
1. In the Avaya IX™ Workplace Client settings, select Desktop Integration.
2. Select Outlook Add-in.
3. Select Enable Outlook Add-in.
4. (Optional) On Avaya IX™ Workplace Client for Windows, to allow calls from Microsoft
Outlook contacts, select Allow calls from Outlook contacts.
5. Save the changes.
6. Restart Avaya IX™ Workplace Client.
July 2020 Using Avaya IX™ Workplace Client for IP Office 45
Comments on this document? infodev@avaya.com
Page 46

Setting up Avaya Equinox
7. Restart Microsoft Outlook.
®
Configuring the browser add-in setting
About this task
Use this procedure only on Avaya IX™ Workplace Client for Windows to configure the browser
add-in setting. After you enable this add-in, you can make calls from the highlighted numbers on
Google Chrome, Mozilla Firefox, and Microsoft Internet Explorer browsers.
Before you begin
• Log in as a UC user.
• In Internet Explorer, go to Tools > Internet options > Advanced and select Enable third-
party browser extensions.
Procedure
1. In the Avaya IX™ Workplace Client settings, select Desktop Integration.
2. Select Browser Add-in.
3. Select Enable Browser Add-in.
4. Save the changes.
After you restart your browser, the browser extension is enabled.
Enabling the Avaya IX™ Workplace Client Google Chrome browser
extension
About this task
Google indicates that you must install browser extensions by using the enterprise policy. Use this
procedure to enable the Google Chrome browser extension for Avaya IX™ Workplace Client.
For information about using the on-premise tools to set Google Chrome policies in an enterprise,
https://support.google.com/chrome/a/answer/187202?hl=en.
see
Before you begin
Install Avaya IX™ Workplace Client.
Procedure
1. To download the Chrome policy templates for Windows and to install them, configure the
registry values by using the enterprise policy:
a. Open your Group Policy Management console.
b. Go to User Configuration\Administrative Templates\Google\Google
Chrome\Extensions.
July 2020 Using Avaya IX™ Workplace Client for IP Office 46
Comments on this document? infodev@avaya.com
Page 47

Manual configuration of Avaya IX™ Workplace Client settings
c. Go to the Configure the list of force-installed apps and extensions setting.
d. Set the value to:
ildhoddlaaaneelljhohbndmjbjbfgcl;file:///C:/Program%20Files
%20(x86)/Avaya/Avaya%20IX%20Workplace/fTarget/
accs_crx_update_manifest.xml
e. Save the changes.
f. Go to the Configure extension, app, and user script install sources setting.
g. Set the value to:
file:///C:/Program%20Files%20(x86)/Avaya/Avaya%20IX
%20Workplace/fTarget/*
h. Save the changes.
2. Apply group policy for the users.
3. Restart the Google Chrome browser.
4. Open Google Chrome and enter chrome://extensions in the address bar.
The system displays the Avaya IX™ Workplace Client add-in for the Chrome browser,
which works properly on Google Chrome.
Uninstalling the Avaya IX™ Workplace Client Google Chrome
browser extension
Before you begin
Exit the Google Chrome browser.
Procedure
1. Delete the group policy:
a. Open your Group Policy Management console.
b. Go to User Configuration\Administrative Templates\Google\Google
Chrome\Extensions.
c. Go to the Configure the list of force-installed apps and extensions setting.
d. Delete:
ildhoddlaaaneelljhohbndmjbjbfgcl;file:///C:/Program%20Files
%20(x86)/Avaya/Avaya%20IX%20Workplace/fTarget/
accs_crx_update_manifest.xml
e. Save the changes.
f. Go to the Configure extension, app, and user script install sources setting.
July 2020 Using Avaya IX™ Workplace Client for IP Office 47
Comments on this document? infodev@avaya.com
Page 48

Setting up Avaya Equinox
®
g. Delete:
file:///C:/Program%20Files%20(x86)/Avaya/Avaya%20IX
%20Workplace/fTarget/*
h. Save the changes.
2. Apply group policy for the users.
3. Restart the Google Chrome browser.
4. Open Google Chrome and enter chrome://extensions in the address bar.
The system does not display the Avaya IX™ Workplace Client add-in for the Chrome
browser.
iOS notifications
Apple Push Notification service (APNs) is a platform notification service created by Apple Inc. With
this service, third-party application developers can send notification events to applications installed
on Apple devices when the application is idle in the background or is in quit state. This iOS
notification feature is available with IP Office Release 11.0.5 deployments.
For example, the notification event might be for an incoming call or incoming voicemail message
to Avaya IX™ Workplace Client for iOS. Apple devices display these notifications through an iOS
notification, such as an incoming call screen for incoming calls and notification for voicemails. The
APNs feature is supported only on one iOS device at any given time. If you are using multiple iOS
devices with the same user credentials, the push notifications are delivered to the latest registered
device in IP Office.
To view the notifications related to Avaya IX™ Workplace Client for iOS in Notifications Center, you
must do the following:
• Connect to the VoIP service on Avaya IX™ Workplace Client for iOS.
• Configure the notification settings for Avaya IX™ Workplace Client for iOS on your Apple
device.
You can view the notifications until you tap or clear any one notification. For example, if you tap a
notification, the conversation opens in Avaya IX™ Workplace Client for iOS and all notifications are
cleared from Notifications Center.
You can perform different actions depending on the type of notification. For example, you can
mark the message as read or reply to the message.
July 2020 Using Avaya IX™ Workplace Client for IP Office 48
Comments on this document? infodev@avaya.com
Page 49

Chapter 5: Managing calls
Making and handling calls
Using Avaya IX™ Workplace Client, you can:
• Make audio or video calls.
• Access call control functionality, such as mute, hold, resume, or end calls.
• Merge or transfer calls.
• Join or answer calls from multiple devices if Simultaneous mode is configured.
• Escalate from an audio call to a video call, a point-to-point call to a conference call, or an
instant message session to a call.
Call management overview
With Avaya IX™ Workplace Client, you can additionally manage calls using the following:
• MacBook Pro touch bar: On Avaya IX™ Workplace Client for Mac
• Avaya L100 Series Headsets (USB): On Avaya IX™ Workplace Client for Mac and Windows
• Plantronics headset: On Avaya IX™ Workplace Client for Mac and Windows
• CallKit: On Avaya IX™ Workplace Client for iOS
• Siri: On Avaya IX™ Workplace Client for iOS
Call management using the MacBook Pro touch bar
Introduced in MacBook Pro with OSX 10.12, the touch bar is a multitouch-enabled strip of glass
built into the keyboard for instant access to the tools that you want, right when you want them. The
touch bar replaces the function keys on the top of the keyboard and is more versatile and capable.
Avaya IX™ Workplace Client for Mac supports the MacBook Pro touch bar. While using Avaya IX
Workplace Client for Mac, the touch bar changes automatically to show you relevant tools based
on what you are doing.
With the MacBook Pro touch bar, you can:
• Answer an incoming audio or video call, or ignore the call.
• Use the active call functions, such as end call, hold or unhold, block or unblock video, and
mute or unmute audio.
™
July 2020 Using Avaya IX™ Workplace Client for IP Office 49
Comments on this document? infodev@avaya.com
Page 50

Managing calls
• Use the auto-correct and auto-suggest functions while composing text during an instant
messaging conversation.
• Use the media playback controls, such as play and pause.
Call management using Avaya Vantage
Avaya IX™ Workplace Client on Avaya Vantage™ supports the Off-hook dialing feature.
You can use a number of audio devices to support calls using Avaya IX™ Workplace Client on
Avaya Vantage™. For complete information, see Using Avaya Vantage™ Connect.
™
Making a call using Off-hook dialing
Procedure
1. To activate Off-hook dialing, do one of the following:
• On the Avaya Vantage™ device, lift the handset.
• On Avaya IX™ Workplace Client on Avaya Vantage™, open the Dialpad screen and then
tap the Speaker icon.
2. Dial a number.
Call management using an Avaya L100 Series USB headset
While using Avaya IX™ Workplace Client for Mac or Windows, the actions that you perform using
your desktop device and the Avaya L100 Series headset are synchronized.
You can use a USB connection from your Avaya L100 Series headset to your desktop device with
Avaya IX™ Workplace Client for Mac or Windows to do the following:
• Answer an incoming call.
You can also answer an incoming call while you are on an active call. Avaya IX™ Workplace
Client places the active call on hold.
• Dismiss an incoming call.
• Mute or unmute the call.
• Hold or retrieve the call.
• Swap between the active and most recently held call.
• End the call.
Note:
• Shared control mode and telecommuter mode do not support headset call control
functionality.
• If you have other applications, which are also using your headset, then the headset call
control functionality such as answer, mute, hold, or end do not work. You can then use
the headset only for audio. Avaya IX™ Workplace Client displays a notification about the
July 2020 Using Avaya IX™ Workplace Client for IP Office 50
Comments on this document? infodev@avaya.com
Page 51

Making and handling calls
limited call control functionality when Avaya IX™ Workplace Client chooses the headset
either at start-up or when you select the headset in Avaya IX™ Workplace Client.
Call management using a Plantronics headset
You can use a Plantronics headset with Avaya IX™ Workplace Client for Mac and Avaya IX
Workplace Client for Windows to do the following:
• Make calls using the primary line.
• Answer calls on the primary line.
You cannot answer a call if you receive multiple call alerts.
• Mute or unmute the call.
• Hold or retrieve the call.
You cannot retrieve a call if there are multiple calls in the on-hold state. Also, you cannot hold
the current call if there is already an on-hold call.
• Enter DTMF digits using the keypad.
• End the call.
™
• Toggle between two active calls. Toggling between calls will hold the current call and retrieve
the on-hold call.
• Use mid-call controls on a dual-registration call, a Meet Me conference call, or an Adhoc
conference call.
You cannot start a dual-registration call, a Meet Me conference call, or an Adhoc conference
call.
Call management using iOS CallKit
Introduced in iOS 10, CallKit is a new framework developed by Apple. CallKit enables VoIP
applications on iOS to adopt the native phone UI for calls. For example, before CallKit, incoming
calls on third-party VoIP applications, such as Avaya IX™ Workplace Client for iOS, were available
only as simple local notifications. With CallKit, incoming calls are displayed fully using the native
phone UI.
Avaya IX™ Workplace Client for iOS supports the CallKit framework on iOS 10 and later versions.
The CallKit framework is enabled by default. You can change the setting by using Avaya IX
Workplace Client for iOS application.
If CallKit is enabled, you can:
• Set Avaya IX™ Workplace Client for iOS as the default calling application using Mobile Device
Management or Apple Configurator.
• Long press the Call button on a contact to override the phone application and use Avaya IX
Workplace Client for iOS.
™
™
• Use your iOS do-not-disturb setting to suppress incoming calls.
July 2020 Using Avaya IX™ Workplace Client for IP Office 51
Comments on this document? infodev@avaya.com
Page 52

Managing calls
• Notice that blocked iOS calls are blocked.
• Use custom ringtones for a contact.
• Receive the same user experience for VoIP calls as native cellular calls for call alerts and
when you answer a call.
• Handle multiple calls with the same user experience as you did while handling multiple
cellular calls. Incoming VoIP calls have the same priority as cellular calls.
• Make and answer VoIP calls by using a Bluetooth headset.
You can also answer calls by using steering wheel controls.
• Make a call from a number of screens on the iOS device by using Avaya IX™ Workplace
Client for iOS.
• Use Apple CarPlay to view the call appearance on the in-car display with controls for end and
mute.
Note:
If you answer an incoming video call, the video is paused. You must resume the video by
using Avaya IX™ Workplace Client for iOS application.
Disabling CallKit on Avaya IX™ Workplace Client for iOS
About this task
Avaya IX™ Workplace Client for iOS supports the CallKit framework on iOS 10 and later versions.
By default, the CallKit framework is enabled.
Note:
To enable more than one VoIP call at a time, you must disable CallKit.
Procedure
1. In the Avaya IX™ Workplace Client settings, select User Preferences > Audio / Video.
Avaya IX™ Workplace Client displays the audio and video settings.
2. To disable CallKit, select Integrated Calls.
3. Save the changes.
Call management using Siri
SiriKit is a new framework developed by Apple, which you can use to make calls by using voice
commands on Avaya IX™ Workplace Client for iOS.
Avaya IX™ Workplace Client for iOS supports the SiriKit framework on iOS 11 and later versions.
The SiriKit framework is enabled by default.
You can use the following voice commands with Siri:
• Call <Local contact> with Equinox.
• Call <phone number> with Equinox.
July 2020 Using Avaya IX™ Workplace Client for IP Office 52
Comments on this document? infodev@avaya.com
Page 53

Making and handling calls
• Call my next meeting with Equinox.
• Dial next meeting with Equinox.
• Video call <Local contact> on Equinox.
• Video call my next meeting with Equinox.
• Call my virtual room on Equinox with video.
You can use Siri to call only local contacts by using Avaya IX™ Workplace Client.
Siri functionality
If you have:
• Overlapping meetings in your calendar, Avaya IX™ Workplace Client calls the first meeting in
the meeting list that has the Click to Join button.
• Two contacts with the same first name in the contacts list, Avaya IX™ Workplace Client calls
the contact that you created first.
To avoid this situation, use the full name or nick name to call a specific contact. For example,
Call Brian Smith with Equinox.
• Multiple virtual rooms, Avaya IX™ Workplace Client calls your default virtual room.
• A contact with multiple phone numbers, Avaya IX™ Workplace Client selects the first number
in the list for that contact.
Shared control mode overview
With the Shared control mode, you can use your deskphone for audio and the Avaya IX
Workplace Client for video. This mode is available on the supported Avaya deskphones that have
the Auto-answer feature.
Features supported in Shared control mode
You can use the Shared control mode to:
• Make a call
• Answer a call
• Place a call on hold
• Retrieve a call on hold
• Terminate a call
• Enter DTMF
• Redial
™
• Make an Attended transfer
• Make a Blind transfer
• Handle multiple calls
• Make Ad-hoc conference
July 2020 Using Avaya IX™ Workplace Client for IP Office 53
Comments on this document? infodev@avaya.com
Page 54

Managing calls
• Make Meet me conference
• Convert Conference calls to P2P calls
• Answer anonymous incoming calls
Enabling the Shared control mode
About this task
Enable the deskphone mode for desktop clients to make and handle calls. By default, the desktop
client uses your computer to make and handle calls.
Before you begin
Log in to your deskphone and Avaya IX™ Workplace Client using the same credentials.
Procedure
1. On the Top of Mind screen, click Manage audio and video devices.
2. In the Place and Receive Call Using field, click My Desk Phone.
Avaya IX™ Workplace Client displays notifications indicating that the deskphone mode is
active. The Manage audio and video icon on the Top of Mind screen changes to display a
deskphone icon. You can now handle your calls by using the Avaya IX™ Workplace Client
user interface and speak or listen using your deskphone.
Shared control mode limitations
Avaya IX™ Workplace Client in the Shared control mode does not support:
• Avaya Equinox® VDI
• E129 SIP Deskphone
• Avaya J129 IP Phone
• Avaya B179
• Avaya Vantage
• Avaya H175 SIP Deskphone
• D100 Series DECT SIP Phones
• The Shared control feature on Avaya IX™ Workplace Client mobile user interfaces
• Muting and unmuting a call
• Video calls. Video calling icons are disabled in the Shared control mode.
• Ignoring a call using the deskphone. Avaya IX™ Workplace Client does not stop the ringing
on the other client.
• Avaya IX™ Workplace Client does not display any message when analog phones are
connected through the Shared control mode.
™
July 2020 Using Avaya IX™ Workplace Client for IP Office 54
Comments on this document? infodev@avaya.com
Page 55

Making an audio or video call
About this task
In your Avaya IX™ Workplace Client, you can make an audio or video call from:
• The dialpad
• A contact card
• An enterprise search card, which searches IP Office Corporate or Internal System directories
• A call history record card
• An instant message card
Note:
The maximum number of calls that you can make at a time using Avaya IX™ Workplace Client
depends on the system configuration. Consult your system administrator for this capability.
Procedure
1. Select one of the following:
Making and handling calls
• Dialpad
• Top of Mind screen
• Contacts screen
• History screen
• Messages screen
• Enterprise user you want to call
2. To make a call from:
• The dialpad: Enter the number to call.
• The Top of Mind screen: In the find someone or name or number field, type the
number.
• An enterprise search result or an Avaya IX™ Workplace Client screen: Select the contact
person or number.
3. Select one of the following:
•
Audio Call (
•
Video Call ( )
)
Answering or ignoring a call
About this task
If you are already on a call, Avaya IX™ Workplace Client alerts you with a beep for waiting calls.
July 2020 Using Avaya IX™ Workplace Client for IP Office 55
Comments on this document? infodev@avaya.com
Page 56

Managing calls
If the administrator configures the Team Button feature for your extension, you can view a visual
notification with the monitored station name for incoming calls.
You might use applications such as Skype or Viber for VoIP calls. If you are on such a VoIP call
and use Avaya IX™ Workplace Client to answer an incoming call, Avaya IX™ Workplace Client
might display an error message. You see the error message when Avaya IX™ Workplace Client
cannot get audio resources to support the incoming call.
Note:
If CallKit is disabled and you receive a video call in Avaya IX™ Workplace Client for iOS when
your device is locked, you must unlock your iOS device to answer the call. If CallKit is enabled
and you answer a video call, the application pauses the video. You must resume the video by
using the Avaya IX™ Workplace Client for iOS application.
•
To receive the call, select .
•
To dismiss the call, select .
• (Optional) If the administrator hides the Caller ID for the Team Button feature, to view the
Caller ID, select
.
Managing calls
Using Avaya IX™ Workplace Client as the default application for telephony
services
About this task
Use this procedure only on desktop clients to configure Avaya IX™ Workplace Client as the default
application for telephony services. By using this procedure, you can use Avaya IX™ Workplace
Client as the primary application to make and receive calls instead of Microsoft Lync, Skype, or
any other desktop applications.
Procedure
1. In the Avaya IX™ Workplace Client settings, select User Preferences.
2. Select General.
3. Select Use Avaya IX Workplace as default application for telephony services.
4. Save the changes.
Sending all calls to voice mail when your presence status is set to “Do not disturb”
About this task
Use this procedure if you want Avaya IX™ Workplace Client to send all incoming calls to voice mail
when you set your presence status to “Do not disturb (DND)”.
Before you begin
Enable and log in to the VoIP service.
July 2020 Using Avaya IX™ Workplace Client for IP Office 56
Comments on this document? infodev@avaya.com
Page 57

Making and handling calls
Procedure
1. In the Avaya IX™ Workplace Client settings, select User Preferences.
2. (Optional) If available on the Avaya IX™ Workplace Client platform, select General.
Otherwise, go to the next step.
3. Select Activate SAC When DND Is Set.
Avaya IX™ Workplace Client sends all your incoming calls to voice mail when your
presence status is DND.
4. Save the changes.
Sending all calls to voice mail
About this task
Use this procedure to route all calls to a predefined number set on the server by the administrator.
The number is usually your corporate voice mail number.
Before you begin
Ensure that the administrator configured on the server the number to which you can route all calls.
Procedure
1. On the Top of Mind screen, select the presence status indicator.
2. Do one of the following:
• On mobile clients: Go to the Incoming Calls screen and select Send All Calls.
• On desktop clients: In the Incoming Call Features field, select Send All Calls.
Entering digits during a call
About this task
Use the keypad to enter any DTMF inputs during a call. For example, to interact with a conference
bridge or an Interactive Voice Response (IVR) system.
Procedure
1.
While on a call, select
2. On the keypad, enter the digits as required.
.
Muting and unmuting a call
Procedure
1.
While on a call, to mute the audio, select
.
Avaya IX™ Workplace Client mutes the microphone.
2. To unmute the audio, select the button again.
July 2020 Using Avaya IX™ Workplace Client for IP Office 57
Comments on this document? infodev@avaya.com
Page 58

Managing calls
Placing a call on hold and resuming the call
Procedure
1. To place a call on hold:
•
On mobile clients: Select
•
On desktop clients: Select .
Avaya IX™ Workplace Client puts the call on hold.
2. To resume the call, select the button again.
On mobile clients, if you are on a different screen in Avaya IX™ Workplace Client while
resuming the call, you must select Resume.
and then select .
Pausing and resuming a video call
About this task
When you pause a video call, Avaya IX™ Workplace Client stops transmitting your video to the
other party. When a video call is paused, you can still receive video from the other party and your
audio is still transmitted to the other party.
Procedure
1. To pause a video call, do one of the following:
•
On mobile clients: Select
•
On desktop clients: Select
Avaya IX™ Workplace Client pauses the video call.
2. To resume transmitting video, select the button again.
Avaya IX™ Workplace Client resumes the video call.
and then select .
.
Stopping the video transmission in a call
About this task
Use this procedure to stop the video transmission during a call. The call becomes audio-only.
Stopping video during a call does not disconnect the call.
Procedure
Do one of the following:
•
On mobile clients: Select
•
On desktop clients: Select
and then select Stop Video.
.
The video transmission stops and the Video area closes.
July 2020 Using Avaya IX™ Workplace Client for IP Office 58
Comments on this document? infodev@avaya.com
Page 59

Making and handling calls
Escalating an audio call to a video call or an instant message to a call
About this task
Use this procedure to escalate an audio call to a video call or an instant message to a call. If you
escalate the call to a video call, the person at the other end of the call must unblock the camera.
Note:
You must use Avaya IX™ Workplace Client Conferencing for this feature.
•
While on an active audio call, select Video Call ( ).
Avaya IX™ Workplace Client starts video on the call.
• While in a point-to-point instant messaging conversation, select one of the following from the
conversation window:
-
Audio Call (
-
Video Call (
If the participant has more than one number, you can choose a number.
• While in a multi-party instant messaging conversation, select one of the following from the
conversation window:
)
)
-
Audio Call (
-
Video Call ( ) and then Start a Video Conference
If the participant has more than one number, you can choose a number.
• While in an instant messaging conversation, in the Participants list, right-click or press and
hold a participant and select one of the following:
- Start a Voice Call
- Start a Video Call
If the participant has more than one number, you can choose a number.
) and then Start a Voice Conference
Transferring a call
About this task
Use this procedure to transfer a call. Call transfers are of the following types:
• Blind transfer: Transfer the call to a person without talking to that person to inform that you
are transferring the call.
• Consultative transfer: Talk to the person to whom you are transferring the call before you
actually transfer the call to that person.
Note:
Transferring video calls are not supported.
Procedure
Perform the following steps to perform a blind transfer:
July 2020 Using Avaya IX™ Workplace Client for IP Office 59
Comments on this document? infodev@avaya.com
Page 60

Managing calls
1.
2.
3. To transfer the call, choose:
Perform the following steps to perform a consultative transfer:
4. While on a call, dial the number of the user to whom you want to transfer the call.
5.
6.
7. To transfer the call, choose the existing held call.
While on a call, select More ( ).
Select Transfer Call (
• A contact: Only on mobile clients
• From history: Only on mobile clients
• A number to enter
Avaya IX™ Workplace Client transfers the call.
Select More ( ).
Select Transfer Call (
Avaya IX™ Workplace Client transfers the call.
).
).
Parking or retrieving a parked call
You can use the Call Park feature to retrieve a call that is on hold from any other telephone within
the system. For example, you can answer a call on one extension, park the call, and then retrieve
the call from another extension.
Note:
You can park or unpark calls only on desktop clients, and not on mobile clients.
In Avaya IX™ Workplace Client IP Office, the Call Park feature is supported using short codes. To
use this feature, your administrator must configure short codes in IP Office Web Manager or IP
Office Manager. For information about short codes, see Administering Avaya IP Office™ Platform
with Web Manager or Administering Avaya IP Office™ Platform with Manager.
Viewing call details
Viewing the call quality statistics
About this task
Use this procedure to know the call quality statistics, such as audio codec, round trip time, media
encryption type, packets received, and packets transmitted.
Call quality statistics are only available when a call is in progress.
July 2020 Using Avaya IX™ Workplace Client for IP Office 60
Comments on this document? infodev@avaya.com
Page 61

Procedure
Do one of the following:
• On mobile clients: While on a call, press and hold the timer on the call.
•
On desktop clients: While on a call, select and then select Call Statistics.
Deleting a call history entry
Procedure
1. Go to the History screen.
2. Do one of the following:
• On Avaya IX™ Workplace Client for Android: Press and hold the call entry and then
select Delete.
• On Avaya IX™ Workplace Client for iOS: Swipe the call entry and then select Delete.
•
On Avaya IX™ Workplace Client for Windows and Mac: Select the entry, select
then select Remove from call history.
Avaya IX™ Workplace Client deletes the call history entry.
Making and handling calls
, and
Deleting all call history
Procedure
1. Go to the History screen.
2. Filter the call history and select Delete All History.
3. (Optional) If available on the Avaya IX™ Workplace Client platform, in the confirmation
dialog box, select Delete.
Listening to voice mails
About this task
Use this procedure to listen to voice mails in VoIP deployments.
If you have unread voice mails, Avaya IX™ Workplace Client displays the unread Message Waiting
Indicator (MWI) (
Before you begin
The administrator must configure the Voicemail number field in IP Office Manager.
Procedure
Select the unread MWI ( ) icon.
) icon.
Avaya IX™ Workplace Client dials the voice mail access number and you can listen to your voice
mails.
July 2020 Using Avaya IX™ Workplace Client for IP Office 61
Comments on this document? infodev@avaya.com
Page 62

Managing calls
Ending a call
Procedure
While on a call, select
Avaya IX™ Workplace Client ends the call.
.
Emergency calls
Do not use Avaya IX™ Workplace Client to make emergency calls on mobile devices. Avaya
recommends that you check the product documentation that accompanies your mobile device to
learn about the emergency calling features available on your mobile device. However, you can
make emergency calls on non-mobile devices, such as the deskphone.
If you have any questions or concerns, contact your support team.
Hunt Groups overview
Avaya IX™ Workplace Client for IP Office supports the hunt group feature. A hunt group is a
collection of users handling similar types of calls, for example, a sales department.
The administrator can set up a hunt group of extensions that can handle calls for a department.
For every incoming call, IP Office hunts for the suitable available extension in the hunt group and
presents the call to that extension.
You can enable or disable a particular hunt group on your extension to accept or reject calls for
that hunt group on your extension.
Your administrator must configure hunt group in IP Office Web Manager or IP Office Manager.
After the administrator configures the hunt group, you can view the list of hunt groups that you are
a member of.
If the administrator enables the can change huntgroup membership option, you can enable and
disable a particular hunt group.
Viewing the hunt groups list
About this task
Avaya IX™ Workplace Client for IP Office displays the list of hunt groups configured by the
administrator for you. The administrator configures the default status of the hunt groups.
Before you begin
Ensure that the administrator has added your extension number in the hunt groups.
July 2020 Using Avaya IX™ Workplace Client for IP Office 62
Comments on this document? infodev@avaya.com
Page 63

Procedure
To view the list of hunt groups, do one of the following:
•
On mobile clients, on the Top of Mind screen, tap .
•
On desktop clients, on the home screen, click .
Result
Avaya IX™ Workplace Client displays the list of hunt groups that you are member of.
Enabling a hunt group manually
About this task
Use this procedure to manually enable a hunt group.
Before you begin
Ensure that the administrator has configured the hunt group feature for your extension.
Procedure
Making and handling calls
1. Do one of the following:
•
On mobile clients, on the Top of Mind screen, tap .
•
On desktop clients, on the home screen, click
Avaya IX™ Workplace Client displays the list of hunt groups configured by the administrator
for you.
2. Do one of the following to enable a hunt group:
• On mobile clients, slide the hunt group toggle switch to ON position to enable a hunt
group.
• On desktop clients, select the hunt group check box to enable a hunt group.
.
Result
Avaya IX™ Workplace Client enables you to receive calls for that hunt group.
Disabling a hunt group manually
About this task
Use this procedure to manually disable a hunt group.
Before you begin
Ensure that the administrator has configured the hunt group feature for your extension.
July 2020 Using Avaya IX™ Workplace Client for IP Office 63
Comments on this document? infodev@avaya.com
Page 64

Managing calls
Procedure
1. Do one of the following:
•
On mobile clients, on the Top of Mind screen, tap .
•
On desktop clients, on the home screen, click .
Avaya IX™ Workplace Client displays the list of hunt groups configured by the administrator
for you.
2. Do one of the following to disable a hunt group:
• On mobile clients, slide the hunt group toggle switch to OFF position to disable a hunt
group.
• On desktop clients, clear the hunt group check box to disable a hunt group.
Result
Avaya IX™ Workplace Client disables you from hunt groups and will not be able to receive calls for
that hunt group.
Enabling mobile twinning for incoming call
About this task
In Avaya IX™ Workplace Client for IP Office, you can enable mobile twinning to receive calls to the
twinned destination. After you enable mobile twinning, all incoming calls ring simultaneously in the
Avaya IX™ Workplace Client for IP Office and your twinned destination configured by the
administrator.
The twinned destination can be a mobile number or any external number; the user can dial
normally. It should include any prefix if necessary.
Note:
The mobile twinned destination rings for all incoming calls. If you are in an active call and you
receive another call you will hear a beep tone simultaneously in the Avaya IX™ Workplace
Client for IP Office and your twinned destination.
• You can press ** to switch from the active call and accept the incoming call.
• You can configure to route the incoming call to Interactive Voice Response (IVR) or to
forward the incoming call when the twinned destination is busy.
Before you begin
Ensure that the administrator has configured mobile twinning and added your mobile twinning
destination number.
Procedure
1. On the Top of Mind screen, select the presence status indicator.
July 2020 Using Avaya IX™ Workplace Client for IP Office 64
Comments on this document? infodev@avaya.com
Page 65

Making and handling calls
2. Do one of the following:
• On mobile clients, in the Incoming Call Features field, slide the Mobile Twinning
toggle switch to ON position.
• On desktop clients, in the Incoming Call Features field, click Mobile Twinning.
Result
All your incoming calls ring simultaneously in the Avaya IX™ Workplace Client for IP Office and on
your twinned destination.
Configuring call forwarding to destination for desktop clients
About this task
In Avaya IX™ Workplace Client for IP Office, you can configure to forward calls to destination. You
can select and set the destination number for the following call forwarding options:
• Forward All Calls
• Forward calls when you are busy
• Forward calls when you do not answer a call
Procedure
1. On the Top of Mind screen, select the presence status indicator.
2. In the Incoming Call Features field, click Call Forward.
Avaya IX™ Workplace Client for IP Office displays the Call Forward window.
3. On the Call Forward window, do any of the following:
• To forward all calls, select the All Calls check box and in the Number field, type the
destination number
• To forward calls when you are busy, select the When Busy check box and in the
Number field, type the destination number.
• To forward calls when you do not answer a call, select the When No Answer check box
and in the Number field, type the destination number.
Note:
When you enable All Calls, all calls are forwarded to destination number, irrespective
of whether both When Busy and When No Answer options are enabled.
Both When Busy and When No Answer call forwarding options use the same
destination number to forward the calls.
4. Click OK.
Result
Incoming calls to the Avaya IX™ Workplace Client for IP Office is forwarded to the set destination
number.
July 2020 Using Avaya IX™ Workplace Client for IP Office 65
Comments on this document? infodev@avaya.com
Page 66

Managing calls
Configuring call forwarding to destination for mobile clients
About this task
In Avaya IX™ Workplace Client for IP Office, you can configure to forward calls to destination. You
can select and set the destination number for the following call forwarding options:
• Forward All Calls
• Forward calls when you are busy
• Forward calls when you do not answer a call
Procedure
1. On the Top of Mind screen, select the presence status indicator.
2. In the Incoming Call Features field, click Call Forward.
Avaya IX™ Workplace Client for IP Office displays the Call Forward window.
3. On the Call Forward window, do any of the following:
• To forward all calls, slide the All Calls toggle switch to ON position.
Avaya IX™ Workplace Client for IP Office displays the Forward all incoming calls to
dialog box. Type the destination number
• To forward when you are busy, slide the When Busy toggle switch to ON position.
Avaya IX™ Workplace Client for IP Office displays the Forward all incoming calls only
when i’m busy to dialog box. Type the destination number.
• To forward when you do not want to answer a call, slide the When No Answer toggle
switch to ON position.
Avaya IX™ Workplace Client for IP Office displays the Forward all incoming calls only
when I don’t answer to dialog box. Type the destination number.
Note:
When you enable All Calls, all calls are forwarded to destination number, irrespective
of whether both When Busy and When No Answer options are enabled.
Both When Busy and When No Answer call forwarding options use the same
destination number to forward the calls.
4. Click OK.
Result
Incoming calls to the Avaya IX™ Workplace Client for IP Office is forwarded to the set destination
number.
July 2020 Using Avaya IX™ Workplace Client for IP Office 66
Comments on this document? infodev@avaya.com
Page 67

Chapter 6: Conferencing using Avaya
Equinox® Conferencing
Avaya Equinox® Conferencing overview
Avaya Equinox® Conferencing continues the evolution of conferencing with the following features:
• Meeting participation extended to include the WebRTC participant. You do not need any plugin to participate.
• An integrated portal that detects the browser or device you are on and connects you to the
meeting. This is possible using WebRTC or the native application.
• Audio participation extended to thousands.
• Automatic cloud provisioning for room systems.
The Avaya IX™ Workplace Client accesses Avaya Equinox® Meetings Online using HTTPS, from
within the Equinox Meetings tab of the client. The Avaya IX™ Workplace Client can access local
on-premise Avaya Equinox® Conferencing in the same way using HTTPS, that is, if the access
URL is configured under Equinox Meetings. However, if the Avaya IX™ Workplace Client accesses
local on-premise Avaya Equinox® Conferencing through SIP trunks, audio and video will be
available but not sharing or conference roster. The same applies for accessing Scopia over SIP
trunks too. Even when Avaya IX™ Workplace Client accesses local on-premise IP Office Meet Me
Conferencing, audio will be available but not sharing or conference roster.
Download and installation of Avaya Equinox® Conferencing client
The Avaya Equinox® Conferencing portal detects whether you have installed Avaya IX
Workplace Client.
• If Avaya IX™ Workplace Client is installed, Avaya IX™ Workplace Client is used to join a
conference.
• If Avaya IX™ Workplace Client is not installed, the portal prompts users to use the WebRTC
browser client only on desktops. Otherwise, you must install Avaya IX™ Workplace Client to
join the conference.
• If Avaya IX™ Workplace Client is installed but not logged-in, you can join the conference
without configuring your account.
July 2020 Using Avaya IX™ Workplace Client for IP Office 67
Comments on this document? infodev@avaya.com
™
Page 68

Conferencing using Avaya Equinox® Conferencing
The portal provides a mechanism to detect the version of the installed client and install any
required update, linking to the app store as appropriate for mobile clients.
User types
You can log in using your authorized credentials or log in as guest users.
Users with authorized credentials can be of the following types:
• UC Users: These users use Avaya IX™ Workplace Client as a primary client for voice and
video calls, voice workflow features, audio conferences, and instant messaging and
presence. A UC user can be a host or guest of any conference.
• OTT Hosts: These users do not use Avaya IX™ Workplace Client as a primary client, but
need to host audio conferences and present content. These users have a virtual room and
associated features, such as content library, recording resources, minutes, and notes. In this
context, OTT means that clients join the conference using HTTP-based protocols, not SIP.
Guest users can be of the following types:
• OTT guests: These users do not use Avaya IX™ Workplace Client as a primary client, but
need to join audio conferences as a guest. They might need to present using screen sharing.
• Outbound guest: An outbound guest is a user of the Avaya UC or OTT deployment who joins
an Avaya IX™ Workplace Client conference hosted by an external party. For example, an
Avaya Equinox® Conferencing user of XYZ Corp joins an Avaya Equinox® Conferencing 9.0
conference hosted by a user at ABC Corp.
• Inbound guest: An inbound guest is a user from an external company, such as a partner,
supplier customer, or prospect who joins a conference hosted by a user of the Avaya UC or
OTT deployment.
Avaya IX™ Workplace Client for Windows supports Integrated Windows Authentication (IWA) for
logging into an Avaya IX™ Workplace Client conference. If IWA is enabled, you can use your
Windows login credentials to log in to the conference.
Moderator role
Moderator role is determined automatically in the UC environment when you join from Avaya IX
Workplace Client. If you go to the conference portal first, the moderator role is determined based
on the login status of the portal.
When you join a conference, the Place participants in a ‘waiting room’ until the moderator
joins option might be selected by default. In this case, you are assigned the participant role
automatically and placed in a waiting room state. To become a moderator, you must make a
request and enter the moderator PIN. You can then start the conference.
™
July 2020 Using Avaya IX™ Workplace Client for IP Office 68
Comments on this document? infodev@avaya.com
Page 69

Starting a meeting
Procedure
1. Do one of the following:
• If you are logged in to Avaya IX™ Workplace Client, on the Top of Mind screen, select
Start My Meeting.
• If you are not logged in to Avaya IX™ Workplace Client, on the Join Meeting screen,
enter the details to start a meeting.
2. (Optional) To use Avaya IX™ Workplace Client for audio and video during the meeting,
ensure that Use Workplace for Audio + Video is enabled by default.
3. (Optional) To call back your number, disable Use Workplace for Audio + Video and do
one of the following:
• On mobile clients: Select Call Me Back and enter your number.
• On desktop clients: Select Callback my video number and enter your number.
4. (Optional) To view only the presentation, disable Use Workplace for Audio + Video and
do one of the following:
Avaya Equinox® Conferencing overview
• On mobile clients: Clear Call Me Back.
• On desktop clients: Clear Callback my video number.
5. Do one of the following:
• On mobile clients and Avaya IX™ Workplace Client for Windows: Select Join.
• On Avaya IX™ Workplace Client for Mac: Join Meeting.
Starting a conference by adding contacts to an existing call
About this task
Use this procedure to start an audio or video conference call using Avaya Equinox® Conferencing.
Before you begin
Remove the adhoc conference URI, that is, the value from the Adhoc Conference Address or
Server Address field.
Note:
You cannot configure the Adhoc Conference Address settings on Avaya IX™ Workplace
Client for Android on Avaya Vantage™.
Procedure
1. Start a call by doing one of the following:
• On the Contacts, History, or Messages screen, search for a contact.
July 2020 Using Avaya IX™ Workplace Client for IP Office 69
Comments on this document? infodev@avaya.com
Page 70

Conferencing using Avaya Equinox® Conferencing
• Dial the telephone number.
2. Select one of the following:
•
Audio Call ( ): To start an audio call.
•
Video Call ( ): To start a video call.
3. Start a conference call from the Contacts, History, or Messages screen by doing the
following:
a. Drag the card of the contact that you want to include in the conference and drop it
over the existing call.
b. Select Merge.
Avaya IX™ Workplace Client starts the conference call.
4. Start a conference call from the New Conversation screen by doing the following:
a. Select New conversation.
b. In the New Conversation screen, drag and drop contacts.
You can add one Contact to the New conversation for making a call. Adding more
than one contact disables the Call icons.
c.
Select Audio Call ( ) or Video Call ( ).
Avaya IX™ Workplace Client starts the conference call.
Merging two point-to-point calls to create a conference call
Before you begin
You must have multiple calls in progress.
Procedure
1. Do one of the following:
•
On mobile clients: For the active call, select and then select Merge and the call that
you want to merge.
• On desktop clients: Drag the contact card of the held call and drop it over the card of the
active call.
2. (Optional) If available on the Avaya IX™ Workplace Client platform, confirm whether you
want to merge the calls. Otherwise, go to the next step.
Avaya IX™ Workplace Client creates a conference.
3. Resume the held call.
Escalating a point-to-point call to a conference call
About this task
During a point-to-point call, you can escalate the call to conference to become the moderator.
July 2020 Using Avaya IX™ Workplace Client for IP Office 70
Comments on this document? infodev@avaya.com
Page 71

Avaya Equinox® Conferencing overview
Procedure
1.
For the active call, select and then select Merge and then select the conference call.
2. (Optional) If available on the Avaya IX™ Workplace Client platform, confirm whether you
want to merge the calls. Otherwise, go to the next step.
Avaya IX™ Workplace Client merges the active call to the conference call.
3. Resume the held call.
Joining a meeting
Joining a meeting from the Top of Mind screen
About this task
You can use Avaya IX™ Workplace Client to join a conference as a signed-in user or as a guest
user.
Before you begin
If you join a conference as a signed-in user, you must obtain login credentials from the conference
administrator. The conference might be configured so that only authenticated users can participate
in meetings, access webcasts, or watch recordings.
Procedure
1. Open Avaya IX™ Workplace Client.
2. On the Top of Mind screen, select Workplace Meetings.
Avaya IX™ Workplace Client displays the Workplace Meetings screen.
3. In the Your Name field, type the name that you want to display during the meeting.
4. In the Meeting ID field, type the meeting ID of the virtual room.
5. In the Meeting Address field, type the conference address.
6. (Optional) To use Avaya IX™ Workplace Client for audio and video during the meeting,
ensure that Use Workplace for Audio + Video is enabled.
7. (Optional) To call back your number, disable Use Workplace for Audio + Video and do
one of the following:
• On mobile clients: Select Call Me Back and enter your number.
• On desktop clients: Select Callback my video number and enter your number.
8. (Optional) To view only the presentation, disable Use Workplace for Audio + Video and
do one of the following:
• On mobile clients: Clear Call Me Back.
• On desktop clients: Clear Callback my video number.
July 2020 Using Avaya IX™ Workplace Client for IP Office 71
Comments on this document? infodev@avaya.com
Page 72

Conferencing using Avaya Equinox® Conferencing
9. Do one of the following:
• On mobile clients and Avaya IX™ Workplace Client for Windows: Select Join.
• On Avaya IX™ Workplace Client for Mac: Join Meeting.
Joining a meeting as a guest user
Procedure
1. Open Avaya IX™ Workplace Client.
2. To join a meeting, select Join a Meeting.
Avaya IX™ Workplace Client displays the Join Meeting screen.
3. In the Your Name field, type the name that you want to display during the meeting.
4. In the Meeting ID field, type the meeting ID of the virtual room.
5. In the Meeting Address field, type the conference address.
6. (Optional) To use Avaya IX™ Workplace Client for audio and video during the meeting,
ensure that Use Workplace for Audio + Video is enabled by default.
7. (Optional) To call back your number, disable Use Workplace for Audio + Video and do
one of the following:
• On mobile clients: Select Call Me Back and enter your number.
• On desktop clients: Select Callback my video number and enter your number.
8. (Optional) To view only the presentation, disable Use Workplace for Audio + Video and
do one of the following:
• On mobile clients: Clear Call Me Back.
• On desktop clients: Clear Callback my video number.
9. Do one of the following:
• On mobile clients and Avaya IX™ Workplace Client for Windows: Select Join.
• On Avaya IX™ Workplace Client for Mac: Join Meeting.
Joining a meeting by signing in
Before you begin
Obtain login credentials from the conference administrator. The conference might be configured so
that only authenticated users can participate in meetings, access webcasts, or watch recordings.
Procedure
1. Open Avaya IX™ Workplace Client.
2. To join a meeting, select Join a Meeting.
Avaya IX™ Workplace Client displays the Join Meeting screen.
3. Select Sign In.
July 2020 Using Avaya IX™ Workplace Client for IP Office 72
Comments on this document? infodev@avaya.com
Page 73

Avaya Equinox® Conferencing overview
4. In the URL field, type the meeting address.
5. Select Next.
6. Enter your credentials for the meeting portal.
7. Select one of the following:
• Next
• Sign In
Joining a meeting using a supported browser without signing in
About this task
Use this procedure to join a meeting only on desktops by using a supported browser.
Procedure
1. Open the conference link in a supported browser.
2. In the Your Name field, type the name that you want to display during the meeting.
3. In the Meeting ID field, type the meeting ID of the virtual room.
4. Select Join and click one of the following:
• Audio/Video + Presentation: To join a meeting with audio and video, and share or view
data.
• Presentation Only: To join a meeting and only share or view data.
Joining a meeting using a supported browser by signing in
About this task
Use this procedure to join a meeting only on desktops by using a supported browser.
Before you begin
Obtain login credentials from the conference administrator. The conference might be configured so
that only authenticated users can participate in meetings, access webcasts, or watch recordings.
Procedure
1. Open the conference link in a supported browser.
2. Select Sign In.
3. Enter your login credentials.
4. (Optional) To enable the browser to store your login credentials, select Keep me signed
in.
5. Select Sign In.
6. Do one of the following:
• In the Join a Meeting area, in the Meeting ID field, type the meeting ID of the virtual
room.
July 2020 Using Avaya IX™ Workplace Client for IP Office 73
Comments on this document? infodev@avaya.com
Page 74

Conferencing using Avaya Equinox® Conferencing
• In the My Meeting area, ensure that your meeting address is auto-populated.
7. Select Join and click one of the following:
• Audio/Video + Presentation: To join a meeting with audio and video, and share or view
data.
• Presentation Only: To join a meeting and only share or view data.
If you are hosting the meeting, your computer does not send video or audio. However,
you can view the participant list and moderate, chat, and share content.
Adding a participant to a meeting
About this task
Use this procedure to invite participants to an ongoing Avaya IX™ Workplace Client video
conference from any endpoint. You can invite both individual users and people in meeting rooms
equipped with room systems. With Avaya Equinox® Conferencing, you can invite participants by
using:
• The participant's name from the organization's directory.
• The number of the room system or the dedicated endpoint.
• The phone number, E.164 address, IP address, or SIP address of the room system or
dedicated endpoint.
You must have moderator's rights to invite participants. By default, any participant in a video
conference can be a moderator, unless a virtual room is protected by its owner. You still might be
able to invite other users to a video conference if the owner of the video conference shares the
moderator PIN with you.
Procedure
On mobile clients, do the following:
1. On the Conference screen, do one of the following:
•
Select More (
• On the Participants screen, select Add participant (+).
2. In the Add participant to the meeting area, select one of the following:
• Choose a Contact or Terminal
• Enter a Number or Address
3. Select the contact or terminal from your contacts list or dial a number or address.
Avaya IX™ Workplace Client adds the participant to the meeting.
On desktop clients, do one of the following:
4. On the Contacts screen or the History screen, drag the card of a contact or terminal and
drop it over the existing conference card that includes the participants.
) and then select Add participant ( ).
Avaya IX™ Workplace Client adds the participant to the meeting.
July 2020 Using Avaya IX™ Workplace Client for IP Office 74
Comments on this document? infodev@avaya.com
Page 75

Avaya Equinox® Conferencing overview
5. From the Conference screen, dial the number of a person or terminal that you want to add
to the conference:
a.
Select Meeting controls ( ) or More ( ).
b. Select Add Someone to Call.
c. Dial the telephone number or address.
d. Select Add to Meeting.
Avaya IX™ Workplace Client adds the participant to the meeting.
Requesting access to join a meeting
About this task
Use this procedure to request access to a meeting that is locked. The moderator can accept or
deny your request.
Procedure
1. Enter the participant code to enter the meeting.
The moderator receives a notification and you can view a message stating that you are
requesting access.
2. Do one of the following:
• Wait for the moderator to allow you to join the meeting.
• End Call: Disconnect the call without joining the meeting.
Accessing your meeting portal
About this task
Use this procedure to access your meeting portal. You can use the meeting portal to access
recordings, schedule your meetings, and configure the virtual room settings.
Procedure
On the Top of Mind screen, select Go to My Meeting Portal.
Inviting participants to a meeting
About this task
Use this procedure to invite participants to your meeting by email or by using the meeting address.
Before you begin
Log in to your meeting portal.
July 2020 Using Avaya IX™ Workplace Client for IP Office 75
Comments on this document? infodev@avaya.com
Page 76

Conferencing using Avaya Equinox® Conferencing
Procedure
1.
In the My Meeting area, select Share ( ).
2. Select one of the following:
• E-mail invite: To use your email application.
• Copy link: To copy the meeting address and paste it into an instant message.
Scheduling a meeting
Procedure
1. Log in to your meeting portal.
2. (Optional) On mobile clients, open the menu.
3. Select Schedule.
4. Select Add New Schedule (+).
5. On the Schedule a Meeting screen, enter the details.
6. To send an email to the recipients of the meeting, select Send.
Schedule a Meeting field descriptions
Name
To The names of the participants in the meeting.
Subject The subject line of the meeting.
Start Time The date and time of the meeting.
Duration The duration of the meeting.
Recurring To indicate whether the meeting is recurring.
Repeats The frequency at which the meeting is repeated.
Every The number of days after which the meeting is repeated.
Start Time The start date and time of the recurring meeting.
End Date The end date of the recurring meeting.
Location The virtual room of the meeting.
Message The details of the meeting.
Endpoints The endpoints for the meeting.
Broadcast
Broadcast this meeting (live stream) To broadcast this meeting.
Broadcast PIN The PIN to broadcast this meeting.
Description
Table continues…
July 2020 Using Avaya IX™ Workplace Client for IP Office 76
Comments on this document? infodev@avaya.com
Page 77

Avaya Equinox® Conferencing overview
Name Description
Same as meeting PIN To indicate that the broadcast PIN is same as the meeting PIN.
Add an image to help viewers identify
The image to help viewers identify the broadcast.
this broadcast
Enter a description of the broadcast The description for the broadcast.
Direct URL The direct URL to access the broadcast.
Recording and broadcast profile The value for the recording and broadcast profile:
• Default
• 360p
• 720p
• 1080p
Broadcast can be accessed by The broadcast can be accessed by all users or only
authenticated users.
Show broadcast in list of public
events
To indicate that the broadcast is displayed in the list of public
events.
Automatically record broadcast To automatically record the broadcast.
Enable Q&A chat with viewers To enable chat with viewers.
Meeting Option
Meeting PIN The PIN that participants must enter to join your meeting.
Meeting Host The name of the meeting host.
Moderator PIN The PIN that moderators can use to perform specific actions in
the virtual room.
Place participants in a ‘waiting room’
until the moderator joins
To let other participants enter your virtual room only after the
moderator joins the video conference.
Record this meeting To record the meeting.
Terminate at scheduled time and alert
in advance (minutes)
Terminate after all participants left the
meeting (minutes)
To end the meeting at the scheduled time and to specify the
alert time in advance in minutes.
To specify the meeting end time in minutes after all participants
leave the meeting.
Reserved Ports
Full High Definition The port reserved for full high definition.
Endpoints must support resolutions of 1080p and lower.
High Definition The port reserved for high definition.
Endpoints support resolutions of 720p and lower.
Standard Definition The port reserved for standard definition.
Endpoints support resolutions of 352p and lower.
Endpoint options
Table continues…
July 2020 Using Avaya IX™ Workplace Client for IP Office 77
Comments on this document? infodev@avaya.com
Page 78

Conferencing using Avaya Equinox® Conferencing
Name Description
Endpoint options To select an endpoint.
Auto-Dial To select auto-dial.
On Master MCU To select on master MCU.
Customizing your virtual room
About this task
In Avaya Equinox® Conferencing, a virtual room, also known as a meeting room, offers a virtual
meeting place for adhoc or scheduled conferences. Administrators can configure multiple virtual
rooms for a user.
Most people use the default settings of their virtual rooms. This procedure explains how to
customize your virtual room for an optimal conferencing experience.
Before you begin
To make changes, ensure that your virtual room is not in a meeting.
Procedure
1. Log in to your meeting portal.
2. (Optional) On mobile clients, open the menu.
3. Select Settings.
4. Select Virtual Room.
5. Update the virtual room details.
6. Select OK.
Virtual Room field descriptions
Name
Virtual Room Number To select your virtual room number if you have another virtual
Virtual Room Name To set the name of your virtual room that appears in the title
Description To describe your virtual room.
Description
room.
bar of the Virtual Room window.
Table continues…
July 2020 Using Avaya IX™ Workplace Client for IP Office 78
Comments on this document? infodev@avaya.com
Page 79

Avaya Equinox® Conferencing overview
Name Description
Meeting Type To select the meeting type that Avaya IX™ Workplace Client
Conferencing uses.
Meeting types, also known as MCU services, are meeting
templates that determine the core characteristics of a meeting.
Consult your video network administrator before changing this
setting.
Moderator PIN To set the moderator PIN so that only users with the PIN can
perform moderator actions in your virtual room.
Leave this field blank to allow everyone in your meetings to
use moderator controls.
Protect meeting with a PIN To protect your meeting with a PIN.
Only authorized users can join your meeting.
Permanent PIN To set the access PIN for all video conferences held in your
virtual room.
Use one-time PIN for each meeting To use a new access PIN at the beginning of every video
conference that you create in your virtual room.
Participants must enter this PIN to join your meetings.
Default Room To use this virtual room as the default room for all video
conferences.
Allow requests to join locked
meetings
Turn on recordings automatically at
the start of meetings
Place participants in a ‘waiting room’
until the moderator joins
Advanced
Max Participants To specify the maximum number of participants who can join
Search Endpoints To search for endpoints.
To provide a message prompt to users who try to enter a
locked meeting.
Users can then send a joining request to the video conference
moderator.
To automatically record all video conferences in your virtual
room.
You must set the moderator PIN before you select this feature.
To let other participants enter your virtual room only after you
join the video conference.
You must set the moderator PIN before you select this feature.
the video conference.
Accessing the recordings and events
Procedure
1. Log in to your meeting portal.
July 2020 Using Avaya IX™ Workplace Client for IP Office 79
Comments on this document? infodev@avaya.com
Page 80

Conferencing using Avaya Equinox® Conferencing
2. (Optional) On mobile clients, open the menu.
3. Select Recordings + Events.
4. Select one of the following:
• Recommended: To view the recently added and most viewed recordings.
You can view the details of a recording, copy the recording link, share the recording link
by email, and download the recording.
• Events: To view any live events.
• My Recordings: To view your recordings.
You can view the details of a recording, copy the recording link, share the recording link
by email, and download the recording. You cannot view this option as a guest user.
• All Recordings: To view all recordings.
You can view the details of a recording, copy the recording link, share the recording link
by email, and download the recording.
• Trash: To view the deleted recordings.
You cannot view this option as a guest user.
• Search: To search for a recording.
User Settings field descriptions
Name
Edit Profile Photo To select a profile picture for your account.
Time Zone To select a time zone for your account.
Location To select a location for your account.
Default Virtual Room To select a default virtual room for your account if you have
Description
The Automatic option is selected by default.
another virtual room.
General Settings field descriptions
The following fields are read-only.
Name
User name The signed-in user name.
Email The email address of the signed-in user.
First Name The first name of the signed-in user.
Description
Table continues…
July 2020 Using Avaya IX™ Workplace Client for IP Office 80
Comments on this document? infodev@avaya.com
Page 81

Avaya Equinox® Conferencing overview
Name Description
Last Name The last name of the signed-in user.
Telephone (Office) The office telephone number of the signed-in user.
Maximum bandwidth allowed The maximum bandwidth that is allowed during the video
conference meeting.
Personal Endpoint The name of the personal endpoint.
Allow streaming To indicate whether streaming is enabled or disabled.
Allow recording To indicate whether recording is enabled or disabled.
Groups The user group that the signed-in user is a part of.
Schedulable To indicate whether the meeting is scheduled.
Reservable To indicate whether the meeting is reserved.
Changing the meeting portal password
Procedure
1. Log in to your meeting portal.
2. (Optional) On mobile clients, open the menu.
3. Select Settings > Change Password.
4. In the Current Password field, enter your existing password.
5. In the New Password field, enter your new password.
6. In the Repeat New Password field, reenter your existing password.
7. Save the changes.
Configuring the local settings
Procedure
1. Log in to your meeting portal.
2. (Optional) On mobile clients, open the menu.
3. Select Settings.
4. To change to the default settings, select Reset to default.
5. (Optional) On desktop clients, select Enable Avaya IX Workplace on this PC.
6. Save the changes.
July 2020 Using Avaya IX™ Workplace Client for IP Office 81
Comments on this document? infodev@avaya.com
Page 82

Conferencing using Avaya Equinox® Conferencing
Handling conference calls
Viewing the call statistics of a conference call
About this task
Use this procedure to view the audio and video statistics of a conference call.
Procedure
Do one of the following:
• On mobile clients: Press and hold the call timer.
•
On desktop clients: On the Conference screen, select
•
On desktop clients: On the Conference screen, select
Viewing the link quality indicator
About this task
and then select Call Statistics.
and then select Call Statistics.
If you are on an advanced conference call, you can view the link quality indicator. The link quality
indicator provides an indication of the network quality.
Procedure
While on a conference call, check the link quality indicator next to the call timer.
The number of bars in the link quality indicator indicates the quality of the network.
• 5 bars: Indicates that network conditions are optimal.
• 4 bars: Indicates that there are minor network issues.
• 3 bars: Indicates that network issues have been detected.
• 2 bars: Indicates that there are moderate network issues.
• 1 bar: Indicates that there are severe network issues.
• 0 bar: Indicates that Avaya IX™ Workplace Client does not have any audio or video media.
Avaya IX™ Workplace Client also displays this state when you are on a held call, shared control
mode call, or presentation-only mode call.
Requesting permission to speak in the Lecture mode
About this task
Use this procedure to request permission from the moderator to speak. In the Lecture mode, all
participants are muted except the lecturer.
Procedure
1. On the Conference screen, in the Participants area, select your contact card.
July 2020 Using Avaya IX™ Workplace Client for IP Office 82
Comments on this document? infodev@avaya.com
Page 83

Avaya Equinox® Conferencing overview
2. Right-click or press and hold the contact card, and select Raise Hand.
Avaya IX™ Workplace Client displays a raised hand in the Participants area next to your
contact card.
Viewing the meeting encryption status
About this task
Use this procedure to receive the meeting encryption status when you enter a meeting or when
the status changes during a‘ call.
Procedure
On the Conference screen, a lock icon indicates whether the conference is encrypted, not
encrypted, or partially encrypted.
Requesting to become a moderator
About this task
If you join a conference that is protected by a moderator PIN, you get the participant role
automatically. You get the moderator role and capabilities after you enter the moderator PIN.
Procedure
1. On the Conference screen, do one of the following:
•
On mobile and desktop clients: Select .
•
On desktop clients: Select
2. Do one of the following:
•
On mobile clients: Select
• On Avaya IX™ Workplace Client for Mac: Select Moderator Controls.
• On Avaya IX™ Workplace Client for Windows: Select Conference Features.
3. Select Become Moderator.
4. Use the keypad to enter the moderator code.
You become the conference moderator.
.
.
Managing the conference as a moderator
Recording a meeting
About this task
You can only do this task if you are a moderator.
July 2020 Using Avaya IX™ Workplace Client for IP Office 83
Comments on this document? infodev@avaya.com
Page 84

Conferencing using Avaya Equinox® Conferencing
If the meeting recording fails, all participants receive a notification stating that the recording has
stopped. Additionally, the moderator gets a failed notification.
Procedure
1. On the Conference screen, do one of the following:
•
On mobile and desktop clients: Select .
•
On desktop clients: Select .
2. Do one of the following:
•
On mobile clients: Select
• On Avaya IX™ Workplace Client for Mac: Select Moderator Controls.
• On Avaya IX™ Workplace Client for Windows: Select Conference Features.
3. To start recording, select Recording.
4. Add an appropriate name and description to identify the recording.
Avaya IX™ Workplace Client starts recording the meeting.
5. (Optional) You can pause and resume the recording.
.
6. To stop recording, select Recording.
Avaya Equinox® Conferencing saves the recording on the Conferencing server.
Disabling the mute option for all participants in a conference
About this task
When the moderator enables the Lecture mode feature, all participants are muted in the
conference. The participants can only listen to the moderator and cannot unmute their audio.
When an event conference starts, the Lecture mode feature is enabled automatically. Participants
are muted, but presenters are not.
Procedure
1. On the Conference screen, do one of the following:
•
On mobile and desktop clients: Select .
•
On desktop clients: Select
2. Do one of the following:
•
On mobile clients: Select .
• On Avaya IX™ Workplace Client for Mac: Select Moderator Controls.
• On Avaya IX™ Workplace Client for Windows: Select Conference Features.
.
3. To toggle the Lecture Mode feature on and off, select Lecture Mode.
July 2020 Using Avaya IX™ Workplace Client for IP Office 84
Comments on this document? infodev@avaya.com
Page 85

Avaya Equinox® Conferencing overview
Locking or unlocking the conference
About this task
The moderator can lock the conference to prevent new participants from joining the call. However,
the moderator can continue to add participants to the conference.
Procedure
1. On the Conference screen, do one of the following:
•
On mobile and desktop clients: Select .
•
On desktop clients: Select .
2. Do one of the following:
•
On mobile clients: Select
• On Avaya IX™ Workplace Client for Mac: Select Moderator Controls.
• On Avaya IX™ Workplace Client for Windows: Select Conference Features.
3. To toggle the Lock Meeting feature on and off, select Lock Meeting.
.
Muting or unmuting all participants in a conference
About this task
Use this procedure to mute the audio of all participants in a conference, including participants with
presenter privileges. When you mute all participants, the participants can only listen to the
moderator. Anyone can unmute themselves.
Procedure
1. On the Conference screen, do one of the following:
•
On mobile and desktop clients: Select .
•
On desktop clients: Select
2. Do one of the following:
•
On mobile clients: Select
• On Avaya IX™ Workplace Client for Mac: Select Moderator Controls.
• On Avaya IX™ Workplace Client for Windows: Select Conference Features.
3. To mute all participants in the conference, select Mute Everyone.
4. To unmute all participants in the conference, select Unmute Everyone.
.
.
Granting permission to a participant to speak in the Lecture mode
About this task
You can only do this task if you are a moderator.
July 2020 Using Avaya IX™ Workplace Client for IP Office 85
Comments on this document? infodev@avaya.com
Page 86

Conferencing using Avaya Equinox® Conferencing
Procedure
1. On the Conference screen, in the Participants area, select the contact card of the
participant with the raised hand.
2. Right-click or press and hold the contact card, and select Lower Hand.
3. Unmute the participant.
The unmuted participant receives a notification.
Changing the position and zoom of the endpoint’s camera
About this task
Use the Far End Camera Control feature to change the position and zoom of the endpoint’s
camera. You can only do this task if you are a moderator.
Before you begin
Camera rooms must be present in the meeting.
Procedure
1. On the Conference screen, do one of the following:
•
On mobile and desktop clients: Select
•
On desktop clients: Select
2.
(Optional) On mobile clients, select
3. Select Control Camera, and select the camera of the participant that you want to control.
4. Choose the action that you want to perform:
• Up: Move the camera upwards.
• Down: Move the camera downwards.
• Right: Move the camera to the right.
• Left: Move the camera to the left.
• In: Zoom in the camera to make the focus area nearer.
• Out: Zoom out the camera to make the focus area farther away.
Viewing the dial-in information
Procedure
1. On the Conference screen, do one of the following:
•
On mobile and desktop clients: Select
•
On desktop clients: Select
.
.
.
.
.
2.
(Optional) On mobile clients, select
3. Select Dial-in Information.
You can view the dial-in information.
July 2020 Using Avaya IX™ Workplace Client for IP Office 86
Comments on this document? infodev@avaya.com
.
Page 87

Avaya Equinox® Conferencing overview
Approving or declining a participant request to join a locked meeting
About this task
You can only do this task if you are a moderator.
Before you begin
A participant must request access to join the locked meeting.
Procedure
1. On the Conference screen, in the Participants area, select the notification request.
2. In the Requesting Admission area, do one of the following:
• Select the participant name and then select Admit to Meeting or Refuse Admittance.
• Admit All.
• Refuse All.
Extending the meeting end time
About this task
Use this procedure to extend the scheduled or adhoc meeting if the meeting policy has a specified
end time. You can only do this task if you are a moderator.
Before you begin
• A meeting must be in progress.
• The meeting is scheduled for a particular duration.
Procedure
1. On the Conference screen, do one of the following:
•
On mobile and desktop clients: Select
•
On desktop clients: Select
2.
(Optional) On mobile clients, select .
3. Select Extend Meeting.
4. Select one of the following:
• 15 minutes
• 30 minutes
• 60 minutes
All participants in the conference receive an audible message that states that the meeting
is extended.
.
.
July 2020 Using Avaya IX™ Workplace Client for IP Office 87
Comments on this document? infodev@avaya.com
Page 88

Conferencing using Avaya Equinox® Conferencing
Managing conference participants
Selecting a participant as a lecturer
About this task
You must have moderator's rights to set yourself or any other participant as a lecturer. In the
Lecture mode, all participants are muted except the lecturer, unless the moderator unmutes a
participant who requests permission to speak.
This mode is tailored for distance learning, but you can also use it for other purposes such as an
executive addressing employees during companywide gatherings.
Procedure
1. On the Conference screen, in the Participants area, select the contact card of the
participant.
2. Right-click or press and hold the contact card, and do one of the following:
• On mobile clients: Select Promote to Lecturer.
• On desktop clients: Select Lecturer.
3. In the confirmation dialog box, confirm the action.
Avaya IX™ Workplace Client promotes the participant to a lecturer.
Demoting a lecturer to a participant
About this task
You must have moderator's rights to demote a lecturer to a participant.
Before you begin
Ensure that the Lecture mode is active.
Procedure
1. On the Conference screen, in the Participants area, select the contact card of the lecturer.
2. Right-click or press and hold the contact card, and do one of the following:
• On mobile clients: Select Demote from Lecturer.
• On desktop clients: Select Lecturer.
3. In the confirmation dialog box, confirm the action.
Avaya IX™ Workplace Client demotes the lecturer to a participant.
Muting or unmuting a participant in a conference
About this task
Use this procedure to mute or unmute the audio of a participant in a conference.
You can only do this task if you are a moderator.
July 2020 Using Avaya IX™ Workplace Client for IP Office 88
Comments on this document? infodev@avaya.com
Page 89

Avaya Equinox® Conferencing overview
Procedure
1. On the Conference screen, in the Participants area, select the contact card of the
participant.
2. To mute a participant, right-click or press and hold the contact card, and do one of the
following:
• On mobile clients: Select Mute Participant.
• On desktop clients: Select Mute.
3. To unmute a participant, right-click or press and hold the contact card, and do one of the
following:
• On mobile clients: Select Unmute Participant.
• On Avaya IX™ Workplace Client for Mac: Select Unmute.
• On Avaya IX™ Workplace Client for Windows: Toggle Mute.
Blocking or unblocking the video of a participant in a conference
About this task
You can only do this task if you are a moderator.
Procedure
1. On the Conference screen, in the Participants area, select the contact card of the
participant.
2. To block the video, right-click or press and hold the contact card, and do one of the
following:
• On mobile clients: Select Block Camera.
• On desktop clients: Select Block video.
3. To unblock the video, right-click or press and hold the contact card, and do one of the
following:
• On mobile clients: Select Unblock Camera.
• On Avaya IX™ Workplace Client for Mac: Select Unblock video.
• On Avaya IX™ Workplace Client for Windows: Toggle Block video.
4.
To view the participants not in the video conference, select
Video.
Promoting a participant to moderator or presenter
Procedure
and then select Not in
1. On the Conference screen, in the Participants area, select the contact card of the
participant.
July 2020 Using Avaya IX™ Workplace Client for IP Office 89
Comments on this document? infodev@avaya.com
Page 90

Conferencing using Avaya Equinox® Conferencing
2. To promote a participant to moderator, right-click or press and hold the contact card, and
do one of the following:
• On mobile clients: Select Promote to Moderator.
• On desktop clients: Select Moderator.
3. To promote a participant to presenter, right-click or press and hold the contact card, and do
one of the following:
• On mobile clients: Select Promote to Presenter.
• On desktop clients: Select Presenter.
4. In the confirmation dialog box, confirm the action.
Dropping a participant from a conference
About this task
You can only do this task if you are a moderator.
Procedure
1. On the Conference screen, in the Participants area, select the contact card of the
participant.
2. Right-click or press and hold the contact card, and do one of the following:
• On mobile clients: Select Drop from meeting.
• On desktop clients: Select Drop from call.
3. In the confirmation dialog box, confirm the action.
Viewing the participants in a conference
Procedure
1.
On the Conference screen, in the Participants area, select
2. Do one of the following:
• On Avaya IX™ Workplace Client for iOS: Select Everyone.
• On Avaya IX™ Workplace Client for Android and desktop platforms: Select All
Participants.
Viewing the recent speakers in the conference
Procedure
1.
On the Conference screen, in the Participants area, select
2. Select Recent Talkers.
.
.
July 2020 Using Avaya IX™ Workplace Client for IP Office 90
Comments on this document? infodev@avaya.com
Page 91

Avaya Equinox® Conferencing overview
Viewing the web collaboration participants
Procedure
1.
On the Conference screen, in the Participants area, select
2. To view the participants in the web collaboration:
• On Avaya IX™ Workplace Client for iOS: Select In Collab.
• On Avaya IX™ Workplace Client for Android and desktop platforms: Select In
Collaboration.
3. To view the participants not currently accessing the web collaboration:
• On Avaya IX™ Workplace Client for iOS: Select Not in Collab.
• On Avaya IX™ Workplace Client for Android and desktop platforms: Select Not in
Collaboration.
.
Viewing the participants who dropped from a conference
Procedure
1.
On the Conference screen, in the Participants area, select
2. Do one of the following:
• On mobile clients: Select Dropped.
• On desktop clients: Select Dropped Participants.
.
Viewing participants with raised hands
About this task
You can only do this task if you are a moderator.
Procedure
1.
On the Conference screen, in the Participants area, select
2. Select Raised Hands.
.
Sorting the participants in the conference
About this task
Use this procedure to sort the participants on the Conference screen alphabetically or according to
their order of arrival.
Procedure
1.
On the Conference screen, in the Participants area, select
On mobile clients, do the following:
2. Select one of the following:
• Alphabetic - Ascending
July 2020 Using Avaya IX™ Workplace Client for IP Office 91
Comments on this document? infodev@avaya.com
.
Page 92

Conferencing using Avaya Equinox® Conferencing
• Alphabetic - Descending
• Most Recent First
• Most Recent Last
Avaya IX™ Workplace Client sorts the participants on the Conference screen according to
your selection.
On desktop clients, do the following:
3. Select one of the following:
• Alphabetically
• Reverse alphabetically
• Order of arrival
• Reverse order of arrival
Avaya IX™ Workplace Client sorts the participants on the Conference screen according to
your selection.
Ending a conference
About this task
If you are a conference owner or PIN-protected moderator and use on desktop clients to end
the conference, you can view the following options:
• End for Me: If you select this option, the meeting continues without you.
• End for Everyone: If you select this option, all participants receive an audio alert that the
meeting is ending and then the meeting ends for everyone.
Procedure
1. On the Conference screen, do one of the following:
•
On mobile and desktop clients: Select
•
On desktop clients: Select
2. Do one of the following:
•
On mobile clients: Select
• On Avaya IX™ Workplace Client for Mac: Select Moderator Controls > End Meeting
For Everyone.
• On Avaya IX™ Workplace Client for Windows: Select Conference Features > End
Meeting For Everyone.
.
> End Meeting For Everyone.
.
3. In the confirmation dialog box, confirm the action.
July 2020 Using Avaya IX™ Workplace Client for IP Office 92
Comments on this document? infodev@avaya.com
Page 93

Chapter 7: Managing contacts
The Contacts feature provides information about the following:
• Contacts from IP Office Corporate or Internal System directory; IP Office users and hunt
groups either for the local node or the whole SCN. The contacts are not store locally on the
device, but are available during contact search.
• Avaya IX™ Workplace Client contacts, which are IP Office Personal directory contacts of the
individual user. The contacts are downloaded when you log in and stored locally on the device.
• Favorite contacts. You can favorite only the Avaya IX™ Workplace Client contacts.
• Local contacts
Use the Contacts feature to:
• View the details of contacts.
• Create a new contact.
• Make a voice or video call to a contact or a group of contacts.
• Send an email to any contact using the default or configured email application installed on your
device.
You can access local contacts in Avaya IX™ Workplace Client if:
• Contact accounts, such as SIM, Google, and Phone, are available in your address book
• Contact groups, such as Friends and Family, are available in your address book
• Contacts are listed in the default Contacts folder and sub-folders of Contacts folder in Microsoft
Outlook
Viewing the self-contact information
About this task
Avaya IX™ Workplace Client retrieves and displays the self-contact information from the following
directories:
1. Avaya Cloud Services
2. IP Office
3. Local
July 2020 Using Avaya IX™ Workplace Client for IP Office 93
Comments on this document? infodev@avaya.com
Page 94

Managing contacts
Before you begin
Ensure that IP Office or Avaya Cloud Services are configured properly.
Procedure
On the Top of Mind screen, select the presence status indicator.
Avaya IX™ Workplace Client displays the self-contact information with your picture.
Searching for a contact
About this task
When you search for a contact, Avaya IX™ Workplace Client performs a search for that contact in
the IP Office directories. On some Avaya IX™ Workplace Client platforms, you must use the
Search key to view the results after you use this procedure.
Procedure
1. Go to the Contacts screen.
2. Start typing the name of the contact or the contact details that you want to look for in the
following field:
• On mobile clients: find someone
• On desktop clients: name
Avaya IX™ Workplace Client displays the contacts that match the search text.
Creating a new contact
About this task
Use this procedure to create a new contact. Avaya IX™ Workplace Client adds the contact to your
Workplace Contacts list.
Procedure
1. Go to the Contacts screen.
2. Select
On desktop clients:
.
July 2020 Using Avaya IX™ Workplace Client for IP Office 94
Comments on this document? infodev@avaya.com
Page 95

Cancel
New Contact
Add
At least first name AND last name are required.
First Name
Last Name
(Nickname)
Company
Building, office number
Address
City
State/Province
Country
Zip/Postal Code
3. (Optional) On mobile clients, select New Contact.
CANCEL
New Contact
DONE
First Name
Last Name
Nickname
Make a Call
Send a Message
Send an Email
Work
Work
Address
Number is required
Address is required
Work
At least one phone number or
email address is required
Deleting a contact
Deleting a contact
About this task
Use this procedure to delete a contact from your Workplace Contacts list. When you delete a
contact, Avaya IX™ Workplace Client removes the contact from the associated contact groups.
July 2020 Using Avaya IX™ Workplace Client for IP Office 95
4. Enter the appropriate values in the fields.
• Enter the first name and last name.
• Enter an email address or a phone number or both.
• Enter only one work email address.
5. Save the changes.
6. (Optional) To update the contact details, select the contact, select Edit, and perform the
changes.
Comments on this document? infodev@avaya.com
Page 96

Remove Contact
Avaya Equinox
Contact Sources (1)
Send an Email
Send a Message
Work
Make a Call
Offline
Work
Work
Work
Managing contacts
Note:
You can delete a local contact only from the contacts stored in the local address book.
Procedure
1. Go to the Contacts screen.
2. Filter the contacts using the Workplace Contacts option.
3. Locate the contact that you want to delete.
4. Select the contact.
5. Do one of the following:
• On mobile clients: On the Contact Details screen, select Remove Contact.
•
On desktop clients: Select
and then select Remove Contact.
6. Confirm your selection.
Avaya IX™ Workplace Client removes the contact from your Workplace Contacts list.
Contact avatars
Avaya Spaces for Avaya IX™ Workplace Client manage avatar support for the users. in IP Office
The self-avatar is not supported.
The directory service of Avaya IX™ Workplace Client does not support avatars. Therefore, avatars
are not available in Avaya IX™ Workplace Client for mobile and desktop clients.
July 2020 Using Avaya IX™ Workplace Client for IP Office 96
Comments on this document? infodev@avaya.com
Page 97

Chapter 8: Using Avaya Spaces
Avaya Spaces overview
Avaya Spaces is a cloud-based team collaboration and meeting application. It seamlessly
integrates voice, video, tasks, sharing, and more into your browser or the Spaces application.
You can use the Spaces area in the dashboard to start a new conversation. In fact, the first time
you start using Avaya Spaces, you can view the option to create your own Space. You can invite
participants to your Space by entering their email addresses. You can set different permissions for
each participant based on the type of actions you want them to be able to take within your Space.
If you have many Spaces, you can categorize the frequently used ones as favorites.
You can privately share documents and even escalate your chat with audio or video. The Posts
area includes all the documents and files that you or your teammates shared. You can click on any
of the posts to make comments, download the file, or attach more items, perhaps a revised
version if you are editing a document.
You can assign tasks to other members of your space. Tasks are simply things that need to get
done. You can also set due dates and post additional comments.
Avaya Spaces integrates with Avaya IX™ Workplace Client. You can use Avaya IX™ Workplace
Client :
• To exchange instant messages with other users by using Avaya Spaces Direct Messaging.
• To join a Spaces meeting.
Signing up for Avaya Spaces from Avaya IX™ Workplace
Client
Before you begin
Enable Avaya Cloud Services.
Procedure
1. On the Top of Mind screen, in the Workplace Meetings area, select Spaces Sign in / Sign
up.
The Spaces URL opens in the default browser.
July 2020 Using Avaya IX™ Workplace Client for IP Office 97
Comments on this document? infodev@avaya.com
Page 98

Using Avaya Spaces
2. Type your work email address.
Alternatively, if you have an account on Google, Office365, Salesforce, or Avaya, you can
select the corresponding icon to log in to Spaces with your account credentials.
3. Select Yes, sign me up!.
You receive an email to confirm your email address.
4. Follow the steps in the email to complete your account.
Logging in to Avaya Spaces
About this task
Use this procedure to log in to Spaces from Avaya IX™ Workplace Client.
Before you begin
Ensure that you have an account on Spaces.
Procedure
1. On the Top of Mind screen, in the Workplace Meetings area, select Spaces Sign in / Sign
up.
The Spaces URL opens in the default browser.
2. Enter your email address.
Alternatively, if you have an account on Google, Office365, Salesforce, or Avaya, you can
select the corresponding icon to log in to Spaces with your account credentials.
3. In the Password field, type your password.
4. (Optional) To enable the application or browser to store your login credentials, select
Keep me Signed in.
5. Select Sign In.
Opening Avaya Spaces from within Avaya IX™ Workplace
Client
Before you begin
Log in to Avaya Cloud Services.
Procedure
On the Top of Mind screen, in the Workplace Meetings area, select Spaces Dashboard.
July 2020 Using Avaya IX™ Workplace Client for IP Office 98
Comments on this document? infodev@avaya.com
Page 99

Opening Avaya Spaces from within Avaya IX™ Workplace Client
The dashboard opens in one of the following:
• The Spaces application if the application is installed on your mobile device.
• The default browser if the application is not installed.
If the browser is already open, the dashboard opens in a new window.
July 2020 Using Avaya IX™ Workplace Client for IP Office 99
Comments on this document? infodev@avaya.com
Page 100

Chapter 9: Using presence and instant
messaging
Presence and instant messaging
Presence Services is an application that indicates the availability or presence of a person by
states. From the Avaya IX™ Workplace Client, you can:
• Change your presence status to one of the following five supported states: “Available”,
“Busy”, “Away”, “Offline”, and “Do Not Disturb”. The presence status that you set appears
simultaneously across supported clients.
• Change your custom presence note.
Note:
The presence note is visible and available only when the user is logged in to Avaya IX
Workplace Client.
™
Presence: Presence Services supports application and telephony presence information gathered
from IP Office and aggregates this information for each user. Presence Services then makes this
information available to Avaya IX™ Workplace Client users.
Note:
In iOS devices, the Presence status changes to Offline when Avaya IX™ Workplace Client
goes to the background or not visible state.
Application presence is the presence state for non-telephony usage, such as for instant
messaging. Telephony presence is the presence for telephony usage, such as when you are on a
call.
You need to manually set the application presence while telephony presence is set automatically.
For example, there is no “timed inactive” presence state for application presence. For telephony
presence, only the “On a Call” state is supported. The “On a Call” state is automatically set when
the client is in a call, even if a manual presence state was set. In Simultaneous mode, the “On a
Call” state is shown for all the logged-in clients.
Instant messaging: With the integration of Avaya Spaces in IP Office, you can exchange textbased instant messages with users. You can receive image, audio, video, and generic
attachments in an Instant Messaging (IM) conversation. Users with enhanced privileges can send
generic attachments and use the built-in recording feature of Avaya IX™ Workplace Client to attach
July 2020 Using Avaya IX™ Workplace Client for IP Office 100
Comments on this document? infodev@avaya.com
 Loading...