

Page 1

Tech Tip
Contivity Secure IP Services Gateway
Contivity – BCM IPSec Peer-to-Peer Tunnel Using Pre-Shared Key
Authentication
Contents
Contents .......................................................................................................................................... 1
Overview.......................................................................................................................................... 1
Sample Configuration...................................................................................................................... 2
Setup........................................................................................................................................... 2
Configuring WS1......................................................................................................................... 2
Configuring WS2......................................................................................................................... 3
Configuring CES.......................................................................................................................... 3
Configuring network parameters............................................................................................. 3
Configuring Branch Office connection.................................................................................... 4
Configuring Branch Office IPSec parameters....................................................................... 12
Configuring BCM....................................................................................................................... 15
Configuring Interfaces........................................................................................................... 15
Configuring Branch Office tunnel parameters....................................................................... 17
Configuring local and remote accessible networks.............................................................. 21
Verifying firewall rules........................................................................................................... 24
Enabling IPSec ..................................................................................................................... 25
Event Log.................................................................................................................................. 26
Overview
This technical tip illustrates a sample IPSec peer-to-peer tunnel configuration between Contivity
Secure IP Services Gateway and Business Communication Manager (BCM) using pre-share d
key authentication.
TT040922 1.00 September 2004 Page: 1 of 27
Page 2
Tech Tip
Contivity Secure IP Services Gateway
Contivity – BCM IPSec Peer-to-Peer Tunnel Using Pre-Shared Key
Authentication
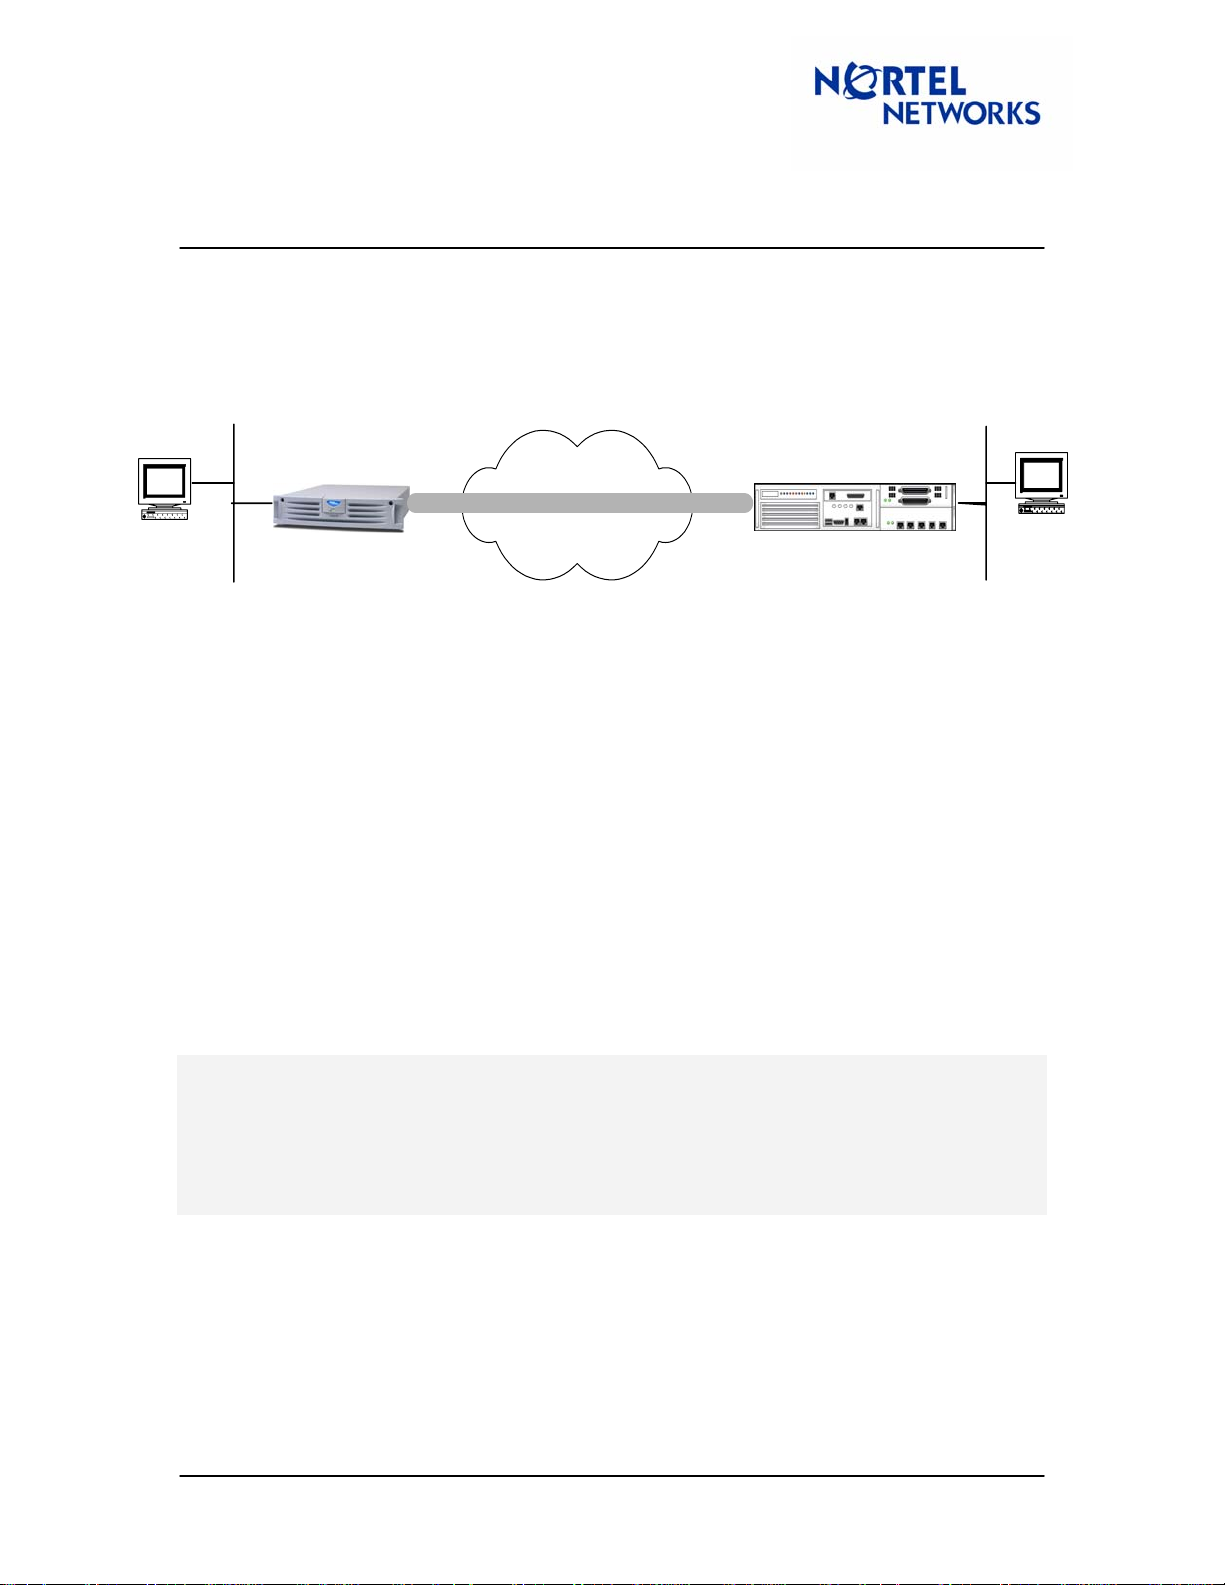
Sample Configuration
Setup
30.1.1.0/24
192.168.10.0/24
10.1.1.0/24
WS2
BCM
WS1
CES
Branch Office Tunn el
WS1 – Windows 2000 workstation, IP 192.168.10.11/24;
WS2 - Windows 2000 workstation, IP 10.1.1.10/24;
CES – Contivity Secure IP Services Gateway, code version V04_85, management IP
192.168.10.1/24, private IP 192.168.10.2/24, public IP 30.1.1.2/24
BCM – Business Communication Manager, Private IP (LAN 1) 10.1.1.1/24, public IP (LAN 2)
30.1.1.1/24.
The goal of the configuration is to set up an IPSec peer-to-peer branch office tunnel between a
CES and a BCM using 3DES with MD5 integrity and a pre-shared key authentication.
Configuring WS1
Configure the IP address (192.168.10.11/24) on the WS1 and the CES private interface
(192.168.10.2) as the default gateway:
C:\>ipconfig
Windows IP Configuration
Ethernet adapter Local Area Connection 2:
Connection-specific DNS Suffix . :
IP Address. . . . . . . . . . . . : 192.168.10.11
Subnet Mask . . . . . . . . . . . : 255.255.255.0
Default Gateway . . . . . . . . . : 192.168.10.2
TT040922 1.00 September 2004 Page: 2 of 27
Page 3
Tech Tip
Contivity Secure IP Services Gateway
Contivity – BCM IPSec Peer-to-Peer Tunnel Using Pre-Shared Key
Authentication
Configuring WS2
Configure the IP address (10.1.1.10/24) on the WS2 and the NG private interface (10.1.1.1) as a
default gateway:
C:\>ipconfig
Windows IP Configuration
Ethernet adapter Local Area Connection 2:
Connection-specific DNS Suffix . :
IP Address. . . . . . . . . . . . : 10.1.1.10
Subnet Mask . . . . . . . . . . . : 255.255.255.0
Default Gateway . . . . . . . . . : 10.1.1.1
Configuring CES
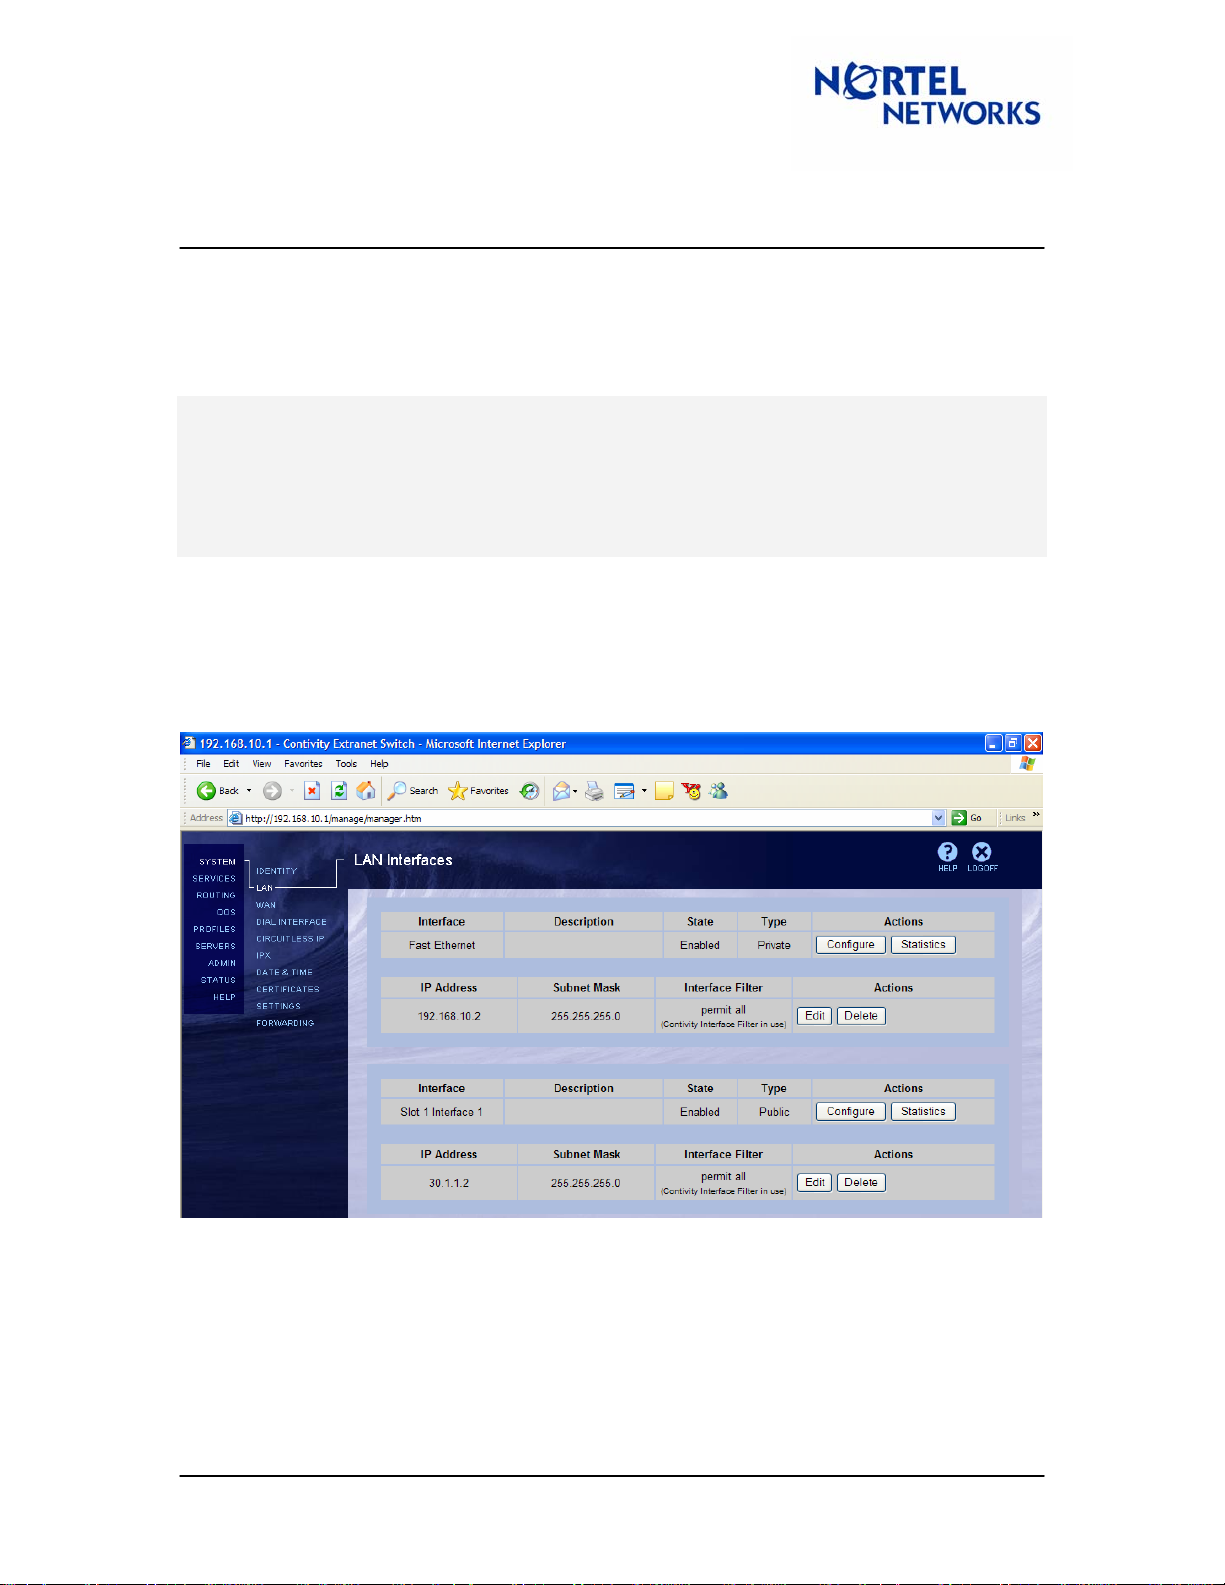
Configuring network parameters
Configure IP address for management (192.268.10.1/24), private (192.168.10.2/24) and public
(30.1.1.2/24) interfaces:
In this configuration CES and BCM are directly connected, if a router is used between CES and
BCM a public default gateway must be configured on RoutingÆStatic Routes screen by clicking
Add Public Route and specifying the address of a public default router.
TT040922 1.00 September 2004 Page: 3 of 27
Page 4
Tech Tip
Contivity Secure IP Services Gateway
Contivity – BCM IPSec Peer-to-Peer Tunnel Using Pre-Shared Key
Authentication
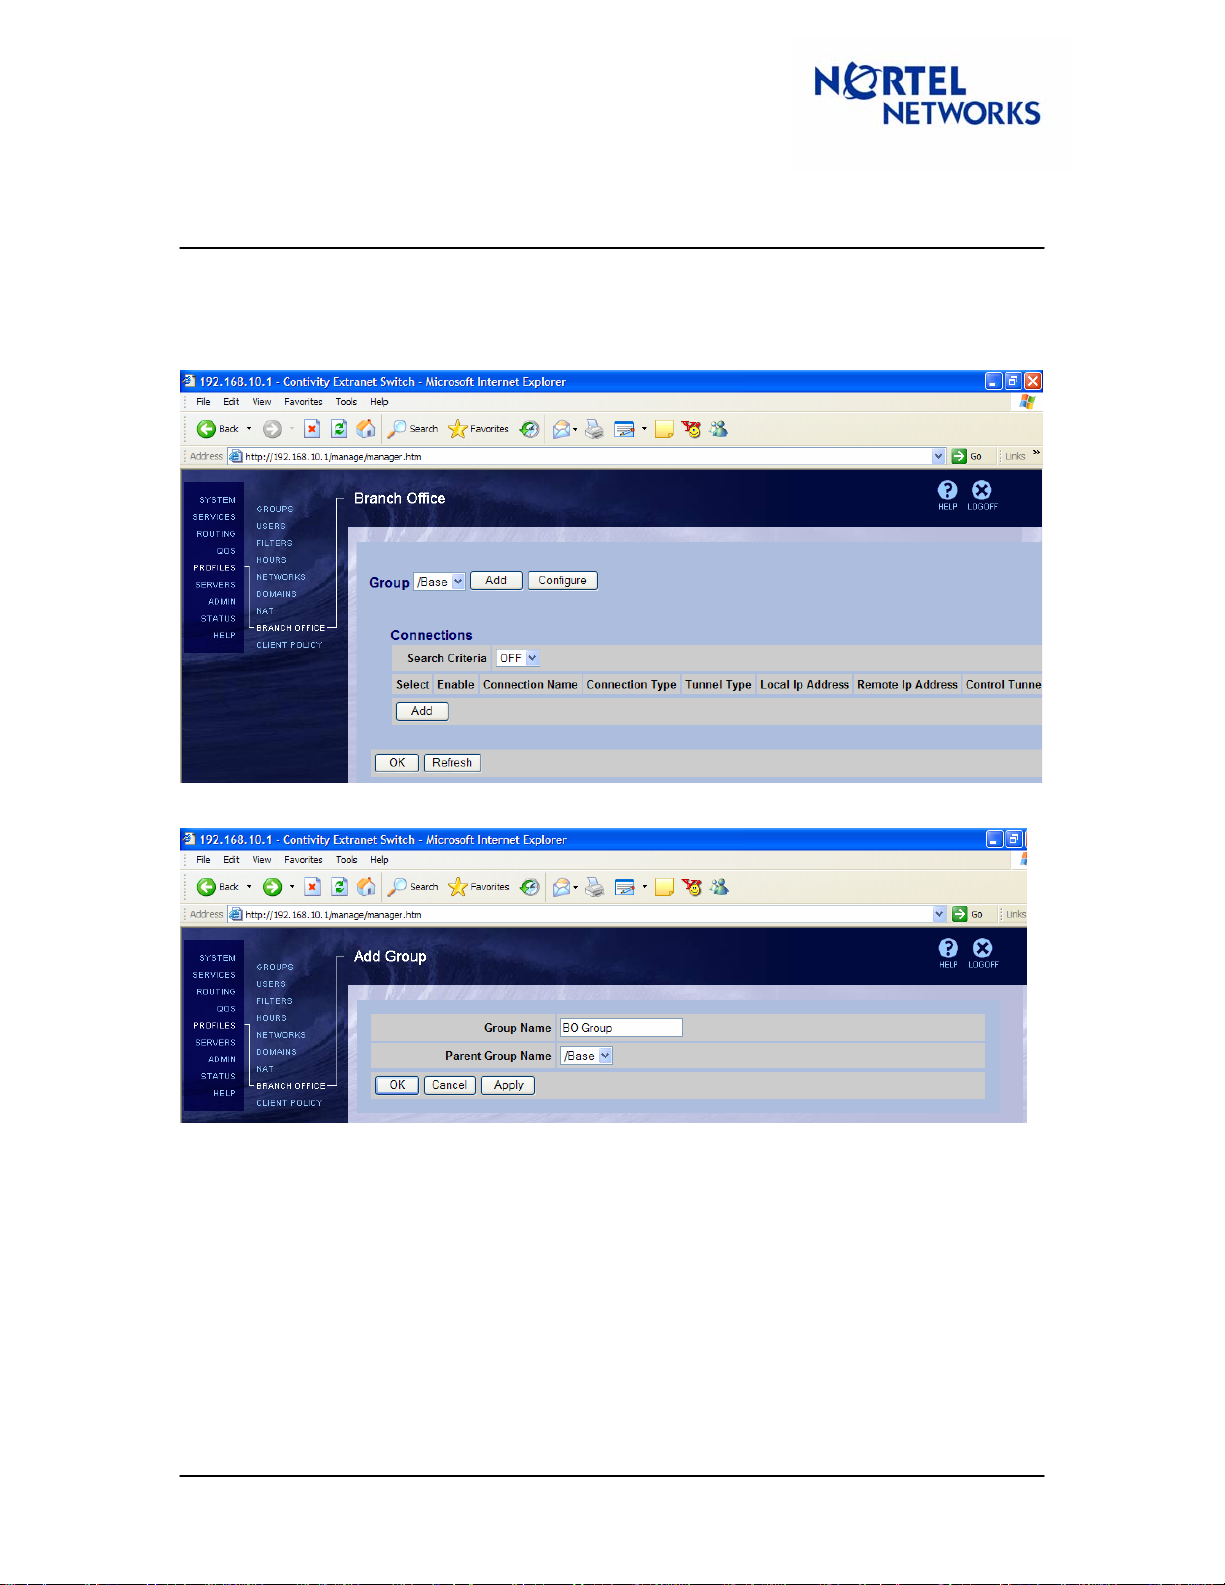
Configuring Branch Office connection
Configure the BO connection. Navigate Profiles ÆBranch Office. To add a new group for the
branch office, next to Group click Add:
Enter a Name for Group (BO Group) and click OK:
TT040922 1.00 September 2004 Page: 4 of 27
Page 5
Tech Tip
Contivity Secure IP Services Gateway
Contivity – BCM IPSec Peer-to-Peer Tunnel Using Pre-Shared Key
Authentication
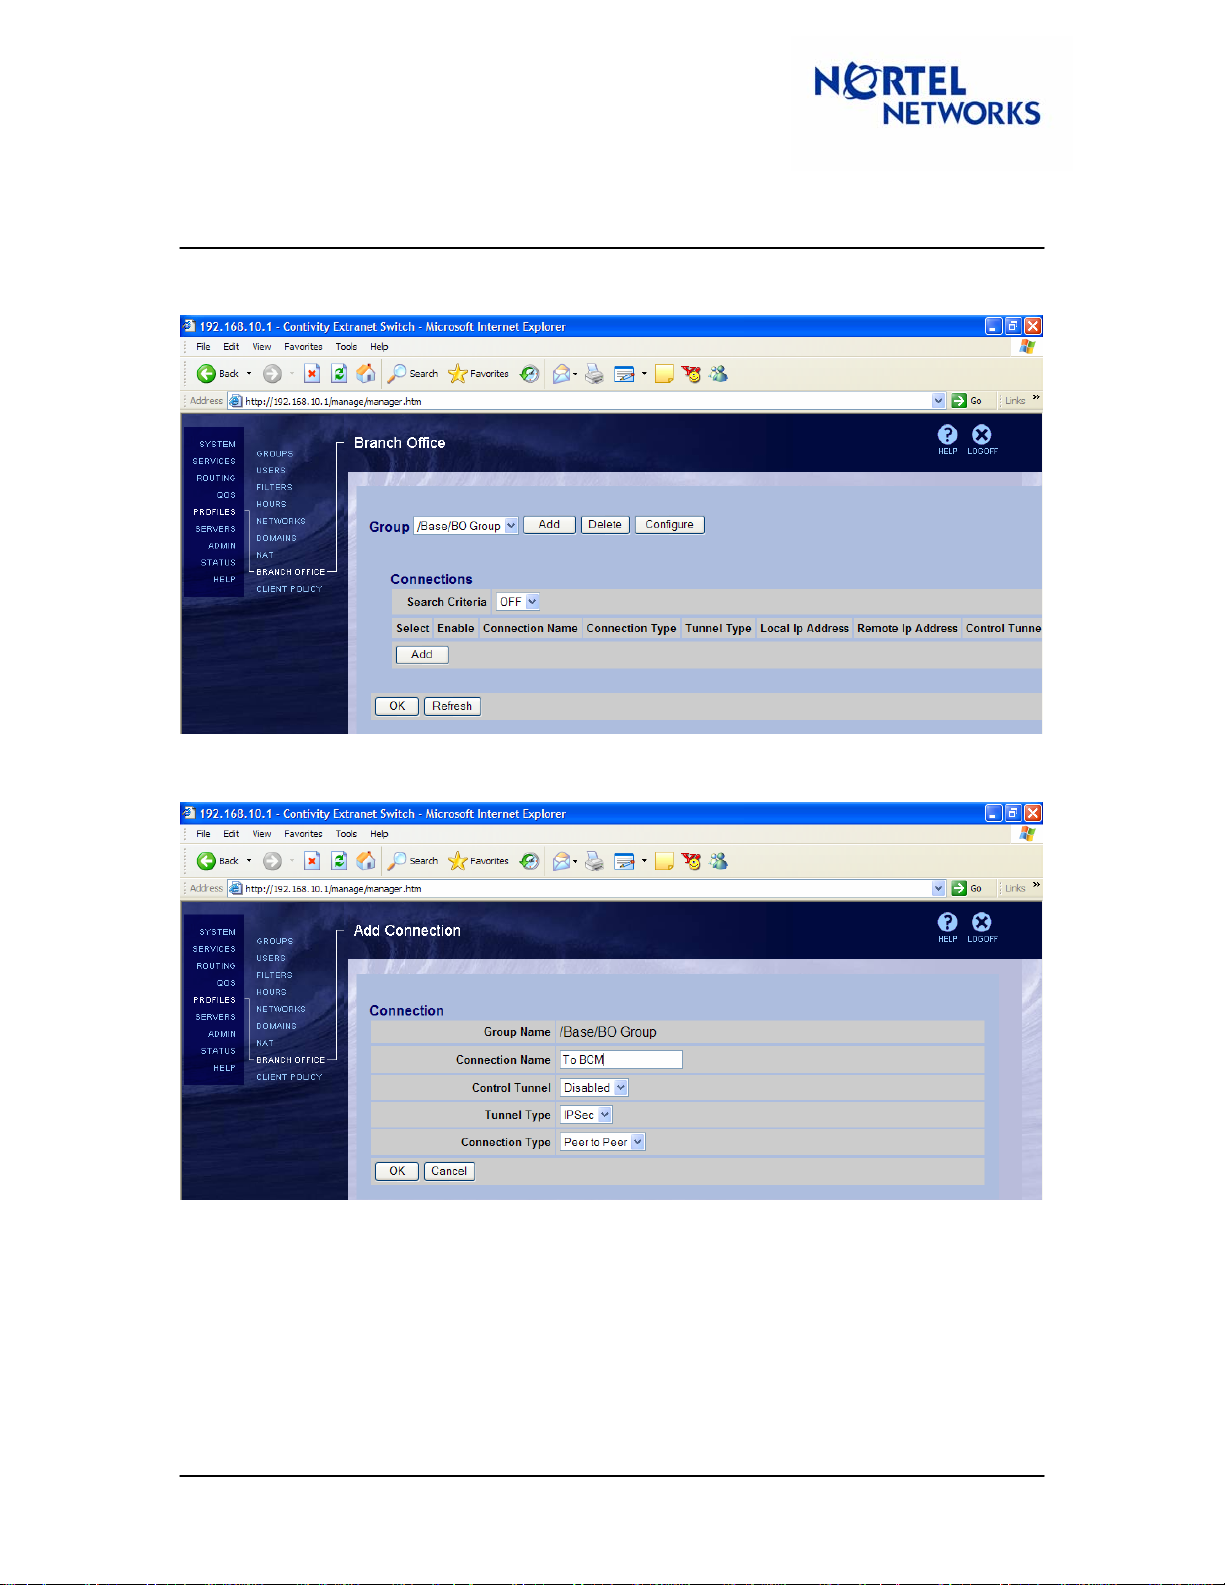
From the drop down menu next to Group, select the newly created group. To add a new branch
office connection, under the Connections section click Add:
Enter a Connection Name (To BCM), leave the rest of the fields to their defaults – Control
Tunnel – Disabled, Tunnel Type – IPSec, Connection Type – Peer to Peer. Click OK:
TT040922 1.00 September 2004 Page: 5 of 27
Page 6
Tech Tip
Contivity Secure IP Services Gateway
Contivity – BCM IPSec Peer-to-Peer Tunnel Using Pre-Shared Key
Authentication
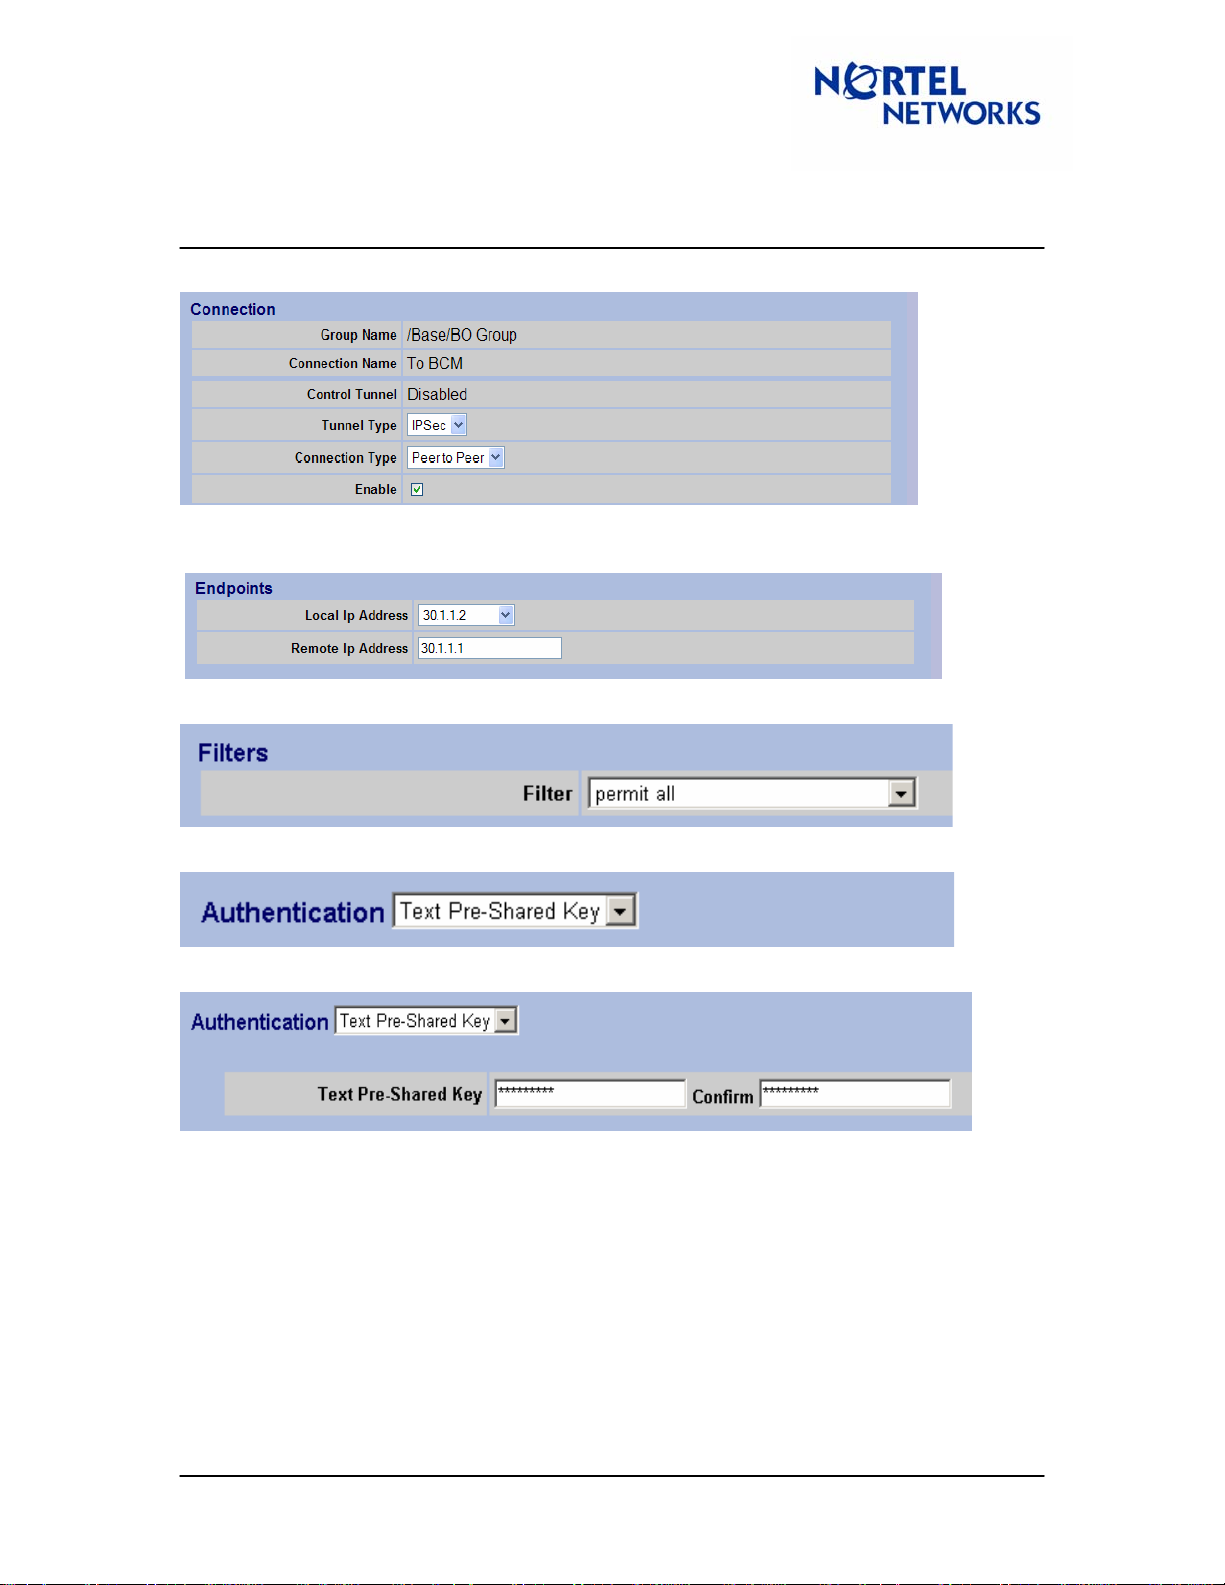
The Connection Configuration screen appears. Select the Enable option:
Select CES public IP address (30.1.1.2) as the Local Endpoint IP Address;
Enter BCM public IP address (30.1.1.1) as the Remote Endpoint IP Address:
Leave the Filter at Permit All:
For Authentication select the Text Pre-Shared Key (selected by default):
Enter a Text Pre-Shared Key – 12345 in this case:
TT040922 1.00 September 2004 Page: 6 of 27
Page 7
Tech Tip
Contivity Secure IP Services Gateway
Contivity – BCM IPSec Peer-to-Peer Tunnel Using Pre-Shared Key
Authentication
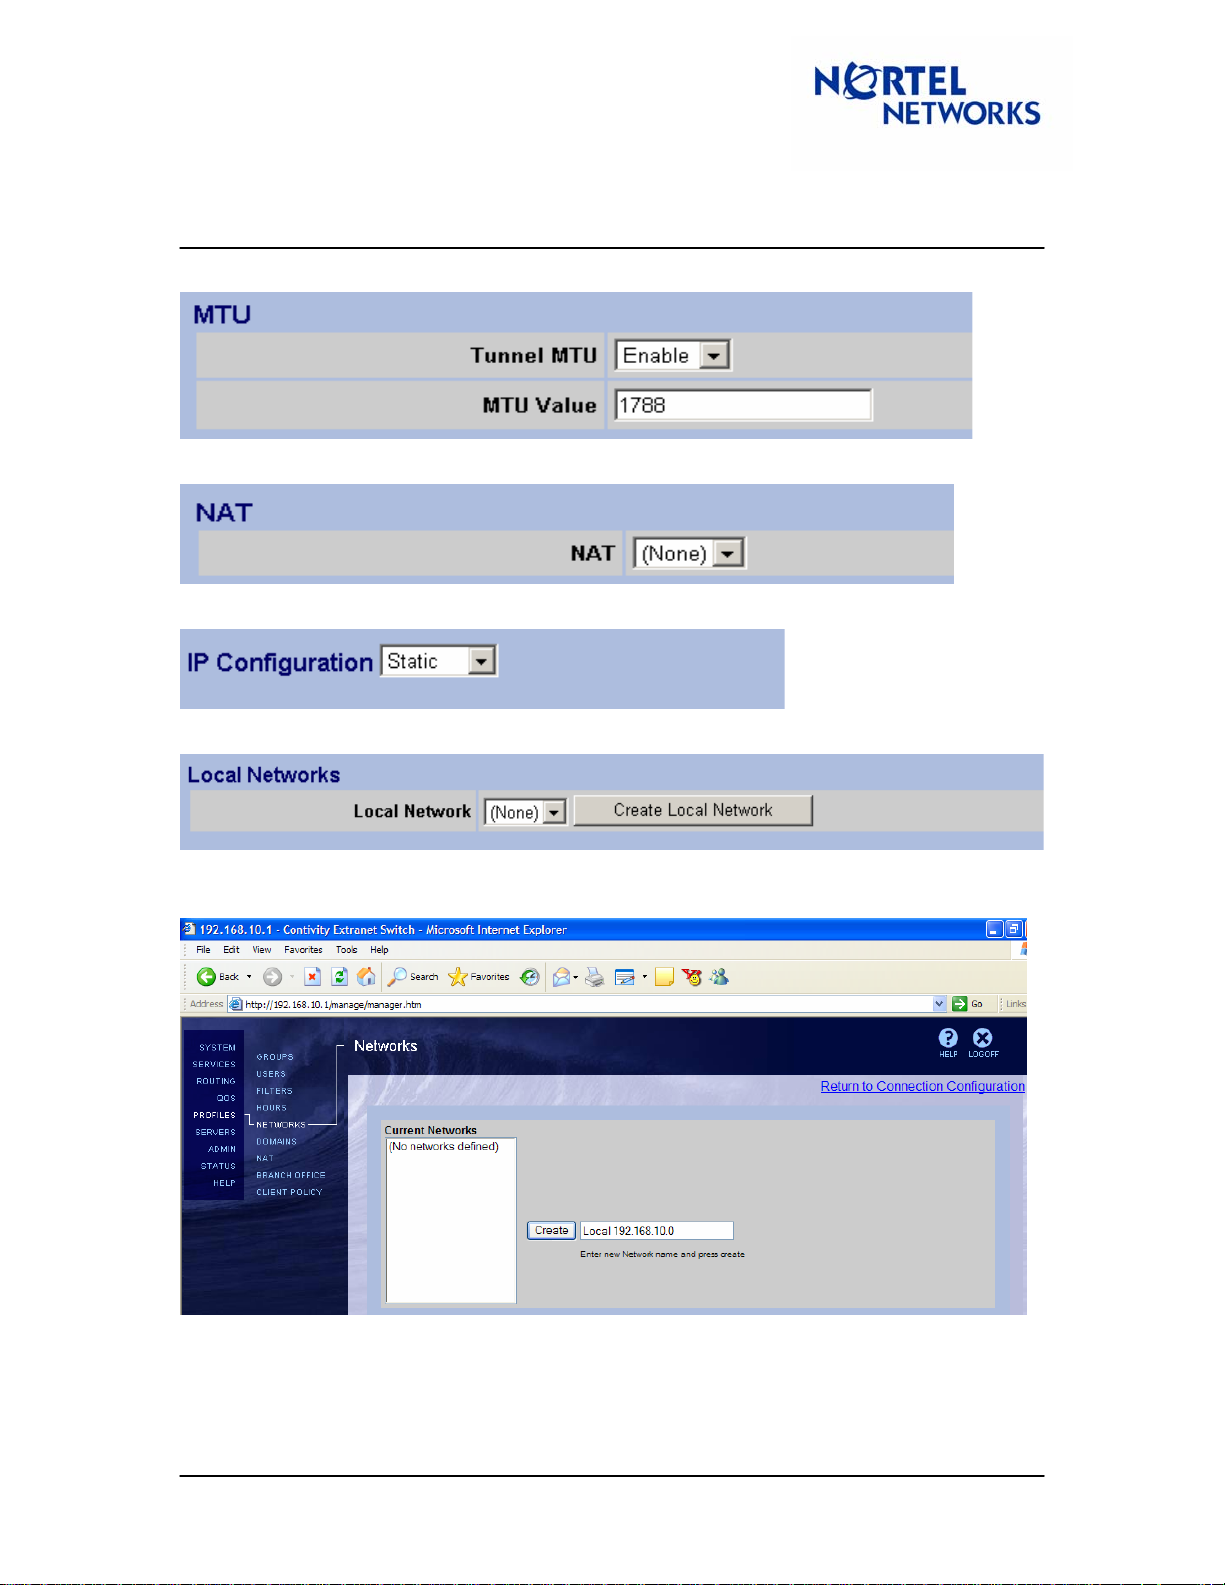
Leave MTU at the default setting:
No NAT will be used in this example, leave the default (None) selection for NAT:
For the IP Configuration select Static:
Define local accessible networks. Next to Local Network select Create Local Network:
The Networks screen appears. Enter the name of the network (local 192.168.10.0) to be created
and click Create:
TT040922 1.00 September 2004 Page: 7 of 27
Page 8
Tech Tip
Contivity Secure IP Services Gateway
Contivity – BCM IPSec Peer-to-Peer Tunnel Using Pre-Shared Key
Authentication
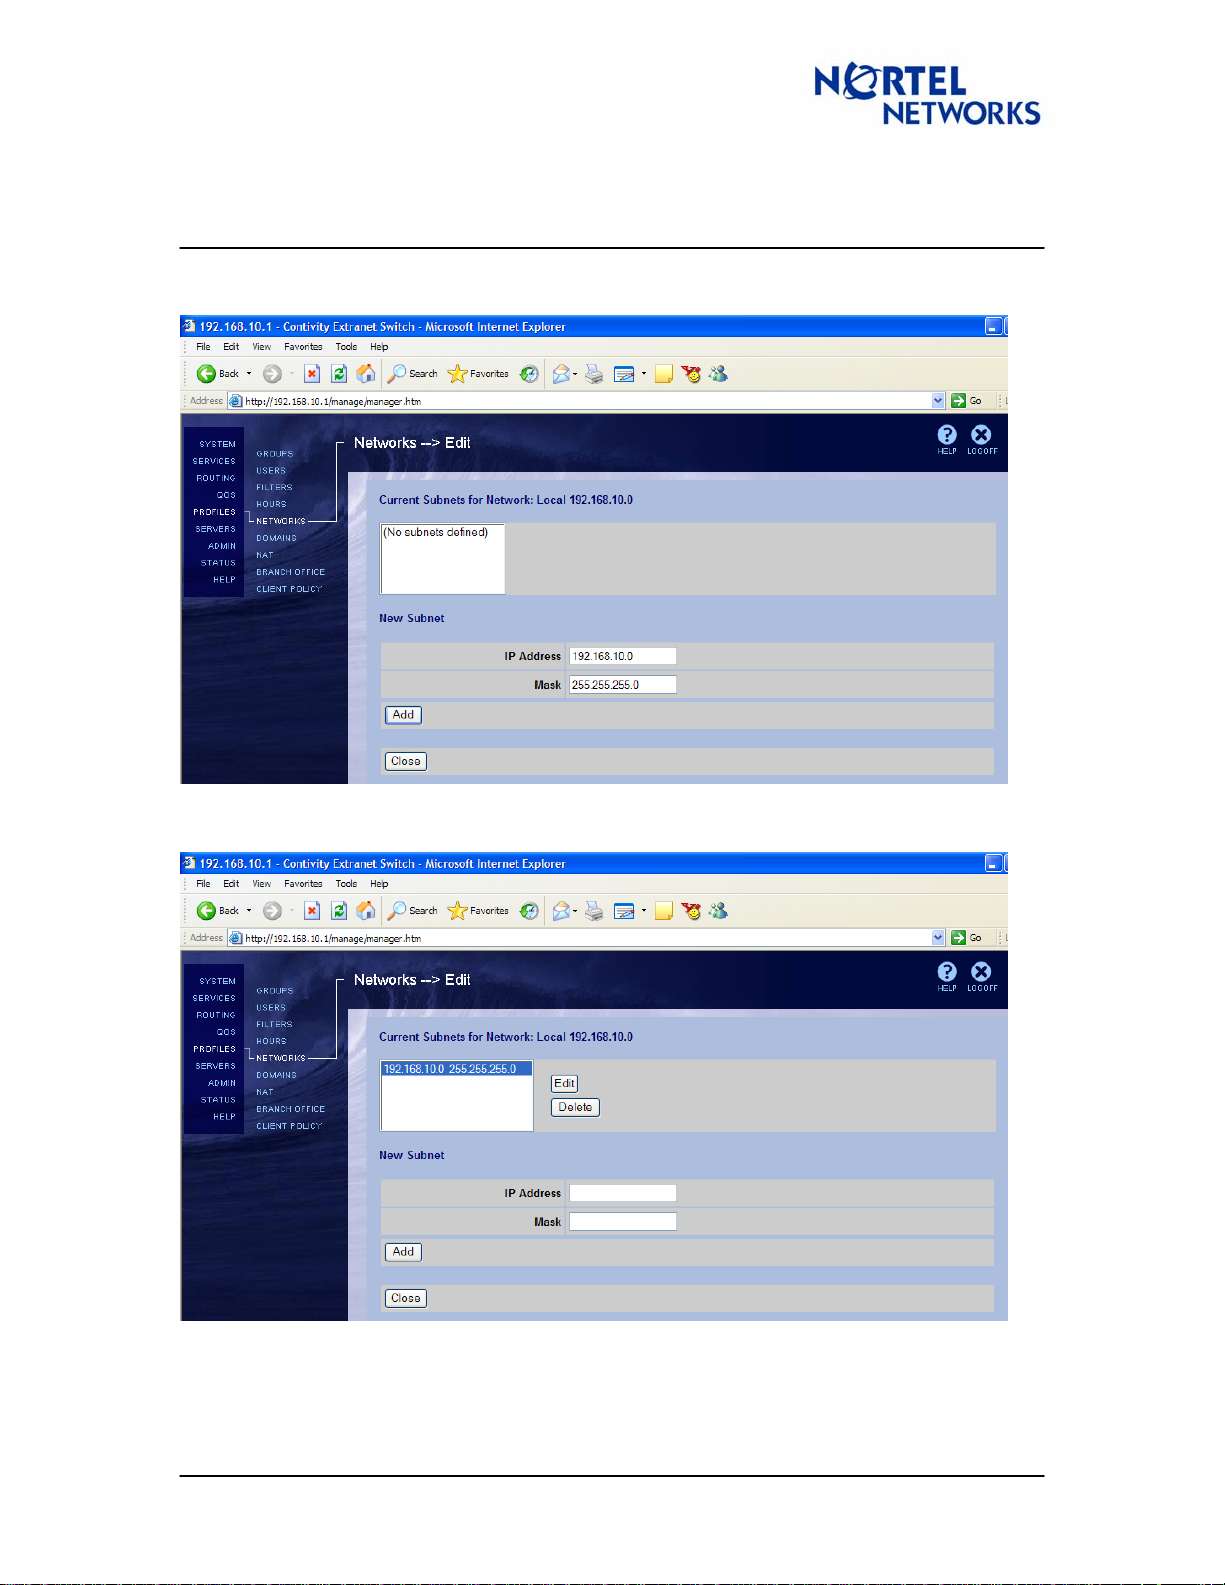
Enter the IP address of the Local Accessible Network (CES private network, 192.168.10.0),
Mask associated with the address (255.255.255.0) and click Add:
Listed under the Current Subnets for Network window is the configured subnet for the network.
Click Close:
TT040922 1.00 September 2004 Page: 8 of 27
Page 9
Tech Tip
Contivity Secure IP Services Gateway
Contivity – BCM IPSec Peer-to-Peer Tunnel Using Pre-Shared Key
Authentication
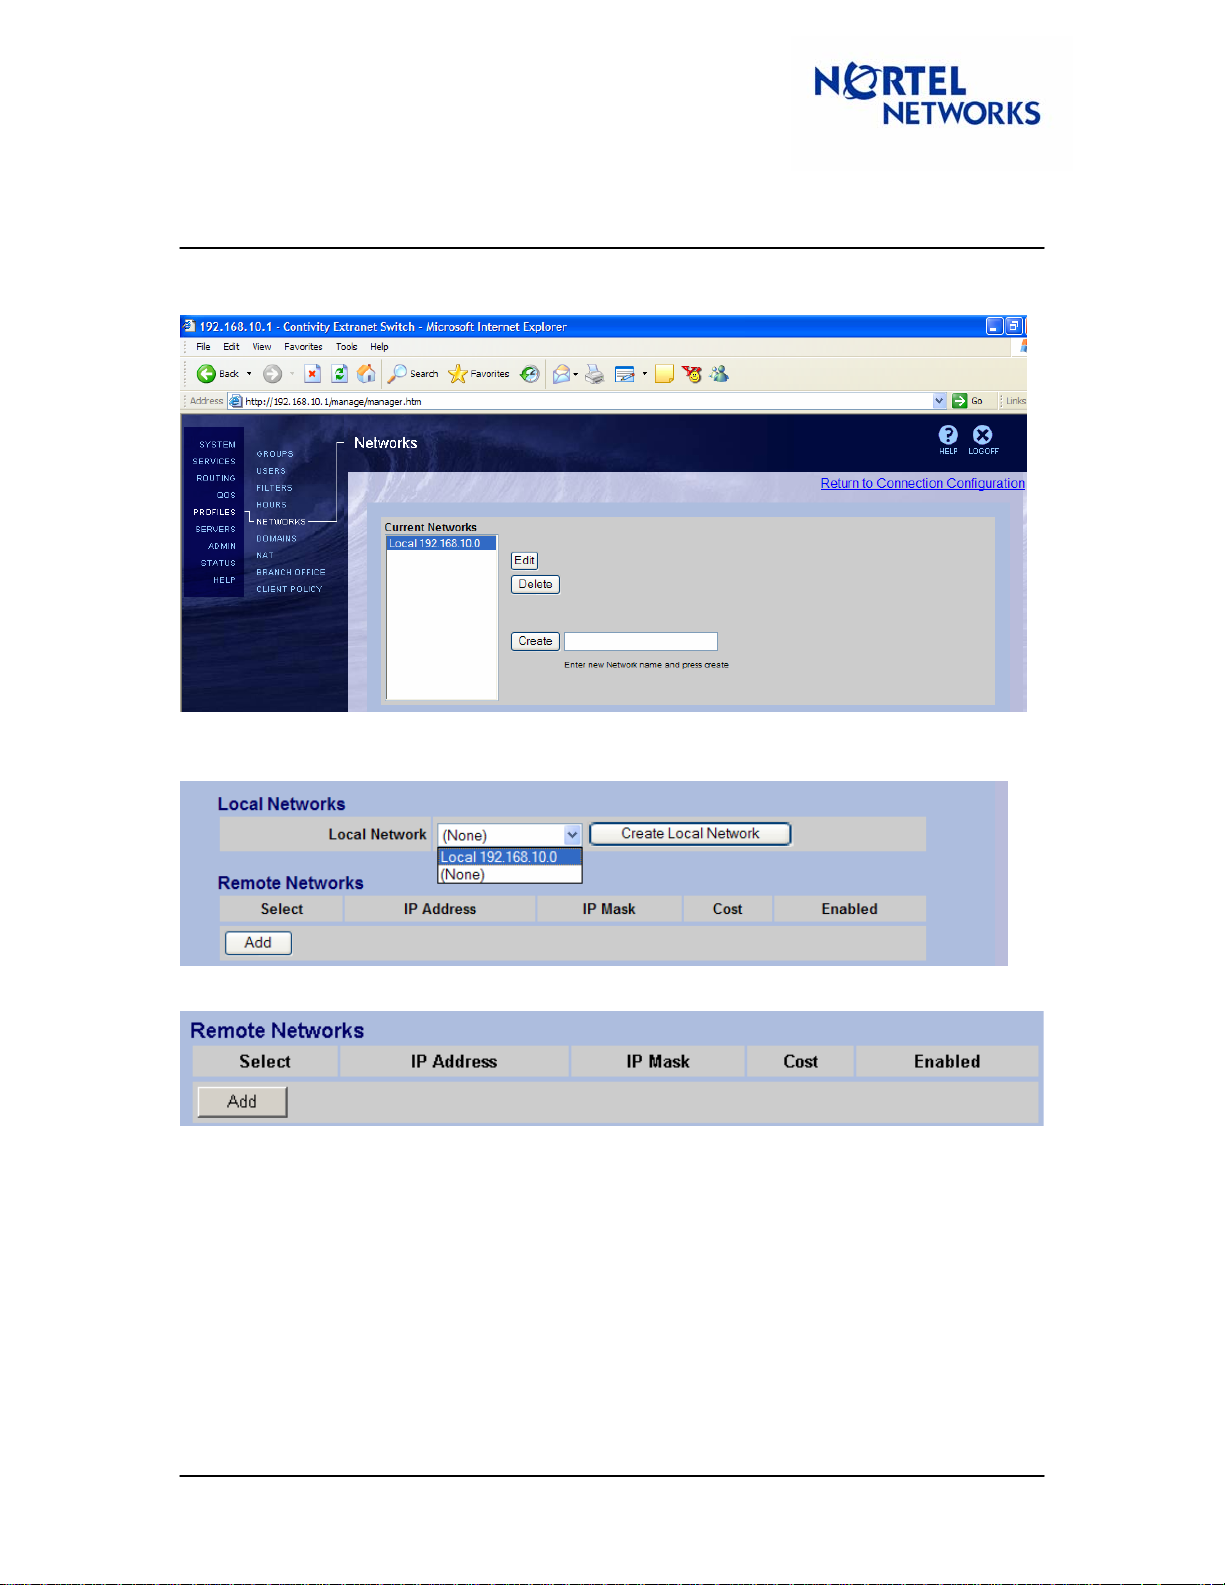
Listed under the Current Networks is the configured network. To return to the branch office
configuration, in the top right corner click on the Return to Connection Configuration link:
From the drop-down list next to Local Network select the newly configured local net work
(local 192.168.10.0):
Define the remote accessible networks. Under the Remote Networks click Add:
TT040922 1.00 September 2004 Page: 9 of 27
Page 10

Tech Tip
Contivity Secure IP Services Gateway
Contivity – BCM IPSec Peer-to-Peer Tunnel Using Pre-Shared Key
Authentication
The Add Remote Network screen appears. Enter the IP Address of the Remote Network (BCM
private network LAN 1 (10.1.1.0), and Mask (255.255.255.0). Leave the Cost to its default. Select
Enabled and click OK:
Listed under the Remote Networks tab is the configured remote network:
TT040922 1.00 September 2004 Page: 10 of 27
Page 11

Tech Tip
Contivity Secure IP Services Gateway
Contivity – BCM IPSec Peer-to-Peer Tunnel Using Pre-Shared Key
Authentication
Once all the parameters have been set, at the bottom of the screen click OK:
TT040922 1.00 September 2004 Page: 11 of 27
Page 12
Tech Tip
Contivity Secure IP Services Gateway
Contivity – BCM IPSec Peer-to-Peer Tunnel Using Pre-Shared Key
Authentication
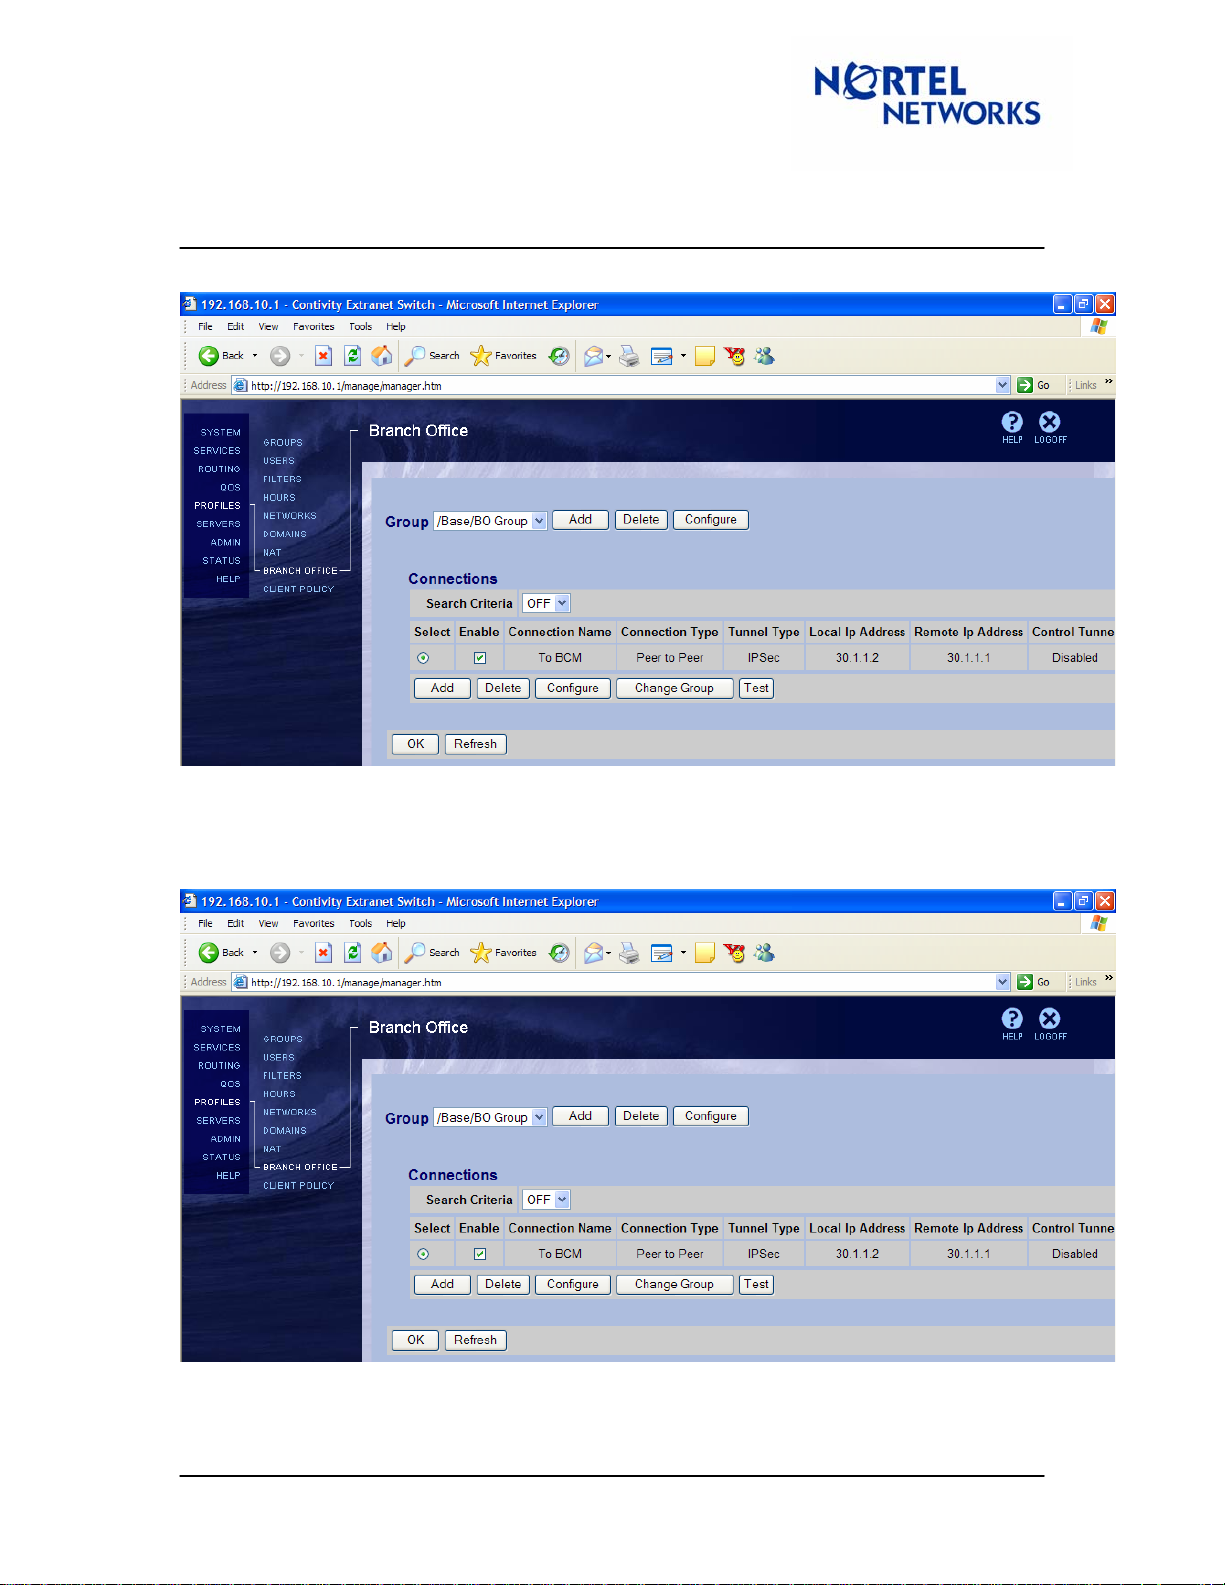
Branch office connection is configured:
Configuring Branch Office IPSec parameters
Navigate Profiles Æ Branch Office to configure branch office IPSec parameters. Select the
group the tunnel belongs to (BO group) and next to the group click Configure:
TT040922 1.00 September 2004 Page: 12 of 27
Page 13

Tech Tip
Contivity Secure IP Services Gateway
Contivity – BCM IPSec Peer-to-Peer Tunnel Using Pre-Shared Key
Authentication
Scroll down to the IPSec section and click Configure:
To interoperate with the BCM, Vendor ID must be disabled for the group. Next to Vendor ID click
Configure:
Screen refreshes. Next to Vendor ID select Disabled:
Compression also needs to be disabled to interoperate with BCM. Next to Compression select
Configure:
Next to Compression select Disabled:
TT040922 1.00 September 2004 Page: 13 of 27
Page 14

Tech Tip
Contivity Secure IP Services Gateway
Contivity – BCM IPSec Peer-to-Peer Tunnel Using Pre-Shared Key
Authentication
Once all the parameters have been set, at the bottom of the screen select OK:
The Contivity gateway is now configured.
TT040922 1.00 September 2004 Page: 14 of 27
Page 15

Tech Tip
Contivity Secure IP Services Gateway
Contivity – BCM IPSec Peer-to-Peer Tunnel Using Pre-Shared Key
Authentication
Configuring BCM
Configuring Interfaces
Log into the BCM Unified Manager. On the navigation Tree, expand the Resources key and
then the LAN key. Click on LAN 1. This is the Private Interface. Enter IP 10.1.1.1 with a mask of
255.255.255.0:
TT040922 1.00 September 2004 Page: 15 of 27
Page 16

Tech Tip
Contivity Secure IP Services Gateway
Contivity – BCM IPSec Peer-to-Peer Tunnel Using Pre-Shared Key
Authentication
Click on LAN 2. This is the Public Interface. Enter IP 30.1.1.1 with a mask of 255.255.255.0:
TT040922 1.00 September 2004 Page: 16 of 27
Page 17

Tech Tip
Contivity Secure IP Services Gateway
Contivity – BCM IPSec Peer-to-Peer Tunnel Using Pre-Shared Key
Authentication
Configuring Branch Office tunnel parameters
On the navigation tree, expand the Services key, expand the VPN key, and expand the IPSec
key.
This will show two options, Branch Office Accounts and Remote User Accounts.
Click on the Branch Office Accounts. This will enable the
Comprehensive.
‘Add’ button under the heading
TT040922 1.00 September 2004 Page: 17 of 27
Page 18

Tech Tip
Contivity Secure IP Services Gateway
Contivity – BCM IPSec Peer-to-Peer Tunnel Using Pre-Shared Key
Authentication
Click Add. This will bring up the Add Branch Office Accounts window:
Fill out the “Add Branch Office Accounts” window as follows:
Enter the Tunnel Number, T1:
Set the IPSec Status to Enabled:
Leave PFS Enabled (Perfect Forward Secrecy) as Yes:
Leave the Idle Timeout as the default value:
TT040922 1.00 September 2004 Page: 18 of 27
Page 19

Tech Tip
Contivity Secure IP Services Gateway
Contivity – BCM IPSec Peer-to-Peer Tunnel Using Pre-Shared Key
Authentication
Set the Highest Encryption as desired and make sure it matches the Contivity setting. We will
set it to ESP- 3DES-MD5 as decided. This setting is enabled by default on the Contivity:
Set the Key Type to Text.
Set the Pre-shared Key to 12345 and confirm it to match the key entered in Contivity
configuration:
Leave the Rekey Timeout as the default value:
Leave the Rekey Data Count(KB) at 0. We are not using this for this setup:
Set the Local Endpoint to 30.1.1.1- LAN 2 IP Address of the BCM (Public):
Set the Remote Endpoint to 30.1.1.2 - Public IP address of the Contivity:
Leave the Send All Traffic Through IPSec Tunnel to default of No:
TT040922 1.00 September 2004 Page: 19 of 27
Page 20

Tech Tip
Contivity Secure IP Services Gateway
Contivity – BCM IPSec Peer-to-Peer Tunnel Using Pre-Shared Key
Authentication
Set Create Firewall Rules for This Tunnel to Yes. This will create appropriate Firewall rules \ to
allow tunnel traffic to pass through the Firewall:
Set Keep-Alive Enabled to Yes. Leave this setting at the default value of No for IPSec tunnel
connections to systems other than BCM or Contivity:
Below are all the settings:
TT040922 1.00 September 2004 Page: 20 of 27
Page 21

Tech Tip
Contivity Secure IP Services Gateway
Contivity – BCM IPSec Peer-to-Peer Tunnel Using Pre-Shared Key
Authentication
Configuring local and remote accessible networks
On the BOT screen, Click on Local Accessible Networks tab:
Click on Configuration in the top menu bar and select Add Local Accessible Network:
TT040922 1.00 September 2004 Page: 21 of 27
Page 22

Tech Tip
Contivity Secure IP Services Gateway
Contivity – BCM IPSec Peer-to-Peer Tunnel Using Pre-Shared Key
Authentication
Enter the Local Accessible Network parameters (L1 - 10.1.1.0/24) and click Save:
A local network is defined:
On the BOT screen, Click on Remote Accessible Networks tab:
TT040922 1.00 September 2004 Page: 22 of 27
Page 23

Tech Tip
Contivity Secure IP Services Gateway
Contivity – BCM IPSec Peer-to-Peer Tunnel Using Pre-Shared Key
Authentication
Click on Configuration on the menu bar and select Add Remote Accessible Network:
Enter the Remote Accessible Network parameters (R1 - 192.168.10.0/24) and click Save:
A remote network is created:
TT040922 1.00 September 2004 Page: 23 of 27
Page 24

Tech Tip
Contivity Secure IP Services Gateway
Contivity – BCM IPSec Peer-to-Peer Tunnel Using Pre-Shared Key
Authentication
Verifying firewall rules
On the BCM, for a branch office tunnel to work, the Firewall has to enabled and the rules have
to be configured to allow traffic through. The rules get created automatically when “Create
Firewall Rules for this Tunnel” is set to Yes in section
parameters
On the navigation Tree, expand Policy Management key and click on IP Firewall Filters:
Configuring Branch Office tunnel
Expand Policy Management key, then expand IP Firewall Filters Key and click on LAN2. The
following three rules illustrated on a screen shot below must be configured:
TT040922 1.00 September 2004 Page: 24 of 27
Page 25

Tech Tip
Contivity Secure IP Services Gateway
Contivity – BCM IPSec Peer-to-Peer Tunnel Using Pre-Shared Key
Authentication
Enabling IPSec
From the navigation tree, expand the VPN key and click on IPSec and select Enabled next to
Status:
Once the branch office tunnel is established, the BOT status is shown as Connected:
TT040922 1.00 September 2004 Page: 25 of 27
Page 26

Tech Tip
Contivity Secure IP Services Gateway
Contivity – BCM IPSec Peer-to-Peer Tunnel Using Pre-Shared Key
Authentication
Event Log
Below is CES event log of the successful tunnel establishment:
09/20/2004 16:34:13 0 Branch Office [01] IPSEC branch office connection
initiated to rem[10.1.1.0-255.255.255.0]@[30.1.1.1] loc[192.168.10.0-
255.255.255.0]
09/20/2004 16:34:13 0 Security [11] Session: IPSEC[30.1.1.1] attempting
login
09/20/2004 16:34:13 0 Security [01] Session: IPSEC[30.1.1.1] has no
active sessions
09/20/2004 16:34:13 0 Security [01] Session: IPSEC[30.1.1.1] T0 BCM has
no active accounts
09/20/2004 16:34:13 0 Security [01] Session: IPSEC[30.1.1.1]:11 SHAREDSECRET authenticate attempt...
09/20/2004 16:34:13 0 Security [01] Session: IPSEC[30.1.1.1]:11
attempting authentication using LOCAL
09/20/2004 16:34:13 0 Security [11] Session: IPSEC[30.1.1.1]:11
authenticated using LOCAL
09/20/2004 16:34:13 0 Security [11] Session: IPSEC[30.1.1.1]:11 bound
to group /Base/BO Group/T0 BCM
09/20/2004 16:34:13 0 Security [01] Session: IPSEC[30.1.1.1]:11
Building group filter permit all
09/20/2004 16:34:13 0 Security [01] Session: IPSEC[30.1.1.1]:11
Applying group filter permit all
09/20/2004 16:34:13 0 Security [11] Session: IPSEC[30.1.1.1]:11
authorized
09/20/2004 16:34:13 0 Security [11] Session: network IPSEC[10.1.1.0-
255.255.255.0] attempting login
09/20/2004 16:34:13 0 Security [11] Session: network IPSEC[10.1.1.0-
255.255.255.0] logged in from gateway [30.1.1.1]
09/20/2004 16:34:13 0 ISAKMP [02] ISAKMP SA established with 30.1.1.1
09/20/2004 16:34:13 0 Security [12] Session: IPSEC[30.1.1.1]:11
physical addresses: remote 30.1.1.1 local 30.1.1.2
09/20/2004 16:34:13 0 Security [12] Session: IPSEC[-]:12 physical
addresses: remote 30.1.1.1 local 30.1.1.2
09/20/2004 16:34:13 0 Outbound ESP from 30.1.1.2 to 30.1.1.1 SPI
0x00163b9d [03] ESP encap session SPI 0x9d3b1600 bound to s/w on cpu 0
09/20/2004 16:34:13 0 Inbound ESP from 30.1.1.1 to 30.1.1.2 SPI
0x00094683 [03] ESP decap session SPI 0x83460900 bound to s/w on cpu 0
09/20/2004 16:34:13 0 Branch Office [00] 4f899f0
BranchOfficeCtxtCls::RegisterTunnel: rem[10.1.1.0-
255.255.255.0]@[30.1.1.1] loc[192.168.10.0-255.255.255.0] overwriting
tunnel context [ffffffff] with [4f7b8b8]
09/20/2004 16:34:13 0 ISAKMP [03] Established IPsec SAs with 30.1.1.1:
09/20/2004 16:34:13 0 ISAKMP [03] ESP 3DES-CBC-HMAC-MD5 outbound SPI
0x163b9d
09/20/2004 16:34:13 0 ISAKMP [03] ESP 3DES-CBC-HMAC-MD5 inbound SPI
0x94683
TT040922 1.00 September 2004 Page: 26 of 27
Page 27

Tech Tip
Contivity Secure IP Services Gateway
Contivity – BCM IPSec Peer-to-Peer Tunnel Using Pre-Shared Key
Authentication
Copyright © 2005 Nortel Networks Limited - All Rights Reserved. Nortel, Nortel Networks, the Nortel logo, Globemark, and
Contivity are trademarks of Nortel Networks Limited.
The information in this document is subject to change without notice. The statements, configurations, technical data, and
recommendations in this document are believed to be accurate and reliable, but are presented without express or implied
warranty. Users must take full responsibility for their applications of any products specified in this document. The
information in this document is proprietary to Nortel Networks Limited.
To access more technical documentation, search our knowledge base, or open a service request online, please visit
Nortel Networks Technical Support on the web at:
If after following this guide you are still having problems, please ensure you have carried out the steps exactly as in this
document. If problems still persist, please contact Nortel Networks Technical Support (contact information is available
online at:
We welcome you comments and suggestions on the quality and usefulness of this document. If you would like to leave a
feedback please send your comments to:
Author: Hitesh Patel
http://www.nortel.com/cgi-bin/comments/comments.cgi?key=techsupport_cu).
CRCONT@nortel.com
http://www.nortel.com/support
TT040922 1.00 September 2004 Page: 27 of 27
 Loading...