

Avaya Starset Instruction Booklet
Customer Instruction Booklet:
StarSet®Headset
Maintenance Hint for Optimum Performance
Replace the Versatip every 6 months or sooner if it hardens, shrinks,
tears, cracks or becomes misshapen.
Clean the Versatip daily with a cloth dampened with warm water; do
not use cleaning solvents as they may damage the Versatip or cause
skin irritation.
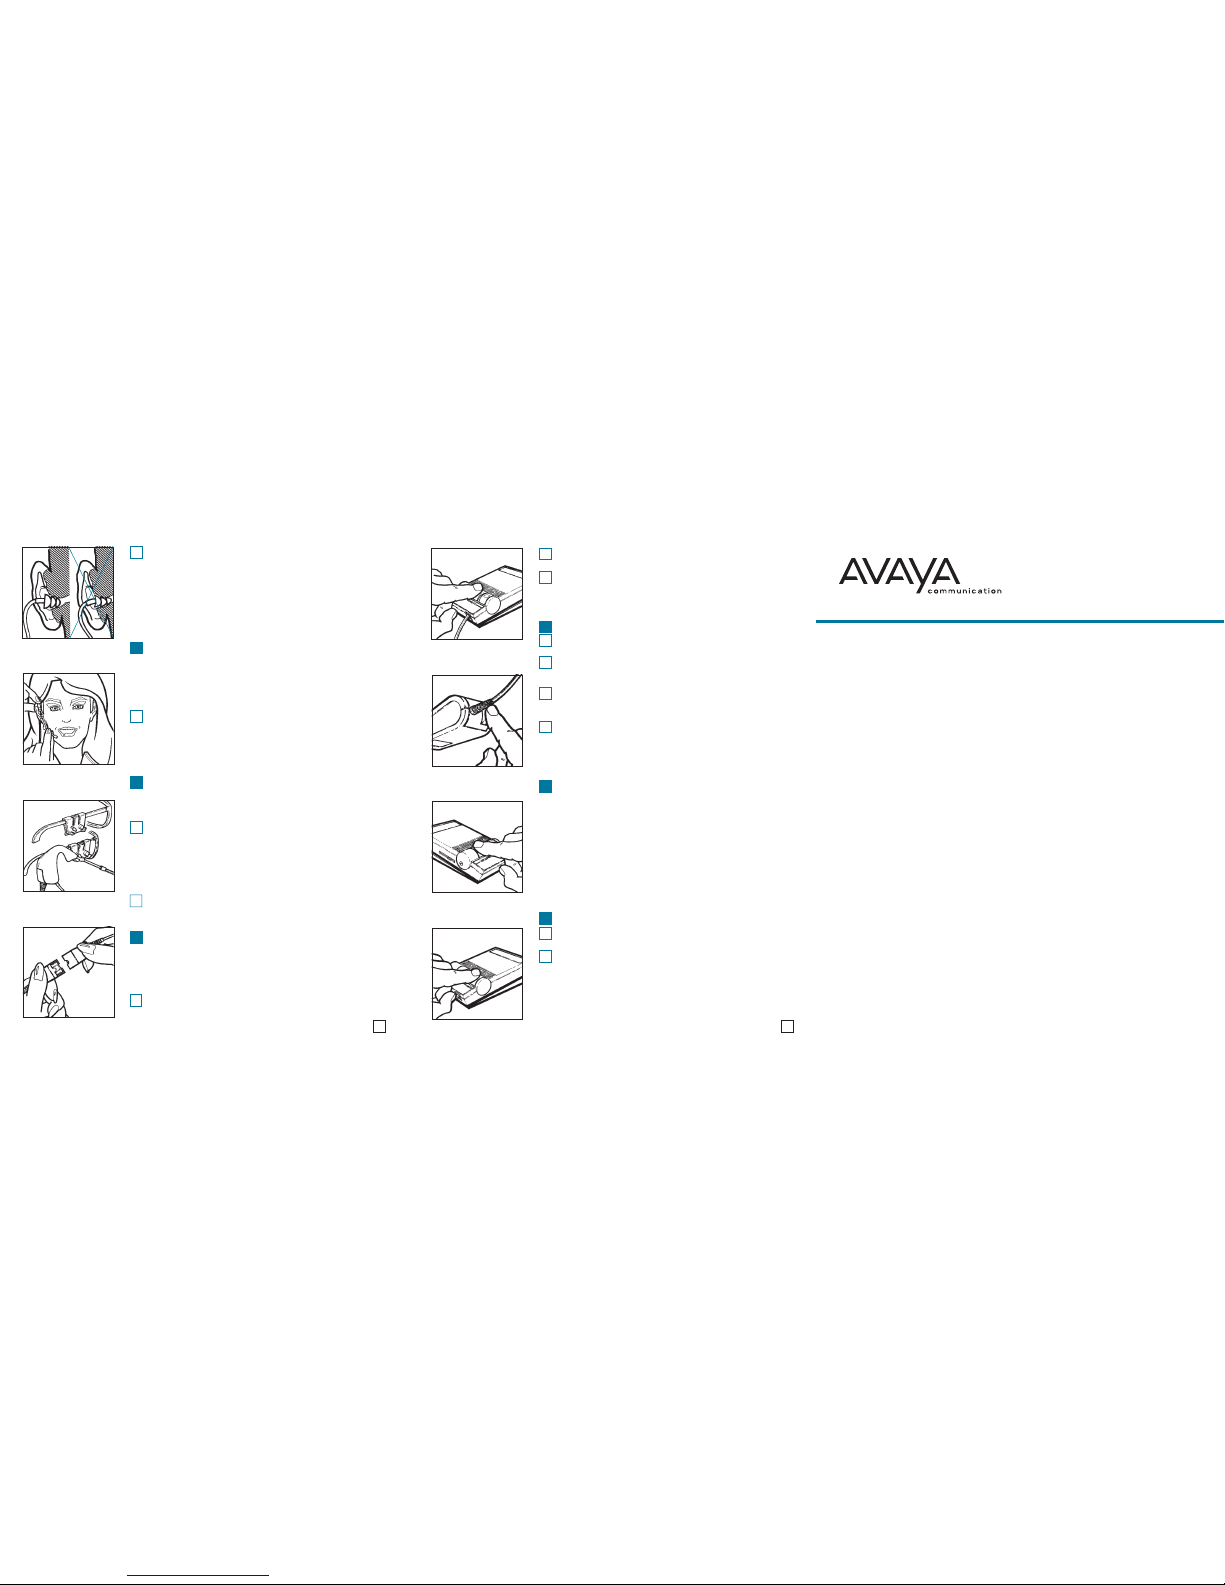
Adjusting the Voice Tube
With one hand, hold the capsule securely against your head. With
your other hand, pull out or push in the voice tube and rotate the tip so
it is approximately 1/2" away from your face at the corner of your
mouth. (Refer to FIGURE 6)
Maintenance Hint for Optimum Performance
Replace your voice tube every six months.
Attaching StarSet®to Glasses
StarSet is designed to fit comfortably with glasses. If you desire a
more secure fit, use the Eyeglass Clip. Attach the clip to the side on
which you wear your headset.
A For plastic frames, slip the clip onto the temple of your glasses with
the grips for the headset facing away from your head.
(Refer to FIGURE 7A)
B For metal or wire frames, pull back the tab on top of the clip. Then,
slip the clip onto the temple of your glasses with the grips for the
headset facing away from your head. The clip should be secure
when the tab is released. (Refer to FIGURE 7B)
Attach the headset by slipping the voice tube balljoint into the clip.
(Refer to FIGURE 7B)
Quick Disconnect
Your headset model is equipped with a Quick Disconnect module.
This feature allows you to temporarily disconnect your headset without
removing your headset, thus freeing you to perform a task away from
the phone. Your conversation is quickly resumed by reconnecting the
Quick Disconnect.
Before attempting to use your headset, be sure that the two Quick
Disconnect halves are connected.
FIGURE 5
FIGURE 6
FIGURE 7
FIGURE 8
1
1
2
A
B
To temporarily disconnect your headset, grasp the Quick Disconnect
as shown and pull straight apart. (Refer to FIGURE 8)
To resume your conversation, reconnect the two halves of the
Quick Disconnect.
Placing and Receiving Calls with the Modular Amplifier
For headset use, depress the middle button (labeled “ON/OFF”) so
that the color indicator is visible. (Refer to FIGURE 9)
To place a call, remove the telephone handset from its cradle. You
should hear your dial tone. Dial normally. To end the call, hang up
the handset.
To receive a call, remove the handset from its cradle. You can now
hear and be heard by the calling party. To end the call, hang up
the handset.
For handset use, depress the “ON/OFF” button again so that the
color indicator does not appear. Pick up your handset as you
would normally.
Setting the Volume Control
To set the volume control to the hearing level most comfortable for
you, start with the wheel turned to number 3, the lowest level. To
increase the volume, rotate the wheel to a higher number. (Refer to
FIGURE 10 or 11, as appropriate)
Using the Mute Button on the Modular Amplifier
To mute your voice while still hearing the caller, depress the “MUTE”
button so that the color indicator is visible. (Refer to FIGURE 12)
To resume speaking to your caller, depress the “MUTE” button again
so that the color indicator does not appear.
IF YOU HAVE ANY QUESTIONS, PLEASE CONTACT YOUR
AVAYA REPRESENTATIVE AT 800-628-2888
49346-01 (10•00)
FIGURE 9
FIGURE 10
FIGURE 11
FIGURE 12
1
2
2
3
1
2
3
4
3 4
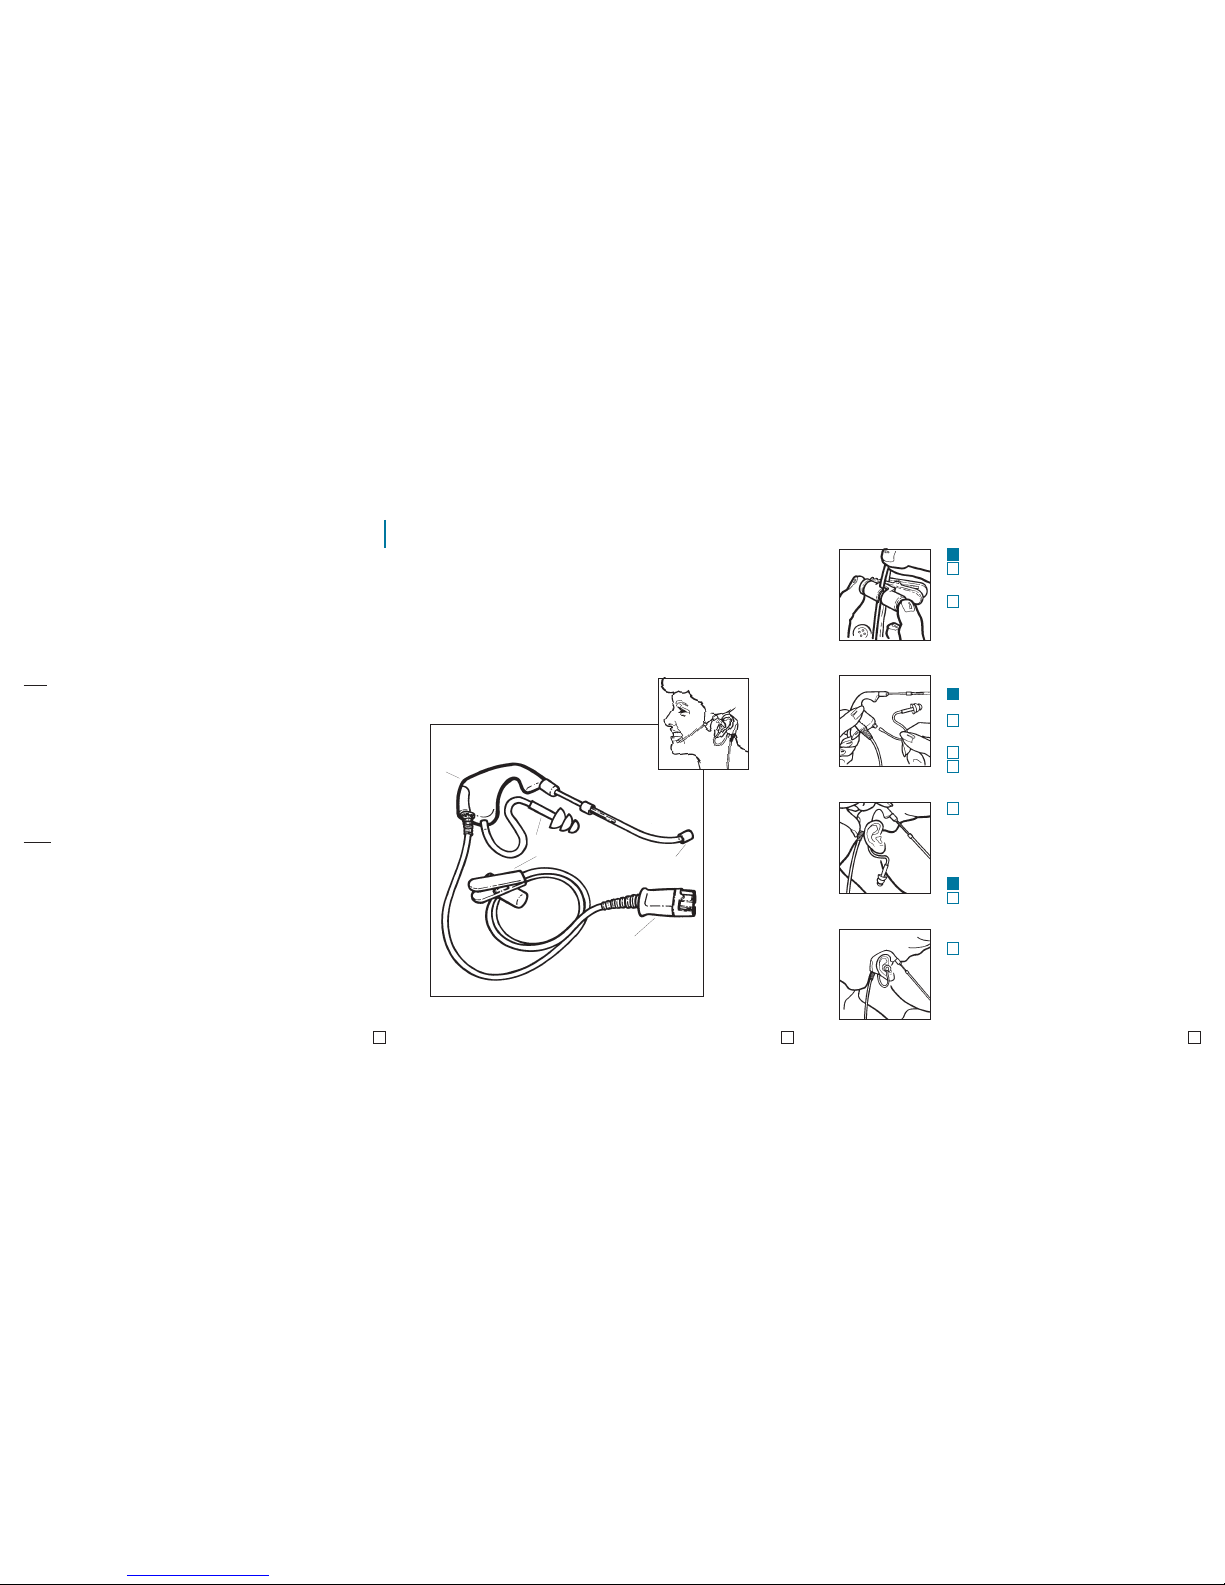
Adjusting the Clothing Clip
An Avaya headset will best serve you when it is properly adjusted
for comfort and clarity. Use the Clothing Clip to keep the headset
properly seated, free from the weight of the cord.
Attach the Clothing Clip to your clothing at a comfortable level.
To adjust the clip position, push the barrel end in and slide the
cord through to provide sufficient slack so that the headset is
not disturbed by head movements. (Refer to FIGURE 1)
Positioning StarSet
®
StarSet has been designed to fit comfortably on either ear.
Attach the Versatip™ Eartip to the StarSet capsule by gently
working the clear plastic tube onto the small metal nib (located
near the capsule cord). (Refer to FIGURE 2)
Extend the voice tube approximately one inch.
Hold the StarSet capsule above your ear and against your head,
with the voice tube over your cheek and the cord behind your ear.
Then, slide the capsule downward behind the top portion of your
ear until positioned as shown. (Refer to FIGURE 3)
Gently rotate StarSet back and forth until it rests securely and
comfortably on your ear. (Refer to FIGURE 4)
Fitting the Versatip™ Eartip
To insert the Versatip Eartip, grasp the tube and gently insert into
the ear canal until the first third is comfortably seated. The first third of
a properly seated Versatip should fit easily into the outer ear canal.
(Refer to FIGURE 5) Fitting may be made easier if you pull your ear
upward and outward during fitting.
To remove, slowly twist the Versatip Eartip while gently pulling
it outward.
WARNING: DO NOT insert the Versatip so far into the ear canal
that it becomes difficult to remove. This may cause discomfort
over time and will hinder clear reception.
If you have a history of ear infections, allergies to plastics, or
you notice any irritation after using the Versatip, you should
avoid this product.
FIGURE 1
FIGURE 2
FIGURE 3
FIGURE 4
1
1
2
2
1
2
3
4
21i
FCC REGISTRATION INFORMATION
In compliance with FCC Rules and Regulations, Part 68, you are advised that:
1. Before installing your headset, you must notify the owner of the host equipment (i.e., leasing company).
Provide them with the headset registration number. The registration number is printed on the headset
registration label.
2. If the installation of your headset requires the installation of a headset jack/JackSet®that connects
to the internal wiring of leased telephones or other devices, such connections can only be made with
permission of the owner of the host equipment.
3. In case of trouble, disconnect your headset to determine the trouble source. If the headset is the source,
modifications or repairs can only be made by the headset manufacturer or its authorized representatives.
INDUSTRY CANADA NOTICE
Notice: The Industry Canada label identifies certified equipment. This certification means that the equipment
meets certain telecommunications network protective, operational and safety requirements. The Department
does not guarantee the equipment will operate to the users satisfaction.
Before installing this equipment, users should ensure that it is permissible to be connected to the facilities
of the local telecommunications company. The equipment must also be installed using an acceptable
method of connection. In some cases, the company’s inside wiring associated with a single line individual
service may be extended by means of a certified connector assembly (telephone extension cord). The
customer should be aware that compliance with the above conditions may not prevent degradation of
service in some situations.
Repairs to certified equipment should be made by an authorized Canadian maintenance facility designated
by the supplier. Any repairs or alterations made by the user to this equipment, or equipment malfunctions,
may give the telecommunications company cause to request the user to disconnect the equipment.
Users should ensure for their own protection that the electrical ground connec-tions of the power utility,
telephone lines and internal metallic water pipe system, if present, are connected together. This precaution
may be particularly important in rural areas.
Caution: Users should not attempt to make such connections themselves, but should contact the appropriate
electric inspection authority, or electrician, as appropriate.
Notice: The Ringer Equivalence Number (REN) assigned to each terminal device provides an indication of
the maximum number of terminals allowed to be connected to a telephone interface. The termination on
an interface may consist of any combination of devices subject only to the requirement that the sum of the
Ringer Equivalence Numbers of all the devices does not exceed 5.
SERVICE INFORMATION
Should you encounter difficulties or be uncertain about proper installation, please follow the procedures below:
• Replace the faulty headset with a working headset. If the problem persists, the problem is probably not
in the headset, but in the equipment to which it is connected.
• If the replacement clears the problem the trouble is in the headset.
Should your headset fail to operate properly, and you wish to obtain service under the Warranty specified
in your agreement with Avaya, please contact your Avaya representative. When returning the headset for
service, it is not necessary to include the amplifier.
TRADEMARK NOTICES
StarSet is a registered trademark of Plantronics, Inc.
Versatip is a trademark of Plantronics, Inc.
JackSet is a registered trademark of Plantronics, Inc.
StarSet®User’s Guide
This user’s guide contains information on the positioning and usage of the Avaya StarSet®Headset.
Refer to the amplifier user’s guide for information on the installation and usage of the amplifier.
StarSet
®
CAPSULE
VERSATIP
™
CLOTHING CLIP VOICE TUBE
QUICK DISCONNECT
 Loading...