

Page 1

Avaya SMON
Manager User
Guide
May 2004
Page 2

Avaya SMON Manager User Guide
Copyright Avaya Inc. 2004 ALL RIGHTS RESERVED
The products, specifications, and other technical information regarding the products
contained in this document are subject to change without notice. All information in this
document is believed to be accurate and reliable, but is presented without warranty of any
kind, express or implied, and users must take full responsibility for their application of any
products specified in this document. Avaya disclaims responsibility for errors which may
appear in this document, and it reserves the right, in its sole discretion and without notice, to
make substitutions and modifications in the products and practices described in this
document.
Avaya™ and SMON™ are registered trademarks and trademarks of Avaya Inc.
© 2004 Avaya Inc. All rights reserved. All trademarks identified by the ® or TM are registered
trademarks or trademarks, respectively, of Avaya Inc. All other trademarks are the property
of their respective owners.
Release 4.002
Page 3

Table of Contents
Preface . . . . . . . . . . . . . . . . . . . . . . . . . . . . . . . . . . . . . . . . . . . . . . . . . .vi
The Purpose of This Guide . . . . . . . . . . . . . . . . . . . . . . . . . . . . . . . . vi
Who Should Use This Guide . . . . . . . . . . . . . . . . . . . . . . . . . . . . . . . vi
Organization of This Guide . . . . . . . . . . . . . . . . . . . . . . . . . . . . . . . . vi
Chapter 1 — Overview . . . . . . . . . . . . . . . . . . . . . . . . . . . . . . . . . . . . . 1
What is RMON . . . . . . . . . . . . . . . . . . . . . . . . . . . . . . . . . . . . . . . . . .1
What is SMON . . . . . . . . . . . . . . . . . . . . . . . . . . . . . . . . . . . . . . . . . .2
Switch Monitoring . . . . . . . . . . . . . . . . . . . . . . . . . . . . . . . . . . . .3
Enterprise Monitoring . . . . . . . . . . . . . . . . . . . . . . . . . . . . . . . . .3
SMON Management Applications . . . . . . . . . . . . . . . . . . . . . . . .3
Overview of SMON Concepts . . . . . . . . . . . . . . . . . . . . . . . . . . . . . . .4
SMON Devices . . . . . . . . . . . . . . . . . . . . . . . . . . . . . . . . . . . . . . .5
Top-Down Monitoring . . . . . . . . . . . . . . . . . . . . . . . . . . . . . . . . .6
Top-Down Monitoring for the MAC Layer . . . . . . . . . . . . . .6
Top-Down Monitoring for the Upper Layers . . . . . . . . . . . .7
SMON Tools . . . . . . . . . . . . . . . . . . . . . . . . . . . . . . . . . . . . . . . . . . . .9
Avaya SMON Manager Tools . . . . . . . . . . . . . . . . . . . . . . . . . .10
Enterprise Switch Statistics . . . . . . . . . . . . . . . . . . . . . . . . .10
Enterprise Port Statistics . . . . . . . . . . . . . . . . . . . . . . . . . . .11
Enterprise Voice Port Statistics . . . . . . . . . . . . . . . . . . . . . .11
Enterprise History . . . . . . . . . . . . . . . . . . . . . . . . . . . . . . . .11
Enterprise Switch History . . . . . . . . . . . . . . . . . . . . . . . . . .12
Port History . . . . . . . . . . . . . . . . . . . . . . . . . . . . . . . . . . . . .13
Device SMON Tools . . . . . . . . . . . . . . . . . . . . . . . . . . . . . . . . . .14
Chapter 2 — Introduction to Avaya SMON Manager . . . . . . . . . . . . 15
Starting Avaya SMON Manager . . . . . . . . . . . . . . . . . . . . . . . . . . . .15
The Online SMON User Interface . . . . . . . . . . . . . . . . . . . . . . . . . . .15
SMON Tabs . . . . . . . . . . . . . . . . . . . . . . . . . . . . . . . . . . . . . . . .16
Online SMON Toolbar . . . . . . . . . . . . . . . . . . . . . . . . . . . . . . . .16
Dialog Area . . . . . . . . . . . . . . . . . . . . . . . . . . . . . . . . . . . . . . . .17
Desktop . . . . . . . . . . . . . . . . . . . . . . . . . . . . . . . . . . . . . . . . . . .17
Working with SMON Tools . . . . . . . . . . . . . . . . . . . . . . . . . . . . . . .18
Configuring Display Options . . . . . . . . . . . . . . . . . . . . . . . . . . .19
Polling Interval . . . . . . . . . . . . . . . . . . . . . . . . . . . . . . . . . .19
Display Mode . . . . . . . . . . . . . . . . . . . . . . . . . . . . . . . . . . .20
Items Per Screen . . . . . . . . . . . . . . . . . . . . . . . . . . . . . . . . .20
TopN Number of Elements . . . . . . . . . . . . . . . . . . . . . . . . .20
Avaya SMON Manager User Guide iii
Page 4

Table of Contents
Configuring Report Options . . . . . . . . . . . . . . . . . . . . . . . . . . .21
Using Dialog Box Options . . . . . . . . . . . . . . . . . . . . . . . . . . . . .21
Generating Reports . . . . . . . . . . . . . . . . . . . . . . . . . . . . . . . . . .22
Report Now . . . . . . . . . . . . . . . . . . . . . . . . . . . . . . . . . . . . .23
Auto Report . . . . . . . . . . . . . . . . . . . . . . . . . . . . . . . . . . . .24
Managing Windows . . . . . . . . . . . . . . . . . . . . . . . . . . . . . . . . . .25
Chapter 3 — Switch Statistics. . . . . . . . . . . . . . . . . . . . . . . . . . . . . . . 26
Accessing Switch Statistics . . . . . . . . . . . . . . . . . . . . . . . . . . . . . . . .26
Using Switch Statistics . . . . . . . . . . . . . . . . . . . . . . . . . . . . . . . . . . .27
Understanding the Switch Statistics Window . . . . . . . . . . . . . .27
Selecting Switches to Poll . . . . . . . . . . . . . . . . . . . . . . . . . . . . .29
Filtering the Switch Statistics Display . . . . . . . . . . . . . . . . . . . .31
Switch Statistics Counters . . . . . . . . . . . . . . . . . . . . . . . . . . . . .31
Sorting the Display . . . . . . . . . . . . . . . . . . . . . . . . . . . . . . . . . .32
Searching for Switches . . . . . . . . . . . . . . . . . . . . . . . . . . . . . . .33
Chapter 4 — Port Statistics . . . . . . . . . . . . . . . . . . . . . . . . . . . . . . . . . 34
Accessing Port Statistics . . . . . . . . . . . . . . . . . . . . . . . . . . . . . . . . . .34
Using Port Statistics . . . . . . . . . . . . . . . . . . . . . . . . . . . . . . . . . . . . .35
Understanding the Port Statistics Window . . . . . . . . . . . . . . . .35
Selecting Ports and LAGs to Poll . . . . . . . . . . . . . . . . . . . . . . . .37
Filtering the Port Statistics Display . . . . . . . . . . . . . . . . . . . . . .39
VLAN Filtering . . . . . . . . . . . . . . . . . . . . . . . . . . . . . . . . . .40
TopN Filtering . . . . . . . . . . . . . . . . . . . . . . . . . . . . . . . . . . .41
Port Statistics Counters . . . . . . . . . . . . . . . . . . . . . . . . . . . . . . .42
Sorting the Display . . . . . . . . . . . . . . . . . . . . . . . . . . . . . . . . . .43
Searching for Ports and LAGs . . . . . . . . . . . . . . . . . . . . . . . . . .44
Chapter 5 — Voice Port Statistics . . . . . . . . . . . . . . . . . . . . . . . . . . . . 46
Accessing Voice Port Statistics . . . . . . . . . . . . . . . . . . . . . . . . . . . . .46
Using Voice Port Statistics . . . . . . . . . . . . . . . . . . . . . . . . . . . . . . . . .47
Understanding the Voice Port Statistics Window . . . . . . . . . . .47
Selecting IP Telephones to Poll . . . . . . . . . . . . . . . . . . . . . . . . .49
Filtering the Voice Port Statistics Display . . . . . . . . . . . . . . . . .51
Voice Port Statistics Counters . . . . . . . . . . . . . . . . . . . . . . . . . .52
Sorting the Display . . . . . . . . . . . . . . . . . . . . . . . . . . . . . . . . . .53
Searching for IP Telephones . . . . . . . . . . . . . . . . . . . . . . . . . . .54
Chapter 6 — Introduction to SMON History . . . . . . . . . . . . . . . . . . . 55
Accessing SMON History . . . . . . . . . . . . . . . . . . . . . . . . . . . . . . . . .55
The SMON History User Interface . . . . . . . . . . . . . . . . . . . . . . . . . .55
SMON Tabs . . . . . . . . . . . . . . . . . . . . . . . . . . . . . . . . . . . . . . . .56
SMON History Toolbar . . . . . . . . . . . . . . . . . . . . . . . . . . . . . . .56
Desktop . . . . . . . . . . . . . . . . . . . . . . . . . . . . . . . . . . . . . . . . . . .57
Info Box . . . . . . . . . . . . . . . . . . . . . . . . . . . . . . . . . . . . . . . . . . .57
Managing Windows . . . . . . . . . . . . . . . . . . . . . . . . . . . . . . . . . . . . .58
iv Avaya SMON Manager User Guide
Page 5

Table of Contents
History Text Report . . . . . . . . . . . . . . . . . . . . . . . . . . . . . . . . . . . . .58
Chapter 7 — Using SMON History . . . . . . . . . . . . . . . . . . . . . . . . . . . 59
Using Enterprise History . . . . . . . . . . . . . . . . . . . . . . . . . . . . . . . . . .60
Understanding the Enterprise History Window . . . . . . . . . . . .60
Collection Parameters . . . . . . . . . . . . . . . . . . . . . . . . . . . . . . . .63
Activating/Deactivating History Collections . . . . . . . . . . . . . . .63
Activating Auto Save . . . . . . . . . . . . . . . . . . . . . . . . . . . . . . . . .64
Viewing the Collection Log . . . . . . . . . . . . . . . . . . . . . . . . .65
Refreshing the Device List . . . . . . . . . . . . . . . . . . . . . . . . . . . . .66
Saving the Enterprise History Window . . . . . . . . . . . . . . . . . . .67
Using Switch History . . . . . . . . . . . . . . . . . . . . . . . . . . . . . . . . . . . .68
Opening a Switch History Window . . . . . . . . . . . . . . . . . . . . . .68
Understanding the Switch History Window . . . . . . . . . . . . . . .69
Saving a Switch History Report . . . . . . . . . . . . . . . . . . . . . . . . .71
Using Port History . . . . . . . . . . . . . . . . . . . . . . . . . . . . . . . . . . . . . . .72
Opening the Port History Chart . . . . . . . . . . . . . . . . . . . . . . . . .72
Understanding the Port History Chart . . . . . . . . . . . . . . . . . . . .73
Modifying the Port History Display . . . . . . . . . . . . . . . . . . . . . .74
Appendix A — Avaya SMON Manager Menus . . . . . . . . . . . . . . . . . 75
Online SMON Menus . . . . . . . . . . . . . . . . . . . . . . . . . . . . . . . . . . . .75
File Menu . . . . . . . . . . . . . . . . . . . . . . . . . . . . . . . . . . . . . . . . .75
Edit Menu . . . . . . . . . . . . . . . . . . . . . . . . . . . . . . . . . . . . . . . . .75
View Menu . . . . . . . . . . . . . . . . . . . . . . . . . . . . . . . . . . . . . . . .76
Window Menu . . . . . . . . . . . . . . . . . . . . . . . . . . . . . . . . . . . . . .76
Help Menu . . . . . . . . . . . . . . . . . . . . . . . . . . . . . . . . . . . . . . . . .77
SMON History Menus . . . . . . . . . . . . . . . . . . . . . . . . . . . . . . . . . . . .77
File Menu . . . . . . . . . . . . . . . . . . . . . . . . . . . . . . . . . . . . . . . . .77
Edit Menu . . . . . . . . . . . . . . . . . . . . . . . . . . . . . . . . . . . . . . . . .77
View Menu . . . . . . . . . . . . . . . . . . . . . . . . . . . . . . . . . . . . . . . .78
Actions Menu . . . . . . . . . . . . . . . . . . . . . . . . . . . . . . . . . . . . . .78
Window Menu . . . . . . . . . . . . . . . . . . . . . . . . . . . . . . . . . . . . . .78
Help Menu . . . . . . . . . . . . . . . . . . . . . . . . . . . . . . . . . . . . . . . . .79
Appendix B — Setting Up the SMON License . . . . . . . . . . . . . . . . . . 80
Index. . . . . . . . . . . . . . . . . . . . . . . . . . . . . . . . . . . . . . . . . . . . . . . . . . . 81
Avaya SMON Manager User Guide v
Page 6

Preface
Welcome to Avaya SMON Manager. This chapter provides an
introduction to the structure and assumptions of the guide. It includes
the following sections:
• The Purpose of This Guide
purpose of this guide.
• Who Should Use This Guide
audience of this guide.
• Organization of This Guide - A brief description of the subjects
covered in each chapter of this guide.
The Purpose of This Guide
This guide contains the information needed to operate Avaya SMON
Manager efficiently and effectively.
Who Should Use This Guide
This guide is intended for use by network managers familiar with
network management and its fundamental concepts. It is assumed that
the user has the basic responsibility for monitoring Avaya’s intelligent
switching devices and the network traffic.
- A description of the intended
- A description of the intended
Organization of This Guide
This guide is structured to reflect the following conceptual divisions:
• Introduction - An introduction to Avaya SMON Manager
including the following chapters:
— Preface - This chapter describes the guide’s purpose, intended
audience, and organization.
Avaya SMON Manager User Guide vi
Page 7

— Overview - This chapter provides an overview of the RMON
standard and Avaya Inc.’s SMON concepts, a graphical
example of SMON’s position in a network, a description of the
Avaya Inc. switch architecture and monitoring concepts, and
an introduction to the SMON tools.
• Online SMON - Instructions on how to use Online SMON
Manager applications.
— Introduction to Avaya SMON Manager - This chapter
describes how to launch Avaya SMON Manager and the
SMON tools. It also describes the Online SMON user interface.
— Enterprise Switch Statistics - This chapter describes the
Enterprise Switch Statistics tool in detail, including sample
screens and filtering options.
— Enterprise Port Statistics - This chapter describes the
Enterprise Port Statistics tool in detail, including sample
screens and filtering options.
Preface
— Enterprise Voice Port Statistics - This chapter describes the
Enterprise Voice Port Statistics tool in detail, including sample
screens and filtering options.
• SMON History - Instructions on how to use SMON History.
— Introduction to SMON History - This chapter explains
how to open SMON History and provides a detailed
description of the SMON History user interface.
— Using SMON History - This chapter describes the SMON
History tools in detail.
The following Appendices are included at the end of this guide:
• Appendix A - The full menu structure in Avaya SMON
Manager.
• Appendix B - How to set up the Avaya SMON Manager license.
Avaya SMON Manager User Guide vii
Page 8

1
Overview
This chapter describes Avaya SMON Manager, Avaya Inc.’s switched
network monitoring system, and includes the following sections:
• What is RMON
• What is SMON
• Overview of SMON Concepts
• SMON Tools
What is RMON
RMON is the internationally recognized and approved standard for
detailed analysis of shared Ethernet and Token Ring media. It ensures
consistency in the monitoring and display of statistics between different
vendors.
RMON’s advanced remote networking capabilities provide the tools
needed to monitor and analyze the behavior of segments on a network.
In conjunction with an RMON agent, RMON gathers details and logical
information about network status, performance, and users running
applications on the network.
- A brief description of the RMON standard.
- A general description of SMON switch
monitoring technology.
- An introduction to SMON
concepts.
- An introduction to different types of SMON tools.
An RMON agent is a probe that collects information about segments,
hosts, and traffic, and sends it to a management station.
The network administrator uses software tools to view the information
collected by the RMON agent on the management station.
RMON has two levels:
• RMON I analyzes the MAC layer (Layer 2 in the OSI seven-layer
model).
• RMON II analyzes the upper layers (Layers 3 and above).
Avaya SMON Manager User Guide 1
Page 9
RMON is an industry standard that Avaya Inc. and other companies
have adopted in their network management applications. Avaya has
taken the RMON standard and extended it to the switching
environment.
What is SMON
SMON is an extension of the RMON standard. SMON adds to the
monitoring capabilities of RMON in the following ways:
• It provides additional tools and features for monitoring in the
• It provides a global view of traffic flow in a network with multiple
SMON extends both RMON I for the MAC layer, and RMON II for the
network layer and above. SMON monitoring collects and displays data in
real-time.
Overview
switch environment.
switches.
Using SMON monitoring, you can get:
• A global view of traffic for all switches on the network.
• An overall view of traffic passing through a specific switch.
• Detailed data about the hosts transmitting packets or cells
through a switch.
• An analysis of traffic passing through each port connected to a
switch.
• A view of traffic between various hosts connected to a switch.
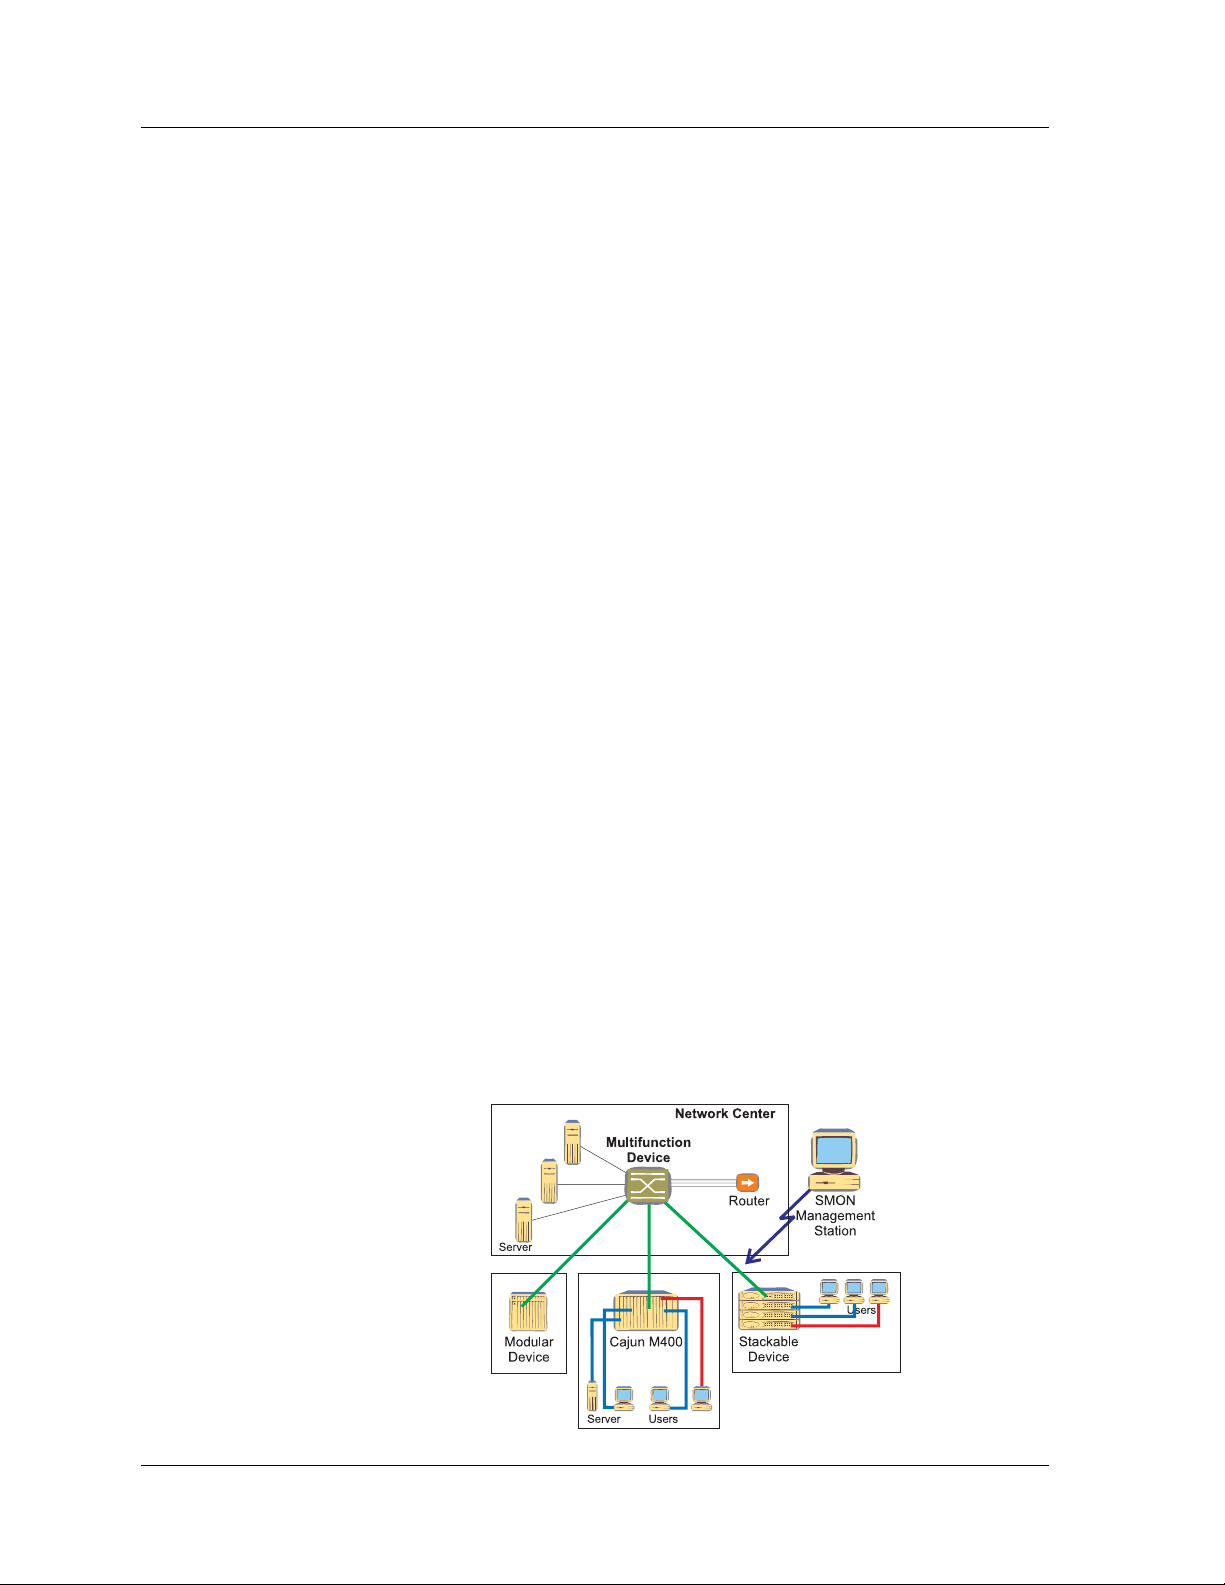
Figure 1-1. SMON Monitoring
Avaya SMON Manager User Guide 2
Page 10

Chapter 1
Switch Monitoring
Effective switch management requires a comprehensive monitoring
mechanism. RMON monitoring is not sufficient for switches. RMON
probes can only be used to monitor and analyze a single segment. When
you deploy a switch in the network, there are additional components in
the network that can not be monitored using RMON, such as switch
ports, VLAN, and statistics for all ports.
SMON meets this challenge by extending RMON to the switched
network. The SMON extensions of RMON allow the network
administrator to analyze the switched network and all of its components.
Enterprise Monitoring
Switches are often used in networks with a complex topology. Switches
are typically deployed at the center of an enterprise network between
clients and servers, or in backbones to provide high bandwidth and
secure connectivity.
Avaya SMON Manager uses a client/server architecture for enterprise
monitoring.
SMON extends RMON to provide global monitoring for complex
networks. Avaya SMON Manager tools provide a network-wide view of
all switched devices in the network. They enable you to monitor the
entire network in a single window.
SMON Management Applications
The management applications provided by the SMON extension of
RMON include SMON I tools on the MAC layer, and AnyLayer SMON
tools on the network layer and above.
The SMON I tools extend RMON I to provide switch monitoring and
global network monitoring on the MAC layer. These tools include:
• Enterprise Switch Statistics
• Enterprise Port Statistics
• Enterprise History
• Switch Statistics
• Switch-wide Quality of Service (QoS) indication (provided as part
of Switch Statistics)
3 Avaya SMON Manager User Guide
Page 11

Overview
•VLAN Statistics
• Port Statistics
• Extended Port Statistics
• Ethernet Segment Statistics
• Host Statistics
• Host Matrix Statistics
• Port History
The AnyLayer SMON tools extend RMON II to provide switch
monitoring on the network layer and above. These tools include:
• Protocol Directory
• Protocol Distribution
• Network Layer Host Statistics over IP
• Network Layer Subnet Statistics over IP
Overview of SMON Concepts
The SMON applications include Avaya SMON Manager and Avaya
Device SMON applications for Avaya Campus devices. These applications
comprise an RMON-compliant network management suite that
implements the SMON extensions to RMON. Avaya SMON Manager and
Avaya Device SMON applications work with the other components of
Avaya Network Management to provide a full spectrum of in-depth
monitoring of switch traffic and network performance.
Avaya SMON Manager and Avaya Device SMON applications consist of a
software console application on a workstation and remote monitoring
probes in network devices that support SMON.
The console applications communicate constantly with the SMON
devices on your network. The console uses the SNMP protocol to gather
information from the devices. Avaya SMON Manager and Avaya Device
SMON applications provide you with a suite of powerful graphic display
tools to view this information.
Avaya’s SMON tools give you detailed analysis of the traffic flow on your
switched network, from a global view down to a specific host, and from
total MAC layer traffic down to a specific application protocol - all in
real-time.
Avaya SMON Manager User Guide 4
Page 12

Chapter 1
SMON Devices
Avaya’s SMON tools provide monitoring capabilities for network devices
that support the SMON extensions of the RMON standard.
For Avaya M770, Avaya P130, Avaya C360, Avaya W310, and
Avaya P330 Devices, SMON monitoring capabilities can be activated by
purchasing an SMON license from Avaya Inc.
Avaya M770 M-MLS Devices and Avaya P333R Devices also support the
AnyLayer SMON extensions of RMON II.
The following table shows the SMON monitoring components supported
by the various network devices.
Table 1-1. SMON Monitoring Support by SMON Devices
Avaya P330
Devices
Avaya
M770
Device
DomainX
Avaya P460,
P580, P882,
W310, C360
and P130
Devices
Enterprise Switch Statistics √√√
Enterprise Port Statistics √√√
Enterprise Voice Port
√
Statistics
Enterprise Port History √√
Switch Statistics √√√
Switch-wide QoS Indication √
1
VLAN Statistics √√√
Port Statistics √
2
√√
2
Ethernet Segment Statistics √√
Host Statistics √
Host Matrix Statistics √
4
4
Port History √√√
Protocol Directory √
Protocol Distribution √
Network Layer Host
4
4
3
√
3
√
3
√
Statistics (IP)
Network Layer Subnet
4
√
3
√
Statistics (IP)
1
As part of Switch Statistics application.
5 Avaya SMON Manager User Guide
Page 13

2
Extended Port Statistics are also supported.
3
Supported when using the Avaya M770 M-MLS.
4
Supported when using a Avaya P333R module.
Top-Down Monitoring
Avaya’s SMON applications provide multi-tiered monitoring capabilities,
both for the MAC layer (SMON I) and for upper layers (AnyLayer
SMON). Multi-tiered monitoring enables you to use powerful top-down
network monitoring techniques.
Top-down monitoring begins when you notice particular traffic flow
patterns in a global view of your network. You then progessively focus in
until you find the specific source or sources of the traffic. Using this
method, the amount of information you need to assess is kept to a
minimum. Top-down monitoring is robust enough to keep you in
control of even the most complex and sophisticated networks.
Overview
Top-D ow n Monitoring for the MAC Layer
The top tier for Avaya SMON monitoring at the MAC layer (SMON I) is
Enterprise Switch Statistics. The Enterprise Switch Statistics tool shows
summary traffic statistics for all switches in your network.
The next two tiers provide a general look at the traffic passing through a
specific switch. In this way, you can view at a glance whether the switch
is functioning efficiently and effectively. These tiers provide answers to
questions such as:
• Is there more traffic than usual passing through this switch?
• Are there more error packets than usual?
• How much traffic is passing through the VLANs?
• Do the VLANs have equal loads?
Avaya SMON Manager User Guide 6
Page 14

Chapter 1
The lower monitoring tiers provide more focused views of the traffic on
the device. They allow you to zero in on a specific host or port on a
switch. You can then pinpoint the exact source of the traffic discovered
in the upper tiers.
Figure 1-2. Top-Down Monitoring for the MAC Layer
Top-D ow n Monitoring for the Upper Layers
7 Avaya SMON Manager User Guide
Avaya’s SMON applications provide a series of AnyLayer SMON tools for
implementing top-down monitoring techniques at the network layer
and above. Top-down monitoring on upper layers allows you to view
aspects of your network that extend beyond the router, or that apply to a
specific application protocol.
The upper tier of SMON top-down monitoring for upper layers is
Protocol Distribution. The Protocol Distribution tool gives a general view
of traffic through a switch, organized by protocol. Some of the types of
questions Protocol Distribution may provide answers to are:
• What proportion of the traffic consists of IP maintenance
protocols, such as ARP, RIP, or SAP?
Page 15

Overview
• Is there an unusual amount of traffic for a specific type of
application protocol, such as e-mail, name service, or HTTP?
• Is there an unusual amount of ICMP traffic that may be caused by
flood pinging?
The lower tiers then allow you to locate the IP subnet or specific IP host
that is the source of the traffic discovered using Protocol Distribution.
Figure 1-3. Top-Down Monitoring for Upper Layers
Avaya SMON Manager User Guide 8
Page 16

Chapter 1
SMON Tools
The SMON tools are divided into the following:
• Avaya SMON Manager Tools
monitoring capabilities for multiple SMON devices on a network.
• Device SMON Tools
- These tools monitor specific devices.
Figure 1-4. SMON Tools
- These tools provide global
9 Avaya SMON Manager User Guide
Page 17

Avaya SMON Manager Tools
Avaya SMON Manager tools provide global monitoring capabilities for
multiple SMON devices on a network. There are two types of SMON
Manager tools:
• Online SMON Tools - Tools providing network-wide switch and
port monitoring information in real-time. These tools include:
— Enterprise Switch Statistics
— Enterprise Port Statistics
— Enterprise Voice Port Statistics
• SMON History Tools - Tools providing views and reports of
monitoring information gathered over time. These tools include:
— Enterprise History
— Enterprise Switch History
Overview
Enterprise Switch Statistics
— Port History
— Enterprise Voice Port Statistics
In addition, the Port History tool can be accessed from Enterprise
History. These tools enable the network administrator to monitor and
control history activities of all switches from two central control screens.
The Enterprise Switch Statistics tool enables the network administrator
to monitor network statistics of all switches on the network level, in a
network which supports SMON.
As more and more switches are implemented in networks, it becomes
increasingly important to be able to get a quick view of all the switches.
The Enterprise Switch Statistics application gives you a bird’s-eye view of
the switched network, allowing you to see at a glance which switches
are functioning properly and which require attention.
All devices on the network which have been discovered by the
management umbrella and possess an SMON probe are displayed in a
bar.
Enterprise Switch Statistics displays a concise analysis of the traffic
traversing the switch. Data is displayed as a bar graph, for an
understanding of the exact levels of traffic traversing the switches.
Avaya SMON Manager User Guide 10
Page 18

Chapter 1
The basic counters (displayed in the bar charts) provide a view of the key
counters for each switch. Placing the cursor over each bar displays an
Info Box, containing the Type, IP address, and MAC address of the
associated device. This allows you to easily track switches.
The Enterprise Switch Statistics view forms the top layer of the MAC
level top-down monitoring concept. It allows you to view the level of a
specific user to isolate network problems quickly and accurately.
The relevant Device SMON application for each specific device can be
opened from within Enterprise Switch Statistics.
Enterprise Port Statistics
Enterprise Voice Port Statistics
Enterprise Port Statistics is an integral part of Avaya SMON Manager. It
allows you to see the data passing through selected ports on switches.
For each port, Avaya SMON Manager summarizes the traffic, such as
good and error unicasts into the switch, and packets from the switch.
If you notice that a particular port displays a disproportionate number of
errors, this may indicate that a specific device connected to the port is
responsible. If the attached port supports a Gigabit Ethernet connection,
only a few hosts will be attached to this port. This makes it easy to locate
the responsible host.
Enterprise Voice Port Statistics allows you to see the information on the
data passing through Avaya IP telephones.
For each Avaya IP telephone, Avaya SMON Manager summarizes the
traffic, such as good and error unicasts into the switch, and packets from
the IP telephone.
If you notice that a particular IP telephone displays a disproportionate
number of errors, this may indicate that the specific IP telephone
connected to the port may be faulty. In addition, very high traffic
statistics for an IP telephone may indicate heavy usage.
Enterprise History
11 Avaya SMON Manager User Guide
Using the Enterprise History tool, you can easily activate the history
mechanism, and upload data from the Avaya M770, Avaya P130,
Avaya P330, Avaya C360, Avaya G350, Avaya W310, Avaya C460, Avaya
P580, and Avaya P882 Device probes.
In addition, you can perform an automatic, periodic upload of data
stored in the probes during the collection period and store this data for
later analysis.
Page 19

Overview
For the Enterprise History application, the agent stores up to 360
separate data samples at equal time intervals that can later be retrieved
from the SMON console. This is called History data, and provides an
alternative method for analyzing the data in a switched network. The
agent collects port history counters for all the ports in a device.
The Enterprise History application is a control center for managing the
collection of History data on all agents in the network. Its main tasks are:
• Showing the status of Port History on each agent.
• Enabling the uploading of History data stored on each of the
agents.
• Activating Port History on the console to display the History data
stored on an agent.
The main advantages of using History data are:
• Quality information about network performance are received.
After analyzing the performance, you can plan accordingly for
expected times when ports on the network are reaching their full
capacity.
Enterprise Switch History
• Data is collected on all switch ports at the same time.
• Statistics can be imported into an external application, such as a
database or spreadsheet, for more detailed analysis.
• Data can be graphically displayed to view history behavior.
The Enterprise History application can save History data from the agents
in the network manually or automatically. Manual upload means that
you must select an agent and then activate the upload. Automatic
upload means that the Enterprise History application saves the data
according to a predefined interval for selected agents.
Enterprise Switch History provides the option to use two collections at
the same time, a long term collection and a short term collection. The
short term collection consists of data collected at brief intervals. This
provides a complete breakdown of network performance over a few
hours or days. The long term collection consists of data collected at
longer intervals over a period of a few days or weeks. This method
provides a long term view of the network.
A collection period is divided into a maximum number of separate
samples. You can upload the data at any time during the collection
period, even before it is completed. By analyzing this data using Port
History, you can view the times and locations of the peak activity periods
on the network.
Avaya SMON Manager User Guide 12
Page 20

Chapter 1
The key parameters for collections are:
• Collection Duration - The interval for each collection. This
defines how long the agent collects and stores the History data.
For example, a collection duration of 2 weeks, results in the agent
collecting and storing data for 2 weeks. The longer the collection,
the longer the interval between when the agent collects data.
• Status - This defines whether a collection is active (the agent
collects data) or inactive (the agent does not collect data). When
setting an automatic upload of data for a Collection, the
management station only uploads data for active Collections.
Port History Using the Port History tool, you can access detailed history information
collected by an SMON probe. This application is launched from the
Enterprise Switch History application.
The benefits of Port History include:
• Quality information reports about the performance of specific
ports.
• The ability to work on all switch ports at the same time.
• The ability to plan for expected times when ports on the network
are reaching their full capacity after analyzing the performance.
• The ability to view the effect of a change of configuration on the
performance of the network. You can also view the exact details
of the change itself in terms of which modules were inserted or
removed.
• The ability to discover the time a reported problem occurred and
on which port.
• The ability to view the ports and times where the traffic is at its
highest or lowest.
• The ability to import the statistics into an external application,
such as a database or spreadsheet, for more detailed analysis.
• The ability to view individual port history statistics in graph form.
13 Avaya SMON Manager User Guide
Page 21

Device SMON Tools
Device SMON tools monitor specific devices and provide statistics on the
traffic passing through a device’s switch fabric, a VLAN, port, and host.
In addition, Device SMON can provide information about host pairs
talking to each other.
For information on Device SMON tools, refer to the appropriate Avaya
Device SMON User Guide.
Overview
Avaya SMON Manager User Guide 14
Page 22

2
Introduction to Avaya SMON Manager
This chapter provides an introduction to Avaya SMON Manager, and
contains the following sections:
• Starting Avaya SMON Manager
Avaya SMON Manager.
• The Online SMON User Interface
the Online SMON user interface.
• Working with SMON Tools
SMON more effectively.
- Techniques for using Online
Starting Avaya SMON Manager
To start Avaya SMON Manager from Avaya Network Management
Console, select
opens with the Online SMON window.
To start Avaya SMON Manager from HP-OV NNM (UNIX or NT-OV),
select
Tools > Avaya > Avaya SMON Manager. Avaya SMON Manager
opens with the Online SMON window.
Tools > Avaya SMON Manager. Avaya SMON Manager
The Online SMON User Interface
- Instructions on starting
- A detailed description of
The user interface consists of the following elements:
• SMON Tabs
Online SMON and SMON History.
• Menu Bar - Menus for accessing Online SMON functions. For
information on the full menu structure in Online SMON, refer to
Online SMON Menus” on page 75.
“
• Online SMON Toolbar
important functions in Online SMON.
• Desktop
are displayed.
Avaya SMON Manager User Guide 15
- Tabs providing a method for switching between
- Buttons providing shortcuts to
- A resizeable window where Online SMON windows
Page 23
Introduction to Avaya SMON Manager
• Dialog Area - A resizeable window where all dialog boxes
appear.
The figure below shows the user interface, with its various parts labeled.
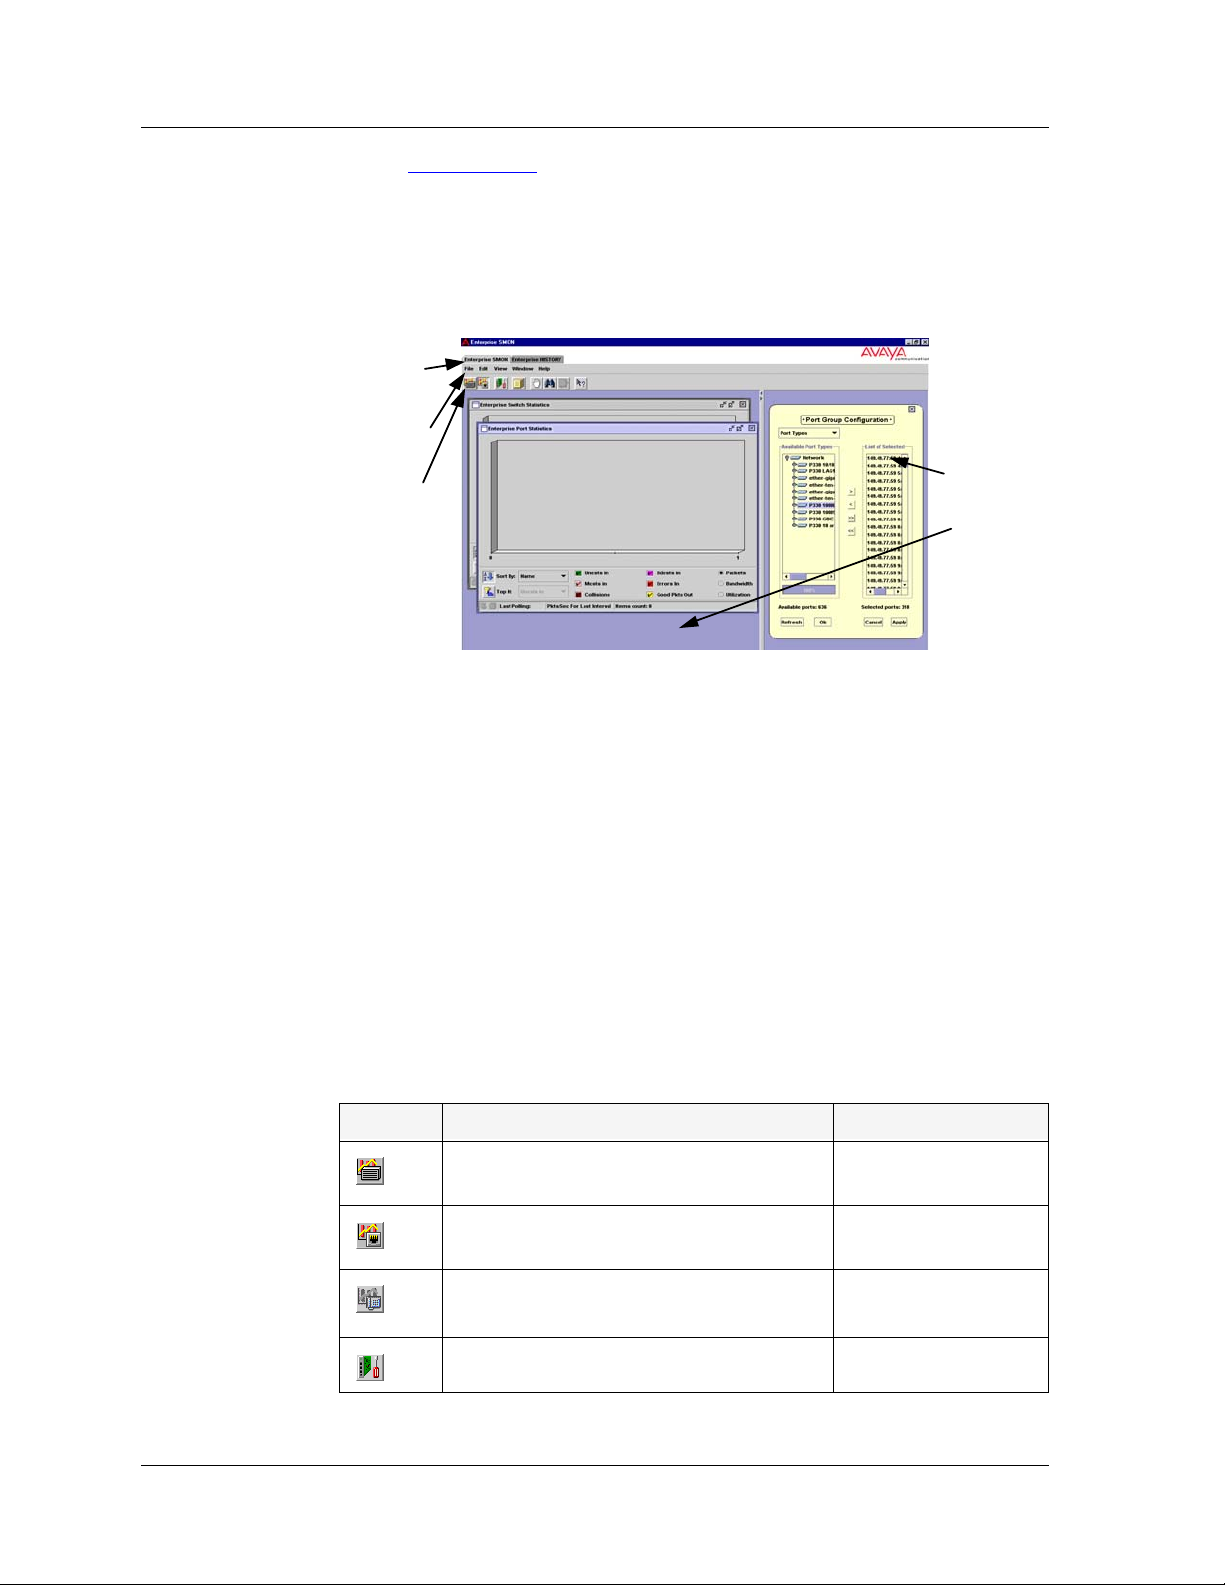
Figure 2-1. Online SMON User Interface
SMON
Tabs
Menu Bar
Toolbar
SMON Tabs
The SMON tabs provide a method for switching between the Online
SMON window and the SMON History window. To view a window, click
the appropriate SMON tab. The relevant window appears.
Online SMON Toolbar
The Toolbar provides shortcuts to the main Online SMON functions and
tools. The following table describes the buttons on the toolbar and lists
the equivalent menu options.
Dialog
Area
Desktop
Table 2-1. Online SMON Toolbar Buttons
Button Description Menu
Activates the Switch Statistics tool.
Activates the Port Statistics tool.
Activates the Voice Port Statistics
tool.
File > New > Switch
Statistics
File > New > Port
Statistics
File > New > Voice
Port Statistics
Opens the Configuration dialog box. Edit > Configuration
Avaya SMON Manager User Guide 16
Page 24
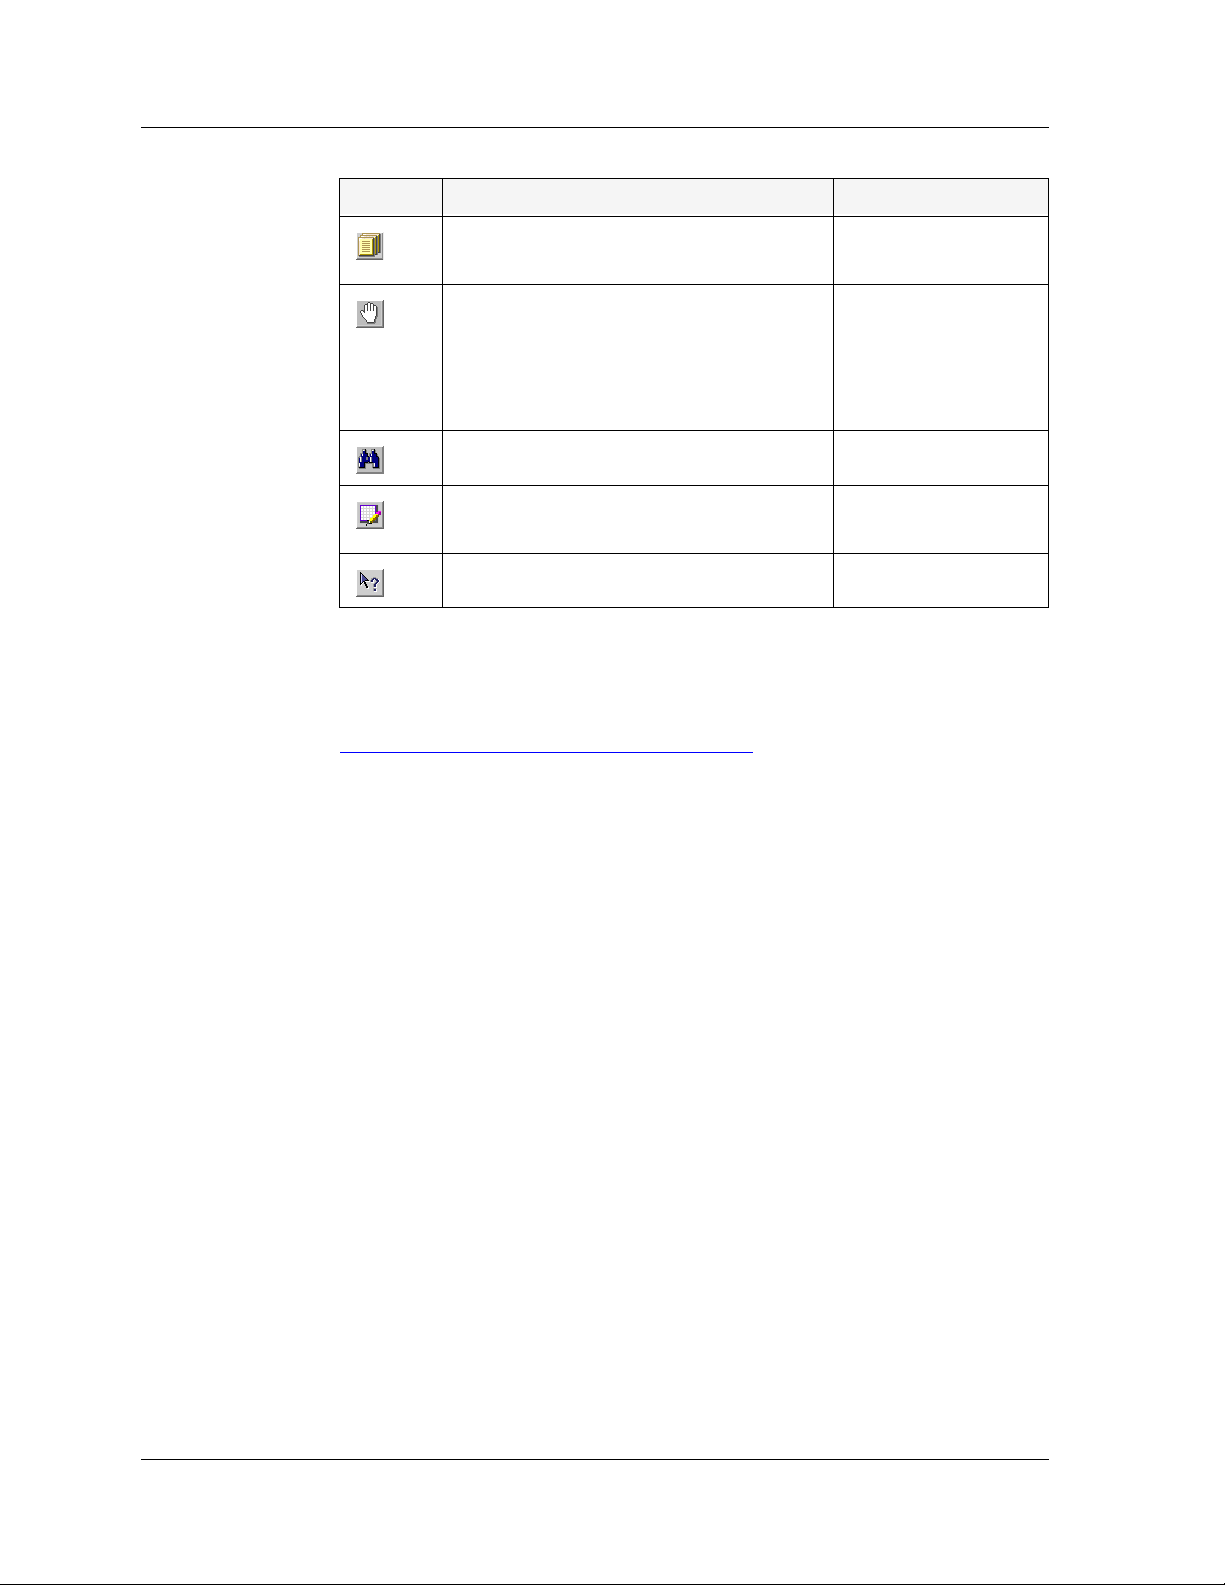
Chapter 2
Table 2-1. Online SMON Toolbar Buttons (Continued)
Button Description Menu
Produces a report file for importing to
a spreadsheet or word processor.
Temporarily stops and then restarts
collection of SMON data. When the
collection of SMON data is paused,
the background of the chart appears
white.
Searches for a specific item.
Opens the Customize View dialog
box.
Opens context sensitive on-line help.
If a tool is not active, clicking the corresponding Online SMON toolbar
button launches the tool. If a tool is already active, clicking the
corresponding Online SMON toolbar button brings the tool to the
foreground. For more information about the individual tools, refer to
“
Avaya SMON Manager Tools” on page 10.
File > Report Now
View > Pause
Edit > Find
View > Customize
Help > Help On
Dialog Area
Desktop
The area on the right side of the user interface is where all dialog boxes
appear. This area can be resized by dragging the vertical splitter bar with
the mouse. When a dialog box opens it replaces the current dialog box in
the Dialog Area.
The left side of the application window is the Desktop. This area can be
resized by dragging the vertical splitter bar with the mouse. Online
SMON windows can be resized and minimized. Minimized windows are
shown at the bottom of the Desktop.
17 Avaya SMON Manager User Guide
Page 25

Working with SMON Tools
The following sections describe features that can help you use Online
SMON tools more effectively. The topics include:
• Configuring Display Options - Instructions on how to
configure general Online SMON options.
• Configuring Report Options - Instructions on how to
configure display options in the Switch, Port, and Voice Port
Statistics applications.
Introduction to Avaya SMON Manager
• Using Dialog Box Options
box options.
• Generating Reports
• Managing Windows
Online SMON windows.
- Instructions on how to generate reports.
- Instructions on how to manage
- Instructions on using the dialog
Avaya SMON Manager User Guide 18
Page 26
Chapter 2
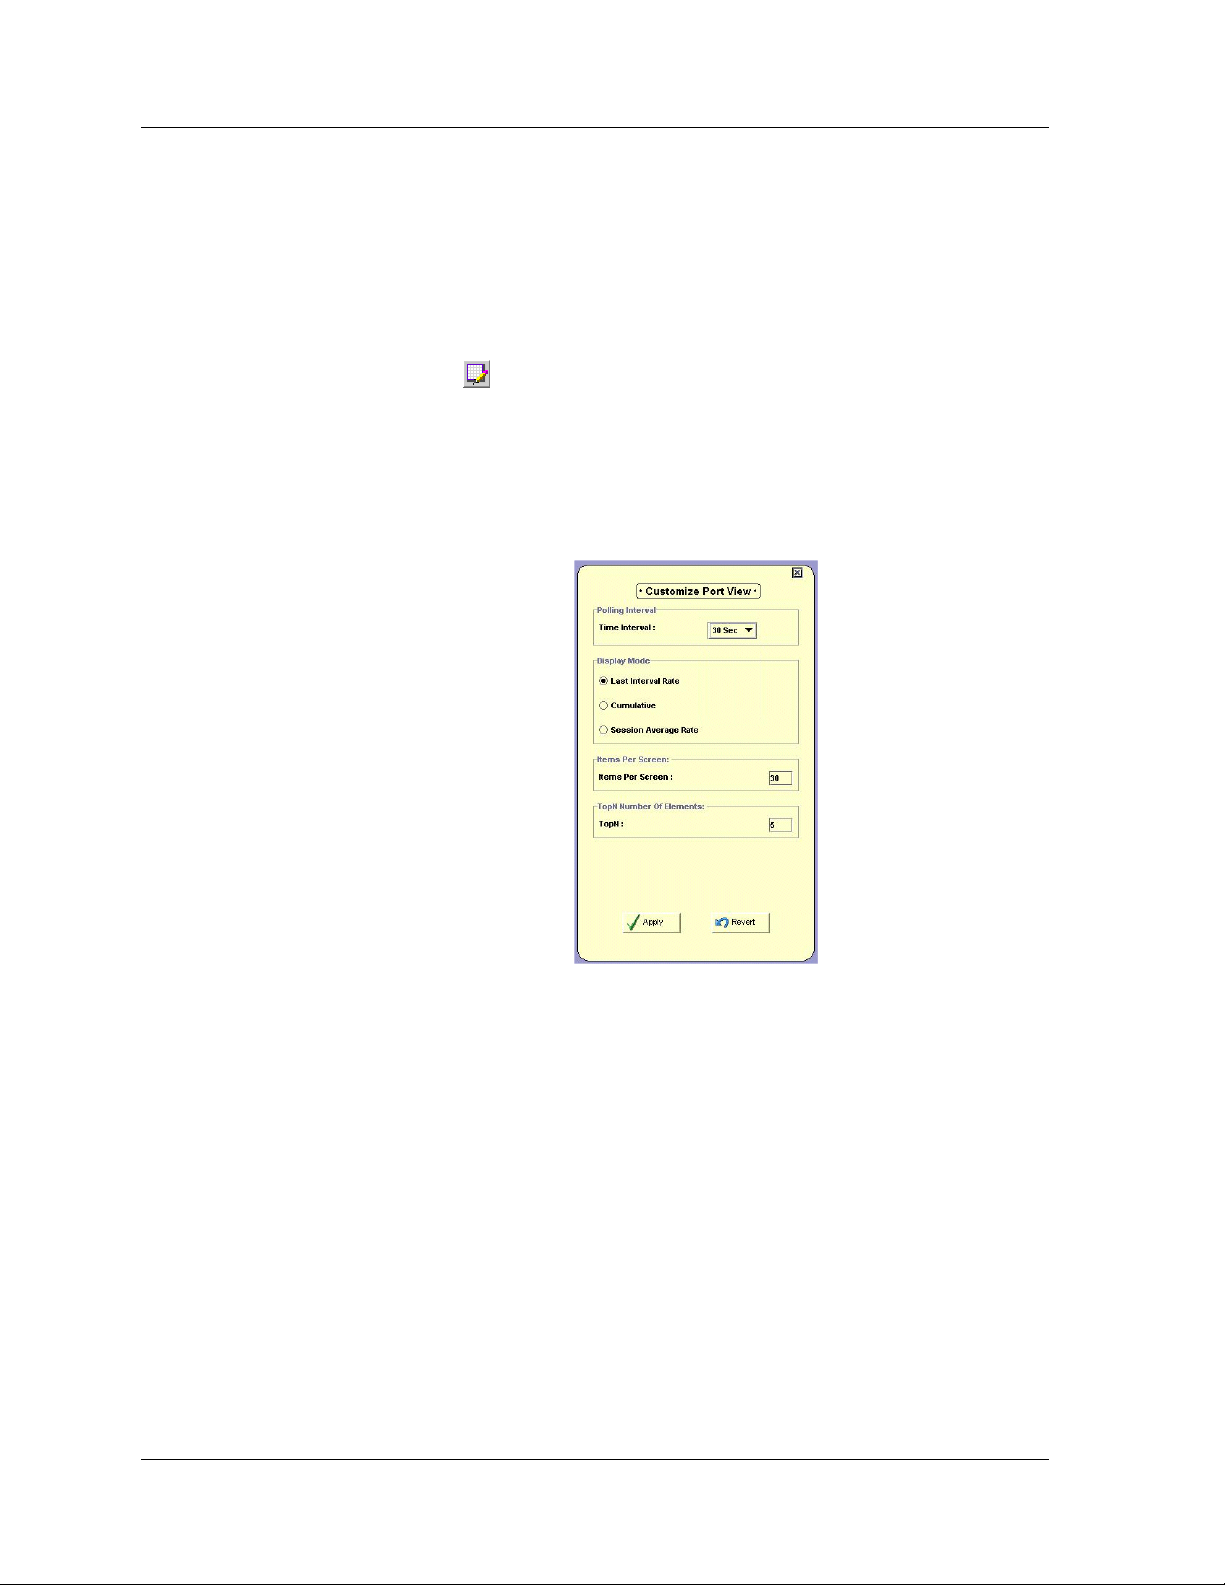
Configuring Display Options
To configure display options for Enterprise Switch, Port, or Voice Port
Statistics:
1. Activate the application for which you want to configure display
options.
2. Click .
Or
Select
The Customize View dialog box enables you to change the following
options:
View > Customize. The Customize View dialog box opens.
Figure 2-2. Customize View Dialog Box
• Polling Interval
• Display Mode
• Items Per Screen
• TopN Number of Elements
Polling Interval
19 Avaya SMON Manager User Guide
The Polling Interval option allows you to configure the way in which
information is collected. If you make the polling interval smaller, you
receive more accurate data at the expense of using more network
resources. The objective is to use the ideal polling interval that provides
accurate data using minimum network resources.
Page 27

Introduction to Avaya SMON Manager
To change the polling interval, select a polling interval from the Polling
Interval
The following polling intervals can be selected:
* Note: The new polling interval will take effect when the device is
pull-down listbox.
• 30 seconds
•1 minute
•5 minutes
• 15 minutes
• 30 minutes
• 60 minutes
next polled.
Display Mode
Items Per Screen
TopN Number of Elements
The Display Mode option allows you to select one of three display
modes. Select a display mode using the option buttons.
The display mode options are:
•
Last Interval Rate - The statistics gathered since the last poll.
Cumulative - The accumulated statistics gathered since the start of
•
the session.
Session Average Rate - The average of the statistics per polling
•
interval since the start of the session.
The Items Per Screen enables you to configure the number of switches,
ports, and LAGs visible in the Enterprise Switch or Port Statistics
windows. To change the number of items visible on the screen, enter a
number in the
* Note: The number of items per screen must be between 1 and 15.
The TopN Number of Elements option enables you to configure the
number of switches, ports, and LAGs visible in the Enterprise Switch or
Port Statistics windows, using TopN filtering. TopN filtering enables
SMON to display only the items with the heaviest traffic. The TopN filter
produces a report for the 1-15 (N) most active items on the network.
Items Per Screen field.
To configure the TopN number of elements, enter the number of items to
display in the Enterprise Switch or Port Statistics window in the
field.
Avaya SMON Manager User Guide 20
TopN
Page 28

Chapter 2
Configuring Report Options
To configure report options for Enterprise Switch, Port, and Voice Port
Statistics, select
File > Options. The Options dialog box opens.
Figure 2-3. Options Dialog Box
The Options dialog box enables you to select a default directory for
saving reports and configure the report format.
To select a default directory for saving reports:
1. Click
2. Navigate to the directory in which you want to save reports.
3. Click
To select a report format, select one of the following options:
•
•
For more information on reports, refer to “
page 22.
Browse. A directory browser window opens.
Open. The path appears in the Reports Directory field.
Tab-separated - The report is formatted as a tab-delimited file.
CSV - The report is formatted as a comma-delimited file.
Using Dialog Box Options
Information entered in a dialog box is not saved until you click the Apply
button.
Generating Reports” on
21 Avaya SMON Manager User Guide
Page 29

Introduction to Avaya SMON Manager
To undo all changes made to the information in the dialog box, click
Revert. The information in the dialog box reverts to what it was when
the dialog box was first opened.
If you have already sent information to the device from the dialog box
and you click
Revert, the information in the dialog box reverts to what it
was when it was last applied.
* Note: When clicking
Generating Reports
You can produce two types of reports with Enterprise SMON Manager:
• Report Now
• Auto Report
Generated reports are text files that can be imported into spreadsheets
such as Excel and database programs such as Access. The reports can be
generated in a tab delimited format or a comma separated format. When
a report is generated, it is saved to the directory specified in the
Directory
Data in a Report Now includes only the statistics collected during the last
polling interval. In an Auto Report, statistics collected at each polling
interval are appended to the report.
field in the General Options dialog box.
Revert, the application does not poll the
device for information. It is therefore possible that the dialog
box may not reflect the true state of the device.
Reports
For more information on selecting a format and a default directory for
reports, refer to “
Avaya SMON Manager User Guide 22
Configuring Report Options” on page 21.
Page 30

Chapter 2
Report Now To generate a report with the statistics from the last time the device was
polled:
1. Click .
Or
Select
File > Report Now. The Report Now dialog box opens.
Figure 2-4. Report Now Dialog Box
2. To change the filename and directory in which to save the report:
a. Click
Browse. A file browser window opens.
b. Select a directory and filename for the report.
3. Click
23 Avaya SMON Manager User Guide
Report. The report is generated.
Page 31
Introduction to Avaya SMON Manager
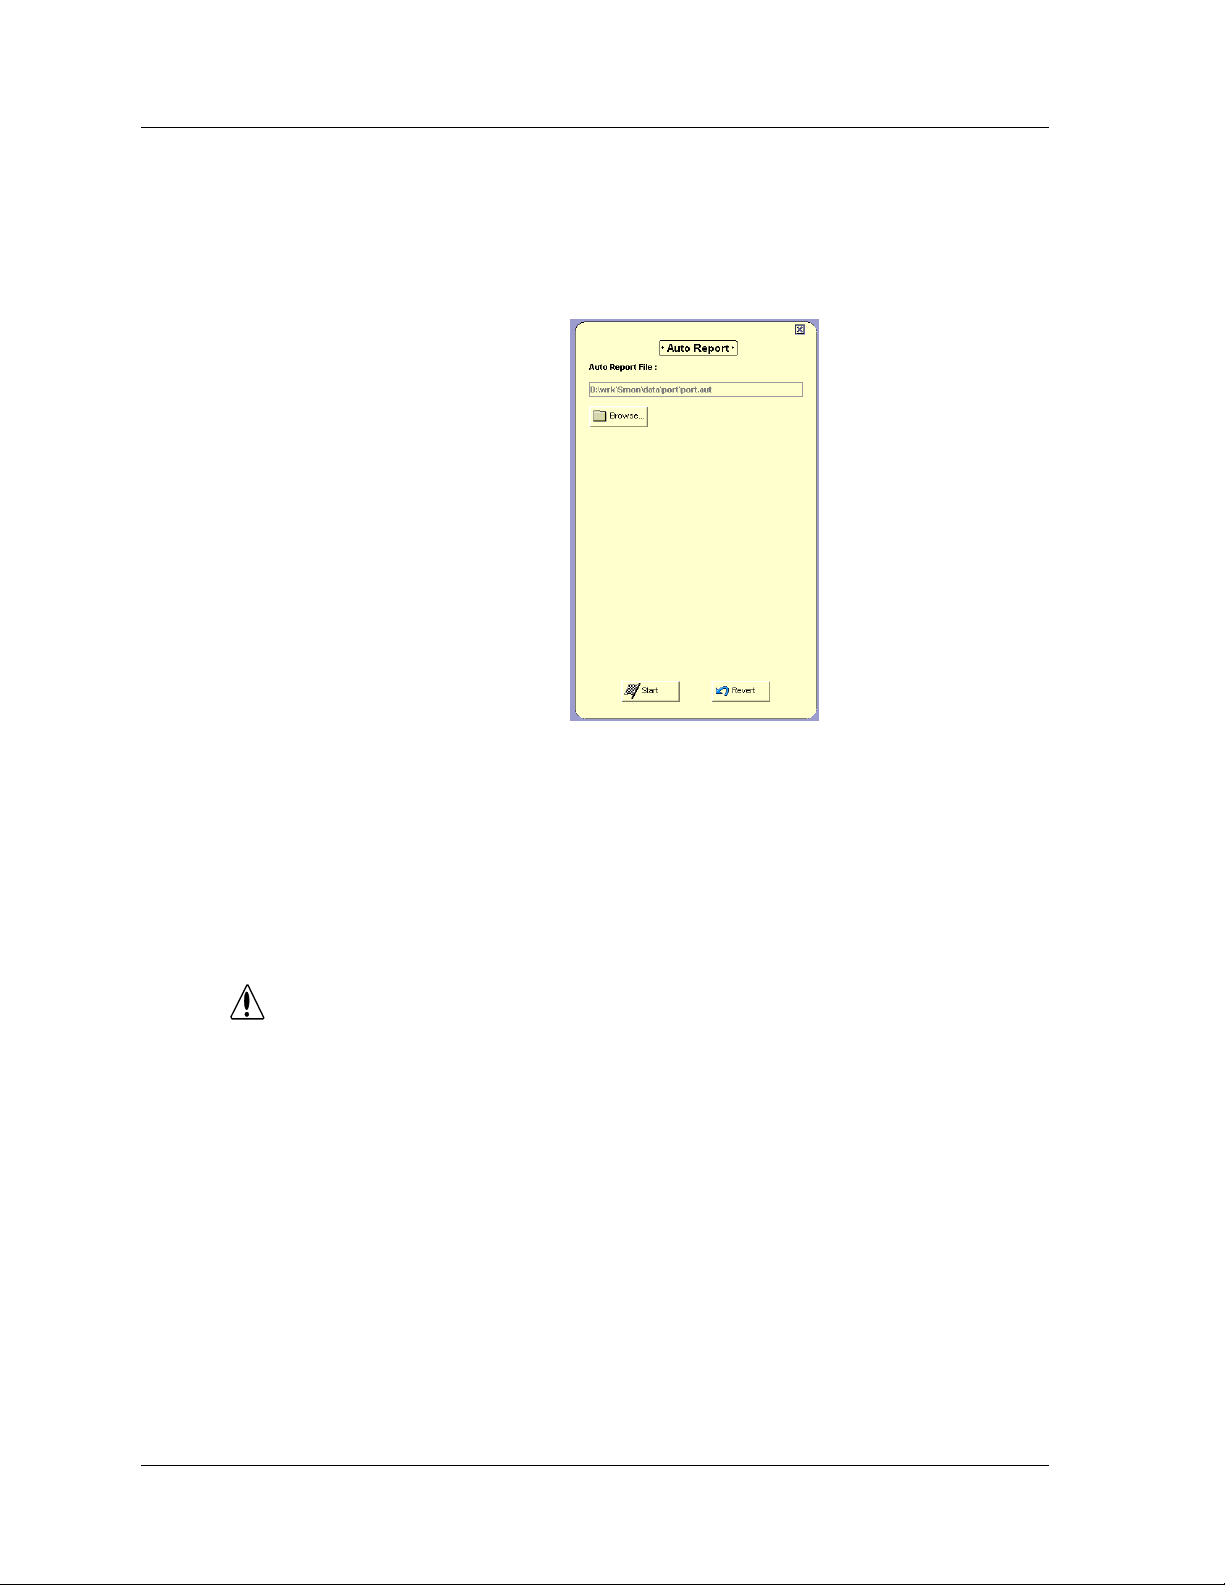
Auto Report To start generating an automatic report:
1. Select
File > Auto Report. The Auto Report dialog box opens.
Figure 2-5. Auto Report Dialog Box
2. To change the filename and directory in which to save the reports:
CAUTION
a. Click
Browse. A file browser window opens.
b. Select a directory and filename for the report.
3. Click
Start. The report is generated immediately. Data is added to
the report after each polling interval.
Auto Reports are automatically saved to the network
management station (NMS). If Auto Reports are generated on
many devices for a long period of time, and none of the files are
deleted, the NMS’s hard disk may become full.
If this occurs, stop the applications that are generating
automatic reports and delete the files that are not required.
To stop generating Auto Reports:
1. Select
2. Click
File > Auto Report. The Auto Report dialog box opens.
Stop.
Or
1. Close Avaya SMON Manager. Auto Reports are no longer
generated.
Avaya SMON Manager User Guide 24
Page 32

Chapter 2
Managing Windows
Online SMON enables you to manage open windows easily.
To cascade all open windows, select
To bring the next window in the list to the front, select
Window > Cascade.
Window > Next.
To bring the previous window in the list to the front, select
Previous
To close all windows, select
To bring a window in the list to the front, select
where
.
Window > Close All.
Window > Window Name,
Window Name is the name of the window you want to view.
Window >
25 Avaya SMON Manager User Guide
Page 33

Switch Statistics
3
Switch Statistics allows you to see the data passing through each switch
in the network. For a detailed overview of Enterprise Switch Statistics,
refer to “
Accessing Switch Statistics
To access the Switch Statistics window:
Enterprise Switch Statistics” on page 10.
1. Click .
Or
Select
application opens with the Switch Group Configuration dialog
box open.
2. Select the switches you want SMON to poll. For instructions on
selecting switches for polling, refer to “
on page 29. The Switch Statistics window displays the selected
switches and their traffic.
File > New > Switch Statistics. The Switch Statistics
Selecting Switches to Poll”
Figure 3-1. Switch Statistics Window
Avaya SMON Manager User Guide 26
Page 34

Chapter 3
Using Switch Statistics
The Switch Statistics window allows you to see the data passing through
each switch in the network. For an explanation of the Switch Statistics
window, refer to “
page 27.
Using Switch Statistics you can:
• Select the switches you want SMON to monitor. For information
on selecting switches to monitor, refer to “
Poll” on page 29.
• Select the switches you want SMON to display. For information
on changing display options, refer to “
Statistics Display” on page 31.
• Select the counters you want SMON to display. For information
on selecting counters, refer to “
page 31.
Understanding the Switch Statistics Window” on
Selecting Switches to
Filtering the Switch
Switch Statistics Counters” on
• Sort the display. For more information on sorting the display,
refer to “
• Search for specific devices. For more information, refer to
Searching for Switches” on page 33.
“
Sorting the Display” on page 32.
Understanding the Switch Statistics Window
The Switch Statistics window is organized as follows:
• The X axis represents packets.
• The Y axis represents switches. Each row on the graph
corresponding to a switch is labeled on the Y axis with the IP
address of the switch or the user defined name for the switch.
• The following indicators can appear after the device name:
— [NS] - The device is not supported by SMON.
— [DP] - The device has a duplicated SMON license.
— [NR] - The device is currently not responding.
— [NL] - The device has no SMON license.
— [SG] - The device information includes segment traffic.
27 Avaya SMON Manager User Guide
Page 35

Switch Statistics
— (*) - Extra information about the port is available in the port’s
Info Box.
— (**) - There are errors on the device. View the device’s Info
Box for more detailed information.
• The table below describes the items found in the Switch Statistics
status bar.
Table 3-1. Switch Statistics Status Bar Items
Item Description
Last Polling
The IP address of the last device polled and the
time when the device was last polled.
Pkts/Sec For Last
Interval
Items count
The average bandwidth utilization for the device
over the last polling interval.
Total number of devices being polled.
Switches in the Switch Statistics window can be labeled with the switch’s
IP address (the default device name) or the user defined name for the
switch. To toggle the display of user defined names for switches, select
View > Switch Default Naming. The display of user defined names for
switches is toggled.
For information on Switch Statistics counters, refer to “
Switch Statistics
Counters” on page 31.
For more information about modifying the display, and the available
toolbar, status bar, and mouse movement options, refer to “
Configuring
Display Options” on page 19.
Avaya SMON Manager User Guide 28
Page 36

Chapter 3
Selecting Switches to Poll
To reduce strain on the network, Avaya SMON Manager enables you to
select the switches that are monitored. SMON only polls the switches
you select. Select the switches you want SMON to monitor using the
Switch Group Configuration dialog box.
In addition, using the Switch Group Configuration dialog box you can
save groups of switches to be monitored.
To open the Switch Group Configuration dialog box:
Click .
Or
Select
Edit > Configuration. The Switch Group Configuration
dialog box opens.
Figure 3-2. Switch Group Configuration Dialog Box
Known Network box shows the devices in the network. You can
The
monitor the progress of the learning process in the progress bar, located
below the
Known Network box.
To sort the switches displayed in the
sorting method from the pull-down list above the
Known Network listbox, select a
Known Network listbox.
Sorting methods include:
• IP Address - The devices are sorted by IP address.
• Device Type - The devices are sorted by device type.
29 Avaya SMON Manager User Guide
Page 37

Switch Statistics
• Groups - The devices are sorted by groups. Only devices in
groups are listed. Moving a group to the
List of Selected, selects all
devices that are members of the group.
To ref r esh t he
Known Network list, click Refresh. The devices in the
network are relearned.
* Note: Clicking
Refresh also refreshes the list of device ports in the
Port Group Configuration dialog box and the list of IP
telephones in the Voice Port Configuration dialog box.
To add switches to the
List of Selected:
Select switches from the
Or
Double-click switches in the
appear in the
To select all switches, click
Selected
.
List of Selected.
>>. All switches are added to the List of
To remove switches from the
Select the switches in the
Known Network and click >.
Known Network. The selected switches
List of Selected:
List of Selected and click <.
Or
Double-click switches in the
are removed from the
To remove all items from the
removed from the
To save the switches in the
1. Click
Group. The Save Group dialog box opens.
List of Selected.
List of Selected as a group:
Figure 3-3. Save Group Dialog Box
2. Enter a name for the group.
3. Click
OK. The switch group is created.
List of Selected. The selected switches
List of Selected.
List of Selected, click <<. All switches are
Avaya SMON Manager User Guide 30
Page 38

Chapter 3
Filtering the Switch Statistics Display
By default, information from all switches selected in the Switch Group
Configuration dialog box is displayed in the Switch Statistics window.
You can limit information being displayed to specific ports using TopN
filtering. This makes it easier to concentrate on specific devices in the
network.
TopN filtering enables SMON to display only the items with the heaviest
traffic. The TopN filter produces a report for the 1-15 (N) most active
items on the network.
SMON selects the TopN items by a rate base which you select from the
pull-down listbox in the Switch Statistics window. SMON measures the
rate base for all the items to find the TopN items and then displays these
items and their statistics.
For information on defining the number of items to display using TopN
filtering, refer to “
TopN Number of Elements” on page 20.
To activate the TopN filter, click at the bottom of the Enterprise
Switch Statistics window. To deactivate the TopN filter, click at the
bottom of the Enterprise Switch Statistics window.
To select a rate base, select a TopN criteria from the
listbox at the bottom of the Enterprise Switch Statistics window.
Switch Statistics Counters
To select a set of statistics to display, click one of the option buttons on
the lower right-hand corner of the window. The statistics sets are:
• Packets - Counters for selected packet types for each switch.
• Bandwidth - The rate at which traffic is entering and exiting
each switch.
The counters relevant to the selected set of statistics appear under the
graph. Check the counters you want displayed. Statistics for the checked
counters are displayed as bar graphs.
TopN pull-down
31 Avaya SMON Manager User Guide
Page 39

Switch Statistics
The following table lists the Switch Statistics counters in the Packets
statistics set.
Table 3-2. Switch Statistics Counters - Packets
Counter Description
Uncsts In
The number of good unicast packets entering
the switch.
Good Pkts In
The number of good packets entering the
switch.
Bdcsts Pkts
The number of good broadcast packets
entering the switch.
Mcsts Pkts
The number of good multicast packets entering
the switch.
Errors In
The number of error packets filtered out by the
switch.
Collisions
The number of collisions occurring on the
switch.
The following table lists the Switch Statistics counter in the
statistics set.
Table 3-3. Switch Statistics Counter - Bandwidth
Counter Description
Bandwidth
In BW
The rate at which traffic is entering the switch
in Kbps.
Sorting the Display
You can sort the display by the device name or any of the counters
available for the device.
To sort the display:
1. Click . The display is sorted by the selected criteria.
2. Select a sorting criterion from the
When sorting by Name, the bars appear in ascending order from bottom
to top. When sorting by packets, the bars appear in descending order
(most traffic at the bottom, least traffic at the top).
Avaya SMON Manager User Guide 32
Sort By pull-down listbox.
Page 40

Chapter 3
Searching for Switches
The Find option allows you to locate a specific switch in the Switch
Statistics window.
To search for a switch:
1. Click .
Or
Select
Edit > Find. The Find Switch dialog box opens.
Figure 3-4. Find Switch Dialog Box
2. Enter the switch name or IP address in the
Find Switch field.
3. Click
Find. The found device is highlighted for easy identification.
* Note: If you enter only part of the name or IP address, SMON will
find the first time the value appears.
To remove the highlight from the application window, click in the
Switch Statistics window. The highlight disappears.
* Note: The
Find button changes to Find Next until all instances of the
search information have been found.
33 Avaya SMON Manager User Guide
Page 41

Port Statistics
4
Port Statistics allows you to see the data passing through each port and
LAG in the network. For a detailed overview of Enterprise Port Statistics,
refer to “
Accessing Port Statistics
To access the Port Statistics window:
Enterprise Port Statistics” on page 11.
Click .
Or
Select
opens with the Port Group Configuration dialog box open.
File > New > Port Statistics. The Port Statistics application
Figure 4-1. Port Statistics Window
Avaya SMON Manager User Guide 34
Page 42

Chapter 4
Using Port Statistics
The Port Statistics window allows you to see the data passing through
each port in the network. For an explanation of the Port Statistics
window, refer to “
page 35.
Using Port Statistics you can:
• Select the ports and LAGs you want SMON to monitor. For
information on selecting ports and LAGs to monitor, refer to
“
Selecting Ports and LAGs to Poll” on page 37.
• Select the ports and LAGs you want SMON to display. For
information on changing display options, refer to “
Port Statistics Display” on page 39.
• Select the counters you want SMON to display. For information
on selecting counters, refer to “
page 42.
Understanding the Port Statistics Window” on
Filtering the
Port Statistics Counters” on
• Sort the display. For more information on sorting the display,
refer to “
• Search for specific ports and LAGs. For more information, refer to
Searching for Ports and LAGs” on page 44.
“
Sorting the Display” on page 43.
Understanding the Port Statistics Window
The Port Statistics window is organized as follows:
• The X axis represents packets or percentage of utilization.
• The Y axis represents ports and LAGs. Each row on the graph
corresponding to a port or LAG is labeled on the Y axis with a port
number, LAG number, or with the user defined name of a port.
• An asterisk (*) following the name of a port or LAG indicates
that extra information about the port is available in the port’s Info
Box.
35 Avaya SMON Manager User Guide
Page 43

Port Statistics
• The table below describes the items found in the Port Statistics
status bar.
Table 4-1. Port Statistics Status Bar Items
Item Description
Last Polling
The IP address of the last device polled and the
time when the device was last polled.
Pkts/Sec For Last
Interval
Items count
The average bandwidth use over the last polling
interval.
Total number of ports being polled.
Ports in the Port Statistics window can be labeled with the port’s IP
address and port number (the default device name) or the user defined
name for the port. LAGs in the Port Statistics window can be labeled
with the LAG’s IP address and LAG number (the default device name) or
the user defined name for the LAG. To toggle the display of user defined
names for ports and LAGs, select
View > Port Default Naming. The display
of user defined names for ports and LAGs is toggled.
* Note: For high-speed ports and LAGs with large polling intervals,
bandwidth and utilization counters may be inaccurate.
For information on Port Statistic counters, refer to “
Port Statistics
Counters” on page 42.
For more information about modifying the display, refer to “
Configuring
Display Options” on page 19.
Avaya SMON Manager User Guide 36
Page 44

Chapter 4
Selecting Ports and LAGs to Poll
To reduce strain on the network, Avaya SMON Manager enables you to
select the ports and LAGs that are monitored. SMON only polls the ports
and LAGs you select. Select the ports and LAGs you want SMON to
monitor using the Port Group Configuration dialog box.
To open the Port Group Configuration dialog box:
Click .
Or
Select
Edit > Configuration. The Port Group Configuration dialog
box opens.
Figure 4-2. Port Group Configuration Dialog Box
Known Ports box shows the device ports in the network. You can
The
monitor the progress of the learning process in the progress bar, located
below the
Known Ports box.
To sort the ports displayed in the
method from the pull-down list under the
Known Ports listbox, select a sorting
Known Ports listbox. Sorting
methods include:
• IP Address - The ports are sorted by IP address.
• Valuable Ports - Only valuable ports appear in the
Known Ports
listbox.
• Port Type - The ports are sorted by port type.
37 Avaya SMON Manager User Guide
Page 45

Port Statistics
• VLAN - The ports are sorted and represented by VLAN. When
using the VLAN sorting method a list of VLANs appears in the
Known Ports list. Moving a VLAN to the List of Selected, selects all
ports that are members of the VLAN.
• Groups - The ports are sorted by groups. Only ports in groups are
listed. Moving a group to the
List of Selected, selects all ports that
are members of the group.
* Note: Selecting
Network, a device, module, port type, or VLAN,
selects all ports under the selected object.
To ref r esh t he
* Note: Clicking
Known Ports list, click Refresh.
Refresh also refreshes the list of switches in the
Switch Configuration dialog box and the list of IP telephones
in the Voice Port Configuration dialog box.
To add ports and LAGs to the
List of Selected:
Select ports and LAGs from the
Or
Double-click ports and LAGs in the
and LAGs appear in the
To select all ports and LAGs, click
List of Selected.
List of Selected.
>>. All ports and LAGs are added to the
To remove ports and LAGs from the
Known Ports and click >.
Known Ports. The selected ports
List of Selected:
Select the ports and LAGs in the
List of Selected and click <.
Or
Double-click ports and LAGs in the
ports and LAGs are removed from the
To remove all items from the
are removed from the
Avaya SMON Manager User Guide 38
List of Selected.
List of Selected, click <<. All ports and LAGs
List of Selected. The selected
List of Selected.
Page 46

Chapter 4
To save the ports and LAGs in the List of Selected as a group:
1. Click
Group. The Save Group dialog box opens.
Figure 4-3. Save Group Dialog Box
2. Enter a name for the group.
3. Click
OK. The port group is created.
Filtering the Port Statistics Display
By default, information from all ports and LAGs selected in the Port
Group Configuration dialog box is displayed in the Port Statistics
window. You can limit information being displayed to specific ports and
LAGs using VLAN and TopN filters. In addition, you can sort the display.
For information on sorting the display, refer to “
page 43.
Sorting the Display” on
39 Avaya SMON Manager User Guide
Page 47
Port Statistics
VLAN Filtering
You can filter the ports and LAGs displayed in the Port Statistics window
by VLAN. Only ports that are members of the selected VLANs are
displayed in the Port Statistics window. This makes it easier to
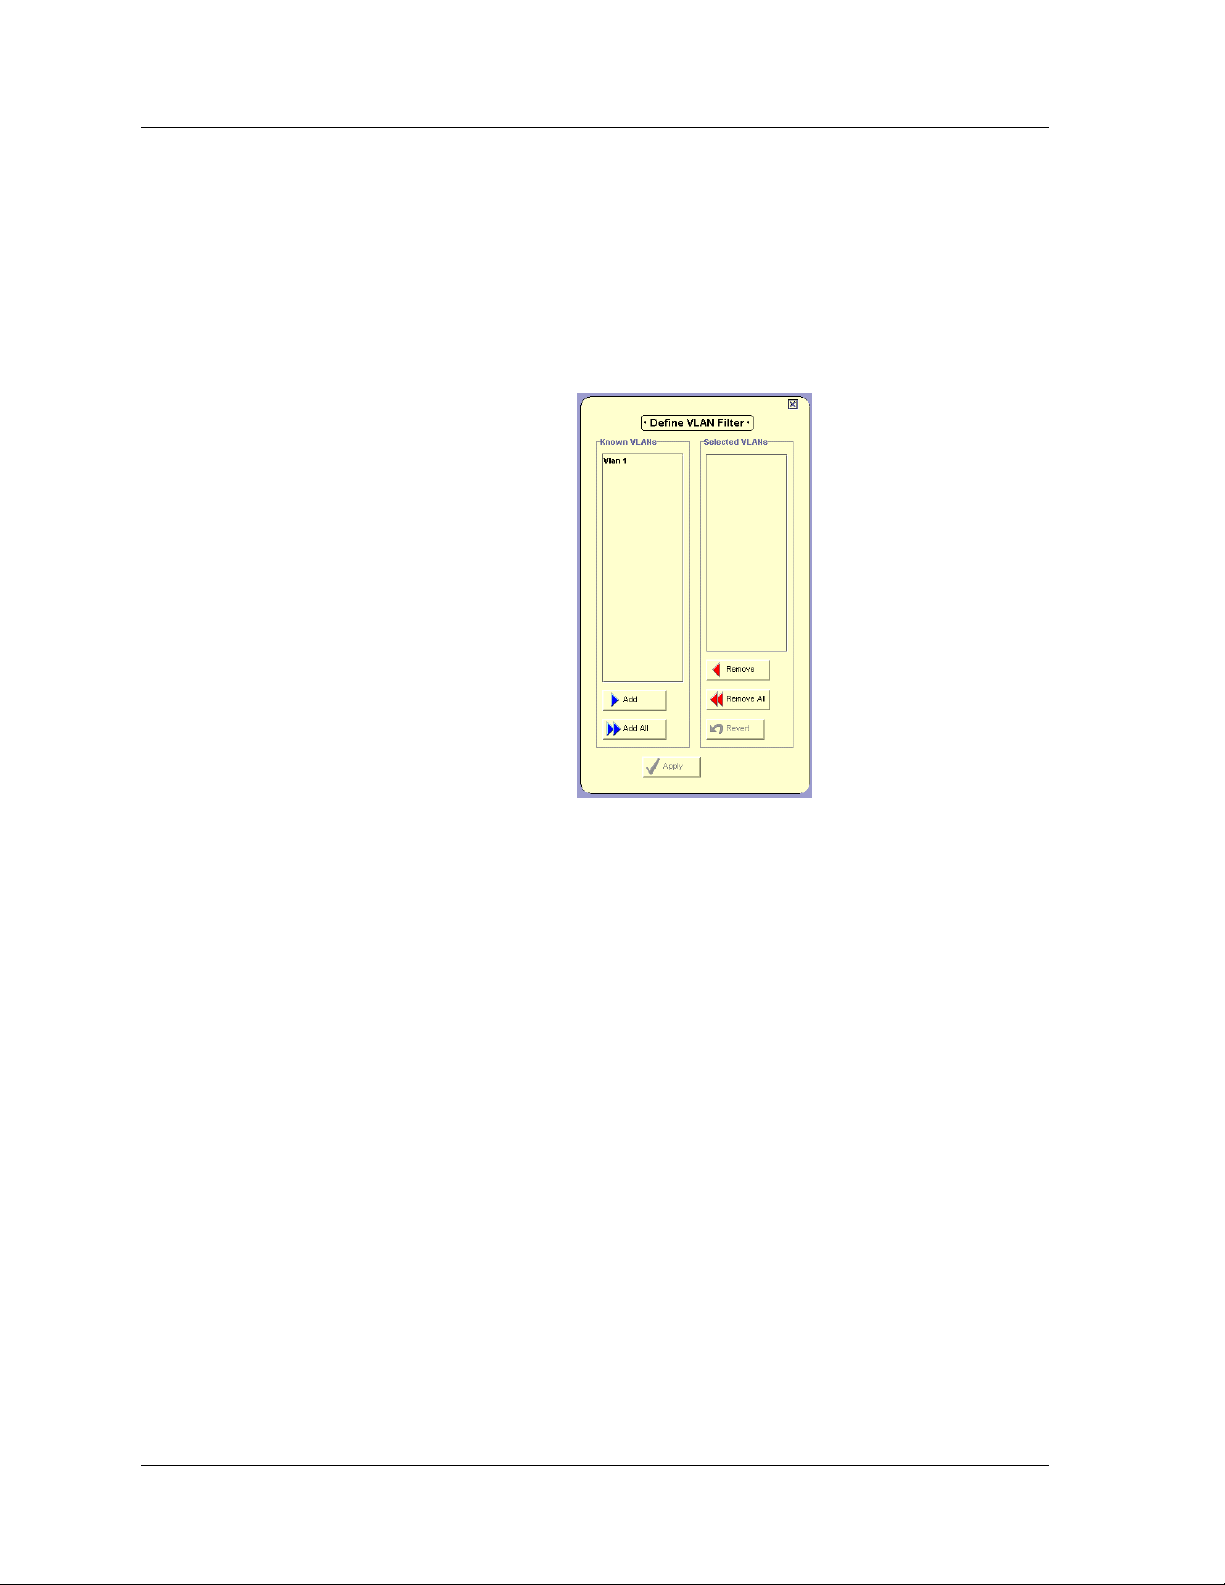
concentrate on specific VLANs in the network. To open the VLAN Filter
dialog box, select
View > Define VLAN Filter. The VLAN Filter dialog box
opens.
Figure 4-4. VLAN Filter Dialog Box
To add VLANs to the
Selected VLANs list:
Select VLANs from the
Or
Double-click VLANs in the
appear in the
To select all VLANs, click
list.
VLANs
Selected VLANs list.
Add All. All VLANs are added to the Selected
To remove VLANs from the
Select VLANs in the
Or
Double-click VLANs in the
are removed from the
Known VLANs list and click Add.
Known VLANs list. The selected VLANs
Selected VLANs list:
Selected VLANs list and click Remove.
Selected VLANs list. The selected VLANs
Selected VLANs list.
Avaya SMON Manager User Guide 40
Page 48

Chapter 4
To remove all items from the Selected VLANs list, click Remove All. All
VLANs are removed from the
Selected VLANs list.
TopN Filtering
To apply the VLAN filter, click
Apply. The Port Statistics information is
filtered.
To toggle the VLAN filter, select
Actions > Activate VLAN Filter.
TopN filtering enables SMON to display only the items with the heaviest
traffic. The TopN filter produces a report for the 1-15 (N) most active
items on the network.
SMON selects the TopN items by a rate base which you select from the
pull-down listbox in the Port Statistics window. SMON measures the rate
base for all the items to find the TopN items and then displays these
items and their statistics.
For information on defining the number of items to display using TopN
filtering, refer to “
TopN Number of Elements” on page 20.
To activate the TopN filter, click at the bottom of the Enterprise Port
Statistics window. To deactivate the TopN filter, click at the bottom of
the Enterprise Port Statistics window.
To select a rate base, select a TopN criteria from the
TopN pull-down
listbox at the bottom of the Enterprise Port Statistics window.
41 Avaya SMON Manager User Guide
Page 49

Port Statistics Counters
To select a set of statistics to display, click one of the option buttons on
the lower right-hand corner of the window. The statistics sets are:
• Packets - Counters for selected packet types for each port.
• Bandwidth - The rate at which traffic is entering and exiting
each port.
• Utilization - The utilized capacity of each port.
The counters relevant to the selected set of statistics appear under the
graph. Check the counters you want displayed. Statistics for the checked
counters are displayed as bar graphs.
Port Statistics
The following table lists the Port Statistics counters in the
statistics set.
Table 4-2. Port Statistics Counters - Packets
Counter Description
Uncsts In
The number of good unicast packets entering
the switch.
Bdcsts Pkts
The number of good broadcast packets
entering the switch.
Mcsts Pkts
The number of good multicast packets entering
the switch.
Errors In
The number of error packets filtered out by the
switch.
Collisions
The number of collisions occurring on the port
or LAG.
Good Pkts Out
The number of good packets leaving the
switch.
Packets
Avaya SMON Manager User Guide 42
Page 50

Chapter 4
The following table lists the Port Statistics counters in the Bandwidth
statistics set.
Table 4-3. Port Statistics Counters - BandWidth
Counter Description
In BW
Out BW
The following table lists the Port Statistics counters in the
statistics set.
Counter Description
Util
Sorting the Display
You can sort the display by the device name or any of the counters
available for the device.
To sort the display:
The rate at which traffic is entering the port or
LAG in Kbps.
The rate at which traffic is exiting the port or
LAG in Kbps.
Utilization
Table 4-4. Port Statistics Counters - Utilization
The average percentage of the port’s capacity
utilized in the last polling interval.
1. Click . The display is sorted by the selected criteria.
2. Select a sorting criterion from the
Sort By pull-down listbox.
When sorting by Name, the bars appear in ascending order from bottom
to top. When sorting by packets, the bars appear in descending order
(most traffic at the bottom, least traffic at the top).
43 Avaya SMON Manager User Guide
Page 51

Searching for Ports and LAGs
The Find option allows you to locate a specific port in the Port Statistics
window.
To search for a port or LAG:
1. Click .
Or
Port Statistics
Select
Edit > Find. The Find Port dialog box opens.
Figure 4-5. Find Port Dialog Box
2. Do one of the following:
• To search for a port or LAG by name:
a. Click the
b. Enter the port name or part of the port name in the
Name
c. Click
Port/LAG Name option button.
Port/LAG
field.
Find. The found port or LAG is highlighted for easy
identification.
* Note: If you enter only part of the name, SMON will find the first
time the value appears.
Avaya SMON Manager User Guide 44
Page 52

Chapter 4
• To search for a port or LAG by port number:
a. Click the
b. Enter the port number in the
c. Click
Port/LAG Number option button.
Port/LAG Number field.
Find. The found port or LAG is highlighted for easy
identification.
To remove the highlight from the application window, click in the Port
Statistics window. The highlight disappears.
* Note: The
Find button changes to Find Next until all instances of the
search information have been found.
45 Avaya SMON Manager User Guide
Page 53

Voice Port Statistics
5
Voice Port Statistics allows you to see the data passing through each
Avaya IP telephone in the network. For a detailed overview of Enterprise
Voice Port Statistics, refer to “
Accessing Voice Port Statistics
To access the Voice Port Statistics window:
Click .
Or
Enterprise Voice Port Statistics” on page 11.
Select
application opens with the Voice Port Group Configuration dialog
box open.
File > New > Voice Port Statistics. The Voice Port Statistics
Figure 5-1. Voice Port Statistics Window
Avaya SMON Manager User Guide 46
Page 54

Chapter 5
Using Voice Port Statistics
The Voice Port Statistics window allows you to see the data passing
through each Avaya IP telephone in the network. For an explanation of
the Voice Port Statistics window, refer to “
Statistics Window” on page 47.
Using Voice Port Statistics you can:
• Select the IP telephones you want SMON to monitor. For
information on selecting IP telephones to monitor, refer to
“
Selecting IP Telephones to Poll” on page 49.
• Select the IP telephones you want SMON to display. For
information on changing display options, refer to “
Voice Port Statistics Display” on page 51.
• Select the counters you want SMON to display. For information
on selecting counters, refer to “
page 52.
Understanding the Voice Port
Filtering the
Voice Port Statistics Counters” on
• Sort the display. For more information on sorting the display,
refer to “
• Search for specific IP telephones. For more information, refer to
Searching for IP Telephones” on page 54.
“
Sorting the Display” on page 53.
Understanding the Voice Port Statistics Window
The Voice Port Statistics window is organized as follows:
• The X axis represents packets or percentage of utilization.
• The Y axis represents IP telephones. Each row on the graph
corresponding to an IP telephone is labeled on the Y axis with the
IP address of the IP telephone.
• An exclamation point (!) following the name of an IP telephone
indicates that it is a one-cable configuration. This means that a
host is connected to the switch through the repeater mounted on
the IP telephone. Traffic generated by the host is reported as part
of the IP telephone’s traffic.
47 Avaya SMON Manager User Guide
Page 55

Voice Port Statistics
• The table below describes the items found in the Voice Port
Statistics status bar.
Table 5-1. Voice Port Statistics Status Bar Items
Item Description
Last Polling
The IP address of the last IP phone being polled and
the time when the IP phone was last polled.
Pkts/Sec For Last
Interval
Items count
Average bandwidth utilization over the last polling
interval.
Total number of IP telephones being polled.
For more information on Voice Port Statistics counters, refer to “
Port Statistics Counters” on page 52.
For more information about modifying the display, refer to “
Configuring
Display Options” on page 19.
Voice
Avaya SMON Manager User Guide 48
Page 56

Chapter 5
Selecting IP Telephones to Poll
To reduce strain on the network, Avaya SMON Manager enables you to
select the IP telephones that are monitored. SMON only polls the IP
telephones you select. Select the IP telephones you want SMON to
monitor using the Voice Port Group Configuration dialog box.
To open the Voice Port Group Configuration dialog box:
Click .
Or
Select
Actions > Configuration. The Voice Port Group
Configuration dialog box opens.
Figure 5-2. Voice Port Group Configuration Dialog Box
Known IP Phones box shows the IP telephones in the network. You
The
can monitor the progress of the learning process in the progress bar,
located below the
Known IP Phones box.
To sort the IP telephones displayed in the
sorting method from the pull-down list under the
Known IP Phones listbox, select a
Known IP Phones listbox.
Sorting methods include:
• IP Address - The IP telephones are sorted by IP address.
• IP Phone Type - The IP telephones are sorted by IP telephone
type.
49 Avaya SMON Manager User Guide
Page 57

Voice Port Statistics
* Note: Selecting Network or IP telephone type, selects all
IP telephones under the selected object.
To ref r esh t he
* Note: Clicking
Known IP Phones list, click Refresh.
Refresh also refreshes the list of switches in the
Switch Configuration dialog box and the list of ports in the
Port Configuration dialog box.
To add IP telephones to the
Select IP telephones from the
List of Selected:
Known Network and click >.
Or
Double-click IP telephones in the
telephones appear in the
To select all IP telephones , click
List of Selected.
List of Selected.
>>. All IP telephones are added to the
Known Network. The selected IP
* Note: If the application cannot determine the port to which the
IP telephone is directly linked, the IP telephone cannot be
moved to the
To remove IP telephones from the
List of Selected.
List of Selected:
Select the IP telephones in the
Or
Double-click IP telephones in the
telephones are removed from the
To remove all IP telephones from the
telephones are removed from the
List of Selected.
List of Selected and click <.
List of Selected. The selected IP
List of Selected.
List of Selected, click <<. All IP
Avaya SMON Manager User Guide 50
Page 58

Chapter 5
Filtering the Voice Port Statistics Display
By default, information from all IP telephones selected in the Voice Port
Group Configuration dialog box is displayed in the Voice Port Statistics
window. You can limit information being displayed to specific IP
telephones using TopN filtering. This makes it easier to concentrate on
specific devices in the network.
TopN filtering enables SMON to display only the items with the heaviest
traffic. The TopN filter produces a report for the 1-15 (N) most active
items on the network.
SMON selects the TopN items by a rate base which you select from the
pull-down listbox in the Switch Statistics window. SMON measures the
rate base for all the items to find the TopN items and then displays these
items and their statistics.
For information on defining the number of items to display using TopN
filtering, refer to “
TopN Number of Elements” on page 20.
To activate the TopN filter, click at the bottom of the Enterprise Voice
Port Statistics window. To deactivate the TopN filter, click at the
bottom of the Enterprise Voice Port Statistics window.
To select a rate base, select a TopN criteria from the
listbox at the bottom of the Enterprise Voice Port Statistics window.
TopN pull-down
51 Avaya SMON Manager User Guide
Page 59

Voice Port Statistics Counters
To select a set of statistics to display, click one of the option buttons on
the lower right-hand corner of the window. The statistics sets are:
• Packets - Counters for selected packet types for each IP
telephone.
• Bandwidth - The rate at which traffic is entering and exiting
each IP telephone.
• Utilization - The utilized capacity of each IP telephone.
The counters relevant to the selected set of statistics appear under the
graph. Check the counters you want displayed. Statistics for the checked
counters are displayed as bar graphs.
Voice Port Statistics
The following table lists the Voice Port Statistics counters in the
statistics set.
Table 5-2. Voice Port Statistics Counters - Packets
Counter Description
Uncsts Pkts
The number of good unicast packets entering
the IP telephone.
Bdcsts Pkts
The number of good broadcast packets
entering the IP telephone.
Mcsts Pkts
The number of good multicast packets entering
the IP telephone.
Errors In
The number of error packets filtered out by the
IP telephone.
Collisions
The number of collisions occurring on the IP
telephone.
Good Pkts Out
The number of good packets leaving the IP
telephone.
Packets
Avaya SMON Manager User Guide 52
Page 60

Chapter 5
The following table lists the Voice Port Statistics counters in the
Bandwidth statistics set.
Table 5-3. Voice Port Statistics Counters - BandWidth
Counter Description
In BW
Out BW
The following table lists the Voice Port Statistics counters in the
statistics set.
Counter Description
Util
Sorting the Display
You can sort the display by the device name or any of the counters
available for the IP telephone.
The rate at which traffic is entering the IP
telephone in Kbps.
The rate at which traffic is exiting the IP
telephone in Kbps.
Utilization
Table 5-4. Voice Port Statistics Counters - Utilization
The average percentage of the IP telephone’s
capacity utilized during the last polling
interval.
To sort the display:
1. Click . The display is sorted by the selected criteria.
2. Select a sorting criterion from the
Sort By pull-down listbox.
When sorting by Name, the bars appear in ascending order from bottom
to top. When sorting by packets, the bars appear in descending order
(most traffic at the bottom, least traffic at the top).
53 Avaya SMON Manager User Guide
Page 61

Searching for IP Telephones
The Find option allows you to locate a specific IP telephone in the Voice
Port Statistics window.
To search for a IP telephone:
1. Click .
Or
Voice Port Statistics
Select
Edit > Find. The Find IP telephone dialog box opens.
Figure 5-3. Find IP Telephone Dialog Box
2. Enter the IP telephone’s IP address in the
IP Telephone Name field.
* Note: If you enter only part of the IP address, SMON will find the
first time the value appears.
3. Click
Find. The found IP telephone is highlighted for easy
identification.
To remove the highlight from the application window, click in the Voice
Port Statistics window. The highlight disappears.
* Note: The
Find button changes to Find Next until all instances of the
search information have been found.
Avaya SMON Manager User Guide 54
Page 62

6
Introduction to SMON History
This chapter provides an introduction to SMON History, and contains the
following sections:
• Accessing SMON History
History window.
• The SMON History User Interface
the SMON History user interface.
• Managing Windows
windows.
• History Text Report
on SMON history.
- Instructions on accessing the SMON
- Instructions on managing SMON History
- Instructions on generating a text report
Accessing SMON History
To access SMON History, click the History tab in the Avaya SMON
Manager window. SMON History opens.
The SMON History User Interface
The user interface consists of the following elements:
- A detailed description of
• SMON Tabs
Online SMON and SMON History.
• Menu Bar - Menus for accessing SMON History functions. For
information on the full menu structure in SMON History, refer to
SMON History Menus” on page 77.
“
• SMON History Toolbar
important functions in SMON tools.
• Desktop
are displayed.
• Info Box
over which the cursor is placed.
Avaya SMON Manager User Guide 55
- Tabs providing a method for switching between
- Buttons providing shortcuts to
- A resizeable window where SMON History windows
- A pop-up box containing information about the item
Page 63

Introduction to SMON History
The figure below shows the user interface, with its various parts labeled.
Figure 6-1. SMON History User Interface
SMON
Tabs
Menu Bar
Toolbar
Desktop
Info Box
SMON Tabs
The SMON tabs provide a method for switching between the
Online SMON window and the SMON History window. To select a
window to view, click the appropriate SMON tab. The relevant window
appears.
SMON History Toolbar
The Toolbar provides shortcuts to the main SMON History functions and
tools. The following table describes the buttons on the toolbar and lists
the equivalent menu options.
Button Description Menu
Opens a saved collection.
Saves the SMON History table to a
text file.
Uploads the selected collection to the
management station.
Table 6-1. SMON History Toolbar Buttons
File > Open
File > Save As
View > Switch
History
Opens a port chart window for the
View > Port Chart
selected port.
Refreshes the information in the
View > Refresh
History Table.
Avaya SMON Manager User Guide 56
Page 64

Chapter 6
Table 6-1. SMON History Toolbar Buttons (Continued)
Button Description Menu
Desktop
Info Box
Activates the selected history
collection for the selected devices.
Deactivates the selected history
collection for the selected devices.
Opens context sensitive on-line help.
The application window is the Desktop. SMON History windows can be
resized and minimized. Minimized windows are displayed at the bottom
of the Desktop.
Info boxes provide information about a device, collection, or point on a
Port Chart. When the cursor is placed over a device in the History Table,
a port in a History Collection, or a point in a Port Chart for about
2 seconds, an Info Box opens.
Actions > Start
Collection
Actions > Stop
Collection
Help > Help On
Figure 6-2. Info Box
To close the Info Box, move the mouse.
When the cursor is placed over a device in the History Table, the Info
Box provides the device’s name, location, IP address, and type.
When the cursor is placed over a statistic in a History Collection, the Info
Box provides all the counters on the port for the selected interval.
57 Avaya SMON Manager User Guide
Page 65

Introduction to SMON History
When the cursor is placed over a point in a Port Chart, the Info Box
displays the counter, counter value, and time for the selected point.
To toggle the display of Info Boxes, select
Info Boxes is toggled.
Managing Windows
When using SMON History to view collections, you may have a large
number of open windows. SMON History enables you to manage open
windows easily.
To cascade all open windows, select
To bring the next window in the list to the front, select
To bring the previous window in the list to the front, select
Previous
To close all windows other than the Enterprise History window, select
Window > Close All.
* Note: The Enterprise History window cannot be closed.
.
View > Info Box. The display of
Window > Cascade.
Window > Next.
Window >
To bring a window in the list to the front, select
where
Window Name is the name of the window you want to view.
History Text Report
The History server saves a text report for every managed device after
each Auto-Upload operation. The server creates a separate directory for
each device (identified by IP address) and saves all reports generated for
the device in this directory. Each day, a new subdirectory is generated in
each device’s directory (identified by date), and the report for that day is
saved there.
The extension of the text report is .csvhis.
To read a text report, open any standard text editor and open the file you
wish to read.
Window > Window Name,
Avaya SMON Manager User Guide 58
Page 66

7
Using SMON History
This chapter provides information on how to use SMON History to
monitor the traffic on your network, and includes the following topics:
• Using Enterprise History
in the Enterprise History window and instructions on how to use
Enterprise History.
• Using Switch History
window and instructions on how to use Switch History.
• Using Port History
and instructions on modifying the display.
For a detailed overview of SMON Enterprise History, refer to “
History” on page 11.
- An explanation of the Port History Chart
- An explanation of the information
- An explanation of the Switch History
Enterprise
Avaya SMON Manager User Guide 59
Page 67

Using Enterprise History
This section provides information about using Enterprise History, and
includes the following topics:
• Understanding the Enterprise History Window
• Collection Parameters
• Activating/Deactivating History Collections
• Activating Auto Save
• Refreshing the Device List
• Saving the Enterprise History Window
Understanding the Enterprise History Window
Using SMON History
The Enterprise History window provides a list of supported devices in the
network, their collection parameters, and Auto Save status.
The Enterprise History window appears when SMON History opens and
cannot be closed while SMON History is running.
Figure 7-1. Enterprise History Window
Collection
Listbox
History
Tabl e
tatus Bar
The Collection Listbox enables you to select the collection type you want
to see and configure in the Enterprise History window. The available
collection types are Long Term and Short Term Collections.
Avaya SMON Manager User Guide 60
Page 68

Chapter 7
The following table provides a list of the columns in the History Table
and their descriptions.
Table 7-1. History Table Fields
Column Description
Status
Name
Address
Auto Save
Duration
Interval
Started
Last Auto Save
The status of the selected collection. Possible statuses
are:
- The selected history collection is active.
- The selected history collection is inactive.
The device name.
The device’s IP address.
Indicates if this collection participates in the Auto
Save scheme (On) or not (Off). For more
information, refer to “
Activating Auto Save” on
page 64.
The total collection duration time.
The sampling interval for this collection, i.e., how
often the device collects the History data for this
Collection.
The date and time when this Collection was started
on the device. This field is empty if the Status is
inactive.
The date and time of the last automatic save of this
Collection from the device. If the save was not
successful, an error indicator appears. This field is
updated with every Auto Save performed on this
Collection. It is applicable only if the Collection is
active and Auto Save policy is active on the device.
For more information, refer to “
Activating Auto
Save” on page 64.
The following table provides a description of the information displayed
in the Enterprise History status bar.
Table 7-2. Enterprise History Status Bar
Item Description
Discovery Status
The discovery status of SMON History. When
Enterprise History is learning the network devices,
a progress bar is displayed. When SMON History
finishes learning the network devices, Ready is
displayed.
61 Avaya SMON Manager User Guide
Page 69

Table 7-2. Enterprise History Status Bar (Continued)
Item Description
Using SMON History
Last Discovery
Total Devices
Auto Save Status
Communication
Status
The date and time of the most recent discovery.
The number of devices listed in the History Table.
Indicates the Auto Save Status. If Auto Save is off
for all devices, the Auto Save Status is Disabled.
If Auto Save is active on one or more devices, the
Auto Save Status is Enabled. For more
information on Auto Save, refer to “
Activating
Auto Save” on page 64.
When SMON History is learning the network
devices, the following icon is displayed:
Avaya SMON Manager User Guide 62
Page 70

Chapter 7
Collection Parameters
Each product family, such as the Avaya P130 or Avaya P882 Device, is
assigned certain predefined collection parameters. The collection
parameters consist of the duration of the collection, the interval at which
information is collected, and the number of buckets in the collection.
The following table shows the short term and long term collection
parameters for different device types:
Table 7-3. Collection Parameters
Device
Type
Parameter
P330/P130/
C360/
W310
P580/P882
M770
Buckets/
Collection
Short Term
Collection
Duration
Interval
10 5 min. 30 sec. 5 hrs. 30 min.
50 25 min. 30 sec. 25 hrs. 30 min.
360 1 day 4 min. 14 days 56 min.
* Note: It is possible for a collection to contain more than the
number of buckets listed above. This occurs when the device
saves a new bucket during the upload process. The collection
includes all information saved on the device at the time the
upload starts and any information added during the upload.
Select a collection type using the
Collection pull-down listbox at the top of
the Enterprise History window. Collection parameters for the selected
collection type are displayed in the History Table.
Activating/Deactivating History Collections
Long Term
Collection
Duration
Interval
To activate the history collection for one or more devices:
1. Select the devices whose collections you want to activate.
— To select all the devices in the Enterprise History Table, select
Edit > Select All.
2. Select a collection type using the
Collection listbox at the top of the
Enterprise History window.
3. Click in the SMON History toolbar.
Or
63 Avaya SMON Manager User Guide
Page 71

Using SMON History
Select Actions > Start Collection. The selected collection is
activated for the chosen devices.
To deactivate the history collection for a device or several devices:
1. Select the devices whose collections you want to deactivate.
— To select all the devices in the Enterprise History Table, select
Edit > Select All.
2. Select a collection type using the
Enterprise History window.
3. Click in the SMON History toolbar.
Or
Select
deactivated for the chosen devices.
If a collection is already active, reactivating or stopping it results in the
loss of data collected and stored in the device. A warning dialog box
opens with the following options when an active collection is activated
or stopped:
Yes - Reactivate/stop the collection.
•
• No - Skip the current device and continue operation for the
remainder of the selected devices.
Activating Auto Save
Enterprise History can save History Collections from devices
automatically. If Auto Save is enabled for a device, when a History
Collection is completed, it is saved to a file. The filename consists of the
device name, collection type, date, and time separated with underscores.
History Collection files have an HIS extension.
Collection listbox at the top of the
Actions > Stop Collection. The selected collection is
For example, a file named
153.34.129.64_Short_Collection_02-24-02_13-42.his
contains the Short Term Collection for the device with the IP address
153.34.129.64 that was saved at 1:42 PM on February 24, 2002.
To automatically save History Collections:
1. Select the devices whose collections you want to automatically
save.
— To select all the devices in the Enterprise History Table, select
Edit > Select All.
Avaya SMON Manager User Guide 64
Page 72

Chapter 7
CAUTION
2. Select Actions > Auto Save On. History Collections for the selected
devices are saved automatically.
When Auto Save is enabled on a device, the Long Term and Short Term
Collections are saved automatically.
Auto Save automatically creates reports and saves them to the
network management station (NMS). If Auto Save is enabled on
many devices for a long period of time, and none of the files are
deleted, the NMS’s hard disk may become full.
If this occurs, stop the applications that are generating
automatic reports and delete the files that are not required.
To stop automatically saving History Collections:
1. Select the devices whose collections you do not want saved
automatically.
Viewing the Collection Log
— To select all devices in the History Table, select
2. Select
The Collection Log provides information about History Collections being
saved automatically. To view the Collection Log, select
Collection Log
Actions > Auto Save Off. History Collections for the selected
devices are no longer saved automatically.
. The Collection Log opens.
Figure 7-2. Collection Log
Edit > Select All.
View >
The Collection Log contains the following fields:
• IP Address - The IP address of the device for which the History
Collection was saved.
• Collection Type - The type of History Collection saved - Long
Term or Short Term.
65 Avaya SMON Manager User Guide
Page 73

Using SMON History
• Auto Save Time - The date and time at which the History
Collection was saved.
• Auto Save Status - The status of the Auto Save action for the
History Collection. If the Auto Save was successful, the Auto Save
Status is Succeeded. If the Auto Save was not successful, the
Auto Save Status contains the reason for the failure.
You can save the Collection Log to a comma separated value (CSV) file.
This file can then be imported into a spreadsheet or database program.
To save the Collection Log to a CSV file:
1. Click .
Or
Select
File > Save As. A file browser opens.
2. Enter a name for the file in the
* Note: The extension for the filename is csv.
3. Browse to the directory in which you want to save the file.
4. Click
Save. The file is saved.
To clear the Collection Log, click
To close the Collection Log, click
Refreshing the Device List
You can refresh the list of devices in the Enterprise History window. This
is useful after network devices are added to or removed from the
network.
To refresh the list of devices in the Enterprise History window:
File name field.
Clear. The Collection Log is cleared.
Close. The Collection Log closes.
Click .
Or
Select
View > Refresh. SMON History relearns the devices in the
network and refreshes the device list in the Enterprise History
window.
Avaya SMON Manager User Guide 66
Page 74

Chapter 7
Saving the Enterprise History Window
You can save the information in the Enterprise History window to a
comma separated value (CSV) file. This file can then be imported into a
spreadsheet or database program. To save the Enterprise History window
to a CSV file:
1. Click .
Or
Select
2. Enter a name for the file in the
File > Save As. A file browser opens.
File name field.
* Note: The extension for the filename is csv.
3. Browse to the directory in which you want to save the file.
4. Click
Save. The file is saved.
67 Avaya SMON Manager User Guide
Page 75

Using Switch History
This section provides information about using the Switch History
window, and includes the following topics:
• Opening a Switch History Window
• Understanding the Switch History Window
• Saving a Switch History Report
Opening a Switch History Window
The Switch History window provides a table with traffic statistics for all
of the ports on a selected device. You can upload the Switch History data
from a device or open an existing History file. In addition, you can also
save the information in a Switch History window to a file.
Using SMON History
To upload data from a device to a Switch History window:
1. Select the History Collection to upload using the
pull-down listbox.
2. Select the devices whose History Collections you want to upload
from the History Table.
— To select all the devices in the History Table, select
All
.
3. Click .
Or
Select
each device selected.
To open a saved History file:
1. Click .
Or
Select
View > Switch History. A Switch History window opens for
File > Open. A file browser opens.
Collection
Edit > Select
2. Select an his file to open.
3. Click
Avaya SMON Manager User Guide 68
Open. The selected History file opens in a Switch History
window.
Page 76

Chapter 7
Understanding the Switch History Window
The Switch History window provides a list of ports on the selected
device, their collection parameters, and Auto Save status.
Figure 7-3. Switch History Window
Title B ar
Counter
Listbox
Switch History
Report
Status Bar
The Title Bar of the Switch History window provides the following
information:
• For uploaded data - The device name and collection type.
• For saved data - The filename of the saved collection.
Counter Type pull-down listbox enables you to select the counter you
The
want to see in the Switch History Report. The following table provides a
list of available counters and their descriptions:
Table 7-4. Switch History Counters
Counter Description
Total Pkts
Multicast Pkts
Broadcast Pkts
CRC Align Errors
The total number of packets entering the
switch.
The number of good multicast packets entering
the switch.
The number of good broadcast packets
entering the switch.
The number of packets with CRC alignment
errors entering the switch.
69 Avaya SMON Manager User Guide
Page 77

Table 7-4. Switch History Counters (Continued)
Counter Description
Using SMON History
Collisions
The number of collisions occurring on the
switch.
Undersize Pkts
The number of undersize packets entering the
switch.
Oversize Pkts
The number of oversize packets entering the
switch.
Fragments
The number of packet fragments entering the
switch.
Jabbers
Drop Events
Total Octets
Util (hundredth%)
The number of jabbers entering the switch.
The number of dropped events on the switch.
The total number of octets entering the switch.
The percentage of the switch’s bandwidth
being used.
Each row in a Switch History Report represents a port on the selected
device. The first column in a Switch History Report provides port names.
Subsequent columns provide the amount of the selected counter at the
time and date in the column header. The number of columns in a Switch
History Report is one more than the number of buckets in the collection.
Avaya SMON Manager User Guide 70
Page 78
Chapter 7
The following table provides a description of the information displayed
in the Switch History Status Bar.
Table 7-5. Switch History Status Bar
Item Description
Upload Status
Completion
Buckets
The upload status of Switch History. When Switch
History is uploading data from the device, a
progress bar is displayed.
* Note: The upload progress can be greater
than 100%. This occurs when the
device saves a new bucket during the
upload. The uploaded data includes all
information saved on the device at the
time the upload starts and any
information added during the upload.
However, the Upload Status
percentage is based on the standard
number of buckets in the collection.
When Switch History finishes uploading data,
Ready is displayed.
If the data in the Switch History Report is from a
saved file, Saved Session is displayed.
The percentage of the Collection that appears in
the Switch History Report.
The number of buckets in the collection.
Auto Save Status
Indicates the Auto Save Status. If Auto Save is off
for the device, the Auto Save Status is Auto Save
Off. If Auto Save is active on the device, the Auto
Save Status is Auto Save On. For more
information on Auto Save, refer to “
Activating
Auto Save” on page 64.
Communication
Status
When Switch History is uploading data from a
device, the following icon is displayed:
Saving a Switch History Report
You can save the information in a Switch History Report to a history file.
This is useful if you manually uploaded a collection, and you want to
save it.
71 Avaya SMON Manager User Guide
Page 79

To save a Switch History Report to a file:
1. Click .
Or
Using SMON History
Select
2. Enter a name for the file in the
* Note: The extension for the filename is his.
3. If you want to save the file in a different directory, browse to the
directory in which you want to save the file.
4. Click
Save. The Switch History Report is saved to the file.
Using Port History
This section provides information about using the Port History Chart,
and includes the following topics:
• Opening the Port History Chart
• Understanding the Port History Chart
• Modifying the Port History Display
File > Save As. A file browser opens.
File name field.
Opening the Port History Chart
The Port History Chart provides a chart with traffic statistics for a
selected port. To open the Port History Chart for a port:
1. Select a port from a Switch History Report.
2. Click .
Or
Select
information on the selected port.
Avaya SMON Manager User Guide 72
View > Port Chart. The Port History Chart opens with
Page 80

Chapter 7
Understanding the Port History Chart
The Port History Chart provides a graphical representation of the traffic
on the selected device during the selected collection.
Figure 7-4. Port History Chart
Port Chart
Counters
Samples
Box
Status Bar
The Port Chart shows the traffic on the port during the period of the
collection. Each counter is represented by a line of a different color.
The Counters checkboxes enable you to select the counters you want
displayed in the Port Chart. To view a counter in the Port Chart, check
the counter’s checkbox.
The Samples Box enables you to configure the number of samples visible
in the Port Chart. To configure the number of samples visible in the Port
Chart:
1. Enter a number in the
* Note: The number of samples must be between 1 and the number
of buckets in the collection.
2. Press ENTER. The display changes, showing the selected number
of samples in the Port Chart.
Samples Per Screen field.
73 Avaya SMON Manager User Guide
Page 81

Using SMON History
The following table provides a description of the information displayed
in the Port History Chart Status Bar.
Table 7-6. Port History Chart Status Bar
Item Description
Session Start
Time
Session End Time
Total No. of
Samples
Samples Per
Screen
The time at which the current Collection started.
The time at which the current Collection ended.
The number of buckets in the collection.
The number of samples visible in the Port Chart.
Modifying the Port History Display
You can modify the display of the Port History Chart.
compress the graph to show all of the samples in the collection, double-click
To
anywhere in the Port Chart. The Port Chart displays all of the samples in the
collection.
To zoom in on the graph, press SHIFT and select a portion of the graph
using the mouse. The graph zooms in and displays the selected portion.
To return the graph display to the configured number of samples per
screen, click anywhere in the Port Chart. The display returns to the
configured number of samples per screen.
Avaya SMON Manager User Guide 74
Page 82

Avaya SMON Manager
A
Menus
This appendix provides the full structure of the menus in Avaya SMON
Manager.
Online SMON Menus
This section gives the full structure of the menus in the Online SMON
page of Avaya SMON Manager.
File Menu
Table A-1. Enterprise SMON - File Menu
Item Description
Edit Menu
New > Switch Statistics
New > Port Statistics
New > Voice Port
Statistics
Close
Auto Report
Report Now
Options
Exit
Table A-2. Enterprise SMON - Edit Menu
Item Description
Opens or activates the Enterprise Switch
Statistics window.
Opens or activates the Enterprise Port Statistics
window.
Opens or activates the Enterprise Voice Port
Statistics window.
Closes the active window.
Opens the Auto Report dialog box.
Opens the Report Now dialog box.
Opens the Options dialog box.
Closes Avaya SMON Manager.
Configuration
Avaya SMON Manager User Guide 75
Opens the Port or Switch Configuration dialog
box.
Page 83

Table A-2. Enterprise SMON - Edit Menu (Continued)
Item Description
Avaya SMON Manager Menus
View Menu
Find
Opens the Find dialog box.
Table A-3. Enterprise SMON - View Menu
Item Description
Customize
Opens the Customize Switch or Port dialog
box.
Pause
Define VLAN Filter
Activate VLAN Filter
Port Default Naming
Stops all polling.
Opens the Define VLAN Filter dialog box.
Toggles the VLAN Filter.
Toggles between the display of default port
names and user defined port names.
IP Telephone Default
Naming
Toggles between the display of default
IP telephone names and user defined
IP telephone names.
Switch Default Naming
Toggles between the display of default device
names and user defined device names.
Window Menu
Table A-4. Enterprise SMON - Window Menu
Item Description
Cascade
Next
Previous
Close All
Window Name
Avaya SMON Manager User Guide 76
Cascades all open windows.
Brings the next open window in the list to the
front.
Brings the previous open window in the list to
the front.
Closes all windows.
Brings the named window to the front.
Page 84

Appendix A
Help Menu
Table A-5. Enterprise SMON - Help Menu
Item Description
Contents
Help On
About Avaya SMON
Manager
SMON History Menus
This section gives the full structure of the menus in the SMON History
page of Avaya SMON Manager.
File Menu
Table A-6. SMON History - File Menu
Item Description
Open
Save As
Opens the on-line help to the Contents page.
Activates context-sensitive on-line help.
Opens a window with Avaya SMON Manager
version and copyright information.
Opens a saved History collection.
Saves the current History collection to a file.
Edit Menu
Exit
Table A-7. SMON History - Edit Menu
Item Description
Select All
Closes Avaya SMON Manager.
Selects all rows in a table.
77 Avaya SMON Manager User Guide
Page 85

View Menu
Avaya SMON Manager Menus
Table A-8. SMON History - View Menu
Item Description
Switch History
Port Chart
Collection Log
Refresh
Info Box
Actions Menu
Item Description
Start Collection
Stop Collection
Auto Save Off
Uploads the selected collection to the
management station.
Opens a chart showing the traffic on the port
during the collection period.
Opens the Collection Log.
Refreshes the information in the History Table.
Toggles the display of info boxes.
Table A-9. SMON History - Actions Menu
Activates the selected history collection for the
selected devices.
Deactivates the selected history collection for
the selected devices.
Stops automatic history report saving.
Auto Save On
Starts automatic history report saving.
Window Menu
Table A-10. SMON History - Window Menu
Item Description
Cascade
Next
Previous
Close All
Window Name
Avaya SMON Manager User Guide 78
Cascades all open windows.
Brings the next open window in the list to the
front.
Brings the previous open window in the list to
the front.
Closes all windows other than the Enterprise
History window.
Brings the named window to the front.
Page 86

Appendix A
Help Menu
Table A-11. SMON History - Help Menu
Item Description
Contents
Help On
About Avaya SMON
Manager
Opens the on-line help to the Contents page.
Activates context-sensitive on-line help.
Opens a window with Avaya SMON Manager
version and copyright information.
79 Avaya SMON Manager User Guide
Page 87

B
Setting Up the SMON License
Avaya Network Management does not include a license for using SMON.
Instead, a trial version of Avaya SMON Manager is included. This trial
version expires 60 days after its first use.
The Avaya SMON Manager (with Avaya Network Management) package
contains a license that allows you to use Avaya SMON Manager on a
permanent basis. The license is supplied as a separate document in the
Avaya SMON Manager (with Avaya Network Management) package.
When launching Avaya SMON Manager before entering a valid license
key, a dialog box for entering the license key is displayed. If you
purchased the Avaya SMON Manager (with Avaya Network
Management), enter the provided license key. This allows unlimited use
of Avaya SMON Manager. If you purchased the Avaya Network
Management package, press ENTER. This allows use of Avaya SMON
Manager for 60 days.
In addition, an embedded license is required for Device SMON for
Avaya P130, Avaya P330, and Avaya M770 Devices. For more
information, refer to the appropriate Avaya Device SMON User Guide.
Avaya SMON Manager User Guide 80
Page 88

Index
A
Accessing
History
port statistics
switch statistics
voice port statistics
Activating
history collection
Adding
Auto Save devices
Auto Save
adding devices
policy
removing devices
Avaya SMON Manager
introduction
overview
tools
Avaya SMON Manager Guide
intended readers
organization of this guide
purpose
C
Changing
display mode
polling interval
Collection
Log
parameters
Collection, Enterprise History
definition
duration
long term
short term
Configuring
Auto Save
polling interval
Counters
port statistics
switch statistics
voice port statistics
Creating
groups of ports and LAGs to monitor
groups of switches to monitor
55
34
26
46
63
64
64
12
64
1
4
9
vi
vi
vi
20
19
65
63
12
13
12
12
64
19
42
31
52
29
37
D
Deactivating
history collection
Desktop
Device
rediscovery
Device SMON
tools
Dialog area
Dialog box
find IP telephones
find ports and LAGs
find switches
IP telephone group configuration
port group configuration
switch group configuration
Display mode
E
Enterprise
monitoring
Enterprise History
collections
how it works
overview
window
Enterprise Port Statistics
overview
Enterprise SMON History, see History
Enterprise Switch Statistics
overview
F
Filter
TopN
VLAN
Find IP telephone dialog box
Find port dialog box
Find switch dialog box
Finding
IP telephones
ports and LAGs
switches
Format report options
17, 57
2
17
12
11
60
11
10
20, 31, 41, 51
40
33
63
66
54
44
33
49
37
29
20
3
12
54
44
33
54
44
21
Avaya SMON Manager User Guide 81
Page 89

Index
G
General options
display mode
polling interval
Generating
Enterprise reports
Global network monitoring
Groups
creating port
creating switch
H
History
accessing
activating collections
collections
deactivating collections
managing windows
toolbar
uploading data
user interface
History Text Report
How to
access port statistics
access switch statistics
access voice port statistics
activate history collection
add a device to the Auto Save report
configure the polling interval
create port groups
create switch groups
deactivate history collection
filter ports and LAGs
filter switches
filter voice ports
find ports and LAGs
find switches
findIP telephones
generate reports
manage History windows
modify the Port History display
rediscover devices
remove a device from the Auto Save report
64
resize the desktop
resize the dialog area
select directory to save reports
select IP telephones to poll
select ports and LAGs to poll
select switches to poll
sort IP telephones
sort ports
sort switches
20
19
22
3
37
29
55
63
63
63
25, 58
56
72
55
58
34
26
46
63
64
19
37
29
63
39
31
51
44
33
54
22
25, 58
74
66
17
17
21
49
37
29
53
43
32
upload data to the management station
use dialog box options
use display mode option
use port statistics
use switch statistics
use the polling interval option
use TopN port filtering
use TopN switch filtering
use TopN voice port filtering
use voice port statistics
view the Collection Log
work with the Online SMON tools
I
Intended users
Introduction
IP telephones
finding
L
LAGs
finding
Log
Collection
Long term history collection
M
MAC layer top-down monitoring
Management applications
Managing
windows
Monitoring
global network
multi-tiered
switch
top-down
O
Online SMON
toolbar
tools
user interface
working with the tools
Organization of this guide
Overview of Avaya SMON Manager
P
Policy
Auto Save
Polling
interval
selecting IP telephones
selecting ports and LAGs
selecting switches
setting interval
3
10
vi
1
54
44
65
25, 58
3
6
6
16
15
12
19
19
21
20
35
27
41
20, 31
47
65
3
18
vi
49
37
29
72
19
51
18
12
6
4
Avaya SMON Manager User Guide 82
Page 90

Index
Port group configuration dialog box 37
Port History
modifying
overview
Port statistics
accessing
counters
34
tool
using
window
Ports
filtering the display
finding
TopN filtering
Purpose of this guide
R
Rediscovering devices
Removing
Auto Save devices
Reports
format options
generating
selecting a directory
Resizing
desktop
dialog area
RMON standard
S
Saving reports
Searching
IP telephones
ports and LAGs
switches
Selecting
directory to save reports
IP telephones to poll
ports and LAGs to poll
report formats
switches to poll
SMON
applications
devices
probes
standard
16, 56
tabs
tools
top-down monitoring
Sorting
IP telephones
ports
switches
74
13
34
42
35
35
39
44
41
vi
66
64
21
22
21
17, 57
17
1
21
54
44
33
21
49
37
21
29
3
5
5
2
3, 9
6
53
43
32
Switch group configuration dialog box
Switch monitoring
Switch statistics
accessing
counters
tool
using
window
Switches
filtering the display
finding
TopN filtering
T
Tool
port statistics
SMON history
switch statistics
voice port statistics
Toolbar
history
Online SMON
Toolbar buttons
Tools
Device SMON
Online SMON
Top-down monitoring
MAC layer
overview
upper layers
TopN
port filtering
switch filtering
voice port filtering
U
Understanding
the port statistics window
the switch statistics window
the voice port statistics window
Uploading data to the management station
Upper layers top-down monitoring
User interface
desktop
dialog area
Online SMON
Using
Auto Save
dialog box options
port statistics
switch statistics
voice port statistics
26
31
26
27
27
33
56
6
6
72
17, 57
17
64
3
31
20, 31
34
59
26
46
16
16
2
10
7
41
20, 31
51
35
27
15
21
34, 35
26, 27
46, 47
29
47
7
83 Avaya SMON Manager User Guide
Page 91

Index
V
Viewing
the Collection Log
VLAN filter dialog box
VLAN filtering
Voice port
group configuration dialog box
Voice port statistics
accessing
counters
tool
using
window
46
52
46
47
47
65
40
40
49
Voice ports
filtering the display
TopN filtering
W
Welcome to Avaya SMON Manager
What is RMON?
What is SMON?
Who should use this guide
Window
Enterprise History
Windows, managing
Working with SMON tools
51
51
1
2
vi
60
25, 58
18
vi
Avaya SMON Manager User Guide 84
 Loading...