

Page 1

CRK; Reviewed:
SPOC 7/1/2011
Solution & Interoperability Test Lab Application Notes
©2011 Avaya Inc. All Rights Reserved.
1 of 21
Polycom8400-SES
These Application Notes describe the procedures for configuring Polycom® SpectraLink®
8400 Series Telephones which were compliance tested with Avaya Aura® Communication
Manager and Avaya Aura® SIP Enablement Services.
The overall objective of the interoperability compliance testing is to verify Polycom®
SpectraLink® 8400 Series Telephones functionalities in an environment comprised of Avaya
Aura® Communication Manager, Avaya Aura® SIP Enablement Services, various Avaya
H.323, SIP IP Telephones, and DCP telephones.
Information in these Application Notes has been obtained through DevConnect compliance
testing and additional technical discussions. Testing was conducted via the DevConnect
Program at the Avaya Solution and Interoperability Test Lab.
Avaya Solution & Interoperability Test Lab
Application Notes for Polycom® SpectraLink® 8400 Series
Telephones and Avaya Aura® Communication Manager
and Avaya Aura® SIP Enablement Services – Issue 1.0
Abstract
Page 2

CRK; Reviewed:
SPOC 7/1/2011
Solution & Interoperability Test Lab Application Notes
©2011 Avaya Inc. All Rights Reserved.
2 of 21
Polycom8400-SES
1. Introduction
These Application Notes describe the procedures for configuring Polycom® SpectraLink® 8400
Series Telephones (8440 and 8450) which were compliance tested with Avaya Aura®
Communication Manager and Avaya Aura® SIP Enablement Services.
Polycom® SpectraLink® 8400 series Telephones (herein referred to as SpectraLink 8400 Series)
improve productivity and responsiveness for on-site mobile professionals across a wide range of
industries, including healthcare, retail, manufacturing and hospitality. Built on open standards,
SpectraLink 8400 Series transforms the delivery of mobile enterprise applications by bringing
the power of thin client and browser technology to front-line professionals in an easy-to-use and
easy-to-manage interface. Additionally, SpectraLink 8400 Series supports a broad range of
interfaces to enterprise-grade PBX, wireless LAN, and infrastructures to deliver maximum
interoperability with the low cost of ownership.
These Application Notes assume that Communication Manager and SIP Enablement Services are
already installed and basic configuration steps have been performed. Only steps relevant to this
compliance test will be described in this document. For further details on configuration steps not
covered in this document, consult reference [1], [2], and [3].
2. General Test Approach and Test Results
The general test approach was to place calls to and from SpectraLink 8400 Series and exercise
basic telephone operations. The main objectives were to verify the following:
Registration
Codecs (G.711MU and G.729A)
Inbound calls
Outbound calls
Hold/Resume
Call termination (origination/destination)
Transfer with Shuffling enabled (origination/destination/ attended/unattended)
Transfer with Shuffling disabled (origination/destination/ attended/unattended)
Three party conference (origination/destination)
Avaya Feature Name Extension (FNE)
o Call Park
o Call Pickup
o Call Forward (Unconditional, Busy/no answer)
MWI
Voicemail
Serviceability
2.1. Interoperability Compliance Testing
The interoperability compliance test included features and serviceability. The focus of the
interoperability compliance testing was primarily on verifying call establishment on SpectraLink
8400 Series. SpectraLink 8400 Series operations such as inbound calls, outbound calls,
Page 3

CRK; Reviewed:
SPOC 7/1/2011
Solution & Interoperability Test Lab Application Notes
©2011 Avaya Inc. All Rights Reserved.
3 of 21
Polycom8400-SES
hold/resume, transfer, conference, Feature Name Extension (FNE), and SpectraLink 8400 Series
interactions with SIP Enablement Services, Communication Manager, and Avaya SIP, H.323,
and digital telephones were verified. The serviceability testing introduced failure scenarios to
see if SpectraLink 8400 Series can recover from failures.
2.2. Test Results
The test objectives were verified. For serviceability testing, SpectraLink 8400 Series operated
properly after recovering from failures such as cable disconnects, and resets of SpectraLink 8400
Series and SIP Enablement Services. SpectraLink 8400 Series successfully negotiated the codec
that was used. The features tested worked as expected.
2.3. Support
Technical support on SpectraLink 8400 Series can be obtained through the following:
Phone: (978) 292-5000, and select Option 3.
Web: http://www.polycom.com/support/index.html
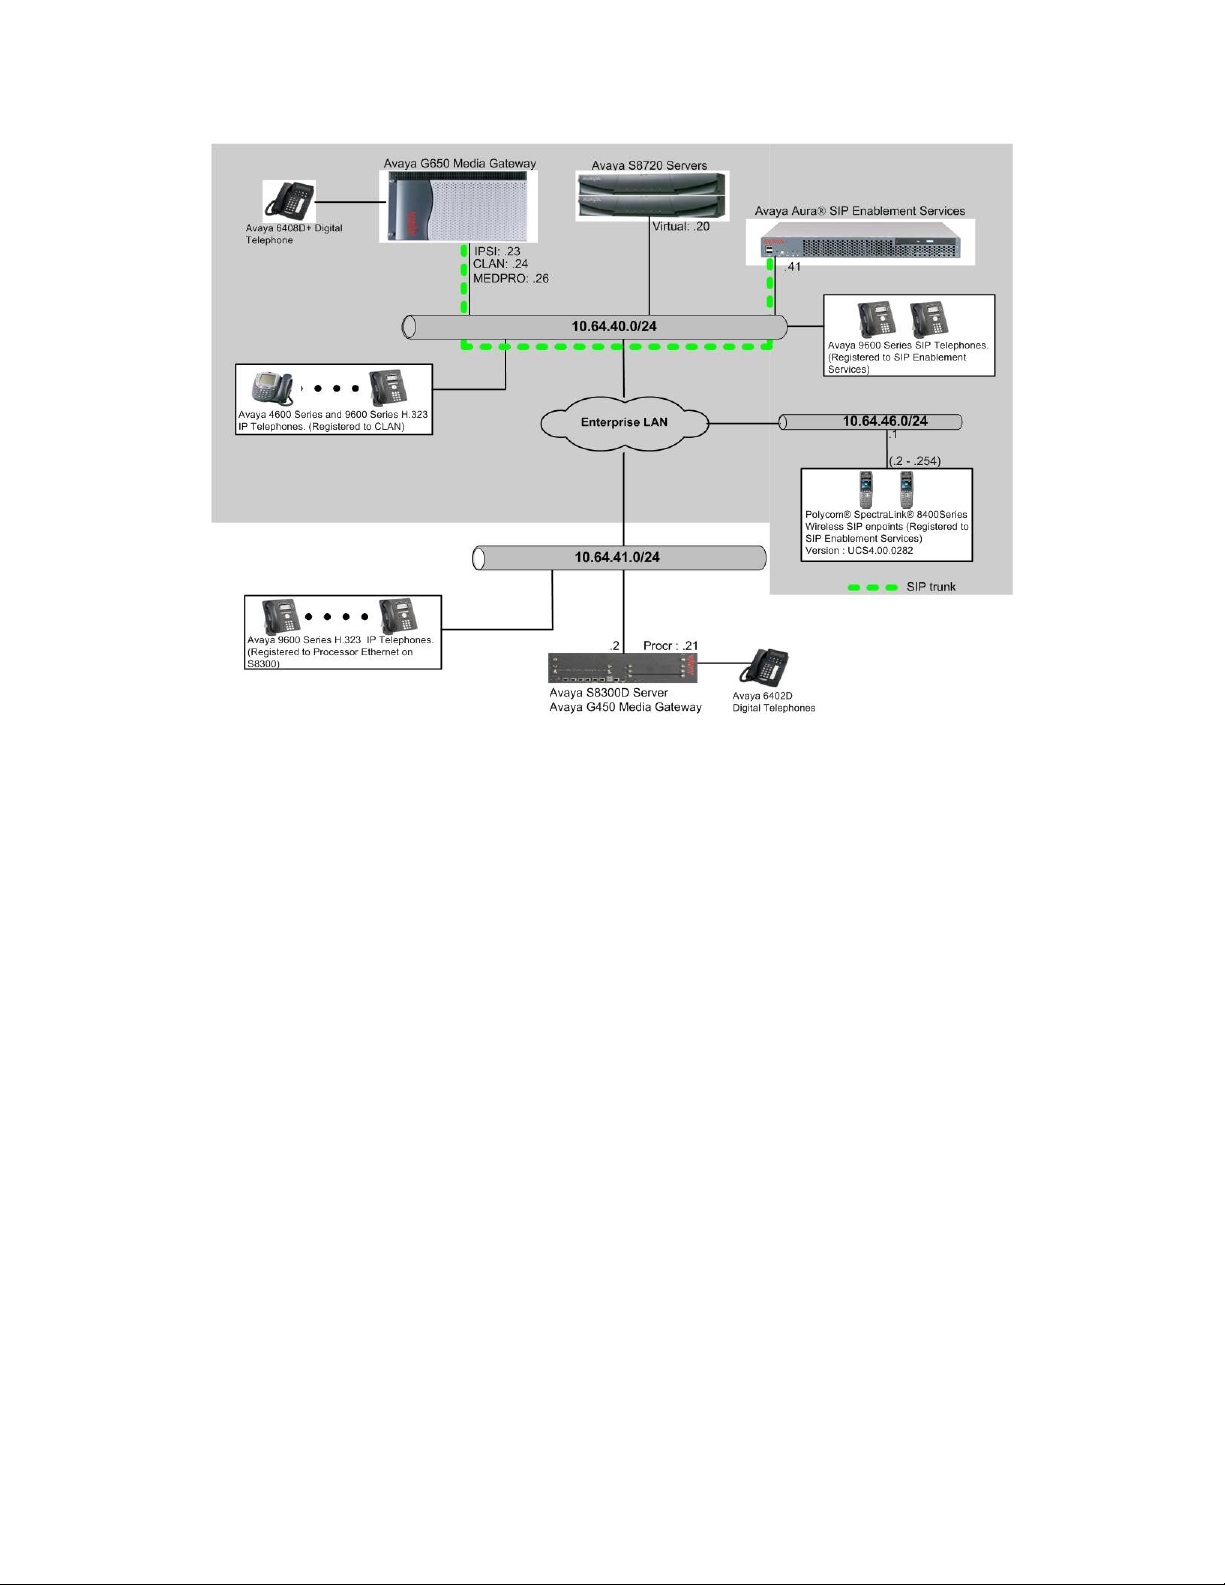
3. Reference Configuration
Figure 1 illustrates a sample configuration consisting of an Avaya S8720 Servers, an Avaya
G650 Media Gateway, a SIP Enablement Services server, and SpectraLink 8400 Series. The
solution described herein is also extensible to other Avaya Media Servers and Media Gateways.
Avaya S8300D Server with an Avaya G450 Media Gateway was included in the test to provide
an inter-switch scenario. For completeness, an Avaya 4600 Series H.323 IP Telephone, Avaya
9600 Series SIP IP Telephones, Avaya 9600 Series H.323 IP Telephones, and Avaya 6400 Series
Digital Telephones, are included in Figure 1 to demonstrate calls between the SIP-based
SpectraLink 8400 Series and Avaya SIP, H.323, and digital telephones.
Page 4
CRK; Reviewed:
SPOC 7/1/2011
Solution & Interoperability Test Lab Application Notes
©2011 Avaya Inc. All Rights Reserved.
4 of 21
Polycom8400-SES
Figure 1: Test Configuration of SpectraLink 8400 Series
Page 5

CRK; Reviewed:
SPOC 7/1/2011
Solution & Interoperability Test Lab Application Notes
©2011 Avaya Inc. All Rights Reserved.
5 of 21
Polycom8400-SES
4. Equipment and Software Validated
Equipment
Software/Firmware
Avaya S87020 Servers
Avaya Aura® Communication
Manager 5.2.1 (R015x.02.1.016.4)
Avaya G650 Media Gateway
-
TN2312BP IP Server Interface
TN799DP C-LAN Interface
TN2302AP IP Media Processor
HW11 FW044
HW01 FW028
HW20 FW118
Avaya Aura® SIP Enablement Services
SES-5.2.1.0-016.4
Avaya S8300D Media Server with Avaya G450
Media Gateway
Avaya Aura® Communication
Manager 6.0.1 (R016x.00.1.510.1) with
SP2 (00.1.510.1-18860)
Avaya 4600 and 9600 Series SIP Telephones
9620 (SIP)
9630 (SIP)
9650 (SIP)
2.6.4
2.6.4
2.6.4
Avaya 4600 and 9600 Series H.323 Telephones
4625 (H.323)
9620 (H.323)
9630 (H.323)
9650 (H.323)
2.9
3.1
3.1
3.1
Avaya 6408D+ Digital Telephone
-
SpectraLink 8400 Series
UCS 4.0.0.10555
The following equipment and software were used for the test configuration.
5. Configure the Avaya Aura® Communication Manager
This section describes the procedure for setting up a SIP trunk between Communication Manager
and SIP Enablement Services. The steps include setting up an IP codec set, an IP network region,
IP node name, a signaling group, a trunk group, and a SIP station. Before a trunk can be
configured, it is necessary to verify if there is enough capacity to setup an additional trunk. The
highlights in the following screens indicate the values used during the compliance test. Default
values may be used for all other fields.
These steps are performed from the Communication Manager System Access Terminal (SAT)
interface. SpectraLink 8400 Series and other SIP telephones are configured as off-PBX
telephones in Communication Manager.
Page 6

CRK; Reviewed:
SPOC 7/1/2011
Solution & Interoperability Test Lab Application Notes
©2011 Avaya Inc. All Rights Reserved.
6 of 21
Polycom8400-SES
5.1. Capacity Verification
display system-parameters customer-options Page 1 of 11
OPTIONAL FEATURES
G3 Version: V15 Software Package: Standard
Location: 1 RFA System ID (SID): 1
Platform: 6 RFA Module ID (MID): 1
USED
Platform Maximum Ports: 44000 10273
Maximum Stations: 36000 10122
Maximum XMOBILE Stations: 0 0
Maximum Off-PBX Telephones - EC500: 50 0
Maximum Off-PBX Telephones - OPS: 100 4
Maximum Off-PBX Telephones - PBFMC: 0 0
Maximum Off-PBX Telephones - PVFMC: 0 0
Maximum Off-PBX Telephones - SCCAN: 0 0
display system-parameters customer-options Page 2 of 11
OPTIONAL FEATURES
IP PORT CAPACITIES USED
Maximum Administered H.323 Trunks: 100 44
Maximum Concurrently Registered IP Stations: 18000 4
Maximum Administered Remote Office Trunks: 0 0
Maximum Concurrently Registered Remote Office Stations: 0 0
Maximum Concurrently Registered IP eCons: 0 0
Max Concur Registered Unauthenticated H.323 Stations: 5 0
Maximum Video Capable H.323 Stations: 5 0
Maximum Video Capable IP Softphones: 5 0
Maximum Administered SIP Trunks: 100 50
Maximum Administered Ad-hoc Video Conferencing Ports: 0 0
Maximum Number of DS1 Boards with Echo Cancellation: 0 0
Maximum TN2501 VAL Boards: 10 1
Maximum Media Gateway VAL Sources: 0 0
Maximum TN2602 Boards with 80 VoIP Channels: 128 1
Maximum TN2602 Boards with 320 VoIP Channels: 128 0
Maximum Number of Expanded Meet-me Conference Ports: 0 0
Enter the display system-parameters customer-options command. Verify that there are
sufficient Maximum Off-PBX Telephones – OPS licenses. If not, contact an authorized Avaya
account representative to obtain additional licenses
On Page 2 of the form, verify that the number of SIP trunks supported by the system is sufficient
for the number of SIP trunks needed. If not, contact an authorized Avaya account representative
to obtain additional licenses.
Page 7

CRK; Reviewed:
SPOC 7/1/2011
Solution & Interoperability Test Lab Application Notes
©2011 Avaya Inc. All Rights Reserved.
7 of 21
Polycom8400-SES
5.2. IP Codec Set
change ip-codec-set 1 Page 1 of 2
IP Codec Set
Codec Set: 1
Audio Silence Frames Packet
Codec Suppression Per Pkt Size(ms)
1: G.711MU n 2 20
2:
3:
4:
.
.
.
##################### CODEC SETTINGS #####################
##
## G.711a Codec Enabled
## Determines whether G.711 a-law codec is available on
## the phone.
## 0 for No
## 1 for Yes
## SET ENABLE_G711A 1 (This shows the default)
##
##Added the following statement:
SET ENABLE_G711A 0
##
## G.711u Codec Enabled
## Determines whether G.711 mu-law codec is available on
## the phone.
## 0 for No
## 1 for Yes
## SET ENABLE_G711U 1
##
##
## G.729 Codec Enabled
## Determines whether G.729 codec is available on the
## phone.
## 0 for G.729(A) disabled
## 1 for G.729(A) enabled without Annex B support
## 2 for G.729(A) enabled with Annex B support
## SET ENABLE_G729 1
##
This section describes the steps for administering a codec set in Communication Manager. This
codec set is used in the IP network region for communications between Communication
Manager and SIP Enablement Services. Enter the change ip-codec-set <c> command, where c
is a number between 1 and 7, inclusive. IP codec sets are used in Section 5.3 for configuring IP
network region to specify which codec sets may be used within and between network regions.
For the compliance testing, G.711MU, G.729A were tested for verification.
To configure a specific codec for Avaya 9600 Series SIP phones, the 46xxsettings.txt file must
be configured. The following shows the CODEC SETTINGS section in the 46xxsettings.txt
file that needs to be modified.
Page 8

CRK; Reviewed:
SPOC 7/1/2011
Solution & Interoperability Test Lab Application Notes
©2011 Avaya Inc. All Rights Reserved.
8 of 21
Polycom8400-SES
## G.726 Codec Enabled
## Determines whether G.726 codec is available on the
## phone. This parameter is not supported on 16cc phones.
## 0 for No
## 1 for Yes
## SET ENABLE_G726 1
##
## G.726 Payload Type
## Specifies the RTP payload type to be used with the
## G.726 codec. (96-127). This parameter is not supported
## on 16cc phones.
## SET G726_PAYLOAD_TYPE 110
##
## G.722 Codec Enabled
## Determines whether G.722 codec is available on the
## phone. This parameter is not supported on 16cc phones.
## 0 for No
## 1 for Yes
## SET ENABLE_G722 0
SET ENABLE_G722 1
##
## DTMF Payload Type
## Specifies the RTP payload type to be used for RFC
## 2833 signaling. (96-127).
## SET DTMF_PAYLOAD_TYPE 120
##
## DTMF Transmission Method
## Specifies whether DTMF tones are sent in-band, as
## regular audio, or out-of-band, using RFC 2833
## procedures.
## 1 for in-band
## 2 for out-of-band using RFC 2833
## SET SEND_DTMF_TYPE 2
##
.
.
.
5.3. Configure IP Network Region
This section describes the steps for administering an IP network region in Communication
Manager for communication between Communication Manager and SIP Enablement Services.
Enter the change ip-network-region <n> command, where n is a number between 1 and 250
inclusive, and configure the following:
Authoritative Domain – Enter the appropriate name for the Authoritative Domain. Set
to the appropriate domain. During the compliance test, the authoritative domain is set to
avaya.com. This should match the SIP Domain value on SIP Enablement Services, in
Section 6.1.
Intra-region IP-IP Direct Audio – Set to yes to allow direct IP-to-IP audio connectivity
between endpoints registered to Communication Manager or SIP Enablement Services in
the same IP network region. The default value for this field is yes.
Codec Set – Set the codec set number as provisioned in Section 5.2.
Inter-region IP-IP Direct Audio – Set to yes to allow direct IP-to-IP audio connectivity
between endpoints registered to Communication Manager or SIP Enablement Services in
different IP network regions. The default value for this field is yes.
Page 9

CRK; Reviewed:
SPOC 7/1/2011
Solution & Interoperability Test Lab Application Notes
©2011 Avaya Inc. All Rights Reserved.
9 of 21
Polycom8400-SES
change ip-network-region 1 Page 1 of 19
IP NETWORK REGION
Region: 1
Location: Authoritative Domain: avaya.com
Name:
MEDIA PARAMETERS Intra-region IP-IP Direct Audio: yes
Codec Set: 1 Inter-region IP-IP Direct Audio: yes
UDP Port Min: 2048 IP Audio Hairpinning? n
UDP Port Max: 3029
DIFFSERV/TOS PARAMETERS RTCP Reporting Enabled? y
Call Control PHB Value: 46 RTCP MONITOR SERVER PARAMETERS
Audio PHB Value: 46 Use Default Server Parameters? y
Video PHB Value: 26
802.1P/Q PARAMETERS
Call Control 802.1p Priority: 6
Audio 802.1p Priority: 6
Video 802.1p Priority: 5 AUDIO RESOURCE RESERVATION PARAMETERS
H.323 IP ENDPOINTS RSVP Enabled? n
H.323 Link Bounce Recovery? y
Idle Traffic Interval (sec): 20
Keep-Alive Interval (sec): 5
Keep-Alive Count: 5
5.4. Configure IP Node Name
change node-names ip Page 1 of 2
IP NODE NAMES
Name IP Address
ASM 10.64.40.42
CLAN 10.64.40.24
CLAN-AES 10.64.40.25
G450 10.64.41.21
MEDPRO 10.64.40.26
MM-MAS 10.64.20.63
S8300 10.64.42.21
SES 10.64.40.41
This section describes the steps for setting IP node name for SIP Enablement Services in
Communication Manager. Enter the change node-names ip command, and add a node name for
SIP Enablement Services along with its IP address.
5.5. Configure SIP Signaling
This section describes the steps for administering a signaling group in Communication Manager
for communication between Communication Manager and SIP Enablement Services. Enter the
add signaling-group <s> command, where s is an available signaling group and configure the
following:
Group Type – Set to sip.
Near-end Node Name - Set to CLAN as displayed in Section 5.4.
Far-end Node Name - Set to the SIP Enablement Services name configured in Section
5.4.
Far-end Network Region - Set to the region configured in Section 5.3.
Far-end Domain - Set to avaya.com. This should match the SIP Domain value in
Section 6.1.
Page 10

CRK; Reviewed:
SPOC 7/1/2011
Solution & Interoperability Test Lab Application Notes
©2011 Avaya Inc. All Rights Reserved.
10 of 21
Polycom8400-SES
Direct IP-IP Audio Connections – Set to y, since Media Shuffling is enabled during the
add signaling-group 201 Page 1 of 1
SIGNALING GROUP
Group Number: 201 Group Type: sip
Transport Method: tls
IMS Enabled? n
Near-end Node Name: CLAN Far-end Node Name: SES
Near-end Listen Port: 5061 Far-end Listen Port: 5061
Far-end Network Region: 1
Far-end Domain: avaya.com
Bypass If IP Threshold Exceeded? n
Incoming Dialog Loopbacks: eliminate RFC 3389 Comfort Noise? n
DTMF over IP: rtp-payload Direct IP-IP Audio Connections? y
Session Establishment Timer(min): 3 IP Audio Hairpinning? n
Enable Layer 3 Test? n Direct IP-IP Early Media? n
H.323 Station Outgoing Direct Media? n Alternate Route Timer(sec): 6
add trunk-group 201 Page 1 of 21
TRUNK GROUP
Group Number: 201 Group Type: sip CDR Reports: y
Group Name: To SES COR: 1 TN: 1 TAC: 116
Direction: two-way Outgoing Display? y
Dial Access? n Night Service:
Queue Length: 0
Service Type: tie Auth Code? n
Signaling Group: 201
Number of Members: 10
compliance test
5.6. Configure SIP Trunk
This section describes the steps for administering a trunk group in Communication Manager for
communication between Communication Manager and SIP Enablement Services. Enter the add
trunk-group <t> command, where t is an unallocated trunk group and configure the following:
Group Type – Set the Group Type field to sip.
Group Name – Enter a descriptive name.
TAC (Trunk Access Code) – Set to any available trunk access code.
Signaling Group – Set to the Group Number field value configured in Section 5.5.
Number of Members – Allowed value is between 0 and 255. Set to a value large enough
to accommodate the number of SIP telephone extensions being used.
Note: Each SIP call between two SIP endpoints (whether internal or external) requires two SIP
trunks for the duration of the call. The license file installed on the system controls the maximum
permitted.
Page 11

CRK; Reviewed:
SPOC 7/1/2011
Solution & Interoperability Test Lab Application Notes
©2011 Avaya Inc. All Rights Reserved.
11 of 21
Polycom8400-SES
5.7. Configure SIP Endpoint
Add station 28002 Page 1 of 6
STATION
Extension: 28002 Lock Messages? n BCC: 0
Type: 9630SIP Security Code: TN: 1
Port: S30168 Coverage Path 1: 99 COR: 1
Name: WiFi-1 Coverage Path 2: COS: 1
Hunt-to Station:
STATION OPTIONS
Time of Day Lock Table:
Loss Group: 19
Message Lamp Ext: 28002
Display Language: english Button Modules: 0
Survivable COR: internal
Survivable Trunk Dest? y IP SoftPhone? n
add station 28002 Page 6 of 6
STATION
SIP FEATURE OPTIONS
Type of 3PCC Enabled: None
SIP Trunk: 201
add off-pbx-telephone station-mapping 28003 Page 1 of 3
STATIONS WITH OFF-PBX TELEPHONE INTEGRATION
Station Application Dial CC Phone Number Trunk Config Dual
Extension Prefix Selection Set Mode
28002 OPS - 28002 201 1
This section describes the steps for administering OPS stations in Communication Manager and
associating the OPS station extensions with the telephone numbers of SpectraLink 8400 Series.
Enter add station s, where s is an extension valid in the provisioned dial plan. The following
fields were configured for the compliance test.
Type – Set to 9630SIP.
Name – Enter a descriptive name
Repeat this step as necessary to configure additional SIP endpoint extensions.
On Page 6 of the STATION form, enter the trunk group number that was assigned in Section 5.6
for the SIP Trunk field.
Enter the add off-pbx-telephone station-mapping command and configure the following:
Station Extension – Set the extension of the OPS station as configured above.
Application – Set to OPS.
Phone Number – Enter the number that SpectraLink 8400 Series will use for registration
and call termination. In the example below, the Phone Number is the same as the
Station Extension, but is not required to be the same.
Trunk Selection – Set to the trunk group number configured in Section 5.6.
Config Set – Set to 1
Repeat this step as necessary to configure additional off-pbx-telephone station-mapping.
Page 12

CRK; Reviewed:
SPOC 7/1/2011
Solution & Interoperability Test Lab Application Notes
©2011 Avaya Inc. All Rights Reserved.
12 of 21
Polycom8400-SES
The following Avaya feature name extension (FNE) set was utilized during the compliance test.
change off-pbx-telephone feature-name-extensions set 1 Page 1 of 2
EXTENSIONS TO CALL WHICH ACTIVATE FEATURES BY NAME
Set Name:
Active Appearance Select: 27051
Automatic Call Back: 27052
Automatic Call-Back Cancel: 27053
Call Forward All: 27054
Call Forward Busy/No Answer: 27055
Call Forward Cancel: 27056
Call Park: 27057
Call Park Answer Back: 27058
Call Pick-Up: 27059
Calling Number Block: 27060
Calling Number Unblock: 27061
Conference on Answer: 27062
Directed Call Pick-Up: 27063
Drop Last Added Party: 27064
Exclusion (Toggle On/Off): 27065
Extended Group Call Pickup:
Held Appearance Select: 27067
Enter change off-pbx-telephone feature-name-extensions set 1 to view the feature name
extensions. The highlighted fields are tested during the compliance test.
Page 13

CRK; Reviewed:
SPOC 7/1/2011
Solution & Interoperability Test Lab Application Notes
©2011 Avaya Inc. All Rights Reserved.
13 of 21
Polycom8400-SES
6. Configure SIP Enablement Services
This section describes the steps for creating a SIP trunk between SIP Enablement Services and
Communication Manager. SIP user accounts are configured in SIP Enablement Services and
associated with a Communication Manager OPS station extension. SpectraLink 8400 Series will
register with SIP Enablement Services using the SIP user accounts. The highlights in the
following screens indicate the values used during the compliance test. Default values may be
used for all other fields.
6.1. Configure SIP Enablement Services Server Properties
Launch a web browser, enter https://<IP address of SIP Enablement Services server>/admin
in the URL, and log in with the appropriate credentials. Navigate to Administration SIP
Enablement Services upon successful login.
Page 14
CRK; Reviewed:
SPOC 7/1/2011
Solution & Interoperability Test Lab Application Notes
©2011 Avaya Inc. All Rights Reserved.
14 of 21
Polycom8400-SES
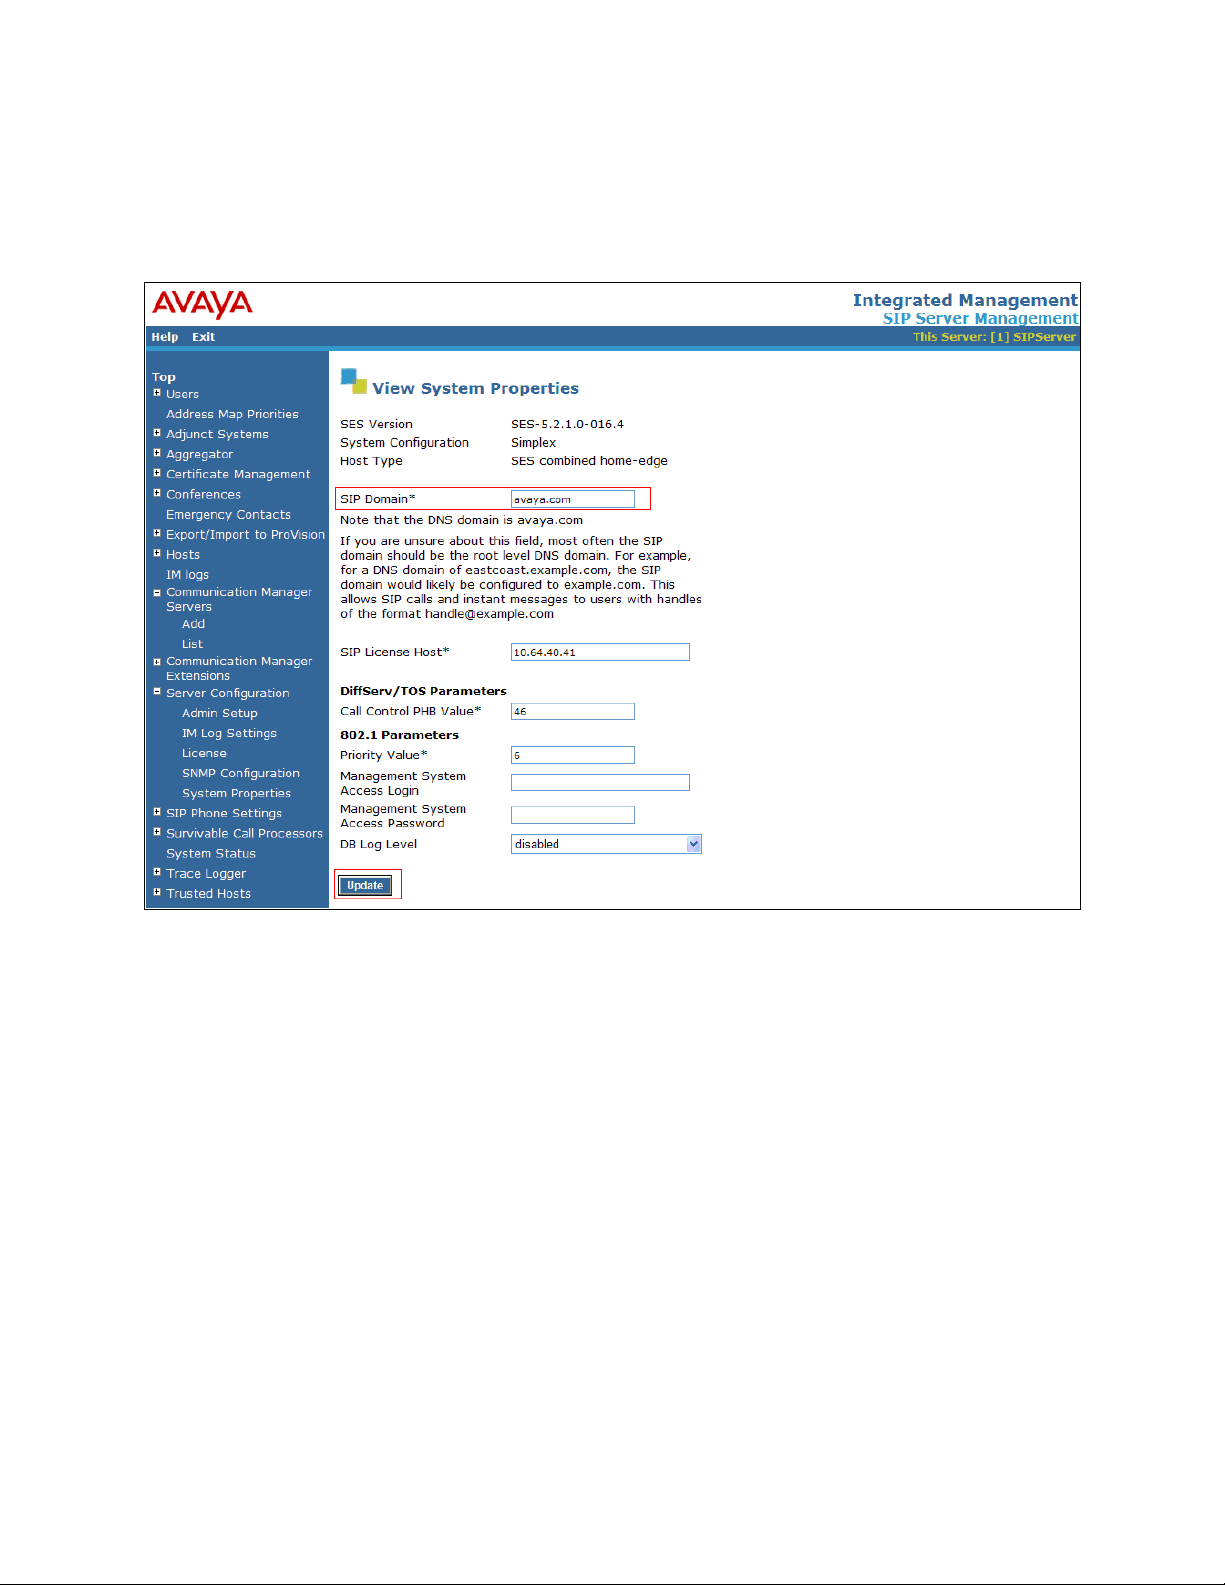
In the Integrated Management SIP Server Management page, select the Server
Configuration System properties link from the left pane of the screen. Verify the SIP
Domain matches the Far-end Domain field value configured for the signaling group on
Communication Manager in Section 5.5. Click on the Update button, after the completion.
Page 15
CRK; Reviewed:
SPOC 7/1/2011
Solution & Interoperability Test Lab Application Notes
©2011 Avaya Inc. All Rights Reserved.
15 of 21
Polycom8400-SES
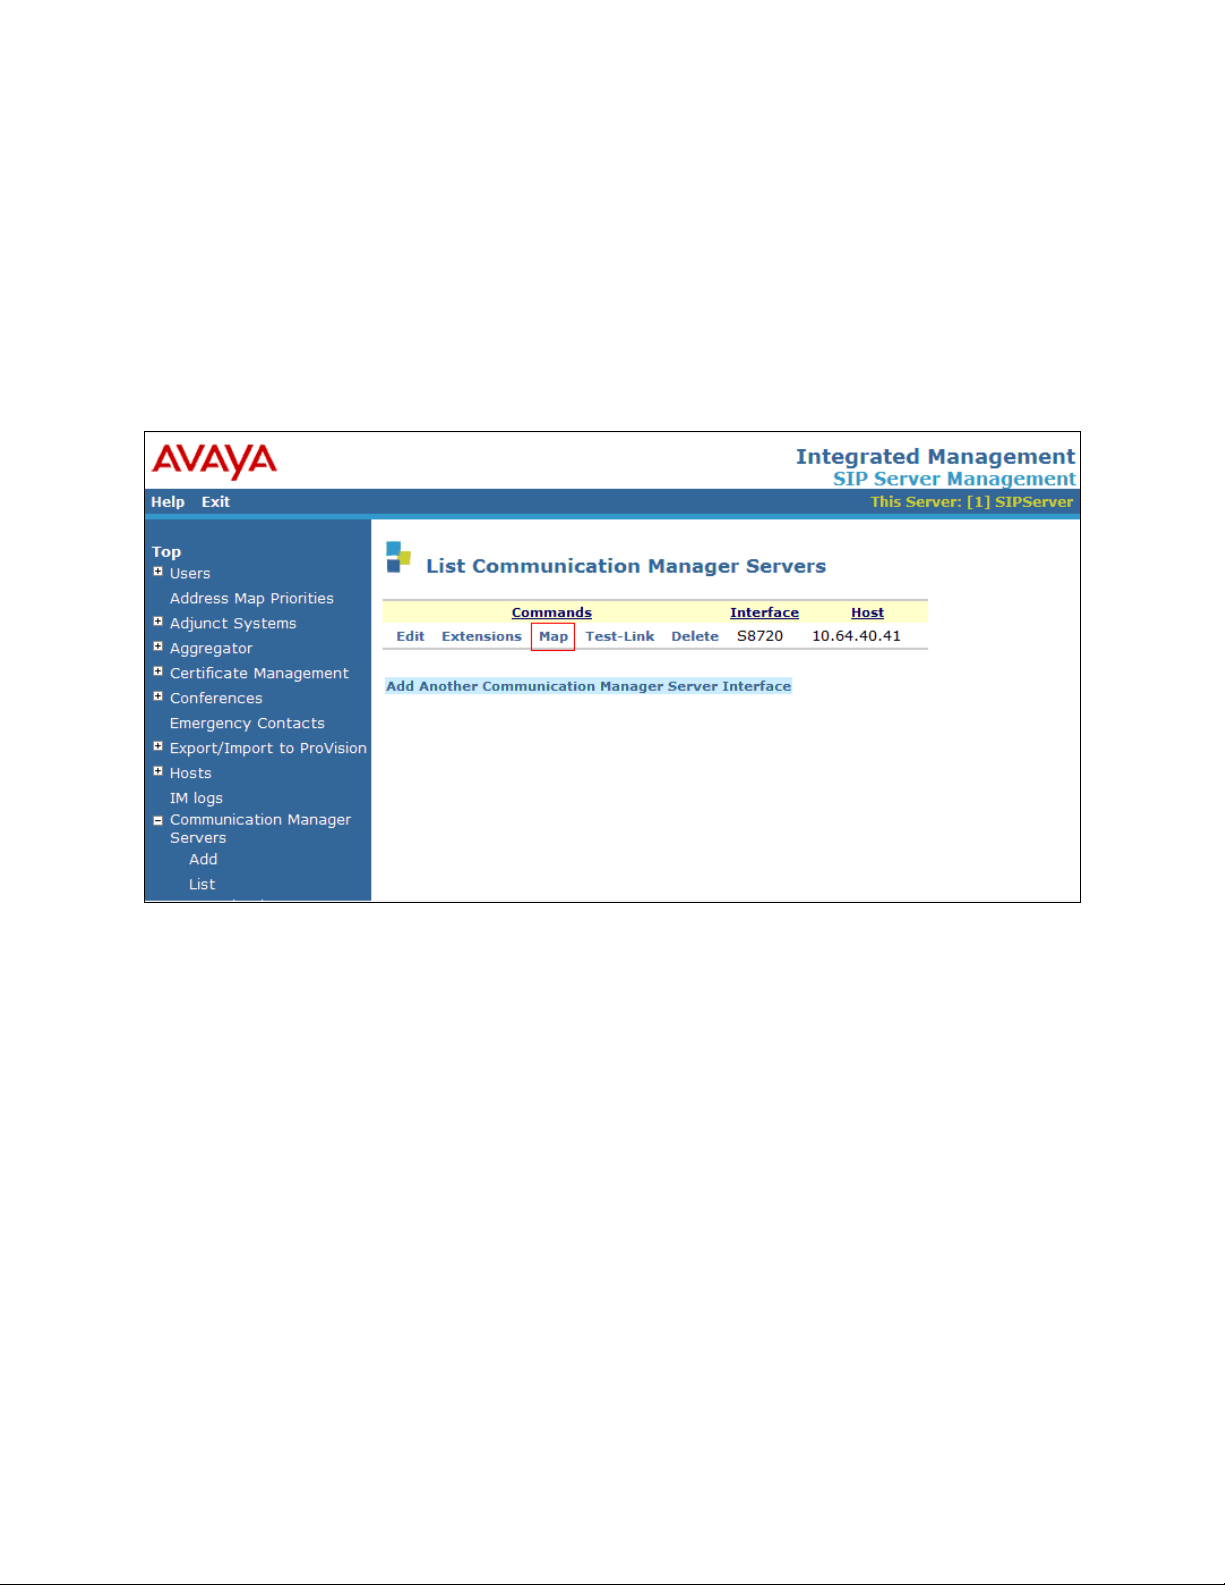
6.2. Configure Communication Manager Server Interface
This section provides steps to add SIP-enabled media servers to the SIP domain. In the
Integrated Management SIP Server Management page, select the Communication Manager
Servers List link from the left pane of the screen. The following screen shows the List
Communication Manager Servers page. Prior to the compliance test, the Communication
Manger Server Interface was already configured.
Click the Map link to go to the Add Address Map screen for that Communication Manager
server.
Page 16

CRK; Reviewed:
SPOC 7/1/2011
Solution & Interoperability Test Lab Application Notes
©2011 Avaya Inc. All Rights Reserved.
16 of 21
Polycom8400-SES
The following screen displays the Communication Manager Address Map page. To add new
address map to associate with Communication Manager Server, click on Add Another Map.
In the Add Communication Manager Server Address Map screen, provide the following
information:
Name – Enter a descriptive name for this map.
Pattern –
Click on the Add button.
Page 17

CRK; Reviewed:
SPOC 7/1/2011
Solution & Interoperability Test Lab Application Notes
©2011 Avaya Inc. All Rights Reserved.
17 of 21
Polycom8400-SES
6.3. Configure Users
This section provides steps to add users to be administered in the SIP Enablement Services
database. In the Integrated Management SIP Server Management page, select the Users
Add link from the left pane of the screen. The highlighted fields were configured for the
compliance test:
Primary Handle – Enter the phone number of SpectraLink 8400 Series. This number
was configured in Section 5.7.
Password / Confirm Password – Enter a password; both field entries must match
exactly.
First Name – Enter the first name of the user in alphanumeric characters.
Last Name – Enter the last name of the user in alphanumeric characters.
Add Communication Manager Extension - Select this field if you want to associate a
new extension number with this user in the database now. If so, the Add
Communication Manager Extension screen will be displayed next, after this user
profile has been added. If not, in the future you may choose to associate extensions with
the user.
Click Add when finished.
Page 18

CRK; Reviewed:
SPOC 7/1/2011
Solution & Interoperability Test Lab Application Notes
©2011 Avaya Inc. All Rights Reserved.
18 of 21
Polycom8400-SES
Page 19

CRK; Reviewed:
SPOC 7/1/2011
Solution & Interoperability Test Lab Application Notes
©2011 Avaya Inc. All Rights Reserved.
19 of 21
Polycom8400-SES
From the next screen, enter the numeric telephone extension you want to create in the database.
<?xml version="1.0" encoding="utf-8" standalone="yes"?>
<!-- Default Master SIP Configuration File-->
<!-- Edit and rename this file to <Ethernet-address>.cfg for each phone.-->
<!-- $Revision: 1.14 $ $Date: 2005/07/27 18:43:30 $ -->
<APPLICATION APP_FILE_PATH="sip.ld" APP_NET_LOAD_FILE_PATH=""
CONFIG_FILES="sip_28002.cfg" MISC_FILES="" LOG_FILE_DIRECTORY=""
OVERRIDES_DIRECTORY="" CONTACTS_DIRECTORY="" />
<?xml version="1.0" encoding="utf-8"?>
<PHONE_CONFIG>
<reg reg.1.address="28002@avaya.com" reg.1.displayName="28002" reg.1.label="28002"
reg.1.auth.userId="28002" reg.1.auth.password="123456"
reg.1.server.1.address="10.64.40.41" reg.1.server.1.port="5060" />
<msg.mwi msg.mwi.1.subscribe="28002@avaya.com" />
Select the extension's Communication Manager server from the drop-down list. Click on the
Add button.
7. Configure SpectraLink 8400 Series
This section provides steps to configure SpectraLink 8400 Series. The latest firmware was
provided by Polycom SpectraLink. For additional information regarding configuring the
SpectraLink 8400 series handsets please refer to the latest product documentation available at
www.polycom.com. The following files need to be configured, as the phone boots up to register
with SIP Enablement Services:
00907a0cd950.cfg – The first file that the phone searches while booting up is
<MAC>.cfg file. The header, 00907a0cd950, indicates the MAC address of SpectraLink
8400 Series. In this configuration file, there are sub-configuration files that are listed
under CONFIG_FILES field; sip_28002.cfg. During the compliance test, sip_28002.cfg
was modified.
Sip_28002.cfg – This is an extension configuration file. This file includes UserID,
Password, Fully Qualified Domain Name (FQDN) of the phone, and the IP address of
SIP Enablement Services.
Page 20

CRK; Reviewed:
SPOC 7/1/2011
Solution & Interoperability Test Lab Application Notes
©2011 Avaya Inc. All Rights Reserved.
20 of 21
Polycom8400-SES
</PHONE_CONFIG>
8. Verification Steps
The following steps may be used to verify the configuration:
Verify that SpectraLink 8400 Series successfully registers with SIP Enablement Services
server by following the Users Registered Users link on the SES Administration Web
Interface.
Place calls to and from SpectraLink 8400 Series and verify that the calls are successfully
established with two-way talk path.
While calls are established, Enter status trunk <t:r> command, where t is the SIP trunk
group configured in Section 5.6, and r is trunk group member. This will verify whether
the call is shuffled or not.
9. Conclusion
SpectraLink 8400 Series was compliance tested with Communication Manager (Version 5.2.1)
and SIP Enablement Services (Version 5.2.1). SpectraLink 8400 Series (UCS 4.0.0.10555)
functioned properly for feature and serviceability. During compliance testing, SpectraLink 8400
Series successfully registered with SIP Enablement Services, placed and received calls to and
from SIP and non-SIP telephones, and executed other telephony features like three-way
conference, transfers, hold, etc.
10. Additional References
The following Avaya product documentation can be found at http://support.avaya.com
[1] Administering Avaya Aura™ Communication Manager, Release 5.2, Issue 5.0, May 2009,
Document Number 03-300509.
[2] Administering Avaya Aura™ SIP Enablement Services on the Avaya S8300 Server, Issue 2.0,
May 2009, Document Number 03-602508.
The following document was provided by Polycom SpectraLink.
[3] Polycom® SpectraLink® 8400 Series Wireless Handset User Guide, February 2011, 172536720-001 Rev A
Page 21

CRK; Reviewed:
SPOC 7/1/2011
Solution & Interoperability Test Lab Application Notes
©2011 Avaya Inc. All Rights Reserved.
21 of 21
Polycom8400-SES
©2011 Avaya Inc. All Rights Reserved.
Avaya and the Avaya Logo are trademarks of Avaya Inc. All trademarks identified by ® and ™
are registered trademarks or trademarks, respectively, of Avaya Inc. All other trademarks are the
property of their respective owners. The information provided in these Application Notes is
subject to change without notice. The configurations, technical data, and recommendations
provided in these Application Notes are believed to be accurate and dependable, but are
presented without express or implied warranty. Users are responsible for their application of any
products specified in these Application Notes.
Please e-mail any questions or comments pertaining to these Application Notes along with the
full title name and filename, located in the lower right corner, directly to the Avaya DevConnect
Program at devconnect@avaya.com.
 Loading...