

Page 1

Part No. P0604633 01
Business Communications
Manager
Personal Call Manager
User Guide
Page 2

2
Copyright © 2003 Nortel Networks
All rights reserved.
The information in this document is subject to change without notice. The statements, configurations, technical data, and
recommendations in this document are believed to be accurate and reliable, but are presented without express or implied
warranty. Users must take full responsibility for their applications of any products specified in this document. The
information in this document is proprietary to Nortel Networks NA Inc.
Trademarks
NORTEL NETWORKS is a trademark of Nortel Networks.
P0604633 01
Page 3

Contents
Preface . . . . . . . . . . . . . . . . . . . . . . . . . . . . . . . . . . . . . . . . . . . . . . . . . . . . . . . 9
Before you begin . . . . . . . . . . . . . . . . . . . . . . . . . . . . . . . . . . . . . . . . . . . . . . . . . . . . . . 9
Text conventions . . . . . . . . . . . . . . . . . . . . . . . . . . . . . . . . . . . . . . . . . . . . . . . . . . . . . . 9
Acronyms . . . . . . . . . . . . . . . . . . . . . . . . . . . . . . . . . . . . . . . . . . . . . . . . . . . . . . . . . . . 10
Chapter 1
Personal Call Manager. . . . . . . . . . . . . . . . . . . . . . . . . . . . . . . . . . . . . . . . . . 11
Using a handsfree telephone with Personal Call Manager . . . . . . . . . . . . . . . . . . . . . 11
About this guide . . . . . . . . . . . . . . . . . . . . . . . . . . . . . . . . . . . . . . . . . . . . . . . . . . 11
Installing Personal Call Manager . . . . . . . . . . . . . . . . . . . . . . . . . . . . . . . . . . . . . . . . . 12
Starting Personal Call Manager . . . . . . . . . . . . . . . . . . . . . . . . . . . . . . . . . . . . . . . . . . 12
Personal Call Manager icons . . . . . . . . . . . . . . . . . . . . . . . . . . . . . . . . . . . . . . . . . . . . 13
Personal Call Manager task tray icon . . . . . . . . . . . . . . . . . . . . . . . . . . . . . . . . . . 13
Personal Call Manager task tray menu . . . . . . . . . . . . . . . . . . . . . . . . . . . . . . . . . 13
Personal Call Manager window . . . . . . . . . . . . . . . . . . . . . . . . . . . . . . . . . . . . . . . . . . 14
Opening the window . . . . . . . . . . . . . . . . . . . . . . . . . . . . . . . . . . . . . . . . . . . . . . . 14
Components of the window . . . . . . . . . . . . . . . . . . . . . . . . . . . . . . . . . . . . . . . . . . 15
Closing the window . . . . . . . . . . . . . . . . . . . . . . . . . . . . . . . . . . . . . . . . . . . . . . . . 19
Setting up Personal Call Manager . . . . . . . . . . . . . . . . . . . . . . . . . . . . . . . . . . . . . . . . 20
Defining the line used . . . . . . . . . . . . . . . . . . . . . . . . . . . . . . . . . . . . . . . . . . . . . . 20
Changing the dialing properties . . . . . . . . . . . . . . . . . . . . . . . . . . . . . . . . . . . . . . 21
Defining long distance numbers in your area code . . . . . . . . . . . . . . . . . . . . . . . . 29
Making a call . . . . . . . . . . . . . . . . . . . . . . . . . . . . . . . . . . . . . . . . . . . . . . . . . . . . . . . . 30
Making a call using the Address Book . . . . . . . . . . . . . . . . . . . . . . . . . . . . . . . . . 30
Making a call using the task tray or Calls menu . . . . . . . . . . . . . . . . . . . . . . . . . . 31
Making a call using the toolbar . . . . . . . . . . . . . . . . . . . . . . . . . . . . . . . . . . . . . . . 32
Redialing a number . . . . . . . . . . . . . . . . . . . . . . . . . . . . . . . . . . . . . . . . . . . . . . . . 33
3
Menu bar . . . . . . . . . . . . . . . . . . . . . . . . . . . . . . . . . . . . . . . . . . . . . . . . . . . . . 15
Toolbar . . . . . . . . . . . . . . . . . . . . . . . . . . . . . . . . . . . . . . . . . . . . . . . . . . . . . . 16
Address Book . . . . . . . . . . . . . . . . . . . . . . . . . . . . . . . . . . . . . . . . . . . . . . . . . 17
Current Calls . . . . . . . . . . . . . . . . . . . . . . . . . . . . . . . . . . . . . . . . . . . . . . . . . . 17
Status bar . . . . . . . . . . . . . . . . . . . . . . . . . . . . . . . . . . . . . . . . . . . . . . . . . . . . 19
I am dialing from . . . . . . . . . . . . . . . . . . . . . . . . . . . . . . . . . . . . . . . . . . . . . . . 22
I am in this country . . . . . . . . . . . . . . . . . . . . . . . . . . . . . . . . . . . . . . . . . . . . . 23
Area Code . . . . . . . . . . . . . . . . . . . . . . . . . . . . . . . . . . . . . . . . . . . . . . . . . . . 24
Use a calling card for long distance . . . . . . . . . . . . . . . . . . . . . . . . . . . . . . . . 25
Disable call waiting by dialing . . . . . . . . . . . . . . . . . . . . . . . . . . . . . . . . . . . . . 28
To access outside lines . . . . . . . . . . . . . . . . . . . . . . . . . . . . . . . . . . . . . . . . . . 28
Dial using . . . . . . . . . . . . . . . . . . . . . . . . . . . . . . . . . . . . . . . . . . . . . . . . . . . . 28
Business Communications Manager Personal Call Manager
Page 4

4 Contents
Answering a call . . . . . . . . . . . . . . . . . . . . . . . . . . . . . . . . . . . . . . . . . . . . . . . . . . . . . . 35
Putting a call on hold . . . . . . . . . . . . . . . . . . . . . . . . . . . . . . . . . . . . . . . . . . . . . . . . . . 38
Multiple calls . . . . . . . . . . . . . . . . . . . . . . . . . . . . . . . . . . . . . . . . . . . . . . . . . . . . . . . . 39
Transferring a call . . . . . . . . . . . . . . . . . . . . . . . . . . . . . . . . . . . . . . . . . . . . . . . . . . . . 40
Conferencing a call . . . . . . . . . . . . . . . . . . . . . . . . . . . . . . . . . . . . . . . . . . . . . . . . . . . 45
Returning a call . . . . . . . . . . . . . . . . . . . . . . . . . . . . . . . . . . . . . . . . . . . . . . . . . . . 33
Calling from the Quick Dial list . . . . . . . . . . . . . . . . . . . . . . . . . . . . . . . . . . . . . . . 34
Knowing when someone is calling . . . . . . . . . . . . . . . . . . . . . . . . . . . . . . . . . . . . 35
Knowing who is calling . . . . . . . . . . . . . . . . . . . . . . . . . . . . . . . . . . . . . . . . . . . . . 35
Displaying who is calling from the task tray . . . . . . . . . . . . . . . . . . . . . . . . . . 35
Answering a call using the You Have a New Call dialog box . . . . . . . . . . . . . . . . . 36
Answering a call from the window . . . . . . . . . . . . . . . . . . . . . . . . . . . . . . . . . . . . . 37
Answering a call from the task tray or Calls menu . . . . . . . . . . . . . . . . . . . . . . . . 37
Accessing the Notes tab . . . . . . . . . . . . . . . . . . . . . . . . . . . . . . . . . . . . . . . . . . . . 37
Putting a call on hold using the window . . . . . . . . . . . . . . . . . . . . . . . . . . . . . . . . 38
Putting a call on hold using the task tray or Calls menu . . . . . . . . . . . . . . . . . . . . 38
Answering a held call using the window . . . . . . . . . . . . . . . . . . . . . . . . . . . . . . . . 38
Answering a held call using the task tray or Calls menu . . . . . . . . . . . . . . . . . . . . 38
Switching between calls using the window . . . . . . . . . . . . . . . . . . . . . . . . . . . . . . 39
Switching between calls using the task tray and Call menus . . . . . . . . . . . . . . . . 39
Transferring a call without an announcement . . . . . . . . . . . . . . . . . . . . . . . . . . . . 40
Transferring a call using the window . . . . . . . . . . . . . . . . . . . . . . . . . . . . . . . . 40
Transferring a call using the right mouse button . . . . . . . . . . . . . . . . . . . . . . . 40
Transferring a call using the task tray or Calls menu . . . . . . . . . . . . . . . . . . . 42
Transferring a call using the keyboard . . . . . . . . . . . . . . . . . . . . . . . . . . . . . . 43
Transferring a call with an announcement . . . . . . . . . . . . . . . . . . . . . . . . . . . . . . . 44
Transferring a call with an announcement using the window . . . . . . . . . . . . . 44
Transferring a call with an announcement using the right mouse button . . . . 44
Transferring a call with an announcement using the task tray or Calls menu . 44
Creating a conference . . . . . . . . . . . . . . . . . . . . . . . . . . . . . . . . . . . . . . . . . . . . . . 45
Creating a conference using the Conference box . . . . . . . . . . . . . . . . . . . . . . 45
Creating a conference using the Calls box . . . . . . . . . . . . . . . . . . . . . . . . . . . 45
Creating a conference using the task tray or Calls menu . . . . . . . . . . . . . . . . 45
Putting conferences call on hold . . . . . . . . . . . . . . . . . . . . . . . . . . . . . . . . . . . . . . 46
Putting the conference calls on hold using the window . . . . . . . . . . . . . . . . . 46
Putting conference calls on hold using the task tray or Calls menu . . . . . . . . 46
Taking a conference off hold . . . . . . . . . . . . . . . . . . . . . . . . . . . . . . . . . . . . . . . . . 46
Restoring a held conference using the window . . . . . . . . . . . . . . . . . . . . . . . 46
Restoring a held conference using the task tray or Calls menu . . . . . . . . . . . 46
Splitting a conference . . . . . . . . . . . . . . . . . . . . . . . . . . . . . . . . . . . . . . . . . . . . . . 47
Splitting a conference using the window . . . . . . . . . . . . . . . . . . . . . . . . . . . . . 47
Splitting a conference using the task tray or Calls menu . . . . . . . . . . . . . . . . 47
P0604633 01
Page 5

Contents 5
Ending a conference . . . . . . . . . . . . . . . . . . . . . . . . . . . . . . . . . . . . . . . . . . . . . . . 48
Ending a conference using the release button . . . . . . . . . . . . . . . . . . . . . . . . 48
Ending a conference using the window . . . . . . . . . . . . . . . . . . . . . . . . . . . . . 48
Ending a conference using the keyboard . . . . . . . . . . . . . . . . . . . . . . . . . . . . 48
Ending a conference using the task tray or Calls menu . . . . . . . . . . . . . . . . . 48
Ending a call . . . . . . . . . . . . . . . . . . . . . . . . . . . . . . . . . . . . . . . . . . . . . . . . . . . . . . . . 49
Ending a call using the release button . . . . . . . . . . . . . . . . . . . . . . . . . . . . . . . . . 49
Ending a call using the window . . . . . . . . . . . . . . . . . . . . . . . . . . . . . . . . . . . . . . . 49
Ending a call using the task tray or Calls menu . . . . . . . . . . . . . . . . . . . . . . . . . . 49
Ending a call using the keyboard . . . . . . . . . . . . . . . . . . . . . . . . . . . . . . . . . . . . . 49
Calling features . . . . . . . . . . . . . . . . . . . . . . . . . . . . . . . . . . . . . . . . . . . . . . . . . . . . . . 50
Do Not Disturb (DND) . . . . . . . . . . . . . . . . . . . . . . . . . . . . . . . . . . . . . . . . . . . . . . 50
Turning DND on or off . . . . . . . . . . . . . . . . . . . . . . . . . . . . . . . . . . . . . . . . . . . 50
Call Forward . . . . . . . . . . . . . . . . . . . . . . . . . . . . . . . . . . . . . . . . . . . . . . . . . . . . . 50
Calls Log Window . . . . . . . . . . . . . . . . . . . . . . . . . . . . . . . . . . . . . . . . . . . . . . . . . . . . 52
Viewing the Calls Log . . . . . . . . . . . . . . . . . . . . . . . . . . . . . . . . . . . . . . . . . . . . . . 52
Viewing the Incoming Calls . . . . . . . . . . . . . . . . . . . . . . . . . . . . . . . . . . . . . . . 52
Viewing the Outgoing Calls . . . . . . . . . . . . . . . . . . . . . . . . . . . . . . . . . . . . . . . 53
Updating the Calls Log . . . . . . . . . . . . . . . . . . . . . . . . . . . . . . . . . . . . . . . . . . 53
Sorting the Calls Log . . . . . . . . . . . . . . . . . . . . . . . . . . . . . . . . . . . . . . . . . . . 53
Making a call from the Calls Log . . . . . . . . . . . . . . . . . . . . . . . . . . . . . . . . . . . . . . 53
Printing call information from the Calls Log . . . . . . . . . . . . . . . . . . . . . . . . . . . . . . 54
Deleting calls from the Calls Log . . . . . . . . . . . . . . . . . . . . . . . . . . . . . . . . . . . . . . 54
Closing the Calls Log Window . . . . . . . . . . . . . . . . . . . . . . . . . . . . . . . . . . . . . . . 54
Address Book . . . . . . . . . . . . . . . . . . . . . . . . . . . . . . . . . . . . . . . . . . . . . . . . . . . . . . . 55
The Tree View of the Address Book . . . . . . . . . . . . . . . . . . . . . . . . . . . . . . . . . . . 55
The List View portion of the Address Book . . . . . . . . . . . . . . . . . . . . . . . . . . . . . . 56
Contacts . . . . . . . . . . . . . . . . . . . . . . . . . . . . . . . . . . . . . . . . . . . . . . . . . . . . . . . . 57
Adding a new contact to the Address Book . . . . . . . . . . . . . . . . . . . . . . . . . . 57
Address Properties dialog box . . . . . . . . . . . . . . . . . . . . . . . . . . . . . . . . . . . . 58
Adding a caller to the Address Book . . . . . . . . . . . . . . . . . . . . . . . . . . . . . . . 63
Finding a contact in the Address Book . . . . . . . . . . . . . . . . . . . . . . . . . . . . . . 64
Editing the properties of a contact . . . . . . . . . . . . . . . . . . . . . . . . . . . . . . . . . 67
Organizing the Address book . . . . . . . . . . . . . . . . . . . . . . . . . . . . . . . . . . . . . 68
Copying a contact . . . . . . . . . . . . . . . . . . . . . . . . . . . . . . . . . . . . . . . . . . . . . . 68
Copying a contact using the linked copy method . . . . . . . . . . . . . . . . . . . . . . 69
Copying a contact using the template copy method . . . . . . . . . . . . . . . . . . . . 70
Moving a contact . . . . . . . . . . . . . . . . . . . . . . . . . . . . . . . . . . . . . . . . . . . . . . . 71
Deleting a contact . . . . . . . . . . . . . . . . . . . . . . . . . . . . . . . . . . . . . . . . . . . . . . 72
Printing Contacts . . . . . . . . . . . . . . . . . . . . . . . . . . . . . . . . . . . . . . . . . . . . . . 72
Folders . . . . . . . . . . . . . . . . . . . . . . . . . . . . . . . . . . . . . . . . . . . . . . . . . . . . . . . . . 74
Creating a new folder in the Address Book . . . . . . . . . . . . . . . . . . . . . . . . . . 74
Business Communications Manager Personal Call Manager
Page 6

6 Contents
Quick Dials . . . . . . . . . . . . . . . . . . . . . . . . . . . . . . . . . . . . . . . . . . . . . . . . . . . . . . . . . . 80
Displaying the information about Personal Call Manager . . . . . . . . . . . . . . . . . . . . . . 80
Synchronization with the telephone . . . . . . . . . . . . . . . . . . . . . . . . . . . . . . . . . . . . . . . 81
Accessing Help . . . . . . . . . . . . . . . . . . . . . . . . . . . . . . . . . . . . . . . . . . . . . . . . . . . . . . 81
Personal Call Manager Preferences . . . . . . . . . . . . . . . . . . . . . . . . . . . . . . . . . . . . . . 83
Quitting Personal Call Manager . . . . . . . . . . . . . . . . . . . . . . . . . . . . . . . . . . . . . . . . . . 87
Removing Personal Call Manager . . . . . . . . . . . . . . . . . . . . . . . . . . . . . . . . . . . . . . . . 87
Glossary . . . . . . . . . . . . . . . . . . . . . . . . . . . . . . . . . . . . . . . . . . . . . . . . . . . . . 89
Copying a folder . . . . . . . . . . . . . . . . . . . . . . . . . . . . . . . . . . . . . . . . . . . . . . . 75
Moving a folder . . . . . . . . . . . . . . . . . . . . . . . . . . . . . . . . . . . . . . . . . . . . . . . . 76
Renaming a folder . . . . . . . . . . . . . . . . . . . . . . . . . . . . . . . . . . . . . . . . . . . . . 77
Deleting a folder . . . . . . . . . . . . . . . . . . . . . . . . . . . . . . . . . . . . . . . . . . . . . . . 77
Importing Contacts . . . . . . . . . . . . . . . . . . . . . . . . . . . . . . . . . . . . . . . . . . . . . 78
Exporting Contacts . . . . . . . . . . . . . . . . . . . . . . . . . . . . . . . . . . . . . . . . . . . . . 79
Adding Quick Dials . . . . . . . . . . . . . . . . . . . . . . . . . . . . . . . . . . . . . . . . . . . . . . . . 80
Accessing context-sensitive Help . . . . . . . . . . . . . . . . . . . . . . . . . . . . . . . . . . . . . 81
Opening the Help contents screen . . . . . . . . . . . . . . . . . . . . . . . . . . . . . . . . . . . . 81
Accessing the Tip of the Day . . . . . . . . . . . . . . . . . . . . . . . . . . . . . . . . . . . . . . . . 81
Turning the Tip of the Day off . . . . . . . . . . . . . . . . . . . . . . . . . . . . . . . . . . . . . 82
Turning the Tip of the Day on . . . . . . . . . . . . . . . . . . . . . . . . . . . . . . . . . . . . . 82
Changing the Search preferences . . . . . . . . . . . . . . . . . . . . . . . . . . . . . . . . . . . . 83
Changing the Startup Option . . . . . . . . . . . . . . . . . . . . . . . . . . . . . . . . . . . . . . . . 84
Changing the Dialing Rule Setting . . . . . . . . . . . . . . . . . . . . . . . . . . . . . . . . . . . . 85
Changing the Caller’s Record Display Setting . . . . . . . . . . . . . . . . . . . . . . . . . . . 86
Index . . . . . . . . . . . . . . . . . . . . . . . . . . . . . . . . . . . . . . . . . . . . . . . . . . . . . . . . 91
P0604633 01
Page 7

Tables
Table 1 You Have a New Call descriptions . . . . . . . . . . . . . . . . . . . . . . . . . . . . . . 36
Table 2 Copy Methods . . . . . . . . . . . . . . . . . . . . . . . . . . . . . . . . . . . . . . . . . . . . . 69
7
Business Communications Manager Personal Call Manager
Page 8

8 Tables
P0604633 01
Page 9

Preface
Business Communications Manager Personal Call Manager is a TAPI-based application that
provides an easy-to-use interface between your computer and your telephone. You use the
telephone to speak with a caller. You can customize your Address Book and your calls. Basic
functions that Personal Call Manager performs include making and answering calls, putting calls
on hold, transfer calls, and making conference calls.
Before you begin
This guide is intended for users who wish to manage their own calls, and who have Personal Call
Manager installed on their PC, which is registered with the Business Communications Manager
server. This guide assumes that you have the following background:
• Working knowledge of the Windows operating system
• Some experience with windowing systems or graphical user interfaces (GUIs).
9
Text conventions
This guide uses the following text conventions:
bold Courier text
italic text Indicates new terms, book titles, and variables in command syntax
bold text indicates dialog boxes, buttons and menu options
separator ( > ) Shows menu paths.
Indicates command names and options and text that you need to enter.
Example: Use the
Example: Enter
descriptions. Where a variable is two or more words, the words are
connected by an underscore.
Example: If the command syntax is
show at <valid_route>, valid_route is one
variable and you substitute one value for it.
Example: Protocols > IP i dentifi es the IP o ption on th e Protocol s menu.
dinfo command.
show ip {alerts|routes}.
Business Communications Manager Personal Call Manager
Page 10

10 Preface
Acronyms
This guide uses the following acronyms:
API Application Programming Interf ace
CLID Calling Line Identification
CTE Computer Telephony Engine
CTI Computer Telephony Integration
DND Do Not Disturb
ERC Express Routing Code
IP Internet Protocol
O/S operating system
PCM Personal Call Manager
PIN Personal Identifica tion Number
TAPI Telephony Application Programming Interface
TSP TAPI Service Provider
URL Uniform Resource Locator
P0604633 01
Page 11

Chapter 1
Personal Call Manager
Business Communications Manager Personal Call Manager is a Telephony Application
Programming Interface (TAPI)-based application that provides an easy to use computer interface
for your telephone.
With Personal Call Manager you can:
• make calls
• redial telephone numbers
•return calls
•answer calls
• put calls on and off hold
• manage multiple calls
• transfer calls
• conference calls
• activate and de-activate Do Not Disturb
• call forward your telephone
11
Personal Call Manager also has an Address Book that allows you to store the names, addresses,
and telephone numbers of your contacts on your computer where they are easy to find and use.
Using a handsfree telephone with Personal Call Manager
Personal Call Manager is a tool designed to accompany your telephone. It provides tools to make
processing calls easier, but you must still use your telephone to speak with the caller. For this
reason, we recommend that you use a te le phone eq uipped wi th hands free . When us ing a ha ndsfre e
telephone, you can perform all of the Personal Call Manager functions without picking up the
telephone handset.
About this guide
Personal Call Manager provides several ways to perform each task. Although this document
describes all of the pos sib le method s, you only need to use one of the methods to per fo rm the tas k.
Business Communications Manager Personal Call Manager
Page 12
12 Chapter 1 Personal Call Manager
Installing Personal Call Manager
Personal Call Manager must be installed on your computer before you can use it. The files
required to inst all Per son al Call Manager are on th e Bus ine ss Communications Manager ba se unit.
To install Personal Call Manager:
1 Exit any Windows programs that are running.
2 On the Unified Manager front page, click on Install Client. The Client Install Application
page appears.
3 Click on Personal Call Manager. The Personal Call Manager page appears.
4 Click on Install Personal Call Manager. A file download window appears.
5 Select Save this program to disk and click OK. The SaveAs dialog appears.
6 Choose a location to save this file to. Click Save. The file begins downloading.
7 When the file is finished downloading, double-click on it. The install application begins.
8 Follow the on-screen instructions.
Note: The installation files for Personal Call Manager are no t deleted by th e installation
wizard. These files are stored in a folder named
C:\Program Files\Nortel Networks\ClientInstall\Personnal Call Manager.
You can delete the installation files as they are not needed by Personal Call Manager.
Starting Personal Call Manager
You can start Personal Call Manager from the shortcut icon on the desktop or from the Windows
Start button.
To start Personal Call Manager from the shortcut icon:
1 Double-click .
To start Personal Call Manager using the Start button:
1 Click the Start button, point to Programs, point to Personal Call Manager and then click
Personal Call Manager.
The Personal Call Mana ger i ntrod uction sc reen appear s bri efly. The Personal Call Manag er icon is
added to the task tray and task bar, and the Personal Call Manager window appears.
P0604633 01
Note: When you install Personal Call Manager, the shortcut icon is installed by default.
Page 13
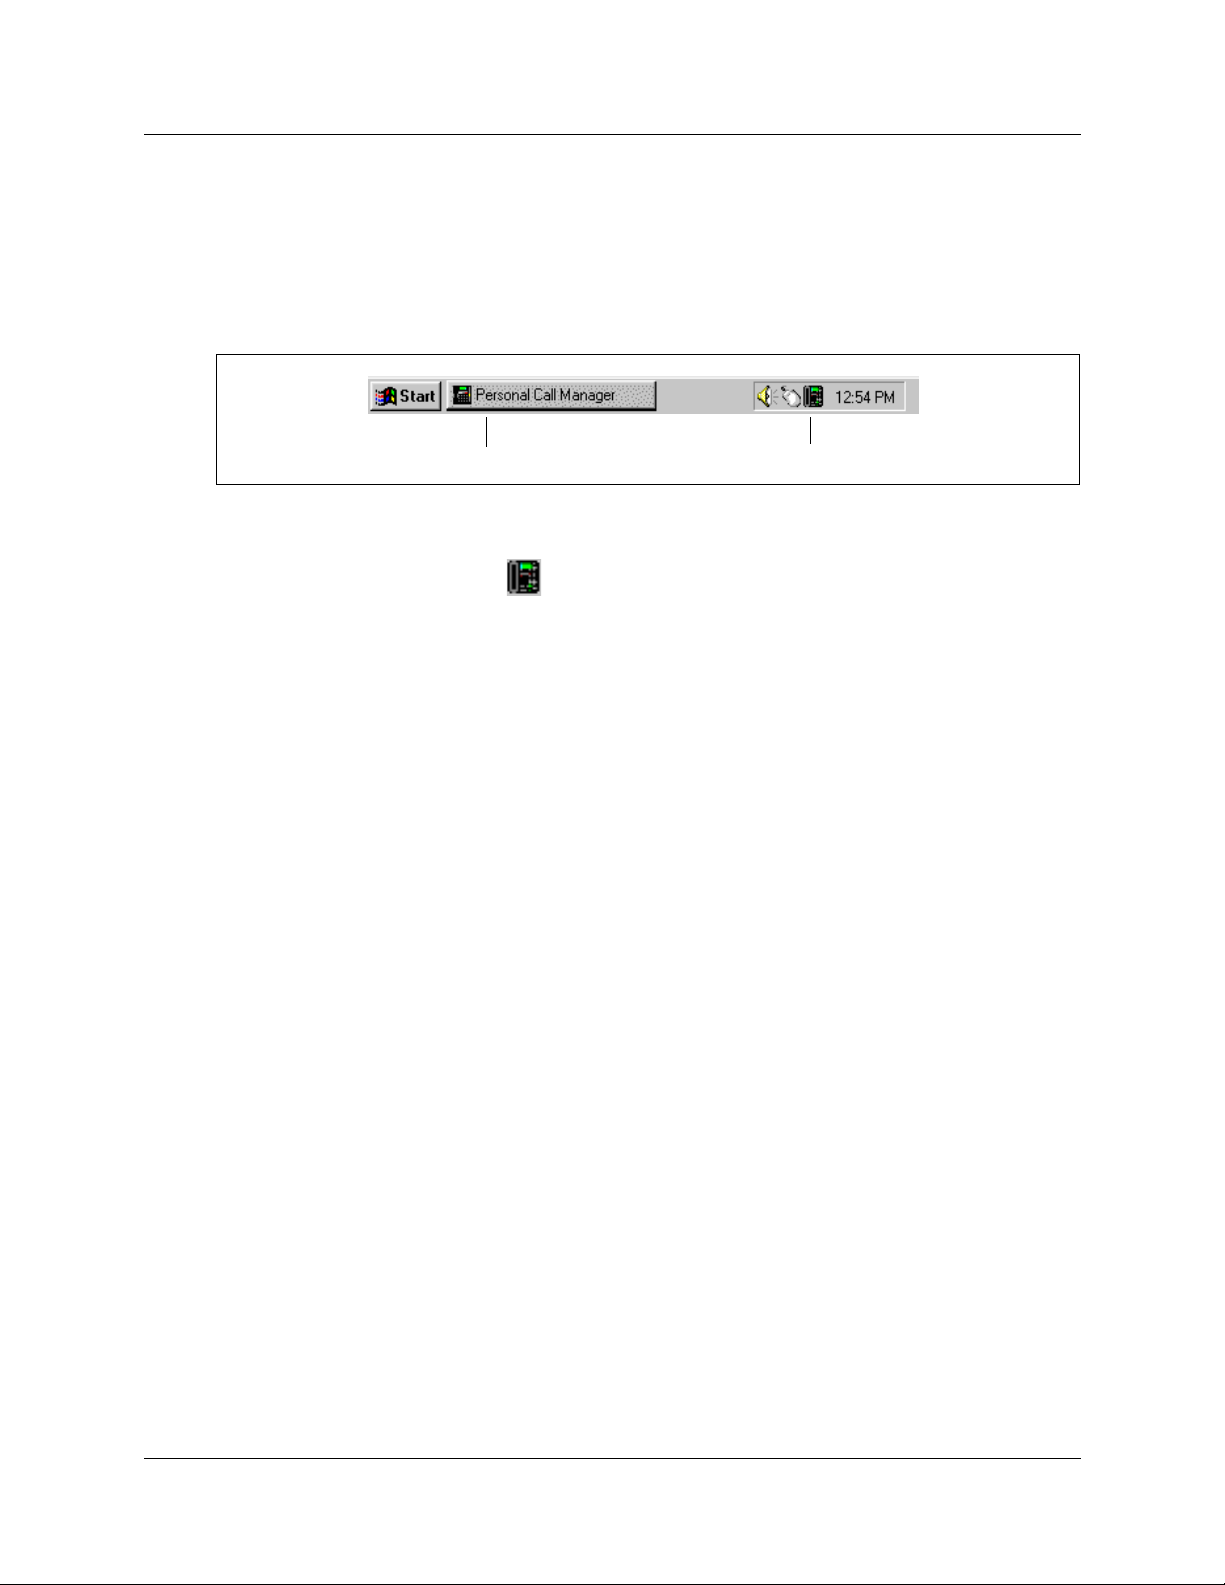
Personal Call Manager icons
When Personal Call Manager st arts up, two icons are added to the scr een : the taskbar icon and the
task tray icon. These two icons have different tasks. The taskbar icon opens the Personal Call
Manager window. The task tray icon gives you access to Personal Call Manager functions when
you are using another program. The diagram below shows where these icons are located.
Chapter 1 Personal Call Manager 13
Taskbar icon
Task tray icon
Personal Call Manager task tray icon
The Personal Call Manager icon appears on the right side of the task tray.
When you move the mouse pointer over the Personal Call Manager icon, the number of current
calls is displayed. The number displayed includes the active call, conference calls and calls on
hold.
When you right-click the Person al Cal l Manager i con, a menu a ppears that allows you to exit from
Personal Call Manager, set Personal Call Manager options, or open the Personal Call Manager
window. The Personal Call Manager window provides access to additional features such as the
Address Book.
When you click the Personal Call Manager icon, the task tray menu appears. From the task tray
menu you can perform most basi c cal l fun ctions , such as maki ng and ans wering call s, put ting calls
on hold, transferring calls and conferencing calls.
Personal Call Manager task tray menu
The Personal Call Manager t ask tra y menu is divi ded int o two main sect ions. The lower por tion of
the menu contains the following call control options:
• Callers List - a list of the telephone numbers of the last ten calls
• Redial List - a list of the last ten telephone numbers you dialed
• Quick Dials - a group of telephone numbers you want quick access to
• Transfer - allows you to transfer the active call to another telephone
• Manual Dial - allows you t o call someone by entering their telephone number on the
computer keyboard
• DND - turns the Do Not Disturb feature on or off
Business Communications Manager Personal Call Manager
Page 14
14 Chapter 1 Personal Call Manager
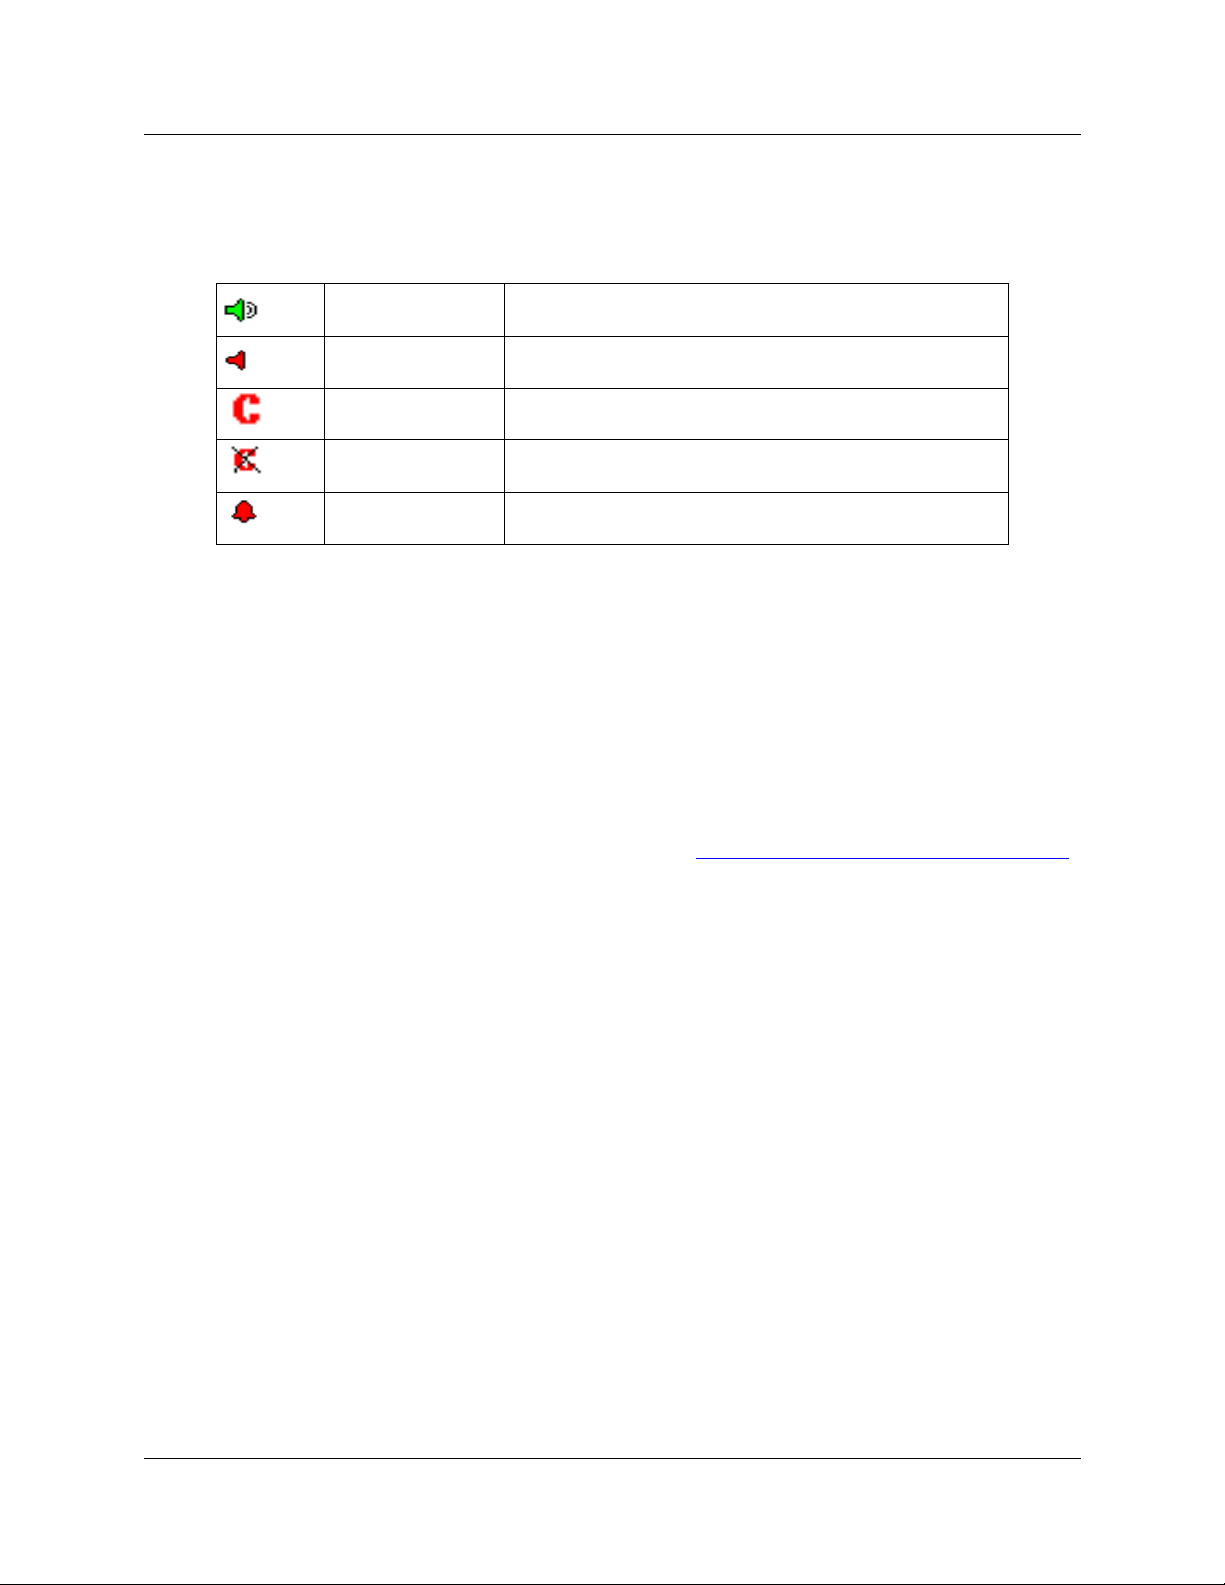
The upper portion of the menu contains the current calls. Each of these calls has an icon beside it
to indicate the status of the call. If there are currently no calls, the upper portion of the menu does
not appear.
Active Call Appears beside the call you are currently on.
Held Call Appears beside calls that are on hold. Any call that is not
active is on hold.
Conference Call Appears beside the two calls that you are connected to when
you are on a conference call.
Held Conference Appears beside conference calls that are on hold.
Ringing Appears beside calls that are ringing.
Personal Call Manager window
From the Personal Cal l Manager window you can pe rf orm all of the functi ons of t he Personal Call
Manager task tray icon as well as access the Address Book, the Help files and Personal Call
Manager setup.
Opening the window
When you start Personal Call Manager, the window appears. If you do not want the window to
appear when you start Personal Call Manager, refer to “Changing the Startup Option” on page 84
When you change this option, the window is minimized to an icon on the taskbar when you start
Personal Call Manager. You can also minimize the window at anytime by clicking the minimize
button in the top right corner of the window.
.
To maximize the window:
• click the Personal Call Manager icon in the taskbar
or
• right-cli ck the Person al Call Manag er icon in the t ask tray and cl ick Open.
P0604633 01
Page 15
Chapter 1 Personal Call Manager 15
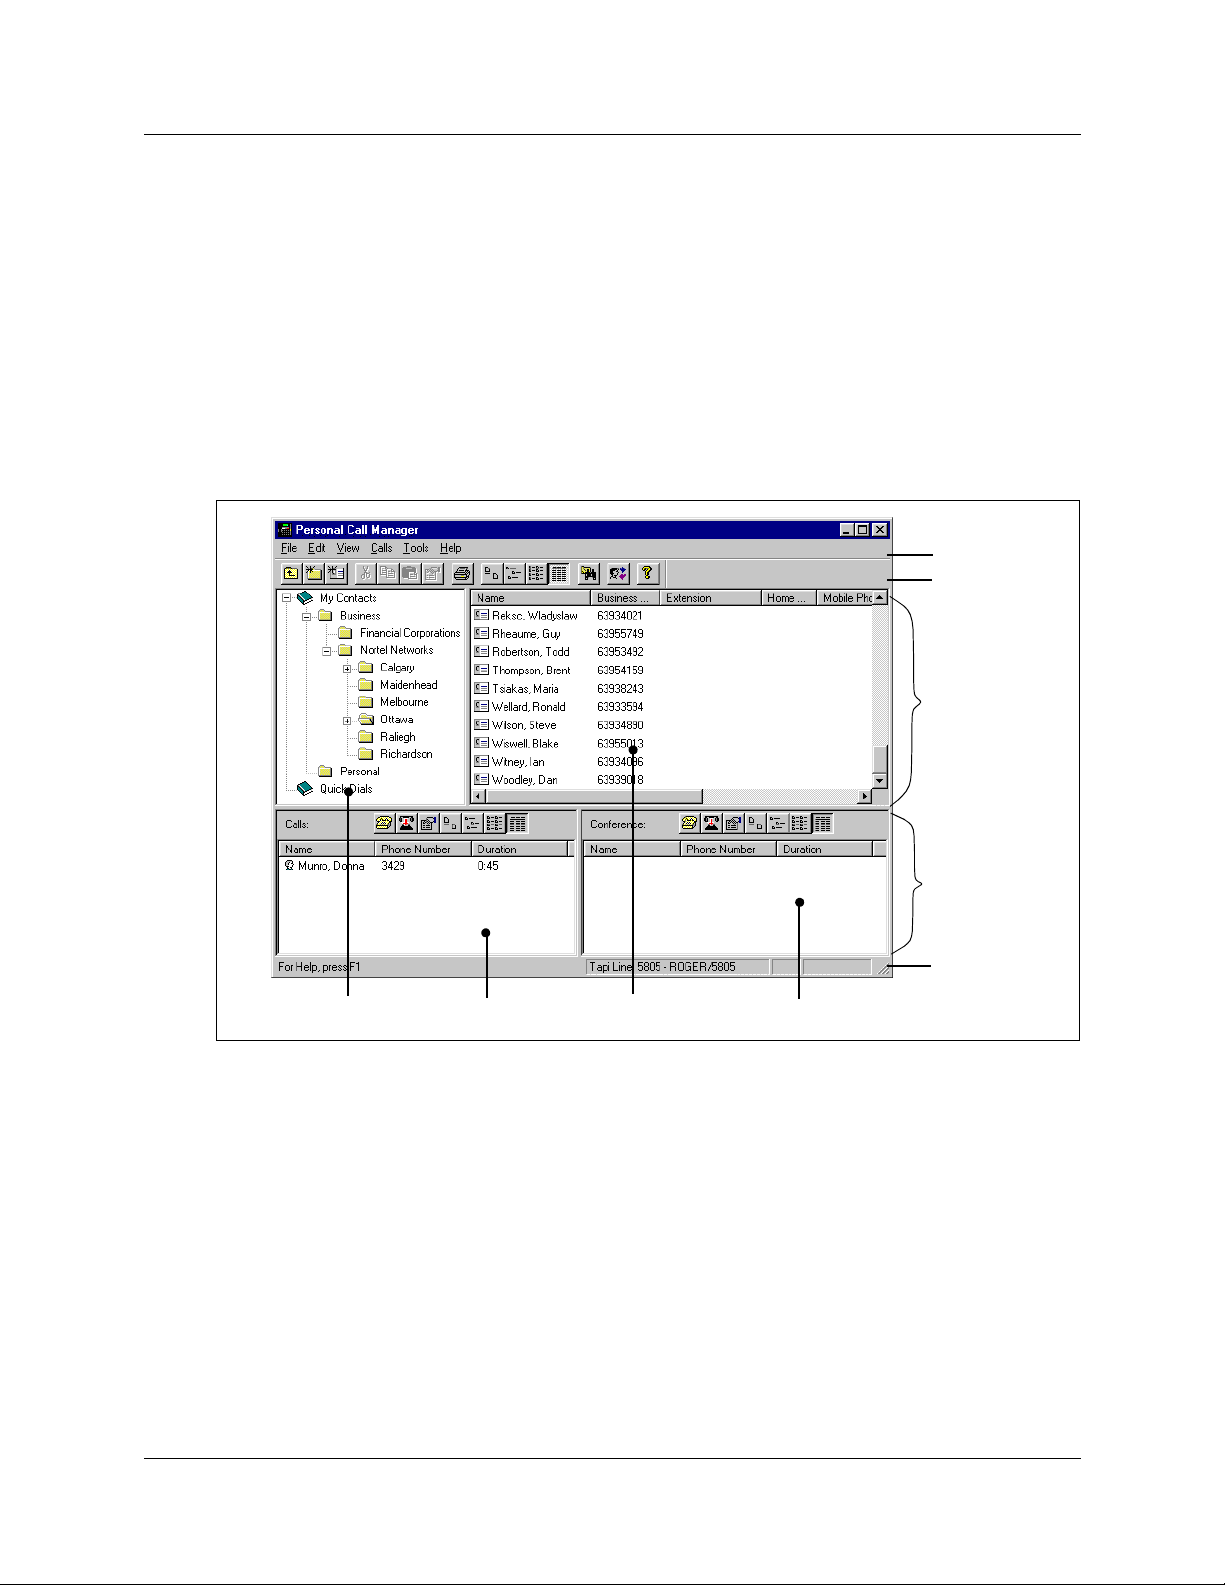
Components of the window
The Personal Call Manager window shows the following:
• the Menu bar
• the toolbar
• the address book
• the curre nt calls
• the status bar
All of these components, except the Menu bar, can be turned on or off to suit your needs.
Menu Bar
Toolbar
Address Book
Current Calls
Status Bar
Tree View List ViewCalls box Conference box
Menu bar
The Menu bar shows the menus available from the window. From these menus you can access all
of the features available from Personal Call Manager. The Menu bar is always visible on the
window.
One of the menus on the Menu bar is the Calls menu. The items on the Calls menu are identical to
the items on t he Personal Call Manager task tray menu.
Business Communications Manager Personal Call Manager
Page 16
16 Chapter 1 Personal Call Manager
Toolbar
The toolbar contains several buttons that provide quick and easy access to Personal Call Manager
functions.
Displaying the toolbar
To display the toolbar:
1 Click the View menu and then click Toolbar.
The toolbar toggles between being displayed and not being displayed. When the toolbar is set
to be displayed, 4 appears beside the Toolbar menu item in the View menu.
Using the toolbar
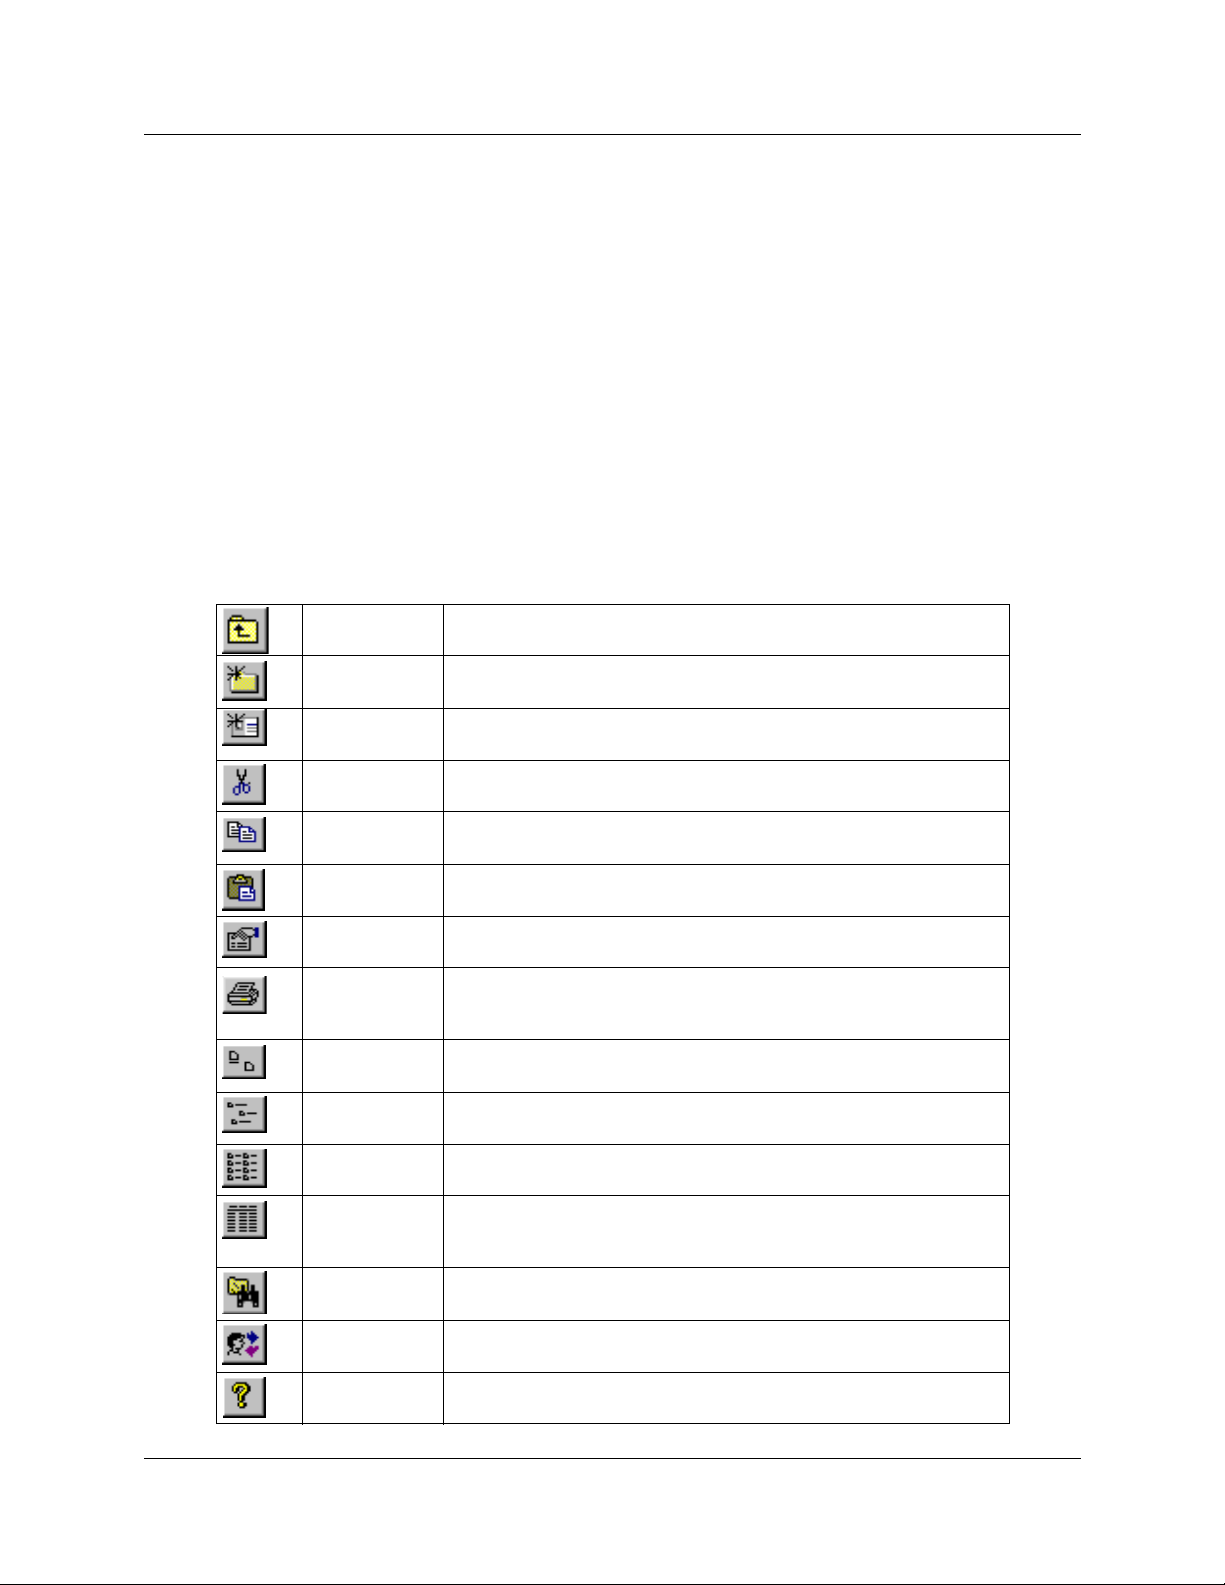
The toolbar buttons provide access to commonly used features.
Up One Lev el Exits from the current direc tory and mo ves one level up in the contact
tree.
New Folder Adds a new folder to the Address Book.
New Contact Adds a new contact to the Address Book.
Cut Copies the selected fol der or cont act onto the clipboard and de letes it.
Copy Copies the selected folder or contact onto the clipboard.
Paste Copies the folder or contact stored on the clipboard to the selected
Properties Displays the Address Properties dialog box if a contact is selected or
Print Prints information about the currently selected contact.
Large Icons Displays the folders and contacts in the Address Book in large icons.
Small Icons Displays the folders and contacts in the Address Book in small icons.
List Displays the folders and contacts in the Address Book in small icons
Detail Displays the f olders and co ntacts in the Addres s Book in a report view
Find Perso n Displays the Search dialog box. The Search dialog box is used to fin d
Calls Log Displays the Calls Log Window. This window shows all of the calls
About Displays a dialog box containing information about the Personal Call
folder.
the Folder Property dialog box if a folder is selected.
If a folde r is selec ted, p rints information about al l of t he co nta cts in the
folder.
organized in v ertical colum ns.
format. In this format the icon, first name, last name, telephone
numbers, and email information of the contact appears.
a particular contact within the Address Book.
made or received while Personal Call Manager was operating.
Manager software such as the software version.
P0604633 01
Page 17

Chapter 1 Personal Call Manager 17
Address Book
The Address Book is a list of all the contacts stored in Personal Call Manager. The Address Book
consists of two parts:
• the Tree View which shows the structure of your folders
• the List View which shows the folders and contacts stored in the currently selected folder
For more information about the Address Book, refer to “Address Book” on page 55
.
Displaying the Address Book
To display the Address Book:
1 Click the View menu and then click Only Address Book to display only the Address Book.
or
1 Click the View menu and then click Both Address Book and Calls to display both the
Address Book and the Current Calls.
The symbol • appears beside the current selection.
Current Calls
The Current Calls section of the screen shows which calls are active. The Current Calls section
consists of two parts:
• the Calls box which shows the calls that are currently on your telephone
• the Conference box which shows the conference calls that are currently on your telephone.
Displaying the Current Calls
To display the Current Calls:
1 Click the View menu and then click Only Calls to display only the Current Calls.
or
1 Click the View menu and then click Both Address Book and Calls to display both the
Address Book and the Current Calls.
The symbol • appears beside the current selection.
Business Communications Manager Personal Call Manager
Page 18
18 Chapter 1 Personal Call Manager
Current Calls icons
There are se veral icons t hat are used in the Current C alls section. Each icon is used to represent a
call. The icons also show the status of the calls.
Active Call Appears beside the call you are on.
Held Call Appears beside calls that are on hold. Any call that is not
Conference Call Appears beside the two calls that you are connected to when
Held Conference Appears beside conference calls that are on hold.
Ringing Appears beside the calls that are ringing.
active is on hold.
you are on a conference call.
Current Calls Too lbar
Above the Calls box and the Conference box are toolbars that you use to control the calls or
change how the calls are displayed.
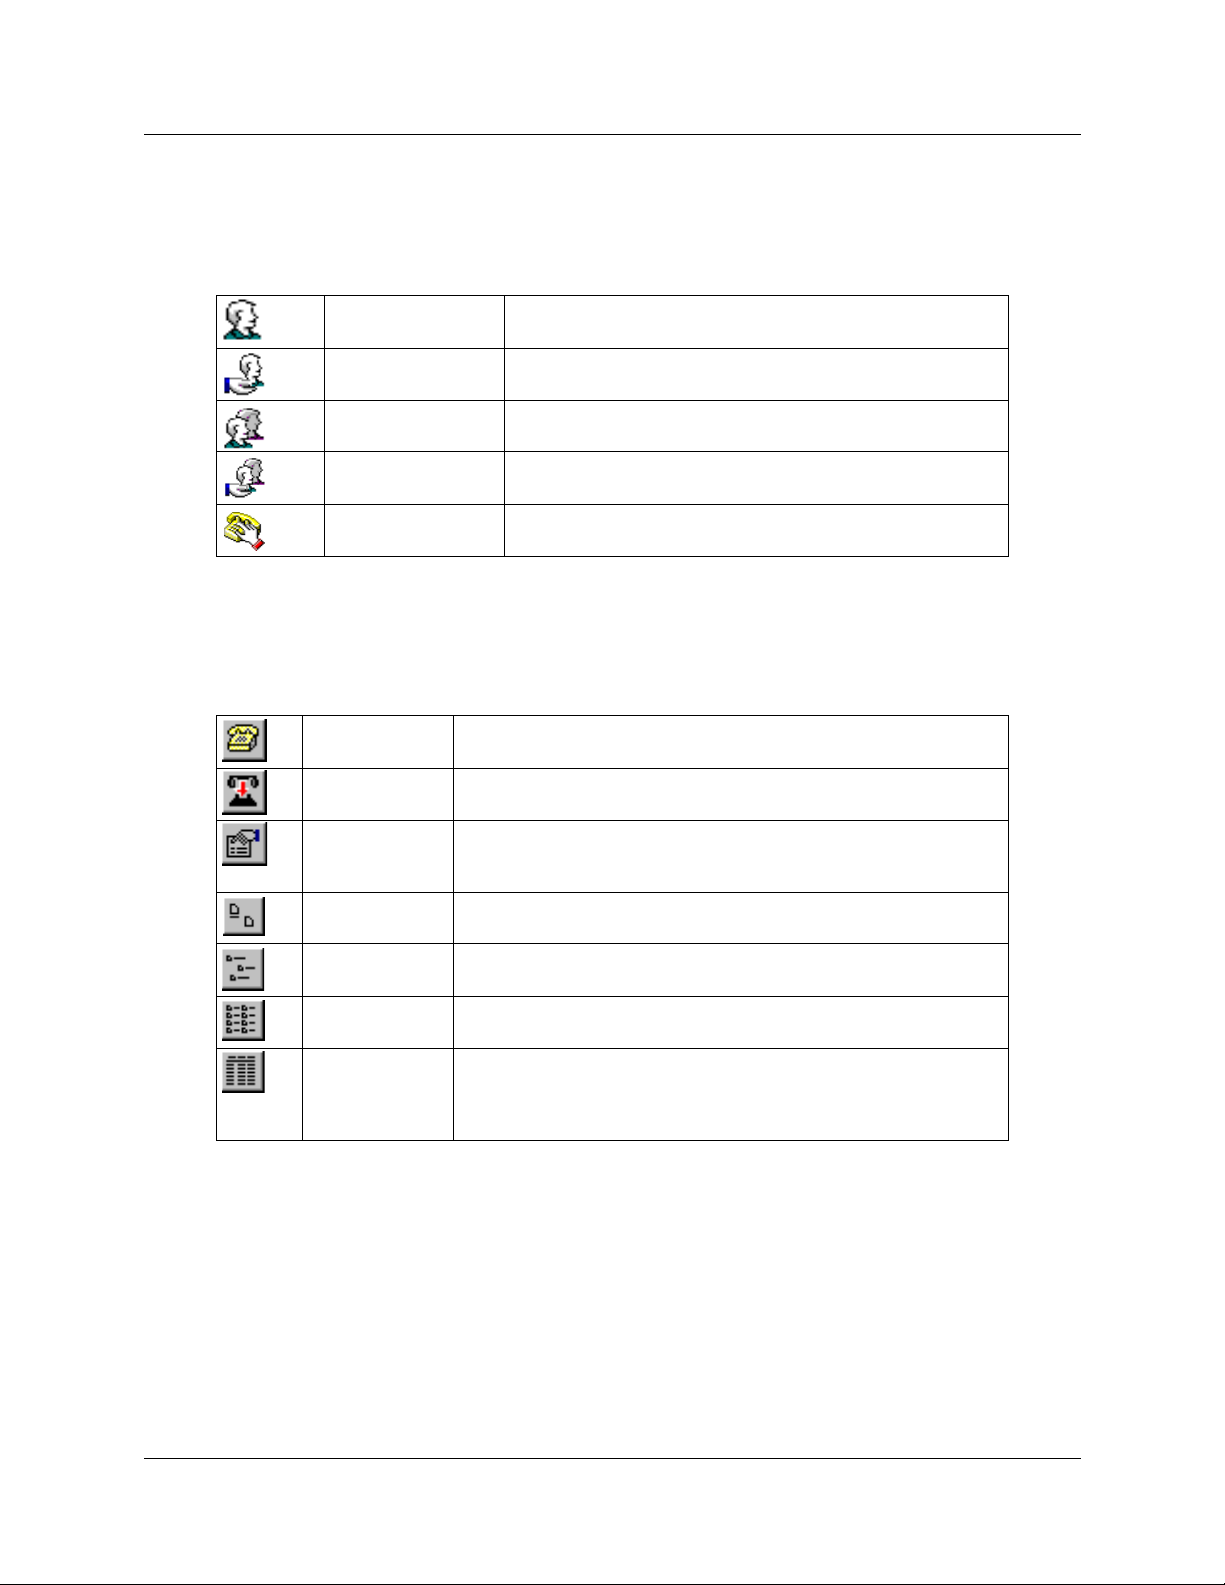
Manual Dial Displays the Dial dialog box. This dialog box allows you to call
Release Hangs up the selected call. If only there is only one call, that call is
Properties Displays the Notes tab of the Address Properties dialog box for the
Large Icons Displays the current calls or conference calls in large icons.
someone who is not in the Address Book.
automatically selected.
selected call. If the selected call is not in the Address book, a
message appears asking if you want to add this caller.
P0604633 01
Small Icons Displays the current calls or conference calls in small icons.
List Displays the current calls or conference calls in small icons
organized in v ertical colum ns.
Detail Displays the current calls or conference calls in a report view format.
In this format the icon, caller’s name, telephone number and call
duration appears. The duration is a running count of how many
minutes the call has been connected.
Page 19
Chapter 1 Personal Call Manager 19
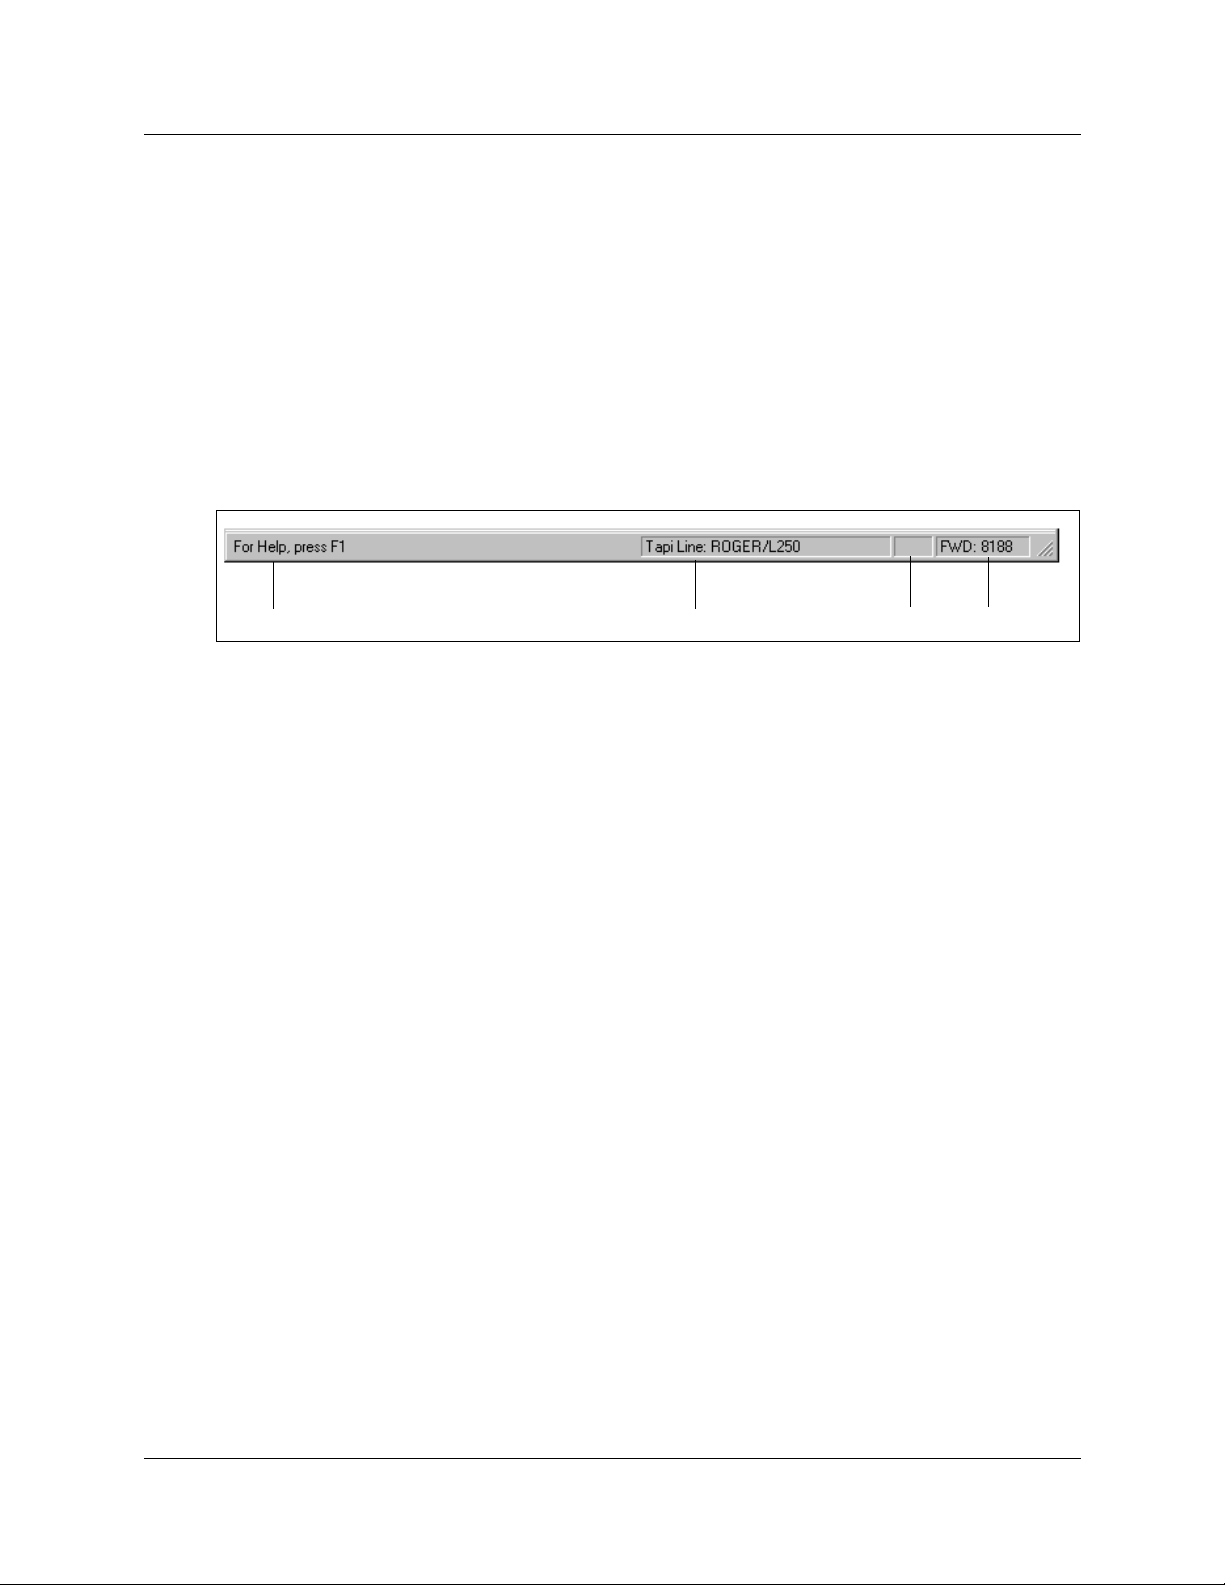
Status bar
The Status bar is at the bottom of the screen and provides four information message areas:
• Help messages – Sh ows a h elp mes sage, if a vai labl e, for the area the mouse po int er is poi nting
on. For example, if the pointer is on one of the buttons on the toolbar, the message describes
what the button does.
• Line used – Identifies which telephone line is being used by Personal Call Manager.
• DND – The acronym DND appears if the Do Not Distur b (DND) fea ture is turned on for your
telephone.
• Call Forward – Indicates if Call Forward is activated, and to which number your telephone is
call forwarded.
Help messages Line used DND Call Forward
Displaying the Status bar
To display the Status bar:
1 Click the View menu and then click Status Ba r .
The Status bar toggles between being displayed and not being displayed. When the Status bar
is set to be displayed, 4 appears beside the Status Bar menu item.
Closing the window
T o cl ose the wind ow, click the minimize button in the top ri ght cor ner of t he windo w. The window
is minimized to an icon on the taskbar.
When you close the window, call control features are still available from the Personal Call
Manager icon in the task tray.
Business Communications Manager Personal Call Manager
Page 20
20 Chapter 1 Personal Call Manager
Setting up Personal Call Manager
Before you can use Personal Call Manager you must choose the TAPI line that will be used and
define the dialing proper ti es.
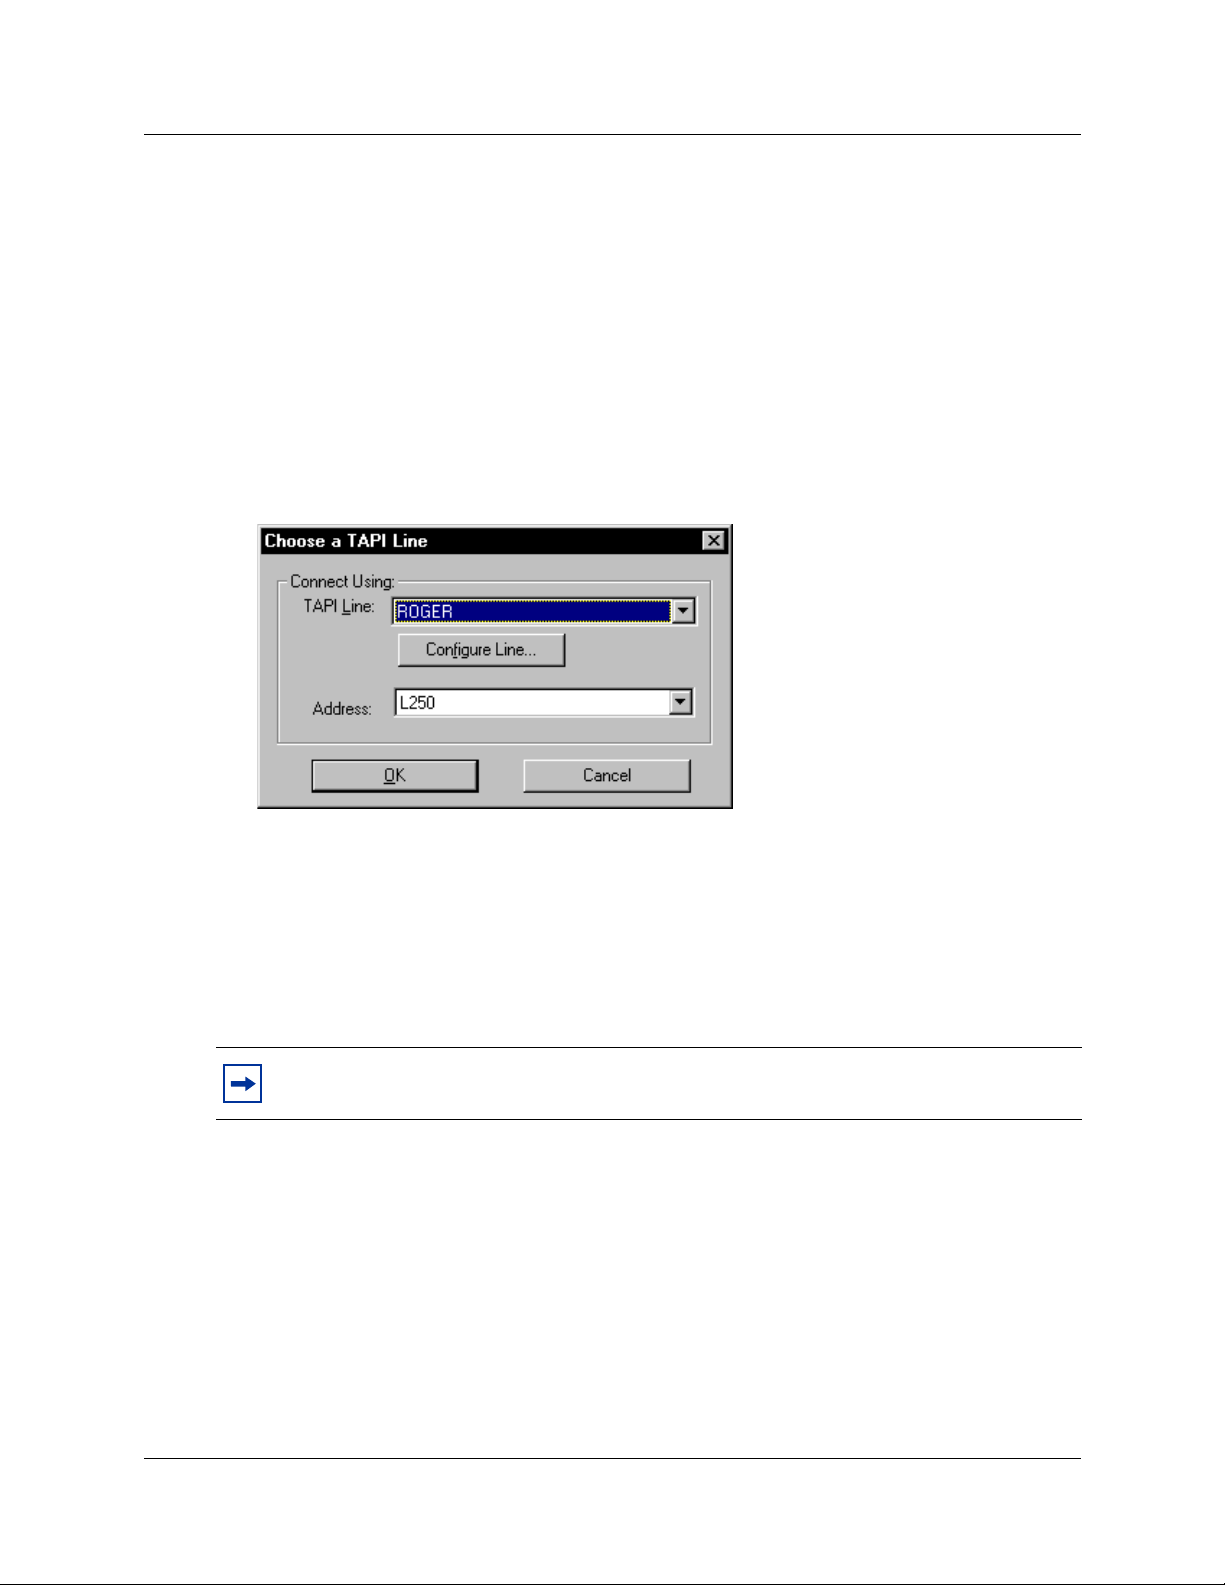
Defining the line used
If there are several lines avail able, y ou can choo se which line Pe rsonal Call Mana ger uses to make
calls. To choose a line:
1 Click the Tools menu and then click Dial Using.
The Choose a TAPI Line dialog box appears.
2 Click the TAPI Line list box.
3 Click the line Personal Call Manager uses.
4 Click the Address list box.
5 Click the address for the line you chose.
6 Click the OK button.
Note: When using the Business Communications Manager TSP, the name of the TAPI
line is the same as the extension name for your telephone.
P0604633 01
Page 21
Chapter 1 Personal Call Manager 21
Changing the dialing properties
Note: The following description and screen are samples. The screen you see displayed
will contain similar informati on but the presen tation may v ary dependi ng on the ver sion of
the Windows operating system you are using. Refer to the Windows documentation that
came with your system f or further specification s.
You use the Dialing Properties to define where you are situated and what is required to dial from
this location. To access dialing properties:
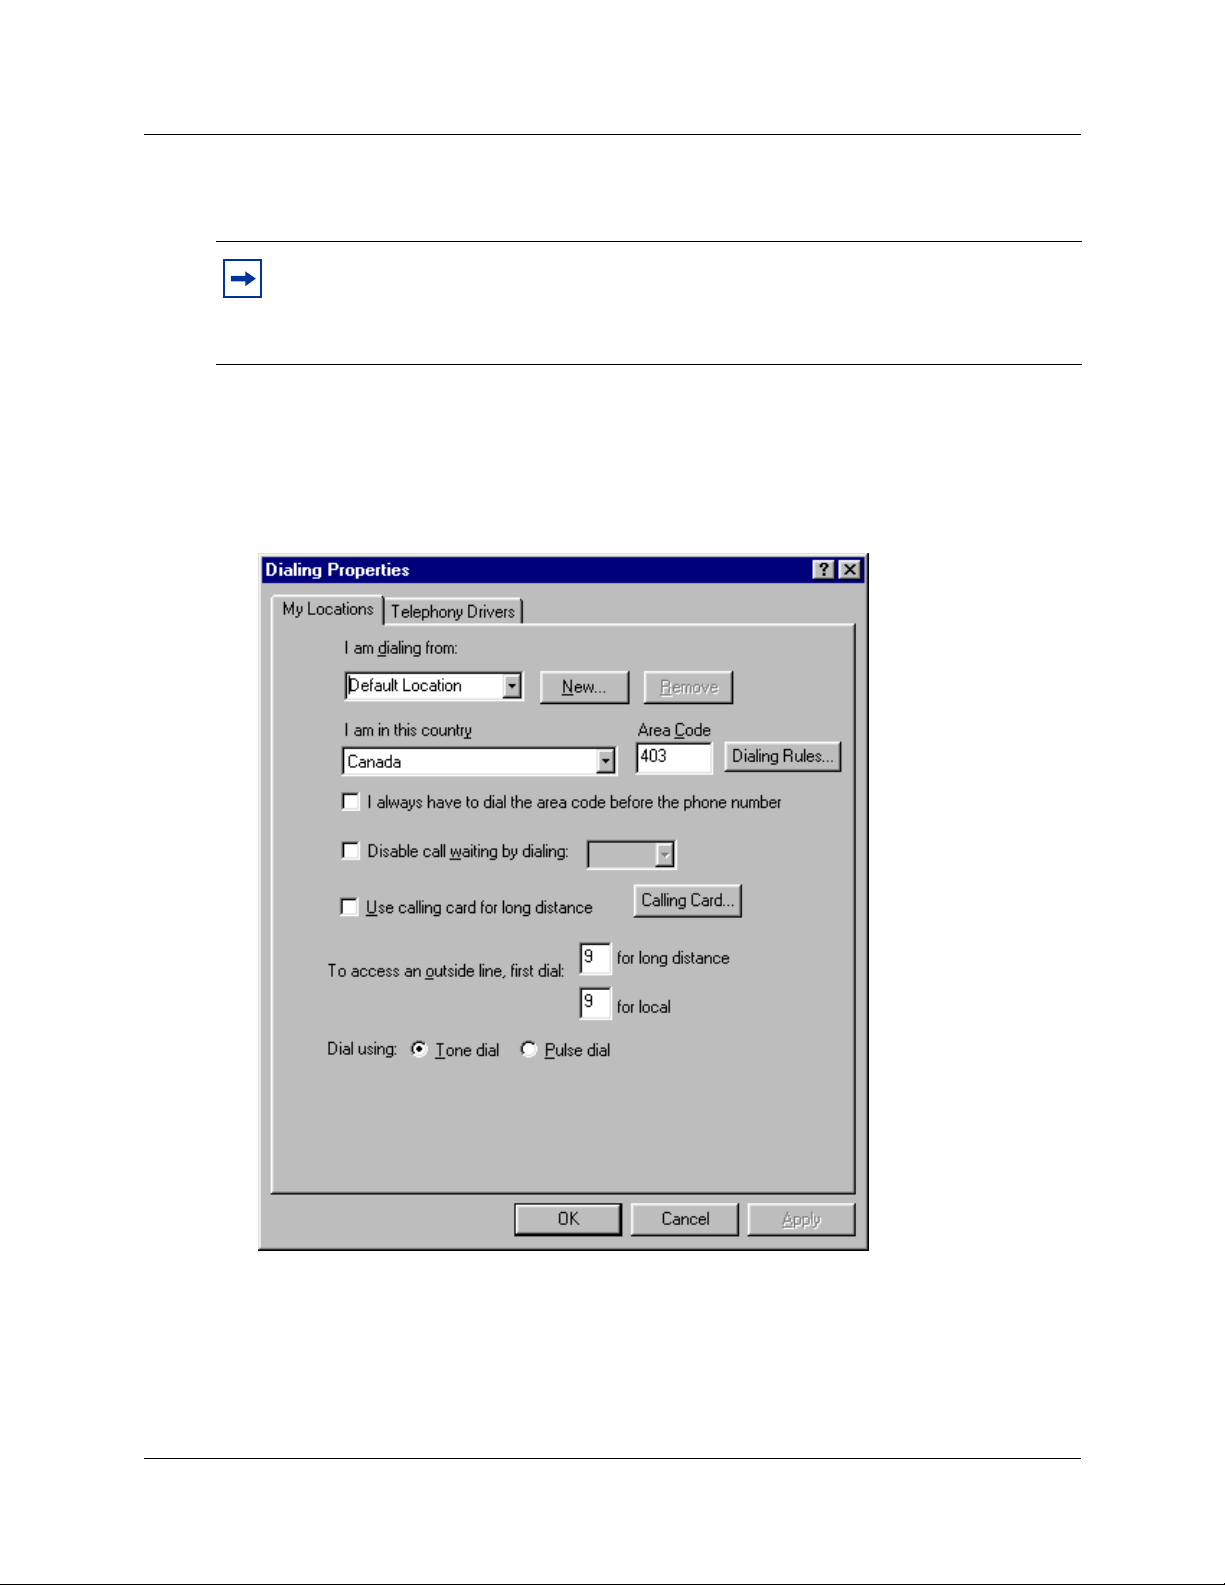
1 Click the Tools menu and then click Dialing Properties.
The Dialing Properties dialog box appears.
Business Communications Manager Personal Call Manager
Page 22

22 Chapter 1 Personal Call Manager
From the Dialing Properties dialog box you can control these options:
• the location you are dialing from (I am dialing from)
• the country you are in (I am in this country)
• the area code you are dialing from (Area Code)
• if you are using a calling card (Use a calling card for long distance)
• the number used to disable Call Waiting (Disable call waiting by dialing)
• access to lines (To access an outside lines)
• the type of dialing system (Dial using)
I am dialing from
Use the I am dialing from list box to save different sets of dialing properties. You can use I am
dialing from when you have a computer (such as a laptop) that you use at different locations. You
can save the settings for the different locations under different names in the I am dialing from list
box. You can then quickly change to the new settings when you switch locations.
For example, you can ha ve a laptop computer that you use at both the nor th and south locations. If
the north and south locati ons have different dialing requirements (suc h as ca ll wait ing in the north
but not in the south ), you can s et up t wo dif f erent sets of d iali ng pro per ties in t he I am dia ling from
list box. Then, when you switch locations, you can change the dialing properties by changing the
name that appears in the I am dialing from list box.
Creating a new location
When you create a new location, you are creating the name that is used to access the new set of
dialing properties. After you create the location, any changes made to Dialing Properties dialog
box are saved with this name.
To create a new location:
1 Click the New button.
A dialog box appears confirming that a new location was created.
2 Select the text in the I am dialing from list box.
3 Type the name of the new location.
4 Change the other parameters on the Dialing Properties dialog box to match the dialing
properties required for this location.
These fields are described later in this section.
5 Click the Apply button to store the changes with the new location.
P0604633 01
Page 23

Chapter 1 Personal Call Manager 23
Selecting a location
When you select a location, all of the dialing properties are changed to the settings that are stored
for that location.
To select a location:
1 Click the button in the I am dialing from list box.
A list of locations appears.
2 Click the location you are currently at.
The dialing properties are changed to the setting stored for this location.
Deleting a location
When you no longer need a location, you can delete it from the list of locations.
To delete a location:
1 Click the button in the I am dialing from list box.
The list of locations appears.
2 Click the location you want to delete.
3 Click the Remove button.
A confirm deletion dialog box appears.
4 Click the Yes button.
I am in this country
This field defines the country of the you are currently in.
To select a country:
1 Click the I am in this country list box.
2 Scroll through the list of countries.
3 Click the country you are in.
Note: You can scroll quickly t hr ough t he list of countries by t yping the first few lett er s of
the country’s name. As you type, the list finds the country that matches the letters you
type.
Business Communications Manager Personal Call Manager
Page 24
24 Chapter 1 Personal Call Manager
Area Code
The Area Code box defines the area code you are currently in. Personal Call Manager uses the
number in this field to determine if a call is a local call (to the sa me area code ) or a long distance
call.
To enter an area code:
1 Select the characters in the Area Code box and type the area code.
In some locations, the area code must al ways be adde d when dial ing a tel ephone nu mber. To make
Personal Call Manager include the area code, select the I always have to dial the area code
before the phone number check box.
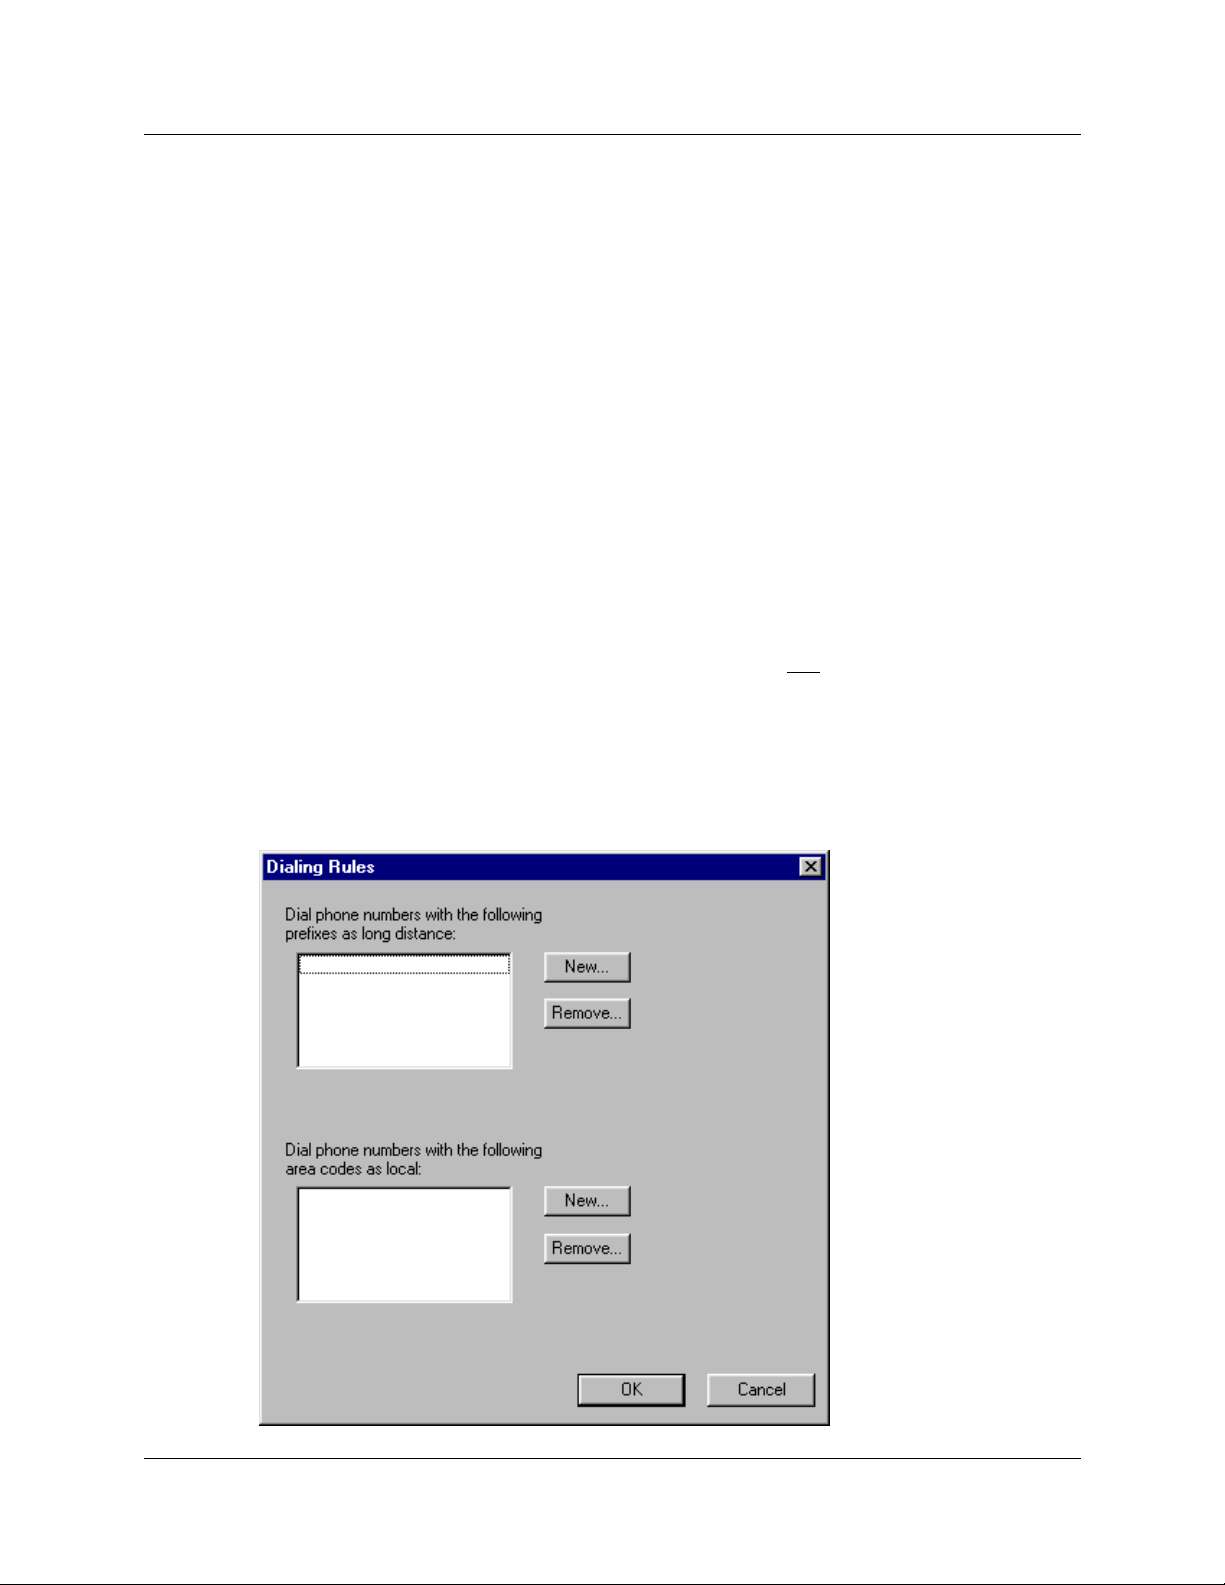
Dialing Rules
In some locations, calls within the same area code are considered long distance calls. These calls
require the country code and area code (e.g. 1-403) to be added to the front of the telephone
number before they are dialed.
The Dialing Rules feature allows you to define the prefixes (e.g. 222
calls in your area code.
To set the prefixes that are long distance:
1 Click the Dialing Rules button.
The Dialing Rules dialog box appears.
-xxxx) that are long distance
P0604633 01
Page 25

Chapter 1 Personal Call Manager 25
To add a prefix that is considered long distance
1 Click the New button located in the top half of the dialog box.
The New Area Code and Prefix dialog box appears.
2 Type the prefix and click the OK button.
To delete a prefix that is considered long distance
1 Click the prefix you want to delete.
2 Click the Remove button.
To add a prefix that is considered local
1 Click the New button located in the bottom half of the dialog box.
The New Area Code and Prefix dialog box appears.
2 Type the prefix and click the OK button.
To delete a prefix that is considered local
1 Click the prefix you want to delete.
2 Click the Remove button.
Use a calling card for long distance
Select this check box if you want to use a calling card for long distance telephone numbers. The
Calling Card button lets you define which calling card you are using.
To use a calling card:
1 Select the Use calling car d for long distance check box.
If you have previously set up a calling card, the settings for that calling card are used.
If you have not set up a calling card, refer to “Setting up a calling card”.
To stop using a calling card:
1 Clear the Use calling card for long distance check box.
Business Communications Manager Personal Call Manager
Page 26
26 Chapter 1 Personal Call Manager
Setting up a calling card
You must set up the calling card parameters before you can use a calling card. To set up a calling
card:
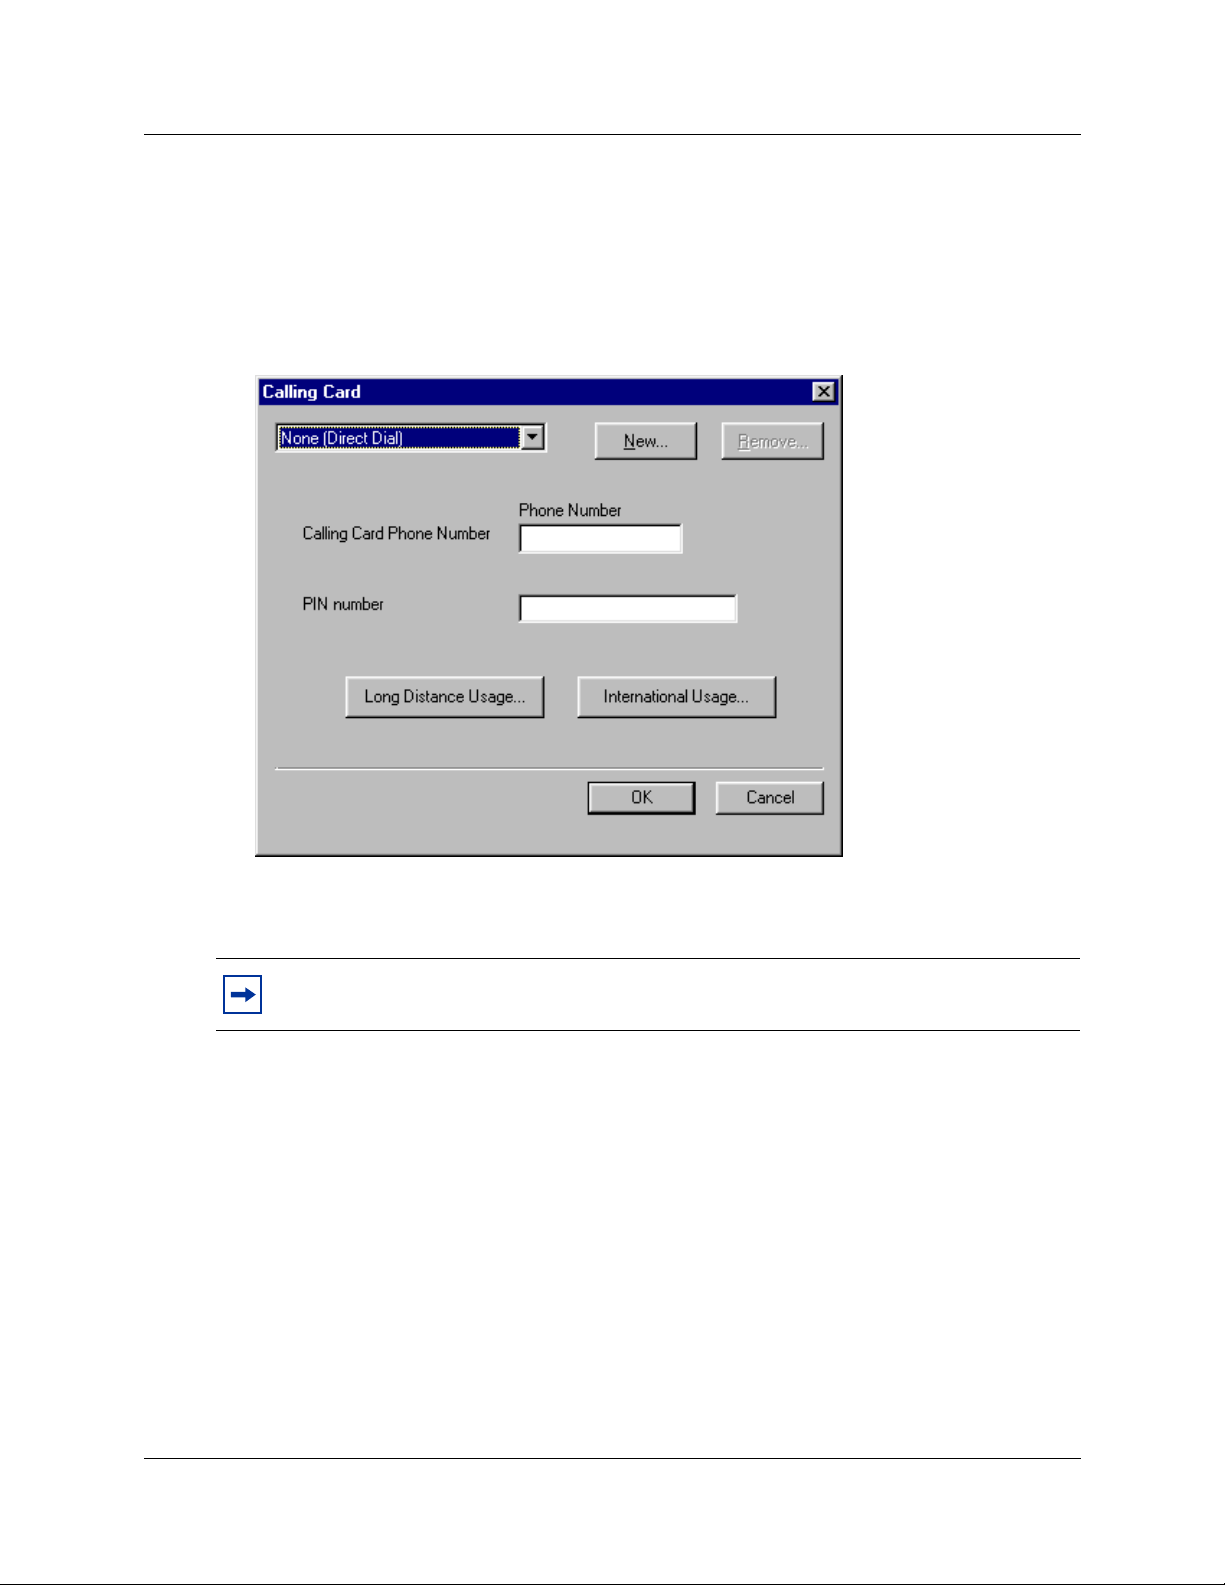
1 Click the Calling Card button.
The Calling Card dialog box appears.
2 Click the list box at the top of the dialog box.
3 Scroll through the list to find the calling card you are using and then click the calling card.
Note: If the callin g card you are us ing is not on thi s list, re fer to “Addin g a cust om cal ling
card” on page 26.
4 In the Calling Card Phone Number box, type the calling card telephone number.
5 In the PIN number box, type the calling card PIN number.
6 Click the OK button.
Adding a custom calling card
The dialing parameters for some calling cards are already configured in Personal Call Manager
and appear in the list of calling cards. If the calling card you are using is not on the list of cards,
you must set up how to use your calling card.
To add a custom calling card:
1 Click the Calling Card button.
The Calling Card dialog box appears.
P0604633 01
Page 27
Chapter 1 Personal Call Manager 27
2 Click the New button.
The Create New Calling Card dialog box appears.
3 Type the name of the calling card and click the OK button.
A message appears informing you that you must set up the dialing rules for the new calling
card.
4 Click the OK button.
5 In the Calling Card Phone Number box, type the calling card number.
6 In the PIN number box, type your calling card PIN number.
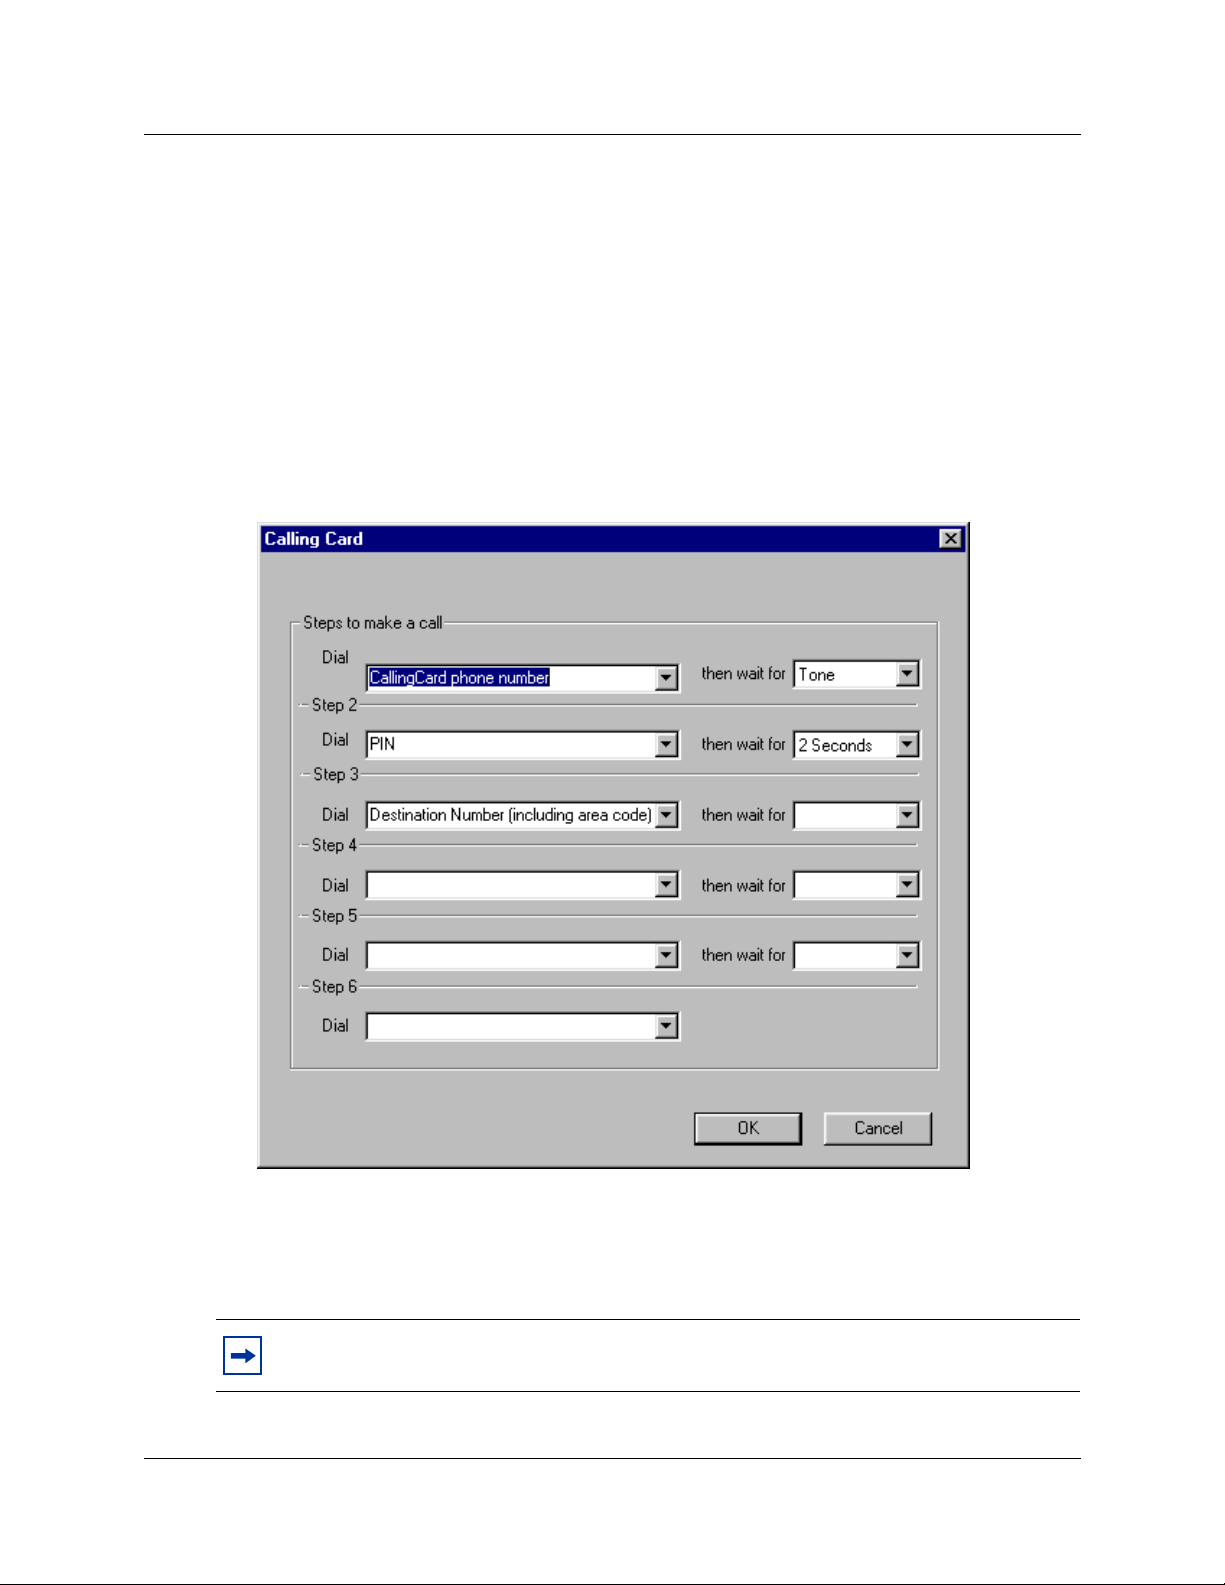
7 Click the Long Distance Usage button.
A second Calling Card dialog box appears.
8 Click the first Dial list box and then click the first set of numbers that must be dialed.
9 Click the next Dial list box and then click the next set of numbers to be dialed.
Repeat step 9 until you have completed all of the steps needed to make a call using your
calling card.
Note: Refer to the documentation that came with your calling card for the sequence of
steps that are required with your card.
Business Communications Manager Personal Call Manager
Page 28

28 Chapter 1 Personal Call Manager
10 When all of the required steps are added, click the OK button.
11 Click the International Usage button.
12 Repeat steps 8 to 11 to add the step s required to make an international cal l.
13 Click the OK button to return to the Dialing Pr oper ti es dialog box.
Disable call waiting by dialing
If call waiting is availab le for the curre nt location, use this field to define the numbers requi r ed to
disable call waiting. Your telephony application uses these numbers to disable call waiting when
required.
To enter the numbers required to disable call waiting:
1 Select the Disable call waiting by dialing check box.
2 From the Disable call waiting by dialing list box select the appropriate disable call waiting
code.
If the appropriate code does not appear in the list, type the disable call waiting code in the list
box.
To identify that call waiting is not used, clear the Disable call waiting by d ialing check box.
To access outside lines
There are two boxes for accessing outside lines. The first box is for the digits required to access
local numbers and the second box is for the digits required to access long distance lines. These
access numbers are required if you are using a line pool or call routing to make calls. These
numbers are the same numbers you dial if you are making an outside call from your telephone.
If you do not dial an extra number (e.g. 9) when making a call from your telephone, leave these
boxes blank.
To change the outside line access numbers:
1 In the for long distance box, type the number required to access an outside line for a long
distance call.
2 In the for local box, type the number required to access an outside line for a local call.
Dial using
Use these options to choose tone dialing signals or pulse dialing signals when making a call. To
select pulse dialing, click the Pulse dial option. To select tone dialing, click the To ne dial option.
P0604633 01
Page 29
Chapter 1 Personal Call Manager 29
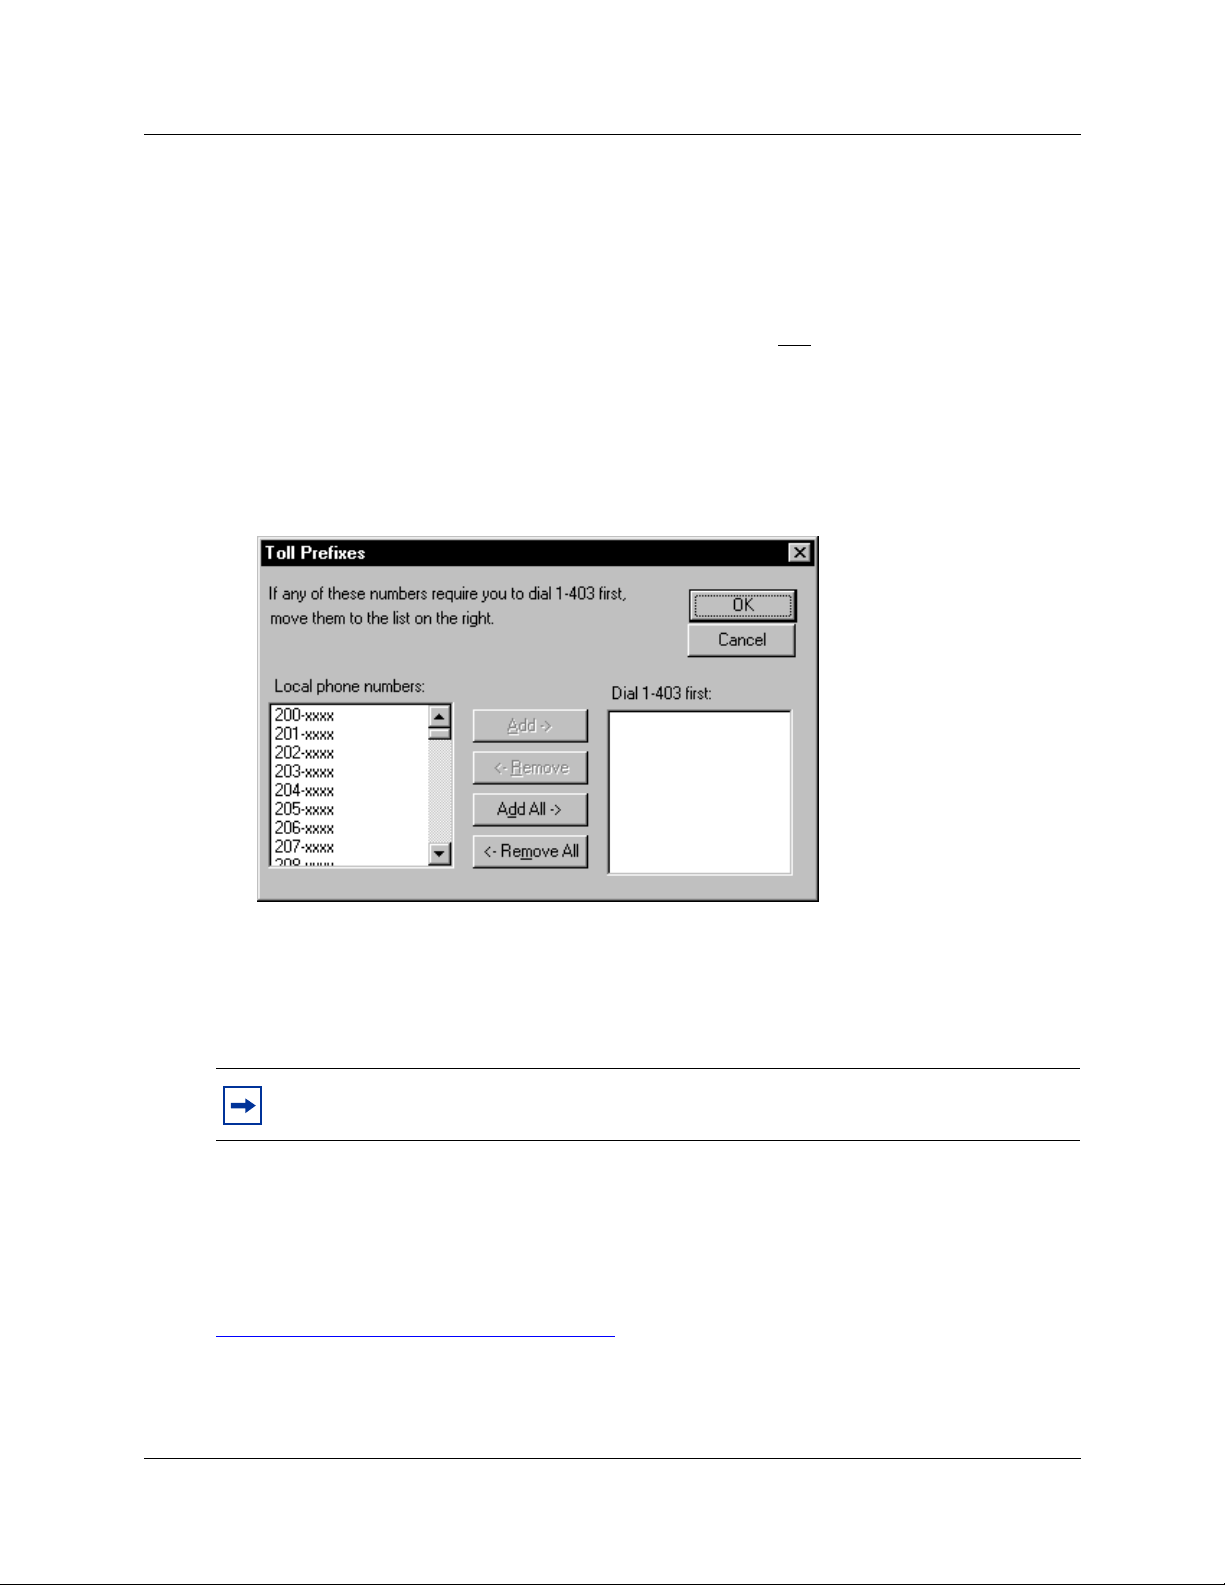
Defining long distance numbers in your area code
In some locations, calls within the same area code are considered long distance calls. These calls
require the country code and area code (e.g. 1-403) to be added to the front of the telephone
number before they can be dialed.
The Toll Prefixes feature allows you to define the prefixes (e.g. 222
calls in your area code.
To define toll prefixes:
1 Click the Tools menu and then click Toll Prefixes.
The Toll Prefixes dialog box appears.
-xxxx) that are long distance
2 From the list of prefixes in the Local phone numbers select the prefix that requires an area
code added.
3 Click the Add-> button.
4 Repeat steps 3 and 4 for each prefix that requires an area code added.
Note: If you add a prefix to the Dial fi rst list that do es not require an area co de, remove it
by clicking the prefix and clicking the <-Remove button.
5 When you have finished moving all of the prefixes that require an area code, click the OK
button.
The Toll Prefixes dialog box closes.
The Toll Prefixes feature is available only if the country you choose in the Dialing Properties
dialog box has a country code of 1. For more information about dialing properties, refer to
“Changing the dialing properties” on page 21
Business Communications Manager Personal Call Manager
.
Page 30

30 Chapter 1 Personal Call Manager
Making a call
Using Personal Call Manager, you can make a call using the Calls menu, the Personal Call
Manager task tray menu, the toolbar, or the Address Book. When you make a call, the Ringing
icon appears in the Calls box, the Personal Call Manager task tray menu and the Calls menu. When
the call is an swered, the icon changes to the Active Call icon. Bo th the Ringing and the Active
icons have a label that is used to identify the call.
If you make a call using the Address Book, the name in the Address Book is used as the label for
the call.
If you manually dial th e t el ephone number, Personal Call Manager c o mpar es the numbe r dialed to
the numbers stored in the Address Book. If a match is found, the name from the Address Book is
used as the label. If no match is found, the number dialed is used as the label.
Making a call using the Address Book
Before you can call a number from the Address Book, you must add the number to the Address
Book. For more information about adding numbers to the Address Book, refer to “Adding a new
contact to the Address Book” on page 57.
To make a call using the right mouse button:
1 Look in the Address Book to find the icon of the person you want to call.
2 Right-click the icon. Point to Dial and click the telephone number you want to dial for the
person (e.g. the contact’s Business number).
You can use the drag and drop feature to make a call. To make a call using the drag and drop
method:
1 Look in the Address Book to find the icon of the person you want to call.
2 Use the right mouse but t on to drag the icon into the Calls box.
3 Click the telephone number you want to dial for the person (e.g. the contact’s Business
number).
To call the prime telephone number using the Address Book:
1 Look in the Address Book to find the icon of the person you want to call.
2 Make the call by double-clicking on the icon or dragging the icon to the Calls box.
Note: When you add a contact, you define one of the telephone numbers as the prime
number.
P0604633 01
Page 31

Chapter 1 Personal Call Manager 31
Making a call using the task tray or Calls menu
To make a call:
1 Click the Personal Cal l M an age r t ask tray icon or the Calls menu and then click Ma nual Dial .
The Dial dialog box appears.
2 Type the telephone number you want to dial.
If you have the Search Option set to Fast Search, Per sonal Call Manage r compares the number
you are entering to the contacts stored in the Address Book. Any contacts that match the
numbers you are e nteri ng appe ar i n th e bot tom of the dia log bo x. To dial one of these contac ts,
click the contact you want to call. The default number appears in the Phone Number Type list
box. To choose a different number, from the Phone Number Type list box select Business,
Home, or Mobile.
3 Click the Dial button.
If you want to ca ll a co ntact i n the Add ress Book and you r emember only t he c ontact ’s name, enter
the contact’s name in the Enter Phone Number or Name box. If you are using Fast Search, any
contacts that match the name you are entering appear in the bottom of the dialog box. If you are
using Slow Search you must click the Find Now button to find the contacts.
For more information about Search Options, refer to “Changing the Search preferences” on page
83.
You can open the Dial dialog box using two other methods:
1 Press the F3 key.
or
1 Click the Personal Call Manager task tray icon or the Calls menu, point to Quick Dials and
then click Other.
Business Communications Manager Personal Call Manager
Page 32

32 Chapter 1 Personal Call Manager
Making a call using the toolbar
To make a call using the toolbar:
1 Click .
The Dial dialog box appears.
2 Enter the telephone number you want to dial.
If you have the Search Option set to Fast Search, Per sonal Call Manage r compares the number
you are entering to the contacts stored in the Address Book. Any contacts that match the
number you are entering appear in the bot tom of the dialog box. To dial one of these contacts,
click the contact you wan t to call. The defau lt number app ears in th e Phone Number Type list
box. To choose a different number, from the Phone Number Type list box select Business,
Home, or Mobile.
3 Click the Dial button.
If you want to ca ll a co ntact i n the Add ress Book and you r emember only t he c ontact ’s name, enter
the contact’s name. If you are using Fast Sear ch, any contacts that matc h the name you are ent ering
appear in the bottom of the d ialog bo x. If you ar e using Slow Searc h you must cl ick th e Find Now
button to find the contacts.
For more information about Search Options, refer to “Changing the Search preferences” on page
83.
You can open the Dial dialog box using two other methods:
1 Press the F3 key.
or
1 Click the Personal Call Manager task tray icon or the Calls menu, point to Quick Dials and
then click Other.
P0604633 01
Page 33

Chapter 1 Personal Call Manager 33
Redialing a number
Personal Call Manager keeps a list of the last ten telephone numbers you called. The most recent
call is at the top of the lis t and the oldest call is at the bottom. When there are ten calls on the list
and you make another ca ll , t he ne w cal l is added to the top of th e l ist and the oldest call is d eleted.
If you call a number that is on the list, the number does not appear on the list a second time. The
number is moved from its previous location to the top of the list.
To redial one of the last ten telephone numbers:
1 Click the Personal Call Manager icon on the taskbar or the Calls menu and then point to
Redial List.
2 Click the number you want to redial.
Returning a call
Personal Call Manager kee ps a li st of t he tel eph one number s of th e last ten peo ple who ca ll ed you.
The Callers List shows both the calls you answered and the calls you were unable to answer. You
can use this list to return the calls.
The calls on the Cal lers List are nu mber ed from on e to te n. Call number one is th e most re cen t call
and is stored at the top of the list. Call number ten is the oldest call and is stored at the bottom of
the list. When there are ten calls on the list and you receive another call, the new call is added to
the top of the list and the oldest call is deleted. If you receive a call from a number that is on the
list, the number does not appe ar on the lis t t wice . The numbe r is moved from its previous locati on
to the top of the list.
Telephone numbers appear on the Callers List if:
• you subscribe to a Cal ler ID (CLID) service.
or
• you receive an internal call through Business Communications Manager.
To return a call:
1 Click the Personal Call Manager task tray icon or the Calls menu and then point to Callers
List.
2 Click the number of the person you want to call.
Business Communications Manager Personal Call Manager
Page 34

34 Chapter 1 Personal Call Manager
Calling from the Quick Dial list
Before you can call a number from the Quick Dial list, you must add the number to the Quick
Dials. For more information about Quick Dials, refer to “Quick Dials” on page 80
To call one of the numbers from the Quick Dial list using the Address Book:
1 Click the Quick Dials icon in the Tree View portion of the Address Book.
The icons of all the Quick Dials appear in the List View of the Address Book.
2 Drag the icon of the contact you want to call into the Calls box.
To call one of the numbers from the Quick Dial list using the Personal Call Manager task tray or
Calls menu:
1 Click the Personal Call Manager task tray icon or the Calls menu and then point to Quick
Dials.
2 Click the icon of the person you want to call.
.
P0604633 01
Page 35

Answering a call
Knowing when someone is calling
Personal Call Manager notifies you when there is an incoming call. When someone calls you, the
You Have a New Call dialog box appears, and the Ringing icon appears in the Calls box, the
Personal Call Manager ta sk t ra y menu and the Calls menu. If you s ubs cri be to a Call er ID service,
or you are receiving an internal call through Business Communications Manager, the name or
number of the caller appears below the icon and in the You Have a New Call dialog box.
Knowing who is calling
When a call is made or received, an icon appears in the Calls box, Calls menu, and Personal Call
Manager task tray menu. These icons are given a label to help identify who is on the call. The
information on the label depends on several factors.
If you subscribe to a Call er ID service, Personal Call Manager compares the received number to
the numbers stored in the Address Book. If a match is found, the name from the Address Book
appears with the Active Call icon. If a match is not found, the name sent with the Caller ID
information appear s. If a match is not f ound and a na me is not sent wit h the Cal ler I D informa tion,
the telephone number appears.
Chapter 1 Personal Call Manager 35
If no Caller ID informatio n is availab le, or you do not su bscribe to this servi ce, the word Unknown
is used as the label.
Internal calls show the name of the contact stored in the Address Book if available. When there is
no name for the caller in the Address Book, the Business Communications Manager extension
name appears.
Displaying who is calling from the task tray
When you click the Personal Call Mana ger ic on in th e ta sk tray, the current calls appear s at t he top
of the menu. If you subscribe to a Caller ID service or you are receiving an internal call through
Business Communications Manager, the name or number of the caller appears beside the icon. To
perform a function on one of the current calls, point at the name or number of the caller and a
menu appears.
Business Communications Manager Personal Call Manager
Page 36

36 Chapter 1 Personal Call Manager
Answering a call using the You Have a New Call dialog box
Personal Call Manager displays the You Have a New Call dialog box when you receive a call.
If you subscribe to Caller ID services, information about the caller appears in the You Have a New
Call dialog box.
Table 1 You Have a New Call descriptions
Heading Description
From If the caller is one of the c ont ac ts in your Address Book, the name and telephone numbe r you
Type A short description of how the call was routed to your extension. The type can be:
Dept If the caller is one of the contacts in your Address Book, the Department name you assigned
Company If the caller is one of the contacts in your Address Book, the Company name you assigned to
assigned to this contact in your Address Book appears in this box.
If the caller is not one of your contacts, the name and/or telephone number supplied by the
Caller ID service appears in this box.
• Direct Call - the caller dialed your telephone number or extension
• Forward Busy - the caller was forwarded to you from a busy extension
• Forward No Answer - the caller was forwarded to you from an extension that was not
answered
• Forward Uncond itionally - the caller was forwarded from an extension that has all cal ls
forwarded to your telephone
• Pick Up From Another Ext - you used the Call Pickup feature to answer this call
• Retrieved As a Parked Call - you used a Call Park Retrieval code to answer this call
• Redirect To This Stn - the caller was forwarded to you from another extension
• Transferred - the caller was transferred to you from another extension
• Reminder - the caller was returned to your extension
• Unknown - the Caller ID information is unknown and cannot be displayed
• Unavailable - the Caller ID information is unavailable and cannot be displayed
to this contact in your Address Book appears in this box.
If the caller is not one of your contacts, this box is empty.
this contact in your Address Book appears in this box.
If the caller is not one of your contacts, this box is empty.
P0604633 01
Page 37

Chapter 1 Personal Call Manager 37
Also, if the caller is one of the contacts in your Address Book and you assigned a picture or voice
announce message to the contact, a small picture appears in the dialog box and a voice announce
message plays. For more information about adding contacts to the Address Book, refer to “Adding
a new contact to the Address Book” on page 57.
To answer a call using the You Have a New Call dialog box:
1 Click the Answer button.
Note: The Cancel button cancels only the You Have a New Call dialog box, not the call.
If you click the Cancel button, the You Have a New Call dialog box closes but the call
continues to ring on your telephone.
Answering a call from the window
To answer the call:
1 Double-click the Ringing ico n.
The icon changes to the Active Call icon and the call is answered.
or
2 Right-click the Ringing icon in the Calls box and then click Answer.
Answering a call from the task tray or Call s menu
To answer a call:
1 Click the Persona l Call Manager task tr ay ic on or t he Calls menu and then point to the label of
the call.
2 Click Answer.
Accessing the Notes tab
After you have answered the call, you can display the Notes tab of the Address Properties dialog
box. Use the Notes tab to record information about the contact, such as recent orders, meeting
locations, etc. For instructions about adding information to the Notes tab, refer to “Note” on page
63.
To display t he Notes tab:
1 Click the icon of the caller.
2 Click .
Business Communications Manager Personal Call Manager
Page 38

38 Chapter 1 Personal Call Manager
Putting a call on hold
When a call is put on hold, the icon for th e call changes from the Active Call icon to t he He ld Ca ll
icon. For information about the various icons , ref er to “Personal Call Manager task tr ay menu” on
page 13 and “Current Calls icons” on page 18.
Putting a call on hold using the window
To put a call on hold:
1 Make or answer the call.
2 Right-click the icon of the call in the Calls box and then click Hold.
Putting a call on hold using the task tray or Calls menu
To put a call on hold:
1 Make or answer the call.
2 Click the Personal Call Manager task tray icon or the Calls menu, point to the call you want
to put on hold and click Hold.
Answering a held call using the window
To answer a held call:
1 Right-click the icon of the call in the Calls box and then click UnHold.
Answering a held call using the task tray or Calls menu
To answer a held call:
1 Click the Personal Call Manager task tray icon or the Calls menu and then point to the caller
you want to talk to.
2 Click UnHold.
P0604633 01
Page 39

Multiple calls
Personal Call Manager can control severa l ca lls at once. The maximum number of call s is equal to
the maximum number of lines available. All of the calls currently connected appear on the
Personal Call Manager task tray menu, the Calls menu, and the window.
Although several calls can be co ntrolle d, only on e cal l can be active at any t ime, ex cept if you have
a conference. In a conference, you can have two active calls. When you answer a held call, the
currently active call is automatically put on hold. This allows you to switch between held calls
simply by answering the caller you w ant to talk to.
Switching between calls using the window
On the window, the currently connected calls appear in the Calls box. The currently active call
shows the Active Call icon while the rest of the calls show the Held Call icon .
To switch to a different call:
Chapter 1 Personal Call Manager 39
1 Double-click the icon of the caller you want to talk to.
or
2 Right-click the icon of the caller you want to talk to and then click UnHold.
Switching between calls using the task tray and Call menus
On the Personal Call Manager task tray menu and the Calls menu, the currently connected calls
appear at the top of t he menu. The curre ntly acti ve call sho ws the Acti ve Call ico n while the re st of
the calls show the Held C all icon.
To switch to a different call:
1 Click the Personal Call Manager task tray icon or the Calls menu, point to the caller you
want to talk to and then click UnHold.
The caller you point to becomes the active call and the other call is put on hold.
Business Communications Manager Personal Call Manager
Page 40

40 Chapter 1 Personal Call Manager
Transferring a call
Personal Call Manager allows you to transfer a call to a different telephone. You can transfer the
call with an announcement or without. With an announcement, you are calling the person you are
transferring the call to before you transfer the call. Use announcements to inform the person who
the caller is and why they are calling.
Note: Transferring your telephone to an external telephone number is not supported.
Transferring a call without an announcement
When you transfer a call without an announcement, you are transferring without checking if the
person is available to answer the call. This is also known as a blind transfer.
Transferring a call using the window
To transfer a call:
1 Make or answer the call.
2 Drag the icon of the call to another call icon in the Calls box or to a contact icon in the
Address Book.
If you are transferring the call to a contact in the Address Book, the contact must be showing
in the List View portion of the Address Book. For information about finding a contact, see
“Finding a contact in the Address Book” on page 64
.
Transferring a call using the right mouse button
You can use the right mouse button and the icons on the window to transfer a call. To transfer a
call:
1 Make or answer the call.
2 Right-click the icon in the Calls box and then point to Transfer.
A menu of the current calls appears.
3 Click one of the current calls.
The call is tr ansferred to the person selected.
If the person you want to transfer the call to does not appear on the list of current calls,
perform steps 4 and 5.
4 Click Other.
The Transfer dialog box appears.
P0604633 01
Page 41

Chapter 1 Personal Call Manager 41
5 Type the telephone number of the person you want to transfer the call to and click the
Transfer button.
The call is t ransferred to the number entered.
Note: If Fast Search is enabled, Personal Call Manager compares the telephone number
you are entering to the contacts stored in the Address Book. Any contacts that match the
numbers you are entering appear in the bottom of the dialog box. Click the contact you
want and click the Transfer button.
.
Note: If you want to cal l a contact tha t is in the Add ress Book and you remember only t he
contact’s name, type the contact’s name.
Note: If Fas t Sear ch is e nabled, any cont acts t hat mat ch the n ame you ar e ente ring ap pea r
in the bottom of the dialog box. Click the contact you want and click the Transfer button.
Note: If Slow Search is enabled, you must enter the name and then click the Find Now
button. Any contacts that match the name you entered appear in the bottom of the dialog
box. Click the contact you want and click the Transfer button.
Note: For information about Fast and Slow Search, see “Changing the Search
preferences” on page 83.
Business Communications Manager Personal Call Manager
Page 42

42 Chapter 1 Personal Call Manager
Transferring a call using the task tray or Calls menu
To transfer a call:
1 Make or answer the call.
2 Click the Personal Call Manager task tray icon or the Calls menu and then point to Transfer.
A menu of the current calls appears.
3 Click one of the current calls.
The call is tr ansferred to the person selected.
If the person you want to transfer the call to does not appear on the list of current calls,
perform steps 4 and 5.
4 Click Other.
The Transfer dialog box appears.
5 Type the telephone number of the person you want to transfer the call to and click the
Transfer button.
The call is t ransferred to the number entered.
Note: If Fast Search is enabled, Personal Call Manager compares the telephone number
you are entering to the contacts stored in the Address Book. Any contacts that match the
numbers you are entering appear in the bottom of the dialog box. Click the contact you
want and click the Transfer button.
Note: If you want to cal l a contact tha t is in the Add ress Book and you only remember t he
contact’s name, type the contact’s name.
Note: If Fas t Sear ch is e nabled, any cont acts t hat mat ch the n ame you ar e ente ring ap pea r
in the bottom of the dialog box. Click the contact you want and click the Transfer button.
Note: If Slow Search is enabled, you must enter the name and then click the Find Now
button. Any contacts that match the name you entered appear in the bottom of the dialog
box. Click the contact you want and click the Transfer button.
Note: For information about Fast and Slow Search, see “Changing the Search
preferences” on page 83.
P0604633 01
Page 43

Chapter 1 Personal Call Manager 43
Transferring a call using the keyboard
You can use the keyboard and the icons on the window to transfer a call. To transfer a call:
1 Make or answer the call.
2 Click the icon in the Calls box.
3 Press the F4 key.
The Transfer dialog box appears.
4 Enter the telephone numb er of the person you want to transfer the call to and click the
Transfer button. The call is transferred to the number entered.
Note: If Fast Search is enabled, Personal Call Manager compares the telephone number
you are entering to the contacts stored in the Address Book. Any contacts that match the
numbers you are entering appear in the bottom of the dialog box. Click the contact you
want and click the Transfer button.
Note: If you want to cal l a contact tha t is in the Add ress Book and you remember only t he
contact’s name, type the contact’s name.
Note: If Fas t Sear ch is e nabled, any cont acts t hat mat ch the n ame you ar e ente ring ap pea r
in the bottom of the dialog box. Click the contact you want and click the Transfer button.
Note: If Slow Search is enabled, you must enter the name and then click the Find Now
button. Any contacts that match the name you entered appear in the bottom of the dialog
box. Click the contact you want and click the Transfer button.
Note: For information about Fast and Slow Search, see “Changing the Search
preferences” on page 83.
Business Communications Manager Personal Call Manager
Page 44

44 Chapter 1 Personal Call Manager
Transferring a call with an announcement
When you transfer a call wit h an announceme nt, you ar e calling th e person you are transfer ring the
call to befo re you transfer the call. Calling the person first allows you to check if the pers on is
available and give that person information about the call.
Transferring a call with an announcement using the window
To transfer a call:
1 Make or answer the call.
2 Put the call on hold.
3 Call the person you are tr ansferring the call to.
4 Give the person any pertinent information about the call.
5 Drag the icon of the call you are transferring to the Active Call icon.
Transferring a call with an announcement using the right mouse button
You can use the right mouse button and the icons on the window to transfer a caller. To transfer a
call:
1 Make or answer the call.
2 Put the call on hold.
3 Call the person you are tr ansferring the call to.
4 Give the person any pertinent information about the call.
5 Right-click the icon in the Calls box and point to Transfer.
A menu of the current calls appears.
6 Click the icon of the person you are transferring.
Transferring a call with an announcement using the task tray or Calls menu
To transfer a call:
1 Make or answer the call.
2 Put the call on hold.
3 Call the person you are tr ansferring the call to.
4 Give the person any pertinent information about the call.
5 Click the Personal Call Manager task tray icon or the Calls menu and then point to the
Transfer menu item.
A menu of the current calls appears.
6 Click the icon of the person you are transferring (the first call you made or answered).
P0604633 01
Page 45

Conferencing a call
In a conference call you connect yourself and two other people onto a single call.
Creating a conference
T o cr eate a co nferen ce you mus t have a t lea st two l ines, one for ea ch call er. These two lines can be
external lin es or internal lines.
Creating a conference using the Conference box
To create a conference:
1 Make or answer the two calls you want to connect in a conference call.
2 Drag the icon of the first call from the Calls box to the Conference box.
3 Drag the icon of the second call from the Calls box to the Conference box.
The icons for the two calls change to Conference icons.
Chapter 1 Personal Call Manager 45
Creating a conference using the Calls box
To create a conference:
1 Make or answer the two calls to be connected in a conference call.
2 Right-click the icon of the first call to be connected in a conference call and then click
Conference.
3 Right-click the icon of the second call to be connected in a conference call and then click
Conference.
The icons for the two calls move to the Conference box and their icons change to Conference
icons.
Creating a conference using the task tra y or Calls menu
To create a conference:
1 Make or answer the two calls to be connected in a conference call.
2 Click the Personal Call Manager task tray icon or the Calls menu.
3 Point to the first call to be conferenced and then click Conference.
4 Click the Personal Call Manager task tray icon or the Calls menu.
5 Point to the second call to be conferenced and then click Conference.
The icons for the two calls change to the Conference icon.
Business Communications Manager Personal Call Manager
Page 46

46 Chapter 1 Personal Call Manager
Putting conferences call on hold
When you put a confe re nce on hol d, both calls are p ut on hold. Neither caller c an speak to you but
the two callers can speak to each other.
Putting the conference calls on hold using the window
To put the conference calls on hold:
1 Right-click one of the calls in the Conference box and then click HoldConf.
The calls are put on hold and the icons change to Held Conference icons.
Putting conference calls on hold using the task tray or Calls menu
To put the conference calls on hold:
1 Click the Personal Call Manage r task t ray icon or the Calls menu, point to one of the cal ls in
the conference and then click HoldConf.
The calls are put on hold and the icons change to Held Conference icons.
Taking a conference off hold
There are two ways to take a conference off hold:
Restoring a held conference using the window
To cancel hold on a conference:
1 Right-click one of the calls in the Conference box and then click UnHoldConf.
The calls in the conference become active and the icons change to Conference icons.
Restoring a held conference using the task tray or Calls menu
To cancel hold on a conference:
1 Click the Personal Call Manage r task t ray icon or the Calls menu, point to one of the cal ls in
the conference and then click UnHoldConf.
The calls in the conference become active and the icons change to Conference icons.
P0604633 01
Page 47

Chapter 1 Personal Call Manager 47
Splitting a conference
When you split a co nfe re nce, the conference i s e nde d, bu t both calls remain conn ect ed. One of the
callers becomes t he act ive c all a nd the other call er is pu t on ho ld. The conf erenc e ends and th e tw o
callers can no longer speak to each other.
Splitting a conference using the window
To split a conference using the window:
1 Drag one of the icons from the Conference box.
The call whose icon you remove from the Conference box becomes the active call and the other
call is put on hold. The icons for both calls move to the Calls box.
You can also use the right mous e butt on and the i cons on th e window t o spl it a confer ence. To split
a conference:
1 Right-click one of the icons in the Conference box and then click Split Conf.
The caller you select becomes the active call while the other caller is put on hold. The icons for
both calls move to the Calls box.
Splitting a conference using the task tray or Calls menu
To split a conference:
1 Click the Personal Cal l Manager tas k tr ay icon or the Calls menu, point to the i con of one of
the callers in the confe rence and then click Split Conf.
The caller you select becomes the active call and the other caller is put on hold.
Business Communications Manager Personal Call Manager
Page 48

48 Chapter 1 Personal Call Manager
Ending a conference
When you end a conference, you remove yourself from the co nference and let the other two caller s
continue to talk to each other. While the other callers are talking to each other they are still using
two of your telephone lines.
If you want to end the conference and disconnect both the callers, split the conference and end
each of the calls.
Ending a conference using the release button
To end a conference:
1 Click the icon of one of the conference calls in the Conference box.
2 In the Conference box, click .
Ending a conference using the window
To end a conference:
1 Right-click one of the icons in the Conference box and then click Release Conf.
The confer ence ends.
Ending a conference using the keyboard
To end a conference:
1 Click one of the icons in the Conference box.
2 Press the Delete key on your PC keyboard.
The confer ence ends.
Note: When you use the keyboard to end a call, make sure you click one of the icons in
the Conference Box before you press the Delete key. If you do not and a contact in the
Address Book is highlighted, the contact is deleted. To retrieve a contact that is
accidentally deleted, click the Edit menu and then click Undo.
Ending a conference using the task tray or Calls menu
To end a conference:
1 Click the Personal Call Manager task tray icon or Calls menu and then point to the icon of
one of the calls in the conference.
2 Click Release Conf.
The confer ence ends.
P0604633 01
Page 49

Ending a call
Ending a call using the release button
To end a call:
1 Click the icon of the call in the Calls box.
Note: If there is only one call in the Calls box, you do not need to select the call.
2 In the Calls box, click .
Ending a call using the window
To end a call:
Chapter 1 Personal Call Manager 49
1 Right-click the icon of the call in the Calls box and then click Release.
Ending a call using the task tray or Calls menu
To end a call:
1 Click the Personal Call Manager task tray icon or the Calls menu, point to the call you want
to disconnect and then click Release.
Ending a call using the keyboard
To end a call using the keyboard, the Personal Call Manager window must be visible.
To end a call:
1 Click the icon of the call in the Calls box.
2 Press the Delete key on your PC keyboard.
Note: When you use the keyboar d to end a ca ll , make sur e you cl ic k the icon in the Calls
box before you press the Delete key. If you do not and a contact in the Address Book is
highlighted, the contact is deleted. To retrieve a contact that is accidentally deleted, click
the Edit menu and then click Undo.
Business Communications Manager Personal Call Manager
Page 50

50 Chapter 1 Personal Call Manager
Calling features
Personal Call Manager gives you ea sy acc ess t o two c ommon cal ling featu res: Do Not Di sturb and
Call Forward.
Do Not Disturb (DND)
When DND is enabled, the telephone does not ring when someone calls, but the line indicator
flashes. In Personal Call Manager, the You Have a New Call dialog box appears and the icon for
the call appears in the Calls box.
You can turn the Do Not Disturb (DND) f eatur e on or of f fr om th e Calls menu or the Per sonal Call
Manager icon in the task tray.
Turning DND on or off
To turn DND on or off:
1 Click the Personal Call Manager task tray icon or the Calls menu and then click DND.
When DND is on:
• the Personal Call Manager task tray icon changes to
• a check mark appears beside the DND menu item on the Calls menu and the Personal Call
Manager task tray menu
• DND appears in the Status bar
Call Forward
To call forward your telephone:
1 Click the Tools menu and then click Forward.
The Forward dialog box appears.
P0604633 01
Page 51

Chapter 1 Personal Call Manager 51
2 Type the telephone number you want to call forward your telephone to.
3 Click the Forward button.
The number your telephone is forwarded to appears on the “Status bar
Note: If Fast Search is enabled, Personal Call Manager compares the telephone number
you are entering to the contacts stored in the Address Book. Any contacts that match the
numbers you are entering appear in the bottom of the dialog box. Click the contact you
want and click the Forward button.
Note: If you want to forward your telephone to a contact that is in the Address Book and
you remember only the contact’s name, enter the contact’s name.
Note: If Fas t Sear ch is e nabled, any cont acts t hat mat ch the n ame you ar e ente ring ap pea r
in the bottom of the dialog box. Click the contact you want and click the Forward button.
Note: If Slow Search is enabled, you must type the name and then click the Find Now
button. Any contacts that ma tch the name you enter appear in the bottom of the dialog box.
Click the contact you want and click the Forward button.
Note: For information about Fast and Slow Search, see “Changing the Search
preferences” on page 83.
”.
Note: Call forwarding your telephone to an external telephone number is not supported.
Business Communications Manager Personal Call Manager
Page 52

52 Chapter 1 Personal Call Manager
Calls Log Window
The Calls Log consists of two parts: the Incoming Calls Log and the Outgoing Calls Log. The
Incoming Calls Log shows all of the calls that were made to your telephone. The Outgoing Calls
Log shows all of the calls you made from your telephone. Calls made or received while Personal
Call Manager was not operating do not appear.
The Calls Log shows the name and telephone number of the caller, if available. The Calls Log also
shows the date and time the call was made and how long the call was.
Viewing the Calls Log
To view the Calls Log:
1 Click .
or
1 Click the Tools menu and then click Show Call Log Window.
The Calls Log window appears with either the Incoming Calls showing or the Outgoing Calls
showing.
Viewing the Incoming Calls
To view the Incoming Calls:
1 Click on the Toolbar.
or
1 Click the View menu and then click Incoming Calls Log.
P0604633 01
Page 53

Chapter 1 Personal Call Manager 53
Viewing the Outgoing Calls
To view the Outgoing Calls:
1 Click .
or
1 Click the View menu and then click Outgoing Calls Log.
Updating the Calls Log
If you make or answer a call while the Calls Log is open, the Calls Log is not updated. To update
the Calls Log:
1 Click .
or
1 Click the View menu and then click Refresh.
Sorting the Calls Log
You can sort the Calls Log by name, telephone number, duration, or date and time.
• To sort the Calls Log by the name of the caller, click Name.
• To sort the Calls Log by the telephone number of the caller, click Phone No.
• To sort the Calls Log by the length of the call, click Duration.
• To sort the Calls Log by time the call was made or received, click Date & Time.
Making a call from the Calls Log
You can call any of the numbers stored in the Incoming or Outgoing Call Log. To make a call:
1 Click the number you want to dial.
2 Click .
or
1 Click the number you want to dial.
2 Click the Edit menu and then click Redial.
Note: The appropriate call resource must be assigned as the TAPI Line before you can
make a call from the Call s Log.
For example, the TAPI line cannot be an intercom line, if you want to make a call to an
external telephone number.
Business Communications Manager Personal Call Manager
Page 54

54 Chapter 1 Personal Call Manager
Printing call information from the Calls Log
You can print the Calls Log information for any call in t he Calls Log.
To print the Calls Log information:
1 Click the call you want to print.
Note: You can select several calls to print by holding down the Control or Shift key and
clicking other calls.
2 Click .
or
Click the Edit menu and then click Print.
Deleting calls from the Calls Log
To delete a call from the Calls Log:
1 Select the call you want to delete.
2 Click .
or
1 Click the Edit menu and then click Delete.
Closing the Calls Log Window
To close the Calls Log Window:
1 Click the File menu and then click Exit.
You can also close the Calls Log Window by clicking the Close Wind ow button i n t he upper right
corner of the window.
P0604633 01
Page 55

Address Book
The Address Book is the portion of Personal Call Manage r where you store te lephone numbers and
addresses of the people and businesses you deal with. Each entry in the Address Book is called a
contact. A contact is normally the telephone number of a person or business, but it can be any
number you want to keep track of or store in Personal Call Manager.
The Tr ee View of the Address Book
When you view the Address Book, the l ef t si de sh ows the tree structure of the Address Book. The
tree structure shows how the folders are organized. It also lets you select the folder you want to
view. A sample tree view appears belo w.
Chapter 1 Personal Call Manager 55
The contac ts are store d in two main areas:
• Quick Dials – Contacts added to the Quick Dials section appear on the Calls menu and the
Personal Call Manager task tray menu. You can add contacts to the Quick Dials section, but
not folders.
• My Contacts – Contacts added to the My Contacts section do not appear in the Calls or
Personal Call Manager task tray menu, but can easily be accessed from the Address Book. In
the My Contacts section, you can add contacts and folders.
Folders are added to help organize the contacts. By grouping the contacts into smaller groups of
similar contacts, the co ntacts are easier to view on the scree n and easier to find and ac cess.
You can change which folders app ear by cl icki ng cer tain p orti ons of the Tree View. Clicking a box
with “+” in it expands the folder and shows the folder’s contents. Clicking a box with “-” in it
collapses the folder an d hides the folder’s contents. Double- click a folder to open or close the
folder. When a folder is open, the contents of the folder appear in the List view portion of the
Address Book.
Business Communications Manager Personal Call Manager
Page 56

56 Chapter 1 Personal Call Manager
The List View portion of the Address Book
On the right side of the screen is the List View of the Address Book. The List View shows the
contacts and folders stored in the folder selected in the Tree View.
The List View of the Address Book can be viewed in four different formats: large icons, small
icons, list, and detail.
Displaying the Address Book in large icons
If you select large icons, each contact appears with the last name of the contact below the icon.
To view in large icons:
•Click .
or
•Click the View menu and then click Large Icon.
Displaying the Address Book in small icon s
If you select small icons, the contacts appe ar horizon tally with t he last name of eac h contact on the
right of the icon.
To view in small icons:
•Click .
or
•Click the View menu and then click Small Icon.
Displaying the Address Book in list view
If you select list v iew, the contacts appear vertic ally wi th the la st name of each co ntact on the r ight
of the icon.
To view in lis t view:
•Click .
or
•Click the View menu and then click List.
P0604633 01
Page 57

Chapter 1 Personal Call Manager 57
Displaying the Address Book in details view
If you select details view, the last name, first name, telephone numbers you can call and Email
Address and Email type are shown for each contact.
To view in details view:
•Click .
or
•Click the View menu and then click Detail.
Contacts
A contact is any ent ry in the Address Book. A contact can be a person, busines s, o r a ny n umber or
address you want stored in Personal Call Manager.
Adding a new contact to the Address Book
You add contacts using the Address Properties dialog box.
To add a contact using the toolbar:
1 Click .
The Address Properties dialog box appears.
2 Enter the address information for this contact.
For descriptions of the address fields, refer to “Address Properties dialog box” on page 58
3 Click the OK button.
Note: If a contact with the same name is in the Address Book, a message appears asking
if you want to make a duplica te. If you wan t to make a duplic ate of a contac t, use t he co py
method described in “Copying a contact” on page 68.
The contact is added to the folder shown in the List View of the Address Book.
To add a contact using the right mouse button:
1 Right-click in an open area in the List view portion of the Address Book.
2 Point to New and then click Contact.
The Address Properties dialog box appears.
.
3 Type the address inform ation for this contact.
For descriptions of the address fields, refer to “Address Properties dialog box” on page 58
Business Communications Manager Personal Call Manager
.
Page 58

58 Chapter 1 Personal Call Manager
4 Click the OK button.
Note: If a contact with the same name is in the Address Book, a message appears asking
if you want to make a duplica te. If you wan t to make a duplic ate of a contac t, use t he co py
method described in “Copying a contact” on page 68.
The contact is added to the folder shown in the List View of the Address Book.
To add a contact using the Menu bar:
1 Click the File menu, point to New and then click Contact.
The Address Properties dialog box appears.
2 Type the address inform ation for this contact.
For descriptions of the address fields, refer to “Address Properties dialog box” on page 58
3 Click the OK button.
Note: If a contact with the same name is in the Address Book, a message appears asking
if you want to make a duplica te. If you wan t to make a duplic ate of a contac t, use t he co py
method described in “Copying a contact” on page 68.
.
The contact is added to the folder shown in the List View of the Address Book.
Address Properties dialog box
The Address Properties dialog box has four tabs. Use each tab to enter different types of contact
information.
• Business - Use this tab to enter the name, address, and telephone number of the contact.
• EMail Address - Use this tab to enter the e-mail address and type.
• Settings - Use this tab to enter the default telephone number.
• Note - Use this tab to enter any other information about the contact.
P0604633 01
Page 59

Chapter 1 Personal Call Manager 59
Business
Use the Business tab to enter the name, address, and telephone number of a contact.
The first information you enter is the contact’s name. The contact’s name is divided into the first
name and the last name. Both the first name and the last name must be entered before a contact can
be added to the Address Book. The last name is used as the label for the contact in the Address
Book. The first name is used as the label in the Calls box when you are on a call to the contact.
When you search for a contact, you can search using the first name or the last name.
After you enter the na me you can en ter th e con tact’s address. There are five dif f erent boxes f or the
address: Address, City, State, Zip code, and Country.
After entering the addres s, you can en ter the Title, Company, Department, Of f ice, and Assist ant of
the contact.
The final informat ion t o enter i s the c ontact’s telephone numbers. The P hone number box has a li st
box that allows you to enter four different telephone numbers. You can enter the Business, Home,
Mobile, and Fax telephone numbers for the contact. Either the Business, Home, or Mobile
telephone number can be dialed from the task tray or the Personal Call Manager window.
Business Communications Manager Personal Call Manager
Page 60

60 Chapter 1 Personal Call Manager
E-Mail Address
The E-Mail Address tab has two boxes: E-mail address and E-mail type.
E-mail address spec ifies where the conta ct’s E-mail account is. E-mail t ype speci fies whi ch type of
E-mail service the contact uses.
P0604633 01
Page 61

Chapter 1 Personal Call Manager 61
Settings
Use the Settings tab to select the dialing default used for the contact and the picture displayed and
voice announcement heard when this contact calls you.
For the default te le phone number dialed, you can choose Business, Home, or Mob ile. The settings
you specify define the telephone number automatically used for this co ntact only. Other contacts
are not affected by the defaults you choose for this contact. You can choose to override these
settings when making a ca ll by sel ecti ng any oth er tel ephone numbe r defi ned for the cont act in t he
Address Book.
You can select a voice announcement to play whe n you rece ive a cal l from th is cont act. Thi s voice
announcement allows yo u t o i dentify who is call ing without having t o l ook at the computer screen
or telephone display.
To add or change the voice announcement for this contact:
1 Record the voice announcement message you want to play when this contact calls and save it
in a .WAV file format. The message is typica lly the contact’s name, but can be any.WAV file.
Note: You can record the voice announcement using the Sound Recorder accessory
included with Windows 95 or any other sound editing application.
2 Click beside the Voice Announce File Path field.
3 Move to the folder where the voice announcement file is stored.
Business Communications Manager Personal Call Manager
Page 62

62 Chapter 1 Personal Call Manager
4 Double-click the voice announcement file you want to use.
If you decide you no longe r want a voic e a nnounce ment for t his co ntact , you can r emove th e voice
announcement from the contact.
To remove the voice announcement:
1 Click beside the Voice Announce File Path field.
The voice announcement no longer plays for this contact.
Note: The .WAV file you del ete from the contact is no t deleted from the computer hard
drive and can be used again later.
You can select an image that displays on the You Have a New Call dialog box when you receive a
call from this contact. This image gives you a visual reminder of who the caller is. The image is
typically a picture of the contact, but can be any image that reminds you of the contact.
Note: You must use a 16-color or 256-color bitmap file (*.bmp) as the image for the
contact.
To add or change the bitmap image:
1 Create or fi nd the image you want to di splay when this contact calls. You can create this file
with any graphics application that saves the image as a .BMP file.
2 Click beside the Image File Path field.
3 Move to the folder where the image file is store d.
4 Double-click the image file you want to use.
If you decide you no longer want Personal Call Manager to display an image when this contact
calls, you can remove the image file from the contact.
To remove the image file:
1 Click beside the Image File Path field.
The image file no longe r appears for this contact.
Note: The .BMP file you delete from the contact is not deleted from the computer hard
drive and can be used again later.
P0604633 01
Page 63

Chapter 1 Personal Call Manager 63
Note
Use the Note tab to record miscellaneous information about the contact. You can enter significant
dates, recent orders, meeting locations or any information you want handy when you call the
contact.
Adding a caller to the Address Book
When you receive a call , you can add the calle r to your Add ress Book. You must open the Pers onal
Call Manager window before you add a caller.
To add a caller:
1 Click the caller’s icon in the Calls box.
2 Click .
A dialog box appears asking you if you want to create a new contact.
3 Click the Yes button.
The Address Properties dialog box appears.
4 Enter the address information for this contact.
For descriptions of the address fields refer to “Address Properties dialog box” on page 58
5 Click the OK button.
The contact is added to the folder shown in the List View of the Address Book.
Note: If you subscribe to Caller ID service, the telephone number, and name if available,
are automatically entered into the dialog box.
Business Communications Manager Personal Call Manager
.
Page 64

64 Chapter 1 Personal Call Manager
Finding a contact in the Address Book
The Address Book has a search feature to help you find a contact. You can search for a contact
using the contact’s name or telephone number.
The Search feature operates in two different modes: Slow Search and Quick Search. In Slow
Search mode, you enter the characters you want to find and click the Find Now button. Personal
Call Manager searches the Addr ess Book t o find th e contac t. In Quic k Search mode , Persona l Call
Manager starts searching through contacts as soon as you type a character.
To change the Search mode used, refer to “Changing the Search preferences” on page 83
Slow Search
To find a contact:
1 Click the Tools menu and then click Find Person.
or
Click .
The Search dialog box appears.
.
2 Type the name or telephone number of the contact you want to find.
3 Click the Find Now button.
A list of the contacts that match the name or number you entered appears in the Search dialog
box.
4 Click the last name of the contact you want.
5 Click the OK button.
The folder containing the contact opens and the selected contact is highlighted.
P0604633 01
Page 65

Quick Search
To find a contact:
1 Click the Tools menu and then click Find Person.
or
Click .
The Search dialog box appears.
Chapter 1 Personal Call Manager 65
2 Enter the first character of the name or telephone number of the contact you want to find.
Personal Call Manager compa res the letter or number you entered to the contact s s tor ed i n t he
Address Book. Any contacts that match the character you entered appear in the bottom of the
Search dialog box.
If you have several contacts starting with that character, enter the next character in the name or
telephone number. Personal Call Manager then displays only the contacts that match both of
those characters.
3 Continue entering characters scroll to find the contact in the Search dialog box.
4 Click the last name of the contact you want.
5 Click the OK button.
The folder containing the contact opens and the selected contact is highlighted.
Business Communications Manager Personal Call Manager
Page 66

66 Chapter 1 Personal Call Manager
Entering names or numbers
If you know only part of the name or telephone number of the contact you want to find, you can
type the letters or digits you know and the Search feature finds any contacts that match the
information you enter.
If the portion of the name or number you kn ow is a t th e beginning, type the portio n you kn ow and
click the Find Now button. Personal Call Manager finds any contacts that start with the letters or
digits you enter.
If you remember the contact’s first name, but not last name, type a comma followed by the
contact’s first name. For example, if you are looki ng for a con tact named Tom, type “,Tom”. All of
the contacts whose first name is Tom are found.
If the portion you know is not at the start, you can use “wild card” characters at the start of the
name or number. There are two wild card characters you can use:
? U se the question mark to represent any single character.
* Use the asterisk to represent any characters that precede the characters you entered.
For example, the following names are in the Address Book:
Chatterton Jones Mason Smith Stanley Steward Washington
• If you enter “S” the names found are Smith, Stanley and Steward.
• If you enter “Ste” the only name found is Stewart.
• If you enter “?a” the names found are Mason and Washington.
• If you enter “??a” the names found are Chatterton and Stanley.
• If you enter “*a” the names found are Chatterton, Mason, Stanley, Steward, and Washington.
Note: You can also enter a comma (,) as a special character. This special character adds a
pause between the numbers dialed.
P0604633 01
Page 67

Chapter 1 Personal Call Manager 67
Editing the properties of a contact
The information stored with a contact can be changed whenever required. A typical example is
when a contact moves or changes telephone numbers.
To change the properties of a contact using the right mouse button:
1 Find the contact in the Address Book.
You can find the contact manually or use the Personal Call Manager Search feature
2 Right-click the contact and then click Properties.
The Address Properties dialog box appears.
.
3 Click the tab that has the information you want to change and then make the changes.
“Adding a new contact to the Address Book” on page 57
describes the information that can be
entered.
To change the properties of a contact using the toolbar:
1 Find the contact in the Address Book.
You can find the contact manually or use the Personal Call Manager Search feature
.
2 Click the contact.
3 Click .
The Address Properties dialog box appears.
4 Move to the tab that has the information you want to change and then make the changes.
“Adding a new contact to the Address Book” on page 57
describes the information that can be
entered.
Business Communications Manager Personal Call Manager
Page 68

68 Chapter 1 Personal Call Manager
To change the properties of a contact using the Menu bar:
1 Find the contact in the Address Book.
You can find the contact manually or use the Personal Call Manager Search feature
2 Click the contact.
3 Click the File menu and then click Properties.
The Address Properties dialog box appears.
4 Click the tab that has the information you want to change and then make the changes.
.
“Adding a new contact to the Address Book” on page 57
entered.
describes the information that can be
Organizing the Address book
As you add contacts to the Address Book, divide the contacts into logical groups. This makes it
easier for you to find the contacts you enter.
You group the contacts together by adding folders to the Address Book and moving your contacts
into the appropriate folders. A simple example is to add two folders, one named Personal and one
named Business. All of your business contacts are then stored in the Business folder and all of
your personal contac ts are stored i n the Per sonal fo lder. For more information, refer to “Creating a
new folder in the Address Book” on page 74.
Copying a contact
When you copy a contact, you create a new contact in the Address Book based on the original
contact. Personal Call Ma nager pr ovides two ways to copy a contact : a link ed copy and a te mpla te
copy. In the linked copy, all of the information about the contact is copied. In a template copy, all
of the information about the contact except the contact name is copied. In both methods of
copying, the original contact remains in the original folder.
P0604633 01
Page 69

Deciding which copy method to use
The copy method you choose depends on what you want to do. Refer to the table below to decide
which copy method to use.
Table 2 Copy Methods
Linked Copy Template Copy
Chapter 1 Personal Call Manager 69
Information
copied
Changes
are linked
Purpose
Example
For information about how to make a linked copy of a contact, refer to “Copying a contact using
the linked copy method” on page 69.
The new contact contains the exact same
information as the original contact.
Yes.
When you change one of the properties of the
contact, Personal Call Manager automatically
updates the original contact and all of the copies
of the cont act.
Use a linked cop y when you w ant to ha v e identic al
copies of a single contact in several different
folders. You do this to make the contact easier to
find and organize.
You know a person who is your sales
representative and a member of your baseball
team. Put the original contact in your Business
folder and make a linked copy of the contact in
your Pe rsonal folder. You can then find contact
information for this person when you are looking
for sales representatives or baseball players. If
this person’s telephone number changes, you can
change either copy of the contact and both copi es
are updated.
The new contact has a different name than the
original contact. The other contact information is
the same.
No.
When you change one of the properties of the
contact, the other copies are not changed.
Use a template copy to create a new contact that
is similar, but not identical to, an existing contact.
A new person joins a company you that you
already have a contact for. The address and
telephone number of the new contact is the same
as the existing contact, but the name is different.
To make a contact for the new person, make a
copy of the existing contact an d cha ng e the na me.
For information about how to make a templ ate c opy of a co ntact , r efer t o “ Copying a contac t using
the template copy method” on page 70.
Copying a contact using the linked copy method
Use this method of copying a contact when you want to create a copy that is linked to the original
contact. For information about the two different methods of copying a contact, refer to “Deciding
which copy method to use” on page 69.
To copy a contact using drag and drop, the contact must be visible in the List View and the folder
you are copying it to must be visible in the Tree View. To copy a contact:
1 Press and hold the Control key on your PC keyboard.
2 Drag the contact you want to copy to the new folder.
Business Communications Manager Personal Call Manager
Page 70

70 Chapter 1 Personal Call Manager
To copy a contact using the toolbar:
1 Click the contact you want to copy.
2 Click .
3 Open the folder you want to copy the contact into.
The contents of the folder appear in the List View box.
4 Click .
The contact is copied to the new folder.
To copy a contact using the right mouse button:
1 Right-click the contact you want to copy and then click Copy.
2 Open the folder you want to copy the contact into.
The contents of the folder appear in the List View box.
3 Right-click an open area in the folder and then click Paste.
The contact is copied to the new folder.
To copy a contact using the Menu bar:
1 Click the contact you want to copy.
2 Click the Edit menu and then click Copy.
3 Open the folder you want to copy the contact into.
The contents of the folder appear in the List View box.
4 Click the Edit menu and then click Paste.
The contact is copied to the new folder.
Copying a contact using the template copy method
Use this method of copying a contact when you want to create a new contact that is based on an
existing contact. All of the contact information except the contact name is copied to the new
contact. This feature allows you to quickly add contacts that are similar to existing contacts. For
information about the two different methods of copying a contact, refer to “Deciding which copy
method to use” on page 69.
To copy a contact using the right mouse button:
1 Right-click the contact you want to copy and then click Copy.
2 Open the folder you want to copy the contact into.
The contents of the folder appear in the List View box.
3 Right-click one of the contacts in the folder.
The contact click is not affected by the pasting procedure.
4 Click Paste Special.
You are prompted to enter a name.
P0604633 01
Page 71

Chapter 1 Personal Call Manager 71
5 Type the name of the contact and click the OK button.
After the contact is copied into the folder, you can open the contact properties and change any
properties.
To copy a contact using the Menu bar:
1 Click the contact you want to copy.
2 Click the Edit menu and then click Copy.
3 Open the folder you want to copy the contact into.
The contents of the folder appear in the List View box.
4 Click the Edit menu and then click Paste Special.
You are prompted to enter a name.
5 Type the name of the contact and click the OK button.
After the contact is copied into the folder, you can open the contact properties and change any
properties.
Moving a contact
Contacts can be moved from one folder to another to help organize the Address Book. When you
move a contact, the contact does not remain in the original folder.
To move a contact using dra g and dr op, the contact must be visible in th e Lis t View and the folder
you are moving it to must be visible in the Tree View. To move a contact:
1 Drag the contact you want to copy to the new folder.
To move a contact using the toolbar:
1 Click the contact you want to move.
2 Click .
The icon for the contact dims.
3 Open the folder you want to move the contact into.
The contents of the folder appear in the List View box.
4 Click .
The contact is moved to the new folder.
To move a contact using the right mouse button:
1 Right-click the contact you want to move and then click Cut.
The icon for the contact dims.
2 Open the folder you want to move the contact into.
The contents of the folder appear in the List View box.
3 Right-click an open area in the folder and then click Paste.
The contact is moved to the new folder.
Business Communications Manager Personal Call Manager
Page 72

72 Chapter 1 Personal Call Manager
To move a contact using the Menu bar:
1 Click the contact you want to move.
2 Click the Edit menu and then click Cut.
The icon for the contact dims.
3 Open the folder you want to move the contact into.
The contents of the folder appears in the List View box.
4 Click the Edit menu and then click Paste.
The contact is moved to the new folder.
Note: After you u se th e Cut c ommand (ind icate d by the contac t icon dimming), y ou mus t
use the Paste command to move the contact before using the Cut or Copy commands
again. If you use th e Cut o r Copy command before pa sting th e contact , the contact remains
in the original folder and does not move.
Deleting a contact
To delete a contact using the right mouse button:
1 Right-click the contact you want to delete and then click Delete.
To delete a contact using the Menu bar:
1 Click the contact you want to delete.
2 Click the Edit menu and then click Delete.
To delete a contact using the keyboard:
1 Click the contact you want to delete.
2 Press the Delete key.
Printing Contacts
There are two printing fo rmats you ca n use to prin t in formati on about any of th e contact s stor ed in
the Address Book. You can print a contact list or contact details.
Printing a contact list
When you print a contact list, the name, company, and telephone numbers stored in the Address
Book for the contact are printed. You can print contact list information for one or many contacts.
P0604633 01
Note: When printing a contact list, set your page orientation to landscape.
Page 73

Chapter 1 Personal Call Manager 73
To print a contact list:
1 Click the contacts you want.
Note: Use the Control or Shift keys to select more than one contact.
2 Click the File menu and then click Print Contact List .
or
Click .
3 Click the OK button.
To print a contact list for all of the contacts in a folder:
1 Click the folder or folders that contain the contacts you want to print.
Note: Use the Control or Shift keys to select more than one folder.
2 Click the File menu and then click Print Contact List .
or
Click .
3 Click the OK button.
Print Contact Details
When you print the co ntact det ails, al l the inf ormation i n the Addr ess Book for the sele cted cont act
is printed. You can print contact detail information for one or man y contacts.
To print contact details:
1 Click the contact or contacts you want.
Note: Use the Control or Shift keys to select more than one contact.
2 Click the File menu and then click Print Contact Detai l.
Business Communications Manager Personal Call Manager
Page 74

74 Chapter 1 Personal Call Manager
Folders
Folders can be added only to the My Contacts section and the folders in the My Contacts section.
You cannot add folders to the Quick Dial s secti on. For more informat ion on , refer to “Quick Dial s”
on page 80.
Creating a new folder in the Address Book
To create a new folder using the right mouse button:
1 Click a folder in the Tree View of the Address Book.
The contents of the selected folder appear in the List View. The new folder is added to this
folder.
2 Right-click an open area in the List View.
3 Point to New and then click Folder.
The Create New Folder dialog box appears.
4 Type the name of the new folder and then click the OK button.
The new folder is added to the selected folder.
When naming the new folder, you must use a name that does not already exist in the selected
folder.
To create a new folder using the toolbar:
1 Click a folder in the Tree View of the Address Book. The contents of the selected folder
appear in the List View. The new folder is added to this folder.
2 Click .
The Create New Folder dialog box appears.
3 Type the name of the new folder and then click the OK button.
The new folder is added to the selected folder.
When naming the new folder, you must use a name that does not already exist in the selected
folder.
To create a new folder using the Menu bar:
1 Click a folder in the Tree View of the Address Book. The contents of the selected folder
appear in the List View. The new folder is added to this folder.
2 Click the File menu, point to New and then click Folder.
The Create New Folder dialog box appears.
3 Type the name of the new folder and then click the OK button.
The new folder is added to the selected folder.
When naming the new folder, you must use a name that does not already exist in the selected
folder.
P0604633 01
Page 75

Chapter 1 Personal Call Manager 75
Copying a folder
When you copy a folder, the folder and all of the contacts and folders contained in the folder are
copied to the new folder.
T o copy a fol der using dr ag and drop, the f older must be visible in the Li st View and the folder you
are moving it to must be visible in the Tree View. To copy a folder:
1 Press and hold the Control key on your PC keyboard.
2 Drag the folder you want to copy to the folder you want it copied to.
The folder must be in the List View box to use the right mouse button. To copy a folder using the
right mouse button:
1 Right-click the folder you want to copy and then click Copy.
2 Open the folder you want to copy the folder to.
The contents of the folder appear in the List View box.
3 Right-click an open area in the List View box and then click Paste.
To copy a folder using the toolbar:
1 Click the folder you want to copy.
2 Click .
3 Open the folder you want to copy the folder to.
The contents of the folder appear in the List View box.
4 Click .
To copy a folder using the Menu bar:
1 Click the folder you want to copy.
2 Click the Edit menu and then click Copy.
3 Open the folder you want to copy the folder to.
The contents of the folder appear in the List View box.
4 Click the Edit menu and then click Paste.
Business Communications Manager Personal Call Manager
Page 76

76 Chapter 1 Personal Call Manager
Moving a folder
Folders can be moved from one enclosing folder to another. When you move a folder, you move
the folder and all of the contacts and folders that it contains.
To move a folder using drag and drop, the folder must be visible in the List View and the folder
you are moving it to must be visible in the Tree View. To move a folder:
1 Drag the folder you are moving to the folder you want it moved to.
To move a folder using the toolbar:
1 Click the folder you want to move.
2 Click .
3 Open the folder you want to move the folder to.
The contents of the folder appear in the List View box.
4 Click .
The folder must be in the List View box to use the right mouse button. To move a folder using the
right mouse button:
1 Right-click the folder you want to move and then click Cut.
2 Open the folder you want to move the folder to.
The contents of the folder appear in the List View box.
3 Right-click an open area in the folder and then click Paste.
To move a folder using the Menu bar:
1 Click the folder you want to move.
2 Click the Edit menu and then click Cut.
3 Open the folder you want to move the folder to.
The contents of the folder appear in the List View box.
4 Click the Edit menu and then click Paste.
P0604633 01
Page 77

Chapter 1 Personal Call Manager 77
Renaming a folder
To change the name of a folder using the right mouse button:
1 Right-click the folder you want to rename and then click Properties.
The Folder Property dialog box appears.
2 Type the new name of the folder and then click the OK button.
To change the name of a folder using the toolbar:
1 Click the folder you want to rename.
2 Click .
The Folder Property dialog box appears.
3 Type the new name of the folder and then click the OK button.
To change the name of a folder using the Menu bar:
1 Click the folder you want to rename.
2 Click the File menu and then click Properties.
The Folder Property dialog box appears.
3 Type the new name of the folder and then click the OK button.
Deleting a f older
When you delete a folder, the folder and all the contacts and folders contained in the folder are
deleted.
To delete a folder using the right mouse button:
1 Right-click the folder you want to delete and then click Delete.
2 Click the OK button to confirm deleting the folder and its contents.
To delete a folder using the Menu bar:
1 Click the folder you want to delete.
2 Click the Edit menu and then click Delete.
3 Click the OK button to confirm deleting the folder and its contents.
Business Communications Manager Personal Call Manager
Page 78

78 Chapter 1 Personal Call Manager
Importing Contacts
If you have a list of contacts in another appli ca ti on, yo u can save your list of conta ct s as a text file
and then import those contacts into Personal Call Manager.
To import addresses:
1 Open the application that contains your existing contact list and save the list as a comma
delimited text file. Make a note of the or der of the information fie lds in the existing file.
Note: Refer to the documentation that came with the application for instructions on how
to save the contact list as a comma delimited text file.
2 Open the Personal Call Manager window.
3 Click the File menu and then click Import Address.
The Import address from text file dialog box appears.
4 Click to choose the file you want to import.
The Open dialog box appears.
5 Move to the f older that contains the file you want to import.
6 Double-click the file you want to import.
The Import address from te xt fi le dia log box a ppears with th e path a nd fil e name in t he Sourc e
Text File field.
P0604633 01
Page 79

Chapter 1 Personal Call Manager 79
7 Click the list box of one of the information fields (for example, Last Name) and then click the
text that corresponds to that information field (for example. the last name of the contact).
8 Repeat step 7 for ea ch of the inform ation fi elds. Choos e None if the information for the field is
not in the file you are importing.
9 Click the Import button.
The contacts from the text file are added to your Address Book. You can now move the new
contacts into their folders.
Exporting Contacts
You can save all of the contacts in your Address Book into a comma delimited text file. You can
use this file in other applications. For example, you can add your contacts to a customer database
or use the contacts to create a mailing list.
To export contacts:
1 Click the File menu and then click Export Address.
The Export address into a text file dialog box appears.
2 Click to enter the nam e of the text file.
The Save as dialog box appears.
3 Move to the f older you wa nt to store the text file in.
4 In the File name box type the file name.
Business Communications Manager Personal Call Manager
Page 80

80 Chapter 1 Personal Call Manager
5 Click the Save button.
The Export address into text file dialog box appears with the path and file name in the
Destination Text File field.
6 In the Field 1 list box select the in form ation you want t o appea r in t he fir st f ield of the t ext f ile
(e.g. Las t Name).
Repeat step 6 until all of the fields show the information you want. For any field you do not
want inform ation in, click None.
Note: Only one type of information can appear in each box.
7 Click the Export button.
All the contacts in the Address Book are saved to a comma delimited text file.
Quick Dials
The Address Book is divided into two mains sections: My Contacts and Quick Dials. The
My Contacts section stores your contacts. The Quick Dials section used stores contacts that you
use frequently or need to access quickly.
The contacts you a dd to t he Quic k Dials sect ion are a utomati call y added to th e Qui ck Dials menu.
You can access the Quick Dials menu from the Calls menu or the Personal Call Manager task tray
menu.
Adding Quick Dials
To add a Quick Dial, add the contact to the Quick Dials section of the Address Book. Any of the
methods described earlier to add a contact can be used to add Quick Dials.
Displaying the information about Personal Call Manager
The About Personal Call Manager window shows the version number of the Personal Call
Manager software you are using.
To access the About Personal Call Manager window:
1 Click the Help menu and then click About PCM.
or
1 Click .
P0604633 01
Page 81

Synchronization with the telephone
Common call control operations can be performed on either the telephone or on Personal Call
Manager. For example, to end a call you can press the Rls (Release) key on the telephone or click
Release in Personal Call Manager.
Any telephone programming you use to customize your telephone is not synchronized. For
example, the personal speed dials programmed on the telephone are not automatically copied into
Personal Call Manager.
Accessing Help
Accessing context-sensitive Help
You can access context-sensitive Help by pressing the F1 key. The Help information that appears
is about the currently active window, dialog box or menu item.
Chapter 1 Personal Call Manager 81
Opening the Help contents screen
You can access Help from the Menu bar. To access the Help window:
1 Click the Help menu and then click Help topics.
The main Help window gives you access to all of the help information.
Use the Contents tab to view the Help topics. To go to one of the topics, double-click the topic.
Use the Index tab to view an alphabetically sorted list of Help topics. The topics on the Index tab
are more detailed than the topics on the Contents tab. To go to a topic, click the topic.
Use Find tab to enter a word or topic you need help information about. The Find feature searches
through the Help information and displays information about the word or topic you enter.
Accessing the Tip of the Day
The Tip of the Day window shows helpful information about how to use Personal Call Manager.
To display the Tip of the Day window:
1 Click the Help menu and then click Tip of the Day.
Business Communications Manager Personal Call Manager
Page 82

82 Chapter 1 Personal Call Manager
Turning th e Tip of the Day off
The Tip of the Day window appears when you start Personal Call Manager.
To turn the Tip of the Day off:
1 Click the Help menu and then click Tip of the Day.
2 Clear the Show Tips at Startup check box.
When the Show Tips at Startup check box is empty, the Tip of the Day window does not appear
when you start Personal Call Manager.
Turning th e Tip of the Day on
To turn the Tip of the Day on:
1 Click the Help menu and then click Tip of the Day.
2 Select the Show Tips at Startup check box.
When the Show Tips at Startup check box contains a check mark, the Tip of the Day window
appears when you start Personal Call Manager.
P0604633 01
Page 83

Personal Call Manager Preferences
Personal Call Manager preferences determine how the Address Book is searched, how Personal
Call Manager appears when you start it up, and whether the dialing rules are used.
Changing the Search preferences
The Search feature operates in one of two different modes: Slow Search and Quick Search. In
Slow Search mode, you type the characters you want to find and click the Find Now button.
Personal Call Manager searches through the Address Book to find the contact. In Quick Search
mode, Personal Call Manager starts searching through the cont act s as soon as you type a char ac ter.
Note: If you plan on using the Quick Search mode, your computer must have a Pentium
processor or better. If you use a slower processor, Fast Search is slower.
To change the Search mode from the Menu bar:
Chapter 1 Personal Call Manager 83
1 Click the Tools menu and then click Options.
The Options dialog box appears.
2 Click the Search Option you want to use.
To change the Search mode from the task tray:
1 Right-click the Personal Call Manager task tray icon and then click Options.
The Options dialog box appears.
2 Click the Search Option you want to use.
Business Communications Manager Personal Call Manager
Page 84

84 Chapter 1 Personal Call Manager
Changing the Startup Option
The Startup Option determines if the window is open or minimized when you start Personal Call
Manager.
To change the Startup Option from the Menu bar:
1 Click the Tools menu and then click Options.
The Options dialog box appears.
2 Click the Startup Option you want to use.
To change the Startup Option from the task tray:
1 Right-click the Personal Call Manager task tray icon and then click Options.
The Options dialog box appears.
2 Click the Startup Option you want to use.
P0604633 01
Page 85

Chapter 1 Personal Call Manager 85
Changing the Dialing Rule Setting
The Dialing Rule Setting determines if the dialing properties entered in the Dialing Properties
dialog box are used. This feature is enabled by default.
When the Dialing Rule Setting is enabled, Personal Call Manager uses dialing properties, such as
the local area code and the outside line access code, when making a call. When the Dialing Rule
Setting is disabled, Personal Call Manager does not use the dialing properties and you must
manually enter any additional dialing information, such as the outside line access code.
To change the Dialing Rule Setting from the Menu bar:
1 Click the Tools menu and then click Options.
The Options dialog box appears.
2 Click the Use Rules defined in the Dialin g Property Dialog check box to change the setting.
To change the Dialing Rule Setting from the task tr ay:
1 Right-click the Personal Call Manager task tray icon and then click Options.
The Options dialog box appears.
2 Click the Use Rules defined in the Dialin g Property Dialog check box to change the setting.
Business Communications Manager Personal Call Manager
Page 86

86 Chapter 1 Personal Call Manager
Changing the Caller’s Record Display Setting
When the Caller’s Record Display Setting is on, Personal Call Manager compares the incoming
telephone number to the entries in the Address Book. If a match is found, the Notes tab of the
Address Properties dialog box appears showing the information for the caller. If a match is not
found, a message appears asking if you want to add the caller to the Address Book.
Personal Call Manager receives the incoming telephone number only if:
• You subscribe to a Caller ID (CLID) service.
or
• You are receiving an internal call through Business Communications Manager.
To change Caller’s Record Display Sett ing from the Menu bar:
1 Click the Tools menu and then click Options.
The Options dialog box appears.
2 Click the Auto display contact’s notes page upon answering the call check box to change
the setting.
To change the Dialing Rule Setting from the task tr ay:
1 Right-click the Personal Call Manager task tray icon and then click Options.
The Options dialog box appears.
2 Click the Auto display contact’s notes page upon answering the call check box to change
the setting.
P0604633 01
Page 87

Quitting Personal Call Manager
You can quit Personal Call Manager from the task tray or the window.
To quit Personal Call Manager using the task tray:
1 Right-click the Personal Call Manager task tray icon and then click Exit.
To quit Personal Call Manager using the window:
1 Click the File menu and then click Exit.
You can also quit Personal Call Manager by clicking the close button in the upper right corner of
the Personal Call Manager window.
Removing Personal Call Manager
Chapter 1 Personal Call Manager 87
You can remove Personal Call Manager from your computer. For example, if you get a new
computer you want to move Personal Call Manager to the new computer. The Uninstall program
makes sure all of the fil es that comp rise Personal Call Manager are removed from the computer
hard disk.
Note: If you are moving Personal Call Manager to a new computer, make a copy of the
PCMAddressBook.mdb file before you remove Persona l Call Manager. (Use Find or look
in the Nortel Networks folder.) You can then copy this file to the new computer where
Personal Call Manager is installed. This copies all of the contacts you have added to the
Address Book to the new computer.
To remove the Personal Call Manager software:
1 Make sure you have quit Personal Call Manager.
2 Click the Windows Start button, point to Settings and then click Control Panel.
3 Double-click the Add/Remove Programs icon.
4 Click Personal Call Manager.
5 Click the Add/Remove button.
All of the files associated with Personal Call Manager are removed from your computer hard
drive.
Business Communications Manager Personal Call Manager
Page 88

88 Chapter 1 Personal Call Manager
P0604633 01
Page 89

Glossary
Address Bo ok
Call Forward
Calling Line Identification (CLID)
Contact
89
The portion of Personal Call Manager where you store the telephone numbers and
addresses of people and businesses.
A feature that forwards all the calls arriving at your telephone to another telephone.
A service provided by the telephone company that allows you to see the caller’s telephone
number and in some cases th e cal ler’ s name. If yo u subsc ribe t o t his s ervic e, Pers ona l Call
Manager can then show you the caller’s name or telephone number on the computer
screen.
A contact is any entry in the Address Book. A contact can be a person, business, or any
number or address you want stored in Personal Call Manager.
Dialing properties
The dialing propertie s def ine where you are situated and what is r equi red to dial from this
location.
Do Not Disturb
A feature that sto ps cal ls fr om rin ging at your tele phone . The You Have a New Cal l dialog
box still appears.
Business Communications Manager TSP
The application that provides Personal Call Manager with access to the TAPI functions.
Extension name
The name used to identify your telephone on the Business Communications Manager
system.
Handsfree
A feature you can use to make calls without using the telephone handset.
Icon
A graphic symbol used to represent an object (such a contact or call) or a task (such as
manual dialing) in Personal Call Manager.
List View
The portion of the Address Book t hat shows the cont acts and folder s stor ed in the select ed
folder.
Business Communications Manager Personal Call Manager
Page 90

90 Glossary
Menu bar
The menu bar shows the menus available from the main window.
PC (Personal Computer )
A Windows® compatible computer that runs the Personal Call Manager software.
Quick dials
A group of telephone numbers that you can call by selecting a menu item.
Status bar
An area at the bottom of the c omput er screen which provides i nfo rmat ion messages about
Personal Call Manager.
TAPI
T AP I stands for Telephony Application Programming Inte rface. It is a set of programmi ng
tools that allows Persona l Call Manager to communic ate with the telephone system.
TAPI line
The telephone line that Personal Call Manager uses to make a call.
Task tray
An area in the bottom right hand corner of the PC screen. It contains the Personal Call
Manager task tray icon which is used to perform several common call control functions.
Taskbar
An area at the bottom of the computer screen. It contains the Personal Call Manager
taskbar icon that is us ed to maxi mize the Person al Ca ll Manage r Window or bring it to the
foreground.
Tool bar
The tool bar contains several buttons that provide quick and easy access to Personal Call
Manager functions.
Tr ee View
The portion of the Address Book that shows how the folders used to store the contacts are
organized.
Wild card character
A special character that can be used represent any letter or number.
P0604633 01
Page 91

Index
91
A
acronyms 10
Active Call icon 14, 18, 35
Address Book 15
adding a contact 57
changing the view 56
displaying 17
icons 55
list view 56
tree view 55
Address of contact 59
Answering a call
Call Answer dialog box 36
Calls menu 37
held call 38
task tray 37
when is someone calling 35
who is calling 35
window 37
Answering a held conference call
Calls menu 46
task tray 46
window 46
B
Blind transfer 40
Buttons
About 16
Copy 16
Cut 16
Detail 16, 18
Find Person 16
Large Icons 16, 18
List 16, 18
Manual Dial 18
New Contact 16
New Folder 16
Paste 16
Small Icons 16, 18
toolbar 16
Up One Level 16
C
Call Answer dialog box 36
Call duration 18
Call Forward 19, 50
Call Waiting 28
Calling
last callers 33
last calls 33
prime telephone number 30
Quick Dials 34
redialing 33
returning 33
Calling car d 25
Calling Line Identification service 33, 35, 86
Calls
answering 37
displaying the number of 13
ending 49
switching between several calls 39
Calls menu 15
Closing the window 19
Conference
answering a held conference call 46
creating 45
ending 48
hold 46
splitting 47
Conference Call icon 14, 18
Contact
adding 57
address 59
changing 67
copying 68, 70
cutting 72
default telephone number 61
deleting 72
e-mail address 60
finding 42, 43, 51, 64
moving 71
name 59
pasting 70, 72
telephone number 59
conventions, text 9
Copying
contact 68
folders 75
Current Calls box 15
displaying 17
D
Dialing properties 21
Business Communications Manager Personal Call Manager
Page 92

92 Index
Do Not Disturb (DND) 19, 50
Duration, call 18
E
E-Mail Address 60
Exiting Personal Call Manager 87
F
Finding a contact 64
entering a name or number 66
using wild cards 66
Folders
adding 74
copying 75
cutting 76
deleting 77
moving 76
pasting 75, 76
H
Held Call icon 14, 18, 38
Held Conference icon 14, 18
Help
contents tab 81
find tab 81
index tab 81
messages 19
opening 81
Hold
answering a held call 38
conference calls 46
putting a call on hold 38
I
Icons
active call 14, 18, 35
Address Book 55
conference call 14, 18
held call 14, 18, 38
held conference 14, 18
Personal Call Manager 35
ringing 14, 18
task tray menu 14
L
Last callers 33
Last calls 33
Line used 20
List View 56
M
Making a call 30
Address Book 30
Calls menu 31
Quick Dials 34
redialing a number 33
returning a call 33
task tray 31
toolbar 32
Menu bar 15
Moving
contacts 71
folders 76
My Contacts 55
N
Name 59
New Call dialog box 35
O
On-line help
accessing 81
contents tab 81
find tab 81
index tab 81
opening 81
Outside lines 28
P
Personal Call Manager
about 80
exiting 87
location 22
preferences 83
quitting 87
removing 87
starting 12
task tray icon 13, 35
Preferences
dialing properties 21
Personal Call Manager 83
search 83
Prime telephone number, calling 30
Pulse dialing 28
P0604633 01
Page 93

Index 93
Q
Quick Dials 55
adding 80
list 34
Quitting Personal Call Manager 87
R
Redialing a telephone number 33
Removing Personal Call Ma nager 87
Returning a call 33
Ringing icon 14, 18
S
Search
entering a name or number 66
for a contact 64
options 83, 84, 85, 86
preferences 83
wild cards 66
Search mode 64
Quick Search 65
Slow Search 64
Starting Personal Call Manager 12
Status bar 15
displaying 19
Synchronization with the telephone 81
displaying 16
Find Person button 16
Large Icons button 16, 18
List button 16, 18
Manual Dial button 18
New Contact 16
New Folder 16
Paste button 16
Small Icons button 16, 18
Up one level button 16
Transferring a call
blind 40
Calls menu 42, 44
task tray 42, 44
window 40, 44
with an announcement 44
without an announcement 40
Tree View 55
W
Wild cards 66
Window
closing 19
components 15
opening 14
T
Task tray icon 13
displaying the number of calls 13
menu 13
who is calling 35
Task tray menu 13
icons 14
Telephone line used 19, 20
Telephone lines 28
Telephone number of contact 59
default 61
Telephone synchronization 81
text conventions 9
Tone dialing 28
Toolbar 15
About button 16
buttons 16
Copy button 16
Cut button 16
Detail button 16, 18
Business Communications Manager Personal Call Manager
Page 94

94 Index
P0604633 01
 Loading...