

Page 1

PeriRDB User’s Guide 2.1
Avaya Business Communications Manager
Document Status: Standard
Document Number: P0602814
Document Version: 1.92
Date: June 2010
Page 2

© 2010 Avaya Inc.
All Rights Reserved.
Notices
While reasonable efforts have been made to ensure that the information in this document is complete and accurate at the time of printing,
Avaya assumes no liability for any errors. Avaya reserves the right to make changes and corrections to the information in this document
without the obligation to notify any person or organization of such changes.
Documentation disclaimer
Avaya shall not be responsible for any modifications, additions, or deletions to the original published version of this documentation
unless such modifications, additions, or deletions were performed by Avaya. End User agree to indemnify and hold harmless Avaya,
Avaya’s agents, servants and employees against all claims, lawsuits, demands and judgments arising out of, or in connection with,
subsequent modifications, additions or deletions to this documentation, to the extent made by End User.
Link disclaimer
Avaya is not responsible for the contents or reliability of any linked Web sites referenced within this site or documentation(s) provided by
Avaya. Avaya is not responsible for the accuracy of any information, statement or content provided on these sites and does not
necessarily endorse the products, services, or information described or offered within them. Avaya does not guarantee that these links will
work all the time and has no control over the availability of the linked pages.
Warranty
Avaya provides a limited warranty on this product. Refer to your sales agreement to establish the terms of the limited warranty. In
addition, Avaya’s standard warranty language, as well as information regarding support for this product, while under warranty, is
available to Avaya customers and other parties through the Avaya Support Web site: http://www.avaya.com/support
Please note that if you acquired the product from an authorized reseller, the warranty is provided to you by said reseller and not by Avaya.
Licenses
THE SOFTWARE LICENSE TERMS AVAILABLE ON THE AVAYA WEBSITE, HTTP://SUPPORT.AVAYA.COM/LICENSEINFO/
ARE APPLICABLE TO ANYONE WHO DOWNLOADS, USES AND/OR INSTALLS AVAYA SOFTWARE, PURCHASED FROM
AVAYA INC., ANY AVAYA AFFILIATE, OR AN AUTHORIZED AVAYA RESELLER (AS APPLICABLE) UNDER A
COMMERCIAL AGREEMENT WITH AVAYA OR AN AUTHORIZED AVAYA RESELLER. UNLESS OTHERWISE AGREED TO
BY AVAYA IN WRITING, AVAYA DOES NOT EXTEND THIS LICENSE IF THE SOFTWARE WAS OBTAINED FROM ANYONE
OTHER THAN AVAYA, AN AVAYA AFFILIATE OR AN AVAYA AUTHORIZED RESELLER, AND AVAYA RESERVES THE
RIGHT TO TAKE LEGAL ACTION AGAINST YOU AND ANYONE ELSE USING OR SELLING THE SOFTWARE WITHOUT A
LICENSE. BY INSTALLING, DOWNLOADING OR USING THE SOFTWARE, OR AUTHORIZING OTHERS TO DO SO, YOU,
ON BEHALF OF YOURSELF AND THE ENTITY FOR WHOM YOU ARE INSTALLING, DOWNLOADING OR USING THE
SOFTWARE (HEREINAFTER REFERRED TO INTERCHANGEABLY AS "YOU" AND "END USER"), AGREE TO THESE
TERMS AND CONDITIONS AND CREATE A BINDING CONTRACT BETWEEN YOU AND AVAYA INC. OR THE
APPLICABLE AVAYA AFFILIATE ("AVAYA").
Copyright
Except where expressly stated otherwise, no use should be made of the Documentation(s) and Product(s) provided by Avaya. All content
in this documentation(s) and the product(s) provided by Avaya including the selection, arrangement and design of the content is owned
either by Avaya or its licensors and is protected by copyright and other intellectual property laws including the sui generis rights relating
to the protection of databases. You may not modify, copy, reproduce, republish, upload, post, transmit or distribute in any way
content, in whole or in part, including any code and software. Unauthorized reproduction, transmission, dissemination, storage, and or
use without the express written consent of Avaya can be a criminal, as well as a civil offense under the applicable law.
Third Party Components
Certain software programs or portions thereof included in the Product may contain software distributed under third party agreements
("Third Party Components"), which may contain terms that expand or limit rights to use certain portions of the Product ("Third Party
Terms"). Information regarding distributed Linux OS source code (for those Products that have distributed the Linux OS source code),
and identifying the copyright holders of the Third Party Components and the Third Party Terms that apply to them is available on the
Avaya Support Web site: http://support.avaya.com/Copyright.
Trademarks
The trademarks, logos and service marks ("Marks") displayed in this site, the documentation(s) and product(s) provided by Avaya are the
registered or unregistered Marks of Avaya, its affiliates, or other third parties. Users are not permitted to use such Marks without prior
written consent from Avaya or such third party which may own the Mark. Nothing contained in this site, the documentation(s) and
product(s) should be construed as granting, by implication, estoppel, or otherwise, any license or right in and to the Marks without the
express written permission of Avaya or the applicable third party. Avaya is a registered trademark of Avaya Inc. All non-Avaya
trademarks are the property of their respective owners.
Downloading documents
For the most current versions of documentation, see the Avaya Support. Web site: http://www.avaya.com/support
Contact Avaya Support
Avaya provides a telephone number for you to use to report problems or to ask questions about your product. The support telephone
number is 1-800-242-2121 in the United States. For additional support telephone numbers, see the Avaya Web site: http://
www.avaya.com/support
any
Page 3

Table of Contents
Preface . . . . . . . . . . . . . . . . . . . . . . . . . . . . . . . . . . . . . . . . . . . . . . . . . . . . . . 5
Scope . . . . . . . . . . . . . . . . . . . . . . . . . . . . . . . . . . . . . . . . . . . . . . . . . . . . 6
Intended Audience . . . . . . . . . . . . . . . . . . . . . . . . . . . . . . . . . . . . . . . . . . 6
How to Use This Manual . . . . . . . . . . . . . . . . . . . . . . . . . . . . . . . . . . . . . 7
Organization of This Manual . . . . . . . . . . . . . . . . . . . . . . . . . . . . . . . . . . 7
Conventions Used in This Manual . . . . . . . . . . . . . . . . . . . . . . . . . . . . . . 8
Solaris and Windows 2000 Conventions . . . . . . . . . . . . . . . . . . . . . . . . 10
Trademark Conventions . . . . . . . . . . . . . . . . . . . . . . . . . . . . . . . . . . . . . 10
Introduction to RDB Access . . . . . . . . . . . . . . . . . . . . . . . . . . . . . . . . . . . 11
Overview. . . . . . . . . . . . . . . . . . . . . . . . . . . . . . . . . . . . . . . . . . . . . . . . . 12
Using the RDB package . . . . . . . . . . . . . . . . . . . . . . . . . . . . . . . . . . 13
Supported RDBM Systems. . . . . . . . . . . . . . . . . . . . . . . . . . . . . . . . . . . 13
PeriSQL . . . . . . . . . . . . . . . . . . . . . . . . . . . . . . . . . . . . . . . . . . . . . . . . . . . . 15
Automatically Generating SQL Commands (PeriSQL) . . . . . . . . . . . . 16
Accessing PeriSQL . . . . . . . . . . . . . . . . . . . . . . . . . . . . . . . . . . . . . . . . . 17
Setting the Environment Variables . . . . . . . . . . . . . . . . . . . . . . . . . 17
Accessing PeriSQL From the Command Line. . . . . . . . . . . . . . . . . 18
Accessing PeriSQL From PeriProducer. . . . . . . . . . . . . . . . . . . . . . 19
PeriSQL Display. . . . . . . . . . . . . . . . . . . . . . . . . . . . . . . . . . . . . . . . . . . 20
PeriSQL User Accounts . . . . . . . . . . . . . . . . . . . . . . . . . . . . . . . . . . 21
PeriSQL Tables . . . . . . . . . . . . . . . . . . . . . . . . . . . . . . . . . . . . . . . . 22
PeriSQL Columns . . . . . . . . . . . . . . . . . . . . . . . . . . . . . . . . . . . . . . 23
Column Characteristics . . . . . . . . . . . . . . . . . . . . . . . . . . . . . . . 24
Using PeriSQL to Query an RDBMS. . . . . . . . . . . . . . . . . . . . . . . . . . . 25
Creating and Customizing the SQL Command in PeriSQL. . . . . . . 25
Selecting Multiple Columns (Join) . . . . . . . . . . . . . . . . . . . . . . 26
Performing a Query With PeriSQL . . . . . . . . . . . . . . . . . . . . . . . . . 27
Debugging the SQL Command in PeriSQL. . . . . . . . . . . . . . . . . . . 28
Reported Issues. . . . . . . . . . . . . . . . . . . . . . . . . . . . . . . . . . . . . . . . . . . . 28
Using Stored Procedures, Functions, and Triggers. . . . . . . . . . . . . . . . . 28
Displaying Predefined Procedures, Functions, and Triggers. . . . . . 29
Implementing Procedures and Functions . . . . . . . . . . . . . . . . . . . . . 31
Writing Procedures and Functions to an Application . . . . . . . . 31
Supplying Arguments to Functions and Procedures . . . . . . . . . 33
Sybase Stored Procedures . . . . . . . . . . . . . . . . . . . . . . . . . . . . . 35
Using PeriSQL With the SQL Block . . . . . . . . . . . . . . . . . . . . . . . . . . . 36
Writing the PeriSQL SELECT to an SQL Block. . . . . . . . . . . . . . . 36
SQLClnt . . . . . . . . . . . . . . . . . . . . . . . . . . . . . . . . . . . . . . . . . . . . . . . . . . . 37
Accelerating RDBMS Access With SQLClnt . . . . . . . . . . . . . . . . . . . . 38
Limitations For SQLClnt . . . . . . . . . . . . . . . . . . . . . . . . . . . . . . . . . 38
Configuring For SQLClnt . . . . . . . . . . . . . . . . . . . . . . . . . . . . . . . . 38
Using the SQL Request Accelerator . . . . . . . . . . . . . . . . . . . . . . . . 38
Using the SQLClnt Backup Server (-s option). . . . . . . . . . . . . . . . . 39
Page 3
Page 4

PeriRDB User’s Guide
CORBAClnt . . . . . . . . . . . . . . . . . . . . . . . . . . . . . . . . . . . . . . . . . . . . . . . . 49
Timing, Measuring, and Logging RDBMS Server Performance . . . 40
Cryptutil Utility . . . . . . . . . . . . . . . . . . . . . . . . . . . . . . . . . . . . . . . . . . . . 40
Using the Cryptutil Utility . . . . . . . . . . . . . . . . . . . . . . . . . . . . . . . . 40
Syntax . . . . . . . . . . . . . . . . . . . . . . . . . . . . . . . . . . . . . . . . . . . .40
Using the Encrypted Connect String with SQLClnt . . 41
Using encrypted Connect Strings with gen.cfg . . . 42
Accessing Databases using SQLClnt on an Intermediate Node . . . . . . .43
SQLClnt on the Same Node as the IVR Application . . . . . . . . . . . .43
SQLClnt on an Intermediate Node . . . . . . . . . . . . . . . . . . . . . . . . . .44
SQLClnt and vmst on an Intermediate Node . . . . . . . . . . . . . . . . . . 45
SQLClnt and periq on an Intermediate Node . . . . . . . . . . . . . . . . . . 46
Working with CORBA Server Objects . . . . . . . . . . . . . . . . . . . . . . . . . 50
CORBAClnt . . . . . . . . . . . . . . . . . . . . . . . . . . . . . . . . . . . . . . . . . . . . . . 50
corbaclnt Usage Menu . . . . . . . . . . . . . . . . . . . . . . . . . . . . . . . . . . . 51
Installation/Startup of corbaclnt on Solaris . . . . . . . . . . . . . . . . . . . 51
CORBAClnt Server Report . . . . . . . . . . . . . . . . . . . . . . . . . . . . . . . 51
Reported Issues. . . . . . . . . . . . . . . . . . . . . . . . . . . . . . . . . . . . . . . . . 52
The CORBA Block . . . . . . . . . . . . . . . . . . . . . . . . . . . . . . . . . . . . . . . . .53
Invoking Operations With the CORBA Block . . . . . . . . . . . . . . . . .54
Specifying Return Types . . . . . . . . . . . . . . . . . . . . . . . . . . . . . . . . .55
Specifying Return Exceptions . . . . . . . . . . . . . . . . . . . . . . . . . . . . .56
PeriRDB Libraries . . . . . . . . . . . . . . . . . . . . . . . . . . . . . . . . . . . . . . . . . . 57
PeriRDB Libraries . . . . . . . . . . . . . . . . . . . . . . . . . . . . . . . . . . . . . . . . . 58
Index . . . . . . . . . . . . . . . . . . . . . . . . . . . . . . . . . . . . . . . . . . . . . . . . . . . . . . 59
Page 4
Page 5

Preface
Page 6

PeriRDB User’s Guide
Scope
The PeriRDB User’s Guide provides a feature description and reference for PeriSQL
and SQLClnt software functions as well as SQL database libraries. This document
also includes installation, configuration, and operation information.
This document uses PeriProducer as the application development tool. For
information about using PeriProducer, see the PeriProducer User’s Guide.
Intended Audience
This document is intended for application developers implementing RDBMS
applications in an Avaya Media Processing Server (MPS) environment.
To use this document, you should be familiar with relational databases, and structured
query languages.
Avaya recommends that application developers attend an on-site PeriProducer class as
well as a system familiarization training program before attempting to create
interactive applications.
Page 6
Page 7

How to Use This Manual
This manual uses many standard terms relating to computer system and software
application functions. However, it contains some terminology that can only be
explained in the context of the MPS Series system. Refer to the Glossary of MPS
Terminology for definitions of MPS Series specific terms.
Initially, you should read this manual at least once, from start to finish. Later, you can
use the Table of Contents to locate topics of interest for reference and review.
If you are reading this document online, use the cross-reference links (shown in blue)
to quickly locate related topics. <L
with your cursor over the cross-reference link. Click on any point in a Table of
Contents entry to move to that topic. Click on the page number of any Index entry to
access that topic page.
To familiarize yourself with various specialized textual references within the manual, ,
see Conventions Used in This Manual on page 8.
Preface
EFT> click once with your mouse while positioned
Periphonics is part of Avaya. The name Periphonics, and variations thereof, appear in
this manual only where it is referred to in a product. (For examples, a PeriProducer
application, the PERImps package, the perirev command, etc.)
Organization of This Manual
• Chapter 1: PeriSQL
Describes Periphonics’ SQL generation and display tool, PeriSQL
• Chapter 2: SQLClnt
Describes Periphonics’ RDBMS server request accelerator, SQLClnt
• Chapter 3: CORBAClnt
Describes Periphonics’ CORBA server tool, CORBAClnt
• Chapter 4: PeriRDB Libraries
Describes PeriRDB’s database libraries
Page 7
Page 8

PeriRDB User’s Guide
Conventions Used in This Manual
This manual uses different fonts and symbols to differentiate between document
elements and types of information. These conventions are summarized in the
following table.
Conventions Used in This Manual Sheet 1 of 2
Notation Description
Normal text
important term
system
command
command,
condition
and alarm
file name /
directory
on-screen field
<KEY NAME>
Book Reference
Normal text font is used for most of the document.
The Italics font is used to introduce new terms, to highlight
meaningful words or phrases, or to distinguish specific terms from
nearby text.
This font indicates a system command and/or its arguments. Such
keywords are to be entered exactly as shown (i.e., users are not to
fill in their own values).
Command, Condition and Alarm references appear on the screen
in magenta text and reference the Command Reference Manual,
the PeriProducer User’s Guide, or the Alarm Reference Manual,
respectively. Refer to these documents for detailed information
Commands, Conditions, and Alarms.
about
This font is used for highlighting the names of disk directories, files,
and extensions for file names. It is also used to show displays on
text-based screens (e.g., to show the contents of a file.)
This font is used for field labels, on-screen menu buttons, and
action buttons.
A term that appears within angled brackets denotes a terminal
keyboard key, a telephone keypad button, or a system mouse
button.
This font indicates the names of other publications referenced
within the document.
cross reference
!
A cross reference appears on the screen in blue text. Click on the
cross reference to access the referenced location. A cross
reference that refers to a section name accesses the first page of
that section.
The Note icon identifies notes, important facts, and other keys to
understanding.
The Caution icon identifies procedures or events that require
special attention. The icon indicates a warning that serious
problems may arise if the stated instructions are improperly
followed.
Page 8
Page 9
Conventions Used in This Manual Sheet 2 of 2
Notation Description
Preface
The flying Window icon identifies procedures or events that apply
to the Windows 2000 operating system only.
The Solaris icon identifies procedures or events that apply to the
Solaris operating system only.
1. Windows 2000 and the flying Window logo are either trademarks or registered
trademarks of the Microsoft Corporation.
2. Solaris is a trademark or registered trademark of Sun Microsystems, Inc. in the
United States and other countries.
2
1
Page 9
Page 10

PeriRDB User’s Guide
Solaris and Windows 2000 Conventions
This manual depicts examples (command line syntax, configuration files, and screen
shots) in Solaris format. In certain instances Windows 2000 specific commands,
procedures, or screen shots are shown where required. The following table lists
examples of general operating system conventions to keep in mind when using this
manual with either the Solaris or 2000 operating system.
Solaris Windows 2000
Environment $MPSHOME %MPSHOME%
Paths $MPSHOME/common/etc %MPSHOME%\common\etc
Command <command> & start /b <command>
Trademark Conventions
The following trademark information is presented here and applies throughout for
third party products discussed within this manual. Trademarking information is not
repeated hereafter.
Solaris is a trademark or registered trademark of Sun Microsystems, Inc. in the United
States and other countries.
Microsoft, Windows, Windows 2000, Internet Explorer, and the Flying Windows logo
are either trademarks or registered trademarks of Microsoft Corporation.
Netscape® and Netscape Navigator® are registered trademarks of Netscape
Communications Corporation in the United States and other countries. Netscape's
logos and Netscape product and service names are also trademarks of Netscape
Communications Corporation, which may be registered in other countries.
Page 10
Page 11

Introduction to RDB
Access
This chapter covers:
1. Overview
2. Using the RDB package
3. Supported RDBM Systems
Page 12
PeriRDB User’s Guide
Overview
Relational Database Management Systems (RDBMS) Database access is enabled
through the MPS Relational Database (RDB) collection of programs and libraries.
Program type Description
MPS RDB Programs
MPS SQL
GUI utility to access an RDBMS, build and perform Structured
Query Language (SQL) commands and display results. It can be
launched as a stand-alone application or from within the SQL block
in MPS Developer for application development.
SQLClnt
Cryptutil
CORBAClnt
Program to accelerate access to an RDBMS. Used in conjunction
with PERIQ.
Encryption program used to encrypt access strings. These access
strings are used by SQLClnt during logon.
Program to access Common Object Request Broker Architecture
(CORBA) servers
There are three types of MPS RDB Libraries:
« MPS RDB
« SQL Client
« MPS SQL
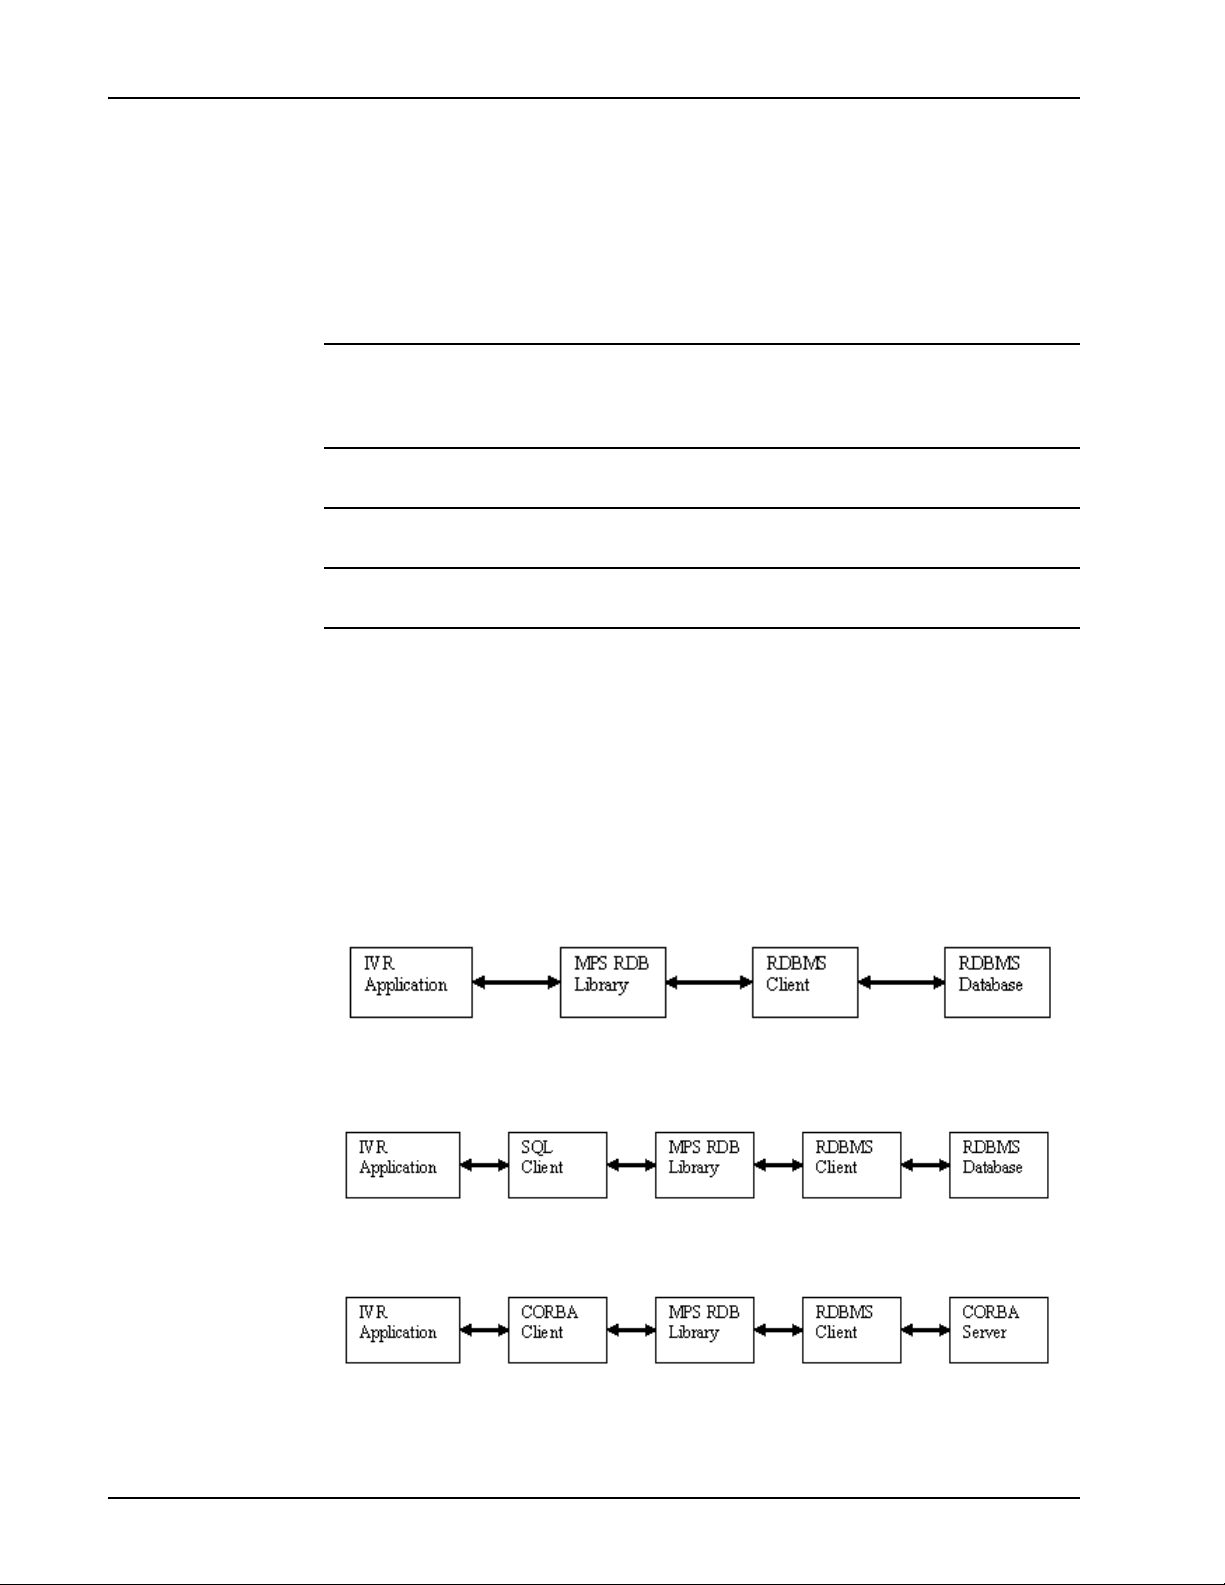
MPS RDB Libraries are used by three types of applications based on the kind of
connection to the database:
1. applications making direct (native) connections to relational
databases
2. applications using SQL Client (SQLClnt)
3. applications using CORBA Client (CORBAClnt)
Page 12
Page 13

Introduction to RDB Access
Using the RDB package
1. Write an Interactive Voice Response (IVR) application using MPS Devel-
oper.
2. Include SQL blocks in the IVR application.
a. Type SQL commands into the block or use MPS SQL.
b. Specify native, SQL Client, or CORBA Client connections in each
block.
3. When you run the IVR application, each SQL block formulates SQL
commands.
4. If the application uses a client connection, the SQL commands are sent to
either the SQL Client or CORBA Client. (This step is omitted if the application uses a native connection.)
5. The SQL commands are sent to a program/library that is part of MPS
RDB.
6. The RDB program/library forwards the SQL commands to the RDBMS
Client.
7. If the application uses native or SQL Client connections, the RDBMS Cli-
ent sends the SQL commands to the RDBMS database. If the application
uses CORBA Client connections, the RDBMS Client sends the SQL commands to the CORBA Server.
8. The results from the RDBMS Database (or CORBA Server) are sent back
to the IVR application in reverse order.
Supported RDBM Systems
The following tables show supported connection types for third-party relational
database systems.
Connection
type
Native Oracle 8i (1), 9i,
Oracle Sybase Informix MS SQL DB2
10g (2)
Sybase 10.x,
11.x, 12.1
IDS
7.31,
9.21,
9.30,
9.40
DB2 7.x,
8.1
ODBC
Connect ODBC
4.2. For MS SQL
Server 7.0,
2000, use
Connect 5.0
Page 13
Page 14

PeriRDB User’s Guide
Connection
type
Native Oracle 8i(1).
ODBC
Oracle Sybase Informix MS SQL DB2
Up to patch
rdb2.0.8; use
ODBC for
higher patch
levels
MS ODBC or
Oracle ODBC
9i, 10g. From
patch rdb2.0.9
or higher
Sybase 10.x,
11.x, 12.1
IDS 7.31,
9.21,
9.30, 9.40
MS SQL
Server 6.5, 7.0,
2000
1. Oracle 8i is not supported by the vendor since December 2004.
2. Access to Oracle 10g requires Oracle 9i client.
DB2
7.x, 8.1
Page 14
Page 15

PeriSQL
This chapter covers:
1. Automatically Generating
SQL Commands (PeriSQL)
2. Accessing PeriSQL
3. PeriSQL Display
4. Using PeriSQL to Query an
RDBMS
5. Using Stored Procedures,
Functions, and Triggers
6. Using PeriSQL With the SQL
Block
Page 16
PeriRDB User’s Guide
Automatically Generating SQL Commands (PeriSQL)
The Periphonics SQL Generate and Display Tool (PeriSQL) allows you to create,
modify, and execute Structured Query Language (SQL) SELECT commands through
a graphical interface.
PeriSQL uses the relational database management system (RDBMS) server’s master
data dictionary to query, retrieve, and display information about the various database
objects.
You can also use PeriSQL to access stored Procedures, Functions, and Triggers (see
Using Stored Procedures, Functions, and Triggers on page 28).
You can use PeriSQL as a stand-alone utility (see Accessing PeriSQL From the
Command Line on page 18) or with the PeriProducer SQL block (see Accessing
PeriSQL From PeriProducer on page 19).
References to PeriProducer’s SQL block are used throughout this section. For detailed
information about the SQL block, refer to the PeriProducer User’s Guide.
Page 16
Page 17
Accessing PeriSQL
You can access PeriSQL as a stand-alone utility or through the PeriProducer SQL
block.
Setting the Environment Variables
Before PeriSQL can access the RDBMS, you must set the required environment
variables for the particular RDBMS.
Normally, the required environment variables are established during the installation of
the PeriRDB package.
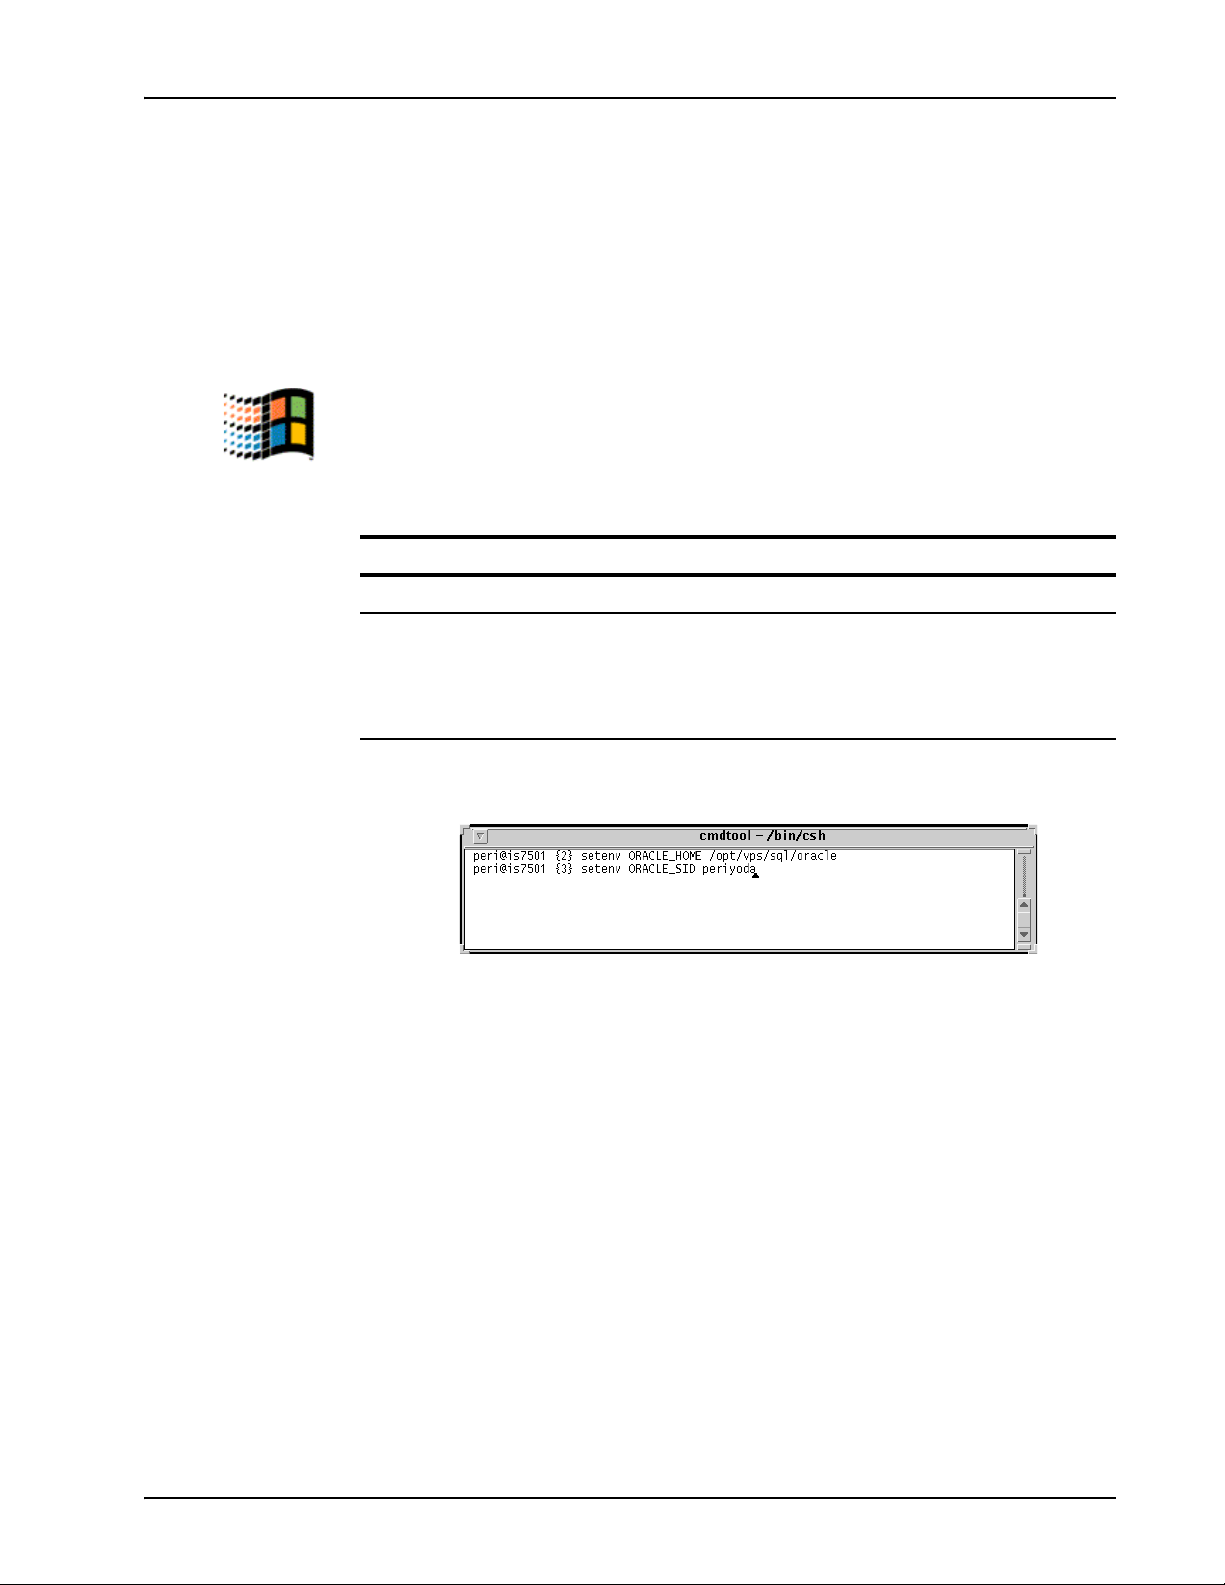
To access Oracle, set the following Oracle-specific environment variables:
PeriSQL
variable name defines
ORACLE_HOME the base directory for the Oracle installation
ORACLE_SID an alias for the Oracle SID (server name)
For example:
This alias must be properly defined in the
$ORACLE_HOME/network/admin/tnsnames.ora file to
refer to a valid Oracle server instance (SID)
Page 17
Page 18
PeriRDB User’s Guide
To access Sybase, set the following Sybase-specific environment variables:
variable name defines
SYBASE the base directory for the Sybase installation
DSQUERY the name of the Sybase server
For example:
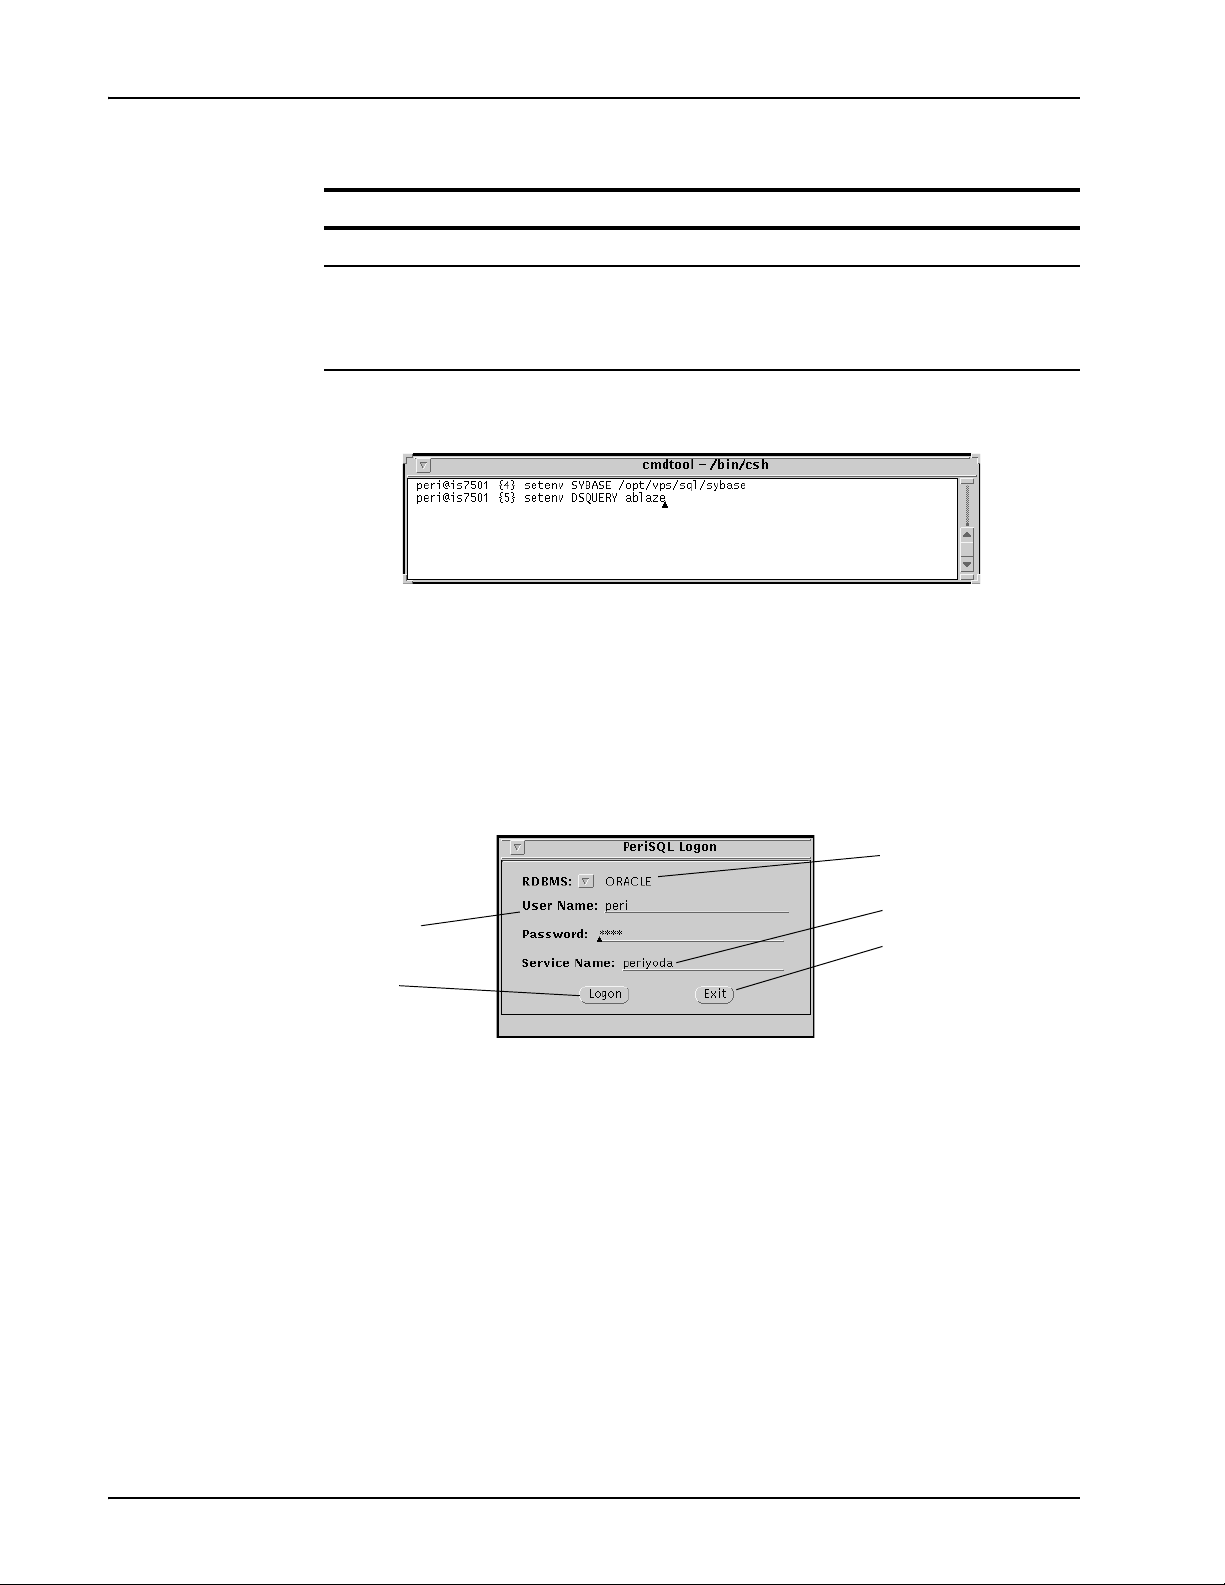
Accessing PeriSQL From the Command Line
DSQUERY must be properly defined in the
$SYBASE/interfaces file for a valid Sybase server.
Access PeriSQL from the command line by entering the following command:
perisql &
PeriSQL displays the Logon window:
Select the RDBMS
Type the user
name and
to access
RDBMS server name
password
Exit without
Select
logging on
Logon
Page 18
Page 19

PeriSQL
Accessing PeriSQL From PeriProducer
Use an SQL block to access PeriSQL from PeriProducer. From an SQL block action
window, select PeriSQL.
Access
PeriSQL
Select the
RDBMS
PeriSQL displays the Logon window:
Select the RDBMS
Type the user
name and
password
Select
Logon
to access
RDBMS server name
Exit without
logging on
When you run PeriSQL from PeriProducer, you can write an SQL SELECT statement
(query) directly from PeriSQL into a PeriProducer SQL block’s action window. For
additional information, see Using PeriSQL With the SQL Block on page 36.
If PeriSQL is initiated from PeriPro, then exiting PeriPro also exits PeriSQL.
Page 19
Page 20

PeriRDB User’s Guide
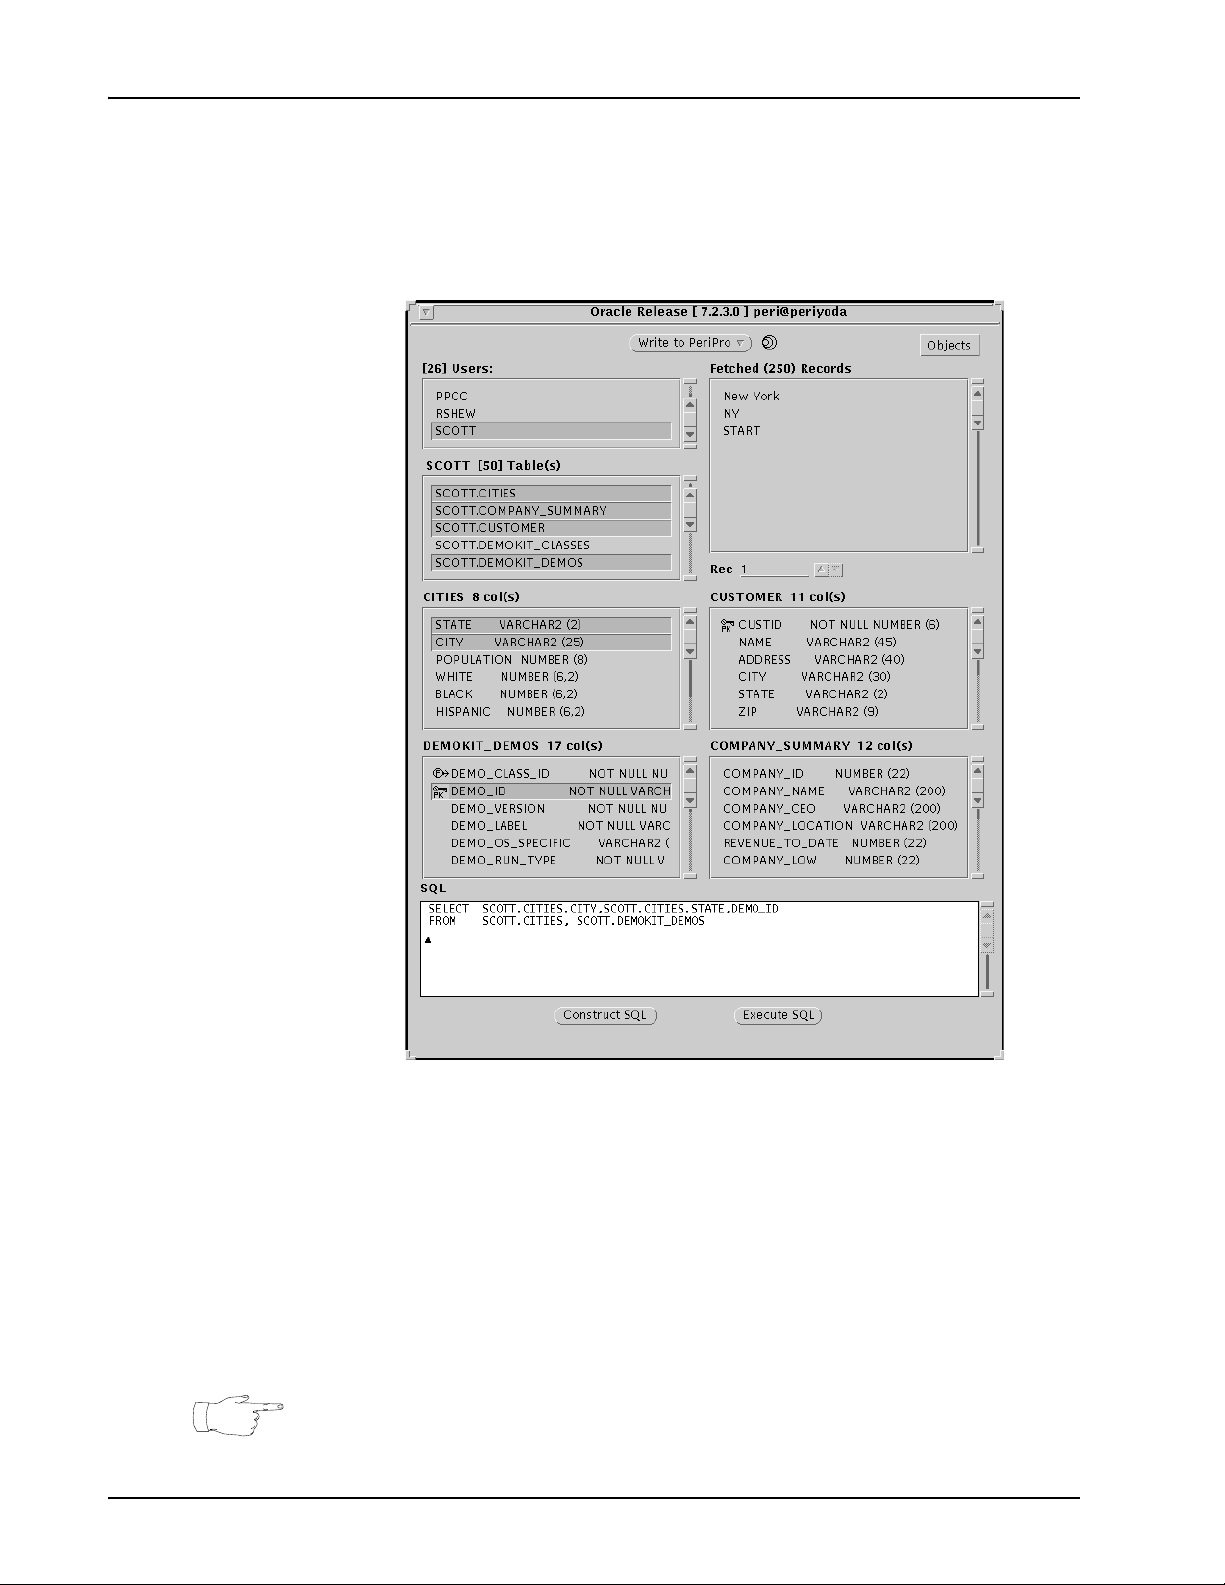
PeriSQL Display
PeriSQL runs in its own window. The display changes dynamically, displaying and
labeling scrolling lists based on your selections. The following items appear in every
PeriSQL window (Inquiry window):
Standard PeriSQL window items
Peri logo
Write to PeriPro
Objects Signals PeriSQL to display any predefined Procedures,
2
/Databases
Users
Fetched (#) Records Displays the record(s) retrieved from a successful query. # is the
1
3
Clicking the Periphonics logo in the heading of the PeriSQL
Inquiry window, displays an "About" window containing PeriSQL
copyright and version information.
Copies the current SQL command statement to the selected
SQL block.
PeriSQL can write the SQL command to any open SQL block
window that has SELECT as its DML type. For additional
information, see Using PeriSQL With the SQL Block on page 36.
Functions or Triggers when you select a user/database. For
additional information, see Using Stored Procedures, Functions,
and Triggers on page 28.
Displays information about the RDBMS server user
accounts/databases that have been defined.
When you click a user account/database name, PeriSQL
displays the names of all tables owned by that user/account. See
PeriSQL User Accounts on page 21.
number of records that satisfied the query.
An entry in the scrolling list corresponds to a column from the
SQL SELECT list, for the currently displayed record.
Rec The current record number.
PeriSQL displays only one record at a time. Use this field to
display a specific record from the returned record set.
SQL Displays the SQL command.
Construct SQL Creates the SQL SELECT command based on the selected
columns and tables, and displays it in the SQL scrolling list box.
Execute SQL Executes the current SQL SELECT command. Select Execute
SQL to perform the query on the database.
1. Write to PeriPro is only enabled if you access PeriSQL from PeriProducer.
2.Oracle
3.Sybase
Page 20
Page 21

PeriSQL
PeriSQL User Accounts
At startup, PeriSQL displays the user/database accounts scrolling list. This list
contains the user accounts that are defined for the RDBMS.
ORACLE
Current RDBMS
User accounts in
alphabetical order
Current RDBMS
Database accounts
in alphabetical order
RDBMS
server
user
click Peri logo
for PeriSQL
info
SYBASE
RDBMS
server
user
click Peri logo
for PeriSQL
info
A user account is not a physical structure in the database; rather, users own the
database objects.
Page 21
Page 22

PeriRDB User’s Guide
PeriSQL Tables
When you select a user account name, PeriSQL displays that user’s set of table names
in a scrolling list below the user accounts list. The title of the scrolling list identifies
the current user account.
Click to
display tables
current
account
Tables i n
alphabetical
order
This list contains the names of all the tables owned by the selected user.
Tables are the storage mechanism for data within a relational database system. Tables
are made up of rows and columns. Each table in the RDBMS has an owner and a
name.
OWNER TABLE
COL1 COL2
COL3
...
Indicates the owner
and the table name
column
DATA1
DATA1a
DATA1b
.
.
.
DATA2
DATA2a
DATA2b
.
.
.
DATA3
DATA3a
DATA3b
.
.
.
...
...
...
names
table
row
table column
• Each column contains the same type of data (for example, employee numbers).
See PeriSQL Columns on page 23.
• Each row contains data for a common thread (for example, various data for a
single employee). Rows (records) in an RDBMS are in no specific order.
Page 22
Page 23

PeriSQL
You can display tables for only one user at a time. When you click a different user
name, PeriSQL:
• removes the tables for the previous user from the display
• writes the new user’s tables to the scrolling list
• titles the scrolling list with the new account name
PeriSQL Columns
When you select a table, PeriSQL displays the set of columns for that table below the
table objects list. The title of the scrolling list identifies the selected table.
Click to
display
columns
Current table
column that requires
data
Columns
data type
primary key
length
You can display the columns for up to four tables at one time; PeriSQL labels each list
with the appropriate table name. Each list contains a fixed set of columns.
• Select a column to include it in the SQL command.
• You can select multiple columns from one or more of the displayed tables.
• To deselect a column, click it again.
The columns of a table describe the attributes of the data residing in the table. Each
column has a name and specific characteristics.
Page 23
Page 24

PeriRDB User’s Guide
Column Characteristics
Data Type and Length
Each column has at least two characteristics: its data type and its length.
Character Meaning
data type Each RDBMS uses a different naming convention to describe the
length The longest item that can be stored in the column.
If the column has the NUMBER data type, it can have the additional characteristics of
precision and scale.
data type. For example, with an Oracle RDBMS, data type can be:
CHAR. An alphanumeric string with maximum length 255
DATE. Year, month, day, hour, seconds
LONG RAW. A byte string with fixed length 65535
LONG. An alphanumeric string with fixed length 65535
RAW. A byte string with maximum length 255
VARCHAR2. An alphanumeric string with maximum length 255
NUMBER. Decimal value
Character Meaning
precision Determines the number of significant digits in the
numeric value.
scale Determines the placement of the decimal point.
For example, a column with characteristics NUMBER (9,2) has a total of nine digits,
two of which are to the right of the decimal point.
NOT NULL (Oracle) and null (Sybase)
For an Oracle RDBMS, SQL uses "NOT NULL" to indicate a column that must be
filled with a value in every row—that is, NULL or no value is not a valid entry.
For a Sybase RDBMS, SQL uses "null" to indicate a column where NULL or no value
is a valid entry.
Key Type
The table definition can include columns designated as primary or foreign keys:
• a primary key is a column that uniquely identifies each row in the table
• a foreign key is a column that is a primary key in another table
PeriSQL displays these columns marked by distinctive glyphs:
Primary key
Foreign key
Page 24
Page 25

Using PeriSQL to Query an RDBMS
Perform the following steps to create an SQL SELECT command and query the
RDBMS. See the appropriate section for details about each step. For information
about accessing PeriSQL, see page 17.
How to ...Use PeriSQL to Query an RDBMS
1.From the Users/Databases list, select a user account name. PeriSQL displays a
list of all tables owned by that user. See page 21.
2.From the list of tables, select the table name(s). You can display from one to four
tables at a time. PeriSQL displays each table’s columns and attributes. See page
22.
3.From each table’s columns list, select the column(s) you want to include in the
SQL command. You can select multiple columns from one or more displayed
tables. See page 23.
4.Select Construct SQL. PeriSQL writes the SQL command text to the SQL scrolling
list box. You can customize the SQL command. See page 25.
PeriSQL
5.Select Execute SQL. PeriSQL performs the current query and displays the first
retrieved record (if any) in the Fetched Records list. See page 27.
To display other records from the query, either enter the record number in the Rec
field or use the up and down arrows to scroll to the desired number.
Creating and Customizing the SQL Command in PeriSQL
To create an SQL command, you must select at least three pieces of information from
the scrolling lists:
• a user/database name (see PeriSQL User Accounts on page 21)
•a table name (see PeriSQL Tables on page 22)
• a table column (see PeriSQL Columns on page 23)
You can select columns from more than one table. See Selecting Multiple Columns
(Join) on page 26.
Select Construct SQL to build an SQL command based on the highlighted scrolling
list entries. PeriSQL inserts the SQL keywords required to specify the query criteria.
PeriSQL places the SQL command text in the SQL scrolling list.
SQL command
user
Page 25
column
table
Page 26

PeriRDB User’s Guide
You can modify the SQL command manually within the SQL scrolling list. Position
the cursor at the desired character and use the keyboard to modify the command.
PeriSQL accepts valid SQL syntax and keywords.
For example:
If you select Construct SQL after you modify the statement in the SQL scrolling list,
PeriSQL prompts you before it builds the SELECT statement based on your current
selections. Select Continue to overwrite the current statement based on your selections
or Cancel to retain the current (that is, modified) statement.
Enclose character
literals in single quotes
(apostrophes)
Selecting Multiple Columns (Join)
If you select columns from more than one table, PeriSQL performs a join operation. A
join associates columns common to two or more tables.
To indicate a join operation in the SELECT statement, PeriSQL:
• lists the selected tables in the FROM clause.
• specifies the relationship between the tables in the WHERE clause.
For example:
The WHERE clause is based on columns that are common to two or more tables in the
query.
PeriSQL automatically builds up to four joins from the currently displayed tables. If
you need to constrain the query further, modify the SQL statement manually within
the SQL scrolling list (see Creating and Customizing the SQL Command in PeriSQL
on page 25).
Page 26
Page 27

RDBMS release
number
PeriSQL
Performing a Query With PeriSQL
To query the database using the SQL command in the SQL scrolling list, select
Execute SQL.
Execute SQL performs the following:
1. PeriSQL sends the SQL statement to the SQL server.
2. The SQL server prepares and parses the statement, and opens all database
resources required to execute the SQL statement.
If any records match the query, PeriSQL displays the first returned record in the
Fetched Records scrolling list.
Number of
retrieved
records
Currently displayed
record #
Click to view
another record
or enter record
# directly into
Rec field
Each line entry in the Fetched Records list represents a column from the SQL
SELECT list. PeriSQL can only display one record at a time.
Page 27
Page 28

PeriRDB User’s Guide
Debugging the SQL Command in PeriSQL
If PeriSQL cannot successfully execute the SELECT command, it provides an error
message to indicate a logic or syntax error.
A parse error indicates a syntax error in the SELECT statement. PeriSQL indicates the
location of the syntax error. For example:
offset 1
A“no data” message indicates that the query did not retrieve any data. The query
successfully executed, but no data matched the query. For example:
offset 20
Reported Issues
PeriSQL does not support Oracle reference cursors.
!
Using Stored Procedures, Functions, and Triggers
You can use PeriSQL to display templates of Procedures, Functions, and Triggers
defined for each user (see Displaying Predefined Procedures, Functions, and
Triggers on page 29). You can also use PeriSQL to write Procedure and Function
declarations to an SQL application (see Implementing Procedures and Functions on
page 31).
Page 28
Page 29

PeriSQL
You cannot use PeriSQL to execute Procedures, Functions, or Triggers.
You cannot use PeriSQL to define Procedures, Functions, or Triggers. Your System
Administrator, Database Administrator, or database developer must predefine these
objects.
Displaying Predefined Procedures, Functions, and Triggers
To display predefined objects, first select Objects and then select the user account.
This feature is not currently available for use with an ODBC RDBMS.
First: Select objects
Second: Select
the user account
If you select a user account that has predefined Procedures, Functions, or Triggers,
PeriSQL launches a separate "Objects Browser" window displaying the templates of
these objects. To display the predefined objects for another user account in a separate
"Objects Browser" window, select another user account.
Page 29
Page 30

PeriRDB User’s Guide
total defined
objects
Objects Browser
Window
user account
scroll buttons are
enabled if there
are multiple pages
of objects
click on an object
to display the
object’s template
and attributes
click a second time
on an object to
open a "text
popup" window
displaying its
source code.
total # of pages
current page
Triggers are for
display only
required
arguments and
types
Text Popup
(Source Code)
Window
In the Objects Browser window, the heading in the top sub-window indicates the User
Name, the number of Procedures, Functions, and Triggers defined for the account and
the number of "pages" required to view all templates for the account. Left and right
scrolling buttons to move between multiple pages of objects are located in the upper
left corner.
Moving the cursor over an object causes information about the object to display in the
lower sub-window, including its "Package" name (if any), its Status (Valid/Invalid),
and its Last Modified Date/Time.
Page 30
Page 31

PeriSQL
Implementing Procedures and Functions
To implement a Procedure or Function in an application, you must include the object’s
declaration in an SQL block in the application and supply variables for any required
arguments.
PeriSQL includes Triggers for display only. You cannot use PeriSQL to add a Trigger
to an application.
Writing Procedures and Functions to an Application
You can use PeriSQL and an Objects Browser to write Procedures and Functions
directly to an SQL application.
How to ...Write Procedures and Functions to an Application
1. In the SQL block, select PROCEDURE.
Indicates the block will execute
a Procedure or Function
2. In the PeriSQL Objects Browser, click <
Function.
3. Click <
Procedure Call (or Function Call if object is a Function) and PeriSQL copies the
object declaration to the PeriSQL window.
If text is selected (highlighted) in a source code window, choosing Selected Text
from the Construct SQL menu copies the text to the PeriSQL window.
MENU> on the selected object to open the Construct SQL menu. Select
SELECT> on the desired Procedure or
Page 31
Page 32

PeriRDB User’s Guide
Select the object
click <Menu>
4. From the PeriSQL Write to PeriPro menu, select the SQL block to write to.
PeriSQL copies the contents of the SQL window, which can be an edited object
declaration, to the SQL block window.
Copies the
declaration to
the SQL block
Or: Type the object declaration directly into
the SQL block window and edit it as desired
Indicates the block will execute
a Procedure or Function
Page 32
Page 33

PeriSQL
Supplying Arguments to Functions and Procedures
You can display the template for a Procedure or Function to determine the required
arguments and types. You must specify data cards or constants for required arguments
in the object declaration. You can edit a Procedure or Function in either PeriSQL’s
SQL window and/or PeriPro’s SQL block (after selecting the Write to PeriPro menu
in PeriSQL).
• IN designates an argument passed from the application to the RDBMS
• OUT designates an argument returned to the application
• IN/OUT designates an argument that both passes data to the RDBMS and returns
data to the application
For example, the following implementation of the Procedure GET_STAR_EMP
requires a floating point number as input and returns character strings:
Three required
arguments
Input to the
Procedure
Output from
the Procedure
All Functions return a value. You must always specify a character data card to receive
the return value.
Page 33
Page 34

PeriRDB User’s Guide
Supplying Arguments in the SQL Block Window
After you transfer the object declaration to the application, you can either enter the
arguments manually, and/or use the SQL Pane menu options.
For example:
Bind variables must have a colon prefix
Separate arguments
with commas
Use the full
(folder datacard)
name
For a Procedure or Function, you must specify a numeric data card to receive the
return value.
For example:
Variable to receive
the return value
Oracle: Must enter := to indicate the assignment
Sybase (Procedures only): No parentheses around arguments and
use = to indicate the assignment
Page 34
Page 35

PeriSQL
Supplying Arguments in PeriSQL
You can manually enter the arguments in the object declaration before you write the
declaration to the application. You can use the Write to PeriPro menu to copy the
declaration and argument to the application (see Writing Procedures and Functions
to an Application on page 31).
Enter the arguments
before writing the object
to the application
Sybase Stored Procedures
The following summarizes differences in the implementation of Sybase Stored
Procedures from that of Oracle Stored Procedures.
• Sybase objects include only Procedures and Triggers (in Sybase, there are no
Functions).
• A Sybase Procedure can have only IN and OUT arguments (no IN/OUT
arguments).
• In the SQL text window in the SQL block, to execute a Procedure, parentheses
are not allowed around arguments.
Page 35
Page 36

PeriRDB User’s Guide
Using PeriSQL With the SQL Block
You can launch PeriSQL from an SQL block action window to create, modify, and
execute SQL SELECT commands through a graphical interface. Use this feature to
create and test SELECT commands before you add them to the application.
For details about using PeriSQL, see Using PeriSQL to Query an RDBMS on page
25.
PeriSQL can write the constructed SQL command to any open SQL block window
that has SELECT as its DML type. The SQL block action window must be open.
You must access PeriSQL from PeriProducer to use this feature. For information about
accessing PeriSQL, see Accessing PeriSQL on page 17.
Writing the PeriSQL SELECT to an SQL Block
First, construct the SELECT statement in PeriSQL (see Using PeriSQL to Query an
RDBMS on page 25).
Next, in the PeriSQL window, click <M
down menu, select the SQL block to write to. PeriSQL can write the SQL command
directly to any open SQL block that has SELECT as its DML type.
Open SQL blocks with a DML type
other than SELECT are unavailable
You can also use Write to PeriPro to write a Procedure or Function to an SQL block.
See Using Stored Procedures, Functions, and Triggers on page 28.
You may have to manually add database and user qualifiers into a SELECT block if
the database you used in PeriSQL differs from the one in SELECT block.
ENU> on Write to PeriPro. From the pull
Open
SELECT SQL
blocks
You can leave PeriSQL active for the entire current PeriProducer session. That is, you
can iconize PeriSQL, load applications, add or delete SQL blocks, etc. PeriSQL
dynamically updates the Write to PeriPro menu to reflect the current application.
Page 36
Page 37

SQLClnt
This chapter covers:
1. Accelerating RDBMS
Access With SQLClnt
2. The Cryptutil utility
3. Instructions to install Oracle
Client 8.1.7 on an IBM 335
Page 38

PeriRDB User’s Guide
Accelerating RDBMS Access With SQLClnt
You can accelerate RDBMS requests by coding the application to use a dedicated SQL
client (sqlclnt). Refer to page 13 for valid database configurations.
Using an SQL client can reduce traffic directed to an RDBMS server because each
SQL client can maintain an open connection to the RDBMS server. Applications can
use an SQL client connection and then release the SQL client for another application.
Installing PeriRDB installs SQLClnt.
For more information, see the Installing MPS Software on a Solaris Platform or
Installing MPS Software on an NT Platform book.
Limitations For SQLClnt
Executing a Resume connector following receipt of an SQL exception/condition
(sqlerr, etc.) in an attempt to resume execution at the SQL block for which the
condition occurred produces unpredictable results. For additional information about
the Resume connector, see the PeriProducer User Guide.
SQLClnt is not currently supported on Windows NT.
Configuring For SQLClnt
Before an application can use an SQLClnt, both the periq and the sqlclnt
daemons must be running.
Start the periq daemon before the sqlclnt daemon.
Typically, systems use configuration files to start required instances of these daemons.
See the periq and sqlclnt man pages for a description of the available command
line options. The most commonly used options are used as examples in this document.
Using the SQL Request Accelerator
To use an SQLClnt for an RDBMS request, select Use or Use and Release in the
SQL block window. If Use is specified, an sqlclnt is reserved for the current
application (after first being acquired, if necessary) and released only when a Use
and Release is subsequently specified in an SQL block (the release is automatic if
the application restarts or aborts). If Use and Release is specified, the sqlclnt is
released (for use by other applications) after the SQL block has executed.
After an SQL block specifies Use, every SQL block that needs to utilize the
"reserved" sqlclnt, must also specify the Use (or Use and Release) option.
Under Queue, enter a queue name (optional) to associate this SQL block with a
specific SQLClnt.
Page 38
Page 39

SQLClnt
The following is an example of how to start an SQLClnt:
sqlclnt -v 254 -s 230 -m oracle -q MYoracle -c
To use the previous SQLClnt, the queue name MYoracle would have to be entered
into the Queue field of the SQL block, and the RDBMS type oracle would have to
be selected in the RDBMS field of the SQL block.
Name the SQLClnt
Queue
When using an SQLClnt (selecting Use or Use and Release) the Connect:
buttons Logon and Logoff are disabled. The application does not log on or log off the
RDBMS server; SQLClnt performs all the necessary logons and logoffs.
Reserve an SQLClnt for
the application
Release the SQLClnt for
use by other applications
SQLClnt stores the number of retrieved records found for a Select statement in the
SQL_Info.RdbmsMsg data card. Users can assign this number to a Number data card
using the To Number operator in a Compute Block.
Typically, systems use configuration files to start required instances of these daemons.
See the MPS Command Reference Manual (P0602476) for a description of the
available command line options. The most commonly used options are used as
examples in this document.
Using the SQLClnt Backup Server (-s option)
If the primary database (contacted when you use the - u suffix) can not be reached
(due to network problems, database shutdown, and so on), then use the secondary
database by adding the -S suffix.
Once SQLClnt connects to the secondary database server, it does not revert back to the
primary database server unless SQLClnt is restarted or if the connection to the
Page 39
Page 40

PeriRDB User’s Guide
secondary server goes down.
If you want to use an encrypted connect string, use option –b. Encrypt the connect
string by using the Cryptuti utility.
Timing, Measuring, and Logging RDBMS Server Performance
A new command line option, sqlclnt -l, logs the longest duration of any transaction
sent to the RDBMS server for which it received responses. As part of the command to
start SQLClnt, users must specify the directory path into which to place the log file.
For example, if SQLClnt is started by the following command:
sqlclnt -v 254 -s 230 -m oracle -u usr/passwd@vador -l /tmp & -c
then a file called sqlclnt-vps254-230.log will be created in the /tmp directory.
Cryptutil Utility
The Cryptutil utility is used to encrypt the RDBMS connect strings. This utility
encrypts the given RDBMS connect strings and prints it to the standard output. The
encrypted RDBMS connect string is specified at the beginning of the SQLClnt. The
SQLClnt decrypts the connect string and uses it to connect to the database.
The Cryptutil utility does not validate the given connect string i.e., it does not
validate if the given string is a valid RDBMS connect string. You must copy the
encrypted string and use the same with the SQLClnt.
Using the Cryptutil Utility
The Cryptutil utility is located at the same location as the SQLClnt and
PERISql executable. For example, /opt/vps/PERIrdb/bin
You do not need to set any environment variable to use the Cryptutil utility.
Syntax
Cryptutil <string>
This utility prints the encrypted RDBMS connect string and the original connect string
to the standard output. A sample output is shown below:
cryptutil scott/tiger@ORCL
Original String: scott/tiger@ORCL
Crypted String: Mmvn5bdiuqqi5OZvomTTzkCyEbR6yFRcqDo3rw==
Page 40
Page 41

SQLClnt
Using the Encrypted Connect String with SQLClnt
New command line options have been added to the SQLClnt, namely U and B.
• U—This option is used to denote an Encrypted RDBMS Connect String
• B—This option is used to denote an Encrypted RDBMS Connect String for a
Backup/Fail-Over RDBMS server.
Page 41
Page 42

PeriRDB User’s Guide
Using Option U
An example of using the SQLClnt with option U is given below:
"sqlclnt -v 2 -s 221 -m oracle -U
uiYLCVuOUkLOyMpDjkj/4myePZhW5HhwhBYbgw== -1 /tmp/sqlclntlog -c"
The U option is followed by the encrypted RDBMS connect string which is generated
by the Cryptutil. The SQLClnt decrypts this string and connects to the RDBMS.
The options U and u cannot be specified together as there can only be one primary
database.
Using Option B
The encrypted RDBMS connect strings can be used with the Backup/Fail-Over
database as well as the primary database. The example for the same is given below:
"sqlclnt -v 254 -s 221 -m oracle -U
uiYLCVuOUkLOyMpDjkj/4myePZhW5HhwhBYbgw==-B
uiYLCVuOUkLOyMpDjkj/4myePZhW5HhwhBYbgw== -1
/tmp/sqlclntlog & -c"
Option B is followed by an encrypted RDBMS Connect string. Unlike option U, there
can be more than one option B specified when starting a SQLClnt as there can be
more than one backup/failover server.
Using encrypted Connect Strings with gen.cfg
For starting the SQLClnt from gen.cfg, the procedure mentioned in the “Using the
Encrypted Connect String with SQLClnt” on page 41 holds good. A sample entry in
the gen.cfg for a SQLClnt with encrypted RDBMS connect string is given below.
"sqlclnt - 0 0 "sqlclnt v 2 -s 221 -m oracle -U
uiYLCVuOUkLOyMpDjkj/4myePZhW5HhwhBYbgw== -l
/tmp/sqlclntlog -c""
Page 42
Page 43

Accessing Databases using SQLClnt on an Intermediate Node
A
SQLClnt usually runs on the same node as the IVR application. You can also run
SQLClnt on an intermediate node. Using an intermediate node centralizes the
database client software while using SQLClnt to accelerate access to the database.
The configuration is highly scalable. You can install a number of nodes, each of them
running multiple instances of an application coupled with a group of nodes in which
multiple instances of SQLClnt are running. When SQLClnt runs on the intermediate
node, you must also install the database client on the intermediate node.
Use one of the following configurations when installing SQLClnt and related
processes.
• Typical installation with SQLClnt and related processes installed on the same
node as the application.
• SQLClnt on an intermediate node but related processes are on the same node.
• SQLClnt and vmst on an intermediate node.
• SQLClnt and periq on an intermediate node.
The IVR application uses the libvagsqlclnt.so library.
SQLClnt
The IVR application uses the vagsqlclnt.dll library.
SQLClnt on the Same Node as the IVR Application
The following diagram shows a typical configuration where SQLClnt and the
application are installed on the same node.
IVR
pplication &
library
vmst
periq
SQLClnt &
database
client
Database
Page 43
Page 44

PeriRDB User’s Guide
A
SQLClnt on an Intermediate Node
The following diagram shows SQLClnt on an intermediate node but related processes
on the same node with the IVR application.
IVR
pplication &
library
vmst
peri q
SQLClnt &
databas e
client
Dat aba se
After you have installed SQLClnt and the related processes, configure the nodes.
1. Run the following commands on Node A.
a. vmst -v 1
Set Vmst 1 to run on this node.
b. periq -v 1 -s 16
Start periq and connect to vmst number 1 running on this host, using port
16. Port 16 is the default for periq and is configured in
$ASEHOME/etc/services.
2. Run the following command on Node B.
sqlclnt -v 1 -s 230 -N NodeA -u ndb/peri@database -m
oracle -q oracleq10 -P 16
Start SQLClnt and connect to vmst 1 running on NodeA and using port 230.
Port 230 is one of many available to sqlclnt and is configured in
$ASEHOME/etc/services.
• The unencrypted connection string to the database is ndb/peri@database.
• The mode is Oracle.
• SQLClnt is in the queue, oracleq10.
• The communication with periq is through port 16.
This is the most efficient configuration because communication between vmst and
the application or periq are local. Communication with SQLClnt takes place over
the network.
Page 44
Page 45

SQLClnt
SQLClnt and vmst on an Intermediate Node
The following diagram shows SQLClnt and vmst on an intermediate node with
periq on the same node as the IVR application.
IVR
Appl i cat i on&
library
per i q
After you have installed SQLClnt and the related processes, configure the nodes.
1. Run the following command on Node A.
vmst
SQLClnt &
dat abas e
client
Dat abase
a. periq -v NodeB:2 -s 16
Start periq and connect to vmst 2 running on host Node B, using port 16.
Port 16 is the default for periq and is configured in
$ASEHOME/etc/services.
2. Run the following commands on Node B.
a. vmst -v 2
Run vmst 2 on this node.
b. sqlclnt - v2 -s 230 -u sa/peri@database -m
sybase -q sybaseq21 -P 16
Start SQLClnt and connect to vmst 2 running on this node using port 230.
• Port 230 is one of many available to SQLClnt and is configured in
$ASEHOME/etc/services.
• The unencrypted connection string to the database is sa/peri@database.
• The mode is Sybase.
• SQLClnt is in the queue, sybaseq21.
• The communication with periq is through port 16.
This configuration is detailed for information purposes. It is more efficient to run
vmst on the same node as the IVR application.
Page 45
Page 46

PeriRDB User’s Guide
A
SQLClnt and periq on an Intermediate Node
SQLClnt and periq on an intermediate node with vmst on the same node as the
IVR application.
IVR
pplication &
library
vmst
SQLClnt &
database
client
peri q
Database
After you have installed SQLClnt and the related processes, configure the nodes.
1. Run the following command on Node A.
a. vmst -v3
Run vmst 3 on this node.
2. Run the following commands on Node B.
a. periq -v NodeA:3 -s 16
Start periq and connect to vmst number 3 running on host Node B, using
port 16. Port 16 is the default for periq and is configured in
$ASEHOME/etc/services..
b. sqlclnt -v 3 -s 230 -N NodeA -u sa/peri@data-
base -m odbc -q odbcq32 -P 16
Start SQLClnt and connect to vmst 3 running on this node using port 230.
• Port 230 is one of many available to SQLClnt and is configured in
$ASEHOME/etc/services.
• The unencrypted connection string to the database is sa/peri@database.
• The mode is ODBC.
• SQLClnt is in the queue, odbcq32.
• The communication with periq is through port 16.
Page 46
Page 47

SQLClnt
This page has been intentionally left blank.
Page 47
Page 48

CORBAClnt
This chapter covers:
1. Working with CORBA Server
Objects
2. CORBAClnt
3. The CORBA Block
Page 49

Working with CORBA Server Objects
PeriRDB version 1.2 supports integration with CORBA (Common Object Request
Broker Architecture). The CORBA Block in PeriProducer accesses information in a
CORBA server through CORBAClnt. The CORBAClnt daemon connects to a
specified VMST, after which it connects and binds to an Object Request Broker
(ORB). After these initial operations, CORBAClnt waits until it receives a CORBA
request from an application CORBA block.
Installing PeriRDB installs SQLClnt.
For more information, see the Installing MPS Software on a Solaris Platform or
Installing MPS Software on an NT Platform book.
CORBAClnt is currently not supported on Windows NT.
CORBAClnt
The information that an application developer enters in the CORBA block is used to
build and send a request from the application to corbaclnt.
CORBAClnt
The corbaclnt uses the CORBA Dynamic Invocation Interface (DII) to invoke any
method on any CORBA object using knowledge obtained at run-time from either a
CORBA Interface Repository (IR) server or a CORBA "stringified" Internet Object
Reference (IOR). The CORBA block in conjunction with corbaclnt is a dynamic, runtime invocation of CORBA services, not a static, precompiled invocation. The DII
approach allows PeriPro applications to invoke operations on any CORBA registered
object without having to link the client-side stubs that may have been generated for a
particular object by an Object Request Broker (ORB) vendor's Interface Definition
Language (IDL) compiler.
The Interface Repository mode functionality has not been implemented for this
release.
Application requests are handled by corbaclnt on a first-in, first-out basis, and all
application requests are managed in a queue. If increased parallelism is necessary,
multiple corbaclnt processes can be started. The number of corbaclnt
processes necessary is determined by the number of applications executing and the
rate at which CORBA requests are made.
Page 49
Page 50

PeriRDB User’s Guide
corbaclnt Usage Menu
The following options are available for CORBAClnt:
Name Option meaning
-v # mps number
1
-P port
-m queue_type ’corba’
-q name
-X {s|n} debugging level
-r {dev|file} redirect output
-H help
1. Use of PeriQ (see - P, -q option above), in conjunction with
corbaclnt is not currently implemented.
2. Use of PeriQ (see - P, -q option above), in conjunction with
corbaclnt is not currently implemented.
2
PeriQ port (default - any)
CORBA Naming Service
Installation/Startup of corbaclnt on Solaris
To interface with a CORBA server (on Solaris), there must be an entry in the $ASEHOME/etc/services file specifying valid port(s) for corbaclnt. For example:
# CORBA daemon
#
corbaclnt 231-239
The following should generally be affected during system startup (example line and
port numbers shown):
vms -V254 &
corbaclnt -v 254 -s231 &
CORBAClnt is currently not supported on Windows NT.
CORBAClnt Server Report
For an instance of corbaclnt, the following shows an example of how to use the
AMU command to display the elapsed time of all invoked methods:
amu -v 131 -s 242 -c "req st"
Note that vengine's output must first have been redirected to a file or to the screen.
To prevent problems caused by a modem connection loss, amu redirection to a device
(req redirect /dev/...) only works if this functionality has been enabled by setting the
variable AmuRedir to "tty" in the $ASEHOME/etc/ase.conf file.
Page 50
Page 51

!
!
CORBAClnt
Reported Issues
corbaclnt is blocked on a request to the CORBA server, and if the server does not
respond, due to a network, server crash or infinite loop on the server side, that
corbaclnt gets frozen and there will be a permanent deny of services from corbaclnt,
until it is terminated and restarted. This is a known problem with no re-design or
threaded implementation planned.
If a request for resource comes from an application to periq, and the service is not
registered, then currently periq does not return any response to the corresponding
application (vrto).
This issue pertains to MPS RDB systems (Solaris only) that interface with a CORBA
server. If Periq is restarted using the commands:
srp periq -stop
srp periq -start
while applications are running, vrto occurs. After this event, applications cannot
execute CORBA requests.
To correct this issue, restart the CORBA servers.
Page 51
Page 52

PeriRDB User’s Guide
The CORBA Block
The information that an application developer enters in the CORBA Block is used to
build and send a request from the application to corbaclnt. Run-time
implementation occurs through CORBAClnt, which allows invocation of and access to
class objects hosted through a CORBA server.
The CORBA block has the following fields:
Name Meaning
Mode Specifies whether the object named in this block will be handled using
an IDL Name or an IOR File query. PeriRDB currently only supports
the use of an IOR File query (Stringified Object Repository).
IOR File The file that contains the stringified Internet Object Reference (IOR),
that is, the absolute path of the file that contains a CORBA server's
specific stringified class/object. A CORBA host server can generate a
stringified object reference by using the object_to_string method of an
OMG-compliant ORB. The IOR is used by the CORBAClnt to convert
the string to an object reference handle. The object reference is used
to invoke the operation on the CORBA object. A standard Folders
menu is used to enter the IOR File field either as a Characters
datacard or as a string literal.
Invoke Operation This is where you specify operations to access a CORBA server. For
more information, see Invoking Operations With the CORBA Block on
page 53.
Return Type Here the user must specify the data type for every parameter that will
be returned by the operation. For more information on return types,
see Specifying Return Types on page 54.
Page 52
Page 53

CORBAClnt
Name Meaning
Exceptions The CORBA block recognizes a set of CORBA Server Exceptions that
the user can handle. All Exceptions are always enabled (i.e.
selectable). For more information on return exceptions, see Specifying
Return Exceptions on page 55.
Invoking Operations With the CORBA Block
The operation to invoke is entered in free format. A folder or datacard can be specified
to receive the return value, if any. Datacards and literals can be specified to pass
application data as parameters to the operation. Each parameter must be identified as
being in (sent to the server), out (returned from the server), or inout (both sent to and
returned from the server).
The following is an example of the syntax required to invoke a CORBA server's
method/operation:
The request invokes the getBestEmployee method of the named object, passes five
parameters with the indicated types and usage taken from or stored to folder.id,
folder.name, folder.salary, folder.factor, and folder.desc.
The returned value is stored to folder AnyFolder. The datacards in AnyFolder must
match in type, size, and name, the data returned from the server.
Returning the result to a folder instead of a datacard is valid only when the return type
in the CORBA block is set to any. See Specifying Return Types on page 54.
The following rules apply to the entry of operations in the Invoke Operation textbox:
• Only one operation may be entered in a CORBA block's Invoke Operation
textbox.
• When using the Bind with Datanames option of the hidden menu for the
Invoke Operation window in the CORBA block to specify datacard names,
each datacard name is automatically preceded by a colon (:). If entered
manually, the entire datacard name including the parent folder(s) and the
preceding colon must be typed.
• The list of parameter(s) passed to the CORBA server in the Invoke
Operation statement must be enclosed within parentheses. Every parameter
must be either a Characters datacard, a folder, or for in parameters only a
Numeric literal or a Character literal enclosed within apostrophe. A boolean
value should be passed as a Character "1" for "True", "0" for "False". If there
are no parameters, the open and close parentheses must be included, for
example: result = methodname ()
• An Array element cannot be passed to or returned from the Server.
• A subfolder cannot be passed to or returned from the Server.
• A hash (#) symbol at the start of a text line in the Invoke Operation window
comments out that line.
Page 53
Page 54

PeriRDB User’s Guide
Specifying Return Types
The user must specify the data type for every parameter which will be returned by the
operation.
The following table shows the primitive data types that are supported and any special
instructions to follow when specifying the return types. A "Return" datacard cannot be
an array element.
Name Meaning
• PeriPro creates the vagorb and corba folders in the Global Data Folders
window for use during its interaction with corbaclnt. The folders are created
when the developer adds the first CORBA block specifying a valid Invoke
Operation. Users should not alter the contents of these folders.
• The only timeout condition currently applicable to execution of a CORBA
block is vrto. The timer can be set in an Environment block using the option
vpsrcvtime in the "Vengine" Class. This corresponds to vengine command line
option - M.
short Specify a Characters datacard. A return type char indicates that the
parameter is one byte in length.
long Specify a Characters datacard. A return type char indicates that the
parameter is one byte in length.
float Specify a Characters datacard. A return type char indicates that the
parameter is one byte in length.
char Specify a Characters datacard. A return type char indicates that the
parameter is one byte in length.
boolean Specify a Characters datacard. A return type char indicates that the
parameter is one byte in length.
string Specify a Characters datacard. A return type char indicates that the
parameter is one byte in length.
void Server does not return a result. For return type void, do not specify a
target datacard. Precede the method name by the word "void", as in
the following example:
void methodname (long folder.data-1 in)
struct Return type struct is not currently implemented.
any For return type any, the datacards in the specified folder must be
consistent with (in type, size, and data names) the data components
returned by the method. The folder must be a non-empty "upper-level"
(01) folder that does not contain any subfolder(s).
Page 54
Page 55

CORBAClnt
Specifying Return Exceptions
The following table shows the exceptions available with the CORBA block:
CORBA Block
Condition name
badoperation BOP Bad Operation Thrown by server when a request is received
badparameter BP Bad Parameter An attempt was made to pass an unexpected
comfail CF Comm Failure The connection through the IR/IOR was refused
marshall TMAR Marshalling The IDL specification is inconsistent with the
nilobjref NIL Null Object Ref Object not registered with CORBA Server.
notimpl NI Not Implemented The requested object is not implemented.
nonexistobj NEO Nonexisting
orberr UNK Unknown
exception case
connector
CORBA Block
name
Object
Exception
Description
for an operation that does not exist on the
server.
parameter, or invalid data type, to the
operation.
or is broken.
IOR. For example, if the return type specified
to be float, but server returned long.
Object does not exist.
User Thrown Exception
varies ALL Combined
Unselected
All other CORBA Server / Operation Errors
not explicitly specified.
Page 55
Page 56

PeriRDB Libraries
This chapter covers:
1. The PeriRDB and SQLClnt
Libraries
Page 57

PeriRDB Libraries
PeriRDB Libraries
The following tables list each database with its associated library. The PeriRDB
libraries are located in $RDBHOME/lib.
Database Library
ORACLE libvagoracle.so
SYBASE libvagsybase.so
INFORMIX libvaginformix.so
ODBC libvagodbc.so
vengine/vmst/periq/SQLClnt interface libvagsqlclnt.so
The following table lists the SQLClnt runtime shared libraries.
Database Library
ORACLE libsqlclntorc.so
SYBASE libsqlclntsyb.so
ODBC libsqlclntodbc.so
IPC Support Utilities
(password hiding, recycling, and SQL support routines)
livsqlipc.so
The following table lists the PeriSQL runtime shared libraries.
Database Library
ORACLE libpsqloracle.so
SYBASE libpsqlsybase.so
Page 57
Page 58

Index
Page 59

Index
Symbols
# 54
A
About window 20
AMU command
any
55
51
B
badoperation 56
badparameter
boolean
56
55
C
char 55
comfail
commands
commenting out lines in an operation
Common Object Request Broker Architecture
configuration of SQLClnt
conventions
CORBA
corba folder
CORBAClnt options
CORBAClnt Server Report
Cryptutil Utility
56
51
AMU
sqlclnt
vengine
manual
50
39, 40
55
54
38
8
55
51
51
40
50
write procedures and functions to an application
31
I
IDL 50
in
54
54
inout
Interface Definition Language (IDL)
Interface Repository (IR)
Internet Object Reference (IOR)
invoking CORBA operations
IOR
50
50
IR
Issues, reported
52
50
54–55
50
50
J
joins 26
K
keys 24
L
logging RDBMS server performance 40
Logon window
long
55
18
M
marshall 56
measuring RDBMS server performance
40
D
DB2 13, 14
50
DII
Dynamic Invocation Interface (DII)
F
float 55
foreign keys
functions
24
28–35
H
How To
use PeriSQL to query an RDBMS
50
25
Page 59
N
nilobjref 56
nonexistobj
NOT NULL
notimpl
24
null
56
24
56
O
Object Request Broker (ORB) 50
Objects Browser Window
ODBC
operations, invoking in CORBA
options in CORBAClnt
Oracle
ORB
13, 14
13, 14
50
30
51
54–55
Page 60

PeriRDB User’s Guide
orberr
56
out
54
P
Peri logo 20
periq
38
PeriRDB Libraries
PeriSQL
primary keys
procedures
16–36
accessing
columns
creating an SQL command
debugging the SQL command
options
performing a query
query with
selecting multiple columns
tables
user accounts
using with the SQL block
writing to an SQL block
20
22
28–35
58
18
23
27
25
21
24
36
36
25
26
28
string
55
struct
55
structured query language (SQL)
creating with PeriSQL
debugging with PeriSQL
Sybase
Sybase implementation differences
13, 14
25–28
25
28
T
Text Popup Window 30
timeout conditions
timing RDBMS server performance
triggers
28–35
55
V
vagorb folder 55
55
void
vpsrcvtime
55
vrto
55
35
40
Q
queries. See structured query language (SQL)
Queue name
38
R
RDBMS 16
accelerating requests
server performance
relational database management system. See RDBMS
report, CORBAClnt server
return exceptions
return types
56
55
38–40
40
51
S
SELECT statements 25–28
server performance
short
55
Source Code Window
SQL block
using with PeriSQL
writing from PeriSQL
SQL. See structured query language
SQLClnt
sqlerr
38–40
38
40
30
36
36
Page 60
 Loading...