

Page 1

Part No. 207809-B
August 2000
4401 Great America Parkway
Santa Clara, CA 95054
Installing and Administering
Optivity Quick2Config 2.2
Page 2

2
Copyright © 2000 Nortel Networks
All rights reserved. August 2000.
The information in this document is subject to change without notice. The statements, configurations, technical
data, and recommendations i n t hi s document are believed to be accurate and reliable, but are presented without
express or implied warranty. Users must take full responsibility for their applications of any products specified in
this document. The information in this document is proprietary to Nortel Networks NA Inc.
The software described in this document is fur nished under a license agreement and may only be used in
accordance with the terms of that license. A summary of the Software License is included in this document.
Trademarks
NORTEL NETWORKS is a trademark of Nortel Networks.
Optivity is a registered trademark and Quick2Config is a trademark of Nortel Networks.
Microsoft, Windows, and Windows NT are registered trademarks of Micr osoft Corporation.
All other trademarks and registered trademarks are the property of their respective owners.
Restricted Rights Legend
Use, duplication, or disclosure by the United States Government is subject to restrictions as set forth in
subparagraph (c)(1)(ii) of the Rights in Technical Data and Computer Software clause at DFARS 252.227-7013.
Notwithstanding any other license agreement that may pertain to, or accompany the delivery of, this computer
software, the rights of the United States Government regarding its use, reproduction, and disclosure are as set forth
in the Commercial Computer Software-Restricted Rights cl ause at FAR 52.227-19.
Statement of Conditions
In the interest of improving internal design, operational function, and/or reliability, Nortel Networks NA Inc.
reserves the right to make changes to the products described in this document without notice.
Nortel Networks NA Inc. does not assume any liability that may occur due to the use or application of the
product(s) or cir cuit l ay ou t(s ) des cribed herein.
Portions of the code in this software product may be Copyright © 1988, Regents of the University of California. All
rights reserved. Redistri bution and use in source and binary forms of such portions are permitted, provided that the
above copyright notice and this paragraph are duplicated in all such forms and that any documentation, advertising
materials, and other materials related to such distribution and use acknowledge that such port ions of the software
were developed b y the Uni v ersity of California , Berkele y. The name of the Uni versity m ay not be used to e ndorse or
promote products derived from such portions of the software without specific prior written permission.
SUCH PORTIONS OF THE SOFTWARE ARE PROVIDED “AS IS” AND WITHOUT ANY EXPRESS OR
IMPLIED WARRANTIES, INCLUDING, WITHOUT LIMITATION, THE IMPLIED WARRANTIES OF
MERCHANTABILITY AND FITNESS FOR A PARTICULAR PURPOSE.
In addition, the program and information contained here in are licensed only pursuant to a license agreement that
contains restrictions on use and disclosure (that may incorporate by reference certain limitat ions and notices
imposed by third parties).
207809-B
Page 3

Nortel Networks NA Inc. Optivity® Network Management Software License
Agreement
NOTICE: Please carefully read this license agreement before copying or using the accompanying Optivity network
management software or installing the hardware uni t with pre-enabled Opt ivity network management software
(each of which is referred to as “Software” in this Agreement). BY COPYING OR USING THE SOFTWARE,
YOU ACCEPT ALL OF THE TERMS AND CONDITIONS OF THIS LICENSE AGREEMENT. THE TERMS
EXPRESSED IN THIS AGREEMENT ARE THE ONLY TERMS UNDER WHICH NORTEL NETWORKS
WILL PERMIT YOU TO USE THE SOFTWARE. If you do not accept these terms and conditions, return the
product, unused and in the original shipping container, within 30 days of purchase to obtain a credit for the full
purchase price.
1. License Grant. Nortel Networks NA Inc. (“Nortel Networks”) grants the end user of the Software (“Licensee”)
a personal, nonexclusive license: a) to use the Software either on a single computer or, if applicable, on a single
authorized device identified by host ID ; b) to copy the Software solel y f or backup purposes in support of
authorized use of the Software; and c) to use and copy the associated user manual solely in support of
authorized use of the Software by Licensee. This license applies to the Software only and does no t extend to
Nortel Networks Agent software or other Nortel Networks software products. Nortel Networks Agent software
or other Nortel Networks software products are licensed for use under the terms of the applicable Nortel
Networks NA Inc. Software License Agreement that accompanies such software and upon payment by the end
user of the applicable license fees for such software.
2. Restrictions on use; reservation of rights. The Software and user manuals are protected under copyright laws.
Nortel Networks and/or its licensors retain all title and ownership in both the Software and user manuals,
including an y revisions made by Nortel N etwo rk s or its li ce nsor s. T he cop yr ight notic e mu st be repr od uced a nd
included with any copy of any portion of the Software or user manuals. Licensee may not modify, translate,
decompile, disassembl e , use for any competitive analysis, reverse engineer, distribute, or create derivative
works from the Software or use r manuals or any copy, in whole or in part. Except as expressly provide d in this
Agreement, Licensee may not copy or transfer the Soft ware or user manuals, in whole or in pa r t. The Software
and user manuals embody Nortel Networks’ and its licensors’ confidential and proprietar y inte llectua l pro perty.
Licensee shall not disclose to any third party the Software, or any information about the operation, design,
performance, or implementation of the Software and user manuals that is confidential to Nortel Networks and
its licensors; howe ver, Licensee may grant per mission to its consul tants, sub con tra ctors, and age nts to use the
Software at Licensee’s facilit y, provided they have agreed to use the Software only in a ccordance with the terms
of this license.
3. Limited warranty. Nortel Networks warrants each item of Software, as delivered by Nortel Networks and
properly installed and operated on Nortel Networks hardware or other equipment it is originally licensed for, to
function substant ially as described in its accompanying user manual du r ing its warranty period, which begins
on the date Software i s first shipped to Licensee. If any item of S oftware fails to so fun ction d ur ing it s warranty
period, as the sole remed y Nortel Netwo rks will a t its d iscretion p ro vide a sui table fix, patch, or workaround for
the problem that may be included in a future Software release. Nortel Networks further warrants to Licensee
that the media on which the Software is provided will be free from defects in materials and workmanship under
normal use for a period of 90 days from the date the Sof tware is f irst shipped to Licensee. Nortel Netw orks will
replace defective media at no charge if it is returned to Nortel Networks during the warranty period along with
proof of the date of shipment. This warranty does no t apply if the media has been damaged as a result of
accident, misuse, or abuse. The Licensee assumes all responsibility for selection of the Software to achieve
Licensee’s intended results and for the installation, use, and results obtained from the Software. Nortel
Networks does not warrant a) that the functions contained in the software will meet the Licensee’s
requirements, b) that the So ftw a re will o pera te in th e h ar dw a re or software combinations tha t t he Licensee may
select, c) that the operation of the Software will be uninterrupted or error free, or d) that all defects in the
operation of the Software will be corrected. Nortel Networks is not obligated to remedy any Software defect
that cannot be reproduced with the latest Software release. These warranties do not apply to the Software if it
has been (i) altered, except by Nortel Networks or in accordance with its instructions; (ii) used in conjunction
3
Installing and Administering Optivity Quick2Config 2.2
Page 4

4
with another vendor’s product, resulting in the defect; or (iii) damaged by improper environment, abuse,
misuse, accident, or negligence. THE FOREGOING W ARRANTIES AND LIMITATIONS ARE EXCLUSIVE
REMEDIES AND ARE IN LIEU OF ALL OTHER WARRANTIES EXPRESS OR IMPLIED, INCLUDING
WITHOUT LIMITATION ANY WARRANTY OF MERCHANTABILITY OR FITNESS FOR A
PARTICULAR PURPOSE. Licensee is responsible for the security of its own data and information and for
maintaining adequate procedures apart from the Software to reconstruct lost or altered files, data, or programs.
4. Limitation of liability. IN NO EVENT WILL NORTEL NETWORKS OR ITS LICENSORS BE LIABLE
FOR ANY COST OF SUBSTITUTE PROCUREMENT; SPECIAL, INDIRECT, INCIDENTAL, OR
CONSEQUENTIAL DAMAGES; OR ANY DAMAGES RESULTING FROM INACCURATE OR LOST
DATA OR LOSS OF USE OR PROFITS ARISING OUT OF OR IN CONNECTION WITH THE
PERFORMANCE OF THE SOFTWARE, EVEN IF NORTEL NETWORKS HAS BEEN ADVISED OF THE
POSSIBILITY OF SUCH DAMA GE S. IN NO EVENT SHALL THE LIABILITY OF NORTEL NETWORKS
RELATING TO THE SOFTWARE OR THIS AGREEMENT EXCEED THE PRICE PAID TO NORTEL
NETWORKS FOR THE SOFTWARE LICENSE.
5. Government Licensees. This provision applies to all Software a nd documentation acqui red directly or
indirectly by or on beh alf of the United States Government. The Software and documentation are commercial
products, licensed on the open market at market prices, and were developed entirely at private expense and
without the use of any U.S. Government funds. The license to the U.S. Government is granted only with
restricted rights, and use, duplication, or disclosure by the U.S. Government is subject to the restrictions set
forth in subparagraph (c)(1) of the Commercial Computer Software––Restricted Rights clause of FAR
52.227-19 and the limitations set out in this license for civilian agencies, and subparagraph (c)(1)(ii) of the
Rights in Technical Data and Computer Software clause of DFARS 252.227-7013, for agencies of the
Department of Defense or their successors, whichever is applicable.
6. Use of Software in the European Community. This provision applies to all Software acquired for use within
the European Community. If Licensee uses the Software within a country in the European Community, the
Software Directi ve enacted by the Cou n ci l of E urope a n Comm unitie s Dire ctive dated 14 May , 199 1 , will ap ply
to the examination of the Software to facilitate interoperability. Licensee agrees to notify Nortel Networks of
any such intended examination of the Software and may procure support and assistance from Nortel Networks.
7. T erm and termination. This license is effecti v e u ntil ter minated; ho we v er, all of the restrictions with respect to
Nortel Networks’ copyright in the Software and user manuals will cease being effective at the date of expiration
of the Nortel Networks copyr ight; those restrictions relating to use and di sclosure of Nortel Networks’
confidential information shall continue in effect. Licensee may terminate this license at any time. The license
will automatically terminate if Licensee fails to comply with any of the terms and conditions of the license.
Upon termination for an y rea son, Lice nsee will imm ediately destro y or re turn to Norte l Netw orks th e Softwa re,
user manuals, and all copies. Nort el Networks is not liable to Licensee for damages in any form solely by
reason of the termination of this license.
8. Export and Re-export. Licensee agrees not to export, directly or indirectly, the Software or related technical
data or information without first obtaining any required expor t licenses or other governmental approvals.
Without lim iting the foreg oing, Licensee, o n behalf of itse lf and its subsid iaries and af f iliat es, agrees that it will
not, without first obtaining all export licenses and approvals required by the U.S. Government: (i) export,
re-export, transfer, or divert any such Software or technical data, or any direct product thereof, to any country to
which such exports or re-exports are restricted or embargoed under United States export control laws and
regulations, or to any national or resident of such restricted or embargoed countries; or (ii) provide the Software
or related technical data or information to any military end user or for any military end use, including the
design, development, or production of any chemical, nuclear, or biological weapons.
9. General. If any provision of this Agreement is hel d t o be i nvalid or unenforceable by a court of competen t
jurisdiction, the remainder of the provisions of this Agreement shall remain in full force and effect. This
Agreement will be governed by the laws of the state of California.
Should you have any questions concerning this Agreement, contact Nortel Networks, 4401 Great America Parkway,
P.O. Box 58185, Santa Clara, California 95054-8185.
207809-B
Page 5

LICENSEE ACKNOWLEDGES THAT LICENSEE HAS READ THIS AGREEMENT, UNDERSTANDS IT,
AND AGREES TO BE BOUND BY ITS TERMS AND CONDITIONS. LICENSEE FURTHER AGREES THAT
THIS AGREEMENT IS THE ENTIRE AND EXCLUSIVE AGREEMENT BETWEEN NORTEL NETWORKS
AND LICENSEE, WHICH SUPERSEDES ALL PRIOR ORAL AND WRITTEN AGREEMENTS AND
COMMUNICATIONS BETWEEN THE PARTIES PERTAINING TO THE SUBJECT MATTER OF THIS
AGREEMENT. NO DIFFERENT OR ADDITIONAL TERMS WILL BE ENFORCEABLE AGAINST NOR T EL
NETWORKS UNLESS NOR T EL NETWORKS GIVES ITS EXPRESS WRITTEN CONSENT, INCLUDING AN
EXPRESS WAIVER OF THE TERMS OF THIS AGREEMENT.
5
Installing and Administering Optivity Quick2Config 2.2
Page 6

6
207809-B
Page 7

Contents
Preface . . . . . . . . . . . . . . . . . . . . . . . . . . . . . . . . . . . . . . . . . . . . . . . . . . . . . . 15
Before you begin . . . . . . . . . . . . . . . . . . . . . . . . . . . . . . . . . . . . . . . . . . . . . . . . . . . . .15
Text conventions . . . . . . . . . . . . . . . . . . . . . . . . . . . . . . . . . . . . . . . . . . . . . . . . . . . . . .16
Installation directory . . . . . . . . . . . . . . . . . . . . . . . . . . . . . . . . . . . . . . . . . . . . . . . . . . . 16
Screen illustrations . . . . . . . . . . . . . . . . . . . . . . . . . . . . . . . . . . . . . . . . . . . . . . . . . . . .17
Related publications . . . . . . . . . . . . . . . . . . . . . . . . . . . . . . . . . . . . . . . . . . . . . . . . . . .17
How to get help . . . . . . . . . . . . . . . . . . . . . . . . . . . . . . . . . . . . . . . . . . . . . . . . . . . . . . 17
Chapter 1
Preparing to in s ta l l th e Q u ick2C o nfig software . . . . . . . . . . . . . . . . . . . . . 19
Quick2Config components . . . . . . . . . . . . . . . . . . . . . . . . . . . . . . . . . . . . . . . . . . . . . .19
Preinstallation tasks . . . . . . . . . . . . . . . . . . . . . . . . . . . . . . . . . . . . . . . . . . . . . . . . . . . 20
Preinstallation checklist . . . . . . . . . . . . . . . . . . . . . . . . . . . . . . . . . . . . . . . . . . . . .20
Verifying supported platforms . . . . . . . . . . . . . . . . . . . . . . . . . . . . . . . . . . . . . . . . 20
Determining the presence of a Web server . . . . . . . . . . . . . . . . . . . . . . . . . . . . . .23
Verifying disk space availability . . . . . . . . . . . . . . . . . . . . . . . . . . . . . . . . . . . . . . . 23
Other system requirements . . . . . . . . . . . . . . . . . . . . . . . . . . . . . . . . . . . . . . . . . .24
Where to go from here . . . . . . . . . . . . . . . . . . . . . . . . . . . . . . . . . . . . . . . . . . . . . . . . . 25
Contents 7
Chapter 2
Installing Quick2Config on Windows systems . . . . . . . . . . . . . . . . . . . . . . 27
What the installation program does . . . . . . . . . . . . . . . . . . . . . . . . . . . . . . . . . . . . . . . 27
Running the Quick2Config server installation program . . . . . . . . . . . . . . . . . . . . . . . . 28
Verifying the server installation . . . . . . . . . . . . . . . . . . . . . . . . . . . . . . . . . . . . . . . . . . 32
Starting the Quick2Config server . . . . . . . . . . . . . . . . . . . . . . . . . . . . . . . . . . . . . . 32
Starting the server on a computer without a third-party Web server . . . . . . . .32
Starting the server on a computer running a third-party Web server . . . . . . . 33
Starting a Quick2Config client session . . . . . . . . . . . . . . . . . . . . . . . . . . . . . . . . . 34
Removing the Quick2Config server software . . . . . . . . . . . . . . . . . . . . . . . . . . . . . . . .36
Installing and Administering Optivity Quick2Config 2.2
Page 8

8 Contents
Chapter 3
Installing Quick2Config on UNIX systems. . . . . . . . . . . . . . . . . . . . . . . . . . 37
Before you begin . . . . . . . . . . . . . . . . . . . . . . . . . . . . . . . . . . . . . . . . . . . . . . . . . . . . .37
What the installation program does . . . . . . . . . . . . . . . . . . . . . . . . . . . . . . . . . . . . . . . 38
Gaining access to the installation files . . . . . . . . . . . . . . . . . . . . . . . . . . . . . . . . . . . . . 38
Running the installation program . . . . . . . . . . . . . . . . . . . . . . . . . . . . . . . . . . . . . . . . . 38
Verifying the installation . . . . . . . . . . . . . . . . . . . . . . . . . . . . . . . . . . . . . . . . . . . . . . . . 41
Starting the Quick2Config server without a console window . . . . . . . . . . . . . . . . . . . . 46
Removing the Quick2Config server software . . . . . . . . . . . . . . . . . . . . . . . . . . . . . . . .46
Chapter 4
Installing the Quick2Config standalone client . . . . . . . . . . . . . . . . . . . . . . 49
Installing the standalone client software on a Windows system . . . . . . . . . . . . . . . . . 49
Installing the standalone client software on UNIX systems . . . . . . . . . . . . . . . . . . . . . 54
Removing the Quick2Config standalone client software . . . . . . . . . . . . . . . . . . . . . . . 58
Starting the Quick2Config server . . . . . . . . . . . . . . . . . . . . . . . . . . . . . . . . . . . . . . 42
Starting the server from the local console . . . . . . . . . . . . . . . . . . . . . . . . . . . 42
Starting the server from a remote console . . . . . . . . . . . . . . . . . . . . . . . . . . . 43
Starting the standalone client software . . . . . . . . . . . . . . . . . . . . . . . . . . . . . . . . . 44
Running the installation program . . . . . . . . . . . . . . . . . . . . . . . . . . . . . . . . . . . . . . 50
Verifying the client installation on Windows systems . . . . . . . . . . . . . . . . . . . . . . .53
Gaining access to the installation files . . . . . . . . . . . . . . . . . . . . . . . . . . . . . . . . . . 54
Running the installation program . . . . . . . . . . . . . . . . . . . . . . . . . . . . . . . . . . . . . . 54
Verifying the client installation on UNIX systems . . . . . . . . . . . . . . . . . . . . . . . . . . 57
Removing the Quick2Config standalone client from Windows systems . . . . . . . .58
Removing the Quick2Config standalone client from UNIX systems . . . . . . . . . . .58
207809-B
Chapter 5
Setting up Quick2Config . . . . . . . . . . . . . . . . . . . . . . . . . . . . . . . . . . . . . . . . 61
Setup tasks overview . . . . . . . . . . . . . . . . . . . . . . . . . . . . . . . . . . . . . . . . . . . . . . . . . . 62
Assigning the Administrator password . . . . . . . . . . . . . . . . . . . . . . . . . . . . . . . . . . . . .63
Configuring the Web server . . . . . . . . . . . . . . . . . . . . . . . . . . . . . . . . . . . . . . . . . . . . . 66
Configuring the TFTP server . . . . . . . . . . . . . . . . . . . . . . . . . . . . . . . . . . . . . . . . . . . . 68
Determining whether a TFTP server is running . . . . . . . . . . . . . . . . . . . . . . . . . . .70
Editing the server startup script to use a different TFTP directory . . . . . . . . . . . . 70
Page 9

Contents 9
Configuring the SYSLOG server . . . . . . . . . . . . . . . . . . . . . . . . . . . . . . . . . . . . . . . . . 71
Enabling remote client software setup . . . . . . . . . . . . . . . . . . . . . . . . . . . . . . . . . . . . . 72
Copying the client installation files to a Windows system . . . . . . . . . . . . . . . . . . .72
Copying the client installation files to a UNIX system . . . . . . . . . . . . . . . . . . . . . . 73
Setting up sample configuration files . . . . . . . . . . . . . . . . . . . . . . . . . . . . . . . . . . . . . . 73
Copying the configuration files on Windows systems . . . . . . . . . . . . . . . . . . . . . . 73
Copying the configuration files on a UNIX system . . . . . . . . . . . . . . . . . . . . . . . . . 74
Chapter 6
Administerin g th e Q u ick2C o n fi g se rver . . . . . . . . . . . . . . . . . . . . . . . . . . . 75
Viewing server events . . . . . . . . . . . . . . . . . . . . . . . . . . . . . . . . . . . . . . . . . . . . . . . . .75
Using command line options . . . . . . . . . . . . . . . . . . . . . . . . . . . . . . . . . . . . . . . . . . . . 76
Generating a debug report . . . . . . . . . . . . . . . . . . . . . . . . . . . . . . . . . . . . . . . . . . . . . . 79
Chapter 7
Administering user groups and user accounts . . . . . . . . . . . . . . . . . . . . . 81
Creating user groups . . . . . . . . . . . . . . . . . . . . . . . . . . . . . . . . . . . . . . . . . . . . . . . . . .81
Adding a user group . . . . . . . . . . . . . . . . . . . . . . . . . . . . . . . . . . . . . . . . . . . . . . .82
Renaming a user group . . . . . . . . . . . . . . . . . . . . . . . . . . . . . . . . . . . . . . . . . . . . .83
Creating user accounts . . . . . . . . . . . . . . . . . . . . . . . . . . . . . . . . . . . . . . . . . . . . . . . . 84
Adding a user account . . . . . . . . . . . . . . . . . . . . . . . . . . . . . . . . . . . . . . . . . . . . . . 84
Renaming a user account . . . . . . . . . . . . . . . . . . . . . . . . . . . . . . . . . . . . . . . . . . . 84
Setting user account properties . . . . . . . . . . . . . . . . . . . . . . . . . . . . . . . . . . . . . . . 85
Setting access permissions on user accounts . . . . . . . . . . . . . . . . . . . . . . . . . . . . . . . 86
Changing the account owner . . . . . . . . . . . . . . . . . . . . . . . . . . . . . . . . . . . . . . . . 87
Assigning a user account to user groups . . . . . . . . . . . . . . . . . . . . . . . . . . . . . . . 88
Appendix A
Recommended access permissions . . . . . . . . . . . . . . . . . . . . . . . . . . . . . . 91
Appendix B
Resetting the Administrator password . . . . . . . . . . . . . . . . . . . . . . . . . . . . 93
Index . . . . . . . . . . . . . . . . . . . . . . . . . . . . . . . . . . . . . . . . . . . . . . . . . . . . . . . . 95
Installing and Administering Optivity Quick2Config 2.2
Page 10

10 Contents
207809-B
Page 11

Figures
Figure 1 Optivity Quick2Config 2.2 Introduction dialog box . . . . . . . . . . . . . . . . . . 29
Figure 2 Choose Install Folder dialog box . . . . . . . . . . . . . . . . . . . . . . . . . . . . . . . .30
Figure 3 Choose Shortcut Location dialog box . . . . . . . . . . . . . . . . . . . . . . . . . . . .31
Figure 4 Starting Server progress window . . . . . . . . . . . . . . . . . . . . . . . . . . . . . . . 32
Figure 5 Optivity Quick2Config Server window—Server ready . . . . . . . . . . . . . . . 33
Figure 6 Optivity Quick2Config Login dialog box . . . . . . . . . . . . . . . . . . . . . . . . . . 35
Figure 7 Optivity Quick2Config 2.2 Introduction dialog box . . . . . . . . . . . . . . . . . . 39
Figure 8 Choose Install Folder dialog box . . . . . . . . . . . . . . . . . . . . . . . . . . . . . . . .40
Figure 9 Optivity Quick2Config Server window . . . . . . . . . . . . . . . . . . . . . . . . . . . . 43
Figure 10 Optivity Quick2Config Login dialog box . . . . . . . . . . . . . . . . . . . . . . . . . . 45
Figure 11 Optivity Quick2Config 2.2 Standalone Client Introduction dialog box . . . . 51
Figure 12 Choose Install Folder dialog box . . . . . . . . . . . . . . . . . . . . . . . . . . . . . . . .52
Figure 13 Optivity Quick2Config 2.2 Standalone Client Introduction dialog box . . . . 55
Figure 14 Choose Install Folder dialog box . . . . . . . . . . . . . . . . . . . . . . . . . . . . . . . .56
Figure 15 Optivity Quick2Config Login dialog box . . . . . . . . . . . . . . . . . . . . . . . . . . 64
Figure 16 Optivity Quick2Config main window . . . . . . . . . . . . . . . . . . . . . . . . . . . . . 65
Figure 17 Properties tab—Basic tab for Administrator account . . . . . . . . . . . . . . . .65
Figure 18 Properties tab—Basic tab for Web server . . . . . . . . . . . . . . . . . . . . . . . .67
Figure 19 Properties tab—Basic tab for TFTP server . . . . . . . . . . . . . . . . . . . . . . . . 69
Figure 20 Properties tab—Basic tab for SYSLOG server . . . . . . . . . . . . . . . . . . . . . 72
Figure 21 Expanded User Groups item . . . . . . . . . . . . . . . . . . . . . . . . . . . . . . . . . . 82
Figure 22 Renamed user group . . . . . . . . . . . . . . . . . . . . . . . . . . . . . . . . . . . . . . . . 83
Figure 23 User account—Basic properties . . . . . . . . . . . . . . . . . . . . . . . . . . . . . . . .85
Figure 24 Permissions Tab . . . . . . . . . . . . . . . . . . . . . . . . . . . . . . . . . . . . . . . . . . . .87
Figure 25 Permissions tab . . . . . . . . . . . . . . . . . . . . . . . . . . . . . . . . . . . . . . . . . . . .89
Figures 11
Installing and Administering Optivity Quick2Config 2.2
Page 12

12 Figures
207809-B
Page 13

Tables
Table 1 Preinstallation checklist . . . . . . . . . . . . . . . . . . . . . . . . . . . . . . . . . . . . . . 20
Table 2 Supported platform configurations: Quick2Config server . . . . . . . . . . . . .21
Table 3 Supported platform configurations: Quick2Config standalone client . . . .22
Table 4 Supported platform configurations: Quick2Config Web client . . . . . . . . .22
Table 5 Minimum disk space requirements . . . . . . . . . . . . . . . . . . . . . . . . . . . . . . 23
Table 6 Other system requirements . . . . . . . . . . . . . . . . . . . . . . . . . . . . . . . . . . . 24
Table 7 Setup tasks . . . . . . . . . . . . . . . . . . . . . . . . . . . . . . . . . . . . . . . . . . . . . . . .62
Table 8 Default location of TFTP server directory . . . . . . . . . . . . . . . . . . . . . . . . .68
Table 9 Server information types for the event log . . . . . . . . . . . . . . . . . . . . . . . . 75
Table 10 Server command line options . . . . . . . . . . . . . . . . . . . . . . . . . . . . . . . . . .76
Table 11 Default access permissions . . . . . . . . . . . . . . . . . . . . . . . . . . . . . . . . . . .86
Table 12 Recommended access permissions . . . . . . . . . . . . . . . . . . . . . . . . . . . . .91
Tables 13
Installing and Administering Optivity Quick2Config 2.2
Page 14

14 Tables
207809-B
Page 15
Preface
15
Welcome to Installing and Administering Optivity Quick2Config 2.2. The
Optivity Quick2Config
problematic areas of networking—configuration management. By taking
advantage of the unique capabilities of the Java programming language,
Quick2Config provides comprehensive, platform-independent management
capabilities that revolutionize the approach to configuring networks. The
powerful structure of Quick2Config enables network administrators to adopt
top-down, network-level configuration strategies, thus preventing the conflicts
that can result from traditional bottom-up, device-level configuration.
This guide is part of the Optivity Quick2Config documentation set and describes
how to install the Quick2Config server and the Quick2Config standalone client
software. This guide also describes how to administer the Quick2Config server.
™
application offers a solution for one of the most
Note:
on the documentation CD that is included in the Optivity
package.
Before you begin
This guide is intended for the network administrator who is responsible for
administering the Quick2Config server. Within the Quick2Config environment,
this person is called the Quick2Config administrator.
Although you do not need prior knowledge of the Quick2Config software, you
should have:
• Working knowledge of the Windows operating system or UNIX windowing
systems and graphical user interfaces (GUIs).
• Familiarity with basic networking terminology, theories, and practices.
The complete Optivity Quick2Config documentation set is located
Quick2Config
Installing and Administering Optivity Quick2Config 2.2
Page 16

16 Preface
Text conventions
This guide uses the following text conventions:
angle brackets (< >) Indicate that you choose the text to enter based on the
description inside the brackets. Do not type the
brackets when entering the command.
Example:
<InstallDir>:
bold Courier text
italic text Indicates book titles and variables in command syntax
bold text
plain Courier
text
separator ( > ) Shows menu paths.
Installation directory
Indicates command names and options and text that
you need to enter.
Example: Use the
Example: Enter
dinfo
command.
show ip {alerts|routes}.
descriptions.
Examples:
Using the Optivity Quick2Config 2.2 Client Software
Used for emphasis.
Indicates command syntax and system output, for
example, prompts and system messages.
Example:
Set Trap Monitor Filters
Example:
From the Windows Start menu, choose Programs >
Quick2Config > Server.
207809-B
This guide uses the variable <InstallDir> to indicate the directory that you
specify as the destination directory for the Quick2Config server software.
Similarly, this guide uses the variable <ClientInstallDir> to indicate the dir ect or y
that you specify as the destination directory for the Quick2Config standalone
client software.
Page 17

Screen illustrations
The screen illustrations in this guide show the Java (Metal) “look and feel” option.
You can change the “look and feel” of the Quick2Config window with the
View > Preferences menu command. For more information, see Using the
Optivity Quick2Config 2.2 Client Software.
Related publications
For more information about using Quick2Config, refer to:
• Using the Optivity Quick2Con fi g 2.2 Cli ent Sof tware (part number 207810-B)
Intended for Quick2Config users, this guide describes how to use the
Quick2Config client software to configure and maintain internetworks.
You can print selected technical manuals and release notes free, directly from the
Internet. Go to the s upport .baynet works .com/li brary /tpubs / Web address. Find the
product for which you n eed documentation. Then lo cate the specific c ate gor y an d
model or version for your hardware or software product. Use Adobe Acrobat
Reader to open the manuals and release notes, search for the sections you need,
and print them on most standard printers. Go to the Adobe Systems Web address
at www.adobe.com to download a free copy of Acrobat Reader.
Preface 17
You can purchase selected documentation sets, CDs, and technical publications
though the Internet at the www1.fatbrain.com/documentation/nortel/ Web
address.
How to get help
If you purchased a service contract for your Nortel Networks™ product from a
distributor or authorized reseller, contact the technical support staff for that
distributor or reseller for assistance.
Installing and Administering Optivity Quick2Config 2.2
Page 18

18 Preface
If you purchased a Nortel Networks service program, cont act one of the fol lowing
Nortel Networks Technical Solutions Centers:
Technical Solutions Center Telephone
EMEA (33) (4) 92-966-968
North America (800) 2LANWAN or (800) 252-6926
Asia Pacific (61) (2) 9927-8800
China (800) 810-5000
An Express Routing Code (ERC) is available for many Norte l Ne twor ks products
and services. When you use an ERC, your call is routed to a technical support
person who specialize s in suppor ting tha t product or servi ce. To locate an ERC for
your product or service, go to the www12.nortelnetworks.com/ URL and click
ERC at the bottom of the page.
207809-B
Page 19

Chapter 1
Preparing to install the Quick2Config software
This chapter describes important inf ormation ab out preparing you r system prior to
installing the Optivity Quick2Config 2.2 software. Nortel Networks strongly
suggests that you read this entire chapter before starting the installation process.
Information in this chapter is organized as follows:
• “Quick2Config components” (next)
• “Preinstallation tasks” on page 20
• “Where to go from here” on page 25
Quick2Config components
The Quick2Config application comprises the following components:
19
• Quick2Config se rv er sof twar e, which is a v ail able fo r Microso ft W i ndows and
UNIX platforms.
• Quick2Config client software, which is available in two versions:
— The standalone version is a Java application. In UNIX environments, you
can install the standalone client software on one machine and run on
many client machin es using X W i ndo ws. Alte rnati v ely, you can install the
standalone client software on each client machine. In Windows
environments, the standalone client software must be installed on each
client machine.
— The Web browser version is a Java applet that resides on the same
machine as the Quick2Config server. The Web browser version of the
client software is downloaded to the client machine whenever a
Quick2Config user starts a client session.
Installing and Administering Optivity Quick2Config 2.2
Page 20

20 Chap ter 1 Preparing to instal l the Qu ic k2 Con fig so ftwar e
Preinstallation tasks
This section describes preinstallation tasks that you must complete before
installing the Quick2Config software.
Preinstallation checklist
Review the preinstallation checklist in Table 1 and perform all listed tasks before
installing Optivity Quick2Config.
Table 1 Preinstallati on ch ecklis t
Completed Task
Verify supported platforms (page20).
Note that on AIX and HP/U X systems , y ou m ust instal l the J a va Virtual
Machine (JVM) before you instal l Quick2Config.
Determine whether a Web server is running on the server system
(page 23).
Verify disk space requirements (page 23).
Verify memory, display, and client system requirements (page 24).
207809-B
Verifying supported platforms
The following tables list the platform requirements for running the Optivity
Quick2Config 2.2 software:
• Table 2 is a matrix of the hardware and operating systems that are supported
by the Optivity Quick2Config 2.2 server software.
• Table 3 is a matrix of the hardwar e, operati ng systems, win do w en vi ronments,
and (optional) network management platforms that are supported by the
Optivity Quick2Config 2.2 standalone client software.
• Table 4 is a matrix of the hardware, operati ng systems , and Web browsers that
are supported by the Optivity Quick2Config 2.2 Web client software.
Page 21

Chapter 1 Preparing to install the Quick2Config software 21
Verify that your system configuration matches one of the configurations listed in
the following tables.
Table 2 Supported platform configurations: Quick2Config server
Hardware platform Operating system
Intel Pentium, Pentium Pro,
or Pentium II, 300MHz or faster
RS/6000 & Power PC AIX 4.2, 4.3, or 4.3.2
700 series HP-UX 10.2 or 11.00
800 series HP-UX 10.2 or 11.00
Sun SPARCstation 20
UltraSPARCstation
Windows 95, Windows98, Windows 2000,
or Windows NT 4.0 (Server or Workstation)
and Service Pac k 5
AIX Java Developer Kit (JDK) 1.1.8 or the
Java Runtime Environment (JRE)
HP-UX JDK 1.1.8 or the Java Runtime
Environment (JRE)
HP-UX JDK 1.1.8 (JRE)
Solaris 2.5.1, 2.6, or 2.7
Installing and Administering Optivity Quick2Config 2.2
Page 22

22 Chap ter 1 Preparing to instal l the Qu ic k2 Con fig so ftwar e
Table 3 Supported platform configurations: Quick2Config standalone client
Hardware platform Operating system
Intel Pentium, Pentium Pro,
or Pentium II
RS/6000 & Power PC AIX 4.2, 4.3, or 4.3.2
700 series HP-UX 10.2 or 11.0
800 series HP-UX 10.2 or 11.0
Sun SPARCstations 10 or 20
UltraSPARCstations
Windows 95
Windows 98
Windows NT 4.0
Windows 2000
AIX Java Developer
Kit (JDK ) 1.1.8
HP-UX JDK 1.1.8
HP-UX JDK 1.1.8
Solaris 2.5.1, 2.6, or
2.7
Window
environment
N/A HP Openview 5.x or 6.x
AIX Motif or Common
Desktop Environment
(CDE)
CDE HP Openview 5.x or 6.x
CDE HP Openview 5.x or 6.x
CDE Solstice Domain Manager
Table 4 Supported platform configurations: Quick2Config Web client
Network management
platform (optional)
Tivoli TME 10/NetView 5.0x
NetView 4.1 or
Tivoli TME 10/Netview, 5.0x
2.3
or
HP Openview 5.x or 6.x
or
Tivoli TME 10/Netview, 5.0x
Hardware platform Operating system Browser
Intel Pentium, Pentium Pro,
or Pentium II
Sun SPARCstation 10 or 20
UltraSPARCstation
RS/6000 & Power PC AIX 4.2, 4.3, or 4.3.2 Netscape 4.5 (or later)
700 series HP-UX 10.2 or 11.0 Netscape 4.5 (or later)
800 series HP-UX 10.2 or 11.0 Netscape 4.5 (or later)
Windows 95
Windows 98
Windows 2000
Windows NT 4.0 and
Service Pack 5
Solaris 2.5.1, 2.6, or 2.7 Netscape 4.5 (or later)
Netscape 4.5 (or later)
Microsoft Internet Explorer 5.0 (or later)
207809-B
Page 23

Chapter 1 Preparing to install the Quick2Config software 23
Determining the presence of a Web server
The Quick2Config server uses a Web server to communicate with Quick2Config
client sessions. You can use the Web server that is integrated with Quick2Config
or you can use a third-party Web server.
Determine whether the system onto which you are installing the Quick2Config
server already has a Web server installed on it and, if it does, decide which Web
server you will use.
Note:
You can run the Web server integrated with Quick2Config and
another Web server simultaneously as long as the Web servers are running
on different ports. By default, the integrated Web server runs on port 80,
which is typically the port that Web servers use. However, you can
configure the integrated Web server to run on any unused port. See
“Configuring the Web server” on page 66.
Verifying disk space availability
Table 5 shows the disk space required to install the Quick2Config server and
client software. Verify that your system has the required disk space.
Note:
your network devices in the Quick2Config database.
Table 5 Minimum disk space requirements
Quick2Config software AIX HP-UX Solaris
Server 33 MB 48 MB 44 MB 34 MB
Standalone client 16 MB 34 MB 32 MB 22 MB
You will need additional disk space to store information about
Windows 95
Windows 98
Windows NT
Installing and Administering Optivity Quick2Config 2.2
Page 24

24 Chap ter 1 Preparing to instal l the Qu ic k2 Con fig so ftwar e
Table 5 Minimum disk space re quirements (continued)
Quick2Config software AIX HP-UX Solaris
Web client 6 MB 6 MB 6 MB 6 MB
Standalone client installation files
(These files are not required to run
the Quick2Config
more information, see “Enabling
remote client software setup” on
page 72.)
application. For
8 MB 15 MB 17 MB 12 MB
Other system requirements
In addition to allocating enough disk space, you need to plan for other system
requirements that affect the operation of the Quick2Config software. These
requirements include system memory and display.
Table 6 shows the syst em memory and d isplay re quireme nts for the Quick2Con fi g
server and client software. Verify that your system meets these requirements.
Windows 95
Windows 98
Windows NT
207809-B
Table 6 Other system requirements
Quick2Config software AIX HP-UX Solaris
Server computers
• Memory
• Display
Client computers
• Memory
• Display
256 MB
256 colors
128 MB
256 colors
256 MB
256 colors
128 MB
256 colors
256 MB
256 colors
128 MB
256 colors
Windows 95
Windows 98
Windows NT
128 MB
256 colors
96 MB
256 colors
Page 25

Where to go from here
If you are installing Quick2Config on a Windows system, see Chapter 2,
“Installing Quick2Config on Windows systems,” on page 27.
If you are installing Quick2Conf ig on a UNIX system, g o to Chapter 3, “Installing
Quick2Config on UNIX systems,” on page 37.
Chapter 1 Preparing to install the Quick2Config software 25
Installing and Administering Optivity Quick2Config 2.2
Page 26

26 Chap ter 1 Preparing to instal l the Qu ic k2 Con fig so ftwar e
207809-B
Page 27

Chapter 2
Installing Quick2Config on Windo ws systems
This chapt er describes how to install and uninstall the Optivity Quick2Config 2.2
server softwa re on Windows systems.
Information in this chapter is organized as follows:
• “What the installation program does” (next)
• “Running the Quick2Config server installation program” on page 28
• “Verifying the server ins t allation” on page 32
• “Removing the Quick2Config server software” on page 36
What the installation program does
The installation program for Quick2Config installs the standalone and the Web
versions of t he clie nt so ftware , as well as the Quick2Config server. In ad dition, t he
installation program does the following:
27
• Creates an installation folder if one does not already exist. The default
installatio n folder is C:\Program File s\Optivity\Quick 2Config.
• Creates an uninstall program for the Quick2Config software.
• Creates a Quick2Config program group with icons for starting the
Quick2Config server and starting the Quick2Config standalone client.
Installing and Administering Optivity Quick2Config 2.2
Page 28

28 Chap ter 2 Installing Qu ic k2 Con fig on Wi ndow s sy ste ms
Running the Quick2Config server installation program
The Quick2Config server installation program displays a series of dialog boxes
that guide you through the installation. When you have completed a dialog box,
click Next to continue with the installation. You can click a window’s Previous
button to move back through the dialog boxes, in order to review or change a
setting. You can also click Exit at an y time to exit the instal lation pr ogram without
installing the Quick2Config software.
To install the Q uick2Config server software on a Windows system:
1
Log on to a Windows system.
2
Close any Windows programs that are running.
3
Insert the Qu ick2Config CD into the CD-ROM drive.
4
From the Windows Start menu, choose Run.
5
In the Run window, type the following command:
<drive>:\Install\win32\q2c.exe
A window opens, informing you that the installation program is being
prepared. After several seconds, the Optivity Quick2Config splash window
opens. Next, the InstallAnywhere Wizard starts, and the Quick2Config
installation program’s Introduction dialog box opens (Figure 1).
207809-B
Page 29

Chapter 2 Installing Quick2Config on Windows systems 29
2.2 Introduction dialog box
Figure 1 Optivity Quick2Config
6
Click Next.
The Software License Agreement dialog box opens.
7
Read the license agreement, and then do one of the following:
• If you agree with the terms of the license, click Yes, and then click Next.
The Important Information window opens.
• If you do not agree with the terms, click No to exit the installation
program.
8
Read the information in th e Important Information dialog box, a nd then click
Next.
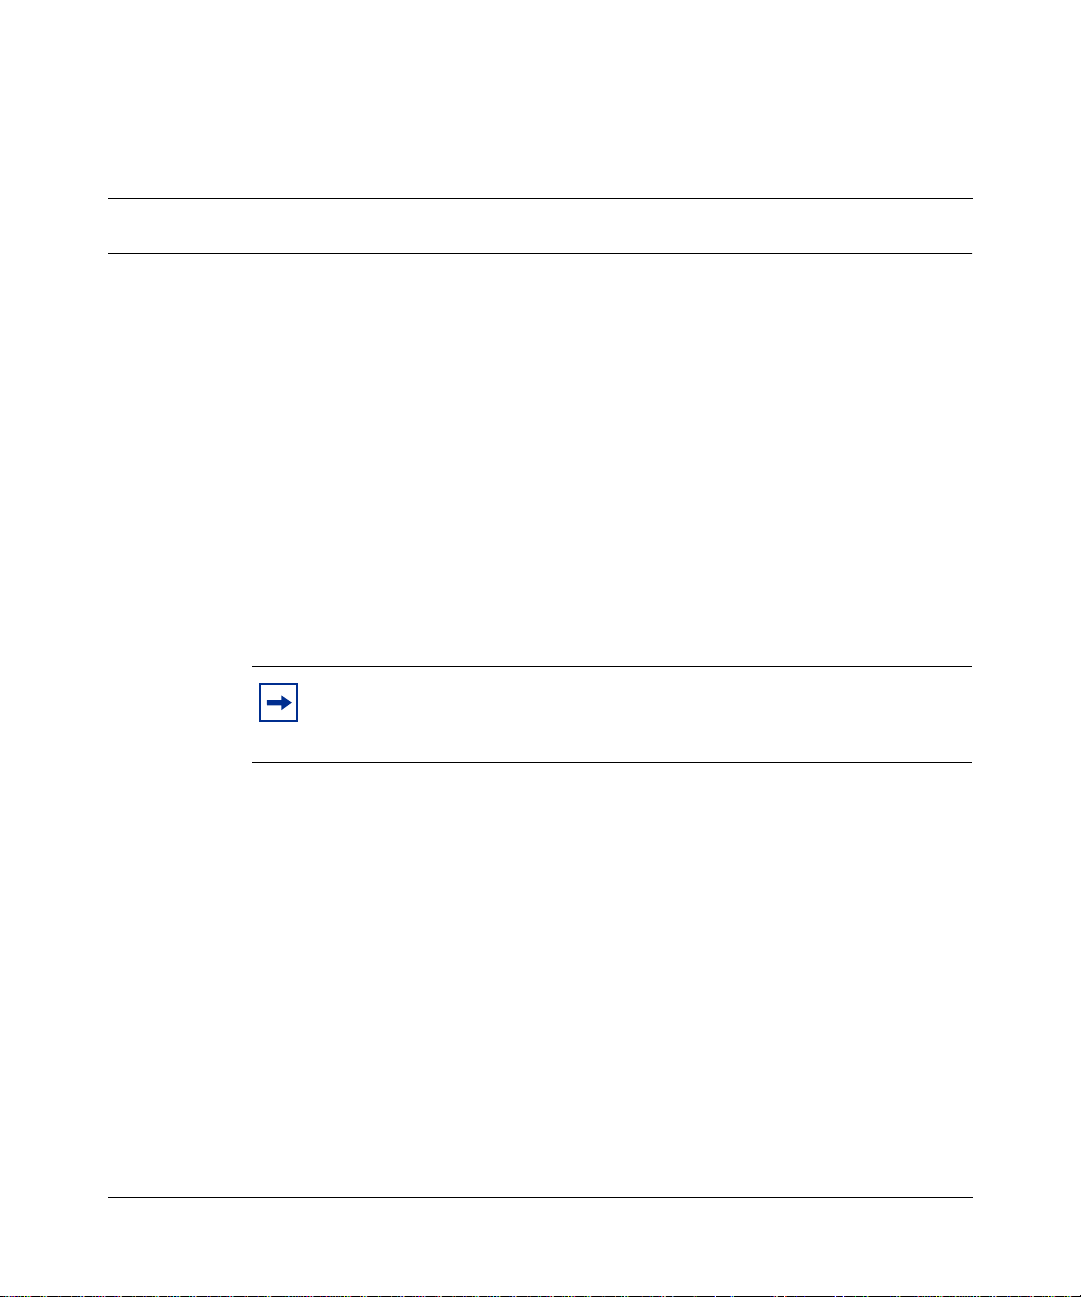
The Choose Install Folder dialog box opens (Figure 2).
Installing and Administering Optivity Quick2Config 2.2
Page 30
30 Chap ter 2 Installing Qu ic k2 Con fig on Wi ndow s sy ste ms
Figure 2 Choose Install Folder dialog box
9
Specify a location for the Quick2Config files.
You can install the Quick2Config files in any directory on a local disk. The
default directory is C:\Program Files\Optivity\Quick2Config.
207809-B
If you are using Quick2Config with a third-party Web server instead of the
integrated Web server, you must create a link or an alias to the installation
directory. (The details of how you link a file system directory to a Web
directory depend on the Web server.) For example, you can install the
Quick2Config files in the default directory
C:\Program Files\Optivity\Quick2Config and then create a Web directory
called Quick2Config and map that directory to
C:\Program Files\Optivity\Quick2Config.
Caution:
Do not install t he Quic k2Config software directly into the Web
server’s document root directory. If you do, the existing index.html page
will be overwritten. The document root directory is the directory from
which a Web server serves HTML files to Web browsers.
10
Click Next.
The Choose Shortcut Location dialog box opens (Figure 3).
Page 31

Chapter 2 Installing Quick2Config on Windows systems 31
Figure 3 Choose Shor tcut Loc ati on dia lo g box
11
Specify the folder where you want to copy the Quick2Config program icons.
By default, the installation program copies the program icons into a folder
called Quick2Config 2.2.
12
Click Install.
The installation program copies the files from the CD, and after a few
moments, the Install Complete dialog box opens.
13
Click Done.
This completes the installation process. Now you can verify the installation.
Installing and Administering Optivity Quick2Config 2.2
Page 32

32 Chap ter 2 Installing Qu ic k2 Con fig on Wi ndow s sy ste ms
Verifying the server installation
To verify that the Quick2Config server software has been installed correctly, do
the following:
• Start the Quick2Config server (next).
• Start a Quick2Config client session (page 34).
Starting the Quick2Config server
The way you start t he Quick2Conf ig se rver for the f ir st time depe nds on whether a
third-party Web server is running on the computer where you installed the
Quick2Config server.
If a third-part y Web server i s not runni ng, go to “Starti ng the serv er on a computer
without a third-party Web server” (next).
If a third-party Web server is running, go to “Starting the server on a computer
running a third-party Web server” on page 33.
207809-B
Starting the server on a computer without a third-party Web server
To start the Quick2Config server on a computer without a third-party Web server:
➨ From the Windows Start menu, choose Programs > Quick2Config 2.2 >
Server.
The server takes a few moments to perform its startup procedures, and then the
Starting Server window opens. This window displays the progress of the
Quick2Config server’s startup process (Figure 4).
Figure 4 Starting Server progress window
The Optivity Quick2Config Server window also opens. This window displays
information about Quick2Config’s services and drivers as they are loaded.
Page 33

Chapter 2 Installing Quick2Config on Windows systems 33
Figure 5 shows an example of the Optivity Quick2Config Server window. The
message “Optivity Quick2Config Server -- Ready” indicates that the
Quick2Config se rver has been installed correctl y a nd that clients can connect to it.
Figure 5 Optivity Quick2Config Server window—Server ready
Starting the server on a computer running a third-party Web server
How you start the Quick2Config server for the first time on a computer running a
third-party Web server depends on whether you plan to use Quick2Config’s
integrated Web server or the third - party Web server.
If you are using the Web server inte g rated into th e Quick2Con f ig se rv er, you must
change the port for the integrated Web server to avoid port conflicts. The
integrated Web server is set up t o ru n on port 80, which is the d ef ault po rt for Web
servers.
To start the Quick2Config server and change the port for its Web server:
1
Open a command window and navigate to the directory containing the
Quick2Config files.
2
At the command prompt, type the following command:
server -httpport <portnumber>
Installing and Administering Optivity Quick2Config 2.2
Page 34

34 Chap ter 2 Installing Qu ic k2 Con fig on Wi ndow s sy ste ms
portnumber
where
Web server is running.
If you plan to use a third-party Web server with Quick2Config, you can start the
Quick2Config server as follows:
is a number other than the port on which the third-party
➨ From the Windows Start menu, choose Programs > Quick2Config 2.2 >
Server.
The Quick2Config server takes a few seconds to perform its startup procedures.
The Starting Serv er window opens and displays the pr ogr ess of the Quick2Config
server’s startup process. (See Figure 4 on page 32.)
The Optivity Quick2Conf ig Server window also opens. (See Figur e 5 on page 33.)
This window displays information about Quick2Config’s services and device
driv ers as the y are load ed. The message “Opti v ity Quick2Conf ig Server -- Ready”
indicates that Quick2Config has been installed correctly.
Next, you must start a client session so that you can configure the integrated Web
server (page 66).
207809-B
Note:
about SYSLOG and TFTP conflicts, you can start the Quick2Config
server with command line options that dis abl e the SYSLOG and TFTP
daemons. See “Using command line options” on page 76.
If the Optivity Quick2Config Server window displays messages
Starting a Quick2Config client session
Although you can start a client session from a Web browser, for purposes of
verifying the installation, use the following procedure to start the st andalone
client:
➨ From the Windows Start menu, choose Programs > Quick2Config 2.2 >
Standalone Client.
After a few moments, the Optivity Quick2Config Login dialog box opens.
(See Figure 6 on page 35.) The opening of this dialog box indicates that the
Quick2Con fig software has been installed correctly and that the client software
can connect to the Quick2Config server.
Page 35

Chapter 2 Installing Quick2Config on Windows systems 35
Figure 6 Optivity Quick2Config Login dialog box
You are now ready to log in to the Quick2Config server and complete the setup
tasks. See Chapter 5, “Setting up Quick2Config,” on page 61.
Or you can cancel the client session and install the Quick2Config standalone
client on client compute rs, and then complete the setup t ask s la ter. See Chapter 4,
“Installing the Quick2Config standalone client,” on page 49.
Installing and Administering Optivity Quick2Config 2.2
Page 36

36 Chap ter 2 Installing Qu ic k2 Con fig on Wi ndow s sy ste ms
Removing the Quick2Config server software
When you install the Quick2Config server software, the installation program
creates an uninsta ll pr ogram, wh ich you can us e to remo v e t he Qui ck2Conf i g f il es
from your system.
To remove the Quick2Config server software from your system:
1
Stop the Quick2Config server if it is running.
2
From the Windows Start menu, choose Settings > Control Panel >
Add/Remove Programs.
The Add/Remove Programs Properties dialog box opens.
3
Select Optiv it y Quick2Config 2.2.
4
Click Add/Remove.
The Uninstaller dialog box opens.
5
Click Uninstall.
The uninstall program removes the Quick2Config server files from your
system. The uninstall program does not remove the <InstallDir>\database
directory. Nortel Networks recommends that you back up this directory so
that it will be available when you reinstall Quick2Config.
207809-B
Page 37

Chapter 3
Installing Quick2Config on UNIX systems
This chapt er describes how to install and uninstall the Optivity Quick2Config 2.2
software on UNIX systems.
Information in this chapter is organized as follows:
• “What the installation program does” on page 38
• “Gaining access to the installation files” on page 38
• “Running the installation program” on page 38
• “Verifyi ng the installation” on page 41
• “Starting the Quick2Config server without a console window” on page 46
• “Removing the Quick2Config server software” on page 46
Before you begin
37
Before you proceed with the installation process on HP-UX or AIX systems,
verify that the appropriate JVM has been installed:
• For HP-UX syst ems, v erify that HP- UX Java VM 1.1.8 is installed. If it is n ot,
go to http://www.hp.com to download the Java Development Kit (JDK).
• For AIX systems, verify that AIX Jav a VM 1.1.8 is installed. If it is not, g o t o
http://www.ibm.com to download the AIX JDK.
Installing and Administering Optivity Quick2Config 2.2
Page 38

38 Chap ter 3 Installi ng Quic k2 Config on UNIX systems
What the installation program does
The installation program for Quick2Config installs the standalone and Web
versions of t he clie nt so ftware , as well as the Quick2Config server. In ad dition, t he
installation program does the following:
• Creates an uninstall program for the Quick2Config software.
• Creates the following symbolic links:
— /usr/Quick2Config/server/bin -> <InstallDir>
— /us r/Quick2Con fig/client/bin -> <InstallDir>
Gaining access to the installation files
The Quick2Config software is shipped on a CD. You can install Quick2Config in
one of the following ways:
• Locally from a CD-RO M drive
• Remotely from a network drive
• Remotely from a netw ork loca tion tha t contain s the Qu ick2Conf ig in stallat ion
files.
Note:
consult with your system administrator for help with mounting the
CD drive or installing the software from a remote location.
If necessary, review your operating system documentation or
Running the installation program
To install the Quick2Config server and standalone client software:
1
Open a command window.
2
Log in as root by typing the following command:
su
3
At the password prompt, type your root password.
207809-B
Page 39

Chapter 3 Installing Quick2Config on UN IX sy st ems 39
4
Navigate to the Quick2Config installation files. For example, if the
installation CD is mounted on the drive /cdrom, type the following command:
cd /cdrom/Install/<platform>
platform
where
• aix
• hpux/10.20
• hpux/11.0
• solaris
5
Type the following command:
sh q2c.bin
is one of the following:
A window opens, informing you that the installation program is being
prepared.
Note:
On AIX and HP-UX systems, a message box opens and displays
the JREs on your system. Select the JRE that you w a nt Quic k2Con fig to
use.
After sev era l second s, the Opt i vity Quic k2Conf ig splash windo w ope ns. Ne xt,
the InstallAnywhere wizard starts, and the Quick2Config installation
program’s Introduction dialog box opens (Figure 7).
2.2 Introduction dialog box
Figure 7 Optivity Quick2Config
Installing and Administering Optivity Quick2Config 2.2
Page 40

40 Chap ter 3 Installi ng Quic k2 Config on UNIX systems
6
Click Next.
The Software License Agreement dialog box opens.
7
Read the license agreement, and then do one of the following:
• If you agree with the terms of the license, click Yes, and then click Next.
The Important Information dialog box opens.
• If you do not agree with the terms, click No to exit the installation
program.
8
Read the information in th e Important Information dialog box, a nd then click
Next.
The Choose Install Folder dialog box opens (Figure 8).
Figure 8 Choose Install Folder dialog box
207809-B
9
Specify a location for the Quick2Config files.
You can install the Quick2Config files in any directory on a local disk. The
default directory is /opt/optivity/Quick2Config.
Page 41

Chapter 3 Installing Quick2Config on UN IX sy st ems 41
If you are using Quick2Config with a third-party Web server instead of the
integrated Web server, you must create a soft link to t he Quick2Config
installation directory. For example, create a Quick2Config directory in the
Web server directory structure and link that directory to the Quick2Config
installation directory.
Caution:
server’s document root directory. If you do, the existing index.html page
will be overwritten. The document root directory is the directory from
which a Web server serves HTML files to Web browsers.
10
Click Install.
The installation program copies the files from the CD, and after a few
moments, the Install Complete dialog box opens.
11
Click Done.
This completes the installation process. Now you can verify the installation.
Do not install t he Quic k2Config software directly into the Web
Verifying the installation
To verify that the Quick2Config software has been installed correctly, do the
following:
• Start the Quick2Config server.
• Start a Quick2Config client session.
Installing and Administering Optivity Quick2Config 2.2
Page 42

42 Chap ter 3 Installi ng Quic k2 Config on UNIX systems
Starting the Quick2Config server
You can start the serve r from the local console (next) or from a remote console
(page 43).
Note:
By default, the script that starts Quick2Config requires the
X Windows system to be running, and it assumes that you want the
Quick2Config console window to open when the server starts. For
information about starting the server without a console window, see
“Starting the Quick2Config server without a console window” on
page 46.
Starting the server from the local console
To start the server from the local console:
1
Open a command window.
2
Log in as root.
3
Navigate to the location of the Quick2Config program files by typing the
following command:
cd /usr/Quick2Config/server/bin
4
Type the following command:
./server.sh
207809-B
Page 43

Chapter 3 Installing Quick2Config on UN IX sy st ems 43
The Optivity Configuration Server window opens. This window displays
information about the Quick2Config services and device drivers as they are
loaded and started. The message “Optivity Quick2Config Server Ready”
indicates that Quick2Config has been installed correctly and that clients can
connect to the server (Figure 9).
Figure 9 Optivity Quick2Config Server window
Starting the server from a remote console
To start the server from a remote console:
1
Open a command window and type the following command:
xhost +<servername>
servername
where
the Quick2Config server is installed.
2
Telnet or rlogin to the system where the Quick2Config server is installed.
is the name (or the IP address) of the system on which
Installing and Administering Optivity Quick2Config 2.2
Page 44

44 Chap ter 3 Installi ng Quic k2 Config on UNIX systems
3
Set the display environment variable.
• If you are ru nning the UNIX shell (sh) or the Korn shell (ksh), type the
following commands:
DISPLAY=localsystem:0.0
export DISPLAY
localsystem:0.0
where
is the local display.
• If you are running the C shell (csh), type the following commands:
setenv DISPLAY=localsystem:0.0
export DISPLAY
localsystem:0.0
where
4
Navigate to the location of the Quick2Config program files by typing the
is the local display.
following command:
cd /usr/Quick2Config/server/bin
5
Type the following command:
./server.sh
The Optivity Quick2Config Server window opens. This window displays
information about the Quick2Config services and device drivers as they are
loaded and started. The message “Optivity Quick2Config Server Ready”
indicates that Quick2Config has been installed correctly and that clients can
connect to the server. (See Figure 9 on page 43.)
Starting the standalone client software
Although you can start a client session from a Web browser, for purposes of
verifying the i nstal lati on use the fol lo wi ng proce dure to start the st andalo ne cl ient :
1
Open a command window.
2
Navigate to the location of the Quick2Config program files by typing the
following command:
cd /usr/Quick2Config/client/bin
3
Type the following command:
207809-B
.
/client.sh
Page 45

Chapter 3 Installing Quick2Config on UN IX sy st ems 45
After a few moments, the Optivity Quick2Config Login dialog box opens
(Figure 10). The opening of this dialog box indicates that the Quick2Config
client software has been installed correctly and that the client software can
connect to the Quick2Config server.
Figure 10 Optivity Quick2Config Login dialog box
You are now ready to log in to the Quick2Config server and complete the setup
tasks. See Chapter 5, “Setting up Quick2Config,” on page 61.
Or you can cancel the client session and install the Quick2Config standalone
client on cl ient computers, and complete the setup tasks later. See Chapter 4,
“Installing the Quick2Config standalone client,” on page 49.
Installing and Administering Optivity Quick2Config 2.2
Page 46

46 Chap ter 3 Installi ng Quic k2 Config on UNIX systems
Starting the Quick2Config server without a console window
The script that starts the Quick2Config server on UNIX systems, server.lax,
includes the
-console
running, and it assumes that you want the Quick2Config console window to open
when the server starts.
If you do not want the Quick2Config console window to be displayed, you can
edit the server.lax script and remove th e
command line. You might choose to do this so that you can configure the system
to start the Quick2Config server at boot time. For example, after you remove the
-console
option from the server startup command line in server.lax, add a
statement similar to the following to the appropriate init fi le so that the
Quick2Config server starts at boot time:
#!/sbin/sh
if ( -f /usr/Quick2Config/server/bin/server.sh ); then
/usr/Quick2Config/server/bin/server.sh&
fi
exit 0
option. This option requires that the X Window system is
-console
option from the serv e r s ta rt up
To stop the Quick2Config, use the
-stop
option.
Removing the Quick2Config server software
In order to remove the Quick2Config server files from your system, you must run
the uninstall script.
To run the uninstall script:
1
Log in as root.
2
Navigate to the location of the uninstall script by typing the following
command:
207809-B
cd <InstallDir>/uninstall
InstallDir
where
is the directory where you installed Quick2Config. The
default installation directory is /opt/optivity/Quick2Config.
Page 47

3
Type the following command:
Chapter 3 Installing Quick2Config on UN IX sy st ems 47
./uninstall
The Uninstaller dialog box opens.
4
Click Uninstall.
The uninstall program removes the Quick2Config server files from your
system. The uninstall program does not remove the Quick2Config database
directory <InstallDir>/database. You might want to back up this directory so
that it will be available when you reinstall Quick2Config.
Installing and Administering Optivity Quick2Config 2.2
Page 48

48 Chap ter 3 Installi ng Quic k2 Config on UNIX systems
207809-B
Page 49

Chapter 4
Installing the Quick2Config standalone client
This chapt er describes how to install and uninstall the Optivity Quick2Config 2.2
standalone client software on Windows systems and on UNIX systems.
Information in this chapter is organized as follows:
• “Installing the standalone client software on a Windows system” (next)
• “Installing the standalone client software on UNIX systems” on page 54
• “Removing the Quick2Config standalone client software” on page 58
You do not need to install the client software on client computers because client
computers can start a Quick2Config session through a Web browser. However, if
the connection between the client computer and the server computer is slow (for
example, a 28.8 Kb/s dial-up connection), you might want to install the
Quick2Config standalone client software. Otherwise, Quick2Config users must
wait for the client softwar e to be downloaded to the client computer each time
they start a Quick2Config session .
49
Installing the standalone client software on a Windows system
The installation program for the Quick2Config standalone client does the
following:
• Creates an installation folder if one does not already exist. The default
installation folder is:
C:\Program Files\Optivity\Quick2Config\StandaloneClient
• Creates an uninstall program for the Quick2Config client software.
Installing and Administering Optivity Quick2Config 2.2
Page 50

50 Chap ter 4 Installing the Qu ic k2 Conf ig sta nda lon e client
• Creates a Quick2Conf ig program grou p if one do es not e xis t, and adds an icon
for starting a Quick2Config client session.
Running the installation program
The installation program for the Quick2Config standalone client displays a series
of dialog boxes that guide you through the installation process. When you have
completed a dialog box, cli ck Ne xt t o cont inue wi th the inst allat ion. You ca n clic k
a window’s Previous button to move back through the dialog boxes, in order to
review or change a setting. You can also click Exit at any time to end the
installation program without installing the Quick2Config software.
To install the Quick2Config standalone client on a Windows system:
1
Log on to a Windows 95, Windows 98, or Windows NT system.
2
Close any Windows programs that are running.
3
Insert the Qu ick2Config CD into the CD-ROM drive.
4
From the Windows Start menu, choose Run.
207809-B
5
In the Run window, type the following command:
<drive>:\install\win32\client.exe
A window opens, informing you that the installation program is being
prepared. After several seconds, the Optivity Quick2Config splash window
opens. Next, the InstallAnywhere wizard starts, and the Quick2Config
installation program’s Introduction dialog box opens (Figure 11).
Page 51

Chapter 4 Installing the Quick2Config standalone client 51
Figure 11 Optivity Quick2Config 2.2 Standalone Client Introduction dialog box
6
Click Next.
The Software License Agreement dialog box opens.
7
Read the license agreement, and then do one of the following:
• If you agree with the terms of the license, click Yes, and then click Next.
The Important Information dialog box opens.
• If you do not agree with the terms, click No to exit the installation
program.
8
Read the information in th e Important Information dialog box, a nd then click
Next.
The Choose Install Folder dialog box opens (Figure 12).
Installing and Administering Optivity Quick2Config 2.2
Page 52

52 Chap ter 4 Installing the Qu ic k2 Conf ig sta nda lon e client
Figure 12 Choose Install Folder dialog box
9
Specify a location for the Quick2Config client files.
You can install the Quick2Config files in any directory on a local disk.
The default directory is:
C:\Program Files\Optivity\Quick2Config\StandaloneClient
207809-B
10
Click Next.
The Choose Shortcut Location dialog box opens.
11
Specify the folder where you want the Quick2Config program icons to be
copied.
By default, the installation program copies the program icons into a folder
called Quick2Config 2.2.
12
Click Install.
The installation program copies the files from the CD, and after a few
moments, the Install Complete dialog box opens.
13
Click Done.
This completes the installation process. Now you can verify the installation.
Page 53

Chapter 4 Installing the Quick2Config standalone client 53
Verifying the client installation on Windows systems
To verify that the standalone client software has been installed correctly:
1
Start the Quick2Config server if it is not running.
If the server is installed on a W indo ws system, see “Star ting the Quick2 Config
server” on page 32.
If the server is installed on a UNIX system, see “Starting the Quick2Config
server” on page 42.
2
From the Windows start menu, choose Programs > Quick2Config 2.2 >
Standalone Client.
After a few seconds, the Optivity Quick2Config Login dialog box opens,
indicating that the Quick2Config client software has been installed correctly.
The Optivity Quick2Config Login window displays the following information:
• The host name, which is the name of the computer that is running the
Quick2Config server. Type the host name or the IP address of the system that
is running the Quick2Config server.
• The default port for the Quick2Config server, which is 7000.
• The Previous Servers list, which contains the host names and ports of
Quick2Config servers that the client computer has accessed. (The dialog box
displays the host n ame and port numbe r of the se rv er that w as last accessed b y
this client c omputer.) Because this is the first time that you have started a
session, the list contains one entry—the name of the server where you
installed the server and port 7000.
You are now ready to log in to the Quick2Config server. If you did not complete
the setup tasks after you installed the server, you should complete them now.
Installing and Administering Optivity Quick2Config 2.2
Page 54

54 Chap ter 4 Installing the Qu ic k2 Conf ig sta nda lon e client
Installing the standalone client software on UNIX systems
The installation program for the Quick2Config standalone client does the
following:
• Copies the Quick2Config program files from the CD to the installation
directory.
• Creates the following symbolic link:
/usr/Quick2Config/client/bin -> <ClientInstallDir>
Gaining access to the installation files
You can install the standalone client software in any of the following ways:
• Locally from a CD-RO M drive
• Remotely from a network drive
• Remotely from a netw ork loca tion tha t contain s the Qu ick2Conf ig in stallat ion
files
207809-B
Note:
consult with your system administrator for assistance mounting the
CD drive or installing the software from a remote location.
If necessary, review your operating system documentation or
Running the installation program
To install the Quick2Config standalone client software:
1
Open a command window.
2
Log in as root by typing the following command:
su
3
At the password prompt, type your root password.
Page 55

Chapter 4 Installing the Quick2Config standalone client 55
4
Navigate to the Quick2Config installation files. For example, if the
installation CD is mounted on the drive /cdrom, type the following command:
cd /cdrom/Install/<platform>
platform
where
• aix
• hpux/10.20
• hpux/11.0
• solaris
5
Type the following command:
sh client.bin
is one of the following:
A window opens, informing you that the installation program is being
prepared.
Note:
On AIX and HP-UX systems, a message box opens and displays
the JREs on your system. Select the JRE that you w a nt Quic k2Con fig to
use.
After sev era l second s, the Opt i vity Quic k2Conf ig splash windo w ope ns. Ne xt,
the InstallAnywhere wizard starts, and the Quick2Config installation
program’s Introduction dialog box opens (Figure 13).
2.2 Standalone Client Introduction dialog box
Figure 13 Optivity Quick2Config
Installing and Administering Optivity Quick2Config 2.2
Page 56

56 Chap ter 4 Installing the Qu ic k2 Conf ig sta nda lon e client
6
Click Next.
The Software License Agreement dialog box opens.
7
Read the agreement, and then do one of the following:
• If you agree with the terms of the license, click Yes, and then click Next.
The Important Information dialog box opens.
• If you do not agree with the terms, click No to exit the installation
program.
8
Read the information in th e Important Information dialog box, a nd then click
Next.
The Choose Install Folder dialog box opens (Figure 14).
Figure 14 Choose Install Folder dialog box
207809-B
9
Specify a location for the Quick2Config client files.
You can install the Quick2Config files in any directory on a local disk.
The default directory is /opt/optivity/Quick2Config/StandaloneClient.
10
Click Install.
The installation program copies the files from the CD, and after a few
moments, the Install Complete dialog box opens.
11
Click Done.
This completes the installation process. Now you can verify the installation.
Page 57

Chapter 4 Installing the Quick2Config standalone client 57
Verifying the client installation on UNIX systems
To verify that the standalone client software has been installed correctly:
1
Start the Quick2Config server if it is not running.
If the server is installed on a W indo ws system, see “Star ting the Quick2 Config
server” on page 32.
If the server is installed on a UNIX system, see “Starting the Quick2Config
server” on page 42.
2
Open a command window, and navigate to the location of the Quick2Config
program files by typing the following command:
cd /usr/Quick2Config/client/bin
3
Type the following command:
./client.sh
After a few moments, the Optivity Quick2Config Login dialog box opens,
indicating that the Quick2Config client software has been installed correctly.
The Optivity Quick2Config Login dialog box displays the following information:
• The host name, which is the name of the computer that is running the
Quick2Config server. Type the host name or the IP address of the system that
is running the Quick2Config server.
• The default port for the Quick2Config server, which is 7000.
• The Previous Servers list, which contains the host names and ports of
Quick2Config servers that the client computer has accessed. (The dialog box
displays the host n ame and port numbe r of the se rv er that w as last accessed b y
this client c omputer.) Because this is the first time that you have started a
session, the list contains one entry—the name of the server where you
installed the server and port 7000.
You are now ready to log in to the Quick2Config server. If you did not complete
the setup tasks after you installed the server, you should complete them now. See
Chapter 5, “Setting up Quick2Config,” on page 61.
Installing and Administering Optivity Quick2Config 2.2
Page 58

58 Chap ter 4 Installing the Qu ic k2 Conf ig sta nda lon e client
Removing the Quick2Config standalone client software
When you install the Quick2Config standalone client software, the installation
program creates an uninstall program, which you can use to remove the
Quick2Config files from your system.
Removing the Quick2Config standalone client from Windows systems
To remove the Quick2Config standalone client from a Windows system:
1
From the Windows Start menu, choose Settings > Control Panel >
Add/Remove Programs.
The Add/Remove Programs Properties dialog box opens.
2
Select Optivity Quick2Config 2.2 Standalone Client.
3
Click Add/Remove.
The Uninstaller dialog box opens.
207809-B
4
Click Uninstall.
The uninstall program removes the Quick2Config client files from your
system.
Removing the Quick2Config standalone client from UNIX systems
When you install the Quick2Config server software, the installation program
creates an uninsta ll pr ogram, wh ich you can us e to remo v e t he Qui ck2Conf i g f il es
from your system.
To run the uninstall program:
1
Log in as root.
2
Navigate to the location of the uninstall script by typing the following
command:
cd <ClientInstallDir>/uninstall
Page 59

Chapter 4 Installing the Quick2Config standalone client 59
ClientInstallDir
where
is the directory where you installed the
Quick2Config client. The default installation directory is
/opt/optivity/ncs/Quick2Config/StandaloneClient.
3
Type the following command:
./uninstall
The Uninstaller dialog box opens.
4
Click Uninstall.
The uninstall program removes the Quick2Config client files from your
system.
Installing and Administering Optivity Quick2Config 2.2
Page 60

60 Chap ter 4 Installing the Qu ic k2 Conf ig sta nda lon e client
207809-B
Page 61

Chapter 5
Setting up Quick2Config
This chapter describes the tasks that you need to perform after you have installed
the Quick2Config software.
Information in this chapter is organized as follows:
• “Setup tasks overview” on page 62
• “Assigning the Administrator password” on page 63
• “Configuring the Web server” on page 66
• “Configuring the TFTP server” on page 68
• “Configuring the SYSLOG server” on page 71
• “Enabling remote clien t software setup” on page 72
• “Setting up sample configuration files” on page 73
61
Installing and Administering Optivity Quick2Config 2.2
Page 62

62 Chapter 5 Setting up Quick2Config
Setup tasks overview
After you have installed the Quick2Config server, you need to perform one or
more setup tasks. Table 7 lists the tasks and the conditions under which you need
to perform them.
Table 7 Setup tasks
If you... Perf orm this setu p task.. .
Installed the Quick2Config server and
verified its installation
Have multiple Web servers on your
computer and are using the Web
server integrated with Quick2Config
Installed the Quick2Config server
on a system that is running a TFTP
daemon
Installed the Quick2Config server
on a system that is running a SYSLOG
daemon
Want Quick2Config users to be
able to download the standalone client
software
Want Quick2Config users to be able to
gain access to the demonstration files
Change the password for the Quick2Config
administrator. See “Assigning the Administrator
password” on page 63.
Configure the W eb serv er. See “Configuring the
Web server” on page 66.
Configure the TFTP server. See “Configuring the
TFTP server” on page 68.
Configure the SYSLOG serve r. Se e “Configuring
the SYSLOG server” on page71.
Copy the standalone client files to the
downloads directo ry. See “Enabling remote
client software setup ” on page 72.
Copy the demo nstratio n configur ation files to the
TFTP server. See “Setting up sample
configuration files” on page 73.
207809-B
Page 63

Chapter 5 Setting up Quick2Config 63
Assigning the Administrator password
When you install the Quick2Config server, the installation program creates one
Quick2Config user account called Administrator. This is the account that you
must use to administer the Quick2Con fig ser ver; it is the only account fr om which
you can create Quick2Config user groups and user accounts, retain control over
access permissions, and override locks on configuration data.
When the installation program creates the Administrator account, it does not
assign a password to the account. Therefore, the first thing that you should do
after installing the software is to assign a password to the Administrator account.
Note:
combination of characters, including spaces.
To assign a password to the Administrator account:
1
Start the Quick2Config server if it is not already running.
• If you are running the server on a Windows system, see “Starting the
Quick2Config server” on page 32.
• If you are running the server on a UNIX system, see “Starting the
Quick2Config server” on page 42.
2
Start a Quick2Config client session.
• To start the client on a Wi ndows system:
From the Windows start menu, choose Programs >
Quick2Config 2.2 > Standalone Client.
• To start the client on a UNIX system:
In a command window, type the following command:
/usr/Quick2Config/client/bin/client.sh
After a few moments, the Optivity Quick2Config Login dialog box opens
(Figure 15).
Passwords are case sensi ti ve; the y can conta in any number and an y
Installing and Administering Optivity Quick2Config 2.2
Page 64

64 Chapter 5 Setting up Quick2Config
Figure 15 Optivity Quick2Config Login dialog box
207809-B
3
Verify that the Us er ID f iel d reads Administra tor a nd that the P assw ord f ield is
empty.
4
Click OK.
After several seconds, the Optivity Q uick2Config main window opens
(Figure 16).
Page 65

Figure 16 Optivity Quick2Config main window
Menu Bar
Toolbar
Navigation
Pane
Chapter 5 Setting up Quick2Config 65
Context-Sensitive
Pane
Message Pane
Status Bar
Drag this border to resize
the navigation pane.
5
In the navigation pane, choose Server Setup > User Groups >
context-sensitive and messages panes.
Drag this border to resize the
Administrators > Administrator.
6
In the context-sensitive pane, click the Properties tab.
The Basic tab displays the properties for the Administrator account
(Figure 17).
Figure 17 Properties tab—Basic tab for Administrator account
Installing and Administering Optivity Quick2Config 2.2
Page 66

66 Chapter 5 Setting up Quick2Config
7
Complete th e fields in the Basic tab as follows:
• In the Actual Name field, type your name.
• In the Email Address field, type your e-mail address.
• In the Password field, type a password.
As you type, asterisks represent the characters; you do not see the
password.
8
Press [Enter] or [Tab].
Quick2Config pads the password field with additional asterisks and displays
the Confirm password field.
9
In the Confirm password field, type your password.
Quick2Config assigns the new password to the Administrator account. You can
continue with the client session; however, the next time that you log in with the
Administrator ID, you must type the new password.
Note:
passwords. Therefore, if you forget the p assword for th e Administr ator
account, you must remove a set of files. For more information, see
Appendix B, “Resetting the Administrator password,” on page 93.
Quick2Config does not provide a mechanism for resetting
Configuring the Web server
By default, the integrated Web server is configured to run on port 80. You must
reconfigure the Web server:
• If you have installed Quick2Config on a system on which a third-party Web
server is running
and
• Quick2Config clients will connect to Quick2Config with the integrated Web
server.
You specify the port for the integrated Web server in the Web server Properties
tab. Alternatively, you can start the Quick2Config server with the command line
option -
httpport
. (See “Using command line options” on page 76.)
207809-B
Page 67

Chapter 5 Setting up Quick2Config 67
To specify the port for the integrated Web server:
1
Start the Quick2Config server.
Note:
If the third-party Web server is set to run on the default port
(port 80), the integrated Web server will not start and you will not be a ble
to view the Quick2Config Help system.
2
Start a Quick2Config client session.
3
Log in as the Administrator.
4
In the navigation pane, choose Server Setup > Web Server.
5
In the context-sensitive pane, click the Properties tab.
The Basic tab displays the properties for the Web server (Figure 18).
Figure 18 Properties tab—Basic tab for Web server
6
Clear the Enabled check box to disable the Web server.
Installing and Administering Optivity Quick2Config 2.2
Page 68

68 Chapter 5 Setting up Quick2Config
7
In the Port field, type or select a port for the Web server.
The standard Web server port is 80. If a third-party Web server is running on
port 80, pick another port, such as 8080.
Note:
If you specify a port other than 80, Quick2Config users must
specify that port in the URL when they connect to the server. For
example, if you specify port 8080, the URL to connect to the
Quick2Config server is http://servername:8080/index.html.
8
Restart the Quick2Config server.
Configuring the TFTP server
The Quick2Config serv er includes a TFTP server that Quic k2Conf ig users can use
to import and e xport de vi ce conf igura tions. By de fau lt, the i nteg rated TFTP se rver
starts on port 69 when you start the Quick2Config server. Table 8 lists the default
TFTP directory for Windows and UNIX operating systems.
Table 8 Default location of TFTP server directory
Operating system Default TFTP directory
Windows <
UNIX /tftpboot
InstallDir
>\database\tftp
207809-B
If a TFTP serv er is running when you start t he Quick2 Confi g serv er, the integrated
TFTP server is di sa ble d . To use the TFTP server that is alr ea dy r unni ng, you need
to specify its location.
To specify the directory location of the TFTP server:
1
Start a Quick2Config client session.
2
Log in as Administrator.
3
In the navigation pane, choose Server Setup > TFTP Server.
Page 69

Chapter 5 Setting up Quick2Config 69
4
In the context-sensitive pane, click the Properties tab.
The Basic tab displays the properties for the TFTP server (Figure 19).
Figure 19 Properties tab—Basic tab for TFTP server
5
In the Directory field, type the directory location of the running TFTP server.
6
Make sure that the port is 69.
Note:
Most device s t ha t s uppo rt TFTP require that t he TFTP port be set
to 69; therefore, Nortel Networks recommends that you do not change
the port nu mber for the TFTP server.
On Windows systems, the Quick2Config serv e r sa ves the TFTP directory location
informati on. However, on UNIX systems, this information is reset—as specified
in the Quick2Config server startup script—each time you start the Quick2Config
server. You should edit this script if the directory location of the TFTP server is
other than the default (/tftpboot). See “Editing the server startup script to use a
different TFTP directory” on page 70.
Installing and Administering Optivity Quick2Config 2.2
Page 70

70 Chapter 5 Setting up Quick2Config
Determining whether a TFTP server is running
On UNIX systems, you can determine whether your system is curr ent ly running a
TFTP server (a nd its directo r y location) as follows:
1
Open a command window.
2
Open the /etc/inetd.co nf file.
3
Look for a l ine that starts with
tftp dgram udp wait root /usr/bin/tftpd /tftphome
If the line starts with the comment symbol (#), the T FTP server is not running.
Note the last item on the line; this is typically the TFTP server directory. In the
example, the TFTP server directory is /tftphome. This is the directory that you
must specify in the TFTP Basic Properties tab. Alternatively, you can edit the
Quick2Config startup script (next).
Editing the server startup script to use a different TFTP directory
tftp
or
#tftp
, similar to the following:
207809-B
If the TFTP directory you are using i s not /t ftpboot (r e ga rdless of the TFTP ser ve r
you are using), edit the Quick2Config startup script as follows:
1
Open a command window.
2
Log in as root.
3
Start an editing session.
4
Open the /usr/Quick2Config/server/bin/server.sh file.
5
Navigate to the line that begins as follows:
java/jre/bin/jre $NO_JIT
6
Locate the command line option:
-tftpdir /tftpboot
7
Edit the directory name.
8
Save the file.
Page 71

Configuring the SYSLOG server
The Quick2Config server includes a SYSLOG server, which records messages
sent from devices within the network. The SYSLOG server starts on port 514
when you start the Quick2Config serve r. However, if another SYSLOG server is
already running on your sys tem, the Qui ck2Conf i g SYSLOG serv er does not st art
and you cannot view the contents of the SYSLOG file from within the
Quick2Config environment.
If you want to view SYSLOG messages from within the Quick2Config
environment, you must edit the current SYSLOG server’s syslog.conf file. On
UNIX systems, the syslog.conf file is located in the /etc directory. On Windows
systems, refer to the SYSLOG server documentation to detemine the location of
the syslog.conf file.
Nortel Networks recommends that you edit the syslog.conf file only if you
understand SYSLOG server functions and if you know the facility and level (or
priority) of the SYSLOG me ssages sent f rom the ne twor k devices. After you have
determined the facility and level values, edit the syslog.conf file and direct only
those facility/level values that you want to view within Quick2Config to
/usr/Quick2Config/server/bin/syslog.txt.
Chapter 5 Setting up Quick2Config 71
To view the contents of the /usr/Quick2Config/server/bin/syslog.txt file:
➨ Choose View > Syslog.
To disable (or enable) the SYSLOG server:
1
Start a Quick2Config client session.
2
Log in as Administrator.
3
In the navigation pane, choose Server Setup > SYSLOG Daemon.
4
In the context-sensitive pane, click the Properties tab.
The Basic tab displays the properties for the SYSLOG server (Figure 20).
Installing and Administering Optivity Quick2Config 2.2
Page 72

72 Chapter 5 Setting up Quick2Config
Figure 20 Properties tab—Basic tab for SYSLOG server
5
Clear (or check) the Enabled check box.
Enabling remote client software setup
The login page for the Quick2Config Web client contains a link from which
Quick2Config users can download the standalone client software. When users
follow this link, their Web browser displays standalone.html, a Web page that
contains links for downloading the installation files for each version of the
standalone client software.
207809-B
For the links to work, you must copy the standalone client installation files from
the Quick2Config installation CD to the <InstallDir>/downloads directory .
Copying the client installation files to a Windows system
To copy the standalone client installation files to a Windows system:
1
Insert the Qu ick2Config installation CD into the CD drive.
2
Navigate to the directory <drive>:\Downloads, where drive is the CD drive.
3
Copy the contents of the directory to <InstallDir>\Downloads.
Page 73

Chapter 5 Setting up Quick2Config 73
Copying the client installation files to a UNIX system
To copy the standalone client installation files to a UNIX system:
1
Mount the CD drive.
2
Insert the installation CD into the CD drive.
3
Open a command window.
4
Create a directory for the files by typing the command:
mkdir /usr/Quick2Config/server/bin/Downloads
5
Change to the location of the Quick2Config standalone client installation
files.
For example, if the installation CD is mounted on the drive /cdrom, type the
following command:
cd /cdrom/Downloads
6
Type the command:
cp -R * /usr/Quick2Config/server/bin/Downloads
The files are copied from the CD to the Downloads directory.
Setting up sample configuration files
Some versions of Quick2Config include sample configuration files. For these
versions, the sampl e config uration f iles are copie d to the demodata dir ectory when
you install th e Quick2Config server. You must copy t hese files t o t he TFTP server
directory before you (or other users) can import the files into the Quick2Config
database.
Copying the configuration files on Windows systems
To copy the configuration files on Windows systems:
1
Open Windows Explorer and navigate to the <InstallDir>\demodata
directory.
Installing and Administering Optivity Quick2Config 2.2
Page 74

74 Chapter 5 Setting up Quick2Config
2
Copy the content s of this di rectory to the <InstallDir>\database\tf tp director y.
Note:
The tftp directory is created the first time that you start the
Quick2Config server. If you have not started the Quick2Config server,
you can create the directory <InstallDir>\database\tftp manually.
Copying the configuration files on a UNIX system
To copy the configuration files on a UNIX system:
1
Open a command window.
2
Change to the location of the Quick2Config configuration files by typing the
following command:
cd /usr/Quick2Config/server/bin/demodata
3
Copy the files to the TFTP directory.
For example, if the TFTP directory is /tftpboot, type the following command:
cp * /tftpboot
207809-B
Page 75

Chapter 6
Administering the Quick2Config server
This chapter identifies key administrative tasks and provides recommendations for
setting up user accounts, access permissions, and notifications.
Information in this chapter is organized as follows:
• “Viewing server events” (nex t)
• “Using command line options” on page 76
• “Generating a debug report” on page 79
Viewing server events
The Quick2Config server re cords messages ab out its operation in an ev ent log file.
You can view the Quick2Config server’s event log, and you can also specify the
type of information that you want to view.
75
To view the Quick2Config server event log:
➨ Open the Optivity Quick2Config Server window.
Table 9 lists the type of information that you can choose to display in the Optivity
Quick2Config Server window.
Table 9 Server information types for the event log
Types Description
None No messages appear.
Severe Only messages about severe errors appear.
Error Messages about errors and severe errors appear.
Installing and Administering Optivity Quick2Config 2.2
Page 76

76 Chapter 6 Administering the Quick2Config server
Table 9 Server information types for the event log (continued)
Types Description
Warning Messages about warnings, errors, and severe errors appear.
Informative Informative messages, warnings, and all errors appear. This is the
default setting.
To change the type of information that t he Opt ivity Quick2Config Server wind ow
displays:
1
Open the Optivity Quick2Config Server window.
2
Choose Log > Filter.
The menu displays the fi lters th at can be app lied to messag es generated b y the
server.
3
Click the type of messages that you want the server window to display.
Using command line options
207809-B
On both Win dows systems and UNIX systems, you can customize the beha vior of
the Quick2Config server by using command line options. For example, if your
system is already running a SYSLOG daemon, you can start the Quick2Config
server on a Windows system without its SYSLOG daemon by typing the
command:
server.exe -syslogd off
Table 10 lists the command line options in alphabetical order.
Table 10 Server command line options
Option Description
-cache
size
-cli Causes the server to run in command mode.
Specifies the size of the server cac he (in n um be r of object s).
Larger values improve server performance but use more
memory.
Default: 1024
Page 77

Chapter 6 Administering the Quick2Conf ig se rv er 77
Table 10 Server command line options (continued)
Option Description
-console Displays the log console when the server starts. By default, the
-database
-debug_report Starts the Quick2Config Debug wizard.
-docroot
-forcetftpdir
-h, -?, -help Displays the help information for the Quick2Config server
-httpd on | off Specifies whether the integrated Web server should be enabled
-httpport
-interpret
-logfile
-logging 0 | 1 | 2 | 3 | 4 Controls the amount of log information that is displayed. A value
-port
-proxy
-registry
-shell Runs the server in shell mode.
-stop Stops the server. Use this flag to stop the server when it has
path
path
path
portnumber
script
filename
portnumber
portnumber
path
console is displayed.
Specifies the root location of the Quick2Config database.
Windows default:
UNIX default: /usr/Quick2Config/server/bin
Specifies the docu me nt ro ot for the Web server. Necessary only
if you are using a third-party Web server.
Specifies the path to the TFTP directory.
options.
on startup. Default: on
Specifies the TCP port to use for Web traffic. Valid if the
integrated Web ser ver is enabled; that is, -httpd on.
Default: 80
Causes the server to run the specified script file. The server
subsequently exits.
Specifies the name of the log file to which log data is written.
The name can be an absolute or relative file name.
Default: srvlog.txt
of 0 causes no logging to be displayed. A value of 4 causes
severe, error, warning, and informational messages to be
logged.
Default: 4
Specifies the TCP port on which the Quick2Config client and
Quick2Conf ig serv er com m u nic ate.
Default: 7000
Specifies the TCP port on which the server's pro xy soc ket server
runs. This proxy socket is used for tunneling TELNET sessions
from the client to various hosts.
Default: 5000
Specifies the path to the server's registry.
been started without the console.
<InstallDir>\
Quick2Config
Installing and Administering Optivity Quick2Config 2.2
Page 78

78 Chapter 6 Administering the Quick2Config server
Table 10 Server command line options (continued)
Option Description
-syslogd on | off Specifies whether to enable the built-in SYSLOG daemon on
-tftpd on | off Specifies whether to enable the built-in TFTP server at startup.
-tftpdir
path
-timestamp on | off Specifies whether to prefix log file entries with a timestamp.
startup.
Default: on
Default: on
Specifies the def au lt path to the TFTP directory. This option is
effective only if the TFTP path has not been pre v ious ly set . If the
path has been set, use the -for ce tftp dir opt ion .
Default: on
To use command line options on Windows systems:
1
Open a command window.
2
Navigate to the NETconfigurator installation directory.
3
Type the command
server.exe <option1, option2, ...>
option1, option2
where
, ... are the options listed in Table 10.
207809-B
To use command line options on UNIX systems, you can do one of the following:
• Edit the server startup script /usr/NETconfigurator/server/bin/server.sh.
• Specify the options when you issue the
server
command on the command
line.
Page 79

Generating a debug report
Quick2Config includes a Debug Wizard, which you can use to write bug reports.
You can send these bug reports to Nortel Networks support engineers.
To generate a debug report on Windows systems:
1
At a command line prompt, navigate to the Quick2Config installation
directory.
2
Type the following command:
Chapter 6 Administering the Quick2Conf ig se rv er 79
server -debug_report
The Debug Package Wizard opens.
3
Complete th e information as requested by the Debug Wizard.
4
E-mail the resulting file to the person who requested the debug report.
To generate a debug report on UNIX systems:
1
At a command line prompt, navigate to the Quick2Config installation
directory.
2
Type the following command:
sh server.sh -debug_report
The Debug Package Wizard opens.
3
Complete th e information as requested by the Debug Wizard.
4
E-mail the resulting file to the person who requested the debug report.
Installing and Administering Optivity Quick2Config 2.2
Page 80

80 Chapter 6 Administering the Quick2Config server
207809-B
Page 81

Chapter 7
dministering user groups and user accounts
A
As the Quick2Config administrator, you are responsible for creating accounts for
network engineers (users) who are authorized to configure network devices. You
can create user groups as well as user accounts. This means that you can collect
users who perform similar functions (and probably need access to the same set of
items) together in one group and assi gn acce ss pe rmissi ons to th e grou p inst ead of
to each individual user account.
This chapter identifies key administrative tasks and provides recommendations for
setting up user groups and user accounts.
Information in this chapter is organized as follows:
• “Creating user groups” (next)
• “Creating user accounts” on page 84
• “Setting access permissions on user accounts” on page 86
81
Creating user groups
To create a user group in Quick2Config, you need to do the following:
1
Add the user group to the Quick2Config database.
2
Rename the user group.
These procedures are described i n the following sections.
Installing and Administering Optivity Quick2Config 2.2
Page 82

82 Chapter 7 Administering user groups and user accounts
Adding a user group
To add a new user group to the Quick2Config serve r:
1
Start a Quick2Config client session as Administrator.
2
In the navigation pane, choose Server Setup > User Groups.
3
In the context-sensitive pane, click th e Palette tab.
4
Add a new group to the User Groups. You can do this in one of three ways:
• Double-click the Group icon in the Palett e.
• Drag the Group icon from the Palette to the User Groups icon in the
hierarchy.
• Click the Group icon in the Palette, then click the Paste button.
Note:
using for future tasks, the majority of the procedures discussed in this
guide use the double-click method.
5
If you did not expand the User Groups item before, expand it now.
In the navigation pane, you see a new user group, named Group.
(See Figure 21.) See the next section for information about how to rename a
user group.
Figure 21 Expanded User Groups item
Although you can choose the method you are most comfortable
207809-B
Page 83

Chapter 7 Administering user groups and user accounts 83
Renaming a user group
Quick2Config assigns the name Group to each new user group that you create.
You will probably want to rename groups to reflect the nature of the group. For
example, if you have two levels of network engineers, you might want to create
two groups and call one “Level 1” and the other “Level 2.”
To rename a user group:
1
In the navigation pane, right-click the user group item that you want to
rename.
2
From the pop-up menu, choose Rename.
The Rename dialog box opens.
3
In the Rename dialog box, type a name for the group.
Figure 22 shows an example of renaming a user group to Level 2.
Figure 22 Renamed user group
4
Click OK.
Installing and Administering Optivity Quick2Config 2.2
Page 84

84 Chapter 7 Administering user groups and user accounts
Creating user accounts
To create a user account in Quick2Config, you need to do the following:
1
Add the user account to the Quick2Config database.
2
Rename the user account.
3
Set the account properties—for example, password and e-mail address.
4
Set the account permissions.
Each of these procedures is described in the following sections.
Adding a user account
To add a new user to a user group:
1
In the navigation pane, select the user group to which you want to add a user.
2
In the context-sensitive pane, click th e Palette tab.
207809-B
3
In the Palette tab, double-click User.
4
If you did not expand the user group item before, expand it now.
In the navigation pane, you see a new user, named User.
See the next section for information about how to rename a user account, and see
“Setting user account properties” on page 85 for information about setting the
properties on a user account.
Renaming a user account
Quick2Config assigns the name User to each user account that you create. Nortel
Networks recommends that you rename the user accounts so that you can
distinguish one account from another.
To rename a user account:
1
In the navigation pane, right-click the user account that you want to rename.
2
From the pop-up menu, choose Rename.
Page 85

Chapter 7 Administering user groups and user accounts 85
The Rename dialog box opens.
3
In the Rename dialog box, type a name for the user account.
4
Click OK.
In the navigation pane, the name of the user account changes immediately.
Setting user account properties
User accounts have a basic set of properties, which includes:
• User name, which is the Quick2Config login name for the account
• Actual name, which is the name of the person assigned to the user account
• E-mail address
• Password
When you create a user account, Quick2Config assigns the name User to the user
name property; all other properties are null.
To set the properties for a user account:
1
In the navigation pane, click the user account for which you want to set the
properties.
2
In the context-sensitive pane, click the Properties tab.
The Properties tab displays the basic user account properties (Figure 23).
Figure 23 User account—Basic properties
Installing and Administering Optivity Quick2Config 2.2
Page 86

86 Chapter 7 Administering user groups and user accounts
3
Complete th e fields in the Basic tab as follows:
• In the User Name field, type the user’s login name.
• In the Actual Name field, type the user’s na me.
• In the Email Address field, type the user’s e-mail address.
• In the Password field, type a password.
As you type, asterisks represent the characters; you do not see the
password.
4
Press [Enter] or [Tab].
Quick2Config pads the password field with additional asterisks and displays
the Confirm Password dialog box.
5
In the Confirm Password field, type the password.
Remember, passwords can be any combination of characters, including
spaces. Passwords are case sensitive.
Setting access permissions on user accounts
207809-B
Each item in the Quick2Config database has a set of access permissions
associated with it. Access permissions are based on the assignment of two
characteristics: access group and privilege. The access groups, which establish
groupings of users, are owner, group, and everyone. By default, the owner of an
item is the user who ad ds the item to the hierarchy. The group for an item is the
user group (or groups) that have been given access to the item. The owner of the
item grants access to user groups. Everyone includes the entire set of
Quick2Config users.
When you add a ne w use r a cco unt to the Quick2Confi g dat abase, you become the
owner of the user account and Quick2Config assigns the default access
permissions to the item. Table 11 lists the default access permissions.
Table 11 Default access permissions
Access group Privilege
Owner—Administrator Read/Write
Group—Administrators Read
Everyone Read/Write
Page 87

Chapter 7 Administering user groups and user accounts 87
You should change the perm issio ns on new user accounts so that users can chang e
their own passwords.
Changing the account owner
To change the owner of a user account:
1
In the navigation pane, click the user.
2
In the context-sensitive pane, click the Permissions tab.
If the Permissions tab is not available, choose View > Context Pane >
Permissions. The Permissions tab opens (Figure 25).
Figure 24 Permissions Tab
3
Click the scroll arrow in the Owner box.
4
Choose the new owner for the account.
Note:
“Apply settings to subitems” check box on the Permissions tab.
Because user accounts do not have subitems, you can disregard the
Installing and Administering Optivity Quick2Config 2.2
Page 88

88 Chapter 7 Administering user groups and user accounts
Assigning a user account to user groups
Although you must create a new user account within a user group, Quick2Config
does not automatically assign the new user account to the specified user group.
Rather, you must use the Permissions tab to assign the user to the user group.
To assign a user to one or more user Groups:
1
In the navigation pane, right-click the user account that you want to assign to
a group.
2
In the context-sensitive pane, click the Permissions tab.
If the Permissions tab is not available, choose View > Context Pane >
Permissions.
3
Click the Group List arrow to display a list of user groups.
4
Select one or more groups from the group list.
5
Select or clear the Read and Write check boxes for the group.
207809-B
Page 89

Chapter 7 Administering user groups and user accounts 89
To change the owner of a user account:
1
In the navigation pane, click the user.
2
In the conte xt -se nsi t ive pane, click the Permissions tab . I f the Permissions ta b
is not available, choose View > Context Pane, and select Permissions.
The Permissions tab opens (Figure 25).
Figure 25 Permissions tab
3
Click the arrow in the Owner box to see a list of possible owners.
4
Choose the new owner for the account.
Installing and Administering Optivity Quick2Config 2.2
Page 90

90 Chapter 7 Administering user groups and user accounts
207809-B
Page 91

Appendix A
Recommended access permissions
Table 12 shows the recommended permissions to restrict access to administrator
accounts. Nortel Networks recommen ds that you implement these access
permissions; however, the requirements of your organization might necessitate
that you establish a different set of access permissions.
Table 12 Recommended access permissions
Item Owner Owner Group Everyone
Server Setup Admin rw r r
User Groups Admin rw r r
Administrators (User Group) Admin rw r none
Administrator (User Account) Admin rw r none
New Groups Admin rw r r
New User Accounts User rw r r
91
Installing and Administering Optivity Quick2Config 2.2
Page 92

92 Appendix A Recommended access permissions
207809-B
Page 93

Appendix B
Resetting the Administrator password
Quick2Config does not provide an automated mechanism for resetting the
password on the Administrator account; however, if you forget the password on
the Administrator account, you can use the following procedure to reset it.
This procedure maintains device configuration information in the Quick2Config
database; however, it removes all the Quick2Config server s etup information (for
example, Web server port, user groups, and user account information).
To reset the Administrator p assword:
1
As a precaution, mak e a cop y of the Quick2Con f i g\dat abase di rect ory (an d its
subdirectories).
2
Delete the NETconfigurator\database\admin directory.
93
Note:
all user group and user account information as well as other information
you have specified in the Server Setup folder. In addition, removing the
admin directory cause s t he ownership of all objects in the Quick 2Config
database to be changed to Administrator.
3
Start the Quick2Config server and client.
4
Verify that the User ID field in the Login dialog box reads “Administrator”
and that the Password field is empty.
5
Change the password for the Administrator account.
See “Assigning the Administrator password” on page 63.
6
If necessary, add user groups and user accounts, reset Web server and TFTP
server ports, and change the ownership of database items.
Deleting the NETconfigurator\database\admin directory removes
Installing and Administering Optivity Quick2Config 2.2
Page 94

94 Appendix B Resetting the Administrator password
207809-B
Page 95

Index
95
A
access permissions
default 86
recommended 91
Administrator account
access permissions 91
overview 63
password
assigning 63
resetting 93
properties 66, 86
Administrator password, assigning 63
Administrator, Quick2Config, defined 15
C
checklist, preinstallation 20
client
Quick2Config standalone 19
Quick2Config Web 19
ClientInstallDir, defined 16
command line options 76
configuration files, setting up for tutorial 73
configurations, supported
Quick2Config server 21
Quick2Config standalone client 22
Quick2Config Web client 22
conventions, text 16
customer support 17
D
debug reports
on UNIX systems 79
on Windows systems 79
Debug wizard 79
demonstration files 73
directories, installation 16
disk space requirements 23
E
event log
specifying information types 75
viewing 75
G
groups
renaming 83
H
host name 53, 57
I
installation directory
conventions 16
Quick2Config client
UNIX default 56
Windows default 52
Quick2Config server
UNIX default 40
Windows default 30
installation program
Quick2Config server
described 27
Installing and Administering Optivity Quick2Config 2.2
Page 96

96 Index
running 28
Quick2Config standalone client
described 49
running 50
verifying 53, 57
InstallDir, defined 16
L
Login dial og box 35, 45, 64
M
main window 65
memory requirements 24
messages, filtering 76
O
options, command line 76
P
passwords
assigning 63
confirming 66, 86
resetting 93
valid characters in 63
permissions, setting on user accounts 86
platform configuration s
Quick2Config server 21
Quick2Config standalone client 22
Quick2Config Web client 22
platforms, supported 20
ports
Quick2Config server 53, 57
SYSLOG 71
TFTP server 68
Web server 68
preinstallation checklist 20
product support 17
properties
Administrator account 66, 86
SYSLOG server 72
TFTP server 69
user accounts 85
Web server 67
publications, related 17
Q
Quick2Config
standalone client 19
Web client 19
Quick2Config Administrator, defined 15
Quick2Config client, about 19
Quick2Config Login dialog box 35, 45, 64
Quick2Config main window 65
Quick2Confi g pro gram gro up 50
Quick2Config server
configurations supported 21
configuring SY S LO G 71
console window 42, 46
default port 53, 57
events 75
installing on
UNIX systems 38
Windows systems 27
removing from
UNIX systems 46
Windows systems 36
setup tasks 62
starting on
UNIX systems, local console 42
UNIX systems, remote console 43
Windows system with multiple Web
servers 33
Windows systems 32
startup script 69, 70
X Windows 42, 46
Quick2Config server events, viewing 75
Quick2Config standalone client
configurations supported 22
copying files
207809-B
Page 97

Index 97
UNIX systems 73
Windows systems 72
installation, verifying 53, 57
installing on
UNIX systems 54
Windows systems 49
removing from
UNIX systems 58
Windows systems 58
starting on
UNIX systems 44
Windows systems 34
Quick2Config tutorial
setting up files 73
Quick2Configr program group 27
R
related publications 17
requirements
disk space 23
memory 24
S
U
user accounts
access permissions 91
actual name property 86
adding 84
changing owner of 87, 89
e-mail address property 86
password 86
renaming 84
setting properties 85
user groups
adding 82
renaming 83
W
Web servers
configuring 66
document root of, defined 30, 41
multiple 62
port 68
properties 67
server command line options 76
server information types 75
setup tasks 62
support, Nortel Networks 17
supported platforms 20
SYSLOG server
configuring 71
port 71
properties 72
T
technical support 17
text conventions 16
TFTP server
properties 69
tutorial, setting up files for 73
Installing and Administering Optivity Quick2Config 2.2
Page 98

98 Index
207809-B
 Loading...